

Page 1

OmniPage® Pro
User’s Manual
CAERE CORPORATION
100 Cooper Court
Los Gatos, California
95032-7603 USA
Page 2

Caere GmbH
Innere Wiener Strasse 5
81667 München, Germany
Caere UK Information Centre
Abbey House
4 Abbey Orchard Street
Westminster, London SW1P 2JJ
Centre d’informations Caere
72, rue Baratte-Cholet
94100 S a int-Maur, Fran ce
Please Note
To u se this program, you should know how to work in t he Microsoft Windows environ me nt. Please
refer to Windows documentation if you have questions about how to use menu commands, dialog
boxes, scroll bars, edit boxes, and so on.
OmniPage Pro for Window s
Ver si on 9
Copyright© 1998 Caere Corporation. All rights reserved. The Caere logo, Caere®, OmniPage®,
OmniPage Pro®, PageKeeper®, Language Analyst®, 3D OCR®, AutoOCR Toolbar™, Tr ue Page®,
and OCR Proofreader are trademarks of Caere Corporation
Many of the designations used by manufacturers and sellers to distinguish their products are
claimed as trademarks. Such designations appearing in this manual have been printed in initial
capitals.
ii
800-1288-030A
Page 3

Welcome
Using This Manual ............................................................................................................viii
Chapter 1 Installation and Setup
Minimum System Requirements.........................................................................................2
Installing OmniPage Pro .....................................................................................................2
Starting and Closing OmniPage Pro...................................................................................3
Registering OmniPage Pro ..................................................................................................5
Chapter 2 Introduction to OmniPage Pro
What Is Optical Character Recognition (OCR)?................................................................8
OmniPage Pro’s OCR Capabilities ..............................................................................8
Basic Steps of OmniPage Pro OCR .............................................................................9
The OmniPage Pro Desktop .............................................................................................10
AutoOCR Tool b a r ..................... .. ... ................... ... .. .................... .. .. .................... .. ... ....11
Standard Toolbar..........................................................................................................12
Zone Toolbar.................................................................................................................12
Options Dialog Box......................................................................................................13
Getting Online Help ...........................................................................................................14
Help Menu ....................................................................................................................14
Conte x t- S e ns i t i ve He l p.. .. ... ......... ... .. .......... .. ... ................... ... .. .................... .. .. ............15
Produ c t S u p p or t ............. .. .. .................... .. ... ................... ... .. ................... ... .. .......... .. ... .........1 6
Table of Contents
Chapter 3 Processing Documents
Ways to Process Documents ..............................................................................................18
Using the OCR Wizard................................................................................................18
Automatic Processing
Performing Multiple Tasks at Once...........................................................................19
Starting the OCR Process Outside OmniPage Pro ..................................................19
Bringing Document Images into OmniPage Pro ...........................................................20
Scan ni ng Pa g e s .................... .. ... ................... .. ... ................... ... .. .......... .. ... ................... .. 2 0
Load in g I ma g e F il e s ...... .......... .. .. .......... ... .. ................... ... .. .................... .. ... ................20
Creating Zones for OCR ....................................................................................................22
Creating Zones Automatically ...................................................................................22
.................................................................................................19
iii
Page 4

Performing OCR on a Document .....................................................................................23
Proofreading OCR Results ................................................................................................24
Verifying Text ..............................................................................................................25
Proofreading OCR Results in Microsoft Word .......................................................25
Using OCR in Other Applications ...................................................................................29
Worki ng with Docum e nt s ................ ... .. .................... .. .. .......... ... .. ................... ... .. .............30
Resizing a Page View .................................................................................................31
Chang in g P a g es .. .. ... .......... .. .. .................... .. ... ................... ... .. ................... ... .. .......... .. .31
Reordering Pages ........................................................................................................32
Delet in g P ages ................... .. .. .................... .. ... ................... ... .. .......... .. ... ................... .. .32
Printing a Document ..................................................................................................33
Closing a Document ...................................................................................................33
Exporting Documents ........................................................................................................34
Saving a Document......................................................................................................34
Copying a Document to the Clipboard ....................................................................36
Sending a Document as a Mail Attachment ............................................................37
Chapter 4 OmniPage Pro Settings
Setting AutoOCR Toolbar Commands ............................................................................40
AUTO Button Commands..........................................................................................41
Image Button Commands...........................................................................................41
Zone Button Commands.............................................................................................42
OCR Button Commands .............................................................................................43
Export Button Commands..........................................................................................44
Selecting OmniPage Pro Settings......................................................................................45
Accur a cy Se t t i ng s ....... .......... .. ... ................... .. ... ................... ... .. .................... .. .. ..................46
Scanner Settings...................................................................................................................46
Page Format Settings ..........................................................................................................47
Tables Settings .....................................................................................................................47
Langu age Settings . ... .. .......... .. ... ................... .. ... ................... ... .. .................... .. .. ..................48
OCR Aware Settings ...........................................................................................................48
Process Settings ...................................................................................................................49
Microsoft Word Settings ....................................................................................................50
Settings Guidelines .............................................................................................................51
Chapter 5 Customizing OCR
Adjusting Page Images Before OCR.................................................................................62
Customizing Zones.............................................................................................................63
Zone too l b a r.... .................... .. .. .......... ... .. ................... ... .. .................... .. ... ................... .. .63
Drawing Zones Manually ..........................................................................................64
Modifying Text and Graphic Zones ..........................................................................65
Modifying Table Zones...............................................................................................69
Delet in g Zo n e s....... ... .......... .. .. .................... .. ... ................... ... .. .......... .. ... ................... .. .71
Chang in g Zone Prope rties.... ... .. .................... .. ... ................... .. ... ................... ... .. ........71
Creating Zone Templates............................................................................................73
iv
Page 5

Spec if y in g F o nts ......... .. ... ................... .. ... .......... .. .. .................... .. ... ................... ... .. .......... .. ..74
Training OCR for Special Characters ...............................................................................75
Creating User Dictionaries.................................................................................................77
Saving Settings Files............................................................................................................78
Scheduling OCR ..................................................................................................................80
Scheduling Individual Documents............................................................................80
Scheduling Documents from an Input Folder ........................................................81
Modifying Output Options for Documents .............................................................83
Chapter 6 Technical Information
General Troubleshooting Solutions .................................................................................86
Solutions to Try First ...................................................................................................86
Testing OmniPage Pro.................................................................................................87
Low Memory Problems...............................................................................................88
Low Disk Space Problems...........................................................................................88
Supported File-Format Types............................................................................................89
Scan ne r S e tu p I ss u e s ...... .. .......... .. ... ......... ... .. .................... .. .. .................... .. ... ................... ..91
Scanner Drivers Supplied by the Manufacturer......................................................91
Scanner Drivers Supplied by Caere...........................................................................92
Scan Manager is Needed with OmniPage Pro ........................................................92
Problems Connecting OmniPage Pro to Your Scanner ..........................................93
Missing
Scanner Message on Launch.......................................................................................94
System Crash Occurs While Scanning ......................................................................94
Scanner Not Listed in Supported Scanners List Box...............................................95
Scan ni ng Tips . .......... .. .. .................... .. ... ................... ... .. .......... .. ... ................... .. ... .........95
OCR Problems .. .......... .. ... ................... .. ... ................... ... .. .......... .. ... ................... ... .. ........... ...96
System Crash During OCR.........................................................................................96
Text Does Not Get Recognized Properly..................................................................97
Problems With Fax Recognition.................................................................................98
Uninstalling the Software...................................................................................................99
Scan Image
Comman d
...................................................................................94
v
Page 6

vi
Page 7

W elcome
Welcome to OmniPage Pro, and thank you for using our software!
The following documentation has been provided to help you learn
about OmniPage Pr o.
This User’s Manual
This manual intr oduces you to the basi cs of using OmniPag e Pr o. It
includes installatio n and setup instr uctions, an introduction to
OmniPage Pro, task-oriented instructions, ways to customize
processing, settings guidelines, and technical information.
This manual is also available as an electronic PD F file. To open the file,
Start
click
Applications
Pro has been installed.
Online Help
OmniPage Pro’s online Help contains detailed information on features,
settings , and procedures . The online Help con f orms to Win dows 95
Help conventions and has been designed for quick and easy information
retrieval. Please see “Getting Online Help” on page 14 for more
information.
in the Windows tas kbar and choose
Caere DocumentsOmniPage Pro Manual
Programs
after OmniPage
Caere
Readme File
Readme
The
Please read it before using OmniPage Pro. To open this text file, click
Start
in the Windows tas kbar and choose
Applications
Pro has been installed.
Scanner Setup Notes
Scanner Setup Notes
The
and related issues. To open this PDF file, click
taskbar and choose
Scanner Setup Notes
file co nta i ns last-minute inf o rmation ab o u t the so f t wa re.
Programs
Caere DocumentsOmniPage Pro Readme
contains informati on about supported sca nners
Programs
after OmniPage Pro has been in stalled.
Caere ApplicationsCaere Documents
Caere
after OmniPage
Start
in the Windows
vii
Page 8
Using This Manual
Using This Manual
This manual is written with the assumption that you know how to work
in the Microsoft Window s e nvironment . P lease refer to your Windows
document ation if you have q u e stions about how t o u se dialog boxes,
menu commands , scroll bars, d rag and drop functionality, shortcut
menus, and so on .
The following conventions are used in this manual.
Convention Purpose
Italicized text
Note symbo l
Warning symbol
• Emphasi zes menu commands ,
dialog box options, labeled
buttons, and file names
For example:
“Choose
menu.”
• Emphasize s new terms the
first time they are used
• Emphasizes important word s
in a sentence
Introduces a tip or an item of
note
Introduces important
information
Open...
in the File
viii
Page 9

Chapter 1
Installation and Setup
This chapter provides installation and setup information for OmniPage
Pro and the Scan Manager.
For technical and troubleshooting information, please read Chapter 6,
Tech ni c al In f o rm a tio n .
For information on su pported scanners and scanner setu p , read the
Scanner Setup Notes
taskbar and choose
Scanner Setup Notes
This chapter contains the following topics:
• Min imum System Requirements
• Installing OmniPage Pro
• Starting and Closing OmniPage Pro
• Registering OmniPage Pro
. To open this PDF file, click
Programs
after OmniPage Pro has been in stalled.
Caere ApplicationsCaere Documents
Start
in the Windows
1
Page 10

Minim u m Sy stem Requ irem ents
Minimum System Requirements
You need the following setup, at minimum, to install and run OmniPage
Pro:
• Computer with a 486 or higher processor
• Microsoft Windows 95, Windows 98, or Windows NT 4.0
• 16MB of memory (RAM)
• 45MB of free hard disk space to install application files, the Scan
Manager, and one OCR language
55MB to install above files and al l OCR la nguages
• SVGA or VGA monitor with 256 colors
• Windows-compatible pointing device
• CD-ROM drive for inst allation
• A compatible scanner if you plan to scan documents
Please see the
Performance and speed will be enhanced if your computer’s processor,
memory, and available disk space exceed the minimum requirements.
Scanner Setup Notes
for a list of tested scanners.
Installing OmniPage Pro
OmniPage Pro’s Setup program takes you through installation with
onscree n instructions at e very step.
Before installing OmniPage Pro:
• Make sure your scann e r is connected, turned on, and compat ible
with your system.
• Close all other applications, especially anti-virus programs.
• Log into your computer with administrator privileges if you are
installing on Windows NT.
If you own a previous version of OmniPage Pro, or if you are upgrading
from OmniPage Limited Edition, it is strongly recommended that you
uninstall that product first and then restart your computer.
2 Chapter 1
Page 11
Star ti n g an d Closing Om n i Pa ge Pro
To install OmniPage Pr o:
1 Insert OmniPage Pro’s CD-ROM in the CD-ROM drive.
The Setup prog ram should star t au tomatically. If it does not
start, lo cate your CD-ROM drive in Windows Expl orer and
double-click the Setup.exe program at the top-level of the
CD-ROM.
2 Follow the instructions on each s creen to install the software.
During installation, you may be prompted to enter a serial
number. You can find your serial number on the label of the
CD-ROM envelope.
The Caere Scan Manager is installed during OmniPage Pro installation.
You will be prompted to select your scanner manufacturer and model in
the Scan M anag er so t ha t yo u ca n use yo ur scanne r wi t h Omn iPag e Pr o.
Read the
scanner suppo rt and setu p. You can open the Notes a fter OmniPag e Pro
has been installed by clicking
choosing
Setup Notes
Scanner Setup Notes
Programs
.
Caere Applicati onsCaere Documents
for the most detailed information about
Start
in the Windows tas kbar and
Scanner
Starting and Closing OmniPage Pro
If you plan to scan, make sure your scanner is attached to your compu ter
and turned on before you start OmniPage Pro.
To start OmniPage Pro, do one of the following:
•Click
• Double-click the OmniPage Pro icon located in the folder where
Installation and Setup 3
Start
in the Windows taskbar and choose
Applications
(Use the program group you selected during installation if it is
different than
you installed OmniPage Pro.
OmniPage Pro 9.0
Caere A pplicat ions
.
.)
Programs
Caere
Page 12
Starting and Closing OmniPage Pro
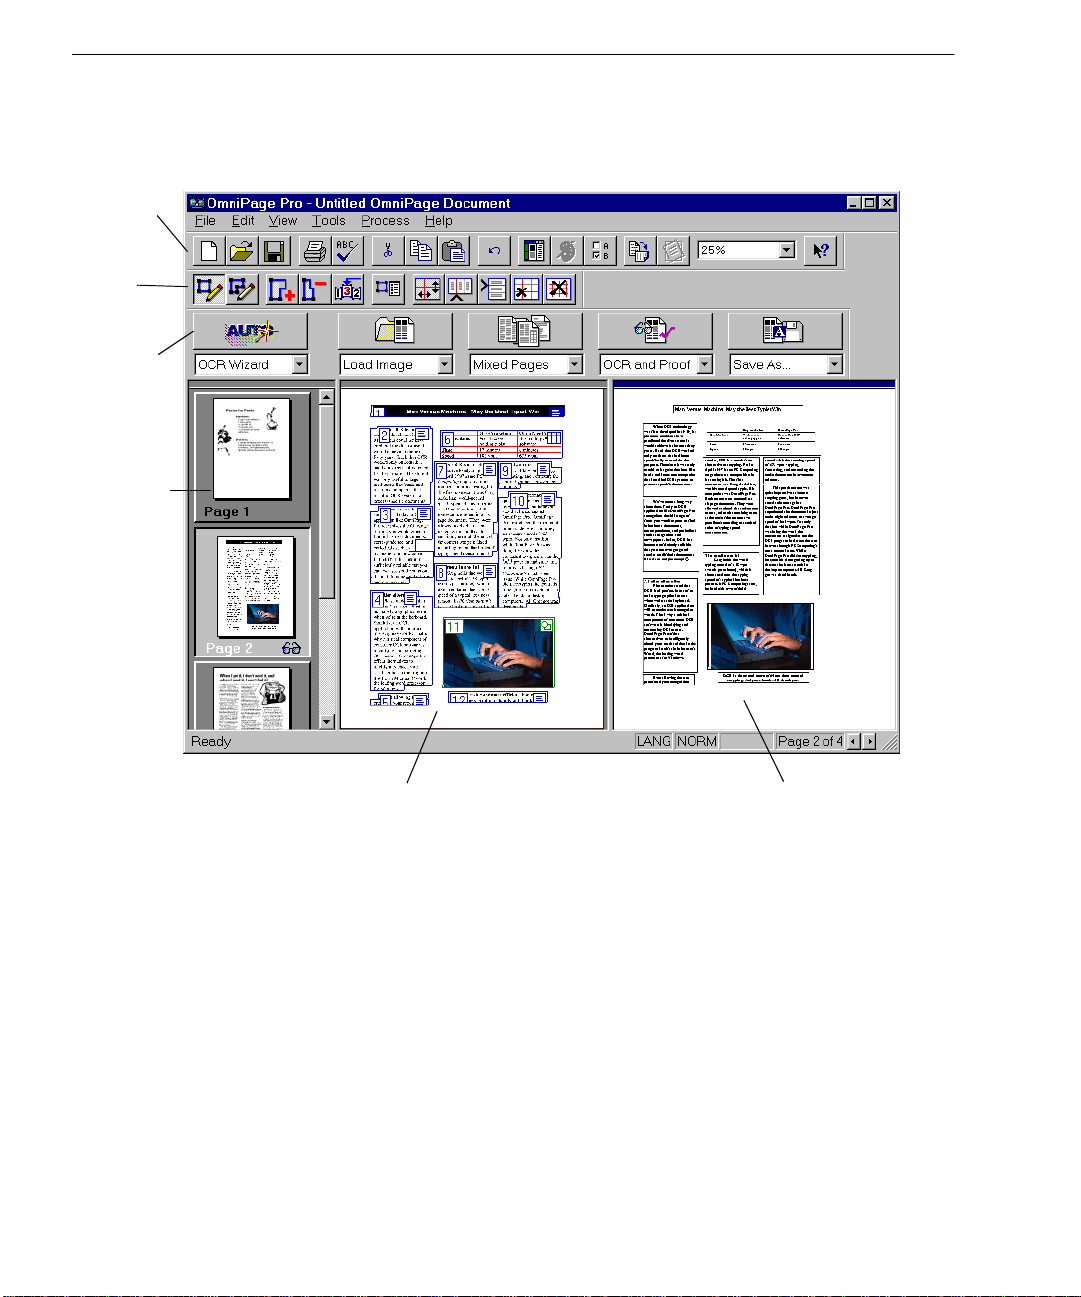
OmniPage Pro’s desktop appears when you open OmniPage Pro. See
“The OmniPage P ro De sktop” on page 10 for an intro duction to
OmniPage Pro’s user interface.
Standard
toolbar
Zone
toolbar
AutoOCR
toolbar
The
thumbnail
viewer
displays the
pages in an
open
document.
The image viewer
displays t h e current
page’s original image.
The text viewer displays the
current page’s recognized
text and re t ai ned graphic s .
Closing OmniPage Pro
Choose
Exit
in the file menu to close OmniPage Pro. You are prompted
to save th e current document if you have not saved it or have modified
it since the last save.
4 Chapter 1
Page 13

Registering OmniPage Pro
Register y our copy of OmniPage Pro wit h Caere Corp oration to receive
notification of special offers and the best prices on product upgrades.
Some versions of OmniPage Pro will only launch 25 times if you do not
register it.
If you purchased your product directly from Caere or if you were
previously registered, you may not need to register again. Your version
of OmniPage Pro will not displ a y a
register it.
To register OmniPage Pro:
Register
Registering OmniPage Pro
menu if you do not need to
1 Click the
2 Click
3 Fill out the information requested on the screen and then click
Next
4 Follow the instructions on the screen.
OmniPage Pro will decide on the best metho d of registration
according to your country and computer system. It may try
using mode m, FTP, or HTTP connections to tra nsmit your
registration information directly. Or, it may prompt you to call
a phone number or print out and mail in your registra tion
information.
After registration is complete, you will be given a registration number.
Be sure to write that number down and keep it handy in case you need
to use it for reinstallation. If you reinstall OmniPage Pro using your
registration number on the same comp uter, you will not have to go
through the entire registration process again to rer e gister it.
To reregister OmniPage Pro after reinstallation:
1 Click the
Register
Register Now
.
Register
menu to open the Regi ste r dialog box.
.
menu to open the Regi ste r dialog box.
2 Click
3 Type in your registration number and click OK.
Installation and Setup 5
Reregister
.
Page 14

6 Chapter 1
Page 15

Chapter 2
Introduction to
OmniPage Pro
You probably use your computer for most business correspondence and
other written projects. The challenge is that certain sources of
information cannot be immediately used on a computer.
For example, if you want to incorporate information from a magazine
article into a document in your word processor, you somehow hav e to
get the text from the article into your computer. Painstakingly retyping
the article is not an appealing solution.
OmniPage Pro offers a smart solution to increase your work
productivity. OmniPage P ro’s
technology accurately and easily converts scanned paper documents
and image files into editable text for use in your favorite computer
applications. OmniPage Pro eliminates the need for manual retyping.
optical character recognition (OCR)
Please continue reading this chapter for information on these topics:
• What Is Optical Character Recognition (OCR)?
• The OmniPage Pro Desktop
• Getting Online Help
• Product Support
7
Page 16

What Is Optical Charac ter Recognition (OCR)?
What Is Optical Character Recognition (OCR)?
Optical character rec ognition (OCR
computer-editable text. An image is an electronic pic tur e of text such as
a scanned paper document or an electronic fax file. Images do not have
editable te xt characters; they have many tiny dots (
form a pi cture of tex t.
During OCR, OmniPage Pro analyzes an image and define s characters
to produce editable text. After OCR, you can save the resulting text to a
variety of word-processing, page layout, and spreadsheet applications.
) is the process of turning an
OmniPage Pro’s OCR Capabilities
In addition to text recognition, OmniPage Pro can retain the following
elements of a document during OCR.
Graphics
Photos, logos, and drawings are examples of graphics.
Text formatting
Font types, fon t sizes, and fo nt styles (such as bold or
of text format ting.
Page formatting
Column structure, paragraph spacing, table formats, and placement of
graphics are examples of page formatting.
pixels
) that togeth e r
italic
) are exam ples
image
into
The graphics, text formatting, and page formatting elements that
OmniPage Pro retains are determined by t he settings you select. See
“Settings Guidelines” on page 51 for more information.
OmniPage Pro only recognizes machine -pr int ed charac ters such as
laser-printed or typewritten text. However, it can retain handwritten
text, such as a signature, as a graphic.
8 Chapter 2
Page 17

What Is Optical Charac ter Recognition (OCR)?
Basic Steps of OmniPage Pro OCR
These are the basic steps of OmniPage Pro’s OCR process.
1 Bring a document image into OmniPage Pro.
You can scan a paper document or load an image file. The
resulting image appears in OmniPage Pro’s image viewer. See
“Bringing Document Images into OmniPage Pro” on page 20 for
more information.
2 Create zones to identify areas you want to recognize as
text or retain as graphics.
Zones
are borders that enclose the areas of a document image that
will get processed. Yo u can create zones autom ati cally, manually,
or with a templa te . Any areas not en closed by zones ar e ignored
during OCR. See “Creating Zones for OCR” on page 22 for more
information.
3 Perform OCR to convert text information into editable
text characters.
During OCR, OmniPage Pro interprets text characters i n an image.
After OCR, you can check and correct errors in the text using the
OCR Proofreader. See “Per forming OCR on a Document” on page
23 for more information .
4 Export the document to the desired location.
You can sav e your doc umen t to a specified file format, plac e it on
the Clipboard, or send it as a mail attachment. See “Exportin g
Documents” on page 34 for more information.
There are differ en t ways to start th e OC R proce ss in Omn iPage Pro. See
“Ways to Process Documents” on page 18 for more information.
Intr od u ction to OmniPage Pro 9
Page 18
The OmniPage Pro Desktop
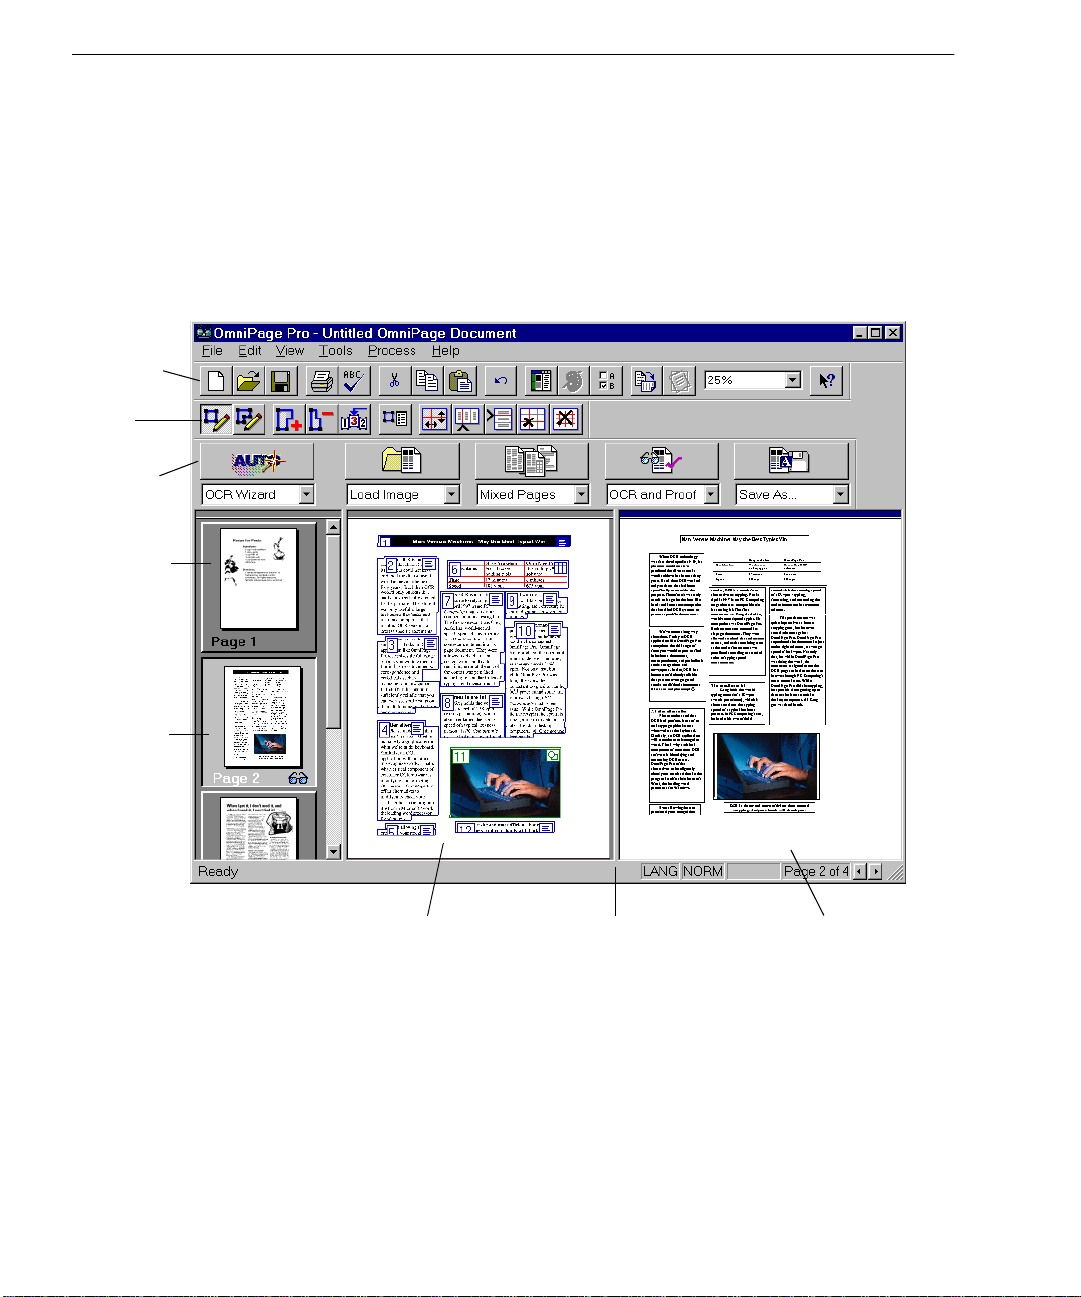
The OmniPage Pro Desktop
OmniPage Pro’s desktop displays the pages of an open document in its
thumbnail viewer, image viewer, and text viewer. You can use buttons
in the Standard, AutoOCR, and Zone toolba rs to perfo rm various tasks
on the document.
Standard
toolbar
Zone
toolbar
AutoOCR
toolbar
The
thumbnail
viewer
displa ys a
picture o f
each page
in the
document.
The cur rent
page is
highlighted
with a light
border
around it.
The image viewer
displays the current
page’s original image.
Drag this splitter to
the left or right to
resize a viewer.
The t ex t vi ew er dis pl ay s th e
current page’s recognized
text and retained graphics.
10 Chapter 2
Page 19
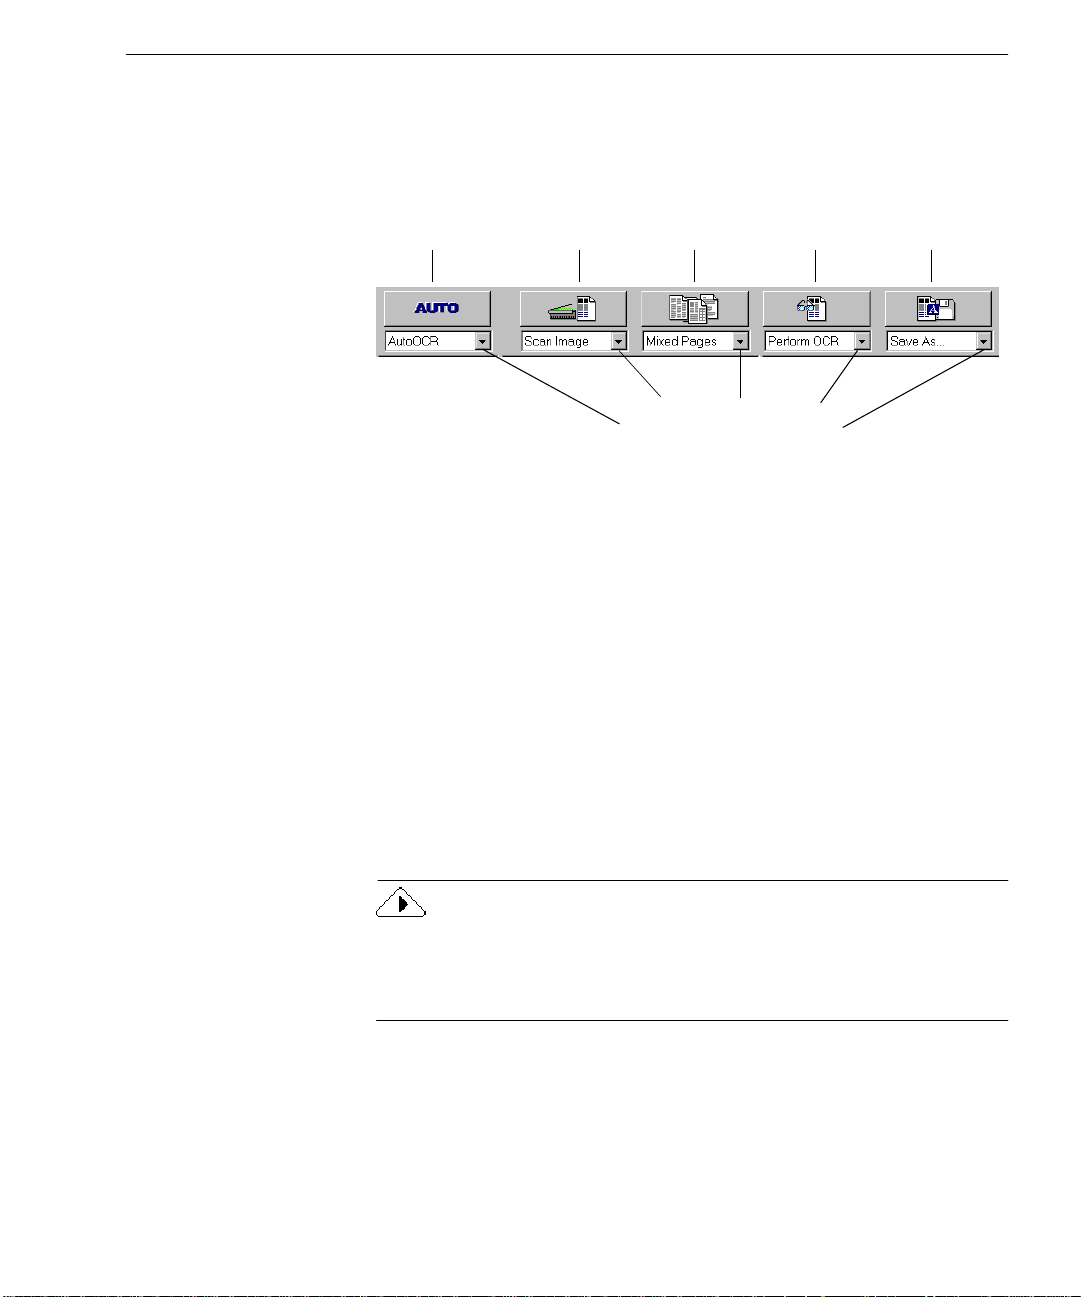
AutoOCR T oolbar
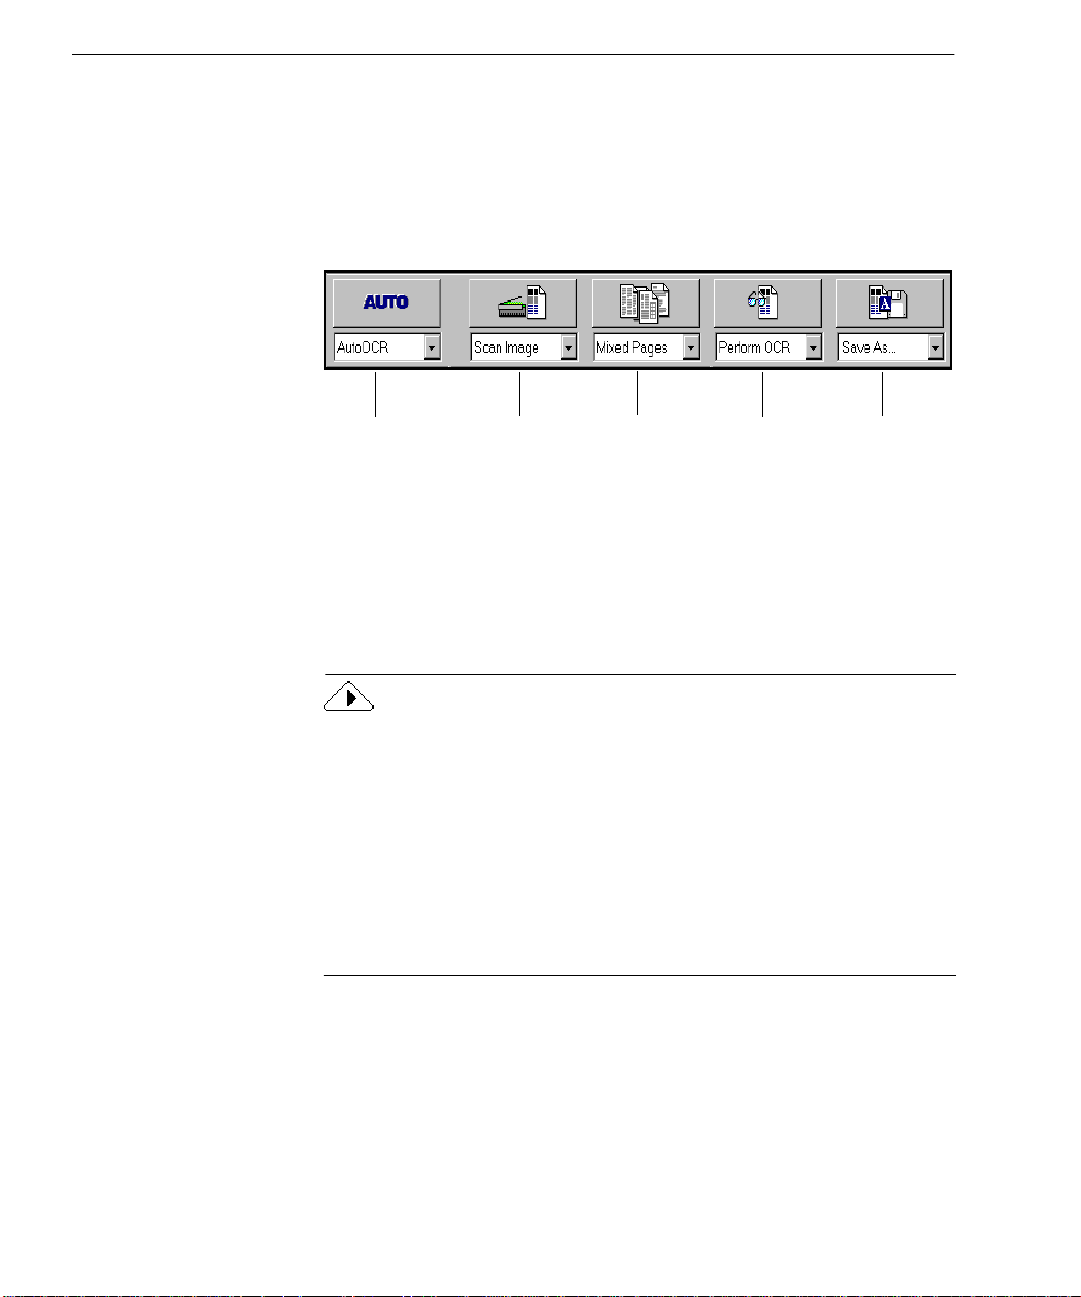
The AutoOCR® toolbar contains buttons that can activate each step of
the OCR process.
The OmniPage Pro Desktop
AUTO
button
Image
button
Click the down arrow to
display the commands in a
button’s drop-down list.
Zone
button
OCR
button
Export
button
You can set different commands in the AutoOCR toolbar buttons for the
operations y o u want to perform. Choose a command u sing each
buttons’s drop-down list.
• The AUTO button allows you to activate automati c processing or
use the OCR Wizard.
•The Image button allows you to bring in images by scanning or
loading pages.
• The Zone button allows you to automatically create zones on
images based on their original page layouts or predefined
templates.
• The OCR button allows you to perform OCR, train characters for
OCR, or sched u le OCR at a later time.
• The Export button all ows you to save, copy, or send your
recognized document as a mail attachment.
Please see “Setting AutoOCR Toolbar Commands” on page 40 for more
information on each toolba r button. Also see the separately enclose d
OmniPage Pro 9 Reference card, which shows all available AutoOCR
toolbar com mands.
Intr od u ction to OmniPage Pro 11
Page 20
The OmniPage Pro Desktop
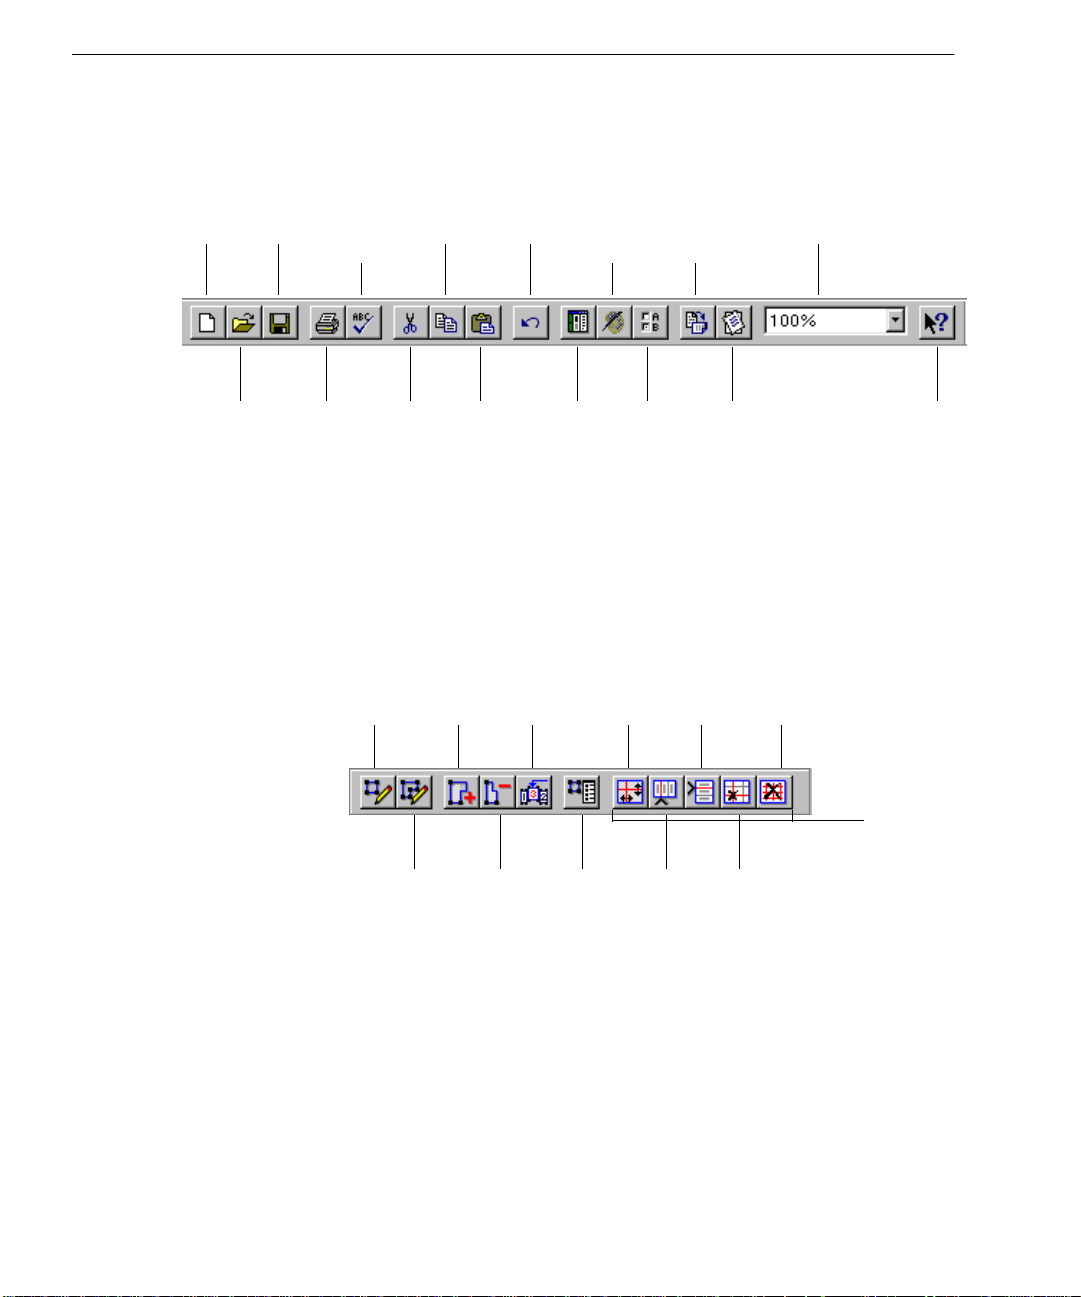
Standard Toolbar
The Standar d toolbar contains buttons a nd a drop-down list fo r
performing standard tasks.
New
Open
Save
Print
Zone Toolbar
Options
Rotate
Image
Straighten
Image
Zoom
Help
Proofread
OCR
Cut
Copy
Paste
Undo
Image
Editor
View
The Zone toolbar contains buttons that allow you to draw and define
zones on a page image.
Draw
Rectangular
Zones
Add to
Zone
Reorder
Zones
Move Row
or Column
Divid ers
Insert
Row
Dividers
Remove/Repla ce
All Row and
Column Dividers
Table
tools
Draw
Irregular
Zones
Subtract
from
Zone
Zone
Properties
Insert
Column
Dividers
Remove Row or
Column Dividers
See “Customizing Zones” on page 63 for more information.
12 Chapter 2
Page 21
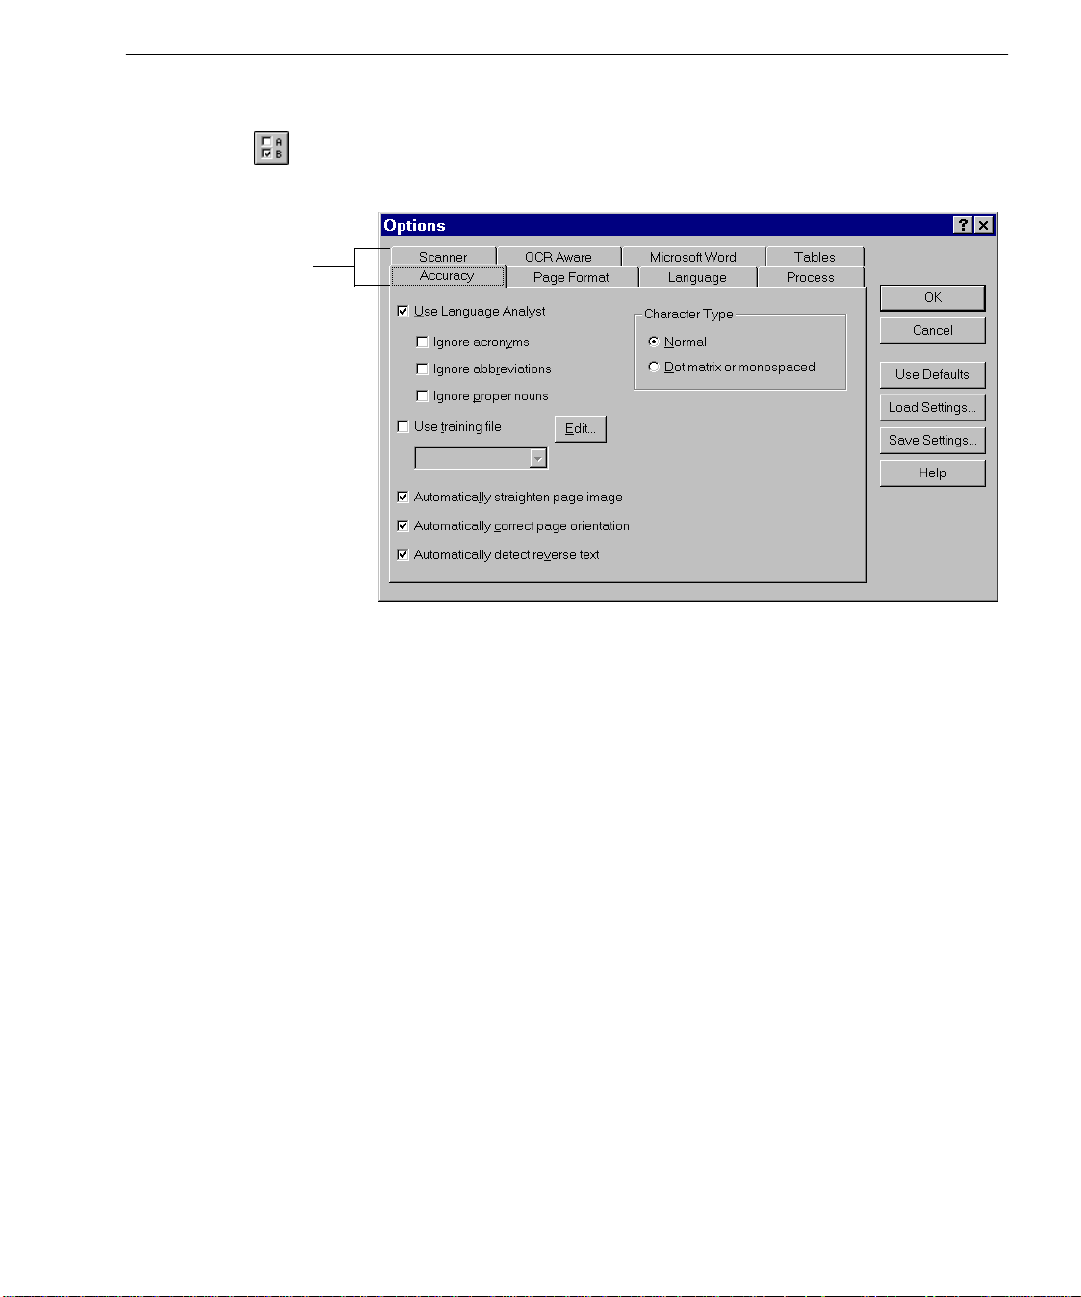
Options Dialog Box
Click the tabs in
the Options
dialog box t o
view and select
different settings.
The OmniPage Pro Desktop
You can selec t se ttings for OmniPage Pr o in the Options dialog box. To
open it, click the Op tions butt on or choose
Options...
in the Tool s menu.
See Chapter 4, Om niPa ge Pro Sett ings, f or more inf ormat ion on s ett ings.
Intr od u ction to OmniPage Pro 13
Page 22
Gettin g O n lin e He lp
Getting Online He lp
In addition to using this manu al, you can use OmniPage Pro’s onli ne
Help topics to learn about features, settings, and procedures. Online
Help is available after you install OmniPage Pro.
OmniPage P ro’s online Help follows t he conventions of Microso f t
Windows 95 Help. Ch oose
menu to get information on us in g He lp.
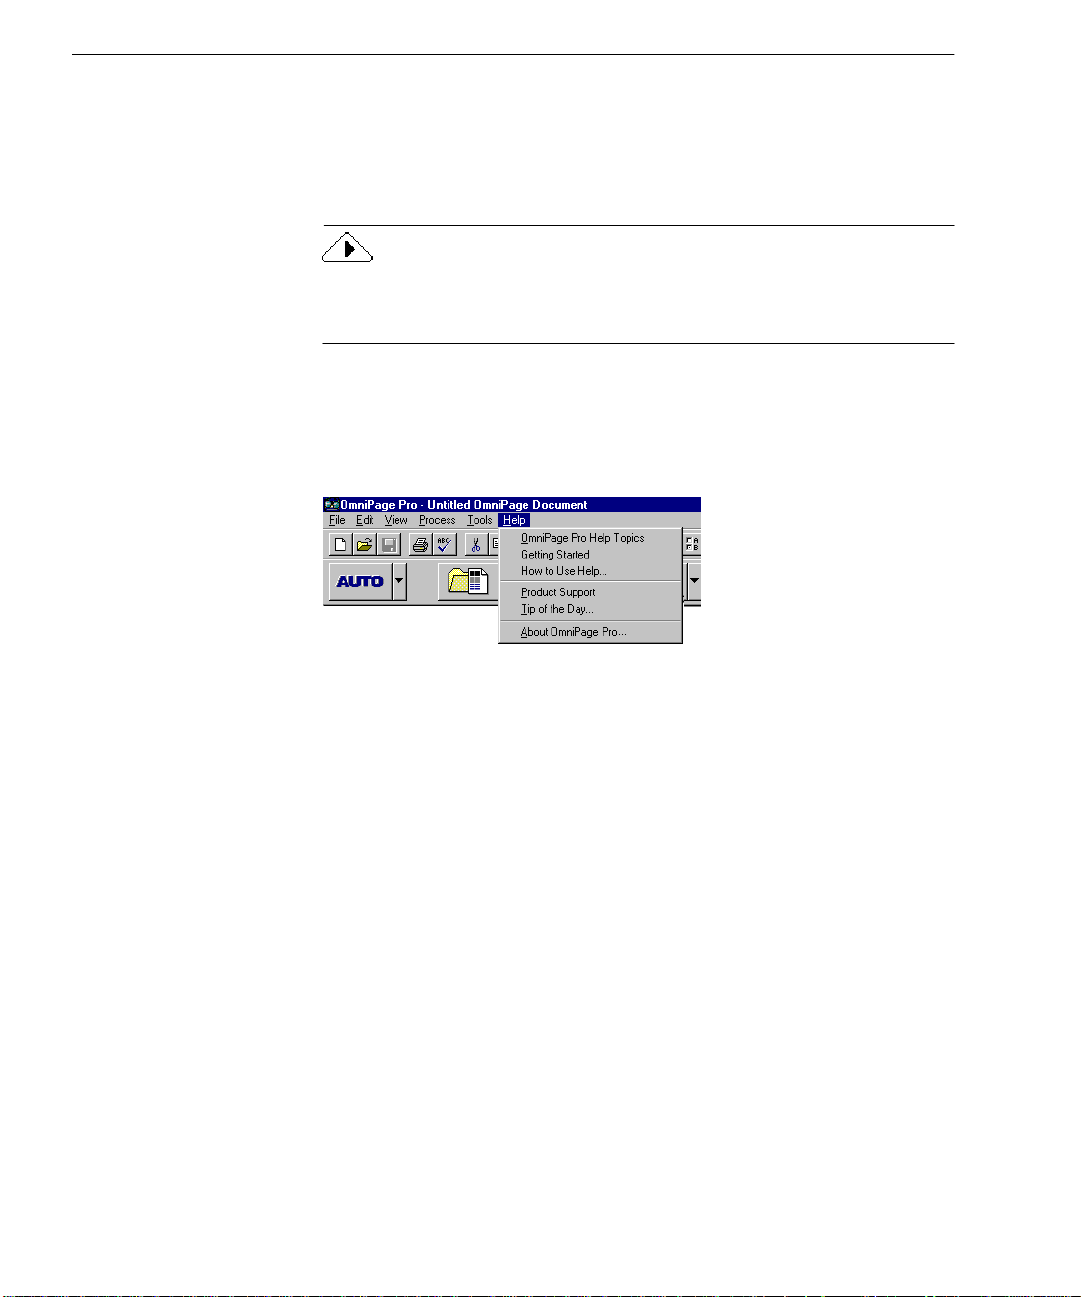
Help Menu
One way to open Omni Page Pro ’s onl ine Hel p is to c hoose c ommands in
the Help men u.
How to Use Help...
in OmniPage Pro’s Help
• Choose
listings for OmniPage Pro Help topics.
• Choose
Pro.
• Choose
that explai n how to u se and customize Hel p .
• Choose
services for OmniPage Pro.
• Choose
• Choose
version of OmniPage Pro.
14 Chapter 2
OmniPage Pro Help Topics
Getting Started
How to Use Help...
Product Support
Tip of the Day
About OmniPage Pro...
to get int roductor y topics to OmniPage
to get Microsoft Windows Help topics
to find ou t h o w to g e t p rod uct supp or t
to get hints for using OmniPage Pro.
to get information about you r
to get co n t e n t s and index
Page 23
Context-Sensitive Help
You can get on-the-spot information abou t a p a rticular OmniPage Pro
command, toolbar button, or dialog box option in the following ways:
• Click the Help button in the Standard toolbar and then click any
toolbar button, menu command, or area of the OmniPage Pro
desktop to display a Help topic explaining that item.
• Click the question-mark button in the upper-right corner of a
dialog box and then click an item in the dialog box to get a popup explanation for that item.
• Some d ia l o g bo x e s h a ve a
information about th at dialog box.
Help
button. Click
Getting Onlin e Help
Help
to get
Intr od u ction to OmniPage Pro 15
Page 24
Product Support
Product Support
For the fastest and easiest way to get help, please look for soluti ons in
this manual or in the online Help. See “General Troubleshooting
Solutions” on page 86 for troublesh ooting tips.
If you need additional help, please use the following resources:
• Cae re ’s World Wide Web site
Go to Caere’s World Wide Web site fo r common question s and
answers, updates, patches, troubleshooting procedures, and
product information. Caere’s Web site address:
http://www.caere.com
• OmniPage Pro Readme file
Read the
about the software. This is available after installing OmniPage
Pro. To open the file, click
choose
OmniPage Pro Readme
• Scanner Setup Notes
Read the
scanners and relat ed iss u es. This document has been provided to
you as an electronic document in PDF format. To open this
documen t , click
Programs
Notes
• Caere Product Support document
Read the
telephone numbers, incl ud ing ones for int e rnational product
support. This document has been provided to you as an
electronic document in PDF format. To open this document, click
Start
Applications
OmniPage Pro Readme
Programs
Scanner Setup Notes
Caere Appl ic ationsCaere Documents
.
Caere Product Support
in the Windows tas kbar and choose
Caere Applications Caere Documents
Start
Caere Documents Product Support
.
in the Windows tas kbar and choose
file for last-minute information
Start
in the Windows taskbar and
document to learn about supported
document to get a list of support
Programs
Scanner Setup
Caere
.
You must have Adobe Acrobat Reader 3. 01 or greater inst alled if
you want to read the
PDF documents. To install the Reader, click
taskbar and choose
Acrobat Reader.
16 Chapter 2
Caere Product Support
Programs
Caere Applications Caere Documents
Scanner Setup Notes
and
Start
in the Windows
Page 25

Chapter 3
Processing Documents
This chapter describ e s how to work with documents in OmniPage Pro,
including each step of the OCR process.
There are different ways to accomplish the same tasks in OmniPage Pro.
You can use toolbar buttons or menu commands to start procedures.
OmniPage Pro can perform all O CR ste ps automa tica lly, or you can sta rt
each step individually. You can even do diff erent tas ks at the same time.
Please continue reading this chapter for information on these topics:
• Ways to Process Documents
• Br ingin g Documen t Images into OmniPage Pro
•Creating Zones for OCR
• Performing OCR on a Document
• Proofreadi ng OCR Results
• Using OCR in Other Applications
• W orking with D ocuments
• Exporting Documents
For complete information on all OmniPage Pro commands, settings, and
procedures, please use OmniPage Pro’s online Help. See “Getting
Online Help” on page 14 for more information.
17
Page 26

Ways to Process Do cuments
Ways to Process Documents
Optical character recognition (OCR) is the process of turning an image
into compu te r-editable text so you do not h ave to retype th e text
manually. The basic steps of OmniPage Pro’s OCR process are explained
on page 9. The following is a summ ary of those steps.
1 Bring a document image into OmniPa ge Pro.
See page 20 for more information.
2 Create zones to identify areas you wan t to recognize as te xt or
retain as graphics.
See page 22 for more information.
3 Perform OCR to convert text information into editable text
characters.
See page 23 for more information.
4 Exp or t the docu ment to the d e s i red lo c ation.
See page 34 for more information.
Using the OCR Wizard
The OCR Wizard guides you through the entire OCR process by asking
you question s ab out your document and selecting the ap p ropriate
settings for you.
To process your document using the OCR Wizard:
1Set
2 Click AUTO or choose
3 Answer the question in the first screen and click
4 Continu e answering questions in the screens that follow.
18 Chapter 3
OCR Wiz ard
down list.
The first wizard screen appears.
as the command in the A UTO button’s drop-
OCR Wizard
in the Process menu.
Next
.
Page 27

Automatic Processing
Use the AUTO but ton to proce ss a new docu ment fr om s tart to f inis h or
to finish processing an open document.
To process your document automatically:
Ways to Proc ess Documents
1Set
2 Set the desired Image, Zone, OCR, and Export commands.
3 Choose
4 Place y o ur document in your sca nner if you are scanning.
5 Click AUT O or choose
AutoOCR
down list.
See “Setting AutoOCR Toolbar Commands” on page 40 for
more information.
appropriate for your document.
See “Settings Guidelines” on page 51 for more information.
Each page of the document is processed and finished in order
according to the selected commands. If page i mages in an open
document alr e ady ha ve zon e s, OmniPage Pro will ski p zon ing
for those pages and continue with the selected OCR an d export
operations.
as the command in the AUTO button’s drop-
Options...
in the Tools menu and check that settings are
AutoOCR
Performing Multiple Tasks at Once
OmniPage Pro takes advant age of your computer’s abi lity to handle
more than one process at a time. You can simultaneously scan, create
zones, recognize, and edit documents. You do not have to wait for any
process to complete before moving on to the next task.
For example, if you s can a multi ple-page document, y ou can draw zones
on an image as soon as the first page is scanned and you can edit
recognized text as soon as it appears in the text viewer. These tas ks can
be done while other pages are being scanned and recognized.
in the Process menu.
Starting the OCR Process Outside OmniPage Pro
You can start the OCR process outside OmniPage Pro i n a variety of
ways. For example, you can use the
from another applica tion an d past e reco gnize d text into an open
document. See “Using OCR in Other Applicatio ns” on page 29 for more
info r mation.
Proc es sing Documents 19
OCR Awa re
feature to in itiate OCR
Page 28
Bringing Document Images into OmniPage Pro
Bringing Document Images into OmniPage Pro
You can bring document images into OmniPage Pro by scanning pages
or loading image files.
Scanning Pages
You can scan paper documents to convert them to electronic images in
OmniPage Pro. If a document is already open, scanned pages are
insert e d as ne w p a g es.
To scan in OmniPage Pro, you must install the Scan Manager and select
your default scanner. See “Scan Manager is Needed with OmniPage
Pro” on page 92 for more information.
To scan pages into OmniPage Pro:
1 Place your page in your scanner.
You can scan a stack of pag e s if you have an automatic
document feeder (ADF).
2Set
3 Choose
4 Click the Image button or choose
Scan Image
down list.
make sure the appropriate settings are selected.
Scan until empty
Select
pages in an ADF at once. Otherwise, you must click the Image
button to scan each subsequent page.
menu.
Pages are scanned in order and combined into one working
document.
Loading Image Files
You can load image files into OmniPage Pro. An image file is an
electronic picture of text, such as a scanned paper document or an
electron ic fax, that i s sa ved in an image fi le for mat suc h as PCX or T IFF.
If a document is already open, loaded image files are inserted as new
pages.
The following procedure is for loading image files only. To open an
OmniPage Document (*.met), use the
menu.
as the command in the Image button’s drop-
Options...
in the Tools menu and click the
in the
Scanner
Scan Im ag e
Open...
tab if you want to scan all
in the Process
command in the File
Scanner
tab to
20 Chapter 3
Page 29
Bringing Document Images into OmniPage Pro
To load image files into OmniPage Pro:
1Set
Load Image
as the command in the I mag e button’s dr op -
down list.
2 Click the Image b utton or choose
Load Image
in the Proc e ss
menu.
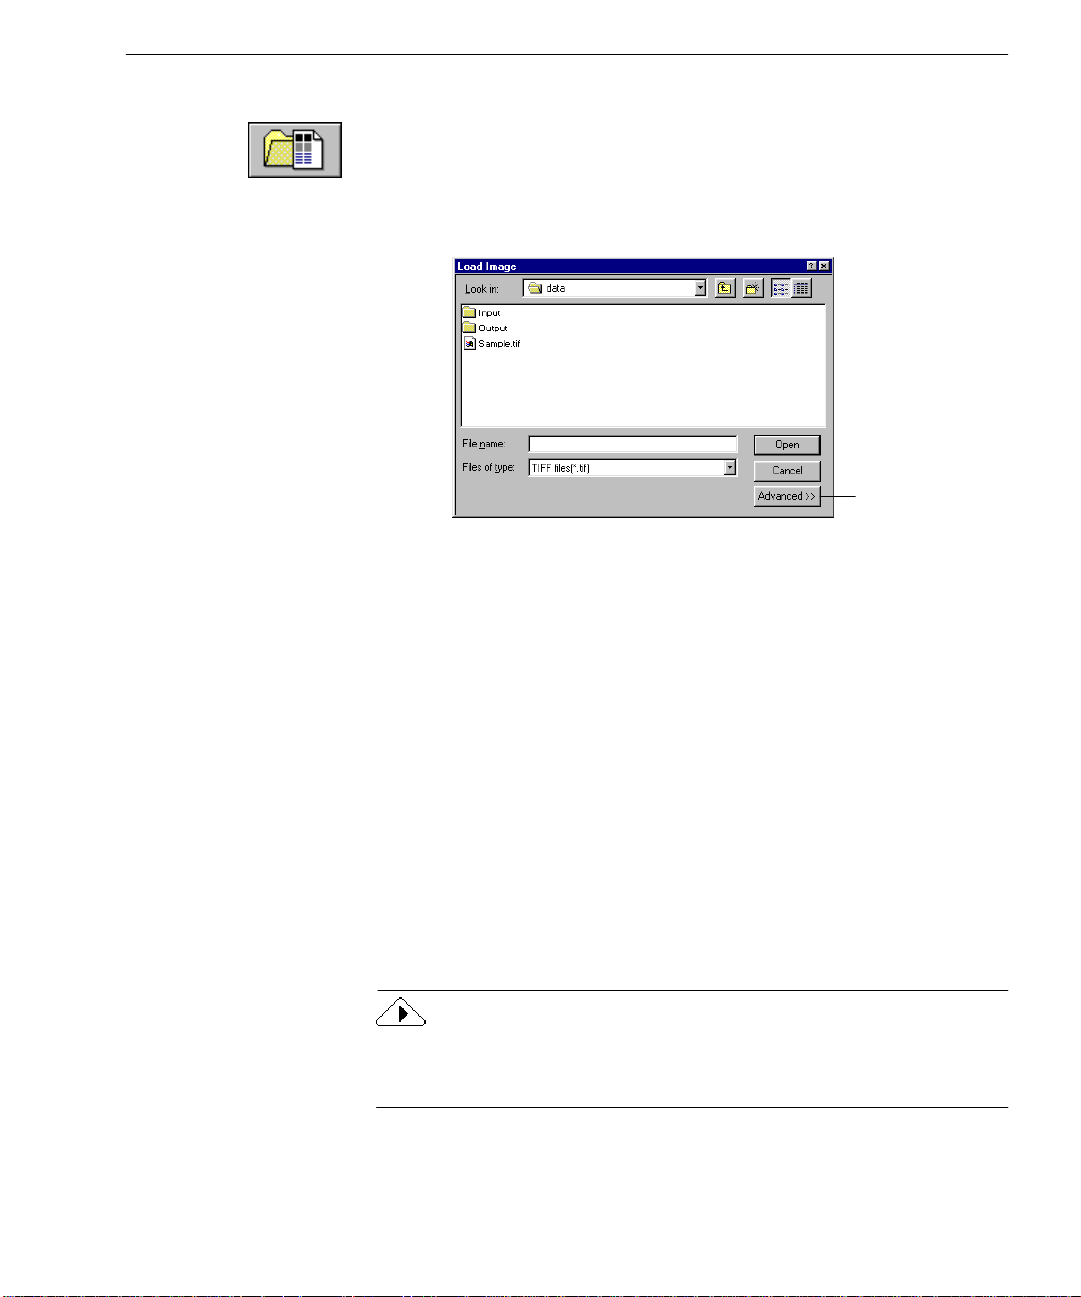
The Load Image dialog box appears.
Click Advanced if
you want to sel ect
files from more
than one folder.
3 Select the folder location and file type of the file you want to
load.
See “Supported File-Format Types” on page 89 for a complete
list of suppor te d file formats.
4 Select the files you want to load.
You can S hift-c lick or Ctrl-c lick to select m ultip le files in the
same folder.
folder
Advanced
.
if you want to sel e ct files from more than one
• S elect a file and click
•Click
Add All
Open
to add all files from the current folder.
when you have selected all the files you want to
Add
to put it i n th e
Selected Files
list.
5 Click
6 Click
load.
Image files are loaded in the order selected and combined into
one wor k in g do cu m e nt .
If you have el e ctronic fax f ile s that you want to convert to editable text,
save the fax files in TIFF format and load them into OmniPage Pro using
Load Im age
the
Proc es sing Documents 21
command .
Page 30
Creating Zones for OCR
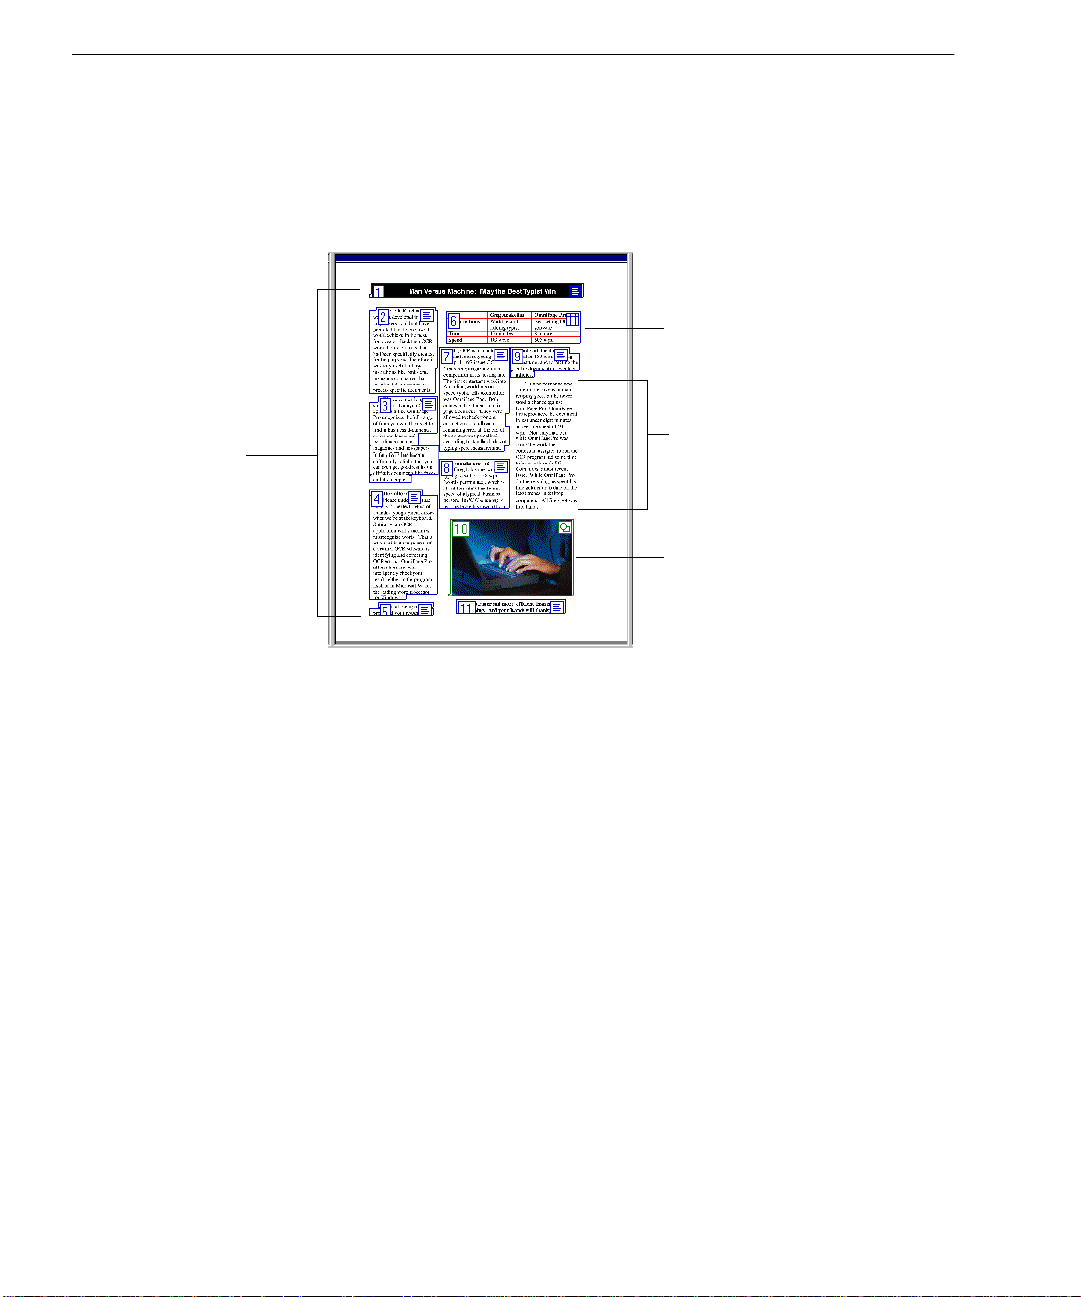
Creating Zones for OCR
These are text
zones. They
will be
converted to
text during
OCR.
Page images are displayed in OmniPage Pro’s image viewer where
zones
are created before OCR. Zones are b orders that identify areas of an
image that will be recognized as text or retained as graphics. Any part of
an image not enclosed by a zone is ignore d duri ng OCR.
This is a table zone. It will
be kept in a row- andcolumn format during OCR.
This is an unzoned
area. It will be ignored
during OCR.
This is a graphic zone. It
will be kept as a graphic
image during OCR.
The easiest way to create zones on a page is to let OmniPage Pro do it
automat ical ly fo r yo u. Howe ver, you may wan t to d raw z ones m anua lly
if you want to customize the way your page will be processed. For
example, if you only want to process certain areas of a page, you would
manually dr aw zones around the desired areas. For information on
drawing zones manually, modifying zones, deleting unwanted zones,
and using zone te mp lates, please see “Customi zing Zones” on page 63.
Creating Zones Automatically
OmniPage Pro can analyze a page and create zon es automatically for
you. It uses the selected setting in the Zone button to determine the text
flow on a page and brea k s it into ordere d zone s.
To create zones automatically:
1 Choose a se tting in the Zone button’s drop-down list that most
closely matches the format of your document.
You can choose
Spreadsheet Pages, Mixed Pages
“Zone Button Co mmands” on page 42 for more in for matio n on
these settings.
22 Chapter 3
Single-Column Pages, Multiple-Column Pages
, or a template of your own. Se e
,
Page 31
Performing OCR on a Document
2 Click the Zone button or choose
menu.
OmniPage Pro automatically draws zones on the current page
in the image viewer. Each zone has a number indicating its
order and a picture indicating its zone type.
Make sure zones are identified correctly before performing OCR. For
example, if you want to retain an area as a graphic, that ar ea sh oul d be
identified as a
page 71 for more information.
Graphic
zone type. See “Changing Zone Properties” on
Performing OCR on a Document
Performin g OC R con ver ts an ima ge to edit abl e t ext . Th is is al s o r eferr ed
recognizin g text
to as
OmniPage Pro only recognizes machine-printed characters such as
laser-printed or typewritten text. However, it can retain handwritten
text, such as a signature, as a graphic.
.
Auto Zones
in the Process
To perform OCR:
1 Choose
tab.
2 Select an
OmniPage Pro uses this setting to determine the output
formatting of a document dur ing OCR.
3Set
down list.
Or, set
OCR Proofreader to begin automatical ly after OCR.
4 Click the OCR button.
The page is recognized according to the current zones and
settings. If there are no zones on the page , zones are cre ated
according to the current command in the Zone button.
Proc es sing Documents 23
Options...
Output Format
OCR and Proof
Perform OCR
in the Tools menu and click the
setting for your document.
as the command in the OCR button’s drop-
as the command if you do not want the
Page Format
Page 32
Proofr eading OCR Results
To schedule a g rou p of documents f or OCR at a particul ar time, see
“Scheduling OCR” on page 80.
Proofreading OCR Results
After performing OCR, recognized text appears in the text v iewer where
you can proofread the results. Proofreading starts automatically if you
OCR and Proof
chose
OmniPage Pro marks suspected error s in green and in serts a red “r eject”
character for any character it cannot recognize. To turn off these color
markers , choo se
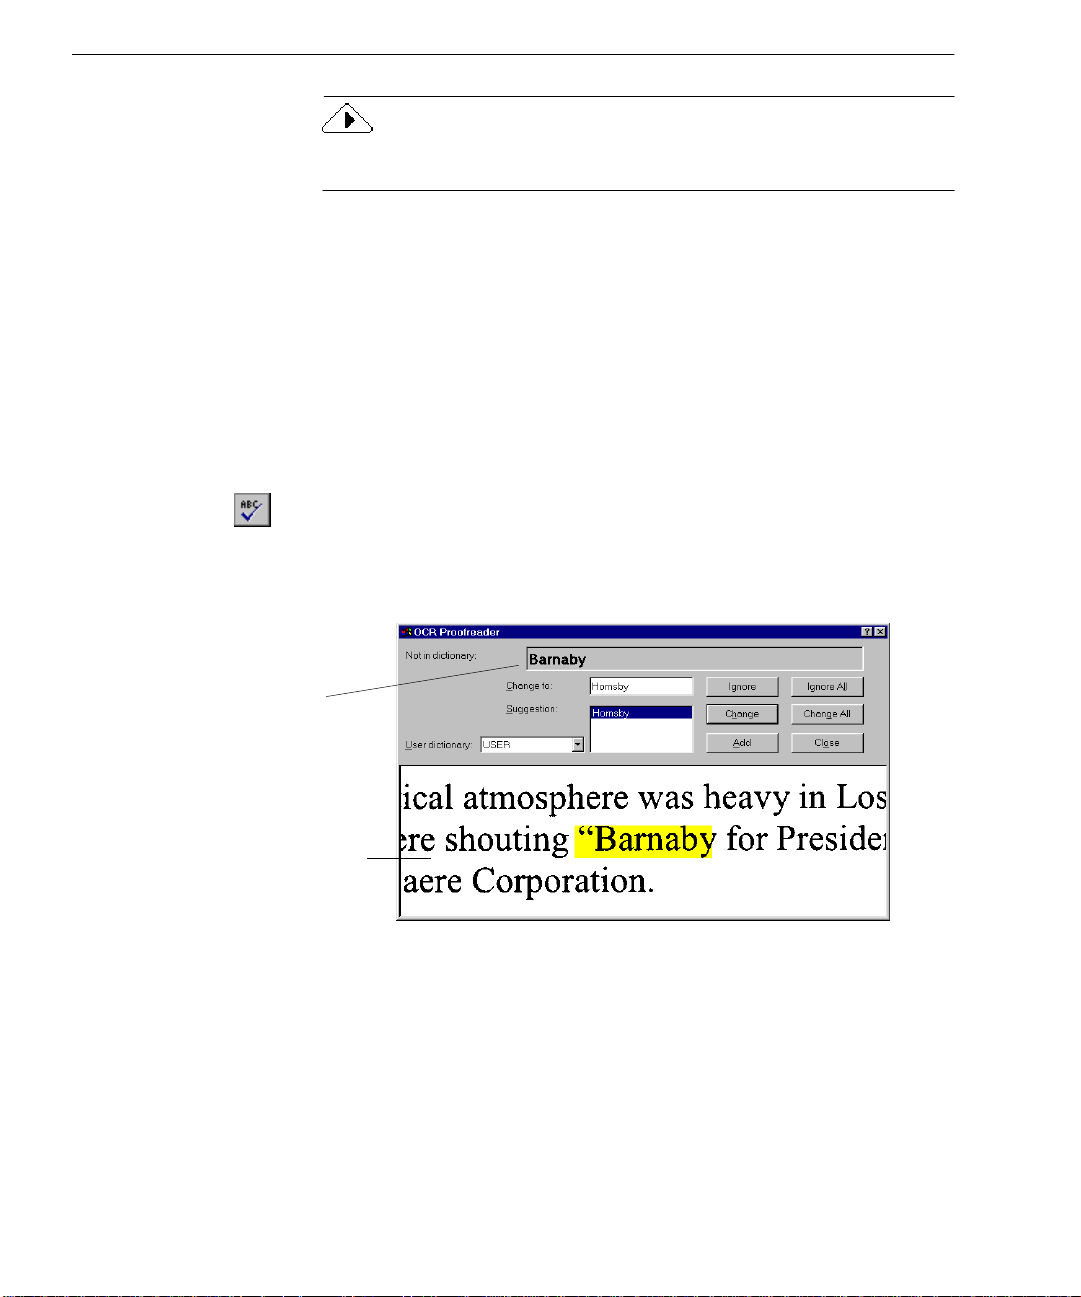
To proofread OCR results and correct errors:
Show Markers
as the OCR process command.
in the View menu so that it is deselected.
This is what OmniPage Pro
thought the word was.
This window shows a picture of
the original image. Click inside it
to enlarge or re duce the pictur e.
Y ou can also drag a corne r of the
dialog bo x to see mo re areas of
the imag e.
1 Click th e Proofread OCR button or choose
Proofread OCR...
the Tools menu.
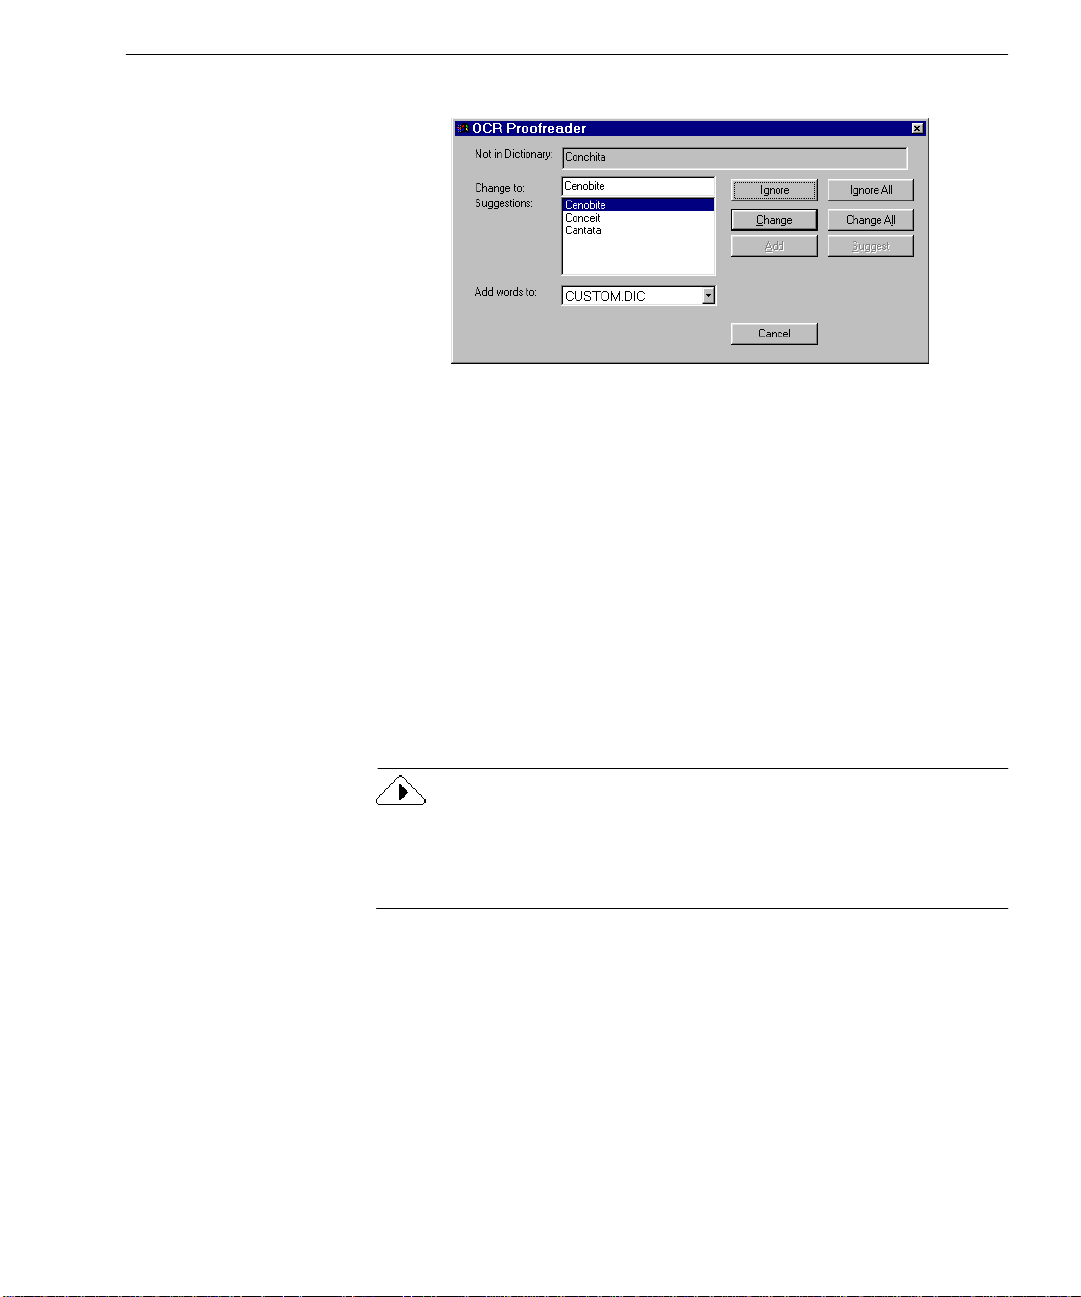
If a suspected error is detected, the OCR Proofread e r dialog
box displays the error and a pictur e of how it orig i nally l ooked
in the image.
2 Select one of these options for the word:
• Click
• Click
Ignore
to allow the wor d to remain as is.
Ignore All
to ignore all instances of the word in the
current document.
• Click
• Click
Change
to
edit box.
Change All
word in the
to replace t he word with the word in the
to replace al l instances of the word with the
Change to
edit box.
in
Change
24 Chapter 3
Page 33

Proofreading OCR Resu lts
3 Click
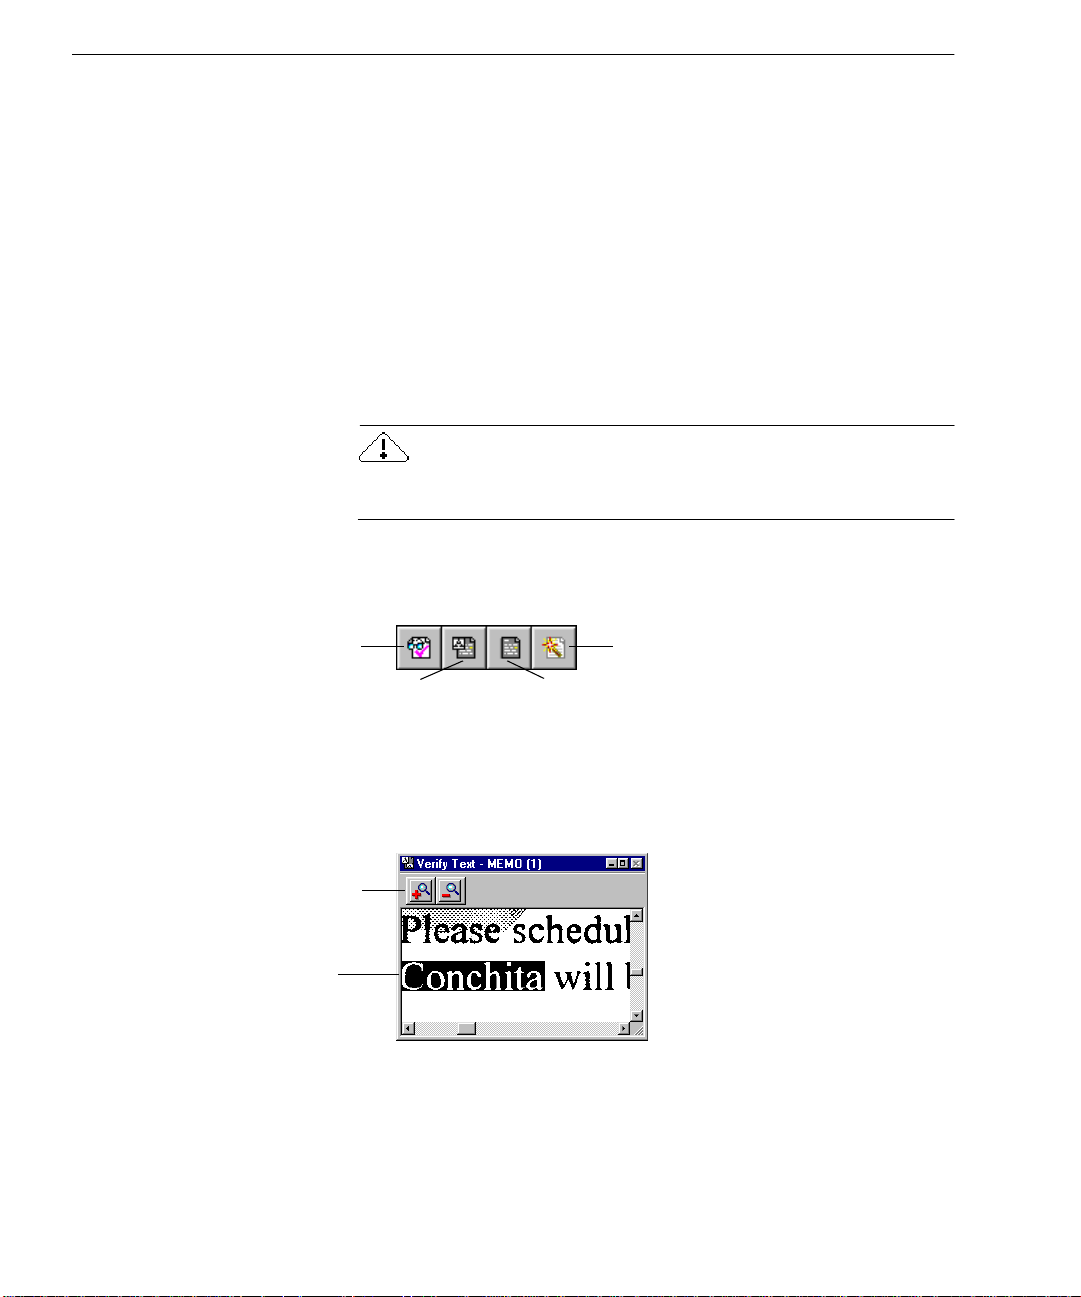
Verifying Text
After performing OCR, you can compare rec ognized text against the
original image t o ve rify that the text was recognized correctly.
To verify text against its original image:
1 Doub le-click any wo rd i n the te x t vie wer or select a wo rd and
This window shows a
picture of the original
image. Click inside it to
enlarge or reduce the
picture. You can also
drag a corner of the
window to resize it.
•Click
Add
to add the word to the current user dictionary.
After you choose an option for the word, the OC R Proofreader
looks for the next possible error.
Close
to stop proofreading OCR.
Color markers are removed from words that have been
proofread.
choose
Verify Text
in the Tools menu.
The Verify Text window op e ns and sho ws a picture of th e
original word and its surroundi ng area.
Close
button
2 Click inside the window to enlarge or reduce the picture.
The picture is enlarged on the first two clicks and reduced on
the next two cli ck s.
3 Continue double-clicking words that you want to verify.
The display ch anges as you select new words.
4 Click the Close button to close the window.
Proofreading OCR Results in Microsoft Word
You can proofre ad OCR resul ts dire ctly in Microsoft Word 9 5
(version 7) or Wo rd 97 if you have one of those versions installed on
your computer.
To enable proofreading in Microsoft Word:
1 Sele ct setti n g s in the
Opt ions dialo g b ox.
See “Microsoft Word Settings” on page 50 for more
information.
Proc es sing Documents 25
Microsoft Word
tab of OmniPage Pro’s
Page 34
Proofr eading OCR Results
2 Make sure the *.doc file extension is associated with the
versi on of Word you plan to use.
Refer to you r W indows documentation for more inf ormation
on associating file extensions with applications.
To proofread OCR results and correct errors in Microsoft
Word:
1 Perfor m OCR on yo u r doc ument and then save it as the
appropriate file type:
• Save as
• Save as
Word for Windows 7.0, 95
Word 97
if you are using that version.
if you are using that version.
2 Open the document in Microsoft Word.
The documen t must be open e d on a system that has OmniPage Pro
installed.
An OmniPage menu appears in Microsoft Word’s menu bar as
well as this corresponding toolbar:
Proofread
OCR
Use these buttons
to zoom in or out
on the image.
original image
Remove OCR
Proofreader Support
Verify Text
3 Choose
Close Image Viewer
Proofread OCR...
in the OmniPage menu or click the
Proofread OCR button.
If a suspected error is detected, the Verify Text window appears
displaying the original image of the text.
26 Chapter 3
Page 35
Proofreading OCR Resu lts
The OCR Proofreader dialog box also appears.
4 Select one of these options for the word:
•Click
•Click
•Click
•Click
•Click
Ignore
Igno re A ll
Change
to
edit box.
Change All
word in the
Add
to add the word to the current user dictionary.
to allow the wor d to re ma i n as is.
to ignore all instances of the word.
to replace th e wor d with th e wor d in the
to repla ce all insta n ce s of the word with the
Change to
edit box.
After you choose an option for the word, the OC R Proofreader
looks for the next possible error.
Change
5 Click
Close
to stop proofreading OCR.
Color markers are removed from words that have been
proofread.
To verify rec ognized text against its original image in Microsoft Word,
you must process the document in OmniPage Pro and save it to the
appropriate Word format. You cannot verify text against original
images using the OCR Aware feature.
To verify text against its original image in Microsoft Word:
1 Follow step s 1 and 2 in the preceding instructio ns if your
document is not already open in Microsoft Word.
2 Sele ct a word th at is a suspec te d erro r.
Suspect words are marked in the color that was selected in the
Microsoft Word
Proc es sing Documents 27
tab of OmniPage Pro’s Opti ons dialog box.
Page 36

Proofr eading OCR Results
You can only verify words that are marked as suspected errors.
However, once the V eri fy Te x t window is ope n , you ca n u se its
scroll bars and zoom buttons to see any part of the original image.
Use these buttons
to zoom in or out
on the imag e.
Removing OmniPage Pro Data from the Word Document
After proofreading OCR, y ou should remov e OmniPage Pro data fr om
your document to reduce its file size. Y ou are automatically prompted to
remove OmniPage data after all suspect words have been proofread.
You can also choose
menu. The OmniPage menu, toolbar, color markers, and image data will
all be removed from the document.
3 Choose
Verify Text...
in the OmniPage menu.
The Verify Text window ope ns and shows a picture of the
original word and its surround ing area.
4 Repeat steps 2 and 3 to continue pro ofreading other suspect
words.
The display changes as you select new words.
5 Choose
Close Image Viewer
in the OmniPage menu to close the
window wh e n you are done.
Remove OCR Proofreader Support
in the OmniPage
28 Chapter 3
Page 37

Using OCR in Ot her Applications
Using OCR in Other Applications
You can use OmniPage Pro's
applications. For example, you can scan, recognize, and paste text
directly into a document without ever leaving your word-processing
application.
You can use OCR Aware with 32-bit applications that have been
registered with OmniPage Pr o. An application must be installe d on your
computer in order to use it with OCR Aware. See page 49 for more
information on registering applications with OCR Aware.
For informa t i o n on other wa y s to start OCR ou t side Omn iPage Pr o,
please se e the “Star ti ng OCR Outs ide OmniP age P ro” o nli ne Hel p t opi c.
To use OCR Aware in an application:
1 Align your document in your scanner if you plan to scan.
2 Open the applicatio n in which you wan t to insert recognize d
text.
The application must be registered to work with OCR A ware.
You do not need to open OmniPage Pro itself .
3 Place the cursor at the location in your document where you
want to insert recognized text.
OCR Awa re
feature to use OCR in other
4 Choose
you want to check the curren t settings.
5 Choose
are re ady to start the OCR process.
OCR processing occurs according t o the selected settings.
Recognized text appears at the cursor location in your
application. If no documen t is ope n, text is copied to the
Clipboard.
Text formatting, such as bold and italics, is retained if the
application supports RTF information. Otherwise, only plain text
will be pasted. Graphics are retained if the application supports
bitmap images.
Proc es sing Documents 29
Acquire Text Settings...
Acquire Text...
in the application's File menu when you
in the application's File menu if
Page 38

Working with Documents
Working with Documents
OmniPage Pro’s thumbnail, image, and text viewers allow you to look
at and work with pages in the current docum ent.
Thumbnail viewer
Image viewer Text viewer
This section describes the following procedures:
• Resizing a Page View
• Changing Pages
• Reordering Pages
•Deleting Pages
• Pr in t in g a Do cument
• Closing a Do cument
30 Chapter 3
Drag this splitter to the left
or right to resize a view.
Page 39
Resizing a P age View
You can resize a page displayed in the image viewer or text viewer to
enlarge or reduce the view.
To resize a page view:
1 Click in the viewer you want to enlarge or reduce to make it
active.
2 Choose a size option in the Zoom drop-down list in the
Standard toolbar.
Or, choose
the drop-down list.
The page resizes as specified.
You can also click your right mouse button in the viewer you want to
resize and select a size opt ion in the shortcut menu. (If you are resizing
the image viewer, click outside of a zone.)
Changing Pages
The thumbnail viewer, image viewer, and text viewer all display the
same page of a document.
Working with Documents
Zoom
in the V iew menu and selec t a size option in
You can change pages in a document in the following ways:
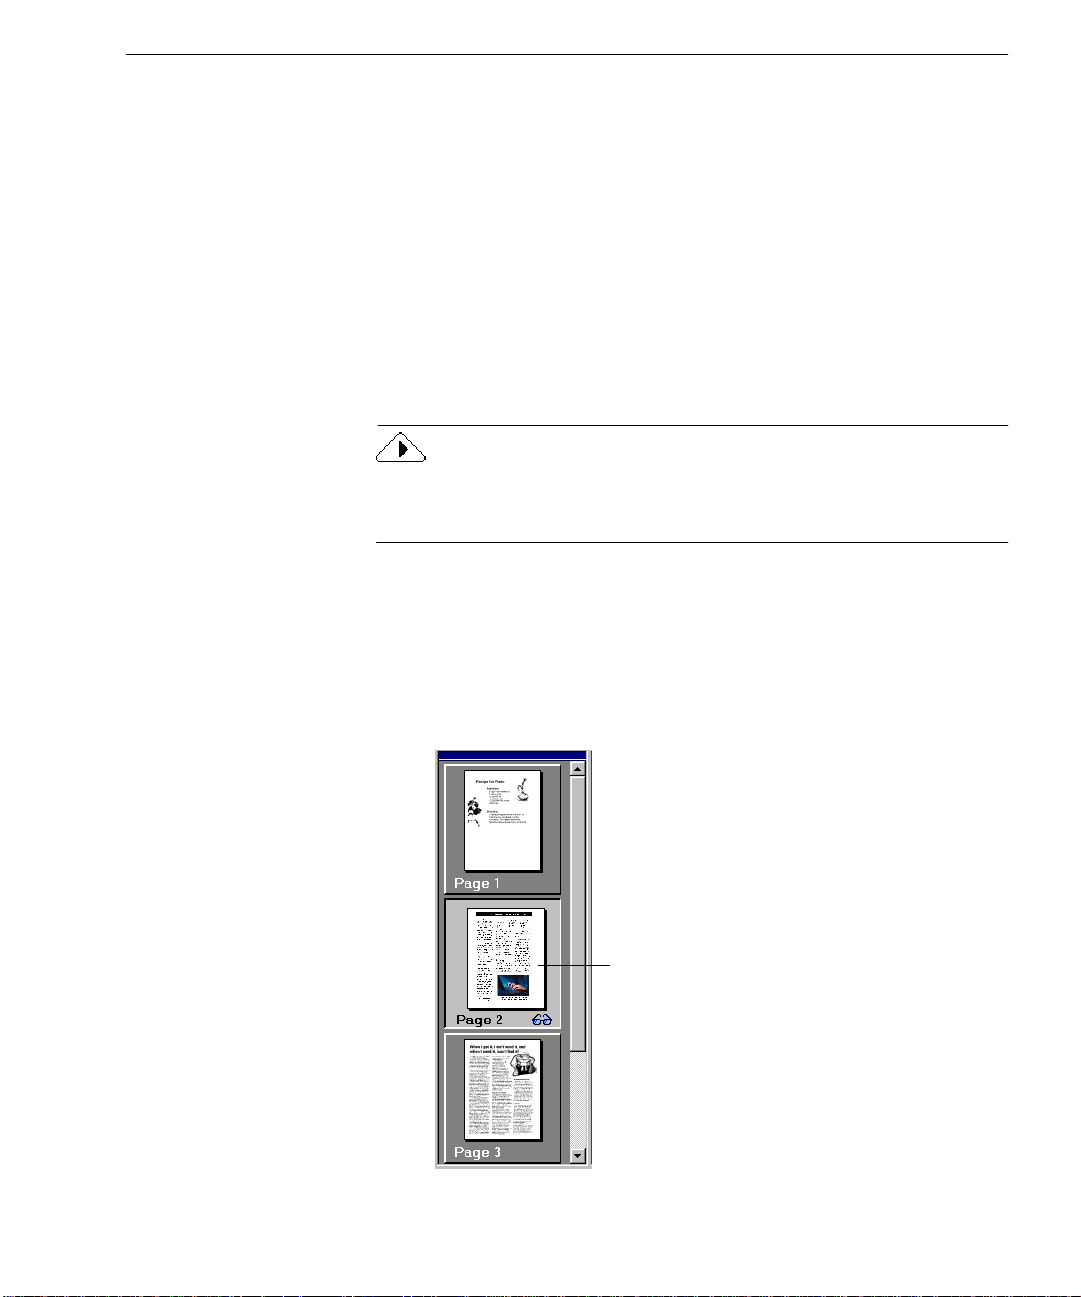
• Click the thumbnail of the page you want to display.
The thumbnail of the currently
displaye d page is highligh ted
with a li g ht borde r around it.
Proc es sing Documents 31
Page 40
Working with Documents
• Click the Next Page or Previo us Page buttons at the lower-ri ght
corner of the OmniPage Pro desktop.
• Choose
Reordering Pages
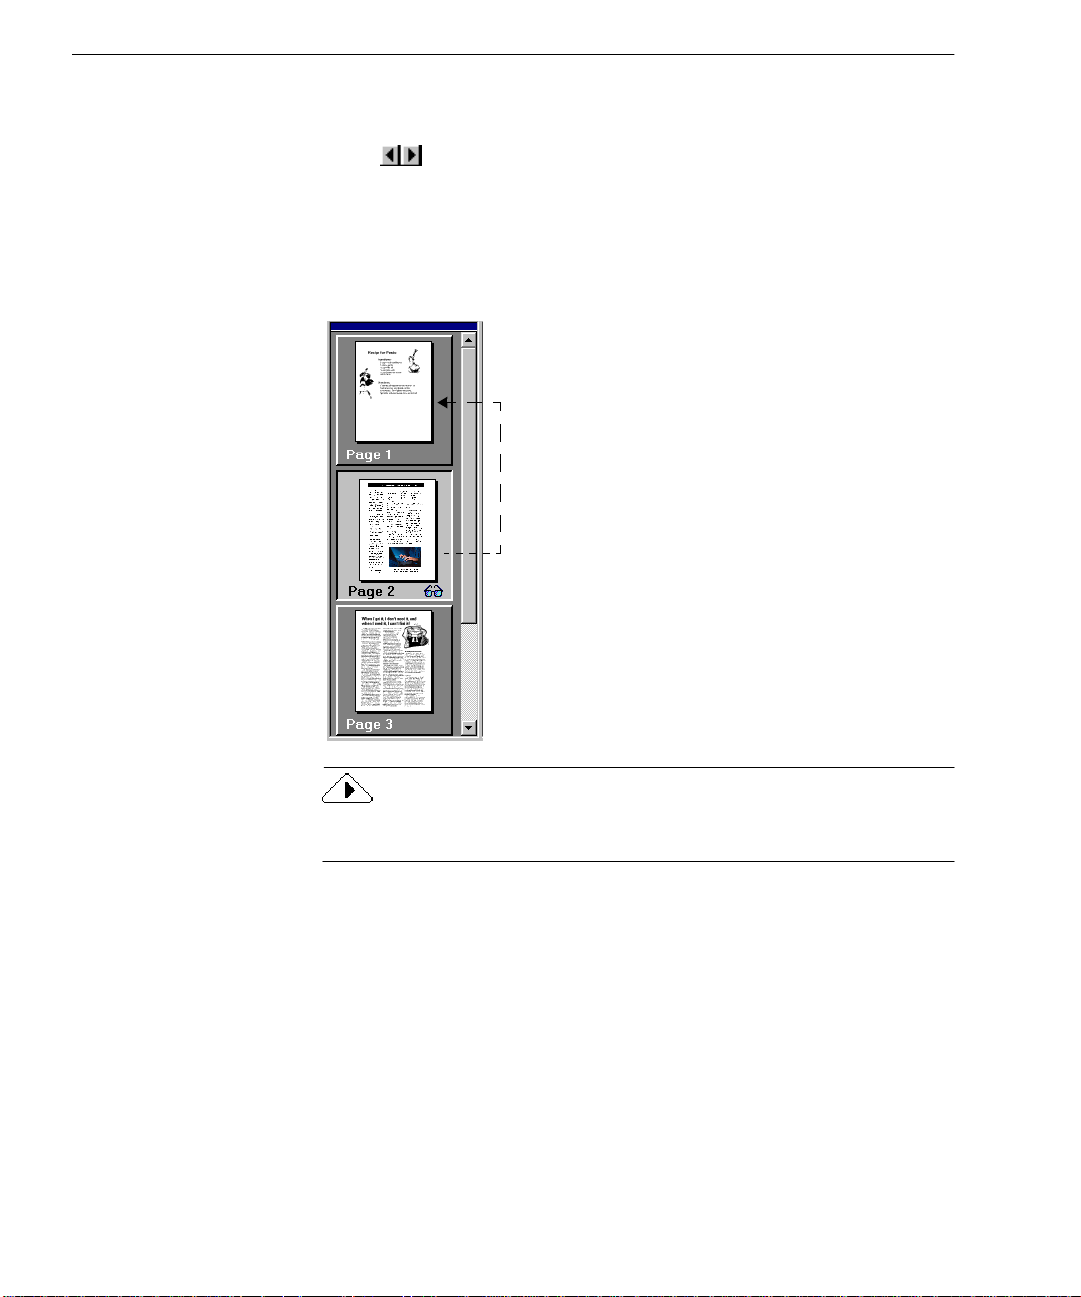
You can reorder pages in a docume nt by dragging their thumbnai ls to
different positions in the thumbnail viewer.
Next Page, Previous Page
Click the thumbnail of the page
you want to move and drag it
above the desired page number.
Go to Page...
, or
in the Edit menu.
Hold down the Ctrl key while you click thumbnails if you want to select
multiple thumbnails to move as a group.
Delet ing Page s
If you del e te a p age from a document in O mn iPa g e Pro, the thu mb nail,
original image, and recognized text for that page are all deleted.
To permanently delete pages:
• Choose
currently displayed page.
• Select one or more th umbnails of pages you want to delete an d
press the Delete key.
32 Chapter 3
Delete Current Page
in the Edit menu to delete the
Page 41
Undoing Changes
Working with Documents
You can cli ck the U ndo button or ch oose
the very last change you made in the text viewer. You can also choose
Undo
to cancel zone edits in the image viewer. However, page delet ions
cannot be undone.
Printing a Document
You can print the current document's original page images or
recognized text.
To print a document:
1 Choose
following in the submenu:
• Choose
• Choose
2 Select the desired print se ttings in the Print dialog box.
3 Click OK to start the prin t job.
As a shortcut, you can click either the text or image viewer to make it
active and then click the Print button to print from th at viewer.
Undo
in the Edit menu to cancel
Print...
in the File menu and choose one of the
Image...
Text.. .
to print original p a g e im ages.
to print recog nized text.
Closing a Document
Choose
You are prompted to save your doc ument if you have not saved it or
have modified it since the last save. Save a document as an OmniPage
Document (*.met) if you want to reopen it in OmniPage Pro again.
Proc es sing Documents 33
Close
in the File me nu to close a docu ment.
Page 42

Exporting Documents
Exporting Documents
You can export a docume nt to other applicatio n s by :
• Saving a Document
• Copying a Document to the Cl ipboard
• Sending a Document as a Mail Attachment
After you export a document, a copy of the document remains ope n in
OmniPage Pro. Save the d ocument as an Omni Page Docum ent (*.met)
if you want to reopen it in OmniPage Pro again. OmniPage Documents
retain all ori g inal images, zones, and rec og nized text.
Saving a Document
You can save recognized text and original images to disk in a variety of
file types.
To save recognized text:
The A dd to P age Ke eper s etting only
appears if you have PageKeeper
installed on your computer. It puts a
link to the saved document in
PageK eep er’s default folder.
1 Choose
You can also click the Export button with
drop- down list.
The Save As dialog box appears.
2 Select a folder location and file type for your document.
See “Supported File-Format Types” on page 89 for a complete
list of su p ported file type s .
3 Type in a file name and select save options.
Save As...
in the File menu.
Save As
selected in the
34 Chapter 3
Page 43

4 Click OK.
The document is saved to disk as specified. Graphics and
formatting are saved in the document only if the selected file
type supports them.
To save original images:
Exporting Documents
The Add to Pa geKeeper setting only
appears if you have PageKeeper
instal led on yo ur compu ter . It puts a
link to the saved document in
PageKeeper’s default folder.
1 Choose
Save Image...
in the File menu.
The Save Image dialog box appears.
2 Select a folder location and file type for your document.
See “Supported File-Format Types” on page 89 for a complete
list of supported file types.
3 Type in a file name and select
Save
and
Image
optio n s .
4 Click OK.
The image is saved to disk as specified. (Zones and recognized
text are not saved with the file.)
Proc es sing Documents 35
Page 44

Exporting Documents
Saving a Document as You Work
Click the Save button in the Standard toolbar or choose
menu to save changes to the current document as you work.
Save
in the File
The Save As dialog box appears the first time you choose
document has not been saved as an OmniPage Document or text-based
file. See “Saving a Document” on page 34 for more information.
If a docume nt has been sa ved as an OmniPage Document (*.met), all
the changes you make in t he open document are saved when you choose
Save
. If a documen t has been saved as a text -based f ile type , only the te xt
changes are saved out to that file.
For example, suppose you save the current document as a text file cal led
Memo.txt
OmniPage P ro. Whenever you choose
text will be saved to the
, but continue to make changes to the recognized text in
Save
Memo.txt
file.
Copying a Document to the Clipboard
You can copy every page of a recognized document to the Clipboard
and then paste the text direct ly into anothe r applic ation.
To cop y a document to the Clipboard:
1Set
2 Click the Export button or choose
Copy to Cl ipboard
drop- down list.
Process menu.
The document is copied to the Clipboard.
as the command in the Export button’s
Save
if a
, chang e s in th e re cogniz ed
Copy to Clipboard
in the
Text formatting, such as bold and italics, is retained when you paste
into an application that supports RTF information. Otherwise, only
plain text will be pasted. Graphics are retained if the application
supports bitmap images.
36 Chapter 3
Page 45

Sending a Document as a Mail Attachment
You can send a rec ognized document as a fi le attached t o a mail message
if you have a MAPI-compliant mail applicat ion, such as Micro soft
Outlook, installed.
To send a document as a ma il attachment:
Exporting Documents
1 Choose
You can also click the Export but ton with
the drop-down list.
The Send Mail dialog box appears.
2 Specify a file type and attachment option s f or your document.
3 Click OK.
4 Log into your mail application if you are prompted to do so.
A new message appears ready for addressing.
5 Address yo ur ma il m ess a ge as desire d an d clic k the Send
button.
The document is sent as an attachment to the mail me ssage.
Send Mail...
in the File menu.
Send Mail
selected in
Proc es sing Documents 37
Page 46

38 Chapter 3
Page 47

Chapter 4
OmniPage Pro Settings
This chapter d escri bes th e set tin gs in t he Aut oOCR t ool bar and Optio ns
dialog box. Please also look in OmniPage Pro’s online help for more
detailed information on settings.
The settin gs you sel ect for pr ocessi ng docu ments can greatly af fect O CR
results. You may have to experiment with different settings to get the
results you want. Settings guidelines are provided at the end of this
chapter to get y ou started.
Please continue reading this chapter for information on these topics:
• Setting AutoOCR Toolbar Commands
• Selecting OmniPage Pro Settings
• Accuracy Settings
• Scanner Settings
• Page Format Settings
• Tables Settings
•OCR Aware Settings
•Process Settings
• Microsoft Word Settings
• Settings Guidelines
39
Page 48
Setting AutoOCR Toolbar Commands
Setting AutoOCR Toolbar Commands
The AutoOCR toolbar buttons allow you to take a document through
each step of the OCR pr ocess. Every to olbar but ton has d ifferen t proc ess
commands th at can be set for t he operations you want to perform.
OmniPage Pro can go through all ste p s au tomatically, or you can start
each step individually.
AUTO
button
Image
button
Zone
button
OCR
button
Export
button
You can set AutoOCR toolbar comman ds in three locations:
• Click the down arrow below each AutoOCR toolbar button and
select a process command in the drop-down list.
• Choose
Process Settings...
in the Process menu.
• Click the Options button and select process commands in the
Options dialog box.
The pictur es in the AutoOCR toolba r buttons c hange as y ou set differ ent
process commands. The commands can be activated by clicking the
AutoOCR toolba r b uttons or choosing comma nd s in the Process menu.
A descript i on of the se lec ted pr oc ess c omma nd i s dis pla yed be low e ach
AutoOCR tool bar but ton when
Toolbar s dialog box. Choose Toolbars... in the
in the
Large Buttons
is checked (default setting)
V i ew menu to open the
dialog box. Toolbars can be “torn off” and relocated anywhere on your
desktop.
All AutoOCR toolbar commands are shown i n the ir drop- down states
on a separately en closed OmniPage Pro 9 Reference card.
40 Chapter 4
Page 49

AUTO Button Commands
Use the AUTO button to proce ss a new docu ment fr om s tar t to f inis h or
to finish processing an open document. T he AUTO button’ s drop-down
list contains
AutoOCR
Select
to the selec ted pr oces s comm ands. See “ Aut oma tic Proc ess ing” o n pag e
19 for more informa tion.
OCR Wizard
For new docu ments, select
you through the entire OCR process. See “Using the OCR Wizard” on
page 18 for information.
AutoOCR
AutoOCR
to finish processing a new or open document according
Image Button Commands
Use the Image button to bring a document image into OmniPage Pro’s
image viewer. The Image button’s drop-down list contains the
Image
Scan Imag e
and
commands.
OCR Wizard
and
OCR Wizard
Setting AutoOCR Toolba r Command s
commands.
to have the OCR Wizard guide
Load
Load Image
Load Image
Select
JPG, or PCX files.
Scan Image
Scan Image
Select
command only appears in the drop-down list if you have installed the
Caere Scan Manager and have selected your default scanner. Depending
upon your scanner model and software drivers, you may have your
scanner turned on.
Please see “Bringing Document Images into OmniPage Pro” on page 20
for more information.
to load existing image files such as TIFF, DCX , BMP ,
to scan paper documents in your scanner. This
OmniPage Pro Setti ngs 41
Page 50
Setting AutoOCR Toolbar Commands
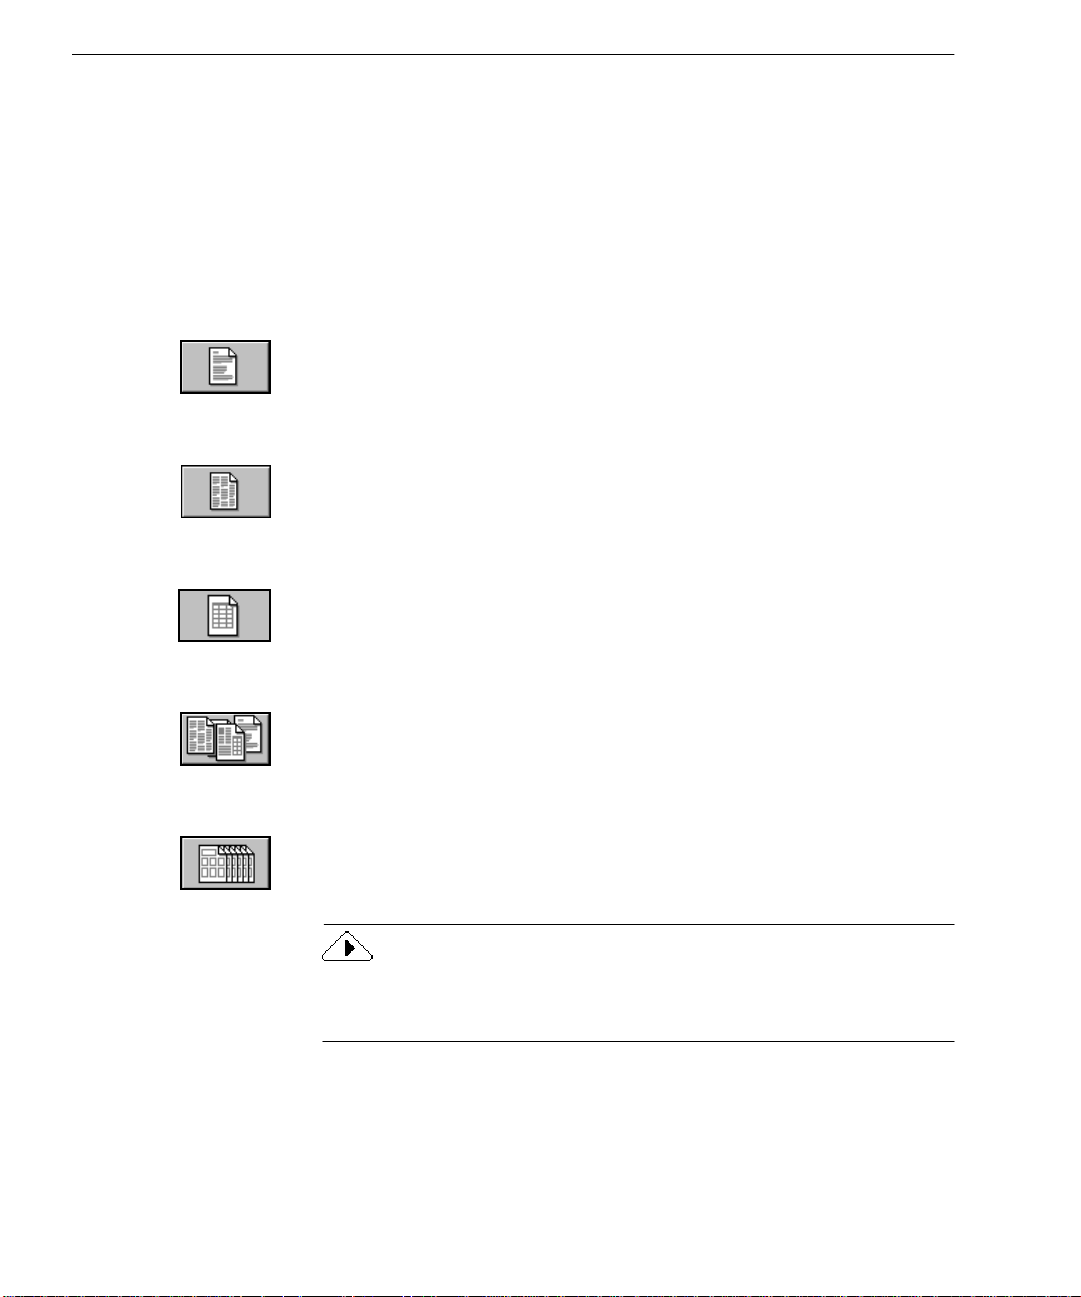
Zone Button Commands
Use the Zone bu tton to auto matical ly crea te zones on docume nt images .
Zones are bordered areas that specify what will be recognized as text or
retained as graphics on an image. The Zone button’s drop-down list
contains the
Pages,
you have created. See “Creating Zones for OCR” on page 22 for more
information.
Single-Column Pages
Select
and order zones on single-colu mn document images such as letters or
memos.
Multiple-Column Pages
Select
and order zones on multiple-column document images such as
magazine or newspaper articles.
Spreadsheet Pages
Select
order zones on pages th at have information arranged in rows and
columns such as sp readsheets.
Single-Column Pages, Multiple-Column Page s, Spreadsheet
Mixed Pages
and
Single-Column Pages
Multiple- Colu mn Pa ges
Spreadsheet Pages
commands an d th e name s of a ny z one temp la tes
to have OmniPag e Pro automatic ally draw
to have OmniP age Pro aut omati cally draw
to have OmniPag e Pro automatically draw and
Mixed Pages
Mixed Pages
Select
variety of page layouts. OmniPage Pro will automatically draw and
order zones on each page.
Zone Templates
Select a zone te mp late to create zon e s on document images using that
template. See “Creating Zone Templates” on pag e 73 f or more
information.
Zone Templates do not appear until you have saved a template. Once
created, template names appear, proceeded by the word “Template:” in
the drop-down list of the Zone button.
42 Chapter 4
if your document contains multiple page s with a
Page 51

OCR Button Commands
Use the OCR button to perform the selected OCR operation on
document images. The OCR button’s d rop- down list contains the
Perform OCR, OCR and Proof, Train OCR,
Perform OCR
Perform OCR
Select
OmniPage Pro analyzes the image and identifies characters to produce
editable text. See “Performing OCR on a Document” on page 23 for more
info rmat ion .
OCR and Proof
OCR and Proof
Select
automatically st art checking for errors after OCR. See “Proofreading
OCR Results” on page 24 for mor e in f ormation.
Train OCR
Trai n OCR
Select
characters. These pre-recognized character s are saved in a training file,
which OmniPage Pro can use to compare with the characters in
document images during OCR. See “Training OCR for Special
Characters” on page 75 for more information.
to teach OmniPage Pro how to recognize special
Setting AutoOCR Toolba r Command s
Defer OCR
and
to recognize text on document images. During OCR,
to recog n i ze te xt on document imag e s a nd
commands.
Defer OCR
Defer OCR
Select
OmniPage Pro will process your document up to the point of OCR and
then ask if you want to schedule the document to be finished later. See
“Scheduling OCR” on pa ge 80 for more information.
OmniPage Pro Setti ngs 43
to delay tex t rec ogn iti on dur in g aut omati c pr oces sin g.
Page 52
Setting AutoOCR Toolbar Commands
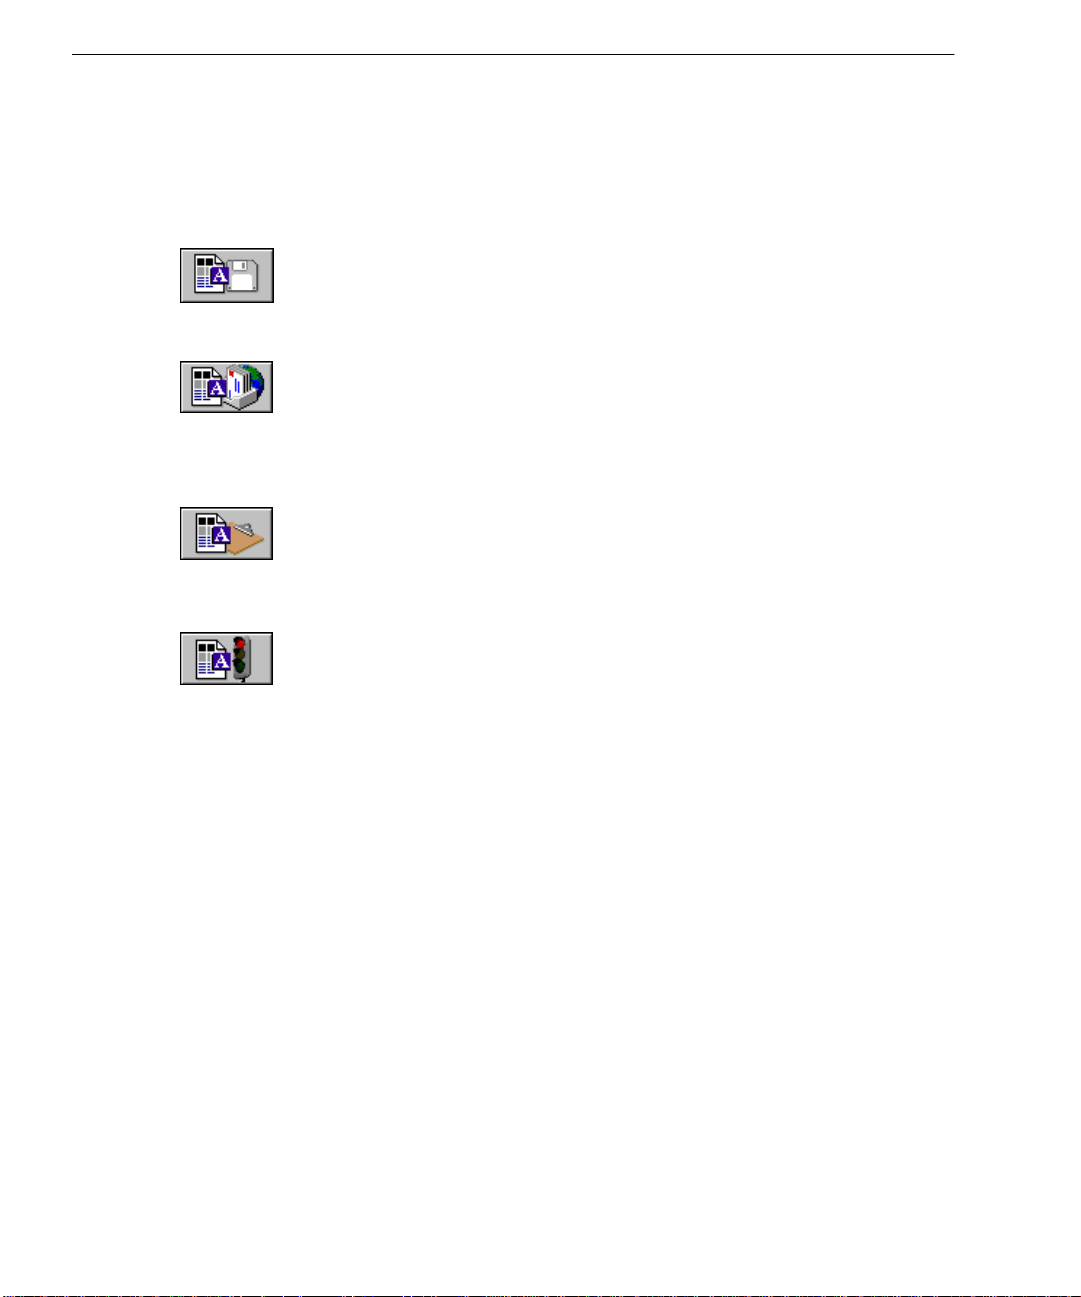
Export Button Commands
Use the Export button to expor t recognized text and retained graphics to
other appli cation s. Th e Export bu tton’s drop-dow n list c ontains the
As, Send Mail, Copy to Cl ipboard,
Save As
Select
format. See “Saving a Document” on page 34 for more information.
Send Mail
Select
mail message if you have a MAPI-compliant mail application, such as
Microsoft Exchange or Ou tlook, installed. See “Sending a Doc u me nt as
a Mail Attachment” on pa ge 37 for more in formatio n.
Copy to Clipbo ard
Select
Clipboard. See “Copying a Document to the Clipboa rd” on page 36 for
more informatio n.
Defer Export
Select
after automatic processing. OmniPage Pro will process your document
up to the point of e xport and then stop.
Save As
Send Mail
Copy to Clipb oard
Defer Export
to sav e a reco gnized document to disk in a speci fied file
to send a recognized document as a file attached to a
if you d o no t wa nt to expor t y o ur document ri gh t
Save
Defer Export
and
to place a copy of a recognized document on the
commands.
44 Chapter 4
Page 53

Selecting OmniPage Pro Settings
Selecting OmniPage Pro Settings
Click each tab to
view an d s elect
differe nt set ti n g s.
Click the Options button or choose
Options...
in the Tools menu to open
the Options dial og box. This is the central location fo r OmniPage Pro
settings.
Click for a
description of
each setting.
Default settings are shown in most examples that follow. However,
documents require different settings depending on their input attributes
and your output goals. To get the best resu lts, learn how to identify
document characteristics and make selections for them. You may have
to experimen t with different settings to get the results you want. Refer
to the “ Set tin gs G uidel ines ” begi nn ing o n pa ge 51 for mor e in for matio n.
OmniPage Pro Setti ngs 45
Page 54

Accuracy Setting s
Accuracy Settings
Click the
The Language Analyst
evaluates and replaces
unknown words with
words most likely to be
correct during OCR.
Tr aining files help
recognize special
characters during OCR.
Usually, these setting
should be selected for
opti mal accuracy.
Deselec t any that c ause
over correction.
Scanner Settings
Click the
The
depending on your particular scanner, you might have to have your
scanner connected and turned on for the
Accuracy
Scanner
Scanner
tab to select settings that affect OCR accuracy.
Select the type
of charac t ers
that are in your
document.
tab to select settings for scanning pages.
tab appears only if you have installed Scan Manager, and
Scanner
tab to appear.
This is recommended
for blac k and white
pages.
This is recomme nded
for pages with colored
back g ro unds, c o lo r e d
text, or pages containing
grays c ale graphi c s .
This is recommended
for pages with color
graphics that you want
to save.
46 Chapte r 4
Use these
settings if your
scanner has an
automatic
document
feeder .
Use the
brightness
slider to adjust
for blac k and
white,
grayscale, or
color scanning.
Page 55
Page Format Settings
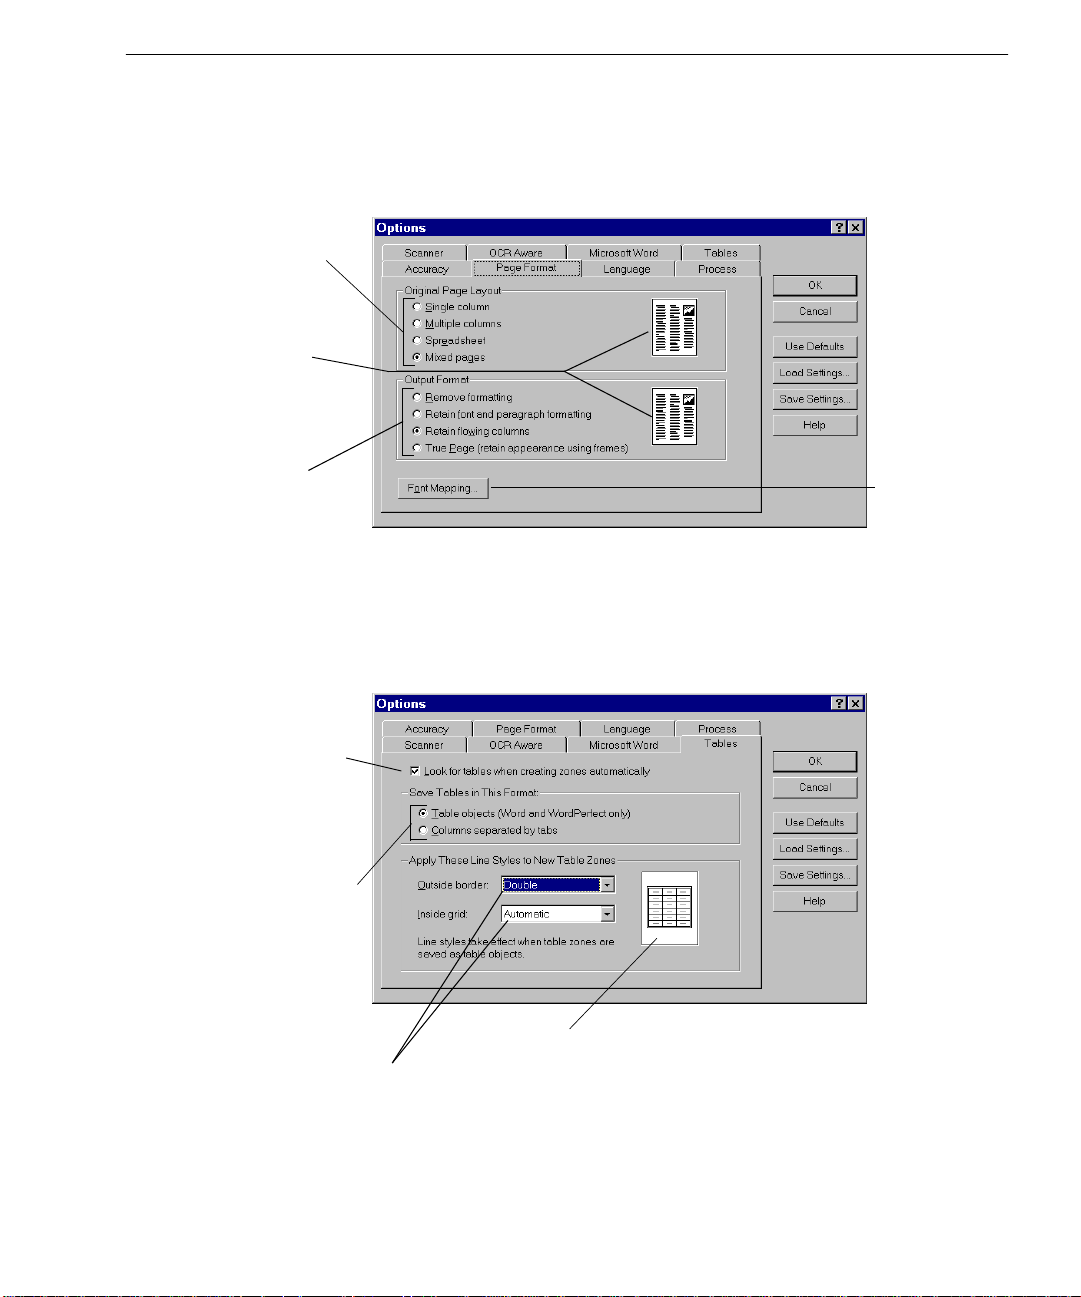
Page Format Settings
Select a setting that best
describes how your
original page looks.
The page icons
change to depict the
general appearance
of your page original.
Select a setting to
determine what you
want yo u r page to
look like after OCR.
Tables Settings
Select to automatically
detect tables that have grid
lines between rows and
columns.
Click the
Page Format
tab to se l e c t se ttings that determine h ow th e
formatting of a page is handled during OCR.
Click the
Tables
tab to select table settings for your document.
Click to select
font options for
recognized text
If your t arget application is
Microsoft Word or
W ordPerfect, you can select
Table objects... to have
tables saved with their
grids. Otherwise, tables will
be saved as tab-delimi t ed
text.
These drop-down menus
determine how your table
borders w ill look after export.
OmniPage Pro Setti ngs 47
Changing the line styles using
the drop-down menus will
change the page icon to show
the gener al appeara nce you ca n
expect of t h e t able grids and
border after export.
And, once line styles are changed,
the color of the grid in the image
viewer also changes to:
Light red shows single lines
Dark red shows double lines
Gray shows no lines
Page 56

Language Set tings
Language Settings
Click the
Select the la ngu age
that appears most i n
your document.
Select additional
languages for a
multilanguag e
document. You must
have installed those
langu ages during
installation.
OCR Aware Settings
Click the
OCR Aware allows you to initiate OCR from another application. See
“Using OCR in Other Applications” on page 29 for more information.
Language
tab to selec t language set t ings for your document.
OCR Awa re
This is the
language that
will be used in
dialog boxes,
windows, and
menu
commends.
This is t h e
character used
in place of
unknown
characte rs. Y ou
can enter your
own choice.
tab to select settings for the OCR Aware feature.
OCR Aw are allows you
to start scanning and
perform OCR from
another application .
An
application
If your application is not
listed , click Browse... to
locate the application file
(*.exe) and add it t o the
Registered list box.
48 Chapter 4
Click Regis ter
Office 97...
to register
Office 97
applications.
must be
registered to
work with
OCR Aware.
Page 57

Process Settings
Some applications may be pre-registered with OCR Aware during
OmniPage Pro installation. These applications will display in the
Registered
list box.
To register an application with OCR Aware:
1 Launch the application you want to register and open a
documen t in it.
This will ensure that the application name appears in the list
box in step 5.
Process Settings
The OCR Wizard will
guide you through the
OCR process when you
click the AUTO button on
the AutoOCR toolbar.
Specifies where
newly loaded or
scanned images
are to be ad ded to
an open document.
2 Choose
3 Click the
4 Make sure that
Options…
OCR Aware
Enab le O C R Aware
in OmniPage Pro’s Tools menu.
tab in the Optio ns di alog box.
is selected.
5 Select the name of the application you want to register in the
Unregistered
6 Click
Add >>
list box.
to add the selec te d application to th e
Registered
list box and then click OK.
OmniPage adds the
Acquire Text...
Acquire Text Settings...
and
commands to the File menus of registered applications.
Click the
Process
tab to se t comm ands a nd se tti ng s fo r ea ch st ep of O CR.
These specify
the OCR steps
that you want.
These specify
how the
recognized
text is to be
exported.
OmniPage Pro Setti ngs 49
Page 58
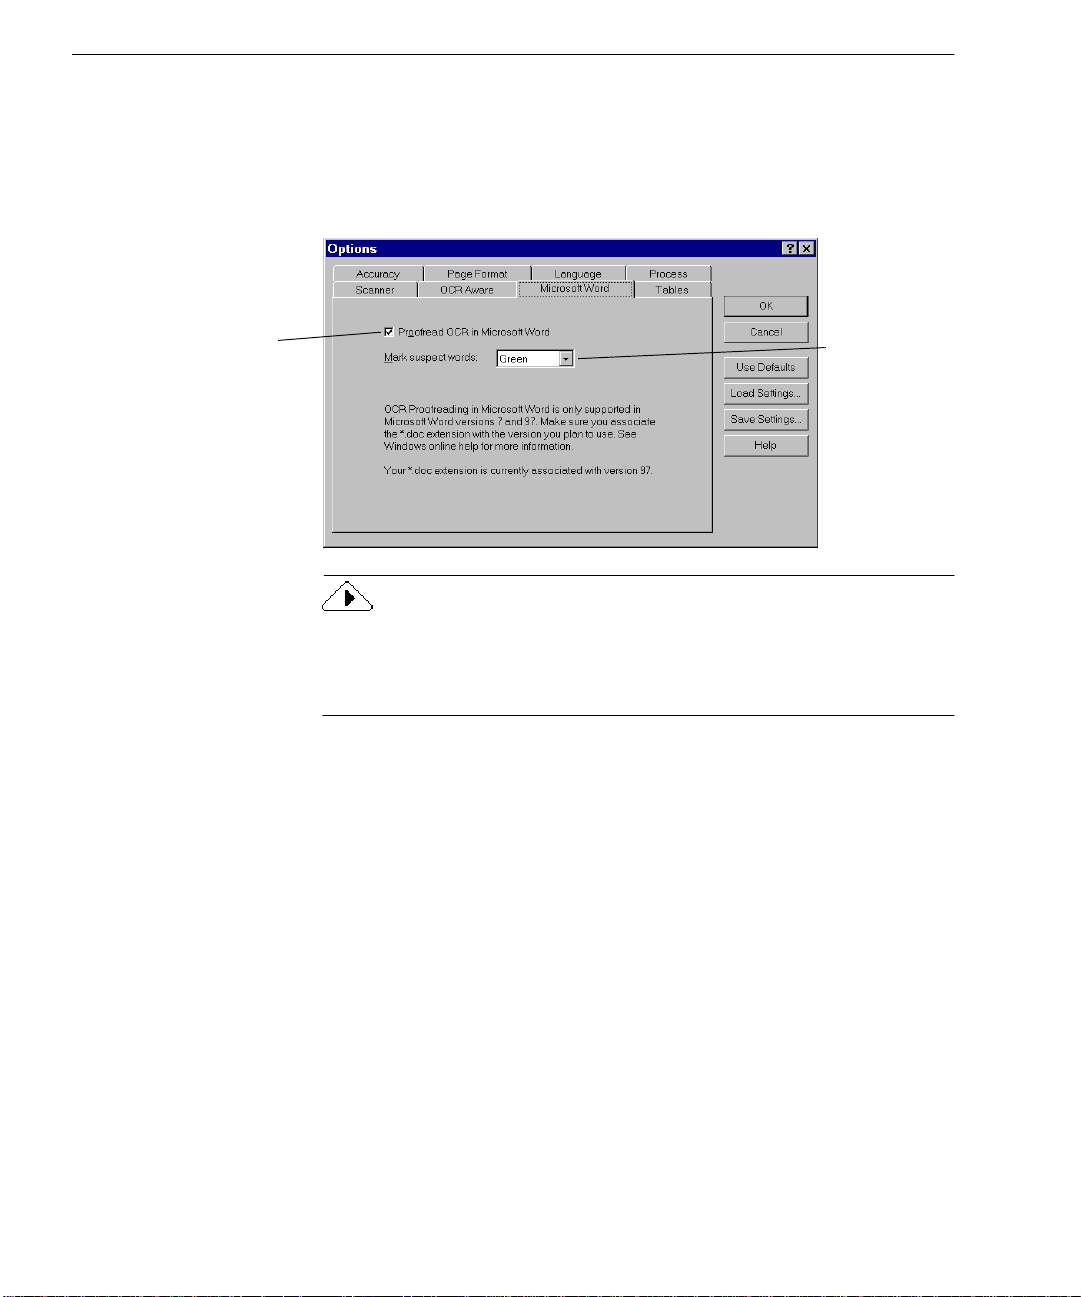
Microsoft Word Settings
Microsoft Word Settings
Sele ct t h is i f yo u
want to c h eck for
OCR errors in
Microsoft Word.
Click the
Microsoft Word
tab to select se ttings for OCR proofreadi ng
directl y in Mic rosoft Word. S ee “Pro ofreadin g OCR Res ults in Micr osoft
Word” on page 25 for more informatio n.
Select the
color in which
you wan t
suspected
errors to
appear in
Microsoft
Word.
Proofreading OCR in Microsoft Word is on ly supporte d i n Microsoft
Word 95, Word 7.0, and Word 97. Make sure you associate the *.doc
extension with the version you plan to use. Please refer to your
Windows documentation for more information.
50 Chapter 4
Page 59

Settings Guidel ines
The settin g s you sele ct in Omni Page Pro can gr e a tly affect OCR result s.
Make sure that settings are appropriate for your document
begin processing. You may have to experiment with different settings to
get the re sults yo u wa n t.
Answer the fol lowing questions to get settings recommendations for
your documents. Generally, if you indicate the characteristics of your
documents to OmniPage Pro, you will receive better OCR results.
• What type of document are you processing?
Magazine and newspaper pages
Memos and letters
Text and table
Spreadsheets
Legal documents
Mixed formats or not sure
• What is the quality of the original document?
Poor or not sure
Good
, page 53
, page 55
, page 52
, page 53
, page 54
, page 55
, page 52
, page 54
Settings Guidelines
before
you
• How much original formatting do you want to keep?
Minimal
Some
As much as possible
• Do you want to retain graphics in your document?
Yes
No
• How many languages are in your document?
One la nguage
More than one language
• Are you processing a multipage document?
Yes
No
OmniPage Pro Setti ngs 51
, page 56
, page 56
, page 57
, page 58
, page 58
, page 59
, page 59
, page 60
, page 60
Page 60

Settings Guidelines
What type of document are you processing?
Magazine and new spa pe r
pages
Recommen dati o ns
• Select Multiple columns in the Page
Format settings.
• Sele c t the appropriate page size and
orientation in the Scan ner settings if you
are scanning .
• Draw zones manually or modify
automatically created zones if auto
zoning does not su c c ess fu l ly create
zones aro und all page areas yo u want
to process. See “Customizing Zones” on
page 63, for more information. Keep
associated sections of text, such as
paragraphs, together in one zone. Omit
unnecessary parts of the page such as
separator lines between columns.
Memos and letters Recommenda tions
• Select Single column in the Page Format
settings.
• Sele c t the appropriate page size and
orientation in the Scan ner settings if you
are scanning .
52 Chapter 4
Page 61

What type of document are you processing?
Text and table Recommendations
•In Page Format settings, select Single
column or Multiple column page layout
depending on the number of columns in
your document.
• Select the appropriate page size and
orientation in the Scanner settings if you
are scanning.
• If your table has no grid lines, draw a
zone around the table, and set its
properties to Table, and its content to
Numeric, unless it has text headings,
then select Alphanumeric. (Tables wi t h
grids are automatically detected).
• Choose the format you want to use to
save the table by either selecting Table
objects or Colu mns s eparated by tabs in
the Table settings.
Spreadsheets Recommendations
• Select Spreadsheet and Retain flowing
columns in the Page Format settings.
• Select the appropriate page size and
orientation in the Scanner settings if you
are scanning.
• Iden t i fy the zone conte n t as Numeric if
only numbers (no words or text headers)
are in your document.
• Choose the format you want to use to
save the table by either selecting Table
objects or Colu mns s eparated by tabs in
the Table settings.
Settings Guidelines
OmniPage Pro Setti ngs 53
Page 62
Settings Guidelines
What type of document are you processing?
Legal documents Recommendations
• Select Singl e colu mn in the Page Format
settings if the document has one, pagewide text column, even if document has
pleading-line numbers.
• Select Multiple columns in the Page
Format settings if text appears in two or
more column s .
• Sele c t the appropriate page size and
orientation in the Scan ner settings if you
are scanning .
• Draw zones manually or modify
automatically created zones to omit
unnecessary parts of the page. For
example, do not include line numbers in
a zone if you plan to renumber lines in
your word processor.
• Select Hard carriage return after every
line in the Save As dialog box if you
want to preser ve line numbering.
Mixed formats or not sure Recommendations
• Select Mixe d pages in the Page Format
settings.
• Sele c t the appropriate page size and
orientation in the Scan ner settings if you
are scanning .
• Draw zones manually or modify
automatically created zones if auto
zoning does not su c c ess fu l ly create
zones aro und all page areas yo u want
to process. See “Customizing Zones” on
page 63, for more information. Keep
associated sections of text, such as
paragraphs, together in one zone. Omit
unnecessary parts of the page such as
unwanted graphics.
54 Chapter 4
Page 63
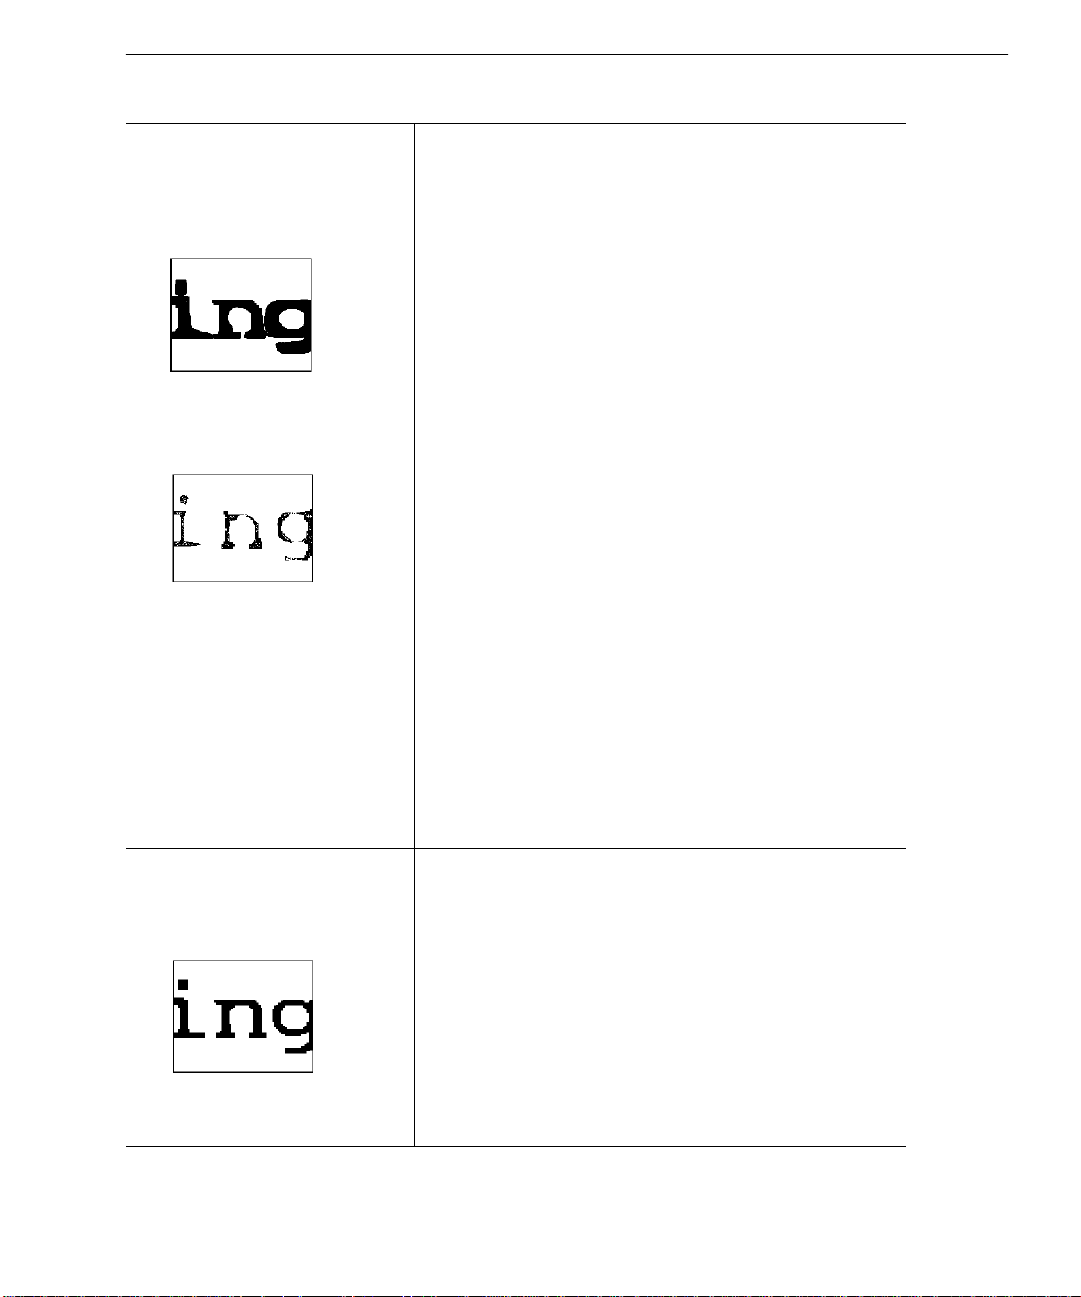
What is the quality of the original document?
Settings Guidelines
Poor or not sure
Degraded photocopies, colored or
shaded backgrounds or text, runtogether or broken text characters
thick, run-together text
characters
thin, broken text
characters
colored text or text on a
colored background
Recommendations for scanning
• Select
Grayscale with 3D OCR
settings if you have a grayscale scanner and your
page contains grayscale graphics, colored
background, or colored text.
• For best accuracy, use the
your pages are black and white. By usi ng the
Brightness
slider on the
the setting for thick, run-together text characters or
dark backgrounds. Darken the setting for thin,
broken text characters.
• Try to scan original documents rather than
photocopies.
in the
Black a n d white
Scanner
tab settings, lighten
Scanner
Other recommendations
• Select
Use Language Analyst
settings. OmniPage Pro will evaluate words and
make logical replacements for hard-to-recognize
characters.
• Draw zones manually to omit any smudges or
scribbles on the page.
• Choose
Proofread OCR...
locate possible errors after OCR.
• Choose
Dot matrix or monospaced
settings if you recognize the original font
characteristics as such. Choose
not monospaced.
• Ask senders to select
Fine
send faxes that you plan to recognize.
in the
Accuracy
in the Tools menu to
in the
if the text is
mode wh en they
or
Normal
Best
setting if
Accuracy
Good
Clear, well-formed, black text
characters on a clean, white
background
Recommendations
• Select
Normal
settings for the fastest processing if you are
scanning.
• Select
Use Language Analyst
as the character type in the
in the
Accuracy
Accuracy
settings.
• For faster processing and more accurate results, in
well-formed text
characters
the
Language
the
Main language
• Choose
locate possible errors after OCR.
settings, select only the language as
that appears in your document.
Proofread OCR...
in the Tools menu to
OmniPage Pro Setti ngs 55
Page 64

Settings Guidelines
How much original formatting do you want to keep?
Minimal
Keep one font and one font size
only
Some
Keep font characteristics and
paragraph formatting
Recommendations
• Select
•Click
• Select one of the text-only formats in the Save
Remove formatting
settings.
Font Mapping
settings and select the font and size you want
mapped.
As dialog box if you want to be able to open
the document i n any text applic ation.
in the
...
in the
Page Format
Page Format
Recommendations
• Select
•Click
• Save to the file format of your target word
Retain font and paragraph formatting
the
Page Format
Font Mapping
settings and select the fonts you want mapped
to various font types.
processing application for the best results.
If you, or the eventual recipient of a file, do
not have the exact application, saving to a RTF
format will retain some text formatting, such as
bold and italics.
settings.
in the
...
Page Format
in
56 Chapter 4
Page 65

Settings Guidelines
How much original formatting do you want to keep?
As much as possible
Keep font characteristics,
paragraph formatti ng, colum n
formatting and graphic positioning
Recommendations
• Select
True Page
retai n the original appearance of a page
using frames. The formatting will be precise
but will be more difficult to edit.
• Select
Retain flowing columns
settings if your page contains multiple
Format
columns and you want text to flow between
paragraphs and columns in your target
application. The formatting may be less
precise t h an
edit.
Please note: The
uses frames when necessary to maintain column
formatting and graphic positioning. Althoug h
frames will appear in the text viewer, only required
frames, such as frames around graphics, will be
exported.
• Make sure all parts of the page are inclu ded
within zones. Any part not enclosed within a
zone is ignored during OCR and will not
appear in the re cognized document.
• Select
Retain graphics
box.
• Save to the file format of your target word
processing application for the best results.
If you, or the eventual recipient of a file, do
not have the exact application, saving to a RTF
format will re tain some te xt formatt ing, such as
bold and ita l ics.
in the
Page Forma t
True Page
but will be easier to
Retain flowing columns
in the Save As... dialog
in th e
settings to
Page
setting
OmniPage Pro Setti ngs 57
Page 66
Settings Guidelines
Do you want to retain graphics in your document?
Yes
Keep graphics such as logos and
photos during OCR processing
Recommendations for scanni ng
• Select
scanning pages with multiple-color graphics
and you want to retain the graphics in color.
• Select
settings if you are scanning with a grayscale
scanner and you want to retain grayscale
graphics.
• Select
you are scanning line-art drawings.
in the
Color
Grayscale with 3D OCR
Black a nd wh it e
Scanner
settings if you are
in the
Scanner
in th e
Scan ner
settings if
Other recommendations
• Manually draw zones aro und graphic areas if
necessary.
• Make sure separate zones are drawn around
graphic areas and text areas.
• Make sure graphic zones are identified as
Graphic
click with your mouse to determine its
properties.
• Select
box when you save a document to another file
format.
• To save graphics separately from text after
OCR, choose
and select
zone types. Select the zone and right-
Retain graphics
Save Image...
Save each graphic zone to a file
in the Save As dialog
in the File menu
.
No
Ignore graphics such as logos and
photos during OCR processing
58 Chapter 4
Recommendations
• Deselec t
box when you save a document to another file
format.
Retain graphics
in the Save As dialog
Page 67

How many languages are in your document?
One language Recommendations
• Select the document language as the Main
language in the Language settings.
If your document contains a language that is
not installed in OmniPage Pro, you can add
languages to OmniPage Pro by uninstalling
and then reinstalling it.
• For faster processing and more accurate
results, select only the language that appears in
your document in the Languag e settings.
Settings Guidelines
More than one
language
Recommendations
• Select the main document language and any
additional languages in the Language settings.
If your docum ent co nt ains languag es t hat are
not instal led in OmniPage Pro , you can add
languages to OmniPage Pro by uninstalling
and then reinstalling it.
• For faster processing and more accurate
results, select only the languages that appear in
your document in the Languag e settings.
OmniPage Pro Setti ngs 59
Page 68

Settings Guidelines
Are you processing a multipage document?
Yes Recommendations if you have an
automatic document feeder (ADF)
• Select Scan until em pt y in the Scanner settings
to scan a stack of pages at once. Otherwise,
you must click the Image button to scan each
subsequent page.
• Select Double-sided pages to scan pages with
print on both sides. You will be prompted to
turn the stack over .
• Insert blank (paper) pages to separate more
than one job within a stac k of pages. You can
save pages between blank pages as separate
files after OCR.
Other recommendations
• Set the desired pro c ess commands an d cl ick
AUTO to automatically process each page of
your document in order.
• Create and use a zone template if all pages
have similar zoning requirements. See
“Creating Zone Templates” on page 73 for
more information.
• Choose Schedule OCR... in the Process menu
to schedule processing for a specific time. Pick
a time that you plan to be away from your
computer.
• After OCR, choose Save As... in the Fi le me nu.
You can select an option to save the
recognized document as a single file, one file
per page, or a new file after each blank page.
No Recommendations
• Set the desired pro c ess commands an d cl ick
AUTO to automatically process the page.
• Click the Image button to add more pages to
the document by scanning or loading images.
60 Chapter 4
Page 69

Chapter 5
Customizing OCR
OmniPage Pro has many features that allow you to customize the way
your documen t s are handl ed during OCR. This chapter describes ho w
to use these features.
Please continue reading this chapter for information on these topics:
• Adjusting Page Image s Before OCR
• Customizing Zones
• Specifying Fonts
• Training OCR for Special Characters
• Creating User Dictionaries
• Saving Settings Files
• Scheduling OCR
61
Page 70
Adjusting Page Images Before OCR
Adjusting Page Images Before OCR
You can rotate and straighten page images in OmniPage Pro’s image
viewer before zoning and OCR take place. This is recommended to
improve OCR accuracy on pages that are not oriented correctly.
If you need to rotate or straighten a page, be sure to do so
create zones because all zones are deleted during these operations.
To rotate a page image:
1 Click on the page image to make the image viewer active.
2 Click the Rotate Image button to rotate the image 90-degrees
(clockwise) at a time.
Or, choose
degrees.
To straighten a page image:
1 Click on the page image to make the image viewer active.
2 Click the Straighten Image button.
Or, choose
OmniPage Pro straightens the page image up to a maximum of
10 degrees. OmniPage Pro will not straighten a page if it
determines that it is unnecessary.
It is recommended that you have OmniPage Pro automatically
rotate or straig hten pag es if needed dur ing OCR by simpl y selec ting
Automatically straighten page image
the
orientation
Rotate
Straighten Image
options in the
in the View menu and select 90, 180, or 270
in the View menu.
Automatically correct page
and
Accuracy
tab of the Option s d ia l o g bo x.
before
you
62 Chapter 5
Page 71
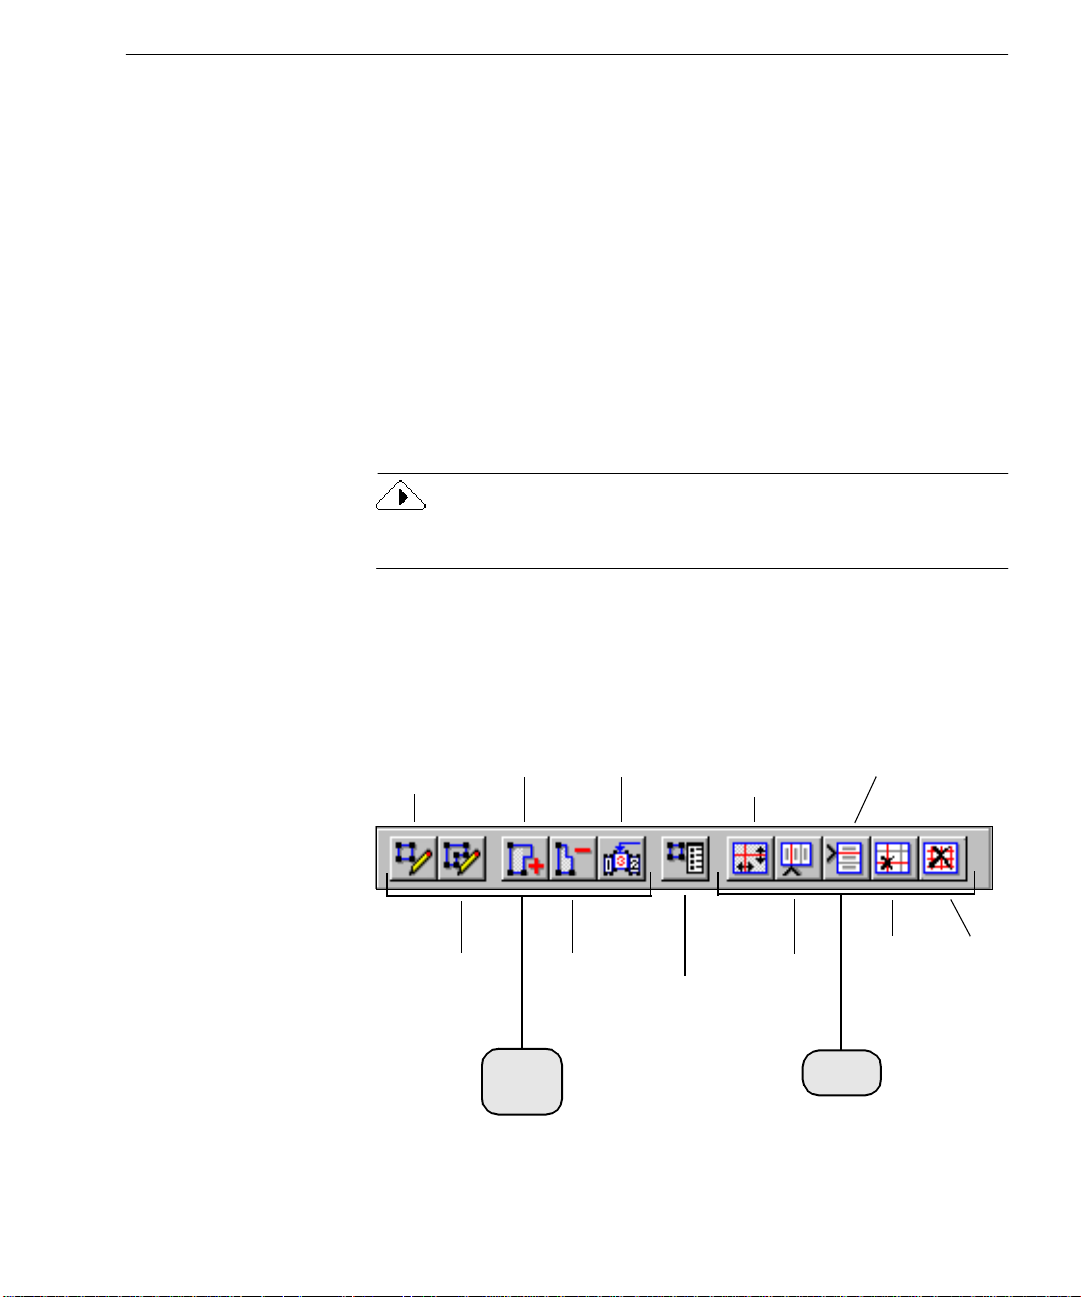
Customizing Zones
Zones are borders created aroun d areas of a page image to identify what
will be recognized as text or retained as a graphic during OCR. Zones
play a big part in determining OCR results.
You can create z ones automatically, manually, or with a template .
Topics in this section describe how you can customize zones including:
• Drawing Zones Manually
• Mo dify ing Text and Graphic Zones
• Modifying Table Zones
• Deleting Zones
• Chan ging Zone Properties
• Creating Zone Templates
For informat i o n on creating z ones auto m a ti c a l l y, p l e a se se e “Cre a t i n g
Zones for OCR” on page 22.
Customizing Zones
Zone toolbar
The Zone toolbar contains buttons for drawing and modifying zones.
Toolbars can be “torn off” and relocated anywhere on your desktop.
Draw
Rectangular
Zones
Draw
Irregular
Zones
Add t o
Zone
Subtract
Text and
Graphics
buttons
from
Zone
Reorder
Zones
Move Row or
Zone
Properties
Column
Dividers
Column
Divi ders
Insert
Insert Row
Dividers
Remove
Column
Dividers
Table
buttons
Row or
Remove
Replace
All Row
and
Column
Dividers
/
Customizing OCR 63
Page 72
Customizing Zones
Drawing Zones Manually
You can draw zones manually on an image using buttons in the Zone
toolbar. Re ctangul ar zone s are the most common, but you can al so draw
irregular-shaped zones for graphics and text. Only rectangular (and
square) zones are allowed for tables.
To draw rectangular zones:
1 Click the Draw Rectangular Zones button.
The mouse pointer in the image viewer becomes a drawing
tool.
2 Enclose an area of the image you want as a zone by holding
down the mouse but ton and dr aggi ng the d rawing tool to for m
a rectangular box.
Try to keep areas of text, such as paragraphs or single columns,
toget h e r i n th e sa me zone.
3 Release the mouse button when you are done.
A number appears within the zone indicating its processing
order.
You cannot draw overlapping zones. If you attempt to draw a zone
over an existing zone, the borders of the n ew zone will wrap
the boundaries of the existing zone when you release the mouse
button.
To draw irregular-shaped zones:
1 Click the Draw Irregular Zones button.
The mouse pointer in the image viewer becomes a drawing
tool.
2 Position the draw ing tool where you want to start drawing the
first sid e of the zone.
3 Click th e m ou s e button on c e .
4 Move the drawing tool to form the first side of your zone.
5 Click the mouse button when you have drawn the desired line
length.
6 Draw a perpendicular line in either direction to form the next
side of the z one.
7 Repeat steps 6 and 7 to finish drawing each side of your zone.
around
64 Chapter 5
Page 73

Customizing Zones
You will not be allowed to draw a line if it constitutes a
restricted shape. The following zone shapes ar e restricted:
Indent ed along
the bottom
Indented along
the top
To draw a table zone:
1 Click the Zon e Properties button and se lect
Tabl e zo ne
zone type.
See “Changing Zone Properties” on page 71 for more
information.
2 Click the Draw Rectangular Zones button.
The mouse pointer in the image viewer becomes a drawing
tool.
3 Enclose an area of the image you want as a table zone by
holding dow n the mou se butto n an d dr ag ging the drawing
tool to form a rectangu la r or square box.
4 Release the mouse button when you are done.
Row and column dividers appear in the table zone. You can
adjust, ad d, or remov e the dividers using other toolbar buttons.
as the
5 Repeat steps 3 and 4 until you have finished drawing table
zones around the desired areas of the page.
Modifying Te xt and Graphic Zones
You can modify zones by moving, resizing, reordering, extending,
subtracting, connecting, or dividing them.
To move zones:
1 Deselect the buttons in the Zone toolbar.
(If one of the first two drawing buttons is sel e cted, you do not
have to deselect it.)
2 Place the mouse pointer inside a zone.
3 Hold down the mouse b utton and drag the zone to the desired
location.
Customizing OCR 65
Page 74
Customizing Zones
To resize zones:
1 Deselect the buttons in the Zone toolbar.
(If one of the first two drawing buttons is selected, you do not
have to deselect it.)
2 Select the zone y ou want to resize by clicking inside it.
The selected zone is shaded and handles appear on its border.
3 Place the mouse pointer over a handle so that it changes to a
two-wa y a rrow.
4 Hold down the mouse button and drag the handle in the
direction that you want to enlarge or reduce the zone.
5 Release the mouse button when you are done.
The zone border changes to display th e modified zone area.
To reorder zones:
1 Click th e R e orde r Zones bu t ton.
The numbers in the zones disappear.
2 Click within the zone you want recognized first.
The numbe r 1 appears in the zone.
3 Click within the zone you want recognized next.
The numbe r 2 appears in the zone.
4 Repeat step 3 until all the zones are appropriately ordered.
If you do not number all the zones, they are automatically
numbered for you when you start OCR.
The numbered order of zones determines the order in which text
will be placed on a recognized page. However, if you select
Page
Retain flo wing columns
or
as the Output Option for a page, th e
order of the te xt will be based on the order of the original page.
To extend an area of a zone:
1 Click th e Add to Zon e b utton.
The mous e poin ter in t he image vi ewer beco mes a draw ing tool
with a plus sign.
True
66 Chapter 5
Page 75
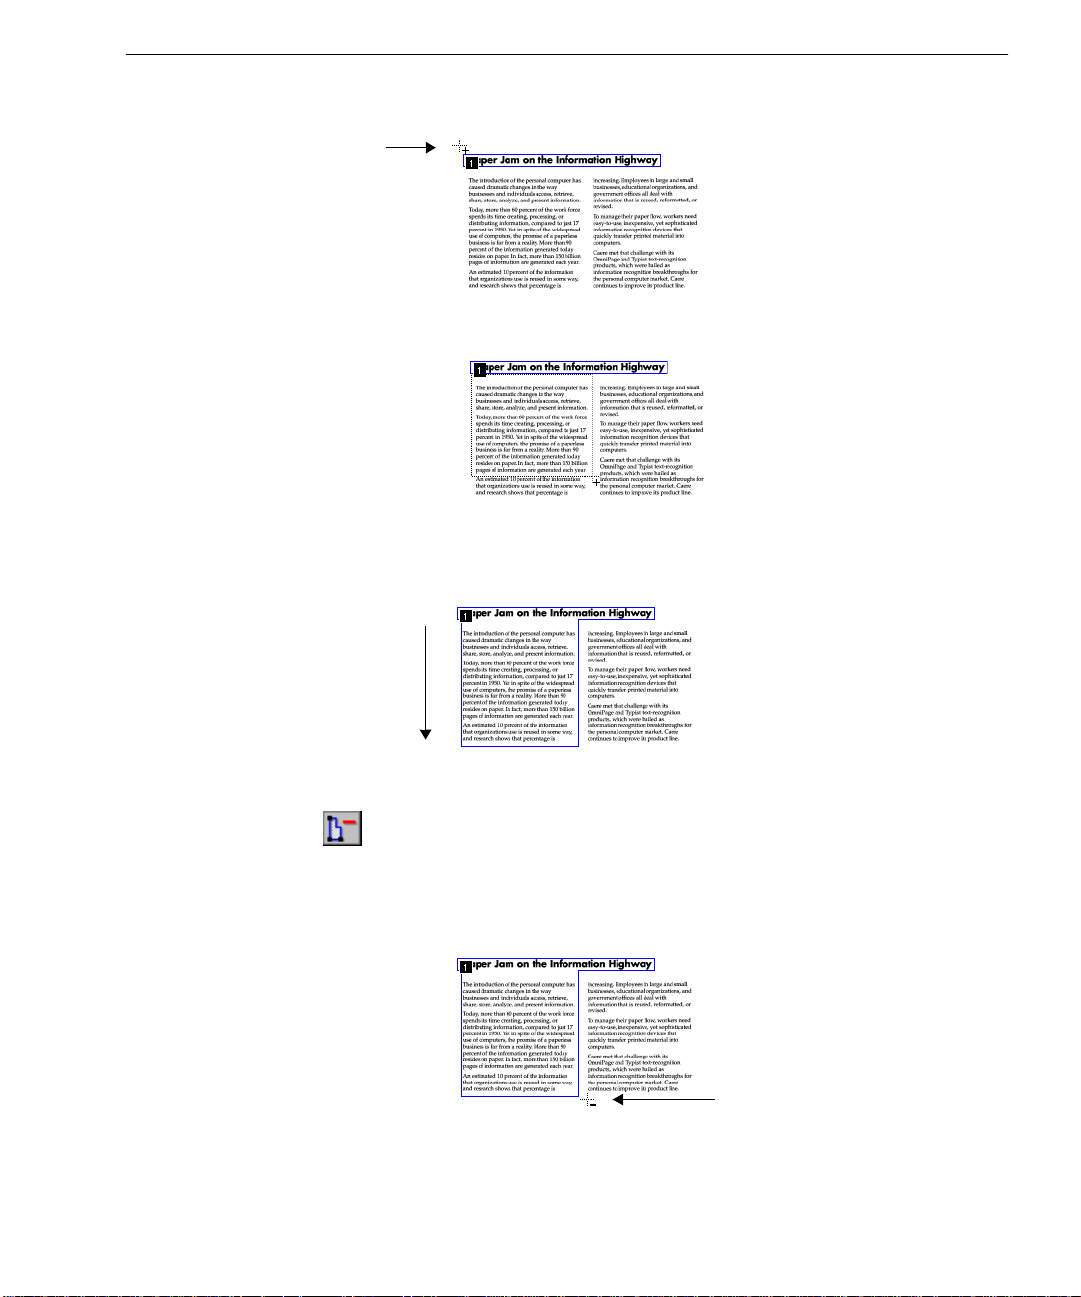
drawing to o l
Customizing Zones
2 Position the drawing tool at the point where you want to start
exten ding th e zo n e .
3 Hold down the mouse b u tton and drag the drawing tool in the
direc tion that y ou want to ex te nd the zon e .
4 Release the mouse button when you are finished extending the
zone.
The zone border changes to display the modified zone area.
The left area of
this zone has
been extended
downwa rd.
To subt ract an area of a zone:
1 Click the Subtract fr om Zone button.
The mouse pointer in the image viewer becomes a drawing tool
with a minus sign.
2 Position the drawing tool at the point where you want to start
subtracti ng from the zone.
drawing tool
3 Hold down the mouse b u tton and drag the drawing tool in the
direction that y ou want to sub t ra ct from the zo n e.
Customizing OCR 67
Page 76

Customizing Zones
4 Release the mouse button when you are finished subtracting
from the zone.
The zone border changes to display th e modified zone area.
Table zones are constrained to rectangular and square shapes.
Attemptin g to mod ify t he area of a tab le zone to an i rregul ar shape i s not
allowed. Table zone s , ho we v e r, can be re s iz ed , a nd i t is recommende d
that you resize the table zon e as desc ribed on “To extend an area of a
zone:” on page 66.
To connect two or more zones:
1 Click th e Add to Zon e b utton.
The mous e poin ter in t he image vi ewer beco mes a draw ing tool
with a plus sign.
2 Hold the mouse b u tton down and drag the drawing tool over
the area where you want the zones to be connected.
3 Release the mouse button when you are done.
The zone border changes to display th e modified zone area.
To divide a zone:
1 Click the Subtract from Zone button.
The mous e poin ter in t he image vi ewer beco mes a draw ing tool
with a minus sign.
2 Hold the mouse button down and drag the area where you
want to divide the z o ne.
3 Release the mouse button when you are done.
The zone border changes to display th e modified zone area.
68 Chapter 5
Page 77

Modifying Table Zones
You can modify table zones by moving, resizing, reordering, extending,
subtracting zones, and adding or removing table grids.
To move dividers in a table zone:
1 Click the Move Row or Column Dividers button.
2 Place the mouse pointer within the table zone in the image
viewer.
The mouse pointer becomes a vertical- or horizontal-bar tool
depending on which divider is being passed over.
3 Hold the mou s e button down and drag the row or column
divider you want to move. Ctrl-clicking a column divider will
move only a column divider for single cell. Rows dividers,
however, cannot be moved one cell a t a time.
The selected divider moves. The cell divider, however, cannot
be moved beyon d its own cell.
4 Release the mouse button when you are done.
To insert column dividers in a table zone:
1 Click the Inse r t Column Di viders bu tt on.
Customizing Zones
2 Place the mouse pointer within the table zone where you want
to insert a col u mn divider.
The mouse pointer becomes an upward-facing caret (^) with a
dimmed vertical bar.
3 Click the mouse button.
A new column divider is inserted in the table. Hold down the
Ctrl key to insert a column divider only for a single cell; the cell
that contains the mouse pointer.
To insert row div id ers in a table zo ne:
1 Click the Insert Row Div iders button.
2 Place the mouse pointer within the table zone where you want
to insert a col u mn divider.
The mouse pointer becomes a right-facing caret ( > ) with a
dimmed horizontal bar.
3 Click the mouse button.
A new row appears.
Customizing OCR 69
Page 78
Customizing Zones
To remove a row or column divider from a table zone:
1 Click the Remove Row or Column Dividers button.
2 Place the mouse pointer within the table zone where you want
to remove a row o r c olu mn.
The mouse pointer becomes a small “x” with a dimmed bar.
3 Position the bar on the divider you want to remove and click
the mouse button. Ctrl-c lick ing a colum n div ider will remove
only the column divider from a single cell. To remove a row
divider, the whole row divider must be remove d.
The selected divider disappears.
To remove all row or column dividers from a table zone:
1 Click the Remove/Replace All Row and Column Dividers
button.
2 Place the mouse pointer within the table image zone.
The mouse pointer becomes a larg e “X”.
3 Click th e m ou s e button.
The internal row and column divi der s disappear, and the
mouse pointer changes to a grid. Clicking the mouse button
again res tores all the rows and column dividers to the
originally drawn positions.
If you are dissatisfied with a change you have made to a table divider,
you can cancel your last alteration with the Undo command, Ctrl-Z.
Additional ly, you c an insert a se t of row and column di viders in a table
zone by clicking the Remove/Replace All Row and Column Dividers
button and then clicking in the table zone. This works only if your have
previously used the Remove/Replace All Rows and Columns tool on
the zone.
70 Chapter 5
Page 79
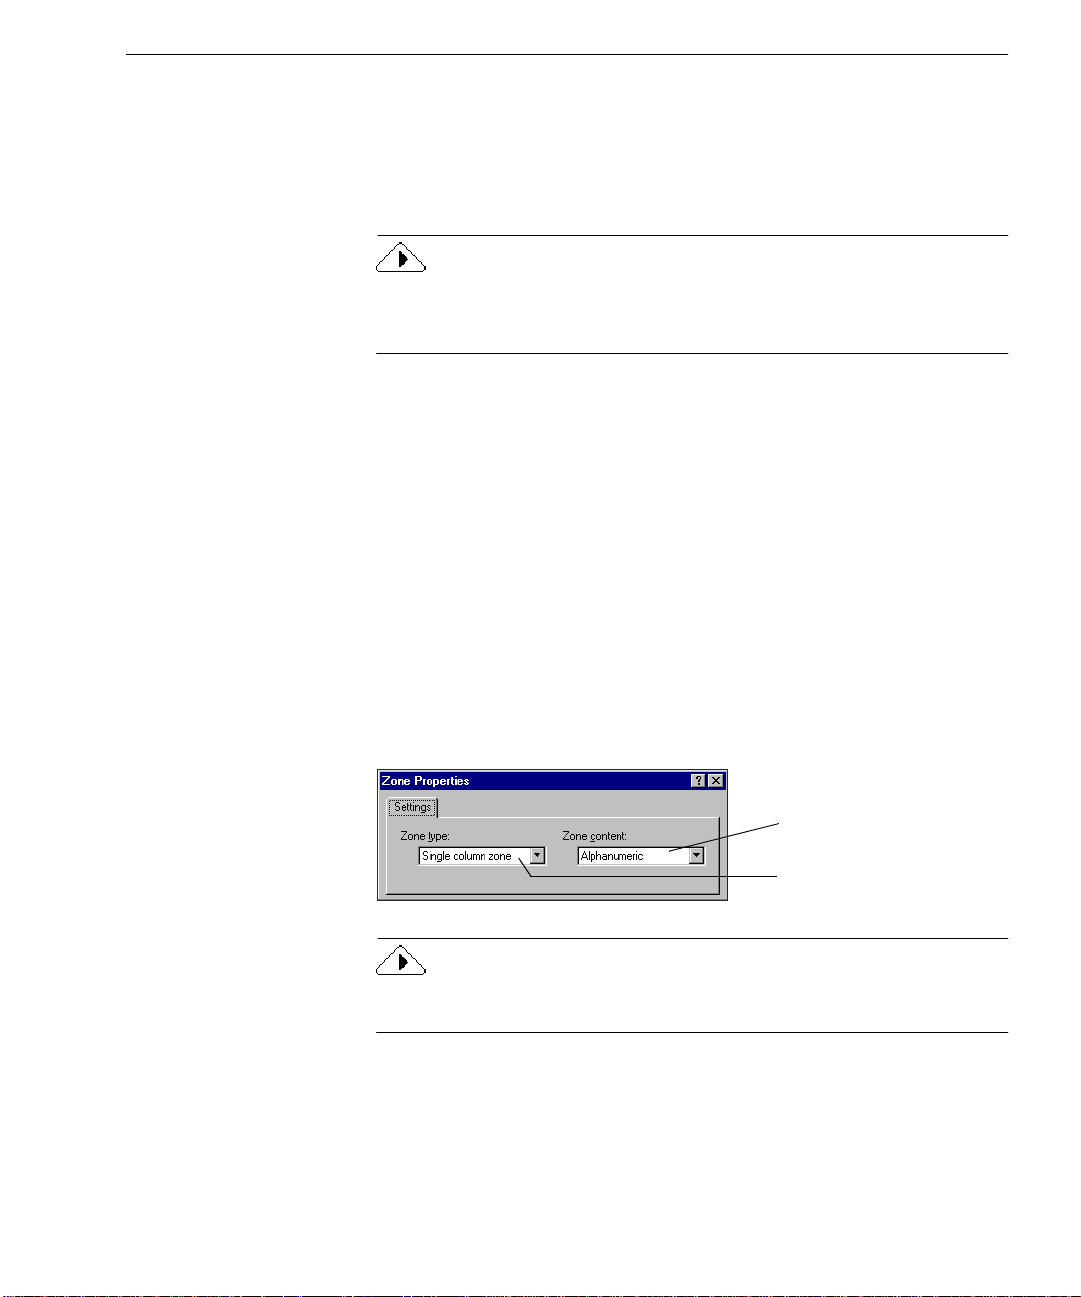
Deleting Zones
You can delete the current zones if you want to create new zones. You
can also delete indi vidu al zon es that you do not wa nt to pro ces s duri ng
OCR. Any part of a page imag e not enclos ed by a zone is ignor ed dur ing
OCR.
To delete and replace the current zones automatically, click the Zone
button in the AutoOCR toolbar. You will be prompted to replace the
current zon e s.
To delete zones:
1 Select the zone you want to delete by clicking inside the zone.
• Shift- c l ick to sele ct ad d i tional zones.
• Choose
current page.
Selected zones are shaded.
Select All
in the Edit menu to select all zones on the
Customizing Zones
2 Press the Delete key or choose
The selected zones disappear.
Changing Zone Properties
You can set certain properties for zones to customize how each zone will
be treated duri ng OCR. The Zone P roperties dial og box contain s settings
zone type
for
When you change a zone type using the Zone Properties button, newly
drawn zones
zone content
and
and
any previously selected zones will change zone type.
Clear
in the Edit menu.
.
Zone content drop-down list
Zone type drop-down list
Customizing OCR 71
Page 80

Customizing Zones
Zone Type
Every zone on a page has a zone - ty p e se tting. You can sele ct the
following zone types:
Single-column text zone
•
Mult i p le- c olumn t ex t zo ne
•
for text zones that contain a single column
for text z ones that contain m ul tiple
columns
Table zone
•
for text or numeric zones that contain data in rows and
columns
Auto-detect zone
•
for the automatic detection of zon e - content type
(not usually recommended)
Graphic zone
•
for photos , dra wings , and are as of text that you want
to retain as a graphic
Reverse-text zone
•
for single columns of light text on dark
background
Zone Content
All text zones on a page also have a zone-content setting. This specifies
the characters OmniPag e Pr o looks for within a zone during OCR. You
can sele ct
Alphanumeric
Numeric
or
as the zon e-content setting.
For example, if a particular zone only contains numbers and
mathematical signs, you can specify the contents of th at zone to be
Numeric
. OmniPage Pro will only look for numeric characters in that
zone during recognition.
OmniPage Pro assigns a zone type and Alphanumeric contents to each
zone when it creates zones au tom atic ally. This is true for all zones
recognized automatically, except graphic-content zones. You do not
need to change the zone properties unless you want to modify the way
zones will be tre at e d du ring OCR .
To change the properties of a zone:
1 Select the zone you want to modify by clicking it.
You can Shift-clic k to select mult iple zones . Selected zon es are
shaded.
72 Chapter 5
Page 81
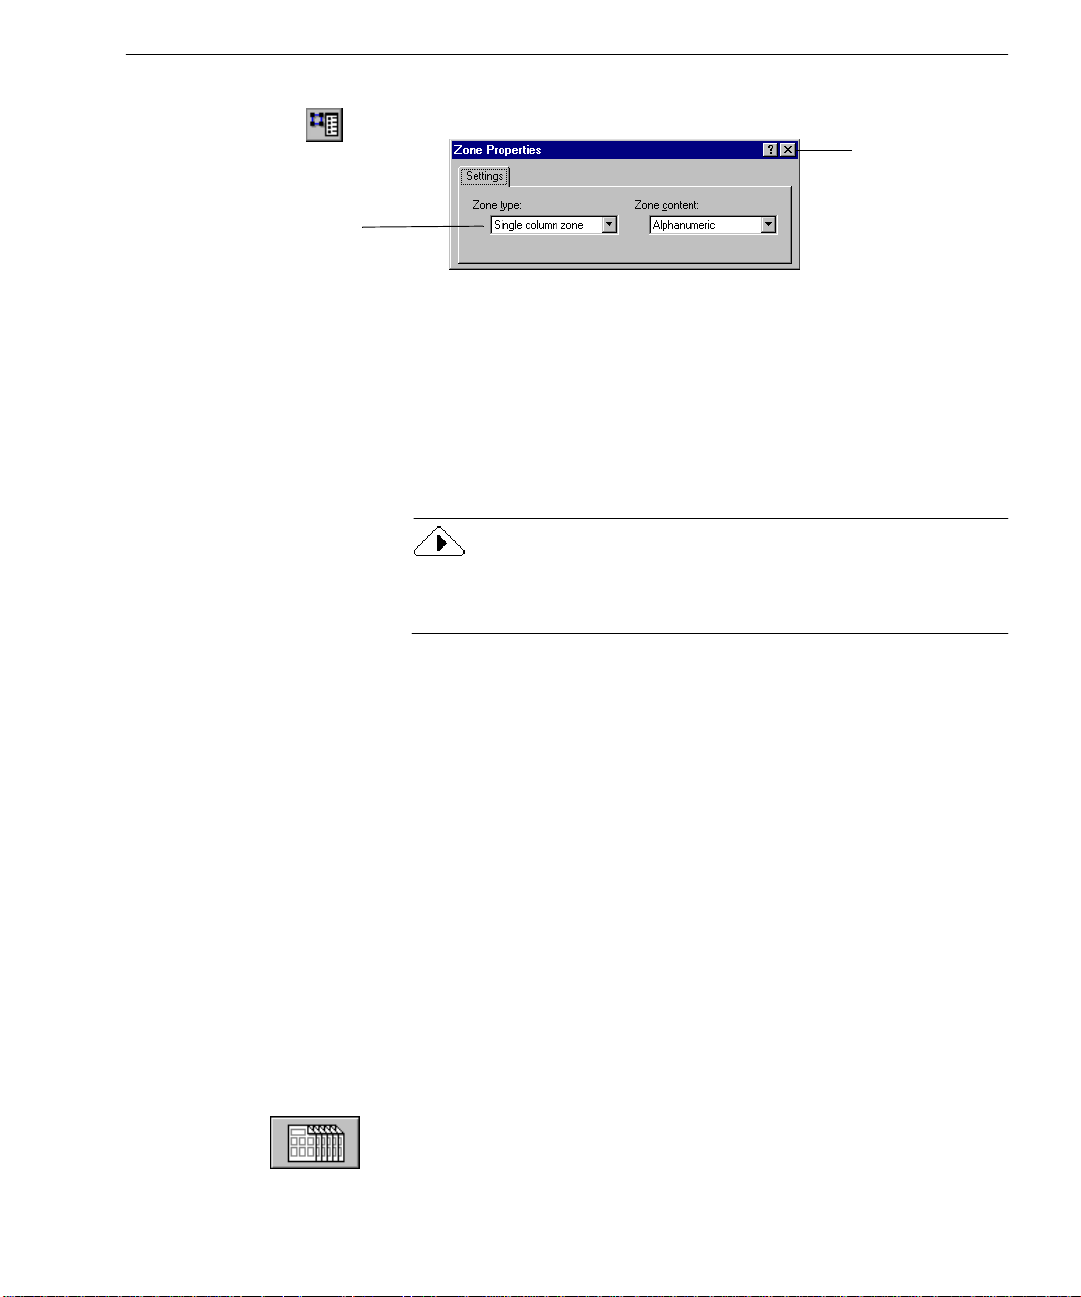
The settings in this dialog
box will be blank if m ulti ple
zones with different settings
are selec ted.
Customizing Zones
2 Click the Zone Properties button to open the Zone Properties
dialog box.
Close button
3 Select a zone type for the selected zones.
If you change an irregul ar-shaped zone to a Table type zone,
OmniPage Pro substitutes the larges t rectangle that fully
encloses the irregular area.
4 Select a zone content for the selected zones.
You can selec t a zone-content setting for any zone type except
Graphic.
5 Click the Close button when you are done.
You can also chan ge a zo ne’s t ype and content settin gs in dividual ly
by clicking y ou r right-mouse bu tton over the zone and choosing a
setting in the shortcut menu that appears.
Creating Zone Templates
A zone template has attributes including size, shape, position, order,
type, and con tent. Zo ne templ ates a re usef ul to cr eate zon es on an image
if you process a l ot of docu ment s th at hav e the sam e la yout an d con tent.
To create a zone template:
1 Load a page image and create the desired zones.
2 Choose
The New Template dialog box appears.
3 Type a name for your file in the
4 Click OK.
The zone template file is saved in the data fold er in your
installation folder. Select it in the Zone button drop-down list.
To create zones with a template:
1 Select the zone template that you want to use in the Zone
button dr op - down list.
2 Click the Zone button or choose
OmniPage Pro creates your predefined zones on the page
image using the zone template.
Customizing OCR 73
Save Zone Template
... in the Tools menu.
File name
Temp late
text box.
in the Process menu.
Page 82

Specifyi ng Fonts
Specifying Fonts
You can retain the f ont characteristics in your document during OCR if
you select an Output Format op tion other than
Page Format
tab of the Options dialog box.
Remove formatting
in the
OmniPage Pr o automatic ally
To map f onts, Omni Page Pr o analyze s te xt and cate gorize s it a s one of
these font types:
• Proportional Serif
Character spacing varies depending on the character; short lines
finish off the letter strokes. The body text in this manual is an
example of this font type.
• Proportional Sans-Serif
Character spacing varies depending on the character; letter
strokes do not have finishing lines. The headings in this manual
are an example of this font type.
• Monospaced Serif
Character spacing is the same for each character; short lines finish
off the letter strok e s. Courier is an example of this font type.
• Monospaced Sans-Serif
Character spacing is the sa me for each charact er; letter strokes do
not have finishing lines.
To customize the font mapping for font types:
1 Choose
box.
2Click the
Options...
Page Format
maps
detected font types to specified font s.
is an example of this font .
in the Tools menu to op e n the Options di alog
tab.
3Click
The selected fonts are
applied to text when their
correspo nding font types
are detected duri ng O CR.
4 Select the font you want mapped to each font type.
5Click OK when you are done.
74 Chapter 5
Font Mapping...
The fonts available in the drop-down lists depend on the True
Type fonts installed on your system.
to open the Font Mapping dialog box.
Page 83

Training OCR for Special Characters
training file
A
Pro compares with charact ers on a page image dur ing OCR. You can
create a training file for special characters th at mi g h t normally be
difficult to recognize such as the copyright symbol © or the registered
trademark symbol ®.
To create a training file:
1 Open the image file or scan the page that includes characters
2 Create zones around the te xt that you want to train .
is a set of pre-recognized text char acters that OmniP age
you want to train.
Training OCR for Special Character s
Original character image
OmniPage Pro’s
interpretation of the image
3Set
4 Click the OCR button or choose
5 Double-click a character you want to train. Or select it and click
Most charact e rs do not need to be trained. Look f or uncommon
characters such as the copyright symbol ©.
Train OCR
list.
OmniPage Pro analyzes the document and then opens the Train
Characters dialog box.
Specify
.
as the command in th e OCR butt on’s dr op -down
Train O CR
in the Process menu.
Do not train OmniPage Pro for regular characters because it may
interfere with recognition.
Customizing OCR 75
Page 84

Training OCR for Special Characters
Click the character
you want to
associate with the
selected character
The associated
charac t er appears
here
The Specify Character dialog box shows how the selected
character appeared in the origin al page image.
The origi nal
image of the
selected
character
6 Specify how you want OmniPage Pro to in ter pret the character
during OCR by entering a character in the
Character
edit box.
7Click
OK to
return to the Train Characters dial og b ox.
8 Repeat steps 5–7 to continue specifying characters.
9Click
Save
Or, click
to save the specifi e d c har acters to a training file.
Append
to add the specified characters to another
training file.
After saving or appending to a file, you are asked if you want
to make this the cur rent train in g fi l e . Cli c k
current page using the training file you just created. Click
Yes
to recognize the
No
to
return to the image withou t recognizing it .
T raining files are saved in the data folder in your installation folder. You
can sele c t them in the
Accuracy
tab of the Options dialog box.
To edit a training file:
1 Choose
Edit Training File...
in the Tools menu.
A dialog box appears listing all your training files.
2 Double-click the training file you want to edit. Or, select it and
Edit.
click
76 Chapter 5
Page 85

Original image
Associated characters
Creating User Di c ti onaries
The Train Character dialog box displays charac ters in the
selected file.
3 Edit the characters as desired.
• Double-click a character that you want to edit.
• C lick a chara ct e r tha t yo u wa n t to rem o v e a nd cl i ck
4 Do one of the following after editing the training file:
•Click
•Click
Save
to save change s in the training f il e .
Append
to add all trained characters to another train i ng
file.
•Click
Cancel
to exit without saving the edits to the training file.
Delete
.
Creating User Dictionaries
Two dictionaries are used when you perform OCR and check for errors:
the dictionary for the language you are using, and a user dictionary
where you can add special wo rds man ual ly. You can create mult iple
user dictionaries, but you can only use one at a time. You can select a
user dict ionary in the
To customize a user dictio nary:
1 Choose
A dialog box lists all user dictionary files.
This is Microsoft Word’s
user dictionary. You can
use it with OmniPage Pro.
This is OmniPage Pro’s
default user dictionary.
2 Do one of the following:
Customizing OCR 77
Language
tab of the Options dialog box.
Edit User Dictionary...
in the Tools menu.
Page 86
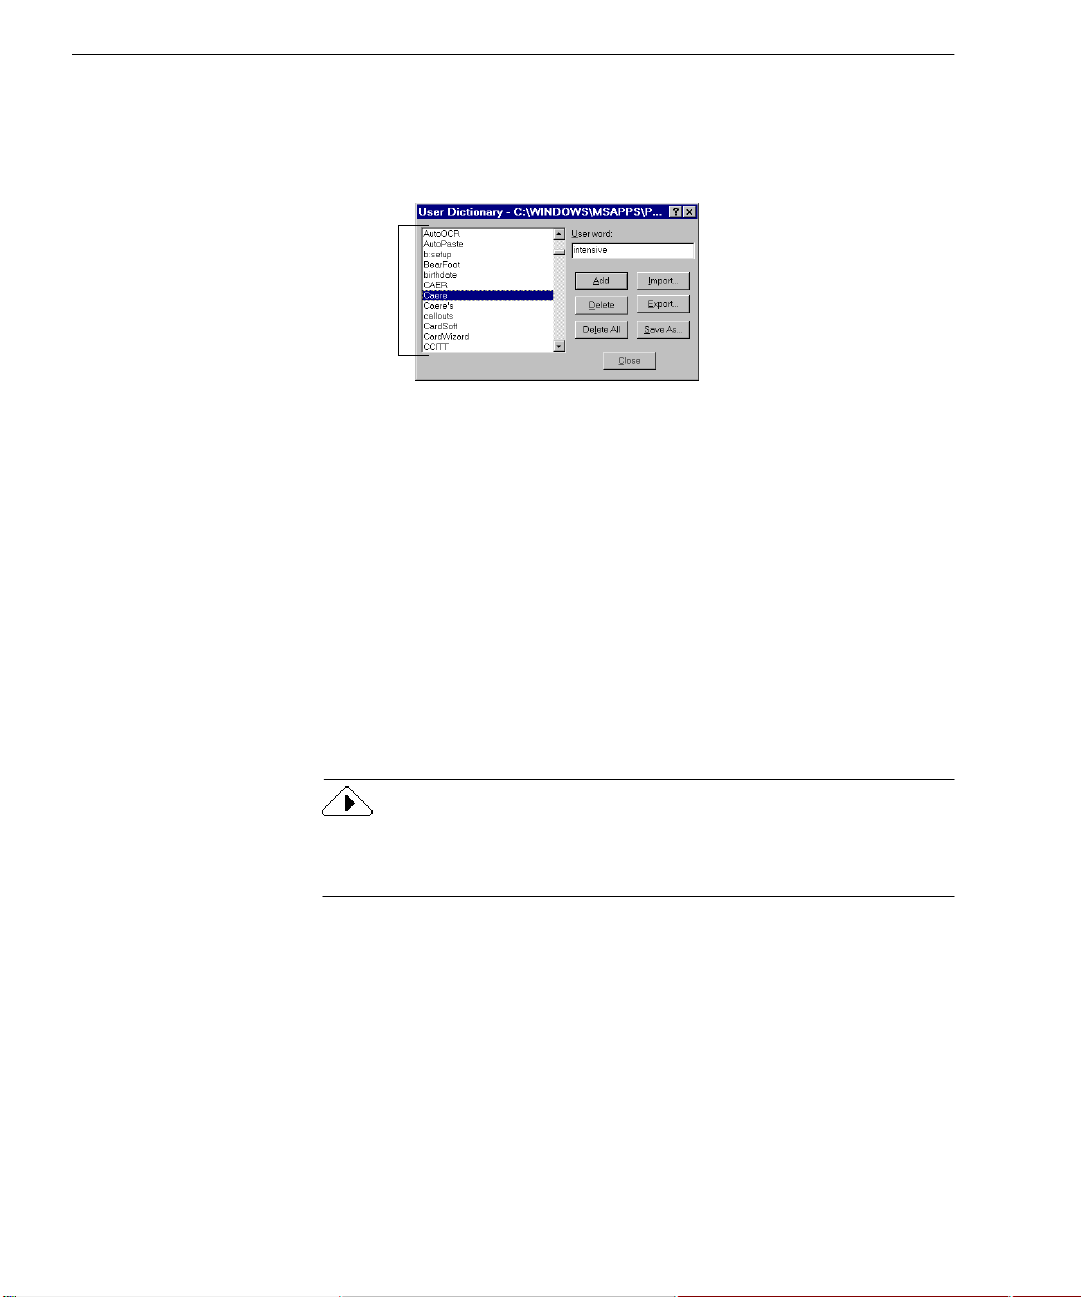
Saving Settings Files
Wor ds in the user dictionary
appear in this list box.
3 Add or delete words as desired:
4Click
• Select a file and click
• Clic k
• Type a word in the
• Select a word in the list box and click
• Click
OmniPage Pro’s user dictionaries are saved in the data folder
in your installation folder.
New
to create a new us er diction ary. Enter a name in the
dialog box that appears and click OK.
The User Dictionary dialog box appears.
Delete All
to remove all words from the dictionary.
Import...
Close
to add words from a tex t f ile.
when you are finished editing the user dictionary.
Edit
to edit an existing user dictionary.
User word
edit box and click
Delete
to delete it. Click
Add
to add it.
Saving Settings Files
You can save OmniPage Pro settings to a file. A settings file is useful for
quickly loading particular settings that you need for certain documents.
The sett ings you se lect in Omn iPage Pro can greatly affect OCR results.
For help in selecting settings for different kinds of documents, see
“Settings Guidelines” on page 51.
To save settings to a file:
1 Choose
2 Select the desired settings in the Options dialog box.
78 Chapter 5
Options...
in the Tools menu.
Page 87

Saving Settings Files
3 Click
Save Settings...
to open the Save Settings dialog box.
4 Select a folder location for the settings file.
5 Type in a file name for the settings file and click OK.
All the curr ent se tti ngs in the Option s di alog box a re save d i nto
a settings fi le with an .ini extension.
6 Click OK to close the Options dialog box.
To load a settings file:
1 Choose
Options...
in the Tools menu to open the Options dialog
box.
2 Click
Load Settings...
to open the Load Settings dialog box.
3 Select the folder locatio n of th e se ttings file you want to load.
4 Select the name of the settings f il e y ou want to load and click
OK
.
The settings change according to the selected file.
5 Click OK to close the Options dialog box.
Customizing OCR 79
Page 88

Scheduli ng OCR
Scheduling OCR
Scheduling Individual Documents
You can schedu l e OC R to take pl ac e on one or mor e O mniPage
documents, supported image files, and pages in your s canner. This
processing can take place while you are away from your computer as
long as OmniPage Pro is still running. Scheduled documents are opened
at the specified time, unfinished pages are recognized, and the
documents are saved in a preselected format and location.
Scheduled documents are deleted from the processing queue if you
close OmniPage Pro. Therefore, you should keep OmniPage Pro
running until the documents are processed.
Topics in this section include :
• Sch edul i ng In div idua l Do cu m ent s
• Schedulin g Documents from an Input Folde r
• Modifying Output Options for Documents
You can schedule individual documents from different folders.
Scheduled docu m ents ar e reco gnize d at the specified ti me a nd then
saved in th e designated outpu t f older.
To schedule individual documents:
1 Choose
Schedule OCR...
in the Proc e ss me nu.
The Schedule OCR dialog box appears.
Click Add...
All scheduled
documen t s are
displa yed in this
processing queue.
Click this to modify
default output options.
OmniPage Pro starts
processing scheduled
documents, in order,
at the specified time.
80 Chapter 5
to add
documents
to the
processing
queue.
Click Remove
to remove a
selected
document
from the
processing
queue.
Page 89
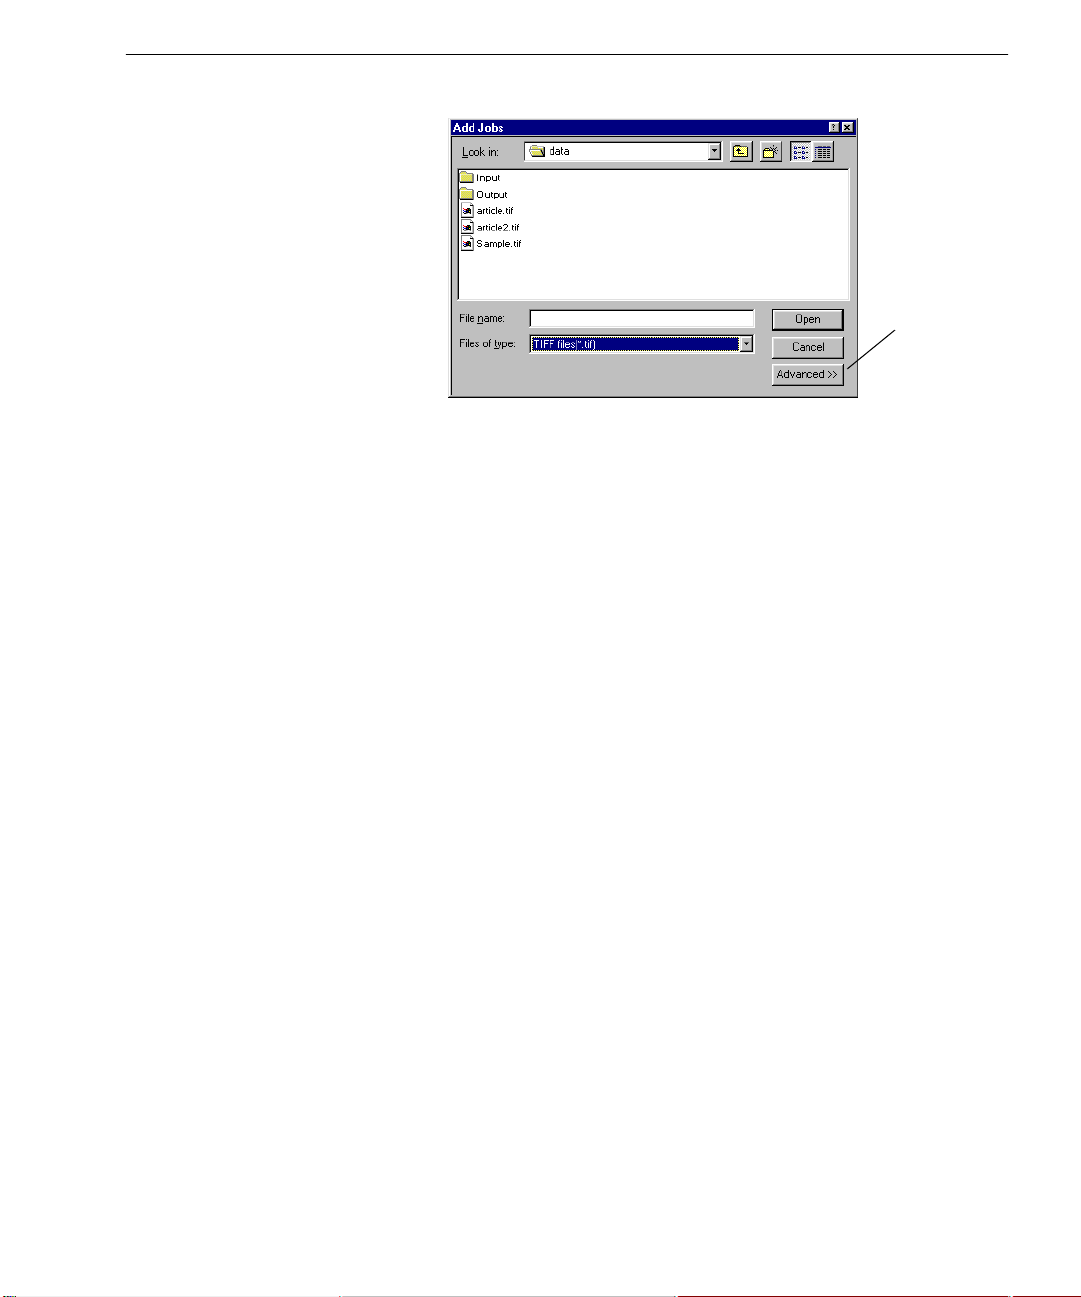
Scheduling OCR
2 Click
Add...
to open the Add Jobs dialog box.
Click
Advanced
to select
documents
from more
than one
folder.
3 Locate and select th e files you want to add to the schedule.
You can select OmniPage Documents and supported image
files.
4 Click
Open
after selecting the desired files.
The Schedule OCR dialog box displays the newly added files.
5 Sele ct the time th a t yo u want Omn iP a g e Pr o to pro ce s s the
sched uled documents.
Finish now
Select
if you want OmniPage Pro to process all
scheduled documents as soon as y ou close the dialog box.
6 Click OK in the Schedule OC R di alog box to save your se ttings
as specified.
All scheduled fi les are pro cessed, in order, at the schedul e d
time.
Scheduling Documents from an Input Folder
You can set up OmniPa ge Pro to automatically schedule docu me nts
from a specified input folder. Scheduled documents are recognized at
the specified time and then saved in the designated output folder.
Customizing OCR 81
Page 90
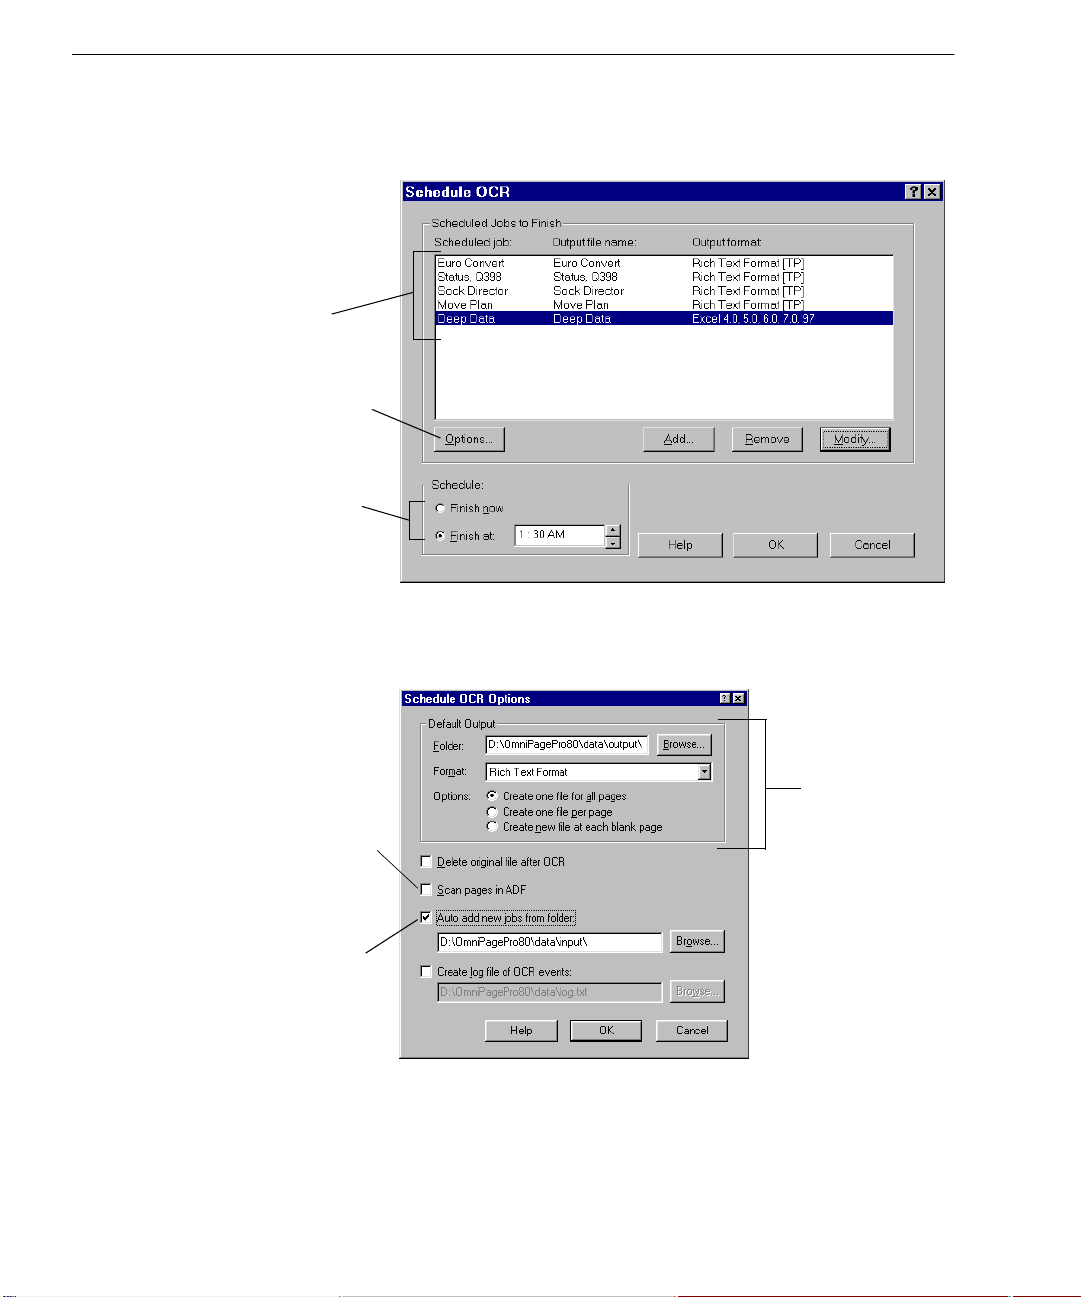
Scheduli ng OCR
To schedule document s from an input folder:
All scheduled
documents are
displayed in this
processing queue.
Click this to modify
default output options.
Omn i Page Pr o s tarts
processing documents
in the queu e at the
specified time.
1 Choose
Schedule OCR...
in the Proc e ss me nu.
The Schedule OCR dialog box appears.
2Click the
Options...
button to ope n the Schedule OCR Options
dialog box.
The sel ect ed ou tpu t
options are used for
Select this to schedule
documents in your
scanner’s automaticdocume nt feeder (ADF).
Select this to
automatically schedule
documents in the
specified folder.
3 Select
Auto add new jobs from folder
and select the desired input
all newly s cheduled
documents.
folder.
82 Chapter 5
Page 91
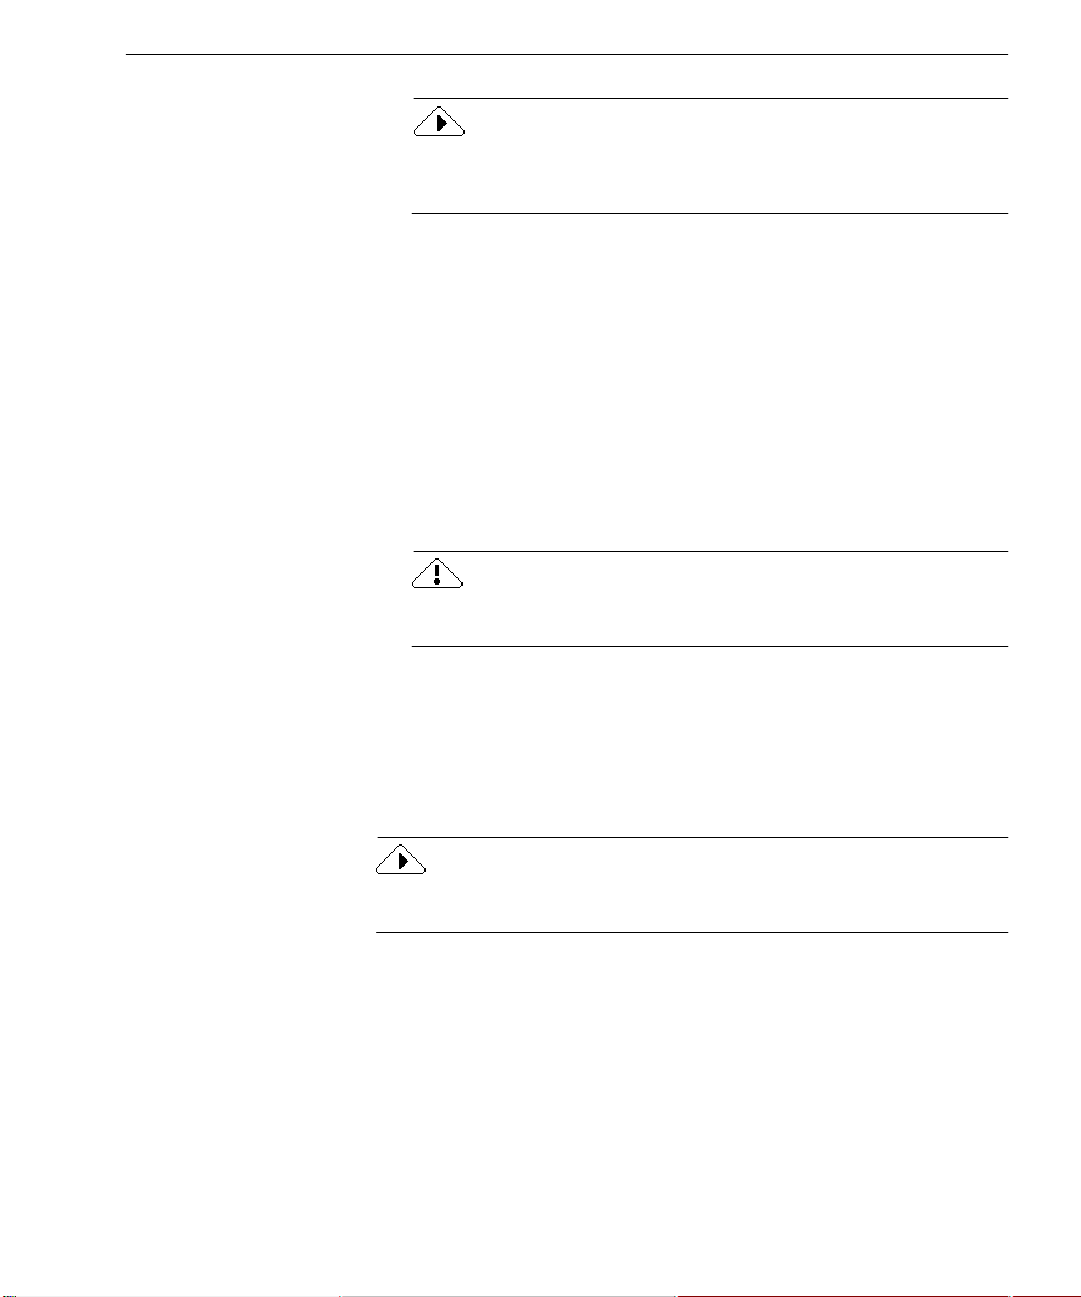
Scheduling OCR
If you use the auto-add feature to schedule documents and you do
not select
from the input folder to the output folder after processing.
4 Click OK in the Schedule OCR Options dialog box to accept the
5 Sele ct the time th a t yo u want Omn iP a g e Pr o to pro ce s s
6 Click OK in the Schedule OC R di alog box to save the settings
Delete original file after OCR
selected settings.
The Schedule OCR dialog box reappears and adds documents
from the input folder to the processing queue.
sched uled documents.
and close the dialog box.
Processing begins at the specified time. Right before pr ocessi ng
begins, OmniPage Pro checks the input folder again and adds
any new documents to the processing queue.
, original files will be moved
After scheduled jobs are processed, the
option will be deselected.
Auto add new j ob s from folder
Modifying Output Options for Documents
All newly sch e duled documents have the same default output fold er
and file form at assigned to them. Th e def ault output file name uses the
original file name and the extension of the output file format. You can
modify all of these output options for any scheduled document.
Click the
default opti o n s us e d f or al l n e w l y sc h e d ul e d docum e n t s.
Opti on s. . .
button in the Sche dul e OC R di alog box t o c hang e t he
Customizing OCR 83
Page 92

Scheduli ng OCR
To modify the output options for an individual document:
Select the document for
which you want to modify
output options.
Click this to modify
default output options.
1 Choose
Schedule OCR...
in the Proc e ss me nu.
The Schedule OCR dialog box appears.
2 Select a scheduled file and click
Scheduled Job dialog box.
Modify…
Click this
to modify
the output
options for
the
selected
document.
to open the Modify
Select output options
for this particular
document.
Select this if you want
the original document
deleted after processing.
3 Select the desired options for the document.
4Click OK to accept the selected options.
The Schedule OCR dialog box reappears.
5Click OK to close the Sch e dule OCR dialog box.
84 Chapter 5
Page 93

Chapter 6
Technical In formatio n
This chapter provides troubleshooting and other technical information
about using OmniPage Pro.
Please also read the online
Scanner Setup Notes
software-driver issues. The Readme file contains last-mi nut e
information relating to OmniPage Pro. To open these documents, click
Start
in the Windows taskbar and choose :
Applications
Please continue reading this chapter for information on these topics:
• General Troubleshooting Solutions
• Supported File-Format Types
• Scanner Setup Issues
•OCR Problems
• Uninstalling the Software
list all supported scanners and any connection or
Caer e Document sScanner Setup Notes or Readme.
Readme
file and the
Scanner Setup Notes
Programs
Caere
. The
85
Page 94

General Troubleshooting Solutions
General Trouble shooting Solutions
Although OmniPage Pro is designed to be easy to use, problems
sometimes occur. Many of the onscreen error messages contain selfexplana tory descr ipti ons of what to do — check connec tions, close oth er
applications to free up memory, and so on. Sometimes that is all the
troubleshooting help you need .
Please se e your Wi ndows doc umentati on for informa tion on opti mizing
your system and application performance.
Topics in this section include :
• Solutio ns to Try First
• Testing OmniPage Pro
• Low Memory Problems
• Low Disk Space Problems
Solutions to Try First
Try these possible solutions if you experience problems using
OmniPage Pro:
• Make sure that your system meets all requirements listed under
“Minimum System Requirements” on page 2.
• Make sure that your scanner is plugged in and that all cable
connections are secure.
• T urn off your computer and your scanner, turn your scanner back
on, and then res tart yo ur comput er. Make sure other applica tion s
are functioning properly.
• Use the software that came with your scanner to verify that the
scanner wor ks properly be f o re using it with Omni Page Pro.
• Make sure you have the correct drivers for your scanner, printer,
and video card. See the
by clicking
Caere Applicatio ns> Ca ere Doc umen ts >Scanner Setup No tes.
• Run ScanDisk for Windows 95 or 98, or Check Disk for W indows
NT to che c k you r hard disk for errors. Se e Window s o nl in e h e lp
for more information.
• Defragment your hard disk. See Windows online help for more
informatio n.
• Uninstall and rei nstall OmniPage Pro and the Scan Manager.
86 Chapter 6
Start
in the Windows taskbar and choose
Scanner Setup Notes
for more information
Programs>
Page 95

Testing OmniPage Pro
Restarting Wi ndows 95 or 98 in
allows you to test OmniPage Pro on a simplified system. This is
recommended when you ca nn ot resolve crashing problems or if
OmniPage Pro has stopped running altogether. See Windows online
help for more information.
Your scanner will not run with OmniPa ge Pro in safe mode o r VGA
mode , so do not tes t sc a n n e r pro b l e m s in this confi gurati on.
T o test OmniPage Pro in safe mode (Windows 95 or 98):
1 Restart your computer in safe mode by pressing F8
immediately after you see the “Starting Windows” message.
2 Launch OmniPage Pro and try performing OCR on an image.
Use an existing image file such as the Sample.tif file.
• If OmniPage Pro does not launch or run properly in safe
mode, then there may be a problem with the installation.
Uninstall and reinstall OmniPage Pro, and then run it in
Windows safe mode.
• If OmniPage Pro runs in safe mode, then a device driver on
your system may be interfering with OmniPage Pro
operation. Troubleshoot the problem by restarting Windows
in Step-by-Step Confirmation mode. See Windows online
Help for more information.
safe mode
Genera l T ro u ble sh ooting So lu ti on s
or Windows NT in
VGA mode
T o test OmniPage Pro in VGA mode (Windows NT):
1 Restart your computer.
2 Select
3 Press Ctrl+Alt+Delete and select
4 In the Task Manager dialog b ox, select all bac kground
5 Launch OmniPage Pro and try performing OCR on an image.
Technical Information 87
Windows NT Workstation Version 4.00 [VGA mode]
press Enter.
Task Manager
applications an d click End Process. See your Windows
documen t ation for more informat ion.
Use an existing image file such as the Sample.tif file.
.
and
Page 96

General Troubleshooting Solutions
Low Memory Problems
Low Disk Space Problems
OmniPage Pro may run poorly under low-memory conditions. This
may be indi cated by various error messages or if OmniPage Pro works
slowly and accesses the hard drive often. Try these solut ions for low
memory conditions :
• Restart your computer.
• Close other open applications to release memory.
• C l o se u n ne cessary OmniPa g e Pro w in dows.
• Defragm ent your hard disk to free up contiguous blocks of disk
space. See Window s online help for i nstructions.
• Increase the a mou nt of free har d disk space.
• Increase your computer’s physical memory (RAM).
More memor y optimizes OCR performanc e. See “Minim um
System Requirements” on page 2 for more information.
Problems may occur if your system runs low on fre e di sk space. Try
these solutions for low disk space problems:
• E m p ty th e Windows Recyc l e Bi n.
• Clo se all ope n appl icat ion s and de let e the *.tmp files in the
Temp folder. This folder is usually located in your W indows
folder.
• Run ScanDisk for Windows 95 or 98, or Check Disk for W indows
NT to che c k fo r errors that may be us in g di s k spa ce. See
Windows online help for instr uctions.
• Back up unneeded files onto floppy disk s or other media and
dele te the m from you r h a rd d isk.
• Remove Windows applications that you do not use.
• D ef ragment your hard disk. Se e Windo ws onlin e He l p fo r
instructions.
• Clea r the cache for your web browser and limit its size.
88 Chapter 6
Page 97

Supported File -Format Types
OmniPage Pro can open these file -format types:
Supported File-Form at Types
BMP, Bitmap
DCX
JPEG
TIFF Packbits
†
Caere Documents from version 8.0 can be opened if the original images were
(*.bmp)
(*.dcx)
(*.jpg)
(*.tif)
OmniPage Document
PCX
(*.pcx)
TIFF uncompressed
TIFF Group 3 or 4, compressed
(*.met)
(*.tif)
†
‡
(*.tif)
‡
preserved as .tif or .jpg files.
‡
TIFF files can be single- or multiple-pa ge; line art, grayscal e, or color. They c an
be up to 600 dpi, but 300 dpi is recommended for optimal OCR accuracy.
OmniPage Pro sto r es a 300 dpi line-art image or a 150 dpi grayscale or color
image, depending on which is being viewed at the time.
Image fil e s can be l oaded at bit depths of 1, 8, or 24.
OmniPage Pro can save original images to these file-format
types:
Bitmap
(*.bmp)
PCX
(*.pcx)
TIFF uncompressed
(*.tif)
TIFF Group 4, compressed
TIFF Packbits
OmniPage document
(*.tif)
(*.tif)
Saving Image Files
OmniPage Pro saves each page of a multiple-page image separately.
If you select Save all pages in the Save Image dialog box, Page# is
appended to file names to distinguish separately saved pages.
If you select Save ea ch graphic zone to a file, then Zone # is appended to file
names to distin guish separate ly saved graphic zones.
Images that are saved at low resolutions are not recommended for
reloading for OCR.
Technical Information 89
Page 98

Supported File-Form at Types
OmniPage Pro can save recognized text to these file formats:
dBase III, III+, IV, 5.5
(*.dbf)
Excel 3. 0, 4. 0, 5 .0, 6 .0,
7.0, 97
(*.xls)
FrameM aker 5.5.3
(*mif)
Freelance Graphics
(*txt)
Harvard Graphics
(*prn)
†
HTML
Lotus 1-2 -3, 97
(*.wk1)
†
When saving to HTML, all graphics are saved as separate image files using
(*.htm)
Microsoft PowerPoint
(*.rtf)
Microsoft Publisher 98
(*.rtf)
OmniPage Document
(
)
*.met
PageMaker 6.5.2 (MS
Word) (
Quattro P ro for Wind ows
4.0, 8
Rich Text Format
(*.rtf)
Text on ly Word Pro 96, 97
*.doc
(*.xls)
)
Text only with line breaks
(*.txt)
Ventura Publisher
(MS Word)
Word for Windows 2.0,
6.0, and 7.0
Microsoft Word 95 and
Word 97
Wordpad
WordPerfect for
Windows 5.1, 5.2
(*.wp5)
95, 98
(*.lwp)
(*.doc)
(*.doc)
(*.doc)
(*.rtf)
, 6.0, 6.1,
(*.wpd)
JPEG format.
90 Chapter 6
Page 99

Scanner Setup Issues
This section con tains information on setting up your scanner and
solutions for scanning problems you may encounter.
Scann er Setup Iss ues
For more detailed scanner information, read the
clicking
Applications>Ca ere Documents >Scanner Setup Notes.
Topics in this section include:
Start
in the Windows taskbar and choose
• Scanner Drivers Supplied by the Manufacturer
• Scanner Drivers Supplied by Caere
• Problems Connecting OmniPage Pro to Your Scanner
• Missing Scan Image Command
• Scanner Message on Launch
• System Crash Occurs While Scanning
Scanner Setup Notes
Programs>Caere
Scanner Drivers Supplied by the Manufacturer
Many scanners are shipped with one or more
software that allows your computer to communicate with your scanner.
Some scanners do not require drivers and other scanners require more
than one driver. Refer to your scanner documen tation for information
about installing any requir ed sca nner dr iver s.
Make sure that your scanner and scanne r d rivers are properly i n stalled
and configured before installi ng OmniPa ge Pro. Make sur e that you
have installed the appropriate scanner drivers supplied by the
manufacturer.
scan ner drivers
by
. This is
For HP IIp, IIc, IIcx, 3p, and 3c scanners, use the drivers that came with
the scanners, or select a TWAIN driver in the Caere Scan Manager.
Technical Information 91
Page 100
Scanner Setup Issues
Scanner Drivers Supplied by Caere
OmniPage Pro is shipped with special scanner drivers that allow it to
communicate with supported scanners. These scanner driver files are
installed on your computer when you install the Caere Scan Manager.
These drivers often work in conjunction with the drivers from your
scanner manufacturer. To use your scanner with OmniPage Pro, you
must select the appropriate scanner in the Caere Scan Manager.
Scan Manager is Needed with OmniPage Pro
To use your scanner with OmniPage Pro, you must install the Caere
Scan Manager and select your scanner in it. The Scan Manager shou ld
have been installed during OmniPa ge Pro’s installa tion.
To check if the Scan Manager is installed:
1Click
2 Look for the
To install the Scan Manager:
1 Make sure your scanner is on before you start your computer.
2 Close OmniPage Pro if it is open.
3 Insert OmniPage Pro’s CD-ROM.
4 Cancel the regular Setup program if it starts automatically.
5 Double-click the setup.exe program in the
6 Select your scanner when you are prompted and follow the
Start
in the Windows taskbar and choose
Settings
The icon does not appear if the Scan Manager is not installed.
Use the following procedure to install the Scan Manager if it
has not been installed.
instructions on the screen.
Once your scanner is set up with OmniPa g e Pro, you can selec t
scanner settings in Omni Page Pro’s Options dialog box . Se e
“Scanner Settin gs” on page 46 for more information.
Control Panel.
Caere Scan Manager
icon.
Scanmgr
folder.
Read the
scanner support and setup. You can open this document after OmniPage
Pro installation by clicking
ProgramsCaere ApplicationsCaer e Document s
92 Chapter 6
Scanner Setup Notes
for the most detailed information about
Start
in the Windows taskbar and choosing
Scanner Setup Notes
.
 Loading...