

Page 1

OmniPage Pro for
Visioneer PaperPort
Version 7.0
Release Notes
Read me first!
1
Page 2

About This Software
OmniPage Pro for Visioneer PaperPort is specially designed to
work with scanners that support Visioneer PaperPort. It includes
all the advanced OCR capabilities of OmniPage Pro plus special
integration with PaperPort software.
These Release Notes are a supplement to the manual included in
your package. Before installation, please read the following
topics contained within this booklet:
• Working With Visioneer PaperPort
• Documentation Notes
• General Notes on Using OmniPage Pro
• OCR Aware Notes
• Windows NT Support
• Image-Editing Applications
• True Page Formatting
Working With Visioneer PaperPort
Recommended Scanners
OmniPage Pro for Visioneer PaperPort is recommended for the
following PaperPort-ready scanners:
• Visioneer PaperPort Vx
• Visioneer PaperPort ix
• Visioneer PaperPort
• Hewlett-Packard ScanJet 4s
• Hewlett-Packard ScanJet 4Si
• Compaq Scanner Keyboard
Linking to OmniPage Pro
During installation, OmniPage Pro automatically integrates with
your Visioneer PaperPort software. An OmniPage Pro icon is
automatically added to the Link Bar at the bottom of the
PaperPort Desktop. This allows you to open PaperPort images in
OmniPage Pro.
OmniPage Pro icon
2
Page 3
To open PaperPort images in OmniPage Pro:
1 Select the images on the PaperPort Desktop.
2 Drag the images onto the OmniPage Pro icon in the
PaperPort Link Bar.
OmniPage Pro launches if it is not already open. The
images are displayed in the image viewer.
Please see OmniPage Pro’s online help for information on
creating zones and performing OCR on images.
Using OmniPage Pro OCR with Other Application Links
During installation, OmniPage Pro is set up as the default OCR
engine in PaperPort. OmniPage Pro OCR is used when you drag
PaperPort images onto text-based application icons — such as
Microsoft Word — in the Link Bar.
To make sure OmniPage Pro OCR is used:
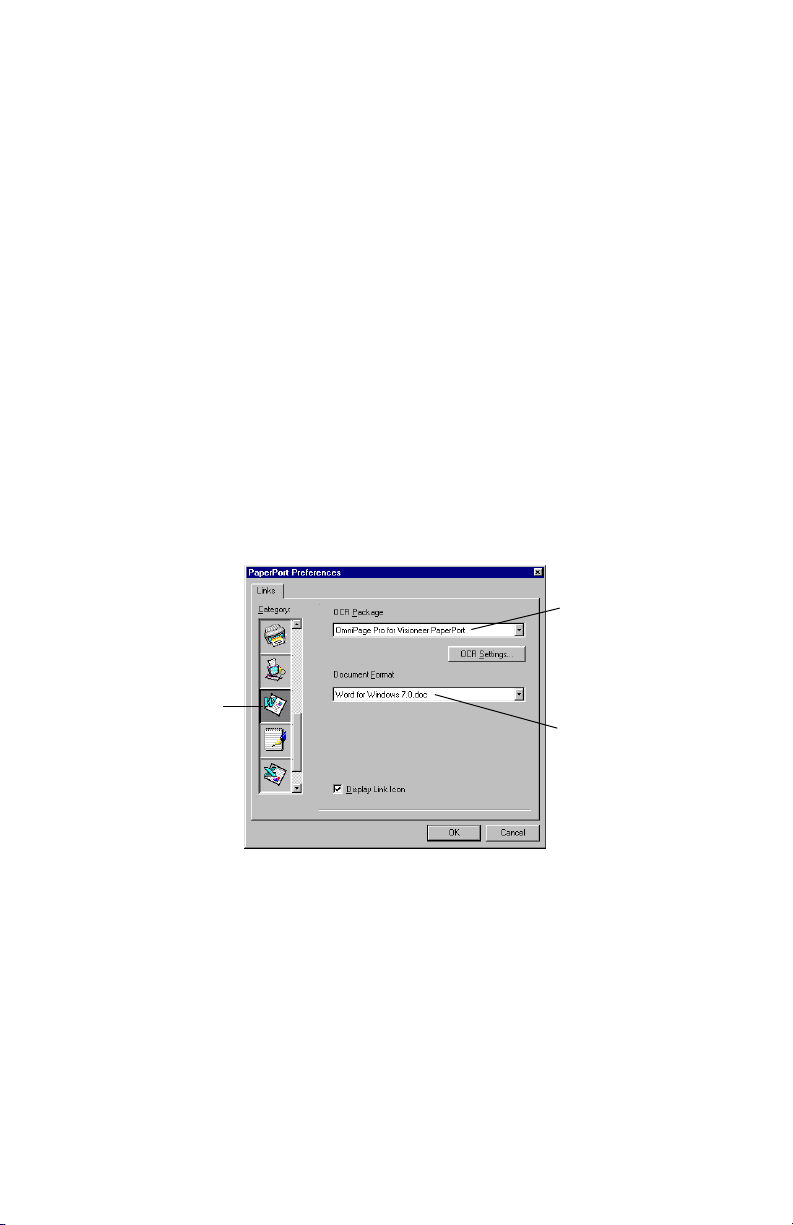
1 Open PaperPort and choose Link Preferences... in the Edit
menu. (The command is Preferences... in earlier versions
of PaperPort.)
Make sure
OmniPage Pro for
Visioneer PaperPort
is selected.
Click the icon of
the application
you want to check.
2 Click the icon in the Category scroll list of the text-based
3 Make sure OmniPage Pro for Visioneer PaperPort is selected
4 Repeat steps 2 and 3 for other text-based applications
5 Click OK to accept the current selections and close the
Select the format in
which you want
OmniPage Pro to
save a document
after text recognition.
application that you want to check.
as the OCR Package.
you want to check.
dialog box.
3
Page 4

To select OmniPage Pro processing options:
Click the tabs
to display and
select various
settings.
1 Open PaperPort and choose Link Preferences... in the Edit
menu (or Preferences... in earlier versions of PaperPort).
OCR Settings
Click
select OmniPage Pro
processing options.
to
2 Click OCR Settings... to open the Options dialog box.
3 Click the Accuracy, Page Format, Language, and PaperPort
tabs and select the desired settings.
In the PaperPort settings:
•Select Auto Zones to have OmniPage Pro create zones
automatically on page images. Zones identify which
areas of the image are processed during OCR. If Auto
Zones is deselected, a zoning window will appear
before OCR so you can draw zones manually.
•Select Check Recognition to check for errors before
exporting recognized text to the target application.
4 Click OK to accept the selections and close the dialog
box.
The selected settings are used when you drag images to
text-based application icons on the PaperPort Link Bar.
4
Page 5

Some Page Format settings, such as Retain Graphics or True Page,
will not take effect if they are not supported by your target
application.
Documentation Notes
The complete user documentation for OmniPage Pro for
Visioneer PaperPort is available in the online help. To open the
online help, choose OmniPage Pro Topics in the Help menu.
The manual included with OmniPage Pro for Visioneer
PaperPort includes information about other scanners and
directions for scanning into OmniPage Pro directly. Please
disregard this information — this version of OmniPage Pro has
been customized for Visioneer PaperPort and does not support
other scanners or direct scanning.
General Notes on Using OmniPage Pro
Opening Caere Documents From Previous Versions
You can open Caere Documents from previous versions only if
their original images were preserved. (Caere Documents are now
called OmniPage Documents.)
OmniForm Compatibility
OmniForm versions 1.x and 2.0 conflict with this version of
OmniPage Pro, so please do not run both programs
simultaneously. OmniForm 2.01 is compatible with OmniPage
Pro.
HTML Support
If you save recognized text in HTML format, any retained
graphics will be saved separately as JPEG files. You can insert the
graphics back into the HTML file in your target application.
Saving Images Files
If you select Save All Pages in the Save Image dialog box, Page# is
appended to file names to distinguish separately saved pages. If
you select Save Each Graphic Zone to a File, then Zone# is
appended to file names to distinguish separately saved graphic
zones.
5
Page 6

Saving to Word 7
Saving recognized documents to Word 7 may take a long time
(several minutes or so) if a lot of graphics are included in the
document.
OCR Aware Notes
The OCR Aware feature adds an Acquire Text command to the File
menu of major text-based applications. You can use this to load
an image file and perform OCR on the spot. For complete
information on using OCR Aware, please see OmniPage Pro’s
online help.
Registering Applications With OCR Aware
OCR Aware supports 32-bit applications and 16-bit applications.
Applications must be registered in the OCR Aware section of the
Options dialog box. The easiest way to register an application is
to launch the application first. Any application that is running
automatically appears in the Unregistered list. Click Add to add a
selected application to the Registered list. Some applications must
be registered this way rather than using the Browse button.
Otherwise, they may not be registered correctly.
Please note the following:
• This version of OCR Aware does not allow direct scanning.
• OCR Aware is not compatible with the 2.x versions of
America Online (AOL). Before running these versions of
AOL, please turn off OCR Aware. To do so, open
OmniPage Pro for Visioneer PaperPort, choose Options... in
the Tools menu, click the OCR Aware tab. Deselect Enable
OCR Aware.
OCR Aware is compatible with AOL 3.0. Please contact AOL
about upgrading your version.
• OCR Aware commands do not appear right away in the
Excel 7.0 File menu. To make the commands appear,
minimize and then restore Excel or switch to another
application and back.
• OCR Aware cannot automatically paste text into Quattro
Pro; text is placed on the Clipboard instead.
• OCR Aware may not paste text into separate cells correctly
in spreadsheet applications. For best results, recognize
spreadsheet images in OmniPage Pro and then save them
6
Page 7

to a file format appropriate for your spreadsheet
application.
Windows NT Support
OmniPage Pro for Visioneer PaperPort is supported on Windows
NT 3.51 except for the following features:
• Opening Microsoft Exchange faxes or sending recognized
documents as Exchange mail
•The Convert To command in image file shortcut menus
These features may be supported on Windows NT 4.0.
However, they have not been tested.
Please note the following about working on Windows NT:
• It may take a long time (several minutes or so) to open
OCR Aware settings in Windows NT via the Acquire Text
Settings... command. This depends on the speed of your
computer.
• Some dialog boxes are slightly different in Windows NT
than they are in Windows 95. The documentation for
OmniPage Pro follows Windows 95 dialog box conventions
and terminology.
Image-Editing Applications
OmniPage Pro can link to various image-editing applications so
you can edit retained graphics in OmniPage Pro’s text viewer.
OmniPage Pro uses the image-editing application that is
currently associated with bitmap images. You can associate
bitmaps with applications in Windows 95 Explorer by choosing
Options... in the View menu and clicking the File Types tab.
These image-editing applications have been tested to work with
OmniPage Pro:
• Microsoft Paint
• Corel Photopaint
• Corel Draw
• Adobe Photoshop
• Micrografx Picture Publisher
• Micrografx PhotoMagic
Other image-editing applications may work, but have not
been tested by Caere.
7
Page 8

Please note the following:
• Image Assistant is not a supported application.
• To use Microsoft Paint, be sure that bitmap files are
associated with mspaint.exe not pbrush.exe.
• Picture Publisher does not support grayscale graphics
when you launch it from OmniPage Pro.
• Do not change the graphics mode (for example, black-andwhite to grayscale) when editing graphics in OmniPage
Pro.
• Certain low-memory conditions may cause problems
during an image-editing session. If problems occur, close
other applications to free memory.
True Page Formatting
True Page formatting retains as much of a page's original
formatting as possible during OCR.
Frames in the Text Viewer
OmniPage Pro’s text viewer displays text and graphics in frames
(formatting boxes) when you recognize documents with the Tr u e
Page setting. If a text area is too large for a frame, some text may
be hidden from view. To view the text, use the arrow keys to
scroll up, down, right, and left.
To resize or move frames, save the document in a recommended
file format and open it in your target application. For information
on working with frames, see your application’s documentation.
Recommended File Formats for True Page
To get recommended file formats for True Page formatting,
choose Options... in the Tools menu, click the Process tab, and
select Show True Page Formats Only. The Save As dialog box will
only list file formats that support True Page formatting. Other file
formats will not be selectable.
Removing Frames on Export for Easier Editing
For easier editing in your target application, you can specify the
removal of frames when you save a document to another file
format. To do so, choose Options... in the Tools menu, click the
Page Format tab, and select Remove Frames on Export. You must
specify this option before performing OCR.
8
Page 9

Please note the following:
• Some frames may be retained (such as frames around
graphics, captions, and certain side-by-side columns) if
necessary to preserve formatting.
• Ami Pro and Word Pro do not support “frameless” True
Page for documents with side-by-side columns. In these
cases, do not select Remove Frames on Export. Otherwise,
unexpected page breaks may occur in the document.
800-1240-030A
9
 Loading...