

North Star CutoMato 51 Instruction Manual

North Star Engineered Products
Division of Glassline Corporation
PO Box 1141
Perrysburg, OH 43552
419 726 2647 ph
419 726 8583 fax
sales@northstarfoodequipment.com
VEGETABLES SLICING MACHINE,CUTOMATO MODEL 51
Instructions Manual
General
The Vegetables Slicing Machine, Cutomato Model 51, can process all types of vegetables and
fruits, including the soft and squashy ones.
General Description
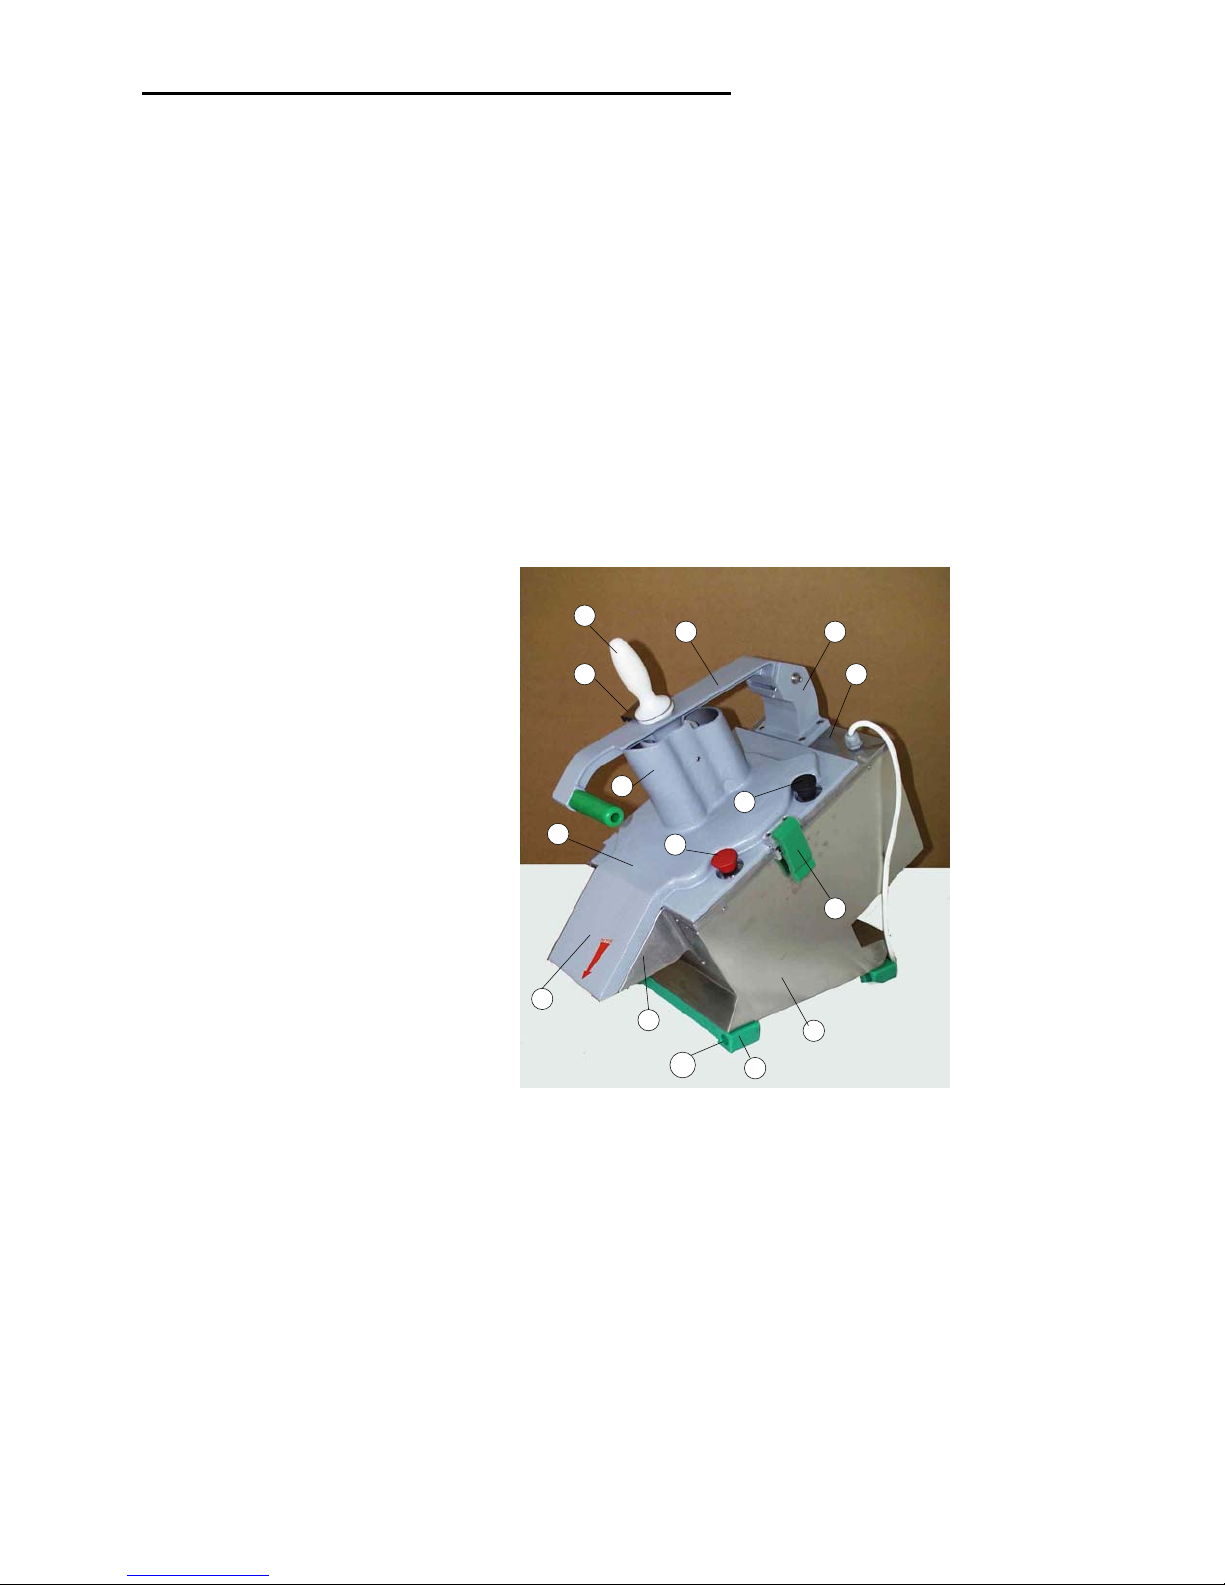
The Slicing Machine includes the following basic components:
1. The machine body
2. Machine cover
3. product pusher handle
4. Stainless Steel Cover – casing
5. Handle axis support and limit switch housing
6. Products fennel (body part)
7. Products fennel (cover part)
8. Feed tube for products input
9
9A
53
1
9. Manual pusher
10. Cover locking handle
11. Base supporters
12. Off switch
13. On switch
Power Supply
2
8
12
13
10
Voltage: 208 – 230 VAC
110 VAC
Capacity: ½ HP
Operation
7
6
11A
11
4
1. Place machine on stable working table, 70 cm high.
2. Place machine so there is space left on the working table for placing a container under the
fennel (6) for collecting the sliced products. If the base supporters (11) are too close to the
table’s edge (if the working table is less than 80 cm wide), you can choose between the 2
following options to your convenience:
Placing a mobile container adjacent to the working table, under the fennel, at an
appropriate height.
Installation of leading rods into the leading feed tube (11A) on the base supporters.
When selecting this option, it will be possible to place vessels, of a maximum of 11
cm high over these rods.
-2-

3. Generally, products are inserted through the feed tube (8) and are pushed in using the
pushing handle (3). Elevating the handle beyond a certain height will automatically stop
machine operation.
Working Methods
Products can be prepared and processed in 3 optional ways:
Option # 1: Cutting of relatively large and hard vegetables, such as: potatoes, radishes, onions,
apples.
Option # 2: Slicing of soft and squashy vegetables and fruits of up to 78 mm in diameter in
various shapes (chips, cubes, and slices).
Option # 3: Precise cutting of round slices of up to 44 mm in diameter, of elongated vegetables
and fruits such as: cucumbers, squash, bananas, carrots – using a special feed tube.
The final shape of the sliced products is detailed in the table on page…
Option # 1
1. Prepare the pushing handle: attach the pushing shaper (part No. 20) into the handle
feed tube (3) by pressing the two spring pins and sliding it inside until pins are released
into the designated bores (pictures No. 2.1 and 2.2).
2. Prepare the product feed tube on the cover: the feed tube (8) is clean and there is no
other adapter.
3
25
20
8
Fig. 2.1 Fig. 2.2 Fig. 2.3
3. Preparation of the slicers:
Open cover. Move pushing handle as far to the back as possible. Open cover by
releasing closure (part No. 10 in picture 1) and turn cover counter clockwise.
Attach plastic slinger (part No. 25 in picture 2.3).
4. Slicing options
Cutting slices: attach disc according to the required slice size (see picture 2.4).
-3-
Grating or Waldorf style: attach the grating or Waldorf disc as in the slicing
options.
Cutting different sizes of cubes or sticks. Place permanent disc on its designated
base (picture 2.5), and attach the desired blade above it (picture 2.6).
Note: place the plate only after you swiftly clean the base.
Fig. 2.6 Fig. 2.5 Fig. 2.4
Warning!
Hold blades only in designated holding points.
Keep your fingers away from blades.
Never apply too much pressure when installing or removing the cutting
appliances.
Always act gently and with consideration.
Option # 2
1. Prepare the compression system: attach the special round compressor as described in
option # 1 (see picture 3.1).
2. Prepare the feed tube. Place round adapter into its designated niche in the feed tube. You
can find the adapter’s correct place by turning it and then slide it all the way inside (see
picture 3.2).
3
22
8
Prepare blades:
Open cover as described in option # 1.
Fig. 3.2 Fig. 3.1
-4-
Do not install the plastic ejector if you intend to cut an especially soft or squashy
vegetable or fruit (such as a tomato).
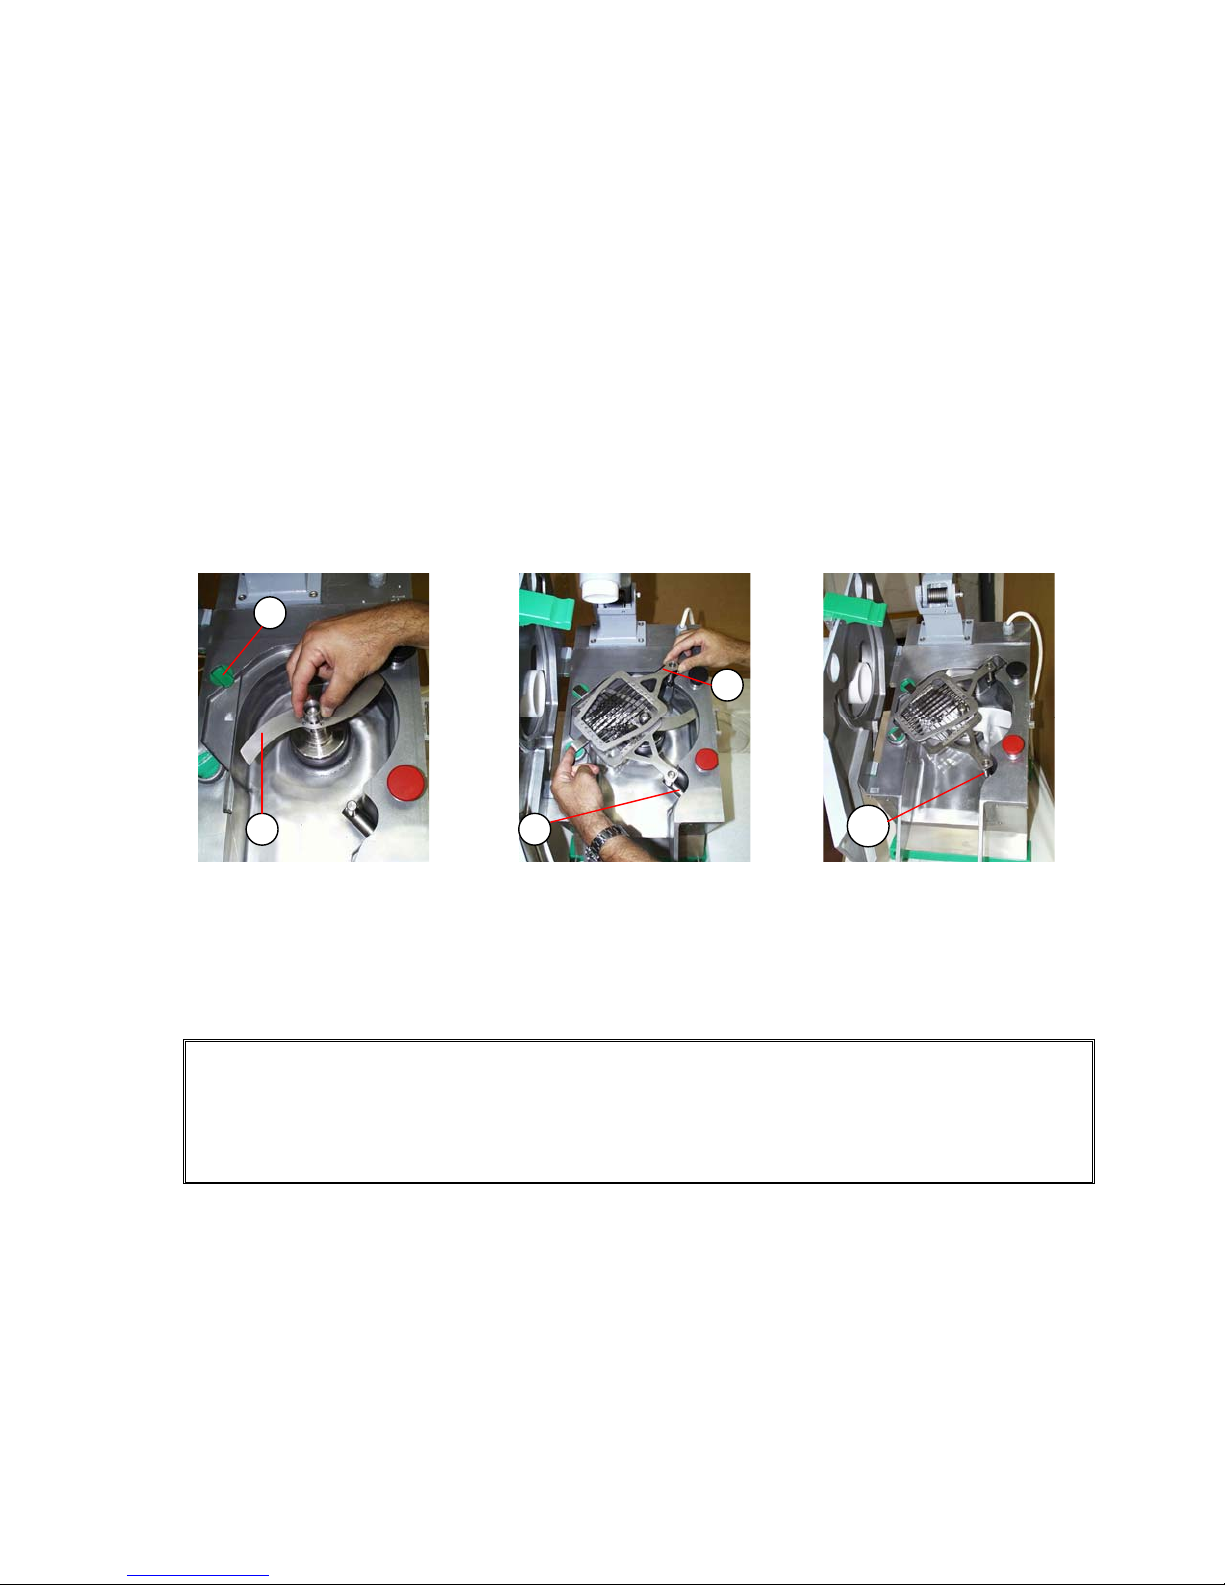
Install the slicing blade (part No. 24) in accordance with the cutting plate (see
picture 3.3).
Note: always make sure (by touch) that the blade adapter will be in its designated
place, on the main axis.
Install the blades frame (part No. 23) as shown in pictures 3.4 and 3.5. Ensure
contact between front leading points on sliding surface frame (green bushing – part
No. 27), and the lower side of the adapter bushing of the frame (part No. 23A) to
the horizontal dynamic leading rod (part No. 28).
Notice: the frames are installed gradually. Initially place the lower frame. Note
that frames are identical. Note that you can obtain sticks by installing
frames only – without using the slicing blade. Slices can be obtained by
using the upper frame only.
27
23
24
Fig. 3.3
28
23A
Fig. 3.5 Fig. 3.4
Warning!
Assembly and disassembly of components will always be done without exerting
any force.
It is forbidden and undesired to draw fingers near any of the blade types.
Always act gently and with consideration.
Option # 3
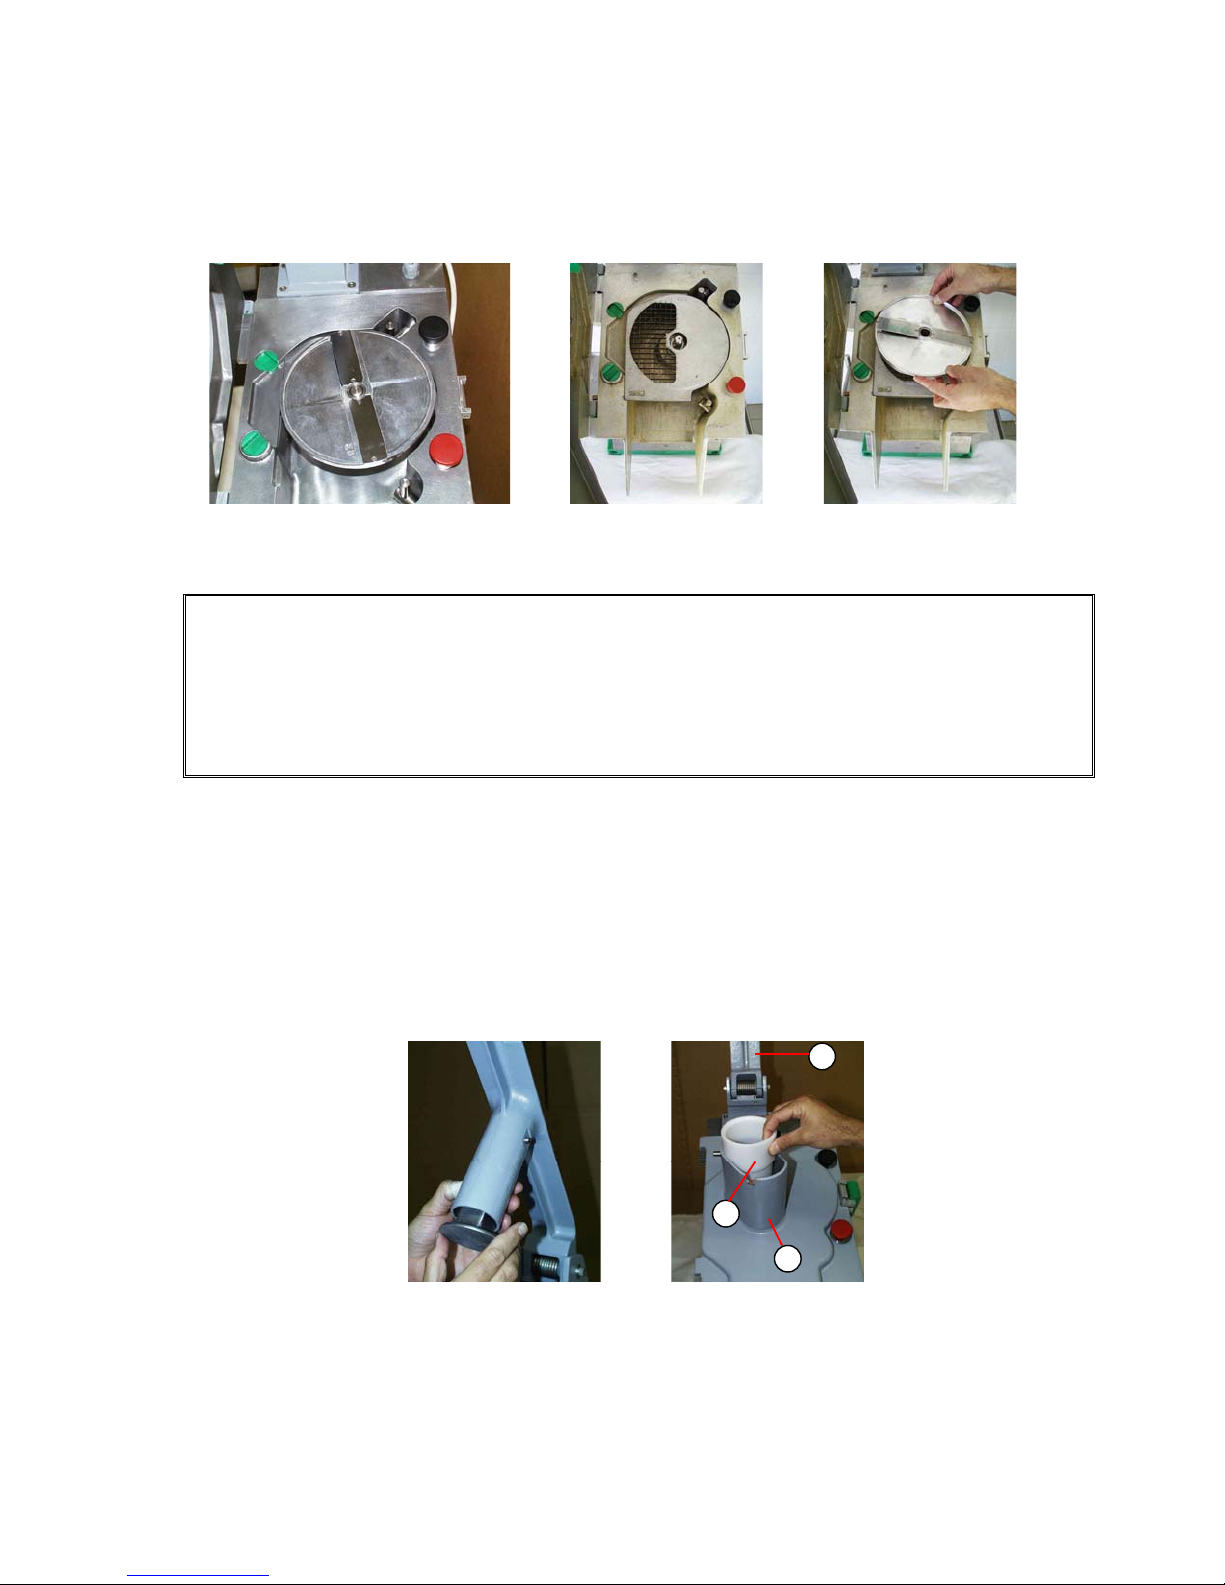
1. Prepare the pushing system: using this method, products are pushed in with the manual
pusher (part No. 9) or without it at all – the vegetable is pushed into the blades by its own
weight (a cucumber for example).
-5-

2. Prepare the feed tube. Using this method, the feed tube handle (3), together with the
adapter (9A) become the feed tube. Lower the handle and insert the plastic adapter (9A)
(see picture 4.1).
Make sure the pin set on the feed tube (30) will be inserted, by a ¼ turn, into the slit in the
Stainless Steel ear-shaped adapter (picture 4.2).
Products are inserted using the manual compressor as shown in picture 4.3.
3. Prepare blades: prepare blades by selecting one of the possibilities described earlier.
Usually, one of the slicing blades is selected.
9A
30
8
3
Fig. 4.1 Fig. 4.3 Fig. 4.2
9A
9
Warning!
Never insert your fingers through the cut product outlet fennel (parts 6 and
7). If any cut vegetables have accumulated it should be cleaned only after the
cover is opened!
Cleaning Operations
1. During work, when transferring between different types of slicing or products, you may
open the cover and, quite easily, manually remove remaining product from the machine
inner spaces into the collecting vessel.
2. Upon completion of work, rinse the inner parts only with running water. The cover,
which can be easily removed, can also be rinsed with running water.
3. Warning! Never let running water come in contact with upper surface of machine
body, (see area 5C in picture 5.1), connecting line to closure (5A in picture 5.1), and
area of connection to handle (5B in picture 5.1).
These surfaces can be wiped with a damp cloth only.
4. All cutting appliances and adapters will be cleaned separately in running water. All these
5C
5A
5B
-6-
Fig. 5.1

appliances can be cleaned in the dishwasher.
Warning!
Never attempt to free remains of food, which are stuck in the blades, with your
fingers.
Preventive Maintenance
The operator can perform the following maintenance jobs:
1. Replace blades on the moving frames.
During normal operation, a blade will need to be replaced once every few months:
When blade looks damaged (worn, blunt, cracked, etc.), replace it by releasing the
2 screws attaching it to the frame. Open screws gently and carefully with a
screwdriver.
Release blade from frame while paying attention to the way it was installed.
Place the new blade exactly in the same way as the other blades. Do not turn its
direction.
Before closing screws, wipe clean the screw head.
During normal operation, send the slicer to be sharpened every 4 to 6 months.
Always have a spare slicer at hand.
Release the installed slicer from the adapter by releasing 6 screws.
Send the slicer for sharpening.
Install the reserve slicer.
2. Send the slicing blades to a professional grinder for sharpening.
3. Perform daily lubrication.
Every morning, before commencing work, place several edible oil drops (soy oil, for
example) over:
The moving rods (part No. 28 in picture 3.4)
The green bushings that are used for the sliding surfaces (part No. 27 in picture
3.4).
-7-
 Loading...