

Page 1

N
941/95x GPS Chart Navigators
WAYPOINT/ROUTE SHARING
AND COLOR PALETTE SELECTION
OPERATOR INSTRUCTIONS
orthstar Technologies
30 Sudbury Road
Acton, Massachusetts 01720
www.NorthstarNav.com
Sales: 978/897-6600
P/N GM1508 Rev. C
Page 2

Page 3
941/951x GPS Chart Navigators
Welcome
The Northstar 941/95x Waypoint/Route Sharing and Color Palette Selection Operator Instructions
describe how to share waypoints and routes between the 941 and 95x (951/952/957/958); and how
to select among the three color palettes available for the 952/957/958. These features are available
for units running software version 3.12 or higher.
Getting technical support
After you’ve followed the instructions in this manual, if you require additional technical support or
have any other service-related questions, you can contact either your dealer or the Northstar Service
Department. Northstar’s Service Department can be reached by email, fax, U.S. mail, or phone as
described in the table below. Whether you send an email or fax, or write or phone, please have the
unit’s serial number available, and be as complete and accurate as possible when describing the
problem so that a service technician can research the problem and provide the quickest possible
response.
Northstar’s Service Department is available between 9:00 AM and 5:00 PM Eastern Time, Monday
through Friday, excluding major holidays.
Table 1: Contacting Northstar
Email:
Service: [email protected]
Sales: [email protected]
Fax:
Service: 978/897-1595
Sales: 978/897-7241
Telephone:
Main number: 978/897-6600 or 800/628-4487
U.S. mail:
30 Sudbury Road
Acton, MA 01720
Website:
www.NorthstarNav.com (you can send email to
Northstar directly from this site)
NOTE:
You can email the Service Department directly from Northstar’s website. The address is www.NorthstarNav.com.
From here, you also can access additional technical information under either the Manuals
or Support links.
Waypoint/Route Sharing & Color Palette Selection Operator Instructions, Rev. C 1 of 8
Page 4

941/95x GPS Chart Navigators
Hearing from you
Your feedback is important and helps ensure that this manual is a valuable resource. Send your questions, comments, or suggestions about this manual to:
Sharing waypoints and routes
The waypoint and route import/export feature allows two or more 941 or 95x units to conveniently
“share” all the same waypoints and routes.
Only one unit, designated the “master,” enters the import/export function. The other unit can
remain in normal operation as long as you don’t actually add or modify its waypoints or routes
during the transfer process. Any screen can be displayed during the transfer process, including the
IMPORT DATA screen or the EXPORT DATA screen. You can designate either of the two units as the
master because both units are able to import and export waypoints and routes; but once you select
the master, make sure you select the correct function for what you want to do (import copies waypoints and routes into the master unit; export copies waypoints and routes from the master unit).
Connecting the two units
The two units must be properly connected using the auxiliary head ports. For interfacing details, it is
recommended that you first see your local Northstar dealer. You also can review the Northstar 951/
952 Installation Manual (P/N GM1505C).
Moving waypoints and routes into a master unit (import)
When you move and routes into unit 1 (the designated master) from unit 2, the entire contents of
unit 2 are imported into unit 1. Also, if any waypoint or route name matches exist, the waypoints or
routes from unit 2 overwrite the waypoints or routes already in unit 1.
NOTE:
If you press any function key on the master unit during the
transfer, the error message
HIT
will be displayed, the process will be aborted, and the
master unit will display the particular screen accessed by that
function keypress. You can press any key on the other unit,
however, without interrupting the transfer process.
To purposely stop the transfer at any time, press the
key. If you press the STOP key, the master unit displays the
dialog-box message
and the status bar displays the message
ABORTED
are in the receiving unit (be aware that a particular route may
not contain all of its waypoints due to the transfer interruption).
Press the
cess (this means that all waypoints and routes, not just the
ones already in the receiving unit and the ones left to be transferred, are re-transferred).
. Waypoints and routes transferred up to that point
START key again to re-start the entire transfer pro-
TRANSFER ABORTED BY KEY
STOP
TRANSFER ABORTED BY KEY HIT,
TRANSFER
2 of 8 Waypoint/Route Sharing & Color Palette Selection Operator Instructions Rev. C
Page 5
941/951x GPS Chart Navigators
1. Select the unit you’d like to use as the master. Remember: You can use either of the two units as
the master because both units are capable of importing or exporting waypoints and routes.
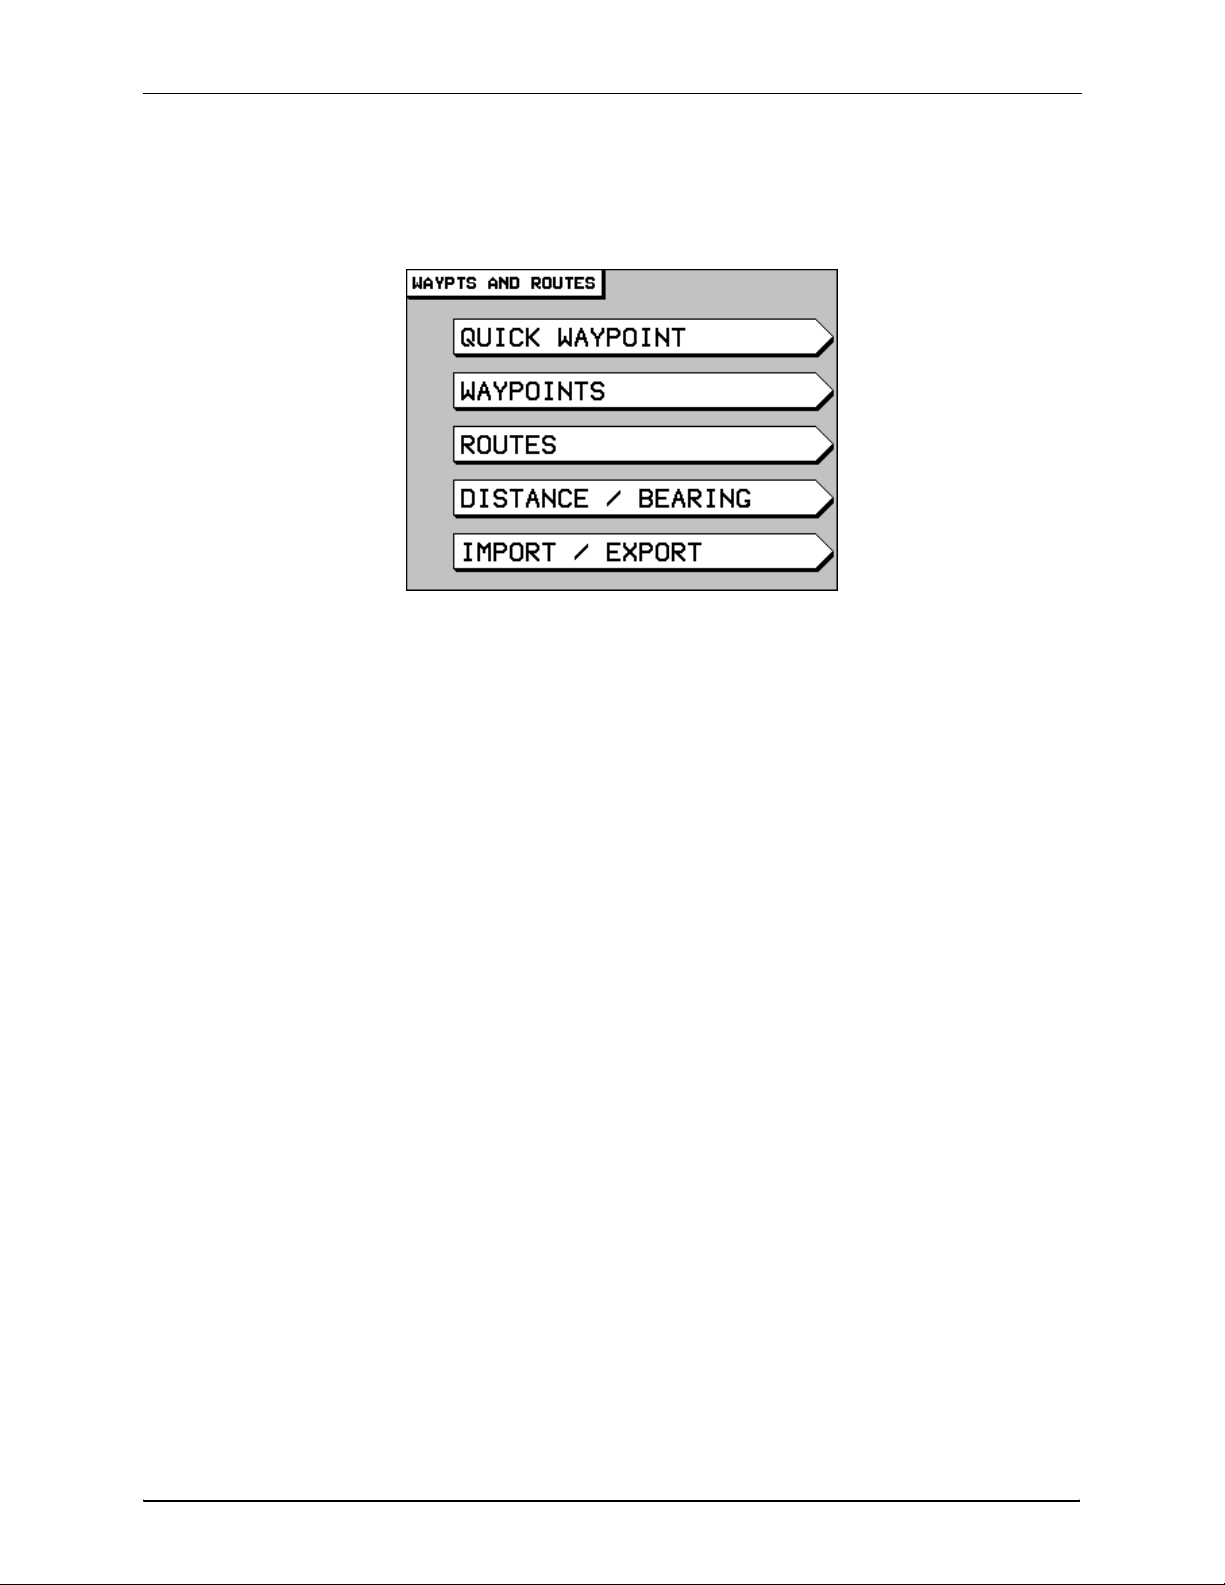
2. At the master unit, press the WAYPTS/ROUTES key to display the WAYPTS AND ROUTES
screen.
Waypoint/Route Sharing & Color Palette Selection Operator Instructions, Rev. C 3 of 8
Page 6
941/95x GPS Chart Navigators
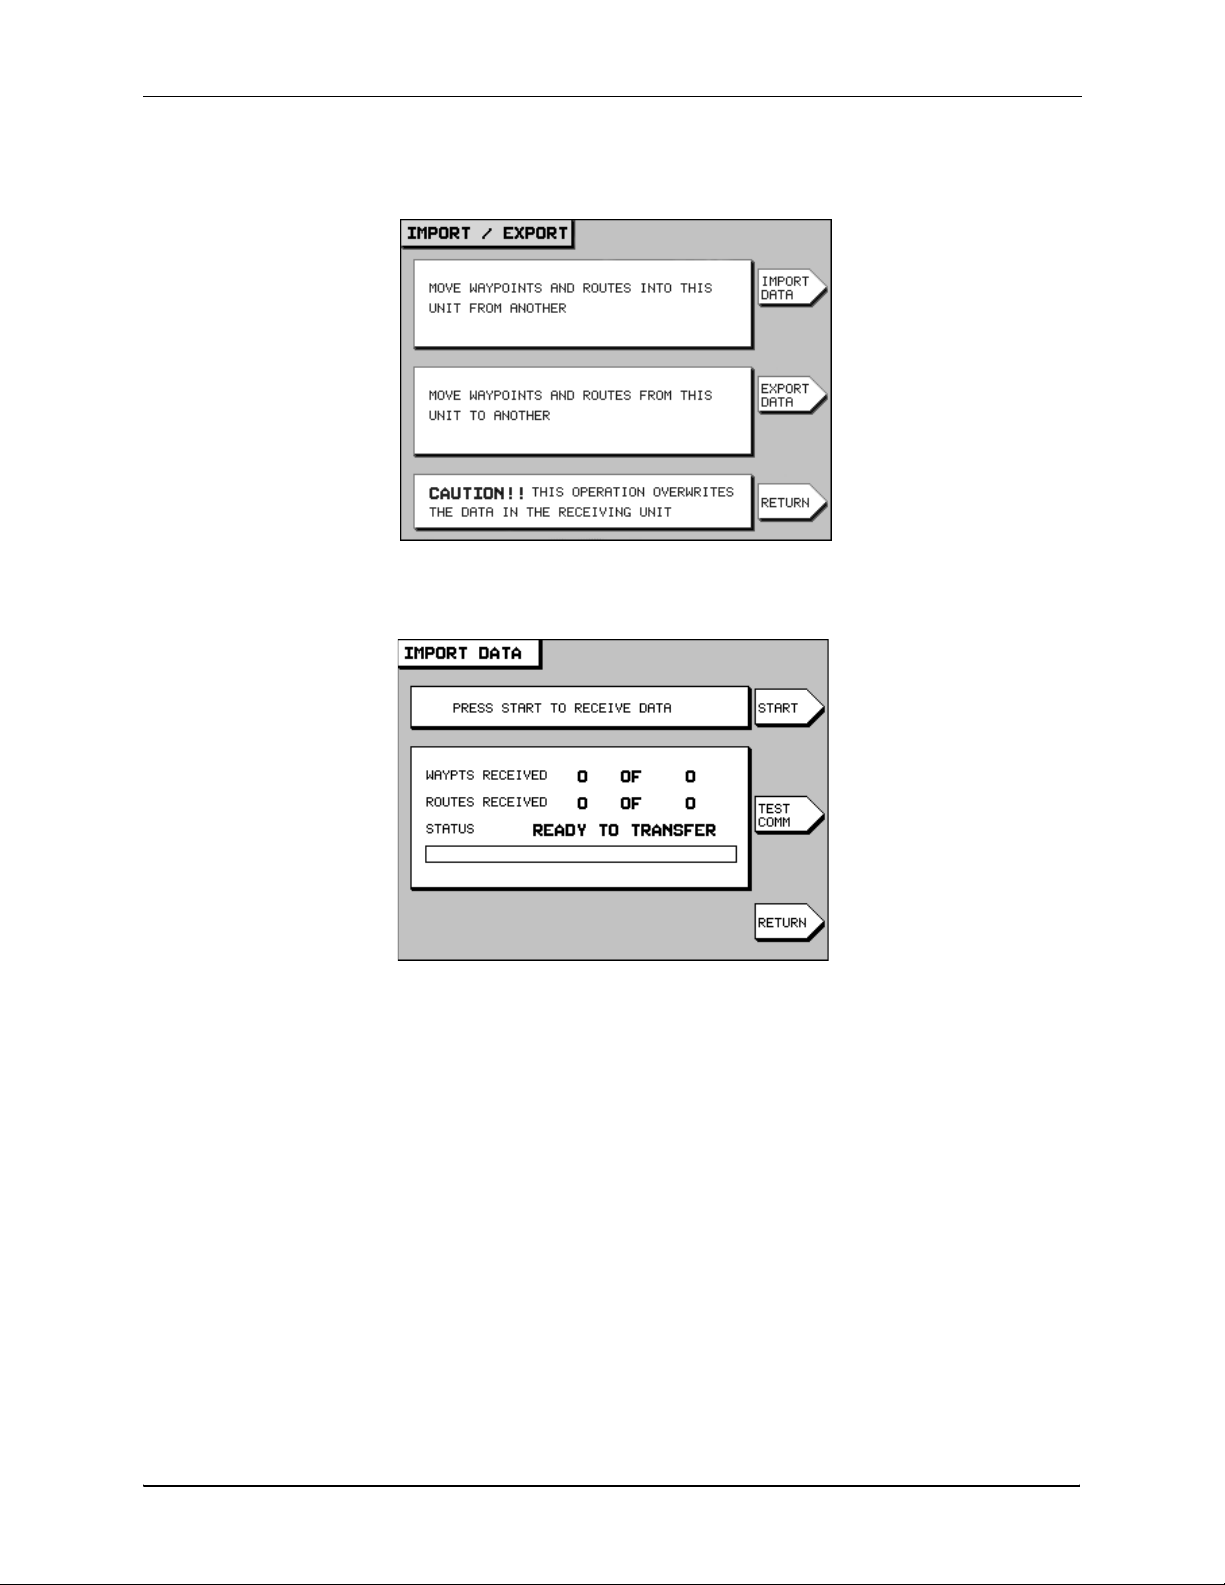
3. Press the IMPORT/EXPORT menu key to display the IMPORT/EXPORT screen.
4. Press the IMPORT DATA menu key to display the IMPORT DATA screen. The status bar in the
center of the screen displays the message READY TO TRANSFER to show that the transfer is
ready to start.
5. Before transferring, check the communication link between the two units by pressing the TEST
COMM key. The status bar should display the message REMOTE LINK OK.
6. To move waypoints and routes into this master unit from the other unit, press the START key.
The status bar displays the message TRANSFERRING and updates every second with the number of waypoints and routes already received against the total quantity to be received. The
progress bar, located below the status bar, graphically displays the percentage completed.
If there’s a problem with the transfer process, the following messages may appear:
• If the other unit is off-line, the master unit displays the dialog-box message COULDN’T GET
REMOTE WAYPT/ROUTE COUNT and the status-bar message COMMUNICATION ERROR.
• If the other unit doesn’t contain any waypoints and routes, the master unit displays the dia-
log-box message NO WAYPTS OR ROUTES TO TRANSFER and the status-bar message NO
TRANSFER DONE.
• If the master unit is completely full of waypoints and routes (no more room available), the
master unit displays the dialog-box message LOCAL UNIT STATUS ERROR [002] DATABASE
FULL and the status-bar message COMMUNICATION ERROR.
4 of 8 Waypoint/Route Sharing & Color Palette Selection Operator Instructions Rev. C
Page 7
941/951x GPS Chart Navigators
If there’s no problem with the transfer process, the master unit’s status bar displays the message
TRANSFER COMPLETE when done. You can now press any key to resume other operations.
Moving waypoints and routes from a master unit (export)
When you move waypoints from unit 1 (the designated master) into unit 2, the entire contents of unit
1 are exported into unit 2. Also, if any waypoint or route name matches exist, the waypoints or
routes from unit 1 will overwrite the waypoints or routes already in unit 2.
NOTE:
If you press any function key on the master unit during the
transfer, the error message
HIT
will be displayed, the process will be aborted, and the
master unit will display the particular screen accessed by that
function keypress. You can press any key on the other
however, without interrupting the transfer process.
TRANSFER ABORTED BY KEY
unit,
To purposely stop the transfer at any time, press the
key. If you press the STOP key, the master unit displays the
dialog-box message
and the status bar displays the message
ABORTED
are in the receiving unit (be aware that a particular route may
not contain all of its waypoints due to the transfer interruption).
Press the
cess (this means that all waypoints and routes, not just the
ones already in the receiving unit and the ones left to be transferred, are re-transferred).
. Waypoints and routes transferred up to that point
START key again to re-start the entire transfer pro-
TRANSFER ABORTED BY KEY HIT,
STOP
TRANSFER
1. Select the unit you’d like to use as the “master.” Remember: You can use either of two units as
the master because both units are capable of importing or exporting waypoints and routes.
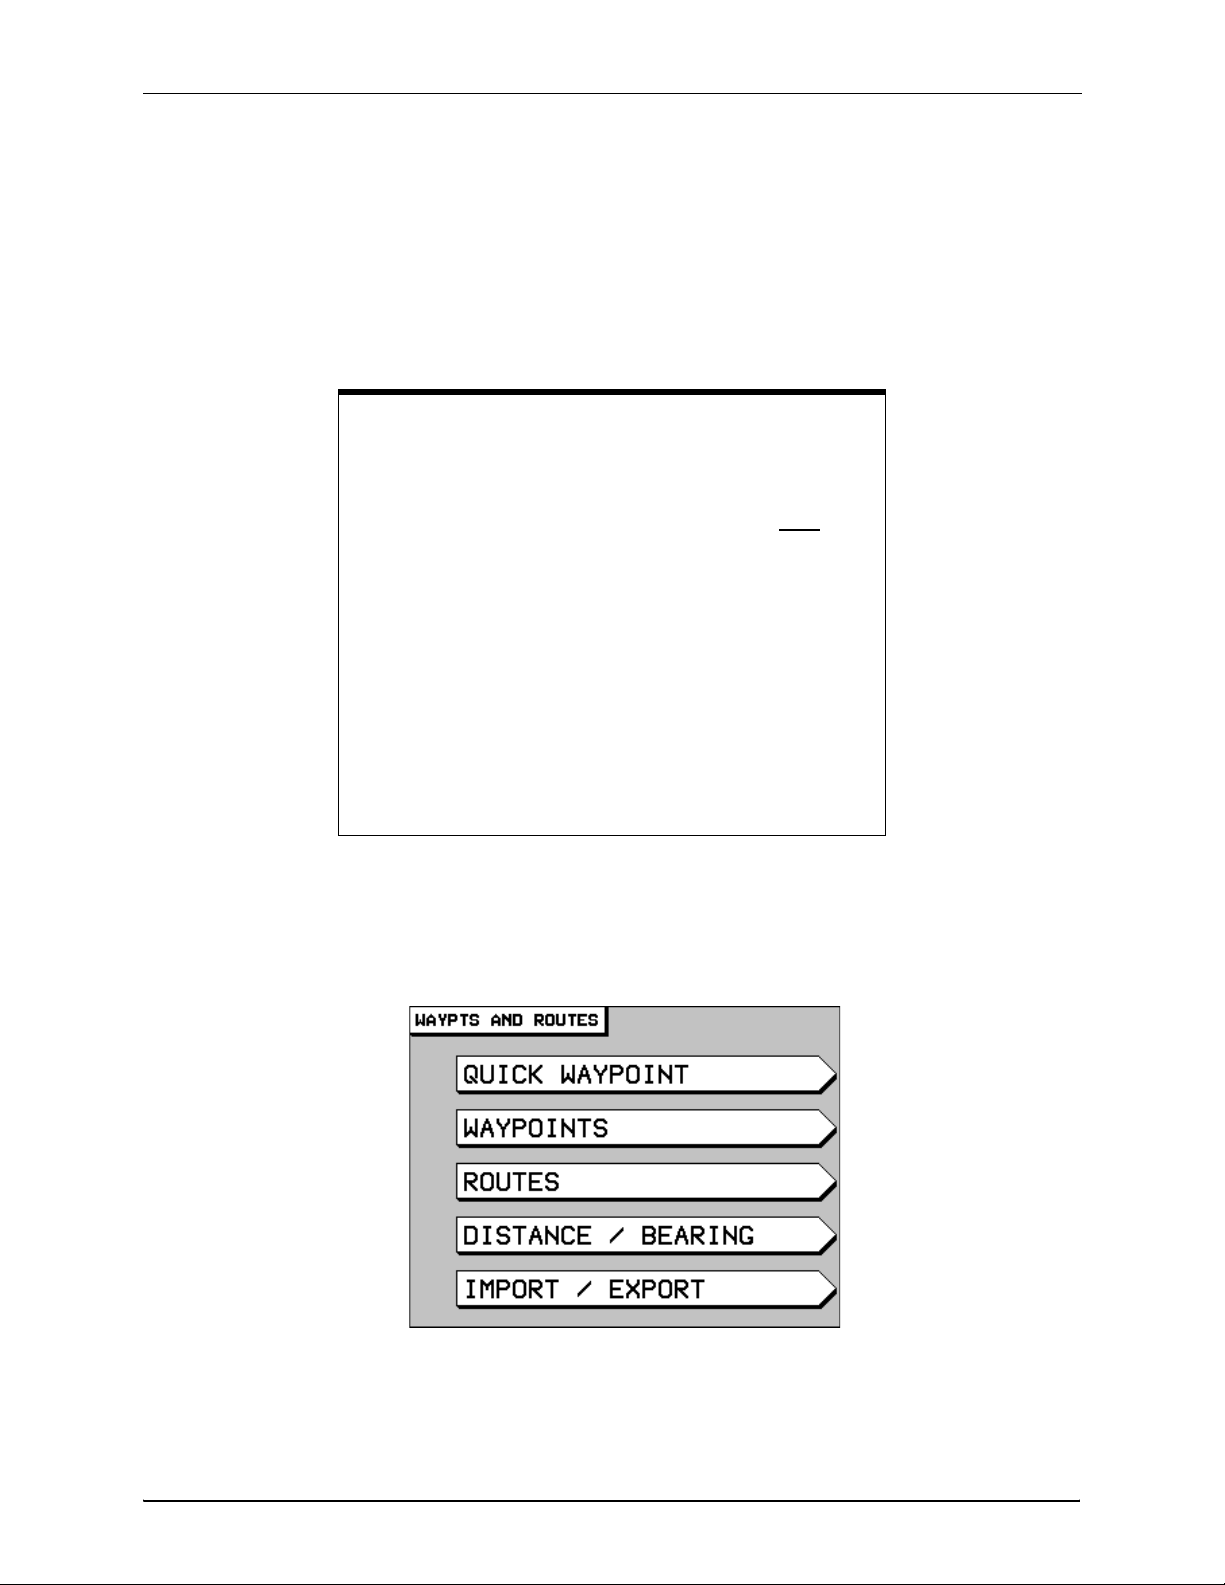
2. At the “master” unit, press the WAYPTS/ROUTES key to display the WAYPTS AND ROUTES
screen.
Waypoint/Route Sharing & Color Palette Selection Operator Instructions, Rev. C 5 of 8
Page 8
941/95x GPS Chart Navigators
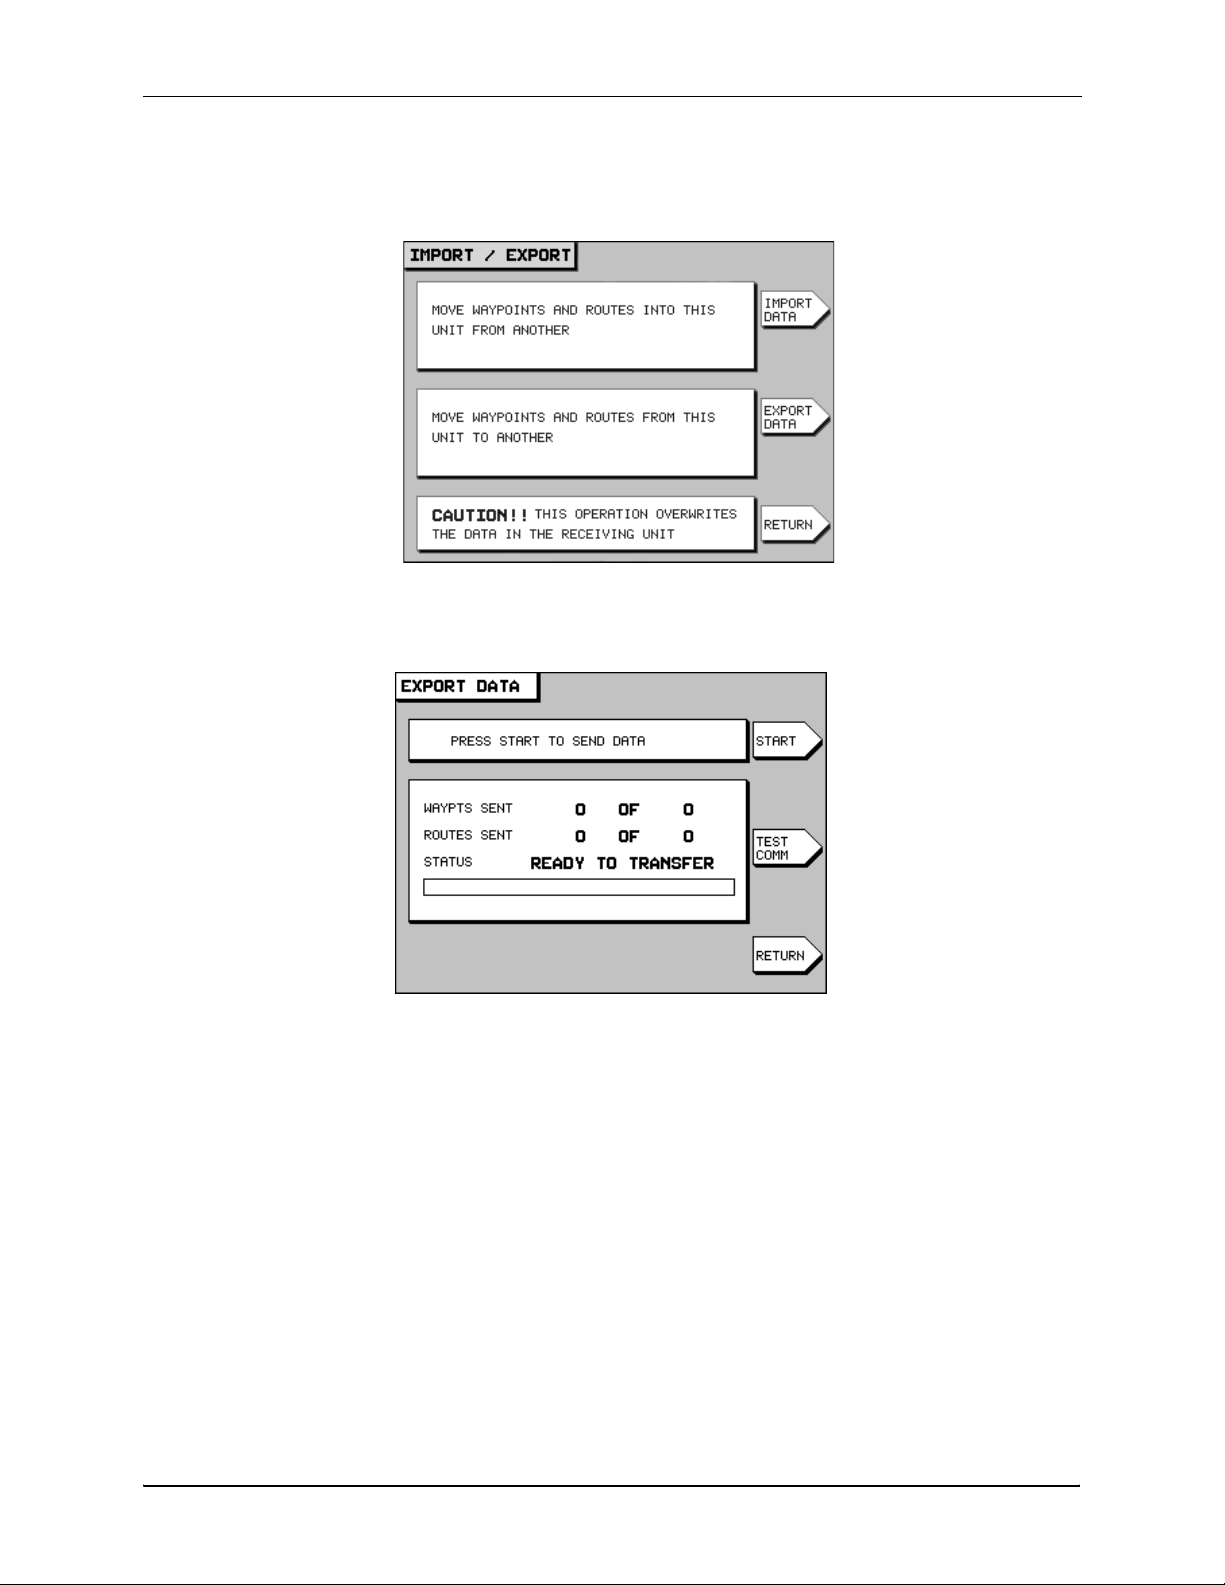
3. Press the IMPORT/EXPORT menu key to display the IMPORT/EXPORT screen.
4. Press the EXPORT DATA menu key to display the EXPORT DATA screen. The status bar in the
center of the screen displays the message READY TO TRANSFER to show that the transfer is
ready to start.
5. Before transferring, check the communication link between the two units by pressing the TEST
COMM key. If the status bar now displays the message REMOTE LINK OK, you may begin to
transfer waypoints.
6. To move waypoints and routes from the master unit into the other unit, press the START key.
The status bar displays the message TRANSFERRING and updates every second with the number of waypoints and routes sent compared to the total quantity to be sent. The progress bar,
located below the status bar, graphically shows the percentage completed.
If there’s a problem with the transfer process, the following messages may appear:
• If the other unit is off-line, the master unit displays the dialog-box message TRANSFER
ABORTED BY COMMUNICATION TIMEOUT and the status-bar message COMMUNICATION
ERROR.
• If the master unit doesn’t contain any waypoints and routes, the master unit displays the
dialog-box message NO WAYPTS OR ROUTES TO TRANSFER and the status-bar message NO
TRANSFER DONE.
6 of 8 Waypoint/Route Sharing & Color Palette Selection Operator Instructions Rev. C
Page 9
941/951x GPS Chart Navigators
• If the other unit is completely full of waypoints and routes (no more room available), the
master unit displays the dialog-box message REMOTE UNIT STATUS ERROR [002] DATABASE FULL and the status-bar message TRANSFER ERROR.
7. If there’s no problem with the transfer process, status bar displays the message TRANSFER COMPLETE when done. You can now press any key to resume other operations.
Changing the color palette
The following information applies only to the color 95x navigators (the 941 and 951 have black-andwhite display screens).
The 952 offers three color-palette choices for its display screen:
• normal (the factory default)
• hi-brite (best for bright daylight conditions)
• night (best for nighttime conditions)
This feature provides for better viewing in bright sun and nighttime conditions than a single color
palette. The colors of the hi brite palette are the same as the normal palette, only brighter; water is
displayed in white and land areas are displayed in brown. However, the night palette displays water
in black and land areas in green; text on the chart screens is displayed in magenta instead of black,
and depth lines are displayed in bright blue.
NOTE:
Each time you turn the unit off, it returns to the normal palette.
The hi brite and night color-palette selections aren’t saved at
each power off.
To select a different color palette:
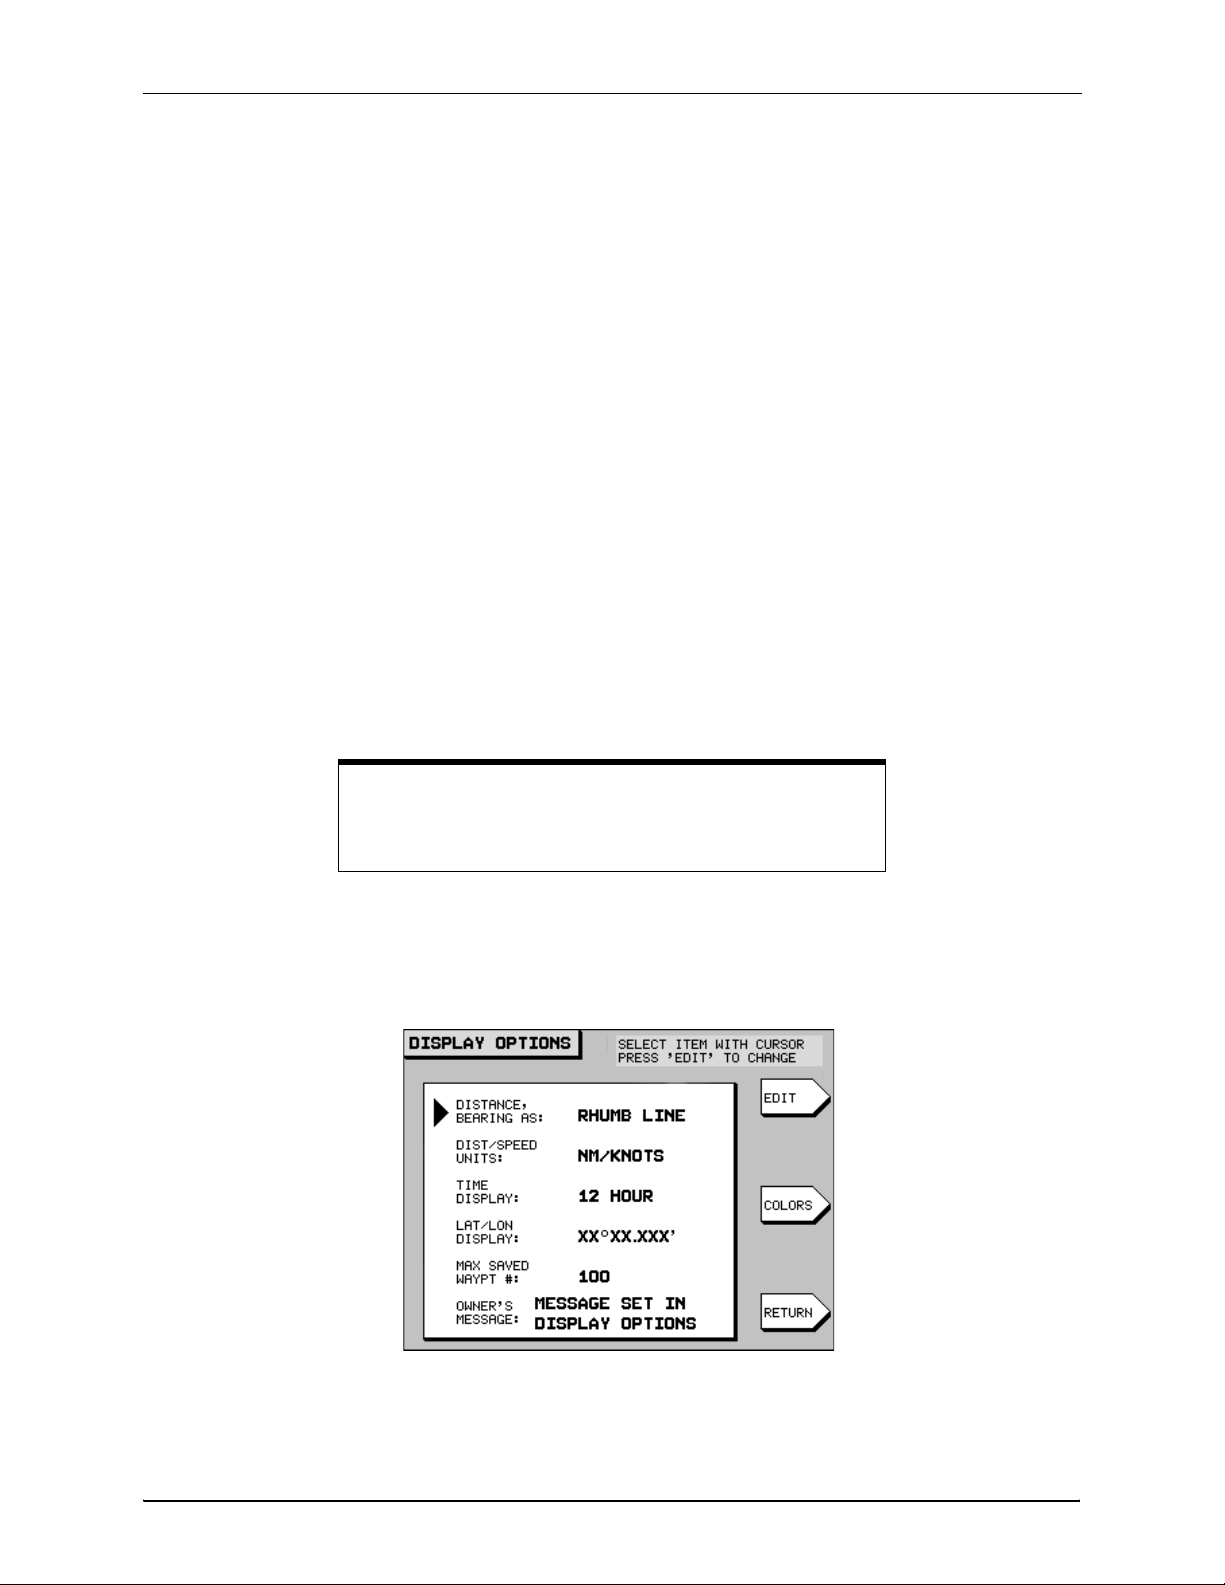
1. Press the STAR key to display the USER CUSTOMIZATION screen.
2. Press the DISPLAY OPTIONS menu key to display the DISPLAY OPTIONS screen.
Waypoint/Route Sharing & Color Palette Selection Operator Instructions, Rev. C 7 of 8
Page 10
941/95x GPS Chart Navigators
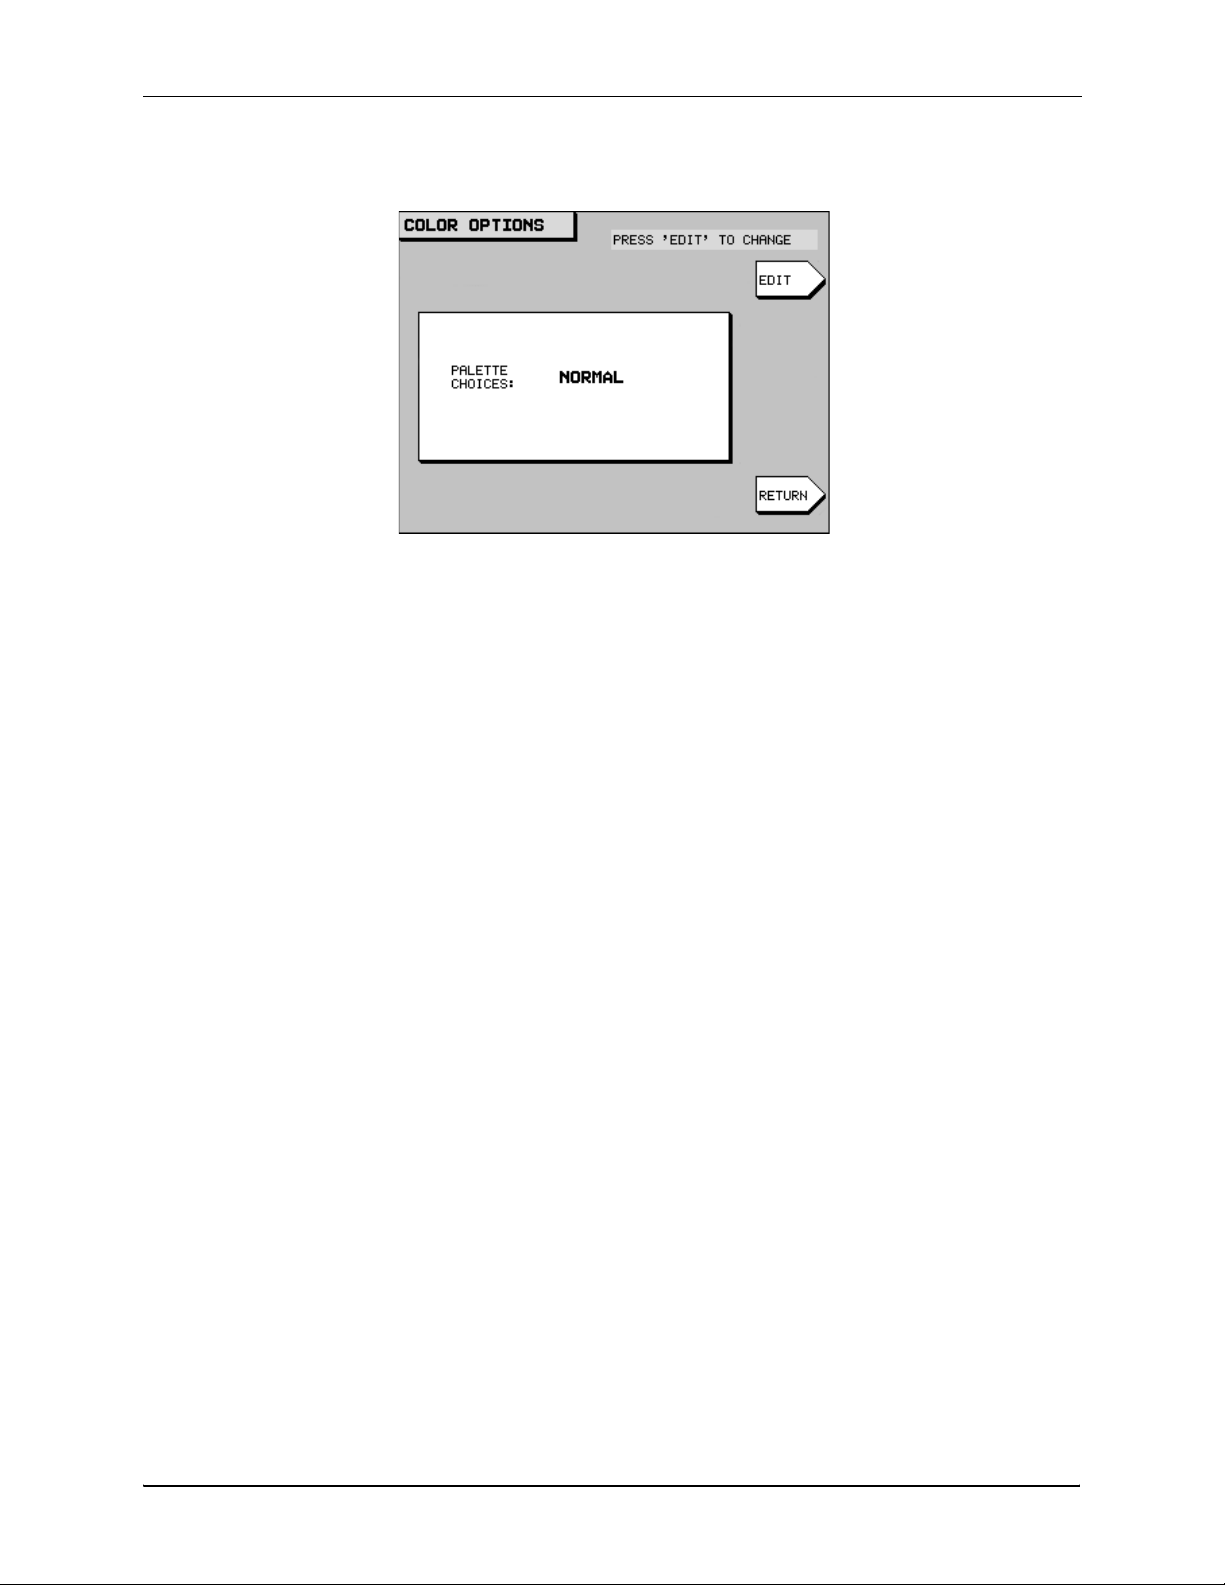
3. Press the COLORS menu key to display the COLOR OPTIONS screen.
4. To change the palette choice, press the EDIT menu key, then use the CURSOR PAD to view the
three choices: NORMAL, HI BRITE, and NIGHT. Press the ENTER key to make your selection (or
clear to leave the option unchanged). The unit will immediately display the new palette choice.
8 of 8 Waypoint/Route Sharing & Color Palette Selection Operator Instructions Rev. C
 Loading...