


For expanded strategies and more information on all aspects of the game, check out www.smashbros.com.
AllezdansleDojo!!
Pour des stratégies et plus d’information sur tous les aspects de ce jeu, visitez www.smashbros.com.
NEED HELP WITH INSTALLATION, |
BESOIN D’AIDE POUR L’INSTALLATION, |
¿NECESITAS AYUDA DE INSTALACION, |
MAINTENANCE OR SERVICE? |
L’ENTRETIEN OU LA RÉPARATION? |
MANTENIMIENTO O SERVICIO? |
Nintendo Customer Service
SUPPORT.NINTENDO.COM or call 1-800-255-3700
NEED HELP PLAYING A GAME?
Recorded tips for many titles are available on Nintendo’s Power Line at (425) 885-7529. This may be a long-distance call, so please ask permission from whoever pays the phone bill.
If the information you need is not on the Power Line, you may want to try using your favourite Internet search engine to find tips for the game you are playing. Some helpful words to include in the search, along with the game’s title, are: “walk through,” “FAQ,” “codes,” and “tips.”
Service à la Clientèle de Nintendo
SUPPORT.NINTENDO.COM ou appelez le 1-800-255-3700
BESOIN D’AIDE DANS UN JEU?
Un nombre d’astuces pré-enregistrées sont disponibles pour de nombreux titres sur la Power Line de Nintendo au (425) 885-7529. Il est possible que l’appel pour vous soit longue distance, alors veuillez demander la permission de la personne qui paie les factures de téléphone. Si les informations dont vousavez besoin ne
se trouvent pas sur la Power Line, vous pouvez utiliser votre Moteur de Recherche préféré pour trouver de l’aide de jeu. Certains termes utiles que vous pouvez inclure dans votre recherche sont “walk through” (“étape par étape”), “FAQ” (“Foire Aux Questions), “codes” et “tips” (“astuces”).
Servicio al Cliente de Nintendo
SUPPORT.NINTENDO.COM o llame al 1-800-255-3700
¿NECESITASAYUDACON UNJUEGO?
Consejos grabados para muchos títulos están disponibles a través del Power Line de Nintendo al (425) 885-7529. Esta puede ser una llamada de larga distancia, así que por favor píde permiso a la persona que paga la factura del teléfono. Si el necesitas, recomendamos que uses el Motor de Búsqueda de tu preferencia para encontrar consejos para el juego que
estás jugando. Algunas de las palabras que te ayudarán en tu búsqueda además del titulo, son: “walk through” (“instrucciones paso a paso”), “FAQ” (“Preguntas Frecuentes”), “codes” (“códigos”), y “tips” (“consejos”).
The Official Seal is your assurance |
|
Ce Sceau Officiel est votre garantie que le |
|
El Sello Oficial es su ratificación de |
|
|
|||
that this product is licensed or |
|
présent produit est agréé ou |
|
que este producto tiene licencia o es |
manufactured by Nintendo. Always |
|
manufacturé par Nintendo. Recherchez-le |
|
manufacturado por Nintendo. Busque |
look for this seal when buying |
|
toujours quand vous achetez des |
|
siempre este sello al comprar sistemas |
video game systems, accessories, |
|
appareils de jeu vidéo, des accessoires, |
|
de vídeojuegos, accesorios, vídeojuegos, |
games and related products. |
|
des jeux et d’autres produits apparentés. |
|
y productos relacionados. |
|
65590A |
NINTENDO OF AMERICA INC. |
|
P.O. BOX 957, REDMOND, WA |
|
98073-0957 U.S.A. |
|
www.nintendo.com |
PRINTED IN USA / IMPRIMÉ AU É.-U. |
INSTRUCTION BOOKLET
MODE D’EMPLOI
PLEASE CAREFULLY READ THE Wii™ OPERATIONS MANUAL COMPLETELY BEFORE USING YOUR Wii HARDWARE SYSTEM, GAME DISC OR ACCESSORY. THIS MANUAL CONTAINS IMPORTANT HEALTH AND SAFETY INFORMATION.
IMPORTANT SAFETY INFORMATION: READ THE FOLLOWING WARNINGS BEFORE YOU OR YOUR CHILD PLAY VIDEO GAMES.
 WARNING – Seizures
•Some people (about 1 in 4000) may have seizures or blackouts triggered by light flashes or patterns, and this may occur while they are watching TV or playing video games, even if they have never had a seizure before.
•Anyone who has had a seizure, loss of awareness, or other symptom linked to an epileptic condition, should consult a doctor before playing a video game.
•Parents should watch their children play video games. Stop playing and consult a doctor if you or your child has any of the following symptoms:
Convulsions |
Eye or muscle twitching |
Altered vision |
Loss of awareness |
Involuntary movements |
Disorientation |
•To reduce the likelihood of a seizure when playing video games:
1.Sit or stand as far from the screen as possible.
2.Play video games on the smallest available television screen.
3.Do not play if you are tired or need sleep.
4.Play in a well-lit room.
5.Take a 10 to 15 minute break every hour.
 WARNING – Repetitive Motion Injuries and Eyestrain
Playing video games can make your muscles, joints, skin or eyes hurt. Follow these instructions to avoid problems such as tendonitis, carpal tunnel syndrome, skin irritation or eyestrain:
•Avoid excessive play. Parents should monitor their children for appropriate play.
•Take a 10 to 15 minute break every hour, even if you don’t think you need it.
•If your hands, wrists, arms or eyes become tired or sore while playing or if you feel symptoms such as tingling, numbness, burning or stiffness, stop and rest for several hours before playing again.
•If you continue to have any of the above symptoms or other discomfort during or after play, stop playing and see a doctor.
 CAUTION – Motion Sickness
Playing video games can cause motion sickness in some players. If you or your child feels dizzy or nauseous when playing video games, stop playing and rest. Do not drive or engage in other demanding activity until you feel better.
This Nintendo game is not designed for use with any unauthorized device. Use of any such device will invalidate your Nintendo product warranty. Copying of any Nintendo game is illegal and is strictly prohibited by domestic and international intellectual property laws. “Back-up” or “archival” copies are not authorized and are not necessary to protect your software. Violators will be prosecuted.
REV–E
WARRANTY & SERVICE INFORMATION |
REV-Q |
You may need only simple instructions to correct a problem with your product. Try our website at support.nintendo.com or call our Consumer Assistance Hotline at 1-800-255-3700, rather than going to your retailer. Hours of operation are 6 a.m. to 7 p.m., Pacific Time, Monday - Sunday (times subject to change). If the problem cannot be solved with the troubleshooting information available online or over the telephone, you will be offered express factory service through Nintendo. Please do not send any products to Nintendo without contacting us first.
HARDWARE WARRANTY
Nintendo of America Inc. (“Nintendo”) warrants to the original purchaser that the hardware product shall be free from defects in material and workmanship for twelve (12) months from the date of purchase. If a defect covered by this warranty occurs during this warranty period, Nintendo will repair or replace the defective hardware product or component, free of charge.* The original purchaser is entitled to this warranty only if the date of purchase
is registered at point of sale or the consumer can demonstrate, to Nintendo’s satisfaction, that the product was purchased within the last 12 months.
GAME & ACCESSORY WARRANTY
Nintendo warrants to the original purchaser that the product (games and accessories) shall be free from defects in material and workmanship for a period of three (3) months from the date of purchase. If a defect covered by this warranty occurs during this three (3) month warranty period, Nintendo will repair or replace the defective product, free of charge.*
SERVICE AFTER EXPIRATION OF WARRANTY
Please try our website at support.nintendo.com or call the Consumer Assistance Hotline at 1-800-255-3700 for troubleshooting information and repair or replacement options and pricing.*
*In some instances, it may be necessary for you to ship the complete product, FREIGHT PREPAID AND INSURED FOR LOSS OR DAMAGE, to Nintendo. Please do not send any products to Nintendo without contacting us first.
WARRANTY LIMITATIONS
THIS WARRANTY SHALL NOT APPLY IF THIS PRODUCT: (a) IS USED WITH PRODUCTS NOT SOLD OR LICENSED BY NINTENDO (INCLUDING, BUT NOT LIMITED TO, NON-LICENSED GAME ENHANCEMENT AND COPIER DEVICES, ADAPTERS, AND POWER SUPPLIES); (b) IS USED FOR COMMERCIAL PURPOSES (INCLUDING RENTAL); (c) IS MODIFIED OR TAMPERED WITH; (d) IS DAMAGED BY NEGLIGENCE, ACCIDENT, UNREASONABLE USE, OR BY OTHER CAUSES UNRELATED TO DEFECTIVE MATERIALS OR WORKMANSHIP; OR (e) HAS HAD THE SERIAL NUMBER ALTERED, DEFACED OR REMOVED.
ANY APPLICABLE IMPLIED WARRANTIES, INCLUDING WARRANTIES OF MERCHANTABILITY AND FITNESS FOR A PARTICULAR PURPOSE, ARE HEREBY LIMITED IN DURATION TO THE WARRANTY PERIODS DESCRIBED ABOVE (12 MONTHS OR 3 MONTHS, AS APPLICABLE). IN NO EVENT SHALL NINTENDO BE LIABLE FOR CONSEQUENTIAL OR
INCIDENTAL DAMAGES RESULTING FROM THE BREACH OF ANY IMPLIED OR EXPRESS WARRANTIES. SOME STATES DO NOT ALLOW LIMITATIONS ON HOW LONG AN IMPLIED WARRANTY LASTS OR EXCLUSION OF CONSEQUENTIAL OR INCIDENTAL DAMAGES, SO THE ABOVE LIMITATIONS MAY NOT APPLY TO YOU.
This warranty gives you specific legal rights. You may also have other rights which vary from state to state or province to province.
Nintendo’s address is: Nintendo of America Inc., P.O. Box 957, Redmond, WA 98073-0957 U.S.A. This warranty is only valid in the United States and Canada.
This software uses a font that is either made by or created based on a font made by Fontworks Japan, Inc. which has been modified to accommodate the software design.
© 2008 Nintendo / HAL Laboratory, Inc. Characters: © Nintendo / HAL Laboratory, Inc. / Pokémon. / Creatures Inc. / GAME FREAK inc. / SHIGESATO ITOI / APE inc. / INTELLIGENT SYSTEMS / Konami Digital Entertainment Co., Ltd. / SEGA. TM, ®, the Nintendo Wi-Fi Connection logo and the Wii logo are trademarks of Nintendo. © 2008 Nintendo.

It’s simple, really! Smack your opponents and send them FLying off the screen to win!
 First things FIrst—- attack!
Once the FIght’s on, use the variety of moves at your disposal to attack!
 Raise that damage percentage!
Land blows on the enemy to raise his or her damage percentage. When the
percentage gets high enough...…
 Send ‘em flFLying!
Use a powerful smash attack to whack your foe and launch ‘em off the fiFIeld of battle!
Controls |
|
05 |
Nintendo Wi-Fi Connection |
20 |
||||||||||||||
|
|
|
|
|
|
|
07 |
Vault |
|
|
|
|||||||
Basic Moves |
|
23 |
||||||||||||||||
|
|
|
|
|
|
|
13 |
|
|
|
|
|
|
|
26 |
|||
Getting Started |
|
Options |
|
|
||||||||||||||
Basic Play |
|
|
15 |
Data |
|
|
|
26 |
||||||||||
Group |
|
|
|
17 |
|
|
|
|
|
|
|
|
||||||
Solo |
|
|
|
18 |
Manuel en français |
29 |
||||||||||||
|
|
|
|
|
|
|
|
|
|
|
|
|
|
|
|
|
|
|
SYSTEM MENU UPDATE
Please note that when first loading the Game Disc into the Wii console, the Wii will check if you have the latest system menu, and if necessary a Wii system update screen will appear. Press OK to proceed.
Super Smash Bros. Brawl is an action game where up to four players pick characters and plunge into frenzied battle. Beat up your foes to send ‘em soaring off the stage!
Higher damage |
|
|
|
|
|
|
|
|
|
launches foes! |
|
|
|
|
|
|
|
|
|
Each attack you land will raise |
|
|
|
|
|
|
|
|
|
your foe’s damage percentage— |
|
|
|
|
|
|
|
|
|
the higher the percentage climbs, |
|
|
|
|
|
|
|
|
|
the farther a foe will FLy. Use |
|
|
|
|
|
|
|
|
|
a variety of moves from your |
|
|
|
|
|
|
|
|
|
arsenal to raise your opponent’s |
|
|
|
|
|
|
|
|
|
damage percentage, then seal |
|
|
|
%…... |
|
|
|
% ... |
|
their fate with a powerful |
|
damage |
|
damage |
|||||
Low |
|
far! High |
|
||||||
|
|
|
|||||||
smash attack! |
|
FLy |
|
ya! |
|
||||
Won’t |
|
See |
|
||||||
|
|
|
|
|
|||||
|
|
|
|
|
|
||||
 Just make it back to the stage!
Even if you’re knocked off of the
stage, don’t panic— you might just be able to recover!
Use your midair jump and special moves to keep yourself in the air
and moving back toward the stage.
|
Use |
a |
Now use |
a |
You made |
it! |
||
Launched? |
|
|
|
|||||
midair |
jump! |
|
special |
move! |
Fight |
on! |
|
|
|
|
|
|
|
|
|||
Compatible Controllers
all of the controllers listed below are compatible with Super Smash Bros. Brawl, but this manual will use the Wii Remote and Nunchuk control scheme in its explanations.
Wii Remote™ |
Wii Remote |
Classic Controller |
Nintendo GameCube™ |
|
and Nunchuk™ |
(Held Sideways) |
Controller |
||
|
03 |
04 |

TILT |
as you normally would. |
Controls |
|
TAP |
as if fLicking it. |
Move your character with  and press
  or
or  to attack (For more on basic moves
 P.7 ). Adjust control settings in Options
 P.26 .
Black words = menu navigation. |
Wii Remote |
Red words = in-game commands. |
|
Pause |
Select |
|
|
Attack |
|
|
Grab |
Cancel |
|
|
||
|
Use special |
|
HOME Menu |
move |
|
Grab |
||
|
CAUTION: WRIST STRAP USE
Please use the wrist strap to help prevent injury to other people or damage to surrounding objects or the Wii Remote in case you accidentally let go of the Wii Remote during game play.
Also remember the following:
•Make sure all players put on the wrist strap properly when it is their turn.
•Do not let go of the Wii Remote during game play.
•Dry your hands if they become moist.
•Allow adequate room around you during game play and make sure that all areas you might move into are clear of other people and objects.
•Stay at least 3 feet from the television.
•Use the Wii Remote Jacket.
 CONTROL CHART
When using just the Wii Remote (held sideways), the Classic Controller, or Nintendo GameCube Controller, the control schemes are as follows. All can be customized in options.
Wii Remote |
Choose option |
Shield |
(Held Sideways) |
|
|
|
Jump |
Grab |
|
Move |
Special MOVE |
|
CANCEL |
|
|
|
|
|
Crouch |
attack/SELECT |

 Choose option

 Jump
Jump


 Move
Move

 Crouch
Drop through  platform

 Jump
Jump

 Shield
Nunchuk
 Taunt
Taunt
 P.8
P.8
Smash attack
 P.9
P.9
The Wii Remote pointer is only used on the Wii menu  P.13 and HOME menu for this game.
Pointer 

Jumping via  and smash attacks via shaking the Wii Remote are control options that can be toggled on and off under the Controls submenu in Options.
tap |
Drop through |
smash attack |
|
quickly |
|||
|
TaunT |
|
|
Classic Controller |
Choose option |
smash attack |
|
|
|
||
|
TaunT |
Shield |
|
|
Jump |
Grab |
|
|
Move |
Special MOVE |
|
|
CANCEL |
||
|
|
||
|
Crouch |
attack/SELECT |
|
|
Drop through |
|
|
Nintendo |
Choose option |
smash attack |
|
GameCube |
|||
|
|
||
Controller |
TaunT |
Shield |
|
|
|||
|
Jump |
Grab |
|
|
Move |
attack/SELECT |
|
|
Crouch |
Special MOVE |
|
|
CANCEL |
||
|
|
||
|
Drop through |
|
05 |
06 |
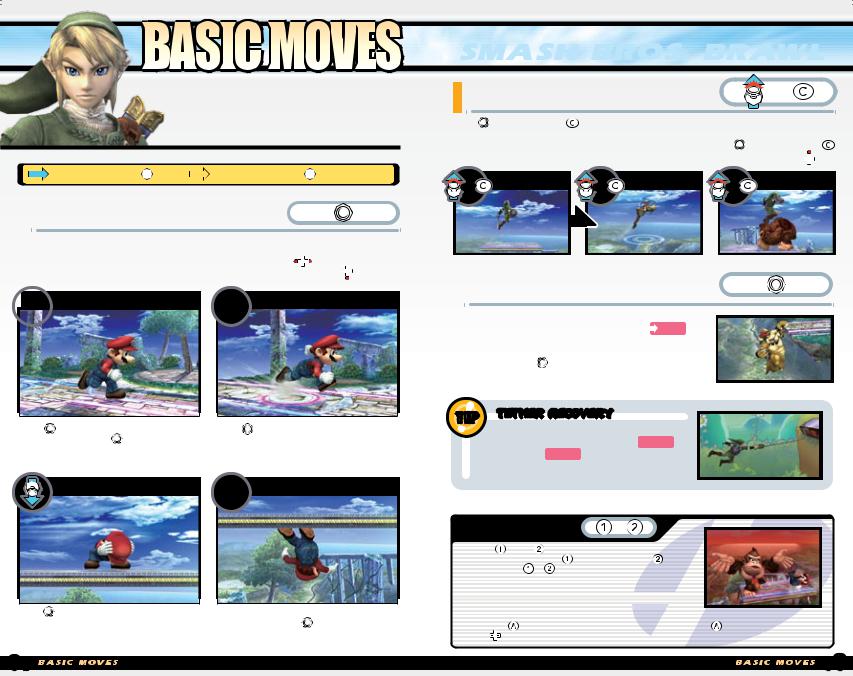
Use the basic moves explained here to keep on top of the FIght. Any character can perform these moves, but the individual forms the moves take vary from FIghter to FIghter.
 indicates a tilt of
 , while
 indicates a tap of
 .
.
 MOVE
MOVE
This basic action allows you to close in or run away from other players.
*When playing with the Wii Remote held sideways, press |
twice |
the same |
direction (hold down after the second press) to dash. |
tap |
to drop |
through a platform. |
|
|

 WALK
WALK 
 DASH
DASH
|
|
|
|
|
Tilt left or right to walk. The |
|
Tap |
left or right quickly and |
|
farther you tilt |
the faster |
|
hold |
dash. You will continue |
you move. |
|
|
to dash until you stop tilting. |
|
|
|
|
|
|
CROUCH  DROP THROUGH
|
|
|
|
Tilt down to crouch in place. |
|
When standing |
FLoating |
This position stabilizes you, |
|
platforms, tap |
down to drop |
reducing the chances an attack |
|
through the platform. |
|
will push you back. |
|
|
|
JUMP |
|
|
|
OR |
||
|
|
|
|
|||
Tap up or press |
to jump into the air. While in the air, |
|||||
you may jump once more. When directly above |
foe, use their |
|||||
head as a footstool and jump off by tapping |
or pressing |
|||||
the moment you make contact. *You can also jump by pressing |
||||||
|
JUMP |
|
MIDAIR JUMP |
|
FOOTSTOOL |
|
OR |
OR |
OR |
JUMP |
|||
|
|
|||||
|
|
|
||||
 EDGE CLIMB
When knocked off of the stage, use a midair jump and special moves P.10 to draw near the edge of a platform and grab hold of it. While hanging from the edge, tilt up to climb up. Some characters can grab the ledge from farther out using a tether recovery.
TIP Tether Recovery
Certain characters can throw out a tether with a special move  P.10 or a grab
 P.11 Use the extended tether like a grappling hook to recover from long distances.
TAUNT |
OR |
|
|
|
|
Press and |
to perform a unique taunt. |
|
Use your up |
down taunt |
and |
side taunt |
let your opponents |
|
know just |
they’re messing with. You |
|
can’t move or perform other actions while  taunting, so be careful about when you
  choose to strut.
 When playing with the Wii Remote held sideways, you up taunt by
pressing |
Taunt by simultaneously pressing |
and a direction |
with |
perform an up taunt, down taunt, |
side taunt. |
07 |
08 |
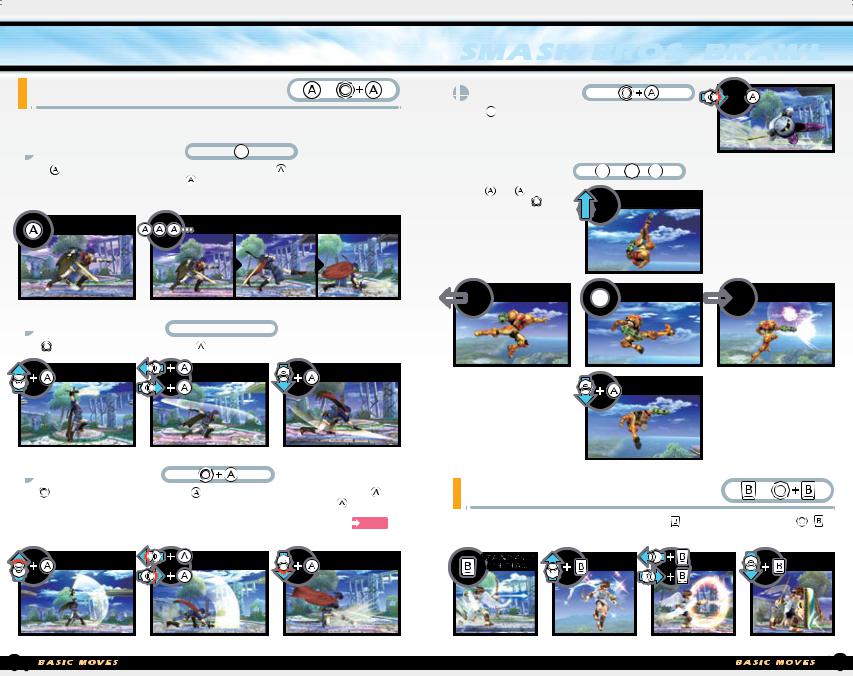
ATTACKS |
OR |
|
Press by itself or
 with
with to unleash many attacks.
 Standard Attack
Press to do a standard attack or rapidly tap for a standard
combo You can also hold down |
for repeated standard attacks. |
If one of these connects while |
have the button held down, you’ll |
automatically launch a standard combo with some characters.
STANDARD |
STANDARD COMBO |
|
ATTACK |
||
|

 Strong Attack
Tilt in any direction and press |
for a strong attack. |
|
|
Strong Up |
OR |
Strong SIDE |
Strong DOWN |
|
|
|
|

 Smash Attack
Tap in any direction and press |
for a smash attack. Hold down |
|||
after pressing it to charge your smash attack, then release |
to launch |
|||
it. This is called a smash charge. |
|
|
|
|
If you turn on the Shake Smash option in the Controls submenu |
P.26 |
|||
under Options, you can also do smash attacks by shaking the |
. |
|||
UP SMASH |
OR |
SIDE SMASH |
DOWN SMASH |
|
|
|
|
|
|
Dash Attack |
DASH |
|
+ |
Press  while dashing to do a dash attack and get the FIrst strike in as you close in on your foe.
 Air Attack
Press or any direction with to do midair attacks.

 BACK AIR
 OR
OR


 Up AIR
 STANDARD AIR
 FRONT AIR
DOWN AIR |
*These controls assume |
|
you face right. |
||
|
SPECIAL MOVES |
|
|
OR |
|
Use one of four special moves by pressing |
or any direction with |
|||
Some have variations cued by additional commands. |
|
|||
Standard |
UP |
|
SIDE |
DOWN |
Special |
Special |
OR |
Special |
Special |
09 |
10 |
Defensive Shield |
OR |
|
Pressing or calls a shield that defends you from attacks for as long as the button is held down. It shrinks as it absorbs attacks and as time passes. If your shield breaks, you’ll be stunned. You can move while shielding by using
 OR
OR

 Evasion
 OR
OR 

Do evasive maneuvers by tapping while shielding. Use these to dodge attacks or to get behind a nearby foe. You can even dodge in midair by
pressing |
or |
|
|
|
|
|
|
Backward |
|
Sidestep |
|
Forward |
|
OR |
Roll |
OR |
OR |
Roll |
||
|
*Above controls assume you face right.
|
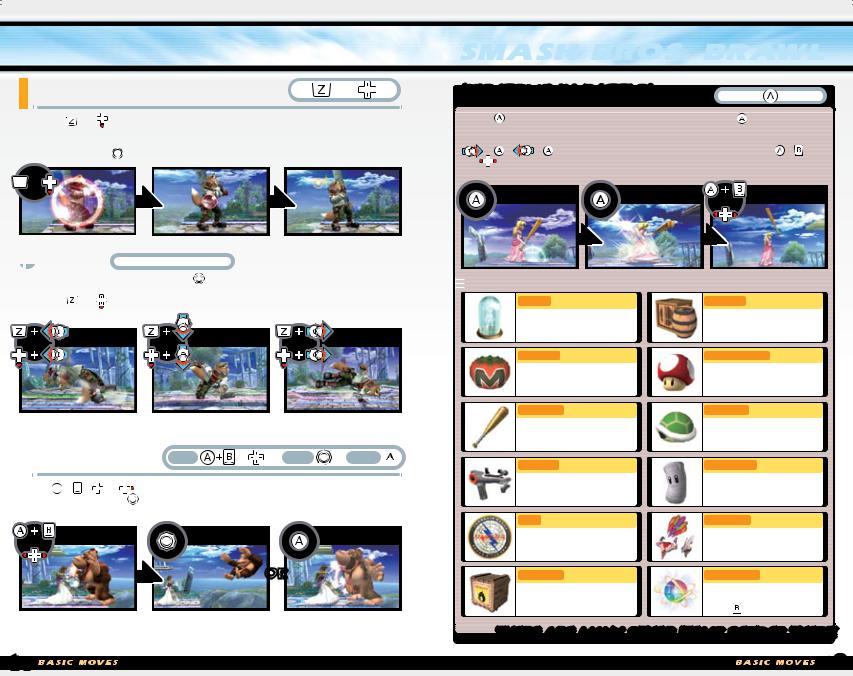
Grab/Throw GRAB |
OR THROW |
ATTACK |
|
|
|
|
Press  +
+ 
 or
or to grab your opponent, then throw in one of four directions by tilting Once you’ve grabbed an enemy, you can attack before throwing by pressing
OR |
GRAB |
THROW |
ATTACK |
|
|
|
OR
USE ITEMS IN BATTLE!
Press |
when near an item to pick it up, then press again to use |
it. |
items activate as soon as you grab them.) With some items, |
|
Bat, you can do a special smash attack pressing |
|
Discard an item at any time by pressing |
control schemes let you discard items with the grab button.
PICK UP |
USE ITEM |
OR |
DISCARD |
|
|
|
 Items
Items
Helping ASSIST TROPHY |
Carrying Containers |
Spawns a character |
Produce items |
to help you. |
when broken. |
Recovery Maxim Tomato |
Super |
Transforming Mushroom |
|
Recovers up to 50% |
BrieFLy boosts your |
of damage. |
size and power. |
Battering Home-Run Bat |
Throwing Green Shell |
Launches foes with a |
Slides along and |
smash attack. |
launches foes. |
Shooting Super Scope |
Prize Giving Sandbag |
Fires small blasts |
can produce items |
and charged shots. |
each time you hit it. |
Gear Franklin Badge |
Combining Dragoon Parts |
ReFLects projectiles. |
Collect three parts to |
|
see what happens! |
Exploding Blast Box |
Final Smash Smash Ball |
Explodes from a |
Destroy it and |
strong attack or FIre. |
unleash a Final Smash |
|
with |
There are many other items besides these!
11 |
12 |
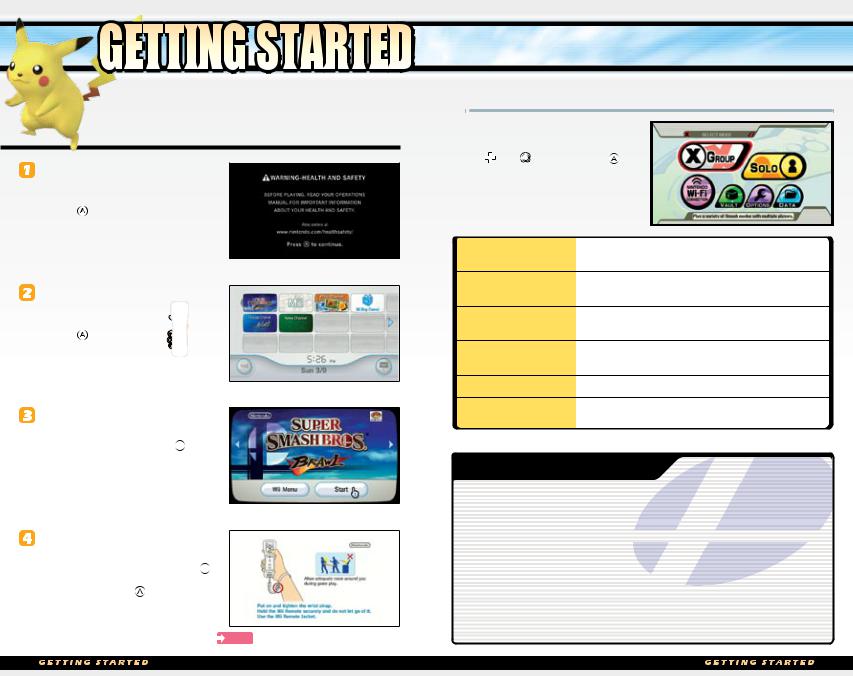
Insert the Super Smash Bros. Brawl Game Disc into your Wii console. Your console will automatically turn on.
Once powered on, your console will display the screen shown on the right. After reading the info, press .
*The screen on the right will display even if you insert the Game Disc after powering on your Wii console. *You’ll be unable to use a Nintendo GameCube Controller to navigate until you reach the game’s main menu.
Next, put your pointer on the icon for the Disc Channel and press . Remember to point the Wii Remote directly at the screen when using it.
Once you do this, you’ll see the channel preview screen. Place your pointer on the Start icon and press  .
.
The strap usage screen will display next. Once you’ve properly placed your hand through the strap, press  . At the title screen that follows, press once more to go to the main menu.
*From this point on, you will not be able to use the pointer to navigate the game. For more on controls and
specific button functions, please see P.05 .
 Main Menu
You have six options to choose from on the main menu. Move between options with  or , then press
to select an option.
Group  P.17
P.17
Solo  P.18
P.18
Nintendo Wi-Fi
Connection  P.20
P.20
Vault  P.23
P.23
Options  P.26
P.26
Data  P.26
P.26
Play a standard match, change settings, and set up tourneys in this multiplayer mode. You can also register your name  P.16 .
Fight CPU opponents, practice in training mode, and embark on a story-driven adventure. Some modes allow two-player play.
Face off against distant opponents, from your closest friends to unknown rivals. There are also a few minigames.
Admire stickers and trophies you’ve accumulated, replay your favourite Smash moments, and enjoy other bonuses.
Adjust screen size, game controls, and other game settings.
Play Smash Bros. movies, listen to music from the game, and view game records.
Saving
The game will ask you if you’d like to make a save file if you do not currently have one. Once made, the game will automatically save your data to the Wii every time you adjust settings, or end a match and return to the main menu. 

*You need 128 blocks of free memory to save this game.
*You can’t copy save data from this game to an SD memory card. However, some Vault data can be copied to an SD memory card  P.25 .
*If you don’t create a save data file when you start, you will not be able to play via Nintendo Wi-Fi Connection and Vault data will not be saved.
*Save your game manually by selecting Save on the map screen P.19 in
Adventure Mode: The Subspace Emissary (under the Solo option).
13 |
14 |
Once you’ve selected a mode, choose your character and stage and get ready to FIght. Use all your skills and moves to knock your opponents off the stage.
 Basic Rules
Essentially, just attack your opponents to launch them off the stage! Raise your rival’s damage percentage high enough and FInish the job with a smash attack.
TIP The Basics
Higher damage % = Longer launch!
Even if you’re knocked far away from the stage, make it back to solid ground with your midair jump and special moves!
 Selecting a Character
Selecting any battle mode will take you to the characterselection screen. Use to choose a character by placing
your game token |
(Pick up and place your game |
token again with |
and Once all players have selected, |
the words “READY |
FIGHT” will appear. Press to advance |
to the stage-selection screen. Hold down to return to the previous menu.
|
|
Change match rules |
||||
Change match type |
|
|
|
|
|
|
|
|
|
|
|
||
|
|
|
|
|
||
|
|
|
|
|
||
Change character colour |
|
|
|
|
|
|
|
|
|
|
|
||
Colour changes each time |
|
|
|
|
||
you press . |
|
|
|
|
||
Toggle human/CPU players |
|
|
|
|
|
|
|
|
|
|
|
||
Choose between human or |
|
|
|
|
||
computer players. You can |
|
|
|
|
||
set computer players’ CPU |
Select or register a name P.16 |
|||||
Lv. (difFIculty). |
||||||
|
|
|
|
|||
 Names
Names
In addition to creating a label that identiFIes your character in battle, creating a name makes a proFIle that tracks your FIght records and your preferred control settings. You can also save your name to a Wii Remote P.17 and bring it to a friend’s house for use on other Wii Consoles. records can’t be saved to a Wii Remote.
|
|
|
|
|
|
At character |
|
|
Already registered? |
|
Or register a new |
selection, select |
. |
|
Choose it here... |
|
one with New Entry. |
|
|
|
|
|
|
 Stage Selection
Select the stage for your brawl. Move over stages with
 and choose with
 .
.
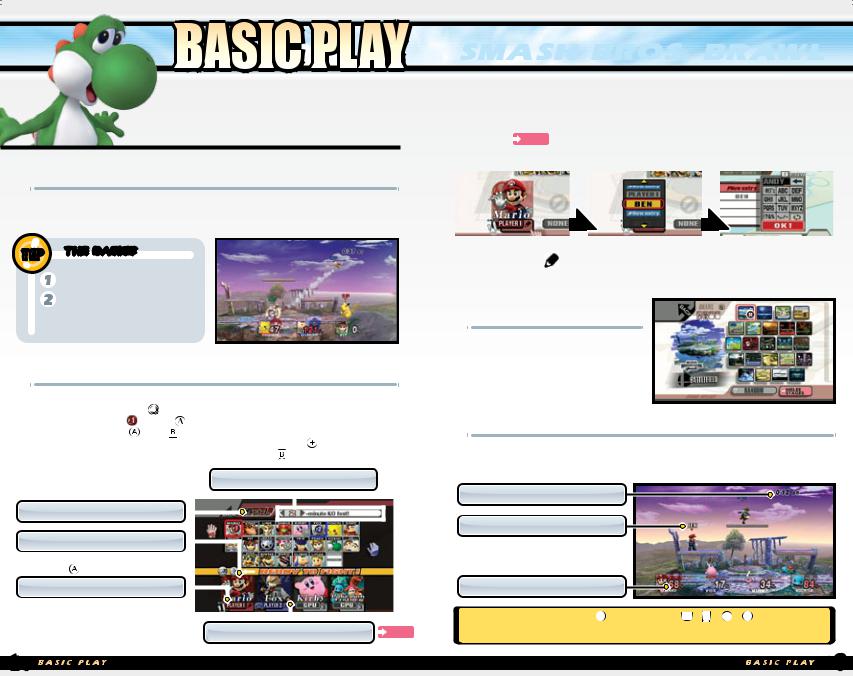
 Play Screen
Send your foes FLying to win! When the match ends, you’ll see results.—then, depending on the mode, you’ll either return to the character-selection screen or go to the next match.
Time Left
Name
If you’ve selected a name, it appears above your character’s head.
Damage %
After you’ve paused with  , you can press
  +
+  +
+  +
+  to cancel the current brawl.
*When you cancel a brawl, no data about wins or place is generated.
15 |
16 |
 Loading...