


need help with installation, maintenance or service?
Nintendo cuSTomer service SUPPORT.nintendo.com
or call 1-800-255-3700 MON.-SUN., 6:00 a.m. to 7:00 p.m., Pacific Time
(Times subject to change)
BESOIN D’AIDE POUR L’INSTALLATION, L’ENTRETIEN OU LA RÉPARATION?
SERVICE À LA CLIENTÈLE DE NINTENDO
SUPPORT.NINTENDO.COM
ou composez le 1 800 255-3700
LUN.-DIM., entre 6 h 00 et 19 h 00, heure du Pacifique (Heures sujettes à changement)
|
|
|
|
|
|
|
|
67932A |
|
||||||||||
|
|
|
|
|
|
|
|
|
|||||||||||
Nintendo of America Inc. |
|
|
|
|
|
|
|
|
|
|
|
|
|
|
|
|
|
|
|
P.O. Box 957, Redmond, |
|
|
|
|
|
|
|
|
|
|
|
|
|
|
|
|
|
|
|
WA 98073-0957 U.S.A. |
|
|
|
|
|
|
|
|
|
|
|
|
|
|
|
|
|
|
PRINTED IN JAPAN |
www.nintendo.com |
|
|
|
|
|
|
|
|
|
|
|
|
|
|
|
|
|
|
IMPRIMÉ AU JAPON |
NTR-IMWE-CAN
INSTRUCTION BOOKLET /
MODE D’EMPLOI
PLEASE CAREFULLY READ THE SEPARATE HEALTH AND SAFETY PRECAUTIONS BOOKLET INCLUDED WITH THIS PRODUCT BEFORE USING YOUR NINTENDO® HARDWARE SYSTEM, GAME CARD OR ACCESSORY. THIS BOOKLET CONTAINS IMPORTANT HEALTH AND SAFETY INFORMATION.
IMPORTANT SAFETY INFORMATION: READ THE FOLLOWING WARNINGS BEFORE YOU OR YOUR CHILD PLAY VIDEO GAMES.

 WARNING - Seizures
•Some people (about 1 in 4000) may have seizures or blackouts triggered by light flashes or patterns, and this may occur while they are watching TV or playing video games, even if they have never had a seizure before.
•Anyone who has had a seizure, loss of awareness, or other symptom linked to an epileptic condition should consult a doctor before playing a video game.
•Parents should watch their children play video games. Stop playing and consult a doctor if you or your child has any of the following symptoms:
Convulsions |
Eye or muscle twitching |
Loss of awareness |
Altered vision |
Involuntary movements |
Disorientation |
•To reduce the likelihood of a seizure when playing video games:
1.Sit or stand as far from the screen as possible.
2.Play video games on the smallest available television screen.
3.Do not play if you are tired or need sleep.
4.Play in a well-lit room.
5.Take a 10 to 15 minute break every hour.

 WARNING - Radio Frequency Interference
The Nintendo DS can emit radio waves that can affect the operation of nearby electronics, including cardiac pacemakers.
•Do not operate the Nintendo DS within 9 inches of a pacemaker while using the wireless feature.
•If you have a pacemaker or other implanted medical device, do not use the wireless feature of the Nintendo DS without first consulting your doctor or the manufacturer of your medical device.
•Observe and follow all regulations and rules regarding use of wireless devices in locations such as hospitals, airports, and on board aircraft. Operation in those locations may interfere with or cause malfunctions of equipment, with resulting injuries to persons or damage to property.
 WARNING - Repetitive Motion Injuries and Eyestrain
Playing video games can make your muscles, joints, skin or eyes hurt. Follow these instructions to avoid problems such as tendinitis, carpal tunnel syndrome, skin irritation or eyestrain:
•Avoid excessive play. Parents should monitor their children for appropriate play.
•Take a 10 to 15 minute break every hour, even if you don’t think you need it.
•If your hands, wrists, arms or eyes become tired or sore while playing, or if you feel symptoms such as tingling, numbness, burning or stiffness, stop and rest for several hours before playing again.
•If you continue to have any of the above symptoms or other discomfort during or after play, stop playing and see a doctor.

 WARNING - Battery Leakage
The Nintendo DS contains a rechargeable lithium ion battery pack. Leakage of ingredients contained within the battery pack, or the combustion products of the ingredients, can cause personal injury as well as damage to your Nintendo DS.
If battery leakage occurs, avoid contact with skin. If contact occurs, immediately wash thoroughly with soap and water. If liquid leaking from a battery pack comes into contact with your eyes, immediately flush thoroughly with water and see a doctor.
To avoid battery leakage:
•Do not expose battery to excessive physical shock, vibration, or liquids.
•Do not disassemble, attempt to repair or deform the battery.
•Do not dispose of battery pack in a fire.
•Do not touch the terminals of the battery, or cause a short between the terminals with a metal object.
•Do not peel or damage the battery label.
Important Legal Information |
REV–E |
This Nintendo game is not designed for use with any unauthorized device. Use of any such device will invalidate your Nintendo product warranty. Copying of any Nintendo game is illegal and is strictly prohibited by domestic and international intellectual property laws. “Back-up” or “archival” copies are not authorized and are not necessary to protect your software. Violators will be prosecuted.

THIS GAME CARD WILL WORK
ONLY WITH THE NINTENDO DS™
VIDEO GAME SYSTEM.
NEED HELP PLAYING A GAME?
Recorded tips for many titles are available on Nintendo’s Power Line at (425) 885-7529. This may be a long-distance call, so please ask permission from whoever pays the phone bill.
If the information you need is not on the Power Line, you may want to try using your favorite Internet search engine to find tips for the game you are playing. Some helpful words to include in the search, along with the game’s title, are: “walk through,” “FAQ,” “codes,” and “tips.”
©2008 - 2009 Nintendo/Creatures Inc. TM, ® and the Nintendo DS logo are trademarks of Nintendo.
©2009 Nintendo.
This product uses the LC Font by Sharp Corporation, except some characters. LCFONT, LC Font and the LC logo mark are trademarks of Sharp Corporation. This product includes RSA BSAFE Cryptographic software from RSA Security Inc. RSA and BSAFE are registered trademarks of RSA Security Inc. in the United States and/or other countries. © 2005 RSA Security Inc. All rights reserved. Ubiquitous TCP/IP+SSL © 2001-2005 Ubiquitous Corp.
Contents
About Personal Trainer: Walking |
6 |
Records |
|
Things You'll Need |
6 |
Select a Player |
24 |
Getting Started |
8 |
View Records |
25 |
Registering a Player |
|
Play with Records |
31 |
Registration Process |
10 |
Edit Player |
37 |
Creating a Mii Character or a Dog |
12 |
Manage Data |
38 |
Let’s Get Walking! |
20 |
Handwriting Help |
39 |
Checking Your Life Rhythm |
22 |
Manuel en français |
45 |
5
 About Personal Trainer: Walking
Please read before using
Personal trainer: walking uses an Infrared Game Card to connect to an Activity Meter™ accessory. The Infrared Game Card is a Nintendo DS Game Card with an infrared connection feature, and the Activity Meter accessory measures your life rhythm and step count.
You can check the data recorded by the Activity Meter accessory and use it to play various games by sending it to this software using the infrared connection. (Your life rhythm and step count cannot be checked using the Activity Meter accessory by itself.)
•One Activity Meter accessory can store only one player’s data.
•Up to four Activity Meter accessories can be used with this software (see page 10).
•Be sure to read the Activity Meter Operations Manual before using this Game Card.
 Things you’ll need
Apartfromthissoftware,you’llneedaNintendoDSsystem*(soldseparately)andanActivity Meter accessory.
* “Nintendo DS system” is a general term for the Nintendo DS, Nintendo DS Lite, or Nintendo DSi systems
Personal Trainer: Walking |
Nintendo DS system |
Activity Meter accessory |
Infrared Game Card |
||
|
(sold separately) |
|
Note: In order for the Activity Meter accessory to start measuring your step count, you first need to register a player. To do so, please follow the instructions given under Registering a Player (see page 10).
In this manual, represents the top screen and
  represents the Touch Screen.
Personal Trainer: Walking uses the Nintendo DS system’s clock function. Please ensure that the time setting of your Nintendo DS system is correct. If you are using more than one system, be sure to synchronize each system’s time setting before use.
Changing the Nintendo DS system’s time setting after registering a player will cause life-rhythm and step-count data to be recorded incorrectly, and could also cause recorded data to be lost when the Activity Meter accessory's battery is changed.
Note: To learn how to change the DS system’s date and time settings, please refer to the operations manual for your DS system.

 CAUTION - Injury Due to Pre-existing Conditions
Using the Activity Meter accessory may require varying amounts of physical activity. Consult a doctor before using the this product if:
•you are or may be pregnant,
•you have heart, respiratory, back, joint or other orthopedic conditions,
•you have high blood pressure,
•you have difficulty with physical exercise, or
•you have been instructed to restrict physical activity.
While using the Activity Meter accessory, if you experience excessive fatigue, shortness of breath, chest tightness, dizziness, discomfort or pain, STOP USE IMMEDIATELY and consult a doctor.
6 |
7 |
|
|

Getting Started
Make sure the Nintendo DS system is off, then push the PERSONAL TRAINER: WALKING Infrared Game Card into the Nintendo DS Game Card slot until you hear it click.
1Turn on the power, and the Health and Safety Screen will appear.After reading the text, touch the Touch Screen with the stylus to proceed to the DS Menu Screen.
2Touch the PERSONAL TRAINER: WALKING panel on the DS Menu Screen to begin.The title screen will then appear.
• If you have your DS system set to Auto Mode, you do not need to do this. For more information, please refer to the operations manual for your DS system.
The in-game language depends on the one that is set on the system. In this game, you can choose between three different languages: English, French, and Spanish. If your Nintendo DS system is already set to one of these, that same language will be displayed in the game. If your Nintendo DS system is set to another language, the in-game default language will be English.You can change the in-game language by changing the language setting of your system. For further instructions about how to change language settings, please refer to the operations manual for your Nintendo DS system.
 The title screen
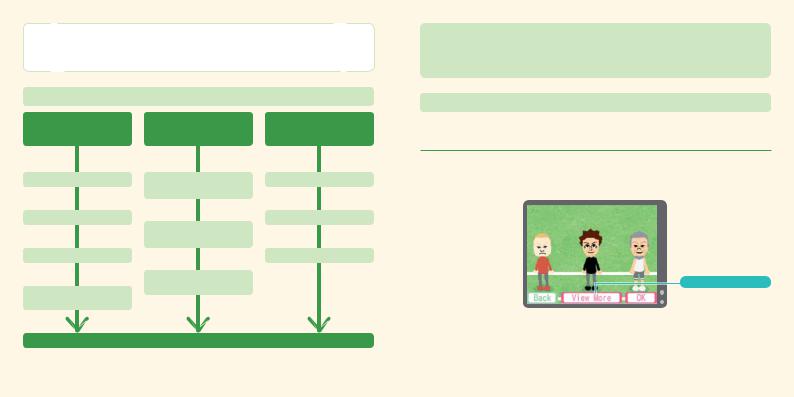
The first time you start this software, only REGISTER A PLAYER will be displayed on the Touch Screen. Touch it to start registering a player.
If you have already registered a player, the following options will be displayed:
CHECK YOUR RHYTHM |
Check your life rhythm by connecting the Activity Meter accessory to the |
|
(see page 22) |
Infrared Game Card. |
|
RECORDS |
View players’ records and play games using the recorded data. |
|
(see page 24) |
||
|
||
|
|
|
REGISTER A PLAYER |
Register a new player. |
|
(see page 10) |
||
|
||
MANAGE DATA |
Erase or transfer player data. |
|
(see page 38) |
||
|
About recorded data
Your life-rhythm data will be saved when you connect the Activity Meter accessory to the Infrared Game Card.
Data is also automatically saved when you change certain settings and at certain special times. Up to four players’ data can be stored on one Infrared Game Card.
Note: You can erase all data and reset the software to factory settings by holding down the A Button, B Button, X Button, Y Button, L Button, and R Button simultaneously immediately after step 2 of Getting Started
(see page 8). Please be careful when erasing data, as erased data cannot be recovered.
8 |
9 |
|
|

Registering a Player / Registration Process
One Activity Meter accessory can store one player’s measured data, and up to four players can be registered on one Infrared Game Card. Why not try registering your family?
Note: A separate Activity Meter accessory is required for each registered player.
Before using the Activity Meter accessory for the first time
Please remove the plastic tab from the Activity Meter accessory and dispose of it immediately to avoid it being swallowed by children or pets.
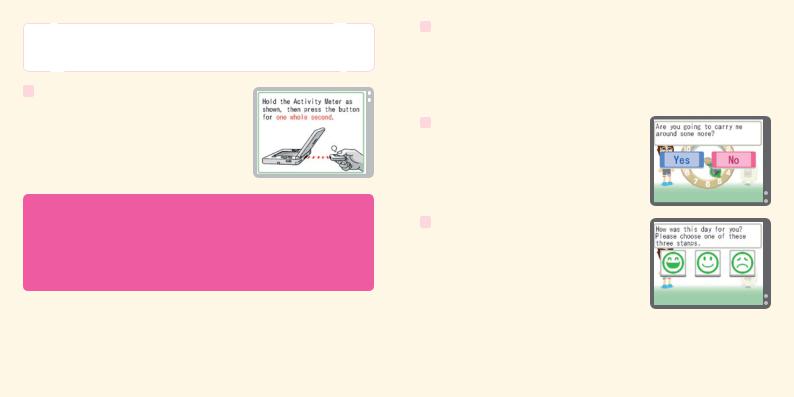
1 Touch REGISTER A PLAYER on the title screen. Touch NEXT, then push the Communication Button to connect the Activity Meter accessory to the Infrared Game Card as shown on the top screen.
•Ensure that the Activity Meter accessory and the PERSONAL TRAINER: WALKING Infrared Game Card’s sensors are facing each other at a distance of no greater than 2 inches, and that they are kept still.
•In order to use the Activity Meter accessory, necessary data will be sent from the Infrared
Game Card to the Activity Meter accessory.
•When data is being sent, the Activity Meter accessory’s light will flash red.
•If there is a problem with the infrared connection, please consult the Infrared Connection and Troubleshooting sections of the Activity Meter Operations Manual.
2After an introduction to the Activity Meter accessory, the date and time settings of your Nintendo DS system will be displayed.You’ll be asked if the settings are correct. If they are, touch YES to use them and the Activity Meter accessory's date and time will be set
accordingly. If the date and time settings are incorrect, touch NO, restart the DS system, and set the correct date and time.
•To learn how to change the system’s date and time settings, refer to the operations manual for your Nintendo DS system.
•If the system’s date and time settings are changed after registering a player, there is a possibility that life-rhythm and step-count data will not be saved correctly.
3Create your player by first selecting the player type – person or dog (see pages 12 – 19).
4When you’ve finished creating your player, connect the Activity Meter accessory to the Infrared Game Card.You are now ready to record your life rhythm!
When registering on another Infrared Game Card
•Touch REGISTER A PLAYER and create your player again.
•Even if you register on another Infrared Game Card, your player data will not be erased from the original Infrared Game Card.
•If the date and time of the original Nintendo DS system is different from that of the new system, there is a possibility that your records won’t be stored correctly. Please synchronize the two systems before registering a player.
10 |
11 |
|
|
Registering a Player / Creating a Mii Character or a Dog
Human players can create a Mii™ character using this software or import a Mii character from a Wii™ console. Use this software to create dog characters for your dog.
 The player creation process
Creating a Mii character for a |
Importing a Mii character |
Creating a dog |
|
person in SELECT A Mii |
for a person in IMPORT A Mii |
||
(see page 17) |
|||
(see pages 13 – 17) |
(see pages 18 – 19) |
||
|
|||
Choose gender and age |
Connect the Nintendo DS |
Choose gender and size |
|
|
system to a Wii console |
|
|
Select a Mii character |
|
Choose a dog |
Edit the Mii character
Choose clothes and favorite color
Transfer the Mii character from the Wii console to the DS system
Choose a collar color
Choose clothes and favorite color
Enter a name, family name (if you are the first player to register), and birthday to complete registration
What is a Mii character?
A Mii is a character that represents you, which you can create according to your own tastes by choosing facial features, your favorite color, and so on.You can also use Mii characters imported from a Wii console in this software (see pages 18 – 19).
 Creating a Mii character for a human player with SELECT A Mii
Use this software to create a Mii for your player.

 Choose gender and age, then select a Mii
Please select your player’s gender and age (adult or child). A selection of Mii characters will then appear on the Touch Screen. Touch the Mii character you would like to use for your player, then touch OK. This Mii character can be edited freely (see page 14).
VIEW MORE
Touch to see a different selection of Mii characters.
12 |
13 |
|
|

 Edit the Mii character
You can edit the face of the Mii character you have selected. When asked if you would like to edit this Mii character, touch YES. The screen shown below will be displayed.You can then edit the Mii character – refer to the next page for further details.
If you touch NO, the software will skip this step and proceed to choosing clothes and a favorite color for your Mii character (see page 16).
Current Mii character
Use the L Button and R Button to rotate.
Editing icons
The icons displayed will vary depending on the feature you have chosen. Touch the arrows to display different pages of icons.
Undo
Undo the last change you made.
Features
1Touch the feature you want to edit.
Features:
Outline |
Hair |
Eyebrows |
Eyes |
Nose |
Mouth |
Other |
|
|
2Touch a feature to select it, then touch the editing icons to change the color, location, and so on.
3 Repeat steps 1 and 2 until you have finished creating your Mii character, then touch OK.
14 |
15 |
|
|


 Choose clothes and favorite color
Select the outfit that you’d like, then select your favorite color.

 Enter your name
Enter your first name by writing it on the Touch Screen.

 Enter your family name
Enter your family name by writing it on the Touch Screen as you did with your name. This family name will be used for all registered players.
Note: This step only appears the first time you register a player. For subsequent players, this step will be skipped.

 Enter your birthday
Use  and
and  to enter your birthday, then select OK to continue. All the data you’ve entered will be displayed on the top screen. Once you have confirmed that this data is correct, touch YES to complete player registration.
Your name, birthday, and other details can be changed at any point by going to EDIT PLAYER
(see page 37).
Creating a dog character
To create a character for your dog, please follow the steps below.
1.Select the gender and size of your dog.
2.Select a dog from the ones displayed on the Touch Screen.
3.Select a collar color.
4.Enter your dog’s name, your family name (if this is the first player you’ve registered), and your dog’s birthday. Confirm this data to finish creating a dog character for your dog.
16 |
17 |
|
|

 Creating a Mii character for a person with IMPORT A Mii
Instructions in black are for the Nintendo DS system, and instructions in green are for the Wii console.
1 Touch IMPORT A Mii, then touch CONNECT.
2Turn on the Wii console. From the Wii Menu, select the Mii Channel and then START. When the Mii Channel is displayed, point the Wii Remote controller away from the screen and press the A Button, B Button, 1 Button, and 2 Button on the Wii Remote in that order, holding down the 2 Button (press only one button at a time). You will be asked if you’d like to start
DS Wireless Communications. Select YES to start the connection between the Nintendo DS system and the Wii console.
3When the screen shown on the right is displayed, grab the Mii character you’d like to import using the A Button and
B Button, then drop it into the frame at the top of the screen. The import of your Mii character will begin.
4Once the Mii character has been imported, touch OK to end the connection. The Mii character's nickname will be used as your player’s name. Select your clothes and favorite color, then enter your family name (if this is the first player you’ve registered) and birthday to finish creating your player.The CONNECT TO DS button will also be added to the Mii Channel.
Note: If you are registering the first player and importing a Mii character, you will be allowed to enter a family name and new name for the Mii character.You will not be able to change the Mii character's name later.
When you have performed this process once, you can select the CONNECT TO DS button to start importing a Mii character anytime you wish to repeat this process in the future.
•For details on how to create a Mii character, refer to the Wii Operations Manual – Channels & Settings.
•Mii characters imported from Wii consoles will not be deleted from the Mii Channel.
•Mii characters created in this software cannot be exported to Wii consoles.
•The nickname and features of Mii characters imported from Wii consoles cannot be edited in this software once they have been imported. The clothes, favorite color, and birthday for the Mii character can be edited by going to EDIT PLAYER (see page 37).

 Guidelines for communications
For best results when using the wireless communications feature, follow these guidelines.
The  icon is an indicator of wireless communications. It appears on the DS Menu Screen or game screen of the Nintendo DS system.
The DS Wireless icon indicates that the associated choice will activate the wireless communications function.
The  icon, which is displayed on the Nintendo DS system during wireless communications, is an indicator of the current wireless signal strength. There are four levels of signal strength, each level represented by a bar. A stronger signal reception will provide smoother wireless communications play.
Note: When wireless communications are in progress, the Power Indicator LED of the Nintendo DS system will blink rapidly.
For best results, follow these guidelines:
•Begin with the distance between the Nintendo DS system and the Wii console at about 33 feet or less and move closer or farther apart as desired, keeping the signal strength at two or more bars for best results.
•Avoid having people or other obstructions between the Nintendo DS system and the Wii console.
•Avoid interference from other devices.If communications seem to be affected by other devices
(wireless LAN, microwave ovens, cordless devices, computers), move the Wii console to another location or turn off the interfering device.
18 |
19 |
|
|
Let’s Get Walking!
Once you have registered your player, it’s time to start walking – carrying the Activity Meter accessory with you, of course! By recording your steps with the Activity Meter accessory, it’s easy to check your life rhythm.
 Your daily step target
At first, your target number of steps for one day will be set to 3,000.You can change your step target freely, so try to find a step target that is suitable for you.You can set your daily step target with CHANGE STEP TARGET (see page 37).
 Checking if you’ve reached your step target
You can check if you have reached your daily step target by shaking the Activity Meter accessory and looking at its light. (The actual number of steps taken can only be checked using this software).
Step target not reached |
The light flashes |
red |
once. |
Step target reached |
The light flashes |
green |
twice. |
 The amount of data that can be saved on the Activity Meter accessory
Please refer to this chart for the amount of data that the Activity Meter accessory can store.When the amount of data that can be saved is exceeded, old data will be overwritten, starting with the oldest.
Life rhythm (steps walked in minute increments)
Step count (steps walked in hourly or daily increments)
Usually up to seven days (minimum four days)
 Approx.30 days
•If you erase a registered player (see page 38) or reset the software to factory settings, the data stored on the Activity Meter accessory cannot be reflected in the software. Please be careful when using these options.
•For more details, see the Calculating Your Steps Walked and Life Rhythm section of the Activity Meter Operations Manual.
 When the Activity Meter accessory's battery runs low
When the Activity Meter accessory's battery starts to run low, the screen on the right will automatically be displayed. Be sure to replace the battery as soon as possible. For more details, see the Checking Battery Power and Replacing the Battery section of the Activity Meter Operations Manual.
To ensure quality measurement, only periods of walking of 10 seconds or more count toward your step total.
20 |
21 |
|
|
Checking Your Life Rhythm
Using CHECK YOUR RHYTHM, you can see at what times you walked and how many steps you took. Use the procedure below to check your step count and look back at your life rhythm.
1 On the title screen, touch CHECK YOUR RHYTHM and follow the instructions on the top screen to connect the Activity Meter accessory to the Infrared Game Card.
•Ensure that the Activity Meter accessory and the PERSONAL TRAINER: WALKING Infrared Game Card’s sensors are facing each other at a distance of no greater than 2 inches, and that they are kept still.
•Measured data will be sent from the Activity Meter accessory to the Infrared Game Card.
•When data is being sent, the Activity Meter accessory’s light will flash red.
•If there is a problem with the infrared connection, please consult the Infrared Connection and Troubleshooting sections of the Activity Meter Operations Manual.
2Once the data has been sent to the Infrared Game Card, you will be able to check the periods in which you walked and the number of steps you took.Next, the Activity Meter accessory will ask you if you’re going to carry it around some more – please touch YES or NO as appropriate. Touch YES if you intend to walk some more that day. You will be returned to the title screen.
Touching NO will advance you to Step 3.
Note: If you have unchecked records from the previous day, those records will be checked before the current day’s step count and walking periods.
3You will also be asked if you achieved your mini target. (Mini targets are simple, casual goals for the day, meant to improve your quality of life.) Please touch YES or NO as appropriate.You’ll then be able to see at which times of day you were most active and view detailed results for both the day being checked as well as recent days.
4After viewing your daily results, you’ll then be asked to evaluate the day by choosing one of three stamps. Finally, you’ll receive your mini target for the next day.
Note: If you reached your daily step target (see page 20), your stamp will be green. If the daily step target was not reached, your stamp will be red.
22 |
23 |
|
|

Records / Select a Player
View the records of the players registered on your Infrared Game Card and use their data to play games. Why not check out other people’s records while you check your own life rhythm?
Records screen |
Today’s life rhythm and rating |
|
Touch a player’s Mii character or dog to view their records. The menu below will be displayed. Touch the various options to proceed to that screen.
Note: If your Privacy Setting (see page 37) is set to KEEP PRIVATE, then you will need to connect the corresponding Activity Meter accessory to the Infrared Game Card when you select your Mii character or dog.
VIEW RECORDS Page 25
PLAY WITH RECORDS Page 31
EDIT PLAYER Page 37
Records / View Records
Use RHYTHM DETAILS to look back at your recent records minute by minute, and use CALENDAR to look back at all your records so far.You can also see how your life rhythm changes over time.
 Rhythm details
Look back at your recorded step count and the amount of time you walked, minute by minute. Touch the day you’d like to see records for. Use  and
and  to scroll through the list.
Note: You can also select records by pressing up and down on theControl Pad.
Note for the day (see page 27)
LOCK (see page 26)
Use this to prevent records from being erased.
Lock icon
Displayed on locked records.
24 |
25 |
|
|
 Minute-by-minute records
The number of steps you took |
|
|
|
|
|
|
|
|
|
|
|
every minute is recorded in |
|
|
|
|
Step count |
RHYTHM DETAILS. You can |
|
|
|
|
|
|
|
|
|
|
|
move the hands of the clock |
|
|
|
|
Note icon |
backward and forward to find |
|
|
|
Select a time with a note |
|
the time you’d like to check by |
|
|
|
||
dragging them with the stylus or |
|
|
|
attached to enlarge the note. |
|
|
|
|
|
|
|
by touching and . |
|
|
|
|
|
|
|
|
|
|
|
Note: The hands of the clock can also be moved backward and forward using the L Button and the R Button respectively.
Notes
Touch a blue note to go to the time to which it is attached.
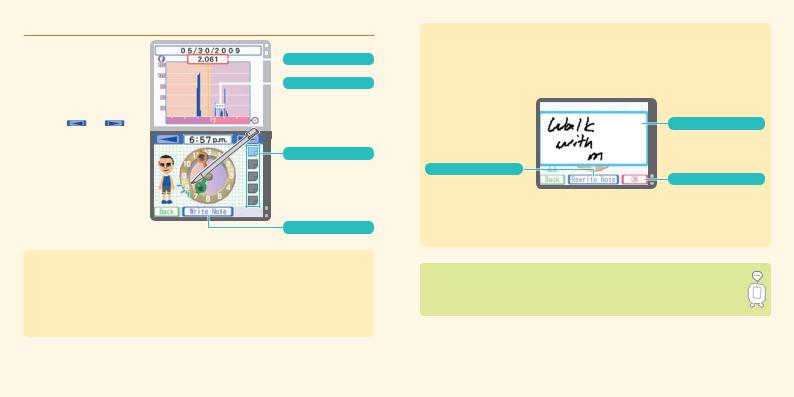
WRITE NOTE
About saving and locking records
After 28 days, old records are erased from RHYTHM DETAILS. (They will still be available to view in CALENDAR.) If there is a certain day’s records that you want to protect, select that day’s records and then touch LOCK to prevent them from being erased.You can lock up to
20 records in this way.
Note: You can remove the lock from locked records by touching UNLOCK. This will allow that day’s records to be erased.
Writing notes
Any words or pictures you draw or write on a note will appear exactly as you entered them.
Touch WRITE NOTE to make a blank note appear on the Touch Screen. Feel free to draw or write anything you like.You can add up to five notes to any one day’s records.
Note: A new note cannot be added to a point in your records that is within five minutes of another note.
REWRITE NOTE
Start over with a blank note.
Removing a note
Note box
Write words or draw pictures in here.
OK
Add your note.
If you select a time that already has a note attached in your minute-by-minute records, DELETE NOTE will appear instead of WRITE NOTE.Touch DELETE NOTE to remove the note.
Be sure to lock any records that you do not want erased! Don’t forget, adding notes to a day’s records will make it easier to remember your activities that day.
26 |
27 |
|
|
 Loading...