

Nikon COOLPIX 8400 quick start guide

En
DIGITAL CAMERA
Quick Start Guide

Step 1
Step 2
pg. 1
Step 1
Step 2
Step 3
Step 4
Step 5
Step 6
Step 7
Step 8
Step 9
Check the package contents
pp. 2–14
Take pictures
Step 1 Charge the battery ...........................................pg. 2
Step 2 Attach the camera strap................................... pg. 3
Step 3 Insert the battery.............................................. pg. 4
Step 4 Insert a memory card........................................pg. 5
Step 5 Turn the camera on...........................................pg. 6
Step 6 Choose a language and set the clock.............. pg. 7
Step 7 Format the memory card..................................pg. 9
Step 8 Take pictures ................................................... pg. 10
Step 9 View pictures .................................................. pg. 14
pp. 15–33
Install PictureProject and transfer pictures
Step 1 Install PictureProject....................................... pg. 16
Windows............................................. pg. 17
Macintosh........................................... pg. 23
Step 2 Transfer pictures ............................................. pg. 28
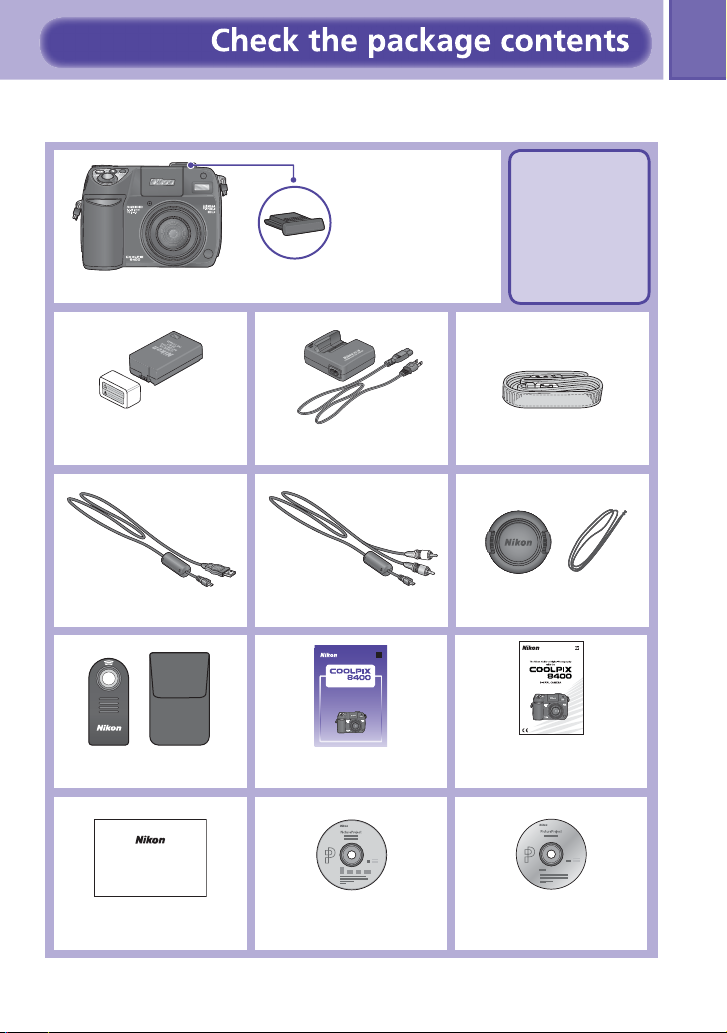
Check that you have all the items listed below.
1
COOLPIX 8400 digital camera
EN-EL7 rechargeable battery
(with terminal cover)
UC-E6 USB interface cable
ML-L3 remote control
(with carrying case)
Accessory shoe cover
(on camera)
MH-56 battery charger
with power cable
*
EG-CP14
Audio / video cable
En
DIGITAL CAMERA
Quick Start Guide
Quick Start Guide
(this guide)
NOTE: Memory
cards are not
included with
the camera.
Camera strap
Lens cap with cord
Guide to Digital
Photography with the
COOLPIX 8400
Warranty
Warranty
* Shape of cord depends on country of use.
PictureProject installer CD
PictureProject reference
manual CD
2
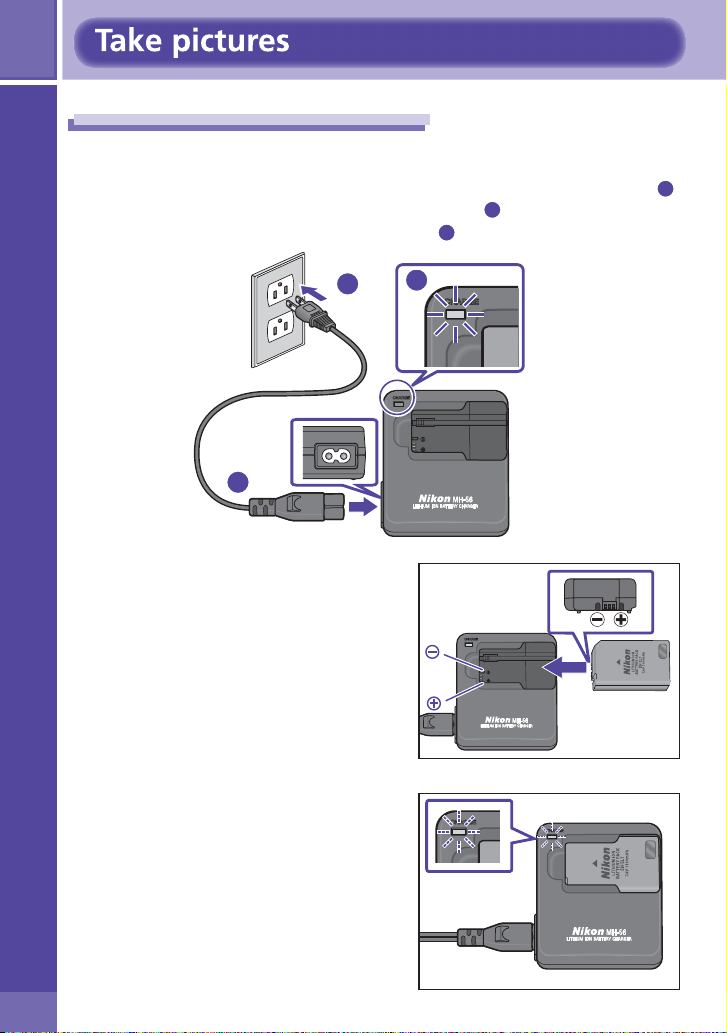
Charge the battery
Step 1
Connect the power cable
1
Charge the battery
Connect the power cable to the supplied MH-56 battery charger (
and insert the wall plug into a power outlet (
will light to show that the charger is on (3).
2
). The CHARGE lamp
1
)
1
Insert the battery
2
Remove the terminal cover from the
EN-EL7 and slide the battery into the
MH-56 terminals fi rst.
The CHARGE lamp will start to blink.
2
3
3
Charge the battery
3
Charging is complete when the
CHARGE lamp stops blinking.
An exhausted battery can be fully
recharged in about two and a half
hours.
Step 2
Attach the camera strap securely to the two eyelets on the camera body as
shown below.
Attach the camera strap
Charge the battery / Attach the camera strap
The Lens Cap
When replacing or removing
the lens cap, press the tabs on
either side of the cap to release
the latch (1). To avoid losing
the lens cap, use the cord
provided to attach it to the
camera as shown (2).
1
2
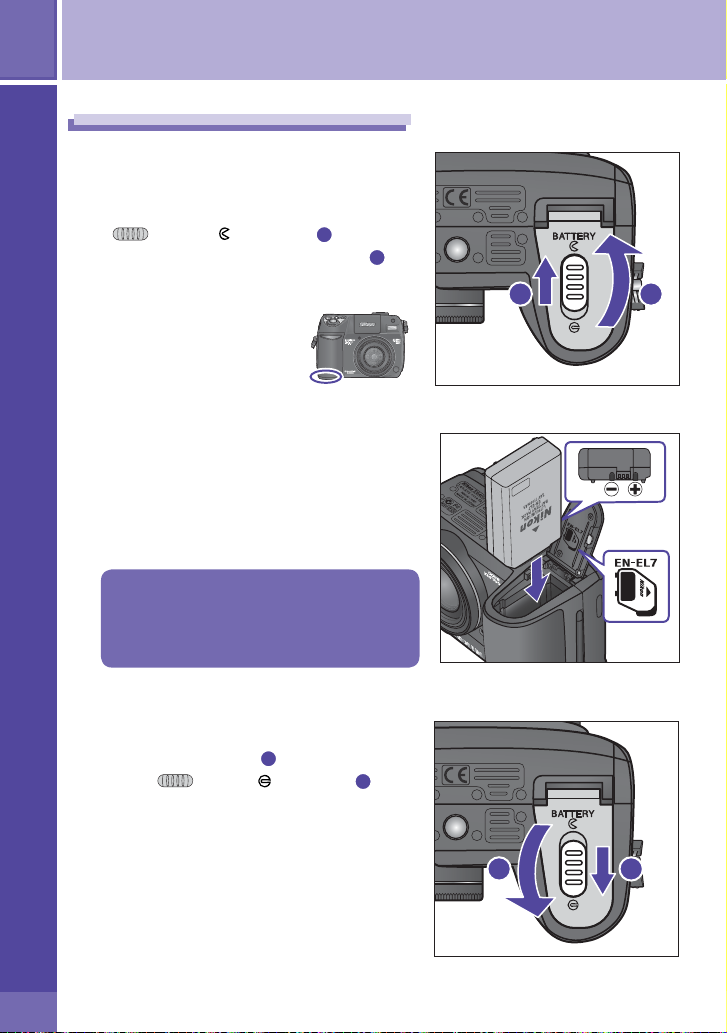
4
Insert the battery
Step 3
1
2
Insert the battery
Open the battery-chamber cover
After confi rming that the camera is off,
slide the battery-chamber cover latch
) to the position (1) and fl ip
(
the battery-chamber cover open (2).
Insert the battery
Insert a fully-charged EN-EL7 battery
as shown in the label inside the battery-chamber cover, making sure the
positive (“+”) and negative (“–”) terminals are in the correct orientation.
Inserting the battery upside down or
backwards could damage the camera.
Check to be sure the battery is in the
correct orientation.
1 2
Close the battery-chamber cover
3
Close the cover (1) and slide the
latch (
sure that the battery-chamber cover
is properly latched.
) to the position (2). Be
1
2
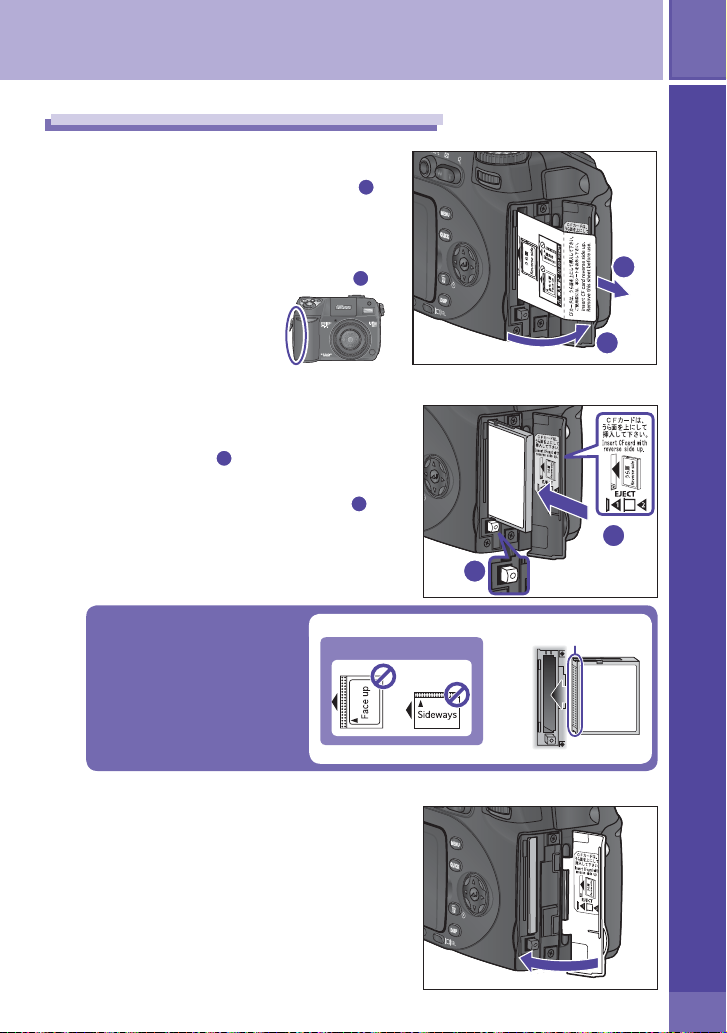
Take pictures
5
Step 4
1
2
Insert a memory card
Open the memory card slot cover
Open the memory card slot cover (1).
A yellow notice describing memory
card insertion is placed in the memory card slot at shipment. Remove the
notice and read the instructions (2).
Insert a memory card
Check that the eject button is all
the way down (1) and then insert a
memory card as shown in the label inside the memory card slot cover (2).
Insert memory cards terminals fi rst. Inserting the card
upside down or backwards
could damage the camera
or the card. Check to be
sure the card is in the correct orientation.
DO NOT INSERT:
Rear label
1
of insertion
Insert a memory card
2
1
2
Terminals
Direction
Rear
label
Close the memory card slot cover
3
6
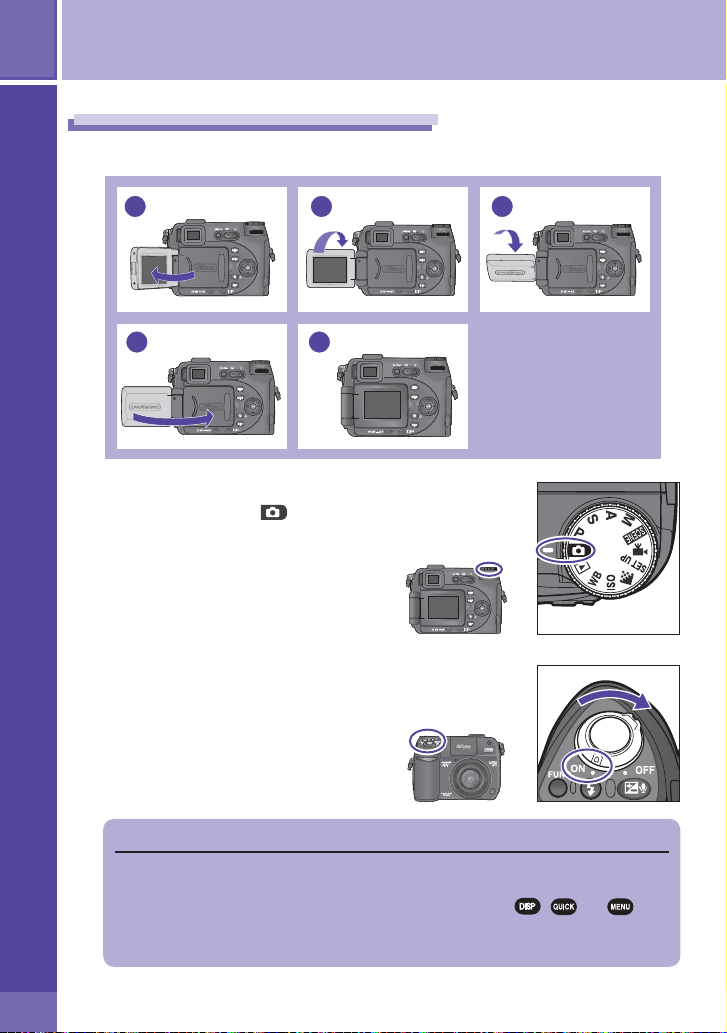
Turn the camera on
Step 5
Turn the camera on
Open the monitor
1
1
32
4
Remove the lens cap and rotate
2
the mode dial to (auto mode)
Turn the camera on
5
3
Auto Power Off
If no operations are performed for about 1 minute (the default setting), the
camera will enter standby mode and display will turn off automatically to save
power. The display can be reactivated by pressing the , , or button, rotating the mode dial to a new position, or pressing the shutter-release
button halfway.
Take pictures
HOME TIME ZONE
a
HOME TIME ZONE
n
7
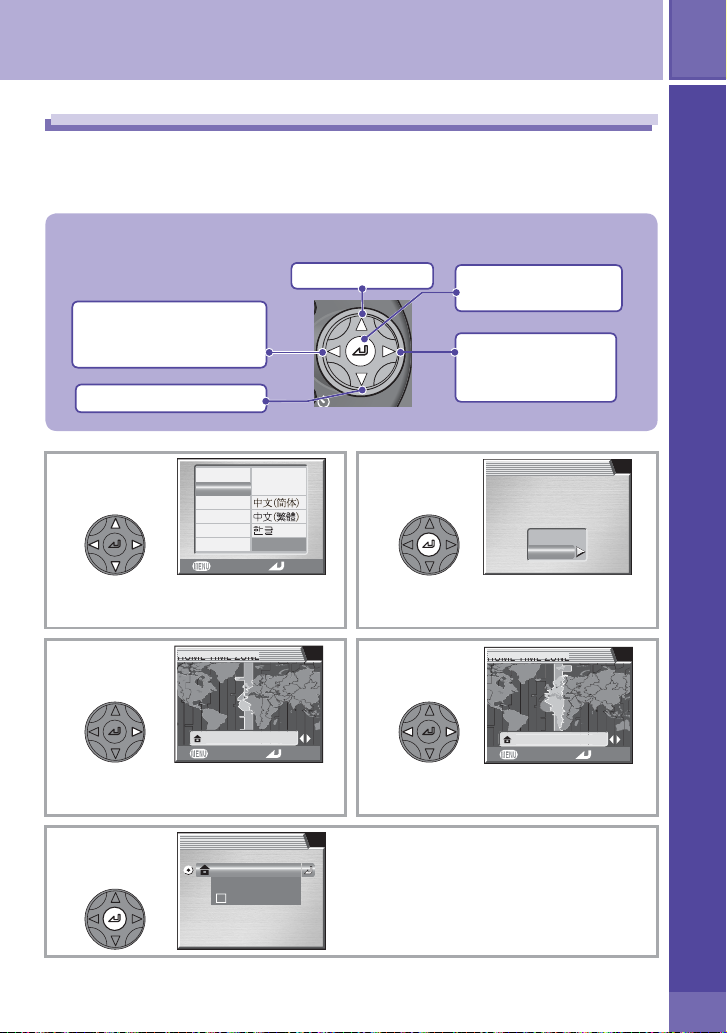
Step 6
Choose a language and set the clock
The fi rst time the camera is turned on, a language-selection dialog will be
displayed in the monitor. Follow the steps below to choose a language and
set the time and date.
The multi selector is used to navigate the camera menus.
Cancel and return to
previous menu, or move
cursor left
Move cursor down
1
Choose language.
3
Deutsch
English
Español
Français
Italiano
Nederlands
Cancel
Svenska
日本語
Set
Move cursor up
2
4
Press center to
make selection
Display sub-menu,
move cursor right,
or make selection
DATE
Set time and date?
No
Yes
Display DATE menu.
Choose a language and set the clock
Display map of world timezones.
5
TIME ZONE
London, Casablanc
Back Set
01. 09. 2004 00 : 00
Madrid, Paris, Berlin
Time zone
DaylightSaving
Madrid, Paris, Berli
Back Set
Select home time zone.
TIME ZONE menu displayed.
8
F2.6
126
60
Choose a language and set the clock
6
TIME ZONE
01. 09. 2004 00 : 00
Madrid, Paris, Berlin
Time zone
DaylightSaving
To turn daylight saving time on or off,
press multi selector down to highlight
DaylightSaving and press multi selector center. When DaylightSaving
is checked, time will automatically be
advanced one hour. Before proceeding to Step 7, press multi selector up to
highlight current time zone.
7 8
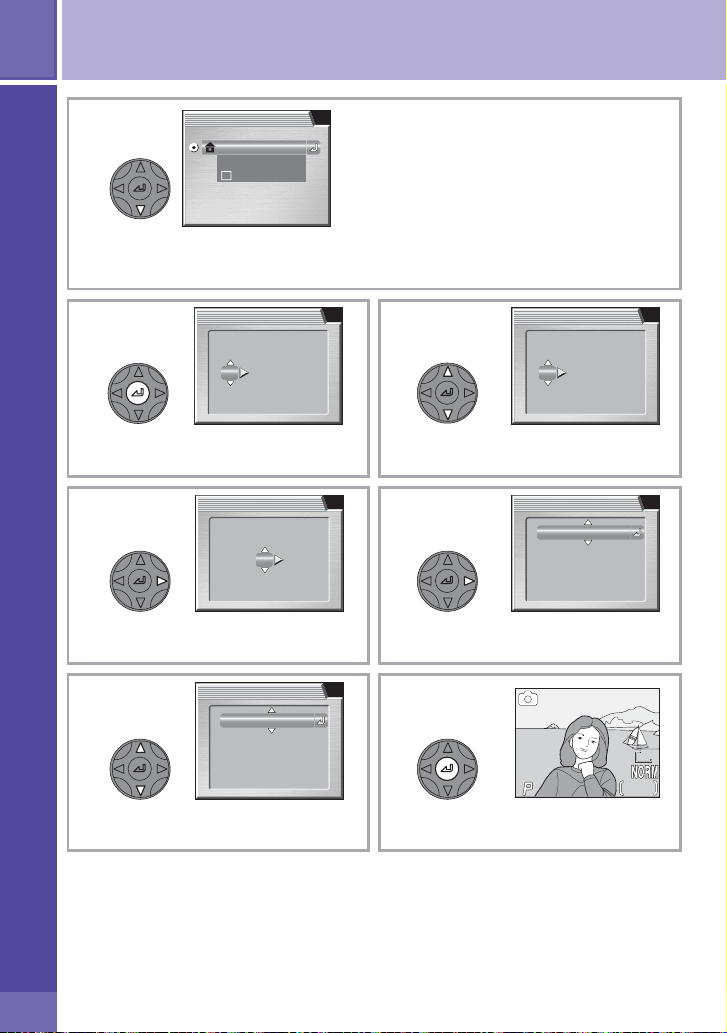
Display DATE menu.
DATE
DM Y
01
01 ..200409
00 : 00
Edit Day (order of Day, Month, and
Year may differ in some areas).
9
DATE
DM
09
01 ..200409
00 :
00
Y
10
Select Month. Repeat steps 8 – 9 to
edit Month, Year, hour, and minute.
DATE
DM Y
01
01 ..200409
00 : 00
DATE
DM Y
DM
01 ..200410
10 :
00
Highlight D M Y.
DATE
DM
10 ..200401
10 :
Choose order in which Month,
Day, and Year will be displayed.
DMY
00
1211
Exit to shooting mode.
1/60
1 /60
F2.6
F2.6
8M8M8M
126
126
Take pictures
9
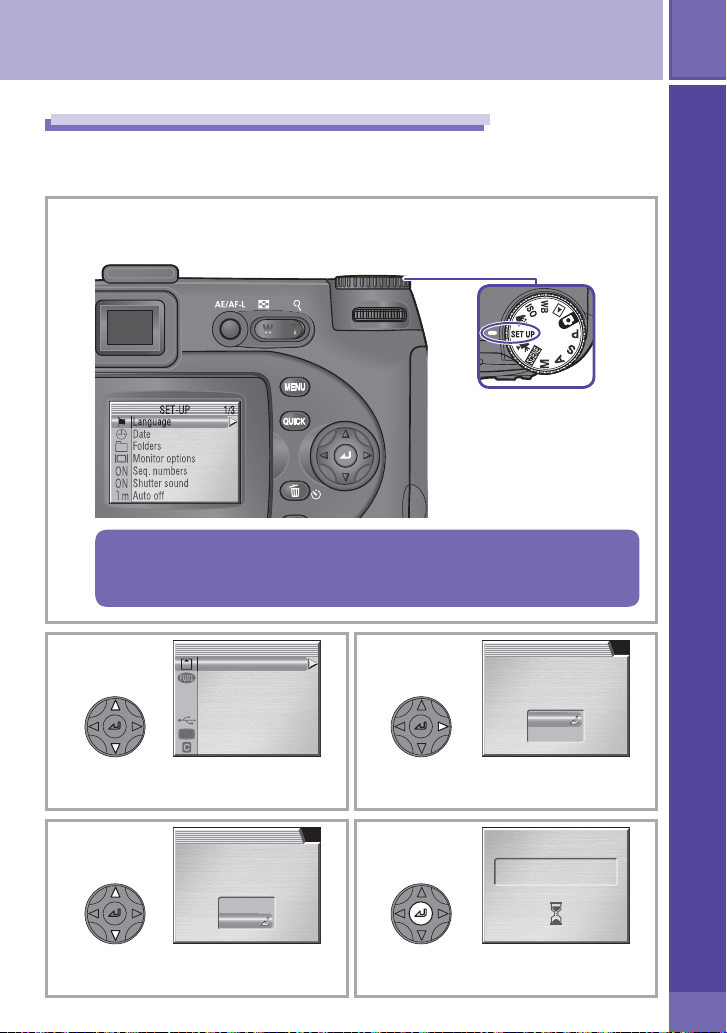
Step 7
Memory cards must be formatted before fi rst use. Follow the steps below to
format the card.
1
2
Format the memory card
Rotate the mode dial to SETUP
The setup menu will be displayed.
Mode dial
Note that formatting memory cards permanently deletes any data
they may contain. Be sure to copy any photographs and other data
you wish to keep to a computer before proceeding.
SET-UP
CF card format
Controls
Shot confirmation
OFF
info.txt
OFF
USB
Video mode
Reset all
Highlight CF card Format.
2/3
3
CF CARD FORMAT
WARNING!
All images will be
deleted!
No
Format
Display options.
Format the memory card
4
CF CARD FORMAT
WARNING!
All images will be
deleted!
No
Format
Highlight Format.
5
Format card. Do not proceed to
Step 8 until formatting is complete.
FORMATTING
 Loading...