

Page 1

AF-S DX NIKKOR
16-85mm f/3.5-5.6 ED VR
使用説明書
User’s Manual
Benutzerhandbuch
Manuel d’utilisation
Manual del usuario
Användarhandbok
Pykoводство пользoвaтеля
Gebruikshandleiding
Manuale d’uso
Εγχειρίδιο οδηγιών χρήσης
P. 2
Pg. 12
S. 28
P. 38
Pág. 48
S. 58
СТР. 68
P. 78
Pag. 88
Σελ. 98
108
122
132
Jp
En
De
Fr
Es
Sv
Ru
Nl
It
Gr
Sc
Tc
Kr
Page 2

安全上のご注意
ご使用の前に「安全上のご注意」をよくお読みのうえ、正しくお使いください。この「安全上のご注意」は製品を安
全に正しく使用していただき、あなたや他の人々への危害や財産への損害を未然に防止するために、重要な内容を記
載しています。お読みになった後は、お使いになる方がいつでも見られる所に必ず保管してください。
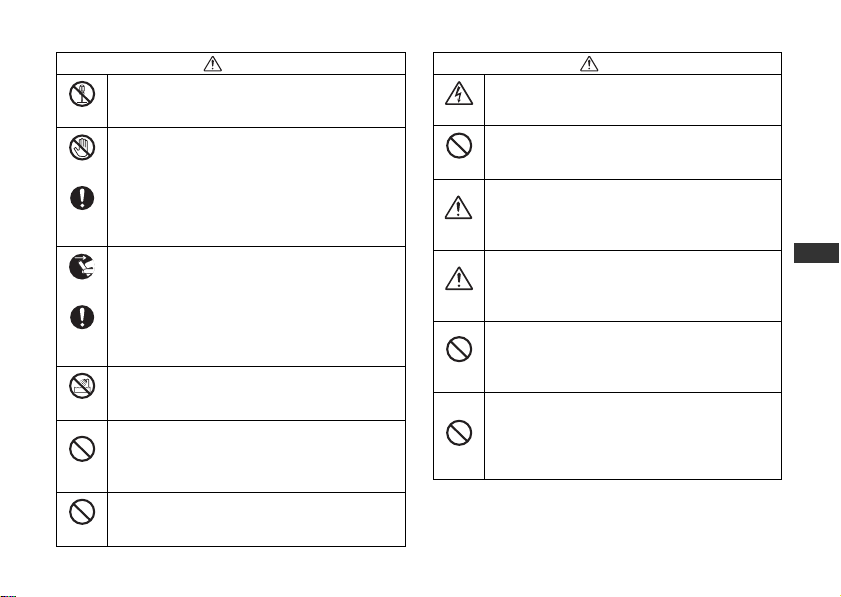
表示について
表示と意味は次のようになっています。
警告
Jp
En
De
Fr
Es
Se
Ru
Nl
It
Ck
注意
お守りいただく内容の種類を、次の絵表示で区分し、説明しています。
絵表示の例
この表示を無視して、誤った取り扱いをすると、人が死亡または重傷を負う可能性が想定される内容を
示しています。
この表示を無視して、誤った取り扱いをすると、人が傷害を負う可能性が想定される内容および物的損
害の発生が想定される内容を示しています。
記号は、注意(警告を含む)を促す内容を告げるものです。図の中や近くに具体的な注意内容(左図の場合は
感電注意)が描かれています。
記号は、禁止(してはいけないこと)の行為を告げるものです。図の中や近くに具体的な禁止内容(左図の場
合は分解禁止)が描かれています。
記号は、行為を強制すること(必ずすること)を告げるものです。図の中や近くに具体的な強制内容(左図の
場合は電池を取り出す)が描かれています。
Ch
Kr
2
Page 3
警告
分解したり修理・改造をしないこと
感電したり、異常動作をしてケガの原因となります。
分解禁止
落下などによって破損し、内部が露出したときは、
接触禁止
露出部に手を触れないこと
感電したり、破損部でケガをする原因となります。
カメラの電池を抜いて、販売店またはニコンサー
ビス機関に修理を依頼してください。
すぐに修理
依頼を
熱くなる、煙が出る、こげ臭いなどの異常時は、速
やかにカメラの電池を取り出すこと
電池を取る
そのまま使用すると火災、やけどの原因となりま
す。電池を取り出す際、やけどに十分注意してくだ
さい。電池を抜いて、販売店またはニコンサービス
すぐに修理
機関に修理を依頼してください。
依頼を
水につけたり水をかけたり、雨にぬらしたりしな
いこと
水かけ禁止
発火したり感電の原因となります。
引火・爆発のおそれのある場所では使用しないこと
プロパンガス・ガソリンなど引火性ガスや粉塵の
発生する場所で使用すると、爆発や火災の原因と
使用禁止
なります。
レンズまたはカメラで直接太陽や強い光を見ない
こと
見ないこと
失明や視力障害の原因となります。
注意
ぬれた手でさわらないこと
感電の原因になることがあります。
感電注意
製品は幼児の手の届かないところに置くこと
ケガの原因になることがあります。
放置禁止
逆光撮影では、太陽を画角から十分にずらすこと
太陽光がカメラ内部で焦点を結び、火災の原因に
なることがあります。画角から太陽をわずかに外
使用注意
しても火災の原因になることがあります。
使用しないときは、レンズにキャップをつけるか
太陽光のあたらない所に保管すること
太陽光が焦点を結び、火災の原因になることがあ
保管注意
ります。
三脚にカメラやレンズを取り付けたまま移動しな
いこと
転倒したりぶつけたりしてケガの原因になること
移動禁止
があります。
窓を閉め切った自動車の中や直射日光が当たる場
所など、異常に温度が高くなる場所に放置しない
こと
内部の部品に悪い影響を与え、火災の原因となる
放置禁止
ことがあります。
Jp
En
De
Fr
Es
Se
Ru
Nl
It
Ck
Ch
Kr
3
Page 4
Jp
En
De
Fr
Es
Se
Ru
Nl
It
Ck
Ch
Kr
4
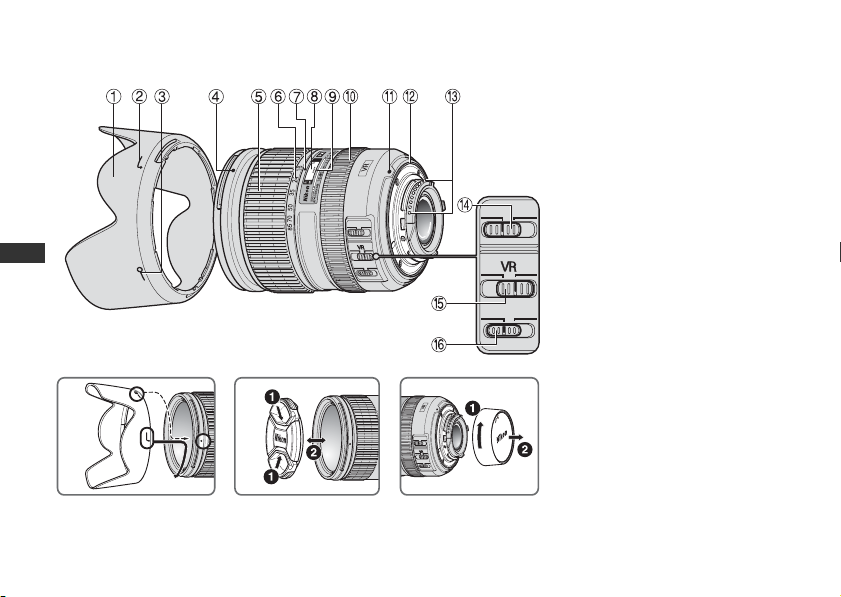
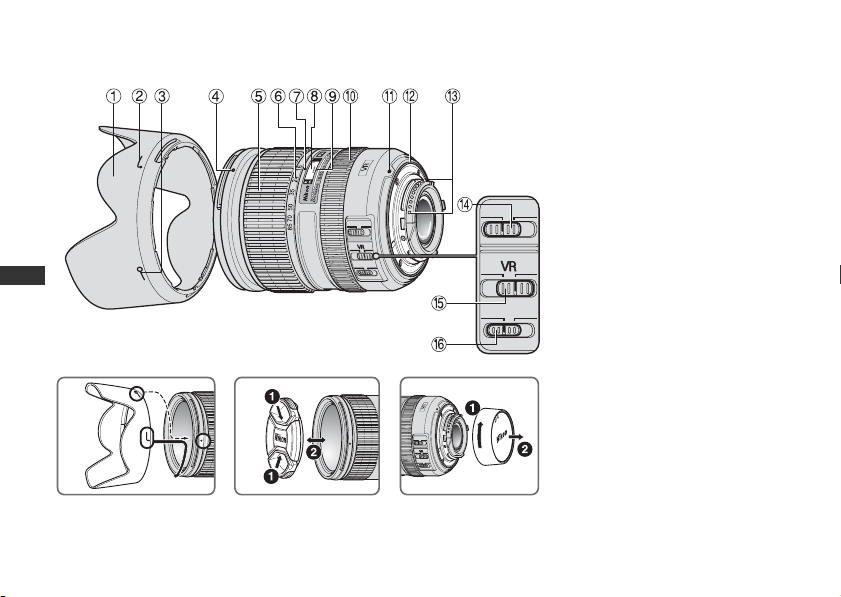
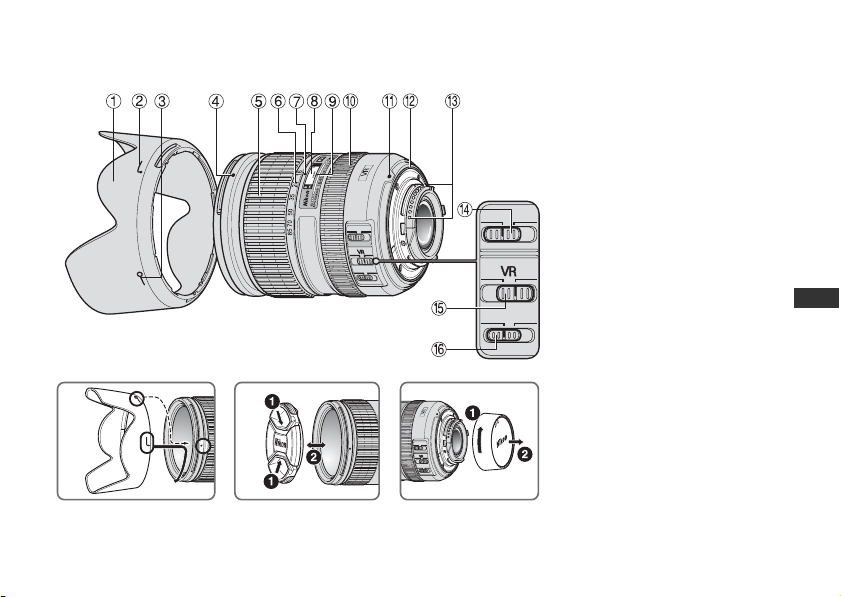
各部の名称
D
1 フード(P. 9)
( ):参照頁
2 フード取り付け指標(P. 9)
3 フードセット指標(
4 フード着脱指標(
5 ズームリング(
6 焦点距離目盛
M
M
M/A
OFF
ON
ACTIVE
NORMAL
M/A
A
ON
B
NORMAL
C
7 焦点距離目盛指標
8 距離目盛
9 距離目盛基準線
OFF
0 フォーカスリング(
a レンズ着脱指標
ACTIVE
b レンズマウントゴムリング
P. 9)
(
c
CPU信号接点(P. 9)
P. 9)
P. 9)
P. 5)
P. 6)
d フォーカスモード切り換え
スイッチ(
e 手ブレ補正スイッチ(
P. 6)
P. 7)
f 手ブレ補正モード切り換え
スイッチ(
P. 7)
Page 5

このたびはDXニッコールレンズをお買い上げいただきありがとうございます。このレンズは、ニコンDXフォーマッ
トのニコンデジタル一眼レフカメラ(
ニコンDXフォーマットでの撮影画角は、
ご使用の前に、この「使用説明書」をよくお読みの上、正しくお使いください。また、カメラの使用説明書もご覧ください。
D300、D90など)専用です。
35mm
判換算で焦点距離の約
1.5
倍の焦点距離に相当する画角になります。
主な特長
・ 手ブレ補正機能を使用すると、使わないときと比べ
・ レンズ内超音波モーター(サイレント・ウェーブ・
・ 被写体までの距離情報をカメラボディー側に伝達す
・ ニコン独自の
※
3.5段分
ため、シャッタースピードの選択範囲が広がり、幅広
い領域で手持ち撮影が可能です。(※
ただし、
トデジタル一眼レフ使用時、
マットデジタル一眼レフ使用時。ズームレンズは最も
望遠側で測定。)
モーター)を採用し静かな
影が可能です。また、フォーカスモード切り換えス
イッチd により
シャッタースピードを遅くして撮影できる
CIPA規格準拠。
FX フォーマット対応レンズはFX フォーマッ
DX レンズは DX フォー
AF(オートフォーカス)撮
AF(オートフォーカス)撮影および
MF(マニュアルフォーカス)撮影ができます。
る機能を備え、
カメラとの組み合わせ時には、より的確な露出制御を
実現します。
3Dマルチパターン測光機能を持った
ED レンズ(特殊低分散)ガラスによる
色収差の補正とともに、非球面レンズや良好なボケ味
を再現する円形絞りの採用によりすぐれた光学性能、
描写性能を発揮します。
ズーミングと被写界深度
撮影を行う場合は、ズームリング5 を回転させ(焦点距
離が変化します)構図を決めてから、ピント合わせを
行ってください。プレビュー(絞り込み)機構を持つカ
メラでは、撮影前に被写界深度を確認できます。
・ このレンズは内焦方式を採用しています。ニコン内焦
方式は、通常のレンズと異なるため、至近距離になる
と焦点距離が若干短くなります。
・ 距離目盛は目安であり、被写体までの距離を保証する
ものではありません。また、遠景撮影でも被写界深度
などの影響により∞マークに届かない位置でピント
が合う場合があります。
Jp
En
De
Fr
Es
Se
Ru
Nl
It
Ck
Ch
Kr
5
Page 6
ピント合わせの方法(図
ご使用のカメラや撮影目的によって、下表のようなピン
ト合わせが選択できます。
カメラの
フォーカス
モード
AF
M
M/A M
マニュアル優先
オートフォーカス撮影
マニュアルフォーカス撮影(フォーカスエイド可)
A)
レンズの設定モード
マニュアルフォーカス撮影
(フォーカスエイド可)
M/A(マニュアル優先オートフォーカス)モード
Jp
の使い方
En
1
De
Fr
Es
Se
Ru
Nl
It
Ck
Ch
Kr
レンズのフォーカスモード切り換えスイッチ d を
M/A]にセットします。
[
2
オートフォーカス撮影時、シャッターボタンを半押
ししたまま、あるいは
ま、フォーカスリングを手で回転させると、瞬時に
マニュアルフォーカス撮影が行えます。
3
シャッターボタンの半押しや AF 作動ボタンを再度
操作すると
AFで撮影が可能となります。
AF作動ボタンを保持したま
オートフォーカスが苦手な被写体について
「広角・超広角レンズのオートフォーカス撮影について」
(
P. 11)をご覧ください。
6
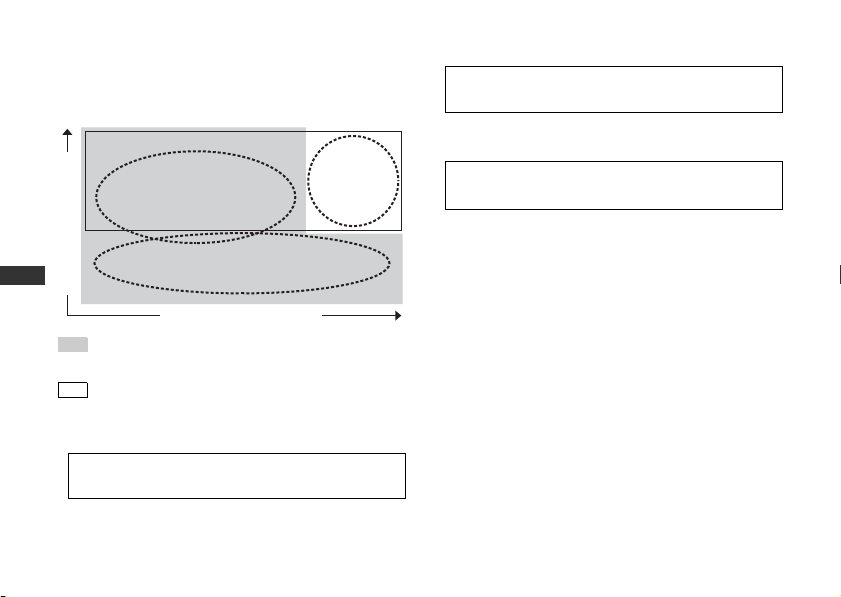
手ブレ補正機能
手ブレ補正機能の概念図
高
周
波
数
NORMALモードで対応
ACTIVEモードで対応
手ブレ補正
NORMALモードまたはACTIVEモードで対応
パンニング(流し撮り)での手ブレ補正
NORMALモードで対応
激しい揺れでの手ブレ補正
ACTIVEモードで対応
手ブレ
パンニング
(流し撮り)
振 幅 大
激しい揺れ
例)乗り物等
での揺れ
Page 7

手ブレ補正スイッチの使い方(図B)
ON: シャッターボタンを半押しすると、手ブレ
を補正します。ファインダー内の画像のブ
レも補正するため、ピント合わせが容易で、
フレーミングしやすくなります。
OFF: 手ブレを補正しません。
手ブレ補正モード切り換えスイッチの使い方(図C)
NORMAL: 主に、通常の手ブレを補正します。パンニ
ングに対応し、流し撮りも行えます。
ACTIVE: 乗り物に乗っている等、揺れの激しい条件
でのブレから通常の手ブレを補正します。
このモードではパンニング自動検出は行い
ません。
手ブレ補正使用時のご注意
・ シャッターボタンを半押し後、ファインダー像が安定
してから撮影することをおすすめします。
・ 流し撮りする場合は、必ず
ださい。
NORMALモードでは、流し撮りなどでカメ
ラの向きを大きく変えた場合、流した方向の手ブレ補
正は機能しません。例えば、流し撮りで横方向にパン
ニングすると、縦方向の手ブレだけが補正され、流し
撮りが行えます。
・ 手ブレ補正の原理上、シャッターレリーズ後にファイ
ンダー像がわずかに動くことがありますが、異常では
ありません。
・ 手ブレ補正中にカメラの電源スイッチを
り、レンズを取り外したりしないでください。(その
状態でレンズを振るとカタカタ音がすることがあり
ますが、故障ではありません。カメラの電源スイッチ
を再度
ONにすれば、音は消えます。)
・ 内蔵フラッシュ搭載のカメラで、内蔵フラッシュ充電
中には、手ブレ補正は行いません。
・
三脚を使用するときは、手ブレ補正スイッチeを[
にしてください。ただし、三脚を使っても雲台を固定し
ないときや、一脚を使用するときには、スイッチを[
にすることをおすすめします。
・ AF 作動ボタンのあるカメラ(D2 シリーズ、D300な
ど)で、
AF作動ボタンを押しても、手ブレ補正は作
動しません。
NORMAL モードにしてく
OFF にした
OFF
ON
Jp
En
De
Fr
Es
Se
Ru
]
Nl
It
]
Ck
Ch
Kr
7
Page 8

絞り値の設定
絞り値を設定する場合は、カメラで設定してください。
開放F値の変化
このレンズはズーミングにより、開放F値が最大1
変化します。ただし、露出を決める際に、
はカメラが自動的に補正しますので考慮する必要はあ
りません。
Jp
En
De
Fr
Es
Se
Ru
Nl
It
Ck
Ch
Kr
8
1
/3段
F値の変化量
カメラの内蔵フラッシュ使用時のケラレに
ついて
・ ケラレ(写真の一部に影ができる)を防止するため、
レンズフード1は取り外して使用してください。
・ 撮影距離
D300S
D300/D200
D100
D90/D80/D50
D5100/D5000/
D3100/D3000/
D70
D60/D40
・
・ このレンズをカメラに取り付けたときのケラレの最
0.6m未満では使用できません。
デジタル
一眼レフカメラ
シリーズ/
シリーズ
ケラレなく撮影できる焦点距離と
•
焦点距離
• 焦点距離 24mm以上は制約なし。
焦点距離16mm以上は制約なし。
•
•
焦点距離
• 焦点距離 24mm以上は制約なし。
•
焦点距離
• 焦点距離 24mm以上は制約なし。
• 焦点距離 24mm以上は制約なし。
16mm
16mm
16mm
撮影距離
では撮影距離
では撮影距離
では撮影距離
0.7m
1.0m
2.0m
以上。
以上。
以上。
D300/D200/D90/D80/D50 の内蔵フラッシュは、
18mmレンズの画角をカバーする照射角で、D100の
内蔵フラッシュは、
照射角なので、焦点距離
ます。
新情報は、カメラの使用説明書でご確認ください。
20mmレンズの画角をカバーする
16mm では周辺が暗くなり
Page 9

バヨネットフード
HB-39
の取り付け、取り外し
取り付け方
レンズ先端のフード着脱指標4 とフード取り付け指標
(、
2ヶ所のいずれか)2を合わせ、カメラ側から見
て反時計回りにカチッと音がするまでフード1 を回転
させ、確実に取り付けます。(図
・ フード着脱指標とフードセット指標( )3が合っ
ていることを確認してください。
・ フードが正しく取り付けられないと撮影画面にケラ
レを生じますのでご注意ください。
・ フード先端を強くつかむと着脱が困難になります。着
脱の際は、フードの根元(フード取り付け指標部分)
付近を持って回転させてください。
D)
取り外し方
フードの根元(フード取り付け指標部分)付近を持ち、
カメラ側から見て時計回りにフードを回転させて取り
外します。
レンズのお手入れと取り扱い上のご注意
・ レンズの CPU 信号接点 c は汚さないようにご注意く
ださい。
・ レンズマウントゴムリング b が破損した場合は、そ
のまま使用せず修理を依頼してください。
・ レンズ面の清掃は、ホコリを拭う程度にしてくださ
い。指紋がついたときは、柔らかい清潔な木綿の布に
無水アルコール(エタノール)または市販のレンズク
リーナーを少量湿らせ、レンズの中心から外周へ渦巻
状に、拭きムラ、拭き残りのないように注意して拭い
てください。
・ シンナーやベンジンなどの有機溶剤は絶対に使用し
ないでください。
レンズ表面の汚れや傷を防ぐためには、NCフィルター
・
をお使いいただけます。また、レンズフード
ちます。
・ レンズをソフトケースに入れるときは、必ずレンズ
キャップと裏ぶたを取り付けてください。なお、フー
ド1を逆向きにしてレンズに取り付けた状態でも収
納可能です。
・ フード 1 を持ってカメラを持ち上げたりしないでく
ださい。
・ レンズを長期間使用しないときは、カビやサビを防ぐ
ために、高温多湿のところを避けて風通しのよい場所
に保管してください。また、直射日光のあたるところ、
ナフタリンや樟脳のあるところも避けてください。
・ レンズを水に濡らすと、部品がサビつくなどして故障
の原因となりますのでご注意ください。
ストーブの前など、高温になるところに置かないでく
・
ださい。極端に温度が高くなると、外観の一部に使用し
ている強化プラスチックが変形することがあります。
1
も役立
Jp
En
De
Fr
Es
Se
Ru
Nl
It
Ck
Ch
Kr
9
Page 10

付属アクセサリー
・ 67mmスプリング式レンズキャップ LC-67
・ 裏ぶた
・ バヨネットフード
・ ソフトケース CL-1015
HB-39
別売アクセサリー
・ 67mmネジ込み式フィルター
使用できないアクセサリー
・ テレコンバーター:全種類
Jp
・ オート接写リング:
En
・
Kリング:全種類
・ オートリング
De
・ ベローズアタッチメント:全種類
Fr
・ アタッチメントリング
Es
※その他のアクセサリーでも、使用できない場合があり
Se
ます。アクセサリーの使用説明書をご確認ください。
Ru
仕 様
Nl
型式 ニコン
It
Ck
Ch
焦点距離
Kr
最大口径比 1:3.5―5.6
PKリング全種類
BR-4
SX-1
FマウントCPU内蔵Gタイプ、
AF-S DXニッコールズームレンズ(ニ
コンデジタル一眼レフカメラ[ニコン
DXフォーマット]専用)
16mm―85mm
10
レンズ構成
画角 83°―18°50′
焦点距離目盛
撮影距離情報
ズーミング ズームリングによる回転式
ピント合わせ
手ブレ補正 ボイスコイルモーター(
撮影距離目盛 ∞〜
最短撮影距離 撮像面から0.38 m(ズーム全域)
絞り羽根枚数
絞り方式 自動絞り
絞りの範囲 焦点距離
11群17
枚(非球面レンズ3枚、EDレンズ2枚)
16、24、35、50、70、85mm
カメラボディーへの撮影距離情報出力可能
IF(ニコン内焦)方式、超音波モー
ターによるオートフォーカス、マニュ
アルフォーカス可能
レンズシフト方式
VCM)による
0.38m
7枚(円形絞り)
16mm時 f/3.5―22、
85mm時 f/5.6―36
測光方式 開放測光
アタッチメントサイズ
大きさ
質量 約485 g
・ 仕様、外観の一部を、改善のため予告なく変更するこ
とがあります。
67 mm(P=0.75 mm)
約
72 mm
(最大径)×
マウント基準面からレンズ先端まで)
85 mm
(バヨネット
Page 11
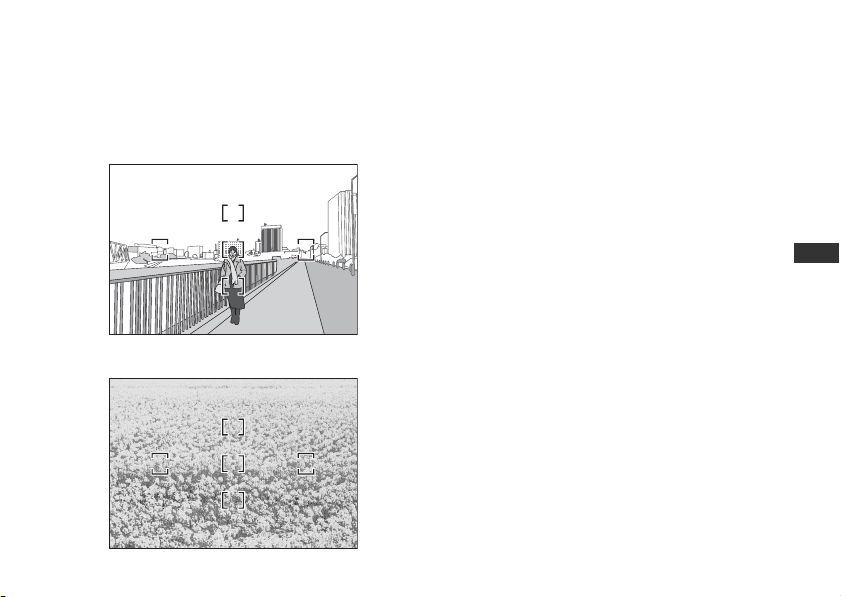
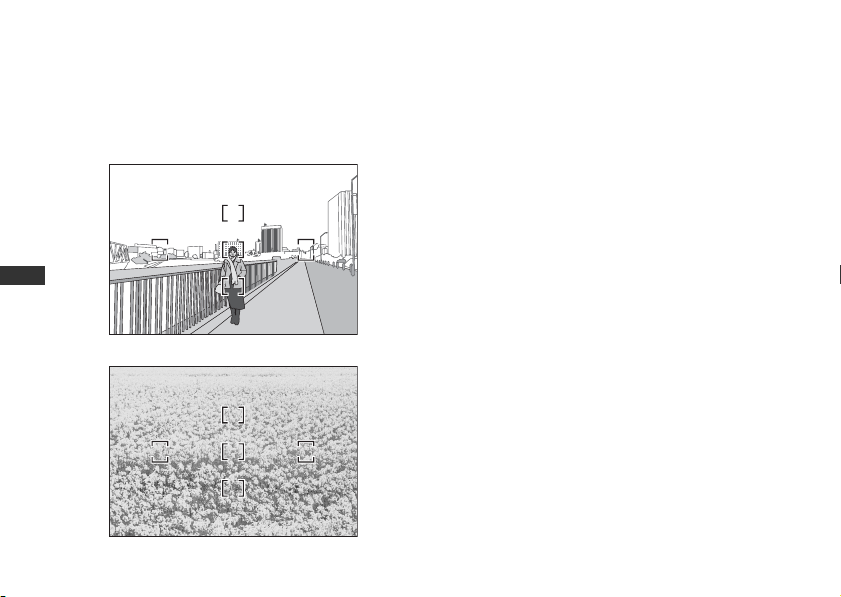
広角・超広角レンズのオートフォーカス撮影について
広角・超広角レンズでは、標準クラスのレンズと比べ、下記のような撮影条件になりやすく、オートフォーカス撮影
時には注意が必要です。
以下をお読みになって、オートフォーカス撮影にお役立てください。
E〈人物〉
1. フォーカスフレームに対して主要な被写体が
小さい場合
図Eのように、フォーカスフレーム内に遠くの建物と
近くの人物が混在するような被写体になると、背景
にピントが合い、人物のピント精度が低下する場合
があります。
2. 絵柄がこまかな場合
図Fのように、被写体が小さいか、明暗差が少ない被
写体になると、オートフォーカスにとっては苦手な
被写体になります。
F〈花畑〉
◆このような時には・・・
1、2のような被写体条件でオートフォーカスが上手く働
かない場合、主要被写体とほぼ同じ距離にある被写体で
フォーカスロックし、構図を元に戻して撮影する方法が
有効です。
また、マニュアルフォーカスに切り換えて、マニュアル
でピントを合わせて撮影する方法もあります。
その他
お手持ちのカメラボディーの使用説明書で「オート
フォーカスが苦手な被写体について」の説明も参照して
ください。
Jp
En
De
Fr
Es
Se
Ru
Nl
It
Ck
Ch
Kr
11
Page 12

Notes on Safety Operations
CAUTION
Do not disassemble
Touching the internal parts of the camera or lens
could result in injury. Repairs should be
performed only by qualified technicians. Should
the camera or lens break open as the result of a
fall or other accident, take the product to a Nikonauthorized service representative for inspection
Jp
after unplugging the product and/or removing
En
the battery.
De
Turn off immediately in the event of
Fr
malfunction
Es
Should you notice smoke or an unusual smell
Se
coming from the camera or lens, remove the
Ru
battery immediately, taking care to avoid burns.
Nl
Continued operation could result in injury.
It
After removing or disconnecting the power
Ck
source, take the product to a Nikon-authorized
Ch
service representative for inspection.
Kr
12
Do not use the camera or lens in the
presence of flammable gas
Operating electronic equipment in the presence
of flammable gas could result in an explosion or
fire.
Do not look at the sun through the lens or
viewfinder
Viewing the sun or other strong light sources
through the lens or viewfinder could cause
permanent visual impairment.
Keep out of reach of children
Particular care should be taken to prevent infants
from putting the batteries or other small parts
into their mouths.
Observe the following precautions when
handling the camera and lens
• Keep the camera and lens unit dry. Failure to do
so could result in fire or electric shock.
Page 13

• Do not handle or touch the camera or lens unit
with wet hands. Failure to do so could result in
electric shock.
• When shooting with back-lighting, do not point
the lens at the sun or allow sunlight to pass
directly down the lens as this may cause the
camera to overheat and possibly cause a fire.
• When the lens will not be used for an extended
period of time, attach both front and rear lens
caps and store the lens away from direct
sunlight. Failure to do so could result in a fire, as
the lens may focus sunlight onto a flammable
object.
Jp
En
De
Fr
Es
Se
Ru
Nl
It
Ck
Ch
Kr
13
Page 14
Nomenclature
Jp
En
De
Fr
Es
Se
Ru
Nl
It
Ck
Ch
D
Kr
14
( ) : reference page
1Lens hood (P. 22)
2Lens hood attachment
index (P. 22)
3Lens hood setting index
(P. 22)
4Lens hood mounting
M
M
M/A
OFF
ON
ACTIVE
NORMAL
A
B
C
M/A
ON
NORMAL
index (P. 22)
5Zoom ring (P. 16)
6Focal length scale
OFF
7Focal length index
8Distance scale
ACTIVE
9Distance index line
0Focus ring (P. 16)
aMounting index
bLens mount rubber
gasket (P. 22)
cCPU contacts (P. 22)
dFocus mode switch
(P. 16)
eVibration reduction ON/
OFF switch (P. 18)
fVibration reduction
mode switch (P. 18)
Page 15

Thank you for purchasing the AF-S DX NIKKOR 16-85mm f/3.5-5.6G ED VR lens. DX Nikkor lenses
are specially designed for use with Nik on digital-S LR (Nikon DX for mat) cameras, s uch as the D30 0
and D90. When mounted on Nikon DX format cameras, the lens picture angle is equivalent to
approximately 1.5× the focal length in 35mm format. Before using this lens, please read these
instructions and refer to your camera’s User’s Manual.
Major features
• By enabling vibration reduction, slower shutter
speeds (3.5 stops*) can be used, thus increasing
the range of usable shutter speeds and zoom
positions, particularly when hand-holding the
camera. (*The effects of VR on shutter speed are
measured according to Camera and Imaging
Products Association (CIPA) standards; FXformat lenses are measured using FX-format
digital cameras, DX-format lenses using DXformat cameras. Zoom lenses are measured at
maximum zoom.)
• More accurate exposure control is possible
when this is mounted on a Nikon camera
with 3D color matrix metering capability,
because subject distance information is
transferred from the lens to the camera body.
• The use of three aspherical and two extralow dispersion (ED) lens elements ensures
sharp pictures virtually free of color fringing.
Also, the seven-bladed diaphragm produces
a nearly-circular aperture, a feature which
causes out-of-focus areas of the picture to
become soft and unobtrusive.
• This lens employs a Silent Wave Motor to
drive the focusing mechanism, making
autofocusing smooth, silent and almost
instantaneous. The focus mode switch d is
provided for simple selection of autofocus
(A) or manual focus (M) operation.
Jp
En
De
Fr
Es
Se
Ru
Nl
It
Ck
Ch
Kr
15
Page 16

Focusing, zooming, and depth of
field
Before focusing, rotate the zoom ring 5 to
adjust the focal length until the desired
composition is framed in the viewfinder.
If your camera has a depth-of-field preview
(stop-down) button or lever, depth of field can
be previewed through the camera viewfinder.
• Due to the optical characteristics of this lens,
Jp
at closer focus distances, the focal length
En
decreases slightly.
De
• The distance scale does not indicate the
Fr
precise distance between the subject and
Es
the camera. Values are approximate and
Se
should be used only as a general guide.
Ru
When shooting distant landscapes, depth of
Nl
field may influence operation so that the
It
camera may focus at a position that is closer
Ck
than infinity.
Ch
Kr
16
Focusing (Fig. A)
Set your camera’s focus mode selector
according to this chart:
Camera’s
focus mode
AF
M
Autofocus with manual override (M/A
mode)
1
Set the lens focus mode switch d to M/A.
2
Autofocus is enabled, but autofocus
operation can be overridden by rotating
the separate focus ring while pressing the
shutter-release button halfway, or by
pressing the AF-ON button on the camera
body of cameras so equipped.
Lens focus mode
M/A M
Autofocus
with manual
priority
Manual focus (focus assist is
available)
Manual focus
(focus assist is
available)
Page 17

3
Press the shutter-release button halfway or
the AF-ON button once again to cancel
manual focus and resume autofocus.
Getting good results with autofocus
Refer to “Notes on using wide- or super wideangle AF Nikkor lenses” (P. 26).
Jp
En
De
Fr
Es
Se
Ru
Nl
It
Ck
Ch
Kr
17
Page 18
Vibration reduction mode
Basic concept behind vibration
reduction
Number of vibrations
Camera shake
Jp
En
De
Fr
Es
Se
Ru
Nl
It
Ck
Ch
Kr
18
Set the vibration reduction mode switch
to NORMAL.
Set the vibration reduction mode switch
to ACTIVE.
When taking pictures
Set the vibration reduction mode switch to
either NORMAL or ACTIVE.
Panning shots
Strength of vibrations
Camera
shake when
taking pictures
from a moving
vehicle
When taking panning shots
Set the vibration reduction mode switch to
NORMAL.
When taking pictures from a moving
vehicle
Set the vibration reduction mode switch to
ACTIVE.
Setting the vibration reduction ON/
OFF switch (Fig. B)
ON: Vibration is reduced while the
shutter- release button is pressed
halfway and also at the instant the
shutter is released. Because vibration
is reduced in the viewfinder, auto/
manual focusing and exact framing
of the subject are easier.
OFF: Vibration is not reduced.
Page 19

Setting the vibration reduction mode
switch (Fig. C)
NORMAL:The vibration reduction mechanism
primarily reduces camera shake,
making smooth panning shots
possible.
ACTIVE: The vibration reduction mechanism
reduces more noticeable camera
shake, such as that which occurs
when takin g pictures from a moving
vehicle. In this mode, the lens does
not automatically distinguish
panning from camera shake.
Notes on using vibration reduction
• After pressing the shutter-release button
halfway, wait until the image in the
viewfinder stabilizes before pressing the
shutter-release button the rest of the way
down.
• When taking panning shots, be sure to set
the vibration reduction mode switch to
NORMAL.
• If the camera is panned in a wide arc,
compensation for camera shake in the
panning direction is not performed. For
example, when panning the camera in a
horizontal direction, vertical camera shake is
reduced. This stabilizes the image whilst
allowing the desired panning effect to be
realized.
• Due to the characteristics of the vibration
reduction mechanism, the image in the
viewfinder may be blurred after the shutter is
released. This is not a malfunction.
Jp
En
De
Fr
Es
Se
Ru
Nl
It
Ck
Ch
Kr
19
Page 20

• Do not turn the camera off or remove the
lens from the camera while vibration
reduction is operating. Failure to observe this
note could result in the lens sounding and
feeling as if an internal component is loose or
broken when it is shaken. This is not a
malfunction. Turn the camera on again to
correct this.
• With cameras featuring a built-in flash,
Jp
vibration reduction does not function while
En
the built-in flash is charging.
De
• When the camera is mounted on a tripod, set
Fr
the vibration reduction ON/OFF switch e to
Es
OFF. However, it is recommended that the
Se
switch be set to ON when using the camera
Ru
on an unsecured tripod head or with
Nl
monopod.
It
• With autofocus cameras such as D2-series
Ck
and D300 models, featuring an AF-ON
Ch
button, vibration reduction does not
Kr
function when the AF-ON button is pressed.
20
Setting the aperture
Use the camera to adjust the aperture setting.
Variable maximum apertures
Zooming the lens from 16mm to 85mm
decreases the maximum aperture by 1
However, the camera will compensate for any
change in aperture by adjusting the shutter
speed so as to maintain the correct exposure
value.
1
/3 stop.
Page 21

Flash photography using cameras
with a built-in flash
• To prevent vignetting, do not use the lens
hood 1.
• The built-in flash cannot be used over
distances of less than 0.6 m (2.0 ft.).
Digital-SLR
cameras
D300S
D300/D200
D100
D90/D80/D50
Supported focal length/
shooting distance
• 16mm/0.7 m (2.3 ft.) or
greater
• 24mm or longer/no
restrictions
• 16mm or longer/no
restrictions
• 16mm/1 m (3.3 ft.) or greater
• 24mm or longer/no
restrictions
• 16mm/2 m (6.6 ft.) or greater
• 24mm or longer/no
restrictions
D5100/D5000/
D3100/D3000/
D70-series/
D60/D40series
•24mm or longer/no
restrictions
• The built-in flashes on the D300, D200, D90,
D80, and D50 are compatible with focal
lengths of 18mm or greater, and the built-in
flash on the D100 is compatible with focal
lengths of 20mm or greater. Vignetting
occurs at a focal length of 16mm.
• For the latest information on vignetting with
this lens, see the camera manual.
Jp
En
De
Fr
Es
Se
Ru
Nl
It
Ck
Ch
Kr
21
Page 22

Using the Bayonet Hood HB-39
Attaching the hood
Align the lens hood attachment index ( ) 2
on the hood with the lens hood mounting
index 4 on the lens, and turn the hood 1
counterclockwise (as viewed when holding
the camera with the lens facing away from
you) until it clicks into place (Fig. D).
• Be sure that the lens hood mounting index is
Jp
aligned with the lens hood setting index
En
() 3.
De
• If the lens hood is not correctly attached,
Fr
vignetting may occur.
Es
• To facilitate attachment or removal of the
Se
hood, hold it by the base (near the lens hood
Ru
attachment index) rather than its outer edge.
Nl
Detaching the hood
It
Hold the lens hood by the base (near the lens
Ck
hood attachment index) and turn clockwise, as
Ch
viewed when holding the camera with the
Kr
lens facing away from you, to detach.
22
Lens care
• Be careful not to allow the CPU contacts c
to become dirty or damaged.
• If the lens mount rubber gasket b is
damaged, be sure to visit the nearest Nikon
authorized dealer or service center for repair.
• Clean lens surfaces with a blower brush. To
remove dirt and smudges, use a soft, clean
cotton cloth or lens tissue moistened with
ethanol (alcohol) or lens cleaner. Wipe in a
circular motion from the center to the outer
edge, taking care not to leave traces or touch
other parts of the lens.
• Never use thinner or benzene to clean the
lens, as this could cause damage, result in a
fire, or cause health problems.
• NC filters are available to protect the front
lens element. The lens hood 1 also helps to
protect the front of the lens.
• When storing the lens in its flexible lens
pouch, attach both the front and rear lens
caps. The lens can also be stored with the
lens hood 1 attached in the reverse
position.
Page 23

• When the lens is mounted on a camera, do
not pick up or hold the camera and lens by
the lens hood 1.
• When the lens will not be used for an
extended period of time, store it in a cool, dry
place to prevent mold. Be sure to store the
lens away from direct sunlight or chemicals
such as camphor or naphthalene.
• Do not get water on the lens or drop it in
water as this will cause it to rust and
malfunction.
• Reinforced plastic is used for certain parts of
the lens. To avoid damage, never leave the
lens in an excessively hot place.
Standard accessories
• 67-mm Snap-on Front Lens Cap LC-67
•Rear Lens Cap
• Bayonet Hood HB-39
• Flexible Lens Pouch CL-1015
Optional accessories
• 67-mm screw-on filters
Incompatible accessories
• Teleconverters (all models)
• Auto Ring BR-4 and all models of Auto
Extension Ring PK, K Ring and Bellows
focusing attachment.
• Attachment Ring SX-1
Other accessories may not be suitable for use
with this lens. For details, refer to the
documentation provided with accessories.
Jp
En
De
Fr
Es
Se
Ru
Nl
It
Ck
Ch
Kr
23
Page 24

Specifications
Type of lens G-type AF-S DX Zoom-NIKKOR
Focal length 16mm–85mm
Maximum
aperture
Jp
Lens
En
construction
De
Fr
Picture angle 83º–18º50’
Es
Focal length
Se
scale
Ru
Distance
Nl
information
It
Zoom control Manually via separate zoom
Ck
Ch
Kr
24
lens with built-in CPU and
Nikon bayonet mount
(specially designed for use
with Nikon digital-SLR—Nikon
DX format—cameras)
f/3.5–5.6
17 elements in 11 groups
(3 aspherical lens and 2 ED lens
elements)
16, 24, 35, 50, 70, 85mm
Output to camera body
ring
Focusing
Nikon Internal Focusing (IF)
system (utilizing an internal
Silent Wave Motor); manually
via separate focus ring
Vibration
reduction
Shooting
distance scale
Lens-shift method using voice
coil motors (VCMs)
Graduated in meters and feet
from 0.38 m (1.5 ft.) to infinity
()
Closest focus
distance
No. of
0.38 m (1.3 ft.) from focal plane
at all zoom positions
7 pcs. (rounded)
diaphragm
blades
Diaphragm Fully automatic
Aperture
range
Exposure
f/3.5 to f/22 (at 16mm), f/5.6 to
f/36 (at 85mm)
Via full-aperture method
measurement
Attachment
67 mm (P = 0.75 mm)
size
Page 25

Dimensions
Approximately 72 mm (dia.) ×
85 mm (extension from the
camera’s lens-mount flange)
Weight Approximately 485 g (17.1 oz)
Specifications and designs are subject to change
without notice or obligation on the part of the
manufacturer.
Jp
En
De
Fr
Es
Se
Ru
Nl
It
Ck
Ch
Kr
25
Page 26
Notes on using wide- or super wide-angle AF Nikkor lenses
In the following situations, autofocus may not perform as expected when shooting with wide- or
super wide-angle AF Nikkor lenses.
1. When the main subject in the focus
brackets is relatively small
When a person standing in front of a distant
background is positioned within the focus
brackets, as shown in Fig. E, the background
may be in focus, while the subject is out of
focus.
2. When the main subject is a finely
patterned subject or scene
When the subject is finely patterned or of
low contrast, such as a field filled with
flowers, as shown in Fig. F, focus may be
difficult to acquire using autofocus.
Responses to these types of
situations
(1) Focus on a different subject located at the
same distance from the camera, apply
focus lock, recompose, and shoot.
Jp
En
De
Es
Se
Ru
Nl
Ck
Ch
Kr
E A person standing in front of a
distant background
Fr
F A field filled with flowers
It
26
Page 27

(2) Set the camera’s focus mode to manual
focus and focus manually on the subject.
Refer to “Getting Good Results with Autofocus”
in the camera’s User’s Manual.
Jp
En
De
Fr
Es
Se
Ru
Nl
It
Ck
Ch
Kr
27
Page 28

Hinweise für sicheren Betrieb
ACHTUNG
Keinesfalls zerlegen.
Beim Berühren der Innenteile von Kamera oder Objektiv droht
Verletzungsgefahr. Überlassen Sie Reparaturen unbedingt
ausschließlich qualifizierten Technikern. Kommt es durch einen
heftigen Stoß (z.B. Fall auf den Boden) zu einem Bruch von
Kamera oder Objektiv, so trennen Sie zunächst das Produkt vom
Stromnetz bzw. entnehmen die Batterie(n) und geben es dann
an eine autorisierte Nikon-Servicestelle zur Überprüfung ab.
Bei einer Störung sofort die Stromversorgung
ausschalten.
Jp
Bei Entwicklung von Rauch oder ungewöhnlichem Geruch
durch Kamera oder Objektiv entnehmen Sie sofort die
De
Batterie(n); dabei vorsichtig vorgehen, denn es besteht
Verbrennungsgefahr. Bei einem Weiterbetrieb unter diesen
Fr
Umständen droht Verletzungsgefahr.
Es
Nach dem Abtrennen von der Stromversorgung geben Sie
das Gerät an eine autorisierte Nikon-Servicestelle zur
Se
Überprüfung ab.
Ru
Kamera oder Objektiv keinesfalls bei Vorhandensein
Nl
von brennbarem Gas einsetzen.
Wird elektronisches Gerät bei brennbarem Gas betrieben,
It
so droht u. U. Explosions- oder Brandgefahr.
Ck
Keinesfalls durch Objektiv oder Sucher in die Sonne
Ch
blicken.
Beim Betrachten der Sonne oder anderer starker
Kr
Lichtquellen durch Objektiv oder Sucher droht eine
permanente Schädigung des Sehvermögens.
28
Dem Zugriff von Kindern entziehen.
Es ist unbedingt dafür zu sorgen, dass Kleinkinder keine
Batterien oder andere Kleinteile in den Mund nehmen
können.
Beim Umgang mit Kamera und Objektiv unbedingt
die folgenden Vorsichtmaßnahmen beachten:
• Schützen Sie die Kamera und das Objektiv vor
Feuchtigkeit. Andernfalls droht Brand- oder
Stromschlaggefahr.
• Handhaben oder berühren Sie die Kamera bzw. das
Objektiv keinesfal ls mit nassen Händen. Andernfalls droht
Stromschlaggefahr.
• Bei Gegenlichtaufnahmen nicht das Objektiv gegen die
Sonne richten oder das Sonnenlicht direkt durch das
Objektiv eintreten lassen. Dies könnte eine Überhitzung
der Kamera verursachen und ein Brand könnte die Folge
sein.
•
Vor einem längeren Nichtgebrauch des Objektivs bringen
Sie den vorderen und hinteren Deckel an und bewahren
das Objektiv gesch ützt vor direkter Sonnenlicht einwirkung
auf. Andernfalls droht Brandgefahr wegen möglicher
Fokussierung von Sonnenlicht durch das Objektiv auf
brennbare Gegenstände
.
Page 29
Bezeichnung der Bauteile
1
D
( ): Seite mit weiteren Erläuterungen
Gegenlichtblende (S. 34)
Markierung für die Arretierung
2
der Gegenlichtblende (S. 34)
3
Markierung für die Ausrichtung
der Gegenlichtblende (S. 34)
4 Markierung für das Ansetzen
M
M
M/A
OFF
ON
ACTIVE
NORMAL
M/A
A
ON
B
ACTIVE
NORMAL
C
der Gegenlichtblende (S. 34)
5 Zoomring (S. 31)
6 Brennweitenskala
OFF
7 Brennweiten-Index
8 Entfernungsskala
9 Markierung für die
Entfernungseinstellung
0 Entfernungseinstellring (S. 31)
a Objektivindex
b Gummiring der
Objektivfassung (S. 35)
c CPU-Kontakte (S. 35)
d Fokusmodusschalter (S. 31)
e Bildstabilisator-Schalter
ON/OFF (S. 32)
f VR-Modus-Schalter (S. 32)
Jp
De
Fr
Es
Se
Ru
Nl
It
Ck
Ch
Kr
29
Page 30

Wir danken Ihnen für das Vertrauen, das Sie Nikon mit dem Kauf des AF-S DX NIKKOR 16-85 mm 1:3,5-5,6G ED VR
entgegenbringen. DX-NIKKOR-Objektive sind speziell für die Verwendung mit digitalen Nikon-Spiegelreflexkameras
mit DX-Bildformat konstruiert, wie etwa die D300 und die D90. Der Bildwinkel des Objektivs entspricht bei
Verwendung an einer DX-Format-Kamera dem eines Objektivs mit der ca. 1,5-fachen Brennweite an einer
Kleinbildkamera. Machen Sie sich bitte vor dem Einsatz dieses Objektivs mit dem Inhalt dieser Bedienungsanleitung
und dem Benutzerhandbuch Ihrer Kamera vertraut.
Hauptmerkmale
• Bei eingeschaltetem Bildstabilisator können längere
Belichtungszeiten (3,5 Stufen*) verwendet werden. Auf
diese Weise kann mit längeren Belichtungszeiten
fotografiert werden, insbesondere bei
Freihandaufnahmen mit längeren Brennweiten.
Jp
(*Die Wirkung des Bildstabilisators (VR) auf die
Belichtungszeit wird gemäß CIPA-Standards ermittelt
(Camera and Imaging Products Association); FX-Objektive
De
werden an FX-Format-Kameras gemessen, DX-Objektive
Fr
an DX-Format-Kameras. Zoomobjektive werden bei der
längsten Brennweiteneinstellung gemessen.)
Es
• Der Fokussiermechanismus des Objektivs wird von
Se
einem Silent Wave Motor angetrieben, so dass die
Ru
Scharfeinstellung per Autofokus stufenlos, geräuscharm
und praktisch verzögerungsfrei erfolgt. Der
Nl
Fokusmodusschalter
It
Auswählen von Autofokus (A) oder manuellem Fokus
(M).
Ck
• Bei einer Nikon-Kamera mit 3D-Color-Matrixmessung
Ch
ist mit diesem Objektiv eine sehr präzise
Kr
Belichtungssteuerung möglich, da in diesem Fall
Informationen zum Abstand des Motivs vom Objektiv
an das Kameragehäuse übertragen werden.
d
dient zum einfachen
• Das Objektiv ist mit drei asphärischen und zwei EDGlas-Linsen (extra-low dispersion) ausgestattet, die
eine hohe Bildschärfe praktisch ohne Farbsäume
ermöglichen. Auch die Irisblende mit sieben
Lamellen erzeugt eine fast kreisrunde
Blendenöffnung. Mit dieser Eigenschaft erscheinen
Bereiche außerhalb des Fokus weich und unauffällig.
30
Page 31

Fokussierung, Zoom und Tiefenschärfe
Stellen Sie vor der Fokussierung mit dem Zoomring 5
die Brennweite so ein, dass Sie im Sucher den
gewünschten Bildausschnitt sehen. Bei Kameras, die
mit einer Abblendtaste ausgestattet sind, kann die
Tiefenschärfe vor dem Auslösen im Sucher beurteilt
werden.
• Aufgrund der optischen Eigenschaften dieses
Objektivs nimmt die Brennweite bei kürzeren
Aufnahmedistanzen etwas ab.
• Die Entfernungsskala zeigt nicht den genauen
Abstand zwischen Motiv und Kamera an. Die Werte
sind Näherungswerte und können nur als Richtlinie
dienen. Bei Landschaftsaufnahmen fokussiert die
Kamera aufgrund der Schärfentiefe möglicherweise
auf eine nähere Entfernung als unendlich.
Fokussierung (Abb. A)
Wählen Sie den Fokussiermodus der Kamera anhand
der folgenden Tabelle:
Fokussiermodus
der Kamera
AF
M
Autofokus-Modus mit manueller
Einstellmöglichkeit (M/A-Modus)
1
Stellen Sie den Fokusmodusschalter d am Objektiv auf
M/A.
2
Der Autofokus ist aktiviert, aber Sie können manuell
fokussieren, indem Sie den Entfernungeinstellring
[0] drehen, während Sie den Auslöser am ersten
Druckpunkt gedrückt halten oder während Sie die
AF-ON-Taste am Kameragehäuse gedrückt halten
(insofern die Kamera über eine AF-ON-Taste verfügt).
3
Drücken Sie den Auslöser erneut bis zum ersten
Druckpunkt oder drücken Sie die AF-ON-Taste
erneut,
zum Autofokusbetrieb zurückwechseln möchten.
Gute Ergebnisse mit dem Autofokus
Einzelheiten siehe »Hinweise zum Gebrauch von Weitwinkel- und
Superweitwinkel-AF-NIKKOR-Objektiven« (S. 37).
Fokussteuerung des Objektivs
M/A M
Autofokus-Modus
mit manueller
Einstellmöglichkeit
Manuelles Fokussieren
(entfernungsmessung verfügbar)
wenn Sie von der Manuellen Fokussirung
Manuelles
Fokussieren
(entfernungsmessung
verfügbar)
Jp
De
Fr
Es
Se
Ru
Nl
It
Ck
Ch
Kr
31
Page 32

Bildstabilisator
Grundlegende Funktionsweise des
Bildstabilisators
Frequenz der Vibrationen
Kameraverwacklungen
Jp
Kameraschwenks
Starke
Kameraverwacklung
bei Aufnahmen aus
einem fahrenden
Fahrzeug
Stellungen des ON/OFF-Schalters für den
Bildstabilisator (Abb. B)
ON:Die Kamerabewegungen werden beim
Drücken des Auslösers bis zum ersten
Druckpunkt und auch bei der eigentlichen
Auslösung ausgeglichen. Vibration wird im
Sucher reduziert, erleichtert daher die
Schärfeneinstellung (A und M) und die
Wahl des Bildausschnitts.
OFF:Keine reduzierte Vibration.
De
Fr
Es
Se
Ru
Nl
It
Ck
Ch
Kr
Einstellung des Bildstabilisatorschalters auf
Einstellung des Bildstabilisatorschalters auf
Bei normalen Aufnahmen
Wählen Sie eine der Bildstabilisator-Einstellungen
auf NORMAL oder ACTIVE.
Bei Kameraschwenks
Wählen Sie eine der Bildstabilisator-Einstellungen
auf NORMAL.
Bei Aufnahmen aus einem Fahrzeug in Bewegung
Wählen Sie eine der Bildstabilisator-Einstellungen
auf ACTIVE.
Stärke der Vibrationen
32
NORMAL
ACTIVE
Stellungen des Bildstabilisatorschalters
.
(Abb. C)
.
NORMAL: Der Vibrationsreduktions-Mechanismus
verringert Kameraverwacklungen und
ermöglicht gleichmäßige
Kameraschwenks.
ACTIVE: Der Bildstabilisator gleicht auch stärkere
Kameraverwacklungen aus, wie sie z.B.
beim Aufnehmen während der Fahrt
auftreten. In diesem Modus unterscheidet
das Objektiv nicht automatisch zwischen
Kameraschwenks und Verwacklungen.
Page 33

Hinweise zum Bildstabilisator
• Tippen Sie den Auslöser an, warten Sie, bis sich das
Bild im Sucher stabilisiert hat, und drücken Sie erst
dann den Auslöser ganz nach unten.
• Stellen Sie den VR-Modus-Schalter auf NORMAL,
wenn Sie vorhaben, Schenkaufnahmen zu machen.
• Wenn Sie mit dieser Einstellung die Kamera bei einem
Schwenk in einem weiten Bogen bewegen, so
werden Kameravibrationen in Richtung dieser
Bewegung nicht ausgeglichen. Wenn Sie z.B. die
Kamera horizontal schwenken, werden
Kameravibrationen in vertikaler Richtung reduziert.
Dies stabilisiert das Bild und dabei wird der
gewünschte Schwenkeffekt erzielt.
• Aufgrund der Eigenschaften des
Bildstabilisierungsmechanismus e rscheint das Bild im
Sucher nach dem Auslösen unter Umständen
verschwommen. Dies ist jedoch keine Fehlfunktion.
• Schalten Sie die Kamera nicht aus und nehmen Sie
auch nicht das Objektiv von der Kamera ab, solange
der Bildstabilisator arbeitet. Andernfalls kann beim
Schütteln des Objektivs ein Geräusch zu hören sein,
als seien innere Bauteile lose oder gebrochen. Dies ist
jedoch keine Fehlfunktion. Schalten Sie die Kamera
wieder ein, um das Problem zu beheben.
• Bei Kameras mit integriertem Blitzgerät funktioniert
der Bildstabilisator nicht, solange das integrierte
Blitzgerät geladen wird.
• Bei Verwendung eines Stativs wird die Verwendung
des Bildstabilisators nicht empfohlen. Stellen Sie den
Bildstabilisatorschalter e in diesem Fall auf »OFF«.
Ausnahme: Bei Verwendung eines Einbeinstativs
oder nicht arretierten Stativkopfs sollte der
Bildstabilsator aktiviert werden (»ON«).
• Bei Autofokus-Kameras, wie beispielsweise den
Modellen der D2- und D300-Serie, die mit einer AFON-Taste ausgestattet sind, bewirkt das Drücken der
AF-ON-Taste keine Aktivierung des Bildstabilisators.
Blendeneinstellung
Stellen Sie die Blende an der Kamera ein.
Variable Lichtstärke
Beim Verstellen der Brennweite von 16 mm bis auf 85
mm nimmt die Lichtstärke um 1
Die Kamera kompensiert jedoch jede
Blendenänderung durch Anpasse n der Belichtungszeit,
damit der korrekte Belichtungswert beibehalten wird.
1
/3 Blendenstufen ab.
Jp
De
Fr
Es
Se
Ru
Nl
It
Ck
Ch
Kr
33
Page 34

Integriertes Blitzgerät und
Abschattung
• Verwenden Sie keine Gegenlichtblende 1, da diese
einen Schatten ins Motiv werfen konnte.
• Das integrierte Blitzgerät kann nich t fur Entfernungen
von unter 0,6 m eingesetzt werden.
Digitale
Spiegelreflexkameras
D300S
Jp
D300/D200
D100
De
Fr
D90/D80/D50
Es
D5100/D5000/
Se
D3100/D3000/
D70-Serie/D60/
Ru
D40-Serie
Nl
• Die integrierten Blitzgeräte der Serien D300, D200, D90,
It
D80 und D50 eignen sich für Brennweiten ab 18 mm, das
Ck
integrierte Blitzgerät der D100 eignet sich für
Ch
Brennweiten ab 20 mm. Bei einer Brennweite von 16 mm
werden die Bildecken nicht ausreichend ausgeleuchtet.
Kr
• Aktuelle Angaben zur Verschattung mit diesem
Objektiv finden Sie im Kamerahandbuch.
34
Einstellbare Brennweite/
Aufnahmedistanz
• 16 mm: ab 0.7 m
• ab 24 mm: keine Einschränkungen
• ab 16 mm: keine Einschränkungen
• 16 mm: ab 1 m
• ab 24 mm: keine Einschränkungen
• 16 mm: ab 2 m
• ab 24 mm: keine Einschränkungen
• ab 24 mm: keine Einschränkungen
Verwenden der BajonettGegenlichtblende HB-39
Anbringen der Gegenlichtblende
Richten Sie die Markierung für die Arretierung der
Gegenlichtblende ( ) 2 an der Gegenlichtblende
und die Markierung für das Ansetzen der
Gegenlichtblende 4 am Objektiv aneinander aus und
drehen Sie die Gegelichtblende 1 gegen den
Uhrzeigersinn (von der Rückseite der Kamera aus
betrachtet), bis sie mit einem Klicken einrastet (Abb. D).
• Achten Sie darauf, die Markierung für das Ansetzen
der Gegenlichtblende und die Markierung für die
Ausrichtung der Gegenlichtblende ( ) 3
aneinander auszurichten.
• Wenn die Gegenlichtblende nicht richtig angebracht
ist, schattet sie u. U. einen Teil des Motivs ab.
• Das Anbringen bzw. Abnehmen der Gegenlichtblende
fällt leichter, wenn Sie diese an der Basis (in der Nähe der
Markierung für die Arretierung der Gegenlichtblende
( )) und nicht an den äußeren Kanten fassen.
Abnehmen der Gegenlichtblende
Die Gegenlichtblende zum Lösen an der Basis fass en (in
der Nähe der Markierung für die Arretierung der
Gegenlichtblende) und von der Rückseite der Kamera
aus gesehen im Uhrzeigersinn drehen.
Page 35

Pflege des Objektivs
• Halten Sie die CPU-Kontakte c stets sauber und
schützen Sie sie vor Beschädigung.
• Wenn der Gummiring der Objektivfassung b
beschädigt ist, bringen Sie das Objektiv zum nächsten
Nikon-Vertragshändler bzw. zu einer NikonReparaturwerkstatt.
• Säubern Sie die Linsenobeflächen mit einem Blasepinsel.
Staub und Flecken entfernen Sie mit einem sauberen,
weichen Baumwolltuch oder Optik-Reinigungspapier,
das Sie mit Ethanol (Alkohol) oder
Optikreinigungsflüssigkeit anfeuchten. Wischen Sie in
kreisförmigen Bewegungen von der Mitte nach außen,
ohne dass Wischspuren zurückbleiben oder Sie andere
Teile des Objektivs berühren.
• Verwenden Sie keinesfalls Verdünner oder Benzin zur
Reinigung des Objektivs, da dieses zu Beschädigungen
führen, ein Feuer auslösen oder Gesundheitsschäden
verursachen könnte.
• Zum Schutz der Frontlinse kann ein Klarglasfilter (NC)
verwendet werden. Die Gegenlichtblende 1 wirkt als
zusätzlicher Frontlinsenschutz.
• Beim Verstauen des Objektivs in seinem flexiblen Etui
müssen der vordere und der hintere Deckel. Das Objektiv
lässt sich auch dann verstauen, wenn die
Gegenlichtblende 1 in der umgekehrten Position
angebracht ist.
• Halten oder heben Sie das Objektiv oder die Kamera
nicht an der angesetzten Gegenlichblende 1.
• Bei längerer Nichtbenutzung sollte das Objektiv an
einem kühlen, trockenen Ort aufbewahrt werden, um
Schimmelbildung zu vermeiden. Halten Sie das Objektiv
von direkter Sonneneinstrahlung oder Chemikalien wie
Kampfer oder Naphthalin fern.
• Halten Sie das Objektiv von Wasser fern, das zur Korrosion
und zu Betriebsstörungen führen kann.
• Einige Teile des Objektivs bestehen aus verstärktem
Kunststoff. Lassen Sie das Objektiv deshalb nie an
übermäßig heißen Orten liegen!
Serienmäßiges Zubehör
• Vorderer Objektivdeckel LC-67 mit
Schnappverschluss (67 mm)
• Hinterer Objektivdeckel
• Bajonett-Gegenlichtblende HB-39
• Objektivbeutel CL-1015
Sonderzubehör
• 67-mm-Schraubfilter
Nicht geeignetes Zubehör
• Telekonverter (alle Modelle)
• Auto-Ring BR-4 und alle Modelle von AutoZwischenring PK, K-Ring und Balgenvorsatz.
•Anschlussring SX-1
Auch anderes Zubehör ist möglicherweise für dieses
Objektiv nicht geeignet. Einzelheiten entnehmen Sie
bitte der Dokumentation zu dem jeweiligen Zubehör.
Jp
De
Fr
Es
Se
Ru
Nl
It
Ck
Ch
Kr
35
Page 36

Technische Daten
Objektivtyp AF-S DX Zoom-NIKKOR-Objektiv Typ
Brennweite 16 - 85 mm
Maximale
Blendenöffnung
Objektivaufbau 17 Linsen in 11 Gruppen
Jp
Bildwinkel 83° bis 18°50´
De
Brennweitenskala
Fr
Entfernungsdaten
Es
Zoomen Manuell über separaten Zoomring
Se
Fokussierung
Ru
Nl
It
Bildstabilisator Optischer Bildstabilisator mit
Ck
Ch
Entfernungsskala
Kr
36
G mit integrierter CPU und NikonBajonettfassung (speziell ausgelegt
für den Gebrauch mit NikonSpiegelreflexkameras (DX-Format)
1:3,5–5,6
(3 asphärische Linsen und 2 ED-GlasLinsen)
16, 24, 35, 50, 70, 85 mm
Werden an Kameras übertragen
Innenfokussierung nach dem NikonIF-System (mittels integriertem Silent
Wave-Motor); manuell über
separaten Entfernungseinstellring
beweglicher Linsengruppe; Antrieb
durch Schwingspulenmotoren
Unterteilt in Meter und Fuß; 0,38 m
bis Unendlich ( )
Naheinstellgrenze
Blende
Blendenart Vollautomatisch
Blendenbereich 3,5 bis 22 (bei 16 mm), 5,6 bis 36 (bei
Belichtungsmessung
Filtergewinde 67 mm (P = 0,75 mm)
Abmessungen
Gewicht ca. 485 g
Änderungen und Irrtümer vorbehalten.
0,38 m von der Sensorebene
gemessen, bei allen
Zoompositionen
Irisblende mit 7 gerundeten
Lamellen
85 mm)
Offenblendenmessung
ca. 72 mm (Durchm.) × 85 mm (Länge
ab Bajonettauflage)
Page 37

Hinweise zum Gebrauch von Weitwinkel- und Superweitwinkel-AF-NIKKOR-Objektiven
In den folgenden Fällen funktioniert der Autofokus bei der Aufnahme von Bildern mit AF-NIKKOR-Weitwinkel- und Superweitwinkelobjektiven u. U. nicht erwartungsgemäß.
E Eine Person vor einem weit
entfernten Hintergrund
F Eine Blumenwiese
1. Das Hauptmotivelement ist zu klein für
das AF-Messfeld
Wenn das Hauptmotiv nur einen geringen Teil des
aktiven Fokusmessfelds abdeckt, wie an den
Fokusmessfeld-Markierungen in Abb. E zu sehen,
stellt die Kamera unter Umständen auf den
Hintergrund, nicht jedoch das Hauptmotiv scharf.
2. Das Motiv weist eine Struktur aus
zahlreichen kleinen Elementen auf
Bei Motiven mit kleinteiliger Strukturierung oder
geringem Kontrast, zum Beispiel einer Blumenwiese
wie in Abb. F zu sehen, ist eine Sch arfeinstellung per
Autofokus u. U. schwierig.
Lösungsmöglichkeiten für solche Fälle
(1) Fokussieren Sie zunächst auf ein anderes Motiv im
selben Abstand von der Kamera, nutzen Sie den
Autofokusmesswertspeicher, wählen den
gewünschten Bildausschnitt und machen Sie so die
Aufnahme.
(2) Aktivieren Sie die manuelle Fokussierung und
stellen Sie von Hand auf das Motiv scharf.
Näheres zu diesem Thema finden Sie außerdem unter
»Gute Ergebnisse mit dem Autofokus« in der
Benutzerhandbuch zur Kamera.
Jp
De
Fr
Es
Se
Ru
Nl
It
Ck
Ch
Kr
37
Page 38

Remarques concernant une utilisation en toute sécurité
ATTENTION
Ne pas démonter
Le fait de toucher aux pièces internes de l'appareil ou de
l'objectif pourrait entraîner des blessures. Les réparations
doivent être effectuées par des techniciens qualifiés. Si
l'appareil ou l'objectif est cassé suite à une chute ou un
autre accident, apportez le produit dans un centre de
service agréé Nikon pour le faire vérifier après avoir
débranché le produit et retiré les piles.
En cas de dysfonctionnement, éteignez l'appareil
immédiatement
Jp
Si vous remarquez de la fumée ou une odeur inhabituelle se
En
dégageant de l'appareil photo ou de l'objectif, retirez
De
immédiatement les piles, en prenant soin de ne pas vous brûler.
Continuer d'utiliser son matériel peut entraîner des blessures.
Fr
Après avoir retiré ou débranché la source d'alimentation,
Es
confiez le produit à un centre de service agréé Nikon pour
Se
le faire vérifier.
Ru
N'utilisez pas l'appareil photo ou l'objectif en
présence de gaz inflammable
Nl
L'utilisation de matériel électronique en présence de gaz
It
inflammable risquerait de provoquer une explosion ou un
Ck
incendie.
Ch
Ne regardez pas le soleil dans l'objectif ou le viseur
Kr
Regarder le soleil ou toute autre source lumineuse violente
dans l'objectif ou le viseur peut provoquer de graves
lésions oculaires irréversibles.
38
Tenir hors de portée des enfants
Faites extrêmement attention à ce que les enfants ne
mettent pas à la bouche les piles ou d'autres petites pièces.
Observez les précautions suivantes lorsque vous
manipulez l'appareil et l'objectif
• Maintenez l'appareil photo et l'objectif au sec. Le non-
respect de cette précaution peut provoquer un incendie
ou une électrocution.
• Ne manipulez pas et ne touchez pas l'appareil photo ou
l'objectif avec les mains humides. Le non-respect de
cette précaution peut provoquer une électrocution.
• Lors d'une prise de vue à contre-jour, ne dirigez pas
l'objectif vers le soleil et évitez que les rayons du soleil
pénètrent dans l'objectif ; l'appareil photo pourrait
chauffer à l'excès, ce qui risquerait de provoquer un
incendie.
• Lorsque vous n'utilisez pas l'objectif pendant une
période prolongée, fixez les bouchons avant et arrière, et
rangez l'objectif à l'abri de la lumière directe du soleil. Le
non-respect de cette précaution peut provoquer un
incendie, car l'objectif peut concentrer la lumière du
soleil sur un objet inflammable.
Page 39

Nomenclature
D
( ) : page de référence
1 Parasoleil (P. 44)
2 Repère de fixation du
parasoleil (P. 44)
Repère de réglage du parasoleil
3
4
Repère de montage du parasoleil
(P. 44)
(P. 44)
5 Bague de zoom (P. 41)
M
M
M/A
OFF
ON
ACTIVE
NORMAL
M/A
A
ON
B
NORMAL
C
6 Echelle des focales
7 Repère des focales
8 Echelle des distances
OFF
9 Ligne de repère des distance
0 Bague de mise au point (P. 41)
ACTIVE
a Repère de montage
b Joint en caoutchouc de
l'objectif (P. 45)
c Contacts CPU (P. 45)
d Commutateur de mode de
mise au point (P. 41)
Commutateur ON/OFF
e
(MARCHE/ARRET) de réduction
de vibration
(P. 42)
f Commutateur de mode de
réduction de vibration (P. 42)
Jp
De
Fr
Es
Se
Ru
Nl
It
Ck
Ch
Kr
39
Page 40

Nous vous remercions d'avoir choisi l'objectif AF-S DX NIKKOR 16-85mm f/3,5-5,6G ED VR. Les objectifs DX Nikkor
sont spécialement conçus pour les reflex numériques Nikon (format Nikon), notamment ceux des séries D300 et
D90. Une fois monté sur des appareils photo au format Nikon DX, l'angle de champ de l'objectif est environ égal à
1,5× la focale en format 24 × 36 mm. Avant d'utiliser cet objectif, veuillez lire ces instructions et vous reporter au
Manuel d'utilisation de l'appareil photo.
Principales caractéristiques
• Lorsque vous activez la réduction de vibration, il est
possible de prendre des photos à des vitesses d'obturation
réduites (3,5 valeurs*). Vous augmentez ainsi la plage des
vitesses d'obturation et des positions de zoom disponibles,
notamment lorsque vous tenez l'appareil photo en main.
Jp
(*Les effets de la fonction VR sur la vitesse d'obturation sont
mesurés selon les normes de la CIPA (Camera and Imaging
En
Products Association) ; les mesures des objectifs de format
De
FX sont effectuées avec des appareils photo numériques de
Fr
format FX, celles des objectifs de format DX avec des
appareils photo de format DX. Les zooms sont réglés sur
Es
leur focale maximale lorsque les mesures sont effectuées.)
Se
• Cet objectif utilise un moteur silencieux SWM pour
Ru
entraîner le mécanisme de mise au point, permettant
Nl
un autofocus régulier, silencieux et presque
instantané. Le commutateur de mode de mise au
It
point d sert à sélectionner facilement les modes
Ck
autofocus (A) et mise au point manuelle (M).
Ch
• Un contrôle d'exposition plus précis est possible quand
cet objectif est monté sur un appareil photo Nikon à
Kr
mesure matricielle couleur 3D, parce que l'information
de distance au sujet est transférée de l'objectif au boîtier.
• L'utilisation de trois éléments asphériques et de deux
éléments à dispersion très faible (ED) assure des
images nettes pratiquement exemptes de frangeage
de couleur. En outre le diaphragme à sept lamelles
offre une ouverture pratiquement circulaire, ce qui
atténue et rend pratiquement imperceptibles les
zones de l'image qui sont floues.
40
Page 41

Mise au point, cadrage au zoom et
profondeur de champ
Avant de mettre au point, tournez la bague de zoom 5
pour régler la focale jusqu'à ce que la composition
souhaitée soit cadrée dans le viseur.
Si votre appareil possède un levier ou une commande
d'aperçu de la profondeur de champ (diaphragme),
vous pouvez en obtenir l'aperçu dans le viseur de
l'appareil photo.
• En raison des caractéristiques optiques de cet
objectif, la focale diminue légèrement aux distances
de mise au point rapprochées.
• L'échelle de distance n'indique pas la distance précise
entre le sujet et l'appareil photo. Les valeurs sont
approximatives et ne doivent être considérées que
comme une estimation générale. Lorsque vous
photographiez des paysages éloignés, l'appareil
photo risque de faire la mise au point sur une position
plus proche que l'infini, sous l'influence de la
profondeur de champ.
Mise au point (Fig. A)
Réglez le sélecteur de mise au point de l'appareil
conformément à ce tableau :
Mode de mise
au point de
l'appareil
AF
M
Autofocus avec priorité manuelle (Mode M/A)
1
Réglez le commutateur de mode de mise au point
d de l'objectif sur M/A.
2
L'autofocus est activé, mais il est possible d'utiliser la mise
au point manuelle en tournant la bague de mise au point
manuelle séparée tout en appuyant sur le déclencheur à
mi-course ou en enfonçant la commande AF-ON du
boîtier, pour autant que votre appareil en soit équipé.
3
Appuyez sur le déclencheur à mi-course ou appuyez de
nouveau sur la commande AF-ON pour annuler la mise au
point manuelle et revenir à l'autofocus.
Optimisation des résultats avec l'autofocus
Reportez-vous à la section « Remarques sur l'emploi des
objectifs AF Nikkor grand-angle ou super grand-angle »
Mode de mise au point de l'objectif
M/A M
Autofocus avec
priorité manuel
Mise au point manuelle (assistance à la
mise au point disponible)
Mise au point manuelle
(assistance à la mise au
point disponible)
(P. 47).
Jp
De
Fr
Es
Se
Ru
Nl
It
Ck
Ch
Kr
41
Page 42

Mode de réduction de vibration
Concept de base de la réduction de vibrati on
Nombre de vibrations
Bougé de l'appareil
Panoramiques
Jp
En
De
Fr
Es
Se
Ru
Nl
It
Ck
Ch
Kr
Placez le commutateur de mode de réduction de
vibration sur NORMAL.
Placez le commutateur de mode de réduction de
vibration sur ACTIVE.
Pendant la prise de vue
Réglez le commutateur du mode de réduction de la
vibration soit sur NORMAL soit sur ACTIVE.
Lors de la prise de vue de panoramiques
Réglez le commutateur du mode de réduction de la
vibration sur NORMAL.
Lors de la prise de vue depuis un véhicule en mouvement
Réglez le commutateur du mode de réduction de la
vibration sur ACTIVE.
42
Force des vibrations
Bougé de l'appareil
lorsque les photos
sont prises d'un
véhicule e n
mouvement
Réglage de la bague de commutateur ON/
OFF (MARCHE/ARRET) de réduction de la
vibration (Fig. B)
ON :La vibration est réduite lorsque vous
appuyez sur le déclencheur à mi-course
ainsi qu'au moment où vous le relâchez.
Comme la vibration est réduite dans le
viseur, la mise au point auto/manuelle et le
cadrage exact du sujet sont plus simples.
OFF : La vibration n'est pas réduite.
Réglage du commutateur de mode de
réduction de la vibration (Fig. C)
NORMAL : Le mécanisme de réduction de la vibration
réduit le bougé de l'appareil et rend les
panoramiques beaucoup plus faciles.
ACTIVE : Le mécanisme de réduction de vibration
atténue le bougé de l'appareil plus
particulièrement perceptible lors de la
prise de vue depuis un véhicule en
mouvement, par exemple. Sur ce mode,
l'objectif ne fait pas automatiquement la
différence entre le panoramique et le
bougé de l'appareil.
Page 43

Remarques relatives à l'utilisation du mode
de réduction de vibration
• Sollicitez légèrement le déclencheur, puis attendez
que l'image affichée dans le viseur se stabilise avant
d'appuyer à fond sur le déclencheur.
• Lorsque vous prenez des panoramiques, vérifiez que
vous avez bien placé le mode de réduction de la
vibration sur NORMAL.
• Si vous déplacez l'appareil photo en arc de cercle, la
correction du bougé de l'appareil ne s'effectue pas dans
le sens du panoramique. Par exemple, lorsque vous
tournez l'appareil photo horizontalement, seul le bougé
d'appareil vertical est réduit. Ceci permet de stabiliser
l'image et d'obtenir l'effet de panoramique souhaité.
• En raison des caractéristiques du mécanisme de
réduction des vibrations, l'image affichée dans le
viseur peut être floue lorsque vous relâchez le
déclencheur. Il ne s'agit pas d'un dysfonctionnement.
• N'éteignez pas l'appareil photo ou ne retirez pas
l'objectif de l'appareil lorsque le mode de réduction
de vibration est actif. Si vous ne respectez pas cette
consigne, l'objectif peut émettre un son et donner
l'impression qu'un composant interne est détaché ou
cassé. Il ne s'agit pas d'un dysfonctionnement.
Allumez à nouveau l'appareil pour résoudre cet
incident.
• Avec des appareils photo équipés d'un flash intégré,
la réduction de vibration ne fonctionne pas lorsque
ce dernier se recharge.
• Si l'appareil photo est monté sur un trépied, réglez le
commutateur ON/OFF de réduction de vibration e
sur OFF. Toutefois, nous vous recommandons de
régler ce commutateur sur la position ON lorsque
vous utilisez l'appareil photo sur un trépied instable
ou sur un pied.
• Sur les appareils photo autofocus, notamment ceux
de la série D2 et les modèles D300 possédant une
commande AF-ON, la réduction de vibration ne
fonctionne pas lorsque la commande AF-ON est
enfoncée.
Réglage de l'ouverture
Utilisez l'appareil photo pour régler l'ouverture.
Ouvertures maximales variables
Le fait de zoomer avec l'objectif de 16mm à 85mm
diminue l'ouverture maximale de 1
L'appareil photo compense néanmoins les
changements d'ouverture en réglant la vitesse
d'obturation afin de maintenir la valeur d'exposition
correcte.
1
/3 de valeur.
Jp
De
Fr
Es
Se
Ru
Nl
It
Ck
Ch
Kr
43
Page 44

Photographie au flash avec des
appareils ayant un flash intégré
• Pour éviter le vignettage, n'utilisez pas le parasoleil
1.
• Il est impossible d'utiliser le flash intégré à des
distances inférieures à 0,6 m.
Appareils photo
SLR numériques
D300S
D300/D200
Jp
En
D100
De
Fr
D90/D80/D50
Es
D5100/D5000/
Se
D3100/D3000/
Ru
Séries D70/D60/
Séries D40
Nl
• Les flashes intégrés du D300, D200, D90, D80 et D50
It
sont compatibles avec des focales de 18mm ou
Ck
supérieures tandis que le flash intégré du D100 est
Ch
compatible avec des focales de 20mm ou supérieures.
Le vignettage se produit à une focale de 16mm.
Kr
•
Pour obtenir les dernières informations sur le vignettage avec
cet objectif, reportez-vous au manuel de l'appareil photo.
44
Focale/distance de prise de vue
prises en charge
• 16mm/0.7 m ou plus
• 24mm ou plus/pas de limite
• 16mm ou plus/pas de limite
• 16mm/1 m ou plus
• 24mm ou plus/pas de limite
• 16mm/2 m ou plus
• 24mm ou plus/pas de limite
• 24mm ou plus/pas de limite
Utilisation du parasoleil à baïonnette
HB-39
Fixation du parasoleil
Alignez le repère de fixation du parasoleil ( ) 2 sur
le parasoleil avec le repère de montage du parasoleil 4
sur l'objectif et tournez le parasoleil 1 dans le sens
inverse des aiguilles d'une montre (vu à partir de
l'arrière de l'appareil photo) jusqu'au déclic de mise en
place (Fig. D).
• Vérifiez que le repère de montage du parasoleil est
bien aligné sur le repère de réglage du parasoleil
() 3.
• Si le parasoleil n'est pas correctement fixé, il risque
d'entraîner du vignettage.
• Pour faciliter le montage ou le retrait du parasoleil,
tenez-le par la base (près du repère de fixation du
parasoleil) et non par le bord extérieur.
Retrait du parasoleil
Tenez le parasoleil par la base (près du repère de
fixation du parasoleil) et faites-le pivoter dans le sens
des aiguilles d'une montre pour le retirer (l'objectif de
l'appareil photo ne doit pas être dirigé vers vous).
Page 45

Soin de l'objectif
• Il est important de nettoyer régulièrement les contacts
CPU c et de ne pas les endommager.
• Si le joint en caoutchouc de l'objectif b est
endommagé, rendez-vous chez votre revendeur ou dans
le centre de réparations agréé Nikon le plus proche pour
réaliser les réparations nécessaires.
•
Nettoyer la surface de l'objectif avec une soufflette ou une
brosse de nettoyage. Pour enlever les poussières ou les traces,
utiliser de préférence un tissu de coton doux, ou un tissu
optique, légèrement humidifié avec de l'alcool éthylique
(éthanol). Procédez par légers mouvements circulaires en
partant du centre vers l'extérieur, en prenant soin de ne pas
laisser de traces et de ne pas toucher d'autres zones de l'objectif
•
Ne jamais employer de solvant ou de benzènes susceptibles
d'endommager l'objectif, de prendre feu ou de nuire à la santé
• Des filtres NC sont disponibles pour protéger la lentille de
l'objectif avant. Le parasoleil 1 assure également une
bonne protection contre les chocs.
• Lorsque vous rangez l'objectif dans son étui souple, fixez
les deux bouchons avant et arrière de l'objectif. L'objectif
peut aussi être rangé lorsque le parasoleil 1 est fixé en
position inversée.
• Lorsque l'objectif est installé sur un appareil photo, ne
saisissez et ne tenez pas l'appareil photo ainsi que
l'objectif par le parasoleil 1.
• En cas d'inutilisation pour une période prolongée,
entreposez le matériel dans un endroit frais, sec et aéré
pour éviter les moisissures. Veillez à tenir le matériel
éloigné des sources de lumière, et des produits
chimiques (camphre, naphtaline, etc.).
• Éviter les projections d'eau ainsi que l'immersion, qui
peuvent provoquer la formation de rouille et des
dommages irréparables.
• Certaines pièces de l'objectif sont en plastique renforcé.
Pour éviter tout problème, ne pas soumettre l'objectif à
de fortes chaleurs.
Accessoires fournis
• Bouchon d'objectif avant encliquetable 67 mm LC-67
• Bouchon arrière de l'objectif
• Parasoleil à baïonnette HB-39
.
• Étui souple pour objectif CL-1015
Accessoires en option
.
• Filtres à visser 67 mm
Accessoires incompatibles
• Téléconvertisseur (tous les modèles)
• La bague auto BR-4 et tous les modèles de bague
allonge auto PK, les bagues K et les soufflets.
• Bague de fixation SX-1
L'emploi d'autres accessoires peut ne pas être adapté
avec cet objectif. Pour plus d'informations, reportezvous à la documentation qui les accompagne.
Jp
De
Fr
Es
Se
Ru
Nl
It
Ck
Ch
Kr
45
Page 46

Caractéristiques
Type d'objectif Zoom-NIKKOR DX AF-S de type G
Focale 16mm–85mm
Ouverture
maximale
Construction
optique
Jp
En
Champ angulaire
De
Focales
Fr
Informations de
distance
Es
Commande de
Se
zoom
Ru
Mise au point Système Internal Focusing (IF) Nikon
Nl
It
Ck
Réduction de
Ch
vibration
Kr
46
avec CPU et monture baïonnette
Nikon (spécialement conçus pour
être utilisés sur des SLR Nikon
numériques au format Nikon DX)
f/3,5–5,6
17 éléments en 11 groupes
(éléments : 3 lentilles asphérique et 2
lentilles ED)
83º–18º50’
16, 24, 35, 50, 70, 85mm
A l'appareil
Manuel avec bague de zoom
indépendante
(utilisant un moteur à ondes
silencieux interne) ; manuel par
bague de mise au point séparée
VR optique utilisant des moteurs à
bobine acoustique (VCM)
Echelle des
distances de prise
de vue
Distance de mise
au point minimale
Nb. de lamelles
du diaphragme
Diaphragme Entièrement automatique
Plage des
ouvertures
Mesure de
l'exposition
Taille des
accessoires
Dimensions Environ 72 mm (dia.) × 85 mm
Poids Environ 485 g
Les caractéristiques et la conception sont susceptibles d'être
modifiés sans préavis ni obligation de la part du fabricant.
Graduée en mètres et pieds de
0,38 m à l'infini ( )
0,38 m à partir du plan focal quel que
soit le réglage du zoom
7 (circulaires)
f/3,5 à f/22 (à 16mm), f/5,6 à f/36
(à 85mm)
Par la méthode à pleine ouverture
67 mm (P = 0,75 mm)
(à partir du plan d'appui de la
monture d'objectif de l'appareil)
Page 47

Remarques sur l'emploi des objectifs AF Nikkor grand-angle ou super grand-angle
Dans les situations suivantes, l'autofocus risque de ne pas fonctionner correctement lors de la prise de vue avec des
objectifs AF Nikkor grand-angle ou super grand-angle.
E Une personne debout sur un fond
éloigné
F Un champ couvert de fleurs
1. Quand le sujet principal dans les
collimateurs de mise au point est
relativement petit
Quand une personne debout sur un arrière-plan
éloigné est placée dans le collimateur de mise au
point, comme illustré à la Fig. E, l'arrière-plan peut
être net, alors que le sujet est flou.
2. Quand le sujet principal est une scène ou
un sujet possédant des motifs précis
Quand le sujet a des motifs précis ou est à faible
contraste, par exemple un champ couvert de fleurs,
comme indiqué sur la Fig. F, la mise au point
automatique peut être difficile à obtenir.
Solutions face à ces types de situations
(1) Mettez au point sur un autre sujet équidistant de
l'appareil, appliquez la mémorisation de la mise au
point, recomposez et déclenchez.
(2) Réglez le mode de mise au point de l'appareil photo
sur la mise au point manuelle et effectuez
manuellement la mise au point sur le sujet.
Reportez-vous à la section « Optimisation des résultats
avec l'autofocus » du Manuel d'utilisation de l'appareil
photo.
Jp
De
Fr
Es
Se
Ru
Nl
It
Ck
Ch
Kr
47
Page 48

Notas sobre un uso seguro
PRECAUCIÓN
No desarme el equipo
El contacto con las piezas internas de la cámara o del
objetivo puede provocar lesiones. Las reparaciones
solamente deben ser ejecutadas por técnicos cualificados.
Si a causa de un golpe u otro tipo de accidente la cámara o
el objetivo se rompen y quedan abiertos, desenchufe el
producto y/o retire la batería, y a continuación lleve el
producto a un centro de servicio técnico autorizado Nikon
para su revisión.
Apague inmediatamente el equipo en caso de
Jp
funcionamiento defectuoso
En
Si observa que sale humo o que la cámara o el objetivo
De
desprenden un olor extraño, retire la batería
inmediatamente, con cuidado de no quemarse. Si sigue
Fr
utilizando el equipo corre el riesgo de sufrir lesiones.
Es
Una vez extraída o desconectada la fuente de alimentación,
lleve el producto a un centro de servicio técnico autorizado
Se
Nikon para su revisión.
Ru
No utilice la cámara ni el objetivo en presencia de gas
Nl
inflamable
It
La utilización de equipos electrónicos en presencia de gas
inflamable podría producir una explosión o un incendio.
Ck
No mire hacia el sol a través del objetivo ni del visor
Ch
Mirar hacia el sol u otra fuente de luz potente a través del
Kr
objetivo o del visor podría producirle daños permanentes
en la vista.
48
Mantener fuera del alcance de los niños
Se debe tener especial cuidado en evitar que los niños se
metan en la boca pilas u otras piezas pequeñas.
Adopte las siguientes precauciones al manipular la
cámara y el objetivo
• Mantenga la cámara y el objetivo secos. De no hacer esto
podría producirse un incendio o una descarga eléctrica.
• No manipule ni toque la cámara ni el objetivo con las
manos húmedas. De lo contrario podría recibir una
descarga eléctrica.
• En disparos a contraluz, no apunte el objetivo hacia el sol ni
deje que la luz solar pase directamente por él, ya que
podría sobrecalentar la cámara y, posiblemente, causar
un incendio.
• Cuando el objetivo no vaya a utilizarse por un período de
tiempo prolongado, colóquele la tapa frontal y guárdelo
alejado de la luz solar directa. De no hacer esto podría
producirse un incendio, ya que el objetivo podría enfocar
la luz solar directa sobre un objeto inflamable.
Page 49

Nomenclatura
1
D
( ): página de referencia
Visera del objetivo (P. 54)
2 Marca de acoplamiento de la
visera del objetivo (P. 54)
3 Marca de ajuste de la visera
del objetivo (P. 54)
4 Marca de montura de la visera
M
M
M/A
OFF
ON
ACTIVE
NORMAL
M/A
A
ON
B
ACTIVE
NORMAL
C
del objetivo (P. 54)
5 Anillo del zoom (P. 51)
6 Escala de distancias focales
OFF
Marca de distancias focal
7
8 Escala de distancias
9 Línea indicadora de distancias
0 Anillo de enfoque (P. 51)
a Marca de montaje
b Junta de goma de montaje del
objetivo (P. 55)
c Contactos CPU (P. 55)
Interruptor de modo de
d
enfoque (P. 51)
e Interruptor ON/OFF de
reducción de vibración (P. 52)
f Interruptor de modo de
Jp
En
De
Fr
Es
Se
Ru
Nl
It
Ck
Ch
Kr
reducción de vibración (P. 52)
49
Page 50

Le agradecemos la compra del objetivo AF-S DX NIKKOR 16-85mm f/3,5-5,6G ED VR. Los objetivos DX Nikkor están
especialmente diseñados para utilizarse con cámaras Nikon digital-SLR (formato Nikon DX), como por ejemplo la
D300 y la D90. Cuando se montan en las cámaras de formato Nikon DX, el ángulo de imagen del objetivo equivale
aproximadamente a 1,5× de la distancia focal en formato 35mm. Antes de utilizar este objetivo, lea estas
instrucciones y consulte la Manual del usuario de su cámara.
Principales funciones
• Si activa la reducción de la vibración, podrá utilizar
velocidades de obturación más lentas (3,5 pasos*). De
este modo, aumenta el rango de velocidades de
obturación y posiciones de zoom posibles,
especialmente si sujeta la cámara con la mano. (*Los
Jp
efectos de la VR en la velocidad de obturación se
miden según los estándares de Camera and Imaging
En
Products Association (CIPA); los objetivos de formato
De
FX se miden mediante el uso de cámaras digitales de
Fr
formato FX, los objetivos de formato DX, mediante el
uso de cámaras de formato DX. Los objetivos con
Es
zoom se miden con el zoom máximo.)
Se
• Este objetivo utiliza un motor Silent Wave para
Ru
accionar el mecanismo de enfoque, en consecuencia,
el enfoque automático es suave, silencioso y
Nl
prácticamente instantáneo. El interruptor de modo
It
de enfoque d tiene como finalidad facilitar la
Ck
elección de funcionamiento con enfo que automático
(A) o enfoque manual (M).
Ch
• Es posible aumentar el control de la exposición
cuando la lente se monta en una cámara Nikon con
capacidad de medición de matriz de color
tridimensional, dado que la información de distancia
del sujeto se transfiere desde el objetivo hasta el
cuerpo de la cámara.
• El uso de tres elementos de objetivo esféricos y dos
elementos de dispersión extrabaja (ED) garantiza
imágenes nítidas y casi sin dispersión de color.
Además, el diafragma de siete hojas permite una
apertura casi circular, una característica que provoca
que las zonas fuera del enfoque de la imagen queden
suavizadas y poco visibles.
Kr
50
Page 51

Enfoque, zoom y profundidad de
campo
An tes d e enf oca r, gi re el ani llo d el zo om 5 para ajustar
la distancia focal hasta que la composición deseada
quede encuadrada en el visor.
Si su cámara cuenta con un botón o palanca de
previsualización de profundidad de campo (reducción
de apertura), podrá obtener la previsualización de la
profundidad de campo a través del visor de la cámara.
• Debido a las características ópticas de este objetivo, la
distancia focal en las distancias de enfoque cortas se
reduce sensiblemente.
• La escala de distancia no indica la distancia precisa
entre el sujeto y la cámara. Los valores son
aproximados y deberían utilizarse exclusivamente
como guía general. Cuando se tomen fotografías de
paisajes lejanos, la profundidad de campo podría
influir en el funcionamiento, de forma que es posible
que la cámara realice el enfoque en una posición más
cercana que el infinito.
Enfoque (Fig. A)
Aj us te e l se le cto r d e mo do de e nf oqu e d e su cám ar a de
acuerdo con este cuadro:
Modo de enfoque
de la cámara
AF
M
Enfoque automático con prioridad manual
(Modo M/A)
1
Ajuste el interruptor de modo de enfoque d del
objetivo a M/A.
2
El enfoque automático está habilitado, pero su
funcionamiento puede anularse girando el anillo de
enfoque separado mientras se pulsa el botón del
disparador a medio recorrido, o pulsando e l botón AF-ON
del cuerpo de las cámaras que cuenten con este botón
3
Pulse el botón del disparador a medio recorrido o el
botón AF-ON una vez más para cancelar el enfoque
manual y volver al enfoque automático.
Cómo obtener buenos resultados con el
autofoco
Consulte “Notas sobre la utilización de objetivos Nikkor
AF de gran angular o súper gran angular” (P. 57).
Modo de enfoque del objetivo
M/A M
Enfoque automático
con prioridad manual
Enfoque manual (con ayuda de enfoque)
Enfoque manual (con
ayuda de enfoque)
Jp
En
De
Fr
Es
Se
Ru
.
Nl
It
Ck
Ch
Kr
51
Page 52

Modo de reducción de la vibración
Conceptos básicos sobre la reducción de la vibración
Número de vibraciones
Vibración de la cámara
Fotografías panorámicas
Jp
En
De
Fr
Es
Se
Ru
Nl
It
Ck
Ch
Kr
Ponga el interruptor del modo de reducción de
vibración en la posición NORMAL.
Ponga el interruptor del modo de reducción de
vibración en la posición ACTIVE.
Cuando se toman fotografías
Ponga el interruptor del modo de reducción de
vibración en la posición NORMAL o ACTIVE.
Cuando se toman fotografías panorámicas
Ponga el interruptor del modo de reducción
de vibración en la posición NORMAL.
Cuando se toman fotografías desde un vehículo en movimiento
Ponga el interruptor del modo de reducción de
vibración en la posición ACTIVE.
52
Fuerza de vibraciones
Vibración de la
cámara cuando se
toman fotografías
desde un vehículo
en movimiento
Ajuste del interruptor de anillo de ON/OFF
de reducción de vibración (Fig. B)
ON:
OFF: No se reduce la vibración.
La vibración se reduce al pulsar el botón del
disparador a medio recorrido, y también en
el momento en el que se libera el obturador.
Como se reduce la vibración en el visor, es
más fácil de hacer el enfoque automático/
manual y el encuadre exacto del objeto.
Ajuste del interruptor de modo de
reducción de vibración (Fig. C)
NORMAL: El mecanismo de reducción de la vibración
reduce principalmente las vibraciones de la
cámara, haciendo posibles las fotografías
con panorámica suave.
ACTIVE:
El mecanismo de reducción de la vibración
reduce las sacudidas de la cámara más
perceptibles, como por ejemplo las que
tienen lugar al tomar fotografías desde un
vehículo en movimiento. En este modo, el
objetivo no distingue automáticamente entre
las panorámicas y la vibración de la cámara
.
Page 53

Notas sobre el uso de la reducción de vibració n
• Tras pulsar el disparador a medio recorrido, espere a
que se estabilice la imagen que aparece en el visor
antes de pulsar por completo el disparador.
• Cuando tome panorámicas, asegúrese de que el
interruptor de modo de reducción de vibración está
en posición NORMAL.
• Si la cámara realiza un barrido formando un arco
amplio, no se realiza compensación para las
sacudidas de la cámara en la dirección del barrido. Por
ejemplo, si coloca la cámara en dirección horizontal,
se reducen las sacudidas verticales de la cámara. Así,
se estabiliza la imagen al tiempo que se permite
utilizar el efecto horizontal o vertical deseado.
• Debido a las características del mecanismo de
reducción de la vibración, la imagen del visor puede
aparecer borrosa después de soltar el disparador. No
se trata de un mal funcionamiento.
• N o ap ague la cá mar a ni r etir e el o bje tivo de la cám ara
mientras esté activado el modo de reducción de la
vibración. Si no se adopta esta medida, podría
producirse un sonido y tacto en el objetivo similar a
cuando un componente interno está suelto o roto al
moverse. No se trata de un mal funcionamiento.
Vuelva a encender la cámara para corregirlo.
• En cámaras con flash incorporado, la reducción de la
vibración no funciona cuando se está cargando el
flash incorporado.
• C uan do l a cá mar a es té m ont ada en u n tr ípo de, aju ste
el interruptor ON/OFF de reducción de vibración e
en OFF. No obstante, se recomienda colocar el
interruptor en la posición ON si se utiliza la cámara en
un cabezal de trípode sin fijar o en un monópode.
• En cámaras con enfoque automático, como por
ejemplo la serie D2 y los modelos D300, que cuentan
con un botón AF-ON, la reducción de vibración no
funciona cuando se pulsa el botón AF-ON.
Ajuste del diafragma
Utilice la cámara para ajustar el diafragma.
Aperturas variables máximas
Al hacer zoom con el objetivo desde 16mm hasta
85mm se reduce la abertura máxima en 1
Sin embargo, la cámara compensará cualquier cambio
de diafragma ajustando la velocidad de obturación
para que el valor de la exposición sea el adecuado.
1
/3 parada.
Jp
En
De
Fr
Es
Se
Ru
Nl
It
Ck
Ch
Kr
53
Page 54

Fotografía con flash utilizando cámaras
con flash incorporado
• Para evitar el viñeteado, no use la visera del objetivo 1.
• El flash incorporado no se puede utilizar a distancias
inferiores a 0,6 m.
Cámaras SLR
digitales
D300S
D300/D200
Jp
D100
En
De
D90/D80/D50
Fr
D5100/D5000/
Es
D3100/D3000/
Se
Serie D70/D60/
Ru
Serie D40
Nl
• El flash incorporado de los modelos D300, D200, D90, D80
It
y D50 es compatible con distancias focales de 18mm o
superiores, mientras que el flash incorporado de la D100 es
Ck
compatible con distancias focales de 20mm o superiores.
Ch
Con una distancia focal de 16mm produce viñeteado.
Kr
• Para obtener la información más reciente sobre la
aparición de viñeteado con este objetivo, consulte el
manual de la cámara.
54
Distancia de disparo/
longitud focal admitida
• 16mm/0.7 m o superior
• 24mm o superior/sin restricciones
• 16mm o superior/sin restricciones
• 16mm/1 m o superior
• 24mm o superior/sin restricciones
• 16mm/2 m o superior
• 24mm o superior/sin restricciones
• 24mm o superior/sin restricciones
Utilización del parasol de bayoneta HB-39
Instalación de la visera
Alinee la marca de acoplamiento de la visera del
objetivo ( ) 2 del parasol con la marca de montura
de la visera del objetivo 4 del objetivo, y gire el parasol
1 hacia la izquierda (vista con el objetivo mirando en
dirección opuesta a la suya) hasta que encaje en su
posición (Fig. D).
• Asegúrese de que la marca de montaje del parasol
esté alineada con la marca de ajuste de la visera del
objetivo ( ) 3.
• Si el parasol del objetivo no está correctamente
colocado, podría producirse viñeteo.
• Para facilitar el montaje y la extracción del parasol,
su jéte lo po r la b ase (cer ca de la ma rca de mo ntaj e del
parasol) y no desde el borde exterior.
Desmontaje de la visera
Sujete el parasol por su base (cerca de la marca de
montaje del parasol) y gírelo en el sentido de las agujas
del reloj (con el objetivo de la cámara sin apuntar hacia
usted) para desmontarlo.
Page 55

Cuidados del objetivo
• Es importante mantener limpios los contactos CPU c y
evitar que se dañen.
• Si la junta de goma de montaje del objetivo b se daña,
asegúrese de ir a un distribuidor autorizado Nikon o a un
centro de servicio para que lo reparen.
• Limpiar la superficie del objetivo con un cepillo soplador.
Para eliminar la suciedad o las huellas, utilizar un trapo de
algodón suave y limpio o papel especial para objetivos
humedecido en etanol (alcohol) o limpiador de ob jetivos.
Limpiar describiendo un movimiento circular del centro
hacia fuera, teniendo cuidado de no dejar restos ni tocar
otras partes del objetivo.
• No usar en ningún caso disolvente ni benceno para
limpiar el objetivo ya que podría provocar daños, un
incendio o daños a la salud.
• Se dispone de filtros NC para proteger la parte frontal del
objetivo. También una visera del objetivo 1 contribuirá
a proteger la parte frontal del objetivo.
• Al guardar el objetivo en su bolsa flexible, coloque las
tapas delantera y trasera del objetivo. El objetivo también
puede guardarse cuando la visera del objetivo 1 está
acoplada en la posición inversa.
•
Cuando el objetivo esté montado en una cámara, no sostenga
ni levante la cámara y el objetivo por la visera del objetivo
• Cuando no se vaya a utilizar el objetivo durante largo
tiempo, guardarlo en un lugar fresco y seco para evitar la
formación de moho. Asegúrese de guardar el objetivo,
además, lejos de la luz solar directa o de productos
químicos tales como alcanfor o naftalina.
1.
• No mojar el objetivo ni dejarlo caer al agua, ya que se
oxidaría y no funcionaría bien.
• Algunas partes del objetivo son de plástico reforzado.
Para evitar daños, no dejarlo nunca en un lugar
excesivamente caliente.
Accesorios estándar
• Tapa frontal a presión del objetivo de 67 mm LC-67
• Tapa trasera del objetivo
• Parasol de bayoneta HB-39
• Bolsa flexible para objetivo CL-1015
Accesorios opcionales
• Filtros con rosca de 67 mm
Accesorios no compatibles
• Teleconvertidores (todos los modelos)
• Anillo auto BR-4 y todos los modelos de anillo de
autoextensión PK, anillo K y accesorios de enfoque de
fuelle.
• Anillo de fijación SX-1
Hay otros accesorios que pueden ser inadecuados para
utilizar con este objetivo. Si desea más información,
consulte la documentación facilitada junto con los
accesorios.
Jp
En
De
Fr
Es
Se
Ru
Nl
It
Ck
Ch
Kr
55
Page 56

Especificaciones
Tipo de objetivo Objetivo AF-S DX Zoom-NIKKOR tipo
Distancia focal 16mm–85mm
Apertura máxima
Estructura del
objetivo
Jp
Angulo de imagen
Escala de
En
distancias focales
De
Información de
Fr
distancia
Es
Zoom Manual mediante anillo de zoom
Se
Enfoque Sistema de enfoque interno de
Ru
Nl
It
Reducción de
Ck
vibraciones
Ch
Kr
56
G con CPU incorporada y montaje de
bayoneta Nikon (diseñado
especialmente para utilizarse con
cámaras digitales SLR de NIKONcámaras con formato Nikon DX)
f/3,5–5,6
17 lentes en 11 grupos
(3 lentes asférica y 2 lentes ED)
83º–18º50’
16, 24, 35, 50, 70, 85mm
Salida al cuerpo de la cámara
independiente
Nikon (IF) (con un motor Silent Wave
interno); manual por anillo de
enfoque independiente
Método de desplazamiento del
objetivo mediante motores de
bobina de voz (VCM)
Escala de
distancias de la
toma
Distancia de
enfoque más
cercana
Nº de láminas
del diafragma
Diafragma Totalmente automático
Gama de
aperturas
Medición de la
exposición
Tamaño de
accesorios
Dimensiones
Peso Aproximadamente 485 g
Las especificaciones y los diseños están sujetos a cambios
sin previo aviso ni obligación por parte del fabricante.
Calibrado en metros y pies desde
0,38 m a infinito ( )
0,38 m a partir del plano focal en
todas las posiciones de zoom
7 piezas (redondeadas)
f/3,5 hasta f/22 (a 16mm), f/5,6 hasta
f/36 (a 85mm)
Por el método de plena apertura
67 mm (P = 0,75 mm)
Aproximadamente 72 mm (diá.) × 85 mm
(extensión de la brida de la montura
del objetivo de la cámara)
Page 57

Notas sobre la utilización de objetivos Nikkor AF de gran angular o súper gran angular
En la situaciones siguientes, el enfoque automático podría no funcionar como se espera al fotografiar con objetivos
Nikkor AF de gran angular o súper gran angular.
E Una persona se encuentra delante
de un fondo distante
F Un campo lleno de flores
1. Cuando el sujeto en los corchetes de
enfoque es relativamente pequeño
Cuando una persona situada delante de un fondo
distante está colocada dentro del marco de
enfoque, tal y como se muestra en la Fig. E, el fondo
podría aparecer enfocado, mientras que el sujeto
podría aparecer desenfocado.
2. Cuando el sujeto principal es una escena o
sujeto muy preciso con patrones repetidos
Cuando el sujeto tiene patrones muy precisos o
tiene poco contraste, como un campo cubierto de
flores, como se muestra en la Fig. F, el enfoque
automático pudiera ser difícil de obtener.
Respuestas a estos tipos de situaciones
(1) Enfoque un sujeto diferente situado a la misma
distancia respecto a la cámara, aplique el bloqueo
del enfoque, recomponga, y haga la toma.
(2) Ajuste el modo de enfoque de la cámara en
enfoque manual y enfoque al sujeto de forma
manual.
Consulte “Cómo obtener buenos resultados con el
autofoco” en el Manual del usuario de la cámara.
Jp
En
De
Fr
Es
Se
Ru
Nl
It
Ck
Ch
Kr
57
Page 58

Att notera för en säker hantering
SE UPP!
Montera inte isär kameran
Om du rör vid delarna inne i kameran eller objektivet kan du
skada dig. Reparationer ska endast utföras av kvalificerade
tekniker. Om kameran eller objektivet skulle brytas upp
efter att de tappats i marken eller stötts till, ska du efter att
den kopplats bort från nätströmmen och/eller batteriet
lossats, lämna in produkten till ett auktoriserat Nikonservicecenter för inspektion.
Stäng genast av kameran om den slutar att fungera
korrekt
Jp
Om det kommer rök eller någon ovanlig lukt från kameran
En
eller objektivet ska du genast ta bort batteriet. Var försiktig
De
så att du inte bränner dig. Fortsatt användning kan medföra
personskada.
Fr
När du har avlägsnat eller kopplat bort strömkällan bör du
Es
ta utrustningen till ett auktoriserat Nikon-servicecenter för
Sv
kontroll.
Ru
Använd inte kameran eller objektivet i närheten av
lättantändlig gas
Nl
Hantering av elektrisk utrustning i närheten av
It
lättantändlig gas kan resultera i explosion eller brand.
Ck
Titta inte in i solen genom objektivet eller sökaren
Ch
Om du tittar in i solen eller någon annan stark ljuskälla
genom objektivet eller sökaren kan ögonen skadas
Kr
permanent.
58
Förvara utom räckhåll för barn
Var försiktig och förvara produkten utom räckhåll för barn
så att de inte stoppar batterier eller andra smådelar i
munnen.
Observera följande försiktighetsåtgärder när du
hanterar kameran och objektivet
• Håll kameran och objektivet torra. Underlåtenhet att följa
denna anvisning kan resultera i brand eller elektrisk stöt.
• Hantera eller rör inte kameran eller linsen med våta
händer. Underlåtenhet att följa dessa anvisningar kan
resultera i elektrisk stöt.
• När du fotograferar i motljus ska du tänka på att inte rikta
objektivet mot solen och inte heller låta solstrålar gå rakt
in i objektivet. Annars kan kameran bli överhettad och
kanske orsaka brand.
• När objektivet inte ska användas under en längre
tidsperiod ska både främre och bakre objektivlock sättas
fast och objektivet placeras på en plats skyddad mot
direkt solljus. Underlåtenhet att följa denna anvisning kan
orsaka brand, eftersom objektivet kan fokusera solljuset
mot ett lättantändligt objekt.
Page 59

Nomenklatur
D
( ) : referenssida
1 Motljusskydd (S. 64)
2 Motljusskydd fästindex (S. 64)
3 Motljusskydd
inställningsindex (S. 64)
4 Motljusskydd
monteringsindex (S. 64)
M
M
M/A
OFF
ON
ACTIVE
NORMAL
M/A
A
ON
B
NORMAL
C
5 Zoomring (S. 61)
6 Brännviddsskala
7 Brännviddindikering
OFF
8 Avståndsskala
9 Indikeringslinje för avstånd
0 Fokusring (S. 61)
ACTIVE
a Monteringsindikering
b Gummipackning för
linsmontering (S. 65)
c CPU-kontakter (S. 65)
d Brytare för fokusläge (S. 61)
e Brytare för
vibrationsreducering ON/OFF
(S. 62)
f Lägesbrytare för
vibrationsreducering (S. 62)
Jp
En
De
Fr
Es
Sv
Ru
Nl
It
Ck
Ch
Kr
59
Page 60

Tac k för att du köp te objek tivet AF-S D X NIKK OR 16-85 mm f/3,5-5,6G ED VR. DX Nikkor-objektiv är särskilt utformade
för användning med Nikon digitala systemkameror (Nikon DX-format), till exempel D300 och D90. När objektivet är
monterat på kameror med Nikon DX-format, motsvarar objektivets bildvinkel cirka 1,5× brännvidden i formatet
35mm. Innan detta objektiv används bör du läsa dessa instruktioner och din kameras Användarhandbok.
Huvudfunktioner
• Med vibrationsreduktionen aktiverad kan längre
slutartider användas (3,5 steg*). Därmed ökar antalet
slutartider och zoompositioner som kan användas,
särskilt på en handhållen kamera. (*Effekterna av VR
på slutartiden mäts i enlighet med standarden från
Camera and Imaging Products Association (CIPA);
Jp
Objektiv med FX-format mäts med digitalkameror i
En
FX-format, och objektiv med DX-format med kameror
med DX-format. Zoomobjektiv mäts vid maximal
De
zoom.)
Fr
• Detta objektiv använder en Silent Wave Motor för
Es
drivning av fokuseringsmekanismen, vilket gör
autofokuseringen smidig, tyst och nästan omedelbar.
Sv
Du kan använda fokuslägesbrytaren d när du lätt vill
Ru
växla mellan autofokusering (A) och manuell
Nl
fokusering (M).
• Mer exakt exponeringskontroll är möjlig när
It
objektivet monteras på en Nikon-kamera med
Ck
kapacitet för 3D-färgmatrixmätning, eftersom
Ch
information om avstånd till motivet överförs från
objektivet till kamerahuset.
Kr
• Användning av tre asfäriska objektivelement och två
objektivelement med särskilt liten spridning (ED) ger
skarpa bilder i stort sett utan missfärgning. Den
sjubladiga slutaren ger en nästan cirkulär bländare,
vilket gör att områden som ligger utanför kamerans
fokus blir mjuka och diskreta.
60
Page 61

Fokusering, zoomning och skärpedjup
Vrid på zoomringen 5 innan du fokuserar, för att ändra
brännvidden tills du uppnått den önskade bilden i
sökaren.
Om din kamera har en knapp eller spak för
förhandsgranskning av skärpedjupet (manuella
mätningar) kan du förhandsgranska skärpedjupet
genom sökaren.
• På grund av linsens optiska egenskaper minskar
brännvidden något på närmare fokusavstånd.
• Avståndsskalan anger inte det exakta avståndet
mellan motivet och kameran. Värdena är ungefärliga
och ska användas endast som en allmän vägledning.
När du tar bilder av avlägsna landskap kan
skärpedjupet påverka användningen så att kameran
fokuserar på en punkt som är närmare än oändligt
avstånd.
Fokusering (bild A)
Ställ in kamerans fokuslägesväljare enligt denna tabell:
Kamerans
fokusläge
AF
M
Autofokusering med manuell åsidosättning
(M/A-läge)
1
Ställ in linsens brytare för fokusläge d på M/A.
2
Autofokus har aktiverats, men den automatiska
fokuseringen kan åsidosättas om du roterar den
separata fokusringen samtidigt som du trycker in
avtryckaren halvvägs, eller om du trycker på AF-ONknappen på kamerahuset om kameran har en sådan
3
Tryck in avtryckaren halvvägs eller tryck på AF-ONknappen en gång till om du vill avbryta den
manuella fokuseringen och gå tillbaka till
autofokus.
Så får du bra bilder med autofokus
Läs ”Information om att använda vidvinkel- eller
supervidvinkel-AF-Nikkor-objektiv” (S. 67).
Läge för objektivfokus
M/A M
Autofokusering
med manuell
prioritet
Manuell fokusering (fokushjälp finns
tillgänglig)
Manuell fokusering
(fokushjälp finns
tillgänglig)
Jp
En
De
Fr
Es
Sv
.
Ru
Nl
It
Ck
Ch
Kr
61
Page 62

Läget för vibrationsreducering
Grundläggande koncept bakom vibrationsreduktion
Antal vibrationer
Jp
En
De
Fr
Es
Sv
Ru
Nl
It
Ck
Ch
Kr
Ställ in lägesbrytaren för vibrationsreducering på
NORMAL.
Ställ in lägesbrytaren för vibrationsreducering på
ACTIVE.
När du tar bilder
Ställ in lägesbrytaren för vibrationsreducering på
antingen NORMAL eller ACTIVE.
När du tar panoreringsbilder
Ställ in lägesbrytaren för vibrationsreducering på
NORMAL.
När du tar bilder från ett fordon i rörelse
Ställ in lägesbrytaren för vibrationsreducering på
ACTIVE.
62
Kameraskakning
Panoreringsbilder
Vibrationsstyrka
Kameraskakning
när du tar bilder
från ett fordon i
rörelse
Ställa in ON/OFF-brytaren för
vibrationsreducering (
ON: Vibrationer reduceras när avtryck aren trycks
in halvvägs och även ögonblicket när
slutaren utlöses. Eftersom vibrationer
reduceras i sökaren är det lättare att
autofokusera/fokusera manuellt och
komponera motivet exakt.
OFF: Vibrationer reduceras inte.
bild B)
Ställa in lägsbrytaren för
vibrationsreducering (
NORMAL: Mekanismen för vibrationsreducering
inriktas främst på att reducera
kameraskakningar, vilket gör det lättare att
ta mjuka panoreringsbilder.
ACTIVE: Mekanismen för vibrationsreduktion
reducerar mer märkbara kameraskakninga r,
till exempel skakningar när du tar bilder från
ett fordon i rörelse. I det här läget särskiljer
inte linsen panorering från
kameraskakningar.
bild C)
Page 63

Att notera om vibrationsreducering
• Tryck först ned avtryckaren halvvägs och vänta sedan
tills bilden i sökaren stabiliseras innan du trycker ned
avtryckaren helt.
När du tar panoreringsbilder ska du tänka på att ställa
•
in lägesbrytaren för vibrationsreducering på
• Om du flyttar kameran i en vid båge när du panorerar,
kompenserar den inte för vibrationer i
panoreringsriktningen. Om du till exempel panorerar
kameran horisontellt reduceras den vertikala
kameraskakningen. Bilden stabiliseras samtidigt som
den önskade panoreringen kan genomföras.
• På grund av vibrationsreduceringens mekaniska
egenskaper kan bilden i sökaren bli suddig efter att
avtryckaren släppts. Detta är inte något fel.
• Stäng inte av kameran och lossa inte objektivet från
kameran när vibrationsreduceringen är aktiverad. Om
detta inte efterföljs kan det låta och kännas som en
invändig del är lös eller trasig i objektivet när du skak ar
på det. Detta är inte något fel. Starta kameran igen för
att korrigera detta.
• För kameror som har inbyggd blixt, fungerar inte
vibrationsreduceringen när den inbyggda blixten
laddas.
NORMAL
• När kameran är monterad på ett stativ ska
vibrationsreduceringens ON/OFF-brytare e ställas in
på OFF. Vi rekommenderar emellertid att
omkopplaren ställs in på ON när kameran används
med ett olåst stativhuvud eller med ett enbensstativ.
.
• För kameror med autofokus, till exempel D2-serien
och D300-modeller, och en AF-ON-knapp, fungerar
inte vibrationsreduktion när AF-ON-knappen trycks
ned.
Ställa in bländaren
Använd kameran för att justera bländarinställningen.
Variabel maximal bländare
Om man zoomar objektivet från 16mm till 85mm
minskas den maximala bländaren med 1
Men kameran kompenserar alla ändringa r av bländaren
genom att justera slutartiden så att rätt
exponeringsvärde uppnås.
1
/3 stopp.
Jp
En
De
Fr
Es
Sv
Ru
Nl
It
Ck
Ch
Kr
63
Page 64

Blixtfotografering med kameror som
har inbyggd blixt
• Använd inte motljusskyddet om du vill undvika
vinjettering 1.
• Den inbyggda blixten kan inte användas för kortare
avstånd än 0,6 m.
Digitala
systemkameror
D300S
D300/D200
Jp
En
D100
De
Fr
D90/D80/D50
Es
D5100/D5000/
Sv
D3100/D3000/
Ru
D70-serien/D60/
D40-serien
Nl
• De inbyggda blixtarna på D300, D200, D90, D80 och
It
D50 är kompatibla med en brännvidd på 18mm eller
Ck
mer, och den inbyggda blixten på D100 är
Ch
kompatibel med en brännvidd på 20mm eller mer.
Vinjettering uppstår vid brännvidden 16mm.
Kr
• För den senaste informationen om vinjettering med
detta objektiv, se kamerans handbok.
64
Brännvidd/bildtagningsavstånd
som stöds
• 16mm/0.7 m eller mer
• 24mm eller mer/inga begränsningar
• 16mm eller mer/inga begränsningar
• 16mm/1 m eller mer
• 24mm eller mer/inga begränsningar
• 16mm/2 m eller mer
• 24mm eller mer/inga begränsningar
• 24mm eller mer/inga begränsningar
Använda bajonettskyddet HB-39
Montera skyddet
Rikta in motljusskyddets fästindex ( ) 2 mot
skyddet med motljusskyddets monteringsindex 4 på
objektivet och vrid skyddet 1 moturs (när du håller
kameran med objektivet bort från dig) tills det klickar på
plats (bild D).
• Kontrollera att indikeringen för fäste av
motljusskyddet är riktad mot motljusskyddets
inställningsindex av motljusskyddet ( ) 3.
• Om motljusskyddet inte sitter korrekt kan vinjettering
uppstå.
• Det är lättare att fästa och ta av motljussk yddet om du
håller det vid basen (nära fästningsindikeringen) och
inte i ytterkanten.
Ta bort skyddet
Ta av motljusskyddet genom att hålla i det vid basen
(nära fästningsindikeringen) och vrida det medurs, om
du håller kameran med objektivet riktat ifrån dig.
Page 65

Vård av objektivet
• Var försiktig så att inte CPU-kontakterna c blir smutsiga
eller skadas.
• Om gummipackningen för linsmontering b är skadad
ska du uppsöka närmaste auktoriserade Nikonåterförsäljare eller Nikon-servicecenter för reparation.
• Rengör objektivets ytor med en blåsborste. Använd en
mjuk, ren bomullsduk eller linsduk fuktad med etanol
(alkohol) eller linsrengöringsmedel, för att ta bort smuts
och fettfläckar. Torka i en cirkulär rörelse från mitten och
utåt. Lämna inte kvar några spår av rengöringsmedlet
och rör inga andra delar av objektivet.
• Använd aldrig thinner eller bensen för rengöring av
linsen, eftersom det kan skada den och orsaka brand eller
hälsoproblem.
• Det finns NC-filter som skyddar den främre linsen.
Motljusskyddet 1 hjälper också till att skydda den främre
linsen.
• När objektivet förvaras i sin flexibla objektivpåse ska både
främre och bakre linsskydd vara monterade. Objektivet
kan även förvaras med motljusskyddet 1 monterat i
omvänt läge.
• När objektivet är monterat på kameran bör du inte lyfta
eller hålla kameran och objektivet i motljusskyddet 1.
• Om objektivet inte ska användas under en längre
tidsperiod ska det förvaras svalt och torrt, så att mögel
kan undvikas. Förvara det också skyddat mot direkt solljus
och kemikalier såsom kamfer och naftalen.
• Se till att det inte kommer vatten på objektivet och tappa
det inte i vatten, eftersom det då kommer att rosta och
sluta fungera.
• Förstärkt plast används i vissa av objektivets dela r. Lämna
aldrig objektivet på en alltför varm plats för att undvika
skador.
Standardtillbehör
• 67-mm främre objektivlock som knäpps på plats LC-67
•Bakre objektivlock
• Bajonettskydd HB-39
• Flexibelt objektivfodral CL-1015
Extra tillbehör
• 67-mm skruvfilter
Tillbehör som inte passar
• Telekonvertrar (alla modeller)
• Fokuseringsutrustning som autoring BR-4 och alla
modeller av autoförlängningsring PK, K-ring och bälgar.
•Monteringsring SX-1
Andra tillbehör är eventuellt inte lämpliga att användas
tillsammans med detta objektiv. Mer information finns i
dokumentationen som medföljer tillbehören.
Jp
En
De
Fr
Es
Sv
Ru
Nl
It
Ck
Ch
Kr
65
Page 66

Specifikationer
Typ av objektiv NIKKOR zoomobjektiv av G-typ AF-S
Brännvidd 16mm–85mm
Maximal
bländare
Objektivkonstruktion
Jp
Bildvinkel 83º–18º50’
En
Brännviddsskala
De
Avståndsinformation
Fr
Zoomreglage Manuellt via separat zoomring
Es
Fokusering
Sv
Ru
Vibrationsreducering
Nl
It
Skala för
Ck
fotograferingsavstånd
Ch
Kortaste
Kr
fokuseringsavstånd
Antal lamellblad
66
DX med inbyggd CPU och Nikons
bajonettkoppling (speciellt
utvecklad för användning med
Nikon SLR-Nikon DX digitalkameror)
f/3,5–5,6
17 element i 11 grupper (3 asfäriska
linselement och 2 ED-linselement)
16, 24, 35, 50, 70, 85mm
Skickas till kamerahuset
Nikon Internal Focusing-system (IF)
(använder intern Silent Wave Motor);
manuellt med separat fokusring
Objektivbyte med VCM-motorer
(voice coil)
Graderad i meter och fot från 0,38 m
till oändligt avstånd ( )
0,38 m från skärpeplanet vid alla
zoompositioner
7 st (rundade)
Irisbländare Helautomatisk
Bländarintervall f/3,5 till f/22 (vid 16mm), f/5,6 till f/36
Exponeringsmätning
Tillbehörsstorlek 67 mm (P = 0,75 mm)
Storlek Ungefär 72 mm (diam.) × 85 mm
Vikt Ungefär 485 g
Specifikationer och utförande kan ändras när som helst,
utan att tillverkaren meddelar detta och utan någon
skyldighet för densamme.
(vid 85mm)
Via metod med full bländare
(utanför kamerans objektivfäste)
Page 67

Information om att använda vidvinkel- eller supervidvinkel-AF-Nikkor-objektiv
I följande situationer kanske autofokus inte fungerar som förväntat vid bildtagning med vidvinkel- och
supervidvinkel-AF-Nikkor-objektiv.
E En person som står framför en
avlägset belägen bakgrund
F Ett fält fullt av blommor
1. När huvudmotivet i fokuseringsramarna
är förhållandevis litet
När en person som står framför en avlägsen
bakgrund placeras inom fokusmarkeringarna, enligt
bilden E, kan bakgrunden vara i fokus, medan
motivet är suddigt.
2. När huvudmotivet är ett litet mönstrat
objekt eller en vy
Som bilden F visar kan det vara svårt att använda
autofokuseringen när motivet är starkt mönstrat
eller har låg kontrast, som exempelvis ett fält med
blommor.
Lösning på dessa typer av situationer
(1) Fokusera på ett annat motiv som befinner sig på
samma avstånd från kameran. Lås fokuseringen där,
komponera bilden på nytt och tryck av.
(2) Ställ in kamerans fokusläge till manuell fokusering
och fokusera manuellt på motivet.
Se ”Erhålla bra resultat med autofokus” i kamerans
Användarhandbok.
Jp
En
De
Fr
Es
Sv
Ru
Nl
It
Ck
Ch
Kr
67
Page 68

Примечания по безопасности использования
ПРЕДОСТЕРЕЖЕНИЕ
Не разбирайте фотокамеру
Прикосновение к внутренним частям фотокамеры
или объектива может привести к получению травм.
Ремонт должен производиться только
квалифицированными специалистами. В случае
повреждения корпуса фотокамеры или объектива в
результате падения или другого происшествия
отключите сетевой блок питания и/или извлеките
батарею и доставьте изделие для проверки в
авторизованный сервисный центр Nikon.
В случае неисправности немедленно
Jp
выключите фотокамеру
En
При появлении дыма или необычного запаха, исходящего
из фотокамеры или объектива, немедленно извлеките
De
батареи, стараясь не допустить ожогов. Продолжение
Fr
работы с устройством может привести к получению травм.
После извлечения батареи или отключения источника
Es
питания доставьте изделие для проверки в ближайший
Se
авторизованный сервисный центр компании Nikon.
Не пользуйтесь фотокамерой или объективом при
Ru
наличии в воздухе легковоспламеняющихся газов
Nl
Работа с электронным оборудованием при наличии в
воздухе легковоспламеняющихся газов может
It
привести к взрыву или пожару.
Ck
Не смотрите на солнце через объектив или
Ch
видоискатель
Если смотреть на солнце или другие источники
Kr
яркого света через объектив или видоискатель, то это
может вызвать необратимое ухудшение зрения.
68
Храните в недоступном для детей месте
Примите особые меры предосторожности во
избежание попадания батарей и других небольших
предметов детям в рот.
Соблюдайте следующие меры
предосторожности во время эксплуатации
фотокамеры и объектива
• Не допускайте попадания воды на фотокамеру и
объектив. Несоблюдение этого требования может
привести к пожару или поражению электрическим
током.
• Не прикасайтесь к фотокамере или объективу
мокрыми руками.
Несоблюдение этого требования может привести к
поражению электрическим током.
• При съемке с задним освещением не направляйте
объектив на солнце, а также не допускайте
п
адания солнечного света в объектив, так как это
по
может привести к перегреву фотокамеры и ее
возгоранию.
• Если объектив не будет использоваться в течение
длительного времени, прикрепите переднюю и
заднюю крышки объектива и не оставляйте
объектив под прямыми солнечными лучами.
Несоблюдение этого условия может привести к
возгоранию, поскольку объектив может
сосредоточить со
легковоспламеняющемся предмете.
нечные лучи на каком-либо
л
Page 69

Обозначения на иллюстрации
D
( ): ссылочная страница
1
Бленда объектива
2
Указатель прикрепления
бленды объектива
3
Указатель регулировки
бленды объектива
4
Указатель крепления
бленды объектива
M
M
M/A
OFF
ON
ACTIVE
NORMAL
M/A
A
ON
B
NORMAL
C
5
Кольцо увеличения (CTP. 71
6 Шкала фокусного
расстояния
7 Указатель фокусного
OFF
расстояния
8
ACTIVE
Шкала расстояния
9 Указатель расстояния
0 Фокусирующее кольцо
(CTP. 71)
a Указатель крепления
b
Резиновое кольцо крепления
объектива
c Контакты CPU (CTP. 75)
d Переключатель режимов
фокусировки (CTP. 71)
e
Переключатель подавления
вибраций ON/OFF
f Переключатель режимов
(CTP. 75)
(CTP. 74)
(CTP. 74)
(CTP. 74)
(CTP. 74)
(CTP. 72)
)
Jp
En
De
Fr
Es
Se
Ru
Nl
It
Ck
Ch
Kr
подавления вибраций
(CTP. 72)
69
Page 70

Благодарим за приобретение объектива AF-S DX NIKKOR 16-85мм f/3,5-5,6G ED VR. Объективы DX
Nikkor разработаны специально для использования с цифровыми зеркальными фотокамерами Nikon
(формат Nikon DX), например с моделями D300 и D90. При использовании с фотокамерами формата
Nikon DX угол изображения объектива эквивалентен фокусному расстоянию приблизительно 1,5× в
формате 35мм. До использования этого объектива ознакомьтесь с данными инструкциями и прочитайте
Руководство пользoвaтеля фотокамеры.
Основные возможности
• При включении функции подавления вибраций
можно использовать более длительные
выдержки (3,5 ступени*), тем самым увеличивая
диапазон значений выдержки и зума (особенно
при ручной съемке). (*Влияние VR на выдержку
измеряется в соответствии со стандартами
Jp
Camera and Imaging Products Association (CIPA;
En
Ассоциация производителей фотокамер и
De
устройств обработки изображений); объективы
формата FX измеряются с помощью цифровых
Fr
фотокамер формата FX, объективы формата
Es
DX измеряются фотокамерами формата DX.
Зум-объективы измеряются при максимальном
Se
увеличении.)
Ru
• Данный объектив использует бесшумный
волновой привод Silent Wave Motor для
Nl
управления механизмом фокусировки, что
It
делает процесс автофокусировки плавным,
Ck
бесшумным и практически мгновенным.
Переключатель режимов фокусировки d
Ch
обеспечивает удобное переключение между
Kr
автоматическим (A) и ручным (M) режимами
фокусировки.
• Более точный контроль экспозиции достигается
при установке объектива на фотокамеру Nikon с
возможностью 3D цветового матричного
замера, так как информация о расстоянии до
объекта передается от объектива к
фотокамере.
• При использовании в объективе трех
асферических элементов и двух элементов со
сверхнизкой дисперсией (ED) достигаются
резкие снимки практически без цветной
окантовки. Кроме того, образуемое
семилепестковой диафрагмой отверстие близко
по форме к окружности, что делает зону,
находящуюся не в фокусе, более мягкой и
незаметной.
70
Page 71

Фокусировка, увеличение и глубина
резкости
Прежде чем выполнять фокусировку, поверните
кольцо увеличения 5 для регулировки фокусного
расстояния, пока в видоискателе не будет
выделена необходимая композиция.
Если фотокамера оснащена кнопкой или
рычажком просмотра глубины резкости
(затемнение), то глубину резкости можно
проверить через видоискатель фотокамеры.
• Вследствие оптических характеристик данного
объектива при съемке с близких расстояний
фокусное расстояние немного уменьшается.
• На шкале расстояния не отображается точное
расстояние между объектом съемки и
фотокамерой. Эти значения являются
приблизительными, и их следует использовать
только в качестве ориентировочных. При
съемке пейзажей на большом расстоянии
глубина резкости может повлиять на
функционирование фотокамеры так, что
фокусировка может быть выполнена не на
бесконечность, а на более близкое расстояние.
Фокусировка (Рис. A)
Установите переключатель режимов фокусировки
фотокамеры в соответствии с приведенной таблицей.
Режим
фокусировки
фотокамеры
AF
М
Режим фокусировки объектива
M/A
Автофокусировка
с приоритетом
ручных настроек
Ручная фокусировка (доступна
функция focus assist)
М
Ручная фокусировка
(доступна функция
focus assist)
Автофокусировка с блокировкой
ручных настроек (режим M/A)
1
Установите переключатель режимов
фокусировки d в положение M/A.
2
Включенная функция автофокусировки отменяется
при вращении специального кольца фокусировки;
при этом спусковая кнопка затвора должна быть
нажата наполовину или должна быть нажата кнопка
AF-ON, если она имеется на корпусе фотокамеры
3
Снова нажмите спусковую кнопку затвора
наполовину или кнопку AF-ON для отмены ручной
фокусировки и возобновления автофокусировки
.
Получение хороших результатов съемки
с использованием автофокусировки
См. «Примечания по использованию
широкоугольных объективов AF Nikkor» (CTP. 77).
Jp
En
De
Fr
Es
Se
Ru
Nl
It
.
Ck
Ch
Kr
71
Page 72

Режим подавления вибраций
Основное понятие подавления вибраций
Число вибраций
Дрожание фотокамеры
Фотокамера дрожит
при выполнении
съемки с
движущегося
автомобиля
Установка переключателя подавления
вибраций ON/OFF (Рис. B)
ON:
Подавление вибраций выполняется при нажатии
спусковой кнопки затвора наполовину и в момент
спуска затвора. Поскольку в видоискателе
выполняется подавление вибраций,
автоматическую/ручную фокусировку и точное
кадрирование объекта съемки выполнить легче.
Панорамные снимки
Jp
En
De
Fr
Es
Se
Ru
Nl
It
Ck
Ch
Kr
Установите переключатель режима
подавления вибраций в положение
Установите переключатель режима
подавления вибраций в положение
При съемке изображений
Установите переключатель режима подавления
вибраций в положение
При съемке панорамных снимков
Установите переключатель режима
подавления вибраций в положение NORMAL.
При съемке изображений с движущегося автомобиля
Установите переключатель режима
подавления вибраций в положение ACTIVE.
Сила вибраций
NORMAL
или
72
NORMAL
ACTIVE
ACTIVE
OFF:
Подавление вибраций не
выполняется.
Установка переключателя режима
подавления вибраций (Рис. C)
.
.
NORMAL:
.
ACTIVE:
Механизм подавления вибраций в
первую очередь устраняет последствия
дрожания фотокамеры, позволяя
выполнять мягкие панорамные снимки.
Механизм подавления вибраций
компенсирует наиболее заметные
дрожания фотокамеры, например
дрожание фотокамеры при съемке с
движущегося автомобиля. В этом режиме
не выполняется автоматического
различения объективом панорамной
съемки и дрожания фотокамеры
.
Page 73

Примечания по использованию
подавления вибрации
• После нажатия спусковой кнопки затвора
наполовину необходимо дождаться
стабилизации изображения в видоискателе
перед тем, как нажать спусковую кнопку затвора
до конца.
• При съемке панорамных снимков не забудьте
установить переключатель режима подавления
вибраций в положение NORMAL.
•
При съемке панорамы по широкой траектории
подавление вибраций фотокамеры в направлении
съемки панорамы не будет выполняться.
Например, при панорамировании фотокамеры в
горизонтальном направлении подавляются ее
вертикальные дрожания. Это позволяет
стабилизировать изображение, а также достичь
нужного эффекта панорамирования
• Вследствие особенностей характеристик
механизма подавления вибраций после того,
как будет отпущена кнопка спуска затвора,
изображение в видоискателе может оказаться
смазанным.
• Не выключайте фотокамеру и не снимайте с
фотокамеры объектив при работе в режиме
подавления вибраций. Если пренебречь этим
примечанием, то при сотрясении объектива
может послышаться звук, как при отсоединении
или поломке внутренних компонентов. Это не
является неисправностью. Для устранения этой
ситуации снова включите фотокамеру.
.
• При использовании моделей фотокамер,
оснащенных встроенной вспышкой, при заряде
вспышки функция подавления вибраций не
работает.
• Если фотокамера установлена на штатив,
установите переключатель подавления
вибраций ON/OFF e в положение OFF. Однако
этот переключатель рекомендуется установить
в положение ON при использовании
фотокамеры на штативе с незакрепленной
головкой или на моноподе.
• При использовании таких фотокамер с
автофокусировкой, как модели серии D2 и D300,
оснащенных кнопкой AF-ON, функция
подавления вибрации не будет работать при
нажатии кнопки AF-ON.
Установка диафрагмы
На фотокамере можно настроить параметры
диафрагмы.
Изменение максимального значения
диафрагмы
При увеличении с 16мм до 85мм на объективе
максимальное значение диафрагмы
уменьшается ступенями по 11/3.
Однако фотокамера компенсирует любые
изменения значений диафрагмы путем
регулирования выдержки, чтобы обеспечить
правильное значение экспозиции.
Jp
En
De
Fr
Es
Se
Ru
Nl
It
Ck
Ch
Kr
73
Page 74

Съемка фотографий с
использованием фотоаппаратов
со встроенной вспышкой
• Для предотвращения этого явления не
используйте бленду объектива 1.
• Встроенную вспышку нельзя использовать для
съемки с расстояний менее 0,6 m.
Цифровые
фотокамеры
SLR
D300S
Jp
D300/D200
En
De
D100
Fr
D90/D80/D50
Es
Se
D5100/D5000/
D3100/D3000/
Ru
Сери
Nl
It
Ck
Ch
Kr
я D70/D60/
сери
я D40
•
Встроенные вспышки фотокамер D300, D200, D90, D80 и
D50 поддерживают фокусное расстояние 18мм или более;
встроенная вспышка фотокамеры D100 поддерживает
фокусное расстояние 20мм или более. Виньетирование
возникает при съемке с фокусным расстоянием 16мм.
•
Для получения последней информации о виньетировании
с данным объективом см. руководство к фотокамере.
74
Поддерживаемые значения
фокусного расстояния/
расстояния съемки
•16мм/0.7 m или более
•24мм или более/без ограничений
•16мм или более/без ограничений
•16мм/1 m или более
•24мм или более/без ограничений
•16мм/2 m или более
•24мм или более/без ограничений
•24мм или более/без ограничений
Использование бленды с
байонетным креплением HB-39
Установка бленды
Совместив указатель прикрепления бленды
объектива () 2 на бленде с указателем
крепления бленды объектива 4 на объективе,
поворачивайте бленду 1 против часовой стрелки
(держа фотокамеру объективом от себя) до
полной фиксации (Рис. D).
• Убедитесь, что установочная метка объектива
совпадает с указателем регулировки бленды
объектива () 3.
• Если бленда установлена на объектив
ненадлежащим образом, может возникнуть
эффект виньетирования.
• Для облегчения установки или снятия бленды
удерживайте ее за основание (рядом с
установочной меткой бленды), а не за внешнюю
кромку.
Снятие бленды
Чтобы отсоединить бленду, удерживайте ее за
основание (рядом с установочной меткой
бленды) и поверните по часовой стрелке,
удерживая фотокамеру объективом от себя.
Page 75

Уход за объективом
• Избегайте попадания грязи на контакты CPU c
или их повреждения.
• При повреждении резинового кольца крепления
объектива b обратитесь за помощью к
ближайшему авторизованному дилеру
компании Nikon или в сервисный центр.
•
Выполняйте очистку поверхности объектива
продуванием воздухом. Для удаления грязи и пятен
используйте мягкую, чистую хлопчатобумажная
ткань или протирочную ткань для объектива,
смоченную этанолом (алкоголем) или жидкостью
для чистки линз. Протирайте круговыми движениями
от центра к краям, стараясь не оставлять следов или
дотрагиваться до других частей объектива
•
Не используйте растворитель или бензол для очистки
объектива, так как это может стать причиной его
повреждения, вызвать пожар или проблемы со здоровьем
•
Для защиты передней линзы объектива можно использовать
нейтральные светофильтры. Бленда объектива 1 также
помогает защитить переднюю линзу объектива
•
При хранении объектива в мягком чехле следует
прикрепить переднюю и заднюю крышки объектива.
Объектив также можно хранить, прикрепив к нему
бленду объектива 1 обратной стороной
•
Не поднимайте и не носите объектив или фотокамеру,
держась за прикрепленную к объективу бленду
•
Если объектив не будет использоваться в течение
длительного времени, храните его в сухом, прохладном
месте для защиты от влаги. Никогда не оставляйте
объектив под воздействием прямых солнечных лучей и
не подвергайте его воздействию химикатов, например
камфарных или нафталиновых средств
.
.
.
1.
.
• Избегайте попадания на объектив воды и не
бросайте его в воду, так как это может стать
причиной возникновения ржавчины или
неисправности.
• В некоторых частях объектива используется
пластиковый материал повышенной прочности.
Для предотвращения повреждения никогда не
оставляйте объектив в местах с повышенной
температурой.
Стандартные принадлежности
• Передняя крышка объектива LC-67 диаметром
67 мм
• Задняя крышка объектива
• Бленда с байонетным креплением HB-39
• Мягкий чехол для объектива CL-1015
Дополнительные принадлежности
.
• Ввинчивающиеся фильтры диаметром 67 мм
Несовместимые принадлежности
• Телеконвертеры (все модели)
• Автоматическое кольцо BR-4 и все модели
автоматического кольца увеличения PK, кольцо
K и фокусировочный мех.
• Закрепляющее кольцо SX-1
Другие принадлежности могут не подходить для
использования с данным объективом.
Дополнительные сведения см. в документации,
прилагаемой к принадлежностям.
Jp
En
De
Fr
Es
Se
Ru
Nl
It
Ck
Ch
Kr
75
Page 76

Технические характеристики
Тип объектива ТипG AF-S DX зум-объектив
Фокусное
расстояние
Максимальное
значение
диафрагмы
Структура
Jp
объектива
En
Угол
De
изображения
Fr
Шкала
фокусного
Es
расстояния
Se
Информация о
расстоянии до
Ru
объекта
Nl
Управление
It
зумом
Фокусировка Система внутренней фокусировки
Ck
Ch
Kr
NIKKOR со встроенным CPU и
байонетной оправой Nikon
(разработана специально для
использования с цифровыми
фотокамерами Nikon SLR формата
Nikon DX)
16мм–85мм
f/3,5–5,6
17 элементов в 11 группах
(3 асферических и 2 ED элемента
объектива)
83°–18°50’
16, 24, 35, 50, 70, 85мм
Выход до корпуса фотокамеры
Ручное, с помощь
кольца увеличения
Nikon Internal Focusing (IF)
(с помощью бесшумного волнового
привода Silent Wave Motor);
вручную - с помощью отдельного
кольца увеличения
ю отдельног
76
Подавление
вибрации
Шкала
расстояния
съемки
Наиболее
близкое
расстояние для
фокусировки
Число
лепестков
диафрагмы
Диафрагма Полностью автоматическая
Шкала
диафрагмы
Измерение
зкспозиции
Размер насадки 67 мм (P = 0,75 мм)
Размеры Прибл. диаметр 72 мм × 85 мм
Масса Прибл. 485 г
Характеристики и дизайн могут быть изменены
о
без предупреждения и каких-либо обязательств
со стороны изготовителя.
Метод перемещения линз с
помощью электродвигателей с
линейной обмоткой (VCM)
Разметка в метрах и футах от
0,38 м до бесконечности ()
0,38 м от фокальной плоскости во
всех пол
7 лепестков (округлая)
от f/3,5 до f/22 (при 16мм),
от f/5,6 до f/36 (при 85мм)
С помощью метода полной
диафрагмы
(выдвижение из оправы объектива)
жениях зуммирования
о
Page 77

Примечания по использованию широкоугольных объективов AF Nikkor
В следующих ситуациях автофокусировка может работать ненадлежащим образом при съемке с
помощью широкоугольных объективов AF Nikkor.
1.
E Человек, стоящий перед фоном,
находящимся на большом расстоянии
Если главный объект съемки, находящийся
в рамках фокуса, относительно малого
размера на изображении
Как показано на рис. E, при наведении рамки
фокуса на человека, позади которого имеется
обширный задний фон, фокусировка может быть
выполнена не на человеке, а на этом фоне.
2. Если основной объект съемки
является ярким, узорчатым
объектом или экспозицией
Если объект имеет яркие узоры или отличается
низким уровнем контрастности, например поле
цветов, как показано на рис. F, возможно,
F Поле, покрытое цветами
автофокусировку будет сложно выполнить.
Способы действий в подобных ситуациях
(1)
Выполните фокусировку на другом объекте,
расположенном на том же расстоянии от фотокамеры,
затем используйте блокировку фокусировки, повторно
скомпонуйте кадр и сделайте снимок
(2) Установите ручной режим фокусировки
фотокамеры и выполните фокусировку на
объекте съемки вручную
См. «Получение хороших результатов съемки с
использованием автофокусировки» в
Руководство пользoвaтеля фотокамеры.
.
.
Jp
En
De
Fr
Es
Se
Ru
Nl
It
Ck
Ch
Kr
77
Page 78

Veiligheidsvoorschriften
WAARSCHUWING
Haal het toestel niet uit elkaar
Het aanraken van de inwendige delen van het fototoestel
of van het objectief kan een letsel veroorzaken.
Herstellingen mogen alleen worden uitgevoerd door
bevoegde technici. Indien het fototoestel of het objectief
breekt na een val of een ander ongeluk, laat u het product
door een door Nikon erkende servicedienst nakijken nadat
u de stekker uit het stopcontact hebt gehaald en/of de
batterijen hebt verwijderd.
Jp
Schakel het toestel onmiddellijk uit bij storingen
En
Indien u merkt dat er rook of een ongewone geur uit het
De
fototoestel of het objectief komt, moet u de batterij
onmiddellijk verwijderen om brandwonden te vermijden.
Fr
Verdere bediening van het toestel kan een letsel tot gevolg
Es
hebben.
Se
Nadat u de stroombron hebt verwijderd of losgekoppeld,
Ru
laat u het toestel nakijken door een door Nikon erkende
servicedienst.
Nl
Gebruik het fototoestel of het objectief niet in de
It
buurt van ontvlambare gassen
Ck
Het bedienen van elektronische apparatuur in de buurt van
Ch
ontvlambare gassen kan leiden tot een ontploffing of
Kr
brand.
78
Kijk niet naar de zon door het objectief of de beeldzoeker
Kijken naar de zon of naar ander fel licht door het objectief
of de beeldzoeker kan een blijvend oogletsel veroorzaken.
Buiten het bereik van kinderen houden
Zorg ervoor dat kleine kinderen de batterijen of andere
kleine onderdelen niet in hun mond kunnen stoppen.
Let op de volgende punten bij het gebruik van het
fototoestel en het objectief
• Houd de camera en het objectief droog. Indien u deze
voorzorgsmaatregel niet in acht neemt, kan dit brand of
een elektrische schok tot gevolg hebben.
• Bedien het fototoestel of het objectief niet of raak deze
niet aan met natte handen. Indien u deze
voorzorgsmaatregel niet in acht neemt, kan dit een
elektrische schok tot gevolg hebben.
• Wanneer u opnames maakt bij tegenlicht, mag u het
objectief niet naar de zon richten en moet u vermijden
dat zonlicht rechtstreeks in het objectief valt. Dit kan
namelijk leiden tot oververhitting van de camera met
mogelijk brand tot gevolg.
•
Wanneer u het objectief niet gebruikt gedurende een langere
periode, bevestig dan zowel de voorste als de achterste
objectiefdoppen om het objectief te beschermen tegen di rect
zonlicht. Indien u deze voorzorgsmaatr egel niet in acht neemt,
kan dit brand tot gevolg hebben, aangezien het objectief het
zonlicht kan convergeren op een ontvlambaar voorwerp
.
Page 79

Benamingen
D
( ): referentiepagina
1 Zonnekap (P. 84)
2 Koppelingswijzer zonnekap
(P. 84)
3 Vergrendelingswijzer
zonnekap (P. 84)
M
M/A
OFF
ON
ACTIVE
NORMAL
M/A
A
ON
B
ACTIVE
NORMAL
C
(P. 84)
5 Zoomring (P. 81)
6 Schaal brandpuntsafstand
OFF
Index brandpuntsafstand
7
8 Schaal afstand
9 Afstand indexlijn
0 Scherpstelring (P. 81)
a Bevestigingswijzer
b Rubberen afdichtingsring
voor lensbevestiging (P. 85)
c CPU-contactpunten (P. 85)
d Scherpstelmodusschakelaar
(P. 81)
e ON/OFF-schakelaar voor
vibratiereductie (P. 82)
f Vibratiereductiemodus-
Jp
En
De
Fr
Es
Se
Ru
Nl
It
Ck
Ch
Kr
4 Bevestigingswijzer zonnekap
M
schakelaar (P. 82)
79
Page 80

Bedankt voor de aankoop van het AF-S DX NIKKOR 16-85mm f/3,5-5,6G ED VR-objectief. DX Nikkor-objectieven zijn
speciaal ontworpen voor Nikon digitale SLR (Nikon DX-formaat)-camera's, zoals de D300 en D90. Wanneer het
objectief is geplaatst op fototoestellen van Nikon DX-formaat, is de beeldhoek van het objectief gelijk aan circa 1,5×
de brandpuntsafstand in 35mm-formaat. Lees deze instructies eerst door en raadpleeg de Gebruikshandleiding van
uw fototoestel alvorens u deze lens gebruikt.
Belangrijke functies
• Door vibratiereductie te activeren kunnen langere
snelle sluitertijden (3,5 stoppen*) worden gebruikt
waardoor meer snelle sluitertijden en zoomstanden
kunnen worden toegepast, vooral wanneer u de
camera vasthoudt om te fotograferen. (*De effecten
van VR op sluitertijd worden gemeten overeenkomstig
Jp
de Camera and Imaging Products Association (CIPA)-
En
standaarden; FX-formaat objectieven worden
De
gemeten met behulp van FX-formaat digitale
camera's, DX-formaat objectieven met behulp van DX-
Fr
formaat camera's. Zoomobjectieven worden bij
Es
maximale zoom gemeten.)
Se
• Dit objectief maakt gebruik van een Silent Wavemotor om het scherpstellingsmechanisme aan te
Ru
drijven, waardoor de autofocus vloeiend, stil en bijna
Nl
onmiddellijk gebeurt. De scherpst elmodusschakelaar
It
d is voorzien om eenvoudig kiezen tussen autofocus
(A) of manueel scherpstellen (M) mogelijk te maken.
Ck
• Een nauwkeuriger e belichtingsregeling is mogelijk als
Ch
het objectief op een Nikon-fototoestel met 3D-
Kr
kleurenmatrixmeting is bevestigd, omdat de
afstandgegevens van het onderwerp worden
overgedragen van het objectief naar het fototoestel.
• Door drie asferische en twee extra lage
dispersielenselementen (ED) te gebruiken, worden
scherpe beelden gegarandeerd die zo goed als vrij
zijn van kleurranden. Bovendien staat het diafragma
met zeven bladen garant voor een nagenoeg
cirkelvormig diafragma. Daardoor worden delen van
het beeld waarop niet is scherpgesteld, zacht en
discreet.
80
Page 81

Scherpstellen, zoomen en
scherptediepte
Voordat u kunt scherpstellen, draait u de zoomring 5
om de brandpuntsafstand aan te passen totdat de
gewenste compositie wordt weergegeven in de
beeldzoeker.
Indien uw camera beschikt over een voorbeeldknop of
-hendel (stop-beneden), kunt u de scherptediepte zien
door de zoeker van de camera.
• Wegens de optische eigenschappen van dit objectief
wordt de brandpuntsafstand iets kleiner bij kleinere
scherpstelafstanden.
• De afstandsschaal geeft niet de exacte afstand weer
tussen het onderwerp en de camera. Waarden zijn
benaderingen en dienen enkel als algemene
referentie. Bij het fotograferen van landschappen kan
de velddiepte de werking beïnvloeden waardoor de
camera mogelijk op een punt scherpstelt dat
dichterbij ligt dan oneindig.
Scherpstellen (fig. A)
Stel de scherpstelmodus-selector van uw camera in
volgens deze tabel.
Scherpstelmodus
van het
fototoestel
AF
M
Autofocus met handmatige overbrugging
(M/A-modus)
1
Stel de scherpstelmodusschakelaar d in op M/A.
2
Autofocus is ingeschakeld, maar u kunt dit
opheffen door de aparte scherpstelring te draaien
terwijl u de ontspanknop half ingedrukt houdt of
door te drukken op de AF-ON-knop op
fototoestellen die hiermee zijn uitgerust.
3
Druk de ontspanknop of de AF-ON-knop opnieuw
half in om de handmatige scherpstelling te
annuleren en autofocus te hernemen.
Goede resultaten met autofocus
Zie “Opmerkingen over het gebruik van de groothoek
of de supergroothoek van de AF Nikkor-objectieven”
(P. 87).
Scherpstelmodus van het objectief
M/A M
Autofocus met
manuele prioriteit
Manueel scherpstellen (hulpfunctie is
beschikbaar)
Manueel scherpstellen
(hulpfunctie is
beschikbaar)
Jp
En
De
Fr
Es
Se
Ru
Nl
It
Ck
Ch
Kr
81
Page 82

Vibratiereductiemodus
Basisconcept van vibratiereductie
Aantal vibraties
Jp
En
De
Fr
Es
Se
Ru
Nl
It
Ck
Ch
Kr
Stel de vibratiereductieschakelaar in op
NORMAL.
Stel de vibratiereductieschakelaar in op ACTIVE.
Bij het fotograferen
Stel de vibratiereductieschakelaar in op NORMAL of
ACTIVE.
Bij panoramafotografie
Stel de vibratiereductieschakelaar in op NORMAL.
Bij fotografie vanuit een bewegend voertuig
Stel de vibratiereductieschakelaar in op ACTIVE.
82
Cameratrilling
Panoramafoto's
Sterkte van vibraties
Cameratrilling
bij het maken
van foto's vanuit
een bewegend
voertuig
De vibratiereductie ON/OFF -schakelaar (fig. B)
ON: Vibratie wordt verminderd terwijl de
OFF: Vibratie wordt niet verminderd.
ontspanknop half wordt ingedrukt en ook
op het moment dat de ontspanknop wordt
losgelaten. Omdat vibratie wordt
verminderd in de beeldzoeker wordt
automatisch en handmatig scherpstellen
en nauwkeurige kadrering van het
onderwerp gemakkelijker.
De vibratiereductiemodusschakelaar
instellen (fig. C)
NORMAL:
ACTIVE: Het vibratiereductiemechanisme
Het vibratiereductiemechanisme
vermindert vooral cameratrillingen,
waardoor vloeiende panorama-opnamen
mogelijk worden
vermindert vooral zichtbare
cameratrillingen, wanneer u bijvoorbeeld
foto's neemt vanuit een bewegend
voertuig. In deze modus maakt de lens niet
automatisch het onderscheid tussen
pannen en cameratrillingen.
.
Page 83

Opmerkingen over het gebruik van de
vibratiereductie
• Nadat u de ontspanknop half hebt inge drukt, wacht u
totdat het beeld in de beeldzoeker stabiliseert
alvorens u de ontspanknop verder indrukt.
• Zet bij panorama-opnamen de
vibratiereductiemodusschakelaar op NORMAL.
• Als het fototoestel gepand wordt in een grote cirkel,
wordt er geen compensatie uitgevoerd voor
bewegingen van het fototoestel in de panrichting.
Wanneer u bijvoorbeeld de camera horizontaal
beweegt, worden verticale cameratrillingen
onderdrukt. Dit stabiliseert het beeld terwijl het
gewenste bewegingseffect kan worden gerealiseerd.
• Als een gevolg van de eigenschappen van
vibratiereductie is het mogelijk dat het beeld in de
beeldzoeker vaag wordt na het loslaten van de
sluiterknop. Dit is geen storing.
• Schakel het fototoestel niet uit of verwijder het
objectief niet van het fototoestel terwijl de
vibratiereductie in werking is. Als u deze
voorzorgsmaatregel niet in acht neemt, kan het
objectief klinken en aanvoelen alsof een interne
component is losgekomen of afgebroken wanneer
ermee wordt geschud. Dit is geen storing. Schakel het
fototoestel opnieuw in om dit te corrigeren.
• Bij fototoestellen met ingebouwde flitser werkt de
vibratiereductie niet wanneer de ingebouwde flitser
wordt opgeladen.
• Als het fototoestel op een statief met drie poten is
geplaatst, stelt u de ON/OFF-schakelaar voor
vibratiereductie e in op OFF. Het is echter aan te
raden de schakelaar op ON in te stellen wanneer u de
camera gebruikt met een statief met drie poten
zonder het uiteinde van het statief vast te maken of
met een statief met één poot.
• Bij fototoestellen met autofocus, zoals de D2-serie en
de D300-modellen, die zijn uitgerust met een AF-ONknop, werkt vibratiereductie niet wanneer de AF-ONknop wordt ingedrukt.
De diafragma instellen
Gebruik het fototoestel om de instellingen van de
diafragma aan te passen.
Variabele maximale diafragma's
Door met de lens te zoomen van 16mm naar 85mm,
vermindert de maximale lensopening met 1
diafragma's.
De camera compenseert echter diafragmawijzigingen
door de sluitertijd aan te passen en zo de correcte
belichtingswaarde te behouden.
1
/3
Jp
En
De
Fr
Es
Se
Ru
Nl
It
Ck
Ch
Kr
83
Page 84

Foto's nemen met een fototoestel met
ingebouwde flitser
• Om vignetteren te voorkomen maakt u geen gebruik
van de zonnekap 1.
• De ingebouwde flitser kan niet worden gebruikt op
afstanden van minder dan 0,6 m.
Digitale SLR-
fototoestellen
D300S
Jp
D300/D200
En
D100
De
Fr
D90/D80/D50
Es
D5100/D5000/
Se
D3100/D3000/
D70-serie/D60/
Ru
D40-serie
Nl
• De ingebouwde flitsers van de D300, D200, D90, D80 en D50
It
zijn geschikt voor brandpuntsafstanden van 18mm of meer,
Ck
terwijl de ingebouwde flitser van de D100 geschikt is voor
Ch
brandpuntsafstanden van 20mm of meer. Vignettering
komt voor op een brandpuntsafstand van 16mm.
Kr
• Zie de camerahandleiding voor de meest recente
informatie over vignettering met dit objectief.
84
Ondersteunde brandpuntsafstand/
opnameafstand
• 16mm/0.7 m of hoger
• 24mm of langer/geen beperkingen
• 16mm of langer/geen beperkingen
• 16mm/1 m of hoger
• 24mm of langer/geen beperkingen
• 16mm/2 m of hoger
• 24mm of langer/geen beperkingen
• 24mm of langer/geen beperkingen
Bajonetkap HB-39 gebruiken
De kap bevestigen
Lijn de koppelingswijzer van de zonnekap ( ) 2 op
de kap uit met de bevestigingswijzer van de zonnekap
4 op het objectief en draai de kap 1 tegen de klok in
(wanneer u het objectief van het fototoestel van u
wegricht) tot hij vastklikt (fig. D).
• Zorg ervoor dat de bevestigingsmarkering van de
zonnekap wordt uitgelijnd met de
vergrendelingswijzer van de zonnekap ( ) 3.
• Als de zonnekap niet correct is bevestigd, kan er
vignettering voorkomen.
• Om het vastmaken of verwijderen van de zonnekap
te vergemakkelijken, neemt u deze aan de basis vast
(bij het verbindingsstuk van de zonnekap) in plaats
van aan de buitenste rand.
De kap losmaken
Houdt de zonnekap vast bij de basis (bij het
verbindingsstuk van de zonnekap) en draai rechtsom,
gezien vanuit het standpunt wanneer u de camera
vasthoudt met het objectief weg van u gericht, om los
te maken.
Page 85

Onderhoud van het objectief
• Zorg ervoor dat de CPU-contactpunten c niet vuil of
beschadigd worden.
• Als de rubberen afdichtingsring voor de lensbevestiging
b beschadigd is, bezoekt u de dichtstbijzijnde officiële
Nikon-dealer of service center voor herstel.
• Reinig het objectief met een blaasbalgje. Om vuil en
vlekken te verwijderen, gebruikt u een zachte, zuivere
katoenen doek of een objectiefdoekje met ethanol
(alcohol) of objectiefreiniger. Maak ronddraaiende
bewegingen van het midden naar de buitenkant en let
erop dat u geen strepen maakt of andere onderdelen van
het objectief aanraakt.
• Gebruik nooit thinner of benzeen om de lens te reinigen
aangezien dit de lens kan beschadigen, of brand of
gezondheidsproblemen kan veroorzaken.
• NC-filters zijn beschikbaar om het voorste
objectiefelement te beschermen. De zonnekap 1 helpt
ook om de voorkant van het objectief te beschermen.
• Wanneer u het objectief in het flexibele objectiefetui
opbergt, maakt u zowel de voorste als de achterste
objectiefdoppen vast. Het objectief kan ook worden
opgeborgen terwijl de zonnekap 1 in de omgekeerde
positie is bevestigd.
• Wanneer het objectief is geïnstalleerd op een fototoestel,
mag u het fototoestel en het objectief niet optillen of
vasthouden aan de zonnekap 1.
•
Berg het objectief op in een koele, droge plaats om
schimmel te voorkomen, wanneer u het objectief
gedurende een lange periode niet gebruikt. Berg het
objectief ook op om deze te beschermen tegen rechtstreeks
zonlicht of chemicaliën zoals kamfer en naftaleen
• Laat geen water op het objectief komen en laat het
objectief niet in water vallen. Hierdoor zal het objectief
roesten en slecht functioneren.
• Bepaalde onderdelen van het objectief zijn vervaardigd
uit versterkt plastic. Zet het objectief nooit in een
overmatig hete ruimte om schade te voorkomen.
.
Standaardaccessoires
• 67-mm makkelijk te bevestigen voorste objectiefdop LC-67
• Achterste objectiefdop
•Bajonetkap HB-39
• Flexibel objectiefetui CL-1015
Optionele accessoires
• 67-mm vastschroefbare filters
Niet-compatibele accessoires
• Teleconvertoren (alle modellen)
•
Autoring BR-4 en alle modellen van de automatische
verlengingsring PK, K-ring en bevestiging voor blaasbalg
•Verbindingsring SX-1
Andere accessoires zijn mogelijk niet geschikt voor
gebruik met dit objectief. Raadpleeg de bijgeleverde
documentatie bij de accessoires voor meer informatie.
Jp
En
De
Fr
Es
Se
Ru
Nl
It
.
Ck
Ch
Kr
85
Page 86

Technische gegevens
Objectieftype G-type AF-S DX Zoom-NIKKOR-
Brandpuntsafstand
Maximaal
diafragma
Objectiefopbouw
Jp
En
De
Beeldhoek 83º–18º50’
Schaal
Fr
brandpuntsafstand
Es
Afstandgegevens
Se
Zoombediening Manueel via aparte zoomring
Ru
Scherpstellen Nikon intern scherpstelsysteem (IF)
Nl
It
Ck
Vibratiereductie Lens-shiftmethode met behulp van
Ch
Kr
Schaal
opnameafstand
86
objectief met ingebouwde CPU en
Nikon-bajonetsluiting (speciaal
ontworpen voor gebruik met Nikon
digitale SLR-Nikon DX-formaat
fototoestellen)
16mm–85mm
f/3,5–5,6
17 elementen in 11 groepen
(3 asferische lenzen en 2 EDobjectiefelement)
16, 24, 35, 50, 70, 85mm
Uitgang naar fototoestel
(met behulp van een Silent Wavemotor); handmatig via aparte
scherpstelring
voice coil-motoren (VCM's)
Schaalverdeling in meters vanaf
0,38 m tot oneindig ( )
Dichtste
scherpstelafstand
Aantal
diafragmabladen
Diafragma Volledig automatisch
Bereik diafragma f/3,5 tot f/22 (bij 16mm), f/5,6 tot
Meting
belichting
Grootte hulpstuk
Afmetingen Circa 72 mm (dia.) × 85 mm
Gewicht Circa 485 g
Wijzigingen in ontwerp en technische gegevens
voorbehouden zonder voorafgaande kennisgeving of
verplichting vanwege de fabrikant.
0,38 m vanaf filmvlak bij alle
zoomstanden
7 stuks (afgerond)
f/36 (bij 85mm)
Met de volledige diafragmamethode
67 mm (P = 0,75 mm)
(verlenging van de
objectiefbevestigingsrand van het
fototoestel)
Page 87

Opmerkingen over het gebruik van de groothoek of de supergroothoek van de AF Nikkor-objectieven
In de onderstaande situaties is het mogelijk dat autofocus niet functioneert zoals verwacht wanneer u foto's neemt
met de groothoek of de supergroothoek van de AF Nikkor-objectieven.
E Een persoon die voor een
achtergrond in de verte staat
F Een bloemenveld
1. Wanneer het hoofdonderwerp in de
scherpstelhaakjes betrekkelijk klein is
Wanneer een persoon die voor een achtergrond in
de verte staat, binnen de scherpstelhaakjes wordt
geplaatst, zoals getoond in fig. E, is het mogelijk dat
wordt scherpgesteld op de achtergrond en niet op
het onderwerp.
2.
Wanneer het hoofdonderwerp een fijn
onderwerp of fijne scène is, met een patroon
Wanneer het onderwerp fijn is en voorzien is van
een patroon of een laag contrast heeft, zoals een
bloemenveld, zoals getoond in fig. F, kan het
moeilijk zijn om scherp te stellen zonder autofocus
te gebruiken.
Oplossingen voor deze soorten situaties
(1) Stel scherp op een ander onderwerp op dezelfde
afstand van het fototoestel, gebruik vervolgens de
scherpstelvergrendeling, stel het beeld opnieuw
samen en neem de foto.
(2) Stel de scherpstelstand van de camera in op
handmatige scherpstelling en stel handmatig
scherp op het onderwerp.
Raadpleeg “Goede resultaten met autofocus” in de
Gebruikshandleiding van het fototoestel.
Jp
En
De
Fr
Es
Se
Ru
Nl
It
Ck
Ch
Kr
87
Page 88

Note sulle operazioni di sicurezza
ATTENZIONE
Non smontare
Toccando le parti interne della fotocamera o dell'obiettivo si
potrebbero causare dei guasti. Le riparazioni devono essere
eseguite solamente da tecnici qualificati. Qualora, in caso di
caduta o di qualsiasi altro incidente, la fotocamera o
l'obiettivo dovessero rompersi, portare il prodotto presso un
punto di assistenza Nikon autorizzato per l'ispezione, dopo
averlo disinserito dalla presa e/o rimosso la batteria.
In caso di malfunzionamento, disattivare
Jp
immediatamente la fotocamera
Qualora dalla fotocamera o dall'obiettivo dovesse uscire del
En
fumo o un odore insolito, rimuovere immediatamente la
De
batteria, facendo attenzione a non ustionarsi. Continuando a
Fr
utilizzare la fotocamera, sussiste il rischio di lesioni.
Dopo aver rimosso o scollegato la fonte di alimentazione,
Es
portare il prodotto presso un punto di assistenza Nikon
Se
autorizzato per l'ispezione.
Ru
Non usare la fotocamera o l'obiettivo in presenza di
gas infiammabili
Nl
L'utilizzo di apparecchiature elettroniche in presenza di gas
It
infiammabili può causare esplosioni o incendi.
Ck
Non guardare il sole in modo diretto attraverso
Ch
l'obiettivo o il mirino
Guardando in modo diretto il sole o qualsiasi altra fonte
Kr
intensa di luce, si è soggetti al rischio di indebolimento
permanente della vista.
88
Tenere lontano dalla portata dei bambini
Fare molta attenzione che i bambini non ingeriscano le
batterie o altre piccole parti.
Nell'utilizzo della fotocamera e dell'obiettivo,
osservare le seguenti precauzioni
• Mantenere la fotocamera e l'obiettivo asciutti. In caso
contrario si potrebbe verificare un incendio o scosse
elettriche.
• Non maneggiare né toccare la fotocamera o l'obiettivo
con le mani bagnate. In caso contrario, si potrebbero
verificare scosse elettriche.
• Durante le riprese controluce, non puntare l'obiettivo
verso il sole ed evitare che la luce solare passi
direttamente attraverso di esso, poiché la fotocamera
potrebbe surriscaldarsi ed eventualmente provocare un
incendio.
• Se si prevede di non utilizzare l'obiettivo per un periodo
prolungato di tempo, montare entrambi i tappi di
protezione e riporlo lontano dalla luce diretta del sole. Il
mancato rispetto di questa istruzione può causare
incendi, poiché l'obiettivo potrebbe concentrare la luce
del sole su un oggetto infiammabile.
Page 89

Denominazione
1
D
( ): pagina di riferimento
Paraluce (P. 94)
2 Riferimento di fissaggio
paraluce (P. 94)
3 Riferimento di inserimento
paraluce (P. 94)
4 Riferimento di innesto
M
M/A
OFF
ON
ACTIVE
NORMAL
M/A
A
ON
B
NORMAL
C
5 Anello dello zoom (P. 91)
6 Scala della lunghezza focale
7 Riferimento lunghezze focali
OFF
8 Scala delle distanze
9
Contrassegno distanza
0 Anello di messa a fuoco (P. 91)
ACTIVE
a Indice di montaggio
b Guarnizione in gomma della
montatura dell'obiettivo
(P. 95)
c Contatti CPU (P. 95)
d Interruttore della modalità di
messa a fuoco (P. 91)
e Interruttore ON/OFF di
riduzione vibrazioni (P. 92)
f Interruttore della modalità di
riduzione delle vibrazioni
Jp
En
De
Fr
Es
Se
Ru
Nl
It
Ck
Ch
Kr
paraluce (P. 94)
M
(P. 92)
89
Page 90

Grazie per aver acquistato l'obiettivo AF-S DX NIKKOR 16-85mm f/3,5-5,6G ED VR. Gli obiettivi DX Nikkor sono
appositamente concepiti per l'utilizzo con le fotocamere SLR digitali Nikon (formato Nikon DX), come la D300 e la
D90. Quando è montato su fotocamere formato Nikon DX, l'angolo d'immagine dell'obiettivo è
approssimativamente pari a 1,5 volte la lunghezza focale nel formato 35mm. Prima di utilizzare l'obiettivo, leggere
queste istruzioni e la Manuale d'uso della fotocamera.
Caratteristiche principali
• Attivando la funzione di riduzione vibrazioni, è possibile
impostare tempi di posa più lunghi (3,5 stop*), pertanto
si ha una maggiore gamma di tempi di posa e di
posizioni dello zoom a disposizione, soprattutto
quando si utilizza la fotocamera a mano libera. (*Gli
effetti di VR sul tempo di posa sono misurati in base agli
Jp
standard CIPA (Camera and Imaging Products
En
Association); gli obiettivi in formato FX sono misurati
De
usando fotocamere digitali in formato FX, gli obiettivi in
formato DX usando fotocamere in formato DX. Gli
Fr
obiettivi zoom sono misurati allo zoom massimo.)
Es
•
Questo obiettivo si avvale di un motore Silent Wave
Se
che aziona il meccanismo di messa a fuoco, pertanto
la messa a fuoco automatica risulta agevole, silenziosa
Ru
e quasi immediata. L'interruttore della modalità di
Nl
messa a fuoco
It
la messa a fuoco automatica (A) o manuale (M).
• Montando questo obiettivo su una fotocamera Nikon
Ck
in grado di eseguire la misurazione Color matrix 3D, è
Ch
possibile eseguire un controllo dell'esposizione più
Kr
preciso, in quanto le inform azioni relative alla distanza
dal soggetto vengono trasferite dall'obiettivo al
corpo macchina.
d
consente di selezionare facilmente
• L'utilizzo di tre elementi asferici e due elementi ED
(extra-low dispersion) all'interno dell'obiettivo
assicura fotografie nitide praticamente prive di
aberrazioni cromatiche. Inoltre, il diaframma a sette
lamelle consente di ottenere un'apertura quasi
circolare, pertanto gli oggetti non a fuoco davanti o
dietro il soggetto verranno resi con sfocature
morbide e gradevoli.
90
Page 91

Messa a fuoco, zoom e profondità di
campo
Prima di mettere a fuoco, ruotare l'anello dello zoom 5
per regolare la lunghezza focale e far rientrare nel
mirino la composizione desiderata.
Se la fotocamera è dotata di pulsante o leva di
anteprima della profondità di campo (stop-down), è
possibile verificare l'effettiva profondità di campo nel
mirino della fotocamera.
• A causa delle caratteristiche ottiche dell'obiettivo,
quando si mette a fuoco a distanze ravvicinate la
lunghezza focale diminuisce leggermente.
• La scala distanze non indica la distanza precisa tra il
soggetto e la fotocamera. I valori sono approssimativi
e servono solo a titolo di riferimento generale.
Durante le riprese di paesaggi distanti, la profondità di
campo può influire sul funzionamento della
fotocamera, che potrebbe mettere a fuoco su un
punto più vicino dell'infinito.
Messa a fuoco (Fig. A)
Posizionare il selettore del modo di messa a fuoco della
fotocamera in conformità alla seguente tabella:
Modo di messa
a fuoco della
fotocamera
AF
M
Messa a fuoco automatica con esclusione per
il funzionamento in manuale (modalità M/A)
1
Impostare l'interruttore della modalità di messa a
fuoco d dell'obiettivo su M/A.
2
L'autofocus è attivo, ma è possibile escluderlo
ruotando l'anello di messa a fuoco separato e
premendo contemporaneamente il pulsante di
scatto a metà corsa, oppure premendo il pulsante
AF-ON sul corpo macchina, se la fotocamera ne è
dotata.
3
Per disattivare la messa a fuoco manuale e riattivare
l'autofocus, premere il pulsante di scatto a metà
corsa, oppure premere nuovamente il pulsante
AF-ON.
Ottenere buoni risultati con l'autofocus
Fare riferimento a "Note sull'utilizzo degli obiettivi
grandangolo e supergrandangolo AF Nikkor" (P. 97).
Modo di messa a fuoco dell'obiettivo
M/A M
Messa a fuoco
automatica con
precedenza manuale
Messa a fuoco manuale
(aiuto per la messa fuoco disponibile)
Messa a fuoco manuale
(aiuto per la messa
fuoco disponibile)
Jp
En
De
Fr
Es
Se
Ru
Nl
It
Ck
Ch
Kr
91
Page 92

Modalità Riduzione vibrazioni
Principio di funzionamento della riduzione vibrazioni
Numero di vibrazioni
Vibrazione della
fotocamera
Panoramiche
Jp
En
De
Fr
Es
Se
Ru
Nl
It
Ck
Ch
Kr
Impostare l'interruttore della modalità di
riduzione vibrazioni su NORMAL
Impostare l'interruttore della modalità di
riduzione vibrazioni su ACTIVE
Durante l'acquisizione di immagini
Impostare l'interruttore della modalità di riduzione
vibrazioni su NORMAL o su ACTIVE.
Durante la ripresa panoramica
Impostare l'interruttore della modalità di riduzione
vibrazioni sul NORMAL.
Durante l'acquisizioni di immagini da un veicolo in
movimento
Impostare l'interruttore della modalità di riduzione
vibrazioni su ACTIVE.
92
Intensità delle vibrazioni
Vibrazione
della fotocamera
durante l'acquisizione
di immagini da un
veicolo in
movimento
Impostazione dell'interruttore anellare di
attivazione/disattivazione riduzione dell
evibrazioni (Fig. B)
ON:
OFF: Le vibrazioni non vengono ridotte.
Le vibrazioni vengono ridotte mentre si tiene
premuto il pulsante di scatto a metà corsa e
anche al momento dello scatto. Siccome le
vibrazioni sono ridotte nel mirino, risultano
semplificate sia la regolazione manuale/
automatica della messa a fuoco che l'esatta
inquadratura del soggetto
.
Impostazione dell'interruttore di selezione
della modalità di riduzione delle vibrazioni
(Fig. C)
NORMAL: Il meccanismo di riduzione delle vibrazioni
ACTIVE:
riduce innanzitutto la vibrazione della
fotocamera, semplificando l'acquisizione di
immagini panoramiche.
La funzione di riduzione vibrazioni attutisce
i movimenti più evidenti della fotocamera,
come quelli che si verificano durante le
riprese da un veicolo in moto. In questa
modalità, l'obiettivo non riesce a distinguere
automaticamente le panoramiche dalle
vibrazioni della fotocamera
.
Page 93

Note sulla funzione Riduzione vibrazioni
• Dopo aver premuto il pulsante di scatto a metà corsa,
attendere che l'immagine nel mirino si stabilizzi,
quindi premere completamente il pulsante di scatto.
• Durante l'acquisizione di immagini panoramiche,
regolare l'interruttore di selezione della modalità di
riduzione delle vibrazioni su NORMAL.
• Se si esegue un ampio arco per creare una
panoramica, i movimenti della fotocamera nella
direzione della panoramica non vengono
compensati. Ad esempio, quando si esegue un
movimento di panning in orizzontale, vengono
ridotte le vibrazioni in senso verticale. In questo
modo, l'immagine viene stabilizzata, consentendo
tuttavia di ottenere l'effetto di panning desiderato.
• Le caratteristiche del meccanismo di riduzione delle
vibrazioni possono rendere sfocata l'immagine nel
mirino quando si rilascia il pulsante di scatto. Non si
tratta di un malfunzionamento.
• Non disattivare la fotocamera né rimuovere
l'obiettivo quando la modalità Riduzione vibrazioni è
in funzione. In caso contrario, il movimento
dell'obiettivo può generare un suono simile a quello
di un componente interno lento o rotto. Non si tratta
di un malfunzionamento. Per risolvere il problema,
riattivare la fotocamera.
• Sulle fotocamere dotate di flash incorporato, la
funzione Riduzione Vibrazioni non può essere
utilizzata mentre il flash incorporato si sta ricaricando.
• Quando la fotocamera è sul cavalletto, impostare
l'interruttore ON/OFF di riduzione vibrazioni e su
OFF. Tuttavia, si consiglia di impostare il selettore su
ON quando si utilizza la fotocamera su un cavalletto
con testa non fissata o con un monopiede.
• Con le fotocamere dotate di autofocus, quali ad
esempio i modelli delle serie D2 e D300, su cui è
presente il pulsante AF-ON, la funzione di riduzione
vibrazioni non può essere utilizzata quando si preme
il pulsante AF-ON.
Impostazione dell'apertura
Regolare l'apertura utilizzando la fotocamera.
Apertura massima variabile
Modificando lo zoom dell'obiettivo da 16mm a 85mm
l'apertura massima diminuisce di 1
Tuttavia, la fotocamera compensa le variazioni di
apertura regolando il tempo di posa, in modo da
garantire un'esposizione corretta.
1
/3 di stop.
Jp
En
De
Fr
Es
Se
Ru
Nl
It
Ck
Ch
Kr
93
Page 94

Fotografare con il flash usando
fotocamere con flash incorporato
• Per evitare l'effetto vignettatura, non utilizzare il
paraluce 1.
• Il flash incorporato non può essere utilizzato a
distanze inferiori a 0,6 m.
Fotocamere
SLR digitali
D300S
Jp
D300/D200
En
D100
De
Fr
D90/D80/D50
Es
D5100/D5000/
Se
D3100/D3000/
Ru
serie D70/D60/
serie D40
Nl
It
• I flash incorporati delle fotocamere D300, D200, D90,
D80 e D50 sono compatibili con lunghezze focali di
Ck
18mm o superiori, mentre il flash incorporato della
Ch
D100 è compatibile con lunghezze focali di 20mm o
Kr
superiori. Alla focale di 16mm si ha vignettatura.
• Per le informazioni più recenti sulla vignettatura con
questo obiettivo, vedere il manuale della fotocamera.
94
Lunghezza focale supportata/
distanza di scatto
• 16mm/0.7 m o superiore
• 24mm o superiore/nessuna restrizione
• 16mm o superiore/nessuna
restrizione
• 16mm/1 m o superiore
• 24mm o superiore/nessuna restrizione
• 16mm/2 m o superiore
• 24mm o superiore/nessuna restrizione
• 24mm o superiore/nessuna restrizione
Uso del paraluce a baionetta HB-39
Fissaggio del paraluce
Allineare il riferimento di fissaggio paraluce ( ) 2 sul
paraluce con il riferimento di innesto paraluce 4
sull'obiettivo, quindi ruotare il paraluce 1 in senso
antiorario (guardato impugnando la fotocamera con
l'obiettivo rivolto in direzione opposta a sé) fino a
quando non scatterà in posizione (Fig. D).
• Assicurarsi che il riferimento di innesto paraluce sia
allineato con il riferimento di inserimento paraluce
() 3.
• Se il paraluce non è fissato correttamente, si può
verificare la vignettatura.
• Per facilitare il fissaggio e la rimozione del paraluce,
impugnarlo per la base (vicino al riferimento di
fissaggio paraluce) anziché verso il bordo esterno.
Smontaggio del paraluce
Per smontare il paraluce, impugnarlo per la base (vicino
al riferimento di fissaggio paraluce) e ruotare in senso
orario (impugnando la fotocamera con l'obiettivo
rivolto in direzione opposta a sé).
Page 95

Cura e manutenzione dell'obiettivo
• Fare attenzione a non sporcare o danneggiare i contatti
CPU c.
• Nel caso in cui la guarnizione in gomma della montatura
dell'obiettivo b sia danneggiata, provvedere alla relativa
riparazione presso il rivenditore o il centro assistenza
autorizzato Nikon più vicino.
•
Pulire la superficie delle lenti con un pennello a pompetta.
Per rimuovere impronte e macchie, fare uso di un fazzoletto
di cotone, soffice e pulito, o di una cartina ottica
leggermente imbevuti con alcool o con un liquido
detergente specifico per obiettivi. Strofinare delicatamente
con movimento circolare dal centro verso l'esterno, facendo
attenzione a non lasciare tracce o toccare altre parti
• Per la pulizia non utilizzate mai solventi o benzina, che
potrebbero danneggiare l'obiettivo, causare incendi o
problemi di intossicazione.
• Per la protezione dell'elemento anteriore dell'obiettivo
sono disponibili appositi filtri NC. Anche il paraluce 1
può essere utilizzato per proteggere la parte anteriore
dell'obiettivo.
• Prima di riporre l'obiettivo nella relativa custodia
flessibile, montare entrambi i coperchi anteriore e
posteriore. L'obiettivo può inoltre essere riposto con il
paraluce 1 montato al contrario.
• Quando l'obiettivo è montato sulla fotocamera, non
afferrare o reggere la fotocamera e l'obiettivo dal
paraluce 1.
.
• Se prevedete di non utilizzare l'obiettivo per un lungo
periodo di tempo, riponetelo in un ambiente fresco e
ventilato per prevenire la formazione di muffe. Tenerlo
inoltre lontano dal sole o da agenti chimici come canfora
o naftalina.
• Non bagnarlo e fare attenzione che non cada in acqua. La
formazione di ruggine potrebbe danneggiarlo in modo
irreparabile.
• Alcune parti della montatura sono realizzate in materiale
plastico rinforzato. Per evitare danni non lasciare mai
l'obiettivo in un luogo eccessivamente caldo.
Accessori in dotazione
• Copriobiettivo anteriore snap-on da 67 mm LC-67
• Copriobiettivo posteriore
• Paraluce a baionetta HB-39
• Custodia morbida per obiettivo CL-1015
Accessori opzionali
• Filtri a vite da 67 mm
Accessori non utilizzabili
• Teleconvertitore (tutti i modelli)
• Anello automatico BR-4 e tutti i modelli di anelli di
prolunga ottiche PK, anelli K e i dispositivi di messa a
fuoco a soffietto.
• Anello di fissaggio SX-1
Eventuali altri accessori possono non essere adatti per
l'uso con questo obiettivo. Per informazioni dettagliate,
consultare la documentazione fornita con gli accessori.
Jp
En
De
Fr
Es
Se
Ru
Nl
It
Ck
Ch
Kr
95
Page 96

Caratteristiche tecniche
Tipo di obiettivo Obiettivo AF-S DX Zoom-NIKKOR
Lunghezza focale
Apertura
massima
Costruzione
obiettivo
Jp
En
Angolo di campo
De
Scala della
Fr
lunghezza focale
Es
Dati distanze Uscita verso il corpo fotocamera
Zoom Manuale mediante anello dello
Se
Ru
Messa a fuoco Sistema di messa a fuoco interna (IF)
Nl
It
Ck
Riduzione
Ch
vibrazioni
Kr
96
tipo G con CPU incorporata e attacco
a baionetta Nikon (appositamente
progettato per essere utilizzato con
le fotocamere digitali Nikon SLR formato Nikon DX)
16mm–85mm
f/3,5–5,6
17 elementi in 11 gruppi (3 elementi
asferico da obiettivo e 2 elementi
obiettivo ED)
83º–18º50’
16, 24, 35, 50, 70, 85mm
zoom separato
Nikon (utilizza un motore interno
Silent Wave); manuale mediante
anello di messa a fuoco separato
Metodo di spostamento ottiche con
motori voice coil (VCM)
Scala delle
distanze di
ripresa
Distanza focale
minima
Nr. delle lamelle
diaframma
Diaframma Completamente automatico
Gamma di
apertura
Misurazione
dell'esposizione
Misura
dell'accessorio
Dimensioni Circa 72 mm (dia.) × 85 mm
Peso Circa 485 g
Le specifiche e i disegni sono soggetti a modifica senza
preavviso od obblighi da parte del produttore.
Graduata in metri e piedi da 0,38 m
all'infinito ( )
0,38 m dal piano focale in tutte le
posizioni dello zoom
7 pz. (arrotondati)
Da f/3,5 a f/22 (a 16mm), da f/5,6 a
f/36 (a 85mm)
Attraverso il metodo di apertura
massima
67 mm (P = 0,75 mm)
(sporgenza dalla flangia di
montaggio della fotocamera)
Page 97

Note sull'utilizzo degli obiettivi grandangolo e supergrandangolo AF Nikkor
Nelle seguenti situazioni, quando si scattano fotografie con gli obiettivi grandangolo e supergrandangolo AF Nikkor,
l'autofocus potrebbe non funzionare come previsto.
E Una persona ferma davanti ad uno
sfondo distante
F Un prato fiorito
1. Il soggetto principale nella cornice di
messa a fuoco è di dimensioni
abbastanza ridotte
Se il soggetto è posizionato in primo piano con uno
sfondo distante, e sia lo sfondo che il soggetto sono
all'interno delle cornici di messa a fuoco, come
mostrato nella Fig. E, è possibile che lo sfondo sia a
fuoco e che il soggetto risulti sfocato.
2. Il soggetto principale è un soggetto o una
scena con sfondo finemente decorato
Se il soggetto è finemente decorato o a basso
contrasto, ad esempio un campo di fiori come
illustrato nella Fig. F, potrebbe essere difficile
ottenere la messa a fuoco automatica.
Operazioni da effettuare in queste
situazioni
(1) Mettere a fuoco un altro soggetto collocato alla
stessa distanza dalla fotocamera, quindi utilizzare il
blocco della messa a fuoco, ricomporre e scattare.
(2) Impostare il modo di messa a fuoco manuale della
fotocamera e mettere a fuoco manualmente il
soggetto.
Fare riferimento a "Ottenere buoni risultati con
l'autofocus" nel Manuale d'uso della fotocamera.
Jp
En
De
Fr
Es
Se
Ru
Nl
It
Ck
Ch
Kr
97
Page 98

Σημειώσεις για τους Χειρισμούς ασφαλείας
ΠΡΟΣΟΧΗ
Μην αποσυναρμολογείτε τη συσκευή
Εάν αγγίξετε τα εσωτερικά τμήματα της φωτογραφικής
μηχανής ή του φακού, μπορεί να προκληθεί τραυματισμός. Οι
επισκευές θα πρέπει να πραγματοποιούνται μόνο από
εξειδικευμένους τεχνικούς. Εάν η φωτογραφική μηχανή ή ο
φακός σπάσουν λόγω πτώσης ή άλλου ατυχήματος,
αποσυνδέστε το προϊόν από την πρίζα ή/και αφαιρέστε την
μπαταρία και απευθυνθείτε σε έναν εξουσιοδοτημένο
αντιπρόσωπο σέρβις της Nikon για επιθεώρηση.
Απενεργοποιήστε αμέσως τη φωτογραφική μηχανή σε
Jp
περίπτωση δυσλειτουργίας
Εάν παρατηρήσετε καπνό ή ασυνήθιστη οσμή να προέρχεται
De
από τη φωτογραφική μηχανή ή το φακό, αφαιρέστε αμέσως την
μπαταρία, προσέχοντας να μην καείτε. Η συνέχιση της
Fr
λειτουργίας μπορεί να προκαλέσει τραυματισμό.
Es
Αφού αφαιρέσετε ή αποσυνδέσετε την πηγή τροφοδοσίας,
Se
προσκομίστε το προϊόν σε έναν εξουσιοδοτημένο
αντιπρόσωπο σέρβις της Nikon για επιθεώρηση.
Ru
Μην χρησιμοποιείτε τη φωτογραφική μηχανή ή το φακό
Nl
όταν στο περιβάλλον υπάρχουν εύφλεκτα αέρια
It
Σε περίπτωση χρήσης ηλεκτρονικών συσκευών σε χώρους
όπου υπάρχουν εύφλεκτα αέρια ενδέχεται να προκληθεί
Gr
έκρηξη ή πυρκαγιά.
Ch
Kr
Kr
98
Μην κοιτάζετε προς τον ήλιο μέσα από το φακό ή το
σκόπευτρο
Εάν κοιτάξετε προς τον ήλιο ή άλλες δυνατές πηγές φωτός μέσα
από το φακό ή το σκόπευτρο ενδέχεται να προκληθεί μόνιμη
βλάβη στην όρασή σας.
Φυλάσσετε μακριά από παιδιά
Θα πρέπει να δώσετε ιδιαίτερη προσοχή, ώστε να αποφευχθεί
το ενδεχόμενο μικρά παιδιά να βάλουν στο στόμα τους τις
μπαταρίες ή άλλα μικρά εξαρτήματα.
Τηρείτε τις ακόλουθες προφυλάξεις κατά το χειρισμό της
φωτογραφικής μηχανής και του φακού
• Η φωτογραφική μηχανή και ο φακός θα πρέπει να
διατηρούνται στεγνά. Διαφορετικά, ενδέχεται να προκληθεί
πυρκαγιά ή ηλεκτροπληξία.
• Μην χειρίζεστε ή μην αγγίζετε τη φωτογραφική μηχανή ή το
φακό με βρεγμένα χέρια. Διαφορετικά, ενδέχεται να
προκληθεί ηλεκτροπληξία.
• Κατά τη λήψη με οπίσθιο φωτισμό, μην στρέφετε το φακό
προς τον ήλιο και μην αφήνετε το φως του ήλιου να περάσει
απευθείας μέσα από το φακό, καθώς η φωτογραφική μηχανή
ενδέχεται να υπερθερμανθεί και είναι πιθανό να προκληθεί
πυρκαγιά.
• Εάν δεν πρόκειται να χρησιμοποιήσετε το φακό για μεγάλο
χρονικό διάστημα, προσαρτήστε το μπροστινό και το πίσω
καπάκι του φακού και αποθηκεύστε το φακό σε ένα σκιερό
μέρος. Διαφορετικά, ενδέχεται να προκληθεί πυρκαγιά,
καθώς το φως του ήλιου μπορεί να διοχετευτεί σε ένα
εύφλεκτο αντικείμενο μέσω του φακού.
Page 99

Ονοματολογία
D
( ) : σελίδα αναφοράς
1 Σκίαστρο φακού (Σελ. 104)
2 Δείκτης προσάρτησης
σκιάστρου φακού (Σελ. 104)
3 Δείκτης ρύθμισης σκιάστρου
φακού (Σελ. 104)
4 Δείκτης θέσης σκιάστρου
φακού (Σελ. 104)
M
M
M/A
OFF
ON
ACTIVE
NORMAL
M/A
A
ON
B
NORMAL
C
5 Δακτύλιος zoom (Σελ. 101)
6 Κλίμακα εστιακής απόστασης
7 Δείκτης εστιακής απόστασης
OFF
8 Κλίμακα απόστασης
9 Γραμμή δείκτη απόστασης
0 Δακτύλιος εστίασης (Σελ. 101)
ACTIVE
a Δείκτης θέσης
b Ελαστικός μονωτικός
σύνδεσμος μοντούρας φακού
(Σελ. 105)
c Επαφές CPU (Σελ. 105)
d Διακόπτης λειτουργίας
εστίασης (Σελ. 101)
e Διακόπτης ON/OFF
απόσβεσης κραδασμών
(Σελ. 102)
f Διακόπτης λειτουργίας
απόσβεσης κραδασμών
(Σελ. 102)
Jp
De
Fr
Es
Se
Ru
Nl
It
Gr
Ch
Kr
Kr
99
Page 100

Σας ευχαριστούμε που αγοράσατε το φακό AF-S DX NIKKOR 16-85mm f/3,5-5,6G ED VR. Οι φακοί DX Nikkor έχουν
σχεδιαστεί ειδικά για χρήση με ψηφιακές φωτογραφικές μηχανές SLR της Nikon (φορμά DX της Nikon), όπως την D300 και
την D90. Όταν τοποθετείται σε φωτογραφικές μηχανές με φορμά DX της Nikon, η οπτική γωνία του φακού ισοδυναμεί με
περίπου 1,5× της εστιακής απόστασης στο φορμά 35mm. Πριν από τη χρήση αυτού του φακού, διαβάστε τις παρούσες
οδηγίες και συμβουλευτείτε το Εγχειρίδιο οδηγιών χρήσης της φωτογραφικής σας μηχανής.
Κύρια χαρακτηριστικά
• Ενεργοποιώντας την απόσβεση κραδασμ ών, μπορείτε να
χρησιμοποιήσετε μικρότερες ταχύτητες κλείστρου (3,5
στοπ*), αυξάνοντας έτσι το εύρος των δυνατών
ταχυτήτων κλείστρου και των θέσεων zoom, ειδικά όταν
κρατάτε τη φωτογραφική μηχανή στο χέρι. (*Τα
Jp
αποτελέσματα του VR στην ταχύτητα κλείστρου
μετρήθηκαν σύμφωνα με τα πρότυπα της Camera and
De
Imaging Products Association (CIPA - Ένωση για τις
Fr
Φωτογραφικές Μηχανές και τα Προϊόντα Απεικόνισης). Οι
φακοί με φορμά FX μετρήθηκαν με ψηφιακές
Es
φωτογραφικές μηχανές με φορμά FX, οι φακοί με φορμά
Se
DX με φωτογραφικές μηχανές με φορμά DX. Οι φακοί με
Ru
zoom μετρήθηκαν στο μέγιστο zoom.)
Nl
• Αυτός ο φακός ενσωματώνει ένα Αθόρυβο μοτέρ για την
It
κίνηση του μηχανισμού εστίασης, επιτρέποντας την
ομαλή, αθόρυβη και σχεδόν ακαριαία αυ τόματη εστίαση.
Gr
Με το διακόπτη λειτουργίας εστίασης d η επιλογή της
Ch
λειτουργίας αυτόματης εστίασης (A) ή χειροκίνητης
Kr
εστίασης (M) είναι απλή.
Kr
• Αν τοποθετηθεί σε μια φωτογραφική μηχανή της Nikon
με δυνατότητες μέτρησης 3D color matrix, είναι δυνατός
ο έλεγχος της έκθεσης με μεγαλύτερη ακρίβεια, επειδή οι
πληροφορίες απόστασης από το θέμα μεταδίδονται από
το φακό στη φωτογραφική μηχανή.
• Η χρήση τριών στοιχείων ασφαιρικού φακού και δύο
στοιχείων φακού εξαιρετικά χαμηλής διασποράς (ED)
εξασφαλίζει ευκρινείς φωτογραφίες χωρίς καμία
χρωματική απόκλιση. Επίσης, το διάφραγμα επτά
λεπίδων δημιουργεί ένα σχεδόν κυκλικό διάφραγμα, το
οποίο συμβάλλει στην ομαλή και ανεπαίσθητη εμφάνιση
των περιοχών της φωτογραφίας που δεν έχουν εστιαστεί.
100
 Loading...