

Nikon AF-S DX 55-300 User Manual [ru]

Jp
En
De
Fr
Es
AF-S DX NIKKOR 55-300mm f/4.5-5.6G ED VR
使用説明書
User’s Manual
Benutzerhandbuch
Manuel d'utilisation
Manual del usuario
Användarhandbok
Pykoводство пользoвaтеля
Gebruikshandleiding
Manuale d'uso
Εγχειρίδιο οδηγιών χρήσης
Návod k obsluze
Užívateľská príručka
Manualul utilizatorului
Посібник користувача
ҋᅶᢪϷ
P.2
Pg. 12
S. 20
P. 28
Pág. 36
S. 44
Стр. 52
P. 60
Pag. 68
σελίδα 76
Str. 84
Str. 92
Pag. 100
Стор.
108
116
ᎁ
ᲃ
130
Ὦ
ㅪ
138
####
㛣⪿ⴋ
Sv
Ru
Nl
It
Gr
Cz
Sk
Ro
Ua
Sc
Tc
Kr

Jp
En
De
Fr
Es
Sv
Ru
Nl
It
Cz
Sk
Ro
Ua
Ck
安全上のご注意
■
ご使用の前に「安全上のご注意」をよくお読みのうえ、正しくお使い
ください。この「安全上のご注意」は製品を安全に正しく使用してい
ただき、あなたや他の人々への危害や財産への損害を未然に防止する
ために、重要な内容を記載しています。お読みになった後は、お使い
になる方がいつでも見られる所に必ず保管してください。
表示について
表示と意味は次のようになっています。
この表示を無視して、誤った取り扱いをすると、人が死亡または
警告
A
A
お守りいただく内容の種類を、次の絵表示で区分し、説明しています。
絵表示の例
I
E
K
重傷を負う可能性が想定される内容を示しています。
この表示を無視して、誤った取り扱いをすると、人が傷害を負う
可能性が想定される内容および物的損害の発生が想定される内
注意
容を示しています。
記号は、注意(警告を含む)を促す内容を告げるものです。図の中や近
L
くに具体的な注意内容(左図の場合は感電注意)が描かれています。
記号は、禁止の行為(してはいけないこと)を告げるものです。図の中
F
や近くに具体的な禁止内容(左図の場合は分解禁止)が描かれています。
記号は、行為を強制すること(必ずすること)を告げるものです。図の
D
中や近くに具体的な強制内容(左図の場合は電池を取り出す)が描かれて
います。
Ch
警告
Kr
E
G
C
分解禁止
接触禁止
すぐに
修理依頼を
分解したり修理・改造をしないこと
感電したり、異常動作をしてケガの原因となります。
落下などによって破損し、内部が露出したときは、露出部に手
を触れないこと
感電したり、破損部でケガをする原因となります。
カメラの電池を抜いて、販売店またはニコンサービス機関
に修理を依頼してください。
A
2

K
C
J
F
F
I
F
A
A
A
F
電池を取る
すぐに
修理依頼を
水かけ禁止
使用禁止
見ないこと
感電注意
放置禁止
使用注意
保管注意
移動注意
放置禁止
警告
熱くなる、煙が出る、こげ臭いなどの異常時は、速やか
にカメラの電池を取り出すこと
そのまま使用すると火災、やけどの原因となります。
電池を取り出す際、やけどに充分注意してください。
電池を抜いて、販売店またはニコンサービス機関に修理を
依頼してください。
水につけたり水をかけたり、雨にぬらしたりしないこと
発火したり感電の原因となります。
引火・爆発のおそれのある場所では使用しないこと
プロパンガス・ガソリンなど引火性ガスや粉塵の発生する
場所で使用すると、爆発や火災の原因となります。
レンズまたはカメラで直接太陽や強い光を見ないこと
失明や視力障害の原因となります。
ぬれた手でさわらないこと
感電の原因になることがあります。
製品は幼児の手の届かないところに置くこと
ケガの原因になることがあります。
逆光撮影では、太陽を画角から充分にずらすこと
太陽光がカメラ内部で焦点を結び、火災の原因になること
があります。画角から太陽をわずかに外しても火災の原因
になることがあります。
使用しないときは、レンズにキャップをつけるか太陽光の
あたらない所に保管すること
太陽光が焦点を結び、火災の原因になることがあります。
三脚にカメラやレンズを取り付けたまま移動しないこと
転倒したりぶつけたりしてケガの原因になることがあります。
窓を閉め切った自動車の中や直射日光が当たる場所など、
異常に温度が高くなる場所に放置しないこと
内部の部品に悪い影響を与え、火災の原因となることがあ
ります。
A
A
注意
Jp
En
De
Fr
Es
Sv
Ru
Nl
It
Cz
Sk
Ro
Ua
Ck
Ch
Kr
3
Jp
このたびはDXニッコールレンズをお買い上げくださいまして、誠に
ありがとうございます。ご使用の前に、この使用説明書をよくお読み
En
の上、正しくお使いください。また、カメラの使用説明書もご覧くだ
さい。
De
• このレンズは、
Fr
(
Es
シリーズ、
D300
画角は、
35 mm
画角になります。
フォーマットのニコンデジタル一眼レフカメラ
DX
など)専用です。DXフォーマットでの撮影
D90
判換算で焦点距離の約
倍の焦点距離に相当する
1.5
Sv
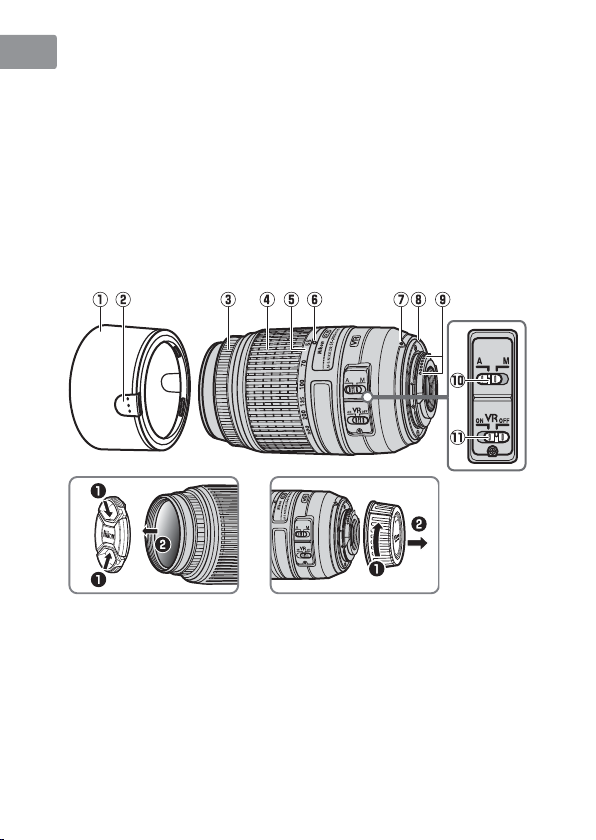
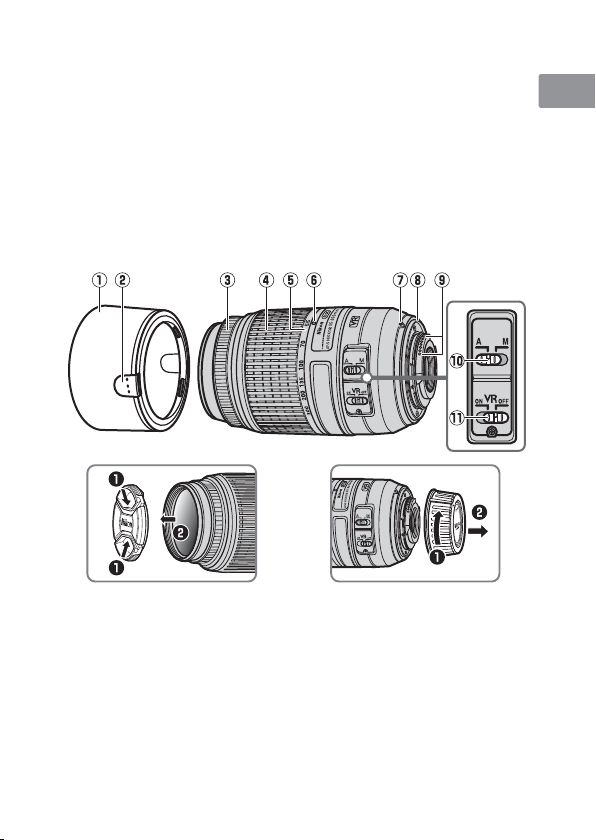
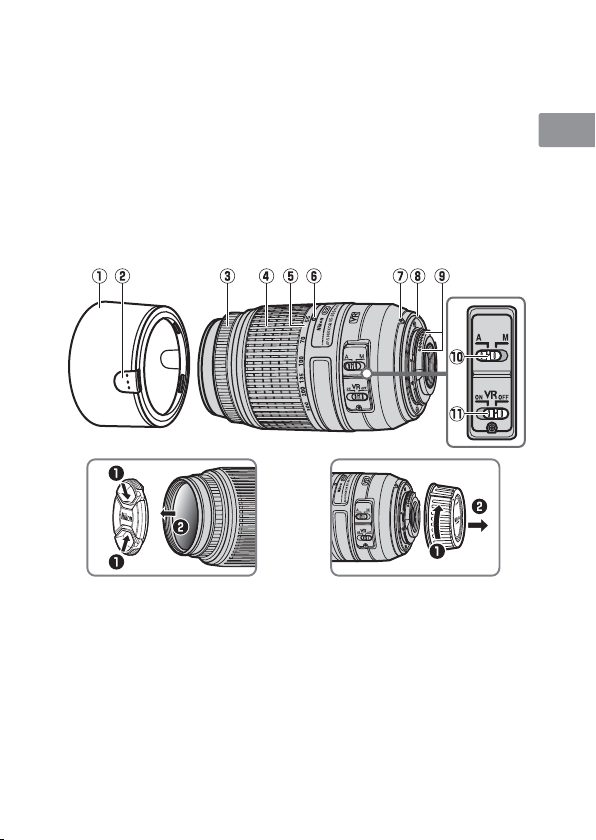
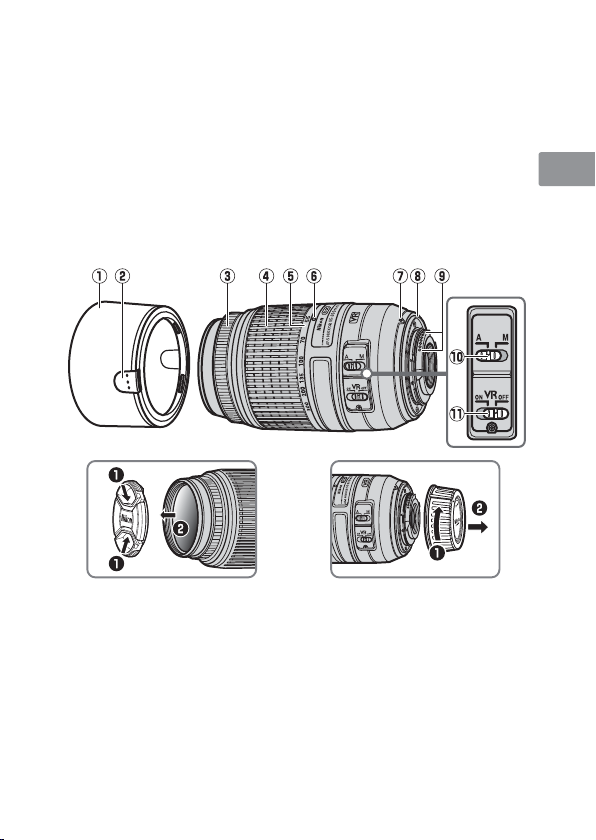
各部の名称
■
Ru
Nl
It
Cz
Sk
Ro
Ua
Ck
Ch
Kr
q
フード
........................................ P. 5
w
フード着脱ボタン
e
フォーカスリング
r
ズームリング
t
焦点距離目盛
y
焦点距離目盛指標
................ P. 5
................ P. 6
.......................... P. 6
....................... P. 11
u
レンズ着脱指標
i
レンズマウント
ゴムリング
o
信号接点
CPU
!0
切り換えスイッチ
A-M
!1
手ブレ補正スイッチ
..................... P. 5
...................... P. 10
...................... P. 10
...... P. 6
........... P. 7
4

カメラへの取り付け方・取り外し方
■
取り付け方
z カメラの電源を
x レンズの裏ぶたを取り外す
c カメラとレンズのレンズ着脱指標を合わせ、反時計回りにカチッ
と音がするまでレンズを回す
• このとき、レンズのレンズ着脱指標が真上にきます。
取り外し方
z カメラの電源を
x レンズ取り外しボタンを押しながら、時計回りにレンズを回して
取り外す
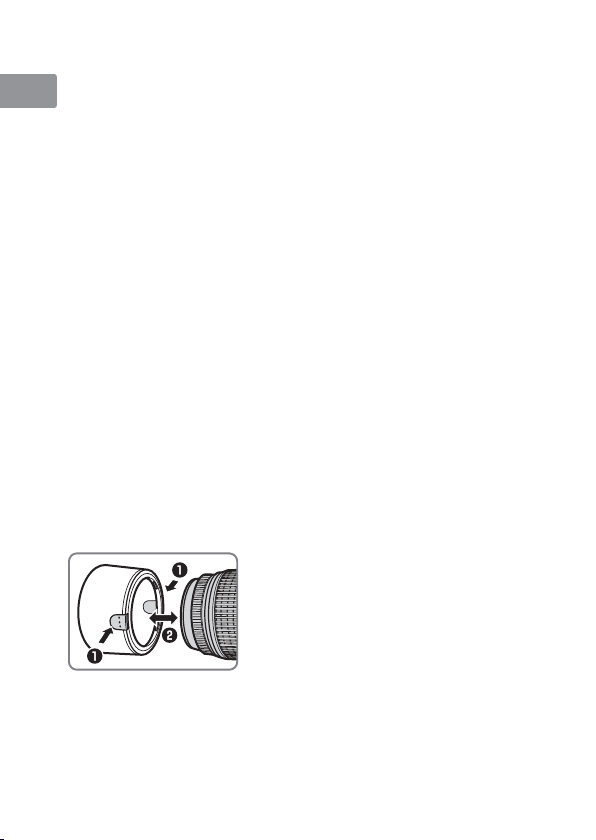
フードの使い方
■
画像に悪影響を及ぼす光線をカットし、レンズ面の保護にも役立ちます。
取り付け方/取り外し方
にしてボディーキャップを外す
OFF
にする
OFF
• フード着脱ボタンを押した状態(q)で、
フードを取り付けまたは取り外します
(w)。
• 収納時はフードを逆向きにしてレンズ
に取り付けられます。
Jp
En
De
Fr
Es
Sv
Ru
Nl
It
Cz
Sk
Ro
Ua
Ck
Ch
Kr
5
Jp
En
De
Fr
Es
Sv
Ru
Nl
It
Cz
Sk
Ro
Ua
Ck
Ch
Kr
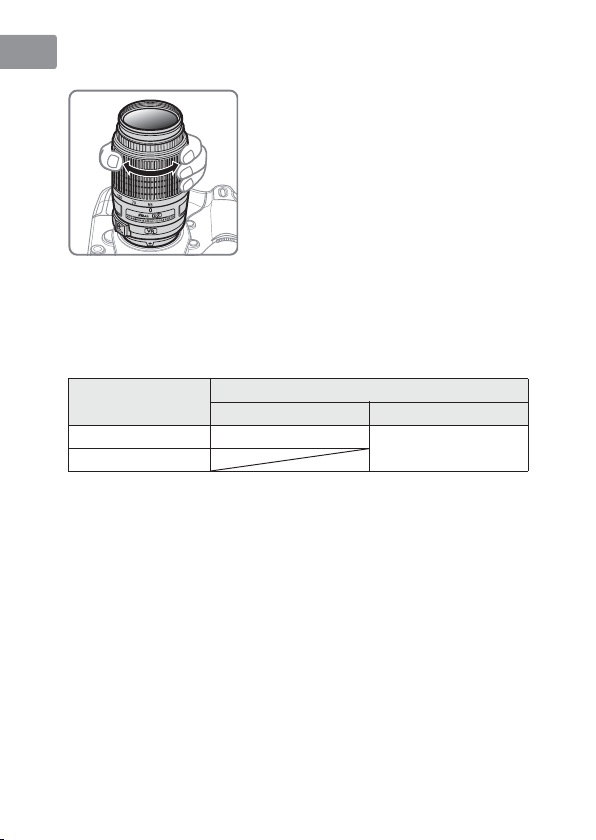
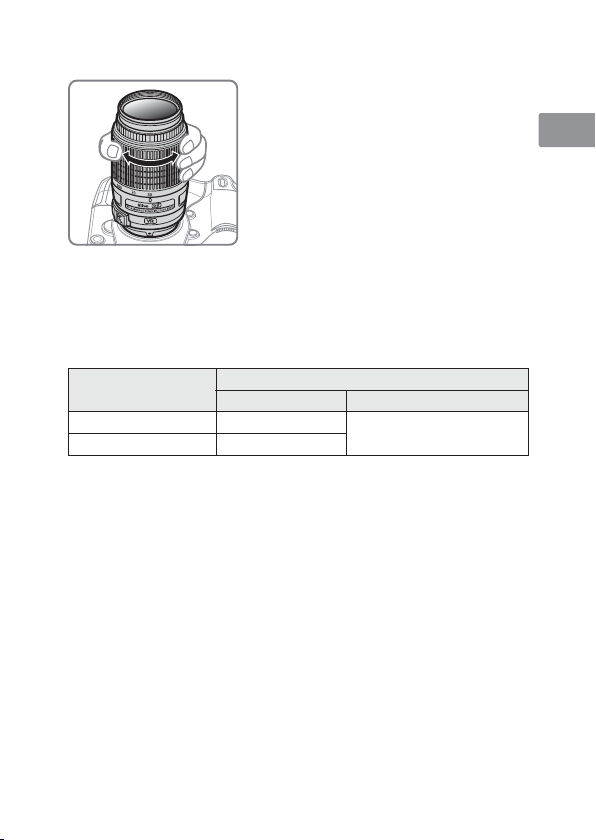
ズーミングと被写界深度
■
撮影を行う場合は、ズームリングを回転さ
せ(焦点距離が変化します)、構図を決め
てからピント合わせを行ってください。プ
レビュー(絞り込み)機構を持つカメラで
は、撮影前にファインダー内で被写界深度
を確認できます。
• このレンズは、撮影距離が短くなるにし
たがって焦点距離が短くなります。
ピント合わせの方法
■
カメラのフォーカスモードとレンズの
を変えることにより、ピント合わせの方法を選べます。
• カメラのフォーカスモードについては、カメラの使用説明書をご覧ください。
カメラの
フォーカスモード
オートフォーカス マニュアルフォーカス
AF
MF
オートフォーカス撮影
z カメラのフォーカスモードをAF(オートフォーカス)にセット
する
x レンズの
c シャッターボタンを半押ししてピントを合わせて撮影する
• オートフォーカス撮影ではフォーカスリングが回転しますの
で、フォーカスリングに触れないように注意してください。
マニュアルフォーカス撮影
z レンズの
x フォーカスリングを回転させてピントを合わせて撮影する
• カメラ側のフォーカスモードがオートフォーカスでもマニュア
ルフォーカスでもマニュアルフォーカス撮影ができます。
切り換えスイッチを[A]にセットする
A-M
切り換えスイッチを[M]にセットする
A-M
レンズのフォーカスモード
A
切り換えスイッチの位置
A-M
(フォーカスエイド可)
M
6
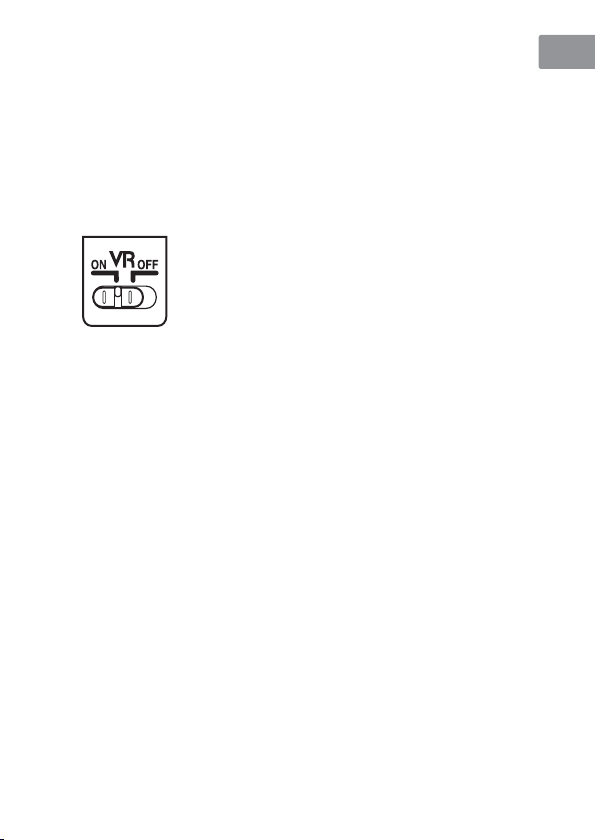
手ブレ補正機能(VRⅡ)
■
手ブレ補正機能(VRⅡ)を使用すると、使わないときと比べ約4 段
分※シャッタースピードを遅くして撮影できるため、シャッタース
ピードの選択範囲が広がり、幅広い領域で手持ち撮影が可能です。
(※当社測定条件によります。また、手ブレ補正効果は、撮影者や撮影条件に
よって異なります。)
手ブレ補正スイッチの使い方
: シャッターボタンを半押しすると、手ブレ
ON
を補正します。ファインダー像のブレも補
正するため、ピント合わせが容易で、フレー
ミングしやすくなります。
:手ブレを補正しません。
OFF
Jp
En
De
Fr
Es
Sv
Ru
Nl
It
Cz
Sk
Ro
Ua
Ck
Ch
Kr
7

Jp
手ブレ補正使用時のご注意
• シャッターボタンを半押し後、ファインダー像が安定してから撮影
En
De
Es
Sv
Ru
Nl
Cz
Sk
することをおすすめします。
• 流し撮り(パンニング)でカメラの向きを大きく変えた場合、流し
た方向の手ブレ補正は機能しません。例えば、横方向に流し撮りす
Fr
ると、縦方向の手ブレだけが補正されます。
• 手ブレ補正の原理上、シャッターレリーズ後にファインダー像がわ
ずかに動くことがありますが、異常ではありません。
• 手ブレ補正中にカメラの電源スイッチを
り外したりしないでください。(その状態でレンズを振るとカタカ
タ音がすることがありますが、故障ではありません。カメラの電源
スイッチを再度ONにすれば、音は消えます。)
• 内蔵フラッシュ搭載のカメラで、内蔵フラッシュ充電中には、手ブ
It
レ補正は行いません。
• 三脚を使用するときは、手ブレ補正スイッチを[
さい。ただし、三脚を使っても雲台を固定しないときや、一脚を使
用するときには、スイッチを[ON]にすることをおすすめします。
にしたり、レンズを取
OFF
Ro
Ua
Ck
Ch
]にしてくだ
OFF
Kr
8

絞り値の設定
■
絞り値は、カメラ側で設定してください。
開放F値の変化
このレンズはズーミングにより、開放F値が最大
だし、露出を決める際に、F値の変化量はカメラが自動的に補正しま
すので考慮する必要はありません。
カメラの内蔵フラッシュ使用時のご注意
■
ケラレを防止するために、レンズのフードは取り外して使用してくだ
さい。
※ カメラの内蔵フラッシュのケラレとは、フラッシュの光がレンズの先端でさ
えぎられて影になり、画像に映り込む現象です。
段変化します。た
2/3
Jp
En
De
Fr
Es
Sv
Ru
Nl
It
Cz
Sk
Ro
Ua
Ck
Ch
Kr
9

Jp
En
De
Fr
Es
Sv
Ru
Nl
It
Cz
Sk
Ro
Ua
Ck
Ch
レンズのお手入れと取り扱い上のご注意
■
• フードをレンズに装着した状態で、フードだけを持たないでくだ
さい。
•
信号接点は汚さないようにご注意ください。
CPU
• レンズマウントゴムリングが破損した場合は、そのまま使用せず販
売店またはニコンサービス機関に修理を依頼してください。
• レンズ面の清掃は、ホコリを拭う程度にしてください。指紋がつい
たときは、柔らかい清潔な木綿の布に無水アルコール(エタノー
ル)または市販のレンズクリーナーを少量湿らせ、レンズの中心か
ら外周へ渦巻状に、拭きムラ、拭き残りのないように注意して拭い
てください。
•
シンナーやベンジンなどの有機溶剤は絶対に使用しないでください。
• レンズ表面の汚れや傷を防ぐためには、NCフィルターをお使いい
ただけます。また、レンズのフードも役立ちます。
• レンズをケースに入れるときは、必ずレンズキャップと裏ぶたを取
り付けてください。
• レンズを長期間使用しないときは、カビやサビを防ぐために、高温
多湿のところを避けて風通しのよい場所に保管してください。ま
た、直射日光のあたるところ、ナフタリンや樟脳のあるところも避
けてください。
• レンズを水に濡らすと、部品がサビつくなどして故障の原因となり
ますのでご注意ください。
• ストーブの前など、高温になるところに置かないでください。極端
に温度が高くなると、外観の一部に使用している強化プラスチック
が変形することがあります。
Kr
付属アクセサリー
■
•
• 裏ぶた
• フード
• ソフトケース
スプリング式レンズキャップ
58 mm
LF-4
HB-57
CL-1020
LC-58
10

使用できるアクセサリー
■
•
■
型式
焦点距離
最大口径比
レンズ構成
画角
焦点距離目盛
撮影距離情報 カメラへの撮影距離情報を出力可能
ズーミング ズームリングによる回転式
ピント合わせ
手ブレ補正
最短撮影距離 撮像面から
絞り羽根枚数
絞り方式 自動絞り
絞りの範囲
測光方式 開放測光
アタッチメントサイズ
寸法
質量 約
※ 仕様、外観の一部を、改善のため予告なく変更することがあります。
ネジ込み式フィルター
58 mm
仕様
ニコンFマウント
レンズ
55 mm―300 mm
1:4.5―5.6
11群17枚(ED
枚)
1
28°50'―5°20'
55、70、100、135、200、300 mm
超音波モーターによるオートフォーカス、
マニュアルフォーカス可能
ボイスコイルモーター(
シフト方式
枚(円形絞り)
9
• 焦点距離
• 焦点距離
58 mm(P=0.75 mm
約
76.5 mm
ウント基準面からレンズ先端まで)
530 g
CPU内蔵G
レンズ2枚、高屈折率レンズ
(ズーム全域)
1.4 m
55 mm時: f/4.5―22
300 mm時: f/5.6―29
(最大径)×
VCM
)
123 mm
タイプ、
AF-S DX
)によるレンズ
(レンズマ
Jp
En
De
Fr
Es
Sv
Ru
Nl
It
Cz
Sk
Ro
Ua
Ck
Ch
Kr
11

Jp
For Your Safety
En
De
Fr
Es
Sv
Ru
Nl
It
Cz
Sk
Ro
Ua
Ck
Ch
Kr
12
CAUTIONS
• Do not disassemble. Touching the internal parts of the camera or lens
could result in injury. In the event of malfunction, the product should
be repaired only by a qualified technician.
open as the result of a fall or other accident, remove the camera
battery and/or disconnect the AC adapter and then take the product
to a Nikon-authorized service center for inspection.
• Turn the camera off immediately in the event of malfunction.
you notice smoke or an unusual smell coming from the equipment,
immediately unplug the AC adapter and remove the camera battery,
taking care to avoid burns.
injury. After removing the battery, take the equipment to a Nikonauthorized service center for inspection.
•
Do not use in the presence of flammable gas. Operating electronic equip-
ment in the presence of flammable gas could result in explosion or fire.
• Do not look at the sun through the lens or the camera viewfinder.
Viewing the sun or other bright light source through the lens or
viewfinder could cause permanent visual impairment.
• Keep out of reach of children.
result in injury.
• Obser ve the following precautions when handling the lens and camera:
- Keep the lens and camera dry.
could result in fire or electric shock.
- Do not handle the lens or camera with wet hands. Failure to observe
this precaution could result in electric shock.
- Keep the sun well out of the frame when shooting backlit subjects.
Sunlight focused into the camera when the sun is in or close to the
frame could cause a fire.
- If the lens will not be used for an extended period, attach the front
and rear lens caps and store the lens out of direct sunlight.
direct sunlight, the lens could focus the sun’s rays onto flammable
objects, causing fire.
• Do not carry tripods with a lens or camera attached.
accidentally strike others, resulting in injury.
•
Do not leave the lens where it will be exposed to extremely high temperatures,
such as in an en closed automo bile or in dire ct sunligh t. Failure to observe this
precaution could adversely affect the lens’ internal parts, causing fire.
Continued operation could result in fire or
Failure to observe this precaution could
Should the product break
Failure to observe this precaution
Should
If left in
You could trip or
Thank you for your purchase of an AF-S DX NIKKOR 55–300mm
f/4.5–5.6G ED VR lens. Before using this product, please
carefully read both these instructions and the camera manual.
Note: DX lenses are for use only with DX-format digital single-lens
reflex cameras such as the D90 or D300 series. The angle of view
of a lens on a DX-format camera is equivalent to that of a lens
with a focal length about 1.5 × longer mounted on a 35 mm
format camera.
■ Parts of the Lens
Jp
En
De
Fr
Es
Sv
Ru
Nl
It
Cz
Sk
Ro
Ua
Ck
Lens hood................................. 14
q
Latch
w
e
r
t
y
............................................. 14
Focus ring.................................. 15
Zoom ring................................. 15
Focal length scale................ 19
Focal length mark
Lens mounting mark ..........14
u
Rubber lens-mount
i
gasket......................................18
CPU contacts ...........................18
o
A-M mode switch .................15
!0
Vibration reduction
!1
ON/OFF switch..................16
Ch
Kr
13
Jp
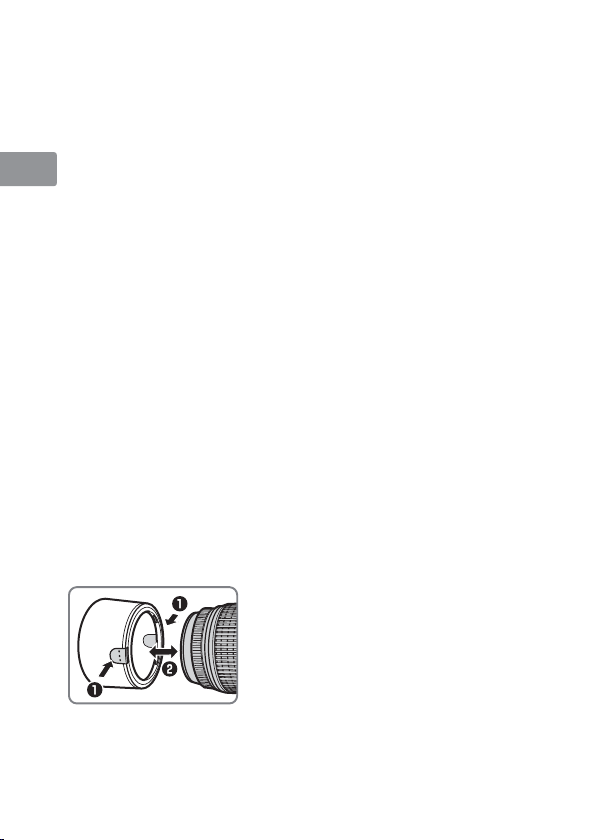
■ Attaching and Removing the Lens
En
Attaching the Lens
Turn the camera off and remove the camera body cap.
z
De
Fr
Es
Sv
Ru
Nl
It
Cz
Sk
Ro
Ua
Ck
Ch
Kr
Remove the lens cap.
x
Attach the lens.
c
Keeping the lens mounting mark aligned with the
mounting mark on the camera body, position the lens in
the camera’s bayonet mount and then rotate the lens
counter-clockwise until it clicks into place with the lens
mounting mark at the top.
Removing the Lens
Turn the camera off.
z
Remove the lens.
x
To remove the lens, press the lens release button while
turning the lens clockwise.
■ The Lens Hood
The lens hoods protect the lens and block stray light that
would otherwise cause flare or ghosting.
Attaching and Removing the Hood
Press the latches (q) and attach or
remove the hood (w).
be reversed and mounted on the lens
when not in use.
The hood can
14

■ Zoom and Depth of Field
Before focusing, rotate the zoom ring
to adjust the focal length and frame
the photograph.
depth-of-field preview (stop down),
depth of field can be previewed in
the viewfinder.
Note:
The focal length of this lens
decreases as the focus distance shortens.
■ Focus
Focus mode is determined by the camera focus mode and the
position of the lens A-M mode switch. See the camera manual
for information on camera focus mode selection.
Lens focus mode
Camera focus mode
AF Autofocus
MF —
Autofocus
Set the camera to AF (autofocus).
z
Slide the lens A-M mode switch to A.
x
Focus.
c
Press the shutter-release button halfway to focus. Be careful
not to touch the focus ring while the camera focuses.
Manual Focus
Slide the lens A-M mode switch to M.
z
Focus.
x
Focus manually using the lens focus ring.
can be used regardless of the focus mode selected with
the camera.
A M
If the camera offers
Manual focus with
electronic rangefinder
Manual focus
Jp
En
De
Fr
Es
Sv
Ru
Nl
It
Cz
Sk
Ro
Ua
Ck
Ch
Kr
15

Jp
■ Vibration Reduction (VRII)
Vibration reduction (VRII) reduces blur caused by camera
En
shake, allowing shutter speeds up to four stops slower than
would otherwise be the case (Nikon measurements; effects
De
vary with the photographer and shooting conditions).
Fr
increases the range of shutter speeds available and permits
hand-held, tripod-free photography in a wide range of
Es
situations.
Sv
Using the Vibration Reduction ON/OFF Switch
Ru
Nl
It
Using Vibration Reduction: Notes
Cz
• When using vibration reduction, press the shutter-release
Sk
Ro
Ua
Ck
Ch
Kr
button halfway and wait for the image in the viewfinder to
stabilize before pressing the shutter-release button the rest
of the way down.
• When the camera is panned, vibration reduction applies only
to motion that is not part of the pan (if the camera is panned
horizontally, for example, vibration reduction will be applied
only to vertical shake), making it much easier to pan the
camera smoothly in a wide arc.
• When vibration reduction is active, the image in the
viewfinder may be blurred after the shutter is released.
does not indicate a malfunction.
Select ON to enable vibration reduction.
reduction is activated when the shutter-release
button is pressed halfway, reducing the effects
of camera shake for improved framing and focus.
Select OFF to turn vibration reduction off.
Vibration
This
This
16

• Do not turn the camera off or remove the lens while
vibration reduction is in effect. If power to the lens is cut
while vibration reduction is on, the lens may rattle when
shaken.
reattaching the lens and turning the camera on.
• If the camera is equipped with a built-in flash, vibration
reduction will be disabled while the flash charges.
• Turn vibration reduction off when the camera is securely
mounted on a tripod, but leave it on if the tripod head is not
secured or when using a monopod.
■ Aperture
Aperture is adjusted using camera controls.
Zoom and Maximum Aperture
Changes to zoom can alter the maximum aperture by up to
2
/3 EV. The camera however automatically takes this into
account when setting exposure, and no modifications to
camera settings are required following adjustments to zoom.
■ Built-in Flash Units
When using the built-in flash on cameras equipped with a
built-in flash unit, remove lens hoods to prevent vignetting
(shadows created where the end of the lens obscures the
built-in flash).
This is not a malfunction, and can be corrected by
Jp
En
De
Fr
Es
Sv
Ru
Nl
It
Cz
Sk
Ro
Ua
Ck
Ch
Kr
17

Jp
■ Lens Care
• Do not pick up or hold the lens or camera using only the lens
En
De
Sv
Ru
Cz
Sk
Ro
Ua
Ck
Ch
Kr
hood.
• Keep the CPU contacts clean.
• Should the rubber lens-mount gasket be damaged, cease
Fr
use immediately and take the lens to a Nikon-authorized
service center for repair.
Es
• Use a blower to remove dust and lint from the lens surfaces.
To remove smudges and fingerprints, apply a small amount
of ethanol or lens cleaner to a soft, clean cotton cloth or lenscleaning tissue and clean from the center outwards using a
circular motion, taking care not to leave smears or touch the
glass with your fingers.
Nl
• Never use organic solvents such as paint thinner or benzene
It
to clean the lens.
• The lens hood or NC filters can be used to protect the front
lens element.
• Attach the front and rear caps before placing the lens in its
flexible pouch.
• If the lens will not be used for an extended period, store it in
a cool, dry location to prevent mold and rust.
direct sunlight or with naphtha or camphor moth balls.
• Keep the lens dry. Rusting of the internal mechanism can
cause irreparable damage.
• Leaving the lens in extremely hot locations could damage or
warp parts made from reinforced plastic.
■ Supplied Accessories
• 58 mm snap-on Front Lens Cap LC-58
• Rear Lens Cap LF-4
• Bayonet Hood HB-57
• Flexible Lens Pouch CL-1020
■ Compatible Accessories
58 mm screw-on filters
18
Do not store in

■ Specifications
Type Type G AF-S DX lens with built-in CPU and
Nikon F mount
Foca l length 55–300 mm
Maximum aperture f/4.5–5.6
Lens construction 17 elements in 11 groups (including 2 ED lens
elements and one HRI lens element)
Angle of view 28° 50′–5° 20′
Foca l length scale
Distance information Output to camera
Zoom Manual zoom using independent zoom ring
Focu sing Autofocus controlled by Silent Wave Motor,
Vibration reduction Lens shift using voice coil motors (VCMs)
Minimum focus
distance
Diaphragm blades 9 (rounded diaphragm opening)
Diaphragm Fully automatic
Aperture range • 55 mm focal length: f/4.5 to f/22
Metering Full aperture
Filter-attachment
size
Dimensions Approx. 76.5 mm diameter × 123 mm (distance
Weig ht Approx. 530 g (18.7 oz)
Graduated in millimeters (
manual focus
1.4 m (4.59 ft) from focal plane at all zoom
positions
• 300 mm focal length: f/5.6 to f/29
58 mm (P =0.75 mm)
from camera lens-mount flange)
55, 70, 100, 135, 200, 300
Jp
En
De
Fr
Es
Sv
)
Ru
Nl
It
Cz
Sk
Ro
Ua
Ck
Ch
Kr
Nikon reserves the right to change the specifications of the
hardware described in this manual at any time and without prior
notice.
19

Jp
Für Ihre Sicherheit
En
De
Fr
Es
Sv
Ru
Nl
It
Cz
Sk
Ro
Ua
Ck
Ch
Kr
SICHERHEITSHINWEISE
• Nicht auseinanderbauen. Das Berühren der Innenteile von Kamera oder Objektiv
könnte zu Verletzungen führen. Im Falle einer Fehlfunktion sollte das Produkt
auschließlich von einem qualifizierten Fachmann repariert werden. Sollte das
Produkt aufgrund eines Herunterfallens oder eines Unfalles aufbrechen,
entfernen Sie den Kamera-Akku und/oder trennen Sie den Netzadapter vom
Netz und bringen Sie das Produkt zur Inspektion zum Nikon-Kundendienst.
• Schalten Sie die Kamera im Falle einer Fehlfunktion unverzüglich ab. Wenn Sie Rauch
oder einen ungewöhnlichen Geruch aus Ihrer Ausrüstung wahrnehmen,
trennen Sie sofort den Netzadapter vom Netz und entfernen Sie den KameraAkku. Geben Sie dabei acht, dass Sie sich nicht verbrennen. Ein weiterer Betrieb
könnte zu einem Brand oder zu Verletzungen führen. Nach Entfernen des Akkus
bringen Sie die Ausrüstung zur Inspektion zum Nikon-Kundendienst.
• Nicht in Gegenwart von entflammbarem Gas verwenden. Der Betrieb von
Elektrogeräten in Gegenwart von entflammbarem Gas könnte zu einer
Explosion oder zu einem Brand führen.
• Blicken Sie nicht durch das Objektiv oder den Kamerasucher in die Sonne. Das Betrachten
der Sonne oder einer anderen hellen Lichtquelle durch das Objektiv oder den
Sucher kann zu permanenten Sehstörungen führen.
• Außerhalb der Reichweite von Kindern aufbewahren. Ein Nichtbeachten dieser
Vorsichtsmaßnahme kann zu Verletzungen führen.
•
Beachten Sie die folgenden Vorsichtsmaßnahmen beim Umgang mit Kamera und Objektiv
- Halten Sie Objektiv und Kamera stets trocken. Ein Nichtbeachten dieser
Vorsichtsmaßnahme kann zu Feuer oder Stromschlägen führen.
- Bedienen Sie die Kamera oder das Objektiv nicht mit nassen Händen. Ein
Nichtbeachten dieser Vorsichtsmaßnahme kann zu Stromschlägen führen.
- Halten Sie die Sonne sicher außerhalb des Bildbereiches, wenn Sie Motive im
Gegenlicht aufnehmen. Sonnenlicht, das in der Kamera fokussiert wird, wenn sich die
Kamera im oder nah beim Bildmotiv befindet, kann zu einem Brand führen.
- Wird das Objektiv für längere Zeit nicht verwendet, bringen Sie den vorderen
und hinteren Objektivdeckel an und lagern Sie das Objektiv an einem Ort
ohne direkte Sonneneinstrahlung. Wird es in direktem Sonnenlicht gelagert,
könnte das Objektiv die Sonnenstrahlen auf entflammbare Objekte
fokussieren und Sie so entzünden.
•
Tragen Sie Stative nicht mit aufgesetzter Kamera oder aufgesetztem Objektiv
Gefahr zu stolpern oder versehentlich andere Personen zu stoßen, was zu
Verletzungen führen kann.
• Lagern Sie das Objektiv nicht an Orten, an denen es ex trem hohen Temperaturen
ausgesetzt ist, wie beispielsweise in einem geschlossenen Auto oder direkt in der Sonne.
Andernfalls können die internen Teile des Objektivs nachteilig beeinflusst
werden und es könnte zu einem Brand kommen.
:
. Es besteht die
20
Vielen Dank, dass Sie sich für ein AF-S DX NIKKOR 55–300 mm
1:4,5–5,6G ED VR Objektiv entschieden haben. Bitte lesen Sie vor
der Verwendung dieses Produktes sowohl diese Anleitung als
auch das Handbuch der Kamera sorgfältig.
Hinweis: DX-Objektive können nur mit digitalen Spiegelreflexkameras mit DXFormat wie der D90 oder einer Kamera der D300-Serie verwendet werden.
Der Blickwinkel eines Objektives auf einer Kamera mit DX-Format entspricht
dem eines Objektives mit einer etwa 1,5 × längeren Brennweite auf einer
Kamera mit 35 mm Kleinbildformat.
■ Objektivkomponenten
Gegenlichtblende............................22
q
Verriegelung........................................22
w
Fokussierring.......................................23
e
Zoomring...............................................23
r
Brennweitenskala.............................27
t
Markierung für Brennweitenskala
y
Markierung für die Ausrichtung
u
des Objektivs.................................22
Dichtungsmanschette..................26
i
CPU-Kontakte .....................................26
o
A-M-Umschalter................................23
!0
Bildstabilisator
!1
AN/AUS-Schalter ........................24
Jp
En
De
Fr
Es
Sv
Ru
Nl
It
Cz
Sk
Ro
Ua
Ck
Ch
Kr
21

Jp
■ Ansetzen und Abnehmen des Objektivs
En
Ansetzen des Objektivs
Schalten Sie die Kamera ab und entfernen Sie den
z
De
Fr
Es
Sv
Ru
Nl
It
Cz
Sk
Ro
Ua
Ck
Ch
Kr
Gehäusedeckel der Kamera.
Entfernen Sie den Objektivdeckel.
x
Setzen Sie das Objektiv an.
c
Richten Sie die Markierung für die Ausrichtung des Objektivs
mit der Markierung am Kameragehäuse aus, setzen Sie das
Objektiv in den Bajonettanschluss der Kamera ein und
drehen es dann gegen den Uhrzeigersinn, bis es mit einem
Klicken einrastet und die Markierung für die Ausrichtung des
Objektivs nach oben zeigt.
Abnehmen des Objektivs
Schalten Sie die Kamera ab.
z
Nehmen Sie das Objektiv ab.
x
Um das Objektiv abzunehmen, drücken Sie die
Objektiventriegelungstaste, während Sie das Objektiv im
Uhrzeigersinn drehen.
■ Die Gegenlichtblende
Die Gegenlichtblende schützt das Objektiv und verhindert das
Eindringen von Streulicht, das ansonsten zu Streulicht oder
Geisterbildern führen würde.
Anbringen und Abnehmen der Gegenlichtblende
Drücken Sie die Verriegelungen (q)
und bringen Sie die Gegenlichtblende
(w) an oder nehmen Sie sie ab. Die
Gegenlichtblende kann umgekehrt auf
dem Objektiv angebracht werden,
wenn sie nicht verwendet wird.
22
■ Zoom und Tiefenschärfe
Drehen Sie, bevor Sie fokussieren, den
Zoomring, um die Brennweite
einzustellen und einen Bildausschnitt zu
wählen. Verfügt die Kamera über eine
Abblendtaste, kann die Tiefenschärfe im
Sucher im Voraus bewertet werden.
Hinweis: Die Brennweite dieses Objektivs nimmt
bei der Fokussierung auf nahe Motive ab.
■ Scharfeinstellung
Der Fokusmodus wird durch den Fokusmodus der Kamera und
die Position des Objektiv-A-M-Umschalters bestimmt. Beachten
Sie das Handbuch der Kamera für weitere Informationen zur Wahl
des Fokusmodus an der Kamera.
Objektiv-Fokusmodus
Kamera-Fokusmodus
AF Autofokus
MF —
Autofokus
Versetzen Sie die Kamera in den AF (Autofokus)-Modus.
z
Stellen Sie den Objektiv-A-M-Umschalter auf A.
x
Fokussieren Sie.
c
Drücken Sie den Auslöser bis zum ersten Druckpunkt, um zu
fokussieren. Berühren Sie nicht den Fokussierring, während
die Kamera fokussiert.
Manuelle Fokussierung
Stellen Sie den Objektiv-A-M-Umschalter auf M.
z
Fokussieren Sie.
x
Fokussieren Sie manuell mit Hilfe des Fokussierrings am
Objektiv. Die manuelle Fokussierung kann unabhängig vom
an der Kamera gewählten Fokusmodus verwendet werden.
A M
Manueller Fokus mit
elektronischer Einstellhilfe
Jp
En
De
Fr
Es
Sv
Ru
Nl
It
Cz
Sk
Ro
Ua
Ck
Ch
Kr
23

Jp
■ Bildstabilisator (VRII)
Der Bildstabilisator (VRII) reduziert die Bewegungsunschärfe, die
En
durch Kamera-Verwacklung entsteht und erlaubt so eine bis zu
vier Stufen längere Belichtungszeit, als es ansonsten der Fall wäre
De
(Nikon-Messungen; die Effekte können je nach Fotograf und
Aufnahmesituation variieren). Dies vergrößert die Auswahl
Fr
verfügbarer Belichtungszeiten und erlaubt Fotografien aus der
Hand ohne Stativ in einer Vielzahl von Situationen.
Es
Verwendung des Bildstabilisator AN/AUS-Schalters
Sv
Ru
Nl
It
Cz
Verwendung des Bildstabilisators: Hinweise
Sk
• Drücken Sie bei Verwendung des Bildstabilitsators den Auslöser
Ro
Ua
Ck
Ch
Kr
bis zum ersten Druckpunkt und warten Sie, bis sich das Bild im
Sucher stabilisiert, bevor Sie den Auslöser vollständig drücken.
• Wird die Kamera geschwenkt, gleicht der Bildstabilisator nur die
Bewegung aus, die sich nicht im Schwenkbereich befindet
(wenn die Kamera beispielsweise horizontal geschenkt wird,
wird der Bildstabilisator nur auf vertikale Verwacklungen
angewendet), so dass ein sauberes Verschwenken der Kamera in
einem weiten Bogen um ein Vielfaches erleichtert wird.
• Wenn der Bildstabilisator aktiv ist, ist das Bild im Sucher
möglicherweise verschwommen, wenn der Auslöser gedrückt
wurde. Dies stellt keine Fehlfunktion dar.
Wählen Sie ON
Der Bildstabilisator wird aktiviert, wenn der
Auslöser bis zum ersten Druckpunkt gedrückt wird;
er verringert die Effekte einer Kamera-Verwacklung
für verbesserte Motivwahl und Scharfstellung.
Wählen Sie OFF (AUS), um den Bildstabilisator
auszuschalten.
(EIN), um den Bildstabilisator zu aktivieren.
24

• Schalten Sie die Kamera nicht ab und entfernen Sie nicht das
Objektiv, solange der Bildstabilisator aktiv ist. Wenn die
Stromversorgung des Objektivs unterbrochen wird, solange der
Bildstabilisator aktiv ist, könnte das Objektiv klappern, wenn es
geschüttelt wird. Dies stellt keine Fehlfunktion dar und kann
dadurch beseitigt werden, dass das Objektiv wieder angesetzt
und die Kamera eingeschaltet wird.
•Verfügt die Kamera über ein eingebautes Blitzgerät, wird der
Bildstabilisator deaktiviert, solange das Blitzgerät sich auflädt.
• Schalten Sie den Bildstabilisator ab, wenn die Kamera fest auf
einem Stativ aufsitzt, lassen Sie ihn jedoch angeschaltet, wenn
der Stativkopf nicht feststehend ist oder
verwenden.
wenn Sie ein Einbein
■ Blende
Die Blende wird mit den Bedienelementen der Kamera
eingestellt.
Zoom und maximale Blende
Änderungen am Zoom können die maximale Blende um bis zu
2
/3 LW verändern. Die Kamera berücksichtigt dies allerdings
automatisch beim Einstellen der Belichtung und Sie müssen
nach Anpassung des Zooms keine Veränderungen an den
Kameraeinstellungen vornehmen.
■ Integrierte Blitzgeräte
Entfernen Sie die Gegenlichtblende, wenn Sie das integrierte
Blitzgerät der Kamera verwenden (insofern vorhanden), da die
Gegenlichtblende sonst einen Schatten ins Motiv würfe.
Jp
En
De
Fr
Es
Sv
Ru
Nl
It
Cz
Sk
Ro
Ua
Ck
Ch
Kr
25

Jp
■ Pflege des Objektivs
• Halten oder heben Sie das Objektiv oder die Kamera nicht an
En
De
Sv
Ru
Cz
Sk
Ro
Ua
Ck
Ch
Kr
der angesetzten Gegenlichtblende.
• Halten Sie die CPU-Kontakte sauber.
• Sollte die Dichtungsmanschette beschädigt werden, setzen Sie
den Gebrauch sofort aus und bringen Sie das Objektiv zum
Fr
Nikon-Kundendienst zur Reparatur.
•Verwenden Sie zum Entfernen von Staub und Verunreinigungen
Es
vom Objektiv einen Blasebalg. Um Schmierflecke und
Fingerabdrücke zu entfernen, bringen Sie eine kleine Menge
Ethanol oder Objektivreiniger auf ein weiches, sauberes
Baumwolltuch oder ein Objektivreinigungstuch auf und reinigen
Sie das Objektiv mit Kreisbewegungen von der Mitte nach
Nl
außen. Achten Sie dabei darauf, dass keine Schmierflecke
verbleiben, und dass sie das Glas nicht mit den Fingern berühren.
It
•Verwenden Sie niemals orga
Verdünner oder Waschbenzin zur Reinigung des Objektivs.
•Zum Schutz der Frontlinse kann die Gegenlichtblende oder ein
Klarglasfilter (NC) verwendet werden.
• Bringen Sie den vorderen und den hinteren Objektivdeckel auf
dem Objektiv an, bevor sie es in seiner Tasche verstauen.
• Wenn das Objektiv für längere Zeit nicht verwendet wird, lagern
Sie es an einem kühlen, trockenen Ort, um Schimmel und
Korrosion zu vermeiden. Lagern sie das Objektiv nicht direkt in
der Sonne oder mit Mottenkugeln aus Naphtha oder Kampfer.
• Halten Sie das Objektiv stets trocken. Eindringendes Wasser
kann zur Korrosion innenliegender Teile und irreparablen
Schäden führen.
• Das Lagern des Objektiv an sehr heißen
verstärktem Plastik beschädigen oder verformen.
nische Lösungsmittel wie
Orten
kann Teile aus
■ Im Lieferumfang enthaltenes Zubehör
• 58 mm aufschna ppender vorderer Objektivdeckel LC-58
• Hinterer Objektivdeckel LF- 4
• Bajonett-Gegenlichtblende HB-57
• Objektivbeutel CL-1020
26

■ Kompatibles Zubehör
58-mm-Schraubfilter
■ Technische Daten
Typ AF-S DX-Objektiv vom Typ G mit integrierter CPU
und Nikon F-Bajonettanschluss
Brennweite 55–300 mm
Lichtstärke 1:4,5–5,6
Optischer Aufbau 17 Linsen in 11 Gruppen (enthält 2 ED-Linsen und eine HRI-
Linse)
Bildwinkel 28 ° 50 ′–5 ° 20 ′
Brennweitenskala Unterteilt im Millimeter (55, 70, 100, 135, 200, 300)
Entfernungsinformation Übermittlung an die Kamera
Zoom Manueller Zoom mit unabhängigem Zoomring
Fokussierung Autofokus mit Silent-Wave-Motor, manueller Fokus
Bildstabilisator Bewegliche Linsengruppe mit Voice-Coil-Motoren
(VCMs)
Naheinstellgrenze 1,4 m von der Sensorebene gemessen, bei allen
Zoompositionen
Blendenlamellen 9 (Blendenöffnung mit abgerundeten Lamellen)
Blendensteuerung Vollautomatisch
Blendenbereich • 55 mm Brennweite: 4,5 bis 22
• 300 mm Brennweite: 5,6 bis 29
Belichtungsmessung Offenblende
Filtergewinde 58 mm (P = 0,75 mm)
Abmessungen Durchmesser ca. 76,5 mm × 123 mm (Länge ab
Bajonettauflage)
Gewicht ca. 530 g
Änderungen und Irrtümer vorbehalten.
Jp
En
De
Fr
Es
Sv
Ru
Nl
It
Cz
Sk
Ro
Ua
Ck
Ch
Kr
27

Jp
Pour votre sécurité
En
De
Fr
Es
Sv
Ru
Nl
It
Cz
Sk
Ro
Ua
Ck
Ch
Kr
28
ATTENTION
• Ne pas démonter. Toucher les parties internes de l’appareil photo ou de l’objectif
peut provoquer des blessures. En cas de dysfonctionnement, le produit devra
être réparé par un technicien qualifié uniquement. Si le produit s’ouvre à cause
d’une chute ou de tout autre accident, retirez l’accumulateur de l’appareil
photo et/ou débranchez l’adaptateur secteur et confiez le produit à un centre
Nikon agréé pour le faire vérifier.
•
Mettre immédiatement l’appareil hors tension en cas de dysfonctionnement
de la fumée ou une odeur inhabituelle provenant de l’équipement, débranchez
immédiatement l’adaptateur secteur et retirez l’accumulateur de l’appareil photo,
tout en prenant soin de ne pas vous brûler. Poursuivre son utilisation peut
provoquer un incendie ou des blessures. Après avoir retiré l’accumulateur, confiez
l’équipement à un centre Nikon agréé pour le faire vérifier.
Ne pas utiliser en présence de gaz inflammable
•
en présence d’un gaz inflammable peut provoquer une explosion ou un incendie.
• Ne pas r ega rder le s olei l av ec l ’obj ect if ou le v ise ur de l’a ppar eil phot o. Regarder le soleil
ou toute autre source lumineuse intense avec l’objectif ou le viseur peut
provoquer des troubles de la vision irréversibles.
• Tenir éloigné des enfants. Le non-respect de cette précaution peut provoquer
des blessures.
•
Suivre les précautions ci-dessous lors de la manipulation de l’objectif et de l’appareil photo
- Tenir l’objectif et l’appareil photo au sec. Le non-respect de cette précaution
peut provoquer un incendie ou un choc électrique.
- Ne pas manipuler l’objectif ou l’appareil photo avec des mains mouillées. Le
non-respect de cette précaution peut provoquer un choc électrique.
- Ne pas inclure le soleil dans le cadrage lors de la prise de vue de sujets en
contre-jour. La concentration de la lumière du soleil dans l’appareil photo
lorsque le soleil est dans ou à proximité du champ de l’image peut provoquer un
incendie.
- Si vous n’avez pas l’intention d’utiliser l’objectif pendant une période
prolongée, fixez les bouchons avant et arrière et rangez l’objectif hors de la
lumière directe du soleil. Si l’objectif est laissé en contact direct avec la
lumière du soleil, les rayons peuvent toucher des objets inflammables,
provoquant ainsi un incendie.
• Ne pas porter un trépied sur lequel un objectif ou l’appareil photo est fixé. Vous
risqueriez de trébucher ou de frapper accidentellement des personnes,
provoquant ainsi des blessures.
• Ne pas laisser l’objectif là où il serait exposé à des températures élevées, comme une
voiture fermée ou à la lumière directe du soleil. Le non-respect de cette précaution
peut avoir des répercussions sur les parties internes de l’objectif, pouvant
provoquer un incendie.
. L’utilisation d’équipement électronique
. Si vous détectez
:
Nous vous remercions d’avoir acheté l’objectif AF-S DX NIKKOR
55–300 mm f/4.5–5.6G ED VR. Avant d’utiliser ce produit, veuillez
lire attentivement ces instructions et le manuel de l’appareil
photo.
Remarque : les objectifs DX ne doivent être utilisés qu’avec des appareils photo
numériques reflex de format DX tels que la gamme D90 ou D300. L’angle de
champ d’un objectif sur un appareil photo au format DX est équivalent à celui
d’un objectif avec une focale environ 1,5 × plus longue montée sur un
appareil photo au format 24×36 mm.
■ Parties de l’objectif
Parasoleil................................................30
q
Repère .....................................................30
w
Bague de mise au point ...............31
e
Bague de zoom..................................31
r
Échelle des focales...........................35
t
Repère de l'échelle des focales
y
Repère de montage de
u
l’objectif............................................30
Joint en caoutchouc de la
i
monture d’objectif ....................34
Contacts du
o
microprocesseur.........................34
Commutateur de mode A-M.... 31
!0
Commutateur MARCHE / ARRÊT
!1
pour la réduction de
vibration...........................................32
Jp
En
De
Fr
Es
Sv
Ru
Nl
It
Cz
Sk
Ro
Ua
Ck
Ch
Kr
29
Jp
■ Fixer et retirer l’objectif
En
Fixer l’objectif
Mettez l’appareil photo hors tension et retirez le bouchon
z
De
Fr
Es
Sv
Ru
Nl
It
Cz
Sk
Ro
Ua
Ck
Ch
Kr
de boîtier de l’appareil.
Retirez le bouchon d'objectif.
x
Fixez l’objectif.
c
En maintenant le repère de montage de l’objectif aligné avec
le repère de montage sur le boîtier de l'appareil photo,
positionnez l’objectif dans la monture à baïonnette de
l’appareil puis faites tourner l’objectif dans le sens opposé
des aiguilles d’une montre jusqu’à ce qu’il s'emboîte, le
repère de montage de l’objectif vers le haut.
Retirer l’objectif
Mettez l’appareil photo hors tension.
z
Retirez l’objectif.
x
Pour retirer l'objectif, appuyez sur la commande de
déverrouillage de l'objectif tout en tournant l'objectif dans le
sens des aiguilles d'une montre.
■ Parasoleil
Le parasoleil protège l’objectif et bloque la lumière diffusée
pouvant causer de la lumière parasite ou une image fantôme.
Fixation et retrait du parasoleil
Appuyez sur les loquets (q) pour fixer
ou retirer le parasoleil (w). Le parasoleil
peut être retourné et monté sur
l’objectif lorsqu’il n’est pas utilisé.
30
 Loading...