


Nice
MC200
Control unit
EN - Instructions and warnings for installation and use IT - Istruzioni ed avvertenze per l’installazione e l’uso
FR - Instructions et avertissements pour l’installation et l’utilisation ES - Instrucciones y advertencias para la instalación y el uso
DE - Installierungs-und Gebrauchsanleitungen und Hinweise
PL - Instrukcje i ostrzeżenia do instalacji i użytkowania
NL - Aanwijzingen en aanbevelingen voor installatie en gebruik
RU - Инструкции и предупреждения по монтажу и эксплуатации

EN
ENGLISH
GENERAL WARNINGS: SAFETY - INSTALLATION - USE (instructions translated from Italian)
 The following warnings are taken directly from the Regulations and apply, as far as possible, to the product described herein
WARNING |
Important safety instructions. Observe all the instructions as improper installation may cause serious damage |
WARNING |
Important safety instructions. It is important to comply with these instructions to ensure personal safety. Store these |
|
instructions |
•Before commencing the installation, check the “Product technical specifications”, in particular whether this product is suitable for automating your guided part. Should it be unsuitable, DO NOT proceed with the installation
•The product cannot be used unless it has been commissioned as specified in the “Testing and commissioning” chapter
WARNING According to the most recent European legislation, the implementation of an automation system must comply with the harmonised standards set forth in the Machinery Directive in force, which allow for declaring the presumed conformity of the automation. On account of this, all operations regarding connection to the mains electricity, as well as product testing, commissioning and maintenance, must be performed exclusively by a qualified and skilled technician!
•Before proceeding with the product’s installation, check that all materials are in good working order and are suitable for the intended applications
•The product is not intended for use by persons (including children) with reduced physical, sensory or mental capacities, nor by anyone lacking sufficient experience or familiarity with the product
•Children must not play with the appliance
•Do not allow children to play with the control devices of the product. Keep the remote controls out of reach of children
WARNING In order to avoid any danger from inadvertent resetting of the thermal cut-off device, this appliance must not be powered through an external switching device, such as a timer, or connected to a supply that is regularly powered or switched off by the circuit
1 – English

• Provide a disconnection device (not supplied) in the plant’s mains power supply, with a contact opening distance that ensures complete |
EN |
|
disconnection under the conditions envisaged by Overvoltage Category III |
||
|
||
• Handle the product with care during installation, taking care to avoid crushing, knocks, falls or contact with liquids of any kind. Keep the |
|
|
product away from sources of heat and open flames. Failure to observe the above can damage the product and increase the risk of danger |
|
|
or malfunctions. If this should happen, stop installation immediately and contact the Customer Service |
|
|
• The manufacturer assumes no liability for damage to property, items or persons resulting from non-compliance with the assembly instructions. |
|
|
In such cases the warranty does not cover material defects |
|
|
• Cleaning and maintenance to be carried out by the user must not be effected by unsupervised children |
|
|
• Before intervening on the system (maintenance, cleaning), always disconnect the product from the mains power supply |
|
|
• The packaging materials of the product must be disposed of in compliance with local regulations |
|
|
• When performing a manoeuvre, keep an eye on the automated mechanism and keep all bystanders at a safe distance until the movement |
|
|
has been completed |
|
|
• Do not operate the automation if any people in the vicinity are working on it; disconnect the power supply before permitting any work to be |
|
|
carried out |
|
1 PRODUCT DESCRIPTION AND INTENDED USE
MC200 is an electronic control unit that allows for controlling and commanding a motor designed to automate a shutter, overhead door, sectional door, rolling shutter or other similar applications.
 WARNING! - Any use other than that specified herein or in environmental conditions other than those stated in this manual is to be considered improper and is forbidden!
Functional characteristics:
•it connects to the mains power supply (see data in the chapter, “Product technical specifications”);
•it can be programmed by setting 8 dip-switches;
•it is equipped with an incorporated radio receiver that allows for controlling the automation through a radio transmitter;
•various accessories can be connected to the control unit, such as: a pair of photocells, a warning light (powered at the mains voltage) for luminous warnings, a wall-mounted button to control the automation with “step-by-step”-type commands, an external radio antenna, a sensitive edge, etc.
•it is equipped with a type “IBT4N” connector, compatible with the IBT4N interface, which allows for connecting all devices equipped with BusT4 interface, such as, for example, Oview programming units.
English – 2

EN
2 USE LIMITATIONS
•The MC200 control unit can be used exclusively with an asynchronous single-phase motor. The motor must be: a) powered from the mains and sized for the same voltage that powers the control unit; b) equipped with a thermal cut-off; c) equipped with a mechanical device that limits its movement (limit switch); d) equipped with connections to 3 conductors: “Common”, “Open” and “Close”.
•The radio receiver incorporated in the control unit is only compatible with transmitters that adopt the FLOR, O-CODE or SMILO radio coding
protocols (these are Nice standards).
• Further use limitations are specified in the “Product technical specifications” chapter.
3 INSTALLATION
 Important! - Prior to installing the product, check its use limitations by reading Chapters 2 and 7.
 Check that the temperature is suitable for the type of application.
 The product must not be installed outdoors.
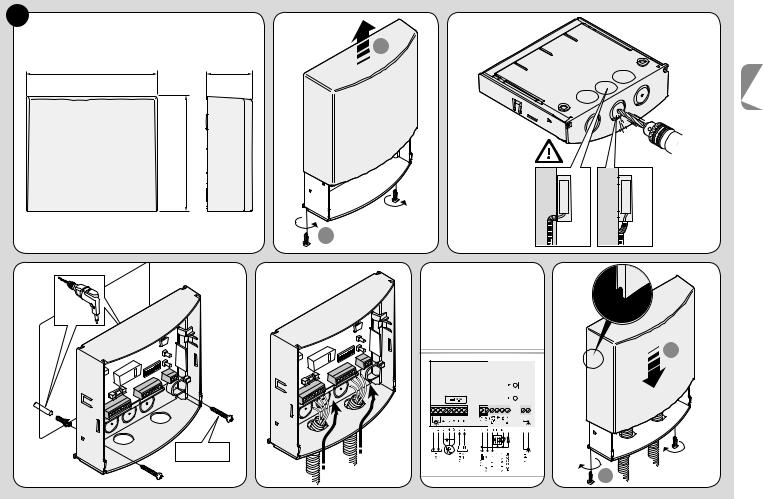
 When drilling the control unit box for passing the cables (Fig. 1-C), it is important to remember that the cables must always enter the box from below. Moreover, take suitable precautions to guarantee the required protection rating (IP 44) for the type of installation.
 Before proceeding with the installation, prepare the electrical cables required for the system by referring to Fig. 2b and to “Table
1 - Technical specifications of electrical cables”.
 Warning! – When laying the tubes for protecting the electrical cables and when laying the cables into the control unit housing, bear in mind that due to possible water deposits in the junction wells, the cable protection tubes might create water vapour the control unit, with consequent damage to the electronic circuits.
Install the control unit by referring to Fig. 1.
3 – English

1 A |
B |
C |
|
|
2 |
128 mm |
45 mm |
|
|
112 mm |
If necessary, |
Drill the |
|
|
||
|
|
use the cable |
underside |
|
|
entry openings |
of the |
|
|
at the rear of the |
control |
|
|
box, but only |
unit box. |
|
|
with suitable |
|
|
1 |
tube fittings. |
|
D |
E |
F |
G |
Electrical connections.
Refer to Chapter 4
1
x 2
Ø 3,5 x 35
2
English – 4
EN

EN
4 ELECTRICAL CONNECTIONS
 WARNING! – All electrical connections must be made with the system disconnected from the power supply. Incorrect connections can damage the equipment or injure people.
 WARNING! – The connections must only be carried out by qualified personnel.
4.1 - Arranging the electrical cables to connect devices to the control unit (Table A)
Table A - Characteristics of electrical cables for the relevant connections
Device to be connected |
Cable cross-section |
|
Maximum cable length |
|
|
|
|
POWER SUPPLY FOR THE CONTROL |
1 cable: 2 x 1.5 mm2 |
|
30 m (*1) |
UNIT |
|
||
|
|
|
|
|
|
|
|
WARNING LIGHT WITH RADIO AN- |
1 cable: 2 x 1.5 mm2 (for the lamp) |
20 m |
|
TENNA |
1 RG58-type shielded cable (for aerial) |
20 m (recommended < 5 m) |
|
|
|
|
|
DEVICES CONNECTED TO TERMINALS |
6 cables: 1 x 0.5 mm2 |
(*2) |
50 m |
8-9-10-11-12-13 |
|
|
|
POWER SUPPLY FOR MOTOR |
3 cables: 1 x 1.5 mm2 |
|
10 m |
(*1) – If the power cable is longer than 30 m a cable with larger cross-sectional dimensions is required, for example, 2 x 2.5 mm2. (*2) – These 6 cables can be replaced by a single 6 x 0.5 mm2 cable.
WARNING! – The cables used must be suited to the type of environment of the installation site.
4.2 - List of control unit parts
During the successive control unit connection and programming phases, to identify the components mentioned in the text refer to Fig. 2 and its key.
A- Line fuse (6.3 A)
B- Connector for inserting the IBT4N interface
C- “OK” LED
D- “Radio” LED
E- T2 button, for memorising a transmitter and for cancelling a transmitter or the entire control unit memory
F- T1 button, for programming and for sending step-by-step commands
G- Dip-switch for programming the functions
5 – English
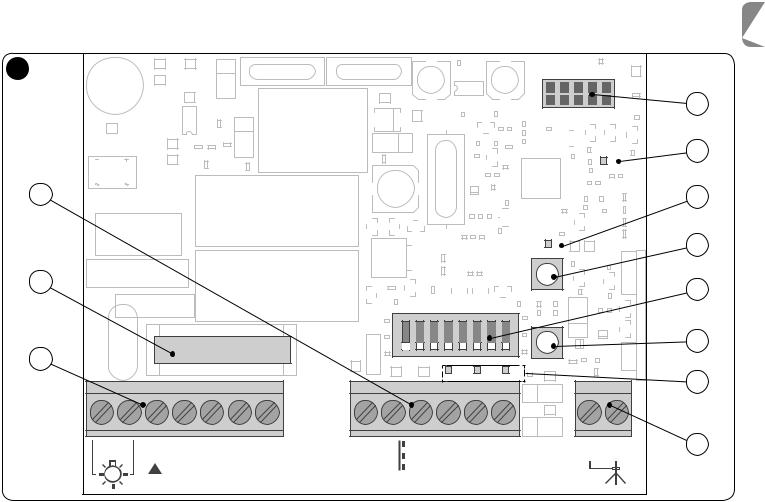
H- LED for inputs (“Stop”, “SbS”, “Photo”)
I- Terminals for radio antenna
2
L
A
M
C  L N
L N
L - Low-voltage input terminals
M - Terminals for connecting the power supply line and for the motor
B
C
D
E
|
|
|
|
|
|
|
G |
1 |
2 |
3 |
4 |
5 |
6 |
7 |
8 |
|
|
|
|
|
|
|
F |
|
|
H |
0V |
Test |
I |
|
||
Com 24V |
Photo Stop SbS Photo |
|
EN
English – 6

EN
3
4
8 |
8,2kΩ |
|
Sensitive edge |
||
11 |
||
|
||
“S” |
8,2kΩ |
4.3 - Basic connections
•Connecting the motor to the MC200 control unit
Connect the 3 conductors coming from the motor (Up phase, Common, Down phase) respectively to terminals 3, 4 and 5 of the control unit, as shown in Fig. 3.
WARNING! Before connecting the motor, it is imperative to verify that the conductor connected to terminal 3 causes the door to OPEN, that the conductor connected to terminal 5 causes the door to CLOSE, and that the conductor connected to terminal 4 is the COMMON conductor.
Warning! – Do not connect multiple motors in parallel to the same control unit, unless expressly envisaged in the motor’s instruction manual; in this case, use the appropriate expansion boards.
•Connecting the power supply to the MC200 control unit
Connect the 2 wires coming from the mains (Live and Neutral) respectively to terminals 6 and 7 of the control unit, as shown in Fig. 3.
•Earthing the motor
Warning! - To comply with the electrical safety requirements of the relevant product class (Class II), it is mandatory to earth the motor outside of the MC200 control unit.
7 – English

4.4 - Connection of accessories
To connect the relevant accessories refer to Table B, to Fig. 3 and to the instruction manual of each accessory. Table B summarises all the accessories that can be connected to the control unit terminals and the specifications for making the electrical connections. Before proceeding, carefully read the table and its notes. Note – Due to the fact that certain inputs offer different functions for connecting the accessories, once the connections have been made it will be necessary to set the dip-switches according to the accessories connected (see Chapter 5 - Programming).
Table B - Function of the terminals (inputs and outputs)
Terminals |
Description of the function |
|
|
1 - 2 |
Output for flashing warning light at the mains voltage. |
|
|
3 - 4 - 5 |
Output for controlling the motor (open, common, close). |
|
|
6 - 7 |
Input of the power supply line coming from the mains (live, neutral). |
8Reference to 0 V for the “Common” conductor of the devices connected to terminals 9, 10, 11, 12 and 13.
924 V output. Output for devices (for example, photocells) with 24 V

 power supply (low-voltage): maximum current draw: 100 mA.
10Photo test output. 24 V

 output for a transmission photocell (TX) or for a “door open indicator light” function. Maximum current draw: 50 mA.
11Stop input. Input for safety devices with 8.2 kΩ fixed resistor (sensitive edge, etc.).
12SbS input. Input for a normally open (NO) button, for sending commands in step-by-step mode.
13Photo input. Input for a normally closed (NC) reception photocell (RX), or for a normally open (NO) button.
14 - 15 Input for an antenna-radio receiver.
EN
4.5 - How to manage the “Photo test” output and the “Stop”, “SbS” and “Photo” inputs
4.5.1 - Photo test output (terminal 10)
This output must be configured through programming dip-switch 7 depending on the type of device connected: if a transmission photocell (TX) is connected, the dip-switch must be set to ON; if instead a “door open indicator light” is connected, the dip-switch must be set to OFF. NOTES • If a “door open indicator light” is connected to this output, the TX photocell must be connected to terminal 9. • The “door open indicator light” signals have the following meanings:
light off = door closed; light on = door open; slow flashing = door in opening phase; fast flashing = door in closing phase.
4.5.2 - Stop input (terminal 11)
This input must be configured through programming dip-switches 1 - 2 depending on the type of device connected: normally closed (NC) contacts, normally open (NO) contacts or fixed resistance (8.2 kΩ) contacts. Warning! - Only the use of a fixed resistance contact together with the OFF+OFF setting of dip-switches 1 - 2 guarantees the minimum level of resistance against faults, requested by the regulations. Normally the
English – 8

EN
intervention of the device connected to the Stop input causes the immediate stoppage of the motor’s movement, with a brief inversion of the manoeuvre (selectable through dip-switch 3). To deactivate this inversion following the intervention of the safety device (for example, when the sensitive edge touches the floor), it is possible to use an “S” contact (with 8.2 kΩ fixed resistor connected in series) to be connected in parallel to the sensitive edge (see Fig. 4). The “S” contact must be placed so that it closes in the last 30/40 mm of the closing manoeuvre, before the sensitive edge intervenes. In this way, when the “S” contact closes and the sensitive edge intervenes (for example, on the floor), the automation stops without inverting the manoeuvre and the door remains fully closed. In this condition, the system allows for commanding the opening manoeuvre only.
The status of the Stop input is signalled by the “Stop” LED with the meanings specified in Table C.
Table C - Status of the “STOP” input signalled by the relative LED
“Stop” LED signal |
Meaning (status of the Stop input) |
|
|
On |
Active (consent for manoeuvre) |
|
|
Off |
Not active (manoeuvre stopped) |
|
|
50% on + 50% off |
Inversion deactivated |
|
|
20% on + 80% off |
Not active, with inversion deactivated (allowed only after the opening manoeuvre) |
|
|
4.5.3 - SbS input (terminal 12)
Whenever the button connected to this input is pressed, the system runs the command following the last command sent, according to a default sequence which can be programmed through dip-switch 5 (for example, > open > stop > close > stop > again...). If the control button is kept pressed (from 4 to 10 seconds), the system always commands an opening manoeuvre; if instead the button is held for more than 10 seconds, the system always commands a closing manoeuvre. This particular function can be useful whenever there are multiple control units, when the user wishes to control them simultaneously and have the doors perform the same manoeuvre, regardless of the current status of each control unit.
4.5.4 - Photo input (terminal 13)
This input must be configured through programming dip-switch 4 depending on the type of device connected: if a normally closed (NC) reception photocell (RX) is connected, the dip-switch must be set to OFF; if instead a normally open (NO) button is connected, the dip-switch must be set to ON. Note – If a normally closed (NC) reception photocell (RX) has been connected, if there is no consent only the opening manoeuvre can be carried out.
9 – English
5PROGRAMMING
IMPORTANT! - After making all the connections, power the control unit and set the eight dip-switches on the board, on the basis of the type of devices connected and the functions to be activated or deactivated. Refer to Table D for programming the unit.
Table D - Setting the dip-switches
Dip-switch |
|
Setting |
Description of the set function |
|
|
|
|
|
|
|
(1) OFF; (2) OFF |
Enables the Stop input for the connection of a 8.2 kΩ fixed resistor, without button “S” that excludes the inversion |
||
|
(see Fig. 4) |
|||
|
|
|
||
|
|
|
|
|
Switches |
(1) |
OFF; (2) ON |
Enables the Stop input for the connection of a 8.2 kΩ fixed resistor, with button “S” that intervenes at 30/40 mm from |
|
1 - 2 |
the limit switch to exclude inversion (see Fig. 4) |
|||
|
|
|||
|
(1) ON; (2) OFF |
Enables the Stop input for the connection of a NO (normally open) contact |
||
|
|
|
||
|
(1) ON; (2) ON |
Enables the Stop input for the connection of a NC (normally closed) contact |
||
|
|
|
|
|
Switch 3 |
|
OFF |
Enables the Stop input to stop the current manoeuvre and perform a brief inversion of the movement |
|
|
|
|
||
|
ON |
Enables the Stop input to stop the current manoeuvre |
||
|
|
|||
|
|
|
|
|
Switch 4 |
|
OFF |
Enables the Photo input for the connection of photocells |
|
|
|
|
||
|
ON |
Enables the Photo input for being used as a closing command |
||
|
|
|||
|
|
|
|
|
Switch 5 |
|
OFF |
Enables the following cyclical commands, of the step-by-step type: > Open > Stop > Close > Stop > (again...) |
|
|
|
|
||
|
ON |
Enables the following cyclical commands, of the step-by-step type: > Open > Stop > (again...) |
||
|
|
|||
|
|
|
|
|
Switch 6 |
|
OFF |
Disables the condominium function |
|
|
|
|
||
|
ON |
Enables the condominium function |
||
|
|
|||
|
|
|
|
|
Switch 7 |
|
OFF |
Enables the “Door open indicator light” function |
|
|
|
|
||
|
ON |
Enables the Photo Test function |
||
|
|
|||
|
|
|
|
|
Switch 8 |
|
OFF |
Disables the “Pause Time” for the automatic re-closing of the door, following an opening command |
|
|
|
|
||
|
ON |
Enables the “Pause Time” for the automatic re-closing of the door, following an opening command |
||
|
|
|||
|
|
|
|
|
EN
English – 10

EN
5.1 - Insights on certain programmable functions and options
5.1.1 - Dip-switches 1 and 2 (for the Stop input)
These dip-switches are used to programme the Stop input on the basis of the type of safety device connected:
-Contact with 8.2 kΩ fixed resistance, with inversion.
-Contact with 8.2 kΩ fixed resistance, without inversion.
-NO (normally open) contact.
-NC (normally closed) contact.
5.1.2 - Dip-switch 5 (for the SbS input)
If the SbS input is programmed with the step-by-step sequence of commands: > Open > Stop > (again...), therefore, with dip-switch 5 set to
ON, during use of the automation it will not be possible to command the closing of the door. This command can only be given by programming the automatic re-closing (dip-switch 8 set to ON), or through a radio transmitter.
5.1.3 - Dip-switch 6
•During an opening manoeuvre: if the condominium function is enabled (dip-switch 6 set to ON), it prevents the stoppage of the manoeuvre after an opening or step-by-step command is sent, or its inversion prior to terminating at the limit switch.
•During a closing manoeuvre: if the condominium function is enabled (dip-switch 6 set to ON), the sending of an opening or step-by-step command stops the manoeuvre and inverts its movement, making the door open.
5.2 - Memorisation of the dip-switch settings
After setting all the dip-switches (or later on, whenever the user wishes to modify the setting of one or more dip-switches), it is necessary to memorise the settings in the control unit, in the following way: when the “OK” LED starts flashing (green/red) it means that one or more dipswitches has been shifted. Therefore, to memorise the new setting press and hold button T1 on the control unit, until the “OK” LED remains steady lit green. Subsequently, release the button.
5.3 - Programming the “Work Time” of the motor and the “Pause Time” for automatic re-closing
The “Work Time” and the “Pause Time” are two basic parameters of the control unit and are programmed one after the other, with the same procedure. These parameters can only be programmed once all the dip-switches have been set and memorised.
• What is the “Work Time”? It is the maximum duration for which the control unit keeps the motor powered from the time a command is sent.
This duration must be long enough for the motor to complete the manoeuvre (up to the limit switch). The default setting (or after the memory is fully deleted) is 120 seconds. However this value can be modified by programming a duration of 5 seconds (minimum) up to 120 seconds (maximum). The procedure entails measuring the time – in self-recognition mode – required for the motor to complete a manoeuvre. For this reason it is necessary to measure the most strenuous manoeuvre for the gate (i.e. the slowest one), which normally corresponds to the start of
11 – English

a movement from a limit switch. Warning! - It is advisable to programme a slightly longer duration (by a few seconds) with respect to the time necessary to complete the manoeuvre.
• What is the “Pause Time”? It is the time for which the control unit waits to re-close the door automatically, once the user has sent an opening command (function: automating re-closing). The programmable Pause Time lasts from 5 seconds (minimum) to 120 seconds (maximum). The Pause Time can also be eliminated entirely: this serves to disable automatic re-closing.
To memorise the “Work Time” and the “Pause Time”
01.Bring the door to the low limit switch.
02.Press and hold button T1 on the control unit: as soon as the motor starts moving towards the high limit switch, start counting 5 seconds. At the end of the 5 seconds the control unit will start memorising the duration of the manoeuvre;
03.Continue holding button T1; wait for the manoeuvre to end at the high limit switch; wait a few seconds more and then release the button. The motor will stop and the control unit will memorise the new Work Time that has just been counted.
04.Within 2 seconds from the motor’s stoppage, press and hold button T1 on the control unit: from this moment the Pause Time will start being measured.
05.Release button T1 after the desired time has elapsed (maximum 120 seconds); the control unit will command the motor to perform a downward manoeuvre while it memorises the time that has just been measured. This time will subsequently be used for the automatic re-closing of the door.
IMPORTANT - The programmed Pause Time will only be executed if dip-switch 8 is set to ON.
To modify the “Work Time” and the “Pause Time”
01.To modify the “Work Time” alone, repeat the procedure from the beginning and stop at Step 4.
To disable the “Pause Time”
01.To disable automatic re-closing and, therefore, eliminate the Pause Time, repeat the procedure from the beginning and stop at Step 4.
Alternatively, the automatic re-closing can be disabled by putting dip-switch 8 to OFF.
EN
English – 12

EN
5.4 - Memorising the transmitters
The radio receiver incorporated in the control unit is compatible with all transmitters that adopt the FLOR, O-CODE or SMILO radio coding protocols (these are Nice standards).
5.4.1 - Two procedures to memorise the transmitter button
Among the available procedures for memorising transmitters, some allow for memorising in “standard” mode (or Mode 1) and others in “custom” mode (or Mode 2).
•STANDARD memorisation (also referred to as “Mode 1”)
Procedures of this type allow for simultaneously memorising – during their execution – all the buttons present on the transmitter. The system automatically associates each button with a command pre-defined by default, according to the following table:
Command |
Button |
|
|
|
|
1 |
- Up |
will be associated with 1st button / button 1 / σ button |
2 |
- Stop |
will be associated with 2nd button / button 2 / ν button |
3 |
- Down |
will be associated with 3rd button / button 3 / τ button |
4 |
- Step-by-Step |
will be associated with 4th button / button 4 (if present on the transmitter). |
Note - The transmitter buttons are normally identified by symbols and numbers. If these are not present on the transmitter, to identify the 1st button, 2nd button, etc., refer to Fig. 5.
•CUSTOM memorisation (also referred to as “Mode 2”)
Procedures of this type allow for memorising, during their execution, a single button among those present on the transmitter, by combining it with one of the following available commands: Up, Stop, Down, Step-by-Step.
The choice of the button and of the command to be paired with it is made by the installer, on the basis of the automation’s needs.
5.4.2- Number of transmitters that can be memorised
The control unit’s receiver has 192 memory locations. A location can memorise either a single transmitter (i.e. the combination of its buttons and commands) or a single button with the relative command.
13 – English

––––––––––––– PROCEDURES –––––––––––––
WARNING! - To be able to run Procedures A, B, C, D, F, the control unit’s memory must be unlocked. If it is locked, run Procedure G to unlock it.
PROCEDURE A - Memorising ALL buttons of a single transmitter (STANDARD mode or Mode 1)
01.On the control unit: press and hold button T2 until the “radio” LED lights up; then release the button.
02.(within 10 seconds) On the transmitter to be memorised: press and hold any button and wait for the “radio” LED to emit 3(*) long flashes (= memorisation completed correctly). Lastly, release the button.
03.Note - After the 3 long flashes a further 10 seconds remain to memorise an additional transmitter (if desired), starting from Step 02. At the end of the procedure, the transmitter buttons will be paired with the commands specified in the Mode 1 description (Paragraph 5.4.1).
PROCEDURE B - Memorising a SINGLE BUTTON of a transmitter (CUSTOM mode or Mode 2)
01.From the table below choose the command to be paired with the relevant button to be memorised.
Choose the command |
To memorise the command... (Step 02) |
|
|
|
|
1 |
- Up |
...press button T2 once. |
|
|
|
2 |
- Stop |
...press button T2 twice. |
|
|
|
3 |
- Down |
...press button T2 3 times. |
|
|
|
4 |
- Step-by-Step |
...press button T2 4 times. |
|
|
|
02.On the control unit: press and release several times button T2, as indicated near the command chosen in the above table.
03.(within 10 seconds) On the transmitter: press and hold the desired button and wait for the “radio” LED to emit 3(*) long flashes (= memorisation completed correctly). Lastly, release the button.
04.Note - After the 3 long flashes a further 10 seconds remain to memorise an additional button (if desired), starting from Step 01.
(*)- Notes to Procedures A and B:
The “radio” LED can also emit the following signals:
–1 fast flash, if the transmitter is already memorised.
–6 flashes, if the transmitter’s radio coding is not compatible with that of the control unit’s receiver.
–8 flashes, if the memory is full.
EN
English – 14

EN
PROCEDURE C - Memorising a transmitter by means of another transmitter already memorised (memorisation far from the control unit)
This procedure allows for memorising a new transmitter by means of a second transmitter already memorised in the same control unit. This enables the new transmitter to receive the same settings as the transmitter already memorised. The procedure does not entail any direct action on button T2 of the control unit, but its mere execution within its reception range.
01.On the transmitter to be memorised: press and hold the button to be memorised.
02.On the control unit: after a few seconds (roughly 5) the “radio” LED lights up. Release the transmitter key.
03.On the transmitter already memorised: press and release 3 times the memorised button to be copied.
04.On the transmitter to be memorised: press and release once the same button pressed at Step 01.
PROCEDURE D - Deleting a single transmitter (if memorised in Mode 1) or a single transmitter key (if memorised in Mode 2)
01.On the control unit: press and hold button T2.
– After roughly 4 seconds the “radio” LED lights up steady (continue holding the button down).
02.On the transmitter to be deleted from the memory: press and hold a button(*) until the “radio” LED (on the control unit) emits 5 fast flashes (or 1 flash if the transmitter or button is not memorised).
(*)Note - If the transmitter is memorised in Mode 1, any button can be pressed and the control unit deletes the entire transmitter. If the transmitter is memorised in Mode 2, it is necessary to press the memorised button that must be deleted. To delete additional buttons memorised in Mode 2, repeat the entire procedure for each button that must be deleted.
PROCEDURE E - Deleting ALL memorised transmitters
01.On the control unit: press and hold the “radio” button.
–After roughly 4 seconds the “radio” LED lights up steady (continue holding the button down).
–After roughly 4 seconds the “radio” LED turns off (continue holding the button down).
02.When the “radio” LED starts flashing, count 2 flashes and prepare to release the button precisely during the 3rd flash that follows.
03.After the deletion, the “radio” LED flashes fast.
04.Lastly, the “radio” LED emits 5 long flashes to signal that the deletion has been successful.
15 – English

PROCEDURE F - Deleting ALL the memory and restoring the default settings |
EN |
||
|
|
||
01. |
On the control unit: press and hold the “radio” button. |
||
|
|||
|
– After roughly 4 seconds the “radio” LED lights up steady (continue holding the button down). |
|
|
|
– After roughly 4 seconds the “radio” LED turns off (continue holding the button down). |
|
|
|
|
|
|
02. |
When the “radio” LED starts flashing, count 4 flashes and prepare to release the button precisely during the 5th flash that follows. |
|
|
03. |
After the deletion, the “radio” LED flashes fast. |
|
|
04.Lastly, the “radio” LED emits 5 long flashes to signal that the deletion has been successful.
PROCEDURE G - Locking (or releasing) the memory
WARNING! - This procedure locks the memory by preventing the execution of Procedures A, B, C, D, F.
01.Disconnect the control unit from the power supply.
02.On the control unit: press and hold the “radio” button then power the control unit (continue holding the button down).
03.After 5 seconds the “radio” LED emits 2 slow flashes; release the button.
04.(within 5 seconds) On the control unit: repeatedly press the “radio” button to choose one of the following options:
•LED off = Deactivation of the memory lock.
•LED on = Activation of the memory lock.
05.Five seconds after last pressing the button, the “radio” LED emits 2 slow flashes to signal the end of the procedure.
English – 16

EN
6 TESTING AND COMMISSIONING
These are the most important phases in the automation’s arrangement to ensure maximum system safety.
They must be carried out by a qualified and expert technician who must define the necessary tests to verify the solutions adopted to counter any risks present, and check compliance with laws, regulations, standards: in particular, all the requirements of the EN 13241, EN 12445 and EN 12453 standards.
Any supplementary devices must undergo specific testing to verify their operation and correct interaction with the MC200 control unit. Refer to the respective user manuals.
6.1 - Testing
The testing procedure can also be performed as a periodic check of the automation devices. Each component of the system (sensitive edges, photocells, warning lights, etc.) requires a specific testing phase; for these devices, observe the testing procedures described in the respective instruction manuals. Run the test as follows:
01.Ensure that all specifications in the “WARNINGS” chapter have been strictly observed
02.Using the control button or the transmitter, command the door Closing and Opening manoeuvres. During these movements, make sure that a) the photocells (if present) intervene during the Closing manoeuvre; b) the sensitive edge (if present) intervenes with the set mode; c) that the automatic re-closing of the door (if programmed) occurs in the closing direction. If the results of the tests do not conform to the requirements, make sure that the electrical connections have been made correctly. In particular, refer to the warnings stated in Paragraph 4.3.
03.Perform several tests to verify that the door moves smoothly, identifying any assembly or adjustment defects and points of excessive friction.
04.Verify the correct operation of each safety device present in the system (photocells, sensitive edges, etc.).
05.Check the operation of the photocells (if present) and any interference with other devices:
1 - insert a cylinder (with diameter 5 cm and length 30 cm) between a pair of photocells, first next to the TX photocell then next to the
RX photocell, to interrupt the line of sight between them;
2 - verify that this causes the intended action in the control unit: for example, the inversion of movement during the closing manoeuvre.
17 – English

6.2 - Commissioning
Commissioning can only take place once all the testing phases have terminated successfully (Paragraph 6.1).
Partial or “makeshift” commissioning is forbidden.
01.Prepare and store (for at least 10 years) the automation’s technical file, which must include at least: an assembly drawing of the automation; the wiring diagram; the analysis of risks and solutions adopted; the manufacturer’s declaration of conformity for all the devices installed (for the MC200 control unit use the annexed EU Declaration of Conformity); a copy of the automation’s instruction manual and maintenance schedule.
02.Prepare the declaration of conformity of the automation and hand it to the owner of the automation.
03.Hand over to the owner the “User Manual” (pull-out insert contained in the automation’s manual).
04.Draw up the maintenance schedule and hand it to the owner of the automation.
05.Before commissioning the automation, adequately inform the owner in writing regarding the attendant residual risks.
EN
7 PRODUCT DISPOSAL
This product constitutes an integral part of the automation and, therefore, must be disposed of together with it.
Similarly to the installation phase, once the product reaches the end of its useful life, the disassembly and scrapping operations must be performed by qualified personnel.
This product is made of various types of materials, some of which can be recycled while others must be scrapped. Seek information on the recycling and disposal systems envisaged by local regulations in your area for this product category.
 WARNING! - Some parts of the product may contain polluting or hazardous substances which, if released into the environment, constitute serious environmental and health risks.
As indicated by the adjacent symbol, the product may not be disposed of together with domestic waste. Sort the materials for disposal, according to the methods envisaged by current legislation in your area, or return the product to the retailer when purchasing an equivalent product.
 WARNING! - Local regulations may envisage the application of heavy fines in the event of improper disposal of this product.
English – 18

EN
8 TECHNICAL SPECIFICATIONS
 All technical specifications stated herein refer to an ambient temperature of 20°C (± 5° C). • Nice S.p.A. reserves the right to modify its products at any time when deemed necessary, while nonetheless maintaining their intended use and functionality.
MC200 ELECTRONIC CONTROL UNIT
Power supply: |
from: 120 V 50/60 Hz to: 230 V 50/60 Hz |
||||
|
|
|
|
|
|
Maximum power of motor: |
450 W (if powered at 120 V); 950 W (if powered at 230 V) |
||||
|
|
|
|
|
|
Control signal voltage: |
roughly 24 V |
|
|
|
|
|
|||||
|
|
|
|
|
|
Devices (terminals 8-9): |
voltage at roughly 24 V |
|
; max current 100 mA |
||
|
|||||
|
|
|
|
|
|
Safety input: |
in configuration with fixed resistor, must be 8.2 kΩ |
||||
|
|
|
|
|
|
Operating temperature: |
-20°C ... +55°C |
||||
|
|
|
|
|
|
Dimensions (mm): |
127 x 111 x 45 |
||||
|
|
|
|
|
|
Weight (g): |
300 |
|
|
|
|
|
|
|
|
|
|
IP rating: |
44 |
|
|
|
|
|
|
|
|
|
|
|
|
|
|
|
|
RADIO RECEIVER (incorporated in the control unit)
Frequency: |
433.92 MHz |
|
|
Radio coding: |
FLOR, O-CODE, SMILO |
19 – English
EU Declaration of Conformity
(No. 629/MC200) and declaration of incorporation of “partly-completed machinery”
Note: The contents of this declaration correspond to that stated in the official document filed in the offices of Nice S.p.A. and, in particular, to the latest version thereof available prior to the printing of this manual. The text herein has been re-edited for editorial purposes. A copy of the original declaration can be requested from Nice S.p.A. (TV) Italy.
Revision: 0; Language: EN
•Manufacturer’s name: Nice S.p.A.
•Address: Via Pezza Alta 13, 31046 Rustignè di Oderzo (TV) Italy
•Person authorised to compile the technical documentation: Nice S.p.A. - Via Pezza Alta 13, 31046 Rustignè di Oderzo (TV) Italy
•Product type: Control unit for 1 motor 230 V
•Model/Type: MC200
•Accessories: Series FLOR, O-CODE, SMILO radio remote controls
The undersigned, Roberto Griffa, as Chief Executive Officer, hereby declares under his own responsibility that the product identified above complies with the provisions of the following directives:
• Directive 2014/53/EU (RED)
–Health and safety (Art. 3(1)(a)): EN 62479:2010
–Electrical safety (Art. 3(1)(a)): EN 60950-1:2006 + A11:2009 + A12:2011 + A1:2010 + A2:2013
–Electromagnetic compatibility (Art. 3(1)(b)): EN 301 489-1 V2.2.0:2017; EN 301 489-3 V2.1.1:2017
–Radio spectrum (Art. 3(2)): EN 300 220-2 V3.1.1:2017
In addition, the product conforms to the following directive in accordance with the provisions applicable to “partly-completed machinery” (Annex II, Part 1, Section B):
•Directive 2006/42/EC OF THE EUROPEAN PARLIAMENT AND OF THE COUNCIL OF 17 May 2006 relative to machinery and amending Directive 95/16/EC (recast).
–It is hereby declared that the relevant technical documentation has been compiled in accordance with Annex VII, Part B, of Directive 2006/42/
EC and that the following essential requirements have been applied and fulfilled: 1.1.1 - 1.1.2 - 1.1.3 - 1.2.1 - 1.2.6 - 1.5.1 - 1.5.2 - 1.5.5 - 1.5.6 - 1.5.7 - 1.5.8 - 1.5.10 - 1.5.11
–The manufacturer undertakes to transmit, in response to a reasoned request by the national authorities, relevant information on the “partlycompleted machinery”. This shall be without prejudice to the intellectual property rights of the manufacturer of the “partly-completed machinery”.
–If the “partly-completed machinery” is commissioned in a European country with an official language other than the language used in this declaration, the importer must include a translation to accompany this declaration.
–The “partly-completed machinery” must not be commissioned until the final machine in which it is to be incorporated is declared to conform to the provisions of Directive 2006/42/EC, if applicable.
The product also complies with the following standards:
EN 61000-6-2:2005; EN 61000-6-3:2007 + A1:2011; EN 60335- 1:2012 + A11:2014; EN 62233:2008
Place and Date: Oderzo, 05/09/2017
Mr. Roberto Griffa
(Chief Executive Officer)
EN
English – 20

ITALIANO
IT
AVVERTENZE GENERALI: SICUREZZA - INSTALLAZIONE - USO (istruzioni originali)
 Le seguenti avvertenze sono trascritte direttamente dalle Norme e per quanto possibile applicabili al prodotto in oggetto
ATTENZIONE |
Istruzioni importanti per la sicurezza. Seguire tutte le istruzioni poiché l’installazione non corretta può causare |
|
gravi danni |
ATTENZIONE |
Istruzioni importanti per la sicurezza. Per la sicurezza delle persone è importante seguire queste istruzioni. |
|
Conservare queste istruzioni |
•Prima di iniziare l’installazione verificare le “Caratteristiche tecniche del prodotto”, in particolare se il presente prodotto è adatto ad automatizzare la vostra parte guidata. Se non è adatto, NON procedere all’installazione
•Il prodotto non può essere utilizzato prima di aver effettuato la messa in servizio come specificato nel capitolo “Collaudo e messa in servizio”
ATTENZIONE |
Secondo la più recente legislazione europea, la realizzazione di un’automazione deve rispettare le norme armonizzate |
|
previste dalla Direttiva Macchine in vigore, che consentono di dichiarare la presunta conformità dell’automazione. |
|
In considerazione di ciò, tutte le operazioni di allacciamento alla rete elettrica, di collaudo, di messa in servizio e di |
|
manutenzione del prodotto devono essere effettuate esclusivamente da un tecnico qualificato e competente! |
•Prima di procedere con l’installazione del prodotto, verificare che tutto il materiale da utilizzare sia in ottimo stato ed adeguato all’uso
•Il prodotto non è destinato a essere usato da persone (bambini compresi) le cui capacità fisiche, sensoriali o mentali siano ridotte, oppure con mancanza di esperienza o di conoscenza
•I bambini non devono giocare con l’apparecchio
•Non permettere ai bambini di giocare con i dispositivi di comando del prodotto. Tenere i telecomandi lontano dai bambini
ATTENZIONE Al fine di evitare ogni pericolo dovuto al riarmo accidentale del dispositivo termico di interruzione, questo apparecchio non deve essere alimentato con un dispositivo di manovra esterno, quale un temporizzatore, oppure essere connesso a un circuito che viene regolarmente alimentato o disalimentato dal servizio
1 – Italiano

• Nella rete di alimentazione dell’impianto prevedere un dispositivo di disconnessione (non in dotazione) con una distanza di apertura dei
|
contatti che consenta la disconnessione completa nelle condizioni dettate dalla categoria di sovratensione III |
|
• Durante l’installazione maneggiare con cura il prodotto evitando schiacciamenti, urti, cadute o contatto con liquidi di qualsiasi natura. |
|
|
|
Non mettere il prodotto vicino a fonti di calor e, né esporlo a fiamme libere. Tutte queste azioni possono danneggiarlo ed essere causa di |
|
|
malfunzionamenti o situazioni di pericolo. Se questo accade, sospendere immediatamente l’installazione e rivolgersi al Servizio Assistenza |
|
• |
Il produttore non si assume alcuna responsabilità per danni patrimoniali, a cose o a persone derivanti dalla non osservanza delle istruzioni di |
IT |
|
||
montaggio. In questi casi è esclusa la garanzia per difetti materiali
• La pulizia e la manutenzione destinata ad essere effettuata dall’utilizzatore non deve essere effettuata da bambini senza sorveglianza
• Prima degli interventi sull’impianto (manutenzione, pulizia), disconnettere sempre il prodotto dalla rete di alimentazione
• Il materiale dell’imballo del prodotto deve essere smaltito nel pieno rispetto della normativa locale
• Durante l’esecuzione della manovra controllare l’automazione e mantenere le persone lontano da essa, fino al termine del movimento
• Non comandare il prodotto se nelle sue vicinanze ci sono persone che svolgono lavori sull’automazione; scollegate l’alimentazione elettrica prima di far eseguire questi lavori
1 DESCRIZIONE DEL PRODOTTO E DESTINAZIONE D’USO
MC200 è una centrale elettronica che permette il controllo e il comando di un motore destinato all’automatizzazione di una serranda, o di una porta basculante, o di una porta sezionale, o di una tapparella oppure di altre applicazioni similari.
 ATTENZIONE! - Qualsiasi altro uso diverso da quello descritto e in condizioni ambientali diverse da quelle riportate in questo manuale è da considerarsi improprio e vietato!
Caratteristiche funzionali:
•si collega alla rete elettrica (vedere i dati nel capitolo “Caratteristiche Tecniche del prodotto”);
•si programma tramite l’impostazione di 8 dip-switch;
•è dotata di un ricevitore radio incorporato che permette di comandare l’automazione tramite un trasmettitore radio;
•si possono collegare alla centrale diversi accessori quali: una coppia di fotocellule, un lampeggiante (con alimentazione a tensione di rete) per segnalazioni luminose, un pulsante a parete per comandare l’automazione con comandi di tipo “passo-passo”, un’antenna radio esterna, un bordo sensibile eccetera.
•è dotata di un connettore tipo “IBT4N”, compatibile con l’interfaccia IBT4N, che consente di collegare tutti i dispositivi dotati di interfaccia
BusT4 come, ad esempio, l’unità di programmazione Oview.
Italiano – 2

|
|
|
|
2 |
LIMITI D’IMPIEGO |
|
• La centrale MC200 può essere utilizzata esclusivamente con un motore asincrono monofase. Il motore deve essere: a) alimentato dalla rete |
|
|
elettrica, e deve essere dimensionato per la stessa tensione che alimenta la centrale; b) provvisto di un protettore termico; c) provvisto di un |
|
IT |
dispositivo elettromeccanico che ne limita il movimento (finecorsa); d) fornito di collegamenti a 3 conduttori: “Comune”, “Apre”, “Chiude”. |
|
• Il ricevitore radio incorporato nella centrale permette l’uso esclusivo dei trasmettitori che adottano i protocolli di codifica radio FLOR, O-CODE |
||
|
o SMILO (sono degli standard di Nice). |
|
|
• Ulteriori limiti d’impiego sono riportati nel capitolo “Caratteristiche Tecniche del prodotto”. |
|
|
|
|
|
3 |
INSTALLAZIONE |
 Importante! - Prima di eseguire l’installazione del prodotto verificare i suoi limiti d’impiego leggendo il capitolo 2 e 7.
 Accertarsi che la temperatura sia idonea all’ambito di applicazione.
 Il prodotto non deve essere installato in ambiente esterno.
 Quando si effettua la foratura del box della centrale per il passaggio dei cavi (fig. 1-C) è importante sapere che il punto di entrata dei cavi nel box deve avvenire sempre nella parte bassa del box. Inoltre, prendere le opportune precauzioni per garantire il grado di protezione richiesto (IP 44), in base al tipo di installazione.
 Prima di eseguire l’installazione preparare i cavi elettrici necessari al vostro impianto, facendo riferimento alla fig. 2b e alla “Tabella 1 - Caratteristiche tecniche dei cavi elettrici”.
 Attenzione! – Durante la posa in opera dei tubi di protezione dei cavi elettrici e la posa dei cavi nel contenitore della centrale, è importante sapere che, a causa di possibili depositi d’acqua presenti nei pozzetti di derivazione, i tubi di protezione dei cavi possono creare del vapore acqueo all’interno della centrale e che ciò può danneggiare i circuiti elettronici.
Installare la centrale facendo riferimento alla fig. 1.
3 – Italiano
1 A |
B |
C |
|
|
2 |
128 mm |
45 mm |
112 mm
IT
|
Se necessario, |
Forare il |
|
utilizzare l’entrata |
lato infe- |
|
cavi nel retro del |
riore del |
|
box, ma solo con |
box della |
|
l’uso di idonei |
centrale. |
|
raccordi per i |
|
1 |
tubi. |
|
D |
E |
F |
G |
Collegamenti elettrici.
Fare riferimento
al Capitolo 4
1
x 2
Ø 3,5 x 35
2
Italiano – 4

IT
4 COLLEGAMENTI ELETTRICI
 ATTENZIONE! – Tutti i collegamenti elettrici devono essere eseguiti in assenza di tensione all’impianto. Collegamenti errati possono causare danni alle apparecchiature o alle persone.
 ATTENZIONE! – Le operazioni di collegamento devono essere eseguite esclusivamente da personale qualificato.
4.1 - Predisposizione dei cavi elettrici per il collegamento dei dispositivi alla centrale (Tabella A)
Tabella A - Caratteristiche dei cavi elettrici per i collegamenti
Dispositivo da collegare |
Sezione del cavo |
|
Lunghezza massima del cavo |
|
|
|
|
ALIMENTAZIONE PER LA CENTRALE DI |
N°1 cavo: 2 x 1,5 mm2 |
|
30 m (*1) |
COMANDO |
|
|
|
LAMPEGGIANTE CON ANTENNA |
N°1 cavo: 2 x 1,5 mm2 |
(per la lampadina) |
20 m |
RADIO |
N°1 cavo schermato tipo RG58 (per l’antenna) |
20 m (consigliato < di 5 m) |
|
|
|
|
|
DISPOSITIVI COLLEGATI AI MORSETTI |
N°6 cavi: 1 x 0,5 mm2 (*2) |
50 m |
|
8-9-10-11-12-13 |
|
|
|
ALIMENTAZIONE PER IL MOTORE |
N°3 cavi: 1 x 1,5 mm2 |
|
10 m |
(*1) – Se il cavo di alimentazione è più lungo di 30 m occorre un cavo con sezione maggiore, ad esempio, 2 x 2,5 mm2. (*2) – Questi 6 cavi possono essere sostituiti da 1 unico cavo da 6 x 0,5 mm2.
ATTENZIONE! – I cavi utilizzati devono essere adatti al tipo di ambiente in cui avviene l’installazione.
4.2- Elenco delle parti che compongono la centrale
Durante le successive fasi di collegamento e di programmazione della centrale, per individuare i conponenti citati nel testo fare riferimento alla fig. 2 e alla sua legenda.
A- Fusibile di linea (6,3 A)
B- Connettore per inserire l’interfaccia IBT4N
C- Led “OK”
D- Led “radio”
E- Pulsante T2, per la memorizzazione di un trasmettittore e per la cancellazione di un trasmettitore o di tutta la memoria della centrale
F- Pulsante T1, per la programmazione e per l’invio dei comandi Passo-passo
5 – Italiano

G- Dip-switch per la programmazione delle funzioni
H- Led ingressi (“Stop”, “SbS”, “Photo”)
I- Morsetti per antenna radio
2
L
A
M
C  L N
L N
L- Morsetti per gli ingressi a bassa tensione
M- Morsetti per il collegamento della linea di alimentazione e per il motore
B
C
D
E
|
|
|
|
|
|
|
G |
1 |
2 |
3 |
4 |
5 |
6 |
7 |
8 |
|
|
|
|
|
|
|
F |
|
|
H |
0V |
Test |
I |
|
||
Com 24V |
Photo Stop SbS Photo |
|
IT
Italiano – 6

3
IT
4
8 |
8,2kΩ |
|
Bordo Sensibile |
||
11 |
||
|
||
“S” |
8,2kΩ |
4.3 - Collegamenti di base
•Collegamento del motore alla centrale MC200
Collegare i 3 conduttori provenienti dal motore (Fase di salita, Comune, Fase di discesa) rispettivamente ai morsetti 3, 4 e 5 della centrale, come mostrato nella fig. 3.
ATTENZIONE! Prima di collegare il motore è tassativo accertarsi che il conduttore che verrà collegato al morsetto 3 faccia APRIRE la porta, che il conduttore che verrà collegato al morsetto 5 faccia CHIUDERE la porta e che il conduttore che verrà collegato al morsetto 4 sia il COMUNE.
Attenzione! – Non collegare più motori in parallelo ad una stessa centrale, se non espressamente previsto dal manuale istruzioni del motore; eventualmente utilizzare le apposite schede di espansione.
•Collegamento dell’alimentazione alla centrale MC200
Collegare i 2 fili provenienti dalla rete elettrica (Fase e Neutro), rispettivamente ai morsetti 6 e 7 della centrale, come mostrato nella fig. 3.
•Collegamento a Terra del motore
Attenzione! - Per rispettare i requisiti di sicurezza elettrica richiesti dalla classe di appartenenza del prodotto (Classe II), è obbligatorio effettuare il collegamento di messa a Terra del motore, all’esterno della centrale MC200.
7 – Italiano

4.4 - Collegamento degli accessori
Per collegare gli accessori previsti fare riferimento alla Tabella B, alla fig. 3 e al manuale d’istruzione di ogni accessorio. La Tabella B riassume tutti gli accessori collegabili sui morsetti della centrale e le specifiche per effettuare i collegamenti elettrici. Prima di procedere, leggere attentamente la tabella e le sue note. Nota – Poiché alcuni ingressi offrono diverse funzioni per il collegamento degli accessori, al termine dei collegamenti sarà necessario impostare i dip-switch secondo gli accessori collegati (vedere il capitolo 5 - Programmazione).
Tabella B - Funzione dei morsetti (ingressi e uscite)
Morsetti |
Descrizione della Funzione |
|
|
|
|
|
|
|
|
|
|
1 - 2 |
Uscita per un segnalatore luminoso lampeggiante alla tensione di rete. |
|
|
||
|
|
|
|
|
|
3 - 4 - 5 |
Uscita per il comando del motore (apre, comune, chiude). |
|
|
||
|
|
|
|
|
|
6 - 7 |
Ingresso per la linea di alimentazione proveniente dalla rete elettrica (fase, neutro). |
|
|
||
|
|
|
|
||
8 |
Riferimento a 0 Volt per il conduttore “Comune” dei dispositivi collegati nei morsetti 9, 10, 11, 12 e 13. |
||||
|
|
|
|
|
|
9 |
Uscita 24 V. Uscita per i Servizi (ad esempio, le fotocellule) con alimentazione a 24 V |
|
(bassa tensione): corrente massima assorbibile: 100 mA. |
||
|
|||||
|
|
|
|
|
|
10 |
Uscita Photo test. Uscita a 24 V |
|
per una fotocellula di trasmissione (TX), oppure per una spia-porta-aperta. Corrente massima assorbibile: |
||
|
|||||
50 mA. |
|
|
|
|
|
|
|
|
|
|
|
11Ingresso Stop. Ingresso per i dispositivi di sicurezza con resistenza costante 8,2kΩ (bordo sensibile ecc.).
12Ingresso SbS. Ingresso per un pulsante NA (normalmente aperto), per l’invio di comandi con la modalità passo-passo.
13Ingresso Photo. Ingresso per una fotocellula di ricezione (RX) normalmente chiusa (NC), oppure per un pulsante NA (normalmente aperto). 14 - 15 Ingresso per un’antenna-ricevitore radio.
4.5- Come gestire l’uscita “Photo test” e gli ingressi “Stop”, “SbS”, “Photo”
4.5.1 - Uscita Photo test (morsetto 10)
Questa uscita deve essere configurata con il dip-switch di programmazione 7 in base al tipo di dispositivo collegato: se viene collegata una fotocellula di trasmissione (TX), il dip-switch deve essere impostato in ON; se invece viene collegata una spia-porta-aperta, il dip-switch deve essere impostato in OFF.
NOTE • Se a questa uscita viene collegata una spia-porta-aperta, la fotocellula TX deve essere collegata al morsetto 9. • Le segnalazioni della spia-porta-aperta hanno i seguenti significati:
spia spenta = porta chiusa; spia accesa = porta aperta; lampeggio lento = porta in apertura; lampeggio veloce = porta in chiusura.
4.5.2 - Ingresso Stop (morsetto 11)
Questo ingresso deve essere configurato con il dip-switch di programmazione 1 - 2 in base al tipo di dispositivo collegato: contatti normalmente
IT
Italiano – 8

IT
chiusi (NC), contatti normalmente aperti (NA) oppure contatti a resistenza costante (8,2kΩ). Attenzione! - Solo l’utilizzo di un contatto a resistenza costante insieme all’impostazione OFF+OFF dei dip-switch 1 - 2 garantisce il livello minimo di resistenza ai guasti, richiesto dalle normative. Normalmente l’intervento del dispositivo collegato all’ingresso Stop provoca l’arresto immediato del movimento del motore, con una breve inversione della manovra (selezionabile con il dip-switch 3). Per disattivare questa inversione all’intervento del dispositivo di sicurezza (ad esempio, quando il bordo sensibile tocca il pavimento) è possibile utilizzare un contatto “S” (con una resistenza da 8,2kΩ collegata in serie) da collegare in parallelo al bordo sensibile (vedere la fig. 4). Il contatto “S” deve essere posizionato in modo che egli si chiuda negli ultimi 30/40 mm della manovra di chiusura, prima che intervenga il bordo sensibile. In questo modo, quando il contatto “S” si chiude e il bordo sensibile interviene (ad esempio, sul pavimento), l’automazione si blocca senza invertire la manovra e la porta resta completamente chiusa. Da questo stato il sistema permette di comandare solo la manovra di apertura.
Lo stato dell’ingresso Stop viene segnalato dal Led “Stop” con i significati indicati nella Tabella C.
Tabella C - Stato dell’ingresso “STOP” segnalato dal relativo Led
Segnalazione del Led “Stop” |
Significato (stato dell’ingresso Stop) |
|
|
Acceso |
Attivo (consenso alla manovra) |
|
|
Spento |
Non attivo (manovra bloccata) |
|
|
50% acceso + 50% spento |
Inversione disattivata |
|
|
20% acceso + 80% spento |
Non attivo, con inversione disattivata (consentita solo la manovra di apertura) |
|
|
4.5.3 - Ingresso SbS (morsetto 12)
Ogni volta che si preme il pulsante collegato a questo ingresso il sistema esegue il comando successivo all’ultimo comando inviato, secondo una sequenza stabilita in fabbrica, programmabile con il dip-switch 5 (ad esempio, > apre > stop > chiude > stop > daccapo...). Se il pulsante di comando viene premuto a lungo (da 4 a 10 secondi), il sistema comanda sempre una manovra di apertura; se invece si superano i 10 secondi il sistema comanda sempre una manovra di chiusura. Questa particolare funzione può essere utile in presenza di più centrali, quando si vuole comandare queste nello stesso istante e si desidera che le rispettive porte eseguano la stessa manovra, indipendentemente dallo stato in cui si trova ciascuna centrale.
4.5.4 - Ingresso Photo (morsetto 13)
Questo ingresso deve essere configurato con il dip-switch di programmazione 4 in base al tipo di dispositivo collegato: se viene collegata una fotocellula di ricezione (RX) normalmente chiusa (NC), il dip-switch deve essere impostato in OFF; se invece viene collegato un pulsante NA (normalmente aperto), il dip-switch deve essere impostato in ON. Nota – Se è stata collegata una fotocellula di ricezione (RX) normalmente chiusa (NC), in assenza di consenso può essere eseguita solo la manovra di apertura.
9 – Italiano
 Loading...