

Page 1
Xen IPK
Xen Mail CTI Installation
Guide
NEC Business Solutions Ltd
Doc. No. 8557 - Release 1.1
June 2004
Page 2

June 2004 NEC Business Solutions Ltd
THIS PAGE INTENTIONALLY LEFT BLANK
ii Xen IPK Xen Mail CTI Installation Guide
Doc. No. 8557 - Release 1.1
June 2004
Page 3

Table of Contents
Chapter 1 Introduction
Section 1 Overview- - - - - - - - - - - - - - - - - - - - - - - - - - - - - - - - - - - - - - - - - - - 1
About this guide . . . . . . . . . . . . . . . . . . . . . . . . . . . . . . . . . . . . . . . . 1
Conventions - - - - - - - - - - - - - - - - - - - - - - - - - - - - - - - - - - - - - - - 1
Section 2 Battery Disposal and Safety - - - - - - - - - - - - - - - - - - - - - - - - - - - - 2
Related documentation - - - - - - - - - - - - - - - - - - - - - - - - - - - - - - - 3
Chapter 2 Setting Up the System
Section 1 New with this Product - - - - - - - - - - - - - - - - - - - - - - - - - - - - - - - - - 5
Section 2 Setup Overview . . . . . . . . . . . . . . . . . . . . . . . . . . . . . . . . . . . . . . . . . 6
Setup steps- - - - - - - - - - - - - - - - - - - - - - - - - - - - - - - - - - - - - - - - 6
Section 3 Installing the voice messaging system boards. . . . . . . . . . . . . . . . 7
Section 4 Connecting communication devices . . . . . . . . . . . . . . . . . . . . . . . . 8
Section 5 Integration Overview . . . . . . . . . . . . . . . . . . . . . . . . . . . . . . . . . . . . . 9
Section 6 Programming the Phone System . . . . . . . . . . . . . . . . . . . . . . . . . . 10
Section 7 Setting up the Voice Messaging System Software. . . . . . . . . . . . 18
Section 8 Changing the Keypad Map . . . . . . . . . . . . . . . . . . . . . . . . . . . . . . . 22
Section 9 Signing In and Signing Out. . . . . . . . . . . . . . . . . . . . . . . . . . . . . . . 24
Chapter 3 Remote Access
Section 1 Remote access overview- - - - - - - - - - - - - - - - - - - - - - - - - - - - - - 25
Remote access software functions - - - - - - - - - - - - - - - - - - - - - - 25
Section 2 Setting up the support computer . . . . . . . . . . . . . . . . . . . . . . . . . . 26
Section 3 Preparing an existing support computer. . . . . . . . . . . . . . . . . . . . 28
Section 4 Setting up a support computer’s phone book . . . . . . . . . . . . . . . 29
Section 5 Starting and Ending a Remote Access Connection . . . . . . . . . . . 32
Direct connection requirements- - - - - - - - - - - - - - - - - - - - - - - - - 32
Modem connection requirements - - - - - - - - - - - - - - - - - - - - - - - 32
Section 6 Using the OS/2 host process switcher. . . . . . . . . . . . . . . . . . . . . . 34
Section 7 Changing the remote access default logon name and
password . . . . . . . . . . . . . . . . . . . . . . . . . . . . . . . . . . . . . . . . . . . . . 35
Section 8 Transferring files . . . . . . . . . . . . . . . . . . . . . . . . . . . . . . . . . . . . . . . 37
Doc. No. 8557 - Release 1.1
June 2004
Xen IPK Xen Mail CTI Installation Guide iii
Section 9 Tracking remote access connections . . . . . . . . . . . . . . . . . . . . . . 38
Page 4

June 2004 NEC Business Solutions Ltd
Section 10 Using Dial Back . . . . . . . . . . . . . . . . . . . . . . . . . . . . . . . . . . . . . . . . .39
Section 11 Using keyboard chat. . . . . . . . . . . . . . . . . . . . . . . . . . . . . . . . . . . . .40
Chapter 4 Backing Up & Restoring the System
Section 1 Using the backup and restore utilities - - - - - - - - - - - - - - - - - - - - 41
Setup steps for LAN backups and restores- - - - - - - - - - - - - - - - - 41
Setup steps for backups and restores with no LAN connection- - - 41
Section 2 Installing the BRFT Remote . . . . . . . . . . . . . . . . . . . . . . . . . . . . . . . 42
Section 3 Installing network protocols for backups. . . . . . . . . . . . . . . . . . . . 43
Section 4 Setting the voice messaging system to log on to a network . . . . 46
Windows connection with NetBIOS - - - - - - - - - - - - - - - - - - - - - - 46
Automatic Windows log on . . . . . . . . . . . . . . . . . . . . . . . . . . . . . . . 47
NetWare connection- - - - - - - - - - - - - - - - - - - - - - - - - - - - - - - - - 48
Section 5 Setting up a remote Windows computer for backups. . . . . . . . . . 50
Windows 98 or ME setup - - - - - - - - - - - - - - - - - - - - - - - - - - - - - 50
Windows NT or 2000 setup . . . . . . . . . . . . . . . . . . . . . . . . . . . . . . . 51
Section 6 Scheduling system backups . . . . . . . . . . . . . . . . . . . . . . . . . . . . . .53
Section 7 Transferring backup files . . . . . . . . . . . . . . . . . . . . . . . . . . . . . . . . . 56
Direct connection requirements - - - - - - - - - - - - - - - - - - - - - - - - - 56
Modem connection requirements- - - - - - - - - - - - - - - - - - - - - - - - 56
Section 8 Restoring system files . . . . . . . . . . . . . . . . . . . . . . . . . . . . . . . . . . .58
Chapter 5 Upgrading the Voice Messaging System
Section 1 Upgrade overview - - - - - - - - - - - - - - - - - - - - - - - - - - - - - - - - - - - 61
Upgrade steps - - - - - - - - - - - - - - - - - - - - - - - - - - - - - - - - - - - - - 61
Section 2 Adding system languages and prompts. . . . . . . . . . . . . . . . . . . . . 62
Steps for adding a language - - - - - - - - - - - - - - - - - - - - - - - - - - - 62
Section 3 Increasing the number of ports . . . . . . . . . . . . . . . . . . . . . . . . . . . . 64
Steps for adding ports - - - - - - - - - - - - - - - - - - - - - - - - - - - - - - - 64
Section 4 Adding feature packages . . . . . . . . . . . . . . . . . . . . . . . . . . . . . . . . . 66
Steps for adding feature packages - - - - - - - - - - - - - - - - - - - - - - 66
Section 5 Setting up actions after greetings . . . . . . . . . . . . . . . . . . . . . . . . . . 68
Chapter 6 Setting Up TeLANophy
Section 1 TeLANophy overview - - - - - - - - - - - - - - - - - - - - - - - - - - - - - - - - 71
TeLANophy setup steps - - - - - - - - - - - - - - - - - - - - - - - - - - - - - - 71
Section 2 Configuring network protocols for TeLANophy. . . . . . . . . . . . . . . 72
Section 3 Specifying station numbers for VewCall Plus . . . . . . . . . . . . . . . . 73
Section 4 TeLANophy workstation overview . . . . . . . . . . . . . . . . . . . . . . . . . 74
iv Table of Contents
Doc. No. 8557 - Release 1.1
June 2004
Page 5

Xen IPK Table of Contents
Setup steps- - - - - - - - - - - - - - - - - - - - - - - - - - - - - - - - - - - - - - - 74
Section 5 TeLANophy workstation hardware and software requirements . 75
Section 6 Setting up TeLANophy network protocols . . . . . . . . . . . . . . . . . . 76
Section 7 TCP/IP for Windows 98 or later. . . . . . . . . . . . . . . . . . . . . . . . . . . . 77
Section 8 TCP/IP for Windows NT 4.0. . . . . . . . . . . . . . . . . . . . . . . . . . . . . . . 78
Section 9 TCP/IP for Windows 2000 . . . . . . . . . . . . . . . . . . . . . . . . . . . . . . . . 79
Section 10 Testing the TCP/IP setup. . . . . . . . . . . . . . . . . . . . . . . . . . . . . . . . . 80
Section 11 TeLANophy workstation installation overview . . . . . . . . . . . . . . . 81
Installing ViewFax - - - - - - - - - - - - - - - - - - - - - - - - - - - - - - - - - - 81
Section 12 Installing TeLANophy from a CD . . . . . . . . . . . . . . . . . . . . . . . . . . 82
Section 13 Installing TeLANophy from a network . . . . . . . . . . . . . . . . . . . . . . 83
Section 14 Using TeLANophy applications with WANs and the Internet . . . 84
Section 15 Installing ViewMail for Microsoft Messaging on Workstations . . 85
Workstation requirements- - - - - - - - - - - - - - - - - - - - - - - - - - - - - 85
Installing ViewMail for Microsoft Messaging - - - - - - - - - - - - - - - - 85
Appendix A About the System Board
Section 1 About the system board - - - - - - - - - - - - - - - - - - - - - - - - - - - - - - 87
XenMail CTI system board - - - - - - - - - - - - - - - - - - - - - - - - - - - - 87
Daughter Board- - - - - - - - - - - - - - - - - - - - - - - - - - - - - - - - - - - - 89
Appendix B Starting and Shutting Down the System
Section 1 Starting and shutting down the system- - - - - - - - - - - - - - - - - - - 91
Appendix C Changing Network Protocols
Section 1 Changing network protocols- - - - - - - - - - - - - - - - - - - - - - - - - - - 93
Changing network protocols - - - - - - - - - - - - - - - - - - - - - - - - - - - 93
Doc. No. 8557 - Release 1.1
June 2004
Xen IPK Xen Mail CTI Installation Guide v
Page 6

June 2004 NEC Business Solutions Ltd
THIS PAGE INTENTIONALLY LEFT BLANK
vi Table of Contents
Doc. No. 8557 - Release 1.1
June 2004
Page 7

Chapter 1– Introduction
Introduction Chapter 1
S
ECTION
OVERVIEW
1
About this guide
The Installation Guide contains instructions for setting up the voice
messaging system. Refer to, Chapter 2– Setting Up the System to begin
the set up process.
Conventions
This guide uses the following conventions:
User input
Information that the user types appears in a unique font. For example, type
MSGORDER and press ENTER.
Key names
Names of keys on the keyboard appear in capital letters. For example,
ALT+TAB.
A Note contains information that supplements the main text but is not essential
to the understanding of the text. A Note may supply information that applies
only in special cases.
A See also provides references to other topics related to the current topic.
CAUTION: A Caution advises users that failure to avoid or to take a specific
action may lead to unwanted results.
WARNING! A Warning advises users that failure to avoid or to take a specific
action will result in physical harm to the user, damage to the hardware, or destruction of data.
Doc. No. 8557 - Release 1.1
June 2004
Xen IPK Xen Mail CTI Installation Guide Chapter 1 - 1
Page 8

June 2004 NEC Business Solutions Ltd
S
ECTION
B
ATTERY DISPOSAL
AND SAFETY
2
The XenMail CTI system includes a battery list below. When disposing of
these batteries, you must comply with applicable Federal and State
regulations regarding proper disposal procedures.
IMPORTANT SAFEGUARDS FOR BATTERY DISPOSAL
DO NOT PLACE USED BATTERIES IN YOUR REGULAR TRASH! THE
PRODUCT YOU PURCHASED CONTAINS A NICKEL-CADMIUM OR
SEALED LEAD BATTERY. NICKEL-CADMIUM OR SEALED LEAD
BATTERIES MUST BE COLLECTED, RECYCLED OR DISPOSED OF IN
AN ENVIRONMENTALLY SOUND MANNER.
The incineration. landfilling or mixing of nickel-cadmium or sealed lead
batteries with the municipal solid waste stream is PROHIBITED BY LAW in
most areas. Contact your local solid waste management officials for other
information regarding the environmentally sound collection, recycling and
disposal of the battery.
Nickel-Cadmium (or sealed lead) batteries must be returned to a Federal or
State approved nickel-cadmium (or sealed lead) battery recycler. This may
be where the batteries were originally sold or a local seller of automotive
batteries. Contact your local waste management officials for other
information regarding the environmentally sound collection, recycling and
disposal of the battery contained in this product.
Table 1-1: Battery Types and Quantities for KSUs and ETUs
Unit Name Type of Battery Quantity
XenMail CTI Lithium 1
CAUTION
Danger of explosion if batteries are incorrectly installed. Replace only with
the same or equivalant type of battery as indicated throughout this manual.
2 - Chapter 1 Introduction
Doc. No. 8557 - Release 1.1
June 2004
Page 9

Xen IPK Xen Mail CTI Installation Guide
Related documentation
The product disc contains this guide, the System Management Guide, the
System Conversation Guide, and the User Guide in the PDF format. If you need
Acrobat Reader to access a PDF file, you can install it from the voice
messaging system’s disc.
The following books and online resources can help you learn more about
working with your voice messaging system:
• System Management Guide: Contains instructions for setting up, maintaining,
and customising the voice messaging system. This guide includes a comprehensive troubleshooting chapter.
• System Conversation Guide (available as a PDF file only): Contains tables of
the system conversation’s prompts and phrases.
• User Guide: Contains instructions for subscribers about accessing their
accounts and checking and sending messages.
• Field Help: Press F1 to see field-specific help for entering data or codes in a
field on the voice messaging system screen.
• Third party documentation: You can find compliance information for third-party
electronic devices in the manufacturer’s documentation included in the
XenMail CTI package. Do not use a third-party manufacturer’s documentation
to set up, upgrade, or manage XenMail CTI. Refer only to XenMail CTI documentation to set up, upgrade, and manage XenMail CTI.
Doc. No. 8557 - Release 1.1
June 2004
Introduction Chapter 1 - 3
Page 10

June 2004 NEC Business Solutions Ltd
THIS PAGE INTENTIONALLY LEFT BLANK
4 - Chapter 1 Introduction
Doc. No. 8557 - Release 1.1
June 2004
Page 11

Chapter 2 – Setting Up the System
Setting Up the System Chapter 2
S
ECTION
NEW WITH THIS
RODUCT
P
1
After reviewing the information in the table below, proceed to the “Setup
Overview” on page 6.
Setting up the XenMail CTI
Previous setup procedure New setup procedure
Installing the voice
messaging system
software, OS/2 software,
and other system
components
Accessing the voice
messaging system
application screens
Backing up and restoring
voice messaging system
files
Everything you need to run the XenMail CTI is
preinstalled. To begin using the system, install the
voice messaging system board into a slot in the phone
system.
With XenMail CTI package, the voice messaging
system application is stored on a hard drive located on
the voice messaging system board. You can plug a
monitor, keyboard, and mouse directly into the voice
messaging system board or use remote access
software installed on a support computer to access
voice messaging system screens and files.
Tape backups are not available with the
XenMail CTI. You can schedule backups of voice
messaging system files using the fields on a new
system screen. To transfer files to a local or network
drive and later restore them to the voice messaging
system, you can use the new Backup/ Restore/ File
Transfer (BRFT) utility.
Doc. No. 8557 - Release 1.1
June 2004
Xen IPK Xen Mail CTI Installation Guide Chapter 2 - 5
Page 12

June 2004 NEC Business Solutions Ltd
S
ECTION
SETUP OVERVIEW
2
The XenMail CTI is a fully tested and assembled voice messaging system.
The voice messaging system software, a modem and custom OS/2 Warp
4.0 operating system software are preinstalled on a board that you place in
the phone system.
The following steps offer guidelines for setting up a new XenMail CTI
package. You can also use these steps if you are “upgrading” to XenMail
CTI package from a different product. (Back up the existing voice
messaging system database first. Once you complete the steps below,
restore it as described in “Restoring system files” on page 47. Fax
messages cannot be restored.)
If you are upgrading an existing, see "Upgrading the Voice
Messaging System," on page 61.
Setup steps
1 Insert the voice messaging system board into the phone system.
See "Installing the voice messaging system boards" on page 7.
2 Connect communication devices to voice messaging system board.
See “Connecting communication devices” on page 8.
3 Set up the phone system integration.
See "Integration Overview" on page 9.
4 If you plan to use a remote access connection to access the voice messaging
system screens, set up a support computer to do so.
See "Remote Access" on page 25.
5 Configure the voice messaging system software for network backups,
feature packages, and system languages.
See "Setting up the Voice Messaging System Software" on page 18.
6 Customise the integration, as necessary.
See “Changing the Keypad Map” on page 22.
7 Sign in to the system screens.
See “Signing In and Signing Out” on page 24.
8 If your system includes TeLANophy, set it up.
See “TeLANophy overview” on page 32.
9 Set up the voice messaging system ports, transaction boxes, and
subscribers, and integration options for your site.
See System Management Guide: System overview, Chapter 2.
10 If your system includes FaxMail, set it up.
See System Management Guide: “FaxMail setup, Chapter 9.
11 Back up the voice messaging system.
See “Using the backup and restore utilities on page 32.
6 - Chapter 2 Setting Up the System
Doc. No. 8557 - Release 1.1
June 2004
Page 13

Xen IPK Xen Mail CTI Installation Guide
S
ECTION
INSTALLING THE VOICE
MESSAGING SYSTEM
BOARDS
3
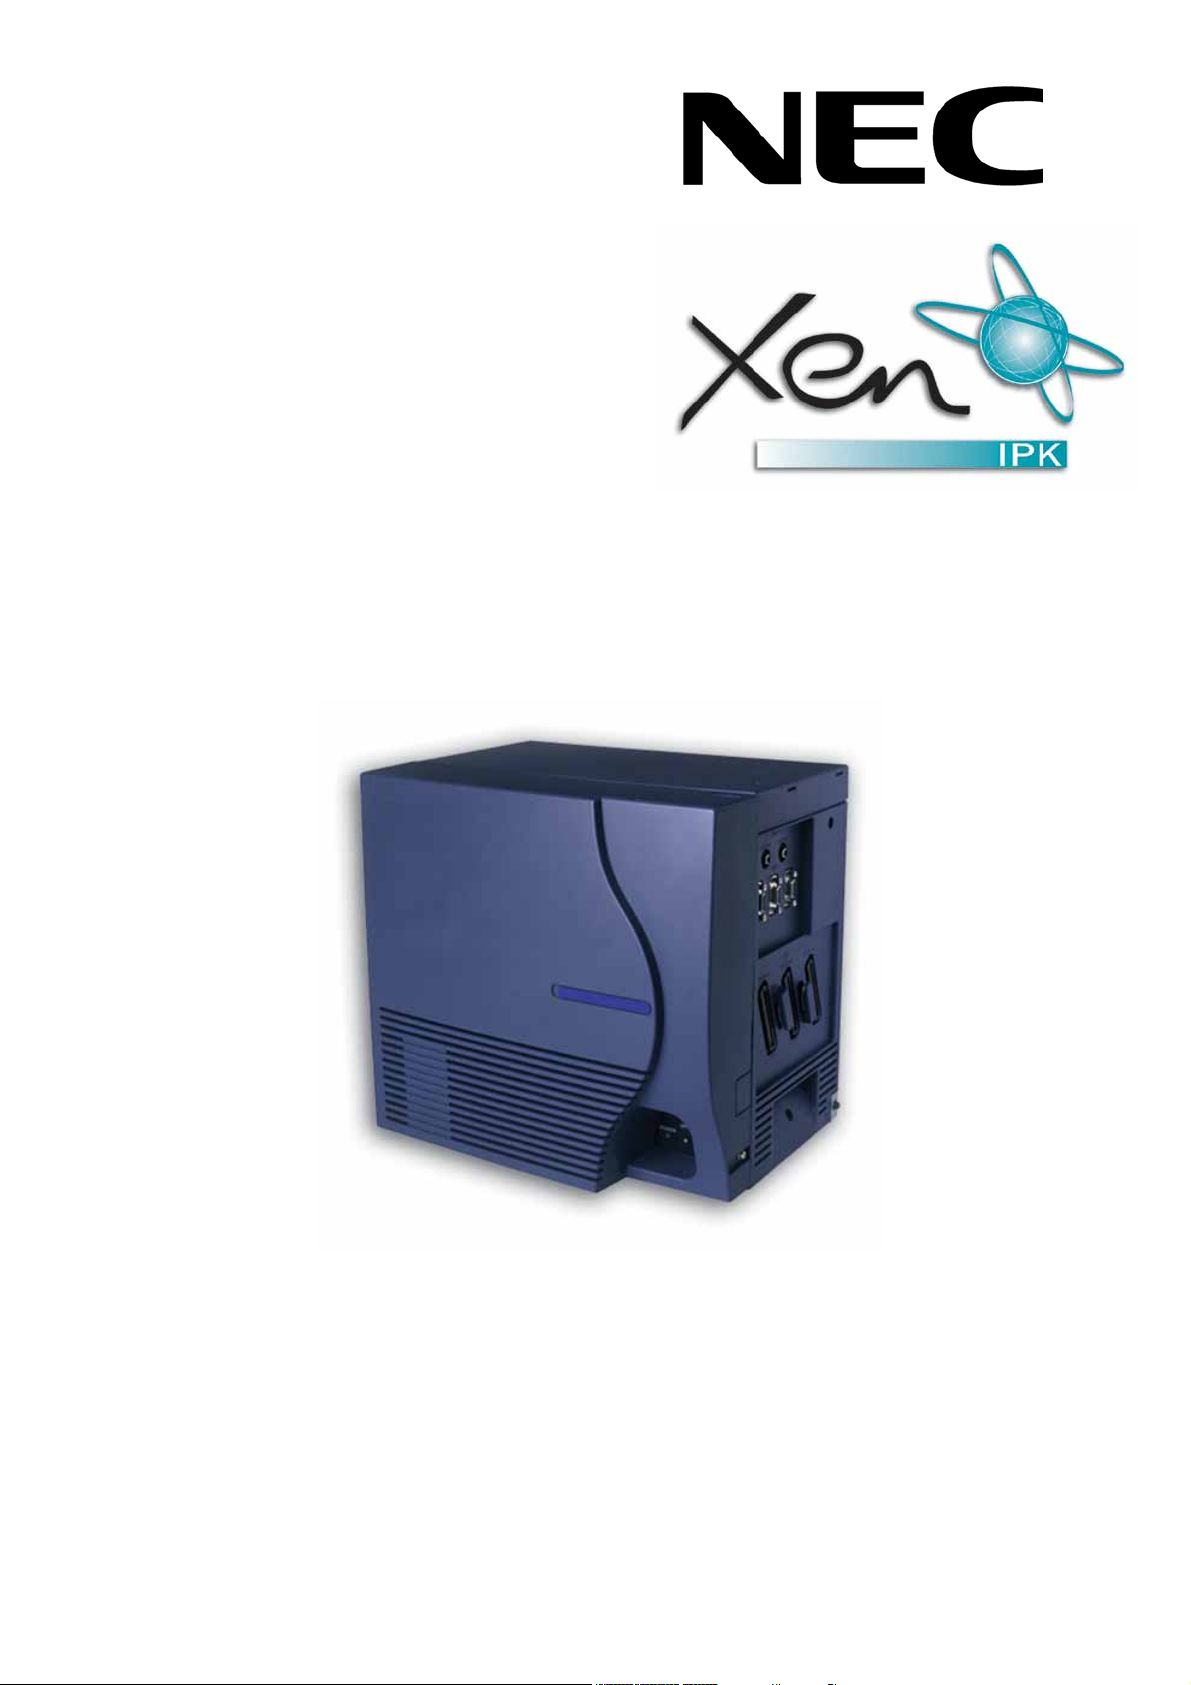
The voice messaging system board provides all voice messaging system
application functions and voice recording storage on their hard disks.
To install the voice messaging system board in the phone system, perform
the following procedure. For an illustration of the main board used for all
systems, see “About the system board.”
To install the voice messaging system board(s)
1 Turn off the phone system.
2 Insert the board halfway into any available slot in the phone system.
3 Do one of the following:
• To access the voice messaging system screens using a monitor, keyboard,
and mouse, plug these devices into the appropriate locations on the voice
messaging system board.
• To access the voice messaging system screens using a remote access connection, set SW3 dip switch #2 Off for a direct connection or On for a modem
connection.
4 Confirm the SW3 dip switch #1 and #2 are set Off and switch #3 and #4
are set On.
5 Insert the board all the way into the slot.
6 Confirm the Shutdown switch is set On.
7 Turn on the phone system. When the software LED lights, the voice
messaging system is running and ready for use. The system may take
5-10 minutes to start.
Doc. No. 8557 - Release 1.1
June 2004
Setting Up the System Chapter 2 - 7
Page 14

June 2004 NEC Business Solutions Ltd
S
ECTION
4
Perform the procedure below in the following scenarios:
CONNECTING
COMMUNICATION
DEVICES
• If you want to access the voice messaging system’s hard drive using a monitor,
keyboard, and mouse plugged directly into the voice messaging system board.
(When you are on-site and the system is accessible.)
• If you want to utilise a LAN connection for TeLANophy and to perform network
backups.
• If you want to utilise a modem for remote access connections.
Refer to “About the system board” for an illustration of the voice messaging
system board.
To connect communication devices to the voice messaging system
1 If you did not plug in a monitor, keyboard, and mouse when you installed
the voice messaging system board and you want to use these devices,
do the following:
• Set the Shutdown switch Off to shut down the voice messaging system.
• After voicemail has shut down, turn off the KSU.
• Pull the board half-way out of the phone system.
• Plug in a monitor, keyboard, and mouse into the voice messaging system
board.
• Push the board into the phone system. Be sure that the board are firmly
seated in the slot.
• Set the Shutdown switch On and turn KSU on.
2 To utilise a LAN connection, plug the network cable connector into the
Ethernet jack on the voice messaging system board.
3 To utilise a modem connection, plug the modem’s analogue phone line
into the phone jack on the voice messaging system board.
8 - Chapter 2 Setting Up the System
Doc. No. 8557 - Release 1.1
June 2004
Page 15

Xen IPK Xen Mail CTI Installation Guide
S
ECTION
INTEGRATION
O
VERVIEW
5
The basic integration between the phone system and the voice messaging
system is set up using procedures found in this section and in your phone
system manufacturer’s documentation.
In this section, you specify how the phone system will work with the voice
messaging system integration by assigning extension numbers and setting
up hunt groups, trunk routing, and call overflow. See “Programming the
Phone System” on page 10.
Additional voice messaging system features, such as live record, easy
message access, identified subscriber messaging, and trunk mapping for
transaction boxes, are set up on the voice messaging system’s Switch
Setup. screens. Refer to related topics in the System Management Guide
for details.
Doc. No. 8557 - Release 1.1
June 2004
Setting Up the System Chapter 2 - 9
Page 16

June 2004 NEC Business Solutions Ltd
S
ECTION
PROGRAMMING THE
P
HONE SYSTEM
6
To set up the phone system to support digital voice messaging, complete
the procedures in this section.
The following table describes the key functions on individual stations.
Key Function
FEATURE Return to preceding page
RECALL Advance to next page
CONF Go to next selection
REDIAL Enter pause, hyphen, *, or #
SPEAKER Exit programming mode
ANSWER Go back one level
TRANSFER Save settings
HOLD Clear settings
*Move left
# Move right
To enter programming mode
1 From port 01 or 02, press the FEATURE key.
2 Press the HOLD key.
3Dial #0*.
To assign interface slot number
Memory block 7-1 assigns the slot number on the phone system that
contains the voice messaging system board.
1 Press the LK7 key.
2 Press the LK1 key.
3 Enter the cabinet number and press # .
4 Enter the slot number for the voice messaging system board.
5 Press the RECALL key twice to advance to page 3.
6 Press the LK4 key.
7 Press the TRANSFER key to save the slot assignment and advance to
the next slot.
8 Press the ANSWER key twice to exit slot assignment.
10 - Chapter 2 Setting Up the System
Doc. No. 8557 - Release 1.1
June 2004
Page 17

Xen IPK Xen Mail CTI Installation Guide
To assign phone type
Memory block 7-2 assigns port numbers and specifies the ports as Digital
Voicemail (DVM) ports.
1 Press the LK7 key.
2 Press the LK2 key.
3 Enter the port number of the first voice messaging system port.
NOTE: Ports 01 and 02 cannot be assigned as voicemail.
4 Press the LK7 key to assign the port as DVM.
5 Press the TRANSFER key to save the port assignment and advance to
the next port.
6 Repeat steps 4 and 5 for the remaining ports.
7 Press the ANSWER key twice to exit port assignment.
CAUTION: If you make a mistake while performing the above procedure, start
over from step 1 of the procedure, “To assign interface slot number”
on page 10.
To assign station numbers
Memory block 4-10 assigns the extension numbers that the phone system
will use to access voice messaging system ports.
1 Press the LK4 key.
2Dial 10.
3 Press * four times, then enter the port number of the first voice
messaging extension.
4 Enter the extension number to be assigned to this port.
5 Press the TRANSFER key to save the extension number assignment.
6Dial 10.
7 Press the CONF key to advance to the next voice messaging system
port.
8 Repeat steps 4 through 7 for each extension number to be assigned.
9 Press the ANSWER key to exit extension assignment.
Doc. No. 8557 - Release 1.1
June 2004
Setting Up the System Chapter 2 - 11
Page 18

June 2004 NEC Business Solutions Ltd
To set up a hunt group
Memory block 4-14 assigns the first extension as the pilot hunt number.
Memory block 4-15 assigns extensions to the hunt group.
1 Press the LK4 key.
2Dial 14.
3 Press * twice, then enter the port number of the first voice messaging
extension.
4 Press the LK2 key to assign the port as a master in the hunt group.
5 Press the TRANSFER key to save the pilot hunt number assignment
and advance to memory block 4-15.
6 Press * twice and dial 14.
7 Press the CONF key to advance to the next port.
8 Press the LK2 key to assign the port as a master in the hunt group.
9 Press the TRANSFER key to save the pilot hunt number assignment.
10 Repeat steps 6 through 9 for each voice messaging port to assign all as
masters in the hunt group.
11 Enter the port number for the first voice messaging extension.
12 Press the TRANSFER key.
13 Press * twice.
14 Dial 5.
15 Press the CONF key to advance to the next port.
16 Enter the extension number of the next port.
17 Press the TRANSFER key to save the hunt group extension
assignment.
18 Repeat steps 13 through 17 for each extension.
NOTE: To set up call overflow, program the phone system to handle calls
when all voice messaging ports are busy. For a circular hunt group, set
the last voice messaging system port to forward to the first port. With
this setup, forwarded callers hear a ringback tone and callers who dial
the system directly hear a busy tone. Or, you can forward overflow
calls to an operator by setting the last voice messaging system port to
forward to the operator.
19 Press the ANSWER key to exit hunt group extension assignment.
12 - Chapter 2 Setting Up the System
Doc. No. 8557 - Release 1.1
June 2004
Page 19

Xen IPK Xen Mail CTI Installation Guide
To set up trunk routing
Memory block 3-42 assigns direct inward termination (DIT) of central office
(CO) lines during day mode for the system. Memory block 3-43 directs CO
lines during night mode. Perform this procedure if you are planning to use
the voice messaging system’s automated attendant.
1 Press the LK3 key.
2 Press the TRANSFER key.
3Dial 42.
4 Press * four times, then enter the number of the first CO line to ring the
voice messaging system.
5 Enter the extension of a voice messaging system hunt group master
port.
6 Press the TRANSFER key to save the CO line assignment for day mode
and to advance to the next memory block.
7 Enter the extension of a voice messaging system hunt group master
port
8 Press the TRANSFER key again to save the CO line assignment for
night mode.
9Press * .
10 Dial 2.
11 Press the CONF key to advance to the next CO line.
12 Repeat steps 5 through 11 for each CO line to ring the voice messaging
system.
13 Press the ANSWER key to exit the DIT assignment.
To make the forward all calls setting available by class of service
Memory block 1-8-08 enables the selected class of service to forward all
calls.
1 Press the LK1 key.
2 Press the LK8 key.
3Dial 08.
4 Enter the class of service number.
5 The LK1 key is lit when the forward all calls setting is available to the
selected class of service. Press the LK1 key if it is not already lit.
6 Press the TRANSFER key to save the selection and advance to the next
class of service.
7 Repeat steps 4 through 5 for each class of service that requires the
forward-all-calls setting.
8 Press the ANSWER key twice to exit the forward-all-calls selection.
Doc. No. 8557 - Release 1.1
June 2004
Setting Up the System Chapter 2 - 13
Page 20

June 2004 NEC Business Solutions Ltd
To make the call forwarding on busy/no answer setting available by class
of service
Memory block 1-8-08 enables the selected class of service to forward calls
on busy/no answer.
1 Press the LK1 key.
2 Press the LK8 key.
3Dial 08.
4 Enter the class of service number.
5 Press the RECALL key.
6 The LK5 key is lit when the forwarding on busy/no answer setting is
available to the selected class of service. Press the LK5 key if it is not
already lit.
7 Press the TRANSFER key to save the selection and advance to the next
class of service.
8 Repeat steps 5 through 7 for each class of service that requires call
forwarding busy/no answer.
9 Press the ANSWER key twice to exit the station class of service
assignment.
To enable live record by trunk
Memory block 3-45 selects the live record feature for each CO line.
1 Press the LK3 key.
2 Press the TRANSFER key.
3Dial 45.
4 Press * twice, then enter the CO line number.
5 Press the LK2 key to enable live record on this CO line.
6 Press the TRANSFER key to save the live record setting.
7 Press * twice.
8Dial 45.
9 Press the CONF key to advance to the next CO line.
10 Repeat steps 5 through 9 for each CO line that will use live record.
11 Press the ANSWER key to exit live record trunk selection.
14 - Chapter 2 Setting Up the System
Doc. No. 8557 - Release 1.1
June 2004
Page 21

Xen IPK Xen Mail CTI Installation Guide
To make the live record setting available by class of service
Memory block 1-8-08 enables the selected class of service to use the live
record feature from the phone.
1 Press the LK1 key.
2 Press the LK8 key.
3Dial 08.
4 Enter the class of service number.
5 Press the RECALL key to advance to page 4.
6 Press the LK5 key to make the live record setting available to the
selected class of service.
7 Press the TRANSFER key to save the selection and advance to the next
class of service.
8 Repeat steps 5 through 7 for each class of service.
9 Press the ANSWER key twice to exit the station class of service
assignment.
To allow the voice messaging system to use a barge-in code for live
record
1 Press the LK1 key.
2 Press the LK8 key.
3Dial 08.
4 Enter the class of service number for the voice messaging system ports.
5 The LK4 key is lit when voice messaging system trunk lines are enabled
to receive a barge-in code. Press the LK4 key if it is not already lit.
6 Press the TRANSFER key to save the selection.
7 Press the ANSWER key twice to exit the station class of service
assignment.
To allow individual stations to receive a barge-in code for live record
1 Press the LK1 key.
2 Press the LK8 key.
3Dial 08.
4 Enter the class of service number.
5 The LK5 key is lit when the class of service is enabled to receive a
barge-in code. Press the LK5 key if it is not already lit.
6 Press the TRANSFER key to save the selection.
7 Repeat steps 4 and 5 for each class of service that requires live record.
Doc. No. 8557 - Release 1.1
June 2004
Setting Up the System Chapter 2 - 15
8 Press the ANSWER key twice to exit the selection.
Page 22

June 2004 NEC Business Solutions Ltd
To assign the extension number of the voice messaging system for live
record
Memory block 1-8-26 identifies the voice messaging ports available for live
record.
1 Press the LK1 key.
2 Press the LK8 key.
3Dial 26.
4 Enter the extension number of the voice messaging system hunt group
master port.
5 Press the TRANSFER key to save the port settings.
6 Press the ANSWER key twice to exit the port assignment for live record.
To assign feature access keys
Memory block 4-12 assigns line keys as feature access keys. Program each
line key as a feature access key to allow live record on individual
extensions.
1 Press the LK4 key.
2Dial 12.
3 Press * four times, followed by the port number of the extension that you
want to program.
4 Enter the first line key number (for example, 09) to be assigned as a
feature access key.
5 Press the LK6 key.
6 Enter the feature access key number (01-10).
7 Press the TRANSFER key to save the key assignment and advance to
the next line key number.
8 Repeat steps 5 through 7 for each line key.
9 Repeat steps 3 through 8 for the remaining extensions that will use live
record.
10 Press the SPEAKER key to exit programming mode.
To program individual stations for call forward on all calls
1 Go off hook.
2 Dial 41, then enter the extension number of the first DVM port.
3 Hang up.
16 - Chapter 2 Setting Up the System
Doc. No. 8557 - Release 1.1
June 2004
Page 23

Xen IPK Xen Mail CTI Installation Guide
To program individual stations for call forward on busy/no answer
1 Go off hook.
2 Dial 43, then enter the extension number of the first voice messaging
system port.
3 Hang up.
To cancel call forward or call forward on busy/no answer for individual
stations
1 Go off hook.
2 Do one of the following:
• Dial 42 to cancel call forward all calls.
3 Do one of the following:
• Dial 42 to cancel call forward all calls.
• Dial 44 to cancel call forward on busy/no answer.
4 Hang up.
Doc. No. 8557 - Release 1.1
June 2004
Setting Up the System Chapter 2 - 17
Page 24

June 2004 NEC Business Solutions Ltd
S
ECTION
7
You must set up the voice messaging system software to:
SETTING UP THE VOICE
M
ESSAGING SYSTEM
OFTWARE
S
• Perform network backups
• Use TeLANophy
• Select system languages
To do so, review the following table and then perform the procedure, “To set
up the voice messaging system software” on page 18.
Setup option Action required
TeLANo phy
Network protocols
Prompts
T Configure TCP/IP or IPX/SPX protocols
T For TCP/IP, indicate: subnet mask, router, domain, server
name and TCP/IP address of voice messaging system
T For IPX/SPX, indicate: NetWare bindery or directory mode,
preferred server and name context, frame header type
T For NetBIOS over TCP/IP, configure TCP/IP and indicate: NT
domain, NT user ID, and NT password
T Indicate the system language you want to use
To set up the voice messaging system software
1 Ask your network administrator for the information required to set up the
feature packages and network protocols. Refer to the table on page 18
for details.
2 Do one of the following:
• If you are using a monitor, keyboard, and mouse plugged into the voice messaging system board to access the system screens, you should be able to
view the Banner screen.
• If you are using remote access software to access system screens, follow
the instructions in “Remote Access” on page 25 to establish a remote access
connection.
3 Shut down the voice messaging system application by pressing ESC at
the Banner screen and then following the system prompts.
4 To open an OS/2 command prompt from the voice messaging system
screens, do one of the following:
• If you are using a monitor, keyboard, and mouse plugged into the voice messaging system board to access the voice messaging system screens, go to
the OS/2 desktop and select the OS/2 Window icon.
• If you are using a remote access connection, switch to the OS/2 Host
Process Switcher window. (See "Using the OS/2 host process switcher" on
page 34 for instructions.) Type 0 to choose “Start a new 0S/2 text session”
and press ENTER.
5 At the OS/2 command prompt, type f: and press ENTER.
6Type cd \ and press ENTER.
7Type setup and press ENTER.
18 - Chapter 2 Setting Up the System
Doc. No. 8557 - Release 1.1
June 2004
Page 25

Xen IPK Xen Mail CTI Installation Guide
8Type y to proceed with the voice messaging system Setup utility.
9 From the Setup Type menu, type 2 to choose “Configure system” and
press ENTER.
10 Press ENTER to confirm that the voice messaging software is installed
on drive E.
11 Press ENTER to confirm that the voice messaging software is installed
in the Vmail directory.
12 Review the features and options available with your new system that are
listed on-screen. Press ENTER to continue.
13 From the Update Configuration menu, choose all the configuration
options you want to set up your system:
• To set up TeLANophy, type 1 and press ENTER.
• To enable network backups, type 3 and press ENTER.
• To select the system language, type 4 and press ENTER.
NOTE: Numbers for each menu item may vary.
14 When you have completed your selection(s), press ENTER.
To set up the voice messaging system software, continued
1 From the Select Network Protocols menu, select all that apply:
• To select IPX/SPX, type 1 and press ENTER.
• To select TCP/IP, type 2 and press ENTER.
• To select NetBIOS over TCP/IP, type 3 and press ENTER.
NOTES:
• Either a TCP/IP or IPX/SPX configuration is required for TeLANophy.
• Either an IPX/SPX or a NetBIOS over TCP/IP configuration is required to
perform network backups.
• To set up NetBIOS over TCP/IP, a TCP/IP configuration is also required.
Select option 2 and 3 to set this up.
2 When you have completed your selection(s), press ENTER.
3 If you selected TCP/IP, perform the following actions. Otherwise, go to
step 5.
• Type 1 and press ENTER. Type the correct value for the “TCP/IP Address”
field and press ENTER.
• Type 2 and press ENTER. Type the correct value for the “Subnet Mask” field
and press ENTER.
• Type 3 and press ENTER. Type the correct value for the “Default Router”
field and press ENTER.
• Type 4 and press ENTER. Type the correct value for the “Domain” field and
press ENTER.
• Type 5 and press ENTER. Type the correct value for the “Name Server” field
and press ENTER.
4 Confirm your entries are correct. Press ENTER to continue.
Doc. No. 8557 - Release 1.1
June 2004
Setting Up the System Chapter 2 - 19
Page 26

June 2004 NEC Business Solutions Ltd
5 If you selected IPX/SPX, perform the appropriate action below.
Otherwise, go to step 5.
• To select “Version 3.x or 4.x bindery mode,” type 1 and press ENTER.
• To select “Version 4.x directory service,” type 2 and press ENTER.
To set up the voice messaging system software, continued
1 If you selected “Version 3.x or 4.x bindery mode,” perform the following
actions. Otherwise, go to step 2.
• Type m and press ENTER. Type the correct value for the “NetWare name
context” field and press ENTER.
• Confirm your entry is correct. Press ENTER to continue.
2 If you selected “Version 4.x directory service,” perform the following
actions:
• Type m and press ENTER. Type the correct value for the “NetWare name
context” field and press ENTER.
• Confirm your entry is correct. Press ENTER to continue.
• Type m and press ENTER. Type the correct value for the “Preferred NetWare
server name” field and press ENTER.
• Confirm your entry is correct. Press ENTER to continue.
3 From the Ethernet Frame Header menu, perform the appropriate action
below:
• To select “Ethernet 802.2,” type 1 and press ENTER.
• To select “Ethernet 802.3,” type 2 and press ENTER.
• To select “Ethernet Snap,” type 3 and press ENTER.
• To select “Ethernet II,” type 4 and press ENTER.
4 When you have completed your selection, press ENTER to continue.
5 If you selected NetBIOS over TCP/IP, perform the following actions.
Otherwise, go to step 1.
• Type 1 and press ENTER. Type the correct value for the “Workstation name”
field and press ENTER.
• Type 2 and press ENTER. Type the correct value for the “NT Domain name”
field and press ENTER.
• Type 3 and press ENTER. Type the correct value for the “Workstation
description” field and press ENTER.
NOTE: If you have not configured TCP/IP, an error message is displayed. Fol-
low the on-screen instructions to continue.
6 Press ENTER to confirm your entries.
20 - Chapter 2 Setting Up the System
Doc. No. 8557 - Release 1.1
June 2004
Page 27

Xen IPK Xen Mail CTI Installation Guide
To set up the voice messaging system software, continued
1 From the TeLANophy Server Name menu, perform one of the following
actions:
• To enter a name for the voicemail server, type m and press ENTER. Type the
server name and press ENTER.
• To use the default server name, press ENTER. “Vserver” is the default
server name.
2 Confirm your entry is correct. Press ENTER to continue.
3 Select the network protocols that you want the voicemail server to use to
communicate with the TeLANophy workstations:
• To select “IPX/SPX,” type 1 and press ENTER.
• To select “TCP/IP,” type 2 and press ENTER.
NOTE: If you have not configured either of these protocols, an error message
4 When you have completed your selection(s), press ENTER.
is displayed. Follow the on-screen instructions to continue.
5 If you chose to add language prompts in step 13, follow the on-screen
instructions to configure the system for these features.
6 From the Setup Complete menu, type y and press ENTER to exit the
Setup utility.
7 Shut down and restart the voice messaging system by setting the
board’s Shutdown switch Off. After the system has shut down, set the
switch On and then press the Power button to restart.
NOTE: A system with incorrect protocol information cannot connect to the
LAN. To reenter the correct values, perform the procedure, “To change
an existing network protocol configuration.”
Doc. No. 8557 - Release 1.1
June 2004
Setting Up the System Chapter 2 - 21
Page 28

June 2004 NEC Business Solutions Ltd
S
ECTION
CHANGING THE
K
EYPAD MAP
8
Callers interact with the voice messaging system by using the keypads on
their touch-tone phones. The keypad map determines how digits are
mapped to letters.
Each digit on a caller’s phone is mapped to two or three letters in the voice
messaging system. Callers can enter a wildcard digit in place of any letter
when they are not sure of the letter. For example, a system using the Q=7,
Z=9 keypad map, the digits 7-1-1 represent P, Q, R, or S followed by any
two letters.
The voice messaging system supports five keypad maps:
Keypad map name Wildcard
Q, Z on the zero digit 1
Q, Z on the 1 digit 0
Q=7, Z=9 1
numbers only 1 (groups only)
Cosmos (Sweden) None
The mapping of digits to letters should match the phone system and the
phones of the outside callers. The system uses the Q=7, Z=9 keypad map
by default. If your system requires a different keypad map, use the following
procedure to change it.
22 - Chapter 2 Setting Up the System
Doc. No. 8557 - Release 1.1
June 2004
Page 29

Xen IPK Xen Mail CTI Installation Guide
To change the keypad map
1 Shut down the voice messaging system by pressing ESC at the Banner
screen and then follow the system prompts.
2 To open an OS/2 command prompt from the voice messaging system,
do one of the following:
• If you are using a monitor, keyboard, and mouse plugged into the voice messaging system board to access the voice messaging screens, go to the OS/
2 desktop and select the OS/2 Window icon.
• If you are using a remote access connection to access the voice messaging
screens, switch to the OS/2 Host Process Switcher window. (See "Using the
OS/2 host process switcher" on page 34 for instructions.) Type 0 to choose
“Start a new 0S/2 text session” and press ENTER.
3Type e: and press ENTER.
4Type cd \vmail and press ENTER.
5Type remap and press ENTER.
6 Type the number for the keypad map that you want to use, and press
ENTER. If an ID conflict error is displayed, follow the on-screen
instructions. A conflict is caused when there are two IDs that are made
up of letters or numbers that map to the same digits. Callers would enter
the same digits to enter both IDs.
7 At the OS/2 command prompt, type vm and press ENTER to restart the
voice messaging system application.
Doc. No. 8557 - Release 1.1
June 2004
Setting Up the System Chapter 2 - 23
Page 30

June 2004 NEC Business Solutions Ltd
S
ECTION
SIGNING IN AND
S
IGNING OUT
9
Some of the procedures in this guide require that you sign in to the system
before you can change any system settings. Use the following procedures
to sign in and out of the system.
For security reasons, it is a good idea to change the sign-in ID which is the
personal ID for the system’s default system manager. After you change it,
make sure to tell the system manager what to enter for the system sign-in ID
when signing in to the system.
To sign in to the system
1 At the Banner screen, press F2.
2Type
3 If prompted, type your security code and press ENTER. (You can set a
To sign out of the system
1 Press ESC until you see the message “Are you sure you want to sign out
To change the default sign-in ID
1 Go to the Personal Directory page for the system manager.
2 In the “Personal ID” field, type a new ID.
nec and press ENTER.
security code by changing the Personal Options for the system manager
through the system conversation.)
to the Banner screen?”
Type y to confirm that you want to sign out and return to the Banner screen.
24 - Chapter 2 Setting Up the System
Doc. No. 8557 - Release 1.1
June 2004
Page 31

Chapter 3 – Remote Access
Remote Access Chapter 3
S
ECTION
REMOTE ACCESS
OVERVIEW
1
Using remote access software, you can establish a direct or modem
connection with the voice messaging system to perform setup,
maintenance, and troubleshooting tasks.
Remote access software is preinstalled on the voice messaging system, but
you need to install it on the support computer. To do so, see "Setting up the
support computer" on page 8.
Remote access software functions
Using remote access software installed on a support computer, you can:
• Access the voice messaging system screens and files. See "Starting and Ending a Remote Access Connection" on page 13.
• Open an OS/2 command prompt. See "Using the OS/2 host process switcher"
on page 15.
• Perform file management tasks on the voice messaging system. See "Transferring files" on page 17.
• Generate reports on remote access connections. See "Tracking remote access
connections" on page 18.
• Communicate with someone on-site when you are off-site using keyboards
connected to the voice messaging system and the support computer. See
"Using keyboard chat" on page 20.
Doc. No. 8557 - Release 1.1
June 2004
Xen IPK Xen Mail CTI Installation Guide Chapter 3 - 25
Page 32

June 2004 NEC Business Solutions Ltd
S
ECTION
SETTING UP THE
SUPPORT COMPUTER
2
Before you can establish a remote access connection with the voice
messaging system, you need to install CoSession Windows remote
software version 7.0 on the support computer. Remote access software is
preinstalled in the C:\Cs2 directory on the voice messaging system.
When you install the software, the remote software setup program will
automatically detect the support computer’s modem settings. However,
some communications software may conflict with the setup. You may need
to edit the System.ini file to resolve these conflicts. If a message appears
during installation, write down the message so you can complete the
requested changes after setup is complete. For more details, see the
Readme file on the voice messaging system’s disc.
To install remote access software
1 Do one of the following:
• If you are installing remote software on a support computer that does not use
MS-DOS remote access software, go to step 2.
• If you are installing the remote software on a support computer that uses
MS-DOS remote access software to support other voice messaging systems, then follow the instructions in "Preparing an existing support computer"
on page 10 before continuing with this procedure.
2 If the support computer uses an external modem, confirm that it is turned
on.
3 Insert the voice messaging disc in the support computer’s CD-ROM
drive.
4 From the Start menu, choose “Run.”
5Type
6 Follow the on-screen instructions until you reach the Install Options
7 Select “Custom Install” and click “OK.”
8 Clear the “Cosession for Windows Host” selection.
9 Select “CoSession for Windows Remote” and click “Install.”
<disc drive>:\Cosession\setup and choose “OK.”
dialogue box.
26 - Chapter 3 Remote Access
Doc. No. 8557 - Release 1.1
June 2004
Page 33

Xen IPK Xen Mail CTI Installation Guide
To install remote access software, continued
1 Clear the “NetWare SPK,” “NetBIOS,” and “WinSock” selections.
2 Select “Modem/Serial” and click “OK.”
3 Follow the on-screen instructions until you reach the Viewer Default
Modem Settings window.
4 When prompted, use one of the following field value sets for setting up
the connection.
Direct connection
• Modem Name: Direct-Connect
• For Q revision Q931 or higher, the direct connect Baud rate is 57,600. For
Q930 or lower, the direct connect Baud rate is 19,200
• ComPort: set the support computer’s serial port that the null-modem cable
uses
Modem connection
• Modem Name: select the applicable modem; if the modem is not listed,
select “Generic High Speed”
• Baud rate: 19200
• ComPort: set the support computer’s serial port that the modem uses
5 If setting up a modem connection, type the phone number used to dial
the host.
6 Complete the on-screen registration information and click “Continue” to
complete the installation.
Doc. No. 8557 - Release 1.1
June 2004
Remote Access Chapter 3 - 27
Page 34

June 2004 NEC Business Solutions Ltd
S
ECTION
PREPARING AN
EXISTING SUPPORT
COMPUTER
3
If your support computer uses MS-DOS remote software to support other
voice messaging systems, perform the following procedure before installing
the CoSession Windows remote software.
This procedure is necessary to prevent the CoSession Windows remote
software installation from overriding the MS-DOS remote software settings.
To save the support computer’s MS-DOS remote access software
settings
1 Before updating the software, record the following information:
• The COM port for the modem.
• The type of modem installed.
• The logon name, password, and phone number for each phone book entry
set up.
2 Using a text editor, open the computer’s Autoexec.bat file.
3 If the Rr.bat file is being launched, type
that starts the Rr.bat file.
If the Rr.bat file is not listed, continue with step 4.
4 Save and close the file.
5 Shut down and restart the support computer.
6 Install the CoSession Windows remote software as described in "To
install remote access software" on page 8.
rem at the beginning of the line
28 - Chapter 3 Remote Access
Doc. No. 8557 - Release 1.1
June 2004
Page 35

Xen IPK Xen Mail CTI Installation Guide
S
ECTION
SETTING UP A
SUPPORT COMPUTER’S
PHONE BOOK
4
The support computer’s phone book stores basic connection information,
such as modem type, COM port, and baud rate settings. This information is
used to communicate with the voice messaging system.
The connection settings used by the voice messaging system are already
set up by default and are listed below:
COM port
COM 1 is designated for direct connections and COM 2 is assigned to the voice messaging system’s modem.
Baud/Speed
For Q revision Q931 or higher, the direct connect Baud rate is 57,600. For Q930 or
lower, the direct connect Baud rate is 19,200.
Modem
The voice messaging system’s modem type is “Generic High Speed.”
Answer/Originate call
This setting lets the voice messaging system answer calls from the support computer.
To set up the phone book, first customise the Default phone book entry to fit
your needs. Then, create a phone book entry specifically for each site that
you will access using a remote access connection. If you plan to use more
than one method to connect to the same voice messaging system, create a
phone book entry for each connection type (modem and direct).
To do so, complete the procedures, "To set up the Default phone book
entry" on page 12 and "To add a phone book entry" on page 12.
Doc. No. 8557 - Release 1.1
June 2004
Remote Access Chapter 3 - 29
Page 36

June 2004 NEC Business Solutions Ltd
To set up the Default phone book entry
1 Start the remote software on the support computer.
2 From the CoSession Remote Viewer Control Center window, click
“Phone book.”
3 In the Phone Book window, confirm that the “Name” field contains
“Default.”
4 For modem connections, in the “Phone ID” field, enter digits routinely
used for making calls, such as 0.
5 In the Communications type box, click “Setup.”
6 In the “COM Port” field, select the COM port for either the null modem
serial cable or the modem on the support computer.
7 For Q revision Q931 or higher, the direct connect Baud rate is 57,600.
For Q930 or lower, the direct connect Baud rate is 19,200.
8 In the “Modem Name” field, do one of the following:
• For direct connections, select “Direct-Connect.”
• For modem connections, select the support computer’s modem (or select
“Generic High Speed” or “Hayes Extended”).
9 Click “Save” and then click “Close.”
10 In the Terminal type box, click “Setup.”
11 In the CoSession Remote Setup window, type
name and
voice as the password. The logon name and password are
support as the logon
case sensitive.
12 Click “Save” and then click “Close.”
30 - Chapter 3 Remote Access
Doc. No. 8557 - Release 1.1
June 2004
Page 37

Xen IPK Xen Mail CTI Installation Guide
To add a phone book entry
1 In the Phone Book window, click “New.”
2 In the New phone book entry dialogue box, click “Default” to use the
settings for the Default phone book entry.
3 In the “Name” field, type a name for the voice messaging system, such
as the company name. Each voice messaging system name must be
unique.
4 Type a description in the “Description” field, if appropriate.
5 For modem connections, type the voice messaging system modem’s
phone number in the “Phone ID” field. This number is determined when
the technician programs the phone system to integrate the voice
messaging system board.
NOTES
• For long-distance numbers, enter the complete phone number, up to 50 characters.
• You can use a comma (,) to insert a two-second delay. For example:
9,12065551234,,,,567 adds an 8- to 10-second delay before dialling extension 567.
6 Type a description in the “Description” field, if appropriate.
7 If you want remote software to dial this phone book entry whenever you
start a remote access connection, select “Quick Connect.”
8 Click “Save” and then click “Close.”
TIP: If you plan to access the same voice messaging system using both modem
and direct connections, set up a phone book entry for each connection
type. Since each phone book entry name must be unique, indicate the connection type for the voice messaging system in the “Name” field for the two
entries.
Doc. No. 8557 - Release 1.1
June 2004
Remote Access Chapter 3 - 31
Page 38

June 2004 NEC Business Solutions Ltd
S
ECTION
STARTING AND ENDING
A REMOTE ACCESS
ONNECTION
C
5
Remote access software lets you access the voice messaging system
application from a support computer. To start a remote access connection,
review the connection requirements on this page and then perform the
procedure, "To establish a remote access connection" on page 14. Only one
remote access connection can be maintained at a time.
Once you have established a connection, the Remote Control window
appears. Keystrokes that you enter on the support computer are sent to the
voice messaging system only when this window is active.
To end a remote access connection, perform the procedure, "To end a
connection" on page 14.
If you routinely connect to the voice messaging system through a long-distance call, you may be able to save money by using Dial Back. See "Using
Dial Back" on page 19 for more information.
Direct connection requirements
• One end of a null modem serial cable must be plugged into an available serial
port on the support computer. The other end must be plugged into the serial port
on the voice messaging system board.
• Confirm that DIP switch #2 is set for direct connection. If necessary, shut down
the voice messaging system, set it correctly, and then restart the system.
Modem connection requirements
• A 100 percent Hayes-compatible modem must be installed on the support computer. The voice messaging system comes with a 56K baud modem installed.
• A public phone network (analogue) line must be connected to the support computer’s modem. In addition, the voice messaging system’s modem must be connected to an analogue line.
• Confirm that DIP switch #2 is set for modem connection. If necessary, shut
down the voice messaging system, set it correctly, and then restart the system.
See Also:
Changing the remote access default logon name and password......................... 35
Transferring files................................................................................................... 37
32 - Chapter 3 Remote Access
Doc. No. 8557 - Release 1.1
June 2004
Page 39

Xen IPK Xen Mail CTI Installation Guide
To establish a remote access connection
1 Make sure the phone book is set up as described in "Setting up a
support computer’s phone book" on page 11.
2 Start the remote software on the support computer.
3 Do one of the following:
• If the voice messaging system you want to call is displayed in the “Name”
field, continue to step 4.
• If not, select a different phone book entry from the “Name” menu.
4 Choose “Call.” You may need to repeat this step more than once before
you can establish a connection.
5 If you are at the OS/2 Host Process Switcher window, type the
appropriate number to select “Voice mail for OS/2” and press ENTER to
view the voice messaging system screens.
To end a connection
1 If the OS/2 Host Process Switcher window is active, choose “Voice mail
for
OS/2” to switch to the voice messaging system application.
2 Go to the CoSession Remote Viewer Control Center window on the
support computer.
3 Choose “Hang up” to end the connection.
TIP: To improve voice messaging system performance, always make the voice
messaging system the active screen before ending a remote access connection.
Doc. No. 8557 - Release 1.1
June 2004
Remote Access Chapter 3 - 33
Page 40

June 2004 NEC Business Solutions Ltd
S
ECTION
USING THE OS/2 HOST
PROCESS SWITCHER
6
Once you establish a remote access connection with the voice messaging
system, you can use the OS/2 Host Process Switcher to switch between
applications. In addition, you can use the Process Switcher to open an OS/2
command prompt necessary to access files or customise settings on the
voice messaging system.
To use the OS/2 Host Process Switcher
1 Establish a remote access connection.
2 From the CoSession Remote Viewer Control Center window, press ESC
and release. Then quickly press ALT to display the OS/2 Host Process
Switcher window. (You may need to try this a few times.)
3 Perform one of the following actions:
• Type 0 and press ENTER to open an OS/2 command prompt.
• Type the appropriate number to select “Voice mail for OS/2” and press
ENTER to view the voice messaging system screens.
CAUTION:
Avoid typing exit in an OS/2 window. This may cause the system to
behave erratically and you may lose your ability to access the voice
messaging system application. For the same reason, avoid opening a
DOS window.
34 - Chapter 3 Remote Access
Doc. No. 8557 - Release 1.1
June 2004
Page 41

Xen IPK Xen Mail CTI Installation Guide
S
ECTION
CHANGING THE
REMOTE ACCESS
DEFAULT LOGON NAME
AND PASSWORD
7
Each phone book entry you create uses a logon name and password to
access the voice messaging system. The default logon name is “support,”
and the default password is “voice.” For improved security, you may want to
change these settings.
The logon name and password are case-sensitive and must be set the
same on both the voice messaging system and the support computer’s
phone book entries. On the voice messaging system, there is a separate file
for direct and modem connection settings. To change these settings,
perform the following procedure.
To change the remote access default logon name and password
1 Establish a remote access connection with the voice messaging system.
2 Use the OS/2 Process Switcher window to open an OS/2 command
prompt as described in "Using the OS/2 host process switcher" on page
15.
3 At an OS/2 command prompt, type
4Type
5Type
6 From the OS/2 Script File Generator menu, press F1 to load the script
7 Type the number corresponding to the script file you want to load:
8 Press F7 and follow the on-screen instructions to change the logon
cd \cs2 and press ENTER.
cs2gen and press ENTER.
files.
• If you are using a direct connection, select Direct.cs2 and press ENTER.
• If you are using a modem connection, select Modem.cs2 and press ENTER.
name on the voice messaging system.
The current settings are shown at the bottom of the screen.
c: and press ENTER.
Doc. No. 8557 - Release 1.1
June 2004
Remote Access Chapter 3 - 35
Page 42

June 2004 NEC Business Solutions Ltd
To change the remote access default logon name and password,
continued
1 Press F8 and follow the on-screen instructions to change the password.
2 Press F10 and type
y to save your changes.
3 Press F11 to exit the Script File Generator utility.
4 End the remote access connection.
5 From the CoSession Remote Viewer Control Center window on the
support computer, confirm that the same phone book entry used to
connect to the voice messaging system in step 1 is displayed in the
“Name” field.
6 Choose “Setup” next to “Terminal type.”
7 In the CoSession Remote Viewer Setup window, type the new logon
name and password.
8 Choose “Save,” then choose “Close.”
9 To change security settings on the remaining direct.cs2 or modem.cs2
script file on the voice messaging system and the support computer,
repeat steps 1 through 16 using the phone book entry for the alternative
connection type.
If you do not already have a phone book entry set up to access the same
voice messaging system using an alternative connection type, see the
procedure, "To add a phone book entry" on page 12 to do so.
CAUTION: Avoid changing the Direct.cs2 and the Modem.cs2 script files during
the same remote access session because you may lose the ability to
access the voice messaging system application using remote access
software.
36 - Chapter 3 Remote Access
Doc. No. 8557 - Release 1.1
June 2004
Page 43

Xen IPK Xen Mail CTI Installation Guide
S
ECTION
TRANSFERRING FILES
8
You can use a remote access connection to transfer a file or group of files
between the support computer and voice messaging system. Files
transferred between the support computer and the voice messaging system
are copied (not moved).
To transfer files, perform the procedure, “To transfer files between the voice
messaging system and support computer.”
To customise the remote access file transfer settings, perform the
procedure, “To change file transfer option settings.” You can change the
following default file transfer settings on the support computer:
• “Compression,” which is set to “On” by default to automatically compress files
for transfer.
• “Overwrite,” which is set to “Verify” and “Always” by default to confirm the transfer in the event that the file transfer would replace an existing file.
• “Full view,” which is set to “Off” by default to display complete file information on
both directory panels. When the option is set to “Off,” only the file name and size
are displayed.
To transfer files between the voice messaging system and support
computer
1 Establish a remote access connection with the voice messaging system.
2 From the CoSession Remote Viewer Control Center window, select “File
Transfer.”
3 From the File Transfer window, select the drive and directory in the
source directory which contains the file(s) that you want to transfer. This
is in either the local directory (support computer) or the host directory
(voice messaging system).
4 From the source directory, select the file(s) that you want to transfer.
5 Confirm your selection and choose “Transfer.” If a message is displayed
indicating that you have “Too many bytes selected to transfer,” ignore it
by choosing “OK.”
6 When the transfer is complete, choose “Close.”
To change file transfer option settings
1 On the support computer, from the CoSession Remote Viewer Control
Center window, choose “File transfer.”
2 From the Options menu, change the desired settings.
Doc. No. 8557 - Release 1.1
June 2004
Remote Access Chapter 3 - 37
Page 44

June 2004 NEC Business Solutions Ltd
S
ECTION
TRACKING REMOTE
ACCESS CONNECTIONS
9
The remote software’s billing log stores the following information about each
remote access connection:
• The date the call occurred.
• The starting and ending times of the connection.
• The name and phone number of the voice messaging system.
The billing log is a fixed-length record text file that you can format, print, or
import into a database, spreadsheet, or word processing application.
To turn the billing log on or off
1 On the support computer, go to the CoSession Remote Viewer Control
Center window.
2 Choose “Setup,” and then choose “Billing log” from the menu.
A check mark is displayed when this option is turned on. Select “Billing
log” again to turn off the billing log.
To view the billing log
1 Go to the C:\Insync\Csw directory on the support computer.
2 Open the Csw.bil file.
Each record in the billing log is separated by a carriage return. This file
exists only after you have established a remote access connection with
the billing log turned on.
38 - Chapter 3 Remote Access
Doc. No. 8557 - Release 1.1
June 2004
Page 45

Xen IPK Xen Mail CTI Installation Guide
S
ECTION
USING DIAL BACK
10
The voice messaging system can receive a call, disconnect, and call back
the support computer using Dial Back. If you routinely connect to a voice
messaging system through a long-distance call, Dial Back may reduce longdistance phone charges.
Perform the following procedure to set up Dial Back. Once you have set it
up, start a remote access connection, as described in "To establish a
remote access connection" on page 14. You will need to wait a couple of
minutes for the call back and a connection.
To set up the voice messaging system to use Dial Back
1 Establish a remote access connection with the voice messaging system.
2 Use the OS/2 Process Switcher window to open an OS/2 command
prompt as described in "Using the OS/2 host process switcher" on page
15.
3 At an OS/2 command prompt, type
4Type
5Type
cd \cs2 and press ENTER.
cs2gen and press ENTER.
c: and press ENTER.
6 From the OS/2 Script File Generator menu, press F1 to load the script
files.
7 Type the number corresponding to the modem.cs2 script file.
8 Press F6 until “Dial Back & Password” appears in the “Security” field at
the bottom of the screen.
9 Press F10, and then type
y to save.
10 Press F1 to load the script files.
11 Type the number for the [your login name].cs2 file. If you haven’t
changed the default logon name, the file is Support.cs2.
12 Press F5 to specify the support computer’s phone number.
13 Press F10, and then type
y to save.
14 Press F11 to exit the Script File Generator utility.
15 At an OS/2 command prompt, type
cs2host @modem.cs2
and press ENTER.
When the OS/2 Host starts, the voice messaging system is set up to use Dial Back.
16 To return to the voice messaging system screens, select “Voice mail for
OS/2” from the OS/2 Process Switcher window and press ENTER.
Doc. No. 8557 - Release 1.1
June 2004
Remote Access Chapter 3 - 39
Page 46

June 2004 NEC Business Solutions Ltd
S
ECTION
USING KEYBOARD
CHAT
11
With keyboard chat, you can use the support computer to exchange
messages with an on-site system manager. This individual can access the
voice messaging system using a keyboard and monitor plugged into the
system. Communicating using keyboard chat may prevent the need for an
additional long-distance phone call.
When you use keyboard chat, a chat window appears on each monitor, that
lets you and the person at the voice messaging system exchange
messages. Perform the following procedure to use keyboard chat.
To use keyboard chat
1 Establish a remote access connection.
2 Switch to the CoSession Remote Viewer Control Center window.
3 Choose “Keyboard chat.”
4 From the CoSession Remote Chat window, type the message you want
displayed in the “Your text” section. The message window will appear on
the voice messaging system’s monitor.
5 If appropriate, choose “Attention,” which beeps the voice messaging
system to get the other person’s attention.
6 When the person at the voice messaging system types text, it will
appear in the “Host text” section of the support computer’s monitor.
7 To end the keyboard chat session, close the CoSession Remote Chat
window.
40 - Chapter 3 Remote Access
Doc. No. 8557 - Release 1.1
June 2004
Page 47

Chapter 4 – Backing Up & Restoring the System
Backing Up & Restoring
the System
S
ECTION
USING THE BACKUP
AND RESTORE
UTILITIES
1
Chapter 4
The backup and restore utilities let you:
• Back up files after installation or before a major software upgrade from the voice
messaging system screen.
• Transfer backup files to your support computer.
• Restore backup files if your system crashes or equipment fails.
The BRFT (backup and restore file transfer) utility consists of two software
programs, the BRFT Host, and the BRFT Remote. The BRFT Host is
included on the voice messaging system hard disk. The BRFT Remote
must be installed on the same support computer that you use to establish
remote access connections.
Setup steps for LAN backups and restores
1 Setup network protocols.
See “Installing network protocols for backups” on page 43.
2 Log on to a network.
To log on to a Microsoft Windows NT with NetBIOS over TCP/IP or a Novell NetWare network, see “Setting the voice messaging system to log on
to a network” on page 46.
To set up a remote Windows computer without a Windows network
domain for backups, see “Setting up a remote Windows computer for
backups” on page 50.
3 Schedule backups.
See “Scheduling system backups” on page 53 .
4 Restore system files.
See “Restoring system files” on page 58.
Setup steps for backups and restores with no LAN connection
1 Setup the support computer.
See “Installing the BRFT Remote” on page 42.
2 Schedule backups.
See “Scheduling system backups” on page 53.
3 Transfer backup files to a support computer.
See “Transferring backup files” on page 56.
4 Restore system files.
See “Restoring system files” on page 58.
Doc. No. 8557 - Release 1.1
June 2004
Xen IPK Xen Mail CTI Installation Guide Chapter 4 - 41
Page 48

June 2004 NEC Business Solutions Ltd
S
ECTION
INSTALLING THE BRFT
R
EMOTE
2
If the voice messaging system is not connected to a LAN, the support
computer can be used for backups.
To enable the BRFT utility, install the BRFT Remote on the support
computer that you use to establish remote access connections.
For Windows 95 computers, perform the procedure to the right.
Otherwise use the procedure below.
To install BRFT Remote
1 Insert the voice messaging system’s disc in the support computer's CD-
ROM drive.
2 If the support computer is running Windows, open a DOS window.
3 At the DOS command prompt, change to the computer’s CD-ROM drive.
4Type cd
5Type install and press ENTER.
6 Follow the on-screen instructions to complete the installation.
NOTE: If you get an “Incorrect DOS” error message and the utility exits,
To install BRFT Remote for Windows 95
1 Insert the voice messaging system’s disc in the support computer's CD-
ROM drive.
2 If the support computer is running Windows, open a DOS window.
3 At the DOS command prompt, change to the computer’s CD-ROM drive.
4Type
5Type
6Type
7 Follow the on-screen instructions to complete the installation.
\packages\brftrmt to change to the BRFT subdirectory.
you are probably installing on a Windows 95 computer. Perform
the next procedure.
cd \packages\brftrmt to change to the BRFT subdirectory.
set comspec=c:\windows\command.com and press ENTER.
install and press ENTER.
42 - Chapter 4 Backing Up & Restoring the System
Doc. No. 8557 - Release 1.1
June 2004
Page 49

Xen IPK Xen Mail CTI Installation Guide
S
ECTION
INSTALLING NETWORK
PROTOCOLS FOR
BACKUPS
3
Either an IPX/SPX or a NetBIOS over
TCP/IP configuration is required for network backups. You do not need an
activation or an upgrade code to enable network backups.
Perform the following procedure to enable network backups on your
system. Before you begin, ask your network administrator for the following
installation information:
T For IPX/SPX, indicate: NetWare bindery or directory, preferred server, name context,
and frame header type.
T For NetBIOS over TCP/IP, configure TCP/IP and indicate a Windows network domain
name.
Or if no domain, perform the procedures in “Setting up a remote Windows computer for backups” on page 50 and indicate a Windows Workgroup name.
T For TCP/IP, indicate: subnet mask, router, domain, server name, and
TCP/IP address of voice messaging system.
For network backups using a Windows NT network with NetBIOS over TCP/
IP or a Novell NetWare network, you must also set up the system to log on
to the network. After performing the following procedure, refer to “Setting
the voice messaging system to log on to a network” on page 46.
To install network protocols for backups
1 Do one of the following:
• If you are using a monitor, keyboard, and mouse plugged into the voice messaging system board to access the system screens, you should be able to
view the Banner screen.
• If you are using remote access software to access system screens, establish
a remote access connection. For instructions, see “Remote Access” on
page 25.
2 Shut down the voice messaging system application by pressing ESC at
the Banner screen and then following the system prompts.
3 To open an OS/2 command prompt from the voice messaging system
screens, do one of the following:
• If you are using a monitor, keyboard, and mouse plugged into the voice messaging system board to access the voice messaging system screens, go to
the OS/2 desktop and select the OS/2 Window icon.
• If you are using a remote access connection to access the voice messaging
system screens, from the
OS/2 Host Process Switcher window, type
OS/2 text session” and press ENTER.
0 (zero) to choose “Start a new
Doc. No. 8557 - Release 1.1
June 2004
Backing Up & Restoring the System Chapter 4 - 43
Page 50

June 2004 NEC Business Solutions Ltd
To install network protocols for backups, continued
1 At the OS/2 command prompt, type f: and press ENTER.
2Type cd \ and press ENTER.
3Type setup and press ENTER.
4Type y to proceed with the voice messaging system Setup utility.
5 From the Setup Type menu, type 2 to choose “Configure System” and
press ENTER.
6 Follow the on-screen instructions until you reach the Update
Configuration menu.
7 Choose “Configure Network Protocols (for Network Backup/Restore)” by
typing the corresponding menu number and pressing ENTER.
8 When you have completed your selection, press ENTER to continue.
9 From the Select Network Protocols
• To select IPX/SPX, type 1 and press ENTER.
• To select TCP/IP, type
• To select NetBIOS over TCP/IP, type
NOTE:
To set up NetBIOS over TCP/IP, a TCP/IP configuration is also
2 and press ENTER.
menu, select all that apply:
3 and press ENTER.
required. Select option 2 and 3 to set this up.
10 When you have completed your selection(s), press ENTER.
11 If you selected TCP/IP, perform the following actions. Otherwise, go to
step 13.
• Type 1 and press ENTER. Type the correct value for the “TCP/IP Address”
field and press ENTER.
• Type
• Type
• Type
• Type
2 and press ENTER. Type the correct value for the “Subnet Mask”
field and press ENTER.
3 and press ENTER. Type the correct value for the “Default Router”
field and press ENTER.
4 and press ENTER. Type the correct value for the “Domain” field and
press ENTER.
5 and press ENTER. Type the correct value for the “Name Server”
field and press ENTER.
12 Confirm your entries are correct. Press ENTER to continue.
13 If you selected IPX/SPX, perform the appropriate action below.
Otherwise, go to step 2.
• To select “Version 3.x or 4.x bindery mode,” type 1 and press ENTER.
• To select “Version 4.x directory service,” type
2 and press ENTER.
14 If you selected “Version 3.x or 4.x bindery mode,” perform the following
actions. Otherwise, go to step 15.
• Type m and press ENTER. Type the correct value for the “NetWare name
context” field and press ENTER.
• Confirm your entry is correct. Press ENTER to continue.
44 - Chapter 4 Backing Up & Restoring the System
Doc. No. 8557 - Release 1.1
June 2004
Page 51

Xen IPK Xen Mail CTI Installation Guide
15 If you selected “Version 4.x directory service,” perform the following
actions:
• Type m and press ENTER. Type the correct value for the “NetWare name
context” field and press ENTER.
• Confirm your entry is correct. Press ENTER to continue.
• Type
Ware server name” field and press ENTER.
• Confirm your entry is correct. Press ENTER to continue.
16 From the Ethernet Frame Header menu, perform the appropriate action
below:
• To select “Ethernet 802.2,” type 1 and press ENTER.
• To select “Ethernet 802.3,” type
m and press ENTER. Type the correct value for the “Preferred Net-
2 and press ENTER.
• To select “Ethernet Snap,” type
• To select “Ethernet II,” type
3 and press ENTER.
4 and press ENTER.
To install network protocols for backups, continued
1 When you have completed your selection, press ENTER to continue.
2 If you selected NetBIOS over TCP/IP, perform the following actions.
Otherwise, go to step 4.
• Type 1 and press ENTER. In the “Workstation name” field, type the NT log
on name of the voice messaging system and press ENTER.
• Type
• Type
• Leave the “User” and “Password” fields blank.
2 and press ENTER. In the “NT Domain name” field, type the voice
messaging system’s NT domain name and press ENTER.
If no domain, type the Windows workgroup name in this field.
3 and press ENTER. In the “Workstation description” field, type a
description of the voice messaging system and press ENTER.
3 Press ENTER to confirm your entries.
NOTE: If you have not configured TCP/IP, an error message is dis-
played. Follow the on-screen instructions to continue.
4 Follow the on-screen instructions to continue.
5 When you reach the Setup Complete menu, press ENTER to exit the
Setup utility.
6 Shut down and restart the voice messaging system by setting the
board’s Shutdown switch Off. After the system has shut down, set the
switch On and then press the Power button to restart.
NOTE: A system with incorrect protocol information cannot connect to
the LAN. To reenter the correct values, perform the procedure,
”To change an existing network protocol configuration.”
Doc. No. 8557 - Release 1.1
June 2004
Backing Up & Restoring the System Chapter 4 - 45
Page 52

June 2004 NEC Business Solutions Ltd
S
ECTION
4
Windows connection with NetBIOS
SETTING THE VOICE
MESSAGING SYSTEM
TO LOG ON TO A
NETWORK
To set the voice messaging system to log on to a Windows ME, 98, NT or
2000 network with NetBIOS over TCP/IP, you need to:
• Add the Windows user ID and password with network access rights.
• Log on to the NT domain or Workgroup from the voice messaging system.
• Map a network drive on the computer.
To add the user with network access rights to the voice messaging
system
1 On the voice messaging system, go to an OS/2 command prompt.
2 Log on as an administrator and type
logon admin /p:admin
and press ENTER.
NOTE: To change the default administrator log on, perform “To change
the default administrator user ID and password” on page 47.
3 Add a user with network access rights by using specific words in place of
“userid” and “password” and typing
net user userid password /add
and pressing ENTER.
NOTE: The userid and password must match the settings for the Win-
dows computer. See "Setting up a remote Windows computer
for backups," on page 50 for more details.
4 Log off the default administrator by typing Logoff and pressing ENTER.
To log on to Windows NT with NetBIOS
1 Go to an OS/2 command prompt.
2 Use specific words in place of “userid” “password” and “domain.”
• If using a network domain, type
logon userid /p:password
/d:domain
• If no domain, type
logon userid /p:password
3 Press ENTER.
To map a Windows NT network drive
1 Go to an OS/2 command prompt.
2 Use specific words in place of “server” and “share” and type
net use x: \\server\share
and press ENTER.
46 - Chapter 4 Backing Up & Restoring the System
Doc. No. 8557 - Release 1.1
June 2004
Page 53

Xen IPK Xen Mail CTI Installation Guide
Automatic Windows log on
After performing the procedures on page 46, you can set up your voice
messaging system to automatically log on to a Windows network by
performing the following procedure.
If you prefer to avoid the security risks of automatically logging on, you can
use the second and third procedures on page 46 to manually log on.
To automatically log on to Windows NT with NetBIOS
1 Make a backup copy of the Startit.cmd file.
2 Go to the OS/2 command prompt and type
tedit c:\startit.cmd
and press ENTER.
3 Go to the beginning of the file and insert the following command lines. If
not using a domain, insert all but the /d:domain command. Use specific
words in place of “userid” and “password.” “Server” is the Windows
computer name and “Share” is the Windows share name.
logon userid /p:password
/d:domain
net use h: \\server\share
4 Save the file and close it.
5 Shut down and restart the voice messaging system by setting the
board’s Shutdown switch Off. After the system has shut down, set the
switch On and then press the Power button to restart.
To change the default administrator user ID and password
1 Go to an OS/2 command prompt and type
logon admin /p:admin
and press ENTER.
2 Use specific words in place of “userid” and “password” and add a new
admin by typing
net user userid password
/add
and pressing ENTER.
3 Assign administrator privileges by typing
net user userid
/privilege:admin
and pressing ENTER.
4 Log off the default administrator by typing logoff and pressing ENTER.
5 Log on as the new administrator by typing
logon userid /p:password
Doc. No. 8557 - Release 1.1
June 2004
Backing Up & Restoring the System Chapter 4 - 47
and pressing ENTER.
Page 54

June 2004 NEC Business Solutions Ltd
6 Delete the default by typing
net user admin /delete
and pressing ENTER.
7 Log off the new admin by typing logoff and pressing ENTER.
NetWare connection
To set the voice messaging system to log on and attach to a Novell NetWare
network, you need to edit three files: Nconnect.cmd, Rconnect.cmd, and
Startit.cmd. To do so, perform the following three procedures.
To edit the Nconnect.cmd file
1 Shut down the voice messaging system application by pressing ESC at
the Banner screen and then following the system prompts.
2 To open an OS/2 command prompt from the voice messaging system
screens, do one of the following:
• If you are using a monitor, keyboard, and mouse plugged into the voice messaging system board to access the voice messaging system screens, go to
the OS/2 desktop and select the OS/2 Window icon.
• If you are using a remote access connection to access the voice messaging
system screens, switch to the
OS/2 Host Process Switcher window. Type
text session” and press ENTER.
0 to choose “Start a new 0S/2
3 At the OS/2 command prompt, type e: and press ENTER.
4Type cd \vmail and press ENTER.
5 Make a backup copy of the Nconnect.cmd file.
6 Using the OS/2 tedit text editor, open the Nconnect.cmd file. To do so,
type
tedit nconnect.cmd
and press ENTER.
NOTE: Refer to the text editor’s online help for instructions on using this
text editor.
7 Go to the end of the file.
8 Add commands that are specific to the network. For more information,
refer to the documentation that comes with the network. For example,
type:
login server_one/username
map j:=server_one\admin:
attach server_two/username
map k:=server_two\
accounting:
map l:=server_two\develop:
9 Save the file and close it.
NOTE: You can log on to only one server, but you can attach to as many
48 - Chapter 4 Backing Up & Restoring the System
Doc. No. 8557 - Release 1.1
June 2004
Page 55

Xen IPK Xen Mail CTI Installation Guide
To edit the Rconnect.cmd file
1 At the OS/2 command prompt, type e: and press ENTER.
2Type cd \vmail and press ENTER.
3 Make a backup copy of the Rconnect.cmd file.
4 Using the OS/2 text editor, open the Rconnect.cmd file. To do so, type
tedit rconnect.cmd
and press ENTER.
5 Go to the line “set dozetime=10.”
6 If necessary, replace 10 with the number of minutes between polls
made to the network by the Rconnect.cmd file. (If you set this field to a
higher number, it may take longer before subscribers are notified
that the network is down.)
additional servers as necessary.
7 Save the file and close it.
To edit the Startit.cmd file
1 At the OS/2 command prompt, type e: and press ENTER.
2Type cd \vmail and press ENTER.
3 Make a backup copy of the Startit.cmd file.
4 Using the OS/2 text editor, open the Startit.cmd file. To do so, type
tedit startit.cmd
and press ENTER.
5 Go to the line
“rem <voice messaging system drive letter>: && cd \vmail && start
‘background re-connect’
/f rconnect.cmd”
and remove rem from it. This sets up the Rconnect.cmd file to run automatically when the voice messaging system restarts.
6 Save the file and close it.
7 At an OS/2 command prompt, type shutdown and press ENTER.
Doc. No. 8557 - Release 1.1
June 2004
Backing Up & Restoring the System Chapter 4 - 49
Page 56

June 2004 NEC Business Solutions Ltd
S
ECTION
SETTING UP A REMOTE
W
INDOWS COMPUTER
FOR BACKUPS
5
You can set up a remote Windows computer without a Windows network
domain for backing up the voice messaging system.
Based on the version of Windows that you are using, perform the applicable
set of procedures on the next three pages. For more detailed instructions,
ask your network administrator or refer to the Windows network
documentation.
Windows 98 or ME setup
To set up a Windows 98 or ME workgroup
1 From the Control Panel on the Windows computer, double-click the
Network icon.
2 In the Configuration tab of the Network window, confirm that “File and
printer sharing for Microsoft Networks” is listed in the list of installed
network components.
If it is installed, continue to step 3. If it is not installed, install the service.
3 In the Identification tab, confirm that the “Computer name” is one word
with no spaces.
4 Also confirm that the “Workgroup” field has a value that is different than
any valid network domain name. If the field is blank, type a unique
name.
5 Then write down the “Computer name” and “Workgroup” field values,
because you will need these when setting up the voice messaging
system.
6 In the Access Control tab, confirm that the “Share-level access control”
field is selected and click “OK.”
7 When prompted, restart the computer.
To set up share-level access for 98 or ME
1 From the Windows computer desktop, double-click the My Computer
icon.
2 Right-click the drive or directory that you want the computer to share
with the voice messaging system and then select the Sharing menu.
3 Select “Shared As” and in the “Share Name” field, type a name.
4 Set the “Access Type” and “Passwords” fields, as needed.
5 Write down the share name and password settings for reference during
the voice messaging system setup and then click “Apply.”
NOTE: The user that is added to the voice messaging system in the
procedure on page 46 must use the same password as this
password.
50 - Chapter 4 Backing Up & Restoring the System
Doc. No. 8557 - Release 1.1
June 2004
Page 57

Xen IPK Xen Mail CTI Installation Guide
Windows NT or 2000 setup
To set up an NT or 2000 workgroup
1 Log on to the Windows NT or 2000 computer with administration access
rights.
2 Right-click the My Computer icon and select the Properties menu.
3 In the Network Identification tab, confirm that the computer name is all
one word with no spaces.
4 Click “Properties” and set up a unique Workgroup name, which must be
different than any domain on the network.
5 Write down the computer name and Workgroup name for reference
during the voice messaging system setup and then click “OK.”
To set up an NT or 2000 user ID and password
1 For Windows NT, from the Start menu, click the Programs>
Administrative Tools> User Manager menus.
For Windows 2000, from the Control Panel, double-click the Users and
Passwords icon. In the Advanced tab, under the Advanced User Management section, click “Advanced.”
2 Do one of the following:
• For Windows NT, if you want to use a new account, click “Add” and follow
the on-screen instructions to set up a new user ID, privileges and password.
• For Windows 2000, if you want to use a new account, right-click the users
folder and select “New user...” Follow the on-screen instructions to set up
the new user ID and password.
• Or for either NT or 2000, if you want the voice messaging system to use the
default Guest account, enable the single user Guest account and confirm
that the Guest password is set.
NOTE:
Confirm that you are using the single user Guest account for
this step, which is different than the Guests group account.
3 For either the Guest or new account, clear the check box for the “User
must change password on the next log on” field.
4 Write down the account’s User ID and password for reference during the
voice messaging system setup.
5 Click “Apply” and then click “Close” to complete the setup.
Doc. No. 8557 - Release 1.1
June 2004
Backing Up & Restoring the System Chapter 4 - 51
Page 58

June 2004 NEC Business Solutions Ltd
To set up share-level access for NT or 2000
1 On the Windows computer desktop, double-click the My Computer icon.
2 Right-click the drive or directory that you want the voice messaging
system to share and then click the Sharing menu.
3 Select the “Share this folder” field and set the appropriate Share name.
NOTE: If you are sharing drive C, do not use the default C$ setting.
Instead, select “New Share” and create a new sharing profile.
4 Click “Permissions,” select “Everyone” and then click “Remove.”
5 In the Permissions dialogue box, click “Add” and add the Guest or new
user account that you set up in the previous procedure.
6 Then set up the read/write privileges for this user account and click
“Apply.”
52 - Chapter 4 Backing Up & Restoring the System
Doc. No. 8557 - Release 1.1
June 2004
Page 59

Xen IPK Xen Mail CTI Installation Guide
fil
S
ECTION
SCHEDULING SYSTEM
BACKUPS
6
It is a good idea to back up your voice messaging system files on a regular
basis. You may also want to back up voice messaging system files after the
initial installation, before upgrading the system, and after upgrading the
system.
You can use the Backup Schedule screen to schedule two different types of
backups:
• An immediate backup. See “To schedule an immediate backup” on page 53.
• Two scheduled backups. You can set up to two daily, weekly or monthly recurring backups.
The backup process requires that you select the type of backup and
indicate the appropriate directory path for storing backup files:
• For a network backup, indicate a remote directory path on a network drive. For
backing up to Windows NT with NetBIOS over TCP/IP, see “Windows connection with NetBIOS.”
• For a local backup, indicate a local directory path on the voice messaging system’s hard disk.
TIP:
•Back up your
• Keep a written log of the directory path where your backup files are
stored.
es on a regular schedule, such as every month.
Use the voice messaging system’s Backup screen to schedule backups of
the voice messaging system’s files. You can choose whether you want to
backup prompts, logs, and incoming messages. The voice messaging
system’s database and OGMs (opening greeting messages) are included in
all backups.
To schedule an immediate backup
1 Go to the Backup Schedule screen.
2 In the “Name” field of the Immediate Backup section, type the name you
want to use for the backup file set.
3 In the “Destination path” field, type the path to where you want the files
saved.
NOTE: The directory path must exist before the system will accept it as
the destination path.
4 In the “Contents” field, select which files that you want to back up.
5 In the “Start backup” filed, type y and press ENTER.
6 The voice messaging system then performs an immediate backup. It
may take up to a minute to start.
NOTE: For network backups, you must install the correct network protocols
on your voice messaging system. See "Installing network protocols
for backups," on page 43.
Doc. No. 8557 - Release 1.1
June 2004
Backing Up & Restoring the System Chapter 4 - 53
Page 60

June 2004 NEC Business Solutions Ltd
To schedule recurring backups
1 Go to the Backup Schedule screen.
2 In the “Name” field of the Immediate Backup section, type the name you
want to use for the backup file set.
3 In the “Destination path” field, type the path to where you want the files
saved.
4 In the “Contents” field, select which files that you want to back up.
5 In the “Frequency” section, select the frequency by typing an x next to
one of the three options.
6 For a weekly backup, type the letter representing the day. For a monthly,
type f for first or l for last and then type the letter of the appropriate
day.
7 In the “Start time” and “Start date” fields, type the time and date that you
want the backup to occur.
8 In the “Enable backup” field, type y to enable the backup and press
ENTER.
9 The voice messaging system then performs the backup at the scheduled
date and time.
NOTE: The voice messaging system must be running at the scheduled date
and time for the backup to occur.
APPLICATION SCREEN PAGE 10
> 1. Ans 5. Ans
1:06pm DAY 28-Jun-02
2. Ans 6. Ans
3. Ans 7. Ans
Recording Time:281:17
4. A/D
Sandy Simmons
E A S Y M A D E A P P L I C A T I O N Page 10
BACKUP SCHEDULE (System data is included in all backups) |
Immediate Backup Scheduled Backup #1 Scheduled
Backup #2
Name:___________ Name: _____________ Name:
______________
Destination Destination
Destination
Path:____________ Path: ______________ Path:
________________
Contents: Contents:
Contents:
Prompts: No Logs: No Prompts: No Logs: No Prompts: No
Logs: No
Messages: No Messages: No
Messages: No
8. A/D
Name Accepts the name that you want to use for the backup file set.
Destination path Accepts the appropriate directory path for where you want to store the backup
files.
Prompts Accepts
Logs Accepts
Messages Accepts
Start backup? Accepts
y to backup all system prompts. Otherwise, type n.
y to backup all system logs. Otherwise, type n.
y to backup all system messages. Otherwise, type n.
y to begin an immediate backup.
54 - Chapter 4 Backing Up & Restoring the System
Doc. No. 8557 - Release 1.1
June 2004
Page 61

Xen IPK Xen Mail CTI Installation Guide
Frequency Accepts an x in the space next to one of the three frequency options. For “Weekly,”
type the letter representing the day. For the monthly schedule, type
then the letter representing the day. Type the days in MTWHFSU format (H=Thursday, U=Sunday).
Start time Sets the time for when the backup begins in hh:mmam format. For example, 2:00am.
Start date Sets the date for when the backup begins in dd-mmm format. For example, 28-Jun.
Enable backup? Accepts
f for first or l for last and
y to enable the scheduled backup to occur. Otherwise, type n.
Doc. No. 8557 - Release 1.1
June 2004
Backing Up & Restoring the System Chapter 4 - 55
Page 62

June 2004 NEC Business Solutions Ltd
S
ECTION
TRANSFERRING
BACKUP FILES
7
With the BRFT utility, you can use either a null modem serial cable or a
modem to connect the BRFT Remote on the support computer to the BRFT
Host on the voice messaging system.
TIP: After transferring files to your support computer hard disk, copy them to an
appropriate media for off-site storage.
Direct connection requirements
• One end of a null modem serial cable must be plugged into an available serial
port on the support computer. The other end must be plugged into the serial port
on the voice messaging system board. See “About the system board” for
details.
• Confirm that SW3 dip switch #2 is set for direct connections. If necessary, shut
down the voice messaging system, set it correctly, and then restart the system.
Modem connection requirements
• A 100 percent Hayes-compatible modem must be installed on the support computer. The voice messaging system comes with a 9600K baud modem installed.
• A public phone network (analogue) line must be connected to the support computer’s modem. In addition, the voice messaging system’s modem must be connected to an analogue extension port.
56 - Chapter 4 Backing Up & Restoring the System
Doc. No. 8557 - Release 1.1
June 2004
Page 63

Xen IPK Xen Mail CTI Installation Guide
To transfer backup files to a support computer
1 Establish a remote access connection. See "To establish a remote
access connection," on page 33 for details.
2 At an OS/2 command prompt, go to the E:\Vmail directory.
3 For a direct connection, type brfthost -d and press ENTER.
For a modem connection, type brfthost -bn -m and press ENTER,
where n represents the baud rate. For example, type
rate of 9600.
4 During the file transfer, a message with the connection type and baud
displays on the screen.
NOTE: To cancel the file transfer on the host computer, press
5 End the connection and exit Windows Remote.
6 Go to the directory where you installed the BRFT Remote software and
double-click on the Brftrmt.exe file to start the program.
-b9600 for a baud
CTRL+BREAK.
7 From the BRFT Connection menu, type 3 and press ENTER to select
“Configure serial ports.”
8 From the Serial Port Configuration menu, select one of the following:
• 1 and press ENTER for “Select serial port.”
• 2 and press ENTER for “Change baud rate.”
NOTE:
These settings must match the host’s BRFT serial port settings.
9 To save the new serial port settings for future BRFT connections, type 3
to save the settings. Otherwise, these settings are only valid for this
connection.
10 Type 4 to return to the BRFT Connection menu.
NOTE: After 2 minutes of inactivity, the host utility will end the connec-
tion.
11 From the BRFT Connection menu, type 1 for a modem connection or
type 2 for a direct connection.
12 If asked, type the voice messaging system’s phone number and press
ENTER.
13 Follow the on-screen instructions until the main menu appears.
14 When the main menu appears, type 1 to transfer backup files.
15 Follow the on-screen instructions to complete the backup and exit the
BRFT Remote software.
Doc. No. 8557 - Release 1.1
June 2004
Backing Up & Restoring the System Chapter 4 - 57
Page 64

June 2004 NEC Business Solutions Ltd
S
ECTION
RESTORING SYSTEM
FILES
8
If the voice messaging system's database becomes corrupt and unusable,
you can restore system files from a recent backup using the Restore utility.
For LAN backups, perform the procedure to the right. For other backups,
perform the procedure on the next page.
In rare cases, you may wish to reset the voice messaging system settings to
the factory defaults. To do so, perform the procedure, “To restore system
default settings (disaster recovery)” on page 60.
WA R NI N G ! Restoring the voice messaging system files will overwrite existing files.
WA R NI N G ! You risk data corruption if you perform any other tasks on the computer while
the data is being restored.
WA R NI N G ! Restoring the voice messaging system default settings will erase software configuration settings and all subscriber and port settings. Backup the current database before
proceeding.
To restore system files from a LAN backup
1 Establish a remote access connection. See "To establish a remote
access connection," on page 33.
2 Copy the backup files to the voice messaging system.
3 Shut down the voice messaging system application.
4 At an OS/2 command prompt, go to the E:\Vmail directory.
5Type vmrestor and press ENTER.
6 Follow the on-screen instructions to restore the system files.
7 Restart the voice messaging system application.
To restore system files from a modem or direct connection
1 If you are restoring system files from diskettes, copy the backup files to
the support computer's hard disk.
2 With Windows Remote, establish a remote access connection. See "To
establish a remote access connection," on page 33 for details.
3 From the voice messaging system console, go to an OS/2 command
prompt.
4 Change to the E:\Vmail directory.
5 For a direct connection, type brfthost -d and press ENTER.
For a modem connection, type brfthost -bn -m and press ENTER,
where n represents the baud rate. For example, type
rate of 9600.
6 End the remote access connection and exit Windows Remote.
7 On the support computer, go to the directory where the BRFT remote
software is installed and double-click on the “Brftrmt.exe” file.
8 At the BRFT Connection menu, type 3 and press ENTER to select
“Configure serial ports.”
58 - Chapter 4 Backing Up & Restoring the System
-b9600 for a baud
Doc. No. 8557 - Release 1.1
June 2004
Page 65

Xen IPK Xen Mail CTI Installation Guide
9 At the Serial Port Configuration menu, select one of the following:
• 1 and press ENTER for “Select serial port.”
• 2 and press ENTER for “Change baud rate.”
NOTE:
These settings must match the host’s BRFT serial port settings.
10 To save the new serial port settings for future BRFT connections, type 3
to save the settings. Otherwise, these settings are only valid for this
connection.
11 Type 4 to return to the BRFT Connection menu.
NOTE: After 2 minutes of inactivity, the host utility will end the connec-
tion.
12 At the BRFT Connection menu, type 1 for a modem connection or
type 2 for a direct connection.
13 If prompted, type the voice messaging system’s phone number and
press ENTER.
14 Follow the on-screen instructions until the main menu appears.
15 At the main menu, type 2 to transfer the restore files.
16 Follow the on-screen instructions to complete the transfer.
17 Exit the BRFT remote software.
18 With Windows Remote, establish a remote access connection.
19 Shut down the voice messaging system application.
20 At an OS/2 command prompt, change to the E:\Vmail directory.
21 Type vmrestor and press ENTER.
22 Follow the on-screen instructions to restore the system files.
NOTE: Several times during the restore process, you may be asked to
overwrite files. Type y and press ENTER for each occurrence,
and continue.
23 Restart the voice messaging system application.
Doc. No. 8557 - Release 1.1
June 2004
Backing Up & Restoring the System Chapter 4 - 59
Page 66

June 2004 NEC Business Solutions Ltd
To restore system default settings (disaster recovery)
1 Shut down the voice messaging system application.
2 Open an OS/2 command prompt from the voice messaging system by
performing one of the following:
• If you are using a monitor, keyboard, and mouse plugged into the voice messaging system board to access the voice messaging system screens, go to
the OS/2 desktop and select the OS/2 Window icon.
• If you are using a remote access connection to access the voice messaging
system screens, switch to the
OS/2 Host Process Switcher window. Type
session” and press ENTER.
0 to choose “Start a new 0S/2 text
3 At the OS/2 command prompt, type f: and press ENTER.
4Type cd \ and press ENTER.
5Type default and press ENTER.
6 Shut down and restart the voice messaging system by setting the
board’s Shutdown switch Off. After the system has shut down, set the
switch On and then press the Power button to restart.
7 Set up or change settings for the voice messaging system software as
described in “Setting up the voice messaging system software”.At the
OS/2 command prompt, type f: and press ENTER.
8Type cd \ and press ENTER.
9Type default and press ENTER.
10 Shut down and restart the voice messaging system by setting the
board’s Shutdown switch Off. After the system has shut down, set the
switch On and then press the Power button to restart.
11 Set up or change settings for the voice messaging system software as
described in “Setting up the voice messaging system software”.
60 - Chapter 4 Backing Up & Restoring the System
Doc. No. 8557 - Release 1.1
June 2004
Page 67

Chapter 5 – Upgrading the Voice Messaging System
Upgrading the Voice
Messaging System
S
ECTION
UPGRADE OVERVIEW
1
This chapter describes the process for upgrading an existing XenMail CTI
package. To perform an upgrade, you will need the upgrade file that was
provided when you purchased additional system options.
Upgrading an existing system may include adding any or all of the following
options:
• New system languages.
• Additional voice messaging system ports.
• New feature packages, such as TeLANophy.
Refer to the steps below to perform an upgrade.
If you are upgrading from a different product line, see “New with this product” and “Set up overview” to set up your “new” system.
Upgrade steps
Chapter 5
1 Back up the voice messaging system and transfer the backup files to a
support computer or a LAN.
See “Using the backup and restore utilities” on page 41.
2 If your upgrade includes new system languages or Hospitality prompts,
configure the voice messaging system software to use them.
See "Adding system languages and prompts"on page 62.
3 If your upgrade includes new ports, configure the phone system and voice
messaging system to use them.
See "Increasing the number of ports"on page 64.
4 If your upgrade includes new feature packages, configure the voice
messaging system software to use them.
See "Adding feature packages"on page 66.
Doc. No. 8557 - Release 1.1
June 2004
Xen IPK Xen Mail CTI Installation Guide Chapter 5 - 61
Page 68

June 2004 NEC Business Solutions Ltd
S
ECTION
2
Perform the following steps to add system languages and prompts.
ADDING SYSTEM
LANGUAGES AND
PROMPTS
You can also use these steps to change your default system language or
remove a language and replace it with another selection. An upgrade file is
not required for such tasks.
Steps for adding a language
1 Configure the voice messaging system software to use additional languages
and prompts.
See the procedure, “To add or update system languages and prompts” on
page 62.
2 Back up the voice messaging system.
See “Using the backup and restore utilities” on page 41.
To add or update system languages and prompts
1 Shut down the voice messaging system application by pressing ESC at
the Banner screen and then following the system prompts.
2 If you haven’t already done so for this upgrade, transfer the upgrade file
from the support computer to the C:\ directory (root) on the voice
messaging system hard drive. See “Transferring files” on page 37.
3 To open an OS/2 command prompt from the voice messaging system
screens, do one of the following:
• If you are using a monitor, keyboard, and mouse plugged into the voice messaging system board to access the voice messaging system screens, go to
the OS/2 desktop and select the OS/2 Window icon.
• If you are using a remote access connection to access the voice messaging
system screens, switch to the
OS/2 Host Process Switcher window.
session” and press ENTER.
4 At the OS/2 command prompt, f: and press ENTER.
5 cd \ and press ENTER.
6 setup and press ENTER.
7 y to proceed with the voice messaging system Setup utility.
8 From the Setup menu, 1 to choose “Add new features” and press
ENTER.
9 Press ENTER to confirm that the voice messaging software is installed
on drive E.
10 Press ENTER to confirm that the voice messaging software is installed
in the Vmail directory.
11 From the Upgrade Code menu,
the C:\ directory and press ENTER.
1 to use the upgrade file you copied to
0 to choose “Start a new 0S/2 text
12 Press ENTER to confirm that the upgrade file is located in the C:\
directory.
62 - Chapter 5 Upgrading the Voice Messaging System
Doc. No. 8557 - Release 1.1
June 2004
Page 69

Xen IPK Xen Mail CTI Installation Guide
13 Review the features and options available with your new system that are
listed on-screen. Press ENTER to continue.
14 From the Add New Features menu, choose “Add new prompts” by
typing the corresponding menu number and pressing ENTER.
15 When you have completed your selection, press ENTER to continue.
16 Follow the on-screen instructions to configure the system software for
the languages that you want to add or update.
17 If you are updating an existing language, you may want to avoid
overwriting customised or rerecorded prompts. If so, at the Install All
New Prompts menu, choose “No” and then press ENTER to continue.
18 When you reach the Setup Complete menu, type y and press ENTER
to exit the Setup utility.
19 Shut down and restart the voice messaging system by setting the
board’s Shutdown switch Off. After the system has shut down, set the
switch On and then press the Power button to restart.
Doc. No. 8557 - Release 1.1
June 2004
Upgrading the Voice Messaging System Chapter 5 - 63
Page 70

June 2004 NEC Business Solutions Ltd
S
ECTION
3
Refer to the steps below to increase the number of ports on your system.
INCREASING THE
NUMBER OF PORTS
Steps for adding ports
1 Program the phone system to assign extensions to the new ports, and revise
the hunt group.
2 Configure the voice messaging system software to work with the additional
ports.
See “To add ports” on page 64.
3 Customise the new ports for your site.
See “Completing the site information” and “Setting up ports” in the System Management Guide.
4 Back up the voice messaging system.
See “Using the backup and restore utilities” on page 41.
To add ports
1 Shut down the voice messaging system application by pressing ESC at
the Banner screen and then following the system prompts.
2 If you haven’t already done so for this upgrade, transfer the upgrade file
from the support computer to the C:\ (root) directory on the voice
messaging system hard drive. See “Transferring files” on page 37.
3 To open an OS/2 command prompt from the voice messaging system
screens, do one of the following:
• If you are using a monitor, keyboard, and mouse plugged into the voice messaging system board to access the voice messaging system screens, go to
the OS/2 desktop and select the OS/2 Window icon.
• If you are using a remote access connection to access the voice messaging
system screens, switch to the
OS/2 Host Process Switcher window.
session” and press ENTER.
4 At the OS/2 command prompt, f: and press ENTER.
5 cd \ and press ENTER.
6 setup and press ENTER.
7 y to proceed with the voice messaging system Setup utility.
8 From the Setup menu, 1 to choose “Add new features” and press
ENTER.
9 Press ENTER to confirm that the voice messaging software is installed
on drive E.
10 Press ENTER to confirm that the voice messaging software is installed
in the Vmail directory.
0 to choose “Start a new 0S/2 text
11 From the Upgrade Code menu, 1
the C:\ directory and press ENTER.
12 Press ENTER to confirm that the upgrade file is located in the C:\
directory.
64 - Chapter 5 Upgrading the Voice Messaging System
to use the upgrade file you copied to
Doc. No. 8557 - Release 1.1
June 2004
Page 71

Xen IPK Xen Mail CTI Installation Guide
13 Review the features and options available with your new system that are
listed on-screen. Press ENTER to continue.
14 From the Add New Features menu, choose “Add voice ports” by typing
the corresponding menu number and pressing ENTER.
15 When you have completed your selection, press ENTER to continue.
16 Follow the on-screen instructions to configure the system software for
the additional ports.
17 When you reach the Setup Complete menu, type y and press ENTER
to exit the Setup utility.
18 Shut down and restart the voice messaging system by setting the
board’s Shutdown switch Off. After the system has shut down, set the
switch On and then press the Power button to restart.
Doc. No. 8557 - Release 1.1
June 2004
Upgrading the Voice Messaging System Chapter 5 - 65
Page 72

June 2004 NEC Business Solutions Ltd
S
ECTION
ADDING FEATURE
PACKAGES
4
To add feature packages, such as TeLANophy or ActiveFax, perform the
following steps.
Steps for adding feature packages
1 Ask your network administrator for the information required to set up the
feature packages and network protocols at your site.
Some feature packages require a LAN integration. If the correct network
protocols are not set up on your system, you are prompted to set them up
when you configure the voice messaging system software. Refer to the
table below for details.
2 Configure voice messaging system software to use feature packages.
See “To add feature packages” on page 67.
3 If you added TeLANophy, set it up.
See TeLANophy overview, Chapter 6.
4 If you added ActiveFax, set it up.
See System Management Guide: FaxMail setup, Chapter 9.
5 Back up the voice messaging system.
See “Using the backup and restore utilities” on page 41.
Setup option Action required
TeLANophy
Network protocols
T Configure TCP/IP or IPX/SPX protocols
T For TCP/IP, indicate: subnet mask, router, domain, server name,
and TCP/IP address of voice messaging system
T For IPX/SPX, indicate: NetWare bindery or directory mode, pre-
ferred server and name context, frame header type
T For NetBIOS over TCP/IP, configure TCP/IP and indicate: NT
domain, NT user ID, and NT password
66 - Chapter 5 Upgrading the Voice Messaging System
Doc. No. 8557 - Release 1.1
June 2004
Page 73

Xen IPK Xen Mail CTI Installation Guide
To add feature packages
1 Shut down the voice messaging system application by pressing ESC at
the Banner screen and then following the system prompts.
2 If you haven’t already done so for this upgrade, transfer the upgrade file
from the support computer to the root (c:\) directory on the voice
messaging system hard drive. See “Transferring files” on page 37.
3 To open an OS/2 command prompt from the voice messaging system
screens, do one of the following:
• If you are using a monitor, keyboard, and mouse plugged into the voice messaging system board to access the voice messaging system screens, go to
the OS/2 desktop and select the OS/2 Window icon.
• If you are using a remote access connection to access the voice messaging
system screens, switch to the OS/2 Host Process Switcher window.
choose “Start a new 0S/2 text session” and press ENTER.
4 At the OS/2 command prompt, f: and press ENTER.
5 cd \ and press ENTER.
0 to
6 setup and press ENTER.
7 y to proceed with the voice messaging system Setup utility.
8 From the Setup menu, 1 to choose “Add new features” and press
ENTER.
9 Press ENTER to confirm that the voice messaging software is installed
on drive E.
10 Press ENTER to confirm that the voice messaging software is installed
in the Vmail directory.
11 From the Upgrade Code menu, 1 to use the upgrade file you copied to
the C:\ directory and press ENTER.
12 Press ENTER to confirm that the upgrade file is located in the C:\
directory.
13 Review the features and options available with your new system that are
listed on-screen. Press ENTER to continue.
14 From the Add New Features menu, choose the features you want to set
up by typing the corresponding menu number and then pressing
ENTER.
15 When you have completed your selection(s), press ENTER to continue.
16 Follow the on-screen instructions to configure the system software for
these new features.
17 When you reach the Setup Complete menu, type y and press ENTER
to exit the Setup utility.
18 Shut down and restart the voice messaging system by setting the
board’s Shutdown switch Off. After the system has shut down, set the
switch On and then press the Power button to restart.
A system with incorrect protocol information cannot connect to the LAN. To
Doc. No. 8557 - Release 1.1
June 2004
Upgrading the Voice Messaging System Chapter 5 - 67
reenter the correct values, perform the procedure, “to change an existing
network protocol configuration.”
Page 74

June 2004 NEC Business Solutions Ltd
S
ECTION
SETTING UP ACTIONS
AFTER GREETINGS
5
If the caller does not press any touchtone keys during the operator’s
greeting, the system takes the action specified in the Action section of
Application screen page 4. The actions for the operator box are the same as
for a transaction box.
If the operator’s extension is busy or does not answer after a set number of
rings, calls go by default to the public interview box.
The public interview box plays a series of questions and records the caller’s
response. If your system uses the public interview box, set up at least one
subscriber with access to these messages, called public messages, to
ensure that someone will receive them and respond in a timely manner.
Messages in the operator box, which have been listened to, are
automatically deleted according to the setting in the “Public hold/archive
msgs” field on the Public Interview Box screen. Messages left in the system
operator box can also be manually deleted before the voice messaging
system deletes them by pressing F7 from Application screen page 4.
To set up actions after greetings
1 Go to Application screen page 4.
2 In the Action section, in both the “Day” and “Night” fields, the appropriate
values and press ENTER.
3 If you typed g (Go to system ID) in either the “Day” or “Night” field, then
in the field to the right, the system extension that you want to route the
call to, and press ENTER.
If you want to send the call to the public interview box, $PM.
4 If the Action value is “Take-msg,” then in the “Max-msg” field, the
appropriate value.
5 If the Action value is “Take-msg,” then in the “Edits OK?” field, the
appropriate value.
6 If the Action value is “Take-msg,” then in the “Send msg urgent?” field,
the appropriate value.
7 If the Action value is “Take-msg,” then in the “After msg” field, the
appropriate value.
See Also:
Public interview box overview ............................................................................ 229
68 - Chapter 5 Upgrading the Voice Messaging System
Doc. No. 8557 - Release 1.1
June 2004
Page 75

Xen IPK Xen Mail CTI Installation Guide
APPLICATION SCREEN PAGE 4
E A S Y M A D E A P P L I C A T I O N Page 4 of 12
20. Set up System Operator
System ID: 0 Voice name: 0:01 Language: US
-->Transfer ------------------->Greeting ----->Action ----------------------- Day? Yes--> 0 | »Day: 0:09 | Day: GotoID--> 0
Nite? No | Nite: 0:09 | Nite: GotoID--> $PM
| |
Release 0 Rings | Alt: 0:07 | Max-msg: 90 sec
Intro: 0:01 Holding? No | | Edits OK? Yes
Transfer options : A | Active: D/N | Send msg urgent? No
Gather ID intro : 0:00 | | After msg: GotoID--> $HANGUP
-----------------------------------------------------------------------------Alternate system IDs for special operators on each port: 1=131 2=132 3-4=135
Day (Action) Accepts one of the following field values for the action taken after playing the
greeting during the day schedule.
S (Say good-bye) Plays a prompt asking whether the caller needs further assistance,
pauses, says good-bye, then disconnects.
O (Transfer to the operator) Routes the caller to the operator box. This setting is not
recommended for use with the operator box.
H (Hang up) Disconnects without saying good-bye.
R (Restart) Returns the caller to the opening greeting box. This setting is not recom-
mended for use with the operator box.
G (Go to system ID) Routes the call to another system ID. If you choose this option,
enter an ID to route the call to in the field to the right. Do not enter a system ID for the
operator box.
T (Take a message) Records a message for the owner of the voice mailbox.
Night (Action) Accepts the same field values as the “Day” field. The value determines what
action is taken after playing the greeting during the night schedule.
Max-msg Accepts the maximum length, in seconds, of a message from an unidentified
caller. This setting applies only if the Action value is set to “Take a message.”
Edits OK? Accepts y or n to let callers change messages they have just recorded. This
setting applies only if the Action value is set to “Take a message.”
Send msg urgent? Accepts one of the following values for enabling an unidentified caller
to leave an urgent message. This setting applies only if the Action value is set to “Take a message.”
Y (Yes) Sets the system to send every message from an unidentified caller as an urgent
message.
A (Ask) Sets the voice messaging system to ask unidentified callers whether to mark a
message as urgent.
N (No) Prevents unidentified callers from marking messages as urgent.
After msg Accepts the same field values as the “Day” action field (except “Take a mes-
sage”). The value determines the action taken after recording a caller’s message. This setting
applies only if the Action value is set to “Take a message.”
Doc. No. 8557 - Release 1.1
June 2004
Upgrading the Voice Messaging System Chapter 5 - 69
Page 76

June 2004 NEC Business Solutions Ltd
THIS PAGE INTENTIONALLY LEFT BLANK
70 - Chapter 5 Upgrading the Voice Messaging System
Doc. No. 8557 - Release 1.1
June 2004
Page 77

Chapter 6 – Setting Up TeLANophy
Setting Up TeLANophy Chapter 6
S
ECTION
TELANOPHY
OVERVIEW
1
TeLANophy is a suite of applications that combines features of the voice
messaging software, the phone system, and a LAN. The TeLANophy suite
consists of ViewMail
ViewMail for Microsoft Messaging. TeLANophy subscribers can use their
workstations to access and manage voice and fax messages. Perform the
following setup steps to use TeLANophy at your site.
®
, ViewFax®, ViewCall® Plus (with PhoneBASIC™), and
TeLANophy setup steps
1 Activate TeLANophy and configure network protocols on the voice
messaging system:
• If you purchased TeLANophy as part of a new voice messaging system or
want to use a trial version, the TeLANophy feature package is automatically
activated the first time you set up the system. If you did not configure the
system’s network protocols at that time, see “Configuring network protocols
for TeLANophy” on page 72. Otherwise, continue with step 2.
• If you are adding TeLANophy to an existing system, see “Adding feature
packages” to upgrade your system and configure network protocols to use
this feature.
2 Connect the voice messaging system to a LAN.
See “Connecting communications devices.”.
3 For ViewCall Plus, specify station numbers for ViewCall Plus on the voice
messaging system.
See “Specifying station numbers for VewCall Plus” on page 73.
4 Install and set up the TeLANophy application on individual workstations.
See “TeLANophy workstation overview” on page 74.
Doc. No. 8557 - Release 1.1
June 2004
Xen IPK Xen Mail CTI Installation Guide Chapter 6 - 71
Page 78

June 2004 NEC Business Solutions Ltd
S
ECTION
CONFIGURING
NETWORK PROTOCOLS
FOR TELANOPHY
2
Perform the following procedure to set up or reconfigure network protocols
for
TeLANophy.
To configure network protocols for TeLANophy
1 Ask your network administrator for the information required to set up
network protocols. Refer to the table in Chapter 2 for details.
2 Shut down the voice messaging system application by pressing ESC at
the Banner screen and then following the system prompts.
3 To open an OS/2 command prompt from the voice messaging system
screens, do one of the following:
• If you are using a monitor, keyboard, and mouse plugged into the voice messaging system board to access the voice messaging system screens, go to
the OS/2 desktop and select the OS/2 Window icon.
• If you are using a remote access connection to access the voice messaging
system screens, switch to the OS/2 Host Process Switcher window by pressing Esc+Alt. Type
ENTER.
0 to choose “Start a new 0S/2 text session” and press
4 At the OS/2 command prompt, type f: and press ENTER.
5Type
6Type
7Type
cd \ and press ENTER.
setup and press ENTER.
y to proceed with the voice messaging system Setup utility.
8 Press ENTER to continue until you reach the Setup Type menu.
9 From the Setup Type menu, type
2 to choose “Configure system” and
press ENTER.
10 Press ENTER until you reach the Update Configuration menu.
11 From the Update Configuration menu, type
1 to configure or reconfigure
network protocols for TeLANophy and press ENTER.
12 When you have completed your selection(s), press ENTER.
13 Follow the on-screen instructions to continue.
14 From the Setup Complete menu, type
y and press ENTER to exit the
Setup utility.
15 Shut down and restart the voice messaging system by setting the
board’s Shutdown switch Off. After the system has shut down, set the
switch On and then press the Power button to restart.
NOTE: A system with incorrect protocol information cannot connect to
the LAN. To reenter the correct values, perform the procedure,
see “To change an existing network protocol configuration.”
72 - Chapter 6 Setting Up TeLANophy
Doc. No. 8557 - Release 1.1
June 2004
Page 79

Xen IPK Xen Mail CTI Installation Guide
S
ECTION
SPECIFYING STATION
3
For ViewCall Plus to work correctly, the phone system’s station numbers
must be entered into the voice messaging system.
NUMBERS FOR
V
EWCALL PLUS
To specify station numbers in the voice messaging system
1 Go to line 7 on Application screen page 1.
2 In the “Station numbers” field, enter the phone system station numbers
that are connected to the voice messaging system ports.
APPLICATION SCREEN PAGE 1
»1. Ans 5. Ans 10:30am DAY 20-Aug-02
2. Ans 6. Dial INSERT
3. Ans 7. A/D Recording Time: 112:12
4. A/D 8. Msg System manager
E A S Y M A D E A P P L I C A T I O N Page 1 of 12
1. Site name: Organisation's name
2. Contact: Organisation's system manager Phone#: 555-555-5555
----------------------------- Calls Answered ---------------------------------
3. Total trunks/stations: 12 / 24 Calls/day: 500
4. Day calls answered: All trunks Night calls: All trunks
5. All ports busy action: Ring-until-answered
----------------------------- Access Numbers ---------------------------------
6. Trunk pilot #: 555-555-5555 # of trunks answered: 12
Alternate trunk #s: 800-555-5555
7. Port stations Pilot #: 500
Station numbers: 500-508
Port station numbers Accepts the extension number of each phone system line that is connected to
a voice messaging port, in ascending order, separated by commas. If the numbers are sequential, type
a range separated by a hyphen.
Doc. No. 8557 - Release 1.1
June 2004
Setting Up TeLANophy Chapter 6 - 73
Page 80

June 2004 NEC Business Solutions Ltd
S
ECTION
TELANOPHY
WORKSTATION
OVERVIEW
4
This chapter provides instructions for installing and setting up TeLANophy
on user workstations.
Setup steps
1 Make sure workstations meet hardware and software requirements.
See “TeLANophy workstation hardware and software requirements” on
page 75.
2 Set up network protocols on the TeLANophy workstations.
See “Setting up TeLANophy network protocols” on page 76.
3 Install and set up TeLANophy applications on individual workstations.
See “TeLANophy workstation installation overview” on page 81.
4 Tell subscribers how to get started.
See System Management Guide: “Training subscribers.”
74 - Chapter 6 Setting Up TeLANophy
Doc. No. 8557 - Release 1.1
June 2004
Page 81

Xen IPK Xen Mail CTI Installation Guide
S
ECTION
5
TELANOPHY
WORKSTATION
HARDWARE AND
SOFTWARE
REQUIREMENTS
Hardware/software Requirements
Hardware
Memory and hard
disk space
Operating system
E-mail system for
ViewMail for Microsoft
Messaging (VMM)
T PentiumII 300 with at least 128 MB RAM or better recom-
mended (required by VMM)
T NIC
T PC-compatible sound device (optional)
T 16 MB of hard disk space
T 8 MB RAM (16 MB or more recommended)
T 52K conventional memory
T Any of the following:
• Microsoft Windows 98
• Microsoft Windows NT 4.0 with Service Pack 6A
• Microsoft Windows 2000
• Microsoft Windows XP
T Any of the following:
• Microsoft Exchange
• Microsoft Outlook (for Outlook 98 and Outlook 2000,
need Corporate or Workgroup version)
Note: When a customer is running the Windows XP
operating system, the following versions of Microsoft
Outlook will work with our new VMM:
• Outlook 97
• Outlook 98
• Outlook 2000 with Service Pack 1
• Outlook 2002(XP) with Service Pack 1
• Microsoft Windows Messaging
Doc. No. 8557 - Release 1.1
June 2004
Setting Up TeLANophy Chapter 6 - 75
Page 82

June 2004 NEC Business Solutions Ltd
S
ECTION
SETTING UP
T
ELANOPHY
NETWORK PROTOCOLS
6
TeLANophy workstations can use TCP/IP as the communications protocol.
TeLANophy uses TCP port 1024. You need to know the TCP/UDP port to
allow access through a firewall.
Refer to the following sections to install and set up the TCP/IP protocol, and
to use TeLANophy applications over wide area networks (WANs) and the
Internet.
• To set up TCP/IP workstation, see “TeLANophy workstation installation overview,” on page 81.
• To use TeLANophy applications over a WAN or the Internet with TCP/IP, see
“Using TeLANophy applications with WANs and the Internet” on page 84.
See Also:
OS/2 Warp documentation
76 - Chapter 6 Setting Up TeLANophy
Doc. No. 8557 - Release 1.1
June 2004
Page 83

Xen IPK Xen Mail CTI Installation Guide
S
ECTION
TCP/IP FOR WINDOWS
98
OR LATER
7
Perform the following procedure to set up Windows 98 or later workstations
that use TeLANophy applications with
TCP/IP.
To set up a Windows 98 or later workstation
1 From the Windows taskbar, choose “Start,” choose “Settings,” and then
choose “Control Panel.”
2 In the Control Panel, double-click “Network.”
3 In the Configuration tab, check whether
“TCP/IP protocol” is listed. Then choose the appropriate scenario:
• If it is listed, choose “Cancel.”
• If it is not listed, choose “Add,” then follow the on-screen instructions
to install the driver from your Windows.
Next Step:
OS/2 Warp documentation
Doc. No. 8557 - Release 1.1
June 2004
Setting Up TeLANophy Chapter 6 - 77
Page 84

June 2004 NEC Business Solutions Ltd
S
ECTION
TCP/IP FOR WINDOWS
NT 4.0
8
Perform the following procedure to set up Windows NT 4.0 workstations that
use TeLANophy applications with TCP/IP.
Administrative rights are required to configure a workstation. If the buttons
are shaded, you do not have administrative rights.
To set up a Windows NT 4.0 workstation
1 From the Windows taskbar, choose “Start,” choose “Settings,” and then
choose “Control Panel.”
2 In the Control Panel, double-click “Network.”
3 Choose the Protocols tab, and check whether “TCP/IP protocol” is listed.
Then choose the appropriate scenario:
• If “TCP/IP protocol” is listed, choose “Cancel.”
• If “TCP/IP protocol” is not listed, choose “Add,” and then follow the on-screen
instructions to install the driver from your Windows NT 4.0 disc.
78 - Chapter 6 Setting Up TeLANophy
Doc. No. 8557 - Release 1.1
June 2004
Page 85

Xen IPK Xen Mail CTI Installation Guide
S
ECTION
TCP/IP FOR
W
INDOWS 2000
9
Perform the following procedure to set up Windows 2000 workstations that
use TeLANophy applications with TCP/IP.
Administrative rights are required for setting up a Windows 2000
workstation. Without administrative rights, an error message appears
explaining that you have insufficient rights for changing settings.
To set up a Windows 2000 workstation
1 From the Windows taskbar, choose “Start,” choose “Settings,” and then
choose “Control Panel.”
2 In the Control Panel, double-click “Network and connections.”
3 Right-click “Local area connections.” On the Shortcut menu, click
“Properties.”
4 In the Local area connections dialogue box, click “Install” and choose
“Protocol.”
5 Click “Add” and click “TCP/IP.”
6 Click “Add.”
Doc. No. 8557 - Release 1.1
June 2004
Setting Up TeLANophy Chapter 6 - 79
Page 86

June 2004 NEC Business Solutions Ltd
S
ECTION
TESTING THE TCP/IP
SETUP
10
To test the TCP/IP setup on individual workstations, perform the following
procedure.
To use the PING software
1 On the workstation, open an MS-DOS command prompt.
2Type
ping <IP address of the voice messaging system> and press ENTER.
3 If you see a PING software reply message containing bytes received,
the TCP/IP software is configured properly. If not, you will get a message
saying that the IP address could not be reached. Try one or more of the
following actions to correct the problem:
• The workstation may not be configured correctly. Repeat the appropriate
protocol setup procedure for the workstation’s operating system.
• The voice messaging system’s protocols may not be configured correctly.
Perform the procedure, “To set up the voice messaging system software” to
confirm or correct these settings.
• There may be a problem with the network. Contact the network administrator.
• Network cables may not be attached correctly or securely. Check the LAN
connections for the voice messaging system and the workstation.
• You may not have restarted the workstation. Close all files, shut down all
applications, and restart.
80 - Chapter 6 Setting Up TeLANophy
Doc. No. 8557 - Release 1.1
June 2004
Page 87

Xen IPK Xen Mail CTI Installation Guide
S
ECTION
TELANOPHY
WORKSTATION
INSTALLATION
OVERVIEW
11
The installation files for TeLANophy applications are stored on the voice
messaging system’s disc. There are two ways that you can install
TeLANophy applications on individual workstations:
• You can take the voice messaging system’s disc to each workstation and install
TeLANophy applications from the disc. To use this method, see “Installing TeLANophy from a CD” on page 82.
• You can copy the TeLANophy application install files to a network drive and then
install them on individual workstations from the network. See “Installing TeLANophy from a network” on page 83.
Refer to the following table to determine the correct file path when you
install TeLANophy applications using either method.
Installing ViewFax
When installing ViewFax on Windows 98 or later, the installation may stop
and return an error message about the Daemon.exe file. If this happens,
press CTRL-ALT-DEL and go to the task manager or close program box.
Highlight Daemon.exe and click “End Task” or “End Process.” Return to the
ViewFax installation window and click “Retry” to continue.
TeLANophy application paths
Application Disc directory path
ViewMail \Viewapps\Viewmail\Full
ViewCall Plus \Viewapps\Vcp\Full
ViewFax \Viewapps\Viewfax\Full
ViewMail for Microsoft Messaging \Viewapps\Vmm\Full
Doc. No. 8557 - Release 1.1
June 2004
Setting Up TeLANophy Chapter 6 - 81
Page 88

June 2004 NEC Business Solutions Ltd
S
ECTION
12
To install TeLANophy from a CD
INSTALLING
T
ELANOPHY FROM A
CD
1 At the workstation, insert the voice
messaging support CD in the CD-ROM drive.
2 Choose “Start,” and then choose “Run.”
3 Refer to the table on page 81 for the TeLANophy application path. Type
<TeLANophy CD directory path>\setup
and choose “OK.”
Warning! ViewMail and ViewFax must be installed in the default directories. If ViewMail is already installed, do not install ViewCall Plus in the same directory, or both programs
may not work properly. ViewFax must be installed after ViewMail for Microsoft Messaging
(VMM), or both programs may not work properly.
4 In the Welcome dialogue box, choose “Next.”
5 In the Information dialogue box, choose “OK.”
6 Perform one of the following:
• If you are installing ViewCall Plus, in the Install Options dialogue box, select
“Local installation.”
• If you are not installing ViewCall Plus, continue with step 7.
7 Follow the on-screen instructions to complete the installation.
82 - Chapter 6 Setting Up TeLANophy
Doc. No. 8557 - Release 1.1
June 2004
Page 89

Xen IPK Xen Mail CTI Installation Guide
S
ECTION
INSTALLING
T
ELANOPHY FROM A
NETWORK
13
To install TeLANophy applications on individual workstations from a
network, perform the following procedures.
Because you must have network rights to create directories, copy files, and
grant directory rights to other workstations, the network administrator may
need to perform the “To copy TeLANophy installation files to a network
directory” procedure for you.
To copy TeLANophy installation files to a network directory
1 Log on to the network.
2 On a network drive accessible to all workstations, create an installation
directory for the applications. For example, for ViewMail, type
md x:\viewapps\viewmail
and press Enter.
3 Insert the voice messaging system’s disc in the CD-ROM drive. For
each TeLANophy application you want to install, copy the subdirectory
from the disc to the installation directory that you created in step 2.
To install TeLANophy from a network
1 Choose “Start,” and then “Run.”
2 Refer to the table on page 81 for the TeLANophy application path. Type:
<your network TeLANophy application path>\setup
and choose “OK.”
For example, for ViewMail, type
x:\viewapps\viewmail\full\setup
Warning! ViewMail and ViewFax must be installed in the same directory (the default). If
ViewMail is already installed, do not install ViewCall Plus in the same directory, or
both programs may not work properly.
3 Perform one of the following actions:
• If you are installing ViewCall Plus, in the Welcome dialogue box, choose
“Next.”
• If you are not installing ViewCall Plus, go to step 6.
4 In the Information dialogue box, choose “OK.”
5 In the Install Options dialogue box, select “Local installation.”
6 Follow the on-screen instructions to complete the installation.
Doc. No. 8557 - Release 1.1
June 2004
Setting Up TeLANophy Chapter 6 - 83
Page 90

June 2004 NEC Business Solutions Ltd
S
ECTION
USING TELANOPHY
APPLICATIONS WITH
WAN
I
S AND THE
NTERNET
14
TeLANophy clients or workstations can use TCP/IP to run TeLANophy
applications over the Internet or a wide area network (WAN). The following
conditions are required to establish a TCP/IP connection between a remote
workstation and the voice messaging system:
• The workstation is connected to the voice messaging system through a WAN,
dial-up Internet service, or dedicated Internet connection.
• The network administrator has configured the network to allow for remote connections.
• TeLANophy uses TCP port 1024. You need to know the TCP/UDP port to allow
access through a firewall.
After these requirements are met, the workstation can access the voice
messaging system as it would any other Internet service.
To set up a workstation for a WAN or Internet connection
1 From the workstation, connect to the WAN or Internet service provider,
using TCP/IP as the network protocol.
2 After the connection between the workstation and host is established,
open the desired TeLANophy application.
84 - Chapter 6 Setting Up TeLANophy
Doc. No. 8557 - Release 1.1
June 2004
Page 91

Xen IPK Xen Mail CTI Installation Guide
S
ECTION
INSTALLING VIEWMAIL
FOR MICROSOFT
M
ESSAGING ON
ORKSTATIONS
W
15
This topic updates the item “Setting up TeLANophy Workstations” in
Chapter 6 of this Installation Guide.
Workstation requirements
One of the following operating systems:
Windows
Windows NT
Windows
Windows
10 MB of free hard disk space
®
98
®
4.0 with Service Pack 6a
®
2000
®
XP
NOTE: The new TeLANophy clients are not compatible with Windows
When using Office 2000 or Office XP/2000, you must install Service
Pack 1 for Office before installing VMM ViewMail for Microsoft
Messaging.
Setup steps
1 Set up the TCP/IP network protocol on the TeLANophy workstations.
See “TeLANophy workstation overview” on page 74.
2 Install and set up TeLANophy on the workstation. See “To install
ViewMail for Microsoft Messaging from the voice messaging compact
disc” on page 86.
3 Tell subscriber’s how to get started.
See “TeLANophy training” in the System Management Guide.
®
95
Installing ViewMail for Microsoft Messaging
If you are upgrading to Outlook 2002® and are running a previous version of
Microsoft Messaging (VMM), your must uninstall VMM first before installing
Outlook 2002.
Doc. No. 8557 - Release 1.1
June 2004
Setting Up TeLANophy Chapter 6 - 85
Page 92

June 2004 NEC Business Solutions Ltd
To install ViewMail for Microsoft Messaging (VMM) with Outlook 2002
1 Exit Outlook.
2 Uninstall previous versions of VMM using the Add/Remove Programs
tool in the Windows Control Panel.
3 If using the 16-bit version of VMM, run VIEWBGON.EXE to completely
remove VMM from your system. This utility is located in the Viewapps
directory on the voicemail CD.
4 Install Microsoft Office XP.
5 Install Service Pack 1 for Microsoft Office XP at: http:/
office.microsoft.com/downloads/2002/oxpsp1.aspx.
6 Close all applications.
7 Install the latest version of VMM. See “To install ViewMail for Microsoft
Messaging from the voice messaging compact disc” on page 86.
8 Shut down, then restart the workstation.
9 Open Outlook 2002 with VMM.
To install ViewMail for Microsoft Messaging from the voice messaging
compact disc
1 At the workstation, insert the voice messaging compact disc in the CD-
ROM drive.
2 On the taskbar, click “Start,” then select the Run menu.
3 Type \Viewapps\Vmm\Full\Setup and select “OK.”
4 If asked to restart the system, click “Yes.” Windows will shut down and
restart. You will have to login before the install program continues.
5 On the Welcome screen, click “Next.”
6 When prompted to select an installation directory:
• To accept the default directory, click “Next.”
• To install the program in another directory, click “Browse, “ navigate to the
directory, click “OK, “ and then click “Next.”
7 To install the program in another directory, click “Browse, “ navigate to
the directory, click “OK, “ and then click “Next.”
8 On the Ready to Install screen, click “Next.”
9 On the Installation is Complete screen, click “Finish.”
10 If prompted to restart the computer, do so.
86 - Chapter 6 Setting Up TeLANophy
Doc. No. 8557 - Release 1.1
June 2004
Page 93

Chapter A – About the System Board
About the System Board Appendix A
S
ECTION
ABOUT THE
SYSTEM BOARD
1
The voice messaging board provides all voice messaging system
application functions and voice recording storage on its hard disk. To install
the voice messaging system board, see “Installing the voice messaging
system board.” To connect communication devices, see “Connecting
communication devices.”
XenMail CTI system board
Doc. No. 8557 - Release 1.1
June 2004
Xen IPK Xen Mail CTI Installation Guide Appendix A - 87
Page 94

June 2004 NEC Business Solutions Ltd
A Backplate Connector
B SW2:
Do not use. Keep the default settings as illustrated.
C SW1:
Do not use. Keep the default settings as illustrated.
D Expansion Board Cable
E Modem connector
F Hard Drive LED:
Indicates hard disk activity.
H LAN connector
I Keyboard connector
J Mouse connector
K COM (serial) port connector
L VGA Monitor connector
M SW3:
By default, dip switch #1 is set to Off so that the voice messaging system
application starts when the board is turned on. Set the switch On to only
start OS/2 software.
By default, dip switch #2 is set Off for direct (serial) remote access
connections. Set the switch On for modem connections.
Switches #3 and #4 are not used. Keep the default settings as illustrated.
N Power button:
Do not use. Cuts the power to the board from the PC and the hard drive.
O Software LED:
Voice messaging software LED is green when the software is active, amber
when active with possible application problem, and red when inactive or
shut down.
P Shutdown switch:
By default, the switch is set On. Before turning off the phone system and
disconnecting the system board, set the switch Off to shut down the
software and system board properly.
Before restarting, set On. The board restarts only when the switch is on.
88 - Appendix A About the System Board
Doc. No. 8557 - Release 1.1
June 2004
Page 95

Xen IPK Xen Mail CTI Installation Guide
Q Shutdown LED:
Red when switch is On and green when switch is Off. Once light goes out,
you can safely turn off power to the KSU and disconnect the board.
R MB LED and switch:
Do not use. Must be set On at all times and the LED red.
Daughter Board
Doc. No. 8557 - Release 1.1
June 2004
A F206 LED
B CGA LED
C Application LED
D VM Channel 1
E VM Channel 2
F VM Channel 3
G VM Channel 4
H VM Channel 5
I VM Channel 6
J VM Channel 7
K VM Channel 8
L Fax Channel 1
M Fax Channel 2
About the System Board Appendix A - 89
Page 96

June 2004 NEC Business Solutions Ltd
Designation Control Purpose
iCMC System
Diagnostic
Red LED Indicator After the board is installed, this LED lights to indicate
initialisation and then turns off after the board is
completely initialised, (after a few seconds).
• Remains On over 5 minutes — indicates initialisation
failure
• Off — indicates normal operation
• Flashing — indicates hardware failure
OP-STA1 Yellow LED Indicator Displays computer status 1
OP-STA2 Red LED Indicator Displays computer status 2
ENET CON. Green LED Indicator Ethernet Connection indicator
ENET BSY. Yellow LED Indicator Ethernet Busy indicator
APPL. Red LED Indicator AV Application status
H.D. Green LED Indicator Hard Drive R/W activity
Shutdown Push button Push to shutdown and restart the board
LAN Connector, 8 pin
modular socket ISO
10 Base-T LAN Connector, TCIP/IP socket service;
Ethernet Port
8877
COM-1 Connector, D-type
RS-232 9 Pin
COM-2 Connector, D-type
RS-232 9 pin
Serial #1 provide EIA/TIA RS-232C compatibility, wired
as DTE; modem or PMS port
Serial #2 provide EIA/TIA RS-232C compatibility, wired
as DTE; default console port for direct connections
90 - Appendix A About the System Board
Doc. No. 8557 - Release 1.1
June 2004
Page 97

Chapter B – Starting and Shutting Down the System
Starting and Shutting Down
the System
S
ECTION
STARTING AND
SHUTTING DOWN
THE SYSTEM
1
Appendix B
Some procedures require that you shut down and restart the voice
messaging application. Others require that you shut down and restart both
the voice messaging application and the operating system. See the
following procedures to shut down the voice messaging application or the
application and the operating system.
Caution Do not disconnect the board or turn off the power while the
Application LED (Red) is on.
Caution Always shut down the voice messaging system before turning off
the phone system or subscribers may lose messages.
To shut down and restart the voice messaging system application
1 Shut down the voice messaging application by pressing ESC at the
Banner screen and then following the system prompts.
2 If you are connected to the voice messaging system using a monitor,
keyboard, and mouse, perform the following actions to restart the voice
messaging application. Otherwise, go to step 3.
• Go to the OS/2 desktop by pressing ALT+ESC repeatedly until it appears.
• Select the Restart Voicemail icon on the OS/2 desktop.
3 If you are using a remote access connection to access the voice
messaging system screens, perform the following actions to restart the
voice messaging application:
• Open an OS/2 command prompt as described in “Using the OS/2 host process switcher” on page 34.
• At the OS/2 command prompt, type
• Type
• Type
cd \vmail and press ENTER.
vm and press ENTER.
e: and press ENTER.
Doc. No. 8557 - Release 1.1
June 2004
Xen IPK Xen Mail CTI Installation Guide Appendix B - 91
Page 98

June 2004 NEC Business Solutions Ltd
To shut down and restart the voice messaging system
1 Shut down the voice messaging application by pressing ESC at the
Banner screen and then following the system prompts.
CAUTION If you set the Shut down switch OFF before exiting the application, the system will not wait for a call to finish before disconnecting all lines.
2 Locate the Shutdown switch on the voice messaging system board and
set it Off. The system automatically exits the voice messaging application
(if open), shuts down OS/2, and turns the board’s power off.
CAUTION If the Shut down switch is already set OFF, go to an OS/2 command
prompt, type shutdown and wait for the shutdown to finish. Then push the Power button.
3 Restart the voice messaging system by setting the Shutdown switch On
and then pressing the Power button.
92 - Appendix B Starting and Shutting Down the System
Doc. No. 8557 - Release 1.1
June 2004
Page 99

Chapter C – Changing Network Protocols
Changing Network Protocols
S
ECTION
CHANGING NETWORK
PROTOCOLS
1
Appendix C
Changing network protocols
To change the network protocol configuration for an existing voice
messaging system, perform the following procedure.
To remove a network protocol configuration, perform the procedure, “To
remove the existing network protocol configuration” on page 94.
To change an existing network protocol configuration
1 Ask your network administrator for the information required to set up
network protocols. Refer to the table in Chapter 2 for details.
2 Shut down the voice messaging system application by pressing ESC at
the Banner screen and then following the system prompts.
3 At the OS/2 command prompt, type f: and press ENTER.
4Type cd \ and press ENTER.
5Type setup and press ENTER.
6Type y to proceed with the voice messaging system Setup utility.
7 Press ENTER to continue until you reach the Setup Type menu.
8 From the Setup Type menu, type 2 to choose “Configure system” and
press ENTER.
9 Press ENTER to confirm that the voice messaging software is installed
on drive E.
10 Press ENTER to confirm that the voice messaging software is installed
in the Vmail directory.
11 Review the features and options available with your system that are
listed on-screen. Press ENTER to continue.
12 From the Update Configuration menu, type 3 to reconfigure network
protocols and press ENTER.
13 When you have completed your selection(s), press ENTER.
14 Follow the on-screen instructions to continue.
15 From the Setup Complete menu, type y and press ENTER to exit the
Setup utility.
16 Shut down and restart the voice messaging system by setting the
board’s Shutdown switch Off. After the system has shut down, set the
switch On and then press the Power button to restart.
Doc. No. 8557 - Release 1.1
June 2004
Xen IPK Xen Mail CTI Installation Guide Appendix C - 93
Page 100

June 2004 NEC Business Solutions Ltd
To remove the existing network protocol configuration
1 Shut down the voice messaging system application by pressing ESC at
the Banner screen and then following the system prompts.
2 At the OS/2 command prompt, type f: and press ENTER.
3Type cd \ and press ENTER.
4Type setup and press ENTER.
5Type y to proceed with the voice messaging system Setup utility.
6 Press ENTER to continue until you reach the Setup Type menu.
7 From the Setup Type menu, type 3 to choose “Remove configuration”
and press ENTER.
8 Press ENTER to confirm that the voice messaging software is installed
on drive E.
9 Press ENTER to confirm that the voice messaging software is installed in
the Vmail directory.
10 Review the features and options available with your system that are
listed on-screen. Press ENTER to continue.
11 From the Remove Configuration menu, type 3 to reconfigure network
protocols and press ENTER.
12 When you have completed your selection(s), press ENTER.
13 Follow the on-screen instructions to continue.
14 From the Setup Complete menu, type y and press ENTER to exit the
Setup utility.
15 At an OS/2 command prompt, type shutdown and press ENTER.
16 Shut down and restart the voice messaging system by setting the
board’s Shutdown switch Off. After the system has shut down, set the
switch On and then press the Power button to restart.
94 - Appendix C Changing Network Protocols
Doc. No. 8557 - Release 1.1
June 2004
 Loading...