

Page 1

LCD Projector
MODEL VT440 VT540
VT440G VT540G
VT440J VT540J
(Japanese model) (Japanese model)
SERVICE MANUAL
Better Service
PART No.399911031
Better Reputation
Better Profit
SAFETY CAUTION:
Before servicing this chassis, it is important that the service
technician read and follow the “Safety Precautions” and “Product
Safety Notice” in this Service Manual.
WARNING:
SHOCK HAZARD - Use an isolation transformer when servicing.
Page 2

CONTENTS
SAFETY PRECAUTIONS .................................................................................................................................. 2-1
USERS MANUAL............................................................................................................................................... 3-1
TROUBLE SHOOTING ...................................................................................................................................... 4-1
METHOD OF ADJUSTMENTS .......................................................................................................................... 5-1
CIRCUIT DESCRIPTION ................................................................................................................................... 6-1
METHOD OF DISASSEMBLY ........................................................................................................................... 7-1
DISASSEMBLY.................................................................................................................................................. 8-1
PACKAGING...................................................................................................................................................... 9-1
REPLACEMENT PART LIST ........................................................................................................................... 10-1
CONNECTION DIAGRAMS............................................................................................................................. 11-1
BLOCK DIAGRAM ........................................................................................................................................... 12-1
SCHEMATIC DIAGRAMS................................................................................................................................ 13-1
1-1
Page 3

SAFETY PRECAUTIONS
CAUTION
RISK OF ELECTRIC SHOCK
CAUTION: TO REDUCE THE RISK OF ELECTRIC SHOCK, DO NOT REMOVE
COVER. NO USER-SERVICEABLE PARTS INSIDE. REFER SERVICING
TO QUALIFIED SERVICE PERSONNEL.
This symbol warns the user that uninsulated voltage within the unit may
have sufficient magnitude to cause electric shock. Therefore, it is dangerous
to make any kind of contact with any part inside of this unit.
This symbol alerts the user that important literature concerning the
operation and maintenance of this unit has been included.
Therefore, it should be read carefully in order to avoid any problems.
DO NOT OPEN
ATTENTION
RISQUE D'ELECTROCUTION
NE PAS OUVRIR
MISE EN GARDE: AFIN DE REDUIRE LES RISQUES D' ELECTROCUTION, NE PAS
DEPOSER LE COUVERCLE, IL N'Y A AUCUNE PIECE
UTILISABLE A L'INTERIEUR DE CET APPAREIL. NE CONFIER
LES TRAVAUX D'ENTRETIEN QU'A UN PERSONNEL QUALIFIE.
Ce symbole a pour but de prévenir I' utilisateur de la présence d'
une tension dangereuse, non isolée se trouvant à l' intérieur de l'
appareil. Elle est d' une intensité suffisante pour constituer un risque
d' électrocution. Eviter le contact avec les pièces à l' intérieur de
cet appareil.
Ce symbole a pour but de prévenir l' utilisateur de la présence d'
importantes instructions concernant l' entretien et le fonctionnement
de cet appareil. Par conséquent, elles doivent être lues
attentivement afin d' éviter des problèmes.
2-1
Page 4

SAFTY PRECAUTIONS
During servicing carefully observe the following.
1. OBSERVE ALL PRECAUTIONS
Items and locations that require special care during servicing, such as the cabinet, chassis, and parts are labelled
with individual safety instructions. Carefully comply with
these instructions and all precautions in the instruction
manual.
2. BE CAREFUL OF ELECTRIC SHOCK
The chassis carries an AC voltage. If you touch the
chassis while it is still alive, you will get a severe shock.
If you think the chassis is alive, use an isolating
transformer or gloves, or pull out the plug before
replacing any parts.
3. USE SPECIFIED PARTS
The components have been chosen for minimum
flammability and for specific levels of resistance value
and withstand voltage. Replacement parts must match
these original specifications. Parts whose specifications
are particularly vital to safe use and maintenance of the
set are marked on the circuit diagrams and parts list.
Substitution of these parts can be dangerous for you
and the customer, so use only specified parts.
4. REMOUNT ALL PARTS AND RECONNECT ALL
WIRES AS ORIGINALLY INSTALLED
For safety, insulating tape and tubes are used
throughout, but some lift-off parts on the printed wiring
board require special attention.
All wires are positioned away from high-temperature and
high-voltage parts, and, if removed for servicing, they
must be retuned precisely to their original positions.
5. LAMP
Be very careful of the lamp because it generates high
heat while it is used at high voltage. When replacing
the bulb, make sure it is cool enough.
6. LENS
Do not look into the lens during projection. This important
to avoid damage to the eyes.
7. SERVICING
At the time of repair or inspection services, use an earth
band (wrist band), without fail.
8. RUN A COMPLETE SAFETY CHECK AT THE
COMPLETION OF SERVICING
After completion of servicing, confirm that all screws,
parts, and wiring, removed or disconnected for servicing,
have been returned to their original positions. Also
examine if the serviced sections and peripheral areas
have suffered from any deterioration as a result of
servicing. In addition, check insulation between external
metallic parts and blades of wall-outlet plugs. This
examination is indispensable in confirming complete
establishment of safety.
(Insulation check)
Pull out a plug from a wall outlet to disconnect the
connection cable. Then turn on the POWER switch.
Use a 500V megger (Note 2) and confirm that the
insulation resistance is 1MΩ or more between each
terminal of the plug and exposed external metal (Note
1). If the measured value is below the specified level,
then it is necessary to inspect and fix the set.
(Note 1)
Exposed external metal....RGB input terminals, control
terminals, etc.
(Note 2)
If a 500V megger is not available for an unavoidable
reason, then use a circuit tester or the like for inspection.
2-2
Page 5

LCD Projector
MultiSync VT440/VT540
User’s Manual
Page 6

IMPORTANT INFORMATION
Precautions
Please read this manual carefully before using your NEC
MultiSync VT440/VT540 Projector and keep the man ual
handy for future reference.
Your serial number is located under the name plate label
on the right side of your MultiSync VT440/VT540. Record
it here:
CAUTION
To turn off main power , be sure to remove the
plug from power outlet.
The power outlet socket should be installed
as near to the equipment as possible, and
should be easily accessible.
CAUTION
TO PREVENT SHOCK, DO NO T OPEN THE
CABINET.
NO USER-SERVICEABLE PARTS INSIDE.
REFER SERVICING TO QUALIFIED NEC
SERVICE PERSONNEL.
This symbol warns the user that uninsulated
voltage within the unit may be sufficient to
cause electrical shock. Therefore, it is dangerous to make any kind of contact with any
part inside of the unit.
This symbol alerts the user that important information concerning the operation and maintenance of this unit has been provided. The
information should be read carefully to avoid
problems.
W ARNING
TO PREVENT FIRE OR SHOCK, DO NOT EXPOSE THIS
UNIT TO RAIN OR MOISTURE.
DO NOT USE THIS UNIT’S GROUNDED PLUG WITH AN
EXTENSION CORD OR IN AN OUTLET UNLESS ALL
THREE PRONGS CAN BE FULLY INSERTED.
DO NOT OPEN THE CABINET. THERE ARE HIGH-VOLTAGE COMPONENTS INSIDE. ALL SERVICING MUST BE
DONE BY QUALIFIED NEC SERVICE PERSONNEL.
RF Interference
WARNING
The Federal Communications Commission does not
allow any modifications or changes to the unit EXCEPT
those specified by NEC Technologies in this manual.
Failure to comply with this government regulation could
void your right to operate this equipment.
This equipment has been tested and found to comply
with the limits for a Class B digital device , pursuant to
Part 15 of the FCC Rules. These limits are designed
to provide reasonable protection against harmful interference in a residential installation. This equipment
generates, uses, and can radiate radio frequency energy and, if not installed and used in accordance with
the instructions, may cause harmful interference to
radio communications. However, there is no guarantee that interference will not occur in a particular installation. If this equipment does cause harmful interference to radio or television reception, which can be
determined by turning the equipment off and on, the
user is encouraged to try to correct the interference
by one or more of the following measures:
• Reorient or relocate the receiving antenna.
• Increase the separation between the equipment and
receiver .
• Connect the equipment into an outlet on a circuit different from that to which the receiver is connected.
• Consult the dealer or an experienced radio / TV technician for help .
In UK, a BS approved power cable with moulded plug
has a Black (five Amps) fuse installed for use with this
equipment. If a po wer cable is not supplied with this equipment please contact your supplier.
DOC Compliance Notice
This Class B digital apparatus meets all requirements of
the Canadian Interference-Causing Equipment Regulations.
3. GSGV Acoustic Noise Information Ordinance:
The sound pressure level is less than 70 dB (A) according to ISO 3744 or ISO 7779.
• IBM is a registered trademark of International Business Machines
Corporation.
• Macintosh and PowerBook are registered trademarks of Apple
Computer, Inc.
• Other product and company names mentioned in this user's manual
may be the trademarks of their respective holders.
E–2
Page 7

Important Safeguards
These safety instructions are to ensure the long life of
your projector and to prev ent fire and shock. Please read
them carefully and heed all warnings.
CAUTION
Do not unplug the power cable from the wall outlet under any
one of the following circumstances. Doing so can cause damage
to the projector:
Installation
1. For best results, use your projector in a darkened room.
2. Place the projector on a flat, level surface in a dry area away
from dust and moisture.
3. Do not place your projector in direct sunlight, near heaters
or heat radiating appliances.
4. Exposure to direct sunlight, smoke or steam can harm internal components.
5. Handle your projector carefully . Dropping or jarring can damage internal components.
6. Do not place heavy objects on top of the projector.
7. If you wish to have the projector installed on the ceiling:
a. Do not attempt to install the projector yourself.
b. The projector must be installed by qualified technicians
in order to ensure proper operation and reduce the risk
of bodily injury.
c. In addition, the ceiling must be strong enough to support
the projector and the installation must be in accordance
with any local building codes.
d. Please consult your dealer for more information.
Power Supply
1. The projector is designed to operate on a power supply of
100-120 or 200-240 V 50/60 Hz A C. Ensure that y our power
supply fits this requirement before attempting to use your
projector.
2. Handle the pow er cable carefully and a void e xcessive bending. A damaged cord can cause electric shock or fire.
3. If the projector is not to be used for an extended period of
time, disconnect the plug from the power outlet.
* While the Hour Glass icon appears.
* While the message "Please wait a little." appears. This mes-
sage will be displayed after the projector is turned off.
* Immediately after the power cable is plugged into the wall
outlet (the POWER indicator has not changed to a steady amber
glow).
* Immediately after the cooling fan stops working (The cooling
fan continues to work for 30 seconds after the projector is
turned off with the POWER button).
* While the POWER and the ST ATUS indicators are alternately
flashing.
Cleaning
1. Unplug the projector before cleaning.
2. Clean the cabinet periodically with a damp cloth. If heavily
soiled, use a mild detergent. Never use strong detergents
or solvents such as alcohol or thinner.
3. Use a blower or lens paper to clean the lens, and be careful
not to scratch or mar the lens.
E–3
Page 8

Lamp Replacement
• T o replace the lamp , f ollow all instructions provided on page
E-33.
• Be sure to replace the lamp when the message "The lamp
has reached the end of its usable life. Please replace the
lamp."appears. If you continue to use the lamp after the lamp
has reached the end of its usable life, the lamp bulb may
shatter, and pieces of glass may be scattered in the lamp
case. Do not touch them as the pieces of glass may cause
injury. If this happens, contact your NEC dealer for lamp
replacement.
• Allow a minimum of 30 seconds to elapse after turning off
the projector. Then disconnect the power cable and allo w 60
minutes to cool the projector before replacing the lamp.
Fire and Shock Precautions
1. Ensure that there is sufficient ventilation and that vents are
unobstructed to prevent the build-up of heat inside y our projector. Allow at least 3 inches (10 cm) of space between
your projector and a wall.
2. Prevent foreign objects such as paper clips and bits of paper from falling into your projector. Do not attempt to retrieve any objects that might fall into your projector. Do not
insert any metal objects such as a wire or screwdriver into
your projector. If something should fall into your projector,
disconnect it immediately and have the object remov ed by a
qualified NEC service personnel.
3. Do not place any liquids on top of your projector.
• Do not look into the lens while the projector is on. Serious
damage to your eyes could result.
• Keep any items such as magnifying glass out of the light
path of the projector. The light being projected from the lens
is extensive, therefore any kind of abnormal objects that
can redirect light coming out of the lens, can cause unpredictable outcome such as fire or injury to the eyes.
• Do not cover the lens with the supplied lens cap or equivalent while the projector is on. Doing so can lead to melting of
the cap and possibly burning your hands due to the heat
emitted from the light output.
E–4
Page 9

TABLE OF CONTENTS
1. INTRODUCTION
Introduction to the MultiSync VT440/VT540 Projector
Getting Started ............................................................ E-6
What’s in the Box ......................................................... E-7
Getting to Know Your MultiSync VT440/VT540 Projector
Front / Side Features ..............................................E-8
Rear / Side Features............................................... E-9
Top Features ......................................................... E-10
Terminal Panel Features ....................................... E-11
Remote Control Features...................................... E-12
.................E-6
..................E-8
2. INSTALLATION
Setting Up Your Projector........................................... E-14
Selecting a Location ..................................................E-14
Using a Tabletop or Cart ............................................E-14
Distance Chart...........................................................E-15
Ceiling Installation ..................................................... E-16
Reflecting the Image.................................................. E-16
Wiring Diagram..........................................................E-17
Connecting Y our PC ..............................................E-18
Connecting Your Macintosh Computer ..................E-19
Connecting an External Monitor............................ E-21
Connecting Your DVD Player................................. E-22
Connecting Your VCR or Laser Disc Player .......... E-23
3. OPERATION
General Controls ....................................................... E-24
Enlarging and Moving a Picture................................. E-24
Using the Menus........................................................ E-25
Menu Tree .................................................................. E-26
Menu Elements.......................................................... E-27
Menu Descriptions & Functions.................................E-28
Source Select ............................................................E-28
RGB/Video/S-Video
Picture ....................................................................... E-28
Brightness/Contrast/Color/Hue/Sharpness
Volume.......................................................................E-28
Image Options ...........................................................E-28
Keystone ...............................................................E-28
Color Temperature ................................................ E-28
Lamp Mode ........................................................... E-29
Gamma Correction................................................ E-29
Aspect Ratio.......................................................... E-29
Noise Reduction.................................................... E-29
Color Matrix........................................................... E-29
White Balance....................................................... E-30
Auto Adjust............................................................ E-30
Position/Clock ....................................................... E-30
Resolution .............................................................E-30
Factory Default...................................................... E-30
Menu.......................................................................... E-31
Menu Mode ........................................................... E-31
Basic/Advanced................................................E-31
Language ..............................................................E-31
Projector Pointer ................................................... E-31
Source Display...................................................... E-31
Volume Bar (Direct Button) ................................... E-31
Menu Display Time................................................ E-31
Setup .........................................................................E-31
Orientation ............................................................ E-31
Background........................................................... E-31
Signal Select .........................................................E-32
Auto Start ..............................................................E-32
Power Management.............................................. E-32
Power Off Confirmation......................................... E-32
Keystone Save ......................................................E-32
Clear Lamp Hour Meter ........................................ E-32
Help ...........................................................................E-32
Contents................................................................ E-32
Information ............................................................ E-32
4. MAINTENANCE
Replacing the Lamp................................................... E-33
Remote Control Battery Installation...........................E-34
Cleaning or Replacing the Filters .............................. E-34
5. TROUBLESHOO TING
Power / Status Light Messages ................................. E-35
Common Problems & Solutions................................. E-35
6. SPECIFICATIONS
Optical/Electrical/Mechanical..................................... E-36
Cabinet Dimensions .................................................. E-37
D-Sub Pin Assignments............................................. E-38
Timing Chart .............................................................. E-39
PC Control Codes...................................................... E-40
Cable Connection ...................................................... E-40
E–5
Page 10

1. INTRODUCTION
Introduction to the MultiSync VT440/VT540 Projector
This section introduces you to your new MultiSync VT440 (SVGA)/
VT540 (XGA) Projector and describes the features and controls.
Congratulations on Your Purchase of The MultiSync VT440/
VT540 Projector
The MultiSync VT440/VT540 is one of the very best projector s available today. The MultiSync VT440/VT540 enables you to project precise images up to 300 inches across (measured diagonally) from your
PC or Macintosh computer (desktop or notebook), VCR, D VD player,
document camera, or even a laser disc player.
You can use the projector on a tabletop or cart, you can use the projector to project images from behind the screen, and the projector can
be permanently mounted on a ceiling*1. The remote control can be
used wirelessly.
• The supplied remote control can be used without a cable.
• You can control the projector with a PC using the PC Control
• The contemporary cabinet design is light, compact, easy to carry ,
• Eight pointers are available for your presentation.
*1 Do not attempt to mount the projector on a ceiling yourself.
*2 An XGA image (10242768) is con verted into an 8002600 crisp
*3 An SXGA image (128021024) is converted into a 10242768
Features you’ll enjoy:
• Simple set up and operation.
• Front ventilation directs hot air away from your audience.
• A high-performance 160 watt NSH (130 watt in Eco mode) lamp.
The lamp life can be extended up to 3000 hours by using the Eco
mode.
• The supplied wireless remote control that operates the projector
from any angle.
• Manual zoom control enables you to adjust the image between
25 (0.63 m) and 300 inches (7.6 m) (measured diagonally).
• Keystone correction allo ws you to correct trapezoidal distortion
so that the image is square.
• Y ou can choose between video modes depending on your source:
“normal” for a typical picture, “natural” for true color reproduction.
• An image can be projected from in front or behind a screen, and
the projector can even be installed on the ceiling.
• NEC Technologies’ exclusive Advanced AccuBlend intelligent
pixel blending technology - an extremely accurate image compression technology - offers a crisp image with SXGA (1280 x
1024) resolution*3.
• Supports most IBM VGA, SVGA, XGA*2 , SXGA(with Advanced AccuBlend)*3, Macintosh, component signal (YCbCr /
YPbPr) or any other RGB signals within a horizontal frequency
range of 15 to 100 kHz and a vertical frequency range of 50 to
117 Hz. This includes NTSC, PAL, PAL60, SECAM and
NTSC4.43 standard video signals.
NOTE: Composite video standards are as follows:
NTSC: U.S. TV standard for video in U.S. and Canada.
PAL: TV standard used in Western Europe.
PAL60: TV standard used for NTSC playback on PAL TVs.
SECAM: TV standard used in France and Eastern Europe.
NTSC4.43: TV standard used in Middle East countries.
Getting Started
The fastest way to get started is to take your time and do everything
right the first time. Take a few minutes now to review the user’s
manual. This may save you time later on. At the beginning of each
section of the manual you’ll find an overview. If the section doesn’t
apply, you can skip it.
port.
and complements any office, boardroom or auditorium.
The projector must be installed by qualified technicians in order
to ensure proper operation and reduce the risk of bodily injury.
In addition, the ceiling must be strong enough to support the projector and the installation must be in accordance with any local
building codes. Please consult your dealer for more information.
image with NEC technology’s Advanced AccuBlend on VT440.
crisp image with NEC technology’s Advanced AccuBlend on
VT540.
E–6
Page 11

What's in the Box?
RGB
INPUT
OUTPUT
AUD
IN
OUT
PC-CONTROL S-VIDEO VID
Make sure your box contains everything listed. If any pieces are missing, contact your dealer.
Please save the original box and packing materials if you ever need to ship your MultiSync VT440/VT540 Projector.
POWER
STATUS
ON
N
E
T
E
/
R
OFF
C
A
N
C
E
L
RD-366E
MAGNIFY
HELP
SELECT
M
E
N
U
E
N
T
E
R
POINTER
POWER
MUTE
SOURCE AUTO ADJUST
Projector
SOURCE
N
U
E
M
SELECT
Vol.
C
A
N
C
PIC.
AUTO
ADJ.
Vol.
L
E
Card remote control
Lens cap
String and rivet
ON DIP
1
23456
Power cable
Quick
Connect
Signal cable
Pin adapter for Macintosh
Guide
User's
Manual
E–7
Page 12

RGB
INPUT
OUTPUT
AUD
IN
OUT
PC-CONTROL S-VIDEO VID
Getting to Know Your MultiSync VT440/VT540 Projector
RGB
INPUT
OUTPUT
AUD
IN
INOUT
OUT
PC-CONTROL S-VIDEO VIDEO
Front/ Side Features
Remote Sensor
Slot for Kensington
MicroSaver
Security System
Air-Filter
(inlet)
Carrying Handle
Controls
Zoom Lever
POWER
ON
/
STAND BY
E
R
C
A
N
C
E
L
Terminal Panel
STATUS
N
T
E
SELECT
AC Input
Connect the supplied power
cable’s three-pin plug here.
Remote Sensor
SOURCE AUTO ADJUST
M
E
N
U
Air-Filter (inlet)
Lens Cap
Adjustable Tilt Foot Button
Adjustable Tilt Foot
Lens
Focus Ring
NOTE: Built-in Security Slot ( )
This security slot supports the MicroSaver® Security System.
MicroSaver® is a registered trademark of Kensington Microware
Inc.The logo is trademarked and owned by Kensington Microware
Inc.
Ventilation (outlet)
Carrying the Projector:
Raise the carrying handle up. Always carry your projector by the
carrying handle.
NOTE:When moving the pr ojector or when it is not in use , cover the
lens with the lens cap.
OFF
/
ON
L
E
C
N
A
C
R
E
T
SELECT
U
N
N
E
POWER
E
STATUS
M
SOURCE AUTO ADJUST
E–8
Page 13

M
E
N
U
E
N
T
E
R
C
A
N
C
E
L
SELECT
POWER
STATUS
ON
/
STAND BY
SOURCE AUTO ADJUST
Rear/ Side Features
RGB
INPUT
OUTPUT
AUD
IN
OUT
PC-CONTROL S-VIDEO VID
B
UT
PUT
AUD
IN
OUT
L S-VIDEO VID
RD-366E
Remote Sensor
Remote Sensor
Built-in Monaural Speaker (1W)
Rear Foot
Lamp Cover
Card Remote Slot
Slot for Card Remote Control
The supplied card remote control can be stored in the cabinet.
To store the card remote control:
1. Insert the card remote control STRAIGHT into the slot.
2. Push the card remote control until it is into place.
AUTO
ADJ.
L
E
C
N
A
C
Vol.
SOURCE
To pull out the card remote control:
1. Push the bottom of the card remote control straight to eject the
card remote control.
2. Pull out the card remote control.
PIC.
U
SELECT
MUTE
N
Vol.
E
M
POWER
POINTER
R
E
T
N
E
HELP
RD-366E
MAGNIFY
Lamp Cover Screw
Rear Foot
Attaching the lens cap to the lens hood with the supplied string and rivet
1. Thread the string through the hole on the lens cap and then tie a
knot in the string.
Lens Cap
2. Tie a knot again
3. Use the rivet to attach the string to the bottom of the lens hood.
Rivet
String
NOTE: Do not push or pull the card remote control in a slanting
direction. Unless you push the card r emote control straight, you may
not eject the card remote contr ol. Should this happen, try pushing the
card remote control straight again.
E–9
Page 14

Top Features
1
5
4
7
C
A
SELECT
N
C
STATUS
POWER
E
N
T
E
R
ON
/
STAND BY
6
8
9
1 Source Button
Use this button to select a video source such as a PC, VCR or D VD
player.
2 Auto Adjust Button
Use this button to adjust Position-H/V and Pixel Clock/Phase for
an optimal picture. Some signals may not be displayed correctly or
take time to switch between sources.
3 Menu Button
Displays the menu.
4 Select (▲▼§ ©) / Volume (+) (–) Buttons
▲▼: Use these buttons to select the menu of the item you wish
to adjust.
§ ©: Use these buttons to change the level of a selected menu
item.
A press of the © button executes the selection. When no menus
appear, these ▲▼ buttons work as a volume control.
When the pointer is displayed, these § © ▲▼ buttons move the
pointer.
SOURCE AUTO ADJUST
M
E
N
U
E
L
3
2
6 Cancel Button
Press this button to exit the menu. Press this button to return the
adjustments to the last condition while you are in the adjustment
or setting menu.
7 Status Indicator
When this is lit red (orange in Eco mode) continually, it’s warning
you that the projection lamp has exceeded 2000 hours (up to 3000
hours in Eco mode) of service. After this light appears, it is advisable to replace the projection lamp as soon as possible. (See page
E-33). In addition the message “The lamp has reached the end of
its usable life. Please replace the lamp.” appears continually until
the lamp is replaced.
If this light blinks red rapidly, it indicates that the lamp cover or
filter cover is not attached properly or the projector is overheated.
See the Power / Status Light Messages on page E-35 for more
details.
8 Power Indicator ( )
When this indicator is green, the projector is on; when the indicator is orange, it is in standby mode.
5 Enter Button
Executes your menu selection and activates items selected from
the menu.
9 Power Button (ON / STAND BY)
Use this button to turn the power on and off when the power is
supplied and the projector is in standby mode.
NOTE: To turn off the projector, press and hold this button for
minimum of two seconds.
E–10
Page 15

Terminal Panel Features
RGB
AUDIO
INPUT
1
IN
OUT
OUTPUT
INOUT
2
PC-CONTROL S-VIDEO VIDEO
7
6
1. RGB Input Connector(Mini D-Sub 15 pin)
Connect your PC or other RGB equipment. Use the supplied signal cable to connect to a PC.
POWER
STATUS
ON
/
STAND BY
3
4
8
N
E
T
E
R
C
A
N
SELECT
C
E
L
E
N
U
SOURCE AUTO ADJUST
M
Slot for Kensington
MicroSaver Security System
5
5. Video Input (RCA)
Connect a VCR, DVD player, laser disc player, or document camera here to project video.
2. RGB Monitor Output Connector (Mini D-Sub 15 pin)
You can use this connector to loop your computer image to an
external monitor from the RGB input source.
3. Audio Input / Output Mini Jack
This is where you connect audio output from your computer. Or
connect additional external speakers here to listen to audio coming
from your Video or S- Video input.
4. Audio Input / Output Connector (RCA)
This is where you connect audio output from a VCR, D VD player ,
or laser disc player. Or connect additional e xternal speakers to listen to audio coming from your RGB source.
NOTE: Either connector 3 or 4 can be used for input or output, however they cannot both be used for input simultaneously. It can damage your equipment.
6. S-Video Input Port (Mini DIN 4 Pin)
Connect the S-Video input from an external source like a VCR.
7. PC Control Port (Mini DIN 8 Pin)
Use this port to connect your PC to control your projector. This
enables you to use your PC and serial communication protocol to
control the projector. If you are writing your o wn program, typical
PC control codes are on page E-40.
A cap is put on the port at the factory . Remove the cap when using
the port.
8. Built-in Security Slot (
)
This security slot supports the MicroSaver ® Security System.
MicroSaver ® is a registered trademark of K ensington Micro w are
Inc. The logo is trademarked and owned by K ensington Microware
Inc.
E–11
Page 16

Remote Control Features
SELECT
POINTER
Vol.–
Vol.+
POWER
HELP
RD-366E
PIC.
MUTE
MAGNIFY
SOURCE
AUTO
ADJ.
M
E
N
U
E
N
T
E
R
C
A
N
C
E
L
1 Source Button
Press to select a video source.
2 Auto Adjust Button
Use this button to adjust Position-H/V and Pixel Clock/Phase for
an optimal picture. Some signals may not be displayed correctly,
or in some cases it may take some time for a source to switch between sources.
3 Menu Button
Displays the menu.
4 Select (▲▼
▲▼: Use these buttons to select the menu of the item you wish
§ ©: Use these buttons to change the level of a selected menu
A press of the © button executes the selection. When no menus
appear, these ▲▼ buttons work as a volume control.
When the pointer is displayed, these § © ▲▼ buttons move the
pointer.
5 Enter Button
Use this button to enter your menu selection.
6 Cancel Button
Press this button to exit “Menus”. Press this button to return the
adjustments to the last condition while you are in the adjustment
or setting menu.
7 Magnify Button
Use the (+) or (–) button to adjust the image size up to 400%.
When the Pointer is displayed, the magnified image is displayed at
the center of the Pointer. When the Pointer is not displayed, the
magnified image is displayed at the center of the screen.
When the image is magnified, the pointer is changed to the magnifying icon.
8 Pointer Button
Press this button to display one of the eight pointers; press again to
hide the pointer. You can move your pointer icon to the area you
want on the screen using the Select button.
9 Picture Mute Button
This button turns off the image and sound for a short period of
time. Press again to restore the image and sound.
10 Help Button
Provides information about operation and adjustment procedures
or the set information for the current menu or adjustment during
menu operation. This also displays information how to use the Help.
11 Power Button
If power is applied, you can use this button to turn your projector
on and off.
NOTE: To turn off the projector, press and hold the POWER button for a minimum of two seconds.
§ ©) / Volume (+) (–) Buttons
to adjust.
item.
Remote Control
1
12
2
3
4
5
6
8
9
7
11
10
NOTE: Remove the transparent insulation tape before use. See
page E-34 for battery installation.
H
N
A
P
A
J
S
T
L
M
O
n
V
CR2025
O
3
2
-
L
L
i
L
C
E
12 Infrared Transmitter
Direct the remote control toward the remote sensor on the projector cabinet.
Remote Control Precautions
• Handle the remote control carefully.
• If the remote control gets wet, wipe it dry immediately.
• Avoid excessive heat and humidity.
• Do not place the battery upside down.
NOTE: Before you use the card remote control for the first time, be
sure to remove the insulation tape from the card remote control.
* Keep the coin cell battery out of reach of children so as not to
allow them to swallow the cell battery.
CAUTION:
Danger of explosion if battery is incorrectly replaced.
Replace only with the same or equivalent type recommended by
the manufacturer.
Dispose of used batteries according to your local regulations.
E–12
Page 17

Operating Range
7m
22 feet
30˚
7m7m
22 feet
30˚
E–13
Page 18

2. INSTALLATION
RGB
INPUT
OUTPUT
AUD
IN
INOUT
OUT
PC-CONTROL S-VIDEO VIDEO
RGB
INPUT
OUTPUT
AUD
IN
OUT
PC-CONTROL S-VIDEO VID
E
LE
RGB
INPUT
OUTPUT
AUD
IN
OUT
PC-CONTROL S-VIDEO VID
ER
TA
This section describes how to set up your MultiSync VT440/VT540
projector and how to connect video and audio sources.
Setting up Your Projector
Y our MultiSync VT440/VT540 Projector is simple to set up and use.
But before you get started, you must first:
1. Determine the image size.
2. Set up a screen or select a non-glossy white wall onto which you
can project your image.
Carrying the Projector: Always carry your projector by the handle.
Ensure that the power cable and any other cables connecting to video
sources are disconnected before moving the projector.
When moving the projector or when it is not in use, cover the lens
with the lens cap.
Carrying handle
OFF
/
ON
L
E
C
N
A
C
R
E
T
SELECT
U
N
N
E
POWER
E
STATUS
M
SOURCE AUTO ADJUST
Selecting a Location
The further your projector is from the screen or wall, the larger the
image. The minimum size the image can be is approximately 25"
(0.64 m) measured diagonally when the projector is roughly 4 feet
(1.2 m) from the wall or screen. The largest the image can be is 300"
(7.6 m) when the projector is about 39.3 feet (12.0 m) from the wall
or screen.
Using a Tabletop or Cart
1. Place your projector on a flat level surface at the optimal distance
from the screen or wall so you realize the size image you want.
(Avoid having bright room lighting or sun light directly on the
screen or wall where you’ll be projecting the image.)
2. Connect the power cable, remove the lens cap and turn the projector on. (If no input signal is available, the projector will display a
background image.)
3. Ensure that the projector is square to the screen.
4. Move the projector left or right to center the image horizontally
on the screen.
5. To center the image vertically, lift the front edge of the projector
and press the One-Touch Tilt button on the front side of the projector to release the Front Adjustable foot.
Side view
Screen
(There is approximately 10 degrees of up and down adjustment
for the front of the projector.)
Adjusting the Tilt Foot
1) Press and hold the Tilt button on the front of the projector.
2) Lift the front edge of the projector to the height you want, and
release the button to lock the Adjustable Tilt Foot.
POWER
STATUS
ON
N
E
T
E
R
/
OFF
C
A
N
SELECT
C
E
L
SOURCE AUTO ADJUST
M
E
N
U
2
1
To fine-tune the image’s position vertically on the screen, rotate the
foot. Each of the rear feet height can be changed up to 0.6” (4mm).
CT
L
SOURCE AUTO ADJUST
M
E
N
U
Top view
Screen
S
POW
L
E
OFF
C
/
N
A
ON
C
U
N
E
M
SELECT
R
E
T
N
E
SOURCE AUTO ADJUST
POWER
STATUS
6. If the projected image does not appear square to the screen then
use keystone correction for proper adjustment.
7. Adjust the size of the image using the Zoom ring on the lens.
E–14
Page 19

Distance Chart
C
A
E
α
D
Formulas(mm) Formulas(inch)
"H = Horizontal Screen Width "H = Horizontal Screen Width
A = C/cosα A = C/cosα
C (wide) = 36.8712 × (diagonal screen size/ 0.92205) – 43.5689 C (wide) = (36.8712 × (diagonal screen size/0.92205) – 43.5689) / 25.4
C (tele) = C(wide) × 1.2 C (tele) = C (wide) × 1.2
D = 1.45 × M – 62.9 D = 1.45 × M – 62.9 / 25.4
E = 62.9 + 5.5M E = (62.9 + 5.5M) / 25.4
M = 1.25H / 22.86 M = 1.25H / 0.9
Zoom Lens (Wide)
α degree 9.01 8.93 8.85 8.82 8.81 8.79 8.78 8.77 8.75 8.74 8.74 8.73 8.72 8.72
β (=sinα) 0.16 0.16 0.15 0.15 0.15 0.15 0.15 0.15 0.15 0.15 0.15 0.15 0.15 0.15
γ (=cosα) 0.99 0.99 0.99 0.99 0.99 0.99 0.99 0.99 0.99 0.99 0.99 0.99 0.99 0.99
Screen Size H-Width inch 24 32 48 56 64 72 80 96 120 144 160 192 216 240
4:3 Diagonal inch 30 40 60 70 80 90 100 120 150 180 200 240 270 300
A mm 1171 1575 2384 2789 3193 3598 4002 4811 6025 7238 8047 9666 10879 12093
C mm 1156 1556 2356 2756 3155 3555 3955 4755 5955 7154 7954 9554 10753 11953
D mm -15 2 34 50 66 82 98 130 179 227 259 324 372 420
E mm 246 307 430 491 552 613 674 796 980 1163 1285 1530 1713 1896
inch 46 62 94 110 126 142 158 189 237 285 317 381 428 476
inch 46 61 93 108 124 140 156 187 234 282 313 376 423 471
inch -1 0 1233457910131517
inch 10 12 17 19 22 24 27 31 39 46 51 60 67 75
Zoom Lens (Tele)
α degree 6.28 7.46 7.39 7.37 7.36 7.35 7.34 7.32 7.31 7.30 7.30 7.29 7.29 7.28
β (=sinα) 0.11 0.13 0.13 0.13 0.13 0.13 0.13 0.13 0.13 0.13 0.13 0.13 0.13 0.13
γ (=cosα) 0.99 0.99 0.99 0.99 0.99 0.99 0.99 0.99 0.99 0.99 0.99 0.99 0.99 0.99
Screen Size H-Width inch 20 32 48 56 64 72 80 96 120 144 160 192 216 240
4:3 Diagonal inch 25 40 60 70 80 90 100 120 150 180 200 240 270 300
A mm 1396 1883 2851 3334 3818 4302 4785 5753 7204 8655 9623 11558 13009 14460
C mm 1387 1867 2827 3307 3787 4266 4746 5706 7146 8585 9545 11464 12904 14344
D mm -23 2 34 50 66 82 98 130 179 227 259 324 372 420
E mm 216 307 430 491 552 613 674 796 980 1163 1285 1530 1713 1896
inch 55 74 112 131 150 169 188 226 284 341 379 455 512 569
inch 55 74 111 130 149 168 187 225 281 338 376 451 508 565
inch -1 0 1233457910131517
inch 8 12 17 19 22 24 27 31 39 46 51 60 67 75
Distance Chart
A: Distance between the
lens and the screen center
C: Horizontal throw dis-
tance between screen
surface and the lens
D: Vertical distance be-
tween projector base
and base of image
E: Vertical distance be-
tween projector base
and screen center
Screen (inch)
H
4:3 Diagonal
NOTE: Distances may vary +/–5%.
300
250
200
150
100
50
Screen Size (inch)
0
024681012
Throwing Distance (m)
wide
300
250
200
150
100
50
Screen Size (inch)
0
0 100 200 300 400
Throwing Distance (inch)
tele
Throwing Distance Screen Size (inch)
(inch) (m) Wide Tele
45 1.2 30 25
61 1.6 40 33
93 2.4 60 50
108 2.8 70 58
124 3.2 80 67
140 3.6 90 75
156 4.0 100 83
187 4.8 120 100
234 6.0 150 125
282 7.2 180 150
313 8.0 200 167
376 9.6 240 200
423 10.8 270 225
471 12.0 300 250
E–15
Page 20

Ceiling Installation
Formulas(mm)
H” = Horizontal Screen Width (inch)
F
PC-CONTROLS-VIDEO VIDEO
INOUT
OUTPUT
OUT
IN
INPUT
RGB
B
α
AUDIO
A
C
A: Distance between the lens and the screen center
B: Vertical distance between the top of the supplied ceiling mount and the screen center
C: Horizontal throw distance between screen surface and the lens
F: Vertical distance between projector base and top of image
Zoom Lens (Wide)
α degree 9.01 8.93 8.85 8.82 8.81 8.79 8.78 8.77 8.75 8.74 8.74 8.73 8.72 8.72
β (=sinα) 0.16 0.16 0.15 0.15 0.15 0.15 0.15 0.15 0.15 0.15 0.15 0.15 0.15 0.15
γ (=cosα) 0.99 0.99 0.99 0.99 0.99 0.99 0.99 0.99 0.99 0.99 0.99 0.99 0.99 0.99
Screen Size H-Width inch 24 32 48 56 64 72 80 96 120 144 160 192 216 240
4:3 Diagonal inch 30 40 60 70 80 90 100 120 150 180 200 240 270 300
A mm 1171 1471 2242 2628 3013 3399 3785 4556 5713 6870 7641 9184 10341 11498
C mm 1156 1452 2214 2595 2976 3357 3738 4500 5644 6787 7549 9074 10217 11360
B mm 277 338 461 522 583 644 705 827 1011 1194 1316 1561 1744 1927
F mm -46 -29 3 19 35 51 67 100 148 196 229 293 341 390
inch 46 58 88 103 119 134 149 179 225 270 301 362 407 453
inch 46 57 87 102 117 132 147 177 222 267 297 357 402 447
inch 11 13 18 21 23 25 28 33 40 47 52 61 69 76
inch -2 -1 011234689121315
A = C/cosα
B = 94 + 5.5 × M
C (wide) = 36.8712 × (diagonal screen size/ 0.92205) – 43.5689
C (tele) = C(wide) × 1.2
F = 1.4516 × M – 94
M = 1.25H” / 22.86
Formulas(inch)
H” = Horizontal Screen Width
A = C/cosα
B = (94+5.5 × M) / 25.4
C
(wide) = (36.8712 × (diagonal screen size/0.92205) – 43.5689) / 25.4
C (tele) = C (wide) × 1.2
F = 1.4516 × M – 94/25.4
M = 1.25H / 0.9
Zoom Lens (Tele)
α degree 6.28 7.1 7.0 7.0 7.0 7.0 6.9 6.9 6.9 6.9 6.9 6.9 6.9 6.9
β (=sinα) 0.11 0.12 0.12 0.12 0.12 0.12 0.12 0.12 0.12 0.12 0.12 0.12 0.12 0.12
γ (=cosα) 0.99 0.99 0.99 0.99 0.99 0.99 0.99 0.99 0.99 0.99 0.99 0.99 0.99 0.99
Screen Size H-Width inch 20 32 48 56 64 72 80 96 120 144 160 192 216 240
4:3 Diagonal inch 25 40 60 70 80 90 100 120 150 180 200 240 270 300
A mm 1396 1902 2900 3399 3898 4397 4896 5893 7390 8887 9885 11881 13378 14875
C mm 1387 1887 2878 3373 3869 4364 4860 5851 7337 8823 9814 11796 13282 14768
B mm 247 338 461 522 583 644 705 827 1011 1194 1316 1561 1744 1927
F mm -54 -29 3 19 35 51 67 100 148 196 229 293 341 390
WARNING
• Installing your projector on the ceiling must be done by a qualified technician. Contact your NEC dealer for more information.
* Do not attempt to install the projector yourself.
• Only use your projector on a solid, lev el surface. If the projector falls to the ground, you can be injured and the projector
severely damaged.
• Do not use the projector where temperatures vary greatly . The
projector must be used at temperatures between 32˚F (0˚C)
and 95˚F (35˚C).
• Do not expose the projector to moisture, dust, or smoke. This
will harm the screen image.
• Ensure that you have adequate ventilation around your projector so heat can dissipate. Do not cover the vents on the side
or the front of the projector.
inch 55 75 114 134 153 173 193 232 291 350 389 468 527 586
inch 55 74 113 133 152 172 191 230 289 347 386 464 523 581
inch 10 13 18 21 23 25 28 33 40 47 52 61 69 76
inch -2 -1 011234689121315
If your projector is mounted on the ceiling and your image is upside
down, use the “Menu” and “Select” buttons on your projector cabinet or ▲▼ button on your remote control to correct the orientation.
(See page E-31.)
Reflecting the Image
Using a mirror to reflect your projector’s image enables you to enjoy
a much larger image. Contact your NEC dealer if you need a mirror.
If you’re using a mirror and your image is inverted, use the “Menu”
and “Select” buttons on your projector cabinet or ▲▼ buttons on
your remote control to correct the orientation. (See page E-31.)
E–16
Page 21

Wiring Diagram
Macintosh or Compatibles
(Desktop type or notebook type)
Pin adapter for Macintosh (supplied)
Speaker System
Monitor
VCR, DVD Player or LaserDisc Player
RGB OUTPUT
PC CONTROL
To video, S-video, and audio
inputs on the projector.
S-VIDEO
AUDIORGB INPUT
IN
OUT
OUT
IN
VIDEO
IBM VGA or Compatibles
(Desktop type or notebook type)
Signal cable (supplied)
To mini D-Sub 15-pin connector on the
projector. It is recommended that you
use a commercially available distribution
amplifier if connecting a signal cable
longer than the supplied cable.
DVD Player (with component output)
Optional Component V cable
Document Camera
NOTE: When using with a notebook PC, be sure to connect between the projector and the notebook PC
before turning on the power to the notebook PC. In most cases signal cannot be output from RGB output
unless the notebook PC is turned on after connecting with the projector.
NOTE:
* If the screen goes blank while using your remote control, it may be the result of the computer’s screen-
saver or power management software.
* If you accidentally hit the POWER button on the remote control, wait 30 seconds and then press the
POWER button again to resume.
NOTE: If using video, S-video, or audio cables, the cables should be 3 m (9.8 feet) or shorter.
E–17
Page 22

Connecting Your PC
IBM VGA or Compatibles
(Notebook type)
IBM VGA or Compatibles
(Desktop type)
Signal cable (supplied)
To mini D-Sub 15-pin connector on the projector. It is recommended that you use a commercially availab le distribution amplifier if connecting a signal cable longer than the supplied one.
RGB INPUT
RGB
INPUT
AUDIO
AUDIO
OUTPUT
PC-CONTROL S-VIDEO VIDEO
IN
OUT
INOUT
Audio cable
(not supplied)
Connecting your PC to your MultiSync VT440 (SVGA)/ VT540 (XGA) projector will enable you to project your computer’s screen image for
an impressive presentation.
To connect to a PC, simply:
1. Turn off the power to your projector and computer.
2. Use the supplied signal cable to connect your PC to the projector.
3. Turn on the projector and the computer.
4. If the projector goes blank after a period of inactivity, it may be caused by a screen saver installed on the computer you’ve connected to the
projector.
E–18
Page 23

Connecting Your Macintosh Computer
Macintosh (Notebook type)
Audio cable
(not supplied)
Signal cable
(supplied)
RGB INPUT
RGB
INPUT
AUDIO
OUTPUT
PC-CONTROL S-VIDEO VIDEO
IN
OUT
AUDIO
INOUT
Macintosh (Desktop type)
For older Macintosh,
use the supplied pin
adapter to connect to
your Mac's video
port.
Pin adapter for Macintosh
(supplied)
NOTE: The new Macintosh computer
such as G3 will have the 15 pin HD connector. The VT440/VT540's "Plug and
Play" data will be downloaded to the
Macintosh. Therefore, the Mac adapter
will not be necessary.
To connect to a Macintosh, simply:
1. Turn off the power to your projector and your Macintosh com-
ON DIP
23456
1
puter.
2. Use the supplied signal cable to connect your Macintosh computer to the projector.
3. Turn on the projector and the Macintosh computer.
E–19
Page 24

When using a Macintosh computer with the projector, set the DIP
switches of the supplied pin adapter according to your resolution.
After setting, restart your Macintosh computer.
See the following pages for setting of the DIP switches.
• When using with a Macintosh, SVGA(8002600 :VT440)/
XGA(10242768 : VT540) is recommended if your Macintosh
supports this mode.
• When using with a Macintosh PowerBook, output may not be
set to 8002600 unless “mirroring” is off on your PowerBook.
Refer to owner’s manual supplied with your Macintosh computer for mirroring.
NOTE: A Video Adapter cable manufactured by Apple Computer is
needed for a PowerBook which does not have a mini D-Sub 15-pin
connector.
Settings for Monitor Mode
Number of DIP switch
Resolution
13" multi-scan mode /16"-13" ON ON ON ON
17" multi-scan mode /19"-13" ON ON ON
21” multi-scan mode /21"-13" ON ON ON
13" fixed mode /640x480 ON ON
VGA/SVGA mode ON ON
16" fixed mode /832x624 ON ON
19" fixed mode /1024x768 ON ON
21" fixed mode /1152x870 ON ON ON ON
1 23 456
NOTE: For settings other than display modes supported by your
Macintosh and the projector, use of the DIP switch may bounce an
image slightly or may display nothing. If this happens, set the DIP
switch to the 13" fixed mode and then restart your Macintosh. After
that, restore to a displayable mode and then restart the Macintosh
again. Make sure that the projector and your Macintosh are connected with the pin adapter and the supplied signal cable (mini DSub 15-pin connector) and then restart your Macintosh.
Examples of DIP switch setting
17" multi-scan mode VGA/SVGA mode 19" fixed mode
ON
NOTE: Refer to your computer’s owner’s manual for more information about your computer’s video output requirements and an y special identification or configuring your projector’s image and monitor may require.
ON
654 321
321
ON
654321
654
E–20
Page 25

Connecting an External Monitor
External monitor
RGB
INPUT
AUDIO
OUTPUT
PC-CONTROL S-VIDEO VIDEO
IN
RGB OUTPUT
AUDIO IN
OUT
INOUT
AUDIO OUT
You can connect a separate, external monitor to your VT440/VT540 to simultaneously vie w on a monitor the image you're projecting. To do so:
1. Turn off the power to your projector, monitor and computer.
2. Use a 15-pin cable to connect your monitor to the RGB Monitor Output (Mini D-Sub 15 pin) connector on your projector.
3. Turn on the projector, monitor and the computer.
E–21
Page 26

Connecting Your DVD Player
DVD player
Y Cb Cr
R L
Red
White
RGB INPUT
RGB
Cr
Cb
Y
INPUT
AUDIO
OUTPUT
PC-CONTROL S-VIDEO VIDEO
IN
OUT
INOUT
Optional 15-pin-to-RCA23 cable
(Component V )
Audio Equipment
Audio cable
(not supplied)
R L
White
Red
You can connect your projector to a DVD player with component outputs or Video output. To do so, simply:
1. Turn off the power to your projector and DVD player.
2. If your DVD player has the component video (Y,Cb,Cr) output, use the optional 15-pin-to-RCA23 cable to connect your DVD player to the
RGB INPUT connector on the projector.
For a DVD player without component video (Y,Cb,Cr) outputs, use common RCA cables (not provided) to connect a composite VIDEO
output of the DVD player to the Video Input of the projector.
3. Turn on the projector and DVD player.
NOTE: Refer to your DVD player’s owner’s manual for more information about your DVD player’s video output requirements,
E–22
Page 27

Connecting Your VCR or Laser Disc Player
VCR/ Laser disc player
L
R
White
Red
S-video cable
(not supplied)
RGB
INPUT
AUDIO
OUTPUT
S-VIDEO
PC-CONTROL S-VIDEO VIDEO
IN
OUT
INOUT
VIDEO
Audio equipment
Document camera
Audio cable
(not supplied)
L
R
VIDEO
White
Red
Video cable (not supplied)
Use common RCA cables (not provided) to connect your VCR, laser disc player or document camera to your projector.
To make these connections, simply:
1. Turn off the power to the projector and VCR, laser disc player or document camera.
2. Connect one end of your RCA cable to the video output connector on the back of your VCR or laser disc player, connect the other end to the
Video input on your projector. Use an audio cable (not supplied) to connect the audio from your VCR or laser disc player to your audio
equipment (if your VCR or laser disc player has this capability). Be careful to kee p your right and left channel connections correct for stereo
sound.
3. Turn on the projector and the VCR or laser disc player.
NOTE: Refer to your VCR or laser disc player owner’s manual for more information about your equipment’s video output requirements.
E–23
Page 28

3.OPERATION
This section describes how to select a computer or video source, how
to adjust the picture, and how to customize the menu or projector
settings.
General Controls
Before you turn on your projector, ensure that the computer or video
source is turned on and that your lens cap is removed.
1. Turn on the Projector
Plug the supplied power cable in the wall outlet. The projector
will go into its standby mode and the power indicator will glow
orange.
Only after you press the “POWER” button on the projector cabinet or the remote control will the power indicator turn to green
and the projector become ready to use.
NOTE: To turn the projector on by plugging in the power cable,
use the menu and enable the “Auto Start” feature. (See page E-
32.)
NOTE: Re gardless of the lamp mode setting, the lamp always stays
in High-Bright mode for 3 minutes after the projector is turned
on. If you have selected the Eco mode, the STA TUS indicator blinks
green and the lamp will change to Eco mode in 3 minutes.
2. Select the Computer or Video Source
Press the Source button on the remote control or the projector
cabinet to select “Video” (VCR, document camera, or laser disc
player), S-Video” or “RGB” (computer or DVD with component
output) to display the image.
Or press the “Menu” button on the remote control or the cabinet
and use the menu to select your video source: “Video”, “S-V ideo”
or “RGB”.
3. Adjust the Image Size and the Focus
Use the Zoom lever to adjust the image size, then use the Focus
ring to obtain the best focus.
Use the “Magnify” button (+) or (-) on the remote control to make
the image larger up to 400%.
4. Turning off the Projector
First press the “POWER” button on the projector cabinet or the
remote control for a minimum of two seconds. The power indicator will glow orange. After the projector turns off, the cooling fans
keep operating for 30 seconds.
Do not disconnect the power cable during this time. Then, unplug
the power cable. The power indicator will go out.
Enlarging and Moving a Picture
You can enlarge the area you want up to 400 percent.
To do so:
1) Press the POINTER button on the card remote control to display the pointer.
POINTER
2) Move the pointer to the area you want to enlarge.
Vol.
SELECT
Vol.
3) Adjust the image size up to 400 percent.
MAGNIFY
MAGNIFY
IMPORTANT:
• The projector should be unplugged if it will not to be used for an
extended period.
• To turn off the image and sound briefly (five minutes or less),
use the “Picture Mute” button instead of turning the projector
off and on.
• The projector will display a black, blue image or logo if no input
signal is present.
• Do not turn the projector off and then immediately back on. The
projector needs to cool for 30 seconds before it can be restarted.
E–24
Page 29

Using the Menus
NOTE: An interlaced motion video image may be blurred while
the menu is displayed.
1. Press the “Menu” button on the remote control or the projector
cabinet to display the Main Menu.
2. Press the ▲▼ buttons on the remote control or the projector cabinet to highlight the menu for the item you want to adjust or set.
3. Press the © button or the “Enter” button on the remote control or
the projector cabinet to select a submenu or item.
4. Adjust the level or turn the selected item on or off by using “Select” § or © buttons on the remote control or the projector cabinet. The on-screen slide bar will show you the amount of increase
or decrease.
5. The change is stored until you adjust it again.
ENTER: Stores the setting or adjustments.
CANCEL: Return to the previous screen without storing settings
or adjustments.
6. Repeat steps 2-5 to adjust an additional item, or press “Cancel”
on the remote control or the projector cabinet to quit the menu
display.
E–25
Page 30

MENU Tree
Basic/ Advanced Menu
Sub Menu
(all)
(all)
(VCH)
(VCH)
(V)
Items
Hi-Bright/ Eco
(all)
(all)
(all)
(all)
Normal/ Natural1/ Natural2
Aspect Ratio
Noise Reduction
Color Matrix
White Balance
Auto Adjust
Position/ Clock
Resolution
All Data/ Current Signal
Menu Mode
English/ German/ French/ Italian/ Spanish/ Swedish/ Japanese
Pointer 1–8
Source Display
Volume Bar (Direct Button)
Menu Display Time
Signal Select
RGB
VIDEO/ S-VIDEO
Auto Start
Power Management
Power Off Confirmation
Keystone Save
Clear Lamp Hour Meter
(all)
Normal/ Zoom/ Wide Zoom/ Cinema
Off/ Low/ Medium/ High
HDTV/ SDTV/ B-Y/R-Y, Cb/Cr, Pb/Pr
Brightness R/G/B, Contrast R/G/B
On/ Off
Horizontal/ Vertical/ Clock/ Phase
Auto/ Native
Basic/ Advanced
On/ Off
On/ Off
Manual/ Auto 3sec/ Auto 10sec/ Auto 30sec
Auto/ RGB/ Component
Auto/ NTSC3.58/ NTSC4.43/ PAL/
PAL60/ SECAM
On/ Off
On/ Off
On/ Off
On/ Off
(VCH)
(VCH)
(CH)
(all)
(R)
(RH)/(R)
(R)
Source Name
Input T erminal
Horizontal Frequency
Vertical Frequency
Sync Polarity
Signal T ype
Video T ype
Sync T ype
Interlace
E–26
Orientation
Background
Resolution
Aspect Ratio
Gamma Correction
Noise Reduction
Color Matrix
Matrix T ype
Lamp Hour Meter
Projector Usage
Front/ Floor, Rear/Ceiling, Rear/Floor.
Front/Ceiling
Blue/ Black/ Logo
NOTE:
Adjustable sources
R=RGB V=Video/S-Video
C=Component H=HDTV
All=All sources
Page 31

Menu Elements
Title bar
Highlight
Tab
OK Button
Cancel Button
Solid triangle
Check box
Radio button
Slide bar
○○○○○○○○○○○○○○○○○○○○○○○○○○○○○○○○○○○○○○○○○○○○○○○○○○○○○○○○○○○○○○○○
Menu windows or dialog boxes typically have the following elements:
Title bar: Indicates the menu title.
Highlight: Indicates the selected menu or item.
Solid triangle: Indicates further choices are available. A highlighted triangle indicates the item is active.
Tab: Indicates a group of features in a dialog box. Selecting on any tab brings its page to the front.
Radio button: Use this round button to select an option in a dialog box.
Check box: Place a checkmark in the square box to turn the option On.
Slide bar: Indicates settings or the direction of adjustment.
OK button: Press to confirm your setting. You will return to the previous menu.
Cancel button: Press to cancel your setting. You will return to the previous menu.
E–27
Page 32
Menu Descriptions & Functions
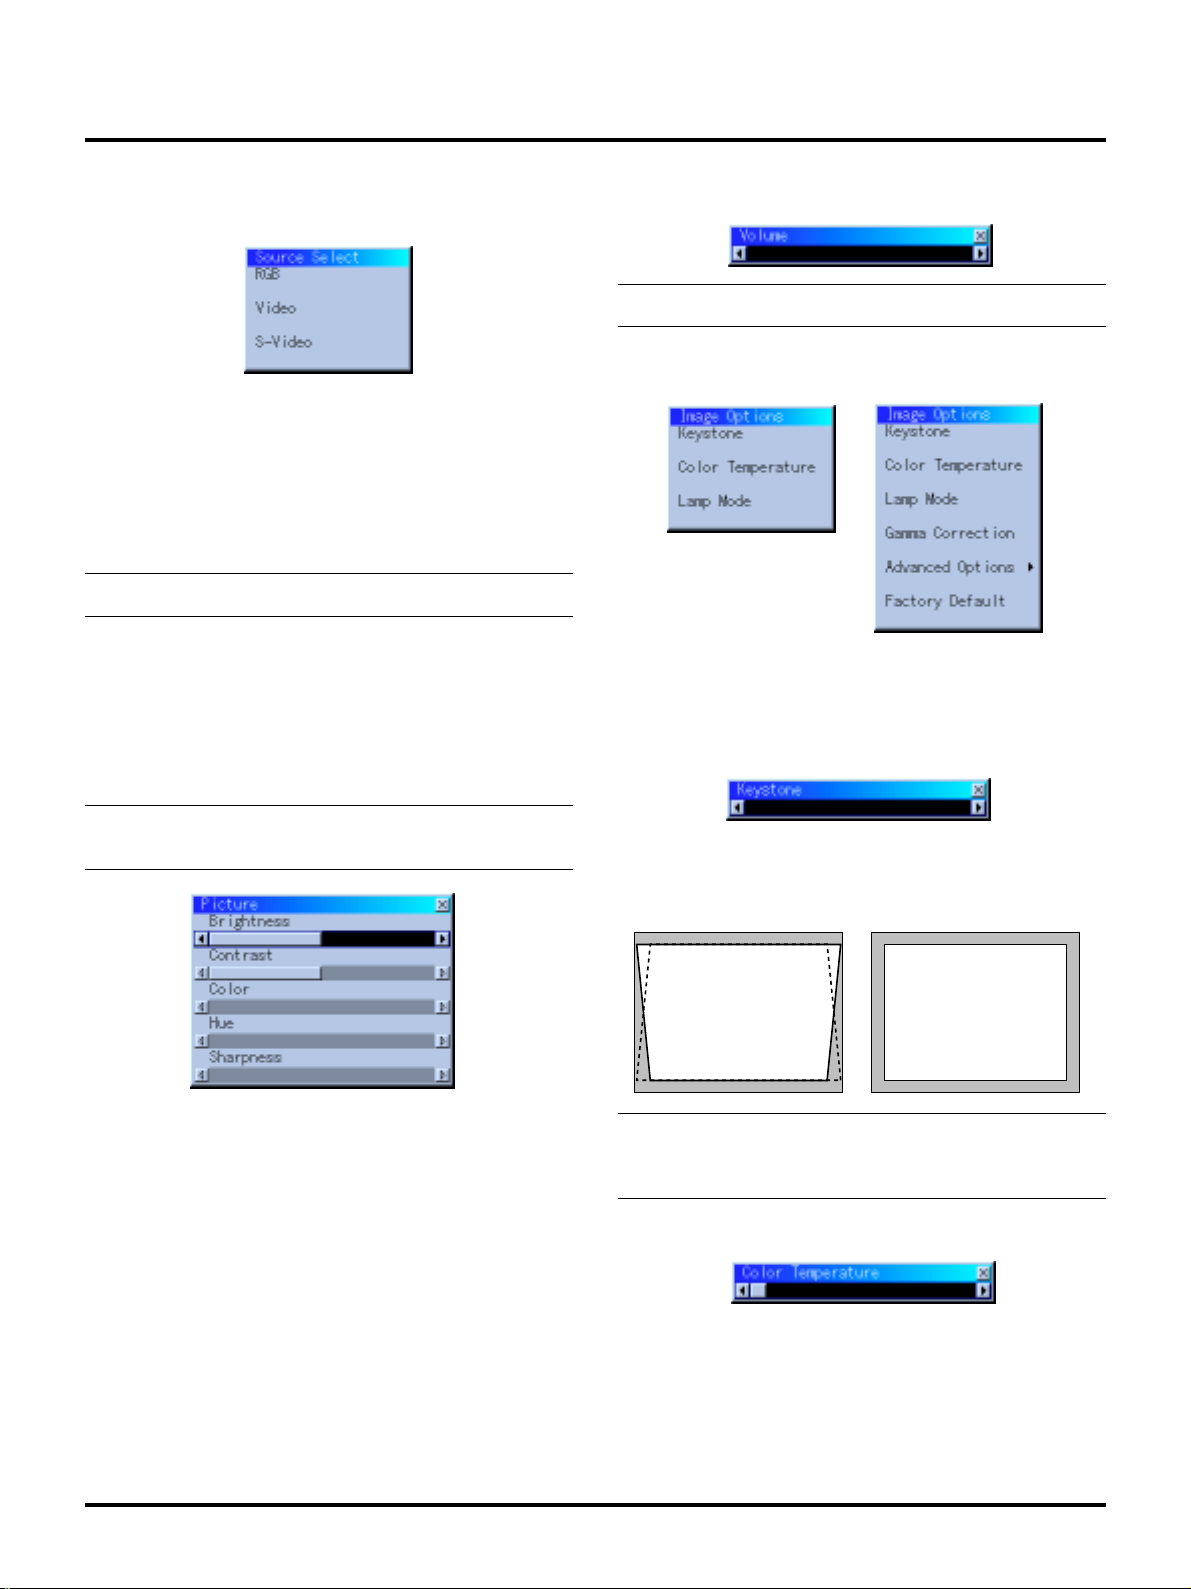
Source Select
Enables you to select a video source such as a VCR, DVD player,
laser disc player, computer or document camera depending on what
is connected to your inputs. Press the “Select” button on the projector cabinet or ▲▼ buttons on your remote control to highlight the
menu for the item you want to adjust.
RGB
Selects the computer connected to your RGB or component signal.
NOTE: An optional component cable (Component V cable) is needed
for a component signal.
V olume
Adjusts the sound level of the projector.
NOTE:Y ou can display the volume bar without opening the menu.See
"Volume Bar (Direct Button)"on page E-31 for more details.
Image Options
Basic Mode
Advanced Mode
Video
Selects what is connected to your V ideo input-VCR, laser disc player ,
DVD player or document camera.
S-Video
Selects what is connected to your S-Video input-VCR, DVD player,
or laser disc player.
NOTE: A frame may freeze for a brief period of time when a video is
played back in fast-forward or fast-rewind with a Video or S-Video
source.
Picture
Provides access to controls for your image. Use the “Select” button
on the projector cabinet or the remote control to highlight the menu
for the item you want to adjust.
Brightness
Adjusts the brightness level or the back raster intensity.
Contrast
Adjusts the intensity of the image according to the incoming signal.
Color
Increases or decreases the color saturation level (not valid for RGB).
Hue
Varies the color level from +/- green to +/-blue. The red le v el is used
as reference. This adjustment is only valid for V ideo and Component
inputs (Not RGB).
Sharpness
Controls the detail of the image for V ideo (Not for RGB and Component).
Provides optional controls such as Keystone Correction, Color Temperature and Lamp Mode. When you select Adv anced Mode, the following options are availa ble: Gamma Correction, Aspect Ratio, Noise
Reduction, Color Matrix, White Balance, Auto Adjust, Position/Clock,
Resolution, and Factory Default.
Keystone
This feature corrects the keystone (trapezoidal) distortion to make
the top of the screen longer or shorter to be the same as the bottom.
Use the § or © buttons on the slide bar to correct the keystone
(trapezoidal) distortion.
Keystone distortion
NOTE: The maximum keystone angle that can be corrected is 15
degrees upward and downward with the projector placed horizontally. However, a picture will be blurred if you correct the keystone
angle beyond +12 degrees or more for SXGA signal on VT440.
Normal
Color T emperatur e
This feature adjusts the color temperature using the slide bar.
Move the slide bar to the right to increase the color temperature for a
bluish image; to the left to decrease it for a reddish image.
E–28
Page 33
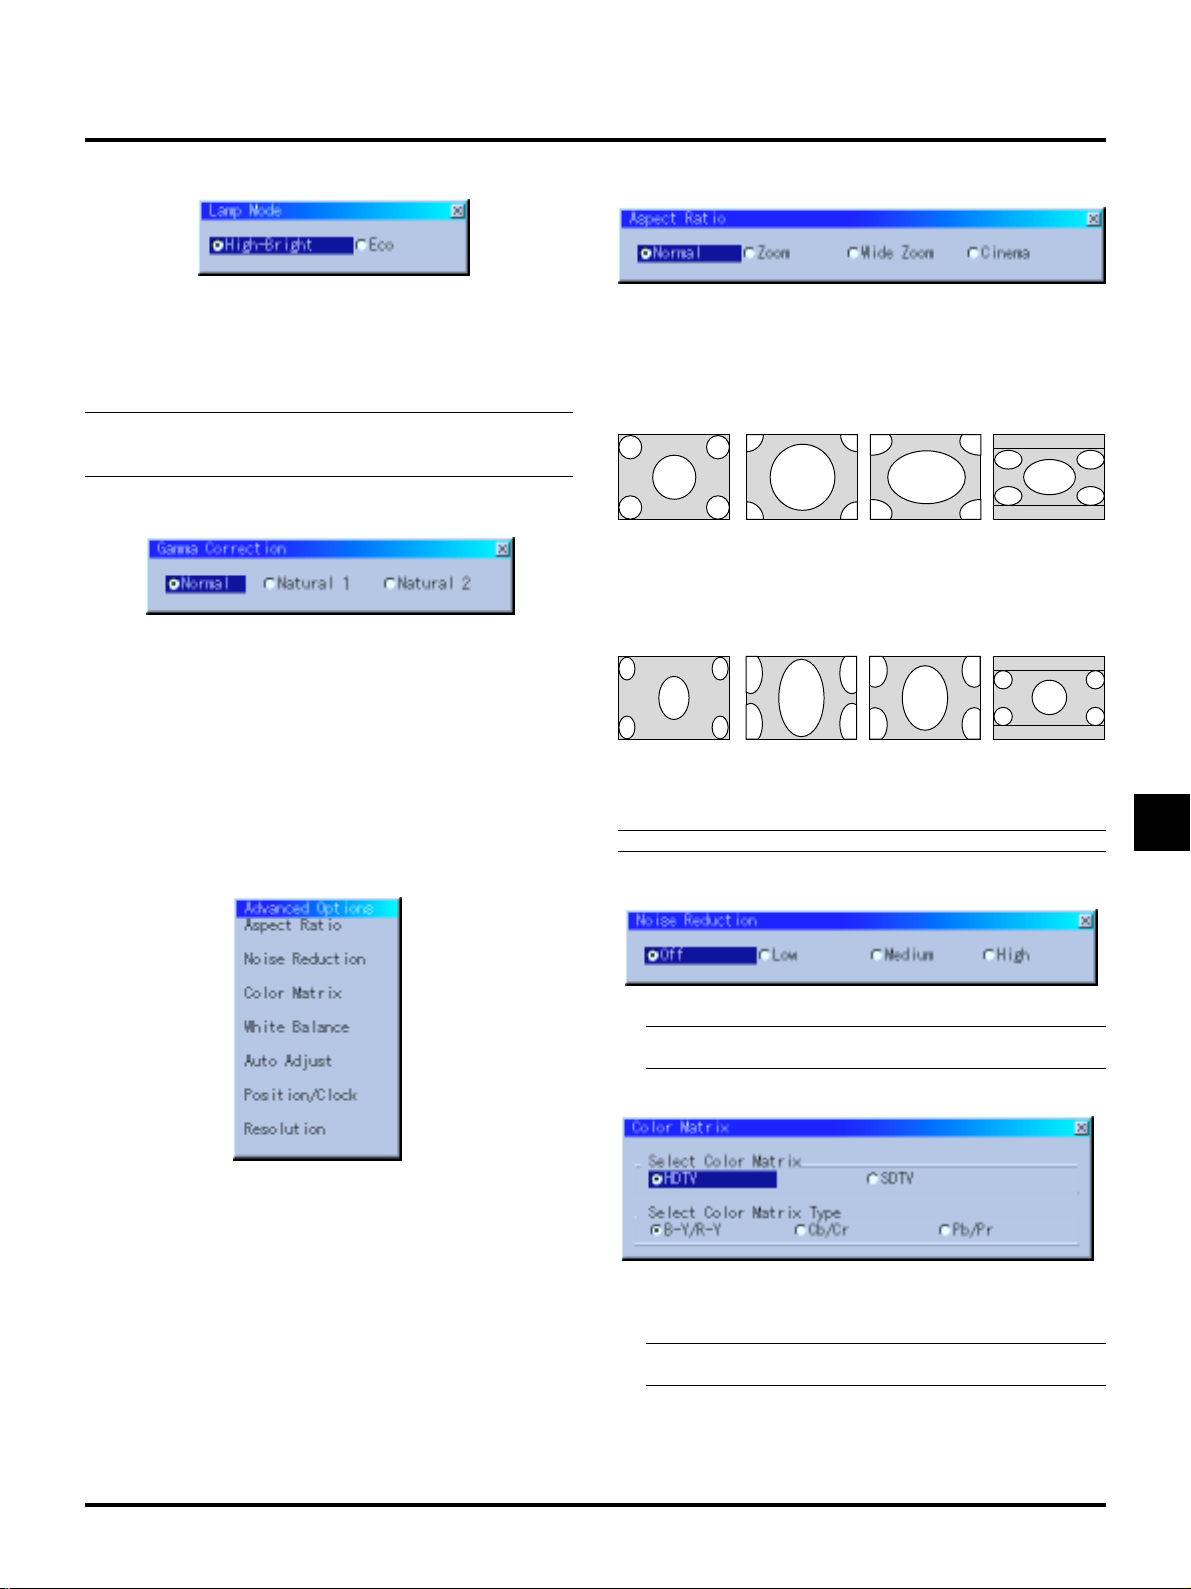
Lamp Mode
Aspect Ratio
This feature enables you to select two brightness mode of the lamp:
High-Bright and Eco modes. The lamp life can be extended up to
3000 hours by using the Eco mode.
High-Brigh Mode: This is the default setting.
Eco Mode: Select this mode to increase the lamp life.
NOTE: If you have selected the Eco mode, the lamp lights in HighBright mode for 3 minutes after the projector is turned on. After 3
minutes the lamp will change to Eco mode.
Gamma Correction (Advanced mode)
Use the § or © buttons to choose “Normal” when in a lighted
room and “Natural 1&2” when in a darkened room. “Natural 1”
for better flesh tone; “Natural 2” for true reproduction of middle
tones.
Each mode is recommended for :
Normal: the regular picture
Natural 1: true color reproduction of natural tones
Natural 2: dark portions of a picture
Advanced Options (Advanced mode)
Allows for adjustments of image position and stability.
Aspect Ratio allows you to select the best Aspect mode to display
your source image.
When 4:3 is selected from the source (i.e. DVD player), the following selections will display:
Normal Zoom Wide Zoom Cinema
A-Standard
4:3 Aspect
B-All 4 sides
stretched
C-Left & Right
stretched
D-Left and right
stretched
When Anamorphic or 16:9 is selected from the source (i.e. DVD
player), the following selections will display:
Normal Zoom Wide Zoom Cinema
A-16:9 image
displayed
in 4:3 mode
B- All 4 sides
stretched
C- Left & right
stretched
D- Left and right
stretched to
display the true
aspect
NOTE: Aspect Ratio is not available for “RGB”.
Noise Reduction:
When you select Advanced Options in Advanced mode, the following options are available: Aspect Ratio, Noise Reduction, Color Matrix, White Balance, Auto Adjust, Position/Clock, Resolution, and
Factory Default.
You can select three levels video noise reduction.
NOTE: The lower the Noise Reduction level, the better the image quality by way of higher video bandwidth.
Color Matrix
First select an appropriate color matrix to fit your component
signal for HDTV or SDTV. Then select an appropriate matrix
type from B-Y/R-Y, Cb/Cr or Pb/Pr.
NOTE: The Color Matrix feature is available for component
video signal only.
E–29
Page 34
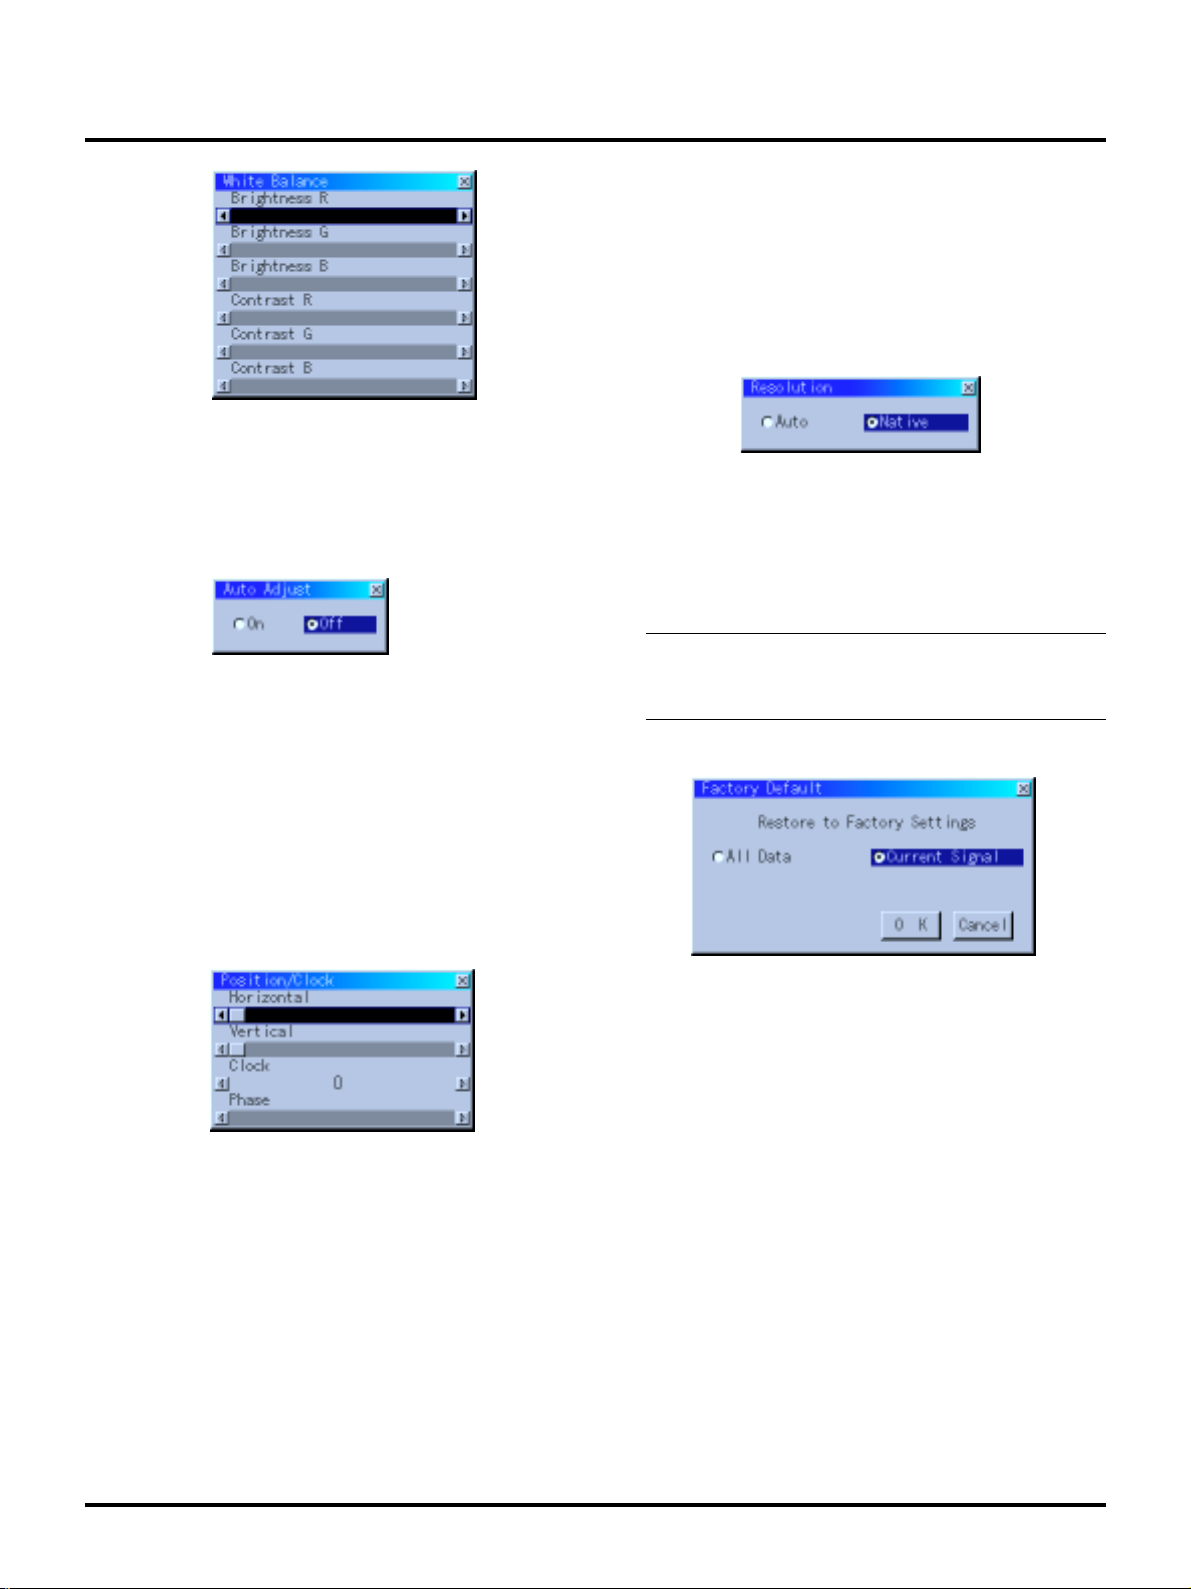
White Balance:
This allows you to adjust the white balance. Brightness for each
color (RGB)is used to adjust the black level of the screen;
Contrast for each color (RGB)to adjust the white level of the
screen.
First use the up or down buttons to select R, G, or B for the brightness and the contrast. Next use the
level.
Auto Adjust:
When “Auto Adjust” is set to “On”, the projector automatically
determines the best resolution for the current RGB input signal
to project an image using NEC’s Advanced AccuBlend Intelligent Pixel Blending Technology.
The image can be automatically adjusted for geometry and stability; “Horizontal Position”, “Vertical Position”, “Clock” and
“Phase”.
On: Automatically adjusts image “Horizontal Position”, “V er -
tical Position”, “Clock” and “Phase”.
Off: User can adjust the image display functions (“Horizontal
Position”, “Vertical Position”, “Clock” and “Phase”)
manually.
§ or © buttons to adjust the
Phase: Use this item to adjust the clock phase or to reduce video
noise, dot interference or cross talk. (This is evident when
part of your image appears to be shimmering.) Use the
§ and © buttons to adjust the image.
Use “Phase” only after the “Clock” is complete.
This adjustment is made automatically when the Auto
Adjust is turned on.
Resolution (when Auto Adjust is off):
This allows you to activa te or deactivate the Advanced AccuBlend
feature.
Auto: Turns on the Advanced AccuBlend feature. The projec-
tor automatically reduces or enlarges the current image
to fit the full screen.
Native: Turns off the Advanced AccuBlend feature. The projec-
tor displays the current image in its true resolution.
NOTE: While you are displaying an image with higher resolution than the projector's native resolution, even when you are in
the Native mode, the image is displayed full screen using the
Advanced AccuBlend feature.
Factory Default (Advanced mode)
Position/ Clock (when Auto Adjust is off)
This allows you to manually adjust the image horizontally and
vertically, and adjust Clock and Phase.
Horizontal/Vertical Position:
Adjusts the image location horizontally and vertically
using the § and © buttons.
This adjustment is made automatically when the Auto
Adjust is turned on.
Clock: Use this item with the “Auto Adjust off” to fine tune the
computer image or to remove any vertical banding that
might appear. This function adjusts the clock frequencies that eliminate the horizontal banding in the image.
Press the § and © buttons until the banding disappears.
This adjustment may be necessary when you connect your
computer for the first time. This adjustment is made automatically when the Auto Adjust is turned on.
Changes all adjustments and setting to the factory preset for each
source individually except Lamp Usage Hours. (To reset the lamp
usage time, see “Clear Lamp Hour Meter” on page E-32.)
All Data: Reset all the adjustments and settings for all
the signals to the factory preset.
Current Signal: Resets the adjustments for the current signal to
the factory preset levels.
The items that can be reset are: Picture, Color T emper ature, Gamma
Correction, Aspect Ratio, Noise Reduction, Color Matrix, White
Balance, Position/Clock and Resolution.
E–30
Page 35
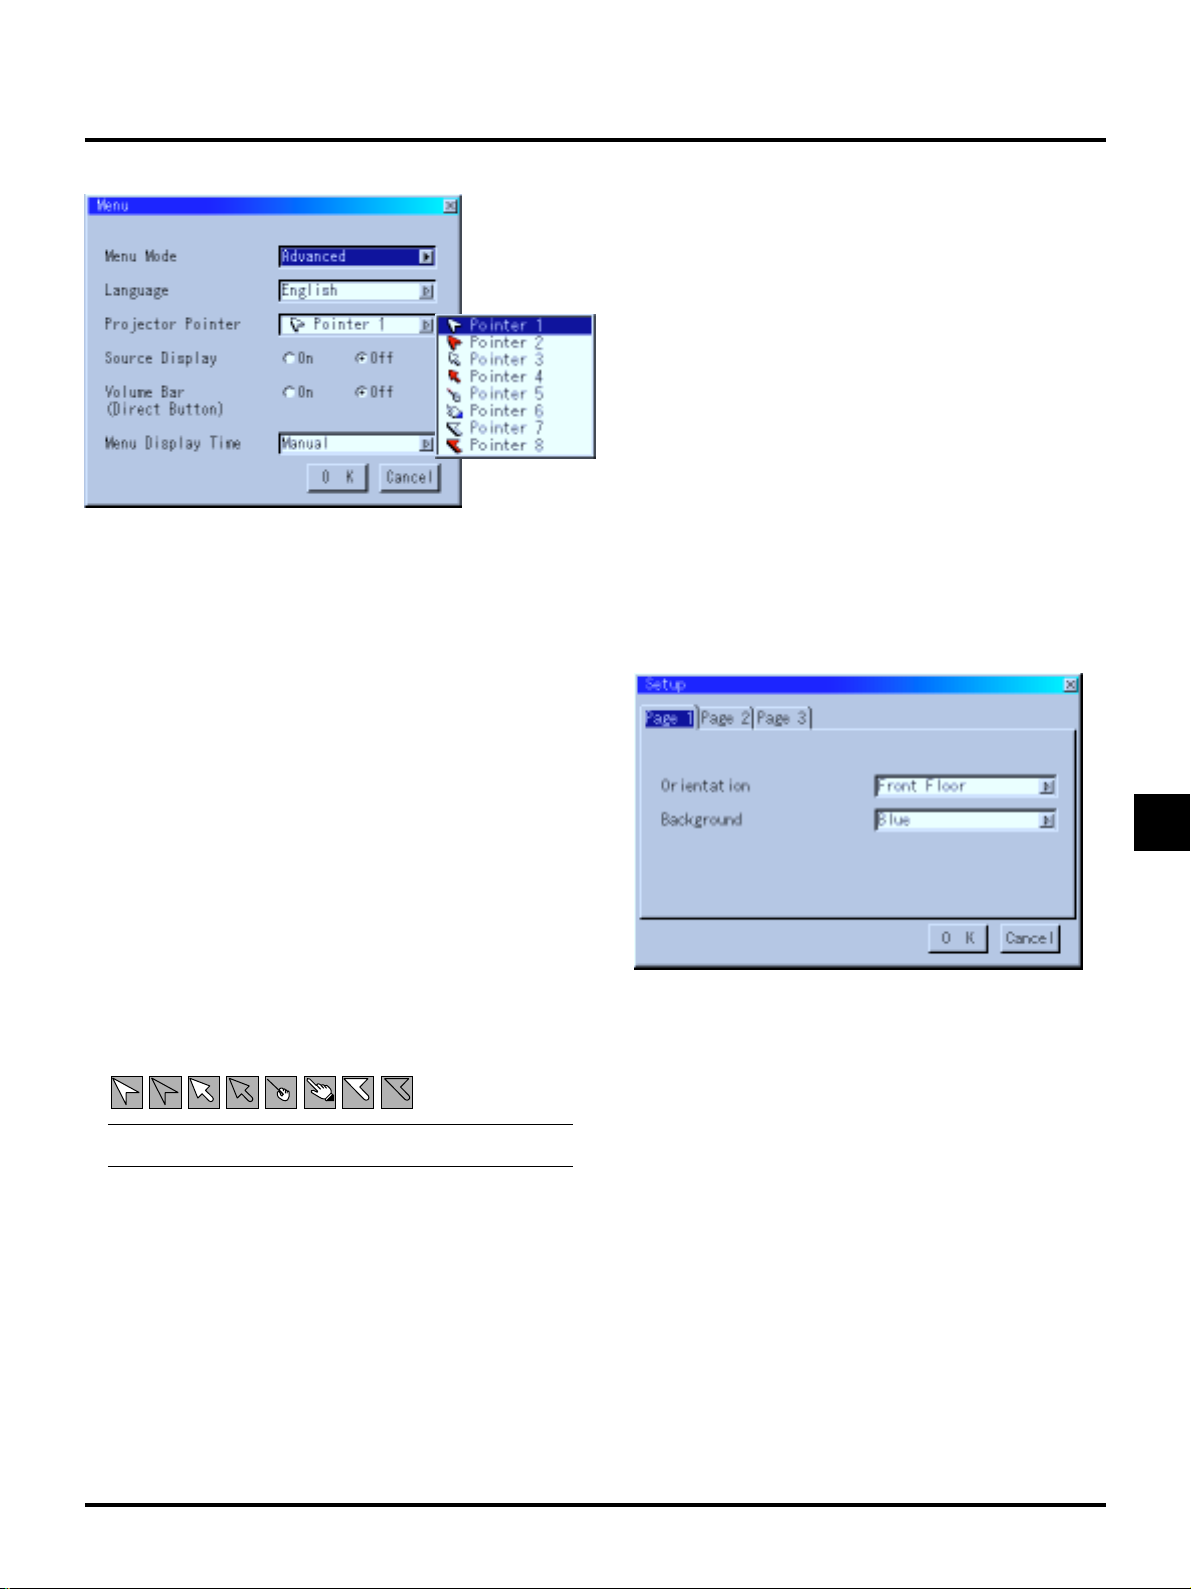
Menu
Menu Display Time (Advanced mode):
This option allows you to select how long the projector waits
after the last touch of a button to turn off the menu.
The preset choices are "Manual", "Auto 3 sec", "Auto 10 sec",
and "Auto 30 sec". The "Auto 30 sec" is the factory preset.
Manual............The menu can be turned off manually.
Auto 3 sec .......The menu will automatically be turned off in 3
seconds if no buttons are pressed within 3 seconds.
Auto 10 sec.....The menu will automatically be turned off in 10
seconds if no buttons are pressed within 10 seconds.
Auto 30 sec.....The menu will automatically be turned off in 30
seconds if no buttons are pressed within 30 seconds.
Allows you to set preferences for the on-screen menu.
Menu Mode:
This feature allows you to select two menu modes: one has basic
functionality and the other more advanced functionality.
Basic Mode........... This is the normal mode.
Advanced Mode ... This mode is used for advanced users. In this
mode you can change the following settings:
Gamma Correction, Aspect Ratio, Noise Reduction, Color Matrix, White Balance, Auto
Adjust, Position/Clock, Resolution, Factory
Default, Menu Display Time, Signal Select,
Auto Start, Power Management, Power Off
Confirmation and Keystone Save and Clear
Lamp Hour Meter.
Language:
You can choose one of seven languages for on-screen instructions. The options are: English, German, French, Italian, Spanish, Swedish and Japanese.
Projector Pointer:
This enables you to select from eight different Pointer icons for
the “Pointer” button on your remote control.
After moving your Pointer icon to the area you want on the screen,
press the Magnify button on the remote control to enlarge the
selected area on the screen. See page E-24 for more details.
NOTE: There may be cases where the P ointer function is not a vailable (ex. a non-interlace signal at 15kHz such as video game.)
Setup
Enables you to set operating options.
Press “OK” to save your changes for all the features of Page1, P age2,
and Page3.
[Page1]
Orientation:
This reorients your image for your type of projection.
The options are:front floor projection, rear ceiling projection, rear
floor projection, and front ceiling projection.
Background:
Use this feature to display a black/ blue screen or logo when no
signal is available.
Source Display:
You can turn on and off the information for input name such as
VIDEO and RGB.
When this option is on, the current input will be displayed each
time you switch sources or turn on the projector.
Volume Bar (Direct Button):
This option turns on or off the volume bar when you adjust the
sound volume using VOL+/-(up and down) button.
On ...................You can increase or decrease the sound volume
with the volume bar on screen.
Off .................. You can increase or decrease the sound volume
without having to use the volume bar.
E–31
Page 36
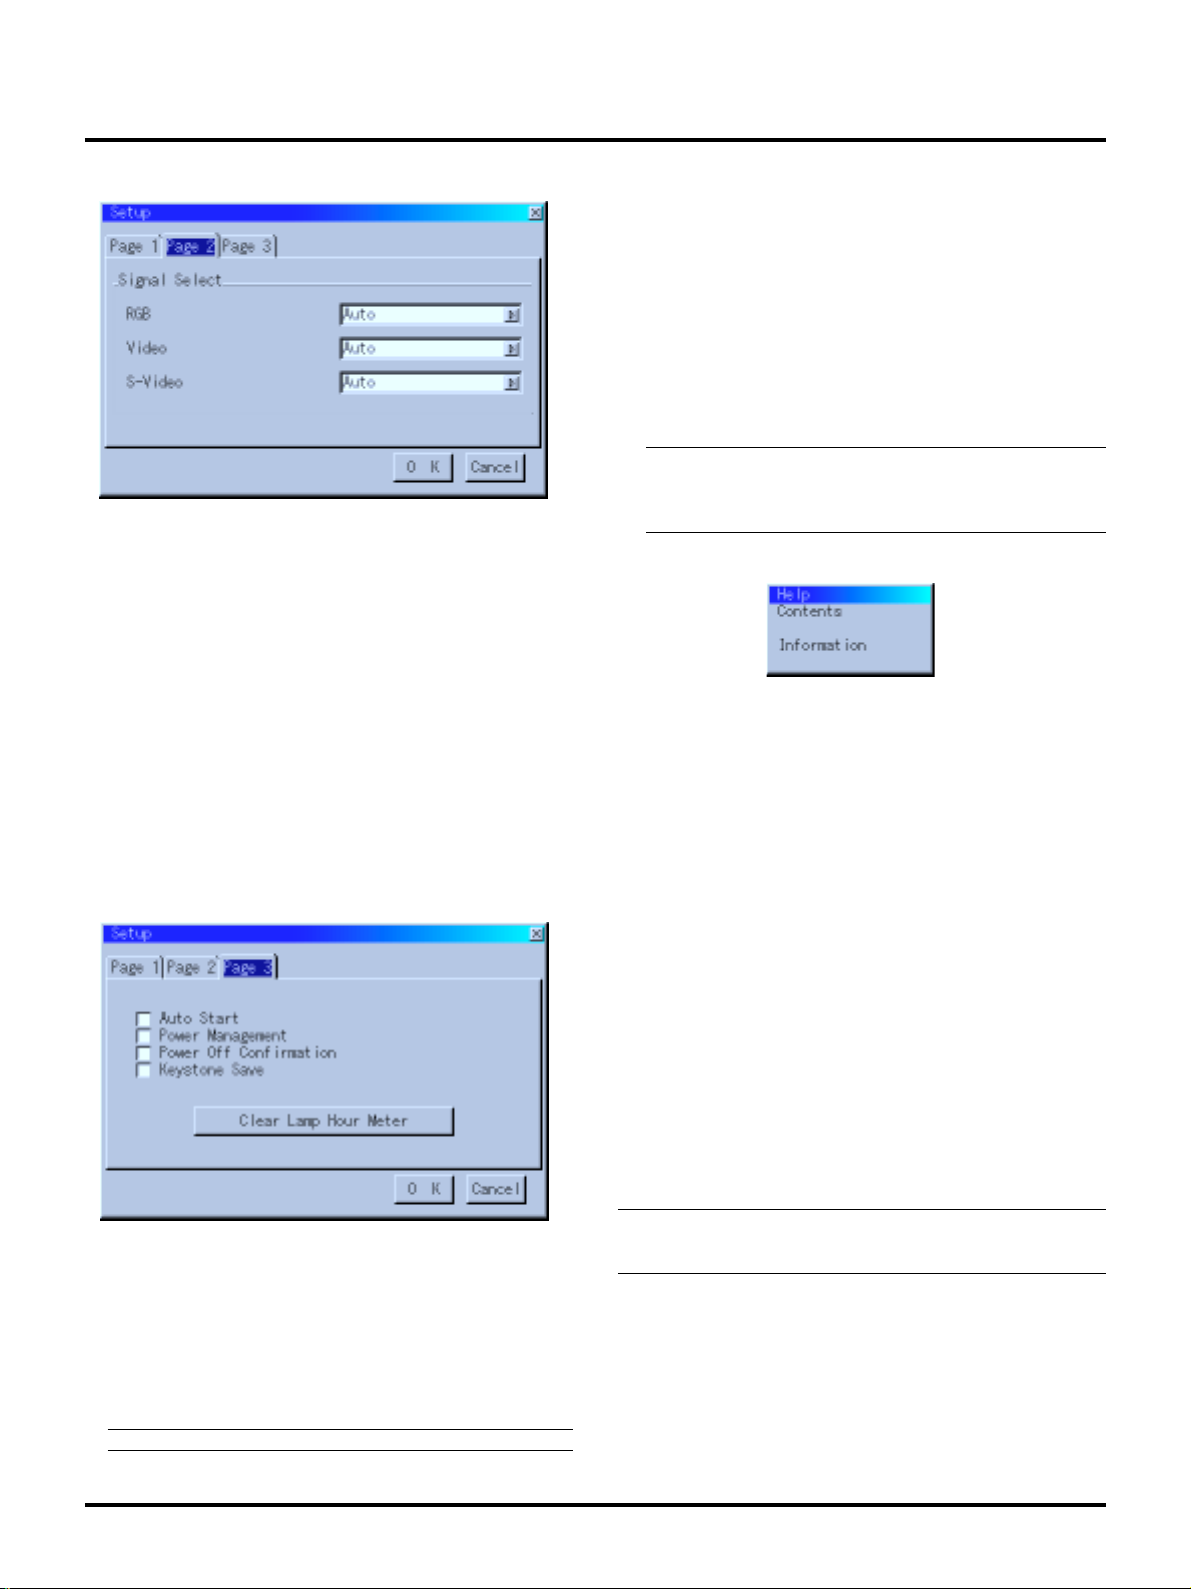
[Page2] (Advanced mode) Power Off Confirmation:
This option determines whether a confirmation dialog for turning off the projector will appear or not.
Keystone Save:
This option enables you to save your current keystone settings.
Saving your change once affects all sources. The changes are
saved when you turn off the projector.
Clear Lamp Hour Meter:
Resets the lamp clock back to zero. Pressing this button displays
the “Are you sure?” confirmation dialog box. To reset the lamp
usage hour meter, press “OK”.
NOTE: The projector will turn off and go into standby mode after 2100
hours (up to 3150 hours in Eco mode) of service. If this happens, press
the “Help” button on the remote control for ten seconds to reset the
Signal Select:
<RGB>
Allows you to choose "RGB" for an RGB source such as a computer, or "Component" for a component video source such as a
DVD player . Normally select "Auto" and the projector automatically detects a component signal. However there may be some
component signals that the projector is unable to detect. If this is
the case, select "Component".
<Video &S-Video System Select>
This feature enables you to select composite video standards
manually. Normally select "Auto".
When you select the video standard for V ideo and S-Video separately, f irst select the radio b utton and then select the video standard from the pull-down menu.
This must be done for Video and S-Video respectively.
[Page 3] (Advanced mode)
lamp clock back to zero. Do this only after replacing the lamp.
Help
Contents
Provides an online help about how to use the menus. An underlined
link means that you can move to an adjustment item directly . Selecting the underlined link and pressing ENTER moves to the corresponding adjustment item.
Information
Displays the status of the current signal and lamp usage. This dialog
box has four pages. The information included are as follows:
[Page 1]
Source Name
Input Terminal
Horizontal Frequency
V ertical Frequency
Sync Polarity
[Page 3]
Aspect Ratio
Gamma Correction
Noise Reduction
Color Matrix
Matrix Type
Auto Start:
Turns the projector on automatically when the power cable is
inserted into an active power outlet. This eliminates the need to
always use the “Power” button on the remote control or projector
cabinet.
Power Management:
When this option is on and there is no RGB input for five minutes or more, the projector will automatically turn itself off.
NOTE:This featur e does not work with Video or S-Video sources.
[Page 2]
Signal Type
Video T ype
Sync Type
Interlace
Resolution
NOTE:The progress indicator shows the percentage of remaining
bulb life.The value informs you of the amount of lamp and projector
usage respectively.
[Page 4]
Lamp Hour Meter
Projector Usage
E–32
Page 37
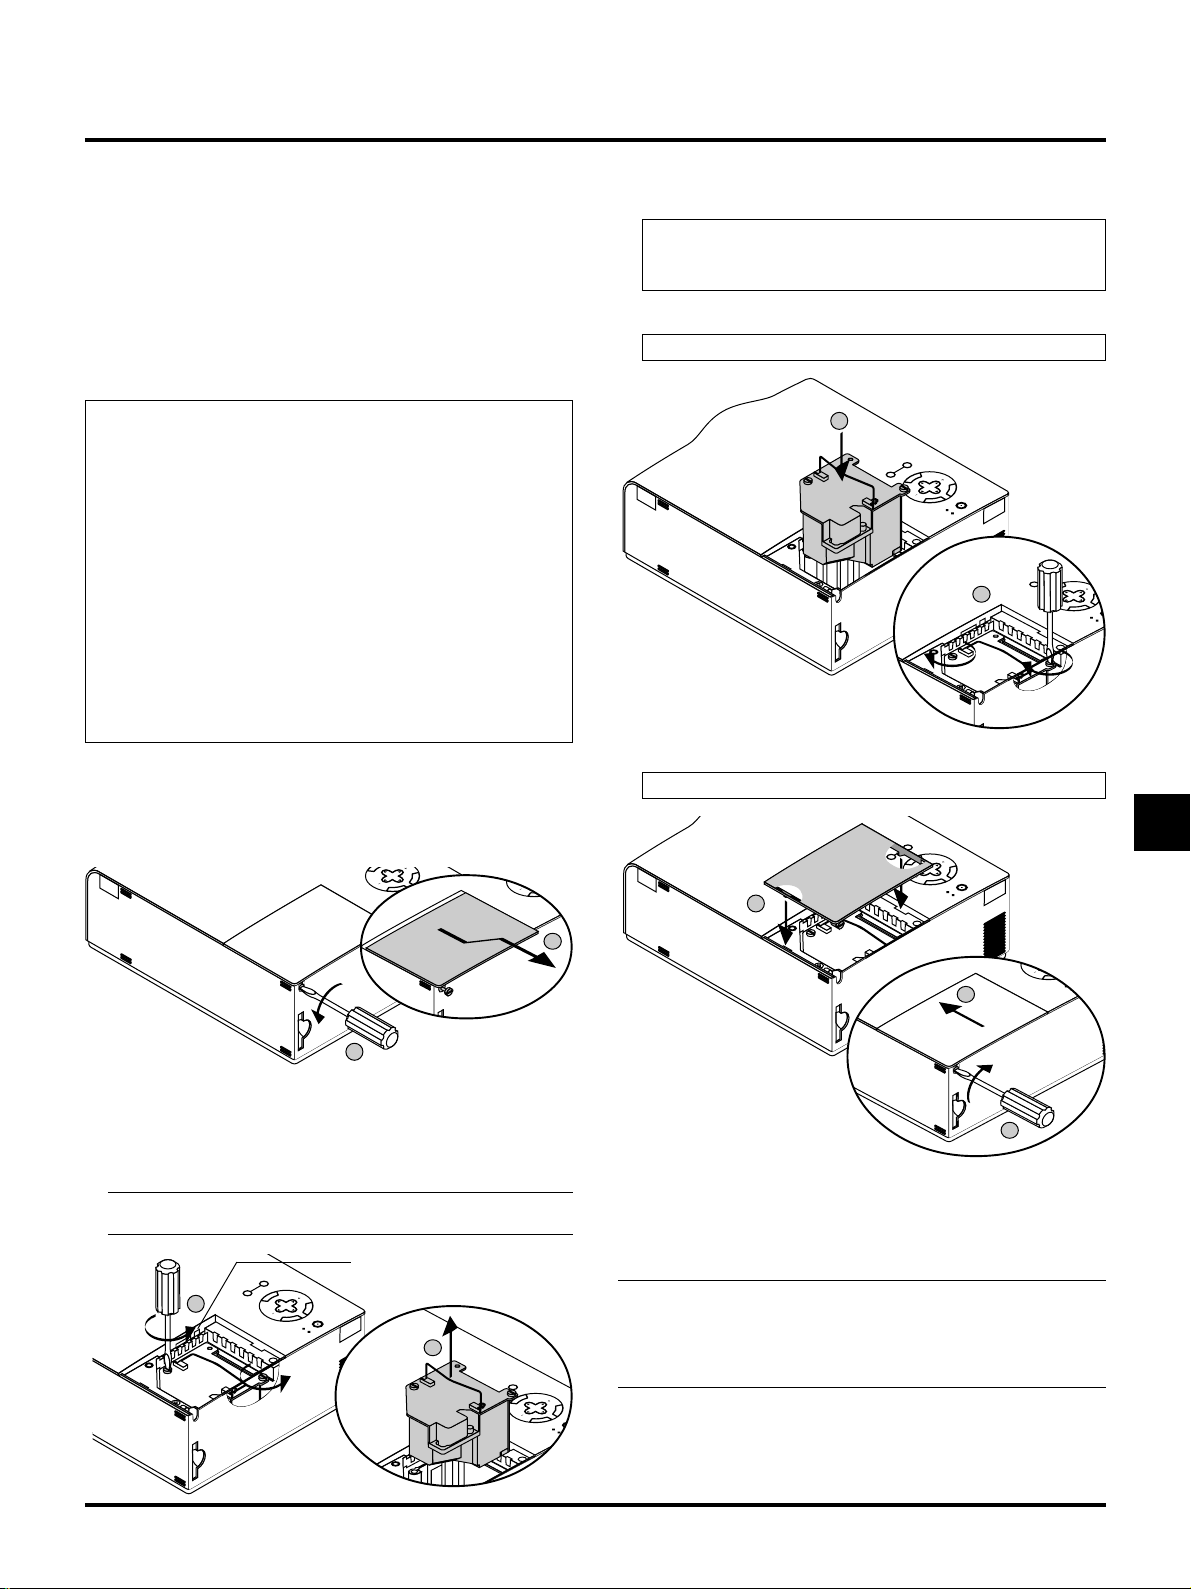
4. MAINTENANCE
M
RC
M
E
N
T
E
R
C
A
N
C
E
L
SELECT
POWER
STATUS
O
SOURC
2
M
E
N
U
E
N
T
E
R
C
A
N
C
E
L
SELECT
POWER
STATUS
SOURCE AUTO ADJUST
2
M
E
N
U
E
N
T
E
R
C
A
N
C
E
L
SELECT
POWER
STATUS
SOURCE AUTO ADJUST
2
M
E
E
N
T
E
R
C
A
N
C
E
L
SELECT
POWER
STATUS
ON
/
OFF
SOURCE
3
2
This section describes the simple maintenance procedures you should
follow to replace the lamp, clean the filter, and replace the batteries
in the remote control.
Replacing the Lamp
After your lamp has been operating for 2000 hours (up to 3000 hours
in Eco mode) or longer, the “Status” light in the cabinet will go on
and the message will appear. Even though the lamp may still be working, replace it at 2000 (up to 3000 hours in Eco mode) hours to maintain optimal projector performance.
CAUTION
• DO NO T TOUCH THE LAMP immediately after it has been
used. It will be extremely hot. Turn the projector off, wait a
full minute, and then disconnect the power cable. Allow at
least one hour for the lamp to cool before handling.
• DO NOT REMOVE ANY SCREWS except the lamp cover
screw and three lamp case screws. You could receive an electric shock.
•
The projector will turn off and go into stand by mode after 2100
(up to 3150 hours in Eco mode) hours of service. If this happens,
be sure to replace the lamp. If you continue to use the lamp after
2000 hours (up to 3150 hours in Eco mode) of use, the lamp bulb
may shatter, and pieces of glass may be scattered in the lamp
case. Do not touch them as the pieces of glass may cause injury.
If this happens, contact your NEC dealer for lamp replacement.
To replace the lamp:
1. Loosen the lamp cover screw until the screwdriver goes into a
freewheeling condition and remove the lamp co ver. The lamp cover
screw is not removable.
SOU
L
E
C
SELECT
N
A
C
OFF
R
/
E
T
E
N
ON
STATUS
POWER
3. Insert a new lamp housing until the lamp housing is plugged into
the socket.
CAUTION: Do not use a lamp other than the NEC replacement lamp (VT40LP).
Order this from your NEC dealer.
Secure it in place with the two screws.
Be sure to tighten the screws.
1
U
N
E
M
SOURCE AUTO ADJUST
L
E
C
SELECT
N
A
C
OFF
R
/
E
T
E
N
ON
STATUS
POWER
4. Reattach the lamp cover.
Tighten the lamp cover screw.
Be sure to tighten the screw.
U
N
E
M
SOURCE AUTO ADJUST
7
1
L
E
C
SELECT
N
A
C
OFF
R
/
E
T
E
N
ON
STATUS
POWER
1
2. Loosen the two screws securing the lamp housing until the screwdriver goes into a freewheeling condition. The two scre ws are not
removable.
Remove the lamp housing by pulling out the handle.
NOTE: There is an interlock on this case to prevent the risk of
electrical shock. Do not attempt to circumvent this interlock.
Interlock
U
N
E
M
SOURCE AUTO ADJUST
1
L
E
C
SELECT
N
A
C
OFF
R
/
E
T
E
N
ON
STATUS
POWER
5. After you install a new lamp, select [Advanced Menu] →
[Setup]→[Page 3]→[Clear Lamp Hour Meter] to reset the lamp
usage hours.
NOTE: When the lamp exceeds 2100 hours (up to 3150 hours in Eco
mode) of service, the projector cannot turn on and the menu is not
displayed. If this happens, press the Help button on the remote control for a minimum of 10 seconds while in standby mode. When the
lamp time clock is reset to zero, the STATUS indicator goes out.
E–33
Page 38
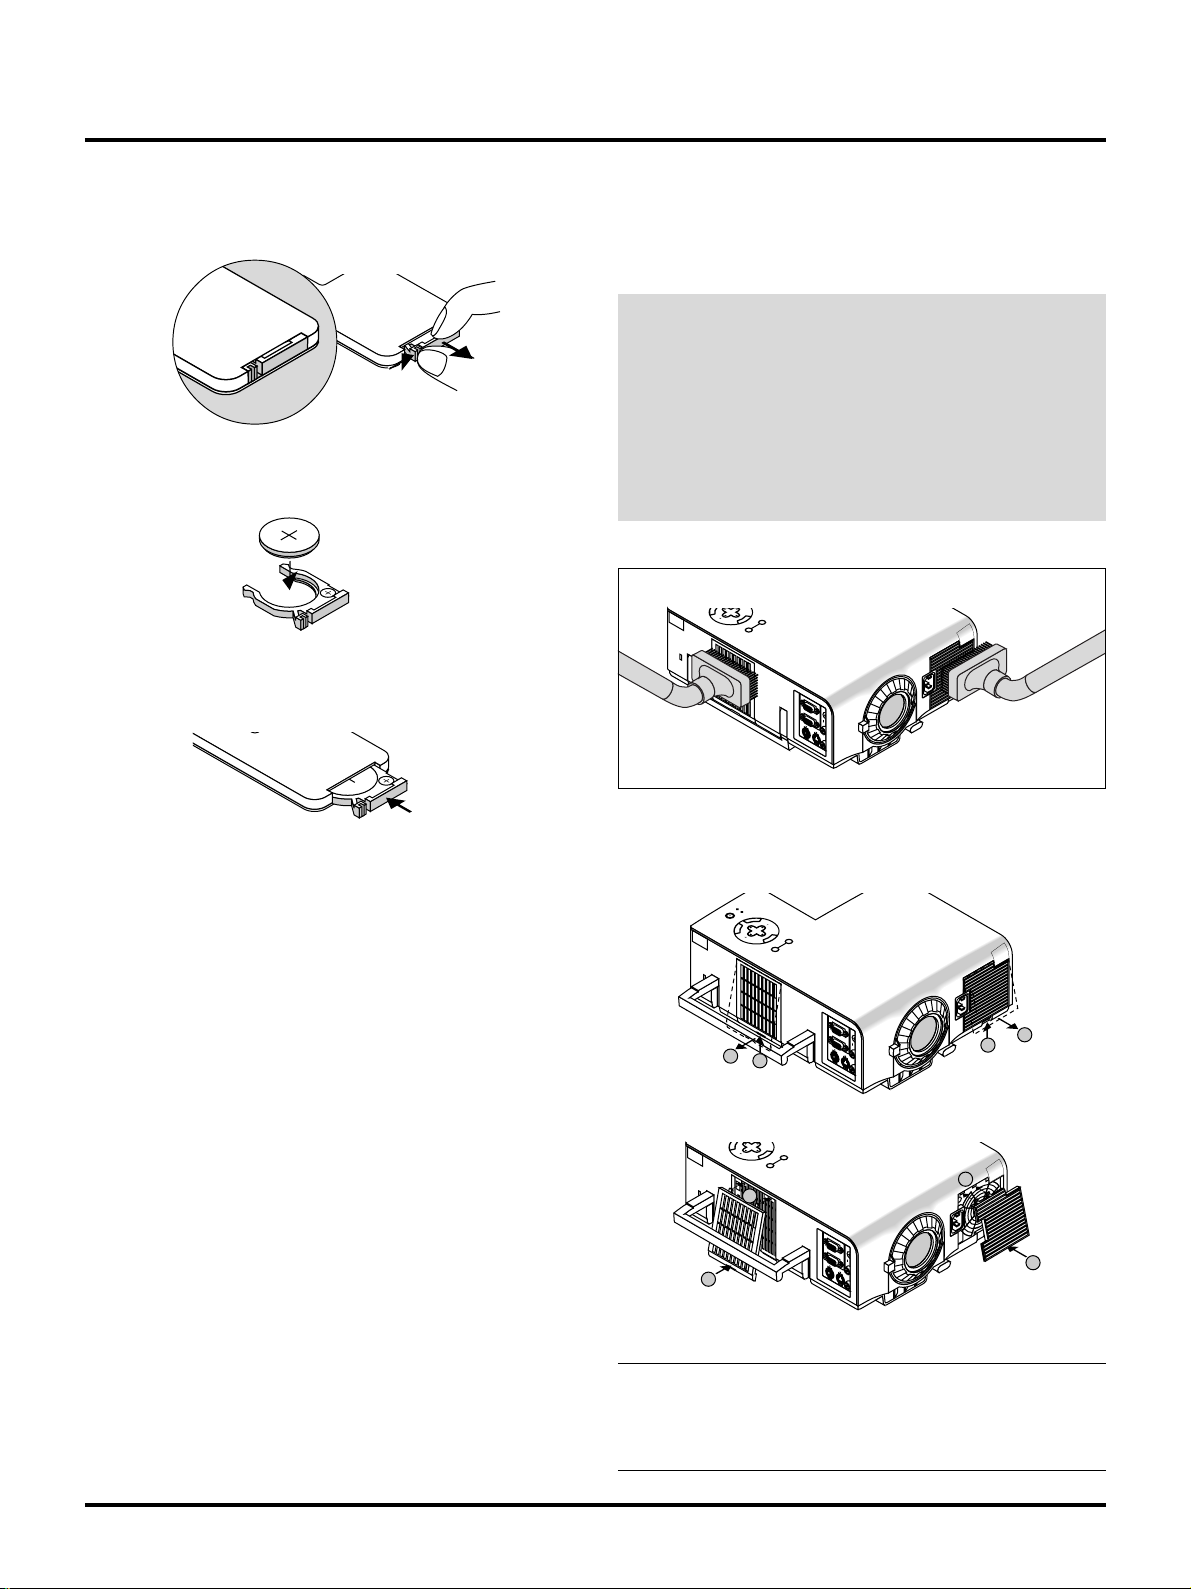
C
A
RGB
INPUT
OUTPUT
AUD
IN
OUT
PC-CONTROL S-VIDEO VID
RGB
INPUT
OUTPUT
AUD
IN
OUT
PC-CONTROL S-VIDEO VID
C
A
RGB
INPUT
OUTPUT
AUD
IN
OUT
PC-CONTROL S-VIDEO VID
M
n
O
2
-
L
i
C
E
L
L
3
V
O
L
T
S
J
A
P
A
N
H
CR2025
Remote Control Battery Installation
[Wireless Card Remote Control]
1. Press firmly and slide the battery cover off.
2. Remove the old Lithium coin cell and install new one (CR2025).
Ensure that the side with a “+” is facing up.
H
N
A
P
A
J
S
T
L
M
O
n
CR2025
V
O
3
2
-
L
L
i
C
L
E
3. Put the cover back.
Cleaning or Replacing the Filters
The air-filter sponge keeps the inside of the MultiSync VT440/VT540
Projector free from dust or dirt and should be cleaned after every 100
hours of operation (more often in dusty conditions). If the filter is
dirty or clogged, your projector may overheat.
CAUTION
• Turn off the power and unplug the projector before replacing the filter.
• Only clean the outside of the filter cover with a vacuum
cleaner.
• Do not attempt to operate the projector without a filter
cover.
• Your projector will not operate unless the filter cover is
installed correctly.
To clean the air-filter:
Vacuum the filter-through the filter cover.
N
SELECT
C
E
L
SOURCE AUTO ADJUST
M
E
N
U
H
N
A
P
A
J
S
T
L
M
O
n
CR2025
V
O
3
2
-
L
L
i
C
L
E
To replace the air-filter:
1. Remove the filter cover by pushing up on the catch of the cover
until you feel it detach.
POWER
STATUS
ON
N
E
T
E
/
R
OFF
C
A
N
SELECT
C
E
L
2
N
C
E
L
SOURCE AUTO ADJUST
M
E
N
U
2
1
SELECT
SOURCE AUTO ADJUST
M
E
N
U
1
1
1
2
2
2. Reinstall the new filter cover.
NOTE: Do not detach the sponge from the filter cover. Do not wash
the filter cover with soap and water. Soap and water will damage the
the filter membrane. Before replacing the filter cover, remove dust
and dirt from the projector cabinet. Keep out dust and during filter
replacement.
E–34
Page 39
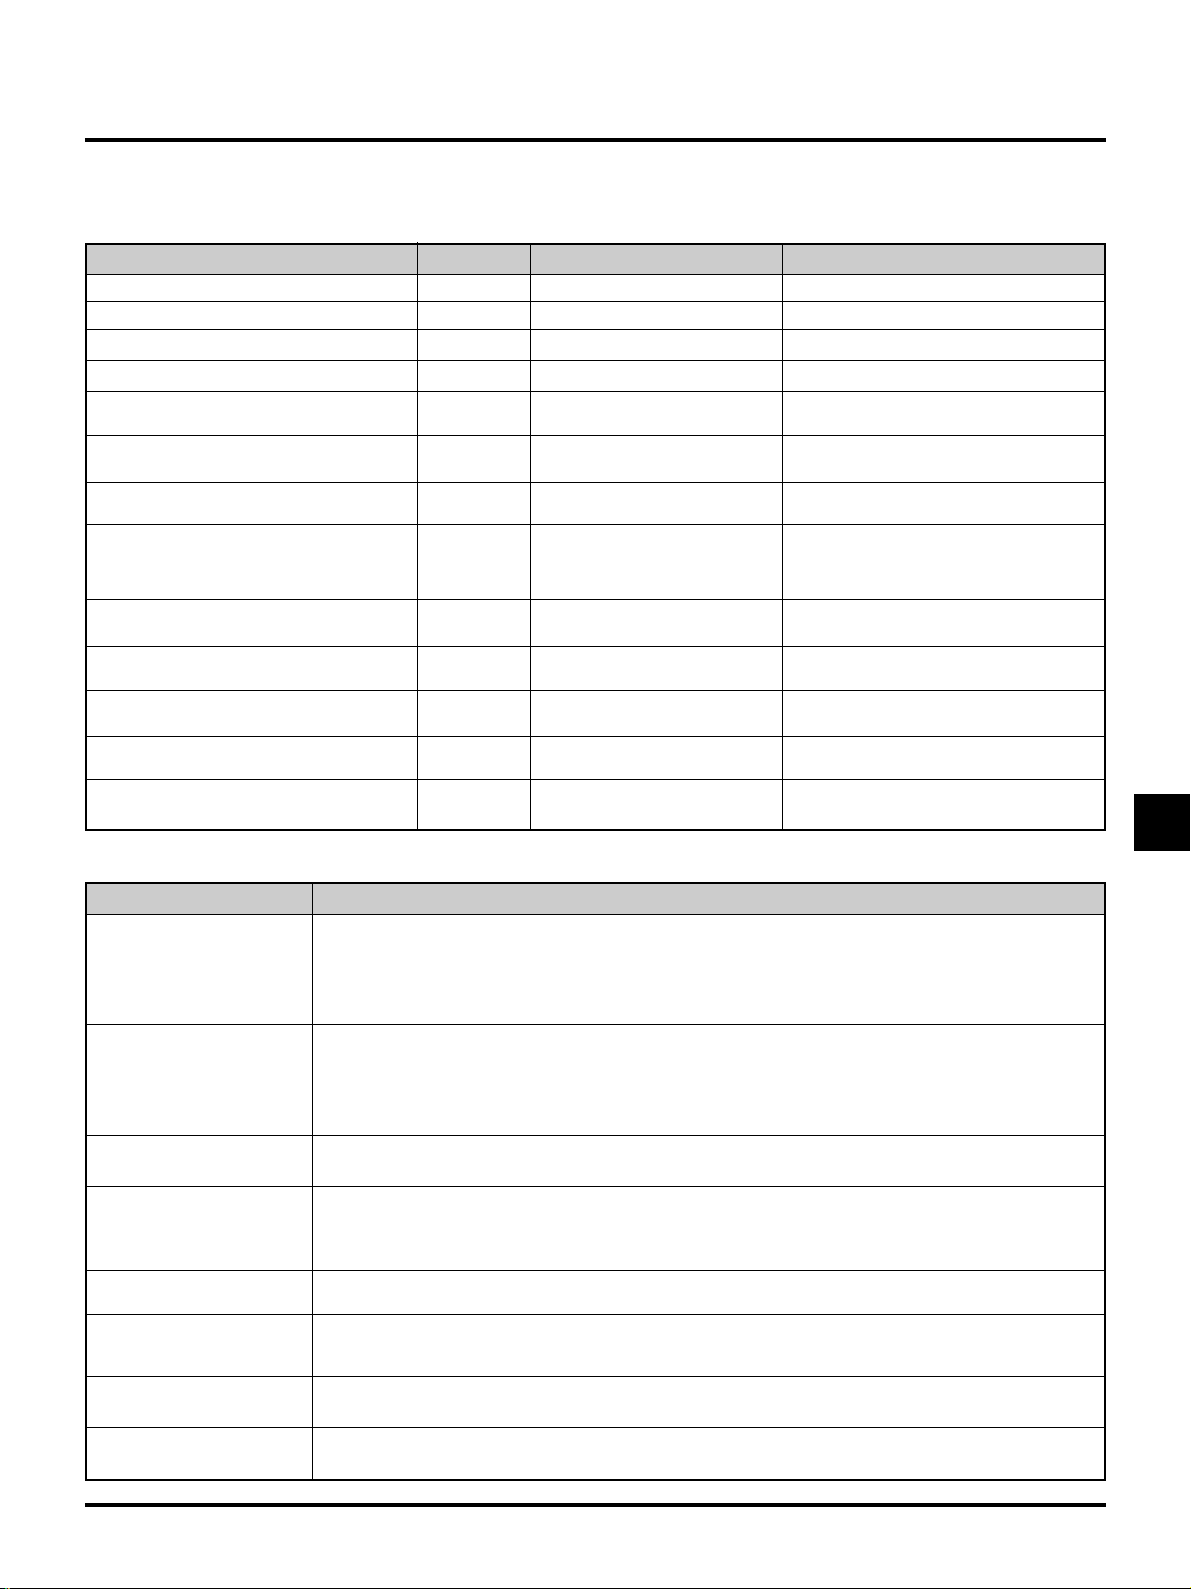
5. TROUBLESHOOTING
This section helps you resolve problems you may encounter while setting up or using the projector.
Power/ Status Light Messages
Condition
Standby
Cooling down
Lamp in High-Bright mode
Lamp in Eco mode
One minute after lamp is turned on
Retrying to turn on lamp
3 minutes after lamp is turned on in
Eco mode
Lamp has reached its end of life
(2000 hours or over)
Lamp life has reached its end of life
(2100 hours or over)
Lamp or filter cover error (3 locations)
Fan error
Lamp error
Temperature error
Power Indicator Status Indicator
Steady orange
Blinking green
Steady green
Steady green
Blinking green
Blinking green
Steady green
Steady green
Steady orange
Steady orange
Steady orange
Steady orange
Steady orange
–
–
–
Steady green
No light in High-Bright mode
Blinking green in Eco mode
Blinking orange
Blinking green
Steady red (High-Bright mode)/
Steady orange (Eco mode)
Steady red
Blinking red (1 sec interval)
Blinking red (8 sec interval)
Blinking red (12 sec interval)
Blinking red (4 sec interval)
Note
–
Blinks green for 30 seconds
–
–
The message “Please wait a little” appears
The projector retries 3 times at an interval of 15 sec for max. 45 sec)
Fixed at High-Bright mode. Lamp mode
can be changed on the menu
Message appears on screen during 20002100 hours of lamp usage. The projector
reaches its end of life. Please replace the
lamp as soon as possible
The projector is in standby mode and cannot be turned on.
The projector is in standby mode and cannot be turned on.
The projector is in standby mode and cannot be turned on.
The projector is in standby mode and cannot be turned on.
The projector is in standby mode and cannot be turned on.
Common Problems & Solutions
Problem Check These Items
Does not turn on
No picture
Image isn’t square to the
screen
Picture is blurred
Image is scrolling vertically ,
horizontally or both
Remote control does not
work
Status indicator is lit or blinking
Cross color in RGB mode
• Check that the power cable is plugged in and that the power button on the projector cabinet or the remote
control is on.
• Ensure that the lamp cover is installed correctly. See page E-33.
• Check to see if the projector has overheated or the lamp usage exceeds 2100 hours (3150 hours in Eco
mode). If there is insufficient v entilation around the projector or if the room where you’ re presenting is particularly warm, move the projector to a cooler location.
• Use the menu to select your source (Video, S-Video or RGB). See page E-28.
• Ensure your cables are connected properly.
• Use menus to adjust the brightness and contrast. See page E-28.
• Remove the lens cap.
• Reset the settings or adjustments to factory preset levels using the Factory Default on the Image Options
Menu in Advanced mode. See page E-30.
• Reposition the projector to improve its angle to the screen. See page E-14.
• Use the Keystone on the Image Options Menu to correct the trapezoid distortion. See page E-28
• Adjust the focus. See page E-24.
• Reposition the projector to improve its angle to the screen. See page E-14.
• Ensure that the distance between the projector and screen is within the adjustment range of the lens. See
page E-15.
• Use menus or Source button on the remote control or the cabinet to select the source you want to input.
• Install a new battery. See page E-34.
• Make sure there are no obstacles between you and the projector.
• Stand within 22 feet (7 m) of the projector. See page E-13.
• See the Power/ Status Light messages above.
• If Auto Adjust is off, turn it on. If Auto Adjust is on, turn it off and balance the image with the P osition and Clock
Adjust on the Advanced Options Menu. See page E-30.
E–35
Page 40

6. SPECIFICATIONS
This section provides technical information about the MultiSync VT440/VT540 Projector’s performance.
Model Number VT440 / VT440G / VT540 / VT540G
Optical
LCD Panel 0.9” p-Si TFT active-matrix, 8002600 dots (VT440) / 10242768 dots (VT540)
Lens Manual zoom, manual focus
F2.0 – 2.3 f=35.8 – 43.0 mm
Lamp 160W NSH lamp (130W in Eco mode)
Image Size 25 – 300 inches (0.64 – 7.62 m) diagonal
Projection Distance 3.94 – 39.04 ft (1.2 - 12.0 m)
Electrical
Inputs Video (NTSC / PAL / PAL60 / SECAM / NTSC4.43)
Horizontal Frequency : 15 – 100 kHz (RGB : 24 kHz or over)
Vertical Frequency : 50 – 117 Hz
Video Bandwidth RGB: 80 MHz
Color Reproduction Full color, 16.7 million colors simultaneously.
Horizontal Resolution 550 TV lines : NTSC / PAL / NTSC4.43 / YCbCr
350 TV lines : SECAM
RGB VT440 : 800 dots horizontal, 600 dots vertical
VT540 : 1024 dots horizontal, 768 dots vertical
Power Requirement 100 – 120 / 200 – 240 VAC, 50 / 60 Hz
Input Current 2.7 A (100 – 120 VAC) / 1.3A (200 – 240 VAC)
Power Consumption 240 W (205 W in Eco mode)
Mechanical
Dimensions 9.57" (W)24.0" (H)211.2" (D) / 243 mm (W)2103 mm (H)2284 mm (D) (not including lens)
Net Weight 8.8 lbs / 3.9 kg
Environmental Considerations
Regulations UL Approved (UL 1950, CSA 950)
We provides more information about our projectors through the World Wide Web at http://www.nec-pj.com/
The specifications are subject to change without notice.
Operational Temperatures: 32˚ – 95˚F (0˚ to 35˚C), 20 – 80% humidity
Storage Temperatures: 14˚ – 122˚F (-10˚ to 50˚C), 30 – 85% humidity
Meets DOC Canada Class B requirements
Meets FCC Class B requirements
Meets AS/NZS3548 Class B
Meets EMC Directive (EN55022, EN55082-1, EN61000-3-2, EN61000-3-3)
Meets Low Voltage Directive (EN60950, TUV GS Approved)
E–36
Page 41

TROUBLESHOOTING
Operational checks
By making checks on operation under normal working conditions, a certain degree of fault diagnosis can be
carried out. Prior to removing the top cover, make the following checks:
• Is the POWER indicator lit in orange color in the standby state?
NO • The POWER cord is disconnected.
YES
▼
• Is the STATUS indicator flashing?
YES • The lamp fails to light.
▼
NO
• Is the STATUS indicator lit?
▼
• Problem in the power supply.
• The cable (POPM) is disconnected.
• Fuses (F3100 to F3104) of the MAIN PWB have blown out.
• Failure in the CPU peripheral circuits of the MAIN PWB.
• Clogging around the air filter.
• Deviation from the working range and the temperature-condition range.
•The cable (bimetal) is disconnected.
▼
• The filter cover or the lamp cover is dislodged.
• The fan is stopped due to the fan being out of order or intrusion of foreign substance.
• The cable (POLM) is disconnected.
• The cables (POF1, POF2) are disconnected.
• The cable (POMK) is disconnected.
• Lamp is out of order.
[Flashing at the intervals of once every 12 seconds (6-second ON/6-second OFF)]
[Flashing at the intervals of 1 second (0.5-second ON/0.5-second OFF)]
[Flashing at the intervals of once every 8 seconds (4-second ON/4-second OFF)]
[Flashing at the intervals of once every 12 seconds (6-second ON/6-second OFF)]
[Flashing at the intervals of once every 8 seconds (4-second ON/4-second OFF)]
[Flashing at the intervals of 1 second (0.5-second ON/0.5-second OFF)]
[Flashing at the intervals of once every 12 seconds (6-second ON/6-second OFF)]
YES
NO
▼
• Is the POWER indicator lit in green with POWER ON?
YES • The lamp’s life has expired. (The STATUS indicator is lit in red.)
▼
NO
• Peripheral circuits are out of order around the cabinet switch, remote control, remote control light receiver, and
CPU.
▼
• The total lamp lighting time has exceeded 2000 hours, or the data are destroyed.
▼
• Failure in I/O PWB and MAIN PWB.
• The cables (POMI, POXV, POXT, PORX, POGX, POBX) are disconnected.
• The LC panel is out of order.
4-1
Page 42

TROUBLESHOOTING
POWER block
Problems in the POWER and related circuits often cause typical malfunctions, such as no picture presentation,
no power supply to each PWB, no lamp lighting, no fan rotation, and so on.
Confirm whether the voltage outputs specified below are available at the POPM connector of the MAIN PWB.
PIN No. Signal name Standby Power ON Related circuits
1 PS_PW 0V +3.3V POWER ON/OFF control signal (output from MAIN)
2 GND GND GND GND
3 A+17.5V +17.5V +17.5V LC driver system
4 GND GND GND GND
5 A+12V 0V +12V
6 A+12V 0V +12V Fan control
7 GND GND GND GND
8 GND GND GND GND
9 S+5V +5V +5V A/D, ENDEAVOR
10 S+5V +5V +5V Same as above
11 GND GND GND GND
12 GND GND GND GND
13 S+3.3V +3.3V +3.3V A/D, YAMAG, UNI2, CPU, and CPU peripheral
14 S+3.3V +3.3V +3.3V Same as above
15 GND GND GND GND
Input signal processor system, VIDEO signal processor system
4-2
Page 43

TROUBLESHOOTING
LCES PWB
Are the following signal inputs available at POSV (connected with POSV of the MAIN PWB)?
(See the waveform diagram.)
PIN No.
• 9-14 : Rch video signal (10Vp-p)
• 22-27 : Gch video signal (10Vp-p)
• 35-40 : Bch video signal (10Vp-p)
NO
POSV connector defective
▼
YES
Are the following signal outputs available at the respective output pins and test pins of IC5201
(or IC5202, IC5203)? (See the waveform diagram.)
▼
PIN No.
• 27 : Y shift register start pulse (DY)
• 28-29 : Y shift register transfer clock (CLY, CLYB)
• 30-31 : X shift register transfer clock (CLX, CLXB)
• 32 : X shift register start pulse (DX)
• 33-34 : X driver driving direction changeover (DIRX, DIRXB)
• 35-36 : Enable pulse
• 37 : Pre-charge pulse (NRG)
• 38-39 : Y driver driving direction changeover (DIRY, DIRYB)
• TP5201, TP5202, TP5203, TP5204, TP5205, TP5206
Pre-charge level (NRS1R, NRS2R, NRS1G, NRS2G, NRS1B, NRS2B)
• TP5207, TP5209, TP5211
Panel’s opposing electrode potentia (LCCOMR, LCCOMG, LCCOMB)
NO
POST connector defective, or failure in the MAIN PWB or LCES PWB
▼
YES
▼
Failure in the LC panel, or other LCES PWB malfunction (defective soldering, cracks in PWB)
4-3
Page 44

TROUBLESHOOTING
LCEX PWB
Are the following signal inputs available at POSV (connected with POSV of the MAIN PWB)?
(See the waveform diagram.)
PIN No.
• 3-14 : Rch video signal (10Vp-p)
• 16-27 : Gch video signal (10Vp-p)
• 29-40 : Bch video signal (10Vp-p)
NO
POSV connector defective
▼
YES
Are the following signal outputs available at the respective output pins and test pins of IC6201
(or IC6202, IC6203)? (See the waveform diagram.)
▼
PIN No.
• 27 : Y shift register start pulse (DY)
• 28-29 : Y shift register transfer clock (CLY, CLYB)
• 30-31 : X shift register transfer clock (CLX, CLXB)
• 32 : X shift register start pulse (DX)
• 33-34 : X driver driving direction changeover (DIRX, DIRXB)
• 35-36 : Enable pulse
• 37 : Pre-charge pulse (NRG)
• 38-39 : Y driver driving direction changeover (DIRY, DIRYB)
• TP6201, TP6202, TP6203
Pre-charge level (NRS1R, NRS1G, NRS1B)
• TP6204, TP6206, TP6208
• Panel’s opposing electrode potential (LCCOMR, LCCOMG, LCCOMB)
NO
POST connector defective, or failure in the MAIN PWB or LCES PWB
▼
YES
▼
Failure in the LC panel, or other LCES PWB malfunction (defective soldering, cracks in PWB)
4-4
Page 45

TROUBLESHOOTING
• Troubleshooting for the I/O block, Sync block, and Video block
1. No video images are generated. (VIDEO system)
1
Are there signals (Y, R-Y, B-Y) at L3401 to 3? See the relevant circuit diagram for waveforms.
YES Check Q3401 to 3, IC3401, and the peripheral circuits.
NO
▼
2
Are there signals at Pins 30 to 32 of IC1104?
YES Check Q1115 to 7 and the peripheral circuits.
NO
▼
3
Is the input signal for S VIDEO?
▼
YES To !.
NO
▼
4
Is the input signal for SECAM or B/W?
YES To 9.
NO
▼
5
Are there signals at Pin 9 (Y: 2Vp-p) and Pin 7 (C) of IC1104?
YES Check the power supply of IC1104, I2C bus, and the peripheral circuits.
NO
▼
6
Are there signals at Pin 23 (Signal C) and Pin 25 (Signal Y) of IC1101?
▼ ▼ ▼
▼
YES Check FL1114 to 5, Q1104 to 1109, and the peripheral circuits.
NO
▼
7
Is there a video signal at Pin 3 of IC1101? (1.4Vp-p)
YES Check the power supply of IC1101, the FSC (chroma frequency) signal at
▼ ▼
Pin 19, and the peripheral circuits.
NO
▼
8
Is there a video signal at Pin 6 of IC1104? (2.0Vp-p)
YES Check Q1101 and the peripheral circuits.
NO
▼
9
Is there a video signal at Pin 41 of IC1104? (1.0Vp-p)
YES Check the power supply of IC1104, I2C bus, and the peripheral circuits.
NO
▼
0
Is there a video signal input in CV at Pin 20 of POMI? (1.0Vp-p)
NO Check the POMI connector, poor soldering in I/O PWB, and the signal cable.
▼▼
▼
▼
YES Check Q1005, IC1100, FL1113, and the peripheral circuits.
!
Are there signals at Pin 4 (Y: 1Vp-p) and Pin 2 (C) of IC1104?
YES Check the power supply of IC1104, I2C bus, and the peripheral circuits.
NO
▼
@
Are there video signal inputs at Pin 18 (Y) and Pin 16 (C) of POMI?
NO Check the POMI connector, poor soldering in I/O PWB, and the signal cable.
YES Check Q1006, Q1107, and the peripheral circuits.
▼
▼
▼
4-5
Page 46

2. No RGB images are generated. (VIDEO system)
1
Are there video signals (R, G, B/Y, Cb, Cr) at TP3403 to 5?
TROUBLESHOOTING
YES Check IC3401 and the peripheral circuits.
NO
▼
2
Are there video signal inputs at Pin 30 (R), Pin 28 (G), and Pin 26 (B) of POMI?
NO Check the POMI connector, poor soldering in I/O PWB, and the signal cable.
YES Check Q1020 to 4 and the peripheral circuits.
▼
▼
▼
3. No images are generated. (Sync system)
1
Is there a horizontal sync signal (in positive polarity) at TP3503?
YES To @.
NO
▼
2
Is there a horizontal sync signal (in positive polarity) at Pin 111 of IC3401?
YES Check IC3401 and the peripheral circuits.
NO
▼
3
Is the input signal for VIDEO or DVD?
YES To 7.
NO
▼
4
Is there a horizontal sync signal (in positive polarity) at Pin 83 of IC3301?
▼
▼
▼
YES Check IC3301 and the peripheral circuits.
NO
▼
5
Are there signals at Pin 4 (SOG), Pin 6 (H), and Pin 8 (V) of IC1006?
YES Check IC1006 and the peripheral circuits.
NO
▼
6
Are there signal inputs at Pin 28 (SOG), Pin 24 (H), and Pin 22 (V) of POMI?
NO Check the POMI connector, poor soldering in I/O PWB, and the signal cable.
YES Check Q1025 to 34, Q1000, Q1013 to 6, and the peripheral circuits.
7
Is there a horizontal sync signal (in positive polarity) at Pin 86 of IC3301?
▼
▼
YES Check IC3301 and the peripheral circuits.
NO
▼
8
Is there a horizontal sync signal (in positive polarity) at Pin 19 of IC1104?
YES Check IC1106 and the peripheral circuits.
NO
▼
9
Are there video signals (sync provided) at Pin 41 (VIDEO) and Pin 43 (DVD) of IC1104?
YES Check the power supply of IC1104, I2C bus, and the peripheral circuits.
NO
▼
0
Is the input signal for VIDEO?
▼
▼
▼
▼
▼
NO
YES To 0, No VIDEO images.
▼
▼
4-6
Page 47

TROUBLESHOOTING
▼
!
Is there a video signal input (sync provided) at Pin 28 (G) of POMI?
NO Check the POMI connector, poor soldering in I/O PWB, and the signal cable.
YES Check IC1001, Q1000, and the peripheral circuits.
@
Is there a vertical sync signal (in positive polarity) at TP3507?
NO
@
Is the input signal for VIDEO or DVD?
NO
#
Is there a vertical sync signal (in positive polarity) at Pin 84 of IC3301?
NO
$
Are there signals at Pin 4 (SOG), Pin 6 (H), and Pin 8 (V) of IC1006?
NO
%
Are there signal inputs at Pin 28 (SOG), Pin 24 (H), and Pin 22 (V) of POMI?
NO Check the POMI connector, poor soldering in I/O PWB, and the signal cable.
▼
▼
YES Check IC3502 and the peripheral circuits.
▼
YES To ^.
▼
YES Check IC3301 and the peripheral circuits.
▼
YES Check IC1006 and the peripheral circuits.
▼
▼▼
▼
▼
▼
▼
YES Check Q1025 to 34, Q1000, Q1013 to 6, and the peripheral circuits.
^
Is there a vertical sync signal (in positive polarity) at Pin 87 of IC3301?
YES Check IC3301 and the peripheral circuits.
NO
▼
&
Is there a vertical sync signal (in negative polarity) at Pin 5 of IC1104?
YES Check Q1110 to 1 and the peripheral circuits.
NO To 9.
▼
▼
▼
4. No sound generation
1
Are there audio signals at Pins 48 and 56 of IC4100?
YES Check the speaker, connector, and the peripheral circuits.
NO
▼
2
Is there an audio signal at Pin 9 of IC4100?
YES Check IC4100, VOL voltage at Pin 28, and the peripheral circuits.
NO
▼
3
Is there a signal input at Pin 14 (AUDIO) of POMI?
NO Check the POMI connector, poor soldering in I/O PWB, and the signal cable.
▼
▼
▼
4-7
YES Check Q1011, ST connector, and the peripheral circuits.
▼
Page 48

METHOD OF ADJUSTMENTS
PC Control Software
Table of Contents
1. Outline software descriptions
2. Equipment to be used and operating environments
3. Troubleshooting and adjustment procedures
3-1. Replacement of the MAIN PWB
3-2. Replacement of the LCEP PWB
3-3. Replacement of the VIDEO-DEC PWB
3-4. Replacement of the LCD panel
4. Various functional descriptions
4-1. Data
4-2. Sub-B/C
4-3. Flicker
4-4. Ghost
4-5. Lamp
4-6. Option
5. Error messages
5-1
Page 49

METHOD OF ADJUSTMENTS
1. Outline software descriptions
This is the PC control software for servicing adjustments to be conducted during the replacement of the MAIN
PWB, LCEP PWB, VIDEO-DEC PWB, or the LCD panel for the LCD projector, the VT440/VT540 Series.
This software is used for the adjustment of Sub-Brightness/Sub-Contrast, Flicker, and Ghost, and also the
modification of Lamp Usage Time, Filter Usage Time, Panel Usage T ime, Projector Usage Time, and Language
Selection.
In addition, it enables reading and writing of various data, such as the V-T data for the PJ, the adjusting data for
factory shipment, various data for setting (user), and the logo and uniformity data.
2. Equipment to be used and operating environments
<Equipment to be used>
• Software for servicing adjustments (Ser_99vt.exe Ver1.0)
Attached files: V-T Data, etc.
• Personal computer [Enabled to actuate Windows95 or Windows3.1, and the serial port (COM1 or COM2 or
COM3) is of the D-SUB9pin.]
• Video signal generator [Auto-adjustment type: Enabled to generate an output of NTSC split color bars (7
colors)]
• Component signal generator [Auto-adjustment type: Enabled to generate an output of 15kHz Component
Video 60Hz split color bars (7 colors)]
• Serial cable (Accessory for the PJ main unit)
<Connections>
• Connect the PC CONTROL terminal (Mini DIN-8pin) of the PJ with either serial port COM1 or COM3 (D-SUB
9pin) of the personal computer through a serial cable (accessory for the PJ main unit).
• During the adjustment of RGB Sub-Brightness/Sub-Contrast, connect the RGB terminal of the PJ with an
ANALOG RGB output of the personal computer or an RGB signal generator to be used for adjusting signal
generation.
• During the adjustment of Component Sub-Brightness/Sub-Contrast, connect the RGB terminal of the PJ with
a Component signal generator to be used for adjusting signal generation.
• During the adjustment of Video Sub-Brightness/Sub-Contrast, connect the VIDEO terminal with a Video
signal generator to be used for adjusting signal generation.
<Setting of personal computer that generates adjusting pattern screen outputs>
• Personal computer’s definition, frequency, and the No. of colors
Make settings at VESA XGA (1024x768) 70Hz, high color (16 bits) or above.
• Method of adjusting pattern screen display
Using the [ON] button located in the test pattern box, the adjusting pattern screen can be displayed on the
PC screen. In this case, however, only the test patterns in the [Sub-B/C] tab can be displayed. All other
adjusting patterns are the internally available test patterns.
5-2
Page 50

3. Troubleshooting and adjustment procedures
3-1. Replacement of the MAIN PWB
<Copying of the V-T data, ADJ data, Logo data, and Uniformity data>
Let the PJ power supply stay in the STAND BY state and select the [Data] tab for servicing software.
Make data read/write according to the descriptions (1) and (2) below.
(1)Data Read
Prior to the replacement, and as required, read the presently used data of the MAIN PWB and save
them in the relevant file.
(According to the type of fault, it may be impossible to save these data.)
Designate the file name and save the data by clicking the relevant [Read (PJ->File)] button of the V-T
data, ADJ data, Logo data, and Uniformity data.
(2)Data Write
After the replacement of the MAIN PWB, click the relevant [Write (File->PJ)] button of the V-T data,
ADJ data, Logo data, and Uniformity data to select the saved file, and write the data.
If it is impossible to save the data of the MAIN PWB used before the replacement, write the V-T data
of the model from the file as required, using the [Write (File->PJ)] button of the V-T data.
After all the data have been written, pull out the AC cord of the PJ and confirm that the Power LED is
unlit. Since then, connect the AC cord again.
<Adjustment of Sub-Brightness/Sub-Contrast>
Select the [Sub-B/C] tab for servicing software.
Make the respective adjustments of RGB/Component/Video according to the descriptions (1), (2) and (3)
below.
METHOD OF ADJUSTMENTS
(1)Adjustment of RGB Sub-Brightness/Sub-Contrast
Select [RGB] in the Auto ADJ box.
Make adjustments by either method of (a) or (b) below.
(a) Auto adjustment
As an adjusting signal, enter an input of Window (Center: White) with the use of an RGB signal
generator. Otherwise, enter an RGB output of the personal computer. (When the PC output is
used in the auto-adjustment mode, the screen is automatically changed over to the Window screen.)
When the [Auto] button is clicked in the Auto ADJ box, automatic adjustment is started.
After the completion of automatic adjustment, confirm that there is no coloring of the gray scale.
If any coloring is perceived, make fine adjustments of (b) by manual adjustment.
Note: It is impossible to carry out normal adjustments if the definition (VESA XGA 70Hz) or the
pattern is improper for the adjusting signal.
(b) Manual adjustment
If the automatic adjustment is impossible, manual adjustments should be carried out.
As an adjusting signal, enter an input of gray scale with the use of an RGB signal generator.
Otherwise, enter an RGB output of the personal computer and display a gray scale with the use of
the [Scale] button in the Test Pattern box.
Use a scroll bar to adjust Sub-Brightness/Sub-Contrast, making sure not to cause black and white
chroma and also coloring in the gray scale.
After the completion of manual adjustment, click the [Set] button in the Data box.
5-3
Page 51

METHOD OF ADJUSTMENTS
(2)Adjustment of Component Sub-Brightness/Sub-Contrast
Select [Component] in the Auto ADJ box.
Make adjustments by any method of (a), (b) or (c) below.
(a) Auto adjustment
As an adjusting signal, enter a split color bar (7 colors) with the use of a Component signal generator.
When the [Auto] button is clicked in the Auto ADJ box, automatic adjustment is started.
After the completion of automatic adjustment, confirm that there is no coloring of the gray scale.
If any coloring is perceived, make fine adjustments of (b) by manual adjustment.
Note: It is impossible to carry out normal adjustments if the pattern is improper for the adjusting
signal.
(b) Manual adjustment
If the automatic adjustment is impossible, manual adjustments should be carried out.
As an adjusting signal, enter an input of gray scale with the use of a Component signal generator.
Use a scroll bar to adjust Sub-Brightness/Sub-Contrast, making sure not to cause black and white
chroma and also coloring in the gray scale.
After the completion of manual adjustment, click the [Set] button in the Data box.
(c) Copying of the Video adjusting value
If no Component signal generator is available, try to check [Video-> Comp] in the Auto ADJ box.
Then, the same adjusting value as that for Video is written during the adjustment of Video.
(3)Adjustment of Video Sub-Brightness/Sub-Contrast
Select [Video] in the Auto ADJ box.
Make adjustments by either method of (a) or (b) below.
(a) Auto adjustment
As an adjusting signal, enter an input of split color bar (7 colors) with the use of a Video signal
generator.
When the [Auto] button is clicked in the Auto ADJ box, automatic adjustment is started.
After the completion of automatic adjustment, confirm that there is no coloring of the gray scale.
If any coloring is perceived, make fine adjustments of (b) by manual adjustment.
Note: It is impossible to carry out normal adjustments if the pattern is improper for the adjusting
signal.
5-4
(b) Manual adjustment
If the automatic adjustment is impossible, manual adjustments should be carried out.
As an adjusting signal, enter an input of gray scale with the use of a Video signal generator.
Use a scroll bar to adjust Sub-Brightness/Sub-Contrast, making sure not to cause black and white
chroma and also coloring in the gray scale.
After the completion of manual adjustment, click the [Set] button in the Data box.
When the respective adjustments have been finished for RGB/Component/Video, a check mark is
given to the left-end check box in the Auto ADJ box.
<Adjustment of Flicker>
Select the [Flicker] tab for servicing software.
Make the respective adjustments of Floor/Ceiling according to the descriptions (1) and (2) below.
(1)Adjustment of Floor
Check [Floor].
Click the [ON] button in the Test Pattern box in order to display the internal horizontal line signal.
If this [ON] button is clicked continuously, a changeover action takes place in the toggle mode in the
course of R-> G-> B-> R. Make adjustments with the scroll bar so that the flicker in the center part
becomes minimum for each color.
Page 52

METHOD OF ADJUSTMENTS
(2)Adjustment of Ceiling
Check [Ceiling].
Click the [ON] button in the Test Pattern box in order to display the internal horizontal line signal.
If this [ON] button is clicked continuously, a changeover action takes place in the toggle mode in the
course of R-> G-> B-> R. Make adjustments with the scroll bar so that the flicker in the center part
becomes minimum for each color.
When adjustments have been finished for both (1) and (2) above, click the [Set] button in the Data box.
Click the [CLS] button in the Test Pattern box in order to clear the internal test signal.
<Adjustment of Ghost>
Select the [Ghost] tab for servicing software.
Click the [ON] button in the Test Pattern box in order to display the internal ghost adjusting signal.
Make adjustments with the scroll bar so that the ghost becomes minimum for each color.
When adjustments have been finished, click the [Set] button in the Data box.
Click the [CLS] button in the Test Pattern box in order to clear the internal test signal.
<Modification of Lamp, Filter, Panel, and Projector Usage Time>
In the case of failure in the <Copying of the V-T data, ADJ data, Logo data, and Uniformity data> to be
carried out in the first place, each usage time must be fixed at “0 hours.” Therefore, make the setting of
each usage time, as required.
Let the PJ power supply stay in the STAND BY state and select the [Lamp] tab for servicing software.
Make the modification of the usage time according to the descriptions (1), (2), and (3) below.
(1)Modification of the lamp usage time
Check [Change time (Lamp Usage Time)] and make the setting of lamp usage time by the use of the
scroll bar.
After the completion of this setting, click the [Set] button.
(2)Modification of the filter usage time
Check [Change time (Filter Usage Time)] and set the lamp usage time using the scroll bar/editor input.
After the completion of this setting, click the [Set] button.
(3)Modification of the panel usage time
Check [Change time (Panel Usage Time)] and set the lamp usage time using the scroll bar/editor
input.
After the completion of this setting, click the [Set] button.
(4)Check [Change time (Projector Usage Time)] and set the lamp usage time using the scroll bar/editor
input.
After the completion of this setting, click the [Set] button.
Upon the completion of (1), (2), (3), and (4) above, pull out the AC cord of the PJ and confirm that the
Power indicator is unlit. Since then, connect the AC cord again.
<Language Setting>
Select the [Lamp] tab for servicing software.
In the case of the domestic (Japan) mode, check [VTxxxJ Model] in the Language box.
In the case of an overseas mode, check [Vtxxx, G, GS Model].
In this unit, the factory data only are rewritten to hold the user setting values for the <Copying of the V-T
data, ADJ data, Logo data, and Uniformity data> to be carried out in the first place. For this reason, there
can be no coincidence between the set language and the displayed language (user setting).
5-5
Page 53

METHOD OF ADJUSTMENTS
3-2. Replacement of the LCEX (LCES) PWB
<Adjustment of Flicker>
Make the similar adjustments as those for the replacement of the MAIN PWB.
3-3. Replacement of the VIDEO-DEC PWB
<Adjustment of Sub-Brightness/Sub-Contrast>
Make the similar adjustments as those for the replacement of the MAIN PWB.
3-4. Replacement of the LCD panel
<Adjustment of Sub-Brightness/Sub-Contrast>
If there is coloring in the gray scale, carry out fine adjustments manually.
In regard to the method of adjustments, refer to the descriptions about the replacement of the MAIN PWB.
<Adjustment of Flicker>
Make the similar adjustments as those for the replacement of the MAIN PWB.
<Adjustment of Ghost>
Make the similar adjustments as those for the replacement of the MAIN PWB.
<Adjustment of Uniformity>
Make the similar adjustments as those for the replacement of the MAIN PWB.
<Modification of Lamp, Filter, Panel, and Projector Usage Time>
Change the panel usage time to “0 Hours.”
In regard to the method of modification, refer to the descriptions about the replacement of the MAIN PWB.
5-6
Page 54
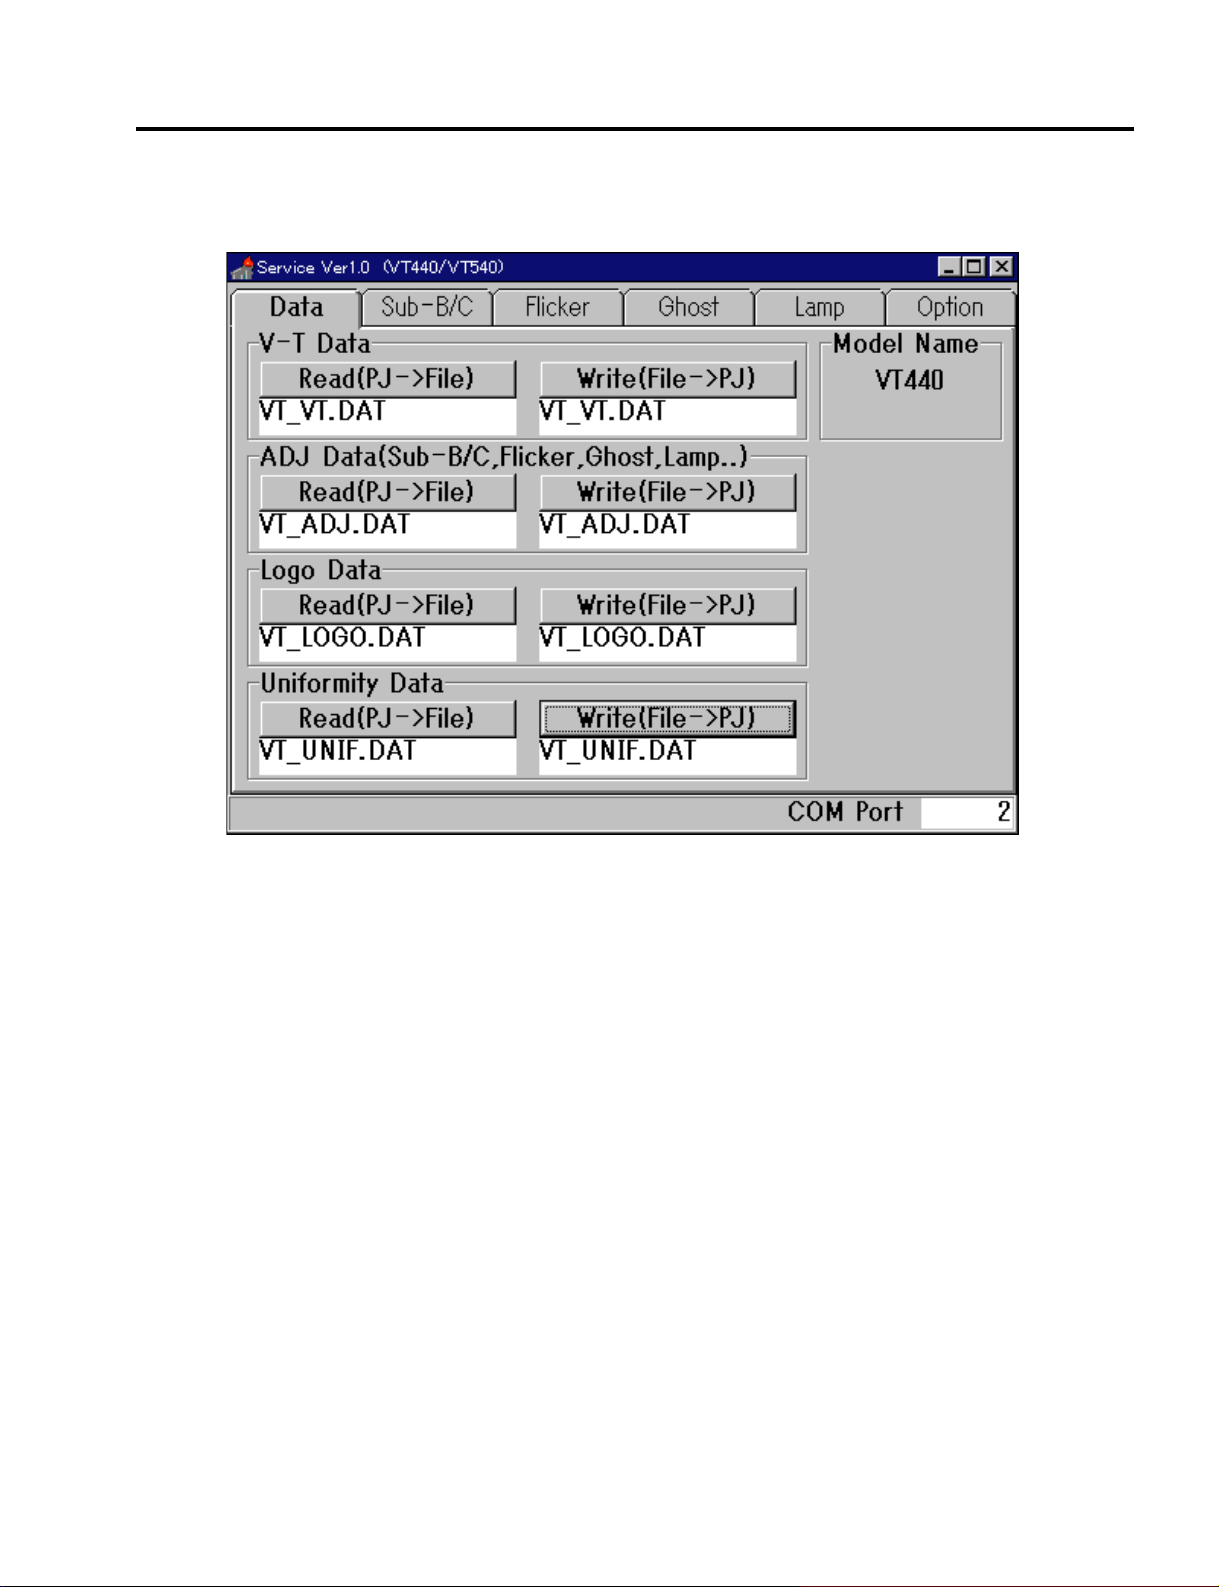
4. Various functional descriptions
4-1. Data
METHOD OF ADJUSTMENTS
<Model Name>
The present PJ data are acquired and discrimination of the model is carried out.
In the case of the VT440 System, [VT440] is displayed. For the VT540 System, [VT540] is displayed.
<Read and Write of the V-T Data>
At the time of the replacement of the MAIN PWB, this function is used to write the V-T data, which have been
used before the replacement, in the new MAIN PWB.
The action for reading and writing of the V-T data should be carried out while the PJ power supply is made to
stay in the Standby mode.
When the [Read (PJ-> File)] button in the V-T Data box is clicked under the condition that the MAIN PWB
before replacement is left attached, the Save Dialog is opened. In this state, designate the file name.
The V-T data are read out of the PJ and saved with the specified file name.
The saved file name is displayed below the [Read (PJ-> File)] button.
When the [Write (File-> PJ)] button in the V -T Data box is clicked after the replacement of the MAIN PWB, the
Open Dialog is opened. In this state, select the saved file name.
Write the V-T data in the PJ from the designated file.
The written file name is displayed below the [Write (PJ-> File)] button.
5-7
Page 55

METHOD OF ADJUSTMENTS
<Read and Write of the ADJ Data>
At the time of the replacement of the MAIN PWB, this function is used to write the V-T data (adjusting data
used for shipment and various user setting values), which have been used before the replacement, in the
new MAIN PWB.
The data rewritten in this case are the factory shipment adjusting data for Sub-Brightness/Sub-Contrast,
Flicker, Ghost, and Uniformity, and also the various data of usage time for the lamp, filter, and panel.
The action for the saving and writing of the ADJ data should be carried out while the PJ power supply is made
to stay in the Standby mode.
When the [Read (PJ-> File)] button in the ADJ Data box is clicked under the condition that the MAIN PWB
before replacement is left attached, the Save Dialog is opened. In this state, designate the file name.
The ADJ data are read out of the PJ and saved with the specified file name.
The saved file name is displayed below the [Read (PJ-> File)] button.
When the [Write (File-> PJ)] button in the ADJ Data box is clicked after the replacement of the MAIN PWB, the
Open Dialog is opened. In this state, select the saved file name.
Write the ADJ data in the PJ from the designated file.
The written file name is displayed below the [Write (PJ-> File)] button.
After the ADJ data have been written, pull out the AC cord of the PJ without fail and confirm that the Power
LED is unlit.
<Read and Write of the Logo Data>
At the time of the replacement of the MAIN PWB, this function is used to write the Logo data (user registration), which have been used before the replacement, in the new MAIN PWB.
The action for the saving and writing of the Logo data should be carried out while the PJ power supply is
made to stay in the Standby mode.
When the [Read (PJ-> File)] button in the Logo Data box is clicked under the condition that the MAIN PWB
before replacement is left attached, the Save Dialog is opened. In this state, designate the file name.
The Logo data are read out of the PJ and saved with the specified file name.
The saved file name is displayed below the [Read (PJ-> File)] button.
When the [Write (File-> PJ)] button in the Logo Data box is clicked after the replacement of the MAIN PWB,
the Open Dialog is opened. In this state, select the saved file name.
Write the Logo data in the PJ from the designated file.
The written file name is displayed below the [Write (PJ-> File)] button.
<Read and Write of the Uniformity Data>
At the time of the replacement of the MAIN PWB, this function is used to write the Uniformity data, which have
been used before the replacement, in the new MAIN PWB.
The action for the reading and writing of the Uniformity data should be carried out while the PJ power supply
is made to stay in the Standby mode.
When the [Read (PJ-> File)] button in the Uniformity Data box is clicked under the condition that the MAIN
PWB before replacement is left attached, the Save Dialog is opened. In this state, designate the file name.
The Uniformity data are read out of the PJ and saved with the specified file name.
The saved file name is displayed below the [Read (PJ-> File)] button.
When the [Write (File-> PJ)] button in the Uniformity Data box is clicked after the replacement of the MAIN
PWB, the Open Dialog is opened. In this state, select the saved file name.
Write the Uniformity data in the PJ from the designated file.
The written file name is displayed below the [Write (PJ-> File)] button.
Note 1: According to the type of fault, it may be impossible to save the data.
The default data are written in the MAIN PWB in advance.
Note 2: The ADJ data should be written under the condition that the PJ power supply is made to stay in the
standby state. In addition, unless the AC cord of the PJ is drawn out after data writing, the written
data cannot be written in the Flash ROM.
Note 3: When all-data resetting is effected, various user setting values written by ADJ data writing cannot be
held and the factory shipment values are recovered.
5-8
Page 56
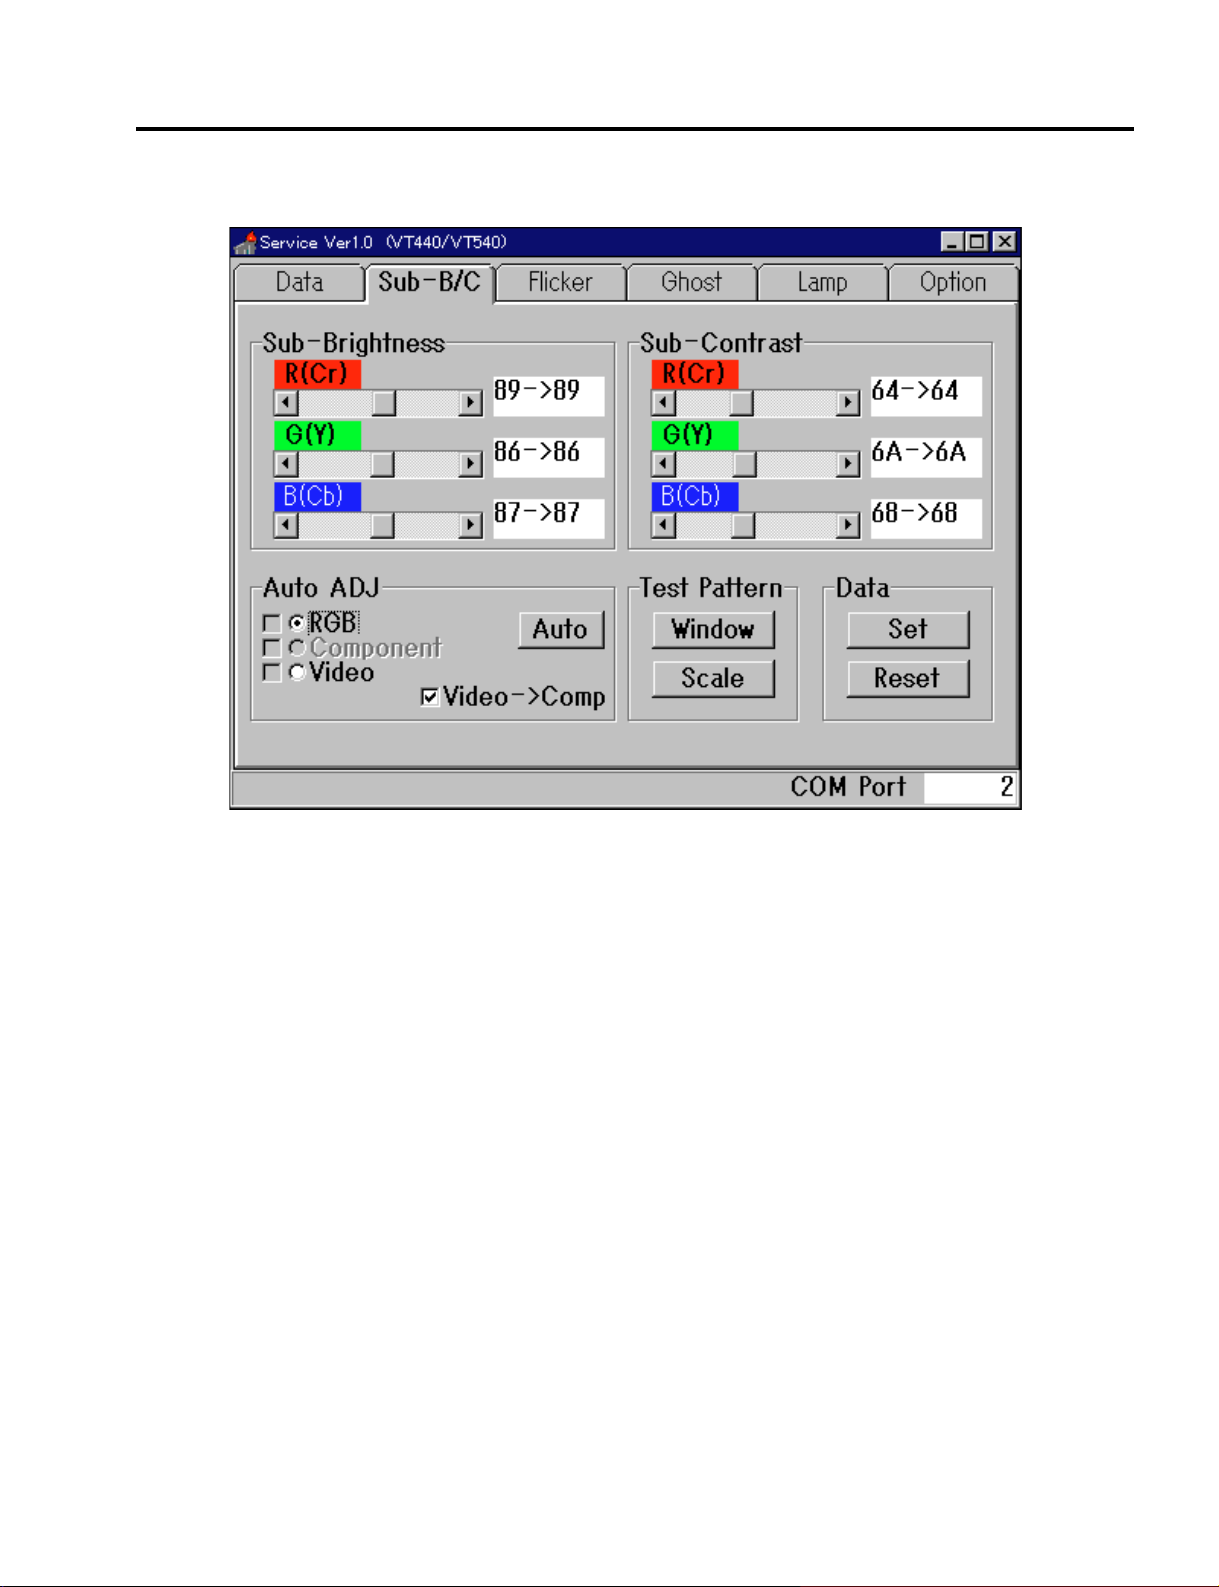
4-2. Sub-B/C
METHOD OF ADJUSTMENTS
<Sub-Brightness/Sub-Contrast>
This function is used for the manual adjustment of Sub-Brightness/Sub-Contrast.
The data are independently possessed by the three types of signals for RGB, Component, and Video. The
signal data selected in the Auto ADJ box are acquired and they are respectively displayed for R(Cr)/G(Y)/
B(Cb) beside the scroll bar on the screen.
The data acquired firstly (at the time of starting of the adjusting software) are stored as the initial value and
displayed on the left of the arrow mark. The present value is displayed on the right of the arrow.
When writing of the ADJ data is conducted with [Data], however, the written data are regarded as the initial
value.
Display the gray scale and make adjustments with the use of the scroll bar, making sure not to cause white
and black chroma and also coloring.
Adjusting range: 00H - FFH
5-9
Page 57

METHOD OF ADJUSTMENTS
<Auto ADJ>
This function is used for the selection and automatic adjustment of signals to be used for the adjustment of
Sub-Brightness/Sub-Contrast.
Select the required adjusting signal from RGB/Component/Video.
According to the selected signal, signal changeover (RGB/Component-> RGB1, Video-> Video), data read,
and data reset (signal being displayed) are carried out.
When the [Auto] button is clicked, automatic adjustment is carried out for the selected signal.
If a signal generator is used during the automatic adjustment of RGB, setting should be made at Window
(Center: White) at VESA XGA 70Hz. When a PC signal is used, the Window mode is chosen automatically.
For the automatic adjustment of Component, the signal should be set at the split color bar (7 colors).
In case of failure in the adjustment of Component, check [Video-> Comp].
During the adjustment of Video, the same data are copied in Component.
In the case of automatic adjustment, or when the data are written with the use of the [Set] button in the Data
box, a check mark is given to the check box located on the left of the RGB/Component/Video selection as a
mark of the completion of adjustment.
This check mark is cleared when the data are reset with the [Reset] button in the Data box.
<Test Pattern>
This function is used when a personal computer intended for adjustments is used as a signal source.
When the [Window] button is clicked, a window display is presented on the PC screen.
This window is used for the adjustment of RGB, but the preliminary display of this window is not required in
the case of the automatic adjustment since it is automatically displayed.
When the [Scale] button is clicked, a 16-gradation gray scale is displayed on the PC screen.
When a double click is conducted on the test pattern, this double click is cleared.
<Data>
When the [Set] button is clicked, the adjusted values of Sub-Brightness/Sub-Contrast, adjusted with the scroll
bar, are written in the Flash ROM.
In the case of automatic adjustment, it is unnecessary to click the [Set] button since the adjusted values are
automatically written in the Flash ROM.
When the [Reset] button is clicked, the adjusted values of Sub-Brightness/Sub-Contrast are restored to the
initial values (at the time of starting of the adjusting software) and written in the Flash ROM.
Note 1: The data adjusted with the scroll bar are the temporary ones. They are not sustained in the PJ without
taking any measures. Execute [Set] and write the data in the Flash ROM.
Note 2: Since automatic adjustment is conducted by examining the predetermined position in the screen, this
adjustment is impossible to carry out unless the patterns, definition, etc., are found inadequate.
5-10
Page 58

4-3. Flicker
METHOD OF ADJUSTMENTS
<Floor/Ceiling>
This function is used for the adjustment of flicker.
The data are sustained for Floor and Ceiling, respectively.
The present data of the PJ are acquired and displayed on the screen.
The data acquired firstly (at the time of starting of the adjusting software) are stored as the initial value and
displayed on the left of the arrow mark. The present value is displayed on the right of the arrow.
When writing of the ADJ data is conducted with [Data], however, the written data are regarded as the initial
value.
Select the method of projection for Floor/Ceiling adjustment.
The scroll bar on the selected side becomes adjustable.
Display the Test Pattern, and make adjustments with the scroll bar so that the flicker in the center part
becomes minimum for R/G/B, respectively.
Adjusting range: 00H - FFH
<Test Pattern>
This function is used when an internal Test Pattern is displayed for flicker adjustment.
When the [ON] button is clicked, a horizontal line signal of R is displayed on the projected screen.
If this [ON] button is continuously clicked since then, a changeover action takes place in the toggle mode in
the order of horizontal line signal of G-> horizontal line signal of B-> and horizontal line signal of R.
When the [CLS] button is clicked, the Test Pattern is cleared (input changeover to RGB1).
<Data>
When the [Set] button is clicked, the flicker value adjusted with the scroll bar is written in the Flash ROM.
When the [Reset] button is clicked, the adjusted flicker value is restored to the initial value (at the time of
starting of the adjusting software) and written in the Flash ROM.
Note 1: The data adjusted with the scroll bar are the temporary ones. They are not sustained in the PJ without
taking any measures. Execute [Set] and write the data in the Flash ROM.
5-11
Page 59
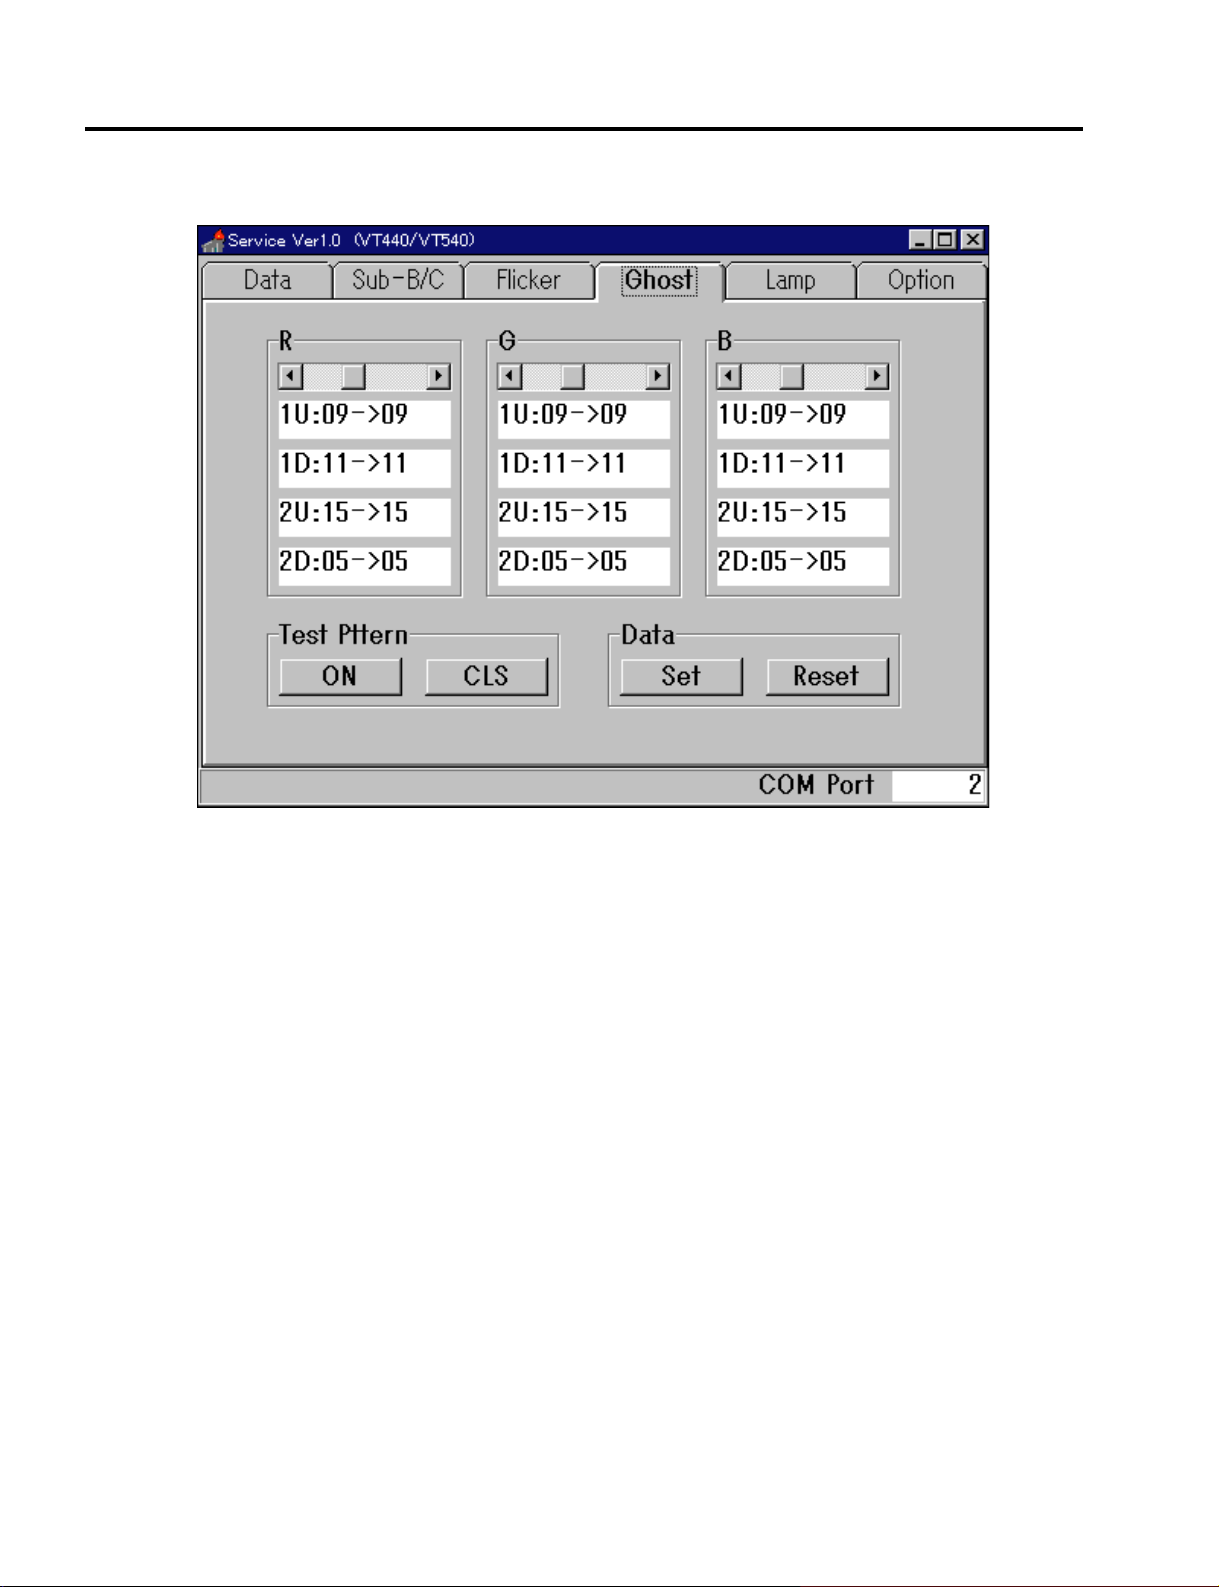
METHOD OF ADJUSTMENTS
4-4. Ghost
<Ghost R/G/B>
This function is used for the adjustment of Ghost.
The present PJ data are acquired and displayed on the screen.
The data acquired firstly (at the time of starting of the adjusting software) are stored as the initial value and
displayed on the left of the arrow mark. The present value is displayed on the right of the arrow.
When writing of the ADJ data is conducted with [Data], however, the written data are regarded as the initial
value.
The data come in 4 types for each color. During the adjustment, the increment and decrement actions are
carried out simultaneously for these 4 types.
Display the Test Pattern, and make adjustments with the use of the scroll bar so that Ghost becomes minimum in the half-tone area on the right of the pattern, for R/G/B, respectively.
Adjusting range: “VT540” 00H - 2FH
“VT440” 00H - 17H
<Test Pattern>
This function is used when an internal Test Pattern is displayed for ghost adjustment.
When the [ON] button is clicked, an adjusting signal of Ghost is displayed on the projected screen.
When the [CLS] button is clicked, the Test Pattern is cleared (input changeover to RGB1).
<Data>
When the [Set] button is clicked, the adjusting signal of Ghost adjusted with the scroll bar is written in the
Flash ROM.
When the [Reset] button is clicked, the adjusted ghost value is restored to the initial value (at the time of
starting of the adjusting software) and written in the Flash ROM.
Note 1: The data adjusted with the scroll bar are the temporary ones. They are not sustained in the PJ without
taking any measures. Execute [Set] and write the data in the Flash ROM.
5-12
Page 60

4-5. Lamp
METHOD OF ADJUSTMENTS
<Change time (Lamp Usage Time)>
This function is used when changing the lamp usage time.
The action for the modification of the lamp usage time should be carried out while the PJ power supply is
made to stay in the Standby mode.
At the beginning (at the time of adjusting software start), the projector data are acquired and stored as the
initial values.
However, if ADJ Data Write is performed with [Data], the written data are stored as the initial values.
If it is necessary to change the Lamp Usage Time, check the Change Time. Then the usage time is displayed
as “0 Hours” and the percentage indication as “100%.” When the display is like that, operation becomes
possible with the scroll bar, the [Set] button, and the [Reset] button.
Set up the proper time and percentage with the scroll bar.
When the [Set] button is clicked, the lamp usage time and percentage preset with the scroll bar are written in
the Flash ROM and displayed on the [Set] button.
When the [Reset] button is clicked, the lamp usage time and percentage are restored to the initial values (the
values at the time of adjusting software start) and written in the Flash ROM. Since then, the display on the
[Set] button is cleared.
After the Lamp Usage Time has been changed ([Set] and [Reset]), pull out the AC cord of the PJ without fail
and confirm that the Power LED is unlit.
When changing the Lamp Usage Time to “0 Hours” and “100%,” use the ON-screen menu. Then, clearing
becomes possible.
Setting range: 0 Hours - 3000 Hours
0% - 100%
5-13
Page 61

METHOD OF ADJUSTMENTS
<Change time (Filter Usage Time)>
This function is used when changing the filter usage time.
The action for the modification of the filter usage time should be carried out while the PJ power supply is
made to stay in the Standby mode.
At the beginning (at the time of adjusting software start), the projector data are acquired and stored as the
initial values.
However, if ADJ Data Write is performed with [Data], the written data are stored as the initial values.
If it is necessary to change the Filter Usage Time, check the Change Time. Then the usage time is displayed
as “0 Hours.” At that time, operation becomes possible with the scroll bar, the [Set] button, and the [Reset]
button.
Set up the proper time with the use of the scroll bar or by directly entering the time data into the time display
editor.
When the [Set] button is clicked, the filter usage time preset with the scroll bar/editor input is written in the
Flash ROM and displayed on the [Set] button.
When the [Reset] button is clicked, the filter usage time is restored to the initial values (those at the time of
adjusting software start) and written in the Flash ROM. Since then, the display on the [Set] button is cleared.
Upon the completion of changing the filter usage time ([Set] and [Reset]), pull out the AC cord of the PJ
without fail and confirm that the Power LED is unlit.
When changing the Filter Usage Time to “0 Hours,” use the ON-screen menu in the serviceman mode. Then,
clearing becomes possible.
Setting range: Scroll bar 0 Hours - 32000 Hours
Editor input 0 Hours - 596523 Hours
<Change time (Panel Usage Time)>
This function is used when changing the panel usage time.
The action for the modification of the panel usage time should be carried out in the Standby mode at all times.
At the beginning (at the time of adjusting software start), the projector data are acquired and stored as the
initial values.
However, if ADJ Data Write is performed with [Data], the written data are stored as the initial values.
If it is necessary to change the Panel Usage Time, check the Change Time. Then the usage time is displayed
as “0 Hours.” At that time, operation becomes possible with the scroll bar, the [Set] button, and the [Reset]
button.
Set up the proper time with the use of the scroll bar or by directly entering the time data into the time display
editor.
When the [Set] button is clicked, the panel usage time preset with the scroll bar/editor input is written in the
Flash ROM and displayed on the [Set] button.
When the [Reset] button is clicked, the panel usage time is restored to the initial values (those at the time of
adjusting software start) and written in the Flash ROM. Since then, the display on the [Set] button is cleared.
After the Panel Usage Time has been changed ([Set] and [Reset]), pull out the AC cord of the PJ without fail
and confirm that the Power LED is unlit.
Upon the completion of changing the panel usage time ([Set] and [Reset]), pull out the AC cord without fail,
and confirm that the Power LED is unlit.
When changing the panel usage time to “0 Hours,” use the ON-screen menu to enable the clearing action in
the serviceman mode.
Setting range: Scroll bar 0 Hours - 32000 Hours
Editor input 0 Hours - 596523 Hours
5-14
Page 62

METHOD OF ADJUSTMENTS
<Change time (Projector Usage Time)>
This function is used when changing the Projector Usage Time.
The action for the modification of the projector usage time should be carried out in the standby mode at all
times.
The present projector data are acquired and displayed on the screen.
The data acquired at the beginning (at the time of adjusting software start) are stored as the initial values and
displayed on the left of the arrow mark. The present values are displayed on the right of the arrow mark.
However, if ADJ Data Write is performed with [Data], the written data are stored as the initial values.
If it is necessary to change the Projector Usage Time, check the Change Time. Then, operation becomes
possible with the scroll bar, the [Set] button, and the [Reset] button.
Set up the proper time with the use of the scroll bar or by directly entering the time data into the time display
editor.
When the [Set] button is clicked, the projector usage time preset with the scroll bar/editor input is written in the
Flash ROM and displayed on the [Set] button.
When the [Reset] button is clicked, the projector usage time is restored to the initial values (those at the time
of adjusting software start) and written in the Flash ROM. Since then, the display on the [Set] button is
cleared.
After the Projector Usage Time has been changed ([Set] and [Reset]), pull out the AC cord of the PJ, without
fail, and confirm that the Power LED is unlit.
Setting range: Scroll bar 0 Hours - 32000 Hours
Editor input 0 Hours - 596523 Hours
<Language>
The default data setting of OSD display is carried out for the domestic (Japan) models (in Japanese) and the
overseas models (in English).
For the domestic (Japan) models, select [VTxxxJ Model].
For the overseas models, select [VTxxx, G, GS Model].
This setting is intended for the factory data only. Modification of user setting is not performed. (This is because of holding the user setting when ADJ data writing is effected with [Data].)
Note 1: In case of ADJ data Read/Write with [Data] during the replacement of the MAIN PWB, it is unneces-
sary to change the lamp, filter, panel,and projector usage time as well as the language since these
data have already been changed to the previous usage time.
Note 2: For the [Set]/[Reset] action of the lamp, filter, panel, and projector usage time, such operation should
be carried out in the standby state. In addition, these writing data cannot be written in the Flash ROM
unless the AC cord of the PJ is pulled out after the completion of [Set]/[Reset].
5-15
Page 63

METHOD OF ADJUSTMENTS
4-6. Option
<Power>
Used for Power ON/OFF.
When ON/OFF is selected, the power supply is turned ON and OFF.
<Input Select>
Used for input changeover.
The input line is changed over to the selected input.
<Test Pattern>
Used to display the various internal test patterns.
[Flicker]: Horizontal line signal for flicker adjustment
[Ghost]: Signal for ghost adjustment
[Scale]: 16-gradation horizontal gray scale
[Cross]: Cross hatch
[100% Raster]: All-white raster
[50% Raster]: 50% brightness raster
[25% Raster]: 25% brightness raster
[0% Raster]: All-black raster
[CLS]: Test Pattern clear (Changed over to RGB1 input)
[R]/[G]/[B]: Test Patterns appearing in checked color except for [Ghost]
5-16
Page 64

METHOD OF ADJUSTMENTS
<COM>
Used for the selection of PC Com Port and Baud Rate.
Communication cannot be maintained unless the Baud Rate does not coincide with the PJ setting.
The default setting for the PJ is 38400 bps.
<CRC>
The VT440/540 is provided with a protective function not to perform unwanted POWER ON when the internal
data (except for the adjusting data) have been changed. The CRC function is used in the case of failure in
POWER ON due to the modification of the internal data.
When this button is pressed, the data error detection table is updated so that it is available for the present
data.
5-17
Page 65

METHOD OF ADJUSTMENTS
5. Error messages
“RS xxxxxx”
A communication error in conjunction with the PJ.
Examine the connections and confirm whether the main power supply of the PJ is turned ON or not.
“ACK Data length error,” “R-CheckSum error,” “Write error”
A communication error in conjunction with the PJ.
Confirm whether the PJ is really free from errors. Please repeat the action once more again.
“Can not open comport”
Failure in opening the serial port.
Confirm if there is any other application that uses the serial port.
“Do not open comport”
Communication is maintained under the condition that the opening of the above-mentioned serial port has
failed.
Confirm if there is any other application that uses the serial port.
“File format error,” “Address error”
During data writing from a file, the data format of the designated file is wrong.
Designate the correct file.
“Data write error!! Please retry.”
Data writing has failed. Please repeat the action once more again.
“Level error,” “Adjust error”
Failure in the automatic adjustment of Sub-Brightness/Sub-Contrast.
Please repeat the action once more again.
5-18
Page 66

1. Adjustment of the optical axis (Shadow adjustment)
1-1. Tools required
1-2. Preliminary arrangements before adjustments
1-3. Method of shadow adjustment in each color
Fig. 1 Flow Chart of Shadow Adjustment
Fig. 2 Objective Blocks to be Adjusted
2. Adjustment of the Polarizing Plate
2-1. Tools required
2-2. Preliminary arrangements before replacement
2-3. Replacement procedures
Fig. 3 Disassembly Diagram
METHOD OF ADJUSTMENTS
5-19
Page 67

METHOD OF ADJUSTMENTS
1. Adjustment of the optical axis (Shadow adjustment)
This adjustment is intended to remove color stain (defined as shadow hereafter) that may appear at the edge
part of the projected screen possibly caused by a problem around the optical engine block.
Adjustments can be carried out based on the flow chart in Fig. 1 and the objective blocks to be adjusted, shown
in Fig. 2.
1-1. Tools required
The following tools are required for adjustments:
<Tools to be used>
• Ball driver for FL adjustment and FL2 adjustment : Opposite side 2.0mm
(Ball driver DB-20 (2.0mm), Part No. : 92339583)
• Minus screwdriver for Mirror 1 adjustment: Blade width 5.0mm
<Jig for lamp lighting>
• Dummy load PWB (VT) (Part No.: 98999241)
1-2. Preliminary arrangements before adjustments
1) Remove the top cover Assy.
2) Remove the Main PWB Assy, the LCES or LCEX PWB Assy, and the Key PWB Assy.
3) Remove the Cover (suction air duct) Assy (Part No.: 24FT7461), the Suction air duct (SK) Assy (Part
No.: 24FT7451), and the Optical cover (SK) (Part No.: 24F32021).
Taking out the filter Assy B in advance facilitates the removal of the optical cover (SK).
4) Mount the dummy load and turn on the power source circuit.
5) Zoom the lens to maximum image size.
6) Adjust the focus of the screen overall by means of the lens focus adjuster. This adjustment should be
carried out in the all-white mode.
1-3. Method of shadow adjustment in each color
1-3-1. Vertical shadow adjustment for G and R (when the shadow color is magenta, cyan, or blue)
1
Replace the FL vertical adjusting screw. (Part name: Nylock screw (HLSS4*6), Part No.:
24N04751)
Then, follow the working procedures below by the use of a ball driver (opposite side 2.0mm).
2
Sufficiently loosen the FL vertical fixing screws (Part name: special screw (PL-HM2.5*6), Part
No.: 12851741) (in 2 positions).
3
Loosen the FL horizontal fixing screws by one turn (Part name: special screw (PL-HM2.5*6),
Part No.: 12851741) (in 2 positions).
4
Turn the FL vertical adjusting screw to eliminate the vertical shadow (magenta, cyan, and blue)
from the projected screen.
5
Fix the FL horizontal fixing screws (in 2 positions).
The fixing torque is 3.5 ± 0.5kgf·cm.
6
Fix the FL vertical fixing screws (in 2 positions).
The fixing torque is 3.5 ± 0.5kgf·cm.
5-20
Page 68

METHOD OF ADJUSTMENTS
1-3-2. Vertical shadow adjustment for B (when the shadow color is yellow)
1
Replace the RL2 vertical adjusting screw. (Part name: Nylock screw (HLSS4*6), Part No.:
24N04751)
Then, follow the working procedures below by the use of a ball driver (opposite side 2.0mm).
2
Sufficiently loosen the RL2 vertical fixing screw (Part name: special screw (PL-HM2.5*6), Part
No.: 12851741) (in 1 position).
3
Loosen the RL2 horizontal fixing screw by one turn (Part name: special screw (PL-HM2.5*6),
Part No.: 12851741) (in 1 position).
4
Turn the RL2 vertical adjusting screw to eliminate the vertical shadow (yellow) from the projected screen.
5
Fix the RL2 horizontal fixing screw (in 1 position).
The fixing torque is 3.5 ± 0.5kgf·cm.
6
Fix the RL2 vertical fixing screw (in 1 position).
The fixing torque is 3.5 ± 0.5kgf·cm.
1-3-3. Horizontal shadow adjustment for G (when the shadow color is magenta or blue)
1
Loosen the FL horizontal fixing screws by one turn (in 1 position).
2
Move the FL to the right and left by hand, in order to eliminate the horizontal shadow (magenta
and blue) from the projected screen.
3
Fix the FL horizontal fixing screws (in 2 positions).
The fixing torque is 3.5 ± 0.5kgf·cm.
1-3-4. Horizontal shadow adjustment for R (when the shadow color is cyan)
1
Loosen the Mirror 1 fixing screw (Part name: PL-CPIMS2.5*6*15BF, Part No.: 910E2511) by 0.5
turns (in 1 position).
2
Using a minus screwdriver, turn and move the Mirror 1 to eliminate the horizontal shadow (cyan)
from the projected screen.
3
Fix the Mirror 1 fixing screw (in 1 position).
The fixing torque is 3.5 ± 0.5kgf·cm.
1-3-5. Horizontal shadow adjustment for B (when the shadow color is yellow)
1
Loosen the RL2 horizontal fixing screw by one turn (in 1 position).
2
Move the RL2 to the right and left by hand, in order to eliminate the horizontal shadow (yellow)
from the projected screen.
3
Fix the RL2 horizontal fixing screw (in 1 position).
The fixing torque is 3.5 ± 0.5kgf·cm.
5-21
Page 69
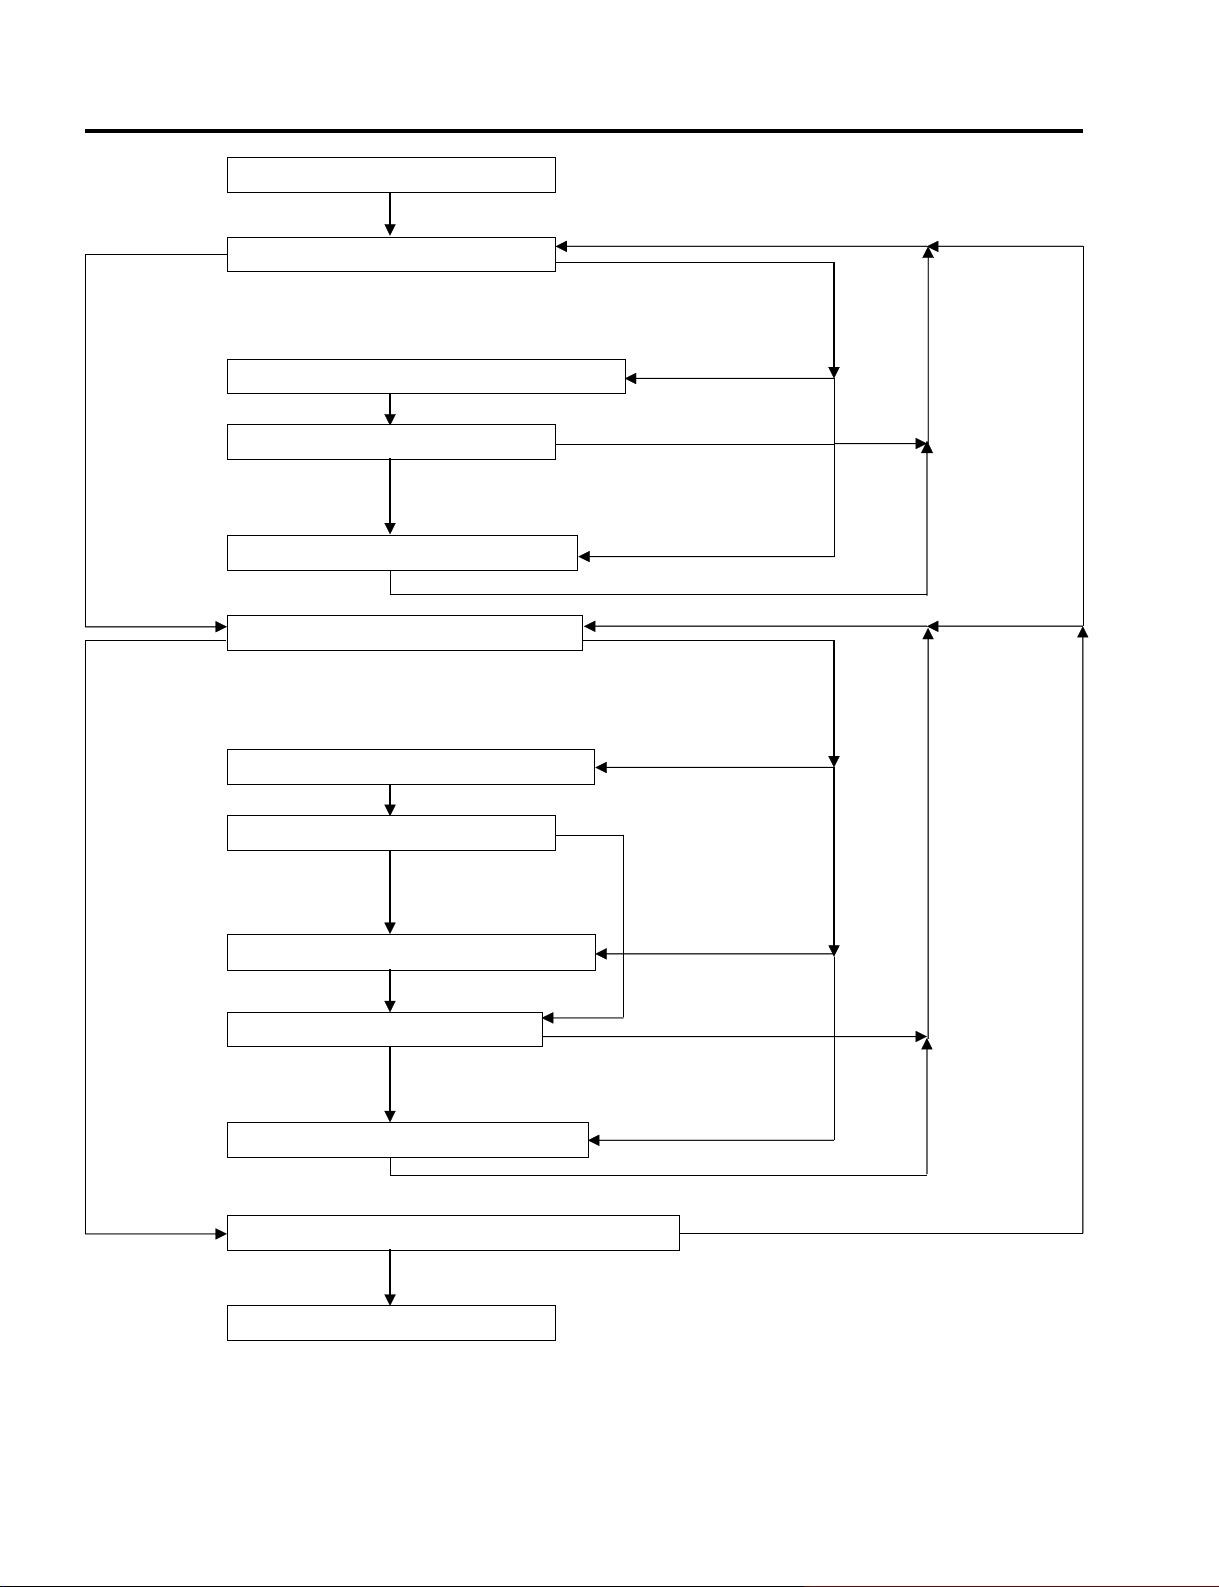
METHOD OF ADJUSTMENTS
Start of adjustment
Check the vertical shadows of R, G, B.
No shadows Shadows present present
Shadows of G and
R present
Adjust the vertical shadows of G and R. (1-3-1)
No shadows
Check the vertical shadows of B.
Shadows present
Shadows of only B
present
Adjust the vertical shadows of B. (1-3-2)
Check the horizontal shadows of R, G, B.
No shadows Shadows present present
Vertical shadows
Horizontal shadows
Adjust the horizontal shadows of G. (1-3-3)
No shadows
Check the horizontal shadows of R.
Shadows present
Adjust the horizontal shadows of R. (1-3-4)
Check the horizontal shadows of B.
No shadows
Shadows present
Adjust the horizontal shadows of B. (1-3-5)
Check the vertical and horizontal shadows of R, G, B.
No shadows Shadows present
Shadows of G
present
Shadows of R
present;
no shadows of G
Shadows of only
B present
5-22
End of adjustment
Fig. 1
Page 70
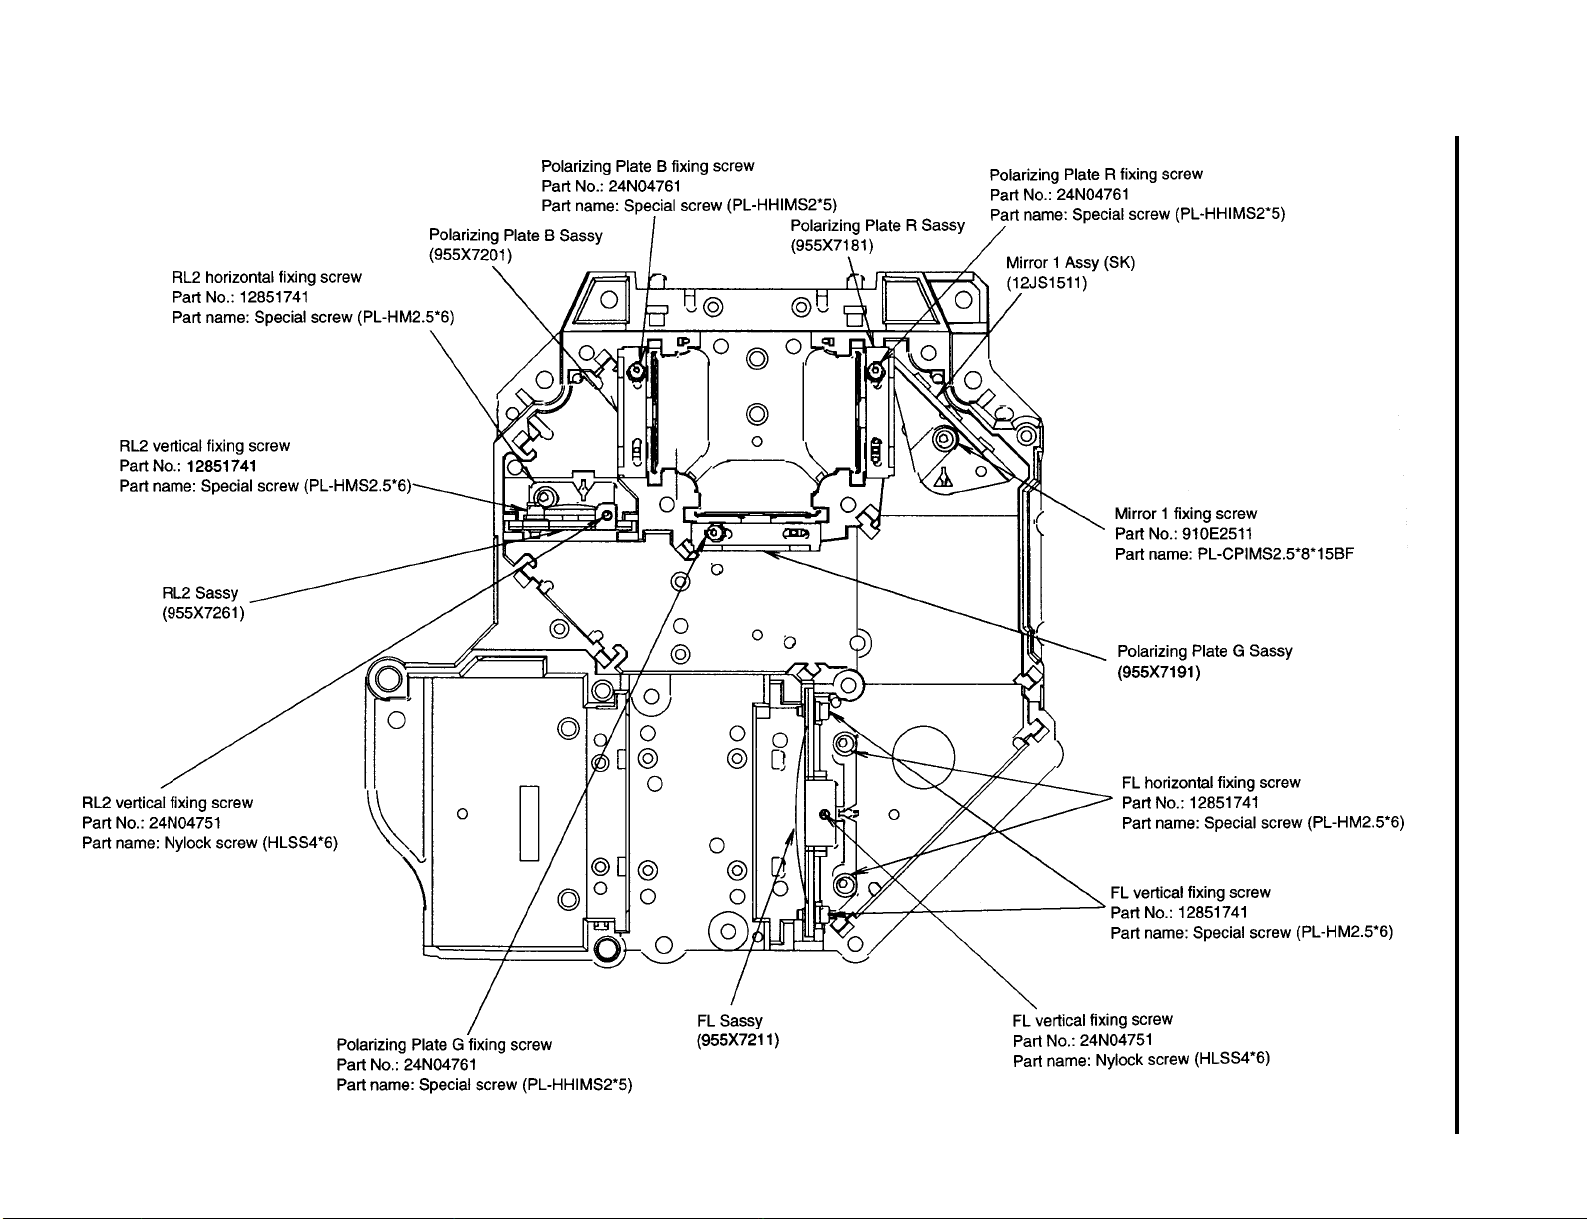
5-23
METHOD OF ADJUSTMENTS
Fig. 2
Page 71

METHOD OF ADJUSTMENTS
2. Adjustment of the Polarizing Plate
It is unnecessary to adjust the polarizing plate.
If the polarizing plate is damaged, however, it is necessary to replace the polarizer and the mounting metal fitting
(POL).
<Replacement procedures>
2-1. Tools required
The following tools are required for this replacement:
<Tools to be used>
• Ball driver for polarizing plate fixing screw mounting and dislodgment : Opposite side 1.5mm
(Ball driver DB-15 (1.5mm) Part No. : 9N000001).
2-2. Preliminary arrangements before replacement
1) Remove the top cover Assy.
2) Remove the Main PWB Assy, the LCES or LCEX PWB Assy, and the Key PWB Assy.
3) Remove the Cover (suction air duct) Assy (Part No.: 24FT7461), the Suction air duct (SK) Assy (Part
No.: 24FT7451), and the Optical cover (SK) (Part No.: 24F32021).
Taking out the filter Assy B in advance facilitates the removal of the optical cover (SK).
2-3. Replacement procedures
1) Remove the polarizing plate Sassy.
Then start the work below for the polarizing plate sassy.
2) Take out the mounting metal fitting (POL) from the condenser lens Assy.
3) Mount a new polarizer on the new mounting metal fitting (POL).
If the mounting metal fitting (POL) is attached with double coated adhesive tapes (in 2 positions), the
mounting of the polarizer should be done after the removal of the peel-off paper.
4) For the item assembled as per 3) above, mount this item on the condenser lens Assy.
In this case, the mounting metal fitting (POL) shall be fixed at the right angles with the condenser lens
Assy. The fixing torque for the polarizing plate fixing screw shall be 1.5 to 2.0kgf·cm.
Note) In regard to the polarizing plate R sassy, the polarizing plate G sassy, and the polarizing plate B
sassy, the mounting angles for the respective polarizing plate fixing screws differ from each
other. Make sure not to confuse these angles. (See Fig. 2.)
5) Mount the polarizing plate sassy, each assembled as per 4) above.
5-24
Page 72
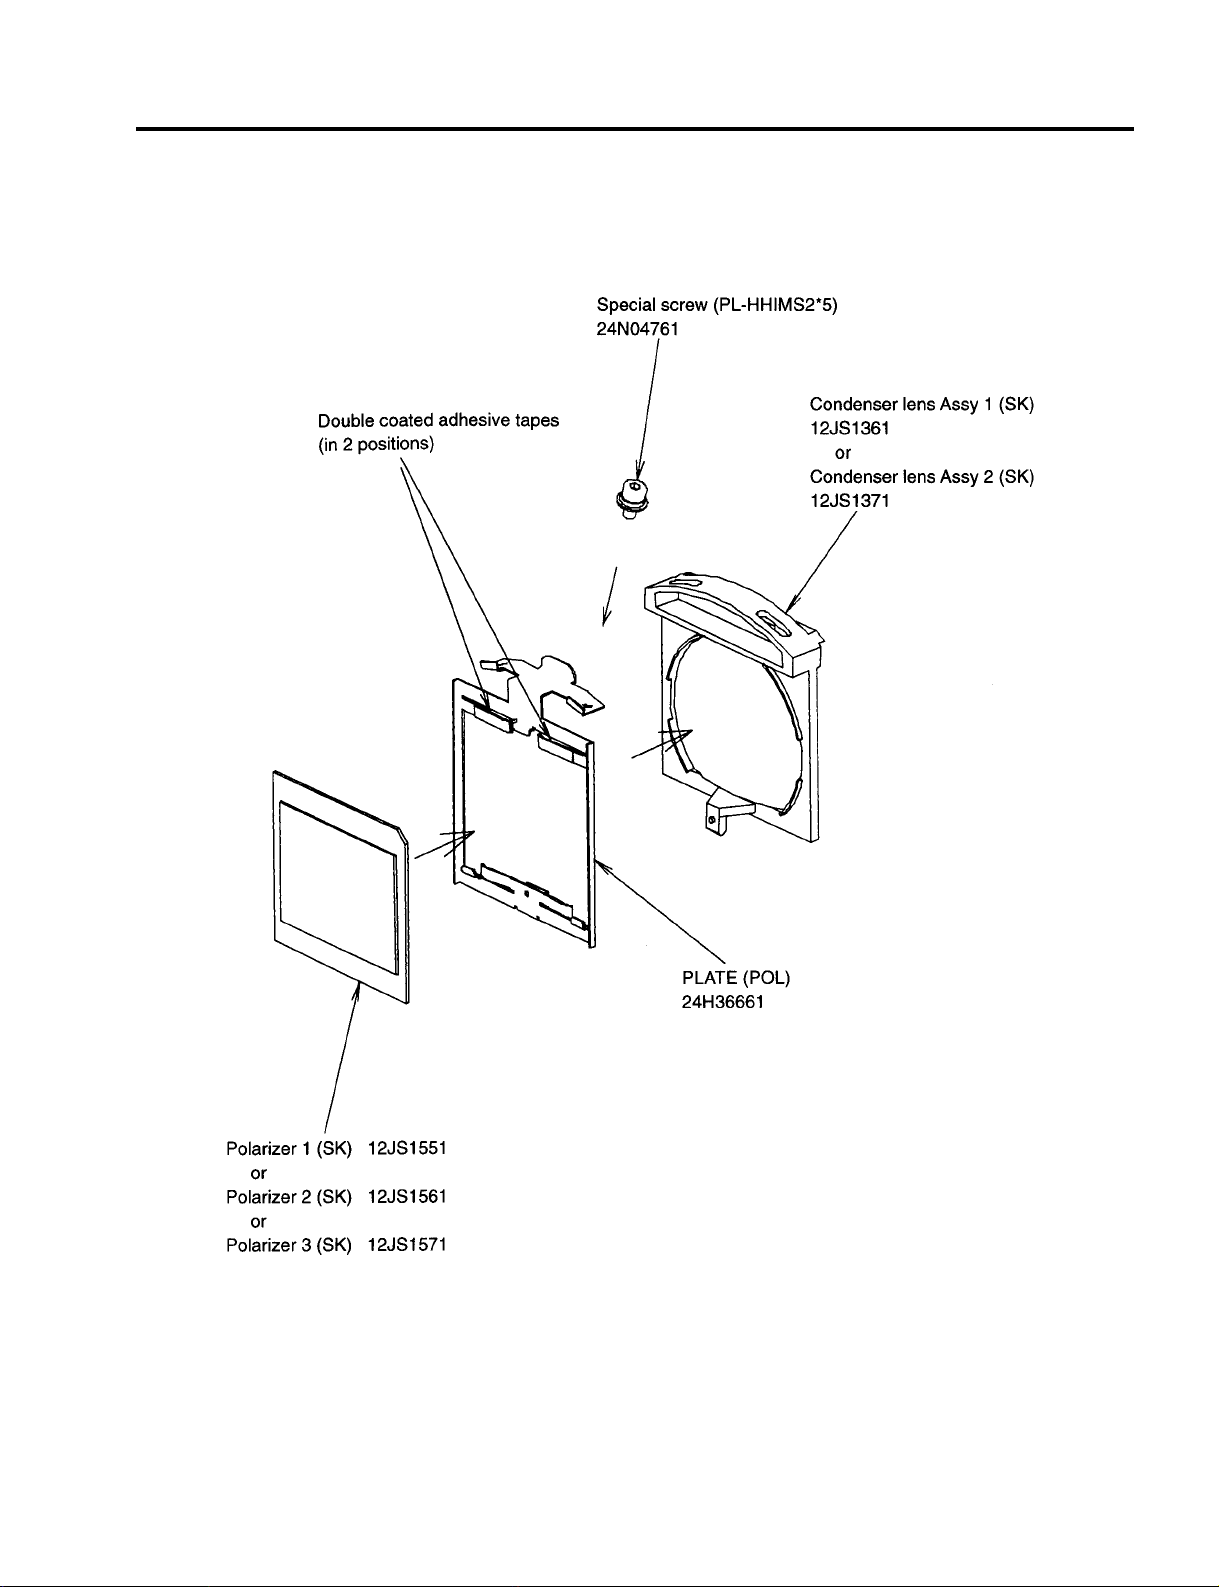
METHOD OF ADJUSTMENTS
Fig. 3
5-25
Page 73

METHOD OF ADJUSTMENTS
Picture Quality Decision Criteria
Judge units that satisfy the following criteria as acceptable.
(1) Pixel Mis-Convergence
The pixel Mis-Convergence of the red and blue shall be as specified below in reference to the green.
• 1 pixel or less in the center area
• 1 pixel or less in the peripheral (Edge) areas
Mis-Convergence of one quarter (1/4) or more from the above specifications (1 1/4 pixels in the peripheral
area) may be acceptable, provided that the signal color of green registers with the pixels of the other colors and
does not appear seriously poor as viewed 2 meters away.
(2) A bright pixel defect is always visible on a totally black screen in units of pixels.
Up to 6 pixel defects are permissible for a single color, or up to 18 pixel defects for all the three colors combined.
Bright spots of less than 1 pixel are acceptable unless they are frequently visible 2 meters away.
(This does not apply to bright spots concentrated or markedly visible.)
(3) Dust, smear
Any dust or smear visible in excess of 2 pixels is not permissible at the best focus point.
(2) Replace the LCD panel if bright spot defects exceed the specified level.
(3) Remove dirt and smear in excess of the permissible level.
Lens and Mirror Cleaning
(1) Lens Cleaner
* Cleaning fluid
Use absolute alcohol.
If moisture remains on the surface without drying soon after it is cleaned, use
fresh absolute alcohol.
* Cleaning method
Soak a clean cotton cloth or a sheet of commercial cleaning paper with the
cleaning fluid. Hold it between your thumb and index finger, and start cleaning
the lens at the center and circle the cloth or paper toward the edge, wiping off
foreign matter out to the edge. Do not apply pressure on the lens surfaces
while cleaning.
(2) Mirror Cleaner
Never grip the mirror hard because it is vapor-deposited. Minor stains may be removed by dissolving them with
alcohol and wiping off dry.
(3) Point
Stains on both sides of the LCD unit and on the LCD side of the field lens degrade the picture. Keep them
clean.
5-26
Page 74

LC driver block
1. Circuit configuration
1-1 PWB configuration
• MAIN PWB
Used for the phase decode processing of the RGB video signals, the level adjustment, and the generation of various timing signals.
• Used for the level shift processing of the panel drive timing signals for the LCES PWB (SVGA) and the
LCEX PWB (XGA), and also for the generation of panel auxiliary signals.
• The above-mentioned two types of PWBs are connected through the FFC (Flexible Flat Cable) cables
of 40 pins (POSV) and 30 pins (POST).
2. Output signal
2-1 Signal level
• RGB video signal : 10.0Vp-p (2.0V/12.0V)
• Panel driving signal : 15.5Vp-p (0.0V/15.5V)
• Panel aux. signal : 5.0Vp-p (2.5V/7.5V)
2-2 Driver panel
• SVGA : Model 0.9 LC panel (P09SG210) by EPSON
• XGA : Model 0.9 LC panel (P09XG210) by EPSON
CIRCUIT DESCRIPTION
3. Outline hardware description
3-1 RGB video signal
This signal output is generated from the signal processing circuit G/A, UNI2 (IC3601), on the main board
(MAIN PWB). Each 10-bit R,G,B digital video signal (3.3Vp-p) is processed for 6/12 (SVGA/XGA) phase
decode processing by the phase decoding ICs (IC3701, 3702, 3703, 3704, 3705, 3706), and also for the
level adjustment (10.0Vp-p (2.0V/12.0V)) by the serial D/A (IC3711). Since then, each signal is fed to the
LC panel through the LC driver boards (LCES PWB/ LCEX PWB).
3-2 Panel driving signal
This signal output is generated from the signal processing circuit G/A, YAMAG (IC3701), on the same
main board (MAIN PWB). The panel drive timing signal (3.3Vp-p) is processed for level shifting to the level
(15.5Vp-p) required to drive the shift register in the LC panel by the aid of the level shift ICs (IC5201, 5202,
5203/ IC6201, 6202, 6203) located on the LC driver boards (LCES PWB/ LCEX PWB). Since then, the
processed signal is fed to the LC panel.
3-3 Panel auxiliary signal
This signal output is generated from the LC panel signal processing circuit G/A, YAMAG (IC3701), on the
same main board (MAIN PWB). The panel auxiliary signal (3.3Vp-p) is processed for level shifting to the
level (5.0Vp-p, (2.5V/7.5V)) required to pre-charge the video line in the LC panel by the aid of the level
shift ICs (IC5201, 5202, 5203/ IC6201, 6202, 6203) located on the LC driver boards (LCES PWB/ LCEX
PWB). Since then, the processed signal is fed to the LC panel via the diamond buffer of the complex
transistor group.
6-1
Page 75
CIRCUIT DESCRIPTION
3-4 Interface between MAIN and LCES, LCEX
P0SV P0ST
Pin No. Signal name Pin No. Signal name
1 A+17.5V 1 DGND
2 A+17.5V 2 DY
3 VIDR/2 3 CLY
4 VIDR/4 4 NRG
5 VIDR/6 5 NRC
6 VIDR/8 6 D+5V
7 VIDR/10 7 DGND
8 VIDR/12 8 DX
9 VIDR/1 9 CLX
10 VIDR/3 10 ENB1R
11 VIDR/5 11 ENB2R
12 VIDR/7 12 DGND
13 VIDR/9 13 ENB1G
14 VIDR/11 14 ENB2G
15 AGND 15 ENB1B
16 VIDG/2 16 ENB2B
17 VIDG/4 17 D+5V
18 VIDG/6 18 DGND
19 VIDG/8 19 SHENB
20 VIDG/10 20 SHCLP
21 VIDG/12 21 ENBY1
22 VIDG/1 22 ENBY2
23 VIDG/3 23 DGND
24 VIDG/5 24 (NC)
25 VIDG/7 25 DIRY
26 VIDG/9 26 DIRX
27 VIDG/11 27 SCLK
28 AGND 28 D+5V
29 VIDB/2 29 ADATA
30 VIDB/4 30 DGND
31 VIDB/6
32 VIDB/8
33 VIDB/10
34 VIDB/12
35 VIDB/1
36 VIDB/3
37 VIDB/5
38 VIDB/7
39 VIDB/9
40 VIDB/11
6-2
Page 76

3-5 List of I2C control ICs (Output block)
Item name Circuit symbol Function Slave address Remarks
CIRCUIT DESCRIPTION
M62398FP IC5103/IC6103 Serial D/A 92H
3-6 Interface with the LC panel
SVGA panel XGA panel
PORES/GES/BES POREX/GEX/BEX
Pin No. Signal name Pin No. Signal name
1DY 1DY
2 CLY 2 CLY
3 CLY 3 CLY
4 VDDY 4 NRG
5 NRG 5 VDDY
6 DIRY 6 VDDX
7 LCCOM 7 CLX
8 ENB1 8 CLX
9 ENB2 9 DX
10 DIRX 10 ENB2
11 CLX 11 ENB1
12 CLX 12 DIRX
13 DX 13 VSSX
14 VDDX 14 VID1
15 NC 15 VID2
16 NC 16 VID3
17 VSSX 17 VID4
18 VID1 18 VID5
19 VID2 19 VID6
20 VID3 20 VID7
21 VID4 21 VID8
22 VID5 22 VID9
23 VID6 23 VID10
24 VSSX 24 VID11
25 LCCOM 25 VID12
26 NRS1 26 NRS
27 NRS2 27 LCOOM
28 VSSY 28 DY
29 VSSY 29 DIRY
30 DY 30 VSSY
Output video level adjustment,
flicker adjustment
6-3
Page 77

CIRCUIT DESCRIPTION
I/O Block, VIDEO Processor Block, SYNC Block
1. I/O terminals
1-1 Video input
• RCA PHONO terminal for composite video signal input (1 system)
• S VIDEO input terminal (1 system)
1-2 RGB input (Application to the component input through the conversion cable)
• Mini D-SUB 15-pin (1 system) (plug & play applicable)
1-3 RGB output
• Mini D-SUB 15-pin (1 system)
1-4 Audio I/O
• Mini jack for audio I/O (For both input and output; used in common for respective video signals)
• RCA PHONO terminal for audio I/O (For both input and output; used in common for respective video
signals)
1-5 PC CONTROL terminal
• Mini DIN-8P (1 system)
• External control applicable
2. Input signals
2-1 Signal level
• Composite video : 1.0Vp-p/75Ω
• S VIDEO input : 1.0Vp-p/75Ω (Signal Y), 0.28Vp-p/75Ω (Signal C burst level)
• RGB signal : 0.7Vp-p/75Ω
• Sync signal : TTL level (positive/negative)/ 1kΩ
• Component signal: 1.0Vp-p/75Ω (Signal Y), 0.7Vp-p/75Ω (Signal Cb/Cr, Pb/Pr)
• Audio signal : 0.5Vrms/47kΩ
2-2 Color system applicable to video input
• NTSC3.58
• NTSC4.43
•PAL
• PAL-60
• SECAM
• B/W60, B/W50 (B/W: Black-and-white signal without burst)
2-3 Scanning frequency applicable to RGB signals
• Horizontal: 15 to 100kHz
• Vertical: 50 to 117 Hz
2-4 Component signals
• Component video Y/Cb/Cr (DVD output signal)
• HDTV 720p signal, 1080i signal, 480p signal
6-4
Page 78

3. I/O PWB block
3-1 RGB OUT circuit
The RGB video signal input entered in Pin 15 of the Mini D-SUB is amplified at the 6dB amplifier (IC4000;
AD8013AR) so that it attains 1Vp-p at the time of 75Ω termination.
The H Sync output is generated through the buffer circuit (Q4000 to Q4002).
The V Sync output is in the THROUGH OUT.
3-2 Plug & Play
The V Sync terminal of Pin 15 of the Mini D-SUB and the serial terminal of Pins 12 and 15 are connected
to the Plug & Play IC (IC4001: 12LC21T) so that the projector can be detected at the PC.
4. MAIN PWB block
4-1 Video signal processor block
The composite video signal passes through the 6dB amplifier (IC1100; MM1031XM) and the low-pass
filter (FL1113), and enters Pin 41 of the video decode IC (IC1104: CXA2139S) at 1Vp-p. The NTSC and
PAL signals are led to the IC’s internal SW and 6dB amplifier, and the resultant output is fed to Pin 6. The
signals are further sent to the 3-line Y/C separator circuit (IC1101: TC9090AF). The signals from Y/C
separation are returned again to the video decode IC.
The composite SECAM signal and the B/W signal do not pass through the 3-line Y/C separator circuit. The
composite SECAM signal is processed for Y/C separation by the BPF & TRAP that is incorporated in the
video decode IC.
The SF video input signal is directly entered in the video decode IC.
The result of discrimination for the color system, vertical frequency, etc., to be conducted at the video
decode IC is supervised by the CPU through the I2C bus. According to this result, the CPU controls the 3line Y/C separator IC and the video decoder at the appropriate setting values through the I2C bus.
In the video decode IC, the sharpness control and the compensation for the phase in conjunction with the
chroma output signal are carried out for Signal Y. The signal decoded (decoding angle = 90ÅB) to the Y/
chroma in the video decode IC is entered in the A/D converter IC (IC3401: CXA3506R).
The sync signal contained in the Y signal selected by the switch of the video decode IC is sent as the H·V
timing pulses to the sync signal changeover block (IC3301: YAMAG) at the next stage, through the horizontal and vertical sync separator circuit in the IC, the copy guard signal mask circuit, the AFC circuit, IC’s
external mono-multi circuit, etc.
CIRCUIT DESCRIPTION
4-2 Sync signal processor block (Mini D-SUB 15-pin input)
The sync signal input entered in Pin 15 of the Mini D-SUB is sent to the amplitude limiter circuit. In this
amplitude limiter circuit, the H/V sync signal limited to 0.6Vp-p is applied to the sync signal processor IC
(IC1006: M52347FP).
In order to cope with the sync attenuation signals, the Sync on Green signal input is entered in the sync
signal processor IC via the Sync chip clamp circuit and the AMP circuit. The DVD signal only is entered in
Pin 43 of the video decode IC via IC1001, so that sync processing is conducted in the same manner as for
the video signals.
In the sync signal processor IC, the following processing is carried out:
• Discrimination of the presence of H/V Sync
• Discrimination of the polarity of H/V Sync
• Sync separation for the composite Sync
• Sync separation for the G-Sync
• Generation of clamp pulses
• H/V Sync output
The result of discrimination is read out at the serial D/A (IC1003: CXA1315) and sent to the CPU. The H/
V Sync output is sent to the Sync signal changeover block (IC3301: YAMAG). After the completion of
output synchronization and selection for the video decode IC, the H sync signal is sent to the A/D converter IC (IC3401: CXA3506R) and the V sync signal is sent to the signal processor IC (IC3502: Endeavor).
6-5
Page 79

CIRCUIT DESCRIPTION
4-3 RGB/Component signal processor and A/D converter block
The video signal input entered in Pin 15 of the Mini D-SUB is fed to the A/D converter IC (IC3401: CXA3506R)
through the buffer circuit. In the case of a component signal, only the chroma signals (Pb, Pr, Cb, Cr) are
entered after their levels have been lowered at the attenuator of -6B.
In the A/D converter IC, the video signal from the video decode IC or the video signal at Pin 15 of the Mini
D-SUB is selected. After the contrast has been adjusted at the built-in analog amplifier, this signal is
processed for A/D conversion into the 8-bit digital signal.
The 8-bit digital signal is entered in the signal processor IC (IC3502: Endeavor) for signal processing.
The signal to be used to clamp the video signal (clamp pulses) is the clamp pulse signal from the sync
signal processor IC (IC1006: M5234FP) or the one from the signal processor IC (IC3502: Endeavor)
chosen by the changeover action at the signal changeover block (IC3301: YAMAG). This signal is then
entered in the A/D converter IC (IC3401: CXA3506R) for signal clamping. Generally for the VIDEO and
HD signals, the clamp pulses of the signal processor IC are used. For the RGB signals, the clamp pulses
of the sync signal processor IC are generally used.
4-4 Audio signal processing
The audio signal passes through the buffer circuit of the MAIN PWB, and is then fed to the output AMP IC
(IC4100: AN7512SH) that is incorporated in the VOLUME control of the KEY PWB.
The VOLUME control is effected at the serial D/A (IC1003: CXA1315). The amplified audio signal is output
(MAX: 1W) to the speaker system (8W x 1).
4-5 Interface with I/O PWB and MAIN PWB
Pin No. Signal name Pin No. Signal name
1 DGND 16 S-C
2 EXT3 17 AGND
3 EXT2 18 S-Y
4 EXT1 19 AGND
5 DGND 20 CV
6 RXD 21 AGND
7 DGND 22 V
8 TXD 23 AGND
9 DGND 24 H
10 VCCS+5V 25 AGND
11 VCCA+9R1 26 B
12 VCCA+9R1 27 AGND
13 AGND 28 G
14 AUDIO 29 AGND
15 AGND 30 R
4-6 List of I2C control ICs
Item name Circuit symbol Function Slave address Remarks
CXA2139S IC1104 Video decode 8AH/8BH
TC9090AF IC1101 Y/C separation B2H
CXA1315M IC1003 Serial D/A 40H/41H
CXA3506R IC3401 A/D converter 9AH
6-6
Page 80

CIRCUIT DESCRIPTION
Signal Processor Block
1. PLL block
The PLL block is incorporated in the A/D converter (IC3401). In the PLL block, the dot clock signal is generated
in synchronization with the horizontal sync signal input. This clock signal is fed to the ENDEAVOR (IC3502).
2. ENDEAVOR (IC3502)
The ENDEA VOR (IC3502) is an LSI used as the center of video signal processing. The video signal (8 bits x 3)
digitized at the A/D converter is entered in the ENDEAVOR, where frequency conversion, definition conversion,
ON-screen signal mixing, V-T compensation, etc., are carried out. The resultant signal is output to the G/A, UNI2
(IC3601), for the color irregularity compensation.
These ENDEAVOR functions are used with the aid of the frame memory composed of the built-in SDRAM.
3. CPU block
The CPU block is composed of the CPU (IC3205), SRAM x 4 (IC3201-3204), 4M FLASH ROM (IC3207), 8M
FLASH ROM x 2 (IC3208-3209), and the YAMAG (IC3301). This block is used for various projector controls.
The booting programs and various data are accommodated in the 4M FLASH ROM, while the main programs
are accommodated in the 8M FLASH ROM.
4. YAMAG (IC3301)
The YAMAG (IC3301) incorporates the various functions as specified below.
Generation of the address decode and chip select signals
Frequency measurement and interlace discrimination circuit
I/O port (3 x 8 bits)
Beat cancel circuit (Frequency divider circuit, phase comparison, random generation)
2 → 1 sync signal and clamp pulse changeover and sync width variable circuit
Fan rpm control circuit (2 systems of PWM)
Remote control decode, key, external control mixing, and interrupt generator circuit
Timing signal generator circuit for the LC panel
5. UNI2 (IC3601)
The UNI2 is the color irregularity compensation IC for the 10-bit input - 10-bit output. The color irregularity
compensation data of 25 x 20 = 500 points are accommodated in the screen. By these compensation data and
linear interpolation, compensation for the color irregularity is carried out in the screen.
6-7
Page 81
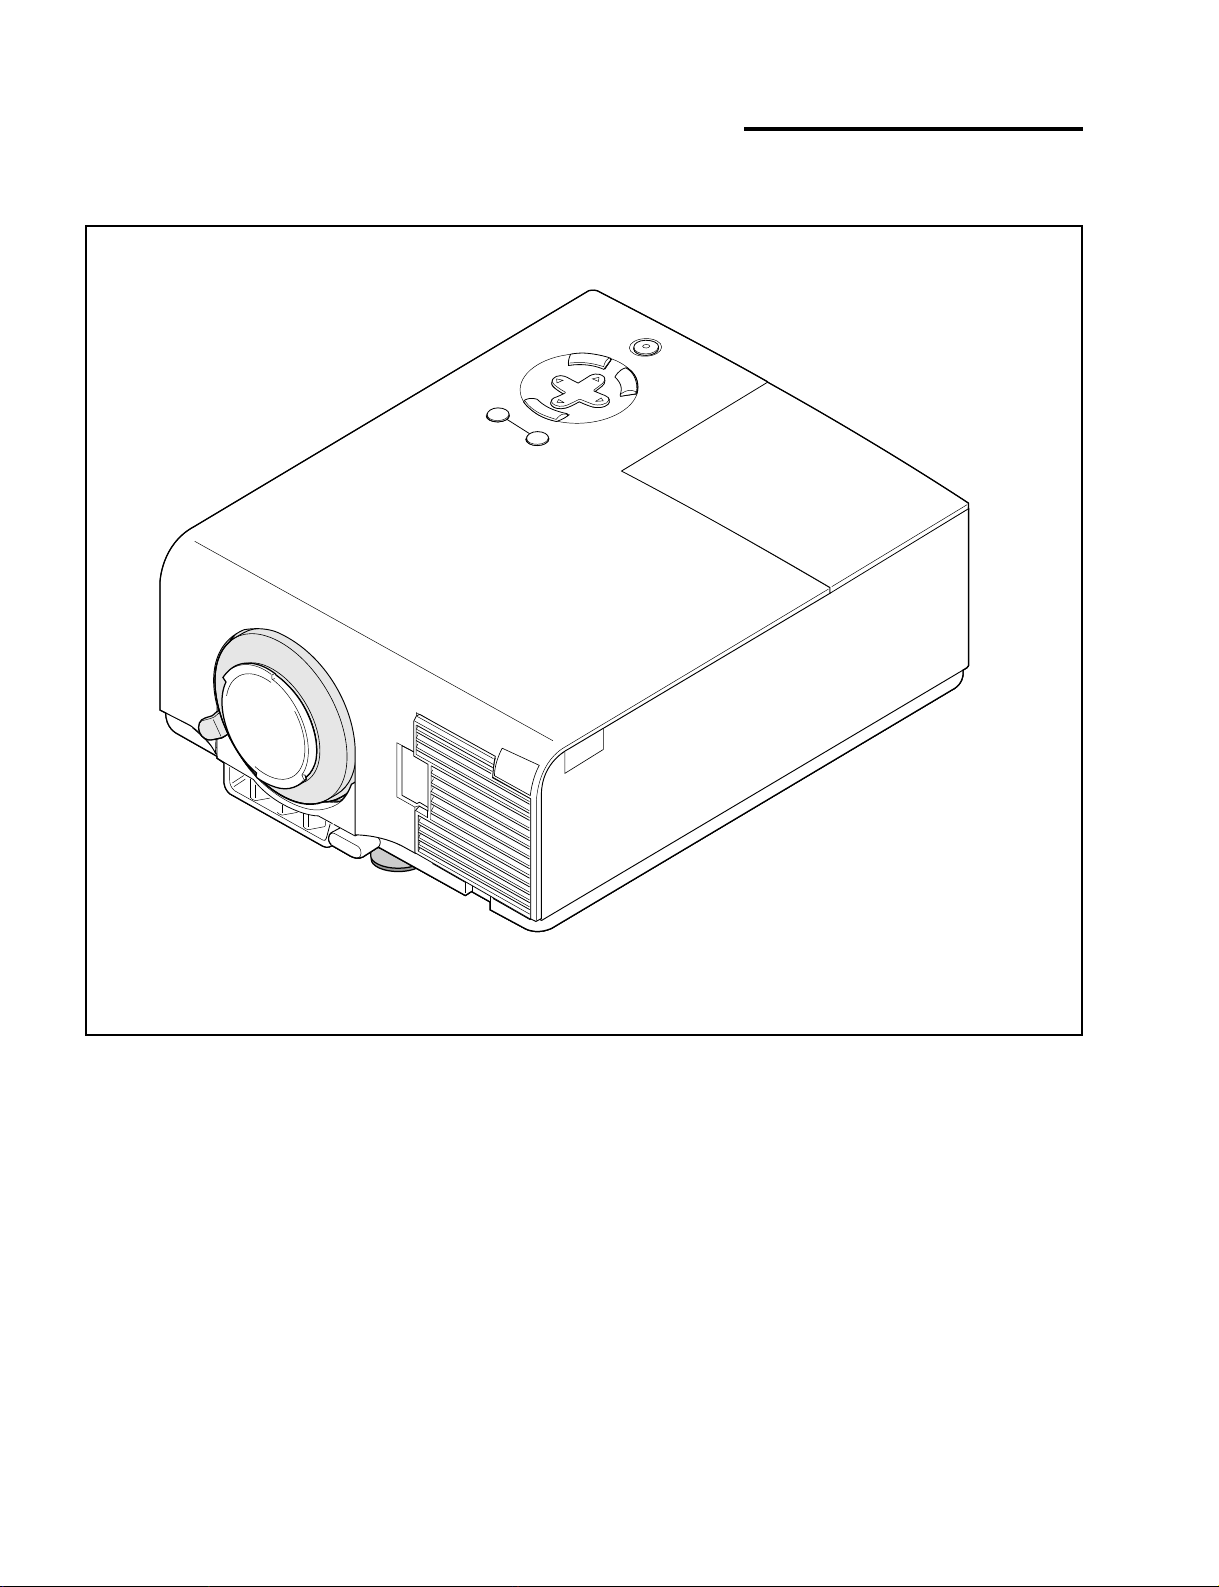
METHOD OF DISASSEMBLY
1. Main unit diagonal view
7-1
Page 82

METHOD OF DISASSEMBLY
1
2. FIL TER ASSY A/FILTER ASSY B/LAMP COVER ASSY/CAP
(1) Loosen the one screw 1, and take out the LAMP
COVER ASSY.
(2) Take out the FILTER ASSY A/FILTER ASSY B/
and the CAP.
FILTER ASSY B
LAMP COVER ASSY
Screw
CAP
FILTER ASSY A
7-2
Page 83
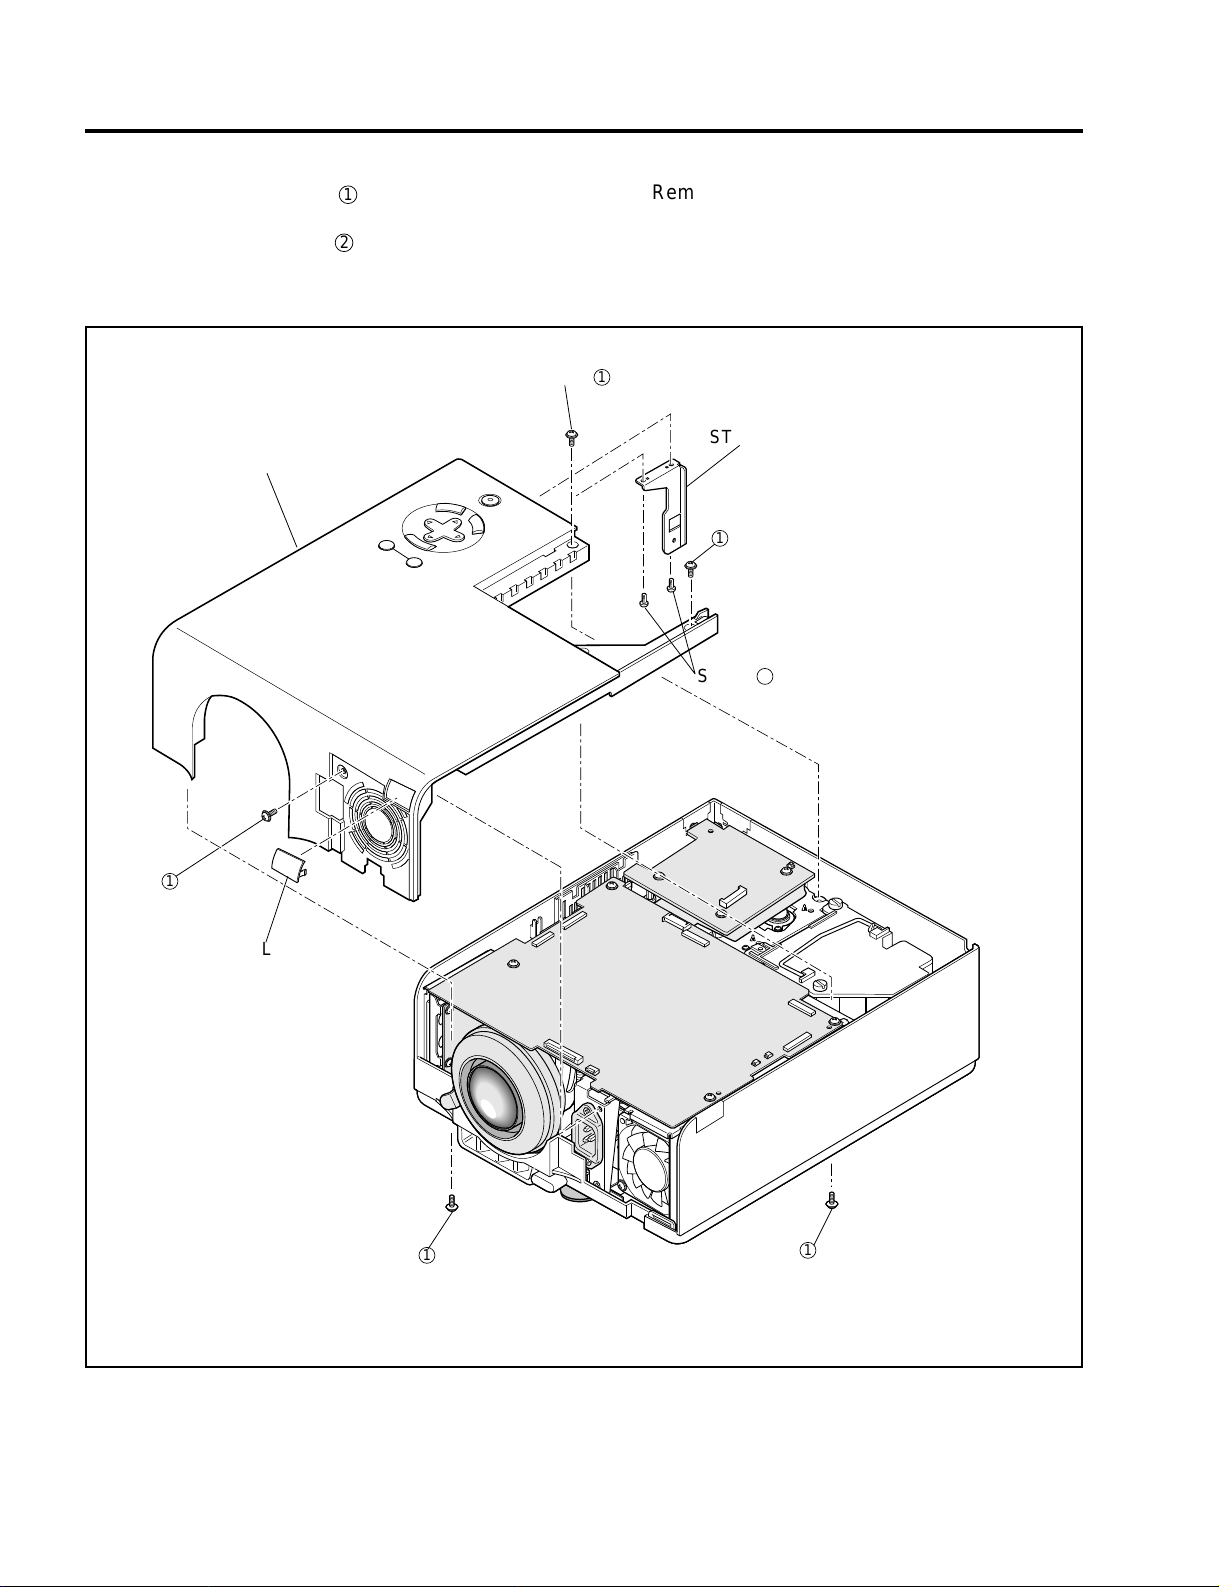
METHOD OF DISASSEMBLY
3. TOP COVER ASSY/STAY R/FILTER F
(1) Remove the five screws 1, and take out the TOP
COVER ASSY.
(2) Remove the two screws 2, and take out the ST A Y
R.
Screw
TOP COVER ASSY
(3) Remove the FILTER F.
Note) Refer to P7-4 and P7-5.
1
STAY R
1
1
FILTER F
1
Screw 2
1
7-3
Page 84
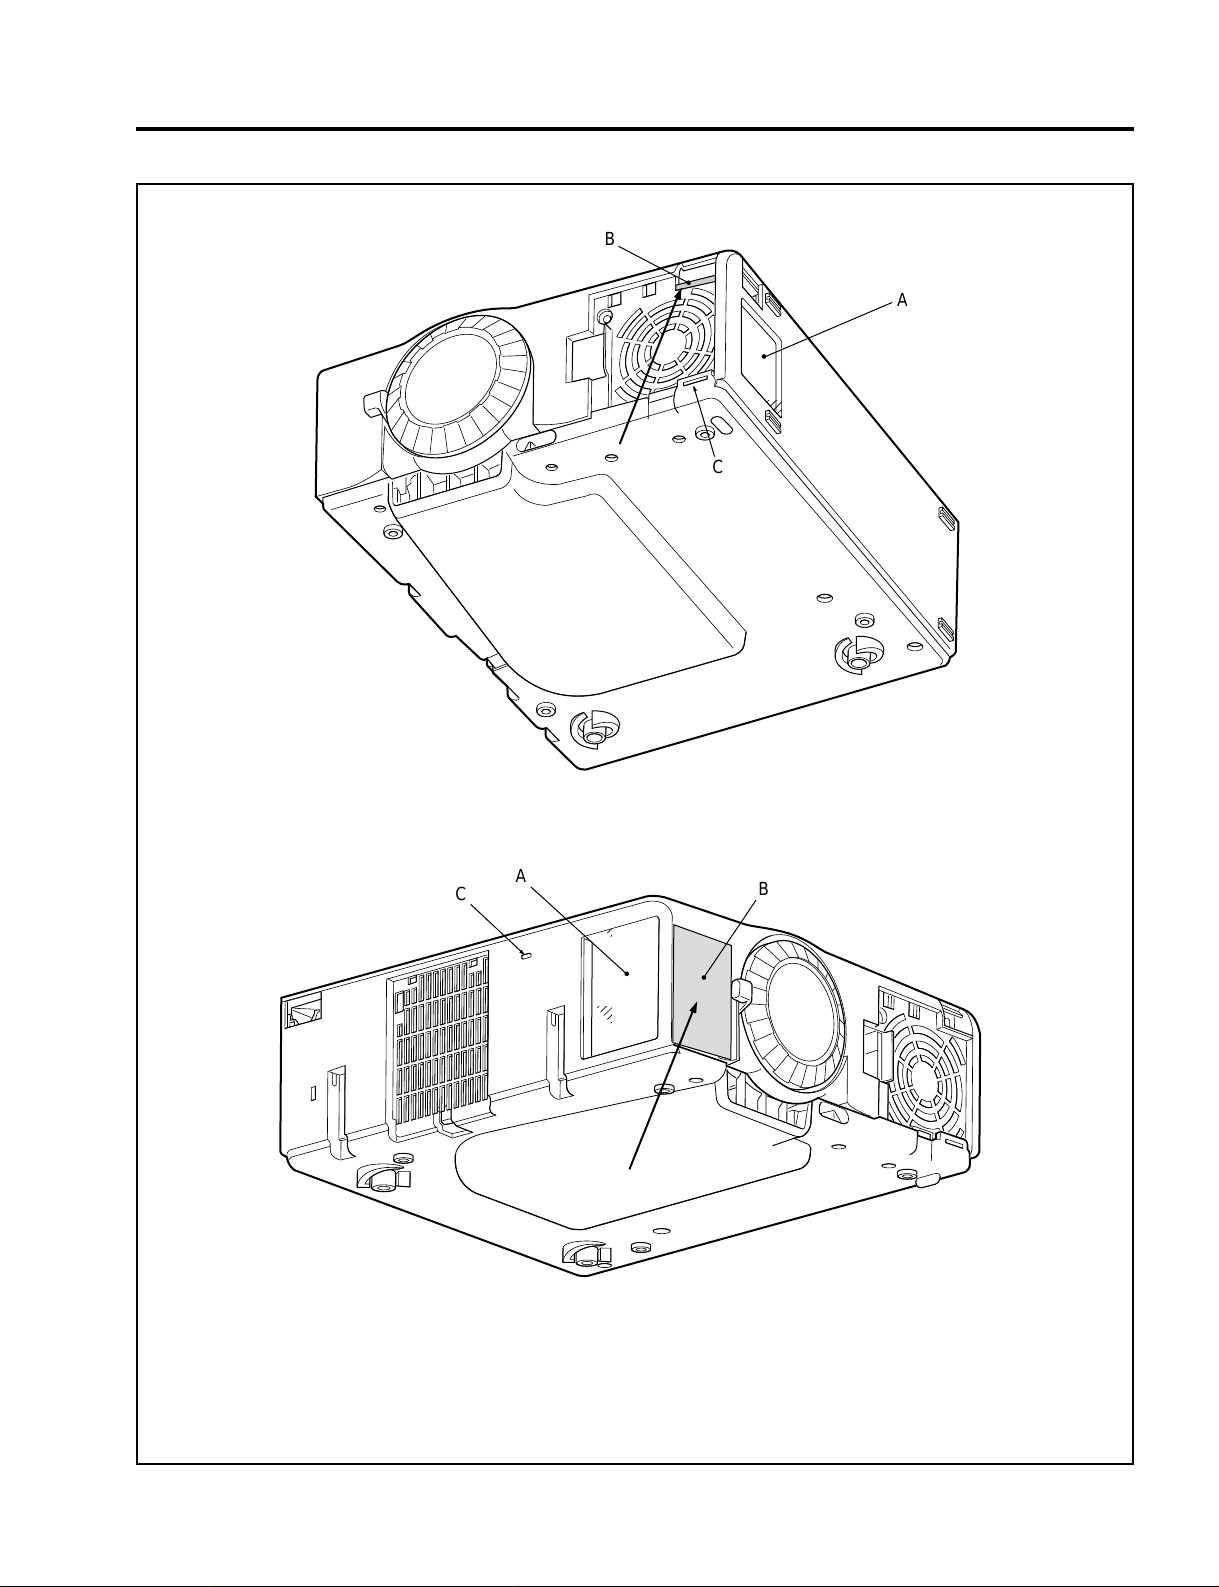
METHOD OF DISASSEMBLY
B
A
C
C
A
B
1: Hold both sides of the set with both hands at Part A. Apply a force to Part B in the direction of the
arrow (diagonally toward the top of the set). In this case, the force being applied should be as low
as possible in order not to damage the switch.
2: Confirm that the claw of C (each side surface) has been disengaged.
7-4
Page 85
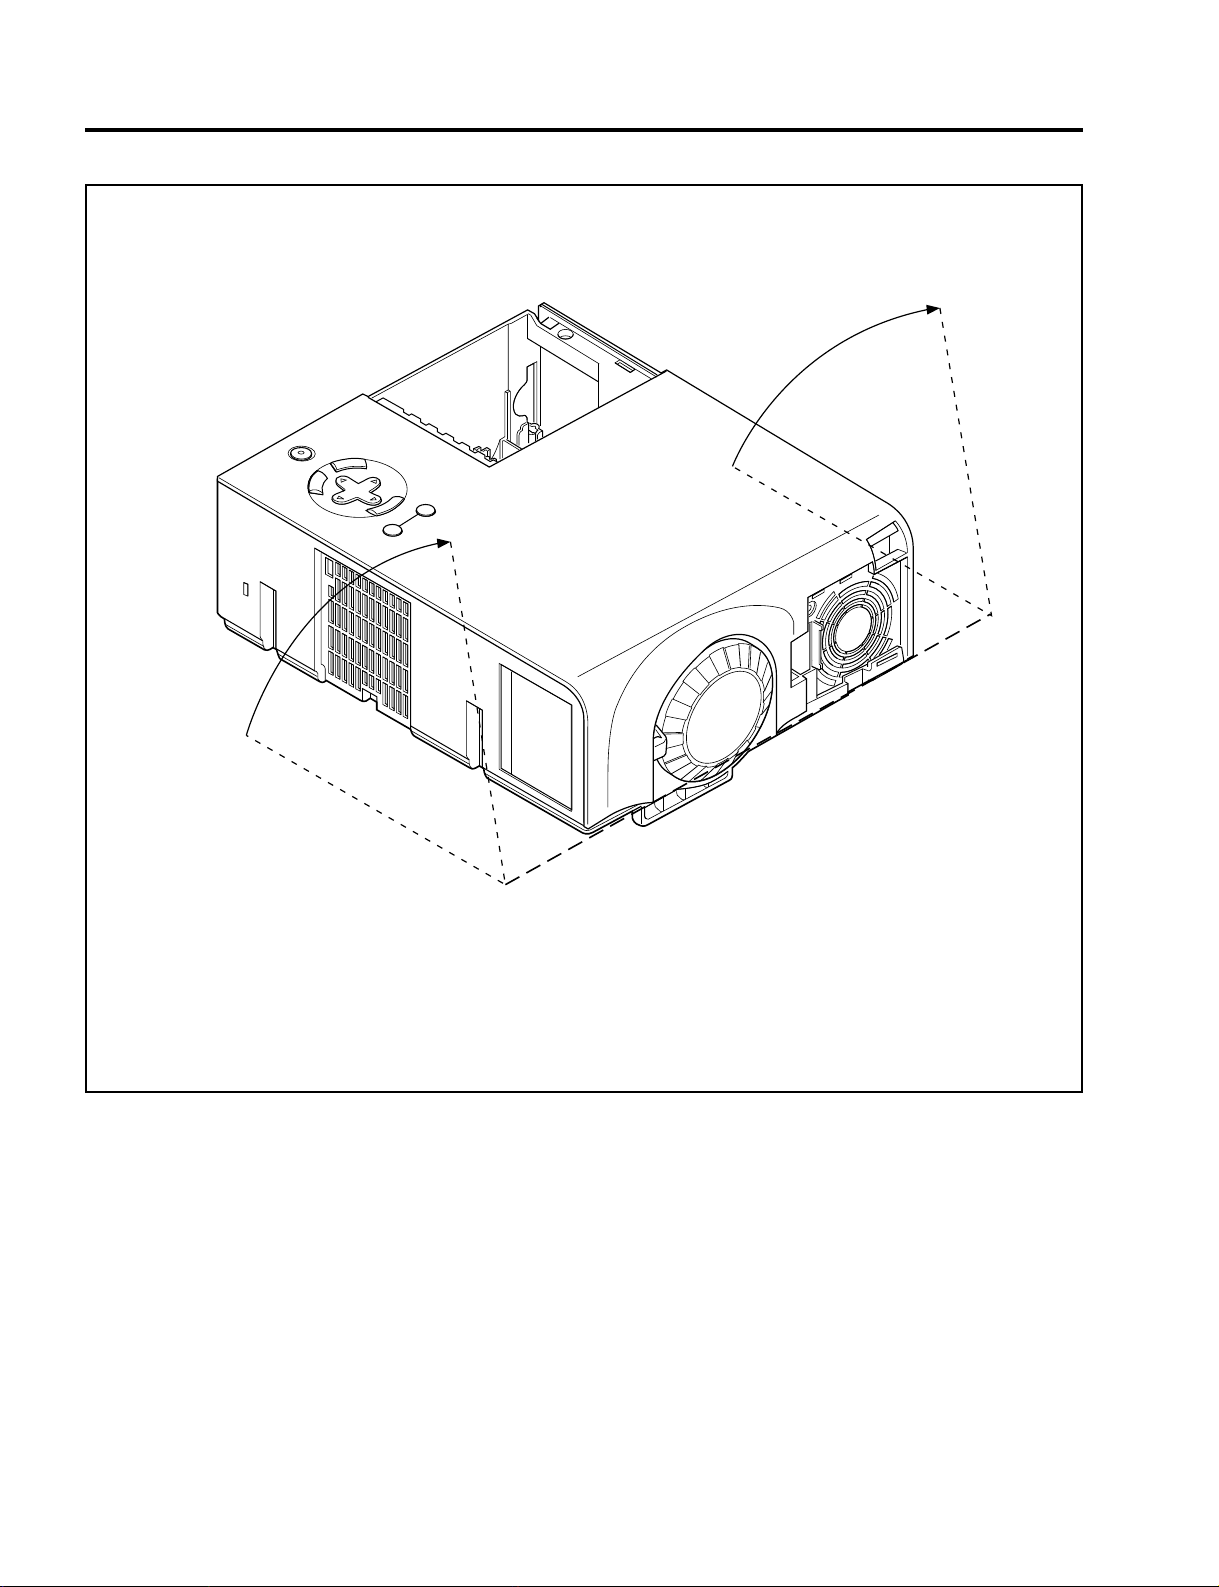
METHOD OF DISASSEMBLY
7-5
3: Remove the top cover in the direction of the arrow. At that time, this action should be done in the
direction of rotation, with the front side of the cabinet regarded as a fulcrum.
When mounting the top cover, the procedures should be reverse as those for the removal.
Page 86
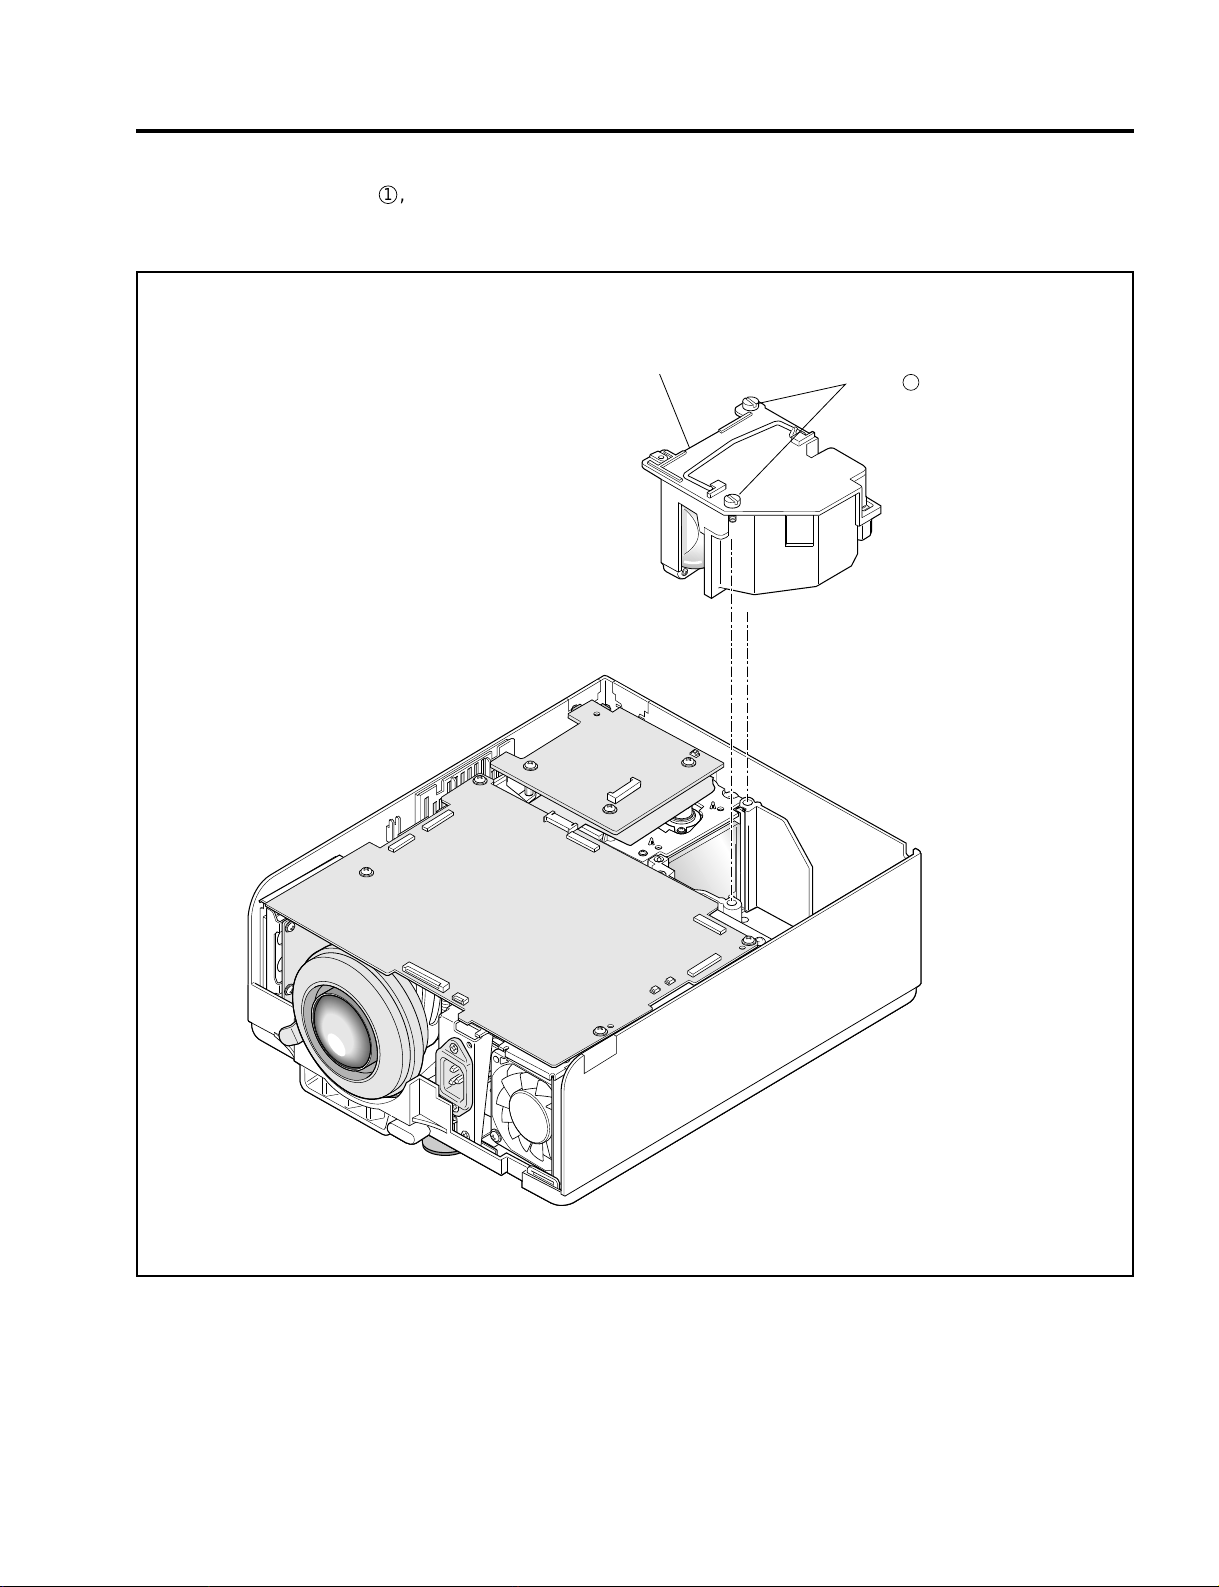
4. LAMP BOX SASSY
1
(1) Loosen the two screws 1, and take out the LAMP
BOX SASSY.
METHOD OF DISASSEMBLY
LAMP BOX SASSY
Screw
7-6
Page 87

METHOD OF DISASSEMBLY
5. MAIN PWB ASSY
(1) Remove the four screws 1, and take out the MAIN
PWB ASSY .
MAIN PWB ASSY
Screw
1
7-7
Page 88

METHOD OF DISASSEMBLY
6. LCEX PWB ASSY (VT540 System)/LCES PWB ASSY (VT440 System)/KEY PWB ASSY/
BARRIER (B/M)
(1) Remove the two screws 1 and two studs, and
take out the LCEX PWB ASSY (VT540 System)
and the LCES PWB ASSY (VT440 System).
(2) Remove the three screws 2, and take out the
KEY PWB ASSY and the BARRIER (B/M).
Screw
2
Screw
1
• LCEX PWB ASSY
(VT540)
• LCES PWB ASSY
(VT440)
STAD
KEY PWB ASSY
BARRIER (B/M)
7-8
Page 89

METHOD OF DISASSEMBLY
1
7. POWER UNIT
(1) Remove the three screws 1 and the two screws
2
, and take out the POWER UNIT.
POWER UNIT
Screw
7-9
Screw
2
Page 90

8. OPTICAL ENGINE ASSY
(1) Remove the five screws 1, and take out the OP-
TICAL ENGINE ASSY.
Screw
METHOD OF DISASSEMBLY
1
OPTICAL ENGINE ASSY
7-10
Page 91
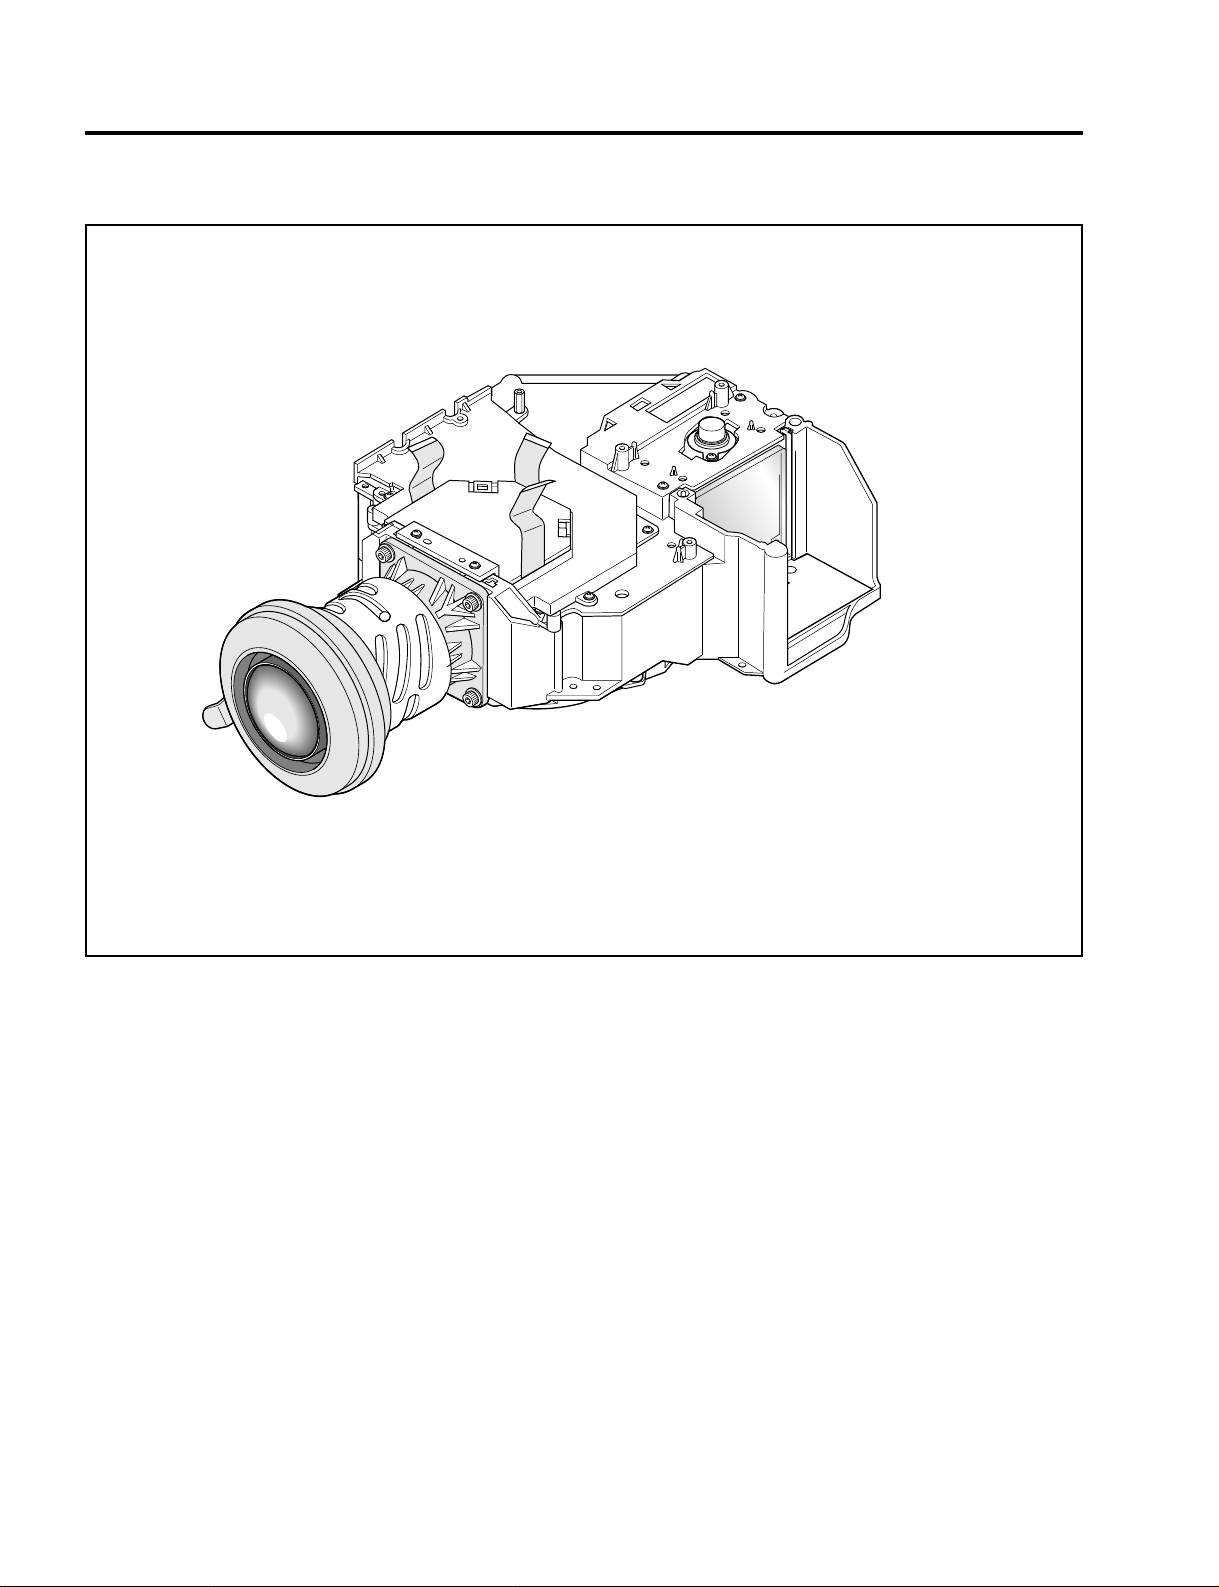
METHOD OF DISASSEMBLY
9. OPTICAL ENGINE ASSY
7-11
Page 92

10. ZOOM LENS (SK)
(1) Remove the four screws 1, and take out the
ZOOM LENS (SK).
Screw 1
METHOD OF DISASSEMBLY
ZOOM LENS (SK)
Screw
1
7-12
Page 93

METHOD OF DISASSEMBLY
11. COVER (INHAIL DUCT) ASSY/INHAIL DUCT (SK) ASSY/STOPPER (XDP) ASSY
(1) Remove the COVER (INHAIL DUCT) ASSY.
(2) Remove the two screws 2, and take out the
STOPPER (XDP) ASSY.
COVER (INHAIL DUCT) ASSY
Screw
1
Screw
2
(3) Remove the three screws 1 and the stud, and
take out the INHAIL DUCT (SK) ASSY.
STAD
INHAIL DUCT (SK) ASSY
Screw
1
STOPPER (XDP) ASSY
7-13
Page 94
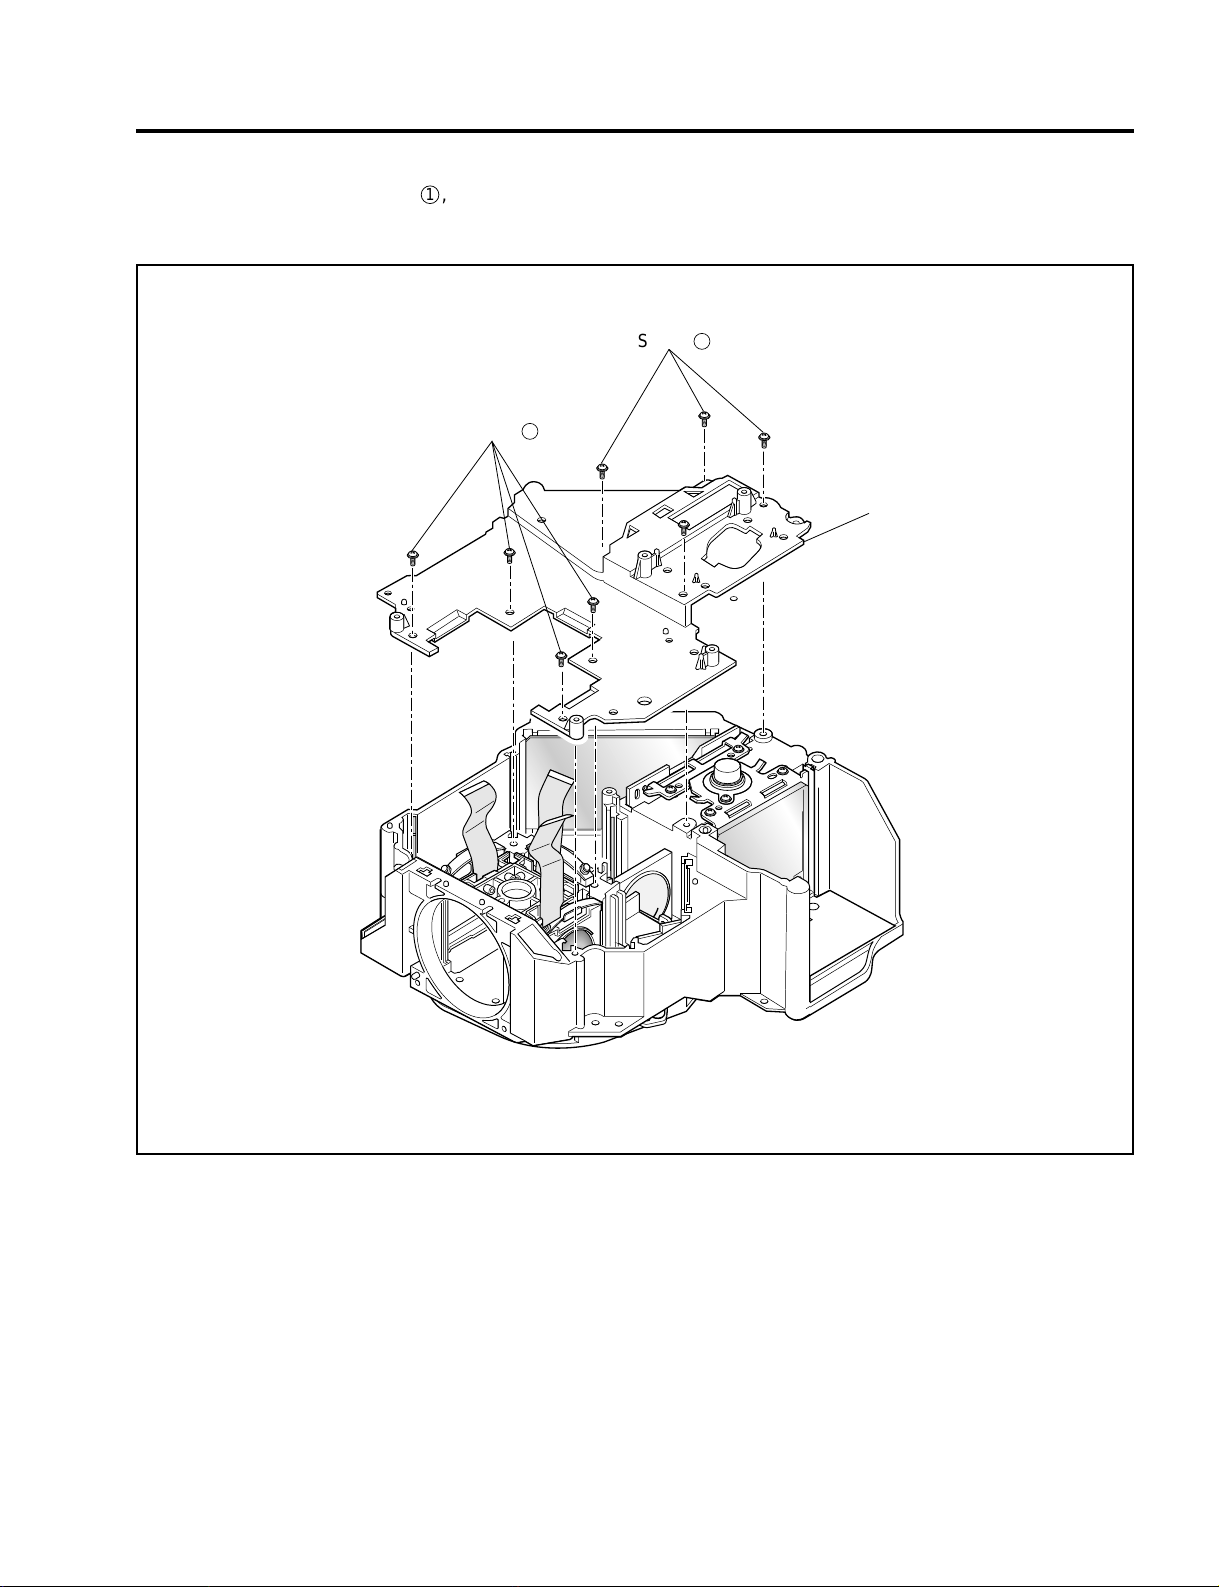
12. COVER OPT (SK)
(1) Remove the eight screws 1, and take out the
COVER OPT (SK).
Screw
1
Screw
METHOD OF DISASSEMBLY
1
COVER OPT (SK)
7-14
Page 95

METHOD OF DISASSEMBLY
13. OPT BASE SASSY/BARRIER (XDP)
(1) Remove the two screws 1, and take out the OPT
BASE SASSY.
(2) Remove the BARRIER (XDP).
Screw
1
BARRIER (XDP)
OPT BASE SASSY
7-15
Page 96
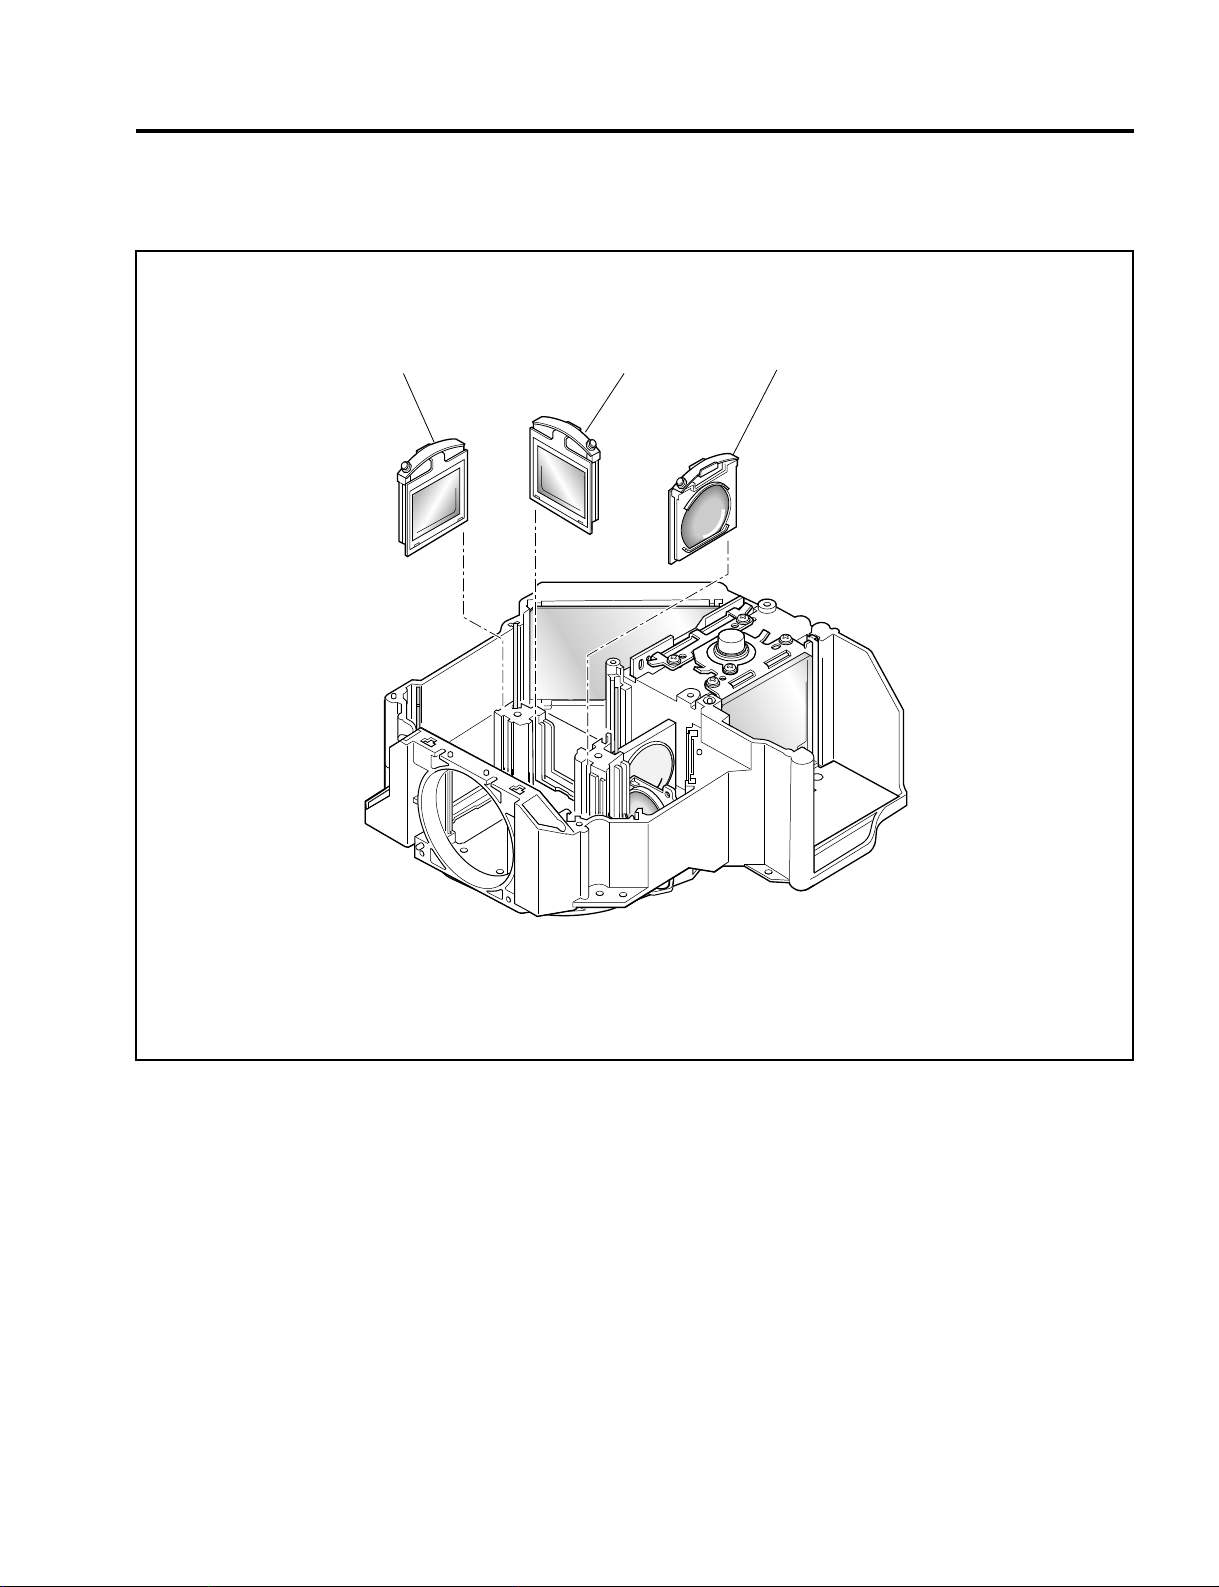
14. R POL SASSY/G POL SASSY/B POL SASSY
(1) Remove the R,G,B POL SASSY.
METHOD OF DISASSEMBLY
R POL SASSY
G POL SASSY
B POL SASSY
7-16
Page 97
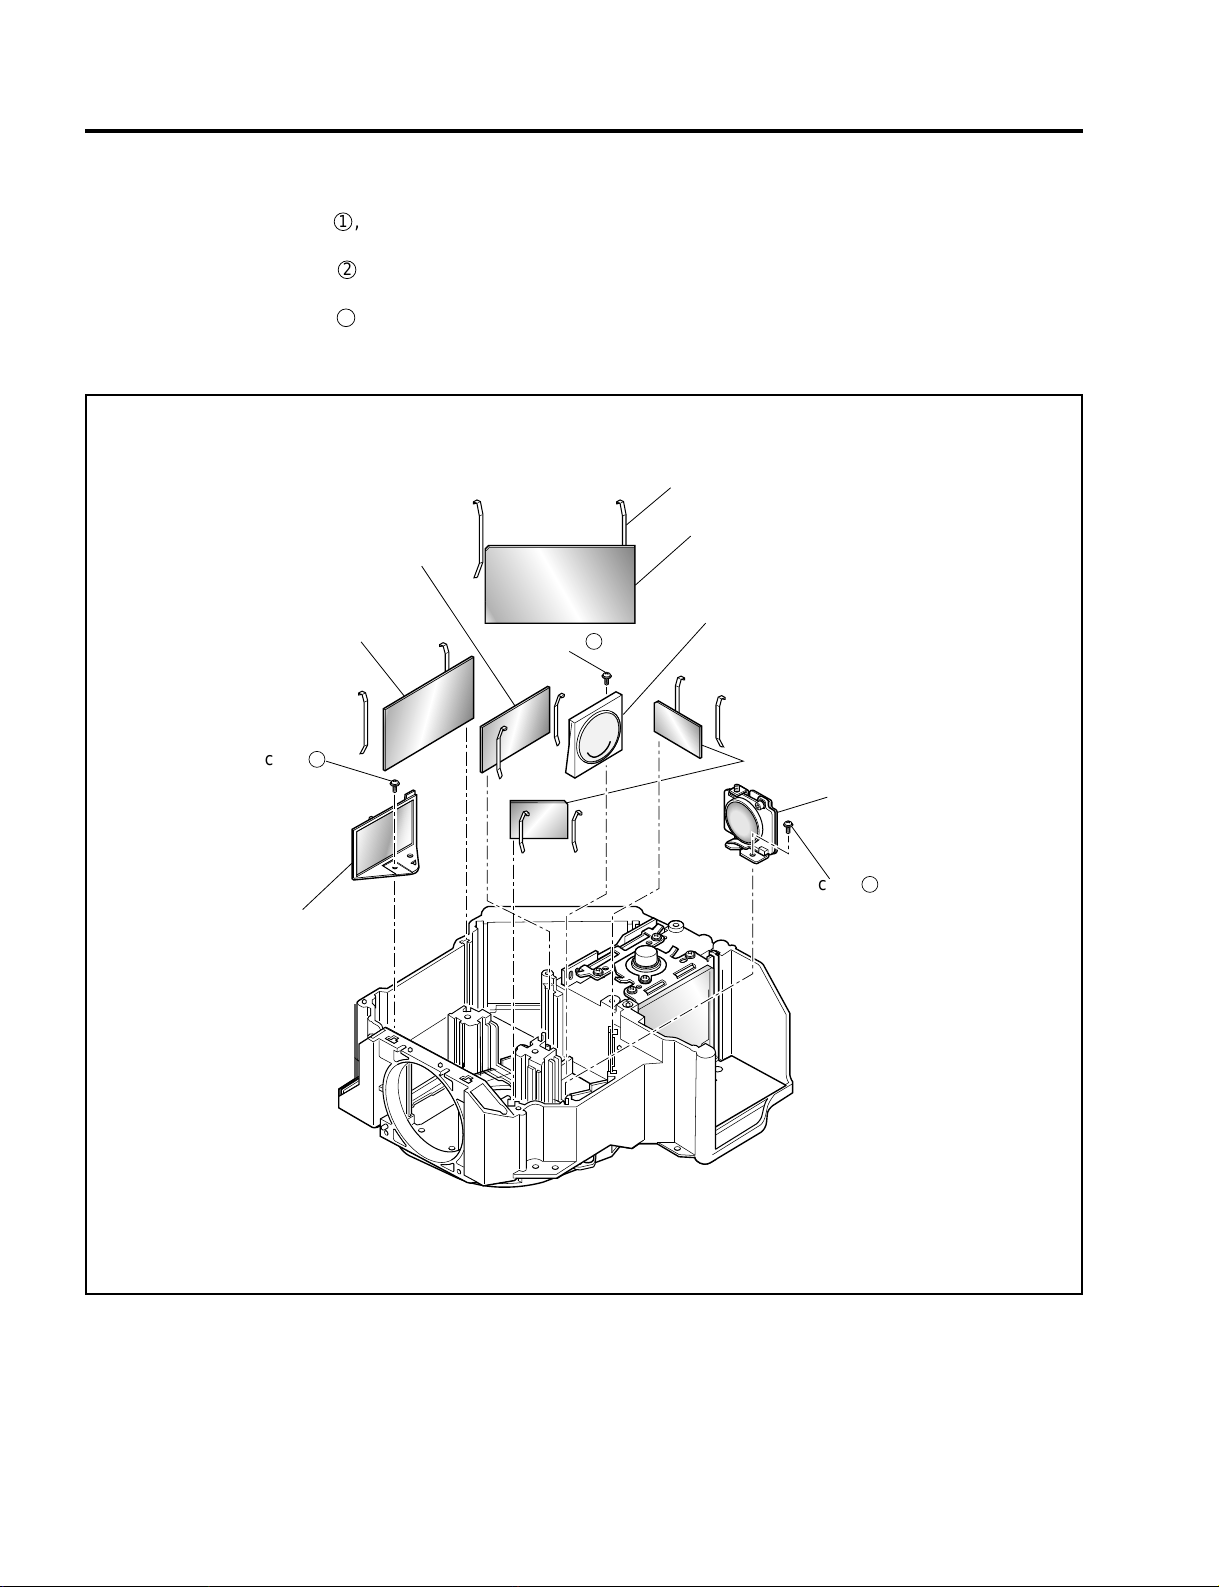
METHOD OF DISASSEMBLY
15. MIRROR ASSY1 (SKT)/DICHROIC MIRROR 1 (SK)/DICHROIC MIRROR 2 (SK)/
MIRROR 0 (SK)/MIRROR 2 (SK)/RELAY LENS ASSY 1 (SK)/RL2 SASSY/SPRING S
(1) Remove the one screw 1, and take out the MIR-
ROR ASSY1 (SKT).
(2) Remove the one screw 2, and take out the RE-
LAY LENS ASSY 1 (SK).
(3) Remove the one screw 3, and take out the RL2
SASSY.
(4) Remove ten pieces of SPRING S, and take out
one each of the DICHROIC MIRROR 1 (SK),
DICHROIC MIRROR 2 (SK), MIRROR 0 (SK), and
also the two pieces of MIRROR 2 (SK).
SPRING S
DICHROIC MIRROR 2 (SK)
DICHROIC MIRROR 1 (SK)
Screw
1
MIRROR ASSY 1 (SKT)
Screw
2
MIRROR 0 (SK)
RELAY LENS ASSY (SK)
MIRROR 2 (SK)
RL2 SASSY
Screw
3
7-17
Page 98
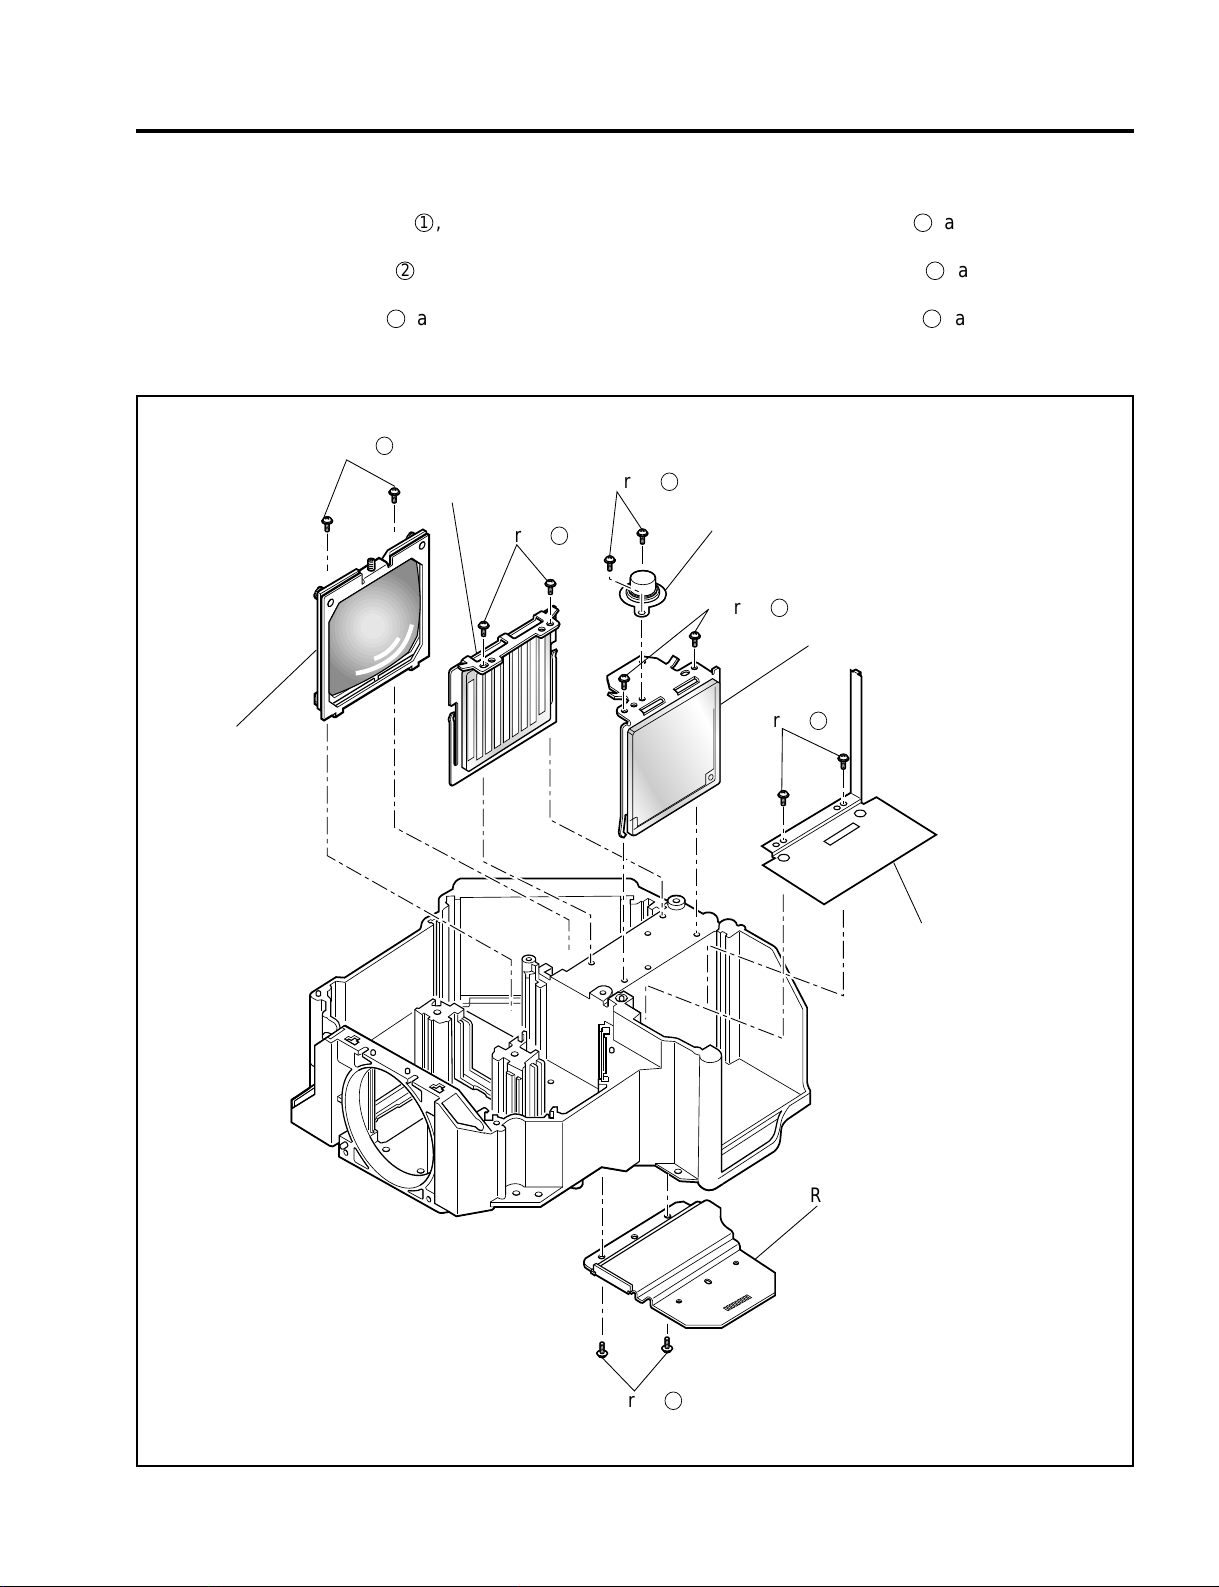
METHOD OF DISASSEMBLY
16. FL SASSY/IT1 SASSY/IT2 SASSY/BARRIER 2 (SEPARATE BASE)/
BARRIER 1 (SEPARATE BASE)/THERMOSTAT
(1) Remove the two screws 1, and take out the
THERMOSTAT.
(2) Remove the two screws 2, and take out the IT1
SASSY.
(3) Remove the two screws 3, and take out the BAR-
RIER 2 (SEPARATE BASE).
Screw
5
IT2 SASSY
Screw
(4) Remove the two screws 4, and take out the BAR-
RIER 1 (SEPARATE BASE).
(5) Remove the two screws 5, and take out the FL
SASSY.
(6) Remove the two screws 6, and take out the IT2
SASSY.
1
FL SASSY
Screw
6
THERMOSTAT
Screw
2
IT1 SASSY
Screw
3
BARRIER 2
(SEPARATE BASE)
Screw
BARRIER 1(SEPARATE BASE)
4
7-18
Page 99
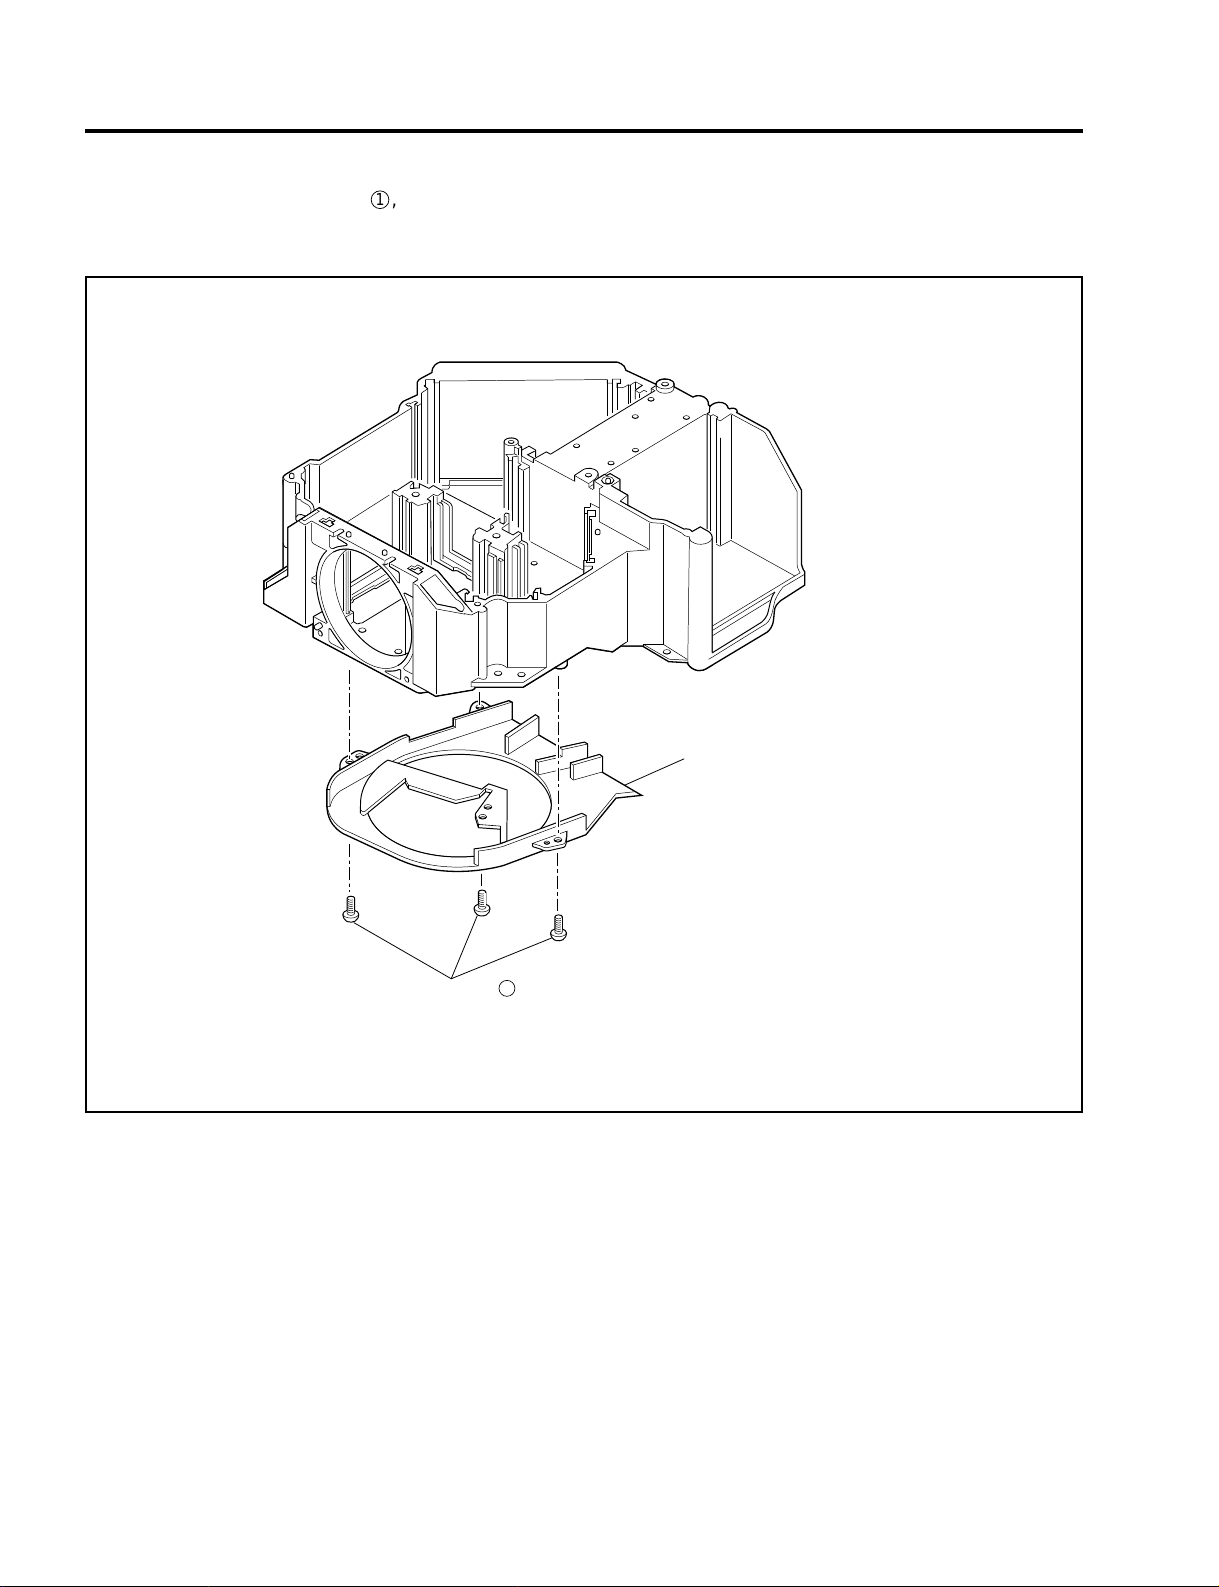
METHOD OF DISASSEMBLY
17. DUCT CASE (SK) ASSY
(1) Remove the three screws 1, and take out the
DUCT CASE (SK) ASSY.
Screw
DUCT CASE (SK) ASSY
1
7-19
Page 100
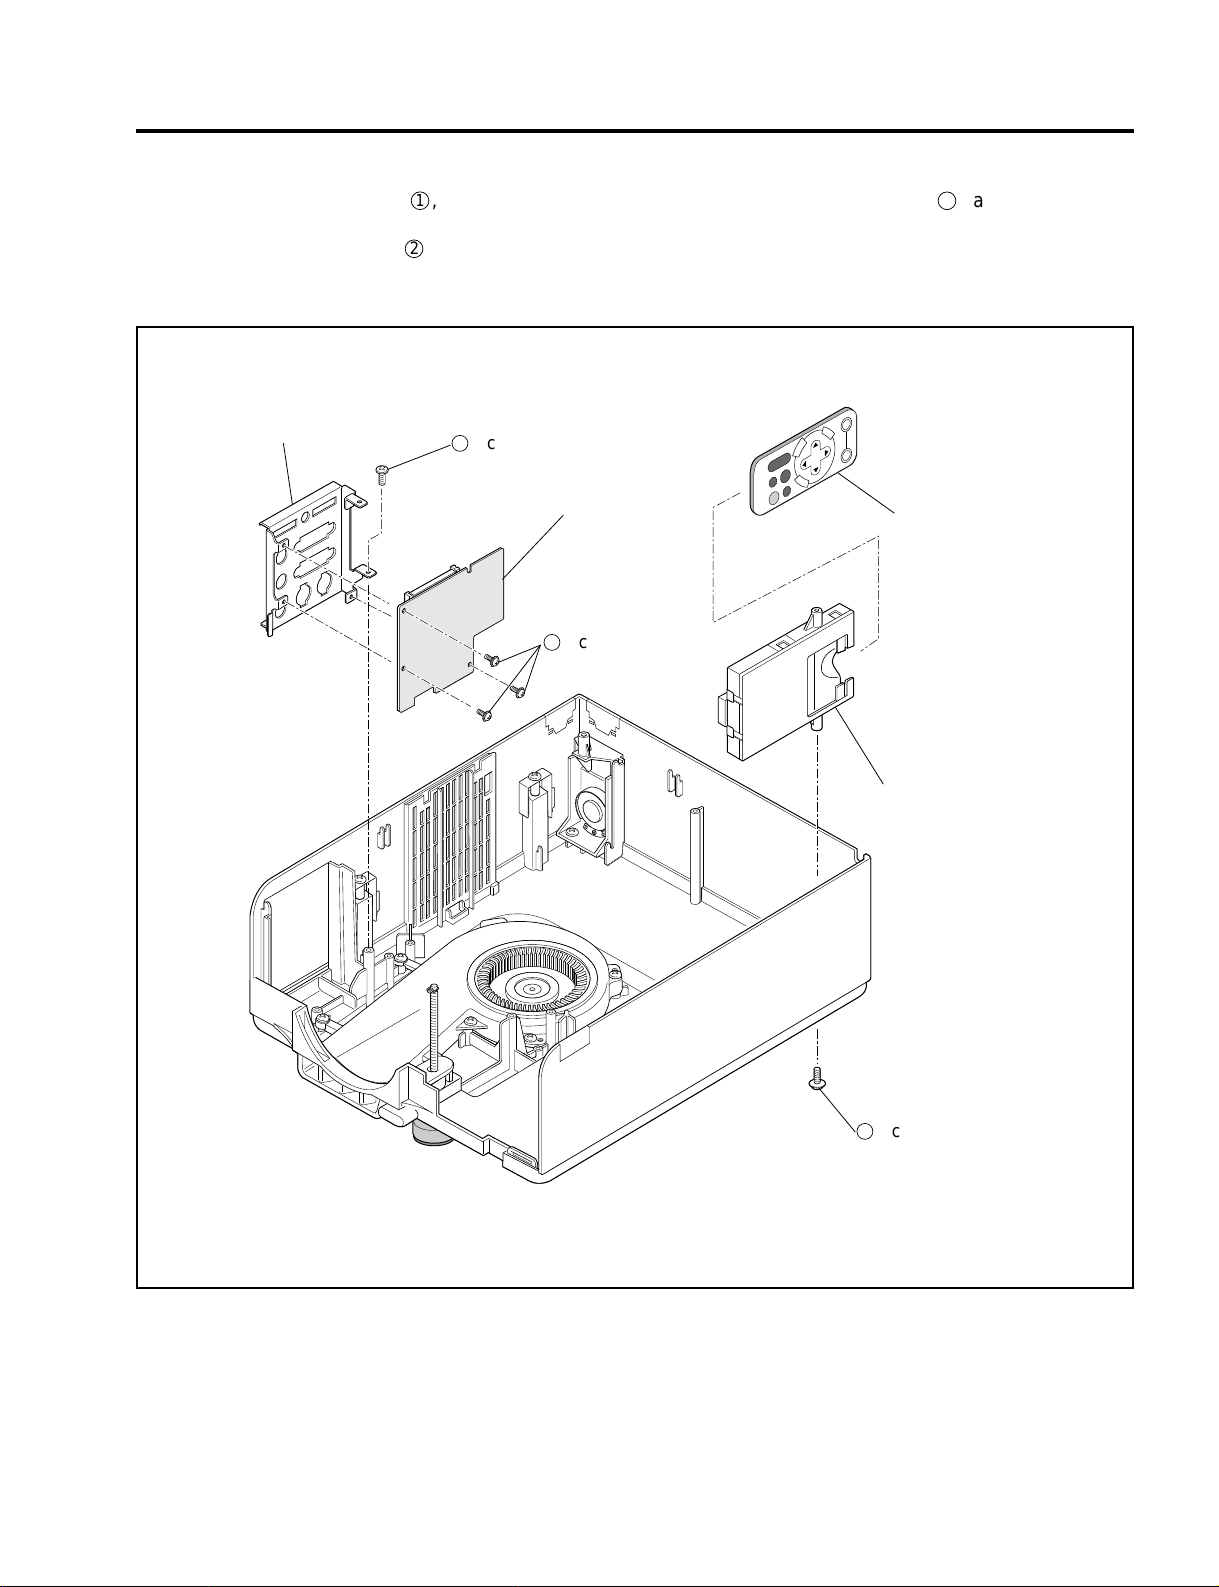
METHOD OF DISASSEMBLY
18. BRACKET (I/O) ASSY/I/O PWB ASSY/REMOCON CASE UNIT
(1) Remove the one screw 1, and take out the
BRACKET (I/O) ASSY.
(2) Remove the three screws 2, and take out the I/O
PWB ASSY .
(3) Remove the one screw 3, and take out the
REMOCON CASE UNIT.
BRACKET (I/O) ASSY
1
Screw
I/O PWB ASSY
2
REMOCON RD-366E
Screw
REMOCON CASE UNIT
3
Screw
7-20
 Loading...