

Page 1
S70
SYSTEM REMOTE CONTROL
OWNER’S MANUAL
Page 2

CONTENTS
Introduction . . . . . . . . . . . . . . . . . . . . . . . . . . . . . . . . . . . . . . . . . . . . . . . .17
Installing the battery . . . . . . . . . . . . . . . . . . . . . . . . . . . . . . . . . . . . . . . . .17
Set-up of the S70 remote control . . . . . . . . . . . . . . . . . . . . . . . . . . . . . . .17
Component Selection
S100 or S170 preamp selection
Activating and setting the clock
Adjusting Display Contrast
Using the NAD S70 Remote Control . . . . . . . . . . . . . . . . . . . . . . . . . . . . .19
On/Off
Mute & Display Back Light
Volume (Up & Down)
Main Menu: Operating Components in the System
Main Menu: Viewing Timer Status
Main Menu: Activating and Viewing Sleep Timer Status
Setting and Activating the Timer Function . . . . . . . . . . . . . . . . . . . . . . .21
NAD-Link . . . . . . . . . . . . . . . . . . . . . . . . . . . . . . . . . . . . . . . . . . . . . . . . . .21
Troubleshooting Guide . . . . . . . . . . . . . . . . . . . . . . . . . . . . . . . . . . . . . . .22
2
Page 3
3
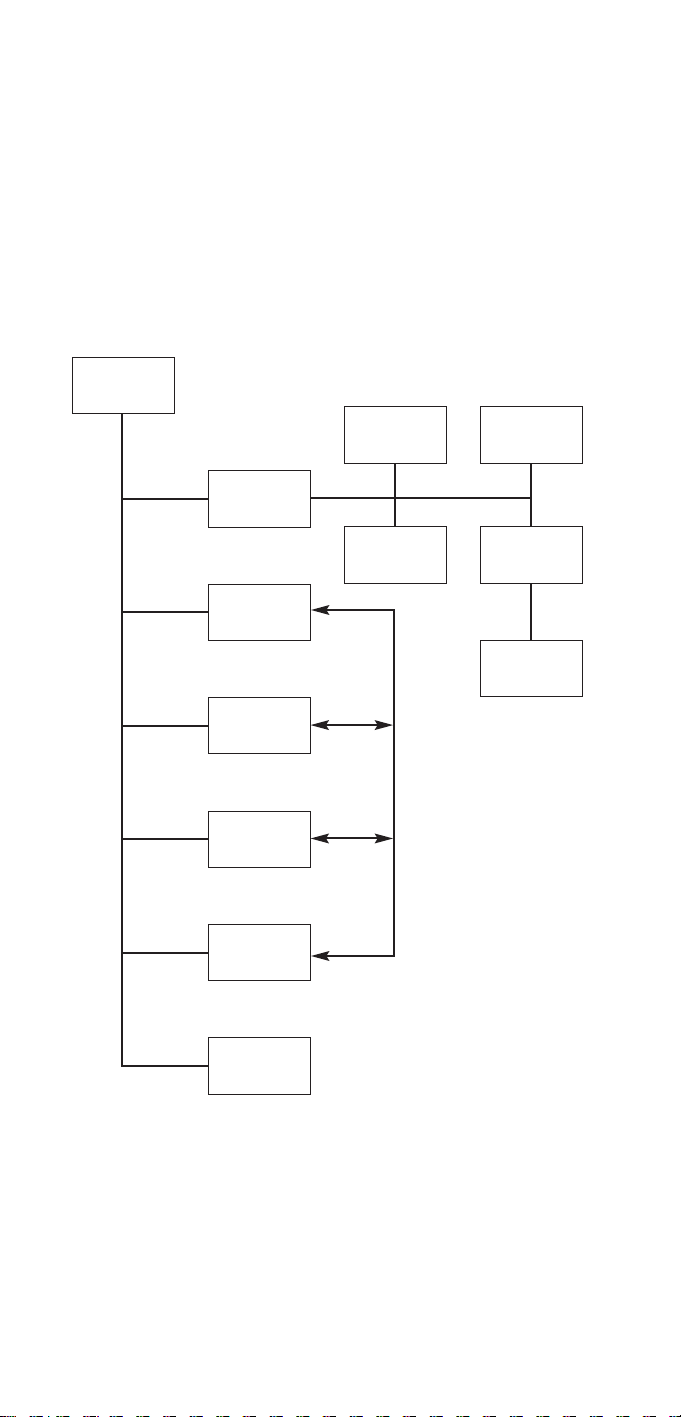
Main Menu
NAD S70 System Remote Control
Menu & Sub-menu Structure
FIGURE 1
NOTE: Component menus are optional.
Please refer to the chapter ‘Setup of the S70 remote control’
Return to Main Menu by pressing button next to ‘EXIT’ in display
Timer Status
Menu
Component No.1
menu
(eg. AMP)
Component No.2
menu
(eg. PREAMP)
Component No.3
menu
(eg. TUNER)
Component No.4
menu
(eg. CD)
System Setup
Menu
Timer Setup Menu
Timer Select Menu
Clock Setup Menu
Contrast
Adjustment
Preamp Selection
(eg. S170 or S100)
Page 4
45678
Page 5
Page 6
Page 7
Page 8
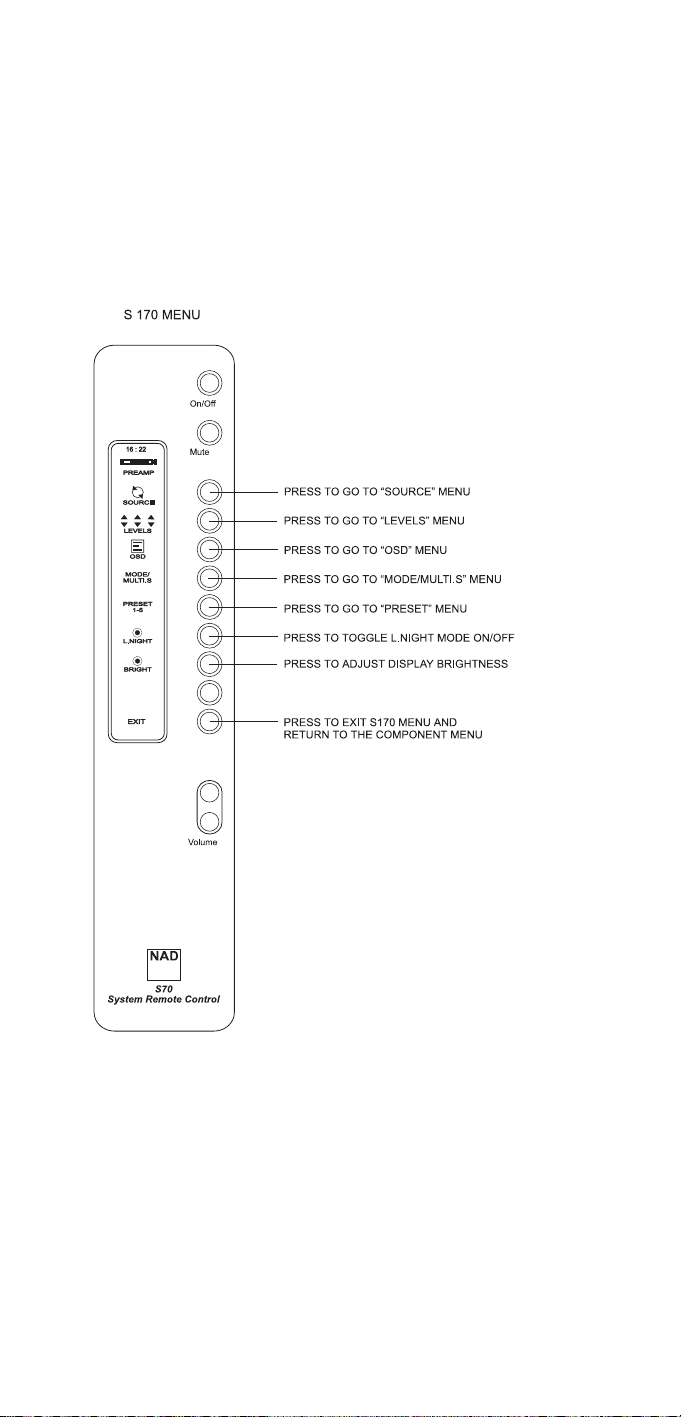
FIGURE 6
Page 9

9
FIGURE 6a
Page 10

10
FIGURE 6b
Page 11

11
FIGURE 6c
Page 12

12
FIGURE 6d
Page 13

13
FIGURE 6e
Page 14

14
FIGURE 7
Page 15

15
FIGURE 8
Page 16

16
FIGURE 9
Page 17

17
INTRODUCTION
Thank you for purchasing the NAD S70 System Remote Control. With the S70
you can control all components of your NAD Silver Series system. The S70 can
easily be customised to suit your particular NAD Silver Series system and provides
additional functionality such as a clock, Sleep and on/off timer.
Although the S70 is primarily meant to complement the NAD Silver Series, it will
also function with most remote controlled NAD products from the C Series.
To ensure long-term, trouble free operation, avoid the remote control being
exposed to shocks and water. Should water enter the case of the remote control,
remove the battery as explained in this manual and have it inspected by a
qualified service technician before attempting to use it again. Use a dry soft cloth
to clean the remote control casing. If necessary, lightly dampen the cloth with
soapy water. Do not use solutions containing benzol or other volatile agents.
Using a fresh battery, the NAD S70 will operate up to a distance of 20ft (7m) and
within an angle of 45° either way from a straight line from the front panels of
your NAD Silver Series system. Make sure there is a clear line-of-sight between
the components of your system and the window on the front of the S70. Note
that strong lighting and direct sunlight can affect the range of the S70.
INSTALLING THE BATTERY
Alkaline batteries are recommended for maximum operating life. One 9V (PP-3)
battery must be fitted in the battery compartment at the rear of the Remote
Control handset.
• Using a Phillips No.1 screwdriver, carefully remove the screw from the battery
compartment lid.
• Lift the cover slightly at the back and then slide it backwards so it disengages
itself from the S70’s casework.
• If replacing battery; unplug the old battery from the battery snap-on
connector. Be careful not to stretch the connector’s wires.
• Plug the new battery onto the snap-on connector; make sure the orientation
is correct and that the wires aren’t trapped beneath or over the battery itself
when placing it inside the remote control’s casework.
• Slide the battery cover back on and replace the screw to hold it in place. The
screw should engage easily to the thread, don’t use force to replace the screw,
you may damage the thread in the S70’s casework.
The low power consumption and energy saving features of the S70 mean that
the battery will last a long time. When you notice that the range of the S70 is
decreasing it may be necessary to replace the battery.
NOTE: Be careful not to lose the battery compartment screw. Should the original
screw get lost, replace only with a screw of the exact same type (metric, 2mm, 8
to 10mm long). Using the wrong type of screw will permanently damage the
casework of the S70 remote control.
SET-UP OF THE S70 REMOTE CONTROL
Component selection
The NAD S70 remote control can be customised to suit your particular NAD Silver
Series system by selecting only those components present in your system.
The NAD S70 is a "menu-driven" remote control, where many of its buttons vary
in function, depending on which Menu was selected. The display next to these
buttons indicates which functions are available. In normal operation, the Main
Menu is the starting point. Figure No.1 shows how the menus are organised.
Page 18

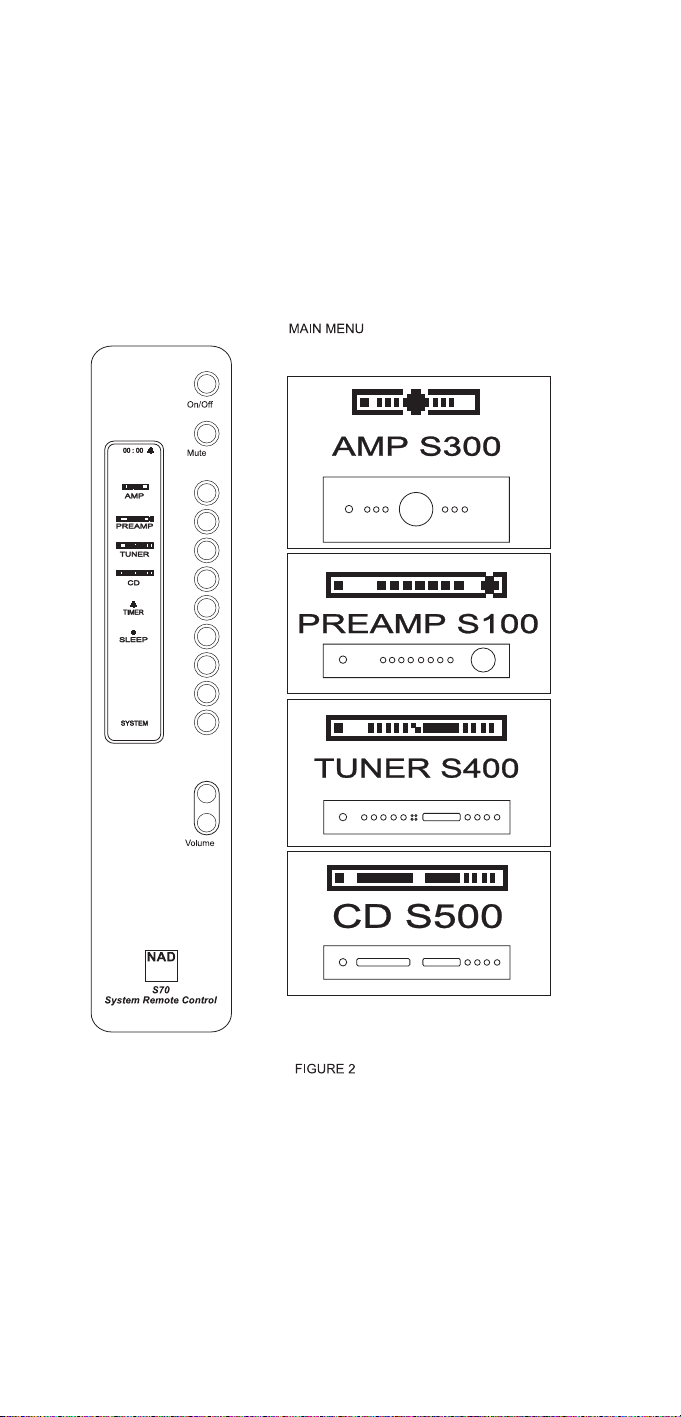
Press any button (other than Volume Up/Down) to activate the display. In the
Main menu, each category of Silver Series component is represented by its own
icon. Refer to figure No.2.
To set up the S70 for your system:
•From the Main Menu on the remote control, press the button next to where it
indicates "SYSTEM" in the display.
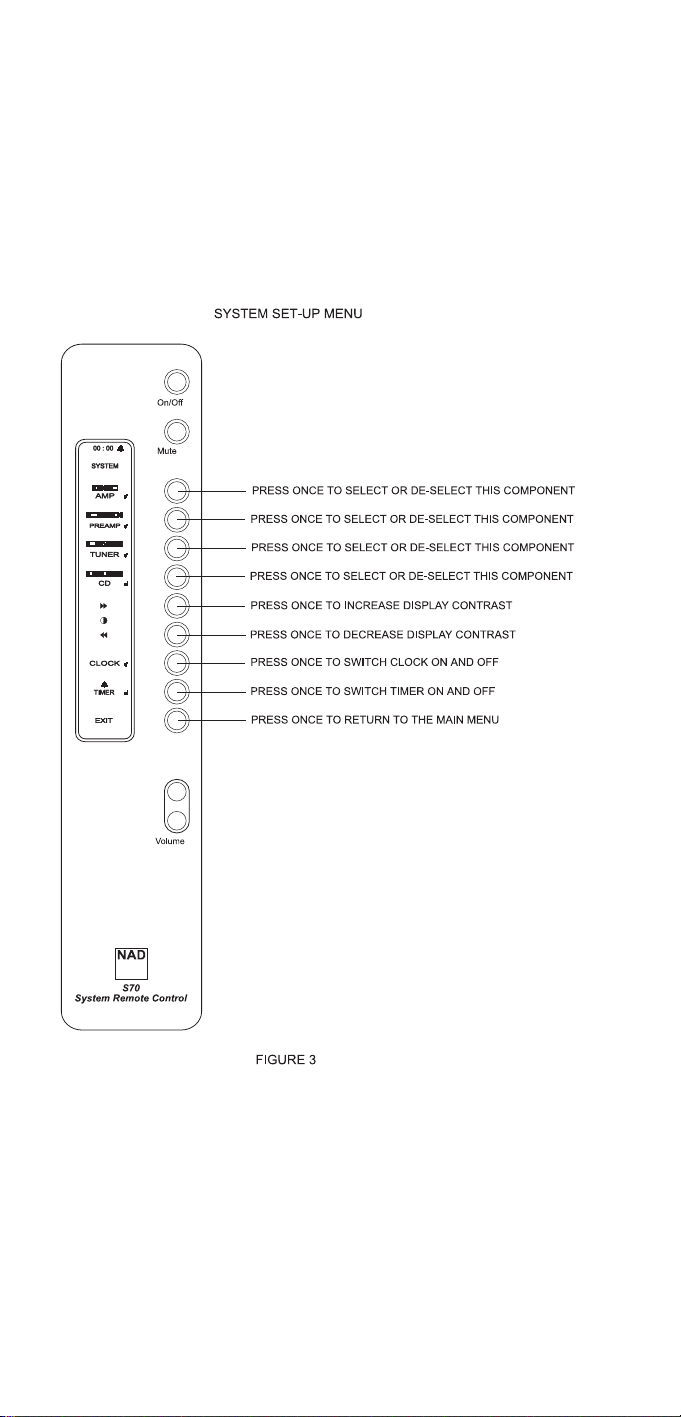
• The display will change to System Set-up Menu. Refer also to figure No.3
• The display will show several components, such as "AMP", "PREAMP",
"TUNER", "CD" with corresponding icons. By pressing the button next to the
component you can select or de-select a component for the Main Menu. A
tick-mark next to the component will indicate whether component has been
selected. For instance, if your system comprises the NAD S200 amplifier, S400
tuner and S500 CD player make sure the boxes for amp, tuner and CD player
are ticked, the others not.
•Press the button next to "EXIT" at the bottom to leave and save the set-up
and return to Main Menu.
Set-up of the S70 remote control: S100 or S170 Preamp selection
Note that within "PREAMP" Component one can choose from 2 different
models: the S100 Stereo pre-amp and the S170 AV Pre-amp/Processor:
•To select, press and hold down the button next to "PREAMP" for 2 seconds.
The display will change to show the sub-menu with "S100" and "S170". A
tick-mark indicates which of the two is selected.
•Press the button next to the model that is part of your system (refer to model
number as mentioned on the preamp's front panel), a tick-mark indicates
which model has been selected.
•Press the button next to "EXIT" at the bottom to return to the System Set-up
Menu.
• In System Set-up Menu, make sure that "PREAMP" has a tick-mark next to it,
to indicate it has been selected.
NOTE: If your NAD Silver Series component is not available from the System Setup menu, your S70 can be updated in many cases. Consult your NAD dealer.
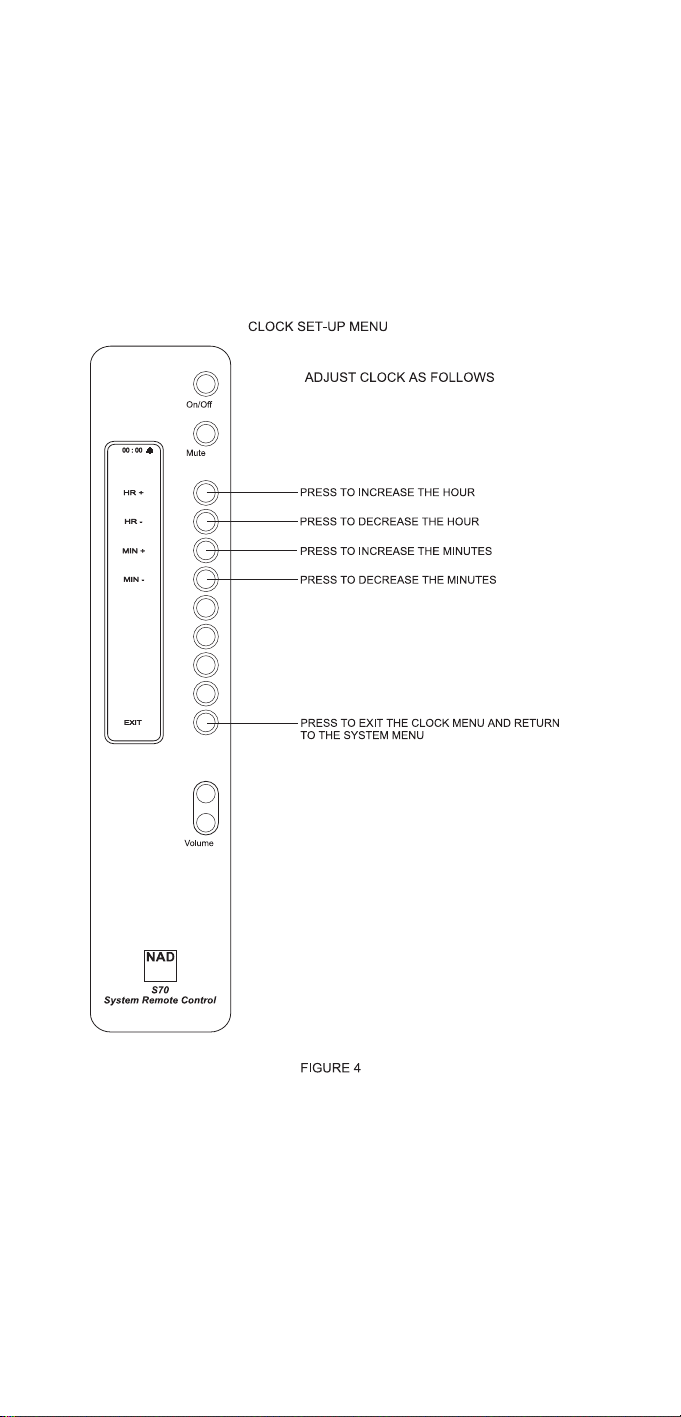
Activating and setting the clock
The S70 Remote Control also has a clock built-in, which gives you extra facilities
such as Sleep Timer and Timer function. For these to function, you need to
activate and set the clock:
•From the Main Menu, press the button next to "SYSTEM".
• In the System Set-up Menu, activate the clock by pressing the button next to
"CLOCK"; a tick mark will appear to indicate that the clock has been
activated.
•Press the button next to "CLOCK" for 2 seconds
• The Clock Set-up Menu allows for adjusting the clock. Use the 24-hour format
to enter the correct time (for example, 2:15PM would be 14:15) by pressing
the buttons next to "HR+" (to adjust hours upwards), "HR-" (adjust hours
downwards), "MIN +" (adjust minutes upwards), "MIN -" (adjust minutes
downwards). Refer also to figure No.4.
•Press the button next to "EXIT" to return to System Set-up Menu.
•Press the button next to "EXIT" to return to Main Menu.
NOTE: If you choose to de-select (no tick-mark) from the System Set-up Menu
you will have to adjust the clock again next time you activate it.
Adjusting display contrast
The NAD S70’s display contrast can be adjusted to optimise legibility from a wide
viewing angle. The factory setting will be suitable in almost all cases but under
exceptional circumstances or if the battery is becoming very weak it may be
18
Page 19

necessary to adjust contrast.
•From the Main Menu, press the button next to "SYSTEM".
•Press the button next to ">>" to increase contrast or "<<" to decrease
contrast.
• When the optimum contrast level has been set, press the button next to "EXIT"
to return to Main Menu.
USING THE NAD S70 REMOTE CONTROL
The NAD S70 is a "menu-driven" remote control, where many of its buttons vary
in function, depending on which Menu was selected. The display next to these
buttons indicates which functions are available. In normal operation, the Main
Menu is the starting point. Figure No.1 shows how the menus are organised.
The Volume Control, Mute and On/Off buttons will always perform the same
function, regardless of whichever Menu was selected.
The display will always turn itself off, 25 seconds after the last button has been
pressed, to prolong battery life. Pressing any button, other than the volume
buttons, will activate the display again.
On/Off
Press this button to switch components from the Operating to the Stand-by mode
and vice versa.
As this is a toggle command, switching between Stand-by and Operating mode,
you may consider to switch all components to operating mode so that using
On/Off button on the S70 all components are synchronised in status: Press the
power button on the front panel of each remote controlled Silver Series
component so that all are turned on and in Operating mode. By connecting NADLink between all components, they will remain in synchronisation with each other,
even if one of the components is just out of the S70’s range. Refer also to chapter
NAD-Link below. The On/Off function is always available, regardless of whichever
Menu the S70 is in.
Mute & Display back light
Press the Mute Button to temporarily switch off the sound from the amplifier or
pre-amplifier. Press Mute again to restore sound.
The Mute button also engages the back-lighting for the display so that the S70
can easily be used in dark environments. Press the Mute button for 2 seconds to
engage the back-lighting. The light will turn itself off automatically after 15
seconds to conserve battery power. The Mute and Back-light functions are always
available, regardless of whichever Menu the S70 is in.
Volume (Up & Down)
Press the lower button to decrease volume, the upper button to increase volume.
Using the Volume buttons doesn’t activate the display. The Volume function is
always available, regardless of whichever Menu the S70 is in.
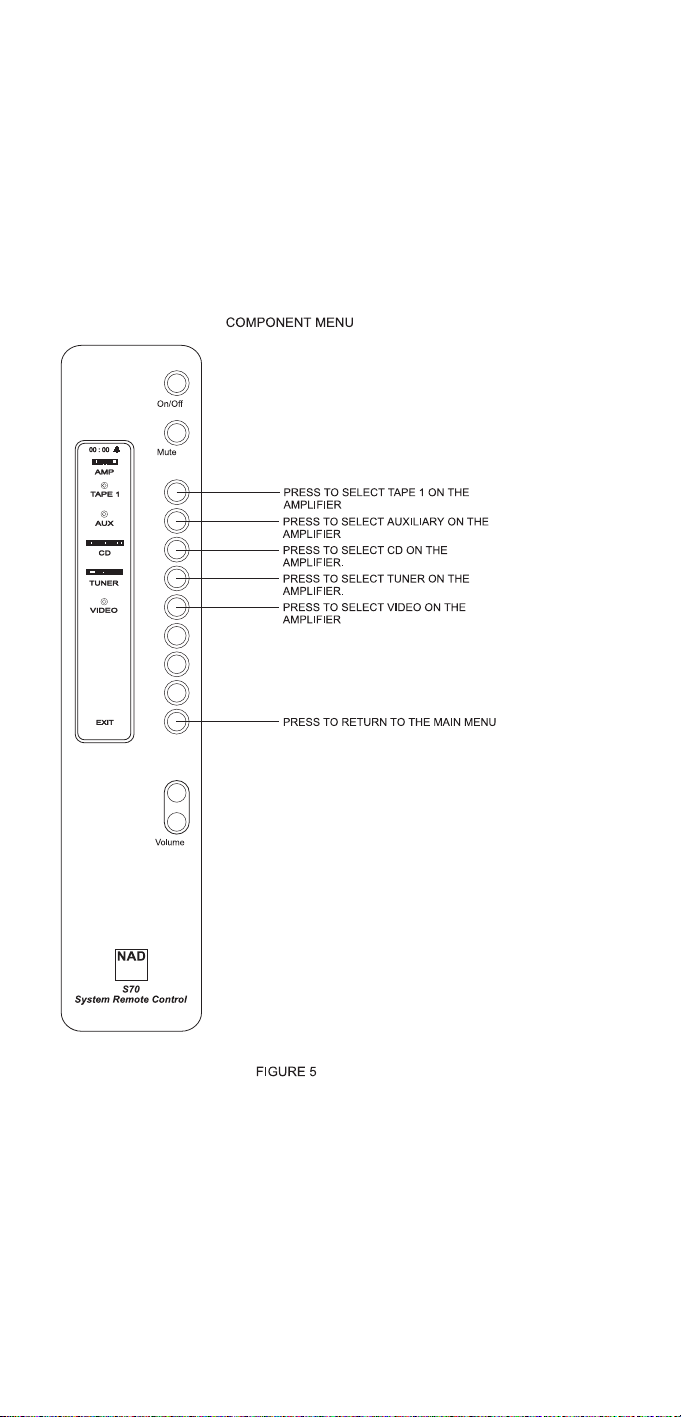
Main Menu: Operating components in the system
The other available functions of the S70 depend on whichever Menu has been
selected. From the Main menu, (figure No. 2) you can select which component
you wish to operate, such as amplifier, tuner, CD player, etc. The S70 comes
standard with a selection of Component Menus, such as Amplifier Component,
Pre-amplifier Component, Tuner Component, CD Component, etc. The
commands from within these Component Menus correspond with those on the
front panel or the original remote control of the component.
• Select Main Menu by pressing the button next to "EXIT" in any of the other
19
Page 20

menus.
• In the Main Menu, press the button next to component displayed you wish to
operate, e.g. "AMP".
• The appropriate Component Menu and its icon appear in the top of the
display, the "AMP" Menu in this example, with all available functions will
appear. Press the button next to the function desired in the display. See also
figure No. 5.
•Press the button next to "EXIT" again to return to the Main Menu from
where you can select another component.
NOTE: If in System Set-up Menu "S170" was selected as "PREAMP" (refer to
section " Set-up of the S70 remote control: S100 or S170 Preamp selection")
additional sub-menus for SOURCE, LEVELS, OSD, MODE/MULTI.S and PRESET 1-5
become available. See also S170 menu, figure No. 6 and figures No. 6a through
6e for S170 submenus.
In some Component Menus selecting a function will take you to another
Component Menu. For example, pressing the button for CD in the Amplifier
Component Menu will switch the input of the amplifier to the CD input and change
from the Amplifier Component menu to the CD player Component Menu. These
buttons can be recognised by the icon corresponding to the Component Menu.
NOTE: You can set up and customise the NAD S70 to suit your particular NAD
system. Refer to chapter "Set-up of the NAD S70 Remote Control".
Main Menu: Viewing Timer status
The S70 can be used to turn your system on and off at specific times with the
Timer function. To set, activate or de-activate the Timer function, refer to chapter
"Setting and activating the Timer".
You can view the Timer status and engage from the Main Menu:
• Select Main Menu by pressing "EXIT" in any of the other menus.
•Press the button next to "TIMER" once. The display will now show the On
Time and Off Time and which component was selected. The symbol on
the right of the clock in the top of the display indicates that Timer function is
activated. Refer also to Figure No. 7.
•Press the button next to "EXIT" to return to Main Menu.
NOTE: The Timer function in the Main Menu is available only if both Clock and
Timer functions have been selected (indicated by tick-mark) in the System Set-up
Menu. Refer to chapter "Set-up of the S70 Remote Control" for information on
activating and setting the clock.
Main Menu: Activating & viewing Sleep Timer status
With the Sleep Timer function you can set the S70 to automatically switch off
your system after a preset number of minutes to Standby mode (provided all
components were in Operation mode, not in Stand-by mode).
•To activate the Sleep Timer function, press the button next to "SLEEP". The
clock in the display changes to show the time set for the Sleep Timer
Function. It is now activated and set for 10 minutes. The symbol on the
left of the clock in the top of the display indicates that the Sleep Timer
function is now activated, regardless of whichever Menu was selected. Refer
also to figure No. 8.
• Each consecutive press will advance the sleep time in 10 minutes increments,
up to 90 minutes.
•To cancel the Sleep mode, continue pressing the SLEEP button until "OFF"
appears in the display.
20
Page 21

NOTES: Make sure that the S70 is located well within range of all components,
otherwise the Sleep Timer function will function erratically or not at all.
The Sleep function is available only if Clock function has been selected (indicated
by tick-mark) in the System Set-up Menu. Refer to chapter "Set-up of the S70
Remote Control" above for information on activating and setting the clock.
SETTING AND ACTIVATING THE TIMER FUNCTION
The S70 can be used to turn your system on and off at specific times with the
Timer function. This way, you can use your system as an alarm clock, for instance.
Before the Timer function can be set, it needs to be activated:
•From the Main Menu, press the button next to "SYSTEM".
• In the System Set-up Menu, press the button next to "TIMER"; a tick mark will
appear to indicate that the Timer Function has been activated. In all Menus,
the symbol on the right of the clock in the top of the display indicates that
Timer function is activated.
To de-activate, press button again so that tick mark disappears.
•Press the button next to "EXIT" to return to Main Menu.
To set the timer:
•From the Main Menu, press the button next to "SYSTEM".
• In the System Set-up Menu, press the button next to "TIMER" for 2 seconds.
• In the Timer Set-up Menu, press the button next to "ON" to set the time you
want the system to switch on. Use the 24-hour format to enter the correct time
(for example, 2:15PM would be 14:15) by pressing the buttons next to "HR+"
(to adjust hours upwards), "HR-" (adjust hours downwards), "MIN +" (adjust
minutes upwards), "MIN -" (adjust minutes downwards). Refer also to figure
No.9.
•Press the button next to "OFF" to set the time to switch the system off, using
the time adjustment buttons as described above.
•Press the button next to "EXIT" to return to System Set-up Menu.
•Press the button next to "EXIT" to return to Main Menu
•You can check the Timer setting and status from the Main Menu, refer to
chapter "Using the NAD S70 System Remote Control", section "Main Menu:
Viewing Timer status".
NOTES: Make sure that the S70 is located well within range of all components,
otherwise the Timer function will function erratically or not at all.
The Timer function is available only if Clock function has been selected (indicated
by tick-mark) in the System Set-up Menu. Refer to chapter "Set-up of the S70
Remote Control" above for information on activating and setting the clock.
NAD-LINK
Many NAD components feature NAD-Link. The RCA sockets on the back panel of
these components, marked "NAD-Link In" and "Out" allow for remote control
command communication between the components when connected with each
other. Connecting NAD-Link between the various components is not strictly
necessary for the S70 to work, but it will improve overall performance and
consistency for remote control commands.
Connect the "NAD-Link Out" from one component to the "NAD-Link In" on the
other component. From the latter, connect from "NAD-Link Out" to the "NADLink In" on the next component, etc., so that the entire system’s NAD Link
sockets are connected in a daisy-chained fashion, always IN to OUT and OUT to
IN. Do not connect the "NAD Link-Out" from the last component to the first
component’s "NAD-Link In" in the chain.
21
Page 22

22
TROUBLESHOOTING GUIDE
Remote control works
intermittently or doesn’t
work at all
• Battery flat or snap-on
connector incorrectly
attached
• IR transmitter or receiver
windows obstructed
• IR receiver on components
are in direct sun or very
bright ambient light
• Check or replace battery
• Remove obstruction
• Place unit away from
direct sun, reduce amount
of ambient light
Problem Cause Solution
Sleep Timer and Timer
functions can’t be activated
• These functions are
available only if clock is
activated
•Activate clock
Although activated, Sleep
Timer and Timer function do
not work properly or at all
• IR transmitter or receiver
windows obstructed
• IR receiver on components
are in direct sun or very
bright ambient light
• Remove obstruction
• Place unit away from
direct sun, reduce amount
of ambient light
Display is difficult to read • Too little or too much
contrast
• Battery almost flat
• Adjust display’s contrast
level
• Replace battery
Can not operate NAD S170
AV preamp / processor
• S100 is selected in System
set-up as preamp
• Select S170 as preamp in
System Set-up
Sometimes not all
components respond to
On/Off command, causing
these to be "out-of-sync" for
stand-by/operating status
• Remote control is just out
of range
• Reduce operating distance
• Connect NAD-Link
between components
Can not operate NAD S100
Stereo preamp
• S170 is selected in system
set-up as preamp
• Select S100 as preamp in
System Set-up
Page 23

23
Page 24

www.NADelectronics.com
©2001 NAD ELECTRONICS INTERNATIONAL
All rights reserved. No part of this publication may be reproduced, stored or transmitted
in any form without the written permission of NAD Electronics International
S70 Manual (S170 revision) 08/01 Printed in Hong Kong
 Loading...