

Page 1

GB
F
D
E
I
P
S
S70
SYSTEM REMOTE CONTROL
OWNER’S MANUAL
Page 2

CONTENTS
Introduction . . . . . . . . . . . . . . . . . . . . . . . . . . . . . . . . . . . . . . . . . . . . . . . .11
Installing the battery . . . . . . . . . . . . . . . . . . . . . . . . . . . . . . . . . . . . . . . . .11
Set-up of the S70 remote control . . . . . . . . . . . . . . . . . . . . . . . . . . . . . . .11
Component Selection
Activating and setting the clock
Adjusting Display Contrast
Using the NAD S70 Remote Control . . . . . . . . . . . . . . . . . . . . . . . . . . . . .12
On/Off
Mute & Display Back Light
Volume (Up & Down)
Main Menu: Operating Components in the System
Main Menu: Viewing Timer Status
Main Menu: Activating and Viewing Sleep Timer Status
Setting and Activating the Timer Function . . . . . . . . . . . . . . . . . . . . . . .15
NAD-Link . . . . . . . . . . . . . . . . . . . . . . . . . . . . . . . . . . . . . . . . . . . . . . . . . .15
Troubleshooting Guide . . . . . . . . . . . . . . . . . . . . . . . . . . . . . . . . . . . . . . .16
2
GB
Page 3

GB
3
Main Menu
NAD S70 System Remote Control
Menu & Sub-menu Structure
FIGURE 1
NOTE: Component menus are optional.
Please refer to the chapter ‘Setup of the S70 remote control’
Return to Main Menu by pressing button next to ‘EXIT’ in display
Timer Status
Menu
Component No.1
menu
(eg. AMP)
Component No.2
menu
(eg. PREAMP)
Component No.3
menu
(eg. TUNER)
Component No.4
menu
(eg. CD)
System Setup
Menu
Timer Setup Menu
Timer Select Menu
Clock Setup Menu
Page 4
GB
4
Page 5
GB
5
Page 6
GB
6
Page 7

GB
7
Page 8
GB
8
Page 9
GB
9
Page 10
GB
10
Page 11

GB
11
INTRODUCTION
Thank you for purchasing the NAD S70 System Remote Control. With the S70
you can control all components of your NAD Silver Series system. The S70 can
easily be customised to suit your particular NAD Silver Series system and provides
additional functionality such as a clock, Sleep and on/off timer.
Although the S70 is primarily meant to complement the NAD Silver Series, it will
also function with most remote controlled NAD products from the C Series.
To ensure long-term, trouble free operation, avoid the remote control being
exposed to shocks and water. Should water enter the case of the remote control,
remove the battery as explained in this manual and have it inspected by a
qualified service technician before attempting to use it again. Use a dry soft cloth
to clean the remote control casing. If necessary, lightly dampen the cloth with
soapy water. Do not use solutions containing benzol or other volatile agents.
Using a fresh battery, the NAD S70 will operate up to a distance of 20ft (7m) and
within an angle of 45° either way from a straight line from the front panels of
your NAD Silver Series system. Make sure there is a clear line-of-sight between
the components of your system and the window on the front of the S70. Note
that strong lighting and direct sunlight can affect the range of the S70.
INSTALLING THE BATTERY
Alkaline batteries are recommended for maximum operating life. One 9V (PP-3)
battery must be fitted in the battery compartment at the rear of the Remote
Control handset.
• Using a Phillips No.1 screwdriver, carefully remove the screw from the battery
compartment lid.
• Lift the cover slightly at the back and then slide it backwards so it disengages
itself from the S70’s casework.
• If replacing battery; unplug the old battery from the battery snap-on
connector. Be careful not to stretch the connector’s wires.
• Plug the new battery onto the snap-on connector; make sure the orientation
is correct and that the wires aren’t trapped beneath or over the battery itself
when placing it inside the remote control’s casework.
• Slide the battery cover back on and replace the screw to hold it in place. The
screw should engage easily to the thread, don’t use force to replace the screw,
you may damage the thread in the S70’s casework.
The low power consumption and energy saving features of the S70 mean that
the battery will last a long time. When you notice that the range of the S70 is
decreasing it may be necessary to replace the battery.
NOTE: Be careful not to lose the battery compartment screw. Should the original
screw get lost, replace only with a screw of the exact same type (metric, 2mm, 8
to 10mm long). Using the wrong type of screw will permanently damage the
casework of the S70 remote control.
SET-UP OF THE S70 REMOTE CONTROL
Component selection
The NAD S70 remote control can be customised to suit your particular NAD Silver
Series system by selecting only those components present in your system.
The NAD S70 is a "menu-driven" remote control, where many of its buttons vary
in function, depending on which Menu was selected. The display next to these
buttons indicates which functions are available. In normal operation, the Main
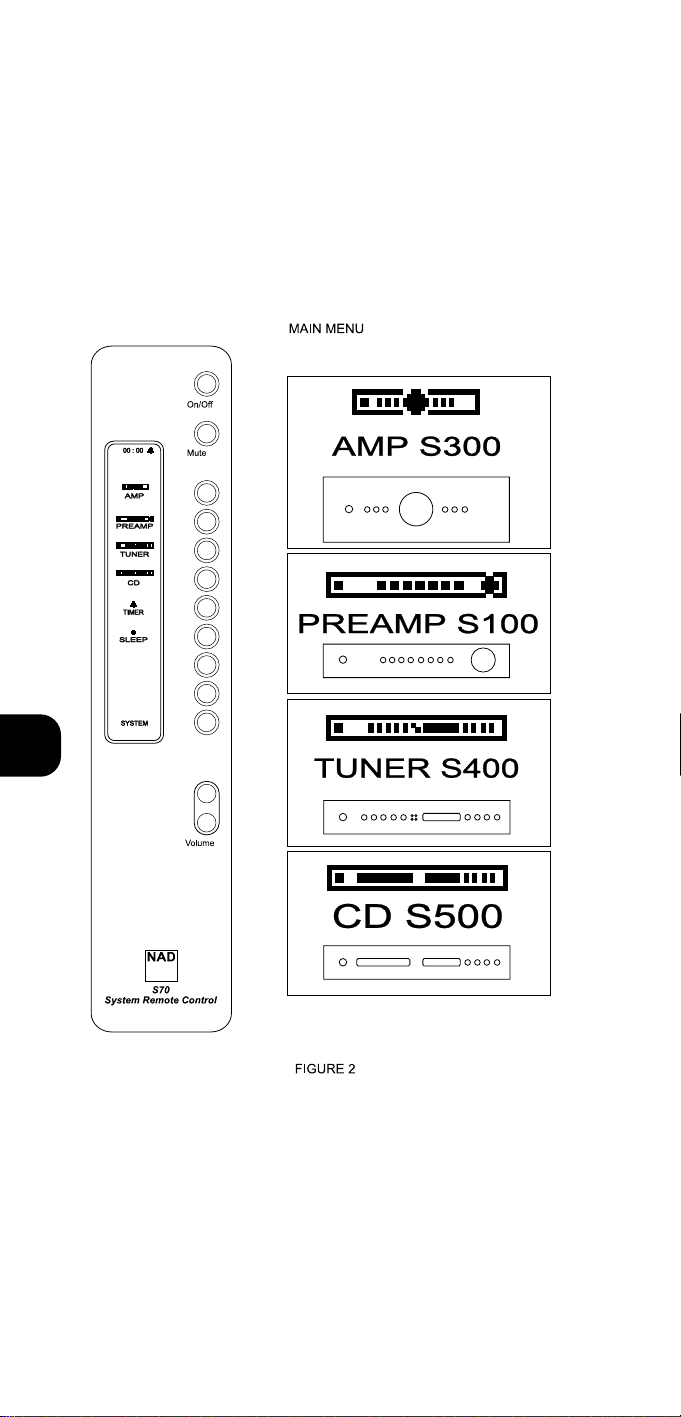
Menu is the starting point. Figure No.1 shows how the menus are organised.
Page 12

Press any button (other than Volume Up/Down) to activate the display. In the
Main menu, each category of Silver Series component is represented by its own
icon. Refer to figure No.2.
To set up the S70 for your system:
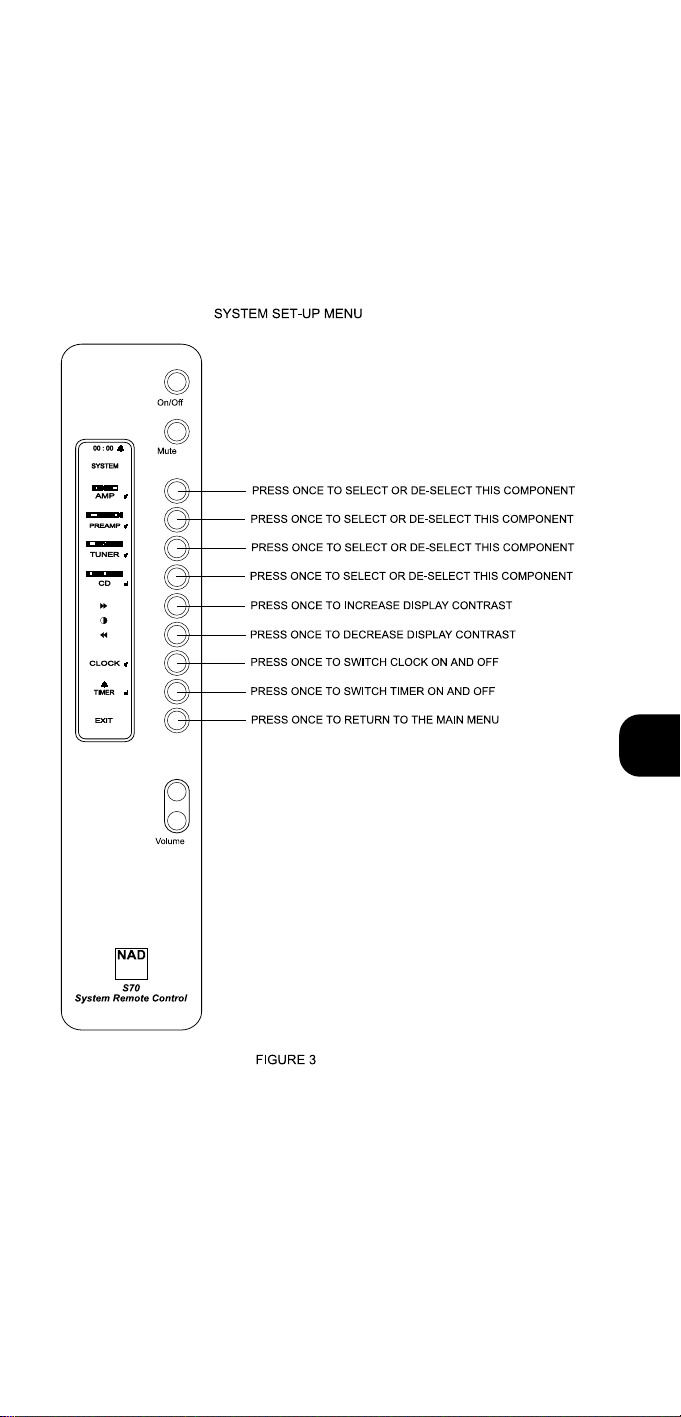
• From the Main Menu on the remote control, press the button next to where it
indicates "SYSTEM" in the display.
• The display will change to System Set-up Menu. Refer also to figure No.3
• The display will show several components, such as "AMP", "PREAMP",
"TUNER", "CD" with corresponding icons. By pressing the button next to the
component you can select or de-select a component for the Main Menu. A
tick-mark next to the component will indicate whether component has been
selected. For instance, if your system comprises the NAD S100 pre-amplifier,
S400 tuner and S500 CD player make sure the boxes for pre-amp, tuner and
CD player are ticked, the others not.
• Press the button next to "EXIT" at the bottom to leave and save the set-up
and return to Main Menu.
NOTE: If your NAD Silver Series component is not available from the System Setup menu, your S70 can be updated in many cases. Consult your NAD dealer.
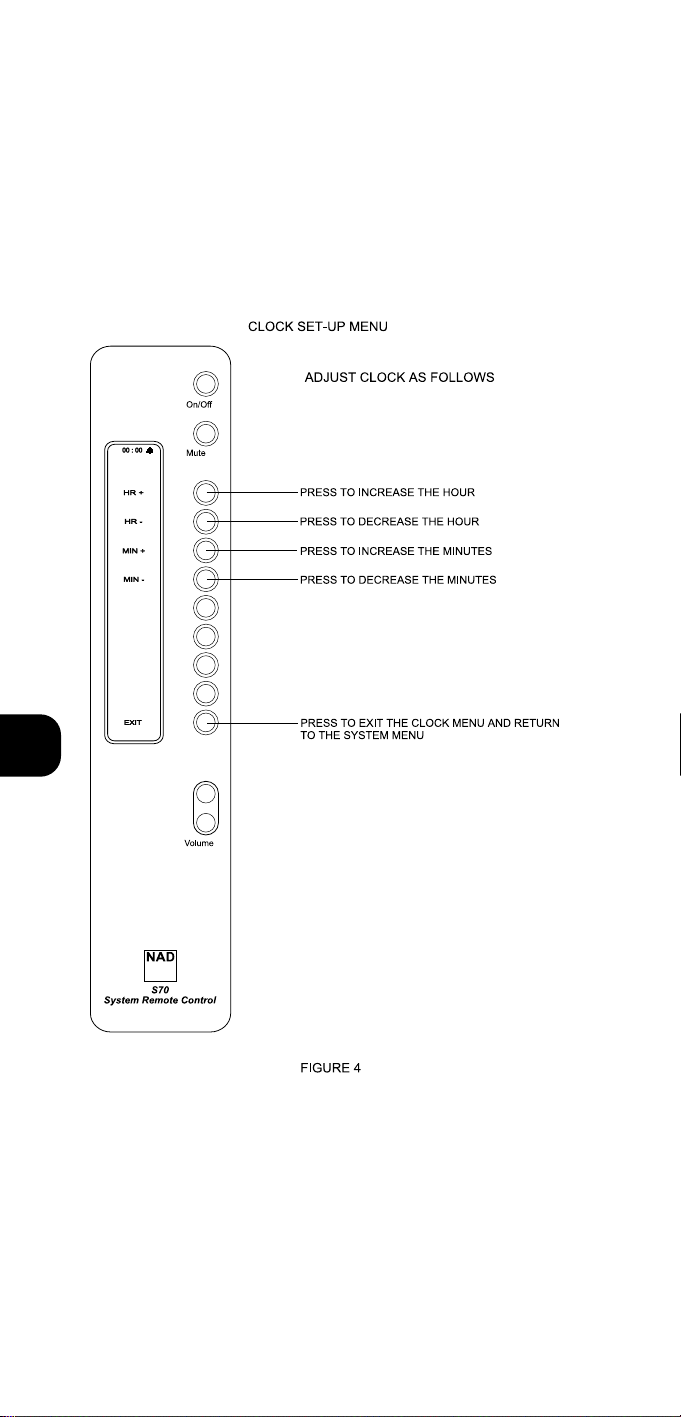
Activating and setting the clock
The S70 Remote Control also has a clock built-in, which gives you extra facilities
such as Sleep Timer and Timer function. For these to function, you need to
activate and set the clock:
• From the Main Menu, press the button next to "SYSTEM".
• In the System Set-up Menu, activate the clock by pressing the button next to
"CLOCK"; a tick mark will appear to indicate that the clock has been
activated.
• Press the button next to "CLOCK" for 2 seconds
• The Clock Set-up Menu allows for adjusting the clock. Use the 24-hour format
to enter the correct time (for example, 2:15PM would be 14:15) by pressing
the buttons next to "HR+" (to adjust hours upwards), "HR-" (adjust hours
downwards), "MIN +" (adjust minutes upwards), "MIN -" (adjust minutes
downwards). Refer also to figure No.4.
• Press the button next to "EXIT" to return to System Set-up Menu.
• Press the button next to "EXIT" to return to Main Menu.
NOTE: If you choose to de-select (no tick-mark) from the System Set-up Menu
you will have to adjust the clock again next time you activate it.
Adjusting display contrast
The NAD S70’s display contrast can be adjusted to optimise legibility from a wide
viewing angle. The factory setting will be suitable in almost all cases but under
exceptional circumstances or if the battery is becoming very weak it may be
necessary to adjust contrast.
• From the Main Menu, press the button next to "SYSTEM".
• Press the button next to ">>" to increase contrast or "<<" to decrease
contrast.
• When the optimum contrast level has been set, press the button next to "EXIT"
to return to Main Menu.
USING THE NAD S70 REMOTE CONTROL
The NAD S70 is a "menu-driven" remote control, where many of its buttons vary
in function, depending on which Menu was selected. The display next to these
buttons indicates which functions are available. In normal operation, the Main
Menu is the starting point. Figure No.1 shows how the menus are organised.
The Volume Control, Mute and On/Off buttons will always perform the same
12
GB
Page 13

function, regardless of whichever Menu was selected.
The display will always turn itself off, 25 seconds after the last button has been
pressed, to prolong battery life. Pressing any button, other than the volume
buttons, will activate the display again.
On/Off
Press this button to switch components from the Operating to the Stand-by mode
and vice versa.
As this is a toggle command, switching between Stand-by and Operating mode,
you may consider to switch all components to operating mode so that using
On/Off button on the S70 all components are synchronised in status: Press the
power button on the front panel of each remote controlled Silver Series
component so that all are turned on and in Operating mode. By connecting NADLink between all components, they will remain in synchronisation with each other,
even if one of the components is just out of the S70’s range. Refer also to chapter
NAD-Link below. The On/Off function is always available, regardless of whichever
Menu the S70 is in.
Mute & Display back light
Press the Mute Button to temporarily switch off the sound from the amplifier or
pre-amplifier. Press Mute again to restore sound.
The Mute button also engages the back-lighting for the display so that the S70
can easily be used in dark environments. Press the Mute button for 2 seconds to
engage the back-lighting. The light will turn itself off automatically after 15
seconds to conserve battery power. The Mute and Back-light functions are always
available, regardless of whichever Menu the S70 is in.
Volume (Up & Down)
Press the lower button to decrease volume, the upper button to increase volume.
Using the Volume buttons doesn’t activate the display. The Volume function is
always available, regardless of whichever Menu the S70 is in.
Main Menu: Operating components in the system
The other available functions of the S70 depend on whichever Menu has been
selected. From the Main menu, (figure No. 2) you can select which component
you wish to operate, such as amplifier, tuner, CD player, etc. The S70 comes
standard with a selection of Component Menus, such as Amplifier Component,
Pre-amplifier Component, Tuner Component, CD Component, etc. The
commands from within these Component Menus correspond with those on the
front panel or the original remote control of the component.
• Select Main Menu by pressing the button next to "EXIT" in any of the other
menus.
• In the Main Menu, press the button next to component displayed you wish to
operate, e.g. "AMP".
• The appropriate Component Menu and its icon appear in the top of the
display, the "AMP" Menu in this example, with all available functions will
appear. Press the button next to the function desired in the display. See also
figure No. 5.
• Press the button next to "EXIT" again to return to the Main Menu from
where you can select another component.
13
GB
Page 14

In some Component Menus selecting a function will take you to another
Component Menu. For example, pressing the button for CD in the Amplifier
Component Menu will switch the input of the amplifier to the CD input and change
from the Amplifier Component menu to the CD player Component Menu. These
buttons can be recognised by the icon corresponding to the Component Menu.
NOTE: You can set up and customise the NAD S70 to suit your particular NAD
system. Refer to chapter "Set-up of the NAD S70 Remote Control".
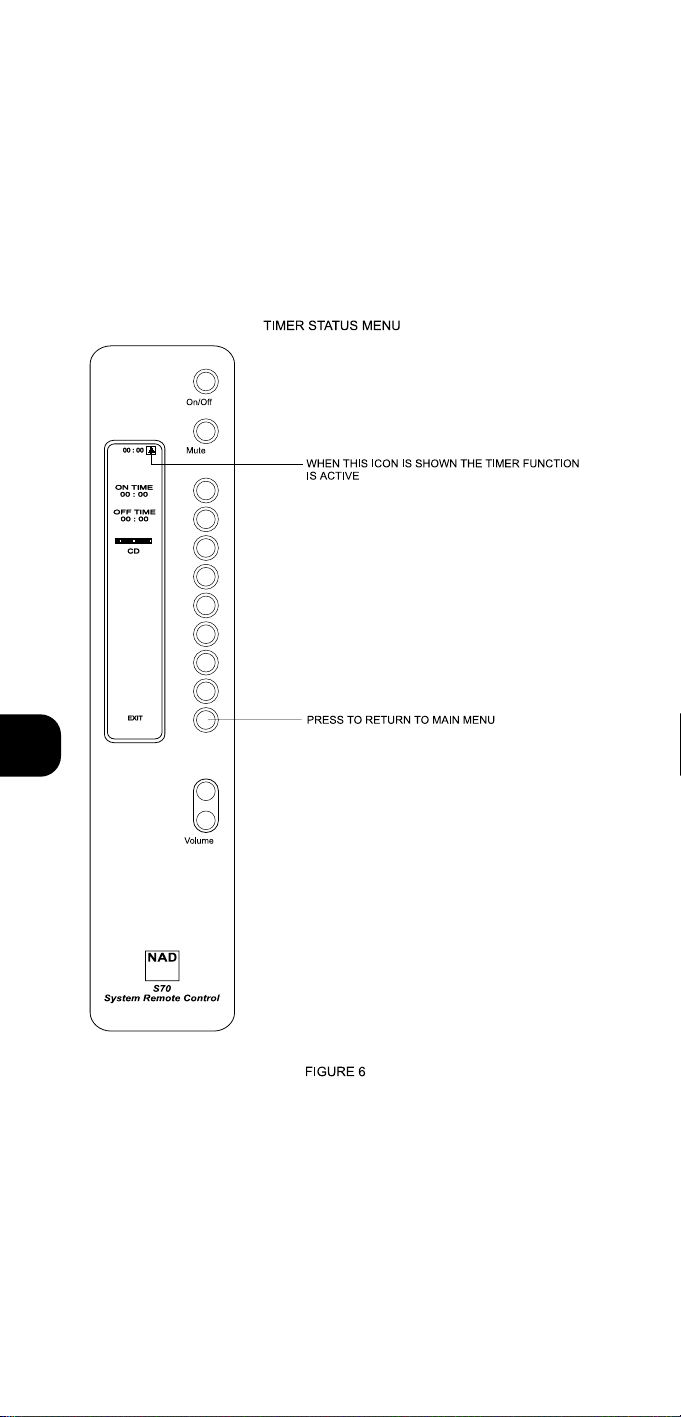
Main Menu: Viewing Timer status
The S70 can be used to turn your system on and off at specific times with the
Timer function. To set, activate or de-activate the Timer function, refer to chapter
"Setting and activating the Timer".
You can view the Timer status and engage from the Main Menu:
• Select Main Menu by pressing "EXIT" in any of the other menus.
• Press the button next to "TIMER" once. The display will now show the On
Time and Off Time and which component was selected. The symbol on
the right of the clock in the top of the display indicates that Timer function is
activated. Refer also to Figure No. 6.
• Press the button next to "EXIT" to return to Main Menu.
NOTE: The Timer function in the Main Menu is available only if both Clock and
Timer functions have been selected (indicated by tick-mark) in the System Set-up
Menu. Refer to chapter "Set-up of the S70 Remote Control" for information on
activating and setting the clock.
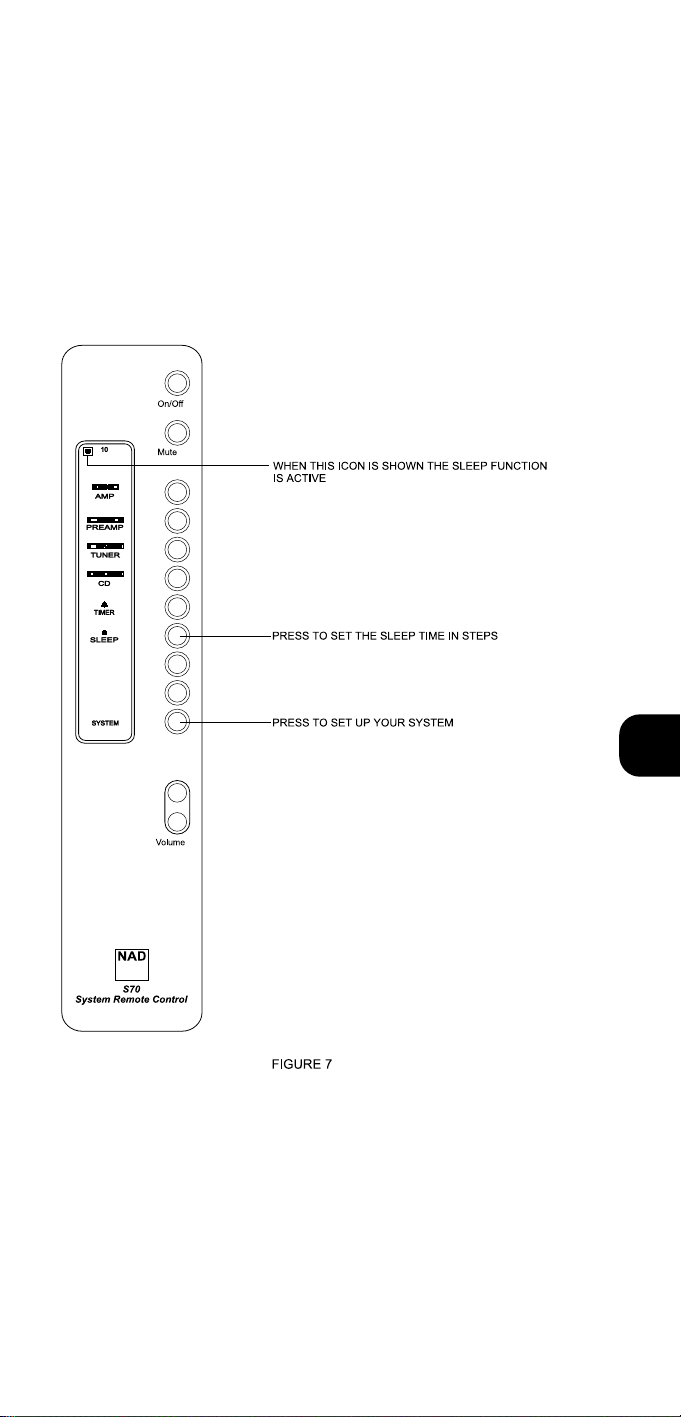
Main Menu: Activating & viewing Sleep Timer status
With the Sleep Timer function you can set the S70 to automatically switch off
your system after a preset number of minutes to Standby mode (provided all
components were in Operation mode, not in Stand-by mode).
• To activate the Sleep Timer function, press the button next to "SLEEP". The
clock in the display changes to show the time set for the Sleep Timer
Function. It is now activated and set for 10 minutes. The symbol on the
left of the clock in the top of the display indicates that the Sleep Timer
function is now activated, regardless of whichever Menu was selected. Refer
also to figure No. 7.
• Each consecutive press will advance the sleep time in 10 minutes increments,
up to 90 minutes.
• To cancel the Sleep mode, continue pressing the SLEEP button until "OFF"
appears in the display.
NOTES: Make sure that the S70 is located well within range of all components,
otherwise the Sleep Timer function will function erratically or not at all.
The Sleep function is available only if Clock function has been selected (indicated
by tick-mark) in the System Set-up Menu. Refer to chapter "Set-up of the S70
Remote Control" above for information on activating and setting the clock.
14
GB
Page 15

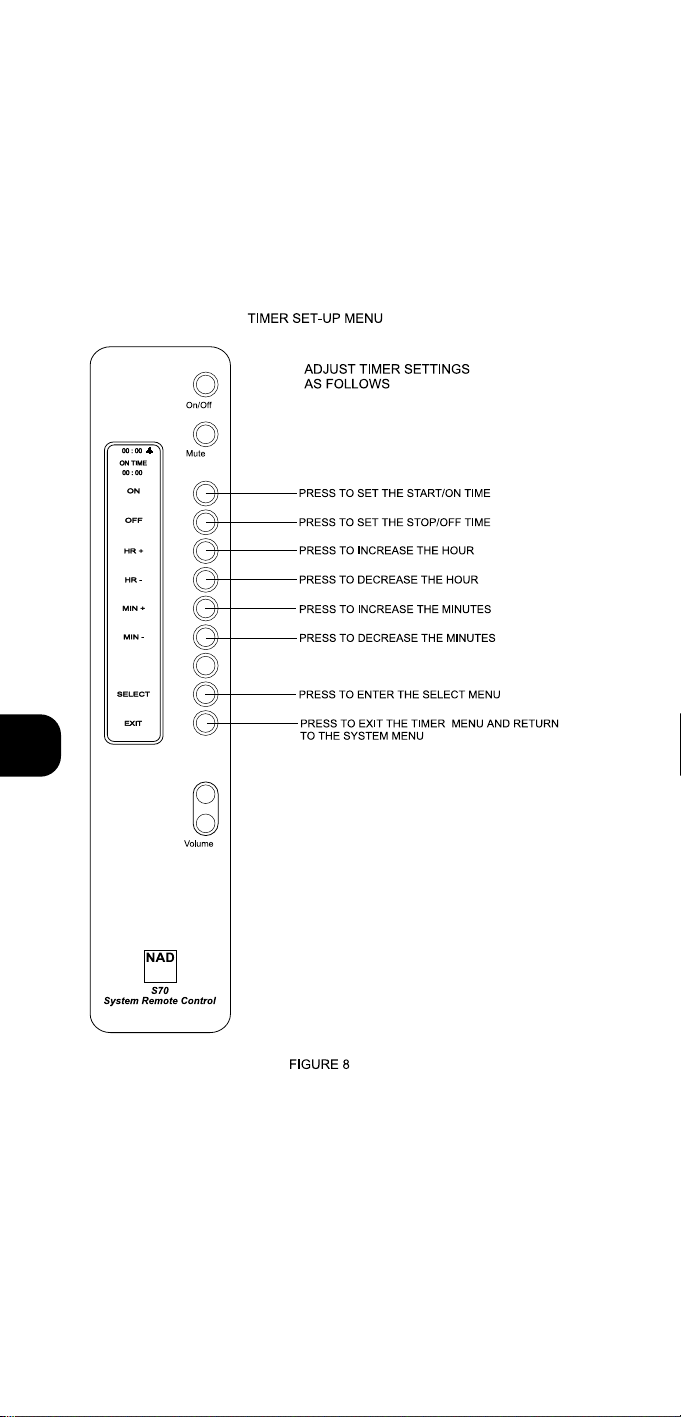
SETTING AND ACTIVATING THE TIMER FUNCTION
The S70 can be used to turn your system on and off at specific times with the
Timer function. This way, you can use your system as an alarm clock, for instance.
Before the Timer function can be set, it needs to be activated:
• From the Main Menu, press the button next to "SYSTEM".
• In the System Set-up Menu, press the button next to "TIMER"; a tick mark will
appear to indicate that the Timer Function has been activated. In all Menus,
the symbol on the right of the clock in the top of the display indicates that
Timer function is activated.
To de-activate, press button again so that tick mark disappears.
• Press the button next to "EXIT" to return to Main Menu.
To set the timer:
• From the Main Menu, press the button next to "SYSTEM".
• In the System Set-up Menu, press the button next to "TIMER" for 2 seconds.
• In the Timer Set-up Menu, press the button next to "ON" to set the time you
want the system to switch on. Use the 24-hour format to enter the correct time
(for example, 2:15PM would be 14:15) by pressing the buttons next to "HR+"
(to adjust hours upwards), "HR-" (adjust hours downwards), "MIN +" (adjust
minutes upwards), "MIN -" (adjust minutes downwards). Refer also to figure
No.8.
• Press the button next to "OFF" to set the time to switch the system off, using
the time adjustment buttons as described above.
• Press the button next to "EXIT" to return to System Set-up Menu.
• Press the button next to "EXIT" to return to Main Menu
• You can check the Timer setting and status from the Main Menu, refer to
chapter "Using the NAD S70 System Remote Control", section "Main Menu:
Viewing Timer status".
NOTES: Make sure that the S70 is located well within range of all components,
otherwise the Timer function will function erratically or not at all.
The Timer function is available only if Clock function has been selected (indicated
by tick-mark) in the System Set-up Menu. Refer to chapter "Set-up of the S70
Remote Control" above for information on activating and setting the clock.
NAD-LINK
Many NAD components feature NAD-Link. The RCA sockets on the back panel of
these components, marked "NAD-Link In" and "Out" allow for remote control
command communication between the components when connected with each
other. Connecting NAD-Link between the various components is not strictly
necessary for the S70 to work, but it will improve overall performance and
consistency for remote control commands.
Connect the "NAD-Link Out" from one component to the "NAD-Link In" on the
other component. From the latter, connect from "NAD-Link Out" to the "NADLink In" on the next component, etc., so that the entire system’s NAD Link
sockets are connected in a daisy-chained fashion, always IN to OUT and OUT to
IN. Do not connect the "NAD Link-Out" from the last component to the first
component’s "NAD-Link In" in the chain.
15
GB
Page 16

16
GB
TROUBLESHOOTING GUIDE
Remote control works
intermittently or doesn’t
work at all
• Battery flat or snap-on
connector incorrectly
attached
• IR transmitter or receiver
windows obstructed
• IR receiver on components
are in direct sun or very
bright ambient light
• Check or replace battery
• Remove obstruction
• Place unit away from
direct sun, reduce amount
of ambient light
Problem Cause Solution
Sleep Timer and Timer
functions can’t be activated
• These functions are
available only if clock is
activated
• Activate clock
Although activated, Sleep
Timer and Timer function do
not work properly or at all
• IR transmitter or receiver
windows obstructed
• IR receiver on components
are in direct sun or very
bright ambient light
• Remove obstruction
• Place unit away from
direct sun, reduce amount
of ambient light
Display is difficult to read • Too little or too much
contrast
• Battery almost flat
• Adjust display’s contrast
level
• Replace battery
Sometimes not all
components respond to
On/Off command, causing
these to be "out-of-sync" for
stand-by/operating status
• Remote control is just out
of range
• Reduce operating distance
• Connect NAD-Link
between components
Page 17

TELECOMMANDE DE SYSTEME NAD S70
Introduction . . . . . . . . . . . . . . . . . . . . . . . . . . . . . . . . . . . . . . . . . . . . . . . .18
Mise en place de la pile . . . . . . . . . . . . . . . . . . . . . . . . . . . . . . . . . . . . . . .18
Mise en service de la télécommande S70 . . . . . . . . . . . . . . . . . . . . . . . . .18
Choix des éléments de chaîne
Activation et réglage de l’horloge
Réglage du contraste de l’affichage
Utilisation de la Télécommande NAD S70 . . . . . . . . . . . . . . . . . . . . . . . .20
Marche/Arrêt
Muet et Rétro éclairage de l’affichage
Volume (Augmenter & Diminuer)
Menu Principal : Commande des éléments de la chaîne
Menu Principal : Visualisation de l’état de la Minuterie
Menu Principal : Activation et visualisation de l’Extinction Programmée
Réglage et activation de la fonction Minuterie . . . . . . . . . . . . . . . . . . . .22
Liaison NAD . . . . . . . . . . . . . . . . . . . . . . . . . . . . . . . . . . . . . . . . . . . . . . . .23
Guide de Dépannage . . . . . . . . . . . . . . . . . . . . . . . . . . . . . . . . . . . . . . . .24
17
F
Page 18

INTRODUCTION
Nous vous remercions d’avoir acheté la Télécommande de Chaîne NAD S70. Avec
la S70, vous pouvez commander tous les éléments de votre chaîne NAD Série
Silver. La S70 est facile à personnaliser en fonction des spécificités de votre propre
chaîne NAD Série Silver ; de plus, elle est dotée de fonctionnalités
supplémentaires comme une horloge, une extinction programmée et une
minuterie d’extinction / allumage.
Bien que la S70 ait avant tout été conçue en tant que complément pour les
chaînes NAD Série Silver, elle fonctionnera aussi avec la plupart des produits NAD
télécommandés de la Série C.
Afin de garantir la longévité et la fiabilité de la télécommande, évitez de l’exposer
aux chocs ou à l’humidité. Si de l’eau pénètre dans le boîtier de la télécommande,
retirez la pile suivant les instructions données dans ce manuel, puis faites contrôler
la télécommande par un technicien de service après vente qualifié avant de tenter
de l’utiliser à nouveau. Pour nettoyer le boîtier de la télécommande, utilisez un
chiffon doux et sec. Si nécessaire, humectez le chiffon avec de l’eau savonneuse.
N’utilisez pas des solutions contenant du benzol ou tout autre agent volatile.
Munie d’une pile neuve, la NAD S70 fonctionnera jusqu’à une distance de 7
mètres et à un angle de 45° de part et d’autre de l’axe perpendiculaire aux faces
parlantes de votre chaîne NAD Série Silver. Veillez à ce qu’il y ait un espace
dégagé entre les éléments de votre chaîne et la fenêtre à l’avant de la S70. Notez
qu’un éclairage puissant ou une exposition directe aux rayons du soleil peuvent
diminuer la portée de la S70.
MISE EN PLACE DE LA PILE
Il est recommandé d’utiliser des piles alcalines pour une longévité maximale. Une
pile de 9 V (PP-3) doit être insérée dans le compartiment à l’arrière du combiné de
télécommande.
• A l’aide d’un tournevis cruciforme, retirez avec précaution la vis du couvercle
du compartiment de la pile.
• Soulevez légèrement l’arrière du couvercle puis glissez le couvercle vers l’arrière
de manière à le dégager du boîtier de la S70.
• Si vous remplacez la pile, débranchez le connecteur à pressions de l’ancienne
pile. Faites attention de ne pas étirer les câbles du connecteur.
• Branchez le connecteur à pressions sur la nouvelle pile ; veillez à ce que
l’orientation soit correcte et à ce que les fils ne sont pas coincés sur ou sous la
pile lorsque vous insérez cette dernière dans le boîtier de la télécommande.
• Glissez le couvercle de la pile pour la remettre en place, puis revissez la vis
pour l’y maintenir. La vis doit entrer facilement dans le filetage du trou. Ne
forcez pas pour remplacer la vis, car vous risqueriez d’endommager le filetage
du boîtier.
La faible consommation et les fonctionnalités d’économie d’énergie de la S70
permettent à la pile de durer longtemps. Dès que vous remarquerez que la portée
de la S70 diminue, cela voudra peut-être dire qu’il est temps de remplacer la pile.
NOTA: Faites attention de ne pas perdre la vis du compartiment de la batterie. Si
vous perdez la vis d’origine, remplacez la par une vis identique (pas métrique, 2
mm, longueur 8 à 10 mm). Si vous utilisez une vis qui n’est pas du bon type, cela
endommagera définitivement le boîtier de la télécommande.
MISE EN SERVICE DE LA TÉLÉCOMMANDE S70
Choix des éléments de chaîne
La télécommande NAD S70 est personnalisable en fonction de votre propre
chaîne NAD Série Silver, car vous pouvez sélectionner uniquement les éléments
présents dans votre chaîne.
18
F
Page 19

La NAD S70 est une télécommande “à menus”, sur laquelle beaucoup des boutons
ont des fonctions différentes suivant le menu sélectionné. L’affichage à côté de ces
boutons indique les fonctions disponibles. En fonctionnement normal, le Menu
Principal est le point de départ. La Figure N° 1 montre l’organisation des menus.
Appuyez sur n’importe quel bouton (autre que Volume Augmenter/Diminuer
[Volume Up/Down]) pour activer l’affichage. Sur le Menu Principal, chaque
catégorie d’élément de la Série Silver est représentée par sa propre icône.
Reportez-vous à la Figure N° 2 (Menu principal).
Pour configurer la S70 pour votre système :
• A partir du Menu Principal de la télécommande, appuyez sur le bouton en
face du mot “CHAINE” [“SYSTEM”] de l’affichage.
• L’affichage passera au menu de Configuration de la Chaîne [System Set-Up].
Reportez-vous aussi à la Figure N° 3.
• L’affichage montrera plusieurs éléments, comme “AMPLI”, “PREAMPLI”,
“TUNER”, “CD” avec les icônes correspondantes. En appuyant sur le bouton à
côté de l’élément, vous pouvez sélectionner ou désélectionner un élément à
inclure dans le Menu Principal. Lorsque l’emplacement à côté de l’élément
concerné est coché, cela indique qu’il a été sélectionné. Par exemple, si votre
chaîne comporte le préamplificateur NAD S100, le tuner S400 et le lecteur de
CD S500, veillez à ce que les cases du préampli, du tuner et du lecteur de CD
soient cochées, mais pas les autres.
• Appuyez sur le bouton en face du mot “QUITTER” [“EXIT”], dans la partie
inférieure de l’affichage, pour quitter le menu de configuration et revenir au
Menu Principal.
NOTA: Si votre élément NAD Série Silver ne figure pas sur le menu de
Configuration du Système, votre S70 pourra être mis à jour dans de nombreux
cas. Consultez votre revendeur NAD.
Activation et réglage de l’horloge
La Télécommande S70 a une horloge intégrée, qui vous apporte d’autres
fonctionnalités comme par exemple une Extinction Programmée [Sleep Timer] et
une Minuterie [Timer]. Pour que ces fonctionnalités soient actives, vous devez
d’abord activer et régler l’horloge :
• A partir du Menu Principal, appuyez sur le bouton à côté du mot “SYSTEME”
[“SYSTEM”].
• Sur le Menu de Configuration Système, activez l’horloge en appuyant sur le
bouton à côté du mot “HORLOGE” [“CLOCK”]; l’emplacement correspondant
est coché pour indiquer que l’horloge a été activée.
• Appuyez sur le bouton à côté du mot “HORLOGE” [“CLOCK”] pendant 2
secondes.
• Le Menu de Configuration de l’Horloge permet de régler l’horloge. Utilisez le
format 24 heures pour entrer l’heure (par exemple, 14:15 pour deux heures et
quart de l’après midi), en appuyant sur les boutons à côté de “HR +”
(augmenter l’heure), “HR -” (diminuer l’heure), “MIN +” (augmenter les
minutes) et/ou “MIN -” (diminuer les minutes). Reportez-vous aussi à la Figure
N° 4.
• Appuyez sur le bouton à côté du mot “QUITTER” [“EXIT”] pour revenir au
Menu de Configuration Système.
• Appuyez sur le bouton à côté du mot “QUITTER” [“EXIT”] pour revenir au
Menu Principal.
NOTA: Si vous décidez de désélectionner l’horloge (option non cochée) sur le
Menu de Configuration Système, il sera nécessaire de régler l’horloge à nouveau
la prochaine fois que vous la sélectionnerez.
19
F
Page 20

Réglage du contraste de l’affichage
Il est possible de régler le contraste de la NAD S70 afin d’optimiser la lisibilité
pour des angles de vision très larges. Le réglage d’origine conviendra presque
toujours mais, dans des circonstances exceptionnelles ou si la pile est très faible, il
peut être utile de régler le contraste.
• A partir du Menu Principal, appuyez sur le bouton à côté du mot “SYSTEME”
[“SYSTEM”].
• Appuyez sur le bouton à côté de l’icône “>” pour augmenter le contraste, ou
sur le bouton à côté de l’icône “<” pour diminuer le contraste.
• Une fois que le contraste idéal aura été trouvé, appuyez sur le bouton à côté
du mot “QUITTER” [“EXIT”] pour revenir au Menu Principal.
UTILISATION DE LA TÉLÉCOMMANDE NAD S70
La NAD S70 est une télécommande “à menus”, sur laquelle beaucoup des
boutons ont des fonctions différentes suivant le menu sélectionné. L’affichage à
côté des ces boutons indique les fonctions disponibles. En fonctionnement
normal, le Menu Principal est le point de départ. La Figure N° 1 montre
l’organisation des menus.
Les boutons de Commande de Volume, de Marche/Arrêt [On/Off] et de la
fonction Muet [Mute] assurent toujours la même fonction, quel que soit le Menu
affiché.
L’affichage s’éteint toujours 25 secondes après la dernière impulsion sur un
bouton, afin de prolonger la durée de vie des piles. Pour réactiver l’affichage, il
suffit d’appuyer sur n’importe quel bouton autre que les boutons de commande
du volume.
Marche/Arrêt [On/Off]
Appuyez sur ce bouton pour mettre les différents éléments de votre chaîne en
Marche ou en mode Veille.
Ce bouton fonctionne comme un sélecteur à bascule, chaque impulsion ayant
pour effet de passer d’un état à l’autre (de Marche à Veille ou inversement), il
serait utile que vous commenciez par mettre tous les éléments de votre chaîne en
mode Marche, de manière à ce que chaque impulsion sur le bouton Marche/Arrêt
de la S70 ait un effet synchronisé sur tous les éléments : Appuyez donc sur le
bouton d’alimentation sur la face parlante de chaque élément télécommandé Série
Silver de manière à ce que tous soient allumés et opérationnels. Si vous reliez tous
les éléments avec la liaison NAD [NAD Link], ils resteront tous synchronisés, même
si l’un des éléments est hors de portée de la télécommande S70. Reportez-vous
aussi au chapitre concernant la Liaison NAD ci-dessous. La fonction Marche/Arrêt
est toujours disponible quel que soit le Menu affiché sur la S70.
Muet [Mute] et Rétro éclairage de l’affichage
Appuyez sur le bouton Muet [Mute] pour couper provisoirement le son de
l’amplificateur ou du préamplificateur. Appuyez à nouveau sur le bouton Muet
pour rétablir le son.
Le bouton Muet [Mute] sert aussi à allumer le rétro éclairage de l’affichage de
manière à permettre une utilisation aisée de la S70 dans une ambiance nonéclairée. Appuyez sur le bouton Muet pendant 2 secondes pour allumer le rétro
éclairage. L’éclairage s’éteint automatiquement après 15 secondes afin
d’économiser les piles. Les fonctions Muet et Rétro éclairage sont toujours
disponibles, quel que soit le Menu affiché sur la S70.
20
F
Page 21

Volume (Augmenter & Diminuer)
Appuyer sur le bouton inférieur pour diminuer le volume sonore, ou sur le bouton
supérieur pour l’augmenter. L’utilisation des boutons de volume n’active pas
l’affichage. La fonction Volume est toujours disponible, quel que soit le Menu
affiché sur la S70.
Menu Principal : Commande des éléments de la chaîne
Les autres fonctions disponibles sur la S70 dépendent du Menu sélectionné. A
partir du Menu Principal [Main Menu] (figure N° 2), vous pouvez choisir l’élément
que vous voulez commander, par exemple l’amplificateur, le tuner, le lecteur CD,
etc ... La S70 est fournie d’origine avec un choix de menus de différents éléments
de chaîne, par exemple l’élément amplificateur, l’élément tuner, l’élément lecteur
CD, etc .... Les commandes disponibles sur ces Menus d’Eléments correspondent
à celles disponibles sur la face parlante ou sur la télécommande d’origine de
l’élément concerné.
• Sélectionnez le Menu Principal [Main Menu] en appuyant sur le bouton à côté
du mot “QUITTER” [“EXIT”], à partir de n’importe quel autre menu.
• A partir du Menu Principal, appuyez sur le bouton à côté de l’élément affiché
que vous souhaitez commander, par exemple “AMPLI”.
• Le Menu Elément approprié et son icône apparaissent dans la partie supérieure
de l’affichage, en l’occurrence le Menu “AMP” dans le cas de notre exemple,
et toutes les fonctions disponibles s’affichent. Appuyez sur le bouton à côté de
la fonction souhaitée, indiquée sur l’affichage. Reportez-vous aussi à la Figure
N° 5.
• Appuyez à nouveau sur le bouton à côté du mot “QUITTER” [“EXIT”] pour
revenir au Menu Principal pour sélectionner un autre élément à commander.
Sur certains Menus Eléments, le choix d’une fonction donnée vous amène à un
autre Menu Elément. A titre d’exemple, le fait d’appuyer sur le bouton CD du Menu
Elément Amplificateur commute l’entrée de l’amplificateur sur l’entrée CD puis
passe du Menu Elément Amplificateur au Menu Elément Lecteur CD. Ces boutons
sont reconnaissables grâce à l’icône correspondant au Menu Elément concerné.
NOTA: Vous pouvez configurer et personnaliser la NAD S70 pour qu’elle
corresponde a votre propre chaîne NAD. Reportez-vous au chapitre “Mise en
service de la Télécommande S70”.
Menu Principal : Visualisation de l’état de la Minuterie
Vous pouvez utiliser la S70 pour allumer et éteindre votre chaîne a des heures
précises, grâce à la fonction Minuterie. Pour régler, activer ou désactiver la fonction
Minuterie, reportez-vous au chapitre “Réglage et activation de la Minuterie”.
Vous pouvez visualiser l’état de la Minuterie et l’activer à partir du Menu Principal:
• Sélectionnez le Menu Principal [Main Menu] en appuyant sur “QUITTER”
[“EXIT”] à partir de n’importe quel autre menu.
• Appuyez une fois sur le bouton à côté du mot “MINUTERIE” [“TIMER”].
L’affichage indique maintenant l’Heure de Mise en Marche [On Time] et l’heure
d’Arrêt [Off Time], ainsi que l’élément sélectionné. Le symbole à droite de
l’horloge, dans la partie supérieure de l’affichage, indique que la fonction
Minuterie est active. Reportez-vous aussi à la Figure N° 6.
• Appuyez sur le bouton à côté du mot “QUITTER” [“EXIT”] pour revenir au
Menu Principal.
NOTA: La fonction Minuterie sur le Menu Principal n’est accessible que si les
fonctions Horloge [Clock] et Minuterie [Timer] ont été sélectionnées (cochées) sur
le Menu de Configuration Système. Reportez-vous au chapitre “Mise en service
de la Télécommande S70” ci-dessus, pour des informations concernant
l’activation et le réglage de l’horloge.
21
F
Page 22

Menu Principal : Activation et visualisation de l’Extinction
Programmée [Sleep Timer]
Grâce à la fonction d’Extinction Programmée [Sleep Timer], vous pouvez régler la
S70 pour commuter automatiquement votre chaîne en mode Veille après un
nombre préréglé de minutes (à condition que tous les éléments soient en mode
Marche et non en mode Veille).
• Pour activer la fonction d’Extinction Programmée [Sleep Timer], appuyez sur le
bouton à côté du mot “EXTINCTION” [“SLEEP”]. L’horloge de l’affichage
change pour indiquer l’heure réglée pour la fonction Extinction Programmée.
La fonction est maintenant activée et réglée pour un délai de 10 minutes. Le
symbole à gauche de l’horloge dans la partie supérieure de l’affichage
indique que la fonction Extinction Programmée est maintenant activée, quel
que soit le Menu sélectionné. Reportez-vous aussi à la Figure N° 7.
• Chaque impulsion successive sur le bouton fait avancer le délai d’extinction de
10 minutes, jusqu’à 90 minutes au maximum.
• Pour annuler le mode d’Extinction Programmée, continuez à appuyer sur le
bouton “EXTINCTION” [“SLEEP”] jusqu’à ce que le mot “INACTIF” [“OFF”]
soit affiché.
NOTES: Veillez à ce que la S70 soit située bien à portée de tous les éléments de
la chaîne, sinon la fonction Extinction Programmée fonctionnera de façon
imprévisible ou ne fonctionnera pas du tout.
La fonction Veille n’est accessible que si la fonction Horloge [Clock] a été
sélectionnée (option cochée) sur le Menu de Configuration Système. Reportezvous au chapitre “Mise en service de la Télécommande S70” ci-dessus, pour de
plus amples informations concernant l’activation et le réglage de l’horloge.
RÉGLAGE ET ACTIVATION DE LA FONCTION MINUTERIE
Vous pouvez utiliser la S70 pour allumer et éteindre votre chaîne à des heures
précises, grâce à la fonction Minuterie. Cela veut dire que vous pouvez, par
exemple, utiliser votre chaîne comme un réveil. Avant de pouvoir régler la
fonction Minuterie, il faut d’abord l’activer:
• A partir du Menu Principal, appuyez sur le bouton à côté du mot “SYSTEME”
[“SYSTEM”].
• Sur le Menu de Configuration Système, appuyez sur le bouton à côté du mot
“TIMER”; l’option correspondante sera cochée pour indiquer que la Fonction
Minuterie a été activée. Sur tous les Menus, le symbole à droite de
l’horloge, dans la partie supérieure de l’affichage, indique que la fonction
Minuterie a été activée. Pour la désactiver, appuyez à nouveau sur le bouton
de manière à ce que l’option ne soit plus cochée.
• Appuyez sur le bouton à côté du mot “QUITTER” [“EXIT”] pour revenir au
Menu Principal.
22
F
Page 23

23
F
Pour régler la Minuterie :
• A partir du Menu Principal, appuyez sur le bouton à côté du mot “SYSTEME”
[“SYSTEM”].
• Sur le Menu de Configuration Système, appuyez sur le bouton à côté du mot
“TIMER” pendant 2 secondes.
• Sur le Menu de Configuration Minuterie, appuyez sur le bouton à côté du mot
“MARCHE” [“ON”] pour régler l’heure à laquelle vous souhaitez que la chaîne
se mette en marche. Utilisez le format 24 heures pour entrer l’heure (par
exemple, 14:15 pour deux heures et quart de l’après midi), en appuyant sur
les boutons à côté de “HR +” (augmenter l’heure), “HR -” (diminuer l’heure),
“MIN +” (augmenter les minutes) et/ou “MIN -” (diminuer les minutes).
Reportez-vous aussi à la Figure N° 8.
• Appuyez sur le bouton à côté du mot “ARRET” [“OFF”] pour régler l’heure à
laquelle vous souhaitez que la chaîne s’éteigne, en vous servant des boutons
de réglage de l’heure comme indiqué ci-dessus.
• Appuyez sur le bouton à côté du mot “QUITTER” [“EXIT”] pour revenir au
Menu de Configuration Système.
• Appuyez sur le bouton à côté du mot “QUITTER” [“EXIT”] pour revenir au
Menu Principal.
• Vous pouvez vérifier le réglage et l’état de la Minuterie à partir du Menu
Principal. Reportez-vous au chapitre “Utilisation de la Télécommande NAD
S70”, section “Menu Principal : Visualisation de l’état de la Minuterie”.
NOTES: Vérifiez que la S70 est bien située dans la portée de tous les éléments de
la chaîne, sinon la fonction Minuterie fonctionnera de façon imprévisible ou ne
fonctionnera pas du tout.
La fonction Minuterie n’est disponible que si la fonction Horloge a été
sélectionnée (option cochée) sur le Menu de Configuration Système. Reportezvous au chapitre “Mise en service de la Télécommande S70” ci-dessus, pour de
plus amples informations concernant l’activation et le réglage de l’horloge.
LIAISON NAD
De nombreux éléments de chaînes NAD comportent la fonctionnalité Liaison NAD
[NAD-Link]. Les connecteurs RCA sur le panneau arrière de ces éléments, repérés
“Entrée” et “Sortie Liaison NAD” [“NAD-Link In” et “Out”], permettent de
relayer les télécommandes entre les différents éléments reliés ensemble.
Il n’est pas absolument nécessaire de relier les différents éléments via les Liaisons
NAD pour permettre à la S70 de fonctionner, mais les performances globales et
l’homogénéité des télécommandes seront améliorées si vous le faites.
Reliez la “Sortie Liaison NAD” [“NAD-Link Out”] d’un élément de la chaîne à
l’”Entrée Liaison NAD” [“NAD-Link In”] d’un autre. Reliez ensuite la “Sortie
Liaison NAD” [“NAD-Link Out”] de ce deuxième élément à l’”Entrée Liaison
NAD” [“NAD-Link In”] de l’élément suivant, et ainsi de suite, afin de relier en
chaîne tous les connecteurs de Liaison NAD de l’ensemble de la chaîne. Reliez
toujours une ENTREE [IN] à une SORTIE [OUT] et une SORTIE [OUT] à une ENTREE
[IN]. Ne reliez pas la “Sortie Liaison NAD” [“NAD-Link Out”] du dernier élément
de la chaîne à l’”Entrée Liaison NAD” [“NAD-Link In”] du premier.
Page 24

24
F
GUIDE DE DÉPANNAGE
La télécommande
fonctionne de façon
intermittente ou ne
fonctionne pas du tout
• La pile est à plat ou le
connecteur à pressions est
mal branché
• La Fenêtre de l’émetteur
et/ou du récepteur IR est
obstruée
• Le récepteur IR des
éléments de chaîne est
exposé directement au
soleil ou à un éclairage
puissant
• Vérifiez ou remplacez la
pile
• Eliminez l’obstruction
• Eloignez l’élément des
rayons du soleil, réduisez
la puissance de la lumière
ambiante
Problème Cause Solution
Il est impossible d’activer les
fonctions Extinction
Programmée et Minuterie
• Ces fonctions ne sont
disponibles que si
l’horloge est activée
• Activez l’horloge
Lorsqu’elles sont activées, les
fonctions Extinction
Programmée et Minuterie
fonctionnent mal ou ne
fonctionnent pas du tout
• La Fenêtre de l’émetteur
et/ou du récepteur IR est
obstruée
• Le récepteur IR des
éléments de chaîne est
exposé directement au
soleil ou à un éclairage
puissant
• Eliminez l’obstruction
• Eloignez l’élément des
rayons du soleil, réduisez
la puissance de la lumière
ambiante
Il arrive que la commande
de Marche/Arrêt n’agisse pas
sur tous les éléments de la
chaîne, ce qui entraîne une
“désynchronisation” des
états veille/marche
• La télécommande
légèrement hors de
portée
• Rapprochez la
télécommande de la
chaîne
• Reliez les éléments de la
chaîne par la Liaison NAD
L’affichage est difficile à lire • Trop ou pas assez de
contraste
• La pile est presque à plat
• Réglez le contraste de
l’affichage
• Remplacez la pile
Page 25

NAD S70 SYSTEMFERNBEDIENUNG
Vorbemerkungen . . . . . . . . . . . . . . . . . . . . . . . . . . . . . . . . . . . . . . . . . . . .26
Einlegen der Batterie . . . . . . . . . . . . . . . . . . . . . . . . . . . . . . . . . . . . . . . . .26
Einstellen der NAD S70 Fernbedienung . . . . . . . . . . . . . . . . . . . . . . . . . .26
Auswahl der Komponenten
Aktivieren und Einstellen der Uhr
Einstellen des Display-Kontrastes
Verwenden der NAD S70 Fernbedienung . . . . . . . . . . . . . . . . . . . . . . . .28
“On/Off”
“Mute” & Display-Hintergrundbeleuchtung
“Volume” (höher & geringer)
Hauptmenü: Bedienen von Komponenten im System
Hauptmenü: Anzeigen des Timer-Status
Hauptmenü: Aktivieren und Anzeigen des Sleep-Timer-Status
Einstellen und Aktivieren der Timer-Funktion . . . . . . . . . . . . . . . . . . . . .30
NAD-Link . . . . . . . . . . . . . . . . . . . . . . . . . . . . . . . . . . . . . . . . . . . . . . . . . .31
Hilfestellung zur Problemlösung . . . . . . . . . . . . . . . . . . . . . . . . . . . . . . .32
25
D
Page 26

VORBEMERKUNGEN
Vielen Dank für den Kauf der NAD S70 Systemfernbedienung. Mit der S70
können Sie alle Systemkomponenten der NAD Silver Serie bedienen. Die S70 kann
einfach an individuelle NAD Silver Series Systeme angepasst werden und
zusätzliche Funktionen wie Uhr, Sleep- und Ein-/Aus-Timer.
Obwohl die S70 in erster Linie für die NAD Silver Series gebaut worden ist, kann
sie natürlich auch mit den meisten fernbedienbaren Geräten der NAD C-Serie
eingesetzt werden.
Um einen langen und problemlosen Betrieb zu gewährleisten, die Fernbedienung
von Erschütterungen und Wasser fernhalten. Sollte Wasser in die Fernbedienung
eindringen, die Batterien gemäß den Hinweisen in dieser Anleitung
herausnehmen und die Fernbedienung vor der erneuten Verwendung von einem
qualifizierten Servicetechniker untersuchen lassen. Reinigen Sie das Gehäuse der
Fernbedienung mit einem trockenen weichen Tuch. Befeuchten Sie das Tuch bei
Bedarf leicht mit etwas Seifenwasser. Verwenden Sie keine Lösungsmittel, die
Benzol oder andere Verdunstungsmittel enthalten.
Mit einer frischen Batterie arbeitet die NAD S70 bis zu einer Entfernung von 7 m
und in einem Winkel von 45° zu beiden Seiten einer geraden Linie von den
Frontplatten der NAD Silver Series Systemkomponenten. Es muss eine klare
Sichtverbindung zwischen den Systemkomponenten und dem Fenster vorne an
der S70 bestehen. Beachten Sie, dass helle Beleuchtung und direkte
Sonneneinstrahlung die Reichweite der S70 beeinträchtigen können.
EINLEGEN DER BATTERIE
Für eine maximale Betriebsdauer werden Alkaline-Batterien empfohlen. Eine 9-VBlockbatterie (PP-3) muss in das Batteriefach die auf der Rückseite der
Fernbedienung eingelegt werden.
• Die Schraube am Batteriefachdeckel vorsichtig mit einem
Kreuzschlitzschraubendreher lösen.
• Deckel leicht anheben und nach hinten schieben, bis er vom Gehäuse der S70
abgenommen werden kann.
• Soll die alte Batterie ersetzt werden, die alte Batterie vom Batterieclip
abnehmen. Nicht an den Anschlussdrähten ziehen.
• Den Batterieclip mit richtiger Polung auf die neue Batterie stecken und beim
Einlegen der Batterie in das Batteriefach darauf achten, dass die
Anschlussdrähte nicht gequetscht oder eingeklemmt werden.
• Batteriefachdeckel wieder einschieben und mit der Schraube befestigen. Die
Schraube sollte leicht in das Gewinde und nicht mit Gewalt eingedreht
werden. Sie könnten sonst das Gewinde im Gehäuse der S70 beschädigen.
Der niedrige Stromverbrauch und die Energiesparfunktionen der S70 sorgen
dafür, dass Batterien sehr lange halten. Wenn Sie bemerken, dass die Reichweite
der S70 nachlässt, müssen Sie vielleicht die Batterie ersetzen.
HINWEIS: Achten Sie darauf, dass Sie die Schraube für den Batteriefachdeckel nicht
verlieren. Eine verlorene Originalschraube darf nur mit einer Schraube des exakt
gleichen Typs ersetzt werden (metrisch, 2 mm, 8 bis 10 mm lang). Eine falsche
Schraube kann das Gehäuse der S70-Fernbedienung dauerhaft beschädigen.
EINSTELLEN DER S70 FERNBEDIENUNG
Auswahl der Komponenten
Die NAD S70 Fernbedienung kann durch Auswahl der vorhandenen Komponenten
einfach an individuelle NAD Silver Series Systeme angepasst werden.
26
D
Page 27

Die NAD S70 ist eine “menügesteuerte” Fernbedienung. Das bedeutet, viele
Tasten haben je nach aktivem Menü verschiedene Funktionen. Im Display neben
diesen Tasten werden die verfügbaren Funktionen angezeigt. Im normalen Betrieb
ist das Hauptmenü der Ausgangspunkt. Abb. 1 veranschaulicht die Menüstruktur.
Drücken Sie zur Aktivierung des Displays eine beliebige Taste (außer “Volume
höher/geringer”). Im Hauptmenü wird jede Silver Series Komponentenkategorie
von einem eigenen Symbol dargestellt. Siehe Abbildung 2.
So stellen Sie die S70 für Ihr System ein:
• Drücken Sie bei aktivem Hauptmenü der Fernbedienung die Taste neben der
Displayanzeige “SYSTEM”.
• Im Display erscheint das Menü “System Set-up”. Siehe auch Abbildung 3.
• Im Display werden mehrere Komponenten mit den jeweiligen Symbolen
angezeigt wie “AMP”, “PREAMP”, “TUNER” oder “CD”. Durch Drücken der
Taste neben der Komponente können Sie eine Komponente für das
Hauptmenü aktivieren oder deaktivieren. Aktive Komponenten sind durch ein
Häkchen gekennzeichnet. Wenn Ihr HiFi-System z. B. aus einem NAD S100
Vorverstärker, S400 Tuner und einem S500 CD-Player besteht, aktivieren Sie
die Kästchen für Vorverstärker, Tuner und CD-Player und die anderen nicht.
• Drücken Sie die Taste unten neben “EXIT”, um die Einstellungen zu speichern
und zum Hauptmenü zurückzukehren.
HINWEIS: Falls Ihre NAD Silver Series Komponente im Menü “System Set-up”
nicht verfügbar ist, kann die S70 in vielen Fällen aktualisiert werden. Wenden Sie
sich an Ihren NAD-Händler.
Aktivieren und Einstellen der Uhr
In der S70 Fernbedienung ist auch eine Uhr eingebaut, die Ihnen zusätzliche
Funktionen wie Sleep- und Ein-/Aus-Timer bietet. Damit diese Funktionen
einsetzbar sind, muss die Uhr aktiviert und eingestellt werden:
• Drücken Sie im Hauptmenü die Taste neben “SYSTEM”.
• Aktivieren Sie im Menü “System Set-up” die Uhr durch Drücken der Taste
neben “CLOCK”. Zur Anzeige, dass die Uhr aktiviert ist, erscheint ein Häkchen.
• Drücken Sie 2 Sekunden lang die Taste neben “CLOCK”.
• Im Menü “Clock Set-up” können Sie die Uhr stellen. Geben Sie die aktuelle
Zeit im 24-Stunden-Format ein. Verwenden Sie dazu die Tasten neben “HR+”
(Stunden erhöhen), “HR-” (Stunden verringern), “MIN +” (Minuten erhöhen),
“MIN -” (Minuten verringern). Siehe auch Abbildung 4.
• Drücken Sie die Taste neben “EXIT”, um zum Menü “System Set-up”
zurückzukehren.
• Drücken Sie die Taste neben “EXIT”, um zum Hauptmenü zurückzukehren.
HINWEIS: Wenn Sie die Uhr im Menü “System Set-up” deaktivieren (kein
Häkchen), muss die Uhr bei der nächsten Aktivierung erneut eingestellt werden.
Einstellen des Display-Kontrastes
Um die Lesbarkeit der Anzeige aus kleineren Betrachtungswinkeln zu verbessern,
kann der Display-Kontrast der NAD S70 eingestellt werden. Die Werkseinstellung
ist für die meisten Anwendungsfälle ausreichend, aber unter außergewöhnlichen
Lichtverhältnissen oder bei einer schwachen Batterie kann eine Einstellung
erforderlich werden.
• Drücken Sie im Hauptmenü die Taste neben “SYSTEM”.
• Drücken Sie die Taste neben “>”, um den Kontrast zu erhöhen, oder neben
“<”, um ihn zu verringern.
• Wenn der optimale Kontrast eingestellt ist, drücken Sie die Taste neben
“EXIT”, um zum Hauptmenü zurückzukehren.
27
D
Page 28

VERWENDEN DER NAD S70 FERNBEDIENUNG
Die NAD S70 ist eine “menügesteuerte” Fernbedienung. Das bedeutet, viele
Tasten haben je nach aktivem Menü verschiedene Funktionen. Im Display neben
diesen Tasten werden die verfügbaren Funktionen angezeigt. Im normalen Betrieb
ist das Hauptmenü der Ausgangspunkt. Abb. 1 veranschaulicht die Menüstruktur.
Die Tasten “Volume”, “Mute” und “On/Off” haben unabhängig von der
aktuellen Menüauswahl immer dieselbe Funktion.
Um die Lebensdauer der Batterie zu erhöhen, schaltet das Display 25 Sekunden
nach dem letzten Tastendruck automatisch ab. Durch Drücken einer beliebigen
Taste (außer “Volume höher/geringer”) kann das Display wieder aktiviert werden.
“On/Off”
Drücken Sie diese Taste, wenn Sie Komponenten aus dem Betriebsmodus in den
Bereitschaftsmodus und umgekehrt schalten wollen:
Da dieser Umschaltbefehl zwischen Bereitschafts- und Betriebsmodus wechselt,
können Sie damit alle Komponenten auf einmal einschalten und den Status aller
Komponenten über die Taste “On/Off” der S70 synchronisieren: Schalten Sie
durch Drücken der Taste “Power” auf der Frontplatte jeder fernbedienbaren Silver
Series Komponente alle Geräte in den Betriebsmodus. Wenn Sie die Geräte über
NAD-Link miteinander verbinden, arbeiten alle synchron, auch wenn eines der
Geräte außerhalb der Reichweite der S70 aufgestellt sein sollte. Siehe auch
Kapitel “NAD-Link” weiter unten.
Die Funktion “On/Off” ist unabhängig von der aktuellen S70-Menüauswahl
immer verfügbar.
“Mute” & Display-Hintergrundbeleuchtung
Drücken Sie die Taste “MUTE” auf der Fernbedienung, um die Klangwiedergabe
vom Verstärker oder Vorverstärker kurzzeitig abzuschalten. Drücken Sie “MUTE”
erneut, um die Wiedergabe wieder einzuschalten.
Mit der Taste “Mute” wird ebenfalls die Display-Hintergrundbeleuchtung aktiviert,
sodass die S70 bequem auch bei schwacher Umgebungsbeleuchtung verwendet
werden kann. Drücken Sie die Taste “Mute” 2 Sekunden lang um die
Hintergrundbeleuchtung zu aktivieren. Um die Batterie zu schonen, wird die
Beleuchtung nach 15 Sekunden automatisch wieder abgeschaltet.
Die Funktionen “Mute” und “Hintergrundbeleuchtung” sind unabhängig von der
aktuellen S70-Menüauswahl immer verfügbar.
“Volume” (höher & geringer)
Drücken Sie die Taste “geringer” für eine niedrigere Lautstärke, und die Taste
“höher”, wenn Sie die Lautstärke erhöhen möchten. Die Tasten “Volume”
aktivieren das Display nicht. Die Funktion “Volume” ist unabhängig von der
aktuellen S70-Menüauswahl immer verfügbar.
28
D
Page 29

Hauptmenü: Bedienen von Komponenten im System
Die anderen Funktionen der S70 sind abhängig von der aktuellen Menüauswahl.
Im Hauptmenü (“Main Menu”, Abb. 2) können Sie die Komponente auswählen,
die Sie bedienen möchten, z. B. Verstärker, Tuner, CD-Player usw. Die S70 enthält
standardmäßig eine Reihe von Komponentenmenüs wie “Amplifier Component”,
“Pre-amplifier Component”, “Tuner Component”, “CD Component” usw. Die
Befehle in diesen Komponentenmenüs entsprechen denjenigen der jeweiligen
Frontplatten oder der Original-Fernbedienungen der entsprechenden Geräte.
• Wählen Sie das Hauptmenü (“Main Menu”) durch Drücken der Taste neben
der Displayanzeige “SYSTEM” in einem der anderen Menüs.
• Drücken Sie im Hauptmenü die Taste neben der angezeigten Komponente, die
Sie bedienen möchten, z. B. “AMP”.
• Im Display oben wird das entsprechende Symbol und Komponentenmenü, in
diesem Beispiel “AMP”, mit allen verfügbaren Funktionen angezeigt. Drücken
Sie die Taste neben der im Display angezeigten und gewünschten Funktion.
Siehe auch Abb. 5.
• Drücken Sie erneut die Taste neben “EXIT”, um zum Hauptmenü
zurückzukehren, wo Sie eine andere Komponente auswählen können.
In manchen Komponentenmenüs ruft die Auswahl einer Funktion ein anderes
Komponentenmenü auf. Wenn Sie z. B. die Taste für “CD” im Menü “Amplifier
Component” drücken, wird der Verstärkereingang auf “CD” und vom Menü
“Amplifier Component” in das Menü “CD player Component” umgeschaltet.
Diese Tasten erkennen Sie an den mit den jeweiligen Komponentenmenüs
verbundenen Symbolen.
HINWEIS: Die NAD S70 kann für Ihr individuelles NAD-HiFi-System eingestellt und
angepasst werden. Siehe Kapitel “Einstellen der NAD S70 Fernbedienung”.
Hauptmenü: Anzeigen des Timer-Status
Über die Timer-Funktion der S70 kann Ihr HiFi-System zu bestimmten Zeiten einund ausgeschaltet werden. Wie Sie die Timer-Funktion einstellen, aktivieren oder
deaktivieren, finden Sie im Kapitel “Einstellen und Aktivieren der Timer-Funktion”.
Den Timer-Status können Sie im Hauptmenü anzeigen:
• Wählen Sie das Hauptmenü (“Main Menu”) durch Drücken von “EXIT” in
einem der anderen Menüs.
• Drücken Sie einmal die Taste neben “TIMER”.
Im Display werden “On Time” (“Einschaltzeit”) und “Off Time” (“Ausschaltzeit”)
und das ausgewählte Gerät angezeigt. Das Symbol rechts von der Uhr im
Display oben zeigt an, dass die Timer-Funktion aktiviert ist. Siehe auch Abb. 6.
• Drücken Sie die Taste neben “EXIT”, um zum Hauptmenü zurückzukehren.
HINWEIS: Die Timer-Funktion ist im Hauptmenü nur verfügbar, sofern die
Funktionen “Clock” und “Timer” im Menü “System Set-up” aktiviert sind
(angezeigt durch ein Häkchen). Im Kapitel “Einstellen der NAD S70
Fernbedienung” finden Sie weitere Informationen zum Aktivieren und Einstellen
der Uhr.
29
D
Page 30

Hauptmenü: Aktivieren und Anzeigen des Sleep-Timer-Status
Mit der Funktion “Sleep Timer” können Sie die S70 so programmieren, dass Ihr
System automatisch nach einer eingestellten Zeit in den Bereitschaftmodus
(“Standby”) geschaltet wird (vorausgesetzt, die Komponenten sind in Betrieb und
nicht im Bereitschaftsmodus).
• Um die Funktion “Sleep Timer” zu aktivieren, drücken Sie die Taste neben
“SLEEP”. Die Uhr im Display wechselt zur Anzeige der eingestellten Zeit für die
Sleep-Timer-Funktion. Sie ist jetzt aktiviert und auf 10 Minuten eingestellt. Das
Symbol links von der Uhr im Display oben zeigt an, dass die TimerFunktion aktiviert ist (unabhängig vom gerade ausgewählten Menü). Siehe
auch Abb. 7.
• Jeder weitere Tastendruck erhöht die Zeit bis zum Abschalten in Schritten von
10 Minuten bis zu 90 Minuten.
• Möchten Sie den Sleepmodus abbrechen, halten Sie die Taste “SLEEP” so
lange gedrückt, bis im Display “OFF” angezeigt wird.
HINWEISE: Achten Sie darauf, dass sich die S70 in ausreichender Nähe von allen
Komponenten befindet, sonst könnte die Sleep-Timer-Funktion fehlerhaft oder
überhaupt nicht funktionieren.
Damit die Sleep-Funktion verfügbar ist, darf nur die Funktion “Clock” im Menü
“System Set-up” aktiviert sein (angezeigt durch ein Häkchen). Im Kapitel
“Einstellen der NAD S70 Fernbedienung” oben finden Sie weitere Informationen
zum Aktivieren und Einstellen der Uhr.
EINSTELLEN UND AKTIVIEREN DER TIMER-FUNKTION
Über die Timer-Funktion der S70 kann Ihr HiFi-System zu bestimmten Zeiten einund ausgeschaltet werden. Auf diese Weise können Sie Ihr System z. B. als
Wecker verwenden. Bevor Sie die Timer-Funktion einstellen können, muss sie
aktiviert werden:
• Drücken Sie im Hauptmenü die Taste neben “SYSTEM”.
• Drücken Sie im Menü “System Set-up” die Taste neben “TIMER”. Zur Anzeige,
dass die Timer-Funktion aktiviert ist, erscheint ein Häkchen. In allen Menüs
zeigt das Symbol rechts von der Uhr im Display oben an, dass die TimerFunktion aktiviert ist. Zum Deaktivieren der Funktion die Taste erneut drücken;
das Häkchen wird gelöscht.
• Drücken Sie die Taste neben “EXIT”, um zum Hauptmenü zurückzukehren.
So stellen Sie den Timer ein:
• Drücken Sie im Hauptmenü die Taste neben “SYSTEM”.
• Drücken Sie im Menü “System Set-up” 2 Sekunden lang die Taste neben
“TIMER”.
• Drücken Sie im Menü “Timer Set-up” die Taste neben “ON”, um die Zeit
einzustellen, zu der das System eingeschaltet werden soll. Geben Sie die
aktuelle Zeit im 24-Stunden-Format ein. Verwenden Sie dazu die Tasten neben
“HR+” (Stunden erhöhen), “HR-” (Stunden verringern), “MIN +” (Minuten
erhöhen), “MIN -” (Minuten verringern). Siehe auch Abbildung 8.
• Drücken Sie die Taste neben “OFF”, um die Zeit einzustellen, zu der das
System wieder ausgeschaltet werden soll. Gehen Sie dabei wie oben
beschrieben vor.
• Drücken Sie die Taste neben “EXIT”, um zum Menü “System Set-up”
zurückzukehren.
• Drücken Sie die Taste neben “EXIT”, um zum Hauptmenü zurückzukehren.
• Im Hauptmenü können Sie die Timer-Einstellung und den Status überprüfen
(siehe Kapitel “Verwenden der NAD S70 System-Fernbedienung”, Abschnitt
“Hauptmenü: Anzeigen des Timer-Status”.
30
D
Page 31

HINWEISE: Achten Sie darauf, dass sich die S70 in ausreichender Nähe von allen
Komponenten befindet, sonst könnte die Timer-Funktion fehlerhaft oder
überhaupt nicht funktionieren.
Damit die Timer-Funktion verfügbar ist, darf nur die Funktion “Clock” im Menü
“System Set-up” aktiviert sein (angezeigt durch ein Häkchen). Im Kapitel
“Einstellen der S70 Fernbedienung” oben finden Sie weitere Informationen zum
Aktivieren und Einstellen der Uhr.
NAD-LINK
Viele HiFi-Komponenten von NAD sind mit NAD-Link ausgestattet. Die
gummiisolierten Buchsen mit der Bezeichnung “NAD-Link In” und “Out” auf der
Rückwand dieser Geräte ermöglichen die Übertragung von
Fernbedienungsbefehlen zwischen den Komponenten, wenn diese miteinander
verbunden sind.
Für den Betrieb der S70 ist eine geschlossene NAD-Link-Verbindung zwischen den
verschiedenen Gerätekomponenten nicht unbedingt erforderlich, aber die
Gesamtleistung und Eindeutigkeit der Fernbedienungsbefehle wird verbessert.
Verbinden Sie “NAD-Link Out” eines Gerätes mit “NAD-Link In” eines anderen
Gerätes. Stellen Sie dann weitere Verbindungen her, immer von “NAD-Link Out”
auf “NAD-Link In” des nächsten Gerätes usw., bis alle NAD-Link-Buchsen des
HiFi-Systems in Reihe geschaltet sind. Verbinden Sie NICHT den “NAD Link-Out”Ausgang des letzten Gerätes mit dem “NAD-Link In”-Eingang des ersten Gerätes
in der Kette.
31
D
Page 32

32
D
HILFESTELLUNG ZUR PROBLEMLÖSUNG
Fernbedienung funktioniert
nur sporadisch oder gar
nicht
• Batterien schwach oder
Batterieclip falsch
aufgesteckt
• IR-Sender- oder
Empfängerfenster
verdeckt
• IR-Empfänger an den
Geräten in direktem
Sonnenlicht oder sehr helle
Umgebungsbeleuchtung
• Batterie überprüfen oder
ersetzen
• Hindernis beseitigen
• Gerät nicht in direktem
Sonnenlicht aufstellen,
Umgebungsbeleuchtung
reduzieren
Problem Ursache Abhilfe
Funktionen “Sleep Timer”
und “Timer” können nicht
aktiviert werden
• Diese Funktionen sind nur
bei aktivierter Uhr
verfügbar
• Uhr aktivieren
Funktionen “Sleep Timer”
und Timer-Funktion
funktionieren trotz
Aktivierung nicht richtig
oder gar nicht
• IR-Sender- oder
Empfängerfenster
verdeckt
• IR-Empfänger an den
Geräten in direktem
Sonnenlicht oder sehr helle
Umgebungsbeleuchtung
• Hindernis beseitigen
• Gerät nicht in direktem
Sonnenlicht aufstellen,
Umgebungsbeleuchtung
reduzieren
Display ist schlecht lesbar • Zu wenig oder zu viel
Kontrast
• Batterie verbraucht
• Display-Kontrast einstellen
• Batterie ersetzen
Manchmal reagieren nicht
alle Geräte auf Ein-/AusBefehle, wobei diese nicht
mehr “synchron” mit dem
Bereitschafts-/Betriebsstatus
sind
• Fernbedienung ist
außerhalb der Reichweite
• Fernbedienungsabstand
verringern
• Komponenten über NADLink verbinden
Page 33

CONTROL REMOTO DEL SISTEMA NAD S70
Introducción . . . . . . . . . . . . . . . . . . . . . . . . . . . . . . . . . . . . . . . . . . . . . . . .34
Instalación de la pila . . . . . . . . . . . . . . . . . . . . . . . . . . . . . . . . . . . . . . . . .34
Preparación del control remoto S70 . . . . . . . . . . . . . . . . . . . . . . . . . . . . .34
Selección de Componentes
Activación y ajuste del reloj
Ajuste de Contraste del Visualizador
Uso del Control Remoto NAD S70 . . . . . . . . . . . . . . . . . . . . . . . . . . . . . .36
On/Off (Conectado/Desconectado)
Silenciamiento & Luz de Fondo del Visualizador
Volumen (Arriba & Abajo)
Menú Principal: Funcionamiento de los componentes del sistema
Menú Principal: Visionado del Estado del Cronómetro
Menú Principal: Activación y Visionado del Estado de Reposo del Cronómetro
Ajuste y Activación de la Prestación Timer . . . . . . . . . . . . . . . . . . . . . . .38
NAD-Link . . . . . . . . . . . . . . . . . . . . . . . . . . . . . . . . . . . . . . . . . . . . . . . . . .39
Guía de Investigación de Averías . . . . . . . . . . . . . . . . . . . . . . . . . . . . . . .40
33
E
Page 34

INTRODUCCIÓN
Gracias por comprar el Control Remoto de Sistema NAD S70. Con el S70 usted
puede controlar todos los componentes de su sistema Serie Silver NAD. El S70 se
puede adaptar fácilmente a los deseos del usuario de modo que sirva para su
sistema Serie Silver NAD y provee funcionalidad adicional tal como un reloj,
cronómetro de Reposo y on/off.
Aunque primariamente el S70 es para complemento de la Serie Silver NAD
también funcionará con la mayoría de los productos NAD controlados
remotamente de la Serie C.
Para asegurar un funcionamiento duradero y sin problemas, evite que el control
remoto quede expuesto a choque y agua. Si penetra agua en el estuche del
control remoto, quite la pila como se explica en este manual y haga que el control
sea inspeccionado por un técnico de servicio cualificado antes de intentar usarlo
otra vez. Use un paño seco y suave para limpiar el estuche de control remoto. Si
es necesario, humedezca ligeramente el paño con agua jabonosa. No use
soluciones que contengan benzol u otros agentes volátiles.
Utilizando una pila nueva, el NAD S70 funcionará a una distancia de hasta 7m y
con un ángulo de 45° a ambos lados de una línea recta desde los paneles
delanteros de su sistema Serie Silver NAD. Asegúrese de que haya una línea de
visión clara entre los componentes de su sistema y la ventanilla de la parte
delantera del S70. Observe que la luz fuerte y la luz del sol directa pueden afectar
el alcance del S70.
INSTALACIÓN DE LA PILA
Recomendamos pilas alcalinas para máxima duración de funcionamiento. Debe
montarse una pila de 9V (PP-3) en el compartimento de la pila situado en la parte
trasera del equipo manual del Control Remoto.
• Usando un destornillador Phillips No.1, quite cuidadosamente el tornillo de la
tapa del compartimento de la pila.
• Levante la cubierta un poco en la parte trasera y luego deslícela hacia atrás de
modo que se desenganche del estuche del S70.
• Si cambia la pila, desenchufe la pila vieja del conector de montaje instantáneo
de la pila. Tenga cuidado de no estirar los cables del conector.
• Enchufe la nueva pila en el conector de montaje instantáneo, asegúrese de
que la orientación es correcta y que los cables no queden atrapados detrás de
o sobre la pila misma al colocarla dentro del estuche del control remoto.
• Deslice la cubierta de la pila otra vez y coloque de nuevo el tornillo para que la
sostenga en posición. El tornillo debe enganchar sin dificultad en el roscado, no
lo fuerce para volver a colocarlo, podría dañar el roscado del estuche del S70.
El bajo consumo de energía eléctrica y el ahorro de la misma son características
del S70 que significan que la pila durará largo tiempo. Cuando usted note que el
alcance del S70 está disminuyendo puede ser necesario cambiar la pila.
NOTA: Tenga cuidado de no perder el tornillo del compartimento de la pila. Si se
pierde el tornillo original, substitúyalo únicamente con un tornillo del mismo tipo
exactamente (métrico, 2mm, 8 a 10mm de longitud). Si se usa un tornillo de tipo
incorrecto se dañará permanentemente el estuche del control remoto S70.
PREPARACIÓN DEL CONTROL REMOTO S70
Selección de componentes
El control remoto NAD S70 se puede adaptar al usuario para que sirva para su
sistema particular de la Serie Silver NAD seleccionando únicamente los
componentes que hay en su sistema.
34
E
Page 35

El NAD S70 es un control remoto “accionado por menú”, en que muchos de los
pulsadores varían en prestación, según sea el Menú que se seleccione. El
visualizador próximo a estos pulsadores indica qué funciones están disponibles. En
funcionamiento normal, el punto inicial es el Menú Principal. La Figura No.1
muestra cómo están organizados los menús.
Pulse cualquier pulsador (excluyendo Volume Up/Down) para activar el
visualizador. En el menú Principal, cada categoría de componente de la Serie Silver
está representada por su propio icono. Vea la figura No.2.
Para preparar el S70 para su sistema:
• A partir del Menú Principal del control remoto, pulse el pulsador próximo a
donde indica “SYSTEM” (sistema) en el visualizador.
• El visualizador cambiará al Menú de Preparación del Sistema. Vea también la
figura No.3
• El visualizador mostrará varios componentes, tales como “AMP”, “PREAMP”,
“TUNER”, “CD” (Amplificador, preamplificador, sintonizador, CD) con los iconos
correspondientes. Pulsando el pulsador próximo al componente usted puede
seleccionar o deseleccionar un componente para el Menú Principal. Una
marca ✓ próxima al componente indicará si el componente ha sido
seleccionado. Por ejemplo, si su sistema comprende el preamplificador NAD
S100, sintonizador S400 y tocadiscos CD S500 asegúrese de que las casillas para
preamplificador, sintonizador y tocadiscos CD están marcadas, las otras no.
• Pulse el pulsador próximo a “EXIT” (salir) situado en la parte inferior para salir
y memorizar la preparación y volver al Menú Principal.
NOTA: Si su componente de la Serie Silver NAD no está disponible en el menú de
Preparación del Sistema, en muchos casos se puede actualizar su S70. Consulte a
su concesionario NAD.
Activación y ajuste del reloj
El Control Remoto S70 tiene también incorporado un reloj, que le proporciona a
usted prestaciones extra tales como Sleep Timer (cronómetro de reposo) y la
prestación Timer (cronómetro). Para que funcionen estas prestaciones, usted ha
de activar y ajustar el reloj:
• A partir del Menú Principal, pulse el pulsador próximo a “SYSTEM”.
• En el Menú de Preparación del Sistema, active el reloj pulsando el pulsador
próximo a “CLOCK” (reloj); aparecerá una marca ✓ para indicar que se ha
activado el reloj.
• Pulse el pulsador próximo a “CLOCK” durante 2 segundos
• El Menú de Preparación del Reloj le permite ajustar el reloj. Use el formato de
24-horas para introducir la hora correcta (por ejemplo, 2:15PM serán las
14:15) pulsando los pulsadores próximos a “HR+” (para ajustar horas hacia
arriba), “HR-” (ajusta horas hacia abajo), “MIN +” (ajusta minutos hacia
arriba), “MIN -” (ajusta minutos hacia abajo). Vea también la figura No.4.
• Pulse el pulsador próximo a “EXIT” para volver al Menú de Preparación del
Sistema.
• Pulse el pulsador próximo a “EXIT” para volver al Menú Principal.
NOTA: Si usted elige deseleccionar (no marcar con ✓) en el Menú de Preparación
del Sistema, tendrá que ajustar el reloj otra vez la próxima vez que lo active.
35
E
Page 36

Ajuste del contraste del visualizador
El contraste del visualizador del NAD S70 puede ajustarse para optimizar la
legibilidad desde un ángulo amplio de visionado. El ajuste de fábrica será
adecuado en casi todos los casos pero en circunstancia excepcionales o si la pila
está debilitándose mucho puede ser necesario ajustar el contraste.
• A partir del Menú Principal, pulse el pulsador próximo a “SYSTEM”.
• Pulse el pulsador próximo a “>” para aumentar el contraste o “<” para
disminuir el contraste.
• Ajustado el nivel óptimo de contraste, pulse el pulsador próximo a “EXIT”
para volver al Menú Principal.
USO DEL CONTROL REMOTO NAD S70
El NAD S70 es un control remoto “accionado por menú”, en que muchos de los
pulsadores varían en prestación, según sea el Menú que se seleccione. El
visualizador próximo a estos pulsadores indica qué funciones están disponibles. En
funcionamiento normal, el punto inicial es el Menú Principal. La Figura No.1
muestra cómo están organizados los menús.
Los pulsadores de Volume Control, Mute y On/Off (control de volumen,
silenciamiento y conectado/desconectado) siempre realizan las mismas funciones,
sea cual fuere el Menú seleccionado. El visualizador se desactiva automáticamente
siempre, 25 segundos después de que se haya pulsado el último pulsador, para
prolongar la duración de la pila. Si se pulsa cualquier pulsador, excepto los
pulsadores de volumen, se activa otra vez el visualizador.
On/Off (Conectado/Desconectado)
Pulse este pulsador para cambiar los componentes de modo de Funcionamiento a
Reserva (Standby) y viceversa.
Puesto que este es un mando alternante, si se cambia entre modo de Reserva y
Funcionamiento, usted puede considerar cambiar todos los componentes a modo
de funcionamiento de modo que usando el pulsador On/Off del S70 todos los
componentes estén en estado sincronizado: Pulse el pulsador de alimentación
eléctrica situado en el panel delantero de cada componente de la Serie Silver
controlado remotamente de modo que todos se pongan en on y en modo de
Funcionamiento. Conectando NAD-Link entre todos los componentes,
permanecen en sincronización unos con otros, incluso aunque uno de los
componentes esté fuera del alcance del S70. Vea también el capítulo siguiente
sobre NAD-Link. La prestación On/Off está siempre disponible, sea cual fuere el
Menú en que esté el S70.
Silenciamiento & luz de fondo del Visualizador
Pulse el Pulsador Mute (silenciamiento) para desconectar temporalmente el sonido
del amplificador o preamplificador. Pulse Mute otra vez para restablecer el sonido.
Además el pulsador Mute activa la luz de fondo del visualizador de modo que se
pueda usar cómodamente el S70 en ambientes oscuros. Pulse el pulsador Mute
durante 2 segundos para activar la luz de fondo. La luz se desactiva
automáticamente transcurridos 15 segundos para conservar la energía eléctrica de
la pila. Las prestaciones Mute y Back-light (luz de fondo) siempre están
disponibles, sea cual fuere el Menú en que esté el S70.
Volumen (Arriba & Abajo)
Pulse el pulsador inferior para disminuir el volumen, el pulsador superior para
aumentar el volumen. El uso de los pulsadores Volume (volumen) no activa el
visualizador. La prestación Volume está siempre disponible, sea cual fuere el Menú
en que está el S70.
36
E
Page 37

Menú Principal: Funcionamiento de los componentes del sistema
Las demás prestaciones disponibles del S70 dependen de qué Menú se haya
seleccionado. A partir del menú Principal, (figura No. 2) usted puede seleccionar
el componente que desee hacer funcionar, como amplificador, sintonizador,
tocadiscos CD, etc. El S70 se entrega como equipo standard con una selección de
Menús de Componentes, como Componente Amplificador, Componente
Preamplificador, Componente Sintonizador, Componente CD, etc. Los mandos
procedentes de esos Menús de Componentes corresponden a los del panel
delantero del control remoto original del componente.
• Seleccione el Menú Principal pulsando el pulsador próximo a “EXIT” en
cualquiera de los otros menús.
• En el Menú Principal, pulse el pulsador próximo al componente visualizado
que desea hacer funcionar, por ej. “AMP”.
• El Menú de Componente apropiado y su icono se presentan en la parte
superior del visualizador, aparecerá el Menú “AMP” en este ejemplo, con
todas las funciones disponibles. Pulse el pulsador próximo a la prestación
deseada en el visualizador. Vea también la figura No. 5.
• Pulse el pulsador próximo a “EXIT” otra vez para volver al Menú Principal a
partir del cual usted puede seleccionar otro componente.
En algunos Menús de Componentes si se selecciona una prestación esto le lleva a
otro Menú de Componente. Por ejemplo, si se pulsa el pulsador para CD en el
Menú de Componente Amplificador se cambia la entrada del amplificador a
entrada CD y cambia de menú de Componente Amplificador a Menú de
Componente tocadiscos CD. Estos pulsadores pueden reconocerse por el icono
correspondiente al Menú de Componente.
NOTA: Usted puede preparar y adaptar para sí mismo el NAD S70 para que sirva
para su sistema NAD particular. Vea el capítulo “Preparación del Control Remoto
NAD S70”.
Menú Principal: Visionado del estado del Cronómetro
El S70 puede usarse para que su sistema se ponga en on y off en tiempos
específicos con la prestación Timer (cronómetro). Para ajustar, activar o desactivar
la prestación Timer, vea el capítulo “Ajuste y activación del Cronómetro”.
Usted puede visionar el estado del Timer y activarlo a partir del Menú Principal:
• Seleccione el Menú Principal pulsando “EXIT” en cualquiera de los otros
menús.
• Pulse el pulsador próximo a “TIMER” una vez.
El visualizador mostrará On Time y Off Time (tiempo conectado y desconectado) y
el componente que se seleccionó. El símbolo a la derecha del reloj en la
parte superior del sintonizador indica que la prestación Timer está activada.
Vea también la Figura No. 6.
• Pulse el pulsador próximo a “EXIT” para volver al Menú Principal.
NOTA: La prestación Timer del Menú Principal sólo está disponible si las dos
funciones Clock y Timer (reloj y cronómetro) se han seleccionado (indicado por la
marca ✓ ) en el Menú de Preparación del Sistema. Vea el capítulo “Preparación
del Control Remoto S70” para información sobre activación y ajuste del reloj.
Menú Principal: Activación y visionado del estado de Reposo de
Cronómetro
Con la prestación Sleep Timer (reposo de cronómetro) usted puede ajustar el S70
para que desconecte automáticamente su sistema después de un número
predeterminado de minutos pasándolo a modo Standby (reserva) (con tal que
todos los componentes estén en modo de Operation (funcionamiento), no en
modo de Stand-by).
37
E
Page 38

• Para activar la prestación Sleep Timer, pulse el pulsador próximo a “SLEEP”. El
reloj del visualizador cambia para indicar el tiempo ajustado para la Prestación
Sleep Timer. Esta se encuentra ahora activada y ajustada para 10 minutos. El
símbolo a la izquierda del reloj en la parte superior del visualizador indica
que ahora está activada la prestación Sleep Timer, sea cual fuere el Menú que
estaba seleccionado. Vea también la figura No.7.
• Cada pulsación consecutiva aumenta el tiempo de reposo en incrementos de
10 minutos, hasta 90 minutos.
• Para cancelar el modo Sleep, continúe pulsando el pulsador SLEEP hasta que
aparezca “OFF” en el visualizador.
NOTAS: Asegure que el S70 esté situado bien dentro del alcance de todos los
componentes, de lo contrario la prestación de Sleep Timer funcionará
erráticamente o no funcionará en absoluto.
La prestación Sleep está disponible únicamente si se ha seleccionado la prestación
Clock (indicado por la marca ✓) en el Menú de Preparación del Sistema. Vea el
capítulo “Preparación del Control Remoto S70” anterior para información sobre
activación y ajuste del reloj.
AJUSTE Y ACTIVACIÓN DE LA PRESTACIÓN TIMER
El S70 puede usarse para poner su sistema en on y off en tiempos específicos con
la prestación Timer. De este modo, usted puede usar su sistema como un reloj
despertador, por ejemplo. Antes de poder ajustar la prestación Timer se necesita
activarla:
• A partir del Menú Principal, pulse el pulsador próximo a “SYSTEM”.
• En el Menú de Preparación del Sistema, pulse el pulsador próximo a “TIMER”;
aparecerá una marca ✓ para indicar que se ha activado la Prestación Timer. En
todos los Menús, el símbolo a la derecha del reloj en la parte superior del
visualizador indica que se ha activado la prestación Timer. Para desactivarla,
pulse el pulsador otra vez de modo que desaparezca la marca ✓.
• Pulse el pulsador próximo a “EXIT” para volver al Menú Principal.
Para ajustar el cronómetro:
• A partir del Menú Principal, pulse el pulsador próximo a “SYSTEM”.
• En el Menú de Preparación del Sistema, pulse el pulsador próximo a “TIMER”
durante 2 segundos.
• En el Menú de Preparación de Timer, pulse el pulsador próximo a “ON” para
ajustar la hora que desea que el sistema se ponga en on. Use formato de 24horas para introducir la hora correcta (por ejemplo, 2:15PM será las 14:15)
pulsando los pulsadores próximos “HR+” (para ajustar las horas hacia arriba),
“HR-” (para ajustar las horas hacia abajo), “MIN +” (para ajustar los minutos
hacia arriba), “MIN -” (para ajustar los minutos hacia abajo). Vea también la
figura No.8.
• Pulse el pulsador próximo a “OFF” para ajustar la hora para poner el sistema
en off, usando los pulsadores de ajuste de hora y minutos como se describe
antes.
• Pulse el pulsador próximo a “EXIT” para volver al Menú de Preparación del
Sistema.
• Pulse el pulsador próximo a “EXIT” para volver al Menú Principal.
• Usted puede comprobar el ajuste del Cronómetro y su estado a partir del
Menú Principal, vea el capítulo “Uso del Control Remoto del Sistema NAD
S70”, sección “Menú Principal: Visionado del estado del Cronómetro”.
NOTAS: Asegure que el S70 esté situado bien dentro del alcance de todos los
componentes, de lo contrario la prestación Timer funcionará erráticamente o no
funcionará en absoluto.
38
E
Page 39

La prestación Timer sólo está disponible si se ha seleccionado la prestación Clock
(indicado por la marca ✓) en el Menú de Preparación del Sistema. Vea el capítulo
“Preparación del Control Remoto S70” anterior para información sobre la
activación y ajuste del reloj.
NAD-LINK
Muchos componentes NAD tienen la conexión NAD-Link. Las tomas RCA del
panel trasero de estos componentes, marcadas con las palabras “NAD-Link In”
(entrada NAD-Link) y “Out” (salida) permite la comunicación de órdenes del
control remoto entre los componentes cuando están conectados entre sí.
La conexión NAD-Link entre los diversos componentes no es estrictamente
necesaria para el funcionamiento del S70, pero mejorará el rendimiento y
consistencia generales para las órdenes de control remoto.
Conecte la salida “NAD-Link Out” de un componente a la entrada “NAD-Link In”
del otro componente. A partir de éste último conecte “NAD-Link Out” a “NADLink In” en el componente siguiente, etc., de modo que el las tomas NAD Link de
todo el sistema estén conectadas a manera cadena de margaritas, siempre IN con
OUT y OUT con IN. No conecte la salida “NAD Link-Out” del último componente
a la entrada “NAD-Link In” del primer componente de la cadena.
39
E
Page 40

40
E
GUÍA DE INVESTIGACIÓN DE AVERÍAS
El control remoto funcionará
intermitentemente o no
funciona
• Pila gastada o conector de
montaje rápido
incorrectamente unido
• Ventanillas del transmisor
de IR (rayos infrarrojos)o
del receptor obstruidas
• Receptor de IR de los
componentes a la luz
directa del sol o con luz
ambiental brillante
• Compruebe o cambie la
pila
• Quite la obstrucción
• Ponga el equipo lejos de
la luz directa del sol,
reduzca la cantidad de luz
ambienta
Problema Causa Solución
No pueden activarse las
prestaciones Sleep Timer y
Timer
• Estas prestaciones sólo
están disponibles si el reloj
está activado
• Active el reloj
Aunque están activadas, las
prestaciones Sleep Timer y
Timer no funcionan bien o
no funcionan en absoluto
• Ventanillas de transmisor
de IR o receptor
obstruidas
• Receptor de IR de los
componentes a la luz
directa del sol o con luz
ambiental brillante
• Quite la obstrucción
• Ponga el equipo lejos de
la luz directa del sol,
reduzca la cantidad de luz
ambienta
El visualizador se lee con
dificultad
• Demasiado poco
contraste o contraste
excesivo
• La pila casi gastada
• Ajuste el nivel de
contraste del visualizador
• Cambie la pila
Algunas veces no todos los
componentes responden al
mando de On/Off, haciendo
que queden
“desincronizados” para el
estado de standby/funcionamiento
• El control remoto está
simplemente fuera del
alcance
• Reduzca la distancia
operativa
• Conecte NAD-Link entre
los componentes
Page 41

TELECOMANDO DEL SISTEMA NAD S70
Introduzione . . . . . . . . . . . . . . . . . . . . . . . . . . . . . . . . . . . . . . . . . . . . . . .42
Installazione della batteria . . . . . . . . . . . . . . . . . . . . . . . . . . . . . . . . . . . .42
Setup (impostazione) del telecomando dell’S70 . . . . . . . . . . . . . . . . . . .42
Selezione componenti
Come attivare e regolare l’orologio
Come regolare il contrasto del display
Come impiegare il telecomando del NAD S70 . . . . . . . . . . . . . . . . . . . . .44
Acceso/spento
Controluce Mute & Display (tacitazione e display)
Volume (su e giú)
Menú principale: funzionamento dei componenti del sistema
Menú principale: come prendere visione della condizione del
temporizzatore “Timer Status”
Menú principale: come attivare e visionare la condizione del
temporizzatore “Sleep Timer Status”
Come regolare ed attivare la funzione temporizzatore . . . . . . . . . . . . . .46
NAD Link . . . . . . . . . . . . . . . . . . . . . . . . . . . . . . . . . . . . . . . . . . . . . . . . . .47
Guida Ricerca Guasti . . . . . . . . . . . . . . . . . . . . . . . . . . . . . . . . . . . . . . . . .48
41
I
Page 42

INTRODUZIONE
Vi ringraziamo per avere acquistato il telecomando NAD del sistema S70. Con
l’S70 potete comandare tutti i componenti del Vs. sistema NAD Serie Silver. L’S70
può essere impostato “su misura”, a seconda del Vs. particolare sistema NAD
Serie Silver; Vi offre funzionalità supplementare, quale ad esempio l’orologio, il
modo “sonno” e il temporizzatore acceso/spento.
Sebbene l’S70 sia da considerare principalmente quale un complemento della
Serie Silver della NAD, funziona anche con la maggior parte dei prodotti
telecomandati della NAD della Serie C.
Per assicurare un funzionamento pressoché eterno e senza noie, evitare sempre che
il telecomando venga contaminato da acqua o soggetto a scosse. Se la custodia del
telecomando venisse contaminata da acqua, togliere la batteria come indicato nel
presente Manualetto e procedere all’ispezione a cura di un tecnico qualificato, prima
di tentare di riutilizzarlo. Impiegare un panno soffice ed asciutto per pulire il
telecomando. Se necessario, inumidire leggermente il panno con un po’ di acqua e
sapone. Non impiegare soluzioni a base di benzolo o altri prodotti volatili.
Se la batteria è nuova, l’S70 NAD funziona fino ad una distanza di 7 metri ed
entro un angolo di 45 dalla retta immaginaria tra i pannelli anteriori del Vs.
sistema NAD Serie Silver. Assicurarsi che la traiettoria tra i componenti del Vs.
sistema e la finestrella anteriore dell’S70 non sia ostruita.
Notare che la portata dell’S70 può risultare ridotta se vi è troppa luce o sotto i
raggi diretti del sole.
INSTALLAZIONE DELLA BATTERIA
Per garantire la massima durata di funzionamento si raccomandano batteriee
alcaline. Occorre montare una batteria da 9 volt (PP-3) nel portabatteria sul retro
del telecomando.
• Impiegando un cacciavite Phillips No. 1, svitare con attenzione la vite dal
coperchietto del portabatteria.
• Sollevare leggermente il coperchietto sul retro e poi farlo scorrere a tergo in
modo che si stacchi dalla custodia dell’S70.
• Quando si sostituisce la batteria: staccare la vecchia batteria dal connettore a
scatto. Fare attenzione a non allungare i cavi dei connettori.
• Inserire la nuova batteria nel connettore a scatto: assicurarsi che
l’orientamento sia come prescritto e che i cavi non rimangano pizzicati sotto o
sopra la batteria quando questa viene inserita nella custodia del telecomando.
• Richiudere lo sportellino e riavvitare la vite. La vite deve impegnarsi nel filetto
senza sforzare: esercitare pressione minima, poiché altrimenti si corre il rischio
di danneggiare il filetto nella custodia dell’S70.
Il basso consumo di corrente e i dispositivi di risparmio dell’energia dell’S70
assicurano che la batteria duri moltissimo tempo. Quando si nota che la portata
dell’S70 sta diminuendo, è giunto allora il momento di sostituire la batteria.
NOTA: Fare attenzione a non allentare la vite dello scomparto portabatteria. In
caso di smarrimento della vite originale, sostituirla solo con una di tipo esattamente
eguale (metrica, 2 mm, lunghezza 8-10 mm). Impiegando una vite di tipo non
prescritto si danneggia permanentemente la custodia del telecomando S70.
IMPOSTAZIONE DEL TELECOMANDO DELL’S70
Selezione componenti
Il telecomando S70 NAD può essere impostato “su misura” a seconda del sistema
NAD Serie Silver in dotazione, selezionando solo quei componenti che fanno
parte del Vs. sistema.
42
I
Page 43

L’S70 NAD è un telecomando comandato tramite una serie di menú: molti dei
pulsanti hanno funzioni differenti a seconda del menú particolare che è stato
selezionato. Il display accanto a questi pulsanti indica quali funzioni sono
disponibili. Per il funzionamento normale, il punto di partenza è il Menú
Principale. La Fig. 1 indica la gerarchia dei vari menú.
Premere un qualsiasi pulsante (tranne Volume Up/Down) per attivare il display. Nel
menú principale, ogni categoria dei componenti della Serie Silver è rappresentata
da una sua icona individuale. Fare riferimento alla figura No. 2.
Come impostare l’S70 per il Vs. sistema:
• Partendo dal Menú Principale sul telecomando, premere il pulsante accanto
alla dicitura “SYSTEM” sul display.
• Il display passerà a “System Set” - menú UP. Vedere anche la figura No. 3
• Il display visualizzerà vari componenti, quali: as “AMP”, “PREAMP”, “TUNER”,
“CD” con le corrispondenti icone. Premendo il pulsante accanto al
componente potete selezionare o annullare la scelta di un componente dal
menú principale. Il componente selezionato è evidenziato con “spunto”. Ad
esempio, se il Vs. sistema è costituito da un preamplificatore NAD S100, un
sintonizzatore S400 ed un riproduttore per CD S500, assicurarsi allora che le
caselle per il preamplificatore, il sintonizzatore e il riproduttore per CD siano
spuntate e che le altre non siano marcate.
• Premere il pulsante accanto ad “EXIT” in basso per terminare e memorizzare
l’impostazione e ritornare al menú principale.
NOTA: Se il Vs. componente NAD Serie Silver non è disponibile dal menú di
impostazione del sistema, l’S70 può essere aggiornato nella maggior parte dei
casi. Interpellare il Concessionario NAD.
Come attivare e regolare l’orologio
Il telecomando S70 incorpora inoltre un orologio che Vi permette di attivare le
funzioni Temporizzatore Sonno e Temporizzatore. Funzionano se si attiva e si
regola l’orologio:
• Partendo dal menú principale, premere il pulsante accanto a “SYSTEM”.
• Nel “Menú impostazione sistema”, attivare l’orologio premendo il pulsante
accanto a “CLOCK”; lo spunto di conferma compare per confermare che
l’orologio è stato attivato.
• Premere per due secondi il pulsante accanto a “CLOCK”
• Il menú di impostazione dell’orologio permette di regolare le ore. Impiegare il
formato “24 ore” per iscrivere le ore corrette (ad esempio 2:15 p.m. diventa
14:15) premendo i pulsante accanto ad “HR+” (per regolare le ore in avanti),
“HR-” (per regolare le ore indietro), “MIN+” (per regolare i minuti in avanti),
“MIN-” (regolare i minuti all’indietro). Vedere anche la figura No. 4.
• Premere il pulsante accanto ad “EXIT” per ritornare a “Menú impostazione del
sistema”.
• Premere il pulsante accanto ad “EXIT” per ritornare al Menú Principale.
NOTA: Se si sceglie di annullare (eliminando ovvero lo spunto di conferma) dal
menú di impostazione del sistema occorre allora regolare nuovamente l’orologio
quando lo si attiva.
Come regolare il contrasto del display
Il contrasto del display del NAD S70 può essere regolato per renderlo quando piú
leggibile possibile da un angolo abbastanza largo. L’impostazione effettuata in
fabbrica è piú che perfetta per la maggior parte dei casi, ma in condizioni
particolari (o se la batteria è pressoché scarica) può darsi che occorra regolare il
contrasto.
43
I
Page 44

• Partendo dal menú principale, premere il pulsante accanto a “SYSTEM”.
• Premere il pulsante accanto a “>”per aumentare il contrasto oppure “<” per
diminuire il contrasto.
• Una volta impostato il livello ottimale di contrasto, premere il pulsante accanto
a “EXIT” per ritornare al menú principale.
COME IMPIEGARE IL TELECOMANDO DEL NAD S70
L’S70 NAD è un telecomando comandato tramite una serie di menú: molti dei
pulsanti hanno funzioni differenti a seconda del menú particolare che è stato
selezionato. Il display accanto a questi pulsanti indica quali funzioni sono
disponibili. Per il funzionamento normale, il punto di partenza è il Menú
Principale. La Fig. 1 indica la gerarchia dei vari menú.
I pulsanti per il controllo del volume (Volume Control), per la tacitazione (Mute) e
per Acceso/Spento (On/Off) svolgono sempre la medesima funzione, qualunque
sia il menú selezionato. Il display si spegne sempre. 25 secondi dopo che l’ultimo
pulsante è stato premuto, al fine di risparmiare la batteria. Il display viene
riattivato premendo un pulsante qualsiasi, tranne quelli del volume.
Acceso/spento
Premere questo pulsante per portare i componenti dal modo di funzionamento a
quello di attesa “Stand-by” o viceversa.
Dal momento che si tratta di un comando che cambia lo stato di funzionamento,
commutando tra Stand-by e modo di funzionamento, forse è meglio a volte
portare tutti i componenti nel modo di funzionamento in modo che - impiegando
poi il pulsante Acceso/Spento sull’S70 - tutti i componenti siano sincronizzati nella
condizione prescritta: premere il pulsante di alimentazione sul pannello anteriore
di ciascun componente telecomandato della Serie Silver in modo che tutti siano
accesi e si trovino nel modo di funzionamento. Collegando il NAD-Link tra tutti i
componenti, questi rimangono sincronizzati l’uno con gli altri, anche se uno dei
componenti si trova fuori dal campo di azione dell’S70. Vedere anche il capitolo
NAD-Link qui sotto. E’ sempre disponibile la funzione Acceso/Spento, qualunque
sia il menú nel quale si trova l’S70.
Controluce Mute & Display (tacitazione e display)
Premere il pulsante di tacitazione (Mute) per spegnere provvisoriamente il suono
dall’amplificatore o dal preamplificatore. Ripremere “MUTE” per ripristinare il
suono. Il pulsante di tacitazione Mute inserisce inoltre la retroilluminazione per il
display, per permettere di impiegare l’S70 anche al buio. Premere il pulsante Mute
per due secondi per accendere la retroilluminazione. L’illuminazione si spegne
automaticamente dopo quindici secondi per risparmiare batteria. Le funzioni di
tacitazione e retroilluminazione (rispettivamente Mute e Back-light) sono sempre
azionabili, qualunque sia il menú nel quale l’S70 si trova.
Volume (su e giú)
Premere il pulsante inferiore per diminuire il volume; premere quello superiore per
aumentare il volume. Azionando i pulsanti del volume non si attiva il display. E’
sempre disponibile la funzione Volume, qualunque sia il menú nel quale si trova l’S70.
Menú principale: funzionamento dei componenti del sistema
Le altre funzioni disponibili dell’S70 dipendono da quale menú è stato
selezionato. Partendo dal menú principale (Fig. 2) potete selezionare quale
componente desiderate azionare, ad esempio: l’amplificatore, il sintonizzatore, il
riproduttore per CD, ecc. L’S70 di tipo standard ha una selezione dei Menú
Componenti, quali: componente amplificatore, componente preamplificatore,
componente sintonizzatore, componente CD, ecc. I comandi da questi Menú
Componenti corrispondono a quelli sul pannello anteriore o al telecomando
originale del componente.
44
I
Page 45

• Selezionare Menú Principale premendo il pulsante accanto ad “EXIT” in uno
qualsiasi degli altri menú.
• Partendo dal Menú Principale, premere il pulsante accanto al componente
visualizzato che si desidera azionare, ad esempio “AMP”.
• Il particolare Menú Componenti e la relativa icona compariranno nella parte
superiore del display: nel nostro esempio otteniamo il Menú “AMP” con tutte
le funzioni disponibili che vengono visualizzate. Premere il pulsante accanto
alla funzione desiderata sul display. Vedere anche la Fig. 6.
• Premere un’altra volta il pulsante accanto ad “EXIT” per ritornare al Menú
Principale ove potete quindi selezionare un altro componente.
In alcuni Menú Componenti, selezionando una funzione si passa
automaticamente ad un altro Menú Componenti. Ad esempio, premendo il
pulsante per i CD nel Menú Componente Amplificatore si porta l’input
dell’amplificatore a quello dei CD e si cambia dal Menú Componente
Amplificatore a quello per il riproduttore dei CD. Questi pulsanti sono riconoscibili
tramite l’icona che corrisponde al Menú Componenti.
NOTA: Potete impostare “su misura” l’S70 per il NAD conformemente al Vs.
particolare sistema NAD. Vedere il capitolo “Impostazione del telecomando del
NAD S70”.
Menú principale: come prendere visione della condizione del
temporizzatore “Timer Status”
L’S70 può essere impiegato per accendere e spegnere il sistema ad ore prescelte
tramite la funzione del temporizzatore (Timer). Per l’impostazione, l’attivazione
oppure disattivazione della funzione Timer fare riferimento al capitolo
“Impostazione ed attivazione del temporizzatore”.
E’ possibile visionare la condizione del temporizzatore con relativa attivazione dal
Menú Principale:
• Selezionare Menú Principale premendo “EXIT” in uno qualsiasi degli altri
menú.
• Premere una volta il pulsante accanto a “TIMER”.
Il display riporterà ora il tempo di accensione e spegnimento (On Time ed Off
Time) e quale componente è stato selezionato. Il simbolo sulla destra
dell’orologio nella parte superiore del display indica che la funzione
Temporizzatore è attivata. Vedere anche la figura No. 5.
• Premere il pulsante accanto ad “EXIT” per ritornare al Menú Principale.
NOTA: La funzione del temporizzatore nel Menú Principale è disponibile solo se le
funzioni Orologio e Temporizzatore (rispettivamente Clock e Timer) sono state
selezionate (condizione questa evidenziata dallo spunto) nel menú di
impostazione del sistema. Vedere il capitolo “Impostazione del telecomando S70”
per informazioni relative all’attivazione e regolazione dell’orologio.
45
I
Page 46

Menú principale: come attivare e visionare la condizione del
temporizzatore “Sleep Timer Status”
Avvalendosi della funzione per la temporizzazione del sonno (Sleep Timer) è
possibile impostare l’S70 in modo che spenga automaticamente il sistema dopo
un numero dato di minuti nel modo di attesta (a patto che tutti i componenti si
trovino nel modo di funzionamento e non in quello di attesa).
• Per attivare la funzione Temporizzazione Sonno, premere il pulsante accanto a
“SLEEP”. L’orologio del display cambia per indicare le ore impostate per la
funzione di temporizzazione del sonno. E’ cosí attivata ed impostata su dieci
minuti. Il simbolo sulla sinistra dell’orologio nella parte superiore del display
indica che la funzione temporizzazione sonno è ora attivata, qualunque sia il
menú selezionato in precedenza. Vedere anche la figura No. 8.
• Ogni volta che si premere consecutivamente il comando si aumenta il tempo
in scarti di dieci minuti, fino al massimo di novanta minuti.
• Per cancellare il modo “Sleep”, continuare a premere il pulsante “SLEEP”
finché il display non riporta la dicitura “OFF”.
NOTE: Assicurarsi che l’S70 sia collocato entro la portata prescritta per tutti i
componenti, poiché altrimenti la funzione di temporizzazione del sonno non
funzionerà come prescritto oppure non funzionerà affatto.
La funzione Sonno è disponibile solo se la funzione Orologio è stata selezionata
(come confermato dallo spunto) nel menú di impostazione del sistema. Vedere il
capitolo “Impostazione del telecomando S70” qui sopra per informazioni relative
all’attivazione e regolazione dell’orologio.
COME REGOLARE ED ATTIVARE LA FUNZIONE
TEMPORIZZATORE
L’S70 può essere impiegato per accendere e spegnere il sistema ad ore prescelte
tramite la funzione del temporizzatore (Timer). In questo modo potete impiegare
il sistema quale sveglia. Prima di potere impostare la funzione temporizzatore
occorre attivarla:
• Partendo dal menú principale, premere il pulsante accanto a “SYSTEM”.
• Nel “Menu impostazione del sistema”, premere il pulsante accanto a “TIMER”;
lo spunto di conferma compare per confermare che la funzione Temporizzatore
è stata attivata. Il simbolo in tutti i menú, sulla destra dell’orologio nella
parte superiore del display, indica che la funzione Timer è attivata. Per la
disattivazione ripremere il pulsante in modo da cancellare lo spunto.
• Premere il pulsante accanto ad “EXIT” per ritornare al Menú Principale.
Per impostare il temporizzatore:
• Partendo dal menú principale, premere il pulsante accanto a “SYSTEM”.
• Nel “Menú impostazione del sistema”, premere il pulsante accanto a “TIMER”
per due secondi.
• Nel Menu di impostazione del temporizzatore, premere il pulsante accanto ad
“ON” per regolare l’ora alla quale desiderate che il sistema si accenda.
Impiegare il formato “24 ore” per iscrivere le ore corrette (ad esempio 2: 15
p.m. diventa 14:15) premendo i pulsante accanto ad “HR+” (per regolare le ore
in avanti), “HR-” (per regolare le ore indietro), “MIN+” (per regolare i minuti in
avanti), “MIN” (per regolare i minuti all’indietro). Vedere anche la figura No. 7.
• Premere il pulsante accanto ad “OFF” per regolare le ore alle quali volete che il
sistema si spenga, impiegando i pulsanti di regolazione delle ore come detto
qui sopra.
• Premere il pulsante accanto ad “EXIT” per ritornare a “System Set” - menú UP.
• Premere il pulsante accanto ad “EXIT” per ritornare al Menú Principale
• Potere controllare l’impostazione e la condizione del temporizzatore dal Menú
Principale: vedere il capitolo “Come impiegare il telecomando del sistema S70
NAD”, sezione che tratta il “Menú Principale”: come prendere visione della
condizione del temporizzatore “Timer Status”.
46
I
Page 47

NOTE: Assicurarsi che l’S70 sia collocato entro la portata prescritta per tutti i
componenti, poiché altrimenti la funzione di temporizzazione non funzionerà
come prescritto oppure non funzionerà affatto.
La funzione Timer è disponibile solo se la funzione Orologio è stata selezionata
(come confermato dallo spunto) nel menú di impostazione del sistema. Vedere il
capitolo “Impostazione del telecomando S70” qui sopra per informazioni relative
all’attivazione e regolazione dell’orologio.
NAD LINK
Molti componenti NAD hanno il NAD-Link. Le prese RCA sul pannello posteriore
di questi comandi (evidenziate con “NAD-Link In” ed “Out”) permettono la
comunicazione del telecomando tra i componenti quando interconnessi.
Non è in effetti assolutamente indispensabile collegare il NAD-Link tra i vari
componenti al fine di assicurare il corretto funzionamento dell’S70, ma si
migliorano le prestazioni e il regolare funzionamento dei telecomandi.
Collegare “NAD-Link Out” da un componente al “NAD-Link In” sull’altro
componente. Partendo da quest’ultimo collegarsi da “NAD-Link Out” a “NADLink In” sull’altro componente, ecc., in modo che tutte le prese NAD-Link del
sistema siano connesse a margherita: ricordare che le connessioni vanno sempre
perfezionate da IN ad OUT e da OUT ad IN. Non collegare “NAD Link-Out”
dall’ultimo componente al “NAD-Link In” del primo componente nella catena.
47
I
Page 48

48
I
GUIDA RICERCA GUASTI
Il telecomando funziona ad
intermittenza oppure non
funziona affatto
• Batteria scarica oppure
connettore a scatto non
connesso come prescritto
• Finestrelle trasmettitore o
ricevitore ad infrarossi
“IR” ostruite
• Ricevitore IR sui
componenti sotto i raggi
diretti del sole oppure
forte luce ambiente
• Controllare o sostituire la
batteria
• Eliminare l’ostruzione
• Collocare l’unità lontano
dal sole; ridurre l’intensità
luminosa dell’ambiente
Problema Causa Soluzione
Non è possibile attivare le
funzioni Sleep Timer e Timer
• Queste funzioni sono
disponibili solo se
l’orologio è attivato
• Attivare l’orologio
Le funzioni Sleep Timer e
Timer non funzionano come
prescritto oppure non
funzionano affatto, sebbene
siano state attivate
• Finestrelle trasmettitore o
ricevitore ad infrarossi
“IR” ostruite
• Ricevitore IR sui
componenti sotto i raggi
diretti del sole oppure
forte luce ambiente
• Eliminare l’ostruzione
• Collocare l’unità lontano
dal sole; ridurre l’intensità
luminosa dell’ambiente
Display difficile da leggere • Contrasto eccessivo
oppure non sufficiente
• La batteria è pressoché
scarica
• Regolare il livello di
contrasto del display
• Sostituire la batteria
Può succedere a volte che
non tutti i componenti
obbediscano il comando
Acceso/Spento, pertanto si
ha un asincronismo per la
condizione di
attesa/funzionamento
• Il telecomando è troppo
lontano
• Avvicinarlo
• Collegare il NAD-Link tra i
componenti
Page 49

TELECOMANDO DO SISTEMA NAD S70
Introdução . . . . . . . . . . . . . . . . . . . . . . . . . . . . . . . . . . . . . . . . . . . . . . . . .50
Instalação das pilhas . . . . . . . . . . . . . . . . . . . . . . . . . . . . . . . . . . . . . . . . .50
Programação do telecomando S70 . . . . . . . . . . . . . . . . . . . . . . . . . . . . . .51
Selecção dos Componentes
Activação e acerto do relógio
Ajuste do Contraste do Visor
Utilização do Telecomando NAD S70 . . . . . . . . . . . . . . . . . . . . . . . . . . . .52
Ligar/Desligar
Mute (Supressão do som) e Retroiluminação do Visor
Volume (Aumentar e Diminuir)
Menu Principal: Operação dos Componentes no Sistema
Menu Principal: Visualização das Regulações do Temporizador
Menu Principal: Activação e Visualização das Regulações do
Temporizador - função adormecer
Ajuste e Activação da Função Temporizador . . . . . . . . . . . . . . . . . . . . . .54
NAD-Link (Interligação NAD) . . . . . . . . . . . . . . . . . . . . . . . . . . . . . . . . . .55
Guia de Resolução de Problemas . . . . . . . . . . . . . . . . . . . . . . . . . . . . . . .56
49
P
Page 50

INTRODUÇÃO
Agradecemos o facto de ter comprado o Telecomando de Sistema NAD S70.
Através do S70 poderá controlar todos os componentes do seu sistema NAD da
Série Prateada. O S70 poderá ser facilmente programado por forma a adequar-se
especificamente ao seu sistema NAD da Série Prateada e proporciona ainda uma
série de outras funcionalidades adicionais tais como o relógio, a função
Adormecer e ligar/desligar o temporizador. Não obstante o facto do telecomando
S70 ter sido originalmente concebido para complementar os componentes NAD
da Série Prateada, funciona também com a grande maioria dos produtos NAD
controlados remotamente que foram lançados depois da Série C.
De modo a garantir um funcionamento duradouro, livre de quaisquer avarias,
recomendamos que evite a exposição do telecomando a choques ou ao contacto
com a água. No caso de entrar água para dentro do telecomando, retire as pilhas,
tal como se explica neste manual de instruções, e deixe que o aparelho seja
inspeccionado por um técnico do serviço de assistência qualificado antes de voltar
a tentar utilizá-lo. Utilize um pano macio e seco para limpar a superfície exterior
do telecomando. Se for caso disso, humedeça ligeiramente o pano em água com
sabão. Não utilize soluções que contenham benzol ou outros agentes voláteis.
Com umas pilhas novas, o telecomando NAD S70 funcionará até uma distância
máxima de 20 pés (7m) e com um ângulo de 45° para qualquer um dos lados, a
partir da linha imaginária que vai do telecomando aos painéis dianteiros do seu
sistema NAD da Série Prateada. Certifique-se de que o percurso entre os
componentes do seu sistema e a janela na parte dianteira do S70 se encontra
livre e desimpedido. Tenha atenção ao facto da iluminação forte e da exposição
directa aos raios solares poder afectar o alcance de controlo do S70.
INSTALAÇÃO DAS PILHAS
Recomenda-se a utilização de pilhas alcalinas para garantir uma vida útil máxima
do seu telecomando. Deverá colocar-se uma pilha de 9V (PP-3) no compartimento
das pilhas situado na parte traseira do Telecomando.
• Com a ajuda de uma chave de parafusos Phillips Nº 1, desaperte
cuidadosamente o parafuso da tampa do compartimento das pilhas.
• Levante ligeiramente a tampa na parte traseira e de seguida deslize-a para trás
por forma a que esta se desengate por si só do invólucro do S70.
• No caso de desejar substituir as pilhas, retire a pilha usada do dispositivo de
ligação da pilha por encaixe. Tenha cuidado para não esticar demasiado os fios
ligados ao dispositivo de ligação.
• Coloque a pilha nova no dispositivo de ligação por encaixe; certifique-se de
que a polaridade é a correcta e de que os fios ligados ao dispositivo de ligação
não ficam presos por debaixo ou por cima da própria pilha, assim que se
coloca a pilha de novo no interior do invólucro do telecomando.
• Deslize a tampa do compartimento das pilhas para trás e aperte o parafuso
por forma a fixá-la na respectiva posição. O parafuso deverá encaixar
facilmente na parte roscada, pelo que não deverá usar de força excessiva para
apertar o parafuso; caso contrário poderá danificar a rosca de aperto da
tampa no compartimento das pilhas do S70.
O baixo consumo de potência e a poupança de energia que caracterizam o S70
permitem que a pilha dure muito mais tempo. Assim que a notar que o raio de
alcance do S70 começa a diminuir, poderá ser necessário substituir a pilha.
NOTA: Tenha cuidado para não perder o parafuso de fixação da tampa do
compartimento das pilhas. No caso de perder o parafuso original, substitua-o
apenas por um parafuso que seja exactamente do mesmo tipo (bitola, 2mm,
comprimento de 8 a 10mm). A utilização de um tipo de parafuso inadequado
danificará definitivamente o invólucro do telecomando S70.
50
P
Page 51

PROGRAMAÇÃO DO TELECOMANDO S70
Selecção dos componentes
O telecomando NAD S70 poderá ser programado de modo a adequar-se na
perfeição ao seu sistema NAD da Série Prateada ao seleccionar-se apenas aqueles
componentes que estão presentes no seu sistema.
O NAD S70 é um telecomando “programável por menus”, em que muitos dos seus
botões incorporam uma série de funções, dependendo do Menu que se encontre
seleccionado. A posição no visor junto a estes botões indica quais as funções que se
encontram disponíveis. Em operação normal, o Menu Principal é o ponto de
partida. A Figura Nº 1 indica a forma como os menus se encontram organizados.
Pressione qualquer um dos botões (para além do botão Aumentar/Diminuir
Volume) para activar o visor. No menu Principal, cada uma das categorias dos
componentes da série Prateada encontra-se representada pelo seu próprio ícone
específico. Consulte a figura Nº 2.
Para programar o S70 para o seu sistema:
• A partir do Menu Principal e através do telecomando, pressione o botão junto
à posição no visor onde é exibida a indicação “SYSTEM”.
• O visor mudará para o Menu Programação do Sistema. Consulte igualmente a
figura Nº 3
• O visor exibirá diversos componentes tais como “AMP”, “PREAMP”,
“TUNER”, “CD” com os ícones correspondentes. Ao pressionar o botão junto
ao componente pretendido seleccionará ou desactivará um componente para
o Menu Principal. Uma marca indicativa junto ao componente assinalará se o
componente foi seleccionado ou não. Por exemplo, se o seu sistema
compreender o pré-amplificador NAD S100, o sintonizador S400 e o leitor de
CD S500, certifique-se de que as caixas correspondentes ao pré-amplificador,
sintonizador e leitor de CD se encontram assinaladas, e as outras não.
• Pressione o botão junto a “EXIT” na parte inferior do visor para abandonar e
guardar a programação e regressar ao Menu Principal.
NOTA: Na eventualidade do seu componente NAD da Série Prateada não se
encontrar disponível a partir do menu de Programação do Sistema, o seu S70 poderá
ser actualizado em muitos casos. Consulte o seu distribuidor autorizado NAD.
Activação e acerto do relógio
O Telecomando S70 possui igualmente um relógio incorporado, que lhe permite
aceder a outro tipo de funcionalidades extra tais como a função Temporizador ou
a função Adormecer. Para poder utilizar correctamente estas funções, necessita de
activar e acertar o relógio:
• A partir do Menu Principal, pressione o botão junto a “SYSTEM”.
• No Menu Programação do Sistema, active o relógio pressionando para o efeito
o botão junto a “CLOCK”; uma marca indicativa será exibida para assinalar
que o relógio foi activado.
• Pressione o botão junto a “CLOCK” durante cerca de 2 segundos.
• O Menu de Acerto do Relógio permite que se acerte o relógio. Utilize o
formato 24 horas para introduzir a hora correcta (por exemplo, 2:15PM
deverá ser introduzida para 14:15), pressionando para o efeito os botões junto
a “HR+” (ajustar para uma hora posterior), “HR-” (ajustar para uma hora
anterior), “MIN +” (aumentar os minutos), “MIN -” (diminuir os minutos).
Consulte igualmente a figura Nº 4.
• Pressione o botão junto a “EXIT” para regressar ao Menu de Programação do
Sistema.
• Pressione o botão junto a “EXIT” para regressar ao Menu Principal.
51
P
Page 52

NOTA: No caso de seleccionar a opção desactivar relógio (sem marca indicativa) a
partir do Menu de Programação do Sistema, então terá de acertar novamente o
relógio da próxima vez que o activar.
Ajuste do contraste do visor
O contraste do visor do telecomando NAD S70 poderá ser ajustado para
optimizar a legibilidade a partir de um amplo campo de visão. Os ajustamentos
de fábrica serão adequados na grande maioria das situações, mas em
circunstâncias excepcionais ou no caso da pilha começar a ficar muito fraca,
poderá ser necessário ajustar o contraste do visor.
• A partir do Menu Principal, pressione o botão junto a “SYSTEM”.
• Pressione o botão junto a “>” para aumentar o contraste ou o botão junto a
“<” para diminuir o contraste.
• Assim que se tiver conseguido ajustar o nível de contraste adequado,
pressione o botão junto a “EXIT” para regressar ao Menu Principal.
UTILIZAÇÃO DO TELECOMANDO NAD S70
O NAD S70 é um telecomando “programável por menus”, em que muitos dos seus
botões incorporam uma série de funções, dependendo do Menu que se encontre
seleccionado. A posição no visor junto a estes botões indica quais as funções que se
encontram disponíveis. Em operação normal, o Menu Principal é o ponto de
partida. A Figura Nº 1 indica a forma como os menus se encontram organizados.
Os botões Controle do Volume, Mute (Supressão do Som) e Ligar/Desligar irão
permitir executar sempre a mesma função, independentemente do Menu que se
encontrar seleccionado. O visor desligar-se-á automaticamente, passados 25
segundos depois do último botão ter sido pressionado, por forma a prolongar o
tempo de duração da pilha. Ao pressionar qualquer botão, para além dos botões
de controle do volume, activará de novo o visor.
On/Off (ligar/desligar)
Pressione este botão para passar os componentes do modo Operação para o
modo Stand-by e vice versa.
Uma vez que este é um comando alternante, de comutação entre o modo Operação
e o modo Stand-by, então o melhor será ligar todos os componentes para o modo
operação, por forma a que ao utilizar o botão Ligar/Desligar no telecomando S70,
todos os componentes fiquem sincronizados em termos de programação: Pressione
o botão alimentação situado no painel frontal de cada um dos componentes da
Série Prateada controlados remotamente de modo a que todos eles sejam ligados e
em modo Operação. Ao ligar o NAD-Link (interligação NAD) entre todos os
componentes, estes irão permanecer sincronizados uns com os outros, mesmo que
um dos componentes se encontre fora do raio de alcance do S70. Consulte
igualmente o capítulo NAD-Link (interligação NAD) abaixo apresentado.
A função
Ligar/Desligar encontra-se sempre disponível, independentemente de qual o
Menu em que o S70 se encontrar.
Mute (Supressão do som) e Retroiluminação do Visor
Pressione o botão Mute (supressão do som) para desligar temporariamente o som
do amplificador ou do pré-amplificador. Pressione de novo o botão Mute para
voltar a escutar o som.
O botão Mute também activa a retroiluminação do visor por forma a que o S70
também possa ser facilmente utilizado em ambientes escuros. Pressione o botão
Mute durante cerca de 2 segundos para activar a retroiluminação do visor. A luz
apagar-se-á automaticamente passados cerca de 15 segundos de maneira a
conservar a carga da pilha. As funções Mute (supressão do som ) e
Retroiluminação do Visor encontram-se sempre disponíveis, independentemente
do Menu em que o S70 se encontrar.
52
P
Page 53

Volume (Aumentar e Diminuir)
Pressione o botão inferior para diminuir o volume e o botão superior para
aumentar o volume. A utilização dos botões de Controlo do Volume não activa o
visor. A função Controle do Volume encontra-se sempre disponível,
independentemente do Menu em que o S70 se encontrar.
Menu Principal: Operação dos componentes do sistema
As restantes funções disponíveis do S70 dependem de qual dos Menus tiver sido
seleccionado. A partir do Menu Principal, (figura Nº 2) poderá seleccionar que
componente é que pretende operar, como por exemplo um amplificador,
sintonizador, leitor de CD, etc.. O S70 é fornecido com uma configuração padrão
que inclui uma selecção de Menus de Componentes, tais como o Componente
Amplificador, o Componente Pré-amplificador, o Componente Sintonizador, o
Componente Leitor de CD, etc.. Os diferentes comandos dos componentes incluídos
dentro destes Menus de Componentes correspondem aos que se encontram
presentes no painel dianteiro ou no telecomando original de cada componente.
• Seleccione o Menu Principal, pressionando para o efeito o botão junto a
“EXIT” caso se encontre em qualquer um dos outros menus.
• No Menu Principal, pressione o botão junto ao componente exibido que
pretende operar, por exemplo, “AMP”.
• O Menu de Componente apropriado e o respectivo ícone são exibidos na
parte superior do visor, neste caso será exibido o Menu “AMP”, com todas as
funções disponíveis. Pressione o botão junto à função desejada no visor. Ver
igualmente a figura Nº 5.
• Pressione de novo o botão junto a “EXIT” para regressar ao Menu Principal, ponto
a partir do qual poderá voltar a seleccionar um outro componente diferente.
Nalguns Menus de Componentes, a selecção de uma função conduzi-lo-á a outro
Menu de Componente. Por exemplo, ao pressionar o botão para CD no Menu de
Componente Amplificador comutará a entrada do amplificador para a entrada
CD e passar do menu Componente Amplificador para o menu de Componente
Leitor de CD. Estes botões podem ser reconhecidos através do ícone
correspondente ao Menu de Componente.
NOTA: Poderá ajustar e programar o Telecomando NAD S70 por forma a adequálo ao seu sistema NAD em especial. Consulte o capítulo “Programação do
Telecomando NAD S70”.
Menu Principal: Visualização das Regulações do Temporizador
O S70 poderá ser utilizado para ligar ou desligar o seu sistema a determinadas
horas específicas através da função Temporizador (Timer). Para ajustar, activar ou
desactivar a função Temporizador, consulte o capítulo “Ajuste e Activação da
Função Temporizador”.
Poderá visualizar as regulações do Temporizador e activá-lo a partir do Menu
Principal:
• Seleccione o Menu Principal pressionando para o efeito “EXIT” em qualquer
um dos outros menus.
• Pressione uma vez o botão junto a “TIMER”.
O visor exibirá agora as regulações de On Time (hora para ligar) Off Time (hora
para desligar) e qual o componente que foi seleccionado. O símbolo à
direita do relógio na parte superior do visor indica que a função Temporizador
se encontra activada. Consulte igualmente a Figura Nº 6.
• Pressione o botão junto a “EXIT” para regressar ao Menu Principal.
NOTA: A função Temporizador no Menu Principal apenas se encontrará
disponível caso ambas as funções Relógio e Temporizador tenham sido
seleccionadas (assinalado através da marca indicativa) no Menu de Programação
do Sistema. Para mais informações acerca de como activar e acertar o relógio,
consulte o capítulo “Programação do Telecomando S70”.
53
P
Page 54

Menu Principal: Activação e Visualização das Regulações do
Temporizador - função adormecer
Graças à função Adormecer no Temporizador, poderá programar o S70 para que
este desligue automaticamente o seu sistema depois de decorrido um número
pré-definido de minutos, passando-o ao modo Stand-by (desde que todos os
componentes se encontrem em modo Operação e não em modo Stand-by).
• Para activar a função Adormecer do Temporizador, pressione o botão junto a
“SLEEP”. O relógio no visor desaparece passando a ser exibido o tempo
programado para a função Adormecer do Temporizador. Encontra-se agora
activado e ajustado para 10 minutos. O símbolo à esquerda do relógio, na
parte superior do visor, indica que a função Adormecer se encontra agora
activada, independentemente de qual dos Menus foi seleccionado. Consulte
igualmente a figura Nº 7.
• Cada pressão consecutiva do botão aumentará o tempo para desligar o
sistema em incrementos de 10 minutos, até ao valor máximo de 90 minutos.
• Para cancelar o modo Adormecer, continue a pressionar o botão SLEEP até
que a indicação “OFF” seja exibida no visor.
NOTAS: Certifique-se de que o S70 se encontra localizado bem dentro do
alcance de todos os componentes, caso contrário a função Adormecer funcionará
de forma deficiente ou até mesmo não funcionar de todo.
A função Adormecer apenas se encontrará disponível caso a função Relógio
tenha sido seleccionada (assinalado através da marca indicativa) no Menu de
Programação do Sistema. Para mais informações acerca de como activar e acertar
o relógio, consulte o capítulo “Programação do Telecomando S70”.
AJUSTE E ACTIVAÇÃO DA FUNÇÃO TEMPORIZADOR
O S70 poderá ser utilizado para ligar ou desligar o seu sistema a determinadas
horas específicas através da função Temporizador (Timer). Assim sendo, poderá
utilizar o seu sistema como um relógio despertador, por exemplo. Antes de poder
ajustar a função Temporizador, é necessário activá-la em primeiro lugar:
• A partir do Menu Principal, pressione o botão junto a “SYSTEM”.
• No Menu de Programação do Sistema, pressione o botão junto a “TIMER”; uma
marca indicativa será exibida para assinalar que a função Temporizador foi
activada. Em todos os Menus, o símbolo à direita do relógio, na parte superior
do visor, indica que a função Temporizador se encontra activada. Para desactivar a
função, pressione de novo o botão de modo a que a marca indicativa desapareça.
• Pressione o botão junto a “EXIT” para regressar ao Menu Principal.
54
P
Page 55

Para ajustar o temporizador:
• A partir do Menu Principal, pressione o botão junto a “SYSTEM”.
• No Menu de Programação do Sistema, pressione o botão junto a “TIMER”
durante cerca de 2 segundos.
• No Menu de Programação do Temporizador, pressione o botão junto a “ON”
para acertar a hora a que pretende que o sistema comece a funcionar. Utilize
o formato 24 horas para introduzir a hora correcta (por exemplo, 2:15PM
deverá ser introduzida para 14:15), pressionando para o efeito os botões junto
a “HR+” (ajustar para uma hora posterior), “HR-” (ajustar para uma hora
anterior), “MIN +” (aumentar os minutos), “MIN -” (diminuir os minutos).
Consulte igualmente a figura Nº 8.
• Pressione o botão junto a “OFF” para programar a hora a que pretende que o
sistema se desligue, utilizando para o efeito os botões de acerto da hora da
forma acima descrita.
• Pressione o botão junto a “EXIT” para regressar ao Menu de Programação do
Sistema.
• Pressione o botão junto a “EXIT” para regressar ao Menu Principal.
• Poderá, em qualquer altura, verificar as regulações e ajustes do Temporizador
a partir do Menu Principal; consulte o capítulo “Utilização do Telecomando do
Sistema NAD S70”, secção “Menu Principal: Visualização das Regulações do
Temporizador”.
NOTAS: Certifique-se de que o S70 se encontra localizado bem dentro do
alcance de todos os componentes, caso contrário a função Temporizador
funcionará de forma deficiente ou até mesmo não funcionar de todo.
A função Temporizador apenas se encontrará disponível caso a função Relógio
tenha sido seleccionada (assinalado através da marca indicativa) no Menu de
Programação do Sistema. Para mais informações acerca de como activar e acertar
o relógio, consulte o capítulo acima apresentado “Programação do Telecomando
S70”.
NAD-LINK (INTERLIGAÇÃO NAD)
Muitos componentes NAD caracterizam-se por possuírem terminais NAD-Link
(interligação NAD). As tomadas RCA existentes no painel traseiro destes
componentes, assinaladas como “NAD-Link In” (entrada da interligação NAD) e
“Out” (saída) permitem o controlo remoto centralizado dos componentes quando
estes se encontram ligados uns aos outros.
Não é obrigatório ligar as NAD-Link (interligações NAD) entre os diversos
componentes para que o S70 possa funcionar, mas na verdade aumentará a
consistência e performance global dos comandos de controlo remoto.
Ligue o terminal “NAD-Link Out” (saída) de um componente ao terminal “NADLink In” (entrada) no outro componente. A partir deste último, ligue o terminal
“NAD-Link Out” ao terminal “NAD-Link In” do componente seguinte, e assim
por diante, por forma a que as tomadas NAD Link de todo o sistema fiquem
ligadas entre si em série, sempre IN (entrada) para OUT (saída) e OUT para IN.
Não ligue o terminal “NAD Link-Out” do último componente ao terminal “NADLink In” do primeiro componente da cadeia de ligação em série.
55
P
Page 56

56
P
GUIA DE RESOLUÇÃO DE PROBLEMAS
O telecomando funciona
intermitentemente ou então
não funciona de todo
• Pilha gasta ou dispositivo
de ligação por pressão
incorrectamente ligado
• Janelas do receptor ou do
transmissor IR obstruídas
• Receptor IR nos
componentes exposto a
raios solares ou a uma luz
ambiente muito intensa
• Verifique ou substitua a
pilha
• Retire a obstrução
• Coloque a unidade num
local em que não fique
sujeito à exposição directa
aos raios solares, reduza a
intensidade da luz
ambiente
Problema Causa Solução
Não se conseguem activar as
funções Temporizador e
Temporizador-Adormecer
• Estas funções apenas se
encontram disponíveis
caso o relógio esteja
activado
• Active o relógio
Apesar de activadas, as
funções Temporizador e
Temporizador-Adormecer
não funcionam
adequadamente ou não
funcionam de todo
• Janelas do receptor ou do
transmissor IR obstruídas
• Receptor IR nos
componentes exposto a
raios solares ou a uma luz
ambiente muito intensa
• Retire a obstrução
• Coloque a unidade num
local em que não fique
sujeito à exposição directa
aos raios solares, reduza a
intensidade da luz
ambiente
É difícil ler a informação no
visor
• Contraste demasiado
pequeno ou demasiado
grande
• Pilha quase gasta
• Ajuste o nível de contraste
do visor
• Substitua a pilha
Por vezes nem todos os
componentes respondem ao
comando ligar/desligar,
fazendo com que estes
fiquem dessincronizados no
modo operação/stand-by
• Telecomando está a uma
distância superior ao raio
de alcance
• Reduza a distância de
operação
• Ligue os terminais NADLink entre os
componentes
Page 57

NAD S70 SYSTEMFJÄRRKONTROLL
Introduktion . . . . . . . . . . . . . . . . . . . . . . . . . . . . . . . . . . . . . . . . . . . . . . . .58
Isättning av batteriet . . . . . . . . . . . . . . . . . . . . . . . . . . . . . . . . . . . . . . . .58
Inställning av S70 fjärrkontrollen . . . . . . . . . . . . . . . . . . . . . . . . . . . . . . .58
Apparatval
Aktivering och inställning av klockan
Justering av kontrast
Hur man använder NAD S70 fjärrkontrollen . . . . . . . . . . . . . . . . . . . . . .59
On/Off
Mute & Display-belysning
Volume (Up & Down)
Huvudmeny: Styrning av apparater i anläggningen
Huvudmenyn: Kontrollera klockstyrningens inställning
Huvudmenyn: Aktivering och kontroll av insomningsautomatikens status
Inställning och aktivering av klockstyrningsfunktionen . . . . . . . . . . . . .61
NAD-Link . . . . . . . . . . . . . . . . . . . . . . . . . . . . . . . . . . . . . . . . . . . . . . . . . .62
Felsökning . . . . . . . . . . . . . . . . . . . . . . . . . . . . . . . . . . . . . . . . . . . . . . . . .63
57
S
Page 58

INTRODUKTION
Tack för att ni införskaffat NAD S70 Systemfjärrkontroll. Med S70 kan du
kontrollera alla delar av din NAD Silver Serie systemet. S70 kan lätt anpassas så att
det passar för just ditt NAD Silver Serie system och ger utökade funktioner som
klocka och klockstyrning med insomningsfunktion.
Även om S70 främst är avsedd att komplettera NADs Silverserie, fungerar den
också med de flesta fjärrstyrda apparaterna ur NADs C-serie.
Utsätt inte fjärrkontrollen för stötar eller slag och undvik kontakt med vatten. Om
vatten skulle tränga in i fjärrkontrollen skall du plocka ur batteriet snarast. Innan du
använder den igen bör du lämna in den hos en kvalificerad tekniker. Om
fjärrkontrollen behöver rengöras skall den torkas av torr, ren trasa. Om nödvändigt
kan trasan fuktas med vatten och lite tvål. Undvik att använda starka lösningsmedel.
Räckvidden med nya batterier är upp till sju meter och med en vinkel på 45
grader på var sida om apparaternas framsida. Det måste vara fri sikt mellan
fjärrkontrollen och apparaterna som skall styras. Tänk på att starka ljuskällor och
direkt solljus kan påverka räckvidden.
ISÄTTNING AV BATTERIET
Vi rekommenderar Alkaliska batterier för maximal livslängd. Ett 9V (PP-3) batteri
skall sättas i i batterifacket i fjärrkontrollens nederdel på baksidan.
• Använd en stjärnmejsel (Phillips Nr.1). Skruva ur skruven försiktigt .
• Lyft locket lite grand i bakändan och drag det utåt.
• När du byter batteri kopplar du bort det gamla batteriet från kontakterna. Se
till att du inte sträcker kablarna till batterikontakten för mycket, då kan
apparaten skadas.
• Sätt kontakten på det nya batteriet och se till att kablarna kommer i kläm när
du sätter i batteriet i batterifacket på fjärrkontrollen.
• Sätt tillbaka locket och skruva fast det. Se till så att skruven kommer i rätt och
att det är lätt att skruva i den. Om skruven kommer snett och /eller man
brukar våld när man skruvar i den kan gängorna skadas.
S70 fjärrkontrollen har mycket låg effektförbrukning och energisparande
funktioner vilket innebär att batteriförbrukningen är låg. Om du märker att
räckvidden på fjärrkontrollen minskar är det dags att byta batteriet.
OBSERVERA: Var noga med att ta till vara skruven när du byter batteri. Om du
skulle tappa bort den får den bara ersättas med en likadan (M2 gänga, 8 till
10mm lång). Om man använder någon annan typ av skruv kommer gängorna att
skadas för all framtid.
INSTÄLLNING AV S70 FJÄRRKONTROLLEN
Apparatval
NAD S70 kan anpassas så att den motsvarar just din NAD Silver Serie anläggning
genom att välja de apparater som ingår I din anläggning.
NAD S70 är en menystyrd fjärrkontroll där många knappar varierar I funktion
beroende på vilken meny som används. En liten ikon i displayen bredvid varje
knapp visar vilken funktion knappen har vid varje meny. I normalläge visas
huvudmenyn som startläge. Figur Nr.1 visar hur menyerna är organiserade.
58
S
Page 59

Tryck på någon knapp (utom volymknapparna) för att aktivera displayen. I
huvudmenyn visas varje kategori Silver Serie apparater med sin egen ikon.
Se figur Nr.2 för att ställa in S70 för din anläggning:
• I huvudmenyn på fjärrkontrollen trycker du på knappen vid texten märkt
“SYSTEM” i displayen.
• Displayen ändras till Systeminställningsmenyn. Se även figur Nr.3
• Displayen visar nu flera olika komponenter, som t.ex. “AMP”, “PREAMP”,
“TUNER”, “CD” med motsvarande ikoner. Genom att trycka på knappen
bredvid ikonen kan du välja eller välja bort någon komponent från
huvudmenyn. En bock bredvid ikonen visar om komponenten valts. Om ditt
system består av en NAD S100 förförstärkare, S400 radiodel och S500 CD
spelare se då till att symbolerna för förförstärkare (pre-amp) och radiodel
(tuner) och CD-spelare är markerade och inga andra.
• Tryck på knappen bredvid “EXIT” längst ner för att spara dina inställningar och
återgå till huvudmenyn.
OBSERVERA: Om du har en produkt i NAD Silver Serie som ej finns med i menyn
kan fjärrkontrollen I de flesta fall uppdateras hos din NAD handlare.
Aktivering och inställning av klockan
S70 fjärrkontrollen har även en inbyggd klocka vilket ger dig möjligheten till
klockstyrning (timer) och insomningfunktion (sleep timer). För att använda dessa
funktioner behöver du aktivera och ställa den inbyggda klockan:
• I huvudmenyn trycker man på knappen bredvid “SYSTEM”.
• I systeminställningsmenyn aktiverar man klockan genom att trycka på knappen
bredvid “CLOCK”, en bock visas för att visa att klockan aktiverats.
• Tryck på knappen vid “CLOCK” i 2 sekunder
• I inställningsmenyn för klockan kan man ställa klockan. Klockan fungerar
enligt normal 24 timmars visning. Ställ klockan med knappen vid “HR+” (för
att justera timmar uppåt), “HR-” (för att justera timmar nedåt), “MIN +” (för
att justera minuter uppåt), “MIN -” (för att justera minuter nedåt). Se även
figur nr.4.
• Tryck på knappen vid “EXIT” för att återgå till systeminställningsmenyn.
• Tryck på knappen “EXIT” för att återgå till huvudmenyn.
OBRESERVERA: Om du väljer att avmarkera (ingen bock) i systemmenyn kommer
du att behöva ställa klockan igen nästa gång du aktiverar den
Justering av kontrast
Kontrasten I displayen på NAD S70 kan justeras så att man får bästa läsbarhet ifrån
ens egen synvinkel. Fabriksinställningen kommar att vara den bästa för de flesta
förhållanden men det kan finnas tillfällen där en annan inställning kan vara
önskvärd, som när batteriet blir svagare, som man kan önska en annan inställning.
• I huvudmenyn trycker du på knappen vid “SYSTEM”.
• Tryck på knappen “>” för att öka kontrasten eller “<” för att minska den.
• När du har den bästa kontrasten trycker du på knappen vid “EXIT” för att
återgå till huvudmenyn.
HUR DU ANVÄNDER NAD S70 FJÄRRKONTROLLEN
NAD S70 är en menystyrd fjärrkontroll där många knappar varierar I funktion
beroende på vilken meny som används. En liten ikon i displayen bredvid varje
knapp visar vilken funktion knappen har vid varje meny. I normalläge visas
huvudmenyn som startläge. Figur Nr.1 visar hur menyerna är organiserade.
Volymkontrollen, Mute och On/Off knapparna fungerar alltid på samma sätt
oavsett vilken meny som valts.Displayen stänger alltid av sig själv efter 25
sekunder efter det att den senaste knappen tryckts in. Detta är för att spara på
batteriet. För att sätta på displayen igen trycker du på någon knapp förutom
volymknapparna.
59
S
Page 60

On/Off
Tryck på denna knapp för att stänga av (stand-by) eller sätta på en apparat och
vice versa.
Om du sätter på alla apparaterna så att de är påslagna kan du styra samtliga
apparater så att de sätts på eller stängs av med en knapptryckning. Om du
dessutom kopplar ihop alla apparaterna med NAD-Link kommer det att kunna
slås av och på även om någon av apparaterna är utom räckhåll för fjärrkontrollen.
Se även kapitlet “NAD-Link” längre bak i manualen. Denna funktion är alltid
tillgänglig oavsett I vilken meny som fjärrkontrollen är i.
Mute & Display-belysning
Tryck på Mute knappen för att stänga av ljudet tillfälligt. Tryck på Mute igen för
att sätta på ljudet igen.
Denna knappen sätter också på belysningen I fjärrkontrollen så att den kan
användas i mörker. För att sätta på belysningen trycker du på Mute i två sekunder.
Belysningen stängs automatiskt efter 15 sekunder för att spara på batteriet. Dessa
funktioner är alltid tillgängliga oavsett I vilken meny som fjärrkontrollen är i.
Volume (Up & Down)
Tryck på den nedre knappen för att sänka volymen och den övre för att höja den.
Displayen aktiveras inte av att man använder volymknapparna.
Denna funktion är alltid tillgänglig oavsett I vilken meny som fjärrkontrollen är i.
Huvudmeny: Styrning av apparater i anläggningen
Övriga funktioner på S70 beror på vilken meny som valts. I huvudmenyn (figur nr.
2) kan man välja vilken apparat som skall styras. NAD S70 levereras med ett urval
av apparatmenyer som förstärkare, förförstärkare, radiodel CD-spelare etc.
Kommandona från dessa menyer motsvarar samma kommandon på apparaternas
egna fjärrkontroller.
• Välj huvudmenyn genom att trycka på knappen vid “EXIT” i någon av de
andra menyerna.
• I huvudmenyn väljer du nu vilken apparat du vill styra genom att trycka på
knappen bredvid symbolen, t.ex. “AMP” (förstärkare).
• Apparatens meny visas med dess ikon högst upp, “AMP” menyn I detta
exempel. Tryck på knapparna bredvid ikonerna för de funktioner du vill
använda. Se även figur nr. 5.
• Tryck på “EXIT” igen för att återgå till huvudmenyn så att du kan välja en
annan apparat.
I vissa apparatmenyer kommer en knapptryckning att växla meny till en annan
meny. Om man t.ex. trycker på CD i förstärkarmenyn kommer förstärkarens CDingång att kopplas in och menyn för CD-spelaren visas i menyn. Dessa knappar
kan lätt kännas igen på ikonerna i apparatmenyn.
OBSERVERA: Du kan konfigurera NAD S70 att passa till just din NAD
anläggning. Se kanpitlet “Inställning av NAD S70 fjärrkontroll”.
Huvudmenyn: Kontrollera klockstyrningens inställning
S70 kan användas till att sätta på och stänga av anläggningen vid bestämda
klockslag med klockstyrningsfunktionen. För att ställa in, aktivera eller de-aktivera
klockstyrningsfunktionen, se kapitlet “inställning och aktivering av Timern”.
Du kan kontrollera Timer status och aktivering ifrån huvudmenyn:
• Välj huvudmenyn genom att trycka “EXIT” i någon annan meny.
• Tryck på knappen vid “TIMER” en gång.
Displayen visar nu tid för påslag och tid för avstängning och vilken apparat som
valts. Symbolen till höger om klockan överst i displayen visar att Timern är
aktiverad. Se även figur nr. 6.
• Tryck på “EXIT” för att återgå till huvudmenyn.
60
S
Page 61

OBSERVERA: klockstyrningsfunktionenen i huvudmenyn är bara tillgänglig om
både klockan och Timern valts (visas med en bock i kanten) i systemmenyn. Se
även kapitlet “Inställning av S70 fjärrkontrollen” för information om hur man
aktiverar och ställer in klockan.
Huvudmenyn: Aktivering och kontroll av insomningsautomatikens status
Med insomningsautomatiken kan man ställa in S70 så att den stänger av
anläggningen efter en inställd tid (förutsatt att alla apparater var påslagna från början).
• För att aktivera insomningsautomatiken trycker du på knappen vid “SLEEP”.
Klockan i displayen ändras så att visa inställd tid för insomningsautomatiken.
Nu är den aktiverad och inställd på 10 minuter. Symbolen visas till vänster
om klockan överst i displayen och visar att insomningsautomatiken är
aktiverad, oavsett vilken meny som valts. Se även figur nr. 7.
• Varje ytterliggare knapptryckning lägger till tio minuter för
insomningsautomatiken upp till nittio minuter.
• För att koppla ur insomningsautomatiken trycker du på SLEEP knappen tills
“OFF” visas i displayen.
OBSERVERA: Se till att S70 är placerad inom räckhåll för alla apparaterna, annars
fungerar inte insomningsautomatiken ordentligt eller inte alls.
Insomningsautomatiken är bara tillgänglig om klockan valts (visas med en bock i
kanten) i systemmenyn. Se även kapitlet “Inställning av S70 fjärrkontrollen” för
information om hur man aktiverar och ställer in klockan.
INSTÄLLNING OCH AKTIVERING AV
KLOCKSTYRNINGSFUNKTIONEN
NAD S70 kan användas för att sättas på och stänga av din anläggning vid
önskade tider med den inbyggda klockstyrningen. På detta sätt kan man använda
sin anläggning som väckarklocka exempelvis. Innan klockstyrningen kan användas
måsta den aktiveras:
• I Huvudmenyn trycker du på “SYSTEM” knappen.
• I inställningsmenyn för anläggningen trycker du på “TIMER” knappen, en
bock i kanten visar att funktionen är aktiverad. I alla menyer visar
symbolen till höger om klockan att timern är aktiverad. För att de-aktivera
trycker du på knappen igen så att bocken försvinner.
• Tryck på “EXIT” knappen för att återgå till huvudmenyn.
För att ställa in timern:
• I Huvudmenyn trycker du på “SYSTEM” knappen
• I inställningsmenyn för anläggningen trycker du på “TIMER” knappen i 2
sekunder.
• I inställningsmenyn för timern trycker du på knappen vid “ON” för att ställa in
tiden du vill att apparaten skall sättas på. Fjärrkontrollen använder 24timmarsformat. Ställ klockan med knappen vid “HR+” (för att justera timmar
uppåt), “HR-” (för att justera timmar nedåt), “MIN +” (för att justera minuter
uppåt), “MIN -” (för att justera minuter nedåt). Se även figur nr.8.
• Tryck på knappen vid “OFF” för att ställa in avstängningstiden på samma sätt
som ovan.
• Tryck på knappen “EXIT” för att återgå till inställningsmenyn för
anläggningen.
• Tryck på knappen “EXIT” för att återgå till huvudmenyn.
• Du kan kontrollera inställning på timern och status ifrån huvudmenyn, se
kapitlet “ Hur du använder NAD S70 fjärrkontrollen”, avsnittet “Huvudmenyn:
Kontrollera klockstyrningens inställning”.
OBSERVERA: Se till att S70 är placerad inom räckhåll för alla apparaterna, annars
fungerar inte klockstyrningen ordentligt eller inte alls.
61
S
Page 62

Klockstyrningen är bara tillgänglig om klockan valts (visas med en bock i kanten) i
systemmenyn. Se även kapitlet “Inställning av S70 fjärrkontrollen” för information
om hur man aktiverar och ställer in klockan.
NAD-LINK
Många NAD apparater har NAD-Link systemet. RCA-kontakterna på baksidan av
de apparaterna märkta “NAD-Link In” och “Out” gör att man kan skicka
fjärrkontrollkommandon mellan apparater med denna koppling.
Anslutning av NAD-Link mellan de olika apparaterna är inte nödvändigt för att
S70 skall fungera men det förbättrar funktionen och tillförlitligheten att
fjärkontrollkommandona når alla apparaterna.
Anslut “NAD-Link Out” från en apparat till “NAD-Link In” på nästa apparat.
Fortsätt så mellan alla apparaterna så att alla kopplas ihop. Koppla alltid IN till
OUT och OUT till IN. Anslut inte “NAD Link-Out” från den sista apparaten I
kedjan till den första apparatens “NAD-Link In”.
62
S
Page 63

63
S
FELSÖKNING
Fjärrkontrollen fungerar
sporadiskt eller inte alls.
• Batteriet slut eller
kontakten inte påsatt
ordentligt
• IR-sändar eller mottagarfönstret
blockerat
• IR-mottagaren på
apparaten utsatt för direkt
solljus eller skarp
belysning.
• Kontrollera eller byt
batteri
• Flytta hindret
• Flytta apparaten bort från
solljuset eller rikta bort
belysningen.
Problem Orsak Lösning
Insomningsautomatiken och
klockstyrningsfunktionen
kan inte aktiveras
• Dessa funktioner är bara
åtkomliga om klockan
aktiverats.
• Aktivera klockan
Även om klockan är
aktiverad fungerar inte
klockstyrningsfunktionerna.
• IR-mottagaren eller sändaren blockerade
• IR-mottagarna på
apparaterna är utsatta för
direkt solljus eller skarp
belysning
• Flytta hindret
• Flytta apparaten bort från
solljuset eller rikta bort
belysningen
Displayen är svår att läsa • För lite eller för mycket
kontrast
• Batteriet nästan slut
• Justera displayens kontrast
l
• Byt batteriet
Ibland svarar inte alla
apparaterna på On/Off så att
de inte är synkroniserade för
av och påslag
• Fjärrkontrollen är på
gränsen av sin räckvidd
• Minska avståndet till
fjärrkontrollen
• Anslut NAD-Link mellan
komponenterna
Page 64

www.NADelectronics.com
©2000 NAD ELECTRONICS INTERNATIONAL
All rights reserved. No part of this publication may be reproduced, stored or transmitted
in any form without the written permission of NAD Electronics International
S70 Manual 05/00 Printed in Hong Kong
 Loading...