


USER GUIDE
GUIDE DE L’UTILISATEUR
EN FR
12-CUP FOOD PROCESSOR ROBOT CULINAIRE DE 12 TASSES
043-2214-8
If you have any questionswww.ormoulinexconcerns.pleaseca call our Moulinex toll-free number at 1-888-670-6681.
Si vous avez des questions des préoccupations, veuillez appeler notre numéro sans frais Moulinex au 1-888-670-6681.


contents
04 important safeguards
06 product diagram
09 operating your food processor
17 care and cleaning
19 recipes
contenu
24 importantes mises en garde
26 pièces et caractéristiques
29 fonctionnement du robot culinaire
37 entretien et nettoyage
39 recettes

EN IMPORTANT SAFEGUARDS
When using electrical appliances, basic safety precautions should always be followed, including the following:
1.Read all instructions.
2.To protect against risk of electrical shock, DO NOT put base, cord, or plug in water or other liquid.
3.Close supervision is necessary when any appliance is used by or near children.
4.Turn unit off and unplug from outlet when not in use, before put ting on or taking off parts, and before cleaning. To disconnect, turn unit off, grasp plug, and pull out from wall outlet.
Never yank on cord.
5.Avoid contact with moving parts.
6.DO NOT operate any appliance with a damaged cord or plug or after the appliance malfunctions or has been damaged in any manner. Return the appliance to an authorized service facility for examination, repair, or electrical/mechanical adjustment.
7.The use of attachments not recommended or sold by the appliance manufacturer may cause fire, electric shock, or injury.
8.DO NOT use outdoors.
9.DO NOT let cord hang over the edge of a table or counter or touch hot surfaces.
10.Keep hands and utensils away from moving blades or Discs while the unit is processing food, to prevent the possibility of severe personal injury or damage to the food processor. A scraper may be used but must be used only when the food processor is not
4

EN
running.
11.Blades are sharp. Handle carefully.
12.Be sure to insert or remove Multipurpose/Chopping blade and Slice/Shred Disc by using hubs to avoid injury.
13.To avoid injury, never place Multipurpose/Chopping blade or Slice/ Shred Disc on Base without first putting Bowl properly in place. Make sure motor, Disc, and/or Multipurpose/Chopping blade have stopped completely before removing cover.
14.Be certain cover is securely locked in place before operating appliance.
15.Never feed food into chute by hand. Always use Food Pusher.
16.DO NOT operate this appliance in the presence of explosive and/or flammable fumes.
17.DO NOT attempt to defeat the cover interlock mechanism.
18.DO NOT use the food processor to process hot liquids
19.DO NOT leave the appliance unattended while it is running.
20.Keep fingers out of discharge opening.
21.This appliance has Overload Protection. When working for too long, the motor will stop working automatically, protecting the appliance from overheating by cooling it down. The appliance will work again when the motor cools down for about 5 minutes.
22.This appliance is for Household Use Only.
Toll free number for Moulinex: 1-888-670-6681
5

EN PRODUCT DIAGRAM
Small food pusher
Big food pusher
Food chute


 Bowl cover
 Bowl
Bowl
Base
1 |
2 |
3 |
|
|
|
1. |
Big food pusher |
|
|
2. |
Small food pusher |
4 |
|
3. |
Disc Stem |
|
4. |
Thin Slice/Shred |
|
|
|
||
|
|
5. |
Multipurpose/Chopping blade |
|
|
6. |
Dough Blade |
|
|
7. |
Spatula |
5 |
6 |
7 |
|
6

EN
Control Panel
|
|
|
1. |
Pulse |
|
|
|
2. |
On |
Pulse |
On |
Off |
3. |
Off |
|
|
Pulse
Pulse button must be pressed and held for unit to operate. When released, unit will stop. Use PULSE for short
processing tasks, such as chopping nuts, raw meats, or vegetables. This lets you check processed results and control the size.
On
When this button is pressed, unit runs continuously until OFF button is pressed.
Off
Processor should always be left in OFF position when unit is not in use.
PREPARING TO USE YOUR FOOD PROCESSOR
BEFORE FIRST USE
•When unpacking the product and removing packing material, handle the Multipurpose/Chopping blade, and Slice/Shred Disc carefully; they are very sharp.
•Wash all parts except the Base in hot, soapy water. Rinse them dry. These parts can also be placed in the dishwasher. Be sure
7

EN
to read this Use & Care Book, paying special attention to the sections on “How to Use” and “Care and Cleaning” to learn the correct methods for taking the unit apart and cleaning.
Note: DO NOT attempt to chop ice in this food processor; it will damage container and dull the Multipurpose/Chopping blade. This unit will not whip cream, beat egg whites to a desirable volume, grind coffee beans or spices with high oil content, or slice or shred hard-cooked eggs, marshmallows, or soft cheeses.
Important: For your protection, this unit has an interlock system. The processor won’t operate unless the bowl is properly locked onto base and cover is properly locked onto the bowl. Be sure to attach the bowl to the base before attaching the food chute Lid on the bowl. Lid should be in the lock position. DO NOT attempt to operate the unit without the bowl lid, bowl and food chute Lid being correctly in place. Be sure base is on a flat, dry and clean surface before you begin processing.
8
OPERATING YOUR FOOD PROCESSOR |
|
EN |
|
||
HOW TO ASSEMBLE THE BOWL |
|
|
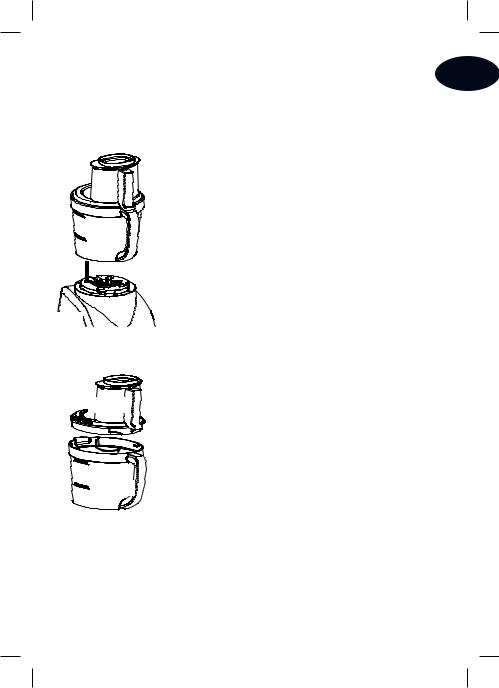
Fig.1
Bowl
Align the base and bowl as illustrated in Fig. 1, then turn the bowl counterclockwise until it clicks into the base.
Note: There is only one position for the bowl to lock onto the base. The food processor will not operate unless the bowl is securely locked onto the base.
Base


HOW TO LOCK THE COVER
Cover
Bowl
Fig.2
Open the food chute lid (see “How to open food chute lid”). Place the cover onto the bowl, align the mark on the cover, twist the cover counterclockwise towards until it clicks into the bowl, as illustrated in the Fig. 2.
Note: When cover is locked into position, the safety mechanism on the cover and bowl will align. The food processor will not operate unless the cover is securely locked onto the bowl.
9
EN
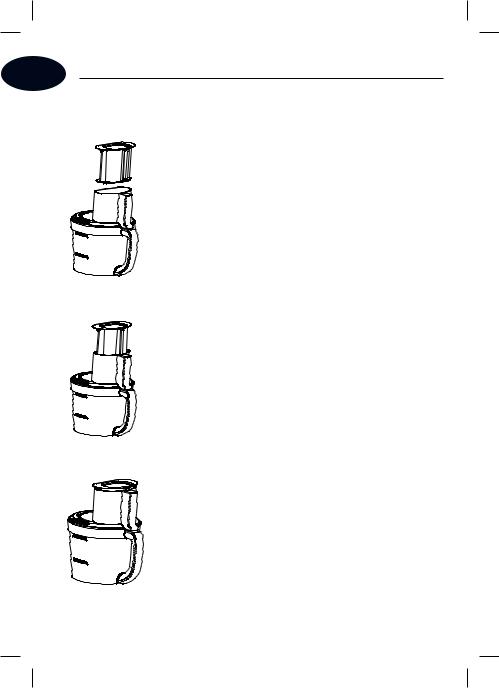
THE IMPORTANCE OF BIG FOOD PUSHER
Put the big food pusher into the food chute. As illustrated in Fig. 3.
Fig.3
When processing large food, the big food pusher has to be pushed into the food chute. As illustrated in Fig. 4.
Note: The food processor will not operate unless the big food pusher is latched onto the food chute.
Fig.4
When processing long and thin food, the big food pusher has to be completely pushed into
the food chute before putting foods into food
chute. As illustrated in Fig. 5.
Note: The food processor will not operate unless the big food pusher is latched onto the food
chute.
Fig.5
10
EN
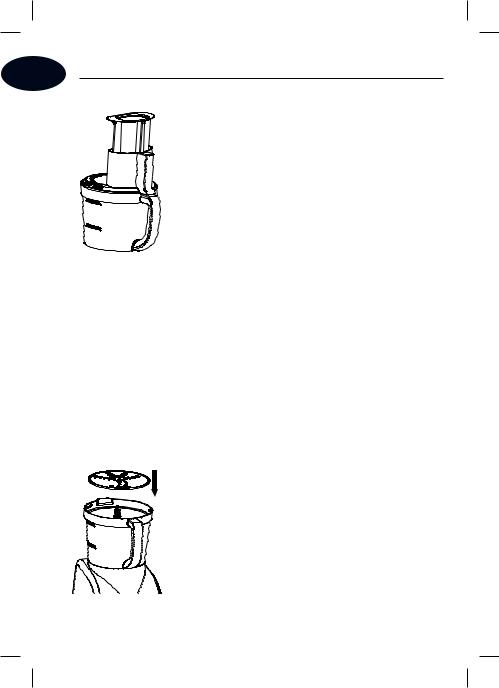
HOW TO CHOP
Note: Make sure the unit is turned OFF and unplugged before using. Process the food into 1 inch (2.5cm) pieces.
Chopping
 Blade
Blade

Fig.6
1.Lock the bowl onto base. (See “How to assemble the bowl ”.)
2.Grasp the Multipurpose/Chopping blade by its center shaft and slide it down onto the center post. (Fig. 6)
3.Place food into bowl.
4.Lock cover onto bowl. (See “How to lock the cover”.)
5.Push the big food pusher into the food chute. (See “The Importance of Big Food Pusher”)
6.Plug the cord into an electric outlet. .
7.Push the ON button to run constantly, or for better control over consistency, push and hold PULSE button. When pulsing, hold the PULSE position for about 2-3 seconds, check result, and repeat for desired consistency.
8.When finished processing food, release from the PULSE position, or if you were using continuous ON, press OFF, allow the chopping
11

EN
blade to stop rotating.
Note: Before opening the Bowl Cover Assembly, press the OFF Button and unplug the cord.
9.To remove bowl cover, unlock by turning clockwise until cover unlatches, and lift off.
10.Take out food pusher, then twist the food chute/cover towards “UNLOCK”to remove the cover.
11.Grasp the Chopping Blade by its shaft and remove. Unlock the bowl by turning it clockwise towards the UNLOCK, and lift it off. Empty the processed food.
CAUTION Chopping Blade is very sharp, must be careful when handling.
HOW TO SLICE OR SHRED
CAUTION Make sure the unit is turned OFF and unplugged before using. NEVER use your hand instead of Food Pusher to push food directly. The use of heavy pressure will not speed up operation.
DO NOT use the processor continuously for more than 3 minutes at a time. Please allow a rest period of 5 minutes between working cycles.
Disc 
 Fig.7
Fig.7
12

EN
PROCESS LARGE FOOD
1.Lock the bowl onto base. (see “How to assemble the bowl”.)
2.Slide the disc stem down onto the center post of the base, then grasp the slice/shred disc (CAUTION It’s very sharp! Be careful when handling!), with the desired side facing up for
either slicing or shredding, push it down onto the disc stem (Fig.7).
3.Lock cover onto bowl.
 Large foods
Fig.8
4.Fill the food chute with large food such as potatoes, chunks of cabbage, green peppers, and whole tomatos (Fig. 8). Push the big food pusher into the Food Chute, making sure the big food pusher latched into the food chute. (See “The Importance of Big Food Pusher”).
5.Plug the cord into an electrical outlet.
13
EN
Fig.9
6.Firmly press on the ON speed button, then press down lightly but f irmly on food pusher. (Fig. 9)
7.When food chute is empty, press OFF and allow the disc to stop rotating.
CAUTION Before opening the Bowl Cover Assembly, turn the unit OFF and unplug
TO PROCESS LONG AND THIN FOODT
1.Lock the bowl onto base. (See “How to assemble the bowl”.)
Disc
 Fig.10
14
 Loading...