

Page 1

MOTORAZR
TM
V3m
Page 2

Page 3

HELLOMOTO
Introducing your new MOTO
Smart/
Speaker-
phone
Key
Volume Keys
Left Soft Key
Perform function
in lower left
display.
Camera Key
Send Key
Make &
answer calls.
Scroll up, down,
right, & left.
040128o
Center Select Key
Open main
menu, select
highlighted option.
RAZRTMV3m wireless phone. Here’s a quick anatomy lesson.
Voice Key
Create voice
records & voice
dial names.
Right Soft Key
Perform function
in lower right
display.
Clear Key
Power/End Key
Turn phone
on/off, end calls,
exit menus.
Camera Lens
Smart/
Speaker-
phone Key
Insert charger
& phone
accessories.
View incoming
call information,
use as camera
viewfinder when
flip is closed.
1
Page 4

Motorola, Inc.
Consumer Advocacy Office
1307 East Algonquin Road
Schaumburg, IL 60196
www.hellomoto.com
1-800-331-6456 (United States)
1-888-390-6456 (TTY/TDD United States for hearing
impaired)
1-800-461-4575 (Canada)
Certain mobile phone features are dependent on the
capabilities and settings of your service provider’s
network. Additionally, certain features may not be
activated by your service provider, and/or the provider's
network settings may limit the feature’s functionality.
Always contact your service provider about feature
availability and functionality. All features, functionality,
and other product specifications, as well as the
information contained in this user’s guide are based
upon the latest available information and are believed to
be accurate at the time of printing. Motorola reserves
the right to change or modify any information or
specifications without notice or obligation.
2
MOTOROLA and the Stylized M Logo are registered in
the US Patent & Trademark Office. The Bluetooth
trademarks are owned by their proprietor and used by
Motorola, Inc. under license. All other product or service
names are the property of their respective owners.
© Motorola, Inc. 2007
Caution:
radio phone, not expressly approved by Motorola,
will void the user's authority to operate the
equipment.
Manual number: 6809515A09-O
Changes or modifications made in the
Page 5

contents
menu map
Use and Care
essentials
about this guide . . . . . . 8
battery . . . . . . . . . . . . . 9
turn it on & off . . . . . . 12
make a call . . . . . . . . . 12
answer a call. . . . . . . . 13
adjust volume. . . . . . . 13
change sounds
settings. . . . . . . . . . . . 14
store a phone
number. . . . . . . . . . . . 14
call a stored phone
number. . . . . . . . . . . . 14
see your phone
number. . . . . . . . . . . . 15
. . . . . . . . . . . . 5
. . . . . . . . . 7
. . . . . . . . . . . . 8
main attractions
get & play music. . . . . 16
record & play voice
records . . . . . . . . . . . . 29
record & play
video clips. . . . . . . . . . 30
take & send a
photo . . . . . . . . . . . . . 32
send a multimedia
(picture/video)
message. . . . . . . . . . . 34
receive a multimedia
(picture/video)
message. . . . . . . . . . . 37
download pictures . . . 38
download V CAST
videos. . . . . . . . . . . . . 38
manage memory . . . . 38
. . . . . . 16
Bluetooth®
connections . . . . . . . . 41
cable connections. . . . 43
TTY operation . . . . . . . 44
basics
. . . . . . . . . . . . . . 46
home screen . . . . . . . 46
navigation key. . . . . . . 49
menus . . . . . . . . . . . . 49
enter text . . . . . . . . . . 51
external screen. . . . . . 55
handsfree speaker . . . 55
standalone mode . . . . 56
change a code, PIN, or
password . . . . . . . . . . 57
lock/unlock phone. . . . 57
if you forget a code,
PIN, or password . . . . 58
contents
3
Page 6

customize
sounds settings . . . . . . 59
get ringtones . . . . . . . . 61
talking phone
settings . . . . . . . . . . . . 61
answer options . . . . . . 61
wallpaper . . . . . . . . . . . 62
screen saver . . . . . . . . 62
backlight . . . . . . . . . . . 63
brightness . . . . . . . . . . 63
AGPS & your
location . . . . . . . . . . . . 64
AGPS limitations
& tips. . . . . . . . . . . . . . 65
calls
redial a number . . . . . . 66
automatic redial. . . . . . 66
emergency calls . . . . . 66
use AGPS during
emergency call . . . . . . 67
recent calls . . . . . . . . . 68
4
. . . . . . . . . . 59
. . . . . . . . . . . . . . . 66
contents
return unanswered
calls . . . . . . . . . . . . . . . 69
attach a number. . . . . . 69
speed dial . . . . . . . . . . 69
voicemail . . . . . . . . . . . 70
in-call options. . . . . . . . 70
other features
advanced calling . . . . . 71
messages . . . . . . . . . . 72
contacts. . . . . . . . . . . . 74
personalizing
features . . . . . . . . . . . . 77
call times & data
volumes. . . . . . . . . . . . 83
handsfree . . . . . . . . . . 85
Bluetooth® wireless
connections . . . . . . . . . 85
data & fax calls . . . . . . 86
network. . . . . . . . . . . . 87
personal organizer . . . . 88
security . . . . . . . . . . . . 89
fun & games . . . . . . . . 89
. . . . . . . . 71
service & repairs
Specific Absorption
Rate Data
Safety and General
Information
Motorola Limited Warranty
for the United States and
Canada
Information from the
World Health
Organization
California Perchlorate
Label
Privacy and Data
Security
Smart Practices
While Driving
index
. . . . . . . . . . . . 102
. . . . . . . . . . . . . 109
. . . . . . . . . . . 110
. . . . . . . . . . . . . 113
. . . . . 92
. . . . . . . . . . . 93
. . . . . . . . . 96
. . . . . . . 107
. . . . . . . 111
Page 7

main menu
B
GET IT NOW*
• Music & Tones
• Picture & Video
•Games
•News & Info
• Tools on the Go
•Extras
C
MESSAGING
•New Msg
•Inbox
• Sent
•Drafts
•Voicemail
• E-mail*
• Mobile IM*
•Chat*
E
CONTACTS
• New Contact
• Contact List
• Groups
• Speed Dials
menu map
A
RECENT CALLS
• Missed
• Received
•Dialed
•All
•View Timers
D
SETTINGS & TOOLS
(see next page)
* optional features
This is the standard main
menu layout. Your phone’s
menu may be a little different.
menu map
5
Page 8

SETTINGS & TOOLS menu
My Account
Tools
• Voice Commands
• Calendar
•Alarm Clock
• World Clock
• Notepad
•Calculator
Bluetooth
• Add New Device
Sounds Settings
• Master Volume
• Call Sounds
• Alert Sounds
• Keypad Volume
• Service Alerts
•Power On/Off
• Alarm Sounds
• Talking Phone
menu map
6
Display Settings
• Banner
• Backlight
• Brightness
• Wallpaper
• Screensaver
• Display Themes
Phone Settings
• Standalone Mode
• Shortcut Key
• Language
• Location
• Security
•System Select
•NAM Select
Call Settings
• Answer Options
•Auto Retry
• TTY Mode
• One Touch Dial
• Voice Privacy
• Data Settings
• DTMF Tones
Memory
• Save Options*
• Phone Memory
•Card Memory*
Phone Info
• My Number
•SW Version
• Icon Glossary
* Options appear only when a
memory card is inserted in
phone.
Page 9

Use and Care
Use and Care
To care for your Motorola phone, please keep it away from:
liquids of any kind dust and dirt
Don’t expose your phone to water, rain,
extreme humidity, sweat, or other moisture. If
it does get wet, don’t try to accelerate drying
with the use of an oven or dryer, as this may
damage the phone.
extreme heat or cold cleaning solutions
Avoid temperatures below 0°C/32°F or
above 45°C/113°F.
microwaves the ground
Don’t try to dry your phone in a microwave
oven.
Don’t expose your phone to dust, dirt, sand,
food, or other inappropriate materials.
To clean your phone, use only a dry soft cloth.
Don’t use alcohol or other cleaning solutions.
Don’t drop your phone.
Page 10

essentials
CAUTION:
phone for the first time, read the
Important Safety and Legal
Information
edged pages at the back of this
guide.
Before using the
included in the gray-
1
Press the center keys to open the
menu.
2
Press the navigation keyS left or right to
scroll to
center key
3
Press the navigation keyS down to
scroll to
center key
A RECENT CALLS
s
to select it.
Dialed
, and press the
s
to select it.
, and press the
about this guide
This guide shows how to locate a menu
feature as follows:
Find it:
This means that, from the home screen:
8
MENU(s) & A RECENT CALLS % Dialed
essentials
symbols
This means a feature is network/
subscription dependent and may not
be available in all areas. Contact your
service provider for more
information.
This means a feature requires an
optional accessory.
Page 11

battery
battery tips
Battery life depends on the network, signal
strength, temperature, features, and
accessories you use.
•
Always use Motorola
Original batteries and
chargers. The warranty
does not cover damage
caused by non-Motorola batteries and/
or chargers.
•
New batteries or batteries stored for a
long time may take more time to
charge.
•
When charging your battery, keep it
near room temperature.
•
When storing your battery, keep it
uncharged in a cool, dark, dry place.
•
Never expose batteries to
temperatures below -10°C (14°F) or
above 45°C (113°F). Always take your
phone with you when you leave your
vehicle.
•
It is normal for batteries to gradually
wear down and require longer charging
times. If you notice a change in your
battery life, it is probably time to
purchase a new battery.
Contact your local recycling center for
proper battery disposal.
Warn ing:
because they may explode.
Before using your phone, read the battery
safety information in the “Safety and General
Information” section included in this guide.
Never dispose of batteries in a fire
essentials
9
Page 12

install the battery
1
2
essentials
10
3
4
charge the battery
New batteries are shipped partially charged.
Before you can use your phone, you need to
install and charge the battery as described
below. Some batteries perform best after
several full charge/discharge cycles.
Note:
When the battery is charging, the
phone automatically changes to the audible
Page 13

Master Volume
setting, regardless of which ring
style you have set. The phone changes back
to your selected ring style when you
disconnect the charger.
To charge using the charger:
1
Insert the
charger into the
USB connector
on your phone as
shown.
2
Plug the other
end of the
charger into the appropriate electrical
outlet.
N
The battery indicator
flashes while
your phone is charging.
3
When your phone is turned on with the
charger attached, the charge complete
message will flash on the display for
two seconds and then the battery meter
symbol will stop flashing when your
phone is fully charged. If your phone is
turned off with the charger attached, the
charge complete message will stay on
the display when your phone is fully
charged. Remove the charger.
Tip:
You can safely leave the charger
connected to the phone after charging is
not
complete. This will
damage the battery.
When you charge the battery, the battery level
indicator in the upper right corner of the
display shows charging progress. At least one
segment of the battery level indicator must be
visible to ensure full phone functionality while
charging.
To charge from your PC,
connect a cable
from your phone’s mini-USB port to a highpower USB port on a computer (not a lowpower one such as the USB port on your
keyboard or bus-powered USB hub). Typically,
essentials
11
Page 14

USB high-power ports are located directly on
your computer.
Both your phone and the computer must be
turned on, and your computer must have the
correct software drivers installed. Cables and
software drivers are available in Motorola
Original data kits, sold separately.
turn it on & off
1
Open your phone.
2
Press and hold the
P
power key
three seconds.
The phone may
require several
seconds to power on.
3
If necessary, enter your four-digit unlock
code (the last four digits of your phone
essentials
12
for
OK
number) and press
phone.
To turn off your phone, press and hold
a few seconds.
to unlock the
O
for
make a call
Note:
You must dial the phone number from
the home screen. See page 46.
1
Dial the number.
Tip:
If you make a mistake, press the
B
clear key
and hold
2
Press N to make the call.
3
Press P to end the call.
Tip:
Closing the flip also ends the call unless
you are using the speakerphone feature (see
page 55).
to delete the last digit. Press
B
to clear all digits.
Page 15

answer a call
adjust volume
When you receive a call, your phone rings or
vibrates and displays an incoming call
message.
1
Press N to answer.
2
Press P to end the call.
Tip:
You can set the phone to answer calls
when you open the flip:
Find it:
% Call Settings % Answer Options % Flip Open
Note:
enter your four-digit unlock code to answer
the call.
MENU(s) & D SETTINGS & TOOLS
If the phone is locked, you must first
Press the up or down
volume keys to:
•
increase or
decrease
earpiece
volume during a
call
•
increase or decrease ringer volume
setting when the home screen is
visible (phone must not be in a call and
flip must be open)
•
silence an incoming call alert
essentials
13
Page 16

change sounds settings
In the home screen,
press the down
volume key to switch
to lower call sounds
volume, then switch
Vibrate Only
to
, and, finally,
Only
Sounds Off
back from silent to vibrate and then to the
lowest call volume setting.
, then
Alarm
All
. Press the up volume key to cycle
3
Enter a name and other details for the
phone number. To select a highlighted
s
item, press the center key
4
Press
Done
to store the number.
To edit or delete a
Tip:
You can set your phone to display a
picture for each caller or set it to play a
ringtone for a specific caller each time they
call you (see “assign picture to entry” on
page 74 and “assign ringtone to entry” on
page 75).
Contacts
entry, see page 74.
.
store a phone number
You can store a phone number in
1
Enter a phone number in the home
screen.
2
Press
Save
.
Select
14
Create New, i
essentials
f necessary.
Contacts
call a stored phone
:
number
Find it:
1
2
MENU(s) & n CONTACTS >Contacts List
Scroll to the
Press N to call the entry.
Contacts
entry.
Page 17

see your phone number
To view your phone number from the home
B#
My Number
.
, and then
Options
. Select
MDN
.
screen, press
While you are on a call, press
Phone Info
, then
essentials
15
Page 18

main attractions
You can do much more with your phone than
make and receive calls!
get & play music
Use the
Tip:
to
16
Music & Tones
•
get new music and tones
•
play music in your
•
record new sounds
•
set music or tones as your ringtone
From the home screen (see page 46), get
Music & Tones
main attractions
menu to:
MUSIC LIBRARY
quickly by pressing Sleft.
download V CAST music
directly to phone
1
Browse or search the catalog to find the
songs you want.
To preview a song, highlight the song and
Preview
select
2
To buy a song, highlight the song and
select
After your press
song details and price.
3
Press
4
When you see a confirmation that your
purchase was successful and your music
is available for download, press
continue, or choose to download later.
.
Buy
.
Buy
your phone shows
BUY(s
) to confirm your selection.
OK(s
) to
Page 19

5
When prompted to select a storage
location, scroll to
and press the center key
downloading.
Note:
Your phone must be in an EVDO
coverage area to download music.
Your phone displays a status indicator.
After downloading, you must wait for the
phone to acquire the content license.
6
Press OK(s) when the download is
complete.
7
Press
Play
immediately.
or
Press
Library
next section).
or
Press OK(s) to return to the previously
viewed music catalog.
Phone Memory
to play the downloaded song
to go to the
or
Memory Card
s
to begin
MUSIC LIBRARY
(see
transfer music from a
computer
You can transfer songs from a computer to
your phone with a USB cable connection. You
can purchase these songs from the V CAST
Music Store or import them from your CD
collection.
computer system requirements
To access the V CAST Music Store from a
computer or to transfer music from a
computer to your phone, you need the
Windows® XP operating system, Windows
Media Player 10, and an active internet
connection.
If you have the Windows XP operating
system and an internet connection, you can
download Windows Media Player 10 from the
V CAST web site:
main attractions
17
Page 20

1
From your computer’s Web browser, go to
http://getitnow.vzwshop.com/
index.aspx&id=music_vcast_catalog
2
In the “Access the V CAST Music Store”
window, click on “DOWNLOAD NOW”.”
buy music from V CAST
Music Store
1
On your computer, launch Windows
Media Player.
2
In the Windows Media Player window,
click on the V CAST Music icon in the
upper right corner.
If you don’t see the V CAST Music icon,
click on the butterfly icon, then select
“V CAST Music” from the list.
3
Click the “Log In” button, then log in by
entering your mobile phone number and
password.
main attractions
18
If you have not registered yet, click on the
“Register” button, then follow the
instructions to register and get your
password.
4
Browse or search the store to find the
songs you want.
To preview a song, click on the headset
icon next to the song title.
5
To buy a song, click the “Purchase” button
next to the song title.
6
Repeat steps 4 and 5 to add more songs
to your shopping cart.
7
When you finish shopping, click on “MY
PURCHASES,” then click on the
“DOWNLOAD” button to download your
songs.
When downloading is complete, click on the
“Library” tab in the Windows Media Player
window to see the songs you purchased.
Page 21

To transfer the songs to your phone, see
“transfer songs to your phone” on page 19.
import songs from an audio CD
1
On your computer, launch the Windows
Media Player.
2
Insert an audio CD into your computer’s
CD ROM drive.
3
Click on the “Rip” tab in the Windows
Media Player window.
4
Highlight the songs you want to import
and click on the “Rip Music” icon.
5
The songs are imported to the Windows
Media Player Library.
To transfer the songs to your phone, see
“transfer songs to your phone” on page 19.
If you do not see the songs you
downloaded in the Windows Media Player
:
Library
1
On your computer, launch Windows
Explorer.
2
In the Windows Explorer window, open
the My Documents folder, then open the
My Music folder and look for the songs
you downloaded.
3
Right-click on each song and select “Add
To Now Playing List.”
The song will be added to the Windows
Media Player Library.
transfer songs to your phone
1 On your computer
Media Player.
2 On your computer
tab in the Windows Media Player window.
, launch Windows
, click on the “Library”
main attractions
19
Page 22

3 On your computer
list options” selection (to the right of
“Library Options”) in the Windows Media
Player window. Then select “Sync List”
from the pull-down menu.
4 On your computer
song(s) from the Library to the Sync list in
the Windows Media Player window.
5
Connect the USB cable to your phone and
to and available USB port on your
computer.
If this is the first time you have connected
the phone to a computer with a USB
cable, additional software drivers may be
installed. (For more information on using a
USB cable connection, see page 43.)
6 On your phone
MENU(s)& B GET IT NOW % Music & Tones
then select
main attractions
20
, click on the “Select
, drag the desired
, press
Sync Music
.
Wait until the phone display shows
Connected
.
7 On your computer
Sync” icon in the Windows Media Player
window.
8 On your phone
complete, then press the
9
Disconnect the cable from the phone and
the computer.
You can now use your phone’s music player to
play the songs you transferred from your
computer.
, click on the “Start
, wait until the transfer is
play music—flip open
Use the
music that you download from the V CAST
Music catalog (see pages 16 and 17).
,
Find it: MENU(s)& B GET IT NOW
% Music & Tones % My Music
Music Library
to access and play the
O
key.
Page 23
Find music on phone
by artist, album,or
song title.
0
❙❙❙
1X
Return to
MUSIC LIBRARY
screen.
1. Genres
3. Albums
5. Playlists
7. Play All
Catalog
Press left soft key to
download music from
V CAST Music
catalog.
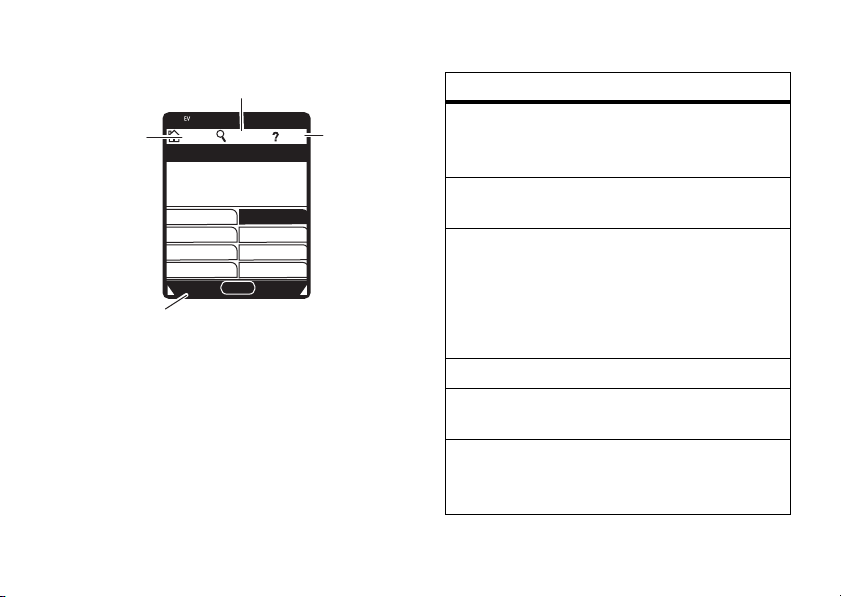
The
HOME, SEARCH
P
HOME SEARCH HELP
MUSIC LIBRARY
2. Artists
4. Songs
6. Inbox
8. Shuffle
OK
, and
HELP
options appear on
all screens in the Music Library.
N
View help
information.
The
option
Genres
Artists
Albums
Songs
Playlists
Inbox
Music Library
includes these options:
Find & play music from a specific
genre (type of music) such as
rock, jazz, or blues.
Find & play music by a specific
artist.
Find & play music from a specific
album.
Note:
Even if you have only one
song from an album, you will see
a listing for that album.
Find & play specific songs.
Play songs from personalized
playlists that you create.
View alert notifications received
when new music from a selected
artist is available for download.
main attractions
21
Page 24

option
Play All
Shuffle
22
Play all songs in the Music Library
in list order.
Play songs in the Music Library in
random order.
•
Press B from any Music Library
screen to return to the previous
screen.
•
Press O from any Music Library
screen to return to the home screen.
•
On screens that show a list of items
(for example, album titles), enter letters
Go To
in the
items beginning with those letters.
main attractions
area to jump directly to
music player controls
Use these keys to control the music player
during song playback
controls with flip open
pause/play
fast forward
skip to next
song
rewind
skip back to
previous song
when the flip is open
To pause, press &
release
the center
s
.
key
To resume play, press
the center key
again.
Press &
Press &
S
right
Press &
Within first two
seconds of song, press
release S
&
s
holdSright
release
.
holdSleft
left
.
:
.
.
Page 25

controls with flip open
return to song
beginning
After first two seconds
of song, press &
release S
turn off music
Pressp.
player
play an album
Find it:
% Music & Tones % My Music
Select
From the GENRES screen
1
2
3
MENU(s)& B GET IT NOW
Genres, Artists
Scroll to the
OK(s
Scroll to the
OK(s
Scroll to the
press
).
).
Options
, or
genre
artist
album
.
left
.
Albums
.
:
you want and press
you want and press
you want to play and
4
Scroll to
Play album
and press OK(s).
(See below for other
selections.)
From the ARTISTS screen
1
Scroll to the
OK(s
2
Scroll to the
press
3
Scroll to
).
Options
Play album
artist
you want and press
album
.
and press OK(s).
(See below for other
selections.)
From the ALBUMS screen
1
Scroll to the
Options
2
Scroll to
.
album
Play album
and press OK(s).
(See below for other
selections.)
OPTIONS
menu
:
you want to play and
OPTIONS
menu
:
you want and press
OPTIONS
menu
main attractions
23
Page 26

When you press
Options
from the
ALBUMS
screen, your phone displays these options:
option
Play album
Play the selected album,
beginning with the first song.
Erase album
Remove the selected album
from the Music Library.
Reinitialize
Library
Database
Under normal conditions, the
Music Library is maintained
automatically. If the library
behaves unexpectedly, use this
option to reinitialize it. This
option deletes the existing
library and creates a new one
that contains all currently
installed music.
main attractions
24
play a song
Find it:
% Music & Tones % My Music
Select
From the GENRES screen
1
2
3
4
MENU(s)& B GETITNOW
Genres, Artists, Albums
Scroll to the
OK(s
Scroll to the
OK(s
Scroll to the
OK(s
Scroll to the
press
genre
).
artist
).
album
).
song
you want to play and
Play(s
). (The song plays only
once.)
or
Press
Options
to select another option (see
page 26).
. or
Songs
.
:
you want and press
you want and press
you want and press
Page 27

From the ARTISTS screen
1
Scroll to the
OK(s
).
2
Scroll to the
OK(s
).
3
Scroll to the song you want to play and
Play(s
press
:
artist
you want and press
album
you want and press
). (The song plays only
once.)
or
Press
Options
to select another option (see
page 26).
From the ALBUMS screen
1
Scroll to the
OK(s
).
2
Scroll to the song you want to play and
Play(s
press
:
album
you want and press
). (The song plays only
once.)
or
Press
Options
to select another option (see
page 26).
From the SONGS screen
:
Scroll to the song you want to play and press
Play(s
). (The song plays only once.)
or
Press
Options
to select another option (see
page 26).
play all songs on phone
Find it:
MENU(s)& B GET IT NOW
% Music & Tones % My Music % Play All
play music from a playlist
Find it:
MENU(s)& B GET IT NOW
% Music & Tones % My Music % Playlists
To play an entire playlist
playlist you want and press
Play playlist
and press OK(s).
, scroll to the
Options
, the scroll to
main attractions
25
Page 28

To play a song from a playlist
playlist you want and press
scroll to the song you want to play and press
Play(s
).
, scroll to the
OK(s
), then
music library options menus
When you scroll to a song
your phone displays these options:
option
Add To
Playlist
Move Song
Erase Song
Song Info
26
Add the selected song to a
playlist.
Move the song from the
memory card to the phone or
from the phone to the card.
Delete the selected song.
View the following information
for the song: Title, artist, album
title, genre, copyright year,
duration, and track number (if
available).
main attractions
and press
Options
option
Reinitialize
Library
Database
,
When you press
playing
Note:
Options
option
Play All
Under normal conditions, the
Music Library is maintained
automatically. If the library
behaves unexpectedly, use this
option to reinitialize it. This
option deletes the existing
library and creates a new one
that contains all currently
installed music.
Options while a song is
, your phone displays these options:
The song is paused when you press
.
Play all songs in the Music
Library in list order.
Page 29

option
Shuffle
Get V CAST
Music
Buy music by
artist
You can also control the music player
the flip closed
close the flip, and use the touch sensor
controls (see page 1):
touch sensor controls
pause/play
fast forward
Play songs in the Music Library
in random order.
Connect to the V CAST Music
catalog to download more
songs.
Connect to the V CAST Music
catalog and go directly to a list
of music available by the artist
performing the current song.
with
! Simply begin song playback,
Press &
Press &
releasey.
holdz.
touch sensor controls
skip to next
song
rewind
skip back
to previous
song
Press &
Press &
Press &
releasez.
holdx.
releasex.
listening tips
When you’re on the go, you can listen to your
music through a wired headset with an EMU
connector (Enhanced Mini USB).
Note:
You cannot charge your phone when an
EMU headset is connected.
When the phone’s flip is open and you are not
using a wired or wireless headset, music is
played through the phone’s speaker.
main attractions
27
Page 30

create a playlist
Find it:
% Music & Tones
1
2
3
4
5
6
7
28
MENU(s) & B GETITNOW
% My Music % Playlists
Press
Options
.
If playlist(s) already exist, press
then scroll to
press
or
If no playlists exist, press
Enter a title for the playlist on the
PLAYLIST
Press B to return to the
menu.
Select
ALBUMS
album, and press
Scroll to a desired song and press
Scroll to
main attractions
Create playlist
OK(s
).
screen and pressOK(s).
Genres, Artists, Albums
screen (see page 21), scroll to an
Add to playlist
and
, navigate to the
OK(s
).
and pressOK(s).
Options
Create
.
CREATE
MUSIC LIBRARY
Options
8
Scroll to the desired playlist and press
ADD(s
).
9
Repeat steps 5 through 8 to add more
songs.
10
,
When finished adding songs to the
P
playlist, press
screen.
to return to the home
edit a playlist
Find it:
% Music & Tones
1
2
3
.
MENU(s) & B GETITNOW
% My Music % Playlists
Scroll to the playlist you want to edit and
Options
Edit playlist
Save
.
.
and press OK(s).
Move
.
press
Scroll to
Edit the playlist as desired.
To change the order of songs in your
playlist, scroll to a song and press
Then scroll up or down to move the song
up or down in the playlist. When finished,
press
Page 31

To delete a song, scroll to the song and
Remove
press
4
Press P to return to the home screen.
.
record & play voice records
You can create a voice record to play back
later as a reminder for yourself.
create voice record
Find it:
% Music & Tones
1
2
3
Press
MENU(s) & B GET IT NOW
Scroll to
Scroll to
Press OK(s) to begin recording, then
press
My Sounds
Record New
STOP(s
and press OK(s).
and press OK(s).
) when finished.
The voice record is automatically saved and
displayed in the
Play, Send
select
Tip:
Press and go! To create a voice record
quickly, press and hold the voice button (on
the right side of the phone), then
OK(s
press
STOP(s
the voice record,
message, or
exit.
Tip:
After you create a voice record, you can
give it a new name. In your
listing, your phone displays an
beside the names of voice records that you
created. Scroll to the voice record that you
want to rename, press
and select
MY SOUNDS
, or
) to begin recording. Press
) when finished. Press
SEND(S
Erase
to delete it. Press P to
Rename
.
list. You can now
Options
.
) to send it in a
Get Music & Tones
Options
Save
to save
æ
indicator
, then scroll to
main attractions
29
Page 32

play voice record
record
Find it:
% Music & Tones
MENU(s) & B GETITNOW
% My Sounds
Scroll to the file name of the desired voice
record and press
PLAY(s
).
record & play video clips
You can record a video clip with your phone
and send it in a multimedia message to other
wireless phone users.
Your camera lens is on the back of your phone
when the phone is open (see page 1).
the clearest videos, wipe the lens clean
with a dry cloth before you capture the
video.
main attractions
30
To ge t
To activate your phone’s video camera:
Find it:
MENU(s) & B GETITNOW
% Picture & Video
1
Scroll to
Tip:
Record Video
and press OK(s).
You can also activate the video
camera viewfinder by pressing and
b
holding the camera key
.
The active viewfinder image appears on
your phone’s screen.
176x144
REC
Options
recording.
N
Press right soft
key to view
Options
Press left soft
key to view
Videos
.
ß
Rec
00:00
Videos
Press s to
begin
menu.
Page 33

2
Point the camera lens at the video subject.
Note:
Before taking pictures or videos,
make sure the camera lens surface is free
of any dust, smudges, or foreign material.
S
Press
Press
(see “adjust video camera settings” on
page 31).
3
Press
Press
then press
4
Press
5
Press
Press
to the
Press
to active viewfinder.
left and right to zoom in and out.
Options
to open the
REC(s
) to begin recording.
Pause
to temporarily stop recording,
Resume
Stop(s
) to stop recording.
Save
to save the video.
or
SEND(s
CREATE VIDEO MSG
or
Erase
) to save the video and go
to delete the video and return
OPTIONS
to continue.
screen.
menu
adjust video camera settings
When the video camera is active, press
to open the
the following options:
option
Brightness
Adjust image brightness.
White Balance
Adjust for different lighting.
Duration
Specify standard lengths for video clips
Short
of
Fit to Video Msg.
settings), or
Color Effects
Select
OPTIONS
menu, which can include
(5 seconds),
Normal, Antique, Black & White
Medium
(15 seconds),
(varies depending on video
Long
(max memory).
, or
Options
Negative
.
main attractions
31
Page 34

option
Switch Storage Devices
Store video clips on memory card or
internal phone memory.
play
To play a video clip stored on your phone:
Find it:
% Picture & Video
1
2
32
MENU(s) & B GETITNOW
Scroll to
Scroll to the clip you want to view and
press
Press
mute the video clip sound. Press
again to turn sound on again.
My Videos
and press OK(s).
PLAY(s
Mute
main attractions
).
while the video clip is playing to
Mute
take & send a photo
You can take a photo with your phone, and
send it to other wireless phone users in a
multimedia message.
Your camera lens is on the back of your phone
b
To ge t
when the phone is open (see page 1).
the clearest photos, wipe the lens clean
with a dry cloth before you capture the
photo.
take & send photo
To activate your phone’s camera:
Find it:
% Picture & Video
1
MENU(s) & B GETITNOW
Scroll to
Tip:
viewfinder by the camera key
quickly.
Take Picture
You can also activate the camera
and press OK(s).
Page 35

The active viewfinder image appears on
your phone’s screen:
640x480
TAKE
TAKE(s
N
Options
Take
Press right soft
key to view
Options
) to take a
ß
Press left soft
key to view
Pictures.
2
Point the camera lens at the photo
Pictures
Press s to
photo.
subject, then press
photo.
Press
S
left and right to zoom in and out.
Options
Press
to open the
OPTIONS
“adjust camera settings” on page 33).
menu.
menu (see
3
Press
Save
to save the photo.
or
Press
SEND(s
CREATE PICTURE MESSAGE
to the
) to save the photo and go
screen.
or
Press
Erase
to delete the photo and return
to active viewfinder.
adjust camera settings
When the camera is active, press
OPTIONS
open the
following options:
option
Resolution
Set resolution to
Picture ID
or
menu, which can include the
1280x1024, 640x480, 320x240
.
Options
to
,
main attractions
33
Page 36

option
Self timer
Set a timer (
10 seconds
Brightness
Adjust image brightness.
White Balance
Adjust for different lighting.
Shutter Sound
Activate a tone that plays when you take a
photo.
Color Effects
Select
34
Off, 3 seconds, 5 seconds
) for the camera to take a photo.
Normal, Antique, Black & White
main attractions
, or
, or
Negative
option
Multishot
Set the camera to take multiple photos with
b
a single press of the camera key
Fun Frame
Go to
Fun Frames
for your photo.
to select an amusing frame
.
send a multimedia (picture/video) message
.
A multimedia message contains embedded
media objects (possibly including photos,
pictures, animations, sounds, voice records).
You can send a multimedia message to other
Verizon Wireless multimedia messagingcapable phones and to other email addresses.
Page 37

create & send message
Find it:
% New Msg
1
2
MENU(s) & C MESSAGING
% Picture Msg
Press keypad keys to enter a phone
number, then press
or
Press
Add
or
Done
Add
Contacts
For each
scroll to the entry and press
Press
Press
For each call you want to add, scroll to the
entry and press
you finish adding entries.
Scroll to the
or
Video Msg
OK(s
).
Contacts
, then press OK(s).
entry you want to add,
OK(s
when you finish adding entries.
Recent Calls
Text
, then press OK(s).
OK(s
). Press
entry area.
Done
).
when
3
Press keypad keys to enter message text.
4
Scroll to the
Pics
.
or
Scroll to the
Videos
5
Scroll to and highlight a picture, and press
OK(s
or
Scroll to and highlight a video clip to
insert, and press
6
If sending a
to insert a sound, scroll to the
area and press
sound to insert and press
7
Scroll to
Picture
entry area and press
Video
entry area and press
.
).
OK(s
).
Picture
message and you want
Sound
Sounds
. Then scroll to a
OK(s
).
Subject
.
entry
main attractions
35
Page 38

8
Press keypad keys to enter the message
subject.
or
Press
Options
, then scroll to
OK(s
press
as the message subject.
9
Press
). Then select a
SEND(s
) to send the message.
Add Quick Text
Quick Text
and
item
message options
While creating a multimedia message, press
Options
to open the
which can include the following options:
option
Entry Mode
Select a text entry mode (see page 51).
main attractions
36
CREATE PICTURE MESSAGE
menu,
option
Preview
View the current contents of the message.
Add Quick Text
Quick Text is a prewritten message that you
can quickly select and send. Your phone
comes with several quick text messages,
and you can create additional ones.
Save As Draft
Save the message to the
Priority Level
Set to
High
or
Normal
Validity Period
Specify the length of time the message
remains in the
Outbox
.
folder.
Drafts
folder.
Page 39

option
Deferred Delivery
Send the message later, at a time and date
that you specify.
Remove Picture, Remove Sound, Remove VCard
Remove a multimedia object from the
message.
Add Slide
Add a slide (page) to the message so you
can add more text, a picture, or a sound.
Add To Contacts
Add the message recipient to your
Contacts
.
receive a multimedia (picture/video) message
When you receive a multimedia message,
g
your phone displays the
indicator and a
sounds an alert.
Open the flip and press
message immediately or
Inbox
your
To view messages in your
Find it:
1
Scroll to the desired message.
2
Press
phone first displays the picture, then the
message.
New Message
for viewing later.
MENU(s) & C MESSAGING % Inbox
Open
to open the message. Your
(message waiting)
notification, and
View Now
View Later
Inbox
:
to view the
to save it in
main attractions
37
Page 40

Multimedia messages that you receive can
contain different media objects:
•
Photos, pictures, and animations are
displayed as you read the message.
•
A sound file begins playing when its
slide is displayed. Use the volume keys
to adjust the volume as the sound file
plays.
•
To open an attachment, highlight the
file indicator/filename and press
(image file type),
OPEN
(vObject such as a
datebook entry, or unknown file type).
PLAY
(sound file), or
Contacts
VIEW
or
2
With
Get New App
to connect to
Note:
Normal airtime and/or carrier usage
charges may apply.
highlighted, press OK(s)
Get It Now
.
download V CAST videos
Find it:
% Picture & Video
Scroll to
Normal airtime and/or carrier usage charges
may apply.
MENU(s) & B GETITNOW
V CAST Video
and press OK(s).
download pictures
Find it:
% Picture & Video
1
38
MENU(s) & B GETITNOW
Scroll to
Get New Pictures
main attractions
and press OK(s).
manage memory
You can store multimedia content such
as songs and photos on your phone’s internal
memory or on a removable microSD
(TransFlash) memory card.
Page 41

install memory card
1
Press and hold O for a few seconds to
turn off your phone.
2
Press in the
battery door
release latch
and remove
the battery
door.
3
Slide the
memory card
completely into
the card slot (so
that only part of
the card is
visible).
4
Replace the battery and the battery door.
set memory for multimedia
content
You set whether multimedia content that you
download or create with your phone’s camera
is stored in phone memory or on the memory
card.
Find it:
MENU(s) & D SETTINGS & TOOLS
% Memory % Save Options
1
2
Scroll to
OK(s
Scroll to
press
Pictures, Videos
).
Phone Memory
OK(s
).
, or
or
Card Memory
Sounds
, and press
and
view memory information
Find it:
MENU(s) & D SETTINGS & TOOLS
% Memory
Select
OK(s
Phone Memory
).
or
Card Memory
and press
main attractions
39
Page 42

move files from phone to
memory card
You can move files (such as pictures and
photos, video clips, and sound and music
files) from your phone to the memory card to
free up phone memory.
Note:
Moving a file to the memory card
deletes the original from phone memory.
To move photos or video clips
Find it:
% Picture & Video
1
40
MENU(s) & B GETITNOW
Open the appropriate list (
My Videos
A memory card icon in the thumbnail
picture for a
is stored on the memory card.
A memory card icon beside a
name indicates that the
the memory card.
).
Picture
indicates that the
main attractions
:
My Pictures
Video
Video
is stored on
or
Picture
file
A
f
in the thumbnail picture for a
Picture
indicates that the
on your phone and cannot be moved to
the memory card
Picture
or
If the
memory card icon, the
stored on the phone.
2
Scroll to the file you want to move and
Options
press
3
Select
Your phone asks if you want to move the file.
4
Select
that you want to move the file.
To move an audio clip that you recorded
Find it:
% Music & Tones % My Sounds
A memory card icon beside the file name of
an audio clip indicates that the audio clip is
stored on the memory card.
MENU(s) & B GETITNOW
Video
.
Move
and press OK(s).
Yes
and press OK(s) to confirm
came preloaded
.
is not marked with a
Picture
or
Video
Picture
is
:
Page 43

If the file name is not marked with a memory
card icon, the audio clip is stored on the
phone.
1
Scroll to the file you want to move and
Options
press
2
Select
Your phone asks if you want to move the
file.
3
Select
that you want to move the file.
.
Move
and press OK(s).
Yes
and press OK(s) to confirm
Bluetooth® connections
Your phone supports Bluetooth wireless
connections. You can connect your phone to a
Bluetooth headset or car kit.
Your phone currently supports the following
Bluetooth profiles:
•
Headset
•
Handsfree Car Kit (optional Motorola
Original accessory)
•
Dial Up Networking (DUN)
•
Serial Port Profile (SPP)
•
OBEX profiles—OPP
For more information about Bluetooth
wireless connections supported by this
device, go to FAQs
www.verizonwireless.com/bluetooth
For information on vehicle compatibility, go to
www.verizonwireless.com/bluetoothchart
to view the Bluetooth compatibility chart.
Note:
All multimedia (video player, audio
player, shutter tones, V CAST) will play from
the speakerphone when your phone is
connected to another Bluetooth device.
For maximum Bluetooth security,
should always pair Bluetooth devices in a
safe, private environment.
.
you
main attractions
41
Page 44

turn Bluetooth power on/off
Find it:
% Bluetooth
Press the left soft key to turn Bluetooth power
On
Note:
power to
turn Bluetooth power
connect to accessories until you turn
Bluetooth power
accessories.
MENU(s) & D SETTINGS & TOOLS
or
Off
.
To extend battery life, set Bluetooth
Off
when not in use. However, if you
Off
, your phone will not
On
and reconnect to the
pair with headset,
handsfree device, or PC
Before you try to connect to another
Bluetooth device,
Bluetooth power is
pairing mode (see the user guide for the
device you are attempting to pair with). You
main attractions
42
make sure your phone’s
On
and the device is in
cannot perform pairing while your phone is
connected to another device.
To pair your phone to a headset accessory,
handsfree car kit, or PC that supports
Bluetooth wireless connections:
Find it:
% Bluetooth % Add New Device
If your Bluetooth power is not turned on, your
phone will prompt you to turn it on.
1
2
MENU(s
Select
Your phone displays a list of device(s)
located within range of the phone. If your
phone is already connected to a device,
your phone lists that device and identifies
it with a
Scroll to a device in the list of devices that
your phone found.
)
D SETTINGS & TOOLS
Add New Device
>
(in-use indicator).
and press OK(s).
Page 45

3
Press
Pair
to connect the device.
4
If the device requests permission to bond
YES
with your phone, select
device PIN code to create a secure
connection with the device. (The PIN code
is typically set to 0000.)
Note:
See the instructions that came with
your handsfree device for the device’s PIN
code and other information about the device.
When the connection is made, the
(Bluetooth) indicator or a
displays in the home screen.
Note:
Once a connection is established with a
device, no other device can connect to your
phone until the currently connected device is
disconnected.
and enter the
Bluetooth
à
message
cable connections
You can use a USB cable to connect
your phone with a PC.
If you use a USB cable connection:
•
You must use the cables included with
the Motorola Original™ data kit (see
the data kit user’s guide for more
information).
•
Make sure to connect the phone to a highpower USB port on your computer (not a
low-power one such as the USB port on
your keyboard or bus-powered USB hub).
Typically, USB high-power ports are
located directly on your computer.
Note:
If you connect your phone to a
low-power USB port, the computer
may not recognize your phone.
•
Make sure both your phone and the
computer are turned on.
main attractions
43
Page 46

TTY operation
You can use an optional TTY device with your
phone to send and receive calls. You must
plug the TTY device into the phone’s headset
jack and set the phone to operate in one of
three TTY modes.
Note:
Use a TSB-121 compliant cable
(provided by the TTY manufacturer) to
connect the TTY device to your phone.
the cable has a 2.5mm jack, you will also
need a Motorola Original™ 2.5mm-to-EMU
TTY adapter to attach the jack to the phone.
Note:
Set the phone to level 4 (middle setting)
for proper operation. If you experience a high
number of incorrect characters, adjust the
volume as needed to minimize the error rate.
Note:
For optimal performance, your phone
should be at least 12 inches (30 centimeters)
from the TTY device. Placing the phone too
close to the TTY device may cause high error
rates.
main attractions
44
If
set TTY mode
When you set your phone to a TTY mode, it
operates in that mode whenever the TTY
device is connected.
Find it:
% Call Settings % TTY Mode
TTY Mode
MENU(s) & D SETTINGS & TOOLS
can include the following options:
option
TTY Full
Transmit and receive TTY characters.
TTY + Talk
Receive TTY characters but transmit by
speaking into microphone.
TTY + Hear
Transmit TTY characters but receive by
listening to earpiece.
Page 47

option
TTY Off
All TTY modes are turned off.
When your phone is in a TTY mode, it displays
the international TTY mode, the international
TTY symbol, and the mode setting, during an
active TTY call.
return to voice mode
To return to standard voice mode, select
TTY OFF
from the
TTY Mode
menu.
main attractions
45
Page 48

basics
EV
EV
See page 1 for a basic phone diagram.
home screen
The home screen is displayed when you are
not
on a call or using the menu. You must be
in the home screen to dial a phone number.
EV
0
❙❙❙
1X
Date & Time
Left Soft Key
Label
Note:
Your home screen may look different
Message
Thu, Oct 23 12:45pm
than the screen shown above.
basics
46
MENU
ò
N
Contacts
Right Soft Key
Label
MENU
The
label in the bottom center of the
display shows that you can press the center
s
to enter the main menu.
key
Labels at the bottom corners of the screen
show the current soft key functions. Press the
left or right soft key to perform the function
indicated by the left or right soft key label.
Your phone displays status indicators:
EV
System Status
Indicators
0
❙❙❙
1X
Thu, Oct 23 12:45pm
Message
MENU
ò
N
Contacts
Page 49

The following table describes the indicators
your phone can display:
alert/indicator
0 EV 1X ❙❙❙
Signal Strength Indicator
1x-EVDO indicator shows when phone is in
1x-EVDO coverage area (necessary for
V CAST services). 1X indicator shows when
phone is in 1x-RTT coverage area. Vertical
bars show the strength of the network
connection.
2
Roaming Indicator
Indicates phone is roaming off your home
network.
5
SSL Indicator
Indicates application verification is via SSL
during a download session.
alert/indicator
L
Data Call, Tethered, or Embedded
WAP/BREW Application Indicator
Shows during data call, tethered mode, or
WAP/BREW application.
M
Dormant
Indicates phone is dormant and PPP
session is active.
9
No Service Indicator
Phone is in area with no service coverage.
8
TTY Indicator
Phone is in TTY mode.
t
Voice Call Indicator
Shows during an active voice call.
P
E911 Indicator
Indicates
E911
is
On
.
basics
47
Page 50

alert/indicator
O
Location On Indicator
Indicates Location
N
Battery Level Indicator
is set to
On
.
Shows battery strength. The more bars, the
greater the charge.
n
All Sounds Off
Indicates
o
Indicates
r
Indicates
q
Master Volume
Alarm Only
Master Volume
Vibrate On
Master Volume
Speakerphone
is set to
is set to
is set to
Off
.
Alarm Only
Vibrate On
.
.
Indicates speakerphone is on.
s
Missed Call
Indicates a missed call.
basics
48
alert/indicator
g
Message Indicator
Shows when you receive a new message.
x
Calendar Event
Shows number of calendar appointments.
y New
Voicemail
Shows when a voicemail message is
received.
u
Alarm On
Shows when an alarm has been set.
E Bluetooth Connection Active
Your phone is paired to another Bluetooth
device.
Page 51

navigation key
Use the navigation keyS to scroll up, down,
left, or right through the menu system. Press
s
the center key
menu item.
to select a highlighted
menus
From the home screen, press
enter the main menu.
The following icons represent features that
may appear in the main menu.
menu features
B GET IT NOW* C MESSAGING
E CONTACTS A RECENT CALLS
D SETTINGS & TOOLS
* Optional network/subscription
dependent feature
MENU(s
) to
menu shortcuts
From the home screen, you can use the
S
navigation key
navigation key direction & menu
up
down
left
right
You can display the menu icons shown above
in the home screen (see “show or hide menu
icons” on page 83).
Tip:
From the main menu, you can quickly
select a menu feature by pressing the number
key associated with that feature. For example,
from the
select
SETTINGS & TOOLS
Display Settings
as a shortcut key:
L Mobile Web
x Calendar
1 Music & Tones
B GET IT NOW*
menu, press 5 to
.
basics
49
Page 52

select feature option
When you select certain features, your phone
displays a list of items or options that you can
select. For example, when you view the
dialed calls list, you can select an entry and
perform additional tasks on that entry:
0
❙❙❙
1X
DIALED CALLS
Jonathan
v
Tue Jul 19, 4:43pm
555-345-4566
t
Mon Jul 18, 3:08pm
Mindy
x
Mon Jul 18, 10:46am
Message
Press left soft key
Messaging
to open
•
Press S to scroll up or down to
Press s to open
item to view item
menu.
details.
highlight the option you want.
•
In a numbered list, press a number key
to highlight the option.
basics
50
OPEN
ò
N
Options
Press right soft
key to open
sub-menu.
Options
•
In an alphabetized list, press a key
repeatedly to cycle through the letters
on the key and highlight the closest
matching list option.
•
When an option has a list of possible
S
values, press
left or right to scroll
through and select a value.
•
When an option has a list of possible
numeric values, press a number key to
set the value.
Page 53

enter text
Some features require you to enter
information. The following is a sample of a
Contacts
screen for
Highlighted
Option
Press left soft
key to change
entry mode.
entry information.
0
1X
❙❙❙
EDIT CONTACT
Name
John Smi
x
Mobile 1
v
Home
Abc
Press s to save
entry information.
SAVE
N
ò
Abc
Cancel
Press S to
scroll to more
options.
The message center lets you compose and
send text messages.
Cursor indicates
insertion point.
Press left soft
key to view
Add
sub-menu.
0
1X
❙❙❙
CREATE TXT MESSAGE
1/7 0/160
To:
1.
2.
3.
4.
Add
Press s to send
message.
N
ò
123
Press right
soft key to
Options
OK
view
Options
sub-menu.
text entry modes
Multiple text entry modes make it easy for
you to enter names, numbers, and messages.
The mode you select remains active until you
select another mode.
From the
CREATE TXT MSG
then select
Entry Mode
screen, press
Options
,
to select an entry mode.
basics
51
Page 54

From the
select an entry mode.
You can select one of the following entry
modes:
iTAP
English
iTAP
Spanish
Abc
ABC
123
Symbols
52
EDIT CONTACT
Let the phone predict each word
(in English) as you press keys.
Let the phone predict each word
(in Spanish) as you press keys.
Enter letters and numbers by
pressing a key one or more times,
first character of a sentence in
uppercase.
Enter letters and numbers by
pressing a key one or more times,
all characters in uppercase.
Enter numbers only.
Enter symbols.
basics
screen, press
Abc
to
capitalization
Press and hold * in any text entry screen to
toggle capitalization options:
abc
=no capital
letters
ABC
= all capital
letters
tap mode
From a text entry screen, specify Tap mode by
Abc
pressing
This is the standard mode for entering text on
your phone. Regular Tap mode cycles through
the letters and numbers of the key you press.
1
Press a key one or more times to select a
letter, number, or symbol.
2
Enter the remaining characters.
Tip:
, then selecting
Press # to insert a space.
Abc
or
ABC
.
Page 55

When you enter text with Tap mode, the soft
key functions change.
Character
displays at
insertion point.
Press left
soft key to
change the
text entry
mode.
0
❙❙❙
1X
CREATE TXT MESSAGE
1/7 0/160
To:
233-2233
T
Abc
Press s to send
message.
P
SEND
N
Press right
soft key to open
Options
Options menu.
tap mode text entry rules
•
Press a key repeatedly to cycle through
its characters.
•
Press S left or right to move the
flashing cursor to the left or right in a
text message.
•
If you enter or edit information and do
not want to save the changes, press
P
to exit without saving.
iTAP® mode
From a text entry screen, specify iTAP mode
Abc
by pressing
iTAP Spanish
, then selecting
.
iTAP software provides a predictive text entry
method that lets you enter a word using one
key press per letter. This can be faster than
Tap mode, because your phone combines the
key presses into common words.
When you enter three or more characters in a
row, your phone may guess the rest of the
iTAP English
or
basics
53
Page 56

word. For example, if you enter
prog
, you
might see:
0
❙❙❙
1X
CREATE TXT MESSAGE
1/7 0/160
To:
233-2233
This is a prog ram
iTAPEn
If you want a different word (such as
SEND
ò
N
Options
Press S right
to accept
program
Enter a space
after
prog
to keep
only prog.
progress
.
continue pressing keypad keys to enter the
remaining characters.
enter words
1
Press keys (one press per letter) to begin
entering a word. As you type, your phone
automatically shows additional letters that
form a suggested combination.
2
Scroll up to view other possible
combinations, and highlight the
combination you want.
basics
54
3
Press S right to enter the highlighted
combination when it spells a word. A
space is automatically inserted after the
word.
If you enter a word that your phone does not
recognize, the phone stores it to use as one
of your word options. When you fill memory
space for unrecognized words, your phone
deletes the oldest words to add new words.
),
numeric mode
From a text entry screen, specify Numeric
Abc
mode by pressing the
123
.
key, then selecting
Press keypad keys to enter the numbers you
want. When you finish entering numbers,
123
press the
key to switch to another entry
method.
Page 57

symbol mode
From a text entry screen, specify Symbols
Abc
mode by pressing
Scroll to the desired symbol on the
screen, then press
Next
Press
down to the next set of symbols, and press
Prev
on the
to page up to the previous set.
, then selecting
OK(s
) to select it.
SYMBOLS
screen to page
Symbols
SYMBOLS
delete letters & words
indicators, and notifications for incoming calls
and other events. For a list of phone status
indicators, see page 47.
.
handsfree speaker
Note:
You must open your phone’s flip to
activate the speakerphone.
Your phone’s integrated handsfree speaker
allows you to talk to another party without
holding the phone to your ear.
Place the cursor to the right of the text you
want to delete, then:
•
Press B to delete one letter at a time.
•
Hold B to delete the entire message.
external screen
When you close your phone, the external
screen (see page 1) shows the time, status
turn on/off
To activate the
speakerphone
during a call,
press and hold the
smart/speakerphone key.
Smart/
Speaker-
phone
Key
040128o
basics
55
Page 58

You will see
indicator
To end the call
will see
Note:
speakerphone does not end the call.
The speakerphone remains on until you press
the smart/speakerphone key again or turn off
the phone.
Note:
when you connect your phone to a handsfree
car kit or headset accessory.
Spkrphone On
q
, and hear a soft audio alert.
Call Ended
Closing the flip while using the
The handsfree speaker is disabled
and the speakerphone
, press
End Call
or press P. You
and hear a soft audio alert.
use with flip closed
1
Open your phone’s flip.
2
Press and hold the smart/speakerphone
key to turn on the speakerphone.
3
Enter the number and press N.
basics
56
4
When the call is connected, close the flip,
and continue your conversation.
5
To end the call, press and hold the smart/
speakerphone key. You will see
and hear a soft audio alert.
Call Ended
standalone mode
Note:
Consult airline staff about the use of
Standalone Mode
whenever instructed to do so by airline staff.
Standalone mode turns off your phone’s
calling features in locations where wireless
phone use is prohibited.
or receive calls in standalone mode,
you can use your phone’s other non-calling
features.
Find it:
% Phone Settings % Standalone Mode
in flight. Turn off your phone
You can not make
MENU(s) & D SETTINGS & TOOLS
but
Page 59

Your phone indicates that
On
with indicators and a message on the
to
Standalone Mode
is set
home screen:
MENU
N
Contacts
%OFF K
Standalone Mode
Thu, Oct 23 12:45pm
Message
change a code, PIN, or password
Your phone’s four-digit unlock code is
originally set to the last four digits of your
phone number, and the six-digit security code
is originally set to 000000. Your service
provider may reset these codes before you
receive your phone.
not
If your service provider has
reset these
codes, you should change them to prevent
others from accessing your personal
information. The unlock code must contain
four digits, and the security code must
contain six digits.
To change a code or password:
Find it:
Press
MENU(s) & D SETTINGS & TOOLS
% Phone Settings % Security % New Passwords
Select the type of code to change, enter the
old code, then enter the new code.
lock/unlock phone
You can lock your phone manually or set the
phone to lock automatically whenever you
turn it off.
To use a locked phone, you must enter the
unlock code. A locked phone still rings or
basics
57
Page 60

vibrates for incoming calls or messages,
you must unlock it to answer
You can make emergency calls on your phone
even when it is locked (see page 66).
.
but
lock
Find it:
% Phone Settings % Security % Phone Lock % Lock Now
or
Both
unlock code before completing your selection.
MENU(s) & D SETTINGS & TOOLS
Automatic Lock
Phone Lock
options require you to enter the
unlock
At the
Enter Unlock Code
digit unlock code and press the
basics
58
prompt, enter your four-
Ok
key.
if you forget a code, PIN, or password
Note:
Your phone’s four-digit unlock code is
or
originally set to 1234
of your phone number. The six-digit security
code is originally set to 000000.
If you forget your security code, contact your
service provider.
to the last four digits
Page 61

customize
sounds settings
You can set your phone to signal incoming
calls or other events by playing specific
ringtones or by vibrating.
master volume
Find it:
% Sounds Settings
1
MENU(s) & D SETTINGS & TOOLS
% Master Volume
Scroll up or down to the desired setting:
High, Med High, Med, Med Low, Low
rings for incoming calls and other events,
depending on the detail settings.
Vibrate Only
an incoming call.
—The phone vibrates to indicate
—Your phone
Alarm Only
alarm to alert you to events. You are not
able to change detail settings for events.
All Sounds Off
to incoming calls or other events.
2
With the desired setting highlighted,
press
3
Press P to return to the home screen.
—Your phone plays an audible
—The phone does not alert you
SET(s).
sounds for calls, events, &
alerts
Note:
Master Volume
Med, Med Low
must be set to
, or
Low
.
High, Med High
customize
,
59
Page 62

Set sounds for calls:
Find it:
% Sounds Settings
1
MENU(s) & D SETTINGS & TOOLS
% Call Sounds
Scroll to
Call Ringtone
and press OK(s), then
scroll to a desired ringtone and press
OK(s
).
Note:
Press the left soft key to preview
the ringtone.
or
Scroll to
scroll to
2
Press P to return to the home screen.
Call Vibrate
On
and press OK(s), then
or
Off
and press OK(s).
Set sounds for events (such as incoming
messages) or alerts:
Find it:
% Sounds Settings
1
60
MENU(s) & D SETTINGS & TOOLS
% Alert Sounds
Scroll to
Voicemail Msg
TXT Message, PIX-FLIX Msg
, and press OK(s).
customize
, or
2
Scroll to
Tone
and press OK(s), then scroll
to a desired ringtone and press
Note:
Press the left soft key to preview
the ringtone.
or
Scroll to
scroll to
Vibrate
and press OK(s), then
On
or
Off
and press OK(s).
or
Scroll to
scroll to
or
but
Reminder
and press OK(s), then
Once, Every 2 Minutes, Every 15 Minutes
Off,
and press OK(s). (For all settings
Off
, your phone plays an audible beep
at the interval you set.)
3
Press P to return to the home screen.
OK(s
).
,
Page 63

get ringtones
Find it:
% Music & Tones
1
2
MENU(s) & B GET IT NOW
% Get New Ringtones
On the
GET NEW RINGTONES
Get New App
Your phone connects to a Web site with
ringtone collections. Follow the prompts
on the screen to browse ringtone lists and
to select and download a ringtone.
Press P to return to the home screen.
and press OK(s).
screen, scroll to
talking phone settings
You can set your phone to
numbers of the keypad keys
press them:
Find it:
% Sounds Settings % Talking Phone % Keypad Digits
MENU(s) & D SETTINGS & TOOLS
speak aloud the
when you
You can also set your phone to
the name of Contacts entries
highlight the entries in the
Find it:
MENU(s) & D SETTINGS & TOOLS
% Sounds Settings % Talking Phone % Contact List Entries
speak aloud
when you
CONTACT LIST
:
answer options
You can use these alternative methods to
answer an incoming call.
Flip Open
Any Key
Send Only
Auto Answer
answer by opening the flip
answer by pressing any key
answer by pressing N only
automatically answer
incoming call (works with
headset, Bluetooth
connections & when phone
operating as speakerphone)
customize
61
Page 64

To activate or deactivate
Find it:
% Call Settings % Answer Options
MENU(s)& D SETTINGS & TOOLS
an answer option:
wallpaper
You can set a photo, picture, or animation as a
wallpaper image for both of your phone’s
screens (main screen—the screen you see
with the flip open—and external screen).
Find it:
% Display Settings % Wallpaper
1
2
62
MENU(s)& D SETTINGS & TOOLS
Select
Main Screen
external screen).
Scroll to the picture in
want and press
or
Press
Options
take a new photo to use as a wallpaper,
customize
or
Front Screen
MY PICTURES
OK(s
).
, then select
Take new picture
(for the
that you
to
or
select
Picture Place
PIX Place, or
your
and download a picture (see
NEW PIX
page 38).
or
To turn off the wallpaper
blank (white) screen in
OK(s
press
3
Press P to return to the home screen.
to select a picture from
select
Get New
to go to
, scroll to
MY PICTURES
).
screen saver
You can set a photo, picture, or animation as a
screen saver image for both of your phone’s
screens (main screen—the screen you see
with the flip open—and external screen). The
screen saver image displays when no activity
is detected for a specified time period.
Find it:
% Display Settings
MENU(s) & D SETTINGS & TOOLS
% Screensaver
GET
the
and
Page 65

1
Select
Main Screen
external screen).
2
Scroll to the picture in
want and press
or
Press
Options
take a new photo to use as a wallpaper,
Picture Place
select
PIX Place, or
your
and download a picture (see
NEW PIX
page 38).
or
To turn off the screen saver
blank (white) screen in
OK(s
press
3
Press P to return to the home screen.
or
Front Screen
OK(s
, then select
to select a picture from
select
).
(for the
MY PICTURES
).
Take new picture
Get New
to go to
, scroll to
MY PICTURES
that you
to
or
GET
the
and
backlight
Set the amount of time that your phone’s
main screen (the screen you see with the flip
open) and keypad backlights remain on, or
turn off backlights to extend battery life.
Find it:
MENU(s) & D SETTINGS & TOOLS
% Display Settings Backlight
brightness
Set the brightness of your phone’s main
screen (the screen you see with the flip
open).
Find it:
MENU(s) & D SETTINGS & TOOLS
% Display Settings % Brightness
customize
63
Page 66

AGPS & your location
Note:
This Motorola mobile phone
incorporates Assisted Global Positioning
System (AGPS) technology that can be used
by emergency services to help determine a
user’s location. This functionality is required
by law and cannot be deactivated. However,
AGPS technology also can be used with
certain location-based software applications—
for example, to provide driving directions—
which may track and monitor a user’s location.
Users who prefer not to permit such tracking
and monitoring should avoid using such
applications.
Your phone uses the Automatic Location
Information (ALI) feature, along with AGPS
satellite signals, to tell the network where you
are physically located.
When ALI is set to
O
displays the
customize
64
(ALI on) indicator. Services
Location On
, your phone
may use your known location to provide
useful information (for example, driving
directions, or the location of the nearest
bank). Your phone prompts you when the
network or a service asks for your location.
You can refuse at this point.
911 Only
When ALI is set to
P
displays the
phone does not send location information
unless you call the emergency phone number
(such as 911).
To view or change the location transmission
status of your phone during a call:
Find it:
% Phone Settings % Location
1
If necessary, enter your phone’s four-digit
unlock code to access the
2
Scroll to
3
Press OK(s) to select the setting.
(ALI off) indicator, and the
MENU(s) & D SETTINGS & TOOLS
Location On
, your phone
or
911 Only
LOCATION
.
menu.
Page 67

AGPS limitations & tips
Your phone uses Assisted Global
Positioning System (AGPS) satellite
signals to estimate your location. If your
phone cannot find strong satellite signals,
your AGPS might be slower, less accurate, or
it might not work at all. AGPS provides only an
approximate location, often within 150 feet
(45 meters) but sometimes much farther from
your actual location.
To improve AGPS accuracy:
•
Go outside and away from
underground locations, covered
vehicles, structures with metal or
concrete roofs, tall buildings, and
foliage. Indoor performance might
improve if you move closer to
windows, but some window sun
shielding films can block satellite
signals.
•
Move away from radios, entertainment
equipment, and other electronic
devices that might interfere with or
block AGPS satellite signals.
•
If your phone has a retractable
antenna, extend the antenna.
•
Hold your phone away from your body,
and point the phone antenna toward
the sky. Do not cover the antenna area
with your fingers
AGPS uses satellites controlled by the U.S.
government and subject to changes
implemented in accordance with the
Department of Defense AGPS user policy and
the Federal Radio Navigation Plan. These
changes might affect AGPS performance.
customize
65
Page 68

calls
For basic instructions on how to make and
answer calls, see page 12.
redial a number
1
Press N to view the dialed calls list.
2
Scroll to the entry you want to call.
3
Press N to redial the number.
automatic redial
When you receive a busy signal, your
phone displays
With automatic redial, your phone
automatically redials the number for four
minutes. When the call goes through, your
66
Call Failed, Number Busy
calls
.
phone rings or vibrates one time, displays
Redial Successful
You must turn on automatic redial to use the
feature. To turn automatic redial on or off:
Find it:
% Call Settings % Auto Retry
When automatic redial is turned off, you can
manually activate the feature to redial a phone
number. When you hear a fast busy signal and
Call Failed
see
Press
, and then connects the call.
MENU(s) & D SETTINGS & TOOLS
:
N
or
RETRY
to activate automatic redial.
emergency calls
Your service provider programs one or more
emergency phone numbers, such as 911, that
Page 69

you can call under any circumstances, even
when your phone is locked.
Note:
Emergency numbers vary by country.
Your phone’s preprogrammed emergency
number(s) may not work in all locations, and
sometimes an emergency call cannot be
placed due to network, environmental, or
interference issues.
1
Enter the emergency number.
2
Press N to call the emergency number.
use AGPS during emergency call
When you make an emergency call, your
phone can use Assisted Global Positioning
System (AGPS) satellite signals to tell the
emergency response center your approximate
location.
The AGPS feature has limitations, so always
tell the emergency response center your best
knowledge of your location. Remain on the
phone for as long as the emergency response
center instructs you.
might not work
AGPS
•
Your phone’s AGPS feature must be
turned on (see page 64).
•
Your local emergency response center
might not process AGPS location
information. For details, contact your
local authorities.
For best results:
•
Go outside and away from
underground locations, covered
vehicles, structures with metal or
concrete roofs, tall buildings, and
foliage. Indoor performance might
improve if you move closer to
windows, but some window sun
for emergency calls:
calls
67
Page 70

shielding films can block satellite
signals.
•
Move away from radios, entertainment
equipment, and other electronic
devices that might interfere with or
block AGPS satellite signals.
If your phone cannot find strong AGPS
satellite signals, the location of the nearest
cell tower in contact with your phone is
automatically provided to the emergency
response center.
recent calls
Your phone keeps lists of the last 60 calls you
received and dialed, even if the calls did not
connect. The lists are sorted from newest to
oldest entries. The oldest entries are deleted
as new entries are added.
calls
68
Shortcut:
view the
Find it:
1
2
3
4
Press N from the home screen to
All Calls
list.
MENU(s)& A RECENT CALLS
Scroll to
Press OK(s) to select the list.
Scroll to an entry.
Press N to call the entry’s number.
Press
entry’s number.
Press
Press
perform other actions on the entry.
Missed, Received, Dialed,
or
Message
to send a message to the
or
OPEN(s
or
Options
to open the
) to view entry details.
Options
or
All
.
menu to
Page 71

The
Options
menu can include the following
options:
option
Save
Create a
the
Details
Display contact information.
Erase
Delete the selected entry (if the entry has
not been locked).
Lock
Lock the entry to prevent it from being
deleted, unlock to allow deletion.
Erase All
Delete all unlocked entries.
View Timers
Go to the
No.
Contacts
field.
View Timers
entry with the number in
screen.
return unanswered calls
Your phone keeps a record of your
s
unanswered calls, and displays the
call) indicator and
number of missed calls.
1
Press
2
Scroll to the call you want to return.
3
Press N to make the call.
X Missed Calls
VIEW
to see the received calls list.
, where X is the
(missed
attach a number
While dialing (with digits visible on the
screen), press
Attach Number,
select
Contacts
or the recent calls list.
Options(s
), then scroll to and
attach a number from
speed dial
Each
Contacts
entry is assigned a unique speed
dial number.
calls
69
Page 72

Tip:
To see an entry’s speed dial number,
MENU(s)& E CONTACTS % Contact List
press
View
scroll to the entry, and press
dial number is displayed with the
Contacts
To speed dial a
1
Enter the speed dial number for the entry
you want to call.
2
Press # to submit the number.
3
Press N to call the entry.
Tip:
Use 1-touch dial for quick calling! Call
speed dial entries 1 through 9 by pressing and
holding the single-digit speed dial number for
one second.
entry:
. The speed
>
,
icon.
voicemail
Voicemail messages that you receive
are stored on the network. To listen to
messages, call your voicemail phone number.
calls
70
Note:
Your service provider may include
additional information about using this
feature.
listen to messages
Find it:
Press N (send key) to call your voicemail
phone number.
If no voicemail number is stored, your phone
prompts you to store a number.
MENU(s)& C MESSAGING % VoiceMail
in-call options
During an active call, press the
access these options:
Contacts Connect Bluetooth
TTY Set-up
Messaging
Phone Info
Recent Calls
Location
OPTIONS
key to
Page 73

other features
advanced calling
features
restrict calls
Restrict outgoing or incoming calls:
MENU(s) & D SETTINGS & TOOLS % Phone Settings
% Security % Restrict Calls
When prompted, enter the unlock code and
Ok
press
and press
Calls
press
. Then select
Change
, then select
Change
Outgoing Calls
. Scroll to
All, None
or
Allow
, or
Incoming
and
Contacts
features
insert special characters
While entering a number, press
and select one of the following:
Attach Number
or the recent calls list.
Insert Pause
connects before it dials the next digit(s) in
the series.
.
Insert Wait
connects, then prompts you for
confirmation before it dials the next digit(s).
Send Message
number you are entering.
other features—advanced calling
—Attach a number from
—Your phone waits until the call
—Your phone waits until the call
—Send a message to the
Options
Contacts
71
Page 74

features
DTMF tones
Your phone can send Dual Tone Multi
Frequency (DTMF) tones for calling card
calls or to navigate automated systems
(such as banking by phone).
Setting up DTMF tones:
MENU(s) & D SETTINGS & TOOLS % Call Settings
% DTMF Tones
Select
Send DTMF tones during a call:
Press number keys.
72
Normal
or
Long
.
other features—messages
messages
features
send text message
MENU(s) & C MESSAGING % New Msg
Press
message.
E-mail
Access your internet e-mail account
to exchange -email from your phone.
Mobile IM
Access your internet Instant
Messaging account to exchange messages
in real time with family and friends.
Chat
Access your internet chat account to
chat in real time with family and friends.
TXT Msg
Options
to perform other actions on the
Page 75

features
store message objects
Go to a multimedia message slide
and press
Save Sound
view sent messages
Options
.
, then select
Save Picture
or
View sent messages:
MENU(s) & C MESSAGINGSent
Scroll to the message you want to view and
Open(s
press
). Press
Options
to perform
other actions on the message.
read received messages
MENU(s) & C MESSAGING % Inbox
Scroll to the message you want to read and
Open(s
press
Press
).
Options
to perform other actions on the
message.
features
drafts
View messages saved in
Drafts
folder:
MENU(s) & C MESSAGING % Drafts
Scroll to the message you want to view and
Open(s
press
To edit the message, press
To delete the message, press
Press
).
EDIT(s
Options
to perform other actions on the
Erase
).
.
message.
erase messages
Delete all messages, or delete only
messages from the
Inbox, Drafts
folder, or
Sent
folder:
MENU(s) & C MESSAGING
Press
Options
Drafts
,
Erase Sent
, then scroll to
, or
Erase All
Erase Inbox, Erase
, and press OK(s).
other features—messages
73
Page 76

contacts
features
create entry
MENU(s)& E CONTACTS % New Contact
view contact
MENU(s)& E CONTACTS % Contact List
To view an entry, scroll to the entry and
VIEW(s
press
on the entry, press
edit entry
MENU(s)& E CONTACTS % Contact List
Scroll to the entry and press
other features—contacts
74
). To perform other actions
Options
.
Edit
.
features
erase entry
MENU(s)& E CONTACTS % Contact List
Scroll to the entry and press
Erase
scroll to
assign picture to entry
When you assign a picture to a
your phone displays that picture when you
receive a call from the entry.
MENU(s)& E CONTACTS % Contact List
Scroll to the entry and press
Picture
to the desired picture and press
and press OK(s).
and press
Set
to go to
Options
Contacts
Edit
. Scroll to
My Pictures
OK(s
, then
entry,
. Scroll
).
Page 77

features
assign ringtone to entry
When you assign a ringtone to a
Contacts
entry, your phone plays that ringtone when
you receive a call from the entry.
MENU(s)& E CONTACTS % Contact List
Scroll to the entry and press
Ringtone
and press
menu. Scroll to the desired
RINGTONE
ringtone and press
Note:
Master Volume
Med High, Med, Med Low
Set
to go to the
OK(s
must be set to
, or
Edit
. Scroll to
CALL
).
Low
(see page 59).
High
,
features
download ringtone for entry
You can download a ringtone and
Contacts
assign it to a
entry. When you
receive a call from that entry, your phone
plays that ringtone
MENU(s)& E CONTACTS % Contact List
Scroll to the entry and press
Ringtone
RINGTONE
and press
menu. Select
Set
to go to the
Edit
Get New App
. Scroll to
CALL
, then
proceed to download and save a ringtone.
set speed dial number
Assign a speed dial number to a
Contacts
entry:
MENU(s)& E CONTACTS % Contact List
Scroll to the entry and press
Edit
. Scroll to
the number to be assigned a speed dial
Options
number and press
and press OK(s).
Speed Dial
, then scroll to
Set
other features—contacts
75
Page 78

features
set default number for entry
Set the default number for a
Contacts
entry
with multiple numbers:
MENU(s)& E CONTACTS % Contact List
Scroll to the entry and press
Edit
. Scroll to
the number to be set as the default number
Options
and press
and press
other features—contacts
76
, then scroll to
OK(s
).
Set As Default
features
add entries to group
Tip:
You can add a
while editing that entry by scrolling to
and pressing
Set
.
Contacts
entry to a group
Group
MENU(s)& E CONTACTS % Groups
Scroll to the group name and press
then scroll to
Add Contacts
want to add and press
Add
and press OK(s). On the
screen, scroll to each contact you
OK(s
Options
,
).
When you are finished adding contacts to a
group, press
Done
.
When you send a message to a group list,
the message goes to all entries in that
group.
Page 79

features
add group
Add a new group as an entry on the
screen:
MENU(s)& E CONTACTS % Groups
Press
New
. Enter the name for the new
group and press
When you send a message to a group list,
the message goes to all
that group.
call contact
MENU(s)& E CONTACTS
Scroll to
scroll to the entry you want to call and
N
press
SAVE(s
Contact List
.
).
Contacts
and press OK(s), then
Groups
entries in
personalizing features
voice recognition
Your phone’s voice recognition feature1
enables you to place calls and complete other
actions by speaking commands to your
phone.
1
Press and release the voice key on the
right side of the phone.
Your phone displays and speaks
, followed by a list of voice
command
commands.
2
Say one of the commands listed in the
following table. Your phone performs the
corresponding action.
1 Voice recognition feature powered
by VoiceSignal v2.1.
Please say a
other features—personalizing features
77
Page 80

voice command
Call <Name or #>
Place a call to:
•a Contacts
entry whose Name you
speak
or
a phone number you speak
•
Tip:
When speaking the name of a
Contacts
entry, say the name exactly as it is listed in
the entry. For example, to call the mobile
Contacts
number for a
entry named Bill Smith,
say “Call Bill Smith mobile.” (If the entry
includes only one number for Bill Smith, say
“Call Bill Smith.”)
Tip:
Speak numbers at a normal speed and
volume, pronouncing each digit distinctly.
Avoid pausing between digits.
other features—personalizing features
78
voice command
Send <Msg Type>
Send a text message or multimedia
message.
Say “Send text” or “Send picture,” then:
•
the Name of a
Contacts
entry
or
•
a phone number
(For instructions on sending a text or
multimedia message, see page 72.)
Lookup <Name>
Look up a
Contacts
entry by speaking the
entry’s Name.
Go To <Menu>
Access the menu or function you specify:
Voicemail, Camera, Redial, Received
Calls
Page 81

voice command
Check <Item>
View status of the Item you say:
Status
—coverage, signal strength, and
battery charge
Voicemail
Messages
multimedia messages
Missed Calls
not answer
Time
Battery
Signal Strength
Vol ume
My Account
Launch Mobile Web and display your
account options
—new voicemail messages
—new received text or
—incoming calls that you did
—time and date
—battery charge
—signal strength
—current volume level
voice command
Help
View Voice Command help information
voice recognition settings
To modify voice recognition settings:
1
Press and release the voice key on the
right side of the phone.
2
Press
Settings
.
other features—personalizing features
79
Page 82

3
Scroll to the desired option and press
OK(s
):
option
Choice Lists
If your phone is not sure that it has correctly
identified a name or number that you speak,
it can display up to three choices and
prompt you to confirm the correct one.
You can control when choice lists appear:
Automatic
—Display a list of choices from
multiple alternatives.
Choice Lists
Always On
(continued)
—Always display a list of choices
when there are multiple alternatives.
Always Off
—Never display a choice list. The
phone chooses from the best alternatives.
other features—personalizing features
80
option
Sensitivity
This setting allows you to fine tune the
phone’s ability to recognize voice
commands.
If sensitivity is too strict
, your phone often
rejects voice commands and displays
“Please repeat ...” or “No match found.”.
Sensitivity
Adjust the
setting toward
If sensitivity is too forgiving
Reject Less
, you often
experience false activations (indicating that
the phone detects a wrong match). Adjust
Sensitivity
the
setting toward
Reject More
.
.
Page 83

option
Digit Dialing
Adapt digit dialing to your voice:
Adapt Digits
—Adapt digits to improve
recognition of spoken phone numbers.
Adaptation takes about 60 seconds.
Reset Digits
—Erase any digital adaptation you
did previously and reset digit recognition to
the factory default. If you have not adapted
digits, this option is grayed out (not
available).
option
Sound
Customize the voice recognition interface
by turning playback on or off for prompts,
names, and numbers. You can also adjust
the speed and volume of name playback.
Prompts
—Turn playback on or off for prompts
such as “Please say a command.”
Digits
—Turn playback on or off for digits (for
example, when confirming a phone
number),
Names
—Turn playback on or off for names.
Name Settings
—Adjust speed and volume of
name playback.
To access additional information for a setting
INFO
you have selected, press
.
other features—personalizing features
81
Page 84

more personalizing features
features
key volume
MENU(s) & D SETTINGS & TOOLS
% Sound Settings % Keypad Volume
Note:
Master Volume
,
Med, Med Low
High
power on/off sounds
Set phone to play music clip when powered
on or off:
MENU(s) & D SETTINGS & TOOLS
% Sound Settings % Power On/Off
Note:
Master Volume
,
Med, Med Low
High
other features—personalizing features
82
must be set to
, or
Low
must be set to
, or
Low
High, Med
.
High, Med
.
features
display themes
Set the colors and styles of screens that
your phone displays:
MENU(s) & D SETTINGS & TOOLS
% Display Settings % Display Themes
menu language
MENU(s) & D SETTINGS & TOOLS
% Phone Settings % Language
create banner
Create a heading to display on your home
screen:
MENU(s) & D SETTINGS & TOOLS
% Display Settings % Banner
Page 85

features
show or hide menu icons
Show or hide menu feature icons in the
home screen:
MENU(s) & D SETTINGS & TOOLS
% Phone Settings % Shortcut Key
Scroll to and select
Show
or
Hide
.
change home keys
Change menus selected when you
press the navigation keys in the home
screen:
MENU(s) & D SETTINGS & TOOLS
% Phone Settings % Shortcut Key
Select
Up Key, Down Key, Left Key
then scroll to and select the menu you want
to assign to that key.
Icons Mode
, then select
, or
Right Key
,
call times & data volumes
Network connection time
time from the moment you connect to your
service provider’s network to the moment
you end the call by pressing
includes busy signals and ringing.
The amount of network connection time
you track on your resettable timer may not
equal the amount of time for which you
are billed by your service provider. For
is the elapsed
O
. This time
other features—call times & data volumes
83
Page 86

billing information, please contact your
service provider directly.
features
view call times
MENU(s) & A RECENT CALLS % View
Timers
Scroll to
Calls
Last Call, All Calls, Received Calls, Dialed
, or
Lifetime Calls
, and press OK(s).
view roaming times
MENU(s) & A RECENT CALLS % View
Timers % Roaming Calls
set in-call timer
MENU(s) & D
% Sound Settings
other features—call times & data volumes
84
SETTINGS & TOOLS
% Service Alerts % Minute Beep
features
view data volumes
MENU(s) & A RECENT CALLS % View
Timers
Scroll to
Lifetime Data Counter
Transmit KB, Received KB, Total KB
, and press OK(s).
reset timer
MENU(s) & A RECENT CALLS % View
Timers
Scroll to the desired timer and press
view last reset
MENU(s) & A RECENT CALLS % View
Timers % Last Reset
, or
Reset
.
Page 87

handsfree
Bluetooth® wireless
Note:
The use of wireless devices and their
accessories may be prohibited or restricted in
certain areas. Always obey the laws and
regulations on the use of these products.
features
accessory volume settings
(car kit or headset)
Adjust volume of headsets or car kit
accessories that are enabled for Bluetooth
connections:
During an active call, press your phone’s up
or down volume key.
connections
features
make phone visible to other device
Allow an unknown Bluetooth device
to discover your phone:
MENU(s) & D SETTINGS & TOOLS % Bluetooth
% Settings
Scroll to On and press OK(s).
connect to recognized device
Connect to a recognized handsfree
device:
MENU(s) & D SETTINGS & TOOLS % Bluetooth
% Add New Device
Select the device.
% Discovery Mode
other features—handsfree
85
Page 88

features
connect to handsfree device
during a call
Switch to a Bluetooth headset or car kit
during a call:
Press
OPTIONS
, then select
Note:
You cannot switch to a headset or car
kit if you are already connected to a
Bluetooth device.
disconnect from device
Scroll to
set Bluetooth power permanently
on
Set
phone is on:
MENU(s) & D SETTINGS & TOOLS % Bluetooth
% On
86
Bluetooth
and select
Bluetooth Power
other features—data & fax calls
to be on whenever your
Connect Bluetooth
Off
.
features
set Bluetooth options
MENU(s) & D
% Bluetooth % Settings
.
data & fax calls
Note:
For information on connecting your
phone and a PC, see “Bluetooth®
connections” on page 41 and “cable
connections” on page 43.
features
data settings
Specify call type for next call:
MENU(s) & D SETTINGS & TOOLS % Call Settings
% Data Settings
Select
Normal, Data Only
SETTINGS & TOOLS
, or
Fax Only
.
Page 89

features
send data or fax
Connect your phone to the device,
then place the call through the device
application.
receive data or fax
Connect your phone to the device,
then answer the call through the device
application.
network
features
network settings
View network information and adjust
network settings:
MENU(s) & D SETTINGS & TOOLS
% Phone Settings
Scroll to
Set Mode
% System Select
and press OK(s).
features
set service tones
Set phone to beep each time the
network registration status changes (for
example, when you roam off network):
MENU(s) & D SETTINGS & TOOLS
% Sound Settings
set call drop alerts
Set phone to beep whenever the
network drops a call. (Because digital
networks are so quiet, the call drop alert
may be your only indication that a call has
been dropped.)
MENU(s) & D SETTINGS & TOOLS
% Sound Settings
% Service Alerts % ERI
% Service Alerts % Voice Call Drop
other features—network
87
Page 90

features
set call connect alerts
Set phone to beep whenever an
outgoing call is connected.
MENU(s) & D SETTINGS & TOOLS
% Sound Settings
% Service Alerts % Call Connect
personal organizer
features
add calendar appointment
Add an event to the calendar:
MENU(s) & D SETTINGS & TOOLS % Tools
% Calendar
Scroll to the desired date and press
then enter new event information.
other features—personal organizer
88
Add
features
view calendar appointment
MENU(s) & D SETTINGS & TOOLS % Tools
% Calendar
Scroll to the date of the scheduled
appointment and press
VIEW(s
press
details.
set alarm
MENU(s) & D SETTINGS & TOOLS % Tools
% Alarm Clock
turn off alarm
Press
Off
,
) again to view appointment
or O.
VIEW(s
), then
Page 91

features
view world clock
View current time in cities around the
world:
MENU(s) & D SETTINGS & TOOLS % Tools
% World Clock
Scroll left or right to the desired city.
take notes
Write notes to yourself:
MENU(s) & D SETTINGS & TOOLS % Tools
% Notepad
calculator
MENU(s) & D SETTINGS & TOOLS % Tools
% Calculator
security
features
change unlock & security codes
MENU(s) & D SETTINGS & TOOLS
% Phone Settings % Security
Scroll to
Change
press
Unlock Code
. If prompted, enter the old code and
Ok
.
% New Passwords
or
Security Code
and press
fun & games
features
launch game or application
Launch a
application:
MENU(s) & B GETITNOW
Select
game or application you want to launch.
Get It Now
Games
game or
or
Tools on the Go
, then select the
other features—security
89
Page 92

features
download game or application
Download a
Get It Now
game or
application:
MENU(s) & B GETITNOW
Games
or
Selet
New App
Tools on the Go
.
, then select
Get
Select a category, application, and pricing
option. Normal airtime and/or carrier usage
charges apply.
Web sessions
Select or create a Web session:
From the idle display, press
MOBILE WEB
90
.
other features—fun & games
S
up to select
features
manage pictures
MENU(s) & B GETITNOW
% Picture & Video
Scroll to
My Pictures
and press OK(s) to view
a list of pictures.
To view a picture, scroll to the picture title
and press
Press
Pictures
VIEW(s
Options
. Scroll to and select:
).
to open the
OPTIONS
menu for
Send, To PIX Place
Get New, Set As, Rename, Lock, Erase, Erase All, Slide
, or
Show
Note:
Picture Info
The
.
OPTIONS
menu includes different
options for locked or preloaded images.
My
,
Page 93

features
manage video clips
MENU(s) & B GETITNOW
% Picture & Video
Scroll to
My Videos
and press OK(s) to view
a list of video clips.
To play a video clip, scroll to the video clip
title and press
Options
Press
My Videos
,
VCAST Video, Rename, Lock, Move, Erase, Erase
Place
,
Video Info
All
PLAY(s
to open the
. Scroll to and select:
or
Trim
).
OPTIONS
menu for
Send, To PIX
.
other features—fun & games
91
Page 94

service & repairs
If you have questions or need assistance,
we’re here to help. Go to
www.motorola.com/consumer/support
where you can select from a number of
customer care options. You can also contact
the Motorola Customer Support Center
at 1-800-657-8909 (United States),
1-888-390-6456 (TTY/TDD United States for
hearing impaired), or 1-800-461-4575
(Canada).
service & repairs
92
,
Page 95

Specific Absorption Rate Data
SAR Data
This model wireless phone meets the
government’s requirements for exposure to radio
waves.
Your wireless phone is a radio transmitter and receiver. It is
designed and manufactured not to exceed limits for exposure to
radio frequency (RF) energy set by the Federal Communications
Commission (FCC) of the U.S. Government and by the Canadian
regulatory authorities. These limits are part of comprehensive
guidelines and establish permitted levels of RF energy for the
general population. The guidelines are based on standards that
were developed by independent scientific organizations through
periodic and thorough evaluation of scientific studies. The
standards include a substantial safety margin designed to assure
the safety of all persons, regardless of age or health.
The exposure standard for wireless mobile phones employs a unit
of measurement known as the Specific Absorption Rate, or SAR.
The SAR limit set by the FCC and by the Canadian regulatory
authorities is 1.6 W/kg.
standard operating positions accepted by the FCC and by Industry
Canada with the phone transmitting at its highest certified power
level in all tested frequency bands. Although the SAR is
determined at the highest certified power level, the actual SAR
level of the phone while operating can be well below the
1
Tests for SAR are conducted using
maximum value. This is because the phone is designed to operate
at multiple power levels so as to use only the power required to
reach the network. In general, the closer you are to a wireless
base station, the lower the power output.
Before a phone model is available for sale to the public in the U.S.
and Canada, it must be tested and certified to the FCC and Industry
Canada that it does not exceed the limit established by each
government for safe exposure. The tests are performed in
positions and locations (e.g., at the ear and worn on the body)
reported to the FCC and available for review by Industry Canada.
The highest SAR value for this model phone when tested for use at
the ear is 1.14 W/kg, and when worn on the body, as described in
this user guide, is 1.56 W/kg. (Body-worn measurements differ
among phone models, depending upon available accessories and
regulatory requirements).
While there may be differences between the SAR levels of various
phones and at various positions, they all meet the governmental
requirements for safe exposure. Please note that improvements to
this product model could cause differences in the SAR value for
later products; in all cases, products are designed to be within the
guidelines.
Additional information on Specific Absorption Rates (SAR) can be
found on the Cellular Telecommunications & Internet Association
(CTIA) Web site:
2
SAR Data
93
Page 96

http://www.phonefacts.net
or the Canadian Wireless Telecommunications Association (CWTA)
Web site:
http://www.cwta.ca
1. I n the United States and Canada, the SAR limit for mobile phon es used
by the public is 1.6 watts/kg (W/kg) averaged over one gram of tissue.
The standard i ncorporates a substantial mar gin of safety to give
additional protection for the public and to account for any variations in
measurements.
2. The SAR information includes the Motorola testing protocol,
assessment proce dure, and measurement uncertain ty range for this
product.
SAR Data
94
Page 97

Important Safety and
Legal Information
95
Page 98

Safety and General Information
Safety In formatio n
This section contains important information on the safe and
efficient operation of your mobile device. Read this
information before using your mobile device.
Exposure to Radio Frequency (RF)
Energy
Your mobile device contains a transmitter and receiver. When it is
ON, it receives and transmits RF energy. When you communicate
with your mobile device, the system handling your call controls the
power level at which your mobile device transmits.
Your Motorola mobile device is designed to comply with local
regulatory requirements in your country concerning exposure of
human beings to RF energy.
Operational Precautions
For optimal mobile device performance and to be sure that human
exposure to RF energy does not exceed the guidelines set forth in
* The information provided in this document supersedes the general
safety information in user’s guides published prior to May 1, 2007.
96
*
the relevant standards, always follow these instructions and
precautions.
External Antenna Care
If your mobile device has an external antenna, use only a
Motorola-supplied or approved replacement antenna. Use of
unauthorized antennas, modifications, or attachments could
damage the mobile device and/or may result in your device not
complying with local regulatory requirements in your country.
DO NOT hold the external antenna when the mobile device is IN
USE. Holding the external antenna affects call quality and may
cause the mobile device to operate at a higher power level than
needed.
Product Operation
When placing or receiving a phone call, hold your mobile device
just like you would a landline phone.
If you wear the mobile device on your body, always place the
mobile device in a Motorola-supplied or approved clip, holder,
holster, case, or body harness. If you do not use a body-worn
accessory supplied or approved by Motorola—or if you hang your
mobile device from a lanyard around your neck—keep the mobile
device and its antenna at least 2.5 centimeters (1 inch) from your
body when transmitting.
Page 99

When using any data feature of the mobile device, with or without
an accessory cable, position the mobile device and its antenna at
least 2.5 centimeters (1 inch) from your body.
Using accessories not supplied or approved by Motorola may
cause your mobile device to exceed RF energy exposure
guidelines. For a list of Motorola-supplied or approved
accessories, visit our Web site at:
www.motorola.com
.
RF Energy Interference/Compatibility
Nearly every electronic device is subject to RF energy interference
from external sources if inadequately shielded, designed, or otherwise
configured for RF energy compatibility. In some circumstances your
mobile device may cause interference with other devices.
Follow Instructions to Avoid Interference
Problems
Turn off your mobile device in any location where posted notices
instruct you to do so.
In an aircraft, turn off your mobile device whenever instructed to
do so by airline staff. If your mobile device offers an airplane mode
or similar feature, consult airline staff about using it in flight.
Implantable Medical Devices
If you have an implantable medical device, such as a pacemaker or
defibrillator, consult your physician before using this mobile
device.
Persons with implantable medical devices should observe the
following precautions:
•
ALWAYS keep the mobile device more than
20 centimeters (8 inches) from the implantable medical
device when the mobile device is turned ON.
•
DO NOT carry the mobile device in the breast pocket.
•
Use the ear opposite the implantable medical device to
minimize the potential for interference.
•
Turn OFF the mobile device immediately if you have any
reason to suspect that interference is taking place.
Read and follow the directions from the manufacturer of your
implantable medical device. If you have any questions about using
your mobile device with your implantable medical device, consult
your health care provider.
Driving Precautions
Check the laws and regulations on the use of mobile devices in the
area where you drive. Always obey them.
When using your mobile device while driving, please:
•
Give full attention to driving and to the road. Using a
mobile device may be distracting. Discontinue use if you
can’t concentrate on driving.
•
Use handsfree operation, if available.
Safety Information
97
Page 100

•
Pull off the road and park before making or answering a
call if driving conditions so require.
•
Do not place a mobile device in the airbag deployment
area.
Responsible driving practices can be found in the “Smart Practices
While Driving” section in this user’s guide and/or at the Motorola
www.motorola.com/callsmart
Web site:
Note:
The use of wireless phones while driving may cause
.
distraction. Discontinue a call if you can’t concentrate on driving.
Additionally, the use of wireless devices and their accessories may
be prohibited or restricted in certain areas. Always obey the laws
and regulations on the use of these products.
Operational Warnings
Obey all posted signs when using mobile devices in public areas.
Potentially Explosive Atmospheres
Areas with potentially explosive atmospheres are often but not
always posted and can include fueling areas such as below decks
on boats, fuel or chemical transfer or storage facilities, or areas
where the air contains chemicals or particles, such as grain dust,
or metal powders.
When you are in such an area, turn off your mobile device, and do
not remove, install, or charge batteries. In such areas, sparks can
occur and cause an explosion or fire.
Safety Information
98
Symbol Key
Your battery, charger, or mobile device may contain symbols,
defined as follows:
Symbol Definition
032374o
032376o
032375o
Li Ion BATT
Important safety information follows.
Do not dispose of your battery or mobile
device in a fire.
Your battery or mobile device may require
recycling in accordance with local laws.
Contact your local regulatory authorities for
more information.
Do not throw your battery or mobile device in
the trash.
Your mobile device contains an internal
032378o
lithium ion battery.
Do not let your battery, charger, or mobile
device get wet.
Listening at full volume to music or voice
through a headset may damage your hearing.
 Loading...