

Page 1

Motorola
iDEN
Digital Multi-Service Data-Capable Phone
®
i35s Phone User’s Guide
@NNTN4573A@
NNTN4573A
Page 2

www.motorola.com/iden
Page 3

Table of Contents
IMPORTANT!
Read“Safetyand GeneralInformation”on page131
before using your i35s phone.
Introduction ..........................................................................................1
Driving Safety Tips.........................................................................................2
Getting Started...................................................................................... 5
i35s Phone Features ........................................................................................6
Battery.............................................................................................................6
Turning Your i35s Phone On/Off ..................................................................9
Enabling Security ..........................................................................................10
Receiving Over-the-Air Programming..........................................................10
Security Features of the i35s Phone ..............................................................11
Keypad Lock .................................................................................................20
Status of Your i35s Phone.............................................................................23
My Information .............................................................................................24
Using T9® Text Input ...................................................................................25
Display Essentials ...............................................................................31
Display Screen Elements...............................................................................31
Call Information Icons...................................................................................34
Navigating Menus and Lists..........................................................................35
Main Menu Options.......................................................................................36
Phonebook........................................................................................... 39
Accessing Phonebook with an i2000, i2000plus, or GSM Phone.................40
Phonebook Entries and Speed Dial Numbers................................................40
Phonebook Icons ...........................................................................................40
i
Page 4

Accessing Your Phonebook ..........................................................................41
About Phonebook Entries..............................................................................42
Pause Digit Entry...........................................................................................51
Plus Dialing ...................................................................................................52
Digital Cellular....................................................................................53
Making Phone Calls ......................................................................................53
Emergency Calling........................................................................................58
Receiving a Phone Call.................................................................................58
Ending a Phone Call......................................................................................59
Recent Calls...................................................................................................59
Call Timers....................................................................................................63
Call Waiting ..................................................................................................64
Call Hold .......................................................................................................66
Three-Way Calling........................................................................................67
Call Forwarding.............................................................................................68
Messages..............................................................................................73
Message Center .............................................................................................73
Voice Mail.....................................................................................................74
Using Voice Mail ..........................................................................................75
Text and Numeric Messaging........................................................................76
Net Alert........................................................................................................78
Using Your Phone as a Modem. ....................................................................78
Mobile Originated Text Messaging................................................... 81
Message Center .............................................................................................81
Text Msg Setup .............................................................................................83
Text Message Inbox ......................................................................................85
Text Message Outbox....................................................................................86
Private Calls........................................................................................95
Private Call....................................................................................................95
Call Alerts......................................................................................................97
Group Call...................................................................................................101
nextel.com
ii
Page 5

Memo ................................................................................................. 105
Adding a New Memo ..................................................................................105
Viewing a Memo.........................................................................................105
Editing a Memo...........................................................................................106
Deleting a Memo.........................................................................................106
Customizing t he i35s phone............................................................. 107
Settings........................................................................................................107
Accessories......................................................................................... 121
Batteries.......................................................................................................121
Travel Chargers...........................................................................................122
Data Accessories .........................................................................................124
Other Important Information ......................................................... 129
Understanding Status Messages ..................................................................129
Safety and General Information ..................................................... 131
RF Operational Characteristics ...................................................................131
Electro Magnetic Interference/Compatibility..............................................134
Medical Devices..........................................................................................134
Operational Warnings..................................................................................136
Operational Cautions...................................................................................137
Accessory Safety Information.....................................................................139
Limited Warranty Motorola Communication Products...............................147
Limited Warranty Motorola Communication Products(International) ......151
Patent and Trademark Information..............................................................155
Index ..................................................................................................157
iii
Page 6

iv
nextel.com
Page 7
DECLARATION OF CONFORMITY
M
Per FCC CFR 47 part 2 Section 2.1077(a)
Responsible party name:
Address: 8000 West Sunrise Boulevard,
Phone number: 1 (800) 453-0920
otorola Inc.
Plantation, FL 33322 USA
Hereby declares that the product:
Product name: i35s
Model Number: H56XAH6RR5AN
Conforms to the following regulation:
FCC Part 15, subpart B
Class B Computer peripheral
Date: October 10th, 2002
Note: This equipment has been tested and found to comply with the limits for a
Class B digital device, pursuant to part 15 of the FCC Rules. These limits are
designed to provide reasonable protection against harmful interference in a
residential installation. This equipment generates, uses and can radiate radio
frequency energy and, if not installed and used in accordance with the
instructions, may cause harmful interference to radio communications.
However, there is no guarantee that interference will not occur in a particular
installation.
If this equipment does cause harmful interference to radio or television
reception, which can be determined by turning the equipment off and on, the
user is encouraged to try to correct the interference by one or more of the
following measures:
-- Reorient or relocate the receiving antenna.
-- Increase the separation between the equipment and receiver.
-- Connect the equipment into an outlet on a circuit different from that to
which the receiver is connected.
-- Consult the dealer or an experienced radio/TV technician for help.
v
Page 8

vi
www.motorola.com/iden
Page 9

Introduction
ongratulations on purchasing your Motorola iDEN
C
• Phonebook— Your consolidated Phonebook holds up to 250 entries and
• SIM Card — Yourphone’s SIM card holds all entries stored in your
• Messages — The Message Center allows you to manage and access your
• Private and Group Calls — You can use your phone as a two-way radio
• VibraCall® Alert* — This feature allows the phone to emit an alarm for
• Speakerphone* — You can enjoy hands-free communication at the touch
• Fax and Data Transfer — for circuit data faxes and file transfers.
* OptionalFeature— Please consult your providerfor availability of purchase.
For more information on these and other featuresof the i35s phone, review this
User’s Guide. There is a Table of Contents in the front of the guide and an Index
in the back of the guide to assist you i n finding the specific information you
want.
multi-service, data-capable, digital, portable phone.
phone
offers:
allows you to store multiplecontactnumbers for each person, offering you
various ways to communicate with your business and personal contacts.
Phonebook. In addition, you have a PIN (Personal Identification Number)
to keep your i nformation safe and secure.
Voice Mail, Text Messagesand Net Alert all from the same inbox.
to communicatedirectly with business and personalcontacts in your iDEN
service area.
calls and messages by means of vibration
of a button. And Speakerphone is especially great for conference calls.
Your i35s
NOTE:Some features of your i35s phone are available only in the iDEN
service area, and are indicated as such in this guide.
NOTE:This guide describes the features of the i35s phone as they
were set up by Motorola. However, your Service Provider or
your organization may have changed or added features. For
more information, check with your Service Provider or your
organization.
1
Page 10

Driving Safety Tips
“Safety is your most important call!”
Your Motorola wireless telephone gives you the powerful ability to
communicate by voice — almost anywhere, anytime, wherever wirelessphone
serviceis availableand safe conditions allow. But an important responsibility
accompanies the benefits of wireless phones, one that every user must uphold.
Whendrivinga car, drivingis your first responsibility. If you find itnecessaryto
use your wireless phone while behind the wheel of a car, practicegood common
sense and remember the following tips:
1. Get to know your Motorola wireless phone and its features such as speed
dial and redial. If available, these features help you to place your call without taking your attention off the road.
2. When available, use a hands-free device. If possible, add an additional
layer of convenience to your wireless phone with one of the many Motorola Original hands-free accessoriesavailable today.
3. Positionyour wireless phone within easy reach. Be able to access your
wireless phone without removingyour eyes from the road. If you receive
an incoming call at an inconvenient time, if possible, let your voice mail
answer it for you.
4. Let the person you are speaking with know you are driving; if necessary,
suspend the call in heavy traffic or hazardous weather conditions. Rain,
sleet,snow, ice, and even heavy trafficcan be hazardous.
5. If you receive an incomingcall at an inconvenienttime do not take notesor
look up phone numbers while driving. Jotting down a “to do” list or going
through your addressbook takes attention away from your primary responsibility — driving safely.
6. Dialsensibly and assess the traffic;if possible, place callswhenyou are not
moving or before pulling into traffic. Try to plan calls when your car will
be stationary. If you need to make a call while moving, dial only a few
numbers,check the road and your mirrors, then continue.
7. Do not engage in stressful or emotional conversations that may be distracting. Make people you are talking with aware you are drivingand suspend
conversations which have the potential to divert your attentionaway from
the road.
www.motorola.com/iden
2
Page 11

Driving Safety Tips
8. Use your wireless phone to call for help. Dial 9-1-1 or other local
emergency number in the case of fire, traffic accident or medical
emergencies.
1
9. Use your wireless phone t o help others in emergencies. If you see an auto
accident, crime in progress or other serious emergency where lives are in
danger, call 9-1-1 or other local emergency number,as you would want
others to do for you.
10. Call roadside assistance or a special non-emergency wireless assistance
number when necessary. If you see a broken-down vehicle posing no serioushazard,abrokentrafficsignal,aminortrafficaccidentwherenoone
appearsinjured, or a vehicleyou know to be stolen, call roadside assistance
or other special non-emergency wirelessnumber.
1
1. Wherever wireless phone service is available.
3
Page 12

www.motorola.com/iden
4
Page 13

Getting Started
This section includes:
i35s Phone Features Page 6
Battery Page 6
Turning Your i35s PhoneOn/Off Page9
Enabling Security Page 10
ReceivingOver-the-Air Programming Page 10
SecurityFeatures of the i35s Phone Page 10
Statusof Your i35s Phone Page 23
My Information Page 24
Using T9® Text Input Page 25
5
Page 14
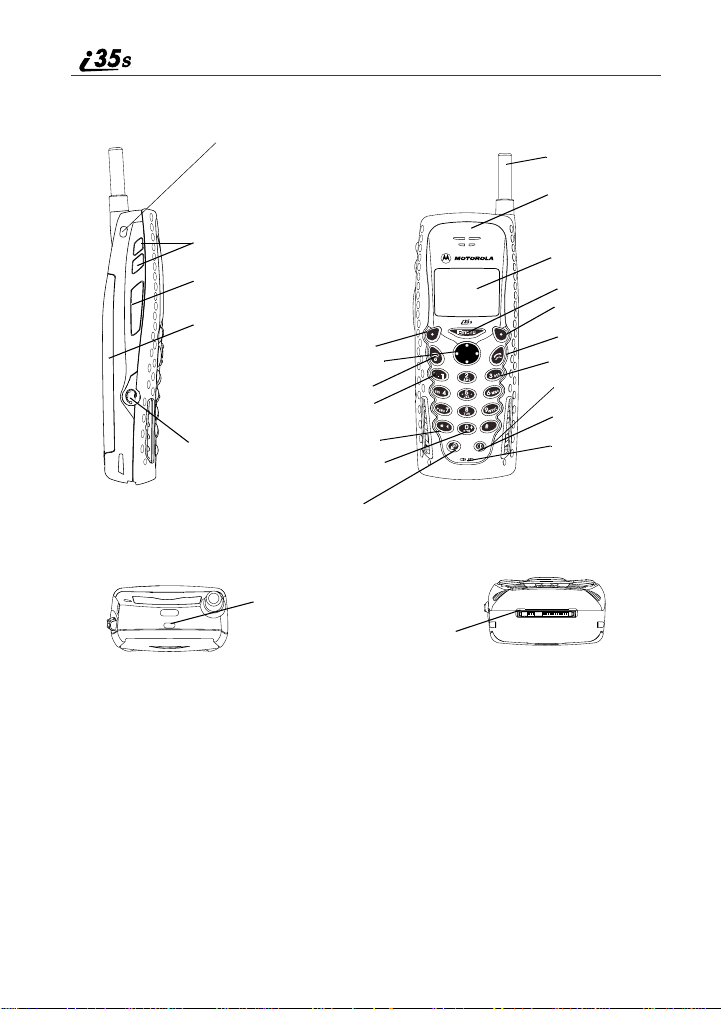
i35s Phone Features
SIDE VIEW
TOP VIEW
Lanyard Hook
Volume Keys
Push-To-Talk (PTT) Button
Battery
4-WayNavigation Key
End/Home K ey
Punctuation Key
Headset Jack
Back/Pause Dialing Key
Next Word/International
Plus Dialing Key
SpeakerKey
StatusLight
*ThroughoutthisUser’sGuide,theoptionkeysA
and B will be represented by C.
OptionKey*
Accessory and Data
Cable Connector
FRONT VIEW
Antenna
Earpiece
Display
Menu Key
Option Key*
Send Key
AlphaNumeric
Keypad
Photosensor
Power On/Off
Microphone
Microphone
BOTTOM VIEW
Battery
Your i35s phone comes with a Lithium Ion battery. After attaching the battery,
you must charge it before you use it for the first time. See “Charging Lithium
Ion Batteries” on page 121 for the charging times for your phone’s battery. The
firsttime you charge your phone’s battery, charge for 30 minutes more than the
time shown on page 121. After the initialcharging,the batterycan be charged in
thetimeshownonpage121.
Instructions for Attaching and Detaching the batterymay be found on Page 7.
www.motorola.com/iden
6
Page 15
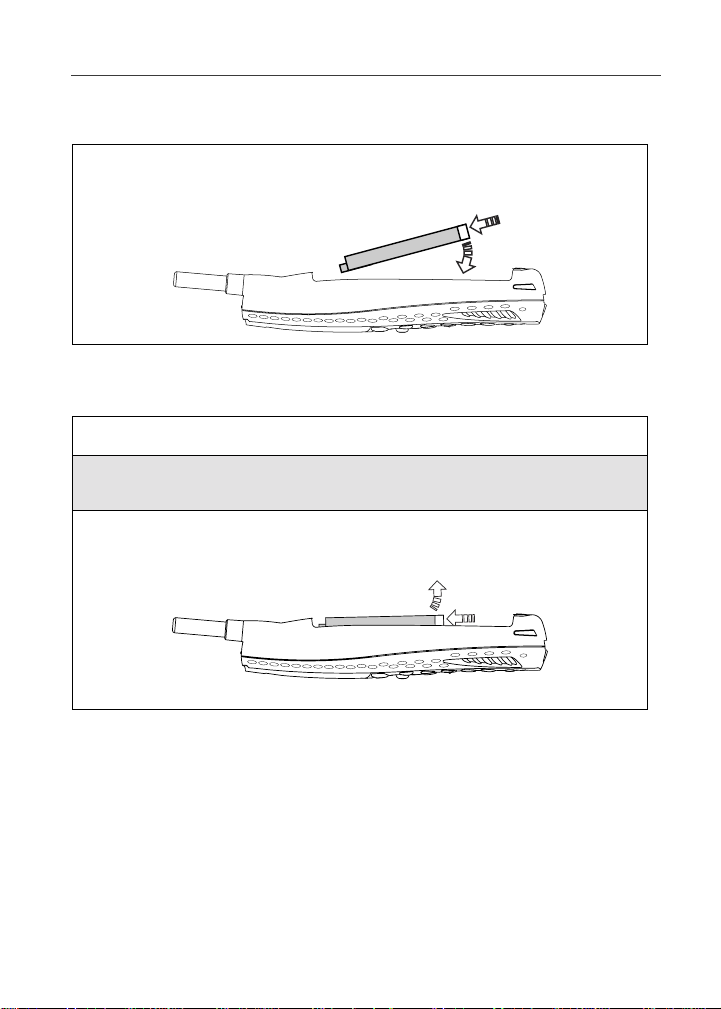
Attaching the Battery
Insert the top of the battery into the battery area under the housing
retentionhooks. Press down on the bottom of the battery to secure it.
Push down on the battery until you hear a click.
Detaching the Battery
1
Ensure the phone is powered off beforeattemptingto detach the battery.
2
Press the battery release button away from the antenna and slide the
battery cover away from the antenna.
3
Remove the battery by pushing the battery toward the antenna and
liftingit out of the phone.
Battery
7
Page 16
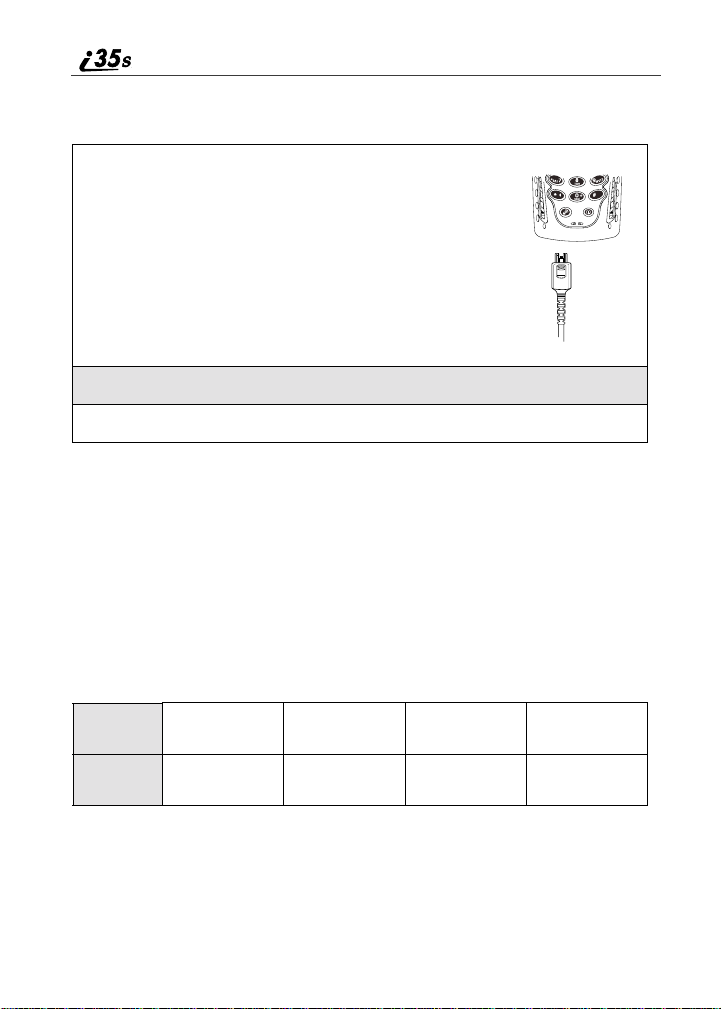
Charging the Battery
1
With your phone’s keypad f acing up, plug the
charger’s accessory connector into the left side of the
accessoryconnector on the bottom of the phone.
2
If the charger has folding electrical prongs, flip open the prongs.
3
Plug the chargerinto an electrical outlet.
NOTE: Your phone’s screen backlight will remain lit while the battery is
charging.
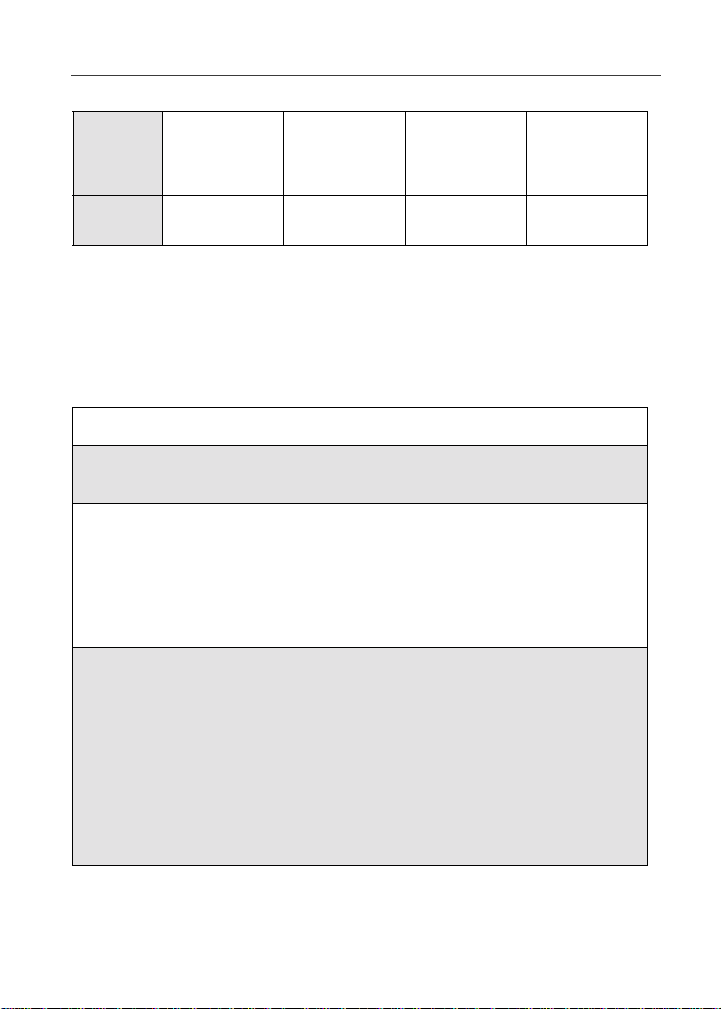
Battery Charging Status
The battery strength indicator icon found on your phone’s display screen shows
the charge amount remaining in the battery. Refer to Battery ChargingTable
below.
Battery Charging
When Using Phone
Icon
Display
Battery
Strength
NOTE: A short, chirp-like sound indicates a low battery. This indicates
abcd
Low
Battery
that you have approximately five minutes of talktime remaining.
11% - 40% 41% - 70% Fully Charged
(90% -100%)
www.motorola.com/iden
8
Page 17
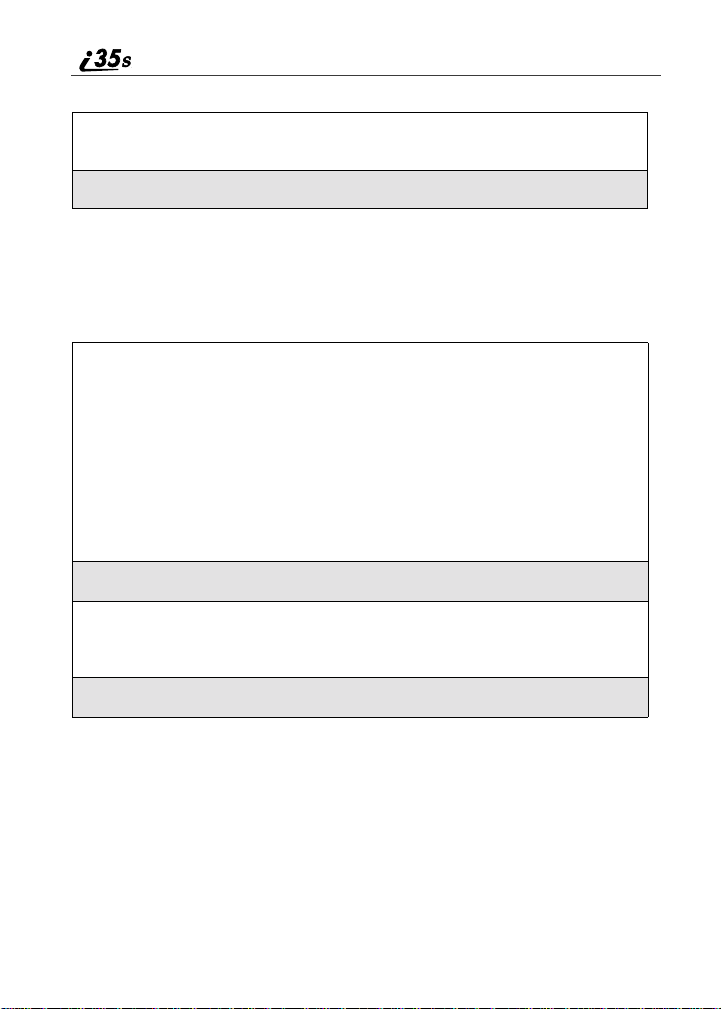
When Charging Battery
A
Turning Your i35s Phone On/Off
Icon
Display
Battery
Strength
NOTE: During the charging process, the battery icon will be flashing. In
efgh
1flashingbar 1flashingbar,
Low
Battery
addition, when the battery is fully charged, the battery icon will
show a fully charged battery.
1 continuous bar
31% - 60% 61% - 90% FullyCharged
1 flashing bar,
2 continuous bars
3 continuous bars
(90% -100%)
Turning Your i35s P hone On/Off
To power the phone on:
1
For optimal signal strength, extend the antenna.
2
Press and hold p near the bottom of the phone until the status light
glows red and a tone briefly sounds.
3
If theEnter SIM PIN Code screen displays, enter your SIM PIN. ( For
more information see “SIM Card Personal Identification Number
(PIN)” on page 12.)
NOTE: The default SIM card PIN is 0000. It is recommended that you
change your PIN to prevent fraudulent use of the SIM card
(see “Changing the PIN” on page 13).
4
Press C under OK.
As your phone connects to the network,
youwillseeawelcomemessageanda
connecting message.When the Ready
screen appears on the display, you are
readytouseyouri35s phone!
9
Page 18
To power the phone off:
1
Press and hold p near the bottom of the phone until you see the
message Powering Off.
2
Push down the antenna.
Enabling Security
To utilizebrowser functionality from your service provider, you must enable
securitythe first time you power on your phone or within 20 days of first
activation of your phone.
1
When you power on your phone for the
first time, after the Re ady screen appears,
you will be prompted to select OK to
update your browser info.
NOTE: If you press C under LATER,
youwillbepromptedtoenable
security each time you power on
your phone until you press
under OK.
2
Press C under O K.
3
You are prompted to enable security. Press C under YES. A series of
screens display. If you subscribeto your service provider plan,your
home page displays.
a
C
4
Press r to return to the Ready screen.
Receiving Over-the-Air Programming
If you have been set up to receiveOver-the-Air Programming by your service
provider, you will receive your PrivateID and Talkgroup lists for Private Call
use, and your Personal Telephone Number via a Net Alert message.
In order to receive your programming, you must have enabled security. W ithin
24 hours of enabling security,you will receive a Net Alert message containing
your lists.
www.motorola.com/iden
10
Page 19

Security Features of the i35s Phone
To accept your phone programming:
1
Youwill receive a Net Alert with the message New BrowserMessage –
Receive ProgrammingInfo.
2
Press C under G OTO.
3
You are prompted to accept changes to your phonebook.Press C under
OK.
4
A confirmation screen displays. Press C under OK.
5
You are prompted again to accept changes to your phonebook. Press C
under OK.
6
A confirmation screen displays. Press C under OK.
7
Press r to return to the Ready screen.
Security Features of the i35s Phone
SIM Card
Your phone comes with a built-in level of security protectionthroughthe use of
the SIM (Subscriber Identity Module) card. The SIM card stores all your
Phonebookinformation. Since this information is stored on the SIM card, not in
your phone itself,you can remove the information by removing the SIM card.
The SIM card is located in the SIM Card Holder on the back of the phone,
underneath the battery. You can verifythatthe SIM cardis in place by removing
the battery and viewing the SIM card through the SIM card holder.
See “Inserting/Removing the SIM Card” on page 17 for information on locating
the SIM card. If there is no SIM card in your phone, notify your sales
representative.
NOTE: Exceptfor making emergency calls,yourphonewill not
functionwithout the SIM card.
11
Page 20
SIM Card P ersonal Identificati on Number (PIN)
To preventunauthorized use of your phone, your SIM card is protectedby a
PIN. Each time the phone is powered on, you must enter your PIN. You can
change or disable your PIN if desired.
NOTE: Disabling your PIN enables anyone to use your phone. If you
disable your PIN, you must still keep the SIM card in the phone
to make calls.
Entering the PIN
Depending on your service provider, your phone
may or may not require you to enter a SIM PIN
when you first use your phone.
If your phone is set to require you to enter a PIN,
your default SIM card PIN is: 0000. It is
recommended that you change your PIN to
preventfraudulent use of the SIM card (see
“Changing the PIN” on page 13).
P
IMPORTANT:
1
From the Enter SIM PIN screen, enter your four- to eight-digit PIN.
An asterisk appears for each character entered.
NOTE: Other than emergency dialing, you will be unable to use any
of the phone functions, including receiving phone calls, until
you enter the PIN.
2
Press C under OK.
If you enter an incorrect PIN, the message SIM PIN incorrect: Try again
appearson your phone’s screen. After three consecutiveincorrectattempts,t he
SIM card is blocked. The phone does not allow you to attemptto enter your PIN
12
Incorrectlyentering your PIN threetimes
causes the SIM card to be blocked. To
unblock your SIM card, you must contact
your service provide r. For more
information,see “Unblocking the PIN” on
page 14.
www.motorola.com/iden
Page 21

Security Features of the i35s Phone
again, even after powering the phone off and back on. If this happens, see
“Unblocking the PIN” on page 14.
Changing the PIN
1
At the Ready screen, press q
andthenpress
R to scroll toSettings.
B
2
Press C under SELECT.The Settingsscreen displays.
3
Press R to scroll to Security.PressC
under SELECT to access the Security
screen.
j
4
At the Security screen, press R to scroll to New Passwords.PressC
under SELECT to access the New Passwords screen.
5
At th e New Passwords screen, press R to scroll to SIM PIN and press
C under SELECT.
6
At the Enter Old SIM PIN Code screen, enter the current SIM PIN
and press
NOTE: The default SIM is 0000.
C under OK.
13
Page 22
7
At the Enter New SIM PIN Code screen, enter the new 4- to 8-digit
SIM PIN and press
8
At the Re-enterNew S IM PIN Code screen, re-enter the new SIM PIN
to confirm, and press
C under OK.
C under OK.
Unblockingthe PIN
If you forget your PIN and unsuccessfully enter it three times, access to your
phone will be blocked.
NOTE: Before you begin, obtain the PIN Unblocking Key (PUK) code
from your service provider, then read and understand the PIN
unblocking sequence. When entering the key press sequence,
each key press must occur within 5 seconds of the prior key
press.
IMPORTANT:
If you unsuccessfully enter the PUK code
ten times, the SIM card is permanently
blocked and must be replaced. If this
happens, all data will be lost. You will get a
message to contact your service provider. If
the SIM card is blocked, the i35s phone only
allows outgoing Emergency calls.
To unblock the PIN:
1
Press **05s.
2
Enter the PUK code.
3
Press s.
4
Enter a new 4- to 8-digit SIM PIN and press s.
5
Re-enter your SIM PIN and press s.
If you entered the codes properly,the SIM Unlocked screen displays.
www.motorola.com/iden
14
Page 23
Security Features of the i35s Phone
Disabling/Enabling the PIN Requirement
When the PIN requirement is enabled, you are
prompted to enter your PIN each time you turn
on your phone. Until a valid PIN is entered, you
can use the phone only to make emergencycalls.
After the PIN is accepted, the phone registers on
the network and the Readyscreen displays.
Whenthe PIN requirementis disabled,the phone
can be used without entering a PIN.
P
IMPORTANT:
1
At the Ready screen, press q
andthenpress
2
Press C under SELECT.The Settingsscreen displays.
R to scroll toSettings.
If you disable the PIN requirement, you
remove protection of personal data on your
SIM card. Anyone can then use your phone
and access your personal data.
B
15
Page 24
3
j
Press R to scroll to Security.PressC
under SELECT to access the Security
screen.
4
At the Security screen, press R to scroll to SIM PIN.PressC under
SELECT to access the SIM PIN screen.
5
Press R to scroll to On or Off. On enables the SIM PIN requirement;
Off disables the SIM PIN requirement. Press
6
At the VerifySIM PIN Code screen, enter the current SIM PIN and
C under OK.
press
C under SELECT.
16
www.motorola.com/iden
Page 25
Security Features of the i35s Phone
Inserting/Removing the SIM Card
IMPORTANT:
If you remove your SIM card and insert
another SIM card i nto your phone, the
following information is erased when you
use the phone with the new SIM card:
• Recent Calls list
• Call Forwarding settings
• Net Alerts
• InformationstoredinMemo
• Browser bookmarks
All Phonebook information will remain
stored on your original SIM card.
Do not touch the gold-colored areas of the
SIM card.
To avoid loss or damage, do not remove
your SIM card from your phone unless
absolutely necessary.
To insert the SIM card
1
With the phone powered off, remove the battery cover and battery. See
“Detachingthe Battery” on page 7.
2
With the antenna facingaway from you
and the back of the phone exposed and
facing up, locate the SIM card holder.
SIM card
holder
17
Page 26

3
Hold the SIM card with the gold contact
side facing down and the cut corner in the
upper left. Do not touch the gold-colored
areas of the SIM card.
4
Carefully slide the SIM card with the cut
corner in the upper left position into the
phone, until it lies flat in the SIM card
holder.
Cut Angled
Corners
To Remove the SIM Card
NOTE:To remove your SIM card, you will need a ballpoint pen (or
another slightly pointed object).
1
With the phone powered off, remove the battery cover and battery. See
“Detachingthe Battery” on page 7.
cut corner
18
www.motorola.com/iden
Page 27
Security Features of the i35s Phone
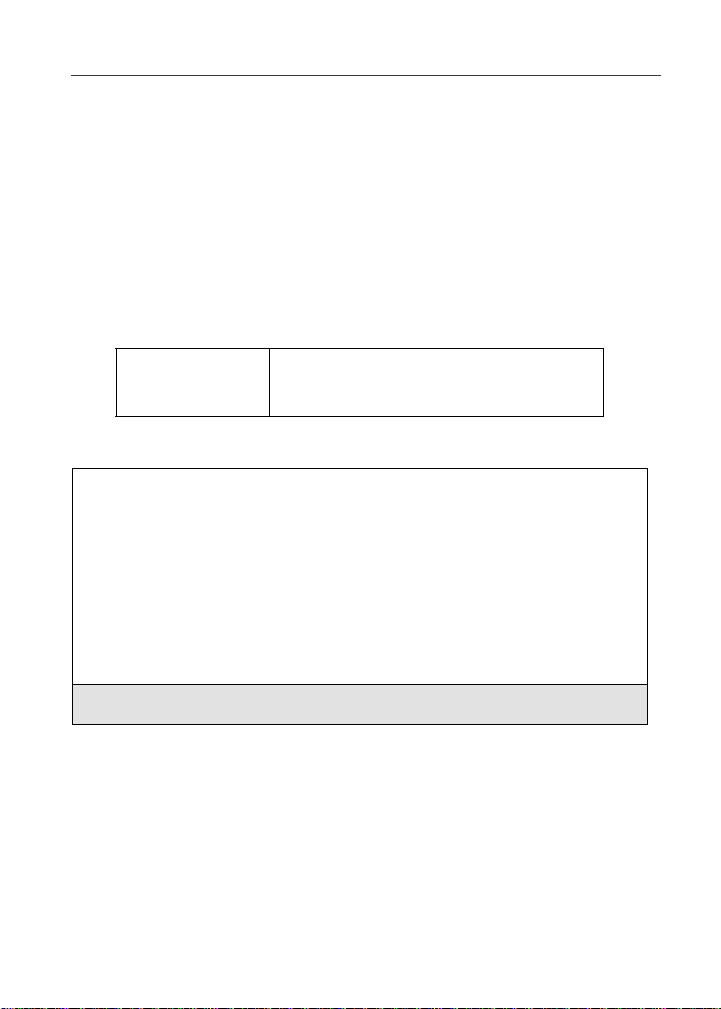
2
With the antenna facing away from you
and the back of the phone exposed and
facing up, insert the tip of a ballpoint pen
into the slot at the bottom of the SIM card,
along the left edge of the SIM card.
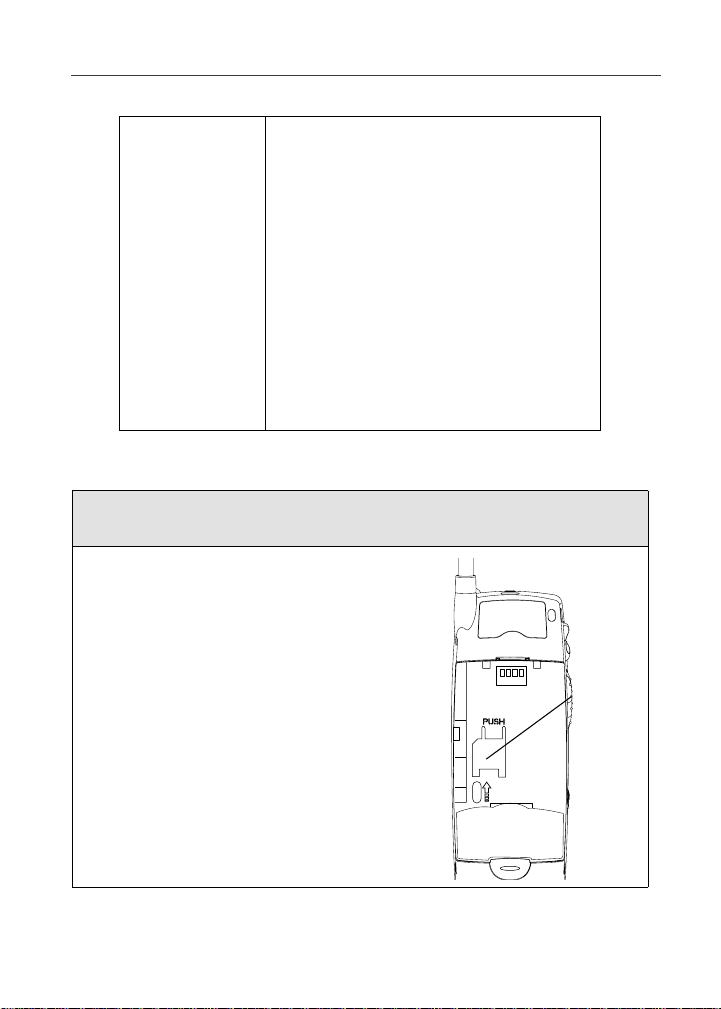
3
With your other hand, gently press the
PUSHtabontopoftheSIMcard.Holdthe
tab down.
slot
tab
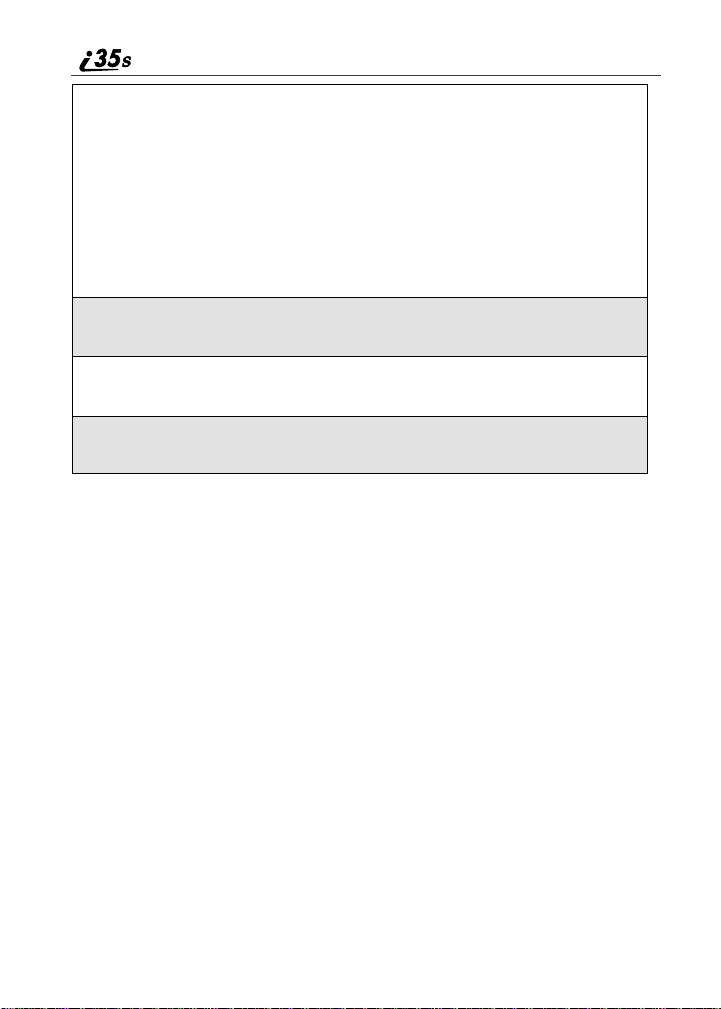
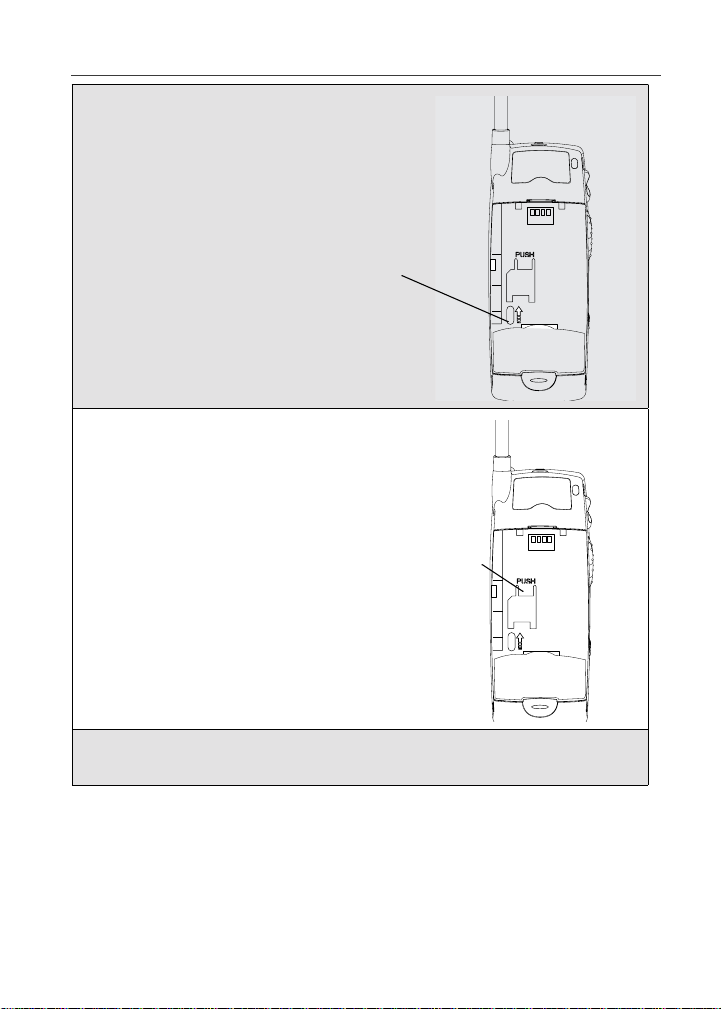
4
While holding the tab down, slide the SIM card up by moving the
ballpoint pen in the direction of the arrow within the slot.
19
Page 28

5
WhentheballpointpenhasmovedtheSIMcardupasmuchas
possible, very carefully lift the SIM card out of the phone. Do not touch
the gold-colored areas of the SIM card.
NOTE: Protect the SIM card as you would any delicate object. When
the SIM card is not in the phone, you should store it in
something protective, such as a mailing envelope.
Keypad Lock
The i35s phone includes a Keypad Lock feature that enables you to quickly lock
the phone’s keypad to avoid inadvertently pressing keys or placing calls. Once
Keypad Lock is activated, you can only perform the following tasks:
• Turn your phone on and off
• Unlock th e keypad
• Receive incoming calls, messages, and alerts.
NOTE: Emergency calls cannot be placed while Keypad Lock is
activated.
Beforelockingyour phone’s keypad, you may want to read this entire section to
learnhowtorespondtoincomingcalls,messages,andalerts.
Activating Keypad Lock
FromtheReadyscreen,pressq
.ThemessageKeypadLocked
*
displayson your phone.
D
Whenevera key is pressed while in Keypad Lock mode, the unlock instructions
display briefly.
www.motorola.com/iden
20
Page 29
Keypad Lock
Receiving Incoming Calls
When you receive an incoming phone call (see “Receiving a Phone Call” on
page 58), Keypad Lock is temporarily disabled.
1
Press C under YES or press s to answer the call. When you end the
call, the Recent Calls list appears. Press
reactivate Keypad Lock and return to the Ready screen.
Or,
C underNOorpressr to send the call to Voice Mail and
Press
reactivate Keypad Lock.
r or press C under EXIT to
Receiving Private Calls
When you receive an incoming Private call, Talkgroup call, or call alert (see
“Private Call” on page 95), Keypad Lock is temporarily disabled.
1
Press and hold the Push-To-Talk(PTT) button on the side of the phone.
Begin talking after the phone emits a chirping sound. Release the PTT
buttonto listen.
2
When you end the call, the Recent Calls list appears. Press r or press
C under EXIT to reactivate Keypad Lock and return to the Ready
screen.
Receiving New Voice Mail
When you receive new Voice Mail (see “Voice Mail” on page 74), Keypad
Lock is temporarily disabled.
1
WhenNe w Voice Mail Message displays,press C underEXIT to
returnto theReady screen and reactivate Keypad Lock.
Or,
Press
C under CALL to access V oice Mail.
2
Once you have finished, press r to exit Voice Mail. The Recent Calls
list displays. Press
Ready screen.
r to reactivate Keypad Lock and return to the
21
Page 30
Receiving N ew Text Messages
When you receive new Text Messages (see “Text and Numeric Messaging” on
page 76), Keypad Lock is temporarily disabled.
1
WhenNew Text Message displays,pressC under EXIT to return to the
Ready screen and reactivate Keypad Lock.
Or,
Press
C under READ to read the message. Press C under SAVE or
DELETE. Once you have finished, press
reactivateKeypadLockreturntotheReady screen.
s or press C under EXIT to
Receiving New Net Alerts
When you receive a new Net Alert, Keypad Lock is temporarily disabled.
1
When New Browser Message displays, press C under EXIT to return
to the Ready screen and reactivate Keypad Lock.
Or,
C under GOTO. Press C under View. Press C under OK or
Press
Reply. Once you have finished, press
Lock then return to the Ready screen.
r until you reactivateKeypad
22
www.motorola.com/iden
Page 31

Status of Your i35s Phone
Deactivating K ey pad Lock
From the Ready screen, press
q*.ThemessageKeypad
Unlocked displays briefly.
E
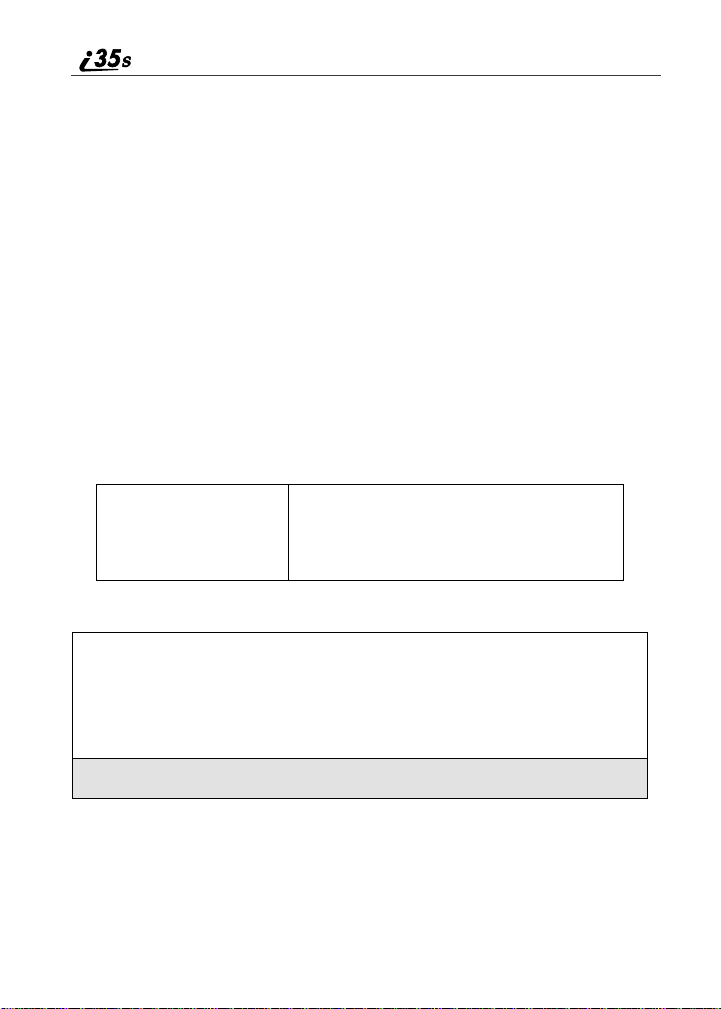
Status of Your i35s Phone
Your i35s phone has a status light that displays at the top of the phone. The
statuslight indicates the status of your connection.
Status Light
Indicator
Flashing Red Signing on to the network. Please wait.
Solid Red No service or out of coverage area.
Flashing
Green
Solid Green In use
i35s Phone Status
Inservice/Readytouse.
.
23
Page 32

My Information
You can select My Info from the main menu to displayor edit the following:
• Name — enter your name in this field.
• PrivateID — your PrivateID is displayed in this field. YourPrivate ID is
the number that others use to contact you using Private calls.
• Phone Numbersof Lines 1 and 2 — your phone’s numbers are displayedin
these fields. You can edit the phone numbers displayed on the My
Information screen, but this does not change your phone numbers.
• Carrier IP — This field displays your phone’s carrier assigned IP address.
• InternetProtocol Addresses(IP Addresses) — these fields display the IP
addressesyou use to access the Internet with your phone.
• CircuitData Number (Ckt) — your circuit data number is in this field.
Viewing/Editing My Information
1
From the Ready screen, press q.
2
Press S to scroll to My Info.PressC under SELECT.The My
Information screen displays.
3
Use S to scroll through the fields.
4
Toedit the displayed information, pressC under CHANGE. Edit
information as desired, and press
C under OK to save the changes.
To return to the Ready screen, press
24
C under EXIT.
www.motorola.com/iden
Page 33

Using T9® Text Input
Using T9®Text Input
Your i35s phone has embedded software, called T9®Text Input, that makes
typing on a phone keypad much like typing on a computer keyboard: it
eliminates the traditional “multi-tap” m ethod of text entry. As you type, you
pressonly one key per letter. T9 Text Input matches your keystrokesto words in
its linguistic database of approximately 60,000 words and proper names. You
may also store additional words you frequently use in your own user database,
which is incorporated into the T9 database.
T9 Text Input is available when you are typing information into your
Phonebook.
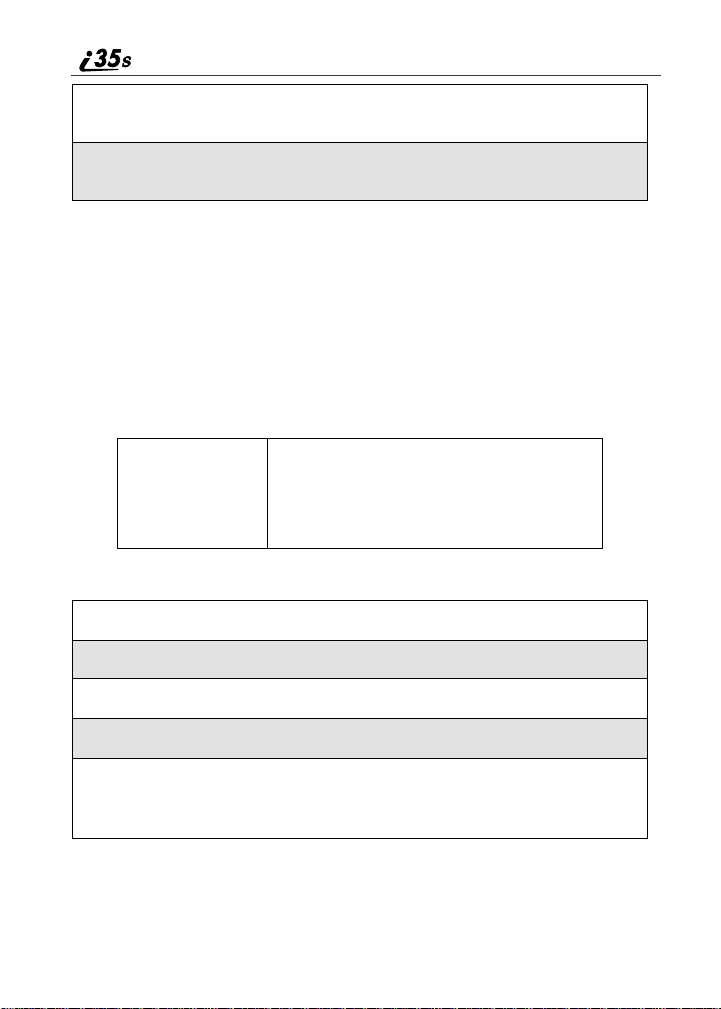
T9 Text Input Entry Modes
Four text entry modes are availablein T9 Text Input: Alpha, Word, Symbols,
and Numeric. When you are using T9 Text Input, an icon in the top right corner
of your phone’s display screen (next t o the battery strength indicator icon)
indicates the T9 Text Input entry mode you are using:
Icon T9 Entry Mode
Name
w Alpha Standard “multi-tap” keypad
# Word Entering words and
! Symbols Entering punctuation and
, Numeric Entering keypad numbers.
When you are using Phonebook, you select your text entry mode from a menu
available whenever the phone is displayinga screen that requiresyou to enter
text (for example,the Name screen or Title screen).
Used For...
text entry.
punctuation with one keypress per character.
symbols such as “@” or “?”.
25
Page 34

Choosing a Text Entry Mod e
1
From any screen that requires text input, press q to access the
Entry Method menu.
A check mark appears next to the current text entry mode. When you
access a screen that requires text input, the default text entry mode is
Alpha.
2
Press S to scroll to the T9 TextInput text entry mode you want to use.
3
Press C under SELECT.
The phone returns to the text entry screen. The text entry mode you
selectedis now active.
Choosing a Language
To change the language of the T9 Text Input database:
1
From any screenthat requires text input, press q to access the
Entry Method menu.
2
Press S to scroll to Languages.
3
Press C under SELECT.
4
Press S to scroll to the language you want T9 Text Input to use.
5
Press C under SELECT.
Using Alpha M ode
To enter text while in Alpha text entry mode to enter letters, numbers, and
symbols:
• Press any button on the al phanumeric keypad t o enter the letters, numbers,
and symbols on that key .
• Typealetterthenpress
Q to activate Caps Lock or type a letter then press
R to deactivate Caps Lock.
www.motorola.com/iden
26
Page 35

Using T9® Text Input
• Pause briefly to leave the currentlydisplayedcharacterin place and move
on to the next place in the text entry field.
• Press
• Press
P to create a space in the text entry field.
C under DELETE to delete one character. Press and hold C under
DELETE to delete an entire entry.
Using Word Mode
In Word mode, T9 Text Input analyzes the letters on the keypad button you
press and arranges them to create words. As you type, T9 Text Input matches
your keystrokes to words in its database and will display the most commonly
used matching word.
Special Key Functions
Some of your phone’s keys assume different functions while in T9 Text Input
Word mode.
Backspace and Erase
C under DELETE once to backspace or to erase a single character. Press
Press
and hold C under DELETE to erase the entire text entry field.
Space
R once to accept a word and insert a space when entering text.
Press
Next Word in Database
0 to display more words in the databasethat match the keystroke
Press
sequence you entered.
Shift and Caps Lock
# to make the next letter typed uppercase(Shift), to make all subsequent
Press
letters types uppercase (Caps Lock), or to go back to lowercase letters.
These icons appear in the top row of your display screen:
• $ for Shift to uppercase
• x for Caps Lock
When neither of these icons appear, letters typed are lowercase.
NOTE: T9 Text Input automatically makes the first letter of a sentence
uppercase.
27
Page 36

Punctuation
In Word mode, T9 Text Input uses Smart Punctuation to quicklyapply basic
rules of grammar to insert the correct punctuation within a word and at the end
of a sentence.
1 to insert punctuation. One of eight basic punctuation symbols will be
Press
inserted(.,-’ @:?;).
0 to change the inserted punctuation symbol to another of the eight
Press
basic punctuationsymbols.
R to accept the punctuation and continue t yping.
Press
NOTE: Additional punctuation symbols are available in Symbols mode.
EnteringaWord
To enter a word using Word mode:
1
Choose Word as your text entry mode.
2
Type a word by using one key-press per desired letter.
For example, to t ype “test” press
NOTE: The displayed word may change as you type it. Do not try to
correct the word as you go. Type to the end of the word
before editing.
3
If the word that appears is not the desired word, press 0 to change the
8378.
word on the display to the next most likely word in the database.
Repeat until the desired word appears.
If the desired word does not appear,you can add it to the database of
wordsusing the instructionsin “Adding Words to the User Database” in
the next section.
www.motorola.com/iden
28
Page 37

Using T9® Text Input
Adding Words to the User Database
To add words to the T9 database:
1
Change from Word t ext entry mode to Alpha text entry mode.
2
Type the word using Alpha text entry mode.
3
Return to Wordtext entry mode.
4
Press R to add a space.
The word you typed in Alpha text entry mode is now in the database.
NOTE: You cannot store alphanumeric combinations, such as Y2K.
Using Numeric Mode
To use Numeric text entry mode, choose Numeric as your text entry m ode and
press the number buttons on your keypad to enter numbers.
Using Symbols M ode
To use Symbols text entry mode:
1
Choose Symbols as your text entry mode.
A row of 32 symbols appears along the bottom of your phone’sdisplay
screen,just above the display option and menu icon. (Press
the complete row.)
2
Press T to highlight the symbol you want to enter into the text entry
field.
3
Press C under SELECT to enter the symbol.
T to view
29
Page 38

30
www.motorola.com/iden
Page 39

Display Essentials
Your i35s phone’s display screen tells you what you need to know.
This section includes:
DisplayScreen Elements Page 31
Status Icons Page 32
Text Display Area Page 34
Call InformationIcons Page 34
Menu Icon Page 34
Display Options Page 35
NavigatingMenus and Lists Page 35
Main Menu Options Page 36
Display Screen Elements
Any time your phone is powered on, the display screen provides you with
information and options.
The Ready Screen
The Ready screen displays any time the
phone is powered on, but not engaged in
some activity.
The Ready screen consist of elements
commontomanyofthescreensyour
phone displays:
• statusicons
• text display area
• menu icon
• displayoptions
A
Status
Status
Status
icon
icon
icon
rows
rows
rows
Text
Text
Text
display
display
display
area
area
area
Menu
Menu
Menu
icon
icon
icon
Display
Display
Display
options
options
options
31
Page 40

USER TIP:You can alwaysaccess the Ready screen by pressing
NOTE:There are instances where
truncation of words occur in some
of the menu items on the i35s phone
that do not allow you to fully view
thecurrentmenuselection. Youcan
P in order to see the next
select
letter on the screen if possible or
press
C under CHANGE to see the
field in more detail.
r.
m
Status Icons
Statusicons provide you with informationabout
your phone and i ts functions. These icons are context sensitive; meaning, the
icons that appear depend on the task you are performing.
Statusicons appearin the two rows at the top of the displayscreen. Some appear
at all times.Othersappear only when your phone is engaged in certain activities
or when you have activated certain features.
Icon Indicates...
abcd
efgd
opqrs
01
GHI
JKL
c Phone In Use — phone is connectedon an
32
Battery Strength Charging icons —
remaining battery charge.More bars on the
battery indicate a greater charge. See the table
on page 8 for detailed information about the
meaningof each battery strength icon.
Signal Strength icons — strength of the
network signal. More bars next to the antenna
indicate a stronger signal.
Active Line icons — currently active phone
line;
0 indicates Line 1 is active; 1 indicates
Line 2 is active.
CallForward icons — phone is set to forward
calls. See “Call Forwarding” on page 68 for
more information.
active call.
www.motorola.com/iden
Page 41

Display Screen Elements
h Private In Use — number being called is a
% Talkgroup In Use — phone is active on a
Y Packet Data Ready — phone is ready to
Z Packet Data Activity — phone is transmitting
] Mobile IP — phone is ready to access the
{ SecureData — phoneis accessingtheInternet
l Roaming — phone is searching for network
. Text Message — you have one or more Text
y Voice Mai l — you have one or more Voice
B
u
Private ID.
talkgroup call.
receivedata through a data cable.
data.
Internet.
using a secure connection.
connections outside your local area.
Messagesor Net Alert messages.
Mail messages.
FaxMail — you have one or more FaxMail
messages.
SpeakerOff — phone’sspeaker is off.
-[\* Ring/Volume icons — you have customized
w#,!
$x
the way in which the phone is set to notify you
when you receive calls and other types of
messages. See “Ring Style and Notification
Type” on page 109 for more information.
T9 Text Input icons — youareusingT9Text
Inputto entertext. See “UsingT9® TextInput”
on page 25 for more information.
33
Page 42

` TTY icons — your phone supports TTY
The icon of the main menu feature currently in use always appears in the top left
of the status icon rows. For a list of the main menu icons, see “Main Menu
Options” on page 36.
devicesand communications
Text Display Area
The text display area shows menu options, messages, names, phone numbers,
and other information.
Call Information Icons
Each of the following icons appear on the left side of the text display area of t he
one-linescreen or the full-sized screen, providingyou with information about
your phones line or lines.
Icon Indicates...
D In Call - phone is in an active call.
E Incoming Call - phone is receiving an
X Outgoing Call - phone is placing an
z On Hold - phone has a call on hold.
? End Call - phone has ended the active call.
incoming all (not active).
outgoing (not active).
Menu Icon
This menu icon S appears on any screen from which a menu can be accessed.
To access a menu, press the q on your keypad. This key has the menu
icon printed on it.
Menus are context sensitive. The menu that appears depends on the screen you
access it from and the items on the menu apply to the task you are currently
performing.
www.motorola.com/iden
34
Page 43

Navigating Menus and Lists
Pressingq or Q from the Ready screen accesses the main menu.
Display Options
Two display options appear at the bottom of m ost screens.These options enable
you to perform a wide variety of actions, including changing, saving and
viewing information, running programs,and cancelingpreviousactions. You
activate a display option by pressing the
NOTE:Throughout the User’s Guide,the optionkeys A and B will be
represented by
The Ready screen display options provide quick a ccess to two main menu
features. By default, the Phonebook (PHBK)andMessages(MESG)display
optionsappear on the Ready screen.
The display options on screens other t han the Ready screen cannot be
customized.
C.
C below it.
Navigating Menus and Lists
The i35s phone is m enu driven. By navigating menus, you access submenus
which lead to a ll of the functions and featuresthatare built into your phone. Use
the menus to store calls, manage your Phonebook, change your phone settings,
browse the Internet, and more.
Some features include lists of names, numbers, or other information. These list
items can be accessed the same way menu options are.
To access the items in a menu or list, scroll throughusingthe four-way
navigation key near the center of your keypad. Scroll down by pressing the
lower portion of the navigation key
of the navigation key
key speeds up scrolling. If you continue scrolling after you have reached the
bottom or top of a menu or list, you “wrap-around” to the opposite end.
Q. Holding down the appropriate part of the navigation
R. Scrollup by pressingthe upper portion
35
Page 44

If more items appear in a menu or list than can be displayed in the text area, a
down arrow or up arrow appears in the left side of the screen indicating that
more options may be accessed by scrolling up or down.
Down arrow Up arrow
B
Main Menu Options
By default, the main menu options appear in the order determined by your
serviceprovider.
To access the main menu, press q or Q from the Ready screen:
Menu Item Use to ...
7 Net Browse the Web.
m Settings Customizeyour phone: Ring/Vibe, In Call
Setup,Security,Initial Setup, Phone Setup,
Voice Volume, and Talkgroup Settings.
b Phonebook Storeand retrievea list of storedentries for
calling,editing, viewing, and deleting.
R Messages Receive, store, access and manage Voice
Mail, FaxMail, Text Messages, and Net
Alert.
; Call Forward Settingsfor forwarding calls in various
situations.
O Memo Input and store numbers to access later.
S
36
www.motorola.com/iden
Page 45

Main Menu Options
z Call Timers Displaythe durationof phone calls,private
j Recent Calls Accessa listof the last 20 sent,received, or
U My Info Viewthe name, PrivateID, phone numbers
: Call A lert Store received call alerts to respond to at
To choose the highlighted Main Menu selection, press C under SELECT. To
exitthe Main Menu and return to the Ready screen, press
r.
press
or group calls, circuit data use, and
Kilobytessent and received.
missedcalls. Calls can be made from this
list.
for lines 1 and 2, IP address, and circuit
data number of your phone.
your convenience.
C under EXIT or
37
Page 46

38
www.motorola.com/iden
Page 47

Phonebook
The Phonebook allows you to store up to 250 frequently used names and
numbers.
When you store information in your Phonebook,it is saved on your SIM card. If
you move your SIM card to another SIM-based Motorola iDEN phone, you can
access informationin your Phonebook from that phone.
NOTE:If you use a different SIM card in your phone, some information
stored in the phone will be lost. See “Inserting/Removing the
SIM Card” on page 17.
This section includes:
AccessingPhonebook with an i2000, i2000plus, or
GSM Phone
Phonebook Entries and Speed Dial Numbers Page 40
Phonebook Icons Page 40
AccessingYour Phonebook Page 41
About Phonebook Entries Page 42
Viewing Phonebook Entries Page 42
Sorting Phonebook Entries Page 43
Adding Phonebook Entries Page 44
Storing Numbers and PrivateIDs Quickly Page 48
Editing Phonebook Entries Page 50
Deleting Phonebook Entries Page 51
Pause Digit Entry Page 51
Plus Dialing Page 52
Page 40
39
Page 48

Accessing Phonebook with an i2000, i2000plus, or GSM Phone
If you plan to use the information stored in your Phonebookwith an i2000,
i2000plus, or any other GSM phone, you must purchaseCompanionPro. Go to
www.motorola.com\iden or your service provider’swebsiteformore
information.
You can use CompanionProto make the Phonebook information saved to your
i35s phone’s SIM card accessible in this type of phone.
Phonebook Entries and Speed Dial Numbers
Your Phonebook can store m ultiple phone numbers to a single name. For
example,you can enter someone’s name into your Phonebook once and then
add that person’s home, office, mobile phone and fax numbers to the name.
Each number stored in your Phonebook is automatically assigned a Speed Dial
number that corresponds to its location in your Phonebook. Each phone number
uses one Speed Dial location, even if it is assigned to the same name as other
phone numbers. The phone number stored in location 1 is assigned Speed Dial
number 1, the phone number stored in location 2 is assigned Speed Dial number
2, and so forth, to location 250.
Phonebook Icons
Icons that appear to the right of entries in your Phonebook convey information
about those entries.
When you enter a phone number in your Phonebook, you can designate the
phone number’s type using any of the following icons:
40
W Mobile
h Private
+ Work
Q Main
L Home
b Pager
www.motorola.com/iden
Page 49

Accessing Your Phonebook
K Fax
n Talkgroup
|
Z Other
NOTE:The Mobile icon automatically appears to the right of the first
number assigned to a name unless you choose another icon.
For more information on entering numbers into your Phonebook, see “Adding
Phonebook Entries” on page 44.
The “picker” arrows appearing around the number type icon indicates multiple
phone numbers stored under one name:
ef pickers
IP (Internet
Protocol
Address)
Accessing Your Phonebook
If PHBK is one of your display options:
From the Readyscreen,press
If PHBK is not one of your display options:
1
From the Ready screen, press q.
2
Press R to scroll to Phonebook.
C under PHBK.
3
Press C under SELECT.
USER TIP:You can also access the Phonebook by pressing q
while your phone is on a phone call or private call.
41
Page 50

This brings you to the Phonebook screen. From this screen, you can view, sort,
add, edit, and delete Phonebook entries, check Phonebook capacity, or make
calls.
About Phonebook Entries
Each Phonebook entry may contain the following information:
• The name associatedwith the entry. Typically, this is the name of the
person whose number you are storing in the Phonebook.
• The type of number to be stored: Mobile, Private, Work, Main, Home,
Pager, Fax, Other, or Talkgroup. If you don’t choose a type, the number is
assignedtype Mobile, unless a Mobile number has already been assigned
to the name.
• The number to be stored. Every Phonebook entry must containa phone
number. This number m ay be any type of phone number,Private ID, or
Talkgroupnumber.
• A Speed Dial number. You may accept the default Speed Dial number or
assign a differentone.
Viewing Phonebook Entries
Names with more than one number assigned to them appear with ef
surrounding the icon to the right of t he name. For example,i f you had stored a
home and work number for Joe Smith, the entry for Joe Smith’s home phone
number would look like this:
Joe Smith eLf
Whenthenameishighlighted,press
of the numbers assigned to that name.
To view any of the phone numbers assigned to a name:
T to scroll to the icons representing each
1
From the Phonebook screen, press S to scroll to the name associated
with the phone number you want to see.
2
Press T to view the icons representing the phone numbers assigned to
that name.
www.motorola.com/iden
42
Page 51

About Phonebook Entries
3
When the icon representing the number you want to view is displayed,
C under VIEW.
press
If there is a Private ID or a Talkgroup number stored for the person,
press q.Thenpress
SELECT.
4
Press S to view the other numbers stored for this name.
Sorting Phonebook Entries
You can sort your Phonebook entries by:
• Name — thenameyouenteredfortheentry.
• Speed No. — the Speed Dial location of the entry.
NOTE:Private and group calls cannot be made from the Phonebook
when sorted by Speed Dial location.
To sort your Phonebook list:
1
From the Phonebook screen, press
q to view the Phonebook Menu
screen.
R to scroll to View and press C under
}
2
Press R to scroll to Sort By.
3
Press C under SELECT.
4
Press R to scroll to the desired sorting method: Name or Speed #.
5
Press C under SELECT.
43
Page 52

Checking Phonebook Capacity
Your Phonebook can store up to 250 separate numbers. To see how many
entriesare stored in your Phonebook:
1
From the Phonebook screen, press q to view the Phonebook
Menu screen.
2
Press R to scroll to Capacity.
3
Press C under SELECT.
The Capacity screen shows how many storagespaces in you
Phonebook are in use and how many are empty.
Adding Phonebook Entries
Using the following instructions, you will enter the information in the order the
items appear on the Phonebook Entry Details screen.However, you can enter
this information in any order by pressing
Entry Details screen.
Youcanleaveanyitemblankorunchangedbypressing
the Entry Details screen. Only a number is required for a valid Phonebook
entry.
After you have entered a phone number and any other information you wish to
include, you can press
To cancel a Phonebook entry at any time, press r to return to the Readyscreen.
C under DONE to save the Phonebook entry.
S to scroll through the items on the
S to scroll past it on
44
www.motorola.com/iden
Page 53

To add a Phonebook entry:
I
1
To access the Entry Details screen:
About Phonebook Entries
From the Phonebook screen, with [New
Entry] highlighted, press
SELECT.
Or,
From the Phonebook screen, press
q.ThenpressR to scroll to
New and press
2
If you want to assign a name to your
Phonebook entry:
With the Name field highlighted,press
under CHANGE.
From the Name screen, enter the name
using the alphanumeric keypad.
See “Us ing T9® Text Input” on page 25 for
information about entering text into this field.
When you are finished, press
The Entry Details screen returns with the Type field highlighted.
3
With the Type field highlighted, press C
under CHANGE.
From the Type Editor screen, press R to
scroll to the type of number you want t o
assign to the Phonebook entry.
C under SELECT.
C under
H
C
C under OK.
Press
C under SELECT.
The Entry Details screen returns with the
# field highlighted.
J
45
Page 54

4
Assign a number t o your Phonebook entry:
With the # field highlighted, press
Type the number using the alphanumeric keypad. For phone numbers,
use the 10-digitf ormat. For Private IDs, use
Area ID * Network ID * Member ID (the asterisks must be included as
part of the Private ID).
Todelete a digit, press
See “Pause Digit Entry” on page 51 and
“Plus Dialing” on page 52 for information
on using these featureswhen storing
phone numbers i n your Phonebook.
NOTE:The number can be up to 20
characters long.
When you are finished, press C under
OK.
The Entry Details screen returns with the Speed # field highlighted.
C under DELETE.
C under CHANGE.
K
46
www.motorola.com/iden
Page 55

About Phonebook Entries
5
The default Speed Dial number assignedto the phone number is
displayedintheSpeed # field. This is always the next available Speed
Dial location.
NOTE:Private IDs and Talkgroup
numbers do not haveassociated
Speed Dial numbers.
If you want to assign the phone numberto
a different Speed Dial location:
With the Speed # field highlighted, press
C under CHANGE.
Press
C under DELETE to delete the
current Speed Dial number.
Type the new Speed Dial number using the alphanumerickeypad.
When you are finished, press
NOTE:If you change the Speed Dial n umber to one alreadyin use,
you will be prompted to overwrite the entry that is currently
in that location. Pressing
existing entry from your Phonebook.
6
If you want to store more numbers to the
name associated with this Phonebook
entry:
Press R to scroll to TYPE and then press
C under CHANGE.
C under OK.
C under YES will delete the
L
AnewType field appears for the additional
number.
Enter the informationfor the additional numbers using step 3 through
step 7.
NOTE:Each name in your Phonebook may have up t o seven
numbers associated with it.
l
47
Page 56

7
When you have entered all the
information you wanted in this
Phonebook entry, press
C under DONE.
N
Storing Numbers and Private IDs Quickly
Your phone gives you two ways to store numbers quickly: (1) from the Rea dy
screen or (2) from the Recent Calls list.
To store a number from the Ready screen:
1
From the Ready screen, use the alphanumeric keypad to enter the
number you want to store.
2
Press q to access the Dialing Menu screen.
3
With StoreNumber highlighted, press C under SELECT.
This displaysthe Store To screen with the [New Entry] field
highlighted.
4
To store to a new entry,pressC under SELECT. The Entry Details
screen will display with the number entered i n the field.
Or,
To store to an existing entry,press
your Phonebook. Or press the first letter of the entry to jump to the
entry. Once the desired entry is highlighted, press
The Phonebook i nformation for that entry displays with the number
enteredinthe# field and the Type field highlighted.
5
Press C underCHANGE. Press R to scroll to the type of number you
want to assign to the Phonebook entry. Press
www.motorola.com/iden
48
R to scroll the list of names in
C under SELECT.
C under SELECT.
Page 57

About Phonebook Entries
6
If you want to add more informationto the Phonebookentry, follow the
applicable instructions in “Adding Phonebook Entries” on page 44.
7
Press C under D ONE.
To store a number from the Recent Calls list:
1
From the Recent Calls screen, press R to scroll to the 10-digit
telephonenumber you want t o store.
2
Press C under STORE. This displays the Store T o screen with [New
Entry] highlighted.
3
To store a new entry,pressC under SELECT. The Entry Details
screen displays with the number enteredin the # field and the Name
fieldhighlighted. Enter the name using the alphanumeric keypad. Press
C under OK.
Or,
To store to an existing entry,press
your Phonebook. Or press the first letter of the entry to jump to the
entry. Once the desired entry is highlighted, press
The Phonebook i nformation for that entry displays with the number
enteredinthe# field and the Type field highlighted.
4
With Type highlighted,press C under CHANGE. Press R to scroll to
the type of number you want to assign to the Phonebook entry. Press
under SELECT.
5
If you want to add more informationto the Phonebookentry, follow the
applicable instructions in “Adding Phonebook Entries” on page 44.
6
Press C under D ONE.
R to scroll the list of names in
C under SELECT.
C
49
Page 58

To store a Private ID from the Recent Calls list:
1
Press R to scroll to the Private ID number you want to store.
NOTE:The S tore option for Private ID numbers (e.g., 123*123*1234),
will not display in the Recent Calls list.
2
With the Private ID highlighted, press q to access the Rec.
Calls M enu.Press
displays the Store To screen with [New Entry] highlighted.
3
To store to a new entry,pressC under SELECT. The Entry Details
screendisplays with the Private ID icon entered in t he Type field, the
Private ID number entered in the # field, and the Name field
highlighted. With the Name field highlighted, press
CHANGE. Enter the name using the alphanumeric keypad. P r ess
under OK.
Or
R to scroll toStore.PressC underSELECT. This
C under
C
To store to an existing entry,press
your Phonebook. Once the desired entry i s highlighted, press
SELECT. The Entry Details screen displays with the Private ID icon
enteredintheType field, the Private ID number entered in the # field,
and the Name field highlighted.
4
Press C under D ONE.
R to scroll the list of names in
Editing Ph onebook Entries
1
From the Phonebook screen, press C to scroll to the entry you want to
edit.
2
Press q to view the Phonebook Menu.
3
Press R to scroll to Edi t.
www.motorola.com/iden
50
C under
Page 59

Pause Digit Entry
4
Press C under SELECT. The Entry Details screen displays.
5
Followthe applicable instructions in “Adding Phonebook Entries” on
page 44 to edit the various fields.
Deleting Phonebook Entries
1
From the Phonebook screen, press R to scrollto the entry you want to
delete.
2
Press q to view the Phonebook Menu.
3
Press R to scroll to DeleteContact or Delete Number.
Delete Contact deletes the name and all numbers associated with that
name.
Delete Number deletes the number associated with the icon that is
currently displayed i n the Phonebook list for the name. The name and
all the other numbers will remain.
4
Press C under SELECT. A warning screen displays requiring you to
confirm the deletion.
Pause Digit Entry
Whenstoringa number, you can programyour phone so that it will not only dial
a number but also pause before entering another series of numbers such as a
personal identification number (PIN) or password. This featureis particularly
usefulfor accessingautomatedservicessuch as voicemail and banking systems
from your i35s phone.
Here’s how it works. Let’s say you have a company voice mail accountthat you
frequently check while traveling. And, to access that account you must do the
following:
• Dial your work number
• Press # while the voice mail greeting is being played
• Enter your PIN to access your messages
51
Page 60

You can program your phone to enter all of the above information for you. All
you have to do is separate each entry with a pause. If you were to program your
phone to automatically input the above information, the stored data would look
likethis 17035551234P#P1234.In this example, the firstelevendigits represent
the number that must be dialed to access your voice mail. The P represents a 3
second pause. The # interrupts your greeting. The second P representsanother 3
second pause. The last four digits represent your PIN.
You can use this feature not only to enter PINs and passwords but also to have
the phone automatically select menu options (i.e., press 1 to hear messages).
To create a three-second pause, follow the steps below:
Press and hold
* for two seconds. The pause symbol (P) will appear
on the display screen.
NOTE:You can enter up to 20 characters in a single entry ,stored or
dialed.
NOTE:If you use a system that will not let you enter an option until the
automated message has played in its entirety, you can program
your phone to pause for more than 3 seconds. For example,
performing the above step twice will program two pauses and
cause your phone to wait 6 seconds before entering the next set
of numbers.
Plus Dialing
This feature enables you to place an internationalcall from most countries —
without entering the local international access code. Use Plus Dialing for all
Phonebook entries if you plan to travel outside the United States. Begin by
following the instructions for “Adding Phonebook Entries” on page 44. Before
you type the phone number to be stored:
1
Press and hold 0 for two seconds. A “0” appears, then changes to a
“+”.
NOTE:The network translates the “+” into the appropriate
international accesscode needed to place the call.
2
Enter the country code, city code, or area code, and phone number.
3
Follow the rest of the instructions for “Adding Phonebook Entries” on
page 44.
52
www.motorola.com/iden
Page 61

Digital Cellular
The i35s phone enables you to make and receive domestic and international
phone calls, make emergency calls, and be notified of a missed call.
This section includes:
Making Phone Calls Page 53
Making TTY Calls Page 58
Emergency Calling Page 58
Receiving a Phone Call Page 58
Ending a Phone Call Page 59
Recent Calls Page 59
Hands-Free Speakerphone (Optional) Page 62
Mute Page 62
Call Waiting Page 64
Call Timers Page 64
Call Hold Page 66
Three-Way Calling Page 67
Call Forwarding Page 68
Making Phone C al ls
Your i35s phone provides the followingfeaturesfor making phone calls:
• Direct Dial
• Phonebook
• RecentCalls
• Speed Dial
53
Page 62

• Turbo Dial
• Last Number Redial
• TTY
®
Using Di rect Dial
1
From the Readyscreen, use the keypad to enter the 10-digit phone
number you want to call.
2
Press s to place the call.
3
Press r to end the call.
NOTE:See “Plus Dialing” on page 52 for information on making
international calls.
If you make a mistake:
• To clear one digit, press
• To clear all digits,press and hold
• To insert a digit, press
• To cancel, press
C under DELETE.
C under DELETE.
T to move the cursor.
r.
Making Calls from the Phonebook
After you have entered phone numbers into your Phonebook, you can use these
numbers to make phone calls. For information on entering numbers into your
Phonebook, see “Adding Phonebook Entries” on page 44.
54
www.motorola.com/iden
Page 63

Making Phone Calls
To make calls from the Phonebook:
1
From the Ready screen, if PHBK is one of your display options, press
C under PHBK.
Or,
From the Readyscreen, press
Phonebook.Press
2
Press R to scroll through the names in your Phonebook.
Or,
Use the alphanumeric keypad to enter the first letter of the name and
press
R to scroll through the names beginning with that letter.
Stop when the name of the person you want to call is highlighted.
3
If more than one number is stored for the person you want to call, ef
appearsaround the icon to the right of the person’sname.
Press
T to scroll through the icons representingthe numbers stored for
that person.
Or,
C under VIEW to view all the numbers stored for this person.
Press
Then press
Or,
If there is a Private ID or a Talkgroup number s tored for this person,
q. When the Phonebook Menu appears,press S to
press
scrollto View and press
the number you want to call.
For more i nformation on assigningmultiple numbers to one person, see
“Adding Phonebook Entries” on page 44.
C under SELECT.
R to scroll to the number you want to call.
q,thenpressR to scrollto
C under SELECT. Then press R to scroll to
4
Press s to place the call.
5
Press r to end the call.
55
Page 64

Making Calls from the Recent Calls List
Your phone stores the numbers of the last 20 calls you received or sent in the
RecentCalls list.
1
From the Ready screen, press R.
Or,
From the Ready screen, press
the firstitem on the list, press
2
PressS to scrollthe list receivedor sent recent calls untilyou reach the
desired call.
3
To view additional information about the call:
Press
C under VIEW.
Or,
q to access the Rec. Calls Menu.ThenpressR to
Press
scrollto View and press
4
Press s to place the call.
5
Press r to end the call.
S to Recent Calls if Recent Calls is not
S to scroll to it. Press C under SELECT.
C under SELECT.
Using Speed Dial
Each phone number stored i n your Phonebook is assigneda Speed Dial number.
You can use the Speed Dial number to quickly place a call.
1
From the Ready screen, enter the Speed Dial number assignedto the
phone number you want to call.
2
Press #.
3
Press s to place the call.
4
Press r to end the call.
56
www.motorola.com/iden
Page 65

Making Phone Calls
Using Turbo Dial
Turbo Dial al lows you to call the numbers in your Phonebook associated with
Speed Dial numbers 1 through 9 by pressing and holding the corresponding
numerickeyonthekeypad.
Press and hold a number key (1 through 9).
NOTE:Turbo Dial cannot be accessed while the browser is active, nor
while Keypad Lock or SIM Lock is active.
Last Number Redial
Press and hold
s to redial the l ast number you called.
Placing International Phone Calls
When making an international call, you can either enter the international access
code directly (011 in the United States) or use Plus Dialing.
You can make international calls from your Phonebook if you have stored the
numbers with Plus Dialing. See “Adding Phonebook Entries” on page 44 and
“Plus Dialing” on page 52 for more information.
NOTE:Your service default is “International Calls Restricted.”
Therefore, you must call Customer Care to obtain international
dialing access.
To make an international call using Plus Dialing:
1
Press and hold 0 for two seconds. A “0” appears, then changes to a
“+”.
NOTE:The network translates the “+” into the appropriate
international accesscode needed to place the call.
2
Enter the country code, city code, or area code, and phone number.
3
Press s to place the call.
4
Press r to end the call.
57
Page 66

Making TTY Calls
NOTE:This feature may not be offered by
your service provider.
You can use your phone to make calls using a
TTY device.
When you make TTY call, the call begins in the
TTY mode you last selected. You can change t he
TTY mode duringa call. For more information on
choosinga TTY mode, see “Setting TTY Mode”
on page 117.
To make a call using a TTY device:
1
Connect one end of a 2.5mm cable into the audio/headset jack on the
phone. (To locate the jack, see page 6.) Connect the other end of the
cord into your TTY device.
2
Enter the phone number you wish to call and press s.
Q
Emergency Calling
Your phone supportsemergency calling. Emergency calls can be made even
when the SIM card is blocked or not in the phone.
To place a callin an emergency, dial 911
emergency dispatch center. If you are on an active call, you must end it before
calling 911.
NOTE: If you have enabled the Keypad Lock feature, you must unlock
the phone’s keypad before any call can be made, including 911
emergency calls.
s. You will be connected to the nearest
Receiving a Phone Call
Incoming calls are indicated by a ring, vibration or backlight
illumination. Press
to answer the call.
58
s or any key on the keypad or press C under YES
www.motorola.com/iden
Page 67

Ending a Phone Call
Ending a Phone Call
r to hang up.
Press
Recent Calls
The Recent Calls featurestoresthe numbersof the 20 most recentcalls you have
made and received, including private and talkgroup calls. You can access
RecentCalls to:
• view your recent calls
• store numbers to the Phonebook
• deleterecentcalls
• call numbers on the Recent Calls list
NOTE:The Recent Calls list displays briefly after you end a call.
Recent C al ls Icons
If the number of the recentcall is stored in yourPhonebook,the nameassociated
with the phone number appears on the Recent Calls list.
For private calls, group calls, and numbers stored in your Phonebook,an icon
appearsto the right of the name or number indicating the Phonebook type. See
“Phonebook Icons” on page 40 for more information about Phonebook types.
For phone calls, an icon appears to the left of the name or number indicating the
type of call:
• N indicates an incoming call
• a indicates an outgoing call
• V indicates a missedcall. (Missed calls appear on your Recent Calls list
only if you have Caller ID.)
For privatecalls,an icon appearsto the left of the name or numberindicating the
type of call:
• h indicates a Private Call
• n indicates a Group Call
59
Page 68

Viewing Recent Calls
To view your Recent Calls list:
1
From the Ready screen, press R.
Or,
From the Readyscreen, press
under SELECT.
2
Press S to scroll the list of recent calls.
S to scroll to Recent Calls.PressC
Getting Detailed Information About Recent Calls
To get more information about a recent call:
1
From the Recent Calls screen, press S to scroll to the call you want
more information on.
2
Press C under V IEW.
Or,
Press
q to access the Rec. Calls Menu.ThenpressR to
scrollto View and press
The Call Details screen that appears displays information such as the name
associated with the number of the recent call, the number, the date, time, and
duration of the call.
C under SELECT.
60
www.motorola.com/iden
Page 69

Storing a Recent Call Number to the Phonebook
To store a number from the Recent Calls list to the Phonebook:
1
From the Recent Calls screen, press S to scroll to the number you
want to store.
2
Press C under STORE.
Thisdisplaysthe Phonebook Ent ry Detailsscreen with the # fieldfilled
in with the number of the recent call.
3
If you want to add more information to the Phonebook entry, follow
applicable the instructions in “Adding Phonebook Entries” on page 44.
Calling From the Recent Calls List
See “Making Calls from the Rec ent Calls List” on page 56.
Deleting Recent Calls
To delete a recent call:
1
From the Recent Calls screen, press S to scroll to the call you want to
delete.
2
Press q to access the Rec. Calls Menu.
Recent Calls
3
Press R to scroll to Delete.
4
Press C under SELECT.
5
Press C under Y ES to confirm the deletion.
61
Page 70

To delete all calls on the Recent Calls list:
1
From the Recent Calls screen, press q to access the Rec.
Calls Menu.
2
Press R to scroll to DeleteAll.
3
Press C under SELECT.
4
Press C under Y ES to confirm the deletion.
Hands-Free Speakerphone (Optional)
NOTE:This is an optional feature. For information on purchasing and
downloading this feature into your phone, please contact your
service provider or go to www.motorola.com/idenupdate.
This feature provides t he convenience of a hands-freesolution,allowing you t o
hold impromptumeetingsand place safer phone calls. The speakerphone option
(SPKR) is available whenever you are on an active phone call.
NOTE:During speakerphone operation, you may either speak or listen,
but you cannot do both at the same time.
To turn the speakerphone on:
While on an active call, press
C under SPKR.
While speakerphone is on, Spkrphone On appears in the text display area.
To turn the speakerphone off:
Press
C under SPKR.
Mute
Use the Mute feature to listen to incoming audio without allowing sound from
your phone’s microphone to be transmitted over the phone line.
www.motorola.com/iden
62
Page 71

Call Timers
To turn mute on:
C under MUTE.
Press
While mute is on, UNMUT appears as a display option.
To turn mute off:
C under UNMUT.
Press
Call Time rs
Call Timers measure the durationof your phone calls, Private or Group calls,
and circuit data use, as well as the number of Kilobytes sent and received by
your phone.
The Call Timers menu displays the following options:
• Last Call — displays the duration of your most recent phone call.
• PhoneReset — keeps a running total of your phone call minutes, until you
reset it.
• Phone Lifetime — displays t he total minutes of all your phone calls.
• Prvt/Grp Reset — keeps a running total of all of your Private and Group
call minutes, until you reset it.
• Prvt/Grp Life — displays the total minutes of all your Private and Group
calls.
• CircuitReset — keeps a running total of all of your circuit data use, until
you reset it.
• Circuit Lifetime — displays the total minutes of all of your circuitdata
use.
• Kbytes Reset — keeps a running total of the number of Kilobytessent and
receivedby your phone, until you reset it.
To view the Call Timers menu:
1
From the Ready screen, press q.
63
Page 72

2
Press R to scroll to C all Timers.
3
Press C under SELECT.
To view or reset the Call Timers option:
1
From the Call Timersm enu, press S to scroll to the Call Timers
option you want to view or reset.
2
Press C under SELECT.
3
If the feature does not include an option to reset or you do not wish to
reset the option, press
C under DONE when you are finished viewing.
Toreset a feature, press
appears, press
NOTE:The values displayed by Call Timers are not intended for billing
purposes. Call Timers are estimatesonly.
C under YES to confirm the reset.
C under RESET.When theconfirmation screen
Call Waiting
Call Waiting allows you to receive a second call while you are talking on the
phone. You can switch between calls so you never have to miss a call. By
default, Call Waiting is always on unless you turn it off for a specific call.
If you’re on a call and you receive a second call,
you will:
• Hear a tone; and
• See a message on your display informing
you of another incoming call.
e
www.motorola.com/iden
64
Page 73

Accepting Calls
Press C under YES. The first call is placed on hold.
Or,
Call Waiting
If you are already on a call, press
second call.
Switching Between Calls
When you accept a second call while you are talking on the phone, your display
shows the name or number of eachcall.An icon appearsto the left of each name
or number indicatingthat the call is on hold z or active D.
C under SWITCH to switch
Press
between calls.
r to end the active call and accept the
[
Declining Calls
C under NO. If you subscribe to Voice M ail, the call will be
Press
forwarded to your Voice Mail box.
Ending the Active Call
Press
r.
65
Page 74

Turning Off Call Waiting
If you do not want to be interrupted during a call, you can turn Call Waiting off
prior to making/receiving a call.
1
From the Ready screen, press q.PressR to scroll to
Settings,and press
2
Press R to scroll to In Call Setup and press C under SELECT.
3
Press R to scroll to C all Waiting and press C under CHANGE.
4
Press R to scroll to Off and press C under SELECT.
Call Waiting is now disabled for the next call. It will automatically reset
to On when you hang up.
C under SELECT.
Call Hold
When you are on an active call, you can place the call on hold and make a
second call.
To place an active call on hold:
1
Press q to access the Calls Menu.
2
Press R to scroll to Hold.
3
Press C under SELECT.
4
If you have not placed a second call, you can resume this call by
pressing
To place a second call while the first call is on hold:
1
Enter the second phone number you want to call. Or select the number
from your Phonebook by pressing
Phonebook.
2
Press s to place t he second call.
C under RESUME.
q and selecting
www.motorola.com/iden
66
Page 75

Three-Way Calling
To toggle between the two calls:
Press
C under SWITCH.
To end the active call:
s. The call on hold becomes active.
Press
Three-Way Calling
Using Three-Way Calling, you can combine two ongoing phone calls into one
conversation. While on an active call, you can make a second call and combine
the two calls. When you place or receive a phone call, the 3-WAY option
appearsin the bottom right-handcorner of the display screen.
To make a three-way call:
1
Place or receive a phone call.
2
While on the call, press C under 3Way.Thefirstcallwillbeplacedon
hold.
3
Enter the second phone number you want to call and press s to place
the second call.
Or, access the number from your Phonebook:
Press
q andthenpressR to scroll to Phonebook.
Press
C under SELECT.
To place the call, see “Making Calls from the Phonebook” on page 54.
4
After you reach the second individual, press q.
5
Press S to scroll to 3Way.
6
Press C under SELECT. Both calls will appear on your display.
67
Page 76

Call Forwarding
CallForwardingforwardscalls to the number you designate. The following Call
Forwarding options are available:
• Off — No calls are forwarded.
• All Ca lls — When this option is turned on, all calls will be sent
automatically to a number you specify.
• Detailed — Choosing this option enables you to forward calls you missed
to different numbers, or to Voice Mail, depending on why you missed each
call:
• Busy — your phone is engaged in other activities.
• No A nswer — you do not answer.The phone will ring 4 times before
forwarding the call.
• Unreachable — yourphone is out of coverage or powered off.
NOTE: For you to receive Voice Mail messages, the All Calls option
must be set to Off and the Detailed options must be set to your
Voice Mail access number.
You can forward Line 1 and Line 2 independently.
When your phone is set to forward all calls, one of the following icons appears
on the top row of your display screen to i ndicate the call forwardingoption you
have chosen:
Icon Indicates...
68
G Line1 is active; calls from Line 1 are being
forwarded.
H Line1 is active; calls from Line 2 are being
forwarded.
I Line 1 is active; calls from Line 1 and Line
2 are being forwarded.
J Line2 is active; calls from Line 1 are being
forwarded.
www.motorola.com/iden
Page 77

Call Forwarding
K Line1 is active; calls from Line 2 are being
L Line 2 is active; calls from Line 1 and Line
TurningOnCallForwarding
1
Press q then press R to scroll to Call Forward.
2
Press C under SELECT.
3
At the Call Forward screen, the Forward
field is highlighted. Press
CHANGE.
forwarded.
2 are being forwarded.
C under
W
4
Press S to scroll to All Calls.
5
Press C under SELECT.
6
Press R to scroll to the To field and press C under CHANGE.
69
Page 78

7
To activatea call forwarding number:
If you have never used Call Forwarding before, the Forwardscreen
appears. Toenter a call forwarding number, t ype the number on your
phone’skeypadorpress
stored in your phone. Press
Or,
C under SEARCH to select from numbers
C under OK.
If you have used Call Forwarding before, the call forwarding number
youlastusedisdisplayed.Press
Forward screen.
To forward your calls to this number, press
To forwardyour calls to a different number, press and hold
DELETE to erase t he displayed number. Typethe new number on your
phone’skeypadorpress
stored in your phone. Press
Your calls will now be forwarded to the number that you selected.
C under CHANGE to access the
C under OK.
C under SEARCH to select from numbers
C under OK.
Turning Off Call Forwarding
1
Press q then press R to scroll to Call Forward.
2
Press C under SELECT.
The Call Forward screen displays with the Forward field highlighted.
C under
70
www.motorola.com/iden
Page 79

Call Forwarding
3
Press R to scroll to the To field and press C under CHANGE.
4
Press S to scroll to Off and press C
under SELECT.
{
SettingCallForwardingtoVoiceMail
In most cases, turning off Call Forwardingrestoresyour abilityto receive Voice
Mail messages when you are unavailable (see “Turning Off Call Forwarding”
on page 70). If you have completed those steps but are still not able to receive
Voice Mail messages, you can reset Call Forwarding to Voice Mail.
For you to receive Voice M ail messages, Call Forwarding must be set to
Detailed with your Voice Mail access number:
1
Press q then press R to scroll to Call Forward.
2
Press C under SELECT.
The Call Forward screen displays with the Forward field set to
Detailed.
3
Press R to scroll to the If Busy field and press C under CHANGE.
4
The call forwarding number you last used is displayed. Press C under
CHANGE.
5
Press and hold C under DELETE to erase t he displayed number.
6
Enter your VoiceMail access number.
7
Press C under O K.
71
Page 80

8
Repeat step 3 through step 7 for the If No Answer field and the If
Unreachable field.
9
When finished, press C under EXIT.
NOTE:You can use the Detailed setting to forward calls to other
numbers if desired. However, it is recommended that you leave
Detailed set to the Voice Mail access number and use the All
Calls setting if you wish to forward your calls to another
number.
72
www.motorola.com/iden
Page 81

Messages
The main topics covered in this section are listed below:
MessageCenter Page 73
Voice M ai l Page 74
Using Voice Mail Page 75
Text and Numeric Messaging Page 76
Net Alert Page 78
Using Your Phone as a Modem Page 78
NOTE: If your service provider supports mobile originated text
messaging, see “Mobile OriginatedText Messaging” on page
81. YourMessage Centerwilllook slightly different than the one
described in this section.
Message Center
The Message Center enables you to access all messaging services through one
screen.
To access the Message Center:
If MESG is one of your display options:
From the Readyscreen,press
If MESG is not one of your display options:
1
From the Ready screen, press q.
2
Press R to scroll to M essages.
3
Press C under SELECT.
C under MESG.
73
Page 82

The Message Center screen displays the number of messages you have in each
message service — VoiceMail, Text Msgs (Text and Numeric Messages), and
Net Al ert (Net Mail).
To access any message service:
1
From the MessageCtr screen,press R to scroll to the message service
youwanttoaccess.
2
Press C under the display option on the right. This option varies
depending on the message service selected.
Voice Mail
New Message I ndicators
When you receive a new message:
• NewVoice Mail Messagewilldisplayonthescreen.
f
• Your phone will alertyou every 30 seconds until you press
or
C under EXIT. (If you are on a call, your phone will alert you once
during the call.)
Transferring Calls to Voice Mail
C under NO while your phone is ringing to transfer incoming
Press
calls directly to Voice Mail.
www.motorola.com/iden
74
C under CALL
Page 83

Using Voice Mail
Logging Into Voice Mail
1
From the Ready screen, press C under
MESG to open up the Message Center
screen.
2
Voice Mail should be highlighted to
indicate that it is selected. If it isn’t
highlighted, press
Mail field.
The number of new messages and the total
numberof messages are displayed.
S to scroll to the Voice
Using Voice Mail
A
g
3
Press C under CA LL to log into your Carrier’s Voice Mail System.
Calling displaysas you are connected to the network.
75
Page 84

Text and Numeric Messaging
With Text and Numeric Messaging, your phone will:
• Allow numeric messages up to 20 characters in length and text (alpha)
messagesupto140charactersinlength.
• Accept your messages even if you are unavailable, if your phone i s turned
off,or if you are busy on another call.
• Alertyou of a new text or numericmessage,even if you are on anothercall.
• Store a message if you are making a Private or Group call and deliver it
upon completion of the call.
• Store the messageif you are outside of the coveragearea and deliver it as
soon as you are back in a coverage area.
• Attemptcontinuousdeliveryof messages until successful, for up to 7 days.
• Refer to text and numeric messages as Text Messages.
• Stamp the message with the time and date the message was left.
• Storeupto16messagesatatime,thatwillremainuntilyoudeletethem.
NOTE:“Mail Waiting, Memory Full” displayswhen the 16 message
register is full. (Messages must be erased before you can
receive others.)
• Allow for “Auto Call Back” of a phone number that is included within a
message,by pressing
Call Back will di al the last number.
New Messages Indicators
When you receive a new message:
• New Text Message willdisplayonthescreen.
s. I f the message containstwo phone numbers, Auto
76
i
www.motorola.com/iden
Page 85

Text and Numeric Messaging
• Your phone will alert you every 30 secondsuntil you press C under READ
or
C under EXIT. (If you are on a call, your phone will alert you once
during the call.)
Accessing New Messages
When you receive a message, you can view it immediately or later:
View a Message Immediately
1
Press C under READ. The message displays.
2
If the message fills more than one screen,use S to scroll through the
rest of the message.
3
Press C under SAVEto save the message.
Or,
Press
C under DELETE to delete the message.
Viewing a Message Later
Press
C under EXIT. The . icon will appear on the second line of the
Ready screen to remind you that you have a stored message.
Viewing Stored Messages
1
In the Message Ctr screen, press S to scroll down to Text Msgs.The
number of new messages and the total number of messages are
displayed.
2
Press C under SELECT. The Text Msg Inbox screen appears.
3
Press S to scroll to the message you want to read and press C under
READ.
4
If the message fills more than one screen,use S to scroll through the
rest of the message.
77
Page 86

5
Press C under SAVE to save the message.
Or,
Press
C under DELETE to delete the message.
Net Alert
With Net Alert, you can send text and numeric messages in any of three ways:
• from your i35s phone
• from a web site provided by your service provider
• from any email application
When you receive a new message:
• Words will display on your phone’s display screen indicatingthat you have
a Net Alert m essage. (The exact words displayed are determined by your
serviceprovider.)
• Yourphone will alert you every 30 secondsuntilyour press
messageor press
If you choose to exit the screen and view the message later, the
appear on the second line of the Ready screen to remind you that you have a
stored message.
You can view new or stored Net Alert messagesat any time by access the
Message Center. For more information, see “Message Center” on page 73.
C to exit the screen.
C to accessthe
. icon will
Using Your Phone as a Modem
NOTE: Some features may be network dependent or subscription only,
and may not be available in all areas. Contact your service
provider for more information.
You can use your i35s phone as a modem for data transfer from your laptop,
handheld device, or desktop computer. This is particularly useful when there is
no wired phone line (wall jack) available.
www.motorola.com/iden
78
Page 87

Using Your Phone as a Modem
You simply attach a data cable (available separately)to your phone and your
computer. See “Data Accessories” on page 124. From that point,your phone is
your modem. This allows you to send or receivetime-critical information such
as email, a field service report, or files.In addition,you can also send or receive
faxes.
This type of wirelessconnectionuses one of two types of data connection: (1)
circuit-switched data and (2) packet data.
• Circuit-switched data is typically used for sendingand receiving faxes and
for transferring large files.
• Packetdata is used for small file transfers such as email.
To use these services, you must installthe iDEN Wireless Data Services
software (available separately). For more information on setting up your
computer and your i35s phone for Packet and Circuit Data calls, see the
Wireless Data Services User’sGuideand contact your carrier.
TTY Users
You can use your phone and computer in TTY mode. Your computer
screen and keyboardreplace the standard TTY device. For more
information, please see the Wireless Data Services User’s Guide.
79
Page 88

80
www.motorola.com/iden
Page 89

Mobile Originated Text
Messaging
Mobile originated text messaging allows you to communicate with other
messagecable devices to send and receive brief text messages. Received
messages appear on your phone display or in your text message inbox.
NOTE:This is a network dependent feature. Please consult with your
service provider for availability.
This document includes:
MessageCenter Page 81
Message Icons Page 83
Text M sg Setup Page 83
Text Message Inbox Page 85
Quick Notes Page 86
Text Message Outbox Page 86
DraftsFolder Page 91
Memory Storage and the Memory Meter Page 92
Message Center
The Message Center enables you to access all messaging services through one
screen. To access the M essage Center:
If MESG is one of your display options:
From the idle screen, press
C under MESG.
81
Page 90

If MESG is not one of your display options:
1
From the idle screen, press q.
2
Press R to scroll to M essages.
3
Press C under SELECT.
The Message Center screen displays the number of messages you have in each
message service:
• Voice M ai l
• Text Inbox (Text and Numeric Messages)
• Net Al ert — Consult y our Service Provider for availability.
• Quick Notes — user-customizable list of canned m essages.
• Text Outbox — contains messages which the phone has sent or is tryingto
send.
• DraftsFolder — contains messages which the user has composed, but not
sent.
• Fax Mail — Consult your Service Provider for availability.
NOTE:The Message Center will not display the number of Quick Notes
messages that are stored.
NOTE:Drafts Folder will only appear at the Message Center if there is
at least one draft message.
To access any message service:
1
From the Message Centerscreen, press R to scroll to the message
serviceyou want to access.
2
Press C under the display option on the right. This option varies
depending on the message service selected.
www.motorola.com/iden
82
Page 91

Text Msg Setup
Message Icons
The following icons appears depending on the type of message.
Icon Description
Message Sent and Confirmed
Message Sent Attempted (if this
doesn’t change to the Message Sent
Confirmed icon, resend the message
again).
Message Forwarded
Message not Received by Addressee
Message Received by Addressee
Message Locked
Message Send Failed
Message Re-sent
Text Msg Setup
Before you begin sending and receiving messages, you must set up your
signature, service center number and expiration information in the Text Msg
Setup Form.
Accessing Text Msg Setup
1
From the Message Centerscreen,press S to scrollto TextInbox,then
press
q to access the Msg Ctr Menu screen.
2
In the MsgCenter Menu screen, the Text Msg Setup field will be
highlighted. Press
C under SELECT.
83
Page 92

3
In the Text Msg Setup screen, Signature is highlighted. Press C under
CHNGE.
Type in your name (up to 11 characters) which will be your signature.
C under OK.
Press
NOTE:Each time you create a message, you will have to add the
signature.
4
From the Text Msg Setup screen, the Srvc Cntr No field will be
highlighted. Press
NOTE:You must use the “+” dialingcode and countrycode as part
of the service center number.If the servicecenternumberis
not preceded by a “+” sign and country code, the message
will not be sent successfully. The network will return an error
message to the phone.
C under CHNGE.
Enter the phone number for the Messaging Service. If you do not know
the number, contact your Service Provider.
5
After you have entered the phone number, press C under OK.
6
From the Text Msg Setup screen, the Expire After field will
highlighted.
NOTE:ThemessagewillonlybekeptbytheSMSCenterforthe
givenperiod until the addressee is reachable. Once the
given period expires, the message will be discarded by the
SMS Center.
If you want to change this setting, press C underCHNGE.
7
In the Expire After screen,press N or press C under --> to changethe
selection.
C under DONE when you are finished.
Press
8
You will be taken back to the Text Msg Setup screen. Press C under
BACK to save the settings.
www.motorola.com/iden
84
Page 93

Text Message Inbox
Text Message Inbox
The Text Message Inbox allows you to access,manage and create messages.
NOTE:The Inbox memory space can hold 14 messages with a
maximum length of 160 characters for each message.
Receiving a Text Message
When you receivea new message,your phone displaysNew Message and gives
an alert.
NOTE:You must set up the text message inbox before you can receive
text messages. See“Text Msg Setup” on page 83.
Press C under READ to open the message (or your text message inbox
if there are multiple messages).
Reading a Message
1
From the Message Centerscreen, press S to scroll to Text Inbox.
Press
C under SELECT.
2
In the TextMessage Inbox, [Create Msg] is highlighted. Press R to
scrollto message that you want to read. Press
3
Once you read the message, you have the choice of saving or deleting
the message.
C under READ.
Or,
Toseemorechoices,press
screen.
4
In the Inbox Menu screen, press R to scroll to your desired choice.
Press
C under SELECT. Follow the prompts f or that particular
selection.
q to access the Inbox M enu
85
Page 94

Quick Notes
Quick Notes are short, pre-writtentext messages that you can create, edit, and
send quickly. The Quick Notes list contains canned text messages that you can
use to send messages or replies.You can store up to 20 Quick Notes. Each
canned text can have a maximum of 30 characters.
Accessing Quick Notes
1
From the Message Centerscreen, press S to scroll to Quick Notes.
Press
C under SELECT.
2
In the QuickNotesscreen, [New Quick Note] is highlighted. Press C
under CREATE.
3
Type the note that you want to store as a Quick Note. Press C under
STORE.
Or,
Press
C under BROWSE to access the Quick No tes screen. There is a
list of pre-installed notes. Press
R to scroll to the desired choice.Press
C under SELECT.
Then press
Quick Note screen returnswith the recently stored quick note
highlighted.
4
Press q to access the Quick Notes Menu screen. Send is
highlighted. Press
SELECT.
C under STORE. A confirmation screen appears. The
R to scroll to the desired action. Press C under
Text Message Outbox
The Text Message Outbox allows you to view and manage outgoing messages.
The Outbox items are numbered, with the largest number on top being the most
recent item sent and the first item is the [CreateMsg].Youcan:
• Create a text message
• Send a message
• Manage an outbox
www.motorola.com/iden
86
Page 95

Text Message Outbox
NOTE:The Outbox and Drafts Folder share the same memory space
and a maximum of 20 messages can be held. If you have
reached the maximum, it will be necessary to delete old
messages before sending out new messages.
Creating Text Messages
1
From the Message Centerscreen, press S to scroll to Text Outbox.
Press
C under SELECT.
2
In the Text Outbox, [Create Msg] is highlighted.Press C under
CREATE.
3
With the To field highlighted, press C under CHNGE to access the To
screen.
Type the number of the person that you are sending the m essage to.
Or,
Press
C under BROWSE to access the Search menu.
You will have the choice to selectRecentCalls, Phonebookor Memo to
obtain an existing number.
Modify the phone number entry as desired then press
when finished.
The New Messagescreen returnswith the Msg field highlighted.
C under OK
87
Page 96

4
With the Msg field highlighted, press C under CHNGE to access the
Msg screen.
Type the message using the alphanumeric keypad. See “Using T9®
Text Input” on page 25 for informationabout entering text into this
field.
Or,
Press
C under BROWSE to accessthe Quick Notes screen.PressR to
scrollto the desired m essage type, then press
C under SELECT.
If you want to i nsert your signature, press
Entry Method screen. Press
under SELECT.
When you are finished, press
The New Messagescreen returnswith the Report field highlighted.
5
With the Report field highlighted, press C under CHNGE if you want
to change the selection. Press
SELECT. The New Message screen returns with the Send As field
highlighted.
Or,
With the Report field highlighted, press
Press
R to scroll to Send As field.
This submits a requestto confirm delivery of your message.
6
You can specify the type of message that you want to send. The default
is Text.Toassignadifferentmessagetype:
With the Send As field highlighted, press
message type.
q to access the New Msg Menu screen.
Press
The New Msg Menu screen returns with the Send field highlighted.
R to scroll to Add Signature.PressC
C under OK.
R to scroll to YES. Press C under
q to access the
P to scroll to select YES.
P to scrollto the desired
88
www.motorola.com/iden
Page 97

Text Message Outbox
7
Press C under SELECT, if you are ready to send the message.
Or,
R to scroll to Save as D raft,thenpressC under SELECT.The
Press
draft will be saved.
Or,
R to scroll to Delete,thenpressC under SELECT. A transient
Press
screen appears.
C under YES to delete the message. Youwill be returned to the
Press
Text Msg Outbox screen.
Or,
Press
C under NO. You will be returned to the New Message screen.
Sending a Message
1
From the New MsgMenu screen, with the Send field highlighted,press
C under SELECT.
Or,
s to send the message. A confirmation screenappears.Press C
Press
under YES to send the message.
2
The message will be sent.
89
Page 98

Managing the Outbox
The Text Message Outbox also allows you to manage your messages. You can
resend a message that has been previously sent, lock, or delete messages.
Resending a Message
1
From the Text Msg Outbox screen, press R to scroll the message that
you would like to resend, press
screen.
2
The Outbox Menu screen appears. Press R to scroll to Re-send.Press
q to go to the Outbo x Menu
C under SELECT.
3
A confirmation screen appears. Press C under YES to confirm. The
messagewill be sent.
Locking messages from the Outbox Screen
1
From the Text Msg Outbox screen, highlight the message that you
wouldliketolock,press
2
The Outbox Menu screenappears.Press R to scroll to Lock.PressC
under SELECT. A confirmation screen appears.
q to go to the Outbox Me nu screen.
Deleting messages f r om the Outbox Screen and Read Screens
1
From the Text Msg Outbox screen, highlight the message that you
would like to delete, press
screen.
q to go to the Outbox Menu
www.motorola.com/iden
90
Page 99

Text Message Outbox
2
The Outbox Menu screen appears with Delete highlighted. Press R to
scrollto Delete the message or scroll to Delete All if you want to delete
all your messages.
C under SELECT.
Press
NOTE:Deleting all messages will only remove those messages that
are not locked. You must first unlock the message before
you can remove it.
3
A confirmation screens appears.
Press
C under YES to delete the message.
Or,
C under NO. You will be returned to the Text Outbox screen.
Press
Drafts Folder
The Drafts Folder contains messages which were created, but not sent either
because you wish to send the message at anothertime or the message is
incomplete.
NOTE:Drafts Folder will only appear at the Message Center if there is
at least one draft message.
NOTE:The Outbox and Drafts Folder share the same memory space
and a maximum of 20 messages can be held. If you have
reached the maximum, it will be necessary to delete old
messages before sending out new messages.
91
Page 100

Accessing the Drafts Folder
1
From the Message Centerscreen, press S to scroll to Drafts Folder.
Press
C under SELECT.
2
In the Drafts Folder screen, [Create Msg] is highlighted. Press C
under CREATE.
3
Follow step 3 through step 6 for “Creating Text Messages” on page 87.
4
Press R to scroll to Save as Draft.PressC under SELECT. A
confirmation screen will appear stating the message has been stored.
5
Press s to return to the idle screen.
Editing the Drafts Folder
1
From the Drafts Folder screen,press R to scroll to the draft that you
want to edit. Press
Change field is highlighted.
2
If you want to change the draft, press C under SELECT. Press S to
scrollto the field that you want to change and follow the prompts or
followstep3throughstep6for“Creating TextMessages” on page 87.
3
Press q to access the New Msg Menu screen.
The New Msg Menu screen returns with the Send field highlighted.
S to scroll to the desired choice.
Press
q to access the Drafts Menu screen. The
Memory Storage and the Memory Meter
Your phone has a specific amount of memory storage and there is a limit on the
amount of messages that it can store. You can check to see how much memory
your phone has in both the Text Inbox and Text Outbox.
The Inbox memory space can hold 14 messages with a maximum length of
70-160 characters (dependingon language) for each message. The Outbox and
DraftsFolder share the same memory space and a maximumof 20 messagescan
be held.
www.motorola.com/iden
92
 Loading...