

Page 1

Motorola
iDEN
TELUS i315 Handset User’s Guide
Page 2

Page 3

Contents
Getting Started ..............................................1
Locating Your SIM Card....................................... 2
Battery.................................................................. 2
Activating your Mike Account...............................6
Powering On and Off ........................................... 6
Finding Your Phone Number ............................... 6
Handset Basics.................................................... 7
SIM Card Security.............................................. 10
Locking the Key pad ................ ... .... .... ............ ... . 13
Games ...............................................................14
Accessories........................................................ 14
For More Infor ma tio n ......................... .... .... .... ... . 14
Mike’s Direct Connect Service................... 15
One Touch PTT .............. .... .... ... .... ............ .... ... . 17
Call Alerts........................................................... 17
Using the Call Alert Queue ................................18
One-to-Many Group Calls..................................19
Mike’s Talkaround
Channels and Codes .........................................22
Private Mike’s Talkaround Calls......................... 24
TM.............................................21
Emergency Calls Using Mike’s Talkaround........25
Setup Options ....................................................25
Making P hon e Ca l ls....... ... ....... .. ... ....... ... .. .. 27
Receiving Phone Calls.......................................27
Call Icons ...........................................................27
Entering the Number to Call...............................27
Using Speakerphone..........................................29
Using Mute.........................................................29
Making Emergency Phone Calls........................30
Advan ce d C alling Opti o ns . ... .............. ... .. .. 31
Call Waiting........................................................31
Call Forwarding..................................................31
Forwardin g All Calls .......... .... .... ............ ... .... .... ..32
Turning Off Call Forwarding...............................32
Forwardin g Mis se d Call s... .... .... .... ........... .... .... ..33
Call Hold.............................................................34
Calling 2 People.................................................34
Creating Pauses and Waits While Dialing..........35
Making Intern ati on al Call s..... .... .... ........... .... .... ..35
Call Timers.........................................................36
i
Page 4

Recent Calls.................................................37
Storing Recent Calls to Contacts.......................37
Deleting Recent Calls ........................................38
Contacts.......................................................39
Viewing Contacts ...............................................40
Creatin g Ent rie s...... .... .... .... .... ........... .... .... .... ... . 41
Storing Numbers Quickly ................................... 42
Editing Ent rie s .. ........... .... .... .... ... ............ .... .... ... . 43
Deleting Entries.................................................. 43
Checkin g Cap acit y.. ............ .... ... .... .... ............ ... . 43
Creating Pauses and Waits ............................... 43
International Numbers........................................44
Entering Text ...............................................45
Using Alpha Mode..............................................45
Using Word Mode .............................................. 45
Special Function Keys .......................................46
Using Numeric Mode ......................................... 47
Using Symbols Mode.........................................47
Messages ..................................................... 49
Message Notifications........................................49
Voice Mail .......................................................... 49
ii
Advanced Voice Mail with Fax...........................50
Text and Numeric Messages .............................51
Setting Up ..........................................................51
Receiving Messages..........................................51
Reading Message s From the Message Center..52
Creating and Sending Messages.......................52
Managing Memory .............................................55
Net Alerts ...........................................................56
Mike’s Wireless Web Service..................... 57
Launching the Microbrowser ..............................57
Navigating the Microbrowser..............................57
Accessing the Browser Menu.............................57
Ending the Microbrowser Session......................58
Using Your Handset as a Modem ......................58
Ring To ne s ..................... ... .. ....... ... .. ........ .. .. 61
Using the Vibrate Feature ..................................61
Turning Ring Tones Off......................................61
Ring and Vibrate ................... .... .... .... .... ........... ..62
Assigning Ring Tones to Contacts.....................62
Viewing Rin g Tone As sign me nt s ............. ..........63
Managing Memory .............................................63
Page 5

Deleting Custom Ring Tones.............................63
GPS Enabled................................................65
IMPORTANT: Things to Keep in Mind............... 65
Viewing Your Approximate Location.................. 66
Enhancing GPS Performance............................67
Updating Satellite Almanac Data ....................... 68
Setting Privacy Options......................................69
Using GPS with Map Software...........................70
Memo............................................................73
Custom i zi n g Y ou r H an ds e t .... ........ .. .. ........75
Setting the Volume.............................................75
Setting Your Handset to Vibrate ........................ 75
Seeing the Display Better .................................. 76
Using a Headset ................................................76
Attachin g a Hea ds et.... .... .... .... ... ............ .... .... ... . 76
Using a Remo te PTT Butto n.......... .... .... .... .... ....76
Using Settings.................................................... 77
Understanding Stat us M essages...............81
Safety and G e ne r a l In fo r m a ti o n..... .. .......... 83
RF Operational Characteristics.......................... 83
Portable Radio Product Operation and EME
Exposure............................................................83
Electro Magnetic Interference/Compatibility.......86
Medical Devices.................................................86
Operational Warnings ........................................87
Operational Cautions .........................................88
Accessory Safety Information ............................89
MOTOROLA LIMITED WARRANTY..................91
Patent and Trademark Information ....................94
Index ............................................................ 97
iii
Page 6

iv
Page 7

DECLARATION OF CONFORMITY
Per FCC CFR 47 Part 2 Section 2.107 7(a)
Responsible Party Name: Motorola, Inc.
Address: 8000 W est Sunrise Boulevard
Plantation, FL 33322 USA
Phone Number: 1 ( 800) 453-0920
Hereby declares that th e product:
Product Name: i315
Model Number: H69XAH6RR1AN
Confor ms to the following regulations:
FCC Par t 15, sub pa rt B, sec ti o n 15 .107 ( a), 15 .107 ( d)
and sect io n 1 5. 10 9( a )
Class B Digital Device
As a personal computer peripheral, this device
complies with Part 15 of the FCC Rules. Oper ation is
subject to the following two conditions: (1) this device
may not cause harmful interference, and (2) this
device must accept any interference received,
including interference that may cause undesired
operation
Note: This equipment has been tested and found
to comply with the limits for a Class B digital
device, pursuant to part 15 of the FCC
Rules. These limits are designed to provide
reas onable protection against harmf ul
interference in a residential installa tion. T his
equipment generates, uses and can radiate
radio frequency energy and, if not installed
and used in accordance with the
instructions, may cause harmful interference
to radio communications. However, there is
no guaran t ee th at int e rfe ren ce w ill no t occ ur
in a particular installation.
If this equipment does cause harmful
interference to radio or television recepti on,
which can be determined by turning the
equipment off and on, the user is encouraged
to try to correct the interference by one or more
of the following measures:
• Reorient or relocate the receiving antenna.
• Incre ase the separ a tio n betw een th e
equipment and receiver.
• Connect t he equipment int o an outlet on a
circuit different from that to which the
receiver is connected.
• Consult t he dealer or an exper ienced
radio/TV techn ic ia n for he lp .
v
Page 8

vi
Page 9
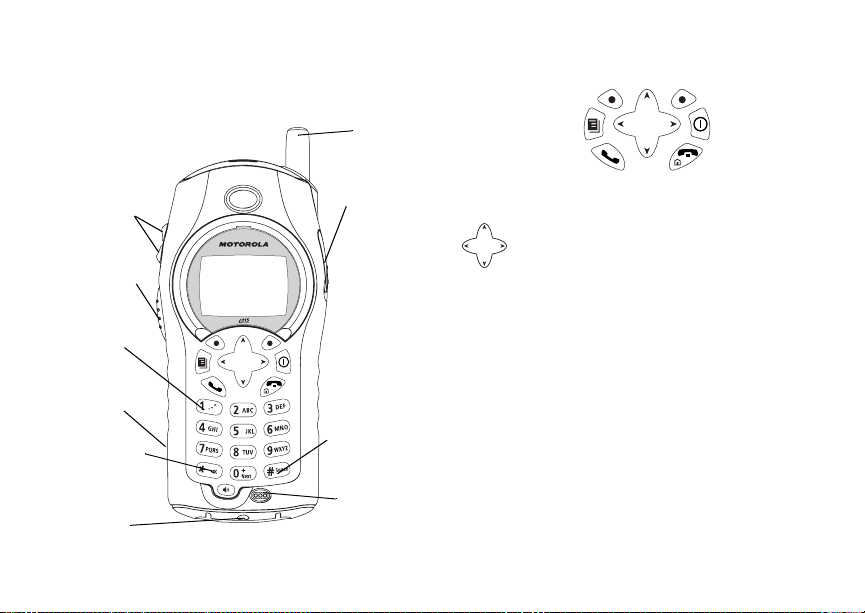
Getting Started
retractable
antenna
volume
controls
Push-To-Talk
(PTT) button
punctuation
key
speaker
(in back)
back/pause
dialing key
accessory
connector
audio jack
next word/
international plus
dialing key
microphone
p Power button.
Navigati on key — pre ss the arr ows t o scro ll
through menus and lists.
Menu key — accesses context-sensitive
m
menus.
Optio n ke y — sel ec ts th e op tion appe ari n g
A
above it on the display.
s Places phone calls.
Ends phone calls; returns to idle screen. In
e
browse r, hold to exit.
To start using your i315 handset:
• Make sure your SIM card is in place.
• Charge the battery.
• Ensure your service is activated.
1
Page 10
Getting Started
Locating Your SIM Card
Your SIM (Subscriber Identity Module) card is a
small piece of white plastic located in the SIM card
holder in the back of your ha ndset, un derneat h the
battery.
SIM card
SIM card
If your SIM card is not in the SIM card holder, it may
be in the box your handset came in, attached to the
SIM card carrier. If this is the case, caref ully detach
your SIM card from the surrounding plastic and
insert it as described in “Inserting Your SIM Card” on
page 12.
2
holder
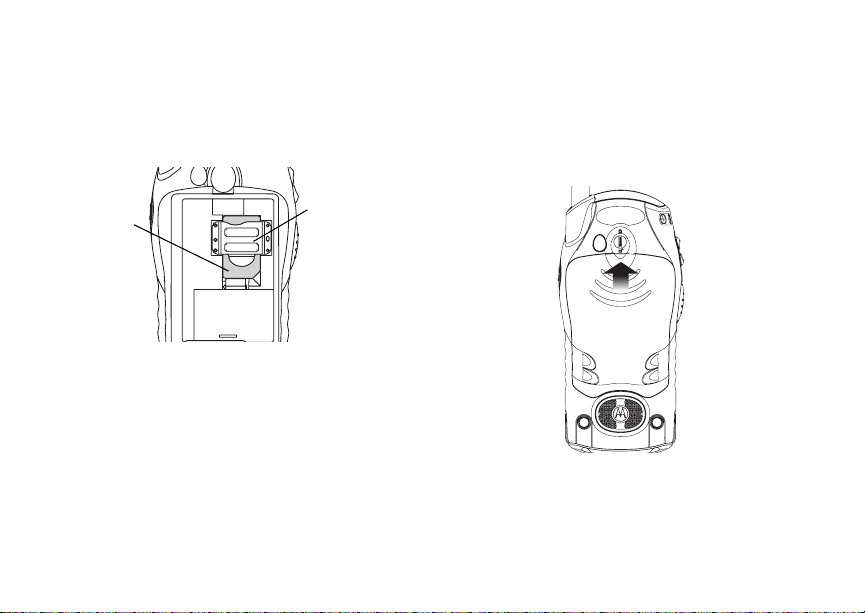
Battery
Removing the Battery Door
1 Make sure the handset is powered off.
2 Slide the release button forward until i t release s
the batte r y do or.
Page 11
Battery
Note: If the rele ase button does not slide for ward
to release the battery door, rotate the
circu lar piece in the ce nter of the release
button to unlock i t.
3 Remove the batte r y door fro m the back of your
handset.
Inserting the Battery
1 Remove the battery door.
2 Insert the top of the battery into the battery area.
Press the bottom of the battery to secure it.
3 Replace the batt ery door and press it gently until
you hear a click.
3
Page 12
Getting Started
4 If you wan t to ensure the battery door does not
accidentally come off, rotate the circular piece in
the cen ter of the releas e butt o n to lo ck it .
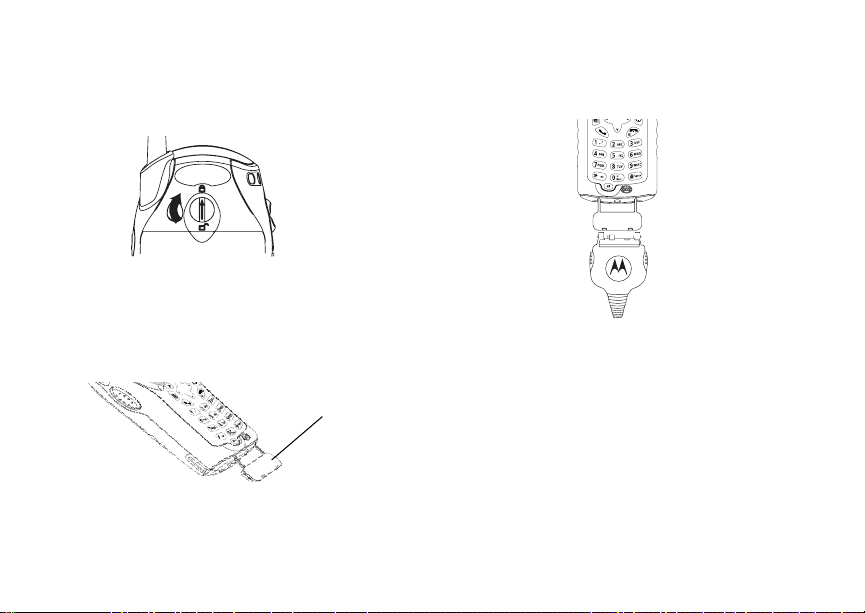
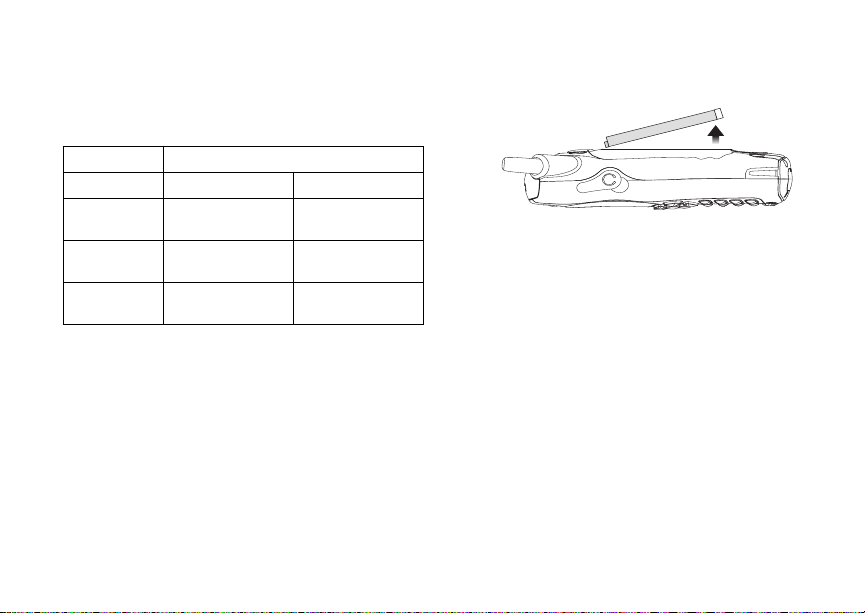
Charging the Battery
Your handset comes with a standard travel cha rger.
1 Plug the charger into an electrical outlet.
2 Open the connector cover.
connector cover
4
3 Plug the other end of the cha r g er int o the
accesso ry connector.
Charger Attached appears on the display.
Tip: To remove the charger f rom the accessory
connector: Press the buttons on the sides of
the plug. Pull the plug straight out.
4 When charging the battery for the first time,
charge f or 30 min ut es lo ng er tha n t he time s hown
in “Char gin g Times” on page 5.
Page 13
Battery
Charging Times
See your battery and charger to determine the
appropriate charging t ime.
Battery Charger
Rapid Mid-Rate
High
Performance
Extra
Capacity
Maximum
Capacity
For best results, charge the batteries within the
temperature range of 10°C to 40°C (50°F to 104°F) .
Prolonged charging is not recommended.
2 hours 4 hours
2.5 hours 6 hours
3.5 hours 7.5 hours
Removing the Battery
1 With the handset powered off, remove the battery
door.
2 Remove the batter y by pus hing th e batt ery to ward
the antenna and lifting it out.
Battery Use and Maintenance
• The Motorola Approved Lithium Ion chargers
provide optimum perfor mance. Other chargers
may not fully charge the Lithium Ion battery or
may yield a reduced number of lifetime charg e
cycles.
• Extreme temperatures degrade batter y
performance. Do not store the battery where
temperatures exceed 60°C (140° F) or fall below
-20°C (4°F ).
• Lithium Ion bat teries have a self discharge rate
and without use, lose about 1% of their charge
per day.
• The battery capacity is degraded if the battery is
stored for long periods while fully charged. If long
term storage is required, store at half capacity.
5
Page 14

Getting Started
Activating your Mike Account
Befor e you can begin using your i315 handset, you
need to activate your Subscriber Identity Module
(SIM) card on The Mike Network. Your SIM card
holds the information required to enable your
handset to conn ect to The Mike Netw ork. It als o
stores your user information, langua ge preference
and contact list entries.
• If you purchase d your handset thro ugh an
Authorized Mike Dealer, your SIM should already
be active.
• If you purchased your handset at another
locatio n, follo w the “G ett in g Activ ate d”
instructions in the Mike Services User’s Guide.
Powe r i ng On and Off
To power your handset on:
1 Press p.
2 If the Enter SIM PIN Code screen appears, enter
your SIM PIN. See “Entering the PIN” on page 11.
Press A un de r Ok.
Note: When you receive your handset, the SIM
PIN is 00 00. Change your PIN to prevent
fraudu lent use of the SI M car d (see
“Changing the PIN” on page 11).
6
As your i315 h andset connects to the network, you
will see a welcome message and a connecting
message. When the idle screen ap pears, the
handset is ready to use.
s
TELUS
S
To power yo ur ha nd set off:
Press and hold p.
d1
MesgsContcs
Finding Your Phone N um ber
My Info lets you view your phone number , Private
ID, and other handset information:
1 From the main menu, select My Info.
2 Scroll to se e yo ur in for m a tio n:
•Name — Enter yo ur na me . See “En ter in g Te xt ”
on page 45.
Page 15

Handset Basic s
•Line1 and Line 2 — your phone numbers for
phone lines 1 and 2. Each is filled in when you
receive your first call on that line .
•Private ID — Your Private ID is the number
that others use t o contact you usin g Private
calls. It is filled in when you receive your first
Private call.
•Group ID — the number of the Talkgroup y ou
have jo in ed .
• Carrier IP — the IP address assigned to
TELUS Mobility. It is filled in when y ou register
for packet data services.
• IP1 Address and IP2 Address — the I P
addresses you use to access t he Internet with
your handset.
•Ckt — Your circuit data number is the number
you use if you want to use your handset to
transfer circu it data. See “Usin g Your Hand s et
as a Modem” on page 58. You receive this
number from TELUS Mobility Client Care.
Note: The context-sensitive menu under My Info
contains information that may be used by
TELUS Mobility Client Care if there is a
problem with your handset’s services.
Customizing Features
You can control ma ny features of your handset,
including the volume of incoming sou nd, rings, and
other tones. See “ Customizing Your Handset” on
page 75.
Handset Basics
Any time your handset is powered on, the display
provid es you wi th in for m a tio n and optio ns .
s
TELUS
MesgsContcs
S
The screen shown above is the idle screen. The idle
screen appears when your h andset is on, but not
engage d in any activity.
Text Area
This area displays menus, messages, names,
phone numbers, and other information.
d1
status icons
text area
menu icon
display options
7
Page 16

Getting Started
Display Options
Two display options appear at the bottom of most
screens . Y ou sel ect a disp la y opt ion by pr es sing the
option key below it.
Menus and Lists
Your handset’s features are arranged in menus,
submenus, and lists.
To access the items in a menu or list, scroll using
the navigation key at the t op of your keypad. This
key lets you scroll up, down, left, or right. Holding
down the appropriate pa rt of the navigation key
speeds up scrolling.
In this guide, this symbol > tells you to select a menu
or list item. For example, Settings > Security
means:
1 Scroll to Settings on the main menu.
2 Press A un de r Select to see the Settings
screen.
3 Scroll to Security.
8
Menu Key
Many of the handset’s features have menu options
that will change depending on the currently
highlighted menu option. These context-sensitive
menus are available any t ime S appear s . Press m
to access the menu.
Main Menu
All your hand set’s fe atur es can be accessed thro ugh
the ma in menu. When you are using a feature, the
icon for that feature appears in the upper left corner
of the display.
a Browser Browse Mike’s Wireless
b Settings
Display/Info
Phone Calls
2-Way Radio
Volume
Security
Advanced
d Contacts
new contact for m
list of contacts
Contacts menu
Web Services.
Cust om iz e yo ur ha nd set’s
settings. See page75.
View, store, edit contacts.
See page 39 .
Page 17

Handset Basic s
e Messages
Voice Ma il
Text Msgs
Fax Mail
Outbox
Drafts
Net Alert
f Call Forward Set call forwarding options.
m Ring Tones
list of ring tones
Ring To ne s me nu
g Memo Store a num b er t o ac ce s s
h Call Timers Handset usage information.
Recent Calls
i
list of calls
recent calls menu
Call Setup menu
j My Info View personal handset
Access messages. See
page 49.
See page33.
Assig n ring tones and tu rn
ringer off. See page 61.
later. See page 73.
See page36.
Lists recent calls. See
page 37.
infor mation , includi ng phone
number and Private ID. See
page 6.
Call Alert
k
list of call alerts
g
Call Alerts menu
l GPS Find yo ur ap proximat e
m Talkaround/TA
Options
Games Access Games. See
G
Lists call alerts. See
page 17.
geographical location. See
page 65.
Launch/Exit Talkarou nd.
Access Talkaround Setup
and Help. See page 21.
“Games” on page 14.
Status Icons
Status icons appear in the two rows at th e top of the
display. Some appear at all times. Others appear
only when your ha ndset is engaged in certain
activi ties or when you have activa ted certain
features.
a b c d
e f g d
o p q r sSign al St re ngth — More bars next
Battery Strength — More bars on
the battery indicate a greater
charge.
to the antenna i ndicate a st ronger
signal.
9
Page 18

Getting Started
A Phone In Use — Your ha ndset is
active on a phone call.
B Private In Use — Your handset is
acti ve on a Private call.
C Talkgroup In Use — Your handset
is active on a group call.
1 2 Active Phone Line — 1 indicates
phone line 1 is ready to make calls;
2 indicates phone line2 is ready to
make calls.
m Talkaround — Your ph on e is set
GHI
J K L
to Talkaround mode.
Call Forward — Your handset is
set to forward calls. See “Call
Forwarding” on page 33.
uvMR Ringer Off — Your handset is set
not to ring. See “Turning Ring
Tones Off” on page 61.
wy x
Messages — You hav e on e or
more me ssages. See “Messages”
on page 49.
D Internet — You are read y to
10
browse the internet.
YZ Packet Data — You are ready to
transfer packet data or are
transferring packet data. See
“Using Your Handset as a Modem”
on page 58.
P Roaming — You are usin g yo ur
handset outside the TELUS
Mobi lit y networ k.
SIM Card Security
The SIM card stores all your Contacts information.
Since this information is stored on your S IM card,
not in your handset, you can remove the information
by removing your SIM card.
Note: Except for making emergency calls, your
handset will not function without the SIM
card.
To prevent unau thorize d use of your handset, your
SIM card can be protected by a PIN that you enter
each time the handset is powered on. You can
change the PIN or turn off the requirement that it be
entered.
Note: Your PIN is set to OFF by default.
Page 19

SIM Card Security
Entering the PIN
You may be required to enter a SIM PIN when yo u
first use your handset.
When you receive your handset, the SI M PIN is
0000. Change your PIN to prevent fraudulent use of
the SIM card .
Important: If you enter your PIN incorrectly five
times, your SIM card is blocked. To
unblock your SI M card, you mu st c ont act
TELUS Mobility Client Care. See
“Unblocking the PIN” on page 12.
1 When the Enter SIM PIN Code screen appears,
enter your SIM PIN. An asterisk appears for each
character entered.
2 Press A under Ok.
Changing the PIN
1 From the main menu, select Settings > Security
> Change Password > SIM PIN.
2 At the Enter Old SIM PIN Code screen, enter the
current SIM PIN.
3 Press A under Ok.
4 At the Enter New SIM PIN Code screen, enter
the new 4- to 8-d igit SIM PI N.
5 Press A under Ok.
6 At the Re-enter New SIM PIN Code screen,
re-enter the new SIM PIN to confirm.
7 Press A under Ok.
Turning the PIN Requirement On and Off
When the SIM PIN requirement is on, you are
prompted to enter your PIN each time you turn on
your handset.
Note: If a SIM PIN is required, your handset will
not function until the SIM PIN is entered,
except for making emergency calls.
When the PIN requi rem e nt is off, yo ur ha ndse t ca n
be used without enterin g a PIN.
Important: When the SIM PIN requirement is off, the
1 From the main menu, select Settings > Security
> SIM PIN.
2 Select On or Off.
3 Enter the current SIM PIN.
4 Press A under Ok.
personal data on your SIM card is not
protected. Anyone can use your handset
and access your personal data.
11
Page 20

Getting Started
Unbl ocking the PIN
If you enter your PIN in co rr ectl y five ti mes, your S IM
card is blocked. To unblock your SIM card, you must
contact TELUS Mobility Client Care to get a PIN
Unblock Key (PUK).
Important: If you unsuccessfully enter the PUK code
To unblock the PIN:
1 Press * # m 1.
2 Enter the PUK code.
3 Press s.
4 Enter a new 4- to 8-digit SIM PIN. Press s.
5 Re-enter your SIM PIN. Press s.
If you entered th e code s pro pe rly , SIM Unlocked
appears on the display.
12
ten times, your SIM card is permanently
blocked and must be replaced. If this
happens, all data is lost. You will get a
message to contact TELUS Mobility
Client Care. Except for making
emergency calls, your handset will not
function with a blocked SIM card.
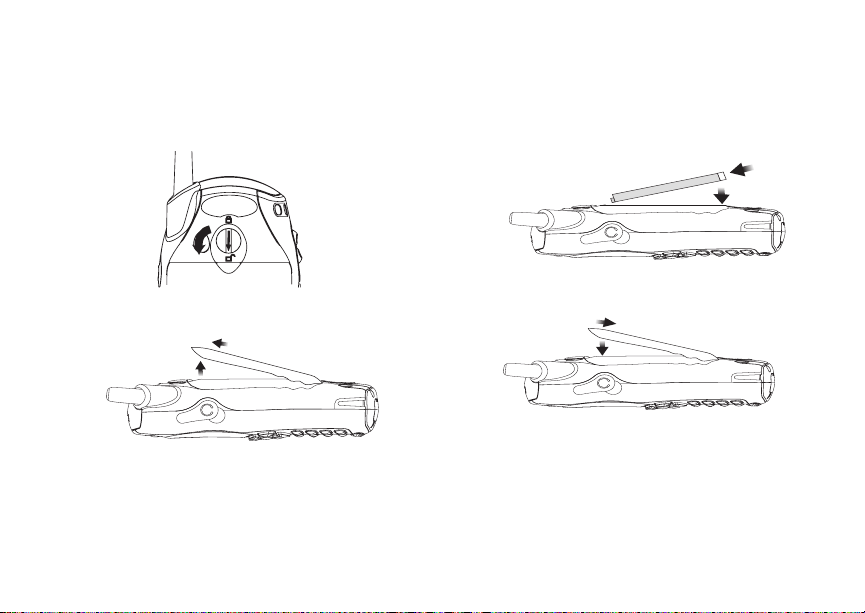
Inserting and Removing Your SIM Card
Important: Do not touch the gold-coloured areas of
Switching SIM Cards
When you move your SIM card from one handset to
another, your C ontacts information will not be
erased as the information is stored in the SIM. If
you remove your SIM card and use it with another
handset, or use another SIM card with your handset,
the following information is erased:
• The recent ca ll s li s t
• Call forwardin g se tti ng s
• Net alerts
• Mobi le originated text messages, drafts, and
quick notes
• Information stored in Memo
• 3 most recent GPS Enabled locations
• Voice records
• Voice names
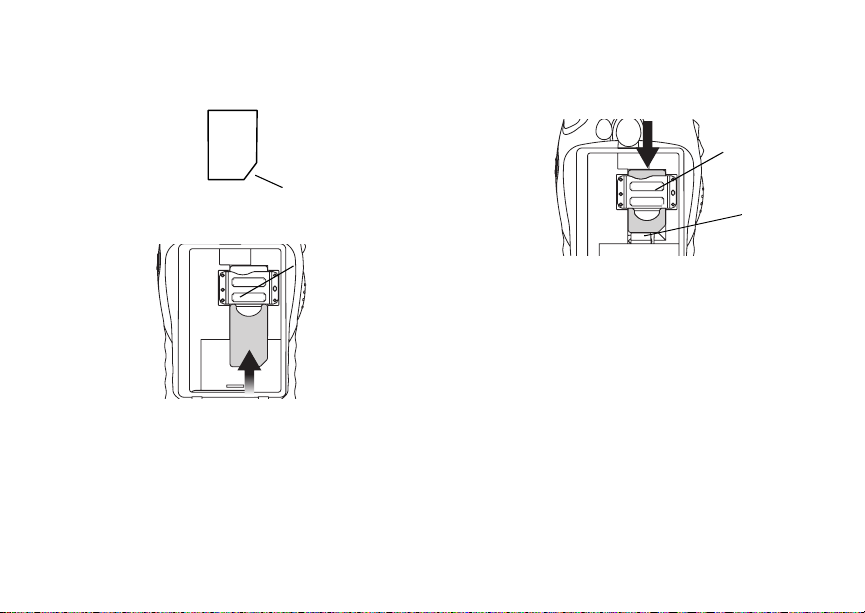
Inserting Your SIM Card
1 With your handset powered off, remove the
battery door and battery. See “Remo v ing the
Battery” on page 5.
your SIM card.
Page 21
Locking the Keypad
2 Hold your SIM card as shown. Do not touch the
gold-coloured area.
cut corner
3 Carefully slide your SIM card into your handset,
until it lies flat in the SIM card holder.
SIM card
holder
Removing Your SIM Card
Important: To avoid loss or damage, do not remove
your SIM card from your handset unless
absolutely necessary.
1 With your ha ndse t po were d off, rem ove the
battery door and battery. See “Removing the
Battery” on page 5.
2 While holding down the tab near the SIM card
holder, slide your SIM card out of the SIM card
holder. Do not touch the gold-coloured area.
SIM card
holder
tab
Note: Protect your SIM card as you would any
delicate object. Store it carefully.
Locking the Keypad
Locking the handset’s keypad prevents its buttons
from be in g pres se d. Whe n t he k ey pa d i s lo cke d, you
can onl y:
• Power the handset on and off
• Unlock the keypad
• Respond to incoming calls, messages, and alerts
Important: Emergency calls cannot be placed while
To lock the keypad:
1 From the idle screen, press m.
2 Press *.
the keypad is locked.
13
Page 22

Getting Started
If you press a key while the keypad is loc ked,
instructions for unlocking the keypad display briefly.
To unlock the keypad:
1 From the idle screen, press m.
2 Press *.
While t he keypad is locked, you can respond to
incomi ng calls, messages, and aler ts just as yo u do
when the keypad is not locked. When finished, press
e to return to the idle screen. The keypad remains
locked.
Games
Your handset comes with pre-installed games.
To access Games:
1 From the ma in menu, select Games.
2 Scroll to the desired game.
Press A under Select.
Accessories
Your handset comes with a battery and a charge r.
To order additional accessories, log on to our Web
site at www.telusmobility.com or contact your Mike
Dealer.
14
For More Information
If you have additional questions about yo ur i315
handset, contact your Mike dealer or TELUS
Mobility Client Care.
Page 23

Mike’s Direct Connect Service
There ar e two ways of communicating over Mike’ s
Direct Connect service:
• one-to-one using a private call
• one-to-many in a group call
Both of these methods are very similar to two-way
radio, and at a fraction of the cost of traditional
cellular. Mike’s Direct Connect also offers the Call
Alert feature, which gives recipients a notice, similar
to a ringer, that y ou would like to spea k to them.
One-to-One Private Calls
Making Private Calls
1 Enter the Private ID you want to call.
2 Press and h ol d the P TT b ut ton on the si de of yo ur
handset. Begin talking after your handset emits a
chirping sound.
3 Release the PTT button to listen.
Tip: To let someone know that you want to talk to
him or her on a Privat e call, send a call al ert.
See “Ca ll Alerts” on page 17.
Every P riva t e I D nu mbe r co nt ains 3 p ar ts — an are a
ID, a fleet ID, and a member ID — with asterisks
between each of these parts. For example:
999*999*9999.
When you place a Private call, you must enter the
entire Private ID number including the asterisks.
When you store a Private ID number in Contacts,
include the asterisks with the entire Private ID
number in cas e yo u t rave l wit h your ha nd set ou t sid e
of your home area.
From the Keypad
To enter the Private ID you want to call, press the
numbers on the keyp ad.
If you make a mistake:
• To clear a digit, press A under Delete.
• To clear all digits, press and hold A under
Delete.
• To insert or de l et e a di gi t a ny whe re i n t he str in g of
digits you have entered, scroll left or right.
• To cancel, press e.
From the Recent Calls List
The recent calls list stores the last 20 calls you
made or received.
15
Page 24

Mike’s Direct Connect Service
To sele ct a Pri vate I D f rom th e r ece nt c al ls l ist a s th e
number you want to call:
1 From the idle screen, scroll down. -or-
From the ma in menu, select Recent Calls.
2 Scroll to the name or Private ID number you want
to call.
From Contacts
If you have Private IDs stored in Contacts, you can
use these numbers to make calls. For information on
entering numbers into Contacts, see “Creating
Entries” on page 41.
Calling from the Contacts List
1 From the ma in menu, select Contacts.
2 Scroll to the name or Private ID number you want
to call.
Tip: To find Contacts entries faster, use the
keypad to enter the first letter of the name.
3 Place the call now. -or-
With the Contacts type field highlighted, scroll left
or right to display the Contacts type for the
number you want to call.
If you a re maki ng a P riv at e c all, yo ur h an ds et plac es
the call to the Pri v at e ID st ored in the Contacts
entry, even if the Private ID icon is not displayed.
16
Calling from a Contacts Entry
1 From the main menu, select Contacts.
2 Scroll to the name or Private ID number you want
to call.
3 Press A under View. -or-
If View is not one of your options: Press m. Select
View.
4 Place the call now. -or-
Scroll to vi ew mor e n umber s . Whe n y ou plac e t he
call, it is made to the number displayed.
Receiving Private Calls
When you r ece ive a Pr iv at e cal l , your hands et emi ts
a chirping sound.
To ans wer a Private call:
1 Wait for the caller to finish speaking.
2 Press and hold the PTT button on the side of your
handse t. Begin talking after your handse t emits a
chirping sound.
Release the PTT button to listen.
Page 25

One Touch PTT
One Touch PTT
One Touch PTT sets your handset to call the most
recent Private ID on the recent calls list, or to a
Privat e ID you ch oo s e, ev ery t im e yo u press the
PTT butt on.
Setting On e Touch PTT
One Touch PTT sets your handset to call the most
recent Private ID on the recent calls list, or to a
Privat e ID you ch oo s e, ev ery t im e yo u press the
PTT butt on.
To set your handset to call the most recent Private
ID on the recent calls list:
1 From the m a in men u, se le ct Setting s > 2- Way
Radio > One Touch PTT.
2 Scroll to Last Call.
3 Press A under Select.
To set your handset to call a Private ID you choose:
1 From the m a in men u, se le ct Setting s > 2- Way
Radio > One Touch PTT.
2 Scroll to Assign Number.
3 Press A under Change.
4 T o enter the number you want your handset to call
every time you press the PTT button:
Enter the number using your keypad. -o r-
Press A under Search. Select Contacts,
Recent Calls, or Memo. Enter the number from
Contacts, the recent calls list, or Memo, as you
would when making a call.
Tip: If you are en te rin g a Talkgrou p n um be r , e nter
# before the number.
5 Press A under Ok.
To turn off One Touch PTT:
1 From the main menu, select Settings > 2-Way
Radio > One Touch PTT.
2 Scroll to Off.
3 Press A under Select.
Call Alerts
Sending a call alert lets the recipient know that you
want to talk to him or her on a Private call.
When you send a call alert, the recipient’s handset
emits a series of beeps and displays your name or
Private ID.
The recipient can:
• Answer — begin a Private ca ll with the sender
• Queue — store the call alert to the call alert
queue , which is a list of call alerts
• Clear — dismiss and delete the call alert
17
Page 26

Mike’s Direct Connect Service
Sending C all Alerts
1 Enter the Private ID you want to send to, as you
would wh en making a Privat e call.
2 Press A under Alert. Ready to Alert appears on
the display.
3 Press the PTT button until Alert Successful
appears on the display.
Receiving Call Alerts
When you receive a call alert, you must answer,
queue, or clear it. You cannot receive phone calls or
Privat e ca ll s un t il you do.
To answer a call alert, press the PTT button to
make a Private call to the sender.
To queue a call alert, press A under Queue.
To clear a call alert, press A under Clear.
Using the Call Alert Queue
When you queue a call alert, it remains in the call
alert queue until you respond to it, or delete it.
Viewing Call Alerts
1 From the ma in menu, select Call Alert.
2 Scroll through the list.
18
Viewing Date and Time
To view the date and time a call alert was received:
1 From the main menu, select Call Alert.
2 Scroll to the ca ll alert you want information on.
3 Press m.
4 Select View.
Responding to Call Alerts in the Queue
After you que ue a cal l aler t , you ca n r espon d t o it by
making a Private call to the sender or sending a call
alert to the sender. This call alert is then removed
from the queue.
Making a Private Call to the Sender
1 From the main menu, select Call Alert.
2 Scroll to the call alert you want to respond to.
3 Press the PTT button to begin the call.
Sending a Call Alert to the Sender
1 From the main menu, select Call Alert.
2 Scroll to the call alert you want to respond to.
3 Press A under Alert. Ready to Ale rt appears on
the disp la y.
4 Press and hold the PTT button until Alert
Successful appears on the display.
Page 27

One-to-Many Group Calls
Note: Answering a call alert from the recent call
list does not remove it from the call alert
queue.
Deleting Call Alerts
To delete a call alert from the queu e:
1 From th e call alert qu eu e, scro ll to the call al ert
you want to delete.
2 Press m.
3 Select Delete.
4 Press A under Yes to confirm.
To delete all call alerts from the queue:
1 From the call ale rt qu eue, pres s m.
2 From t h e cal l ale r t me nu, sele ct Delete All.
3 Press A under Yes to confirm.
Sor t ing Call Alerts
To sort call alerts by the or der they were received:
1 From the main menu, select Call Alert.
2 Press m.
3 Select Sort By.
4 Scroll to First on Top or Last on Top.
5 Press A under Select.
One-to-Many Group Calls
A group call is a type of dispatch call made to all
members of a Talkg roup at once. A Talkgroup is a
group of Private IDs.
To receive group calls made to a Talkgroup, you
must join the Talkgroup. See “Joining a Talkgroup”
on page 20.
Making Group Calls
1 Press #. Then enter the Talkgroup number
using the keypad. -or-
Choose the Talkgroup name from Contacts or
recent calls list.
2 Proceed as if making a Private call.
Receiving Group Calls
To answer a group call:
Proceed as if answering a Private call. Only one
person at a time may speak on a group call.
Turnin g off Group Cal ls
To control whether you hear group calls to your
Talkgroup:
1 From the main menu, select Settings > 2-Way
Radio > Tkgrp Silent.
19
Page 28

Mike’s Direct Connect Service
2 Press A un de r Change.
3 Scroll to On if you don’t want to hear group calls
to your Talkgroup. -or-
Scroll to Off if you want to hear group calls to your
Talkgroup.
4 Press A un de r Select.
Joining a Talkgroup
Your Mike sales representative creates Talkgroups
for you and assigns each Talkgroup to a Talkgroup
number. You can choose a name for each of your
Talkgroups when you create entries for them in
Contacts.
To receive group calls made to a Talkgroup, you
must join the Talkgroup. You can belong to only one
Talkgroup at a time. When you join a new
Talkg roup, you no long belong to your previous
Talkgroup.
To join a Talkgroup:
1 Press #. Then enter the Talkgroup number
using the keypad. -or-
Choose the Talkgroup name f rom Contacts or
recent ca lls list.
Press A under Join.
20
Page 29

Mike’s Talkaround
Mike’s Talkaround allows direct two-way
phone-to-phone communications between two or
more phones equipped for Mike’s Talkaround. You
can make and receive Mike’s Talkaround calls even
when network service is not available. You can talk
to anyone on your code and channel within your
range.
Note: Range will vary based on terrain,
man-ma de structures an d atm osphe ric
conditions.
Mike’s Talkaround allows you to:
• Use code or private mode operation
• Use up to 10 channels
Note: Mike’s Talkaround is not compatible wit h
older Family Radio Services products.
The following features and main menu items will not
be available while in Mike’s Talkaround:
• On-ne twork phone calls
• On-network Private calls
• Data transmission
• Incoming message notification
• Musical ring tones
• Call forwarding
TM
• Messages
• Call Timers
• Call alerts
• Voice records
Using Mike’s Talkaround
To set your phone to Mike’s Talkaround:
1 From the main menu, scroll to Talkaround and
press A under Select.
2 Select Go to Talkaround.
Switching to Talkaround Please Wait displays.
After a few se co nds, the Ta lk ar o un d idle scre en
appears. TA Rea dy appears on the first line of the
displa y. The code you are set to appear s on the
second line of the display. The channel you are set
to appears on the third line of the display.
Note: When switching from the network to Mike’s
Talk around, the last channel and code that
were set ap pe ar on th e Tal k ar o un d idl e
screen.
While in Mik e’ s Tal kar ou n d, thi s icon m appears on
the displ a y, in dica ti ng that t her e i s n o net wor k s ig nal
and Mike’s Talkaround is active .
21
Page 30

Mike’s Talkaround
TM
Exiting Mi ke’s Talkar ou n d
To set your phone to ne tw ork mode when Mike’s
Talkaround is active:
1 From the T alkaround idle s c reen, press m.
2 Scroll to TA Options and press A under Select.
3 Select Exit Talkaround.
Switching to Network Please Wait displays. After
a few seconds, the network idle screen appe ars.
Talk Range
Phones used in Mike’s Talkaround mode should be
a minimum of 6 feet apart to maximize performance
and impro v e tr an sm i ss ion range .
Channe l s an d C o des
Your phone has 10 channel s and 15 codes.
Channels are divided into sets of frequenc ies that
allow you to make and receive Mike’s Talkaround
calls . Oth er pa rti es may als o be talk in g on th e sam e
channel.
Codes help minimize interference from unwanted
messages and other disturbances when you are on
the sam e channel as other s .
22
To have a conversation, all parties must be on the
same channel and code. For privat e Mike’s
Talk arou nd ca lls, t he per s on you are cal lin g mu st be
in Mik e’s Tal kar oun d an d s et to th e same cha nn el to
receive your call.
Note: When making a code call, all parties that
are on your code and channel can hear
your conversation.
To set a channel:
1 From the Talkaround idle screen, press A under
Edit.
2 Scroll to Channel.
3 Press A under Edit.
4 Select a channel.
5 When you are fini shed, press A under Back to
return to the Talk around idle screen.
To set a code:
1 From the Talkaround idle screen, press A under
Edit.
2 Scroll to Code.
3 Press A under Edit.
4 Select a code.
5 When you are fini shed, press A under Back to
return to the Talk around idle screen.
Page 31

Channels and Codes
Making and Receiving Code Calls in Mike’s Tal karo un d
To make a code call in Mike’s Ta lkaround:
1 Press and hold the PTT button. TA Transmi t
appea rs on the first line of display. Begin
speaking after your phone emits the Mike’s
Talkaround tone.
2 Release the PTT button to listen.
The tone emitted from your phone when using
Mike’s T alkaround is 4 bee ps and sounds different
from the standa rd t on e he ar d wi th on -n e tw o rk
Private and group calls.
If you receive an error message:
• There may be no parties on your channel or code.
• You are out of range.
When you receive a code call using Mike’s
Talkaround, TA Receive appears on the first line of
the display.
Note: An incoming Mike’s Talkaround call can be
terminated at any time by pressin g e.
Receive All
You can set your phone to receive Mike’ s
T alkaround transmissions from any phone that is set
to the same channel, regardless of the code (1-15),
by setting the code to Receive All. When you
receive tra ns mis si on s with the code set to Receive
All, the disp la y ch anges from Receive All to the
code on which the transmission was received .
Tip: You can reply to an incoming call within 6
second s after hearing the short ending beep
by pres sing the PTT butt on.
Note: You cannot initiate a code call when the
code is set to Receive Al l. If you press the
PTT button with the code set to Receive
All, you will receive an error message.
To set the code to Receive All:
1 From the Talkaround idle sc reen, press A under
Edit.
2 Scroll to Code.
3 Press A under Edit.
4 Select Receiv e Al l.
5 When you are finished, press A under Back to
return to the Talkaround idle screen.
23
Page 32

Mike’s Talkaround
TM
Private Mike’s Talkaround Calls
You can have a private con v ersation with another
person using Mike’s Talkaround. When on a private
Mike’ s Talkaro und call, no other parties can hear
your conversation. In order to make a private Mike’s
Talkaround Call, you must use the valid 10-digit
Personal Telephone Number (PTN) of the person
you are calling. The person you are calling must be
in Mike’s Ta lk ar ound an d se t to th e sa me c hann el to
receive your call.
If you receive an error message:
• You may not be using a valid PTN.
• The person that you are trying to reach may not
be in Mik e’s Talkaround.
• The person th at you ar e trying to reach is set to a
different ch annel or is out of range.
Privat e Only
To limit Mike’s Talkaround to private conversation
only, set your code to Private Only. In this mode,
code calls will be ignored and only private calls can
be made or rec eived.
Note: You will be required to enter a valid PTN
before pressing the PTT button.
24
To set the code to Private Only:
1 From the Talkaround idle screen, press A under
Edit.
2 Scroll to Code.
3 Press A under Edit.
4 Select Pvt Only.
Making a Private Mike’s Talka round Call
1 Enter the 10-digit PTN of the person you want to
call on yo ur channe l. -or-
Scroll t o a num b er or na me in Contacts. -or-
Scroll to a number in the recent calls list.
2 Press and hold the PTT but ton. Begin speak ing
after your phone emits the Mike’s Talkaround
tone.
3 Release the PTT butto n to liste n.
The number or name of the person you are calling
will appear in the first line of the display.
Receiving a Private Mike’s Talkarou nd Call
The number or name o f the person who initiated the
call will appear in th e first line of the display.
Page 33

Emergency Calls Using Mike’s Talkaround
Note: You can reply wi thin 6 seco nds simply by
pressing the PTT button.
Ending a Private Mike’s Talkaround Call
A private Mike’s Talkaround call w ill end if there is
no communication for 6 seconds.
Note: A private Mike’s Talkaround call may be
inte rru pte d du r ing t h e 6 s ec on d i dle t im e b y
another code call or private call.
The display will return to the Talkaround idle screen.
Emergency Calls Using Mike’s
Talkaround
Emergency phone calls can be initiated if you are in
network coverage. Dial 911 to be connected to an
emergenc y re spon se ce nt e r. If yo u ar e on an active
Mike’s Talkaround call, you must end it before
callin g 911.
Note: If you are using Mike's Talkaround outside
of network coverage, di aling 911 will not
conne ct yo u t o an eme r ge nc y re sp on s e
center.
Setup Options
Mike’s Talkaround setup options are available in the
TA Options screen in both network an d Mike’s
Talkaround modes.
To access Setup Options in network:
1 From the main menu, select Talkaround.
2 Select Setup.
To access Setup Options in Mike’s Talkaround:
1 From the main menu, select TA Options.
2 Select Setup.
You can set your phone to:
• Launch directly into Mike’s Talkaround when you
select Talkaround fro m the main menu .
• Notify you periodically with a tone that you are in
Mike’s Talkaround.
Using Direct Launch
To set your phone to launch Mike’s Talkaround
when you se lect Talkaround from the main menu:
1 From the Setup screen, scroll to Dir e ct La unc h
and press A under Change.
2 Select On.
25
Page 34

Mike’s Talkaround
TM
Note: If Direct Launc h is set to On, you will not
see TA Options when you select
Talkaround from the main menu. In order to
have ac c es s to yo ur setup options , Direct
Launch must be set to Off. Or you can
access setup options while in Mike’s
Talkaro un d by pre ssi ng m and sel ec tin g TA
Options.
To turn off Direct Launch:
1 From the Setup screen, scroll to Direct Launch
and press A under Change.
2 Select Off.
Your phone now displays TA Options when you
select Talkaround from the main menu.
Using State Tone
To set your phone to no tify you with a to ne that yo u
are in Mike’s Talkaround:
1 From the Setup screen, scroll to State Tone and
press A under Change.
2 Select t h e ti me fra me du rin g w hic h y ou wan t t o be
notified that you are in Mike’s Talkaround.
For exa mpl e, if you se le ct 1 hou r, you wi ll be no tif ie d
every hour that you are in Mike’s Talkaround.
To turn off State Tone:
26
3 From the Setup screen, scroll to State Tone and
press A unde r Change.
4 Select Off.
Page 35

Making Phone Calls
To make a p hone call:
1 Enter the number you want to call.
2 Press s to place the call.
3 Press e to end the call.
Receiving Phone Calls
When you receive a phone call, your handset rings,
vibrates, or lights up its backlight.
To answer a phone call:
Press s. -or-
Press A under Yes. -or-
Press any key on the keypad.
To send a phone call to voice mail instead of
answering it:
Press e. -or-
Press A under No.
To end a phone call:
Press e.
Call Icons
When you make a call, call icons appear in the text
area of the handset’s display.
X Placing a phone call.
W Receiving a phone cal l.
Y Phone call is active.
Z Phone call is on hold.
U Phone call ended.
When you miss a call, this ic on appears in the text
area:
V Missed a phone call.
Entering the Number to Call
To enter the number you want to call, yo u can:
• Use the numbers on the keypad
• Select the number from the re cent calls list
• Select the number from Contacts
• Redial the last phone number called
• Use Speed Dial or Turbo Dial
®
27
Page 36

Making P hone Calls
From the Keypad
To enter the number you want to call, press the
numbers on the keypad.
If you make a mistake:
• To clear a digit, press A under Delete.
• To clear all digits, press and hold A under
Delete.
• To insert or d el ete a di gi t an yw her e i n the st rin g o f
digit s you have entered, scroll left or right.
• To cancel , press e.
From the Recent Calls List
The rece nt calls list stores t he last 20 calls you
made or received.
To select a number from the recent calls list as the
number you want to call:
1 From the idle screen, scroll down. -or-
From the ma in menu, select Recent Calls.
2 Scroll to the name or number you want to call.
28
From Contacts
If you have numbers stored in Contacts, you can
use these numbers to make calls. For information on
entering numbers into Con tacts, see “Creating
Entries” on page 41.
Calling from the Contacts List
1 From the main menu, select Contacts.
2 Scroll to the name or number you want to call.
Tip: To find Contacts entries faster, use the
keypad to enter the first letter of the name.
3 Place the call now. -or-
With the Contacts type field highlighted, scroll left
or right to display the Contacts type for the
number you want to ca ll.
If you are making a phone call:
• Your ha ndse t p l ace s th e c al l to t he ph one n um be r
assigned to the Contacts type displayed.
• If the Contacts type displayed is not a phone
number , your hand set pl aces the ca ll to t he phone
number stored in the Contacts entry.
• If the Contacts type displayed is not a phone
number and you have more than one phone
number stored in the Contacts entry, your
handset prompts you to select the phone number
you want to place the cal l to.
Page 37

Using Speake rph one
Calling from a Contacts Entry
1 From the main menu, select Contacts.
2 Scroll to the name or number you want to call.
3 Press A under View. -or-
If View is not one of your options: Press m. Select
View.
4 Place the call now. -or-
Scroll t o vie w more nu mbe rs. When you pl ac e th e
call, it is made to the number displayed.
Redialing the Last Number
Press and hold s to place a call to the last phone
number you called.
Using Speed Dial and Turbo Dial
Each phone number stored in Contacts is assigned
a Speed Di al number which you can use to e nter
that number.
Turbo Dial lets you place calls to the phone numbers
associated with Speed Dial numbers 1 through 9
without entering the nu mber.
Speed Dial
1 From the idle screen, use the keypad to enter the
Speed Dial number assigned to the phone
number you want to call.
®
2 Press #. Turbo Dial
From the idle screen, press and ho ld the Speed
Dial number (1 through 9) assigned to the phone
number yo u w an t to ca ll.
Using Speakerphone
Turning on speakerphone makes incoming sound
come out of the hand set’s speaker instead of the
earpiece. Speakerphone is available whenever you
are on an active ph one call.
To turn speakerphone on or off:
Press A under Speaker. -or-
Press t.
Using Mute
Muting calls lets you listen to incoming sound
without transmitting sound. Mute is available
whenev er yo u ar e on an ac tive cal l.
To turn mute on:
Press A under Mute.
While mute is on, Unmute appears as a disp lay
option.
29
Page 38

Making P hone Calls
To turn mute off:
Press A un de r Unmute.
Making Emergency Phone Calls
Your handset supports emergency calling.
Emergency phone calls can be made even when
your SIM card is blocked or not in your handset.
Dial 9 11 to be co nn ec te d to an em erg en cy r esp ons e
center. If you are on an active call, you must end it
before calling 911.
Important: Emergency calls cannot be placed while
30
the keypad is locked.
Page 39

Advanced Calling Options
Call Waiting
Call Waiting lets you receive a second call while on
an active call. Call Waiting is always available,
unless you turn it off for a specific call.
If you are on a call and receive a second call, your
handset emits a tone and displays a message
saying you are rec eiving a second call.
To accept the second call and put the active cal l on
hold:
Press A under Yes.
To accept the second call and end the active call:
1 Press e.
Your handset rings with the second call.
2 Answer the second call.
To decline the second call :
Press A under No. If you subs cr ibe to vo ice ma i l,
the call is forwarded to your voice mail box.
Tu rn Off Call Waiting
To turn off Call Waiting during a call:
1 Press m.
2 Select In Call Setup > Call Waiting.
3 Press A under Change.
4 Scroll to Off.
Tip: To turn Call Waiting back on while still on the
call: Scroll to On.
5 Press A under Select.
To turn off Call Waiting for the next call you make or
receive:
1 From the main menu, select Settings > Phone
Calls > Call Waiting.
2 Press A under Change.
3 Scroll to Off.
4 Press A under Select.
Call Waiting is turned back on when you end the
call.
Call Fo rwa rd i ng
Call forwarding sends calls to the phone numbers
you specify. You can forward all calls to one number
or forward missed calls to different numbers
depend ing on the reason you missed the call.
31
Page 40

Advanced Call ing Options
You can forward phone lines 1 and 2 independently.
Forwarding All Calls
When you set yo ur hands et t o forward al l ca ll s, an
icon appears in the top row of the display:
G Phone line1 is active; calls to phone line 1 are
being f orwarded.
H Phone line 1 is active; calls to phone line 2 are
being f orwarded.
I Phone line1 is activ e; calls to ph one li nes1 and
2 are being forwarded.
J Phone line 2 is active; calls to phone line 1 are
being f orwarded.
K Phone line 2 is active; calls to phone line 2 are
being f orwarded.
L Phone line2 is active; calls to ph one li nes1 and
2 are being forwarded.
To forw ard all calls:
1 From the ma in menu, select Call Forward.
2 Press A un de r Change.
3 Select All Calls.
4 Scroll to To.
32
5 Press A under Change.
6 If you s pecified a forwarding numb er for all calls
before, this number displays. Press A unde r
Change.
To forward calls to this number, press A under
Ok. -or-
To delete this number, press and hold A under
Delete.
7 To enter the number you want to forw ard calls to:
Enter the number using your keypad. -or-
Press A under Search. Select Contacts,
Recent Calls, or Memo. Enter the number from
Contacts, the recent calls list, or Memo, as you
would when making a call.
8 Press A under Ok.
All your calls are now forwarded t o the number you
specified.
Tip: In so m e f iel ds , yo u ca n se l e ct an o pti on by
scro lling left or right instead of pressing A
under Change.
Turning Off Call Forwarding
If you don’t want all your calls forwarded, turn the
feature off:
1 From the main menu, select Call For wa r d.
Page 41

Forwarding Missed Calls
2 Press A under Change.
3 Select All Calls.
4 Scroll to To.
5 Press A under Change.
6 Scroll to Off.
7 Press A under Select.
All your calls are now sent to your handset.
Calls you miss are fo r w arded acc ording to the
options se t for mis sed cal l s. By de f ault , missed cal ls
are forwarded to voice mail.
Note: To receive voice mail messages, you must
first set up a voice mail account with
TELUS Mobility Client Care or your Mike
Dealer.
Forwarding Missed Calls
You can specify a forwarding number for each type
of missed call:
•If Busy — Your handset is on a call or
transferring data.
• If No Answer — You do not answer on the first 4
rings.
• If Unreachable — Your ha nd se t is out of
coverage or powered off.
Note: If you want a type of missed call sent to
voice mail, the ca ll forw ar din g nu mbe r for
that type of missed call must be your voice
mail access number.
To forward missed calls:
1 From the main menu, select Call Forward.
2 Press A under Change.
3 Select Detailed.
4 Scroll to If Busy to specify a fo rwarding number
for call s receive d w he n yo ur ha ndset is bus y.
5 Press A under Change.
6 If you specified a forwarding number for this type
of call before, this number displays. Press A
under Change.
To forward calls to this number, press A under
Ok and go to step9. -or-
To delete this number, press and hold A under
Delete.
7 T o en t er th e n umb er yo u wan t t o for wa rd th is ty pe
of call to:
Enter the number using your keypad. -or-
Press A under Search. Select Contacts,
Recent Calls, or Memo. Enter the number from
Contacts, the Recent Calls list, or Memo, as you
would when making a call.
33
Page 42

Advanced Call ing Options
8 Press A un de r Ok.
9 Repeat step 4 through step 8 for No Answer and
If Unreachable.
When you are finished, press A under Exit.
Note: Your handset comes pre-programmed to
detailed forward to Mike’s Voice Mail. If you
change your detailed call forwarding,
remember to reset the forwarding back to
your access number or your phone
number.
Switching Between Calls
When you accept a second call, the display shows
the name or number of each call, with an icon
indicating which call is active:
V Phone call is active.
Z Phone call is on hold.
To make the call on hold active and put the active
call on hold:
Press A under Switch.
Call Hold
Call H old lets you put an ac tive call on hold an d
make a second call.
34
To put a call on hold:
1 While on an active call, press m.
2 Scroll to Hold.
3 Press A under Select.
4 If you want to make the call active again, press A
under Resum.
Calling 2 People
Putting a Call on Hold, Makin g a Second Call
1 Place or receiv e a phone call.
2 While the call is active, press m.
3 Select 2nd Call. This puts the call on hold.
4 Enter the second phone number you want to call.
Tip: For quick ways to enter the num ber, press m.
5 Press s to pl ac e the call.
To end the second call and make the call on hold
active again:
Press e.
To make the call on hold active and put the act ive
call on hold:
Press A un de r Switch.
Page 43

Creating Pauses and Waits While Dialing
Merging 2 Calls into a 3-Way Call
After you put a call on hold and place a second call,
you can combine these calls into a 3-way call:
1 Press m.
2 Select Join.
All 3 peopl e in the ca ll ca n speak to an d he ar ea ch
other.
Making a 3-Way Call
1 Place or receive a phone call.
2 While the call is active, press m.
3 Select 3 Way. This puts the call on hold.
4 Enter the second pho ne number you want to call.
Tip: For quick ways to enter th e numbe r, press m.
5 Press s to place the call.
6 Press A under Join.
All 3 peopl e in the ca ll ca n speak to an d he ar ea ch
other.
Creating Pauses and Waits
While Dialing
You can enter a pause or wait while dialing a
number. For more information on pauses and waits,
see “Creating Pauses and Waits” on page 43.
To create a pause while dialing a ph one number:
1 From the keypad, enter the digits you want to
occur before the pause.
2 Press m.
3 Select Insert Pause.
4 Enter the digits you want to occur after the pause.
To create a wait while dialing a phone number:
1 From the keypad, enter the digits you want to
occur before the wait.
2 Press m.
3 Select Insert Wait.
4 Enter th e digits you want to occur after the wait.
Making International Calls
Plus Dialing le ts you place an international call to
most countries without entering the local
intern ational access code.
1 Press and hold 0 for two seconds. A “0”
appears , t he n ch an ges to a “+”.
Note: The network translates the “+” into the
appropriate international access code
needed to place the call.
2 Enter the country code, city code, or area code,
and phone number.
35
Page 44

Advanced Call ing Options
Call Timers
Call timers measure the duration of your phone
calls, Privat e or group calls, an d circuit data use, as
well as the numbe r of Kilobytes sent and received
by your handset:
•Last Call — displays the duration of your most
recent phone call .
• Phone Res et — keeps a running total of your
phone ca ll minutes, until you reset it.
• Phone Life time — displays the total minutes of
all your phone calls.
•Prvt/Grp Reset — keeps a running total of all of
your Private and group call minutes, until you
reset it.
• Prvt/Grp Lifetime — displays th e t ot al mi nute s o f
all your Private and group calls.
• Circuit R e set — keeps a running total of all of
your circuit data use, until you reset it.
• Circuit Lifet ime — displays the total minutes of
all of your circuit data u s e.
•Kbytes Reset — keeps a running total of the
number of Kiloby tes sent an d received by your
handset, until you reset it.
36
To view or res e t a timer:
1 From the main menu, select Call Ti me rs.
2 Select the feature you want to view or reset.
3 To view a feature without resetting: Press A
under Done when you are finished viewing. -or-
To reset a feature: Press A under Reset. Press
A under Yes to confirm.
Note: The values displayed by Call Timers should
not be used for billing. Call timers are
estimates only.
Page 45

Recent Calls
The recent calls list stores the nu mbers of the 20
most recent calls you have made and received.
To view the recent calls list:
1 From the main menu, select Recent Calls.
2 Scroll through the list.
If the number of a recent call is stored in Contacts,
the name associated with th e number appears on
the rece nt calls list.
An icon appears beside the name or number
indica ting the Contacts type of the number used in
the call. See “Contacts” on page 39.
For phone calls, an icon ap pears to the left of the
name or number giving more information about the
call:
X A call you ma de.
W A call you received.
V A missed call. Missed calls appe ar on the
recent calls list only if you have Caller ID.
Tip: The recent c alls li st a lso s t or es call a le rt s y ou
have received. They appear as Private calls.
To get more information on a recent ca ll:
1 From the recent calls list, scroll to the call you
want informa tion on.
2 Press A under View. -or-
If View is not one of your options: Press m. Select
View.
This displays information such as the name
associate d with the call, the nu mbe r , the date , tim e,
and duration of the call.
Storing Recent Calls to Contacts
1 From the rece nt ca lls l i st , s cro ll to t he nu mber yo u
want to store.
2 Press A under Store. -or-
If Store is no t one of y our o pt ion s: Pr ess m. Select
Store.
3 T o store the number as a new entry, select [New
Contact]. -or-
To store the number in an existing entry, select
the en try.
4 With the Contacts type field highlighted, scroll left
or right to display the Contacts type you want to
assign the number.
37
Page 46

Recent Calls
5 If you want to add mor e in form a tio n to the entr y,
follow the applicable instruct ions in “Creati ng
Entries” on page 41.
6 Press A un de r Done.
Deleting Recent Calls
To delete a call:
1 From the recent calls list, scroll to the call you
want to delete.
2 Press m.
3 Select Delete.
4 Press A un de r Yes to confirm.
To delete all calls:
1 From the recent calls list, press m.
2 Select Delete All.
3 Press A un de r Yes to confirm.
38
Page 47

Contacts
Each Contacts entry can store several numbers or
addresses. Information stored in Contacts is saved
on your SIM card. If you move your SIM card to
another SIM-based handset, you can access
information stored in Contacts from that handset
A Contacts entry contains:
• A name — A n ame is required if your are storing
more than one number or address to the entry;
otherwise, it is optional. Typically, this is the name
of the person whose contact information is stored
in the entry.
• A ring t one — You can assign a ring tone to ring
when y ou g et c alls f r om the p ers on w h ose c on t ac t
information is stored in the entry.
• A Contacts type — Each number or address
stored must be assigned a Contacts type:
A Mobile phone nu mb e r
B Private Private ID
C Work1 phone nu mb e r
D Work2 phone nu mb e r
E Home phone nu mb e r
F Email email ad dre ss
G Fax phone nu mber
H Pager ph on e nu mber
I Talkgroup Talkgroup number
J IP IP addre ss
K Other phone nu mb e r
• A number or address — Each Contacts entry
must co ntain a number or address. This may be
any type of phone number, Private ID, Talkgroup
number, email address, or IP address.
• A Sp ee d Dia l nu mber — When yo u st ore a pho ne
number, it is assigned a Speed Dial number. You
can accept the default Speed Dial number or
change it.
39
Page 48

Contacts
• A voice name — If you create a voice name for a
number, you can then dial that number by saying
the voi c e name into your handset. This icon
appears
a voice name is assi gned.
P to the left of the Contacts type icon if
Viewing Contacts
To access C ontacts:
Press A un de r Contcs. -or-
From the ma in menu, select Contacts. -or-
If you are on a call: Press m. Select Contacts.
To view entries:
1 From th e Co nt a ct s lis t, s cr oll t o the en try yo u wa nt
to vie w.
2 If an entry has more than one number or address
stored, <> surrounds the Contacts type icon.
Scroll le ft o r r i ght to v ie w the ic on f o r ea ch nu mb er
stored in the entry.
3 When the icon for the number or address you
want to view is disp layed, press A under View.
-orIf View is not one of your options: Press m. Select
View.
4 Scroll t o view the other numbers and ad dresses
stored for the entry.
40
Tip: To view more entries, continue scrolling.
Searching for a Name
To sea rch for a name in Contacts:
1 From the Contacts list, press m.
2 Select Search.
3 Enter t he name you want to see. See “En tering
Text” on page 45.
4 Press A under Ok.
Your handset finds the name you entered or the
nearest match.
Showing Only Private IDs and Groups
To set Contacts to show only entries that contain
Private IDs and entries for Talkgroups:
1 From the Contacts list, press m.
2 Select Filter.
3 With Prvt/Grp highlighted, press A under
Select.
To set Contacts to show all entries:
1 From the Contacts list, press m.
2 Select Filter.
3 With Show All high li ghted, press A under
Select.
Page 49

Creating Entr ies
Creating Entries
A number or address and a Contacts type are
requir ed for a ll Co nt acts e nt rie s. Ot he r i nf orm at io n is
optio nal. Yo u may enter t he inf or ma tio n in any orde r
by scrolling through the entry details.
After you have entered the number or address,
Contacts type, and any other information you want,
you can press A under Done to save the entry to
Contacts.
To cancel a Contacts entry at any time press, e to
return to the idle sc ree n.
Tip: In some fields that require you to enter
inform ation, yo u ca n begin ent er i ng the
information from the keypad instead of
pressing A under Change.
To create a Contacts entry:
1 To access the entry details screen:
Select Contacts > [New Co ntact]. -or-
From the Contacts list, press m. Scroll to Ne w .
Press A under Select.
2 If you want to assig n a name to the entry :
With the Name field highlighted, press A under
Change.
Enter the name. See “Entering Text” on page 45.
When you are finished, press A under Ok.
3 If you want to assign a ring tone to the name:
With the Ringer fi eld highlighted, press A und er
Change.
Scroll to the ring tone you want to assign. Press
A under Select.
4 To assign a Contacts type to the n umber or
address being stored:
With the Contacts type field highlighte d, press A
under Change.
Scroll to the Contacts type you want to assign.
Press A under Select.
5 To store a number or address:
With the # field (or ID for an email address, or IP
for an IP ad dress) high lig hted, pres s A under
Change.
Enter the number or address. For phone
numbers , us e the 10-dig it format. For email
address e s, see “Ent eri n g Tex t” on pa ge 45.
Press A under Browse to select a number
Tip:
or address from Contacts, the recent calls
list, or Memo.
When you are finished, press A under Ok.
41
Page 50

Contacts
6 If you want to assign more options to the num ber,
press A under Change with the [Options] field
highli ghted. See “Assigning Options” on page 42.
7 If you want to add more numbers or addres ses to
the entry:
Scroll pa s t the in for m a tion you al rea dy ent e red.
Enter th e addit iona l inf ormat ion f or the en try usi ng
step 2 through s t ep 6. You mus t assig n a n ame to
the entry, if you have not already.
8 Press A un de r Done.
Assignin g Opt i on s
1 If you have not already, press A under Change
with the [Options] field highlighted
2 The default Speed Dial number assigned to a
phone number is displayed in the Speed # field.
This is always the next available Speed Dial
location.
If you want to assign the phone number to a
different Speed Dial location:
With the Speed # field highlighted, press A
under Change.
Press A un de r Delete to delete the current
Speed Dial number.
Enter the new Speed Dial number using the
keypad.
42
When you are fini shed, press A under Ok.
3 If you want to create a voice name for a phone
number, scroll to Voice Name and press A under
Record.
As directed by the screen prompts, sa y and
repeat the name you want to assign to the
number. Speak clearly into the microphone.
4 When you are fini shed, press A under Back.
Storing Numbers Quickly
To store numbers to Contacts from the recen t call
list, see “Stor in g Rec ent Call s to Conta ct s” on page
37.
To store numbers to Contacts from Memo, see
“Memo” on page 73.
To store numbers to Contacts from the idle screen:
1 Use the keypad to enter the number you w ant to
store.
2 Press m.
3 Select Store Number.
4 To store the number as a new entry, select [New
Contact]. -or-
To store the number in an existing entry, select
the entry .
Page 51

Editing Entries
5 With the Contacts type field highlighted, scroll left
or right to display the Contacts type you want to
assign the number.
6 If you want to add more information to the entry,
follow the applicable instructions in “Creating
Entries” on page 41.
7 Press A under Done.
Editing Entries
1 From the Contacts list, scroll to the entry you want
to edit.
2 Press m.
3 Select Edit. The entry details screen displays.
4 Follow the applicable instructions in “Creating
Entries” on page 41 to edit the various fields.
Deleting Entries
Delete an Entry
1 From the Contacts list, scroll to the entry you want
to delete.
2 Press m.
3 To delete the entire entry, scroll to Delete
Contact.
4 Press A under Select.
5 Press A under Yes to confirm.
Delete a Number or Address
1 From the Contacts list, scroll to the entry that
cont ains the number or address y ou want to
delete.
2 With the Contacts type field highlighted, scroll left
or right to display the Contacts type for the
number yo u w ant to delete.
3 Press m.
4 Scroll to Delete Number.
5 Press A under Select.
6 Press A under Yes to confirm.
Checking Capacity
To see how many numbers are stored in Contacts:
1 From the Contacts list, press m.
2 Select Capacity.
Creating Pauses and Waits
When storing a number, you can program your
handset to pause or wait be tween di gits while
dialing. A pause makes your handset pause for 3
seconds before dialing furt her. A wait makes your
handse t w ait for your response before dialing
further.
43
Page 52

Contacts
This feature is useful wh en using voice mail or other
automa t e d pho n e systems th at r eq uire you to dial a
phone number and then enter an access number.
To progr am a pause:
Press and hold * until the l etter P appears. The
P repres ents a 3-second pau se.
If you store 17035551235P1234, when you select
this number and make a call, your handset dials the
first 11 digits, pauses f or 3 second s, then di als the
last 4 digits.
If you want a pause longer than 3 seconds, press
and hold * more than once. Each P represents a
3-second pause.
To program a wait:
Press and hold * until the letter W appears. The
W means your handset w aits here before dialing
further.
If you store 17035551235W1234, when you select
this number and make a call, your handset dials the
first 11 digits and then waits. A message appears
asking if you want to send the rest of the digits.
Press A under Yes to dial the last 4 dig its.
Tip: You can create pauses and waits while
dialing a number from the keypad. See
“Creating Pauses and Waits While Dialing”
on page 35.
44
Interna t i on a l N u mber s
When s toring a number that you plan to use for
international calls, use Plus Dialing:
1 Press and hold 0 for two seconds. A “0”
appears, then changes to a “+”.
Note: The network translates the “+” into the
appropriate international access code
needed to place the call.
2 Enter the country code, city code, or area code,
and phone number.
For inf ormat ion ab out maki ng int ernat ional calls , see
“Making International Calls” on page 35.
Page 53

Entering Text
You can enter text into your handset using the
traditional method of pressing a key severa l times
for each character, or by pressing a key once for
each lett er w hile w o rds l ike ly to be th e one yo u w ant
are chosen from a database. You can also enter
symbols and numbers into a text field.
Note: Entering text may work differently in the
browser.
In screens t hat r eq uir e yo u to en t er te xt , you see th e
following icons near the top right corner. These
icons te ll you which text input mode you are using:
Alpha — Press a key several times for each
l
character.
Word — Press a key once for each letter while
j
words li kely to be the one you want are chosen
from a database.
Symbols — Enter punctuation and other
i
symbols.
Numeric — Enter numbers.
k
When you access a screen that requires you to
enter t ex t, you start in Alpha mo de .
To choose a text input mode:
1 At a screen that requires you to enter text, press
m.
2 A checkmark appears next to the current text
input mode. Scroll to the text input mode you want
to use.
3 Press A under Select.
Using Alpha Mode
• Press any key on the keypad to enter the letters,
numbers, and symbols on that key. For example,
to enter the letter Y, press 9 three time s.
• Type a letter then scroll up to make that letter
uppercase, or type a letter then scroll down to
make that letter lowercase.
• See “Special Funct ion Keys” on page 46 for mor e
information on adding spaces, capitalization, and
punctuation.
Using Word Mode
In Word mode, T9 Text Input analyzes the letters on
the keypad button you press and arranges them to
create words. As you type, T9 Text Input matches
your keystrokes to words in its database and
displays the most commonly used matching word.
You can add you own words to this database.
45
Page 54

Ente ring Text
Entering a Word
1 Select Word as your text input mode.
2 Type a word by pressing one key for each letter.
For example, to type “test” press 8 3 7 8.
The displayed word may change as you type it.
Do not try to correct the word as you go. Type to
the end of the wo rd before edi ting.
3 If the word that appears is not the desired word,
press 0 to change the word on the display to
the next most likely word in th e database.
Repeat until the desired word appears.
If the desired word does not appear , you can add it
to the database.
Adding Words to the Database
1 Select Alpha as your text input mode.
2 Ty pe the word u s ing Alpha mode.
3 Select Word as your text input mode.
4 Press #.
The word you typed in Alpha text entry mode is now
in the database.
Note: You cannot store alphanumeric
combinations, such as Y2K.
46
Choosing a Language
To change the language of the database:
1 At a screen that requires you to enter text, press
m.
2 Select Languages.
3 Scroll to the language you want for your
database.
4 Press A under Select.
Special Fu nc t ion K eys
Some of the handset’s keys assume different
functions while in Alph a or Word mode.
Spaces
Press # for a space.
Capitalization
Press and hold # to make the next letter typed
uppercase (shift), to make all subsequent letters
typed uppercase (caps lock), or to go back to
lowercas e letters.
Page 55

Using Numeric Mode
These i cons appear in the top row of you r display:
Shift is on.
m
Caps lock is on.
n
When ne ither of thes e ic ons appe ar, letters t y pe d
are low erc as e .
Note: Your handset automatically makes the first
letter of a sentence uppercase.
Punctuation
Press 1 to insert punctuation. One of eight basic
punctu ation symbols will be inserted (. , - ’ @ : ? ;).
Press 0 to change the inserted punctuation
symbol t o another of the eight basic punctuation
symbols.
Note: Additional punctuation symbols are
availa bl e in S y mb ol s mode.
Usin g N u meri c Mo d e
1 Select Numeric as your text input mode.
2 Press the number buttons on your keypad to
enter numbers.
Using Symbols Mode
1 Select Symbols as your text input mode.
A row of 32 symbols appears along t he bottom of
the handset’s display. Sc roll right to view the
complete row.
2 Scroll left or right to choose the symbol you want
to enter.
3 Press A under Select.
47
Page 56

48
Page 57

Messages
To access your voice mail messages, text and
numeric messages, Net alert s , and any ot her types
of messages you are able to receive, go to the
mess ag e ce nter:
1 Press A under Mesg. -or-
From the main menu, select Messages.
2 Scroll to the type of message you want to access.
3 Press A under the display option on the left.
The message center shows how many messages
you have of each type. You can listen to, read, or
delete these messages.
Message Notifications
When you receive a message, your handset notifies
you with text on the display and a notification tone or
vibration. You can access the messag e or dismiss
the notification.
If you dismiss the notification, the message is not
deleted. It can be accessed through the message
center.
If you are not on a phone call when you receive a
message, your handset soun ds a notificati on tone
every 30 seconds unt il you acce ss the message or
dismiss the alert.
If you are on a call when you receive a message,
your handset may so und a notification tone during
the call or af ter you end the cal l, depend in g on ho w
you set your notifi cation options.
Setting Notification Options
To control wheth er your handset sounds message
notification tones while you are on phone calls:
1 From the main menu, select Settings > Phone
Calls > Notifications.
2 Choose the option you want:
• Receive All — Tones sound during calls for all
types of messages.
• Msg Mail Only — Tones sound during calls for
mail messages; tones for all other types of
messages are held until you end calls.
•Delay All — Tones for all types of messages
are held until you end calls.
3 Press A under Select.
Tip: To set notification option d uring a cal l: Press
m. Select In Call Setup > Notifications.
Voice Mail
Note: To receive voice mail me ssages, you must
first set up a voice mail account with
TELUS Mobility Client Care.
49
Page 58

Messages
When you receive a voice mail message, New
Voice Mail Message appears on the di splay.
To call TELUS Mobility voice mail system and listen
to the message:
Press A un de r Call.
To dism iss the message notification:
Press A un de r Exit. This ico n
the display, reminding you that you have a new
message.
y appears on
Sending Unanswered Calls to Voice Mail
To send a phone call to voice mail ins tead of
answering it:
Press e. -or-
Press A un de r No.
If the caller leaves a message, this icon
appears on the display, reminding you that you have
a new messa g e.
50
y
Advanced Voice Mail with Fax
Mike's Advanced Voice Mail with Fax allows you to
receive faxes directly to your handset and store
them along with your voice messages un til you're
ready to print. Follow the voice mail prompts to print
the fax to a fax machine. It ensures privacy,
convenience and el iminates the need for a separate
fax line.
When you subscribe to Mike's Advanced Voice Mail
with Fax, you'll receive a fax number from your point
of feature activ a tio n. If you have n' t receiv e d a fax
number, please contact the nearest TELUS Mobility
dealer or call TELUS Mobi lity client care.
Please see www.telusmobility.com for more details
of TELUS Mobility Voice Messaging services.
Fax Mail Indicator
Your i315 hand set is equipped with a Fax Mail
indicator to notify you when you have received a fax
through Mike's Advanced Voice Mail with Fax.
When you receive a new fax, New FaxMail Message
appears on the display.
Your ha ndset w ill ale rt yo u audibl y ever y 30 second s
until you press A under Call or A under Exit.
Page 59

Text and Numeric Messages
Text and Numeric Messages
With mobile originated text messaging, you can
send and receive short text messages to and from
other Mike handsets. Messages you receive appear
on your handset’s display and in the text message
inbox.
If your handset is powered off when you receive a
message, your handset notifies you the next time
you power it on. If you are out of your coverage
area, your handset alerts you when you return to
your coverage area.
Tip: While reading a text and numeric message
that contains a phone number, you can press
s to call that number.
Setting Up
Befor e yo u be gi n using mobile origi na t ed tex t
messaging, you may need to set up your signature,
servic e center number, and expiration inf ormation:
1 From the m a in men u, se le ct Messages.
2 Scroll to Text Inbo x.
3 Press m.
4 Select Text Msg Setup.
5 With the Signature field highlighted, press A
under Change.
Enter your signature. It may be up to 11
characters long. See “Entering Text” on page 45.
When you are finished, press A under Ok.
6 With the Srvc Cntr No field highlighted, press A
under Change.
Enter the phone number of your s ervice center. If
you do not know this number, contact TELUS
Mobility.
When you are finished, press A under Ok.
7 With the Expire After field hi ghlighted, press A
under Change.
This is the amount of time messages you send
are saved if they cannot be delivered. After this
period, they a re discarded.
Scroll or press A un de r Q to change field.
When you are finished, press A under Done.
8 Press A under Back to save the information you
entered.
Receiving Messages
When you receive a message, your handset notifies
you as it woul d wit h an y othe r type of mes sa ge . See
“Messag e Noti fic a tio ns ” on pa ge 49.
51
Page 60

Messages
To view the message:
Press A un de r Read.
To dism iss the message notification:
Press A un de r Exit.
Reading Messages From the Message Center
1 From the ma in menu, select Message > Text
Inbox.
2 Scroll to the mess age you want to read.
3 Press A un de r Read.
4 If the message fills more than one screen, scroll
to read it.
5 To keep the message, press A under Save. -or-
To delete the message, press A under Delete.
Tip: To see more choices, including replying to
the message, press m.
Each message can be up to 160 characters long.
Creatin g a nd Se n din g Messages
1 From the ma in menu, select Messages > Text
Inbox > [Create Msg]. -or-
52
From the main menu, select Messages > Text
Outbox > [Create Msg].
2 Press A under Create.
3 To address the message:
Use the keypad t o enter the phone number of the
person you want to send the message to. -or-
Press A under Browse. Select Contacts,
Recent Calls, or Memo. Enter the number from
Contacts, the recent calls list, or Memo, as you
would when making a call.
When you are fini shed, press A under Ok.
4 Enter the text of the message. See “Entering
Text” on page 45. -or-
To use a q uick note: Press A under Browse.
Scroll to the quick note you want. Press A under
Select. For more information on quick notes, see
“Using Quick Notes” on page 53.
If you want to add your signature: Press m. Select
Add Signature.
When you are fini shed, press A under Ok.
5 If you want to send the message, press A under
Yes.
6 With the Report field highlighted, press A under
Change. Select Yes.
Page 61

Creating and Sending Messages
7 If you want to specify the type of message you
want to send:
With the Send As field highlighted, press A
under Change. Scroll to the m essage type you
want. Press A under Select.
8 To send the message : Press s. Press A un de r
Yes. -or-
To save the mes s ag e as a draf t wit h ou t se nd ing
it: Press m. Scroll to Save As Draft. Press A
under Select. -or-
To delete the message without sending it: Press
m. Scroll to Delete. Press A under Select.
Tip: In some fields, you can select an option by
scrolling left or right instead of pressing A
under Change.
Addressing Messages From the
Recent Calls List
1 From the recent calls list, scroll to the name you
want to send a message to.
2 If the entry has more than one phone number
stored, view the phone number you want to send
the message to.
3 Press m.
4 Select Compose SMS. The message is
automatically addressed to the phone number
you chos e.
5 Follow step 4 through step 7 of “Creating and
Sending Messages” on page 52.
Addressing Messages From the Idle Screen
1 Using the keypad, enter t he number you want to
send a me ssage to.
2 Press m.
3 Select Compose SMS. The message is
automatically addressed to the phone number
you chos e.
4 Follow step 4 through step 7 of “Creating and
Sending Messages” on page 52.
Using Quick Notes
Quick notes are short, pre-written text messages
that you can create, edit, and send. You can store
up to 20 quick notes. A quick note may be up to 30
characters long.
To create a quick note:
1 From the main menu, select Messages > Quick
Notes > [New Quick Note].
2 Press A under Create.
53
Page 62

Messages
Enter text. See “Entering Text” on page 45. -or-
To choose from pre-installed notes: Press A
under Browse. Scroll to the note you want. Press
A under Select.
3 Press A un de r Store.
Tip: For more options, incl uding sending the
quick note, press m.
Using Drafts
When you save a message as a draft, it is saved in
the drafts folder. You must have a draft saved to
have a dr afts folder.
To edit a draft:
1 From the ma in menu, select Messages > Drafts
Folder.
2 Press A un de r Change.
3 To edit the fields you want to change, follow
step 3 through step8 in “Creating and Sending
Messages” on pag e 52 .
If you have a draft saved, you can create more
drafts in the drafts folder:
1 From the ma in menu, select Messages > Drafts
Folder > [Create Msg].
2 Press A un de r Create.
54
3 Follow step 3 through s tep 7 in “Creatin g and
Sendin g Messages” on page 52.
4 Scroll to Save As Draft.
Using the Out box
Messages you have sent are stored in the outbox.
These icons appear next to messages in the outbox:
4 Sent and confirmed.
9 Send attempted.
0 Forwarded.
5 Received by addressee.
6 Not received by addressee.
8 Send failed.
7 Re-sent.
R Locked.
Resending Messages
To resend a message:
1 From the main menu, select Messages > Te xt
Outbox.
2 Scroll to the mess ag e you wan t to res en d.
Page 63

Managing Memory
3 Press m.
4 Select Re-send.
5 Press A under Yes to confirm.
Deleting Sent Messages
To delete a sent message:
1 From the m a in men u, se le ct Messag es > Text
Outbox.
2 Scroll to the message you want to delete.
3 Press m.
4 Select Delete.
5 Press A under Yes to confirm.
To delete all unlocked sen t messages:
1 From the m a in men u, se le ct Messag es > Text
Outbox.
2 Press m.
3 Select Delete All.
4 Press A under Yes to confirm.
Locking Sent Messages
When you lo ck a mes sag e, it ca nn ot be de le te d unt i l
you unlock it.
1 From the m a in men u, se le ct Messag es > Text
Outbox.
2 Scroll to the message you want to lock or unlock.
3 Press m.
4 Scroll to Lock to lock the message. -or-
Scroll to Unlock to unlo ck the message.
5 Press A under Select.
Managing Memory
Your text inbox, outbox, and drafts folder have a set
amount of memory availabl e for stor ing message.
The text in box hold s a lim ite d numbe r of mes s ages
depending on the size of the SIM card used. If the
text inbox is full, you cannot receive messages until
you delete some.
The outbox and drafts fold er share memory space.
Together they can hold 20 messages. If the outbox
and drafts folder memory is full, yo u cannot send
messages or sav e drafts unt il you dele te so me .
To view t he amo un t o f memo r y av aila bl e i n yo ur t ex t
inbox:
1 From the main menu, select Messages > Text
Inbox.
2 Press m.
3 Select Memory Meter.
55
Page 64

Messages
To view the amount of memory available in your
outbo x and drafts folder:
1 From the ma in menu, select Messages > Text
Outbox.
2 Press m.
3 Select Memory Meter.
Receiving a Message
When you receive a text and numeric message,
New Text Me ssage appears on the display.
To view the message:
1 Press A un de r Read.
2 If the message fills more than one screen, scroll
to read it.
3 To keep the message, press A under Save. -or-
To delete the message, press A under Delete.
To dism iss the message notification:
Press A un de r Exit. This ico n w appears on
the display, reminding you that you have a new
message.
Reading from the Message Center
1 From the message ce nter, select Text Msgs.
2 Scroll to the mess age you want to read.
3 Press A un de r Read.
56
4 If the message fi lls more than one screen, scroll
to read it.
5 To keep the message, press A u nder Save. -or-
To delete the message, press A under Delete.
Net Alerts
Note: As of this publication, TELUS Mobility does
not support net alert messages on the Mike
Network.
Net alerts are text and numeric messages sent from:
• Your i315 handset
• A website provided by Telus
• Any email ap pl ic at i on
When you receive a Net alert, a no tificat ion appears
on the display.
If you dismiss the notification, this icon w appears
on the display, remindin g you that you have a new
message.
Page 65

Mike’ s Wireless Web
Service
Your i315 handset is equipped with a microbrowser
that can be used to access Mike's Wireless Web
Services and other up-to-the-minute information.
You can view specially designed text versions of
popular Internet sites that provide news, sports,
weather, entertainment, stock quote sites and other
useful information.
To access the microbrowser:
From the idle screen, press m to access the main
menu. Scroll to Browser. Press A under Browse
to access the microb rowser.
Launching the Microbrowser
The first time you use the microbrow ser, you will be
required to go through a security setup process that
takes approximately one to three minu tes. Please
follow the on-screen prompts to complete the
security setup process. This setup process will only
occu r the f irs t t im e yo u us e the servi ce .
To launch the microbrowser:
1 From the idle screen, press m to access the main
menu.
2 Scroll to Net. Press A under Select.
3 Once connected, the Homepage (or the last page
visited) will be displayed. To access the Home
menu page from any other menu in the
microbrowser, press e.
4 T o view additional text while visiting a site, use the
navigation keys to scroll to read it.
Navigating the Microbrowser
When you use the microbrowser, some keys on your
handse t operate differently tha n during a normal
phone ca ll. These keys are explained below:
Home key — press to return to the default
e
Home page (the page first seen when you
launch the browser).
Asterisk/Back key — press to return to the
*
previous page viewed bef ore the current
page.
0/Next key — press after using the bac k
0
key to return to the original page viewed.
Accessing the Browser Menu
1 Press and hold m to access the browser menu.
2 Scroll to select the desired option.
3 Press A under Ok to initiate the option.
57
Page 66

Mike’s Wireless Web Service
Below is th e lis t of av ai la ble optio ns :
•Exit Browser — closes the browser and returns
you to the idle screen. Use this option when you
want to return to the page currently viewed at a
later time, without navigating through the entire
menu structure again.
•Reload — reloads the current Wireless Web page
viewed, refreshing the information with the most
current from the information provider.
•Home — ret urn s you to your default Ho me page,
the fir st pag e yo u se e w he n l au nc h in g t he
microbrowser.
• Bookmarks — al lows you to access bo okmarks
you have c reated us ing option.
• Mark Site — identifies sites you would like to visit
easil y an d qu ic kly from yo ur mi cr o browser.
• About Phone.com — contains information about
the version of the Phone.com browser loaded on
your handset.
• Advanced Options — helps troubleshoot any
service issues you may have with your browser.
58
Ending the Microbrowser Session
At any point in the session, press and hold the e
to close the microbrowser.
Using Your Handset as a Modem
To use your ha ndset as a mod em wi th a laptop,
handhe ld dev ic e, or de sk top comp ut er :
1 Open the flap covering the handset’s accessory
connector.
flap
Page 67

Using Your Handset as a Modem
2 With the handset’s display facing up, insert a data
cable’s connector into the accessory connector,
until you hear a click.
3 Insert the data plug into the COM port of the other
device.
When used as a modem, your handset has these
data transfer modes:
• Circuit data — used for sending and receiv ing
faxes an d f or tr a ns f er r in g lar g e files
• Packet data — used for sma ll fil e tran s fers su ch
as email.
To use these service s, you must install the iDEN
Wireless Data Services software (available
separately). For more information on setting up your
computer and your i315 handset for packet and
circuit data calls, contact TELUS Mobility Client
Care.
4 Press A under Change
5 Scroll to the baud rate for your location.
Press A under Select.
59
Page 68

60
Page 69

Ring Tones
To set the ring tone your handset makes when you
receive phone calls, message notifications, or call
alerts:
1 From the m a in men u, se le ct Ring Tones.
2 Make sure VibeAll or SilentAll is set to Off.
3 Scroll through the list of ring tones to the one you
want to assign. Highlighting a ring tone lets you
hear it.
4 Press A under Assign.
5 Scroll to the feature you want to assign the ring
tone to.
6 Press A under Select.
Tip: A checkmark ne xt to a feature means the
current ring tone has been assign to it. To
remove t he assi gn me nt: Sc rol l to th e fe at ure .
Press A un de r Select.
7 To assign the ring tone to other features, repeat
step 5 through step 6.
8 When you are finished, press A under Done.
Using the Vibrate Feature
You can set your handset to vibrate when you
receive phone calls, Private calls and group calls,
messages notifications, or call alerts.
Tu rn ing Ri ng Ton es Off
You can set your handset to make no sound when
you rece iv e phone ca ll s, P riv ate call s an d gr ou p
calls, messages notifications, or call alerts. If your
handset includes the vibrate feature, you can set
your handset to vibrate instead of ma king a sound.
These ic on indicate how the ringer is set.
u The hand set never rings.
v The ha ndset always vibrates instead of ringing.
M The handset does not ring for phone calls.
These icons may appear at the same time.
Never Ring
1 From the main menu, select Ring To nes >
SilentAll.
2 Scroll left or right to set SilentAll to On.
Always Vibrate Instead of Ringing
1 From the main menu, select Ring To nes >
VibeAll.
2 Scroll left or right to set VibeAll to On.
61
Page 70

Ring Tones
Tip: Pressing th e volume controls to turn down
the volume as far as possible sets VibeAll to
On.
Do Not Ring for Some Features
To set individua l ring options for phone call s,
messag es notifications, or call alerts:
1 From the ma in menu, select Ring Tones.
2 Make sure VibeAll or SilentAll is set to Off.
3 Scroll through the list of ring tones to Silent. -or-
If your handse t includes the vibrate featur e, scroll
through the list of ring tones to Vibrate.
4 Press A un de r Assign.
5 Scroll to the feature you want to set to make no
sound.
6 Press A un de r Select.
7 T o assign Vibrate or Silent to another feature,
repeat step 5 through step6.
8 When yo u ar e finis h ed, press A under Done.
Note: To set ring options for Private calls and
group calls, see “Setting Your Handset to
Vibrate” on page 75.
62
Ring a nd Vibrate
To set a your handset to rin g and vibrate when you
receive phone calls or c all alerts:
1 From the main menu, select Ring Tones.
2 Make sure VibeAll is set to Off.
3 Scroll through the list of ring tones and select the
one you want to ass ign.
4 Press m.
5 Select Assign w/Vi be.
6 Select the feature you want to set to ring and
vibrate.
7 When you are fini shed, press A under Done.
This icon S appears on the display.
Assigning Ring Tones to Contacts
Note: This feature is only available for those
clients using a 64k Mike's Smart Card.
You can se t the ri ng to ne your h and se t make s whe n
you receive phone calls or call alerts from someone
you have stored in Contacts.
1 From the main menu, select Ring Tones.
2 Make sure VibeAll or SilentAll is set to Off.
Page 71

Viewing Ring Tone Assignments
3 Scroll through the list of ring tones to the one you
want to assign. Highlighting a ring tone lets you
hear it.
4 Press A under Assign.
5 Select A Contact.
6 Scroll to the Contacts entry you want to assign
the ring tone to.
7 Press A under Select.
Viewing Ring Tone
Assignments
1 From the m a in men u, se le ct Ring Tones.
2 Highlight any ring tone.
3 Press m.
4 Select Overview.
5 Scroll to view ring tones assigned to features and
Contact entries.
Managing Memory
To view the amount of memory available for custom
ring tones:
1 From the main menu, select Ring Tones.
2 Press m.
3 Select Me mory Usa ge.
Deleting custom ring tones frees memory.
Deleting Custom Ring Tones
To delete a custom ring tone:
1 From the main menu, select Ring To nes.
2 Scroll to the rin g tone yo u wan t to delete .
3 Press m.
4 Select Delete.
5 Press A under Yes to confirm.
63
Page 72

64
Page 73

GPS Enable d
Your handset’s GPS Enabled feature uses
information from Global Positioning System (GPS)
satellites orbiting the Earth to determine the
approximate geographical location of your handset,
expressed as latitude and longitude. The availability
and accuracy of this location information (and the
amou nt of time that it tak es to calc ul ate it) will var y
depending on the environment in which you ar e
using the GPS feature. For exampl e, GPS location
fixes are often difficult to obtain indoors, in covered
locat io ns , between hig h bu ildings , or in other
situations where you have not established a clear
broad view of the sky. SEE: “IMPORTANT: Things
to Keep in Mind” on page 65.
You can also use the GPS feature to view your
approximate location. Location information ap pears
on the handset’s di splay.
If your hand set is connected to a laptop computer or
simila r device, software running on that device can
request your location. To protect your privacy, you
can control whether these requests are granted.
IMPORT ANT: Things to Keep in Mind
If you are using the GPS feature of your hand set
while dr i ving , p le as e gi ve fu ll at tent i on to dr iv in g an d
to the road.
Where adequate signals from multiple satellites
are not available (usually because your GPS
antenna cannot establish a view of a wide area of
open sky), the GPS feature of your handset WILL
NOT WORK. Such sit uations include but are not
limited to:
• In underground locations
• Inside of buildings, trains, or other covered
vehicles
• Under any other metal or concrete roof or
structure
• Between tall buildings or under dense
tree-cover
• Near a powerful radio or television tower
• When your GPS antenn a is cove red (for
example, by your hand or other object) or
facing th e ground
• In te mper atur e extr emes ou tsi de the o pera tin g
limits of your handset
65
Page 74

GPS Enabled
Walking or drivi ng ve ry slo w ly may als o
substantially reduce GPS performance.
Even where location information can be
calculated in such situations, it may take much
longer to do so, and your location estimate may
not be as accurate.
Even where adequate si gnals fro m multiple
satellites are available, your GPS feature will
only provide an approximate location, often
within 150 feet (45 meters) but sometimes much
further from your actual location. Advice on how
to improve GPS performance is provided in
“Enhancing GPS Performance” on page 67.
While the GPS feature of your handset can be a
valuable navigational aid, it does not replace the
need for careful navigating and good judgment.
Never rely solely on one device for navigation.
Remember that the accuracy of the location
information and the time needed to obtain it will vary
depending on circumstances, particularly the ability
to receive signals from adequate number s of
satellites.
66
The satellite s used by the GPS feature of your
handset are controlled by the U.S. government and
are subject to changes i m plemented in accor dance
with the Department of Defense GPS user policy
and the Federal Radionavigation Plan. These
change s ma y af fe ct t he per f or m a nc e of t he GPS
featur e of yo ur ha nd set.
Viewing Your Approximate Locat ion
1 From the main menu, select GPS > Position.
2 Scroll to view the entir e scre en .
This disp la ys t h e fol l owi ng in for ma tion ab ou t th e l a st
time your location was calculated:
• The time (as Greenwich Mean Time) and date
that the location was last calculated
• The approx im at e loc at ion, expre s se d as la ti tud e
and longitude
• The estimated accuracy of the calculated
location. This estimate of accuracy is only a very
rough estimate and may vary substantially from
the actual accuracy of the approximate location
information reported.
• The number of satellites used to calculate the
location. In general, more satellites make for
better accuracy.
Page 75

Enhancing GPS Performance
To calculate your location again:
Press A under Rfrsh.
It may take your handset several minutes to
complete the process of determining your location.
During thi s t ime, a m ess ag e usu al l y app ear s o n y ou r
handset’s display saying your handset is scan ning
for satellites. For tips on getting the best location
calculation, see “Enhancing GPS Performance” on
page 67.
The Position screen displays the updat ed
information.
To cancel a location calculation before it is
completed:
Press A under Cancel to return to the Position
screen. -or-
Press e to return to the idle screen.
Each time approximate location of your handset is
calcul ated, t he lat est locat ion informa tio n is store d in
your handset and remains there even when your
handset is powered off. You will see this information
the next time you view the Position screen.
If you rec ei ve d a ph one ca ll or aler t whil e a tte mpt ing
to determine your location, the Position screen will
disapp ear , but yo ur h an ds et wil l cont in ue att emp tin g
to determine its location. If it is successful, the new
location information will be displayed the next time
you view the Position screen.
Enhancing GPS Performance
Sometim es th e GP S f ea tur e of yo ur han ds et may b e
unable to complete a location calculation
success fully. If t his happens when you are trying to
view your location on the handset’s display, you will
see a message indicating that your handset cannot
access sa tellites.
To improve accuracy and increase your chances of
a successful cal c ulation, do the following while your
handset is determining your approximate location:
• Stay in the open. The GPS feature works best
where ther e is no thi ng bet wee n yo ur ha nd se t and
a large amount of open sky. If possible, go
outs ide, away from tall buildings and foliage.
While performance in a building is improved by
movin g closer to windows, glass with certain sun
shielding films may block satellite signals.
• Hold your handset to enhance reception. Signals
from GPS satellites are transmitted to your GPS
antenn a, wh ic h i s in si de t he b ac k o f yo ur hands et ,
opposite the earpiece, behind the label with
67
Page 76

GPS Enabled
TELUS’ na me o n i t. Hol d yo ur h and se t away from
your body, giving the antenna clear access to
satellite signals. Do not cover the antenna area
with your fingers or anything else.
GPS antenna area
• Stand still. If possible, stand sti ll until your
handset is finished determining your loc ation.
Moving your handset at a walking pace while your
handset is calculating your approximate locati on
may substantially decr ease GPS performan ce.
• In a ca r. When using the GPS Enabled feature in
a car, position your handset so that the GPS
antenna has good access to GPS signals through
the car’s windows. Typically, the GPS antenna
has best access to GPS signals in a car when
place d ne ar a wi nd ow.
68
Note: Although moving your handset at a walking
pace decreases GPS performance, moving
it at the speed of a moving car does not.
Updating Satellite Almanac Data
Another way to ke ep the GPS feature of your
handset working well is to keep your satellite
almanac data up to date.
The United States government m aintains an
almanac of data about where GPS satellites are as
they o rbit the Earth. This information is available to
your handset. Keeping your satellite almanac up to
date help s your hand se t det er m in e your loca t i on
more quic kly.
The almanac contains information about the location
of sat ellites, thei r operational status, an d other
satellite informa tio n . Ke ep in g thi s in form a t io n
updat ed enhances the per formance of your G PS
feature. In most cases, your handset will be able to
get a fix in strong satellite signal conditions with
outdated almanac data, but it may take longer.
If your satellite almanac data is out of date, your
handset may prompt you to update it. Follow the
instructions that appe ar on the handset’s display.
You may be asked to go to a web site or call a
customer care number.
Page 77

Setting Privacy Options
Setting Privacy Options
Your hand set’ s G PS pr iv acy o ptio ns co ntr ol wh et her
software applications may view the locati on of your
handset.You may set your handset to one of these
GPS privacy options:
• Restricted — No software applicat ions may view
the location of your handset. However, location
information may still be available to the handset’s
owner, fleet manager, or account administrator.
• Unrestricted — All application s may view the
location of your handset, without notifying you.
• By Permi s sio n — When an application attempts
to vie w the location of your hands et, you will be
prompted to give permission. However, location
information may still be available to the handset’s
owner, fleet manager, or account administrator.
To set your GPS privacy options:
1 From the main menu, select GPS > Privacy.
2 If your GPS PIN security feature is enabled, enter
your GPS PIN. (See “Setting the GPS PIN
Security Feature” on page 69 for more
information.)
3 Scroll to the privacy setting you want.
4 Press A under Select.
Setting the GPS PIN Security Feature
To prevent your GPS privacy settings from being
altered without your knowledge, your GPS pr ivacy
option can be protected by a PIN.
When you receive yo ur handse t, the GPS se curity
feature is turned off, so you do not have to enter a
GPS PIN to ac ces s yo ur GP S pr iv acy opti on s. If yo u
turn this feature on, you will be required to enter a
GPS PIN to access your GPS privacy options.
To turn the GPS Enabled security feature on or off:
1 From the main menu, select Settings > Security
> GPS PIN.
2 Scroll to On or Off.
3 Press A under Select.
4 Enter the current GPS PIN.
Note: When you receive you r handset, your GPS
PIN is 0000.
5 Press A under Ok.
To change your GPS PIN:
1 From the main menu, select Settings > Security
> Change Password > GPS PIN.
2 Enter the current GPS PIN.
Note: When you receive you r handset, your GPS
PIN is 0000.
69
Page 78

GPS Enabled
3 Press A un de r Ok.
4 Enter the new 4- to 8-digit GPS PIN.
5 Press A un de r Ok.
6 Enter the new 4- to 8-digit GPS PIN to confirm.
7 Press A un de r Ok.
Using GPS with Map Software
You can use the GPS feature of your handset to
provide approximate location data to a laptop
computer or similar device that is running interactive
map softw are such as that made by DeLorme or
Microsoft. This way, if yo ur handset has good
access to GPS signals, your approximate position
on a map ca n be made available as you travel in a
vehicle.
To do this, connect your handset to your laptop (or
other device) with a data cable and set your handset
to transmit data (se e “G ett in g Star ted ” on page 71).
Your handset then provides your approximate
location to the device running the map software,
which displays your location on a ma p. Your
handse t provid es an updated location every second
and the map software displays your changing
location on its map.
See “Enhancing GPS Performance” on page 67 for
more details on obtaining good location information.
70
Note: Because your handset is continuously
determining your location, using the GPS
feature of your handset with map software
uses the handset’s battery power quickly.
Softwa re Compa t ibility
Your handset sends location information to your
laptop or ot h er device usi ng the standa r d Nat i on al
Marine Electronics Association (NMEA) format.
Your handset supports output messages in
NMEA-0183 format and supports the following
NMEA-0183 sentences: GGA, GLL, GSA, GSV,
RMC, and VTG.
The map software running o n your laptop or other
device must support NMEA 3.0.
Page 79

Using GPS with Map Software
Getting Started
To connec t your ha ndset to your laptop or other
device:
1 Open the flap covering the handset’s accessory
connector.
flap
2 With the handset’s display facing up, insert the
data cable’s connector into the accessory
connector, until you hear a click.
3 Insert the data plug into the COM port of your
laptop or other device.
Make sure no other applic ation is using the COM
port se le cted.
Make sure the COM port settings of your laptop or
other device are set to the following:
• Bits per second: 4800
• Data bits: 8
• Parity: None
• Stop bits: 1
• Flow control: Hardware
To set your handset to send location information to
your laptop or other device:
1 From the main menu, select GPS > Interface.
2 With NMEA OUT highlighted, press A under
Change.
3 Scroll to On.
4 Press A under Select. Your handset is now
sending location data to your laptop or other
device.
To stop your hands et from sending location data to
your laptop or other device:
Set NMEA OUT to Off and press A unde r
Select.
71
Page 80

GPS Enabled
Each time you power your handset on, NMEA OUT
is automatically set to Off.
72
Page 81

Memo
Memo lets you store a number, make a call to that
number, and save it to Contacts.
To create a memo:
1 From the main menu, select Memo.
2 Enter the number using your keypad.
3 Press A under Store.
To view the memo later:
1 From the main menu, select Memo.
To delete the memo:
1 From the main menu, select Memo.
2 Press and hold A under Delete.
3 Press A under Store.
To edit the memo:
1 From the main menu, select Memo.
2 Enter the new numb er.
3 Press A under Store.
To make a call to the memo number:
1 From the main menu, select Memo.
2 Press s.
To store the memo number to Contacts:
1 From the main menu, select Memo.
2 Press m.
3 Press A under Select.
4 T o store the number as a new entry, select [New
Contact]. -or-
To store the number in an existing entry, select
the en try.
5 With the Contacts type field highlighted, scroll left
or right to display the Contacts type you want to
assign the number.
6 If you want to add more information to the entry,
follow the ap pli c able inst ruc t i on s in “C reating
Entries” on page 41.
7 Press A under Done.
73
Page 82

74
Page 83

Customizing Your Handset
Setting the Volume
To set the volume of the sound coming from the
handset’s earpiece or speaker:
1 From the m a in men u, se le ct Settings > Volume.
2 Scroll to Earpiece to set the earpiece volume.
-orScroll to Speaker to set the speaker vol ume.
3 Press A under Change.
4 To select the volume:
Scroll left or right. -or-
Press the volum e c o ntr o ls .
5 Press A under Ok.
To set the volume of the handset’s ring:
Press the volum e c o ntr o ls .
For another way to set the volume of the handset’s
ring, or the volume of many other sounds your
handset makes:
1 From the m a in men u, se le ct Settings > Volume.
2 Scroll to the option you want and make the
change. Choose Line 1 or Line 2 to set the
volume of the handset’s ring when you get a call
on that line.
See “Volume Features” on page 78.
Setting Your Handset to Vibrate
To set your handset to vibrat e instead of making a
sound when you receive Private calls and group
calls, even if you want your handset to ring for other
features:
1 From the main menu, select Settings > 2-Way
Radio > Alert Type.
Tip: If Alert Type does not appear: From the
main menu, select Ring Tones. Make sure
VibeAll or SilentAll is set to Off. Repeat
step 1.
2 Press A under Change.
3 Scroll to Vibrate.
4 Press A under Select.
75
Page 84

Customizing Your Handset
Seeing the Display Better
To set the contrast of the display:
1 From the ma in menu, select Settings >
Display/Info > Contrast.
2 Press A un de r Change.
3 Scroll left or right to set the contrast.
4 Press A un de r Ok.
Using a Headset
f you us e a headset or similar device with your
phone, you can set your phone to send incoming
sound t o the he ad set only , o r to the he ad set an d t he
speaker at the same time :
1 From the ma in menu, select Settings >
Advan c ed > H ea dse t/ Spk r.
2 Press A un de r Change.
3 Scroll to HdsetOnly to send incoming sound to
the headset only. -or-
Select Hdset&Spkr to send incoming sound to
the headset and ring tones to the speaker.
4 Press A un de r Select.
76
Note: When using a headset, the PTT button on
your phone works the same way as when
you are not using a headset. Sounds
associated with Private calls and group
calls a re heard through the headset.
Attaching a Headset
1 Lift the audio jack cover.
2 Insert the headset connector firmly into the audio
jack. You may have to rotate the headset
connector unti l it fits securely into the audio jack.
Using a Remote PTT Button
If you are using a headset or other accessory with a
remote PTT button, you can use the remote PTT
button for phone calls and Private calls.
For phone calls, use the remote PTT button to
answer calls, switch between calls, and end calls.
Hold the remote PTT button for less than 2 seconds
to answer calls and switch b etween calls. Hold the
remote PTT button for more than 2 seconds to end
calls.
For Private calls, use the remot e PTT button as you
would the PTT button on your phone.
Page 85

Using Settings
Using Settings
Settin gs contains many subm enus that let you
customize your handset.
Display/Info Features
The Displ ay /In fo menu co nt rol s ho w th e ke ypa d and
displa y appear:
• Backlight — controls how long the backlight
stay s on after you make or re ceive a call.
•Clock — contro ls whether the tim e and date
appears on the idle screen, sets the format of the
time and date, and sets the year.
•Contrast — sets the contrast on the display. See
“Seeing the Display Better” on p age 76.
• Language — sets the language that your
hands et dis p la ys .
Phone Calls Features
The Phone Calls menu controls how your handset
handle s phone calls:
•Set Line — sets phone line 1 or phone line2 as
the active line for outgoing calls.
• Any Key Ans — If this feature is on, you can
answer calls by pressing any key on the keypad.
• Auto Redial — sets your handset to
automaticall y redial calls you make when the
system is busy.
• Call Waiting — See “Call W aiting” on page 31.
• Auto Ans — sets your handset to automatically
answer an incoming call after a specified number
of rings. When this feature is on, the handset
answers by conne cting you to the caller; it does
not send the call to voice mail, unless you are out
of coverage or on the lin e.
• Minute Beep — causes a beep to sound every
minute of an active call.
•Call Duration — causes the duratio n of a call to
appear on the handset’s display when the call
ends.
• Notifications — See “Settin g N ot ifica tio n
Options” on page 49.
2-Way Radio Features
The 2-Way Radio menu controls how your handset
handle s Private calls and group calls:
• Tkgrp Silent — controls w hether you hear group
calls to your Talkgroup. See “Receiving Group
Calls” on page 19.
•Tkgrp Area — lets you ch oose and name
Talkgroup areas.
77
Page 86

Customizing Your Handset
• One Touch PTT — controls the action of the PTT
button from the idle screen. See “Setting One
Touch PTT” on page 17.
•Alert Type — sets your handset to make no
sound when you receive Private calls and grou p
calls. See page 75.
Volume Features
The Volume menu sets the volume of sounds your
hands et makes :
•Line 1 — sets ring volume for phone line 1.
•Line 2 — sets ring volume for phone line 2.
• Messages — sets the vol ume of message
notifications.
•Earpiece — sets the vol um e of soun d c omi ng ou t
of the earpiece.
• Speaker — sets the volume of sound coming out
of the speaker.
•Keypad — sets the volu m e of so und assoc i a te d
with pre s si ng keys and bu t to ns .
•Data — sets the volume of sounds t hat notifies
you that you are receiving a circuit data call.
Security Features
The Security menu lets you turn security features on
and off and ch ange passwords:
78
• Phone Lock — turns o n a feature that locks your
handse t, either immediately or automaticall y after
a set period of inactivity. An unlock code is
required to enable this feature, to unlock the
handse t, and to set a new Unlock code. Contact
TELUS Mobility Client Care for your default
unlock code.
• Keypad Lock — locks the handset’s keypad,
either im m ediatel y or automa tic al ly aft er a se t
period of inactivity. Se e “Locking the Keypad” on
page 13 for more information on locking and
unlocking the keypad.
• SIM PIN — enables and disables your handset’s
SIM PIN security feature. See “Turning the PIN
Requir e me nt On an d Off” on page 11.
• GPS PIN — enables and disables your handset’s
GPS PIN security feature. See “Se tting th e GPS
PIN Security Feature” on page 69.
• Change Passwords — changes your phone
unlock code, security code SIM PIN, and GPS
PIN.
Advanced Features
The Advanced menu contains advanced and
infrequently used Settings features.
• Alert Timeout — controls the amount of time a
tone continues to sound when you recei ve a
message notification or call alert.
Page 87

• Headset/Spker — See “Using a Headset” on
page 76.
• Connectivity — Network ID sets the handset’s
network IDs and their roaming options under the
direction TELUS Mobility Client Care; Master
Reset lets TELUS Mobility Client Care reset your
servic e in the event of a security or provisioning
problem.
• Reset Def a ults — Reset Settings returns all
settings to their original defaults; Reset All
returns all settings to their original defaults and
erases all stored lists. Use only under the
direction of TELUS Mobility Client Care.
•Return to Home — controls how long the recent
calls list di sp la ys after ca ll s.
• Phone Only — allows yo u to c on ser v e ba tt e ry l if e
by turning off dispatch and data modes
•Baud Rate — sets the baud rate at which your
handse t communicates with a laptop computer,
PC, or similar device.
Using Settings
79
Page 88

80
Page 89

Understanding Stat us Messages
You may receive status messages under certain
condit ions. Before contacting TELUS Mobilit y Client
Care, write down the message, numeric code, and
the conditions under which it appeared. The
following table lists and describes the status
messages.
Status Messages Message Description
Number Not in
Service
User Not Available
User Not Authorized
Please Try Later
User Busy in Private
call
User Busy in Data
The number that you entered is not
valid.
The handset that you called is either
busy, out of coverage, or turned off.
Please try again later.
The person that you called has not
purchased this service.
This service is temporarily not
available. Please try again later.
The handset that you called is busy
in a Private Call.
The handset that you called is busy
using an online service.
Status Messages Message Description
Service Restricted
Service Not
Available
System Busy
Service Conflict
Please Try Again
Self Check Error +
Number Code
Self Check Fail +
Number Code
PIN Blocked
Call Your Provider
This service was restricted by
TELUS Mobility, or this service was
not purchased.
This feature is not available on the
current network.
The system is experiencing heavy
traffic. Please try again later.
This service cannot be enabled
because an incompatible service
has already been turned on.
An error occurred. Please try again.
A fault was detected with your
handset. If this error recurs, note the
error code and contact TELUS
Mobility Client Care.
An operational fault was detected
with your handset. Write down the
numeric code, turn your handset off,
and contact Customer Care.
The incorrect PIN was entered five
consecutive times. You will be
unable to place or receive calls on
your handset. Contact TELUS
Mobility Care to have them obtain
the PIN Unblocking Key (PUK)
code.
81
Page 90

Understanding Status Messages
Status Mess ages Messag e D es cr ip t io n
Insert SIM
Check SIM Card
Wrong PIN
Wrong Code
Enter PIN
Enter Unlock Code
New Browser
Message Memory
Full!
82
Your SIM Card is not being
detected. Please check to ensure
that you have inserted the SIM
Card.
Please check your SIM Card to
make sure it has been inserted
properly.
You have entered an incorrect PIN
number.
Your handset will not accept a
non-TELUS Mobility SIM card.
Please enter your 4- to 8- digit SIM
PIN code.
Auto Phone Lock is activated. Enter
you unlock code.
Warns of low memory for Net Alerts.
Page 91

Safety and General Information
IMPORTANT INFORMATION ON SAFE AND
EFFICIENT OPER AT ION .
READ THIS INFORMATION BEFORE USING
YOUR INTEGRATED MULTI-SERVICE
PORTABLE RADIO.
RF Operational Characteristics
Your ra dio product conta ins a radio frequency
transmitter to convey the information you wish to
send as well as occasional automatic signals used
to sustain conne ction to the wireless netw ork, and a
receiver which enables you to receive
communication and connection information from the
network.
Portable Radio Product Operatio n a nd EM E Ex pos u re
Your Motorola radio product is designed to comply
with the following nat ional and intern ational
standards and guidelines regarding exposu re of
human beings to radio frequency electromagnetic
energy (EME):
• United States Federal Communications
Commission, Code of Federal Regulations; 47
CFR part 2 sub-part J.
• American National Standards Institute (ANSI) /
Institute of Electrical and Electronics Engineers
(IEEE). C95. 1-1992.
• Institute of Electrical and Electronics Engineers
(IEEE). C95. 1-1999 Edition.
• International Commission on Non-Ionizing
Radiation Protection (ICNIRP) 1998.
• Ministry of Health (Canada). Safety Code 6.
Limits of Human Exposure to Radiofrequency
Electromagne tic Fields in the Frequency Range
from 3 kHz to 300 GHz, 1999.
• Australian Communications Authority
Radio co mm u ni cation s ( Ele ctroma gnetic
Radiation - Human Exposure) Standard 2003.
• ANATEL, Brasil Regulatory Authority, Resolution
256 (April 11, 2001) “additional requirement s for
SMR, cellular and PCS product certific ation.”
To assure optimal radio product performance
and make sure human exposure to radio
frequ ency electromagnetic energy is within the
guidelines set forth in the above standards,
always adhere to the following procedures:
83
Page 92

Safety and General Information
Phone Operation
When placing or receivi ng a phone call, hold your
radio product as you would a wirel ine telephone.
Speak directl y into the microphone.
Two-way radio operat ion
When us ing your radio product as a
traditional tw o-way radio, hold the
radi o product in a vertical position
with the microphone one to two
inches (2.5 to 5 cm) away from the lips.
Body-worn operation
To maintain compliance with FCC RF exposure
guidelines, if you wear a radio product on your body
when transmitting, always place t he radio product in
a Motorola appr ov ed cl i p, hol d er, holst er , ca se
or body harness for this product. Use of
non-Motorola-approved accessories may exceed
FCC RF exposure guidelines. If you do not use a
Motorola approved body-worn accessory and
are not using the radio product in the intended
use positions along side the head in the phone
mode or in front of the face in the two-way radio
mode, then ensure the antenna and the radio
product are kept the following minimum
distances fro m the body w hen transmitti ng
84
• Phone or Two-way radio mode: one inch (2.5
cm)
• Data operation using an y data featur e with or
without an accessory cable: one inch (2.5 cm)
Antenna Care
Use only the supplied or an approved
replacement antenna. Unauthorized antennas,
modifications, or attachments could damage the
radio product and may violate FCC regulations.
DO NOT hold the an tenna wh en the radio
product is “IN USE”. Holding the antenna affects
call quality and may cause the radio product to
operate at a higher power level than needed.
Approved Accessories
For a list of ap proved Mo to r ol a ac ce s sories ca ll
1-800-453-0920, or visit our web s ite at
www.motorola.com/iden.
Page 93

Portable Radio Product Operation and EME Exposure
ALL MODELS WITH FCC ID AZ489FT5832 MEET THE
GOVERNMENT’S REQUIREMENTS FOR EXPOSURE TO
RADIO WAVES.
Your wireless phone is a radio transmitter and receiver. It is
designed and manufactured not to exceed the emission
limits for exposure to radiofrequency (RF) energy set by the
Federal Communications Commission of the U.S.
Government. These limits are part of comprehensive
guidelines and establish permitted levels of RF energy for
the general population. The guidelines are based on
standards that were developed by independent scientific
organizations through periodic and thorough evaluation of
scientific studies. The standards include a substantial safety
margin designed to assure the safety of all persons,
regardless of age and health.
The exposure standard for wireless mobile phones employs
a unit of measurement known as the Specific Absorption
Rate, or SAR. The SAR limit set by the FCC is 1.6W/kg.
Tests for SAR are conducted using standard operating
positions reviewed by the FCC with the phone transmitting
at its highest certified power level in all tested frequency
bands. Although the SAR is determined at the highest
certified power level, the actual SAR level of the phone
while operating can be well below the maximum value. This
is because the phone is designed to operate at multiple
power levels so as to use only the power required to reach
the network. In general, the closer you are to a wireless
base station antenna, the lower the power output.
Before a phone model is available for sale to the public, it
must be tested and certified to the FCC that is does not
exceed the limit established by the government-adopted
requirement for safe exposure. The tests are performed in
positions and locations (e.g., at the ear and worn on the
1
body) as required by the FCC for each model. The highest
SAR value for this model phone when tested for use at the
ear is 1.45 W/kg and when tested on the body, as described
in this user guide, is 1.26 W/kg during packet data
transmission. (Body-worn measurements differ among
phone models, depending upon available accessories and
FCC requirements.)
While there may be differences between the SAR levels of
various phones and at various positions, they all meet the
government requirement for safe exposure.
The FCC has granted an Equipment Authorization for this
model phone with all reported SAR levels evaluated as in
compliance with the FCC RF exposure guidelines. SAR
information on this model phone is on file with the FCC and
can be found under the Display Grant section of
http://www.fcc.gov/oet/fccid after searching on FCC ID
AZ489FT5832.
Additional information on Specific Absorption Rates (SAR)
can be found on the Cellular Telecommunications Industry
Association (CTIA) web-site at http://www.wow-com.com.
1
In the United States and Canada, the SAR limit for mobile
phones used by the public is 1.6 watts/kg (W/kg)
averaged over one gram of tissue. The standard
incorporates a substantial margin of safety to give
additional protection for the public and to account for any
variations in measurements.
2
The SAR information reported to the FCC includes the
FCC-accepted Motorola testing protocol, assessment
procedure, and measurement uncertainty range for this
product.
2
85
Page 94

Safety and General Information
Electro Magnetic Interference/Compatibility
Note:Nearly every electronic device is
susceptible to electr omagnetic
interference (EMI) if inadequately
shielded, designed or otherwise
configured for electromagnetic
compatibility.
Facilities
To avoi d electromagnetic interference and/or
compatibility conflicts, turn o ff your rad io product in
any faci l it y w he r e po st e d not i ce s i n struct you to do
so. Hospitals or health ca r e fac i lities ma y be usin g
equipm e nt that is sensitive to ex te r na l RF ene r gy .
Aircraft
When instructed to do so, turn off your radio product
when on board an aircr a ft. Any use of a r ad io
product must be in accordance with ap plicable
regulations p er airline crew inst ructions.
86
Medical Devices
Pacemakers
The Advanced Medical Technology Association
(AdvaMed) recommends that a minimum separation
of 6 inches (15 cm) be maintained between a
handheld wireless radio product and a pacemaker.
These recommend ations are consistent wit h those
of the U.S. Food and Drug Administration.
Persons with pacemakers should:
• ALWAYS keep the radio product more than 6
inches (15 cm) from their pacemaker when the
radio product is turned O N.
• Not carry the radio product in a breast pocket.
• Use the ear opposite the pacemaker to minimize
the potential for interference.
• Turn the radio product OFF immediately if you
have any reason to suspect that interference is
taking pl ac e.
Hearing Aids
Some digital wireless radio products may interfere
with some hearing aids. In the event of such
interference, you may want to consult your hearing
aid man ufacturer to discuss alternatives.
Page 95

Operational Warnings
!!
Other Medical Devices
If you use any other personal medical device,
consult the manufacturer of your device to
determine if it is adequately shielded from RF
energy. Your physician may be able to as sist you in
obtain in g th is info rma ti on .
Use While Driving
Check the laws and r egulations on the use of radio
products in the area where you drive. Always obey
them.
When usi ng the radio product while driving, please:
• Give full attention to driving and to the road
• Use hands-free operat ion, if available.
• Pull off the road and park before making or
answering a call if driving conditions so require.
Operational Warnings
For Vehicles with an Air Bag
Do not place a portable radio product in the area
over the air bag or in the air bag deployment area.
Air bags inf l ate w ith gre at for ce . If a po r tab le ra dio is
placed in the air bag deployment a rea and the air
bag inflates, the radio product may be propelled with
great force and cause serious injury to occupants of
the vehi cle.
Potentially Explosive A t m ospher e s
.
Turn of f yo ur ra di o p rod uct p rio r t o e nte ri n g any ar ea
with a pot en tia lly expl os iv e atm o sp here, unl es s it is
a radio product type especially qualified for use in
such areas as “Intrinsically Safe” (for example,
Factory Mutual, CSA, or UL approved). Do not
remove, install, or charge batteries in such areas.
Sparks in a potentially explosive atmosphere can
cause a n e xp losi on or fi r e re su lt ing in bo di l y i njur y or
even death.
Note: The areas with potentially explosive
atmospheres referred to above include
fueling areas such as below deck s on
boats, fuel or chemical transfer or
stor age facilities , areas where the air
cont a ins c h emi cal s o r particles, su ch a s
grain, dust or metal powde r s, and any
87
Page 96

Safety and General Information
!
other area where you would normally be
advised to turn off your vehicle e ngine.
Areas with potentially explosive
atmospheres ar e often but not always
posted.
Blasting Caps and Areas
To avoid possible interference with blasting
operat io ns , tur n of f your radi o pr o duct when you ar e
near electrical blasting caps, in a blasting area, or in
areas posted: “Turn off two-way radio”. Obey all
signs and instructions.
Operational Cautions
Batteries
All batteries can cause property damage an d/or
bodily injury, such as burns if a conductive material
such as j ewelry, keys, or beaded chains touches
exposed terminals. The conductive material may
complete an electrical circuit (short circuit) and
become quite hot. Exercise care in handling any
charged battery, particularly when placing it inside a
pocket, purse, or other container with metal objects.
To reduce the risk of injury, batteries should not be
exposed to fire, disassembled, or crushed.
88
Cleaning and Drying Consider at io ns
Using a leather carry case may help protect the
surfaces and help prevent liquids (e.g., rain) from
entering into the interior of the radio product. This
product is not water proof, and exposing the unit to
liqu ids may result in permanent damage to the unit.
If your radio product interior gets wet, then do not try
to accele rate dryin g w ith th e us e of an ove n or a
dryer as this will dama ge the radio product and void
the war ranty. Instead, do the following:
1 Immediately power off the radio product.
2 Remove Ba ttery and SIM card (i f so equipped)
from radio product.
3 Shake ex c es s liq u id fr o m rad io pr od uc t.
4 Place the radio product and battery in an area
that is at room temperature and has good air fl ow.
5 Let the radio product, ba ttery, and SIM card dr y
for 72 hours bef ore reconnecting the batt ery
and/o r powering on the radio prod uct.
If the radi o product does not work after following the
steps listed above, contact you r dealer for servicing
information.
Page 97

Accessory Safety Information
!!
Clean th e e xt ern al su rfa ces of the ra dio p r od uc t wi th
a damp cloth, using a mild solution of dishwashing
deterge nt and water. Some hous ehol d clea ners m ay
contain chemicals that could seriously damage the
radio pr oduct. Avoi d the us e of any pet role um-b ased
solvent cleane rs. Al so, avoid ap plyi ng liq uids di rectl y
on the radio prod uct.
Accessory Safety Information
Important: Save these accessory safety
• Befor e using any battery or battery charger, read
all the i nst ruc t io ns fo r and c au ti o nary ma rk ings on
(1) the battery, (2) the battery charger, which may
include a separate wall-mou nted power supply or
transformer, and (3) the radio product using the
battery.
• Do not expose any battery charger to water, rain,
or snow as they are designed for indoor or
in-vehi c le us e on ly.
instructions.
Warning: To reduce the risk of injury,
charg e onl y th e r ec har g ea b le bat te r ie s
described in “Ba t te ry” on page 2
through page 5. Other types of
batteries may burst, causing personal
injury and damage.
• To reduce the risk of damage to the cord or plug,
pull by the plug rather than the cord when you
disconnect the battery charger from the power
source outlet.
• Do not operate any battery charger with a
damage d co r d or pl ug — repla ce them
immediately.
• Battery chargers may become warm during
operation, but no t hot. If it becom es hot to the
touch, u np lu g it f rom t he po wer ou tl et imm ed ia te ly
and di scontinue its us e.
• Use of a non-recommended attachment to a
battery charger may result in a risk of fire, electric
shock, or injury to persons.
• Make sure the battery charger power cord is
located so that it will not be stepped on, tripped
over, or subjected to damage or stress.
• An extension cord should not be used with any
battery charger unless absolutely necessary. Use
of an improper extension cord could result in a
risk of fire and electric shock. If an extension cord
must be used, make sure that:
• The pins on the plug of the extension cord are
the same number, size, and shape as tho se on
the plug of the charger.
• The extens io n co r d is properly wir e d and in
good el ectrical condition.
89
Page 98

Safety and General Information
• The cord size is 18AWG for lengths up to 100
feet and 16AWG for lengths up to 150 feet.
• Do not operate any battery charger if it has
received a sharp blow, has been dropped, or has
been damaged in any way; take it to a qualified
service technici an.
• Do not disass emble a battery charger; take it to a
qualified service technician when service or repair
is required. Incorrect reassembly may result in a
risk of electric shock or fire.
• Maximum ambient temperature around the power
supply o r transformer of any batter y charger
should not exceed 40°C (104°F).
• The output power from the power su pply or
transformer must not exceed the rating given on
the Deskt op Dual-Pocket Charger .
• The disconnection from the line voltage is made
by unplugging the power supply from the AC
receptacle.
• To reduce risk of electric shock, unplug any
battery charger from the outlet before attempting
any main tenance or cleaning.
For optimum charging performanc e, turn off the
radio pr od uc t w hil e ch ar g in g it in an y ba tt e ry
charger.
90
Page 99

MOTOROLA LIMITED WARRANTY
Note: FOR IDEN SUBSCRIBER PRODUCTS,
ACCESSORIES AND SOFTWARE
PURCHASED IN THE UNITED STATES
OR CANADA
What Does this Warranty Co ver?
Subject to the exclusions contained below,
Motorola, Inc. warrants its Motorola iDEN Digital
Mobile and Portable Handsets ("Products"),
Motorola-branded or cert ified ac cessories sold for
use with these Products ("Accessories") and
Motorola softwa re contained on CD-Roms or other
tangible media and sold for use with these Products
("Software") to be free from defects in materials and
workmanship under normal consumer usage for the
period(s) outlined below. This limited warranty is a
consumer's exclusive remedy, and applies as
follows to new Products, Accessories and
Software purchased by consumers in the United
States or Canada, which are accompanied by
this written warranty:
PRODUCTS COVERED LENGTH OF
Products as defined
above.
Accessories as defined
above.
Products or
Accessories th at are
Repaired or Replaced.
Software as defined
above. Applies only to
physical defects in the
media that embodies the
copy of the software (e.g.
CD-ROM, or floppy disk).
COVERAGE
One (1) year from the
date of purchase by the
first consumer purchaser
of the product.
One (1) year from the
date of purchase by the
first consumer purchaser
of the product.
The balance of the
original warranty or for
ninety (90) days from
the date returned to the
consumer, whichever is
longer.
Ninety (90) days from
the date of purchase.
91
Page 100

What is not covered? (Exclusions)
Normal Wear and Tear. Periodic maintenance,
repair and replacement of parts due to normal wear
and tear are excluded from coverage.
Batteries. Only batteries whose fully charged
capacity falls below 80% of their rated capacity and
batteries that leak are covered by this limited
warranty.
Abuse & Misuse. Defects or damage that result
from: (a) improper operation, storage, misuse or
abuse, accident or negl ect, such as physical
damage (cracks, scr atches, etc.) to the surface of
the product resulting from misuse; (b) contact with
liquid, water, rain, extreme humidity or heavy
perspiration, sand, dirt or the like, extreme heat, or
food; (c) use of the Products or Accessories for
commercial purposes or subjecting the Product or
Accessory to abnormal usage or conditions; or (d)
other acts wh ic h ar e not the fault of Mo t o rola, are
excluded from coverage.
Use of Non-Motorola Products and Accessories.
Defects or damage that result from the use of
Non-Motorola branded or certified Prod ucts,
Accessories , Softwar e or other periph eral
equipm e nt ar e exc lu de d f rom co ve r ag e.
92
Una uthorized Service or Modification . Defects or
damages resulting from service, testing, adjustment,
installation, maintenance, alteration, including
without limitation, software changes, or modification
in any way by someone other than Motorola, or its
authorized ser vice centers, a re excluded from
coverage.
Altered Products. Products or Acce sso rie s wit h (a)
serial numbers or date tags that have been
remove d, al ter e d or ob lit er a te d; ( b) br o k en sea ls or
that show evidence of tampering; (c) mismatched
board serial numbers; or (d) nonconforming or
non-Motorola housings, antennas, or parts, are
excluded from coverage.
Communicati on Serv ic es . Defects, damages, or
the fai lu r e of Pro du ct s, Acces s ori es or So ft wa re du e
to any comm u n i ca tion serv ic e or si gn al you may
subscribe to or use with the Products, Accessories
or Software is excluded from coverage.
Software Embodied in Physical Media. No
warranty is made that the software w ill meet your
requirements or will work in combination with any
hardwa re or softwa re ap pl ic ations prov id ed by third
parties, that the operation of the softwar e products
will be uninterrupted or error free, or that all defects
in the software products will be co rr ected.
 Loading...