

Page 1

Digital Multi-service Data-capable Phone
@NNTN4781A@
NNTN4781A
Motorola
iDEN
i305 Phone User’s Guide
Page 2

Page 3

IMPORTANT NOTICE: PLEASE READ
PRIOR TO USING YOUR PHONE
The SIM card provided in this kit is intended for use with
the phone provided in this package.
Loss of certain features will result when using a SIM
card from one of the following models: i30sx, i35s,
i50sx, i55sr, i58sx, i60c, i80s, i85s, i88s, i90c, i95cl
series, and the i2000 series.
For more information on SIM card compatibility, go to
www.motorola.com/iden/support.
Page 4

Page 5

Contents
Getti ng Sta rted.... ... ......... ...........................1
Locating Your SIM Card ..................................2
Activatin g Servi ce ........... .... ... .... ................ ......5
Powering On and Off....................................... 5
Enabling Over-the-Air Security ........................5
Finding Your Phone Number ...........................6
Completin g Set up ........... .... ... .... .... ..................7
Phone Basics.............. .... .... ... .......................... 7
SIM Card Security.......................................... 10
Locking the Keypad .......................................13
Accessories ...................................................14
For More Information ..................................... 14
Maki ng C a lls........ .....................................1 5
Phone Calls ..... .............................................. 15
Private Calls...................................................15
Receiving Calls .............................................. 15
Call Icons ..... ..................................................16
Ways to Enter Call s ............... ........................ 16
Using Speakerphone ..................................... 18
Using Mute..................................................... 19
Making Emergency Phone Calls....................19
Call Aler ts .. .............................................. 21
Sending Call Alerts ........................................21
Receiving Call Alerts......................................21
Using the Call Alert Queue ............................21
Recent Calls............................................. 23
Storing Recent Calls to Contacts...................23
Deleting Recent Calls ....................................24
Contacts................................................... 25
Viewing Contacts ...........................................26
Creatin g Ent rie s . .... .... ....................................2 7
Storing Numbers Faster.................................28
Editing Entries................................................29
Deleting Entries..............................................29
Checking Capacity .........................................29
Creatin g Pause s and Waits ...... .... .... ... ..........3 0
International Numbers....................................30
Accessing Contacts with GSM Phones..........31
Call Forw a r di n g ... .................................... 33
Forwarding All Calls.......................................33
Turning Off Call Forwarding...........................34
i
Page 6

Forwarding Missed Calls ............................... 34
Viewing Call Forwarding Settings.................. 35
Creating and Sending Messages...................46
Managing Memory .........................................49
Ring Tones...............................................37
Setting Your Phone to Vibrate ....................... 37
Turning Ring Tones Off ................................. 37
Ring and Vibrat e ......... .... ............................... 38
Assigning Ring Tones to Contacts................. 39
Viewing Ring Tone Assignments ...................39
Downloading More Ring Tones .....................39
Managing Me m ory ...... .... .... ... ........................ 39
Deleting Custom Ring Tones.........................40
Messages .................................................41
Message Notifications....................................41
Voice Mail ............... .......................................41
Text and Numeric Messages ......................... 42
Net Alerts....................................................... 43
Mobile Originated Text Messaging........45
Setting Up ......................................................45
Receiving Messages......................................45
Reading Messages From
the Message Cente r ....... .... ... ........................ 46
ii
GPS Enabled............................................ 51
IMPORTANT: Things to Keep in Mind...........51
Making an Emergency Call ............................52
Viewing Your Approximate Location..............53
Enhancing GPS Performance........................54
Updating Satel lite Alm a na c Data .. .... ... .... ......55
Setting Privacy Options..................................56
Using GPS with Map Software.......................57
Voice Records ......................................... 61
Creatin g Voice Reco rds ........ .... .... .................61
Playing Voice Records...................................61
Labelling Voice Records ................................62
Deleting Voice Records .................................62
Locking Voice Records ..................................62
Managing Memory .........................................62
Advanced Calling Features.................... 65
Call Waiting....................................................65
Call Hold ........................................................66
3-Way Calling.................................................66
Page 7

Creating Pauses and Waits While Dialing .....67
Making Intern ational Call s ..... .... .... .... ............ 67
Setting One Touch PTT................................. 67
Group Calls.................................................... 68
Call Timer s....... ... .... .... .... ....................... .... ... . 69
Using Your Phone as a Modem .....................69
Making TTY Calls ....... .... ............................... 70
Memo ........................................................73
Enter in g Tex t.. ..........................................7 5
Using Alpha Mode .........................................75
Using Word Mode ..........................................75
Special Function Keys ................................... 76
Using Numeric Mode ..................................... 77
Using Symbols Mode..................................... 77
Customizing Your Phone........................79
Setting the Volume ........................................79
Setting Your Phone to Not Ring.....................79
Seeing the Display Better ..............................80
Using a Headset ............................................ 80
Using Settings................................................ 80
Understanding Stat us Messages........... 85
Safety and General Information............. 87
RF Operational Characteristics......................87
Portable Radio Product Operati on and EME
Exposure........................................................87
Electro Magnetic Interference/Compatibility ..90
Medical Devices.............................................90
Operational Warnings ....................................91
Operational Cautions .....................................92
Accessory Safety Information........................93
MOTOROLA LIMITED WARRANTY........ 95
Limited Warranty
Motorola Communicati on Products
(International) .......................................... 99
Patent and Trademark Information...... 103
Index....................................................... 105
Driving Safety Tips................................ 111
iii
Page 8

iv
Page 9

DECLARATION OF CONFORMITY
Per FCC CFR 47 Part 2 Section 2.1077(a)
Responsible Party Name: Motorola, Inc.
Address: 8000 West Sunrise Boule v ard
Plantation, FL 33322 USA
Phone Number: 1 (800) 453-0920
Hereby d eclares that the pr oduct:
Product Name: i305
Model Number: H62XAH6RR1AN
Conforms to the following regulations:
FCC Part 15, subpart B, section 15.107(a),
15.107(d) and section 15.109(a)
Class B Digital Device
Note: This equipment h as been tested an d found
to comply with the limits for a Class B
digi tal device, pursuant to p art 15 of the
FCC Rules. These limits are desi gned to
provide reasonable protection against
harmful interference in a residential
installation. This equipment gener ates,
uses and can radiate radio frequency
energy an d, if not instal led and use d in
accordance with the instructions, may
cause harmful interference to radio
communications. How ever, there is no
guaran te e th at in te rf eren ce wil l n ot oc cur i n
a particular installation.
If this equipment does cause harmful
interference to radio or te levision reception,
which can be determined by turning the
equipment off and on, the user is encouraged
to try to correct the interference by one or
more of the following measures:
• R eo rie nt or rel oc ate the rece iv ing
antenna.
• Increase the separa tion between the
equipment and receiver.
• Connec t the equ ip men t into an out l et on a
circuit different from that to which the
receiver is conn ected.
• Consult th e dealer or an experienced
radio/TV technician for help.
v
Page 10

vi
Page 11

Getting Started
antenna
volume
controls
Push-To-Talk
(PTT) button
speaker
(in back)
speaker key
accessory connector
interface
audio jack
microphone
p Power button.
Navigation key — press the arrows to
scroll through menus and lists.
m Menu key — accesses context-sensitive
menus.
A Option key — sel ec ts the op t io n ap pear i ng
above it on the display.
Note: Throughout this User Guide, the
option ke ys wi ll be rep res ented by
A.
s Send key — places phone calls.
e End key — ends phon e calls; r eturns to
idle screen; in browser mode, returns to
Net main me nu.
1
Page 12
Getting Started
To start using your i305 phone:
• Make sure your SIM card is in place.
• Charg e th e bat t er y.
• Activate your service.
• Enable over-the-air security if you are prompted
to.
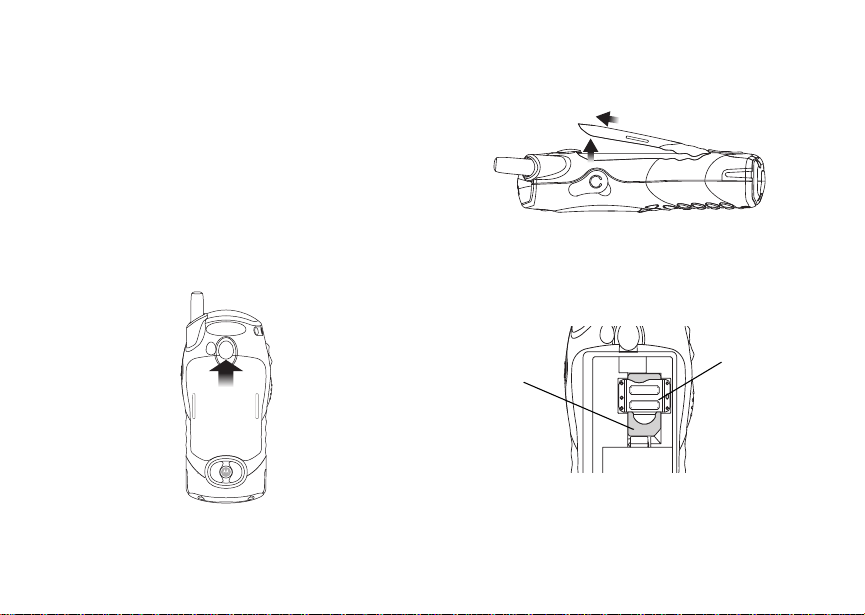
Removing the Battery Door
1 Make sure the phone is powered off.
2 Slide the release button forward until it releases
the battery door.
2
3 Remove the batter y door from the back of your
phone.
Locati ng Your SIM Car d
Your SIM (Subscriber Identity Module) card is a
small piece of white plastic locate d in the SIM card
holder in the back of your phone, underneath the
battery.
SIM card
SIM card
If ther e is no SIM card in your phone o r the box,
contact your service provider.
holder
Page 13
Locating Your SIM Car d
Battery
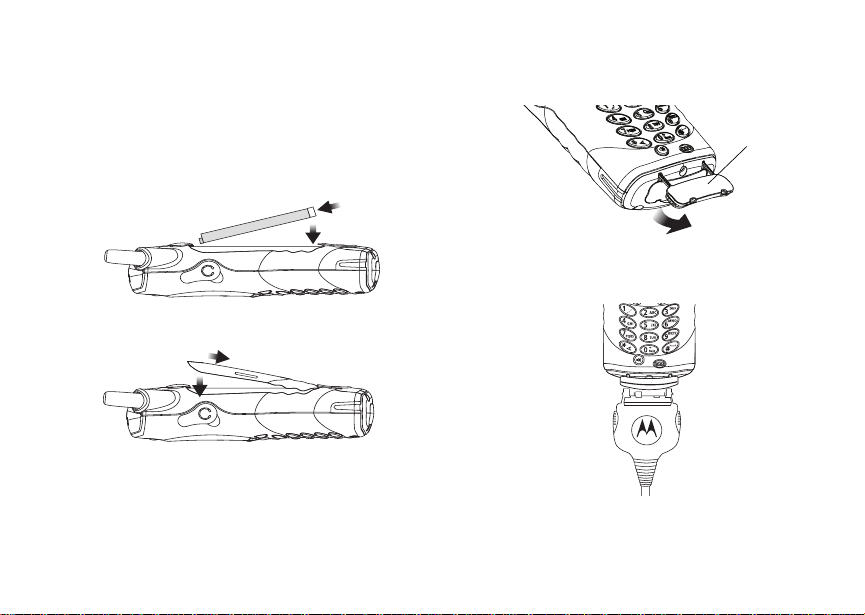
Inserting the Battery
1 Remo ve the batte r y do or.
2 Insert the top of the battery into the battery area.
Press the bottom of the battery to secure it.
3 Replace the batt ery door a nd press it gently until
you hear a cli ck.
Charging the Battery
Your phone comes wit h a standard travel charger.
1 Plug the charger into an electrical outlet.
2 Open the conn ector cover.
connector
cover
3 Plug the other en d of the charger into the
acces so r y co nn ector.
Charger Attached appears on the displ ay.
3
Page 14
Getting Started
Tip: To remove the charger from the accessory
connector: Press the buttons on the sides of
the plug. Pull the plug straight out.
4 When cha rging th e battery for the first time,
charge fo r 30 min ut es lo nger th an th e t im e show n
in “Charging Times”.
Charging Times
See your battery and charger to determine the
appropriate ch arging tim e .
Battery Charger
Rapid Mid-Rate
Slim 2 hours 3 hours
High
Performance
Extra
Capacity
Maximum
Capacity
For best results, charge the batteries within the
temperature range of 50°F to 104°F (10°C to 40°C).
Prolonged charging is not recom mended.
4
2 hours 4 hours
2.5 hours 5.5 hours
3.5 hours 7.5 hours
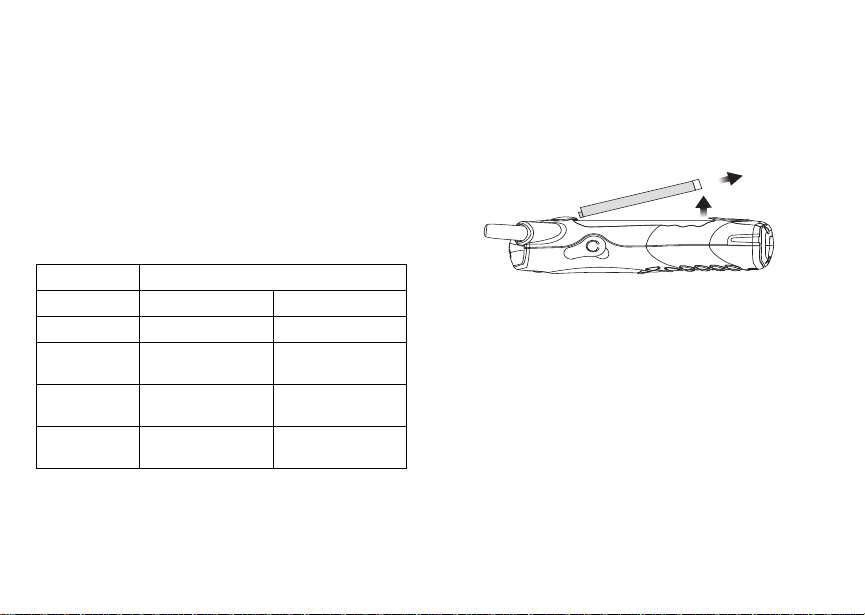
Removing the Battery
1 With the phone powered off, remove the battery
door.
2 Remove the battery by pushing the battery toward
the antenna and lifting it out.
Battery Use and Maintenance
• The Motorola iDEN Approved Lithium Ion
chargers provide optimum performance. Other
chargers may not fully charge the iDEN Lithium
Ion battery or may yiel d a re du c ed number of
lifetime charge cycles.
• Extreme temperatures degrade battery
perfor mance. Do not store the battery where
temperatures exceed 140°F (60°C) or fall below
4°F (-20°C).
• Lithium Ion batt eries have a self discharge rate
and without use, lose about 1% of their charge
per day.
Page 15

Activating Service
• The battery capacity is degraded if the battery is
stored for long periods while fully charged. If long
term storage i s required, store at half capacity.
Activating Service
The first time you power on your phone, you must be
in your local calling area. This activates your
service.
Powering On and Off
To power your phone on:
Press p.
To power your phone off:
Press and hold p.
When You Power On for the First Time
The first time you power your phone on, screen may
appear asking you to update your browser
information. This means you must enable security.
If the Enter SIM PIN Code screen appears, enter
your SIM PIN. See “Entering the PIN” on page 10.
Press A under Ok.
When y ou receive your phone, the SIM PIN is 0000 .
Change your PIN to prevent fraudulent use of the
SIM card (see “Changing the PIN” on page 11).
As your phone connects to t he network, you will see
a connecting message. When the idle screen
appears, the phone is ready to use.
s
S
d1
MesgContcs
Enabling Over-the-Air Security
If you are set up to receive o ver-the-air
programming from your service provider, yo u must
enable securit y the first time you power on yo ur
phone o r w ithin 20 days of first acti vation of your
phone:
1 When you power on your phone for the first time,
after the idle screen appears, you will be
prompted to select Ok to update yo ur bro ws er
information.
Note: If you press A under Later, you will be
prompted to enable security each time you
power on your phone until you press A
under Ok .
2 Press A under Ok.
5
Page 16

Getting Started
3 You are prompted to enable security. Press A
under Yes. A series of screens appe ars. If you
subscribe to your service provider’s pla n, your
home page appears.
4 Press e to return to the idle screen.
Within 24 ho urs of e nabl in g s ecu rit y , y ou w ill r ece iv e
a Net alert containing your Pr ivate ID and Talkgroup
lists for Private calls.
To accept programming:
1 When you receive a Net alert saying New
Browser Message - Receive Programming
Info, press A under Goto.
2 You ar e prompted to accept changes to your lists.
Press A under Ok.
3 If you are prompted again to accept c hanges to
your lists, press A under Ok.
4 A confi rm ation sc reen disp la ys . Pr es s A under
Ok.
5 Press e to return to the idle screen.
Finding Your Phone Number
My Info lets you view your ph one number, Private
ID, and oth er ph one inform a tion:
1 Press m to access the main menu.
2 Scroll to My Info.
3 Press A under Select.
6
4 Scroll to se e yo ur informa tio n:
•Name — Enter yo ur na me . See “En ter in g Te xt ”
on page 75.
•Line1 and Line 2 — your phone number s for
phone lines 1 and 2. These are filled in when
you receive your first Private call after enabling
over-the-air security on your phone.
•Private — Your Private ID is the number th at
othe rs use to contact you usi ng Private cal ls. It
is filled in when you receive your first Private
call.
• Group ID — the number of the Talkgroup you
have joined.
• Carrier IP — the IP address assigned to your
serv ice provider. It is filled in when you register
for packet da ta services.
• IP1 Address and IP2 Address — the IP
addresses you use to access the Internet with
your phon e.
•Ckt — Your circuit data number is the number
you use if you want to use your phone to
transfer circuit data. See “Using Your Phone as
a Modem” on page 69. Y ou receive this number
from your service provider.
• Service Status — This information may be
used by your service provider if there is a
problem wi th yo ur ph on e’s ser v ic e s.
Page 17

Completing Setup
Completing Setup
Voice Mail and Other Message s
To receiv e voice mail, you must set up an account
with your service provider. See “Messages” on page
43 for information on using voice mail.
If your service provider offers mobile originated text
messaging, see “Mobile Originated Text Messaging”
on page 47 for inf orm at i on on se tt i ng up an d us in g it .
Joining a Talkgroup
Your sales representative or your service provider
establ ishes Talkgroups for you and assigns each
Talkgroup a Talkgroup n umber. You can choose a
name for each of your Talkgroups when you create
entries for them in Contacts.
To receive group calls mad e to a Talkgroup, you
must joi n the Tal kg rou p. You ca n be lo ng to onl y on e
Talkgroup at a time. When you join a new
Talkgroup, you no longer belong to your previous
Talkgroup.
To join a Talkgroup:
1 Press #. Then enter the Talkgroup number using
the keypad. -or-
Choose t h e Tal kgr o up na me f r om C on tact s o r th e
recent ca ll s l is t.
2 Press A under Join.
Customizing Features
You can c ontrol many features of your phone,
including the volume of incoming sound, rings, and
other to nes. Se e “Custo mizing Y our Pho ne ” on page
79.
Phone Basics
Any time your phone is power ed on, the display
provid es you wi th in for m a tio n an d options.
s
MesgContcs
S
The screen shown above is the idle screen. The text
that appears on your idle screen depends on your
service provider. The idle screen appears when your
phone i s on, but not engage d in any activity.
d1
status icons
text area
menu icon
display options
7
Page 18

Getting Started
Text Area
This area displays menus, messages, names,
phone nu mb ers, and oth er informa t i on .
Display Options
Two display options appear at the bottom of most
screens . Y ou sel ect a disp la y opt ion by pr es sing the
option key below it.
Menus and Lists
Your phone’s features are arranged in menus,
submenus, and lists.
To access the items in a menu or list, scroll using
the navigation key at the top of your keypad. This
key lets you scroll up, down, left, or right. Holding
down the appropriate pa rt of the navigation key
speeds up scrolling.
In this guide, this symbol > tells you to select a menu
or list item. For example, Settings > Security
means:
1 Scroll to Settings on the main menu.
2 Press A under Select to see the Settings
screen.
3 Scroll to Security.
4 Press A under Select to see the Security
screen.
8
Menu Key
Many f eatures provid e context-sensi tive menus that
let you access related features and actions. The
S icon appears any time a cont ext-sensitive menu
is available. Press m to access the menu.
Main Menu
All your phone’s features can be ac cessed through
the ma in menu. When you are using a feature, the
icon for that feature appears in the upper left corner
of the display.
a Browser Browse the Web.
b Settings
Display/Info
Phone Calls
2-Way Radio
Volume
Security
Advanced
c VoiceRecord Record and play audio
d Contacts
new contact form
list of contacts
Contacts menu
Cust om iz e yo ur phone.
See page 7 9.
message s. See page61.
View, s tore, edit contacts.
See page 2 5.
Page 19

Phone Basics
e Messages
Voice Mail
Text M sgs
Net Alert
Access messages. See
page 41.
f Ca ll Forw a rd Set call forwarding options.
See page33.
g Memo Store a number to access
late r. See page73.
h Call Tim ers Phone usage information.
See page69.
i Recent Calls
list of calls
recent calls menu
Call Setup menu
j My Info View personal phone
k Call Alert
list of call alerts
Call Alerts menu
Lists recent calls. See
page 23.
information, including
phone nu mb er an d P riv ate
ID. Se e page 6.
Lists ca ll al ert s . See
page 21.
l GPS Find your approximate
geographical location. See
page 51.
m Ring Tones
VibeAll
list of ring tones
Ring To ne s menu
Assign ring tones and turn
ringer off. See page 37.
Status Icons
Status icons appear in the two rows at the top of the
display. Some appear at all times. Others appear
only when your phone is engaged in certain
activi ties or when you have activated certain
features.
a b c d
e f g d
o p q r sSignal Strength — More bars
A Phone In Use — Your phone is
B Priv at e In Us e — Y our ph on e i s
Battery Strength — More bars
on the battery indica te a greater
charge.
next to the antenna indicate a
stronger signal.
activ e on a phon e call.
activ e on a Priv a te ca ll.
9
Page 20

Getting Started
C Talkgroup In Use — Your
phone is active on a group call.
1 2 Active Phone Line — 1
indi cates phone line1 is ready
to make ca ll s; 2 indi ca te s phon e
line2 is re ady to make calls.
GHI
J K L
Call Forward — Your phone is
set to forward calls. See “Call
Forwa rding” on page 33.
uvM Ringer Off — Your phone is se t
wy x
not to ring. See “Turning Ring
Tones Off” on page 37.
Messages — You have one or
more message s . Se e
“Messag es” on page 41.
D Internet — You are ready to
browse the internet.
YZ Packet Data — You are ready
to transfer packet data or are
transferring packet data. See
“Using Your Phone as a
Modem” on page 69.
P Roaming — You are using your
phone outside your carri er's
network.
10
SIM Card Security
Your SIM card protects your personal information.
The SIM card stores all your Contacts information.
Since this information is stored on your SIM card ,
not in your phone, you can remove the information
by removing your SIM card.
Note: Except for making emergency calls, your
phone will not functio n without the SIM
card.
To prevent unauthorized use of your phone, your
SIM car d is protected by a PIN that you enter each
time the pho ne is powered on. You ca n ch ange the
PIN or turn off the requirement that it be entered.
Entering the PIN
You may be required to enter a SIM PIN when you
first use your phone.
When you r ece iv e your pho ne, t he SI M PIN is 00 00.
Change your PIN to prevent fraudulent use of the
SIM card.
Page 21

SIM Card Security
Important: If you enter your PIN incorrectly 3 times,
1 When the Enter SIM PIN Code screen appears,
enter your SIM PIN. An asterisk appears for each
your SIM card is blocked. To unblock
your SIM card, you must contact your
service provider. See “Unblocking the
PIN”.
character entered.
2 Press A under Ok.
Changing the PIN
1 From the main menu, select Settings > Security
> Change Password > SIM PIN.
2 At the Enter Old SIM PIN Code screen, enter the
current SIM PIN.
3 Press A under Ok.
4 At the Enter New SIM PIN Code screen, enter
the new 4- to 8-digit SIM PI N.
5 Press A under Ok.
6 At the Re-enter New SIM PIN Code screen,
re-ent er the ne w SIM PIN to confirm.
7 Press A under Ok.
Turning the PIN Requirement On and Off
When the SIM PIN requirement is on, you are
prompted to enter your PIN each time you turn on
your phone.
Note: If a SIM PIN i s r equi r ed , you r ph one w ill no t
function until the SIM PIN is entered,
except for making emergency calls.
When the P IN r equi r em en t is of f, your ph on e can be
used without entering a PIN.
Important: When the SIM PIN requirement is off, the
personal data on your SIM card is not
protected. Anyone can use your phone
and access your personal data.
1 From the main menu, select Settings > Security
> SIM PIN.
2 Select On or Off.
3 Enter the current SIM PIN.
4 Press A under Ok.
Unblocking the PIN
If you enter your PIN incorrectly 3 times, your SIM
card is b l ock ed. To un bl oc k y ou r SIM car d, yo u mu st
contac t your serv ice provider to get a PIN Unblock
Code (PUK).
11
Page 22

Getting Started
Important: If you unsuccessfully enter the PUK code
10 times, your SIM card is permanently
blocked and must be replaced. If this
happens, all data is lost. You will get a
message to contact your service
provider. Except for making emergency
calls, your phone will not function with a
blocked SIM card.
To unblock the PIN:
1 Press * # m 1.
2 At your service provider representative’s request,
provide the information needed to give you a PUK
code.
3 Select Unblock PIN.
4 Enter the PUK code.
5 Enter a new 4- to 8-digit SIM PIN.
6 Re-enter your SIM PIN.
If you entered the cod e s pro per ly , SIM Unlocked
appears on the display.
12
Inserting and Removing Your SIM Card
Important: Do not touch the gold-colored areas of
Switching SIM Cards
Moving your SIM card from one phone to another
moves all your Contacts information, but erases
other inform ation. If you remove your SIM card and
use it with another phone, or use another SIM card
with your phone, the following inform ation is erased:
• The recent call s l is t
• Call forw ard in g setti ng s
• Net aler ts
• Mobile originated text messages, drafts, and
quick no tes
• Information stored in Memo
• 3 most recent GPS Enabled locations
• Voice records
• Voice names
your SIM card.
Page 23
Locking the Keypad
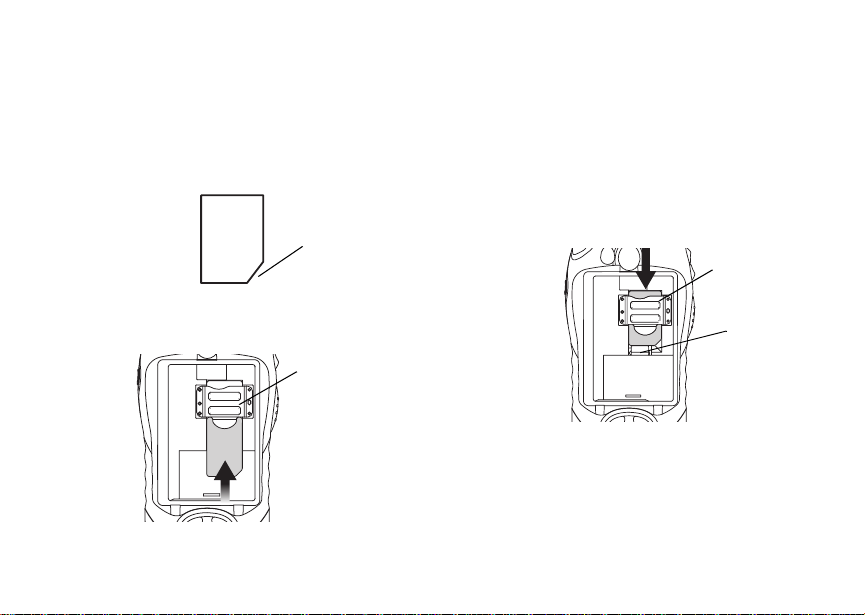
Inserting Your SIM Card
With your phone powered off, remove the battery
door and battery . See “Removing the Battery” on
page 4.
1 Hold your SIM card as shown. Do not touch the
gold-colored area.
cut corner
2 Carefully slide your SIM card into your phone,
until it lies flat in the SIM card holder.
SIM card
holder
Removing Your SIM Card
Important: To avoid loss or damage, do not remove
your SIM car d from your phone unless
absolutely necessary.
1 With your phone powered off, remove the battery
door and battery.
2 While holding the tab down, slide your SIM card
out of the SIM card holder.
SIM card
holder
tab
Note: Protect your SIM card as you would any
delicate object. Store it carefully.
Locking the Keypad
Locking the phone’s keypad prevents its buttons
from be in g pres se d. Whe n t h e key pa d i s lo cke d, you
can onl y:
13
Page 24

Getting Started
• Powe r the ph one on and off
• Unlock th e keypad
• Respond to incoming calls, messag es, and alerts
Important: Emergency call s cannot be placed while
To lock the keypad:
1 From the idle screen, press m.
2 Press *.
If you pr ess a key while the keypad is locked,
instructions for unlocking the keypad display briefly.
To unlock the keypad:
1 From the idle screen, press m.
2 Press *.
While the keypad is locked, you can respond to
incomi ng calls, messages, and alerts just as you do
when the keypad is not locked. When finished, press
e to return to the idle screen. The keypad remains
locked.
the keypad is locked.
Accessories
Your phone comes with a battery and a charger.
To order additional accessories, log on to our Web
site at www.motorola.com/store/iden or contact your
Motorola Aut hor ized Retai le r.
14
For More Information
If you have questions about your i305 phon e,
contact your sales representative or your service
provider.
Page 25

Making Calls
Your i305 phone makes two types of calls: digital
cellular phone calls and Private calls. With Private
calls, you use your phone as a long-range, digital
walkie-talkie.
Phone Calls
1 Enter the number you want to call.
2 Press s to place the call.
3 Press e to end the call.
Private Calls
1 Enter the Private ID you want to call.
2 Press and h ol d the P TT b ut ton on the si de of your
phone. Begin talking after your phone emits a
chirping sound.
3 Release the PTT button to listen.
Tip: To let someone know you want to talk to him
or her on a Pri va te cal l , se nd a call al er t. See
“Call A lerts” on page 21 .
Receiving Calls
Phone Calls
When you receive a phone call, your phone rings,
vibrates, or lights up its backlight.
Answering
Press s. -or-
Press A under Yes. -or-
Press any number key.
Sending to Voice Mail
Press e. -o r-
Press A under No.
Ending
Press e.
Private Calls
When you re ce iv e a Pri va te cal l , yo ur ph on e emit s a
chirping sound.
Answering
1 Wait for the caller to finish speaking.
2 Press and hold the PTT button on the side of your
phone. Beg i n talk ing af ter yo ur ph on e em it s a
chirping sound.
15
Page 26

Making Calls
3 Release the PTT button to listen.
Call Icons
When you make a call, call icons appear in the text
area of the phone’s display.
X Placing a phone call.
W Receiving a phone call.
Y Phone call is active.
Z Phone call is on hold.
U Phone ca ll ended.
When you miss a call, this icon appears in the text
area:
V You mis se d a pho ne call.
Ways to Enter Calls
To enter the number you want to call, you can:
• Use the numbers on the keypad
• Select the number from the recent calls list
• Select the number from Contacts
• Redial the last ph on e nu mb er ca ll ed
16
• Use Speed Dial or Turbo Dial
• Use One Touch PTT to make a Private call
• Use a TTY de vi ce — see “Mak ing TTY Cal ls ” on
page 70
®
From the Keypad
To enter the number you want to call, press the
numbers on the keypad.
If you make a mistake:
• T o clear a digit, press A under Delete.
• To clear all di gits, press and h old A under
Delete.
• T o in se rt o r del e te a d igit an ywh ere i n th e str i ng of
digits you have enter e d, scrol l left or right.
• T o cancel, press e.
From the Recent Calls List
The recent calls list stor es the last 20 calls you
made or received.
To select a number from the recent calls list as the
number yo u w an t to ca ll:
1 From the idle screen, scroll down. -or-
From the main menu, select Recent Calls.
2 Scroll to the name or number you want to call.
Page 27

Ways to Enter Calls
From Contacts
If you have numbers stored in Contacts, you can
use thes e number s to make calls . For inf orma tion on
entering numbers into Contacts, see “Creating
Entries” on page 27.
Calling from the Contacts List
1 From the main menu, select Contacts.
2 Scroll to the name or number you want to call.
Tip: To find Contacts entries faster, use the
keypad to enter the first lett er of the name.
3 Place the call now. -or-
Scroll left or right to display the Contacts type for
the number you want to call.
If you are making a Private call, your phone places
the cal l to the Private ID stored in the Contacts
entry, even if the Private icon is not displayed.
If you are making a phone call:
• Your phone places t he call to the phone number
assign ed to the Contact s type displayed.
• If the Contacts type displayed is not a phone
number, your phone places the call to the phone
number stored in the Contacts entry.
• If the Contacts type displayed is not a phone
number and you have more than one phone
number stored in the Con tacts entry, your phone
prompt s you t o sele ct the ph one num ber you w ant
to place the call to.
Calling from a Contacts Entry
1 From the main menu, select Contacts.
2 Scroll to the name or number you want to call.
3 Press A under View. -or-
If View is not on e o f y our o pt ion s: Pre ss m. Select
View.
4 Place the call now. -or-
Scrol l to v ie w mor e nu mber s. Wh en yo u pla ce th e
call, it is made to the number displayed.
Redialing the Last Number
Press and hold s to place a call to the last phone
number you called.
Using a Voice Name
Note: This is an optional featu re. Contact your
servic e pr ov i de r abou t its av ailabi lit y for
purchase.
17
Page 28

Making Calls
If you have created a voice name in Contacts for the
number you want to call, say the voice name into
your phon e t o en te r the nu mb er . Se e pa ge 26 for
information on voice na mes.
1 Press and hold t until a prompt appears telling
you to say the voice name.
2 Speaking into the microphone, say the voice
name assi gned to the number you want to call.
Your phone plays the name back to you.
If you are making a Private call, press the PTT
button to pl ac e t he cal l.
If you are making a phone cal l, th e call is placed
automatically.
Tip: To stop a phone call from being completed,
press e.
Using Speed Dial and Turb o Dial
Each phone number stored in Contacts is assigned
a Speed Dial number which you can use to enter
that numb er.
Speed Dial
1 From the idle screen, use the keypad to enter the
Speed Dial number assigned to the phon e
number you want to call.
2 Press #.
18
®
3 Press s. Turbo Dial
From the idle screen, press and hold the Speed
Dial number (1 through 9) assigned to the phone
number you want to call.
Using One Touch PTT
One Tou c h PTT sets your phone to call the most
recent Private ID on the recent calls list, or to a
Private ID you choose, every time you press the
PTT button. See “Setting One Touch PTT” on page
67.
Using Speakerphone
Note: This is an optional feature. Contact your
service provider about its availability for
purchase.
Turning on speakerphone makes incoming sound
come out of the phone’s speaker instead of the
earpiece. Speakerphone is availabl e wheneve r you
are on an active phone call.
To turn speakerphone on or off:
Press A under Speaker. -or-
Press t.
Page 29

Using Mute
Using Mute
Muting calls lets you listen to incoming sound
without transmitting sound. Mute is available
whenever you are on an active call.
To turn mute o n:
Press A under Mute.
While mu te is on, Unmute appears as a display
option.
To turn mute off:
Press A under Unmute.
Making Emergency Phone
Calls
Your phone supports emergency calling.
Emergency phone calls can be made even when
your SIM card is blocked or not in your phone.
Dial 911 to be connected to an emergency response
center. If you are on an active call, you must end it
before calling 911.
When you make an emergency call, your phone’s
GPS Enabled feature can help emergency service
personnel find you, if you are in a location where
your phone's GPS antenna has established a clear
view of t he open sky and your local emergency
response center has the equipment to process
location information. See “GPS Enabled” on page
51, and particul arl y “IM PO RTA N T: Thi ngs to Keep
in Mind ” on page 51 and “Making an Emergency
Call” on page 52, for more information on the
limitations of this feature. Because of the limitations
of this feature, always provide your best knowledge
of your location to the emer gency response center
when you make an emergency call.
Important: Emergency calls cannot be placed while
Important: If you have not registered on the
the keypad is locked.
network, emergency calls ca nnot be
placed while your SIM card is in your
phone.
19
Page 30

20
Page 31

Call Alerts
Sending a call alert lets the recipient know you want
to talk to him or her on a Priv ate call.
When you s end a call alert, the recipient’s phone
emits a series of beeps and displays your name or
Private ID.
The recipient can:
• Answer — begin a Private call with the sender
• Queue — store the call alert to the call alert
queue, which is a list of call alerts
• Clear — dismiss and delete the call alert
Sending Call Alerts
1 Enter the Private ID you want to send to, as you
would when making a Private call.
2 Press A under Alert. Ready to Alert appears
on the display.
3 Press the PTT button until Alert Successful
appears on the display.
Note: If the alert is not successful, this may mean
the person you are trying to reach is on a
call or has the phone turned off.
Receiving Call Alerts
When you receive a call alert, you must answer,
queue, or clear it. You cannot receive phone calls or
Private calls u ntil you do.
To ans wer a call alert, press the PTT button to
make a P rivate call to the sender.
To queue a ca ll al er t, pr es s A under Queue.
To clear a call alert, press A under Clear.
Note: The recent calls list also stores call alerts
you have received. They appear as Private
calls. Call alerts remain in your recent calls
list until you delete them or until they reach
the end of the list.
Using the Call Alert Queue
When you queue a call alert , it rema ins in the call
alert queue until you make a Private call to the
sender or delete it.
Viewing Call Aler ts
1 From the main menu, select Call Alert.
2 Scroll through the lis t.
21
Page 32

Call Alerts
Viewing Date a nd Time
To view t he date and time a ca ll alert was received:
1 From the ma in menu, select Call Alert.
2 Scroll to the call alert you want information on.
3 Press m.
4 Select View.
Responding to Call Alerts in the Queue
After you queue a call alert, you can respond to it by
making a Private call to the sender or sending a call
alert to the sender.
Making a Private Call to the Sender
1 From the ma in menu, select Call Alert.
2 Scroll to the call alert you want to respond to.
3 Press the PTT button to begin the call.
This removes the call ale rt from the queue.
Sending a Call Alert to the Sender
1 From the ma in menu, select Call Alert.
2 Scroll to the call alert you want to respond to.
3 Press A under Alert. Ready to Alert appears
on the display.
4 Press the PTT button until Alert Successful
appears on the display.
22
Deleting Call Alerts
To delete a call alert from the queue:
1 From the call alert queue, scroll to the call alert
you want to delete.
2 Press m.
3 Select Delete.
4 Press A under Yes to confirm.
To delete al l cal l ale r ts fr om the qu eu e:
1 From the call alert queue, press m.
2 From the call alert menu, select Delete All.
3 Press A under Yes to confirm.
Sorting Call Ale rts
Tip: You must have at least one call alert in the
queue to access this feature.
To sort call alerts by the order they were received:
1 From the main menu, select Call Alert.
2 Press m.
3 Select Sort By.
4 Scroll to First on Top or La st on Top.
5 Press A under Select.
Page 33

Recent Calls
The recent calls list sto res the numbers of the 20
most recent calls you have made and received.
To view the recent calls list:
1 From the idle screen, press the dow n arrow on
the navigation key. -or-
From the main menu, select Recent Calls.
2 Scroll through the list.
If the number of a recent call is stored in Contacts,
the name associated with the number appears on
the rece nt calls list.
An icon appears beside the name or number
indica ting the Contacts type of the numbe r used in
the cal l. See “Contacts” on page 25.
For phone calls, an icon appears to the left of the
name or number giving more information about the
call:
X A call yo u ma de .
W A call you received.
V A missed ca ll. Missed calls appear on the
recent calls list only if you have Caller ID.
Note: The recent calls list also stores call alerts
you have received. They appear as Private
calls. Call alerts remain in your recent calls
list until you delete them or until they reach
the end of the list.
To get more i nformation on a recent call:
1 From the recent calls list, scroll to the call you
want information on .
2 Press A under View. -or-
If View is not on e o f y our o pt ion s: Pre ss m. Select
View.
This displays information such as the name
associate d w ith the call , the numb e r, the date , tim e,
and duration of the call.
Storing Recent Calls to Contacts
1 From the rece nt ca lls l i st , sc ro ll to t he numbe r yo u
want to store.
2 Press A under Store. -or-
If Store is not one o f your options: Pr ess m.
Select Store.
Tip: If Store is not on this menu, the number is
already stored in Contacts.
23
Page 34

Recent Calls
3 To store the number as a new entry, select [New
Contact]. -or-
To store the number to an existing entry, select
the entry.
4 With the Contacts type field highlighted, scroll left
or right to display the Contacts type you want to
assign t he number. For information on Contacts
types, see page 25.
5 If you want to add mo re in form a tio n to the entr y,
follow the applicable instructions in “C reati ng
Entries” on page 27.
6 Press A under Done.
Deleting Recent Calls
To delete a call:
1 From the recent calls list, scroll to the call you
want to delete.
2 Press m.
3 Select Delete.
4 Press A under Yes to confirm.
To delete all calls:
1 From the recent calls list, press m.
2 Select Delete All.
3 Press A under Yes to confirm.
24
Page 35

Contacts
Contacts stores up to 600 numbers or addresses.
Each Contacts entry can store several numbers or
addresses.
Information stored in Contacts is saved on your SIM
card.
A Contacts entry contains:
• A name — A name is required if your are storing
more than one number or address to the entry;
otherwise, it is optional. Typically, this is the name
of the person whose contact information is stored
in the entry.
• A ring ton e — You can assign a ring tone to each
entry. This is the sound your phone makes when
you receive phone calls or call alerts from any of
the numbers stored in the entry.
• A Contacts type — Each number or address
stored must be assigned a Contacts type:
A Mobile phone nu mber
B Private Private ID
C Work1 phone nu mb e r
D Work2 phone nu mb e r
E Home phone nu mb e r
F Email email ad dre ss
G Fax phone nu mb e r
H Pager phone numbe r
I Talkgroup Talkgroup number
J IP IP addre ss
K Other phon e nu mb e r
• A number or address — Each Contacts entry
must co ntain a number or address. This may be
any type of phone number, Private ID, Talkgroup
number, email address, or IP address.
Note: Yo u ca n s tor e n umber s u p to 6 4 di g its lo ng ,
but ev ery 20 digits must be separated by a
pause or wait. See “Creating Pauses and
Waits” on page 30.
25
Page 36

Contacts
• A Spee d Dia l nu mb er — Wh en you sto re a ph one
number, it is assigned a Speed Dial number. You
can accept the default Speed Dial number or
change i t.
• A voice name — If you create a voice name for a
number, you can then dial that number by saying
the voi ce name into your phone. This icon
appears P to the left of the Contacts type icon if
a voice name is assi gned.
Note: This is an optional feature. Contact your
service provider about its availability for
purchase.
Viewing Contacts
To access C ontacts:
Press A under Contcs. -or-
From the ma in menu, select Contacts. -or-
If you are on a call: Press m. Sele ct Contacts.
To view entries:
1 From th e Co nt a ct s lis t, s cro ll t o the en try yo u want
to vie w.
2 If an entry has more than one number or address
stored, <> surrounds the Contacts type icon.
Scroll le ft o r r i ght to v ie w the ic on f o r ea ch nu mb er
stored in the entry .
26
3 When the icon for the number or address you
want to vi ew is displayed , pres s A under View.
-orIf View is not one of yo ur opti o ns: P ress m. S e le ct
View.
4 Scroll to view the other numbers and addresses
stored for the entry.
Tip: To view more entries, continue scrollin g.
Searching for a Name
To sea rch for a name in Contacts:
1 From the Contacts list, press m.
2 Select Search.
3 Enter t he name you want to s ee. See “Entering
Text” on page 75.
4 Press A under Ok.
Your phone finds the name you ent ered or the
nearest match.
Showing Only Private IDs and Talkgroups
To set Contacts to show only entries that contain
Privat e IDs and Talkg ro up entries :
1 From the Contacts list, press m.
2 Select Filter.
Page 37

Creating Entr ies
3 With Show Prvt/Grp highlighted, press A under
Select.
To set Contacts to show all entries:
1 From the Contacts list, press m.
2 Select Filter.
3 With Show All highlighted, press A under
Select.
Creating Entries
A number or address and a Contacts type are
requir ed for a ll Co nt acts e nt rie s. Ot he r i nf orm at io n is
optio nal. Yo u may enter t he inf or ma tio n in any orde r
by scrolling through the entry details.
After you have entered the number or address,
Contacts type, and any other info rmation you want,
you can press A under Done to save the entry to
Contacts.
To cancel a Contacts entry at any time press, e to
return to the idle sc ree n.
Tip: In some fields that require you to enter
inform ation, yo u ca n be gin enteri ng the
information from the keypad instead of
pressing A under Change.
To create a Contacts entry:
1 To access the entry details screen:
Select Contacts > [New Contact]. -or-
From the Contact s list, press m. Scroll to New.
Press A under Select.
2 If you want to assign a name to the entry:
With the Name field highlighted, press A under
Change.
Enter the name. See “Ent ering Text” on page 75.
When you are finished, press A under Ok.
3 If you want to assign a ring tone to the name:
With the Ringer field highli gh t ed, pres s A unde r
Change.
Scroll to the ring tone you want to assign. Press
A under Select.
4 To assign a Cont acts type to the number or
address being stored:
With th e Co nt ac ts type fi el d highl i gh ted, pr es s A
under Change.
Scroll to the Contacts type you want to assign.
Press A under Select.
5 To store a number or address:
With the # field (or ID for an email address, or IP
for an IP addre s s) hi gh lighted , pres s A under
Change.
27
Page 38

Contacts
Enter the number or address. For phone
numbers, use the 10-digit format. For email
addresses, see “Entering Text” on page 75.
Tip: Press A under Browse to sele ct a numb er
or address from Contacts, the recent calls
list, or Memo.
When yo u ar e finis h ed, press A under Ok.
6 If you want to ass ig n more opt io ns to the num be r ,
press A un der Change with the [Options] field
highli ghted. See “Assigning Options”.
7 If you want to add more numbers or addresses to
the entry:
Scroll past the in form ation yo u al ready enter e d.
Enter th e addit iona l infor mat ion for the en try usi ng
step 2 through s t ep6. You mus t ass ign a n ame to
the entry, if you have not already.
8 Press A under Done.
Assignin g Opt i on s
1 If you have not already, pres s A under Change
with the [Options] field highlighted
2 The default Speed Dial number assigned to a
phone nu mber is displayed in the Speed # field.
This is always the next available Speed Dial
location.
28
If you want to ass ign the phone number to a
different Speed Dial location:
With the Speed # field highlighted, press A
under Change.
Press and hold A under Delete to dele te the
current Speed Dial number.
Enter t he new Speed Dial number using the
keypad.
When you are finished, press A under Ok.
3 When you are finished, press A under Back.
Storing Numbers Faster
To store numbers to Contacts from the recent call
list, see “Stor ing R ec ent Call s to Conta ct s” on page
23.
To store numbers to Contacts from Memo, see
“Memo” on page 73.
To store numbers to Contacts from the idle screen:
1 Use the keypad to enter the number you want to
store.
2 Press m.
3 Select Store Number.
4 To store the number as a new entry, select [New
Contact]. -or-
Page 39

Editing Entries
To store the number to an existing entry, select
the entry.
5 With the Contacts typ e field highlighted, scroll left
or right to display the Contacts type you want to
assign the number.
6 If you want to add more information to the entry,
follow the applicable instructions in “Creating
Entries” on page 27.
7 Press A under Done.
Editing Entries
1 From the Contacts list, scroll to the entry you want
to edit.
2 Press m.
3 Select Edit. The entry details screen displays.
4 Follow the applicable instructions in “Creating
Entries” on page 27 to edit the various fields.
Deleting Entries
Delete an Entry
1 From the Contacts list, scroll to the entry you want
to delete.
2 Press m.
3 T o delete the entire entry, scroll to Delete
Contact.
4 Press A under Select.
5 Press A under Yes to confirm .
Delete a Number or Address
1 From the Contacts list, scroll to the entry that
cont ains the number or address you want to
delete.
2 Scroll left or right to display the Contacts type for
the number you want to delete.
3 Press m.
4 Scroll to Delete Number.
5 Press A under Select.
6 Press A under Yes to confirm .
Note: If an entry contains only one number or
address, deleting the number or address
deletes the entry.
Checking Capacity
To see how many numbers are stored in Co ntacts:
1 From the Contacts list, press m.
2 Select Capacity.
29
Page 40

Contacts
Creating Pauses and Waits
When storing a number, you can program your
phone to pa us e or w ai t bet ween digit s whil e dialing.
A pause ma kes you r ph one pause f or 3 se conds
before dialing further. A wait makes your phone wait
for your response before dialing further.
This feature is useful when using voice mail or other
automa ted phon e sy st em s th at req uire you to dia l a
phone number and then enter an access number.
To progr am a pause:
Press and hold * until the letter P appears. The
P repres ents a 3-second pause.
If you store 17035551235P1234, when you select
this number and make a call , your phone dials the
first 11 digits, pauses for 3 seconds, then dials the
last 4 digits.
If you want a pause longer than 3 seconds, press
and hold * more than once. Each P represents a
3-second pause.
To program a wait:
Press and hold * until the letter W appears. The
W means your phone waits before dialing further.
30
If you store 17035551235W1234, when you select
this numb er and make a cal l, yo ur ph on e dials the
first 11 digits and then waits. A message appears
asking if you want to send the res t of the dig its .
Press A under Yes to dial the last 4 digits.
Tip: You can create pauses and waits while
dial ing a number from the keypad. See
“Creating Pauses and Waits While Dialing”
on page 67.
Internat i o n a l N u mbers
Note: This feature may not be offered by your
service provider.
When storing a number that you plan to use for
international calls, use Plus Dialing:
1 Press and hold 0 for two seconds. A “0”
appears, then changes to a “+”.
Note: The network translates the “+” into the
appropriate international access code
needed to place the call.
2 Enter the country code, city code or area code,
and phone number.
For inf ormat ion ab out maki ng int ernat ional calls , see
“Making International Calls” on page 67.
Page 41

Accessing Contacts with GSM Phones
If you plan to use the information stored in Contacts
with an i2000, i2000plus, or any other G SM phone,
you must purchase CompanionPro. Go to
www.motorola.com/idenupdate or your service
provider’s web site for more information.
You can use CompanionPro to make the Contacts
information saved to your i305 phone’s SIM card
accessible in this type of phone.
Accessing Contacts with GSM Phones
31
Page 42

32
Page 43

Call Forwardi ng
Call forwarding sends calls to the phone numbers
you speci fy. You c an fo rwar d a ll cal l s t o one n umb er
or forwar d missed calls to different numbers
depend ing on the reason yo u missed the call.
You can forward phone lines1 and 2 independently.
Forwarding All Calls
When you s et your phone to forward al l calls, an
icon ap pe ars in t he top row of the display :
G Phone line 1 is active; calls to phone line 1 are
being for w arded.
H Phone line 1 is active; calls to phone lin e2 are
being for w arded.
I Phone line 1 is active; calls to phone lines 1 and
2 are being forwarded.
J Phone line 2 is active; calls to phone lin e1 are
being for w arded.
K Phone line 2 is active; calls to phone lin e2 are
being for w arded.
L Phone line 2 is active; calls to phone lines 1 and
2 are being forwarded.
To forward all calls:
1 From the main menu, select Call Forward.
2 Press A under Change.
3 Select All Calls.
4 Scroll to To.
5 Press A under Change.
6 If you specified a forwarding number for all calls
before, this numb er disp la y s.
To forward calls to this number, press A unde r
Back. -or-
To delete this num be r, pres s A under Change,
then press and hold A under Delete.
To enter the num ber you want to forwa r d ca lls to:
Enter the number using your keypad. -or-
Press A under Search. Select Contacts,
Recent Calls, or Memo. Select the number you
want to enter.
7 Press A under Ok.
All your calls are now forwarded to the number you
specified.
Tip: In some fiel ds, you can select an option by
scrolling left or right instead of pressing A
under Change.
33
Page 44

Call Forwarding
Turning Off Call Forwarding
If you don’t want all your calls forwarded, turn the
feature off:
1 From the ma in menu, select Call Forward.
2 Press A under Change.
3 Select All Calls.
4 Scroll to To.
5 Press A under Change.
6 Scroll to Off.
7 Press A under Select.
All your calls are now sent to your ph one.
Calls you miss are forwarded according to the
options set for missed calls. By default, missed calls
are forwarded to vo ic e ma il.
Forwarding Missed Calls
You can specify a forwarding number for each type
of missed call:
•If Busy — Your phone is on a call or transferring
data.
• If No Answer — You do not answer on the first 4
rings.
• If Unreachable — Your phone is out of coverage
or powered off.
34
Note: If you want a type of missed call sent to
voice mail, the call forwarding number for
that type of missed call must be your voice
mail access number. In most cases, your
voice mail acces s number is your area
code + firs t 3 digi ts of yo ur PTN + MA IL
(6245). To verify your voice mail access
number, contact your service provider.
To forward missed calls :
1 From the main menu, select Call Forw a rd.
2 Press A under Change.
3 Select Detailed.
4 Scroll to If Busy to specify a forwarding number
for calls received when your phone is busy.
5 Press A under Change.
6 If you s pecified a forwarding nu mber for this type
of call before, this number displays.
To forward calls to this number, press A under
Back and go to step 9. -or-
To delete this number, press A under Change,
then press and hold A under Delete.
7 T o enter the number you want to forward this type
of call to:
Enter the number us in g yo ur ke yp ad. -or-
Page 45

Press A under Search. Select Contacts,
Recent Calls, or Memo. Select the number you
want to enter.
8 Press A under Ok.
9 Repeat step 4 through step 8 for If No Answer
and If Unreachable.
When yo u ar e finis h ed, press A under Back.
Viewing Call Forwarding Settings
1 From the main menu, select Call Forward.
2 Press A under Change.
3 Select All Calls.
4 Scroll to To.
5 Press m.
6 Select Retrieve S tatus.
Viewing Call Forwarding Settings
35
Page 46

36
Page 47

Ring Tone s
To set the ring tone your phone makes when you
receive phone calls, message notifications, or call
alerts:
1 From the main menu, select Ring Tones.
2 Make sure VibeAll is set to Off.
3 Scroll through the list of ring tones and select the
one you want to assign. Vibrate set s your ph one
to vibrate instead of making a sound; Silent sets
your phone to neither vibrate nor make a sound.
Tip: Highlighting a ring tone lets you hear it.
4 Press A under Assign.
5 Scroll to the feature you want to assign the ring
tone to.
6 Press A under Select.
Tip: A checkmark next to a feature me ans the
current ring tone has been assigned to it. To
remove t he assi gn me nt: Sc rol l to th e fe at ure .
Press A under Select.
7 To assign the ring tone to other features, repeat
step 5 throug h step 6.
8 When you are finished, press A under Done.
Setting Your Phone to Vibrate
If your phone includes a vibrate feature, you can set
your phon e t o vi bra t e whe n you r ec ei ve p hone cal ls ,
Private calls and group calls, mess ages
notifications, or call alerts.
Note: This is an optional featu re. Contact your
servic e pr ov i de r abou t its av ailabi lit y for
purchase.
Tu rnin g Rin g Tones Off
You can set your phone to make no sound when you
receiv e phone calls, Private call s an d gr o up calls,
messag es noti fic a tio ns , or ca ll al erts . If your ph on e
includes the vibrate feature, you can set your phone
to vibrate instead of making a sound.
These ic on indicate how the ringer is set.
u The phon e never rings.
v The phone always vibrates instead of ri nging.
M The phone does not ring f or phone calls.
These icons may appear at the same time.
37
Page 48

Ring Tones
Never Ring
1 From the ma in menu, select Ring Tones >
SilentAll.
2 Scroll left or right to set SilentAll to On.
Always Vibrate Instead of Ringing
If your ph on e inc lu des a vibra te fe at ure:
1 From the ma in menu, select Ring Tones >
VibeAll.
2 Scroll left or right to set VibeAll to On.
Tip: Pressing the volume controls to turn down
the volume as far as possible sets VibeAll to
On.
Do Not Ring for Some Features
To set individua l ring options for phone calls,
messages notifications, or call alerts:
1 From the ma in menu, select Ring Tones.
2 Make sure VibeAll or SilentAll is set to Off.
3 Scroll through the list of ring tones to Silent. -or-
If your phone incl udes the vibrat e feature, scroll
through the list of ring tones to Vibrate.
4 Press A under Assign.
5 Scroll to the feature you want to set to make no
sound.
38
6 Press A under Select.
7 T o assign Vibrate or Silent to another feature,
repeat step 5 through step 6.
8 When you are finished, press A under Done.
Note: To set ring options for Private calls and
group calls, see “Setting Your Phone to Not
Ring” on page 79 .
Ring and Vibrate
To set a your phone to ring and vibrate when you
receive phone calls or call alerts:
1 From the main menu, select Ring Tones.
2 Make sure VibeAll is set to Off.
3 Scroll through the list of ring tones and select the
one you want to assign.
4 Press m.
5 Select Assign w/Vi be.
6 Select the feature you want to set to ring and
vibrate.
7 When you are finished, press A under Done.
This icon S appears on the display.
Page 49

Assigning Ring Tones to Contacts
Assigning Ring Tones to
Contacts
You can set the ring tone your phone makes when
you rece iv e phone ca ll s or call alerts fr om so me on e
you have stored in Contacts.
1 From the m a in men u, se le ct Ring Tones.
2 Make sure VibeAll or SilentAll is set to Off.
3 Scroll through the list of ring tones to the one you
want to assign. Highlighting a ring tone lets you
hear it.
4 Press A under Assign.
5 Select A Contact.
6 Scroll to the Contacts entry you want to assign
the ring tone to.
7 Press A under Select.
Viewing Ring Tone Assignments
1 From the main menu, select Ring Tones.
2 Make sure VibeAll or SilentAll is set to Off.
3 Highlight any ring tone.
4 Press m.
5 Select Overview.
6 Scroll t o view ring tones assigned to features and
Contact entri es.
Downloading More Ring Tones
If you want to use other ring tones, you can
download them into your phone for a fee. Go to
www.motorola.com/idenupdate for a selection of
custom ring tones and downloading instructions.
Note: Ring tones purchased from thi s web site
may be downloaded only once. If you
delete a ring tone from your phone, you
must purchase it again to download it
again.
Managing Memory
To view the amount of memory available for custom
ring tones:
1 From the main menu, select Ring T ones.
2 Make sure VibeAll or SilentAll is set to Off.
3 Highlight any ring tone.
4 Press m.
5 Select Memory Usage.
Deleting custom ring tones frees memory.
39
Page 50

Ring Tones
Deleting Custom Ring Tones
To delete a custom ring tone:
1 From the ma in menu, select Ring Tones.
2 Make sure VibeAll or SilentAll is set to Off.
3 Scroll to the ring tone you want to delete.
4 Press m.
5 Select Delete.
6 Press A under Yes to confirm.
40
Page 51

Messages
To access your voice mail mess ages, text and
numeric messages, Net alerts, and any other types
of messages you are able to receive, go to the
mess ag e ce nter:
1 Press A under Mesg. -or-
From the main menu, select Messages.
2 Scroll to the type of message you want to access.
3 Press A under the display option on the left.
The message center shows how many messages
you have of each type. You can listen to, read, or
delete these messages.
Message Notifications
When yo u r ec ei ve a mes s age, your ph on e notifies
you with text on the display and a notification tone or
vibration. You can access the messag e or dismiss
the notification.
If you dismiss the notification, the messa ge is not
deleted. It can be accessed through the message
center.
If you are not on a phone call when you receive a
message, your phone sounds a notification tone
every 30 seconds until you access the message or
dismiss the alert.
If you are on a call when you r eceive a message,
your phon e may sou nd a no t ifi cat i on to ne du rin g t he
call or after you end the call, dependi ng on how you
set your notification options.
Setting Notification Options
To control wheth er your phone sounds message
notification tones while you are on phone calls:
1 From the main menu, select Settings > Phone
Calls > Notifications.
2 Choose the option you want:
• Receive All — Tones sound during calls for all
types of messages.
• Msg Mail Only — Tones sound during calls for
mail messages; tones for all other types of
message s are held until you end calls.
•Delay All — T ones for all types of messages
are held until you end cal ls.
3 Press A under Select.
Note: Delay All is the default setting.
Tip: To set notification options during a call: Press
m. Select In Call Setup > Notifications.
41
Page 52

Messages
Voice Mail
Note: To receive voice mail messages, you must
first set up a voice mail account with your
servic e provider.
When you receive a voice mail message, New
Voice Mail Message appears on the display.
To call your service provider’s voice mail system
and liste n to the messag e:
Press A under Call.
To dism iss the message notification:
Press A under Back. This icon
the display, reminding you that you have a new
message.
Sending Unanswered Calls to Voice Mail
To send a phone call to voice mail instead of
answering it:
Press e. -or-
Press A under No.
If the caller leaves a message, this icon
appears on the display, reminding you that you have
a new messa g e.
42
y appears on
y
Text and Numeric Messages
The phone’s display refers to text and numeric
messages as Text Messages.
These messages can be up to 140 letters or 20
digits long. You can store up to 16 of these
messages. Each message is stamped w ith the date
and time it was left.
If your phone is powered off when you receive a
message, your phone notifies you the next time you
power it on. If you are out of your coverage area,
your phone alerts you when you return to your
coverage area.
Your phone attempts to deliver these mes s ages for
the am ount of time you sel ected when you set up
your messaging information.
Tip: While reading a text and numeric message
that con tai ns a phon e numbe r, you can pre ss
s to call that nu mber.
Receiving a Message
When you receive a text and numeric message,
New Text Message appears on the di splay.
To view the message:
1 Press A under Read.
Page 53

Net Alerts
2 If the message fills more than one screen, scroll
to read it.
3 To keep the message, scroll to the end of the
message and press A under Save. -or-
To delete the message, press A under Delete.
To dismiss the message notification:
Press A under Back. This icon w appears on
the display, reminding you that you have a new
message.
Reading from the Message Center
1 From t h e me ss ag e center, selec t Text Msg s.
2 Scroll to the message you want to read.
3 Press A under Read.
4 If the message fills more than one screen, scroll
to read it.
5 To keep the message, scroll to the end of the
message and press A under Save. -or-
To delete the message, press A under Delete.
Net Alerts
Note: This feature may not be offered by your
servic e provider.
Net aler ts are notifica tions that you have a text and
numeric message sent from:
• An i305 phone
• Your service provider’s website
• Any email application
When you receive a Net alert, a notification appears
on the display.
If you dismiss the notification, this icon w appears
on the dis play, reminding y ou that you have a new
message.
43
Page 54

44
Page 55

Mo bile Originat e d Text Messaging
With mobile originated text messaging, you can
send and receive short text messages to and from
other iD EN phones. Messages you receive appear
on your ph one’s display and i n the tex t mes s ag e
inbox. You access these messages thro ugh the
message center. See “Messages” on page 41.
Note: This feature may not be offered by your
servic e provider.
Setting Up
Befor e yo u be gi n using mobil e or i gi nated tex t
messaging, you may need to set up your signature,
servic e center number, and expiration information:
1 From the m a in men u, se le ct Messages.
2 Scroll to Te xt In box .
3 Press m.
4 Select Text Msg Setup.
5 With the Signature field highlighted, press A
under Change.
Enter your signature. It may be up to 11
charac ters long. See “E ntering Text” on page 75.
When you are finished, press A under Ok.
6 With th e Srvc Cntr No field hi gh li g hted , p ress A
under Change.
Enter the phone number of your service center. If
you do not know this number, contact your
service provider.
When you are finished, press A under Ok.
7 With the Expire After field highlighted, press A
under Change.
This is the amount of time messages you send
are saved if they cannot be delivered. After this
period, they are discarded.
Scroll or press A under Q to change field.
When you are finished, press A under Done.
8 Press A under Back to save the information you
entered.
Receiving Messages
When you receive a message, your phone notifies
you as it woul d wit h an y othe r type of mes sa ge . See
“Messag e Noti fic a tio ns ” on page 41.
To view t he message:
Press A under Read.
To dismiss the message notification:
Press A under Exit.
45
Page 56

Mobile Originated Text Messaging
Reading Messages From the Message Center
1 From the ma in menu, select Message > Text
Inbox.
2 Scroll to the mess age you want to read.
3 Press A under Read.
4 If the message fills more than one screen, scroll
to read it.
5 To keep the message, press A under Save. -or-
To delete the messa ge, press A unde r Delete.
Tip: To see more choices, including replying to
the message, press m.
Your te xt inbox holds up to 16 messages.
Creatin g a nd Se n din g Messages
1 From the ma in menu, select Messages > Text
Inbox > [Create Msg]. -or-
From the ma in menu, select Messages > Text
Outbox > [ Create Msg].
2 Press A under Create.
3 To address the message:
46
Use the keypad to enter the phone number of the
person you want to send the me ssage to. -or-
Press A under Browse. Select Contacts,
Recent Calls, or Memo. Enter the number from
Contacts, the recent calls list, or Memo, as you
would when making a call.
When you are finished, press A under Ok.
4 Enter the text of the message. See “Entering
Text” on page 75. -or-
To use a quick note: Press A under Browse.
Scroll to th e q uick n ot e y ou wa nt. Pre ss A u nder
Select. For more inf ormation on quick notes, see
“Using Quick Notes” on page 47.
If you wa nt t o a dd y ou r sig na t ure: Pr es s m. Select
Add Signature.
When you are finished, press A under Ok.
5 If you want t o sen d the me ssa ge, pr ess A under
Yes. -or-
If you want to request confirmation of delivery,
specif y the type of message you want to send,
save the message as a draft, or delete the
message without sending it, press A under No.
6 If you want to request confirmation of delivery:
With the Report field highlighted, press A under
Change. Select Yes.
Page 57

Creating and Sending Messages
7 If you want to specify the type of message you
want to send:
With the Send As field highlighted, press A
under Change. Scroll to the message type you
want. Press A under Select.
8 To send the message: Press s. Press A under
Yes. -or-
To save the mes s ag e as a draf t wit h ou t se nd ing
it: Press m. Scroll to Save As Draft. Press A
under Select. -or-
To delete the message without sending it: Press
m. Scroll to Delete. Press A under Select.
Tip: In some fields, you can select an option by
scrolling left or right instead of pressing A
under Change.
Addressing Messages From the
Recent Calls List
1 From the recent calls list, scroll to the n ame you
want to send a message to.
2 If the entry has more than one phone number
stored, view the phone number you want to send
the message to.
3 Press m.
4 Select Compose SMS. The me ssage is
automatically addressed to the phone number
you chos e.
5 Follow step 4 through step8 of “Creating and
Sending Messages” on page 46.
Addressing Messages From the Idle Screen
1 Using the keypad, enter the number you want to
send a me ssage to.
2 Press m.
3 Select Compose SMS. The me ssage is
automatically addressed to the phone number
you chos e.
4 Follow step 4 through step8 of “Creating and
Sending Messages” on page 46.
Using Quick Notes
Quick notes are short, pre-written text messages
that you can create, edit, and send. You can store
up to 20 quick notes. A quick note may be up to 30
characters long.
To create a quick note:
1 From the main menu, select Messages > Quick
Notes > [New Quick Note].
2 Press A under Create.
47
Page 58

Mobile Originated Text Messaging
Enter text. See “Entering Text” on page 75. -or-
To choose from pre-installed notes: Press A
under Brows e. Scroll to the note you want. Press
A unde r Select.
3 Press A under Store.
Tip: For more options, including sending the
quick note, press m.
Using Drafts
When you save a message as a draft, it is saved in
the drafts folder. You must have a draft saved to
have a dr afts folder.
To edit a draft:
1 From the ma in menu, select Messages > Drafts
Folder.
2 Press A under Change.
3 To edit the fields you want to change, follow
step 3 through step8 in “Creating and Sending
Messages” on pag e 46 .
If you have a draft saved, you ca n create more
drafts in the drafts folder:
1 From the ma in menu, select Messages > Drafts
Folder > [Create Msg].
2 Press A under Create.
48
3 Follow step 3 through step 7 in “Creating and
Sendin g Messages” on page 46.
4 Scroll to Save As Draft.
Using the Out box
Messages you have sent are stored in the outbox.
These icons appear next to messages in the outbox:
4 Sent and confirmed.
9 Send attempted.
0 Forwarded.
5 Received by addressee.
6 Not received by addressee.
8 Send failed.
7 Re-sent.
R Locked.
Resending Messages
To resend a message:
1 From the main menu, select Messages > Text
Outbox.
2 Scroll to the mess ag e you wan t to res en d.
Page 59

Managing Mem ory
3 Press m.
4 Select Re-send.
5 Press A under Yes to co nf irm .
Deleting Sent Messages
To delete a sent message:
1 From the m a in men u, se le ct Messag es > Text
Outbox.
2 Scroll to the message you want to delete.
3 Press m.
4 Select Delete.
5 Press A under Yes to co nf irm .
To delete all unlocked sent messages:
1 From the m a in men u, se le ct Messag es > Text
Outbox.
2 Press m.
3 Select Delete All.
4 Press A under Yes to co nf irm .
Locking Sent Messages
When you lo ck a mes sag e, it ca nn ot be de le te d u nti l
you unlock it.
1 From the m a in men u, se le ct Messag es > Text
Outbox.
2 Scroll to the message you want to lock or unlock.
3 Press m.
4 Scroll to Lock to lock the message. -or-
Scroll to Unlock to unlock the message.
5 Press A under Select.
Managing Memory
Your text inbox, outbox, and drafts folder have a set
amount of memory available for storing messages.
The text inbox holds 16 messages. If the text inbox
is full, you cannot receive messages until you delete
some.
The outbox and drafts folder share memory space.
Together they can hold 20 messages. If the outbox
and drafts fold er memory is full, you cannot send
messages or save drafts until you delete some.
To view t he amo un t o f memo r y av aila bl e i n yo ur t ex t
inbox:
1 From the main menu, select Messages > Text
Inbox.
2 Press m.
3 Select Memory Meter.
To view the amount of memory available in your
outbo x and drafts fold er:
1 From the main menu, select Messages > Text
Outbox.
49
Page 60

Mobile Originated Text Messaging
2 Press m.
3 Select Memory Meter.
50
Page 61

GPS Enable d
Your phone’s GPS Enabled feature uses information
from Global Positioning System (G PS) satellites
orbiting the Earth to determine the approximate
geographical location of your phone, expressed as
latitude and longitude. The availability and accuracy
of this location infor m ation (and the am ount of time
that it takes to calculate it) will vary depending on
the environment in which you are using the GPS
feature. For example, GPS location fixes are often
difficult to obtain indoors, in covered locations,
between high buildings, or in ot he r situ ations whe re
you have not established a clear broad view of the
sky. SEE: “IMPORTANT: Things to Keep in
Mind”.
When you m ake a 911 emergency call, the GPS
feature of your phone can help emer gency
personnel locate you if your phone has adequate
access t o GP S sat e ll ite sig na ls an d your em erge nc y
response center is equipped to process such
information.
You can also use the GPS feature to view your
approximate location. Location information appears
on the phone’s display.
If your phone is connected to a laptop computer or
similar device, software running on that device can
request your location. To protect your privacy, you
can control whether these requests are granted.
IMPORT ANT: Things to Keep in Mind
If you ar e us in g the GP S feat u re o f y ou r ph one whi l e
driving , pl e ase g iv e f u ll att e nt ion t o d riv in g an d to t he
road.
Where adequate signals from multiple satellites
are not available (usually because your GPS
antenna cannot establish a view of a wide area of
open sky), the GPS feature of your phone WILL
NOT WORK. Such situations include but are not
limited to:
• In underground locations
• Inside of buildings, trains, or other covered
vehicles
• Under any other metal or concrete roof or
structure
• Between tall buildings or under dense
tree-cover
• Near a powerful radio or television tower
51
Page 62

GPS Enabled
• When your GPS antenna is covered (for
example, by your hand or other object) or
facing the gro und
• In tem peratu re e xtrem es out sid e the op erat ing
limits of your phone
Walking or drivi ng ve ry slo w ly ma y also
substantially reduce GPS performance.
Even where location information can be
calculated in such situations, it may take much
longer to do so, and your location estimate may
not be as accurate. Therefore, in any 911 call,
always report t he location to the emergency
response center if you can and if you cannot,
remain on your phone for as long as the
emergency response center instructs you.
Even where adequate signals from multiple
satellites are available, your GPS feature will
only provide an approximate location, often
within 150 feet (45 meters) but sometimes much
further from your actual location. Advice on how
to improve GPS performance is provided in
“Enhancing GPS Performance” on page 54.
While the GPS feature of your phone can be a
valuable navigational aid, it does not replace the
need for careful navigating and good judgment.
Never rely solely on one device for navigation.
Remember that the accuracy of the location
52
information and the time needed to obtain it will vary
depending on circumstances, particularly the ability
to receive signals from adequate numbers of
satellites.
On emergency calls, your phone uses assistance
information from the phone network to improve the
speed and accuracy of your phone’s location
calculation: if such as sistance information becomes
unavailable, it may reduce the speed and accuracy
of the location calculation.
The satellites used by the GPS feature of your
phone are controlled by the U.S. government and
are subject to changes implemented in accordance
with the Department of Defense GPS user policy
and the Federal Radionavigation Plan. These
change s ma y af fe ct t he per f or m a nc e of t he GPS
featur e of yo ur ph on e.
Making an Emer gency Call
Dial 911 to be connected to an emergency response
center. If you are on an active call, you must end it
before calling 911.
When you make an emergency 911 call, the GPS
feature of yo ur phone begins to seek in f orm a t io n to
calculate yo ur approximate l ocation. It will take the
GPS feature of your phone some time to
deter mine your approximate locatio n. Even
where your phone has good access to sufficient
Page 63

Viewing Your Approximate Location
GPS satellite signals and network assist data, it may
take 30 seconds or more to dete rmine the
approximate location. This time will increase where
there is reduced access to satellite signals. When
your approximate location is determi ned, it is made
available to the appropriate emergency response
center.
In some cases, your local 911 emergency
response center may not be equipped to receive
GPS location information. For this reason, and
because the GPS location information reported is
only approximate or may not be available in your
location (see “IMPORTANT: Things to Keep in
Mind” on page 51), always report your location to
the 911 operato r you speak to wh en making an
emergency call, if able, just as you would when
using a phone without GPS capabilities.
Note: If yo u are con ce r ne d ab out whether your
local 911 emergency response center is
equipped to receive GPS location
information, contact your local authoritie s.
In general, if your phone has access to signals from
more GPS satellites, your location will be
determined faster and more accurately than if your
phone ha s access to signals f rom fewer GPS
satellites.
If your phone does not have adequate access to
GPS satellites signals, the location of the nearest
cell tower in contact with your phone is automatically
made av ai labl e t o th e e me rgen cy r es po nse c en te r , if
the center has the capability to receive such
information.
See “En hancing GPS Performance” on page 54 for
information on how to help your phone det ermine
your location.
Viewing Your Approximate
Location
1 From the main menu, select GPS > Position.
2 Scroll to view the entire screen.
This displays the following information about the last
time your location was calculated:
• The time (as Greenwich Mean Time) and date
that the location was last calculated.
• The approximate location, expressed as latitude
and longitude.
• The estimated accuracy of the calculated
location. This estimate of accuracy is on ly a very
rough estimate and may vary substantially from
the ac tual accuracy of the approximate location
information reported.
53
Page 64

GPS Enabled
• The number of satellites used to calculate the
location. In general, more satellites make for
better accuracy.
To calcu la te your loca tion again:
Press A under Rfrsh.
It may take your phone several minutes to complete
the pro ces s of det er mini n g yo ur l oca t ion. Dur i ng th is
time, a message usually appears on your phone’s
display saying your phone is scanning for satellites.
For tips on getting the best locat ion calculation, see
“Enhancing GPS Performance”.
The Position screen displays the updated
information.
To canc el a location calculation before it is
completed:
Press A under Cancel to return to the Position
screen. -or-
Press e to return to the idle screen.
Each time approximate locati on of your phone is
calculated, the latest location information is stored in
your phone and remains there even when your
phone is powe red off. You will se e thi s in form a tio n
the next t im e yo u vi ew the Position screen.
54
If you received a phone call or alert while attempting
to determine your location, the Position scre en wil l
disap pear, but your phone will continue attemp ting
to determine its loc a tio n. If it is succe s sf ul, the new
location information will be displayed the next time
you view the Position scre en .
Enhanci ng G PS P er for ma nce
Sometim es the GPS feat u re of yo ur phone ma y be
unable to complete a location calculation
successfully. If this happens when you ar e making
an emergency call, the location of the nearest cell
tower in contact with your phone is made available
to the appropriate emergency response center if the
center has the capability to receive such
informa t io n. If thi s ha pp en s whe n yo u ar e try in g to
view your location on the phone’s display, you will
see a mess ag e in di cating tha t your phon e ca nn ot
access satellites .
To improve accuracy and increase yo ur chances of
a successful calculation, do th e following while your
phone is determining your approximate location:
Page 65

Updating Satellite Almanac Data
• Stay in the open. The GPS feature works best
where there is nothing between your phone and a
large amount of open sky. If possible, go outside,
away fr om tall buildings and foliage. While
perfor mance in a building is improved by moving
closer to windows, glass with certain sun
shielding films may block satellite signals.
• Hold your phon e to en hance rec ep ti on. Signal s
from GPS satellit es are tran s mitte d to your G PS
antenna, which is inside the back of your phone,
opposite the earpiece, above the label with your
servic e provider’s nam e on it. Hol d yo ur ph on e
away from your body, giving the antenna clear
access to satelli te signals. Do not c over the
antenna area with your fingers or anything else.
GPS antenna area
• Stand still. If possible, stand still until your phone
is fi nishe d d et erm in in g your l oca tio n. Mov ing y our
phone at a walking pace while your phone is
calculating your approximate location may
substan tially de cre ase GPS pe r formance.
• In a car. When using the GPS Enabled feature in
a car, position you r phone so that the GP S
antenn a ha s g ood a cce ss t o G PS si gn als t hro ug h
the car’s windows. Typically, the GPS antenna
has best access to GPS signals in a car when
place d near a window.
Note: Although moving your phone at a walking
pace decreases GPS performance, moving
it at the speed of a moving c ar does not .
• Stay in network coverage. Depending on who
your s ervice provider is, the network will provide
your phone with information that helps determine
your loca t io n mo r e quic k ly and ac c u ra t e ly.
Updating Satellite Almanac
Data
Another way to keep the GPS feature of your phone
working well is to keep your satellite almanac data
up to da te.
55
Page 66

GPS Enabled
The United States government maintains an
almanac of data about where GPS satellites are as
they orbit the Earth. This information is available to
your phone. Keeping your satellite almanac up to
date helps your phone determine your location more
quickly.
The almanac contains information about the location
of satellites, their operational st atus, and other
satellite information. Keeping this informatio n
updated enhances the performance of your G PS
feature. In most cases, your phone will be able to
get a fix in strong satellite signal conditions with
outdated almanac data, but it may take longer.
Note: When you make an emergency call, your
phone do es not rely upon th e almanac to
determine your location.
If your satellite almanac data is out of date, your
phone may prompt you to update it. Follow the
instructions that appear on the phone’s display. You
may be as ked to go to a web site or call a customer
care number.
Setting Privacy Options
Your phone’s GPS privacy opt ions control whether
softwa re applications may view the location o f your
phone.Y o u may s et yo ur ph on e t o on e o f t hese G P S
privac y op t io ns :
56
• Restricted — No software applications may view
the loca tion of your phon e. How ev er, loc ati on
information may still be available to the phone’s
owner, fleet ma na ger, or account ad mi nistrator.
•Unrestricted — All applications may view the
location of your phone, without notifying you.
• By Permission — When an application attemp ts
to view the location of your phone, you will be
prompted to give permission. However, location
information may still be available to the phone’s
owner, fleet ma na ger, or account ad mi nistrator.
Note: Privacy options do not apply to the
transmission of location information during
emergency 911 calls.
To set your GPS privacy options:
1 From the main menu, select GPS > Privacy.
2 If your GPS PIN security feature is enabled, enter
your GPS PIN. (See “Setting the GPS PIN
Security Feature” for more information.)
3 Scroll to the privacy setting you want.
4 Press A under Select.
Setting the GPS PIN Security Feature
To prevent your GPS privacy settings from being
altered without your knowledge, your GPS privacy
opti on can be protected by a PIN.
Page 67

Using GPS with Map Software
When you receive your phone, the GPS security
feature is turned off, so you do not have to enter a
GPS PIN to access your GPS privacy options. If you
turn this feature on, you will be required to enter a
GPS PIN to access your GPS privacy options.
To turn the GPS Enabled security feature on or off:
1 From the main menu, select Settings > Security
> GPS PIN.
2 Scroll to On or Off.
3 Press A under Select.
4 Enter the current GPS PIN.
Note: When you receive your phone, your GPS
PIN is 0000 .
5 Press A under Ok.
To change your GPS PIN:
1 From the main menu, select Settings > Security
> Change Password > GPS PIN.
2 Enter the current GPS PIN.
Note: When you receive your phone, your GPS
PIN is 0000 .
3 Press A under Ok.
4 Enter the new 4- to 8-digit GPS PIN.
5 Press A under Ok.
6 Enter the new 4- to 8-digit GPS PIN to confirm.
7 Press A under Ok.
Using GPS with Map Software
You can us e the GPS feature of your phone to
provide approximate location data to a laptop
computer or s imi l ar de vi ce that is runn in g i nter a cti ve
map software such as that made by DeLorme or
Microso ft. Th is way, if your phon e ha s go od acc es s
to GPS sig na ls , your ap pro xi mat e pos it i on on a map
can be mad e available as you travel in a vehicle.
To do this, connect your phone to your laptop (or
other device) with a data cable and set your phone
to transmit data (see “Getting Started” on page 58).
Your phone then provides your approximate location
to the device running the map software, which
displa ys your location on a map. Your phone
provides an updated location every second and the
map softw are displays yo ur changing location on its
map.
See “En hancing GPS Performance” on page 54 for
more details on obtaining good location information.
Note: Because your phone is continuously
determining your location, using the GPS
feature of your phone with map software
uses the phone’s battery power quickly.
57
Page 68

GPS Enabled
Software Compatib ility
Your phone send s location infor mation to your
laptop or othe r device usi ng the standard Na tional
Marine Electronics Associ ation (NMEA) format.
Your phone supp orts output messages in
NMEA-0183 format and su pports the foll owing
NMEA-0183 sentences: GGA, GLL, GSA, GSV,
RMC, and VTG.
The map software running on your laptop or other
device must support NMEA 3.0.
Getting Started
To connect your phone to your laptop or other
device:
1 Open the connector cover.
connector
cover
58
2 With the phone’s display facing up, insert the data
cable’s connector into the accessory connector,
until you hear a click.
3 Insert the data plug into the COM port of your
laptop or other device.
Make sure no other application is using the COM
port selected.
Make sur e t he CO M port setting s of yo ur laptop or
othe r device are set to the following:
• Bits per second : 4800
• Data bits: 8
• Parity: None
• Stop bits: 1
• Flow control: Hardware
Page 69

To set your phone to send location inf ormation to
your laptop or other device:
1 From the main menu, select GPS > Interface.
2 With NMEA OUT highlig hted, pres s A under
Change.
3 Scroll to On.
4 Press A under Select. Your phone is now
sending locat ion data to your laptop or other
device.
To stop your phone from sending location data to
your laptop or other device:
Set NMEA OUT to Off.
Each time you power your ph one on, NMEA OUT is
automatically set to Off.
Using GPS with Map Software
59
Page 70

60
Page 71

Voice R e cords
Note: This is an optional feature. Contact your
servi c e provider about its availability for
purchase.
A voice record is a recording you make with your
phone an d can play back. You c an record notes to
yourself or phone calls.
Your phone can store up to 20 voice records, with a
total tim e of 3 minutes or mo r e, de pe nding on
available memory.
Creating Voice Records
To record a note to yourself:
1 From the m a in men u, se le ct VoiceRecd > [New
VoiceRec].
2 Press A under Record. Say the message you
want to record into the microphone.
3 When you are fini sh ed recor d ing, pre ss A und er
Stop.
To add to the end of voice record:
1 From the m a in men u, se le ct VoiceRecd.
2 Scroll to the voic e record you want to add to.
3 Press m.
4 Scroll to Add To.
5 Press A under Select. Say the mess age you
want to add int o the microphone.
6 When you are finished recording, press A under
Stop.
To record a phone call:
1 While on an active call, press m.
2 Scroll to Record.
3 Press A under Select to start recording.
4 When you are finished recording, press A under
Stop.
Note: Rec ord ing of phon e ca ll s is subject to
applic ab le law s reg ard ing priva c y an d
recording of phon e co nv ersatio ns .
Playing Voice Records
1 From the main menu, select VoiceRecd.
2 Scroll to the voice record you want to play.
3 Press A under Play.
4 T o stop the voice record while it is playing, press
A under Back.
Tip: To fast forward, scroll right. To rewind, scroll
left. To pause or resume, pr ess an y key.
61
Page 72

Voice R ecords
Labelling Voice Records
When you crea t e a voic e rec ord, it is labe le d w ith
the time and date it was recorded. You can then
rename it with a custom label.
1 From the ma in menu, select VoiceRecd.
2 Scroll to the voice record you want to label.
3 Press m.
4 Select Label.
5 Enter the label you want to assign. See “Entering
T ext” on page 75.
6 Press A under Ok.
Deleting Voice Records
To delete a voice record:
1 From the ma in menu, select VoiceRecd.
2 Scroll to the voice record you want to delete.
3 Press m.
4 Select Delete.
5 Press A under Yes to confirm.
To delete all voice records:
1 From the ma in menu, select VoiceRecd.
2 Press m.
3 Select Delete All.
62
4 Press A under Yes to confirm.
Locking Voice Records
When y ou loc k a m ess ag e, it ca nn ot be delet e d un til
you unloc k it.
1 From the main menu, select VoiceRecd.
2 Scroll to the mess ag e yo u wan t to lock or unlo ck.
3 Press m.
4 Scroll to Lock to lock the message. -or-
Scroll to Unlock to unlock the message.
5 Press A under Select.
When a voic e record is lo ck ed , t hi s ic on R appears
next to it.
Managi ng Memo ry
To view the amount of memory available for voice
records:
1 From the main menu, select VoiceRecd.
2 Press m.
3 Select Memory.
To free more memory by deleting all unlocked voice
records:
1 From the main menu, select VoiceRecd.
Page 73

2 Press m.
3 Select Memory.
4 Press A under Delete.
5 Press A under Yes to co nf irm .
Note: Voice records a re stored in your phone
using the same memory space used to
store ring tones. Deleting ring tones frees
memory space for voice records.
Managing Mem ory
63
Page 74

64
Page 75

Advanced Calling Features
Call Waiting
Call Waiting lets you receive a second call while on
an active call. Call Waiting is always available,
unless you turn it off for a specific call.
If you are on a call and receive a second c all, your
phone emits a tone and displays a message sayin g
you are receivin g a second call.
To accept the second call and put the active call on
hold:
Press A under Yes.
To accept the second call and end the active call:
1 Press e.
Your phone rings with the second call.
2 Answer the second call.
To decline the second call:
Press A under No. If you subscribe to voice
mail, the call is forwarded to your voice mail box,
unless you set Call Forward for If Busy to a
different number.
Switching Between Calls
When you accept a second call, the display shows
the name or number of each call, with an icon
indicating which call is active:
Y Phone call is active.
Z Phone call is on hold.
To make the call on hold active and put the active
call on hold:
Press A under Switch.
Tu rn Off Call Waiting
To turn off Call Waiting during a call:
1 Press m.
2 Select In Call Setup > Call Waiting.
3 Press A under Change.
4 Scroll to Off.
Tip: To turn Call Waiting back on while still on the
call: Scroll to On.
5 Press A under Select.
65
Page 76

Advanced Call ing Features
To turn off Call Waiting for the next call you make or
receive:
1 From the ma in menu, select Settings > Phone
Calls > Call Waiting.
2 Press A under Change.
3 Scroll to Off.
4 Press A under Select.
Call Wai tin g is tu rne d back on whe n yo u end the
call.
Call Hold
Call H old lets you put an active call on hold and
make a second call.
To put a call on hold:
1 While on an active call, press m.
2 Scroll to Hold.
3 Press A under Select.
4 If you want to make th e call active again, press
A unde r Resum.
To make a second call while a call is on hold:
1 Enter the number you want to call.
Tip: T o en ter th e numb er fro m Con t ac ts: Pre ss m.
Select Contacts.
2 Press s to pl ac e t he cal l.
66
To end the second c all and make the call on hold
active again:
Press e.
To make the call on hold active and put the active
call on hold:
Press A under Switch.
3-Way Calling
Note: This feature may not be offered by your
service provider.
3-way calling lets you combine 2 phone calls into
one. All 3 people in the call can speak to and hear
each other.
To make a 3-way call:
1 Place or receive a phone c all.
2 While the call is active, press m.
3 Scroll to 3 Way.
4 Press A under Select. This put s the ca ll on ho ld .
5 Enter the second phone number you want to call.
Tip: T o en ter th e numb er fro m Con t ac t s: Pr ess m.
Select Contacts.
6 Press s to place the call.
7 While the second call is active, press m.
8 Scroll to 3 Way.
Page 77

Creating Pauses and Waits While Dialing
9 Press A under Select.
Both calls are now active and appear on the display.
Creating Pauses and Waits
While Dialing
You can enter a pause or wait while dialing a
number. For more information on pauses and waits,
see “Creating Pauses and Waits” on page 30.
To create a pause while dialing a phone numbe r:
1 From the keypad, enter the digits you want to
occur before the pause.
2 Press m.
3 Select Ins ert Pau se.
4 Enter the digits you want to occur after the pause.
To create a wait while dialing a phone number:
1 From the keypad, enter the digits you want to
occur before the wait.
2 Press m.
3 Select Insert Wait.
4 Enter th e digits you want to occur after the wait.
Making International Calls
Note: This feature may not be offered by y our
service provider.
Plus Dialing le ts you place an international ca ll to
most countries without entering the local
international access code.
1 Press and hold 0 for two seconds. A “0”
appears , t he n ch anges to a “+”.
Note: The network translates the “+” into the
appropriate international access code
needed to place the call.
2 Enter the country code, city code or area code ,
and ph one number.
Setting One Touch PTT
One Tou ch PT T s ets your ph on e t o ca ll th e mo st
recent Private ID on the recent calls list, or a Private
ID you choose, every time you press the PTT
button.
To set your phone to call the most recent Private ID
on the recent calls list:
1 From the main menu, select Settings > 2-Way
Radio > One Touch PTT.
2 Scroll to Last Call.
3 Press A under Select.
67
Page 78

Advanced Call ing Features
To set your phone to ca ll a Priv a te I D you cho o s e :
1 From the ma in menu, select Settings > 2-Way
Radio > One Touch PTT > Assigned Number.
2 To enter the Privat e ID you want yo ur ph one to
call every time you press the PTT button:
Enter the number u s ing your keypad. -or-
Press A under Search. Select Contacts,
Recent Calls, or Memo. Select the n umber you
want to enter.
Tip: If you are en t eri ng a Talkgro up nu mbe r, enter
# before the number.
3 Press A under Ok.
To turn off One Touch PTT:
1 From the ma in menu, select Settings > 2-Way
Radio > One Touch PTT.
2 Scroll to Off.
3 Press A under Select.
Group Calls
A group call is a call made to all members of a
Talkg roup at once. A Talkgroup is a predetermined
group of up to 25 Private IDs.
68
Before you can make or receive group calls, a
Talk group must be estab lished. After the Talkgroup
is est ablished, you must join the Talkgroup. See
“Joi ning a Talkgroup” on page 7.
Making Group Calls
1 Press #. Then en te r t he Talkgrou p n umb er u si ng
the keyp ad. -or-
Choose the Talkgroup name from Contacts or
recent calls list.
2 Proceed as if making a Private call.
Receiving Group Calls
To answer a group call:
Proceed as if ans wering a Private call. Only one
person at a time may speak on a group call.
The Private ID or name of the person who is
speaki ng will ap pear on the display below the
Talkgroup number.
Turning off Gro up Calls
To contr ol wh eth er yo u he ar group calls to your
Talkgroup:
1 From the main menu, select Settings > 2-Way
Radio > Tkgrp Silent.
2 Press A under Change.
Page 79

Call Timers
3 Scroll to On if you don’t want to hear group calls
to your Talkgroup. -or-
Scroll to Off if you wa nt to he ar gr ou p c al ls to y ou r
Talkgroup.
4 Press A under Select.
Call Timers
Call timers meas ure the duration of your phone
calls, Private or group calls, and circuit data use, as
well as the number of Kilobytes sent and received
by your ph on e:
•Last Call — displays the duration of your most
recent ph on e ca ll.
• Phone Reset — keeps a running total of your
phone call minutes, until you reset it.
• Phone Lifetime — displays the total minutes of
all your phone calls.
•Prvt/Grp Reset — keeps a running total of all of
your Pr ivate and group call minu tes, until you
reset it.
• Prvt/Grp Lifetime — displays the total minutes of
all your Private and group calls.
• Circuit Res et — keeps a running total of all of
your circuit data use, until you reset it.
• Circuit Life tim e — displays the total minutes of
all of your circuit data use.
• Kbytes Reset — keeps a running total of the
numbe r of Kilobytes sent and received by your
phone, until you reset it.
To view or reset a timer:
1 From the main menu, select Call Timers.
2 Select the feature you want to view or reset.
3 To view a feature without resetting: Press A
under Don e when you are finished viewing. -or-
To reset a featur e: Press A unde r Reset. Press
A under Yes to confirm.
Note: The values di spla yed by Cal l Tim ers sh ould
not be used for billing. Call timers are
estimates only.
Using Your Phone as a Modem
Note: This feature may not be offered by y our
service provider.
To use yo ur phone as a modem wi th a laptop,
handhe ld device, or desktop computer:
69
Page 80

Advanced Call ing Features
1 Open the connector cover.
connector
cover
2 With the phone’s display facing up, insert a data
cable’s connector into the accessory connector,
until yo u he ar a cli ck .
70
3 Insert th e d ata pl ug in to t he C OM port of t he ot he r
device.
When used as a mode m, your pho ne has th ese data
transfer mod es :
• Circuit data — used for sending and receiving
faxes and for transferring large files
• Packet data — used for small file transfers such
as email
To use these services, you must install the iDEN
Wireless Data Services software (available
separately). For more information on setting up your
computer and your i305 phone for packet and circuit
data calls, ref er to the Wireless Data Services
User’s Guide or contact your service provider.
Making TT Y Ca ll s
Note: This feature may not be offered by your
service provider.
To use your phone to ma k e pho ne calls using a
teletypewriter (TTY) device:
1 Connect one end of a 2.5mm cable into the audio
jack on your phone. Connect the other end of the
cable to your TTY device.
2 Make sure that your phone’s TTY feature is on
and sel ect the TTY mode you want to use.
Page 81

Making TTY Calls
3 Use your phone to enter phone numbers and
make calls.
When you make a TTY call, these icons appear on
the phone’s display:
N Phone call is active.
O Phone call is on hold.
TTY device features such as Turbo-Co de,
High- Sp ee d, an d Int er ruptio n are no t sup ported by
your phone. These featur es must be turned off or
disabled to use your TTY device with your phone.
T urning On the TT Y Feature
Your phone’s TTY feature must be on if you want to
make TTY calls, set the TTY mode, or change the
TTY baud rate. To make sure the TTY feature is on:
From the main menu, select Settings > Phone
Calls > TTY. This field must say On.
Choosing a Mode
Your phone supports these TTY mode s:
• TTY — You type and read text on your TTY
device.
•VCO (Voice-Carry-Over) — You speak into your
phone and read text replies on your TTY device.
• HCO (Hearing-Carry-Over) — You type text on
your TTY device and listen to voice replies on
your phon e speaker.
To change mode while not in a call:
1 From the main menu, select Settings > Phone
Calls > TTY > Type.
2 Press A under Change.
3 Scroll to the TTY mode you want.
4 Press A under Select.
When you make a TTY call, the call begins in the
TTY mode you last selected.
To change mode during a call using your phone:
1 Press m.
2 Select TTY > Type.
3 Select the mode you want.
To change mode during a call using your TTY
device , issue one of the following commands:
• “VCO please” — to select VCO mode
• “HCO please” — to select HCO mode
• “HCO off please” — to turn off HCO mode
71
Page 82

Advanced Call ing Features
Important: When you are using HCO, the sound
coming from your phon e speaker may be
uncomfortably loud. Use caution when
putting the phone to your ear. (For
information on setting the volume of
your phone speaker, see “Setting the
Volume” on page 79.)
Changing the TTY Baud Rate
By default, your phone’s TTY baud rate is set to
45.45, the baud rate required for TTY calls within the
U.S. To make calls outside the U.S., set your TTY
baud rate to 50.0.
To change the TTY baud rate:
1 From the ma in menu, select Settings > Phone
Calls > TTY > Baud.
2 Press A under Change
3 Scroll to the baud rate for your location.
4 Press A under Select.
72
Page 83

Memo
Memo lets you store a number, make a call to that
number, and save it to Contacts.
To create a memo:
1 From the main menu, select Memo.
2 Enter the number using your keypad.
3 Press A under Store.
To view the memo later:
1 From the main menu, select Memo.
To delete the memo:
1 From the main menu, select Memo.
2 Press and hold A un de r Delete.
3 Press A under Store.
To edit the memo:
1 From the main menu, select Memo.
2 Enter the new numb er.
3 Press A under Store.
To make a call to the memo number:
1 From the main menu, select Memo.
2 Press s.
To store the memo number to Contacts:
1 From the main menu, select Memo.
2 Press m.
3 Press A under Select.
4 To store the number as a new ent ry, select [New
Contact]. -or-
To store the number to an existing entry, select
the en try.
5 With the Contacts type field highlighted, scroll left
or right to display the Contacts type you want to
assign the number.
6 If you want to add more information to the entry,
follow the ap pli c able inst ruc tions in “Cr ea ti ng
Entries” on page 27.
7 Press A under Done.
73
Page 84

74
Page 85

Entering Text
You can enter text into your phone u s ing the
traditional method of pressing a key several times
for each character, or by pressing a key once f or
each lett er w hile w o rds l ike ly to be the on e yo u wan t
are chosen from a database. You can also enter
symbols and numbers into a text field.
In screens t hat r eq uir e yo u to en t er te xt , you see the
following icons near the top right corner. These
icons te ll you which text input mode you are using:
Alpha — Press a key several times for each
l
characte r.
Word — Press a key once for each letter while
j
words li kely to be the one yo u want are chosen
from a database.
Symbols — Enter punctuation and other
i
symbols.
Numeric — Enter numbers.
k
When you access a screen that requires you to
enter t ex t, you start in Al ph a mo de.
To choose a text input mode:
1 At a screen that requires you to enter text, press
m.
2 A checkmark appears next to the current text
input mode. Scroll to the text input mode you want
to use.
3 Press A under Select.
Using Alpha Mode
• Press any key on the keypad to enter the letters,
numbers, and symbols on that key. For example,
to enter the letter Y, press 9 th ree times .
• Type a letter then scroll up to make that letter
uppercase, or type a letter then scroll down to
make that letter lowercase.
• See “Special Function Keys” on pa ge 76 for more
information on adding spaces, capitalization, and
punctuation.
Using Word Mode
In Word mode, T9 Text Input analyzes the letters on
the keypad button you press and arranges them to
create words. As you type, T9 Text Input matches
your keystr okes to words in its datab as e and
displays the most commonly used matching word.
You can add you own words to this database.
Entering a Word
1 Select Word as your text input mode.
75
Page 86

Ente ring Text
2 Type a word by pressing one key for each letter.
For example, to type “test” press 8 3 7 8.
The displayed word may change as you type it.
Do not try to correct the word as you go. Type to
the end of the wo rd before edi ting.
3 If the word that appears is not the desired word,
press 0 to change the word on the display to the
next most likely word in the database.
Repeat until the desired word appears.
If the desired word does not appear, you can add it
to the database.
Adding Words to the Database
1 Select Alpha as your text input mode.
2 Ty pe the word using Alpha mode .
3 Select Word as your text input mode.
4 Press #.
The word you typed in Alpha text entry mode is now
in the database.
Note: You cannot store alphanumeric
combinations, such as Y2K.
76
Choosing a Language
To change the language of the database:
1 At a screen that requires you to enter text, press
m.
2 Select Languages.
3 Scroll to the language you want for your
database.
4 Press A under Select.
Special Fu nc t ion K eys
Some of the phone’s keys assume different
functions while in Alpha or Word mode.
Spaces
Press # for a space.
Capitalization
Press and hold # to make the next letter typed
uppercase (shift), to make all subsequent letters
typed uppercase (caps lock), or to go back to
lowercas e le tte r s.
Page 87

Using Numeric Mode
These i cons appear in the top row of your display:
Shift is on.
m
Caps lock is on.
n
When ne ither of thes e ic on s appear, le tt e rs ty ped
are low erc as e .
Note: Your phone automatically makes the first
letter of a sentence uppercase.
Punctuation
Press 1 or 0 to insert punctuation. Continue to
press the key to view t he lis t of sy mb ols available
through that key. Pause to select the symbol you
want.
Note: Additional punctuation symbols are
availa bl e in S y mb ol s mode.
Usin g N u meri c Mo d e
1 Select Numeric as your text input mode.
2 Press the number buttons on your keypa d to
enter numbers.
Using Symbols Mode
1 Select Symbols as your text input mode.
A row of symbols appears along the bottom of
your phone’s display. Scroll right to view the
complete row.
2 Scroll left or right to choose the symbol you want
to enter.
3 Press A under Select.
77
Page 88

78
Page 89

Customizing Your Phone
Setting the Vo lume
To set the volume of the sound coming from the
phone’ s earpiece or speaker:
1 From the m a in men u, se le ct Settings > Volume.
2 Scroll to Earpiece to set the earpiece volume.
-orScroll to Speaker to set the speaker volume.
3 Press A under Change.
4 To select the volume:
Scroll left or right. -o r-
Press the volume c ontrols .
5 Press A under Ok.
To set the volume of the phone’s ring :
Press the volume c ontrols .
For another way to set the volume of the phone’s
ring, or the volume of many ot her sounds your
phone ma kes:
1 From the m a in men u, se le ct Settings > Volume.
2 Scroll to the option you want and make the
change. Choose Line 1 or Line 2 to set the
volum e of th e ph on e’ s rin g whe n yo u ge t a call on
that line.
See “Volume Features” on page 81.
Setting Your Phone to Not Ring
To set your phone to make no soun d when you
receiv e ph one call s, Pr iv a te calls, group cal ls ,
message notifications, and call alerts, see “Tur ning
Ring Tones Off” on page 37.
To set your phone to vibrate instead of making a
sound when you rec eive Private calls and group
calls, even if you want your phone to ring for other
features:
1 From the main menu, select Settings > 2-Way
Radio > Alert Type.
Tip: If Alert Type does not appear: From the
main menu, select Ring Tones. Make sure
VibeAll or SilentAll is set to Off. Repeat
step 1.
2 Press A under Change.
3 Scroll to Vibrate.
4 Press A under Select.
Note: This is an optional featu re. Contact your
servic e pr ov i de r abou t its av ailabi lit y for
purchase.
79
Page 90

Customizing Your Phone
If your phone does not include a vibrate feature, you
can still set your phone to make no sound. Scroll to
Silent in step 3 .
Seeing the Display Better
To set the contrast of the display:
1 From the ma in menu, select Settings >
Display/Info > Contrast.
2 Press A under Change.
3 Scroll left or right to set the contrast.
4 Press A under Ok.
Using a Headset
If you use a headset or similar device with your
phone, you can set your phone to send incoming
sound t o the he ad set only , o r to the he ad set an d t he
speaker at the same time :
1 From the ma in menu, select Settings >
Advan c ed > H ea dse t/ Spk r.
2 Press A under Change.
3 Scroll to HdsetOnly to send incoming sound to
the headset only. -or-
Scroll to Hdset&Spkr to send incoming sound to
the headset and the speaker at the same time.
4 Press A under Select.
80
Note: When inserting the headset into the audio
jack in your phone, you may have to rotate
the head se t ja ck u nti l it fits securely int o t he
audio jack.
Using a Remote PTT Button
If you are using a headset or other accessory with a
remote PTT button, you can use the remote PTT
button for phone calls and Private calls.
For phone calls, use the remote PTT button to
answer calls, switch bet ween calls, and end ca lls.
Hold the remote PTT button for less than 2 seconds
to answer calls and switch between calls. Hold the
remote PTT button for more than 2 seconds to end
calls.
For Private calls, use the remote PTT button as you
would the PTT button on your phone.
Using S ett i ng s
Settings contains many submenus that let you
custom iz e yo ur phone.
Display/Info Features
The Dis pl ay/I nf o menu cont r ols ho w t he key pa d an d
displ ay appear:
• Backlight — controls how long the backlight
stays on after you make or receive a call.
Page 91

Using Settings
•Clock — contro ls whether the tim e an d date
appears on the idle screen, sets the format of the
time and date, and sets the year.
•Contrast — sets the contrast on the display. See
“Seeing the Display Better” on page 80.
• Language — sets the language that your phone
displays.
Phone Calls Features
The Phone Calls menu controls how your phone
handle s phone calls:
•Set Line — sets phone line 1 or phone line2 as
the active line for outgoing calls.
• Any Key Ans — If this feature is on, you can
answer calls by pressing any key on the keypad.
• Auto Redial — sets your ph on e to au t om a tic ally
redial calls you make when the system is busy.
• Call Waiting — See “Call Waiting” on page 65.
•Auto Ans — sets your ph on e t o au tom atical ly
answer an incoming call after a specified number
of rings. When this feature is on, the phone
answers by connecting you to the caller; it does
not send the call to voice mail, unless you are out
of cove rage or on the line.
• Minute Beep — cause s a beep t o so un d ev er y
minute of an active call.
•Call Duration — causes the duratio n of a call to
appea r on the phones display when the call ends.
• TTY — lets you use your phone with a TTY
device. See “Making TTY Calls” on page 70.
• Notifications — See “Settin g Not ifi ca tio n
Options” on page 41.
2-Way Radio Features
The 2-Way Radio menu controls how your phone
handle s Private calls and group ca lls:
• Tkgrp Silent — controls wh ether you hear group
calls to your Talkgroup. See “Receiving Group
Calls” on page 68.
•Tkgrp Area — lets you define your Talkgroup
area.
• One Touch PTT — See “Setting One Touch PTT”
on page 67.
•Alert Type — controls how your phone notifies
you when you receive Private calls and group
calls. S ee page 7 9.
Volume Features
The Volume menu sets the volume of sounds your
phone makes:
•Line 1 — sets ring volume for phone line1.
•Line 2 — sets ring volume for phone line2.
81
Page 92

Customizing Your Phone
• Messages — set s the volume of message
notifications.
•Earpiece — sets the v ol um e of so un d c omi ng out
of the earpiece.
• Speaker — sets the volume of sound coming out
of the speaker.
•Keypad — sets the vol u m e of so und assoc iated
with pre s si ng keys and bu tt o ns .
•Data — sets the volume of sounds that notifies
you that you are receiving a circuit data c all.
Security Features
The Security menu lets you turn security features on
and off and ch ange pass w or d s:
• Phone Lock — turns on a feature that locks your
phone, either immediately or automatically after a
set period of inactivity. An unlock code is required
to enable th is f ea tur e, t o un lo ck the ph on e, and to
set a new Unlock code. Contact your service
provider for your default unlock co de.
• Keypad Lock — locks t he ph on e’ s ke ypad , ei ther
immediately or automatically after a set period of
inacti vity. See “Locking the Keypad” on page 13
for more in for ma t ion on l ock in g an d un lo cking th e
keypad.
82
• SIM PIN — enables and disables your phone’s
SIM PIN security feature. See “Unblockin g the
PIN” on page 11.
• GPS PIN — enables an d disables your phone’s
GPS PIN security feature. See “Setting the G PS
PIN Security Feature” on page 56.
• Change Passwords — changes your phone
unlock code, se cur ity co de, SIM PIN, an d GPS
PIN.
Advanced Features
The Advanced menu contains advanced and rarely
used Settings features.
• Alert Timeout — controls the amount of time a
tone continues to sound whe n you receive a
message notification or call alert.
• Headset/Spker — See “Using a Headset” on
page 80.
• Connectivity — Network ID sets the phone’s
network IDs and their roaming options under the
direction of your service provider; Master Reset
lets your service provider reset your service in the
event of a security or provisioning problem.
Page 93

• Res et D efa u l ts — Reset Settings returns all
settings to their original defaults; Reset All
returns all settings to their original defaults and
erases all stored lists. Use only under the
direction of your service provider.
•Return to Home — controls how long the recent
calls list disp lays after ca lls.
• Phone Only — prevents your phone from making
or receiving Private calls or group calls.
•Baud Rate — sets the baud rate at which your
phone commu nica tes with a la ptop computer, PC,
or similar devic e.
Using Settings
83
Page 94

84
Page 95

Understanding Status Messages
You may receive status messages under certain
conditions. Before contacting Customer C are, note
the mess age, numeric code, and the conditions
under which it ap peared. The following table lists
and describes the status messages.
Status Messages Message Description
Number Not in
Service
User Not Available
User Not
Authorized
Please Try Later
Service Restricted
Service Not
Available
The number that you entered is not
valid.
The phone that you called is either
busy, out of coverage, or turned off.
Please try again later.
The person that you called has not
purchased this service.
This service is temporarily not
available. Please try again later.
This service was restricted by your
service provider, or this service was
not purchased.
You are either out of coverage or
having problems with provisioning.
Status Messages Message Description
System Busy
Please Try Again
Self Check Error +
Number Code
Self Check Fail +
Number Code
PIN Blocked
Call Your Provider
Insert SIM
Check SIM Card
Wrong PIN
The system is experiencing heavy
traffic. Please try again later.
An error occurred. Please try again.
A fault was detected with your
phone. If this error recurs, note the
error code and contact Customer
Care.
An operational fault was detected
with your phone. Note the numeric
code, turn your phone off, and
contact Customer Care.
The incorrect PIN was entered 3
consecutive times. You will be
unable to place or receive calls on
your phone. Contact Customer Care
to have them obtain the PIN
Unblocking Key (PUK) code.
Your SIM card is not being detected.
Please check to ensure that you
have inserted th e SIM ca rd co rrec tly
into your phone.
Please check your SIM card to
make sure it has been inserted
properly.
You have entered an incorrect PIN
number.
85
Page 96

Understanding Status Messages
Status Mess ages Mess ag e D es cr iption
Enter SIM PIN
Enter Unlock Code
New Browser
Message Memory
Full!
Scanning for
Satellites
Unable to Locate
Sats
Technical Error
86
Please enter your 4- to 8- digit SIM
PIN code.
Auto Phone Lock is activated. Enter
you unlock code.
Warns of low memory for Net Alerts.
Searching for GPS satellites.
Could not find GPS satellites.
A problem occurred in your phone’s
GPS circuitry. If this error occurs,
contact Customer Care
Page 97

Safety and General Information
IMPORTANT INFORMATION ON SAFE AND
EFFICIENT OPERATION.
READ THIS INFORMATION BEFORE USI NG YOUR
INTEGRATED MU LTI-SER V ICE POR TABL E
RADIO.
RF Operational Characteristics
Your radio product contains a radio frequency
transmitter to convey the information you wish to
send as well as occasional automatic signals used to
sustain connection to the wireless network, and a
receive r whic h enab les yo u to rec eive c ommunica tio n
and connection information from the network.
Portable Radio Product Operation and EME Exposure
Your Motorola r adio product is designed to comply
with the follo wing national and internatio nal
stand ards and guidelines regarding exp osure of
human b eings to radio frequency electro m agnetic
energy (EME):
• United States Federal Communications
Commission, Code of Federal Regulations; 47
CFR part 2 sub-part J.
• American National Standards Institute (ANSI) /
Institute of Electrical and Electronics Engineers
(IEEE). C95. 1-1992.
• Institute of Electrical and Electr onics Engineers
(IEEE). C95. 1-1999 Edition.
• International Commission on Non-Ionizing
Radiation Protection (ICNIRP) 1998.
• Ministry of Health (Canada). Safety Code 6. Limits
of Human Exposure to Radiofrequency
Electromagne tic Fields in the Frequenc y Range
from 3 kH z to 300 GHz, 1999.
• Australian Communications Authority
Radiocommunications (Electromagnetic Radiation
- Human Exposure) Standard 2003.
• ANATEL, Brasil Regulatory Authority, Resolution
256 (April 11, 2001) “additional requirements for
SMR, cellular and PCS product certification.”
To assure optimal radio product performance and
make sure human exposure to radio frequency
electromagnetic energy is within the guidelines
set forth in the above standards, always adhere
to the following procedures:
95
Page 98

Safety and General Information
Phone Operation
When placing or receiving a phon e call, hold your
radio product as you would a wireline telephone.
Speak directl y into the microphone.
Two-way radio opera tion
When us ing your radio product as a
traditional tw o-way radio, hold the
radi o product in a vertical posit ion
with the microphone one to two
inches (2.5 to 5 cm) away from the lips.
Body-worn operation
To maintain compliance with FCC RF exposure
guidelines, if you wear a radio product on your body
when tr ansmitting, al ways place the radio product in
a Motorola approved clip, holder, holster, case or
body harness for this produc t. Use of
non-Motorola-approved accessories may exceed
FCC RF exposure guidelines. If you do not use a
Motorola approved body-worn a ccessory and are
not using the radio product in the intended use
positions along side the head in the phone mode
or in front of the face in the two-way radio mode,
then ensure the antenna and the radio product
are kept the fo llowing minimum distances from
the bod y when transmitting
96
• Phone or Two-way radio mode: one inch (2.5
cm)
• Data operation using any data feat ure with or
without an accessory cable: one inch (2.5 cm)
Antenna Care
Use onl y the supplied or an approved
replacement antenna. Unauthorized antennas,
modifications, or attachments could damage the
radio product and may violate FCC regulations.
DO NOT ho l d t he an ten n a w he n th e r ad i o p rod uc t
is “IN USE”. Holding the antenna affects call quality
and may ca use the radio product to operate at a
higher power level than needed.
Approved Accessories
For a list of approved Moto rola accessories call
1-800-453-0920, or visit our website at
www.mot.com/iden.
Page 99

Portable Radio Product Operation and EME Exposure
ALL MODELS WITH FCC ID H62XAH6RR1AN MEET THE
GOVERNMENT’S REQUIREMENTS FOR EXPOSURE TO
RADIO WAVES.
Your wireless phone is a radio transmitter and receiver. It is
designed and manufactured not to exceed the emission limits
for exposure to radiofrequency (RF) energy set by the
Federal Communications Commission of the U.S.
Government. These limits are part of comprehensive
guidelines and establish permitted levels of RF energy for the
general population. The guidelines are based on standards
that were developed by independent scientific organizations
through periodic and thorough evaluation of scientific studies.
The standards include a substantial safety margin designed
to assure the safety of all persons, regardless of age and
health.
The exposure standard for wireless mobile phones employs
a unit of measurement known as the Specific Absorption
Rate, or SAR. The SAR limit set by the FCC is 1.6W/kg.
Tests for SAR are conducted using standard operating
positions reviewed by the FCC with the phone transmitting at
its highest certified power level in all tested frequency bands.
Although the SAR is determined at the highest certified
power level, the actual SAR level of the phone while
operating can be well below the maximum value. This is
because the phone is designed to operate at multiple power
levels so as to use only the power required to reach the
network. In general, the closer you are to a wireless base
station antenna, the lower the power output.
Before a phone model is available for sale to the public, it
must be tested and certified to the FCC that is does not
exceed the limit established by the government-adopted
requirement for safe exposure. The tests are performed in
positions and locations (e.g., at the ear and worn on the
1
body) as required by the FCC for each model. The highest
SAR value for this model phone when tested for use at the
ear is 1.46 W/kg and when tested on the body, as described
in this user guide, is 1.16 W/kg during packet data
transmission. (Body-worn measurements differ among phone
models, depending upon available accessories and FCC
requirements.)
While there may be differences between the SAR levels of
various phones and at various positions, they all meet the
government requirement for safe exposure.
The FCC has granted an Equipment Authorization for this
model phone with all reported SAR levels evaluated as in
compliance with the FCC RF exposure guidelines. SAR
information on this model phone is on file with the FCC and
can be found under the Display Grant section of
http://www.fcc.gov/oet/fccid after searching on FCC ID
H62XAH6RR1AN.
Additional information on Specific Absorption Rates (SAR)
can be found on the Cellular Telecommunications Industry
Association (CTIA) web-site at http://www.wow-com.com.
1
In the United States and Canada, the SAR limit for mobile
phones used by the public is 1.6 watts/kg (W/kg) averaged
over one gram of tissue. The standard incorporates a
substantial margin of safety to give additional protection for
the public and to account for any variations in
measurements.
2
The SAR information reported to the FCC includes the
FCC-accepted Motorola testing protocol, assessment
procedure, and measurement uncertainty range for this
product.
2
97
Page 100

Safety and General Information
Electro Magnetic Interference/Compatibility
Note:Nearly every electronic device is
susceptible to electromagnetic
interference (EMI) if inadequately
shielded, designed or otherwise
configured for electromagnetic
compatibility.
Facilities
To avoid electromagnet ic interference and/or
compatibility conflicts, turn off your radio product in
any faci l it y w here poste d notice s instruc t you to do
so. Hosp i tal s or he al t h ca re fac i lities may be using
equipm e nt that is sensitive to ext e rnal RF ener gy .
Aircraft
When instructed to do so, turn off your radio product
when on bo ar d an ai r cra ft . An y us e of a rad io prod uct
must be in accordan ce wi th ap pl ic able regu la tions
per airline crew instructions .
98
Medical Devices
Pacemakers
The Advanced Medical Technology Association
(AdvaMed) recommends that a minimum separation
of 6 inches (15 cm) be maintained between a
handhe ld wireless radio product and a pacemaker.
These recommendation s are consistent with those of
the U.S. Food and Drug Administration.
Persons with pacemakers should:
• ALWAYS keep the radio prod uc t mo r e tha n 6
inches (15 cm) from their pacemaker when the
radio product is turned ON.
• Not carry the radio product in a breast pocket.
• Use the ear opposite the pa cemaker to minimize
the potential for interference.
• Turn the radio product OFF immediately if you
have any reason to suspect that interference is
taking place.
Hearing Aids
Some dig ital wire le ss radio produ ct s ma y int e rf er e
with some hearing aids. In the event of such
interference, you may want to consult your hearing
aid manu facturer to discuss altern atives.
 Loading...