

Page 1

Digital Multi-Service Data-Capable Phone
@NNTN5909A@
NNTN5909A
Motorola
iDEN
i
265 Phone User’s Guide
Page 2

Page 3

IMPORTANT NOTICE: PLEASE READ
PRIOR TO USING YOUR PHONE
The SIM card provided in this kit is intended for use with
the phone provided in this package.
Loss of certain features will result when using a S IM
card from one of the following models:
i50sx,i55sr,i58sr,i60c,i80s,i85s,i88s,i90c,i95cl
series, and thei2000 series.
For more information on SIM card compatibility, go to
www.motorola.com/iden/support.
Defects or damage to your Motorola phone that result
from the use of non-Motorola branded or certified
Accessories, i nc luding but not limited to replacem ent
housings and or other peripheral accessories, are
excluded f rom warranty c ov erage. Please refer to the
text of Motorola's Limited One Year warranty located in
this user’s guide for complete details.
i30sx,i35s
,
Page 4

Page 5

i
Contents
Getting Started........................................... 1
Locating Your SIM Card....................................2
Battery...............................................................2
Activating Service..............................................5
Powering On and Off.........................................5
Enabling Over-the-Air Security..........................6
Phone Programming .........................................6
Finding Your Phone Number.............................7
Phone Basics ....................................................7
SIM Card Security...........................................11
Accessories.....................................................14
For More Information.......................................14
Making Calls............................................. 15
Phone Calls.....................................................15
Private Calls....................................................15
Receiving Calls................................................15
Ways to Enter Calls.........................................16
Missed Phone Calls.........................................18
Using Speakerphone.......................................18
Using Mute ......................................................18
Making Emergency Phone Calls.....................19
Call Alerts..................................................20
Sending Call Alerts..........................................20
Receiving Call Alerts.......................................20
Using the Call Alert Queue..............................20
Recent Calls..............................................22
Storing Recent Calls to Contacts ....................22
Deleting Recent Calls......................................23
Contacts ....................................................24
Viewing Contacts ............................................25
Creating Entries ..............................................26
Storing Numbers Faster ..................................27
Editing Entries.................................................28
Deleting Entries...............................................28
Checking Capacity ..........................................28
Creating Pauses and Waits.............................28
International Numbers.....................................29
Accessing Contacts with GSM Phones...........29
Page 6

ii
Call Forwarding........................................ 30
Forwarding All Calls ........................................30
Turning Off Call Forwarding ............................31
Forwarding Missed Calls .................................31
Viewing Call Forwarding Settings....................31
Advanced Calling Features..................... 32
Call Waiting.....................................................32
Switching Between Calls.................................32
Putting a Call on Hold......................................33
Calling 2 People..............................................33
Creating Pauses and Waits While Dialing.......34
Making International Calls...............................34
Setting One Touch PTT...................................34
Group Calls.....................................................35
Call Timers ......................................................36
Using Your Phone as a Modem ......................37
Making TTY Calls............................................38
Memo ........................................................ 40
Ring Tones...............................................41
Setting Your Phone to Vibrate.........................41
Ring and Vibrate .............................................42
Assigning Ring Tones to Contacts..................42
Viewing Ring Tone Assignments ....................42
Downloading More Ring Tones.......................42
Managing Memory ..........................................43
Deleting Custom Ring Tones ..........................43
Entering Text ............................................44
Using Alpha Mode...........................................44
Using Word Mode ...........................................44
Special Function Keys.....................................45
Using Numeric Mode.......................................46
Using Symbols Mode ......................................46
Messages..................................................47
Message Notifications.....................................47
Message Center..............................................48
Voice Mail Messages................................49
Receiving a Message......................................49
Accessing Voice Mail from
the Message Center ...................................49
Sending Unanswered Calls to Voice Mail .......49
Page 7

iii
MOSMS Messages...................................50
Setting Up........................................................50
Receiving a Message......................................50
Reading from the Message Center .................51
Creating and Sending Messages ....................51
Sorting Messages............................................54
Managing Memory...........................................54
Datebook ..................................................55
Viewing Datebook ...........................................55
Creating Events...............................................56
Editing Events .................................................58
Deleting Events...............................................58
Receiving Reminders......................................59
Making Calls From Datebook..........................59
Customizing Datebook Setup..........................60
Java Applications....................................61
Installing Applications......................................61
Running Applications.......................................61
Suspending Applications .................................61
Resuming Applications....................................62
Ending Applications.........................................62
Downloading Applications...............................62
Deleting Applications.......................................62
Managing Memory ..........................................63
Shortcuts on the Main Menu ...........................63
Java Applications and GPS Enabled ..............64
GPS Enabled.............................................67
IMPORTANT: Things to Keep in Mind ............67
Making an Emergency Call .............................68
Viewing Your Approximate Location ...............69
Enhancing GPS Performance.........................70
Updating Satellite Almanac Data ....................72
Setting Privacy Options...................................72
Using GPS with Map Software........................73
Voice Records ..........................................76
Creating Voice Records ..................................76
Playing Voice Records ....................................76
Labeling Voice Records ..................................76
Deleting Voice Records...................................77
Locking Voice Records ...................................77
Managing Memory ..........................................77
Page 8

i
Customizing Your Phone........................ 78
Setting the Volume..........................................78
Setting Your Phone to Vibrate.........................78
Changing the Look of Your Phone..................78
Temporarily Turning Off Calls .........................80
Using Settings.................................................80
Profiles ..................................................... 84
Viewing Profiles...............................................84
Switching Profiles............................................84
How Changing Settings Affects Profiles..........84
Temporary Profiles..........................................85
Creating Profiles..............................................86
Editing Profiles ................................................86
Deleting Profiles..............................................86
Setting Call Filtering ........................................87
Shortcuts.................................................. 89
Creating a Shortcut .........................................89
Using a Shortcut..............................................89
Editing a Shortcut............................................90
Deleting Shortcuts...........................................90
v
Using a Headset .......................................91
Attaching a Headset........................................91
Using a Remote PTT Button ...........................91
Understanding Status Messages............92
Safety and General Information ..............94
RF Operational Characteristics .......................94
Portable Radio Product Operation and EME
Exposure.....................................................94
Electro Magnetic Interference/Compatibility....97
Medical Devices..............................................97
Operational Warnings .....................................98
Operational Cautions ......................................99
Accessory Safety Information .......................100
Page 9

MOTOROLA LIMITED WARRANTY ...... 102
Limited Warranty
Motorola Communication Products
(International)..................................... 106
Patent and Trademark Information ...... 110
Index ....................................................... 111
Driving Safety Tips................................ 116
v
Page 10

i
DECLARATION OF CONFORMITY
Per FCC CFR 47 Part 2 Section2.1077(a)
Responsible Party Name: Motorola, Inc.
Address: 8000 West Sunrise Boulevard
Plantation, FL 33322 USA
Phone Number: 1 (800) 453-0920
Hereby declares that the product:
Product Name: i265
Model Number: H45XAN6RR4AN
Conforms to the following regulations:
FCC Part 15, subpart B, section 15.107(a),
15.107(d) and section15.109(a)
Class B Digital Device
As a personal computer peripheral, this device
complies with Part 15 of the FCC Rules. Operation
is subject to the following two conditions: (1) this
device may not cause harmful interference, and (2)
this device must accept any interference received,
including interference that may cause undesired
operation.
v
Note: This equipment has been tested and
found to comply with the limits for a Class
B digitaldevice, pursuantto part 15 of the
FCC Rules. These limits are designed to
provide reasonable protection against
harmful interferencein a residential
installation. This equipment generates,
uses and can radiate radio frequency
energy and, if not installed and used in
accordance with the instructions, may
causeharmfulinterferencet o radio
communications. However, there is no
guarantee that interference will not occur
in a particular installation.
If this equipment does cause harmful
interference to radio or television reception,
which can be determined by turning the
equipmentoff and on, the user is
encouraged to try to correct the interference
by one or more of the following measures:
• Reorient or relocate the receiving
antenna.
• Increase the separation betweenthe
equipment and receiver.
• Connectthe equipment into an outlet on
a circuit differentfrom that to which the
receiver is connected.
• Consult the dealer or an experienced
radio/TV technician for help.
Page 11
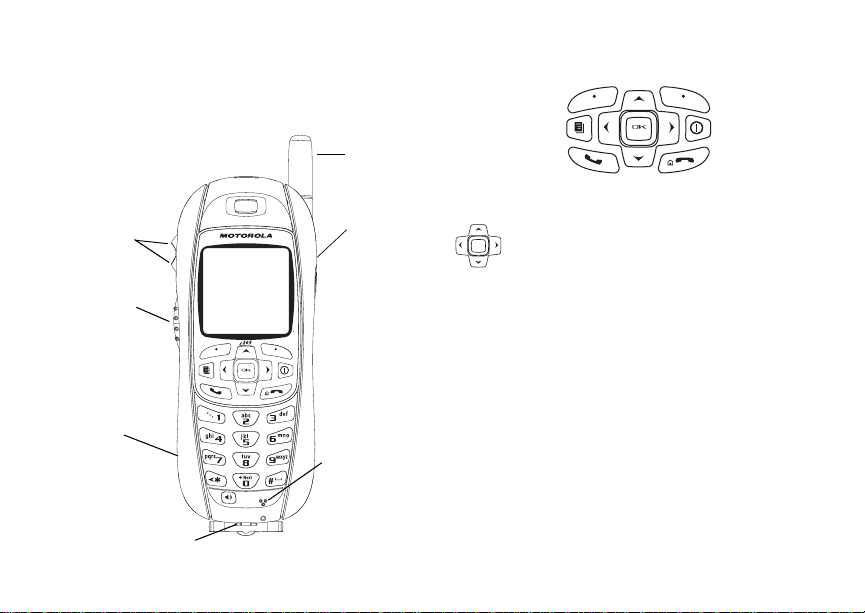
Getting Started
volume
controls
Push-To-Talk
(PTT) button
speaker
(in back)
accessory connector
retractable
antenna
audio jack
microphone
p Power button.
Navigation key — press the arrows to
scroll through menus and lists.
O OK key — selects highlighted item;
answerscalls.
m Menu key — accesses context-sensitive
menus.
A Option key — selects the option
appearing above it on the display.
s Send key — placesphone calls.
e End key — ends phone calls; returnsto
idlescreen.
1
Page 12
Getting Started
To start using youri265 phone:
• Makesure your SIM card is in place.
• Charge the battery.
• Activate your service.
• Enable over-the-air security if you are prompted
to.
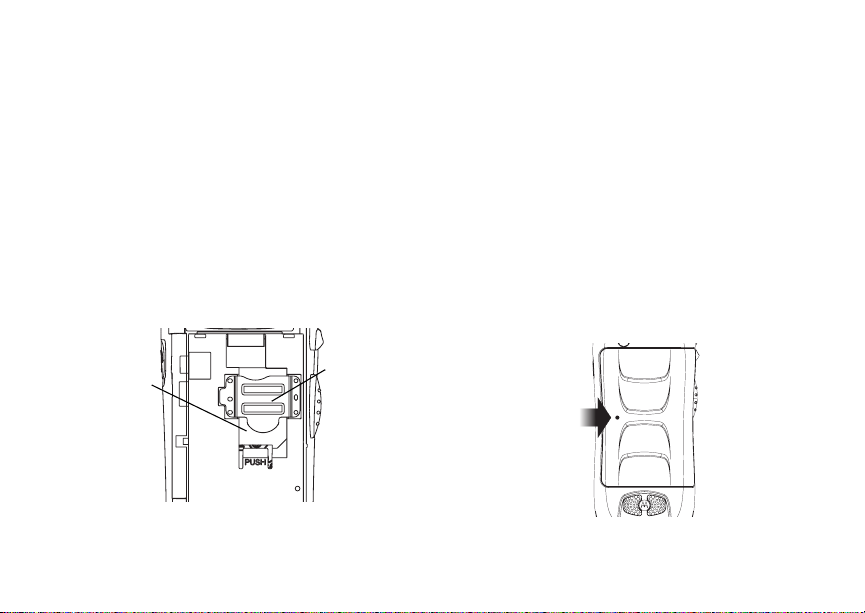
Locating Your SIM Card
Your SIM (SubscriberIdentity Module) card is a
small piece of plastic located in the SIM card
holderin the backof your phone,underneath the
battery.
SIM card
SIM card
2
holder
If your SIM card is not in the SIM card holder, it
may be in the box your phone came in, attached to
a piece of plastic about the sizeof a credit card. If
this is the case, carefullydetach your SIM card
from the surrounding plastic and insert it as
describedin“InsertingYourSIMCard”onpage13.
If there is no SIM card in your phone or the box,
contact your service provider.
Battery
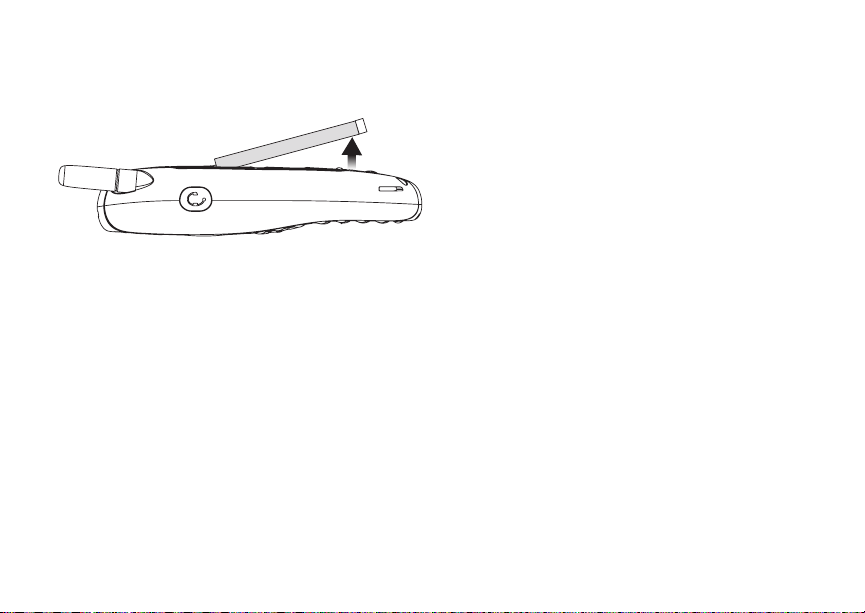
Removing the Back Cover
1 Make sure the phone is powered off.
2 Slide the back cover to the right until it releases.
3 Remove the back cover from the back o f your
phone.
Page 13
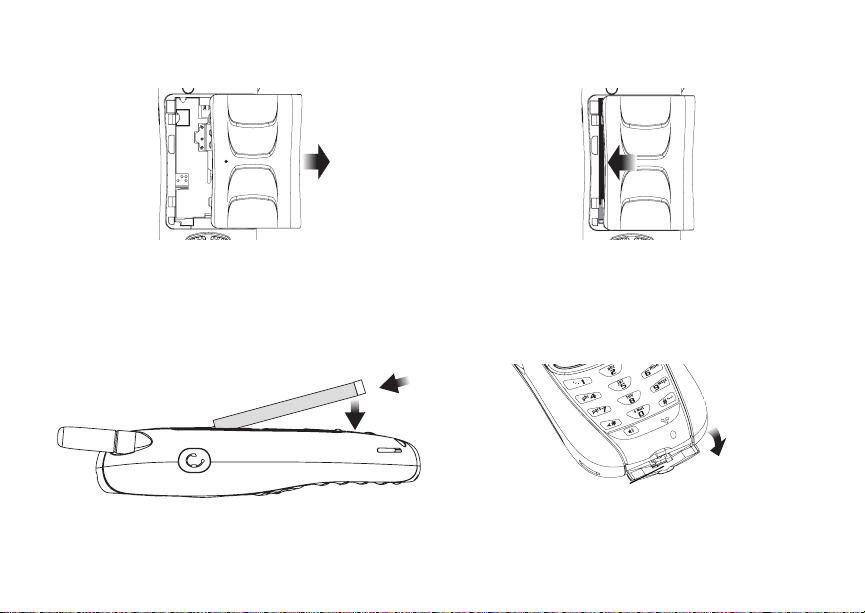
Battery
Inserting the Battery
1 With the phonepoweredoff,removethe back
cover.
2 Insertthe top of the battery into the battery area.
Pressthe bottom of the batteryto secure it.
3 Replacethe back cover and press it gentlyuntil
you hear a click.
Charging the Battery
Your phone comes with a battery charger.
1 Plug the charger into an electrical outlet.
2 Open the connector cover.
connector
cover
3
Page 14
Getting Started
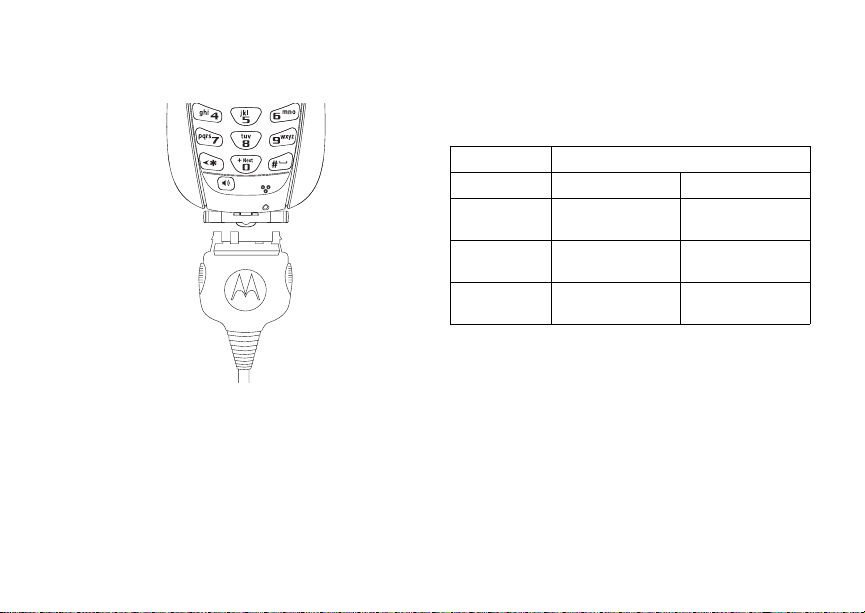
3 Plug the other end of t he chargerinto the
accessory connector.
Tip: To remove the charger from the accessory
connector: Press the buttonson the sides
of the plug.Pull the plug straightout.
4 When charging the battery for the first time,
charge for 30 minutes longer than the time
shown in “Charging Times”.
4
Charging Times
See your battery and chargerto determinethe
appropriate charging time.
Battery Charger
Rapid Mid-Rate
High
Performance
Extra
Capacity
Maximum
Capacity
For best results,charge the batteries within the
temperature range of 50°F to 104°F (10°C to
40°C).
Prolonged charging is not recommended.
2hours 4hours
2.5 hours 5.5 hours
3.5 hours 7.5 hours
Removing the Battery
1 With the phone powered off, remove the back
cover.
Page 15
Activating Service
2 Remove the battery by pushing the battery
toward the antenna and lifting it out.
Battery Us e and Maintenance
• TheMotorola iDEN Approved Lithium Ion
chargers provide optimum performance. Other
chargers may not fully charge the iDEN Lithium
Ion batteryor may yielda reduced number of
lifetime charge cycles.
• Extreme temperatures degrade battery
performance.Do not storethe battery where
temperatures exceed 140°F (60°C) or fall below
4°F (-20°C).
• Lithium Ion batteries have a self discharge rate
and withoutuse, lose about 1% of their charge
per day.
• Thebattery capacityisdegradedif the batteryis
storedfor long periodswhile fully charged.If
long term storage is required, store at half
capacity.
Activating Service
The first time you power on your phone, you must
be in your local calling area. This activates your
service.
Powering On and Off
The first time you power your phone on, a screen
may appear asking you to update your browser
information. This means you must enable security.
To power your phone on:
Press p.
To power your phone off:
Pressand hold p.
When You Power On For the First
Time
If the Enter SIM PIN Code screenappears,enter
your SIM PIN. See “Enteringthe PIN” on page 11
Press A under Ok.
When you receive your phone, the SIM PIN is
0000. Change your PIN to prevent fraudulent use
of the SIM card (see “Changing the PIN” on page
11).
.
5
Page 16
Getting Started
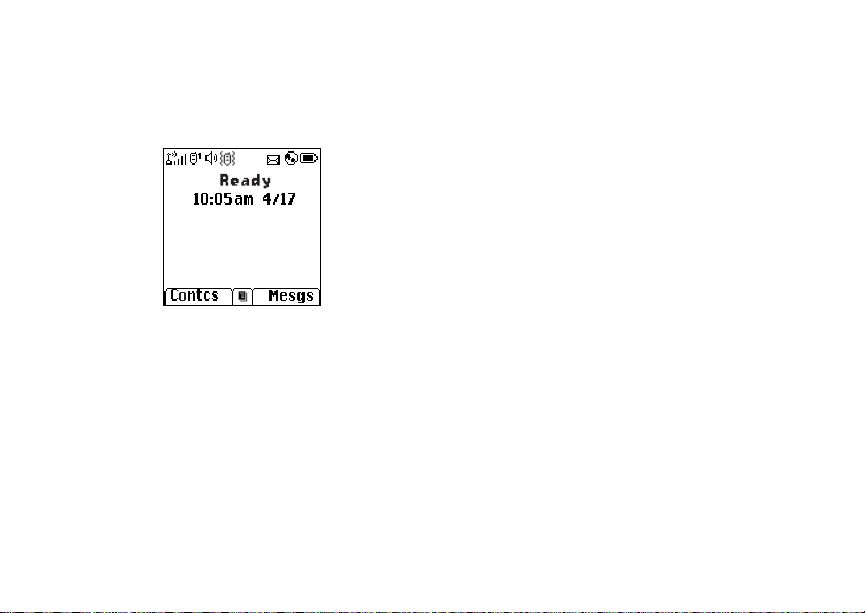
As your phone connects to the network, you will
see a welcome message and a connecting
message. When the idle screen appears, the
phone is ready to use.
Enabling Over-the-Air Security
If you are set up to receive over-the-air
programming from your serviceprovider, you must
enable security the firsttime you power on your
phone or within 20 days of first activation of your
phone:
1 When you power on your phone for the first time,
afterthe idle screen appears, you will be
prompted to select Ok to update your browser
information.
6
Note: If you press A under Later, you will be
prompted to enable security each time
you power on your phone until you press
A under Ok.
2 Press A under Ok.
3 You are prompted to enable security. Press A
under Yes. A series of screensappears. If you
subscribe to your service provider’s plan, your
home page appears.
4 Press e to return to the idle screen.
Phone Programming
Within24 hours of enabling security, you may
receive an alert notification containing your Private
ID and Talkgroup lists for Privatecalls.
To accept programming:
1 When you receivean alert notification saying
New Browser Message - R eceive
Programming Info,pressO or press A
under Goto.
2 You are promptedto accept changes to your
lists. Press O or press A under Ok.
3 If you are prompted again to accept changes to
your lists, press O or press A under Ok.
4 A confirmationscreendisplays.Press O or
press A under Ok.
Page 17
Finding Your Phone Number
5 Press e to return to the idle screen.
Finding Your Phone Number
My Info lets you view your phone number, Private
ID, and other phone information:
1 Press m to access the main menu.
2 Scroll to My Info.
3 Press O.
4 Scroll to see your information:
•Name— Enter your name. See “Entering
Text”onpage44.
•Line1andLine 2 — your phone numbersfor
phone lines 1 and 2. Each is filled in when you
receiveyour first call on that line.
•Private— Your Private ID is the number that
others use to contact you using Private calls.
ItisfilledinwhenyoureceiveyourfirstPrivate
call.
•GroupID— the number of the Talkgroup you
have joined.
• Carrier IP — the IP address assigned to your
serviceprovider.Itisfilledinwhenyou
register for packet data services.
• IP1 Address and IP2 Address —theIP
addresses you use to access theInternet with
your phone.
•Ckt— Y ourcircuit data number is the number
youuseifyouwanttouseyourphoneto
transfer circuit data. See “Using Your Phone
as a Modem”on page 37. Youreceive this
number from your service provider.
Note: The context-sensitivemenuunderMy Info
contains information that may be used by
your service provider if there is a problem
withyour phone.
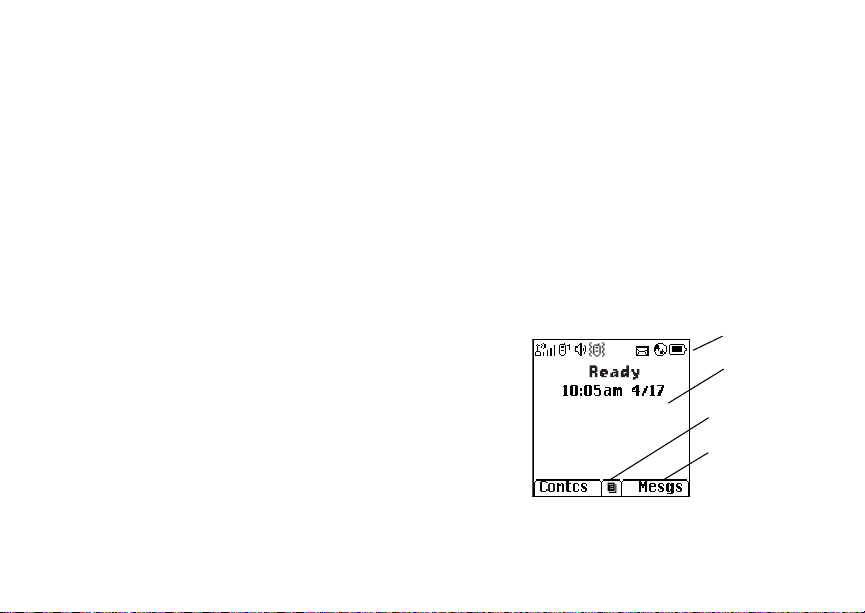
Phone Basics
Any time your phone is powered on, the display
providesyou with information and options.
status i cons
text area
menu icon
display options
7
Page 18

Getting Started
The screen shown is the idle screen. The text that
appearson your idle screen dependson your
serviceprovider. The idle screen appears when
your phone is on, but not engagedin any activity.
Text Ar ea
This area displays menus, messages,names,
phone numbers, and other information.
Display Options
Two display options appear at the bottom of most
screens. You select a display option by pressing
theoptionkeybelowit.
Menus and Lists
Your phone’s featuresare arrangedin menus,
submenus,and lists.
To access the items in a menu or list, scroll using
the navigation key at the top of your keypad. This
key lets you scrollup, down, left, or right.Holding
down the appropriatepart of the navigation key
speeds up scrolling.
In this guide,this symbol > tells you to select a
menu or list item. For example, Settings >
Security means:
1 Scroll to Settings on the main menu.
2 Press O to see the Settings screen.
8
3 Scroll to Security.
4 Press O to see the Security screen.
Quick Access to Main Menu Items
Each arrow in the navigation key and O can be
used to accessa main menu item from the idle
screen. Each of these keys is assigned to a main
menu item when you receive your phone. To
assign different main menu items, see “Personalize
Features” on page 81.
OK Key
Pressing O:
• Selects the highlightedmenuitem or list item
• Sets options
• Confirms actions
• Places and answer calls
Menu Key
Many features provide context-sensitive menus
that let you access related features and actions.
Thisicon
menu is available. Press m to access the menu.
S appearsany time a context-sensitive
Page 19

Phone Basics
Main Menu
All your phone’sfeaturescan be accessedthrough
themainmenu.Youcansetthemainmenuto
appearas a list or as large icons.
Browser Browsethe Web.
a
Java Apps Java applications on your
q
Settings Customizeyour phone.
b
Ring Tones Assign ring tones and turn
m
VoiceRecord Record and play au dio
c
My Info Viewpersonalphone
j
GPS Find your approximate
l
Contacts View, store, edit contacts.
d
phone.See page 61.
Seepage78.
ringeroff. See page 41.
messages.See page 76.
information,including
phonenumberand Private
ID. See page 7.
geographical location. See
page 67.
Seepage24.
Messages Access messages. See
e
Call Forward Set call forwarding
f
Datebook Schedule appointments.
o
Memo Store a number to access
g
Call T imers Phone usage information.
h
RecentCalls Lists recent calls. See
i
Shortcuts Create shortcuts to
s
Profiles Groupsof settingsyou
p
Call Al ert Lists call alerts. See
k
page 47.
options. See page 30.
Seepage55.
later.Seepage40.
Seepage36.
page 22.
screens.See page 89.
applytogether. See
page 84.
page 20.
9
Page 20

Getting Started
Status Icons
Status icons appear at the top of the display. Some
appearat all times. Others appear only whenyour
phone is engaged in certain activitiesor when you
have activated certain features.
abcd
efgd
opqr
s
A
B
C
12
GJ
HK
Battery Strength — A fullerbattery
indicates a greater charge.
Signal Strength — More bars next
to the antenna indicate a stronger
signal.
Phone In Use — Your phone is
active on a phone call.
Private In Use — Your phone is
active on a Private call.
TalkgroupIn Use— Your phoneis
active on a group call.
Active Phone Line —1indicates
phone line 1 is ready to make calls;
2 indicates phone line 2 is ready to
make calls.
Call Forward — Your phone is set
to forward calls. See page 30.
IL
10
u Q RM
wxT
yz
DE
U
YZ
N O
t
RingerOff— Your phone is set not
to ring. See page 41.
Messages —Youhaveoneor
more messages.See page 50.
Internet— You are ready to
browsethe internet.
Airplane Mode — Your phone is
set to airplane mode. See page 80.
Packet Data — You are ready to
transfer packetdata or are
transferring packet data. See
page 37.
TTY — You are readyto use your
phone to make calls using a
teletypewriterdevice.See page 38.
Roaming— You are using your
phoneoutsideyourcarrier's
network.
Page 21

SIM Card Security
SIM Card Security
Your SIM card protects your personalinformation.
The SIM card storesall your Contacts information.
Since this information is storedon your SIM card,
not in yourphone,you can remove the information
by removing your SIM card.
Note: Except for making emergency calls, your
phone will not function withoutthe SIM
card.
To prevent unauthorized use of your phone, your
SIM card may be protected by a PIN that you enter
each time the phoneis powered on. You can
change the PIN or turn off the requirement that it
be entered.
Entering the PIN
You may be required to entera SIM PIN when you
firstuse your phone.
When you receive your phone, the SIM PIN is
0000. Change your PIN to prevent fraudulent use
of the SIM card.
Important: If you enter your PIN incorrectly3 times,
1 When the Enter SIM PIN Code screen appears,
enter your SIM PIN. An asterisk appears for
each character entered.
2 Press A under Ok.
your SIM card is blocked. To unblock
your SIM card, you must contact your
service provider. See “Unblocking the
PIN”.
Changing the PIN
1 From the main menu, select Settings >
Security > Change Password > SIM PIN.
2 At the Enter Old SIM PIN screen, enter the
current SIM PIN.
3 Press A under Ok.
4 At the Enter New SIM PIN screen, enter the
new 4- to 8-digitSIM PIN.
5 Press A under Ok.
6 At the Re-enter New SIM PIN screen,re-enter
the new SIM PIN to confirm.
7 Press A under Ok.
11
Page 22

Getting Started
Turning the PIN Requirement On and
Off
When the SIM PIN requirement is on, you are
prompted to enter your PINeach time you turn on
your phone.
Note: If a SIM PIN is required, your phone will
not function until the SIM PIN is entered,
exceptfor making emergency calls.
When the PIN requirement is off, your phone can
be used without enteringa PIN.
Important: When the SIM PIN requirement is off,
the personal data on your SIM card is
not protected. Anyone can use your
phone and access your personal data.
1 From the main menu, select Settings >
Security > SIM PIN.
2 Select On or Off.
3 Enter the current SIM PIN.
4 Press A under Ok.
Unblocking the PIN
If you enter your PIN incorrectly 3 times,your SIM
card is blocked. To unblock your SIM card, you
must contact your service provider to get a PIN
Unblock Code (PUK).
12
Important: If you unsuccessfully enter the PUK
code 10 times, your SIM card is
permanently blocked and must be
replaced. If this happens, all data is
lost. You will get a message to contact
your service provider. Except for
making emergency calls, your phone
will not function with a blocked SIM
card.
To unblock the PIN:
1 Press *#m1.
2 At your service provider representative’s
request, provide the informationneeded to give
youaPUKcode.
3 Select Unblock PIN.
4 Enter the PUK code.
5 Enter a new 4- to 8-digit SIM PIN.
6 Re-enter your SIM PIN.
If you entered the codes properly, SIM Unlocked
appearson the display.
Page 23
SIM Card Security
Inserting and Removing Your SIM
Card
Important: Do not touch the gold-colored areas of
Switching SIM Cards
Moving your SIM card from one phone to another
moves all your Contacts information, but erases
otherinformation.If you remove your SIM card and
useit with anotherphone,or use anotherSIM card
with your phone, the following information is
erased:
• The recent calls list
• Call forwarding settings
• Net alerts
• MOSMSdrafts, outbox messages,and
customized quick notes
• InformationstoredinMemo
• 3 most recent GPS E nabled locations
• Voice records
• Voice names
• Datebook events
• Options set using the Personalize menu
your SIM card.
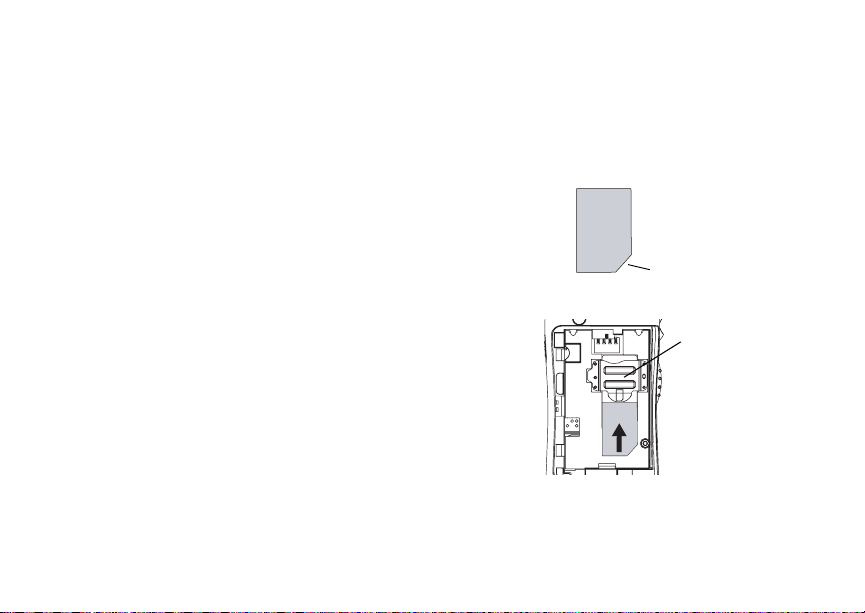
Inserting Your SIM Card
1 With your phone powered off, remove the
battery door and battery. See “Removing the
Battery”onpage4.
2 Hold your SIM card as shown. Do not touch the
gold-coloredarea.
cut corner
3 Carefullyslide your SIM card into your phone,
until it lies flat in the SIM card holder.
SIM card
holder
13
Page 24

Getting Started
Removing Your SIM Card
Important: To avoid loss or damage, do not remove
your SIM card from your phone unless
absolutely necessary.
1 With your phone powered off, remove the back
cover and battery. See “Removing the Battery”
on page 4.
2 While holding down the tab near the SIM card
holder,slide your SIM card out of the SIM card
holder.Do not t ouch the gold-coloredarea.
SIM card
holder
tab
Note: Protect your SIM card as you would any
delicate object. Store it carefully.
14
Accessories
To order accessories, log on to our Web site at
www.motorola.com/store/iden or contact your
Motorola Authorized Retailer.
For More Information
If you have questionsabout youri265 phone,
contact your sales representativeor your service
provider.
Page 25

Making Calls
Youri265 phone makes two types of calls: digital
cellular phone calls and Private calls. With Private
calls,you use your phone as a long-range,digital
walkie-talkie.
Phone Calls
1 Enter the number you want to call.
2 To place the call:
Press s.
If you entered the number from the idle screen,
press O.
3 To end the call:
Press e.
Private Calls
1 Enter the Private ID you want to call.
2 Press and hold t he PTT button on the side of
your phone. Begin talking after your phone emits
a chirpingsound.
3 Releasethe PTT button to listen.
Tip: To let someone know you want to talk to
him or her on a Private call, send a call
alert.See “Call Alerts”on page 20.
Receiving Calls
Phone Calls
When you receive a phone call, your phone rings,
vibrates, or lights up its backlight.
Answering
Press s. -or-
Press O. -or-
Press A under Yes. -or-
Pressany number key.
To answer a call by pressing any number key, you
must have the Any Key Ans featureturnedon (see
“Phone Calls Features” on page 81).
SendingtoVoiceMail
Press e. -or-
Press A under No.
Ending
Press e.
Private Calls
When you receive a Private call, your phone emits
a chirping sound or vibrates.
1 Waitfor the callerto finish speaking.
15
Page 26

Making Calls
2 Press and hold t he PTT button on the side of
your phone. Begin talking after your phone emits
a chirpingsound.
3 Releasethe PTT button to listen.
Ways to Enter Calls
• Usethe numbers on the keypad
• Select the number from the recent calls list
• Select the numberfrom Contacts
• Select a number stored in Datebook
• Redial the last phone number called
• Saya voice name into your phone
• Use Speed Dial or Turbo Dial
• UseOneTouchPTTtomakeaPrivatecall
• Use a TTY device — see “Making TTY Calls” on
page 38
From the Keypad
To enter the numberyou want to call, press the
numbers on the keypad.
Ifyoumakeamistake:
• To clear a digit, press A under De lete.
• To clear all digits,press and hold A under
Delete.
16
®
• To insert or delete a digit anywhere in the string
of digits you have entered, scroll left or right.
• To cancel, press e.
From the Recent Calls List
The recent calls list stores the last 20 calls you
made or received.
1 From the main menu, select Recent Calls.
2 Scrollto the name or number you want to call.
You can callthe number displayedby pressing t
on the top of your phone.
From Contacts
If you have numbersstored in Contacts,you can
use these numbers to make calls. For information
on entering numbers into Contacts,see “Creating
Entries” on page 26.
1 From the main menu, select Contacts.
2 Scrollto the name or number you want to call.
Tip: Tofind Contacts entries faster, use the
keypad to enter the first letter of the name.
3 Place the call now. -or-
Scrollleftor rightto displaythe Contactstype for
the number you want to call.
Page 27

Ways to Enter Calls
If you are makinga Privatecall,your phone places
the call to the Private ID stored in the Contacts
entry, even if the Private icon is not displayed.
Ifyouaremakingaphonecall:
• Your phone places the call to the phone number
assignedto the Contacts type displayed.
• If the Contacts type displayed is not a phone
number, your phone places the call to the phone
number stored in the Contacts entry.
• If the Contacts type displayed is not a phone
number and you have more than one phone
numberstored in the Contactsentry, your phone
prompts you to select the phone number you
wantto place the call to.
From Datebook
If you have numbers stored as partof events in
Datebook, you can use these numbers to make
calls. For information on storing events in
Datebook, see “ Datebook”on page 55.
1 From the main menu, select Datebook.
2 Select the day of the event containing the
numberyou want to call.
3 Highlight or select the event containing the
numberyou want to call.
For details, see “Making Calls From Datebook” on
page 59.
Redialing th e Last Number
Press and hold s to place a call to the last phone
number you called.
Using a Voice Name
IfyouhavecreatedavoicenameinContactsfor
the number you want to call, say the voice name
into your phone to enter the number. See page 25
for information on voice names.
You can use a voice name to enter a number.
1 Press and hold t until a prompt appears telling
youtosaythevoicename.
2 Speaking into the microphone, say the voice
name assignedto the numberyou want to call.
Your phone plays the name back to you.
If you are making a phone call, the call is placed
automatically.
Tip: Tostop a phonecall from being completed,
presse .
If you are making a Private call, press and hold the
PTTbuttontoplacethecall.
17
Page 28

Making Calls
Using Speed Dial and Turbo Di al
Each phone number stored in Contacts is assigned
a Speed Dial number which you can use to call that
number.
Speed Dial
1 From the idle screen, use the keypad to enter
the SpeedDial number assignedto the phone
numberyou want to call.
2 Press #.
3 Press s.
Turbo Dial
From the idle screen, press and hold the Speed
Dialnumber (1 through9) assignedtothephone
numberyou want to call.
®
Using One Touch PTT
One Touch PTT sets your phone to call the most
recentPrivate ID onthe recent calls list, or a
Private ID you choose, every time you press the
PTTbutton.See “Setting One Touch PTT”on page
34.
18
Missed Phone Calls
Whenyou missa call,thisiconV and the number
of phone calls you have missed appear briefly.
Ifyouwanttodismissthemissedcallmessage,
press A under Back. -or-
If you want to view the missed call on the recent
calls list, press A under View.
Using Speakerphone
Turning on speakerphone makes incoming sound
come out of the phone’s speaker instead of the
earpiece.S peakerphoneisavailablewheneveryou
areonanactivephonecall.
To turn speakerphoneon or off:
Press A under Spkr. -or-
Press t.
Using Mute
Muting callslets you listen to incomingsound
withouttransmittingsound.Mute is available
whenever you are on an active call.
To turn mute on:
Press A under Mute.
Page 29

Making Emergency Phone Calls
Whilemuteison,Unmute appears as a display
option.
To turn mute off:
Press A under Unmute.
Making Emergency Phone
Calls
Your phone supportsemergency calling.
Emergency phone calls can be made even when
your SIM card is blocked or not in your phone.
Dial 911 to be connected to an emergency
responsecenter. If you are on an active call, you
must end it before calling 911.
When you make an emergency call, your phone’s
GPS Enabled featurecan help emergency service
personnel find you, if you are in a locationwhere
yourphone's GPS antennahasestablisheda clear
view of the open sky and your local emergency
response center has the equipment to process
locationinformation. See “GPS Enabled”on page
67, and particularly “IMPORTANT: Thingsto Keep
inMind”onpage67and“MakinganEmergency
Call” on page 68, for more information on the
limitations of this feature. Because of the
limitationsof this feature,alwaysprovideyour best
knowledge of your locationto the emergency
responsecenterwhen you make an emergency
call.
Important: Emergency calls cannot be placed while
Important: If you have not registered on the
the keypad is locked.
network, emergencycalls c annot be
placed while your SIM card is in your
phone.
19
Page 30

Call Alerts
Sending a call alert lets the recipient know you
want to talk to him or her on a Private call.
When you send a call alert, the recipient’s phone
emits a seriesof beeps, or vibrates, and displays
your name or Private ID.
The recipientcan:
• Answer — begin a Privatecall with the sender
• Queue — store the call alert to the call alert
queue, which is a list of call alerts
• Clear — dismiss and delete the call alert
Sending Call Alerts
1 Enter the Private ID you want to send to, as you
wouldwhenmakingaPrivatecall.
2 Press A under Alert. Ready to Alert appears
on the display.
3 Press the PTT buttonuntilAlert Successful
appears on the display.
Note: If the alert is not successful, this may
meanthepersonyouaretryingtoreachis
on a call or has the phone turned off.
20
Receiving Call Alerts
When you receive a call alert, you must answer,
queue,or clear it. You cannot receivephone calls
or Private calls until you do.
To answer a call alert:
PressthePTTbuttontomakeaPrivatecallto
the sender.
To queue a call alert:
Press A under Queue.
To clear a call alert:
Press O. -or-
Press A under Clear. -or-
Note: The recent calls list also stores call alerts
you have received. They appear as
Private calls. Call alerts remain in your
recentcalls list until you delete them o r
until theyreach the end of the list.
Using the Call Alert Queue
When you queuea call alert, it remainsin the call
alertqueue until you make a Private call to the
senderordeleteit.
Page 31

Using the Call Alert Queue
Viewing Call Alerts
1 From the main menu, select Call Alert.
2 Scroll through the list.
Viewing Date and Time
To view the date and time a call alertwas received:
1 From the main menu, select Call Alert.
2 Select the call alert you want information on.
Responding to Call Alerts in the
Queue
After you queue a call alert, you can respond to it
by making a Private call to the sender or sending a
call alert to the sender.
Making a Private Call to the Sender
1 From the main menu, select Call Alert.
2 Scrolltothecallalertyouwanttorespondto.
3 PressthePTTbuttontobeginthecall.
This removes the call alert from the queue.
Sending a Call Alert to the Sender
1 From the main menu, select Call Alert.
2 Scrolltothecallalertyouwanttorespondto.
3 Press A under Alert. Ready to Alert appears
on the display.
4 Press the PTT button until Alert Successful
appears on the display.
Deleting Call Alerts
To delete a call alert from the queue:
1 From the call alert queue, scroll to the call alert
you want to delete.
2 Press m.
3 Select Delete.
4 Press O or pressA under Yes to confirm.
To delete all call alertsfrom the queue:
1 From the call alert queue, press m.
2 From the call alert menu,selectDelete All.
3 Press O or pressA under Yes to confirm.
Sorting Call Alerts
Tip: Youmusthaveatleastonecallalertinthe
queue to access this feature.
To sort call alertsby the orderthey were received:
1 From the main menu, select Call Alert.
2 Press m.
3 Select Sort By.
4 Select First on Top or Last on Top.
21
Page 32

Recent Calls
The recent calls list stores the numbers of the 20
most recent calls you have made and received.
If the number of a recent call is stored in Contacts,
the name associated with the number appears on
the recent calls list.
An icon appears beside the name or number
indicating the Contacts type of the number used in
thecall.See“Contacts”onpage24.
For phone calls, an icon appears to the left of the
name or numbergivingmoreinformationabout the
call:
A call you made.
X
A call you received.
W
A missed call. Missed calls appear on the
V
recent calls list only if you have Caller ID.
Note: The recent calls list also stores call alerts
you have received. They appear as
Private calls. Call alerts remain in your
recentcallslistuntil you delete them or
untiltheyreach the end of the list.
22
Viewing Recent Calls
1 From the main menu, select Recent Calls.
2 Scroll through the list.
To get more information on a recent call:
From the recent calls list, select the call you
wantinformationon.
This displays information such as the name
associatedwiththe call,the number, the date,
time,and duration of the call.
Tip: Presss to call the number displayed.
Storing Recent Calls to Contacts
1 From the recent calls list, scroll to the number
you want to store.
2 Press A under Store. -or-
If Store is not one of your options: Press m.
Select Store.
Tip: If Store is not on this menu, the number is
already stored in Contacts.
3 To storethe numberasa new entry,select [New
Contact]. -or-
To store the number to an existing entry, select
the entry.
Page 33

4 With the Contacts type field highlighted, scroll
left or right to display the Contacts type you want
to assign the number. For information on
Contacts types, see page 24.
5 If you want to add more information to the entry,
follow the applicable instructions in “Creating
Entries” on page 26.
6 Press A under Done.
Deleting Recent Calls
To deletea call:
1 From the recent calls list, scroll to the call you
wantto delete.
2 Press A under Delete. -or-
If Delete is not one of your options: Press m.
Select Delete.
3 Press O or pressA under Yes to confirm.
To delete all calls:
1 From the recentcalls list, press m.
2 Select Delete All.
3 Press O or pressA under Yes to confirm.
Deleting Recent Calls
23
Page 34

Contacts
Contacts stores up to 600 numbers or addresses.
Each Contactsentrycan store several numbers or
addresses.
InformationstoredinContactsissavedonyour
SIM card.
A Contacts entry contains:
• A name — A name is required if you are storing
more than one number or address to the entry;
otherwise, it is optional. Typically, this is the
name of the person whose contact information is
stored in the entry.
• Aringtone—Youcanassignaringtoneto
eachentry. This is the sound your phone makes
when you receive phone calls or call alerts from
any of the numbersstoredin the entry.
24
• A Contacts type — Each numberor address
storedmust be assigned a Contactstype:
Mobile phone number
A
Private Private ID
B
Work1 phone number
C
Work2 phone number
D
Home phone number
E
Email emailaddress
F
Fax phone number
G
Pager phone number
H
Talkgroup Talkgroup number
I
IP IP address
J
Other phone number
K
• Anumberoraddress—EachContactsentry
must contain a number or address.This may be
any type of phone number, Private ID, Talkgroup
number,email address,or IP address.
Page 35

Viewing Contacts
Note: You can store numbers up to 64 digits
long, but every 20 digits must be
separated by a pause or wait. See
“Creating Pauses and Waits” on page 28.
• A Speed Dial number — When you store a
phone number, it is assigned a Speed Dial
number. You can accept the default Speed Dial
numberor change it.
• Avoicename — Ifyoucreatea voice name for a
number,you can then dial that number by saying
the voice name into your phone. This icon
appears to the left of the Contacts type icon if a
voice name is assigned.
P
Viewing Contacts
To access Contacts:
From the main menu, selectContacts. -or-
Ifyouareonacall:Pressm. SelectContacts.
To view entries:
1 From the Contacts list, scroll to the entry you
wantto view.
2 If an entry has more than one number or
addressstored,
icon.Scrollleftor right to view the icon for each
numberstoredin the entry.
3 Press O to view the entry.
<> surrounds the Contacts type
4 Scrollto view the other numbers and addresses
storedfor the entry.
Tip: Toview more entries,continue scrolling.
Searching for a Name
To search for a name in Contacts:
1 FromtheContactslist, pressA under Search.
-or-
If Search is not one of your options: Pressm.
Select Search.
2 Enter the name you want to see. See “Entering
Text”onpage44.
3 Press O.
Your phone finds the name you entered or the
nearestmatch.
Showing Only Private IDs and
Talkgroups
To set Contactsto show only entries that contain
Private IDs and Talkgroup entries:
1 From the Contacts list,press m.
2 Select Filter.
3 Set this option to Show Prvt/Grp.
25
Page 36

Contacts
To set Contactsto show all entries:
1 From the Contacts list, press m .
2 Select Filter.
3 Set this option to Show All.
Creating En tries
A number or address and a Contacts type are
required for all Contactsentries. Other information
is optional.You may enter the information in any
order by scrolling through the entry details.
After you have entered the number or address,
Contacts type,andany other informationyouwant,
you canpressA underDone to save the entry to
Contacts.
To cancel a Contacts entry at any time press, e
to return to the idle screen.
To create a Contacts entry:
1 To access the entrydetails screen:
Select Contacts> [New Contact]. -or-
From the Contacts list, press m. SelectNew.
2 Ifyouwanttoassignanametotheentry:
Select Name.
Enterthe name. See “Entering Text” on page
44. When you are finished, press O.
26
Tip: PressA under Browse to select a name
alreadyin Contacts.
3 Ifyouwanttoassignaringtonetothename:
Select Ringer.
Selecttheringtoneyouwanttoassign.
4 ToassignaContactstypetothenumberor
addressbeingstored:
Select the Contacts type field.
Select the Contacts type you want to assign.
5 Tostore a number or address:
Select the # field (or ID for an email address,or
IP for an IP address).
Enterthe number or address. For phone
numbers, use the 10-digit format.For email
addresses, see “Entering Text” on page 44.
Tip: PressA under Browse to select a
numberor address from Contacts,the
recentcalls list, or Memo.
When you are finished,press O.
6 Ifyouwanttoassignmoreoptionstothe
number,select [Options]. See “Assigning
Options” on page 27.
Page 37

Storing Numbers Faster
7 If you want to add more numbersor addresses
to the entry:
Scrollpast the information you already entered.
Enter the additional information for the entry
using step 2 through step 6. You must assign a
name to the entry, if you have not already.
8 Press A under Done.
Assigning Options
1 Ifyouhavenotalready,select[Options].
2 The default Speed Dial number assigned to a
phonenumber is displayed in the Speed # field.
This is always the next available Speed Dial
location.
Ifyouwanttoassignthephonenumbertoa
different Speed Dial location:
With the Speed # field highlighted, press O.
Press A under Delete to delete the current
Speed Dial number.
Enter the new Speed Dial number using the
keypad.
When you are finished,press O.
3 Ifyouwanttocreateavoicenameforaphone
number,select Voice Name.
As directed by the screen prompts, say and
repeatthe name you wantto assign to the
number.Speak clearly into the microphone.
4 When you are finished, press A under Back.
Storing Numbers Faster
To store numbers to Contacts from the recent calls
list, see “Storing Recent Calls to Contacts” on page
22.
To store numbers to Contacts f rom Memo, see
“Memo” on page 40.
To store numbers to Contacts from the idle screen:
1 Use the keypad to enter the number you want to
store.
2 Press m.
3 Select Store Number.
4 To storethe numberasa new entry,select [New
Contact]. -or-
To store the number to an existing entry, select
the entry.
5 With the Contacts type field highlighted, scroll
leftor right to displaythe Contactstype you want
to assign the number.
27
Page 38

Contacts
6 If you want to add more information to the entry,
follow the applicable instructions in “Creating
Entries” on page 26.
7 Press A under Done.
Editing Entries
1 From the Contacts list, scroll to the entry you
wantto edit.
2 Press A under Edit. -or-
If Edit is not one of your options: Press m.
Select Edit.
The entry details screen displays.
3 Follow the applicable instructions in “Creating
Entries” on page 26 to edit the various fields.
Deleting Entries
Delete an Entry
1 From the Contacts list, scroll to the entry you
wantto delete.
2 Press m.
3 To delete the entire entry,select Del ete
Contact.
4 Press O or pressA under Yes to confirm.
28
Delete a Number or Address
1 From the Contacts list, scroll to the entry that
contains the number or address you want to
delete.
2 Scrollleft or right to displaythe Contactstype for
the number you want to delete.
3 Press m.
4 Select Delete Number.
5 Press O or pressA under Yes to confirm.
Note: If an entry contains only one number or
address, deleting the number or address
deletes the entry.
Checking Capacity
To see how many numbers are stored in Contacts:
1 From the Contacts list,press m.
2 Select Capacity.
Creating Pauses and Waits
When storing a number, you can program your
phoneto pause or wait between digits while
dialing. A pause makes your phone pause for 3
seconds beforedialing further. A wait makes your
phone wait for your response before dialing further.
Page 39

International Numbers
This featureis useful when using voice mail or
otherautomatedphone systemsthat requireyou to
dial a phone numberand then enter an access
number.
To program a pause:
Pressand hold * untilthe letter P appears.The
P representsa 3-second pause.
If you store 17035551235P1234, when you select
this number and make a call, your phone dialsthe
first 11 digits, pauses for 3 seconds, then dials the
last 4 digits.
If you want a pause longer than 3 seconds, press
and hold * more t han once.Each P represents a
3-second pause.
To program a wait:
Pressand hold * until the letter W appears.
The W means your phone waits before dialing
further.
If you store 17035551235W1234, when you select
this number and make a call, your phone dialsthe
first11 digits and t hen waits.A message appears
askingif you want to send the rest of the digits.
Press A under Yes to dial the last 4 digits.
Tip: You can create pausesand waitswhile
dialing a number from the keypad. See
“Creating Pauses and Waits While Dialing”
on page 34.
International Numbers
Note: This feature may not be offered by your
service provider.
When storinga number that you plan to use for
international calls, use Plus Dialing:
1 Press and hold 0 f or two seconds. A “0”
appears, then changes to a “+”.
Note: The networktranslates the “+” intothe
appropriate international access code
needed to place the call.
2 Enter the country code, citycode or area code,
and phone number.
For information about making international calls,
see “Making International Calls” on page 34.
Accessing Contacts with GSM Phones
Ifyouplantousetheinformationstoredin
Contacts with ani2000,i2000
GSM phone, download iDEN Phonebook Manager.
Go to idenphones.motorola.com/iden/support for
more information.
You can use iDEN Phonebook Managerto make
the Contacts information saved to your
phone’s SIM card accessible in this type of phone.
plus
, or any other
i
265
29
Page 40

Call Forwarding
Call forwarding sends calls to the phone numbers
you specify. You can forward all calls to one
numberor forward missed calls to different
numbers depending on the reason you missed the
call.
You can forward phone lines 1 and 2
independently.
Forwarding All Calls
When you set your phone to forwardall calls,an
icon appears in the top row of the display:
Phone line 1 is active; calls to phone line 1
G
are being forwarded.
Phone line 1 is active; calls to phone line 2
I
are being forwarded.
Phone line 1 is active; calls to phone lines 1
H
and 2 are being forwarded.
Phone line 2 is active; calls to phone line 1
J
are being forwarded.
Phone line 2 is active; calls to phone line 2
L
are being forwarded.
30
Phone line 2 is active; calls to phone lines 1
K
and 2 are being forwarded.
To forward all calls:
1 From the main menu, select Call Forward >
Forward > All Calls.
2 Select To.
If you specified a forwarding number for all calls
before, this number displays.
To forward calls to this number, press A
under Back.
To delete this number, press O,thenpressand
hold A under Delete.
3 Toenter the number you want to forward calls to:
Enterthe number using your keypad. -or-
Press A under Search.SelectContacts,
Recent Calls,orMemo. Select the number you
wantto enter.
4 Press O.
All your calls are now forwarded to the number you
specified.
Page 41

Turning Off Call Forwarding
Turning Off Call Forwarding
If you don’t want all your callsforwarded, turn the
feature off:
1 From the main menu, select Call Forward > To.
2 Set this option to Off.
All your calls are now sent to your phone.
Calls you miss are forwarded according to the
optionsset for missed calls. By default, missed
calls are forwarded to voice mail.
Note: To receivevoice mailmessages,youmust
firstset up a voice mail account with your
service provider.
Forwarding Missed Calls
You canspecifya forwardingnumberfor each type
of missed call:
•IfBusy— Yourphone is on a call or transferring
data.
•IfNoAnswer— You do not answer on the first
4rings.
• If Unreachable —Your phone is out of
coverage or powered off.
Note: If you want a type of missed call sent to
voicemail,thecallforwardingnumberfor
that type of missed call must be your
voice mail access number.
Toforwardmissedcalls:
1 From the main menu, select Call Forward >
Forward > Detailed.
2 Select If Busy to specify a forwarding number
for calls received when your phone is busy.
3 Ifyouspecifiedaforwardingnumberforthistype
of call before, this number displays.
To forward calls to this number, press A
under Back andgotostep6.-or-
To delete this number, press O,thenpressand
hold A under Delete.
4 To enter the number you want to forward this
type of call to:
Enterthe number using your keypad. -or-
Press A under Search.SelectContacts,
Recent Calls,orMemo. Select the number you
wantto enter.
5 Press O.
6 Repeatstep 2 throughstep 5 for If No Answer
and If Unreachable.
7 When you are finished, press A under Back.
Viewing Call Forwarding Settings
1 From the main menu, select Call Forward >
Forward > All Calls.
2 With To highlighted, press A under Status.
31
Page 42

Advanced Calling Features
Call Waiting
Call Waiting lets you receive a second call while on
an active call. Call Waiting is always available,
unlessyou turn it off for a specific call.
Ifyouareonacallandreceiveasecondcall,your
phoneemits a tone anddisplaysa messagesaying
youarereceivingasecondcall.
To acceptthe second call andputtheactivecall on
hold:
Press A under Yes.
To accept the secondcall and end the active call:
1 Press e.
Yourphone rings with the secondcall.
2 Answer the second call.
To decline the secondcall:
Press A under No.Ifyousubscribetovoice
mail,the call is forwardedto yourvoicemail box,
unless you set Call Forward for If Busy to a
different number.
32
Turn Off Call Waiting
To turn off Call Waitingduringa call:
1 Press m.
2 Select In Call Setup > Call Waiting.
3 Set this option to Off.
Tip: To turn Call Waiting back on while still on
the call, set this option to On.
To turn off Call Waiting for the next call you make
or receive:
1 From the main menu, select Settings > Phone
Calls > Call Waiting.
2 Set this option to Off.
Call Waiting is turned back on when you end the
call.
Switching Between Calls
Any time you have one call active and one call on
hold, to make the call on hold active and put the
active call on hold:
Press A under Switch. -or-
If Switch is not one of your options: Press m.
Select Switch.
Page 43

Putting a Call on Hold
Putting a Call on Hold
1 Whileonanactivecall,pressm.
2 Select Hold.
If you want to make the call activeagain, press
A under Resume.
Calling 2 People
Putting a Call on Hold, Making a
Second Call
1 Place or receive a phone call.
2 While the call is active, press m.
3 Select 2nd Call. This puts the call on hold.
4 Enter the second phone number you want to
call.
Tip: For quick ways to enter the number, press
m.
5 Press s to place the call.
To end the second call and make the callon hold
active again:
Press e.
Tomakethecallonholdactiveandputtheactive
call on hold:
Press A under Switch.
Merging 2 Calls into a 3-Way Call
After you put a call on hold and place a second
call, you can combine these calls into a 3-way call:
1 Press m.
2 Select Join.
All 3 people in the call can speak to and hear each
other.
Making a 3-Way Call
1 Place or receivea phone call.
2 While the call is active, press m.
3 Select 3Way. This puts the call on hold.
4 Enter the second phone number you want to
call.
Tip: For quick ways to enter the number, press
m.
5 Press s to place the call.
6 Press A under Join.
All 3 people in the call can speak to and hear each
other.
33
Page 44

Advanced Calling Features
Creating Pauses and Waits While Dialing
You can enter a pause or wait while dialing a
number.For more information on pauses and
waits, see “Creating Pauses and Waits” on page
28.
To create a pause while dialing a phonenumber:
1 From the keypad, enter the digits you want to
occur before the pause.
2 Press m.
3 Select Insert Pause.
4 Enter the digits you wantto occur after the
pause.
To create a wait while dialing a phone number:
1 From the keypad, enter the digits you want to
occurbeforethe wait.
2 Press m.
3 Select Insert Wait.
4 Enter the digits you wantto occur after the wait.
34
Making International Calls
Note: This feature may not be offered by your
service provider.
Plus Dialinglets you place an internationalcall to
most countries without entering the local
international access code.
1 Press and hold 0 f or two seconds. A “0”
appears, then changes to a “+”.
Note: The networktranslates the “+” intothe
appropriate international access code
needed to place the call.
2 Enter the country code, citycode or area code,
and phone number.
Setting One Touch PTT
One Touch PTT sets your phone to call the most
recentPrivateID on the recentcalls list, or a
Private ID you choose, every time you press the
PTT button.
To set your phone to call the most recent Private ID
on the recent callslist:
1 From the main menu, select Settings > 2-Way
Radio > One TouchPTT.
2 Set this option to Last Call.
Page 45

Group Calls
To set your phone to call a Private ID you choose:
1 From the main menu, select Settings > 2-Way
Radio > One TouchPTT> AssignedNumber.
2 To enter the Private ID you want your phone to
call every time you press the PTT button:
Enterthe number using your keypad. -or-
Press A under Search. Select Contacts,
Recent Calls,orMemo. Select the number you
wantto enter.
Tip: If you are entering a Talkgroup number,
enter# before the number.
3 Press O.
To turn off One TouchPTT:
1 From the main menu, select Settings > 2-Way
Radio > One TouchPTT.
2 Set this option to Off.
Group Calls
A group call is similar to a Privatecall,but is made
to all members of a Talkgroup at once.
Before you can make or receive group calls, a
Talkgroup must be established. After the Talkgroup
is established, you must join the Talkgroup.
Joining a Talkgroup
Your sales representative or your service provider
establishes Talkgroups for you and assigns each
Talkgroup a Talkgroup number. You can choose a
name for eachof yourTalkgroupswhen you create
entries for them in Contacts.
To receive group calls made to any of these
Talkgroups, you must join the Talkgroup.
1 Press A under Contcs. -or-
From the main menu, scroll to Contacts and
press O.
2 Scroll to the Talkgroup you want to join.
3 Press A under Join.
Note: You can only monitor one Talkgroupat a
time.
Making Group Calls
1 Press #. Then enter the Talkgroup number
using the keypad. -or-
Choose the Talkgroup name from Contacts or
recent calls list.
2 Proceedas if makinga Private call.
35
Page 46

Advanced Calling Features
Receiving Group Calls
To answer a group call:
Proceed as if answering a Private call. Only one
person at a time may speak on a group call.
The PrivateID or name of the person who is
speaking will appear on the display below the
Talkgroup number.
Turning off Group Calls
To set your phone to prevent you from hearing
group calls to your Talkgroup:
1 From the main menu, select Settings > 2-Way
Radio > Tkgrp Silent.
2 Set this option On.
To set your phone to let you hear group calls to
your Talkgroup:
Set Tkgrp Silent to Off in step 2.
Call Timers
Call timers measure the duration of your phone
calls, Private or group calls, and circuit data use,
as well as the number of Kilobytes sent and
receivedby your phone:
•LastCall— displays the duration of your most
recent phone call.
36
• Phone Reset — keeps a running total of your
phone call minutes, until you reset it.
• Phone Lifetime —displays the totalminutes of
all your phone calls.
• Prvt/Grp Reset — keepsa runningtotal of all of
your Privateand group call minutes,until you
reset it.
• Prvt/Grp Lifetime — displays the total minutes
of all your Privateand group calls.
• Circuit Reset — keeps a running total of all of
your circuit data use, until you reset it.
• Circuit Lifetime — displaysthe total minutesof
all of your circuit data use.
• Kbytes Reset — keepsa running total of the
numberof Kilobytessent and received by your
phone, until you reset it.
To view or reset a timer:
1 From the main menu, select Call Timers.
2 Select the feature you want to view or reset.
3 To view a feature without resetting: Press O
when you are finished viewing. -or-
To reset a feature: Press A under Reset.
Press O or press A under Yes to confirm.
Page 47

Using Your Phone as a Modem
Note: The values displayed by Call Timers
should not be used for billing. Call timers
are estimates only.
Using Your Phone as a Modem
Note: This feature may not be offered by your
service provider.
To use your phone as a modem witha laptop,
handheld device, or desktopcomputer:
1 Open the connector cover.
connector
cover
2 With the phone’s displayfacingup, insert a data
cable’s connector into the accessory connector,
until you hear a click.
3 Insert the data plug into the data port of the other
device.
When used as a modem, yourphone has these
data transfer modes:
• Circuit data — used for sending and receiving
faxes and for transferring large files
• Packet data — used for small file transferssuch
as email
37
Page 48

Advanced Calling Features
To use these services, you must install the iDEN
Wireless Data Services software (available
separately). For more information on setting up
your computer and your
circuitdata calls,refer to the
Services User’s Guide
provider.
i
265 phone for packet and
WirelessData
or contact your service
Making TTY Calls
Note: This feature may not be offered by your
service provider.
To use your phone to make phone calls using a
teletypewriter (TTY) device:
1 Connectone end of a 2.5mm cable into the
audio jack on your phone. Connect the other
endofthecabletoyourTTYdevice.
2 Make sure thatyour phone’s TTY feature is on
and select the TTY mode you want to use.
3 Use your phone to enter phone numbers and
make calls.
When you make a TTY call, these icons appear on
the phone’s display:
Phone call is active.
N
Phone call is on hold.
O
38
TTY device featuressuch as Turbo-Code,
High-Speed,and Interruption are not supported by
your phone. These features must be turnedoff or
disabled to use your TTY device with your phone.
TurningOntheTTYFeature
Your phone’s TTY feature must be on if you want
to make TTY calls, set the TTY mode, or change
the TTY baud rate.To make sure the TTY feature
is on:
From the main menu,select Settings > Phone
Calls > TTY > Use TTY. This field must say On.
Choosing a Mode
Your phone supports these TTY modes:
•TTY— You type and read text on your T TY
device.
•VCO(Voice-Carry-Over) — You speak into your
phone and read text replieson your TTY device.
• HCO (Hearing-Carry-Over) — You type text on
your TTY device and listen to voice replies on
your phone speaker.
To change mode while not in a call:
1 From the main menu, select Settings > Phone
Calls > TTY > Type.
2 Select the TTY mode you want.
Page 49

Making TTY Calls
When you make a TTY call, the call begins in the
TTY mode you last selected.
To change mode duringa call using your phone:
1 Press m.
2 Select In Call Setup > TTY > Type.
3 Selectthemodeyouwant.
To change mode during a call using your TTY
device,issue one of the followingcommands:
• “VCOplease” — to select VCO mode
• “HCO please” — to select HCO mode
• “HCOoffplease”— to turn off HCO mode
Important: When you are using HCO, the sound
coming from your phone speaker may
be uncomfortablyloud. Use caution
when putting the phone to your ear.
(For information on setting the volume
of your phone speaker, see “Setting the
Volume” on page 78.)
Changing the TTY Baud Rate
By default, your phone’s TTY baud r ate is set to
45.45,the baud rate required for TTY callswithin
the U.S. To make calls outside the U.S., set your
TTY baud rate to 50.0.
To change the TTY baud rate:
1 From the main menu, select Settings > Phone
Calls > TTY > Baud.
2 Selectthebaudrateforyourlocation.
39
Page 50

Memo
Memoletsyoustoreanumber,makeacalltothat
number, and save it to Contacts.
To create a memo:
1 From the main menu, select Memo.
2 Enter the number using your keypad.
3 Press O.
Toviewthememolater:
1 From the main menu, select Memo.
To deletethe memo:
1 From the main menu, select Memo.
2 Press and hold A under Delete.
3 Press O.
To edit the memo:
1 From the main menu, select Memo.
2 Enter the new number.
3 Press O.
To make a call to the memo number:
1 From the main menu, select Memo.
2 To make a phone call, press s. -or-
To make a Privatecall, press the PTT button.
40
To store the memo number to Contacts:
1 From the main menu, select Memo.
2 Press m.
3 Select Storeto Cntcs.
4 Tostore the number as a newentry,select [New
Contact]. -or-
To store the number to an existing entry, select
the entry.
5 With the Contacts type field highlighted, scroll
leftor right to displaythe Contactstype you want
to assign the number.
6 If you want to add more information to the entry,
follow the applicable instructions in “Creating
Entries” on page 26.
7 Press A under Done.
Page 51

Ring Tones
To set the ring tone your phone makes when you
receivephone calls, messagenotifications,or call
alerts:
1 From the main menu, select Ring Tones.
2 Make sure Vibrate All is set to Off.
3 Scrollthroughthe list of ringtonesand selectthe
one you want to assign. Vibrate setsyourphone
to vibrate insteadof makinga sound;Silent sets
your phone to neither vibrate nor make a sound.
Tip: Highlighting a ring tone lets you hear it.
4 Select the features you want to assign the ring
tone to.
5 When you are finished, press A under Don e.
Note: This icon
setyour phonetoneithervibratenor make
a sound for phone calls.
Setting Your Phone to Vibrate
You can set your phone to vibrateinstead of
makinga sound when you receive all phone calls,
Private calls, group calls, messages notifications,
and call alerts.
1 From the main menu, select Ring Tones >
Vibrate All.
M appears on the display if you
2 Set this option to On.
Tip: Pressing the volume controlsto turn down
the volume as far as possible sets Vibrate
All to On.
To set your phone to vibrate instead of making a
sound for some features but not others:
1 From the main menu, select Ring Tones.
2 Make sure Vibrate All is set to Off.
3 Select Vibrate from the list of ring tones.
4 Select the features you wantto set to make no
sound.
5 When you are finished, press A under Done.
Note: To set ring options for Private calls and
groupcalls,see “SettingYour Phone to
Vibrate” on page 78.
These icons indicate how the ringer is set.
Q The phone always vibrates instead of making
a sound.
The phone vibrates insteadof making a
R
sound for phone calls.
Group calls and Private calls are heard
u
throughthe earpiece, not the speaker.
These icons may appear at the same time.
41
Page 52

Ring Tones
Ring and Vibrate
To set your phone to ring and vibrate when you
receivephonecalls or call alerts:
1 From the main menu, select Ring Tones.
2 Make sure Vibrate All is set to Off.
3 Scroll through the list of ring tones and highlight
theoneyouwanttoassign.
4 Press m.
5 Select Assign w/Vibe.
6 Select the features you want t o set to ring and
vibrate.
7 When you are finished, press A under Don e.
Thisicon
S appears on the display.
Assigning Ring Tones to Contacts
You can set the ring tone your phonemakes when
you receive phone calls or call alerts from
someone you have stored in Contacts.
1 From the main menu, select Ring Tones.
2 Make sure Vibrate All is set to Off.
3 Scrollthroughthe list of ringtonesand selectthe
one you wantto assign.
4 Select AContact.
42
5 SelecttheContacts entryyouwantto assignthe
ring tone to.
Viewing Ring Tone Assignments
1 From the main menu, select Ring Tones.
2 Make sure Vibrate All is set to Off.
3 Highlight any ringtone.
4 Press m.
5 Select Overview.
6 Scroll to view ring tones assigned to features
and Contact entries.
Downloading More Ring Tones
If you want to use other ring tones, you can
download them into your phone for a fee. Go to
www.motorola.com/idenupdate for a selection of
custom ring tones and downloading instructions.
Note: Ring tones purchased from this web site
may be downloaded only once. If you
delete a ring tone from your phone, you
must purchase it again to downloadit
again.
Page 53

Managing Memory
To view t he amount of memory available for
custom ring tones:
1 From the main menu, select Ring Tones.
2 Make sure Vibrate All is set to Off.
3 Highlight any ringtone.
4 Press m.
5 Select Memory Usage.
Deleting custom ring tones frees memory.
Note: Ring tones are stored in your phone using
the same memory space used to store
messages, voice records, Java
applications, and wallpaper images.
Deleting some of these other items frees
memoryfor ring tones.
Deleting Custom Ring Tones
To delete a custom ring tone:
1 From the main menu, select Ring Tones.
2 Make sure Vibrate All is set to Off.
3 Scrollto the ring tone you want to delete.
4 Press m.
5 Select Delete.
6 Press A under Yes to confirm.
Managing Memory
43
Page 54

Entering Text
You can entertext into your phone using the
traditional methodof pressing a key several times
for each character, or by pressing a key once for
each letter while words likely to be the one you
want are chosen from a database. You can also
enter symbols and numbers into a text field.
In screens that require you to enter text, you see
the followingicons. These iconstell you which text
input mode you are using:
Alpha — Press a key several times for each
l
character.
Word — Press a key once for each letter
j
whilewords likely to be the one you want are
chosen from a database.
Symbols — Enter punctuation and other
i
symbols.
Numeric — Enter numbers.
k
When you accessa screen that requires you to
entertext, you start in the mode last used.
To choose a text input mode:
1 At a screenthat requires you to enter text, press
m.
44
2 Select the text input mode you want to use. A
checkmark appears next to the current mode.
Using Alpha Mode
• Press any key on the keypad to enter the letters,
numbers,andsymbolson thatkey.F or example,
to enter the letter Y, press 9 three times.
• Type a letter then scroll up to make that letter
uppercase, or type a letter then scroll down to
make that letter lowercase.
• See “Special Function Keys” on page 45 for
more information on adding spaces,
capitalization, and punctuation.
Using Word Mode
In Word mode, T9 Text Input analyzes t he letters
on thekeypadbuttonyoupress and arrangesthem
to create words. As you type,T9 Text Input
matches your keystrokes to words in its database
and displays the most commonly used matching
word. You can add you own words to this
database.
Entering a Word
1 Select Word as your text input mode.
2 Typeawordbypressingonekeyforeachletter.
Forexample,totype“test”press8378.
Page 55

Special Function Keys
The displayed word may change as you type it.
Do not try to correct the word as you go. Type to
the end of the word before editing.
3 If the word that appears is not the desired word,
press 0 to change the word on the display to
the next most likely word in the database.
Repeatuntil the desired word appears.
If the desired worddoesnot appear,you can add it
to the database.
Adding Words to the Database
1 Select Alpha as your text input mode.
2 Type the word using Alpha mode.
3 Select Word as your text input mode.
4 Press #.
ThewordyoutypedinAlphatextentrymodeis
now in the database.
Note: You cannot store alphanumeric
combinations,suchas Y2K.
Choosing a Language
To change the language of the database:
1 At a screenthat requires you to enter text, press
m.
2 Select Languages.
3 Selectthe languageyou want for yourdatabase.
Special Function Keys
Some of the phone’s keys assume different
functions while in Alpha or Word mode.
Spaces
Press # for a space.
Capitalization
When you press and hold the # key, it acts as a
3-way toggle. Press and hold # to make the next
letter typed uppercase (shift), to make all
subsequent letters typed uppercase (caps lock), or
to go back to lowercase letters.
These icons appearin the top row of your display:
m or X
n or W
When neither of these icons appear, letters typed
are lowercase.Scrolling up after typing a letter
makes that letter uppercase.
Note: Your phone automatically makes the first
Shift is on.
Caps lock is on.
lettero f a sentenceuppercase.
45
Page 56

Entering Text
Punctuation
Press 1 or 0 to insert punctuation. Continue to
press the key to view the list of symbols available
through that key. Pause to select the symbol you
want.
Note: Additionalpunctuationsymbols are
available in Symbols mode.
Using Numeric Mode
1 Select Numeric as your text input mode.
2 Press the numberbuttonson your keypad to
enter numbers.
Using Symbols Mode
1 Select Symbols as your text input mode.
A row of symbols appears along the bottom of
the phone’s display. Scroll right to view the
complete row.
2 Press O to select the highlighted symbol.
46
Page 57

Messages
You can receivethe following typesof messages
on your phone:
• Voice mail messages
• Short Message Service (SMS) text messages
• Dependingon your service provider, you may
havethe option to receivefax mail and Net
alerts.
You have 2 ways to access the messages you
receive:
• Respond to the message notification that
appears when the message is received.
• Dismiss the message notification and access
the message later through the message center.
You can listento or view these messages,delete
them, or continue to storethem in the message
center.
Message Notifications
When you receive a message, your phone notifies
youwithtextonthedisplayandanotificationtone
or vibration. You can accessthe message or
dismiss the notification.
If you dismiss the notification, the message is not
deleted.It can be accessedthrought he message
center.
If you are not o n a phonecall when you receivea
message, your phone sounds a notification tone
every 30 seconds until you access the message,
you dismiss the notification, or the alert time-out
expires.
Setting Notification Options
To control whether your phone sounds message
notificationtones while you are on phone calls:
1 From the main menu, select Settings > Phone
Calls > No tifications.
2 Select the option you want:
• Receive All — Tones sound during calls for
all types of messages.
•MsgMailOnly— Tones sound during calls
for SMS messages; tones for all other types
of messages are held untilyou end calls.
• Delay All — Tones for all types of messages
are held until you end calls.
Tip: Toset notification optionsduring a call:
Press m. Select In Call Setup >
Notifications.
47
Page 58

Messages
Message Center
The message center manages your messages.
All your messages are storedin the message
center.T he messagecenter shows how many
messages you have of each type.
To access your messages through the message
center:
1 From the main menu, select Messages.
2 Scrolltothetypeofmessageyouwantto
access.
3 Press O or pressA under the display option
on the left.
48
Page 59

Voice Mail Messages
Note: To receivevoice mailmessages,youmust
firstset up a voice mail account with your
service provider.
Receiving a Message
When you receive a voice mail message, New
Voice Mail Message appearson the display.
To call your service provider’s voice mail system
and listen to the message:
Press A under Call.
To dismiss the message notification:
Press O or press A under Back.
If the callerleaves a message, this icon
appearson the display, remindingyou that you
have a new message.
Accessing Voice Mail from the Message Center
From the main menu, select Messages > Voice
Mail.
y
Sending Unanswered Calls to Voice Mail
To send a phone call to voice mail instead of
answering it:
Press e. -or-
Press A under No.
49
Page 60

MOSMS Messages
Note: This feature may not be offered by your
service provider.
If your serviceprovideroffersMOSMS, your phone
sendsSMS messagesusingMOSMS and receives
SMS messages from other phones that are using
MOSMS.
Setting Up
Before you begin using MOSMS, you may need to
set up your signature, service center number, and
expiration information:
1 From the main menu, select Messages.
2 Scroll to Text Inbox.
3 Press m.
4 Select TextMsg Setup.
5 Select Signature.
Enteryour signature. It may be up to 11
characters long. See “Entering Text” on page
44. When you are finished,pressO.
6 Select Srvc Cntr No.
Enterthe phone number of your servicecenter.
If you do not know this number, contact your
service provider.
50
When you are finished,press O.
7 Select Expire After.
This is the amount of time messages you send
are savedat the service centerif they cannot be
delivered.After this period,they are discarded.
Scroll to select the number of days you want
your messagesto be saved.
When you are finished,press O.
8 Select Auto Clean Up. Set this option to On if
you want your phone t o delete sent messages.
If you set Auto Clean Up to On,selectClean
Up After to set the number of days after which
sent messages are deleted or the number of
messages to be kept.
9 Press A under Done to save the information
you entered.
Receiving a Message
To view t he message:
Press A under Read.
To dismiss the message notification:
Press A under Exit.
Page 61

Reading from the Message Center
If your phone is powered off when you receive a
text message, your phone notifies you the next
time you power it on. If you are out of your
coveragearea,your phone alertsyou when you
return to your coverage area.
Tip: While reading a text and numeric message
that contains a phone number, you can
press s to call t hat number.
Reading from the Message
Center
1 From the main menu, select Messages> Text
Inbox.
2 Selectthemessageyouwanttoread.-or-
Pressthe number of the message you want to
read.
3 If the message fills more than one screen, scroll
to read it.
Tip: Scrolling through one message lets you
view the next message.
4 To save the message, press A under Ok. -or-
To reply to the message, press A under
Reply. -or-
To see all other choices, including forwarding
and deleting the message, callingthe sender, or
storing the sender’s number in Contacts, press
m.
Creating and Sending Messages
1 From the main menu, select Messages>
[Create Message]. -or-
Select [CreateMessage] from Text Inbox, Text
Outbox, or Drafts. -or-
Highlight Quick Notes and press A under
Compose.
Tip: This option is available from many
context-sensitive menus in the message
center.
2 To address the message:
Use the keypad to enter the phone numberof
the person you want to send the message to.
-or-
Press A under Browse. Select Contacts,
Recent Calls,orMemo. Select the number you
wantto enter.
When you are finished,press O.
3 Enter the text of the message. See “Entering
Text”onpage44.-or-
51
Page 62

MOSMS Messages
To use a quick note: Press A under Browse.
Scroll to the quick note you want. For more
informationonquicknotes,see“UsingQuick
Notes”.
When you are finished,press O.
4 If you want to send the message, press O or
press A under Send. -or-
To delete the message withoutsendingit, press
A under Cancel. -or-
If you want to request confirmation of delivery,
save the messageas a draft, or set the sending
method, press m. Selectthe optionyou want.
Beginning Messages From t heRecent
Calls List
1 From the recent calls list, scroll to the name you
wantto send a message to.
2 If theentryhas more than one phone number
stored, view the phone number you want to send
the message to.
3 Press m.
4 Select Compose SMS. The message is
automatically addressed to the phone number
you chose.
5 Follow step 3 through step 4 of “Creating and
Sending Messages” on page 51.
52
Beginning Messages From the Idle
Screen
1 Using the keypad, enter the number you want to
sendamessageto.
2 Press m.
3 Select Compose SMS.Themessageis
automaticallyaddressed to the phone number
you chose.
4 Followstep3throughstep4of“Creatingand
SendingMessages” on page 51.
Using Quick Notes
Quick notes are short, pre-written text messages
that you can create, edit, and send. You can store
up to 20 quick notes.A quicknote may be up to 30
characters long.
To create a quick note:
1 From the main menu,selectMessages > Quick
Notes > [Ne w Note].
2 Press O or press A under Create.Entertext.
See “Entering Text” on page 44. -or-
To choose from pre-installed notes, select the
note you want.
Tip: For more options, includingsending the
quick note, press m.
Page 63

Creating and Sending Messages
Using Drafts
When you save a message as a draft,it is savedin
the draftsfolder.
To edit a draft:
1 From the main menu, select Messages>
Drafts.
2 Selectthedraftyouwanttoedit.
3 Toeditthe fields you want to change, follow
step 2 through step 4 in “Creatingand Sending
Messages” on page 51.
Resendin g Messages
To resend a message:
1 From the main menu, select Messages> Text
Outbox.
2 Scrollto the messageyou want to resend. -or-
Pressthe number of the message you want to
resend.
3 Press s. -or-
Press m. Select Resend.
Deleting Sent Messages
To delete a sent message:
1 From the main menu, select Messages> Text
Outbox.
2 Scrollto the messageyou want to delete.
3 Press A under Delete.
4 Press A under Yes to confirm.
To delete all unlocked sent messages:
1 From the main menu, select Messages> Text
Outbox.
2 Press m.
3 Select Delete All.
4 Press A under Yes to confirm.
Locking and Unlocki ng Sent
Messages
When you lock a message, it cannot be deleted
until you unlock it.
Lockinga Message
1 From the main menu, select Messages> Text
Outbox.
2 Scrollto the messageyou want to lock or
unlock.
3 Press m.
53
Page 64

MOSMS Messages
4 Select Lock.
Unlocking a Message
1 From the main menu, select Messages> Text
Outbox.
2 Scrollto the messageyou want to lock or
unlock.
3 Press A under Unlock.
Sorting Messages
You can sort messagesin your inbox by sender,
time and date, and status. You can sort messages
in your outbox by recipient, time and date, and
status.
1 From the main menu, select Messages> Text
Inbox or Messages > Text Outbox.
2 Highlight any messages.
3 Press m.
4 Select Sort and Order.
5 Select Sort By to specify the sorting method.
6 Select Order By to specify the sorting order.
Managing Memory
Your text inbox, outbox, and drafts folder have a
set amount of memory available for storing
messages.
54
The textinboxholds20 messages. If thet ext inbox
is full, you cannot receive messages until you
deletesome.
The outboxand draftsfoldershare memory space.
Togetherthey can hold 30 messages.If the outbox
and drafts folder memory is full, you cannot send
messages or save drafts until you delete some.
To view t he amount of memory available in your
textinbox:
1 From the main menu, select Messages> Text
Inbox.
2 Press A under Memory.
To view t he amount of memory available in your
outbox and drafts folder:
1 From the main menu, select Messages> Text
Outbox or Messages > Drafts.
2 Press A under Memory.
Page 65

Datebook
Datebook stores up to 250 events. You can store
events over a 13 month period — 12 months after
and 1 month before the current date.
A Datebook event contains:
• A subject — A name you assignto the event.
You can also enter a phone number, Private ID,
or Talkgroup number here. After the event is
stored, you can call this number from Datebook
or when youget a reminderof this event.
• A location — The location of the event. You can
alsoentera phone number, PrivateID, or
Talkgroup number here. After the event is
stored, you can call this number from Datebook
or when youget a reminderof this event.
• A start time — The start time automatically
assigned to an eventis the beginning of the day.
Youcanchangethe starttime, or assign no start
time, before storing the event.
• A duration— the lengthof time the event lasts
• A date — The date automatically assigned to an
eventis the date that was highlighted or
selected when you began creating the event.
Y ou can change this date before storing the
event.
• A repeat — lets you store the event as a
recurring event.
• A reminder — If an event has a start time, you
can set Datebook to remind you that the event is
goingtostart.
• a ring tone for the reminder
• a profile that your phone is switched to while the
event is occurring
• a Java application that starts when the event
starts
Only the subject and date are required.
Viewing Datebook
To access Datebook:
From the main menu, select Datebook.
You can view Datebook by the day, by the week, or
by the month.You can alsoview the details of any
event.
In day view,brief information about each eventfor
that day appears.
In week view, events appearas markers
corresponding to their times.
In month view, days with events appear with a
markerin the corner.
55
Page 66

Datebook
To view an event:
1 Select the day the event occurs.
2 Select the event.
To change the current view:
1 While viewing Datebook, press m.
2 Select the view you want.
Navigating Datebook
To scroll through Datebook:
Scrollleft and rightusingt he navigation key. -or-
In week view and month view, press * or #.
Toseemoreindayview:
Scrollup and down using the navigationkey.
To highlighta day in month view:
Enterthe date using the keypad.
To go to today’s date:
1 While viewing Datebook, press m.
2 Select Go To Today.
To go to any date in Datebook:
1 While viewing Datebook, press m.
2 Select Go To Date.
3 Select the date you want.
56
Creating Events
Every Datebookeventmust have a subjectand be
storedto a date. Other information is optional.
You may enterthe information in any order by
scrolling through the eventdetails.
After you have entered the information you want,
you can press A under Done to store the event
to Datebook.
If you decideyou don’t want to store the e vent:
Press A under Cancel.
To create a Datebook event:
1 While viewing datebook, press A under New.
-orIn day view, select [New Event].
2 To assign a subject to the event:
Select Subject.
Enter the name. See “Entering Text” on page
44. -or-
Press A under Browse to choosefrom
commonevent names. -or-
Enter a phonenumber, Private ID, or Talkgroup
number. After the event is stored, you can call
this number.
Page 67

Creating Events
When you are finished,press O.
3 Ifyouwanttoassignalocationtotheevent:
Select Location.
Enter the location. See “Entering Text” on page
44. -or-
Enter a phonenumber, Private ID, or Talkgroup
number. After the event is stored, you can call
this number.
When you are finished,press O.
4 The start time automatically assigned to an
event is the beginning of the day. If you want to
change the start time or assign no start time:
Select Start.
Enter the start time you want. -or-
Press A under No Time to assign no start
time.
5 Ifyouwanttoassignadurationtotheevent:
Select Duration.
Selectthe durationyou want. -or-
Select Custom to enter a duration.
6 The date automatically assigned to an event is
the date that was highlighted or selected when
you began creatingt he event.To change the
date of the event:
Select Date.
Enter the date you want.
7 If you want to make the event a recurring event:
Select Repeat.
Selectthe repeat cycle you want.
If the event occurs more than once a week:
Select Multiple Day. Select the days you want.
Press A under Done.
Select the date you want this event to stop
recurring.
8 If you want to create a reminder for this event:
Select Reminder.
Select the reminder time you want. -or-
Select Custom to enter a reminder time.
Note: If an event has no start time, you can not
create a reminder for it.
9 If you have enteredall the informationyou want
for this event, press A under Done. -or-
Ifyouwanttoassignaringtone,aprofile,ora
Javaapplication to the event, see “Assigning
More Options”.
57
Page 68

Datebook
Assigning More Options
To assign more options before storing an event:
1 If you have created a reminder for the event and
wantto set the ring tone for that reminder:
Select Ring Tone.
Selectthe ring tone youwantfromthe ring tones
stored in your phone.
2 If you want to assign a profile that your phone is
switched to while the event is occurring:
Select Profile.
Select the profile you want from the profiles
stored in your phone.
Yourphone switches to this profilewhen the
event starts and switches back to the previous
profile when the event ends.
3 IfyouwanttoassignaJavaapplicationtostart
when the event starts:
Select App.
Select the application you want from the Java
applicationsstoredin your phone.
If you created a reminder for this event, your
phonepromptsyoutostarttheJavaapplication
when you get the reminder.
58
Editing Events
To change the details of an event:
1 Select the day the event occurs.
2 Select the event.
3 Press A under Edit.
Tip: To copy an event to another date: Press m.
SelectCopy.
4 Follow the applicable instructions in “Creating
Events”onpage56toeditthevariousfields.
Deleting Events
1 Select the day the event occurs.
2 Select the event.
3 Press m.
4 Select Delete.
5 If the event is not a recurring event, press O or
press A under Yes to confirm. -or-
If the event is a recurring event:
Select This Event Only to deleteonly the event
selected in step 2.
Select Repeat Event to delete all occurrences
of the event.
Page 69

Receiving Reminders
Receiving Reminders
If you createda reminder for a Datebook event,
whenthe remindertime occurs,yourphonenotifies
you with text on the displayanda reminder tone.
To view more details about the event:
Press A under View.
To dismiss the reminder:
Press O,pressA under Dismiss.
For E vents with Java Applications
If you assigned a Java application to start when the
eventstarts,you can startthe applicationwhen you
get the reminder.
1 Press m.
2 Select Launch.
For Events with Numbers to Call
Ifyoustoredaphonenumber,PrivateID,or
Talkgroupnumberin the Subject or Location field
of a Datebook event, you can call or send a call
alert to that number from the reminder for that
event.
Making Calls From Datebook
Ifyoustoredaphonenumber,PrivateID,or
Talkgroup numberin the Subject or Locationfield
of a Datebookevent,you can callor send a call
alertto that number from Datebook.
YoucancallthenumberstoredinSubject and the
numberstoredin Location if one is a phone
numberand the otheris a PrivateID or Talkgroup
number.If both are the same type of number,the
numberin Subject is called or sent a call alert. To
callorsendacallalerttothenumberstoredin
Location, you must delete the number stored in
Subject.
Tomakeacallorsendacallalert:
1 Highlight or select the event containing the
numberyou want to call or send a call alert to.
2 Tomake a phone call:
Press s. -or-
Press m. Select Call # in Event.
To make a Private call or group call:
Pressand hold the PTTbuttonon the side of
your phone. -or-
If you didnot include a # before the Talkgroup
you want to call: Press m.SelectTalkgroup.
59
Page 70

Datebook
To send a call alert:
Press m. Select Alert # in Event.
Customizing Datebook Setup
To access Datebook set up options:
1 From the main menu, select Datebook.
2 Press m.
3 Select Setup.
You can view or change these options:
•StartView— sets Datebook to start in day view,
week view, or month view when you access
Datebook.
•DailyBegin— sets the beginning of your day.
This is the earliest time of day displayed in week
view, if you have a 12-hour day view.
• Delete After — sets the amount of time
Datebook waits to deletean event after is
occurs.
•TimeShift— letsyou shift the timesof all
Datebook events. This is useful if you are
traveling to a differentt ime zone.
• Alert Timeout — setst he amount of time a tone
continues to sound when you receive a
Datebook reminder.
60
•Clock— controls whether the time and date
appear on the idle screen; sets time and date
format; sets year.
Page 71

Java Applications
Your phone arrives with Java applications loaded
and ready to install. You can downloadand install
more Java applications.
Note: Using Java applicationsmay cause your
phone to use up more battery power than
otheruses of your phone.
Installing Ap plications
1 From the main menu, select Java Apps.
2 Select the application or suite of applications
you want to install.
Installation messages appear as the application
installs.
3 IfyouwanttocreateashortcuttotheJava
application on the main menu: Press A under
Next.PressA under Yes.PressO.
4 Press A under Done.
Running Applications
Torunanapplicationthathasashortcutonthe
main menu:
1 From the main menu, select the application or
suite of applications you want to run.
2 Ifyouhaveselectedasuiteofapplications,
selectthe application you want to run.
To run an application that does not have a shortcut
on the main menu:
1 From the main menu, select Java Apps.
2 Select the application or suite of applications
you want to run.
3 Ifyouhaveselectedasuiteofapplications,
selectthe application you want to run.
Tip: If you don’t heart he soundsassociatedwith
the Java application, select Settings >
Volume and check the volumes of Java
Speaker and Java Earpiece.
Suspending Applications
When you suspend an application, it does not stop
running. It goes to the background so that you can
run another applicationin theforeground.
To suspend an application:
Press e .
To view your suspended applications:
From the Java menu, selectSuspended Apps.
You can have up to 3 applications running at one
time—1runningintheforegroundand2inthe
background.
61
Page 72

Java Applications
Resuming Applications
You can resumea suspendedapplication at any
time. This brings it to the foreground.
1 From the Java menu, select Suspended Apps.
2 Select the application you want to resume.
Ending Applications
Toendanapplication:
1 From the main menu, select Java Apps.
2 If theapplication you want to end is part of a
suite of applications, select the suite.
3 Scrollto the applicationyou want to end.
Press A under End. -or-
If End is not one of your options: Pressm.
Select End.
Tip: You can also end applications from the
Suspended Apps screen.
To end all applications:
1 From the main menu, select Java Apps.
2 Scroll to Suspended Apps.
3 Press m.
4 Select End All.
5 Press O or pressA under Yes to confirm.
62
6 If youwant to end all applications withoutletting
them exit, press A under EndNow.
Downloading Applications
If you want to run more Java applications, you can
download them into your phone.
Go to www.mo to rola.com/idenupdate for a
selection of Java applicationsand downloading
instructions.
Deleting Applications
To delete an application:
1 From the main menu, select Java Apps.
2 Scrollto the applicationyou want to delete.
3 Press m.
4 Select Deinstall.
5 Press O or pressA under Yes to confirm.
6 When your phone has finished deleting the
application, press A under Done.
To delete all Java applications:
1 From the main menu, select Java Apps.
2 Scroll to Java System.
3 Press m.
4 Select Delete All.
Page 73

Managing Memory
5 Press O or pressA under Yes to confirm.
Managing Memory
To view the amount of memory available for Java
applications:
1 From the main menu, select Java Apps > Java
System.
2 Press A under Next.
3 To see more memory information, press A
under Next again.
Deleting Java applications freesmemory.
Note: Java application data is stored in your
phone using the same memory space
used to store messages, voice records,
ring tones, and wallpaper images.
Deleting some of these other items frees
memory for Java applications.
Shortcuts o n the Main Me nu
When you install an application, you can create a
shortcut to the application on the mainmenu.
Tocreateashortcuttoanapplicationthatis
alreadyinstalled:
1 From the main menu, select Settings >
Personalize > Menu Options > Add/Remove
Apps. -or-
From the main menu: Press m. SelectMain
Menu Setup > Add/Remove Apps.
2 Scrollto view the list of Java applications. Any
application that has a shortcut on the main menu
has a checkmark next to it.
3 Scrollto the applicationyou want to create a
shortcut for.
4 Press O.
5 Press A under Done.
Toremoveashortcut:
1 From the main menu, select Settings >
Personalize > Menu Options > Add/Remove
Apps. -or-
From the main menu: Press m. SelectMain
Menu Setup > Add/Remove Apps.
2 Scrollto view the list of Java applications. Any
application that has a shortcut on the main menu
has a checkmark next to it.
3 Scrollto the applicationyou want to remove the
shortcut for.
63
Page 74

Java Applications
4 Press O.
5 Press A under Done.
Java Applications and GPS Enabled
Some Java applications can make use of your
phone’s GPS featureto determinethe approximate
geographicallocationof your phone. (See “GPS
Enabled”on page 67 for more information on the
GPS feature.) However, for privacy reasons, you
may not alwayswant Java applications to access
the locationof your phone. Your phoneprotects
your privacyby giving you the option to blockall or
some Java applications from accessing the
locationof your phone.
Setting P rivacy for All Java
Applications
These optionscontrol the privacy of all Java
applicationson your phone:
• Restricted — No Java or similar software
applications may access the location of your
phone. However, location information may still
be availableto the phone’s owner, fleet
manager, or account administrator.
64
• Unrestricted — All Java applications may
accessthe locationof your phone, without
notifying you.
•ByPermission— When a Java application
attempts to access the location of your phone,
you are prompted to give permission. However,
location information may still be available to the
phone’s owner, fleet manager, or account
administrator.
See “SettingPrivacy Options” on page72 for
informationon choosing these options.
Granting or Denying Permission
If you choose By Permission, you must grant or
deny each Java application access to the location
of your phone when the application requests
accessfor the first time. You may be requiredto
grantor deny subsequentrequests from the same
application,depending on the privacy settingyou
choosefor the individual Java application (see
“Setting Privacy for Each Java Application” on
page 65).
When a Java application requests access to the
locationof your phone,a screenappears informing
you.
Page 75

Java Applications and GPS Enabled
To deny thisrequest:
1 Press A under Deny. The applicationdoes
not access the location of your phone.
2 Select the denying option you want:
• Always — If the application requests access
to the location of your phone again, the
request is denied withoutnotifying you.
• For this session — If the application
requests access to the location of your phone
again before you power off your phone,the
request is denied withoutnotifying you.
•OnlyOnce— If the application requests
access to the location of your phone again,
you are prompted to grant or deny
permission.
To grant this request:
1 Press A under Grant. The application
accesses your phone’s location.
2 Select the granting option you want:
• Always — If the application requests access
to the location of your phone again, the
request is granted without notifying you.
• For this session — If the application
requests access to the location of your phone
again before you power off your phone,the
request is granted without notifying you.
•OnlyOnce— If the applicationrequests
access to the location of your phone again,
you are prompted to grant or deny
permission.
Setting P rivacy for Each Java
Application
After a givenJava application requests access to
the locationof your phone for the first time,you
have the opportunity to set the GPS privacy option
for that Java application.
1 From the main menu, select Java Apps.
2 Scrollto the applicationor suite of applications
youwanttosettheprivacyoptionfor.
If the application has requested access to the
location of your phone, this icon
when you highlightthe application.
3 Press m.
4 Select Permissions.
5 Select the privacy option you want for this
application:
•Always— The application always has
permission to access the location of your
phone, without notifying you.
S appears
65
Page 76

Java Applications
•Ask— When the application requestsaccess
to the location of your phone, you are
prompted to grant or deny permission (see
“Grantingor Denying Permission” on page
64).
• Never — When the applicationrequests
accessto the location of your phone, the
request is denied withoutnotifying you.
66
Page 77

GPS Enabled
Your phone’sGPS Enabled featureuses
information from Global Positioning System (GPS)
satellites orbiting the Earth to determine the
approximate geographical location of your phone,
expressed as latitudeand longitude. The
availabilityand accuracy of this location
information (and the amount of time that it takesto
calculateit)will varydependingontheenvironment
in which you are using the GPS feature. For
example, GPS location fixes are often difficult to
obtainindoors,in covered locations, between high
buildings,or in othersituationswhereyou havenot
established a clearbroad view of the sky. SEE:
“IMPORTANT: Things to Keep in Mind”.
When you make a 911 emergency call, the GPS
feature of your phone can help emergency
personnel locate you if your phone has adequate
accessto GPS satellite signals and your
emergencyresponsecenterisequipped toprocess
such information.
You can also use the GPS feature to view your
approximate location. Location information
appearson the phone’s display.
Java applications loaded on your phone can also
request your location. If your phone is connected to
a laptop computer or similardevice, software
runningon that device can request your location.
To protect your privacy, you can control whether
these requests are granted.
IMPORTANT: Things to Keep in Mind
If you are using the GPS feature of your phone
while driving, please give full attention to driving
and to the road.
Whereadequatesignalsfrom multiplesatellites
are not available (usually because your GPS
antenna cannot establish a view of a wide area of
open sky), the GPS feature of your phone WILL
NOT WORK. Such situations include but are
not limited to:
• In underground locations
• Inside of buildings, trains, or other covered
vehicles
• Under any other metal or concrete roof or
structure
• Between tall buildings or under dense
tree-cover
• Near a powerful radio or television tower
67
Page 78

GPS Enabled
• When your GPS antenna is covered(for
example, by your hand or other object) or
facing the ground
• In temperature extremes outside the
operating limits of your phone
Walking or driving very slowly may also
substantially reduce GPS performance.
Even where location information can be
calculated in such situations, it may take much
longer to do so, and your location estimate may
not be as accurate.Therefore, in any 911 call,
always reportthe location to the emergency
response center if you can and if you cannot,
remain on your phone for as long as the
emergency response center instructs you.
Even where adequate signals from multiple
satellites are available, your GPS feature will
only provide an approximate location, often
within 150 feet (45 meters) but sometimes
much further from your actual location. Advice
on how to improve GPS performanceis
provided in “Enhancing GPS Performance” on
page 70.
While the GPS feature of your phone can be a
valuable navigational aid, it does not replace the
need for careful navigating and good judgment.
Never rely solely on one device for navigation.
Rememberthat the accuracy of t he location
68
informationand the timeneededto obtain it will
vary dependingon circumstances, particularly the
abilityto receivesignals fromadequate numbersof
satellites.
On emergency calls, your phone uses assistance
information fromthe phone networkto improve the
speed and accuracy of your phone’slocation
calculation: if such assistanceinformation
becomes unavailable, it may reduce the speed and
accuracyof the location calculation.
The satellites used by the GPS feature of your
phoneare controlled by the U.S. government and
aresubject to changesimplementedin accordance
with the Department of Defense GPS user policy
and the Federal Radionavigation Plan. These
changesmay affect the performanceof the GPS
feature of your phone.
Making an Emergency Call
Dial 911 to be connected to an emergency
responsecenter. If you are on an active call, you
must end it before calling 911.
When you makean emergency 911 call, the GPS
feature of your phone begins to seek information to
calculate your approximate location. It will take
the GPS feature of your phone some time to
determine your approximate location. Even
where your phone has good access to sufficient
Page 79

Viewing Your Approximate Location
GPS satellitesignals and networkassistdata, it
may take 30 seconds or more to determine the
approximate location. This time will increase where
thereis reduced access to satellite signals. When
your approximate location is determined, it is made
available to the appropriate emergency response
center.
In some cases, your local 911 emergency
response center may not be equipped to
receive GPS location information. For this
reason, and because the GPS location information
reported is only approximate or may not be
available in your location(see “IMPORTANT:
Thingsto Keep in Mind” on page 67), always
report your locationto the 911 operator you
speak to when making an emergency call, if able,
just as you would when using a phone without GPS
capabilities.
Note: If you are concerned about whether your
local911 emergencyresponse center is
equipped to receive GPS location
information, contact your local authorities.
In general, if your phone has access to signals
from more GPS satellites, your location will be
determined faster and more accuratelythanif your
phone has access to signalsfrom fewer GPS
satellites.
If your phonedoes not have adequateaccess to
GPS satellites signals, the location of the nearest
cell tower in contact with your phone is
automatically made available to the emergency
responsecenter,if the center has the capability t o
receive such information.
See“Enhancing GPSPerformance”onpage70for
information on how to help your phone determine
your location.
Viewing Your Approximate
Location
1 From the main menu, select GPS > Position.
2 Scrollto view the entire screen.
This displaysthe following informationaboutthe
last time your location was calculated:
• Thetime (as Greenwich Mean Time)and date
that the location was last calculated
• The approximate location, expressed as latitude
and longitude
• Theestimated accuracy of the calculated
location.Thisestimate of accuracyis only a very
roughestimate and may vary substantially from
the actual accuracy of the approximate location
informationreported.
69
Page 80

GPS Enabled
• The number of satellites used to calculate the
location. In general, more satellites make for
better accuracy.
To calculate your location again:
Press A under Rfrsh.
It may take your phone several minutes to
complete the process of determining your location.
During this time, a messageusuallyappearson
your phone’sdisplaysaying your phone is
scanning for satellites. For tips on getting the best
locationcalculation,see “EnhancingGPS
Performance”.
The Position screen displays the updated
information.
To cancel a locationcalculationbeforeit is
completed:
Press A under Cancel to return to the
Position screen. -or-
Press e to return to the idle screen.
Each time approximate location of your phone is
calculated, the latest locationinformation is stored
in your phone and remains there even when your
phone is powered off. You will see this information
thenexttimeyouviewthePosition screen.
70
If you received a phone call or alert while
attemptingt o determineyour location,the Position
screen will disappear, but your phone will continue
attempting to determine its location. If it is
successful,the new locationinformationwill be
displayed the next time you view the Position
screen.
Enhancing GPS Performance
Sometimes the GPS feature of your phone may be
unable to complete a location calculation
successfully. If this happens when you are making
an emergency call, the location of the nearestcell
tower in contact with your phone is made available
to the appropriate emergency response center if
the center has the capability to receive such
information. If this happens when you are trying to
view your location on the phone’s display,you will
see a messageindicating that your phone cannot
accesssatellites.
Page 81

Enhancing GPS Performance
To improve accuracy and increase your chances of
a successful calculation, do the followingwhile
your phone is determining your approximate
location:
• Stay in the open. The GPS featureworks best
wherethereis nothing betweenyour phone and
a large amount of open sky.If possible,go
outside, away from tall buildings and foliage.
While performance in a building is improved by
movingclosertowindows,glasswithcertainsun
shielding films may block satellite signals.
• Extend your phone antenna.
• Hold your phone to enhance reception. Signals
from GPS satellites are transmitted to your GPS
antenna, which is in your phoneantenna. Hold
your phone away from your body, giving the
antenna clear access to satellite signals. Do not
covertheantennaareawithyourfingersor
anything else.
•
GPS antenna
• Standstill. If possible,standstilluntil your phone
is finished determining your location. Moving
your phone at a walking pace while your phone
is calculating your approximate locationmay
substantially decrease GPS performance.
• Ina car. Whenusingthe GPS Enabledfeature in
a car, positionyourphone so that the GPS
antennahas good access to GPS signals
through the car’s windows. Typically, the GPS
antenna has best access to GPS signals in a car
when placed near a window.
Note: Although movingyour phone at a walking
pace decreases GPS performance,
movingit at the speed of a movingcar
does not.
• Stay in network coverage.Depending on who
your service provider is, the network will provide
your phone with information that helps
determine your location more quickly and
accurately.
71
Page 82

GPS Enabled
Updating Satellite Almanac Data
Anotherway to keepthe GPS feature of your
phone workingwell is to keep your satellite
almanac data up to date.
The United States government maintains an
almanac of data about where GPS satellitesare as
they orbit the Earth. This information is available to
your phone. Keepingyour satellite almanac up to
date helps your phone determine your location
more quickly.
The almanac containsinformationabout the
location of satellites, their operational status, and
other satellite information. Keeping this information
updatedenhances the performanceof your GPS
feature. In most cases, your phone will be able to
get a fix in strong satellitesignal conditions with
outdated almanac data, but it may take longer.
Note: When you make an emergency call, your
phone does not rely upon the almanac to
determine your location.
If your satellite almanacdata is out of date,your
phone may prompt you to update it. Followthe
instructions that appear on the phone’s display.
Youmaybeaskedtogotoawebsiteorcalla
customer care number.
72
Setting Privacy Options
Yourphone’s GPS privacyoptions controlwhether
Java applications on your phone or othersoftware
applicationsmay view thelocation of your
phone.You may set your phone to one of these
GPS privacy options.
Note: Privacyoptionsdo not apply to the
transmission of location information
during emergency 911 calls.
To set your GPS privacy options:
1 From the main menu, select GPS > Privacy.
2 If your GPS PIN security feature is enabled,
enter your GPS PIN. (See “Setting the GPS PIN
Security Feature” for more information.)
3 Select the privacy option you want:
• Restricted —NoJavaorsimilarsoftware
applicationsmay view the location of your
phone.However,locationinformation maystill
be available to the phone’s owner, fleet
manager,or account administrator.
• Unrestricted — All applications may view the
locationof your phone, withoutnotifying you.
•ByPermission—Whenanapplication
attempts to view the location of your phone,
youwillbepromptedtogivepermission.
However,locationinformationmay still be
availablet o the phone’sowner,fleet manager,
or account administrator.
Page 83

Using GPS with Map Software
Setting the GPS PIN Security Feature
To prevent your GPS privacy settings from being
alteredwithout your knowledge, your GPS privacy
optioncanbeprotectedbyaPIN.
When you receive your phone, the GPS security
featureisturnedoff,soyoudonothavetoentera
GPS PIN to access your GPS privacy options. If
you turn this feature on, you will be requiredto
entera GPS PIN to access your GPS privacy
options.
To turn the GPS Enabled security featureon or off:
1 From the main menu, select Settings >
Security > GPS PIN.
2 Select On or Off.
3 Enter the current GPS PIN.
Note: When you receive your phone, your GPS
PIN is 0000.
4 Press A under Ok.
To change your GPS PIN:
1 From the main menu, select Settings >
Security > Change Password > GPS PIN.
2 Enter the current GPS PIN.
Note: When you receive your phone, your GPS
PIN is 0000.
3 Press A under Ok.
4 Enter the new 4- to 8-digit GPS PIN.
5 Press A under Ok.
6 Enter the new 4- to 8-digit GPS PIN to confirm.
7 Press A under Ok.
Using GPS with Map Software
You can use the GPS featureof your phone to
provideapproximate locationdata to a laptop
computer or similar device that is running
interactivemap software such as that made by
DeLorme or Microstate. This way, if your phone
hasgood access to GPSsignals,your approximate
positionon a map can be made available as you
travel in a vehicle.
To do this, connect your phone to your laptop (or
otherdevice) with a data cableand set your phone
to transmit data (see “Getting Started” on page 74).
Your phone then provides your approximate
location to the device running the map software,
whichdisplaysyourlocation on a map. Your phone
provides an updated location every second and the
map software displays your changing location on
its map.
See“Enhancing GPSPerformance”onpage70for
more details on obtaining good location
information.
73
Page 84

GPS Enabled
Note: Because your phone is continuously
determining your location, using the GPS
feature of your phone withmap software
uses the phone’s battery power quickly.
Software Compatibility
Your phone sends location information to your
laptop or other device using the standard National
MarineElectronics Association (NMEA) format.
Your phone supports outputmessages in
NMEA-0183 format and supportsthe following
NMEA-0183 sentences: GGA, GLL, GSA, GSV,
RMC, and VTG.
The map software running on your laptop or other
device must support NMEA 3.0.
Getting Started
To connect your phone to your laptop or other
device:
1 Open the connector cover.
connector
cover
74
2 With the phone’s display facing up, insert the
data cable’s connector into the accessory
connector, until you hear a click.
3 InsertthedataplugintotheCOMportofyour
laptop or other device.
Make sure no other application is using the COM
port selected.
Make sure the COM port settings of your laptop or
otherdeviceare set to the following:
• Bits per second:4800
• Data bits: 8
• Parity: None
Page 85

• Stop bits: 1
• Flow control: Hardware
To set your phone to send location information to
your laptop or other device:
1 From the main menu, select GPS > Interface.
2 Set NMEA OUT to On.
Your phone is now sending location data to your
laptop or other device.
To stop your phone from sending locationdata to
your laptop or other device:
Set NMEA OUT to Off.
Each time you power your phone on, NMEA OUT
is automatically set to Off.
Using GPS with Map Software
75
Page 86

Voice Records
A voicerecordis a recording you make with your
phone and can play back.You can record notesto
yourselfor phone calls.
Your phone can storeup to 20 voice records.
Creating Voice Records
Torecordanotetoyourself:
1 From the main menu, select VoiceRecord >
[New VoiceRec].
2 Say the message you want to record into the
microphone.
Tip: To stop recording before you are finished,
press A under Pause. To start recording
again,pressA under Resume.Tostop
recording and discardthe voice record at
any time, press A under Cancel.
3 When you are finished recording, press O.
Toaddtotheendofvoicerecord:
1 From the main menu, select VoiceRecord.
2 Scroll to the voice record you want to add to.
3 Press m.
4 Select Add To.
5 When you are finished recording, press O.
76
To record a phone call:
1 Whileonanactivecall,pressm.
2 Select Record.
3 When you are finished recording, press O.
Note: Recordingof phone calls is subjectto
applicable laws regarding privacy and
recording of phoneconversations.
Playing Voice R ecords
1 From the main menu, select VoiceRecord.
2 Select the voice record you want to play.
3 To stop the voice recordwhileit is playing, press
O.
Tip: Tofast forward,scroll right.Torewind, scroll
left. T opause or resume, press any number
key.
Labeling Voice Records
When you create a voice record, it is labeledwith
the time and date it was recorded.You can then
rename it with a custom label.
1 From the main menu, select VoiceRecord.
2 Scroll to the voice record you want to label.
3 Press A under Label.
4 Enter the label you want to assign. See
“Entering Text” on page 44.
5 Press O.
Page 87

Deleting Voice Records
Deleting Voice Records
To delete a voice record:
1 From the main menu, select VoiceRecord.
2 Scrollto the unlockedvoice recordyou want to
delete.
3 Press m.
4 Select Delete.
5 Press O or A under Yes to confirm.
To delete all voicerecords:
1 From the main menu, select VoiceRecord.
2 Scroll to any voice record.
3 Press m.
4 Select Delete All.
5 Press O or A under Yes to confirm.
Locking Voice Records
When you lock a voicerecord, it cannotbe deleted
until you unlock it.
1 From the main menu, select VoiceRecord.
2 Scroll to the voice record you want to lock or
unlock.
3 Press m.
4 Select Lock to lock the message. -or-
Select Unlock to unlock the message.
Whenavoicerecordis locked,thisicon
next to it.
R appears
Managing Memory
To view t he amount of memory available for voice
records:
1 From the main menu, select VoiceRecord.
2 With [New VoiceRec] highlighted,press A
under Memory.-or-
With any voice record highlighted, press m.
Select Memory.
To free more memory by deleting all unlocked
voice records:
1 From the voice records memory screen, press
A under Delete.
2 Press O or A under Yes to confirm.
Note: Voice records are stored in your phone
using the same memory space used to
storemessages, Java application data,
ring tones, and wallpaper images.
Deleting some of these other items frees
memory for voice records.
77
Page 88

Customizing Your Phone
Setting the Volume
Of the Earpiece and Speaker
1 From the main menu, select Settings > Volume.
2 Scroll to Earpiece to set the earpiece volume.
-orScroll to Speaker to set the speaker volume.
3 To set the volume:
Scrollleft or right.-or-
Pressthe volume controls.
Of t he Ringer
Pressthe volume controls.
Setting Your Phone to Vibrate
To set your phone to vibrate instead of making a
sound when you receive phone calls,Private calls,
group calls, message notifications,and call alerts,
see “Setting Your Phone to Vibrate” on page 41.
To set your phone to vibrate instead of making a
sound when you receive Private callsand group
calls, even if you want your phone to ring for other
features:
78
1 From the main menu, select Settings > 2-Way
Radio > Alert Type.
Tip: If Alert Type does not appear: From the
main menu, select Ring Tones.Makesure
Vibrate All is set to Off. Repeat step 1.
2 Select Vibrate tosetyourphonetovibrate.
Tip: Select Silent in step 2 to set your phone to
neither vibrate nor make a sound.
Chang ing th e Look of Your Phone
Wallpaper
A wallpaperis an image that appears on the idle
screen.
Choosing a Wallpaper
1 From the main menu, select Settings >
Display/Info > Wallpaper > Wallpaper.
2 Select the wallpaper you want.
Tip: If you want to see what the wallpaper looks
like,press A under View.
Setting Wallpaper to Change Automatically
Page 89

Changing the Look of Your Phone
Note: This feature may not be offered by your
service provider.
1 From the main menu, select Settings >
Display/Info > Wallpaper > Auto Cycle.
2 Select how often you want the wallpaper to
change.
Any of the wallpapers in your phone may appear
on your idle screen.
Setting Text Size
To set the size of the text on the internal display:
1 From the main menu, select Settings >
Display/Info > Text Size.
2 Select the option you want:
• Zoom — 11 characters per line
• Standard — 14 characters per line
• Compressed — 18 characters per line
To set your phone to briefly display very large
digitswhen you enter numbers at the idle screen:
1 From the main menu, select Settings >
Display/Info > Large Dialing.
2 Set this option to Large Digits.
Setting Contrast
To set the contrastof the display:
1 From the main menu, select Settings >
Display/Info > Contrast.
2 Scroll left or right to set the contrast.
Setting the Menu View
YoucansettheitemsonyourmainmenuandJava
applicationsmenu to appear as large icons or a
list:
1 From the main menu, select Settings >
Display/Info > Menu View. -orFrom the main menu: Press m. SelectMain
Menu Setup > Menu View.
2 To choose a list, selectListView. -or-
To choose large icons, select IconView.
Setting the Backlight
A backlightlightsthedisplay and keypadwhenyou
make or receive a call, or press keys or buttons.
To control how long the backlight stays on:
1 From the main menu, select Settings >
Display/Info > Backlight > Backlight.
2 Select the number of secondsyou want the
backlight to stay on. -or-
79
Page 90

Customizing Your Phone
Select Off if you never w ant the backlighton.
Temporarily Turning Off Calls
Sometimes you may want to have your phone on,
but turn off its ability to make and receive calls,
such as when you are on an airplane.
To set your phone so that it cannot make or receive
phonecalls,Private calls,or group calls;or transfer
data:
1 From the main menu, select Settings >
Advanced > Airplane Mode.
2 Set this option to On.
This icon
To restore your phone’s ability to do all these
things:
Set this option to Off.
U appears.
Using Settings
Settings contains many submenus that let you
customizeyour phone.
For information on applying groups of settings to
your phone together,see “Profiles” on page 84.
80
Display/Info Features
The Display/Info menu controls how the keypad
and display appear:
• Wallpaper — changes the wallpaperthat
appears on the idle screen.
•Palette— changes the color scheme of the
display.
•TextSize— sets size of text on the display.
• Home Icons — controls whether main menu
iconsappear on the idlescreen.
• Backlight — controls backlightillumination.
•Clock— controls whether the time and date
appear on the idle screen; sets time and date
format; sets year.
•MenuView— controlswhetherthe items on
your main menu and Java applications menu
appear as large icons or a list.
• Large Dialing — sets large digits to appear on
the idle screen when you enter a number.
•Contrast— sets the contrast of the display.
• Language — sets the language that your phone
displays.
Page 91

Using Settings
Phone Calls Features
The Phone Calls menu controls how your phone
handles phone calls:
•SetLine— sets phone line 1 or phone line 2 as
the active line for outgoing calls.
•AnyKeyAns— If this feature is on, you can
answer calls by pressing any key on the keypad.
•AutoRedial— sets yourphoneto automatically
redialcalls you make when the system is busy.
•CallWaiting— See “Call Waiting” on page 32.
• Auto Ans — sets your phone to automatically
answer an incoming call after a specified
numberof rings. When this feature is on, the
phone answers by connecting you to the caller;
it does not send the call to voice mail, unless
you are out of coverage or on the line.
• Minute Beep — causes a beep to sound every
minuteof an active call.
• Call Duration — causes the durationof a callto
appear on the display when the call ends.
• TTY —See“MakingTTYCalls”onpage38.
• Notifications — See“ Message Notifications”on
page 47.
•JavaAppControl— If you have installed a
Javaapplication that answers phone calls, this
setting lets you turn that application on.
2-Way Radio Features
The 2-Way Radio menu controls how your phone
handles Private calls and group calls:
• Tkgrp Silent —controls whether you hear
groupcallsto your Talkgroup.See“Group Calls”
on page 35.
•TkgrpArea— letsyou define your Talkgroup
area.
• One Touch PTT — See “Setting One Touch
PTT”on page 34.
•AlertType— controls how your phone notifies
you when you receive Private calls and group
calls.
Personalize Features
The Personalize menu makes main menu items
easierto access.
• Menu Options — Reorder Menu lets you
changethe orderof the items on the main menu
by grabbing and moving them; Add/Remove
Apps letsyoucreateashortcuttoaJava
application on the main menu.
•UpKey— sets the main menu item you access
when you scroll up from the idle screen.
81
Page 92

Customizing Your Phone
•DownKey— sets the main menu item you
access when you scrolldown from the idle
screen.
• Left Key— sets the main menu item you access
when you scroll left from the idle screen.
•RightKey—sets the main menu item you
access when you scrollright from the idle
screen.
• Center Key — sets the main menu item you
access when you pressO from the idle screen.
• Left Sftkey — sets the main menu item you
access when you press the left option key from
the idle screen.
• Right Sftkey — sets the main menu item you
accesswhen you press the right option key from
the idle screen.
•PowerUp— sets the main menu item you see
when you power on your phone. To set the idle
screen to be t he first thingyou see when you
power on your phone, select Default Ready.
Volume Features
The Volume menu sets the volume of sounds your
phone makes:
•Line1— sets ringer volume for phone line 1.
•Line2— sets ringer volume for phone line 2.
82
• Messages — sets the volume of message
notificationsand Datebookreminders.
• Earpiece — sets the volume of sound coming
outoftheearpiece.
• Speaker — sets the volume of sound coming
outofthespeaker.
•Keypad—setsthevolumeof sound associated
withpressingkeys and buttons.
• Java Earpiece— sets the volume of sound
associated with Java applicationscoming out of
the earpiece.
• Java Speaker —sets the volume of sound
associated with Java applicationscoming out of
the speakers.
•Data— sets the volume of sounds that notify
you that you are receiving a circuit datacall.
Security Features
The Security menu lets you turn security features
on and off and change passwords:
• Phone Lock — turns on a feature that locks
your phone: Lock Now takeseffectimmediately;
Auto Lock takes effect when your phone is
powered off and then on. An unlock code is
required to enablethis feature, to unlock the
phone, and to set a new unlock code. Contact
your service provider for your default unlock
code.
Page 93

Using Settings
•KeypadLock— locks the phone’s keypad,
either immediately or automatically after a set
period of inactivity.
•SIMPIN— enables and disables your phone’s
SIM PIN security feature. See “Turning the PIN
Requirement On and Off”on page 12.
•GPSPIN— enables and disables your phone’s
GPS PIN security feature. See “Setting the GPS
PIN Security Feature” on page 73.
• Change Passwords — changes your phone
unlockcode, securitycode, SIM PIN, and GPS
PIN.
Advanced Features
The Advanced menu contains advanced and rarely
used Settings features.
• Alert Timeout — setst he amount of time a tone
continues to sound when you receive a
message notification, callalert, or Datebook
reminder.
• Headset/Spkr — sets headset option. See
“Using a Headset” on page91.
•DiscoLights— sets the keypad backlight to
lightup when a musical ring tone sounds.
Note: Some musical ring tones you download to
your phone may not activate disco lights.
• Connectivity — Network ID sets the phone’s
network IDs and their roamingoptionsunderthe
direction of your service provider; Master Reset
lets your service provider reset your service in
the event of a security or provisioningproblem.
• Reset Defaults — Reset Settings returns all
settings to their original defaults; Reset All
returns all settings to theiroriginal defaults and
erases all stored lists. Use only under the
direction of your service provider.
• ReturntoHome— controls how long the recent
callslist displays after calls.
• Airplane Mode —prevents your phone from
makingor receivingphonecalls, Privatecalls, or
group calls; or transferring data.
• Phone Only — prevents your phone from
making or receiving Private calls or group calls,
or transferring data.
Note: This feature may not be offered by your
service provider.
•BaudRate— sets the baud rate at which your
phone communicates with a laptop computer,
PC, or similar device.
83
Page 94

Profiles
A profile is a group of settingssaved togetherso
that you can apply them to your phone easily.
A profile contains these settings:
•RingTones— setsall options describedin
“Ring Tones” on page 41, except assigning ring
tones to Contacts.
• Display/Info —setsWallpaper, Color Palette ,
Text Size,andBacklight options.See
“Display/Info Features” on page 80.
• Phone Calls —setsSet Line and Auto Ans
options. See “Phone Calls Features” on page
81.
• Volume — sets all optionsdescribed in “Volume
Features” on page82.
•CallFilter— controlswhich calls, call alerts,
and messagenotifications your phone responds
to. See “Setting Call Filtering” on page87.
• Advanced — setsheadset option.See “Usinga
Headset” on page 91.
Your phone arrives with pre-set profiles.Y ou can
also create your own profiles.
84
Viewing Profiles
To view t he profilesstoredin your phone:
1 From the main menu, select Profiles.
2 Scrolltotheprofileyouwanttoview.
Tip: The profile that is currently in effect on your
phone has a checkmarknext to it.
3 Press A under View.
4 Scrollto view settings.
Switching Profiles
To apply a profile to your phone:
1 From the main menu, select Profiles.
2 Scrolltotheprofileyouwanttoapply.
3 Press O.
The profile you selected is now in effect.
How Changing Settings Affects Profiles
Many of the settingscontained in profiles can be
set without switching or editing profiles — for
example, by selecting Settings or Ring Tones to
set options, or by settingthe volumeof thephone’s
ring using the volume controls.
Page 95

Temporary Profiles
When you do this, your phone either:
• Updates the profile in effect to reflect these
changes, without notifyingyou -or-
• Creates a temporary profile that contains these
changes
Note: This feature may not be offered by your
service provider.
To set your phone to create a temporary profile
that containschanges you make to settings:
1 From the main menu, select Profiles.
2 Press m.
3 Select Setup > Temp Profile.
4 Set this option to On.
To set your phone to update the profile in effect to
reflectany changes you make to settings:
Set Temp Profile to Off in step 4.
If your service provider does not offer the Temp
Profile option,your phone always updates the
profile in effect to reflect the changesyou make to
settings.
Temporary Profiles
If your phone is set to create temporaryprofiles,a
temporary profile is created when you make
changest o settingswithout switching or editing
profiles.
A temporary profileis based on the profilein effect
when you made the changes, but reflects the
changedsettings. Making more changes further
updates the temporary profile, for as longas it is in
effect.
A temporary profilestays in effect until you switch
profiles, power off your phone, or delete it (or the
profile it is basedon) from the list of profiles.
If you do not store a temporary profile, it is deleted
when you switch profiles or power off your phone.
A temporary profileis automaticallygiventhe same
name as the profile it is based on, but with an
asterisk (*) in front of it.
When you view a temporary profile’s settings, the
optionsthat differfrom the profile it is based on
have an asterisk in front of them.
Storing a Temporary Profile
To store a temporaryprofile as a new profile:
1 From the main menu, select Profiles.
85
Page 96

Profiles
2 Scrollto the temporary profile.
3 Press m.
4 Select StoreAsNew.
5 Enter the name you want to give the profile. See
“Entering Text” on page 44.
When you are finished,press O.
To overwrite the profilethe temporaryprofile is
based on:
1 From the main menu, select Profiles.
2 Scrollto the temporary profile.
3 Press m.
4 Select StoreChanges.
The temporaryprofile is storedwith the name of
the profile it is based on. The profile it is based on,
as it existed before you made changes to settings,
is gone.
Creati ng Profil es
1 From the main menu, select Profiles.
2 Select [New Profile]. -or-
Scroll to any profile. Press m. SelectNew.
3 Enter the name you want to give the profile. See
“Entering Text” on page 44.
When you are finished,press O.
86
4 If you want to base this profile on an existing
profile: Select Copy from. Selectthe profileyou
wantto base thisprofile on. If you donot choose
a profile to copy from, the new profile is based
on a defaultprofile.
5 Press A under Create.
6 Scroll through the list of options and set their
values.
7 Press A under Done.
Editing Profiles
1 From the main menu, select Profiles.
2 Scrolltotheprofileyouwanttoedit.
3 Press m.
4 Select Edit.
5 Scroll through the list of options and set their
values.
Deleting Profiles
To deletea profile:
1 From the main menu, select Profiles.
2 Select the profile you want to delete.
Note: A temporary profileis automatically
deleted when the profileit is basedon is
deleted.
Page 97

Setting Call Filtering
3 Press m.
4 Select Delete.
5 Press O or pressA under Yes to confirm.
To delete all profiles:
1 From the main menu, select Profiles.
2 Press m.
3 Select Delete All.
4 Press O or pressA under Yes to confirm.
Setting Call Filtering
The call filtering setting in each profile lets you
controlw hich calls,call alerts,and message
notificationsyour phone notifies you of, and which
it ignores.
To set call filtering:
1 While settingoptions for a profile, select Call
Filter.
2 To set filtering optionsfor phone calls, select
Phone.
•Offsets your phone to notify you of all phone
calls.
•Allsets your phone to ignore all phone calls.
•AllContactssets your phone to notify you
only of phone calls from numbers stored in
Contacts.
•SomeCntcssets your phone to notifyyou
only of phone calls from numbers you select
from Contacts.
3 If you set the Phone option to Some Cntcs,
selectup to 5 Contacts entriesthat contain
phonenumbersyou want to be notifiedof calls
from.
When you are finished,press A under Done.
4 Toset filtering options for Private calls and group
calls, select Prvt/Grp.
•Offsets your phone to notify you of all Private
calls and group calls.
•Onsets your phone to ignore all Private calls
and group calls.
5 To set filtering options for call alerts, select
Alerts.
•Offsets your phone to notify you of all call
alerts.
•Onsets your phone to ignore all call alerts.
6 Toset filtering options for message notifications,
select Notifications.
•Offsets your phone to notify you of all
messages.
• Voice Messagessets your phone not to
sound a tone or vibrate when you receive
voice messages.
87
Page 98

Profiles
• TextMessages setsyour phonenot to sound
atoneorvibratewhenyoureceivetext
messages.
•Allsetsyour phone not to sound a tone or
vibrate when you receive any message.
Note: When you receivea type of message you
have set not to sound a tone or vibrate,
the message notification screen appears
as usual.
7 Press A under Done.
88
Page 99

Shortcuts
Shortcuts lets you accessmost menu options by
pressing a number on your keypad (1 through 9) or
saying the voice name of the shortcut. You create
theshortcutandthenuseittotakeyoutothat
screenany time.
Creating a Shortcut
Note: When you receive your phone,all number
keys may already be assigned to
shortcuts. If this is the case, you can
create new shortcuts by deleting or
replacing existingshortcuts.
1 Go to the menu item you want to createa
shortcut for.
Forexample,ifyouwanttocreateashortcutto
the screen for creating a new Contacts entry:
From the main menu, select Contacts,then
highlight [New Contact].
2 Press and hold m until a confirmation screen
appears.
3 Press O or pressA under Yes.
4 Select Key.
5 Press the number key you want to assign to the
shortcut.
6 Press O.
7 Ifyouwanttorecordavoicenameforthe
shortcut: Select Voice.Asdirectedbythe
screen prompts, say and repeat the name you
wantto assign to the number. Speakclearly into
the microphone.
8 Press A under Done.
9 If the number key you chose is already assigned
to a shortcut, a prompt appears asking if you
wantto replace the existing shortcut.
Press A under Yes to replace the existing
shortcut. -or-
Press A under No ifyouwanttokeepthe
existing shortcut and assign another number key
to the shortcut.
Using a Shor tcut
If you know the shortcut number:
1 From the idle screen, press m.
2 On your keypad,press the number assignedto
the shortcut.
If you do not know the shortcut number:
1 From the main menu, select Shortcuts.
2 Scrollto the shortcutyou wantto use. -or-
89
Page 100

Shortcuts
Ifyouassignedavoicenametotheshortcut:
Pressand hold t. Say the voice name into your
phone. The shortcut with that voice name is then
highlighted.
3 Press O.
Editing a Shortcut
To change the number assignedto a shortcut:
1 From the main menu, select Shortcuts.
2 With any shortcut highlighted, press m.
3 Select Reorder.
4 Scrollto the shortcutyou wantto move.
5 Press A under Grab.
6 Scrollto the place where you wantthe shortcut
to appear.
7 Press A under Insert.
8 Repeat step 4 through step 7 for all the items
you want to move.
9 Press A under Done.
To change the number or voice nameassignedto
ashortcut:
1 From the main menu, select Shortcuts.
2 Highlight any shortcut.
3 Press A under Edit.
90
4 With Key or Voice highlighted, press O to
changeassignments.
Deleting Shortcuts
To deletea shortcut:
1 From the main menu, select Shortcuts.
2 Scrollto the shortcutyou want to delete.
3 Press m.
4 Select Delete.
5 Press O or pressA under Yes to confirm.
To delete all shortcuts:
1 From the main menu, select Shortcuts.
2 With any shortcut highlighted, press m.
3 Select Delete All.
4 Press O or pressA under Yes to confirm.
 Loading...