

Page 1

Digital Multi-service Data-capable Phone
@NNTN4692A@
NNTN4692A
Nextel
iDEN
i205 Phone User’s Guide
Page 2

Page 3

Contents
Getting Started...........................................1
Removing the Back Phone Cover....................2
Locating Your SIM Card ..................................3
Battery .............................................................3
Powering On and Off.......................................6
Activating Service ............................................6
Enabling Over-the-Air Security ........................ 6
Finding Your Phone Number ...........................7
Completing Setup ............................................8
Phone Basics................................................... 9
SIM Card Security.......................................... 12
Locking the Keypad ....................................... 15
Accessories ...................................................16
Nextel Customer Care ...................................17
Making Calls.............................................19
Receiving Calls.............................................. 19
Call Icons.......................................................20
Entering the Number to Call .......................... 20
Using Mute..................................................... 22
Making Emergency Phone Calls.................... 22
Call Alerts ................................................ 25
Sending Call Alerts ........................................25
Receiving Call Alerts......................................25
Using the Call Alert Queue ............................25
Recent Calls............................................. 27
Storing Recent Calls to Contacts ...................27
Deleting Recent Calls ....................................28
Entering Text ........................................... 29
Using Alpha Mode..........................................29
Using Word Mode..........................................29
Special Function Keys ...................................30
Using Numeric Mode .....................................31
Using Symbols Mode.....................................31
Contacts................................................... 33
Viewing Contacts ...........................................34
Creating Entries.............................................35
Storing Numbers Faster.................................36
Editing Entries................................................37
Deleting Entries..............................................37
Checking Capacity .........................................38
Creating Pauses and Waits ...........................38
i
Page 4

International Numbers ................................... 38
Memo ........................................................39
Nextel Voice Mail .....................................41
Setting Up Your Voice Mail Box.....................41
Playing Messages..........................................41
Changing Your Password ..............................42
Recording Your Name ...................................42
Recording Your Active Greeting ....................42
Advanced Voice Mail Features......................43
Messages ................................................. 49
Message Notifications....................................49
Voice Mail ......................................................50
Text and Numeric Messages......................... 50
Net Alerts.......................................................51
Call Forwarding........................................53
Forwarding All Calls....................................... 53
Turning Off Call Forwarding...........................54
Forwarding Missed Calls ............................... 54
Viewing Call Forwarding Settings ..................55
ii
Ring Tones............................................... 57
Setting Your Phone to Vibrate .......................57
Assigning Ring Tones to Contacts.................58
Ring and Vibrate ............................................58
Viewing Ring Tone Assignments...................58
Downloading More Ring Tones......................59
Managing Memory .........................................59
Deleting Custom Ring Tones.........................59
GPS Enabled............................................ 61
IMPORTANT: Things to Keep in Mind...........61
Making an Emergency Call............................62
Viewing Your Approximate Location..............63
Enhancing GPS Performance........................64
Updating Satellite Almanac Data...................65
Setting Privacy Options..................................66
Using GPS with Map Software.......................67
Nextel Online®Services ......................... 71
NOL Services.................................................71
AccessingNOL Services From Your Phone.. 71
Advanced Calling Features.................... 73
Call Waiting....................................................73
Page 5

Call Hold ........................................................ 74
3-Way Calling ................................................74
Creating Pauses and Waits While Dialing .....75
Making International Calls .............................75
Setting One Touch Direct Connect................75
Group Connect
Call Timers..................................................... 77
Using Your Phone as a Modem.....................78
Making TTY Calls ..........................................79
Special Dialing Codes.................................... 80
Additional Phone Features ............................81
TM
Calls ................................. 76
Customizing Your Phone........................ 83
Setting the Volume ........................................83
Setting Your Phone to Not Ring.....................83
Seeing the Display Better ..............................84
Using a Headset ............................................84
Using Settings................................................ 84
Optional Features ..........................................86
Changing the Phone Covers..........................87
Nextel Customer Care .............................89
Domestic Customer Care .............................. 89
Nextel Worldwide Customer Care..................90
Understanding Status Messages........... 91
Nextel Terms and
Conditions of Service ............................. 93
Safety and General Information........... 105
RF Operational Characteristics....................105
Portable Radio Product Operationand EME
Exposure......................................................105
ElectroMagnetic Interference/Compatibility 108
Medical Devices...........................................108
Operational Warnings ..................................109
Operational Cautions ...................................110
Accessory Safety Information ......................111
MOTOROLA LIMITED WARRANTY...... 113
Limited Warranty
Motorola Comm unication Products
(International) ........................................ 117
Patent and Trademark Information...... 121
Index....................................................... 123
iii
Page 6

iv
Page 7

DECLARATION OF CONFORMITY
Per FCC CFR47 Part 2 Section 2.1077(a)
Responsible Party Name: Motorola, Inc.
Address: 8000 West Sunrise Boulevard
Plantation, FL 33322 USA
Phone Number: 1 (800) 453-0920
Hereby declares that the product:
Product Name: i205
Model Number: H62XAH6RR1AN
Conforms to the following regulations:
FCC Part 15, subpart B, section 15.107(a),
15.107(d) and section 15.109(a)
Class B Digital Device
Note: This equipment has been t ested and found
to comply with the limits for a Class B
digital device, pursuantto part 15 of the
FCC Rules. These limitsare designed to
provide reasonable protection against
harmful interference in a residential
installation. This equipment generates,
uses and can radiate radio frequency
energy and, if not installed and used in
accordance with the instructions, may
cause harmful interference to radio
communications. However, there is no
guarantee that interference will not occur in
a particular installation.
If this equipment does cause harmful
interference to radio or television reception,
which can be determined by turning the
equipment off and on, the user is encouraged
to try to correct the interferenceby one or
more of the following measures:
• Reorient or relocate the receiving
antenna.
• Increase the separationbetween the
equipment and receiver.
• Connectthe equipmentinto an outleton a
circuit different from that to which the
receiver is connected.
• Consult the dealer or an experienced
radio/TV technicianfor help.
v
Page 8

vi
Page 9

Getting Started
volume
controls
PUSH-TO-TALK
(PTT) button
speaker
(in back)
backkey
Direct Connect
Group Connect
speaker on/off
antenna
audio jack
space key
microphone
accessory connector
p Power button.
Navigation key — pressthe arrowsto scroll
throughmenus andlists.
Menu key — accessescontext-sensitive
m
menus.
Option key — selects the option appearing
A
above it ont he display.
s Send key — places phone calls.
End key — ends phone calls; returnsto idle
e
screen;in browser mode, returns to Net
main menu.
To start using your i205 phone:
• Make sure yourSIM card is in place.
• Charge the battery.
• Activate your service.
• Enable over-the-air security.
1
Page 10

Getting Started
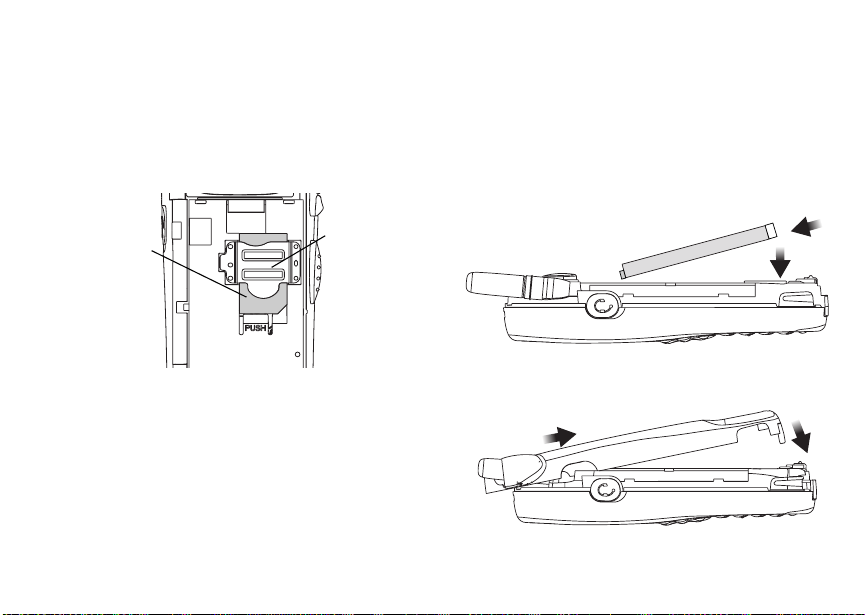
Removing the Back Phone Cover
1 Make sure the phone is powered off. See
“Powering On and Off” on page 6.
2 Slide the release button forward until it releases
the back phone cover.
2
3 Remove the back phone cover from the backof
your phone.
Page 11
Locating Your SIM Card
Locating Your SIM Card
Your SIM (Subscriber Identity Module)card is a
small piece of white plastic located in the SIM card
holderin the backof your phone, underneath the
battery.
SIM card
SIM card
If there is noSIM card in your phone, contactNextel
CustomerCare at1-800-639-6111.
holder
Battery
Inserting the Battery
1 With the phone powered off, remove the back
phone cover.
2 Insert the top of the battery into the battery area.
Press the bottom of the battery to secure it.
3 Replace the back phone cover and press it gently
until you hear a click.
3
Page 12
Getting Started
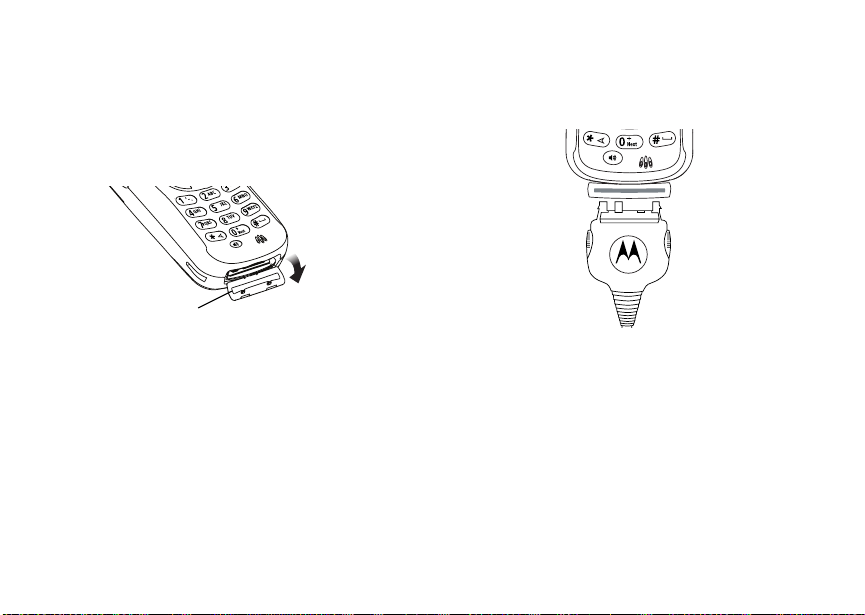
Charging the Battery
Yourphone comes with a charger.
1 Plug the charger into an electrical outlet.
2 Open the connectorcover.
connector
cover
4
3 Plug the other end of the charger into the
accessory connector.
Charger Attached appears on the display.
Tip: Toremovethe chargerfrom the accessory
connector: Press the buttons on the sides of
theplug.Pulltheplugstraightout.
4 If you have purchased optional batteries or
chargers, see “Charging Times” on page 5.
Note: While the phone is charging, the keypad
backlight will not illuminate.
Page 13
Battery
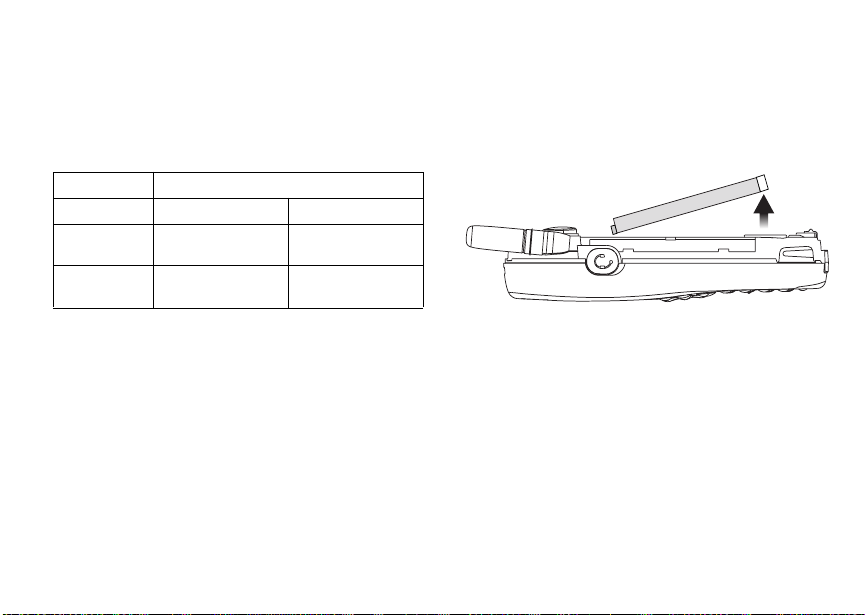
Charging Times
See your LithiumIon battery and travel chargerto
determine the appropriate charging time.
Recommended charging times:
Battery Charger
Rapid Mid-Rate
High
Performance
Maximum
Capacity
For best results, charge the batteries within the
temperature range of 50°F to 104°F (10°C to 40°C).
Prolonged charging is notrecommended.
2 hours 4 hours
3.5 hours 7.5 hours
Removing the Battery
1 With the phone powered off, remove the back
phone cover.
2 Remove thebattery bypushing thebattery toward
the antenna and lifting it out.
Battery Use and Maintenance
• The Motorola iDEN ApprovedLithiumIon
chargers provide optimum performance. Other
chargers may notfullycharge the iDEN Lithium
Ion batteryor may yield areducednumber of
lifetime charge cycles.
• Extreme temperatures degrade battery
performance. Do not store the battery where
temperatures exceed 140°F (60°C) or fall below
4°F (-20°C).
• Lithium Ion batteries have a self discharge rate
and withoutuse, lose about 1% of their charge
per day.
5
Page 14

Getting Started
• The battery capacityis degraded if thebatteryis
stored for long periods while fully charged. If long
term storage is required,storeat half capacity.
Powering On and Off
To power your phone on:
1 Extend the antenna.
2 Press p.
As your phone connects to the network,you will see
a connecting message. When the idle screen
appears, the phone is ready to use.
To power your phone off:
1 Press and hold p.
2 Push downthe antenna.
6
Activating Service
Thefirsttime you poweron yourphone,yourservice
is activated.
A screen then appears prompting you to select Ok
to update your browser information.This screen will
onlyappear during initialactivation.See “Enabling
Over-the-Air Security”.
Enabling Over-the-Air Security
To receive Over-the-AirRadioService Software
(OARSS) Security youmust enable security the first
time you power on yourphone orwithin20 days of
firstactivation of your phone.
1 Press A under Ok.
Note: If you press A under Later, the idle screen
will appear. The next time you select Net
fromthemainmenu,youwillbeprompted
to enable security before you canuse
Nextel Online
2 You are prompted to enable security. Press A
under Yes. A series of screens and then the
default homepage displays.
3 Press e to return to the idle screen.
®
services.
Page 15

Finding Your Phone Number
Within 24 hours ofenabling security, you will receive
a Net alert containingyour Personal Telephone
Number (PTN), Nextel Customer Care number,
Direct Connect
Group ConnectTMcalls.
Note: If youare transferring your phone number
TM
number, and Talkgroup lists for
to Nextel from your previous carrier, that
number will be automatically programmed
into the Contactslist for all other handsets
that were part of yourorder.
1 When you receive a Net alert saying New
Browser Message - Receive Programming
Info,pressA under Goto.
2 Youare prompted to accept changes to your lists.
Press A under Ok.
3 You are prompted again to accept changes to
your lists. Press A under Ok.
4 A confirmation screen displays.Press A under
Ok.
5 Press e to return to the idle screen.
Finding Your Phone Number
My Info lets you view your phone number, Direct
Connectnumber,and other phone information:
1 Press m to access the main menu.
2 Scroll to My Info.
3 Press A under Select.
4 Scroll to see your information:
•Name— Enter your name. See “Entering Text”
on page 29.
•Line1and Line 2 — your phonenumbersfor
phonelines 1 and2. These are filled in when
you receive your first Net alert after enabling
over-the-airsecurity on your phone.
• Direct Connect — Your Direct Connect
number is the number that others use to
contact you using DirectConnect service. It is
filled in when you receive your first Net alert
afterenabling over-the-air security on your
phone.
•GroupID— the number of theTalkgroup you
have joined.
• Carrier IP — theI P address assigned to
Nextel.Itisfilledinwhenyouregisterfor
packet data services.
•IP1Addressand IP2 Address —theIP
addresses assigned to you for using the
Internet with your phone
•Ckt— Your circuitdata number is thenumber
you use if you want to use your phone to
transfer circuit data. See “Using Your Phone as
a Modem” onpage 78. You receive thisnumber
from Nextel.
7
Page 16

Getting Started
• ServiceStatus — Thisinformation may be
used by Nextel Customer Care if thereis a
problem with your phone’s services.
Completing Setup
Joining a Talkgroup
When you enable over-the-air security, you receive
a list of Talkgroups that have been set up for you if
you subscribe to this service. The Talkgroup list is
savedtoContacts.
To receive Group Connect calls made toany of
these Talkgroups, you must join the Talkgroup.
1 Press A under Contcs. -or-
From the main menu, select Contacts.
2 Scroll to the Talkgroup you want to join.
3 Press A under Join.
Note: You will now be able to receive Group
Connect communications from this
Talkgroup only.You can only monitor one
Talkgroup at a time.
Setting Up More Talkgroups
You can set up more Talkgroups in three ways:
• Using Group Connect Managementon MyNextel
at www.nextel.com
8
• Contacting your Nextel Sales Representative at
thetimeofactivation
• UsingWirelessManagerto create, manage, and
delete Talkgroups
When you create your Talkgroups, you can select
your own Talkgroupnumbers.
YoucanjoinanewTalkgroupbypressing# and
entering the number using the keypad. Then press
A under Join.
Nextel Voice Mail
You must set up your voice mail box beforeyou can
retrieve messages.See “SettingUp Your Voice Mail
Box” on page 41.
Nextel Worldwide Service
You can use your phone to make calls
internationally in select cities using other iDEN
networks by calling Customer Care to activate
international dialing on your account. Countries in
whichyou can useyour phone includeArgentina,
Brazil, Canada, Philippines, Israel, Mexico and
Peru*.
* credit approval is required.
®
Page 17

Phone Basics
Customizing Features
You can control many features of your phone,
including the volume of incoming sound, rings, and
othertones.See“CustomizingYour Phone”onpage
83.
Phone Basics
Any time your phone is powered on, the display
provides you withinformationand options.
Thescreenshownaboveistheidlescreen.Theidle
screenappearswhen your phone is on, but not
engaged inany activity.
Text Area
This area displays menus, messages, names,
phone numbers, and other information.
status icons
text area
menu icon
display opti ons
Display Options
Two display options appear at thebottom ofmost
screens. You select a display option by pressing the
option key below it.
Menus and Lists
Your phone’s features are arranged in menus,
submenus, and lists.
Toaccesstheitemsinamenuorlist,scrollusing
the navigationkey at thetop of yourkeypad.This
key lets you scroll up, down, left, or right. Holding
down the appropriatepart of thenavigation key
speeds up scrolling.
Inthisguide,thissymbol> tells you to selecta menu
or list item. For example, Settings > S ecurity
means:
1 Scroll to Settings onthe main menu.
2 Press A under Select to see the Settings
screen.
3 Scroll to Security and press A under Select to
see the Security screen.
9
Page 18

Getting Started
Menu Key
Manyfeaturesprovide context-sensitive menus that
let you access relatedfeaturesand actions. The m
icon appears any time a context-sensitive menu is
available. Press m to access the menu.
Main Menu
All your phone’s features can be accessed through
the main menu. When you are using a feature, the
iconfor that featureappearsin the upperleft corner
of the display.
a Net Browse the Web.
b Settings
Display/Info
Phone Calls
DC/GC Options
Volume
Security
Advanced
m Ring Tones
list of ring tones
Ring Tones menu
10
Customize your phone.
See page 83.
Assign ring tones and turn
ringer off. See page 57.
j My Info View personal phone
n Downloads Provides a catalog of
l GPS Find your approximate
d Contacts
new contact form
list of contacts
Contacts menu
e Messages
Voice Mail
Text Msgs
Net alert
information, including
phone number and Direct
Connectnumber.See
page 7.
downloadable Ring Tones
forpersonalization. Browse
through the catalog,
downloadaringtoneof
your choice and makethat
yourdefaultringtone.Ring
tonesin this catalog will
change daily, so check
regularly for fresh content.
geographicallocation. See
page 61.
Create, view, store, edit
contacts. See page33.
Access messages.See
page 49.
Page 19

Phone Basics
f Call Forward Setcallf orwardingoptions.
Seepage53.
g Memo Store a number to access
later.Seepage39.
h Call Timers Phone usage information.
Seepage77.
i Recent Ca lls
list of calls
recent calls menu
Lists recent calls. See
page 27.
CallSetup menu
k Call Alert
list of call alerts
Lists call alerts. S ee
page 25.
Call Alert menu
Status Icons
Statusicons appearin the two rows at the top of the
display. Some appear at all times. Others appear
onlywhen your phone is engaged in certain
activities or when you have activatedcertain
features.
abcd
efgd
opqr
s
A Phone In Use —Yourphone is
B Direct Con ne ct In Use —Your
C Talkgroup In Use — Your phone is
12 Active Phone Line —1indicates
Battery Strength —Morebarson
the batteryindicate agreater charge.
Signal Strength — More bars next
to the antenna indicate a stronger
signal.
active on aphone call.
phone is active on a Direct Connect
call.
active on aGroup Connect call.
phoneline 1is ready to makecalls;2
indicates phone line 2 is ready to
make calls.
11
Page 20

Getting Started
GHI
JKL
vM Ringer Off — Your phone is set not
u Speaker Off — Sets Direct Connect
wy Messages — You have one or more
ljik
mn
DEF Internet — You are ready to browse
12
Call Forward — Your phone is set
to forward calls. See “Call
Forwarding”on page 53.
to ring. See “SettingYour Phone to
Vibrate” on page 57.
and Group Connect sound to come
through the earpiece rather than
through the speaker. Your phone
does not ring for Direct Connect and
GroupConnect calls if Alert Type is
set to Silent orVibrate.
messages.See“Messages”onpage
49.
T9 Text Input — You are using T9
Text Input to enter t ext. S ee
“Entering Text” on page29.
the internet or are browsing the
internet using a secure connection.
YZ Packet Data — You are ready to
NO TTY — Youare ready to useyour
transfer packet data or are
transferringpacketdata. See “Using
Your Phone as a Modem” on page
78.
phoneto make calls using a
teletypewriter device. See “Making
TTYCalls”onpage79.
SIM Card Security
Your SIM card stores all your Contacts and protects
your personal information. Since this information is
storedon your SIM card, not in your phone, you can
removethe informationby removing your SIM card.
Note: Except for making emergency calls, your
phone will not functionwithout the SIM
card.
To prevent unauthorized use of your phone, your
SIM card is protected by a PIN that you enter each
time the phone is powered on. You can change the
PIN or turn off the requirement that it be entered.
Page 21

SIM Card Security
Turning the PIN Requirement On and Off
When the SIMPIN requirementis off,your phone
canbeusedwithoutenteringaPIN.
Important: When the SIM PINrequirement is off,the
When the SIM PIN requirement is on, you are
prompted to enter your PIN each time you power on
your phone.
Note: If a SIM PIN is required, your phone will not
1 From the main menu, select Settings > Security
>SIMPIN.
2 Scroll to On or Off.
3 Press A under Select.
4 Enter the current SIM PIN.
Note: When youreceive your phone, the SIM PIN
5 Press A under Ok.
personal data on your S IM card is not
protected. Anyone can use your phone
and access your personal data.
function until the SIM PIN is entered,
exceptfor making emergencycalls.
is 0000. Change your PIN toprevent
fraudulentuse of the SIM card (see
“Changing the PIN”).
Entering the PIN
1 When the Enter SIM PIN Code screen appears
after you power on your phone, enter your SIM
PIN.
2 Press A under Ok.
The message SIM Unlocked displays.
Important: If you enter your PIN incorrectly 3
times, your SIM card is blocked. To
unblockyour SIM card, you must contact
Nextel Customer Care. See “Unblocking
the PIN”.
Changing the PIN
Note: The SIM PIN requirement must be turned
on in order to access this feature.
1 Fromthe main menu,select Settings > Security
> Change Password > SIM PIN.
2 At the Enter Old SIM PIN Code screen, enter the
current SIM PIN.
3 Press A under Ok.
4 At the Enter New SIM PIN Code screen, enter
the new 4- to 8-digitSIM PIN.
5 Press A under Ok.
6 At the Re-enter New SIM PIN Code screen,
re-enter the new SIM PIN to confirm.
7 Press A under Ok.
13
Page 22

Getting Started
Changed: SIM PIN displays.
Unblocking the PIN
If you enter your PIN incorrectly three times, your
SIM card is blocked. To unblock your SIM card, you
must contact Nextel Customer Care to get a PIN
Unblock Code (PUK).
Important: If you unsuccessfully enter the PUK code
To unblock the PIN:
1 Press *#m1.
2 At your Nextel Customer Care representative’s
request, provide the information needed to give
youaPUKcode.
3 Select Unblock PIN.
4 Enter the PUK code.
5 Enteranew4-to8-digitSIMPIN.
6 Re-enter your SIMPIN.
Note: These steps must be performed in quick
14
10 times, your SIM card is permanently
blocked and must be replaced. If this
happens, all data is lost. You will get a
message to contact Nextel Customer
Care. Except for making emergency
calls, your phone will not function w ith a
blocked SIM card.
succession.
If you entered the codes properly, SIM Unlocked
appears on the display.
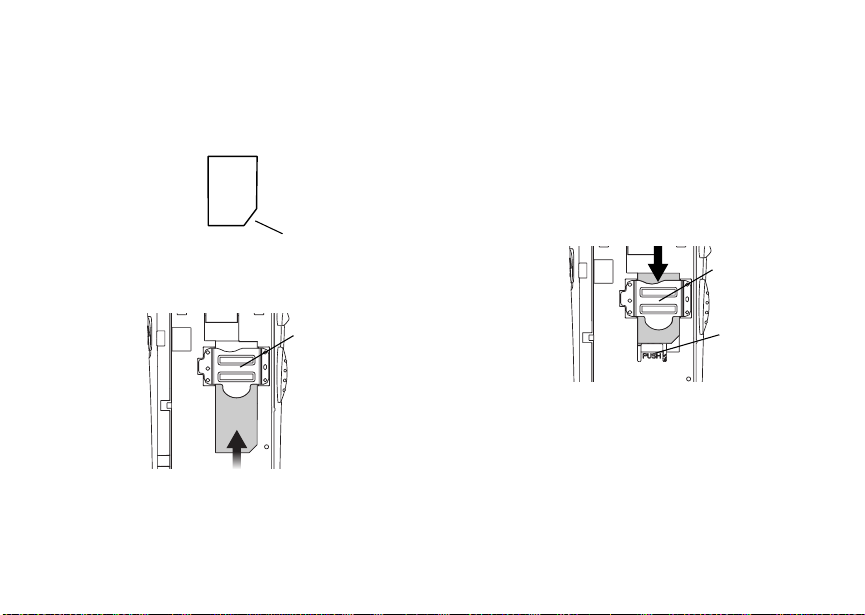
Inserting and Removing Your SIM Card
Important: Do not touchthe gold-colored areas of
The SIM card is designed for optimalContacts
storage and feature use. For Nextel SIM card
compatibility information, visit www.nextel.com/sim.
If you remove your SIM card and useit with another
phone, or use another SIM card with your phone,
the following information is erased:
• The recent calls list
• Call forwarding settings
• Net alerts
• InformationstoredinMemo
• 3 most recent GPS Enabled locations
• Voice records*
• Voice names*
Note: In some cases, Contacts may not be
* See “Optional Features” on page 86.
your SIM card.
accessible if you move your SIM card to
another phone. Contactsentriescreated
with your i205 phone are not readable by
an older iDEN SIM-basedphone.
Page 23
Locking the Keypad
Inserting Your SIM Card
1 With your phone powered off, remove the back
phone cover and battery.
2 Hold your SIM card as shown.
cut corner
3 Carefully slide your SIM card into your phone,
until it lies flat in the SIM card holder.
SIM card
holder
Removing Your SIM Card
Important: To avoid loss or damage, do not remove
your SIM card from your phone unless
absolutely necessary.
1 Withyour phone powered off, remove the back
phonecoverand battery.
2 While holding the tab down, slide your SIM card
out of the SIM card holder.
SIM card
holder
tab
Note: Protect your SIM card as you would any
delicate object. Storeit carefully.
Locking the Keypad
Locking the phone’s keypad prevents its buttons
frombeing pressed.When thekeypadis locked,you
can only:
• Power the phone on and off
15
Page 24

Getting Started
• Unlock the keypad
• Respondto incoming calls, messages, and alerts
Important: Emergency calls cannot be placed while
To lock the keypad:
1 From theidle screen,press m.
2 Press *.
Ifyoupressakeywhilethekeypadislocked,
instructionsf or unlocking the keypad displaybriefly.
To unlock the keypad:
1 From theidle screen,press m.
2 Press *.
While the keypad is locked, you can respond to
incoming calls, messages, and alerts just asyou do
whenthe keypadisnotlocked.Whenfinished,press
e to return to the idle screen. The keypad remains
locked.
You also have the option of settingyour phone to
automatically lock thekeypadif there has been no
activity for a specified time.
1 From the main menu, select Settings > Security
> Keypad Lock.
2 To lock the keypad immediately, selectLock
Now. You will be given the option to press m and
* tolock and unlock the keypad.
16
the keypad is locked.
3 Toset a specific time for the keypad to lockif
there has been no activity, select Auto Lock and
press A under Change.
The keypad can beset to lock i n 5, 10, 15or 20
minutes if the keypad is not touched during the
specified time. To turn the auto lock off, repeat step
3andselectOff.
Accessories
Yourphone comes with a Lithium Ion Battery and
travelcharger.
Various accessories are available for use with your
i205phone, including front and back covers,vehicle
battery charger, batteries,Hands-Freeaccessories
and more.
To order additional accessories, go to
www.nextel.com or call 1-800-Nextel6.You c an also
contact your Nextel Authorized Sales
Representative or stop by any Nextel-owned Retail
Store. For information on Nextel retail store
locations, go to www.nextel.com.
Page 25

Nextel Customer Care
NextelCustomer Care: 1-800-639-6111 or dial 611
fromyour i205 phone.
Nextel Worldwide Customer Care: +1-360-662-5202
(toll-free from your i205 phone).
Nextel Customer Care
17
Page 26

Getting Started
i205 Phone Menu Tree
Net
Settings
Display/Info
Phone Calls
DC/GC Options
Volume
Security
Advanced
Ring Tones
VibeAll On/Off
Ring Tones
Assign w/vibe
Overview
Memory Usage
Delete
My Info
Name
Line 1
Line 2
Direct Connect
Group ID
Carrier IP
IP1 Address
IP2 Address
CKT
Service Status
18
Downloads
GPS
Position
Privacy
Interface
Contacts
[New Contact]
New
Search
Capacity
Filter
Call Setup
Delete All
Contacts (if any)
View
New
Search
Edit
Delete Contact
Delete Number
Capacity
Filter
Call Setup
Delete All
Messages
Voice Mail
Text Msgs
Delete All
Memory Meter
Net Alert
Call Forward
All Calls
- To
Retrieve Status
Detailed
- If Busy
- If No Answer
- If Unreachable
Retrieve Status
Memo
Store
Cancel
Delete
Call Timers
Last Call
Phone Reset
Phone Lifetime
DC/GC Reset
DC/GC Lifetime
Circuit Reset
Circuit Lifetime
Kbytes Reset
Recent Calls
Recent Calls (if any)
Store
View
Delete
Delete All
Call Alert Queue
Call Setup
Call Alert
Call Alerts (if any)
Store
View
Delete
Delete All
Sort By
Recent Calls
Page 27

Making Calls
Your i205 phone makes two types of calls: digital
cellular phone calls and Direct Connect calls. With
Direct Connect calls, you use your phone as a
long-range, digitalwalkie-talkie.
To make a phone call:
1 Enter the number you want to call.
2 Press s to place the call.
3 Press e to endthe call.
To make a Direct Connect call:
1 Enter the Direct Connect number you want to call.
2 Press and hold the PTT button on the side of your
phone. Begin talking after your phone emits a
chirping sound.
3 Release the PTTbutton t o listen.
Tip: To let someone know you want to talk to him
or her on a Direct Connect call, send a call
alert.See “Call Alerts” on page 25.
Dialing Direct Connect Numbers
Every Direct Connect number has3 parts —an area
ID, a network ID, and a member ID — with an
asterisk between each of these parts. For example:
999*999*9999.
When you place a DirectConnectcall, you must
enterthe whole DirectConnect number including
the asterisks.
Tip: When youstore aDirect Connect number in
Contacts it isgood practiceto include the
whole Direct Connect number including the
asterisks in case you travel with your phone,
or another Direct Connect user,outsideof
your network.
Receiving Calls
When you receive a phone call, your phone rings,
vibrates, or lights upits backlight.
To answer aphonecall:
Press s. -or-
Press A under Yes. -or-
Pressany key on the keypad.
To send aphone call to voice mail instead of
answering it:
Press e. -or-
Press A under No.
To end a phone call:
Press e.
19
Page 28

Making Calls
Whenyou receivea Direct Connectcall,yourphone
emits a chirping sound.
To answer a Direct Connect call:
1 Wait for the caller to finish speaking.
2 Press and hold the PTTbuttonontheside of your
phone.Begin talkingafteryour phone emits a
chirping sound.
3 ReleasethePTTbuttontolisten.
Call Ico ns
When you make a call, call icons appear in the text
area of the phone’s display.
X Placing a phone call.
W Receiving a phone call.
Y Phone call is active.
Z Phone call is on hold.
U Phone call ended.
When you miss a call, this icon appears in the text
area:
V Youmissedaphonecall.
20
Entering the Number to Call
To enter the number you want to call, you can:
• Use the numbers on the keypad
• Selectthe number from the recent calls list
• Selectthe number from Contacts
• Redial the last phone number called
• Use Speed Dial or Turbo Dial
• Use One Touch Direct ConnectTMto make a
Direct Connect call
• UseaTTYdevice—see“MakingTTYCalls”on
page 79
From the Keypad
To enter the number you want to call, press the
numbers on the keypad.
If you make a mistake:
• Toclear a digit, press A under Delete.
• To clear all digits, press and hold A under Delete.
• Toinsert or delete a digit anywhere in thestring of
digitsyou have entered, scroll left or right.
• Tocancel, press e.
®
Page 29

Entering the Number to Call
From the Recent Calls List
The recent calls list stores the last 20 callsyou
made or received.
To select anumber from the recent calls list as the
numberyou want tocall:
1 From the idle screen, scroll down. -or-
From the main menu, select Recent Calls.
2 Scrollto the name or number you want to call.
From Contacts
If you have numbers stored in Contacts, you can
usethesenumbersto makecalls.For informationon
entering numbers into Contacts, see “Creating
Entries” on page 35.
Calling from the Contacts List
1 From the main menu, select Contacts.
2 Scrollto the name or number you want to call.
Tip: Tofind Contactsentries faster,use the
keypad to enter the first letter of the name.
3 Placethe call now. -or-
Scrollleft orrightto displaythe Contacts type for
the number you wantto call.
If you are making aDirectConnectcall, your phone
places the call to the Direct Connect number stored
in the Contacts entry, even if the Direct Connect
icon is not displayed.
Ifyouaremakingaphonecall:
• Your phone places the call tothe phone number
assigned to the Contacts type displayed.
• If the Contacts type displayed is not a phone
number, your phone places the call to the phone
number stored in the Contacts entry.
• If the Contacts type displayed is not a phone
number and you have more than one phone
number stored in the Contacts entry, your phone
promptsyoutoselectthe phonenumberyouwant
to place the call to.
Calling from a Contacts Entry
1 From the main menu, select Contacts.
2 Scroll to the name or numberyou want to call.
3 Press A under View. -or-
If View is not one of your options: Pressm.Select
View.
4 Place the call now. -or-
Scroll to viewmore numbers.Whenyou placethe
call,it is made to the number displayed.
21
Page 30

Making Calls
Redialing the Last Number
Pressand hold s to place a call to the last phone
number you called.
Using Speed Dial and Turbo Dial
Each phone number stored in Contacts is assigned
a Speed Dial number which you can use to enter
that number.
Turbo Dial lets you place calls tothe phone numbers
associated with Speed Dial numbers 1 through 9
without entering the number.
Speed Dial
1 From the idle screen, use the keypad to enter the
Speed Dial number assigned to thephone
numberyou want tocall.
2 Press #. Turbo Dial
From the idle screen, press and hold the Speed
Dial number (1 through 9) assigned to the phone
numberyou want tocall.
22
®
Using One Touch Direct Connect
One Touch Direct Connect sets your phone to call
the most recent Direct Connect number on the
recentcalls list, or to a Direct C onnect number you
choose, every time you press the PTT button. See
“Setting One Touch Direct Connect” on page 75.
TM
Using M ute
Muting calls lets you listen to incoming sound
without transmitting sound.Mute is available
whenever you are on an active call.
To turn mute on:
Press A under Mute.
While mute is on, Unmute appears as adisplay
option.
To turn mute off:
Press A under Unmute.
Making Emergency Phone Calls
Yourphone supportsemergency calling.
Emergency phone calls can be made even when
your SIM card is blocked or not in your phone.
Page 31

Dial 911 to be connected to an emergency response
center.Ifyouareonanactivecall,youmustendit
beforecalling911.
When you make an emergency call, your phone’s
GPS Enabled feature can help emergency service
personnel find you, if youare in a locationwhere
your phone's GPS antenna has established aclear
view of theopen sky and yourlocal emergency
response center has the equipment to process
locationinformation. See “GPS Enabled”on page
61, and particularly “IMPORTANT: Things to Keep
inMind”onpage61and“MakinganEmergency
Call” on page 62, for more information on the
limitations of this feature. Because of the limitations
of this feature, always provide your best knowledge
of your locationto the emergency responsecenter
whenyoumakeanemergencycall.
Important: Emergency ca lls cannotbe placed while
Important: If you have not registered o nthe
the keypad is locked.
network, emergencycalls cannot be
placed while your SIM card is in your
phone.
MakingEmergency Phone Calls
23
Page 32

Making Calls
24
Page 33

Call Alerts
Sendinga callalertletsthe recipientknowyou want
to talk tohim or her on aDirectConnectcall.
When you send a call alert, the recipient’s phone
emits a series of beeps and displays your name or
Direct Connect number.
The recipientcan:
• Answer — begin a Direct Connect call with the
sender
• Queue — store the call alert to the call alert
queue, which is a list of call alerts
• Clear — dismiss and delete the call alert
Sending Call Alerts
1 Enter the Direct Connect number you want to
send to, as you would when making a Direct
Connectcall.
2 Press A under Alert. Ready to Alert appears on
the display.
3 Pressthe PTT button until Alert Successful
appears on the display.
Note: If the alert is not successful, this may mean
thepersonyouaretryingtoreachisona
callor has the phone turned off.
Receiving Call Alerts
When you receive a call alert, you must answer,
queue,or clear it. You cannotreceive phone calls or
Direct Connect calls until you do.
To answer a call alert, press the PTT button to
makea Direct Connect call to the sender.
To queue a call alert, press A under Queue.
To clear a callalert,press A underClear.
Note: The recent calls list also stores call alerts
you have received. They appear as Direct
Connect calls. Call alerts remain in your
recent calls listuntil you delete them or until
they reach the endof the list.
Using the Call Alert Queue
When you queue a call alert, it remains in the call
alertqueue until you makea Direct Connectcall to
the sender or delete it.
Viewing Call Alerts
1 From the main menu, select Cal l Alert.
2 Scroll throughthe list.
25
Page 34

Call Alerts
Viewing Date and Time
To view thedate andtime a call alert was received:
1 From the main menu, select Call Alert.
2 Scroll to the call alert you want information on.
3 Press m.
4 Select View.
Responding to Call Alerts in the Queue
After you queue acall alert, you can respond to itby
makinga DirectConnect call to thesender or
sending a call alert to the sender.
Making a Direct Connect Call to the Sender
1 From the main menu, select Call Alert.
2 Scroll to the call alert you want to respond to.
3 PressthePTTbuttontobeginthecall.
This removes the call alert from the queue.
Sending a Call Alert to the Sender
1 From the main menu, select Call Alert.
2 Scroll to the call alert you want to respond to.
3 Press A under Alert. Ready to Alert appears on
the display.
4 Press the PTT button until Alert Successful
appearson the display.
26
Deleting Call Alerts
To delete a call alert from the queue:
1 From the call alert queue, scroll to thecall alert
you want todelete.
2 Press m.
3 Select Delete.
4 Press A under Yes to confirm.
To delete all call alerts from the queue:
1 From thecall alert queue, press m.
2 From thecall alert menu, selectDelete All.
3 Press A under Yes to confirm.
Sorting Call Alerts
Tip: Youmust have at least onecall alert in the
queue to access this feature.
To sortcall alerts by the order they were received:
1 From themain menu, select Call Alert.
2 Press m.
3 Select Sort By.
4 Scroll to First on Top or Last on Top.
5 Press A under Select.
Page 35

Recent Calls
The recent calls list stores the numbers ofthe 20
most recent calls you have made and received.
To view the recent calls list:
1 From the idle screen, press the down arrow on
the navigation key. -or-
From the main menu, select Recent Calls.
2 Scroll through the list.
If the number of a recent call isstored in Contacts,
the name associated with the number appears on
the recent calls list.
An icon appears beside the name or number
indicating the Contacts type of the number used in
thecall.See“Contacts”onpage33.
For phone calls, anicon appears to theleft ofthe
name or number giving more information about the
call:
X A call you made.
W A call you received.
V A missed call. Missed calls appear on the
recent calls list only if you have Caller ID.
Note: The recent calls list also stores call alerts
you have received. They appear as Direct
Connect calls. Call alerts remain in your
recent calls listuntil you delete them or until
they reach the endof the list.
To get more information on a recent call:
1 From the recent calls list, scroll to thecall you
want information on.
2 Press A under View. -or-
If View is not one of your options: Pressm.Select
View.
This displays information such as the name
associated withthe call,the number, the date, time,
and duration of the call.
Storing Recent Calls to Contacts
1 From the recent calls list, scroll to the number you
wantto store.
2 Press A under Store. -or-
If Store is notone of youroptions: Press m.
Select Store.
Tip: If Store is not on this menu, the number is
already stored in Contacts.
27
Page 36

Recent Calls
3 To store the number as a new entry, select [New
Contact]. -or-
To store thenumber to an existing entry, select
the entry.
4 With the Contacts type field highlighted, scroll left
or right to display the Contacts type you want to
assignthe number.For informationon Contacts
types,see page 33.
5 If you want to add moreinformation to theentry,
follow the applicable instructions in “Creating
Entries” on page35.
6 Press A under Done.
Deleting Recent Calls
Todeleteacall:
1 From therecentcalls list, scroll to the call you
want to delete.
2 Press m.
3 Select Delete.
4 Press A under Yes to confirm.
To delete all calls:
1 From the recent calls list, press m.
2 Select Delete All.
3 Press A under Yes to confirm.
28
Page 37

Entering Text
You can enter text into your phone using the
traditionalmethodof pressinga key several times
for each character, or by pressing a key once for
each letter while words likely to be the one you want
are chosen from a database.You can alsoenter
symbolsand numbers into a text field.
In screensthatrequireyou toenter text, you see the
following icons near the top right corner. These
icons tell you which text input mode you are using:
Alpha — Press a key several times for each
l
character.
Word— Press a key once for each letter while
j
wordslikelytobetheoneyouwantarechosen
from a database.
Symbols — Enterpunctuationand other
i
symbols.
Numeric — Enter numbers.
k
When you access a screenthat requires you to
entertext, you start in Alpha mode.
To choose atext input mode:
1 At a screen that requires you to enter text, press
m.
2 A checkmark appears next to the current text
inputmode. Scrollto the textinputmode you want
to use.
3 Press A under Select.
Using Alpha Mode
• Press any key on the keypad to enter the letters,
numbers, and symbols on that key. For example,
to enter the letter Y, press 9 three times.
• Typealetterthenscrolluptomakethatletter
uppercase, or type a letter then scroll down to
make that letter lowercase.
• See “SpecialFunctionKeys” on page 30 formore
information on adding spaces, capitalization, and
punctuation.
Using Word Mode
In Word mode, T9 TextInput analyzes the letterson
the keypad button you press and arranges them to
create words. As youtype, T9 TextInputmatches
your keystrokes to words in itsdatabase and
displaysthemostcommonlyusedmatchingword.
You can addyou own words to thisdatabase.
Entering a Word
1 SelectWord asyour text input mode.
29
Page 38

EnteringText
2 Type a word by pressing one key for each letter.
For example, to type “test” press 8378.
The displayed word may change as you type it.
Do not try to correct the word as you go. Type to
the end ofthe word beforeediting.
3 If the word that appears is not the desired word,
press0 to change the word on the display tothe
next most likely word in the database.
Repeat until the desired word appears.
If the desired word does notappear, you canadd it
to the database.
Adding Words to the Database
1 Select Alpha as yourtext input mode.
2 Type the word using Alpha mode.
3 Select Word as yourtext input mode.
4 Press #.
The word you typed in Alpha text entry mode is now
in the database.
Note: You cannot store alphanumeric
combinations, such as Y2K.
30
Choosing a Language
To change the languageof the database:
1 At a screen that requires you to enter text, press
m.
2 Select Languages.
3 Scroll to the language you want for your
database.
4 Press A under Select.
Special Function K eys
Some of thephone’s keys assume different
functions while in Alpha or Wordmode.
Spaces
Press # for a space.
Capitalization
Press and hold # to make the next lettertyped
uppercase (shift), to make all subsequent letters
typeduppercase (caps lock), or togo back to
lowercase letters.
Page 39

Using Numeric Mode
These icons appear in thetop row ofyour display:
Shift is on.
m
Caps lock is on.
n
When neither of these icons appear, letterstyped
are lowercase.
Note: Your phone automatically makes the first
letterof a sentence uppercase.
Punctuation
Press 1 or 0 to insert punctuation. Continue to
press the key to view the list of symbols available
through that key. Pause to select the symbol you
want.
Note: Additionalpunctuation symbolsare
available in Symbols mode.
Using Numeric Mode
1 Select Numeric as your text input mode.
2 Pressthe number buttonson your keypad to
enter numbers.
Using Symbols Mode
1 SelectSymbolsas your textinput mode.
A row ofsymbolsappearsalong the bottom of
your phone’s display. Scroll right to view the
complete row.
2 Scroll left orrightto choose the symbolyou want
to enter.
3 Press A under Select.
31
Page 40

EnteringText
32
Page 41

Contacts
Contacts stores up to 600 numbers or addresses.
Each Contacts entry can store several numbers or
addresses.
Information stored inContacts is saved on your SIM
card.
A Contacts entry contains:
• A name — A name is required if your are storing
more than one numberor address to theentry;
otherwise,itis optional. Typically,thisis the name
of the person whose contact information is stored
in the entry.
• Aringtone—Youcanassignaringtonetoeach
entry. This is the sound your phone makes when
you receive phone calls or callalerts from any of
the numbers stored in theentry.
• A Contactstype — Each number or address
storedmust be assigned a Contacts type:
A Mobile phone number
B Direct
Connect #
C Work1 phone number
D Work2 phone number
E Home phone number
F Email emailaddress
G Fax phone number
H Pager phonenumber
I Talkgroup Talkgroup number
J IP IP address
K Other phone number
• A number or address — Each Contacts entry
must contain a number or address. This may be
any type of phone number, Direct Connect
number, Talkgroup number, email address,or IP
address.
Direct Connectnumber
33
Page 42

Contacts
Note: Youcanstorenumbersupto64digitslong,
but every 20 digits must be separated by a
pause or wait. See “Creating Pauses and
Waits” on page 38.
• A Speed Dial number — When you store a phone
number, it is assigned a SpeedDial number.You
can accept the default SpeedDial number or
change it.
• A voice name — If you create a voice name fora
number, you can then dial that number by saying
the voice name into your phone. This icon
appearsP to the left of the Contacts type icon if
a voice name isassigned.
Note: This isan optional feature.See “Optional
Features” on page 86.
Viewing Contacts
To access Contacts:
Press A under Contcs. -or-
From the main menu, select Contacts. -or-
Ifyouareonacall:Pressm. Select Contacts.
To view entries:
1 From the Contacts list, scroll tothe entry you want
to view.
34
2 If an entry has more than one number or address
stored, <> surrounds the Contacts type icon.
Scrollleft or righttoviewtheiconfor each number
stored in the entry.
3 Whentheiconforthenumberoraddressyou
want to view is displayed, press A under View.
-orIf View is not one ofyour options:Pressm. Select
View.
4 Scroll to view the other numbers and addresses
stored for the entry.
Tip: Toview more entries, continuescrolling.
Searching for a Name
To search for a name in Contacts:
1 From the Contacts list, press m.
2 Select Search.
3 Enter the name you want to see. See “Entering
Text”onpage29.
4 Press A under Ok.
Yourphone finds the name you entered or the
nearest match.
Page 43

Creating Entries
Showing OnlyDirect Connect num bers and Talkgroups
To set Contacts to showonlyentries that contain
Direct Connect numbers and Talkgroup entries:
1 From the Contacts list, press m.
2 Select Filter.
3 With Show DC highlighted, press A under
Select.
To set Contacts to showallentries:
1 From the Contacts list, press m.
2 Select Filter.
3 Scroll to Show All.
4 Press A under Select.
Creating Entries
A number or address and a Contacts type are
requiredfor all Contactsentries.Other informationis
optional. You may enterthe information in any order
by scrolling through the entry details.
After you have entered the number or address,
Contacts type, and anyother information you want,
you can press A under Done to save the entry to
Contacts.
To cancel a Contacts entry at any time press, e to
return to the idle screen.
Tip: In some fields that require you to enter
information,you can begin entering the
information from the keypad instead of
pressing A under Change.
To create a Contacts entry:
1 To accessthe entry details screen:
Select Contacts > [New Contact]. -or-
From the Contacts list, press m.ScrolltoNew.
Press A under Select.
2 If you want to assigna name to the entry:
Withthe Name field highlighted, press A under
Change.
Enterthe name. See “Entering Text” on page29.
When you are finished, press A under Ok.
3 Ifyouwanttoassignaringtonetothename:
Withthe Ringer field highlighted, press A under
Change.
Scroll to t he ring tone you wantto assign. Press
A under Select.
4 To assigna Contacts type to the number or
address being stored:
Withthe Contacts type field highlighted, press A
under Change.
35
Page 44

Contacts
Scroll to the Contacts type you want to assign.
Press A under Select.
5 To store a number or address:
With the # field (or ID for an email address, or IP
for an IPaddress)highlighted, press A under
Change.
Enter the number or address. For phone
numbers, use the 10-digit format. For email
addresses, see “Entering Text” on page 29.
Tip: Press A underBrowse to select a number or
address from Contacts, the recent calls list,
or Memo.
When you are finished, press A under Ok.
6 If you want to assign a Speed Dial number to the
number, press A under Change with the
[Options] field highlighted. See “Assigning
Options”.
7 If you want to add more numbers or addresses to
the entry:
Scroll past the information you already entered.
Enter the additional information for the entry using
step 2 through step 6. You must assign a name to
the entry, if youhave not already.
8 Press A under Done.
36
Assigning O ptions
1 If you have not already, pressA under Change
with the[Options] fieldhighlighted
2 The default Speed Dial number assigned to a
phone number is displayedin the Speed # field.
This is always the next available Speed Dial
location.
If you wantto assign the phonenumber to a
different Speed Dial location:
With the Speed # field highlighted, press A under
Change.
Press A underDelete to delete the current Speed
Dial number.
Enter the new Speed Dial number using the
keypad.
When you are finished,press A under Ok.
3 When youare finished,press A under Back.
Storing Numbers Fast er
To store numbers to Contacts from the recent call
list, see “Storing Recent Calls to Contacts” on page
27.
To store numbers to Contacts from Memo, see
“Memo” on page 39.
Page 45

Editing Entries
To store numbers to Contactsfrom the idle screen:
1 Use the keypad to enter the number you want to
store.
2 Press m.
3 Select StoreNumber.
4 To store the number asa new entry, select [New
Contact]. -or-
To store the number to anexistingentry,select
the entry.
5 Withthe Contacts type field highlighted, scroll left
or right to display the Contacts type you want to
assignthe number.
6 Ifyouwanttoaddmoreinformationtotheentry,
follow the applicable instructions in “Creating
Entries” on page 35.
7 Press A under Done.
Editing Entries
1 From the Contacts list, scroll to the entry you want
to edit.
2 Press m.
3 Select Edit. The entry details screen displays.
4 Follow the applicable instructions in “Creating
Entries” on page 35 toedit the various fields.
Deleting Entries
Delete an Entry
1 From the Contacts list, scroll tothe entryyou want
to delete.
2 Press m.
3 To delete the entire entry, scroll to Delete
Contact.
4 Press A under Select.
5 Press A under Yes to confirm.
DeleteaNumberorAddress
1 From the Contacts list, scroll to the entry that
contains the number or address you want to
delete.
2 With the Contacts type field highlighted, scroll left
or right to display the Contactstype for the
number you want to delete.
3 Press m.
4 Scroll to Dele te Number.
5 Press A under Select.
6 Press A under Yes to confirm.
37
Page 46

Contacts
Checking Capacity
To see how many numbers are stored in Contacts:
1 From the Contacts list, press m.
2 Select Capacity.
Creating Pauses and Waits
When storing a number, you can program your
phone to pause or wait between digits while dialing.
A pause makes your phone pause for 3 seconds
before dialing further. A wait makes your phone wait
for your response before dialing further.
Thisfeature is useful when using voice mail or other
automated phone systems that require you to dial a
phone number and then enter an access number.
To program a pause:
Press and hold * until the letter P appears. The
P represents a 3-secondpause.
If you store 17035551235P1234, when you select
this number and make acall, yourphone dials the
first11 d igits, pauses for 3 seconds, then dials the
last 4 digits.
If you want a pause longer than 3 seconds, press
and hold * more than once. Each P represents a
3-second pause.
To program a wait:
38
Pressand hold * until the letter W appears. The
W means your phone waits before dialing further.
If you store 17035551235W1234, when you select
this number and make a call, your phone dials the
first11 digitsand then waits.A message appears
askingifyouwanttosendtherestofthedigits.
Press A under Yes to dial the last4 digits.
Tip: You can create pauses and waits while
dialing a numberfrom the keypad. See
“Creating Pauses and WaitsWhileDialing”
on page 75.
International Numbers
When storing a number that you plan to use for
international calls, use Plus Dialing:
1 Press andhold 0 for two seconds. A “0”
appears, then changes to a“+”.
Note: The network translates the “+” into the
appropriate international accesscode
neededto place the call.
2 Enter thecountry code, city code orarea code,
and phone number.
Forinformationaboutmakinginternationalcalls,see
“Making International Calls” on page 75.
Page 47

Memo
Memoletsyoustoreanumber,makeacalltothat
number, and save it to Contacts.
To create a memo:
1 From the main menu, select Memo.
2 Enterthe number using your keypad.
3 Press A under Store.
Toviewthememolater:
1 From the main menu, select Memo.
To delete the memo:
1 From the main menu, select Memo.
2 Pressand hold A under Delete.
3 Press A under Store.
To edit the memo:
1 From the main menu, select Memo.
2 Enterthe new number.
3 Press A under Store.
To make a call to the memo number:
1 From the main menu, select Memo.
2 Press s.
To store the memo number to Contacts:
1 From the main menu, select Memo.
2 Press m.
3 Press A under Select.
4 To store the number as anew entry, select [New
Contact]. -or-
To store the number to an existing entry, select
the entry.
5 Withthe Contacts type field highlighted, scroll left
or right to display the Contactstype you wantto
assign the number.
6 Ifyouwanttoaddmoreinformationtotheentry,
followthe applicableinstructions in “Creating
Entries” on page 35.
7 Press A under Done.
39
Page 48

Memo
40
Page 49

Nextel Voice Mail
Note: To receive voice mail messages, you must
firstset up your voice mailbox.
Setting Up Your Voice M a il Bo x
Using your i205 phone,dial your 10-digitNextel
Personal Telephone Number (PTN). For example:
7035557777. Follow the system instructions to
createa new4- to 7-digit password, record your
name, and record a greeting. When the system
says, “Thank you forusing Nextel Voice Mail,” your
mailbox is set up.
If you are calling from a phoneother than your i205,
dial your 10-digit Nextel PTN. When you hearthe
greeting, press the star key to access your voice
mail box. The system will prompt you to enter your
password. Enter thelast seven digits of yourNextel
PTN. For example:5557777. This is your temporary
password.
Youareinthemainvoicemailmenuwhenyouhear
the options listed below.
• To play your messages, press 1. (This option
plays only if you have new or saved messages.)
• To record a message, press 2.
• To change your greeting, press 3.
• To access your personal options, press 4.
If you press * whileyouareinasub-menu,you
willgo tothe previousmenu.If youpress **,you
will go to the main voice mail menu. From the main
voicemail menu, press # to exit voice mail. At any
time,you may endthe call by pressinge.
Playing Messages
When you receive a newvoice mail message, you
caneitherlistentoitimmediatelybypressingA
under Call, or laterby pressing A under Exit.
These are options available while you arelistening
to your messages:
• Backup — press 1.
• Rewind to beginning of message — press 11.
• Pause or continuethe currentmessage— press
2.
• Fast forward — press 3 .
• Fast forward to end of message — press 33.
• Play the date and time stamp — press 55.
Theseoptionsareavailablewhileamessageis
playing or after it has played:
• Forwardthe message to another subscriber—
press 6.
• Delete the message — press 7.
41
Page 50

Nextel Voice Mail
• Reply to a message — press 8.
• Save the message — press 9.
• Skip to the next message —press #.
Messages that are not saved or deleted remain in
your mailbox as new messages. All messages are
automatically deleted after 30 days.
To retrieve deleted messages, press *3.This
option only applies tothe current voice mail session.
Ifyouendthecall,themessageswillbe
permanently deleted.
Important: After exiting the voice mail session, you
cannot recover deleted messages.
Changing Your Password
1 From the main voice mail menu, press 4 to
accesspersonaloptions.
2 Press 4 to access personal preferences.
3 Press 1 to modify password.
4 Enter your new password. It must be 4 to 7 digits
long.
Note: It isimportant that youchoosea number
that is easy for you toremember, but hard
for someone else to guess. Passwords
using all the same digits, for example
4,4,4,4or a sequentialseries of digits,
1,2,3,4, will not be accepted.
42
5 Press ** to return to the main menu.
Note: If youforgetyour password,contact
Customer Care.
Recording Your Name
When you send, reply to, orcopy a message, your
nameresponseprecedesthe message. To record
or re-record your name at any time:
1 From themain voice mail menu,press 4 to
accesspersonaloptions.
2 Press 4 to access personal preferences.
3 Press 3 to access the record your name option.
4 Press 2 to record your name.
5 Press ** to return to the main menu.
Recording Your Active Greeting
You may want to include one orall of the following
options in your greeting so that callers will know they
are available.
• Press1 tosend a numeric message.
• Press2 tosend an operator-assistedmessage.
(Thisoptionis available only ifyou are a
subscriber of Operator Assisted Messaging.
Contact Nextel Customer Care for more
information.)
Page 51

Advanced Voice Mail Features
• Press # to skip the greeting and record a
message immediately.
To record or alter your greeting at any time:
1 From the main voicemail menu, press 3 to
changeyour greeting.
2 Press 1 to play,press 2 to record orre-record,
or press 7 to delete your active greeting.
3 Recordyour greetingand press # when you
have finished.
4 Press ** to return to the main menu.
Advanced Voice Mail Features
Multiple Greetings
You can create up to five different greetings and
designate whichgreetingwillbe your activegreeting
at any given time. The greeting that was recorded
duringyourinitialvoice mailbox setup is greeting1.
This is your default active greeting.
To record additional greetings:
1 From the main voicemail menu, press 3 to
access the greetings menu.
2 Press 4 to modify greetings.
3 Enter the greeting number you wish to create or
modify.
4 Press 2 to record a greeting.
5 Record your greeting and press # when you
have finished.
6 Press ** to return to the main menu.
To select your active greeting:
1 From the main voicemail menu, press 3 to
access the greetings menu.
2 Press 3 toselectanothergreetingtobeactive.
3 Enter the number of the greeting that you would
liketobeactive.Thesystemwillconfirmyour
active greetingnumber.
4 Press 1 to play your active greeting.
5 Press ** to return to the main menu.
Greetings Schedule
You can choose to haveyour greetings
automaticallyactivated based on a pre-determined
time schedule. By activating the GreetingSchedule,
Greetings 1, 2,and 3 willautomaticallyplay
according to thetime schedule listed below.
Greeting 1 Evenings and
Weekends
5:00 pm – 7:59 am,
Monday– F riday
24-hours, Saturday
and Sunday
43
Page 52

Nextel Voice Mail
Greeting 2 Weekday
Mornings
Greeting 3 Weekday
Afternoons
8:00 am – 11:59 am
Monday– Friday
Noon–4:59pm
Monday– Friday
To activate the greeting schedule:
1 From the main voice mail menu, press 3 to
access the greetings menu.
2 Press 9 to activate your greeting schedule.
3 Press ** to return to the main menu.
Note: The greeting schedule,when on,will
override any othergreeting that you may
setas active.If a greetingis not recorded,a
systemstandard greeting will be played.
Automatic Playback
By default, the playback mode of your voice mail
service is set to normal. This feature automatically
playsandsavesnew messageswhen you log in. To
activate automatic playback:
1 From the main voice mail menu, press 4 to
accesspersonaloptions.
2 Press 4 to access personal preferences.
3 Press 2 to access playback preferences.
4 Press 2 to switch between automatic and
normalplayback.
44
5 Press ** to return to the main menu. Changing the Playback Order of Messages
You can select the orderin which you want unheard
messages to be played. You may listen t o the last
received message first, or you may listen to thefirst
received message first. To select the order in which
new messages should be played:
1 From themain voice mail menu,press 4 to
accesspersonaloptions.
2 Press 4 to access personal preferences.
3 Press 2 to access playback preferences.
4 Press 1 to switch between the playback orders.
5 Press ** to return to the main menu.
Recording, Forwarding, and Replying to Messages
Thesefunctions allow you torecord and send, reply
to, or forward a message to an assigned destination
address or grouplist number.If you record a
complete or partial message, but do not send it,
NextelVoice Mail service will refer to thismessage
as an“in preparation” message.
To record and senda message:
1 From themain voice mail menu,press 2 to
record a message.
Page 53

Advanced Voice Mail Features
2 Recordyour message and press # to end the
message.
3 Press 9 at the prompt to indicate that you want
to send t he message or press 5 for delivery
options.
4 Enterthe mailbox number and/or group list
number(s). (A mailbox number is the10-digit
NextelPTN of a Nextel customer. The Nextel
customer must be in your local callingarea. The
name of the recipient plays if it is recorded.)
5 Press # to send.
6 Press ** to return to the main menu.
Note: Youcan only send messagesusing this
method to Nextel customers in your home
market.
Delivery Options
After you have created a message,you can assign
themessageto a categorybeforeyousendit.Below
is a list of the options that can be applied to a
message:
•Urgent— Recipientwill hear this message
beforeother messages.
•Private— Recipientcannotcopy the message to
another mailbox or phone number.
• Notification of Non-Delivery — You will be
notified if the recipient has not listened to your
message by a certain date a nd time.
• Future Delivery — You canspecify a time and
date (up to three months in advance) for the
messagetobedelivered.
Note: All dates must have digitsin the MM/DD
format(2 digits for themonth and2 digits
for the date). For example, January 2nd
wouldbe0102.
Important: Once a message has been sent for future
delivery, itcannot be retrieved or deleted.
To set a special delivery option:
1 After recording your message, but before sending
it, press 5 for deliveryoptions.
2 Press the number that corresponds with the
desired delivery option:
• Press 1 for urgent.
• Press 2 for private.
• Press 3 for notification of non-delivery. At
prompt, specify time and date.
• Press 4 for future delivery of messages. At
prompt, specify time and date.
• Press 9 to sendthe message i mmediately.
45
Page 54

Nextel Voice Mail
3 The list of optionswill be presented again.Select
an additional option or press 9 to send the
message.
4 Enter thedestination mailbox or group list number
of the recipient(s).
5 Press # to send.
6 Press ** to return to the main menu.
Working With Group Lists
Thisfeatureenablesyou to create a listandassignit
a unique name. Then, you can add mailbox
numbers, group lists, or individuals. Once you
createa list youcan send a voice message to
everyone on the list by entering the group list
number.Youcanhaveupto40grouplists.Eachlist
canholdupto50addresses.
To set up a group list:
1 From the main voice mail menu, press 4 to
accesspersonaloptions.
2 Press 2 to accessyour Group Lists.
3 Press 2 to create a GroupList.
4 Enter the 1- or2-digitgrouplistnumberand press
#.
5 Recordanameforthelistandpress#.
6 Select group members by mailbox number, group
list,or name.
46
7 Press # to saveall entries added to thelist.
8 Press ** to return to the main menu.
To modify a grouplist:
1 From themain voice mail menu,press 4 to
accesspersonaloptions.
2 Press 2 to access group lists.
3 Press 4 to modify agroup list. Enter the number
of the group list youwant to modify.
4 Press 1 to add a new recipient.
5 Press # to save your changes.
6 Press ** to return to the main menu.
Deleting a group list:
1 From themain voice mail menu,press 4 to
accesspersonaloptions.
2 Press 2 to access group lists.
3 Press 3 to delete a group list.
4 Enter the number of the group list you want to
delete.The systemwillplay the nameof the
grouplist.
5 Press # to delete the list.
6 Press ** to return to the main menu.
Page 55

Message Forwarding
Note: Youcan only forwardmessages to Nextel
customers in yourhome market.
This featureallowsyou to program your phone to
automaticallyforwardincomingmessagesto
another mailbox. There are two typesof forwarding:
notified and silent. Notifiedforwarding prompts the
callerthat the message will be forwarded.Silent
forwarding does not prompt the callerthat the
message will be forwarded.
To modify forwarding options:
1 From the main voicemail menu, press 4 to
access personaloptions.
2 Press 5 to modify forwardingoptions.
3 Select the applicable option below:
• To create aforwarding number, press 2.
• If you have already created a forwarding
number, press 2 to modify the number.
• To enable or disable message forwarding,
press 3.
• To change the forwarding type, press 2.
4 Press ** to return to the main menu.
Advanced Voice Mail Features
47
Page 56

Nextel Voice Mail
48
Page 57

Messages
To access your voice mail messages, text and
numericmessages,Net alerts, and anyother types
of messages you are able to receive, go to the
messagecenter:
1 Press A under Mesg. -or-
From the main menu, select Messages.
2 Scrolltothetypeofmessageyouwanttoaccess.
3 Press A under the display option on the left.
The message center shows how manymessages
you have of each type. You can listen to, read, or
deletethese messages.
Note: In order for you to access voice mail
through the message center,theremust
already be a message in your voice mail
box. If there is no message, you must
accessvoicemail by dialing into your voice
mail box using your PTN.
Message Notifications
When you receivea message, your phone notifies
youwithtextonthedisplayandanotificationtoneor
vibration. You can access the message or dismiss
the notification.
Ifyoudismissthenotification,themessageisnot
deleted.Itcanbeaccessedthroughthemessage
center.
If you arenot on a phone call when you receivea
message, your phone soundsa notification tone
every 30 secondsuntil you access the message or
dismiss the alert.
If you are on a call when you receive a message,
yourphonemay sound a notificationtoneduringthe
call or after you end the call, depending on how you
set your notification options.
Setting Notification Options
To control whether your phone sounds message
notificationtoneswhile you are on phone calls:
1 From the main menu, select Settings> Phone
Calls > Notifications.
2 Choose the option you want:
• Receive All —Tonessoundduringcalls for all
types of messages.
• Msg Mail Only — Tones sound during calls for
mail messages;tonesfor all other types of
messages are held until you end calls.
•DelayAll— Tones forall types of messages
are held until you endcalls.
Note: Delay All is the default setting.
49
Page 58

Messages
3 Press A under Select.
Tip: To set notificationoptionsduringa call: Press
m. SelectIn Call Setup > Notifications.
Voice Mail
When you receive a voice mail message, New
Voice Mail Message appears on thedisplay.
To call Nextel’s voice mail system and listen to the
message:
Press A under Call.
To dismiss the message notification:
Press A under Exit.Thisicon
the display, reminding you that you have a new
message.
Sending Unanswered Calls to Voice Mail
To send aphone call t o voicemail instead of
answering it:
Press e. -or-
Press A under No.
If the caller leaves a message, this icon
appears on the display, remindingyou that you have
a new message.
50
y appears on
y
Text and Numeric Messages
The phone’s display refers to text and numeric
messages as Text Messages.
Thesemessagescan be up to140 letters or 20
digitslong.Youcanstoreupto16ofthese
messages. Each message is stamped with the date
and time it was left.
If your phone is poweredoff when you receivea
message, your phone notifiesyou the next timeyou
powerit on. Ifyou are outof your coveragearea,
your phone alerts you when you return to your
coverage area.
Yourphone attempts to deliver these messagesfor
upto7days.
Tip: While reading a text and numeric message
thatcontainsa phonenumber,you canpress
s to call that number.
Receiving a Message
When you receive a text and numeric message,
New Text Message appearson the display.
To view the message:
1 Press A under Read.
2 If the message fills more than one screen, scroll
to read it.
Page 59

NetAlerts
3 To keep the message, press A under Save. -or-
To delete the message, press A under Delete.
To dismiss the message notification:
Press A under Back.Thisiconw appears on
the display, reminding you that you have a new
message.
Reading from th e Message Center
1 From the message center, select Text Msgs.
2 Scrollt o the messageyou want to read.
3 Press A under Read.
4 If the message fills more than one screen, scroll
to read it.
5 To keep the message,scrollto the end ofthe
message and press A under Save. -or-
To delete the message, press A under Delete.
Net Alerts
Net alerts are text and numeric messages sent from:
• Your i205 phone
• www.nextel.com
• Any email application
Note: Yourphone's SMS address is your
PTN@page.nextel.com. Your phone's
Two-Way Messaging address is your
PTN@messaging.nextel.com.
When you receive a Net alert, a notificationappears
on the display.
If you dismiss the notification, this icon w appears
on the display, remindingyou that you have a new
message.
Deleting Net Alerts
1 From the message center, selectNet Alert.
2 Press A under Goto.
3 Scroll to the message you want to delete.
4 Press m.
5 Select Delete.
6 Press A under Yes to confirm.
51
Page 60

Messages
52
Page 61

Call Forwarding
Call forwarding sends calls to the phone numbers
you specify. You can forward all calls to one number
or forward missed calls to different numbers
depending on the reason you missed the call.
You can forward phone lines 1and 2 independently.
Forwarding All Calls
When you setyour phone to forwardallcalls,an
icon appears in the top row of the display:
G Phoneline1isactive;callstophoneline1are
beingforwarded.
H Phoneline1isactive;callstophoneline2are
beingforwarded.
I Phone line 1 is active;callsto phonelines 1
and 2 are being forwarded.
J Phoneline2isactive;callstophoneline1are
beingforwarded.
K Phoneline2isactive;callstophoneline2are
beingforwarded.
L Phone line 2 is active;calls to phonelines 1
and 2 are being forwarded.
To forward all calls:
1 From the main menu, select Cal l Forward.
2 Press A under Change.
3 Select All Calls.
4 Scroll to To.
5 Press A under Change.
6 If you specified aforwarding number for allcalls
before, this number displays.PressA under
Change.
To forward calls to this number, press A under
Ok. -or-
To delete this number, press and hold A under
Delete.
7 To enterthe number you want to forwardcalls to:
Enterthe number using your keypad. -or-
Press A underSearch.Select Contacts, Recen t
Calls,orMemo. Selectthe number you want to
enter.
8 Press A under Ok.
All your calls arenow forwardedto t he number you
specified.
Tip: In some fields, you can select an option by
scrolling left or right insteadof pressing A
under Change.
53
Page 62

Call Forwarding
Turning Off Call Forwarding
If you don’t want all your calls forwarded, turn the
feature off:
1 From the main menu, select Call Forward.
2 Press A under Change.
3 Select All Calls.
4 Scroll to To.
5 Press A under Change.
6 Scroll to Off.
7 Press A under Select.
All your calls arenow sentto your phone.
Calls you miss are forwarded according to the
options set for missed calls. By default, missed calls
are forwardedto voice mail.
Forwarding Missed Calls
You can specify a forwarding number for each type
of missed call:
•IfBusy— Your phone is on acall or transferring
data.
•IfNoAnswer— You do not answer on the first 4
rings.
• If Unreachable — Your phone is outof coverage
or powered off.
54
Note: If you want a type of missed call sent to
voice mail, the call forwarding number for
that type of missed call must be your voice
mail access number.
Toforwardmissedcalls:
1 From themain menu, select Call Forward.
2 Press A under Change.
3 Select Detailed.
4 Scroll to If Busy to specify a forwardingnumber
for calls received when your phone is busy.
5 Press A under Change.
6 If you specified a forwarding number for this type
of call before, this number displays.Press A
under Change.
To forward callsto this number,press A under
Ok andgotostep9.-or-
To delete this number, press and hold A under
Delete.
7 To enter the number you want to forward this type
of call to:
Enterthe number using your keypad.-or-
Press A under Search.SelectContacts, Recent
Calls,orMemo. Select the number you wantto
enter.
8 Press A under Ok.
Page 63

9 Repeatstep 4throughstep 8 forNo Answerand
If Unreachable.
When you are finished, press A under Back.
Viewing Call Forwarding Settings
1 From the main menu, select Call Forward.
2 With To highlighted, press m.
3 Select RetrieveStatus.
Viewing Call Forwarding Settings
55
Page 64

Call Forwarding
56
Page 65

Ring Tones
To set thering tone your phone makes when you
receivephone calls, message notifications, or call
alerts:
1 From the main menu, selectRingTones.
2 Make sure VibeAll is set toOff.
3 Scroll through the list of ring tones and select the
one you want to assign. Vibrate sets your phone
to vibrate instead of making a sound; Silent sets
your phone to neither vibrate nor make a sound.
Tip: Highlighting a ring tone lets you hear it.
4 Press A under Assign.
5 Scrolltothefeatureyouwanttoassignthering
tone to.
6 Press A under Select.
Tip: A checkmark next to a feature means the
currentring tone has beenassigned to it. To
removethe assignment:Scrollto t he feature.
Press A under Select.
7 To assignthe ring tone toother features,repeat
step 5 through step 6.
8 When you aref inished, press A under Done.
Set ti ng Your Phone to Vibrate
You can set your phone to vibrateinsteadof making
a sound when you receive all phone calls,Direct
Connectcalls, Group Connect calls, messages
notifications, and callalerts.
1 From the main menu, select Ring Tones >
VibeAll.
2 Scroll left or right to set VibeAll to On.
Tip: Pressing the volume controlsto turn down
the volumeas far as possiblesetsVibeAll to
On.
Tosetyourphonetovibrateinsteadofmakinga
sound for some features but not others:
1 From the main menu, select Ring Tones.
2 Make sure VibeAll is set toOff.
3 Scroll through the list of ringtonesto Vibrate.
4 Press A under Assign.
5 Scroll to the feature you want to set to make no
sound.
Note: To set ring options for Direct Connect calls
and Group Connect calls, see“Setting Your
Phoneto Not Ring” on page83.
6 Press A under Select.
7 To assignVibrate to another feature,repeat
step 5 through step 6.
57
Page 66

Ring Tones
8 When you are finished, press A under Done.
These icons indicate how the ringer is set.
u DC/GC speaker set to off.
v The phone always vibrates instead of ringing.
M The phone does not ringfor phone calls.
These icons may appear at thesame time.
Assigning Ring Tones to Contacts
You can set the ring tone your phone makes when
you receive phone calls orcallalerts from someone
youhavestoredinContacts.
1 From the main menu, select Ring Tones.
2 Make sureVibeAll is set to Off.
3 Scroll through the list of ring tones to theone you
want to assign. Highlighting a ring tone lets you
hear it.
4 Press A under Assign.
5 Select AContact.
6 Scroll to the Contactsentry you want to assign
theringtoneto.
7 Press A under Select.
58
Ring an d Vibrate
To set ayour phone to ringand vibrate when you
receive phone calls or call alerts:
1 From themain menu, select Ring Tones.
2 Make sure VibeAll is set toOff.
3 Scroll throughthe list of ringtones and select the
one you want to assign.
4 Press m.
5 Select Assignw/Vibe.
6 Select the feature you want to set to ring and
vibrate.
7 When youare finished,press A under Done.
This icon S appears on the display.
ViewingRingTone Assignments
1 From themain menu, select Ring Tones.
2 Make sure VibeAll is set toOff.
3 Highlight any ring tone.
4 Press m.
5 Select Overview.
6 Scroll to view ring tones assigned to features and
Contact entries.
Page 67

Downloading MoreRing Tones
Downloading More Ring Tones
Ifyouwanttouseotherringtones,youcan
download them into your phonefor a fee. Go to
www.nextel.com/idenupdate for a selection of
custom ring tones and downloadinginstructions. A
data cable is required for downloads.
Note: Ring tones purchasedfrom this web site
may be downloadedonly once. If you
delete aring tone from your phone, you
must purchase it again todownload it
again.
Managing Memory
To view the amount of memory availablefor custom
ring tones:
1 From the main menu, select Ring Tones.
2 Make sure VibeAll is set toOff.
3 Highlight any ring tone.
4 Press m.
5 Select Memory Usage.
Deleting custom ring tones frees memory.
Deleting Custom Ring Tones
To delete a custom ring tone:
1 From the main menu, select Ring Tones.
2 Make sure VibeAll is set to Off.
3 Scroll to the ring tone you want to delete.
4 Press m.
5 Select Delete.
6 Press A under Yes to confirm.
59
Page 68

Ring Tones
60
Page 69

GPS Enabled
Your phone’s GPSEnabled feature usesinformation
from Global Positioning System (GPS) satellites
orbiting the Earth to determine the approximate
geographicallocationof your phone, expressed as
latitude and longitude. The availability and accuracy
of this locationinformation (and the amount of time
that it takes to calculate it) will vary depending on
the environmentin which you are using the GPS
feature. For example, GPS location fixes are often
difficult to obtain indoors, in covered locations,
betweenhigh buildings,or in other situations where
you have notestablisheda clear broad view ofthe
sky.SEE: “IMPORTANT: Things to Keep in Mind”
on page 61.
When you make a 911 emergency call, the GPS
feature of your phone can help emergency
personnel locate you ifyour phone has adequate
accessto GPSsatellitesignals and your emergency
response center is equipped to process such
information.
You can also use the GPSfeatureto view your
approximate location.Location informationappears
on the phone’s display.
If your phone is connected to a laptop computer or
similar device, software running on that device can
request your location. To protect your privacy, you
can control whether these requestsare granted.
IMPORTANT: T hings to Keep in Mind
Ifyou are using the GPS featureof yourphonewhile
driving, please give full attention to driving and to the
road.
Where adequate signals from multiple satellites
are not available(usuallybecause your GPS
antennacannot establish aview ofa wide area of
open sky), the GPS feature of your phone WILL
NOT WORK. Such situations include but are not
limited to:
• In underground locations
• Inside of buildings, trains, or other covered
vehicles
• Under any other metal or concrete roof or
structure
• Between tall buildings or under dense
tree-cover
• Near a powerful radio or television tower
61
Page 70

GPS E nabled
• When your GPS antenna is covered (for
example, by your hand or other object) or
facing the ground
• Intemperatureextremesoutsidethe operating
limits of your phone
Walking or driving very slowly may also
substantially reduce GPS performance.
Even where location information can be
calculated in such situations, it may take much
longerto do so, and your location estimate may
not be as accurate. Therefore, in any 911 call,
always report the location to the emergency
response center if you can and if you cannot,
remain on your phone for as long as the
emergency response center instructs you.
Even where adequate signals from multiple
satellites are available, your GPS feature will
only provide an approximate location, often
within 150 feet (45 meters) but sometimes much
further from your actual location. Advice on how
to improve GPS performance is provided in
“Enhancing GPS Performance” on page 64.
While the GPS feature of your phone can be a
valuable navigational aid, itdoes not replace the
need for careful navigatingand good judgment.
Never rely solely on onedevicefor navigation.
Remember that the accuracy of the location
62
informationandthetimeneededtoobtainitwillvary
depending on circumstances, particularly the ability
to receive signals from adequate numbers of
satellites.
On emergencycalls,your phoneuses assistance
informationfromthe phone network to improve the
speed and accuracy of yourphone’s location
calculation:if such assistanceinformation becomes
unavailable, it may reduce the speed and accuracy
of the location calculation.
The satellites used by the GPS feature of your
phoneare controlledby the U.S. government and
are subject to changes implemented in accordance
with the Department of Defense GPS user policy
and the Federal Radionavigation Plan. These
changes may affect the performance of the GPS
feature of yourphone.
Making an Emergency Call
Dial 911 to be connected to an emergency response
center.Ifyouareonanactivecall,youmustendit
before calling 911.
Whenyoumakeanemergency911call,theGPS
feature of yourphone begins to seek information to
calculate your approximate location. It will take the
GPS feature of your phone some time to
determine your approximate location. Even
where your phone has goodaccess to sufficient
Page 71

Viewing Your Approximate Location
GPSsatellite signalsandnetworkassist data,it may
take 30 seconds or more to determine the
approximate location.T his time will increasewhere
thereis reducedaccessto satellite signals.When
your approximate location is determined, it is made
available to the appropriate emergency response
center.
In some cases, your local 911 emergency
response center may not be equipped to receive
GPS location information. For this reason, and
becausethe GPS location information reported is
only approximate or may not be available in your
location(see “IMPORTANT:Thingsto K eep in
Mind” on page 61), always report your location to
the 911 operator you speak to whenmakingan
emergency call, if able, just as you would when
using a phone without GPS capabilities.
Note: If youare concerned about whether your
local911 emergency responsecenteris
equipped to receive GPS location
information, contact your local authorities.
In general, if your phone has access to signals from
more GPS satellites,your location will be
determined faster and moreaccurately than if your
phone has access to signals from fewer GPS
satellites.
If your phone does not have adequate access to
GPS satellitessignals, the locationof the nearest
celltowerin contactwithyourphoneis automatically
madeavailableto the emergency responsecenter,if
the center has the capability to receive such
information.
See “EnhancingGPS Performance” on page64 for
information on h ow to help your phone determine
your location.
Viewing Your Approximate
Location
1 From the main menu, select GPS > Position.
2 Scroll to view the entire screen.
This displays thefollowing information about the last
time your location was calculated:
• The time (asGreenwich Mean Time)and date
that the location was last calculated
• The approximate location, expressed as latitude
and longitude
• The estimated accuracy of the calculated
location.Thisestimateofaccuracyisonlyavery
rough estimate and may vary substantially from
the actual accuracyof the approximate location
information reported.
63
Page 72

GPS E nabled
• The number of satellites used to calculate the
location. In general,more satellites make for
better accuracy.
To calculate your location again:
Press A under Rfrsh.
It may take your phoneseveralminutes to complete
theprocessof determiningyourlocation. During this
time,a message usually appears on yourphone’s
display saying your phone is scanning for satellites.
For tips on getting the best location calculation, see
“Enhancing GPS Performance” on page 64.
The Position screen displays the updated
information.
To cancel a location calculation before it is
completed:
Press A under Cancel to return to the Position
screen. -or-
Press e to return to the idle screen.
Each time approximatelocation of yourphone is
calculated, the latest location information is stored in
your phone and remains there even when your
phoneis powered off. You will seethis information
the next time you view the Position screen.
64
Ifyou receiveda phone call or alertwhileattempting
to determine your location, the Position screen will
disappear, but your phone will continue attempting
to determine its location. If it is successful, the new
location information will be displayed the next time
you view the Position screen.
Enhanci ng GPS Performa nc e
Sometimes the GPS feature of your phone may be
unable to complete a location calculation
successfully. If this happens when you are making
an emergency call, the location of the nearest cell
tower in contact with your phone is made available
to the appropriate emergency response center if the
centerhas the capability to receive such
information. If this happens when you are trying to
viewyour location on the phone’s display, you will
see a message indicating that your phone cannot
accesssatellites.
To improve accuracy and increase your chances of
a successful calculation, do thefollowing while your
phoneis determiningyour approximate location:
Page 73

Updating Satellite Almanac Data
• Stay in the open. The GPS feature works best
wherethereis nothingbetween your phone and a
largeamountof open sky.If possible, go outside,
away from tall buildings and foliage. While
performanceinabuildingisimprovedbymoving
closerto windows, glass with certainsun
shielding films may block satellite signals.
• Hold your phone to enhance reception. Signals
from GPS satellitesare transmitted to your GPS
antenna, which is inside the back of your phone,
opposite the earpiece, above the label with your
service provider’s name on it. Hold your phone
away from your body, giving the antenna clear
access to satellite signals. Do not cover the
antennaarea with your fingers or anythingelse.
GPS antenna area
• Stand still. If possible, stand still until your phone
isfinished determining your location.Moving your
phone at a walking pace while your phone is
calculating your approximate location may
substantially decrease GPS performance.
• In acar. When using the GPS Enabled feature in
a car, positionyour phone so that the GPS
antenna has good access to GPS signals through
the car’s windows. Typically, the GPS antenna
has best access to GPSsignalsin a car when
placed near a window.
Note: Althoughmoving your phone ata walking
pacedecreasesGPSperformance,moving
it at the speed of a moving car does not.
• Stay in network coverage. Depending on who
your service provider is, the network will provide
your phone with information that helps determine
your location more quickly and accurately.
Updating Satellite Almanac
Data
Anotherway tokeep the GPS featureof your phone
working well is tokeep your satellite almanac data
up to date.
65
Page 74

GPS E nabled
The United States government maintains an
almanac of data about where GPS satellites are as
they orbit the Earth. This information is available to
your phone. Keeping your satellite almanac up to
date helps your phone determine your location more
quickly.
Thealmanaccontains informationaboutthe location
of satellites, their operationalstatus,and other
satellite information. Keeping this information
updatedenhances the performance o f yourGPS
feature. In mostcases, your phone will be able to
get a fixin strong satellite signal conditionswith
outdated almanac data, but itmay take longer.
Note: Whenyoumakeanemergencycall,your
phone does not rely upon the almanacto
determine your location.
If your satellite almanac data is out of date, your
phone may prompt you to update it. Follow the
instructionsthat appearon the phone’sdisplay. You
maybeaskedtogotoawebsiteorcallacustomer
care number.
Setting Privacy Options
Your phone’s GPS privacy options control whether
software applicationsmay view thelocation of your
phone.You may set your phone toone of these GPS
privacyoptions:
66
• Restricted — No software applications may view
the location of your phone. However, location
informationmay still be available to the phone’s
owner, fleet manager, or accountadministrator.
•Unrestricted— Allapplicationsmay view the
location of yourphone,withoutnotifyingyou.
• By Permission — Whenan applicationattempts
to view thelocation of yourphone, you will be
prompted to give permission. However, location
informationmay still be available to the phone’s
owner, fleet manager, or accountadministrator.
Note: Privacy options do not applyto the
transmission of locationinformation during
emergency 911calls.
To set your GPS privacy options:
1 From themain menu, select GPS > Privacy.
2 If yourGPS PIN securityfeatureis enabled,enter
your GPS PIN. (See “Setting the GPS PIN
Security Feature” on page 66 for more
information.)
3 Scroll to the privacy setting you want.
4 Press A under Select.
Setting the GPS PIN Security Feature
To prevent your GPS privacy settingsfrombeing
altered withoutyour knowledge,your GPS privacy
optioncanbeprotectedbyaPIN.
Page 75

Using GPS with Map Software
When you receiveyour phone, the GPS security
featureisturnedoff,soyoudonothavetoentera
GPS PIN to accessyour GPS privacy options.If you
turn this feature on, you will be required to enter a
GPS PIN to access your GPS privacy options.
To turn theGPS Enabled securityfeatureon or off:
1 From the main menu, select Settings > Security
>GPSPIN.
2 Scroll to On or Off.
3 Press A under Select.
4 Enter the current GPS PIN.
Note: When you receive your phone, your GPS
PIN is 0000.
5 Press A under Ok.
To change your GPS PIN:
1 From the main menu, select Settings > Security
> Change Password> GPS PIN.
2 Enter the current GPS PIN.
Note: When you receive your phone, your GPS
PIN is 0000.
3 Press A under Ok.
4 Enter the new 4- to 8-digit GPS PIN.
5 Press A under Ok.
6 Enter the new 4- to 8-digit GPS PIN to confirm.
7 Press A under Ok.
Using GPS with Map Software
You can use the GPS feature of your phone to
provide approximate location data to a laptop
computer or similar device that is running interactive
mapsoftwaresuchasthatmadebyDeLormeor
Microsoft. This way, if your phone hasgood access
to GPS signals, your approximate position on a map
canbemadeavailableasyoutravelinavehicle.
To do this, connect your phone to your laptop (or
other device) with a data cable and set your phone
to transmit data (see “Getting Started” on page 68).
Yourphonethen providesyour approximatelocation
to the device running the map software, which
displays your location on amap. Your phone
provides an updated location every second and the
map software displays your changing location on its
map.
See “EnhancingGPS Performance” on page64 for
more details on obtaininggood location information.
Note: Because your phone is continuously
determiningyour location,using the GPS
feature of yourphone with map software
usesthe phone’s battery power quickly.
67
Page 76

GPS E nabled
Software Compatibility
Yourphone sends location information to your
laptop or other device using the standard National
MarineElectronics Association(NMEA)format.
Your phone supports output messages in
NMEA-0183 format and supportsthe following
NMEA-0183 sentences: GGA, GLL, GSA, GSV,
RMC, andVTG.
The map softwarerunning onyour laptop or other
device must support NMEA 3.0.
Getting Started
To connect your phone to your laptop or other
device:
1 Open the connectorcover.
connector
cover
68
2 With the phone’s display facing up, insert the data
cable’s connector into the accessory connector,
untilyou hear aclick.
3 InsertthedataplugintotheCOMportofyour
laptop or other device.
Makesure no other application is using the COM
portselected.
Make sure the COM port settings of your laptop or
other deviceare set to thefollowing:
• Bits per second: 4800
• Data bits: 8
• Parity: None
• Stop bits: 1
• Flow control: Hardware
Page 77

To set your phone to send location information to
your laptop or other device:
1 From the main menu, select GPS > Interface.
2 With NMEA OUT highlighted, press A under
Change.
3 Scroll to On.
4 Press A under Select. Your phone is now
sending location data t o yourlaptopor other
device.
To stop your phone from sending location data to
your laptop or other device:
Set NMEA OUT to Off.
Each time you power your phone on, NMEA OUT is
automatically set to Off.
Using GPS with Map Software
69
Page 78

GPS E nabled
70
Page 79

Nextel Online®Services
You can useyour phone’s Net feature to access a
suite of wirelessdata products known as Nextel
Online (NOL) services. Services include Two-Way
Messaging, Web and Premium Web, Address Book,
Mobile Email, and wireless access to AOL
Messenger
With the exception ofthe basic Two-Way Messaging
service, Nextel Online* services requirethe
activation of a Nextel Online service plan. To order,
call 1-800-NEXTEL6 or contact your Nextel sales
representative.
* Nextel Online is only available in the continental
UnitedStates.
TM
.
NOL Services
• Two-Way Messaging — Discretelysend and
receivetextmessagesvia your Nextelphone,any
email address, or www.nextel.com. There is a
nominal charge for each message sent and
received. Youalso have the optionof subscribing
to the Two-Way Messaging package for greater
functionality and unlimitedmessaging.
• Web — accessthe wireless Internet from your
Nextelphone.
®
Instant
• Premium Web — access any site on the wireless
Internet, conduct topic and keyword searches,
bookmark sites and applications, and customize
your phone's browser menu.
• AddressBook —program your Contactsfromthe
Internet.
• Mobile Email — access and send email from your
Nextelphone.
®
• AOL
Instant MessengerTM— send and receive
instant messages in real–time through a
handset-based interface.
Accessing NOL Services From Your Phone
You must first enable security on your phone to
receive NOL services. See “Enabling Over-the-Air
Security” on page 6.
1 Press m to access the mainmenu and selectNet.
YourNOL home pagedisplays.
2 Choosethe service you want to access.
To access a Two-WayMessaging Service:
Selectthe messaging application from theNet
menu.
71
Page 80

Nextel Online®Services
To access theW eb:
Select Web Sites
, Marketplace, or Search
To access Address Book:
Select BusinessTools >Address Book
To access Mobile Email:
Select Email & More > Mobile Email
®
To access AOL
Instant MessengerTM:
Select Email & More > AIM
Note: Many screens will require you to enter text.
For information on entering text, see
“Entering Text” on page29.
Navigation Keys
•Home—Presse toreturnto your homepage.
Tip: Press e twice to return to your phone'sidle
screen.
•Back—Press* to return to aprevious screen.
•Scroll— A scroll bar on the left of the phone’s
display indicates that additional text can be
viewed.S croll using thenavigation key.
72
Tip: While navigating through Nextel Online
screens, a number may appear to theleft of
theapplicationortopicyouwanttoaccess.
Press the corresponding number on the
keypad for quickeraccessto that application
or topic.
When transmitting highly personal or sensitive data,
such as a credit card number, this icon Eappears,
indicating that the data is encrypted during
transmission.
Note: Youmay be asked to (re)enablesecurityas
Nextel adds new services or upon your
return to the U.S. after traveling.
For more information and multimedia demos, go to
www.nextel.com. You can alsoget one page
service-specific guides called Customer Quick Start
Guides and otherinstructionfor Nextel Online
services atwww.nextel.com.
Page 81

Advanced Calling Features
Call Waiting
Call Waiting lets you receive a second call while on
an active call. Call Waiting is always available,
unlessyou turn itoff for a specificcall.
Ifyouareonacallandreceiveasecondcall,your
phone emits a toneand displays a message saying
youarereceivingasecondcall.
To accept the second call andput the active call on
hold:
Press A under Yes.
To accept the second call andend the active call:
1 Press e.
Yourphone rings with the secondcall.
2 Answerthe second call.
To decline the second call:
Press A under No.If you subscribeto voice mail,
the call is forwarded to your voice mail box,
unless you set Call F orward for If Busy to a
different number.
Switching Between Calls
When you accept a second call, the display shows
the name or number of each call, with an icon
indicating which call is active:
Y Phone call is active.
Z Phone call is on hold.
To make thecall on hold active and put the active
call on hold:
Press A under Switch.
Turn Off Call Waiting
To turn off Call Waitingduring a call:
1 Press m.
2 Select In Call Setup >Call Waiting.
3 Press A under Change.
4 Scroll to Off.
Tip: To turn Call Waiting back on while still on the
call: Scroll to On.
5 Press A under Select.
73
Page 82

Advanced Calling Features
To turn off Call Waitingfor the next callyou make or
receive:
1 From the main menu, select Settings > Phone
Calls > Call Waiting.
2 Press A under Change.
3 Scroll to Off.
4 Press A under Select.
CallWaitingisturnedbackonwhenyouendthe
call.
Call Hold
Call Hold lets you put an active call on hold and
makeasecondcall.
To put a call on hold:
1 Whileonanactivecall,pressm.
2 Scroll to Hold.
3 Press A under Select.
4 If youwantto make the call active again, press A
under Resum.
To make asecond call while acall is onhold:
1 Enter thenumberyou want to call.
Tip: Toenter the numberfromContacts:Pressm.
Select Contacts.
2 Press s to place the call.
74
To end the second call and make the call on hold
active again:
Press e.
Tomakethecallonholdactiveandputtheactive
call on hold:
Press A under Switch.
3-Way Calling
3-waycallinglets youcombine2 phone calls into
one. All 3 people in the call can speak to and hear
each other.
To make a 3-way call:
1 Placeorreceiveaphonecall.
2 While the call isactive, press m.
3 Scroll to 3Way.
4 Press A under Select. This puts thecall on hold.
5 Enter the second phone number you want to call.
Tip: To enter the number from Contacts: Pressm.
Select Contacts.
6 Press s to place the call.
7 While the second call is active, press m.
8 Scroll to 3Way.
9 Press A under Select.
Bothcalls are now active and appear on thedisplay.
Page 83

Creating Pauses and Waits While Dialing
Creating Pauses and Waits
While D ialing
You can enter a pause or wait while dialing a
number. For more information on pauses and waits,
see “Creating Pauses and Waits”on page 38.
To create a pause while dialing a phonenumber:
1 From the keypad, enter the digits you want to
occur before the pause.
2 Press m.
3 Select Insert Pause.
4 Enterthe digits you want tooccur after the pause.
To create a wait while dialing a phone number:
1 From the keypad, enter the digits you want to
occurbefore the wait.
2 Press m.
3 Select Insert Wait.
4 Enterthe digits you want to occurafterthe wait.
Making International Calls
Your service default is “InternationalCalls
Restricted.”Contact NextelCustomer Careto obtain
international dialing access.
Calls placed between theUnited States and Canada
do not require an international access code.
Plus Dialing lets you place an international call to
most countries without entering the local
internationalaccess code.
1 Press and hold 0 for two seconds. A “0”
appears, then changes to a “+”.
Note: The networktranslates the “+” into the
appropriate international access code
needed to place the call.
2 Enterthe country code, city code orarea code,
and phone number.
SettingOneTouchDirect Connect
One Touch Direct Connect sets your phone to call
the most recent Direct Connect number on the
recentcalls list, or a Direct Connect number you
choose,every time you press the PTTbutton.
To set your phone to call the most recent Direct
Connect number on the recent calls list:
1 From the main menu, select Settings > DC/GC
Options > OneTouchDC.
2 Scroll to Last Call.
3 Press A under Select.
75
Page 84

Advanced Calling Features
To set your phone to call aDirectConnectnumber
you choose:
1 From the main menu, select Settings > DC/GC
Options > One Touch DC > Assigned Number.
2 To enter the Direct Connect number you want
your phone to callevery time youpress the PTT
button:
Enter the number using your keypad. -or-
Press A under Search. Select Contacts,Recent
Calls,orMemo. Select the number you wantto
enter.
Tip: If you are enteringa Talkgroupnumber,enter
# before the number.
3 Press A under Ok.
To turn off One Touch Direct Connect:
1 From the main menu, select Settings > DC/GC
Options > One Touch DC.
2 Scroll to Off.
3 Press A under Select.
Group Con nectTMCalls
A Group Connect call is a call made to all members
of a Talkgroup at once. A Talkgroup is a
predetermined group of up to 25 Nextel customers.
76
Before you can make or receive Group Connect
calls, a Talkgroup must be established. After the
Talkgroup is established, you must join the
Talkgroup.See “Joining a Talkgroup”on page 8.
Making Group Connect Calls
1 Press #. Then enter the Talkgroup number
usingthe keypad. -or-
Choosethe Talkgroup name from Contacts or
recent calls list.
2 Proceed as if making a Direct Connect call.
Receiving Group Conn ect Calls
To answer a Group Connect call:
Proceed as if answering a Direct Connect call.
Onlyone person at atimemay speak on aGroup
Connect call.
The Direct Connect number or name of the
personwho is speakingwillappearon thedisplay
below the Talkgroup number.
Turning off Group Connect Calls
To controlwhetheryou hear GroupConnectcalls to
your Talkgroup:
1 From the main menu, select Settings > DC/GC
Options > Tkgrp Silent.
Page 85

Call Timers
2 Press A under Change.
3 Scroll to On if you don’t want to hearGroup
Connectcallsto your Talkgroup.-or-
Scroll to Off if you want to hear Group Connect
calls to your Talkgroup.
4 Press A under Select.
Call Timers
Call timers measure the durationof your phone
calls,Direct Connect or Group Connect calls, and
circuitdata use, as well asthe number of Kilobytes
sent and receivedby your phone:
•LastCall— displays the durationof your most
recent phone call.
• Phone Reset — keeps a running total of your
phone call minutes, until you reset it.
• Phone Lifetime —displays the total minutes of
all your phone calls.
• DC/GC Reset — keeps a running total of all of
your Direct Connect and Group Connect call
minutes, until you reset it.
• DC/GC Lifetime — displays the total minutes of
all your Direct Connect and Group Connect calls.
• Circuit Reset — keeps a running total of all of
your circuit data use, until you reset it.
• Circuit Lifetime — displaysthe total minutes of
all of your circuit data use.
• Kbytes Reset — keeps a running total of the
number of Kilobytes sent and received by your
phone, until you reset it.
To view orreset a timer:
1 From the main menu, select Cal l Timers.
2 Selectthefeatureyouwanttovieworreset.
3 To view a feature without resetting: Press A
under Done when you are finishedviewing. -or-
Toreseta feature: PressA under Reset.PressA
under Yes to confirm.
Note: The values displayed by Call Timers should
not be used for billing. Call timers are
estimates only.
77
Page 86

Advanced Calling Features
Using Your Phone as a Modem
To use your phone as a modem with a laptop,
handheld device, or desktop computer:
1 Open the connectorcover.
connector
cover
78
2 With thephone’s display facing up, insert a data
cable’s connector into the accessory connector,
untilyou hear aclick
.
3 Insertthe dataplugintothe COM port of the other
device.
Whenused as amodem, your phone hasthesedata
transfer modes:
• Circuit data — usedf or sending and receiving
faxes and for transferring large files
• Packetdata — usedfor small file transfers such
as email
Page 87

Making TTY Calls
To use these services, you must install the iDEN
Wireless Data Services software (available
separately) and subscribe to a Nextel Wireless Web
access plan.
computer and your i205 phone for packet and circuit
data call s, refer to the Nextel Online
on www.nextel.com.
For more information on setting
®
User's Guide
up your
Making TTY Calls
To use yourphoneto make phone calls using a
teletypewriter (TTY) device:
1 Connectone end of a2.5mmcableinto the audio
jackon your phone. Connect the other end oft he
cabletoyourTTYdevice.
2 Make sure that your phone’s TTY feature is on
and select the T TY mode you want touse.
3 Use your phone to enter phone numbers and
make calls.
When you make a TTY call, these icons appear on
the phone’s display:
N Phone call is active.
O Phone call is onhold.
TTY device features such as Turbo-Code,
High-Speed, and Interruptionare not supportedby
your phone. These features must beturnedoff or
disabled to use your TTY device with your phone.
Turning On the TTY Feature
Your phone’s TTY feature must be on if you want to
make TTY calls, set theTTY mode, or changethe
TTY baud rate. To makesure the TTYfeature is on:
From the main menu, select Settings > Phone
Calls > TTY. This field must say On.
Choosing a Mode
Your phone supports these TTY modes:
• TTY — You type and read text onyour TTY
device.
•VCO(Voice-Carry-Over) — You speak into your
phone and read text replies on your TTY device.
• HCO (Hearing-Carry-Over) — You type text on
your TTY device and listen to voice replies on
your phone speaker.
To change mode while not ina call:
1 From the main menu, select Settings> Phone
Calls > TTY> Type.
2 Press A under Change.
3 Scroll to the TTY mode you want.
4 Press A under Select.
When you make a TTY call, the callbegins inthe
TTY mode youlast selected.
79
Page 88

Advanced Calling Features
To change mode during a call using your phone:
1 Press m.
2 Select TTY > Type.
3 Selectthemodeyouwant.
To change mode during a callusing your TTY
device, issue one of the following commands:
• “VCO please” — to select VCO mode
• “HCO please” — to select HCO mode
• “HCO off please” — to turn off HCO mode
Important: When youare usingHCO, thesound
coming fromyour phone speaker may be
uncomfortably loud. Use cautionwhen
putting the phone to your ear.(For
information on setting the volume of
your phone speaker, see “Setting the
Volume” on page 83.)
Changing the TTY Baud Rate
By default,your phone’s TTY baud rate isset to
45.45, the baud rate required forTTY calls within the
U.S. To makecalls outside the U.S., set your TTY
baud rate to 50.0.
To change the TTYbaud rate:
1 From the main menu, select Settings > Phone
Calls>TTY>Baud.
80
2 Press A under Change
3 Scrolltothebaudrateforyourlocation.
4 Press A under Select.
Special Dialing Codes
Non-Emergency Numbers
Nextelsupports many “non-emergency” numbers
(such as #77, 311,...) provided by local and state
governments. These numbers are used to report
non-emergency incidents.If the situationincludes
imminent danger or loss of life, you should dial 911.
Telecommunications Relay S ervice
Nextelsupports services for communicating with
speech and/or hearing impaired individuals. Youcan
dial711 to reach a localTelecommunications Relay
Center. You will then be connectedto your
destinationnumber.Relay service works through a
Communications Assistant who reads messages
typedinto a TDD/TTYdeviceby a speechor hearing
impaired individual to you. The Communications
Assistant then types your spoken messages to the
hearing or speech impaired individual.
Telecommunications Relay Service is available 24
hours a day, seven days a week, and every call is
strictly confidential.
Page 89

Additional Phone Features
Note: Using 711 to reach Telecommunications
RelayService may not be availablein all
areas.
Additiona l Phone Feat ures
Contact Nextel Customer Care to obtain these
services or for additional information:
Note: Some servicesare not availableoutsideof
the continental United States.
Caller ID
Your phone automatically displays the phone
numberor name (ifthe 10-digit phone number is
stored in your Contacts) of the person calling
(unless blocked by the caller), enabling you to
decide whetherto take the call or forward it to voice
mail.
Caller ID information is not available on all calls.
Per-Call Blocking
You can block delivery of your phone number to
otherCaller ID units fora single phone call:
Press *67beforedialing the call.
Your Nextel phone number cannot be blockedfrom
callsmadeto911,800,855,866,877,888,orother
toll-free phone numbers.
Per-Line Blocking
You can permanently block delivery of your phone
numberon every call you make.
To disable on a per-call basis:
Press *82before dialing the call.
Alternate Line Service
You can have two different phone numbers on the
same handset.W ith A lternateLine Service,you can:
• Set up differentbilling addresses for each phone
line.
• Use different ringer styles so thatyou can tell
whichlineisreceivingthecall.
• Forwardincomingcallstotheprimaryand
alternate line to different phone numbers.
T oset the active line:
1 From the main menu, select Settings> Phone
Calls > Set Line.
2 Selectthephonelineyouwanttobetheactive
line.
Whencallsmade to the linethat is not activeare set
to be forwarded to the active line, these calls are
sent to voice mail withoutringing.See “Call
Forwarding” on page 53.
81
Page 90

Advanced Calling Features
Call Restrictions
You can prevent your phone from making or
receiving long distance, incoming, and outgoing
(except911) calls.
Nextel 411
You can callNextel 411 within the continental United
Statesand Hawaii. Services include white and
yellow page listings, driving directions, restaurant
reservations, movie listingsand showtimes, and
local event information.
82
Page 91

Customizing Your Phone
Setting the Volume
To set the volume of thesound coming from the
phone’s earpiece orspeaker:
1 From the main menu, selectSettings > Volume.
2 Scroll to Earpieceto set the earpiece volume.
-orScroll to Speaker to set the speakervolume.
3 Press A under Change.
4 To selectthe volume:
Scrollleft orright.-or-
Pressthe volume controls.
5 Press A under Ok.
To set the volumeof the phone’sring:
Pressthe volume controls.
For another way to set the volume of the phone’s
ring,or the volume of many other sounds your
phone makes:
1 From the main menu, selectSettings > Volume.
2 Scrollto the option you want andmake the
change. Choose Line 1 or Line 2 to set the
volume of the phone’s ring when you get a call on
thatline.
See “Volume Features” on page 85.
Settin g Your Phone to Not Ring
To set your phone to make no sound when you
receive phone calls, Direct Connectcalls,Group
Connect calls, message notifications, andcall alerts,
see“SettingYourPhonetoVibrate”onpage57.
Tosetyourphonetovibrateinsteadofmakinga
sound when you receive Direct Connect calls and
GroupConnectcalls,even if you wantyour phoneto
ring for other features:
1 From the main menu, select Settings > DC/GC
Options > Alert Type.
Tip: If Alert Typ e does not appear:From the
main menu, select Ring Tones.Makesure
VibeAll is set to Off. Repeat step 1.
2 Press A under Change.
3 Scroll to Vibrate.
4 Press A under Select.
83
Page 92

Customizing Your Phone
Seeing the Display Better
To set thecontrast of the display:
1 From the main menu, select Settings >
Display/Info > Contrast.
2 Press A under Change.
3 Scroll left or right to set the contrast.
4 Press A under Ok.
Using a Headset
If you use a headset or similar device with your
phone, you can set your phone to send incoming
soundtotheheadsetonly,or to the headset and the
speaker at the same time:
1 From the main menu, select Settings >
Advanced > Headset/Spker.
2 Press A under Change.
3 Scroll to HdsetOnly to send incoming sound to
the headset only. -or-
Scroll to Hdset&Spkr to sendincoming sound to
the headset and thespeaker at thesame time.
4 Press A under Select.
84
Using Settings
Settings contains many submenusthat let you
customize your phone.
Display/Info Features
TheDisplay/Infomenucontrols how the keypadand
display appear:
• Backlight — controls how long thebacklight
stays on afteryou make or receive a call.
•Clock— controls whether the time and date
appearson the idle screen, sets the format of the
time and date, and sets the year.
•Contrast— sets the contrast on the display. See
“Seeing the Display Better” on page 84.
• Language — sets the language that your phone
displays.
Phone Calls Features
The Phone Calls menu controls how your phone
handles phone calls:
• Set Line — sets phone line 1 or phone line 2 as
theactivelineforoutgoingcalls.
• Any Key Ans — If this feature is on, you can
answer calls by pressing any keyon the keypad.
Page 93

Using Settings
•AutoRedial— setsyour phone to automatically
redialcalls youmake when the system is busy.
•CallWaiting— See “Call Waiting” on page 73.
• Auto Ans — sets your phone to automatically
answer an incoming call after a specified number
of rings. When this feature is on, the phone
answers by connecting you to the caller; it does
not send the call tovoicemail,unless you are out
of coverage or onthe line.
• Minute Beep — causes a beep to soundevery
minuteof an activecall.
•CallDuration— causes the duration of a call to
appear on the phones display when the call ends.
• TTY — lets you use your phone with a TTY
device. See “Making TTY Calls” on page 79.
• Notifications — See “Setting Notification
Options” on page 49.
DC/GC Options Fea tures
The DC/GC Options menu controls how your phone
handles Direct Connect calls and Group Connect
calls:
• Tkgrp Silent —controlswhether you hear Group
Connectcallsto your Talkgroup.See “Receiving
Group Connect Calls” on page 76.
•TkgrpArea— letsyou define your Talkgroup
area.
• One T ouchDC —See “Setting One Touch Direct
Connect” on page 75.
•AlertType— controls how your phone notifies
you when you receive Direct Connect callsand
GroupConnect calls. See page 83.
Volume Features
The Volume menu sets the volume of soundsyour
phone makes:
•Line1— sets ring volume for phone line 1.
•Line2— sets ring volume for phone line 2.
• Messages — sets the volume of message
notifications.
• Earpiece — sets thevolume of sound coming out
of the earpiece.
• Speaker — setsthe volume of soundcomingout
of the speaker.
•Keypad— sets the volume of soundassociated
with pressing keys and buttons.
•Data— setsthe volume of sounds that notifies
you that you are receiving a circuitdata call.
Security Fe atures
The Security menu lets you turn security features on
and off and change passwords:
85
Page 94

Customizing Your Phone
• PhoneLock — turnson a feature that locks your
phone,eitherimmediatelyor automaticallyaftera
set period of inactivity. An unlock code is required
to enable thisfeature,to unlock the phone, and to
set a newUnlockcode.ContactNextel Customer
Care for your default unlock code.
• Keypad Lock — locks the phone’s keypad, either
immediately or automatically after a set period of
inactivity. See “Locking the Keypad” on page15
for more information on lockingand unlockingthe
keypad.
•SIMPIN— enables and disables your phone’s
SIM PIN security feature. See “Turning the PIN
Requirement On and Off” on page 13.
• GPS PIN — enables and disables your phone’s
GPS PIN security feature. See “Setting the GPS
PIN Security Feature” on page 66.
• Change Passwords — changes your phone
unlockcode, securitycode,SIM PIN, and GPS
PIN.
Advanced Features
The Advanced menu contains advancedand rarely
used Settings features.
• Alert Timeout — controlsthe amount of timea
tone continues to sound when you receive a
message notification or call alert.
86
• Headset/Spker — See “Using a Headset” on
page 84.
• Connectivity — Network ID sets the phone’s
network IDs and their roaming options under the
directionof Nextel CustomerCare; Master Reset
lets Nextel Customer Care r eset your service in
the event of a security or provisioning problem.
• ResetDefaults — Reset Settings returns all
settings to theiroriginal defaults; Reset All
returns all settings to their original defaults and
erasesall stored lists. Use only under t he
direction of Nextel Customer Care.
•ReturntoHome— controls how long the recent
callslist displaysaftercalls.
• Phone Only — preventsyour phone from making
or receiving Direct Connect calls or Group
Connect calls.
•BaudRate— setsthe baud rate atwhich your
phonecommunicateswith a laptopcomputer, PC,
or similar device.
Optional Features
Speakerphone, VoiceRecord, and Voice-Activated
Dialing can bedownloaded for anadditional fee on
www.nextel.com/idenupdate.
Page 95

Changing the Phone Covers
Changing the Pho ne Covers
To remove the phone covers:
1 Removethe back phone cover as described in
“RemovingtheBackPhoneCover”onpage2.
2 To loosen the front phone cover, gently lift the top
tabs and pull the phone cover away from the
phone slightly.
tabs
3 To loosen the front phone cover further, gently
pull the sides outward at the side tabs.
tabtab
4 Carefully pull the front phone cover away from
your phone.
87
Page 96

Customizing Your Phone
To replace the phone covers or put on new phone
covers:
1 Place thekeypad insidethe front phone cover.
Press the keypad into the front phone cover until
all the keys are in place.
2 Line up the bottom of the front phone cover with
the bottom of your phone. Tabs in the corners of
thefrontphone cover fit into slotsin the cornersof
your phone.
3 Place the front phone cover on your phone and
press it gently until you hear a click. If the bottom
is lined up, thetop tabs snap into place easily.
4 Replace the back phone cover as described in
“InsertingtheBattery”onpage3.
To order new phone covers, log on to
www.nextel.com.
88
Page 97

Nextel Customer Care
There are anumberof featuresavailable with your
Nextel service and your new i205 phone, so you
may be overwhlemed at first. Relax! Nextel
CustomerCare ishere to help. If the feature
information and instructions in this guide don't
answerall your questions, or if you wouldlike to
inquireabout other Nextel products and services,
please feel free t o contact us.
Please take a few steps to gather information about
your phone prior to contacting us. This will better
able us toprovideyou with the highestlevel of
service possible. Please have the following
information available to give to the representative
who answers your inquiry.
• Your Personal Telephone Number (PTN).
• Your phone's model number ( located underneath
the battery).
• The ID numbers printed on your SIM card.
You'll want to keep this information handy so that
you can replace the battery and power up your
phoneshould the representativeneedyouto access
otherinformation on it during your call.
Domestic Customer Care
Visit www.nextel.com for avariety of Customer Care
services:
• Browse for information on phones, coverage,
ratesand other Nextel services.View and
download user's guides, try out our interactive
virtual product and service demos, find answers
to frequently asked questions, order accessories,
locate service and repair centers, upgrade phone
software, send a message and more.
• For self-serviceon your Nextel account, click on
My Account to view your account, pay your bill,
add phones to your account, reset your V oice
Mail password services and more.
• For online assistance, click on Contact Us to
sendus an emailrequest. Our representatives
are committed to assisting you. Every effort will
be made toaddress your questions or concerns
within 24 hours. Contact us to add Wireless Web
and other services, change rate plans, inquire on
your bill and more.
Or, call us at 1-800-639-6111 or dial611 from your
Nextel phone.
89
Page 98

Nextel Customer Care
Nextel Worldwide Customer Care
When traveling outside of the U.S. and Canada, call
+1 (360) 662-5202 for yourCustomer Care service
needs. This customer care number is toll-free from
your Nextelhandset.
International coverage rates and other information
are also available on www.nextel.com.
90
Page 99

Understanding Status Messages
You may receive status messages under certain
conditions. Before contactingNextel Customer
Care, note the message, numeric code, and the
conditions under which it appeared. The following
table lists and describes the status messages.
Status Messages Message Description
Number Not in
Service
User NotAvailable
User Not
Authorized
Please Try Later
User Busy in Direct
Connect call
User Busy in Data
The number that you entered is not
valid.
The phone that you called iseither
busy, out of coverage, or turned off.
Please try again later.
The person that you called has not
purchased this service.
This service is temporarily not
available. Please try again later.
The phone that you called isbusy in
a Direct Connect call.
The phone that you called isbusy
using Nextel Wireless Web services.
Status Messages Message Description
Service Restricted
Service Not
Available
System Busy
Service Conflict
Please Try Again
Self Check Error +
Number Code
Self Check Fail +
Number Code
PIN Blocked
Call Your Provider
This service was restricted by
Nextel, or this service wasnot
purchased.
Youare eitherout of coverage or
having problems with provisioning.
The system i sexperiencing heavy
traffic. Please try again later.
This service cannot be enabled
because an incompatible service
has already been turned on.
An error occurred. Please try again.
A fault was detected with your
phone. If this error recurs, note the
error code and contact Customer
Care.
An operational fault was detected
with your phone. Note the numeric
code, turn y ourphone of f, and
contact Customer Care.
The incorrect PIN was enteredthree
consecutive times. You will be
unable to place or receive calls on
your phone. Contact Nextel
Customer Care to have them obtain
the PINUnblocking Key (PUK)
code.
91
Page 100

Understanding Status Messages
Status Messages Message Description
Insert SIM
Check SIM Card
Wrong PIN
Please Enter
Special Code
EnterSIM PIN
Enter Unlock Code
New Browser
Message Memory
Full!
Scanning for
Satellites
Unable to Locate
Sats
92
YourSIM card is notbeing detected.
Please checkto ensurethat you
haveinsertedtheSIMcard correctly
into your phone.
Please check your SIM card to
make sure it has been inserted
properly.
You have entered an incorrect PIN
number.
You have inserted a SIM card that
will not work with a Nextel phone.
Contact Customer Care if you
believe this is a valid SIMcard.
Please enter your 4- to 8- digit SIM
PIN code.
Auto Phone Lock is activated. Enter
you unlock code.
Warns of low memory for Net Alerts.
Searching for GPS satellites.
Could not find GPS satellites.
Status Messages Message Description
For Update Visit:
Technical Error
Directs you to update GPS satellite
almanac data.
A problem occurred in your phone’s
GPS circuitry. If this error occurs,
contact Customer Care
 Loading...