

Page 1

Nextel
®
Digital Multi-Service Phone
i2000TM Phone User’s Guide
@NTN9110A@
NTN9110A
iDEN
®
Page 2
i2000TM Phone Features Bookmark
You can use this fold-out diagram as a bookmark, making it easy to refer to
while you learn to use your i2000 phone.
Learning
1
2
3
4
5
to Use Your i2000 Phone
Tear off the Quick Reference Card locate d on the back cover, complete
the information and keep it handy.
Read Safety and General Information.
Familiarize yourself with the Table of Contents.
Read Getting Started, which includes a Quick Guide to i2000 Phone
Functions.
View the i2000 Phone Video included in the box.
NOTE: Remove the plastic film lens protector from the display.
Page 3

Table of Contents
i2000TM Phone Features Bookmark................................................... 2
Learning t o Use Your i2000 Phone .............................................2
Table of Contents ......................................................................i
Introduction ................................... ...... ....... ...... ....... ...... ....... ..... 5
Welcome to Nextel®.......................................................................... 5
Questions? ..................................................................................7
Nextel Business Solutions.................................................................. 8
International Business Solutions ... .................................. ...... ..... ..9
Getting Started ........................................................................11
Getting Started................................ ..... ...... .................................. .... 11
About This Section ....................................................................11
Batteries........................................................................................... 11
Attaching the Battery .................................................................12
Detaching the Battery ..................................................... ...........12
Charging the Battery ..................................................................12
Turning Your i2000 Phone On/Off ................................................... 13
Your Phone’s SIM Card................................................................... 14
........................SIM Card Personal Identification Number (PIN) 14
Entering the PIN.................................................................... 14
Keypad Lock.................................................................................... 18
Activating Your i2000 Phone............................................................ 20
Your Nextel Phone Status................................................................ 21
Display Icons.................................................................................... 22
Modes and Menus ........................................................................... 23
Quick Guide to i2000 Phone Functions............................................ 24
Phone Mode .............................................................................24
Private Mode* .......................................................... ...... ...... .....25
Group Mode* ..................................... .................................. .....25
Creating, Editing and Using Stored Lists ............................. 26
Creating, Editing and Using Stored Lists......................................... 26
About This Section ....................................................................26
Storing Names and Numbers........................................................... 26
Pause Digit Entry .......................................................................28
Editing Stored List Entries................................................................ 29
Editing a Private ID or Associated Name ...................................29
Erasing List Entries ....................................................................30
i
Page 4

Phone Mode ........... ....... ...... ...... .............................................. 31
Phone Calls...................................................................................... 31
About This Section ....................................................................31
Programming Your Own Phone Number ...................................31
Displaying Your Phone Number............................................ 32
Making Phone Calls ...................................................................32
Making Calls From the Stored List........................................ 33
Emergency/Non-Emergency Dial......................... ..... ............ 34
Placing International Calls With Plus Dialing .............................34
Plus Dialing........................................................................... 35
Using Hands-Free Speakerpho ne ............................................ .35
Receiving/Ending a Phone Call .................................................36
Missed Call Indicator .................................................................36
Retrieving Missed Calls......................................................... 36
Last 10 Numbers Received/Sent Call List .................................37
Quickstore of Phone Numbers ...................................................37
Reviewing/Storing Received Calls ....................................... 37
Reviewing/Storing Sent Calls................................................ 37
Nextel Voice Mail Service................................................................ 38
About This Section ....................................................................38
Voice Mail Features: Basic .......................................................38
Setting Up Your Voice Mailbox from Within the U.S............. 39
New Message Indicators....................................................... 39
About Voice Mail Menus....................................................... 40
Logging Into Voice Mail......................................................... 40
Listening Options.................................................................. 41
Listening Options (Quick Reference List).............................. 42
Listening to New Messages While Overseas........................ 43
Saving/Deleting Messages.................................................... 43
Choosing Order to Play Unheard Messages......................... 44
Customizing Your Voice Mail Setup ..........................................44
Changing Your Password..................................................... 44
Recording Your Name........................................................... 45
Recording Your Active Greeting............................................ 45
Automatic Playback .............................................................. 46
Voice Mail Features: Advanced ................................................47
Recording and Sending A Message...................................... 47
Special Delivery Options....................................................... 48
.............................................................................................. 48
Greetings Schedule ............................................. ..... ...... ...... 49
Working With Group Lists ..................................................... 50
Message Forwarding............................................................. 52
Time and Date Charts........................................................... 53
www.nextel.com
ii
Page 5

Table of Contents
Pager Notification.................................................................. 53
Additional Phone Services............................................................... 55
About This Section ....................................................................55
Call Waiting ...............................................................................55
Call Hold ....................................................................................56
Three-Way Calling .....................................................................57
Call Forwarding ..........................................................................57
Transferring Calls to Voice Mail .................................................58
Caller ID .....................................................................................58
Alternate Line Service (not available on GSM) ..........................59
Text and Numeric Paging................................................................. 62
About This Section ....................................................................62
Text and Numeric Paging Features ...........................................62
Notification of New Pages ..........................................................63
Accessing New Pages ...............................................................63
................................................................................................... 63
Auto Call Back .............. ..... ...... ..... ...... ...... .................................64
Sending a Page .........................................................................64
Web Paging .......................................................................... 64
E-Mail Paging........................................................................ 65
Numeric Paging .................................................................... 65
Operator Assisted Paging*.................................................... 65
Nextel WorldwideSM Service ...................................................66
Nextel Worldwide Service................................................................ 66
About This Section ....................................................................66
Setting the Way Your Phone Searches for Networks ................66
Manually Searching for a Network ............................................67
Creating Your Phone’s Network Priority List ..............................68
Private/Group Mode ............................................................... 73
Nextel Direct Connect® ................................................................... 73
Displaying Your Private ID .........................................................74
Using the Private/Group Speaker ..............................................74
Placing Private Calls ..................................................................74
Receiving Private Calls ..............................................................75
Quickstore of Private IDs .......................... ..... ...... ..... ...... ...........75
Sending a Call Alert ...................................................................76
Receiving/Responding to a Call Alert ........................................76
Call Alert Queuing .....................................................................77
Group Calls ........................................................................... .....77
................................................................................................... 78
Group-Silent Programming ................................................... 79
iii
Page 6

Customizing the i2000 Phone ................................................80
Customizing the i2000...................................................................... 80
About This Section ....................................................................80
Changing the Display Language...................................................... 80
Setting the Time and Date Format................................................... 81
Setting the Ringer Volume............................................................... 83
Setting VibraCall™........................................................................... 84
Programming Menus........................................................................ 86
Programming Menus Shortcut and Options ...............................86
Ordering Information........................................................................ 90
Accessories ................... ..........................................................91
Accessories...................................................................................... 91
About This Section ....................................................................91
Other Important Information ..................................................98
About This Section ....................................................................98
Nextel Customer Care...................................................................... 98
Understanding Status Messages..................................................... 98
Nextel Terms and Conditions of Service........................................ 100
Safety and General Information..................................................... 103
Warranty Information...................................... ...... ..... ...... ............... 110
Patent and Trademark Information................................................ 116
Index............................................................................................... cxv
Index ............................... ................................ ........................cxv
www.nextel.com
iv
Page 7

Introduction
Welcome to Nextel
Thank you for choosing Nextel as your wireless communi cations provider. The
i2000 phone is one of the most sophis ticated digital cellular instruments
available today--offering you worldwide services so you can keep in touch with
business and personal contacts.
When using your i2000 phone, you’ll enjoy crystal clear connections through
two state-of-the-art services. Whether you are in the U.S. or travelling abroad,
Nextel WorldwideSM Service provides cellular communicati on while in the U.S.,
Canada, Mexico, South America and Asia as well as Europe, Africa and the
Middle East. For up-to-date inform ation on Nextel Worldwide Servic e coverage
see www.nextel.com.
In addition to top-notch communication service, the i2000 phone includes
remarkable features such as a Sub sc ribe r Ide n tity Mod u le (SIM) c ard tha t ho ld s
all of your personal information, including a Personal Identification Number
(PIN) for added security. It also holds your stored lists of names and phone
numbers. Just as you protect your credit and bank cards with a PIN, you can
safeguard your ph one with a PIN to prohibi t unauthorized use.
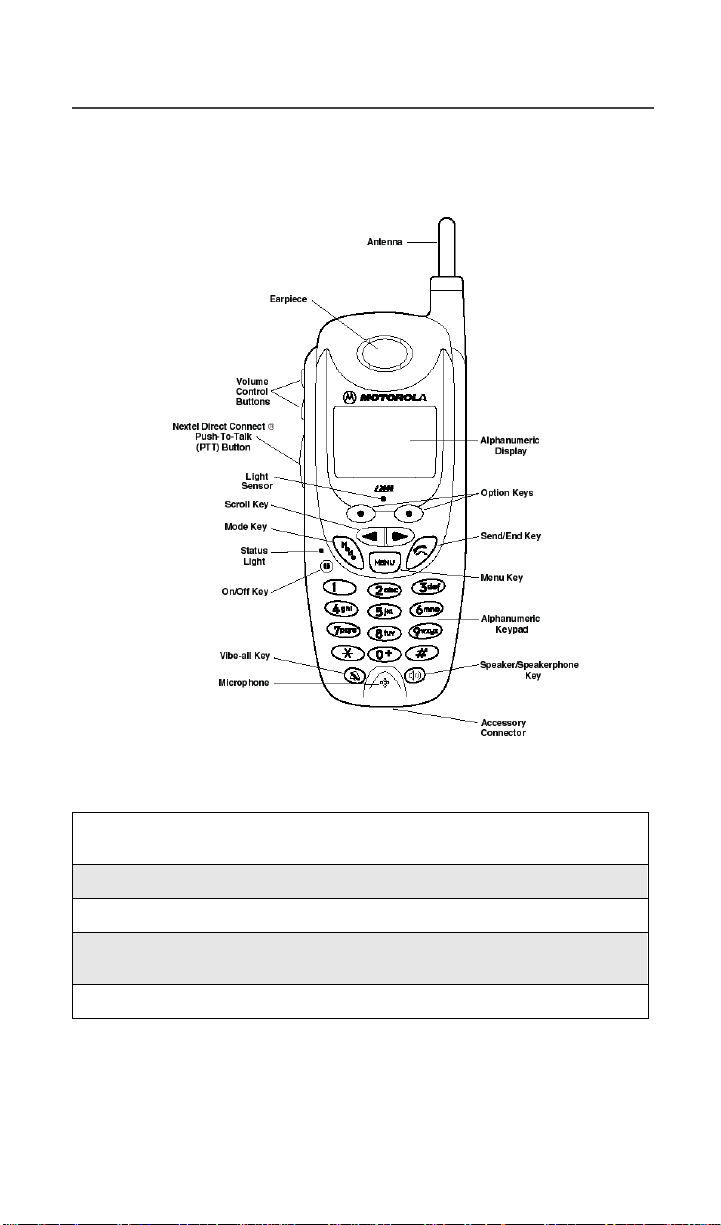
Lastly, before you get started, please refer to the “i2000 Phone Features
Bookmark” attached to the front cover o f thi s guide. Yo u can us e this boo kmark
as a placeholder. It has a picture of th e i2000 phone with all of the co mponents
clearly labeled. Also, the back of this guide includes a topic Index to help you
look up specific information in this guid e.
This guide contains all the information you need to take full advan tage of your
Nextel Worldwide Service, including:
Quick Guide to i2000 Phone Functions -- Enables
experienced cellular phone and two-way radio users to
get started right away!
®
Page 24
Digital Cellular Calling -- Nextel’s Guaranteed All-
Digital Network lets yo u enjoy a c rystal-cl ear connecti on,
with built-in call securit y, every time you place a phone
call. Find out more about placing calls in this section.
Voice Mail -- Takes messages 24-hours a day and
includes other features such as Schedule a Page, which
you can use to remind your self about upcoming
appointments and dates up to six months away. Read
more about these features in this section.
Page 31
Page 38
5
Page 8

Additional Phone Services* -- Includes Call
Forwarding, Call Waiting, Alternate Line Service and
Three-Way Calling, which lets you conduct conference
calls whether you’re in the office or out on travel. Find
out more in this section.
*These features may not be available on GSM networks.
Text and Numeric Paging -- Lets you receive important
text and numeric pages right over the phone. Learn more
about Paging in this section.
Nextel WorldwideSM Service -- When you travel
overseas, the phone will aut omatically search for iDEN
and GSM network coverage to broaden your
communication possibilities around the world. Learn
more about this valuable service in this section.
®
Nextel Direct Connect
-- An innovative feature for
communicating instantly with one or more co-workers at
a fraction of the cost of cellular calls. Read more about
Nextel Direct Connect in this section.
Programming -- At Nextel, we know one size doesn’t fit
all—and this feature proves it! You can customize your
i2000 phone and make it behave the way you want it to.
Learn how in this section.
Other Nextel Advantages -- In addition to all of the
previously mentioned ben efi ts, ther e’s more... Nexte l
features also include the follo wing:
Page 56
Page 63
Page 68
Page 75
Page 82
• The guaranteed all-digital Nextel National
Network
• No Roaming Fees while traveling throughout the
U.S.
• One-second call rounding after the fi rst minute
• Flat-rate long distance pricing to anywhere in the
continental U.S.
• No landline conne ct i on ch arges
NOTE:Are you an experienced digital phone a nd two-way radio user?
Turn to the Getting Started section beginning on Page 11. This
section might be all you need to get started.
For more information about Nextel or to vi ew this guide on our web site, visit us at www.nextel.com.
www.nextel.com
6
Page 9

Welcome to Nextel®
Questions?
To complement the i2000 phone and Nextel Worldwide Service, Nextel has also
launched International Roaming Customer Care support. For specific
International roaming questions (such as coverage and rates) and Customer Care
Service when travel ing overseas call 1(201) 531-5202. This Cust omer Care
number will be toll-free from your Nextel handset both domestically and
internationally.
International and Domestic Coverage, Rates and other information is also
available at www.nextel.com.
For domestic customer care issues including billing issues, general service
needs, or to order additional services, cal l Nextel Customer Care at 1-800-6396111, or dial 611 from your i2000 phone.
7
Page 10

Nextel Business Solutions
The i2000 phone, N extel’s Guar anteed All-Digital National Network and Nextel
Worldwide Service join forces to provide the only office small enough to fit in
your pocket. Below is a list of innovative solutions that will help you get the
most out of your Nextel phone and service!
Ever wish you could take your assis t ant wi th yo u? T he i 20 00 ph on e has
the right business solutions for you.
Personalized 24-hour Voice Mail, which takes messages when you’re
not available and a whole l ot more. (For details see “Nextel Voice Mail
Service” on page 38.) And, Schedule a Page, which can help you
remember those important dates by sending a text message directly to
your phone (see“Web Paging” on page 6 5 ).
Need an extra pair of hands to help juggle your hectic work load?
The i2000 phone doe s n’t come with a pair of hands; but it does include the
hands-free speakerphone feature! You can place a call and set the phone
down--while you hold a conversation or conference call--and use your
hands for more impor tant things like signin g paperw ork, co mposing e -mail,
etc. (For details see “Using Hands-Free Speakerphone” on page 35.)
Ever head for a meeting and forget the company’s address?
Have your assist ant send a tex t page t o your i2000 phone. That ’s right,
you can receive text and numeric p ages right t o your i2000 phon e. (Fo r
details see “Text and Numeric Paging” on page 63.)
Need to remind everyone on the committee you chair about an upcoming meeting?
Create a Group List for any committee, project task force, etc. Then,
create a voice message and send it to everyone in the group! It’s just that
simple with the i2000 phone. (For details see “Creating Gr ou p Lists” on
page 51.)
Holding conference calls has never been easier. Your i2000 phone includes 3-way calling.
With 3-way call ing, you can conduct a conference call with clie nts or
co-workers whether you’re in the office or on the go! (For details see
“Three-Way Calling” on page 58.)
Need to monitor phone call length for charging purposes?
You can with the i2000 phone, just tu rn on the Disp lay Timer and the
duration of the most recent phone call will display. (For details see
“Display Timer: On/Off” on page 89.)
Responsible for keeping in touch with building maintenance workers or p r oject team members?
You can use your i2000 p hone as a two-wa y radio for a fractio n of t he
cost of cellular calls. (For details see “Nextel Direct Connect®” on page
75.)
www.nextel.com
8
Page 11

Welcome to Nextel®
International Business Solutions
With the i2000 phone you can continue to conduct business --even when you
travel overseas! Below is a list of solut ions th at will help y ou ge t the most ou t of
your phone and Next el service while traveling internatio nally.
Does your job require traveling abroad?
The i2000 phone with Nextel Worldwide Service allows you to increase your
communication opp ortunities outside of the U.S., in places like Mexico, Asia,
and Europe to name a few! Placing and receiving international calls has never
been easier. Callers have one number to reach you at no matter where you travel
on the Nextel National Network and Next el Worldwide Servic e. In addition , the
i2000 phone’s int erna tio nal d ia lin g fu nctio n mak es stay ing in to uc h si mple . S ee
“Placing International Calls With Plus Dialing” on page 34.
After a long bus ines s trip out of the c ount ry, d o you d rea d yo ur re turn --kno win g
that dozens of new messages are waiting for you?
The i2000 phone lets you retrieve your vo ice messages while you’re
traveling overseas--so return ing hom e doesn ’t become an overwhelming
event! See “Listening to New Messages While Overseas” on page 43
for more information.
With all of the other details to remember when traveling abroad, wouldn’t it be
nice to have reminders prompt you about important dates?
Well you’ve got it! Wi th the i20 00 phone you ca n have te xt pages se nt
directly to your phone at set dates and times with “Schedule a Page”.
See “Web Paging” on page 65.
9
Page 12

10
www.nextel.com
Page 13

Getting S tarted
Getting Started
In this section, you will learn everything you need to know to beg in using your
i2000 phone. This secti on also includes a Quick Guide po rtion so experienced
digital phone and two-way radio users can get started right away.
About This Section
This section includes instructions for the following tasks:
Batteries: Attaching, Detaching and Charging Page 11
Turning Your i2000 Phone On/Off Page 13
Your Phone’s SIM Card Page 14
Activating Your i2000 Phone
NOTE: Your phone must be activated before you
can place or receive a call.
Your Nextel Phone Status Page 21
Modes and Menus Page 23
Quick Guide to i2000 Phone Functions Page 24
Page 20
Batteries
Your i2000 phone comes with a standard Motorola iDEN Lithium Ion battery
and a Motorola iDEN ap pro ved Lithium Ion battery c h ar ger. After attaching the
battery, charge it (while the phone is off) for at least three hours before you use
it for the first time. After the initial charging, the battery can be charged more
quickly.
Remove the battery from the protective case provided in the original packaging.
When the battery is not attached to the phone store it in this case.
11
Page 14
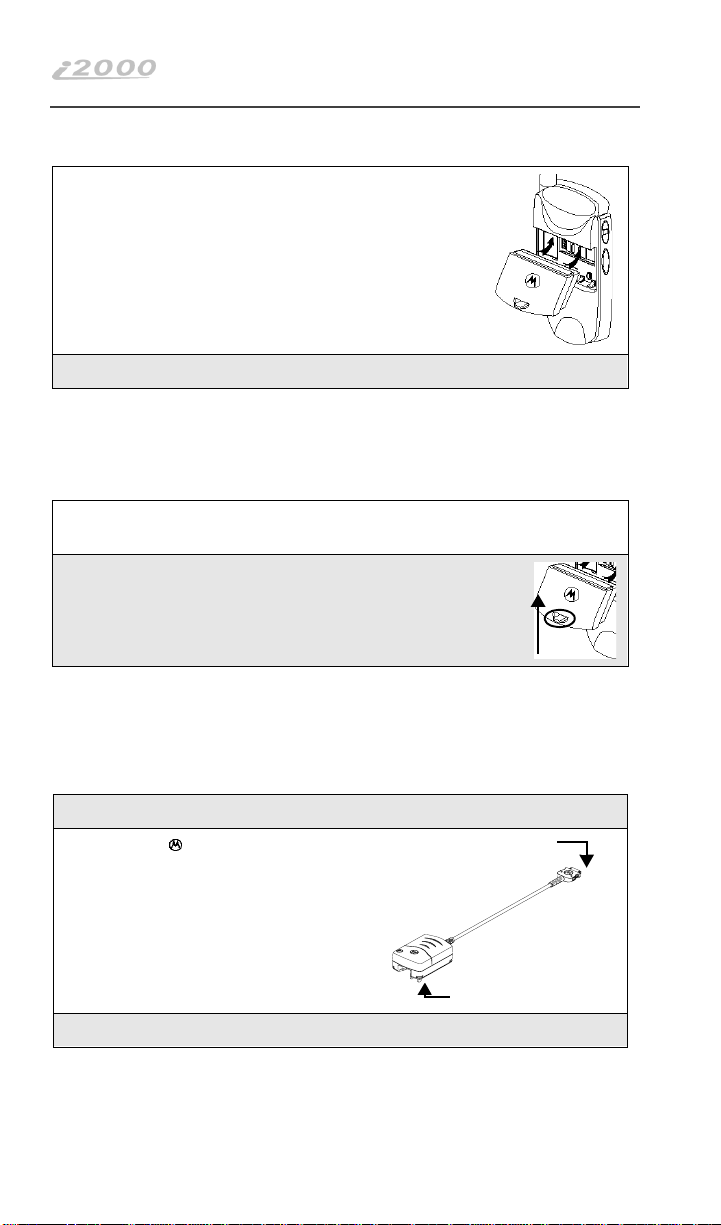
Attaching the Battery
1
Insert the top of the battery into the top of the battery
area (located on the back of the phone) as shown in
the picture.
2
Press down on the bottom of the battery until you hear a click.
NOTE: The battery can be charged with the i2000 phone either turned
on or off. For best results, charge it with the phone turned off.
Detaching the Battery
1
If the phone is turned on, press f until the message Powering Off displays.
2
Press the latch on the battery cover upward and pull the battery outward and away from the phon e.
Push
Upward
Charging the Battery
NOTE: Before you use the battery for the first time, charge it for at least
three hours. After the initial charging, the battery can be
charged more quickly.
1
Make sure your i2000 phone i s facing you.
2
With the logo on the accessory
connector facing y ou, plug the
accessory connector into the bottom
of the i2000 phone.
3
Flip open the prongs and plug the charger into an AC outlet.
www.nextel.com
Accessory Connecto r
(Connect to i2000 phone)
Charger
(Plug into AC outlet)
12
Page 15
Getting Started
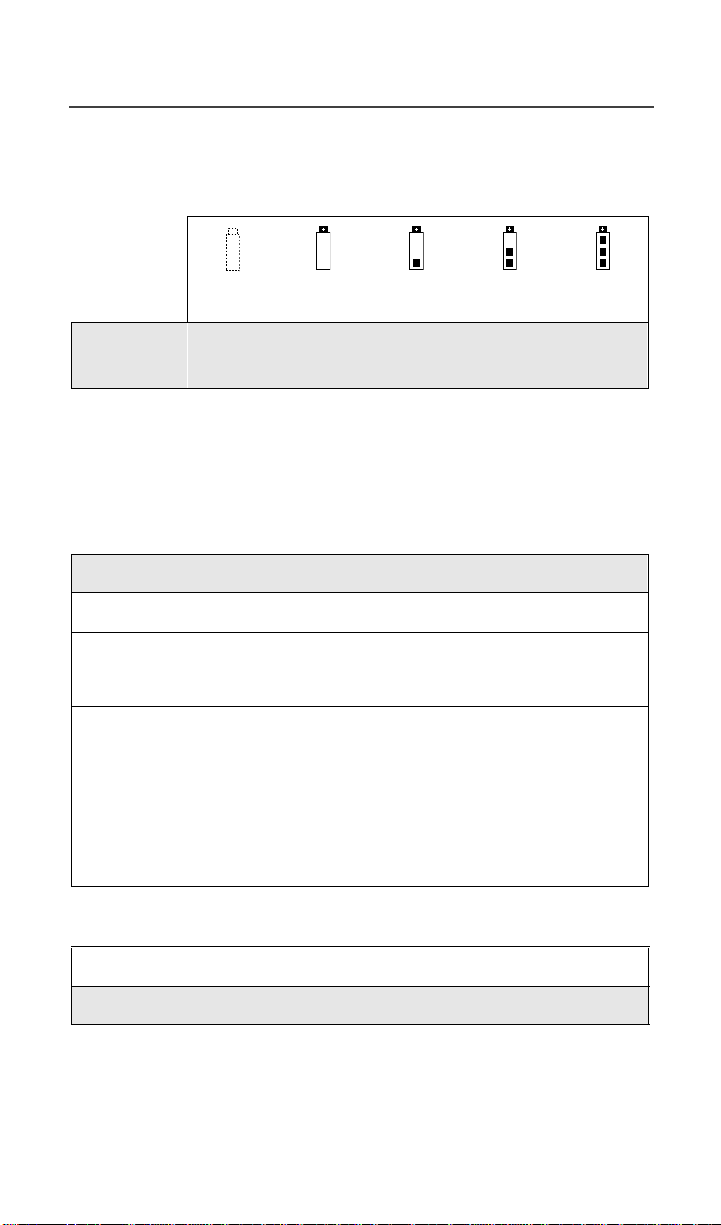
Battery Charging Status
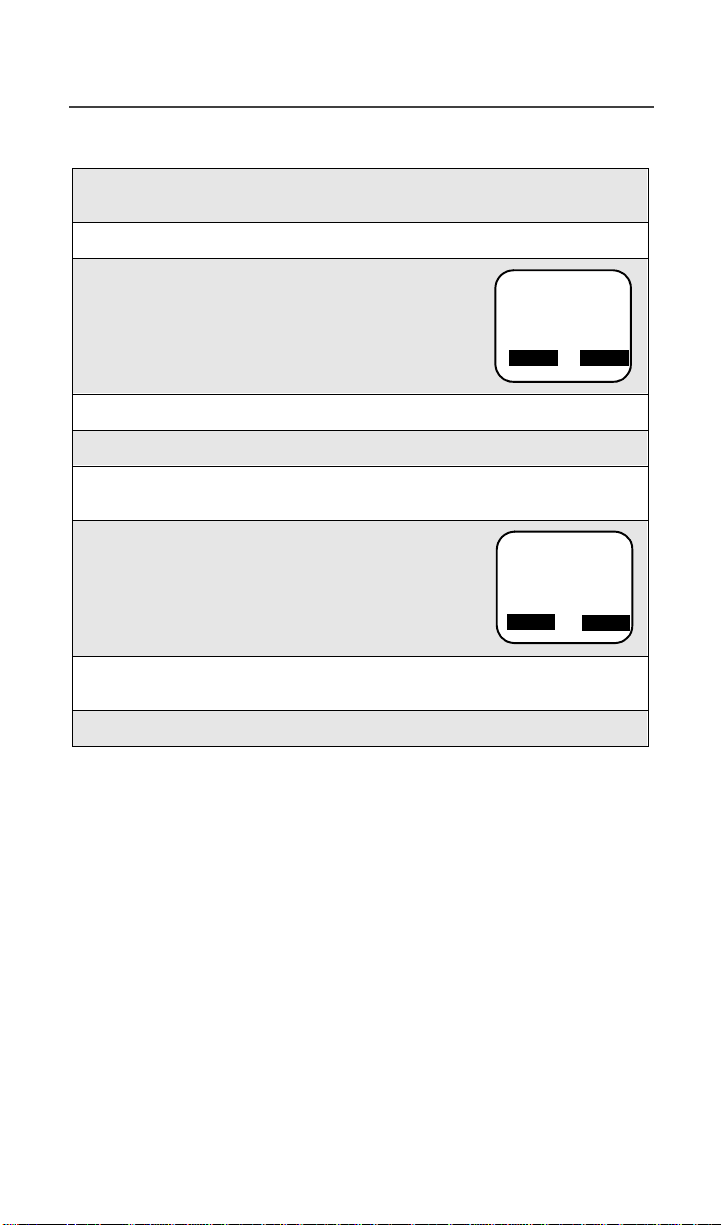
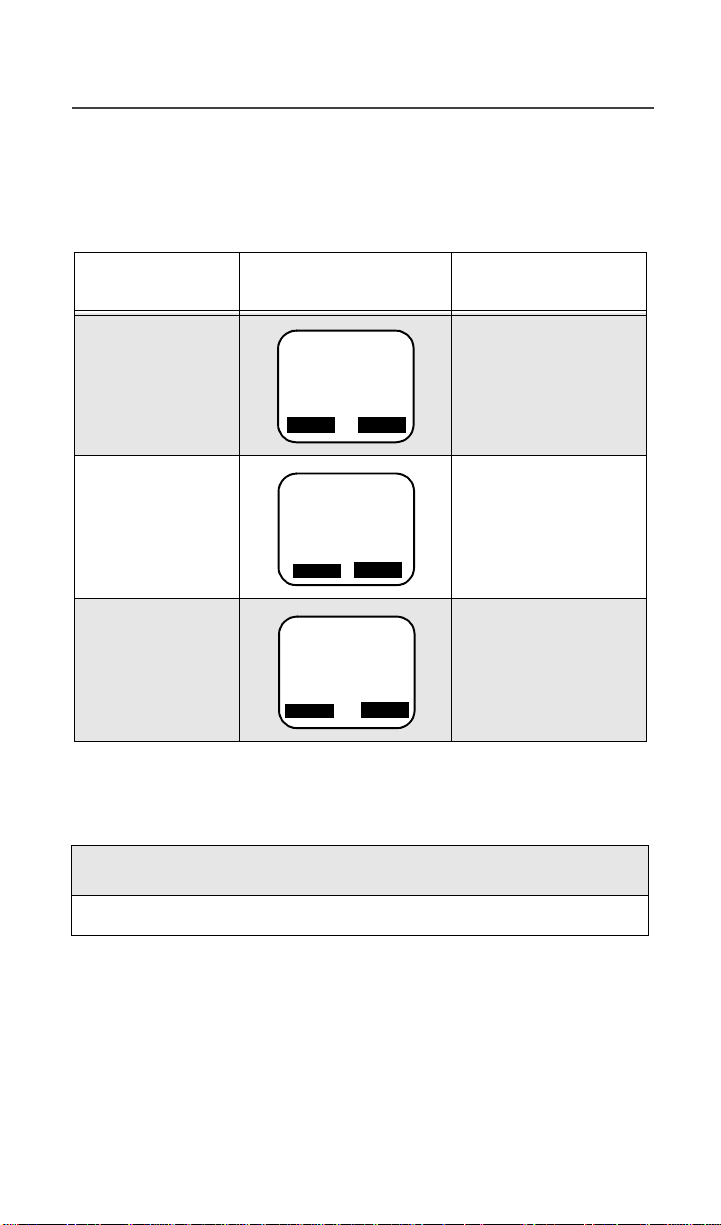
The battery str ength indicator i c on, found on your phone’s display screen,
shows the charge amount remaining in the battery.
Charge Strength
Icon
Flashes
Low Battery
Icon
Displays
0-30% 31-60% 61-90% 91-100%
Icon
Displays
Icon
Displays
Icon
Displays
Fully Charged
A short, chirp-like sound indicates a low battery. The icon flashes when you
have 5 minutes of talk time remaining.
Turning Your i2000 Phone On/Off
Phone On
1
Extend the antenna.
2
Press and hold f until the status light glows red.
3
When the Enter SIM PIN screen displays, enter your SIM PIN. (For
more information see “SIM Card Personal Identification Number
(PIN)” on page 14.)
4
Press o under “Ok”.
As your phone connects to the Nextel National Network, you will see a
Welcome to Nextel message and a connecting message. When Phone
Ready appears on the display, you are ready to use your i2000 phone!
NOTE: When you are in the GSM service area, line 2 of the Phone
Ready screen displays the name of the network providing
GSM service; line 3 displays Nextel.
Phone Off
1
Press and hold f until you see the message Powering Off.
2
Push in the antenna.
13
Page 16
Your Phone’s SIM Card
Your i2000 phone comes with a SIM (Subscriber Identity Module) card loc at ed
in the “SIM Card Holder” on the back of the phone behind the battery. You can
verify that the SIM card is in place by viewing the numbers on the SIM card
through the SIM card holder.
NOTE: If there is no SIM card present, notify your Nextel Authorized
Representative immediately.
The SIM card maintains a ll of the st ored n ames, numb ers, and th e PIN you enter
into your i2000 phone. Your SIM card must be in place to make or receive calls.
This section contains everything you need to know about your SIM card.
However, to quickly begin using your phone you can refe r to “SIM Card
Personal Ident if ication Number (PIN )” on page 14 and “Entering the PIN” on
page 14. Then, proceed to “Attaching the Battery” on page 12 and read the
remaining information at a later time.
SIM Card Personal Identification Number (PIN)
To prevent unauthorized use of your phone, your SIM is protected by a PIN.
Each time the i2000 phone is turned on, a PIN must be entered. You can later
change or disable your PIN if desired.
NOTE: Disabling your PIN enables anyone to use your phone. If you
disable your PIN, you still must keep the SIM card in the phone
to make calls.
Entering the PIN
By default your phone is automatically set to ask for a PIN.
NOTE: Your default SIM card PIN is: 0000. It is rec-
ommended that you change your PIN to
prevent fraudulent use of the SIM card (see
“Changing the PIN” on page 15).
1
From the Enter SIM PIN screen, immediately enter your PIN dig its.
As you enter your PIN, an asterisk appears for each character entered.
NOTE: You will not receive phone calls, etc. until you enter the PIN.
2
Press o under “Ok”.
If you enter an incorrect PIN, the message, Wrong PIN appears. After three
consecutive incorrect attempts, even if you turn your phone off and on again, the
SIM card blocks any additional tries. If this happens, see the following section
titled “Unblocking the PIN” on page 16.)
www.nextel.com
a b
Enter
Enter
SIM PIN
SIM PIN
****
****
Cancl
Ok
14
Page 17
Changing the PIN
1
From the Phone Ready screen, press n until you see the “Prgm” menu option.
2
Press o under “Prgm”.
3
Press 4 then 6.
4
Press o under “Ok”.
5
At the Change PIN? screen, press o under “Ok”.
6
At the Old PIN screen, enter your current PIN then press o under “Ok”.
7
At the New PIN screen, enter your new PIN then
press o under “Ok”.
Getting Started
a 1 b
46=Change
SIM PINs
Exit Ok
a 1 b
New PIN
****
Cancl
Ok
8
At the Repeat New PIN screen, enter yo ur new PIN again then press
o under “Ok”.
9
Press o under “Exit” to return to Phone Ready.
15
Page 18
Unblocking the PIN
If you forget your PIN and unsuccessfully ente r it three
times, access to your i2000 phone will be blocked. To
unblock the PIN:
1
Call International Roaming Customer Care at 1(201) 531-5202 or
a b
PIN Blocked
Call Your
Provider
Domestic Customer Care at 1(800) 639-6111 for your PIN Unblocking
Key (PUK) code.
2
Press any key to display th e PIN Unblocking K ey (PUK) screen. Make
sure no asterisks appear on the screen before you begin to enter the
PUK digits.
(To delete asterisk(s) press until asterisk(s) are deleted.)
3
Enter your PIN Unblocking Key (PUK). As you
enter it, the Enter PUK screen appears and an
asterisk ap p e ar s f o r each charac te r. Th is prevents
others from seeing your PUK. Immediately go to
the next step.
4
Press o under “Ok”.
5
At the New PIN screen, enter a new PIN (must be four to eight characters in length).
s
a b
Enter PUK
**_______
Cancl Ok
a b
New PIN
**_______
Cancl Ok
6
Press o under “Ok”.
7
At the Repeat New PIN screen, enter the new PIN again.
8
Press o under “Ok”.
NOTE: If you unsuccessfully enter the PUK number ten times, the SIM
card is blocked. If this happens, you will get a message to call
your service provider.
www.nextel.com
16
Page 19
Disabling the PIN Requirement
If you disable the PIN requirement, you
remove protectio n of pe rs on al data on your
SIM card. Anyone can then use your phone
and access your personal data.
1
From the Phone Ready screen, press n until you see the “Prgm” menu option.
2
Press o under “Prgm”.
3
Press 4 then 7. Th e 47=Require SIM
PIN:On screen displays, indicating that the PIN
requirement is set.
4
Press o under “Off”.
5
Enter your SIM PIN.
6
Press o under “Ok”.
Getting Started
a 1 b
47=Require
SIM PIN:On
Exit Off
7
Press o under “Exit”.
Enabling the PIN Requirement
1
From the Phone Ready screen, press n until you see the “Prgm” menu option.
2
Press o under “Prgm”.
3
Press 4 then 7. Th e 47=Require SIM
PIN:Off screen displays, indicating that the PIN
requirement is off.
4
Press o under “On”.
5
Enter your SIM PIN (Nextel provides the initial SIM Card PIN).
a 1 b
47=Require
SIM PIN:Of f
Exit On
17
Page 20

6
Press o under “Ok”.
7
Press o under “Exit”.
When the PIN is enabled, you are prompted to enter your
PIN each time you turn on your i2000 phone. Until a valid
PIN is entered, you can use the phone only to make
emergency calls depending on the network.
a b
Enter
SIM PIN
After the PIN is accepted, t he Ph one Ready screen displays.
Incorrectly entering your PIN three
times causes the phone to be blocked.
To unblock your phone, you must
contact Nextel Customer C are . For
more information, see “Unblocking
the PIN” on page 16.
Light Sensor
On your i2000 phone, when a key is pressed, the light sensor will activate the
backlight only when your p ho n e is in p oo r lig ht ing c ond itio ns. If illumination is
needed, even when the back light is disabled, you can manu ally override the
sensor by pressing and holding the n key. This will activate the backlight. If
the phone is in a charger, the backlight will always be illuminated.
Keypad Lock
The i2000 phone includes a Keypad Lock feature that enables you to quickly
lock the phone’s keypad to avoid inadvertently pressing keys or placin g calls.
Once Keypad Lock is activated, you can on ly perform the followi ng tasks
(unless you receive an incoming call, page, etc.):
• Turn your phone On/Off
• Unlock the keypad
NOTE: Before locking your phone’s keypad, you may want to read this
entire section to learn how to respond to incoming calls, pages,
etc.
18
www.nextel.com
Page 21

Getting Started
Activating Keypad Lock
From the Phone Ready screen, simultaneously
* and #. The message Keypad
press
Locked displays on your phone.
NOTE: Whenever a key is pressed, while in Keypad Lock mode, the
Keypad Locked message displays as a reminder.
a 1 b
Keypad
Locked
Receiving Incoming Calls
When you receive an incoming phone call (see“Phone Calls” on page 31 for
more details), keypad lock will b e tempo rarily suspe nded. You may perform the
following:
Press e to answer the call. Or,
Press
o under “End” to send the call to voice mail and reactivate
keypad lock.
Receiving New Mail Messages
When you receive a new mail message (see“Notification of New Pages” on
page 63 for more information), the keypad lock will be temporarily suspended.
You may perform the following:
Press
o under “Later” to return to Phone Ready and reactivate the
lock. Or,
o under “Now”. Press o under “Read”. Press o und er
Press
“Save” or “Erase”. Once you have finis h e d, pre s s
return to Phone Ready and reactivate the lock.
NOTE: If you have disabled the Message Mail Notification feature, only
u icon will display. You will not receive the Read
the
Now/Later options.
o under “Exit” to
19
Page 22
Receiving Voice Mail
When you receive a new voice mail (see“New Message Indicators” on page 39
for more information), keypad lock will be temporarily suspended. You may
perform the following:
When New Voice Mail Waiting displays, press o under “Exit” to
return to Phone Ready and reactivate the lock. Or,
o under “Dial” to access Voice Mail service. Once you have
Press
finished, press
# to exit Voice Mail, return to Phon e Ready and
reactivate the lock.
NOTE: If you have disabled Voice Mail Notification, g will display,
however, “New Voice Mail Waiting” will not appear .
Receiving Nextel Direct Connect® Calls
When you receive an incoming Direct Connect call (see“Nextel Direct
Connect®” on page 73 for additional information), t he phone wil l automatic ally
activate the applicable mode (i.e., Group, Private, etc.). Once the call is
terminated and the Display Timer (see “Display Timer: On/Off” on page 87)
has expired, the phone will return to Phon e Ready and reactivate the lock.
Deactivating Keypad Lock
From the Phone Ready screen, simultaneously
press * and #. The message Keypad
Unlocked displays. Or,
Press * followed by # to unlock the
The message Keypad Unlocked displays.
keypad.
a 1 b
Keypad
Unlocked
Activating Your i2000 Phone
Before you can beg in using your i2000 phone, it needs to be activat ed .
• If you purchased your phone through a Nextel Sales Representative, your
phone should be active already.
• If there is a separate activation sheet in this package, simply follow the
step-by-step instructions included.
If your display rea ds No Service or doesn’t change to the Phone Ready screen
when you turn on your phone, and you know you are in a Nextel coverage area,
call Nextel Customer Care at 1-800-639-6111. When traveling overseas call 1
(201) 531-5202. This Customer Care numb er will be toll-free from your Nextel
handset both domestically and internationally.
NOTE: To register for the first time on the Nextel network, you must
turn on your i2000 phone in your local calling area.
www.nextel.com
20
Page 23

Getting Started
Your Nextel Phone Status
Your i2000 phone ha s a “Status Light” indicator. The “Status Light” shows you,
at a glance, the status of your connection (see Features Bookmark on inside
cover).
Status Light
Indicator
Flashing Red Signing on to the network. Please wait.
Solid Red No service or out of coverage area. If you are in a
Flashing
Green
Solid Green In use.
Nextel Phone Status
coverage area, keep your phone on and it will continue
trying to connect every two minutes. If you cannot
connect after 15 minutes, call Nextel Customer Care at
1-800-639-6111. When traveling overseas call 1 (201)
531-5202. This Customer Care number is toll- f ree
from your Nextel handset both domestically and
internationally.
In service/Ready to use.
NOTE: Nextel Direct Connect calls are not
available outside of your home market
area.
21
Page 24

Display Icons
After you turn on your phone, the following icons may appear on the display:
a
b
g
t
u
q
1
2
c
p
Signal Strength Indicator: Shows the signal strength. Six
bars indicate the strongest signal. Calls and messages
cannot be sent or received when there is no signal.
Battery Strength Indicator: Shows the remaining charge in
your battery.
Voice Mail Indicator: Indicates that you have messages in
your voice mailbox. A fla s hin g vo ic e mail icon ind ica te s
that you have new, unplayed messages.
New Text and Numeric Paging Flashing Indicator: Indicates
that you have new incoming pages.
Unread Text and Numeric Paging Indicator: Indicates that
you have unread but saved pages.
VibraCall™ Indicator: Indicates that the Vibrate All option
is turned on. Yo ur i2000 phone will vibrate instead of
emitting ring tones.
Active Line Indicator: Indicates t he active phone line (1 or
2).
Call Forward Indicator: Indicates that incoming phone calls
have been forwarded for a specified line (1, 2, or both).
Private/Group Speaker Indicator: Indicates that the Private/
Group speaker is off. You will hear Nextel Direct Conne ct
calls through the earpiece.
22
www.nextel.com
Page 25
Modes and Menus
When you first turn on your phone, th e display defaults to Phone mode.
However, your i2000 phone operates in three different modes.
To switch between modes, press m. The table below provides more details
about the three modes:
Mode
Phone Mode
Private Mode
Group Mode
What the Display
Looks Like
a 1 b
Phone Ready
NEXTEL
Name Mail
a 1 b
Prvt Ready
Bob Smith
Numbr
Cancl
a 1 b
Group Ready
Talkgroup 1
Alert
Mail
Function
To make cellular
phone calls.
To make private twoway radio cal ls us in g
Nextel Direct
Connect.
To make group twoway radio cal ls us in g
Nextel Direct
Connect.
If the word Ready does not appear after the mode name in the display, that
mode is either unavailable or it has not been activated. Once a mode is activated,
there are various menu options (within each mode) that allow you to access
different functions. To switch between menu options follow the steps below:
1
Press n.
2
Press o under the displayed menu option that you want to select.
23
Page 26
Quick Guide to i2000 Phone Functions
Now that you understand different modes, here’s a quick way to get s tarted
using them. This Quick Guide highlights some of the most commonly used
functions in Phone, Private, and Group modes . The s e fu nc tio ns are de s cribed
in more detail in later sections.
Phone Mode
You must be in Phone mode to perform the following functions:
Function Action
a 1 b
Phone Ready
NEXTEL
Name
Mail
Dial
Programming
Your Own Phone
Number
Displaying Your
Phone Number
Making a Phone
Call
Ending a Phone
Call
Last Number
Redial
Emergency Dial
Receiving a Phone
Call
1
Press n until you see “Prgm”. Press o under “Prgm” and enter 1.
2
Press o under “Ok”.
3
Enter your phone num be r.
4
Press o under “Store”.
5
Press o under “Exit”.
NOTE: Your phone number is automatic a lly
programmed when you receive your
first call.
1
Press n until you see “Prgm”. Press o under “Prgm”.
2
Press 1.
3
Press o under “Exit”.
Using the keypad, enter the desired number.
Then press e.
Press e.
Press e.
Press and hold 9 for two seconds.
Press e or any numeric key (0 through 9).
24
www.nextel.com
Page 27
Private Mode*
You must be in Private mode to perform private two-way
radio functions.
Private mode.
Press m to switch from Phone to
Function Action
Getting Started
a
1
b
Prvt Ready
1234
Alert
Store
Sending a Prvt Call
From the Prvt Ready mode, your most recently
used Nextel Direct Connect call displays. To
scroll other names, press
name of the individual you would like to call or
enter the Private ID number.
To place the call, press and hold the Nextel
Direct Connect Push-To-Talk button. Wait for
the chirp, then speak into th e microphone.
To listen, release the Nextel Direct Connect
Push-To-Talk button.
* This feature is only available in your hom e m arket area.
Group Mode*
You must be in Group mode to perform group two-way
radio functions.
Sending a Group Call
Press m until yo u reach Group mode.
Function Action
From the Group Ready mode, your most
recently used talkgroup displa ys. T o scroll other
talkgroups,
To place a call to a talkgroup, press and hold the
Nextel Direct Connect Push-To-Talk (PTT)
button. Wait for the chirp, then speak into the
microphone.
press s.
s. Select the
a 1 b
Group Ready
Talkgrp 1
Alert Mail
To listen, release the Nextel Direct Connect
PTT button.
* This feature is only available in your hom e m arket area.
25
Page 28
Creating, Editing and Using
Stored Lists
Creating, Editing and Using Stored Lists
A stored list is made up of names, phone numbers, pri vate IDs and speed dial
numbers. Stored lists are convenient because you do not need to remember
names and numbers. Instead, you simply scroll through your stored list, press a
button and the number is dialed for you.
NOTE: If you want to use your computer to create stored lists for your
i2000 phone, use Nextel’s iDEN Organizer. It’s available for pro-
gramming names, phone numbers, and Private IDs into your
phone. To order, call Nextel Nextday
914-3240 or contact your Nextel Authorized Representative.
NOTE: You may want to read
Dialing” on page 35 before you create a stored list. Using Pause
Digit Entry and Plus Dialing will enable you to create stored lists
that will save time when placing calls.
“Pause Digit E ntry ” o n pa ge 28 and “Plus
About This Section
This section includes instructions for the following tasks:
Storing Names and Numbers Page 26
SM
Accessories at 1-800-
Pause Digit Entry Page 28
Editing Stored List Entries Page 29
Storing Names and Numbers
This programming function allows you to store up to 100 names, phone
numbers and private ID numbers. Your i2000 phone will automatically assign
the next available speed dial number, which you can change. Once you have
stored an individual, you can call them by scrolling through the list and finding
their name, using the speed dial number or using Nextel Direct Connect (see
“Customizing the i2000 Phone” on page 80). Whenever the person calls you,
your phone will display their name if you entered their 10-digit phone number.
The display holds 12 phone-number characters. If the phone number exceeds 12
characters, yo u can pre ss
return to the start of the number, press
26
o under “More” to see the remaining characters. T o
o under “Numbr”.
www.nextel.com
Page 29

Creating, Editing and Using Stored Lists
You can store up to 100 names, phone numbers and private IDs using the following steps:
1
Press n until you see th e “Prgm” option.
2
Press o under “Prgm”. Then press 2 then 0.
3
The message: 20=Phone / Prvt List displays.
Press o under “Ok”. The next screen disp lays the remaining number
of phone numbers and Private IDs that you can store. The phone will
then display the Enter Name screen.
4
Enter the name of the individual you want to store.
(Notice, each key has a number and several letters. To select different
letters on a key, quickly press the key until the desired letter
displays. For example, to enter the letter Y you m ust press the
3 times quickly. Also, you can press and hold
the letter you just entered (lower to upper and upper to lower case). The
default style is upper case.)
NOTE: Press l to delete a letter. Press r to insert a space.
After you have ente red the name, press o under “Store”.
5
Enter Phone Number displays. Enter the area and phone number.
Also, you may use the Plus Dialing and/or Pause Digit Entry at this
screen. Refer to “Pause Digit Entry” on page 28 and/or “Plus Dialing”
on page 35.
# to change the case of
9 key
Press
o under “Store”.
6
The name and Spd# = displays. The system automatically assigns a
speed dial number, which you can change by entering a new number.
Press
o under “Store”.
7
Enter PrvtID displays. Enter the person’s Direct Connect private ID.
o under “Store”.
Press
8
Repeat steps 3 throug h 7 to add additional names/numbers.
9
Press o under “Exit”.
27
Page 30

Pause Digit Entry
When storing a number, you can program your phone so that it will not only dial
a number but also pause and enter another series of numbers such as a personal
PIN or password. This feature is particularly useful fo r auto mated servic es such
as voice mail and banking sy s tems.
Here’s how it works! Let’s say you have a company voice mail account that you
frequently check while on travel. And, to access that account you must do the
following:
• Dial your work number;
• Press
• Enter your personal PIN to access your messages.
You can program your i2000 phone to enter all of the above information for
you. All you have to do is separate each entry with a pause. If you were to
program your phone to automatically input the above information, the stored
data would look like this 17035551234P#P1234. In t his example, the first
eleven digits represent the number that must be dialed to access your voice mail.
The P represents a 3 second pause. The
second P represent s another 3 second pause. T he last four digits repr esent your
personal PIN.
You can use this feature no t only to enter personal PI Ns and passwords but also
to have the phone automatically select menu options (i.e., press 1 to hear
messages).
To create a three-second paus e fol l ow t he st eps below:
# while the voice mail greeting is being played; and
# interrupts your gre e tin g. The
Press and hold * for two seconds. The pause symbol (P) will appear.
NOTE: You can enter up to 20 numbers/characters in a single entry,
stored or dialed.
NOTE: If you use a system that will not let you enter an option until the
automated message has played in its entirety, you can program
your phone to pause for more than 3 seconds. For example, performing the above step twice will program two pauses and
cause your phone to wait 6 seconds before ent ering the next set
of numbers.
www.nextel.com
28
Page 31

Creating, Editing and Using Stored Lists
Editing Stored List Entries
Once you have created lists, yo u can edit them as necessary. Select the
applicable option belo w to edit a portio n of a list.
Edit a Phone Number or Associated Name or Speed Dial Number
1
Press n until you see the “Prgm” option.
2
Press o under “Prgm”. Press 2 then 1.
3
At the Phone List Edit screen press o under “Ok”.
4
At the Edit Entry? screen, press o under “Ok”.
5
Press r until the desired entry appears. Press o under “Ok”.
6
Edit the desired information (Number, Name, Speed Dial Number) and
o under “Store”. If you do not wish to edit one or mo re of the
press
components, just press
7
Press o under “Exit” until you see the Phone Ready screen.
Editing a Private ID or Associated Name
o under “Ok”.
1
Press n until you see “Prgm”.
2
Press o under “Prgm” and enter 2 then 2.
3
Press o under “Ok”. The Edit Entry? screen displays.
4
Press r until the desired entry appears. Press o under “Ok”.
5
Edit the desired information (Private ID, Name) and press o under
“Store”. If you do not wish to edit one or more of the components, just
o under “Store”.
press
6
Press o under “Exit” to close the Private ID List Edit screen.
29
Page 32

Erasing List Entries
Erasing stored list entr ies is as easy as creating them. To erase an entry item,
follow the steps below:
1
Press n until you see the “Prgm” screen.
2
Press o under “Prgm” and enter 2 then 1 to erase a Phone
entry (or
3
At the Phone or (Prvt ID) List Edit screen, press o under “Ok”.
4
Press s at the Edit Entry? screen until you see Erase Entry?
5
Press o under “Ok”.
6
Press s until the desired entry appears.
7
Press o under “Ok”.
8
Press o under “Yes” at the Erase? screen.
9
Press o under “Exit” until you see the Phone Ready screen.
2, 2 to erase a Private ID entry).
30
www.nextel.com
Page 33

Phone Mode
Phone Calls
In addition to making and receiving phone calls while in
Phone mode, you can make emergen cy calls, be notifie d
of a missed call, select ring style notification, set
VibraCall, and more.
NOTE: For most Phone functions, you must be in
Phone Mode. Press
Ready. For more information, see “Modes and Menus” on
page 23.
m until you see Phone
About This Section
This section includes the follo w ing:
Programmin g Your Own Phone Number Page 31
Making Phone Cal l s Page 32
Placing International Calls With Plus Dialing Page 34
Using Hands-Free Speakerphone Page 35
Receiving/Ending a Phone Call Page 36
Missed Call Indicato r Page 36
a 1 b
Phone Ready
NEXTEL
e Mail
Name Mail
Last 10 Numbers Received/Sent Call List Page 37
Quickstore of Phone Numbers Page 37
Programming Your Own Phone Number
Before you get star ted usin g your i2000 ph on e, you may nee d to enter your own
phone number so you can refer to it later if necessary. This is a one-time activity
that can be performed using the following instructions. Or, you can wait for your
first incoming call, when it is automatically entered.
NOTE:If your Nextel phone has two lines, your phone number for
the second line will not be automatically entered with the first
incoming call to that line. You must manually program the
number. F irst sel ect the line for the phone number that you
want to program, and then continue. For more information, see
“Alternate Line Service (Unavailable on GSM)” on page 59.
31
Page 34

1
To store your phone number in your Nextel phone
(or the alternate line, if you have two lines), press
n until you see the “Prgm” menu option.
2
Press o under “Prgm” and press 1.
3
Press o under “Ok”. (After phone number is programmed, option will read “Edit”.)
4
Enter your phone num be r.
5
Press o under “Store”.
6
Press o under “Exit” to return to the Ph on e Ready screen.
Displaying Your Phone Number
1
Press n until you see “Prgm”.
2
Press o under “Prgm”.
a 1 b
1_=Own Ph#
9545553434
Exit Edit
3
Press 1.
4
Press o under “Exit”.
Making Phone Calls
There are five ways to make a phone call: Direct Dial, Scroll, Name Search,
Speed Dial, and Turbo Dial™.
Direct Dial
1
From Phone Ready, enter the number using the keypad.
2
Press e to place the call.
3
Press e to end the call.
www.nextel.com
32
Page 35

If you make a mi stake:
Press s
To Clear One Digit To Clear All Digits To Cancel
Phone Calls
Press and hold s
Press
o under
“Cancl”
Making Calls From the Stored List
Before you can use the Scroll, Name Search, Speed Dial or Turbo Dial methods,
you first must create a phone list. To learn how to create stored lists, see
Page 26.
Scroll
1
From Phone Ready, press s to sele c t t he indi vid ua l yo u wa n t to call.
2
Press e.
Name Search
1
Press o under “Name”.
2
Using the keypad, enter the first letter of the desired name.
3
Press s to scroll names, if necessary.
4
Press e.
Speed Dial
1
2
3
4
Press n until you see th e “Spd#” option.
Press o under “Spd#”.
Enter the speed-dial number.
Press e.
33
Page 36

Turbo Dial
Allows you to call any one of your first eight phone list entries by
pressing and holdi ng the corresponding numeric key (1-8).
Automatic Redial
e to redial the last number you cal led.
Press
NOTE: If you receive “System Busy, Try Later”, press e to redial the
number automatically. You will hear a ring-back tone when the
call is successful.
Emergency/Non-Emergency Dial
The Emergency Dial feature allows you to ca ll 911 emergency by pressing a single key.
NOTE: If your keypad is locked, you must unlock it before pressing the
emergency key.
If you are on an active call, you must end it before pressing the emergenc y key.
Your phone is already programmed with the Non-Emergency number provided
by your local State Police and Highway Patrol. You can use this feature to report
traffic accidents, motorist problems, careless drivers or any other nonemergency highway incident.
Emergency: Non-Emergency:
Press and hold
phone displays “EMERGENCY”.
NOTE: Access to 911 may not be available in all areas. Contact Cus-
9 until the
Check www.nextel.com for an upto-date list of current numbers.
tomer Care at 1-800-639-6111. When traveling overseas call 1
(201) 531-5202. This Customer Care number will be toll-free
from your Nextel handset both domestically and internationally .
Placing International Calls With Plus Dialing
Placing international calls h as never been easier. The i2000 phone and Nextel
Worldwide Service includes access to multiple networks so you can get
connected and stay connected.
When dialing internat io nally, you can either enter the international access code
directly or use “Plus Dialing”. To place an international call using the “Plus
Dialing” feature, see the following section.
www.nextel.com
34
Page 37

Phone Calls
Plus Dialing
This feature enables you to quickly place an international call without entering
the local international access code.
1
Press and hold 0 for two seconds. A “0” appears, then changes to a “+”.
NOTE: The network translates the “+” into the appropriate interna-
tional access code needed to place the call.
2
Enter the country code and phone number.
3
Press e.
Using Hands-Free Speakerphone
The i2000 phone provides the convenience of a hands-free speakerphone for
holding impromptu meetings or listening to your voi ce mail messages.
During speakerpho ne operation, you may eit her speak or listen, but you cannot
do both at the same time. To use the speakerphone:
1
From Phone Ready, enter the number you want to call.
2
Press e to place the call.
3
Press o under “Spkr”. The “Spkr” option flashes while the speakerphone is on. Or,
Press
p while on a phone call.
4
Place the phone 15-30 inches (380-760 mil li meters) away from you. In
a noisy environment, you may want to move t he i2000 phone closer t o
you for improved aud io clarity.
Turning Mute On/Off
If there is background noise in your area, you may have difficulty hearing a
caller’s voice or me ss a ge s . Mu ting the phone, whic h places you in “listen on ly ”
mode, may resolve this problem.
35
Page 38

Mute On
While on an active call:
1
Press o under “Spkr”. The “Spkr” option flashes while the speakerphone is on.
2
Press o under “Mute”. The display cha ng es f r om Phone In Use to Phone —Mute.
Mute Off
While the microphone is muted, you can hear incoming audio, but a caller
cannot hear you speak. You must turn “Mute” off to speak.
o under “Mute”. The display changes fr om Phon e Mute to
Press
Phone In Use, indicating that the microphone is on.
Receiving/Ending a Phone Call
An incoming call is indicated by a ring, vibration or backlight illumination.
You can answer the call by pressing any numeric ke y (0-9), or by pressing
#, or *.
Ending a Call
Press e to ha ng up.
Missed Call Indicator
Your i2000 phone notif ies yo u o f unan swer ed phon e calls .
If you subscribe to Caller ID (and it is available in your
area), your i2000 phone temporarily stores the caller’s
phone number in your Last 10 Received Calls list. Your
screen displays a flashing mess age wi th the number of
missed calls. Press any key to cl ear the flashing indicator.
a 1 b
Phone Ready
NEXTEL
2 Rcvd Calls
Name Mail
Retrieving Missed Calls
1
Press n until you see the “Calls” option.
2
Press o under “Calls”.
3
Use s to continue viewing the list. The phone di splays calls received from newest to ol dest.
e,
36
www.nextel.com
Page 39

Phone Calls
Last 10 Numbers Received/Sent Call List
a 1 b
If you subscribe to Caller ID (and it is available in your
area), you can view, dial, and store the last ten received and
last ten sent telephone numbers. The most recently
received or sent call appears first in your call list. If the
name is not stored, only the ph one number display s.
Phone Ready
Nextel
Calls Spd#
Quickstore of Phone Numbers
Quickstore allows you to quickly store a rec eived or sen t phone number without
going through t he Programming menu.
Reviewing/Storing Received Calls
1
Press n until you see th e “Calls” menu option.
2
Press o under “Calls”. The Rcvd Calls screen opens.
3
Press s to scroll entries. Press o under “Store” to store the
number in the first available storage space.
4
Enter the name usin g the keypad. (Notice, each key has a number and
several letters. To select different letters on a key, quickly press the key
until the desired letter displays. For example, to enter the letter Y youmust press the
5
Press o under “Store” after you have entered the name.
6
Press o under “Cancl” to close the Rcvd Calls screen.
9 key 3 times quickly.)
Reviewing/Storing Sent Calls
1
Press n until you see the “Calls” option.
2
Press o under “Calls”.
3
Press n until you see the “Sent” option, if this option isn’t already vis-
ible.
4
Press o under “Sent”.
5
Press s to scroll entries. (T o sto re an entry from the Sen t list press
o under “Store” and follow steps 4-6 in the previous section titled
“Reviewing/Storing Received Calls”).
37
Page 40

Nextel Voice Mail Service
Welcome to Nextel’s Voice Mail Service, a flexible, easy-to-use system that
takes messages when you’re not available--so you never miss an important call!
About This Section
The main topics covered in this sect i on are listed below:
Voice Mail Features: Basic Page 38
Setting Up Your Voice Mailbox from Within the U.S. Page 39
New Message Indicators Page 39
About Voic e Mail Menu s Page 40
Logging Into Voice Mail Page 40
Listening Options (Quick Reference List) Page 42
Listening to New Messages While Overseas Page 43
Saving/Deleting Messages Page 43
Choosing Order to Play Unheard Messages Page 44
Customizing Your Voice Mail Setup Page 44
Voice Mail Features: Advanced Page 47
Voice Mail Features: Basic
This section covers the most commonly used voice mail features. Once you log
into voice mail, there are a number of innovative features you can access. They
are also covered in this chapter. After you access Voice Mail, an automated
system tells you each menu option and whic h button to press to mak e a menu
selection.
www.nextel.com
38
Page 41

Nextel Voice Mail Service
Setting Up Your Voice Mailbox from Within the U.S.
You must set up your voice mailbox before you can retrieve mess ages. The
following steps will tell you how to setup your mailbox. However, before
proceeding you may want to read “Recording Your Active Greeting” on page
45, which provides information you may want to include in your greeting:
1
Using your Nextel pho ne, dial yo ur 10 -digit N extel P erson al Telepho ne Number (PTN).
If you are calling from a phone other than your Nextel i2000 phone,
dial your 10-digit Nextel Personal Telephone Number (PTN).
When you hear the greeting, press * to access your voice mail account.
2
When prompted, enter your password . (Ne w us ers sh o uld enter the last
seven digits of your phone number. This is your temporary password).
3
Follow the tutorial to:
• Create a new four- to seven - digit password (see “Changing Y our
Password” on page 44).
• Record your name (see “Recording Your Name” on pa ge 45).
• Record a greeting (see “Recording Your Active Greeting” on page
45).
4
When the system says, “Enjoy using Nextel Voice Mail,” your mailbox is set up.
New Message Indicators
When you receive a new message, the following will occur:
• New Voice Mail Waiting will display on the screen once your phone is
turned on (if your phone is off when the call is received).
a 1 g b
New Voice
Mail Waiting
Exit
Dial
• The
g icon will flash at the top of the display.
• Your i2000 phone will alert you every 30 seconds of new Voice Mail
messages.
Voice Mail
Indicator
39
Page 42

About Voice Mail Menus
You are at the main Voice Mail screen when you hear the options listed below.
If you press
entry, please try again.” At that point, press the
# while you are at a sub-menu, the syst em will say, “Invalid
* key until you hear the
below options, indicating that you are at the main Voice Mail menu:
• To play your messages press
1 (this option plays only if you have new
or saved messages)
• To record a Message press
2
• To change your Greeting press 3
• To access your Personal Options press 4
• To mod if y yo ur C on s ta nt Touc h Opti ons press 5
From the main Voice Mail menu, press # to exit Voice Mail. At any time , of
course, you may simply hang up.
Logging Into Voice Mail
To play new messages, you can set your Voice Mail options to Normal or
Automatic Playback. By de fault, yo ur voice mail is set to Norma l. In t his m o de,
after you log into your account, the system gives you a list of options. To listen
to new messages you must select the appropriate option. After each message the
system gives you another list of options. These options enable you to tell the
system what to do with each message (i.e., save, delete, etc.). If you activate
Nextel’s Automatic Playback feature, however, the system will automatically
play and save new messages (see “Automatic Playback” on page 46).
1
Turn on your phone and wait for the screen to display Phone Ready. (See “M od es an d Menus” on
page 23 for additional information.)
If you are calling from a phone othe r tha n yo ur
Nextel i2000 phone, dial your ten-digit Nextel
i2000 phone number. When you hear Nextel’s
Welcome greeting, press * to access your voice
mail account, then skip to step 6 below.
a 1 g b
Phone Ready
Nextel
Name
Mail
2
Press o under “Mail” to open the Mail screen.
3
Voice Mail should be highlighted to indicate that
it is selected. If it isn’t selected, press 1 to
select it. An asterisk indicates new messages.
www.nextel.com
40
a 1 g b
1>Voice Mail
2>Mesg Mail
Ok
Exit
Page 43

Nextel Voice Mail Service
4
Press o under “Ok.” The Voice Mail screen appears.
Notice, the screen dis p la ys the num b er of ne w
messages and the total number of messages in the
system--inc lu ding saved and those in pre p ar a tion
(see “Voice Mail Features: Advanced” on page 47
a 1 g b
Voice Mail
2 New !
3 Total
Exit
Mail
for information on “in preparation” messages). An
exclamation point (!) indicates an urgent message.
5
Press o under “Dial” to log into Nextel’s Voice Mail System. PhoneIn Use displays as you are connected to the network.
6
When prompted , ent er yo ur pa s s wor d .
7
Proceed as desired, then exi t Voice Mail (see “About Voice Mail
Menus” on page 40) or hang up to en d the ca ll.
NOTE: You must receive a message before you can access voice mail
from your i2000 phone. (Tip: Y o u can leave yourself a message.)
Listening Options
With Nextel’s Voice Mail Service you can listen to messages either immediately
or later (also see “Listening Options (Quic k Refer ence List)” on page 42). Select
an option below and follow the steps:
Listen Now
1
Press o under “Dial”.
2
When prompted, enter password.
3
Follow the tutorial.
Listen Later
1
Press o under “Exit”.
Though the
reminder.
When you are ready to listen to your messages, follow the steps in the
g stops flashing, it remains on the screen as a
section titled “Logging Into Voice Mail” on page 40.
41
Page 44

Listening Options (Quick Reference List)
After you access the Nextel Voice Mail Service (see “Logging Into Voice Mail”
on page 40 and follow steps 1 through 6 to access voic e mail) you have several
options. The following information tells you what those options are and when
you can use them.
Options available when selecting messages to be played:
Play new, unheard messages only.
Press 1 then 1
Options available while listening to your message s:
Replay previous six seconds.
Rewind to beginning of message.
Pause/continue the current message.
Fast forward 6 seconds.
Fast forward to end of message.
Play the date and time stamp .
Press 1
Press 1then 1
Press 2
Press 3
Press 3then 3
Press 5then 5
Options available while message is playing or after it has played:
Copy a message to another subscriber. (See
“Voice Mail Features: Advanced” on page 47.)
Delete the message.
Reply to a message.
Save the message.
Press 6
Press 7
Press 8
Press 9
Skip to th e next message. Press #
Recover all deleted messages in that session.
NOTE: Once you end a call, all messages
will be deleted and cannot be
retrieved.
www.nextel.com
42
Press * then
3
Page 45

Nextel Voice Mail Service
Listening to New Messages While Overseas
1
From the Phone Ready screen, press o under “Mail” to open the Mail screen.
2
Voice Mail should be highlighted to indicate that
it is selected. If it isn’t selected, press
select it. An asterisk indicates new messages.
3
Press o under “Ok.” The Voice Mail screen appears.
4
Press o under “Dial”.
NOTE: If you hear a message that says, “Enter the phone number
of the subscriber you are trying to reach” enter your own
i2000 phone number.
5
When the greeting plays, press * to interrupt it.
6
When prompted, enter password.
7
Follow the instructions.
1 to
a 1 g b
1>Voice Mail
2>Mesg Mail
Exit
Ok
Saving/Deleting Messages
While a message is play ing or, after you have finished listening t o it, you can
save it or delete it. To save a message press 9 when prompted to do so. To
delete a message press
Playback” on page 46 to have messages automatically saved).
NOTE: To retrieve deleted messages, press * then 3 from the
main Voice Mail menu. Messages that are not saved or deleted
remain in your mailbox as new messages for 30 days. All messages are automatically deleted after 30 days.
7 when prompted to do so (see “Automatic
After exiting the voice mail session, you cannot
recover deleted messages.
43
Page 46

Choosing Order to Play Unheard Messages
With Nextel Voice Mail service, you can select the order you want u nheard
messages to be played in. You may listen to the last received message first. Or,
you may listen to the first received message first. To select the order new
messages should be played in, follow the steps below:
1
Log into Voice Mail. (See“Logging Into V oice Mail” on page 40.)
2
Press 4 to access Personal Options Menu.
3
Press 4 to access Personal Preferences.
4
Press 2 to access Playback Preferences.
5
Press 1 to select preference. Follow the prompts until you have set your desired pre f e r en c e s.
6
Exit Voic e Mail (see “Abo ut Voice Mail Menus” on page 40) or hang up to end the call.
Customizing Your Voice Mail Setup
Changing Your Password
To change your current password follow the steps below:
1
Log into voice mail (se e “Lo gging Int o Voice Mail” on page 40 and fol-
low steps 1 through 6) .
2
Press 4 to access Personal Options.
3
Press 4 to access Personal Preferences.
4
Press 1 to modify password.
5
Enter your new password (four- to seven digits).
6
Exit Voic e Mail (s ee “About Voice Mail Menus” on page 40) or hang up to end the call.
For security purposes, it is recommended that
you do not choose sequential or repeated digits
Warning
like 1-2-3-4 or 5-5-5-5 for your password.
www.nextel.com
44
Page 47

Nextel Voice Mail Service
Recording Your Name
When you send, reply to, or copy a mes s age your name response precedes the
message. To record or rerecord your name at any time use the following steps:
1
Log into voice mail. (see “Logging Into Voice Mail” on page 40 and follow steps 1 through 6).
2
Press 4 to access Personal Options.
3
Press 4 to access Personal Preferences.
4
Press 3 to access the Record Your Name option.
5
Press 2 to record your name.
6
Exit Voice Mail (see “About Voice Mail Menus” on page 40) or hang up to end the call.
Recording Your Active Greeting
NOTE: Through the Nextel Voice Mail Service, there are a number of
ways people can reach you. You may want to include one or all
of the following options in y our gr e e ting so that callers will
know they are available. Also, in your greeting, you should tell
callers to press the pound sign (#) after they have finished
recording. This will prompt Voice Mail Service to play the list of
• Press 1 to send a numeric page.
• Press
• Press
• Press # to skip the greeting and re cord message immediately.
menu opti on s s hown below:
2 to send an operator assisted message. (This option is available
only if you are a subscriber of Operator Assisted Paging. Contact Nextel
Customer Care for more information.)
9 for other options (after pressing 9 the caller will need to
5 for Delivery Options, which enables them to mark the message
press
as Urgent, Private, etc.).
Sample Greeting
Below is a sample greeting. You can add the above op tions as you see fit. “Hello, you’ve reached _____________. I’m sorry I missed your call. If you
leave a message at the tone, I’ll return your call as soon as possible. If you
would like to bypass this greeting in the future, press pound. Thank you for
calling.”
45
Page 48

To record or alter your greeting at any time follow the steps below:
1
Log into voice mail (see “Logging Into Voice Mail” on page 40 and fol-
low steps 1 through 6) .
2
Press 3 to change your Gre eting.
3
Press 1 to play, 2 to record, or 3 to delete your active greeting.
4
Record your message and press # when you have finished.
5
Exit Voic e Mail (see “Abo ut Voice Mail Menus” on page 40) or hang up to end the call.
Automatic Playback
By default, the playback mode of your Voice Mail Service is set to Normal.
Nextel’s Automatic Playback feature prompts the Voice Mail Service to
automatically play and save new messages, which sav es you time and money.
To activate Automatic Playback follo w th e st eps below:
1
Log into voice mail (se e “Lo gging Int o Voice Mail” on page 40 and fol-
low steps 1 through 6) .
2
Press 4 to access Personal Options.
3
Press 4 to access Personal Preferences.
4
Press 2 to access Playback Preferences.
5
Press 2 and select Automatic Playback.
6
Exit Voic e Mail (see “Abo ut Voice Mail Menus” on page 40) or hang up to end the call.
NOTE: You can deactivate Automatic Playback (after it has been acti-
vated) by following the above steps.
www.nextel.com
46
Page 49

Nextel Voice Mail Service
Voice Mail Features: Advanced
Recording and Sending A Message
These functions allow yo u to record and send, reply to, or copy a message to a
mailbox number, a name in the Voice M ail Service directory, or a Group List
number, to an assigned destinati on address. After you record a message, the
following sending options are available:
NOTE: If you record a complete or partial message--but do not send it,
Voice Mail Service will refer to this message as an “in preparation” message. (Before sending messages you may want to See
“Special Delivery Options” on page 48)
Using Mailbox Numbers
To send a message to another mailbox, enter the mailbox number (10-digit
telephone number ) o f the Nextel customer. The n a me response of the recipient
plays if it is recorded.
Using Group Lists
Enter the one- or two-dig it Group List Number. You must hav e previously
created this list. (See “Working With Group Lists” on pag e 50.)
To record and send a message, proceed to the table below:
1
Log into voice mail (see “Logging Into Voice Mail” on page 40 and fol-
low steps 1 through 6).
2
Press 2 to record a message.
3
Record your message and p ress # to end the message.
4
Press 9 at the prompt to indicate that you want to send the message.
5
Enter the mailbox number and/or group list number(s).
6
Press # to send.
7
Exit Voice Mail (see “About Voice Mail Menus” on page 40) or hang up to end the call.
47
Page 50

Special Delivery Options
After you have created a message, you can assign the message to a cat egory
before you send it. Below is a list of the categories that can be applied to a
message:
Urgent
Recipient will hear this message before other
messages.
Private
Recipient cannot copy the message to another
mailbox or phone number.
Notification of
Non-Delivery
Future Delivery
Y ou will be notified if the recipien t has not listened
to your message by a certain date and time.
You can specify a specified time and date (up to
three months in advance) for the message to be
delivered.
Important: Once a message has been sent for
future delive ry, it cannot be retrieved or dele ted.
To set a special delivery option, follow the steps below:
1
Log into voice mail (see “Logging Into Voice Mail” on page 40).
2
Press 2 to record a message.
3
Record your message and press # when you have finished recording.
4
Press 5 for delivery options.
5
Press the number that corresponds with the desired delivery option:
• Press 1 for Urgent
2 for Private
• Press
• Press 3 for Notification of Non-Delivery. At prom pt , spe c ify t ime.
4 for Future Delivery of Messages. At prompt, specify time.
• Press
• Press
9 to send the message immediately
6
Another list of options will be presented. Select the desired option.
7
Enter the destination mailbox or group number of the recipient(s).
8
Press # to send.
9
Exit Voic e Mail (see “Abo ut Voice Mail Menus” on page 40) or hang up to end the call.
www.nextel.com
48
Page 51

Nextel Voice Mail Service
Greetings Schedule
Nextel Voice Mail allows yo u to r eco r d up to f iv e s ep a rate greetings t hat c a n be
played based on pre-determined time frames. After you have recorded a greeting
for each time frame, you can then sele ct any of those greetings as your active
greeting (see the following table). For example, if you activate the greeting
schedule after you record Morning and Afternoon Greetings, the system will
automatically play greetings 2 and 3 at the appropriate times. See the list of predetermined schedules--then refer to the steps in the followin g ta ble t o record
your greetings:
Greeting 1
Generic
Greeting
24 hours a day/7 days a wee k. (This is the
default setting if you haven’t activated your
greeting schedule.)
Greeting 2
Greeting 3
Greeting 4
Greeting 5
Morning
Greeting
Afternoon
Greeting
7:30 a.m. -- 11:59 a.m.
Monday -- Friday
Noon -- 6:00 p.m.
Monday -- Friday
All Hours 24 hours a day/7 days a week
All Hours 24 hours a day/7 days a wee k
To record your greetings, follow the steps belo w:
1
Log into voice mail (see “Logging Into Voice Mail” on page 40).
2
Press 3 to reach the Greetings menu.
3
Press 4 to modify another greeting.
4
Enter the greeting number you wish to create or modify.
5
Press 2 to record a greeting.
6
Record your greeting and press # when you have fini shed.
7
Exit Voice Mail (see “About Voice Mail Menus” on page 40) or hang up to end the call.
49
Page 52

Activating Your Greeting Schedule
To activate your greeting sche d ule a cco rdi ng to the pre- dete rm in ed tim e fr ames
(Morning, Afternoon, etc.) follow the steps below:
1
Log into voice mail (see “Logging Into Voice Mail” on page 40).
2
Press 3 to reach the Greetings menu.
3
Press 9 to activate your gree ting schedule.
4
Exit Voice Mail (see “About Voice Mail Menus” on page 40) or hang up to end the call.
Working With Group Lists
The Group List feature enables you to create a list and assign it a unique name.
Then, you can add mailbox numbers, group lists or individuals--by name--to the
list. Once you create a list you can send a voice message to everyone on the list
by simply entering the group list number. You can have up to 40 group lists.
Each list can hold up to 50 addresses (see “Using Group Lists” on page 47).
Creating Group Lists
To set up a Group List follow the steps below:
1
Log into voice mail (see “Logging Into Voice Mail” on page 40).
2
Press 4 to modify another gre eting.
3
Press 2 to access your Group Lists.
4
Press 2 to create a Group List.
5
Enter the one- or two-digit group list number and press #.
6
Record a name for the list and press #.
7
Select group memb er s by mailbox number, group list, or name.
8
Press # to save all entries added to the list.
9
Exit Voice Mail (see “About Voice Mail Menus” on page 40).
www.nextel.com
50
Page 53

Nextel Voice Mail Service
Modifying a Group List
1
Log into voice mail (see “Logging Into Voice Mail” on page 40).
2
Press 4 to access Personal Options.
3
Press 2 to access Group Lists.
4
Press 4 to modify a Group List.
5
Enter the number of the Group List you want to modify.
6
Press 1 to add a new recipient.
7
Press # to save your changes.
8
Exit Voice Mail (see “About Voice Mail Menus” on page 40) or hang up to end the call.
Deleting a Group List
1
Log into voice mail (see “Logging Into Voice Mail” on page 40).
2
Press 4 to access Personal Options.
3
Press 2 to access Group Lists.
4
Press 3 to delete a gr oup list.
5
Enter the number of the Gro up List y ou wa nt to d e lete . Th e syste m will
play the name of the gro up list.
6
Press # to delete the list.
7
Exit Voice Mail (see “About Voice Mail Menus” on page 40) or hang up to end the call.
51
Page 54

Message Forwarding
This feature allows you to program yo ur phone to automatically forward
incoming messages to another mailbox. There are three types of forwarding:
Immediate, Silent and Delayed. They are discussed below:
• Immediate Forwarding - Caller is notified that the message will be
forwarded.
• Silent Forwarding - Caller is not notified that the message will be
forwarded.
• Delayed Forwarding - If a caller’s message is no t r etr ieved after a cert ai n
amount of time, the message will automatically be forwarded to another
mailbox or telephone number.
Create/Modify Message Forwarding Number
1
Log into voice mail (see “Logging Into Voice Mail” on page 40).
2
Press 4 to access Personal Options.
3
Press 5 to modify Forwarding Options.
4
Select the applicable option below:
• To create a forwarding number, press
• If you have already created a forwarding number, press
modify the number.
2.
2 to
5
Exit Voice Mail (see “About Voice Mail Menus” on page 40) or hang up to end the call.
Enabling/Disabling Message Forwarding
1
Log into voice mail (“Lo gg ing Into Voice Ma il” on page 40 and follow steps 1 through 6).
2
Press 4 to access Personal Options.
3
Press 5 to modify Forwarding Options.
4
Select the applicable option:
• If Message Forwarding is disabled, press
• If Message Forwardi ng is enabled, press 3 to disable it.
5
Exit Voice Mail (see “About Voice Mail Menus” on page 40) or hang up to end the call.
www.nextel.com
3 to enable it.
52
Page 55

Nextel Voice Mail Service
Modify Forwarding Type
1
Log into voice mail (see “Logging Into Voice Mail” on page 40).
2
Press 4 to access Personal Options.
3
Press 5 to modify Forwarding Options.
4
Press 4 to modify Forwarding Type.
5
Select one of the following options:
• 1 for Immediate Forwarding
2 for Silent Forwarding
•
• 3 for Delayed Forw arding
6
Exit Voice Mail (see “About Voice Mail Menus” on page 40) or hang up to end the call.
Time and Date Charts
Time and Date Charts can be referenced for specific tasks th rou ghout th e Voic e Mail System.
Voice Mail 24-hour Military Time Clock
The voice mail service uses military time, also referred to as the 24-hour clock:
NOTE: To compute the 24-hour clock for p.m. time add 1200 to the a.m.
time. For example, 2:00 p.m. is 1400 hours in military time (0200
+ 1200 = 1400).
Below is a list of hours translated into military time:
Hour
Military
Time
12:00 am 4:00 am 8:00 am 12:00 pm 4:00 pm 10:00 pm
0000 0400 0800 1200 1600 2200
Dates
All dates must h a ve 4 digits in the MM/D D fo r m at (2 digits for th e month and 2
digits for the day). January is 01, February is 02, etc. The first day of t he month
is 01, the second day of the month is 02, etc.
Pager Notification
If you have purchas ed a pager and you would like your pager to notify you of
incoming messages to your i2000 phone when it is turned off, you ca n activate
this feature. To do s o, call Nextel Cus tomer Care at 1-8 00 - 63 9- 6 1 11 or d ia l 61 1
from your Nextel phone.
53
Page 56

Enabling/Disabling Pager Notification
1
Log into voice mail (see “Logging Into Voice Mail” on page 40 and fol-
low steps 1 through 6) .
2
Press 4 to access Personal Options.
3
Press 3 to change Pager Notification Option s.
4
Select the applicable option below:
• If Pager Notificat ion is enabled press
• If Pager Notificat ion is disabled press
Press 4 to enable notification of urgent messages only.
5
Exit Voic e Mail (see “Abo ut Voice Mail Menus” on page 40) or hang up to end the call.
3 to disable it.
3 to enable it.
Limiting Notification to Specific Times
This feature allows you to choose the hours you want the Pager Notificati on
feature to be enabled. By default, it is enabled for 24-hours a day. However, you
can change this. For example, you can select to be paged between 8:00 a.m. and
5:00 p.m. only. This enables you to control the time frame Pager Notification
will be activated. If a call comes in after 5:00 pm, you will not be paged until
8:00 am the next morning. (Befor e using this option, you may want to ref er to
“Time and Date Charts” on page 53 since the phone will only accept time s in a
24-hour clock format.)
1
Log into voice mail (see “Logging Into Voice Mail” on page 40 and fol-
low steps 1 through 6) .
2
Press 4 to access Personal Options.
3
Press 3 to change pager notification op tio ns.
4
Press 5 to modify your notif ica tion time window.
5
Enter the start ing and ending times for your time window.
6
Exit Voice Mail (see “About Voice Mail Menus” on page 40) or hang up to end the call.
www.nextel.com
54
Page 57

Additional Phone Services
Nextel offers a variety of services to help you better manage your business and
personal calls. Call Nextel Customer Care for additional information on phone
services.
NOTE: Some of these features may not be available while using Nextel
Worldwide Service.
About This Section
This section includes:
Call Waiting Page 55
Call Hold Page 56
Three-Way Calling Page 57
Call Forwarding Page 57
Transferring Calls to Voice Mail Page 58
Caller ID Page 58
Alternate Line Service Page 59
Call Waiting
Call Waiting allows you to receive a second call while you are talking on the
phone. With the i2000 phone you can switch between calls so you never have to
miss a call. By default, Call Waiting is always ON unless you turn it OFF for a
specific call.
If you’re on a call and you receive a second call, you will:
• Hear a tone; and
• See a message on your display
informing you of another
incoming call.
At that point, select one of the following options and follow the related instructions.
NOTE: If your phone is activated with two lines and you select the Call
Waiting opti on for one line, the alternate line is automatically
changed.
a 1 b
7035551212
Take Call
On Line 1?
No
Yes
Accept Call
Press
o under “Yes”.
55
Page 58

Decline Call
o under “No”. If you’re a Nextel Voice Mail customer, the call
Press
will be forwarded to your Nextel Voice Mailbox.
Switching Between Calls
Press o under “Hold”. Your phone will refer to the first call as Call-1
and the second call as Ca ll-2. If c a ll 1 is on ho ld your d isplay will read:
Call 1 - Hold 7035551234.
Ending the Active Call
Press
e.
Turning Off Call Waiting
If you do not want to be interrupted during a call, you can turn Call Waiting off
prior to making/receiving a call.
1
Press n until you see “Wait”, then press o under “Wait”.
2
Press o under “Off”. Call Waiting will be disabled for one call and
will automatically reset to “On” when you hang up.
Call Hold
When you are on an active call, you can place a call on hold and make a second
call. The options “3way” and “Spkr” appear only when you are on an active call.
1
To place the active call on hold, press n, then
o under “Hold”. Y ou may then answer
press
or place another call.
2
To toggle between the two calls, press n, then press o under “Hold” again.
www.nextel.com
a 1 b
Call 1-Hold
3way
Hold
56
Page 59

Additional Phone Services
Three-Way Calling
Using 3-way calling, you can combine two ongoing phone calls into one
conversation. This option is available only when you initiate the second call.
When you place or receive a phone call, a “3way” option appears in the bottom
left-hand corner of the display screen.
To make a 3-way call:
1
Place or receive a phone call.
2
Press o under “3way” to place the first call on hold.
3
Enter the phone number for the second individ ual you want to call and
e.
press
4
After you reach the second individual, press o under “3way”. Both
numbers will appear on your display.
Call Forwarding
Call forwarding lets callers reach you wherever you are. Nextel’s Call
Forwarding feature forwards calls to the number you designate. The instructions
below tell you how to use Call Forwarding:
Turning On Call Forward
1
Press n until you see “Forwd”.
2
Press o under “Forwd”.
3
Enter the phone number you want incoming cal ls
forwarded to. (O r , you may pr ess
s to select
a number from your stored list.)
4
Press o under “On”.
5
Press o under “Exit” after the Please Wait message displays.
a 1 b
Phone Ready
Nextel
Forwd
Spd#
a 1 b
Forward:Off
To:5551212
Exit On
57
Page 60

Your calls will now be forwarded to the number that you selected and you will
see the Call Forward icon (
screen. You can for w ard Line 1 or Line 2 independently.
d or e) with the forwarded line number on your
T urning Off Call Forwarding
1
Press n until you see “Forwd”.
2
Press o under “Forwd”.
3
Press o under “Off”.
4
Press o under “Exit” after the Please Wait message displays.
Transferring Calls to Voice Mail
Press o under “End” while your phone is ringing to transfer
incoming calls directly to voice mail (purchase required).
Caller ID
If you subscribe t o C a ller ID, your i2000 phone automatically displays the
phone number and/or name of the person calli ng (unless blocked by the caller),
enabling you to decide whether to take the call or forward it to voice mail
(purchase required).
NOTE: Caller ID is not available in all areas.
Displaying the Caller’s Name
A caller’s phone number will display--if the caller’s phone does not have Caller
ID block. A caller’s name will be displayed on your Nextel phone only if you
previously programmed it in your phone list with one or more of the following:
• the caller’s 10-digit Nextel phone number (703-555-9999)
• the caller’s 1 1-digit regular number (1-703-555-9999).
• the caller’s international number (+1-703-555-9999). For more
information, see “Creating, Editing and Using Stored Lists” on page 26“.
Maintaining Your Privacy with Per-Call and Per-Line Blocking
Nextel provides two no-charge methods to prevent those you call from seeing
your number on their own Caller ID displays.
www.nextel.com
58
Page 61

Additional Phone Services
Your Nextel ph one numb er can not be blo cked fro m call s made to 91 1, 800 , 877,
888, or 900 phone numbers.
Block
Setting
Per-Call
Blocking
What This Setting Does To Set
Selectively blocks delivery of
your phone number to other
Press *, 6, 7 before
dialing the call.
Caller ID units.
Per-Line
Blocking
Permanently blocks delivery
of your phone numbe r on
every call you mak e .
You must order this feature
from Nextel. You can disable
this feature on a per-call
basis by dialing *, 8,
Y ou can disable this feature on
a per-call basis by pressing
*, 8, 2 before the
call.
2 before the call. To get
your company’s line
automatically blo c ke d on
every call, contact Nextel
Customer Care at 1-800-639-
6111.
Alternate Line Service (not available on GSM)
The i2000 phone also allows you to have an alternate line. You can designate
your alter nate line as a “priority line” or you can use it to separate busi ness and
personal calls. If you are an alternate line customer, you will be given a unique
phone number for each l ine.
1
If your Nextel phone is ac ti va te d w ith tw o lin es , yo u ha v e the fo llo wi ng options:
• Different pricing by line
• Distinct billing records to track usage
• Separate address billing for an alternate line, for example , ho me bi llin g
2
The following settings are independent for each phone line. When you
enable a setting, it applies only to the active line.
• Ringer Volume
• Selectable Ring Styles
• Call Forwarding
• One-minute Beep
• Automatic Display Timer
• Resettable Timer
• Total Call Timer
59
Page 62

3
The alternate line does not have all th e features of the first line:
• Line 2 shares the v oi ce m ai lbo x w ith Line 1; there is on ly on e m o nth ly
charge.
• You cannot forward Line 2 to Line 1 and have the phone ring; the call
defaults to Voice Mail.
• Text and Numeric Paging is not offered on Line 2.
• A call from line 2 will appear on the recipient’s Caller ID as the Line 1
phone number.
Selecting the Alternate Line
At the Phone Ready screen:
1
Press n until you see “Line2”. (If you are on Line 2, you will see “Line1”.)
2
Do one of the followi ng:
a 1 b
Phone Ready
Nextel
Line2
Line2
• Press
o under “Line2” to activate Line 2 when Line 1 is the
active line.
• Or, press o under “Line1” to activate Line 1 when Line 2 is
the active line.
Receiving Calls on Your Alternate Line
You can receive calls on either line, regardless of the active line setting.
• If the call is on the same line as the curre ntly active li ne, the active line icon
simply flashes.
• If the call is on the line that is not currently active, the active line icon
remains lit and the additional line icon flashes.
If you are on a call on one line:
1
Press o under “Yes” to answer the call on the
other line. Your original call will be placed on
hold.
www.nextel.com
a h b
3055551212
Take Call
On Line 2?
2
No Yes
60
Page 63

Additional Phone Services
2
You can do one of the following to the active line:
• To end call, press
call. Or, to place the current call on hold, press
• To toggle between the two calls, press
When both calls end, the phone remains active in the last line selected.
e. You will automatically revert to the original
o under “Hold”.
ounder “Hold” again.
61
Page 64

Text and Numeric Paging
Your new Nextel Phone off ers Text and Numeric Paging allowing callers to
send you a page directly to your phone. Nextel Paging helps keep you in touch
with co-workers and customers, regardless of where you travel on the Nextel
National Network or the Nextel Worldwide Service. Whether i t’s your office
calling with a last mi nute schedule change, or a customer trying to reach you
with an important question, you’ll be able to retrieve and r espond to pages
immediately, all from yo ur N extel Phone.
About This Section
This section includes:
Text and Numeric Paging Features Page 62
Notification of New Pages Page 63
Accessing New Pages Page 63
Sending a Page Page 64
Text and Numeric Paging Features
With Nextel Text and Numeric Paging, Nextel will:
• Allow numeric pages up to 20 characters in length and text pages up to 140
character messages.
• Accept your pages even if you are unavailable, if your phone is turned off,
or if you are busy on another call.
• Alert you of a new text or numeric page, even if you are on another call.
• Store a page if you are usin g Nextel Direct Connect and deliver it upon
completion of the call.
• Store the page if you are outside of the coverage area and deliver it as soon
as you are back in a coverage area.
• Attempt continuous delivery of pages until successful, for up to 7 days.
With Nextel Text and Numeric Paging, your Nextel Phone will:
• Refer to text and numeric pages as Message Mail.
• Stamp the page with the time and date the page was left.
• Store up to 16 page s, at a time, that will r e main until you del ete them.
• Allow for “Auto Call Back” of a phone number t hat is included within a
page, by pressi ng
Back will dial the last number.
NOTE: “Mail Waiting, Memory Ful l” displays when 16 message regis-
ters are full. (Messages must be erased before you can receive
others.)
e. If the page contains two phone numbers, Auto Call
62
www.nextel.com
Page 65

Text and Numeric Paging
Notification of New Pages
When a new page arrives:
• “New Mail Read?” displays.
c flashes at the top of the scr een.
•
• Phone rings every 30 seconds as an alert/reminder.
Accessing New Pages
When you receive a pa ge , you ca n vi e w it imme dia te l y or late r:
View a Page Immediately
1
Press o under “Now”. The number of new and saved pages is displayed briefly, followed by your first page.
2
Press o under “Read”.
3
Use the on the side of the phone to scroll through messages.
Viewing a Page Later
Press o under “Later”. The c icon will stop flashing but
theu icon will remain on the display to remind you that you have
a page.
Viewing Stored Pages
1
While in Phone Ready mode (see “Mo des and Menus” on page 23)
o under “Mail”.
press
2
If Mesg Mail isn’t highlighted already, press 2 to select it.
3
Press o under “Ok”.
4
Press o under “Read”.
5
Use the on the side of the phone to scroll through messages.
6
Press o under “Save” to Save the message. Or, press o under “Erase” to delete the message.
7
Press o under “Exit” to exit Mesg Mail.
63
Page 66

Auto Call Back
By simply pressing e while viewing a page, your Nextel Phone automatically
dials the number that appears on your screen, even if the number is included i n
the middle of a text page. This allows you to respond immed iately to important
pages without having to remember the caller’s number or fumble around for a
pen and paper to write it down.
NOTE: If the page you received contains two numbers, Auto Call Back
will dial the last number.
Sending a Page
Nextel’s Paging feature includes four options: Web Paging, Email Paging,
Numeric Paging and Operator Assisted Paging. To use these features review the
information below:
Web Paging
Nextel’s Web Paging enables you to page yourself, someone else or a group of
Nextel customers and includes Schedule a Page, which allows you to send
yourself reminders. To use Web Paging, follow the steps below:
1
From your computer’s Internet browser, go to www.nextel.com and click “Send a Page”.
2
The browser automatically opens to “Send an Individua l Page”. To page
an individual, or yourself, type the applicable 10-digit Nextel phone
number (for example, 7035551234) in the “To” field.
T o s e nd a G roup Page, select “Group Paging” under Options on the left
side of the browser page. In the “To” field, type an individual’s 10-digit
Nextel phone number. Next, click the “Add” button. The information is
inserted in a new window and the “To” field is cleared so you can enter
another 10-digit Nextel phone number. You can send a Group Page to
up to 20 Nextel users at one time.
3
To schedule a page for future delivery (up to 6 months in advance),
click on “Schedule a Page”. A new page appears with the following
fields: Month, Day, Year, Hour, Min. (Minutes) and AM/PM. Clic k the
down arrows at the end of each field to select the desired month, day,
etc. Then click on the “OK” button to store your selections. (The “Can-
cel” button closes the page without saving your select ions.)
4
Type a Subject and a message in the message box.
You can click on the “Count Characters” button to have the system tell
you the number of characters in your message. The total includes
characters from the “To”, “From”, and “Subject” fields as well as
system generated char acters. You can send text pages up to 280
characters in length, sent as two sequential 140 character messages.
www.nextel.com
64
Page 67

Text and Numeric Paging
5
Click “Send Page” to send the message. (The “Clear” button removes
the information from every field.)
6
A new browser page opens with a copy of your message, the recipient’s
telephone number and a Claim Number. You can write down the Claim
Number to check on the delivery status later.
Checking Delivery Status
To find out whether o r no t a mes sa ge w as d elivered, and, if so wh en , f ol l ow th e steps below:
1
Visit Nextel ’s home page at www.nextel.com.
2
Select “Send a Page”.
3
Select “Me ssage Status” under Options (located on the left side of the browser page).
4
Enter the Recipient Telephone Number and the Claim Number.
5
Click on the “Message Status” button. The system will display the requested information.
E-Mail Paging
From any email account, type the 10-digit phone number, of a Nextel
customer, in the “To” field an d add @page.nextel.com (for example,
7035551234@page.nextel.com). The entire message can be up to 140
characters.
Numeric Paging
• The caller must press “1” during your voice mail greetin g.
• Only numeric pa ge s ca n be sent.
Operator Assisted Paging *
• The caller can press “2” during your voice mail greeting. Or, call 1-800NEXGRAM (1-800-639-4726).
• A text page can be sent immediately or for future delivery.
• The operator will send the page.
* The Operator Assisted Paging feature is required. There is also an additional
charge for each message sent. For more information you can visit Nextel at
www.nextel.com or cal l 1-8 00-639-6111 or dial 611 from your Ne xt el phone.
65
Page 68

Nextel Worldwide
Nextel Worldwide Service
The Nextel WorldwideSM Service and the i2000 phone team-up to make keeping
in touch easier than ever when you travel internationally. With your i2000
phone you can call clients, partners and co-workers, check voice mail, and more
whether yo u’re closing a major deal in Europe or negotiating a new contract in
Canada.
SM
Service
About This Section
This section includes:
Setting the Way Your Phone Searches for Networks Page 66
Manually Searchin g for a Netwo r k Page 67
Creating Your Phone’s Network Prior ity List Page 68
NOTE: If you are unsure of the network you will be serviced by, please
call Nextel International Roaming Customer Care toll free at
1(201) 531-5202 or see www.nextel.com.
Setting the Way Your Phone Searches for Networks
You may want to configure the phone to search for a specific network or enable
it to select the best network. The i2000 phone enables you to select the option
that’s right for you. And, you have six options to choose from:
• Last Active—This is the phone ’s default setting. It enables the phone to
switch between iDEN and GSM syst ems that do not overlap (for example,
if you send/receive calls on an iDEN network while in New York. Then
you travel to Paris. Your phone will first search for an iDEN network. If it
cannot locate one, it will automatically search for a GSM network).
NOTE: This is the recommended setting, which reduces network regis-
tration time.
• Roam—This option is useful when you are in an overlapping systemcoverage area and have no preference for either the iDEN or the GSM
network. Your i2000 phone will switch between iDEN and GSM until it
finds an acceptable network.
• iDEN Preferred—This option is useful if your ho me sy st e m is iDEN and
you travel to a country or regi on where GSM coverage is also avail able.
Your i2000 phone always searches first for iDEN networks. If an iDEN
network is not found, your phone will then search for a GSM network.
• iDEN Only—This option is useful when you are in an area that is covered
by iDEN and GSM networks, but you want to use iDEN. Y our i2000 phone
attempts to register only on iDEN networks.
• GSM Preferred—This option is useful if your home system is GSM and
you travel to a country or region where iDEN is also available. Your phone
will always search for GSM networks first. If a GSM network is n ot found,
your phone will then search for an iDEN network.
66
www.nextel.com
Page 69

Nextel Worldwide Service
• GSM Only—This option is useful when you are in an area that is covered
by iDEN and GSM, but you want to use GSM. Your i2000 phone attempts
to register only on GSM networks.
NOTE: Nextel and other networks in North and Latin America are gen-
erally supported by iDEN. Networks in other areas of the world
are generally GSM networks. Be aware that some features that
are supported by iDEN networks are not supported when you
connect to a GSM network.
1
Press n until you see th e “Prgm” menu option.
2
Press o under “Prgm”.
3
Press 5 then 5. Press o under “Ok”.
4
Press s until you see the desired option.
a 1 b
55=Phone Sys
iDEN
Preferred
Exit Ok
a 1 b
Phone System
iDEN
Only
Cancl Ok
5
Press o under “Ok”.
6
Press o under “Exit” when finished.
Manually Searching for a Network
While you are on a GSM netwo r k, yo u ca n perf o rm an
automatic or manual search for available netwo rks. A
manual search allows you to vi ew the available networks
and make a selection rather than use the net w ork
automatically selected by the Nextel Worldwide Service.
1
Press n until you see th e “Prgm” menu selection.
2
Press o under “Prgm”.
a 1 b
57=GSM
Network
Search
Exit Ok
67
Page 70

3
Press 5 then 7.
4
Press o under “Ok”.
5
At the 57 =G SM N etwo r k Search screen, do one of the following:
a 1 b
57=GSM
Network
Search
Exit Ok
• Press
• Or, press
o under “Ok”.
s. At “Manual Search ”, press o under “Ok”.
Then press s to scroll through the network choices. The
network choices ap pe ar in the follo w in g order: Hom e, Preferred,
Available.
Creating Your Phone’s Network Priority List
While you are on a GSM network, you can add, edit, or erase your preferred list of networks.
1
Press n until you see the “Prgm” menu selection.
2
Press o under “Prgm”.
3
Press 5 then 8. Press o under “Ok”.
4
The Add New Entry? screen displays. (If you
have not added any entries, the Network List
Empty screen displays before the Add New
Entry? screen.)
a 1 b
58=GSM
Network List
Exit Ok
a 1 b
Add New
Entry?
Cancl Ok
5
At the Add New Entry? screen, press o under “Ok”. This selection opens a network screen.
www.nextel.com
68
a 1 b
UK Cellnet
234 10 UK
Available
Cancl Ok
Page 71

Nextel Worldwide Service
6
To add the network being displayed, press o under “Ok”. Or,
Press
s to view other avail a ble or known network s. At the
desired network screen, press
NOTE: You can assign numbers 1 through 8 to your preferred net-
work names. However, if you assign a new network name to
a number that already has a stored network name, you will
erase the stored name.
7
At the preferred network screen, for example, UK
Cellnet Pref#=_, assign a number, 1 through 8, to
the network name.
The number that you assign provides the priority
in which the phone looks for the systems when it
o under “Ok”.
a 1 b
UK Cellnet
Pref#=_
Cancl Store
is scanning the pref erred list of networ ks.
8
Press o under “Store”.
9
Repeat steps 5, 6 and 7 to add additional networks. Or, exit this feature press o under “Cancl”.
10
Press o under “Exit” to return to Phone Ready.
Editing Your Phone’s Network Priority List
The previous s ection e nable d you t o assi gn a num ber to a ne twork t o indic ate the
order in which you w ant e d the pho n e to sc a n for a pre f e rr e d ne tw o r k whe n
establishing a connection. In this section you will learn how to reassign a
number to a different net w or k.
1
Press n until you see th e “Prgm” menu selection.
2
Press o under “Prgm”.
3
Press 5 then 8. Press o under “Ok”.
4
The Add New Entry? screen displays. Press s until you see the
a 1 b
58=GSM
Network List
Exit Ok
Edit Entry? screen.
5
Press o under “Ok”.
6
Press s to scroll through your list of network.
69
Page 72

7
Press o under “Ok” when the screen displays the network you want to edit.
8
The phone displays the list of available networks. Press s until
the network you wan t to select displays.
9
Press o under “Ok”. The phone displays the priority number and the newly assigned ne twork.
10
Repeat steps 4 through 9 to edit additional entries.
11
Press o under “Cancl” at the Edit Entry? screen,
12
Press o under “Exit” at the GSM Network List screen to return to Phone Ready.
Erasing An Entry From Your Phone’s Network Priority List
1
Press n until you see the “Prgm” menu selection.
2
Press o under “Prgm”.
3
Press 5 then 8. Press o under “Ok”.
a 1 b
58=GSM
Network List
Exit Ok
4
The Add New Entry? screen displays. Press s until you see the Erase Entry? screen.
5
Press o under “Ok”.
6
Press s to view the network choices for each screen.
7
Press o under “Ok” when the screen displays the network you want to erase.
8
Press s to scroll through the list o f availabl e network s. Press o
under “Ok” when you view the network you want to erase from the list.
9
The Erase? screen appears again aski ng you to confirm your desire to
erase the displayed network from the list.
10
Press o under “Yes”. The network is removed from the list.
www.nextel.com
70
Page 73

Nextel Worldwide Service
Adding New Networks to Your Phone’s Known
Network List
While you are on a GSM network, you can add new network names and network codes to your kno w n list.
1
Press n until you see th e “Prgm” menu selection.
2
Press o under “Prgm”.
3
Press 5 then 6. The 56=GSM Network Name screen displays.
4
Press o under “Ok”. The Add New Entry? screen displays.
NOTE: Once you have added one new network
name and network code to your known
list, you also have the option to edit or
erase these names and codes.
5
At the Add New Entry? screen, press o under “Ok”. The Enter Code screen appears.
6
Enter the five- or six-digit network code.
a 1 b
56=GSM
Network Name
a 1 b
Add New
Entry?
Cancl Ok
a 1 b
Enter Code
_
Cancl Ok
Exit Ok
7
Press o under “Store”. T h e Enter Name screen then appears.
8
Enter the network name. Using your phone’s keypad, press the key that
has the character(s) you want to enter.
Each key, on your phone, has 3 to 4 letters. Whenever a key is pressed,
the first character shown on that key will appe ar first. To change letters,
quickly press the ke y until the desired lett er appears. For example, the
3 key contains the letters “d” “e” and “f”. When this key is pressed,
“d” will appear first. To enter an “e” you must press the 3 key two
times quic kly. To enter an “f” you must press the 3 key three t i mes
quickly.
NOTE: If you make a mistake, press l to backspace and delete
one or more character(s). Press
or more space(s) forward.
r to move the cursor one
71
Page 74

9
To add this network, press o under “Store”. (Selecting “Store” adds
the displayed network to your phone’s known network list. You can
now assign this net work a priority numb er. See “Creating Your Phone’s
Network Priority List” on page 68.)
10
Press o under “Cancl” at the Edit Entry? screen.
11
Press o under “Exit” at the GSM Network Name screen to return to Phone Ready.
72
www.nextel.com
Page 75

Private/Group Mode
Nextel Direct Connect
Nextel Direct Connect is a revolutionary way to communicate with your coworkers and clients...for a fraction of the cost of traditional cellular calls.
You may want to talk to a co-worker right away, but you don’t want to page that
person or leave a lengthy message. With Nextel Direct Connect’s Private Call
feature, you can find them wherever they are in yo ur home coverage area.
Or, maybe you need to communi cate a last-minute schedule change to your
sales people... all 100 of them. It’s easy with Nextel Direct Connect’s Group
Call. This digital two-way radio f eature lets you contact all of them at once!
In addition, Nextel has created Nextel Business Networks
to communicate with individuals outside as well as inside your company. These
Networks link Ne x tel customers in s im ila r in du s tr ie s or g e ographic region s . So ,
if you need to reach a client, vendor, or con t ractor instantly, work smarter by
joining the Nextel Business Networks. For more information, call 1-888NEXTEL2 (1-888-639-8352).
NOTE: Nextel Direct Connect® will only work in your home market area.
This section includes everything you will need to know to take advantage of
Nextel Direct Connect (two-way radio) service:
Using the Private/Group Speaker Page 74
Placing Private Calls Page 74
Receiving Private Calls Page 75
Quickstore of Private IDs Page 75
®
SM
, which allows you
Sending a Call Alert Page 76
Receiving/Responding to a Call Alert Page 76
Call Alert Queuing Page 77
Group Calls Page 77
Group-Silent Programming Page 79
73
Page 76

Displaying Your Private ID
1
Press n until you see the “Prgm” menu selection.
2
Press o under “Prgm” and press 2.
3
Press o under “Exit”.
Using the Private/Group Speaker
You can enable or disabl e the speaker on your i2000 phone for Direct Connect
use. When the speaker is on, the caller’s voice can be heard ove r the speaker.
When the speaker is off, the caller’s voice can only be heard through the
earpiece of your phone.
Turning the Speaker On
Press
k.
Turning the Speaker Off
k. p will appear on your display . A b rie f alert ton e will notify
Press
you of incoming Private or Group calls.
Placing Private Calls
From Private Mode, there are also two ways to reach an individual using Direct
Connect. You can enter the person’s Private ID number then press the Push-ToTalk button. Or, you can store the person’s name and private ID number, then
recall the number from a stored list. Whether you dial the person’s private ID
directly or store it in a list--you must have the individual’s private ID to use
Direct Connect. To learn how to store names and numbers, see “Storing Names
and Numbers” on page 26 if you haven’t done so already.
Entering the Private ID
1
Press m until you see
2
Enter the Private ID.
3
Press and hold the Push-To-T alk button on the side of the phone to talk.
Both phones will chirp before your voice can be heard.
4
Release the Push-To-Talk button to listen.
Prvt Ready
www.nextel.com
.
74
Page 77

Nextel Direct Connect®
Selecting a Name from a Stored List
1
Press m until you see
2
Press s to scroll through the names. Or,
n until “Name” appears. Press o under “Name” and en ter the
Press
first initial of the name then press s to scroll through the names.
3
Press and hold the Push-To-Talk button on the side of the phone. The
person’s phone will chirp to alert them that someone is calling.
4
Release the Push-To-Talk button to listen.
Prvt Ready
.
NOTE: You may receive certain display messages when making a
Direct Connect call. See
page 98.
“Understanding Status Messages” on
Receiving Private Calls
When you receive a Direct Connect call, your ph one will switch to Prvt Re ady .
You will hear a chirp indicating that someon e is calling you . Pres s and hold the
Push-To-Talk button to talk and release it to listen.
Quickstore of Private IDs
Quickstore allows you to quickly store a received or sent Private ID without
having to enter the Programming menu.
With the Private ID displayed:
1
Press o under “Store”.
2
Enter the name associated with the Private ID.
3
Press o under “Store”. The “Stored” message displays with the name that you entered.
75
Page 78

Sending a Call Alert
You can send a Call Alert, which lets the recipient know that you would like to
talk with them. When you send an alert, the recipient’s phone will chirp several
times and your name will appear on their display, if they have stored your
Private ID .
1
Press m until you see
2
Press o under “Alert”.
3
Select the person you wan t to alert by e ntering the ir Private ID or select-
Prvt Ready
.
ing their name from a stored list. (See “Selecting a Name from a Sto red
List” on page 75.)
4
Press and hold the Push-To-Talk button until “Alert-Sent Successful”
displays. The alert plays intermittently until the individual clears it.
Receiving/Responding to a Call Alert
When you receive an alert, your phone will automatically change to Prvt Ready
mode. It will also chirp and y ou will see the nam e or the nu mber (if you ha ve not
stored the individual in a list) of the caller.
1
Press and hold the Push-To-Talk button to answer the Call Alert.
2
Press o under “Clear”, or any key, to clear the Call Alert.
NOTE: Call Alert allows you to contact another Nextel Direct Connect
subscriber at no cost and avoid airtime charges.
NOTE: Until you answer or clear the Call Alert, you will not receive any
additional Phone, Private, or Group calls.
www.nextel.com
76
Page 79

Nextel Direct Connect®
Call Alert Queuing
Call Alert Queuing is a feature that allows you to save up to eight Call Alerts in a Queue or list.
Placing/Clearing a Call Alert in the Queue
When you receive a Call Alert, you can either clear the Call Alert or save it to
the list for later recall.
To clear a Call Alert, press
To place a Call Alert in the Queue, press o under “Queue” or m.
NOTE: If you receive multiple Call Alerts, the last received Call Alert
displays and the remaining Call Alerts are stacked at the beginning of the queue.
o under “Clear”.
Responding to a Call Alert within the Queue
You can respond to the Call Alerts in any order. To select a Call Alert for response:
1
Press o under “Queue”.
2
Press s to scroll to the desired Call Alert.
3
Press and hold the Push-To-Talk button to answer the Call Alert. After
you respond to the Aler t, it is removed from the queue.
Group Calls
In a Group call, you can c ommunicate instantly with a group of people (up to
100) that you have pre viously set up as a "Talkgroup". Your Sales
Representative or Nextel Customer Care must set up your Talkgroup by
providing you w ith a Ta lk group number fo r e ac h Ta lk gro up . Af t er you have the
number, you can assign each Talkgroup number a name and store it in your
i2000 phone (see “Naming a Talkgroup” on page 78).
Talkgroups appear on your display as numbers or programmed names such as
SALES TEAM or Talkgrp 5. Your Nextel Phone can store up to 30 Talkgroups.
You can receive Group calls only in the Talkgroups that you have predefined.
Any communication activity within a Talkgroup automatically switches your
phone to Group mode.
77
Page 80

Naming a Talkgroup
1
Press n until you see the “Prgm” menu selection.
2
Press o under “Prgm”.
1
Press 2 then 3.
2
Press o under “Ok”.
3
At Add New Entry?, press o under “Ok”.
4
At Enter ID, enter the desired Talkgroup number.
5
Press o under “Store”.
6
At Enter Name, enter the desired Talkgroup name.
7
Press o under “Store”.
8
When finished, press o under “Exit”.
Making a Group Call
1
From
Group
group.
Mode, press
s
to scroll to the desired Talk-
2
Press o under “Ok”.
3
Press and hold the Push-To-Talk button to talk. Release the Push-ToTa lk button to liste n.
Receiving a Group Call
When you receive a Group call, you will hear a chirp. Your Nextel phon e
automatically switches to Group mode and the Talkgroup name displays. To
join a Group call:
1
Wait for the caller to finish speaking.
2
Press and hold the Push-To-Talk button to talk. Release the Push-ToTa lk button to liste n.
NOTE: You can receive Group Calls only in the T alkg roup that you have
predefined.
www.nextel.com
78
Page 81

Nextel Direct Connect®
Group-Silent Programming
Group-Silent Programming enables yo u to silence incoming aler ts and voices:
Turning Group-Silent On/Off
1
Press n until you see th e “Prgm” menu selection.
2
Press o under “Prgm”.
1
Press 3 then 8.
2
Press o under “On” or “Off”. (The available option depends on the
current setting being used. For example, if “On” is the current setting,
“Off” will be an option.)
3
Press o under “Exit”. The Group Ready screen displays as Group- Silent.
79
Page 82

Customizing the i2000 Phone
Customizing the i2000
About This Section
You can customize the settings on your i2000 phone by changing the display
language, setting the date and time, and by using the programming menus.
Many of the menus have been discussed throughout this guide.
You may access the menus from the Phone, Private, or Group modes.
Changing the Display La ng ua g e Page 80
Setting the Time and Date Format Page 81
Setting the Ringer Volume Page 83
Selecting a Ring Style Page 83
Setting V ib ra C all ™ Page 84
Programming Menus Page 86
Changing the Display Language
You can customize your i2000 phone to display menus in English, Spanish,
French, or Brazilian Portuguese. The default language is English. You can
manually select one of these languages or have your i2000 phone select one for
you (Automatic). To change the displayed language:
1
Press n until “Prgm” is shown.
2
Press o under “Prgm” then press 7, then
0.
3
Press o under “Ok”.
4
Press s to scroll through the language
options. Selecting “Cancl” at any time retains the
current languag e sele c tio n.
www.nextel.com
80
a 1 b
70=Language
English
Exit Ok
a 1 b
Language
English
Cancl Ok
Page 83

Customizing the i2000
5
When the desired la nguage appears on your display, press
immediately changes to the selected language.
6
Press o under “Exit” to exit this menu.
o under “Ok”. The displayed text
a 1 b
Language
English
Cancl Ok
Setting the Time and Date Format
IMPORTANT: The Time an d Date may not be available in your area and may
not appear on your display. Once this feature becomes available, your i2000
phone will automatically display the local time and date.
NOTE: The Time and Date will not appear on your display when operat-
ing on Nextel Worldwide Service.
You have a choice of a 12- or a 24-hour clock format, as shown in the table below:
12-Hour Display 12:00 am 6:25 am 12:00 pm 10:25 pm
24-Hour Display 00:00 06:25 12:00 22:25
You have a choice of either a MM/DD (month/day) or a DD/M M (day/month)
date format as shown in the table below.
Date Month/Day Fo r m a t
(MM/DD)
Day/Month Format
(DD/MM)
January 2nd 01/02 02/01
December 31st 12/31 31/12
NOTE: All of the modes (Phone Ready, Pri v a te Ready and Group
Ready) display the time and date on the third line of the display.
To set the time and date format once this feature is activated,
follow these steps:
1
Press n until you see th e “Prgm” menu option.
2
Press o under “Prgm” then press 7 then
1.
a 1 b
71=Time/
Date
Exit Ok
81
Page 84

3
Press o under “Ok”. The Time/Date screen displays. The default (preset) time and date format is
set to “On”. However, the time and date does not
display until the Nextel National Network activates this feature.
4
Press s until you see the Tim e Fo rmat screen.
5
Do one of the followi ng:
• To use the 12-hour format, go to the next step.
•
To use the 24-hour format, press o under “24hr”.
6
Press s until you see the Date Format screen.
a 1 b
Tim e/Date
Display:On
Exit Off
a 1 b
Tim e Format:
12 Hour
Exit 24hr
a 1 b
Date Format:
MM/DD
DD/MM
Exit
7
Do one of the followi ng:
• To use the MM/DD format, press
o under “Exit”.
• To use the DD/MM format, press o under “DD/MM”.
8
Press o under “Exit” twice. The Phone, Private, and Group screens
now display the sele c t e d tim e an d da te fo r m ats.
www.nextel.com
82
Page 85

Customizing the i2000
Setting the Ringer Volume
You can adjust the ringer volume for incoming calls. For Alternate Line users,
be sure to select the phon e line b e fore se ttin g the ringer volume (See “Alternate
Line Service (not available on GSM)” on page 59.)
1
Press n until you see th e “Prgm” menu selection.
2
Press o under “Prgm” then press 3 then
0. The display sho w s your current ringer vol-
ume.
3
Press on the side of the phone to listen as you raise or lower the volume. The lowest setting is “Volume Silent”.
4
Once the desired le vel is found, press o under “Exit”.
Selecting a Ring Style
With your i2000 phone, you even have a choice on how you’d like to be notified
of incoming calls. Your Nextel phone has nine selectable ring styles. Customers
with Alternate Line service can use the s ame ri ng style or different ring styles
for each phone lin e, so you can tell which line is ringing. Make s ure you are on
the correct line when selecting a ring style .
a 1 b
30=Ringer
Volume
Exit
1
Press n until you see th e “Prgm” menu selection.
2
Press o under “Prgm” then press 3 then 1.
The display shows your current ring style.
3
Press o under “Ok”.
4
Press s to scroll through the ava i lable Ring Styles.
5
Press on the side of the phone to listen to the selected ring style.
6
Once the desired ri ng is found, press o under “Ok”.
7
Press o under “Exit”.
a 1 b
Ring
Style 4
Cancl
Ok
83
Page 86

Setting VibraCall
™
VibraCall is a vibration alert system that notifies you of incoming Phone,
Private, or Group calls and messages by vibration. You can select this alert
system for all incoming calls/messages, or select individual services for
VibraCall.
NOTE: When you set vibration alerts, they are set only for the current
line. If you have a second phone line, you must select “Line
2” and repeat the procedure for selecting all services or
selecting individu al servi ces t o vibra te.
VibraCall Settings What this setting d oes
Vibrate Alert
Vibrates for all incoming calls and messages.
q -- Vibrate All appears on the display.
p-- Speaker Off appears on the display to
remind you that the audio will be heard through
the earpiece instead of the speaker.
Phone Vibrate
Phone Vibrate/
Ring
Mail Vibe
Group/Prvt Vibe
Vibrates only for incoming phone calls.
Vibrates and rings for incoming phone calls.
Vibrates for incoming mail messages.
Vibrates for incoming group and private calls.
84
www.nextel.com
Page 87

Setting VibraCall™
Using Vibrate Alert (for all incoming calls and messages)
1
Press n until you see th e “Prgm” option.
2
Press o under “Prgm”, press 9 then o
under “All”. The i2000 phone will emit a brief
vibration and also on subsequent power-ups.
a 1 b
9=Vibrate
Alert:Off
Exit
All
Or, use the following shortcut:
q once.
Press
Using Phone, Mail and Group/Prvt Vibrate Option
To use Phone Vibrate, Phone Vibrate/Ring, Mail Vibe or Group/Prvt Vibe follow the steps below:
1
Press n until you see the “Prgm” option.
2
Press o under “Prgm”, press 9.
3
Press n until you see the “Selct” option.
4
Press o under “Selct”. The first selection is Phone Vibrate. Then-
s to scroll to Mail Vibe, then Group/Prvt Vibe.
press
• T o use Phone V ibrate/Ring, from Phone Vibrate display, press
o under “V/Rng”.
press
5
Press o under “On” or “Off” (whichever is applicable).
6
Press o under “Exit”.
nthen
85
Page 88

Programming Menus
1
Press n until you see “Prgm” on the display.
2
Press o under “Prgm”.
3
Press o under “Ok”.
4
Press s to scroll to the desired programming menu optio n or enter the option keypad number.
Programming Menus Shortcut and Options
Option
Number
1
2
3
4
5
6
Menu
Option
Own Ph #
Own Pvt ID
Mail Display:
On/Off
Manual Lock:
On/Off
Auto Lock:
On/Off
Auto Answer:
On/Off
Function
Automatically stores the telephone
number of your Nextel phone after you
receive the first incoming call. Or, you
can enter the number. Also, view your
number. See “Programming Your Own
Phone Number” on page 31.
Displays the private ID number of your
phone. See “Displaying Your Private
ID” on page 74.
Turns on and off the New Mail message
that is displayed with incoming Voice or
Message.
Locks your phon e to prev en t
unauthorized use. You must enter a
password to unlock it.
Even with the manual lock on, you can
reach emergency help by pressing and
holding the
Automatically locks your phone each
time it is powered off to prevent
unauthorized use.
Turns on or off automatic answering of
incoming phone calls after 1-4 rings.
9 key.
86
www.nextel.com
Page 89

Programming Menus
Option
Number
9
10
11
12
13
14
20
21
Menu
Option
Vibrate Alert:
On/Off
Last Call
Timer
Display Timer:
On/Off
Reset Timer
Tota l Timer
1 Minute Beep:
On/Off
Phone/Prvt
List
Phone List
Edit
Function
Provides non-aud ible notification of
incoming phone calls and messages. See
“Last 10 Numbers Received/Sent Call
List” on page 37.
Displays the duration of the most recent
phone call.
Turns on or off automatic display of the
Last Call Time r at th e en d of ea c h ph on e
call.
Displays cumulative airtime of all phone
calls since the last time the timer was
reset.
Displays cumulative airtime of all phone
calls.
Automatically signals each minute of
elapsed phone airtime with an audible
beep.
Adds phone and private numb ers in one
procedure. See “Creating, Editing and
Using Stored Lists” on page 26.
Edits or erases up to 1 00 frequently
called phone numbers and asso ciated
names. See “Edit a Phone Number or
Associated Name or Speed Dial
Number” on page 29.
22
23
24
30
Prvt ID List
Edit
Talkgrp List
Program
Area List
Program
Ringer Volume
Edits or erases up to 100 Private numbers
and associated names. See “Editing a
Private ID or Associated Name” on page
29.
Adds, edits, or erases numbers and
associated names for up to 10 preprogrammed talkgroups. See “Naming a
Talkgroup” on page 78.
Adds, edits, or erases numbers and
associated names for up to 50 targeted
areas.
Sets the ringer volume using the volume
control keys, or lower the volume to
silence the ringer.
87
Page 90

Option
Number
31
32
33
34
35
36
38
40
46
47
55
56
Menu
Option
Set Ring Style
Mail Volume
Earpiece
Volume
Keypad
Volume
Speaker
Volume
Spkr Vol Set
Tone
Silent Group
Change
Passcode
Change SIM
PIN
Require SIM
PIN
Phone Sys
GSM Network
Name
Function
Selects a distinct ring style for incomi ng
phone calls.
Sets the volume of incoming pages and
Voice Mail using the volume control
keys. Or lower the volume to silence the
mail alert tones.
Set the default earpiece volume using the
volume control keys.
Sets the volume of the keypad tone s
using the volume control keys, or to
silence the keypad tones.
Temporarily adjusts the Private/Group
speaker or Speakerphone volume for
noisy environments.
Turns the speaker v olum e set to nes o n or
off.
Silences all incoming Group Call alerts
and voice activity. When set, your screen
displays the message, “Group-Silent”.
See “Group-Silent Programming” on
page 79.
Changes your s ec r e t fo ur-digit pass w ord
from the initial setting 0000.
Changes your pe r s on a l SI M car d PIN
from the initial setting of “0000”.
Sets or removes PIN requirement when
you turn on your i2000 phone.
Sets your i2000 phone for travel by
choosing a phone system setting.
Adds, edits, or erases network names and
network codes to the known list. (GSM
use only)
88
57
58
GSM Network
Search
GSM Network
List
Automatically or manually searches for
an available network. (GSM use only)
Adds, edits, or erases entries in your
preferred list. View entries from the
known list. (GSM use only)
www.nextel.com
Page 91

Programming Menus
Option
Number
70
71
Option
Number
41
42
43
Menu
Option
Language
Time/Date
Do not attempt to use program menus 41, 42,
43, 51 and 60 be cause you can permanently
Warning
damage your ph one. They are for Nextel
Customer Care use only and should never be
programmed by customers unless directed to
do so by technical support.
Menu Option Function
Feature Reset
Master Clear
Master Reset*
Selects one of four languages for your
display text. The default is English. See
“Changing the Display Language” on
page 80.
Selects the standard or military time and
MM/DD or DD/MM date format.
Returns all feature settings to their
original defaults.
Performs Feature Reset and erases
all stored lists.
Resets the phone’s identificatio n
number.
* This feature does not display whil e
connected to GSM networks.
Warning
Function
And, it must never be
used outside of the U.S.
51
60
Net ID
Set Baud Rate
Edits the pre-programmed
Network number list and select
roaming options.
This option should not be used. It
is recommended that you leave it
at the default setting.
NOTE: This option is only avail-
able with the data feature
and is not used with this
phone.
89
Page 92

Ordering Information
Nextel Busi ness Networks allow you to communicate with individuals
outside as well as inside your company. These Networks link Nextel cu stomers in similar industries or geographies. So, if you need to reach a
client, vendor, or contractor instantly, work smarter by joining the Nextel Business Networks. Call 1-888-NEXTEL2 (1-888-639-8352).
Various acc ess ories a r e a vail able fo r use wi th you r i2 000 pho ne, in cluding a Hands-Free Car Kit, Swivel Belt Clip, Cigarette Lighter Adaptor
and International power adaptors. To order accessories discussed in
this guide, or for a br ochure of additional acces sories, cal l Ne xt e l Ne xt -
day Accessories at 1-800-914-3240 or contact your Nextel Authorized
Representative.
Call Nextel Customer Care at 1-800-639-6111 or 611 from your i2000
to order any services discussed in this guide, including Direct Connect,
Additional Phone Services, Voice Mail, Paging Features and much
more!
For Information on Direct Protect
SM
insurance protection for your Nex-
tel phone and more, call 1-888-352-9182 or contact your Nextel Authorized Representative.
Visit us at www.nextel.com
to learn more about Nextel products and
services!
www.nextel.com
90
Page 93

Accessories
Accessories
About This Section
This section includes the following topics:
Leather Carry Case Page91
Batteries Page 91
Travel Charger Page 92
Cigarette Lighter Adaptor Page 93
Desktop Dual-Pocket Charger Page 95
Audio Adaptor Page 96
Dash Mount Holder Page 97
Leather Carry Case
The leather carry case with belt clip allows for ea sy attachment to a belt or
purse. This case accommodates i2000 phone travel chargers, audio accessories,
car accessories, and all battery types.
Batteries
NOTE: For best results, charge the batteries within the temperature
range of 10
NOTE: Prolonged charging is not recommended. For battery charging
guidelines, see Table below.
o
C to 40oC (50oF to 104o).
Charging Lithium Ion Batteries
Table provides the approximate time to fully charge a battery usin g a Motoro la
iDEN Approved Lithium Ion battery charger.
Table 1: Battery Charging Times
MOTOROLA BATTERIES
Kit Number Description/Chemistry
Charging Time
a
NTN1645 Slim Lithium Ion 2.5 Hours
NTN1644 Standard Lith iu m Ion 3 Hours
a. Charging times are based on a fully discharged battery.
91
Page 94

For optimal battery life, use a Motorola iDEN Approved Lithium Ion battery
charger with your Motorola iDEN Lithium Ion battery. Other chargers may not
fully charge your Lithium Ion battery or may yield a reduced number of cycles.
Battery Operating Instructions
• Extreme temperatures will d e grade b at ter y p erf orm anc e . Do n ot store yo ur
battery where temperatures exceed 60°C (140°F) or fall below -20°C (4°F).
• This Lithium Ion battery has a self d ischar ge rate an d witho ut use, wil l lose
about 1% of its charge per day.
• The battery capacity will be degrad ed if stored for lo ng perio ds whil e fully
charged. If long term storage is required, store at half capacity.
• The Motorola iDEN Approved Lithium Ion chargers will provide opti mum
performance. Other chargers may not fully charge your iDEN Lithium Ion
battery or may yield reduc ed number of charge cycles.
• If the battery appears inoperative, the internal protection circuitry may
have been activated. Remov e the batte ry fro m the ph on e an d pu t it in to th e
charger for several minutes to reset the circuitry.
• When batteries are not in use, always store them in the plastic safety tray.
Travel Charger
Using the NPN6197 Travel Charger, you can charge a battery from an AC
outlet. On one end of the Travel Charger, an accessory connector attaches to the
bottom of the phone unit. At the other (AC outlet) end of the device, there is a
compact housing that contains the plug-in power supply. A lightwei ght cable
connects the two en ds (ac c ess ory connector an d s up ply).
A power light (green LED) on the accessory power supp ly indicates that the
Travel Charger is plugged in.
Additional adaptor plugs to accommodate various European power outlets can be purchased separately.
92
www.nextel.com
Page 95

Using the Travel Charger
Accessory Connector
Transformer
1
While holding the i2000 phone with its front toward you, insert the
accessory connector (with the Motorola logo facing you) into the
slot on the bottom of the i
2
Flip open the prongs, and plug the Travel Charger transform er in t o an
2000 phone until you hear a click.
AC wall outlet. The power light (green LED) on the accessory power
supply will come on.
Travel Charger Operating Specifications
Input voltage range: 90-264 VAC @ 50/60 Hz.
Operating temperature range: 0°C to +50°C
Accessories
Cigarette Lighter Adaptor
The NTN1628 Cigarette Lighter Adaptor provides power to the phone and
charges the phone’s Lithium Ion battery.
The power light (green LED) will light when the adaptor is receiving power.
93
Page 96

Using the Cigarette Lighter Adaptor
Cigarette Lighter
Accessory
Connector
1
Attach the Cigarette Lighter Adaptor’s accessory connector to the bot-
tom of the i2000 phone. While holding the i2000 phone with its front
toward you, insert the accessory connector (with the Motorola logo facing you) into the slot on the bottom of the i2000 phone until yo u hear a
click.
2
Remove the vehicle’s cigarette lighter plug from the cigarette lighter receptacle.
Adaptor
Accessory
Connector
3
Plug the cigarette lighter adaptor into the cigarette lighter receptacle.
The power light (green LED) will come on.
4
The i2000 phone may be turned off, turned on, or in use.
Removing the Cigarette Lighter Adaptor
1
Unplug the adaptor’s cigarette lighter adaptor from the vehicle’s cigarette lighter receptacle.
2
Press the latches on the accessory connector.
3
Pull the accessory connector from the bottom of the i2000 phone.
www.nextel.com
94
Page 97

Accessories
Cigarette Lighter Adaptor Operating Specifications
Operating volt a ge range: 10.8 - 33.0 Vdc.
Operating temperature range: -30°C to +60°C
Desktop Dual-Pocket Charger
The NTN1627 Desktop Dual-P ocket Charger charges Motorola authorized
batteries, as listed on page 91, for the i2000 phone.
Front Pocket
LED
Indicators
Figure 4.
1
Plug the flat end of the power-supply cord, with the logo facing
Pin Connector
Rear Pocket
Power Supply Cord
down, into the receptacle labeled “Charging” on the back of the
charger.
2
Plug the transformer end of the power-supply cord in to any standard AC wall outlet.
3
Insert an i2000 phone with an attached battery, into the charger’s front
pocket. This is done by inserting the bottom of the i2000 phone into the
pin connector in the bottom of the charger’s front pocket.
4
If the i2000 phone is properly seated in the front pocket, the charger’s
front pocket LED indicator will light green to indic ate that the battery is
being charged. If a battery is in the rear pocket and the i2000 phone
with a battery is inserted into the front pocket, the battery in the front
pocket will charge to full capaci ty be for e the batte ry in the rea r pock et
is charged. The LED for the rear pocket will flash yellow, indicating
that its battery is waiting to be charged.
5
The charger has the capability of displaying the battery’s charge status.
The indicator will show the following: solid red=1-30%; solid yellow=31-60%; flashing green=61-90%; soli d gr een=91-100%.
95
Page 98

Audio Adaptor
The Audio Adaptor connects an earpiece microphone to your i2000 phone for
privacy and hands-free operation.
The Audio Adaptor fits onto the bottom of the i2000 phone and provides a
standard 2.5mm jack connection for an ear piece microphone or he adset. (The
Audio Adaptor will be packaged with an audio accessory, such as an earpiece
microphone or a headset.)
Using the Audio Adaptor
Audio Adaptor Connector
Buttons
Release
2.5mm jack
1
Hold the phone and the Au dio Adaptor facing you so that you see the Motorola logo on the adaptor.
2
Insert the Audio Adaptor’s connector into the i2000 phone receptacle.
You will hear the connector snap into place.
Attaching/Detaching the Earpiece Microph one
1
Insert the 2.5mm plug of the earpi ece microphone cord into the jack of the Audio Adaptor.
2
Pull on the plug, not the cord, to remove the earpiece microphone.
Removing the Audio Adaptor
1
Press the buttons on the side of the Audio Adaptor.
2
Pull the Audio Adaptor from the i2000 phone.
www.nextel.com
96
Page 99

Dash Mount Holder
The Dash Mount Holder provides a convenient holder for your i2000 phone.
The Dash Mount Holder can be installed either horizontally or vertically.
Do not place the dash mount
holder over the air bag or in the air
bag deployment area.
Using the Dash Mount Holder
1
Mount the Dash Mount Holder to the dash of your vehicle by securing
the four self-tapping screws to the base of the holder. Or , for a semi-permanent installation, use an adhesive strip.
2
Snap your phone secu r e ly int o t he hold e r.
97
Page 100

Other Important Information
About This Section
This section includes the following topics:
Nextel Customer Care Page 98
Understandi ng Status Messages Page 98
Nextel Terms and Conditions of Service Page 100
Nextel Customer Care
Relax! Nextel Customer Care is here to help. There are lo ts of features packed
into your Nextel Worldwide Service...and into your i2000 phone. But don’t
worry. If, after reading this guide, you still have questions about coverage,
billing, Nextel Direct Connect or any other service or feature, call us.
International Roaming Customer Care Support: 1(201) 531-5202 (toll free) or
Domestic Customer Care: 1(800) 639-6111 or 611 from your Nextel phone.
We’ll be happy to give you help, explanations and anything else you need to
enjoy your Nextel Worldwide Service as soon as possible!
Before you call Nextel Customer Care for service or to resolve an issue, be sure
to have your SIM ID number and your model number ready. The SIM ID can be
found on the SIM card, and the mo del number is located on your Nextel phone
behind the battery. You’ll want to record these numbers, and keep them handy,
so that you can replace the battery prior to making your call.
Understanding Status Messages
You may receive status messages under certain conditions. Before contacting
your carrier, note the mess a ge , nu m eric code, and the conditi ons under which it
appeared. The following table lists and describes the status messages.
Status Messages Message Description
Number Not in Service
User Not Available
User Not Authorized
Please Try Later
98
The number that you entered is not valid.
The phone that you called is either busy, out-
of-range, or turned off. Please try again later.
The party that you called has not pur c hased
this service.
This service is temporarily not available.
Please try again later.
www.nextel.com
 Loading...