

Page 1
i2000_en.bk : intro.fm5 Page 1 Wednesday, February 23, 2000 7:58 AM
Congratulations on purchasing your Motorola Timeport i2000,
digital, portable global phone. The use of state-of-the-art
technology, called GSM (Global System for Mobile
Communications) and iDEN, provides world-wide services to keep
you in touch constantly with your business and personal contacts
wherever you travel.
A removable SIM (Subscriber Identity Module) card holds all your
personal information, including secure Personal Identification
Numbers (PINs), names, and phone numbers. Just as you protect
your credit and bank cards with PINs, you can safeguard your SIM
card with a PIN.
AThis user guide describes the features of the i2000 as they
were set up by Motorola. However, your Service Provider or
your organisation may have changed or added features. For
more information, check with your Service Provider or your
organisation.
Your i2000 offers:
Phone Mode
•
Messaging Services
•
- for cellular phone operation.
Introduction
- for messages and voice mail.
Introduction
1 English
Page 2
i2000_en.bk : intro.fm5 Page 2 Wednesday, February 23, 2000 7:58 AM
English
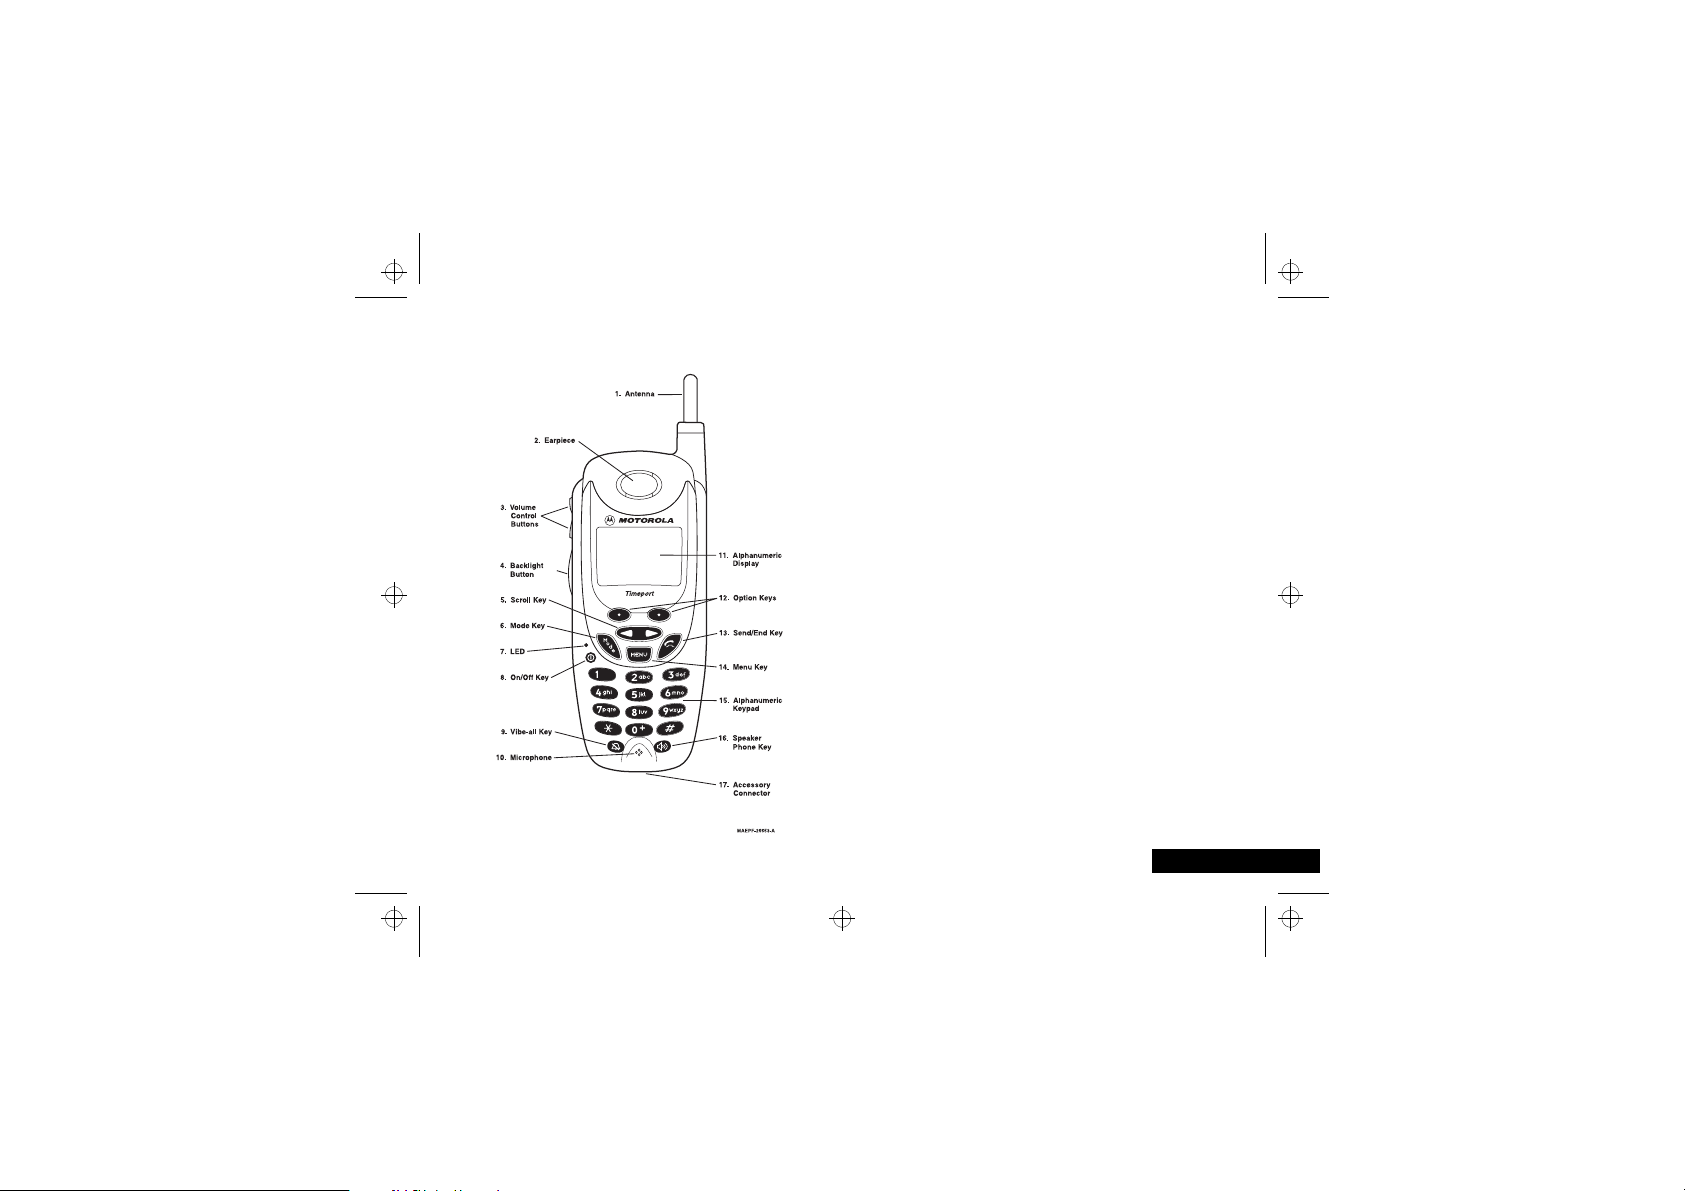
1.
2.
3.
4.
5.
6.
7.
8.
9.
10.
11.
12.
Antenna
Earpiece
Volume
Control
Buttons
Backlight
Button
Scroll Key
Mode Key
LED (Light
Emitting
Diode)
On/Off Key
Vibe-All Key
Microphone
Alphanumeric
Display
Option Keys
Introduction
2
Extend for optimal signal.
Listen to calls when the speaker phone is
off.
Press to adjust volume levels in the Phone
mode. In mail menus, press to scroll
forward and backward.
Press and hold to activate the backlight in
the display. (Insufficient light conditions
only).
Press the left side to scroll backward or the
right side to scroll forward through menu
options and lists. When entering text, press
the left side to erase text or right side to
add a space.
Press to select either phone mode or
programming mode.
Check the phone’s status.
Press and hold to turn your i2000 on or
off.
Press to silence or turn on the ringer tone.
Speak into this during calls.
View up to four lines (up to 12 characters
per line) on the display.
Press the right or left option key to select
the menu option that appears directly
above the key.
13.
14.
15.
16.
17.
Send/End Key
Menu Key
Alphanumeric
Keypad
Speaker
Phone Key
Accessory
Connector
Press to answer an incoming phone call.
After entering a phone number, press to
dial the call or to redial the entered phone
number. Press to end phone calls.
Press to scroll through menu options.
Enter telephone numbers and
alphanumeric characters.
Press to activate the speaker phone during
a phone call.
Use to connect accessories or the battery
charger.
Page 3
i2000_en.bk : intro.fm5 Page 3 Wednesday, February 23, 2000 7:58 AM
Getting Started
In order to get started straight away with your new i2000, follow
these steps:
Charge the Battery
! Before you use your phone, please read the following
for important information on battery charging.
1
Remove the battery from its holder and clip it into your phone.
2
Connect the travel charger to the phone and plug it into a
standard mains socket.
Powering On
1
Insert the SIM card into the tray on the back of your phone
(under the battery).
AThe i2000 supports a 3 Volt SIM card only.
2
Press S to switch on.
3
If prompted, enter your PIN code.
Once a GSM or iDEN network is located by your phone, it
connects and the network name appears on the display.
Making a Call
1
Enter the number you want to call.
AEven if you call a local number, you must include the full
area code but not the country code. However, to call a local
number when you are in the USA, you must include both
the country code and the area code.
AIf you make a mistake, press ´ once to move back one
digit, or select Cancl to start again.
2
Press ° to place the call.
IMPORTANT! Ending a Call
When you have finished your conversation, you must end the
call, even if the other person terminates the call. To end the call,
press °.
AIf you do not end the call, you will remain connected and
you will be charged for the duration of the connection.
Introduction
3
English
Page 4

i2000_en.bk : intro.fm5 Page 4 Wednesday, February 23, 2000 7:58 AM
Understanding this Manual
Many of your phone options are accessed by a simple menu
system. A full description of how to navigate around your phone
is covered in the next section Navigation.
Key Presses
Key presses are represented in this manual using symbols so that
you may locate and use the required sequence quickly. A
sequence of key presses may be shown as follows:
³48
This means that you should press the ³ key followed by the
4 key and then the 8 key, in sequence, not
simultaneously.
Entering Information
When you are requested to enter information, such as the
number of the phone you wish to call, this is represented in
type. For example:
C - enter the required telephone number.
A - enter your Personal Identification Number.
B - enter your unlock code.
English
4
Introduction
Prompts and Messages
Your phone responds to key presses by displaying either easy to
understand prompts that guide you to the next action, or simple
messages confirming that your action is complete. Prompts and
messages are represented in this manual in LCD style, for
example:
Enter PIN or Completed.
Other Symbols
You will find the following symbols used throughout this manual:
AA Note contains additional information which is relevant to
the feature/item.
! A Caution contains important additional information
which is relevant to the efficient and/or safe usage of
your phone.
bold
Page 5

i2000_en.bk : intro.fm5 Page 5 Wednesday, February 23, 2000 7:58 AM
Navigation
A large number of your phone's options are accessed by using
menus which use a common approach for selection, change and
cancellation.
Please read this section carefully before attempting to access a
menu option. When you understand the common approach to
menu navigation and how the menus are shown on the page,
you will be able to access and change options with ease.
About Menus
To select menu options:
1
Press $ until you see the desired menu option.
2
Press ± under the desired menu option to select it.
For example, when there is the word PRGM above the ± key,
pressing this key takes you into the Programming menus.
Introduction
5
English
Page 6

i2000_en.bk : intro.fm5 Page 6 Wednesday, February 23, 2000 7:58 AM
Total Customer Satisfaction
At Motorola, Total Customer Satisfaction is a top priority. If you
have a question, a suggestion or a concern about your Motorola
Cellular Phone, Motorola wants to hear from you.
Please contact the Motorola Cellular Response Centre by fax on:
+44 (0) 131 458 6732, or use one of the local phone numbers in
the following countries:
Austria 0800 297246
Belgium 0800 72 370
Czech Republic 00420 2 21 85 21 01
Denmark 4348 8005
Egypt 02 3411800
Eire 01 402 6887
Finland 0800 117 036
France 0 803 303 302
Germany 0180 35050
Greece 00800 441 28150
Italy 02 696 333 16
Jordan 06 863750
Kuwait 484 2000 Ext 1177
Lebanon 01 744156
Luxembourg 0800 21 99
Netherlands 0800 022 27 43
Norway 22 55 10 04
Oman 790925
Portugal 01 318 0051
English
6
Introduction
Qatar 418999
Saudi Arabia 01 2303294
South Africa 0800 11 48 49
Spain 902 100 077
Sweden 08 445 1210
Switzerland 0800 553 109
Turkey 0212 425 9090
UK 0500 55 55 55
United Arab Emirates 04 32 11 66
Hong Kong 852 25063888
People’s Republic of China 86 10 68466060
Singapore 65 4855 333
Taiwan 886 2 87731746
United States of America 1 800 331 6456
Canada 1 800 461 4575
For e-mail queries contact:mcrc@ei.css.mot.com
For Internet queries contact:http://www.mot.com
Page 7

i2000_en.bk : intro.fm5 Page 7 Wednesday, February 23, 2000 7:58 AM
Motorola’s Warranty
Your Cellular Phone is warranted by Motorola to be of
satisfactory quality, fit for its purpose and comply with applicable
Motorola specifications for a period of twelve (12) months from
the date you bought it (verified by reference to your proof of
purchase).
This warranty does not apply if the phone has:
1
been mishandled, misused, wilfully damaged, neglected,
improperly tested, repaired, altered or defaced in any way.
2
a defect arising as a result of any failure to follow instructions
either in the manual or product specification.
3
a defect which has arisen from the use of non-Motorola
approved accessories or ancillary items attached to or in
connection with the telephone.
This warranty does not affect your statutory rights as a consumer.
Warranty conditions may vary depending on the country in which
you bought the phone.
Introduction
7
English
Page 8

i2000_en.bk : intro.fm5 Page 8 Wednesday, February 23, 2000 7:58 AM
English
8
Introduction
Page 9

i2000_en.bk : toc.fm5 Page 9 Wednesday, February 23, 2000 7:58 AM
Contents
Safety
Important information for the efficient and safe operation of your phone ..............................................................................11
About Your Phone, Battery and SIM Card
Introduces your phone, explains how to charge and maintain batteries, explains about your SIM Card............................... 15
Making and Receiving Phone Calls
Explains how to make single or conference calls, how to redial, how to transfer a call, and how to end a call....................21
Using Your Phone’s Features
Describes how to set up your phone, select networks, Voice Mail and SMS Message Services ..............................................35
Setting Programming Menus
Explains how to customise the settings on your phone by using the Programming Menu .....................................................43
Accessories
Details the accessories available for use with your phone..........................................................................................................47
What To Do If...
Helps you to solve any problems that may occur and provides a list of status messages........................................................49
Index
A comprehensive Index .................................................................................................................................................................. 53
The Manufacturer reserves the right to make changes in technical and product specifications without prior notice.
Contents
9
English
Page 10

English
i2000_en.bk : toc.fm5 Page 10 Wednesday, February 23, 2000 7:58 AM
10
Contents
Page 11

i2000_en.bk : safety.fm5 Page 11 Wednesday, February 23, 2000 7:58 AM
IMPORTANT
For the efficient and safe operation of
your wireless handheld portable
telephone, observe these guidelines.
Exposure To Radio Frequency Signals
Your wireless handheld portable telephone is a low power radio
transmitter and receiver. When it is ON, it receives and also sends
out radio frequency (RF) signals.
European and International agencies have set standards and
recommendations for the protection of public exposure to RF
electromagnetic energy.
•
International Commission on Non-Ionizing Radiation
Protection (ICNIRP) 1996
•
Verband Deutscher Elektringenieure (VDE) DIN-0848
•
Directives of the European Community, Directorate General V
in Matters of Radio Frequency Electromagnetic Energy
•
National Radiological Protection Board of the United
Kingdom, GS 11, 1988
•
American National Standards Institute (ANSI) IEEE.C95.1-1992
•
National Council on Radiation Protection and Measurements
(NCRP). Report 86
•
Department of Health and Welfare Canada. Safety Code 6
These standards are based on extensive scientific review. For
example, over 120 scientists, engineers and physicians from
universities, government health agencies and industry reviewed
the available body of research to develop the updated ANSI
Standard.
The design of your phone complies with these standards when
used normally.
Antenna Care
Use only the supplied or approved replacement antenna.
Unauthorised antennas, modifications or attachments could
damage the phone and may violate FCC regulations.
Phone Operation
Normal Position
telephone with the antenna pointed up and over your shoulder.
Tips on Efficient Operation
efficiently:
•
Extend your antenna fully (if applicable).
•
Do not touch the antenna unnecessarily when the phone is in
use. Contact with the antenna affects call quality and may
cause the phone to operate at a higher power level than
otherwise needed.
:
Hold the phone as you would any other
Safety
:
For your phone to operate most
Safety
11
English
Page 12

i2000_en.bk : safety.fm5 Page 12 Wednesday, February 23, 2000 7:58 AM
Batteries
! All batteries can cause property damage, injury or burns
if a conductive material such as jewellery, keys or
beaded chains touches exposed terminals. The material
may complete an electrical circuit and become quite hot.
To protect against such unwanted current drain,
exercise care in handling any charged battery,
particularly when placing it inside your pocket, purse or
other container with metal objects. When the battery is
detached from the phone, your batteries are packed
with a protective battery cover; please use this cover for
storing your batteries when not in use.
Driving
Check the laws and regulations on the use of wireless telephones
in the areas where you drive. Always obey them. Also, if using
your phone while driving, please:
•
give full attention to driving - driving safely is your first
responsibility
•
use hands-free operation, if available
•
pull off the road and park before making or answering a call if
driving conditions so require.
Electronic Devices
Most modern electronic equipment is shielded from RF signals.
However, certain electronic equipment may not be shielded
against the RF signals from your wireless phone.
English
12
Safety
Pacemakers
The Health Industry Manufacturers Association recommends that
a minimum separation of six (6”) inches be maintained between
a handheld wireless phone and a pacemaker to avoid potential
interference with the pacemaker. These recommendations are
consistent with the independent research by and
recommendations of Wireless Technology Research.
Persons with pacemakers:
•
ALWAYS
Should
their pacemaker when the phone is turned on.
•
Should not carry the phone in a breast pocket.
•
Should use the ear opposite the pacemaker to minimise the
potential for interference.
If you have any reason to suspect that interference is taking
place, turn your phone
Hearing Aids
Some digital wireless phones may interfere with some hearing
aids. In the event of such interference you may want to consult
your hearing aid manufacturer to discuss alternatives.
Other Medical Devices
If you use any other personal medical device, consult the
manufacturer of your device to determine if they are adequately
shielded from external RF energy. Your physician may be able to
assist you in obtaining this information.
Turn your phone
regulations posted in these areas instruct you to do so. Hospitals
or health care facilities may be using equipment that could be
sensitive to external RF energy.
keep the phone more than six inches from
OFF
immediately.
OFF
in health care facilities when any
Page 13

i2000_en.bk : safety.fm5 Page 13 Wednesday, February 23, 2000 7:58 AM
Vehicles
RF signals may affect improperly installed or inadequately
shielded electronic systems in motor vehicles. Check with the
manufacturer or its representative regarding your vehicle. You
should also consult the manufacturer of any equipment that has
been added to your vehicle.
Posted Facilities
Turn your phone
require.
OFF
in any facility where posted notices so
Aircraft
FCC regulations prohibit using your phone while in the air.
OFF
Switch
your phone before boarding an aircraft.
Blasting Areas
To avoid interfering with blasting operations, turn your phone
OFF
when in a “blasting area” or in areas posted: “turn off two-
way radio”. Obey all signs and instructions.
Potentially Explosive Atmospheres
Turn your phone
area with a potentially explosive atmosphere and obey all signs
and instructions. Sparks, from your battery, in such areas could
cause an explosion or fire resulting in bodily injury or even death.
Areas with a potentially explosive atmosphere are often, but not
always clearly marked. They include fueling areas such as
gasoline stations; below deck on boats; fuel or chemical transfer
or storage facilities; areas where fuel odors are present, i.e. if a
gas/propane leak occurs in a car or home; areas where the air
contains chemicals or particles, such as grain, dust, or metal
powders; and any other area where you would normally be
advised to turn off your vehicle engine.
OFF
and do not remove the battery when in any
For Vehicles Equipped with an Air Bag
An air bag inflates with great force. DO NOT place objects,
including both installed or portable wireless equipment, in the
area over the air bag or in the air bag deployment area. If invehicle wireless equipment is improperly installed and the air bag
inflates, serious injury could result.
13
Safety
English
Page 14
i2000_en.bk : safety.fm5 Page 14 Wednesday, February 23, 2000 7:58 AM
European Union Directives
Conformance Statement
This product is in conformance with the
requirements of the applicable EU Council
Directives.
Declarations of Conformance with the
requirements are located at:
Motorola Ltd.
European Cellular Subscriber Division
Midpoint, Alençon Link
Basingstoke, Hampshire RG21 7PL
United Kingdom
English
APPROVED
telecommunications systems specified
in the instructions for use subject to
the conditions set out in them.
S/1357/4/V/503894
Safety
14
for connection to
Page 15

i2000_en.bk : abtphone.fm5 Page 15 Wednesday, February 23, 2000 7:58 AM
About Your Phone, Battery and SIM Card
The Display
The display on your phone can show
alphanumeric characters as well as
useful information symbols.The
various elements of the display are as
follows:
ABC123
Characters are used to display messages and
telephone numbers.
Signal Strength
º
The more segments displayed in the bar graph, the
better the signal strength. You may not either send
or receive messages in weak signal areas.
New Message Mail (SMS Messages)
¹
Indicates that you have new text messages in your
mail box.
Unread Message Mail (SMS Messages)
¸
Indicates that you have unread Message Mail.
Voice Mai
Indicates that unplayed messages are waiting in
your voice mail box.(If supported by your Service
Provider).
Vibrate All
g
Indicates that the Vibrate All option is turned on.
You will not hear a ring tone.
.
l
·
ABC123
Battery Charge Indicator
»
The more segments displayed, the greater the
battery charge. The indicator flashes when you
have less than five minutes of talk time remaining.
Call Divert
·
Indicates that incoming phone calls are being
diverted.
.
About Your Phone, Battery and SIM Card
15
English
Page 16
i2000_en.bk : abtphone.fm5 Page 16 Wednesday, February 23, 2000 7:58 AM
Your Battery
Charging and Attaching the Battery
Remove the battery from the protective case provided in the
original packaging. When the battery is not attached to the
phone or being charged, store it in this case.
ABefore you use the battery for the first time, charge it for at
least three hours.
Charging the Battery
Attach the adapter to the travel charger. Attach the charger
connector to the bottom of the i2000, then plug the charger into
an electrical outlet.
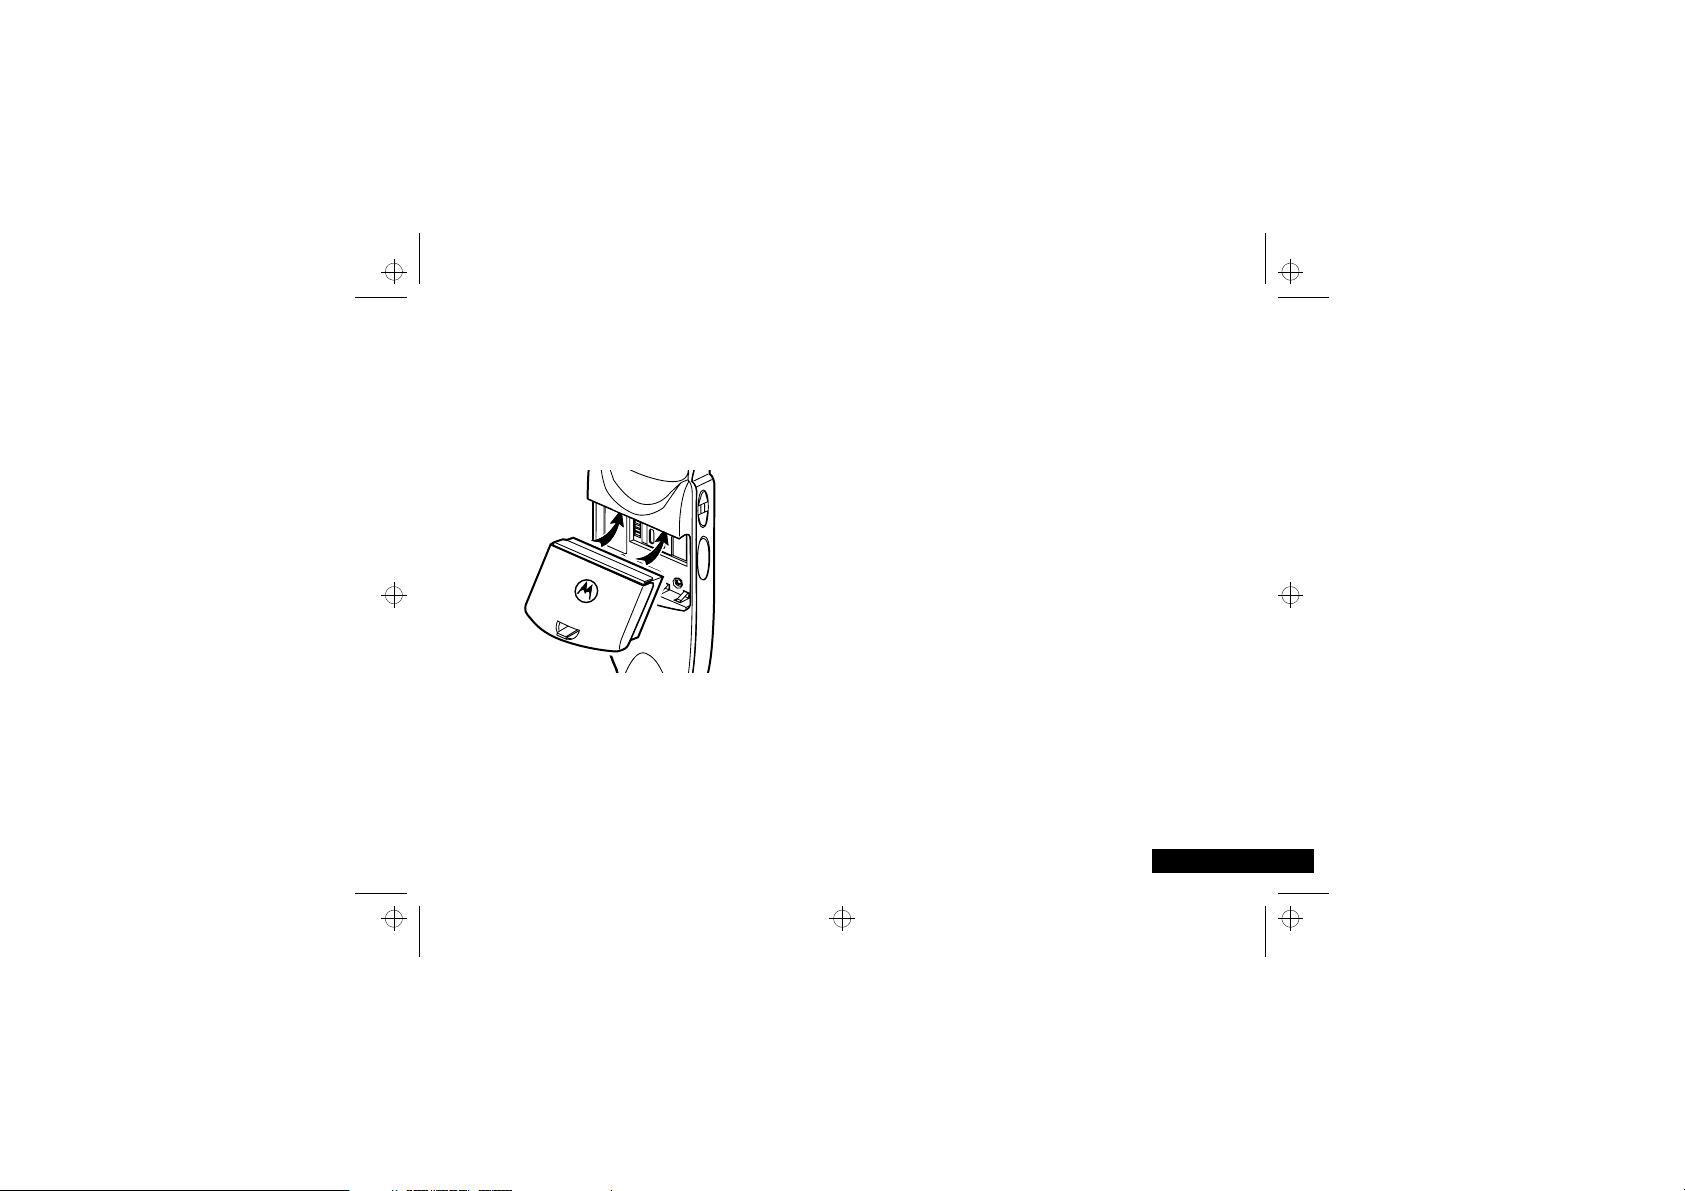
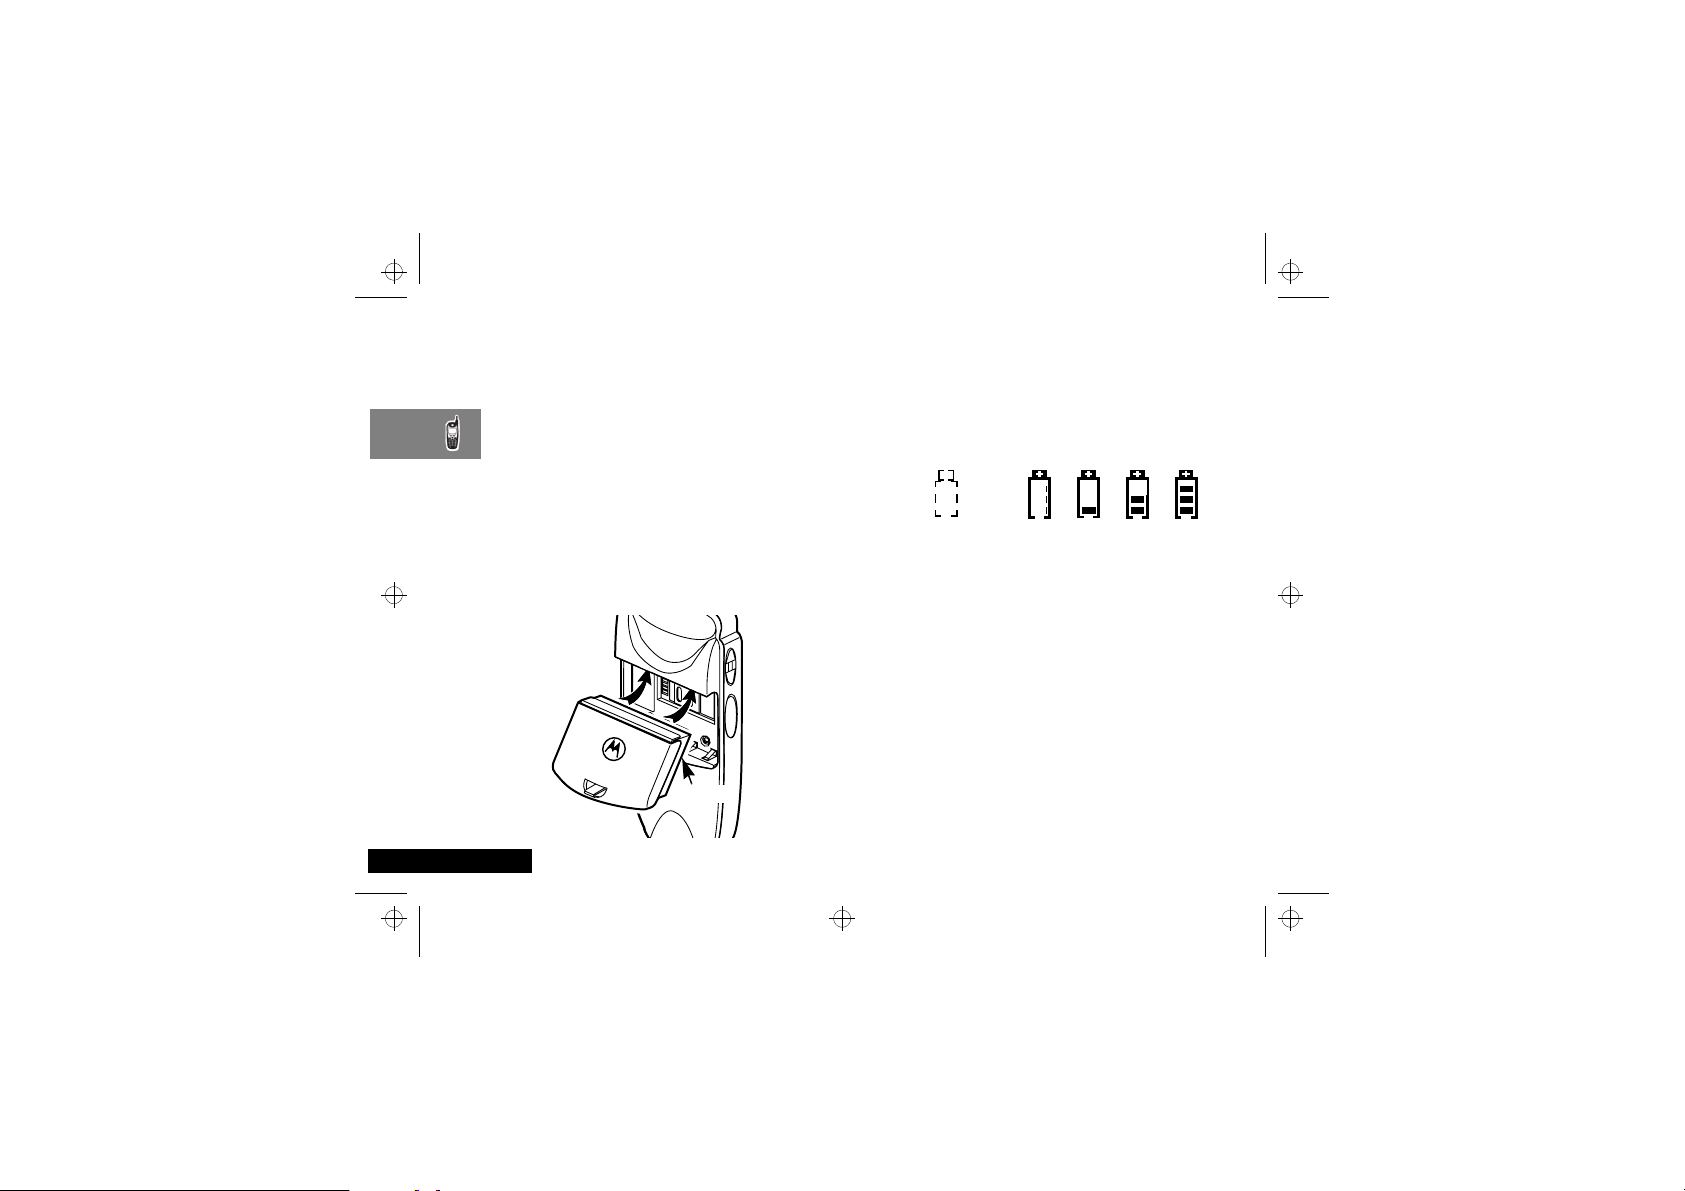
Attaching the Battery
To attach the battery to your i2000, align the battery as shown.
Press down on the battery until you hear a click.
Latch
English
About Your Phone, Battery and SIM Card
16
Battery and Charging Status
A low battery is indicated by a short, chirp-like sound through the
speaker. The battery strength icon shows the remaining charge in
the battery. Three bars indicate full charge. When you have less
than five minutes of talk time remaining, the indicator flashes.
Icon
Flashes
Charging Low Battery
Discharging Low Battery
Detaching the Battery
To detach the battery, press the latch to release the battery and
slide the battery downward
ABefore removing the battery, make sure the phone is turned
Off.
0-30% 31-60% 61-90% 91-100%
0-10% 11-40% 41-70% 71-100%
Page 17
i2000_en.bk : abtphone.fm5 Page 17 Wednesday, February 23, 2000 7:58 AM
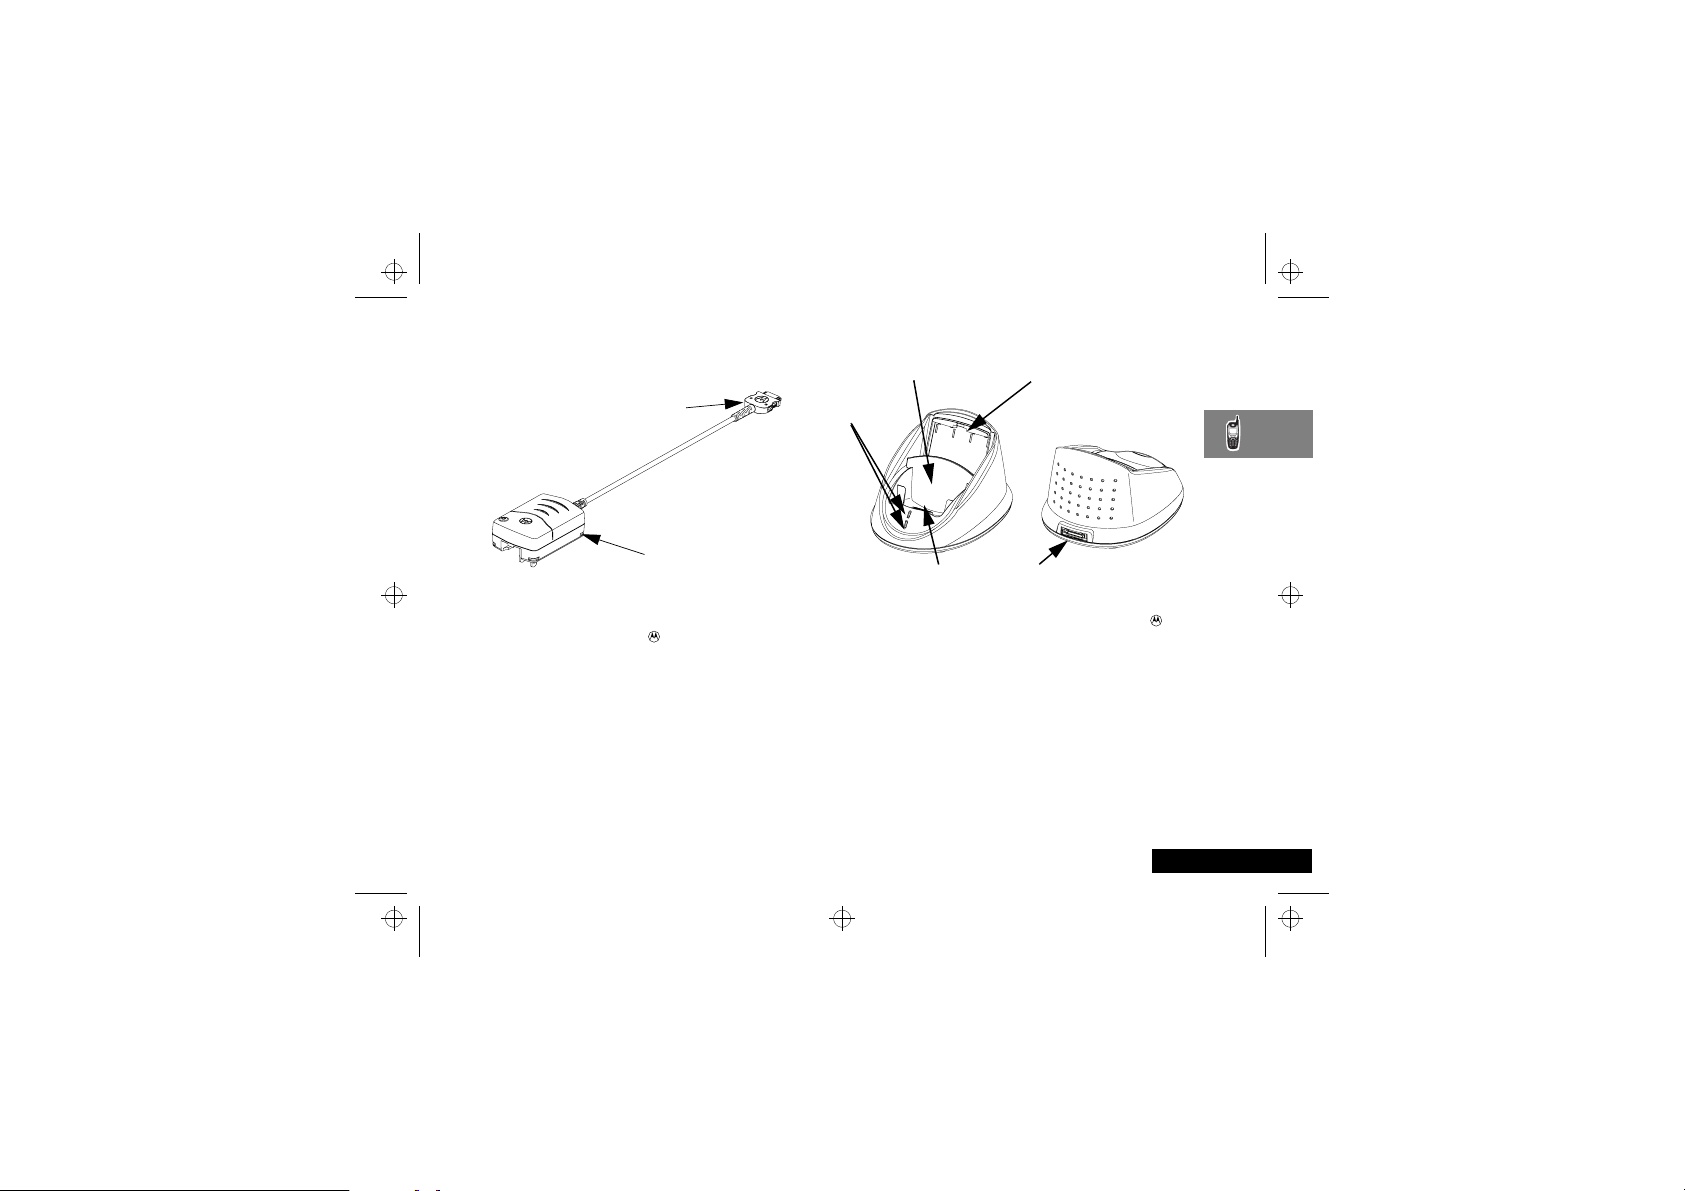
Charging Your Battery Using the Travel
Charger
Accessory Connector
Travel Charger
Transformer
1
While holding the i2000 with its front toward you, insert the
accessory connector (with the logo facing you) into the slot
on the bottom of the i2000 until you hear a click.
2
Attach the adapter to the travel charger transformer if
applicable. While charging in the USA/Canada, remove the
adapter and flip up the prongs.
3
Plug the travel charger transformer into an AC wall outlet. The
power light (green LED) on the travel charger transformer
comes on.
Travel Charger Operating Specifications
Input voltage range: 90-264 VAC @ 50/60 Hz.
Operating temperature range: 0°C to +50°C
Desktop Charging Your Battery
Rear PocketFront Pocket
LED
Indicators
Pin Connector Power Supply Cord
1
Plug the flat end of the power supply cord, with the logo
facing down, into the receptacle labelled “Charging” on the
back of the charger.
2
Plug the transformer end of the power supply cord into a
standard AC wall outlet.
3
Insert an i2000 with an attached battery, into the charger's
front pocket. This is done by inserting the bottom of the i2000
into the pin connector in the bottom of the charger's front
pocket.
About Your Phone, Battery and SIM Card
Receptacle
17
English
Page 18
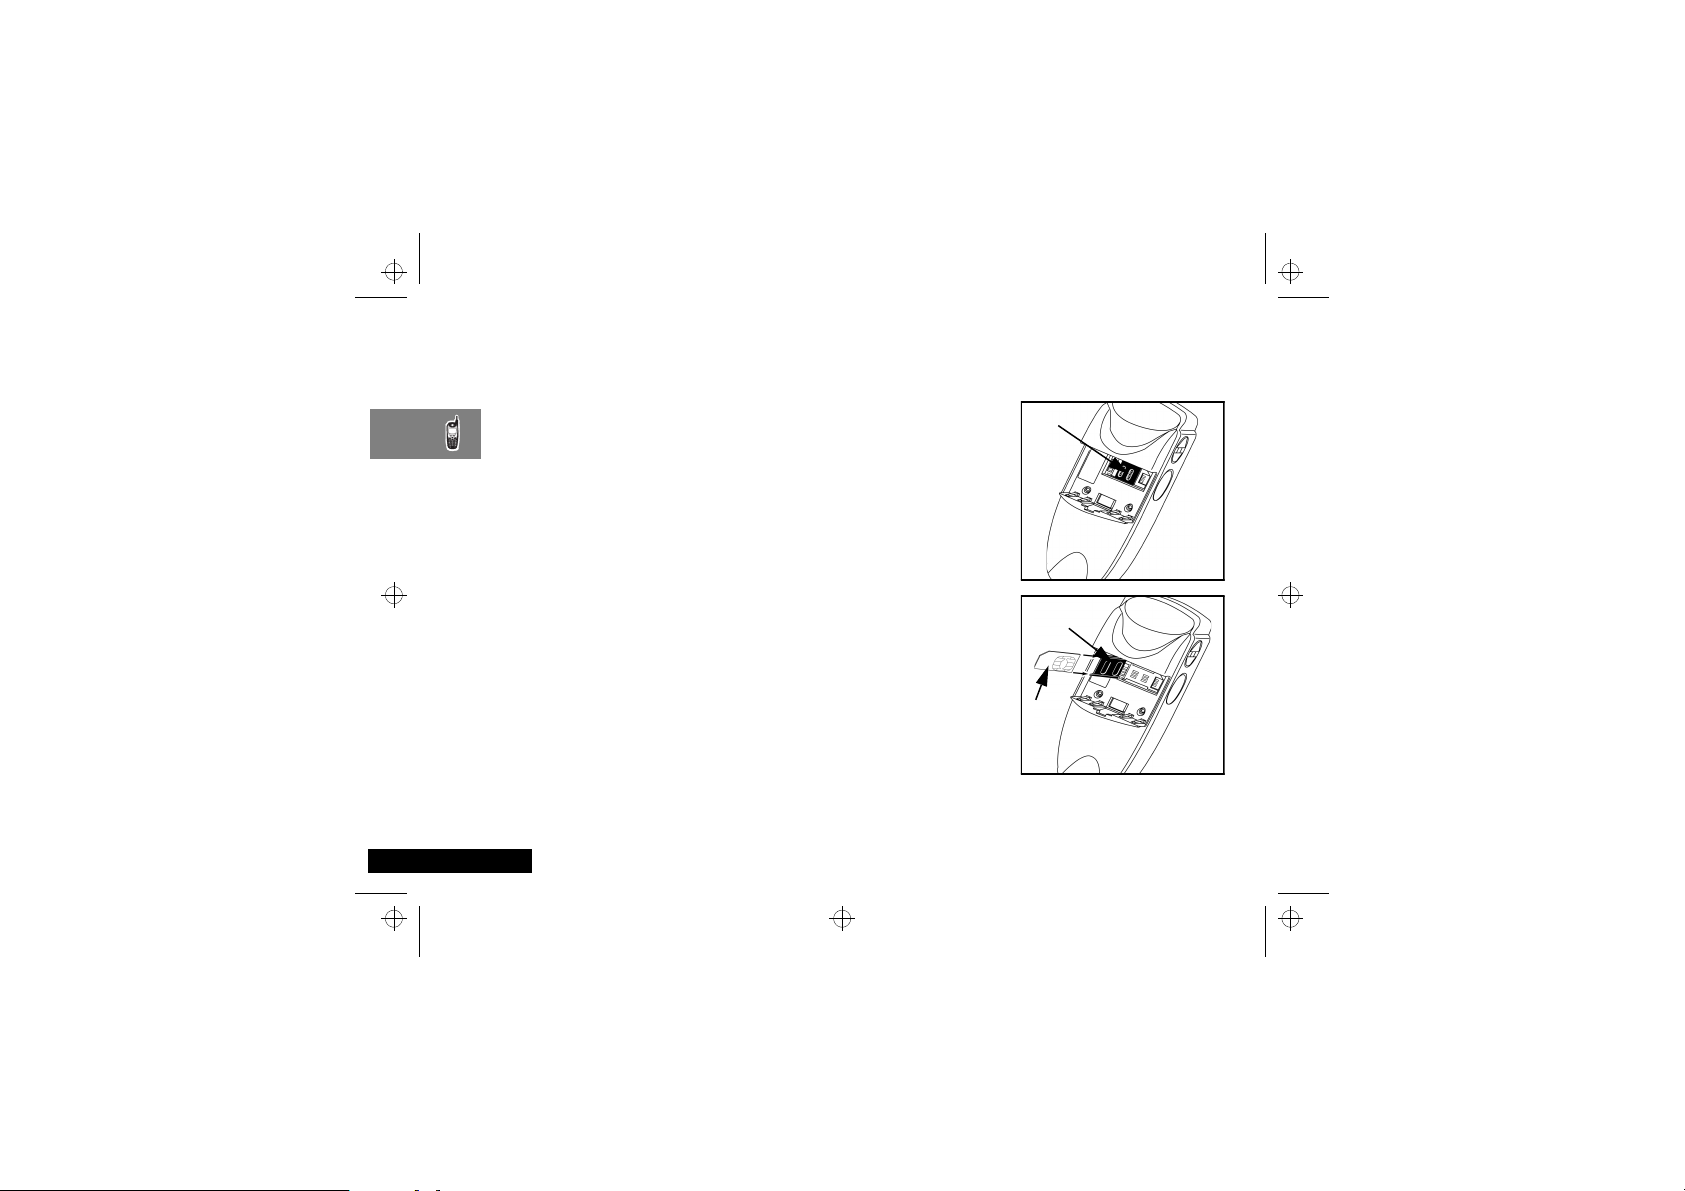
Latch
Latch
SIM card
holder
SIM
card
i2000_en.bk : abtphone.fm5 Page 18 Wednesday, February 23, 2000 7:58 AM
Your SIM Card
Your SIM (Subscriber Identity Module) card was supplied by your
Cellular Service Provider when you bought your phone. You will
not be able to make or receive calls if you do not have a SIM card
inserted in your phone.
ASome networks allow you to make emergency calls without
a SIM card inserted.
The SIM card is a ‘Smart Card’ that contains your phone number,
service details and memory for storing Phone Book numbers and
messages. You can therefore use your SIM card in someone else’s
GSM phone and you will be charged for the call.
AThe i2000 supports a 3 Volt SIM card only
Like a bank or credit card, you should keep your SIM card secure.
Do not bend or scratch your card and avoid exposure to static
electricity or water.
! Switch off your phone before inserting or removing the
SIM card. Failure to do so may damage the memory on
your SIM card.
Your SIM card contains all your stored names, numbers, and PINs
after you enter them in your i2000. You can make a phone call
only when the SIM card is properly placed in the phone.
! Insert and remove your SIM card with care so that you
do not lose it.
English
About Your Phone, Battery and SIM Card
18
SIM Card Insertion/Removal
1
If your i2000 is on,
press and hold the On/
Off key S until you
see the message
Powering Off.
2
If the battery is
attached, remove it.
3
Turn the phone over so
that the antenna is at
the upper left corner.
4
Slide the latch to the
left position and open
the SIM card holder.
5
If you have a full-size
SIM card, gently punch
out the mini SIM card.
6
Position the cut corner
of the SIM card as
illustrated and slide the
card into the holder.
7
Close the card holder
and slide the latch to
the right
8
Now, you can attach the battery.
Page 19

i2000_en.bk : abtphone.fm5 Page 19 Wednesday, February 23, 2000 7:58 AM
Light Sensor
On your i2000, when a key is pressed, the light sensor will
activate the backlight only when your phone is in poor light
conditions. If illumination is needed, even when the backlight is
disabled, you can manually override the sensor by pressing and
holding the $ key. This will activate the backlight. In a
charger, the backlight will always be illuminated.
AThe side backlight button does not illuminate the display
when the light sensor detects sufficient light. To override
the light sensor, press and hold the $ key.
About Your Phone, Battery and SIM Card
19
English
Page 20

i2000_en.bk : abtphone.fm5 Page 20 Wednesday, February 23, 2000 7:58 AM
English
About Your Phone, Battery and SIM Card
20
Page 21

i2000_en.bk : usephone.fm5 Page 21 Wednesday, February 23, 2000 7:58 AM
Making and Receiving Phone Calls
Switching the Phone On and Off
Switching the Phone On
To switch on your i2000, press and hold the On/Off button S
until a set of icons appears on your display. If VibraCall™ is
selected, the phone will vibrate when it is switched on.
If you switch the phone on and there is no SIM card inserted, you
will be asked to insert one. Once inserted, the phone will check
that the SIM card is valid.
One of the following messages will then be displayed:
•
Enter PIN - a request to enter the SIM card PIN code
(if required).
•
SIM Locked Enter PIN - a request to enter the phone
unlock code (if required).
•
A company logo or a welcome message followed by a
network name - as the phone searches and then finds a
suitable network with which to connect.
A message, such as Please Wait, appears while the i2000
connects to your Service Provider’s network.
The second line of text on the Phone Ready screen displays the
System Name, which is the name of the network providing
service in the GSM service area.
When you are in the GSM service area, the third line may display
the name of your Service Provider.
The LED indicator located above the on/off button of the i2000
shows the service state. See the table below for a description of
the phone’s status associated with the LED colour.
LED Indicator Status of Your
Flashing Red
Solid Red
Flashing Green
Solid Green
Registering—your
your Service Provider’s network. Please wait.
No service—your
will continue trying to connect every two
minutes as long as it is turned on.
In service—your
You can now place and receive calls.
In use—-your
Check to make sure that you ended the last
call by pressing
i2000
i2000
is signing on to
i2000
can not sign on. It
i2000
is ready to use.
i2000
is currently being used.
°
.
Making and Receiving Phone Calls
21
English
Page 22

i2000_en.bk : usephone.fm5 Page 22 Wednesday, February 23, 2000 7:58 AM
SIM Card PIN
To prevent unauthorised use of your phone, you may set a SIM
card PIN. After you set the PIN, you will need to enter the PIN
each time you switch on the i2000. After you set a PIN, you can
later change or disable it.
If your i2000 requires a SIM PIN, follow the steps described in
Entering the PIN.
If your i2000 does not require a PIN and you want to set one,
follow the steps described in Enabling the PIN Requirement.
Entering the PIN
AAs you enter PIN and PUK (PIN unblock) numbers,
remember that pressing and holding the 9 key dials the
emergency number.
1
Enter your PIN. As you enter it, an asterisk appears for each
character. This prevents others from seeing your PIN.
If you enter an incorrect PIN, the message, Wrong PIN
appears. After three incorrect attempts, even if you turn off
the phone and turn it on again, the SIM card PIN is blocked. If
this happens, see Unblocking the PIN.
2
Select Ok. Now you are ready to place calls or check your mail.
You can disable the PIN entry requirement. For more information,
see Disabling the PIN Requirement.
Unblocking the PIN
If you forget your PIN and try, unsuccessfully, to enter it three
times, access to your i2000 with that SIM will be blocked. To gain
access, you must first unblock the PIN.
English
Making and Receiving Phone Calls
22
To unblock the PIN:
1
Call your Service Provider for your PUK (PIN unblock code).
2
At the Enter PUK screen, enter your PIN Unblocking Key
(PUK). As you enter it, an asterisk appears for each character.
This prevents others from seeing your PUK.
3
Select Ok.
4
At the New PIN screen, enter a new PIN.
5
Select Ok.
6
At the Repeat New PIN screen, enter the new PIN again.
7
Select Ok. After the system validates your new PIN, your
phone is ready for normal use.
AIf you unsuccessfully enter the PUK number ten times, the
PUK is blocked. If this happens, you will get a message to
call your Service Provider.
You may, however, make emergency calls.
Changing the PIN
To change your SIM card PIN:
1
From the Phone Ready screen, press $ once until you
see the Prgm menu option.
2
Select Prgm.
3
Press 4,6.
4
Select Ok. At the Change PIN? screen, select Ok.
5
At the Old PIN screen, enter your current PIN then select Ok.
6
At the New PIN screen, enter your new PIN then select Ok.
7
At the Repeat New PIN screen, enter your new PIN again
then select Ok.
Page 23

i2000_en.bk : usephone.fm5 Page 23 Wednesday, February 23, 2000 7:58 AM
Disabling the PIN Requirement
! If you disable the PIN requirement, you remove
protection of the personal data on your SIM card each
time your i2000 is turned on. Anyone can then use your
phone and your personal data.
1
From the Phone Ready screen, press $ once until you see
the Prgm menu option.
2
Select Prgm.
3
Press 4,7. The 47=Require SIM PIN:On screen
displays, indicating that the PIN requirement is set.
4
Select Off.
5
Enter your SIM PIN (your Service provider provides the initial
SIM Card PIN).
6
Select Ok.
7
Select Exit.
Enabling the PIN Requirement
1
From the Phone Ready screen, press $ once until you see
the Prgm menu option.
2
Select Prgm.
3
Press 4,7. The 47=Require SIM PIN:Off screen
displays, indicating that the PIN requirement is off.
4
Select On.
5
Enter your SIM PIN (your Service Provider provides the initial
SIM Card PIN).
6
Select Ok.
7
Select Exit.
When the PIN is enabled, the message Enter SIM PIN
appears and asks you to enter your PIN each time you turn on
your i2000. Until you enter a valid PIN, you can use the phone
only to enter the emergency number.
After the PIN is accepted, the Phone Ready screen displays.
AIf you incorrectly enter your PIN three times you will block
the phone. To unblock your phone you must contact your
Service Provider.
Switching the Phone Off
To turn off your i2000 press and hold the On/Off button S
until you see the message Powering Off.
Making and Receiving Phone Calls
23
English
Page 24

i2000_en.bk : usephone.fm5 Page 24 Wednesday, February 23, 2000 7:58 AM
Making Phone Calls
You can place a call by entering the phone number on the
keypad as follows.
1
From the Phone Ready screen, using the keypad, enter the
number you want.
If you make a mistake, either press ´ once to move back
one digit, or select Cancl to start again.
2
Press ° to place the call.
3
To end the call, press °.
International Phone Calls
To make an international phone call press and hold the 0 key.
After a couple of seconds the international dialling prefix + will
appear in the display, this allows you to call from any country
without knowing the local international access code.
Now enter the country code, followed by the phone number. The
country code follows the conventional format, for example 49 for
Germany, 44 for the UK, 46 for Sweden, etc.
Just like a conventional international call, remove the leading '0'
of the area code when you dial.
Inserting Pauses Into Phone Numbers
To obtain a three second 'pause' character in a phone number,
press and hold the * key for a couple of seconds, the pause
symbol P will appear.
The pause character produces a three second delay whenever it is
used. However, the first pause character in a phone number is a
special case, it will not begin its delay until the call is answered.
English
Making and Receiving Phone Calls
24
Pause - A Working Example.
If, for example, you have a tone-based voicemail system on
555-6911, with a mailbox number 1066 and password 2001.
Then you may dial the following number:
5556911P1066P2001O.
The first part of the number would be used to call the voicemail
system.
When the call is answered the first pause will produce a delay of
three seconds before the tones for 1066 are sent to select the
mailbox.
There will be a second pause of three seconds before the tones
for 2001 are sent as the password.
GSM Emergency Calls
The world-wide GSM standard provides a single, uniform
number, 112, to dial in cases of emergency.
Provided that your phone has found a network, you will be able
to make an emergency call. The call can be made regardless of
any security codes and, depending on the network, with or
without a SIM card inserted.
The emergency call will be directed to a central emergency
operator.
To dial the GSM emergency number, press 112O.
While the emergency call is being made and connected, the
display will show Emergency Calling.
Page 25

i2000_en.bk : usephone.fm5 Page 25 Wednesday, February 23, 2000 7:58 AM
Using Other Dialling Methods
To use Scroll, Speed Dial, or Name Search, you must first program
names and numbers in your phone.
Scroll
1
From the Phone Ready screen, press ´ to scroll backward
or forward through your stored list of numbers and names.
2
Press ° to place the call.
3
To end the call, press °.
Speed Dial
1
From the Phone Ready screen, press $ until you see the
Spd# option on the last line of your display.
2
Select Spd#.
3
Enter the assigned speed-dial number (1-255 depending on
your SIM card). You will see the stored name and phone
number associated with the speed-dial number.
4
Press ° to place the call.
5
To end the call, press °.
Name Search
1
From the Phone Ready screen, select Name.
2
Using the keypad, enter the first letter of the name you want
to find, for example, to search for the name Bob:
a) Enter “B” by pressing 2 twice.
b) Press ´
to scroll through all the names starting with
“B” until you see “Bob”.
3
Press ° to place the call.
4
To end the call, press °.
Last Number Redial
To redial the last number that you called, press °.
Turbo Dial
Turbo Dial enables you to quickly place a phone call by pressing
and holding the numeric key on the keypad that corresponds to
the stored entry in your Phone list directory. There are eight
Turbo Dial positions, 1 through 8.
AIf you are on a Phone call, place the call on hold before
From the Phone Ready screen:
1
AKeypad numbers 0 and 9 are not available for Turbo
2
®
using Turbo Dial.
Select one of the first eight entries in the Phone list using key
numbers 1 through 8. For example, press 1 for speed dial
#1.
Dialling.
Press and hold the desired key for two seconds to activate
Turbo Dial. The phone begins to dial the number and Phone
Ready changes to Phone-In Use.
Making and Receiving Phone Calls
25
English
Page 26

i2000_en.bk : usephone.fm5 Page 26 Wednesday, February 23, 2000 7:58 AM
Automatic Redial
If you receive a message System Busy, Try Later, press
° if you want your phone to automatically redial the number.
You will hear a ring-back tone when the call is successful.
Emergency Dial
You can not dial the emergency phone number if the keypad is
locked. You can make an emergency call regardless of any
security codes and, depending on the network, with or without a
SIM card inserted. If you are on an active call, you must end it
before using the emergency number.
1
From any Phone mode, press and hold 9 for two seconds
until the phone displays EMERGENCY. The phone then
automatically dials the emergency number.
2
To end the call, press °.
AThe phone does not save the emergency phone number as
the last number you dialled.
AFor more information on the Emergency Dial feature,
contact your Service Provider.
English
Making and Receiving Phone Calls
26
Hands-Free Speaker Phone
The i2000 provides the convenience of a speaker phone for
holding impromptu meetings or for listening to your voice mail
messages.
During speaker phone operation, you may either speak or listen,
but you can not do both at the same time.
To use the speaker phone, complete the following steps:
1
Press ¯ during a phone call or select Spkr. The Spkr
option flashes while the speaker phone is on.
2
Place the phone 15-30 inches (380-760 millimetres) away
from you. In a noisy environment, you may want to move the
i2000 closer to you for better transmission.
AIf there is background noise in your area, you may have
difficulty hearing a caller’s voice or messages.
To resolve this problem complete the steps below.
1
Press $ until you see the Mute menu option.
2
To listen, press ± under Mute. The display changes from
Phone In Use to Phone Mute, indicating that the
microphone is muted.
3
To speak, press ± under Mute again. The display changes
from “Phone Mute” to Phone In Use, indicating that the
microphone is on.
While the microphone is muted, you can hear incoming audio,
but a caller can not hear any speech coming from your i2000.
Page 27

i2000_en.bk : usephone.fm5 Page 27 Wednesday, February 23, 2000 7:58 AM
Receiving a Phone Call
Receiving a Phone Call
1
Press ° or press any numeric key (0 through 9) to answer a
call.
2
To activate the speaker phone, press ¯ or select Spkr.
3
To end the call, press °.
Missed Call Indicator
Your i2000 notifies you of received, but unanswered phone calls.
If you subscribe to Caller ID, the caller’s phone number is stored
in your Last 10 Calls Received list. Your screen displays a flashing
message, for example, 2 Rcvd Calls, with the telephone
numbers of the missed calls.
APress any key to clear the flashing indicator.
To retrieve the missed calls:
1
From the Phone Ready screen, press $. The menu options
change to Calls and Prgm.
2
Select Calls. The Rcvd Calls screen opens with the number
of the last call that you received.
3
Scroll to continue viewing the list.
What Is My Phone Number?
From the Phone Ready screen, press $ until you see the Prgm
menu option.
Select Prgm.
Press 1 to display your own phone number.
Call Diverting
Call diverting lets callers reach you by diverting incoming calls to
a designated number. You have two options: divert all incoming
calls (unconditional) or select those circumstances (conditional)
when you want your calls diverted.
Unconditional Call Diverting
Unconditional call diverting sends all incoming calls to the
designated number.
AWhen you set unconditional call diverting, your phone does
not ring.
1
From the Phone Ready screen, press $ until you see Divrt
on the last line of the display.
2
Select Divrt.
3
To select the number to where you want your calls diverted,
do one of the following:
•
Enter a number, or
•
Press the scroll keys to select a number from your stored
list.
4
Select On.
5
After the Please Wait message appears, select Exit.
Notice that the Call Divert icon · appears on your display when
Unconditional Call Diverting is set.
Making and Receiving Phone Calls
27
English
Page 28

i2000_en.bk : usephone.fm5 Page 28 Wednesday, February 23, 2000 7:58 AM
Conditional Call Diverting
You may want to divert your calls when your i2000 is:
•
Busy on another call
•
Not answered (NoAns)
•
Outside the service area (NoRch).
AYou must turn off Unconditional Call Diverting before you
can set Conditional Call Diverting options.
1
From the Phone Ready screen, press $ until you see Divrt
on the last line of your display, then select it.
2
Press $ once again until you see Busy and NoAns on the
last line of your display.
•
To divert your calls when your phone is in use, select Busy.
•
To divert your calls when you do not want to answer them,
select NoAns.
3
Press $ again until you see NoRch and Rcl#.
•
To divert your calls when you can not be reached, select
NoRch.
•
To see the call divert number, select Rcl#.
4
After you select the call divert option, either enter the number
where you want your calls to be diverted, or press the scroll
buttons and then select a number.
5
Select On
6
Select Exit.
AYou can set more than one condition by repeating steps 2
through 6.
English
Making and Receiving Phone Calls
28
Call Waiting
Using the Call Waiting feature, you can answer an incoming call
when you are on another call. Call Waiting is on unless you turn
it off for a particular call.
1
After the alert tone, your display shows the incoming number
and asks Accept Call? (if you have Caller ID). To accept
the call, select Yes. To decline the call, select No.
2
Press $, then select Hold to place the second call on hold
and return to the first call. Selecting Hold switches you
between the two calls.
3
To end the active call, press °.
Call Hold
When you are on a call, you can place the call on hold and make
a second call.
1
To place the active call on hold, press $, then select Hold.
You may then answer or place another call.
2
To remove the call from hold, press $, then select Hold
again.
AThe options 3way and Spkr appear only when you are on
an active call.
Page 29

i2000_en.bk : usephone.fm5 Page 29 Wednesday, February 23, 2000 7:58 AM
3
3-Way Calling
If your Service Provider provides 3-way calling, you can combine
two ongoing phone calls into one conversation. This option is
available only when you initiate the second call.
After you place or receive a phone call:
1
Select 3way. This action places the current call on hold.
2
Enter the phone number for the second call and press °.
3
When the second call is connected, select 3way to join the
calls. Both phone numbers and 3way appear on your screen.
4
To end the 3-way call, press °.
Call Barring
If your Service Provider provides Call Barring, you can prevent
incoming and outgoing calls on your i2000.
From the Phone Ready screen press $ until you see the Bar
menu option. Select Bar.
APress ´ to view the call barring choices (incoming,
outgoing, and recall status). See the following procedures
for each.
Barring Incoming Calls
You can choose to bar:
•
When Roaming—blocks all incoming calls while you roam
away from your home system
•
All Calls—blocks all incoming calls.
To Bar incoming calls:
1
From the Phone Ready screen, press $ until you see the
Bar menu option.
2
Select Bar. The Call Barring Incoming screen displays.
Select Ok. The Bar Incoming:Off screen appears.
4
Do one of the following:
•
To leave the incoming call barring as shown (in this
example, off), select Exit, or
•
To bar all incoming calls, select All. At this point, you are
required to enter your password.
5
Enter your call barring password and select Ok.
Barring Outgoing Calls
You can choose to bar:
•
International Calls—blocks all outgoing international calls.
•
International Calls except Home Country—blocks all outgoing
international calls except to your home country.
•
All Calls—blocks all outgoing calls.
To Bar outgoing calls:
1
From the Phone Ready screen, press $ until you see the
Bar menu option.
2
Select Bar. The Call Barring Incoming screen displays.
3
Press ´ once. The Call Barring Outgoing screen
displays.
•
Select Ok. The Bar Outgoing:Off screen displays.
4
Do one of the following:
•
To leave the outgoing call barring as shown (in this
example, off), select Exit.
•
Or, to bar all incoming calls, select All. Now you are
required to enter your call baring password and select Ok.
5
To access the Intl menu option, press $.
Making and Receiving Phone Calls
29
English
Page 30

i2000_en.bk : usephone.fm5 Page 30 Wednesday, February 23, 2000 7:58 AM
6
Do one of the following:
•
Select All to bar all outgoing international calls.
•
Or, press $ again to select xHome to bar all outgoing
calls except to your home country.
Viewing Call Barring Status
To view the Call Barring status:
1
From the Phone Ready screen, press $ until you see the
Bar menu option.
2
Select Bar. The Call Barring Incoming screen displays.
3
Press ´. The Call Barring Outgoing screen
displays.
4
Press ´ again. The Call Barring Recall Status
screen displays.
5
Select OK. At this point, you are required to enter your
password then select OK. Next, the Please Wait message
displays.
AIf you enter the wrong password, the Wrong Bar
Password message displays then the Enter Bar
Password screen displays again. Carefully re-enter your
password. It must be between 4 and 8 digits.
6
After the Please Wait message, the Call Bar
Incoming:Off screen displays. Do one of the following:
•
To view only the Call Bar Incoming status, select Ok.
•
To view the Call Bar Outgoing status, press ´, then
select Ok.
Changing Your Call Barring Password
To change your call barring password complete the following:
1
From the Phone Ready screen, press $ until you see the
Prgm menu option.
2
Press 4,8. The 48=Change Bar Password screen
displays.
3
Select Ok. The Old Code? screen displays.
4
Enter your current password then select OK. The New Code?
screen displays.
5
Enter your new password then select OK.
6
At the Repeat Code screen, enter your new password again
then select OK.
ABe sure to record your new password and store it in a safe
place.
Creating, Editing, and Using Stored Lists
A stored list is a directory of phone numbers and their related
names. Stored lists are convenient because you do not have to
remember names and numbers - you only need to scroll through
your stored list.
Phone Number List
You can set up a phone number list consisting of phone numbers
combined with their associated names. Depending on your SIM
card, you can add up to 255 individual numbers to your phone
number list, store them with names, and assign them to speeddial numbers.
Entering Numbers
To enter a number, press the corresponding key on the keypad.
English
Making and Receiving Phone Calls
30
Page 31

i2000_en.bk : usephone.fm5 Page 31 Wednesday, February 23, 2000 7:58 AM
Entering International Phone Numbers
To enter an international phone number, press and hold 0.
After about two seconds, the international dialling prefix + will
appear in the display. This allows you to call from any country
without knowing the local international access code.
Inserting Pauses into Phone Numbers
To obtain a three-second pause character in a phone number,
press and hold * for about two seconds. The pause symbol P
will appear.
Entering Names
The letters you can enter appear on each key. The table below
uses the 7 key to illustrate how you enter each letter.
To enter: Press
P
Q
R
S
7
To shift to lowercase letters, press and hold # after a letter is
entered.
7
once.
twice.
three times.
four times.
five times.
Storing Names and Numbers
1
Press $ until you see the Prgm menu selection.
2
Select Prgm.
3
Press 2,0.
4
Select Ok.
5
The next screen briefly displays the remaining number of
phone numbers and private IDs that you can store.
6
Enter the name that you want to store.
For example, to store the name “TIM” do the following:
a) Enter “T” by pressing 8 once.
b) Enter “I” by pressing 4 three times.
c) Enter “M” by pressing 6 once.
7
Select Store.
8
Enter the phone number that you want to associate with this
name and select Store.
ATo skip the Phone Number entry, select Skip.
The next screen displays the name that you entered and a
flashing speed-dial number where the entry will be stored.
9
Do one of the following:
•
To accept the speed-dial number shown, select Store.
•
To change the speed-dial number, enter the desired speeddial number. The speed-dial number stops flashing.
Making and Receiving Phone Calls
31
English
Page 32

i2000_en.bk : usephone.fm5 Page 32 Wednesday, February 23, 2000 7:58 AM
Editing and Erasing Phone List Entries
1
Press $ until you see the Prgm menu selection.
2
Select Prgm.
3
Press 2,1.
4
Select Ok. The Edit Entry? screen displays.
5
Do one of the following:
a) To edit an entry, select Ok.
(1) At the Edit Entry screen, press ´ until the
desired entry appears, then select Ok.
(2) At the Edit Number screen, edit the phone number,
if you want, then select Store.
(3) At the Edit Name screen, edit the name, if you wish,
then select Store.
At the Edit Spd# screen, edit the speed number, if
you wish, then select Store.
b) To erase an entry:
(1) At the Edit Entry screen, press ´.
(2) At the Erase Entry screen, select Ok.
(3) Scroll to the desired entry, then select OK. At the
Erase Entry? screen, select Yes.
6
Select Exit to close the Phone List Edit screen.
English
Making and Receiving Phone Calls
32
Last 10 Calls Received and Sent Lists
If you subscribe to your Service Provider’s Caller ID service, you
can view, dial, and store the list of the last ten phone numbers
received and the last ten phone numbers dialled.
The most recent call sent or received appears first in your call list.
From the Phone Ready screen:
1
Press $. The menu options change to Calls and Prgm.
2
Select Calls. The Rcvd Calls screen opens.
AIf the Store option appears, the number currently
displayed is not in your Phone list. To add the number to
your list, select Store.
AIf you want to see the Sent list but the Store option is on
your display, press $ until you see the Sent menu
option.
3
Do one of the following:
•
To view the Calls Received list, use the Scroll key to view
each entry.
AIf the Store option is on your display, press $ until you
see the Rcvd menu option.
•
Or, to view the Calls Sent list, select Sent. Use the Scroll
key to view each entry.
4
To view the Calls Received list again, select Rcvd.
5
To close the Calls list, select Cancl.
Page 33

i2000_en.bk : usephone.fm5 Page 33 Wednesday, February 23, 2000 7:58 AM
Quickstore of Phone Numbers
If you subscribe to your Service Provider’s Caller ID service, you
can use Quickstore to store the last number that you dialled or
quickly store a number from the Last 10 Calls Received and Sent
Lists without having to enter the programming menu.
AAs you scroll through the Last 10 Received or Last 10 Sent
Calls List, only the name displays. If the name is not
available, the phone number displays.
To use Phone Number Quickstore, from either the Phone Ready
screen or from the Last 10 Calls Received or Sent List:
1
Do one of the following:
•
To go to the last call that you dialled, press ´.
•
To view the Received and Sent Calls list, press $ until
you see Calls, then select it.
2
Select Store. The Enter Name screen displays.
3
Enter the name then select Store.
The combined name and number entry is stored in the first
available storage space.
The Stored message displays with the name that you stored.
Making and Receiving Phone Calls
33
English
Page 34

i2000_en.bk : usephone.fm5 Page 34 Wednesday, February 23, 2000 7:58 AM
English
Making and Receiving Phone Calls
34
Page 35

i2000_en.bk : opt_menu.fm5 Page 35 Wednesday, February 23, 2000 7:58 AM
Using Your Phone’s Features
Phone Setup
Using VibraCall
VibraCall is a vibration alert system that notifies you of incoming
Messages and Phone Calls. You can set a vibration alert for either
both these services or for one service only.
The alert choices for VibraCall are as follows:
•Vibe All
messages.
• Phone Vibrate
phone calls.
• Phone Vibrate/Ring
a ring tone for phone calls.
• Mail Vibe
AIf VibraCall is set for incoming calls and messages, the
power-up sequence includes a brief vibrate cycle.
Selecting VibraCall for All Incoming Calls and
Messages
To set a vibration alert for all incoming calls and messages, press
² once; a VibeAll: On message displays briefly.
After you set the alert, the display returns to the previous mode
and g (the Vibrate All icon) appears at the top of your display.
Selecting VibraCall for Individual Services
To set a vibration alert for specific phone or mail services:
1
From the Phone Ready screen, press $ until you see the
Prgm menu option.
2
Select Prgm.
™
—produces a vibration alert for all incoming calls and
—produces a vibration alert for incoming
—produces a vibration alert followed by
—produces a vibration alert for mail messages.
3
Press 9.
4
Press $ until you see the Selct menu option.
5
Select Selct. The first choice is Phone Vibrate.
6
To view the Vibe/Ring vibration alert choices, press $ on
the keypad.
7
To view other choices, press ´.
•
To receive vibration alerts only for Mail, select Mail Vibe,
then select On.
8
Select Exit to return to the Vibrate Alert menu.
9
Select Exit again to return to the phone ready mode.
Phone Lock
You may lock the i2000 keypad to prevent inadvertent key
presses which result in digits being dialled or a phone call being
placed. Press * and # simultaneously to activate the phone
lock. While the phone is locked, the only keys you may press are
the Power Key (to turn off your phone) or the * followed by
the # keys to turn off the phone lock. The phone lock will be
automatically disabled if the i2000 receives a Phone call. At the
end of the call, the keypad lock will be automatically re-activated.
AYou can not place Emergency calls while the keypad is
locked.
Using Your Phone’s Features
35
English
Page 36

i2000_en.bk : opt_menu.fm5 Page 36 Wednesday, February 23, 2000 7:58 AM
Adjust Ring Volume
You can adjust the ring volume on your phone for incoming calls.
1
From the Phone Ready screen, press $ until you see the
Prgm menu option.
2
Select Prgm.
3
Press 3,0. The 30=Ringer Volume screen displays.
The display shows your current ringer volume.
4
Press the Volume Control buttons on the side of the phone to
listen as you either raise or lower the volume. At the lowest
setting, the screen displays Volume Silent.
5
When you reach the desired level, select Exit.
English
Using Your Phone’s Features
36
Setting a Ring Style
Your phone has nine selectable ring styles. To select a ring style
complete the following steps.
1
From the Phone Ready screen, press $ until you see the
Prgm menu option.
2
Select Prgm.
3
Press 3,1.
The display shows your current ring style.
4
Select Ok.
5
Press ´ to scroll through the available Ring Styles.
6
To listen to the ring style you selected, press the Volume
buttons on the side of the phone.
7
Select Ok to select the Ring Style shown.
ATo leave the ring style unchanged, select Cancl.
8
Select Exit.
Page 37

i2000_en.bk : opt_menu.fm5 Page 37 Wednesday, February 23, 2000 7:58 AM
Language Selection
You can customise your i2000 to select and display one of many
languages. You can manually select one of these languages or
have your SIM select it for you (Automatic).
To change the displayed language:
1
From the Phone Ready screen, press $ until you see the
Prgm menu option.
2
Select Prgm
3
Press 7,0.
4
Select Ok.
5
Press ´ to scroll through the language options.
ASelecting Exit at any time retains the current language
selection.
6
When the language you want appears on your display, select
Ok. The displayed text immediately changes to the language
you selected.
7
Select Exit.
AThe language that you select will be the displayed language.
Using Your Phone’s Features
37
English
Page 38

i2000_en.bk : opt_menu.fm5 Page 38 Wednesday, February 23, 2000 7:58 AM
Network Selection
2
When you travel, you may have to change the phone system
setting. You can choose from six phone system settings:
• Last active
systems that do not overlap, for example, travelling between
Paris and New York. If your i2000 can not locate the last
system, for example, GSM, it attempts to locate the other
system, iDEN.
•Roam all
coverage area and have no preference for either system. This
selection causes your i2000 to switch between GSM and iDEN
until it finds an acceptable network.
• GSM preferred
are in a country or region where iDEN coverage is also
available. Your i2000 always searches first for GSM networks.
•GSM only
iDEN and GSM, but you want to use GSM. Your i2000
attempts to register only on GSM networks.
• iDEN preferred
are in a country or region where GSM coverage is also
available. Your i2000 always searches first for iDEN networks.
• iDEN only
iDEN and GSM, but you want to use iDEN. Your i2000
attempts to register only on iDEN networks.
To reselect the phone system:
1
Press $ until you see the Prgm menu option.
—useful when you move between GSM and iDEN
—useful when you are in an overlapping system-
—useful if your home system is GSM and you
—useful when you are in an area that is covered by
—useful if your home system is iDEN and you
—useful when you are in an area that is covered by
Select Prgm.
3
Press 5,5, then select Ok.
4
Press ´ until you see the desired system.
5
Select Ok.
Searching for a Network
While you are on a GSM network, you can perform an automatic
or manual search for available networks. A manual search allows
you to view the available networks and make a selection rather
than use the network automatically selected by the phone.
1
Press $ until you see the Prgm menu selection.
2
Select Prgm.
3
Press 5,7.
4
Select Ok.
5
At the 57=GSM Network Search screen, do one of the
following:
•
Select Ok.
or
•
Press ´. At Manual Search, then select Ok. The
Searching... message appears, indicating that your
phone is looking for an alternative network. Then press
´ to scroll through the network choices.
AThe network choices appear in the following order: Home,
Preferred, Available.
English
Using Your Phone’s Features
38
Page 39

i2000_en.bk : opt_menu.fm5 Page 39 Wednesday, February 23, 2000 7:58 AM
7
Storing Your Preferred List of Networks
While you are on a GSM network, you can add, edit, or erase
your preferred list of networks.
1
Press $ until you see the Prgm menu selection.
2
Select Prgm.
3
Press 5,8.
4
Select Ok. The Add New Entry? screen displays.
AFrom the Add New Entry? screen, you may press ´
to go to the Edit Entry or Erase Entry? screen.
Press ´ to view the network choices for each screen.
5
At the Add New Entry? screen, select Ok. This selection
opens a network screen.
6
Do one of the following:
•
To add this network, select Ok.
or
•
To exit this screen without adding this network, select
Cancl.
or
•
To view or enter another available or known network press
´. At the desired network screen, select Ok.
Selecting Ok adds the displayed network to your preferred
network list.
AYou can assign numbers 1 through 8 to your preferred
network names. However, if you assign a new network
name to a number that already has a stored network name,
you will erase the stored name.
At the preferred network screen, for example, UK Cellnet
Pref#=Ä, assign a number, 1 through 8, to the network
name.
AThe number that you assign provides the priority in which
the phone looks for the systems when it is scanning the
preferred list of networks.
8
Select Ok.
Storing New Networks to Your Known List
While you are on a GSM network, you can add new network
names and network codes to your known list.
1
Press $ until you see the Prgm menu selection.
2
Press ± under Prgm.
3
Press 5,6.
4
Press ± under Ok. The Add New Entry? screen appears.
5
At the Add New Entry screen, press ± under Ok. The
Enter Code screen appears.
6
Enter your five- or six-digit code.
7
Press ± under Store. The Enter Name screen then
appears.
8
Enter the network name.
9
Do one of the following:
•
To add this network, press ± under Store.
or
•
To exit this screen without adding this network, press ±
under Cancl.
ASelecting “Store” adds the displayed network to your
known network list.
Using Your Phone’s Features
39
English
Page 40

i2000_en.bk : opt_menu.fm5 Page 40 Wednesday, February 23, 2000 7:58 AM
Messages (SMS Messages)
Your i2000 provides the following message services:
•
Voice Mail
•
Message Mail (SMS)
When you receive a new message, the ¹ icon appears and
flashes.
•
To read your new mail immediately, select Now.
•
To read your new mail later, select Later.
AAn asterisk * next to a mail service indicates new mail.
To use message services, select Mail from the Phone Ready
screen. The inbox screen opens with your message services listed.
To select a message service, scroll to highlight the service or press
the corresponding number. For example, to access your Message
Mail, press 2.
Voice Mail
When your i2000 receives a Voice Mail message:
•
The ¶ icon appears on your display (if supported by your
Service Provider).
•
The Voice Mail alert tone sounds (if Mail Notification is turned
on).
•
The message, New Voice Mail Waiting appears on your
display.
•
An exclamation point (!) on the display indicates that you have
at least one urgent message.
English
Using Your Phone’s Features
40
From any mode:
1
Select Mail.
2
Select VoiceMail.
The VoiceMail inbox opens and displays the number of your new
and total VoiceMail messages.
To retrieve your VoiceMail immediately:
1
Select Dial. This action automatically places a call to your
voice mailbox. The most recent message is retrieved first.
2
To close your voice mailbox, select Exit.
Message Mail (SMS Messages)
Message Mail can be either a numeric page or a text message of
up to 140 characters. Your phone can receive and store mail
messages at any time, up to the capacity of your SIM card.
AContact your Service Provider for the message capacity of
your SIM card.
1
To postpone reading your mail and to clear the display, select
Later. The icon stops flashing but remains on your display to
remind you that you have unread messages.
To read your mail now:
2
To read your mail now, select Now. The screen will briefly
display the number of new and saved messages in your
mailbox.
3
A list of all your messages will be displayed. Highlight the
message that you wish to read and select Read.
Page 41

i2000_en.bk : opt_menu.fm5 Page 41 Wednesday, February 23, 2000 7:58 AM
To read your mail later:
4
From any mode, select Mail. The Mail box opens.
5
Select Mesg Mail.
Your Message mailbox opens and briefly displays the number of
new and saved messages currently in your mailbox.
6
Next, a list of all messages will display. Select the message that
you wish to read and select Read.
AYour message shows the time and date that the sender
entered it in the network.
Saving and Erasing Mail
After you read a text or numeric message, you can either Save or
Erase the message. Press ± under the desired option.
Auto Call Back
You can respond to numeric pages and text messages containing
a call-back number. To automatically dial a number contained
within a Message Mail, press °.
Mail Memory Full
If the message capacity in your SIM card is full, your phone
displays the message Mail Waiting, Memory Full. You
can not receive new Message Mail until you empty register space
by erasing saved or unread messages.
Using Your Phone’s Features
41
English
Page 42

i2000_en.bk : opt_menu.fm5 Page 42 Wednesday, February 23, 2000 7:58 AM
English
Using Your Phone’s Features
42
Page 43

i2000_en.bk : qkaccess.fm5 Page 43 Wednesday, February 23, 2000 7:58 AM
Setting Programming Menus
! Do not perform menu options 41, 42, and 43 unless your
service provider instructs you to do so.
To customise the settings on your phone, either press ³ or use
the Programming Menu as follows:
1
Press $ until you see Prgm on the display.
2
Select Prgm.
3
Select Ok.
Either press ´ to scroll to the Programming Menu Option
you want or use the keypad to enter the number of the Option.
AThe Programming Menu Option numbers are shown below,
on the left-hand side of the Programming Menu Options.
Either select On to enable the Option or select Off to disable the
Option.
1 Own Ph #
You can enter and store your number and view it.
3 Mail Display:Off
Turn on and off the New Mail message that is displayed with
incoming Voice or Message mail.
4 Manual Lock:Off
Lock your phone to prevent unauthorised use. You must enter a
password to unlock it.
Even with the manual lock on, you can reach emergency help by
pressing and holding the emergency key designated by your
service provider.
5 Auto Lock:Off
Automatically lock your phone each time it is powered off to
prevent unauthorised use.
6 Auto Answer:Off
Turn on or off automatic answering of incoming phone calls after
1-4 rings.
9 Vibrate Alert:Off
Receive a non-audible alert for incoming phone and circuit data
calls and messages.
10 Last Call Timer
Display the duration of the most recent phone call.
11 Display Timer:Off
Turn on or off automatic display of the Last Call Timer at the end
of each phone call.
12 Reset Timer
Display cumulative airtime of all phone calls since last reset.
13 Total Timer
Display cumulative airtime of all phone calls.
14 1 Minute Beep:Off
Automatically signal each minute of elapsed phone airtime with
an audible beep.
20 Phone List
Add phone number.
21 Edit Phone Book
Edit and erase up to 255 frequently called phone numbers and
associated names.
Setting Programming Menus
43
English
Page 44

i2000_en.bk : qkaccess.fm5 Page 44 Wednesday, February 23, 2000 7:58 AM
30 Ringer Volume
Set the ringer volume using the volume control keys, or lower the
volume to silence the ringer.
31 Set Ring Style
Select a distinct ring style for incoming phone calls.
32 Mail Volume
Set the volume of incoming Voice Mail tones using the volume
control keys, or lower the volume to silence the mail alert tones.
33 Earpiece Volume
Set the default earpiece volume using the volume control keys.
34 Keypad Volume
Set the volume of the keypad tones using the volume control
keys, or to silence the keypad tones.
35 Speaker Phone Volume
Temporarily adjust the speaker phone volume for noisy
environments.
36 Spkr Vol Set Tone
Turn the speaker volume set tones on or off.
English
Setting Programming Menus
44
40 Change Password
Change your secret four-digit password from the initial setting of
0000.
46 Change SIM Card PINs
Change your personal SIM card PIN.
47 Require SIM Card PIN
Set or remove PIN requirement when you turn on your i2000.
48 Change Bar Password
Change your call barring password.
55 Phone Sys
Set your i2000 for travel by choosing a phone system setting.
56 GSM Network Name
Add, edit, or erase network names and network codes to the
known list.
57 GSM Network Search
Automatically or manually search for an available network.
58 GSM Network List
Add, edit, or erase entries in your preferred list. View entries from
the known list.
70 Language
Select a language for your display text.
Page 45

i2000_en.bk : qkaccess.fm5 Page 45 Wednesday, February 23, 2000 7:58 AM
! Do not perform the following three menu options
unless your service provider instructs you to do so. You
could damage your phone.
41 Feature Reset
Returns all feature settings to their original defaults.
43 Master Reset
Resets the phone’s identification number. (Only available when in
iDEN coverage.)
Setting Programming Menus
45
English
Page 46

i2000_en.bk : qkaccess.fm5 Page 46 Wednesday, February 23, 2000 7:58 AM
English
Setting Programming Menus
46
Page 47

i2000_en.bk : access.fm5 Page 47 Wednesday, February 23, 2000 7:58 AM
The following accessories have been designed to work with your
phone. Additional accessories may be available and are packaged
separately. Please refer to your local Service Provider or retail
outlet for more information.
Travel Charger
Using the Travel Charger, you can charge a battery from an AC
outlet. On one end of the Travel Charger, an accessory connector
attaches to the bottom of the phone unit. At the other (AC
outlet) end of the device, there is a compact housing that
contains the plug-in power supply. A lightweight cable connects
the two ends (accessory connector and power supply).
A green LED on the accessory power supply indicates that the
Travel Charger is plugged in.
Vehicular Battery Charger (Cigarette Lighter
Adapter)
The Vehicular Battery Charger (VBC) connects to your phone and
allows you to charge your phone’s battery while driving. When
the phone is in use, the adapter overrides the battery to preserve
battery life. The adapter also provides dead battery operation.
The power light (green LED) will light when the VBC is receiving
power.
Easy Install Car Kit
The Easy Install Car Kit plugs into the vehicle’s cigarette lighter. It
features a built-in speaker and a visor microphone for hands free
conversation.
Dashboard Holder
The Dashboard Holder provides a convenient holder for your
i2000 phone. You can install it either horizontally or vertically.
WARNING:
or in the air bag deployment area.
Do not install the Dashboard Holder over the air bag
Leather Carry Case
The leather carry case with belt clip allows for easy attachment to
a belt or handbag. This case accommodates i2000 travel
chargers, audio accessories, and all battery types.
Extended Life Battery
The extended life battery provides the i2000 with up to 220
minutes of talktime and up to 67 hours of standby time.
Slim Battery
The slim, lightweight lithium battery provides the i2000 with up
to 140 minutes of talktime and up to 41 hours of standby time.
Desktop Dual-Pocket Charger
The Desktop Dual-Pocket Charger allows you to charge a battery
fitted in a phone and a spare battery at the same time. The
charging status for each battery is indicated by LEDs at the front
of the charger.
AThe Desktop Charger must be used with the Travel Charger.
Accessories
Accessories
47
English
Page 48

i2000_en.bk : access.fm5 Page 48 Wednesday, February 23, 2000 7:58 AM
Audio Adapter
The Audio Adapter connects an earpiece microphone to your
i2000 for privacy and hands free operation.
The Audio Adapter fits onto the bottom of the i2000 and
provides a standard 2.5mm jack connection for an earpiece
microphone or headset.
UK Adapter Plug
The UK Adapter Plug connects the Travel Charger to a UK-style
mains power outlet.
European Adapter Plug
The European Adapter Plug connects the Travel Charger to a
Continental European-style mains power outlet.
Aust/NZ Adapter Plug
The Australian/New Zealand Adapter Plug connects the Travel
Charger to a Australian/New Zealand mains power outlet.
Indian Adapter Plug
The Indian Adapter Plug connects the Travel Charger to an Indian
mains power outlet. This plug can also be used in Pakistan and
Bangladesh.
English
48
Accessories
Page 49

i2000_en.bk : notes.fm5 Page 49 Wednesday, February 23, 2000 7:58 AM
What to do if...
You can’t switch your phone on
You can’t make calls
You can’t receive calls
Your phone won’t unlock
Your PIN is blocked
Your PIN2 is blocked
Your SIM card won’t work
Check the battery. Is it charged, properly fitted and are the contacts clean and dry? See ‘Important Battery
Information’.
Check the signal strength meter in the display. If the signal is weak, move to an open space or, if you are in
a building, move closer to a wi ndow.
Check your phone is switched on.
Check the Network Selection settings. Try Manual Selection, or try another network. See ‘Network Search’.
Check your Operator coverage map.
Is Restricted displayed? Check the Call Barring and Fixed Dialling settings.
Has the call charge limit been reached? Use your PIN2 code to reset the limit or contact your Service
Provider. See ‘Set Total Charge Limit’.
Has a new SIM card been inserted? Check that no new restrictions have been imposed.
Check the signal strength meter in the display. If the signal is weak, move to an open space or, if you are in
a building, move closer to a wi ndow.
Check the Call Diversion and Call Barring settings.
Check the Ringer and VibraCall™ settings. If both are off, there is no audible alert. See ‘Ring or Vibrate’.
Have you inserted a new SIM card? Enter the new PIN code. See ‘Entering Your SIM Card PIN Code’.
Do you have a replacement phone? Enter the default phone unlock code - 1234.
Have you forgotten the unlock code? Press
code).
Enter the PIN unblocking code supplied with your SIM card (see ‘Unblocking Your Phone’).
Enter the PIN2 unblocking code supplied with your SIM card (see ‘Change SIM PIN2 Code’).
Is the card inserted the right way round? See ‘SIM Card Insertion/Removal’.
Is the gold chip visibly damaged or scratched? Return the card to your Service Provider.
Check the SIM contacts. If they are dirty, clean them with an antistatic cloth.
$ to change the unlock code (you will need your security
What to do if...
49
English
Page 50

i2000_en.bk : notes.fm5 Page 50 Wednesday, February 23, 2000 7:58 AM
The battery won’t charge
The battery icon and meter are
missing
The battery drains faster than
normal
You can’t cancel Call Diverting
or Call Barring
The o symbol is flashing
I can’t make international calls
English
50
What to do if...
Check the charger. Is it properly connected? Are its contacts clean and dry? See ‘Your Battery’.
Check the battery contacts. Are they clean and dry?
Check the battery temperature. If it is warm, let it cool before recharging.
Is it an old battery? Battery performance will decline after several years use. Replace the battery.
Are you using a Motorola original battery? Your charging system may not be able to communicate with
your battery. See ‘Your Battery’.
Are you using a Motorola original battery? Your charging system may not be able to communicate with
your battery. See ‘Your Battery’.
Are you in an area of variable coverage? This uses extra battery power.
Is it a new battery? A new battery will need two to three charge/discharge cycles to attain normal
performance. See ‘Charging a New Battery’
Is it an old battery? Battery performance will decline after several years use. Replace the battery.
Is it a battery that hasn’t been completely discharged? Allow the battery to fully discharge (until the phone
turns itself off) and then charge the battery overnight.
Check that the Frequency Of Search feature in the Network Selection menu has not been set to Fast or
Continuous. See ‘Network Search’.
Check that the Battery Saving Mode feature has not been set to Off.
Are you using your phone in extreme temperatures? At extreme hot or cold temperatures, battery
performance is significantly reduced.
Wait until you are in an area with good network coverage and try again.
There is not enough memory available to store another SMS message. Use the Messages menu to delete
one or more existing messages.
Some Service Providers automatically bar the ability to make international calls. Contact your Service
Provider.
Have you included the relevant codes? Press and hold the
prefix (
) and then enter the appropriate country code followed by the phone number.
+
0 key to display the international dialling
Page 51

i2000_en.bk : notes.fm5 Page 51 Wednesday, February 23, 2000 7:58 AM
About Status Messages
Under certain conditions you may receive status messages shown in the table below. Before contacting your service provider, take a
note of the message, numeric code, and a description of what you were doing with your phone when the message appeared.
Status Message Message Description
Number Not in Service
User Not Available
Please Try Later
Service Restricted
Service Not Available
System Busy Try Later
Service Conflict
Please Try Again
Self Check Error
Self Check Fail
The number that you entered is not valid.
The party that you called is either busy, out-of-range, or turned off. Please try again later.
This service is temporarily not available. Please try again later.
This service was either restricted by your service provider or it was not purchased
This feature is not available on the current network.
The system is experiencing heavy traffic. Please try again later.
This service can not be enabled because an incompatible service has already been turned on.
An error occurred. Note the error code and try again.
A fault was detected with your phone. If this error recurs, note the error code and contact your service
provider.
An operational fault was detected with your phone. Note the numeric code, turn your phone off, and
contact your service provider immediately.
What to do if...
51
English
Page 52

i2000_en.bk : notes.fm5 Page 52 Wednesday, February 23, 2000 7:58 AM
English
What to do if...
52
Page 53

i2000_en.bk : i2000_en.IX Page 53 Wednesday, February 23, 2000 7:58 AM
A
Accessories ..........................................47
Audio Adapter
Aust/NZ Adapter Plug
Dashboard Holder
Desktop Dual-Pocket Charger
Easy Install Car Kit
European Adapter Plug
Extended Life Battery
Indian Adapter Plug
Leather Carry Case
Slim Battery
Travel Charger
UK Adapter Plug
Vehicular Battery Charger
Accessory Connector
Alphanumeric Display
Alphanumeric Keypad
Antenna
Auto Answer
Auto Lock
Automatic Redial
................................. 48
......................48
...........................47
..................................... 47
................................. 47
.............................. 48
.............................. 2
.................................................2
........................................43
............................................43
.................................. 26
..........47
...........................47
....................48
.......................47
.........................48
..........................47
................47
............................. 2
............................2
B
Background Noise ................................ 26
Batteries
Battery Charge Indicator
Attaching
Charging
Detaching
Status
........................................ 16
.........................................16
........................................ 16
..............................................16
...................... 15
C
Call Barring ..........................................29
All Calls
...........................................29
Changing Password
Incoming Calls
International Calls
International Calls except Home
Country
Outgoing Calls
Password
Viewing Status
Call Diverting
Conditional
Unconditional
Call Hold
..............................................28
Call Waiting
Caller ID
...............................................27
Calling a Number
Change Bar Password
Change Password
Change SIM Card PIN
......................... 30
................................. 29
............................ 29
.........................................29
................................ 29
.........................................29
................................ 30
................................ 15, 27
..................................... 28
.................................. 27
.........................................28
................................. 21
.......................... 44
................................ 44
........................... 44
Charging
Charging the Battery
D
Desktop Dual-Pocket Charger
Detaching the Battery
Dialling Methods
Display
E
Earpiece .................................................2
Earpiece Volume
Edit Phone Book
Emergency Calls
Emergency Dial
F
Fault finding ........................................ 49
Feature Reset
G
GSM ............................................... 1, 38
Index
..............................................16
Status
Charging a Battery
Automatic Redial
Emergency Dial
Last Number Redial
Name Search
Scroll
...............................................25
Speed Dial
Turbo Dial®
.................................................15
............................ 16
.......................... 17
.......................... 16
.................................. 25
............................. 26
................................ 26
.......................... 25
................................... 25
....................................... 25
.................................... 25
.................................. 44
.................................. 43
............................ 24, 35
.................................... 26
....................................... 45
53
Index
English
Page 54

i2000_en.bk : i2000_en.IX Page 54 Wednesday, February 23, 2000 7:58 AM
H
Hands-Free Speaker Phone .................. 26
I
In service status ................................... 21
In use status
International Phone Calls
........................................ 21
..................... 24
K
Keypad Lock ........................................ 35
Keypad Volume
................................... 44
L
Language
Change
Last 10 Calls Received and
Last Call Timer
Last Number Redial
LED (Light Emitting Diode)
LED Indicator
Light Sensor
English
.......................................... 44
Sent Lists
...................................... 32
..................................... 43
............................. 25
....................................... 21
Flashing Green
Flashing Red
Solid Green
Solid Red
................................ 21
................................... 21
..................................... 21
........................................ 21
........................................ 19
Index
54
..................... 2
M
Mail .....................................................41
Mail Display
Mail Memory Full
Mail Services
Mail Volume
Making a Phone Call
Manual Lock
Master Reset
Menus
Message Mail (SMS)
Microphone
Mode Key
Motorola
Mute
..........................................43
.................................41
........................................40
.........................................44
............................21
........................................43
........................................45
....................................................2
....................................................26
.............................40
...........................................2
.......................................2, 43
................................................1
N
Name Search ........................................ 25
Network
...............................................38
Networks
No service status
Noise
Number Not in Service
.............................................39
Network List
Network Name
Network Search
Preferred List
.................................... 44
................................ 44
............................... 44
................................... 39
.................................. 21
............................................ 26, 44
.........................51
O
On/Off Button ........................................2
One-Minute Beep
Option Keys
Own Ph #
................................. 43
...........................................2
.............................................43
Page 55

i2000_en.bk : i2000_en.IX Page 55 Wednesday, February 23, 2000 7:58 AM
P
Password .............................................44
Pauses
Inserting into Phone Numbers
Personal Identification Number
- see also PIN
Phone Calls
3-Way Calling
Call Barring
Call Diverting
Call Hold
Call Waiting
Emergency Calls
International
Making
Missed Call Indicator
Receiving
Stored Lists
Phone List
Phone List Entries
Phone Mode
Phone Numbers
What is My Phone Number
Phone numbers
Phone Sys
PIN
................................................ 18, 22
Disabling
Enabling
Entering
Unblocking
PIN - see also
Personal Identification Number
................................... 1
.................................. 29
..................................... 29
................................... 27
.........................................28
.................................... 28
.............................. 24
.................................... 24
............................................21
.........................................27
...................................... 30
............................................43
................................. 32
..........................................2
.................................... 30
............................................44
.........................................23
..........................................23
..........................................22
...................................... 22
..........24
........................27
..............27
........1
PIN Unblock - see also PUK
Please Try Again
Please Try Later
Programming Menus
1 Minute Beep Off
Auto Answer Off
Auto Lock Off
Change Bar Password
Change Password
Change SIM Card PINs
Display Timer Off
Earpiece Volume
Edit Phone Book
Feature Reset
GSM Network List
GSM Network Name
GSM Network Search
Keypad Volume
Language
Last Call Timer
Mail Display Off
Mail Volume
Manual Lock Off
Master Reset
Mode Key
Own Ph #
Phone List
Phone Sys
Reset Timer
Ringer Volume
Set Ring Style
Speaker Phone Volume
................................... 51
.................................... 51
............................ 43
........................... 43
............................. 43
.................................. 43
............................ 44
............................. 43
.............................. 44
.............................. 43
................................... 45
........................... 44
............................... 44
........................................ 44
................................. 43
............................... 43
.................................... 44
.............................. 43
................................... 45
........................................ 43
........................................ 43
........................................ 43
........................................ 44
..................................... 43
................................. 44
.................................. 44
...................22
...................... 44
..................... 44
....................... 44
...................... 44
.................... 44
Spkr Vol Set Tone
Total Timer
Vibrate Alert Off
PUK
.....................................................22
PUK - See also PIN Unblocking Code
............................ 44
...................................... 43
.............................. 43
....22
Q
Quickstore of Phone Numbers .............. 33
R
Receiving a Phone Call ......................... 27
Registering status
Reset Timer
Ring Style
Ringer Volume
Roaming
................................. 21
..........................................43
...................................... 36, 44
.............................. 36, 44
..............................................29
55
Index
English
Page 56

i2000_en.bk : i2000_en.IX Page 56 Wednesday, February 23, 2000 7:58 AM
S
Scroll ................................................... 25
Scroll Key
.............................................. 2
Self Check Error
Self Check Fail
Send/End Key
Service Conflict
Service Not Available
Service Restricted
Signal Strength Symbol
SIM
SIM - see also
Subscriber Identity Module
SIM Card PIN
Change
SMS Messages
Speaker phone
Speaker Phone Key
Speed Dial
Status
Status Messages
Number Not in Service
Please Try Again
Please Try Later
Self Check Error
Self Check Fail
Service Conflict
Service Not Available
Service Restricted
System Busy Try Later
User Not Available
English
.................................. 51
..................................... 51
........................................ 2
................................... 51
........................... 51
................................ 51
...............................................18, 37
.......................................... 44
........................................... 25
.................................................. 21
56
....................... 15
....................................... 22
.................................... 40
...................................... 2
................................ 2
.................... 51
............................. 51
............................... 51
.............................. 51
................................ 51
............................... 51
....................... 51
............................ 51
...................... 51
.......................... 51
Index
............. 1
Stored Lists
Subscriber Identity Module -
Symbols
System Busy Try Later
System Name
...........................................30
Editing and Erasing
Phone List Entries
Last 10 Calls Received
and Sent Lists
Quickstore of Phone Numbers
Storing Names and Numbers
see also SIM
...............................................15
..........................32
................................32
....................................1
...........................51
.......................................21
.........33
...........31
T
Three-Way Calling ................................29
Timer Display
Total Timer
Travel Charger
Travelling between Systems
........................................43
...........................................43
Operating
Using
GSM only
GSM preferred
iDEN only
iDEN preferred
Last active
Roam all
Searching for a Network
Storing New Networks to
Storing Your Preferred
........................................17
...............................................17
........................................38
.................................38
.........................................38
.................................38
........................................38
..........................................38
Your Known List
List of Networks
............................39
............................39
..................38
..................38
Troubleshooting
Turbo Dial®
Turning Off Your i2000
Turning On Your i2000
................................... 49
.........................................25
................. 21, 23
........................21
U
Unread Message Mail ...........................15
User Not Available
................................ 51
V
Vibe-All Key ...........................................2
VibraCall™
Vibrate Alert
Vibrate All
Voice Mail
Volume
Volume Control Buttons
Volume Level
..........................................35
Mail Vibe
.........................................35
Phone Vibrate/Ring
Selecting
Vibe All
Earpiece
Keypad
Mail
.................................................44
Speaker Phone
...........................................35
............................................15
..................................... 15, 40
............................................44
..........................35
.........................................35
........................................ 43
..........................................44
................................ 44
.........................2
.........................................2
W
What to do if... .................................... 49
Page 57

i2000_en.bk : i2000_en.IX Page 57 Wednesday, February 23, 2000 7:58 AM
Index
57
English
Page 58

i2000_en.bk : i2000_en.IX Page 58 Wednesday, February 23, 2000 7:58 AM
English
58
Index
68P09431A71
 Loading...