


Best-Rite 4' x 4' Splash-Cork
Bulletin Board with Silver
Presidential Trim
Instruction Manual
Which board assembly instructions should you use?
Use L-Clip instructions for...
ABC Trim
Aluminum Trim
Deluxe Wood Trim
48 Trim
Use Z-Clip instructions for...
Ultra Trim
Presidential Trim
31 Trim
Trim
Euro
Scroll down for instructions.
3/4
1
1
8
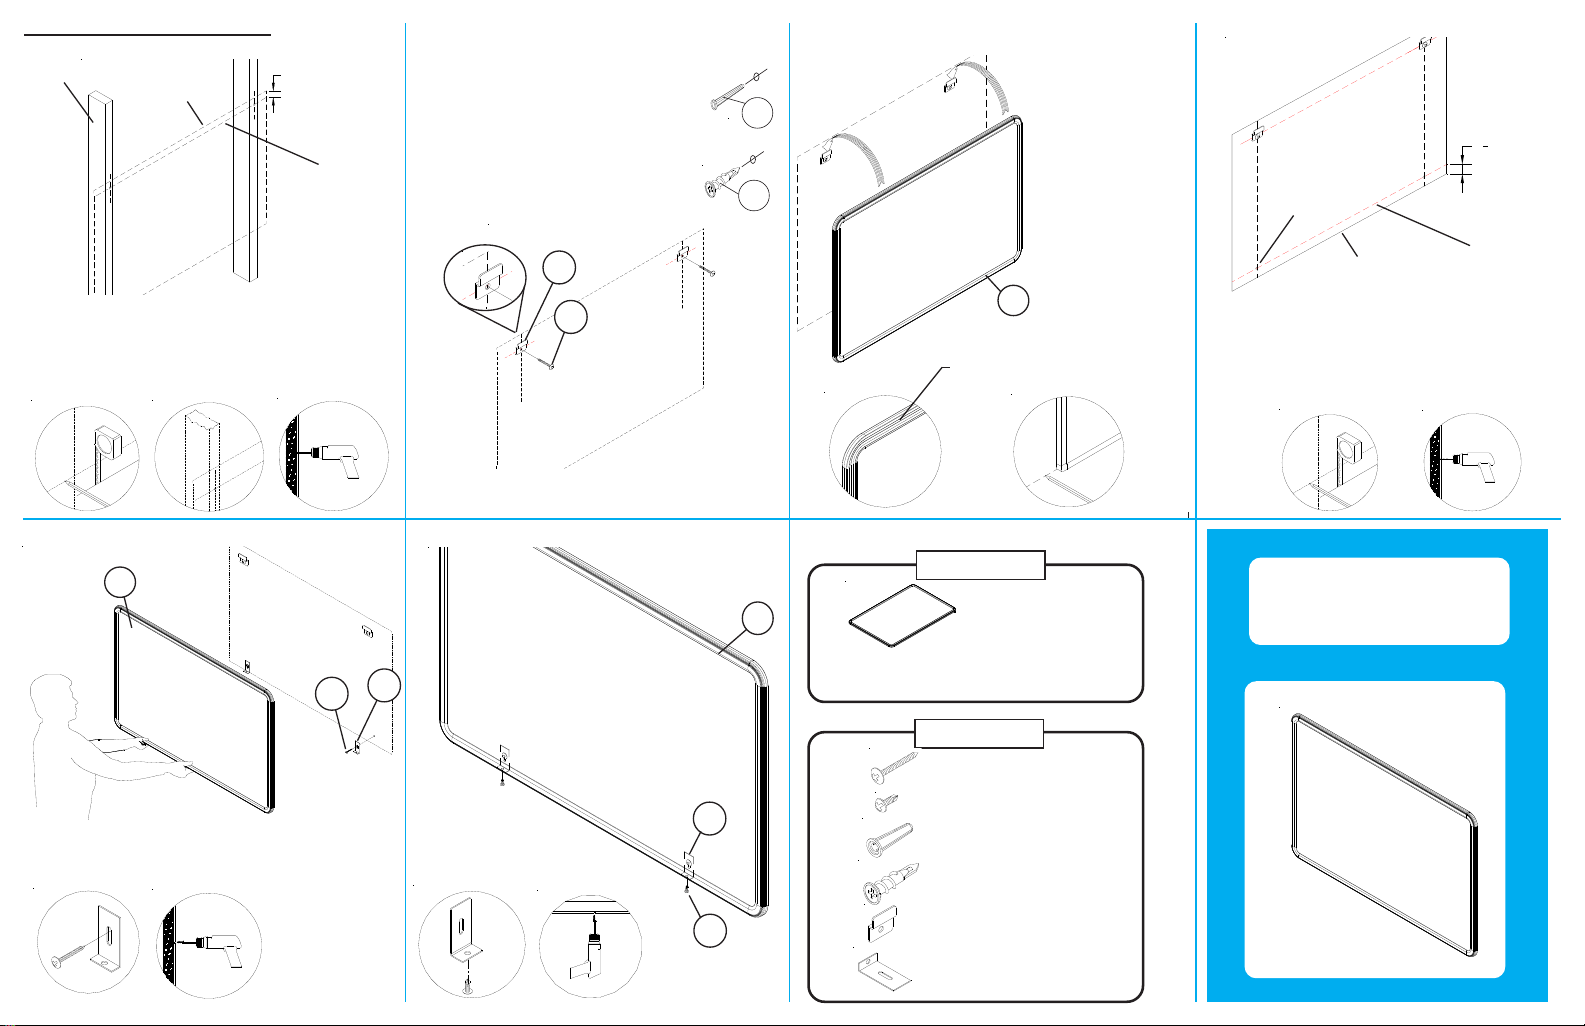
Z Clip Install Instructions
Wall Stud
T op Edge
of Board
Draw line
Board Location
1.
Determine board location. Measure from floor to
the top edge of board. Mark with pencil line the
corner location. Measure down from top edge of
board 3/4”, and draw line as shown. Locate stud
near each end of board and drill pilot hole along line
using 1/8” drill bit.
P-1
Note:
Install Masonry Anchors (D) into 1/4”
Diameter predrill holes for masonry
walls.
Install Drywall Anchors (E) into 1/4”
Diameter predrill holes for sheet rock
walls.
E
A
Board Location
2.
Attach Z-Hangers (E) using Long Screws (A)
as shown.
D
E
P-1
Z Brackets hang in
the trim on back of
board
Parts List
P1 Board
3.
Lift, Tilt, and Slide
Board down over the
Z-Hangers.
Z-Hangers should
catch in the top trim on
the back of the board.
Draw line along
bottom edge of board.
P-1
Board Location
Drill Hole
Bottom Edge
of Board
Draw line
4.
Lift and remove board from the Z-Hangers.
Measure up from bottom line of board 1-1/8”, and
draw line as shown. Locate stud near each end of
board and drill pilot hole along line using 1/8” drill bit.
Z Clip Install
5.
Secure 2 bottom brackets (F) to the wall using 2
long screws (A) as shown.
Hang board on the Z-Hangers (E).
F
A
Hardware List
A Long Screw
B Short Screw
C Screw Anchor - Concrete
D Screw Anchor - Drywall
E Z Hanging Bracket
F Bottom Bracket
(For Concrete walls)
(For Drywall)
6.
Secure board to bottom
brackets (F) using 2 short
screws (B) as shown.
F
B
Z Clip Install_05-29-13

1
1
1
4
L Clip Install Instructions
Wall Stud
Note:
Install Masonry Anchors (D) into 1/4”
Diameter predrill holes for masonry
walls.
Install Drywall Anchors (E) into 1/4”
Diameter predrill holes for sheet rock
walls.
Draw line
D
E
T op Edge of Board
Drill Holes
Board Location
Draw line
Bottom Edge of Board
Determine board location. Measure from floor to
1
the bottom edge of board. Mark with pencil line the
corner location. Measure up from bottom edge of
board 1-1/4” and draw line as shown. Locate
stud near each end of board and drill pilot holes
along line using 1/8” drill bit.
Edge of
Angle Bracket Locations on Board
Board
16” min.
3”
24” max.
See diagram below.
Angle
Bracket
Edge of
Board
Board Location
Equally
Spaced
Attach ½ the # of Angle Brackets using
2
Long Screws (B) as shown.
3
Set board on the Angle
Brackets. Draw line along
top edge of board.
Parts List
P1 Board
Hardware List
A Angle Bracket
Board Location
Lift and remove board from
4
the angle brackets. Measure down
from top line of board 1” and draw line
as shown. Locate stud near each end of
board and drill pilot hole along line using
1/8” drill bit.
L Clip Install
Secure top Angle Brackets (A) to the wall using
5
long screws (B) as shown. Follow diagram in
Step 1. Set board on the bottom angle brackets.
Secure board to bottom and
6
top brackets (A) using short
screws (C) as shown.
B Long Screw
C Short Screw
D Screw Anchor-Concrete
E Screw Anchor-Drywall
L Clip Install_12-12-14
Attention
Please read and follow these instructions!
Failure to follow these instructions will
void your warranty and could result in
board failure and possible injury.
1. Always use the correct supplied mounting hardware for
the type wall your board will be mounted on.
2. Use the correct stated predrill for the type anchor you
will be using.
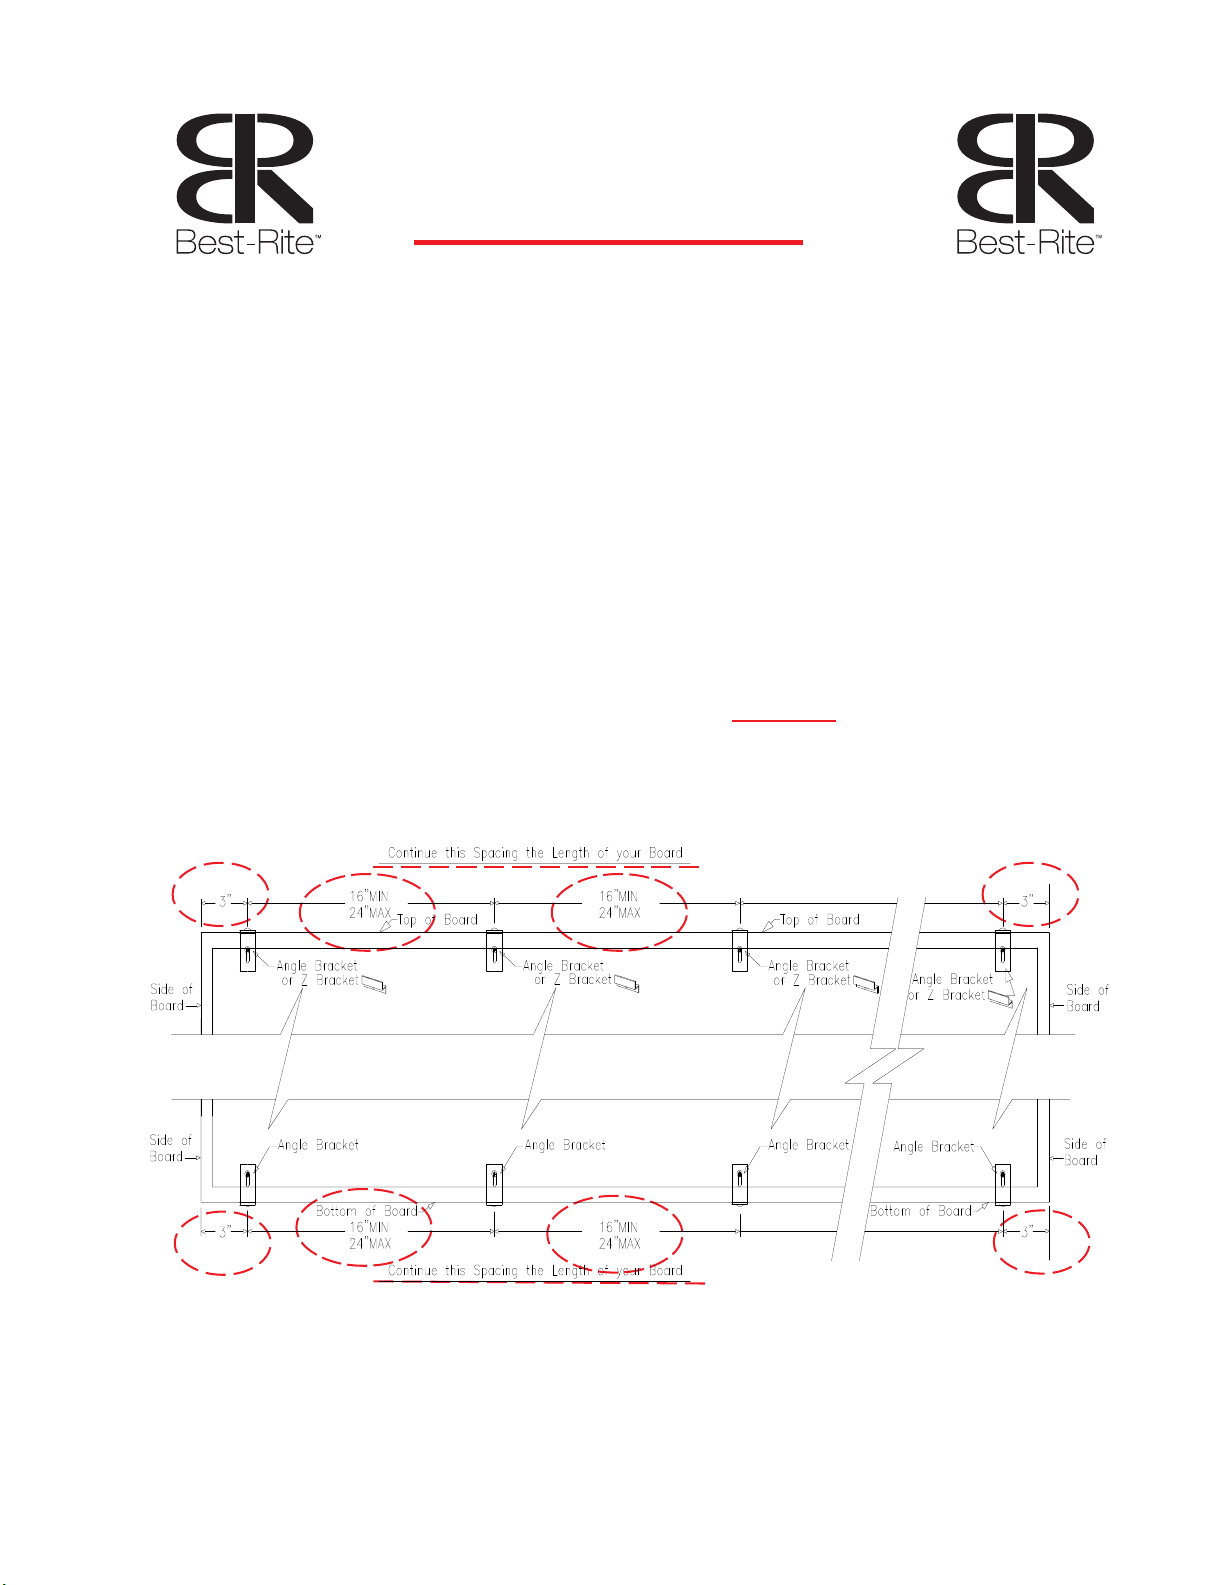
3. The Angle Brackets and Z Clips be installed
according to the layout and spacing as shown below.
MUST
NOTE: For more information, please refer
to our web-site:
www.partsandinstructions.com
WWW.MYBINDING.COM
L-Clip_09-08-15
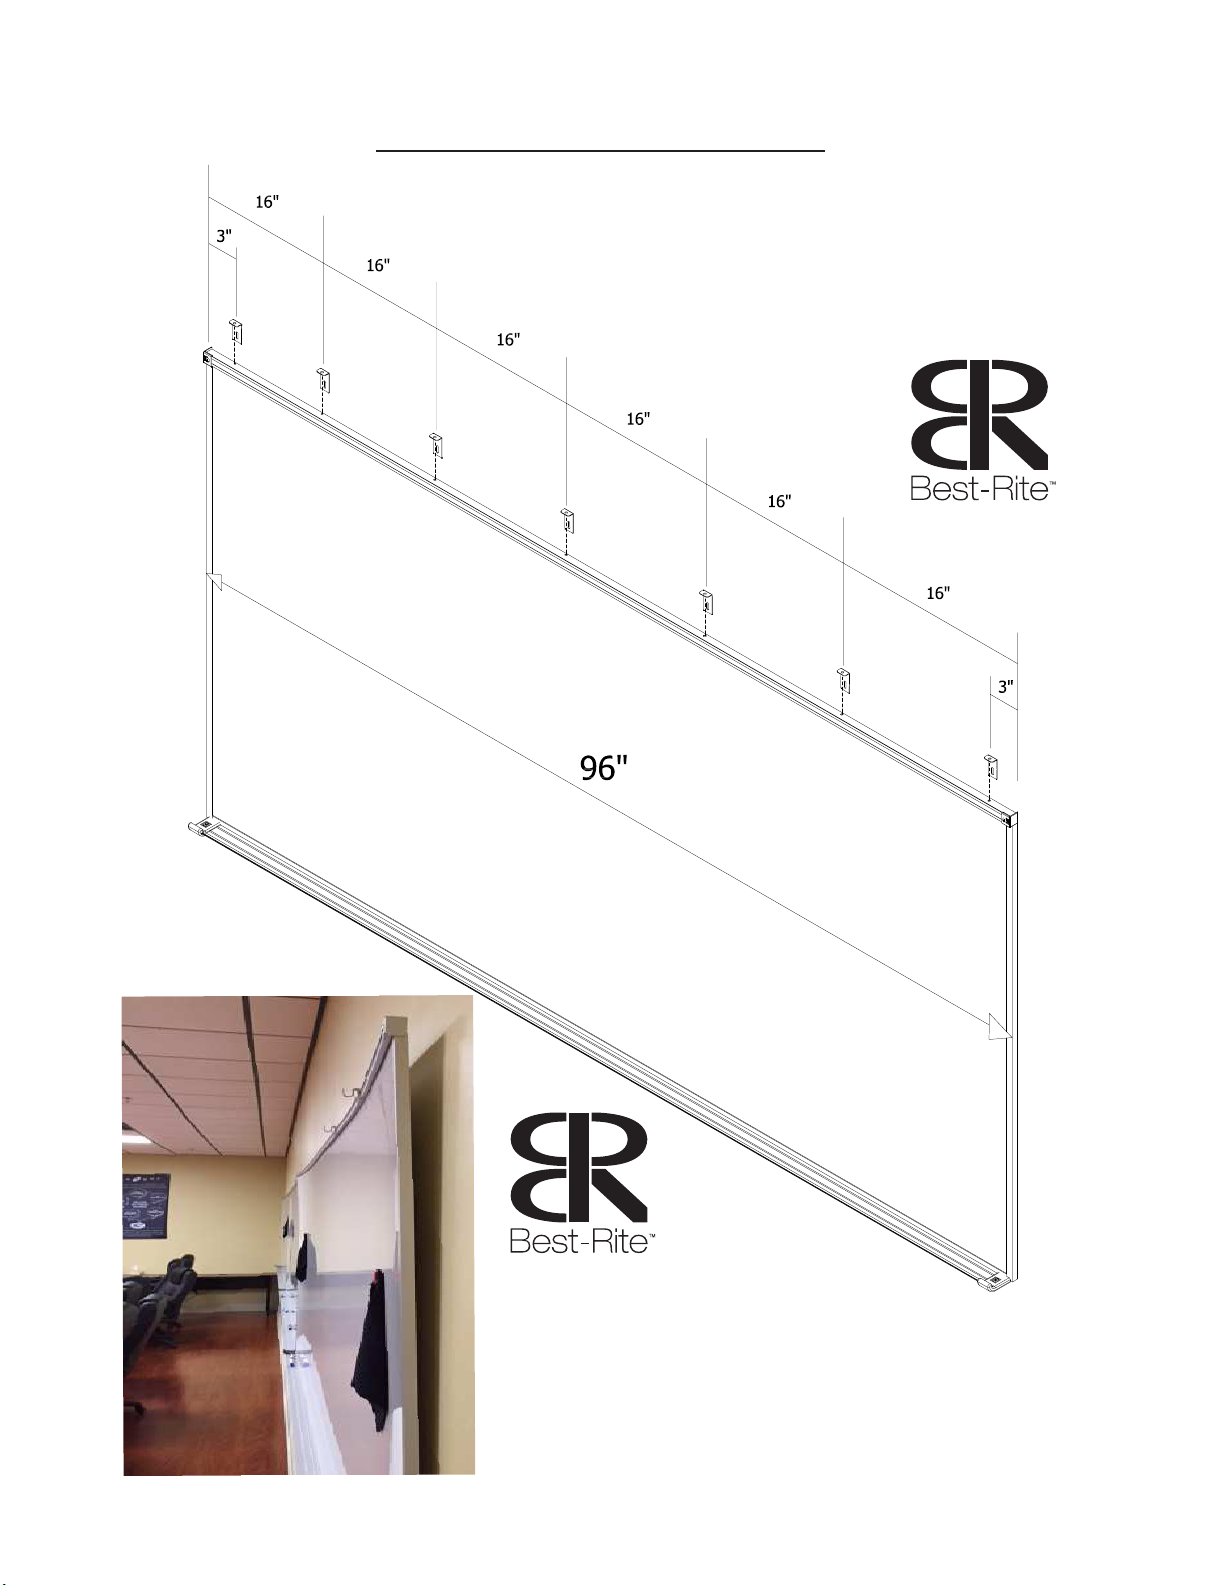
Proper L-Clip Layout
Your top and bottom L-Clip
layouts should be spaced like
this for an 8’ wide board.
If you don’t use this number of
L-Clips on top and bottom, your
board could end up like this. Please
follow these installation directions.
 Loading...