

Page 1
PRECAUCIONES PARA SEGURIDAD
Para reforzar la seguridad de la operación, use el instrumento de
acuerdo a las instrucciones y especificaciones en este Manual del Usuario.
• La batería que se utiliza en este instrumento contiene
substancias irritantes. Si el contenido líquido entra en
contacto accidentalmente con los ojos o la piel,
enjuague inmediatamente con agua, y consulte con
un médico. Si entra en la boca, enjuague inmediatamente dentro de la boca, trague gran cantidad de
agua, vomítela, y consulte con un médico.
• La punta de contacto del micrómetro es aguda.
Manéjelo con cuidado para que no se hiera.
IMPORTANTE
• No desmonte ni modifique este instrumento. Puede causar daños al
instrumento.
• Para limpiar el instrumento, utilice un paño suave empapado en un
detergente neutro diluido. No utilice ningún solvente (tíner). Puede
deformar o dañar el instrumento.
• El husillo está diseñado para no quitarse del casquillo. No lo mueva
más allá del límite superior del rango de medición, ya que eso puede
causar daños al instrumento.
• No use ni guarde el micrómetro en un lugar donde la temperatura
cambie bruscamente. Antes de usar el micrómentro, estabilícelo a la
temperatura del cuarto.
• No guarde el micrómetro en un lugar expuesto al polvo y a la humedad.
• No use el micrómetro en un lugar expuesto al aceite y al agua.
• Nunca aplique una pluma electrónica al micrómetro. Puede causar
daños al instrumento.
• No cargue ni desarme la batería. Puede causar cortocircuito.
• Si no se usa el micrómetro por más de tres meses, quite la batería del
micrómetro para guardarlo con seguridad. La batería puede chorrear
y causar daño al micrómetro.
• La garantía no se aplica si el producto falla o se daña como el resultado
de baja batería.
Consulte las figuras de la izquierda mientras lea este manual.
[1] Nombre y Función de Cada Parte
q Botón de ajuste en cero
w Botón de cambio entre pulgada/mm (sólo tipo pulgada/mm)
e Pantalla de Cristal Líquido
r Tambor (varía dependiendo del modelo)
t Tapa de la batería
[2] Para Poner la Batería
Ponga la batería suministrada consultando las figuras de la izquierda.
• Si se quita la batería y se vuelve a instalar, se cancela el ajuste ORIGIN (origen
o punto cero). En este caso, ajuste de nuevo el ORIGIN (origen o punto cero).
(Consulte la Sección [4].)
• Use sólo pilas SR44 de óxido de plata tipo botón.
• Con una moneda, etc. ajustada sobre la ranura de la tapa de batería, gírela en
la dirección contraria de las manecillas del reloj, de modo que se desmonte.
• Instale la batería con el lado positivo hacia arriba.
• Instale la tapa de la batería cuidadosamente para que la cubierta sea
completamente engranada con el agujero de la rosca y que el sello no salga de
la cubierta. Si la tapa de la batería y el sello no son correctamente instalados,
no se muestra el valor correcto o puede dañarse la unidad.
• Inmediatamente después de haber instalado la batería, es probable que el
micrómetro no cuente o muestre un error. Esto no es indicación de anomalía.
Normalmente se puede corregir la indicación de la pantalla apretando el botón
de Zero. Si no se puede corregir aún, instale de nuevo la batería.
(La batería que se suministra se utiliza únicamente para comprobar el
funcionamiento y el comportamiento del instrumento, por lo que es posible
que no satisfaga la vida útil indicada para la batería.)
[3] Función de Botón y Alarma
1. Funciones de botón
Botón Zero : Cuando se oprime se pone en ceros la pantalla.
2. Indicadores de la pantalla
B:Voltaje bajo de la batería. Cambie la batería inmediatamente.
E-oS : Error debido a ruido electrónico o a exceso de velocidad. Fije el origen
otra vez, como se describe en “[4] Fijar el Origen”.
( Este micrómetro no tiene botón de ON/OFF, por lo que la unidad de pantalla
(LCD) siempre está iluminada. La unidad de pantalla (LCD) consume poca
energía, y la vida de la batería es disponible para 1.2 años bajo el uso normal.)
[4] Fijar el Origen
IMPORTANTE
• Antes de medir, compruebe el origen (punto de dato) de acuerdo con
los pasos descritos abajo.
• Remueva el polvo/aceite de las caras de medición antes de marcar el
origen.
(1) Gire el tambor hasta poner el husillo suavemente en contacto con el tope
fijo. Aplique la fuerza de medición estimada usando el trinquete/ tambor de
fricción.
(2) Oprima el botón ZERO.
(3) Aparece “0.000”, lo que indica que se fijó el origen.
[5] Especificaciones
Rango de medición : 0 a 25 mm/ 0 a 1″
Resolución : 0.001mm/ .00005″
Error instrumental (20°C) : ±2µm (Excluyendo el error de
cuantificación).
Error de cuantificación : ±1 cuenta
Fuerza de medición : 5 a 10 N
Pantalla : LCD (6 dígitos y un signo de menos)
Fuente de energía : 1 batería de óxido de plata
(SR44, No.938882)
Vida de batería : 1.2 años bajo operaciones normales.
(con operaciones contínuas de LCD)
Rango de temperatura en operación
: 5°C a 40°C
Rango de temperatura para almacenar
: –10°C a 60°C
安全に関するご注意
商品のご使用に当たっては、記載の仕様・機能・使用上の
注意にしたがってご使用ください。
それ以外でご使用になりますと安全性を損なうおそれがあります。
・本器に使用している電池や液晶の内部には、刺激性物質
が含まれています。万一その液状の内容物が誤って目や
皮膚などに付着した場合はきれいな水で洗い流してくだ
さい。また口などに入った場合は直ちに口内を洗浄し、大
量の水を飲んで吐き出してください。そしていずれの場
合も必ず医師に相談してください。
・本器の測定部分は鋭利に尖っています。身体を傷つけな
いよう、取り扱いには十分気を付けてください。
重要
・分解、改造をしないで下さい。故障の原因となります。
・お手入れの際は、柔らかい布を希釈した中性洗剤に浸してご使用くだ
さい。有機溶剤(シンナー等)を使用すると変形や故障の原因となり
ます。
・スピンドルは抜けない構造になっていますので、測定範囲を超えて無
理に後退させないでください。故障の原因となります。
・急激な温度変化のある場所での使用、保管は避けてください。また、
ご使用の際は室温に十分なじませてください。
・湿気やほこりの多い場所での保管、水や油が直接かかるような使用は
避けてください。
・電気ペンで番号などを記入することは避けてください。故障の原因と
なります。
・電池については、充電や分解等、ショートの恐れがあることはしない
でください。
・3ヶ月以上ご使用にならない場合は、本器より電池を取り外して保管
してください。電池の液漏れで本器を破損する恐れがあります。
・電池等の消耗による故障または損傷は、保証の対象外となります。
左のイラストと合わせてお読みください。
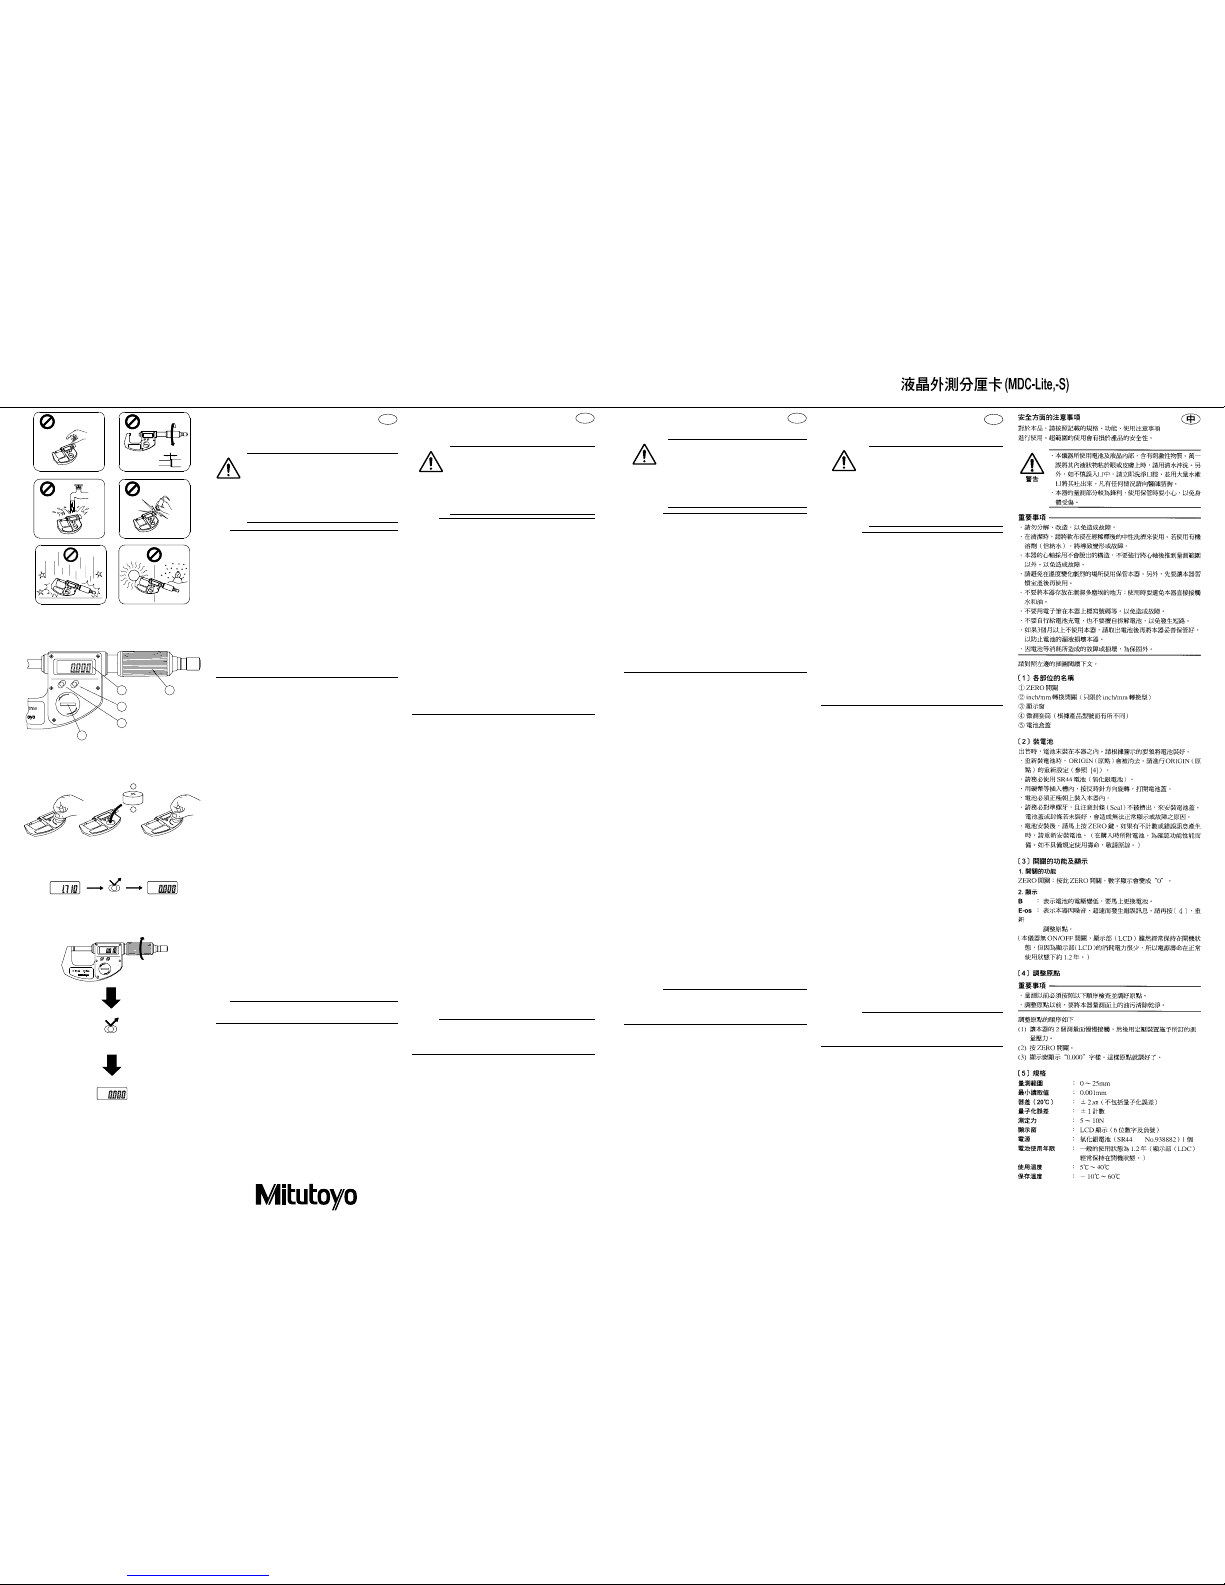
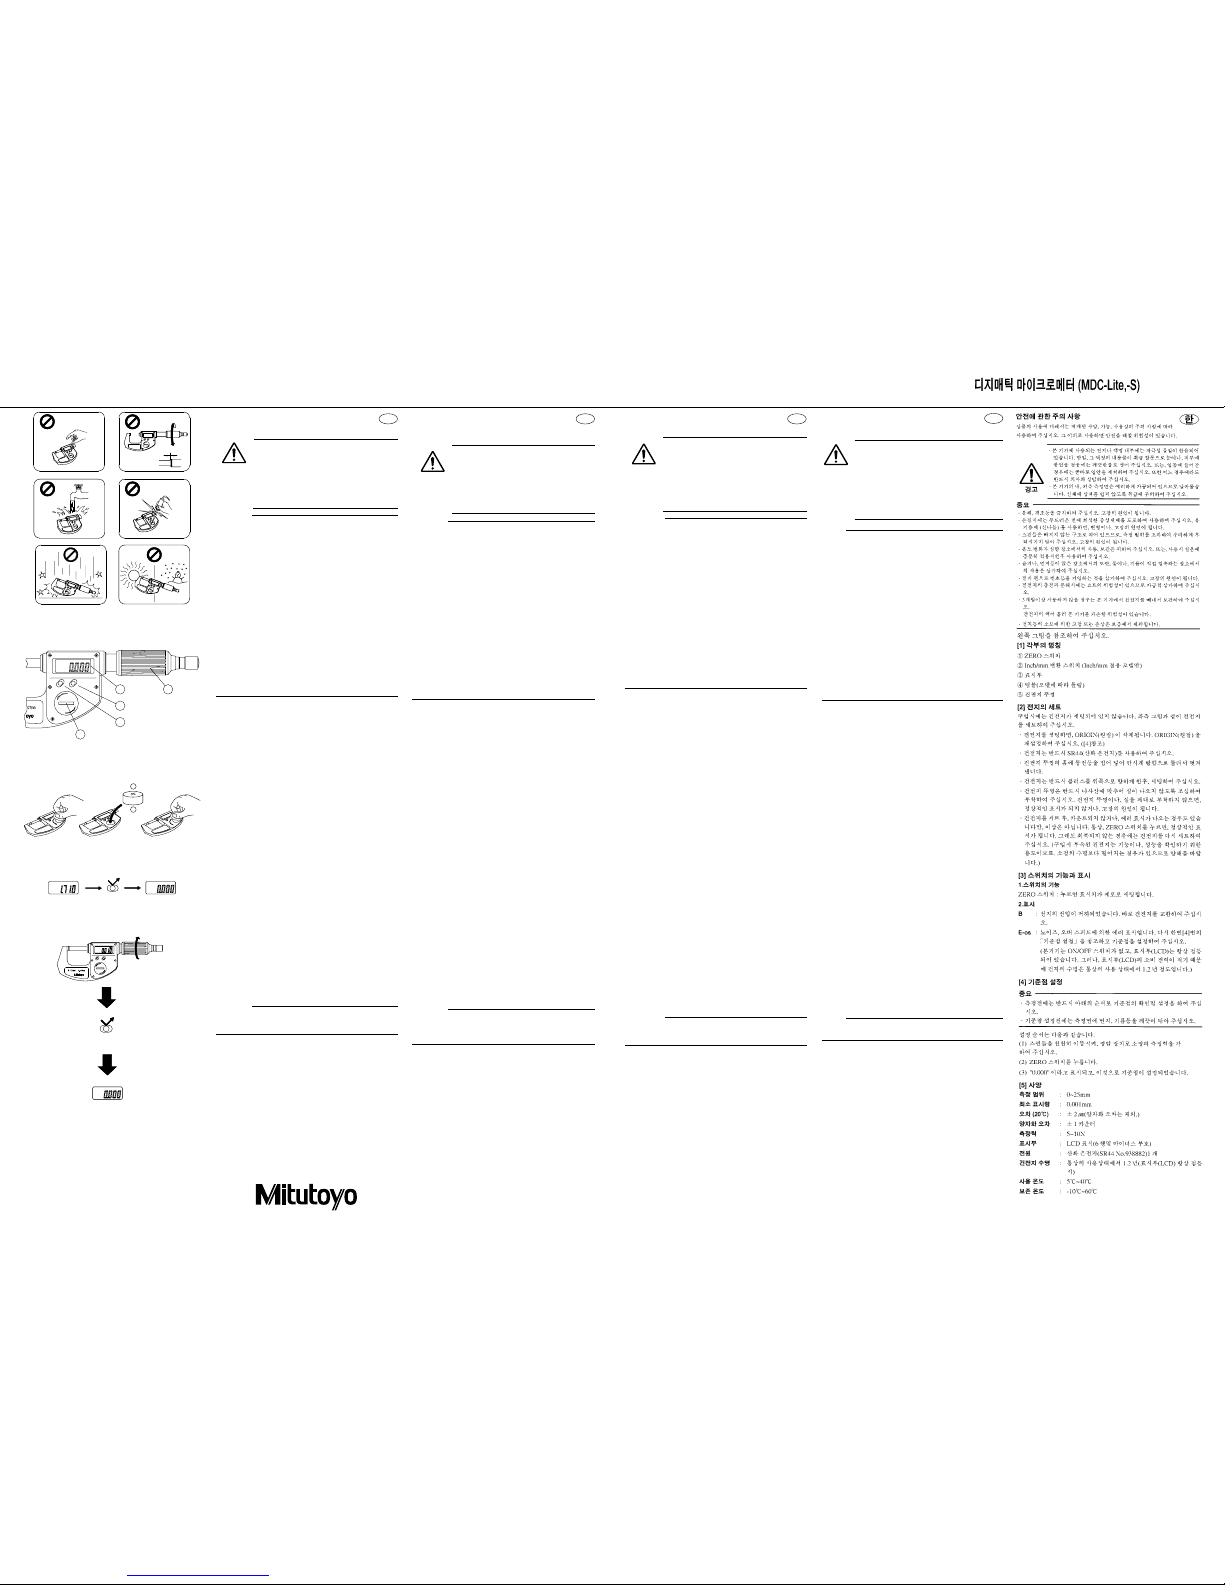
[1]各部の名称
① ZEROスイッチ ②(輸出仕様のみ) ③ 表示部
④ シンブル(モデルによって異なります) ⑤ 電池蓋
[2]電池のセット
お買い上げ時には、電池はセットされておりません。図の要領でセット
してください。
・電池をセットし直すと基点(ゼロセット)位置が消去されます。再度
基点合わせを行ってください。([4]基点合わせ参照)
・電池は必ず SR44(ボタン型酸化銀電池)をご使用ください。
・電池蓋の溝に硬貨などを当て、反時計方向に回してはずします。
・電池は必ずプラス側を上にしてセットしてください。
・電池蓋は必ずねじ山に合わせて、シールがはみ出さないように気を付
けて取り付けてください。電池蓋やシールがうまく取り付いていない
と、正常に表示しない場合や故障の原因となります。
・電池をセットした直後、ZERO スイッチを押してください。
まれにカウントしないことやエラー表示が出ることがありますが、そ
の場合は電池をセットし直してください。
(お買い上げ時に付属されている電池は、機能や性能を確認する為の
ものです。所定の寿命が持たない場合がありますのでご了承くださ
い。)
[3]スイッチの機能と表示
1.スイッチの機能
ZEROスイッチ:押すと表示をゼロセットします。
2.表示
B:電池の電圧が低下しています。すぐに電池を交換してください。
E-oS:ノイ ズ 、
オーバースピード
によるエラー表示です。
再度[4]の「基点合わせ」を参照し、基点合わせをやり直して
ください。
(本器はON/OFF スイッチが無く表示部(LCD)は常時点灯しています。
しかし表示部(LCD)の消費電力は少ない為、電池寿命は通常の使用状
態で1.2 年持ちます。)
[4]基点合わせ
重要
・測定前には必ず以下の手順で基点の確認、設定をしてください。
・この設定の前には、測定面のごみ、油等を取り除いてください。
設定の手順はつぎの通りです。
(1) 両測定面をゆっくり接触させ、定圧装置で所定の測定力をかけます。
(2) ZERO スイッチを押します。
(3)0.000が表示されます。これで基点が設定されました。
[5]仕様
測定範囲 : 0 〜25mm
最小読取値 : 0.001mm
器差(20℃) : ±2μm(量子化誤差を含まず)
量子化誤差 : ±1 カウント
測定力 : 5 〜 10N
表示部 : LCD 表示(6 桁およびマイナス符号)
電源 : 酸化銀電池(SR44 No.938882)1 個
電池寿命 : 通常の使用状態で1.2 年(表示部(LCD)常時点灯)
使用温度範囲 : 5℃〜 40℃
保存温度範囲 : −10℃〜 60℃
警告
デジマチックマイクロメータ
(MDC-Lite,-S)/Digimatic Bügelmeßschraube (MDC-Lite,-S)/Micrómetro Digimatic (MDC-Lite,-S)
/
Digimatic Buitenschroefmaat (MDC-Lite,-S)
/
User’s Manual
No.99MAB015M1
SERIES No.293
J
D
E
NL
[1]
[2]
[3]
[4]
SICHERHEITSVORSCHRIFTEN
Um die Sicherheit des Anwenders zu gewährleisten,
benutzen Sie das Gerät entsprechend den Anweisungen und Spezifikationen in
dieser Bedienungsanleitung.
• Die Silberoxidbatterie, die für dieses Gerät verwendet
wird, enthält ätzende Substanzen. Sollte die Flüssigkeit
versehentlich mit den Augen oder der Haut in Berührung
kommen, sofort mit Wasser abspülen, dann einen Arzt
konsultieren. Sollte die Füssigkeit in den Mund geraten,
sofort mit viel Wasser ausspülen, dann einen Arzt
konsultieren.
• Die Meßflächen dieser Bügelmessschraube sind scharf.
Verletzungsgefahr!
WICHTIG
• Nicht zerlegen. Dieses Gerät nicht modifizieren. Dabei kann das Gerät
beschädigt werden.
• Zum Reinigen des Geräts einen weichen, in verdünntem neutralen
Reinigungsmittel getränkten Lappen verwenden. Kein organisches
Lösungsmittel verwenden (Verdünner usw.). Ander nfalls kann es zu
einer Verformung bzw. Beschädigung des Geräts kommen.
• Die Bügelmessschraube darf nicht in ihre Einzelteile zerlegt werden.
Bewegen Sie die Messspindel nicht über die obere Grenze des
Messbereichs hinaus. Dabei kann das Gerät beschädigt werden.
• Die Bügelmessschraube darf nicht an Orten mit plötzlichen
Temperaturschwankungen benutzt oder gelagert werden. Vor der
Benutzung muß sich die Temperatur der Bügelmessschraube stabilisiert
und an die Umgebungstemperatur angepaßt haben.
• Lagern Sie die Bügelmessschraube nicht an Orten, an denen sie Staub
oder Feuchtigkeit ausgesetzt ist.
• Benutzen Sie die Bügelmessschraube nicht an Orten, an denen sie Öl
oder Wasser ausgesetzt ist.
• Gravieren Sie die Bügelmessschraube niemals mit einem elektrischen
Gravierstift. Dabei kann das Gerät beschädigt werden.
• Wenn die Bügelmessschraube für mehr als 3 Monate nicht mehr
benötigt wird, nehmen Sie die Batterie heraus und bewahren Sie sie
getrennt auf. Die Batterie könnte auslaufen und die Bügelmessschraube
beschädigen.
• Bei Geräteausfall oder -beschädigung aufgrund von normalem
Verschleiß oder durch Auslaufen der Batterie tritt die Gewährleistung
nicht in Kraft.
Beachten Sie beim Lesen dieser Bedienungsanleitung die Abbildungen links.
[1] Name und Funktion der einzelnen Teile
q ZERO-Taste
w Inch/mm-Umschalt-Taste (nur beim Inch/mm-Modell)
e LCD-Anzeige
r Trommel (verschiedene Arten, abhängig vom Modell)
t Batterie-Abdeckung
[2] Einsetzen der Batterie
Setzen Sie die Batterie ein wie in den Abbildungen links gezeigt.
• Wird die Batterie einmal herausgenommen und dann wieder eingesetzt, wird
die Nullpunkteinstellung ORIGIN aufgehoben. In diesem Fall den Nullpunkt
ORIGIN wieder einstellen. (Siehe Kapitel [4].)
• Verwenden Sie eine SR44 Silberoxid-Knopfzelle (Best.-Nr. 938882).
• Lösen Sie den Batteriefachdeckel, indem Sie ihn entgegen der
Uhrzeigerrichtung drehen.
• Setzen Sie die Batterie mit dem Pluspol nach oben ein.
• Achten Sie beim Einsetzen der Batteriefach-Abdeckung darauf, dass diese
richtig sitzt und dass die Abdichtung nicht übersteht. Andernfalls kann es zu
Fehlfunktionen oder unkorrekten Messwerten kommen.
• Drücken Sie nach dem Einsetzen der Batterie die ZERO-Taste. Falls die
Anzeige daraufhin nicht korrekt arbeitet, nehmen Sie die Batterie heraus und
setzen Sie sie nochmals ein.
(Die mitgelieferte Batterie wurde nur zem Überprüfen der Funktion und der
Leistung des Geräts verwendet, daher erreicht sie eventuell nicht die
angegebene Batterielebensdauer.)
[3] Tastenfunktion und Alarm
1. Tastenfunktionen
ZERO-Taste: Durch Drücken dieser Taste wird der Anzeige-Wert zu Null
gesetzt.
2. Fehler-Anzeigen
B:Die Batteriespannung ist zu niedrig. Ersetzen Sie die Batterie sofort.
E-oS : Fehler aufgrund von Störspannungen oder zu hoher Geschwindigkeit.
Stellen Sie den Nullpunkt neu ein, wie unter “[4] Einstellen des
Nullpunktes” beschrieben.
(Diese Bügelmessschraube hat keinen EIN-/AUS-Schalter. Die Anzeige (LCD)
bleibt immer eingeschaltet, da sie kaum Spannung benötigt.)
[4] Einstellen des Nullpunktes
WICHTIG
• Prüfen Sie vor der Messung den Nullpunkt (Referenzpunkt) wie in den
nachfolgenden Schritten beschrieben.
• Säubern Sie die Messflächen von Öl und Staub, bevor Sie den Nullpunkt
einstellen.
(1) Drehen Sie die Trommel und bringen Sie die Messspindel mit Hilfe der
Ratschentrommel vorsichtig in Kontakt mit dem Amboss.
(2) Drücken Sie die ZERO-Taste.
(3) “0.000” wird angezeigt, das bedeutet, der Nullpunkt ist eingestellt.
[5] Spezifikationen
Messbereich : 0 bis 25mm / 0 bis 1″
Ziffernschrittwert : 0,001mm / .00005″
Fehlergrenzen (20°C) : ±0,002mm (ohne Quantisierungsfehler)
Quantisierungsfehler : ±1 Digit
Messkraft : 5 bis 10 N
Anzeige : LCD (6 Digits und 1 Minuszeichen)
Spannungsversorgung : Silberoxid-Batterie (SR44, Nr. 938882) 1 Stück
Batterie-Lebensdauer : 1,2 Jahre bei normalem Betrieb
(bei dauerhaft eingeschaltetem LCD)
Betriebstemperatur : 5 bis 40°C
Lagertemperatur : –10 bis 60°C
WARNUNG
25(1″)
O
x
mm
zero
in/mm
4
3
2
1
5
+
–
SR44
No.938882
mm
mm
ZERO
Z
E
R
O
in
/
m
m
ZERO
mm
(1)
(2)
(3)
ADVERTENCIA
VOORZORGSMAATREGELEN
Om de veiligheid van de gebruiker te garanderen moet dit instrument
gebruikt worden met inachtneming van de aanwijzingen en specificaties in deze
handleiding.
• De zilveroxidebatterij in dit instrument bevat een
irriterende vloeistof. Indien deze vloeistof per
ongeluk in contact komt met ogen of huid, moet u
die meteen spoelen met water en een arts raadplegen. Indien er vloeistof in de mond terechtkomt,
de mond meteen spoelen met water, veel water
slikken en uitbraken, en vervolgens een arts
raadplegen.
• De meetvlakken van de schroefmaat zijn scherp.
Gebruik de schroefmaat met de nodige voorzichtigheid om verwondingen te voorkomen.
BELANGRIJK
• Dit instrument niet demonteren noch aanpassen. Dit kan het instrument beschadigen.
• Reinig het instrument met een zachte doek gedrenkt in een neutrale
vloeistof. Gebruik geen organische solventen (thinner e.d.). Dergelijke
producten kunnen het instrumenten vervormen of beschadigen.
• De spindel is zodanig geconstrueerd dat hij niet uit de schroefmaat
verwijderd kan worden. Draai de spindel daarom nooit verder dan het
maximum meetbereik. Dit kan het instrument beschadigen.
• Bewaar of gebruik de schroefmaat niet op plaatsen waar snelle
temperatuurwissellingen voorkomen. Laat de schroefmaat voor gebruik
op kamertemperatuur komen.
• Bewaar de schroefmaat niet op plaatsen waar hij bloot staat aan stof
of vochtigheid.
• Gebruik de schroefmaat niet op plaatsen waar hij in contact kan komen
met olie of water.
• Gebruik nooit een elektrische graveerpen op de schroefmaat. Dit kan
het instrument beschadigen.
• Probeer de batterij niet te demonteren of op te laden. Er kan kortsluiting
ontstaan.
• Als u de schroefmaat langer dan 3 maanden niet gebruikt moet u de
batterij verwijderen en apart opbergen om beschadiging van de
schroefmaat door eventuele lekkage te voorkomen.
• De garantie vervalt wanneer het produkt niet functioneert of is
beschadigd als gevolg van gebruik/slijtage of leeggelopen batterij.
Raadpleeg de afbeeldingen links bij het lezen van deze handleiding.
[1] Benaming en functie van de onderdelen
q ZERO toets (nulstellen)
w inch/mm toets (alleen op inch/mm type)
e Display (LCD)
r Trommel (uitvoering afhankelijk van type)
t Batterijdeksel
[2] Plaatsen van de Batterij
Plaats de meegeleverde batterij zoals hier links is aangegeven.
• Wanneer de batterij wordt verwijderd en dan weer aangebracht, wordt ORIGIN (nulpunt) teruggesteld. ORIGIN (nulpunt) moet dan opnieuw worden
ingesteld. (Zie [4].)
• Gebruik uitsluitend een SR44 zilveroxide batterij (knoopcel).
• Verwijder het batterijdeksel door het linksom te draaien met een munt o.i.d..
• Plaats de batterij zodanig dat de positieve pool (+) boven ligt.
• Monteer het batterijkapje voorzichtig zodanig dat het kapje volledig samenvalt
met het schroefgat en de pakking niet buiten het kapje uitsteekt. Wanneer het
batterijkapje of de pakking niet juist gemonteerd zijn, kan de display uitlezing
onjuist zijn of kunnen er andere problemen optreden.
• Direkt na plaatsing van de batterij is het mogelijk dat de micrometer niet telt
of dat er een error-melding op de display verschijnt. Dit is niet abnormaal.
Druk de Zero-knop in voor een normale display uitlezing. Als dit geen normale
display uitlezing geeft, plaats dan de batterij opnieuw.
(De meegeleverde batterij dient alleen om de werking van het instrument te
controleren en kan bijgevolg minder lang meegaan.)
[3] Functie van de toetsen en meldingen op het display
1. Functie van de toetsen
ZERO toets : Zet de waarde op het display op nul.
2. Meldingen op het display
B:De batterijspanning is laag. Vervang zo spoedig mogelijk de batterij.
E-oS : Er is een fout opgetreden door elektrische storing of te hoge
meetsnelheid. Stel het nulpunt opnieuw in zoals aangegeven bij “[4]
Instellen van Het Nulpunt”.
(Deze micrometer is niet uitgerust met een ON/OFF schakelaar. De display unit
(LCD) is altijd aan. Aangezien de display unit zeer weinig vermogen dissipeert,
is de levensduur van de batterij 1-2 jaar bij normaal gebruik.)
[4] Instellen van het nulpunt
BELANGRIJK
• Controleer voor het meten altijd het nulpunt (referentiepunt) op
onderstaande wijze.
• Verwijder vuil/olie van de meetvlakken voordat u gaat meten of
nulstellen.
(1) Draai aan de trommel om de meetvlakken voorzichtig met elkaar in contact
te brengen. Breng nu de constante meetkracht aan door aan de ratel (of
frictietrommel, afhankelijk van type) te draaien.
(2) Druk op de ZERO toets.
(3) “0.000” verschijnt op het display, het nulpunt is nu ingesteld.
[5] Specificaties
Meetbereik : 0 t/m 25mm / 0 t/m 1″
Resolutie : 0.001mm /.00005″
Nauwkeurigheid (20°C) : ±2µm (exclusief telfout)
Telfout : ±1 tel
Meetkracht : 5 – 10N
Display : LCD (6 cijfers en minteken)
Voeding : 1 Zilveroxide batterij (SR44, Nr.938882)
Levensduur batterij : 1.2 jaar bij normaal gebruik.
(Met continue functionerend LCD.)
Bedrijfstemperatuur : 5°C tot 40°C
Opslagtemperatuur : –10°C tot 60°C
WAARSCHUWING
Page 2
Digimatic Outside Micrometer (MDC-Lite,-S)/Micromètre d’Exterieur Digimatic (MDC-Lite,-S)/Micrometro per esterni Digimatic (MDC-Lite,-S)/Digimatic Mikrometer för utvändig mätning (MDC-Lite,-S)/
User’s Manual
No.99MAB015M1
SERIES No.293
GB
F
I
S
[1]
[2]
[3]
[4]
25(1″)
O
x
mm
zero
in/m
m
4
3
2
1
5
+
–
SR44
No.938882
mm
mm
ZERO
Z
E
R
O
i
n
/
m
m
ZERO
mm
(1)
(2)
(3)
SAFETY PRECAUTIONS
To ensure operator safety, use the instrument in conformance with
the directions and specifications given in this User's Manual.
• The silver oxide battery used for this instrument contains irritating substance. Should the liquid content accidentally come into contact with the eye or skin, rinse
with water immediately, then consult a physician. Should
it get into the mouth, immediately rinse inside the mouth,
swallow plenty of water and vomit it, then consult a physician.
• The tip of the contact point on this micrometer is sharp.
Handle it with care so as not to scratch yourself.
IMPORTANT
• Do not disassemble. Do not modify this instrument. It may damage the
instrument.
• To clean the instrument, use a soft cloth soaked in a diluted neutral
detergent. Do not use any organic solvent (thinner, etc.). It ma y deform
or damage the instrument.
• The spindle is designed so that it cannot be removed from the inner
sleeve. Do not move it past the upper limit of the measuring range. It
may damage the instrument.
• Do not use and store the micrometer at sites where the temperature
will change abruptly. Prior to use thermally stabilize the micrometer
sufficiently at room temperature.
• Do not store the micrometer at sites where it will be exposed to dust
and moisture.
• Do not use the micrometer at sites where it will be exposed to oil and
water.
• Absolutely do not apply an electric engraver to this instrument. It may
deform or damage the instrument.
• Do not charge or disassemble the battery. Doing so may cause short
circuit.
• If the micrometer is not in use for more than 3 months, remove the
battery from the micrometer for safe keeping. The battery could leak
and cause damage to the micrometer.
• The warranty shall not apply if the product fails or is damaged as a
result of fair wear and tear including battery drain.
Refer to the figures shown on the left while reading this manual.
[1] Name and Function of Each Part
q ZERO button w inch/mm changeover button (unique to inch/mm type)
e LCD r Thimble (type varies depending on the model)
t Battery cap
[2] Installing The Battery
The battery is not installed when it is shipped. Install the battery as shown in the
figures on the left.
• If the battery is removed once then reinstalled, The ORIGIN (zero point) set
is canceled. If this is the case, set the Origin (zero pint) again. (Refer to Section [4].)
• Use only an SR44 button-type silver oxide cell.
• Remove the battery cap by turning it counterclockwise with a coin set in the
groove.
• Install the battery so that the positive side faces up.
• Carefully mount the battery cover so that the cover is completely engaged
with the hole thread and the seal does not extend off the cover. Unless the
battery cover and the seal are mounted properly, the micrometer may not display a correct value or any failure may result.
• Immediately after loading the battery, press the Zero switch.
The micrometer may not count or display an error message on rare occasion.
If a correct display will not be restored, reload the battery.
(The supplied battery is used only for the purpose of checking the functions and
performance of the instrument, therefore it may not satisfy the specified battery
life.)
[3] Button Function and Alarm
1. Button functions
ZERO button : If pressed, it zero-sets the display value.
2. Display indicators
B:Low battery voltage. Immediately replace the battery.
E-oS: Error due to electrical noise or overspeed. Set the origin again, as de-
scribed in “[4] Setting The Origin”.
(This micrometer is not provided with the ON/OFF switch. The display unit
(LCD) is always turned on. Since the display unit (LCD) consumes only a little
power, the battery life is available for 1.2 years under normal use.)
[4] Setting The Origin
IMPORTANT
• Before measuring check the origin (datum-point) according to the steps
below.
• Remove dust/oil from the measuring faces before origin setting.
(1) Turn the thimble to gently bring the spindle into contact with the anvil.
Apply the rated measuring force using the ratchet stop/friction thimble.
(2) Press the ZERO button.
(3) "0.000" appears, indicating the origin has been set.
[5] Specifications
Measuring range : 0 to 25mm/0 to 1"
Resolution : 0.001mm/.00005"
Instrumental error (20°C) : ±2µm (Excluding the quantizing error.)
Quantizing error : ±1 count
Measuring force : 5 to 10N
Display : LCD (6 digits and a minus sign)
Power supply : Silver oxide battery (SR44, No.938882)
1 piece
Battery life : 1.2 years under normal operation
(with LCD continuous operation)
Operating temperature range : 5°C to 40°C
Storage temperature range : –10°C to 60°C
WARNING
MESURE DE SECURITE
Pour assurer des l’utilisation en toute sécurité, utiliser les instruments
conformément aux instructions et aux explications données dans ce manuel
d'utilisation.
• La pile à l’oxyde d’argent utilisée pour cet appareil
contient une substance irritante. En cas de contact
oculaire ou cutané accidentel avec le liquide qu’elle
contient, rincez immédiatement à l’eau puis consultez
un médecin. En cas d’ingestion, rincez immédiatement
la bouche, avalez une grande quantité d’eau et faitesvous vomir. Consultez un médecin.
• La touche micromètre est tranchante. Méfiez vous de
ne pas vous couper.
IMPORTANT
• Ne démontez pas et ne modifiez pas cet appareil. Cela peut endommager l'appareil.
• Pour nettoyer l’appareil, utilisez un chiffon doux imprégné de détergent
neutre dilué. N’utilisez pas de solvant organique (diluant, etc.). Cela
pourrait déformer ou endommager l’appareil.
• La broche est conçue pour ne pas être retirée du canon. Ne pas la
déplacer au-delà de la limite de la plage de mesure. Cela peut endommager l’appareil.
• Ne pas utiliser ou stocker le micromètre dans une pièce où la
température pourrait changer brusquement. Utiliser si possible le
micromètre à une température stable.
• Ne pas placer le micromètre dans un endroit exposé à la poussière et
à l'humidité.
• Ne pas utiliser le micromètre dans un endroit où il serait en contact
avec l'huile et l'eau ; Ne jamais graver le micromètre à l'aide d'un stylo
électronique. Cela peut endommager l’appareil.
• Ne pas charger ou ouvrir les batteries, vous pourriez provoquer un
court circuit.
• Si le micromètre n'est pas utilisé pendant plus de trois mois
retirez les piles pour plus de sécurité. Les piles pourraient couler et
endommager le micromètre.
• La garantie ne s'applique pas en cas de panne ou de dégradation du
produit dues à une usure normale (y compris en cas de fuite de la
pile).
Référence aux schémas CI-contre.
[1] Nom et Fonction de Chaque Partie de la Pièce
q Touche ZERO
w Convertisseur inch/mm (modèles non ímportés en France)
e Ecran LCD
r Tambour (varie selon les modèles)
t Couvercle des piles
[2] Installation des Piles
Installer la pile en vous référant à la figure CI-contre.
• Si la pile est enlevée après avoir été réinstallée, l’ORIGINE (point zéro) réglée
est annulée. Le cas échéant, réglez-la de nouveau (référez-vous au paragraphe
[4].)
• Utiliser une pile SR44 à l'oxyde d'argent.
• Retirez le couvercle du compartiment à pile. Pour cela, dévissez-le (dans le
sens anti-horaire) à l’aide d’une pièce de monnaie ou de tout autre objet
approprié que vous introduisez dans la rainure prévue à cet effet.
• Installer la pile de façon à avoir la face positive sur le dessus.
• Mettre soigneusement en place le couvercle de la pile de façon à ce qu'il
s'emboîte complètement dans le trou taraudé et a ce que le joint ne dépasse
pas du couvercle. Si le couvercle de la pile et le joint ne sont pas correctement
positionnés, les valeurs affichées sur le micromètre peuvent être erronées ou
une erreur peut apparaître.
• Aussitôt la pile chargée, le micromètre peut ne pas fonctionner ou afficher un
message d'erreur (ce qui est très rare). Ce message n'indique pas de
dysfonctionnement. Il suffit généralement d'appuyer sur la touche Zéro pour
rétablir un affichage correct. Si ce n'est pas le cas, recharger la batterie.
(La pile fournie sert uniquement à vérifier les fonctions et les performances
de l’appareil. Elle n’a pas la durée de vie des piles spécifiées.)
[3] Touche de Fonction et Alarme
1. Touche de fonction
En pressant sur le touche ZERO le micromètre s'initialise (remise à zéro).
2. Affichage
B:Pile faible : Changer immédiatement la pile.
E-Os : Erreur dûe à un problème électrique ou à une vitesse exces-
sive. “[4] Paramétrage de L'origine”.
(Ce micrometre est fourni sans commutateur marche/arret (on/off). L'ecran LCD
est toujours actif, la consommation electrique de cet appareil etant tres faible, la
duree de vie de la pile est 1,2 an en fonctionnement normal.)
[4] Paramétrage de L'origine
IMPORTANT
• Avant de mesurer, vérifiez l'origine (point de contact) selon le schéma
ci-contre.
• Enlever la poussière et l'huile de la surface de mesure avant le
paramétrage de l'origine.
(1) Tourner le tambour pour mettre doucement la broche en contact avec la
touche. Appliquer la force de mesure adéquate en utilisant le tambour à
friction (ou le cliquet suivant les modèles).
(2) Presser la touche ZERO.
(3) “0.000” apparaît. L'origine est paramétrée.
[5] Caractéristiques
Capacité de mesure : 0 à 25mm
Résolution : 0,001mm
Erreur de l’appareil (à 20°C) : ±2µm (hors erreur de quantification)
Erreur de comptage : ±1 digit
Force de mesure : 5 à 10 N
Affichage : LCD (–6 digits)
Alimentation : Pile en argent oxydable
(SR44 N° 938882) 1 pièce
Durée de vie de la pile : 1,2 an en fonctionnement normal
(écran LCD en fonctionnement continu)
Température de fonctionnement
: 5°C à 40°C
Température de stockage : –10°C à 60°C
ATTENTION
PRECAUZIONI DI SICUREZZA
Per la sicurezza dell'operatore,utilizzare lo strumento in
conformità alle direttive e specifiche fornite in questo manuale d'uso.
• La batteria ad ossido d’argento utilizzata da questo
strumento contiene sostanze irritanti. Se il liquido della
batteria viene a contatto accidentalmente con gli occhi
o con la pelle, risciacquare immediatamente con acqua
e poi consultare un medico. Se il liquido entra in bocca,
risciacquare immediatamente l’interno della bocca,
ingerire molta acqua ed espellerla, poi consultare un
medico.
• Il bordo delle superfici di contatto del micrometro è
affilato. Maneggiare con cura in modo da non tagliarsi.
IMPORTANTE
• Non smontare. Non modificare questo strumento. Potrebbe danneggiare
lo strumento.
• Per pulire lo strumento, usare un panno soffice bagnato con detergente
neutro. Non usare solventi organici (detergenti ecc.). Possono
deformare o danneggiare lo strumento.
• Lo stelo è progettato in modo da non fuoriuscire dalla slitta interna.
Non ruotare lo stelo oltre il limite superiore del campo di misura.
Potrebbe danneggiare lo strumento.
• Non usare e conservare lo strumento in luoghi dove la temperatura
cambia frequentemente. Prima di utilizzare il micrometro farlo
stabilizzare alla temperatura ambiente della stanza dove verrà utilizzato.
• Non conservare il micrometro in luoghi esposti a polvere e sporco.
Non conservare il micrometro in luoghi esposti a olio e acqua
nebulizzata.
• Non applicare tensioni elettriche esterne al micrometro. Potrebbero
danneggiare lo strumento.
• Non caricare o aprire la batteria, ciò potrebbe causare corto-circuiti.
• Se il micrometro non viene utilizzato per più di 3 mesi, rimuovere per
sicurezza la batteria dallo strumento. La batteria potrebbe perdere
liquido e danneggiare i circuiti del micrometro.
• La garanzia non può essere concessa se il prodotto si guasta o viene
danneggiato a seguito di normale usura, compreso l'esaurimento della
batteria.
Riferirsi alle figure illustrate nella parte sinistra durante la lettura di questo
manuale.
[1] Nome e Funzione di Ogni Parte
q Tasto ZERO
w Tasto di commutazione inch/mm (solo per il tipo provvisto)
e LCD
r Tamburo (il tipo dipende dal modello)
t Coperchio batteria
[2] Installazione della Batteria
Installare la batteria fornita riferendosi alla figura illustrata a sinistra.
• Se si rimuove la batteria e poi la si reinstalla, il parametro ORIGIN (punto
zero) viene cancellato. Se si verifica questo, impostare di nuovo il parametro
ORIGIN (punto zero). (Fare riferimento al paragrafo [4].)
• Usare solo batterie tipo SR44 all'ossido d'argento.
• Rimuovere il coperchio della batteria facendolo ruotare in senso antiorario
con una moneta nella scanalatura.
• Installare la batteria con il polo positivo verso l'alto.
• Montare attentamente il coperchio della batteria in modo che esso sia
completamente innestato con il filetto del foro e che la guarnizione non
fuoriesca dal coperchio. Se il coperchio della batteria e la guarnizione non
sono montati correttamente, il micrometro non può visualizzare il valore o
indicare un errore.
• Subito dopo aver installato la batteria può capitare in rari casi che il micrometro
non effettui i conteggi o visualizzi un messaggio di errore; ciò non indica,
però, un'anomalia. Premere il tasto Zero per visualizzare correttamente. Se
non risulterà una corretta visualizzazione, reinstallare la batteria.
(La batteria in dotazione serve solo a controllare le funzioni e le prestazioni
dello strumento, perciò si potrebbe registrare una discordanza nella durata
della batteria.)
[3] Funzione del Tasto e Allarme
1. Tasti funzione
tasto ZERO : Se premuto viene impostato lo zero sul display.
2. Indicatori nel dispaly
B:Voltaggio batteria basso. Sostituire la batteria.
E-oS : Errore dovuto a disturbi elettrici o a superamento.
della velocità di lettura. Impostare nuovamente l'origine, come descritto
nel punto “[4] Impostazione dell'Origine”.
(Questo micrometro non viene fornito con l'interruttore di accensione/
spegnimento (ON/OFF). L'unità di visualizzazione (LCD) è sempre accesa.
Quando l'unità di visualizzazione (LCD) consuma solo poca potenza
(alimentazione), la batteria avrà una durata di circa 1-2 anni per un normale
utilizzo.)
[4] Impostazione dell'Origine
IMPORTANTE
• Prima di misurare verificare l'origine secondo i passaggi sotto descritti.
• Rimuovere tracce di olio e sporco dalle superfici di misura del
micrometro.
(1) Ruotare il tamburo fino a portare a contatto delicatamente lo stelo con
l'incudine fisso. Applicare la forza di misura utilizzando la frizione del
tamburo.
(2) Premere il tasto ZERO.
(3) “0.000” appare, indicando che l'origine è stata completata.
[5] Specificazioni
Campo di misura : 0 to 25mm/0 to 1″
Risoluzione : 0.001mm/.00005″
Limite dell'errore (20°C) : ±2µm (Escluso l'errore di conteggio)
Errore di conteggio : ±1 digit
Forza di misura : da 5 a 10N
Display : LCD (6 digits e segno –)
Alimentazione : Batteria all'ossido d'argento
(SR44, No.938882) 1 pezzo
Durata batteria : 1-2 anni per normale utilizzo
(con attività continua dell'LCD)
Temperatura di utilizzo : da 5°C a 40°C
Temperatura dimmagazzin : da –10°C a 60°C
ATTENZIONE
SÄKERHETSÅTGÄRDER
För att säkerställa användarens säkerhet, använd mikrometern
i enlighet med riktlinjer och specifikationer i denna manual.
• Silveroxidbatteriet som används i detta instrument
innehåller irriterande substanser. Skulle vätskan av
förseelse komma i beröring med ögon eller hud, ska
kroppsdelen ifråga omedelbart spolas av med vatten,
varefter en läkare ska konsulteras. Skulle vätskan komma
in i munnen, ska munhålan omedelbart spolas ur, drick
sedan stora mängder vatten, framkalla sedan kräkning
och kontakta därefter läkare.
• Mätytorna på denna mikrometer har skarpa kanter. Var
aktsam vid handhavandet för att undvika skador.
VIKTIGT
• Ta inte isär instrumentet. Förändra det heller aldrig. Det kan skada
instrumentet.
• För att rengöra instrumentet ska en mjuk trasa användas, indränkt
med ett utspätt neutralt lösningsmedel. Använd inte någon form av
organiska lösningsmedel (thinner, etc.). Det kan deformera eller skada
instrumentet.
• Spindeln är utformad så, att den EJ kan tas loss från den inre hylsan.
Flytta aldrig spindeln förbi mätområdets övre gräns. Det kan skada
instrumentet.
• Använd och lagra inte mikrometern där det kan förekomma plötsliga
temperaturförändringar. Var noga med att temperatur-stabilisera
mikrometern till rumstemperatur innan mätning sker. Lagra inte
mikrometern så att den utsätts för damm och fukt.
• Använd inte mikrometern där den utsätts för olja eller vatten.
• Använd aldrig elektrisk märkpenna eller liknande på mikrometern. Det
kan skada instrumentet.
• Demontera och ladda INTE batteriet. Detta kan orsaka kortslutning.
• Om mikrometern inte kommer att används på tre månader eller mer,
ta bort batteriet, annars kan batteriet läcka och skada mikrometern.
• Garantin gäller ej för skador som orsakas av normal förslitning inklusive
batteri läckage.
Referera till figurerna till vänster vid läsning av denna manual.
[1] Namn och funktion på varje del
q ZERO-knapp
w tum/mm omställningsknapp (endast tum/mm-typen)
e Display
r Mättrumma (typ varierar beroende på modell)
t Batterilock
[2] Montering av batteri
Sätt i det medföljande batteriet såsom visas på figuren till vänster.
• Om batteriet avlägsnas och sedan monteras på nytt, förloras inställningen av
ORIGIN (nollpunkten). Är detta fallet ska nollpunkten ställas in på nytt. (Se
avsnitt [4].)
• Använd ett SR44 knappformat silveroxidcell.
• Öppna batterilocket genom att vrida det moturs med ett mynt, etc.
• Sätt i batteriet med den positiva sidan (+) vänd uppåt.
• Vid montering av batterilocket, var noga med att locket hakar i rätt i låsningen
och att tätningen ej kommer i kläm. Om batterilocket och tätningen ej monteras
korrekt kanske mikrometern ge felaktiga resultat.
• Direkt efter att batteriet monterats, tryck på Zero-knappen. Det kan hända att
mikrometern inte räknare eller visar ett felmeddelande. Om det inträffar
montera om batteriet.
(Det batteri som ligger bifogat vid leveransen är endast avsett för att kontrollera
instrumentets funktioner och prestanda och det är inte säkert att det uppfyller
batteriets specificerade livslängd.)
[3] Knapparnas funktion och alarm
1. Knappfunktioner
ZERO knapp : Nollställer displayen när den trycks in.
2. Displayindikering
B:Låg batterispänning. Byt snarast ut batteriet.
E-oS : Fel har uppstått p.g.a elektrisk störning eller för snabb förflyttning.
Nollställ mikrometern enligt “[4] Nollställning”.
(Mikrometern är inte utrustad med ON/OFF-knapp. Display enheten (LCD) är
alltid pålslagen. Tack vare display enheten (LCD) drar väldigt lite ström, är
batteriets livslängd likvärdig ungefär 14-15 månader vid normal användning.)
[4] Nollställning
VIKTIGT
• Kontrollera alltid nollpunkten innan mätning, enligt nedanstående.
• Rengör alltid mätytorna innan nollställning.
(1) Rotera mättrumman så att spindeln kommer i kontakt med mätkolven.
Anbringa mätkraften genom att använda friktionsknoppen.
(2) Tryck på ZERO-knappen.
(3) “0.000” visas, indikerar att nollpunkten har ställts in.
[5] Tekniska Data
Mätområde : 0 – 25mm/0 – 1″
Upplösning : 0.001mm/.00005″
Noggranhet (20°):±2µm (Exkl. indikatorfel)
Indikatorfel : ±1 siffra
Mättryck : 5 – 10N
Display : LCD (6 siffror och ± tecken)
Strömförsörjning : Silveroxid batteri (SR44, No.938882) 1 st
Batteriets livslängd : 14-15 månader vid normal användning
(med LCD kontinuerligt igång)
Användningstemperatur : 5°C till 40°C
Lagringstemperatur : –10°C till 60°C
VARNING
Printed in Japan
ERCQNE202122
 Loading...