

Page 1
Operating and Installation
Instructions
Electric Cooktops
To prevent accidents and machine damage, read these instructions
before installation or use.
en-US, CA M.-Nr. 07 844 520
Page 2

Contents
IMPORTANT SAFETY INSTRUCTIONS ............................................................ 4
Caring for the environment .............................................................................. 15
Overview............................................................................................................. 16
Cooktop............................................................................................................... 16
KM 5621 ......................................................................................................... 16
KM 5624 ......................................................................................................... 17
KM 5627 ......................................................................................................... 18
Cooking zone data .............................................................................................. 19
Before first use .................................................................................................. 20
Cleaning the cooktop for the first time................................................................ 20
Turning on the cooktop for the first time ............................................................. 20
How the cooking zones work........................................................................... 21
Cookware ........................................................................................................... 22
Energy saving tips ............................................................................................ 23
Setting range...................................................................................................... 24
Operation............................................................................................................ 25
Cooking zone controls ........................................................................................ 25
Turning the appliance on ..................................................................................... 25
Turning on the 2nd ring ....................................................................................... 25
Turning the appliance off..................................................................................... 25
Residual-heat indicator ....................................................................................... 26
Overheating protection..................................................................................... 27
Cleaning and care ............................................................................................. 28
Frequently Asked Questions ............................................................................ 30
Optional accessories ........................................................................................ 32
Customer Service.............................................................................................. 33
Contact in the event of a fault ............................................................................. 33
Appliance warranty and product registration ...................................................... 33
Installation.......................................................................................................... 34
IMPORTANT SAFETY INSTRUCTIONS - INSTALLATION ................................... 34
Safety distances.................................................................................................. 35
Installation notes ................................................................................................. 39
2
Page 3

Contents
Installation dimensions........................................................................................ 40
KM5621 ......................................................................................................... 40
KM5624 ......................................................................................................... 41
KM5627 ......................................................................................................... 42
Installation ........................................................................................................... 43
Electrical connection ........................................................................................... 45
MieleCare ........................................................................................................... 47
3
Page 4
IMPORTANT SAFETY INSTRUCTIONS
This cooktop complies with all relevant local and national safety
requirements. Inappropriate use can, however, lead to personal injury and material damage.
Read the operating and installation instructions carefully before
using the cooktop. They contain important information on safety,
installation, use and maintenance. This prevents both personal injury and damage to the cooktop.
When installing the cooktop, Miele expressly and strongly advises
that you read and follow the instructions under “Installation”, as
well as in the “IMPORTANT SAFETY INSTRUCTIONS”.
Miele cannot be held liable for injury or damage caused by noncompliance with these instructions.
Keep these instructions in a safe place and pass them on to any
future owner.
4
Page 5

IMPORTANT SAFETY INSTRUCTIONS
Appropriate use
This cooktop is intended for domestic use and use in other similar
environments.
This cooktop is not intended for outdoor use.
The cooktop is intended for domestic use only to prepare food
and keep it warm. Any other use may be dangerous.
Persons (including children) who lack physical, sensory or mental
abilities, or experience with the appliance should not use it without
supervision or instruction by a responsible person.
5
Page 6

IMPORTANT SAFETY INSTRUCTIONS
Safety with children
As with any other appliance, children must be supervised.
Do not leave children unattended: Children should not be alone or
unsupervised in the area where the appliance is installed. Do not allow them to sit or stand on the appliance.
Be sure to supervise any children in the vicinity of the cooktop,
and do not let them play with it.
The cooktop gets hot when in use and remains hot for some time
after being turned off. Keep children away from the appliance until it
has cooled down and is no longer a burn hazard.
Danger of burning. Do not store anything which might arouse a
child’s interest in storage areas above or behind the cooktop. Otherwise they could be tempted to climb onto the appliance.
Risk of burning or scalding. Turn pot and pan handles inward, so
children cannot pull them down and be burned.
Danger of suffocation. While playing, children may become entan-
gled in packaging material (such as plastic wrapping) or pull it over
their head, presenting the risk of suffocation. Keep packaging material away from children.
6
Page 7

IMPORTANT SAFETY INSTRUCTIONS
Technical safety
Unauthorized installation, maintenance, and repairs can cause
considerable danger for the user. Installation, maintenance, and repairs must only be carried out by a Miele authorized technician.
Maintenance by the user: Never repair or replace any part of the
appliance unless the instructions specifically recommend doing so.
Service work should only be performed by a qualified technician.
Damage to the cooktop can compromise your safety. Check the
cooktop for visible signs of damage. Do not use the cooktop if it is
damaged.
Reliable and safe operation of the cooktop can only be guaran-
teed if it is connected to the public power supply.
Be certain your appliance is properly installed and grounded by a
qualified technician. To guarantee the electrical safety of this appliance, continuity must exist between the appliance and an effective
grounding system. It is imperative that this basic safety requirement
be met. If there is any doubt, have the electrical system of the house
checked by a qualified electrician.
Proper installation: Make sure that your appliance has been in-
stalled correctly and that it has been grounded by a qualified technician.
To avoid damaging the cooktop, make sure that the connection
data (voltage and frequency) on the data plate correspond to the
building's power supply before connecting the appliance.
When in doubt, consult a qualified electrician.
Do not connect the appliance to the electrical supply with a power
bar or extension cord. These are a fire hazard and do not guarantee
the required safety of the appliance.
For safety reasons, the cooktop may only be used when it has
been fully installed.
7
Page 8

IMPORTANT SAFETY INSTRUCTIONS
This appliance must not be used in a non-stationary location (e.g.
on a ship).
Any contact with live connections or tampering with the electrical
or mechanical components of the cooktop will endanger your safety
and may lead to appliance malfunctions.
Do not open the casing of the cooktop under any circumstances.
Any repairs not performed by a Miele authorized service techni-
cian will void the warranty.
Defective components should be replaced by Miele original parts
only. Only with these parts can safety of the appliance be assured as
intended by the manufacturer.
The appliance is not intended for use with an external timer switch
or a remote control system.
The cooktop must be connected to the electricity supply by a
qualified electrician (see “Installation – Electrical connection”).
If the power cord is damaged, it must only be replaced by a quali-
fied service technician (see “Installation–Electrical connection”).
The appliance must be completely disconnected from the electric-
ity supply during installation, maintenance and repair work. Ensure
that power is not supplied to the appliance until after it has been installed or until any maintenance or repair work has been carried out.
Disconnect by
- removing the fuse,
- “tripping” the circuit breaker, or
- unplugging the unit (if equipped with plug). Pull the plug not the
cord.
Danger of electric shock. Do not use the cooktop if it is faulty, or if
the ceramic surface is cracked, chipped, or damaged in any way.
Switch it off immediately. Disconnect the cooktop from the electrical
power supply. Contact Miele Service.
8
Page 9

IMPORTANT SAFETY INSTRUCTIONS
If the cooktop is installed behind a cabinet door, do not close the
door while the cooktop is in operation. Heat and moisture can build
up behind the closed door and cause damage to the cooktop, cabinetry, and flooring. Do not close the door until the residual heat indicators go out.
Do not open the cooktop housing under any circumstances.
Disconnect the cooktop from the electrical power supply before
carrying out any maintenance or repair work.
9
Page 10

IMPORTANT SAFETY INSTRUCTIONS
Correct use
DO NOT TOUCH SURFACE UNITS OR AREAS NEAR UNITS –
Surface units may be hot even though they are dark in color. Areas
near surface units may become hot enough to cause burns. During
and after use, do not touch, or let clothing or other flammable materials contact surface units or areas near units until they have had sufficient time to cool. Among these areas are (identification of areas –
for example, the cooktop and surfaces facing the cooktop).
The cooktop gets hot when in use and remains hot for a while af-
ter being turned off. There is a potential hazard until the residual heat
indicator goes out.
Do not leave the cooktop unattended when cooking on high
power. Spilled food will begin to smoke and cause grease splatter,
which can ignite on the cooktop. Doing so may result in carbon
monoxide poisoning and overheating of the appliance.
When in use, the cooktop emits a significant amount of heat,
which can cause objects in the vicinity to catch fire.
Never use the cooktop to heat the room.
Oil and fat can catch fire if overheated. Never leave the appliance
unattended when cooking with oil and fat. If the oil or fat catches
fire, do not attempt to put the flames out with water.
Turn off the cooktop and smother the flames using a lid or a suitable
fire blanket.
Smother the fire or flames, or use a dry chemical extinguishing
agent or foam fire extinguisher.
Storage in or on the appliance: Flammable materials should not be
stored in an oven or in the vicinity of the cooktop.
The flames could set the grease filters of a ventilation hood on fire.
Do not flambé under a ventilation hood.
10
Page 11

IMPORTANT SAFETY INSTRUCTIONS
Spray canisters, aerosols and other inflammable substances can
ignite when heated. Therefore do not store such items or substances
in a drawer under the appliance. Cutlery inserts must be heat-resistant.
Never heat empty cookware.
Do not heat or can food in closed containers, such as tins or
sealed jars, on the cooktop, as pressure will build up in the container
and cause it to explode.
If the cooktop is covered, there is a risk that the material of the
cover will ignite, explode or melt if the cooktop is still hot or if turned
on inadvertently. Never cover the cooktop with a board, cloth or protective sheet.
If the cooktop is turned on or accidentally turned on or if it is still
hot, metal objects on the cooktop can heat up. Other items may melt
or catch fire. Damp lids can become attached to the cooktop by
suction. Do not store items on the cooktop! Always turn the cooking
zones off after use!
You could burn yourself on the hot cooktop. Protect your hands
with heat-resistant pot holders or gloves when handling hot pots and
pans. Do not let them get wet or damp, as this causes heat to transfer through the material more quickly with the risk of scalding or
burning yourself.
When using an electrical appliance, e.g. a hand mixer, near the
cooktop, make sure that the power cable does not come into contact with the hot cooktop. The cable's insulation could become damaged.
Grains of salt, sugar and sand (e.g. from cleaning vegetables) can
cause scratches if they get under pan bases. Make sure that the ceramic surface is clean before placing pans on it.
Even a light object can cause damage to the ceramic cooktop in
certain circumstances. Do not drop anything on the ceramic surface.
11
Page 12

IMPORTANT SAFETY INSTRUCTIONS
Hot objects on the residual-heat indicators can damage the elec-
tronics underneath. Do not place hot pots or pans in this area.
Do not allow solid or liquid sugar, or pieces of plastic or aluminum
foil to get onto the cooktop when it is hot, as they can damage the
ceramic surface when it cools down. If this should occur, turn off the
appliance immediately and scrape off all the sugar, plastic or aluminum residues while still hot, using a shielded scraper blade. Use
pot holders. Allow the ceramic surface to cool down before cleaning
with a suitable ceramic cleaning agent.
Pans that boil dry can cause damage to the ceramic glass. Do not
leave the appliance unattended while it is being used.
Pots and pans with bases with pronounced edges or ridges can
scratch the ceramic surface. Only use pots and pans with smooth
bases.
Lift pans into position on the cooktop. Sliding them into place can
cause scuffs and scratches.
Fire hazard! Loose-fitting or hanging garments can catch fire. Be
sure to wear appropriately fitting clothing when cooking. Never allow
loose clothing or flammable materials to come into contact with the
cooking zones while the cooking zones are in use.
Cookware made of plastic or aluminum foil will melt at high tem-
peratures. Do not use any plastic or aluminum foil cookware.
The cooktop frame or cooktop edges (on cooktops with beveled
edges) can become hot due to the influence of the following factors:
operating duration, high power level(s), large cookware, and the
number of cooking zones being used.
Cookware made from aluminum or with an aluminum base can
cause shiny metallic spots. These spots can be removed with ceramic glass or stainless steel cleaner (see “Cleaning and Care”,
“Cleaning the ceramic surface”).
12
Page 13
IMPORTANT SAFETY INSTRUCTIONS
If residue remains on the cooktop for any length of time, it can
cook into the cooktop and sometimes it is then not possible to remove it. Remove spills and splatters promptly. Also make sure that
the bottom of any cookware is clean, dry, and free of grease before
placing it on the cooktop.
Do not use the ceramic surface for preparing food. Always use
suitable cookware.
Wet sponges or clothes can cause burns due to hot steam if they
are used to wipe spilled food off a hot cooktop. Some cleansers can
emit hazardous vapors if they are applied to a hot surface. Be careful
when cleaning the cooktop.
If the cooktop is damaged, cleansers or spilled food can penetrate
the glass surface and cause a short-circuit. Never cook on a damaged cooktop. Contact an electrician immediately.
The cooktop has cooking zones of different sizes. Use cookware
with a level base that is large enough for the cooking zone. Cookware that is too small leaves part of the hot cooking zone uncovered,
which may cause burns due to touching or ignite clothing. The use of
cookware of the right size also makes for better use of the heated areas.
Not any cookware of glass, glass ceramic, ceramic, clay or other
glass cookware is suitable for use on the cooktop. It can be damaged due to sudden temperature change.
If the handles of a pot or pan extend across an adjacent cooking
zone, this can cause burns, the ignition of flammable materials and
the spilling of food due to inadvertent contact with the cookware.
Turn the pot or pan so that the handles point toward the inside and
do not extend across an adjacent cooking zone.
13
Page 14

IMPORTANT SAFETY INSTRUCTIONS
Cleaning and maintenance
Do not use a steam cleaner to clean the cooktop.
The steam may reach electrical components and cause a short circuit.
Miele will guarantee to supply functional parts for a minimum of
10years and up to 15years following the discontinuation of your
cooktop.
14
Page 15
Caring for the environment
Disposal of the packing material
The cardboard box and packing materials protect the appliance during shipping. They have been designed to be
biodegradable and recyclable.
Ensure that any plastic wrappings,
bags, etc. are disposed of safely and
kept out of the reach of children. Danger of suffocation!
Disposal of your old appliance
Electrical and electronic appliances
contain valuable materials. They also
contain certain substances, compounds
and components which were essential
for the proper functioning and safe use
of the equipment. Handling these materials improperly by disposing of them in
your household waste can be harmful to
your health and the environment. Therefore, please do not dispose of your old
appliance with regular household waste
and follow local regulations on proper
disposal.
Consult with local authorities, dealers or
Miele in order to dispose of and recycle
electrical and electronic appliances.
Miele assumes no responsibility for
deleting any personal data left on the
appliance being disposed. Please ensure that your old appliance is kept
away from children until removal. Observe safety requirements for appliances that may tip over or pose an entrapment hazard.
15
Page 16
Overview
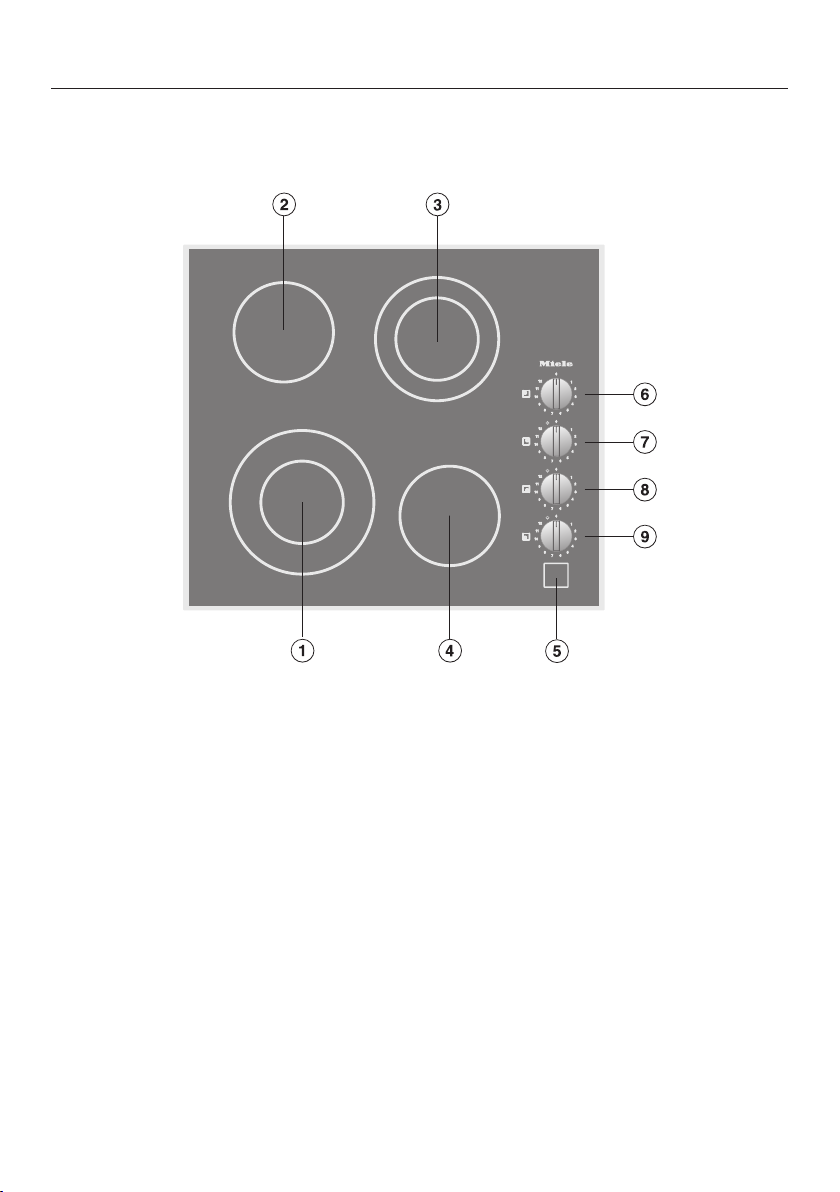
Cooktop
KM 5621
a
Variable cooking zone
b
Standard cooking zone
c
Variable cooking zone
d
Standard cooking zone
e
Residual-heat indicator
16
Cooking zone control knob
f
Back left
g
Back right
h
Front right
i
Front left
Page 17

KM 5624
Overview
a
Variable cooking zone
b
Standard cooking zone
c
Variable cooking zone
d
Variable cooking zone
e
Residual-heat indicator
Cooking zone control knob
f
Back left
g
Back right
h
Front right
i
Front left
17
Page 18

Overview
KM 5627
a
Variable cooking zone
b
Standard cooking zone
c
Variable cooking zone
d
Variable cooking zone
e
Variable cooking zone
f
Residual-heat indicator
18
Cooking zone control knob
g
Back left
h
Back center
i
Back right
j
Front right
k
Front left
Page 19

Overview
Cooking zone data
KM5621
Cooking zone Øinch Øcm Rating in watts for
208/240V
4 3/4" / 8 1/4"
11
5
/16"
4 3/4" / 7 1/16"
11
5
/16"
12/21 900/2,400
14.5 1,200
12/18 700/1,800
14.5 1,200
Total: 6,600
KM5624
Cooking zone Øinch Øcm Rating in watts for
208/240V
7 1/16" / 9 1/16"
11
5
/16"
4 3/4" / 7 1/16"
4 3/4" / 7 1/16"
18/23 1,600/2,500
14.5 1,200
12/18 700/1,800
12/18 700/1,800
Total: 7,300
KM5627
Cooking
Øinch Øcm 208V 240V
zone
7 1/16" / 9 1/16"
11
5
/16"
4 3/4" / 7 1/16"
8 1/4" / 10 5/8"
4 3/4" / 7 1/16"
18/23 1,600/2,500 1,600/2,500
14.5 1,200 1,200
12/18 700/1,800 700/1,800
21/27 2,000/2,700 2,000/3,100
12/18 700/1,800 700/1,800
Total: 10,000 Total: 10,400
19
Page 20

Before first use
Cleaning the cooktop for the first time
Before first use, wipe down the appli-
ance with a damp cloth and dry it.
Turning on the cooktop for the first time
Metal components are protected by a
conditioning agent. Smells and vapor
may occur when the appliance is used
for the first time.
The smell and any vapors do not indicate a faulty connection or a defective
appliance and are not harmful to your
health.
20
Page 21

How the cooking zones work
Standard cooking zones have one heating element, while variable cooking
zones and extended zones have two.
Depending on the model, the heating
elements may be separated by an insulating ring.
Each cooking zone has overheating
protection (a temperature limiter), which
stops the ceramic surface from becoming too hot (see “Safety features – Overheating protection”).
When a power level is selected, the
heat switches on and the element can
be seen through the ceramic surface.
The temperature of the cooking zone
depends on the power level selected,
and is electronically regulated. This
controls the “timing” of a cooking zone,
switching the element on and off.
Standard cooking zone
a
Overheat protection
b
Heating element
Variable cooking zone
a
Technical requirement, not a defect
b
Overheat protection
c
Outer heating element
d
Insulating ring
e
Inner heating element
21
Page 22

Cookware
The most suitable cookware is metal
pots and pans with thick bottoms that,
when cold, bulge inwards slightly. On
warming, the bottom extends and sits
level on the cooking zone; this conducts the heat optimally.
Cold Hot
Glass, ceramic or stoneware cookware
is less suitable. These materials do not
conduct the heat well.
Pots and pans made of synthetic material or aluminum foil are not suitable.
These melt at high temperatures.
Cookware made from aluminum or with
an aluminum base can cause shiny
metallic spots. These spots can be removed with ceramic and stainless-steel
cooktop cleaner (see “Cleaning and
care”, “Cleaning the ceramic surface”).
- Please note that the maximum diameter quoted by manufacturers often
refers to the diameter of the top rim
of the pot or pan. The diameter of the
base (generally smaller) is more important.
The composition of the pan bottom can
affect the evenness of the cooking results (e.g., when making pancakes).
- To make optimum use of the cooking
zones, choose cookware with a suitable base diameter (see “Overview Cooking zone data"”).
- Use only pots and pans with smooth
bases. Rough bases can scratch the
ceramic glass.
- Always lift the cookware to move it.
This will help prevent scratching.
22
Page 23

- Ensure that the bottoms of pots or
pans match the size of the cooking
zone or are somewhat larger. This ensures that heat is not lost unnecessarily.
- Use a lid whenever possible to minimize heat loss.
- For small quantities, select a small
pan. A small pan on a small cooking
zone uses less energy than a large,
only partially filled pan on a large
cooking zone.
- Cook with as little water as possible.
- Once food has come to the boil or
the pan is hot for frying, reduce the
heat to a lower power setting.
- When cooking for a long time, turn
the cooking zone off at least 5 or
10minutes before the end of the
cooking time. This makes use of the
residual heat.
Energy saving tips
23
Page 24

Setting range
Setting range
Melting butter, chocolate, etc.
Dissolving gelatin
Thickening sauces containing only egg yolk and butter
Warming small quantities of liquid
Keeping food warm that sticks easily
Cooking rice
Warming liquid and semi-solid foods
Thickening creams and sauces.
Preparing omelets, lightly fried eggs
Steaming fruit
Thawing frozen foods
Steaming vegetables, fish
Cooking pasta, legumes
Swelling grains
Bringing to a boil and continued cooking of large quantities of
food
Gentle braising (without overheating the fat) of fish, cutlets,
sausages, fried eggs, etc.
Frying pancakes, etc. 9–11
Boiling large quantities of water
Bringing to a boil
1-2
1-3
3–5
4–6
7
8–9
11–12
These settings, which refer to approx. 4 servings, should only be taken as a guide. With
deep pans, larger quantities or when cooking without a lid, a higher setting is required. For
smaller quantities, select a lower setting.
24
Page 25

Operation
Fire hazard due to overheated
food.
Unattended food can overheat and
ignite.
Do not leave the cooktop unattended
whilst it is being used.
Cooking zone controls
The cooktops have different types of
controls:
- Control knobs for variable cooking
zones and extended zones have a
stop point. These must not be turned
past the stop to 0.
- Knobs for standard cooking zones
can be turned through 360°.
Turning the appliance on
Press the cooking zone knob and for
standard cooking zones turn it to
the right or left to the desired setting.
Press the cooking zone knob and for
variable cooking zones turn it to the
right to the desired setting.
Turning on the 2nd ring
Press the knob in and turn it to right
past “12” to the stop.
Turn the knob to the left to the re-
quired power level.
Turning the appliance off
Turn the cooking zone knob for stan-
dard cooking zones to the right or
to the left to “0”.
Turn the cooking zone knob for vari-
able cooking zones to the left to “0”.
25
Page 26

Operation
Residual-heat indicator
When after turning on one cooking
zone, for example the left front, a specified temperature is reached, the associated residual-heat indicator lights up:
When the cooking zone cools down to
a particular temperature after being
switched off, the residual-heat indicator
goes out.
If extremely hot cookware remains
on the cooking zone for a longer
amount of time after it is switched
off, the cooking zone may still be hot
even though the residual-heat indicator is no longer on.
Risk of burning or scalding due
to hot cooking zones.
The cooking zones will be hot after
use.
Do not touch the cooking zones
while the residual heat indicators are
on.
Hot objects on the residual-heat indicators can damage the electronics
underneath.
Do not place hot pots or pans in this
area.
26
Page 27

Each cooking zone is equipped with
overheating protection (internal temperature limiter). This switches off the
cooking zone heating element automatically before it overheats. As soon as
the cooking zone temperature has
cooled sufficiently, heating is switched
on again automatically.
The overheating protection may be activated under the following circumstances:
- No cookware is present on the activated cooking zone.
- The cookware being heated is empty.
- The base of the cookware is not sitting evenly on the cooking zone.
- The cookware is not conducting heat
properly.
You can tell that the overheating protection has activated because the heating
element switches on and off even when
the highest power level is selected.
Overheating protection
27
Page 28

Cleaning and care
Risk of burning or scalding due
to hot cooking zones.
The cooking zones will be hot after
use.
Turn off the cooktop.
Allow the cooktop to cool down be-
fore cleaning.
Risk of damage due to moisture
ingress.
The steam from a steam cleaning ap-
pliance could reach live electrical
components and cause a short circuit.
Do not use a steam cleaner to clean
the cooktop.
All surfaces could be discolored or
damaged if unsuitable cleaning
agents are used. All surfaces are
susceptible to scratching.
Remove all cleaning agent residues
immediately.
Do not clean with any abrasive or
sharp pointed objects.
Clean the cooktop after every use.
Dry the cooktop thoroughly after ev-
ery cleaning to avoid limescale
residue.
Unsuitable cleaning agents
To avoid damaging the surfaces of the
appliance, do not use:
- liquid dish soap
- cleaning agents containing soda, alkalis, ammonia, acids, or chlorides
- cleaning agents containing limescale
remover
- stain or rust removers
- abrasive cleaning agents, such as
scouring powder, scouring liquid, or
pumice stones
- cleaning agents containing solvents
- dishwasher cleaning agents
- grill and oven sprays
- glass cleaners
- hard, abrasive brushes or sponges
(e.g., pot scourers), or sponges which
have been previously used and still
contain abrasive cleaning agents
28
- eraser sponges
Page 29

Cleaning and care
Cleaning the ceramic surface
Risk of damage caused by
pointed objects.
The seal between the cooktop and
the countertop could be damaged.
The seal between the ceramic surface and the frame could be damaged.
Do not use pointed objects for cleaning.
When cleaning with liquid dish soap,
not all contaminants and residues
are removed. An invisible film forms,
which causes discoloration of the ceramic. This discoloration cannot be
removed.
Clean the ceramic surface regularly
with a suitable ceramic cooktop
cleaning agent.
First wipe down the surface with a
damp cloth to loosen soiling, then remove stubborn crusting with a glass
scraper.
Then clean the ceramic surface with
the Miele Ceramic and StainlessSteel Cooktop Cleaner (see “Optional
accessories – Cleaning and care
products”) or with a proprietary ceramic cleaner applied with a paper
towel or a clean cloth. Do not put the
cleaner on a hot cooktop since this
may cause spotting. Please follow the
cleaning-agent manufacturer’s instructions.
Finally wipe the cooktop with a damp
cloth and dry it with a soft, dry cloth.
Residues can burn onto the cooktop
the next time it is used and cause
damage to the ceramic surface. Ensure that all cleaner residues are removed.
Spots caused by limescale, water,
and aluminum residues (spots with a
metallic appearance) can be removed
using the Miele Ceramic and Stainless-Steel Cooktop Cleaner.
Risk of burning or scalding due
to hot cooking zones.
The cooking zones are hot during
use.
Wear pot holders and use a glass
scraper to remove sugar, plastic, or
aluminum foil residues from the hot
cooktop.
Should any sugar, plastic, or alu-
minum foil spill or fall onto a hot
cooking zones while it is in use, first
turn off the cooktop.
Then carefully scrape off these
residues immediately while they are
still hot, using a shielded scraper
blade.
Afterwards, clean the ceramic surface
in its cooled state, as described
above.
Knobs
Clean the knobs with a soft sponge,
warm water, and a small amount of
liquid dish soap.
29
Page 30

Frequently Asked Questions
With the help of the following guide minor faults in the performance of the machine, some of which may result from incorrect operation, can be remedied without contacting the Service Department.
This guide may help you to find the reason for the fault, and how to correct it.
Problem Possible cause and solution
The cooking zones do
not heat up.
There is a strange smell
or vapors when the appliance is being used
for the first time.
The heating element for
one of the cooking
zones switches on and
off.
There is no power to the cooktop.
Check if the breaker has tripped. Contact a quali-
fied electrician or Miele Service (for the minimum
fuse rating, see data plate).
There may be a technical fault.
Turn the knobs to the 0 position.
Disconnect the cooktop from the electricity supply
for approx. 1 minute. To do this:
– Trip the relevant breaker or screw the fuse out
completely.
– Trip the ground-fault circuit interrupter (GFCI).
If, after resetting/replacing the fuse or the GFCI,
the cooktop will still not turn on, contact a qualified electrician or Miele Customer Service.
Metal components are protected by a conditioning
agent. Smells and vapor may occur when the appliance is used for the first time. The smell and any vapors do not indicate a faulty connection or a defective appliance and are not harmful to your health.
This “timing” of the element is normal. It is caused
by the electronic temperature control (see “How the
cooking zones work”).
If the heating switches on and off at the highest
power level, the overheating protection has been
triggered (see “Safety features – Overheating protection”).
30
Page 31

Frequently Asked Questions
Problem Possible cause and solution
The food in the pan is
barely heating up or is
not heating up at all.
The pan is not conducting heat properly.
Use a different pan that is able to better conduct
heat.
The pan is too large for the cooking zone.
Use a smaller pan.
The outer ring of a variable or extended cooking zone
is not switched on.
Switch the outer ring on.
31
Page 32

Optional accessories
Miele offers a range of useful accessories, as well as cleaning and conditioning products for your appliance.
These products can be easily ordered
from the Miele webshop.
These products can also be ordered
from Miele Technical Service (see the
end of these operating instructions) or
your Miele dealer.
Stainless steel conditioner
250ml
Removes heavy soiling, lime scale, and
aluminum residue.
32
Page 33

Customer Service
Contact in the event of a fault
In the event of a fault which you cannot remedy yourself, please contact your
Miele dealer or Miele Customer Service.
You can book a Miele Service Call online at www.miele.com/service.
Contact information for Miele Customer Service can be found at the end of this
document.
Please quote the model identifier and serial number of your appliance (SN) when
contacting Miele Customer Service. Both pieces of information can be found on
the data plate.
Appliance warranty and product registration
You can register your product and/or view the manufacturer´s warranty terms and
conditions for Miele appliances and vacuum cleaners at www.mieleusa.com.
33
Page 34

*INSTALLATION*
Installation
IMPORTANT SAFETY INSTRUCTIONS - INSTALLATION
Risk of damage caused by incorrect installation.
Incorrect installation can damage the cooktop.
The cooktop must only be installed by a qualified specialist.
Risk of electric shock from voltage.
Incorrect connection to the power supply may result in an electric shock.
The cooktop must be connected to the electrical supply by a qualified person
only.
Damage from falling objects.
Take care not to damage the cooktop when installing cabinetry or a ventilation
hood above it.
Install the cabinetry and ventilation hood before installing the cooktop.
Reaching over a hot cooktop to access the cabinets can result in
burns. You can reduce the risk of burns by installing a ventilation
hood that extends at least 4¾" (12cm) past the bottom of the cabinets. Do not install any cabinets above the cooktop.
The countertop must be heat-resistant (up to 212°F / 100°C), so
that it does not become deformed or the veneer detached. The wall
strips must be heat-resistant as well.
The cooktop must not be installed above refrigerators/freezers,
dishwashers, or washer/dryers.
When installing the cooktop, make sure that the power cord can-
not come into contact with hot appliance parts.
Ensure that the power cord cannot be touched after the cooktop
has been installed.
After the installation of the cooktop, the electrical cord may not
come into contact with any moving kitchen parts (e.g. a drawer) or
be subject to mechanical stress.
Observe carefully the safety clearances listed on the following
pages.
34
Page 35

*INSTALLATION*
Safety distances
Safety clearance above the cooktop
For a ventilation hood above the cooktop, always use the clearance specified
by the hood manufacturer. If there are
no specifications from the hood manufacturer or if flammable materials (e.g. a
utensil rail) are installed above the
cooktop, the clearance must be at least
30" (760mm).
Installation
If there is more than one appliance
installed below the ventilation hood,
each with a different safety clearance, the largest clearance must be
used.
35
Page 36

*INSTALLATION*
Installation
Safety clearances to the sides and back of the cooktop
Ideally the cooktop should be installed
with plenty of space on either side.
The minimum distance shown below
must be maintained between the back
of the cooktop and a tall unit or wall.
The minimum distance , shown
below must be maintained between a
tall unit or a wall to the left or right of
the cooktop with a minimum distance of
113/4"(300mm) on the opposite side.
minimum distance between the back
of the counter cut-out and the rear edge
of the counter:
2"(50mm)
minimum distance to the right of the
counter cut-out to the closest adjacent
piece of cabinetry (for instance, a high
cabinet) or a room wall:
2"(50mm)
minimum distance to the left of the
counter cut-out to the closest adjacent
piece of cabinetry (for instance, a high
cabinet) or a room wall:
2"(50mm)
Not allowed
Highly recommended
Not recommended
36
Not recommended
Page 37

*INSTALLATION*
Protective base
Installation of a protective base under
the cooktop is allowed but not required.
If an interim shelf is fitted under the
cooktop, there must be a minimum gap
of 45/16" (110mm) between the top of
the countertop and the top of the shelf.
Leave a gap of 5/16“ (10mm) at the
back of the shelf to accommodate the
cable. If the cooktop has an external
power connection box, the minimum
gap is 13/8” (35mm).
Installation
37
Page 38

*INSTALLATION*
Installation
Safety distance from the wall covering
If a wall covering is installed, a minimum safety distance must be maintained between the countertop cut-out and the covering, since high temperatures can damage these materials.
If the covering is made of a combustible material (such as wood), the distance between the countertop cut-out and the wall covering must be a minimum of
2" (50mm).
For coverings made of non-combustible materials (such as metal, marble, granite,
ceramic tiles) the minimum safety distance between the countertop cut-out and
the wall covering must be 2“ (50 mm) minus the thickness of the covering. For example: thickness of wall covering 2” (50mm) - ⁹/₁₆“ (15mm) = minimum safety distance 1⁷/₁₆” (35mm).
Flush-mounted cooktops Framed cooktops
Wall frame
Wall covering dimension x = thickness of the niche cladding
Countertop
Countertop cut-out
Minimum distance for
flammable materials 2" (50mm).
non-flammable materials 2" (50mm) - dimension x
38
Page 39

*INSTALLATION*
Installation
Installation notes
Seal between cooktop and countertop
Damage caused by incorrect in-
stallation.
Using sealant under the cooktop
could result in damage to the cooktop and the countertop if the cooktop ever needs to be removed for
servicing.
Do not use sealant between the
cooktop and the countertop.
The sealing strip under the edge of
the cooktop provides a sufficient seal
for the countertop.
Tiled countertop
Grout lines and the shaded area under the cooktop frame must be smooth
and even. If they are not, the cooktop
will not sit flush with the countertop and
the sealing strip underneath the cooktop will not provide a good seal between the cooktop and the countertop.
Sealing strip
Dismantling the cooktop for service
purposes may damage the sealing
strip underneath the edge of the
cooktop.
Always replace the sealing strip before reinstalling the cooktop.
39
Page 40
*INSTALLATION*
(75 mm)
15/16"
2
20
1/16"
(558 mm)
21
15/16"
22
5/16"
3/8"
20
2
2
b
(75 mm)
3/8"
3/8"
(567 mm)
a
a
(60 mm)
(60 mm)
b
(509 mm)
(544 mm)
7/16"
21
3/16"
1
(626 mm)
24
15/16"
( 50 mm)0
2"
(7 mm)
1/4"
2
5/8"
(67 mm)
5/8"
2
(491 mm)
19
5/16"
(409 mm)
1/8"
16
(54 mm)
1/8"
2
c
d
c
c
+
-
1
(68 mm)
11/16"
2
(100 mm)
15/16"
3
(244 mm)
9
5/8"
(208 mm)
3/16"
8
0
R
4 mm
3/16"
(518 mm)
+
-
1
e
( 30 mm)0
Installation
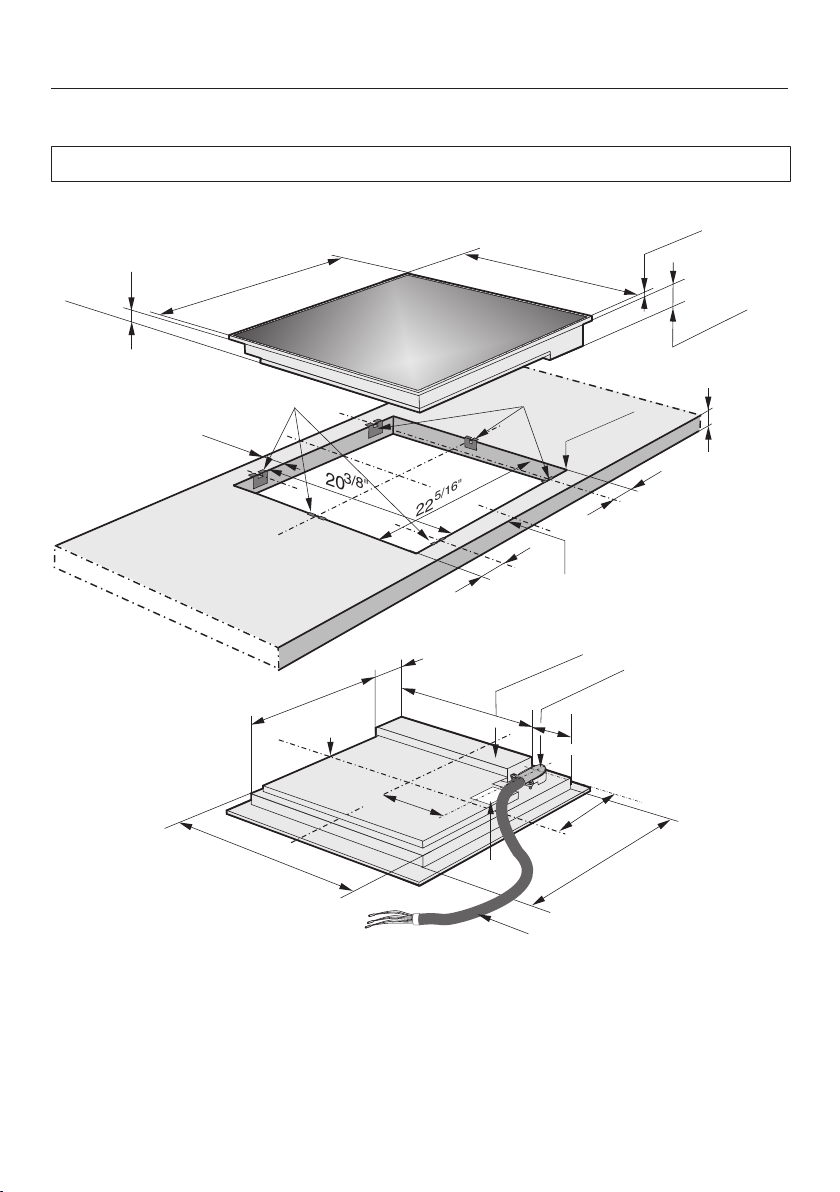
Installation dimensions
All dimensions in this instruction booklet are given in mm and inches.
KM5621
a
b
c
d
e
40
Spring clips
Front
Installation height
Power cord, L=4'(1,200mm)
Data plate
Page 41

*INSTALLATION*
Installation
KM5624
a
Spring clips
b
Front
c
Installation height
d
Power cord, L=4'(1,200mm)
e
Data plate
41
Page 42

*INSTALLATION*
Installation
KM5627
a
Spring clips
b
Front
c
Installation height
d
Power cord, L=4'(1,200mm)
e
Data plate
42
Page 43

*INSTALLATION*
Installation
Installation
Preparing the countertop
Create the countertop cut-out. Re-
member to maintain the minimum
safety distances (see “Installation” –
“Safety distances”).
Wooden countertops
Seal any cut surfaces on the wooden
countertop with a special varnish, silicone rubber, or resin to prevent the
wood from swelling as a result of
moisture. The sealant must be temperature-resistant.
Ensure that the sealant does not get
on the top surface of the countertop.
The sealing strip ensures that the
cooktop will sit securely in the cut-out
without slipping. Any gap between the
trim and countertop will become
smaller over time.
Securing the spring clamps
The exact positioning of the spring
clamps is shown in the individual
cooktop diagrams.
Wooden countertops
Position the spring clamps on the
top edge of the cut-out as shown in
the cooktop illustration.
Fasten the spring clamps using the
13/8“ (3.5)x1” (25mm) wood
screws supplied with the appliance.
43
Page 44

*INSTALLATION*
Installation
Granite and marble countertops
You will need heavy-duty double-sided
adhesive tape (not included with the
cooktop) to fasten the spring clamps.
Attach the adhesive tape along the
top edge of the cut-out in the positions shown in the cooktop illustration.
Position the spring clamps on the top
edge of the cut-out and press them
firmly into place.
Installing the cooktop
Feed the appliance power cord down
through the counter cut-out.
Position the cooktop in the counter
cut-out.
Using both hands, press down evenly
on the sides of the cooktop until it
clicks into position. When doing this
make sure that the seal of the appliance sits flush with the countertop on
all sides. This is important to ensure
an effective seal all round.
If during installation the seal around
the frame does not sit flush with the
countertop in the corners, the corner
radius, maximum 3/16" (≤R4/ 4mm),
can be carefully filed down to fit.
Do not use any additional sealant
(e.g. silicone).
Connect the cooktop to the electrical
power supply.
Coat the side edges and the lower
edges of the spring clamps with silicone.
44
Check that the cooktop works.
The cooktop can only be removed using a special tool.
Page 45

*INSTALLATION*
Installation
Electrical connection
ATTENTION:
Before installation or servicing, disconnect the power supply by either
removing the fuse, shutting off the
main power or manually “tripping”
the circuit breaker.
Installation work and repairs should
only be performed by a qualified
technician in accordance with all applicable codes and standards. Repairs and service by unqualified persons could be dangerous and the
manufacturer will not be held responsible.Installation, repair, and
maintenance work should only be
performed by a Miele-authorized service technician. Work by unqualified
persons can cause considerable
danger to users. Miele cannot be
held liable for any damage arising as
a result of such work.
To guarantee the electrical safety of
this appliance, continuity must exist
between the appliance and an effective grounding system. It is imperative that this basic safety requirement be met. If there is any doubt,
have the electrical system of the
house checked by a qualified electrician.
Installation, repair and maintenance
work should only be performed by a
Miele-authorized qualified electrician
in compliance with local regulations
and the ANSI National Electrical
Code / NFPA 70 in the United States
or the Canadian Electric Code, CSA
C22.1-02. in Canada.
Installer:
Please leave these instructions with
the customer.
Before connecting the appliance to
the power supply, make sure that the
voltage and frequency listed on the
rating label correspond with the
household electrical supply. This
data must correspond to prevent appliance damage.
Consult an electrician if in doubt.
For safety reasons, the cooktop may
only be used when it has been fully
installed into the countertop.
45
Page 46

*INSTALLATION*
Installation
Connection
Ensure that the connection data on
the data plate (voltage, frequency,
and fuse rating) match those of your
electrical supply.
The data plate is located underneath
the cooktop.
The cooktop is approved and ready for
connection to a grounded connector
with three connecting wires, sheathed
by a flexible metal hose.
It must be connected to an assigned
line in an approved connecting socket.
The appliance must be able to be disconnected from the power supply on all
poles by disconnecting devices! (When
turned off, a contact distance of at least
¹/₈" (3mm must be present!) The disconnecting devices are overcurrent protection elements and protective circuit
breakers.
Black: Connect to L1 (hot)
Make sure that the connecting socket is
accessible after the installation of the
cooktop.
Further information can be found on the
included data plate.
WARNING:
THIS COOKTOP MUST BE
GROUNDED
Red: Connect to L2 (hot)
Green: Connect to GND (ground)
KM5621
208V, 60Hz, 40A
240V, 60Hz, 30A
KM5624
208/240V, 60Hz, 40A
KM5627
208/240V, 60Hz, 50A
46
Page 47

This service is available in USA only.
MieleCare, our Extended Service Contract program, gives you the assurance
of knowing that your appliance investment is covered by 5years of worry free
ownership.
MieleCare is the only Extended Service
Contract in the industry that guarantees
repairs by a Miele Authorized Service
Provider using genuine Miele parts.
Only genuine Miele parts installed by
factory trained professionals can guarantee the safety, reliability, and
longevity of your Miele appliance.
Please note that unless expressly approved in writing by Miele’s Service department, Extended Service Contracts
offered by other providers for Miele
products will not be recognized by
Miele. Our goal is to prevent unauthorized (and untrained) service personnel
from working on your Miele products,
possibly doing further damage to them,
you and/or your home.
MieleCare
To learn more about MieleCare Extended Service Contracts, please contact your appliance dealer or visit us
online at:
www.mieleusa.com
47
Page 48

Page 49

Page 50

Page 51

9 Independence Way
Princeton, NJ 08540
U.S.A.
Miele, Inc.
National Headquarters
Please have the model and serial number
of your appliance available when
contacting Customer Service.
Canada
Importer
Miele Limited
Headquarters and Miele Centre
Customer Service & Support
Phone: 888-99-MIELE(64353)
info@mieleusa.com
www.mieleusa.com
161 Four Valley Drive
Vaughan, ON L4K 4V8
www.miele.ca
Customer Care Centre
Phone:
customercare@miele.ca
800-565-6435
905-532-2272
International Headquarters
Miele & Cie. KG
Carl-Miele-Straße 29
33332 Gütersloh
Germany
Page 52

KM5621, KM5624, KM5627
M.-Nr. 07 844 520 / 02en-US, CA
 Loading...