

Miele H 4412 BP Operating instructions
Operating and installation instructions
Ovens
H 4412 BP
To avoid the risk of accidents or
damage to the appliance, it is
essential to read these instructions
before it is installed and used for the
first time.
en - AU, NZ
M.-Nr. 09 284 830

Contents
Warning and Safety instructions .....................................5
Caring for the environment.........................................10
Description of the appliance........................................11
H 4412 BP .......................................................11
Features ........................................................12
Oven controls.....................................................12
Safety features ....................................................12
Cooling fan ....................................................12
Vented oven door ...............................................12
Door lock for pyrolytic operation....................................12
Pyrolytic cleaning..................................................12
PerfectClean treated surfaces ........................................12
Retractable controls................................................13
Accessories ......................................................13
Universal tray and rack with anti-tip safety notches .....................13
Grease filter ...................................................13
Controls ........................................................14
Function selector ..................................................14
Temperature selector ..............................................14
Temperature indicator light y .....................................14
Oven functions...................................................15
Clock timer ......................................................16
Controls .........................................................16
Q, P and O buttons. ............................................16
Display and triangle V in the display ...............................16
Setting the time of day ..............................................17
Using the minute minder ............................................18
To set the minute minder ............................................18
To cancel the time set for the minute minder ............................18
Before using for the first time.......................................19
Operation .......................................................20
Using the oven....................................................20
Pre-heating ......................................................20
Entering the cooking duration (Automatic switch-off) ......................21
Switching a programme off automatically ............................21
Switching on and off automatically ..................................22
The end of a cooking programme ..................................23
2

Contents
To check and change an entered time...............................23
Deleting a cooking duration .......................................23
Settings % ......................................................24
Time of day display (PI)............................................24
Buzzer (P2)......................................................25
Baking tips ......................................................26
Temperature, baking duration ........................................26
Bakeware ........................................................26
Baking paper ..................................................26
Universal tray ..................................................27
Rectangular tins ................................................27
Shelf levels.......................................................27
Frozen food ......................................................27
Baking chart .....................................................28
Fan Plus U ......................................................28
Conventional V ..................................................29
Intensive Bake O .................................................30
Roasting tips ....................................................31
Useful tips .......................................................32
Browning......................................................32
Standing time ..................................................32
Roasting poultry ................................................32
Frozen meat ...................................................32
Roasting chart ...................................................33
Grilling tips ......................................................34
Preparing food for grilling ...........................................35
Grilling on the rack.................................................35
Useful tips .......................................................35
Fan Grilling guide (Fan Grill \)......................................36
Grilling guide (Grill Y).............................................37
Defrosting .......................................................38
Cooking.........................................................39
Cooking ready meals...............................................39
Gentle Bake ......................................................39
Cleaning and care ................................................40
Appliance front ...................................................40
Accessories ......................................................41
3

Contents
Universal tray ..................................................41
Rack, shelf runners ..............................................41
Grease filter ...................................................41
PerfectClean .....................................................42
Oven interior .....................................................44
Manual cleaning of the oven interior.................................44
Pyrolytic cleaning of the oven interior................................45
Removing the oven door ............................................48
Dismantling the oven door ........................................49
To refit the door ...................................................52
To remove the shelf runners .........................................53
Problem solving guide ............................................54
After sales service ................................................57
Optional accessories..............................................58
Electrical connection..............................................61
Installing the oven ................................................62
4

Warning and Safety instructions
This appliance conforms to current
safety requirements. Inappropriate
use can, however, lead to personal
injury and damage to property.
To avoid the risk of accidents and
damage to the appliance, please
read these instructions carefully
before using it for the first time. They
contain important notes on
installation, safety, use and
maintenance.
Keep these instructions in a safe
place and ensure that new users are
familiar with the contents. Pass them
on to any future owner.
Correct application
This appliance is designed for
~
domestic use and for use in similar
environments by guests in hotel or
motel rooms, bed & breakfasts and
other typical living quarters. This does
not include common/shared facilities or
commercial facilities within hotels,
motels or bed & breakfasts.
The appliance is not suitable for
~
outdoor use.
The appliance is intended only to
~
cook, bake, roast, grill, defrost, bottle,
dry fruit etc.
Any other usage is at the owner's risk.
Miele cannot be held liable for damage
resulting from incorrect or improper use
or operation.
This oven is not intended for use by
~
persons (including children) with
reduced physical, sensory or mental
capabilities, or lack of experience and
knowledge, unless they are supervised
whilst using it or have been given
instruction concerning its use by a
person responsible for their safety.
5

Warning and Safety instructions
Safety with children
Children should be supervised to
~
ensure that they do not play with the
appliance. Keep children away from the
appliance at all times to avoid the risk
of injury.
Older children may only use the
~
oven when its operation has been
clearly explained to them and they are
able to use it safely, recognising the
dangers of misuse.
Great care should be taken to
~
ensure that children do not touch the
appliance when it is being used. This is
particularly important when the pyrolytic
cleaning programme is running as the
oven heats to a much higher
temperature than normal.
External parts of the oven such as the
door glass, control panel and the vent
become quite hot. Children's skin is far
more sensitive to high temperatures
than that of adults. Danger of burning!
The cooking zones of the oven become
very hot.
Children could also burn themselves by
pulling out cooking containers.
Technical safety
Installation, maintenance and
~
repairs may only be carried out by a
suitably qualified and competent
person in strict accordance with current
national and local safety regulations.
Repairs and other work by unqualified
persons could be dangerous. The
manufacturer cannot be held liable for
unauthorised work.
Before installation, check the
~
appliance for visible signs of damage.
Do not install and use a damaged
appliance. A damaged appliance could
be dangerous.
The electrical safety of this
~
appliance can only be guaranteed
when continuity is complete between it
and an effective earthing system. It is
most important that this basic safety
requirement is present and tested
regularly and, where there is any doubt,
the household wiring system should be
inspected by a qualified electrician.
The manufacturer cannot be held liable
for the consequences of an inadequate
earthing system (e.g. electric shock).
6

Warning and Safety instructions
Before connecting the appliance to
~
the mains supply, make sure that the
voltage and frequency details given on
the data plate correspond with the
on-site electricity supply, otherwise the
appliance could be damaged. Consult
a competent, qualified electrician if in
doubt.
Do not connect the appliance to the
~
mains electricity supply by a
multi-socket unit or an extension lead.
These do not guarantee the required
safety of the appliance (e.g. danger of
overheating).
For safety reasons, this appliance
~
may only be used when it has been
built in.
Never open the housing of the
~
appliance.
Tampering with electrical connections
or components and mechanical parts is
highly dangerous to the user and can
cause operational faults.
While the appliance is under
~
warranty, repairs should only be
undertaken by a service technician
authorised by the manufacturer.
Otherwise the warranty may be
invalidated.
During installation, maintenance and
~
repair work, the appliance must be
disconnected from the mains electricity
supply. It is only completely isolated
from the electricity supply when:
it is switched off at the mains fuse,
–
the screw-out fuse is removed (in
–
countries where this is applicable),
it is switched off at the wall socket
–
and the plug is withdrawn from the
socket, or it is switched off at the
isolator.
Ensure that current is not supplied to
the appliance until after maintenance
or repair work has been carried out.
Faulty components must only be
~
replaced by genuine Miele original
spare parts. The manufacturer can only
guarantee the safety of the appliance
when Miele replacement parts are
used.
If the supply cord is damaged, it
~
must be replaced by a Miele approved
service technician to avoid a hazard.
This appliance must not be installed
~
and operated in mobile installations
(e.g. on a ship).
7

Warning and Safety instructions
Correct use
Danger of burning!
,
High temperatures are produced by
the oven.
Use oven gloves when placing food
~
in the oven, turning or removing it and
when adjusting oven shelves etc. in a
hot oven. Be very careful that you do
not burn yourself on the top heating /
grill element.
Never leave the appliance
~
unattended when cooking with oil or
fats, as these are a fire hazard if
allowed to overheat.
Fire hazard!
Do not exceed the recommended
~
grilling times when using the Grill Y /
Fan Grill \ functions.
Excessively long cooking times can
lead to food drying out and burning, or
could even cause it to catch fire.
Do not use Grill Y / Fan Grill \ to
~
finish baking par-cooked rolls or bread
or to dry flowers or herbs. Fire hazard!
Use Fan Plus U or Conventional V
instead.
If using alcohol in your recipes, high
~
temperatures can cause the alcohol to
vaporise and even to ignite on the hot
heating elements.
Alcohol should be burnt off before the
dish is placed in the oven to avoid this
danger.
Cover any food which is left in the
~
oven to be kept hot. Any moisture in the
food could lead to corrosion damage in
the oven. This also prevents the food
from drying out.
If you wish to complete a cooking
~
process using the residual heat in the
oven, leave the function selector at the
position set and turn the temperature
selector to the lowest setting. Do not
switch the appliance off until the food
has been removed. Increased moisture
in the oven could cause condensation
to form which could lead to
– corrosion in the oven compartment.
– damage to the control panel, worktop
and surrounding kitchen furniture.
Never cover the floor of the oven
~
with aluminium foil when using the oven
on Conventional V / Intensive
Bake O / Gentle Bake K / Rapid
Heat-up S.
This would cause concentrations of
heat which could cause damage to the
floor of the oven.
For this reason, do not place a dish, tin
or baking tray directly on the oven floor.
If using a tray made by a different
~
manufacturer, make sure that there is a
gap of at least 6 cm between the
bottom of the tray and the floor of the
oven.
8

Warning and Safety instructions
Never add cold water to food on a
~
hot baking tray or directly onto food in a
hot oven. The steam created could
cause serious burns or scalding and
the sudden change in temperature can
damage the enamel.
Always ensure that food is suitably
~
cooked or reheated.
Some foods may contain
micro-organisms which are only
destroyed by thorough cooking at
temperatures over 70 °C for a minimum
of 10 minutes. Therefore, when cooking
or reheating foods, e.g. poultry, it is
particularly important that food is fully
cooked through. If in doubt, select a
longer cooking or reheating time.
It is important that the heat is allowed to
spread evenly throughout the food
being cooked. This can be achieved
by stirring and/or turning the food
during cooking.
Only plastic containers which are
~
declared by the manufacturer as being
suitable for use in an oven may be
used.
Other types of plastic containers melt at
high temperatures and could damage
the oven.
Do not lean or sit on an open oven
~
door, or place heavy items on it. Make
sure that nothing gets trapped between
the door and the oven compartment.
This could damage the oven.
The oven door can support a maximum
load of 15 kg.
Do not use the appliance to heat up
~
the room. Due to the high temperatures
radiated, objects near the appliance
could catch fire.
Accessories
Only use genuine Miele spare parts
~
and accessories with this oven. If spare
parts or accessories from other
manufacturers are used, this may
invalidate the warranty, and Miele
cannot accept liability arising from
damages caused by or linked to these
items.
Remove all accessories as well as
~
the runners and any extra accessories
such as Flexi-Clip runners from the
oven interior before starting the
pyrolytic cleaning process. The high
temperatures needed for pyrolysis will
damage the accessories.
Do not heat up unopened tins or jars
~
of food in the oven. Pressure can build
up and they may explode, resulting in
injury or damage.
Do not push pots and pans around
~
on the oven floor as this could damage
the surface.
The manufacturer cannot be held
liable for damage caused by
non-compliance with these Warning
and Safety instructions.
9
Caring for the environment
Disposal of the packing
material
The transport and protective packing
has been selected from materials which
are environmentally friendly for disposal
and can normally be recycled.
Ensure that any plastic wrappings, bags
etc. are disposed of safely and kept out
of the reach of babies and young
children. Danger of suffocation!
Rather than just throwing these materials
away, please ensure they are offered for
recycling.
Disposal of your old appliance
Electrical and electronic appliances
often contain materials which, if
handled or disposed of incorrectly,
could be potentially hazardous to
human health and to the environment.
They are, however, essential for the
correct functioning of your appliance.
Please do not therefore dispose of it
with your household waste.
Please dispose of it at your local
community waste collection / recycling
centre or contact your Chartered Agent
for advice. Ensure that it presents no
danger to children while being stored
for disposal.
10
It should be unplugged or disconnected
from the mains electricity supply by a
competent person.
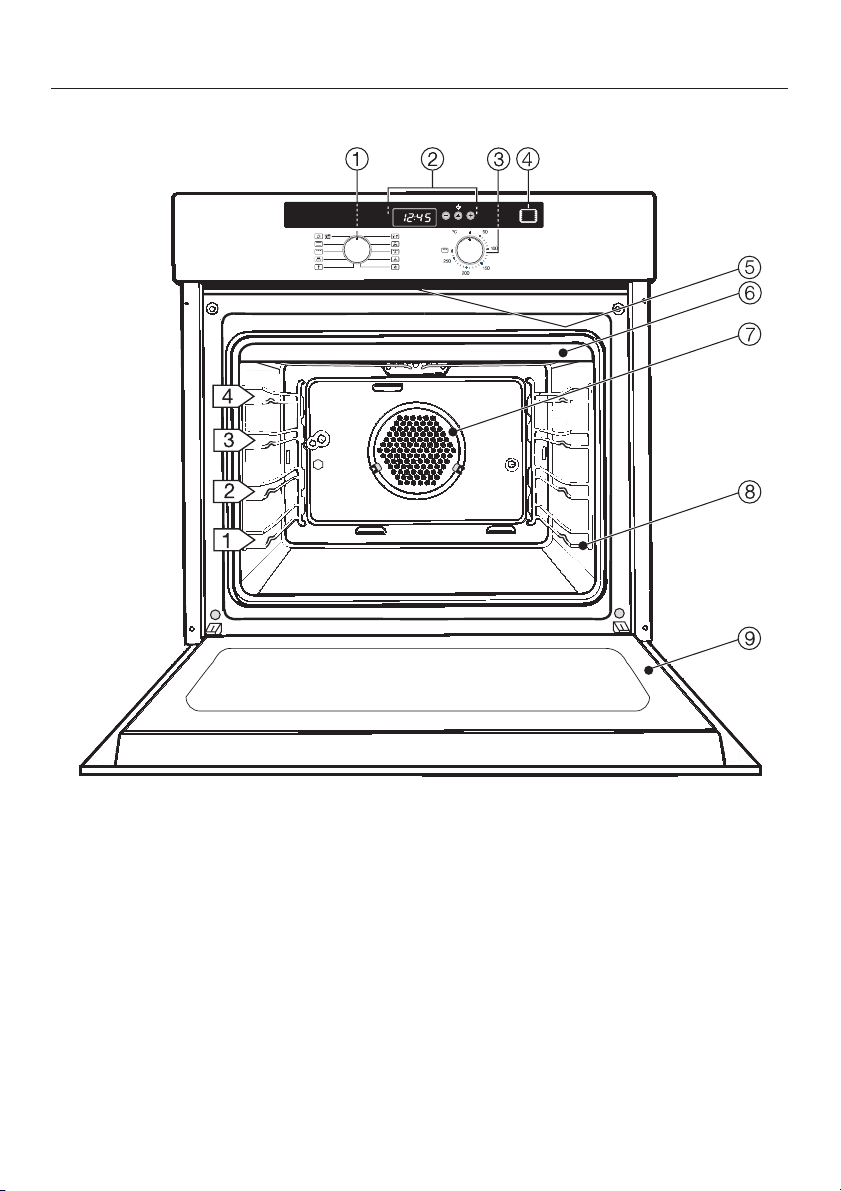
H 4412 BP
Description of the appliance
a Function selector
b Clock timer with buttons O, Q and P
c Temperature selector
d Temperature indicator light y
e Door contact switch, door lock for pyrolytic operation
f Top heat/grill element
g Back panel with air inlet for the fan
h Shelf runners with four shelf levels
i Door
11

Features
Oven controls
The controls offer various cooking
programmes to bake, roast and grill.
Appliances with a clock timer also offer
a time of day display,
–
a minute minder,
–
a timer to automatically switch
–
cooking programmes off,
settings that can be customised.
–
Safety features
Cooling fan
A cooling fan will come on
automatically when a cooking
programme is started. The cooling fan
mixes hot air from the oven cavity with
cool room air before venting it out into
the kitchen through vents located
between the appliance door and the
control panel.
If necessary, the oven door can be
dismantled for cleaning.
See "Cleaning and care" for more
information.
Door lock for pyrolytic operation
At the beginning of a pyrolytic cleaning
programme the door will lock for safety
reasons. The door lock will only be
released after the temperature in the
oven has dropped again below 280 °C.
Pyrolytic cleaning
The oven interior can be kept clean by
using the Pyrolytic function ^.
During the pyrolytic process the oven is
heated to approximately 400 °C. Any
residual soiling is broken down and
reduced to ash by the high
temperatures.
See "Cleaning and care" for more
information.
The cooling fan will continue to run for a
while after the oven has been switched
off to prevent any humidity building up
in the oven, on the control panel or on
the oven housing unit.
When the temperature in the oven has
fallen sufficiently, the cooling fan will
switch off automatically.
Vented oven door
The oven door is an open system and
the door panes have a heat-reflecting
coating.
During operation, cool air is passed
through the oven door to keep the outer
pane cool.
12
PerfectClean treated surfaces
The following surfaces have been
treated with PerfectClean enamel:
–
Universal tray
PerfectClean enamelled surfaces have
very good anti-stick properties and are
much easier to keep clean than
conventional enamel, if cleaned
regularly.
See "Cleaning and care" for more
information.
Retractable controls
The controls are retractable.
Pressing the controls will release or
retract them.
Features
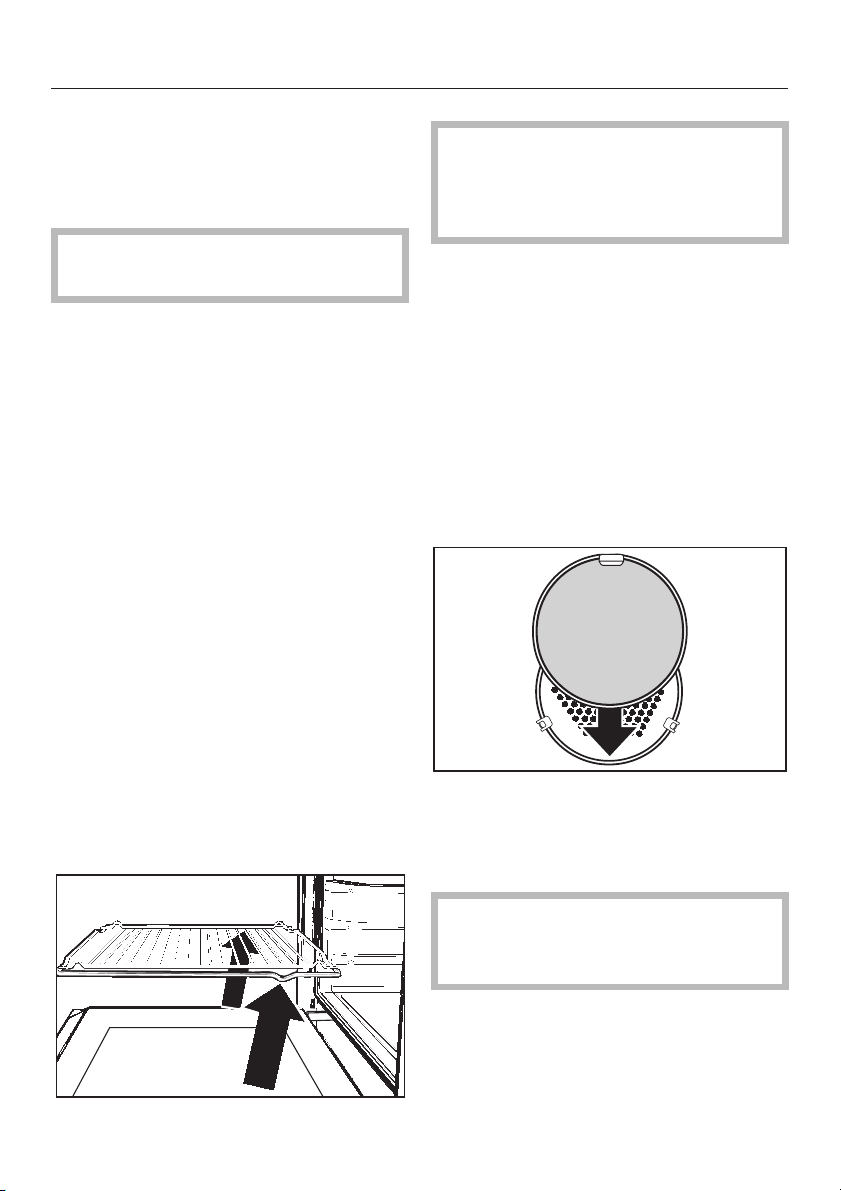
When pushing the universal tray and
rack back in, always ensure that the
safety notches are at the rear of the
oven.
Only retract the controls when at "0",
otherwise they will be damaged.
Accessories
The following accessories are supplied
with this oven.
These and other accessories are also
available to order from Miele or via the
internet at www.miele-shop.com
(depending on country).
See "Optional accessories" for more
information.
Universal tray and rack with anti-tip
safety notches
The baking tray, universal tray and rack
are inserted into the oven between the
two rails of a shelf runner.
The universal tray and rack have safety
notches that prevent them being pulled
right out when they only need to be
partially pulled out.
They can then only be taken out of the
oven by raising them upwards and then
pulling them out.
Grease filter
The grease filter must be fitted in front
of the air inlet for the fan when using:
Fan Plus U for roasting on the rack
–
or cooking in uncovered containers.
– Fan Grill \.
Oil and fat circulated by the moving air
is collected in the grease filter while the
oven interior and the area behind the
rear panel remain clean.
Do not fit the grease filter when
baking as this will prolong the
baking time.
13
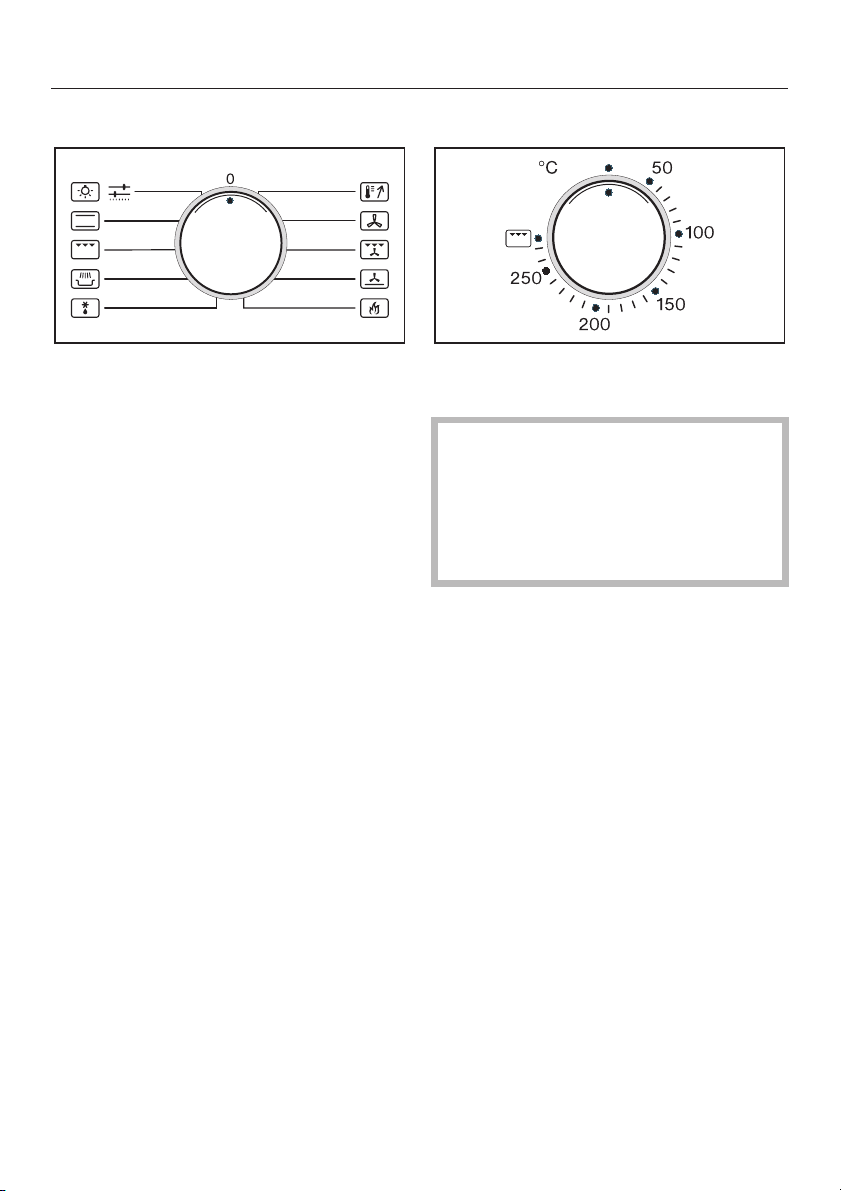
Controls
Function selector
Use the function selector to select the
required function.
The function selector can be turned
clockwise or anti-clockwise.
V Conventional
Y Grill
K Gentle Bake
P Defrost
S Rapid Heat-up
U Fan Plus
\ Fan Grill
O Intensive Bake
^ Pyrolytic
For cleaning the oven interior.
T Lighting:
The oven lighting can be
switched on separately, e.g. for
cleaning.
% Settings:
From this position you can alter
the settings of the appliance.
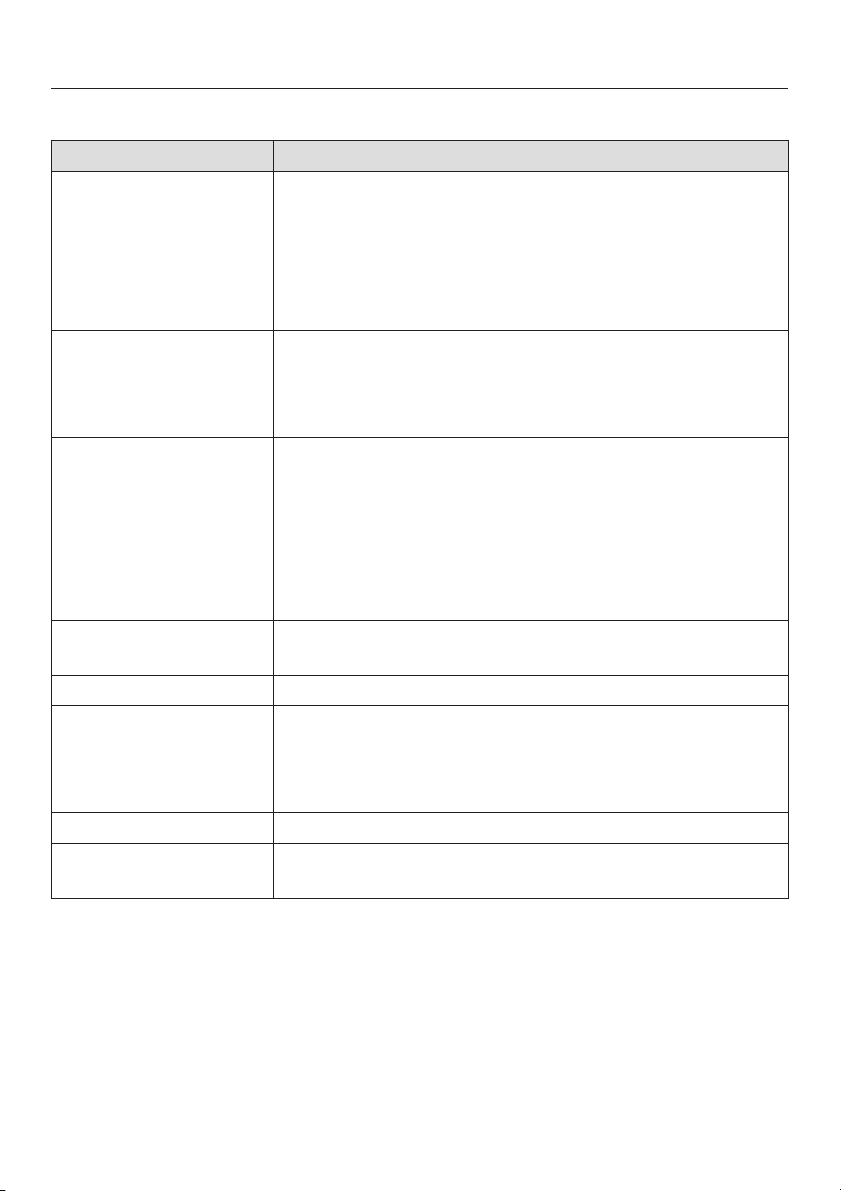
Temperature selector
Use the temperature selector to set the
required temperature.
The temperature selector must only
be turned in a clockwise direction as
far as it will go, and then back again.
Do not force it right round in a
clockwise direction, as this would
damage the selector.
Temperature indicator light y
As soon as a temperature is selected,
the oven heating switches on. The
temperature indicator light y will
show this.
When the selected temperature is
reached, the heating switches off and
the temperature indicator light goes
out. If the temperature falls below the
selected temperature, the heating
switches back on again.
14
Oven functions
Your oven has a range of oven functions for preparing a wide variety of recipes.
Oven function Notes
U Fan Plus
O Intensive Bake
V Conventional
K Gentle Bake – Suitable for bakes and gratins where a cripsy finish is
Y Grill – For grilling thin cuts and for browning food.
\ Fan Grill
P Defrost
S Rapid Heat-up
For baking and roasting.
–
You can bake and roast on different levels at the
–
same time.
Lower temperatures can be used than with
–
"Conventional V" as the Fan Plus system distributes
the heated air around the food.
For cooking dishes which require a moist topping and
–
a crisp base such as pizza and quiche lorraine.
Intensive Bake is not suitable for baking biscuits or for
–
roasting as the juices will become too dark.
For baking traditional recipes, e.g. fruit cake,
–
casseroles.
– Also ideal for soufflés.
– If using an older recipe or cookbook, set the oven
temperature for Conventional 10°C lower as
recommended.
The cooking duration does not need to be changed.
required.
–
For grilling larger items, e.g. rolled meat, poultry.
–
The hot air from the grill is distributed over the food by
the fan. This enables a lower temperature to be
selected than when using "Grill Y".
–
For the gentle defrosting of frozen food.
–
For pre-heating the oven compartment.
The oven function required must then be selected.
15

Clock timer
The clock timer can
display the time of day.
–
be used as a minute minder.
–
be used to switch cooking
–
programmes on or off automatically.
Controls
The clock timer is operated using the
Q, P and O buttons, and
–
the display.
–
Q, P and O buttons.
The Q button is used to select the
symbols for the time settings you can
change or enter.
l Minute minder
m Time of day
g Duration of a cooking programme
) End of a cooking programme
Pressing the O button reduces the
time.
Pressing the P button increases the
time.
The entries are shown in the display.
Display and triangle V in the display
i3:23
lmg)
V
If the Q button is pressed, the symbols
for times that can be entered will light
up.
Press the Q button until the triangle V
is under the required symbol.
Depending on which symbol the
triangle V is under, the following will
appear in the display:
– the time of day m,
– a minute minder l time,
– the duration of a cooking programme
g,
– the end of a cooking programme ).
If the triangle V under a symbol
–
is flashing, the time can be entered
or changed.
–
is illuminated, the time is shown but
cannot be changed.
16

Clock timer
While the triangle V is flashing,
change the selected setting with the O
or P button:
Pressing the P button increases the
–
time.
Pressing the O button reduces the
–
time.
The triangle V will flash for approx.
5 seconds.
Settings can only be changed using
the O or P buttons whilst it is
flashing.
If this period has elapsed, you will
need to call up the required symbol
again with the Q button.
Times change in minute units with each
press of the O and P buttons.
Touching the button for longer speeds
up the change in the display.
Setting the time of day
After connecting the appliance to
the mains supply or after a power
cut, "I2:00" flashes in the display.
The time of display can only be set
when the function selector is in the
"0" position.
Turn the function selector to "0".
^
i3:23
lm
V
^ Touch the Q button repeatedly until
the triangle V is underneath the m
symbol.
^ While the triangle V is flashing, enter
the hours with either the O or P
button and confirm with the Q button.
The minutes and the triangle V will
flash.
^
Now the minutes can be set by
pressing either the O or P button
and confirming with the Q button.
Once the m symbol goes out, the time
has been set and the colon will then
flash permanently.
17

Clock timer
Using the minute minder
The minute minder can be used to time
any activity in the kitchen, e.g. boiling
eggs.
A maximum of 12 hours can be set for
the minute minder.
You can set the minute minder at the
same time as another timed
programme, e.g. as a reminder to stir a
dish or add seasoning etc.
To set the minute minder
0:00
lm
V
^ Call up the l symbol by pressing the
Q.
"0:00" appears in the display.
At the end of the time set for the
minute minder
the l symbol flashes for approx.
–
one minute.
"0:00" lights up for approx.
–
one minute.
a buzzer will sound five times if this
–
option is selected (see chapter
"Settings %").
To cancel the time set for the
minute minder
^ Call up the l symbol with the Q
button.
The triangle V underneath the
symbol needs to be flashing.
Use the O button to set the minute
minder time to "0:00".
^
Whilst the triangle V is flashing,
enter the required time in hours and
minutes with the P button.
The minute minder counts down in
minutes.
The last minute is counted down in
seconds.
The l lights up as a reminder of the
minute minder that has been selected.
The minute minder time will be visible
counting down in the display as long as
the triangle V is underneath the l
symbol.
18
If the controls are pushed in when
the oven is delivered, they will have
to be released before the oven can
be used.
On ovens with a clock timer you also
have to set the time of day before
the oven can be used.
Before using for the first time
Press and release the function
^
selector and the temperature
selector.
Select "Fan Plus U".
^
Select the highest temperature.
^
Heat the empty oven for at least an
^
hour.
Before use, please remove
– any stickers from the floor of the
oven, accessories.
– any cork spacers at the sides
above the oven cavity.
– any protective foil from the
oven front.
See "Cleaning and care" for more
information.
Before using the oven for the first time
– take all accessories out of the oven
and wash them.
– then heat the oven up once with
nothing in it. New ovens can give off
a slight smell on first use. Doing this
will dissipate the smells before you
use it to cook food.
^
Before heating it up, it is a good idea
to wipe the oven out with a damp
cloth first. This way any dust or bits of
packaging that may have
accumulated in the oven cavity
during storage and unpacking will be
removed.
Please ensure the room is well
ventilated during this operation.
Close doors to other rooms to
prevent the smell spreading
throughout the house.
^ Wait until the oven has cooled down.
^ Then wipe out the oven cavity with a
solution of hot water and a mild
detergent and then dry it thoroughly
with a clean cloth.
Leave the oven door open until the
oven interior is completely dry.
On models with a clock timer, you can
set this procedure to finish
automatically. See "Programming
cooking durations".
19

Operation
Using the oven
Place the food in the oven.
^
Use the function selector to select the
^
required function.
The interior lighting comes on.
Use the temperature selector to set
^
the required temperature.
The oven heating and cooling fan will
switch on.
At the end of the programme turn the
^
function and temperature selectors to
"0" and remove the food from the
oven.
The cooling fan will continue to run for
a while after the oven has been
switched off to prevent any humidity
building up in the oven, on the control
panel or on the oven housing unit.
When the temperature in the oven has
fallen sufficiently, the cooling fan will
switch off automatically.
Pre-heating
Most dishes can be placed in a cold
oven. They will then make use of the
heat produced during the heating up
phase.
Pre-heating is only required in a few
cases:
U
V
V
Do not use Rapid Heat-up S to
pre-heat the oven when baking
pizzas or biscuits and small cakes.
They will brown too quickly.
To pre-heat the oven:
^ Select Rapid Heat-up S.
for baking dark bread.
–
for roasting beef/fillet.
–
for baking cakes/pastries with
–
a short baking time (up to
approx. 30 minutes).
– for baking sensitive doughs
(sponges).
20
^
Select the temperature.
The oven will start to heat up.
^
When the temperature indicator light
y goes out for the first time, set the
oven function you require for
continued cooking or baking, and
place the food in the oven.
 Loading...