

Page 1
Quick start guide
CVA 50xx
These short instructions are not a substitute
for the Operating instruction booklet supplied
with your coffee machine.
Please read the Operating instruction booklet supplied
with your machine before using it for the first time and
take note of the Warning and Safety instructions as well
as the full descriptions on how to use your machine.
en - GB, AU, NZ
M.-Nr. 07 479 630
Page 2
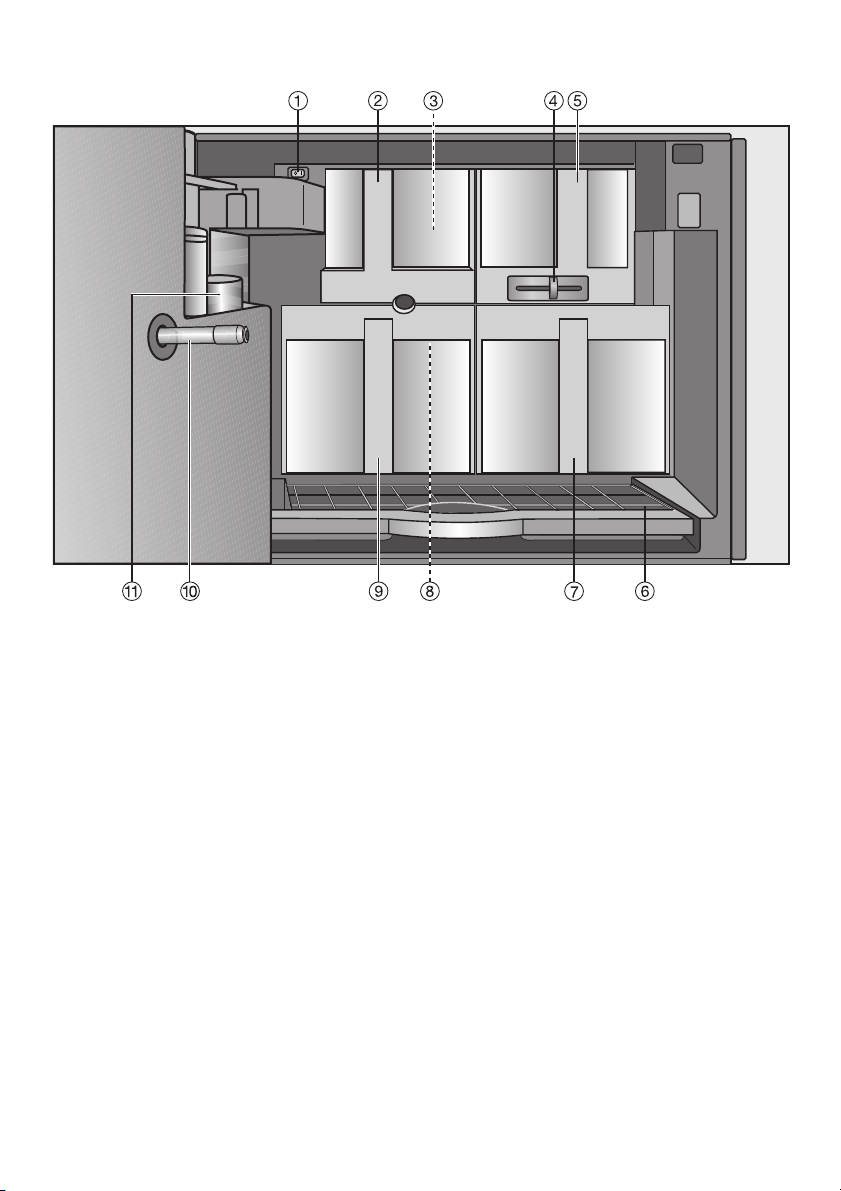
a Master switch
b Ground coffee chute cover
c Ground coffee chute
d Slide control to select fineness of ground coffee
e Coffee bean container
f Drip tray with grid for easier carrying
g Water container (with mains water inlet device on the CVA 5065 only)
h Brew unit
i Waste container
j Central spout connector (connecting the brew unit and the central coffee spout)
k Stainless steel milk flask
Accessory: 1 large cleaning container, 1 small cleaning container, 1 additional lid
for stainless steel milk flask
Page 3
Using the coffee machine - first steps
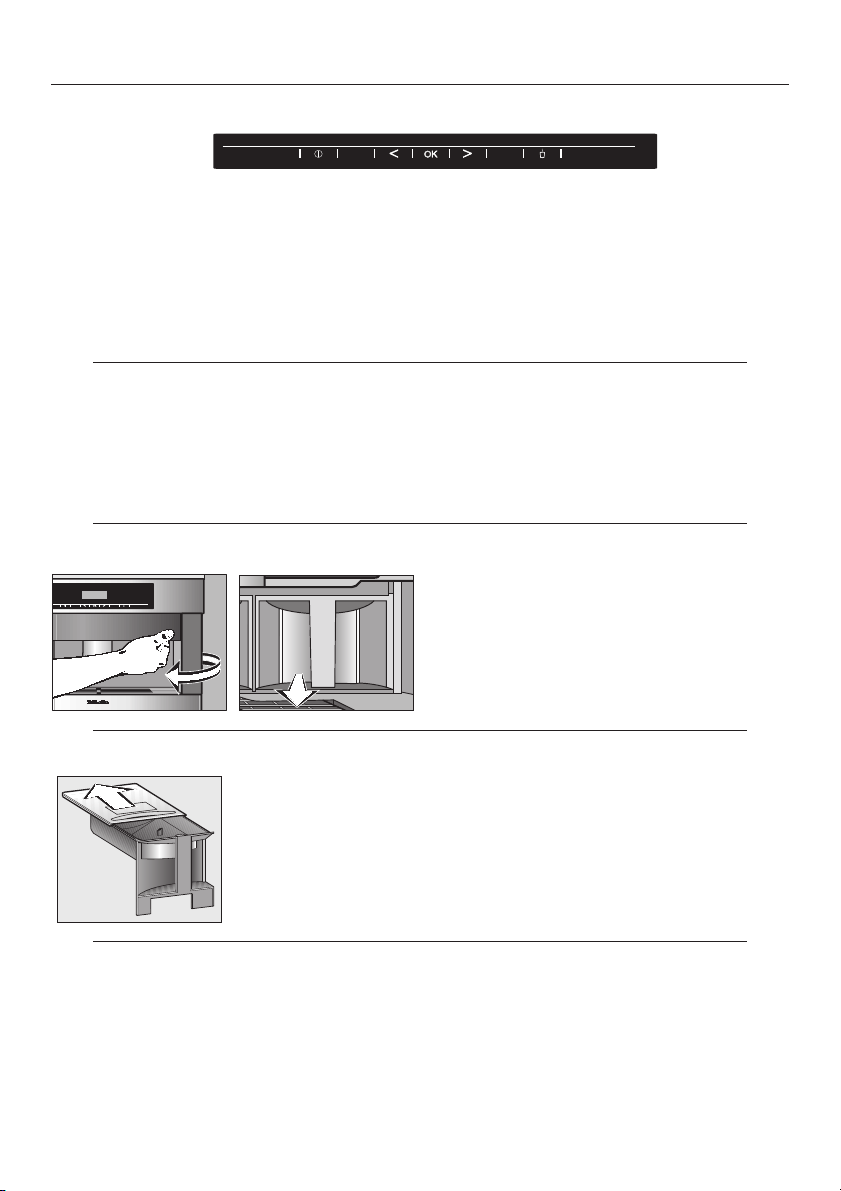
Controls
s On/Off sensor for switching the coffee machine on and off
< Left arrow, for scrolling through the various programme options
OK Sensor for confirming the selection of a programme option and
for saving a setting
> Right arrow, for scrolling through the various programme options
- Sensor for hot water
Display
Drinks selection: coffee,
User profile: n for up to 9 different users
Maintenance programmes: G = Milk pipework, Brew unit, Descale, Rinse
Settings: C = For customising your machine
Fill the water container
J = hot milk, L = milk froth
^ Fill the water container with fresh, cold
tap water up to the "Max." marker.
Filling the coffee bean container
^
Pull the coffee
bean container
out.
Making a drink
^
Place a cup or glass under the
spouts, and select the drink of your
choice.
^
Slide the lid back and fill the container
with roasted coffee beans.
^
Close the lid again.
^
Touch the OK
sensor.
Page 4

Notes on operation
Double portion
When using coffee beans, a double portion of coffee or espresso can be se
^
lected. To do this, touch the OK sensor again whilst "2 portions?" is in the dis
play.
To interrupt the drink-making process
Touch the OK sensor whilst "Stop" is in the display.
^
Drinks with milk
Open the door,
Fill the stainless
^
steel milk flask to
2-3 cm below the
rim of the flask
with cold milk.
Making coffee with ready-ground coffee
Close the lid,
^
making sure it fits
properly.
^
and place the
milk flask inside
the door.
-
-
^ Pull the cover to
the ground
coffee chute out.
Programming the amount: setting the portion size for espresso, coffee, hot
milk, milk froth and hot water
^
^
Place a cup of
the required size
under the outlet
spouts, and se
lect the drink of
your choice.
Hold the OK sen
sor until "Prog.
the amount" ap
pears in the dis
play.
^ Open the lid to the ground coffee
chute a.
^ Place 1 level spoon of ground coffee
in the chute b and then close it.
^ Follow the instructions in the display.
^
^
Touch the OK
sensor again
once the cup is
filled to the level
you want and
whilst "Save"
appears in the
display.
Programme Hot
water via the hot
water outlet and
the hot water
sensor (instead
of the OK sen
sor).
-
Page 5

Programming the amount: setting the portion size for cappuccino and latte
macchiato
Place a cup or
^
glass of the re
quired size under
the outlet spouts,
and select the
drink of your
choice.
Use the arrow
^
sensor to select
"start", and touch
the OK sensor.
Touch and keep
^
your finger on the
OK sensor until
the options for
the drinks
selection appear
in the display.
Touch the OK
^
sensor again
once the cup is
filled to the level
Use the arrow
^
sensors to select
the option for the
quantity you
require.
Confirm by
^
touching the OK
sensor.
you want and
whilst "Save"
appears in the
display.
Selecting or creating a User profile
^ Use one of the
arrow sensors to
select User
profile n and
touch the OK
sensor.
^ Selecting an
existing user
profile: Select
the profile you
want, and touch
the OK sensor.
^ Creating a new
user profile:
Select "Create"
and touch the
OK sensor.
^ Use one of the
arrow sensors to
select the letters
you want and
touch the OK
sensor when
appropriate.
Made a mistake?
Select the bin
symbol and touch
the OK sensor; the
last letter will be
deleted.
Save?
Select OK and
touch the OK
sensor.
Do not save?
Select "Back" and
touch the OK
sensor.
Page 6

Important care tips
All parts except for the brew unit, the coffee bean container, the stainless steel
milk flask and lid, and the cover to the central spout are dishwasher safe.
Before use:
It is very important to programme the water hardness level into the machine to
^
prevent limescale building up too quickly. See "Settings: Water hardness" in the
Operating instruction booklet.
Regular maintenance:
Follow all maintenance instructions that appear in the display.
^
The following must also be cleaned on a regular basis:
^ Follow the clean-
ing instructions
for the machine
door in the Operating instructions.
^
Clean the recess
underneath the
water container.
Rinse the milk pipework after every use
^
Select "Mainte
nance" G, and
touch the OK
sensor.
^ The drip tray
should be
cleaned in the
dishwasher.
^
Wash the bean
container by
hand with hot
water and wash
ing-up liquid.
^
Select "Rinse
milk pipework"
and touch the
OK sensor.
-
^ Wipe the small
drip tray inside
the door.
^
The connecting piece in the door be
tween the brew unit and the coffee
outlet should be wiped clean with a
damp cloth. Lubricate the cap once
a month with the silicone grease
supplied.
^
Select "Start" and
touch the OK
sensor.
^ Using a damp
cloth wipe away
any dry coffee
grounds from inside the machine. A vacuum
cleaner can be
used on dried
coffee grounds.
^
Follow the
instructions in the
display.
-
Page 7

Clean the milk pipework at the end of the day
Follow the
Select "Mainte
^
nance" G, and
touch the OK
sensor.
^
-
Select "Clean
milk pipework"
and touch the
OK sensor.
Select "Start" and
^
touch the OK
sensor.
^
instructions in the
display.
Discard any remaining milk, wash the milk flask and clean the central spout
Wash the stain
^
less steel flask
with hot water
taking particular
care to clean the
neck and seal
thoroughly.
Soiling can
cause the
machine to
malfunction.
^
Slide the insert
back into the lid
until it clicks into
place.
^
Remove the jets
from the central
spout.
Wash the handle
^
of the flask under
running water,
and use a damp
cloth to wipe
away any milk
residues.
^
Pull out both
rubber stoppers
and clean them
thoroughly
together with the
jets.
^
Replace the
stoppers.
^ Pull the central
spout right down
a, and remove
the cover b.
^
After cleaning,
push the jets
firmly back up
into place,
ensuring they are
secure.
^ Turn the cover
round, slide the
insert upwards
to remove, and
clean both parts
thoroughly.
^
Replace the lid
and slide the
central spout
upwards.
Page 8

Clean the brew unit
Press button a
^
under the handle
and turn the han
-
dle to the left b.
Press brew unit
^
catch c down
wards and pull
the brew unit out.
Display message "Please start the cleaning programme" (= degrease the
brew unit)
Pull the cover to
^
the ground
coffee chute off.
Go to "Maintenance" G ... "Clean
^
brew unit" and select "Start" to run the
cleaning programme.
^ Place a cleaning tablet in the chute -
close the lid and follow the
instructions in the display.
Descaling the machine (approx. 20-30 mins)
Important: Only use the descaling tablets supplied, and always place the mainte-
nance containers in position to prevent any descaling agent from splashing onto
the front of the machine and damaging it.
The CVA 5065 (plumbed-in model) switches automatically from the mains water
supply to operating with the water container for the descaling programme.
^
Go to "Mainte
nance" G ...
"Descale" and
select "Start" to
run the descaling
programme.
-
^
Follow the
instructions in
the display.
00 / 4208
 Loading...