

Operating and Installation
Instructions
Coffee System
CVA 2652
To prevent accidents
and appliance damage
read these instructions
before
installation or use.
en - US, CA
M.-Nr. 07 357 030

Contents
IMPORTANT SAFETY INSTRUCTIONS. . . . . . . . . . . . . . . . . . . . . . . . . . . . . . . . . 4
Guide to the coffee system . . . . . . . . . . . . . . . . . . . . . . . . . . . . . . . . . . . . . . . . . . 8
Display . . . . . . . . . . . . . . . . . . . . . . . . . . . . . . . . . . . . . . . . . . . . . . . . . . . . . . . . . 10
First steps to use . . . . . . . . . . . . . . . . . . . . . . . . . . . . . . . . . . . . . . . . . . . . . . . . . 11
Filling water and coffee capsules. . . . . . . . . . . . . . . . . . . . . . . . . . . . . . . . . . . . 13
Allocating various coffee types . . . . . . . . . . . . . . . . . . . . . . . . . . . . . . . . . . . . . 15
Making coffee / espresso . . . . . . . . . . . . . . . . . . . . . . . . . . . . . . . . . . . . . . . . . . 17
Coffee and Espresso ...............................................18
Preparing hot milk, frothed milk, and Cappuccino ........................19
After use.........................................................22
Setting serving sizes . . . . . . . . . . . . . . . . . . . . . . . . . . . . . . . . . . . . . . . . . . . . . . 23
User profiles . . . . . . . . . . . . . . . . . . . . . . . . . . . . . . . . . . . . . . . . . . . . . . . . . . . . . 25
Selecting a user profile .............................................25
Setting a user profile ...............................................25
Making coffee / espresso with user profiles .............................27
Setting serving sizes for user profiles ..................................27
Settings. . . . . . . . . . . . . . . . . . . . . . . . . . . . . . . . . . . . . . . . . . . . . . . . . . . . . . . . . 28
Selecting a language...............................................28
Time of day ......................................................28
Setting the timer...................................................29
Steam system ....................................................31
Lighting: Adjusting the brightness.....................................31
Lighting: Setting the switch-off time....................................32
Display ..........................................................32
Volume ..........................................................33
Info (displaying No. of drinks) ........................................33
System lock ......................................................34
Water hardness ...................................................34
Restore factory default settings .......................................35
Cleaning and care . . . . . . . . . . . . . . . . . . . . . . . . . . . . . . . . . . . . . . . . . . . . . . . . 37
Overview ........................................................37
Descaling the coffee system. . . . . . . . . . . . . . . . . . . . . . . . . . . . . . . . . . . . . . . . 46
Frequently asked questions . . . . . . . . . . . . . . . . . . . . . . . . . . . . . . . . . . . . . . . . 49
Removing a jammed capsule . . . . . . . . . . . . . . . . . . . . . . . . . . . . . . . . . . . . . . . 56
After sales service . . . . . . . . . . . . . . . . . . . . . . . . . . . . . . . . . . . . . . . . . . . . . . . . 59

Contents
Installation instructions . . . . . . . . . . . . . . . . . . . . . . . . . . . . . . . . . . . . . . . . . . . 61
Caring for the environment. . . . . . . . . . . . . . . . . . . . . . . . . . . . . . . . . . . . . . . . . 62
Electrical connection. . . . . . . . . . . . . . . . . . . . . . . . . . . . . . . . . . . . . . . . . . . . . . 63
Installation . . . . . . . . . . . . . . . . . . . . . . . . . . . . . . . . . . . . . . . . . . . . . . . . . . . . . . 64
Installation options .................................................64
Coffee glossary . . . . . . . . . . . . . . . . . . . . . . . . . . . . . . . . . . . . . . . . . . . . . . . . . . 67
The Espresso range. . . . . . . . . . . . . . . . . . . . . . . . . . . . . . . . . . . . . . . . . . . . . . . 68
The "Pure Origin" Espresso range. . . . . . . . . . . . . . . . . . . . . . . . . . . . . . . . . . . 69
The Lungo range . . . . . . . . . . . . . . . . . . . . . . . . . . . . . . . . . . . . . . . . . . . . . . . . . 70
3
IMPORTANT SAFETY INSTRUCTIONS
When using electrical appliances basic safety precautions should always be
followed, including the following:
Read all instructions before installation or use of the coffee system.
Proper use
Please read these instructions
carefully to prevent accidents and
machine damage.
This appliance complies with current
safety requirements. Improper use
of the appliance can cause personal
injury and material damage.
This coffee system is for household
~
use only (up to 20 cups per day), for
the preparation of coffee beverages
such as espresso, cappuccino, latte
macchiato, etc.
Do not use this machine other than for
its intended use. Any other use could
be hazardous.
Read this safety information carefully
before operating the appliance.
They contain important information
on the safe installation, operation,
and care of your coffee system. To
avoid the risk of personal injury or
damage to the coffee system, it is
important that you carefully read the
instructions.
Keep them in a safe place and pass
them on to any future user.
Persons which lack physical,
~
sensory or mental abilities or
experience with the machine should not
use it without supervision or instruction
by a responsible person.
Children
Close supervision is necessary
~
when any appliance is used by or near
children. They could easily be scalded
or burned.
Never let children play with the
~
coffee system.
Install the appliance in an area
~
where it will not be accessible to
children.
4

IMPORTANT SAFETY INSTRUCTIONS
Technical safety
Before installing the appliance
~
check for externally visible damage.
Do not operate a damaged appliance.
Before connecting the appliance to
~
the electrical supply make sure that the
voltage and frequency listed on the
data plate correspond with the
household electrical supply. If in doubt,
consult a qualified technician.
Be certain your appliance is
~
properly installed and grounded by a
qualified technician. To guarantee the
electrical safety of this appliance,
continuity must exist between the
appliance and an effective grounding
system. It is imperative that this basic
safety requirement be met. If there is
any doubt, have the electrical system of
the house checked by a qualified
electrician.
The appliance must be properly
~
installed before operation to ensure that
no electrical components are
accessible. Ensure that power is not
supplied to the appliance while
installation work, repairs or
maintenance is performed.
Do not use an extension cord to
~
connect the appliance to electricity.
Extension cords do not guarantee the
required safety of the appliance
(danger of overheating).
This appliance must not be installed
~
or operated outdoors.
If the appliance is installed behind a
~
door front, use the appliance only when
the door front is open. Do not close the
door front when the appliance is in
operation.
Before service or maintenance
~
disconnect the power supply by either
removing the fuse, “tripping” the circuit
breaker or unplugging the unit.
This appliance must not be used in
~
a non-stationary location (e.g. on a
boat).
Installation work and repairs must
~
only be performed by a trained
technician in accordance with national
and local safety regulations. Repairs
and other work by unauthorized
persons could be dangerous and may
void the warranty.
While the appliance is under
~
warranty repairs should only be
performed by an authorized service
technician. Otherwise the warranty is
void.
Defective components should be
~
replaced by Miele original spare parts
only. Only with these parts can the
manufacturer guarantee the safety of
the appliance.
To protect against fire, electric
~
shock and injury to persons do not
submerge the cord or plugs in water or
other liquids.
5

IMPORTANT SAFETY INSTRUCTIONS
Do not let the cord hang over the
~
edge of a table or counter, or touch hot
surfaces.
Do not operate any appliance with a
~
damaged cord or plug, or after the
appliance malfunctions or has been
damaged in any manner. Contact
Miele.
Always attach the cord to the
~
appliance first, then plug it into the wall
outlet. To disconnect, turn the machine
off, then remove the plug from the wall
outlet.
Never open the outer casing of the
~
appliance. Tampering with electrical
connections or components and
mechanical parts is dangerous and
may cause machine damage.
If the machine is installed in
~
combination with other appliances, a
protective base should be installed
between the appliance and the unit
(except for combinations with a plate
warmer).
Install or locate this appliance only
~
in accordance with the provided
installation instructions.
Use
Use only Nespresso-coffee
~
capsules with this machine. The use of
other products will damage the
appliance.
Caution! Risk of burns when
dispensing hot beverages, they are
extremely hot.
Caution! Do not look directly or, with
an optical instrument into the
lighting - laser radiation.
Do not reach into the brew unit
~
unless the appliance is disconnected
from the power supply. Danger of
injury.
The water lines must be rinsed and
~
the machine cleaned thoroughly before
the first coffee is prepared. The
cappuccinatore should also be
cleaned.
Only fill the water tank with cold,
~
fresh tap water. Warm or hot water, or
any other liquids may damage the
machine. The water should be changed
daily to prevent bacteria or mold
growth.
Do not use deionized or mineral
~
water. Mineral water leads to heavy
calcium buildup in the machine that
can damage the unit.
Only use cold plain milk in the
~
cappuccinatore. Flavored milk products
contain substances that can clog the
machine.
6

IMPORTANT SAFETY INSTRUCTIONS
Do not place anything other than
~
Nespresso capsules un the capsule
carousel.
Do not use damaged, broken or
~
dented capsules! They may jam in the
machine and damage it.
Never place a cup with an
~
alcohol-coffee mixture underneath the
coffee dispenser. Plastic parts of the
unit could catch fire!
The hot water and steam dispensed
~
could cause scalding. These functions
must be used carefully. Never hold any
parts of the body under the steam
nozzle or the hot water dispenser. The
machine must never be used to clean
objects.
Never use a steam cleaner to clean
~
the appliance. Pressurized steam could
damage electrical components and
cause a short circuit.
Clean the coffee system daily to
~
prevent bacterial growth. All parts of
the coffee system are dishwasher-safe
except for the capsule plate and the
plastic drip tray. Failure to properly
maintain machine may cause health
issues.
Do not clean inside the capsule
~
plate opening. Danger on injury.
To avoid injuries allow the coffee
~
system to cool before cleaning or
before putting on or taking off parts.
Turn the machine off at the main switch
when not in use and before cleaning.
The water in the drip tray can be
~
very hot. Use caution when emptying it.
Danger of burns.
The coffee system must be
~
descaled regularly with the supplied
descaling tablets. In areas with very
hard water the machine needs to be
descaled more often.
The capsule plate will soil more or
~
less depending on the coffee capsule
used. Clean the capsule plate every 1
to 2 months with a cleaning tablet,
available from Miele.
Only use the descaling tablets
~
provided by Miele and be sure to use
the correct mixture of water and
descaler. Otherwise appliance damage
may occur.
Do not hang, lean, sit or place heavy
~
items on the door. The machine may be
damaged.
The use of accessories not
~
recommended by the appliance
manufacturer may result in fire, electric
shock or injury to persons.
Do not reach into the perforator.
~
Injuries may occur.
Do not touch hot surfaces. Use
~
buttons or steam lever.
The appliance is designed for use
~
in room temperatures between 59°F
and 140°F (15°C and 60°C). Do not use
the appliance outside of this range of
temperatures.
SAVE THESE INSTRUCTIONS
AND REVIEW THEM
PERIODICALLY
7
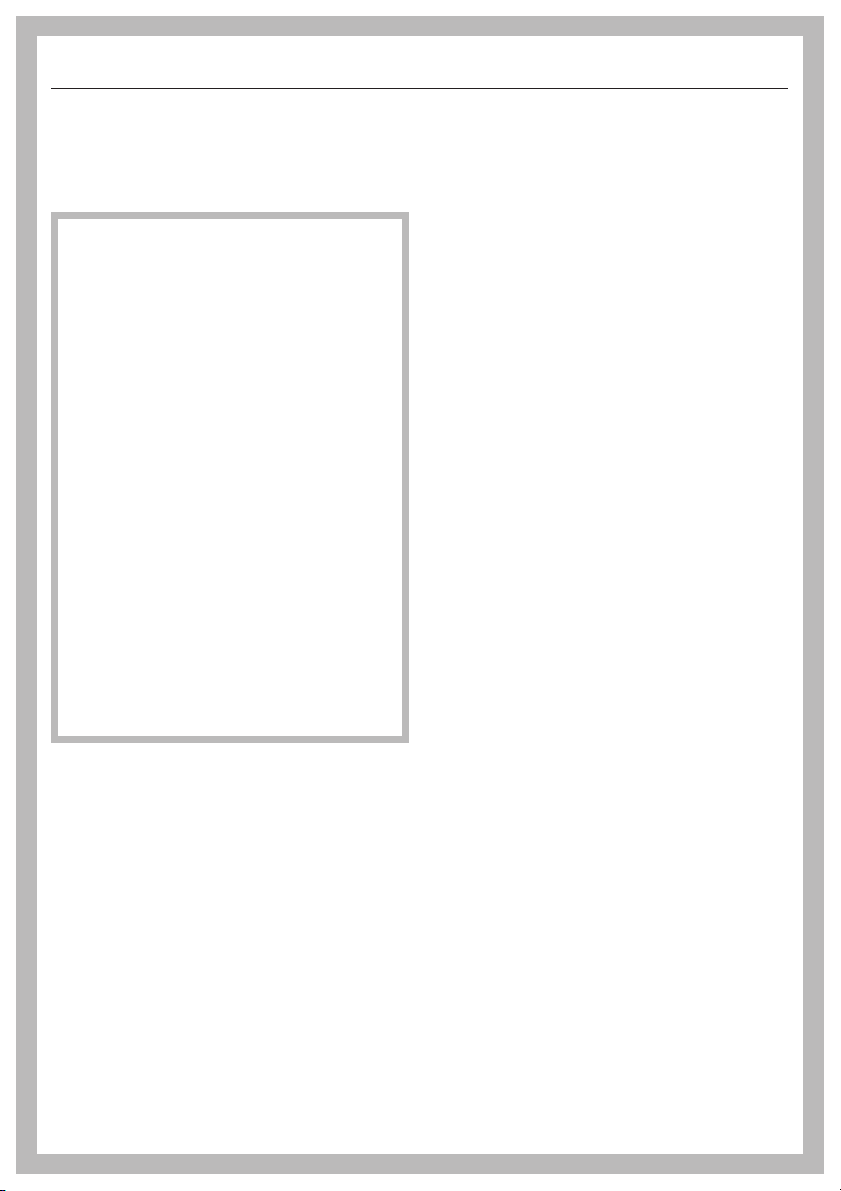
Guide to the coffee system
Front view
a On/Off s touch control
b Display
c Left arrow <, to scroll through program options
d OK touch control, to confirm selected program options and save settings
e Right arrow >, to scroll through program options
f r Drink selection touch control to select the beverage type (coffee or
espresso)
g Door grip
h Plastic drip tray
i Metal drip tray
j Coffee dispenser
k Inset for Cappuccinatore
l Valve / Lever for steam and hot water
8
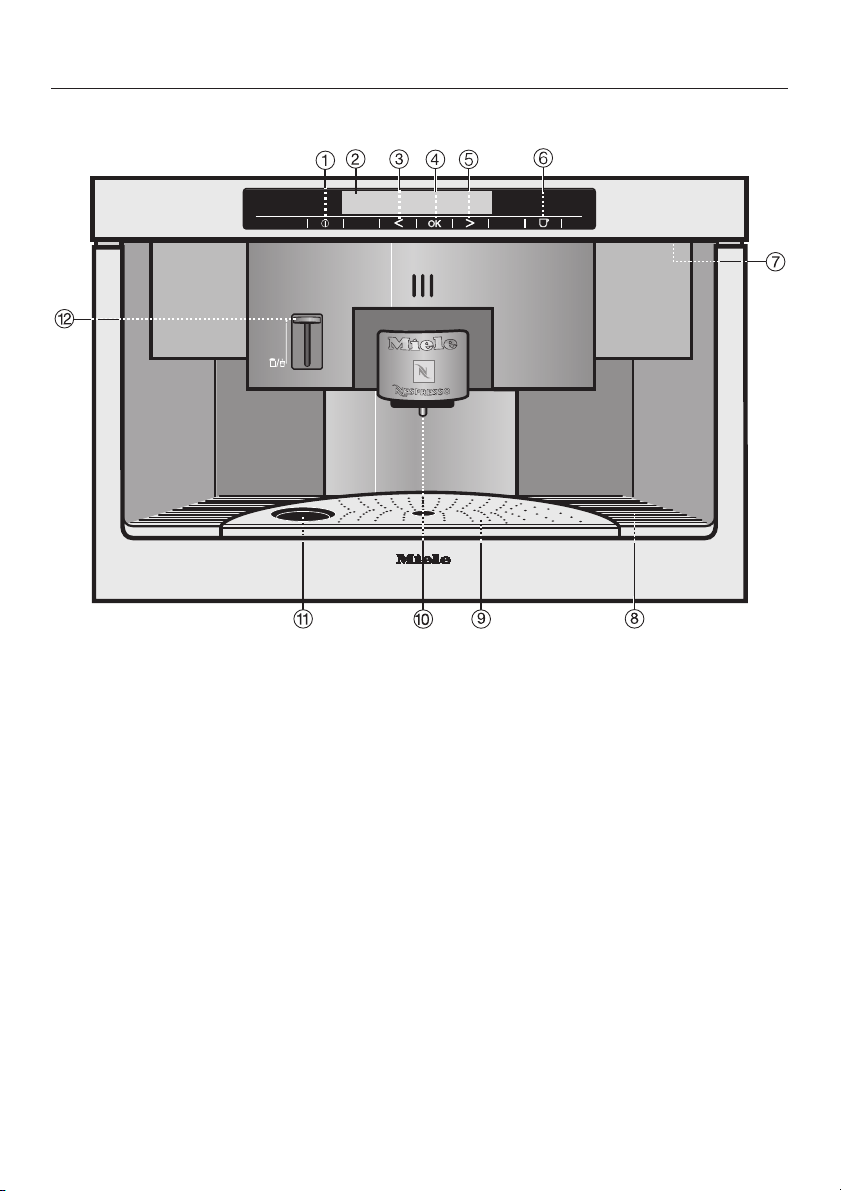
Interior view
Guide to the coffee system
m Main Switch
n Capsule plate (replace with descaling funnel when descaling is performed)
o Brew unit
p Capsule carousel
q Carousel tray
r Water tank
s Drip tray with grid
(with no-spill grid for transport)
t Waste container
9

Display
Touch controls
Select a touch control with your
fingertip to use the machine.
Display
COSI o Espresso
K1 K2 K3 K4 K5 L on G k C
The main menu in the display shows
the following symbols:
K Up to 5 different coffee types
L Steam
o Hot water
n User profile for up to 9 different
users
G Maintenance program - rinse
k Maintenance program - descale
C Settings - customize appliance
^ Use < or > to select a program item
in the display. When the desired
program item is highlighted, select
OK.
10

First steps to use
Before the first use
The appliance must be correctly
installed and connected before the
first use. See the "Installation
Instructions".
Clean the appliance and remove
protective foils before the first use.
See "Cleaning and Care".
Switching on
Select On/Off s to turn the coffee
^
system on.
The first few times the machine is
turned on with the main switch a
welcome screen will briefly appear in
the display, followed by other
messages. The welcome screen will be
displayed until 5 beverages have been
prepared.
Míele Welcome
During the very first use, you will be
prompted to select a language.
^
Tap < or > until the desired language
appears in the display.
Setting the clock
Tap < or > until the desired clock
^
format (12 or 24-hour clock) is
highlighted. Confirm with OK.
Enter the time of day: Use the arrow
^
buttons to first set the hour. Confirm
with OK.
Use the same process to set the
^
minutes.
Select when you would like the time
^
to be displayed:
"On": The time of day will be
–
displayed even if the appliance is off.
– "On for 60 seconds": When the
appliance is turned off, the time of
day will remain displayed for 60
seconds.
– "Not displayed": When the
appliance is switched off, the time
display immediately goes out.
^ Select OK to confirm.
Once the settings have been entered
correctly, the display will show Set-up
successful.
^
Confirm the message with OK.
^
Confirm by selecting OK.
The desired language is now set.
11

First steps to use
Filling lines with water
The appliance is drained completely
before leaving the factory. Before the
first drink is prepared, you will need to
pump water into the lines.
Place a cup under the coffee
^
dispenser.
Hot water
K1 K2 K3 K4 K5 L o n G k C
Select Hot water o using < or >.
^
Confirm with OK.
^
^ Allow some hot water to run into a
cup.
^ Turn off the water by selecting OK
again.
The lines are now filled with water, and
the appliance is ready to use.
Switching off
Select On/Off s to turn the coffee
^
system off.
When a coffee beverage is
prepared, the unit rinses once
before it switches itself off.
12
Filling water and coffee capsules
The appliance should be cleaned
before filling it with water and coffee
capsules (see "Cleaning and care").
Be sure to set the water hardness
(see "Settings - Water hardness").
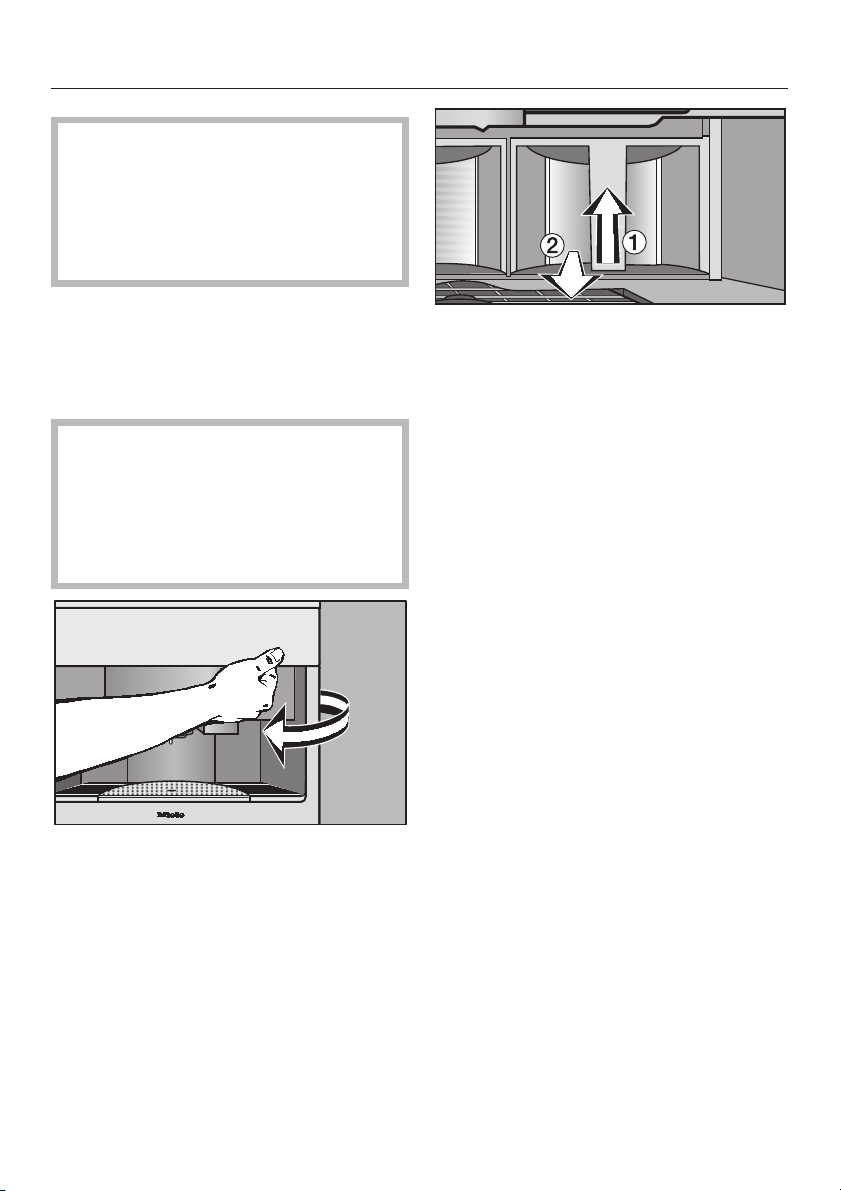
Filling the water tank
The water tank should be washed and
filled with fresh cold tap water before
each day of use.
Never put hot water or any other
,
liquid except cold water into the
water tank. Do not use deionized or
mineral water. They may lead to
heavy calcium built-up in the
machine that can damage the unit.
^
Open the appliance door.
Lift the water tank a and pull it out
^
b.
Fill the container with fresh, cold tap
^
water to the "Max." mark.
A valve at the tank front prevents leaks.
^ Push the water tank back into the
machine.
13
Filling water and coffee capsules
Filling the coffee capsule
carousel
Only insert Nespresso coffee
capsules in the carousel.
Damaged, broken or dented
capsules should not be used they
may jam in the machine.
Pull the carousel tray, a, all the way
There are five chambers, each can hold
four capsules. The coffee types have to
be allocated to their respective
chambers to get the desired coffee
type. You can also fill each chamber
with the same coffee type.
The chambers are factory set for a
coffee type. Fill the chambers
respectively or program other coffee
types according to your preference.
See "Allocating various coffee types".
^
out.
Insert the capsules into the
^
chambers, c of the capsule carousel
b, with the flat, foil side facing down.
The capsule carousel can also be
lifted up and out of the tray for easier
loading.
Take care that the capsules sit
loosely in the chambers so they do
not jam.
14
^ Insert the carousel into the carousel
tray.
^
Push the carousel all the way into the
machine.
^
Close the door.
The machine aligns the carousel
automatically. A sound will be heard.
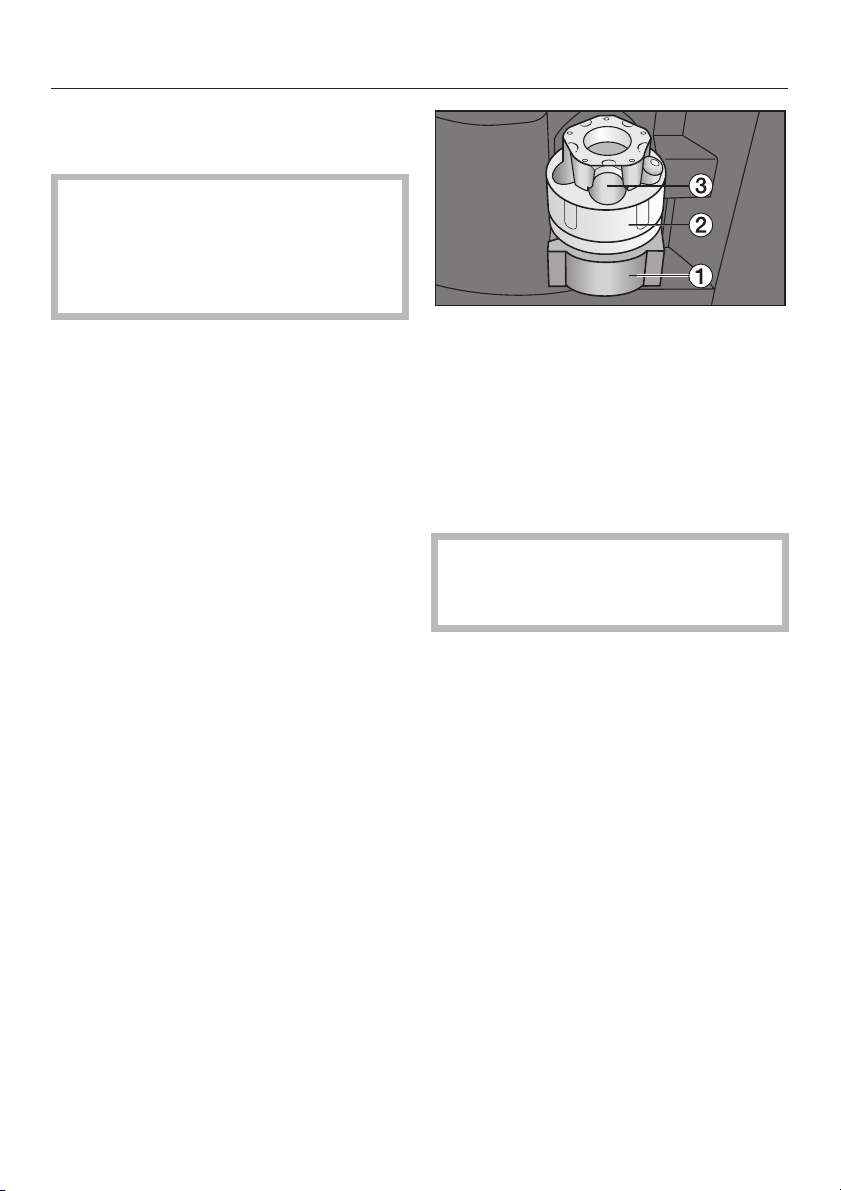
Removing the coffee capsules
^
Pull out the carousel tray and lift out
the carousel.
^
Push the carousel ring up and take
out the capsules.

Allocating various coffee types
Sixteen different Nespresso coffee
types are available for this coffee
system (as well as occasional "Limited
Edition" blends). They differentiate in
terms of acidity, fruitness, bitterness
and roast. Therefore the preparing
times will vary.
See "The Espresso / Lungo range" for
more information on the coffee types.
Allocating the coffee types
Five different coffee types can be filled
in the five chambers of the capsule
carousel. The chambers can be either
allocated to the desired coffee types or
filled with the same coffee type in all
chambers.
Settings F
K1 K1 K3 K4 K5 LLn G k C
^ Select "Settings F" from the main
menu. Confirm with OK.
^ Tap an arrow button until "Allocate
type" is highlighted. Confirm with OK.
^
Use the arrow buttons to select
"Chamber 1" (for example). Confirm
with OK.
Several options are now available:
Select type
Allows you to select from the coffee
types which have already been
allocated.
Use < or > to select the coffee type
^
you wish to allocate to the selected
chamber. Confirm with OK.
Rename type
Allows you to enter a new type of
coffee.
^ Tap < or > until "Rename type" is
highlighted. Confirm with OK.
In the display you will see letters and
numbers. Use the arrow buttons to
select the desired character.
A new word will always be capitalized,
and the appliance will then switch to
lowercase letters.
^ Use < or > to select the desired
characters.
^
Confirm with OK.
You will see the selected text in the
upper line of the display.
If you misspell a word, use the
arrow buttons to select the trash can
symbol. Confirm with OK. The last
entered character will be deleted.
15

Allocating various coffee types
Saving an entry
When the entry is complete, use < or
^
> to select OK. Confirm by pressing
OK again.
The menu for the chamber you are
"loading" will appear in the display.
To exit the menu, use < or > to select
^
"back A". Confirm with OK.
Not saving an entry
If you do not wish to save an entry,
^
use < or > to select "back A".
Confirm with OK.
You can allocate up to 10 types of
coffee. If you try to allocate more
than 10 coffee types "Memory full"
will appear in the display. You will
need to first erase a coffee type to
create space.
Once you allocate a coffee type, it
will be available for use in any
chamber, even if you entered it
under a specific program item, for
example under chamber 1.
Chamber symbols in the display
The following options will only
appear once a new coffee type has
been added:
Change type
This option can be used to change the
type of coffee allocated to a chamber.
^ Tap < or > until "Change type" is
highlighted. Confirm with OK.
Now continue as you would in "Rename
type".
Delete type
This option can be used to completely
delete a coffee type.
^
Select "Delete type" and confirm with
OK.
^
Use < or > to select the coffee type
to be deleted.
^
Confirm with OK.
Once you have assigned a type of
coffee to a chamber, a coffee bean
symbol K will appear in front of the
chamber number in the main menu.
When you select a chamber the type of
coffee allocated to that chamber will
appear in the top line of the display.
If the chamber is empty,an
exclamation point will appear after the
bean symbol.
If the chamber has not been allocated
with a type of coffee a question mark
will appear after the coffee bean
symbol, regardless of whether the
chamber if full or empty. When the
chamber is selected "Empty" will
appear in the top line of the display and
coffee cannot be dispensed from that
chamber.
A check appears after the coffee type
and it will be erased.
16

Clean the coffee system daily to
prevent bacterial growth. All parts of
the coffee system are
dishwasher-safe except for the
capsule plate and the plastic drip
tray. Failure to properly maintain
machine may cause health issues.
Rinse the water lines before
preparing the first drink of the day. If
the machine is still cold this will take
place automatically. The heating
system will heat and the water lines
will be rinsed.
^ Select On/Off s to turn the machine
on.
The following message appears:
Heating-up phase
When the unit is heated, a message
appears:
Making coffee / espresso
Pre-warming the cups
Pre-warming the cups allows the coffee
to fully develop the flavor and aroma.
Use caution. Steam and hot water
are very hot.
Place a cup under the steam / hot
^
water valve.
To pre-warm with hot water
Select hot water "o" using < or >.
^
Confirm with OK.
^
^ Allow some hot water run into a cup.
^ Turn off the water by selecting OK
again.
^ Leave the cup for a few seconds to
warm, then pour the water away.
To pre-warm with steam
^ Select heating with steam "L" using
<or>.
Rinsing
Water will now run out of the coffee
dispenser and a noise will be heard as
the carousel aligns.
The main menu then appears in the
display:
COSI o Espresso
K1 K2 K3 K4 K5 L on G k C
^
Press the steam lever down.
The steam supply is temporary. If
the steam stops prematurely push
the steam lever up then down again.
^
Push the lever up to stop the steam
from dispensing.
^
Pour away any excess water.
17

Making coffee / espresso
Coffee and Espresso
Place a cup under the coffee
^
dispenser.
COSI o Espresso
K1 K2 K3 K4 K5 L on G k C
Use < or > to select the desired
^
coffee type.
Use the "Drink selection" touch
^
control to select Espresso or Coffee.
The beverage type you have
selected will appear in the upper
right hand corner of the display.
^ Select OK.
The desired beverage will now be
dispensed.
If you prefer to have a portion size that
is larger or smaller than the pre-set
sizes for coffee and espresso, see
"Programming quantities - serving
sizes").
Double portion
If you would like a double portion of
coffee or espresso, or to prepare two
portions at the same time,
select OK a second time while the
^
display still reads "Double portion?".
The two portions are prepared one after
the other.
Interrupting preparation
Select OK when "Stop" appears in the
^
display.
The drink preparation will stop.
18
Preparing hot milk, frothed
milk, and Cappuccino
This appliance includes a
Cappuccinatore, which can be used to
easily prepare warm milk, frothed milk,
and cappuccino.
Before using the cappuccinatore for
the first time, wash it either in the
dishwasher or with hot water and
liquid dish soap.
See "Cleaning and care".
Making coffee / espresso
Pushed in: Milk is frothed into the cup
Pulled out: Milk is frothed into the
cappuccinatore
When milk is frothed in the
cappuccinatore the froth is hotter
and has more volume.
When frothing milk into a cup while
dispensing a coffee, the steam
system must be turned on. See
"Settings - Steam system".
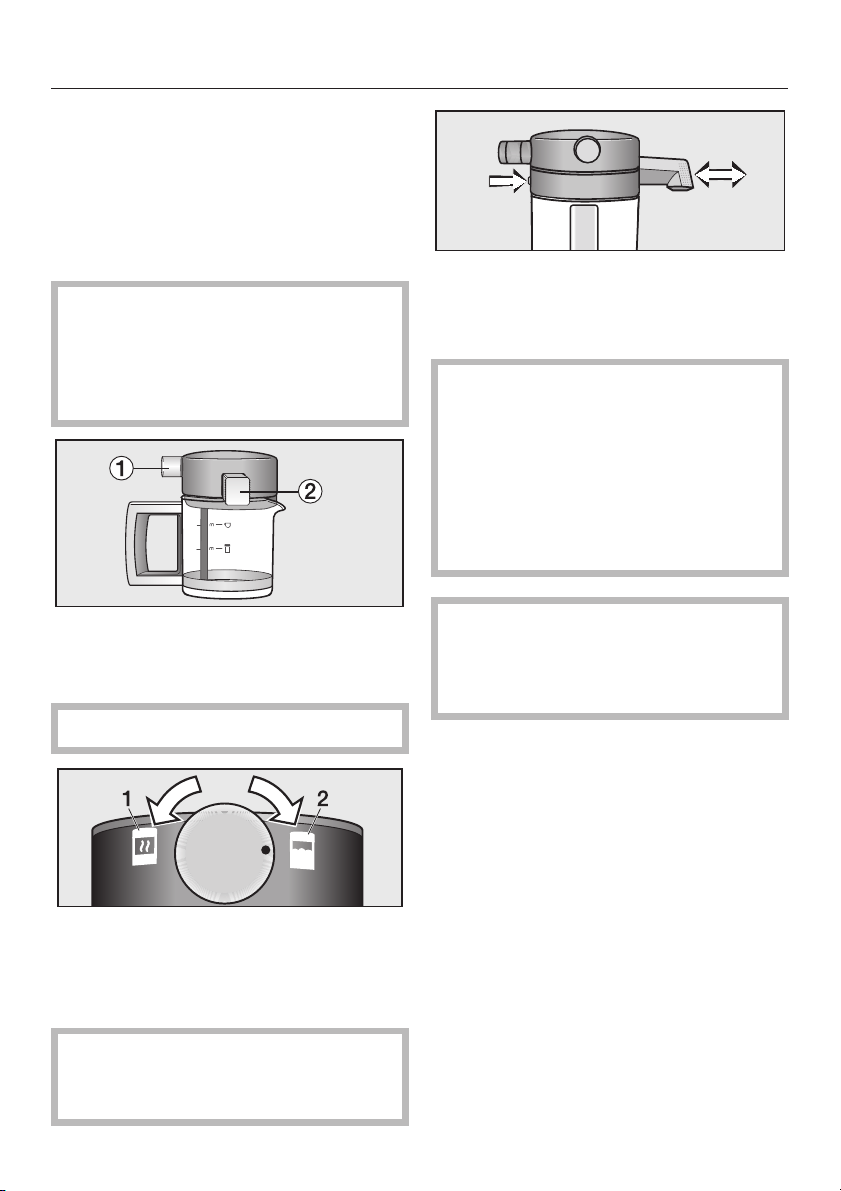
Above the handle on the
cappuccinatore there is a valve a, and
a milk spout b on the side.
Cold milk is best for creating froth.
The steam is regulated by turning the
valve.
Left: hot milk is prepared
Right: froth is prepared
Be sure not to set the valve between
these two settings - this may cause
the milk to splatter.
The steam supply is temporary. If
the steam stops and there is not
enough froth prepared, push the
steam lever up then down again.
19
Making coffee / espresso
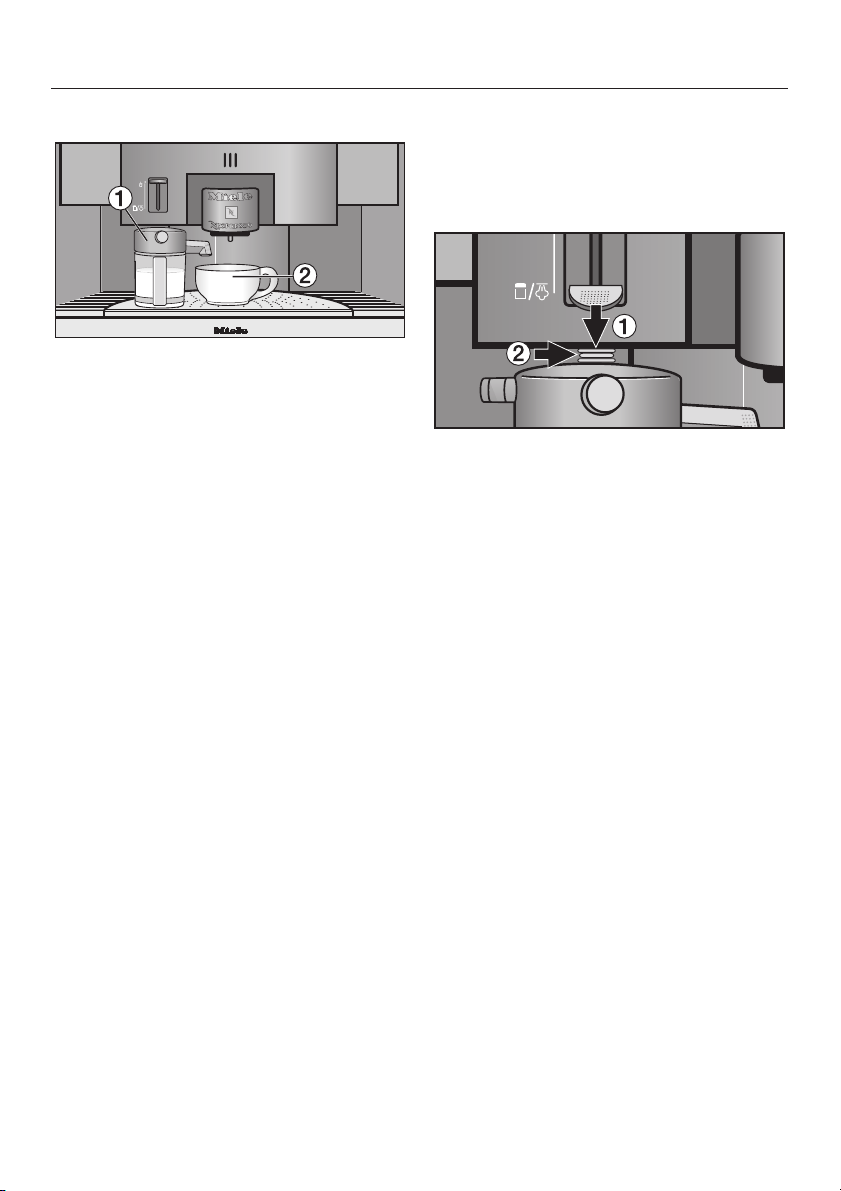
Frothing milk into a cup
Pre-warm the cup before filling with
^
froth.
Push the cappuccinatore spout all
^
the way into the lid.
^ Turn the valve all the way to the right.
^ Fill the cappuccinatore a no higher
than the upper mark with cold milk
and cover with the lid on.
^ Place the cappuccinatore in the inset
on the drip tray, and the cup b
under the spout.
^ Slowly press the steam lever down.
Preparing a cappuccino
Prepare frothed milk in a cup.
^
Place the cup of frothed milk under
^
the coffee dispenser.
Use the drink selection "r" touch
^
control to select Espresso.
^ Select OK.
Espresso now flows through the coffee
dispenser and the cappuccino is ready.
The steam lever must click into the
down position - otherwise the valve is
not properly connected to the
cappuccinatore.
^
Push the steam lever up when
enough froth is prepared.
20

Making coffee / espresso
Frothing milk in the cappuccinatore
Pull the cappuccinatore spout into
^
the "out" position.
Turn the valve all the way to the right
^
for frothing.
Fill the cappuccinatore to the lower
^
marking a with cold milk and cover
with the lid.
^ Place the cappuccinatore in the inset
on the drip tray.
^ Slowly press the steam lever down.
The steam lever must click into the
down position - otherwise the valve is
not properly connected to the
cappuccinatore.
Heating milk
Fill the cappuccinatore to the upper
^
mark with cold milk and put the lid
on.
Turn the valve all the way to the left
^
for heating.
Push the milk spout all the way in (hot
^
milk in the cup) or pull the milk spout
out (hot milk in the cappuccinatore)
and place the cappuccinatore into
the recess in the drip tray.
Slowly press the steam lever down
^
and carefully "connect" the valve to
the cappuccinatore.
^ Push the steam lever up when
enough froth is prepared.
21

Making coffee / espresso
Rinsing the lid
For a quick cleaning between uses of
the cappuccinatore the lid can be
rinsed with the steam valve.
This rinsing does not replace the
cleaning of the cappuccinatore in a
dishwasher.
Maintenance
K1 K2 K3 K4 K5 L on G k C
Select maintenance "G" using < or
^
>.
^ Select "Rinse Cappuccinatore" and
confirm with OK button.
^ Push the cappuccinatore spout "in".
^ Place an empty cup under the
cappuccinatore spout.
^ Press the steam lever down.
The following appears in the display.
After use
If you do not wish to rinse the lines
automatically, they should be flushed
manually before turning the machine off
for the day.
When a coffee beverage is prepared,
the unit always rinses once before it
switches itself off. For this, it is best to
place a container underneath the
beverage nozzle and the steam vent.
The lines can also be rinsed manually
(see "Cleaning and Care" - "Rinsing the
System").
Cappuccinatore being rinsed
Hot water now runs through the lid and
flushes it clean. The process will stop
automatically when the lid is rinsed.
22
 Loading...