


Operating and installation instructions
Built-in Tepan
CT 400 P
Mobile Tepan
CT 400 MP
To avoid the risk of accidents or
damage to the appliance it is
essential to read these
instructions before it is installed
and used for the first time.
Gir
M.-Nr. 06 760 290

Contents
Description of the appliance. . . . . . . . . . . . . . . . . . . . . . . . . . . . . . . . . . . . . . . . . 3
Built-in Tepan . . . . . . . . . . . . . . . . . . . . . . . . . . . . . . . . . . . . . . . . . . . . . . . . . . . . . . 3
Mobile Tepan . . . . . . . . . . . . . . . . . . . . . . . . . . . . . . . . . . . . . . . . . . . . . . . . . . . . . . 4
Optional accessories . . . . . . . . . . . . . . . . . . . . . . . . . . . . . . . . . . . . . . . . . . . . . . . . 6
Warning and Safety instructions . . . . . . . . . . . . . . . . . . . . . . . . . . . . . . . . . . . . . 7
Caring for the environment . . . . . . . . . . . . . . . . . . . . . . . . . . . . . . . . . . . . . . . . . 12
Operation . . . . . . . . . . . . . . . . . . . . . . . . . . . . . . . . . . . . . . . . . . . . . . . . . . . . . . . 13
Cleaning and heating up for the first time . . . . . . . . . . . . . . . . . . . . . . . . . . . . . . . 13
Switching on and off . . . . . . . . . . . . . . . . . . . . . . . . . . . . . . . . . . . . . . . . . . . . . . . 13
Settings . . . . . . . . . . . . . . . . . . . . . . . . . . . . . . . . . . . . . . . . . . . . . . . . . . . . . . . . . 14
Tips . . . . . . . . . . . . . . . . . . . . . . . . . . . . . . . . . . . . . . . . . . . . . . . . . . . . . . . . . . . . 15
Cleaning and care . . . . . . . . . . . . . . . . . . . . . . . . . . . . . . . . . . . . . . . . . . . . . . . . 16
Tepan plate (Built-in and Mobile Tepan) . . . . . . . . . . . . . . . . . . . . . . . . . . . . . . . . 16
Mobile Tepan Stainless steel surrounds and framework . . . . . . . . . . . . . . . . . . . . 17
Wooden surfaces (Mobile Tepan) . . . . . . . . . . . . . . . . . . . . . . . . . . . . . . . . . . . . . 17
Problem solving guide. . . . . . . . . . . . . . . . . . . . . . . . . . . . . . . . . . . . . . . . . . . . . 18
After sales service, data plate. . . . . . . . . . . . . . . . . . . . . . . . . . . . . . . . . . . . . . . 19
CT 400 P installation instructions . . . . . . . . . . . . . . . . . . . . . . . . . . . . . . . . . . . 20
Safety instructions for installation . . . . . . . . . . . . . . . . . . . . . . . . . . . . . . . . . . . . . 20
Accessories . . . . . . . . . . . . . . . . . . . . . . . . . . . . . . . . . . . . . . . . . . . . . . . . . . . . . . 21
Protection during transport . . . . . . . . . . . . . . . . . . . . . . . . . . . . . . . . . . . . . . . . . . 21
Building-in dimensions . . . . . . . . . . . . . . . . . . . . . . . . . . . . . . . . . . . . . . . . . . . . . 22
Worktop cut-out . . . . . . . . . . . . . . . . . . . . . . . . . . . . . . . . . . . . . . . . . . . . . . . . . . . 23
Drilling holes in the furniture front panel for the switching unit . . . . . . . . . . . . . . . 24
Securing the switching unit . . . . . . . . . . . . . . . . . . . . . . . . . . . . . . . . . . . . . . . . . . 25
Fitting the tepan plate . . . . . . . . . . . . . . . . . . . . . . . . . . . . . . . . . . . . . . . . . . . . . . 26
Fitting the indicator light covers and the control . . . . . . . . . . . . . . . . . . . . . . . . . . 27
Protective shelf. . . . . . . . . . . . . . . . . . . . . . . . . . . . . . . . . . . . . . . . . . . . . . . . . . . . 28
Sealant . . . . . . . . . . . . . . . . . . . . . . . . . . . . . . . . . . . . . . . . . . . . . . . . . . . . . . . . . . 28
Shelf CT 400 MA. . . . . . . . . . . . . . . . . . . . . . . . . . . . . . . . . . . . . . . . . . . . . . . . . . 29
Electrical connection. . . . . . . . . . . . . . . . . . . . . . . . . . . . . . . . . . . . . . . . . . . . . . 30
General notes . . . . . . . . . . . . . . . . . . . . . . . . . . . . . . . . . . . . . . . . . . . . . . . . . . . . 30
Mobile Tepan . . . . . . . . . . . . . . . . . . . . . . . . . . . . . . . . . . . . . . . . . . . . . . . . . . . . . 30
Built-in Tepan . . . . . . . . . . . . . . . . . . . . . . . . . . . . . . . . . . . . . . . . . . . . . . . . . . . . . 31
2
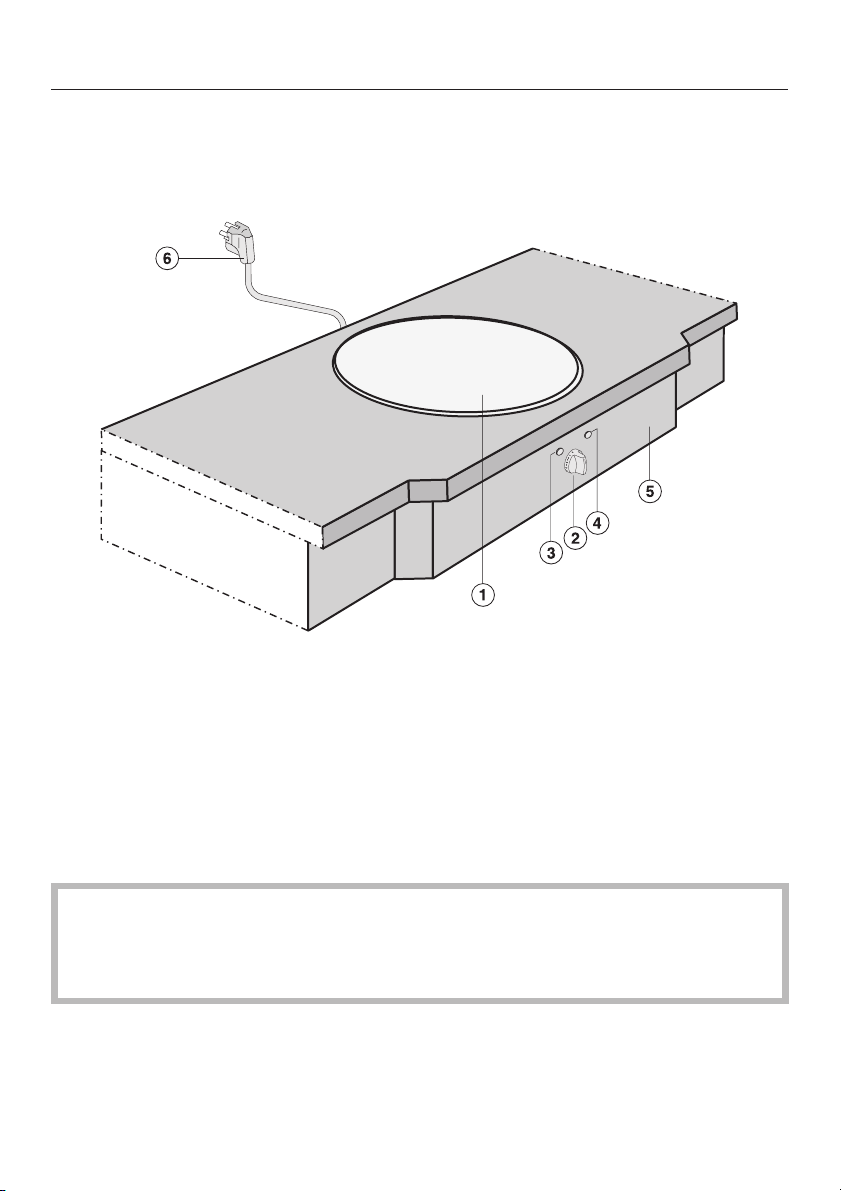
Built-in Tepan
CT 400 P
Description of the appliance
a Tepan plate (approx. Ø 40 cm when heated up)
b Control
c In-operation indicator light (yellow)
d Temperature indicator light (red)
e Kitchen furniture front
f Mains connection cable *
* The appliance may be supplied with or without a plug depending on country
of destination.
The plug shown may differ from the one supplied with your appliance.
3
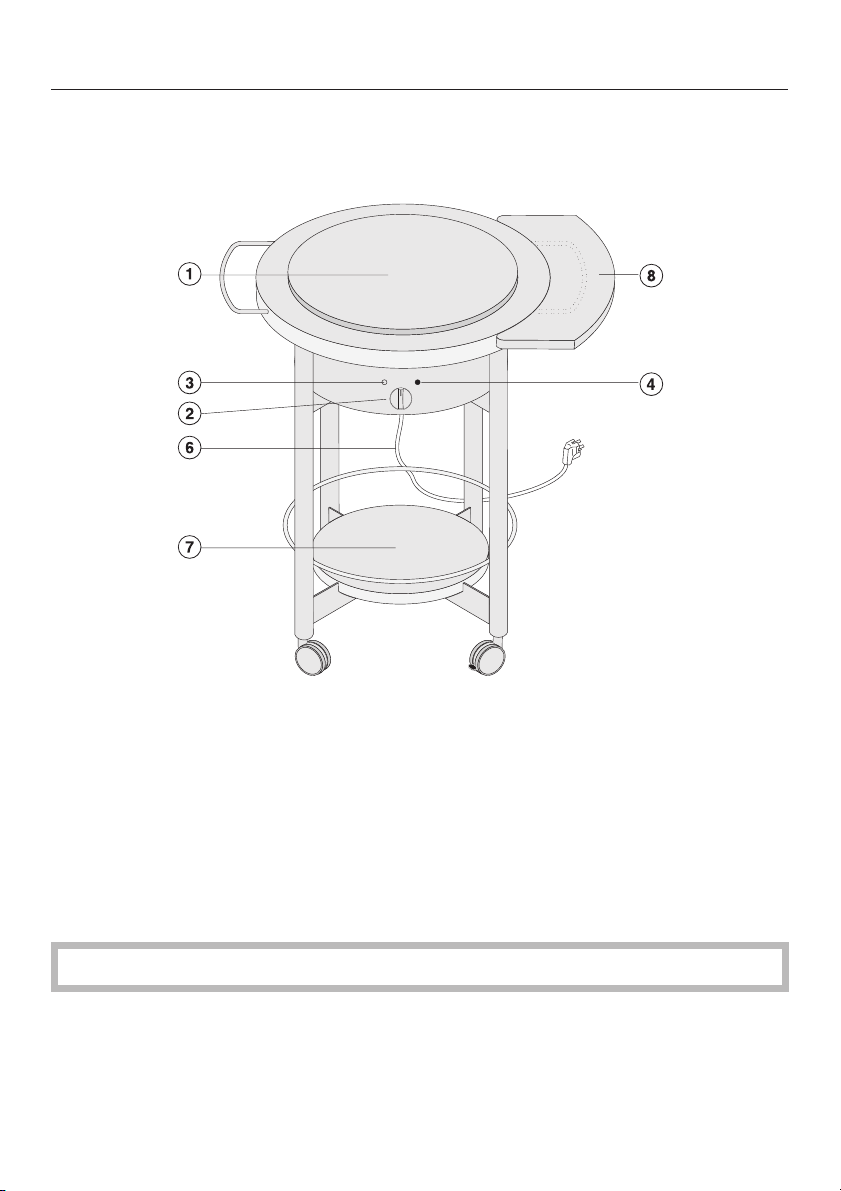
Description of the appliance
Mobile Tepan
CT 400 MP
a Tepan plate (approx. Ø 40 cm when heated up)
b Control
c In-operation indicator light (yellow)
d Temperature indicator light (red)
f Mains connection cable
g Shelf
h Shelf CT 400 MA (see "Optional accessories")
The plug shown may differ from the one supplied with your appliance.
4
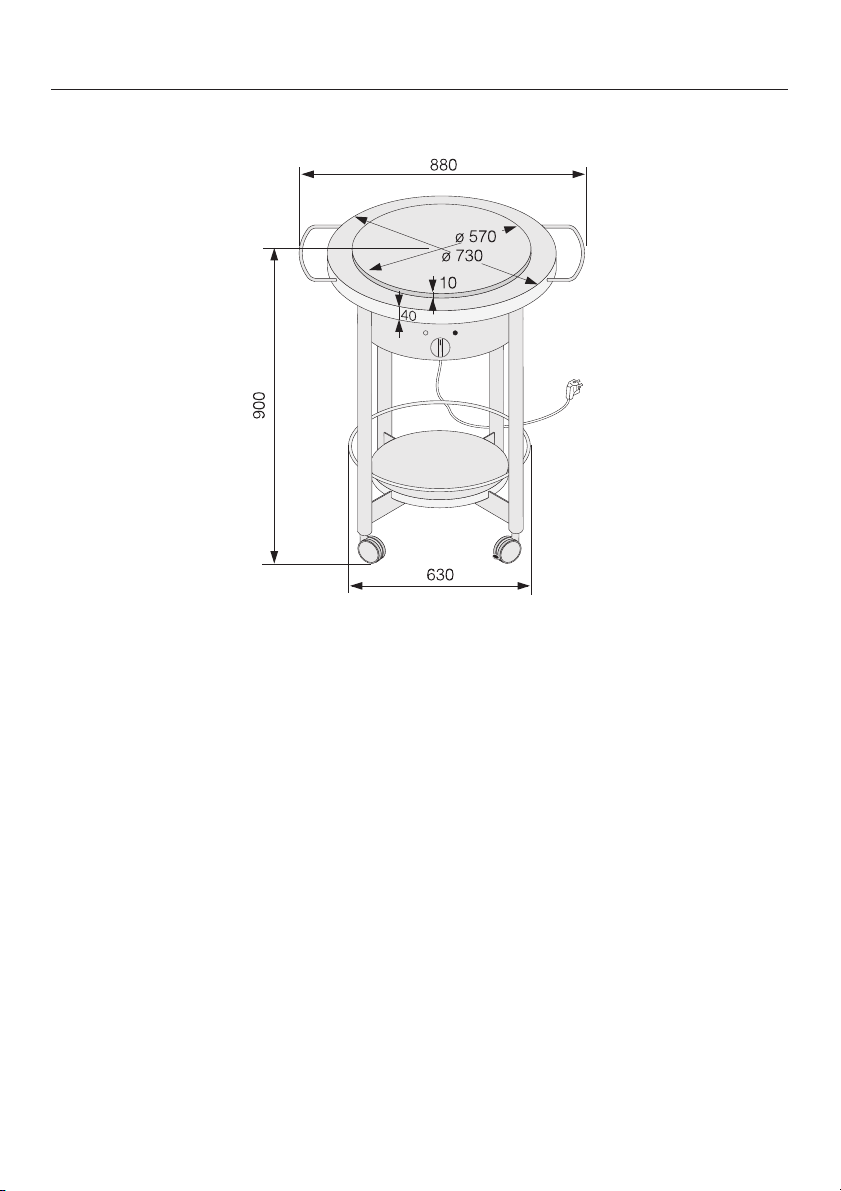
CT 400 MP dimensions
Description of the appliance
5

Description of the appliance
Optional accessories
Shelf CT 400 MA
The shelf can be fitted either on the
right or the left hand side of the mobile
tepan unit.
Stainless steel conditioning agent
To help prevent re-soiling, Neoblank, a
proprietary conditioning agent for
stainless steel can be used on stainless
steel surfaces. Do not use on the tepan
plate or on surfaces which will be used
for preparing food.
E-Cloth (Miele UK only)
For cleaning surfaces such as stainless
steel, glass, plastic and chrome without
the use of chemicals
These accessories are available from
- your Miele dealer or
- the Miele Spare Parts Department (see back cover for contact details).
6

Warning and Safety instructions
To avoid the risk of accidents and
damage to the appliance, please
read these instructions carefully
before using it for the first time. They
contain important notes on its
installation, safety, use and
maintenance.
The use of the appliance by the
elderly or infirm or those who have
not used the appliance before
should be supervised by a
competent and responsible person
to avoid the risk of injury.
A data plate for your appliance is
supplied with this documentation. It
should be stuck into the space
provided at the end of the instruction
book.
Keep these instructions in a safe
place for reference, and pass them
on to any future user.
Technical safety
Before connecting the appliance to
the mains supply make sure that
the connection data on the data plate
(voltage and frequency) match the
mains electricity supply.
This data must correspond in order to
avoid the risk of damage to the
appliance. Consult a qualified
electrician if in any doubt.
This appliance may be connected
via a fused plug and switched
socket. If you wish to connect it to an
isolator switch, or if the appliance is
supplied without a plug, it must be
installed and connected by a suitably
qualified and competent person in strict
accordance with current local and
national safety regulations. The
manufacturer cannot be held liable for
damage caused by incorrect
installation or connection.
The electrical safety of this
appliance can only be guaranteed
when continuity is complete between it
and an effective earthing system which
complies with current local and national
safety regulations. It is most important
that this basic safety requirement is
present and regularly tested and where
there is any doubt, the household
wiring system should be inspected by a
qualified electrician. The manufacturer
cannot be held liable for the
consequences of an inadequate
earthing system (e.g. electric shock).
Do not connect the appliance to
the mains electricity supply by an
extension lead. Extension leads do not
guarantee the required safety of the
appliance (e.g. danger of overheating).
The mobile Tepan unit is not
intended for installation outside of
the home. Should you choose to
operate it outside, the electrical
connection of the appliance must be
approved by a qualified electrician to
ensure safety.
Never open the casing of the
appliance.
Tampering with electrical connections
or components is highly dangerous to
the user and can cause operational
faults.
7

Warning and Safety instructions
Correct usage
For safety reasons this appliance
must only be operated when it has
been built in, either into a worktop or in
the special mobile unit. This is
necessary to ensure that all electrical
components are shielded.
This appliance is intended for
domestic use only and is not to be
used for commercial purposes.
Use this appliance for the
preparation of food only. Any other
usage is at the owner's risk and could
be dangerous. The manufacturer
cannot be held liable for damage
resulting from incorrect or improper use
or operation.
Do not use the appliance to heat
up the room. Due to the high
temperatures radiated, objects near the
appliance could catch fire. The life of
the appliance could also be reduced.
Safety with children
The appliance is only intended for
use by adults who have read these
instructions.
This appliance is not a toy! To
avoid the risk of injury, keep
children well away and do not let them
play with it or use the controls. They will
not understand the potential dangers
posed by it. They should be supervised
whenever you are working in the
kitchen.
Older children may use the
appliance only when its operation
has been clearly explained to them and
they are able to use it safely,
recognising the dangers of misuse.
The appliance gets hot when in
use and remains hot for quite a
while after being switched off. To
safeguard against burning, keep
children well away from the appliance
at all times.
Do not store anything which might
arouse a child's interest in storage
areas above or next to the appliance.
Otherwise they could be tempted into
climbing onto the appliance with the
risk of burning themselves.
8

Warning and Safety instructions
Packaging e.g. cling film,
polystyrene and plastic wrappings
must be kept out of the reach of babies
and young children. Danger of
suffocation. Dispose of or recycle all
packaging safely as soon as possible.
Before discarding an old
appliance, switch off and
disconnect it from the power supply.
Cut off and render any plug useless.
Cut off the cable directly behind the
appliance to prevent misuse. This
should be done by a competent
person. See "Disposal of your old
appliance" for further details.
Protecting the appliance from
damage
As the tepan plate becomes very
hot during use, plastic utensils
must not be used. Even heat-resistant
plastic utensils are unsuitable.
Please note that hard implements,
such as knives, can scratch the
stainless steel surface. Do not use the
stainless steel surfaces on the Tepan
for cutting up food! They are
susceptible to scratching.
Wood is a natural product.
Differences in colour and grain are
a natural characteristic of wood and
therefore quite normal in the Tepan unit.
Only lift the mobile Tepan unit by its
handles. Never use the shelf fitted
on the side of the tepan plate to lift it.
In countries where there are areas
which may be subject to infestation
by cockroaches or other vermin, pay
particular attention to keeping the
appliance and its surroundings in a
clean condition at all times. Any
damage caused by cockroaches or
other vermin will not be covered by the
guarantee.
Do not use a steam cleaner to
clean this appliance. The steam
could reach electrical components and
cause a short circuit. Pressurised
steam could also cause permanent
damage to the surface and to other
components, for which the
manufacturer cannot accept liability.
9

Warning and Safety instructions
Protection from burning and
scalding
The surface of the appliance is hot
when in use, and remains hot for
quite a while after being switched off.
Do not touch it whilst it could still be
hot.
To protect your hands, use
heat-resistant pot holders or oven
gloves when using the appliance. Do
not let them get damp or wet, as this
causes heat to transfer through the
material more quickly with the risk of
burning yourself.
Do not heat up unopened tins or
jars of food on the tepan plate.
Presssure can build up and they may
explode, resulting in injury and scalding
or damage.
Do not use the tepan plate as a
resting place for anything else. The
article could melt or catch fire if
residual heat is still present or if the
appliance is switched on by mistake.
Do not cover the appliance, e.g.
with a cloth, kitchen foil, etc. This
could be a fire hazard if the appliance
is switched on by mistake.
Never leave the appliance
unattended when cooking with oil
or fat as these are fire hazards if
overheated. Very hot oil can catch fire
and could even set a cooker hood
above on fire. Always heat fat slowly,
watching as it heats.
If, despite this, oil or fat does catch
fire, do not attempt to put out the
flames with water. Use a suitable fire
blanket, saucepan lid, damp towel or
similar to smother the flames.
Do not flambé under a cooker
hood. The flames could set the
cooker hood on fire.
10

Warning and Safety instructions
Appliance faults
In the event of damage or a defect,
switch off the appliance immedi
ately. Disconnect completely from the
electricity supply. If the appliance has
not yet been fully installed, the
electricity cable must be disconnected
from the supply point. If connected via
a plug and socket, switch off at the
socket and withdraw the plug. Contact
the Miele Service Department.
Do not reconnect the appliance to the
mains electricity supply until after it has
been repaired.
Repairs may only be carried out by
a suitably qualified and competent
person. Repairs and other work by
unqualified persons could be very
dangerous and could damage the
appliance. The manufacturer cannot be
held liable for unauthorised work. Never
open the housing of the appliance.
While the appliance is under
guarantee, repairs should only be
undertaken by a service technician
authorised by the manufacturer.
Otherwise the guarantee is invalidated.
-
Futher safety notes
When using an electric socket near
the appliance, care should be
taken that the cable of the electrical
appliance does not come into contact
with the hot appliance. The insulation
on the cable could become damaged,
giving rise to an electric shock hazard.
Always ensure that food is
sufficiently cooked or reheated.
Many factors will affect the overall
cooking time, including the size and
amount of food and its temperature.
Some foods may contain
micro-organisms which are only
destroyed by thorough cooking at a
sufficiently high temperature for long
enough. Therefore when cooking or
reheating food such as poultry, it is
particularly important the food is
completely cooked through. If in doubt,
select a longer cooking or reheating
time.
Remove the lower shelf if the Tepan
mobile unit needs to be tipped to
one side when it is being moved (e.g.
to carry it up steps).
When cooking on the mobile Tepan
make sure that the brakes are on.
This way the appliance cannot move
away from you during use.
The manufacturer cannot be held
liable for damage caused by
non-compliance with these Warning
and Safety instructions.
11

Caring for the environment
Disposal of the packing
material
The transport and protective packing
has been selected from materials which
are environmentally friendly for disposal
and can normally be recycled.
Packaging, e.g. cling film, polystyrene
and plastic wrappings, must be kept
out of the reach of babies and young
children. Danger of suffocation.
Dispose of or recycle all packaging
materials safely as soon as possible.
Contact your local waste collection
centre for details of available recycling
schemes.
Disposal of your old appliance
Electrical and electronic appliances
often contain materials which, if
handled or disposed of incorrectly,
could be potentially hazardous to
human health and to the environment.
They are, however, essential for the
correct functioning of your appliance.
Please do not therefore dispose of it
with your household waste.
Please dispose of it at your local
community waste collection/recycling
centre, and ensure that it presents no
danger to children while being stored
for disposal.
12
It should be unplugged or
disconnected from the mains
electricity supply by a competent
person. If connected by a plug, the
plug must be rendered useless and
the cable cut off directly behind the
appliance to prevent misuse.

Operation
Cleaning and heating up for
the first time
Before using for the first time, clean the
appliance with a damp cloth and a little
washing up liquid and then wipe dry.
Metal components have a protective
coating which may give off a slight
smell when heated up for the first time.
The smell and any vapours will
dissipate after a short time and do not
indicate a faulty connection or
appliance.
Switching on and off
To switch the tepan plate on, turn the
control in a clockwise direction a. To
switch off, turn the control in an
anti-clockwise direction b.
Only turn the control clockwise as
far as "12" and anti-clockwise back
to "0" again to switch it off. Do not
attempt to turn it all the way round
from the "12" position to "0" or vice
versa. This will damage the control.
When the appliance is switched on, the
in-operation indicator light c and the
temperature indicator light d come on.
The temperature indicator light will
switch on and off intermittently in
conjunction with the heating element.
13

Operation
Settings
Cooking process Settings
Keeping cooked food warm 1 - 2
Steaming fruit, e.g. apple slices, peach halves,
sliced bananas, etc.
Gentle stir frying of chopped / sliced vegetables, e.g.
leeks, mushrooms, green/red peppers, onion etc.
Gentle frying of fish, meat, sausages,
escalopes etc.
Rapid frying in succession of meat, fish
fried eggs, pancakes, hash browns etc.
Frying steaks, potato cakes, marinated meats,
e.g. kebabs, stir fry meats etc.
These settings given are only a guide. The actual cooking time will depend on the
type of food, its texture and thickness as well as personal taste.
2 - 4
5 - 7
7 - 9
9 - 11
11 - 12
14

Operation
Tips
Wipe the surface of the tepan plate
before each use to remove any dust
particles or other soiling which may
have settled on it since it was last
used.
Pre-heat the tepan plate before use
–
for 10 -15 minutes.
It is important to get the tepan
–
sufficiently hot before use,
particularly when browning and
sealing meat. If it is not hot enough,
the meat will lose too much juice and
become tough.
– For frying, only use the minimum
amount of oil or fat. With marinated
food, no fat or oil is needed. Wait
until the temperature indicator light
has gone out before adding cooking
fat.
– Only use fats and oils which can be
heated to high temperatures.
To prevent meat drying out, do not
–
season with salt until after it has
been cooked.
Thicker cuts should be cooked first
–
on a high heat and then finished on a
lower setting.
Any residues which have stuck to the
–
tepan plate can be used to make a
sauce. Add a little water, stock or
wine and loosen with a heat-resistant
spatula.
–
Marinating meat helps tenderise the
meat as well as provide extra flavour.
–
Pat wet food dry with kitchen paper
before cooking to prevent it spitting.
15

Cleaning and care
Do not use a steam cleaner to clean
this appliance. The steam could
reach electrical components and
cause a short circuit. Pressurised
steam could also cause permanent
damage to the surface and to
components, for which the
manufacturer cannot accept liability.
Do not use cleaners containing
alkalines, soda, acids or chlorides,
oven sprays, dishwasher cleaner or
abrasive cleaning agents, hard
brushes, scouring pads and cloths
or steel wool. You should also avoid
using sponges etc. which have
previously been used with abrasive
cleaning agents, as this will damage
the surface.
Tepan plate (Built-in and
Mobile Tepan)
The tepan plate should be cleaned
after each use.
Use a spatula to remove any large
particles immediately.
Allow the tepan plate to cool down until
it can be touched by hand and then
loosen the soiling with warm water and
a little washing up liquid. Remove the
soiling with a spatula and then wipe the
surface with a damp cloth.
The stainless steel surfaces can be
cleaned using a proprietary
non-abrasive cleaning agent designed
specifically for use on stainless steel.
Follow the manufacturer's instructions
on the packaging carefully.
Important - Conditioning agents for
stainless steel, e. g. Neoblank, must
not be used on the tepan plate!
16
Ensure that every trace of cleaner has
been removed from the surface by
wiping it carefully with a damp cloth.
Any remaining trace of cleaning agent
could otherwise get onto food when the
appliance is next used.
Always dry the surface thoroughly with
a soft cloth after cleaning it with water
or a damp cloth. This prevents a
build-up of limescale deposits.

Cleaning and care
Mobile Tepan
Stainless steel surrounds and
framework
Remove the shelf at the side before
cleaning to avoid any cleaning agent
becoming lodged in the gap between
the shelf and the appliance.
It is best to clean the stainless steel
surfaces with a sponge and a solution
of hot water and a little washing up
liquid. Wipe dry using a soft cloth.
If necessary, a non-abrasive proprietary
cleaner for stainless steel may be used.
Follow the manufacturer's instructions
and apply sparingly following the
direction of the grain.
To help prevent re-soiling, a proprietary
conditioning agent for stainless steel
such as Neoblank (available from the
Miele UK Spare Parts Department) can
also be used on the stainless steel
framework and surrounds. Follow the
manufacturer's instructions and apply
sparingly with an even pressure
following the direction of the grain.
Important: do not use a stainless steel
conditioning agent on the tepan plate
itself.
Wooden surfaces (Mobile
Tepan)
Any soiling to wooden surfaces on the
mobile tepan can be removed with a
damp cloth.
To help protect wooden surfaces a
suitable oil for treating wood can also
be applied.
17

Problem solving guide
Repairs to electrical appliances
must only be carried out by a
suitably qualified and competent
person in strict accordance with
current local and national safety
regulations. Unauthorised repairs
could be dangerous. The
manufacturer cannot be held liable
for unauthorised work.
What to do if ...
... the appliance does not heat up
when it has been switched on
Check whether the house mains fuse
has blown. If it has contact a qualified
electrician or the Miele Service Dept.
(See back page for address).
18

After sales service, data plate
In the event of any faults which you cannot remedy yourself, or if the appliance is
under guarantee, please contact:
Your Miele dealer, or
–
the Miele Service Department (see address on back cover).
–
When contacting the Service Department, please quote the model and serial
number of your appliance, which are given on the data plate.
Please note that telephone calls may be monitored and recorded for training
purposes.
Space in which to stick the extra data plate supplied with the appliance. Ensure
that the model number is the same as the one on the front of these instructions.
19

CT 400 P installation instructions
Safety instructions for
installation
Fit wall units and extractor hood
before fitting the tepan to avoid
damaging the surface.
The veneer or laminate coatings of
worktops (or adjacent kitchen
units) must be treated with 100 °C
heat-resistant adhesive which will not
dissolve or distort.
Any backmoulds must be of
heat-resistant material.
This equipment may only be used
in mobile installations such as
ships, caravans, aircraft etc. if a risk
assessment has been carried out by a
suitably qualified engineer.
Connection should be made via a
suitable isolator or a double pole
fused spur connection unit which
complies with current national and local
safety regulations and the on/off switch
should be easily accessible after the
appliance has been built-in. See
"Electrical connection - Built-in Tepan"
for more details.
After installation, ensure that the
connection cable cannot come into
contact with the underside of the
appliance. Make sure that there is no
mechanical obstruction, such as a
drawer, which could damage it.
A protective shelf should be fitted
underneath the appliance to
ensure that the underside of the
appliance cannot accessed or touched
once it has been installed (see
"Protective shelf").
Observe carefully the safety
distances given on the following
pages.
Do not use any sealant except
where expressly instructed to do
so. The seal underneath the appliance
provides a sufficient seal for the
worktop (see "Sealant").
All dimensions in this instruction booklet
are given in mm.
The appliance must not be built in
over a fridge, fridge-freezer,
freezer, dishwasher, washing machine
or tumble dryer.
20

CT 400 P installation instructions
Accessories
1 control with marked settings
–
4 Spax screws 4 x 15 mm for
–
securing the switching unit
2 indicator light covers; one red, one
–
yellow
1 adhesive symbol for the "0" position
–
1 drilling template
–
Sealing strip
–
Protection during transport
For protection during transport, the
switching unit a is secured to the
underside of tepan with two domed
nuts b.
Loosen the two domed nuts b to
^
remove the switching unit from the
threaded bolts.
Important:
To avoid scratching the worktop
during installation, the domed nuts
b should be screwed back on to the
bolts.
a Switching unit
b Domed nuts
c Temperature limiter
d Data plate
21

CT 400 P installation instructions
Building-in dimensions
Ø 570
Ø 500
0
50
50
0
0
650
ß
20
74
113
e
174
16
122
b
124
c
Ø 550
5
9
65
a
40
50
0
0
0
50
82
d
a Building-in depth
b Integrated switching unit (this is fitted behind the kitchen furniture front with only
the control visible
c Connecting cable - 500 mm long
d Mains connection cable - 1800 mm long *
e Protective shelf
The appliance may be supplied with or without a plug depending on country of
destination.
22

Worktop cut-out
Prepare the worktop cut-out as
^
shown in the diagram.
Make sure that the distance between
the worktop cut-out and the edge of
the worktop is at least 50 mm.
Seal the cut surfaces with a suitable
^
heat-resistant sealant to avoid
swelling caused by moisture.
CT 400 P installation instructions
23

CT 400 P installation instructions
Drilling holes in the furniture
front panel for the switching
unit
Use the drilling template supplied e to
drill the holes for the switching unit in
the furniture front panel.
Drill 3 holes through the front panel,
working from the front as follows:
a for the switching unit spindle
b for the yellow indicator light
c for the red indicator light
To secure the switching unit, make 4
pilot holes d in the front panel
working from the rear.
Important:
Humidity may cause variation in the
size of the drilling template.
Please check the dimensions
before drilling.
On a 40 mm thick worktop place the
drilling template e so that it is flush
with the underside of the worktop (see
illustration).
The gap between the underside of the
worktop and front panel should be
5 mm.
24

CT 400 P installation instructions
Securing the switching unit
Carefully place the stainless steel
^
tepan plate facedown on top of the
worktop, either to the left or right of
the cut-out.
This must be done carefully to
prevent damage to either the
worktop or the tepan plate.
Stick the sealing strip b supplied to
^
the edge of the tepan plate from
below (see illustration).
Place the switching unit in position,
^
as illustrated with its spindle and
indicator lights pressed from inside
into the drill holes made previously.
Secure the switching unit with the
Spax screws a supplied.
25

CT 400 P installation instructions
Fitting the tepan plate
When lowering the tepan into the
cut-out, ensure that the cables do
not get trapped or damaged.
Feed the connection cable down
^
through the cut-out.
Carefully lower the tepan into the
^
cut-out. When doing this, make sure
that the Miele logo a is positioned
above the switching unit (see
illustration).
^
Connect the tepan plate to the mains
electricity supply (AC 230 V / 50 Hz).
^
Any of the sealing strip which
protrudes above the worktop should
be removed using a sharp knife.
26

CT 400 P installation instructions
Fitting the indicator light covers and the control
Fit the control c on to the switching unit spindle with the "0" pointing to the top.
^
Stick the symbol for the zero setting d centrally on the front panel in between
^
the two holes drilled for the indicator lights.
Ensure that both the underside of the symbol sticker d and the surface of the
front panel are clean, dry and free from grease before applying the sticker.
Fit the yellow indicator light cover a into the drill hole on the left and the red
^
cover b into the drill hole on the right.
27

CT 400 P installation instructions
Protective shelf
A protective shelf must be fitted imme
diately below the switching unit to
ensure that the underside of the
appliance cannot be accessed or
touched after it has been built in.
A gap of 10 mm must be maintained
between the shelf and the rear wall.
Sealant
-
Do not use any sealant unless
expressly instructed to do so. The
sealing strip under the edge of the top
part of the tepan provides a sufficient
seal for the worktop.
Do not use sealant between the
frame of the top part of the tepan
and the worktop.
This could cause difficulties if the
tepan ever needs to be taken out for
servicing and possibly result in
damage to the frame or the worktop.
28

Shelf CT 400 MA
Dimensions Fitting the shelf
The shelf can be fitted either on the
right or the left hand side of the mobile
tepan unit.
Screw the brackets supplied to the
^
underside of the shelf (see
illustration).
^ Position the shelf on top of the handle
so that the handle fits into the groove
on the underside of the shelf.
^ Secure the shelf with the screw
supplied (see illustration).
29

Electrical connection
General notes
All electrical work should be carried
out by a suitably qualified and
competent person, in strict
accordance with current local and
national safety regulations (BS 7671
in the UK).
Installation, repairs and other work
by unqualified persons could be
dangerous. The manufacturer
cannot be held liable for
unauthorised work.
Ensure power is not supplied to the
appliance until after installation work
has been carried out.
Do not connect the appliance to the
mains electricity supply via an
extension lead. These do not
guarantee the required safety of the
appliance.
For extra safety it is advisable to install
a residual current device (RCD), with a
trip current of 30 mA.
When switched off there must be an
all-pole contact gap of 3 mm in the
isolator switch (including switch, fuses
and relays).
Important
This appliance is supplied for
connection to a single phase 230-240 V
50 Hz supply with a 3-core cable.
The wires in the mains lead are
coloured in accordance with the
following code:
Green/yellow = earth
Blue = neutral
Brown = live
WARNING:
THIS APPLIANCE MUST BE
EARTHED
Mobile Tepan
Please ensure that the connection data
quoted on the data plate match the
household mains supply.
Connection should be made via a fused
plug and switched socket which
complies with national and local safety
regulations and the on/off switch should
be easily accessible.
30
Non-rewireable plugs BS 1363
The fuse cover must be refitted when
changing the fuse, and if the fuse cover
is lost, the plug must not be used until a
suitable replacement is obtained. The
colour of the correct replacement cover
is that of the coloured insert in the base
of the plug, or the colour that is
embossed in words on the base of the
plug (as applicable to the design of
plug fitted).
Replacement fuses should be ASTA
approved to BS 1362 and have the
correct rating. Replacement fuses and
fuse covers may be purchased from
your local electrical supplier.

Electrical connection
Built-in Tepan
The appliance must only be
operated when built-in. This is to
ensure that all electrical parts are
shielded. Live parts must not be
exposed.
Please ensure that the connection data
quoted on the data plate match the
household mains supply.
Connection should be made via a
suitable isolator or a double pole fused
spur connection unit which complies
with national and local safety
regulations and the on/off switch should
be easily accessible after the appliance
has been built in.
If the switch is not accessible after
installation (depending on country) an
additional means of disconnection must
be provided for all poles.
For extra safety it is advisable to install
a residual current device (RCD) with a
trip current of 30 mA.
When switched off there must be an
all-pole contact gap of 3 mm in the
isolator switch (including switch, fuses
and relays).
Important
This appliance is supplied for
connection to a single phase 230-240 V
50 Hz supply with a 3-core cable.
The wires in the mains lead are
coloured in accordance with the
following code:
Green/yellow = earth
Blue = neutral
Brown = live
WARNING
THIS APPLIANCE MUST BE
EARTHED
Important
The electrical safety of this appliance
can only be guaranteed when
continuity is complete between it and
an effective earthing system, which
complies with current local and national
safety regulations. It is most important
that this basic safety requirement is
present and tested regularly and if
there is any doubt the electrical wiring
in the home should be inspected by a
qualified electrician. The manufacturer
cannot be held liable for the
consequences of an inadequate
earthing system such as an electric
shock.
The manufacturer cannot be held
liable for damage which is the direct
or indirect result of incorrect
installation or connection.
31

Alteration rights reserved / 3606
M.-Nr. 06 760 290 / 02
en-–
 Loading...