


INDEX |
|
Technical specifications of Midland BT1................................................................................................. |
3 |
Charging batteries.................................................................................................................................. |
4 |
Description of the unit and installation brackets..................................................................................... |
4 |
Typical configurations of BT1 ................................................................................................................. |
6 |
Switching your Midland BT1 on and off.................................................................................................. |
6 |
Pairing with Bluetooth devices ............................................................................................................... |
7 |
Adjusting the volume.............................................................................................................................. |
8 |
Using the features of the Bluetooth devices........................................................................................... |
8 |
Using the wired audio input.................................................................................................................. |
11 |
Using a Two Way Radio transceiver..................................................................................................... |
11 |
Special configurations .......................................................................................................................... |
11 |
Recommendations for specific uses..................................................................................................... |
12 |
Light and sound signals/Unit functions............................................................................................ |
14-15 |
FCC Compliance.................................................................................................................................. |
16 |
BT1 Accessories................................................................................................................................... |
17 |
Accessory Order Form ......................................................................................................................... |
18 |
Waiver and General Release................................................................................................................... |
20 |
English
1
2

Midland BT1 Intercom
Thank you for purchasing the Midland BT1 Intercom, the wireless Intercom system for bikers. The Midland BT1 is designed to be fitted directly on to your helmet and to be used for communications between driver and passenger. Besides, the driver’s unit can be used to communicate with Bluetooth devices like cell phones or GPS Sat-Navs.
Both devices are also supplied with a wired connection that can be used to connect an iPod/MP3 player and allow for an external connector to be used for connecting to a GMRS radioincreasing Bike to Bike communication range up to 3 miles.
BT1 - Content of the packaging
›2 devices: one for Driver and one for Passenger
›2 audio kits with two stereo speakers, microphone with boom and wire microphone
›2 plates with bi-adhesive strip to fix the unit onto the helmet
›2 clamps to fix the unit onto the helmet
›2 stereo audio cables to connect an iPod/ or other models of MP3 players
›1 mini USB wall-mounting power supply with double plug
›Wind Suppressing Foam Microphone Cover, Allen key and Velcro strip for assembly
The units included in the packaging are already paired and can therefore be immediately used in the Intercom mode.
Technical specifications
of Midland BT1
General:
›Bluetooth ver. 2.0 stereo (Headset/Handsfree/A2DP protocol)
›AGC system automatically controls the volume in relation to background noise
›Voice (VOX) or manual communications option
›Private or shared (3-way communications) call mode
›Manual controls to enable: telephone, intercom and wire connection
›Fully waterproof
›Lithium battery with 8 hours talk time (up to 2 days in standby mode)
›Recharge time: app. 4 hours
›Dimensions. Length: 87 mm – Width: 47 mm - Thickness: 16 mm
Bluetooth connections:
›Driver’s device:
-with passenger’s unit, in Intercom mode Driver-Passen- ger
-with Cell phone, GPS (Garmin Zumo and TomTom Rider 1 and 2)
›With passenger’s device:
-only with the driver’s unit in Intercom mode Driver-Pas- senger
Wire connections for both units:
›For stereo audio input (iPod/MP3 player)
›For GMRS transceivers (with optional cable)
Attention: before using BT1 for the first time, remember to recharge it for at least 4 hours.
Attention: Midland BT1 is designed to withstand rain and water. However, if it is raining, always verify that the rubber caps protecting the sockets are fully fitted.
English
3
Charging batteries
Make sure that the unit is fully charged before use. Allow at least 5-6 hours for a full charge before using the unit for the first time. Normally, after the first time, it takes 4 hours for a full charge.
Charge the unit by inserting the wall-charger into the charging socket (lift the rubber cover to insert the plug).
›The red LED on the unit will start flashing when charging begins.
›Allow the headset to charge until the red LED turns off.
›When the charge is complete, release the headset from the charger.
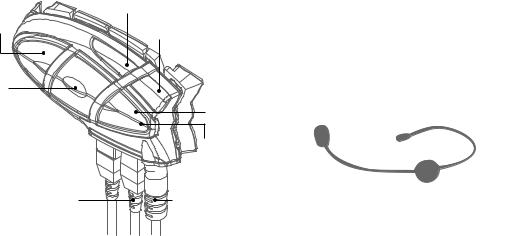
Description of the unit and installation brackets
Description of the BT1 unit
The BT1 has 5 multifunction buttons on the front and 3 wired connections in the lower section.
Phone |
Volume + |
|
(for driver’s |
||
|
||
unit only |
Volume - |
|
|
||
Intercom |
|
AUX
Red and blue light
Charger 
Audio kit |
iPod/MP3 |
|
GMRS |
Description of the button features:
›Telephone (for driver’s unit only): can be used to enable/disable and manage mobile phone features
›Intercom: can be used to enable/disable the Intercom feature
›AUX: can be used to enable/disable the wired audio input
›Volume+: enables you to increase the volume
›Volume -: enables you to decrease the volume
Description of the wired connections
›Charger jack: enables to recharge the unit using a standard mini USB power supply
›Audio kit jack: enable to connect an audio kit (stereo headset and microphone)
›Auxiliary audio jack (AUX): can be used to connect an audio source, like a stereo iPod/MP3 player or GMRS transceiver
Description of the audio kit
The audio system includes two ultra-flat stereo speakers and two interchangeable microphones, which are both supplied with a bracket and wire connection.
Fixing the stereo speakers. The two stereo speakers have a Velcro/adhesive strip that aids their fixing to your helmet. Beware to not completely cover your ear with the speakers, you must always be able to listen to the traffic sound and indication.
The microphone can be fixed onto the helmet in two ways:
Boom Microphone. Place the section with the Velcro/adhesive strip between the padding and the rigid cover of the helmet, so that the microphone is correctly positioned in front of your mouth and that the white symbol is facing your mouth. This type of microphone is suited for Open Faced and Flip Front helmets.
Wire microphone. Using the Velcro/adhesive strip, place the microphone inside the helmet in front of your mouth. This type of microphone is more suited for Full Faced helmets. The mini connector on the microphone allows you choose the
4

microphone that best suits the helmet you are using.
The audio kit must then be connected to the central jack of the Midland BT1 Intercom unit using the “L” shaped connector. This connector is very flexible and can be easily adapted to most commercial helmets.
Description of the installation brackets
The Midland BT1 can be fixed onto the helmet in two different ways: By either using the plate with bi-adhesive strip, or the clamp. These methods allow you to safely “fix” the BT1 unit onto your helmet and to remove it at any time in order to recharge or store it.
Plate with bi-adhesive strip
The fixing plate has a bi-adhesive strip on one of its sides. To fix the plate in place, clean the application area on the helmet surface, remove the bi-adhesive film and place the fixing plate on the helmet by keeping it contact with the surface for a few seconds.
Clamp
Using the Allen Key, loosen the two screws on the clamp and place the rear plate between the helmet padding and the external rigid protection. Then, tighten the two screws in order to firmly fix the clamp in place.
Fitting and removing your Midland BT1
The BT1 can be easily fitted onto the helmet by sliding it downwards so that it fits into the slot of the selected fixing device (plate with bi-adhesive strip or clamp).
English
BT1 is maintained in position thanks to the fixing clip located on the upper section (A).
To detach the BT1, simply press the fixing clip and push the unit upwards.
5
Typical confi gurations of BT1
1. MIDLAND BT1, “Driver only”
›Bluetooth connection for cell phone or GPS (in case of cell phone with MP3 feature, you can listen to music in stereo mode)
›Wired connection for iPod/MP3 player or with a transceiver for bike-to-bike communications up to a distance of 3 miles
2. Midland BT1, “Driver and Passenger”.
›Rider to Passenger intercom feature
›Bluetooth connections for the driver:
Cell phone or GPS and passenger’s device for Intercom communications (in case of cell phone with MP3 feature, the driver can listen to music in stereo mode).
›Bluetooth connections for the passenger:
none; only with the driver’s unit for Intercom communications.
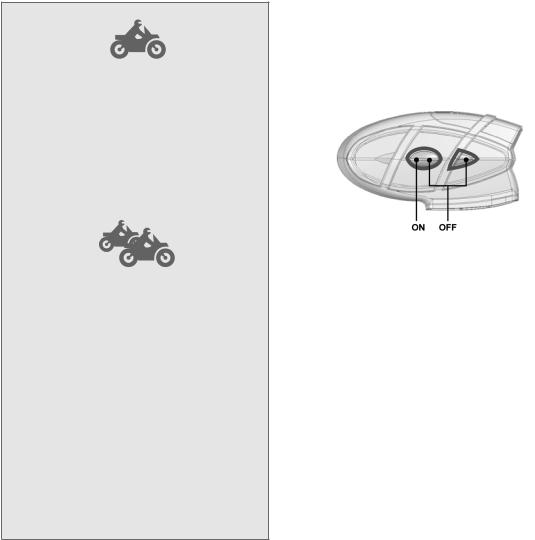
Switching your Midland BT1 on and off
BT1 can be switched on by means of the central button labeled “Intercom”.
To switch off the unit you must use a combination of two buttons (intercom+AUX), thus lessening the chances that you might turn off the unit accidentally (especially whilst wearing heavy gloves).
Switching the unit on:
›Press and hold Intercom button down for approximately 3 seconds until the BLUE indicator lights.
Switching the unit off:
›Press and hold both “Intercom” and “AUX” buttons together for approximately 3 seconds until the RED indicator fl ashes 3 times.
6

Pairing with Bluetooth devices
Your Midland BT1 is a Bluetooth unit that can be paired with other Bluetooth devices.
Before performing this procedure, it is necessary to set BT1 into “Pairing mode” (Setup).
The only operations permitted in this mode are the pairing ones. To use the BT1 unit after pairing it with the desired devices, it is necessary to quit the “Setup” mode and switch to the “Operating” mode.
Setup mode
Switch off the BT1 device. Press and hold down the central button (Intercom/on) for about 7 sec. until the red indicator switches on permanently. BT1 is now in “Setup” mode and can therefore be paired with other devices.
Pairing the unit with the passenger’s device
The two units supplied in the kit, are already paired and ready for use, which means that it is not necessary to perform this procedure.
If the devices are not part of the same kit, you need to pair them in order to be able to use the Intercom function.
Place both BT1 units in Setup mode (red indicator permanently on) Press the “Volume +” button on the first unit until the RED and BLUE lights begin to flash rapidly and alternately. Then press the “Volume –“button on the second unit until the RED and BLUE lights begin to flash rapidly and alternately.
Now both BT1 units are trying to pair to each other.
When successfully paired, each device will light the BLUE light for 1 sec and go back to setting mode (red light always on) waiting for additional pairing or setting procedures.
Pairing the unit with a cell phone - only for the driver’s device
1.Enable the Bluetooth device search feature on your mobile phone.As this procedure varies according to the brand and model of the mobile phone, refer to the manual supplied to your particular phone for further information.
2.Set the BT1 unit in “Setup” mode, then press the “Phone” button on the unit until the red and blue indicators start flashing.
3.After a few seconds the cell phone will display “Midland BT1”. Select it and follow the instructions provided in your mobile phone manual to accept the pairing. When prompted, enter the pairing code, which is 0000 (four zeroes). Your cell phone should then display a confirmation message if the pairing operation has been successfully completed (In case of error message, complete anyway the procedure, exit the “setup” mode and try to use the BT1
with your phone).
4The BT1 unit returns to the Setup mode (red indicator permanently on) to indicate that it is ready to be paired with
other devices
If you pair the BT1 unit with a cell phone, you will not be able to pair it with a GPS Sat-Nav, because both these devices are assigned (high) priority 1.
This problem can be easily solved by pairing your cell phone directly with your GPS Sat-Nav and then pairing the GPS with your Midland BT1 using the above procedure. In this case, the cell phone features will be managed by the GPS Sat-Nav.
Pairing the unit with a GPS Sat-Nav - only for the driver’s unit
It is generally possible to pair the BT1 unit with all GPS SatNavs that support Bluetooth earpieces.
Midland BT1 has been successfully tested for use with GPS ZUMO Sat-Navs manufactured by Garmin and TOMTOM Rider 1 and 2 Sat-Navs.
1.On your GPS Sat-Nav, enable the Bluetooth earphone search feature. As this procedure varies according to the brand and model of GPS, we recommend you refer to the manual supplied with your GPS Sat-Nav for further information.
2.Ensure that the BT1 is in Setup mode (Red light on) & Press the “Phone” button on the BT1 unit until the red and blue indicators start to flash.
3.After a few seconds the GPS Sat-Nav will display “Midland BT1”. Select it and follow the instructions provided in the GPS Sat-Nav manual to accept the pairing. When prompted, enter the pairing code, which is 0000 (four zeroes).
The GPS should then display a confirmation message if the pairing operation has been successfully completed.
4.The BT1 unit returns to the Setup mode (red indicator permanently on) to indicate that it is ready to be paired with
other devices.
If you pair the BT1 unit with a GPS Sat-Nav, you will not be able to pair it with a cell phone, because both these devices
English
7
 Loading...