Microtek SCANMAKER 4900, SCANMAKER 4850 installation guide

Microtek ScanMaker 4850/4900
Scanner Driver Installation for Windows XP
This insert describes how to load the Microtek scanner driver in Windows XP. You need to perform this procedure; otherwise, a warning message will appear indicating that your scanner has not passed Windows logo testing.
The Microtek scanner driver required for Windows XP is included in the Microtek CD-ROM. Follow the steps below to install the scanner driver.
A. Installing the Microtek scanner driver
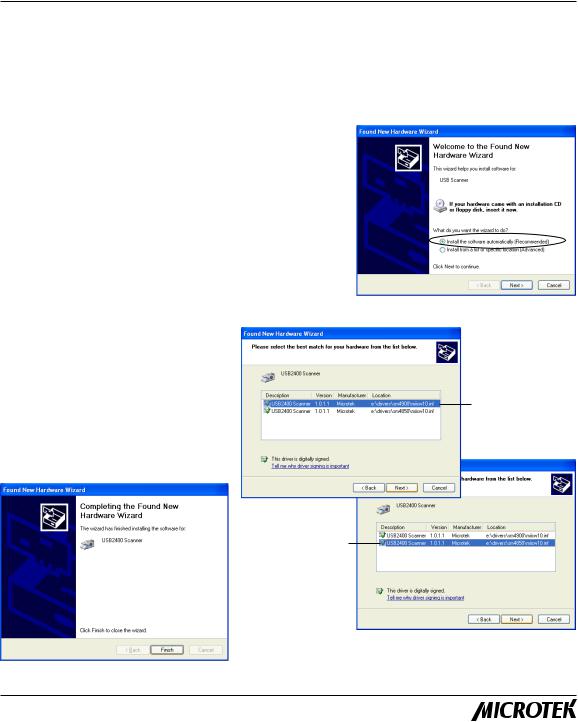
1.Follow the installation instructions included in the scanner package to install the scanner. Once the scanner and software installation is completed, Windows XP displays a message saying that your scanner has been detected (see right). Windows will prompt you to locate the scanner driver.
2.Make sure that your Microtek CD-ROM is placed in the CD-ROM drive and the default option “Install software automatically (Recommended)” is selected. Then click Next>.
3.Once your scanner is detected (see right), select your scanner model, then click Next>. The system starts to copy the relevant files to your hard disk.
4.When done, click Finish to exit the “Found New Hardware Wizard” window.
Select the second item if you are using ScanMaker 4850
Select the first item if you are using
ScanMaker 4900
Copyright© 2002 Microtek International, Inc. http://www.microtek.com I49-003484 A, October 2002
 Loading...