

Page 1
DVD_Porty_MD80146.book Seite 2 Dienstag, 12. Oktober 2004 11:44 11
TABLE OF CONTENTS
Safety instructions . . . . . . . . . . . . . . . . . . . . . . . . . . . . . . . . . . . . . . . . . 4
Disposal . . . . . . . . . . . . . . . . . . . . . . . . . . . . . . . . . . . . . . . . . . . . . . . . 6
Batteries and rechargeable batteries . . . . . . . . . . . . . . . . . . . . . . . . . . . . . . . . . . 6
Packaging . . . . . . . . . . . . . . . . . . . . . . . . . . . . . . . . . . . . . . . . . . . . . . . . . . . . . . 6
Device Name . . . . . . . . . . . . . . . . . . . . . . . . . . . . . . . . . . . . . . . . . . . . . . . . . . . . 6
General information . . . . . . . . . . . . . . . . . . . . . . . . . . . . . . . . . . . . . . . 7
About DVD . . . . . . . . . . . . . . . . . . . . . . . . . . . . . . . . . . . . . . . . . . . . . . . . . . . . . 7
Other playable formats . . . . . . . . . . . . . . . . . . . . . . . . . . . . . . . . . . . . . . . . . . . . 8
Preparation . . . . . . . . . . . . . . . . . . . . . . . . . . . . . . . . . . . . . . . . . . . . . 10
Unpacking the device . . . . . . . . . . . . . . . . . . . . . . . . . . . . . . . . . . . . . . . . . . . . 10
Scope of supply . . . . . . . . . . . . . . . . . . . . . . . . . . . . . . . . . . . . . . . . . . . . . . . . 10
Using the remote control . . . . . . . . . . . . . . . . . . . . . . . . . . . . . . . . . . . . . . . . . 11
Connections and connection options . . . . . . . . . . . . . . . . . . . . . . . . 12
Setting up the device . . . . . . . . . . . . . . . . . . . . . . . . . . . . . . . . . . . . . . . . . . . . 12
The DVD player connections . . . . . . . . . . . . . . . . . . . . . . . . . . . . . . . . . . . . . . 12
Rechargeable connection . . . . . . . . . . . . . . . . . . . . . . . . . . . . . . . . . . . . . . . . . 13
Set viewing angle . . . . . . . . . . . . . . . . . . . . . . . . . . . . . . . . . . . . . . . . . . . . . . . 18
Applying the car bag . . . . . . . . . . . . . . . . . . . . . . . . . . . . . . . . . . . . . . . . . . . . 19
Handling the disk . . . . . . . . . . . . . . . . . . . . . . . . . . . . . . . . . . . . . . . . 20
Disk types that can be played . . . . . . . . . . . . . . . . . . . . . . . . . . . . . . . . . . . . . . 20
Cleaning disks . . . . . . . . . . . . . . . . . . . . . . . . . . . . . . . . . . . . . . . . . . . . . . . . . . 20
Inserting a disk . . . . . . . . . . . . . . . . . . . . . . . . . . . . . . . . . . . . . . . . . . . . . . . . . 21
Key functions . . . . . . . . . . . . . . . . . . . . . . . . . . . . . . . . . . . . . . . . . . . 22
Controls from the unit, the screen or using the remote control . . . . . . . . . . .22
Colour system . . . . . . . . . . . . . . . . . . . . . . . . . . . . . . . . . . . . . . . . . . . . . . . . . . 23
Replay functions . . . . . . . . . . . . . . . . . . . . . . . . . . . . . . . . . . . . . . . . . . . . . . . . 24
Search functions . . . . . . . . . . . . . . . . . . . . . . . . . . . . . . . . . . . . . . . . . . . . . . . . 24
REPEAT function . . . . . . . . . . . . . . . . . . . . . . . . . . . . . . . . . . . . . . . . . . . . . . . . 26
Direct title selection - number keys . . . . . . . . . . . . . . . . . . . . . . . . . . . . . . . . . . 26
Direct title/time selection – GO TO . . . . . . . . . . . . . . . . . . . . . . . . . . . . . . . . . 27
Setting a bookmark . . . . . . . . . . . . . . . . . . . . . . . . . . . . . . . . . . . . . . . . . . . . . .27
Image functions . . . . . . . . . . . . . . . . . . . . . . . . . . . . . . . . . . . . . . . . . . . . . . . . 28
Sound functions . . . . . . . . . . . . . . . . . . . . . . . . . . . . . . . . . . . . . . . . . . . . . . . .29
DVD menus . . . . . . . . . . . . . . . . . . . . . . . . . . . . . . . . . . . . . . . . . . . . . . . . . . . . 30
2
Page 2
DVD_Porty_MD80146.book Seite 3 Dienstag, 12. Oktober 2004 11:44 11
T
ABLE OF CONTENTS
Audio and subtitle language . . . . . . . . . . . . . . . . . . . . . . . . . . . . . . . . . . . . . . 32
Navigating on MP3 CDs . . . . . . . . . . . . . . . . . . . . . . . . . . . . . . . . . . . . . . . . . . 33
JPEG CDs . . . . . . . . . . . . . . . . . . . . . . . . . . . . . . . . . . . . . . . . . . . . . . . . . . . . . . 34
Settings in the SETUP menu . . . . . . . . . . . . . . . . . . . . . . . . . . . . . . . .36
Language Setup menu . . . . . . . . . . . . . . . . . . . . . . . . . . . . . . . . . . . . . . . . . . . 37
“Screen Setup” menu . . . . . . . . . . . . . . . . . . . . . . . . . . . . . . . . . . . . . . . . . . . 38
Audio Setup menu . . . . . . . . . . . . . . . . . . . . . . . . . . . . . . . . . . . . . . . . . . . . . . 39
If errors occur . . . . . . . . . . . . . . . . . . . . . . . . . . . . . . . . . . . . . . . . . . .42
Technical data . . . . . . . . . . . . . . . . . . . . . . . . . . . . . . . . . . . . . . . . . . .44
Code list for selecting the language . . . . . . . . . . . . . . . . . . . . . . . . . . 45
Portable DVD-Player MD 80146 3
Page 3

DVD_Porty_MD80146.book Seite 4 Dienstag, 12. Oktober 2004 11:44 11
SAFETY INSTRUCTIONS
About these instructions
Read these instructions carefully before using the system; Note the
warnings in the operating instructions
Always keep the operating instructions close to hand. If you sell
equipment or give it away, make sure you also hand over these
instructions and the guarantee card.
Never let children handle electrical devices
Never allow children to use electrical devices without
supervision.
If swallowed, batteries may endanger life. Therefore
keep the device and batteries out of the reach of
children. If a battery is swallowed get immediate
medical assistance.
Keep plastic packaging out of the reach of children.
There is a risk of asphyxiation.
the
Set the device up safely
Power connection
4
Place the device on a firm, level surface. It is not
designed for use in rooms with a high humidity content
(e. g. bathrooms) or have an unusual amount of dust.
Always make sure that
there is adequate ventilation;
there are no direct heat sources (e. g. heaters) that
could affect the device;
the device is not in direct sunlight;
you avoid contact with liquid and water (e. g. do not
place vases on top of the device);
the device is not placed close to magnetic fields
(e. g. televisions or other loudspeakers);
naked flames such as lit candles are not placed near
the device.
Only plug the device into a mains plug (240V ~ 50 Hz)
that is easy to reach and is close to the place where you
Page 4
DVD_Porty_MD80146.book Seite 5 Dienstag, 12. Oktober 2004 11:44 11
have set the device up. The mains plug must be freely
accessible so that you can unplug the device quickly if
you have to.
Use only one of the mains adapters supplied. Never try
to connect the mains adapter to other connectors as
this may cause damage.
Never use the device for a long time if the battery is
charging.
Never undertake your own repairs
If the plug, cable or device is damaged pull the plug
immediately out of the mains.
Never try to open and/or repair the device yourself.
There is a risk of electric shock. If there is a defect,
contact our service centre or other suitable specialist
workshop.
Storms
Pull the plug and antenna cable out if you are away for
a long period of time or if there is a storm.
S
AFETY INSTRUCTIONS
CD player
The CD player is a Class 1laser product. The device has
a safety system that prevents dangerous laser rays
escaping from the device during normal use. In order to
avoid eye injuries never manipulate or damage the
device's security system.
Cleaning and maintenance
Only use a clean, soft cloth for cleaning. Never use
cleaning solutions that could damage the surface of the
devices.
Portable DVD-Player MD 80146 5
Page 5
DVD_Porty_MD80146.book Seite 6 Dienstag, 12. Oktober 2004 11:44 11
DISPOSAL
Batteries and rechargeable batteries
Do not put used batteries in the garbage. The batteries
and rechargeable batteries must be deposited at a
collection point for used batteries.
Packaging
All packaging and packaging materials that are no
longer required can and should be recycled.
Device Name
Never dispose of the DVD player in the normal
household garbage. Ask your shire council for options
on disposing of the DVD player properly and in an
environmentally friendly way.
6
Page 6
DVD_Porty_MD80146.book Seite 7 Dienstag, 12. Oktober 2004 11:44 11
GENERAL INFORMATION
About DVD
DVD – Digital Versatile Disk– is a digital medium that
saves information. DVDs are marked with one of the
following symbols.
There are different types of DVD with different memory
capacities depending on how the information is stored.
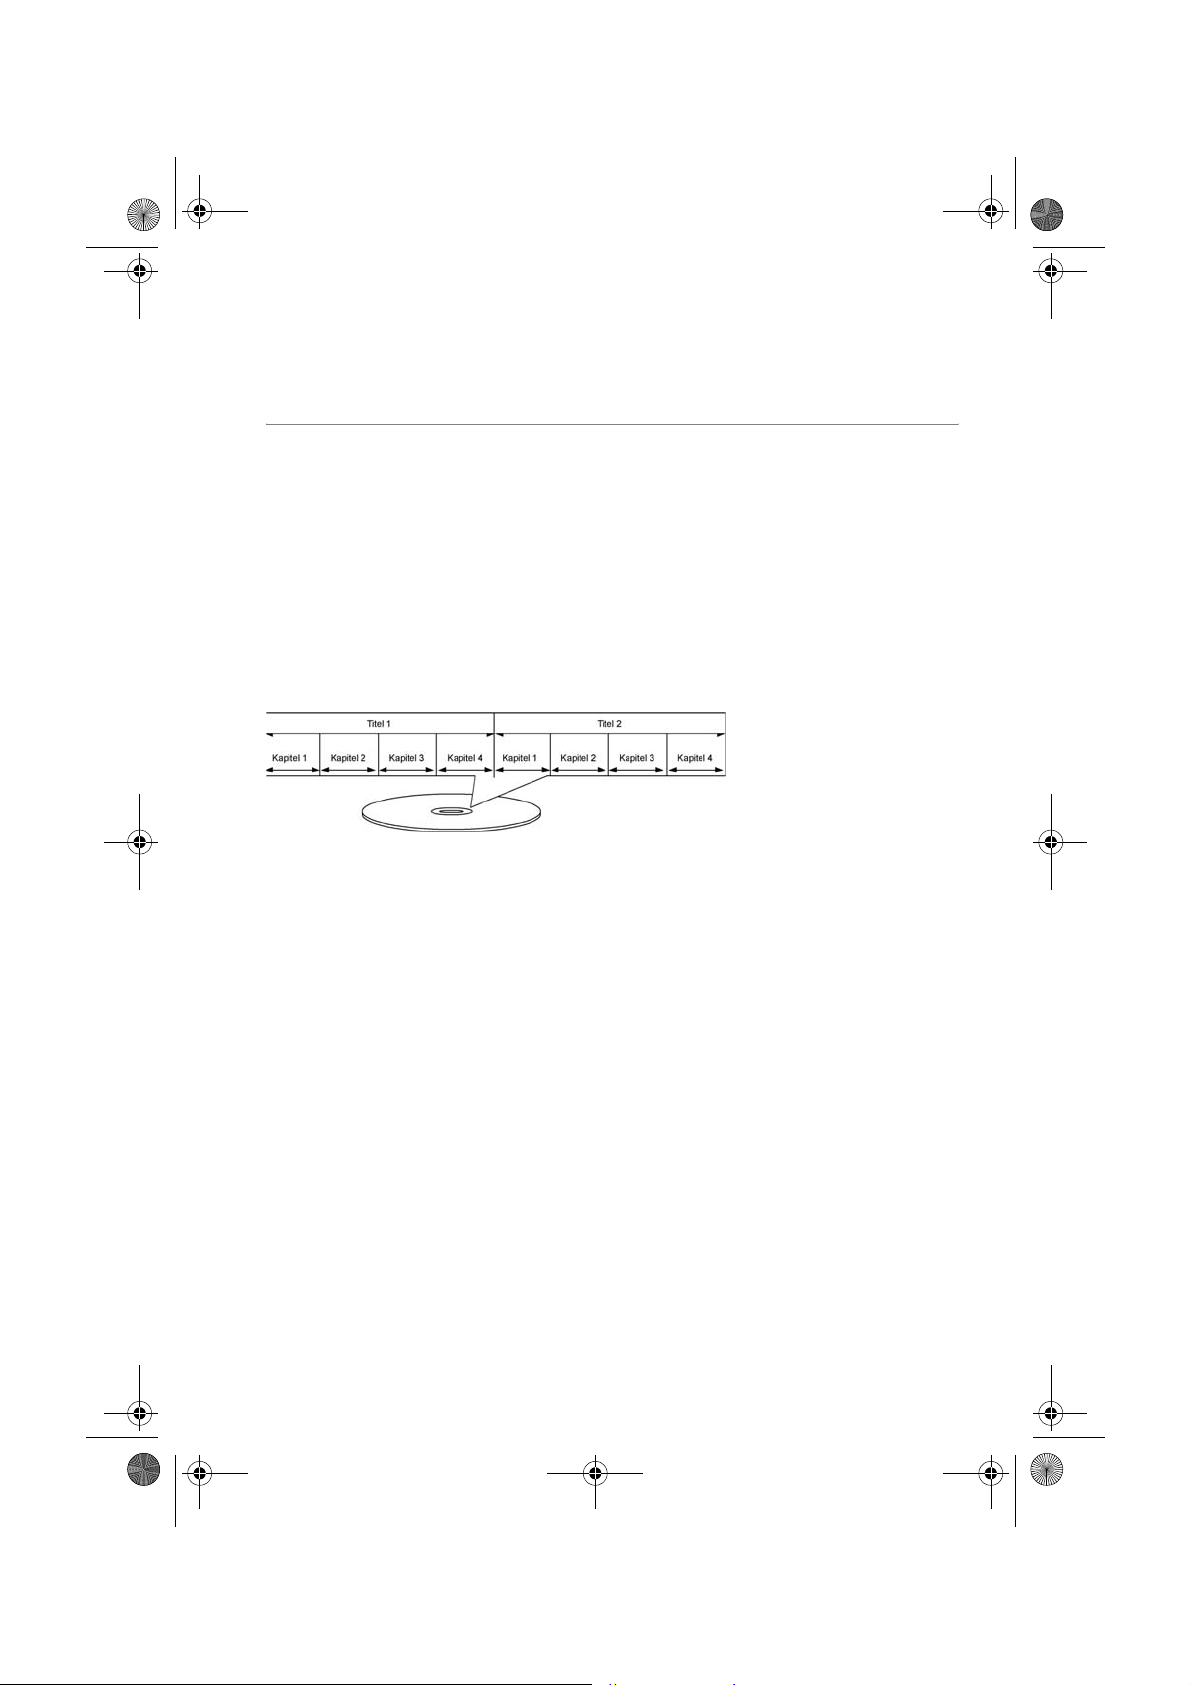
DVD structure
Video DVDs are divided into titles and chapters. A DVD
can have several titles, which may in turn be made up
of several chapters. The titles and chapters are each
numbered sequentially:
The first title of a DVD usually comprises licence
instructions and manufacturer's information. The next
title is usually the film itself. Other titles may include
such items as "making of" documentaries, trailers or
information on the actors.
Up to eight languages and sub-titles in up to 32
languages can be stored on DVDs. The languages and
sub-titles can be played in any combination.
angle if the film was recorded from different camera
positions.
Languages and subtitles
PerspectiveIn many DVDs it is even possible to change the camera
Portable DVD-Player MD80146 7
Page 7
DVD_Porty_MD80146.book Seite 8 Dienstag, 12. Oktober 2004 11:44 11
GENERAL INFORMATION
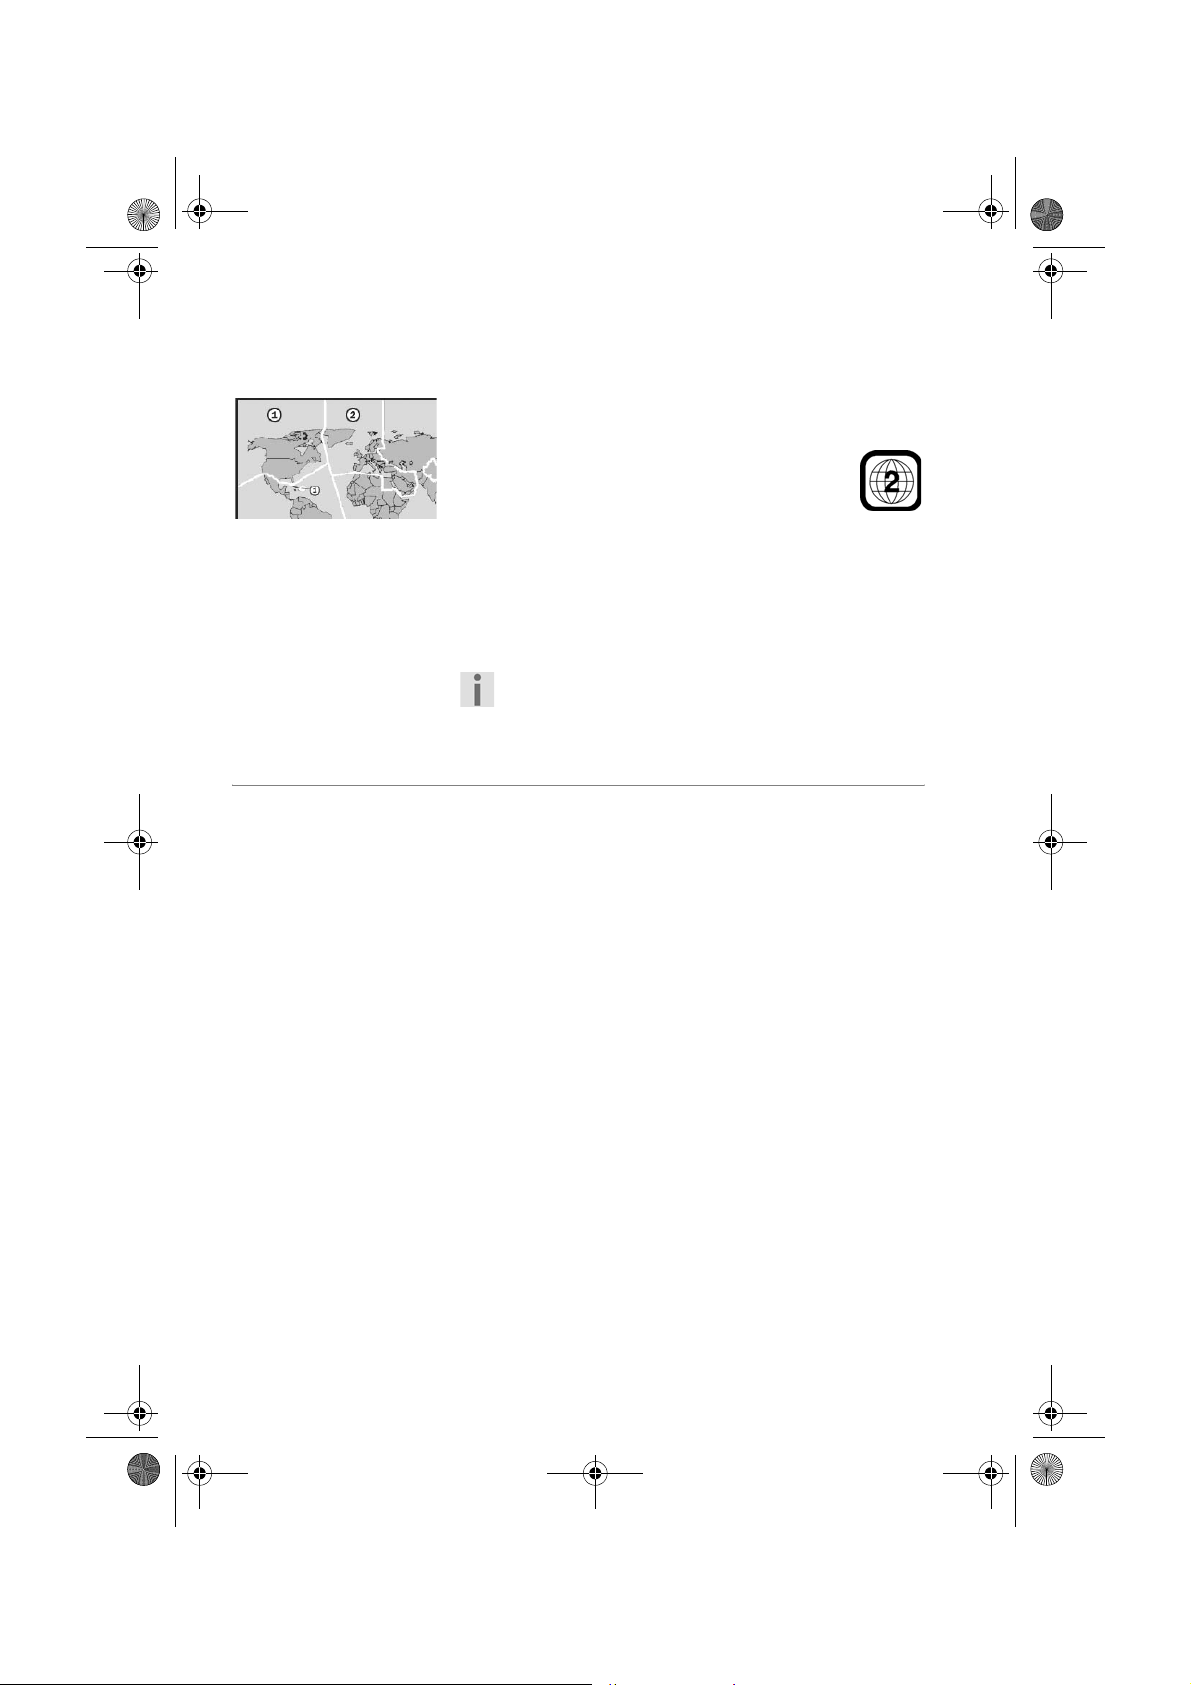
Regional codes
As a result of the global sales strategy a code has been
developed for DVDs that allows the recording only to
be played on devices bought in certain regions.
This code is based on a system that divides the
world into six regions. U.K. is in Zone 2 so
your DVD player will only play DVDs that have
the regional code 2. The regional code is
printed on the DVD packaging (refer to the following
logo).
Apart from DVDs with the regional code 4 the device
will only play DVDs with the regional code 0 (suitable
for any DVD player).
If you find problems when playing certain DVDs
make sure that the DVD has the regional code 4 or
0.
Other playable formats
8
MP3
The MP3 format is a Windows compression format for
audio data. MP3 files have to be saved with the file
extension *.mp3 so that they can be recognised.
In contrast to traditional audio CDs, MP3 CDs can be
sub-divided into directories (folders, albums) and files
(tracks, titles) – just like a data CD for your computer.
Page 8
DVD_Porty_MD80146.book Seite 9 Dienstag, 12. Oktober 2004 11:44 11
Available surround sound formats
The device can read two surround sound formats.
Dolby Digital 5.1
In Dolby Digital sound format the audio material is
saved digitally. To do this up to five separate full
frequency audio channels (front left and right, centre,
rear left and right) and an effect or depth channel (5.1)
are saved separately. Sound media with the Dolby
Digital format are shown by these trademarks.
Because each channel is completely independent a
realistic sound is created with a "three-dimensional"
listening sensation whereby the sound is given
distance, movement and a relative position in the room.
Your device can read this audio data and sends it to the
digital outputs (SPDIF) for decoding.
dts (Digital Theatre Systems)
The dts abbreviation is used for a less frequently used
sound format in which up to 6 (5.1) separate channels
are saved to a sound medium. Sound media with the
dts format are shown by these trademarks.
Your device can read this audio data and sends it to the
digital outputs (SPDIF) for decoding.
G
ENERAL INFORMATION
Portable DVD-Player MD 80146 9
Page 9

DVD_Porty_MD80146.book Seite 10 Dienstag, 12. Oktober 2004 11:44 11
PREPARATION
Unpacking the device
Remove all packing materials.
Caution!
Do not let children play with the plastic film.
There is a risk of asphyxiation!
Scope of supply
When unpacking, ensure that the following parts are included:
DVD player
Rechargeable battery 7.2 V, 4200 mAh
Mains adapter with input 240 V / output 12 V
1 mains cable
1 car adapter (12 V)
1 cinch cable (yellow/white/red/green)
Remote control
1 button battery (3 V; size CR2025)
1 car bag
2 belts
1 headphone
Operating instructions and warranty documents
10
Page 10
DVD_Porty_MD80146.book Seite 11 Dienstag, 12. Oktober 2004 11:44 11
Inserting the batteries into the remote control
Do not expose the remote control to moisture
because this could damage it.
A button battery (CR2025) is supplied for the remote
control.
` Remove the remote control's battery compartment
by pressing the clip in.
` Insert the battery into the compartment so that the
plus pole (marked +) points upwards.
` Insert the remote control's battery compartment
again. The clip should click back into place.
Caution!
The enclosed
batteries must not be charged,
disassembled, thrown into fire or shortcircuited. There is the risk of an explosion.
P
REPARATION
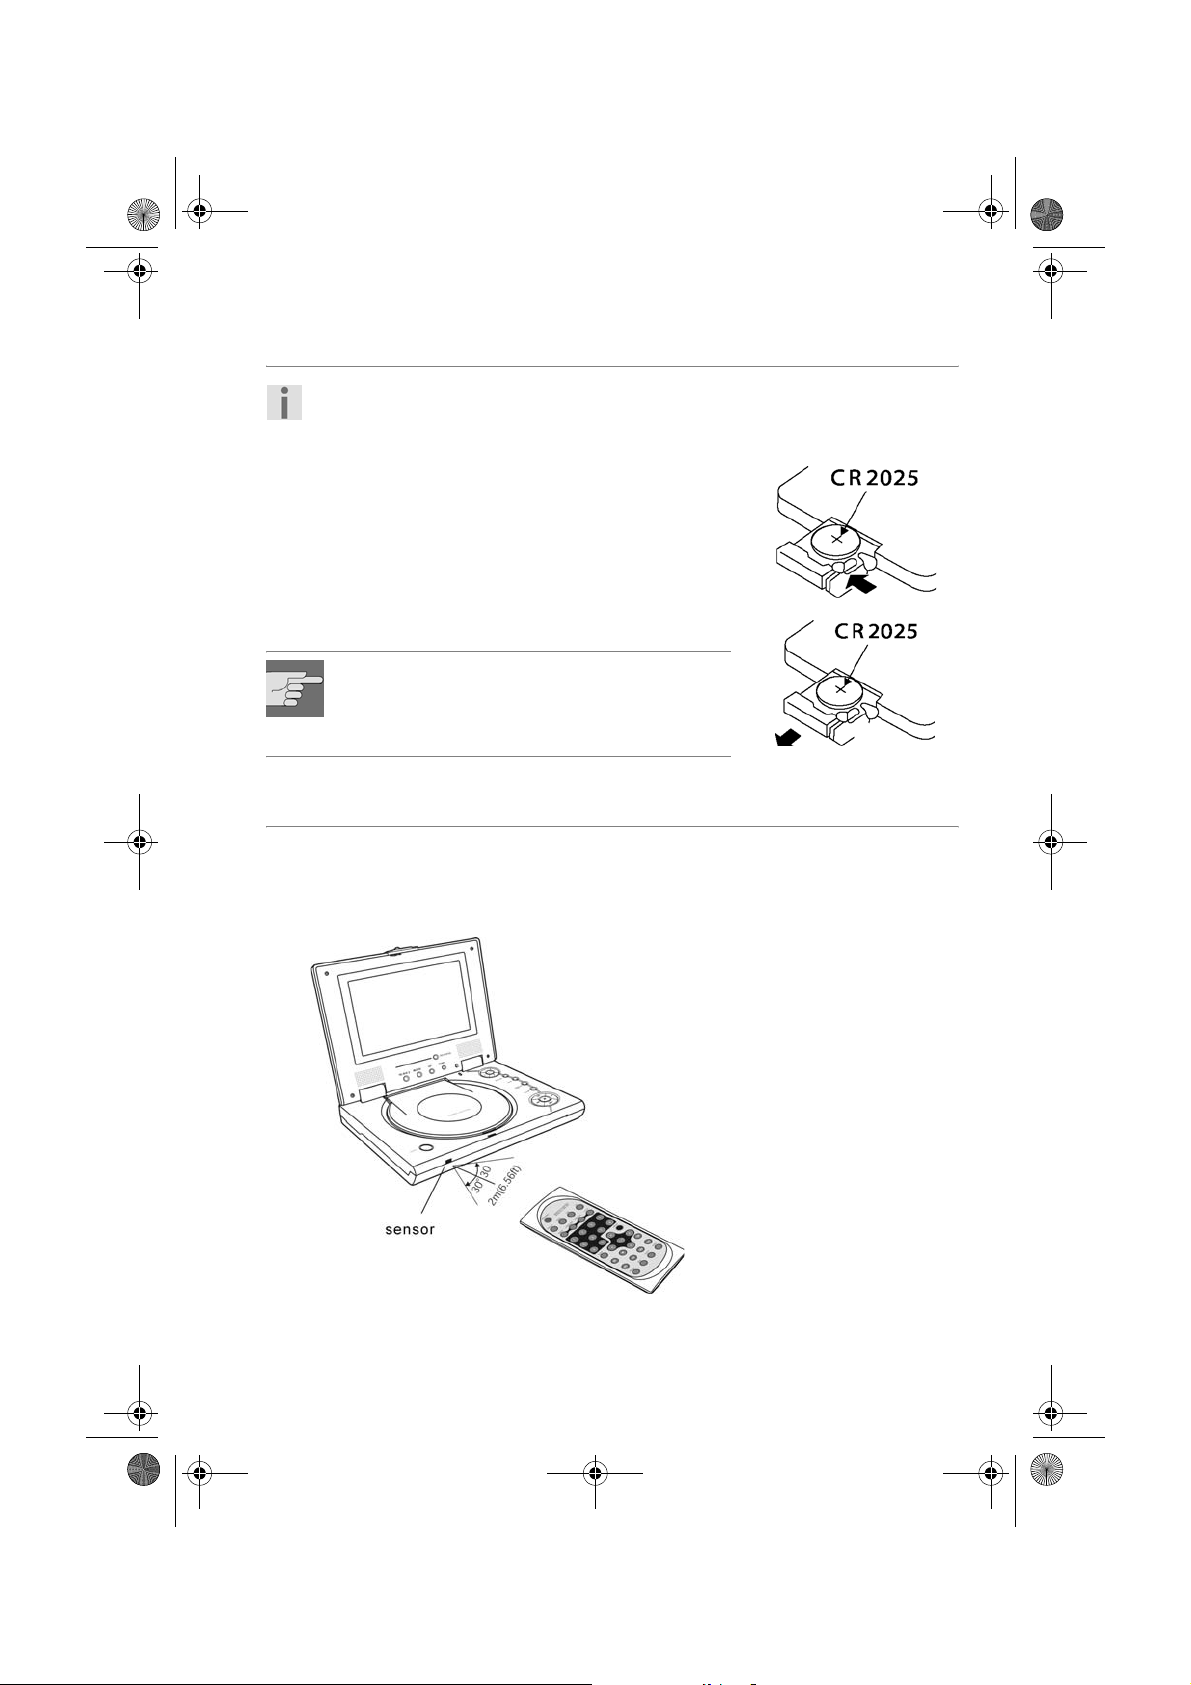
Using the remote control
` Point the remote control to the infrared sensor on the
front of the device.
You can use the remote control from a distance of up to
around 2 m from the device.
Portable DVD-Player MD 80146 11
Page 11

DVD_Porty_MD80146.book Seite 12 Dienstag, 12. Oktober 2004 11:44 11
CONNECTIONS AND CONNECTION OPTIONS
To use the device it only has to be connected to the
electricity. You can connect it via a 240 V plug or use the
rechargeable battery.
However the device can be connected in various ways
to other input and output devices:
to a television
to a video recorder
to a receiver, e. g. stereo system
Make sure that all devices are switched off before
connecting them. Only connect the devices to the
mains when the other connections are complete.
Setting up the device
Place the device on a firm, level surface. Always ensure
that
there is adequate ventilation
no sources of heat affect the device;
the device is not in direct sunlight;
you avoid contact with liquid or water
the device is not placed close to magnetic fields (e. g.
televisions or other loudspeakers).
Some aggressive furniture paints can damage the
device's rubber feet. If necessary, place the devices on a
suitable underlay.
The DVD player connections
Your recorder has standard video, and audio outputs
for connecting to external devices.
12
Page 12
DVD_Porty_MD80146.book Seite 13 Dienstag, 12. Oktober 2004 11:44 11
C
ONNECTIONS AND CONNECTION OPTIONS
Power connection
If you want to connect other devices you should
make these connections before connecting the
DVD player to the mains.
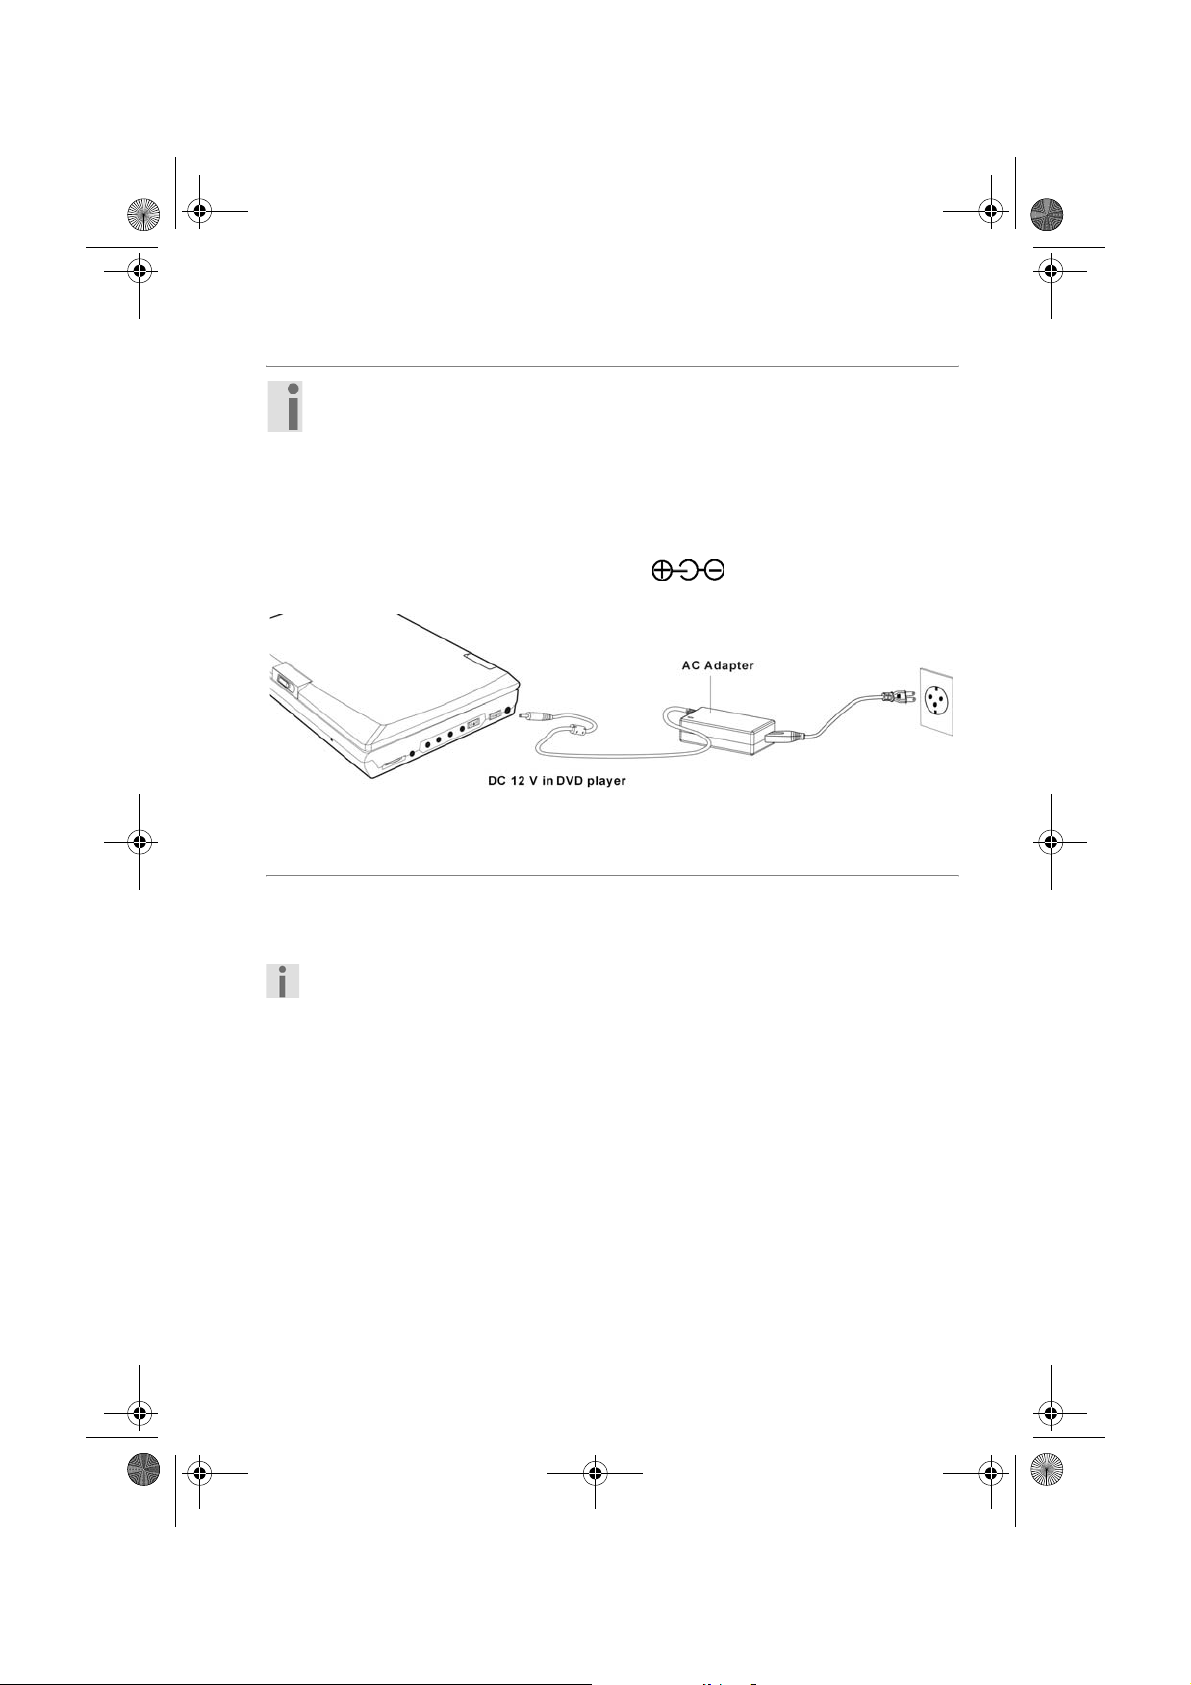
Connection with mains adapter
Insert the mains cable mains adapter plug into the
`
mains adapter.
` Insert the device plug for the supplied mains
adapter
on the side of the device.
into the device connection socket
` Push the mains plug into the socket.
Rechargeable connection
The device is supplied with a rechargeable battery that
you can use to operate the device if there is no other
source of power available.
Before initial use and for each complete charging
process the battery must be charged for around 4
hours. A fully charged battery gives a replay time
of around 2.5 hours (depending on the type of
playback, e g. the volume).
Portable DVD-Player MD 80146 13
Page 13
DVD_Porty_MD80146.book Seite 14 Dienstag, 12. Oktober 2004 11:44 11
CONNECTIONS AND CONNECTION OPTIONS
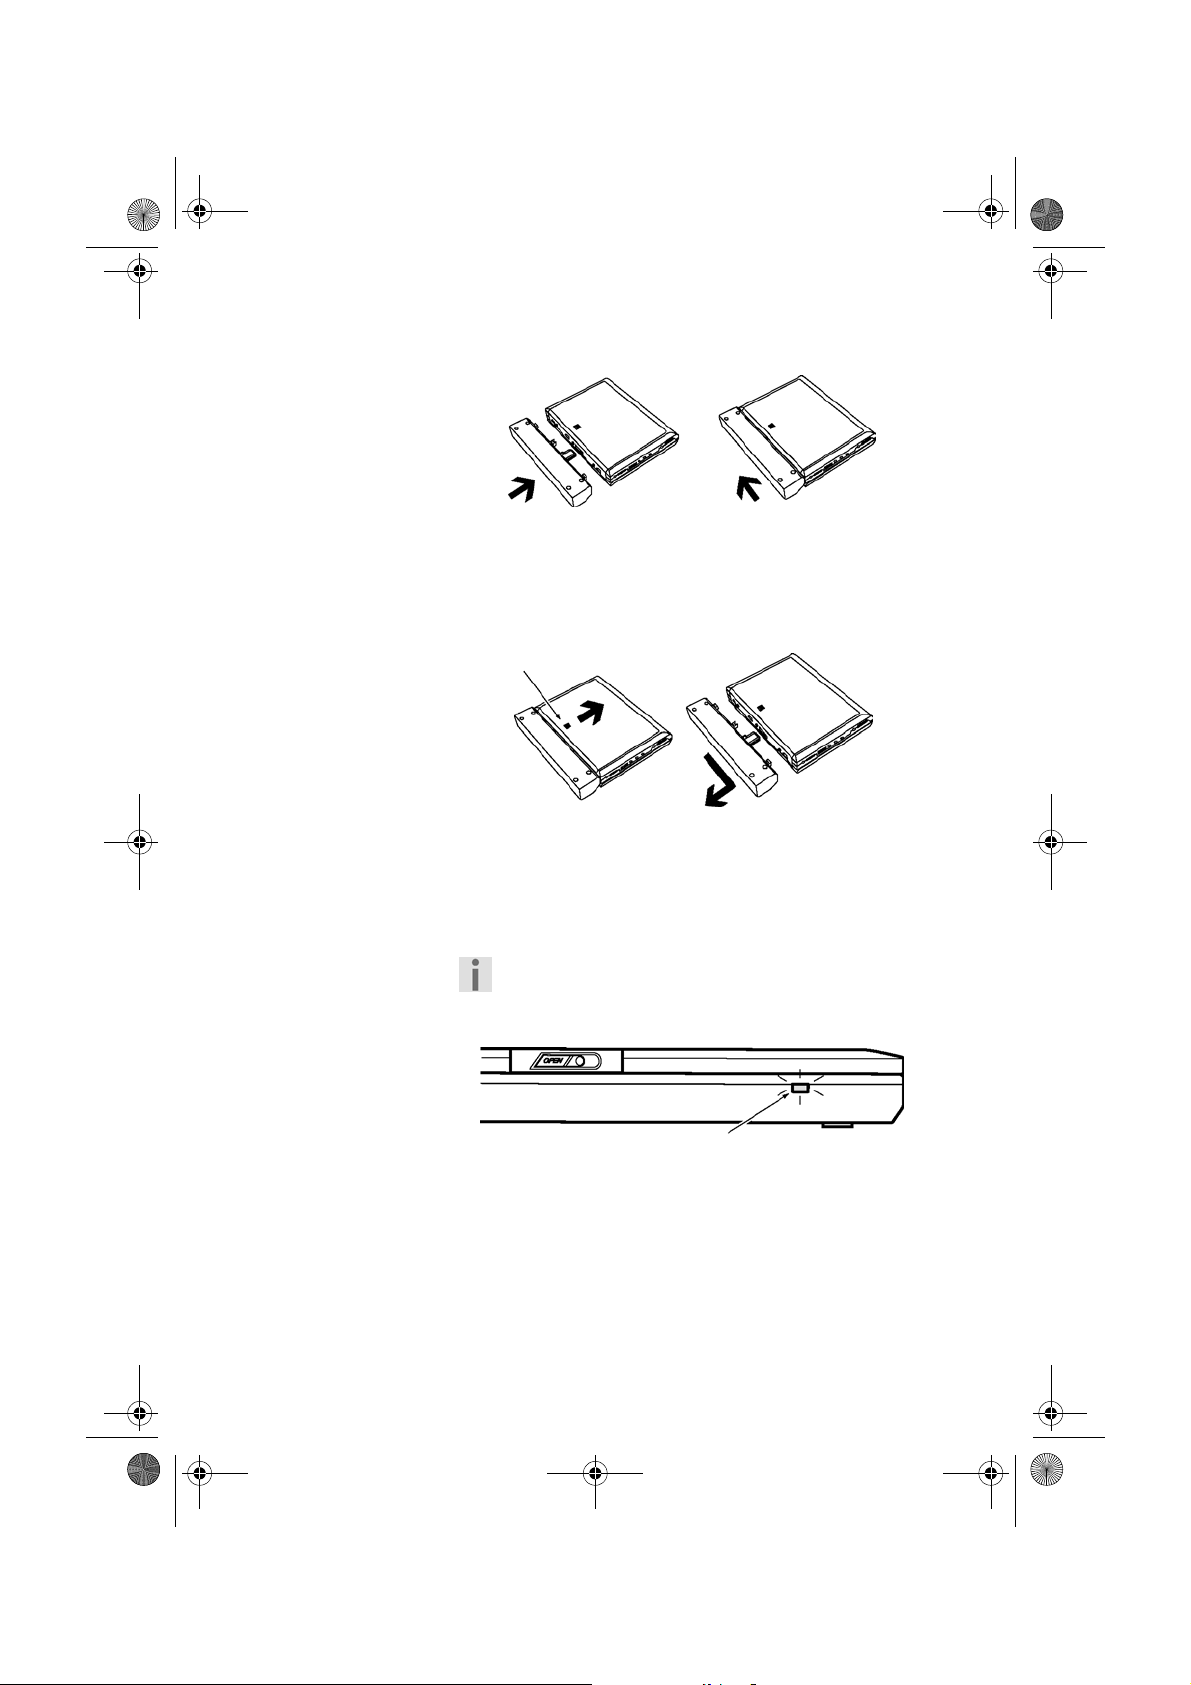
Assemble battery
`
Insert the battery with the connections into the
connection holes on the rear of the device.
` Slide the battery slightly in the direction shown until
you hear it click into place.
Disassembling battery
Catch
14
`
Push the catch on the underside of the device
forward in the direction shown.
` Pull the battery to the side as shown and then to the
rear so that you can lift it up.
Recharge battery
When the battery is attached and the device is
connected to the mains power via the mains
adapter the battery is charged automatically.
Control indicator
` Install the battery as described below.
` Connect the mains adapter with an appropriate
plug.
The control indicator on the other side of the battery
lights up red and the charging process starts.
Page 14
DVD_Porty_MD80146.book Seite 15 Dienstag, 12. Oktober 2004 11:44 11
C
ONNECTIONS AND CONNECTION OPTIONS
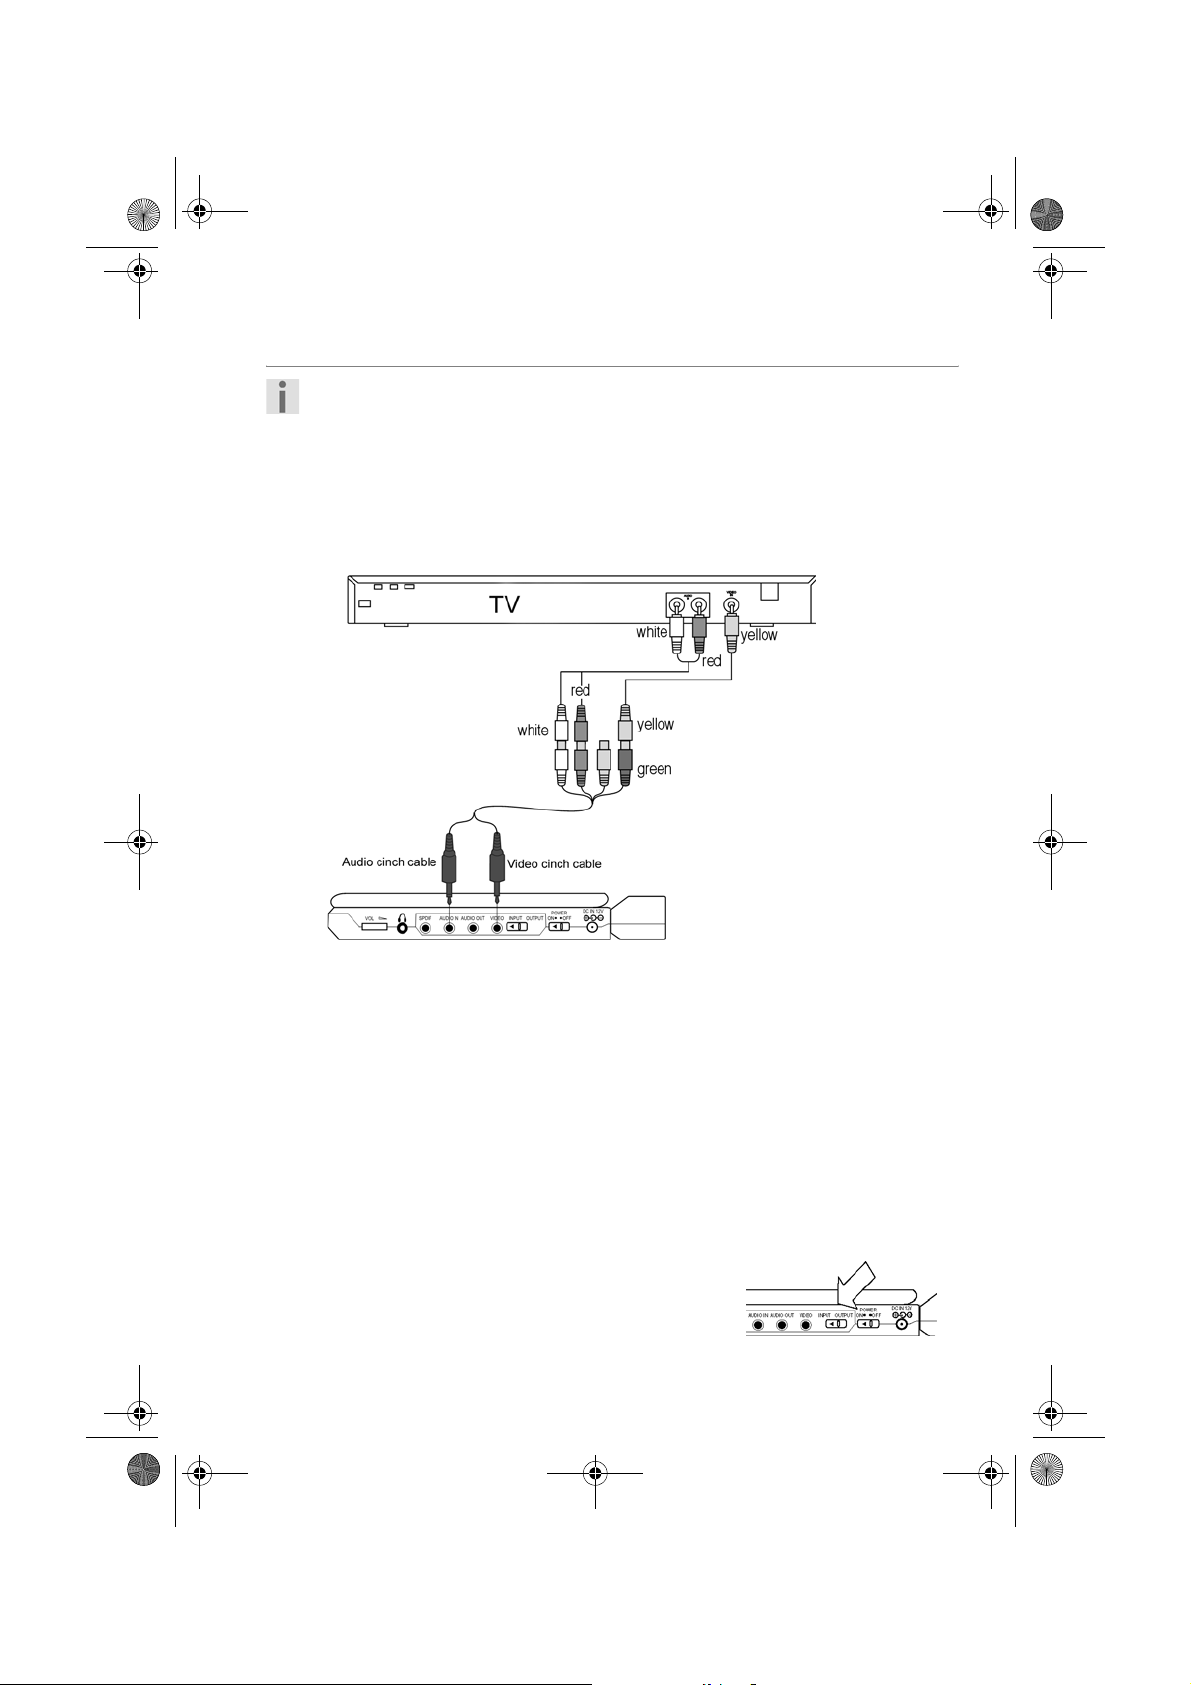
Connection options between the DVD player and television
For sound playback it is important that you note
the colour codes for left/right on the cinch plugs.
The connection for the right channel is always
marked red. The connection for the left channel is
marked black or white.
Connection with the television using the videocinch cable
Connect the VIDEO socket on the DVD player with
`
the VIDEO-IN socket on the television using a video
cinch cable.
` If you want to transfer the sound via the television
connect the AUDIO-OUT socket on the DVD player
with the AUDIO-IN socket on the television using a
video-cinch cable.
` Set the INPUT OUTPUT slide switch to the
OUTPUTposition.
Portable DVD-Player MD 80146 15
Page 15

DVD_Porty_MD80146.book Seite 16 Dienstag, 12. Oktober 2004 11:44 11
CONNECTIONS AND CONNECTION OPTIONS
Connection with the video recorder using the
video cinch cable
You can connect the DVD player with a video recorder.
For this you must connect the devices with a
video cinch cable (to transfer image information) and
an audio cinch cable (to transfer the sound
information).
16
` Connect the VIDEO-OUTPUT socket on the video
player with the VIDEO-IN socket on the DVD player
using a video cinch cable.
` Connect the AUDIO-OUTPUT socket on the video
player with the AUDIO-IN socket on the DVD player
using an audio cinch cable.
` Set the INPUT OUTPUT slide switch to the
INPUTposition.
Page 16

DVD_Porty_MD80146.book Seite 17 Dienstag, 12. Oktober 2004 11:44 11
C
ONNECTIONS AND CONNECTION OPTIONS
Connection with Dolby or DTS digital equipment
In addition to the television you can also play back the
sound via a connected Dolby or DTS digital device.
For modern surround sound devices with a digital input
you can connect the DVD player via the AUDIO-OUT or
SPDIF socket.
` If you want to use the coaxial input on the stereo/
surround sound device, connect the
OPTICAL-IN socket on the device with the SPDIF
socket on the DVD player. Use a cable that is suitable
for coaxial input.
Portable DVD-Player MD 80146 17
Page 17

DVD_Porty_MD80146.book Seite 18 Dienstag, 12. Oktober 2004 11:44 11
CONNECTIONS AND CONNECTION OPTIONS
Connecting ear/headphones
Please note that ear/headphones are not supplied
as standard.
There is a headphone connection on the side
of the device.
` Connect another set of ear/headphones with a 3.5
mm ratchet plug.
CAUTION!
Before putting on the ear/headphones set
the volume to minimum! Otherwise this could
cause damage to your hearing.
Set viewing angle
Your portable DVD player has a TFT screen.
If you find that the quality of the DVD image is not
adequate turn the device a little to improve the viewing
angle.
Please also note that the image quality may even vary
with the disk so it may be necessary to choose a
different viewing angle for each DVD.
18
Page 18

DVD_Porty_MD80146.book Seite 19 Dienstag, 12. Oktober 2004 11:44 11
C
ONNECTIONS AND CONNECTION OPTIONS
Applying the car bag
You can fix the car bag on the back of the front seat in a
car. Thus it is possible to enjoy watching or listening to
disks in the back of the car.
In order to strap the pouch on the front seat, please
proceed as shown in the following pictures:
` In oder to reverse the picture which in now upside-
down, press the REVERSE-button on the unit.
Portable DVD-Player MD 80146 19
Page 19

DVD_Porty_MD80146.book Seite 20 Dienstag, 12. Oktober 2004 11:44 11
HANDLING THE DISK
Disk types that can be played
You can play DVD, CD, CDRW, MP3-CD and SVCD
media on the DVD player. You can insert all the disks
listed here into this device without an adapter.
Disk size 12 cm/8 cm
Single side, single layer/single,
side double layer, PAL/NTSC DVD-Disk
Disk size 12 cm/8 cm
VCDs, SVCDs and CDs
Disk size 12 cm/8 cm
Disk size 12 cm/8 cm
Disk size 12 cm/8 cm
Cleaning disks
Only hold the disks at the edge and avoid fingerprints,
dirt and scratches. These can produce errors or jumps
during playback.
` If you would like to clean a disk wipe it with a soft,
damp cloth, moistened with water
` Wipe from the centre to the edge of the disk.
Circular movements during cleaning produce
scratches. These can produce errors during
playback.
20
Page 20

DVD_Porty_MD80146.book Seite 21 Dienstag, 12. Oktober 2004 11:44 11
Inserting a disk
` Move the screen catch to the right and lift the screen.
` Open the disk compartment by pressing the OPEN
key. –
Open appears on the screen.
` Lift up the cover of the disk compartment.
` Insert a disk into the disk compartment with the title
side upwards. Ensure that the disk is in the centre of
the disk holder.
` Carefully press the disk onto the disk holder,
applying a little pressure.
` Close the disk compartment. Press the cover down
until it clicks into position.
The DVD player will read the disk. The screen displays
Loading and after a few seconds No Disc, if there
is no CD in the disk compartment. If a disk has been
inserted the screen will display the type of disk and the
device will start playback. If a disk has been inserted that
cannot be played because of the format,
Disc
is displayed.
Wrong
H
ANDLING THE DISK
Portable DVD-Player MD 80146 21
Page 21

DVD_Porty_MD80146.book Seite 22 Dienstag, 12. Oktober 2004 11:44 11
KEY FUNCTIONS
Controls from the unit, the screen or using the remote control
Device keys You can activate the important functions of the device
from the keys on the unit. So you can play, pause and
stop disks, activate fast forward and "skip" backwards
and forwards. You can switch PBC on or off and open
and navigate through the main menu.
Screen keys You can change between the 16:9 and 4:3 screen
formats using the keys on the screen. You can change
the screen settings:
Brightness
Contrast
Sharpness
Colour
– Colour tone
and return them to the basic settings. You also have the
option of turning the image by 180°.
Keys on the
remote control
In these instructions when describing the keys we refer to the remote
control because the remote control covers most of the device's
functions. If we refer to the keys on the device or screen we say so
clearly.
22
In addition to these basic functions the remote control
also provides numerous additional user elements for
the full functions of your player.
Page 22

DVD_Porty_MD80146.book Seite 23 Dienstag, 12. Oktober 2004 11:44 11
Switch-on
` Connect the DVD recorder to the power supply.
` Set the INPUT OUTPUT slide switch to the
OUTPUTposition.
` Set the POWER slide switch to the ONposition.
The standby LED lights up green. The machine is in
standby mode
The device then tries to read the disk.
- If no disk has been inserted
If a disk has been inserted that cannot be played
because of the format
Wrong Discis displayed.
- If a disk has been inserted a symbol indicates this.
Loading is displayed on the screen.
No Discappears.
The adjoining icon is displayed on the screen if a function is not possible
or not available in the current mode.
Standby/Switching off
`
Set the POWER slide switch to the OFFposition to
switch the device to standby mode. The display
disappears and the standby LED lights up red.
The player is connected to the power supply even
when in standby mode. To switch the device off
completely, pull out the mains plug or remove
the battery.
K
EY FUNCTIONS
Colour system
Using the P/N key you can switch between the PAL and
NTSC colour systems and the AUTO setting.
You can only change the colour system when the
DVD player is in stop mode or if there is no disk in
the disk compartment. We recommend the AUTO
setting
` Press the P/N key if necessary several times to select a
colour system.
The colour system is displayed on the screen and
immediately transferred for the screen display.
Portable DVD-Player MD 80146 23
Page 23

DVD_Porty_MD80146.book Seite 24 Dienstag, 12. Oktober 2004 11:44 11
KEY FUNCTIONS
Replay functions
PLAY
To start or continue playback press .
`
Playis displayed on the screen.
PAUSE
`
You can pause playback by pressing PAUSE/
STEP once.
Pauseis displayed on the screen.
STEP (plays a single image)
`
In pause mode press (PAUSE/STEP) repeatedly
to move from image to image.
Stepis displayed on the screen.
` Press , to continue normal playback.
STOP
Press STOP once to stop the playback.
`
Prestop appears on the screen. You can continue
playback from the same place with .
appears on the screen.
An MP3 jumps back to the start of the track.
Resume
Search functions
24
` Press STOP again to stop the playback finally.
Stop appears on the screen.
The device is now in stop mode.
SKIP
`
During playback press the or key to skip
backwards or forwards (for DVDs: from chapter to
chapter; for CDs: from title to title).
Next or Previous is displayed briefly on the
screen or the next or previous title is highlighted in
the screen menu.
Page 24

DVD_Porty_MD80146.book Seite 25 Dienstag, 12. Oktober 2004 11:44 11
Pleas e not e that on many D VDs i t is not possib le to
skip over the titles/chapters before the actual film
starts (license notes).
Fast forward
During playback press the (REV) or
`
(FWD)keys to fast forward or backward.
(forwards) or (back) appears on the screen.
as does the speed setting:
Press once: 2x
Press twice: 4x
Press three times: 8x
Press four times: 16x
32x
Press five times:
If you press the key six times or press you return to
the normal playback speed.
.
Slow motion – SLOW
`
During playback press the SLOWkey to play back in
slow motion.
appears on the screen:
Press once: 1/2 forwards
Press twice: 1/4 forwards
Press three times: 1/8 forwards
Press four times: 1/16 forwards
If you press the key again or press you return to
the normal playback speed.
Please note that the SLOW function does not work
on audio CDs and MP3 disks.
Slow and the slow motion level
K
EY FUNCTIONS
SETUP - setup menu
`
Press the SETUP key to open the Setup menu.
` Press the SETUP key again to quit the Setup menu.
Read the information on “Settings in the SETUP
menu” on page 36.
Portable DVD-Player MD 80146 25
Page 25

DVD_Porty_MD80146.book Seite 26 Dienstag, 12. Oktober 2004 11:44 11
KEY FUNCTIONS
REPEAT function
` During playback press the
REPEATkey. Each time you press the REPEATkey
and the section to be repeated appears on the screen
(the entry disappears after a few seconds).
DVD:
Chapter – The chapter is repeated;
Title – The title is repeated;
Disc – The disk is repeated
CD-, SVCD-, VCD:
Title – The title is repeated;
Disc – The disk is repeated
Please note that this function does not work on
SVCDs and VCDs in the PBC mode.
MP3 CD:
Title – The title is repeated;
Folder – The folder is repeated;
Disc – The disk is repeated
If you press the
repeat function.
REPEAT key again you switch off the
Direct title selection - number keys
You can reach a title on the disk directly with the
number keys.
The number keys are the
control.
` Press the corresponding number key once to enter a
number between 1 and 9.
` If you wish to enter a number with two digits first
press the key with the number for the first digit and
then the key for the number for the second digit.
26
0–9 keys on your remote
Page 26

DVD_Porty_MD80146.book Seite 27 Dienstag, 12. Oktober 2004 11:44 11
Direct title/time selection – GO TO
You can navigate directly to a chapter, title or time on
the disk during playback using the GO TO key. You
change the selection each time the key is pressed. The
disk jumps straight to the selected location.
DVD
Press the GO TO key once.
`
The screen displays for example:
(Chapter) 01/04 (Title) 01/15
` Press the navigation keys to make specific changes.
The item to be changed is highlighted in yellow.
` Enter the desired title or chapter using the number
keys and confirm with the
Press the GO TO key again to set the time.
The screen displays for example:
ENTERkey.
(chapter) j (time) -:--:--
The entry field for the time is highlighted in yellow.
` Enter the desired time within the disk and confirm
with the
desired location.
ENTER key. Playback continues from the
K
EY FUNCTIONS
SVCD, VCD, CD
`
Press the GO TO key to set the time.
The screen displays:
j (time) -:--:--
`
Enter the desired time within the disk using the
number keys.
Please note that this function does not work on
MP3 and image disks.
Setting a bookmark
When playing back a DVD, you can set a bookmark at a
particular location. You can jump to the marked
location within the chapter and continue playback from
there.
` Press the MARK key during playback to mark the
location.
The screen displays briefly the
` Press the MARK key again.
Portable DVD-Player MD 80146 27
Bookmarknote
Page 27

DVD_Porty_MD80146.book Seite 28 Dienstag, 12. Oktober 2004 11:44 11
KEY FUNCTIONS
Playback continues from the marked location. Play
Bookmark
appears on the screen.
Image functions
Enlarge/reduce image - ZOOM
DVD/SVCD/VCD:
` Press the ZOOM key. The image is enlarged from the
middle. Each time you press the key
displayed with the next enlargement factor:
Press once: x2
Press twice: x4
Press ZOOM three times to return to the normal view.
Camera position – ANGLE (DVD only)
On a few DVDs some individual scenes are
recorded from various camera angles.
` Press ANGLE to activate the function.
If the scene has various perspectives the symbol
and the current perspective/total number of
perspectives are displayed.
` Press ANGLE again to switch to the next camera
position.
The image changes after a few seconds.
Zoom is
28
Page 28

DVD_Porty_MD80146.book Seite 29 Dienstag, 12. Oktober 2004 11:44 11
Change image setting
You can change the brightness, contrast, colour and
colour tone of the image quickly via the keys on the
screen.
` Press the MODE key repeatedly. Each time the key is
pressed the image display jumps to the next setting
point.
If no key is pressed after 9 seconds the display
disappears again.
` Press DOWN on the screen to reduce the setting.
` Press UP on the screen to increase the setting.
` To reset the screen settings choose the Resetitem.
Press the
DOWN or UP key to confirm.
This setting is lost when the device is switched off.
To set the brightness and contrast permanently
read the information on ““Screen Setup” menu”
on page 38.
Sound functions
K
EY FUNCTIONS
Volume - VOLUME
You can set the volume via the control dial on the side
of the device.
If headphones are connected the device's
speakers are set to mute.
Switch sound off - MUTE
`
Press MUTEto switch the sound off completely.
Mute appears on the screen.
` Click MUTE again switch the sound on again. Mute
off
appears briefly on the screen.
Sound mode (audio CDs only)
Press the L/R key repeatedly to select one of the
`
following playback types:
L/L (Mono left), R/R (Mono right),
L/R
(Stereo).
Portable DVD-Player MD 80146 29
Page 29

DVD_Porty_MD80146.book Seite 30 Dienstag, 12. Oktober 2004 11:44 11
KEY FUNCTIONS
DVD menus
DVD menus
DVDs usually have one or more menus stored on them and you can use these
to navigate on the DVD. The names of these menus depends on the DVD; they
may be called "DVD menu", "Disk menu", "Main menu", "Title menu", "Root
menu" or "Master menu".
In contrast you call up the DVD player menu (SETUP menu) using the SETUP
key.
Root Menu
You can open the root menu stored on the DVD using
MENU/PBC key.
the
` Press the MENU/PBC key.
The structure of the root menu is displayed.
` Select a sub-menu via the number or navigation keys
and confirm by pressing
ENTER.
` You navigate to the items in the DVD menu using the
navigation keys.
` Click ENTER to confirm your selection.
Please note that the precise functions available in
each menu depend on the DVD. E. g. some DVDs
only have one menu that appears no matter
which method is used.
30
Title menu
You can open the title menu stored on the DVD using
TITLE key.
the
` Press the TITLE key.
The structure of the title menu is displayed.
` Navigate in the title menu as previously described for
the root menu.
Page 30

DVD_Porty_MD80146.book Seite 31 Dienstag, 12. Oktober 2004 11:44 11
Display current DVD information
The display function offers a clear option for displaying
the current settings on the disk.
` During playback press the DISPLAYkey to open the
display.
DVD:
The DVD screen menu appears with the entries on
chapter, title, duration of current title and the playback
mode.
` Press the DISPLAY key again.
` Further information on the DVD is displayed, e. g. the
selected audio language, the audio channels, image
format and camera perspective.
` Press the DISPLAY key again to quit the DVD screen
menu.
SVCD/VCD:
The current title, the number of titles in the chapter and
the duration of the current title are displayed.
K
EY FUNCTIONS
PBC function (SVCD and VCD 2.0 only)
Some SVCDs and type 2.0 VCDs that have a title/
chapter structure provide the option of playback
control.
PBC provides extended functions for navigating
through the title/chapter; these include
Direct title selection of title/chapter
SKIP functions
Please note that the precise functions available
depend on the SVCD/VCD.
`Press the MENU/PBC key.
PBC on appears on the screen.
` Select a title via the number keys and confirm by
pressing
ENTER.
` If you wish to switch off the PBC function press the
MENU/PBC key again.
PBC off appears on the screen.
Portable DVD-Player MD 80146 31
Page 31

DVD_Porty_MD80146.book Seite 32 Dienstag, 12. Oktober 2004 11:44 11
KEY FUNCTIONS
Audio and subtitle language
If other languages are available on the DVD or SVCD
and it supports this function these two keys are the
quickest method of selecting other languages.
Please note however that this function has not
been implemented on many DVDs.
Select spoken language
`
Press the LANGUAGE key. The current audio setting
and language are displayed on the screen.
` Press LANGUAGE repeatedly to select another
language stored on the DVD.
The change is made immediately and does need to be
confirmed.
Select sub-title language
Press SUBTITLE repeatedly to select another sub-
`
title language stored on the DVD.
The change is made immediately and does need to be
confirmed. The message disappears after a few
seconds.
32
Page 32

DVD_Porty_MD80146.book Seite 33 Dienstag, 12. Oktober 2004 11:44 11
Navigating on MP3 CDs
The music titles on MP3 CDs may be organised into
folders just like a data CD.
` Insert an MP3 CD.
A menu appears on the screen showing the highest
level of folders stored on the CD. Provided that the CD
actually contains folders, they are listed on the left-hand
side of the menu. The device starts to play back the first
title in the first folder automatically.
The active folder or file is highlighted.
` Use the S and T navigation keys to enter a folder. If
required. you can open sub-folders.
` Press the W key to go back to the higher level menu.
` Press the or (SKIP) key to go forwards or
backwards page by page.
` To hear or see a title, select it and confirm with
ENTER.
The selected title is played after a few seconds.
K
EY FUNCTIONS
Direct selection using the number keys
Press a number key to open a title within the active
`
folder.
The selected title is played after a few seconds.
Portable DVD-Player MD 80146 33
Page 33

DVD_Porty_MD80146.book Seite 34 Dienstag, 12. Oktober 2004 11:44 11
KEY FUNCTIONS
JPEG CDs
On JPEG CDs the images may be organised into folders
just like a data CD.
` Insert a JPEG CD.
The device starts to play back the first image in the first
folder automatically. Otherwise the folder structure is
displayed.
` Press the or (SKIP) key to jump to the
previous or next image.
` Press STOP to open the folder structure.
Navigating in the JPEG
menu is the same as in
the MP3 menu; refer to
chapter above.
` Select the desired image in the file structure with
ENTER and press the key.
Each image is displayed for a few seconds.
Speed of viewing
You can set the time for which each image is displayed
during automatic viewing.
` To set this press :
– once: 2 second interval
– twice: 4 second interval
– three times: 6 second interval
– four times: 8 second interval
– five times: 10 second interval
34
Type of viewing
You can view the JPEB images in 12 different ways (e.g.
from below).
` During playback press the ANGLEkey repeatedly for
the desired viewing type. The chosen viewing type is
displayed on the screen and adopted immediately.
Rotating JPEG pictures
You can change the layout of the current image by
pressing the navigation keys during playback.
Pressing the X navigation key repeatedly: rotates the
image by 90° clockwise each time;
Pressing the W navigation key repeatedly: rotates the
image by 90° anticlockwise each time;
Pressing the S navigation key: reflects the image
horizontally.
Page 34

DVD_Porty_MD80146.book Seite 35 Dienstag, 12. Oktober 2004 11:44 11
Pressing the T navigation key: reflects the image
vertically.
Zooming in on JPEG images
Press the ZOOM key. The image is enlarged from the
`
middle. Each time you press the key
displayed with the next enlargement or reduction
factor:
Press once: 150%
Press twice: 200%
Press three times: 25%
Press four times: 50%
Press ZOOM five times or the key to return to
normal view (100%).
You can use the navigation keys to select the section of
the enlarged image that you wish to view. The screen
displays the direction in which you are navigating
Move Up/Down/Right/Left).
(
Zoom is
K
EY FUNCTIONS
Portable DVD-Player MD 80146 35
Page 35

DVD_Porty_MD80146.book Seite 36 Dienstag, 12. Oktober 2004 11:44 11
SETTINGS IN THE SETUP MENU
All settings are made in the SETP menu that you open
using the SETUPkey. These settings relate to such items
as image format, sound settings and child protection.
` Press SETUP.
The main page of the SETUP menu appears on the
screen with the four menus and the key to quit the
menu:
Language Setup
Screen Setup
Audio Setup
Custom Setup
Exit Setup
The icon on the active menu is highlighted. The
Custom Setup
.
mode
menu is only active in the stop
Navigating in the menus
You move through the menus using the navigation keys. The active
items are shown by a dark bar. An explanation of the navigation is
given at the lower edge of the menu.
Open the active menu with the ENTER key.
Sub- and selection menus
For most sub-menus a selection menu on the right hand side is opened. These are
labeled with a tick. To change the selection, press X to move to the right.
Press S or T to select a different item. Now the new selection is shown by a coloured
bar. Press ENTER to confirm the new selection.
Return to the main menu by pressing W.
Leaving Setup
You can leave the SETUP menu at any point by pressing the SETUP key or clicking
the "Exit Setup" key in the SETUP menu.
36
Page 36

DVD_Porty_MD80146.book Seite 37 Dienstag, 12. Oktober 2004 11:44 11
Language Setup menu
Language Setup
OSD
Menu
Audio
Subtitle
English
French
German
Italian
Spanish
yzwx: Move X: Select SETUP:Quit
S
ETTINGS IN THE SETUP MENU
Select language
Please note, for every
language selection:
it is only possible to
play back a language
that is actually on the
DVD. If you select a
different language, the
DVD player will instead
play the first language
stored on the DVD.
The languages that you
can select for a specific
DVD are normally
listed in the DVD's disk
menu.
OSD
This sets the OSD (on screen display) language, i.e. the
language for the DVD screen. You can choose English,
French, German, Italian, Spanish or Portuguese.
When selecting a language the menu changes
immediately.
Menu, audio, subtitle
In addition to the languages offered you can use the
last item Others to choose another language via a
four-digit code.
You can find a list of the codes page 45 in this
instruction manual.
One language setting each is made in the other three
menu items
Menu: The language of the menu on the disk.
Audio: The spoken language
Subtitle: The subtitle language
You will be given a choice of languages if you
confirm one of these items with
ENTER.
Portable DVD-Player MD 80146 37
Page 37

DVD_Porty_MD80146.book Seite 38 Dienstag, 12. Oktober 2004 11:44 11
SETTINGS IN THE SETUP MENU
“Screen Setup” menu
Screen Setup
TV type
Screen saver
TV system
Brightness
Contrast
yzwx: Move X: Select SETUP:Quit
TV type
Here you set the device's display format to match that
of the screen or television.
4:3/PS:
Selection for televisions with 4:3 format. The Pan Scan
format represents 16:9 full height film formats; side
sections of the image are cut off.
4:3/LB:
Selection for televisions with 4:3 format. The letterbox
format reduces the 16:9 film format to the size of the
screen.
16:9: Selection for televisions with 16:9 format.
4 : 3 PS
4 : 3 LB
16 : 9
38
Screen saver
: If the device is idle for a few minutes a screen saver
On
appears.
Off: Screen saver is de-activated.
TV system
Select the colour standard here:
Auto: The device selects the colour standard
(not all televisions support this
function).
NTSC: Usual colour format for North America.
PAL: Usual colour format for many European
countries.
Page 38

DVD_Porty_MD80146.book Seite 39 Dienstag, 12. Oktober 2004 11:44 11
Brightness
You can set the brightness to "normal, bright or soft".
Contrast
You can change the contrast within a range of -4 to +4.
Audio Setup menu
Audio Setup
Digital Out SPDIF / PCM
SPDIF / RAW
Off
S
ETTINGS IN THE SETUP MENU
yzwx: Move X: Select SETUP:Quit
Digital Out
Here you can set the transfer of the data flow for the
digital output.
You can select the
data mode or the digital audio setting.
Portable DVD-Player MD 80146 39
SPDIF/PCM or SPDIF/RAW
Page 39

DVD_Porty_MD80146.book Seite 40 Dienstag, 12. Oktober 2004 11:44 11
SETTINGS IN THE SETUP MENU
Custom Setup menu
Custom Setup
Parental Ctrl
Password
Angle Mark
Default
yzwx: Move X: Select SETUP:Quit
You can only access the Preferences menu in stop
mode. If playback is in progress press STOP twice.
Child protection
Here you can set the authorisation level for DVDs.
Before setting the child protectionyou have to
enter the four-character password.
PG 13
R
NC 17
40
Some DVDs and CDs are coded with the encryption
signals of the
authorisation classes established by the
Motion Picture Association. The eight authorisation
classes are:
G
PG
PG 13
PGR
R
NC 17
ADULT
OFF
("General") for all age groups
(“Parental Guidance”)
parental guidance recommended
parental guidance most strictly
recommended; some scenes not suitable for
children under 13
("Parental Guidance Restriction") parental
guidance recommended for young people
under 17
("Restriction") parental guidance most strictly
recommended for young people under 17
Not for young people under 17
Only for adults
No parental control set.
Page 40

DVD_Porty_MD80146.book Seite 41 Dienstag, 12. Oktober 2004 11:44 11
For example , if you have inserted a DVD that is coded
with authorisation class 7 (NC 17) or 8 (Adult) and you
have selected authorisation classes 1 to 6, a message
appears and the viewer must enter a password. Parts of
a DVD, i.e. certain scenes, may also be coded with an
authorisation class or various authorisation classes.
Password
Here you can enter a password to control access by
other people.
Old:
Enter the existing password with the number keys on
the remote control. It comprises exactly four digits. If no
password has been entered, the password set by the
factory is in force 8888.
When you have entered the correct password the next
field is activated for your entry.
New:
Enter a four-digit password with the number keys on
the remote control. The bar moves to the next field.
Verify:
Enter the four-digit number again.
` Press ENTERto confirm the new password.
The new password is retained even if you reset the
settings to default.
Angle Mark
If you select the ON setting, a camera symbol can be
seen on the screen if the inserted DVD provides various
camera perspectives.
Default
Select the Read entry and confirm with ENTER. All
settings are reset to the defaults.
Any new password is retained.
Portable DVD-Player MD80146 41
Page 41

DVD_Porty_MD80146.book Seite 42 Dienstag, 12. Oktober 2004 11:44 11
IF ERRORS OCCUR
If errors occur, check first whether you can correct the
problem yourself. The following overview may help
you.
Never try to repair the device yourself.
Contact our service centre or other qualified
personnel if a repair is necessary.
MALFUNCTION POSSIBLE CAUSE/ACTION
GENERAL
No functions
No standby display
The disk does not play
although has been
pressed, or stops again
immediately
No image and sound in
OUTPUT mode
The power is not connected properly.
Pull out the plug and insert it again into the mains.
If the device has been affected by a storm, static
charging or another external factor, try the following:
STANDBY on the device. Then pull out the mains
Press
cable and plug it back in.
The disk has not been inserted properly.
Insert a disk into the disk compartment with the title side
upwards.
The disk is dirty or damaged.
Clean the disk or test the device by inserting another
disk.
Condensed water has formed in the disk compartment.
Leave the disk compartment open for one to two hours
to allow it to dry out.
DVD: The wrong regional code has been set.
Set the correct regional code (2).
Set the INPUT OUTPUT slide switch to the
INPUTposition.
Move the slide switch to the OUTPUT position.
42
Page 42

DVD_Porty_MD80146.book Seite 43 Dienstag, 12. Oktober 2004 11:44 11
I
F ERRORS OCCUR
The device does not
respond to the remote
control
No picture The cable connection between the DVD player and the
No image in INPUT
mode
Very poor, speckled
picture
Distorted image The disk is dirty.
No sound
Sound too quiet Check the audio settings in the SETUP menu: has the
The battery is flat
Replace the batteries.
The remote control is not connecting properly with the
device.
If necessary remove any obstacles between the remote
control and the device. Point the remote control to the
infrared sensor on the front of the device. You should not
be further than m away from the device.
connected television is faulty.
Connect the cable properly.
The television is not switched on or set incorrectly.
Switch the television on. Selected the video channel (AVCHANNEL) on the television.
Set the INPUT OUTPUT slide switch on the device to the
OUTPUTposition.
Move the slide switch to the INPUT position.
An incorrect video format has been selected.
Switch the P/N key to the correct video format (PAL –
NTSC).
Clean the disk.
Small-scale image distortion is not a malfunction.
Muting is on(
Press MUTEto switch the sound on.
correct sound format been selected?
MUTE).
DVD PROBLEMS
Wrong language
Wrong subtitle
language
SKIP function does not
work
The camera position
cannotbe changed.
You have forgotten the
password.
You have entered the wrong language.
Check on the DVD cover or DVD menu whether the
selected language is actually on the DVD. Set the correct
language.
Some DVDs have blocked the SKIP function for certain
titles/chapters.
Only a few disks have various camera positions and they
are usually restricted to certain selected scenes on any
one DVD.
Use the master password 9922.
Portable DVD-Player MD 80146 43
Page 43

DVD_Porty_MD80146.book Seite 44 Dienstag, 12. Oktober 2004 11:44 11
TECHNICAL DATA
Mains adapter: Input: 230 V ~50 Hz
Output: 12 V 2 A
Power consumption:
Standby power
consumption for battery
operation:
Standby power
consumption for mains
operation:
Batteries (remote control): CR2025
Colour television system: PAL/NTSC
Supported
disk formats:
Video formats: 4:3 / 16:9
Dynamic scope: > 80 dB
MP3 coding SO 9660 format
15 W
approx. 1.2 W
approx. 2.2 W
DVD, DVD+R, DVD+RW, DVD-R, DVD-RW; VCD, SVCD,
CD-Audio; CD-R, CD-RW, JPEG-CD, MP3-CD
Sampling frequency:
MPEG 1: 32, 44.1, 48 kHz
Bit rate: 32 - 320 kbps
44
If you use audio CDs please note the following label.
These days there are many non-standard CD
recording and copy protection procedures as
well as various blank CD-R and CD-RW disks.
Therefore in individual cases there may be read
errors or
delays. This does not mean the device is
malfunctioning.
Subject to technical changes.
Page 44

DVD_Porty_MD80146.book Seite 45 Dienstag, 12. Oktober 2004 11:44 11
CODE LIST FOR SELECTING THE LANGUAGE
In the "Preferences" menu you can pre-select the language for audio, subtitles and
the disk menu. In the entry fields enter the four-character code from the following
list:
Abkhazian 6566
Afar 6565
Afrikaans 6570
Albanian 8381
Amharic 6577
Arabic 6582
Armenian 7289
Assamese 6583
Aymara 6588
Azerbaijani 6590
Bashkir 6665
Basque 6985
Bengali; Bangla 6678
Bhutani 6890
Bihari 6672
Breton 6682
Bulgarian 6671
Burmese 7789
Byelorussian 6669
Cambodian 7577
Catalan 6765
Chinese 9072
Corsican 6779
Croatian 7282
Czech 6783
Danish 6865
Dutch 7876
English ] 6978
Esperanto 6979
Estonian 6984
Faroese 7079
Fiji 7074
Finnish 7073
French 7082
Frisian 7089
Galician 7176
Georgian 7565
German 6869
Greek 6976
Greenlandic 7576
Guarani 7178
Gujarati 7185
Hausa 7265
Hebrew 7387
Hindi 7273
Hungarian 7285
Icelandic 7383
Indonesian 7378
Interlingua 7365
Irish 7165
Italian 7384
Japanese 7465
Javanese 7487
Kannada 7578
Kashmiri 7583
Kazakh 7575
Kirghiz 7589
Korean 7579
Portable DVD-Player MD80146 45
Page 45

DVD_Porty_MD80146.book Seite 46 Dienstag, 12. Oktober 2004 11:44 11
CODE LIST FOR SELECTING THE LANGUAGE
Kurdish 7585
Laothian 7678
Latin 7665
Latvian;Lettish 7684
Lithuanian 7679
Macedonian 7775
Malagasy 7771
Malay 7783
Malayalam 7776
Maltese 7784
Maori 7773
Marathi 7782
Moldavian 7779
Mongolian 7778
Nauru 7865
Nepali 7869
Norwegian 7879
Oriya 7982
Panjabi 8065
Pashto;Pushto 8083
Polish 8076
Portuguese 8084
Quechua 81857
Rhaeto-Romance 8277
Romanian 8279
Russian 8285
Samoan 8377
Sanskrit 8365
Scots Gaelic 7168
Serbian 8382
Serbo-Croatian 8372
Shona 8378
Sindhi 8368
Singhalese 8373
Slovak 8375
Slovenian 8376
Somali 8379
Spanish 6983
Sundanese 8385
Swahili 8387
Swedish 8386
Tagalog 8476
Tajik 8471
Tamil 8465
Tatar 8484
Telugu 8469
Thai 8472
Tigrinya 8473
Tonga 8479
Turkish 8482
Turkmen 8475
Twi 8487
Ukrainian 8575
Urdu 8582
Vietnamese 8673
Volapuk 8679
Wolof 8779
Xhosa 8872
Yiddish 7473
Yoruba 8979
Zulu 9085s
46
 Loading...