

Page 1
MSN 5000 5261
01/03
MD 4302 BDA/UK 19.09.2002 13:54 Uhr Seite 1
E-Mail: hotline@medion.co.uk
Fax 01793 71 57 16
Tel. 0870 72 70 370
GB-Wiltshire
Medion Electronics Ltd.
Swindon SN3 5JF
130 Faraday Park
Faraday Road
Dorcan
®
OPERATING MANUAL
HEART RATE MONITOR
C M Y CM MY CY CMY K
MD 4302
®
•
CARE
Wipe the heart rate monitor and the transmitter down with a
damp cloth after training.
Make sure the transmitting unit is stored in a dry place to prevent
the batteries discharging.
•
be able to achieve optimum results.
Do not wear your heart rate monitor for sports where injuries
are likely to occur.
Read the operating manual through carefully and keep it for
future reference as long as you have the heart rate monitor.
People who have heart and circulatory problems or
wearers of heart pacemakers should consult their doctor
before using this heart rate monitor.
•
•
•
indicate your heart rate, calorie consumption and fat burn.
Before you begin your training program visit your doctor and
consult him as to your individual upper and lower heart rate
limit (training range), exercise frequency and duration.
With these parameters of your current fitness level you will
!
The heart rate monitor is not a medical instrument. It is a
training instrument that has been designed to monitor and
SAFETY INSTRUCTIONS
Lift the flap!
Page 2
MD 4302 BDA/UK 19.09.2002 13:54 Uhr Seite 2
Mode
A
Alarm
D
D
C
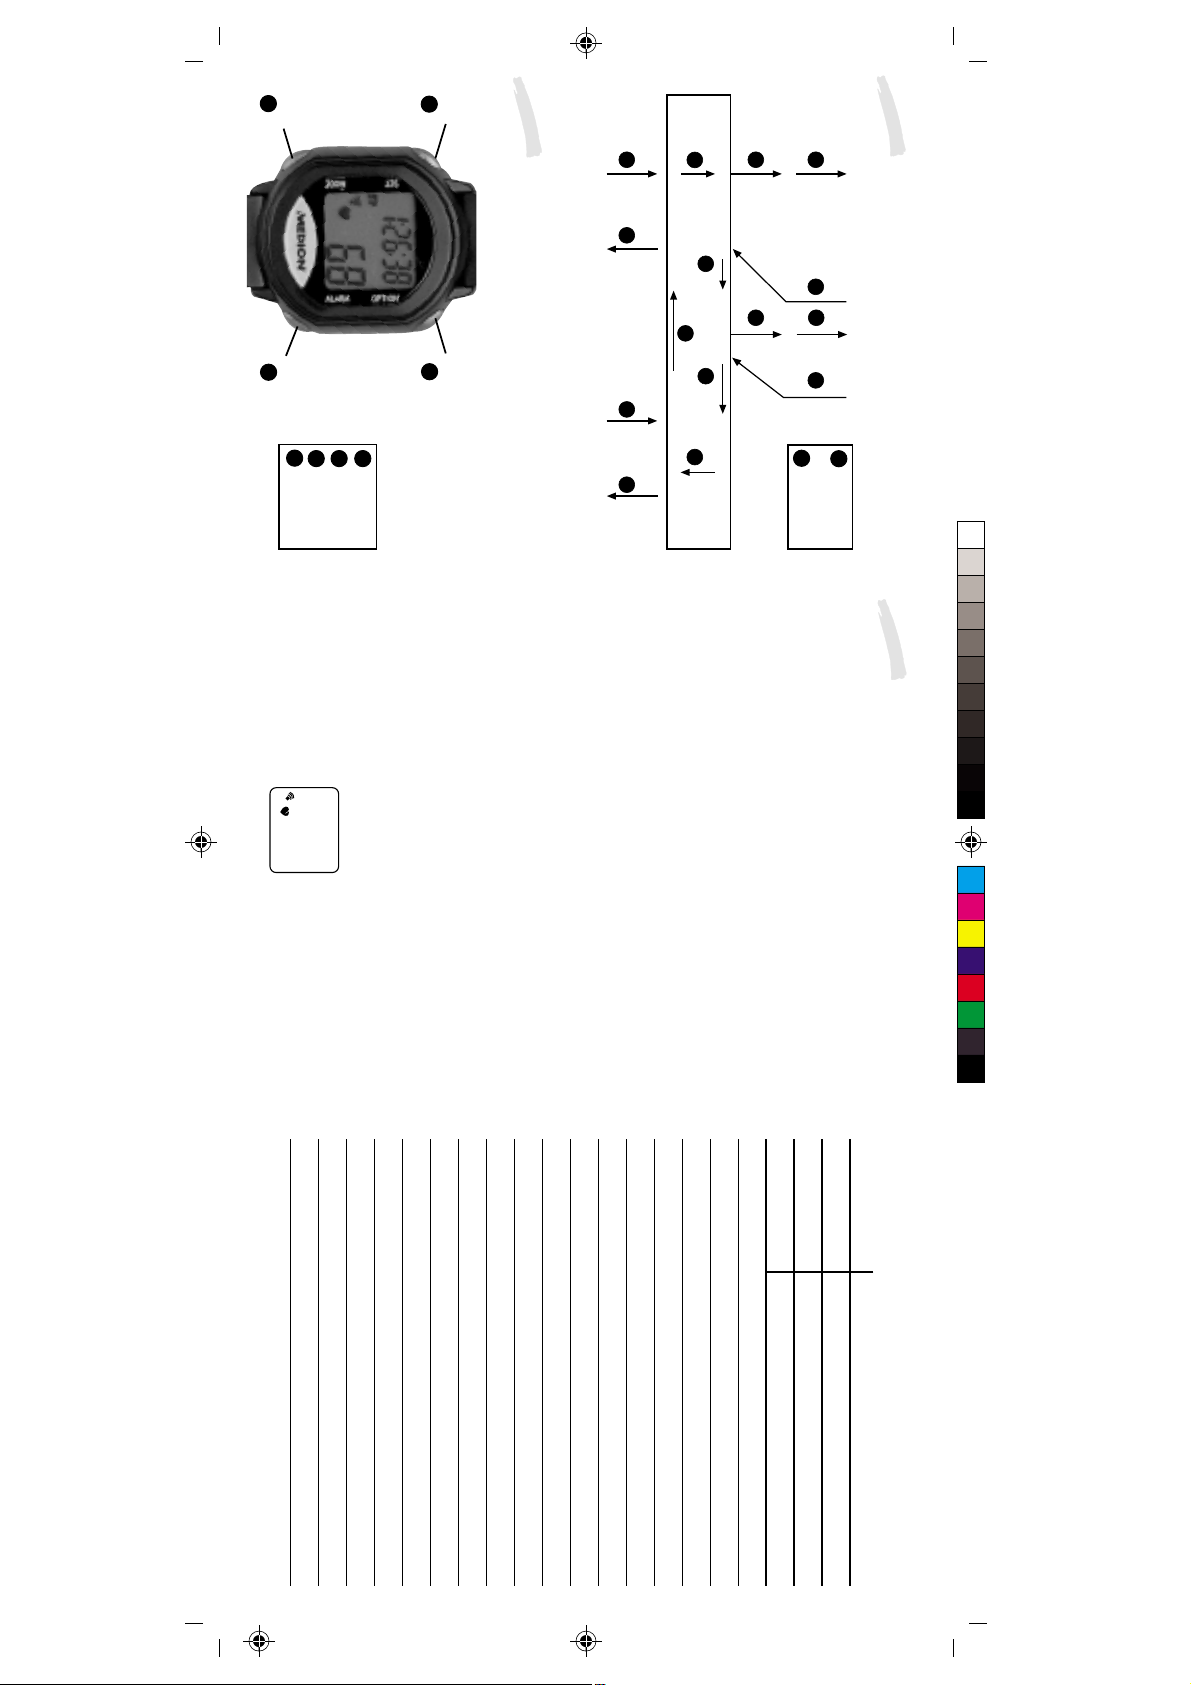
=Alarm buttonB=Set button
=Option button
A
=Mode button
BUTTON FUNCTIONS
B
Your heart rate monitor has four functional buttons.
Set
FAT BURNER MONITOR
KILOGRAM/CALORIE COUNTER
C C C C
A
TRAINING STOPWA TCH MODE
C C
C C
COUNTDOWN MODE
A A
TIME MODE TRAINING ZONE MODE
A
Option
C
MAXIMUM HEART RATE
AVERAGE HEART RATE
A
is touched or when you are no longer within the training range.
Touch the alarm button to activate/deactivate the beep. A sound
symbol appears in the display when the beeper is activated.
mode.
The D alarm button is used to activate a beeper when the button
From the heart rate mode you can move from the average heart
rate to the max. heart rate and back to the average heart rate.
From the training stopwatch mode you can move into the countdown
mode, the lap stopwatch mode and back to the training stopwatch
The C option button is used to switch between the individual options
in the respective operating modes as follows.
You can move from the normal time mode to the alarm mode, the
date mode and back to the normal time mode.
normal time, date, alarm time, countdown timer and calorie
consumption parameters. In addition, the set button is used for
starting the countdown function, training stopwatch function and
lap stopwatch function.
training stopwatch mode and back to the time mode.
The B set button is used to set the upper and lower heart rate,
C
ALARM MODE
C
C
=Option button
The A mode button is used to switch between the different operating
modes. Press the mode button briefly to move from the time mode
into the training zone mode, the heart rate mode, kilocalorie mode,
FLOW DIAGRAM
LAP STOPWATCH MODE
DATE MODE
A
=Mode button
Never activate the function buttons under water, as moisture can
then penetrate the housing.
BUTTON FUNCTIONS
- 1 -
Mode
Alarm
Set
1
3
:
2
4
Option
Name:
Normal pulse:
Lower pulse limit:
Upper pulse limit:
C M Y CM MY CY CMY K
Page 3
- 2 -
Press the mode button. The minute figure
will begin to flash. Use the set button to
Return to the time mode by pressing the
mode button.
set the minutes correctly.
Or for 12-hour setting:
until the word "Hold" disappears from the
display. Now press the set button to select
Confirm your selection using the mode
button, the clock will then appear with
the hour figure flashing. Set the current
hour using the set button.
When 12-hour display is selected, the American calendar format month/date will be displayed
automatically. When the 24-hour display is selected the European calendar format date/month
is displayed. When setting the 12-hour clock make sure the display for AM (before noon)
and PM (after noon) is correct.
between 12-hour and 24-hour display.
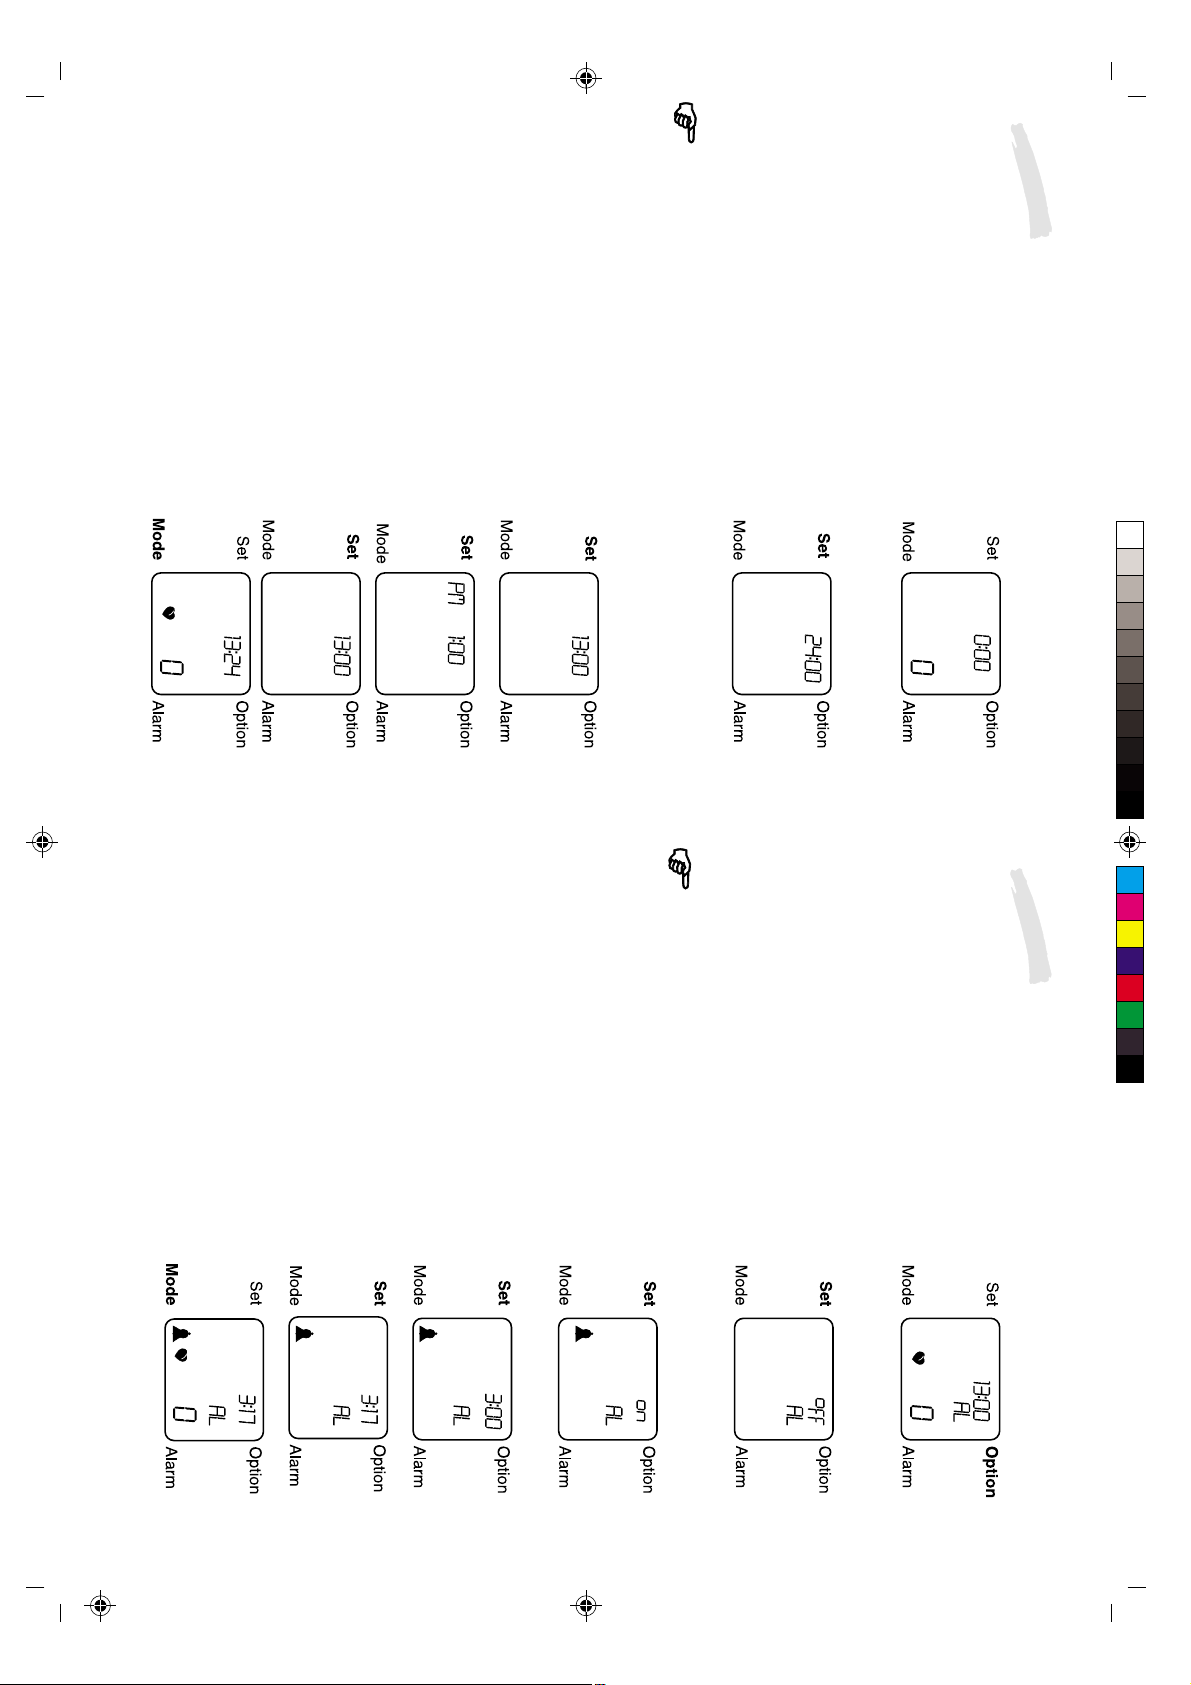
Once in the time mode, keep the set
button pressed for approx. 2 seconds
time mode.
hand corner of the display. If this is not
the case, press the option button until
you are in the correct operating mode.
Then press the mode button to reach the
The monitor must be in the time mode
for the time to be set, i.e. the time is
shown in the top right-hand corner and
the current heart rate in the bottom right-
SETTING THE TIME
MD 4302 BDA/UK 19.09.2002 13:54 Uhr Seite 3
- 3-
Press the mode button. The minute figure
will begin to flash. Now use the set button
Return to the alarm time mode by
pressing the mode button.
to set the minutes.
required by pressing the set button.
Confirm your selection using the mode
button, the alarm clock will then appear
with the hour figure flashing. Set the hour
The bell symbol remains visible in all operating modes if the alarm has been switched on.
the alarm on (the word "on" and a bell
symbol appear in the display) or off (the
word "off" appears in the display).
Once in the time mode, keep the set
button pressed for approx. 2 seconds
until the word "Hold" disappears from the
display. Now press the set button to switch
alarm time mode.
time, the current heart rate and the letters
"AL" can be seen on the display. If this
is not the case, enter the time mode and
press the option button to move into the
SETTING THE ALARM TIME
The monitor must be in alarm time mode
for the alarm time to be set, i.e. the alarm
C M Y CM MY CY CMY K
Page 4

- 4 -
Weekday abbreviations:
MO = Monday, TU = Tuesday, WE = Wednesday,
TH = Thursday, FR = Friday, SA = Saturday,
SU = Sunday
Return to the date mode by pressing the
mode button. The English abbreviation
for the weekday is automatically
displayed before the date.
Press the mode button. The date figure
now flashes. Set the date using the set
button.
month by pressing the set button.
If you have selected the 12-hour display for the time, please note that the American calendar
format month/date will be displayed automatically. If you have selected the 24-hour display,
the European format date/month will be displayed.
Confirm your selection using the mode
button, the date will then appear with the
month figure flashing. Set the required
set the year between the year 2000 and
the year 2050.
Once in the date mode, keep the set
button pressed for approx. 2 seconds
until the word "Hold" disappears from
the display. Now press the set button to
The monitor must be in the date mode
for the date to be set, i.e. the date and
the current heart rate are shown on the
display. If this is not the case, enter the
time mode and press the option button
to reach the date mode.
SETTING THE DATE DISPLAY
Your heart rate monitor is equipped with a 50-year calendar which will calculate the
weekday to the appropriate date until the year 2050.
MD 4302 BDA/UK 19.09.2002 13:54 Uhr Seite 4
- 5 -
The heart symbol flashes in the display
when your heart rate monitor is receiving
2 metres between yourself and other users of heart rate monitors.
TRANSMISSION FREQUENCY INTERFERENCE
Battery-operated heart rate monitors can be influenced by interference from external
radio frequencies. Electronic training devices in fitness clubs, mobile phones, battery-
operated bike computers, high-voltage lines etc. can cause irregular transmission
impulses and lead to the display showing "0" during training. When training takes
place in groups, other heart rate transmitters can overlay your signal causing an
incorrect heart rate display. To achieve correct signals, keep a distance of approx.
signals from the transmitter.
HEART RATE DISPLAY
It can take a few seconds for a heart rate to appear.
Vary the position of the transmitter if necessary to achieve optimum contact.
Fasten the heart rate monitor on your wrist.
Press any button to activate the monitor. If there is no interference the heart signal
will flash with the received transmission signals.
To achieve better skin contact, moisten the conductive transmission pad lightly with ECG
jelly (from chemist stores). Put the belt on a few minutes before starting training so that it
can warm up to body temperature. Find the best position for the belt. The contact between
the skin and the transmitter must not be interrupted when deep breaths are taken.
PUTTING ON THE TRANSMITTER AND THE HEART RATE MONITOR
The transmitter is worn on the naked skin. Set the elastic belt tight enough for the
transmitter to be pressed to your chest.
:
®
C M Y CM MY CY CMY K
Page 5

- 6 -
The training forms given with the different heart rate ranges are only examples. You
must discuss your personal training form with your personal heart rate ranges with
your doctor or a qualified trainer.
CAUTION!
Use your maximum heart rate (MHR) to calculate your training limit values. Contact
your doctor or your trainer to determine your maximum heart rate. If you do not know
your maximum heart rate, you can estimate it using the following formula:
MEN: 220 minus age = Maximum heart rate (MHR)
WOMEN: 230 minus age = Maximum heart rate (MHR)
Calculate the upper and lower limit values of your training form by multiplying your
maximum heart frequency by the factors listed in the following.
Select the training form you require.
training zone mode.
The monitor must be in the training zone
mode for the training limits to be set, i.e.
the display alternates between how long
you were in the upper (HI), lower (LO)
and required (In) training range. If this is
not the case, enter the time mode and
press the mode button to move into the
SETTING THE TRAINING RANGE
The heart rate monitor makes it possible for you to set a specific training range with
upper and lower heart rate limit value.
During training, your current heart rate
is shown in the display. A flashing value
and an arrow pointing upwards or
downwards indicate that you are outside
your set training range. In addition, an
acoustic alarm can be set. The arrows
disappear as soon as your current value
is within the training range again.
MD 4302 BDA/UK 19.09.2002 13:54 Uhr Seite 5
You cannot set a lower limit value that is higher than the upper limit value. In this case the
Exceeding or falling below the set limit
values can be indicated by an acoustic
signal in addition to the optical display.
Press the alarm button to activate or
deactivate the acoustic signal. A sound
symbol appears in the display when the
acoustic signal has been activated.
When the acoustic signal has been activated, an appropriate signal is given every
six seconds if your pulse rate is above or below the limit values.
- 7 -
Return to the training zone mode by pressing the mode button.
WARNING SIGNAL FOR THE TRAINING ZONE
upper limit value will reappear on the display so that you can reset it.
lower limit value between 30 and 179.
Formula: lower limit value: MHR x 0.80
upper limit value: MHR x 0.95
Keep the set button pressed for approx.
2 seconds in the training time mode until
the word "Hold" disappears from the
display. Now press the set button to set
the upper limit value between 100 and
240.
Confirm your selection using the mode
button, the lower limit value will then
appear flashing.
Press the set button to set the required
TRAINING FORM - MAXIMUM LOAD
upper limit value: MHR x 0.80
TRAINING FORM - KEEPING FIT
Formula: lower limit value: MHR x 0.50
upper limit value: MHR x 0.65
TRAINING FORM - STAMINA TRAINING
Formula: lower limit value: MHR x 0.65
C M Y CM MY CY CMY K
Page 6

MD 4302 BDA/UK 19.09.2002 13:54 Uhr Seite 6
Once in the kilocalorie mode keep the
set button pressed for approx. 2 seconds
until the word "Hold" disappears from
the display. Now press the set button to
select your gender between "M" for male
and "F" for female.
to reach the kilocalorie mode.
used will be displayed in the top right-
hand corner, underneath this the current
heart rate and the letters "KCAL" will
also appear. If this is not the case, enter
the time mode and press the mode button
- 8 -
CALORIE CONSUMPTION MODE
To set the data, the monitor must be in
the kilocalorie mode, i.e. the calories
The monitored heart rate is used to calculate the calorie consumption and the fat
burn achieved if the training stopwatch is switched on. For these values to be calculated
accurately, your gender, weight and current activity must be entered. Proceed as
follows:
Return to the heart rate display mode be repressing the option button.
display mode for you to be able to view
the average or maximum heart rate, i.e.
the average heart rate is indicated in the
top right-hand corner, the current heart
rate in the bottom right-hand corner and
the letters "AVG" can be seen in the
display.
If this is not the case, enter the time mode
and press the mode button to move into
the heart rate display mode.
Once in the heart rate display mode,
press the option button, the maximum
heart rate value will appear in the top
right-hand corner and the letters "MAX"
will be on the display.
The monitor must be in the heart rate
HEART RATE DISPLAY MODE
Your heart rate monitor enables you to read off your average and maximum heart
rate and thus to adapt your training optimally and avoid overstrain.
- 9 -
If you have given your weight in lb (English pounds) then your fat burn will also be given
in pounds.
Press the option button to read off the
fat burn to the nearest 10 grams during
your training sequence. The maximum
display is 1.30 kg.
pressing the mode button. Here you can
read off the number of kilocalories used
while the monitor is running in the training
stopwatch mode.
only after the training stopwatch has been started.
Return to the kilocalorie mode by
These calorie parameters are approximate values which are to be used for reference. You
should decide what factor to enter yourself, since you can carry out all of these sports with
different intensities.
Calorie consumption is only monitored from a heart rate of more than 100 beats/minute and
Jogging 0.00036 – 0.00069 Tennis 0.00050
Canoeing 0.00020 – 0.00047 Circuit training 0.00039 – 0.00060
Football 0.00060 Swimming 0.00028 – 0.00078
Gardening work 0.00025 – 0.00057 Skiing 0.00052 – 0.00074
Handball 0.00063 Squash 0.00096
Basketball 0.00063 Cycling 0.00029 – 0.00079
Some examples for the different calorie parameters:
Aerobics 0.00047 – 0.00061 Climbing 0.00055
Badminton 0.00044 Running 0.00074 – 0,00131
Confirm your selection using the mode
button and the weight value will appear
flashing. Set your actual weight between
20kg and 225kg by pressing the set
button.
Use the option button to choose between
kilograms and English pounds (454g).
Press the mode button. The calorie
parameters appear flashing. Use the set
button to set the calorie parameters
between the values 00010 and 00131.
C M Y CM MY CY CMY K
Page 7

MD 4302 BDA/UK 19.09.2002 13:54 Uhr Seite 7
When the training time is reset, the heart rate memory is deleted and your heart rate monitor
is ready for the next training sequence to begin.
- 10 - - 11 -
time to 0:00:00.
line.
By keeping the set button pressed for more than 2 seconds you will return the training
4 beeps will sound at the end of the rest
period. The stored heart rate will be
displayed in the top line in comparison
with the current heart rate in the bottom
another 5 seconds.
Then the rest countdown time will appear
and count down to 0 automatically.
When the set button is pressed again a
beep can be heard and a rest phase of
3 minutes will begin. The training time
you stopped remains displayed for
press the set button to set the training
time and thus your training sequence.
training stopwatch mode.
Once in the training stopwatch mode,
hand corner, under this the heart rate
and the letters "STP" will appear.
If this is not the case, enter the time mode
and press the mode button to reach the
The monitor has to be in the training
stopwatch mode in order to start the
training stopwatch running, i.e. the
training time is displayed in the top right-
TRAINING STOPWATCH MODE
Your heart rate monitor is equipped with a training stopwatch which can be used to
read off times up to 9 hours, 59 minutes and 59 seconds.
S
T
P
After the countdown time has run down, the display stays at 0:00:00 and an acoustic signal
is given. The countdown timer can only be reset to the value you set initially by keeping the
set button pressed for some time.
Start or stop the countdown timer by
pressing the set button. By keeping the
set button pressed, the countdown timer
is reset to the initial value you set.
Return to the countdown mode by
pressing the mode button.
minutes.
Confirm your selection using the mode
button, the minute display will begin to
flash.
Now press the set button to set the
the number of hours between 0 and 9.
Once in the countdown mode, keep the
mode button pressed for 2 seconds until
the word "Hold" disappears from the
display. Now press the set button to set
S
T
P
The monitor must be in the countdown
mode for the countdown timer to be set,
i.e. the countdown timer is indicated in
the top right-hand corner of the display,
under it the current heart rate and the
letters "CDT". If this is not the case, enter
the time mode and press the mode button
to enter the training stopwatch mode and
then the option mode to reach the
countdown mode.
SET AND START COUNTDOWN TIMER MODE
Your heart rate monitor enables you to program a countdown timer from 1 minute to
9 hours and 59 minutes.
C M Y CM MY CY CMY K
Page 8

Press the set button to start the time
measurement for the next lap or press
the option button to leave the lap time
mode again.
Keep the set button pressed for more than 2 seconds to return the lap time mode to
its original state.
lap.
Press the set button again to end the
time measurement for the current lap.
The stopwatch automatically begins time
measurement for the next lap.
Press the set button to start measurement
of the time for the current lap.
The maximum lap time is 99 minutes and 59 seconds. The time displayed then begins at
00:00 again.
If you press the mode button the time
measurement will be stopped without
continuing automatically with the next
the lap time.
- 12 -
Once in the lap stopwatch mode, press
the set button to start measurement of
the training stopwatch mode and then
the option button to reach the lap
stopwatch mode.
of the display, under it the current heart
rate and the letters "LAP".
If this is not the case, enter the time
mode and press the mode button to enter
The monitor must be in the lap time
stopwatch mode for the lap timer to be
set, i.e. the lap number and the lap time
are indicated in the top right hand corner
Your heart rate monitor has a lap time stopwatch for up to 16 training laps.
MD 4302 BDA/UK 19.09.2002 13:54 Uhr Seite 8
LAP TIME STOPWATCH MODE
- 13 -
average heart rate and the time stopped
for every lap. Change between the
Keep the set button pressed for longer
than 2 seconds to delete the lap time
memory.
memory and return to the lap time mode.
individual lap by pressing the set button.
Press the mode button to leave the lap time
Once in the lap time mode keep the
mode button pressed for approx. 2
Press the set button to indicate the
The overall lap time and the total number of laps will now be displayed at 2 second intervals
with the average time for all laps as well as the respective average heart rate from the lap
time memory.
seconds to start the lap time memory.
mode.
the option button to reach the lap time
time for all laps and the total number of laps with the average time for all laps as well
as the respective average heart rate from the lap time memory. In addition you can
request the times of the individual laps with the respective average heart rate.
The monitor must be in the lap stopwatch
mode for the lap memory to be
requested, i.e. the lap number and the
lap time are visible in the top right-hand
corner of the display, under this the
current heart rate and the letters "LAP".
If this is not the case, enter the time
mode and press the mode button to enter
the training stopwatch mode and then
LAP TIME MEMORY
After training, you have the possibility of reading off the training values for the total
C M Y CM MY CY CMY K
Page 9

MD 4302 BDA/UK 19.09.2002 13:54 Uhr Seite 9
GUARANTEE
12
months
from date of
purchase
- 14 -
TROUBLESHOOTING
Heart rate is not displayed
- Check the position of the transmitter
- Is the transmitter too far from the receiver (monitor)?
- Are there electronic sources of interference spoiling perfect transmission
- Does the transmitter need a new battery?
The display is black
- The ambient temperature is outside the operating range (0° to 55°C )
The display is empty
- The receiver needs a new battery. Replace it as soon as possible.
Reset - resetting the receiver
1. Keep all 4 buttons pressed for approx. 3 seconds.
2. Press the set button. The clock then counts down from 3 to 0.
3. Press the mode button and then the option button.
Your heart rate monitor is now in its delivery state.
the bracket and tighten the band until the bracket is pressed together on the handlebars.
in the training stopwatch mode.
automatically switch to the energy-saving
mode and the present time will be
displayed. Press any button to "wake up"
your monitor again, you will then be back
Mode
Alarm
FITTING YOUR HEART RA TE MONIT OR TO BIKE HANDLEBARS
Place the bracket included onto the handlebars. Fasten the heart rate monitor around
ENERGY-SAVING MODE
If no signal is received for approx. 5
minutes, your heart rate monitor will
Set
1
3
:
2
4
Option
E-Mail: hotline@medion.co.uk
Fax 01793 71 57 16
Tel. 0870 72 70 370
Swindon SN3 5JF
GB-Wiltshire
Medion Electronics Ltd.
130 Faraday Park
Faraday Road
Dorcan
unauthorised people shall cause the guarantee to be invalid.
This guarantee does not affect your statutory rights.
Charges will be made for any repairs performed after expiry of the guarantee.
If you require help operating your heart rate monitor, please contact
the help line on 0870 7270370 • Fax: 01793 715716
or e-mail: hotline@medion.co.uk
®
damage to breakable parts. Any improper treatment, use of force or tampering by
GUARANTEE
Dear Customer,
Our Medion service team will gladly help you on all questions concerning your new
heart rate monitor.
Please call the help line below first, as many minor problems can be solved over
the phone. Defective heart rate monitor should be sent to your regional service
center with an enclosed copy of your sales receipt.
For packing please use the original box only.
The guarantee applies only to faulty materials and workmanship and does not cover
Subject to technical modifications!
TECHNICAL DATA
Batteries:
Receiver: 1 x CR 2032 3V
Transmitter: 1 x CR 2032 3V
Transmission frequency: 5,3 KHz
C M Y CM MY CY CMY K
 Loading...