


TABLE OF CONTENTS
Safety instructions . . . . . . . . . . . . . . . . . . . . . . . . . . . . . . . . . . . . . . . . . . . . . . 2
Keep electrical equipment out of reach of children . . . . . . . . . . . . . . . . . . . . . . . . . . . . . . . . . . . 2
Setting the appliance up safely . . . . . . . . . . . . . . . . . . . . . . . . . . . . . . . . . . . . . . . . . . . . . . . . . . .2
Power connection . . . . . . . . . . . . . . . . . . . . . . . . . . . . . . . . . . . . . . . . . . . . . . . . . . . . . . . . . . . . .3
Handling the breadmaker safely . . . . . . . . . . . . . . . . . . . . . . . . . . . . . . . . . . . . . . . . . . . . . . . . . . 3
Never undertake your own repairs . . . . . . . . . . . . . . . . . . . . . . . . . . . . . . . . . . . . . . . . . . . . . . . .4
Cleaning and maintenance . . . . . . . . . . . . . . . . . . . . . . . . . . . . . . . . . . . . . . . . . . . . . . . . . . . . . .4
Appliance description . . . . . . . . . . . . . . . . . . . . . . . . . . . . . . . . . . . . . . . . . . . . 5
Appliance and accessories . . . . . . . . . . . . . . . . . . . . . . . . . . . . . . . . . . . . . . . . . . . . . . . . . . . . . . .5
Operating field . . . . . . . . . . . . . . . . . . . . . . . . . . . . . . . . . . . . . . . . . . . . . . . . . . . . . . . . . . . . . . .6
Items supplied . . . . . . . . . . . . . . . . . . . . . . . . . . . . . . . . . . . . . . . . . . . . . . . . . . . . . . . . . . . . . . . . 8
Available programs . . . . . . . . . . . . . . . . . . . . . . . . . . . . . . . . . . . . . . . . . . . . . . 9
Bread dough programs . . . . . . . . . . . . . . . . . . . . . . . . . . . . . . . . . . . . . . . . . . . . . . . . . . . . . . . . .9
Quick-baking program . . . . . . . . . . . . . . . . . . . . . . . . . . . . . . . . . . . . . . . . . . . . . . . . . . . . . . . . . 9
Program "Knead only" . . . . . . . . . . . . . . . . . . . . . . . . . . . . . . . . . . . . . . . . . . . . . . . . . . . . . . . . . 10
Other programs . . . . . . . . . . . . . . . . . . . . . . . . . . . . . . . . . . . . . . . . . . . . . . . . . . . . . . . . . . . . . . 10
Operation . . . . . . . . . . . . . . . . . . . . . . . . . . . . . . . . . . . . . . . . . . . . . . . . . . . . . . 11
Setting up the unit . . . . . . . . . . . . . . . . . . . . . . . . . . . . . . . . . . . . . . . . . . . . . . . . . . . . . . . . . . . 11
Preparing the dough . . . . . . . . . . . . . . . . . . . . . . . . . . . . . . . . . . . . . . . . . . . . . . . . . . . . . . . . . . 11
Before first use . . . . . . . . . . . . . . . . . . . . . . . . . . . . . . . . . . . . . . . . . . . . . . . . . . . . . . . . . . . . . . . 12
Operation . . . . . . . . . . . . . . . . . . . . . . . . . . . . . . . . . . . . . . . . . . . . . . . . . . . . . . . . . . . . . . . . . . 12
Further settings . . . . . . . . . . . . . . . . . . . . . . . . . . . . . . . . . . . . . . . . . . . . . . . . . . . . . . . . . . . . . . 13
Program sequences . . . . . . . . . . . . . . . . . . . . . . . . . . . . . . . . . . . . . . . . . . . . . .15
Recipe examples . . . . . . . . . . . . . . . . . . . . . . . . . . . . . . . . . . . . . . . . . . . . . . . . . .17
Notes on preparing dough . . . . . . . . . . . . . . . . . . . . . . . . . . . . . . . . . . . . . . . . . . . . . . . . . . . . . 17
Recipes . . . . . . . . . . . . . . . . . . . . . . . . . . . . . . . . . . . . . . . . . . . . . . . . . . . . . . . . . . . . . . . . . . . . . 18
Dealing with problems . . . . . . . . . . . . . . . . . . . . . . . . . . . . . . . . . . . . . . . . . . 20
Technical data . . . . . . . . . . . . . . . . . . . . . . . . . . . . . . . . . . . . . . . . . . . . . . . . . 21
Breadmaker MD 41923 1

T
ABLE OF CONTENTS
Breadmaker MD 41923 2

SAFETY INSTRUCTIONS
About these instructions
Please read these instructions carefully before using the system. Note the warnings in
the operating instructions
Always keep the operating instructions close to hand. If you sell the appliance or give
it away, make sure you also hand over these instructions and the guarantee card.
Keep electrical equipment out of reach of children
Never allow children to use electrical devices unattended.
Keep plastic packaging out of the reach of children. There is a risk of
suffocation.
Setting the appliance up safely
Place the appliance on a heat-resistant, sturdy and level surface.
Never place the appliance on the edge of a table - it could tip over and
fall down.
The appliance must be placed at least 10 cm away from the wall and
from other units (to the back and sides). Do not cover the air vent slots.
Do not set up the appliance near easily flammable materials (curtains,
drapes, paper, etc.). There is a risk of combustion.
Do not place the appliance directly next to a gas or electric cooker or
next to another hot oven.
Never set up the appliance over a hotplate or other heat-generating
appliances (grill, deep fat fryer); not even if an exhauster is installed
above it.
Do not permit moisture to penetrate the housing. There is a risk of
electric shock.
Do not use the appliance out-of-doors.
2

Power connection
Only connect the appliance to a power socket 230 V ~ 50 Hz that is
easy to reach and is close to the place where you have set up the
appliance. The power socket must be freely accessible so that you can
unplug the appliance quickly if you should need to do so.
Handling the breadmaker safely
General instructions
Never leave the appliance unattended during operation.
Never use the appliance if it has been damaged or if the mains cable or
plug shows signs of damage.
Appliance and mains cable
Never touch the appliance, mains cable and plug with wet hands.
There is a risk of electric shock.
Never immerse the appliance, the mains cable or the plug in water or
other liquids.
S
AFETY INSTRUCTIONS
Mains cable
The mains cable may not be wrapped around the appliance during
use. It may not touch any hot surfaces. This could damage it.
Do not kink or pinch the mains cable.
Always remove the mains cable from the mains socket by grasping the
plug - do not pull the cable itself.
Before unplugging the mains cable, switch off the appliance.
Appliance
The viewing window and the dough container will become very hot
during operation. Use pot holders when removing the dough
container.
Do not move the appliance when in operation.
Do not use the dough container as storage for other objects.
Only operate the appliance when the dough container is filled.
Operation without dough can lead to overheating.
Take the dough container out of the appliance when you fill it to avoid
contaminating the baking chamber.
Use only the original accessory parts.
Breadmaker MD 41923 3

SAFETY INSTRUCTIONS
Never undertake your own repairs
If the plug, cable or appliance is damaged, immediately remove the
plug from the power supply.
A damaged mains cable may only be replaced by our Service Centre or
by a qualified specialist workshop to prevent risks.
Never try to open and/or repair the appliance yourself. There is a risk of
electric shock. If there is a defect contact our Service Centre or other
suitable specialist workshop service.
Cleaning and maintenance
Pull the plug from the socket before cleaning the appliance.
Never immerse the appliance or the plug or the mains cable in water or
other liquids.
Allow the appliance to cool down completely.
Do not use cleaning solutions that could damage the surface of the
appliance.
The accessory parts are not dishwasher safe.
4
APPLIANCE DESCRIPTION
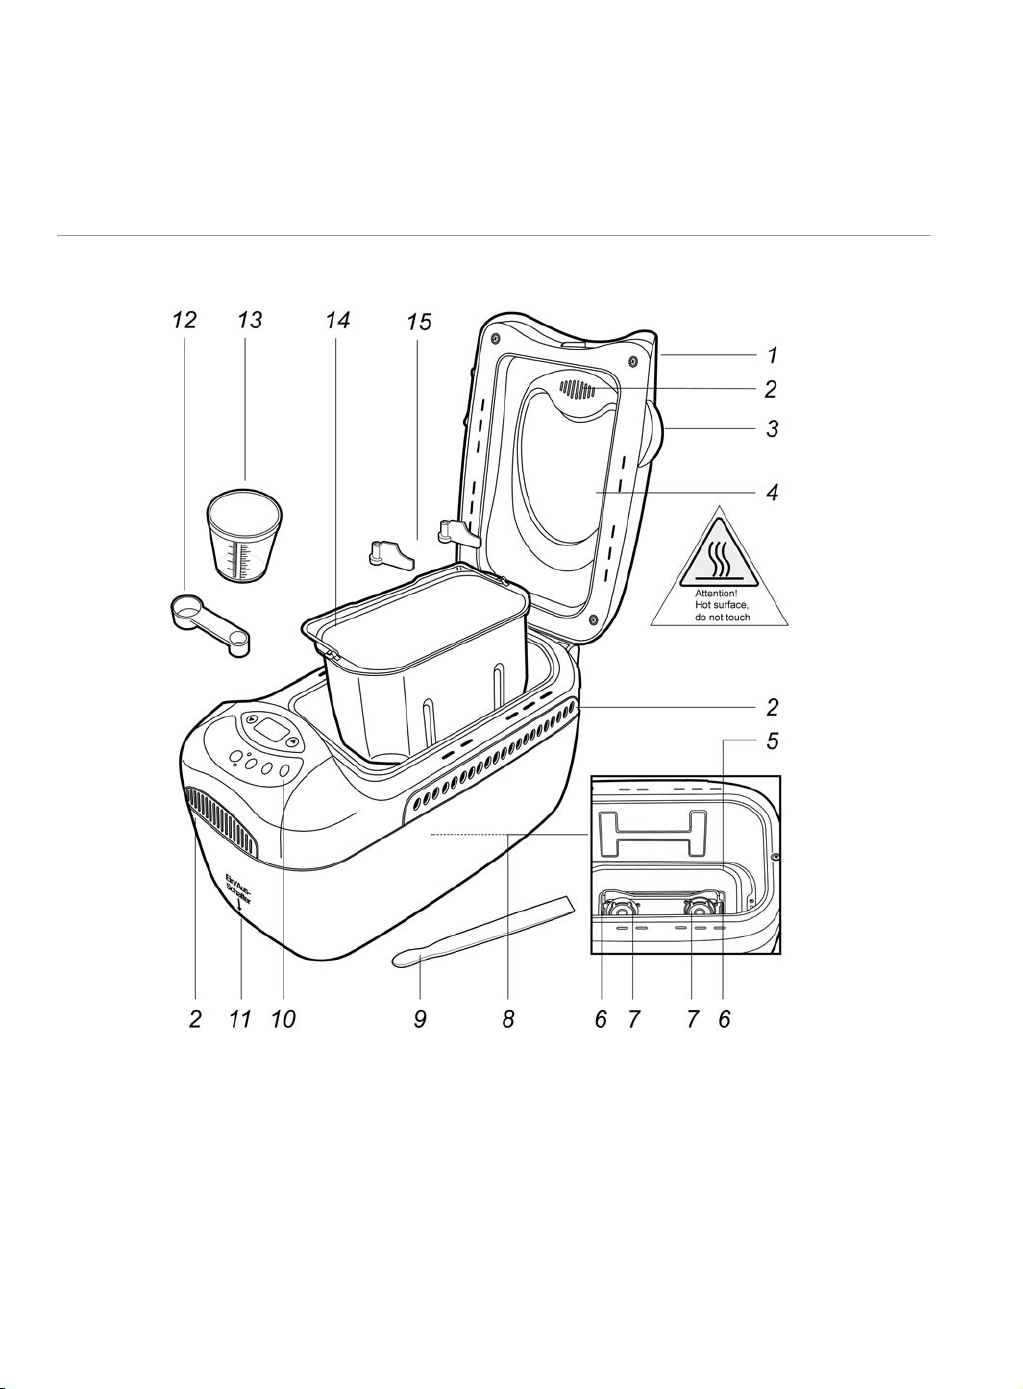
Appliance and accessories
1 Lid
2 Vents:
NEVER COVER!
3Lid handle
4 Viewing window
5 Heating spiral
5
6 Tension spring
7Drive shaft
8Baking area
9 Wooden spatula
10 Operating and display
field
11 On/Off switch under the
appliance
12 Measuring spoon
13 Measuring cup
14 Dough container
15 Dough hook
APPLIANCE DESCRIPTION
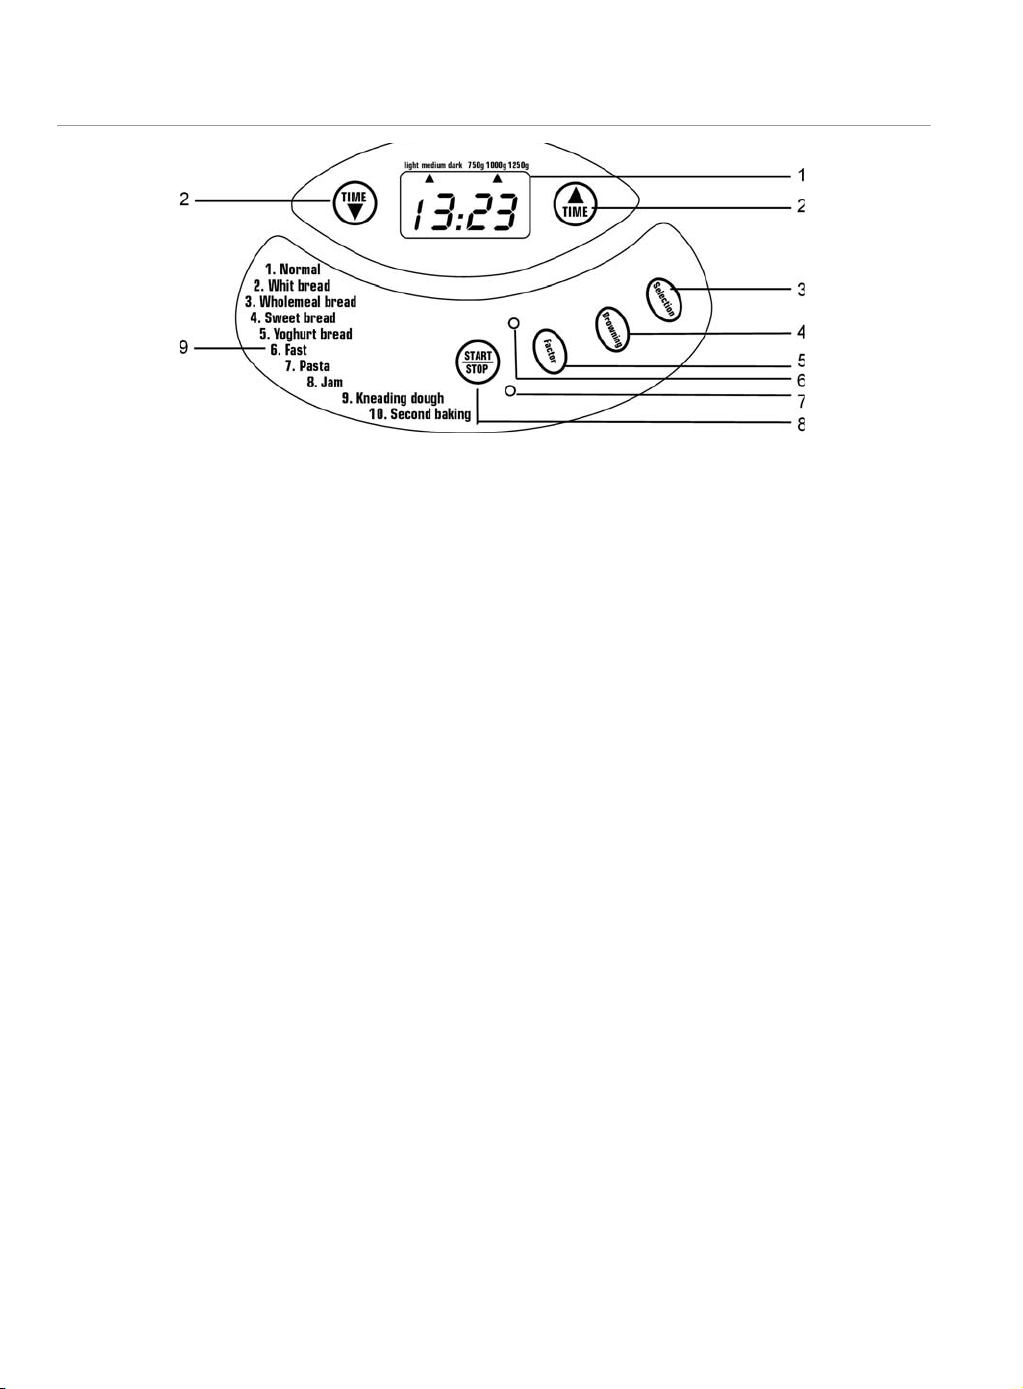
Operating field
1 Digital display
Once the appliance is connected to the mains and switched on, "13:23"
will appear in the display. "1" indicates that Program 1 (normal) is on.
"3:23" indicates the program duration (3 hours, 23 minutes). The other
default settings after switching on the appliance are medium bread
weight and medium browning level, which is displayed by the two
arrows at the upper edge of the display.
2 Time buttons
The breadmaker can bake time-delayed so that the freshly baked bread is
ready at the desired time. By using these two buttons you can set the total
time at which the bread should be finished. The maximum adjustable
time is up to 15 hours, depending on bread size and the selected
program. Each time you press a time button, the time delay is increased
or decreased by 10 minutes. Please note that the fixed baking times of the
programs cannot be shortened.
3 Selection buttons
The breadmaker has 10 different baking programs that can be selected b y
pressing the selection button. Press the button as often as needed until
the desired program appears at the left display edge.
4 Browning button
The br owni ng le vel can be se lect ed in the pro gram s 1 to 6 and in pr ogram
10 using the browning button. If you press this button, the time in the
display will change on the one hand, and on the other an arrow will
appear indicating whether "light", "medium" or "dark" was selected.
6

5 Size button
The bread weight 1,5 lb, 2,0 or 2,5 lb can be selected in the programs 1
to 6. The breadmaker is preset to 2,0 lb. Keep pressing the button until
the arrow appears below the desired weight.
6 On/Off Indicator LED
The LED lights up as soon as the appliance is switched on and supplied
with power.
7 Operating LED
The LED lights up if a baking program is running (possibly time-delayed).
8 Start/Stop button
This button lets you start or cancel the program you selected. Press this
button as well for time-delayed operation.
9 Program list
List of baking programs that can be called up using the selection button.
A
PPLIANCE DESCRIPTION
Breadmaker MD 41923 7

APPLIANCE DESCRIPTION
Items supplied
8
When unpacking, ensure that the following parts are included:
1 x Breadmaker
1 x Dough container
2 x Dough hooks
1 x Measuring cup
1 x Measuring spoon
2 x Wooden spatula
Operating instructions and guarantee card

AVAILABLE PROGRAMS
Bread dough programs
These programs are intended for bread dough with dry yeast. The dough
can be baked in three speed levels: "Normal", "Fast" and "Express".
Normal
Basic program for normal bread dough.
Baguette
Program for breads made of white, finely ground flour in the French style
and light breads with a crispy crust.
Wholemeal bread
Program for dough containing a larger portion of wholemeal wheat, rye,
oatmeal or bran. This program extends the third fermentation process so
that the heavier flour can rise. These breads are usually smaller and more
compact.
Since wholemeal dough must be saturated with water, this dough should
not be baked with time delay.
Sweet bread
Program for pastry, cake, sweet bread or for bread dough having
additional sugar, raisins or chocolate.
Yoghurt bread
Program for breads with added yoghurt or buttermilk.
Quick-baking program
Your breadmaker allows you to bake most breads in a shorter time than
the usual baking time. The "Fast" program is available for this.
Program "Fast"
The program shortens the baking time by approx. 1 hour. The resting
phase after baking is omitted.
Please note that the added water must be 30-35° C warm.
Breadmaker MD 41923 9

AVAILABLE PROGRAMS
Program "Knead only"
Pasta
This program only kneads the dough; the baking phase is omitted. No
more than two and a half measuring cups of basic dough should be used
for this setting.
Knead dough
Use this program to make yeast dough for bread rolls or braided loaves.
The dough is warmed up so that it can rise, but it is not baked. After
kneading you can form the dough as usual and bake it in a normal baking
oven.
Other programs
Please note that the breadmaker can only carry out one of the following
programs at a time.
Jam
Program for processing fresh fruits. Do not exceed the specified amounts,
since the jam could boil over and contaminate the baking area and the
heating coils.
Second baking
This program bakes pre-baked dough (e.g. in case bread is not
completely done). The basic setting is one hour. You can stop the second
baking procedure any time by pressing the
STOP button.
10

OPERATION
Proper use
The appliance is only designed for the usual household amounts. Do
not operate the appliance out-of-doors and do not use for commercial
Setting up the unit
When choosing a location, observe the notes in Chapter “Setting
the appliance up safely” on page 2! An appliance that was set up
incorrectly is a fire hazard!
Preparing the dough
Please note the following:
The dough container is designed for a total weight of maximally 2,5 lb.
Never add a larger amount of ingredients - including the liquids - in a
dough container.
If you live at a higher altitude ( above 900 m sea level) or use very soft
water, the fermenting process of the yeast is increased and the dough
will rise higher. In this case, decrease the amount of yeast by approx.
one fourth of the specified amount.
All liquids should be at room temperature. The optimal temperature
lies between 18 °C and 23 °C for normal programs.
Only use dry yeast for making the dough. In certain circumstances,
fresh yeast will not yield a good result.
Clean the dough container from the outside as well as before
insertion. While filling in the ingredients, make sure that nothing drips
into the baking chamber. The heating coils may not touch the dough!
If you bake with rye flour, consider that this flour hardly rises. For
this reason, the flour should contain a maximum of seven parts rye and
at least three parts wheat flour.
Add the dough ingredients to the dough container as follows: First the
liquids, then the flour. Distribute sugar and salt around the edge of the
flour. Make a small hollow in the flour for the dry yeast.
Please note that the yeast may not touch the liquid nor the salt.
Make sure that the outsides of the dough container are clean
before insertion.
Breadmaker MD 41923 11

OPERATION
Before first use
Operation
` Before using for the first time, wash the dough container, the dough
hooks and the housing of the breadmachine with a clean, moist cloth.
Do not use any strong detergents.
` Carefully dry the cleaned parts.
` Insert the cleaned dough hooks onto the drive shaft in the dough
container.
` Prepare the dough in the dough container.
` Make sure that the outsides of the dough container are clean before
insertion.
` Place the dough container in the brackets in the baking chamber and
press down firmly so that the tensions springs on both sides audibly
engage.
Make sure that the ingredients do not drip into the baking chamber
and do not touch the heating coils!
` Close the lid.
` Put the plug in the socket and switch on the appliance with the mains
switch. An acoustic signal sounds and the red On/Off LED lights up.
The appliance now sets itself to the basic program and the normal
time.
Each time a button is pressed, an acoustic signal sounds as confirmation.
12

Further settings
Select browning level
This setting is only available for the programs "Normal" and "Fast".
O
PERATION
` Press the button
browning levels LIGHT, MEDIUM and DARK. The selected browning
level is displayed by an arrow at the upper display edge.
BROWNING repeatedly to select between the
Optional: Select time delay
You can delay the baking time by up to 15 hours. This time delay is only
available for the programs "Normal" and "Fast".
Calculate the time until the desired bread completion. This is the delayed
time that is displayed.
` Press the
minute stages. If you keep the button pressed down the time will fast
forward.
` To reset the time to ten-minute stages, press the button
you keep the button pressed down the time will fast forward.
TIME button repeatedly . The time is counted up in 10-
TIME . If
Start program
First operation
` Allow the appliance to heat up for 5 minutes.
For first operation, please note:
For the preparation it is necessary to lightly grease a few parts of the appliance. This will
cause it to smell slightly during first operation. This smell is normal and is not a sign of a
malfunctioning appliance.
Do not use the time
delay for recipes
having fresh
ingredients (such as
eggs, fresh milk,
cream, cheese).
` Press the START/STOPbutton to start the baking process. The time will
count down backwards.
Add further ingredients
Depending on the selected program, an acoustic signal will sound after 5
to 20 minutes to remind you that you may now add further ingredients
(raisins, nuts, etc.). This signal will sound after the first kneading phase.
` However, lift the lid up only briefly to prevent the dough from
collapsing. Do not press
process!
STOP, otherwise you will stop the baking
Breadmaker MD 41923 13

During baking
It is completely normal for the viewing window to fog over at the beginning of the baking
process. After a while the condensation will escape through the vents.
The appliance can vibrate somewhat noisily during the kneading phase. This is not a sign of
appliance malfunction.
CAUTION!
Never cover up the vents!
This could cause smoke development if the dough rises over the edge of the dough container
and touches the heating coils. If smoke emerges from the baking area because dough dropped
on the heating coils, keep the lid closed and pull the plug from the socket.
CAUTION!
Never ever extinguish smoldering dough in the appliance with water!
Keeping warm and program end
At the end of the set baking time, five acoustic signals will sound and the
display will show 0:00.
Release dough hooks
If the dough hooks get
caught in the baking
goods, remove only
after the dough has
cooled off. Use the
metal hooks supplied
for this purpose.
If the dough hooks
remain in the dough
container and cannot
be easily removed,
immerse the container
in warm or hot water
for up to 30 minutes
as necessary.
For most programs the appliance will automatically switch to the keeping
warm mode. You can leave the baked goods in the appliance for up to 50
minutes; it is kept warm by the circulating air.
However, do not leave the finished baked goods longer than an hour in
the appliance!
` To switch off the appliance, press
START/STOP.
Remove baking goods from the appliance
` After you have switched off the appliance with START/STOP you can
open the lid.
` Lift out the dough container using the handles. Use potholders when
touching the dough container and handle!
` Turn over the dough container. Carefully tap the bottom to release the
baked goods.
` Allow to cool off on a wire rack.
14

PROGRAM SEQUENCES
Program Normal White bread Wholemeal bread Sweet bread Yoghurt bread
Bread size in grams 750/1000/1250 750/1000/1250 750/1000/1250 750/1000/1250 750/1000/1250
Total time (hours at medium
browning)*
Slow stirring 5/5/5 5/5/5 5/5/5 5/5/5 5/5/5
Rising phase 1
Heating on/off 5/25 s
Kneading and fast kneading
Heating on/off 5/25 s**
Acoustic signal for adding ingredients
Rising phase 2
Heating on/off 5/25 s**
1. Smooth dough 0,5/0,5/0,5 0,5/0,5/0,5 0,5/0,5/0,5 0,5/0,5/0,5 0,5/0,5/0,5
Rising phase 3
Heating on/off 5/25 s**
2. Smooth dough 3/3/3 3/3/3 3/3/3 1,5/1,5/1,5 3/3/3
Suitable time to remove the dough hooks.
Rising phase 4
Heating on/off 5/25 s**
Baking
Heating on/off 22/8 s
Heating on/off 5/25 s**
8/22 after reaching the temperature
Resting phase (without heating) 25/28/29 25/27/30 25/26/28 30/32/34/ 25/25/27
Keeping warm 50/50/50 50/50/50 50/50/50 50/50/50 50/50/50
Timer (max.) 13:35/13:53/13:59 13:50/13:59/13:54 13:53/13:51/13:56 13:59/13:58/13:53 13:55/13:53/13:59
3:13/3:23/3:29 3:20/3:29/3:34 3:13/3:21/3:26 2:29/3:08/3:13 3:15/3:20/3:24
5/5/5 5/5/5 5/5/5 5/5/5 5/5/5
20/23/24 20/22/25 20/21/23 25/27/29 20/20/22
45/45/45 45/45/45 45/45/45 40/40/40 40/40/42
17,5/17,5/17,5 19,5/19,5/19,5 17,5/17,5/17,5 19,5/19,5/19,5 19,5/19,5/19,5
45/45/50 50/50/52 40/40/43 35/37/40 50/50/50
52/59/59 52/59/59 57/64/64 47/52/52 52/57/57
*) For the "Browning light" setting, the total time is reduced by approx. 2 minutes. For the "Browning
dark" setting, the total time is increased by approx. 3 minutes.
**) The heating will not switch on if room temperature is sufficient.
15

Program fast noodle Jam Knead dough Second baking
Bread size in grams 750/1000/1250
Total time (hours at medium
browning)*
Slow stirring 5/5/5 15 5
Rising phase 1
Heating on/off 5/25 s
Kneading and fast kneading
Heating on/off 5/25 s**
Acoustic signal for adding ingredients
Rising phase 2
Heating on/off 5/25 s**
1. Smooth dough 0,5/0,5/0,5
Rising phase 3
Heating on/off 5/25 s**
2. Smooth dough 1,5/1,5/1,5
Suitable time to remove the dough hooks.
Rising phase 4
Heating on/off 5/25 s**
Baking
Heating on/off 22/8 s
Heating on/off 5/25 s**
8/22 after reaching the temperature
Resting phase (without heating) -/-/Keeping warm 50/50/50
Timer (max.) 13:59/13:53/13:55 13:50
2:59/3:03/3:05 0:15 1:20 1:20 1:00
5/5/5 15 5
20/21/21 45 20
45/45/45 20 50
9,5/9,5/9,5
40/40/42
52/55/55 20
16
*) For the "Browning light" setting, the total time is reduced by approx. 2 minutes. For the "Browning
dark" setting, the total time is increased by approx. 3 minutes.
**) The heating will not switch on if room temperature is sufficient.

RECIPE EXAMPLES
Notes on preparing dough
Add the ingredients only in the listed order. This is the only way to
properly mix the ingredients.
Above all, the yeast may not touch the salt nor the liquids.
Measuring ingredients
Adhere exactly to the specified amounts. Especially do not take larger
amounts than specified.
Measure the ingredients exactly. Use the supplied measuring cup and
measuring spoon to measure the ingredients.
Do not heap the ingredients on the measuring spoon; smooth out the
ingredients so that it is level with the edge to avoid using more than
specified.
Further notes
Most of the commercial flour types are suitable for making bread with fine
flour. When adding only minor amounts (10 - 20%) of grist or grains, the
programs for fine flour should also be selected. Program 3 can be used to
make breads consisting mainly (70 - 95%) of whole grains. If you would
like to make your own recipe with a wholemeal portion, we recommend
trying this program first.
Lukewarm milk or water is recommended as liquid ingredient. If the
added liquid is warmer, then baking can proceed faster. If the liquid is
cooler (approx. 20 °C), the bread will be bigger and fluffier.
Please note that butter and margarine should always be added in a soft or
even fluid state.
Bread that is mostly baked with wholemeal flour or with ingredients such
as nuts, bran, etc., will be heavier and smaller than bread made of white
flour.
The yeast must always be dry before being placed on top of the flour.
Please observe the notes at the beginning of these instructions
during processing (refer to “Preparing the dough”, page 11.).
17

RECIPE EXAMPLES
Recipes
White bread
Normal bread
Milk 300 ml 300 ml
Margarine 50 g 50 g
Salt 2 level tsp. (10 g) 2 level tsp. (10 g)
Wheat flour Type 405 500 g 500 g
Sugar 2 heaped tsp. 2 heaped tsp.
Dry yeast 1 packet 1 packet
or fresh yeast 1/2 cube 1/2 cube
Program 1. Normal 6. Fast
Bread size 750 g 750 g
Fast bread
Spiced bread
Normal bread Fast bread
Water 300 ml 300 ml
Sourdough substitution 70 g 70 g
Dry yeast 1 packet 1 packet
or fresh yeast 1/2 cube 1/2 cube
Salt 2 level tsp. (10 g) 2 level tsp. (10 g)
Cumin 1 level tsp. 1 level tsp.
Fennel 1 level tsp. 1 level tsp.
Anise 1/2 level tsp. 1/2 level tsp.
Coriander 1 level tsp. 1 level tsp.
Wheat grist 350 g 350 g
Rye grist, fine 150 g 150 g
18
Program 1. Normal 6. Fast
Bread size 750 g 750 g

Plum purée without sugar
Ingredients: 680 g plums
Program: Jam
Wash plums, remove pits and cut into bite-size pieces. Add 680 g plum
pieces to the dough container, insert into the baking area and start the
jam program. Since the jam is cooked while being stirred, it thickens even
though it does not contain any sugar nor gelling agents.
You can add cinnamon, 1 pinch of cloves or ginger to the plums if desired.
Peach-Raisin Jam, American Style
Ingredients: 340 g ripe peaches with stone removed
340 g sugar
2 Tbsp. raisins
2 whole cloves
1 pinch of ground pepper
Program: Jam
Add all ingredients to the dough container and start the jam program.
R
ECIPE EXAMPLES
Breadmaker MD 41923 19

DEALING WITH PROBLEMS
If the baking result does not have the desired quality, the following
overview should help to find the cause.
Problem Possible cause
The bread sags in the middle. To much and too warm liquids.
(The liquid should be between 21 and 28°C - for fast baking
programs between 30 and 35 °C.)
To little salt.
Too much yeast.
The humidity or room temperature is too high.
The lid was opened during baking.
The bread did not rise enough. Not enough yeast was added.
The yeast was bad.
Not enough sugar was added.
Too much salt was added (harms the yeast).
The liquid is too warm.
The yeast came into contact with salt or liquid before baking.
The bread rises too much. The humidity or room temperature is too high. (If the ambient
conditions cannot be changed, try - as an exception processing cooled ingredients and do not use the time delay.)
Too much yeast.
To much or too warm liquids.
Too much flour.
To little salt.
The bread is too dry and dense. Not enough liquids.
The yeast was off.
The bread is not done and still moist in
the centre.
The bread is too brown. Too much sugar.
Too much additional ingredients were added, such as nuts,
butter, dried fruits, syrup, etc.
Too much fruit juice was added.
Browning level set too high.
20

The bread is full of holes. The water is too hot.
Too much liquid.
Too much yeast.
The humidity or room temperature is too high.
The bread crust is sticky, or the bread is
too wet.
The bread forms air bubbles on the
crust.
The dough is not being kneaded even
though the motor is running.
The ingredients were not kneaded
smoothly.
After finishing baking the bread remained in the appliance far
too long. Condensation formed that could no longer escape
and soaked the bread.
Dry and wet ingredients had the wrong mixing ratio. (Reduce
the liquids or the yeast somewhat, as necessary.)
Too much yeast. Reduce the amount of yeast.
The dough hooks or the dough container were not inserted
correctly.
The ingredients were added in the wrong order.
The dough was too heavy or too dry.
The dough hooks were not inserted correctly.
T
ECHNICAL DATA
TECHNICAL DATA
Voltage supply: 230 V ~ 50 Hz
Power consumption: 850 Watt
Dimensions: approx. 290 mm x 455 mm x 270 mm (W-D-H)
Weight: approx. 7 kg
Subject to technical changes.
Breadmaker MD 41923 21
 Loading...