

Page 1
Page 2
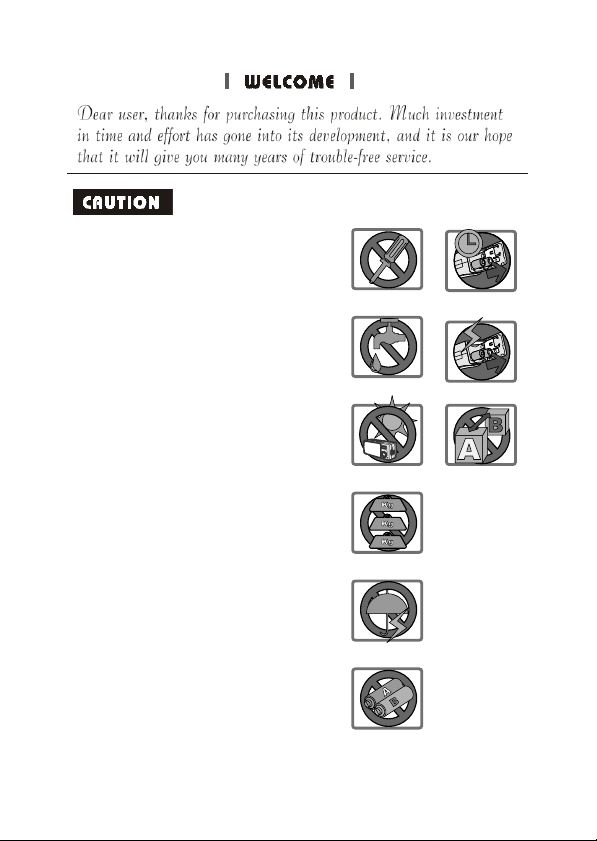
Do not drop, puncture or disassemble
1.
the camera; otherwise the warranty will
be voided.
Avoid all contact with water and dry
2.
hands before using.
3.
Do not expose the camera to high
temperature or leave it in direct sunlight.
Doing so may damage the camera.
Use the camera with care. Avoid
4.
pressing hard on the camera body.
For your own safety, avoid using the
5.
camera when there is a storm or
lightning.
Avoid using batteries of different
6.
brands or types at the same time.
There is potential of explosion from
using incorrect batteries.
Remove batteries during long periods
7.
between usage, as deteriorated
batteries may affect the functionality of
the camera.
8.
Remove batteries if they show signs of
leaking or distortion.
We suggest using only the accessories
9.
supplied by the manufacturer.
1
2
3
4
5
6
7
8
9
Page 3

Contents
Getting Started
1. Your camera parts
2. Loading the battery
3. Inserting and removing the SD/MMC card
Inserting the card
Removing the card
4. Attaching the strap
5. Using the tripod
Basic Operation
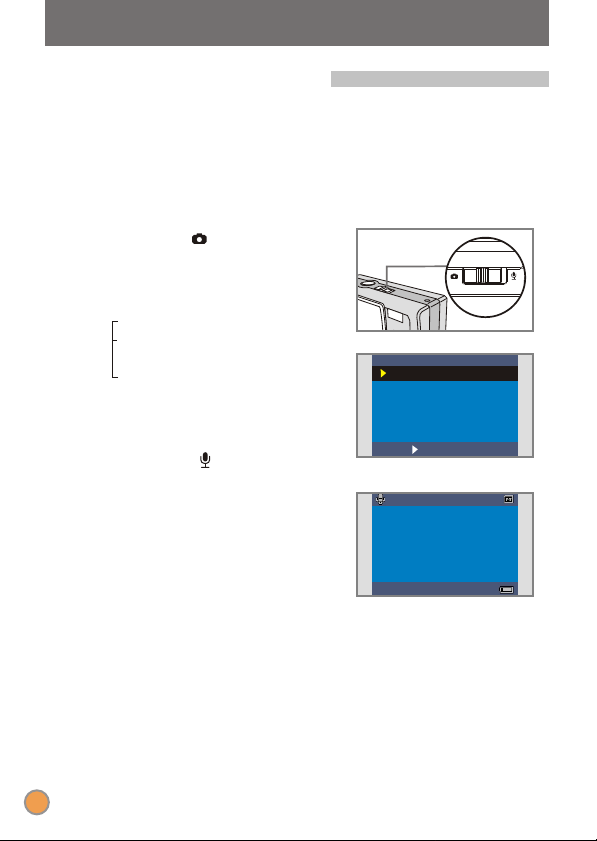
1. Switching on and off
2. Setting the Mode switch
3. Taking still pictures
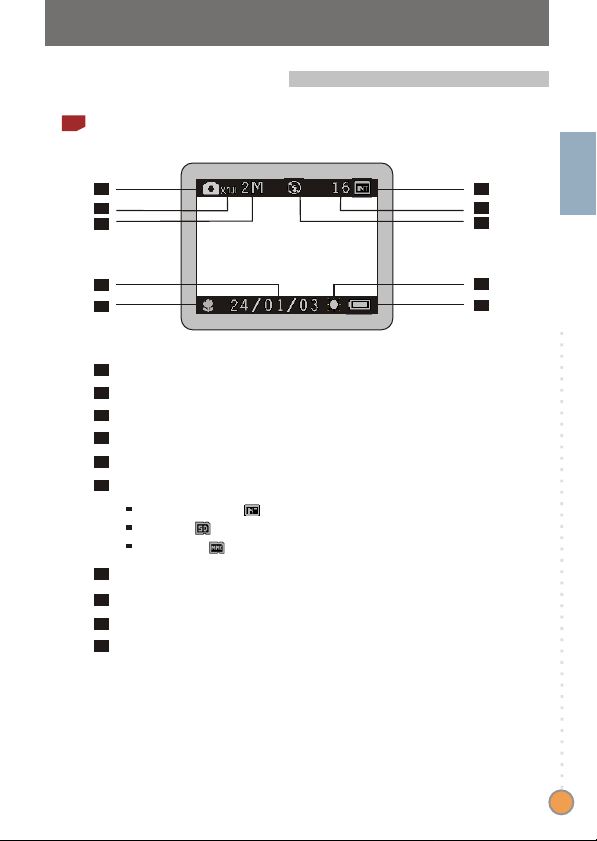
The LCD display information
Snapshot
4. Recording movies
The LCD display information
Making a movie
5. Playing your pictures and movies
The LCD display information
Viewing pictures
Viewing movies
Deleting pictures and movies
4
4
5
6
6
6
7
8
9
9
10
11
11
12
13
13
14
15
15
16
17
18
1
Page 4

6. Recording an audio clip
19
Advanced Settings
1. Menu access
Setting the language
Setting the date and time
Using the flash strobe
Setting the resolution
Setting the date stamp
Setting the flicker
Delete all and format
2. Using the self-timer
3. Using the Smart key
Enjoying your Images and Audio Clips
on the Computer
1. Installing MD 41084 Manager
2. Connecting your camera to your computer
3. Copying images and audio clips to your computer
4. Playing on your computer
Using MD 41084 Manager
1. Installing MD 41084 Manager
2. Connecting your camera to your computer
3. Starting MD 41084 Manager
4. Managing images via MD 41084 Manager
Album mode panel
2
20
20
21
22
23
24
25
26
27
28
29
30
30
33
34
36
37
37
38
40
41
41
Page 5

Picture enhancement
Viewing your images
Copying your images to "My Album"
Designating the album path
Creating an AVI file
5. Using PC Camera via MD 41084 Manager
Live mode panel
Capturing immediate images to your computer
Advanced settings
42
43
44
45
46
47
47
48
49
Troubleshooting
Other Information
1. Battery life
2. LED indicator events
3. Storage capacity
4. More on flicker
5. Specifications
51
53
53
53
54
54
55
3
Page 6
Getting Started
10
19
20
21
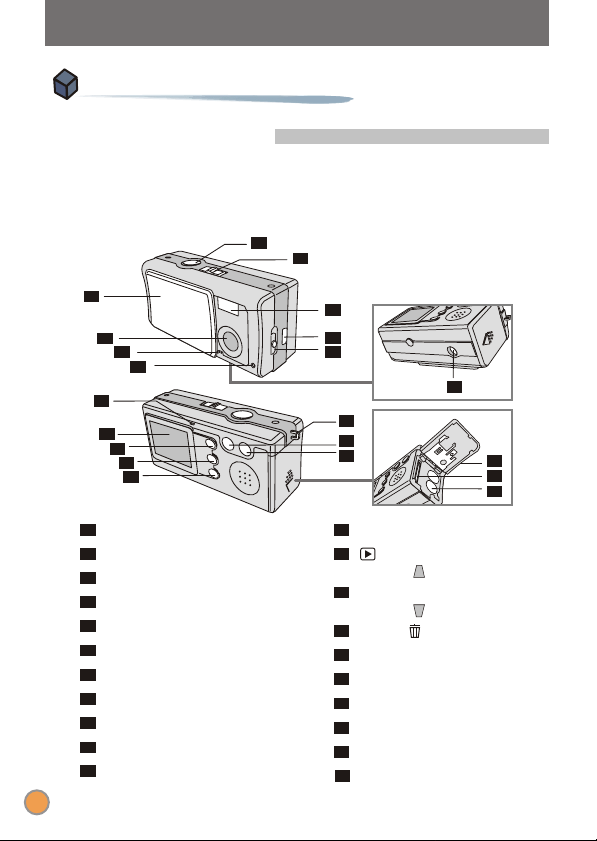
1. Your camera parts
Knowing your camera parts well before using it will help you
operate it more easily.
1
2
3
4
5
6
11
12
13
14
15
1
Shutter/OK button
2
Mode switch
3
Lens cover
4
Lens
Microphone
5
Self-timer lamp
6
Flash strobe
7
USB port
8
9
Focus switch
10
Tripod port
11
LED indicator
4
7
8
9
16
17
18
12
LCD display
13
PLAYBACK button
(Control button)
14
Smart key
(Control button)
15
MENU/ button
16
Strap hook
17
Control - button (Zoom out)
18
Control + button (Zoom in)
19
Battery/card cover
20
Card slot
21
Battery section
Page 7
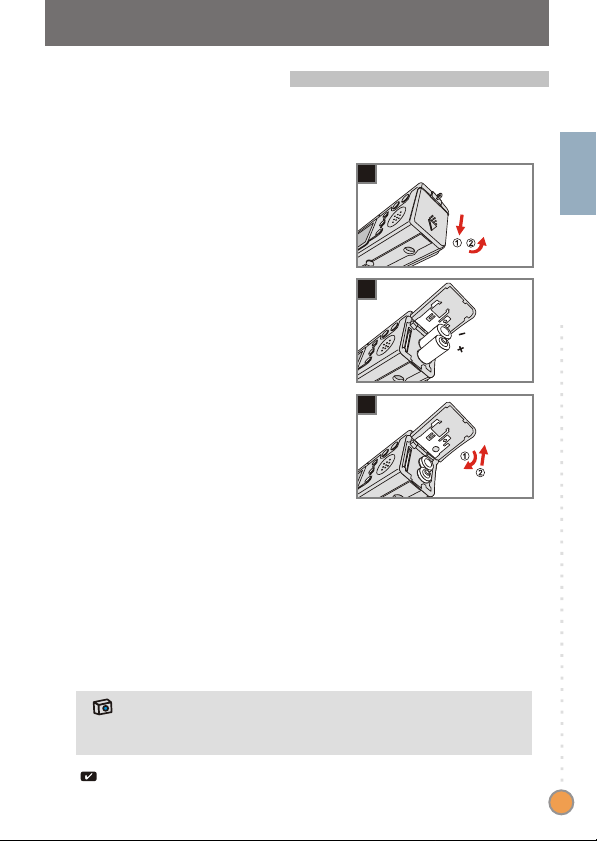
2. Loading the battery
Please use two AAA batteries.
Slide the battery/card cover in the
direction of the indication to open it.
1
Follow the indication to load
batteries into the battery section
2
with the correct + and - ends.
Close inward and slide upward the
battery/card cover to lock it.
3
1. We recommend you to use rechargeable 1.2 V Ni-MH batteries as this
will increase time of usage.
2. You can also use 1.5 V alkaline batteries.
1
2
3
Getting Started
For details of the battery life, please see the "Battery life" section on page 53.
5
Page 8
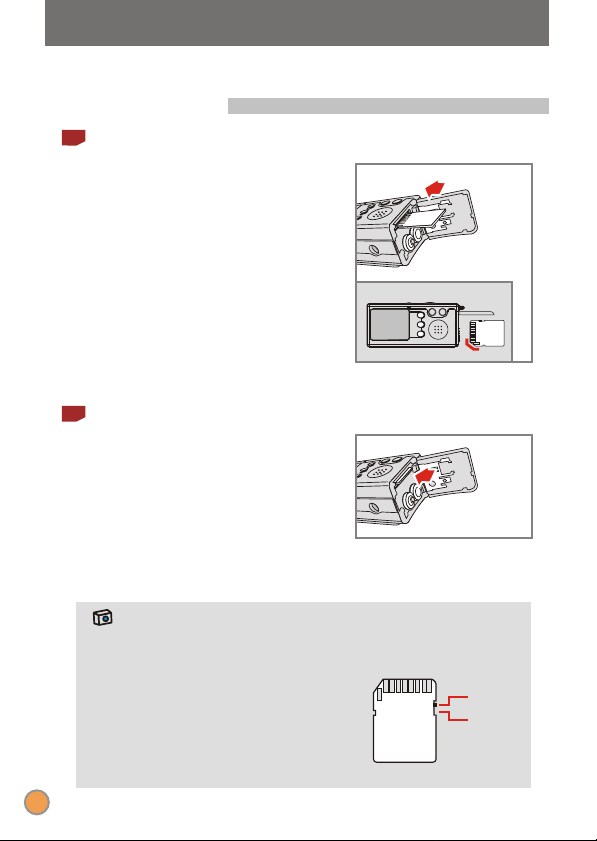
3. Inserting and removing the SD/MMC card
1
Inserting the card
Open the battery/card cover.
1
Insert the card in the direction of
the indication and push it in till the
2
end of the card plot.
Close the battery/card cover.
3
2
Removing the card
Push in and release the card to remove
it.
1. The camera comes with 16MB flash memory built inside for storage. If
you do not insert a SD/MMC card, the data will be saved in the built-in
flash memory automatically.
2. The SD card comes with a write-protect
switch. When the write-protect switch is
set to the lock position, the card will
become non-writable. To ensure that the
camera can operate normally, please
set the write-protect unlock position
before inserting the card.
Unlock
Lock
6
Page 9
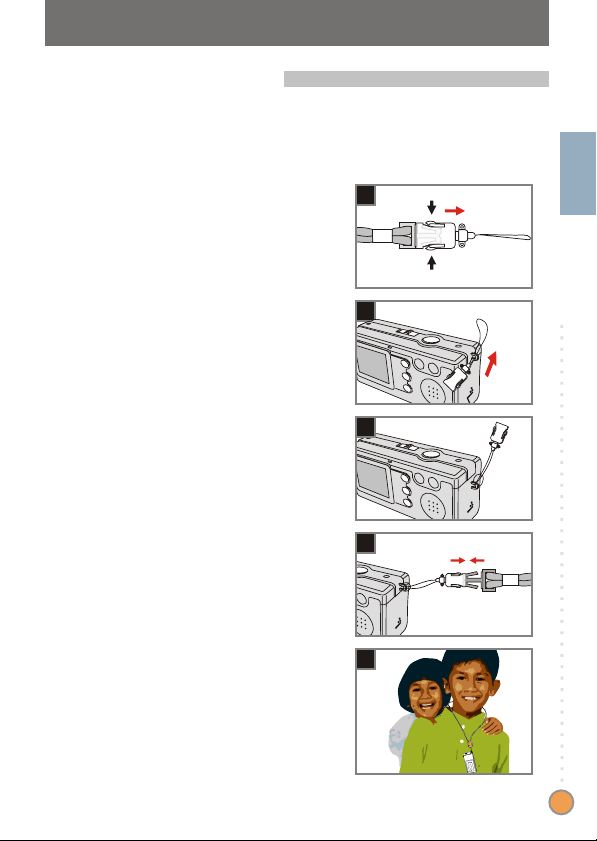
4. Attaching the strap
Getting Started
Getting Started
For convenience and safety, you may wish to attach the
carrying strap.
Press the buttons as indicated to
separate the strap into two parts.
1
Thread the strap loop through the
hook in the direction indicated.
2
Fasten the strap loop as indicated.
3
Combine the strap as indicated.
4
Wear the strap around your neck.
5
1
Getting Started
2
3
4
5
7
Page 10
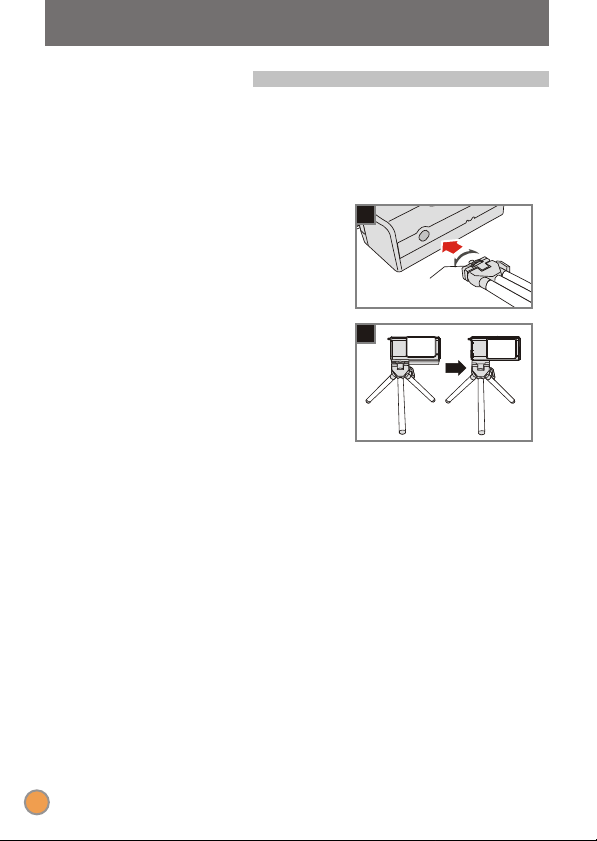
5. Using the tripod
Use the tripod to minimize camera movement and ensure
optimal image quality, particularly while taking self-portraits,
longer movies, video conferencing or in the macro mode.
Attach the tripod to the port on the
bottom of the camera and rotate the
1
serrated wheel to lock it.
Unfold the legs to set up. Then
adjust the alignment to the desired
2
position.
1
Serrated wheel
2
8
Page 11
Basic Operation
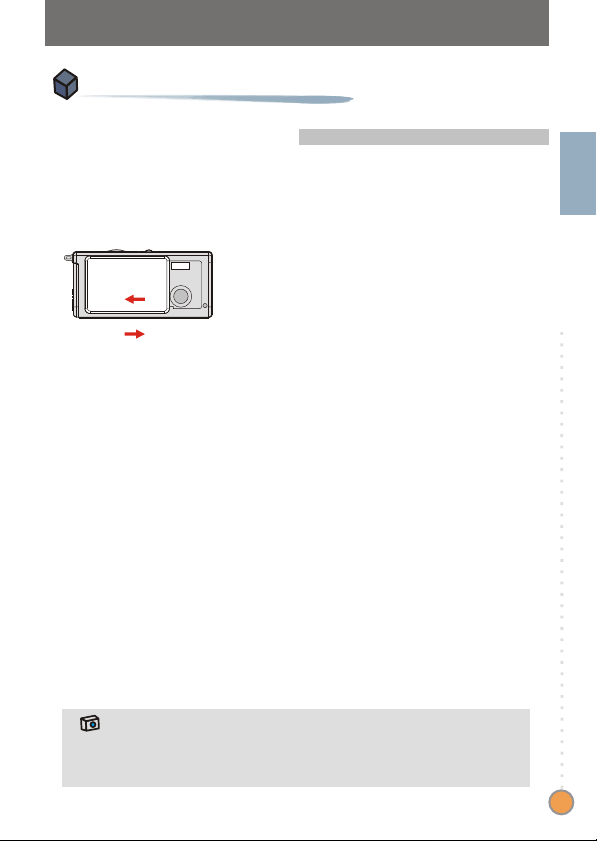
1. Switching on and off
Slide the Lens cover in the direction of the arrow to switch the
camera on or off.
ON
OFF
Basic Operation
If the camera is idle for over 60 seconds, the LCD display will be turned off
to conserve battery power, press any key to wake up the camera. If you do
not operate this camera for over 3 minutes, the camera will shut down
automatically.
9
Page 12
2. Setting the Mode switch
DSC
AVI
SELFTIMER
SETTING
OK SHUTTER
DSC
AVI
SELFTIMER
SETTING
OK SHUTTER
This camera provides two modes of use - DSC (Digital Still
Camera) and Audio modes. Push the Mode switch to select the
mode that you wish to use.
1
2
10
DSC mode:
Taking still pictures, recording
movies and setting the camera.
AVI: recording a movie.
SELFTIMER: taking a
self-portrait picture.
SETTING: fine tuning the camera
settings.
Audio mode:
Recording audio clips.
1
Mode switch
DSC mode
Audio mode
Page 13
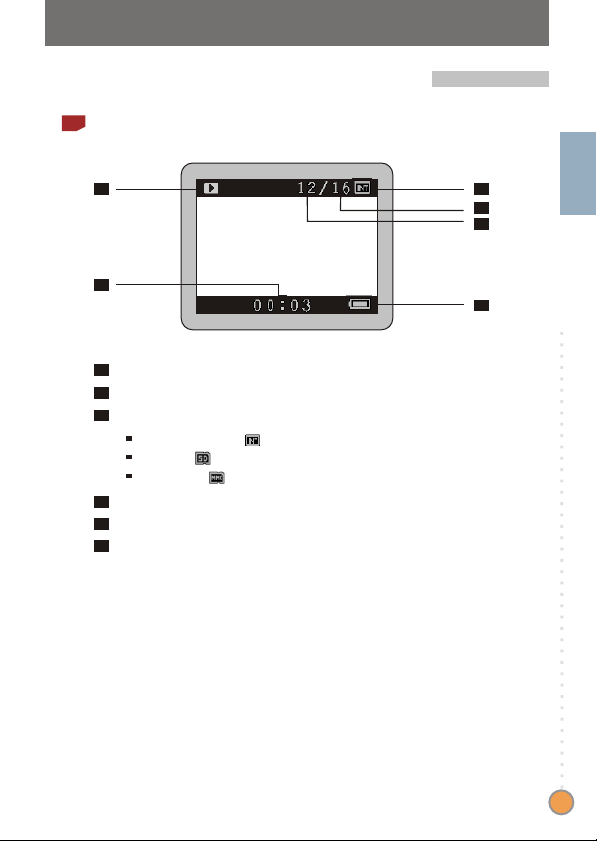
3. Taking still pictures
1
The LCD display information
1
2
3
4
5
Still picture mode
1
2
Zoom ratio
3
Resolution
Date stamp
4
5
Focus mode
6
Storage media
Internal memory:
SD card:
MMC card:
7
Remaining number of pictures
Flash status
8
White balance or effect status
9
Battery life
10
6
7
8
9
10
Basic Operation
11
Page 14

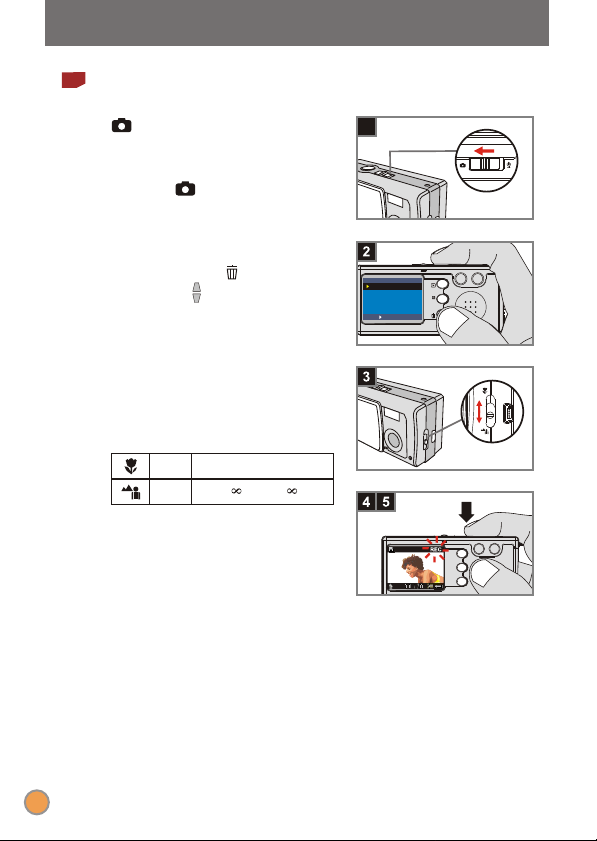
2
Snapshot
mode
1
Slide the Lens cover to switch the
camera on. Then set the Mode
switch to .
Focus
2
Push the Focus switch to set the
mode best for your picture.
12"~16" (30cm~40cm)
Macro
16"~ (40cm~ )
Micro
Zoom in or zoom out
3
Press the Control + button to
zoom in or the Control - button to
zoom out.
Take a still
4
Press the Shutter button to take a
shot.
1
Zoom inZoom out
12
Page 15
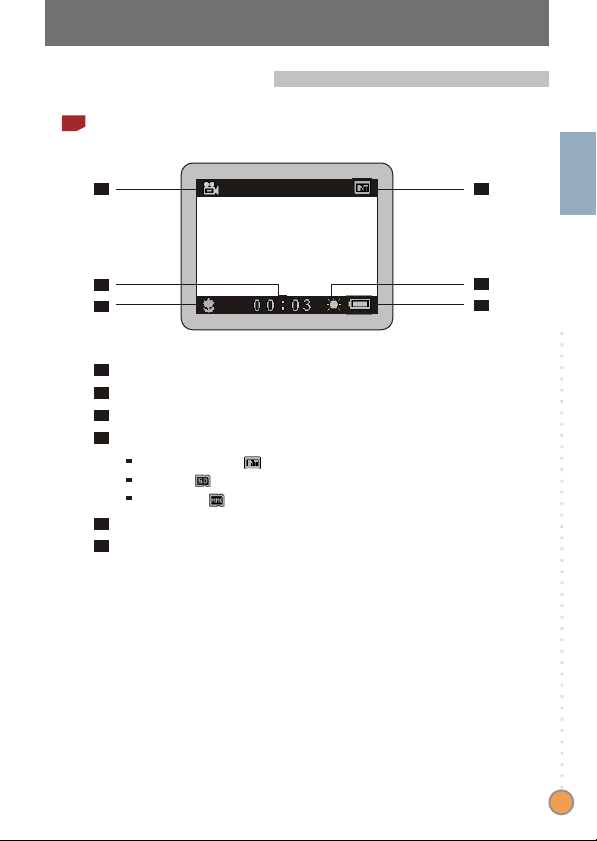
4. Recording movies
1
The LCD display information
1
2
3
Movie mode
1
2
Recording time
3
Focus mode
4
Storage media
Internal memory:
SD card:
MMC card:
5
White balance or effect status
Battery life
6
4
Basic Operation
5
6
13
Page 16
DSC
AVI
SELFTIMER
SETTING
OK SHUTTER
menu
effect
2
Making a movie
mode
1
Slide the Lens cover to switch the
camera on. Then set the Mode
switch to .
Select the AVI item
2
Press the MENU/ button. Use
the Control buttons to highlight
the AVI item, then press the
Shutter button to confirm.
Focus
3
Push the Focus switch to set the
focus as appropriate.
12"~16" (30cm~40cm)
Macro
16"~ (40cm~ )
Micro
Start recording
4
Press the Shutter button to start
recording.
Stop recording
5
Press the Shutter button again to
stop recording.
1
14
Page 17
5. Playing your pictures and movies
1
The LCD display information
1
2
Playback mode
1
2
Playing time of a recording
3
Storage media
Internal memory:
SD card:
MMC card:
4
Number of pictures and movies taken
5
Picture or movie number
Battery life
6
3
4
5
6
Basic Operation
15
Page 18
2
menu
effect
+
-
menu
effect
View the file
+
-
Previous Next
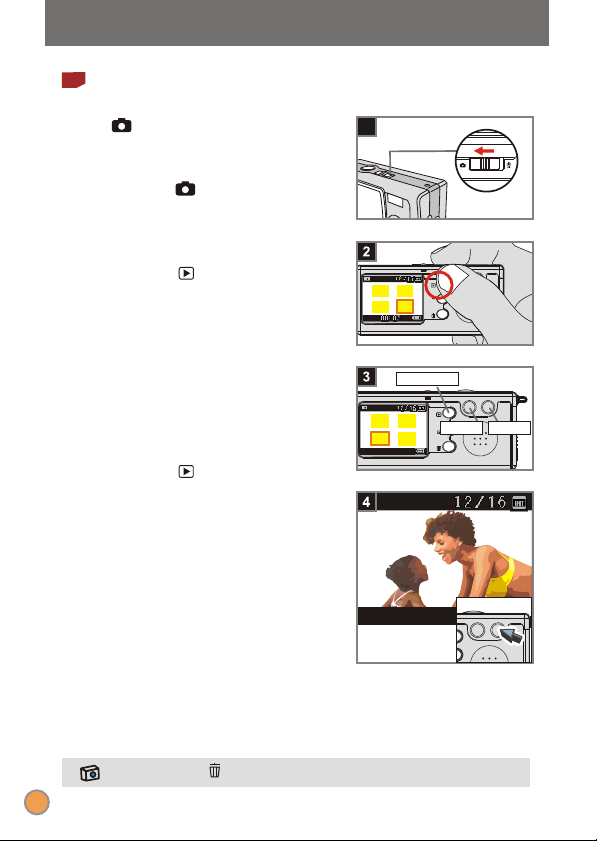
Viewing pictures
mode
1
Slide the Lens cover to switch the
camera on. Then set the Mode
switch to .
Playback mode
2
Press the PLAYBACK button
to enter a thumbnail view. The last
image taken will be highlighted.
Select images
3
Press the Control - button to
select the previous image or the
Control + button to select the next
one. Once you select the target file,
press the PLAYBACK button
to view the file.
Zoom in for a close-up look
4
If you want to take a closer look,
press the Control + button to
zoom in.
1
Zoom in
Press the MENU/ button to exit.
16
Page 19
3
menu
effect
If the
highlighted file
is a movie, a
count indicator will
appear at the bottom
of the LCD display.
menu
effect
View the file
+
-
Previous Next
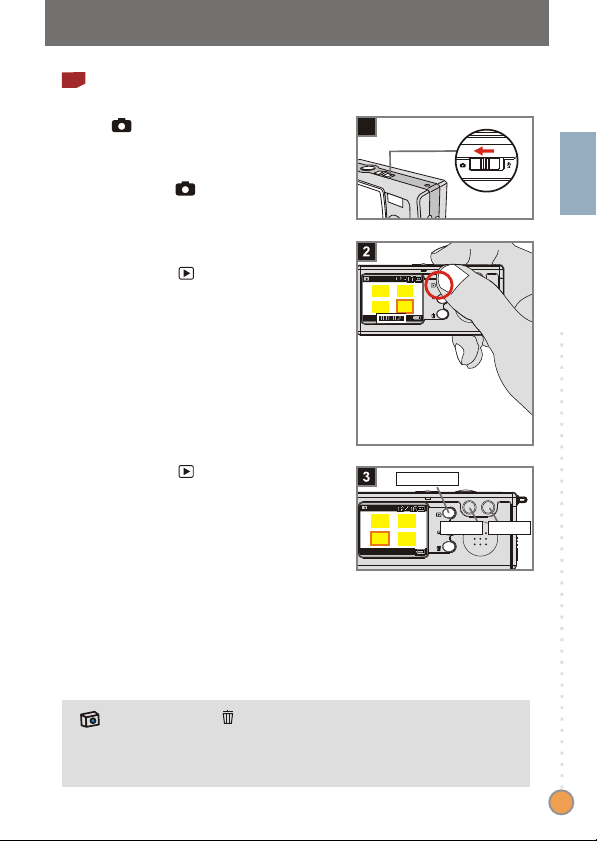
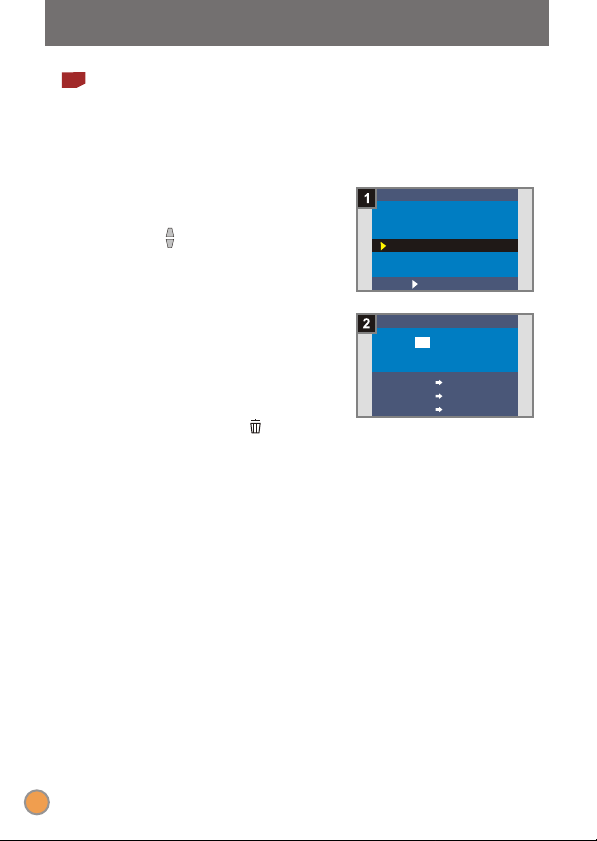
Viewing movies
1
2
3
4
mode
Slide the Lens cover to switch the
camera on. Then set the Mode
switch to .
Playback mode
Press the PLAYBACK button
to enter a thumbnail view. The last
image taken will be highlighted.
Select images
Press the Control - button to
select the previous image or the
Control + button to select the next
one. Once you select the target file,
press the PLAYBACK button
to view the file.
Stop playing the movie
While playing a recording, press
the Shutter button to stop playing
the movie.
1. Press the MENU/ button to exit.
2. While playing a movie on the camera, sound playback is not available.
Please copy the movie to your computer (for details, see page 30) to
view it with sound playback.
1
Basic Operation
17
Page 20
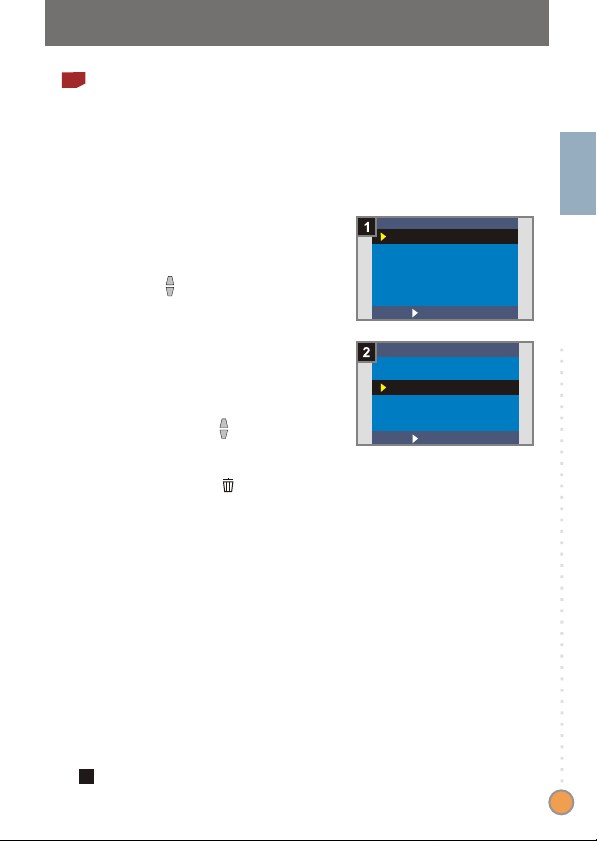
4
menu
effect
menu
effect
+
-
Previous
Delete the file
Next
NO
DELETE ONE?
YES
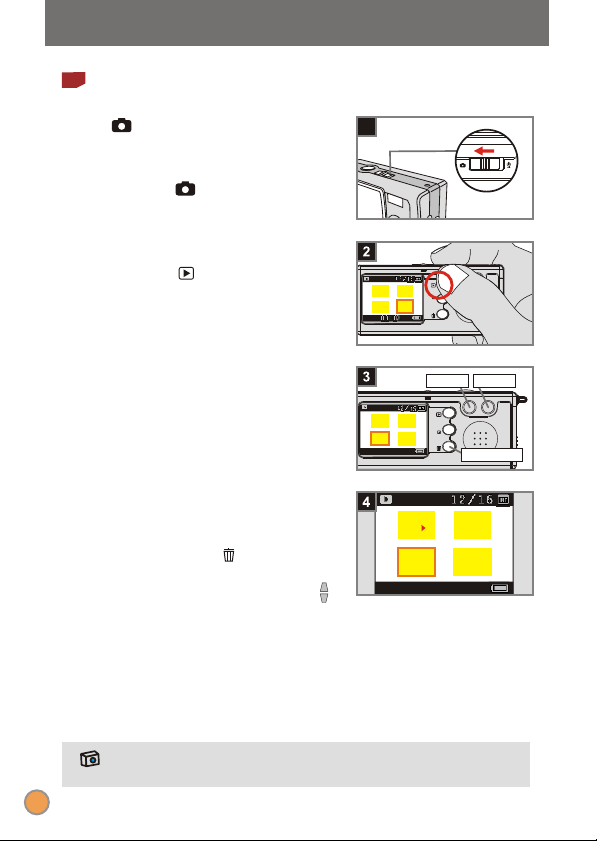
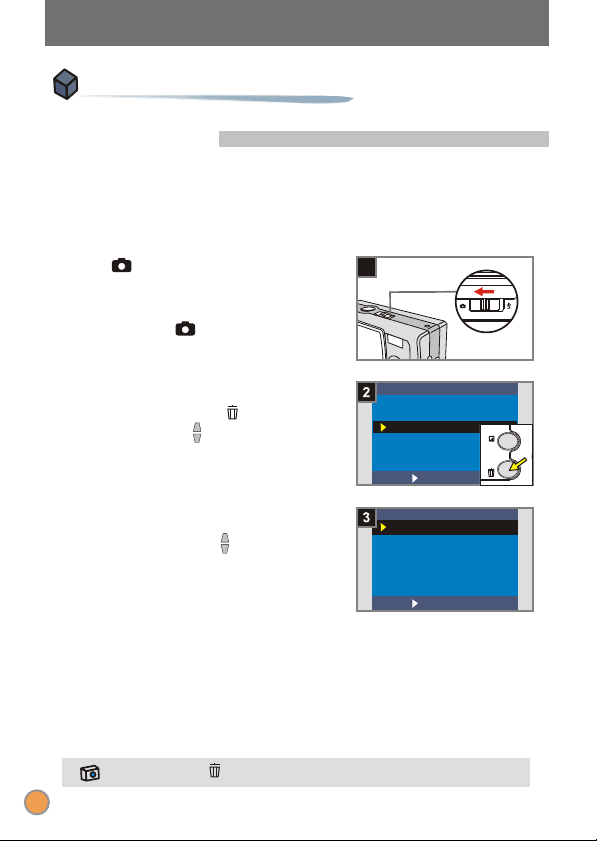
Deleting pictures and movies
mode
1
Slide the Lens cover to switch the
camera on. Then set the Mode
switch to .
Playback mode
2
Press the PLAYBACK button
to enter a thumbnail view. The last
image taken will be highlighted.
Select images
3
Press the Control - button to
select the previous image or the
Control + button to select the next
one.
Delete the image
4
Once you select the target file,
press the MENU/ button to
bring up a confirmation screen of
deletion. Then press the Control
buttons to select the Yes item.
Press the Shutter button to
complete the action of deletion.
1
18
As the step. 4 above, select the No item and then press the Shutter button
to exit if you do not wish to delete the image.
Page 21
0 0 : 0 0
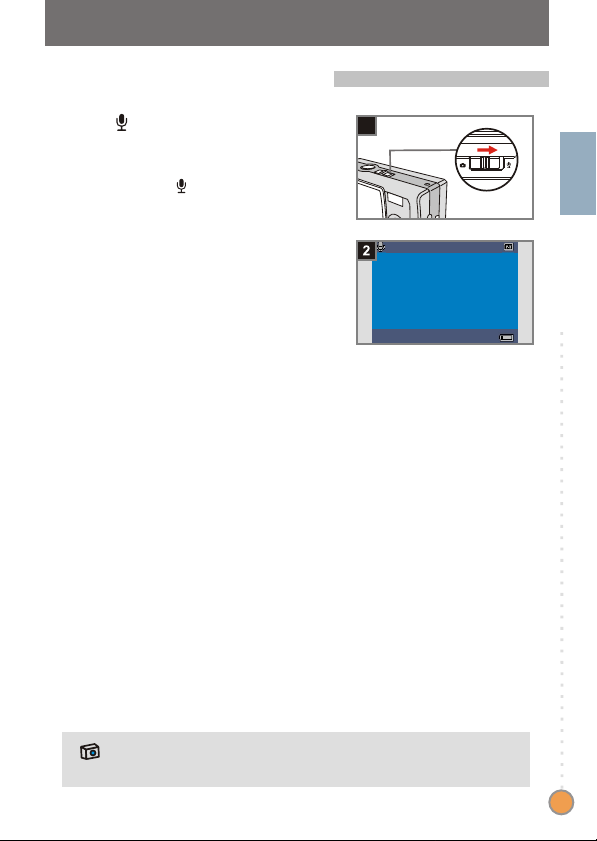
6. Recording an audio clip
mode
1
Slide the Lens cover to switch the
camera on. Then set the Mode
switch to .
Start recording
2
Press the Shutter button to start
recording an audio clip. While
starting to record, the count
indicator at the bottom of the LCD
display will run.
Stop recording
3
Press the Shutter button again to
stop recording.
1
Basic Operation
To play your audio clip, please copy the file to your computer first. For
details on playing an audio clip, please see page 30.
19
Page 22
Advanced Settings
DSC
AVI
SELFTIMER
SETTING
OK SHUTTER
DSC
AVI
SELFTIMER
SETTING
OK SHUTTER
menu
effect
+
-
SETTING
OK SHUTTER
STROBE
QUALITY
DELETE ALL
DATE
DATEST AMP
LANGUAGE
1. Menu access
The SETTING Menu provides more advanced features for you
to fine-tune the camera. The following describes how to access
the Menu.
20
mode
1
Slide the Lens cover to switch the
camera on. Then set the Mode
switch to .
Select the SETTING item
2
Press the MENU/ button. Use
the Control buttons to highlight
the SETTING item, then press the
Shutter button to confirm.
Adjust the settings
3
Use the Control buttons to
highlight the desired item, then fine
tune the setting of your camera.
Press the MENU/ button to exit.
1
Page 23

1
SETTING
OK SHUTTER
STROBE
QUALITY
DELETE ALL
DATE
DATEST AMP
LANGUAGE
LANGUAGE
ENGLISH
DEUTSCH
FRAN AIS
OK SHUTTER
ITALIANO
ESPA OL
PORTUGU S
Setting the language
When you switch the camera on for the first time, the LCD
display may not be shown in your local language. You can set
the LCD display language by using the method below.
1
2
Select the LANGUAGE item
Under the SETTING Menu, use the
Control buttons to highlight the
LANGUAGE item, then press the
Shutter button to confirm.
Select a language
Use the Control buttons to
highlight the desired language, then
press the Shutter button to
confirm. Press the MENU/
button to exit.
Advanced Settings
21
Page 24
2
SETTING
OK SHUTTER
STROBE
QUALITY
DELETE ALL
DATE
DATEST AMP
LANGUAGE
DATE
08:00
2003/01/01
ADJUST
SET SMART
NEXT SHUTTER
+
-
/
Setting the date and time
When you switch the camera on for the first time, please set up
the date and time.
Select the DATE item
1
Under the SETTING Menu, use the
Control buttons to highlight the
DATE item, then press the Shutter
button to confirm.
Set date and time
2
Use the Control +/- buttons to
adjust the value, then press the
Shutter button to shift between
items. Press the Smart key to
confirm or the MENU/ button to
exit.
22
Page 25
3
SETTING
OK SHUTTER
STROBE
QUALITY
DELETE ALL
DATE
DATEST AMP
LANGUAGE
STROBE
OFF
AUTO
OK SHUTTER
Using the flash strobe
When the lighting is not sufficient for your shooting environment,
the flash can provide the extra light you need.
Select the STROBE item
1
Under the SETTING Menu, use the
Control buttons to highlight the
STROBE item, then press the
Shutter button to confirm.
Select the AUTO item
2
Use the Control buttons to
highlight the AUTO item and press
the Shutter button to confirm.
Then press the MENU/ button
to exit.
Advanced Settings
OFF
AUTO
Charging the flash strobe requires more battery power. When the battery
power is low, the flash strobe Auto cannot be set. Please change the
batteries.
The strobe does not fire.
The strobe will automatically fire as more light is
needed.
23
Page 26
4
SETTING
OK SHUTTER
STROBE
QUALITY
DELETE ALL
DATE
DATEST AMP
LANGUAGE
QUALITY
4M 2304x1728
3M 2048x1536
OK SHUTTER
2M 1600x1200
Setting the resolution
Changing the resolution affects the number of pictures that can
be taken. The higher the resolution is, the more memorydemanding the images will be.
Select the QUALITY item
1
Under the SETTING Menu, use the
Control buttons to highlight the
QUALITY item, then press the
Shutter button to confirm.
Select a desired item
2
Use the Control buttons to
highlight the resolution you want to
choose, and press the Shutter
button to confirm. Then press the
MENU/ button to exit.
24
2304X1728
2048X1536
1600X1200
We recommend you to use 2048X1536 to optimize image quality and
memory use.
For details, please see the "Storage capacity" section on page 54.
The most memory-demanding option. Select
the 2304x1728 type when you want to develop
6*8 photos or smaller.
The default setting. Select the 2048x1536
type when you want to develop 5*7 photos or
smaller.
The most memory-saving option. Select the
1600x1200 type when you want to develop 3*5
photos or smaller.
Page 27
5
SETTING
OK SHUTTER
STROBE
QUALITY
DELETE ALL
DATE
DATEST AMP
LANGUAGE
DATE STAMP
NO
YES
OK SHUTTER
Setting the date stamp
Enabling the date stamp will print the date of shooting on the
picture.
Select the DATESTAMP item
1
Under the SETTING Menu, use the
Control buttons to highlight the
DATESTAMP item, then press the
Shutter button to confirm.
Select the YES item
2
Use the Control buttons to
highlight the YES item and press
the Shutter button to confirm.
Then press the MENU/ button
to exit.
Advanced Settings
25
Page 28
6
SETTING
OK SHUTTER
DELETE ALL
DATE
DATEST AMP
LANGUAGE
FLICKER
FORMAT
FLICKER
50 Hz
60 Hz
OK SHUTTER
Setting the flicker
If you travel to another country, the flicker setting may not suit
the country you are staying. To prevent nosie on the LCD display,
please set the flicker matching the place you are staying.
Select the FLICKER item
1
Under the SETTING Menu, use the
Control buttons to highlight the
FLICKER item, then press the
Shutter button to confirm.
Select a desired item
2
Use the Control buttons to
highlight the flicker you want to
choose, and press the Shutter
button to confirm. Then press the
MENU/ button to exit.
26
For more details on flicker settings, please refer to "More on flicker" on
page 54.
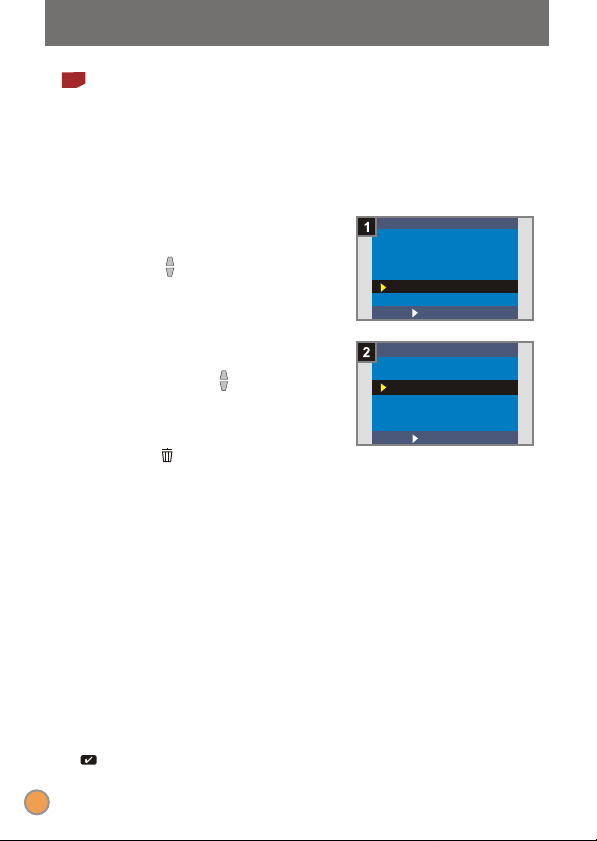
Page 29
7
SETTING
OK SHUTTER
DELETE ALL
DATE
DATEST AMP
LANGUAGE
FLICKER
FORMAT
DELETE ALL
NO
YES
OK SHUTTER
Delete all and format
You can use "delete all" or "format" function to quick erase
obsolete files. "Delete all" will only delete files, while "format" will
format the storage and thus erase all files.
1
2
!
Select the DELETE ALL or
FORMAT item
Under the SETTING Menu, use the
Control buttons to highlight the
DELETE ALL or FORMAT item,
then press the Shutter button to
confirm.
Select the YES item
Use the Control buttons to
select the YES item, and press the
Shutter button to confirm. Then
press the MENU/ button to exit.
Note that the deleted files can not
be restored.
All images and other files will not be recovered if you select the Format item.
Advanced Settings
27
Page 30
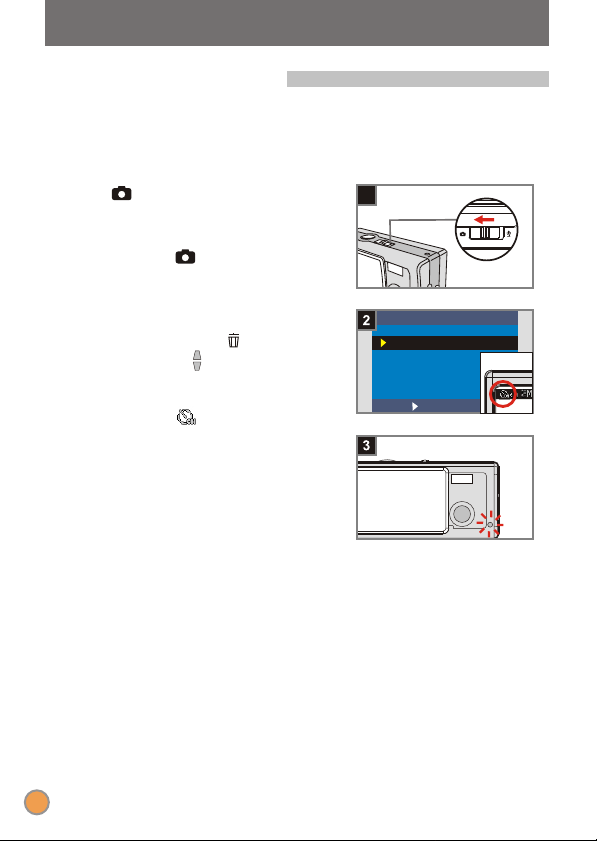
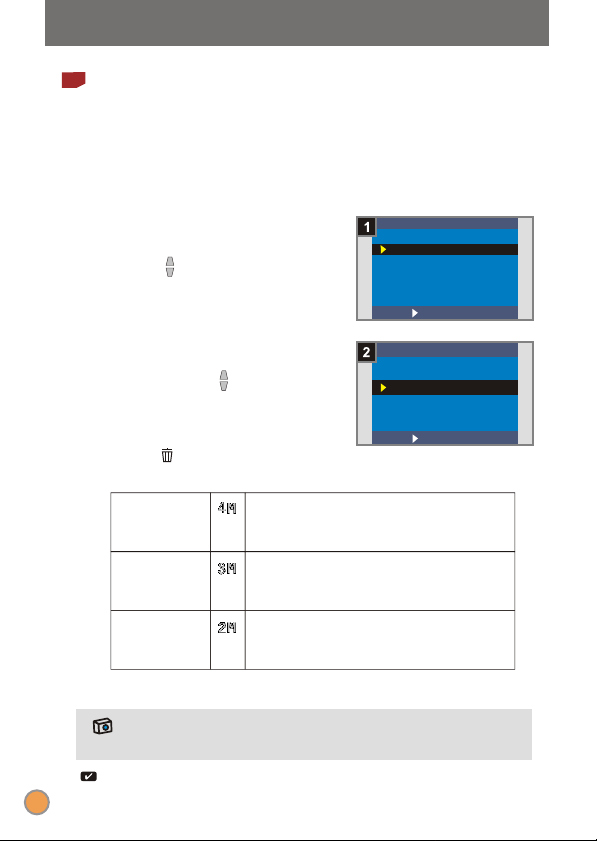
2. Using the self-timer
AVI
SELFTIMER
SETTING
OK SHUTTER
DSC
+
-
The self-timer allows a delay of ten seconds before the shutter
fires when taking a self-portrait picture.
1
2
3
28
mode
Slide the Lens cover to switch the
camera on. Then set the Mode
switch to .
Select the SELFTIMER item
Press the MENU/ button. Use
the Control buttons to highlight
the SELFTIMER item, then press
the Shutter button to confirm. You
will see a icon on the top left
section of the LCD display.
Use the self-timer
When the Shutter button is
pressed, the camera will have ten
seconds delay with the Self-timer
lamp flashing and ten beeps
emitting before taking a picture.
After the shutter fires, the self-timer
will be automatically disabled.
1
Ten beeps
Page 31

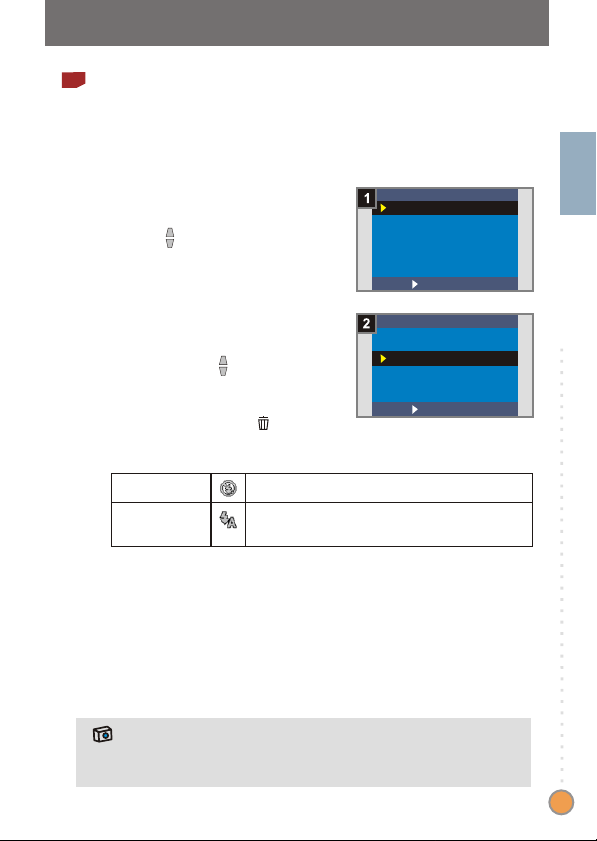
3. Using the Smart key
menu
effect
+
-
SMART key
The Smart key allows you to immediately apply the functions in
common use - Auto, Sunny, Cloudy, Tungsten, Fluorescent
(white balance [WB]) and B & W (photo effect) - of this camera,
as well as view the real-time change on the LCD display.
mode
1
Slide the Lens cover to switch the
camera on. Then set the Mode
switch to .
Press the Smart key
2
Press the Smart key to switch the
mode to cycle through six choices -
Auto, Sunny, Cloudy, Tungsten,
Fluorescent and B & W on the
LCD display.
1
Advanced Settings
Auto
Sunny
Cloudy
Tungsten
Fluorescent
B & W
This item determines the best white balance setting
automatically for your shooting environment.
Suitable for normal outdoor shooting under sunny
(bright) weather.
Suitable for cloudy weather or shady (dim)
environments.
Suitable for indoor shooting with incandescent lamp
lighting (low color condition).
Suitable for indoor shooting with fluorescent lamp
lighting (high color condition).
Changes the shot to black and white.
29
Page 32

Enjoying your Images and Audio
Clips on the Computer
1. Installing MD 41084 Manager
Install MD 41084 Manager before connecting your camera to
your computer for the first time. Please follow the steps to
complete the installation.
Turn on your computer.
1
Do not connect the USB cable to your computer at this stage.
!
Turn off other applications running on your computer.
!
Place the supplied CD into the CD-ROM drive.
2
Move the mouse to the icon (MD 41084 Manager) and click it.
3
If no title appears on the screen, please
follow the steps.
1. Double click the "My computer" icon.
2. Double-click the CD-ROM drive icon (MD 41084 Manager (E:)*). The
name of CD-ROM drive changes depending on how your computer is
set up.
For Windows XP users: Skip step 1. "Installing MD 41084 Manager" and go to
!
step 2. "Connecting your camera to your computer" if you do not use the
functions provided in MD 41084 Manager.
30
Page 33

The "Install Shield Wizard" dialogue box is occurring and the
automatic installation begins. When a window as Fig 1 appears,
4
click "Next". Then follow the on-screen instructions to continue.
Fig 1
Notice for Windows 2000 users
1. The "Digital Signature Not Found" dialogue box might show
twice. Please simply click "Yes". The camera works well for
Windows 2000.
2. Follow the on-screen instructions and click "Finish".
Enjoying your Images on the Computer
Do not restart your computer at this step.
!
31
Page 34

When a window as Fig 2 appears, please click "Yes" or "No"
according to your circumstance.
5
If you are not a Windows XP user, or never install DirectX 8.0 or above, click "Yes".
If you are a Windows XP user, or you have already installed DirectX 8.0 or above,
click "No".
Fig 2
When a window as Fig 3 or Fig 4 appears, please click "OK" or
"Finish" to complete the installation.
6
Fig 3
Fig 4
The driver will be available after restarting your computer.
7
32
Page 35

2. Connecting your camera to your computer
Turn on your computer.
1
Set the Mode switch on your camera to or .
2
Insert the USB cable to the USB port on your computer.
3
Insert the other end of the USB cable to the USB port on your
camera.
4
Enjoying your Images on the Computer
33
Page 36

3. Copying images and audio clips to your
computer
For Windows XP users
1
After connecting your camera with the computer, a window
will automatically appear (as Fig 5). Select the "Open folder
to view files using Windows Explorer" item and then click
"OK".
11
34
Fig 5
22
For Windows 2000/ME/98SE users
Double-click "My computer", then double-click the new
"Removable Disk" icon.
11
22
Page 37

Double-click the "DCIM" file folder.
2
Double-click the "100MEDIA" file folder.
3
Drag the file to the "My Documents" file folder to copy your
image or audio clip to the computer.
4
For Windows XP users
The storage position of the files
You can find the files of your pictures, movies and audio clips as
Fig 6.
Fig 6
For Windows
2000/ME/98SE users
Enjoying your Images on the Computer
35
Page 38

4. Playing on your computer
Double-click "My Documents".
1
For Windows XP users
Select the desired file and double-click it to view.
2
Notice on disconnecting the camera from
the computer for Windows 2000/ME users
To disconnect your camera from the computer, please follow these
steps.
1. Double-click on the task bar.
2. Click (USB Disk), then click "Stop".
3. Select the camera (MD 41084) on the confirmation screen and
click "OK".
4. Follow the on-screen instruction to disconnect your camera from
your computer correctly and safely.
For Windows
2000/ME/98SE users
36
Page 39

Using MD 41084 Manager
1. Installing MD 41084 Manager
You need to install MD 41084 Manager to take advantage of the
provided functions - images enhancement, images management
and PC Camera.
Using MD 41084 Manager
If you never install MD 41084 Manager, please finish the installation
first. For details, please see step 1. "Installing MD 41084 Manager" on
page 30.
If you have already installed MD 41084 Manager, please go to step 2.
"Connecting your camera to your computer" on the next page.
37
Page 40

2. Connecting your camera to your computer
Turn on your computer.
1
Set the Mode switch on your camera to or .
2
Insert the USB cable to the USB port on your computer.
3
Press and hold the Shutter button as you insert the other end
of the USB cable to the USB port on your camera.
4
Please slide the Lens cover on if you want to use PC Camera function.
!
Press and hold the
Shutter button
38
As the step. 4 above, if you do not press and hold the Shutter button when
!
inserting the USB cable to your camera, PC camera function will not be available.
Page 41

Notice for Windows 2000/ME/98SE users
During the installation process for the first time, please follow the steps
below.
For Windows 2000 users
The "Digital Signature Not Found" dialogue box might appear
twice, please simply click "Yes". This camera works well for
Windows 2000.
For Windows ME users
Please select "Automatic search for a better driver" when a
window as Fig 7 appears.
For Windows 98SE users
Click "Next" when a window as Fig 8 appears.
Select "Search for a best driver for your device" and click
"Next" when a window as Fig 9 appears.
Select the position where your Windows 98SE CD-ROM in your
CD-ROM drive. Then follow the on-screen instructions to
complete the installation.
Using MD 41084 Manager
Fig 7 Fig 8 Fig 9
39
Page 42

3. Starting MD 41084 Manager
After the installation of software and hardware, you can access
MD 41084 Manager.
Launch the software
1
Double-click the MD 41084 Manager icon on the desktop
to execute the program; or click the "Start" menu and go up to
"Programs", then go to the folder named "MD 41084 Manager"
and click it to launch the program.
"Album" and "Live" mode
2
The windows below are interface of MD 41084 Manager Album mode (Fig 10) and Live mode (Fig 11). Click the switch
at the top left section of the mode panel to set the mode.
Fig 10 Fig 11
40
Page 43

4. Managing images via MD 41084 Manager
1
Album mode panel
7
8
14
15
Using MD 41084 Manager
1
2
3
4
9
10
11
Album/ Live mode switch
1
2
Upload images to the work
area
3
Transfer images to the
album
Create an AVI file
4
5
Select all images in work
area
Delete images in work area
6
Thumbnail
7
5
6
12
8
9
10
11
12
13
14
15
13
Work area
Send mail
Select all images in My Album
Delete all images in My Album
Album manager
My Album
Minimize
Exit
41
Page 44

2
Picture enhancement
The enhancement function enhances your images form 4 Mega
to 5 Mega, 3 Mega to 4 Mega and 2 Mega to 3 Mega. The
enhanced format offers higher quality, but also requires more
disk space.
When launching MD 41084 Manager, a dialogue box as Fig 12
will automatically pop up to ask if you want to download photos
1
from your camera.
Fig 12
Select the "Enhanced" check box if you want to enhance your
images; or skip this step if you do not need to enhance images.
2
Click "OK" to copy your pictures and movies from the camera; or
click "Cancel" not to copy them.
3
Under the Album mode, click
the icon to launch the
dialog box of enhancement
function when you want to
enhance your images.
42
Page 45

3
Viewing your images
Double-click the desired picture or movie thumbnail in the Work
area to view it. Then a viewer window as Fig 13 (when viewing a
picture) or a default media player window as Fig 14 (when
viewing a movie) will appear.
Next picture
Previous picture
Slide show
Exit
Fig 13
Fig 14
Using MD 41084 Manager
43
Page 46

4
Copying your images to "My Album"
Click the icon to transfer your pictures and movies to the
Work area.
1
Click the desired image in the Work area.
2
Click the icon to copy the image from the Work area to My
Album.
3
Work area
My Album
44
Page 47

5
Designating the album path
Click Album manager to create a new photo album.
1
Key in a new album name, then click to designate a path
where the album will be stored. Click "Update" to confirm. (Fig 15)
2
Double-click the new album item to open the newly created
album. (Fig 16)
3
Using MD 41084 Manager
1
5
2
Fig 15 Fig 16
4
3
45
Page 48

6
Creating an AVI file
Select one or more images from the Work area.
1
Click the icon, then a "Make AVI file" window will appear.
2
Arrange the sequence of the images and adjust the frame rate.
Select the "Compression" check box if you want to reduce the
3
file size. Then press "OK" to complete the AVI file creation.
3
Work area
My Album
46
4
5
Page 49

5. Using PC Camera via MD 41084 Manager
1
Live mode panel
Album/ Live
mode switch
Video Record
Snapshot
Video Format
Setting
Video Source
Using MD 41084 Manager
47
Page 50

2
Capturing immediate images to your computer
Under the Live mode, you can use PC Camera function or run
other video conferencing applications. (This manual provides
information related to PC Camera function only).
Click the icon.
1
Click to designate a path where the file will be stored. Set
the speed and time of the recording. Then press the "Start
2
Record" button to begin recording.
3
4
48
Click the icon to stop recording.
3
Continued from the step. 2 above, as you designate the storing path, please
!
make sure that the destination folder should have at least 500 MB of free space.
Otherwise, the "Fail to make AVI file!" message will appear once you press the
"Start Record" button.
Page 51

3
Advanced settings
Click the (Video Format) and (Setting) icons on the
Live mode panel to bring up advanced settings.
Format settings
Color Space/Compression
1
Set one of the following functions according to your needs.
RGB 24: Better image quality.
I420: The file will be compressed to add advantage for
faster-speed transformation.
Output Size
2
Set output size to change the size of the preview window. The
default size is 320x240. Select larger pixels when you need a
larger preview window.
Using MD 41084 Manager
11
22
49
Page 52

Properties settings
Video Setting
1
1
11
Banding Filter
If the screen of your computer flickers when using PC
Camera function, change the "Banding Filter" item on the
"Video Setting" tab to avoid noise. Select "50Hz" or "60Hz"
until the screen stops flickering. If you want to restore the
default setting, select "Normal AE".
11
11 22
22
Bandwidth
If the controller has no enough bandwidth available for the
camera, set the "Bandwidth" item on the "Video Setting" tab.
The smaller the bandwidth value is, the less the bandwidth is
occupied. Then it will take more time to transmit images.
Custom Setting
2
You can use the default settings or change the settings of
brightness, contrast, saturation, sharpness, and hue on your
own.
50
22
Page 53

Troubleshooting
Question
When using the camera
The camera has no power.
Cannot power on my
camera even though
batteries are installed.
Cannot take pictures and
movies when pressing the
Shutter button.
I did not delete the picture
and movie, but cannot find
the data in the SD/MMC
card.
Cannot set the strobe to the
"Auto" mode.
Answer
The batteries may be out of power, please
change the batteries.
Make sure that the batteries are installed
correctly.
If it is idle over 3 minutes, the camera will
shut down automatically, please slide the
Lens cover to switch the camera on.
Make sure that the Lens cover is open.
The storage is full. Please free some
space of the SD/MMC card or flash
memory.
Check if the camera is under the status of
charging batteries.
Check if the SD/MMC card is set to
"protected".
If the "MEMORY ERROR" or "CARD
ERROR" message shows on the LCD
display, please set the camera to the
Setting mode and format the storage
media.
Check if your files are stored in the
camera's built-in memory. If there is a
or icon at the top right section on the
LCD display, it means you are using the
camera with a SD/MMC card. Please
remove the card to find the data in the flash
memory. (For details, see the "Removing
the card" section on page 6)
Charging the flash strobe requires more
power of batteries. When the battery is
under the status of low power, the strobe
Auto cannot be set. Please change the
batteries.
Troubleshooting
51
Page 54

The image is too blurred.
Adjust the focus.
Keep the camera steady with pressing
the Shutter button while taking pictures.
The image is too dark.
Sound playback is not
available when viewing the
movie on the LCD display.
Noise occurs on my camera
when viewing the image on
the LCD display or on the
computer.
You may need to take pictures or movies in
the place with adequate light or use the
flash strobe.
This situation is normal. If you want the
movie with sound playback, please copy the
movie to your computer and view it on the
computer.
Set the filter matching the place you are
staying. Please refer to the "More on flicker"
section on page 54.
When connecting the camera to your computer
The driver installation failed.
A conflict with other
installed camera or capture
device.
The movie cannot be
played on my computer.
Noise occurs on my
computer when using video
conferencing.
Please remove the driver and other
related programs. Follow the installation
steps in this manual to reinstall.
Install the driver before inserting the USB
cable.
If you have any other camera or capture
device, completely remove the camera and
its driver from the computer to avoid a driver
conflict.
Please install DirectX 8.0 or above. (See the
"Installing MD 41084 Manager" section on
page 30 or download DirectX 8.0 and get
more information on Microsoft website.)
Set the filter matching the place you are
staying. Please refer to the "Banding Filter"
section on page 50.
52
Page 55

Other Information
1. Battery life
Number
Condition
Taking Still Pictures
2048x1536
(without flash strobe)
*Data above is for using rechargeable 750 mAH batteries and in 25 C, with pictures
taken every five seconds.
Notes:
1. The table above is for reference only.
2. Life of battery will be shorten in the following conditions.
(1) Taking snapshot at low temperature.
(2) Switching on/off power repeatedly.
(3) Using the flash strobe frequently.
Number
of images
360
Battery life
(minutes)
30
2. LED indicator events
Condition
LED indicator
Self-Timer
lamp
!
Never eject the card or remove the batteries while the LED indicator is lit up red.
Steady
Flashing
Regularly
Rapidly
Meanings
Ready (waiting for command)
Busy (mode change, storage, capture, flash
charge and data transformation)
Counting
Capturing the picture
Other Information
53
Page 56

3. Storage capacity
Memory
Flash memory (16MB)
SD/MMC card (32MB)
SD/MMC card (64MB)
SD/MMC card (128MB)
SD/MMC card (256MB)
SD/MMC card (512MB)
Notes:
1. Actual number of pictures stored may vary (up to + 30%) depending on
the resolution and color saturation.
2. The table above is for reference only.
Still picture Movie
2048x1536
2304x1728
20
15
30
40
80
60
160
120
320
240
480 640 960 64 mins
1600x1200
30
60
120
240
480
Maximum
recording time
16 mins
32 mins
-
2 mins
4 mins
8 mins
4. More on flicker
The default flicker setting of your camera depends on your
country. When using the camera abroad, please refer to the
table below to match the flicker setting with the place you go.
Country
Setting
Country
Setting
England
50Hz
Portugal
50Hz
Germany
50Hz
America
France
Taiwan
Italy
50Hz 50Hz60Hz
China
50Hz60Hz60Hz
Spain
50Hz
Japan
50/60Hz
Netherlands
Korea
60Hz
54
Page 57

5. Specifications
Hardware resolution
Sensor effective resolution
Internal memory
External memory
Digital still camera
Digital video camcorder
Video conferencing
LCD display
Digital zoom
Exposure
Smart key
Lens
Self Timer
Interface
Power saving
Built-in flash strobe
Built-in microphone
Battery
Dimension
2304x1728 (4.1 Mega pixels)
2048x1536 (3.1 Mega pixels)
Built-in 16 MB SDRAM (buffer)
16 MB flash memory (storage)
Built-in SD/MMC slot (maximum: 512 MB)
JPEG Format
2304x1728 (4.1 Mega pixels); 2048x1536 (3.1 Mega
pixels);1600x1200 (2 Mega pixels)
Motion JPEG (AVI) Format
QVGA (320x240 pixels) / up to 20 fps
VGA (640x480 pixels) / up to 10 fps
QVGA (320x240 pixels) / up to 20 fps
1.5" Color TFT LCD
4x (for still pictures); 2x (for playback view)
Auto
Auto/ Sunny/ Cloudy/ Fluorescent/ Tungsten (five
modes for white balance); black and white (for effect)
F=2.8
10 seconds
USB 1.1 (USB 2.0 compatible)
Auto power-off if idle for over 3 minutes
Auto suspense if idle for over 1 minute
Yes
Yes
AAAx2 (Rechargeable Ni-MH batteries recommended)
88x34x43 mm
Other Information
55
Page 58

Page 59

WILLKOMMEN
Vielen Dank für Ihren Kauf dieses Produkts. Viel Zeit und Mühe wurde in
die Entwicklung dieses Produkts investiert. Wir wünschen uns, dass Ihnen
das Produkt viele Jahre problemlos dienen wird.
SICHERHEITSHINWEISE
1. Lassen Sie die Kamera nicht herunterfallen.
Stoßen Sie die Kamera nicht an, und
bauen Sie sie nicht auseinander.
Ansonsten erlischt die Garantie.
Lassen Sie die Kamera nicht mit Wasser in
2.
Berührung kommen. Trocknen Sie Ihre
Hände, bevor Sie die Kamera verwenden.
Setzen Sie die Kamera keiner hohen
3.
Temperatur oder direkter
Sonneneinstrahlung aus.
beschädigt werden.
4. Gehen Sie vorsichtig mit der Kamera um.
Drücken Sie die Kamera nicht.
5. Verwenden Sie die Kamera aus
Sicherheitsgründen nicht, wenn es Gewitter
bzw. Blitz gibt.
6. Vermeiden Sie Batterien aus
verschiedenen Marken oder Typen
gleichzeitig zu verwenden. Es besteht eine
Explosionsgefahr dadurch.
7. Entfernen Sie die Batterien, wenn die
Kamera für eine längere Zeit nicht
verwendet wird. Auslaufende Batterien
können die Kamerafunktion beeinträchtigen.
8. Entfernen Sie die Batterien, wenn sie
defekt zu sein scheinen.
9. Verwenden Sie nur das vom Hersteller
mitgelieferte Zubehör.
Die Kamera kann
1
2
3
4
5
6
7
8
9
Page 60

Inhaltsverzeichnis
WILLKOMMEN
SICHERHEITSHINWEISE
Inbetriebnahme
1. Kamerakomponenten
2. Einlegen der Batterien
3. Einstecken und Entfernen der SD/MMC-Karte
Einstecken der Karte
Entfernen der Karte
4. Anbringen des Trageriemens
5. Verwenden des Stativs
Grundbedienung
1. Ein- und Ausschalten
2. Einstellen des Modusschalters
3. Aufnehmen von Bildern
LCD-Informationsanzeige
Schnappschuss
4. Aufnehmen von Videoclips
LCD-Informationsanzeige
Aufzeichnen eines Videoclips
5. Wiedergeben Ihrer Bilder und Videoclips
LCD-Informationsanzeige
Anzeigen von Bildern
Anzeigen von Videoclips
Löschen von Bildern und Videoclips
4
4
5
6
6
6
7
8
9
9
10
11
11
12
13
13
14
15
15
16
17
18
1
Page 61

6. Audio aufnehmen
19
Erweiterte Einstellungen
1. Menü
Einstellen der Sprache
Zeit und Datum einstellen
Verwenden des Blitzes
Einstellen der Qualität
Einstellen des Datumsaufdrucks
Flimmer einstellen
Alles löschen und Formatieren
2. Verwenden des Selbstauslösers
3. Verwendung des Smart key
Ihre Bild- und Audiodateien auf dem
Computer abspielen
1. MD 41084 Manager installieren
2. Verbinden der Kamera mit dem Computer
3. Bild- und Audiodateien auf Ihren Computer laden
4. Wiedergabe auf Ihrem Computer
Der MD 41084 Manager
1. MD 41084 Manager installieren
2. Verbinden der Kamera mit dem Computer
3. MD 41084 Manager starten
4. Bildmanagement mit MD 41084 Manager
Album Modus Benutzeroberfläche
2
20
20
21
22
23
24
25
26
27
28
29
30
30
33
34
36
37
37
38
40
41
41
Page 62

Bildaufwertung
Ihre Bilder anschauen
Ihre Bilder in "Mein Album" kopieren
Pfad für Album bestimmen
AVI-Datei kreieren
5. PC-Kamera mit MD 41084 Manager
Live Modus Benutzeroberfläche
Live-Bilder auf Ihren Computer übertragen
Erweiterte Einstellungen
42
43
44
45
46
47
47
48
49
Fehlerbehebung
Weitere Informationen
1. Batterielebensdauer
2. Bedeutungen der LED-Indikator
3. Speicherkapazität
4. Über Flimmer
5. Technische Daten
51
53
53
53
54
54
55
3
Page 63

Inbetriebnahme
10
19
20
21
1. Kamerakomponenten
Für eine einfachere Bedienung Ihrer Kamera, machen Sie sich
mit den Bedienungselementen vertraut.
1
2
3
4
5
6
11
12
13
14
15
1
Auslöser/OK-Taste
2
Modusschalter
3
Objektivabdeckung
4
Objektiv
Mikrofon
5
Selbstauslöser Indikator
6
Blitz
7
USB-Buchse
8
9
Fokusschalter
Stativgewinde
10
11
LED Indikator
4
7
8
9
16
17
18
12
LCD-Anzeige
13
Wiedergabetaste
(Kontrolltaste )
14
Smart Key
(Kontrolltaste )
15
MENU/ Taste
16
Trageriemenöse
17
Kontrolltaste - (Weitwinkel)
18
Kontrolltaste + (Tele)
19
Batterie-/Kartenfachdeckel
20
Kartenschacht
21
Batteriefach
Page 64

2. Einlegen der Batterien
Verwenden Sie bitte zwei AAA-Batterien.
Schieben Sie den
Batteriefachdeckel in die
1
angezeigte Richtung, um das Fach
zu öffnen.
Beachten Sie beim Einlegen der
Batterien in das Batteriefach die
2
korrekte Ausrichtung der Pole +
und -.
Machen Sie den
Batteriefachdeckel zu und
3
schieben ihn nach oben, um ihn zu
schließen.
1. Wir empfehlen Ihnen aufladbare 1.2V Ni-MH Batterien zu verwenden,
da sie eine längere Standzeit haben.
2. Sie können ebenfalls 1.5V Alkali-Batterien verwenden.
Informationen zu der Batterielebensdauer finden Sie im Abschnitt
"Batterielebensdauer" auf Seite 53.
1
2
3
Inbetriebnahme
5
Page 65

3. Einstecken und Entfernen der SD/MMC-Karte
1
Einstecken der Karte
Öffnen Sie den Kartenfachdeckel.
1
Stecken Sie die Karte nach der
angezeigten Richtung ein und
2
drücken sie bis zum Ende des
Kartensteckplatzes ein.
Schließen Sie den Kartenfachdeckel.
3
2
Entfernen der Karte
Drücken Sie die Karte einmal, um sie zu
entriegeln und entfernen.
1. Ein 16MB Flash-Speicher ist in der Kamera integriert. Die Daten
werden automatisch in den integrierten Flash-Speicher gespeichert,
wenn keine SD/MMC-Karte eingesteckt ist.
2. Die SD-Karte ist mit einem SchreibschutzSchalter ausgestattet. Wenn der
Schreibschutz-Schalter auf die
Verrieglungs-Position gestellt ist, können
keine Daten auf die Karte geschrieben
werden. Stellen Sie bitte vor dem Einstecken
der SD-Karte den Schreibschutz-Schalter
auf die Entrieglungs-Position, um einen
reibungslosen Betrieb sicherzustellen.
Entrieglung
Verrieglung
6
Page 66

4. Anbringen des Trageriemens
Inbetriebnahme
Inbetriebnahme
Verwenden Sie den Trageriemen für einfache und sichere
Handhabung der Kamera.
Drücken Sie die Tasten wie
angezeigt, um den Riemen
1
auseinander zu nehmen.
Stecken Sie die Schlaufe durch die
Öse, wie angezeigt.
2
Befestigen Sie die Schlaufe wie
angezeigt.
3
Stecken Sie den Riemen wie
angezeigt wieder zusammen.
4
Legen Sie den Riemen um Ihren
Hals.
5
1
Inbetriebnahme
2
3
4
5
7
Page 67

5. Verwenden des Stativs
Sie können ein Stativ an Ihre Kamera anbringen, um ein W ackeln
der Kamera zu vermeiden und eine optimale Bildqualität zu erhalten.
Sie können so auch Bilder von sich selber, lange Videoclips oder
Bilder im Makromodus mit hoher Qualität aufnehmen.
Befestigen Sie das Stativ an den
Anschluss am Kameraboden und
1
drehen das gezackte Rad, um es
zu verriegeln.
Falten Sie die Stativfüße auf.
Stellen Sie die Position des Stativs
2
nach Bedarf ein.
8
1
Gezacktes Rad
2
Page 68

Grundbedienung
1. Ein- und Ausschalten
Schieben Sie die Objektivabdeckung in Pfeilrichtung, um die
Kamera ein- oder auszuschalten.
Einschalten
Ausschalten
Grundbedienung
Wenn die Kamera sich 60 Sekunden im Ruhezustand befindet, wird der
LCD-Anzeige ausgeschaltet, um Batteriestrom zu sparen. Drücken Sie
eine beliebige Taste, um die Kamera aufzuwecken. Die Kamera wird
automatisch ausgeschaltet, wenn sie sich 3 Minuten im Ruhezustand
befindet.
9
Page 69

2. Einstellen des Modusschalters
DSC
AVI
SELFTIMER
SETTING
OK SHUTTER
DSC
AVI
SELBSTAUSLÖSER
EINSTELLUNG
OK AUSLÖSER
Diese Kamera stellt zwei Modi zur Verfügung - DSC (Digitale
Fotokamera) und Audiomodus. Wählen Sie den gewünschten
Modus mithilfe des Modusschalters.
1
2
10
DSC Modus:
Für Foto- und Videoaufnahmen
sowie Kameraeinstellungen.
AVI: Videoaufnahmen
Selbstauslöser: Zur Aufnahme
eines Selbstportraits
Einstellung: Zur Auswahl der
Kameraeinstellungen
Audiomodus:
Audio aufnehmen.
1
Modusschalter
DSC-Modus
Audiomodus
Page 70

3. Aufnehmen von Bildern
1
LCD-Informationsanzeige
1
2
3
4
5
Fotomodus
1
2
Zoomfaktor
3
Auflösung
Datumsaufdruck
4
5
Fokusmodus
6
Speichermedium
Interner Speicher:
SD-Karte:
MMC-Karte:
7
Verbleibende Bildanzahl
Blitz-Status
8
Weißabgleich oder Effektstatus
9
Batteriestatus
10
6
7
8
9
10
Grundbedienung
11
Page 71

2
Schnappschuss
Modus
1
Schieben Sie die
Objektivabdeckung zur Seite, um
die Kamera einzuschalten. Schalten
Sie den Modusschalter auf .
Fokus
2
Wählen Sie den geeigneten
Fokusmodus mithilfe des
Fokusschalteres.
30cm~40cm (12"~16")
Makro
40cm~ (16" ~ )
Mikro
Heran/herauszoomen
3
Drücken Sie die Kontrolltaste +
zum Heranzoomen, die
Kontrolltaste - zum
Herauszoomen.
Fotoaufnahmen
4
Drücken Sie den Auslöser, um
eine Aufnahme zu machen.
1
HeranzoomenHerauszoomen
12
Page 72

4. Aufnehmen von Videoclips
1
LCD-Informationsanzeige
1
2
3
Videomodus
1
2
Aufnahmezeit
3
Fokusmodus
4
Speichermedium
Interner Speicher:
SD-Karte:
MMC-Karte:
5
Weißabgleich oder Effektstatus
Batteriestatus
6
4
Grundbedienung
5
6
13
Page 73

2
menu
effect
DSC
AVI
SELFTIMER
SETTING
OK SHUTTER
DSC
AVI
SELBSTAUSLÖSER
EINSTELLUNG
OK AUSLÖSER
Aufzeichnen eines Videoclips
14
Modus
1
Schieben Sie die Objektivabdeckung
zur Seite, um die Kamera
einzuschalten. Schalten Sie den
Modusschalter auf .
Wählen sie den Menüpunkt AVI
2
Drücken Sie die MENU / Taste.
Wählen Sie den Menüpunkt AVI
mithilfe der Kontrolltasten und
drücken Sie den Auslöser, um die
Eingabe zu bestätigen.
Fokus
3
Wählen Sie den geeigneten
Fokusmodus mithilfe des
Fokusschalteres.
30cm~40cm (12"~16")
Makro
40cm~ (16"~ )
Mikro
Aufnahmestart
4
Drücken Sie den Auslöser, um die
Aufnahme zu starten.
Aufnahmestopp
5
Drücken Sie den Auslöser erneut,
um die Aufnahme zu stoppen.
1
Page 74

5. Wiedergeben Ihrer Bilder und Videoclips
1
LCD-Informationsanzeige
1
2
Wiedergabemodus
1
2
Spielzeit der Aufnahme
3
Speichermedium
Speichermedium:
SD-Karte:
MMC-Karte:
4
Anzahl der aufgenommenen Fotos und Videos
5
Bild- oder Videonummer
Batteriestatus
6
3
4
5
6
Grundbedienung
15
Page 75

2
+
-
menu
effect
menu
effect
+
-
Datei anzeigen
Vorige Datei
Nächste
Datei
Anzeigen von Bildern
Modus
1
Schieben Sie die
Objektivabdeckung zur Seite, um
die Kamera einzuschalten. Schalten
Sie den Modusschalter auf .
Wiedergabemodus
2
Drücken Sie die
Wiedergabetaste, um die
Miniaturbildanzeige zu öffnen. Die
zuletzt gemachte Aufnahme ist
markiert.
Bild auswählen
3
Drücken Sie die Kontrolltaste -,
um die vorige Datei, die
Kontrolltaste +, um die nächste
Datei auszuwählen. Haben Sie die
gewünschte Datei gewählt,
drücken Sie die
Wiedergabetaste, um die Datei
anzuzeigen.
Heranzoomen zum Vergrößern
4
Um das Bild zu vergrößern,
drücken Sie die Kontrolltaste +
zum Heranzoomen.
1
Heranzoomen
16
Drücken Sie die MENU / Taste zum Abbrechen.
Page 76

3
menu
effect
Ist die
gewählte Datei
eine
Videoaufnahme,
erscheint am unteren
Rand der LCD-Anzeige die
Spielzeit der Aufnahme.
menu
effect
View the file
+
-
Previous Next
Anzeigen von Videoclips
Modus
1
Schieben Sie die
Objektivabdeckung zur Seite, um
die Kamera einzuschalten. Schalten
Sie den Modusschalter auf .
Wiedergabemodus
2
Drücken Sie die
Wiedergabetaste, um die
Miniaturbildanzeige zu öffnen. Die
zuletzt gemachte Aufnahme ist
markiert.
Video auswählen
3
Drücken Sie die Kontrolltaste -,
um die vorige Datei, die
Kontrolltaste +, um die nächste
Datei auszuwählen. Haben Sie die
gewünschte Datei gewählt,
drücken Sie die
Wiedergabetaste, um die Datei
anzuzeigen.
Videowiedergabe stoppen
4
Während der Wiedergabe,
drücken Sie den Auslöser, um die
Videowiedergabe zu stoppen.
1. Drücken Sie die MENU / Taste zum Abbrechen.
2. Wenn Sie einen Videoclip auf der Kamera wiedergeben, dann ist kein
1
Datei anzeigen
Vorige Datei
Ton zu hören. Kopieren Sie bitte den Videoclip zu Ihrem Computer
(Einzelheiten hierzu siehe Seite 30), um den Videoclip mit
Audiowiedergabe anzuschauen.
Nächste
Datei
Grundbedienung
17
Page 77

4
menu
effect
menu
effect
+
-
Previous
Delete the file
Next
NEIN
EINES LÖSCHEN?
JA
Löschen von Bilder und Videoclips
Modus
1
Schieben Sie die
Objektivabdeckung zur Seite, um
die Kamera einzuschalten. Schalten
Sie den Modusschalter auf .
Wiedergabemodus
2
Drücken Sie die
Wiedergabetaste, um die
Miniaturbildanzeige zu öffnen. Die
zuletzt gemachte Aufnahme ist
markiert.
Datei auswählen
3
Drücken Sie die Kontrolltaste -,
um die vorige Datei, die
Kontrolltaste +, um die nächste
Datei auszuwählen.
Datei löschen
4
Haben Sie die gewünschte Datei
ausgewählt, drücken Sie die
MENU / Taste, um den
Bestätigungsdialog zu öffnen.
Wählen Sie Ja mithilfe der
Kontrolltasten und drücken Sie
den Auslöser, um die Datei zu
löschen.
1
Nächste
Vorige Datei
Datei
Datei löschen
18
In o.g. Schritt 4, wählen Sie Nein und drücken Sie den Auslöser, um die
Datei nicht zu löschen und den Löschvorgang abzubrechen.
Page 78

6. Audio aufnehmen
0 0 : 0 0
Modus
1
Schieben Sie die
Objektivabdeckung zur Seite, um
die Kamera einzuschalten. Schalten
Sie den Modusschalter auf .
Aufnahme starten
2
Drücken Sie den Auslöser, um die
Audioaufnahme zu starten. Wenn
Sie die Aufnahme starten, wird der
Zähler am unteren Rand des LCDAnzeige aktiviert.
Aufnahme stoppen
3
Drücken Sie Auslöser erneut, um
die Aufnahme zu stoppen.
1
Grundbedienung
Drücken Sie die MENU / Taste zum Abbrechen.
19
Page 79

Erweiterte Einstellungen
DSC
AVI
SELFTIMER
SETTING
OK SHUTTER
DSC
AVI
SELBSTAUSLÖSER
EINSTELLUNG
OK AUSLÖSER
menu
effect
+
-
EINSTELLUNG
OK AUSLÖSER
BLITZ
QUALITÄT
ALLES LÖSCHEN
DATUM
DATUMSAUFDRUCK
SPRACHE
1. Menü
Das Einstellungsmenü stellt Ihnen erweiterte Einstellungen für
die Feineinstellung Ihrer Kamera zur Verfügung. Im Folgenden
wird der Zugriff auf das Menü beschrieben.
20
Modus
1
Schieben Sie die
Objektivabdeckung zur Seite, um
die Kamera einzuschalten. Schalten
Sie den Modusschalter auf .
Wählen Sie den Menüpunkt
EINSTELLUNG
2
Drücken Sie die MENU / Taste.
Wählen Sie den Menüpunkt
EINSTELLUNG mithilfe der
Kontrolltasten und drücken Sie
den Auslöser, um die Eingabe zu
bestätigen.
Einstellungen ändern
3
Markieren Sie die gewünschte
Einstellung mithilfe der
Kontrolltasten und stellen Sie
die Kamera entsprechend ein.
Drücken Sie die MENU / Taste zum Abbrechen.
1
Page 80

1
EINSTELLUNG
OK AUSLÖSER
BLITZ
QUALITÄT
ALLES LÖSCHEN
DATUM
DATUMSAUFDRUCK
SPRACHE
ENGLISH
DEUTSCH
FRAN AIS
ITALIANO
ESPA OL
PORTUGU S
SPRACHE
OK AUSLÖSER
Einstellen der Sprache
Die Texte auf dem werden wahrscheinlich nicht in
LCD-Anzeige
Ihrer Sprache angezeigt, wenn Sie die Kamera zum ersten Mal
einschalten. Sie können folgendermaßen die LCDAnzeigesprache ändern.
Wählen Sie den Menüpunkt
SPRACHE
1
Markieren Sie den Menüpunkt
SPRACHE im Einstellungsmenü
mithilfe der Kontrolltasten und
drücken Sie den Auslöser, um die
Eingabe zu bestätigen.
Sprache wählen
2
Wählen Sie die gewünschte
Sprache mithilfe der
Kontrolltasten und drücken Sie
den Auslöser, um die Eingabe zu
bestätigen. Drücken Sie die MENU
/ Taste, um die Einstellung zu
beenden.
Erweiterte Einstellungen
21
Page 81

2
EINSTELLUNG
OK AUSLÖSER
BLITZ
QUALITÄT
ALLES LÖSCHEN
DATUM
DATUMSAUFDRUCK
SPRACHE
08:00
2003/01/01
EINSTELLEN
EINRICHTEN SMART
WEITER AUSLÖSER
+
-
/
DATUM
Zeit und Datum einstellen
Stellen Sie Datum und Zeit ein, wenn Sie die Kamera das erste
Mal einschalten.
Wählen Sie den Menüpunkt
DATUM
1
Markieren Sie den Menüpunkt
DATUM im Einstellungsmenü
mithilfe der Kontrolltasten und
drücken Sie den Auslöser, um die
Eingabe zu bestätigen.
Datum und Zeit einstellen
2
Stellen Sie die Werte mithilfe der
Kontrolltasten +/- ein und drücken
Sie den Auslöser, um zum
nächsten Wert zu gelangen.
Drücken Sie den Smart Key zur
Bestätigung, oder die Menü/
Taste zum Abbrechen.
22
Page 82

3
EINSTELLUNG
OK AUSLÖSER
BLITZ
QUALITÄT
ALLES LÖSCHEN
DATUM
DATUMSAUFDRUCK
SPRACHE
AUS
AUTO
OK AUSLÖSER
BLITZ
Verwenden des Blitzes
Der Blitz liefert zusätzliches Licht, wenn das Umgebungslicht für
Ihre Aufnahme nicht ausreicht.
Wählen Sie den Menüpunkt
BLITZ
1
Markieren Sie den Menüpunkt
BLITZ im Einstellungsmenü
mithilfe der Kontrolltasten und
drücken Sie den Auslöser, um die
Eingabe zu bestätigen.
Wählen Sie AUTO
2
Wählen Sie AUTO mithilfe der
Kontrolltasten und drücken Sie
den Auslöser, um die Eingabe zu
bestätigen. Drücken Sie die MENU
/ Taste, um die Einstellung zu
beenden.
Erweiterte Einstellungen
AUS
AUTO
Das Aufladen des Blitzes benötigt mehr Batteriestrom. Der Blitz kann
nicht aktiviert werden, wenn der Batteriestrom schwach ist. Bitte
wechseln Sie in diesem Fall die Batterien aus.
Der Blitz wird nicht aktiviert.
Der Blitz wird automatisch aktiviert, wenn mehr
Licht für die Aufnahme benötigt wird.
23
Page 83

4
EINSTELLUNG
OK AUSLÖSER
BLITZ
ALLES LÖSCHEN
DATUM
DATUMSAUFDRUCK
SPRACHE
QUALITÄT
4M 2304x1728
3M 2048x1536
2M 1600x1200
OK AUSLÖSER
QUALITÄT
Einstellen der Qualität
Die Auflösungseinstellung beeinflusst die Anzahl der Bilder, die
Sie aufnehmen können. Um so höher die Auflösung ist, desto
mehr Speicherplatz beanspruchen die Bilder.
Wählen Sie den Menüpunkt
QUALITÄT
1
Markieren Sie den Menüpunkt
QUALITÄT im Einstellungsmenü
mithilfe der Kontrolltasten und
drücken Sie den Auslöser, um die
Eingabe zu bestätigen.
Wählen Sie die gewünschte
Einstellung
2
Wählen Sie gewünschte Auflösung
mithilfe der Kontrolltasten und
drücken Sie den Auslöser, um die
Eingabe zu bestätigen. Drücken
Sie die MENU / Taste, um die
Einstellung zu beenden.
24
2304X1728
2048X1536
1600X1200
Wir empfehlen Ihnen die Auflösung von 2048x1536 zu verwenden, um ein
Gleichgewicht zwischen der Bildqualität und dem Speicherbedarf zu haben.
Einzelheiten dazu finden Sie im Abschnitt "Speicherkapazität" auf Seite 54.
Die am meisten Speicher beanspruchende Option.
Wählen Sie diese Option, wenn Sie Bilder mit dem
6x8- oder einem kleineren Format ausdrucken
möchten.
Die Standardeinstellung. Wählen Sie diese Option,
wenn Sie Bilder mit dem 5x7- oder einem kleineren
Format ausdrucken möchten.
Die speichersparendste Option. Wählen Sie diese
Option, wenn Sie Bilder mit dem 3x5- oder einem
kleineren Format ausdrucken möchten.
Page 84

5
EINSTELLUNG
OK AUSLÖSER
BLITZ
QUALITÄT
ALLES LÖSCHEN
DATUM
DATUMSAUFDRUCK
SPRACHE
NEIN
JA
OK AUSLÖSER
DATUMSAUFDRUCK
Einstellen des Datumsaufdrucks
Ist der Datumsaufdruck aktiviert, wird das Datum der Aufnahme
auf das Bild gedruckt.
Wählen Sie den Menüpunkt
DATUMSAUFDRUCK
1
Markieren Sie den Menüpunkt
DATUMSAUFDRUCK im
Einstellungsmenü mithilfe der
Kontrolltasten und drücken Sie
den Auslöser, um die Eingabe zu
bestätigen.
Wählen Sie JA
2
Wählen Sie JA mithilfe der
Kontrolltasten und drücken Sie
den Auslöser, um die Eingabe zu
bestätigen. Drücken Sie die MENU
/ Taste, um die Einstellung zu
beenden.
Erweiterte Einstellungen
25
Page 85

6
EINSTELLUNG
OK AUSLÖSER
ALLES LÖSCHEN
DATUM
DATUMSAUFDRUCK
SPRACHE
FLIMMER
FORMATIEREN
50 Hz
60 Hz
OK AUSLÖSER
FLIMMER
Flimmer einstellen
Wenn Sie in ein anderes Land reisen, kann es sein, dass
Sie die Flimmereinstellen dementsprechend ändern müssen.
Um eine Störung der LCD-Anzeige zu vermeiden, stellen
Sie die entsprechende Flimmerfrequenz ein.
Wählen Sie den Menüpunkt
FLIMMER
1
Markieren Sie den Menüpunkt
FLIMMER im Einstellungsmenü
mithilfe der Kontrolltasten und
drücken Sie den Auslöser, um die
Eingabe zu bestätigen.
Wählen Sie die gewünschte
Einstellung
2
Wählen Sie die gewünschte
Flimmereinstellung mithilfe der
Kontrolltasten und drücken Sie
den Auslöser, um Ihre Eingabe zu
bestätigen. Drücken Sie die MENU
/ Taste um das Untermenü zu
beenden.
26
Für weitere Informationen über die Flimmereinstellungen, siehe "Mehr
über Flimmer" auf Seite 54.
Page 86

7
EINSTELLUNG
OK AUSLÖSER
ALLES LÖSCHEN
DATUM
DATUMSAUFDRUCK
SPRACHE
FLIMMER
FORMATIEREN
NEIN
JA
OK AUSLÖSER
ALLES LÖSCHEN
Alles löschen und Formatieren
Mithilfe der "Alles löschen" oder "Formatieren" Funktionen
können Sie nicht mehr benötigte Dateien schnell löschen.
"Alles löschen" löscht die Dateien, während "Formatieren"
den Speicher formatiert und damit alle Dateien löscht.
Wählen Sie den Menüpunkt
ALLES LÖSCHEN oder
1
FORMATIEREN
Markieren Sie den Menüpunkt
ALLES LÖSCHEN oder
FORMATIEREN im
Einstellungsmenü mithilfe der
Kontrolltasten und drücken Sie
den Auslöser, um die Eingabe zu
bestätigen.
Wählen Sie JA
2
Wählen Sie JA mithilfe der
Kontrolltasten und drücken Sie
den Auslöser, um Ihre Eingabe zu
bestätigen. Drücken Sie die MENU
/ Taste um das Untermenü zu
beenden. Beachten Sie, dass
gelöschte Dateien nicht wieder
hergestellt werden können.
Wenn Sie Formatieren wählen, können Bilder und andere Dateien nicht wieder
!
hergestellt werden.
Erweiterte Einstellungen
27
Page 87

2. Verwenden des Selbstauslösers
DSC
AVI
SELFTIMER
SETTING
OK SHUTTER
DSC
AVI
SELBSTAUSLÖSER
EINSTELLUNG
OK AUSLÖSER
+
-
Die Selbstauslöserfunktion gestattet Ihnen ein Bild von sich mit
10 Sekunden Verzögerungszeit aufzunehmen.
1
2
3
28
Modus
Schieben Sie die
Objektivabdeckung zur Seite, um
die Kamera einzuschalten. Schalten
Sie den Modusschalter auf .
Wählen Sie den Menüpunkt
SELBSTAUSLÖSER
Drücken Sie die MENU / Taste.
Wählen Sie den Menüpunkt
Einstellung mithilfe der
Kontrolltasten und drücken
Sie den Auslöser, um die
Eingabe zu bestätigen. Sie
sehen das Symbol in der
linken oberen Ecke der LCDAnzeige.
Verwendung des Selbsauslösers
Die Kamera wartet nach dem
Drücken des Auslösers 10
Sekunden, gibt dabei einen
Piepton 10 Mal ab und veranlasst
die Selbstauslöser-LED zu
blinken, bevor ein Bild
aufgenommen wird. Der
Selbstauslöser wird automatisch
deaktiviert, nachdem ein Bild
aufgenommen wurde.
1
Piept 10 Mal
Page 88

3. Verwendung des Smart key
menu
effect
+
-
Smart key
Mithilfe des Smart key können Sie oft gebrauchte Funktionen Auto, Sonnig, Wolkig, Wolfram, Fluoreszierend (Weißabgleich
[WB]) und SW (Fotoeffekt) - der Kamera einstellen und die
Änderungen in Echtzeit auf der LCD-Anzeige nachverfolgen.
Modus
1
Schieben Sie die
Objektivabdeckung zur Seite, um
die Kamera einzuschalten. Schalten
Sie den Modusschalter auf .
Drücken Sie den Smart Key
2
Drücken Sie den Smart Key, um
einen der folgenden sechs Modi zu
wählen - Auto, Sonnig, Wolkig,
Wolfram, Fluoreszierend und SW.
Auto
Sonnig
Wolkig
Wolfram
Fluoreszierend
SW
1
Zur automatischen Wahl des Weißabgleiches.
Für Außenaufnahmen bei sonnigem Wetter.
Für Aufnahmen bei bewölktem Wetter und dunkler
Umgebung.
Für Innenaufnahmen bei Glühbirnenbeleuchtung
(niedrige Farbintensität).
Für Innenaufnahmen bei Leuchtstoffröhrenbeleuchtung (hohe Farbintensität).
Für Scwarz/Weiß-Aufnahmen.
Erweiterte Einstellungen
29
Page 89

Ihre Bild- und Audiodateien
auf dem Computer abspielen
1. MD 41084 Manager installieren
Installieren Sie MD 41084 Manager bevor Sie Ihre Kamera das
erste Mal an Ihren Computer anschließen. Bitte folgen Sie den
unten stehenden Schritten zur Installation.
Schalten Sie Ihren Computer ein.
1
Verbinden Sie das USB-Kabel noch nicht mit Ihrem Computer.
!
Schließen Sie alle geöffneten Programme auf Ihrem Computer.
!
Legen Sie die beiliegende CD in das CD-ROM-Laufwerk.
2
Bewegen Sie den Mauszeiger auf das Symbol (MD
41084 Manager) und klicken Sie das Symbol.
3
Startet das Menü nicht, gehen Sie
folgendermaßen vor.
1. Doppelklicken Sie "Arbeitsplatz".
2. Doppelklicken Sie das CD-ROM-Laufwerk (MD 41084 Manager (E:)*).
Die Laufwerksbezeichnung dann, je nach Konfiguration des
Computers, verschieden sein.
30
Für Windows XP/ 2000 Benutzer: Wenn Sie die Funktionen des MD 41084
!
Managers nicht verwenden möchten, überspringen Sie Schritt 1 "MD 41084
Manager installieren" und fahren Sie mit Schritt 2 "Verbinden der Kamera mit
dem Computer" fort.
Page 90

Das "InstallShield Wizard" -Dialogfenster wird angezeigt und
die automatische Installation wird gestartet. Klicken Sie auf
4
"Weiter", wenn ein Fenster wie in Abb. 1 erscheint. Folgen Sie
den Bildschirmanweisungen, um fortzufahren.
Abb 1
Hinweis für Windows 2000-Benutzer
1. Das "Digitale Signatur nicht gefunden" -Dialogfenster erscheint
eventuell zwei Mal. Klicken Sie bitte einfach auf "Ja". Diese
Kamera funktioniert gut unter Windows 2000.
2. Folgen Sie den Anweisungen auf dem Bildschirm und klicken auf
"Fertigstellen".
Ihre Bild- und Audiodateien auf dem Computer abspielen
Starten Sie Ihren Computer in diesem Schritt nicht neu.
!
31
Page 91

Klicken Sie je nach Ihrer Kondition auf "Ja" oder "Nein" wenn ein
Fenster wie in Abb. 2 erscheint.
5
Klicken Sie auf "Ja", wenn Ihr Betriebssystem nicht Windows XP ist oder wenn
DirectX 8.0 bzw. sein Nachfolger noch nicht installiert wurde.
Klicken Sie auf "Nein", wenn Ihr Betriebssystem Windows XP ist oder wenn DirectX
8.0 bzw. eine Nachfolgeversion bereits installiert wurde.
Abb 2
Wenn ein Fenster wie in Abb. 3 oder Abb. 4 erscheint, klicken
Sie bitte auf "OK" oder "Fertigstellen", um die Installation zu
6
vervollständigen.
Abb 3
Abb 4
Der Treiber ist verfügbar, nachdem Ihr Computer neu gestartet
wurde.
7
32
Page 92

2. Verbinden der Kamera mit dem Computer
Schalten Sie Ihren Computer ein.
1
Schalten Sie den Modusschalter Ihrer Kamera auf oder .
2
Stecken Sie das USB-Kabel in den USB-Anschluss an Ihrem
Computer ein.
3
Stecken Sie das andere Ende des USB-Kabels in den USBAnschluss an Ihrer Kamera ein.
4
Ihre Bild- und Audiodateien auf dem Computer abspielen
33
Page 93

3. Bild- und Audiodateien auf Ihren Computer laden
Unter Windows XP
1
Ein Fenster wie in Abb. 5 wird automatisch angezeigt,
nachdem die Kamera an den Computer angeschlossen
wurde. Wählen Sie "Ordner öffnen, um Dateien
anzuzeigen mit Windows-Explorer" und klicken dann auf
"Ok".
11
Abb 5
Unter Windows 2000/ME/98SE
Klicken Sie doppelt auf "Arbeitsplatz" und dann auf das
"Wechseldatenträger" -Symbol.
22
34
Arbeitsplatz
11
22
Wechseldate-
nträger (G:)
Page 94

Klicken Sie doppelt auf den "DCIM"-Ordner.
2
Klicken Sie doppelt auf den "100MEDIA" -Ordner.
3
Ziehen Sie die Datei in das Verzeichnis "Eigene Dateien", um
Ihre Bild- und Audiodateien auf den Computer zu kopieren.
4
Unter Windows XP
Speicherort der Dateien
Sie finden Ihre Bild-, Video- und Audiodateien wie in Abb. 6
abgebildet.
Abb 6
Unter Windows
2000/ME/98SE
Ihre Bild- und Audiodateien auf dem Computer abspielen
35
Page 95

4. Wiedergabe auf Ihrem Computer
Klicken Sie doppelt auf "Eigene Dateien".
1
Unter Windows XP
Wählen Sie die gewünschte Datei und klicken doppelt
darauf, um Ihr Bild bzw. Ihren Videoclip anzuschauen.
2
Hinweis zum Trennen der Kamera von dem
Computer unter Windows 2000/ME
Folgen Sie bitte den nachstehenden Schritten, um Ihre Kamera von dem
Computer zu trennen.
1. Klicken Sie doppelt auf auf der Taskleiste.
2. Klicken Sie auf (USB Disk) und dann auf "Stoppen".
3. Bestätigen Sie den Gerätenamen (MD 41084) auf dem
Bestätigungsfenster und klicken dann auf "Ok".
4. Folgen Sie den Anweisungen auf dem Bildschirm, um Ihre Kamera
richtig und sicher von dem Computer zu trennen.
Unter Windows
2000/ME/98SE
36
Page 96

Der MD 41084 Manager
1. MD 41084 Manager installieren
Um von den Funktionen des MD 41084 Managers Bildaufwertung, Bildmanagement und PC-Kamera - Gebrauch zu
machen, müssen Sie die Software zuerst installieren.
Der MD 41084 Manager
Bitte vervollständigen Sie zuerst die Treiberinstallation, wenn der MD
41084 Manager noch nicht installiert wurde. Einzelheiten hierzu siehe
Schritt 1 "MD 41084 Manager installieren" auf Seite 30.
Wenn Sie MD 41084 Manager bereits installiert haben, fahren Sie mit
Schritt 2 "Verbinden der Kamera mit dem Computer" auf der nächsten
Seite fort.
37
Page 97

2. Verbinden der Kamera mit dem Computer
Schalten Sie Ihren Computer ein.
1
Schalten Sie den Modusschalter Ihrer Kamera auf oder .
2
Verbinden Sie das USB-Kabel mit einer USB-Buchse Ihres
Computers.
3
Drücken Sie den Auslöser und halten Sie ihn gedrückt,
4
während Sie das andere Ende des USB-Kabels mit der USBBuchse der Kamera verbinden.
Wenn Sie die PC-Kamera Funktion verwenden möchten, öffnen Sie die Objektivabdeckung.
!
Drücken und halten
Sie den Auslöser.
38
Wenn Sie den Auslöser nicht, wie in Schritt 4 beschrieben, gedrückt halten
!
während Sie das USB-Kabel anschließen, steht die PC-Kamera Funktion nicht
zur Verfügung.
Page 98

Hinweis für Windows 2000/ME/98SE Benutzer
Beachten Sie während der ersten Installation die folgenden Schritte .
Unter Windows 2000
Das "Digitale Signatur nicht gefunden"-Dialogfenster erscheint
eventuell zwei Mal. Klicken Sie bitte einfach auf "Ja". Diese Kamera
funktioniert gut unter Windows 2000.
Unter Windows ME
Wählen Sie bitte "Automatisch nach dem besten Treiber
suchen", wenn ein Fenster wie in Abb. 7 erscheint.
Unter Windows 98SE
Klicken Sie auf "Weiter". wenn ein Fenster wie in Abb. 8
erscheint.
Wählen Sie "Nach dem besten Treiber für das Gerät suchen"
und klicken dann auf "Weiter", wenn ein Fenster wie in Abb. 9
erscheint.
Wählen Sie die Position Ihres Windows 98SE-Treibers. Sie
werden eventuell aufgefordert, die lizenzierte Windows 98SE
CD-ROM in Ihr CD-ROM-Laufwerk einzulegen. Folgen Sie den
Anweisungen auf dem Bildschirm, um die Installation zu
vervollständigen.
Der MD 41084 Manager
Abb 7
Abb 8 Abb 9
39
Page 99

3. MD 41084 Manager starten
Nachdem Software und Hardware installiert sind, können Sie
MD 41084 Manager starten.
Software starten
1
Doppelklicken Sie das Symbol MD 41084 Manager auf
dem Desktop, um das Programm zu starten. Oder klicken Sie
"Start", wählen Sie "Programme", dann das Verzeichnis "MD
41084 Manager" und klicken Sie das Symbol, um das
Programm zu starten.
"Album" und "Live" Modi
2
Die folgenden Abbildungen sind Anzeigen des MD 41084
Managers - Album Modus (Abb. 10) und Live Modus (Abb.
11). Klicken Sie den Schalter links oben, um den Modus zu
wechseln.
Abb 10 Abb 11
40
Page 100

4. Bildmanagement mit MD 41084 Manager
1
Album Modus Benutzeroberfläche
7
8
14
15
Der MD 41084 Manager
1
2
3
4
11
1
Umschalten auf Live Modus
2
Bilder in Arbeitsbereich
laden
3
Bilder ins Album übertragen
AVI-Datei kreieren
4
5
Alle Bilder im
Arbeitsbereich markieren
Bilder im Arbeitsbereich löschen
6
Miniaturbildanzeige
7
Arbeitsbereich
8
5
6
9
10
12
13
Nachricht senden
9
10
Alle Bilder in Meinem
Album markieren
Alle Bilder in Meinem
11
Album löschen
Album-Manager
12
Mein Album
13
Minimieren
14
Beenden
15
41
 Loading...