


MD 41035
DVD Recorder
© 2004 Medion®. All rights reserved.
User’s Manual

IMPORTANT SAFETY INSTRUCTIONS
WARNING: TO REDUCE THE RISK OF FIRE OR ELECTRIC SHOCK, DO NOT
EXPOSE THIS APPLIANCE TO RAIN OR MOISTURE.
CAUTION: TO PREVENT ELECTRIC SHOCK, MATCH WIDE BLADE OF PLUG TO
WIDE SLOT IN OUTLET AND ENSURE PLUG IS FULLY INSERTED.
CAUTION
RISK OF ELECTRIC SHOCK.
DO NOT OPEN.
CAUTION: TO REDUCE THE RISK OF
ELECTRIC SHOCK, DO NOT REMOVE
COVER. NO USER-SERVICEABLE
PARTS INSIDE. REFER SERVICING TO
QUALIFIED SERVICE PERSONNEL.
This symbol warns the
user of uninsulated
voltage within the unit
that can cause dangerous
electric shock.
CAUTION:
THIS DVD VIDEO RECORDER IS A CLASS 1 LASER DEVICE. USE OF CONTROLS, ADJUSTMENTS
OR PERFORMANCE OF PROCEDURES OTHER THAN THOSE SPECIFIED HEREIN MAY RESULT IN
HAZARDOUS RADIATION EXPOSURE. DO NOT OPEN COVERS AND DO NOT ATTEMPT TO
REPAIR THE UNIT YOURSELF. REFER SERVICING TO QUALIFIED PERSONNEL.
This symbol alerts the user
that there are important
operating and maintenance
instructions in the literature
regarding this unit.
This product incorporates copyright protection technology that is protected by method claims of
certain U.S. patents and other intellectual property rights owned by Macrovision Corporation and
other rights owners. Use of this copyright protection technology must be authorized by Macrovision
Corporation, and is intended for home and other limited viewing uses only unless otherwise
authorized by Macrovision Corporation. Reverse engineering or disassembly is prohibited.
2 MD 41035 DVD Recorder
User’s Manual
IMPORTANT SAFETY INSTRUCTIONS
IMPORTANT SAFETY INSTRUCTIONS
Caution
READ THE SAFETY AND OPERATING INSTRUCTIONS before operating your DVD video recorder
and retain the instructions for future use.
FOLLOW INSTRUCTIONS AND HEED ALL WARNINGS on the DVD video recorder and in this manual.
Installation
1. The power supplyofthis DVD recorder is AC100~240V, 50/60Hz, please don’tuse
incorrectpower outlets.Ifyou are unsure ofthe power supplyvoltage, please askyour
local electricitycompany.
2. Please connect the power plug only to a proper outlet.
I
fthe plug does notfit, aska qualified electrician to replace your obsolete outlet.
Please do not modify the plug yourself. To do so will void this safety feature.
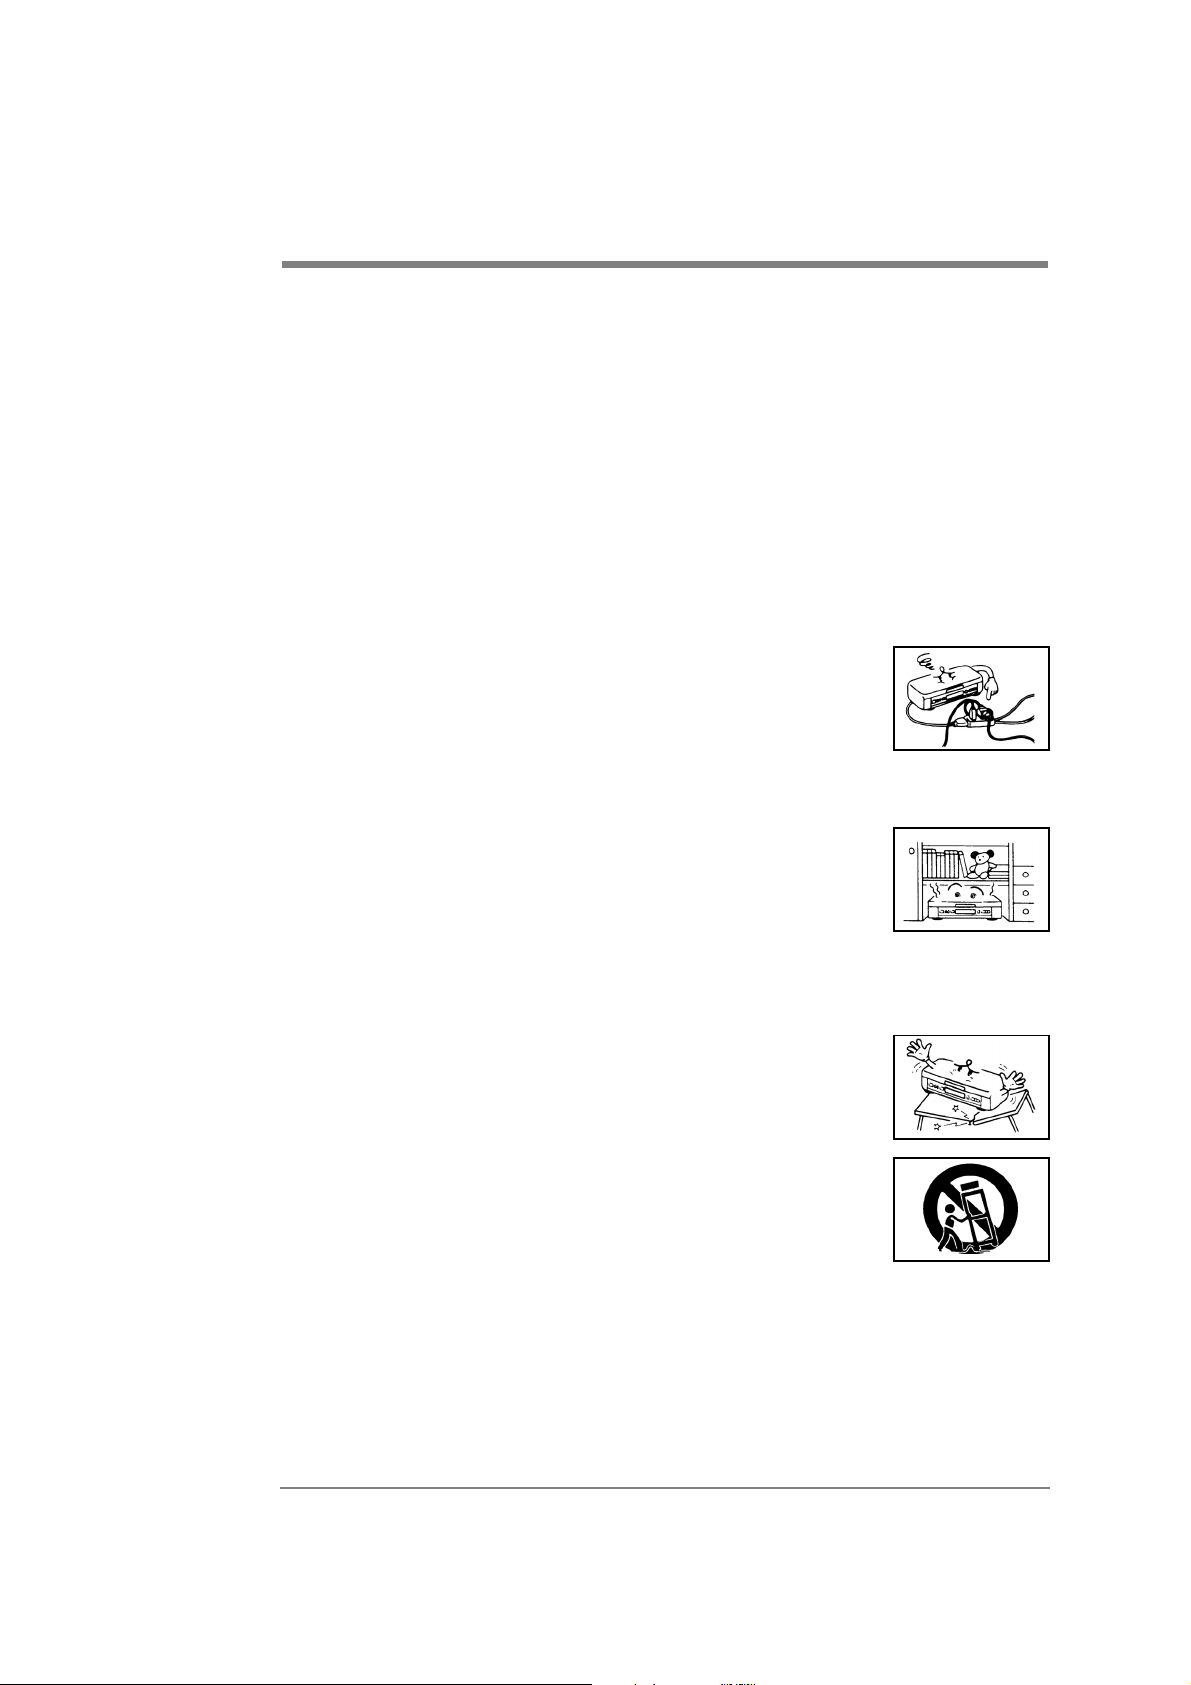
3. Arrange cords so that they will not be stepped on or pinched by
anything placed on or against them. Especially be careful at
plug-ins, receptacles, or cord exit points from the DVD video
recorder. Frayed power cords or damaged plugs are hazardous,
please ask a qualified service technician to replace your power
cord in any of these cases.
Overloaded power outlets and extension cords may cause fire or electrical shock
hazards.
4. Do not cover or block the ventilation holes in the DVD video
recorder cabinet. Doing so may damage the DVD video recorder
or DVD video disc.
Do not place your DVD video recorder on a soft surface, the
ventilation holes can be blocked from the bottom. Avoid placing
it in a small space such as a bookshelf unless ventilation is adequate.
5. Avoid placing the DVD video recorder in an environment with excessive humidity,
sudden temperature changes, or extreme hot or cold temperatures. Otherwise,
condensation may form inside the unit.
6. To avoid accidental damage or injury, please place your DVD
video recorder on a stable and flat surface with no vibration; do
not put any heavy objects on top of it. Please use with a sturdy
stand or table recommended by the manufacturer only; and
follow all the instructions regarding the use of stands or tables.
7. Use care when moving the DVD video recorder on a cart. A
sudden stop, excessive force or uneven surface may cause the
cart to overturn.
8. Do not use any accessory that is not recommended by the
product manufacturer.
9. Unplug this product from the wall outlet and contact Customer Care immediately
under the following conditions:
a) When the power cord or plug is damaged.
b) If any liquid is spilled on, or object has fallen into the product.
c) If the product has been exposed to rain or water.
d) If the product does not operate normally when you follow the instructions in
the user manual.
e) If the product has been dropped or damaged in any way.
User’s Manual
3MD 41035 DVD Recorder

IMPORTANT SAFETY INSTRUCTIONS
10. The product should be placed well away from any heat source such as a radiator,
heater, stove, or any electrical home appliance that produces heat.
Operation/Cleaning
1. Keep your DVD video recorder away from strong magnetic objects.
2. Keep your DVD video recorder away from humid locations, such
as bathtub, sink, laundry, humid basement, or swimming pool.
3. Use only with accessories recommended by the manufacturer in
order to avoid fire, shock or other accident.
4. If your DVD video recorder is exposed to rain, placed in a wet area or struck by a
strong impact, please unplug it immediately and contact Customer Care before
turning it back on.
5. To protect your DVD video recorder during a thunder storm, or
when it won’t be used for a long period of time, please unplug
it from the power outlet and disconnect the cable system. This
will prevent possible damage to the product from lightning or
power surges.
6. Unplug your DVD video recorder before cleaning. Use a damp
cloth for cleaning. Do not use cleaning fluid or aerosol as they
may cause damage, fire, or electrical shock if the liquid runs into
the recorder. Those materials may also tarnish the coating of
your DVD video recorder.
7. Never open or remove the cover or make any adjustment which is not described in
the user manual as it may expose you to an electrical shock or other hazardous
situation, or cause serious damage to your DVD video recorder. Your DVD video
recorder must be serviced by a qualified technician only.
8. Keep any liquids or any unnecessary objects away from your DVD
video recorder. Never turn on your DVD video recorder if any
liquid or small metal object has entered the unit, or an electrical
short, fire or electrical shock may result. In this case, please
unplug your DVD video recorder immediately and contact
Customer Care.
9. Remove the plug from the power outlet before cleaning. Use a damp cloth. Please
don’t use cleaning liquid or aerosol. Don’t allow liquid to drip into the recorder, it
may cause fire or electric shock. Cleaning fluids will erode the surface.
10. Power cord:
• Always hold the plug when removing the power cord. Do not pull the cable.
• Don’t touch the power cord with a wet hand, it may lead to a short on circuit or
you may get an electric shock.
• Don’t let items rest on the power cord.
• Don’t tie or knot the power cord.
• Take care that the power cord is not tripped over or stepped on.
11. When the recorder is temporarily not in use, set the power to stand-by. If the
recorder won’t be used for an extended period, remove the plug from the power
outlet.
12. Emergency
If the following occurs, unplug the unit and contact Customer Care immediately:
• If liquid or metal drops into the unit.
• If an abnormal playback status appears.
4 MD 41035 DVD Recorder
User’s Manual

IMPORTANT SAFETY INSTRUCTIONS
Service
1. Do not attempt to fix this DVD video recorder yourself, please unplug it and contact
Customer Care.
2. Make sure the technician uses manufacturer-recommended parts for replacement.
Substituted may cause fire, electrical shock, or other hazardous situations.
3. Be sure the technician performs a complete safety check to ensure your DVD video
recorder can be operated safely.
Laser Radiation
1. Please obey all operating instructions in this manual to avoid radiation damage.
2. The laser light in this machine can damage human eyes. Please don’t open the
case. If the unit needs service, please contact Customer Care.
This is a class-1 laser
CLASS 1
LASER PRODUCT
product. Use of controls
or adjustments or
procedures other than
those specified herein
may result in hazardous
laser light beam
exposure.
Condensation Warning
Condensation may form on the pickup lens under the following conditions.
• When a heater is turned on.
• In a steamy or very humid room.
• When the unit is suddenly moved from a cold to a warm environment.
If condensation forms inside the unit, it may not operate properly. If you suspect that
condensation has formed in the unit, turn off the power and wait approximately one
hour for condensation to evaporate.
Outside Antenna
An outside antenna system should not be located in the vicinity of overhead power
lines or other electric light or power circuits, or where it can fall into such power lines
or circuits. When installing an outside antenna system, extreme care should be taken to
avoid touching such power lines or circuits because contact with them could be fatal.
User’s Manual
5MD 41035 DVD Recorder

IMPORTANT SAFETY INSTRUCTIONS
Disc Use
1. Take out the disc as shown to the right. Hold the edge and center of
the disc. Don’t touch the varnish side as this may damage the
information on the disc.
2. Don’t put stickers or labels on the disc surface. This will cause a
weight bias on the disc and lead to abnormal playback.
3. Please don’t scratch or spot the varnish side.
4. The rotational speed of the disc is very high. Please don’t use any
broken, scratched, cracked or bent disc or it will damage the DVD
recorder.
5. Disc cleaning
Finger prints or dirty spots on the disc will reduce the reflection,
which will lead to a poor signal. With a poor signal, the playing
performance will decrease. Please use a soft cloth to wipe the disc
straight from center to the outer edge. If the disc is too dirty, you can
use a damp soft cloth to wet the disc first, and then wipe it with a
dry soft cloth.
Never use cleaning liquid, methylbenzene, diluted formula, antistatic liquid or other solution for disc cleaning; it may damage the
surface of the disc.
6. Storage of the disc
• Put the discs in the original box to prevent bending or other
damage to the disc.
• Don’t put the discs in areas with high temperature, high
humidity or in direct sunlight.
• Please read any instructions on the disc label carefully.
1
2
3
4
5
6 MD 41035 DVD Recorder
User’s Manual

Contents
contents
Important Safety Instructions . . . . . .3
Caution . . . . . . . . . . . . . . . . . . . . .3
Installation . . . . . . . . . . . . . . . . . .3
Operation/Cleaning . . . . . . . . . . . . .4
Service . . . . . . . . . . . . . . . . . . . . .5
Laser Radiation . . . . . . . . . . . . . . .5
Condensation Warning . . . . . . . . . .5
Outside Antenna . . . . . . . . . . . . . . .5
Disc Use . . . . . . . . . . . . . . . . . . . . .6
Contents . . . . . . . . . . . . . . . . . . . . .7
Thank You… . . . . . . . . . . . . . . . . .9
…for Choosing This Product! . . . . . .9
Features . . . . . . . . . . . . . . . . . . . .9
Package Contents . . . . . . . . . . . . . .9
Compatibility . . . . . . . . . . . . . . . .10
Recommendations for
Optimal Picture Quality . . . . . . . . .10
Copy Protection . . . . . . . . . . . . . .10
Copyrights . . . . . . . . . . . . . . . . . .10
Panels and Connections . . . . . . . . .11
Front Panel . . . . . . . . . . . . . . . . .11
Rear panel . . . . . . . . . . . . . . . . . .11
Basic (Composite) Connection . . . . .12
Other TV Connections . . . . . . . . . . .14
S-Video . . . . . . . . . . . . . . . . . .15
Component Video . . . . . . . . . . . .15
AV Amplifier/Receiver Connection . .16
Digital Audio . . . . . . . . . . . . . . .16
Analog 5.1 Audio . . . . . . . . . . . .16
Connect to Other Video Inputs . . . .17
ConnectaCamcorder. . . . . . . . .17
Connect a VCR or DVD Player . . . . .17
Tips . . . . . . . . . . . . . . . . . . . . . . .18
Control Buttons and Display . . . . . .19
Front Panel Buttons . . . . . . . . . . .19
Display Window . . . . . . . . . . . . . .19
Remote Control . . . . . . . . . . . . . . .20
Remote Control Buttons . . . . . . .21
Basic Playback Functions . . . . . . . . .23
Preparation: . . . . . . . . . . . . . . . . .23
Primary Settings . . . . . . . . . . . . . .23
Start Playback . . . . . . . . . . . . . . . .24
Skip Playback . . . . . . . . . . . . . . .24
DVD . . . . . . . . . . . . . . . . . . . . .24
VCD/Audio CD . . . . . . . . . . . . . . .24
Pause/Step . . . . . . . . . . . . . . . . . .25
Fast Forward/Rewind . . . . . . . . . .25
DVD . . . . . . . . . . . . . . . . . . . . .25
VCD/Audio CD . . . . . . . . . . . . . . .25
Slow Motion . . . . . . . . . . . . . . . . .25
Stop . . . . . . . . . . . . . . . . . . . . . .25
Disc Playback OSD (On Screen Display) 26
DVD Playback OSD . . . . . . . . . . . . .26
VCD/Audio CD Playback OSD . . . . . . .27
Advanced Playback Functions . . . . . .28
Repeat Playback . . . . . . . . . . . . . .28
DVD . . . . . . . . . . . . . . . . . . . . .28
VCD/Audio CD . . . . . . . . . . . . . . .28
A-B Repeat Playback . . . . . . . . . . .28
Shuffle . . . . . . . . . . . . . . . . . . . .29
Program Playlists . . . . . . . . . . . . .29
CD-DA, MP3, JPEG,
VCD Program Playback . . . . . . . . .29
Cancel Programmed Playback . . . .29
Display JPEG Photos . . . . . . . . . . . .30
Digest . . . . . . . . . . . . . . . . . . . .30
Title Playback . . . . . . . . . . . . . . .30
(DVD only) . . . . . . . . . . . . . . . . .30
DVD Menu . . . . . . . . . . . . . . . . . .30
(DVD only) . . . . . . . . . . . . . . . . .30
Playing Multiple Angles . . . . . . . . .30
Change Subtitle Language . . . . . . .30
Change Audio Language . . . . . . . . .31
Direct Selection . . . . . . . . . . . . . .31
PBC Playback Control . . . . . . . . . . .31
Zoom . . . . . . . . . . . . . . . . . . . . .31
Bookmark Memory . . . . . . . . . . . .32
Create Bookmark . . . . . . . . . . . .32
Jump to Bookmark . . . . . . . . . . .32
Clear Bookmark . . . . . . . . . . . . .32
NTSC/PAL and Progressive Scan . . . .32
User’s Manual
7MD 41035 DVD Recorder

contents
General Setup . . . . . . . . . . . . . . . .33
Entering the Setup Menu . . . . . . . .33
How to Setup . . . . . . . . . . . . . . . .33
Setup Menu Structure . . . . . . . . . .33
Language . . . . . . . . . . . . . . . . . . .34
Aspect Ratio . . . . . . . . . . . . . . . . .35
16:9 (Wide) . . . . . . . . . . . . . . . .35
4:3 (Letterbox) . . . . . . . . . . . . .35
4:3 (Pan Scan) . . . . . . . . . . . . . .35
Channel Search . . . . . . . . . . . . . . .35
Add/Delete Channel . . . . . . . . . . .35
Audio Setup . . . . . . . . . . . . . . . . .36
Analog Output . . . . . . . . . . . . . .36
Digital Output . . . . . . . . . . . . . .36
Date and Time . . . . . . . . . . . . . . .36
Parental Controls . . . . . . . . . . . . .36
Password . . . . . . . . . . . . . . . . . . .36
Factory Reset . . . . . . . . . . . . . . . .37
Disc Media . . . . . . . . . . . . . . . . . .37
Record Speed . . . . . . . . . . . . . . . .37
Auto Chapter . . . . . . . . . . . . . . . .37
Schedule . . . . . . . . . . . . . . . . . . .37
Preparing Discs for Recording . . . . .38
Compatible Discs . . . . . . . . . . . . . .38
Disc Types . . . . . . . . . . . . . . . . . .38
Initialize a New Disc . . . . . . . . . . .38
Manual Disc Recording . . . . . . . . . .41
Pause recording . . . . . . . . . . . . . .41
Recording from External Devices . . .42
Recording from a Camcorder .. . .42
Editing Discs . . . . . . . . . . . . . . . . .43
Erase Whole Disc . . . . . . . . . . . . .43
(DVD+RW only) . . . . . . . . . . . . . .43
Erase One Title . . . . . . . . . . . . . . .43
(DVD+RW only) . . . . . . . . . . . . . .43
Play Full Title . . . . . . . . . . . . . . . .43
Edit DVD Compatibility . . . . . . . . . .44
Insert Chapter . . . . . . . . . . . . . . .44
Remove Chapter . . . . . . . . . . . . . .44
Hide Title . . . . . . . . . . . . . . . . . .45
Show Title . . . . . . . . . . . . . . . . . .45
New Picture . . . . . . . . . . . . . . . . .45
Finalize a DVD+R . . . . . . . . . . . . . .45
Troubleshooting . . . . . . . . . . . . . .46
Additional Information . . . . . . . . . .50
Regional Code . . . . . . . . . . . . . . .50
Technical Specifications . . . . . . . . .50
Glossary . . . . . . . . . . . . . . . . . . .51
Scheduled Disc Recording . . . . . . . .39
Scheduling a Recording . . . . . . . . .39
Stop an In-Process
Scheduled Recording . . . . . . . . . . .39
Recording Quality . . . . . . . . . . . . .40
Correct a Scheduled Recording . . . .40
Cancel a Scheduled Recording . . . .40
Troubleshooting
Scheduled Recordings . . . . . . . . . .40
8 MD 41035 DVD Recorder
User’s Manual

preface
Thank You…
…for Choosing This Product!
Welcome to the latest in television technology. Your new DVD recorder features easy-touse, on-screen menus and closed caption capabilities - all in a space-saving design.
Quite simply, you’ve selected one of the best products in its class. We are proud to offer
a DVD recorder that will bring you convenient, dependable service and enjoyment for
years to come.
This manual is provided to help you set up your DVD recorder and take advantage of its
many features.
Keep this manual in a safe place for future reference. Record your product model
number and serial number here, for use in event of loss or theft.
Model number:
Serial number:
Features
• This DVD recorder can play in NTSC and PAL under progressive or interlace scan
output.
• This unit can be connected with a Dolby Digital or DTS compatible amplifier /
receiver for home theater surround sound.
• Record cable or broadcast TV signal through the antenna, or record video and audio
from an external input such as a DVD player or VCR.
• Schedule up to 8 separate recordings.
Package Contents
• Remote control (includes 2 AAA batteries)
• Power Cord
• TV antenna cable
•BlankDVD+RWdisc
•Video signalcable (composite,yellowconnector)
•Componentvideocable(green, blue, andredconnectors)
•Usermanual / Quick manual
User’s Manual
9MD 41035 DVD Recorder

preface
Compatibility
• Recordable Disc Types
This unit can record to DVD+R and DVD+RW discs. Recorded discs may not be
playable on all conventional DVD players.
• Playable Disc and Media Types
DVD Video, SVCD, DVD+RW, DVD+R, CD-R, DVD-RW, DVD-R, CD-RW, Audio CD, MP3,
and JPEG.
Recommendations for Optimal Picture Quality
The unit is a precision device which is manufactured with highly accurate technology.
Fingerprints or friction on the disc will affect reading from the laser pickup lens, and it
will ruin the image quality. In the worst case scenario, neither video nor audio will be
played from a dirty or scratched disc. To obtain optimum picture quality, the recorder
should be cleaned after every 1,000 hours of use. Please note that this period may vary
depending on the environment (temperature, humidity, dust, etc.). Please contact your
supplier for details.
Copy Protection
This DVD video recorder supports Macrovision copy protection.
This will prevent copy-protected materials from being recorded normally.
Copyrights
• Copyright
The law prohibits copying copyrighted material without the permission of the owner
of the copyright.
• Copy protection
If you attempt to copy a DVD disc with CSS (Content Scrambling System), a DVD copy protection code,
the anti-copy protection function of your DVD recorder will be started to prevent illegal copying.
Dolby and the double-D symbol are registered trademarks of Dolby Laboratories.
DTS and DTS Digital Surround are registered trademarks of Digital Theater Systems, Inc.
10 MD 41035 DVD Recorder
User’s Manual

panels and connections
Panels and Connections
Front Panel
VIDEO:Composite video in for recording from external video equipment such as a
camcorder.
AUDIO L/R:Standard stereo sound connections for recording from external equipment
such as a camcorder. “L” stands for “left” and “R” stands for “right”.
Rear panel
1. POWER CORD SOCKET.
2. ANTENNA:connect cable or TV antenna to “IN” and your TV to “OUT”.
3. VIDEO IN / AUDIO IN: These jacks are the same as the ones on the front of your DVD
recorder. Use them to connect to another video device that you wish to record, such
as a DVD player or VCR.
4. S-VIDEO:For connecting to a TV or monitor’s S-Video input jack.
5. VIDEO OUT:Video signal output.
6. COMPONENT VIDEO OUT:component signal output, for connection with a component
(Y/CB/CR) or progressive scan (Y/PB/PR) device.
7. AUDIO OUT:analog audio output.
8. DIGITAL:Digital audio signal output connector for use with a Digital Audio Receiver/
Audio DA Converter.
User’s Manual
11MD 41035 DVD Recorder

panels and connections
Basic (Composite) Connection
Before changing or connecting any cables, please make sure all devices are
turned off to avoid any electronic discharge that may damage the unit.
This chart shows the basic connections necessary for using your DVD recorder with a TV.
Other types of connections are shown on the following pages. Before you get started,
we recommend that you assess all of the equipment that you would like to connect and
review the following pages closely.
12 MD 41035 DVD Recorder
User’s Manual

panels and connections
This DVD recorder is equipped with a standard composite (AV) video connection, S-Video
connection, and component (YPBPR/ YCBCR) video input. Component provides the best
picture signal, but is not available on all TVs. S-Video provides excellent quality, but not
as good as component. Composite video provides good video quality, but it is not as
good as S-Video or component.
Choose the best way to connect devices depending on your particular equipment.
For a basic (composite) connection, please follow the steps below using the diagram to
the left as a guide.
1
Use the supplied AV cable (red, white, and yellow connectors) to connect the
DVD recorder to your TV’s AV input jacks.
2
Connect one end of the provided TV antenna cable to ANTENNA OUT on the DVD
recorder. Connect the other end to the antenna (RF) input on your TV.
3
Use another TV antenna cable to connect the TV antenna or CATV coaxial cable
from your wall outlet with ANTENNA IN on the DVD recorder.
4
Connect the power cord to an easily accessible AC outlet.
Please note that unlike some VCRs, the DVD recorder will not use the TV antenna
connection to carry sound and video to your TV, although it will pass through the
broadcast or cable signal provided by that connection. You must make a separate audio
and video connection in order to watch DVDs played on your DVD recorder on your TV.
User’s Manual
13MD 41035 DVD Recorder

panels and connections
Other TV Connections
S-Video and Component Video connections carry only the video signal, not audio. To
hear sound when using either of these connections, you will also need to make a
separate audio connection. You can do this by connecting the red and white portions of
the AV cable but NOT the yellow portion. This will play stereo sound through your TV (if
your TV is capable of producing stereo sound). You can also follow the instructions on
the following pages to connect your DVD recorder to an AV amplifier/receiver to send
sound to external speakers.
14 MD 41035 DVD Recorder
User’s Manual

panels and connections
1
S-Video
Connectone end ofthe S-Video cable to one ofthe S-Video connections on the backof
the DVD recorder, and connectthe other end to the S-Video In jackon your TV.
2
Component Video
Connect the component cable (green, blue, and red connectors) to the COMPONENT VIDEO
OUT on the rear panel of the DVD recorder and the corresponding component video in
connections on your television. Make sure to match the colors on the cable connectors
with the colors on the ports.
Connect EITHER the S-Video OR the Component Video cable to your TV. Not both.
L
User’s Manual
15MD 41035 DVD Recorder
panels and connections
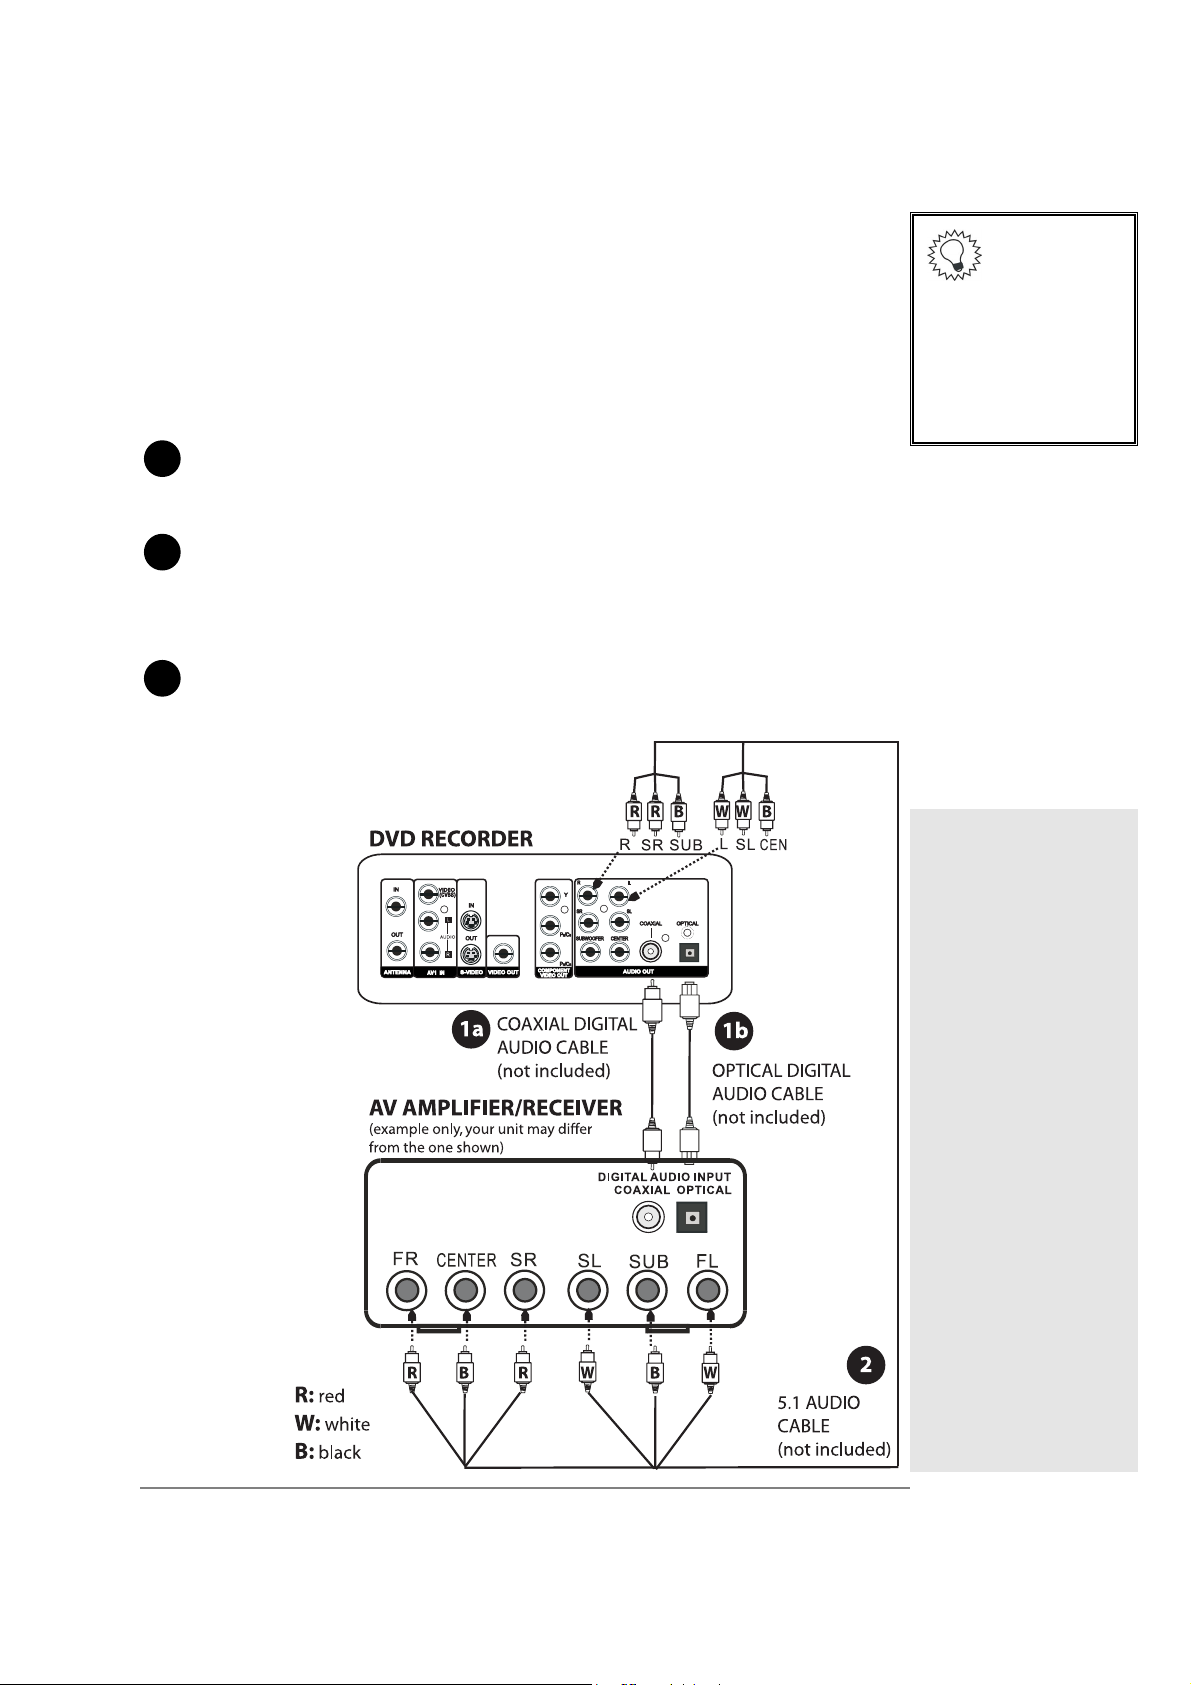
AV Amplifier/Receiver Connection
The following connections are shown as an example only. Please choose the correct
connections for your equipment. For example, you should use either an analog or a
digital audio connection – not both. If you are using a digital connection, you should
use either optical or coaxial – not both.
Digital Audio
1a
For an optical connection, connect an optical cable (also referred to as Toslink)
to OPTICAL DIGITAL OUT on the DVD recorder and OPTICAL DIGITAL IN on the AV
Amplifier or TV.
1b
For a coaxial connection, connect a coaxial digital audio cable to COAXIAL
DIGITAL OUT on the DVD recorder and COAXIAL DIGITAL IN on the AV Amplifier or TV.
Analog 5.1 Audio
2
For analog audio, connect analog AUDIO OUTPUT and VIDEO OUTPUT on your DVD
recorder to analog AUDIO INPUT and VIDEO INPUT on your AV Amplifier or TV.
L
Optical and coaxial
digital audio cables
sold separately.
You must use
the correct audio
settings to avoid loud
noise from your
speakers. Please refer
to Audio Setup on
page 36.
FR: Front right speaker.
Placed in front of the
listener to his or her
right.
Center: Center speaker.
Placed directly in front
of the listener.
SR: Surround right
speaker. Placed behind
the listener to his or
her right.
SL: Surround left
speaker. Placed behind
the listener to his or
her left.
SUB: Subwoofer. This
speaker carries low
frequency sounds and
can be placed
anywhere in the room
as long as it is close to
the ground.
FL: Front left speaker.
Placed in front of the
listener to his or her
left.
16 MD 41035 DVD Recorder
User’s Manual


panels and connections
Tips
1. Most cables and AV connectors on your equipment follow a standard color code.
Observing this color code can be very helpful when connecting your AV equipment.
2. We have provided many different options for audio and video connections so that
you can choose the best for your needs. However, you only need one video
connection and one audio connection between your DVD recorder and your TV.
3. If your antenna/CATV connection is attached to your DVD recorder, and your DVD
recorder is attached to your TV with another antenna cable, you will be able to
watch TV without turning on your DVD recorder.
4. Attaching your DVD recorder to a VCR and then attaching the VCR to the TV will
produce very poor quality video and recordings. The DVD recorder should be
attached directly to the TV.
18 MD 41035 DVD Recorder
User’s Manual

control buttons and display
Control Buttons and Display
1. STANDBY/ON: Puts the unit in and out of standby mode.
2. DISC TRAY
3. OPEN/CLOSE
4. PREV
5. STOP
6. PLAY
7. NEXT
8. RECORD
9. DISPLAY WINDOW: Shows current status of DVD recorder.
: Opens and closes disc tray.
: Jump to the previous chapter.
: Stop playback/recording.
: Plays the current disc.
: Jump to the next chapter.
: Record currently playing channel/video.
Display Window
1. Dolby Digital sound display
2. DTS sound display
3. Title: Display the current title (DVD)
4. Track: Display the current track (VCD)
5. Chapter: Display the current chapter
6. The selected song in program
7. External input for recording
8. Start scheduled recording
9. Title in repeat play
10. A to B repeated playback
11. Channel from external AV amplifier
12. Display the disc type: DVD, VCD, MP3
13. Playback in progress
14. Play/record is currently paused
User’s Manual
19MD 41035 DVD Recorder

control buttons and display
Remote Control
Before using the remote control, put 2 AAA
batteries into the battery compartment.
Please make sure the +/- terminals are
placed correctly, following the instructions
printed in the battery compartment. Point
the remote control at the remote receiver on
the DVD recorder.
20 MD 41035 DVD Recorder
User’s Manual

control buttons and display
Remote Control Buttons
1. STANDBY/ON Puts the unit in or out of standby.
2. CH Choose the previous or next TV channel.
3. VOL Adjust the volume of analog audio output.
4. SETUP Open setup menu (see page 33).
5. RETURN When playing in VCD mode, press this button to return to the previous
menu.
6. CM SKIP Skip about 30 seconds of playback time on a DVD (a typical TV
commercial length).
7. QUALITY Choose the quality of recording (see page 40).
8. RECORD Record the current channel.
9. SOURCE Change to an external input signal for recording (see page 41).
10. PLAY Start playing the disc.
11. PAUSE Pause playback.
12. PREV Jump to the previous chapter.
13. NEXT Jump to the next chapter.
14. DIGEST This button allows you to view JPEG CDs and some VCDs in a thumbnail
mode with nine small images per screen (see page 30).
15. SUBTITLE When playing a DVD with multiple subtitle languages, this button
toggles languages or disables the subtitle function (see page 30).
16. ZOOM Zooming mode in playback. (please refer to page 31).
17. 1/A Repeat one chapter or all the titles in a disc (see page 28).
18. SHUFFLE Random playback for CD/VCD (see page 29).
19. ANGLE Choose a different view angle for playback (see page 30).
20. OPEN/CLOSE Opens or closes disc tray.
21. 1,2,3… For menu, song selection or for time, password input.
22. CLEAR Press clear to erase the last number entered.
23. +10 Plus ten key. To enter “20”, push +10 twice then the 0 button.
24. NTSC/PAL Cycle between normal NTSC, NTSC progressive scan, and PAL (see page 32).
25. PROGRAM Program playback of the disc (see page 29).
26. EDIT When used with DVD+RW discs, this button shows the edit menu where
you can erase titles and chapters (see page 43).
27. BOOK MARK Bookmark memory setup (see page 32).
28. DISPLAY Show status on screen (see page 26).
29. Use to move cursor up, down, left, and right in menus.
30. ENTER Confirm selection of an item in the setup menu.
31. MONITOR Toggle between external source (for recording) and DVD (for playback).
_
32. STEP
33. STOP Stop playback.
34. REV
35. FWD
36. TITLE Display title menu of a DVD (see page 30).
37. MENU/PBC Accesses available DVD (see page 30) or VCD PBC (see page 31) menus.
38. A-B Loop playback between two points (see page 28).
39. SLOW Slow-motion forward/reverse playback (see page 25).
40. AUDIO If a DVD has more than one audio language, this button can select a
41. MUTE Cut out the analog sound output.
Step (frame by frame) playback (see page 25).
_
Rewind.
_
Fast forward.
language for playback.
User’s Manual
21MD 41035 DVD Recorder

control buttons and display
L Please don’t use different brands or types of batteries together. Don’t use a new
and an old battery together.
L If you find the remote distance is reduced, please change both batteries at the
same time.
L If the DVD recorder won’t be operated for an extended period, remove the batteries
from the remote control. Otherwise the remote control may be damaged.
L Don’t place the remote control in areas with high temperature or high humidity.
L Don’t open the case of the remote control.
22 MD 41035 DVD Recorder
User’s Manual

basic playback functions
Basic Playback Functions
Preparation:
D See pages 12–17 for connection diagrams.
D Connect the DVD Recorder to the TV, turn on the TV power, and select the proper
input on your TV (e.g., “AV”).
D If connecting to an audio system, please turn the audio system on and make sure
that it is connected correctly.
D The first time you power on this DVD recorder, please follow the on-screen
instructions.
D Please note that an LED indicator will show when the unit is in standby (off) mode.
Primary Settings
This DVD recorder can be set easily by using the buttons. To
make selections, move the yellow highlight bar to the desired item
with the navigation buttons and then press ENTER to confirm.
1. When the DVD recorder is turned on for the first time, the TV
screen shows the following message:
Choose English menus
De Choose German menus
Press<ENTER> to continue
2. Time and date:
Please set the time and
date:
AM/PM HH:MM AM 00:00
MM/DD/YY 00/00/00
Completed
3. Selection of input signal:
Please select signal type:
Cable
Antenna
Skip
Press the direction keys to
choose the menu language, then
press ENTER to confirm.
Use the direction keys to
move the cursor. Use the
direction keys to change to the
correct the numbers. When you
are finished setting the time and
date, highlight “Completed” and press ENTER to
confirm.
Use the direction keys to select the signal input
source. Press ENTER to confirm or select ”Skip” to
complete this setting later.
The DVD recorder auto-searches the selected signal
type to find channels. When finished, the screen
shows:
4. Press ENTER to exit setup.
User’s Manual
Channel searching done!
To exit press <ENTER> key
23MD 41035 DVD Recorder

basic playback functions
Start Playback
1. Press OPEN/CLOSE to open the disc tray.
2. Put the disc on the disc tray in the proper position and then close the disc tray
3. Press the PLAY button to play the disc.
Some menu selections work only while the disc is being played.
L
In PBC playback on VCD, a PBC displays on the screen.
L
If there is no PBC function on VCD/CD, the disc plays immediately.
L
Skip Playback
DVD
Press NEXT to skip to the next chapter.
Chapter 1 Chapter 2
Press PREV to skip to the beginning or previous chapter.
Chapter 2 Chapter 1
VCD/Audio CD
With PBC on:
During VCD playback, press TITLE to bring up the PBC menu.
PLAYING VCD PBC MENU
Song 1
Song 2
Song 3
With PBC off:
Press NEXT or PREV to skip to the next or previous section on a CD.
24 MD 41035 DVD Recorder
User’s Manual

basic playback functions
Pause/Step
Except for movies on CD, videos can be played frame-by-frame.
1. Press PAUSE to pause the picture. While paused, press STEP
next frame.
2. Press PLAY to resume normal playback.
Fast Forward/Rewind
DVD
1. Press FWD_or REV
cycles through the following speeds: 2x > 4x > 8x > 16x >30x > 60x.
2. Press PLAYto resume normal playback.
VCD/Audio CD
1. Press FWD_or REV
cycles through the following speeds: 2x > 4x > 8x > 16x.
2. Press PLAYto resume normal playback.
While rewinding or fast forwarding, you will not be able to hear the audio
L
portion of the track.
_
to speed up playback. Pressing the button multiple times
_
to speed up playback. Pressing the button multiple times
_
to advance to the
Slow Motion
1. Press SLOW to slow down playback. Pressing the button multiple times cycles
through the following speeds: 1/2 > 1/4 > 1/8.
2. Press PLAYto resume normal playback.
During slow-motion play, you will not be able to hear the audio portion of the
L
track.
Stop
Press STOP while playing a disc to temporarily stop (pre-stop) playback.
Press PLAY to resume play from the point where playback was stopped, or press
STOPagain to stop playback completely.
Completely stop
Playing Pre-stop
STOP
STOP
PLAY
Resume play
If you are finished using the DVD recorder, take out the disc and press STANDBY/ON to
turn the unit off.
25MD 41035 DVD Recorder
User’s Manual

disc playback osd
Disc Playback OSD
(On Screen Display)
The OSD provides useful information about the disc that
is currently being played, as well as quick access to
commonly used menus.
DVD Playback OSD
Press DISPLAY on the remote control to show the
following OSD information:
Title Chapter Time Counter
001
T
Audio channel selection
1/1: AC-3 Stereo English
;
Subtitle selection Random playback
1/2 English 1/2 Normal
A
Repeat playback
C
001
1/4 Off
1. Not all of the OSD options appear on your screen
at once. Use the buttons to move between
display options, and to access the OSD options
that are not currently shown on your screen.
2. Press ENTER to select the item that you would
like to change. The menu item will turn yellow
to indicate that you can change the settings.
3. Use the buttons to cycle through the
available options. When the menu displays the
option that you would like to select, press ENTER
to confirm the setting. The menu item will turn
white to show that your change has been
entered.
4. Press DISPLAY again to exit the OSD display.
00:00:00
Title: If there are multiple
titles on the DVD, this menu
allows you to jump directly to
a desired title.
Chapter: If there are multiple
chapters on the DVD, this
menu allows you to jump
directly to a desired chapter.
Time Counter: The time
counter allows you to begin
playback at a specific point of
time on the DVD.
Audio Channel Selection:
This allows you to set the
audio language for playback.
The languages available
depend on the disc. Not all
discs have multiple audio
languages. You may need to
use the disc menu to change
audio languages - this
depends on the design of the
disc.
Subtitle Selection: This
allows you to set the subtitle
language for playback. The
languages available depend
on the disc. Not all discs have
multiple subtitle languages.
You may need to use the disc
menu to change subtitle
languages - this depends on
the design of the disc.
Random Playback: When
available, this menu allows
you to choose between
normal and random(shuffle)
playback.
Repeat Playback: This menu
allows you to choose
between repeat playback
settings. Please see the
“Advanced Playback
Functions” for more
information about setting a
disc to repeat.
26 MD 41035 DVD Recorder
User’s Manual

disc playback osd
VCD/Audio CD Playback OSD
Press DISPLAY on the remote control to show the following OSD information:
Title Time Counter Audio channel selection
001
T
Random playback Repeat playback
00:00:00
;
1/3: Stereo
1/2 Normal 1/3 Off
PBC On/Off
PBC
1. Not all of the OSD options appear on your screen at once. Use the buttons to
2. Press ENTER to select the item that you would like to change. The menu item will
3. Use the buttons to cycle through the available options. When the menu
4. Press DISPLAY again to exit the OSD display.
PBC On
move between display options, and to access the OSD options that are not currently
shown on your screen.
turn yellow to indicate that you can change the settings.
displays the option that you would like to select, press ENTER to confirm the setting.
The menu item will turn white to show that your change has been entered.
Title: If there are multiple titles on the DVD, this menu allows you to jump directly to a
desired title.
Time Counter: The time counter allows you to begin playback at a specific point of time
on the DVD.
Audio Channel Selection: This allows you to set the audio language for playback. The
languages available depend on the disc. Not all discs have multiple audio languages.
You may need to use the disc menu to change audio languages - this depends on the
design of the disc.
Random Playback: When available, this menu allows you to choose between normal
and random (shuffle) playback.
Repeat Playback: This menu allows you to choose between repeat playback settings.
Please see the “Advanced Playback Functions” for more information about setting a disc
to repeat.
PBC On/Off: Some VCDs have complex PBC menus. This menu allows you to turn the PBC
functionality on or off. Your DVD recorder is easiest to control with the PBC function set
to “Off”.
User’s Manual
27MD 41035 DVD Recorder

advanced playback functions
Advanced Playback Functions
Repeat Playback
Repeat playback lets you select a section of your disc to play in an endless loop.
DVD
1. Press 1/ALL on the remote control to access the repeat function.
2. Press ENTER to enter select mode, then use the buttons to select how much of
the DVD you would like to repeat:
No repeat Repeat current chapter
2/4 Chapter1/4 Off
Repeat current title Repeat entire disc
4/4 Disc3/4 Title
3. Press ENTER to confirm your selection. Press 1/ALL again to exit.
VCD/Audio CD
1. Press 1/ALL on the remote control to access the repeat function.
2. Press ENTER to enter select mode, then use the buttons to select how much of
the DVD you would like to repeat:
No repeat Repeat current track
2/3 Track1/3 Off
Repeat entire disc
3/3 Disc
3. Press ENTER to confirm your selection. Press 1/ALL again to exit.
A-B Repeat Playback
A-B repeat playback allows you to define a specific section of your disc to be played in
an endless loop.
1. Rewind or fast forward your disc to the beginning of the section you want to repeat.
2. Press the A-B button to set up a start point (A). The on screen display shows:
A
B
3. Fast forward or play to the end of the section you would like to repeat.
28 MD 41035 DVD Recorder
User’s Manual

advanced playback functions
4. Press A-B again to set the end point. The OSD shows:
A
B
and the playback between your defined points begins.
3. Press the A-B button a third time to resume normal playback. No OSD is shown.
Shuffle
Shuffle is only available during VCD (PCB off) or CD-DA playback.
1. Press SHUFFLE to play the songs on a disc in a random order. The TV screen shows as
follows:
Normal playback Random playback
2/2 Random1/2 Normal
2. Press ENTER to enter select mode, then use the buttons to make a selection.
3. When in shuffle mode, the OSD shows continuously on the screen.
4. Press SHUFFLE again to resume normal playback, no OSD shows on the screen.
Program Playlists
Programmed song playback can be used on ISO files, CD-DA or VCD (with PBC off) only.
CD-DA, MP3, JPEG, VCD Program Playback
1. Place your disc in the recorder. The
recorder will automatically play the first
file. Press STOP.
2. Press PROGRAM to enter the Program
List screen (shown to right). The top
window shows the tracks on your disc,
and the bottom window shows the tracks
in your playlist.
3. Use the buttons to select the desired
song (file) then press ENTER to confirm
your selection.
4. When you are finished with your playlist,
use the buttons to highlight PLAY at
the bottom of the screen. Press ENTER
and the recorder will play your
programmed list.
5. If you press STOP, your programmed
songs (files) will remain programmed.
Track 001 (00:04:24)
Track 002 (00:03:09)
Track 003 (00:04:18)
Track 004 (00:02:56)
Track 005 (00:03:37)
Track 006 (00:03:45)
Track 003
Track 006
Track 001
Play Clear All
Cancel Programmed Playback
1. Choose Clear All to remove all programmed songs (files) from your playlist. This
does not affect the songs or files on your disc.
2. Press PLAY to resume normal playback.
User’s Manual
29MD 41035 DVD Recorder

advanced playback functions
Display JPEG Photos
When a disc with JPEG files is put into the
recorder, it automatically plays the pictures as a
slideshow. Press STOP to end the slideshow
and enter the track list sceen at any time. Then
you can use the buttons to choose a picture
and press ENTER to show it in full screen mode.
JPEG 1 JPEG 2 JPEG 3
JPEG 4 JPEG 5 JPEG 6
Digest
The digest screen can show 9 thumbnail pictures
on your screen at once. It can help you to find a
picture quickly.
1. Press DIGEST to enter the digest screen.
2. Use the buttons to choose a
picture and press ENTER to show the picture in full screen mode.
3. Move the cursor to and press ENTER to jump to the previous page of thumbnails.
Move the cursor to and press ENTER to jump to the next page of thumbnails.
JPEG 7 JPEG 8 JPEG 9
Title Playback
(DVD only)
Some DVDs have a title menu that can be accessed using the TITLE button on your
remote control.
1. While a DVD with a title menu is playing, press TITLE.
2. Use the buttons to select a title and press ENTER to confirm.
DVD Menu
(DVD only)
Some DVDs have complex content with many subtitle languages, audio languages, video
angles, etc. The DVD menu can be used to acess these features.
1. If the disc contains a DVD menu, press MENU/PBC to show the menu on the screen.
2. Use the buttons to make a slection and press ENTER to confirm.
Playing Multiple Angles
Some DVDs have multiple angle video segments.
1. When a DVD section with multiple view angle is playing, the screen shows:
2. While this icon is showing, press ANGLE to cycle through the available viewpoints.
Change Subtitle Language
When playing a DVD with more than one subtitle language, press SUB-T to change or
cancel subtitles.
1. Press SUB-T to cycle between available subtitle languages and subtitles off.
2. The screen shows the subtitle language’s number. Press ENTER to confirm. Press
SUB-T again to hide the subtitle message.
Some subtitle languages can be only be selected from the DVD menu and can
L
30 MD 41035 DVD Recorder
not be changed with the SUB-T button. Subtitle availability depends on the
design of the DVD.
User’s Manual

advanced playback functions
Change Audio Language
If a DVD has more than one audio language, press AUDIO to change between them.
1. Press AUDIO to cycle through available audio languages.
2. The screen shows the audio language’s number. Press ENTER to confirm your
selection. Press AUDIO again to hide the screen message.
Some audio languages can be only be selected from the DVD menu and can not
L
Direct Selection
When a DVD, VCD or Audio CD is playing, press the numeric keys on the remote control to
jump directly to a specific chapter or song for playback.
To enter double-digit numbers, press the +10 button. For example, to enter “32” press
+10, then 3, then 2.
PBC Playback Control
Only VCDs edition 2.0 or above have this function. Different VCDs will have different PBC
functions, depending on the design of the disc. Please refer to the instruction manual
for the disc for more information.
1. Press MENU/PBC to turn on/off the PBC function. The OSD shows “PBC on” or “PBC
2. If the VCD has a PBC menu, press PREV and NEXT to change pages in the menu.
3. In PBC menus, all selections must be made with the numeric buttons.
4. When playing VCD 2.0 edition discs, set PBC to “off” for optimal operation.
5. When PBC is on, press TITLE to enter the PBC menu.
be changed with the Subtitle button. Audio language availabilitydepends on the
design of the DVD.
off”.
Zoom
1. When playing a DVD or VCD, press ZOOM to cycle through the zoom settings:
x2 > x4 > x8 > normal.
3. An inset screen in the upper left corner shows the entire viewable area.
2. While zoomed, use the buttons to move the zoomed portion within the
viewable area.
ZOOM
User’s Manual
31MD 41035 DVD Recorder

advanced playback functions
Bookmark Memory
This unit supports 5 separate stored bookmarks for the disc currently in the DVD
recorder. When you remove the disc from the recorder, the bookmarks are lost.
Create Bookmark
1. While playing a disc, press BOOKMARK at the point you wish to bookmark. The
Bookmark menu shows on screen as follows:
2. The five lines indicate the five slots that the unit has for memory. A number
indicates that a bookmark is stored in that slot. If there is nothing above the line,
then there is nothing stored in that slot.
3. Use the button to move to an empty slot.
4. Press ENTER to memorize the present point as a bookmark. A number will appear in
the bookmark space, indicating that you have successfully stored the bookmark.
5. Press BOOKMARK again to exit the bookmark menu.
[ ] [ ] [ ] [ ] [ ]
[1]
Jump to Bookmark
1. Press BOOKMARK to enter the bookmark menu.
2. Use thebuttons to select a bookmark.
3. Press ENTER to start playback from that bookmark point.
Clear Bookmark
1. Press BOOKMARK to enter the bookmark menu.
2. Use thebuttons to select a bookmark.
3. Press CLEAR to erase the selected bookmark from memory.
NTSC/PAL and Progressive Scan
The NTSC/PAL button cycles between normal NTSC, NTSC progressive scan, and PAL
viewing modes.
PAL/B is the TV-standard for TVbroadcasts used in Singapore.
NTSC Progressive Scan can be used with a component connection to a TV that supports
progressive scan to watch DVD movies at a higher resolution.
NTSC is the TV-standard for North America and other areas. Ifyou select NTSC, Singapore
movies and television programsin Singaporewill appear incorrectlyonyour screen.
Please see the glossary on page 51 for more information.
32 MD 41035 DVD Recorder
User’s Manual

general setup
General Setup
Entering the Setup Menu
Press SETUP on your remote control to enter the setup menu.
If you press SETUP during playback, playback will pause. It will resume when
L
How to Setup
1. Press SETUP to enter the setup menu.
2. Use the buttons to make a selection and press ENTER to enter into the first
3. In the first sub-menu, use the buttons to make a selection. Press ENTER to
3. In the second sub-menu, use the buttons to make a selection and press ENTER
4. Press SETUP again to exit the setup menu.
Setup Menu Structure
Items in bold are the factory default setting.
1.Language 1.OSD English
2.Video Setup 1.Aspect Ratio 16:9 Wide
you exit the Setup menu.
sub-menu.
enter into second sub-menu, or press to return to the previous page.
to confirm your selection.
German
2.Menu Default
English
Spanish
French
3.Audio Default
English
Spanish
French
4.Subtitles Off
Default
English
Spanish
French
4:3 Letterbox
4:3 PanScan
2.Channel search Antenna
Cable
3.Add/Del channel
4.Cable/Antenna Antenna
Cable
User’s Manual
33MD 41035 DVD Recorder

general setup
3. Audio Setup 1.Analog Output Surround +5.1
2.Digital Output D-PCM
4.System Info 1.Date and Time
2.Parental Controls 1.G
3.Password
4.Factory Reset Confirm
5.Disc Media 1.Finalize
2.Erase Confirm
LR Stereo
Dolby Digital
2.
3.PG
4.PG 13
5.
6.R
7.NC 17
8.NO Limit
Cancel
Cancel
6.Recording 1.Record Speed HQ
SP
LP
EP
SLP
2. Auto Chapter On
Off
7.Schedule
Language
There are four items for which you can change the language: OSD, MENU, AUDIO,
SUBTITLES.
The OSD (on screen display) can be displayed in English or German.
The Menu, Audio, and Subtitle languages available depend on the disc that you are
playing. If the disc has a default setup for audio language and subtitle language, this
recorder will play them automatically.
34 MD 41035 DVD Recorder
User’s Manual

general setup
Aspect Ratio
The following aspect ratios are available for playback:
16:9 (Wide)
Use this for 16:9 wide screen TV video output.
4:3 (Letterbox)
Use this to display full 16:9 video footage on a 4:3 TV screen. Black bars will appear at
the top and bottom of the screen.
4:3 (Pan Scan)
Use this for watching typical 4:3 TV broadcasts on a 4:3 television. If you do not like the
black bars produced by watching 16:9 video footage in letterbox mode, you can watch
them in 4:3; however, the sides of the image will be cropped to fit your screen.
See instructions on the DVD that you want to play for more information.
Channel Search
You must perform a channel search in order for the DVD recorder to recognize your
broadcast or cable channels for display and recording. If you did not perform a channel
search during initial setup, you can do it here.
Add/Delete Channel
You can delete channels after performing a channel search, or add channels that have
been previously deleted. First move to the channel that you want to add or delete. If
the channel has been previously deleted, you may need to use the numeric buttons to
directly enter the channel number.
If the channel is not already memorized by your DVD recorder, selecting Add/Delete will
add it to the memory. If the channel has already been memorized, then selecting
Add/Delete will delete it from your DVD recorder’s memory.
User’s Manual
35MD 41035 DVD Recorder

general setup
Audio Setup
In order to play surround sound, the audio setup must be selected correctly and the
DVD recorder has to be connected with an AV Amplifier/ Receiver. You must set the DVD
recorder correctly to ensure the digital audio signal format is compatible with the
amplifier/receiver.
If you send an incompatible digital signal to an AV Amplifier/Receiver, it may
cause noise from the loudspeaker. This could damage your loudspeakers.
Analog Output
Surround +5.1: Use this setting for analog surround sound connections.
Stereo: Outputs analog sound in standard stereo (two channel).
Digital Output
Use the following mode to connect the digital sound signal from this recorder to an
external amplifier.
D-PCM: D-PCM outputs the same type of format that CDs are usually recorded in. Use
D-PCM for digital sound output in stereo (two channel) as opposed to surround sound.
Dolby® Digital:Recorder outputs Dolby® Digital or DTS® digital audio in surround
sound.
Date and Time
Before scheduling any recordings, the time must be set as follows.
1. Highlight Date and Time and press ENTER to enter setup.
2. Use the buttons to move the cursor, and use the buttons to modify the
time and date.
3. After you have entered the correct time and date, press ENTER to confirm setup. The
screen switches to the previous setup page automatically. Press SETUP again to exit
the setup menu.
Parental Controls
This function allows you to set limits on the content that can be displayed using your
DVD recorder. If this function is on, the DVD recorder will not allow playback of discs
with a rating equal to or higher than the selected rating level. For example, if you select
“PG-13”, then playback of PG-13, R, and NC-17 rated movies will be blocked.
Please set the password before setting parental controls!
Password
The password menu allows you to set up passwords. In order to enter a new password,
you will first need to enter the original password, and then your new password. Press
ENTER to confirm.
The factory default password is “11911”.
L
36 MD 41035 DVD Recorder
User’s Manual

general setup
Factory Reset
Select this option to return all settings to the original factory defaults.
Disc Media
These functions work only on DVD+R or DVD+RW recordable discs. Please make sure that
the correct disc is in the DVD recorder before selecting these settings.
Finalize: Finalize a DVD+R (see page 45).
Erase: Erases all of the information on a DVD+RW.
Record Speed
You can record discs using five different quality levels. See page 40 for more
information on quality levels.
Auto Chapter
When Auto Chapter is on, the DVD recorder automatically inserts chapters into DVDs
that you record. These chapters appear approximately every five minutes. This allows
you to jump to specific sections of your DVD more quickly. However, if you plan to set
your own chapters, you should not record with Auto Chapter on. You will still be able
to add your custom chapters after recording, but you may need to take extra steps to
remove the chapters inserted automatically.
The factory default setting for Auto Chapter is “on”.
Schedule
Use this menu to schedule recordings. See the “Recording Discs” section for information
on using this feature.
See page 51
for a glossary of terms
used in this manual.
User’s Manual
37MD 41035 DVD Recorder

preparing discs
Preparing Discs for Recording
Compatible Discs
• Recordable Disc Types
This unit can record to DVD+R and DVD+RW discs. Please see “Disc Types” below.
• Playable Disc and Media Types
DVD Video Commercial “Hollywood” DVD movies.
SVCD Super VCD. A format for video saved on CD. Usually used in Asia.
DVD+RW DVD format that can be “burned” repeatedly by some recorders.
DVD+R DVD format that can be “burned” only once.
DVD-RW DVD format that can be “burned” repeatedly by some recorders.
DVD-R DVD format that can be “burned” only once.
CD-R Recordable CD format often used for music.
CD-RW Re-recordable CD format, also used for music.
Audio CD Commercial music CD.
MP3 Format for compressed digital music on CD.
JPEG Format for compressed digital photographs on CD or DVD.
We cannot guarantee that your recorded discs will play on another DVD player. Please
check the manual for the other DVD player to make sure that it can play DVD+R and/or
DVD+RW discs.
Although your DVD recorder can play DVD-R, music CDs, and MP3s, you can not use it to
create these types of discs. You can only use it to record video - whether a TV broadcast
or a home movie - to DVD+R or DVD+RW.
Disc Types
DVD+RW discs can be erased and copied over again, although this may reduce the
quality of your recording. DVD+R discs cannot be copied over, and you cannot add new
data to a DVD+R disc once it has been finalized (see the section “Editing Discs” starting
on page 49).
You may not be able to record to a DVD+RW disc that already contains recordings from
another DVD recorder or PC. If you are able to add a new recording to a disc from
another DVD recorder, your recorder will rewrite the DVD menu. If the disc contains data
from a personal computer, this data will be erased by your DVD recorder.
Initialize a New Disc
Your DVD recorder will automatically initialize a new DVD+R or DVD+RW disc the first
time it is placed into the recorder. This takes about 1 minute, during which the TV
screen shows READING. After the procedure is complete, the TV screen shows a blank
title and indicates the recording capacity is 100%.
For more information on erasing discs or portions of discs, please see the section
“Editing Discs” starting on page 43.
38 MD 41035 DVD Recorder
User’s Manual

scheduled disc recording
Scheduled Disc Recording
Scheduling a Recording
Your can schedule up to 8 different programs with your DVD recorder.
1. Make sure that the correct time and date are set on your DVD recorder (see p. 36).
2. Place an initialized DVD+R or DVD+RW disc in the DVD recorder (see p. 38).
3. Press SETUP on your remote control to enter the setup menu. Use the buttons
to highlight “Schedule”, then press ENTER to confirm. A screen with the following
information appears:
No. mm/dd/yy AM/PM Start AM/PM Stop Source Speed
01 __/__/__ __ __:__ __ __:__ _____ ____
02 __/__/__ __ __:__ __ __:__ _____ ____
03 __/__/__ __ __:__ __ __:__ _____ ____
04 __/__/__ __ __:__ __ __:__ _____ ____
05 __/__/__ __ __:__ __ __:__ _____ ____
06 __/__/__ __ __:__ __ __:__ _____ ____
07 __/__/__ __ __:__ __ __:__ _____ ____
08 __/__/__ __ __:__ __ __:__ _____ ____
4. Set the date for your recording: Use thebuttons to move the cursor to the date
(mm/dd/yy) field, and use the buttons to select the date for your recording.
5. Set the start time for your recording: First use thebuttons to move to the
AM/PM field, and use the buttons to select whether your program begins in
the AM or PM hours. Then use thebuttons to move the cursor to the start field,
and use the buttons to select the time that you want to start your recording.
6. Set the stop time: First use thebuttons to move to the AM/PM field, and use
the buttons to select whether your program ends in the AM or PM hours. Then
use thebuttons to move the cursor to the stop field, and use the buttons
to select the time that you want to end your recording.
7. Set the source: Use thebuttons to move the cursor to the source field, and use
the buttons to select the source for your recording.
8. Set the speed (quality): Use thebuttons to move the cursor to the speed field,
and use the buttons to select the quality for your recording. More information
about quality levels is included on page 40.
9. Press ENTER to confirm your settings.
10. When you are done, press SETUP again to leave the setup menu.
11. The system will display a warning message that tells you turn off the recorder in
order to record your scheduled program. Please follow the instructions on screen.
Stop an In-Process Scheduled Recording
While the record is proceeding, press STOP to stop recording and go to DVD mode, or
press POWER to stop recording and go to stand-by status.
User’s Manual
39MD 41035 DVD Recorder

scheduled disc recording
Recording Quality
You can record discs using five different quality levels. The higher the quality level, the
more space (time) will be taken up on your disc. Press QUALITY on your remote to
change the quality settings.
HQ (High Quality): The best picture quality 60 min. / 1 hour
SP (Standard Play): Excellent (DVD video) picture quality 120 min. / 2 hours
LP (Long Play): Good (S-VHS) picture quality 180 min. / 3 hours
EP: (Extended Play): Better than VHS quality 240 min. / 4 hours
SLP: (Super Long Play): VHS picture quality 360 min. / 6 hours
Recording times are estimates, actual recording times may vary. Please note that if your
source video is of low quality, then your final recording will be of low quality even if
you select a higher quality recording level. Recording over previously recorded discs may
also decrease the quality level.
Correct a Scheduled Recording
1. Press SETUP on your remote control to enter the setup menu. Use the buttons
to highlight “Schedule”, then press ENTER to confirm.
2. Use thebuttons to move the cursor to the information that you would like to
correct.
3. Press ENTER to select the information, and use the buttons to make changes.
4. Press ENTER again to confirm your changes, and press SETUP to close the setup
menu.
Cancel a Scheduled Recording
1. Press SETUP on your remote control to enter the setup menu. Use the buttons
to highlight “Schedule”, then press ENTER to confirm.
2. Use thebuttons to move the cursor to the number of the recording that you
would like to cancel (e.g., 01, 02). This is in the first column.
3. Press CLEAR on your remote control.
4. Press ENTER again to confirm that you would like to cancel this scheduled recording,
and press SETUP to close the setup menu.
Troubleshooting Scheduled Recordings
Your DVD recorder will not be able to perform the scheduled recording if:
1. No disc loaded.
2. The disc is write-protected.
3. The disc is not the correct format (DVD+R or DVD+RW).
4. The disc already contains 49 titles. This is the maximum number of titles that can
be recorded to a single disc.
5. Another recording is in progress.
6. The DVD recorder’s Time and Date is not set properly.
7. The time set for your recording is in the past.
8. The 8 memory slots for setting recordings are already filled.
9. There is no signal from the selected input source (it may be connected incorrectly or
turned off).
The DVD recorder will not be able to tell if a disc is damaged. Even if the recording
seems to be working, you may not be able to play back the disc if it has been scratched,
smeared, or otherwise damaged.
40 MD 41035 DVD Recorder
User’s Manual

manual disc recording
Manual Disc Recording
1. Place an initialized DVD+R or DVD+RW disc in the DVD recorder (see p. 38).
2. Select the channel you want to record.
3. Press MONITOR on the remote to switch to external input mode.
4. Press SOURCE to select the input source that you want to record. Press SOURCE
multiple times to cycle through the options: CVBS1 > CVBS2 > S-VIDEO > CHANNEL
5. Press RECORD on the remote control or the front panel of the DVD recorder to start
recording.
6. Press STOP to stop recording. Please wait while the screen displays “WAIT.” After
15 to 17 seconds, the screen displays “LIVE”, and your recording is done.
7. Press MONITOR to switch to DVD mode. The recorded title will appear on the screen.
Press ENTER to view your recorded video.
After recording, the following messages will also be stored:
• Record date and channel source.
• Record time.
• Recording length and recording mode.
• Recording index screen.
DVD+RW: These discs can be erased and recorded over.
DVD+R: These discs can be recorded and finalized only once. They cannot be
erased and recorded over.
Pause recording
1. Press PAUSEwhile recording to temporarily stop the DVD recorder from recording
information. This may be useful for excluding sections that you do not want to
record, such as TV commercials.
2. Press PAUSEagain to resume normal recording.
Chapters
Chapters can only be added after your recording has completed, not during the
recording itself. Please see page 44 for more information about adding chapters.
User’s Manual
41MD 41035 DVD Recorder

recording from external devices
Recording from External Devices
You can record the signal from external devices, such as a VCR, video camcorder (V8,
Hi8), or DVD player onto DVDs using your DVD recorder.
1. Please confirm the external device is properly connected to the DVD recorder. See
the connection diagrams beginning on page 13 for more information.
2. Place an initialized DVD+R or DVD+RW disc in the DVD recorder (see p. 38).
3. Press MONITOR on the remote to switch to external input mode.
4. Press SOURCE to select the source for your recording .
Input Screen Display
(Internal Tuner) (Channel)
AV 1 IN CVBS 1
AV 2 IN CVBS2
S-VIDEO S-VIDEO
ANTENNA CHANNEL
5. Press RECORD to begin recording.
6. Press STOP to stop recording. Please wait while the screen displays “WAIT.” When
“WAIT” disappears from the screen, your recording is done.
7. Press MONITOR to switch to DVD mode. The recorded title will appear on the screen.
Press ENTER to view your recorded video.
The DVD recorder will stop recording automatically if there is no signal from the
L
inputdevice (such as a blankpartofa videotape or an interrupted TVsignal).
Recording from a Camcorder
1. Connectthe red, yellow, and white AVoutputconnectors from your camcorder to
the AV input connectors on the front of your DVD recorder.
2. Place an initialized DVD+R or DVD+RW disc in the DVD recorder (see p. 38).
3. Turn on the DV camcorder and switch it to “VCR” mode.
4. Press MONITOR on the remote to switch to external input mode.
5. Press SOURCE to select the source for your recording .
6. Press RECORD to begin recording.
7. Press STOPto stop recording. Please waitwhile the screen displays “WAIT.” When
“WAIT” disappears from the screen, your recording is done.
8. Press MONITOR to switch to DVD mode. The recorded title will appear on the screen.
Press ENTER to view your recorded video.
Recording will stop automaticallyifthere is no signal from the camcorder.
L
All recorded signals must be in DVD-SD format.
Date and time information can’tbe recorded from a camcorder.
You can’t record copy-protected discs or one-time duplicable discs.
42 MD 41035 DVD Recorder
User’s Manual

editing discs
Editing Discs
Erase Whole Disc
(DVD+RW only)
Press SETUP to enter the setup menu. Select Disc Media, then Erase.
Erase One Title
(DVD+RW only)
Erasing a title can free up space on your DVD+RW.
1. Press TITLE on the remote control to enter the title menu. Use the buttons to
select the title that you would like to erase.
2. Press EDIT on the remote control. The screen will display the following edit options:
EDIT
Erase Title
Play Full Title
Finalize
3. Use the buttons to select Erase Title and press ENTER. Wait approximately 15
seconds for the disc to be erased. “PLEASE WAIT” will be displayed on the screen
while your disc is being erased.
Play Full Title
If there is a hidden chapter in a title, this feature can view all the contents.
1. Press TITLE on the remote control to enter the title menu. Use the buttons to
select the title that you would like to view.
2. Press EDIT on the remote control. The screen will display the following edit options:
EDIT
Erase Title
Play Full Title
Finalize
3. Use the buttons to select Play Full Title and press ENTER.
User’s Manual
43MD 41035 DVD Recorder

editing discs
Edit DVD Compatibility
If there is more than one edited title on disc, but it shows only one title when you try
to play the disc, you must follow the following instructions to make the disc
compatible.
1. Press TITLE on the remote control to enter the title menu. Use the buttons to
select the title that you would like to play.
2. Press EDIT on the remote control. The screen will display the following edit options:
EDIT
Erase Title
Play Full Title
Finalize
3. Use the buttons to select Finalize and press ENTER.
We can’t guarantee that you can play your recorded DVD+R or DVD+RW on
another DVD player. Check the instruction manual of the other DVD player in
advance to confirm that it can play DVD+R or DVD+RW discs.
Insert Chapter
Use this feature to insert chapters into your DVD disc for easier navigation.
1. Play the title that you would like to split into chapters.
2. When you reach the point where you would like to insert a chapter, press EDIT on
the remote control to show the edit menu.
EDIT
Insert Chapter
Remove Chapter
Hide Title
Show Title
New Picture
3. Choose Insert Chapter and press ENTER to add a chapter.
Remove Chapter
Chapter marks can be deleted after recording.
1. While a movie is playing, press EDIT to show the edit menu.
2. Choose “Remove Chapter” to delete the chapter mark for the currently playing
chapter. Press ENTER to confirm.
You can not insert or remove chapters on a DVD+R that has been finalized.
44 MD 41035 DVD Recorder
User’s Manual

editing discs
Hide Title
You can hide titles on your disc so that they can be seen on the title menu, but not
played.
1. While the title that you wish to hide is playing, press EDIT to show the edit menu.
2. Choose “Hide Title” and press ENTER to confirm.
3. Press TITLE to return to the title menu.
Show Title
This feature allows you to play a title that has been hidden.
1. Press TITLE to enter the title menu. Use the buttons to select the hidden title
and press EDIT to bring up the edit menu.
2. Highlight “Play Full Title” and press ENTER to temporarily play the hidden title.
3. While playing a hidden title, “HIDDEN” shows on the top right corner of the screen.
4. Press EDIT again to show the edit menu.
5. Select “Show Title” and press ENTER to permanently “un-hide” the title.
New Picture
You can choose any frame in a title to use as the index scene for that title. The index
scene is displayed on the title menu.
1. Play the title until the frame that you want to use as your index picture appears,
then press EDIT on the remote control.
2. Select “New Picture” and press ENTER.
3. Press TITLE to return to the title menu. The title will show the new picture.
Finalize a DVD+R
This function allows a DVD+R disc to be played on general DVD players. A finalized disc
can’t be recorded with new content or revised.
1. Press SETUP to enter the setup menu and select “Disc Media”.
2. Select “Finalize” and press ENTER to execute.
3. The screen displays the status of the finalization and the remaining time required.
The time required for this function depends on the disc type, length of the recorded
content and the quantity of the titles.
User’s Manual
45MD 41035 DVD Recorder

troubleshooting
Troubleshooting
This section includes possible solutions to common problems that you may experience
with your DVD recorder.
Problem Possible Cause Solution
DVD recorder displays
“HELLO” after the
power is turned on,
but no functions can
be used.
No power, no signal. Power cord is not
The unit turns off by
itself.
The disc tray can’t be
closed, or the disc
tray comes out
automatically after
placing a disc in it.
Primary setup has
not been completed.
properly connected
to the power outlet.
TV is not correctly
connected to the
DVD recorder.
Automatic power off
function: the power
is automatically
turned off after 20
minutes have passed
in stop mode.
Disc is not inserted
correctly in the tray.
Disc is too dirty.
Regional code of the
disc is not correct.
Complete the primary setup before
playback (see page 23).
Make sure the plug is properly inserted
in the power outlet.
Refer to the connection drawings
starting on page 13 to make sure that
the TV is properly connected.
Turn the power back on.
Take the disc out of the tray and
replace it carefully.
Clean the disc.
Check the disc packaging to confirm the
regional code is correct (see page 50).
No playback Power is OFF.
No disc is inserted
(“no disc” will be
shown on screen).
Disc is upside down
(“no disc” is shown
on screen).
Dirty disc.
Deformed disc.
Condensation in
unit.
Turn the power ON.
Insert a disc.
Reload disk - the label side should face
upward.
Clean disc surface.
Replace disc.
Turn power on for 1-2 hours before
using the unit.
46 MD 41035 DVD Recorder
User’s Manual

Problem Possible Cause Solution
troubleshooting
Unwanted mosaiclike display during
playback.
No sound. DVD player is set to
No video/picture. TV is not connected
Remote control does
not work.
Poor disc.
Video CD (MPEG1).
slow or fast
playback.
Audio terminals are
not connected.
TV volume is too low.
Wrong AUDIO OUTPUT
setting.
properly.
Wrong setting for
VIDEO OUTPUT.
No batteries in
remote control.
Replace disc.
Playback with DVD format.
Press PLAY to resume normal playback.
Check audio connections (see pages
14-16).
Adjust TV volume.
Check AUDIO OUTPUT settings (see page
36).
Check video connections (see pages
13-17).
Press SETUP and check the Video Output
settings (see page 35).
Put in new batteries (see page 20).
Does not play, even
when a title is
selected.
Can not play a disc
recorded on this DVD
recorder on another
DVD player.
Dead batteries.
Remote control not
being pointed at the
remote sensor.
Prohibited by the
parental controls.
Disc is not finalized.
Disc is one-time
only.
Other DVD player can
not play DVD+R or
DVD+RW discs.
Other DVD player can
not calibrate because
disc has too little
data.
Replace batteries (see page 20).
Point the remote control at the remote
sensor (see page 20).
Confirm the parental controls setting
(see page 36).
Finalize the disc (see page 45).
If a disc is recorded with content which
is available to be copied one time
only, it can’t be played on another DVD
player.
Check the manual of the other DVD
player.
Try a disc with a larger amount of video
data recorded to it.
User’s Manual
47MD 41035 DVD Recorder

troubleshooting
Problem Possible Cause Solution
Unit doesn’t record. Disc is full.
Source disc is copyprotected.
Power interruption
during the recording.
There are 2
scheduled recording
programs running at
the same time.
Disc format is not
correct.
Audio or subtitle
language is not the
one selected during
the initial setup.
Menus are in the
wrong language.
The selected
language does not
exist in the disc.
Wrong language set
for OSD.
Confirm the available space on the
disc.
Confirm the recording source has no
copyright protection.
None.
Check the recording schedule and
cancel one of the scheduled recordings
(see page 39).
This DVD recorder can record only to
DVD+R or DVD+RW discs (see page 38).
Select another language using AUDIO,
SUBTITLE or the DVD menu.
Check the OSD language setting (see
page 34).
Audio or subtitle
language can not be
changed.
The video image
brightness fluctuates
during playback.
Cannot fast scan
during playback of
DVD movie.
Edited titles/chapters
do not show up
when played on
another DVD player
The disc contains
only one language.
Some discs only
allow the audio and
subtitle language to
be set in the DVD
menu - not with the
AUDIO and SUBTITLE
buttons on the
remote control.
The DVD recorder is
connected to the
television via a VCR.
Some discs may have
sections which
prohibit skip or scan
operations by users.
Disc has not been
made compatible.
Check the disc language contents.
Press the MENU button on the remote
control to access the DVD menu.
Connect the DVD recorder directly to the
TV, bypassing the VCR.
None.
See page 44 for instructions on making
a disc compatible.
48 MD 41035 DVD Recorder
User’s Manual

Problem Possible Cause Solution
troubleshooting
Scheduled recording
did not work.
No disc loaded.
The disc is writeprotected.
The disc is not the
correct format
(DVD+R or DVD+RW).
The disc already
contains 49 titles.
Another recording is
in progress.
The DVD recorder’s
Time and Date is not
set properly.
The time set for your
recording is in the
past.
The 8 memory slots
for setting recordings
are already filled.
Prepare and load a recordable disc.
None.
Replace with a disc that is the correct
format (see page 38).
This is the maximum number of titles
that can be recorded to a single disc
(see page 43 for deleting titles).
Stop the recording in progress (see page
39).
Set the time and date (see page 36).
None.
Cancel a scheduled recording (see page
39).
Video appears on
screen, but flickers,
fades or is distorted
User’s Manual
There is no signal
from the selected
input source.
DVD recorder is in
NTSC mode.
Check the connections and make sure
that the external device is on.
Press the NTSC/PAL button on the
remote control to switch to PAL or NTSC
Progressive Scan mode (see page 32).
49MD 41035 DVD Recorder

additional information
Additional Information
Regional Code
This DVD recorder is designed and manufactured to respond to the Region Management
Information recorded on a DVD disc. If the region number described on the DVD disc
does not correspond to the region number of this DVD recorder, this DVD recorder will
not play the disc. The OSD message “WRONG REGION” will show on the TV screen. This
recorder will play DVD discs made for “ALL” regions, as well as DVD discs made for
Region 4. The illustration below shows the regions and corresponding region numbers.
Region 1 USA & Canada
Region 2 Europe, Japan, South Africa, Middle East
Region 3 Southeast Asia
Region 4 Central & South America, Australia, New Zealand
Region 5 Former Soviet Union, India, Pakistan, Africa
Region 6 China
Technical Specifications
Technical specifications subject to change without notice.
Power Supply: AC100-240 V, 50/60 Hz
Power Consumption: 30W
Weight: 9 lb.
Dimensions: (W x D x H): 17”x11.5”x2.75”
Operating temperature range: 41º F to 104º F
Operating humidity range: 5 % to 90 % (without condensation)
Video System
Composite Video Terminal
Y output level: 1 Vp-p (75 1)
CB output level: 0.525 Vp-p (75 1) (75% Color)
CR output level: 0.525 Vp-p (75 1) (75% Color)
S-Video Terminal
Y output level: 1 Vp-p (75 1)
C output level: 0.286 Vp-p (75 1) NTSC
Video Terminal: 1 Vp-p (75 1)
Horizontal Resolution: More than 500 lines
S/N Ratio: More than 60 dB
Audio Parameters
Frequency Response: 20Hz ~ 20kHz
Dynamic Range: Over 90 dB
S/N Ratio: Over 90 dB
Output level: 2 Vrms
50 MD 41035 DVD Recorder
User’s Manual

Glossary
additional information
Chapter: Chapters are sections of titles.
Not every title has chapters.
Component Interlace : A very high level of
video output that displays alternate lines
of a video frame on each pass (e.g., even
lines, then odd lines).
Component Video : A high-end video
signal that is supported by most DVDs but
very few TVs. Component video connectors
are usually red, green, and blue.
Composite Video: An analog video signal
that is also called CVBS. Most televisions
and VCRs have a composite video
connector, which is usually yellow.
Dolby® Digital: A digital surround-sound
format designed by Dolby Laboratories,
Inc.
DTS® Digital Surround: A digital
surround-sound format by Digital Theater
Systems.
D-PCM: The same type of format that CDs
are usually recorded in. Use D-PCM for
digital sound output in stereo (two
channel) as opposed to surround sound.
DVD+R: A recordable DVD format. DVD+R
discs can not be recorded over. You can
not add recordings to a DVD+R disc that
has been finalized.
DVD+RW: A recordable DVD format. You
can record over erased sections of a
DVD+RW disc.
DVD-R / DVD-RW: A recordable DVD
format. Your DVD recorder can play DVD-R
or DVD-RW discs, but it can NOT record to
them.
DVD-RAM: A recordable DVD format. Your
DVD recorder can NOT play or record DVDRAM discs or cartridges.
JPEG: JPEG is a type of compression used
for still pictures. A digital photo is
sometimes referred to as a “JPEG” as this
is the most common type of format for
digital images.
MPEG: MPEG is a type of compression for
video. There are different types of MPEG.
MPEG 1 is generally used for VCDs. MPEG 2
is used for DVDs and digital TV, and is
higher quality than MPEG 1.
MP3: MP3 is a type of compression used
for music files.
NTSC: The TV color format used in North
America.
PAL/B: The TV color format used in
Singapore.
Pan & scan: A way of reformatting
widescreen movies to fit a standard 4:3
television screen by cropping the sides of
the video.
PBC (Playback Control): Used on some VCDs
and SVCDs to allow menus similar to a DVD
menu. It will be easier to control playback
with your remote control if PBC is set to
“off”. See page 32.
Progressive Scan: Currently the highest
level of video output, it displays all of the
lines of a video frame in one pass (see
Component Interlace above).
Surround Sound: A combination of
multiple-channel audio signal and
multiple-speaker systems that produces
theater-like sound, giving the impression
of being seated live at the center of
events.
SVCD: A disc format for putting DVDquality video on CD.
S-Video: A video signal that is higher
quality than composite video, but not as
good as component video. Many TVs have
S-Video inputs (which may also be labeled
Y/C).
Title: The main unit for video discs.
Usually an entire movie or TV program. A
title is divided into chapters.
Toslink: Another name for an optical
digital audio connector.
VCD (Video CD): A disc format for video on
CDs. Less capacity (and therefore lower
quality) than DVDs.
User’s Manual
51MD 41035 DVD Recorder
 Loading...