

Page 1

Page 2
This symbol signifies a possible danger to your life and health, if specific requests to take
action are not complied with or if appropriate precautionary measures are not taken.
This symbol warns against wrong behavior that will have the consequence of environmental
damage.
This symbol provides information about handling of the product or about the relevant part of
the operating instructions to which particular attention should be paid.
Copyright © 2003
All rights reserved.
This manual is protected by Copyright.
The Copyright is owned by Medion®.
Trademarks:
MS-DOS® and Windows® are registered trademarks of Microsoft®.
Pentium® is a registered trademark of Intel®.
Other trademarks are the property of their respective owners.
The information in this document is subject to change without notice.
[2950-6030-C113ĂRev.00]
Page 3

Inhaltsverzeichnis
1. Normen 4. . . . . . . . . . . . . . . . . . . . . . . . . . . . . . . . . . . . . . . . . . . . . . . . . . . . . . . . . . . . . . . . . . . . . . . . . . .
2. Wichtige Hinweise 4. . . . . . . . . . . . . . . . . . . . . . . . . . . . . . . . . . . . . . . . . . . . . . . . . . . . . . . . . . . . . . . .
3. Übersicht 6. . . . . . . . . . . . . . . . . . . . . . . . . . . . . . . . . . . . . . . . . . . . . . . . . . . . . . . . . . . . . . . . . . . . . . . . .
3.1 Lieferumfang 6. . . . . . . . . . . . . . . . . . . . . . . . . . . . . . . . . . . . . . . . . . . . . . . . . . . . . . . . . . . . . . . . .
3.2 Anschlüsse 7. . . . . . . . . . . . . . . . . . . . . . . . . . . . . . . . . . . . . . . . . . . . . . . . . . . . . . . . . . . . . . . . . .
3.3 Bedientasten und Funktionen der Fernbedienung 8. . . . . . . . . . . . . . . . . . . . . . . . . . . . . . . . .
3.4 Bedientasten am Gerät 8. . . . . . . . . . . . . . . . . . . . . . . . . . . . . . . . . . . . . . . . . . . . . . . . . . . . . . . .
4. Erste Inbetriebnahme 9. . . . . . . . . . . . . . . . . . . . . . . . . . . . . . . . . . . . . . . . . . . . . . . . . . . . . . . . . . . . . .
4.1 Aufstellen und Auspacken 9. . . . . . . . . . . . . . . . . . . . . . . . . . . . . . . . . . . . . . . . . . . . . . . . . . . . . .
4.2 Anschließen und Einschalten 10. . . . . . . . . . . . . . . . . . . . . . . . . . . . . . . . . . . . . . . . . . . . . . . . . . .
DEUTSCH
4.3 OSD-Menü Bedienung 12. . . . . . . . . . . . . . . . . . . . . . . . . . . . . . . . . . . . . . . . . . . . . . . . . . . . . . . .
4.4 Grundeinstellungen OSD-Menü 13. . . . . . . . . . . . . . . . . . . . . . . . . . . . . . . . . . . . . . . . . . . . . . . . .
4.5 Einstellungen bei erster Inbetriebnahme 13. . . . . . . . . . . . . . . . . . . . . . . . . . . . . . . . . . . . . . . . .
5. Alltägliche Bedienung 15. . . . . . . . . . . . . . . . . . . . . . . . . . . . . . . . . . . . . . . . . . . . . . . . . . . . . . . . . . . . .
5.1 Ein- / Ausschalten 15. . . . . . . . . . . . . . . . . . . . . . . . . . . . . . . . . . . . . . . . . . . . . . . . . . . . . . . . . . . .
5.2 Ton einstellen 16. . . . . . . . . . . . . . . . . . . . . . . . . . . . . . . . . . . . . . . . . . . . . . . . . . . . . . . . . . . . . . . .
5.3 Bild einstellen 17. . . . . . . . . . . . . . . . . . . . . . . . . . . . . . . . . . . . . . . . . . . . . . . . . . . . . . . . . . . . . . . .
5.4 Fernsehbetrieb 18. . . . . . . . . . . . . . . . . . . . . . . . . . . . . . . . . . . . . . . . . . . . . . . . . . . . . . . . . . . . . . .
5.5 PC Betrieb 18. . . . . . . . . . . . . . . . . . . . . . . . . . . . . . . . . . . . . . . . . . . . . . . . . . . . . . . . . . . . . . . . . . .
5.6 Betrieb mit zusätzlichen Geräten 18. . . . . . . . . . . . . . . . . . . . . . . . . . . . . . . . . . . . . . . . . . . . . . . .
5.7 Sonderfunktionen 19. . . . . . . . . . . . . . . . . . . . . . . . . . . . . . . . . . . . . . . . . . . . . . . . . . . . . . . . . . . . .
6. Fehlerbehebung 21. . . . . . . . . . . . . . . . . . . . . . . . . . . . . . . . . . . . . . . . . . . . . . . . . . . . . . . . . . . . . . . . . .
7. Technische Daten 22. . . . . . . . . . . . . . . . . . . . . . . . . . . . . . . . . . . . . . . . . . . . . . . . . . . . . . . . . . . . . . . . .
DEUTSCH
Page 4

1. Normen
Der vorliegende Bildschirm ist eine informationstechnische Einrichtung und entspricht den folgenden Richtlinien und NorĆ
men der Europäischen Union:
89/336/CEE vom 3. Mai 1989 mit anschließenden Modifikationen (Direktive 92/31/CEE vom April 1992 und DirekĆ
tive 93/68/CEE vom 22. Juli 1993)
73/23/CEE vom 19. Februar 1973 mit anschließenden Modifikationen (Direktive 93/68/CEE vom
22. Juli 1993)
EN55013, EN55020, EN61000-3-2/-3 (Elektromagnetische Verträglichkeit)
EN60065 (Sicherheitsanforderungen).
Die Übereinstimmung mit den Anforderungen wird durch die, auf dem Produkt angebrachte,
Kennzeichnung zertifiziert.
Der Hersteller kann nicht für den Betrieb außerhalb der Betriebsbedingungen, wie in dieser Bedienungsanleitung beĆ
schrieben, haftbar gemacht werden. Zudem erlöschen hierdurch Ihre Produkthaftungs- und Gewährleistungsansprüche.
2. Wichtige Hinweise
Lesen und beachten Sie die Hinweise, damit bei bestimmungsgemäßem Gebrauch keine Gefahr für Ihre Gesundheit entĆ
steht. Fehler bei der Aufstellung und beim Anschluss können das Gerät oder damit verbundene Geräte beschädigen. BeĆ
achten Sie die Warnungen auf dem Gerät und in der Bedienungsanleitung. Lassen Sie Kinder niemals unbeaufsichtigt
elektrische Geräte benutzen.
ALLGEMEINES
Der von Ihnen erworbene Bildschirm genügt den höchsten Qualitätsanforderungen in diesem Segment und wurde bezügĆ
lich Pixelfehlern überprüft. Trotz höchster Sorgfalt bei der Fertigung der Geräte ist aus technologischen Gründen nicht
zu 100% auszuschliessen, dass einige Bildpunkte Defekte aufweisen.
Bestimmte Bedingungen können zu einem Brummen Ihres Bildschirms führen. Das Brummen kommt im allgemeinen aus
der Netzspannungsversorgung und kann durch die Verbindung von unterschiedlichen Schutzleitern entstehen. Abhilfe
können Sie hier schaffen, in dem Sie einen sogenannten Mantelstromfilter zwischen die ankommende Antennenleitung
und den Antenneneingang am Bildschirm schalten. Die Mantelstromfilter werden in Form eines kleinen Zwischensteckers
im Fachhandel angeboten.
Technisch bedingt kann es auch im Gerät selbst zu einer Geräuschentwicklung kommen. Diese darf jedoch den in der
Gerätespezifikation angegenen Wert nicht überschreiten.
Wenn Ihr Bildschirm mit einer Aussenantenne verbunden ist, muß diese zum Schutz gegen Stromschläge und statische
Aufladungen geerdet sein. Die Erdung muß den geltenden Vorschriften entsprechen.
UMGEBUNGSBEDINGUNGEN
Betreiben Sie den Bildschirm niemals unter Umgebungsbedingungen, die von den in diesem Handbuch angegebenen
technischen Daten abweichen.
Abweichende Bedingungen können zu elektrischer Gefährdung, Brand oder Ausfall des Gerätes führen.
Schützen Sie den Bildschirm vor Feuchtigkeit. Hierzu zählen dauerhaft hohe Luftfeuchtigkeit, die Nähe zu Wasser, Tropfund Spritzwasser sowie Regen. Stellen Sie keine mit Wasser gefüllten Gefäße, wie z.B. Vasen auf das Gerät. Bitte beachĆ
ten Sie bei Anschluss einer Außenantenne, dass an der Kabelzuführung kein Wasser eindringen kann.
Es besteht die Gefahr eines elektrischen Schlags sowie irreparabler Schäden am Gerät.
Schützen Sie das Gerät vor Hitze und direkter Sonneneinstrahlung. Meiden Sie die Nähe zu Feuer, Heizungen, Öfen.
Schützen Sie das Gerät vor Hitzestau. Bedecken Sie nicht die Lüftungsschlitze. Halten Sie ausreichend Abstand oberhalb
und unterhalb der Lüftungsschlitze sowie seitlich zu Möbeln und zur Decke. Verhängen Sie das Gerät nicht mit Gardinen.
Es besteht Brandgefahr durch Überhitzung.
NETZANSCHLUSS UND BEDIENUNG
Zur sicheren Trennung des Bildschirms von der Netzspannung ist der Netzschalter auszuschalten und das Netzkabel aus
dem Netzeingangsmodul zu entfernen. Schließen Sie den Bildschirm nur an eine vorschriftsmäßig installierte Steckdose
mit Schutzkontakten an, deren Netzspannung mit den technischen Daten des Gerätes übereinstimmt. Achten Sie darauf,
dass Netzstecker und Steckdose jederzeit erreichbar sind.
Abweichende Bedingungen können zu elektrischer Gefährdung, Brand oder Ausfall des Gerätes führen.
Verlegen Sie das Netzkabel so, dass sich niemand darin verfangen kann.
Ein Sturz des Bildschirms kann Personen verletzen und zu irreparablen Schäden am Gerät führen.
4
DEUTSCH
Page 5

Verwenden Sie nur das mitgelieferte Netzkabel. Schützen Sie es vor Beschädigungen und nehmen Sie keine VerändeĆ
rungen an ihm vor. Benutzen Sie niemals ein beschädigtes Netzkabel. Sind Netzkabel oder Stecker beschädigt darf das
Display nicht mehr betrieben werden.
Es besteht die Gefahr eines elektrischen Schlags, Brand oder Ausfall des Gerätes.
Berühren Sie den Netzschalter und das Netzkabel niemals mit nassen Händen.
Es besteht die Gefahr eines elektrischen Schlags.
Entfernen Sie niemals den Stecker durch Ziehen des Netzkabels aus der Steckdose. Meiden Sie die Verlegung des NetzĆ
kabels in der Nähe von heißen Objekten.
Es besteht Brandgefahr und elektrische Gefährdung.
Ziehen Sie bei längerer Abwesenheit oder Gewitter aus Sicherheitsgründen den Netzstecker aus der Steckdose und den
Stecker der Hausantenne aus der Antennenbuchse.
Vorsichtsmaßnahme, um einen eventuellen Brand zu verhindern bzw. um Schäden am Gerät und die Gefahr eines elektriĆ
schen Schlags zu vermeiden.
Schalten Sie den Bildschirm und die Signalquelle immer aus, bevor Sie eine Verbindung zwischen beiden Geräten herĆ
stellen.
Es besteht die Gefahr eines elektrischen Schlags.
STÖRUNGEN
Ziehen Sie bei Beschädigungen des Bildschirms bzw. des Netzkabels sofort den Netzstecker aus der Steckdose.
Ziehen Sie sofort den Netzstecker, wenn Rauch, unangenehmer Geruch oder ungewöhnliche Geräusche aus dem Gerät
kommen. Verfahren Sie ebenfalls in dieser Weise, wenn der Bildschirm nach dem Einschalten oder während des Betriebs
kein Bild mehr darstellen kann. Versuchen Sie den Bildschirm in diesem Zustand niemals weiter zu betreiben.
Versuchen Sie auf keinen Fall das Gerät selbst zu öffnen und/oder zu reparieren. In dem Bildschirm befinden sich keine
Teile, die von Ihnen gewartet oder ausgewechselt werden können. Wenden Sie sich an unsere Service-Hotline oder eine
andere geeignete Fachwerkstatt.
REINIGUNG UND PFLEGE
Vor Installation, Reinigung und Pflege schalten Sie das Gerät ab und ziehen den Netzstecker aus der Steckdose. Warten
Sie einige Minuten, damit sich die Kondensatoren im Gerät vollständig entladen können.
Für die Reinigung verwenden Sie nur ein leicht angefeuchtetes, weiches Tuch. Chemische Lösungs- und ReinigungsmitĆ
tel sollten Sie vermeiden, weil diese die Oberflächen beschädigen können.
Ziehen Sie sofort den Netzstecker, falls Fremdkörper wie Wasser, sonstige Flüssigkeiten, Metallteile usw. in den BildĆ
schirm gelangt sind. Versuchen Sie niemals mit irgendwelchen Gegenständen oder mit den Händen in das Gerät zu fasĆ
sen.
Es besteht die Gefahr eines elektrischen Schocks oder Unfalls.
DEUTSCH
BATTERIEN
Batterien können bei Verschlucken lebensgefährlich sein. Bewahren Sie die Batterien deshalb für Kinder unerreichbar
auf. Wurde eine Batterie verschluckt, sollte sofort medizinische Hilfe in Anspruch genommen werden.
Nehmen Sie verbrauchte Batterien immer sofort aus der Fernbedienung heraus, da diese auslaufen und somit Schäden
verursachen können.
Die beiliegenden Batterien dürfen nicht geladen oder mit anderen Mitteln reaktiviert, nicht auseinandergenommen, in
Feuer geworfen oder kurzgeschlossen werden.
Verbrauchte Batterien gehören nicht in den Hausmüll. Die Batterien müssen an den dafür vorgesehenen Sammelstellen
entsorgt werden.
SONSTIGE HINWEISE
Wenn der Bildschirm in den Stand-By-Betrieb geschaltet wurde, ist er immer noch mit dem Netz verbunden. Zur vollständiĆ
gen Trennung müssen Sie den Netzschalter in die Position O" schalten bzw. den Netzstecker aus der Steckdose ziehen.
Es wird aus ergonomischen Gründen empfohlen, die Verwendung von roten und blauen Schriften oder Symbolen auf dunĆ
klen Hintergründen zu vermeiden. Eine derartige Darstellung verursacht wegen des geringen Kontrastes eine schlechte
Lesbarkeit und ermüdet frühzeitig die Augen. Verwenden Sie daher bitte möglichst kontrastreiche Darstellungen, z.B.
schwarze Schrift auf weißem Hintergrund.
Um Augenschmerzen zu vermeiden und den optimalen Betrachtungsabstand zu erhalten, sollte die Entfernung zum GeĆ
rät das fünf- bis sechsfache der Bildschirmdiagonale betragen. In ihrem Fernsehzimmer sollte es so hell sein, dass man
auch lesen könnte. Bei zuviel Helligkeit verlieren sich die Kontraste. Zu wenig Licht strapaziert die Augen durch den HellDunkel-Wechsel auf dem Bildschirm.
Nicht mehr benötigte Verpackungen und Packhilfsmittel sind recyclingfähig und sollen grundsätzlich der WiederverwerĆ
tung zugeführt werden, falls sie nicht mehr benötigt werden.
DEUTSCH
5
Page 6

3. Übersicht
Der TFT-Bildschirm bietet vielfältige Anschlussmöglichkeiten für Personal Computer, DVDĆPlayer, Videorecorder, VideoĆ
kamera, etc.
Egal ob Fernseh-, Video- oder PC-Bilder, alle werden gestochen scharf und verzerrungsfrei auf der völlig planen BildschirĆ
moberfläche dargestellt. Dabei zeichnen sich die Bilder durch eine hervorragende Helligkeit und außergewöhnliche BrilĆ
lanz aus. Weitere wichtige Merkmale sind die große Bildschirmdiagonale von 75 cm bei einem Seitenverhältnis von 15:9
und die sehr geringe Bautiefe.
Für den Fernsehbetrieb ist der Anschluss an eine terrestrische Antenne, SAT-Empfangsanlage oder Kabelfernsehanlage
notwendig.
Die Bedienung erfolgt interaktiv über die mitgelieferte Fernbedienung und das On-Screen-Menü (OSD). Dort können umĆ
fangreiche Einstellungen an der Bildqualität vorgenommen werden.
Ein neuartiges Kühlsystem ermöglicht den Betrieb des TFT-Bildschirms ohne störende Lüftergeräusche. Leise wie ein
herkömmliches Fernsehgerät ist der TFT-Bildschirm hervorragend geeignet für Wohn- und Konferenzräume.
Ausstattung
Hochwertiges Aluminium-Gehäuse
Lüfterloses Design
Bildschirmdiagonale 75 cm
15:9 Format
Sichtwinkel horizontal/vertikal 170 Grad
integriertes Stereo Lautsprechersystem
Einstellmöglichkeiten am Gerät
Digitales Kammfilter
Kompatibel mit PAL, SECAM und NTSC
Kompatibel mit VGA, SVGA, WXGA, XGA und SXGA
Videotext
Automatische Programmidentifizierung und Sendersortierung
Sleep Timer
Bildschirmschoner
2 x SCART Anschlüsse
1 x S-Video
1 x FBAS
1 x DVI (I) (analog und digital)
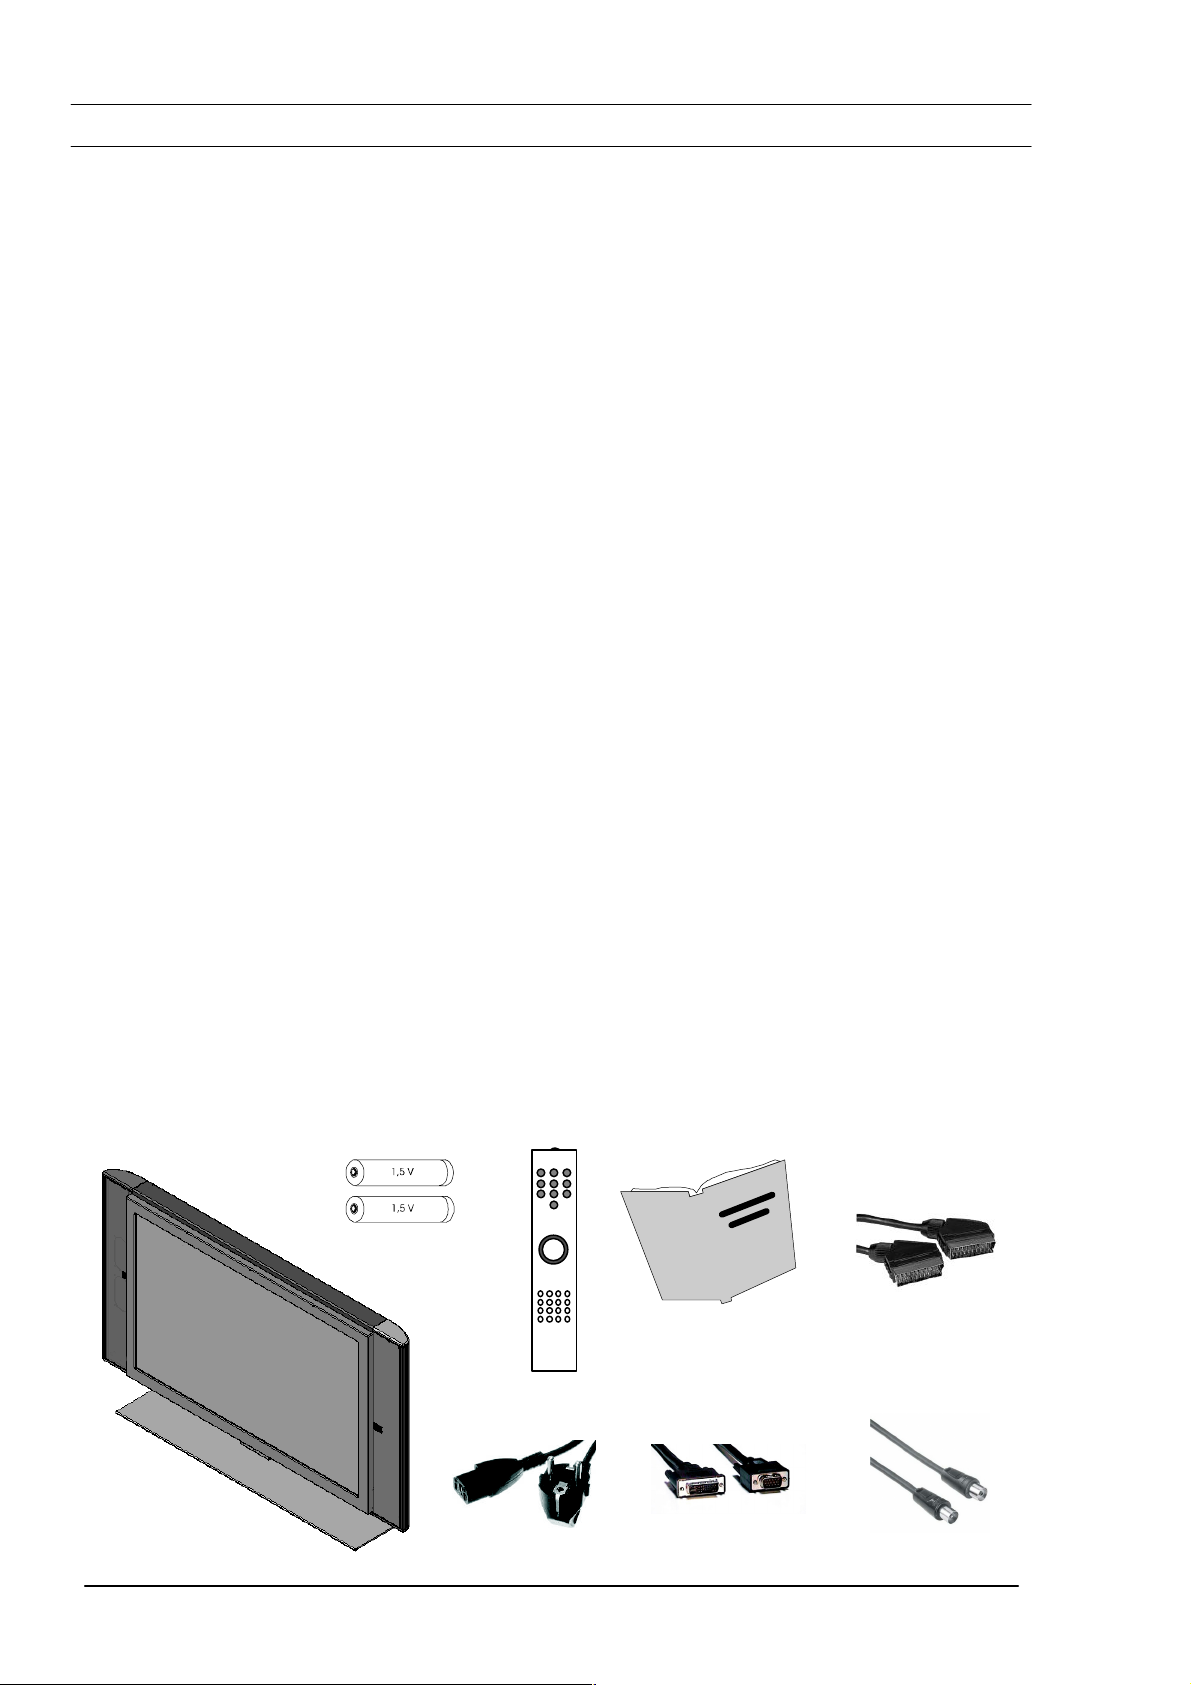
3.1 Lieferumfang
Bitte überprüfen Sie den TFT-Bildschirm nach dem Auspacken auf mögliche Transportschäden und Vollständigkeit der
Lieferung. Der Lieferant kann Ihre Ansprüche bei Transportschäden nur dann gewähren, wenn Sie ihm diese vor der erĆ
sten Inbetriebnahme mitteilen. Fehlt ein Teil des Lieferumfangs, wenden Sie sich bitte an die Service-Hotline. Bewahren
Sie bitte die Original-Verpackung für einen eventuellen Transport des Monitors auf.
Standard-Lieferumfang
2 x Batterie LR03
1 x TFT-Bildschirm
1x Fernbedienung
1 x Netzkabel 2,5 m
je 1 x Bedienhandbuch
und Garantiekarte
1 x Videokabel
HD-Sub auf DVI-I
1 x Scartkabel
1 x Antennenkabel
6
DEUTSCH
Page 7

3.2 Anschlüsse
DEUTSCH
1 2 3 4 5
AUDIO IN
SCART 2
SERIALCVBSS-VIDEO
SCART 1
PC DVI - I
ANTENNA
6
OUT
LINE
CVBSPCS-VIDEO
11 10 9 8 7
[1] SCART 2 - z.B. Anschluss Videorecorder
[2] S-VIDEO (Y/C) - z.B. Anschluss Camcorder mit S-Video Buchse
[3] SERIAL - RS232 Schnittstelle für Servicezwecke
[4] PC DVI-I - Anschluss PC (RGB bei analogen Signalen, DVI bei digitalen Signalen)
[5] AUDIO IN PC - z.B. Anschluss PC mit Line-Out-Buchse
[6] OUT LINE - z.B. Anschluss Audioverstärker oder DVD-Receiver
[7] AUDIO IN CVBS - z.B. Anschluss Camcorder mit Video-Out-Buchse
[8] AUDIO IN S-VIDEO - z.B. Anschluss Camcorder mit S-Video Buchse
[9] ANTENNA - Anschluss TV Antennen-Signal (terrestrische Antenne oder Kabelanschluss)
[10] CVBS - z.B. Anschluss Camcorder mit Video-Out-Buchse
[11] SCART 1 - z.B. Anschluss Satellitenreceiver
DEUTSCH
7
Page 8
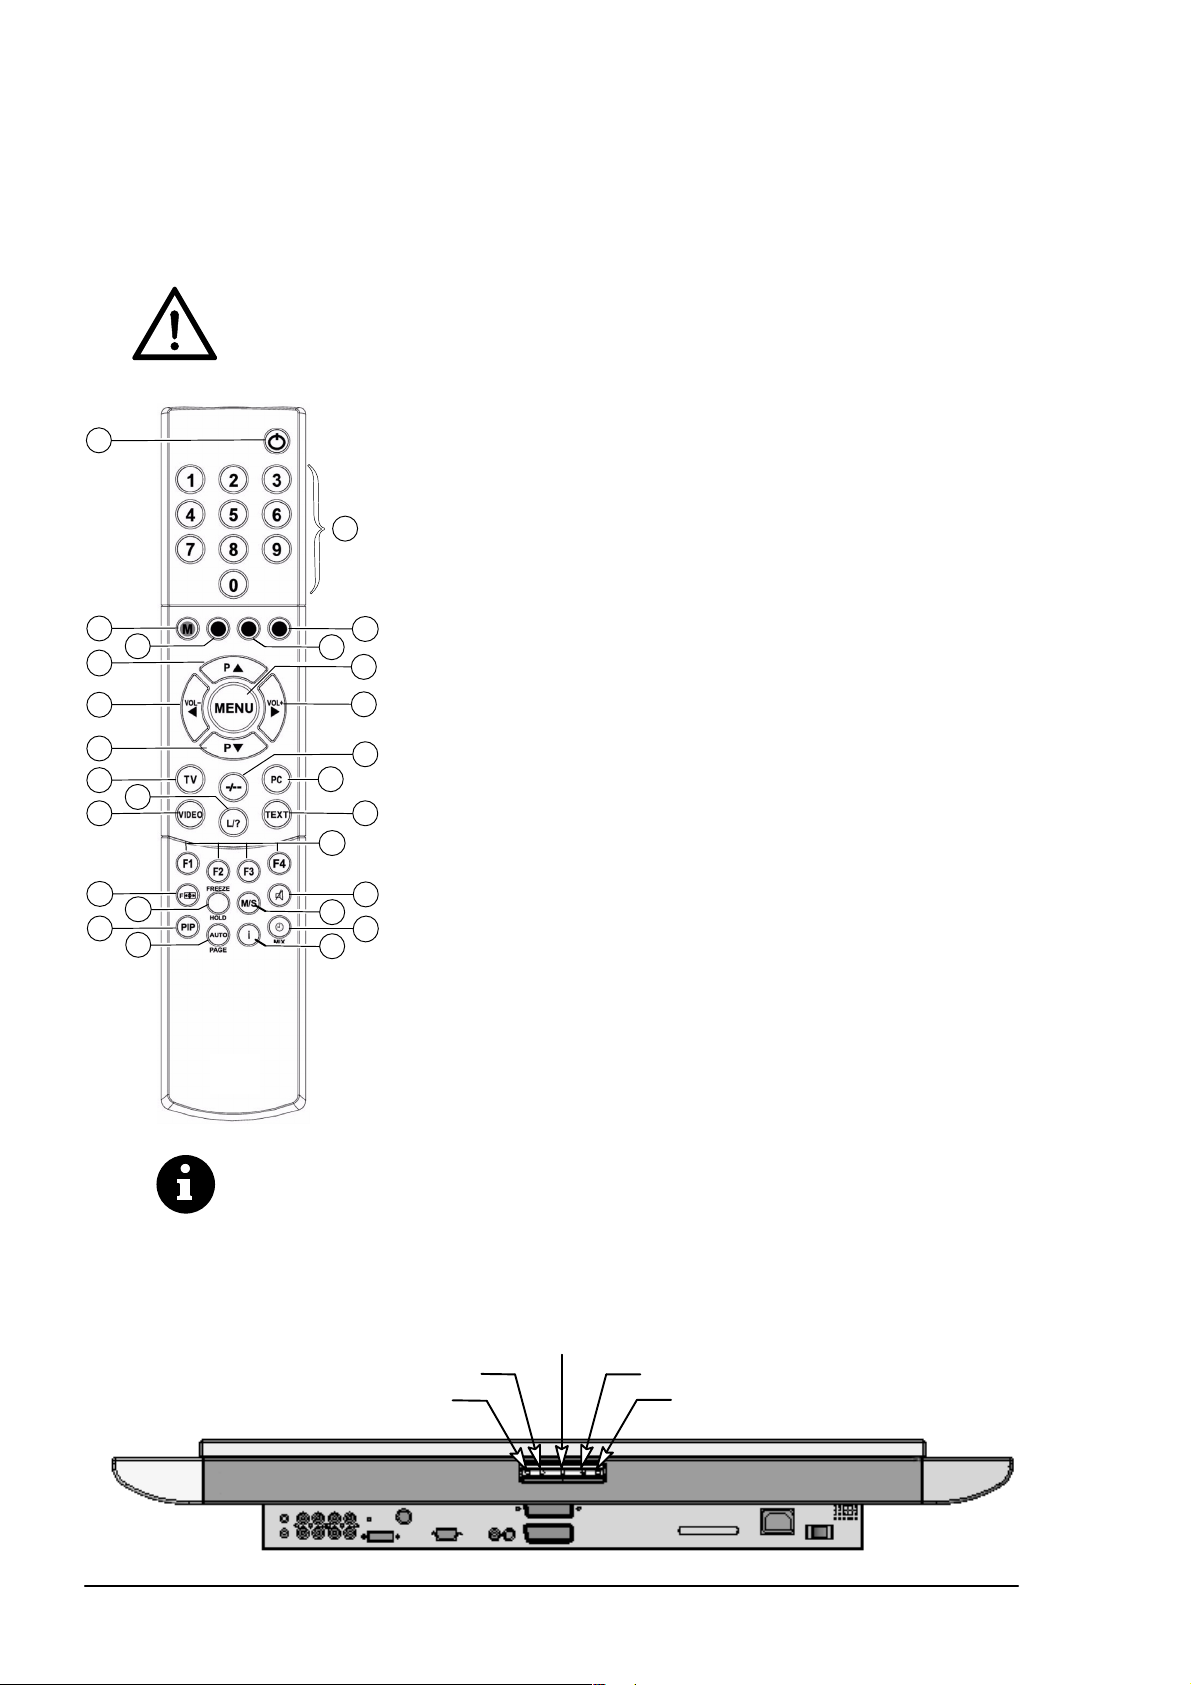
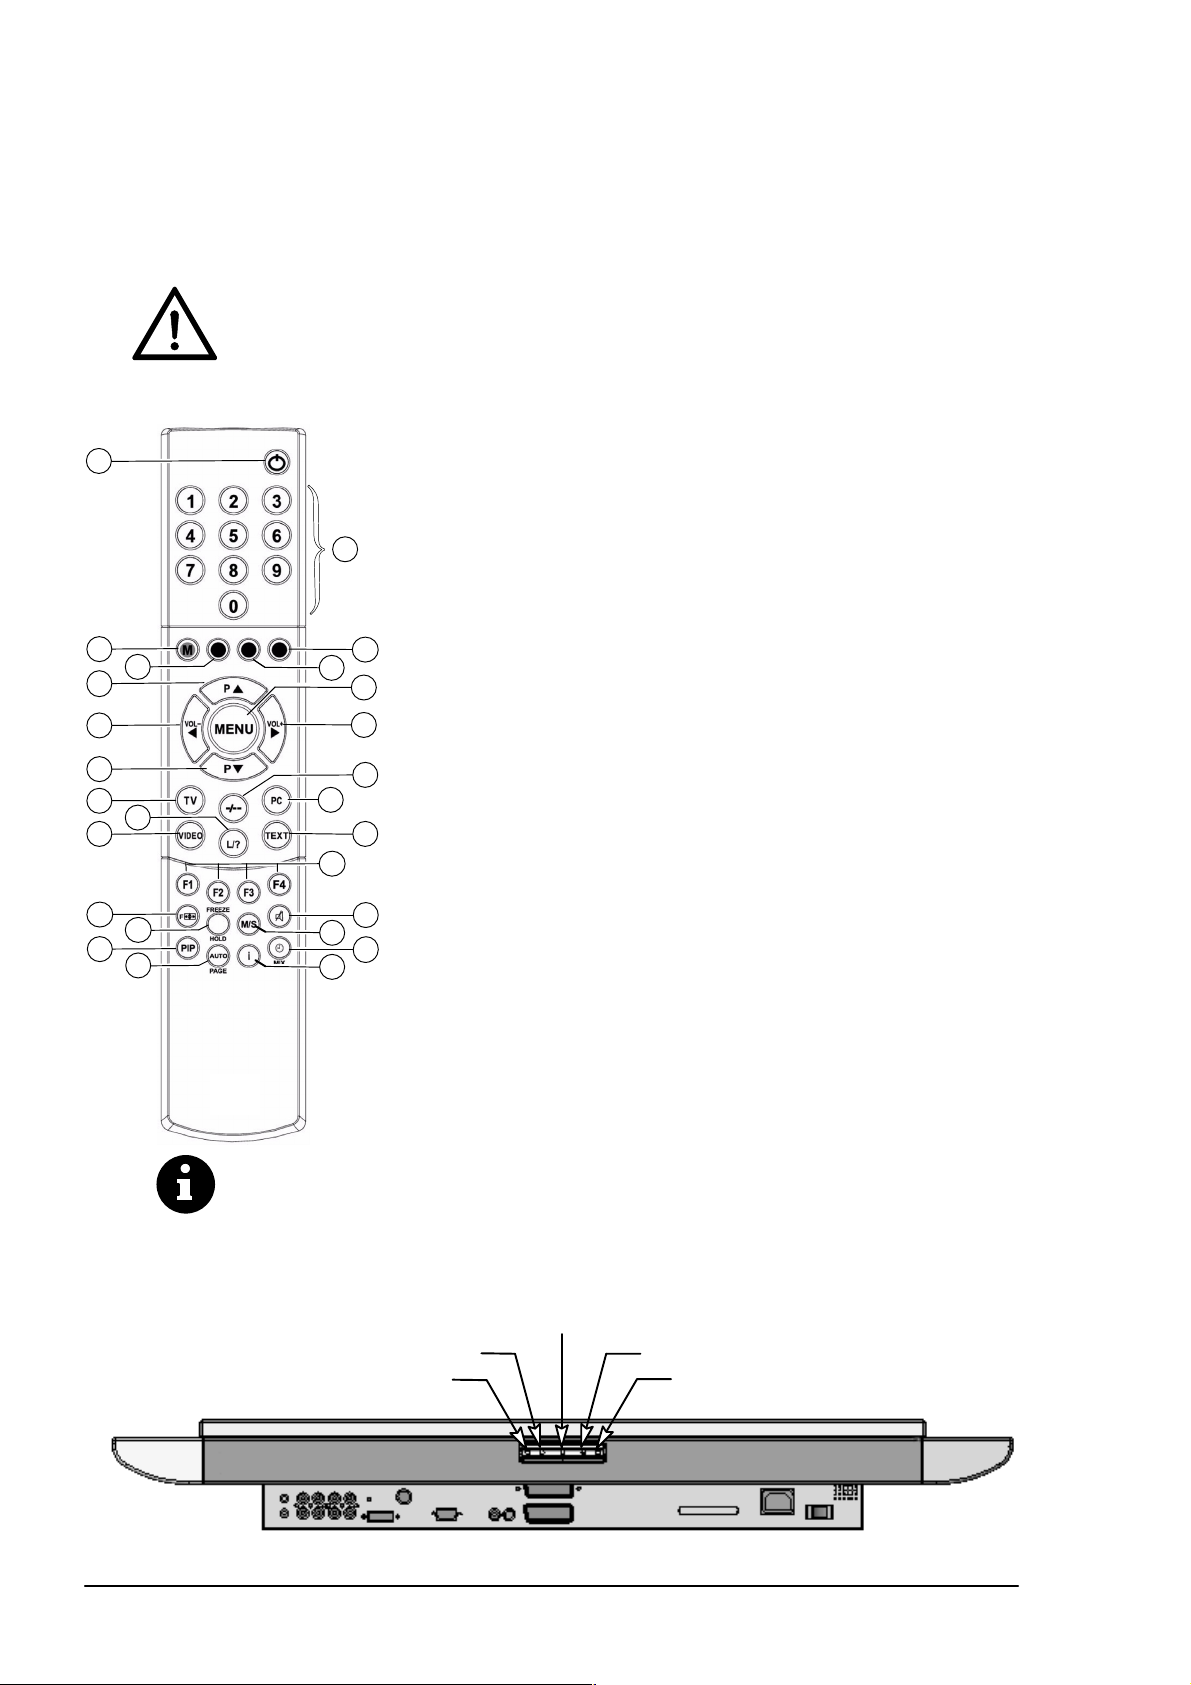
3.3 Bedientasten und Funktionen der Fernbedienung
Um den TFT-Bildschirm mit der Fernbedienung steuern zu können, muss der Netzstecker eingesteckt und der NetzschalĆ
ter eingeschaltet sein.
Die Infrarot-Fernbedienung funktioniert nur, wenn sich kein Hindernis zwischen der Bedienung und dem Infrarot-Sensor
an der Vorderseite (unten) des Bildschirms befindet. Die Reichweite der Fernbedienung beträgt ca. 6m.
Wenn die Batterien schwächer werden, reduziert sich die Reichweite der Fernbedienung. Wechseln Sie in diesem Fall
bitte die Batterien. Es dürfen nur 2 Batterien vom Typ LR03 AAA 1,5 V verwendet werden.
Verbrauchte Batterien gehören nicht in den Hausmüll. Sie müssen bei einer Sammelstelle für
Altbatterien (z.B. Batterie-Sammelbox beim Händler) bzw. beim Sondermüll entsorgt werden
[1] Stand-By Taste
1
3
7
9
11
1212
16
19
23
4
15
21
25
14
18
22
26
2
5
6
6
8
10
13
17
20
24
[2] Programmtasten 1-9, 0
[3] Taste M (Memo), rot
[4] Taste grün
[5] Taste blau
[6] Taste gelb
[7] Taste Programmwahl aufwärts
[8] Menu Taste
[9] Taste zum Verringern der Lautstärke / Richtungstaste links
[10] Taste zum Vergrößern der Lautstärke /
Richtungstaste rechts
[11] Taste Programmwahl abwärts
[12] Taste für Direktwahl TV Betrieb
[13] Taste zum Wechsel zwischen ein- und mehrstelliger
Programmnummer
[14] Taste für Direktwahl PC Betrieb
[15] Taste für Funktion Programmliste im TV Betrieb bzw.
Funktionen im Videotext Betrieb
[16] Taste für Direktwahl Video Betrieb
[17] Taste Direktwahl Videotext
[18] F2 = FREEZE Taste (Videotext Betrieb)
F1 - F4 = Funktionstasten für konfigurationsabhängige
Belegung
[19] Auswahltaste Bildformat
[20] Taste für Tonabschaltung
[21] HOLD Taste
[22] M/S Taste
[23] PIP Taste (Bild-in-Bild)
[24] Taste für Uhrzeit-Anzeige / MIX-Taste
[25] AUTO bzw. PAGE Taste
[26] Info Taste
Die beiliegende Fernbedienung kann sich im Design von der hier dargestellten Fernbedienung
unterscheiden.
3.4 Bedientasten am Gerät
Die Funktionen der Tasten am Gerät entsprechen denen auf der Fernbedienung!
Taste Vol -
Taste P
Taste P
8
Taste Vol +Ă
Stand-By Taste
DEUTSCH
Page 9
4. Erste Inbetriebnahme
Schalten Sie alle beteiligten Geräte einschließlich des TFT-Bildschirms aus, bevor Sie irgendĆ
eine Verbindung herstellen.
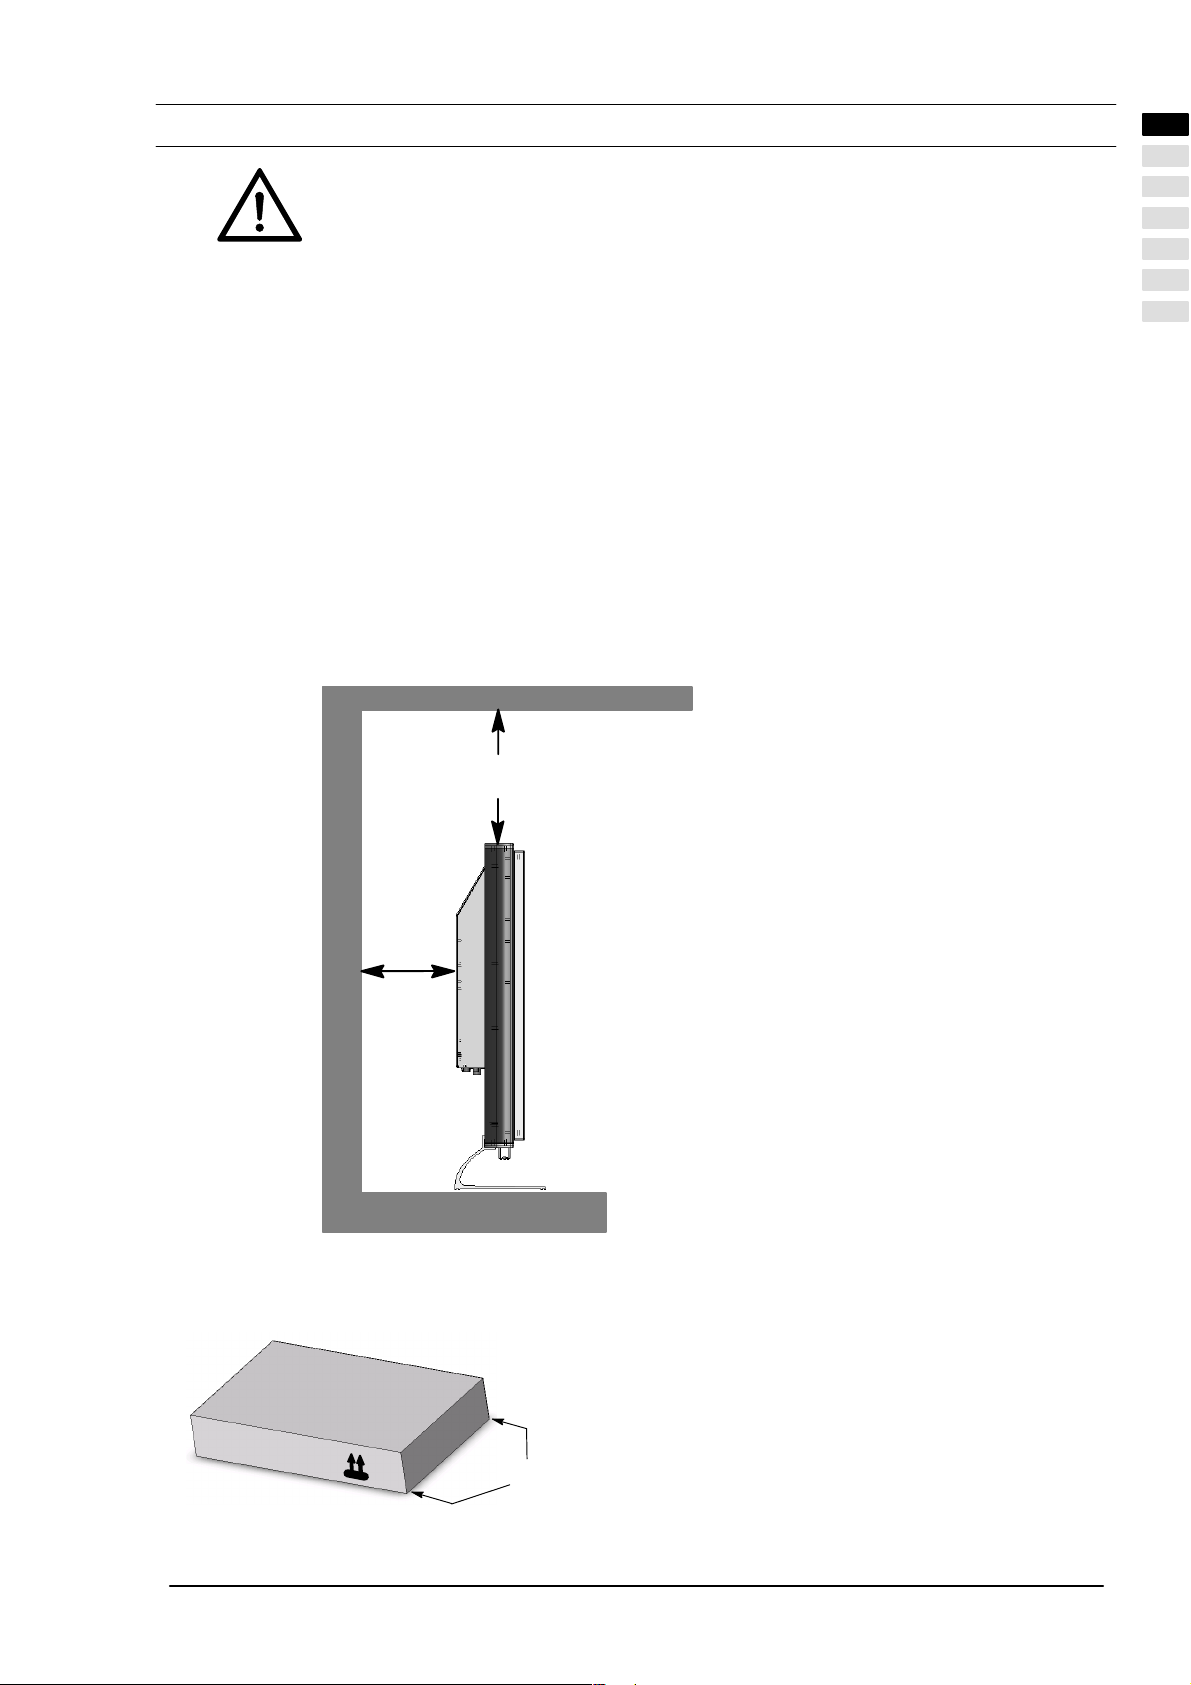
4.1 Aufstellen und Auspacken
AUFSTELLUNGSORT WÄHLEN
Blickrichtung
Trotz des großen Blickwinkels bietet der TFT-Bildschirm die beste Performance bei direkter senkrechter BlickrichĆ
tung. Richten Sie den Bildschirm auf die am häufigsten verwendete Blickrichtung aus.
Aufstellungsort
Lichtreflexion
Vermeiden Sie die Aufstellung gegenüber von Fenstern oder anderen Lichtquellen.
Zugang zum Netzeingang
Netzeingang und Netzschalter sollten jederzeit leicht erreichbar sein.
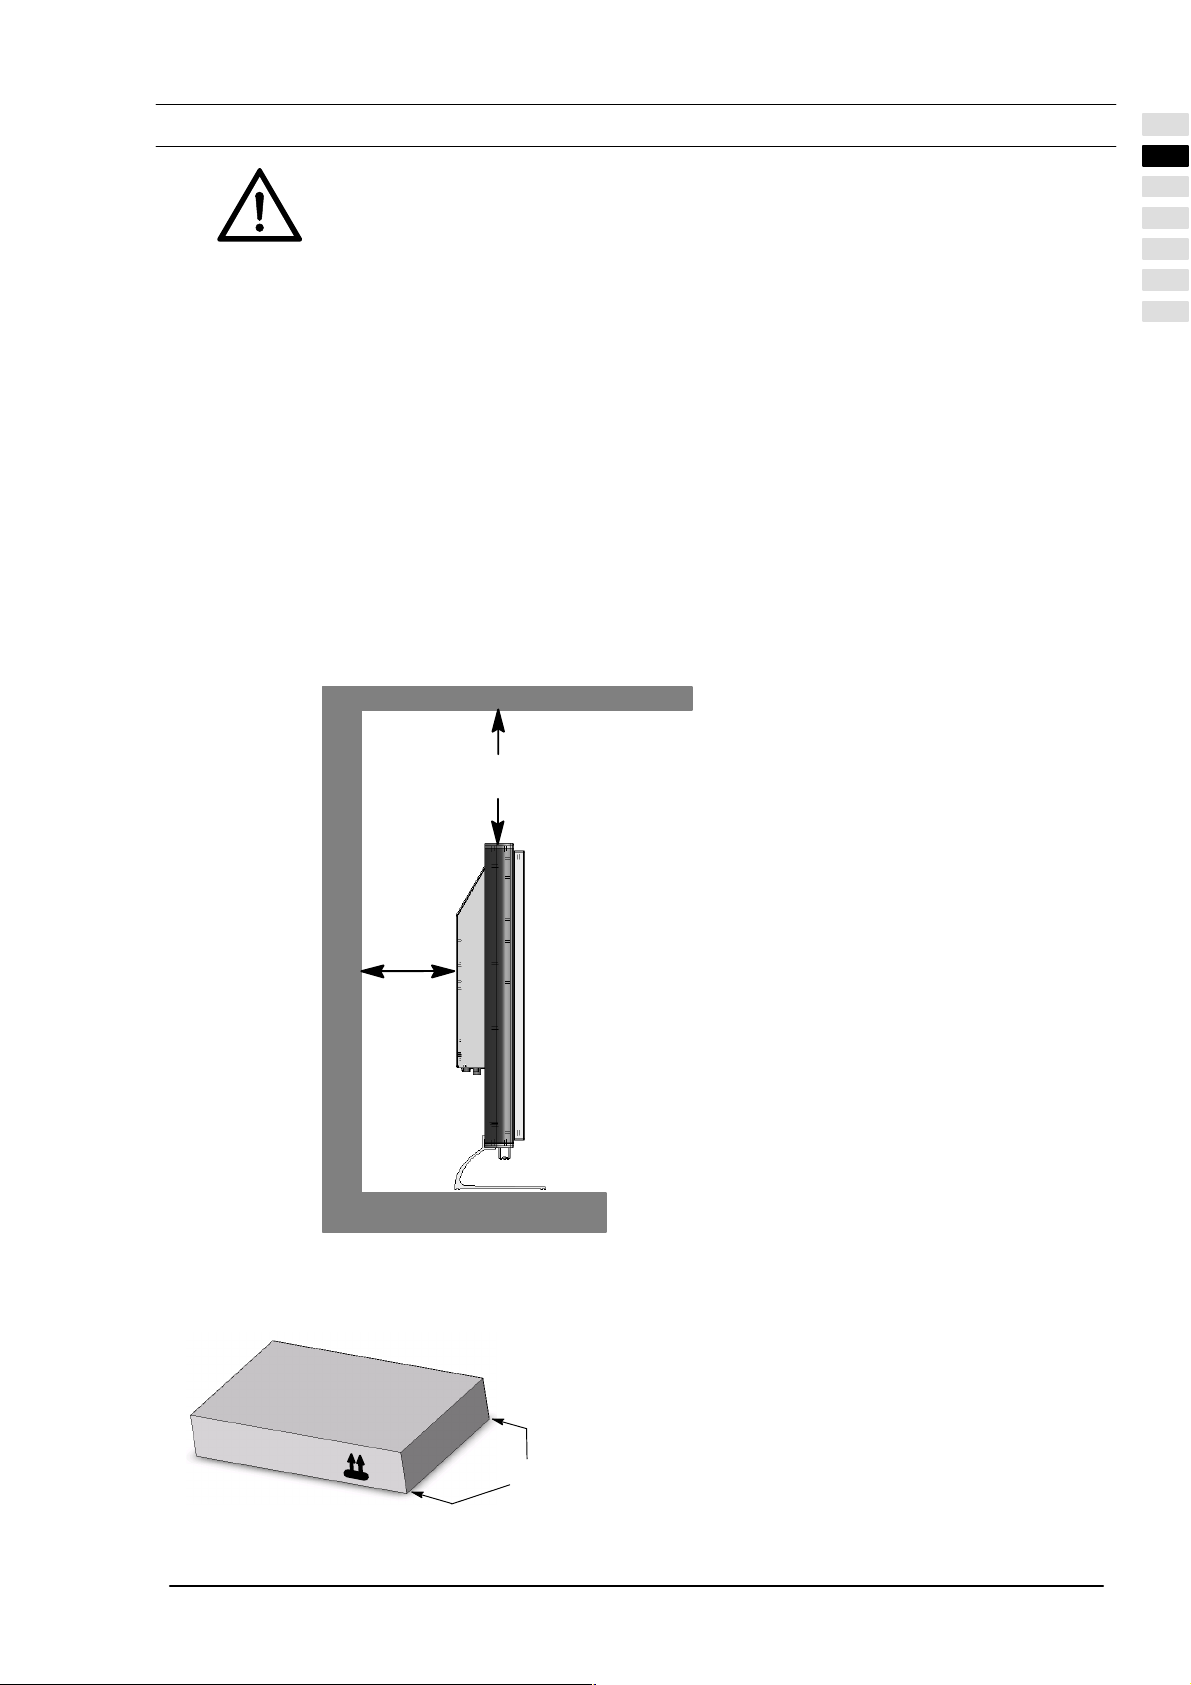
Luftzufuhr
Lassen Sie mindestens 10 cm seitlich und nach hinten Abstand zu Möbeln. Nach oben sollte der Abstand mindeĆ
stens 30 cm zu Möbeln oder zur Decke betragen.
Umgebungstemperatur
Für sicheren und zuverlässigen Betrieb muss die Umgebungstemperatur zwischen 5°C und 35°C liegen.
DEUTSCH
AUSPACKEN
30cm
Freiraum
10cm
Freiraum
DEUTSCH
Öffnungskante
Legen Sie den Karton mit der Unterseite auf einen festen
Untergrund. Die Oberseite erkennen Sie an der Richtung
der Pfeilspitzen auf der Längsseite des Kartons.
Durchtrennen Sie das Verpackungsband an den ÖffĆ
nungskanten und nehmen Sie das Oberteil des Kartons
nach oben ab.
9
Page 10
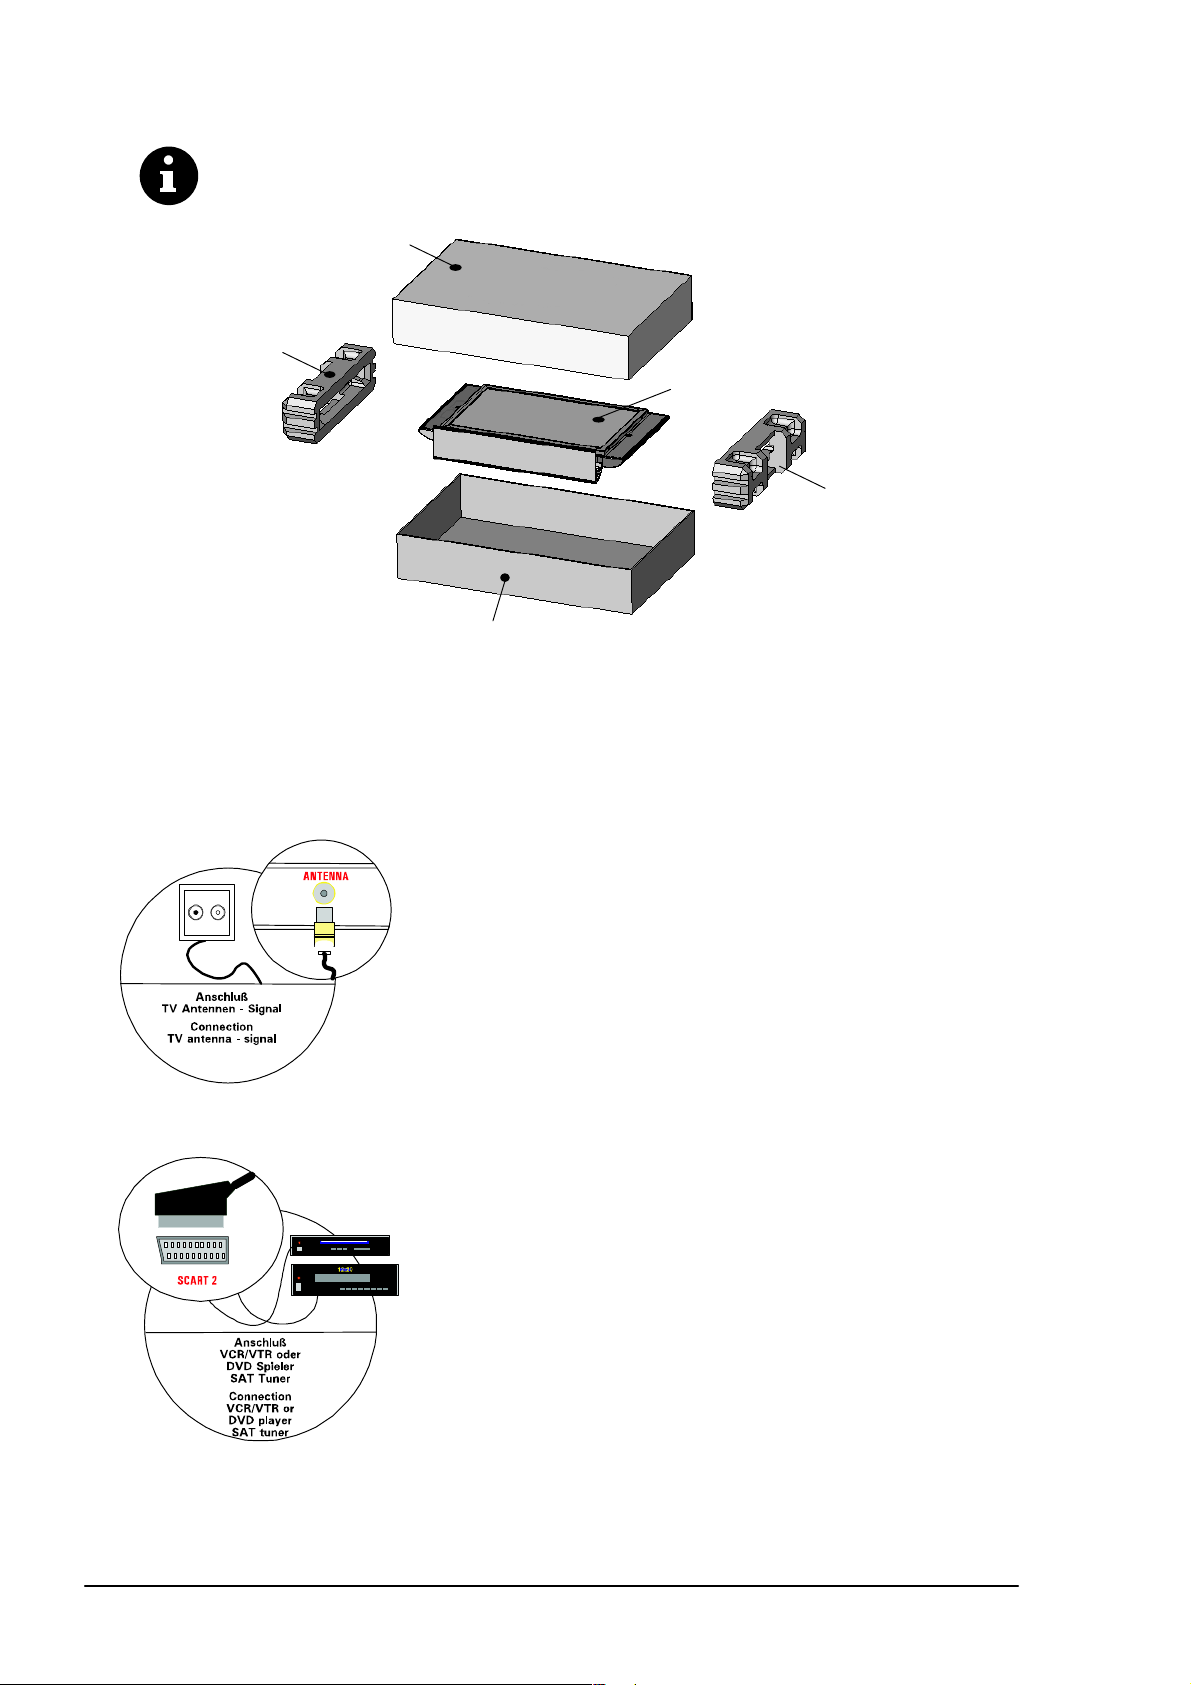
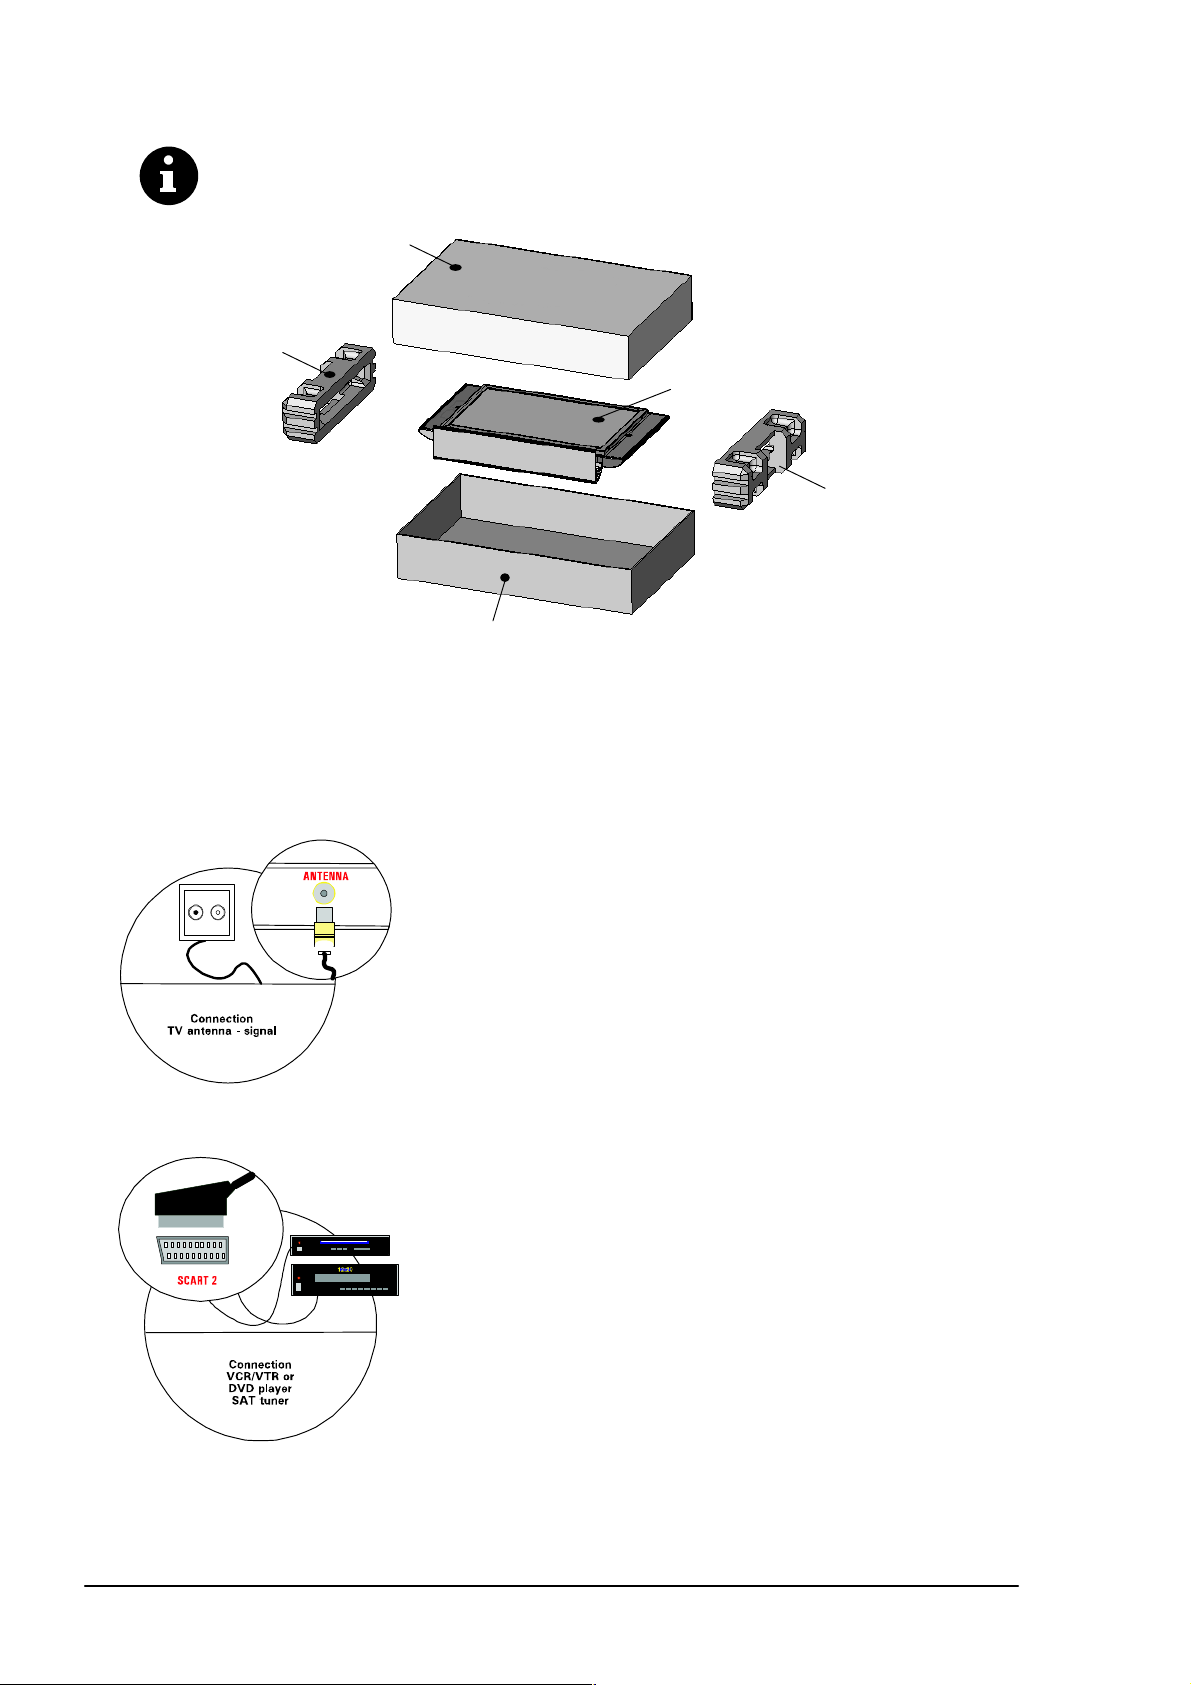
Zum Herausheben fassen Sie den TFT-Bildschirm mittig an beiden Verpackungseinsätzen an.
Es wird empfohlen den TFT-Bildschirm mit zwei Personen herauszuheben.
Karton-Oberteil
Verpackungseinsatz
TFT-Bildschirm
Verpackungseinsatz
Karton-Unterteil
4.2 Anschließen und Einschalten
Anschließen (Übersicht Anschlüsse siehe Abb. Seite 7)
Stecken Sie das Netzkabel in die Netzeingangsbuchse am Bildschirm und den Netzstecker in eine Steckdose.
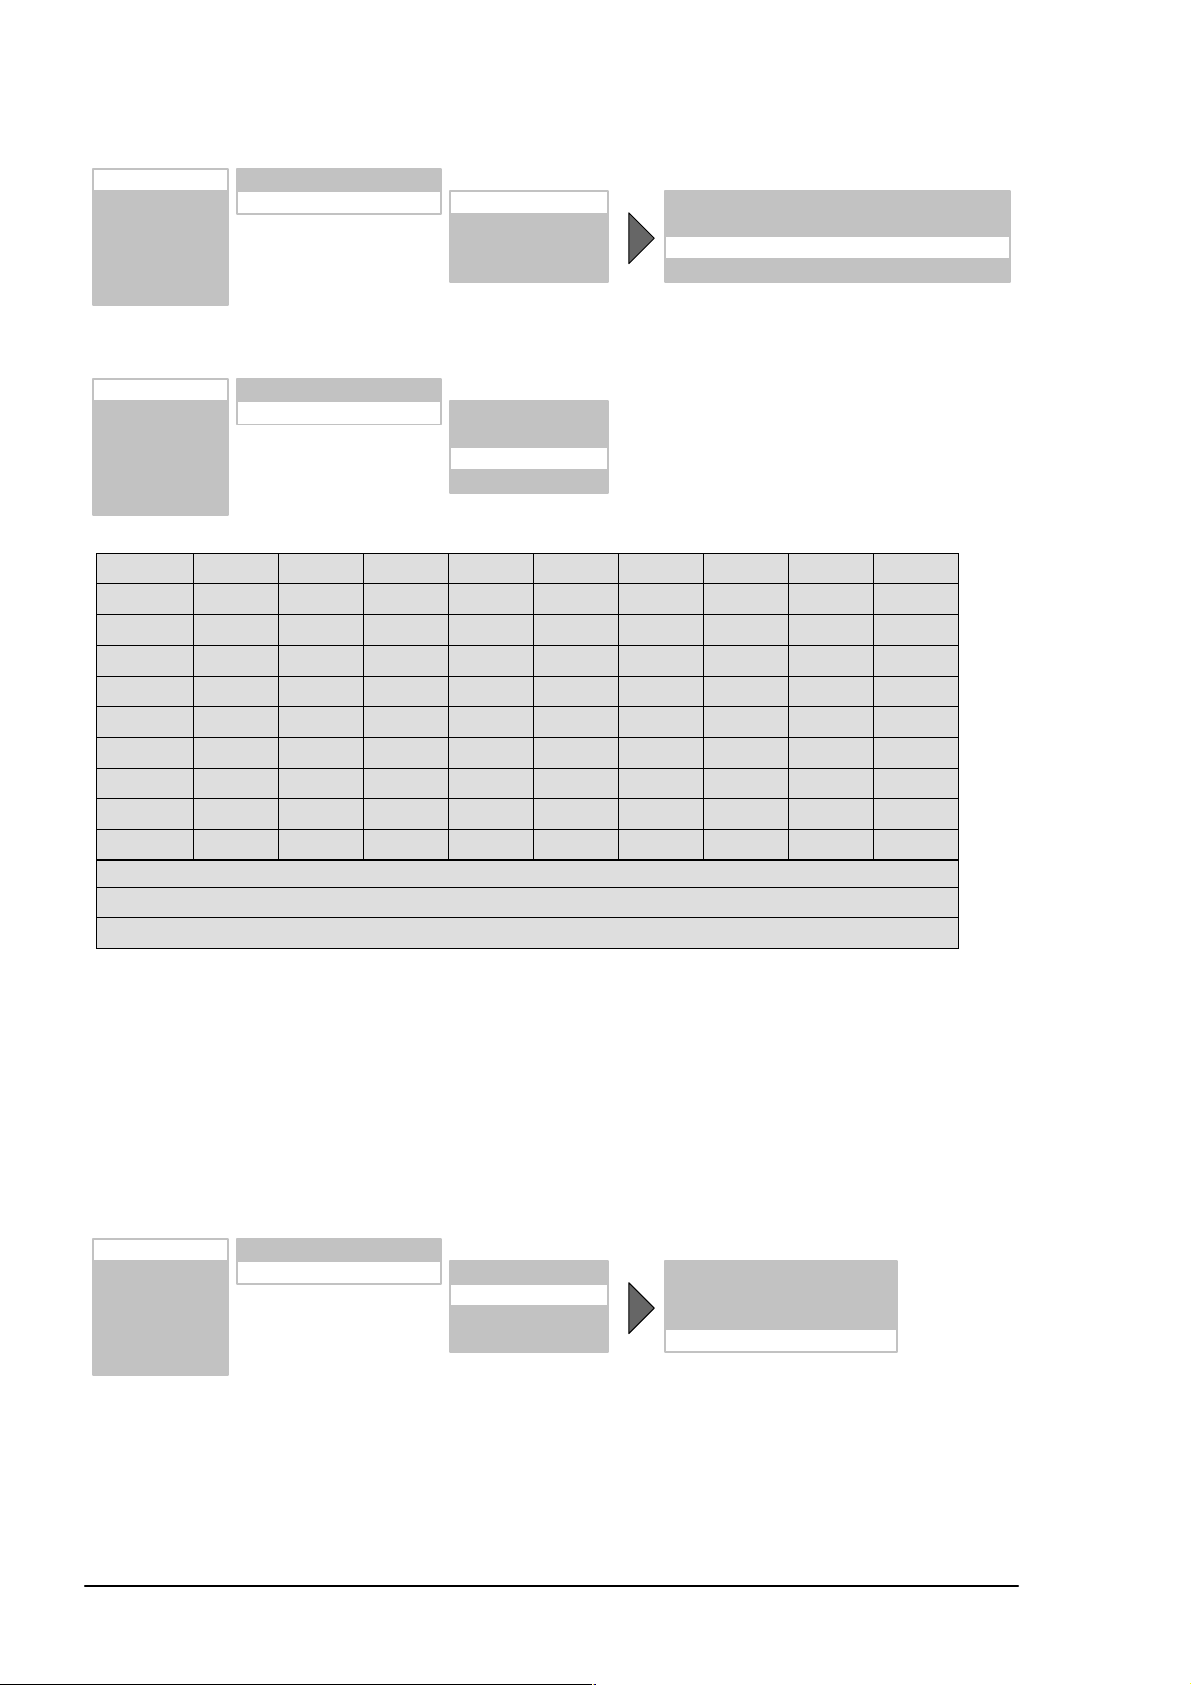
Kabelanschluss / Terrestrische Antenne
Wenn Sie einen Kabelanschluss oder eine terrestrische Antenne anschlieĆ
ßen möchten, verwenden Sie hierfür die Buchse ANTENNA .
Satelliten-Receiver
Wenn Sie Ihr Fernsehprogramm über einen Satelliten empfangen, schließen
Sie Ihren Receiver mit einem SCART-Kabel an die Buchse SCART 1 oder
SCART 2 an. SCART 1 verfügt zusätzlich über einen Anschluss für RGB
Quellen wie z.B. DVD Player.
10
DEUTSCH
Page 11
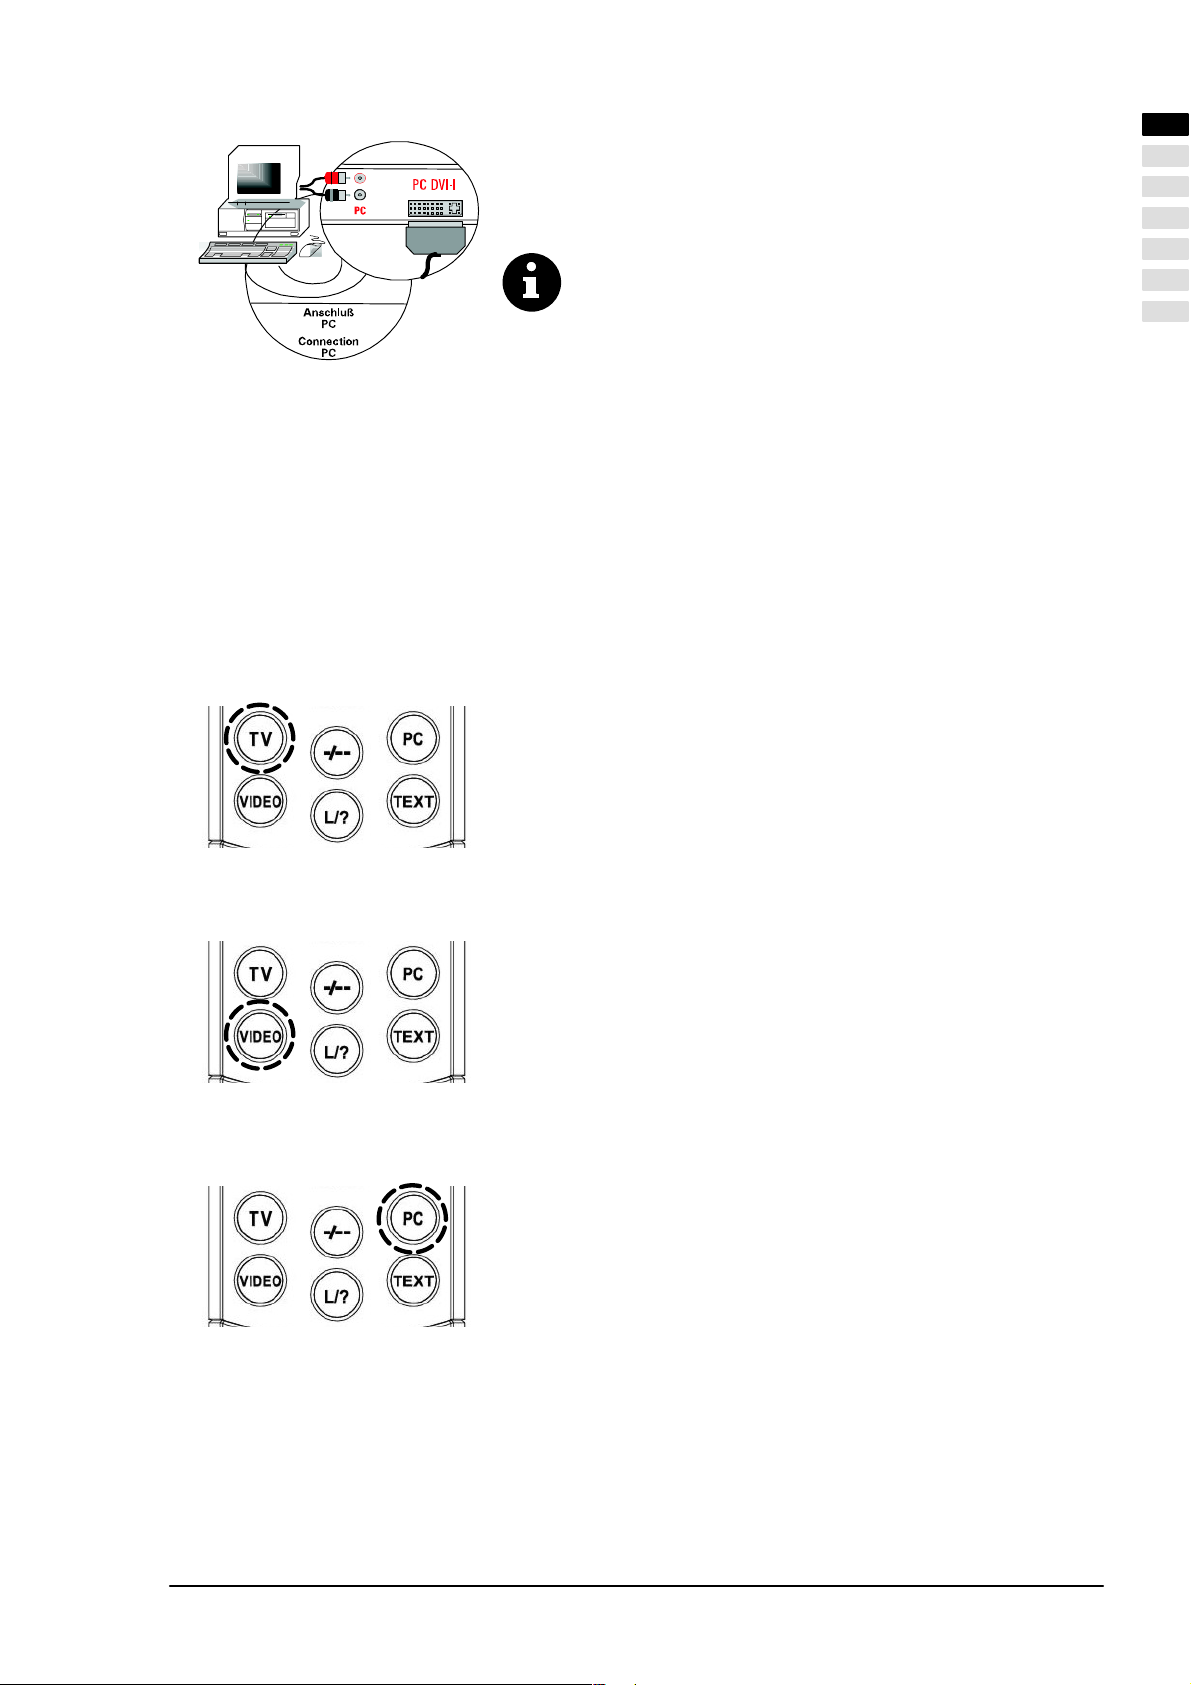
PC
Für den Anschluss Ihres PC's an den TFT-Bildschirm verwenden Sie die PC
DVI-I Buchse. Verfügt Ihr PC über einen analogen VGA-Ausgang, benutzen
Sie zum Anschluss ein Kabel DVI-I auf 15 Pin HD-Sub.
Bei älteren PC-Grafikkarten kann es vorkommen, dass der Pin 9
verschlossen ist. Sollte dies der Fall sein, wenden Sie sich bitte an
die Service-Hotline.
Vorbereitung
Fernbedienung
Öffnen Sie den Batteriefachdeckel auf der Rückseite der Fernbedienung und legen Sie die beiden mitgelieferĆ
ten Batterien (Typ LR03 Mikro AAA) ein. Beachten Sie die Polaritätsangaben auf dem Batteriefachboden.
Schließen Sie das Batteriefach wieder.
Einschalten
Schalten Sie den Netzschalter an der Rückseite des Bildschirms auf Position I". Der Bildschirm ist nun im
Stand-By Betrieb und kann mit der Fernbedienung eingeschaltet werden.
Kabelanschluss / Terrestrische Antenne
Schalten Sie den Bildschirm mit der Taste TV auf Ihrer Fernbedienung
ein.
DEUTSCH
Satelliten-Receiver
PC
Schalten Sie Ihren Satelliten Receiver ein und schalten Sie den BildĆ
schirm mit der Taste VIDEO auf Ihrer Fernbedienung ein. Bitte beachĆ
ten Sie, je nachdem an welcher SCART-Buchse Ihr Receiver angeĆ
schlossen ist, müssen Sie die Taste VIDEO gegebenenfalls mehrfach
drücken.
Schalten Sie den Bildschirm mit der Taste PC auf Ihrer Fernbedienung
ein und wählen Sie den entsprechenden Signaleingang ( PC(RGB)
oder PC(DVI) ). Hierzu rufen Sie über die Taste MENU der FernbedieĆ
nung das OSD-Menü Ihres Bildschirms auf und wählen im Untermenü
EINGÄNGE Ihr Eingangssignal aus.
DEUTSCH
11
Page 12

4.3 OSD-Menü Bedienung
Ihr TFT-Bildschirm läßt sich mit Hilfe der einfachen OSD-Menüsteuerung einstellen und bedienen. Hierzu stehen Ihnen
6 Tasten auf Ihrer Fernbedienung zur Verfügung:
1
2
4
3
5
6
[1] M Taste
Speichert vorgenommene Änderungen ab.
[2] P ĂTaste
Aufwärtsbewegung im OSD-Menü. Das angewählte Menü oder die angewählte Funktion wird farbig hinterlegt.
Werden Funktionen als Wert oder Balkendiagramm dargestellt, können Sie mit dieser Taste den Wert erhöhen.
[3] ĂTaste
Zurück zum vorherigen Menü. Verlassen des ausgewählten Untermenüs bzw. der ausgewählten Funktion.
[4] MENU Taste
OSD-Hauptmenü einblenden. Das Hauptmenü erscheint am oberen linken Bildschirmrand. OSD-Menü
ausblenden.
[5] ĂTaste
Aktiviert das angewählte Untermenü bzw. die angewählte Funktion. Der ausgewählte Menüpunkt wird grün
hinterlegt und kann geändert werden.
[6] PĂĂTaste
Abwärtsbewegung im OSD-Menü. Das angewählte Menü oder die angewählte Funktion wird farbig hinterlegt.
Werden Funktionen als Wert oder Balkendiagramm dargestellt, können Sie mit dieser Taste den Wert reduzieren.
ÄNDERUNGEN SPEICHERN
Die von Ihnen vorgenommenen Änderungen werden durch Drücken der Taste M auf Ihrer Fernbedienung (siehe Abb.
oben) oder durch das Verlassen des OSD-Menüs abgespeichert.
12
DEUTSCH
Page 13

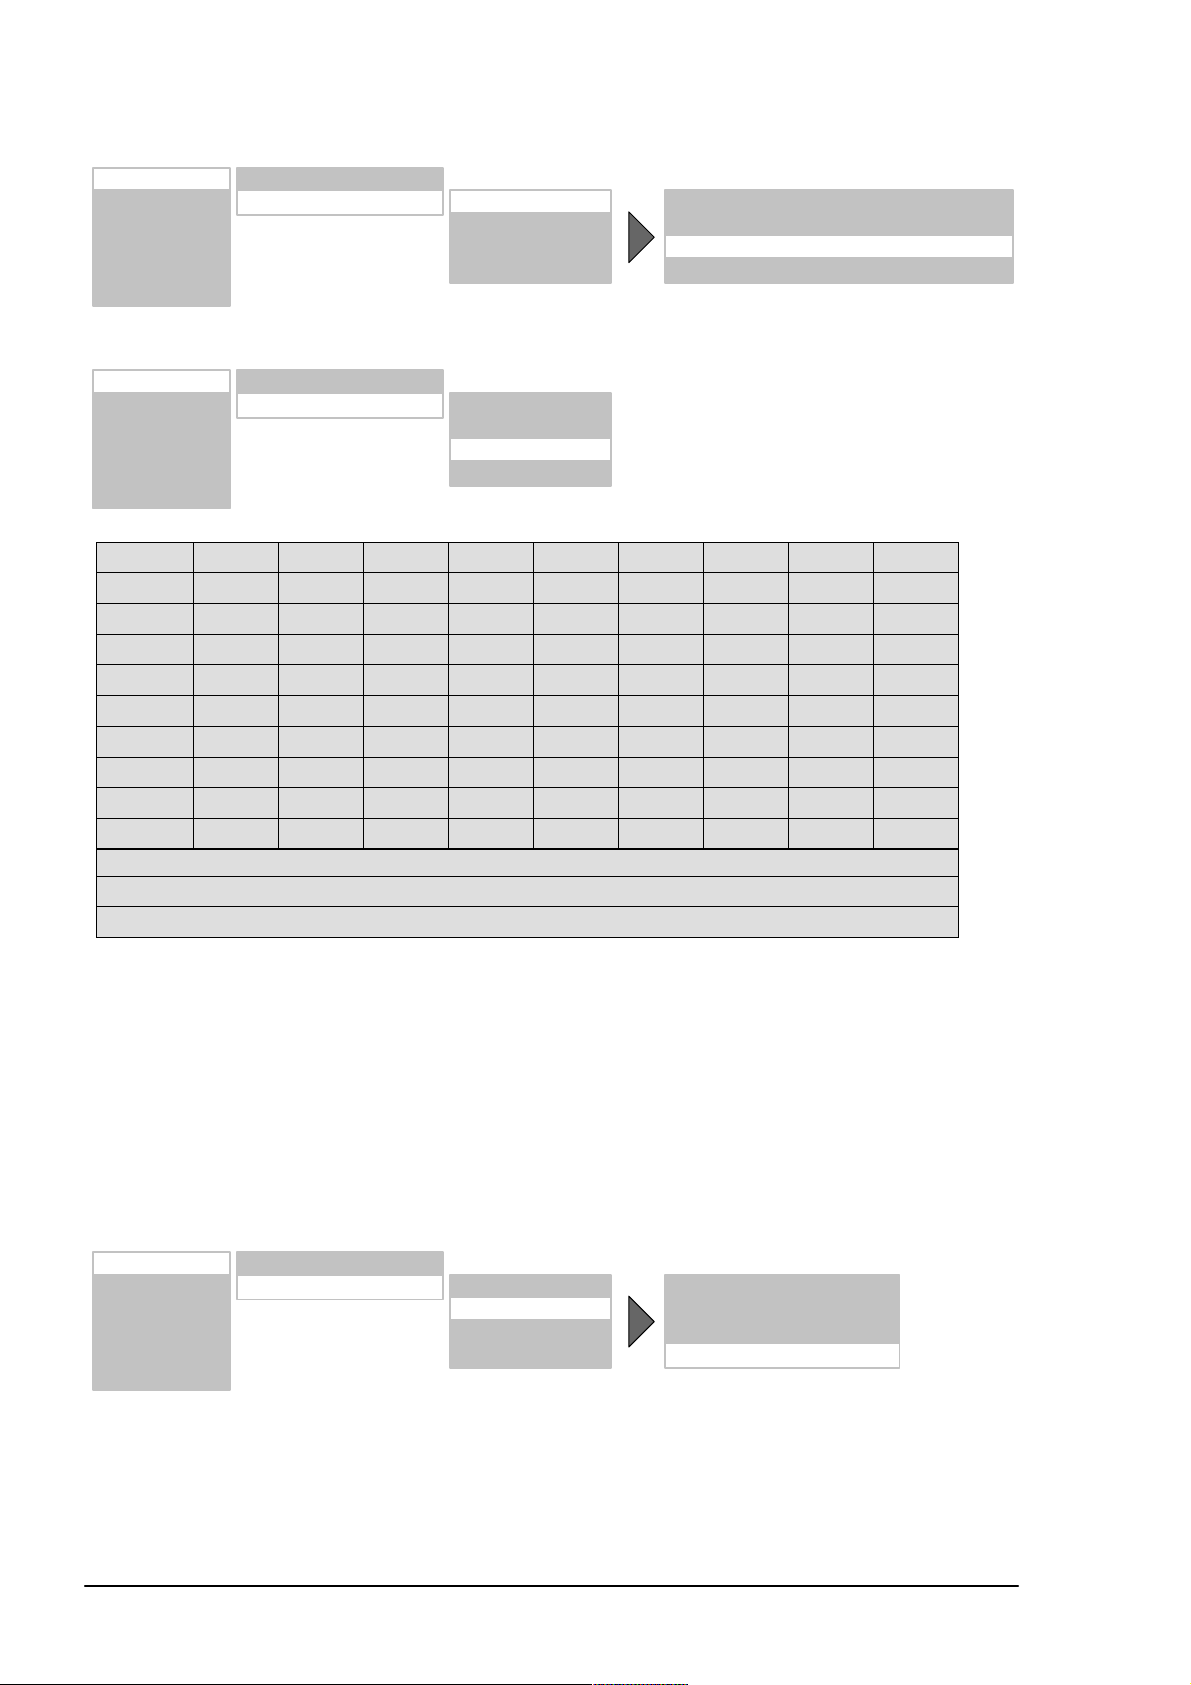
4.4 Grundeinstellungen OSD-Menü
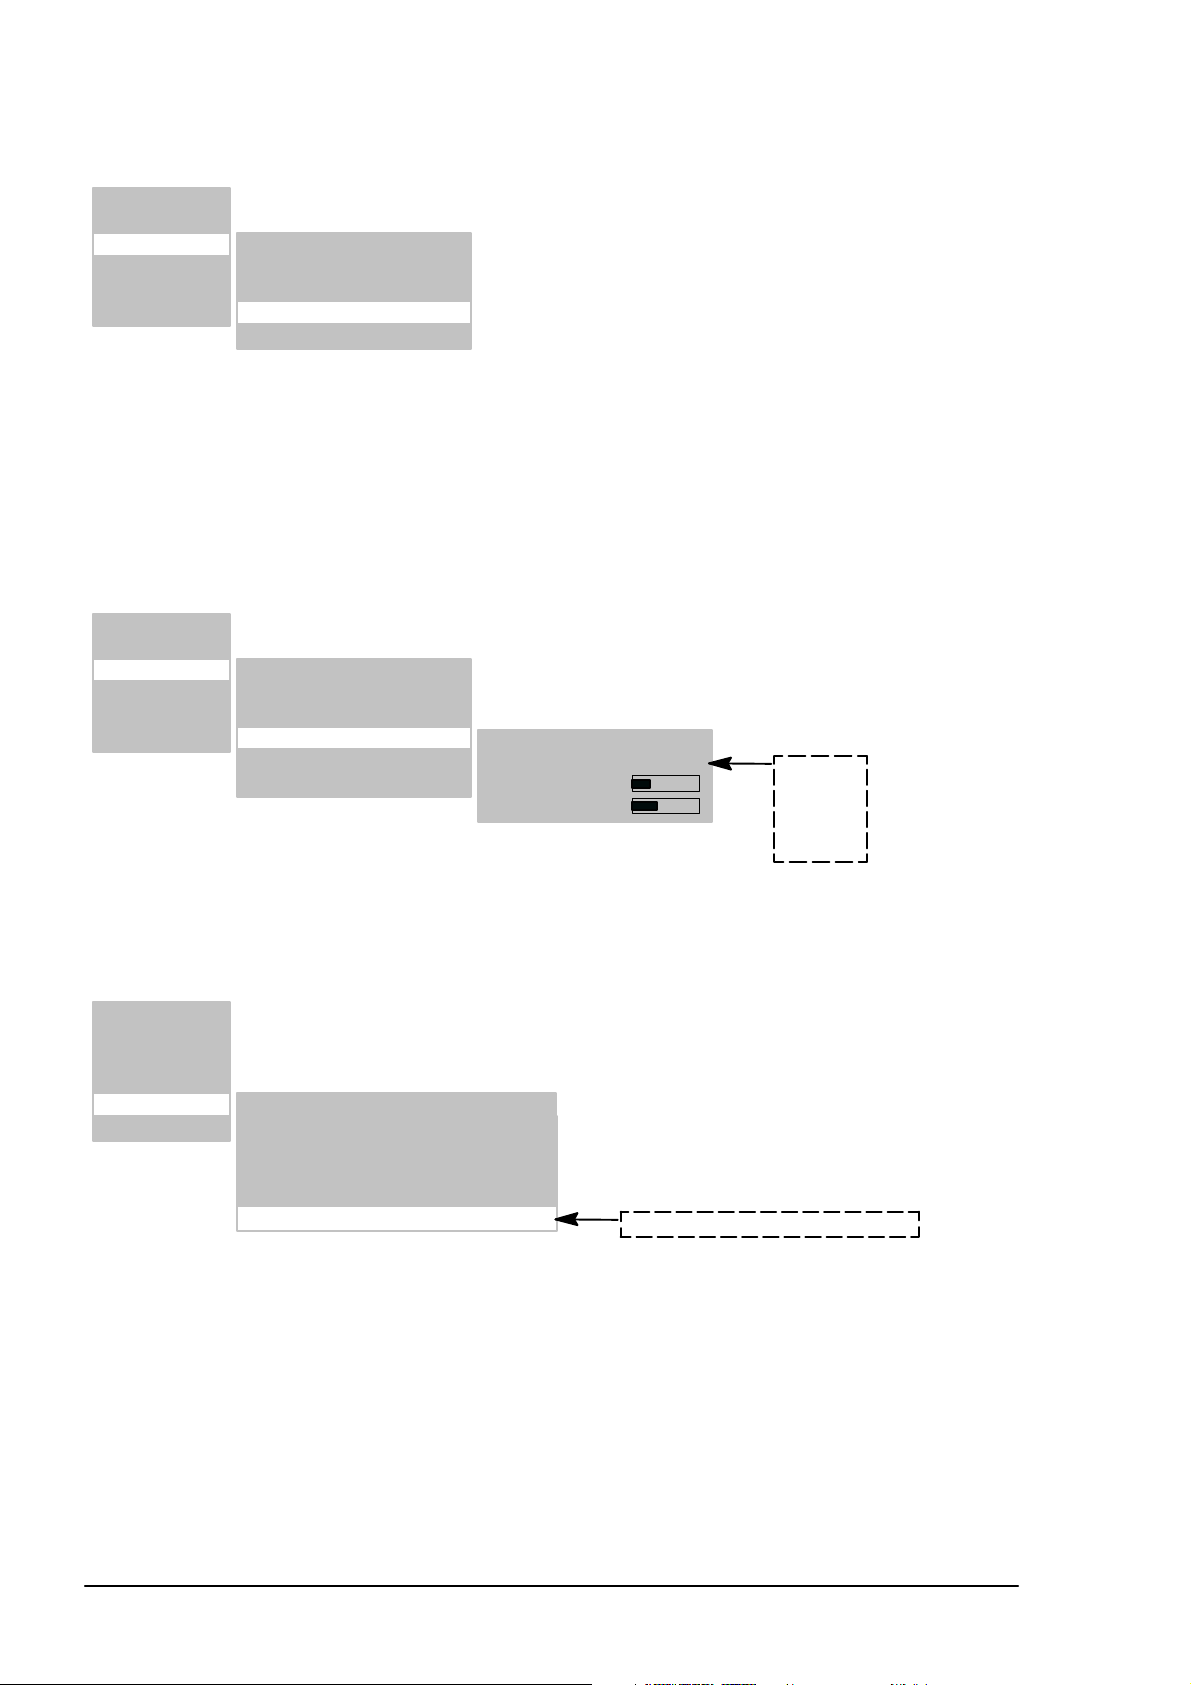
OSD SPRACHE ÄNDERN
Ihr Bildschirm verfügt über ein 6 sprachiges OSD-Menü (deutsch, englisch, französisch, italienisch, niederländisch und
spanisch). Um die voreingestellte Sprache zu ändern, rufen Sie im Hauptmenü den Menüpunkt EINSTELLUNG auf. AktiĆ
vieren Sie im Untermenü den Menüpunkt SPRACHE und wählen Sie die gewünschte Sprache aus:
Eingänge >
Bild >
Anzeige >
To n >
Einstellung >
Info >
ÄNDERN DER OSD-MENÜ EIGENSCHAFTEN
Um die Darstellung bzw. die Einblendezeit (Zeit nach der letzten Betätigung bis zur Ausblendung) des OSD-Menüs zu
verändern, wählen Sie im Hauptmenü den Menüpunkt EINSTELLUNG. Im Untermenü OSD-EINSTELLUNGEN steht IhĆ
nen ein weiteres Untermenü mit den Menüpunkten WARTEZEIT (Auswahlmöglichkeiten: 5, 10 und 15 Sekunden) und
TRANSPARENT (Auswahlmöglichkeiten: Ein und Aus) zur Verfügung:
Eingänge >
Bild >
Anzeige >
To n >
Einstellung >
Info >
Info Signalquelle: EIN
Sprache: Deutsch
OSD Einstellungen: >
ECO Modus/Stand-By: >
Aufruf Werkseinstellungen:
Abschaltzeit: AUS
Info Signalquelle: EIN
Sprache: Deutsch
OSD Einstellungen: >
ECO Modus/Stand-By: >
Aufruf Werkseinstellungen:
Abschaltzeit: AUS
Wartezeit: 5 s
Transparent: AUS
DEUTSCH
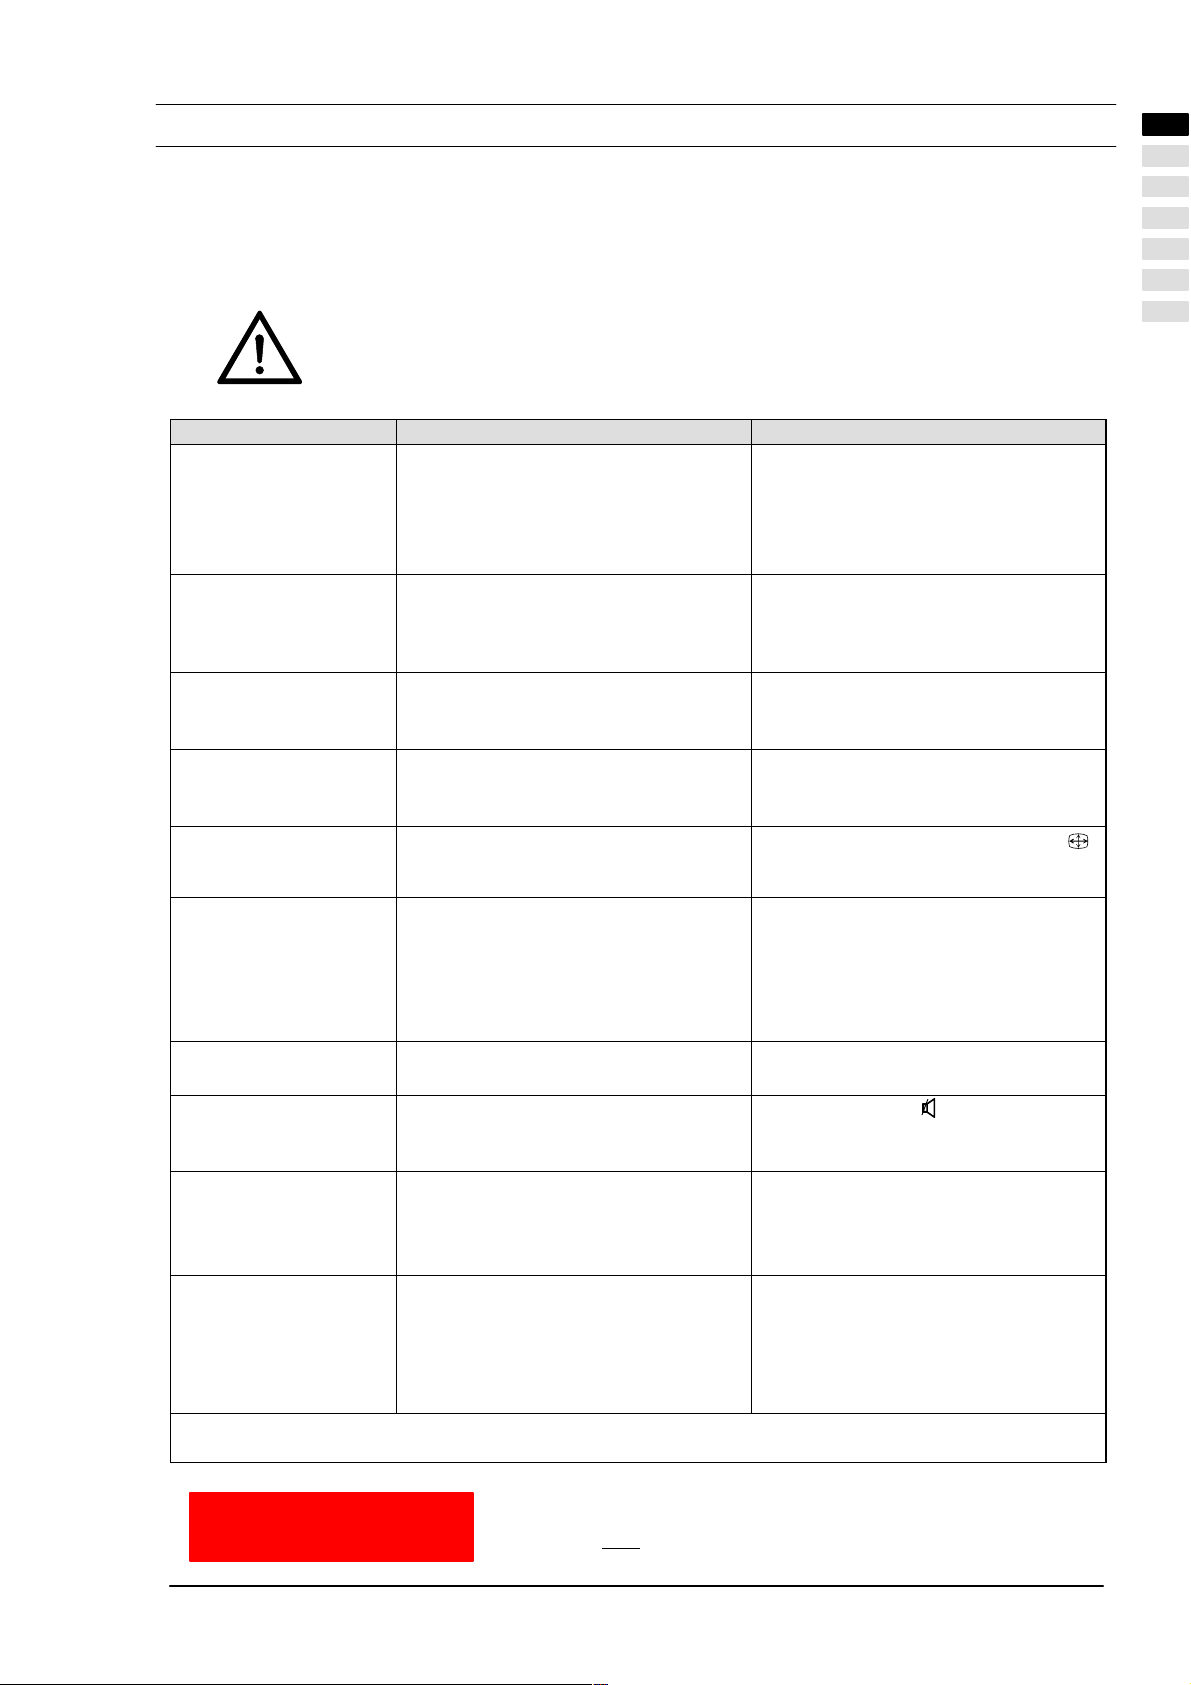
ZURÜCKSETZEN AUF WERKSEINSTELLUNGEN
Sie haben die Möglichkeit alle im OSD-Menü vorgenommenen Änderungen wieder auf die ursprüngliche WerkseinstelĆ
lung zurückzusetzen. Hierzu wählen Sie im Hauptmenü den Menüpunkt EINSTELLUNG und aktivieren im Untermenü
den Menüpunkt AUFRUF WERKSEINSTELLUNGEN:
Eingänge >
Bild >
Anzeige >
To n >
Einstellung >
Info >
Info Signalquelle: EIN
Sprache: Deutsch
OSD Einstellungen: >
ECO Modus/Stand-By: >
Aufruf Werkseinstellungen:
Abschaltzeit: AUS
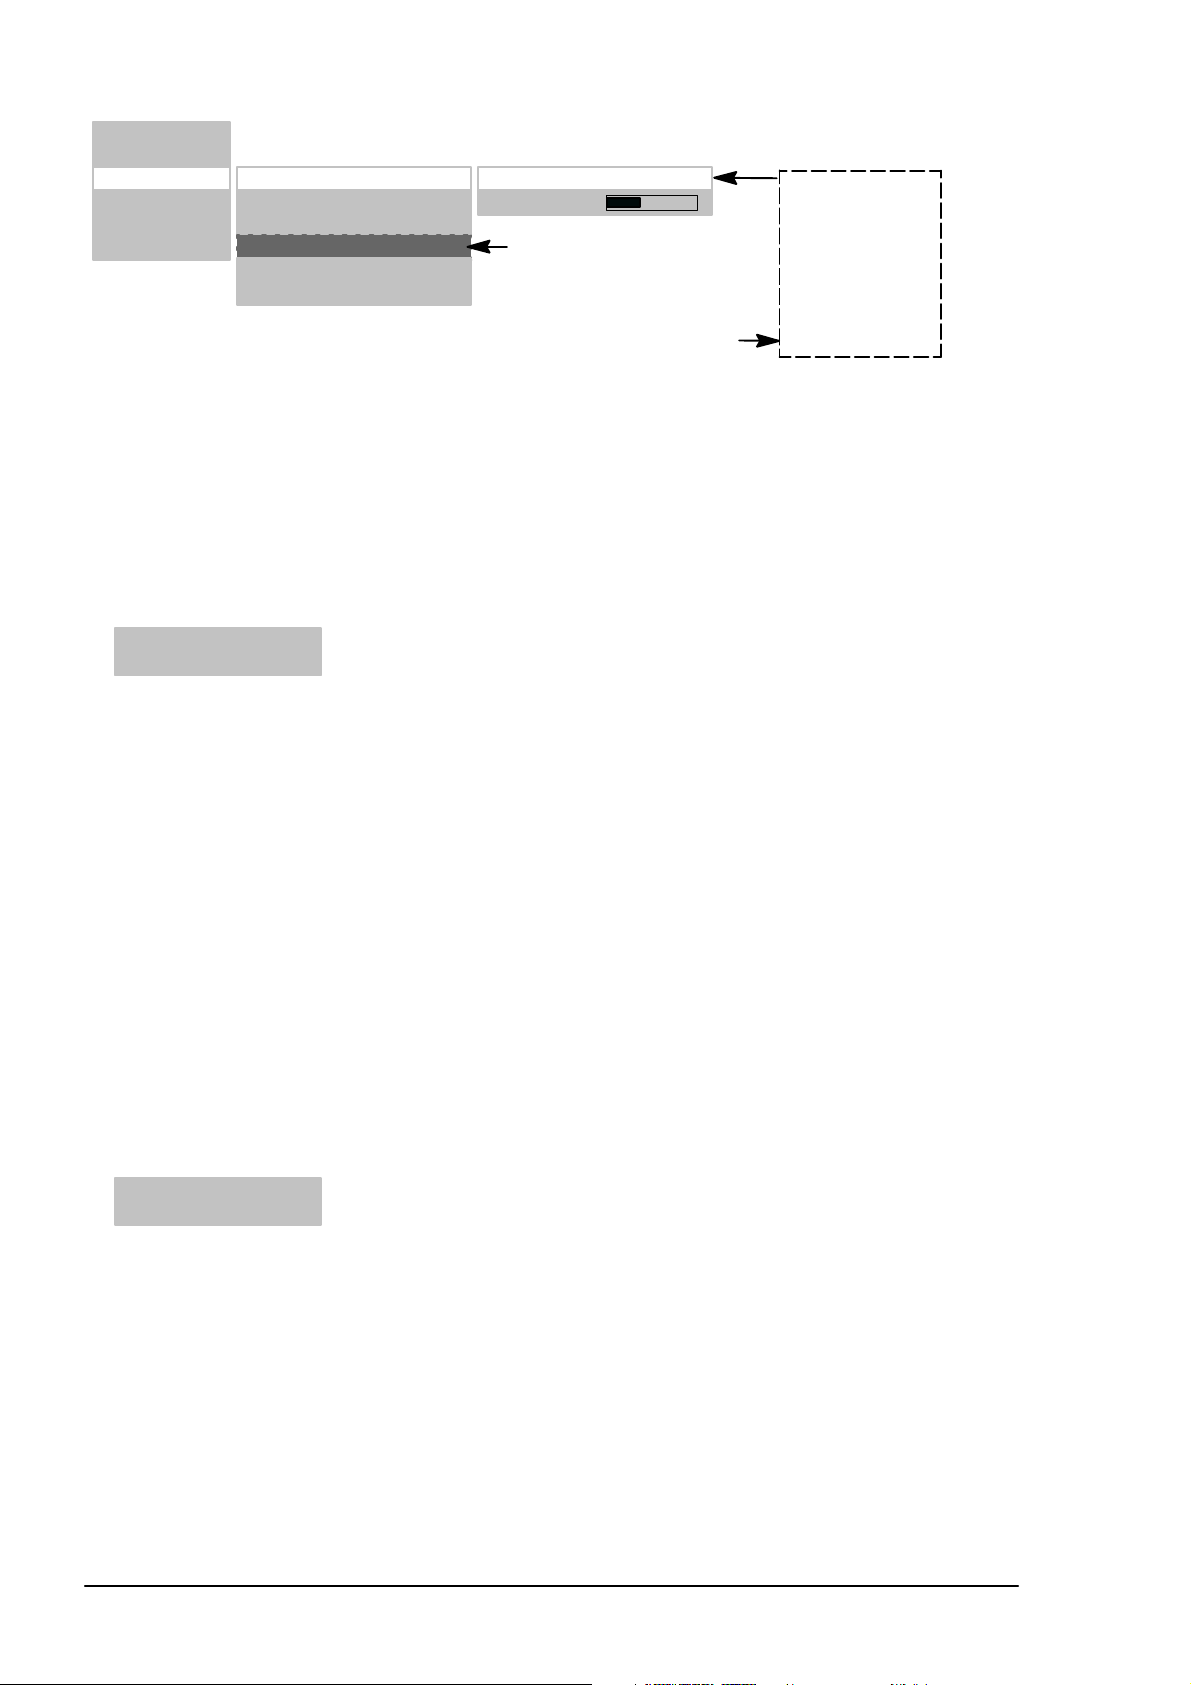
4.5 Einstellungen bei erster Inbetriebnahme
TV BETRIEB
Automatischer Sendersuchlauf
Wenn Sie Ihre Programme ausschließlich über Satellit empfangen, müssen Sie den automatischen Sendersuchlauf
nicht durchführen.
Um den automatischen Sendersuchlauf zu starten gehen Sie wie folgt vor:
Schalten Sie den Bildschirm über die TV-Taste Ihrer Fernbedienung ein.
Rufen Sie das OSD-Menü über die MENU-Taste Ihrer Fernbedienung auf und wählen Sie den Menüpunkt
EINGÄNGE. Es öffnet sich ein Untermenü.
Wählen Sie im Untermenü den Menüpunkt EINSTELLUNG. Es öffnet sich ein weiteres Untermenü.
DEUTSCH
13
Page 14
Wählen Sie nun den Menüpunkt AUTOM. SUCHE und aktivieren Sie den Untermenüpunkt SUCHE STARTEN.
Der automatische Sendersuchlauf startet.
Eingänge >
Bild >
Anzeige >
To n >
Einstellung >
Info >
Quelle: TUNER
Einstellungen > Autom. Suche >
Manuelle Suche >
Sortieren >
Löschen >
TV Standard: PAL BG
Suchart: Alle Programme
Suche starten:
Startpunkt Programm: 01
TV SENDER SORTIEREN
Eingänge >
Bild >
Anzeige >
To n >
Einstellung >
Info >
1 ARD 2 3 4 5 6 7 8 9 10
11 ZDF
21 WDR
31 _ _ _
41
51
61
71
81
91 99
Quelle: TUNER
Einstellungen > Autom. Suche >
Manuelle Suche >
Sortieren >
Löschen >
(Grün)_: Auswahl eines Programmes. Aktuell: 31 MENU: Beenden
(Blau)_: Einfügen eines leeren Programmplatz
(Gelb)_: Ausgewähltes Programm auf aktuelle Position umsetzen
Ändern der Programmnamen
Wenn der TFT-Bildschirm den Sendernamen aus dem Fernsehsignal erkennen kann, wird der erkannte Name in der einĆ
gestellten Programmnummer abgespeichert. Bei nicht erkennen des Programmnamens, erscheint im Namen die ProĆ
grammnummer (z.B. PR02).
Gehen Sie wie folgt vor, um den Programmnamen zu ändern:
Bewegen Sie die Markierung mit der Taste Ăoder Ăauf Menüpunkt Name.
Drücken Sie jetzt die ĂTaste um die erste Zeichenposition anzuwählen.
Mit den Tasten ĂundĂĂkönnen Sie durch den Zeichensatz blättern, bis das gewünschte Zeichen auf der angeĆ
wählten Zeichenposition erscheint.
Verwenden Sie dieāĂĂTaste zur Auswahl der nächsten Zeichenposition.
Wiederholen Sie die 3 vorherigen Schritte solange bis Sie den Namen eingegeben haben. Es sind max. 5 Zeichen
möglich.
Eingänge >
Bild >
Anzeige >
To n >
Einstellung >
Info >
Quelle: TUNER
Einstellungen > Autom. Suche >
Manuelle Suche >
Sortieren >
Löschen >
Programm: 01
TV Standard: PAL BG
Frequenz: 055.25 MHz
Name: SW3
PC BETRIEB
Signaleingang auswählen
Schalten Sie den Bildschirm über die PC-Taste Ihrer Fernbedienung ein.
Rufen Sie das OSD-Menü über die MENU-Taste Ihrer Fernbedienung auf. Der Menüpunkt EINGÄNGE ist farĆ
big hinterlegt.
Wählen Sie im Untermenü QUELLE den entsprechenden Signaleingang aus (PC (RGB) oder PC (DVI)).
14
DEUTSCH
Page 15

Eingänge >
Bild >
Anzeige >
To n >
Einstellung >
Info >
Quelle: PC (RGB)
Einstellungen >
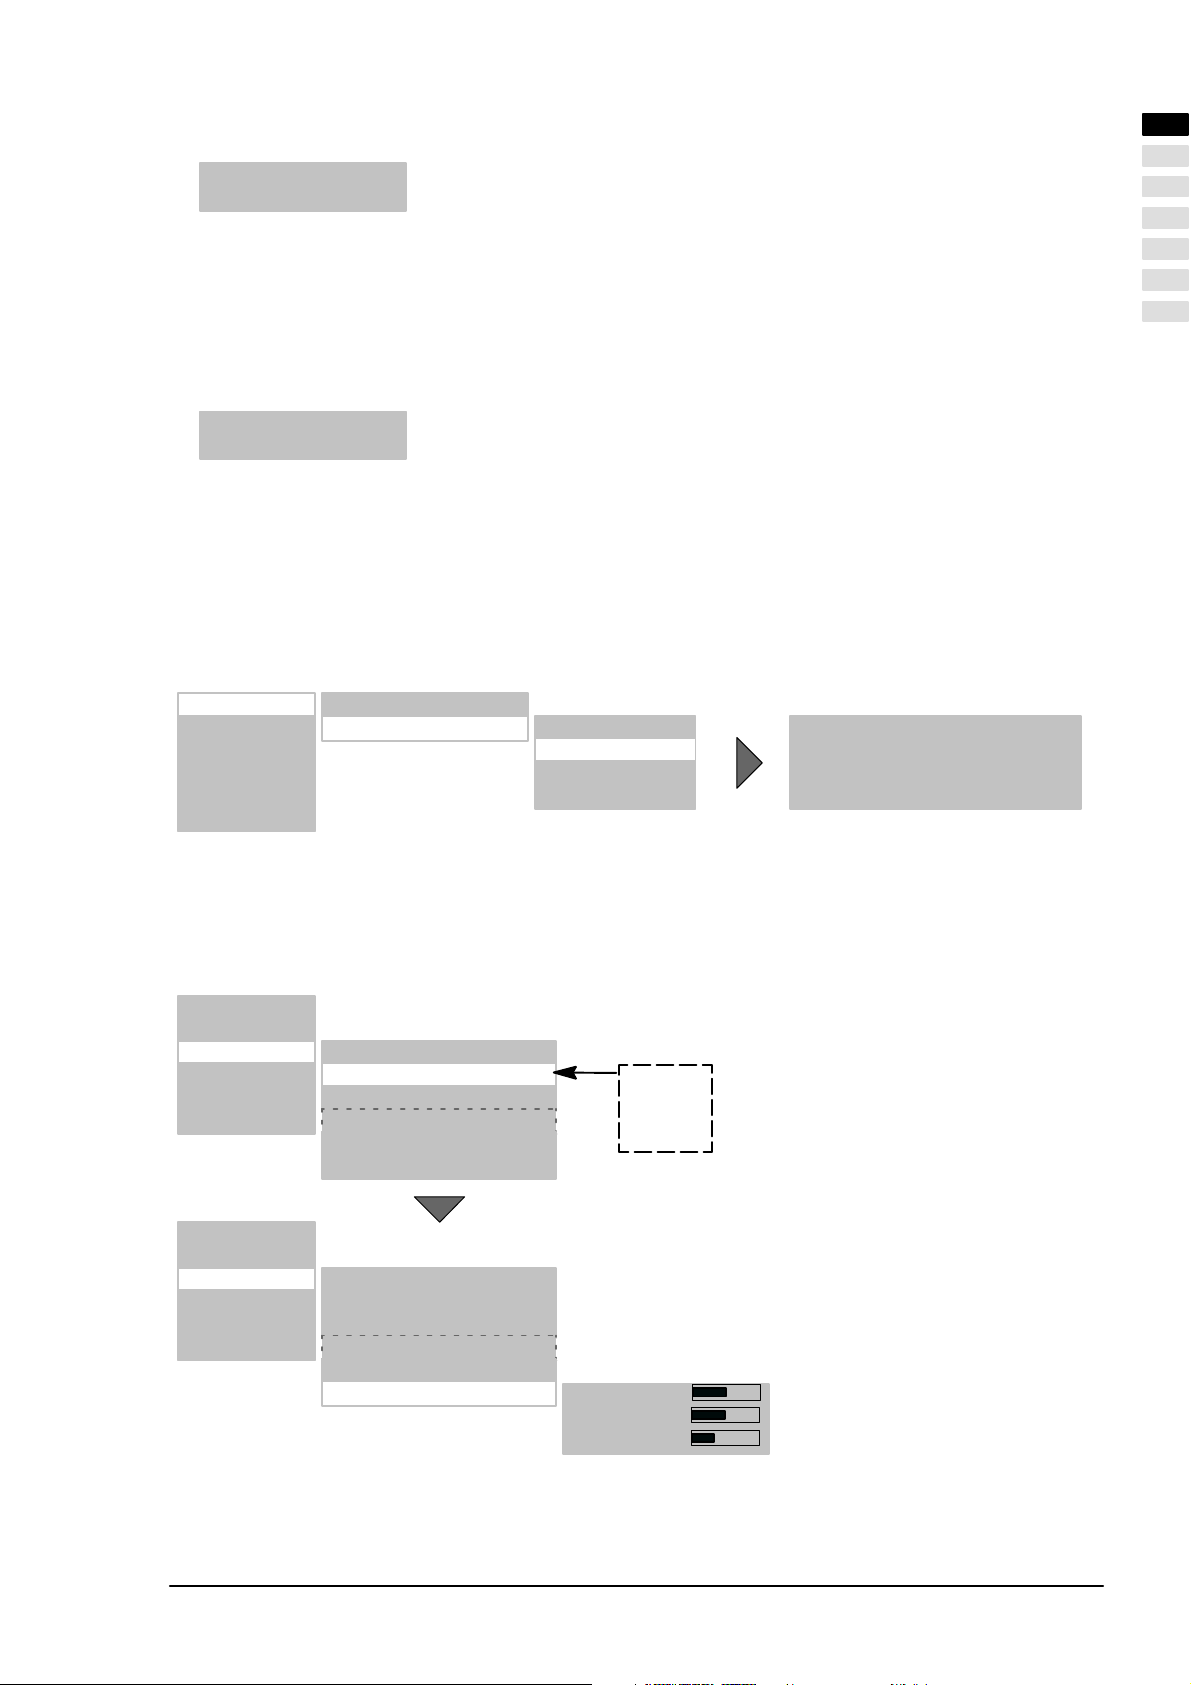
AUTO-ADJUST FUNKTION
Der TFT-Bildschirm führt immer bei der erstmaligen Verwendung eines analogen PC Video-Formates (RGB) automatisch
die Auto-Adjust Funktion aus. Während dieser Zeit bewegt sich die Darstellung leicht hin und her, um die optimale Position
und Wiedergabe zu erreichen.
Die H/V (horizontale/vertikale) Position und die Bildgröße müssen bei einigen ungünstigen PCFormaten manuell eingestellt werden. Die Auto-Adjust Funktion hängt sehr stark von der BildĆ
darstellung ab. Gut geeignet ist die Darstellung eines bildschirmfüllenden Weißbildes.
DEUTSCH
Eingänge >
Bild >
Anzeige >
To n >
Einstellung >
Info >
Sie haben die Möglichkeit häufig benutzte Formate als Benutzerformate abzuspeichern. Der Bildschirm erkennt die abĆ
gespeicherten Formate und stellt sie ohne Ausführung der Auto-Adjust Funktion sofort korrekt dar.
Wählen Sie im Hauptmenü den Menüpunkt EINGÄNGE und rufen Sie das Untermenü EINSTELLUNGEN auf. Es
öffnet sich ein weiteres Untermenü.
Aktivieren Sie den Menüpunkt Benutzerformate.
Mit dem Menüpunkt AUFRUF ermitteln Sie das aktuell eingestellte Benutzerformat. Jetzt können Sie das BenutĆ
zerformat beispielsweise unter Position 1 (8 Positionen sind möglich) mit dem Menüpunkt SPEICHERN ablegen.
Eingänge >
Bild >
Anzeige >
To n >
Einstellung >
Info >
Quelle: PC (RGB)
Einstellungen >
Quelle: PC (RGB)
Einstellungen >
H Freq.: 60.0 kHz
V Freq.: 75.0 Hz
Pixel Takt 78.75 MHz
H / V Pol: + / Benutzerformate >
Auto Abgleich
V Pos:
V Größe:
H Größe:
H Pos:
Phase
H Freq.: 60.0 kHz
V Freq.: 75.0 Hz
Pixel Takt 78.75 MHz
H / V Pol: + / Benutzerformate >
Auto Abgleich
V Pos:
V Größe:
H Größe:
H Pos:
Phase
Position: 1
Aufruf
Speichern
Alle löschen
5. Alltägliche Bedienung
5.1 Ein- / Ausschalten
EINSCHALTEN
Stellen Sie zum Einschalten des TFT-Bildschirmes den Netzschalter in Position I".
Die STAND-BY-LED am Infrarotsensor leuchtet orange.
Drücken Sie jetzt eine der Zifferntasten auf der Fernbedienung, um den TFT-Bildschirm in Betrieb zu setzen.
Die BETRIEBS-LED am Infrarotsensor leuchtet grün.
AUSSCHALTEN
Drücken Sie die Stand-By-Taste auf der Fernbedienung, der TFT-Bildschirm schaltet wieder in den Stand-By-BeĆ
trieb.
Die STAND-BY-LED am Infrarotsensor leuchtet orange.
DEUTSCH
15
Page 16

Um den TFT-Bildschirm wieder komplett auszuschalten, stellen Sie den Netzschalter in Position 0".
Stand-By-Taste
5.2 Ton einstellen
LAUTSTÄRKE EINSTELLEN
Betätigen Sie die Taste Ă(Vol -) oderĂ (Vol +) auf der Fernbedienung, um die gewünschte Lautstärke einzuĆ
stellen.
Eingänge >
Bild >
Anzeige >
To n >
Einstellung >
Info >
Lautstärke:
Balance:
Equalizer: Rock
Option: Stereo
Lautstärke Audio Ausgang:
Max.Einschalt-Lautstärke:
Lautstärkeregelung: EIN
Benutzer EQ Einstellungen >
Anzeige der aktuell eingestellten Lautstärke
Lautstärke beim Einschalten des TFT-Bildschirmes
SOUNDEINSTELLUNG
Unter dem Menüpunkt EQUALIZER können SIe vordefinierte Klangmuster einstellen.
Eingänge >
Bild >
Anzeige >
To n >
Einstellung >
Info >
Wählen Sie den Menüpunkt BENUTZER EQ EINSTELLUNGEN, um Ihr individuelles Klangmuster zu erstellen.
Eingänge >
Bild >
Anzeige >
To n >
Einstellung >
Info >
Lautstärke:
Balance:
Equalizer: Rock
Option: Stereo
Lautstärke Audio Ausgang:
Max.Einschalt-Lautstärke:
Lautstärkeregelung: EIN
Benutzer EQ Einstellungen >
Lautstärke:
Balance:
Equalizer: Rock
Option: Stereo
Lautstärke Audio Ausgang:
Max.Einschalt-Lautstärke:
Lautstärkeregelung: EIN
Benutzer EQ Einstellungen >
Ohne Anhebung
Benutzer
Jazz
Rock
Gesang
Klassik
Pop
< 120 Hz:
500 Hz:
1.5 kHz:
5 kHz:
> 10 kHz
16
DEUTSCH
Page 17

TONABSCHALTUNG
Drücken Sie die Taste auf der Fernbedienung. Der Ton wird abgeschaltet und am Bildschirm erscheint für ca.
3ĂSekunden folgendes Info-Fenster:
TUNER: 2 ZDF
STUMM
Der Ton wird wieder eingeschaltet, wenn Sie die Taste , Ă(Vol -) oderĂ (Vol +) auf der Fernbedienung drükĆ
ken. Am Bildschirm erscheint für ca. 3 Sekunden das folgende Info-Fenster:
TUNER: 2 ZDF
STEREO
5.3 Bild einstellen
Sie haben die Möglichkeit Kontrast, Helligkeit, Bildschärfe und Farbe auf den gewünschten Wert einzustellen.
KONTRAST / HELLIGKEIT / BILDSCHÄRFE / FARBE
Drücken Sie die TasteĂ Ăfür die Erhöhung oder aufĂĂfür die Verringerung der Werte.
Mit der Einstellung BILDSCHÄRFE kann die Darstellung des Bildes verbessert werden.
Der Menüpunkt FARBE erlaubt die Veränderung der Farbbalance:
Drücken Sie TasteĂĂ, das Bild wird mehr grünlich.
Drücken Sie TasteĂ, das Bild wird mehr rötlich.
Eingänge >
Bild >
Anzeige >
To n >
Einstellung >
Info >
Kontrast: 64
Helligkeit: 64
Bildschärfe:
Farbe: 15
DNC: 0
Photo CD: AUS
Interlace: Automatisch
Diese Menüpunkte stehen nicht
lungen EINGÄNGE QUELLE PC(RGB)"
und PC(DVI)" zur Verfügung!
in den EinstelĆ
DEUTSCH
BILDFORMAT
Im Menüpunkt ANZEIGE FORMAT ZOOM können Sie voreingestellte Formate auswählen.
Der Menüpunkt BENUTZERZOOM bietet Ihnen die Möglichkeit ein eigenes Benutzerformat zu erstellen. Um Ihr BenutĆ
zerformat zu aktivieren, wählen Sie im Menüpunkt ZOOM den BENUTZERZOOM aus.
Bildschirmfüllend
In dieser Formateinstellung wird das Bild in horizontaler und vertikaler Richtung so angepasst, dass immer eine bildĆ
schirmfüllende Darstellung sichtbar ist.
Video 4:3
Diese Formateinstellung stellt ein PAL 4:3 Bild im korrekten Seitenverhältnis dar. Am linken und rechten Bildrand sind
dunkle Streifen sichtbar.
Auto
Diese Formateinstellung skaliert das Eingangssignal automatisch in horizontaler und vertikaler Richtung immer auf
eine bildschirmfüllende Darstellung. Es erkennt 16:9 Filmformate und skaliert sie mit den vorgegebenen Faktoren.
Video NLS
Diese Formateinstellung skaliert das Eingangssignal automatisch in horizontaler und vertikaler Richtung bildschirmĆ
füllend, aber nicht linear. Das heißt, dass die Bildinhalte in der Bildschirmmitte original dargestellt werden und zum
Rand hin eine stärkere Skalierung stattfindet.
Benutzerzoom
In dieser Formateinstellung können Sie ein individuelles Bildformat im Bereich von 40% bis 140 % der ursprünglichen
Bildgröße darstellen.
Zoom
Die manuelle Umschaltung von der Formateinstellung Video 4:3 in den Zoom dehnt das Bild in vertikaler und horizonĆ
taler Richtung um ca. 20% über die bildschirmfüllende Darstellung hinaus. Dadurch werden bei der Betrachtung von
Filmen im 4:3 Format, die dunklen Streifen am unteren und oberen Bildrand reduziert.
Video 16:9
Diese Formateinstellung stellt ein PAL 4:3 Bild so dar, dass keine dunklen Streifen am rechten und linken Bildrand
sichtbar sind.
Zum Umschalten der Formate drücken Sie wiederholt die Taste F
DEUTSCH
auf der Fernbedienung.
17
Page 18
Eingänge >
Bild >
Anzeige >
To n >
Einstellung >
Info >
Format >
Farbtemperatur: 9300 k
Kontrast: normal
Bild-in-Bild >
Standbild
Benutzer Farbtemperatur >
Zoom: Bildschirmfüllend
Benutzerzoom:
Dieser Menüpunkt steht nur in
der Einstellung EINGÄNGE
PC(DVI) / PC(RGB) zur VerfüĆ
gung!
Bildschirmfüllend
Video 4:3
Auto
Video NLS
Benutzerzoom
Zoom
Video 16:9
Dieser Menüpunkt steht nur in
der Einstellung EINGÄNGE
PC (DVI) / PC(RGB) zur VerfüĆ
gung!
PC 1:1
5.4 Fernsehbetrieb
Der TFT-Bildschirm befindet sich im Stand-By Betrieb.
Zum Einschalten drücken Sie eine der Zifferntasten 0...9 oder die TV-Taste auf der Fernbedienung.
Während der Initialisierung wird das Firmen-Logo eingeblendet.
Danach erscheint der zuletzt angewählte Fernsehsender (Programmnummer) auf dem Bildschirm. Gleichzeitig
wird das folgende Info-Fenster für ca. 3 Sekunden eingeblendet:
TUNER: 2 ZDF
STEREO
Drücken Sie die Taste Pāābzw. PĂāāum die Programmnummer jeweils um 1 zu erhöhen bzw. zu verringern.
Mit den Zifferntasten auf der Fernbedienung können Sie jede Programmnummer direkt anwählen.
VIDEOTEXT
Ihr TFT-Bildschirm kann TOP/FLOF Videotextinformationen empfangen und darstellen.
Wählen Sie einen Fernsehsender mit Videotext.
Drücken Sie Taste TEXT auf der Fernbedienung um den Videotext anzuzeigen.
Zur direkten Anwahl von Videotextseiten benutzen Sie die Zifferntasten.
Die rote, grüne, gelbe und blaue Taste auf der Fernbedienung haben je nach Videotextart unterschiedliche FunkĆ
tionen, die im unteren Bereich des Videotextes angezeigt werden.
5.5 PC Betrieb
Schalten Sie TFT-Bildschirm und PC AUS.
Verbinden Sie Ihren PC und den TFT-Bildschirm mit einem handelsüblichen Videokabel (DVI-Stecker an BildĆ
schirm und HD-Sub-Stecker an PC).
Schalten Sie TFT-Bildschirm und PC wieder EIN.
Im Menüpunkt EINGÄNGE QUELLE muß PC (RGB) eingestellt sein. Beim Einschalten erkennt der TFT-BildĆ
schirm das am PC eingestellte Bildformat automatisch. Diese Information wird in einem Info-Fenster angezeigt.
RGB-1024x 768
Vollbild
5.6 Betrieb mit zusätzlichen Geräten
VIDEORECORDER
Schalten Sie TFT-Bildschirm und Videorecorder AUS.
Es gibt 3 Anschlussmöglichkeiten für Ihren Videorecorder an den TFT-Bildschirm:
über die Antennenleitung, lesen Sie dazu die Bedienungsanleitung vom Videorecorder
mit einem Scartkabel entweder an SCART1 oder SCART2
wenn Ihr Videorecorder einen S-Video Ausgang besitzt, verbinden Sie diesen mit dem Y/C Eingang.
Schalten Sie TFT-Bildschirm und Videorecorder wieder EIN.
18
DEUTSCH
Page 19
Zum Umschalten auf den angeschlossenen Eingang (z.B. SCART1) drücken Sie wiederholt die VIDEO Taste auf
der Fernbedienung.
SCART 1
Bildschirmfüllend
DVD PLAYER
Schalten Sie TFT-Bildschirm und DVD Player AUS.
Verbinden Sie Ihren DVD Player mit SCART1 oder dem Y/C Eingang, wenn dieser über einen S-Video Ausgang
verfügt.
Schalten Sie TFT-Bildschirm und DVD Player wieder EIN.
Zum Umschalten auf den angeschlossenen Eingang drücken Sie wiederholt die VIDEO Taste auf der FernbedieĆ
nung.
YC
Bildschirmfüllend
5.7 Sonderfunktionen
MANUELLE PROGRAMMSUCHE
Unter Menüpunkt PROGRAMME geben Sie eine Programmnummer ein, die noch nicht in Benutzung ist.
Im Menüpunkt FREQUENZ müssen Sie direkt die Frequenz des Fernsehsenders eingeben, den Sie suchen.
Ist das Bild nicht optimal, erhöhen bzw. verringern Sie die eingegebene Frequenz in kleinen Schritten.
Strahlt der Fernsehsender keinen Namen aus, können Sie diesen unter dem Menüpunkt NAME eingeben.
DEUTSCH
Eingänge >
Bild >
Anzeige >
To n >
Einstellung >
Info >
Quelle: TUNER
Einstellungen > Autom. Suche >
Manuelle Suche >
Sortieren >
Löschen >
Programme: 11
TV Standard: PAL BG
Frequenz: 168.25 MHz
Name: HR
FARBTEMPERATUR
Die Farbtemperatur können Sie unter 3 vordefinierten Werten auswählen oder über den Menüpunkt BENUTZER FARBĆ
TEMPERATUR einen Wert selbst festlegen.
Ein niedriger Wert der Farbtemperatur erhöht den Rotanteil im Bild und läßt es wärmer" erscheinen. Mit steigender FarbĆ
temperatur erhöht sich der blaue Lichtanteil, das Bild wirkt kälter".
Eingänge >
Bild >
Anzeige >
To n >
Einstellung >
Info >
Eingänge >
Bild >
Anzeige >
To n >
Einstellung >
Info >
Format >
Farbtemperatur: 9300 k
Kontrast: normal
Bild-in-Bild >
Standbild
Benutzer Farbtemperatur >
Format >
Farbtemperatur: 9300 k
Kontrast: normal
Bild-in-Bild >
Standbild
Benutzer Farbtemperatur >
7500K
9300K
11000K
Benutzer
Rot: 128
Grün 128
Blau: 110
DEUTSCH
19
Page 20
STANDBILD
Ein Standbild können Sie mit der FREEZE Taste oder unter dem Menüpunkt STANDBILD erzeugen.
Eingänge >
Bild >
Anzeige >
To n >
Einstellung >
Info >
Format >
Farbtemperatur: 9300 k
Kontrast: normal
Standbild
Benutzer Farbtemperatur >
BILD-IN-BILD
Die Funktion BILD-IN-BILD bietet die Möglichkeit bei der Darstellung von PC-Signalen, Videobilder einzublenden.
Der Menüpunkt BILD-IN-BILD ist nur unter den Einstellungen EINGÄNGEĂĂQUELLEĂĂPC(DVI) / PC(RGB) eingeĆ
blendet bzw. die PIP Taste ist aktiv.
Drücken Sie die PIP Taste, das Bild von dem in Menüpunkt ANZEIGEĂĂBILD-IN-BILDĂĂQUELLEĂ eingestellten
Eingang (z.B. Tuner), wird in das aktuelle Bild eingeblendet.
Sollte an diesem Eingang kein Signal anstehen, so bleibt das eingeblendete Fenster dunkel.
Position und Grösse des Fensters können eingestellt werden. Um Ihre individuellen Einstellungen zu aktivieren,
müssen Sie den Menüpunkt GRÖSSE auf EIN stellen.
Eingänge >
Bild >
Anzeige >
To n >
Einstellung >
Info >
Format >
Farbtemperatur: 9300 k
Kontrast: normal
Bild-in-Bild >
Standbild
Benutzer Farbtemperatur >
Grösse (Ein/Aus): AUS
Quelle: Tuner
Hor.. Position:
Vert. Position:
Tuner
SCART1
SCART2
YC
FBAS
AUTOMATISCHESĂABSCHALTEN
Sie können den TFT-Bildschirm so einstellen, dass er nach einer bestimmten Zeit automatisch ausgeschaltet wird.
Wählen Sie im Menüpunkt ABSCHALTZEIT eine der vorgegebenen Zeiten.
Nach Ablauf dieser Zeit wird der TFT-Bildschirm automatisch ausgeschaltet.
Eingänge >
Bild >
Anzeige >
To n >
Einstellung >
Info >
Info Signalquelle: EIN
Sprache: Deutsch
OSD Einstellungen: >
ECO Modus/Stand-By: >
Aufruf Werkseinstellungen:
Abschaltzeit: AUS
Aus / 0:30 / 1:00 / 1:30 / 2:00 / 2:30
ZWEIKANALTON UMSCHALTEN
Zweikanalton ist die Bezeichnung für Filme, bei denen der Zuschauer die Möglichkeit hat, zwischen der Synchronfassung
und der Originalsprache zu wechseln.
Werden Sendungen mit Zweikanalton ausgestrahlt, ist zuerst der Kanal A aktiv.
Drücken Sie die Taste M/S auf der Fernbedienung um auf Kanal B umzuschalten.
20
DEUTSCH
Page 21
6. Fehlerbehebung
Wenn bei der Benutzung Ihres TFT-Bildschirmes ein Fehler auftreten sollte, lesen Sie bitte die nachstehenden Fehler
bzw. deren Behebung durch, bevor Sie das Gerät zur Reparatur geben. Möglicherweise können Sie den Fehler sehr leicht
selbst beheben. Steckt beispielsweise der Netzstecker vom Bildschirm nicht in der Steckdose oder es gibt Probleme mit
der Empfangsanlage (Antenne), so könnten SIe irrtümlich annehmen, der Bildschirm sei defekt.
Sollten die angegebenen Hinweise zur Fehlerbehebung nicht zum Erfolg führen, schalten Sie
das Gerät am Netzschalter AUS und ziehen Sie den Netzstecker aus der Steckdose.
Versuchen Sie niemals das Gerät selbst zu reparieren und entfernen Sie keinesfalls die hintere
Abdeckung am Gerät.
FEHLER MÖGLICHE URSACHE MÖGLICHE BEHEBUNG
Kein Bild und kein Ton,
obwohl der Netzstecker
eingesteckt und Gerät
eingeschaltet ist.
Netzschalter in Position 0" (AUS).
Netzstecker von Gerät nicht in SteckĆ
dose eingesteckt.
Defektes Netzkabel .
Netzschalter in Position I" stellen.
Stecken Sie den Stecker vom NetzkaĆ
bel in die Steckdose.
Service-Hotline anrufen.
DEUTSCH
Bildschirm dunkel.
Schwache oder
übermäßige Farben.
Das Bild ist abgeschnitten
bzw. das Bild ist nicht
zentriert.
Das Bild ist zu gross bzw.
zu klein.
Die Fernbedienung
funktioniert nicht.
Das dargestellte Bild ist zu
dunkel.
Bild wird angezeigt, aber
kein Ton vorhanden.
Einzelne Buchstaben
werden nicht dargestellt
(PC-Modus).
Horizontale Streifen bei
TV- oder Video-Signalen.
Um alle Einstellungen wieder in den Grundzustand zu versetzen, benutzen Sie den Menüpunkt
Kontrasteinstellung zu gering.
Kein Eingangssignal, falscher Eingang
ausgewählt.
Farbe nicht richtig eingestellt.
Anschlusskabel nicht richtig angeĆ
schlossen.
Bildlage nicht richtig eingestellt. Korrigieren Sie die Bildlage.
Bildformat falsch eingestellt. Drücken Sie wiederholt die Taste F ,
Die Batterien sind leer.
Zwischen der Fernbedienung und
dem Sensor befindet sich ein HinderĆ
nis.
Die Fernbedienung befindet sich
außerhalb ihres Betriebsbereiches.
Die Bildqualität ist nicht richtig eingeĆ
stellt.
Tonabschaltung ist eingeschaltet.
Lautstärke auf Minimum eingestellt.
Signalquelle vor dem Bildschirm aufĆ
gestellt.
Schirmung der Videokabel ist nicht
ausreichend.
EINSTELLUNGEN ' AUFRUFEN WERKSEINSTELLUNGEN!
Helligkeit und/oder Kontrast richtig einĆ
stellen.
Anschlusskabel kontrollieren; richtigen
Eingang der Quelle zuordnen.
Stellen Sie Farbe (unter Menüpunkt
BILD) ein.
Kabel korrekt anschließen.
bis das Bild bildschirmfüllend
angezeigt wird.
Legen Sie neue Batterien ein.
Entfernen Sie das Hindernis zwischen
Fernbedienung und Sensor.
Betreiben Sie die Fernsteuerung im
angegebenen Bereich.
Korrigieren Sie Bildhelligkeit und
Kontrast.
Drücken Sie die Taste auf der FernĆ
bedienung.
Erhöhen Sie die Lautstärke.
Stellen Sie die Phasenlage richtig ein.
Überprüfen Sie die Einstellung der
Bildbreite.
Führen Sie Auto-Adjust aus.
Platzieren Sie die Signalquellen grundĆ
sätzlich seitlich oder hinter dem BildĆ
schirm.
Verwenden Sie nur hochwertige
Signalkabel mit hoher SchirmĆ
dämpfung.
Temperaturwarnung
DEUTSCH
Wenn der TFT-Bildschirm zu heiß wird, erfolgt die Anzeige eines roten
Warnfensters im linken oberen Eck des Bildschirms (siehe Abb links). SorĆ
gen Sie jetzt nicht
möglicherweise automatisch in den Stand-By-Modus geschaltet werden.
für die entsprechende Belüftung, kann der Bildschirm
21
Page 22

7. Technische Daten
BILDSCHIRM
Größe / diagonal: 75 cm (30"), 15:9 Format
Darstellbare Bildgröße: 643 mm (horizontal) x 386 mm (vertikal)
Auflösung: 1280 x 768 Bildpunkte
Farbdarstellung: 16.7 Mio Farben gleichzeitig
Betrachtungswinkel: 170° typisch
Kontrastverhältnis: 500:1 typisch
2
Leuchtdichte: 450 cd/m
Reaktionszeit: 25 ms
Pixelfehler: helle und dunkle Punkte ingesamt 7
VIDEO STANDARDS
TV / Video: PAL (BG, I, DK/K', M, L/L') / SECAM / NTSC
TV Tuner: PAL / SECAM, 47 - 861 MHz (VHF, UHF, Hyperband)
PALplus, Cinescope: Automatische Formaterkennung (Bildschirmfüllend)
Formate: 4:3, 16:9, Video NLS, Bildschirmfüllend, Zoom, Benutzerzoom (40%āĆā140%)
FREQUENZBEREICH PC
Horizontalfrequenz: 30 - 80 kHz
Vertikalfrequenz: 50 - 90 Hz
Clockfrequenz: max. 140 MHz
Auflösungen:
Empfohlene Auflösung:
Formate: 1:1, Bildschirmfüllend, Formatfüllend, Zoom, Benutzerzoom
EINGÄNGE / ANSCHLÜSSE / SYNCHRONISATION
PC / Video-Eingang: RBG analog und automatische Sync-Erkennung
Video-Anschlüsse TV Tuner: IEC, 75 Ohm Eingangswiderstand
PC Anschluss analog/digital: DVI-I
Audio-Anschlüsse Intergrierte Lautsprecher: 2 x 2 Breitband mit 2 x 7 W sinus
Synchronisation: Sync auf grün, Composite Sync mit automatischer Erkennung,
Bedienelemente: Netzschalter, IR-Fernbedienung (OSD-Menü 6 Sprachen)
BETRIEBSBEDINGUNGEN
Temperatur: 5°C Ć +35°C (Betrieb), -20°C Ć +60°C (Lagerung)
Luftfeuchtigkeit: 20% Ć 85% (nicht kondensierend)
Höhe: max. 2.000 m (7.000 ft)
DATEN NETZANSCHLUSS
Spannungsversorgung: 220V Ć 240V AC
Netzfrequenz: 50 Hz ± 10%
Leistungsaufnahme: 140 W typisch, 5 W im Stand-By Mode
ABMESSUNGEN UND GEWICHT
Bildschirm H x B x T: 535 mm x 870 mm x 140 mm
Gewicht: 17 kg
minimale Entfernung zwischen zwei dunklen Punkten
DOS: 640 x 480 @ 60 Hz, 720 x 400 @ 70 Hz,
VGA: 640 x 480, SVGA: 800 x 600; XGA: 1024 x 768 50 Hz - 90 Hz
WXGA: 1280 x 768 @ 60 Hz,
SXGA: 1280 x 1024 50 - 75 Hz
1280 x 768 @ 60 Hz
SCART1: RGB, FBAS Eingang, FBAS Ausgang,
SCART2: FBAS Eingang, FBAS Ausgang,
SCART1/SCART2: Audio Ein-/Ausgang
FBAS: RCA-Cinch
Y/C: MiniDIN (HOSIDEN)
Stereo-Eingang: 3 x Cinch 1Vrms (FBAS, Y/C, PC),
Stereo-Ausgang: 1 x Cinch, regelbar
Seperate H- und V-Sync
typisch
5mm
2 x SCART 1 Vrms
22
DEUTSCH
Page 23

Table of contents
1. Standards 2. . . . . . . . . . . . . . . . . . . . . . . . . . . . . . . . . . . . . . . . . . . . . . . . . . . . . . . . . . . . . . . . . . . . . . . .
2. Important information 2. . . . . . . . . . . . . . . . . . . . . . . . . . . . . . . . . . . . . . . . . . . . . . . . . . . . . . . . . . . . .
3. Overview 4. . . . . . . . . . . . . . . . . . . . . . . . . . . . . . . . . . . . . . . . . . . . . . . . . . . . . . . . . . . . . . . . . . . . . . . . .
3.1 Scope of supply 4. . . . . . . . . . . . . . . . . . . . . . . . . . . . . . . . . . . . . . . . . . . . . . . . . . . . . . . . . . . . . .
3.2 Connection sockets 5. . . . . . . . . . . . . . . . . . . . . . . . . . . . . . . . . . . . . . . . . . . . . . . . . . . . . . . . . . .
3.3 Remote control buttons and functions 6. . . . . . . . . . . . . . . . . . . . . . . . . . . . . . . . . . . . . . . . . . .
3.4 Control buttons on the unit 6. . . . . . . . . . . . . . . . . . . . . . . . . . . . . . . . . . . . . . . . . . . . . . . . . . . . .
4. Initial operation 7. . . . . . . . . . . . . . . . . . . . . . . . . . . . . . . . . . . . . . . . . . . . . . . . . . . . . . . . . . . . . . . . . . .
4.1 Unpacking and installing 7. . . . . . . . . . . . . . . . . . . . . . . . . . . . . . . . . . . . . . . . . . . . . . . . . . . . . . .
4.2 Connecting and switching on 8. . . . . . . . . . . . . . . . . . . . . . . . . . . . . . . . . . . . . . . . . . . . . . . . . . .
ENGLISH
4.3 OSD menu Operator Control 10. . . . . . . . . . . . . . . . . . . . . . . . . . . . . . . . . . . . . . . . . . . . . . . . . . .
4.4 Basic settings OSD menu 11. . . . . . . . . . . . . . . . . . . . . . . . . . . . . . . . . . . . . . . . . . . . . . . . . . . . . .
4.5 Settings for initial operation 11. . . . . . . . . . . . . . . . . . . . . . . . . . . . . . . . . . . . . . . . . . . . . . . . . . . .
5. Everyday operator control 13. . . . . . . . . . . . . . . . . . . . . . . . . . . . . . . . . . . . . . . . . . . . . . . . . . . . . . . . .
5.1 Switching on / off 13. . . . . . . . . . . . . . . . . . . . . . . . . . . . . . . . . . . . . . . . . . . . . . . . . . . . . . . . . . . . .
5.2 Setting the volume 14. . . . . . . . . . . . . . . . . . . . . . . . . . . . . . . . . . . . . . . . . . . . . . . . . . . . . . . . . . . .
5.3 Setting the picture 15. . . . . . . . . . . . . . . . . . . . . . . . . . . . . . . . . . . . . . . . . . . . . . . . . . . . . . . . . . . .
5.4 Television mode 16. . . . . . . . . . . . . . . . . . . . . . . . . . . . . . . . . . . . . . . . . . . . . . . . . . . . . . . . . . . . . .
5.5 PC mode 16. . . . . . . . . . . . . . . . . . . . . . . . . . . . . . . . . . . . . . . . . . . . . . . . . . . . . . . . . . . . . . . . . . . .
5.6 Operation with additional devices 16. . . . . . . . . . . . . . . . . . . . . . . . . . . . . . . . . . . . . . . . . . . . . . .
5.7 Special functions 17. . . . . . . . . . . . . . . . . . . . . . . . . . . . . . . . . . . . . . . . . . . . . . . . . . . . . . . . . . . . . .
6. Troubleshooting 19. . . . . . . . . . . . . . . . . . . . . . . . . . . . . . . . . . . . . . . . . . . . . . . . . . . . . . . . . . . . . . . . . .
7. Technical specifications 20. . . . . . . . . . . . . . . . . . . . . . . . . . . . . . . . . . . . . . . . . . . . . . . . . . . . . . . . . . .
ENGLISH
Page 24

1. Standards
This display is an information device and complies with the following directives and standards of the European Union:
89/336/EEC of 3 May 1989 with subsequent modifications (Directive 92/31/EEC of April 1992 and Directive
93/68/EEC of 22 July 1993)
73/23/EEC of 19 February 1973 with subsequent modifications (Directive 93/68/EEC of 22nd July 1993)
EN55013, EN55020, EN61000-3-2/-3 (ElectroMagnetic Compatibility)
EN60065 (Safety Requirements).
Conformity with the requirements is certified by the designation on
the product.
The manufacturer cannot be held liable for operation outside of the operating conditions as described in these operating
instructions. Your product liability and warranty claims shall also lapse due by this.
2. Important information
Read and take heed of the directions so that when used in compliance with the intended use there is no danger to your
health. Installation and connection errors can damage the unit or any devices connected to it. Take heed of the warnings
on the unit and in the operating instructions. Never allow children to use electrical appliances without supervision.
GENERAL
The display you have purchased meets the highest quality requirements in this product segment and has been checked
for pixel defects. Despite taking the greatest care during production of these units, for technological reasons it cannot be
excluded absolutely that there are some pixels with defects.
Certain conditions can cause your display to hum. The humming generally comes from the mains voltage supply and can
occur through the connection of different earth conductors. You can provide a remedy by putting a so-called sheath current
filter between the incoming aerial lead and the aerial input socket on the display. Sheath current filters are available in the
retail trade in the form of a small inline plug.
For technical reasons the unit can generate noise inside itself. However, this must not exceed the value specified in the
appliance specification.
If your display is connected to an external aerial, the latter must be earthed as protection against electric shocks and static
charging. The earthing must comply with the valid regulations.
ENVIRONMENTAL CONDITIONS
Never operate the display in environmental conditions that differ from the technical specifications in this manual.
Differing conditions can cause an electrical hazard, fire or failure of the unit.
Protect the display against moisture. This includes continuous high levels of air humidity, proximity to water, dripping water,
spray water and rain. Do not put any vessels that are filled with water, e.g. vases, on the unit. If you connect an external
aerial, please ensure that no water can penetrate the cable infeed.
There is a risk of electric shock and irreparable damage to the unit.
Protect the unit from exposure to heat and direct sunlight. Avoid proximity to fire, heat sources and ovens. Protect the unit
against heat accumulation. Do not cover over the ventilation slits . Maintain sufficient space above and below the
ventilation slits and on the sides away from furniture and the ceiling. Do not drape curtains over the unit.
This will cause overheating and a risk of fire.
MAINS CONNECTION AND OPERATOR CONTROL
To disconnect the display from the mains voltage, switch off the mains switch and remove the mains cable from the mains
input module. Connect the display only to a plug receptacle that has been installed in compliance with regulations with
earthing contacts, the mains voltage of which complies with the technical specifications of the unit. Ensure that the mains
plug and plug receptacle are accessible at all times.
Differing conditions can cause an electrical hazard, fire or failure of the unit.
Lay the mains cable so that nobody can get caught on it.
Should the display fall, it can injure people and cause irreparable damage to the unit.
2
ENGLISH
Page 25

Use only the mains cable supplied. Protect it against damage and do not modify it. Never use a damaged mains cable.
If the mains cable or plug are damaged the display must not be operated any longer.
There is a danger of electric shock, fire or failure of the unit.
Never touch the mains switch or mains cable with wet hands.
There is a danger of electric shock.
Never remove the plug by pulling the mains cable out of the receptacle. Avoid laying the mains cable in the vicinity of hot
objects.
There is a danger of fire and an electrical hazard.
If absent for a long period of time or if there is lightning, for safety reasons pull the mains plug out of the receptacle and
the building's aerial plug out of the aerial socket.
A precautionary measure to prevent a possible fire, avoid damage to the unit and the danger of an electric shock.
Always switch off the display and the signal source before connecting the two units.
There is a danger of electric shock.
FAULTS
If the display or mains cable is damaged, immediately pull the mains plug out of the plug receptacle.
Pull out the mains plug, if the unit gives off smoke, an unpleasant odour or any unusual noises. Proceed in the same way
if the display is no longer able to display an image after switching on or during operation. Never attempt to continue
operating the display in this situation.
Under no circumstances should you attempt to open the unit and/or repair it yourself. Inside the display there are no parts
that can be serviced or replaced by you. Contact our service hotline or another suitable technical workshop.
CLEANING AND CARE
Before installation, cleaning or care, switch off the unit and pull the mains plug out of the plug receptacle. Wait for several
minutes so that the capacitors in the unit can fully discharge.
For cleaning use only a slightly moistened soft cloth. You should avoid chemical solvents and cleaning agents because
they can damage the surfaces.
Immediately pull out the mains plug, if foreign bodies such as water, other liquids, metal parts etc. get into the display. Never
attempt to reach into the unit with any objects or with your hands.
There is a danger of electric shock or an accident.
ENGLISH
BATTERIES
Batteries can represent a fatal danger, if swallowed. Therefore keep batteries where they are inaccessible for children.
If a battery has been swallowed, medical assistance should be sought immediately.
Always take used batteries out of the remote control immediately, because they will leak and can therefore cause damage.
The enclosed batteries must not be charged or reactivated by any other means and must not be taken apart, thrown into
fire or short-circuited.
Do not put dead batteries in your household waste. The batteries must be disposed of at collection points provided for
this purpose.
OTHER DIRECTIONS
If the display has been switched to standby mode, it is still connected to the mains supply. For complete disconnection
you must switch the mains switch to the position O" or pull the mains plug out of the plug receptacle.
For ergonomic reasons it is recommended that you avoid the use of red or blue fonts or symbols on dark backgrounds.
On account of the poor contrast such a display causes poor legibility and causes early eye fatigue. Therefore please use
displays that are rich in contrast, e.g. black font on a white background.
To avoid aching eyes and obtain an optimized viewing distance, the distance from the unit should be five to six times the
display's diagonal dimension. In your television room it should be so light that you could also read. The contrast is lost
with too much brightness. Too little light strains the eyes due to the alternation between light and dark on the display.
Packing and auxiliary packaging that is no longer required is recyclable and should always be sent for recycling, if no
longer required.
ENGLISH
3
Page 26
3. Overview
The TFT display offers a broad range of connection facilities for PCs, DVD players, video recorders, video cameras, etc.
No matter whether it's a question of TV, video or PC images, they all displayed with a very sharp outline and distortion-free
on an absolutely flat display surface, and the pictures have an excellent degree of brightness and unusual brilliance. Other
important features are the display's large screen diagonal of 75 cm with a aspect ratio of 15:9 and a very slim overall depth.
For TV viewing it is necessary to connect the unit to a terrestrial aerial, SAT receiver or cable TV box.
Operator control is interactive via the remote control provided and the on-screen menu (OSD). A wide range of picture
quality settings can be effected with these.
A new type of cooling system enables operation of the TFT display without any disturbing fan noise. Being as quiet as
a conventional television set the TFT screen is excellently suited for accommodation rooms and conference rooms.
Equipment
HighĆquality aluminium enclosure
Fanless design
Display diagonal 75 cm
15:9 format
Viewing angle horizontal/vertical 170 degrees
Integrated stereo loudspeaker system
Setting facilities on the unit
Digital comb filter
Compatible with PAL, SECAM and NTSC
Compatible with VGA, SVGA, WXGA, XGA and SXGA
Video text
Automatic channel identification and channel sorting
Sleep timer
Screen saver
2 x SCART connections
1 x S-video
1 x FBAS
1 x DVI (I) (analogue and digital)
3.1 Scope of supply
After unpacking please check the TFT display for possible transportation damage and completeness of the delivery. The
supplier can recognize claims for transportation damage only if you advise them of this prior to initial operation of the unit.
If any part of the scope of supply is missing, please contact our service hotline. Please keep the original packing for a
possible return of the display.
Standard scope of supply
2 x LR03 batteries
1x Scart cable
1x Aerial cable
1 x TFT display
1x Remote control
1 x Mains cable 2,5 m
1 each Operating manual
and Warranty card
1x Video cable
HD-Sub on DVI-I
4
ENGLISH
Page 27

3.2 Connection sockets
ENGLISH
1 2 3 4 5
SCART 2
SERIALCVBSS-VIDEO
SCART 1
PC DVI - I
AERIAL
11 10 9 8 7
[1] SCART 2 - e.g. video recorder socket
[2] S-VIDEO (Y/C) - e.g. camcorder socket with S-video jack
[3] SERIAL - RS232 socket for service purposes
[4] PC DVI-I - PC socket (RGB for analogue signals, DVI for digital signals)
[5] AUDIO IN PC - e.g. connection of a PC via the line-out socket
[6] OUT LINE - e.g. audio amplifier or DVD receiver socket
[7] AUDIO IN CVBS - e.g. socket for camcorder with video-out jack
[8] AUDIO IN S-VIDEO - e.g. socket for camcorder with S-video jack
[9] AERIAL - socket for TV aerial signal (terrestrial aerial or cable connection)
[10] CVBS - e.g. socket for camcorder with video-out jack
[11] SCART 1 - e.g. satellite receiver socket
AUDIO IN
6
OUT
LINE
CVBSPCS-VIDEO
ENGLISH
5
Page 28
3.3 Remote control buttons and functions
To be able to control the TFT display with the remote control, the mains plug must be plugged in and the mains switch must
be switched on.
The infrared remote control functions only if there are no obstructions between the control and the infrared sensor on the
front side (bottom) of the display. The range of the remote control is approx. 6 m.
When the batteries get weaker the range of the remote control is reduced. In this case please change the batteries. You
must use only 2 batteries of the type LR03 AAA 1.5 V.
Do not put dead batteries in your household waste. They must be disposed of at a collection
point for used batteries (e.g. the battery collecting box at your retail dealer's premises) or at your
centre for special waste.
[1] Standby button
[2] Programme buttons 1-9, 0
[3] M (memory) button, red
[4] Greenbutton
[5] Bluebutton
[6] Yellowbutton
[7] Button for programme selection up
[8] Menu button
[9] Button for reducing the volume / direction button left
[10] Button for increasing the volume / direction button right
[11] Button for program selection down
[12] Button for direct selection of TV mode
[13] Button for alternation between single and multi-digit
programme number
[14] Button for direct selection of PC mode
[15] Button for function programme list in TV mode or
functions in teletext mode
[16] Button for direct selection of video mode
[17] Button for direct selection of teletext
[18] F2 = FREEZE button (teletext mode)
F1 - F4 = Function buttons for configuration-dependent
allocation
[19] Selection button for picture format
[20] Volume Off
[21] HOLD button
[22] M/S button
[23] PIP button (Picture In Picture)
[24] Button for time display / MIX button
[25] AUTO or PAGE button
[26] Info button
11
1212
16
19
23
1
2
3
4
7
9
5
6
6
8
10
13
14
15
17
18
21
25
20
22
24
26
The design of the supplied remote control may differ from the remote control illustrated here.
3.4 Control buttons on the unit
The functions of the buttons on the unit match those on the remote control !
Vol - button
Button P
Button P
6
Vol +Ă button
Standby button
ENGLISH
Page 29
4. Initial operation
Before you make any connections switch off all the appliances involved including the
TFTĂdisplay.
4.1 Unpacking and installing
SELECT THE LOCATION FOR THE UNIT
Viewing direction
Despite the large viewing angle the TFT display provides its best performance when viewed directly from a vertical
direction. Align the display with the most frequent viewing direction.
Location
Light reflection
Avoid locating the unit opposite windows or other light sources.
Access to the mains input
The mains input and mains switch should be easily accessible at all times.
Air supply
Leave a space of at least 10 cm on the side and to the rear from any furniture. The distance upwards should be at
least 30 cm from furniture or from the ceiling.
Ambient temperature
For safe and reliable operation the ambient temperature must be between 5 °C and 35 °C.
ENGLISH
UNPACKING
30 cm
Space
10 cm
Space
ENGLISH
Place the carton with the underside on a firm base. You
will recognize the top side by the direction of the arrow
tips on the long side of the carton.
Cut through the packaging tape along the opening edges
and take off the top part of the carton upwards.
Opening edge
7
Page 30
To lift out the TFT display, grip the two packaging inserts in the middle.
It is recommended that the TFT display be lifted out by two people.
Top part of carton
Packaging unit
Bottom part of carton
TFT display
Packaging insert
4.2 Connecting and switching on
Connecting (for an overview of the connections see illustration on page 5)
Insert the mains cable into the mains input socket on the display and the mains plug into a plug socket.
Cable connection / terrestrial aerial
If you would like to connect a cable or terrestrial aerial, use the ANTENNA
socket for this purpose.
Satellite receiver
If you receive your TV channels via satellite, connect your receiver by
means of a SCART cable to the SCART 1 or SCART 2 socket. In addition
SCART 1 has a connection for RGB sources such as a DVD player.
8
ENGLISH
Page 31

PC
Use the PC DVI-I socket to connect your PC to the TFT display. If your PC
has an analogue VGA output port, use a DVI-I cable on a 15 Pin HD-Sub to
connect it.
On older PC graphic boards it can happen that pin 9 is barred.
Should this be the case, please contact the service hotline.
Preparation
Remote control
Open the battery compartment on the rear side of the remote control and insert the two batteries provided
(type LR03 micro AAA). Pay attention to the polarity as specified on the bottom of the battery compartment.
Close the battery compartment again.
Switching on
Switch the mains switch on the rear side of the display to position I". The display is now in standby mode and can
be switched on by means of the remote control.
Cable connection / terrestrial aerial
Switch on the display with the TV button on your remote control.
ENGLISH
Satellite receiver
PC
Switch on your satellite receiver and switch on the display via the
VIDEO button on your remote control. Please take note that you may
have to press the VIDEO button several times depending on which
SCART socket your receiver is connected to.
Switch on the display with the button PC on your remote control and
select the appropriate signal input ( PC(RGB) or PC(DVI) ). To do so
call up your display's OSD menu via the remote control button MENU
and select your input signal in the submenu INPUTS.
ENGLISH
9
Page 32

4.3 OSD menu Operator Control
Your TFT display can be set and operated with the aid of the simple OSD menu control. 6 buttons are at your disposal
on your remote control for this purpose:
1
2
4
3
5
6
[1] M button
Stores any changes made.
[2] P Ăbutton
Upward movement on the OSD menu. The selected menu or selected function appears against a
coloured background.
If functions are shown as a value or bar chart, you can increase the value with this button.
[3] Ăbutton
Back to the previous menu. Quits the selected submenu or the selected function.
[4] MENU button
Displays the OSD main menu. The main menu appears on the top left edge of the display. Exit OSD menu.
[5] Ăbutton
Activates the selected submenu or the selected function. The selected menu option appears against a
green background and can be altered.
[6] PĂĂbutton
Downward movement on the OSD menu. The selected menu or selected function appears against a coloured
background.
If functions are shown as a value or bar chart, you can decrease the value with this button.
STORE CHANGES
The changes effected by you are stored by pressing the M button on your remote control (see illustration above) or by
quitting the OSD menu.
10
ENGLISH
Page 33

4.4 Basic settings OSD menu
CHANGING THE OSD LANGUAGE
Your display has a 6-language OSD menu (German, English, French, Italy, Dutch and Spanish). To change the preset
language, select the menu option SET UP in the main menu. Activate the menu option LANGUAGE in the submenu and
select the desired language:
Inputs >
Picture >
Display >
Sound >
Set Up >
Info >
CHANGING THE OSD MENU PROPERTIES
To change the display or the display time (time after the last actuation up to display exit) of the OSD menu, select in the
main menu the menu option SET UP. In the submenu OSD SET UP another submenu with the menu options TIME OUT
(selection options: 5, 10 and 15 seconds) and TRANSPARENCY (selection options: On and Off) are at your disposal:
Inputs >
Picture >
Display >
Sound >
Set Up >
Info >
Display Source Info: On
Language: English
OSD Set Up: >
Pwr Down/Stand–By: >
Reset to factory Defaults: >
Sleep Timer: Off
Display Source Info: On
Language: English
OSD Set Up: >
Pwr Down/Stand–By: >
Reset to factory Defaults: >
Sleep Timer: Off
Time Out: 5 s
Transparency: Off
ENGLISH
RESETTING TO DEFAULT SETTINGS
You have the option of resetting all changes made in the OSD menu back to the original default setting. To do so select
in the main menu the menu option SET UP and activate in the submenu the menu option RESET TO FACTORY
DEFAULTS:
Inputs >
Picture >
Display >
Sound >
Set Up >
Info >
Display Source Info: On
Language: English
OSD Set Up: >
Pwr Down/Stand–By: >
Reset to factory Defaults: >
Sleep Timer: Off
4.5 Settings for initial operation
TV MODE
Automatic channel search
If you receive your channels via satellite only, you do not have to perform the automatic channel search.
To start the automatic channel search, proceed as follows:
Switch on the display via the TV button on your remote control.
Call up the OSD menu via the MENU button on your remote control and select the menu option INPUTS. A
submenu opens.
In the submenu select the menu option SOURCE SETTINGS. Another submenu opens.
ENGLISH
11
Page 34
Now select the menu option AUTO SEARCH and activate the submenu option START SEARCH. The
automatic channel search starts.
Inputs >
Picture >
Display >
Sound >
Set Up >
Info >
Select: TUNER
Source Settings > Auto Search >
Manual Search >
Sort >
Delete >
TV Standard: PAL BG
Search Form: All programs
Start Search:
Program Start Point: 01
SORT TV CHANNELS
Inputs >
Picture >
Display >
Sound >
Set Up >
Info >
1 ARD 2 3 4 5 6 7 8 9 10
11 ZDF
21 WDR
31 _ _ _
41
51
61
71
81
91 99
Select: TUNER
Source Settings > Auto Search >
Manual Search >
Sort >
Delete >
(Green)_: Selection of a channel. Current: 31 MENU: Finish
(Blue)_: Insertion of a vacant channel location
(Yellow)_: Relocate selected channel to current position
Changing the channel name
If the TFT display can detect the channel name from the television signal, the detected name is stored against the preset
programme number. If the channel name is not detected, the programme number appears in the name (e.g. PR02).
Proceed as follows to change the channel name:
Move the marker with button Ăor Ăto the menu option Name.
Now press the Ăbutton to select the first character position.
With buttons ĂandĂĂyou can scroll through the character set until the desired character appears in the selected
character position.
Use the āĂĂbutton to select the next character position.
Repeat the previous 3 steps until you have entered the name. A maximum of 5 characters is possible.
Inputs >
Picture >
Display >
Sound >
Set Up >
Info >
Select: TUNER
Source Settings > Auto Search >
Manual Search >
Sort >
Delete >
Programme: 01
TV Standard: PAL BG
Frequency: 055.25 MHz
Name: SW3
Select PC MODE
signal input
Switch on the display via the PC button on your remote control.
Call up the OSD menu via the MENU button on your remote control. The menu option INPUTS appears
against a coloured background.
In the submenu SELECT select the corresponding signal input (PC (RGB) or PC (DVI)).
12
ENGLISH
Page 35

Inputs >
Picture >
Display >
Sound >
Set Up >
Info >
Select: PC (RGB)
Source Settings >
AUTO-ADJUST FUNCTION
The TFT display always automatically executes the auto-adjust function upon first use of an analogue PC video format
(RGB). During this time period the image moves slightly back and forth to reach the optimal position and image
reproduction.
The H/V (horizontal/vertical) position and the picture size have to be set manually for several
unfavourable PC sizes. The auto-adjust function depends intensely on the picture display. The
display of a full screen white picture is very suitable.
ENGLISH
Inputs >
Picture >
Display >
Sound >
Set Up >
Info >
You have the option of storing frequently used formats as user formats. The display recognizes the stored formats and
immediately displays them correctly without execution of the auto-adjust function.
In the main menu select the menu option INPUTS and call up the submenu SOURCE SETTINGS. Another
submenu opens.
Activate the menu option USER TIMINGS.
With the menu option RECALL determine the currently set user format. You can now store the user format, for
example, in position 1 (8 positions are possible) with the menu option SAVE.
Inputs >
Picture >
Display >
Sound >
Set Up >
Info >
Select: PC (RGB)
Source Settings >
Select: PC (RGB)
Source Settings >
H freq.: 60.0 kHz
V freq.: 75.0 Hz
Pixel Clk: 78.75 MHz
H / V Pol: + / –
User timings >
Auto Setup
V Pos:
V Size:
H Size:
H Pos:
Phase
H freq.: 60.0 kHz
V freq.: 75.0 Hz
Pixel Clk: 78.75 MHz
H / V Pol: + / –
User timings >
Auto Setup
V Pos:
V Size:
H Size:
H Pos:
Phase
Position: 1
Recall
Save
Delete All
5. Everyday operator control
5.1 Switching on / off
TO SWITCH ON
To switch on the TFT display put the mains switch in position I".
The standby LED on the infrared sensor lights up orange.
Now press one of the numeric buttons on the remote control to put the TFT display into operation.
The OPERATING LED on the infrared sensor lights up green.
TO SWITCH OFF
Press the standby button on the remote control, the TFT display switches back to standby mode.
The standby LED on the infrared sensor lights up orange.
ENGLISH
13
Page 36

To switch off the TFT display again completely, put the mains switch in position 0".
Standby button
5.2 Setting the volume
SETTING THE VOLUME
Press button Ă(Vol -) orĂ (Vol +) on the remote control to set the desired volume.
Inputs >
Picture >
Display >
Sound >
Set Up >
Info >
Volume:
Balance:
Equalizer: Rock
Option: Stereo
Volume Line Out:
Max Startup Volume:
AVC: ON
User Equalizer >
Display of the currently set volume
Volume upon switching on the TFT display
SOUND SETTING
Against the menu option EQUALIZER you can set predefined acoustic patterns.
Inputs >
Picture >
Display >
Sound >
Set Up >
Info >
Select the menu option USER EQUALIZER to create your individual acoustic pattern.
Inputs >
Picture >
Display >
Sound >
Set Up >
Info >
Volume:
Balance:
Equalizer: Rock
Option: Stereo
Volume Line Out:
Max Startup Volume:
AVC: ON
User Equalizer >
Volume:
Balance:
Equalizer: Rock
Option: Stereo
Volume Line Out:
Max Startup Volume:
AVC: ON
User Equalizer >
Flat
User
Jazz
Rock
Vocal
Classic
Pop
< 120 Hz:
500 Hz:
1.5 kHz:
5 kHz:
> 10 kHz
14
ENGLISH
Page 37
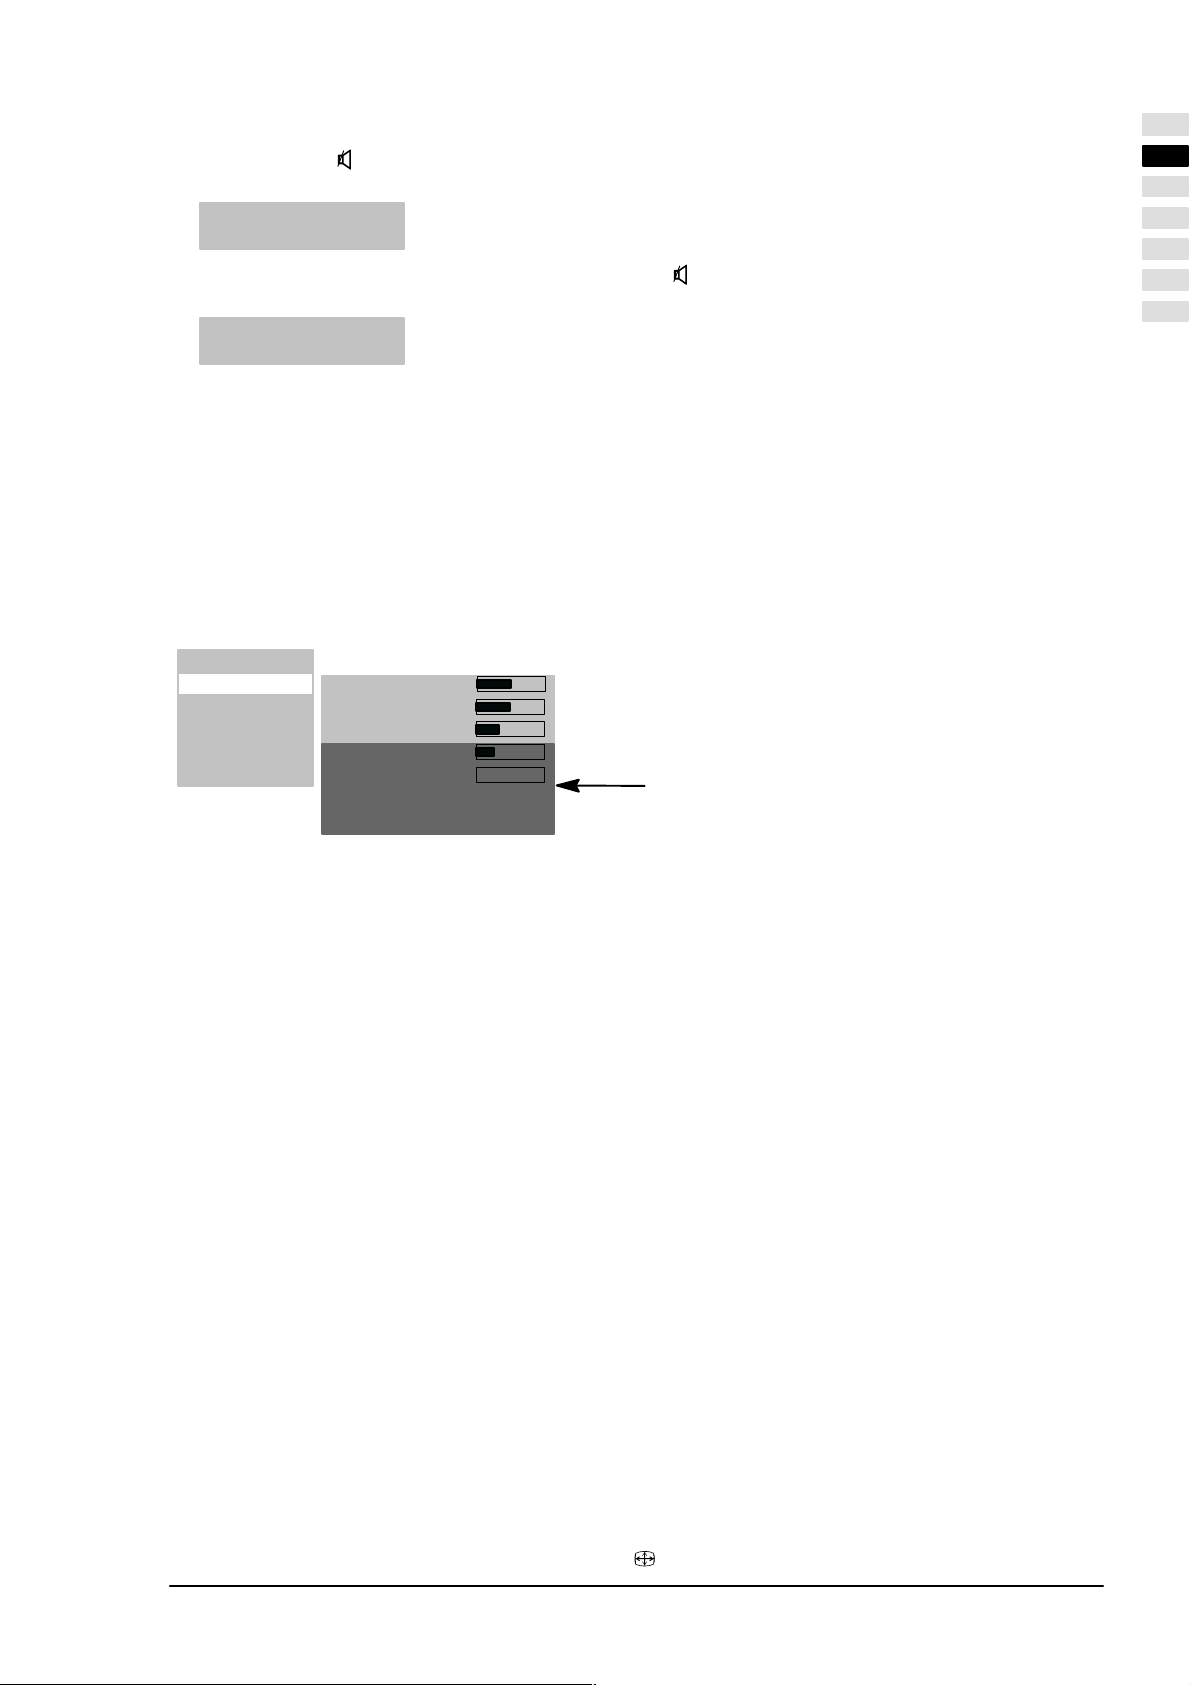
VOLUME OFF
Press the button on the remote control. The volume is turned off and the following info window appears on the
display for approx. 3Ăseconds:
TUNER: 2 ZDF
MUTE
The sound is switched back on, when you press the button , Ă(Vol -) orĂ (Vol +) on the remote control. The
following info window appears on the display for approx. 3 seconds:
TUNER: 2 ZDF
STEREO
5.3 Setting the picture
You have the option of setting the contrast, brightness, picture sharpness and colour to the desired values.
CONTRAST / BRIGHTNESS / PICTURE SHARPNESS / COLOUR
Press buttonĂĂto increase the values or ĂĂto reduce the values.
Display of the picture can be improved with the setting PICTURE SHARPNESS.
Menu option COLOUR allows the colour balance to be changed:
Press buttonĂ, the picture becomes greener.
Press buttonĂ, the picture becomes redder.
Inputs >
Picture >
Display >
Sound >
Set Up >
Info >
Contrast: 64
Brightness: 64
Sharpness:
Color: 15
DNC: 0
Photo CD: Off
Interlace: Auto Mode
These menu options are not available with the
settings INPUTS SELECT PC(RGB)" and
PC(DVI"!
ENGLISH
PICTURE FORMAT
In the menu option DISPLAY FORMAT ZOOM you can select the preset formats.
The menu option USER ZOOM offers you the option of creating your own user format. To activate your user format, select
the USER ZOOM in the menu option ZOOM.
Full screen
In this format setting the picture is adapted in horizontal and vertical directions so that a full screen display is always
visible.
Video 4:3
This format setting displays a PAL 4:3 picture with the correct aspect ratio. Dark stripes are visible on the left and
right-hand side of the picture.
Auto
This format setting always scales the input signal automatically in horizontal and vertical directions to a full screen
display. It recognizes 16:9 film formats and scales them with the predetermined factors.
Video NLS
This format setting scales the input signal automatically in horizontal and vertical directions so that it is screen-filling,
but not linearly, i.e. the picture contents in the centre of the screen are displayed as the original and towards the edges
more intense scaling takes place.
User zoom
With this format setting you can display an individual picture format within the range 40 % to 140 % of the original picture
size.
Zoom
Manual changeover from the size setting video 4:3 to zoom stretches the picture in vertical and horizontal directions
by approx. 20 % beyond the full screen display. Due to this, when viewing films in 4:3 format, the dark stripes are
reduced at the top and bottom edges of the picture.
Video 16:9
This format setting displays a PAL 4:3 picture so that no dark stripes are visible on the right or left-hand sides of the
picture.
To change over the formats, repeatedly press button F
ENGLISH
on the remote control.
15
Page 38

Inputs >
Picture >
Display >
Sound >
Set Up >
Info >
Picture Format >
Color Temperature: 9300 k
Picture Contrast: normal
Picture–In–Picture >
Freeze Picture
User Color Temp >
Zoom: Full Screen
User Zoom:
This menu option is available
only with the setting INPUTS
PC(DVI) / PC(RGB)!
Full Screen
Video 4:3
Auto
Video NLS
User Zoom
Zoom
Video 16:9
This menu option is available
only with the setting INPUTS
PC(DVI) / PC(RGB)!
PC 1:1
5.4 Television mode
The TFT display is in standby mode.
To switch on, press one of the numeric buttons 0...9 or the TV button on the remote control.
During initialization the company logo is displayed.
Then the television channel last selected (programme number) appears on screen. At the same time the following
info window is displayed for approx. 3 seconds:
TUNER: 2 ZDF
STEREO
Press the button Pāāor PĂāā to increase or reduce the programme number by 1 at a time.
You can directly select each programme number with the numeric buttons on the remote control.
TELETEXT
Your TFT display can receive and display TOP/FLOF teletext information.
Select a television channel with teletext.
Press the button TEXT on the remote control to display the teletext.
For the direct selection of teletext pages use the numeric buttons.
The red, green, yellow and blue buttons on the remote control have different functions depending on the type of
teletext, these being displayed in the lower area of the teletext.
5.5 PC mode
Switch off the TFT display and the PC.
Connect your PC and the TFT display by means of a video cable, which is commonly available in the retail trade
(DVI plug to display and HD-Sub connector to PC).
Switch ON the TFT display and PC again.
PC (RGB) must be set in the menu option INPUTS SELECT. Upon switching on, the TFT display automatically
detects the picture format set on the PC. This information is displayed in an info window.
RGB–1024x 768
Full picture
5.6 Operation with additional devices
VIDEO RECORDER
Switch OFF the TFT display and video recorder.
There are 3 possibilities for connecting your video recorder to the TFT display:
via the aerial lead, read the operating instructions for the video recorder on this subject
by means of a scart cable either to SCART1 or SCART2
if your video recorder has an S-video output, connect this to the Y/C input.
Switch the TFT display and video recorder back ON.
16
ENGLISH
Page 39

To switch over to the connected input (e.g. SCART1) press repeatedly the VIDEO button on the remote control.
SCART 1
Full screen
DVD PLAYER
Switch OFF the TFT display and DVD player.
Connect your DVD player by means of SCART1 or the Y/C input, if it has an S-video output socket.
Switch the TFT display and DVD player back ON.
To switch over to the connected input, press the VIDEO button on the remote control.
YC
Full screen
5.7 Special functions
MANUAL CHANNEL SEARCH
Against the menu option CHANNELS you enter a programme number that is not yet in use.
In the menu option FREQUENCY you must directly enter the frequency of the television channel that you are
searching for.
If the picture is not optimal, in small increments increase or reduce the frequency entered.
If the television station does not transmit a name, you can enter one under the menu option NAME.
ENGLISH
Inputs >
Picture >
Display >
Sound >
Set Up >
Info >
Select: TUNER
Source Settings > Auto Search >
Manual Search >
Sort >
Delete >
Programme: 11
TV Standard: PAL BG
Frequency: 168.25 MHz
Name: HR
COLOR TEMPERATURE
You can select the colour temperature from 3 predefined values or define a value yourself via the menu option USER
COLOR TEMPERATURE.
A lower value of the color temperature increases the proportion of red in the picture and gives it a warmer" appearance.
The proportion of blue light increases with an increasing colour temperature, the picture has a colder" effect.
Inputs >
Picture >
Display >
Sound >
Set Up >
Info >
Inputs >
Picture >
Display >
Sound >
Set Up >
Info >
Picture Format >
Color Temperature: 9300 k
Picture Contrast: normal
Picture–In–Picture >
Freeze Picture
User Color Temp >
Picture Format >
Color Temperature: 9300 k
Picture Contrast: normal
Picture–In–Picture >
Freeze Picture
User Color Temp >
7500K
9300K
11000K
User
Red: 128
Green 128
Blue: 110
ENGLISH
17
Page 40

STILL PICTURE
You can create a still picture with the FREEZE button or under the menu option FREEZE PICTURE.
Inputs >
Picture >
Display >
Sound >
Set Up >
Info >
Picture Format >
Color Temperature: 9300 k
Picture Contrast: normal
Freeze Picture
User Color Temp >
PICTURE-IN-PICTURE
The function PICTURE-IN-PICTURE provides the possibility when displaying PC signals of superimposing video pictures.
The menu option PICTURE-IN-PICTURE is superimposed only with the settings INPUTSĂĂSOURCEĂĂPC(DVI) /
PC(RGB) or the PIP button is active.
Press the PIP button, the picture from the input set in menu option DISPLAYĂĂPICTURE-IN-PICTURE
ĂSOURCEĂ (e.g. tuner) is superimposed on the current picture.
If no signal is pending at this input port, the superimposed window remains dark.
Position and size of the window can be set. To activate your individual settings, you must set the menu option
SIZE to ON.
Inputs >
Picture >
Display >
Sound >
Set Up >
Info >
Picture Format >
Color Temperature: 9300 k
Picture Contrast: normal
Picture–In–Picture >
Freeze Picture
User Color Temp >
Size (+On/Off): Off
Source: Tuner
Horizontal Pos:
Vertical Pos:
Tuner
SCART1
SCART2
YC
CVBS
AUTOMATICĂSWITCH-OFF
You can set the TFT display so that it is switched off automatically after a certain amount of time.
In the menu option SLEEP TIMER select one of the predetermined times.
Upon expiry of the time period the TFT display is switched off automatically.
Inputs >
Picture >
Display >
Sound >
Set Up >
Info >
Display Source Info: On
Language: English
OSD Set Up: >
Pwr Down/Stand–By: >
Reset to factory Defaults: >
Sleep Timer: Off
Off / 0:30 / 1:00 / 1:30 / 2:00 / 2:30
SWITCHING OVER TO DUAL CHANNEL SOUND
Dual channel sound is the designation for films giving the viewer the possibility of changing between the synchronized
version and the original language.
If films are transmitted with dual channel sound, channel A is active first of all.
Press the button M/S on the remote control to switch over to channel B.
18
ENGLISH
Page 41
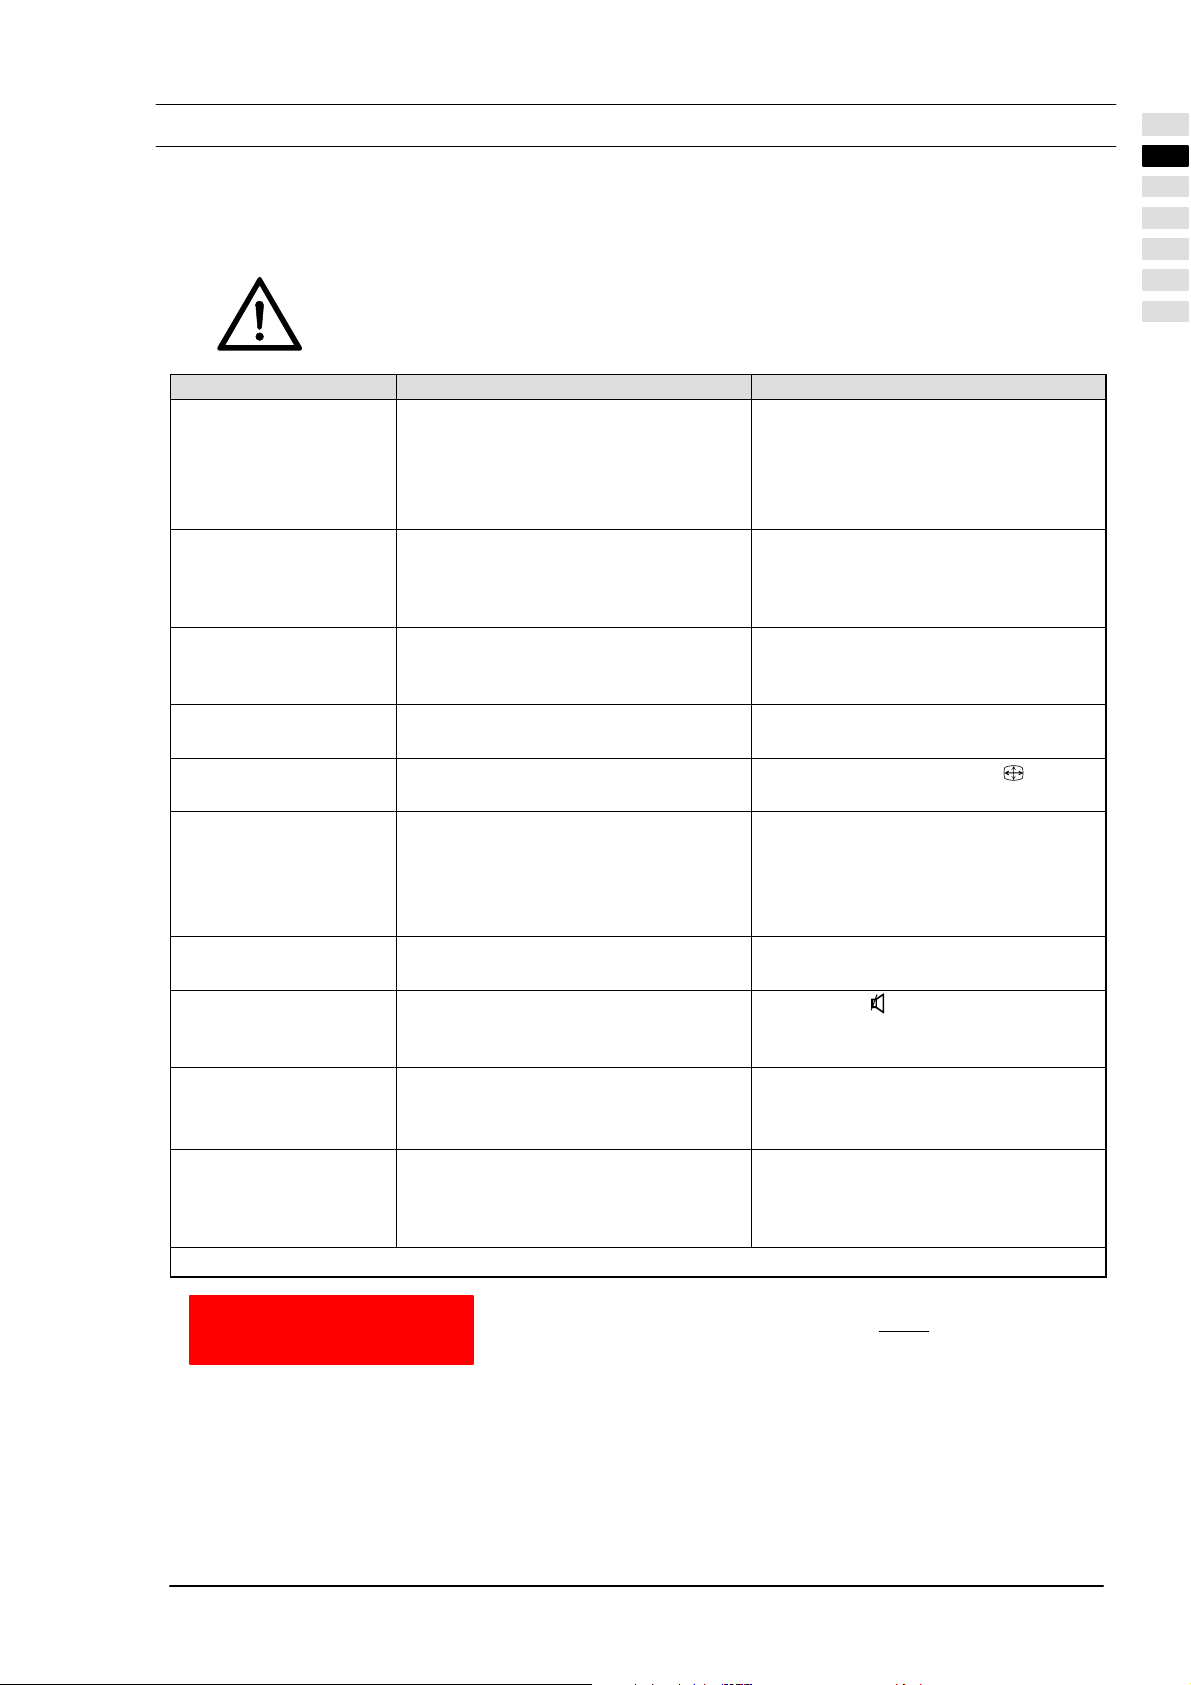
6. Troubleshooting
If a defect occurs when using your TFT display, please read through the following list of defects and remedies before you
send in your appliance for repair. You may be able to remedy the defect yourself very easily. For example, if the mains
plug of the display is not plugged into the plug receptacle or if there are problems with the receiver system (aerial), you
could mistakenly assume that the screen display is defective.
If the information provided for troubleshooting does not prove successful, switch OFF the unit via
the mains switch and pull the mains plug out of the plug receptacle.
Never attempt to repair the unit yourself and under no circumstances should you remove the
rear cover from the unit.
DEFECT POSSIBLE CAUSE POSSIBLE REMEDY
No picture and no sound,
although the mains plug is
inserted and the unit is
switched on.
Mains switch in position 0" (OFF).
Mains plug of unit is not inserted into
the socket.
Defective mains cable.
Shift mains switch to position I".
Insert the mains cable plug into the
socket.
Call the service hotline.
ENGLISH
Screen dark.
Weak or excessive
colours.
The picture is cut off or the
picture is not centred.
The picture is too large or
too small.
The remote control is not
working.
The displayed picture is
too dark.
The picture is displayed,
but there is no sound.
Individual letters are not
displayed (PC mode).
Horizontal stripes with TV
or video signals.
To put all settings back to basic status, use the menu option SETTINGS ' CALL DEFAULT SETTINGS!
Contrast setting too low.
No input signal, wrong input selected.
Colour not correctly set.
Connection cable not correctly
connected.
Picture position not correctly set. Correct the picture position.
Picture format set wrongly. Repeatedly press button F until
The batteries are flat.
There is an obstruction between the
remote control and the sensor.
The remote control is located
outside of its operating range.
The picture quality is not set correctly. Correct the picture brightness and
Volume off is switched on.
Set volume to minimum.
Signal source is set up before the
display.
Screening of the video cable is
insufficient.
Set brightness and/or contrast
correctly.
Check the connection cable; assign
correct input to source.
Set the colour (under menu option
PICTURE).
Connect the cable correctly.
picture is displayed as full screen.
Insert the new batteries.
Remove the obstruction between the
remote control and the sensor.
Operate the remote control within the
specified range.
contrast.
Press the button on the remote
control.
Increase the volume.
Set the phase correctly.
Check the setting for the picture width.
Execute auto-adjust.
Always place the signal sources on
the side of or behind the display.
Use only a high-grade signal cable
with a high screening attenuation.
Temperature warning
ENGLISH
If the TFT display overheats, a red warning window is displayed in the top
left corner of the display (see Fig. on left). If you do not
ventilation, the display may be switched automatically to standby mode.
then provide suitable
19
Page 42

7. Technical specifications
DISPLAY
Size / diagonal: 75 cm (30"), 15:9 format
Active screen size: 643 mm (horizontal) x 386 mm (vertical)
Resolution: 1280 x 768 pixels
Colour display: 16.7m colours simultaneously
Viewing angle: 170° typical
Contrast ratio: 500:1 typical
2
Luminance: 450 cd/m
Response time: 25 ms
Pixel defect:
VIDEO STANDARDS
TV / Video: PAL (BG, I, DK/K', M, L/L') / SECAM / NTSC
TV tuner: PAL / SECAM, 47 - 861 MHz (VHF, UHF, Hyperband)
PALplus, Cinescope: Automatic format detection (full screen)
Formats: 4:3, 16:9, Video NLS, full screen, zoom, user zoom (40%āĆā140%)
PC FREQUENCY RANGE
Horizontal frequency: 30 - 80 kHz
Vertical frequency: 50 - 90 Hz
Clock frequency: max. 140 MHz
Resolutions:
Recommended resolution:
Formats: 1:1, full screen, format-filling, zoom, user zoom
INPUTS / CONNECTIONS / SYNCHRONIZATION
PC / Video input port: RBG analogue and automatic sync detection
Video connectors TV tuner: IEC, 75 ohms input resistance
PC analogue/digital connections: DVI-I
Audio connectors Integrated loudspeakers: 2 x 2 broadband with 2 x 7 W sinusoidal
Synchronization: Sync on green, composite sync with automatic detection,
Operator controls: Mains switch, IR remote control (OSD menu 6 languages)
OPERATING CONDITIONS
Temperature: 5 °C Ć +35 °C (in operation), -20 °C Ć +60 °C (storage)
Air humidity: 20 % Ć 85 % (non-condensating)
Elevation: max. 2,000 m (7,000 ft)
DATA MAINS CONNECTION
Voltage supply: 220 V Ć 240 V AC
Mains frequency: 50 Hz ± 10 %
Power consumption: 140 W typical, 5 W in standby mode
DIMENSIONS AND WEIGHT
Display H x W x D: 535 mm x 870 mm x 140 mm
Weight: 17 kg
light and dark dots in total 7
minimum distance between two dark points 5 mm
DOS: 640 x 480 @ 60 Hz, 720 x 400 @ 70 Hz,
VGA: 640 x 480, SVGA: 800 x 600; XGA: 1024 x 768 50 Hz - 90 Hz
WXGA: 1280 x 768 @ 60 Hz,
SXGA: 1280 x 1024 50 - 75 Hz
1280 x 768 @ 60 Hz
SCART1: RGB, CVBS input, CVBS output,
SCART2: CVBS input, CVBS output,
SCART1/SCART2: Audio input/output
CVBS: RCA cinch
Y/C: MiniDIN (HOSIDEN)
Stereo input: 3 x cinch 1 Vrms (CVBS, Y/C, PC),
Stereo output: 1 x cinch, controllable
Separate H and V sync
typical
2 x SCART 1 Vrms
20
ENGLISH
Page 43

Table des matières
1. Normes 2. . . . . . . . . . . . . . . . . . . . . . . . . . . . . . . . . . . . . . . . . . . . . . . . . . . . . . . . . . . . . . . . . . . . . . . . . . .
2. Remarques importantes 2. . . . . . . . . . . . . . . . . . . . . . . . . . . . . . . . . . . . . . . . . . . . . . . . . . . . . . . . . . .
3. Aperçu 4. . . . . . . . . . . . . . . . . . . . . . . . . . . . . . . . . . . . . . . . . . . . . . . . . . . . . . . . . . . . . . . . . . . . . . . . . . .
3.1 Eléments livrés 4. . . . . . . . . . . . . . . . . . . . . . . . . . . . . . . . . . . . . . . . . . . . . . . . . . . . . . . . . . . . . . .
3.2 Raccordements 5. . . . . . . . . . . . . . . . . . . . . . . . . . . . . . . . . . . . . . . . . . . . . . . . . . . . . . . . . . . . . . .
3.3 Touches et fonctions de la télécommande 6. . . . . . . . . . . . . . . . . . . . . . . . . . . . . . . . . . . . . . . .
3.4 Boutons sur l'appareil 6. . . . . . . . . . . . . . . . . . . . . . . . . . . . . . . . . . . . . . . . . . . . . . . . . . . . . . . . .
4. Première mise en service 7. . . . . . . . . . . . . . . . . . . . . . . . . . . . . . . . . . . . . . . . . . . . . . . . . . . . . . . . . .
4.1 Monter et déballer 7. . . . . . . . . . . . . . . . . . . . . . . . . . . . . . . . . . . . . . . . . . . . . . . . . . . . . . . . . . . .
4.2 Raccorder et mettre en marche 8. . . . . . . . . . . . . . . . . . . . . . . . . . . . . . . . . . . . . . . . . . . . . . . . .
FRANÇAIS
4.3 Commande du menu OSD 10. . . . . . . . . . . . . . . . . . . . . . . . . . . . . . . . . . . . . . . . . . . . . . . . . . . . .
4.4 Réglages de base du menu OSD 11. . . . . . . . . . . . . . . . . . . . . . . . . . . . . . . . . . . . . . . . . . . . . . .
4.5 Réglages pour la première mise en service 11. . . . . . . . . . . . . . . . . . . . . . . . . . . . . . . . . . . . . . .
5. Opérations courantes 13. . . . . . . . . . . . . . . . . . . . . . . . . . . . . . . . . . . . . . . . . . . . . . . . . . . . . . . . . . . . .
5.1 Mettre en marche / arrêter 13. . . . . . . . . . . . . . . . . . . . . . . . . . . . . . . . . . . . . . . . . . . . . . . . . . . . .
5.2 Régler le son 14. . . . . . . . . . . . . . . . . . . . . . . . . . . . . . . . . . . . . . . . . . . . . . . . . . . . . . . . . . . . . . . . .
5.3 Régler l'image 15. . . . . . . . . . . . . . . . . . . . . . . . . . . . . . . . . . . . . . . . . . . . . . . . . . . . . . . . . . . . . . . .
5.4 Mode téléviseur 16. . . . . . . . . . . . . . . . . . . . . . . . . . . . . . . . . . . . . . . . . . . . . . . . . . . . . . . . . . . . . .
5.5 Mode PC 16. . . . . . . . . . . . . . . . . . . . . . . . . . . . . . . . . . . . . . . . . . . . . . . . . . . . . . . . . . . . . . . . . . . .
5.6 Fonctionnement avec des appareils supplémentaires 16. . . . . . . . . . . . . . . . . . . . . . . . . . . . . .
5.7 Fonctions spéciales 17. . . . . . . . . . . . . . . . . . . . . . . . . . . . . . . . . . . . . . . . . . . . . . . . . . . . . . . . . . .
6. Remédier aux défaillances 19. . . . . . . . . . . . . . . . . . . . . . . . . . . . . . . . . . . . . . . . . . . . . . . . . . . . . . . . .
7. Spécifications 20. . . . . . . . . . . . . . . . . . . . . . . . . . . . . . . . . . . . . . . . . . . . . . . . . . . . . . . . . . . . . . . . . . . .
FRANÇAIS
Page 44

1. Normes
Cet écran est un dispositif de technique d'information, il est conforme aux directives et aux normes de l'Union
européenneĂ:
89/336/CEE du 3 mai 1989 et modifications suivantes (Directive 92/31/CEE d'avril 1992 et Directive 93/68/CEE du
22 juillet 1993)
73/23/CEE du 19 février 1973 et modifications suivantes (Directive 93/68/CEE du 22 juillet 1993)
EN55013, EN55020, EN61000-3-2/-3 (compatibilité électromagnétique)
EN60065 (Exigences de sécurité).
La conformité avec les exigences est certifiée par le marquage
Le fabricant ne saurait être tenu responsable de problèmes résultant d'une utilisation non-conforme aux conditions
d'exploitation décrites dans ce mode d'emploi. Dans un tel cas, la responsabilité du fabricant et le droit à la garantie sont
nuls.
apposé sur le produit.
2. Remarques importantes
Lisez et suivez les instructions afin de vous servir de l'appareil conformément à l'usage prévu et de ne pas mettre votre
santé en danger. Des erreurs de montage et de raccordement peuvent endommager l'appareil lui-même et/ou les
appareils auxquels il est relié. Respectez les avertissements figurant sur l'appareil et dans le mode d'emploi. Ne laissez
jamais les enfants se servir d'appareils électriques sans surveillance.
GENERALITES
L'écran que vous avez acheté répond aux plus hautes exigences de qualité dans ce domaine et nous avons vérifié que
les pixels ne présentaient pas de défauts. Bien que nous ayons apporté le plus grand soin à sa production, nous ne
pouvons exclure à 100% que quelques uns de ces pixels présentent un défaut.
Il peut arriver pour différentes raisons que votre écran émette un bourdonnement. En général, ce bourdonnement provient
de l'alimentation secteur et est produit par la connexion de différents conducteurs de protection. Vous pouvez y remédier
en branchant un filtre à courant de gaine entre la ligne d'arrivée de l'antenne et l'entrée de l'antenne sur l'écran. Vous
trouverez des filtres à courant de gaine dans le commerce spécialisé sous la forme de petites fiches intermédiaire.
Pour des raisons techniques, il peut aussi se produire des bruits à l'intérieur de l'appareil. Ces bruits ne devraient
cependant pas dépasser les valeurs indiquées dans la spécification de l'appareil.
Si votre écran est connecté à une antenne extérieure, celle-ci doit être mise à terre afin d'être à l'abri des décharges
électriques et des charges statiques. La mise à terre doit respecter les normes en vigueur.
CONDITIONS AMBIANTES
N'utilisez jamais cet écran dans des conditions ambiantes différant des spécifications indiquées dans ce mode d'emploi..
Des conditions différentes pourraient provoquer une décharge électrique, causer un incendie ou une panne de l'appareil.
Mettez l'écran à l'abri de l'humidité ; à savoir, en particulier, une forte humidité constante de l'air, la proximité de l'eau, des
gouttes d'eau et des projections d'eau ainsi que la pluie. Ne posez pas de récipients remplis d'eau, des vases par exemple,
sur l'appareil. Au moment de raccorder une antenne extérieure, veillez à ce que l'eau ne puisse pas pénétrer au niveau
de l'arrivée du câble.
Il existe un risque de décharge électrique et de dommages irréparables sur l'appareil.
Protégez l'appareil de la chaleur et de l'exposition directe au soleil. Evitez la proximité du feu, des chauffages et des
fourneaux. Evitez le surchauffement. Ne recouvrez pas la grille d'aération. Maintenez un espace suffisant au-dessus et
en dessous de la grille d'aération, de même que sur les côtés par rapport aux meubles et vers le plafond. Ne suspendez
pas de rideaux à proximité de l'appareil.
Il y a un risque d'incendie par surchauffement.
RACCORDEMENT AU SECTEUR ET COMMANDE
Afin de couper en toute sécurité l'écran de la tension du secteur, éteignez tout d'abord l'interrupteur d'alimentation de
l'appareil et retirer le câble d'alimentation de la prise au dos de l'appareil. Branchez l'écran uniquement à une prise de
courant avec contacts de mise à terre installée en bonne et due forme et dont la tension de secteur correspond aux
spécifications de l'appareil. Veillez à ce que la fiche de contact et la prise de courant soient accessibles en tout temps.
Des conditions différentes pourraient provoquer une décharge électrique, causer un incendie ou une panne de l'appareil.
Placez le câble d'alimentation de telle sorte que personne ne puisse s'y prendre les pieds.
Une chute de l'écran risque de blesser les personnes se trouvant à proximité et de causer des dommages irréparables
à l'appareil.
2
FRANÇAIS
Page 45

Utilisez uniquement le câble d'alimentation livré avec l'appareil. Evitez de l'endommager et ne le modifiez en aucune
façon. N'utilisez jamais de câble d'alimentation endommagé. Si le câble d'alimentation ou la fiche sont endommagés,
l'écran ne doit plus être utilisé.
Il y a risque de décharge électrique, d'incendie et de panne de l'appareil.
Ne touchez en aucun cas le commutateur principal ni le câble d'alimentation quand vous avez les mains mouillées.
Il y a risque de décharge électrique.
Ne retirez jamais la fiche de contact en tirant le câble de secteur de la prise de courant. Evitez de poser le câble de secteur
à proximité d'objets très chauds.
Il y a risque d'incendie ou de décharge électrique.
En cas d'absence prolongée ou d'orage, retirez la fiche de contact de la prise de courant et la fiche de contact de l'antenne
de la maison de la douille de l'antenne pour des raisons de sécurité.
Précaution permettant d'éviter un incendie éventuel, ou le cas échéant, des dégâts à l'appareil et éviter le risque de
décharge électrique.
Eteignez toujours l'écran et la source de signal avant de raccorder deux appareils.
Il y a risque de décharge électrique.
PANNES
En cas de dommages causés à l'écran, le cas échéant au câble d'alimentation, retirez immédiatement la fiche de contact
de la prise de courant.
Retirez immédiatement la fiche du contact dès que de la fumée, une odeur désagréable ou des bruits inhabituels sont
émis par l'appareil. Faites de même au cas où aucune image n'apparaît plus à l'écran après que vous avez allumé
l'appareil ou pendant qu'il est en marche. N'essayez jamais de continuer à faire fonctionner l'écran dans cet état.
N'essayez en aucun cas d'ouvrir vous-même l'appareil ou/ni de le réparer. Vous ne pouvez ni réparer ni échanger aucune
des pièces contenues dans l'écran. Appelez notre service après-vente ou un autre atelier spécialisé dans ce domaine.
FRANÇAIS
NETTOYAGE ET ENTRETIEN
Avant d'installer, de nettoyer et d'entretenir l'appareil, il faut l'éteindre et retirer la fiche de contact de la prise de courant.
Attendez quelques minutes que les condensateurs de l'appareil soient complètement déchargés.
Pour le nettoyage servez-vous d'un chiffon doux, légèrement humide. Il faudrait éviter les produits et solutions de
nettoyage chimiques, car ils risquent d'endommager les surfaces.
Si des corps étrangers, tels que de l'eau, des liquides divers, des pièces de métal, etc. pénètrent dans l'appareil, retirez
immédiatement la fiche de contact. N'essayez jamais d'introduire quelque objet que ce soit dans l'écran ni d'y mettre les
mains.
Il y a risque de choc électrique ou d'accident.
PILES
Les piles constituent un danger mortel si elles sont avalées. Gardez-les donc hors de portée des enfants. Si une pile a
été avalée, consultez immédiatement un médecin.
Retirez toujours immédiatement les piles usées se trouvant dans la télécommande, elles risquent de couler et de causer
des dégâts.
Les piles fournies avec l'appareil ne sont pas rechargeables et ne peuvent être réactivées d'aucune façon que ce soit,
elles ne doivent être ni démontées, ni mises au feu, ni court-circuitées.
Les piles usées ne peuvent pas être jetées avec les ordures ménagères. Veuillez les apporter dans les sites de collecte
prévu à cet effet.
REMARQUES IMPORTANTES
Quand l'appareil est en mode d'attente, il reste connecté au secteur. Afin de le déconnecter complètement, mettez
l'interrupteur d'alimentation en position «O», le cas échéant, retirez la fiche de secteur de la prise de courant.
Pour des raisons d'ergonomie, il est recommandé d'éviter l'utilisation de caractères ou de symboles rouges et bleus sur
un fond de couleur foncée. En raison du faible contraste, une telle représentation est difficile à lire et fatigue rapidement
les yeux. Dans la mesure du possible, utilisez de forts contrastes, par exemple des caractères noirs sur fond blanc.
Pour ne pas avoir mal aux yeux, la distance optimale entre les yeux et l'écran représente cinq à six fois la diagonale de
l'écran. La pièce dans laquelle l'écran se trouve devrait être assez éclairée pour qu'il soit possible d'y lire. S'il fait trop clair,
les contrastes se perdent. S'il y a trop peu de lumière, vos yeux se fatiguent en passant du clair au foncé de l'écran.
Les emballages et éléments d'emballage dont vous n'avez plus besoin sont recyclables et devraient toujours être mis au
rebut de manière à permettre leur recyclage.
FRANÇAIS
3
Page 46

3. Aperçu
L'écran TFT peut être raccordé à un ordinateur, un lecteur DVD, un magnétoscope, un caméscope, etc.
Qu'il s'agisse d'images de télévision, de vidéo ou d'ordinateur, les images apparaissant sur cet écran à la surface
parfaitement plane sont toutes d'une netteté parfaite et exemptes de distorsions. Les images se caractérisent par une
clarté excellente et une brillance inégalée. Parmi les autres caractéristiques, il faut citer d'abord la grande diagonale de
l'écran de 75 cm pour un rapport de longueur de 15:9 et le boîtier très peu profond.
En mode télévision, le raccordement doit se faire à une antenne terrestre, un récepteur satellite ou au câble.
L'utilisation interactive se fait grâce à la télécommande livrée avec l'appareil et au menu affiché à l'écran (OSD). C'est là
que vous effectuerez les différents réglages de qualité d'image.
Un nouveau système innovateur de refroidissement permet de se servir de l'écran TFT sans être dérangé par le bruit de
ventilateurs. L'écran TFT est aussi silencieux qu'un téléviseur traditionnel et convient donc parfaitement à l'emploi en
appartement et en salle de conférence.
Equipement
Boîtier aluminium de haute qualité
Conception sans ventilateur
Diagonale de l'écran 75 cm
Format 15:9
Angle de vue horizontal/vertical 170 degrés
Système de haut-parleurs stéréo intégré
Possibilités de réglage sur l'appareil
Filtre en peigne
Compatible avec PAL, SECAM et NTSC
Compatible avec VGA, SVGA, WXGA, XGA et SXGA
Télétexte
Identification automatique de programmes et classement des émetteurs
Arrêt automatique différé (sommeil)
Economiseur d'écran
2 connexions SCART
1 x S-vidéo
1 x FBAS
1 x DVI (I) (analogique et numérique)
3.1 Eléments livrés
Quand vous sortez l'écran TFT de son emballage, vérifiez s'il n'a pas subi de dégâts pendant le transport et si toutes les
pièces s'y trouvent. Le fournisseur est responsable des dommages causés par le transport uniquement si vous les lui
communiquez avant la première mise en service. Si un des éléments de la livraison manque, adressez-vous à notre
service après-vente. Conservez l'emballage d'origine pour un transport éventuel du moniteur.
Livraison standard
2 piles LR03
1 x câble péritel
1 x câble d'antenne
1 écran TFT
1 télécommande
1 câble de secteur 2,5 m
1 manuel d'utilisation et 1
carte de garantie
1 x câble vidéo
HD-Sub vers DVI-I
4
FRANÇAIS
Page 47

3.2 Raccordements
FRANÇAIS
1 2 3 4 5
AUDIO IN
SCART 2
SERIELCVBSS-VIDEO
SCART 1
PC DVI - I
ANTENNE
6
OUT
LIGNE
CVBSORDINATEURS-VIDEO
11 10 9 8 7
[1] SCART 2 - par ex. branchement de magnétoscope
[2] S-VIDEO (Y/C) - par ex. branchement de caméscope par la prise femelle S-vidéo
[3] SERIAL - RS232 Interface pour les opérations de service
[4] PC DVI-I - branchement PC (RGB pour signaux analogiques, DVI pour signaux numériques)
[5] AUDIO IN PC - par ex. branchement ordinateur par la prise femelle sortie prise son
[6] OUT LINE - par ex. branchement d'amplificateur audio ou récepteur DVD
[7] AUDIO IN CVBS - par ex. branchement caméscope par la prise femelle sortie vidéo
[8] AUDIO IN S-VIDEO - par ex. branchement caméscope par la prise femelle S-vidéo
[9] ANTENNE - branchement signal d'antennes TV (antenne terrestre ou raccordement au câble)
[10] CVBS - par ex. branchement caméscope par la prise femelle sortie vidéo
[11] SCART 1 - par ex. branchement de récepteur satellite
FRANÇAIS
5
Page 48

3.3 Touches et fonctions de la télécommande
Pour commander l'écran TFT à l'aide de la télécommande, il faut que la fiche de secteur soit branchée et le commutateur
principal en position de marche.
La télécommande à infrarouge fonctionne uniquement s'il n'y pas d'obstacle entre la commande et le capteur infrarouge
sur la partie avant (en bas) de l'écran. Le rayon d'action de la télécommande est de 6 mètres environ.
Quand les piles sont vides, le rayon d'action de la télécommande diminue. Dans ce cas, changez les piles. Utilisez
uniquement 2 piles de type LR03 AAA 1,5 V.
Veuillez ne pas jeter les piles usagées dans les ordures ménagères. Les piles usagées sont
collectées (par ex. collecteur de piles chez le fournisseur) ou elles sont éliminées comme
déchets spéciaux.
[1] Bouton de mise en veille
[2] Boutons de programmes 1-9, 0
[3] Bouton M (mémoire), rouge
[4] Bouton vert
[5] Bouton bleu
[6] Bouton jaune
[7] Bouton de sélection de chaînes (ascendant)
[8] Bouton de menu
[9] Bouton de réduction du volume sonore / bouton
direction gauche
[10] Bouton d'augmentation du volume sonore /
bouton direction droite
[11] Bouton de sélection de chaînes (descendant)
[12] Bouton de sélection directe commande TV
[13] Bouton de commutation entre les numéros de programme
à un ou deux chiffres
[14] Bouton de sélection directe commande PC
[15] Bouton de fonction liste de programmes en mode TV ou
fonctions en mode télétexte
[16] Bouton de sélection directe commande vidéo
[17] Bouton de sélection directe télétexte
[18] F2 = Bouton d'arrêt FREEZE (mode télétexte)
F1 - F4 = Boutons de fonction pour attribution selon la
configuration
[19] Bouton de sélection format de l'image
[20] Bouton de suppression du son
[21] Bouton d'attente HOLD
[22] Bouton M/S
[23] Bouton PIP (image dans l'image)
[24] Bouton pour affichage de l'heure / bouton MIX
[25] Bouton AUTO ou PAGE
[26] Bouton Info
11
1212
16
19
23
1
2
3
4
7
9
5
6
6
8
10
13
14
15
17
18
21
25
20
22
24
26
Il se peut que la télécommande livrée diffère par sa conception de celle représentée ici.
3.4 Boutons sur l'appareil
La fonction des boutons de l'appareil coïncide avec ceux de la télécommande !
Bouton vol. -
Bouton P
Bouton P
6
Bouton vol. +Ă
Bouton d'attente
FRANÇAIS
Page 49
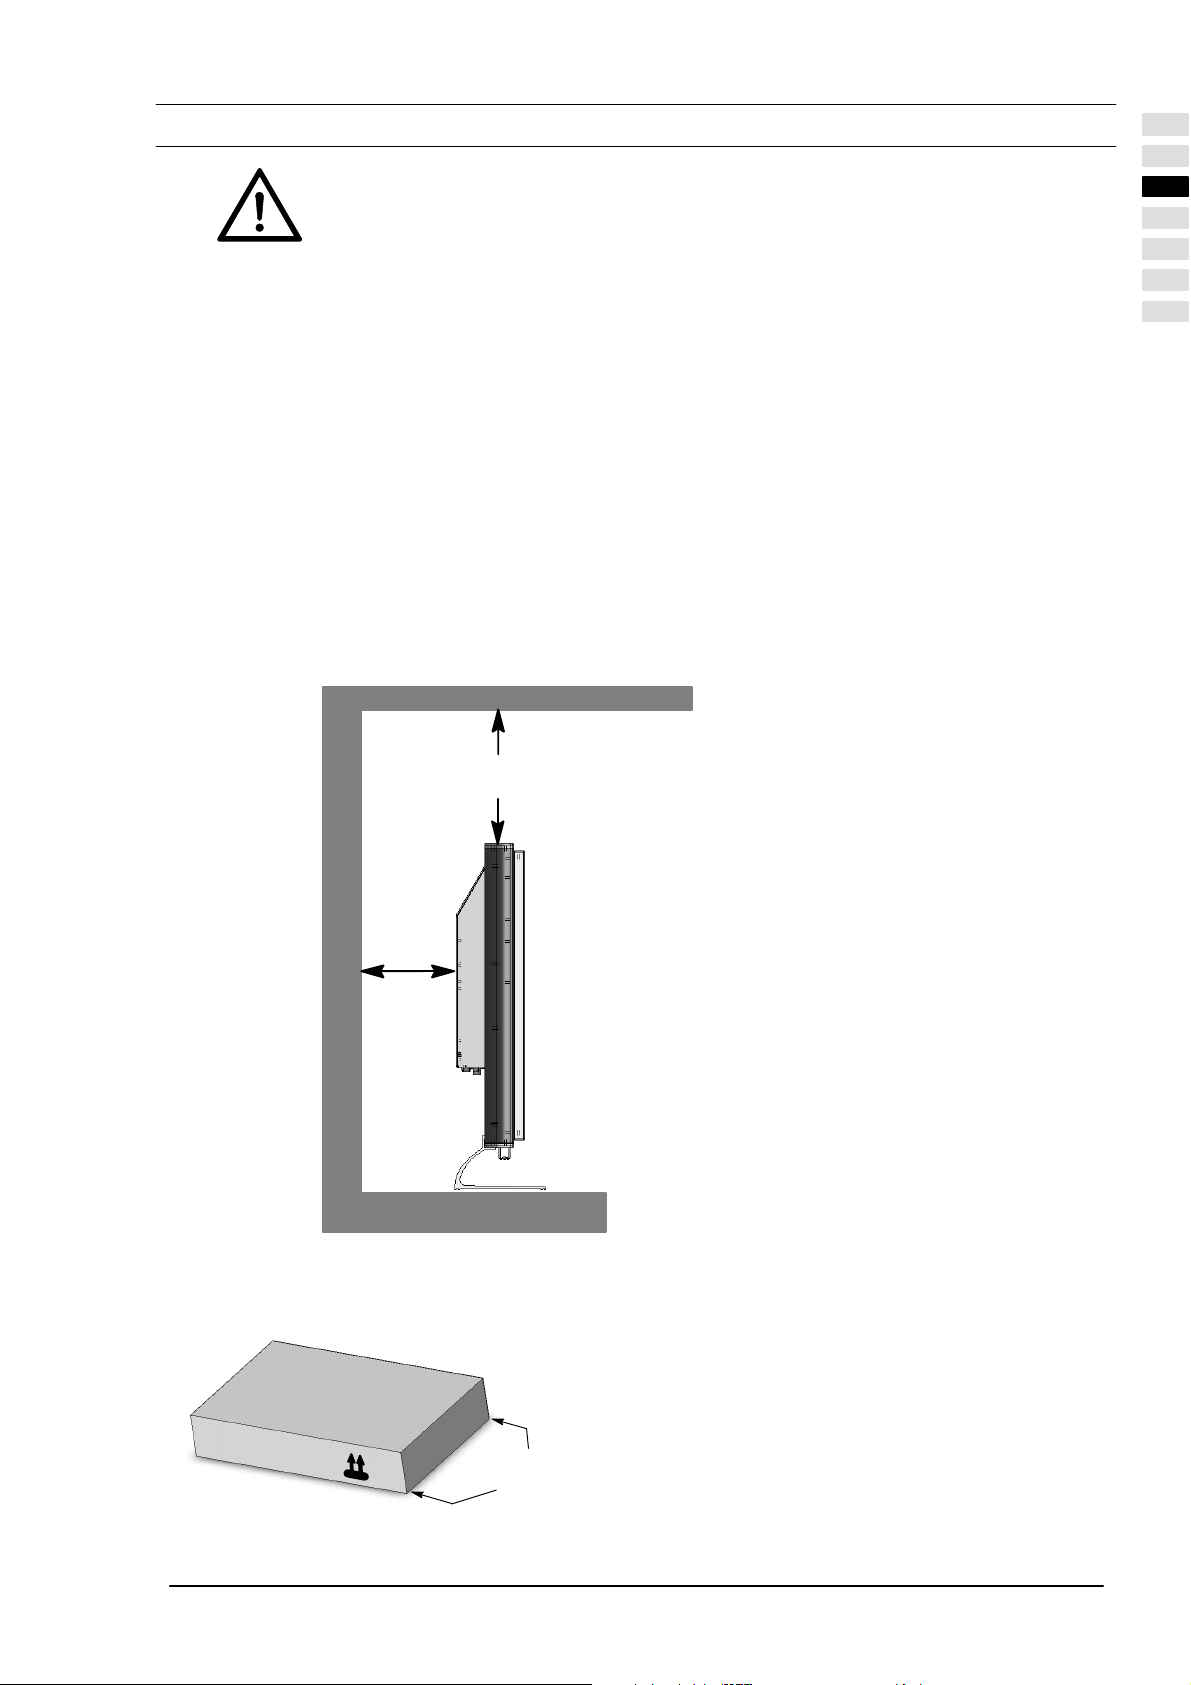
4. Première mise en service
Eteignez tous les appareils concernés, y compris l'écran TFT avant de procéder à tout
raccordement.
4.1 Monter et déballer
CHOISIR LE LIEU DE POSITIONNEMENT
Angle de vue
L'écran TFT possède un grand angle de vision, cependant l'angle de vue idéal est de 90° c'est-à-dire juste en
face de l' appareil. Orientez donc l'écran selon l'angle de vue utilisé le plus fréquemment.
Positionnement
Réflexion de la lumière
Evitez de positionner l'écran en face de fenêtres ou d'autres sources lumineuses.
Accès à l'arrivée du secteur
L'arrivée du secteur et le commutateur principal doivent être facilement accessibles à tout moment.
Ventilation
Laissez un espace de 10 cm au moins sur les côtés et vers l'arrière par rapport aux meubles. Il faut maintenir une
distance de 30 cm au moins vers le haut par rapport aux meubles ou au plafond.
Température ambiante
Pour un fonctionnement sûr et fiable, la température ambiante doit se situer entre 5 °C et 35 °C.
FRANÇAIS
DEBALLER
10 cm
Espace
libre
30 cm
Espace libre
FRANÇAIS
Arête
d'ouverture
Posez le fond du carton sur une base stable. Le haut est
indiqué par les pointes des flèches de direction figurant
sur la longueur du carton.
Ouvrez la bande d'emballage au niveau des arêtes
d'ouverture et soulevez la partie supérieure du carton.
7
Page 50
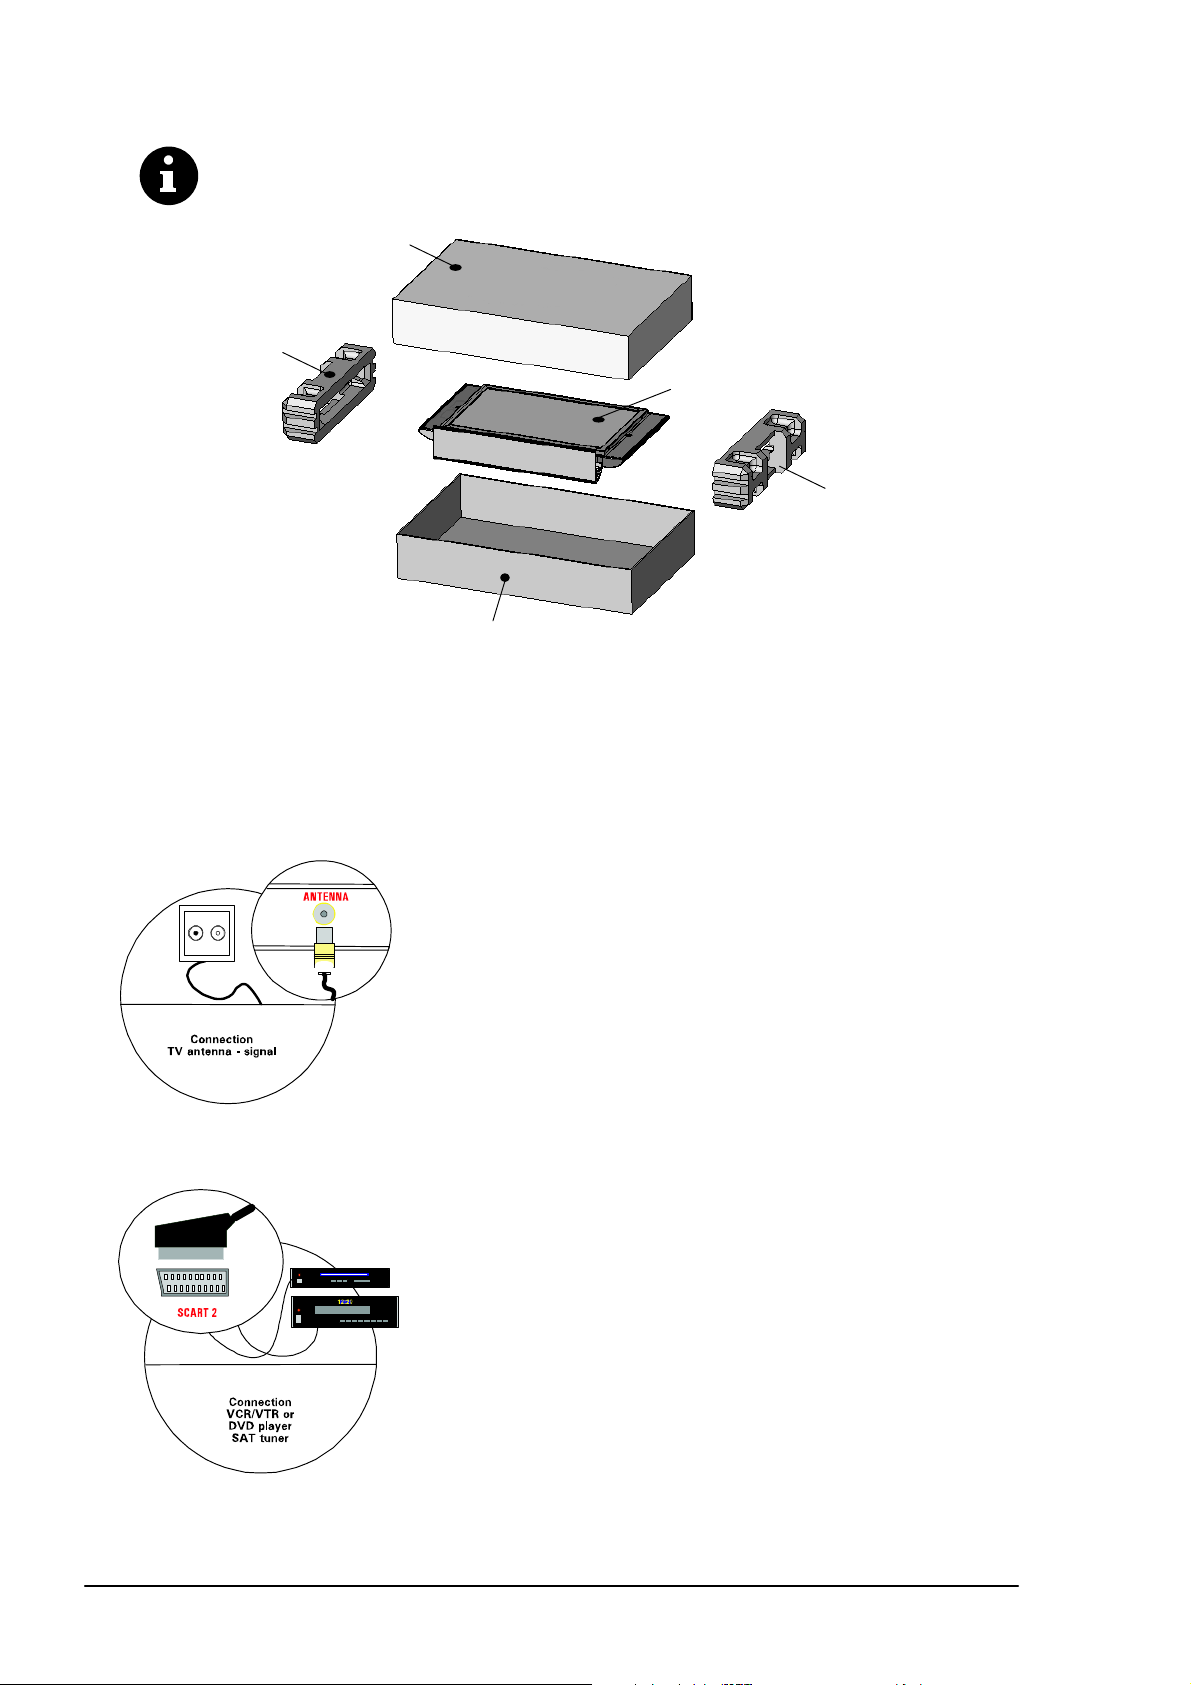
Pour sortir l'écran TFT, saisissez-le au milieu par les deux éléments d'emballage.
Il est recommandé de soulever l'écran TFT et de le sortir à deux.
Partie supérieure du carton
Elément d'emballage
Ecran TFT
Partie inférieure du carton
Elément d'emballage
4.2 Raccordement et mise en marche
Raccordements (Aperçu des raccordements, voir schéma page 5)
Branchez le câble d' alimentation d' une part dans la fiche d'arrivée de secteur de l'écran et d' autre part dans la
fiche de secteur d' une prise de courant.
Branchement au câble / antenne terrestre
Pour raccorde l' appareil au câble ou à une antenne terrestre, utilisez la
fiche ANTENNE.
Récepteur satellite
Si vous captez vos chaînes de télévision par satellite, branchez votre récepĆ
teur à la fiche SCART 1 ou SCART 2 avec un câble SCART.
La prise Péritel 1 dispose en plus d'une connexion pour sources RVB telles
qu'un lecteur de DVD.
8
FRANÇAIS
Page 51
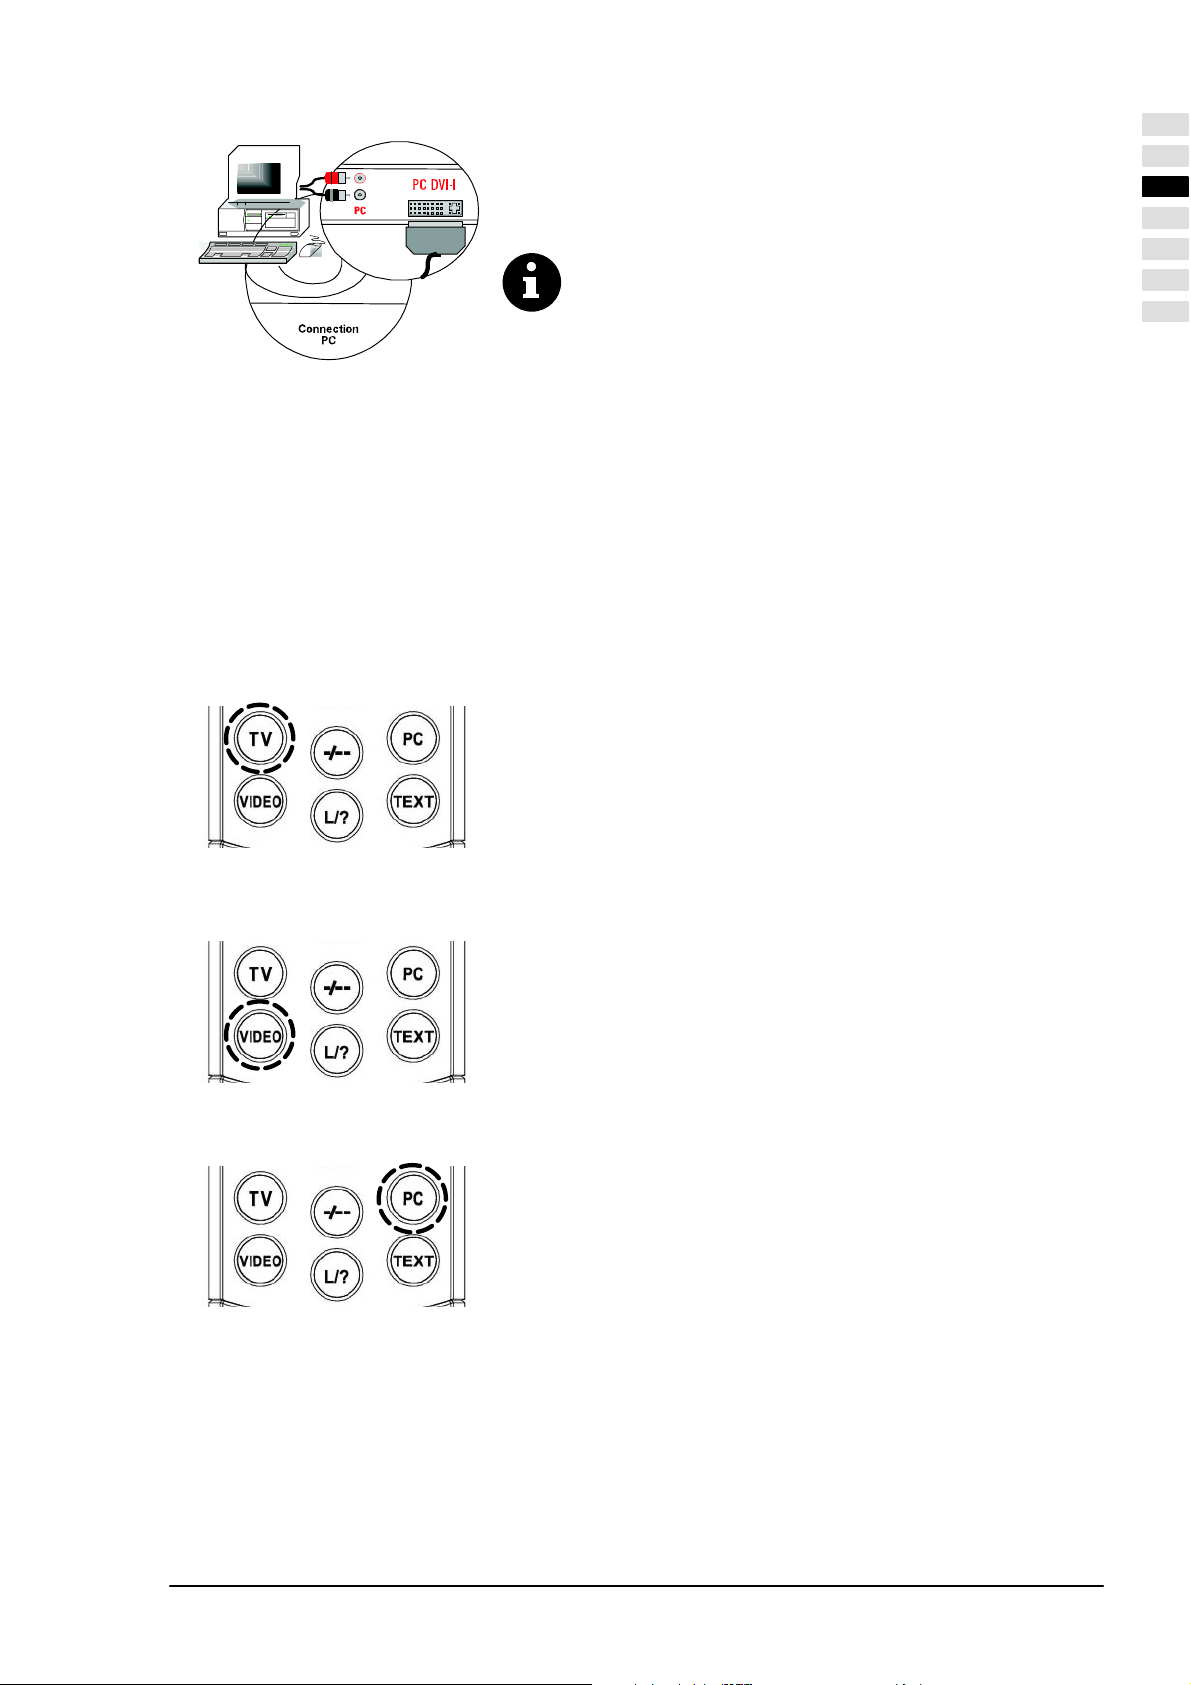
Ordinateur
Pour brancher votre ordinateur sur l'écran TFT, servez-vous de la fiche PC
DVI-I. Si votre ordinateur dispose d'une sortie analogique VGA, servez-vous
d'un câble DVI-I sur 15 Pin HD-Sub pour le raccordement.
Sur les cartes graphiques d'ordinateurs anciens, il se peut que la
broche 9 soit obturée. Si c'était le cas, adressez-vous à notre serĆ
vice après-vente.
Préparation
Télécommande
Ouvrez le couvercle de logement des piles au dos de la télécommande et introduisez les deux piles fournies
avec l'appareil (type LR03 Micro AAA). Respectez les indications de polarité au fond du logement des piles.
Refermez le couvercle du logement des piles.
Mise en marche
Amenez le commutateur principal situé au dos de l'écran en position «I». L'écran se trouve alors en mode de
veille, il peut fonctionner à l'aide de la télécommande.
Branchement au câble / antenne terrestre
Pour mettre l'écran en marche, appuyez sur le bouton TV de votre téléĆ
commande.
FRANÇAIS
Récepteur satellite
Ordinateur
Allumez votre récepteur satellite et allumez l'écran à l'aide du bouton
VIDEO sur votre télécommande. Remarque : selon la fiche SCART à
laquelle votre récepteur est branché, il faut appuyer plusieurs fois sur
le bouton VIDEO.
Allumez l'écran à l'aide du bouton PC de votre télécommande et sélecĆ
tionnez l'entrée de signal appropriée (PC(RGB) ou PC(DVI)). A l'aide
du bouton MENU de votre télécommande, vous affichez le menu OSD
de votre écran où vous sélectionnez votre signal d'entrée dans le
sous-menu ENTREES.
FRANÇAIS
9
Page 52

4.3 Commande du menu OSD
Le menu OSD, d'un emploi aisé, vous permet de régler votre écran TFT et de le commander. Vous disposez de 6 boutons
sur votre télécommande :
1
2
4
3
5
6
[1] Bouton M
Mise en mémoire des modifications effectuées.
[2] Bouton P Ă
Mouvement ascendant dans le menu OSD. Le menu ou la fonction sélectionné(e) s'affiche sur un fond de couleur.
Si les fonctions sont représentées sous forme de valeurs ou de graphiques en bâtons, ce bouton permet
d'augmenter la valeur.
[3] ĂBouton
Retour au menu précédent. Permet de quitter le sous-menu ou la fonction sélectionné(e).
[4] Bouton MENU
Affichage du menu principal OSD. Le menu principal s'affiche sur le bord supérieur gauche de l'écran. Permet
également de sortir du menu OSD.
[5] ĂBouton
Activer le sous-menu ou la fonction sélectionné(e). Le point sélectionné dans le menu s'affiche sur un fond vert
et il peut être modifié.
[6] Bouton PĂĂ
Mouvement descendant dans le menu OSD. Le menu ou la fonction sélectionné(e) s'affiche sur un fond de
couleur.
Si les fonctions sont représentées sous forme de valeurs ou de graphiques en bâtons, ce bouton permet de
diminuer la valeur.
MISE EN MEMOIRE DES MODIFICATIONS
Pour mettre en mémoire les modifications que vous avez effectuées, appuyez sur le bouton M de votre télécommande
(voir schéma ci-dessus) ou quittez tout simplement le menu OSD.
10
FRANÇAIS
Page 53

4.4 Réglages de base du menu OSD
MODIFICATION DE LA LANGUE OSD
Votre écran dispose de 6 langues de menu OSD (allemand, anglais, français, italien, néerlandais et espagnol). Pour
modifier la langue programmée par défaut, sélectionnez le point CONFIG. dans le menu principal. Dans le sous-menu,
sélectionnez LANGUE, puis sélectionnez la langue que vous recherchez :
Entrées >
Image >
Ecran >
Son >
Config. >
Info >
MODIFICATION DES CARACTERISTIQUES DU MENU OSD
Pour modifier la représentation ou la durée d'affichage (temps au bout duquel il s'efface après la dernière opération) du
menu OSD, sélectionnez le point CONFIG. dans le menu principal. Dans le sous-menu CONFIGURATION MENUS, vous
disposez d'un sous-menu supplémentaire où vous accédez aux points DISPARITION AUTO (sélections possibles : 5,
10 et 15 secondes) et TRANSPARENCE (sélections possibles : Oui et Non) :
Entrées >
Image >
Ecran >
Son >
Config. >
Info >
Infos ource : Oui
Langue : Français
Configuration Menus : >
Mise en veille : >
Retour réglages d’usine : >
Sommeil : Non
Infos source : Oui
Langue : Français
Configuration Menus : >
Mise en veille : >
Retour réglages d’usine : >
Sommeil : Non
Disparition Auto : 5 s.
Transparence : Non
FRANÇAIS
RETOUR AUX REGLAGES USINE
Vous avez la possibilité de faire revenir toutes les modifications effectuées dans le menu OSD aux réglages d'origine faits
à l'usine. A cet effet, sélectionnez CONFIG. dans le menu principal, puis dans le sous-menu sélectionnez RETOUR REĆ
GLAGES D'USINE :
Entrées >
Image >
Ecran >
Son >
Config. >
Info >
Infos source : Oui
Langue : Français
Configuration Menus : >
Mise en veille : >
Retour réglages d’usine : >
Sommeil : Non
4.5 Réglages pour la première mise en service
MODE TV
Recherche automatique des émetteurs de télévision
Si vous recevez vos programmes uniquement par satellite, vous n'avez pas besoin d'effectuer la recherche
automatique des émetteurs.
Pour démarrer la recherche automatique des émetteurs, opérez comme suit :
Allumez l'écran en appuyant sur le bouton TV de votre télécommande.
A l'aide du bouton MENU de votre télécommande, affichez le menu OSD où vous sélectionnez ENTREES. Un
sous-menu s'affiche.
Dans le sous-menu, sélectionnez CONFIG. Un sous-menu supplémentaire s'affiche.
FRANÇAIS
11
Page 54

Dans le menu sélectionnez RECH. AUTO. et activez-y le point RECHERCHER. La recherche automatique des
émetteurs démarre.
Entrées >
Image >
Ecran >
Son >
Config. >
Info >
Choisir : TUNER
Réglages > Rech. Auto. >
Recherche man. >
Trier >
Effacer >
Standard TV : PAL BG
Recherche : Tous
Rechercher :
Position de départ : 01
CLASSER EMETTEURS TV
Entrées >
Image >
Ecran >
Son >
Config. >
Info >
1 ARD 2 3 4 5 6 7 8 9 10
11 ZDF
21 WDR
31 _ _ _
41
51
61
71
81
91 99
Choisir : TUNER
Réglages > Rech. Auto. >
Recherche man. >
Trier >
Effacer >
(vert)_: sélection d'une chaîne. Actuel : 31 MENU : Quitter
(bleu)_: insérer un espace vide pour chaîne
(jaune)_: faire passer le programme sélectionné à la position actuelle
Modifier le nom de la chaîne
Quand l'écran TFT identifie le nom de la chaîne à partir du signal de télévision, ce nom identifié est mis en mémoire dans
le numéro de programme du réglage. Quand il ne reconnaît pas le nom de la chaîne, le numéro de la chaîne s'affiche (par
ex. PR02).
Pour modifier le nom de la chaîne, opérez comme suit :
Deplacez le curseur à l'aide du bouton Ăou Ăpour l'amener sur le point NOM du menu.
Appuyez sur le bouton Ăpour sélectionner la première position des caractères.
A l'aide des boutons ĂetĂĂvous pouvez faire défiler les groupes de caractères jusqu'à ce que le caractère voulu
apparaisse à la position sélectionnée.
Utilisez le boutonāĂĂpour sélectionner la position du caractère suivant.
Répétez les 3 étapes précédentes jusqu'à ce que vous ayez entré le nom. Il est possible d'entrer 5 caractères au
maximum.
Entrées >
Image >
Ecran >
Son >
Config. >
Info >
Choisir : TUNER
Réglages > Rech. Auto. >
Recherche man. >
Trier >
Effacer >
Programme : 01
Standard TV : PAL BG
Fréquence : 055.25 MHz
Nom : SW3
MODE PC
Sélectionnez l'entrée de signal
Faites fonctionner l'écran en appuyant sur le bouton PC de votre télécommande.
Affichez le menu OSD à l'aide de la touche MENU de votre télécommande. Le point ENTREES s'affiche sur
fond de couleur.
Dans le sous-menu CHOISIR sélectionnez l'arrivée de signal approprié (PC (RGB) ou PC (DVI)).
12
FRANÇAIS
Page 55

Entrées >
Image >
Ecran >
Son >
Config. >
Info >
Choisir : PC (RGB)
Réglages >
FONCTION AUTO AJUSTAGE
L'écran TFT effectue toujours automatiquement la fonction d'auto-ajustage lors de la première utilisation d'un format vidéo
PC analogique(RGB). Pendant ce temps, l'image se déplace un peu à la recherche de la meilleure position de restitution.
Certains formats peu pratiques d'ordinateurs exigent un réglage manuel de la position (horizonĆ
tale/verticale) et de la dimension de l'image. La fonction d'auto-ajustage dépend beaucoup de la
représentation de l'image. Une bonne solution consiste à représenter une image blanche
couvrant toute la surface de l'écran.
FRANÇAIS
Entrées >
Image >
Ecran >
Son >
Config. >
Info >
Il vous est possible de mettre en mémoire les formats utilisés comme formats utilisateurs. L'écran reconnaît des formats
sauvegardés et les représente immédiatement de manière correcte sans effectuer d'auto-ajustage.
Dans le menu principal, sélectionnez le point ENTREES et affichez le sous-menu REGLAGES. Un sous-menu
supplémentaire s'affiche.
Sélectionnez Formats utilisateurs.
Le point ECRAN vous permet de connaître le format utilisateur actuel. Il vous est alors possible d'enregistrer le
format utilisateur, par ex. à la position 1 (8 positions sont possibles) à l'aide de SAUVER.
Entrées >
Image >
Ecran >
Son >
Config. >
Info >
Choisir : PC (RGB)
Réglages >
Source : PC (RGB)
Réglages >
Fréq. H : 60.0 kHz
Fréq. V : 75.0 Hz
Hor. Pixel 78.75 MHz
Pol. H / V : + / –
Timings perso >
Réglages auto
Pos. V :
Hauteur :
Largeur :
Pos. H :
Phase
Fréq. H : 60.0 kHz
Fréq. V : 75.0 Hz
Hor. Pixel 78.75 MHz
Pol. H / V : + / –
Timings perso >
Réglages auto
Pos. V :
Hauteur :
Largeur :
Pos H :
Phase
Position: 1
Rappeler >
Sauver
Effacer tout
5. Opérations courantes
5.1 Mise en marche / Arrêt
MISE EN MARCHE
Pour mettre l'écran TFT en marche, amener le commutateur principal en position «I».
Le voyant lumineux orange DE MISE EN VEILLE du capteur infrarouge est allumé.
Appuyez sur un des boutons de la télécommande portant un chiffre pour mettre l'écran TFT en marche.
Le voyant lumineux vert FONCTION du capteur infrarouge est allumé.
ARRETER
Appuyez sur le bouton d'attente de la télécommande et l'écran TFT est à nouveau en mode de veille.
Le voyant lumineux orange DE MISE EN VEILLE du capteur infrarouge est allumé.
FRANÇAIS
13
Page 56

Pour arrêter à nouveau complètement l'écran TFT, il faut mettre le commutateur principal en position «0».
Bouton de mise
en veille
5.2 Réglage du son
REGLER LE VOLUME
Pour régler le volume, appuyez sur le bouton Ă(vol -) ouĂ (vol +) de la télécommande.
Entrées >
Image >
Ecran >
Son >
Config. >
Info >
Volume :
Balance :
Egaliseur : Rock
Option : Stéréo
Volume Sortie Aux. :
Volume initial max. :
Volume Automatique : Oui
Egaliseur Utilisateur >
Affichage du volume actuel de réglage
Volume lors de la mise en marche de l'écran TFT
REGLAGE DU SON
Sous EGALISEUR, il est possible de régler des types de son programmés par défaut.
Entrées >
Image >
Ecran >
Son >
Config. >
Info >
Sélectionnez le point EGALISEUR UTILISATEUR pour créer votre son personnalisé.
Entrées >
Image >
Ecran >
Son >
Config. >
Info >
Volume :
Balance :
Egaliseur : Rock
Option : Stéréo
Volume Sortie Aux. :
Volume initial max. :
Volume Automatique : Oui
Egaliseur Utilisateur >
Volume :
Balance :
Egaliseur : Rock
Option : Stéréo
Volume Sortie Aux. :
Volume initial max. :
Volume Automatique : Oui
Egaliseur Utilisateur >
Sans remarque
Utilisateur
Jazz
Rock
Chant
Classique
Pop
< 120 Hz :
500 Hz :
1.5 kHz :
5 kHz :
> 10 kHz
14
FRANÇAIS
Page 57

COUPER LE SON
Appuyez sur le bouton de la télécommande. Le son se coupe; à l'écran, la fenêtre d'information suivante s'affiĆ
che pendant 3Ăsecondes environ :
TUNER : 2 ZDF
Son arrêté
Pour remettre le son, appuyez sur le bouton
d'information suivante s'affiche pendant 3secondes environ :
TUNER : 2 ZDF
STEREO
, Ă(vol -) ouĂ (vol +) de la télécommande. A l'écran, la fenêtre
5.3 Régler l'image
Il vous est possible de régler comme vous le souhaitez le contraste, la luminosité, la netteté et les couleurs.
CONTRASTE / LUMINOSITE / NETTETE / COULEURS
Appuyez sur le boutonĂĂpour augmenter ou surĂĂpour diminuer les valeurs.
Le réglage de la NETTETE permet d'obtenir une meilleure qualité de l'image.
Le point COULEURS permet de modifier l'équilibrage des couleurs :
Appuyez sur le boutonĂĂpour obtenir une image tirant plus sur le vert.
Appuyez sur le boutonĂ pour obtenir une image tirant plus sur le rouge.
Entrées >
Image >
Ecran >
Son >
Config. >
Info >
Contraste : 64
Luminosité : 64
Netteté :
Couleurs : 15
RDB : 0
CD photos : Non
Désentrelacement: Mode auto
Ces points ne sont pas
réglages ENTREES CHOISIR «PC(RGB)»
et «PC(DVI» !
disponibles dans les
FRANÇAIS
FORMAT D'IMAGE
Sous le point ECRANĂ FORMAT ZOOM, il vous est possible de sélectionner les formats par défaut.
Le point ZOOM UTILISATEUR vous donne la possibilité de créer votre propre format utilisateur. Pour accéder à votre forĆ
mat utilisateur, sélectionnez ZOOM UTILISATEUR sous ZOOM.
Plein écran
Ce réglage de format permet d'obtenir toujours une image remplissant la totalité de l'écran à la fois dans le sens vertical
et le sens horizontal.
Vidéo 4:3
Ce réglage de format permet de bien représenter les bords d'une image PAL 4:3. Sur le bord gauche et le bord droit
de l'image, des bandes foncées apparaissent.
Auto
Ce réglage de format modifie automatiquement le signal d'entrée dans le sens horizontal et vertical afin d'avoir touĆ
jours une représentation remplissant la totalité de l'écran. Il reconnaît les formats de film 16:9 et les réduit ou les augĆ
mente à l'aide de facteurs par défaut.
NonLinéaire
Ce réglage de format modifie automatiquement le signal d'entrée dans le sens horizontal et vertical afin d'avoir touĆ
jours une représentation remplissant la totalité de l'écran mais non linéaire. Cela signifie que le contenu de l'image
est représenté comme dans l'original au centre de l'écran et une augmentation ou une diminution plus prononcée est
effectuée sur les bords.
Zoom perso
Ce réglage de format permet de représenter un format d'image individuel entre 40% et 140 % de la dimension de
l'image d'origine.
Zoom
Le passage manuel du réglage de format vidéo 4:3 au zoom étire l'image de 20% environ au-delà de la représentation
remplissant la totalité de l'écran dans le sens vertical et horizontal. De cette manière au visionnement de films de forĆ
mat 4:3 les bandes foncées en haut et en bas de l'écran sont réduites.
Vidéo 16:9
Ce réglage de format permet de représenter une image PAL 4:3 de telle sorte que les bandes foncées sur les côtés
droit et gauche de l'image ne sont plus visibles.
Pour passer d'un format à un autre, appuyez à nouveau sur le bouton F
de la télécommande.
FRANÇAIS
15
Page 58
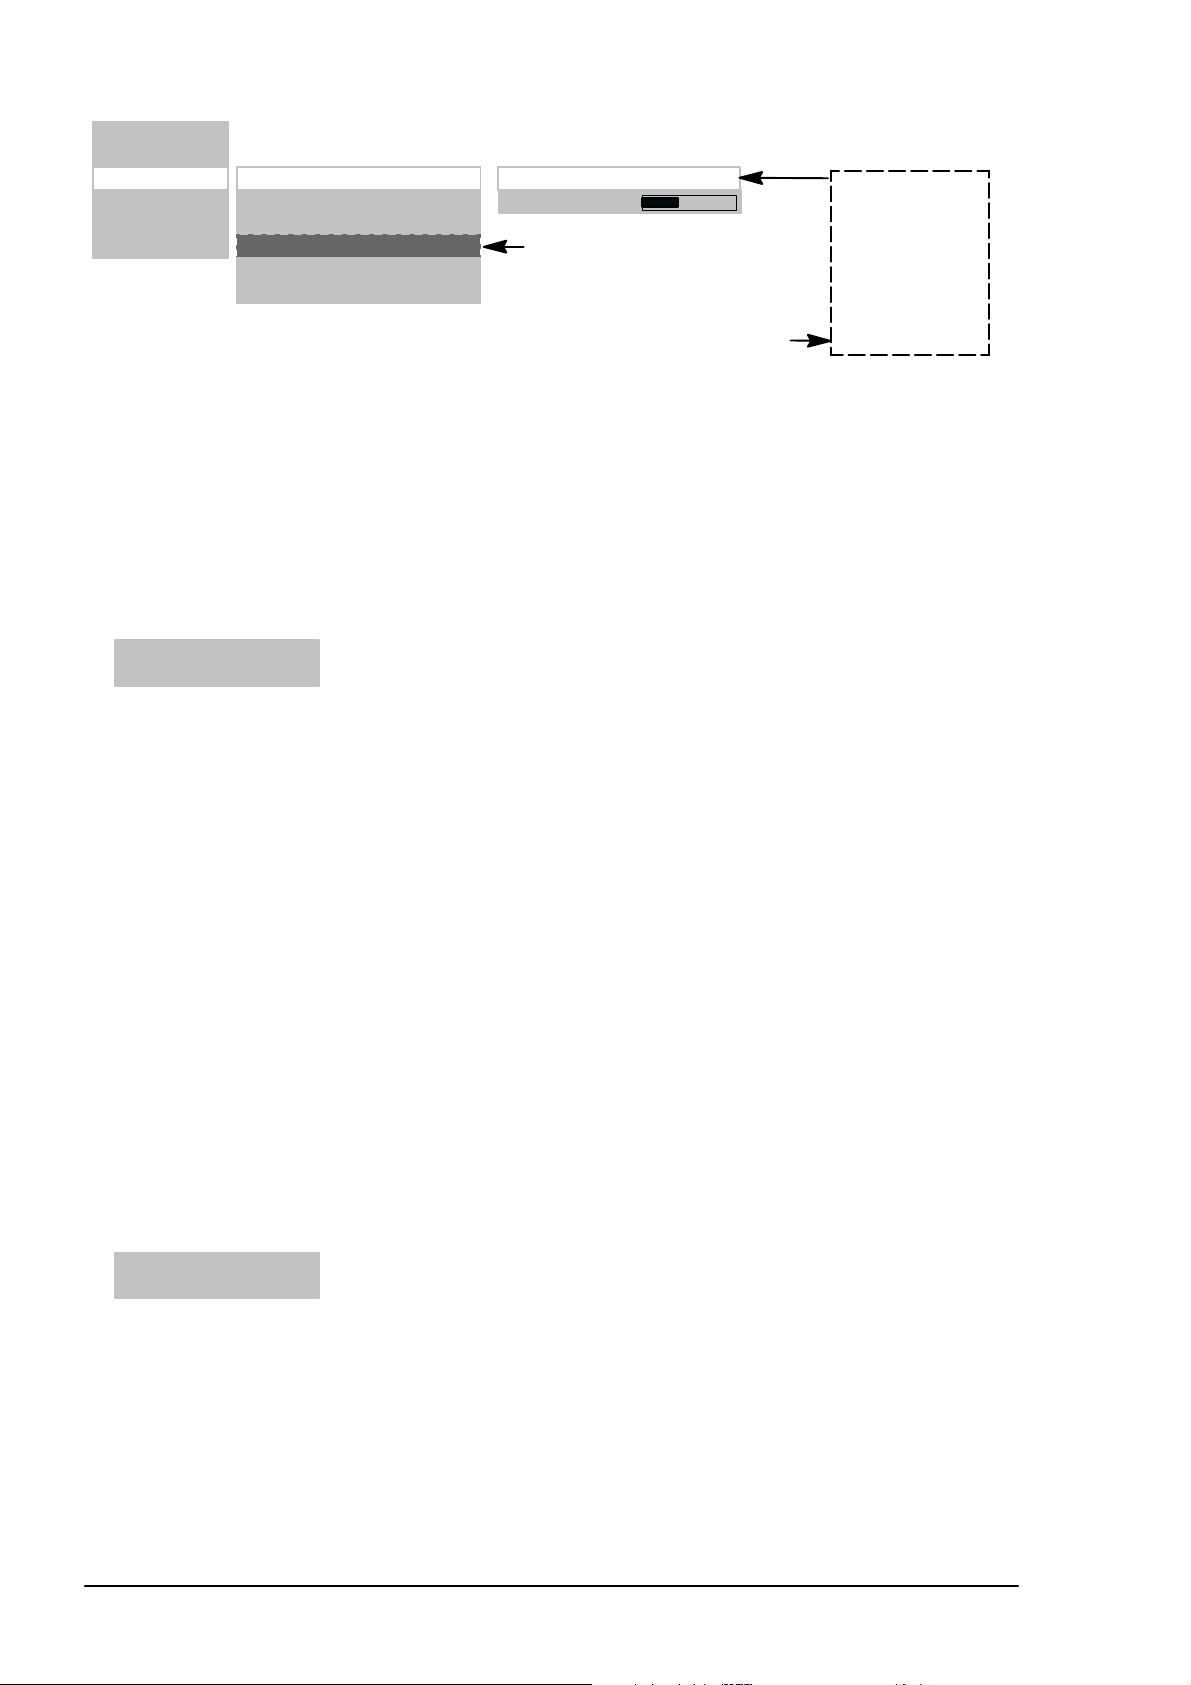
Entrées >
Image >
Ecran >
Son >
Config. >
Info >
Format de l’image >
Temp. de couleur : 9300 k
Contraste : normal
Insertion image >
Figer l’image
Temp. de couleur perso >
Zoom : Plein écran
Zoom perso :
Ce point du menu est disponible
uniquement dans le réglage
ENTREES PC(DVI) / PC(RGB) !
Plein 'écran
Vidéo 4:3
Auto
Non Linéaire
Zoom perso
Zoom
Vidéo 16:9
Ce point du menu est disponible
uniquement dans le réglage
ENTREES PC(DVI) / PC(RGB) !
PC 1:1
5.4 Mode téléviseur
L'écran TFT se trouve en mode de veille.
Pour mettre en marche, appuyez sur un des boutons à chiffres 0...9 ou sur la touche TV de la télécommande.
Au cours de l'initialisation, le sigle de la marque s'affiche.
Ensuite la chaîne programmée en dernier (le numéro du programme) apparaît à l'écran. En même temps, la fenêĆ
tre d'information suivante s'affiche pendant 3 secondes environ :
TUNER : 2 ZDF
STEREO
Appuyez sur la touche P ā ou PĂ āāpour passer à la chaîne suivante ou retourner à la chaîne précédente.
Vous pouvez sélectionner directement le numéro de la chaîne à l'aide des boutons portant un chiffre sur la téléĆ
commande.
TELETEXTE
Votre écran TFT peut recevoir et afficher les informations télétexte TOP/FLOF.
Sélectionnez un émetteur de télévision avec télétexte.
Appuyez sur le bouton TEXTE de la télécommande pour afficher le télétexte.
Pour sélectionner directement des pages de télétexte, utilisez les boutons à chiffres.
Les boutons rouge, vert, jaune et bleu de la télécommande ont des fonctions différentes selon le type de téléĆ
texteĂ; elles sont indiquées dans la partie inférieure du télétexte.
5.5 Mode PC
ETEIGNEZ l'écran TFT et l'ordinateur.
Connectez votre ordinateur et l'écran TFT par un câble vidéo que vous trouvez dans le commerce (fiche DVI de
l'écran et fiche HD-Sub de l'ordinateur).
ALLUMEZ à nouveau l'écran TFT et l'ordinateur.
Sous le point ENTREES SOURCE, le réglage de l'ordinateur (RGB) doit être effectué. A la mise en marche,
l'écran TFT reconnaît automatiquement le format d'image réglé sur l'ordinateur. Cette information s'affiche dans
une fenêtre d'informations.
RGB–1024x 768
Image
5.6 Fonctionnement avec des appareils supplémentaires
MAGNETOSCOPE
ETEIGNEZ l'écran TFT et le magnétoscope.
Votre magnétoscope peut être raccordé à l'écran TFT de 3 manières différentes :
par la ligne d'antenne ; sur ce point consultez les instructions de service du magnétoscope
par un câble Scart soit sur SCART1 ou SCART2
si votre magnétoscope dispose d'une sortie S-vidéo, reliez-la à l'entrée Y/C.
ALLUMEZ à nouveau l'écran TFT et le magnétoscope.
16
FRANÇAIS
Page 59

Pour passer à l'entrée branchée (par ex. SCART1), appuyez de nouveau sur le bouton VIDEO de la télécomĆ
mande.
SCART 1
Remplir la totalité de l’écran
LECTEUR DVD
ETEIGNEZ l'écran TFT et le lecteur DVD.
Reliez votre lecteur DVD à SCART1 ou à l'entrée Y/C si celui-ci dispose d'une sortie S-vidéo.
ALLUMEZ à nouveau l'écran TFT et le lecteur DVD.
Pour passer à l'entrée branchée, appuyez de nouveau sur le bouton VIDEO de la télécommande.
YC
Remplir la totalité de l’écran
5.7 Fonctions spéciales
RECHERCHE MANUELLE DE CHAINES
Sous le point PROGRAMME entrez un numéro de chaîne non encore attribué.
Sous le point FREQUENCE, vous pouvez entrer directement la fréquence de l'émetteur de télévision que vous
recherchez.
Si l'image n'est pas optimale, augmentez, ou le cas échéant diminuez, la fréquence petit à petit.
Si l'émetteur de télévision ne porte pas de nom, vous pouvez l'entrer sous le point NOM.
FRANÇAIS
Entrées >
Image >
Ecran >
Son >
Config. >
Info >
Choisir : TUNER
Réglages > Rech. Auto. >
Recherche man. >
Trier >
Effacer >
Programme : 11
Standard TV : PAL BG
Fréquence : 168.25 MHz
Nom : HR
TEMPERATURE DE COULEUR
Vous pouvez sélectionner la température de couleur parmi trois valeurs par défaut ou vous pouvez en déterminer une
vous-même sous le point TEMP. DE COULEUR.
Une valeur inférieure de température de couleur augmente la part de rouge dans l'image et la fait paraître «plus chaude».
Une température de couleur plus élevée augmente la part de lumière bleue, l'image paraît alors «plus froide».
Entrées >
Image >
Ecran >
Son >
Config. >
Info >
Entrées >
Image >
Ecran >
Son >
Config. >
Info >
Format de l’image >
Temp. de couleur : 9300 k
Contraste : normal
Insertion image >
Figer l’image
Temp. de couleur perso >
Format de l’image >
Temp. de couleur : 9300 k
Contraste : normal
Insertion image >
Figer l’image
Temp. de couleur perso >
7500K
9300K
11000K
PERSO
Rouge : 128
Vert : 128
Bleu : 110
FRANÇAIS
17
Page 60

IMAGE FIXE
Pour obtenir une image fixe, vous pouvez appuyer sur le bouton d'image fixe (FREEZE) ou la créer à partir de FIGER
L'IMAGE dans le menu.
Entrées >
Image >
Ecran >
Son >
Config. >
Info >
Format de l’image >
Temp. de couleur : 9300 k
Contraste : normal
Figer l’image
Temp. de couleur perso >
IMAGE DANS IMAGE>
La fonction INSERTION IMAGE vous permet d'afficher des images vidéo dans la représentation de signaux d'ordinateur.
Le point du menu INSERTION IMAGE est accessible uniquement à partir des réglages ENTREESĂĂCHOISIR
ĂPC(DVI) / PC(RGB), le cas échéant, le bouton PIP est actionné.
Appuyez sur PIP et l'image s'affiche dans l'image actuelle ; cette première image dépend du réglage d'entrée (par
ex. le tuner) dans le menu ECRANĂĂINSERTION IMAGEĂĂSOURCE.
S'il n'y a aucun signal à cette entrée, la fenêtre affichée ne présente pas d'image.
La position et la dimension de la fenêtre peuvent être réglées. Pour effectuer vos réglages individuels, il faut acĆ
tionner MARCHE dans le menu DIMENSION.
Entrées >
Image >
Ecran >
Son >
Config. >
Info >
Format de l’image >
Temp. de couleur : 9300 k
Contraste : normal
Insertion image >
Figer l’image
Temp.de couleur perso. >
Taille (+Eteint) : Eteint
Source : TUNER
Pos. horizontale :
Pos. verticale :
TUNER
SCART1
SCART2
YC
CVBS
ARRETĂAUTOMATIQUE
Vous pouvez régler votre écran TFT de sorte qu'il s'éteigne automatiquement au bout d'un certain temps.
Sous SOMMEIL sélectionnez une des durées par défaut.
Quand ce temps est écoulé, l'écran TFT s'éteint automatiquement.
Entrées >
Image >
Ecran >
Son >
Config. >
Info >
Infos source : Oui
Langue : Français
Configuration Menus : >
Mise en veille : >
Retour réglages d’usine : >
Sommeil : Non
Non / 0:30 / 1:00 / 1:30 / 2:00 / 2:30
COMMUTATION SON DOUBLE CANAL
Le son à double canal permet aux téléspectateurs de passer de la version synchronisée à la version originale de la bande
sonore de films.
Les émissions diffusées en son à double canal le sont d'abord sur le canal A.
Appuyez sur le bouton M/S de la télécommande pour commuter au canal B.
18
FRANÇAIS
Page 61

6. Remédier aux défaillances
Pendant l'utilisation de votre écran TFT, il se pourrait que des erreurs se produisent ; avant de faire réparer votre appareil,
lisez à la page suivante la liste entière des défaillances et comment y remédier. Il est possible que vous puissiez remédier
vous-même très facilement à la défaillance. Par exemple, il se peut que la fiche de contact de l'écran ne soit pas branchée
ou qu'il y ait un problème de récepteur (antenne), dans ce cas, vous croiriez à tort que l'écran est défectueux.
Si les remarques ci-après ne vous permettent pas de remédier à la défaillance, amenez le comĆ
mutateur principal de l'appareil sur ARRET et retirez la fiche de secteur de la prise de courant.
N'essayez jamais de réparer vous-même l'appareil et n'enlever en aucun cas le capot situé à
l'arrière de l'appareil.
DEFAILLANCE CAUSE EVENTUELLE REMEDE POSSIBLE
Pas d'image et pas de
son, pourtant l'appareil est
branché et allumé.
Commutateur principal en position «0»
(ARRET).
Fiche de contact de l'appareil non
branchée dans la prise de courant.
Câble de réseau défectueux.
Mettre le commutateur principal en poĆ
sition «I».
Enfoncer la fiche du câble de réseau
dans la prise de courant.
Téléphoner au service en ligne directe.
FRANÇAIS
Ecran sombre.
Couleurs pâles ou exagéĆ
rées.
L'image est coupée ou
l'image n'est pas centrée.
L'image est trop grande
ou trop petite.
La télécommande ne
fonctionne pas.
L'image est trop foncée.
Une image apparaît mais
il n'y a pas de son.
Certaines lettres ne sont
pas représentées (mode
PC).
Bandes horizontales avec
les signaux TV ou vidéo.
Pour ramener tous les réglages à leur position de départ, sélectionnez dans le menu sous
Constrastes mal réglés.
Pas de signal d'entrée, erreur de séĆ
lection d'entrée.
Couleur mal réglée.
Câble de raccordement mal branché.
Position de l'image mal réglée. Corrigez la position de l'image.
Format d'image mal réglé. Appuyez plusieurs fois sur le bouton F
Les piles sont usées.
Présence d'un obstacle entre la téléĆ
commande et le capteur.
La télécommande se trouve hors
du rayon d'action.
La qualité d'image n'est pas bien réĆ
glée.
Le bouton permettant d'éteindre le son
est actionné.
Le volume sonore est réglé sur miniĆ
mum.
Source de signal positionnée devant
l'écran.
Blindage insuffisant du câble vidéo.
REGLAGES ' APPEL REGLAGES USINE !
Régler correctement la clarté et/ou les
contrastes.
Vérifier le câble de raccordement ; reĆ
chercher l'entrée de source correcte.
Régler la couleur (dans le menu sous
IMAGE).
Brancher le câble correctement.
jusqu'à ce que l'image remplisse
l'écran.
Introduisez de nouvelles piles.
Eliminez l'obstacle se trouvant entre la
télécommande et le capteur.
Faites fonctionner la télécommande à
l'intérieur de son rayon d'action.
Corrigez la clarté de l'image et le
contraste.
Appuyez sur le bouton de la téléĆ
commande.
Augmentez le volume sonore.
Réglez correctement la position de
phase.
Vérifiez le réglage de la largeur
d'image.
Effectuez un auto-ajustage.
De manière générale, positionnez les
sources de signal sur le côté de
l'écran ou derrière celui-ci.
Utilisez uniquement des câbles de siĆ
gnal de bonne qualité à haute capacité
de blindage.
Alerte de température
FRANÇAIS
Une surchauffe de l'écran TFT est signalée dans une fenêtre d'alerte en
rouge, elle s'ouvre dans l'angle supérieur gauche de l'écran (voir schéma à
gauche). Si vous n'améliorez pas
passe automatiquement en mode de veille.
alors l`aération, il se peut que l'écran
19
Page 62

7. Spécifications
ECRAN
Dimension / diagonale : 75 cm (30"), format 15:9
Dimension réelle de l'image : 643 mm (horizontal) x 386 mm (vertical)
Résolution : 1280 x 768 pixels
Performance couleurs : 16.7 millions de couleurs simultanément
Angle de vision : 170° typique
Rapport de contraste d'image : 500:1 typique
2
Luminance : 450 cd/m
Durée de réaction : 25 ms
Erreurs de pixels :
STANDARDS VIDEO
TV / vidéo : PAL (BG, I, DK/K', M, L/L') / SECAM / NTSC
Tuner TV : PAL / SECAM, 47 - 861 MHz (VHF, UHF, Hyperbande)
PALplus, Cinescope : Identification automatique de format (totalité de l'écran)
Formats :
PLAGE DE FREQUENCES PC
Fréquence horizontale : 30 - 80 kHz
Fréquence verticale : 50 - 90 Hz
Fréquence d'horloge : max. 140 MHz
Résolutions :
Résolution recommandée :
Formats : 1:1, totalité de l'écran, totalité du format, zoom, zoom utilisateur
ENTREES / RACCORDEMENTS / SYNCHRONISATION
Entrée PC / vidéo : RBG analogique et identification sync automatique
Raccordements vidéo Tuner TV : IEC, 75 Ohm impédance d'entrée
Raccordement PC analogique/
numérique :
Raccordements audio Haut-parleurs intégrés : 2 x 2 large bande avec sinus 2 x 7 W
Synchronisation : Sync sur vert, Composite Sync à identification automatique,
Eléments de commande : Commutateur principal, télécommande IR (menu OSD 6 langues)
CONDITIONS DE FONCTIONNEMENT
Température : 5 °C Ć +35 °C (fonctionnement), -20 °C Ć +60 °C (stockage)
Humidité de l'air : 20% Ć 85% (non condensant)
Altitude : max. 2.000 m (7.000 ft)
SPECIFICATIONS DU RACCORDEMENT AU SECTEUR
Alimentation en courant : 220 V Ć 240 V AC
Fréquence du secteur : 50 Hz ± 10%
Puissance : 140 W typique, 5 W en mode de veille
DIMENSIONS ET POIDS
Ecran hauteur x largeur x profondeur : 535 mm x 870 mm x 140 mm
Poids : 17 kg
points illuminés et noirs ensemble 7
distance minimale entre deux points noirs 5 mm
4:3, 16:9, vidéo NLS, totalité de l'écran, zoom, zoom utilisateur
(40%āĆā140%)
DOS: 640 x 480 @ 60 Hz, 720 x 400 @ 70 Hz,
VGA: 640 x 480, SVGA: 800 x 600; XGA: 1024 x 768 50 Hz - 90 Hz
WXGA: 1280 x 768 @ 60 Hz,
SXGA: 1280 x 1024 50 - 75 Hz
1280 x 768 @ 60 Hz
SCART1 : RGB, CVBS entrée, CVBS sortie,
SCART2 : CVBS entrée, CVBS sortie,
SCART1/SCART2 : Audio entrée/sortie
Entrée FBAS : RCA-Cinch
Y/C : MiniDIN (HOSIDEN)
DVI-I
Entrée stéréo : 3 x Cinch 1 Vrms (FBAS, Y/C, PC),
Sortie stéréo : 1 x Cinch, réglable
H-Sync et V-Sync séparés
typique
2 x SCART 1 Vrms
20
FRANÇAIS
Page 63

Indice
1. Normas 2. . . . . . . . . . . . . . . . . . . . . . . . . . . . . . . . . . . . . . . . . . . . . . . . . . . . . . . . . . . . . . . . . . . . . . . . . . .
2. Advertencias importantes 2. . . . . . . . . . . . . . . . . . . . . . . . . . . . . . . . . . . . . . . . . . . . . . . . . . . . . . . . . .
3. Resumen 4. . . . . . . . . . . . . . . . . . . . . . . . . . . . . . . . . . . . . . . . . . . . . . . . . . . . . . . . . . . . . . . . . . . . . . . . .
3.1 Volumen de suministro 4. . . . . . . . . . . . . . . . . . . . . . . . . . . . . . . . . . . . . . . . . . . . . . . . . . . . . . . .
3.2 Conexiones 5. . . . . . . . . . . . . . . . . . . . . . . . . . . . . . . . . . . . . . . . . . . . . . . . . . . . . . . . . . . . . . . . . .
3.3 Teclas de funcionamiento y funciones del mando a distancia 6. . . . . . . . . . . . . . . . . . . . . . . .
3.4 Teclas del funcionamiento del aparato 6. . . . . . . . . . . . . . . . . . . . . . . . . . . . . . . . . . . . . . . . . . .
4. Primera puesta en servicio 7. . . . . . . . . . . . . . . . . . . . . . . . . . . . . . . . . . . . . . . . . . . . . . . . . . . . . . . . .
4.1 Desembalaje e instalación 7. . . . . . . . . . . . . . . . . . . . . . . . . . . . . . . . . . . . . . . . . . . . . . . . . . . . .
4.2 Conexión y encendido 8. . . . . . . . . . . . . . . . . . . . . . . . . . . . . . . . . . . . . . . . . . . . . . . . . . . . . . . . .
ESPAÑOL
4.3 Manejo del menú OSD 10. . . . . . . . . . . . . . . . . . . . . . . . . . . . . . . . . . . . . . . . . . . . . . . . . . . . . . . .
4.4 Ajustes básicos del menú OSD 11. . . . . . . . . . . . . . . . . . . . . . . . . . . . . . . . . . . . . . . . . . . . . . . . .
4.5 Ajustes durante la primera puesta en servicio 11. . . . . . . . . . . . . . . . . . . . . . . . . . . . . . . . . . . . .
5. Manejo cotidiano 13. . . . . . . . . . . . . . . . . . . . . . . . . . . . . . . . . . . . . . . . . . . . . . . . . . . . . . . . . . . . . . . . . .
5.1 Encendido / apagado 13. . . . . . . . . . . . . . . . . . . . . . . . . . . . . . . . . . . . . . . . . . . . . . . . . . . . . . . . . .
5.2 Ajustar el sonido 14. . . . . . . . . . . . . . . . . . . . . . . . . . . . . . . . . . . . . . . . . . . . . . . . . . . . . . . . . . . . . .
5.3 Ajustar la imagen 15. . . . . . . . . . . . . . . . . . . . . . . . . . . . . . . . . . . . . . . . . . . . . . . . . . . . . . . . . . . . .
5.4 Modo de televisión 16. . . . . . . . . . . . . . . . . . . . . . . . . . . . . . . . . . . . . . . . . . . . . . . . . . . . . . . . . . . .
5.5 Modo PC 16. . . . . . . . . . . . . . . . . . . . . . . . . . . . . . . . . . . . . . . . . . . . . . . . . . . . . . . . . . . . . . . . . . . .
5.6 Funcionamiento con aparatos adicionales 16. . . . . . . . . . . . . . . . . . . . . . . . . . . . . . . . . . . . . . . .
5.7 Funciones especiales 17. . . . . . . . . . . . . . . . . . . . . . . . . . . . . . . . . . . . . . . . . . . . . . . . . . . . . . . . .
6. Solución de problemas 19. . . . . . . . . . . . . . . . . . . . . . . . . . . . . . . . . . . . . . . . . . . . . . . . . . . . . . . . . . . .
7. Datos técnicos 20. . . . . . . . . . . . . . . . . . . . . . . . . . . . . . . . . . . . . . . . . . . . . . . . . . . . . . . . . . . . . . . . . . . .
ESPAÑOL
Page 64

1. Normas
Esta pantalla es un dispositivo técnico informático y cumple con las directrices y normas siguientes de la Unión Europea:
89/336/CEE del 3 de mayo de 1989 con las modificaciones posteriores (Directiva 92/31/CEE de abril de 1992 y
Directiva 93/68/CEE del 22 de julio de 1993)
73/23/CEE del 19 de febrero de 1973 con las modificaciones posteriores (Directiva 93/68/CEE del
22 de julio de 1993)
EN55013, EN55020, EN61000-3-2/-3 (Compatibilidad electromagnética)
EN60065 (Condiciones de seguridad).
El cumplimiento con las condiciones se certifica por medio de la marca
El fabricante no puede hacerse responsable del funcionamiento fuera de las condiciones que se describen en este
manual de usuario. Además, esto hará que queden anulados los derechos de responsabilidad por productos defectuosos
y de garantía.
estampada en el producto.
2. Advertencias importantes
Lea y siga las advertencias, ya que siguiendo el uso según lo dispuesto no surgirá ningún peligro para su salud. Los
errores en la instalación y la conexión pueden dañar el aparato o los otros aparatos conectados a él. Tenga en cuenta
las advertencias en el aparato y en el manual de usuario. No deje nunca que los niños manejen aparatos eléctricos sin
supervisión.
Generalidades
La pantalla que ha adquirido satisface las más altas exigencias de calidad en este segmento y se han comprobado si
presenta errores de píxels. A pesar de que hemos tenido el máximo cuidado en la fabricación de los aparatos, por motivos
tecnológicos no puede excluirse al 100% que algunos píxels presenten defectos.
Determinadas condiciones pueden causar un zumbido en su pantalla. El zumbido procede generalmente de la
alimentación de red y puede generarse mediante la conexión de diferentes conductores de protección. Puede solucionar
el problema insertando un llamado filtro de pantalla entre la línea de antena entrante y la entrada de antena en la pantalla.
Los filtros de pantalla se encuentran en los establecimientos especializados en forma de un pequeño enchufe intermedio.
Por motivos técnicos pueden generarse también ruidos en el propio aparato. Sin embargo, no debe superar el valor
indicado en la especificación del aparato.
Si su pantalla está conectada a una antena exterior, debe estar puesta a tierra para proteger contra descargas eléctricas
y cargas estáticas. La puesta a tierra debe cumplir con las prescripciones aplicables.
CONDICIONES DEL ENTORNO
No utilice nunca la pantalla en unas condiciones del entorno que difieran de los datos técnicos indicados en este manual.
Las condiciones diferentes pueden dar lugar a un peligro eléctrico, incendio o fallo del aparato.
Proteja la pantalla de la humedad. Este concepto incluye la humedad ambiental elevada continua, la proximidad al agua,
el goteo y salpicaduras de agua, así como la lluvia. No coloque sobre el aparato ningún recipiente lleno de agua, como
por ejemplo, jarrones. Al conectar una antena exterior tenga en cuenta que no puede entrar agua en la entrada de cable.
Existe el peligro de una descarga eléctrica, así como de daños irreparables en el aparato.
Proteja el aparato del calor y de la luz solar directa. No coloque el aparato cerca de un fuego, calefacción u horno. Proteja
el aparato de la acumulación de calor. No cubra las rendijas de ventilación. Mantenga una distancia suficiente por encima
y por debajo de las rendijas de ventilación, así como lateralmente a los muebles y al techo. No cubra el aparato con
cortinas.
Existe peligro de incendio por sobrecalentamiento.
CONEXIÓN A LA RED Y MANEJO
Para separar de forma segura la pantalla de la tensión de red debe apagarse el interruptor de alimentación y
desenchufarse el cable del módulo de entrada de red. Conecte la pantalla solamente a una toma de corriente instalada
según lo prescrito con contactos de protección, cuya tensión de red coincida con los datos técnicos del aparato. Procure
que el conector de red y la toma de corriente estén siempre accesibles.
Las condiciones diferentes pueden dar lugar a un peligro eléctrico, incendio o fallo del aparato.
Tienda el cable de alimentación de forma que nadie pueda tropezar en él.
Si la pantalla cae puede herir a alguien y causar daños irreparables en el aparato.
2
ESPAÑOL
Page 65

Utilice solamente el cable de alimentación suministrado. Protéjalo contra daños y no lo modifique de ninguna forma. No
utilice nunca un cable de alimentación dañado. Si el cable de alimentación o el enchufe están dañados, la pantalla no
debe seguir utilizándose.
Existe peligro de una descarga eléctrica, incendio o fallo del aparato.
No toque nunca el interruptor de alimentación ni el cable de alimentación con las manos húmedas.
Existe peligro de una descarga eléctrica.
No desenchufe nunca el conector de la toma de corriente tirando del cable de alimentación. Evite tender el cable de
alimentación cerca de objetos calientes.
Existe peligro de incendio y peligro eléctrico.
Por motivos de seguridad, en caso de ausencia prolongada o tormenta, desenchufe el conector de red de la toma de
corriente y el conector de la antena doméstica de la toma de antena.
Medida de precaución para evitar un eventual incendio o evitar daños en el aparato y el peligro de una descarga eléctrica.
Apague siempre la pantalla y la fuente de señal antes de conectar ambos aparatos.
Existe peligro de una descarga eléctrica.
AVERÍAS
Si la pantalla o el cable de alimentación están dañados, desenchufe inmediatamente el conector de red de la toma de
corriente.
Desenchufe inmediatamente el conector de red cuando salgan del aparato humo, olor desagradable o ruidos inusuales.
Haga esto siempre que la pantalla no pueda reproducir ninguna imagen después de encenderla o durante su
funcionamiento. No intente nunca seguir utilizando la pantalla en este estado.
No intente nunca abrir y/o reparar el aparato por sí solo. En la pantalla no hay piezas que pueda mantener o cambiar por
sí mismo. Póngase en contacto con nuestro teléfono de servicio al cliente u otro taller de servicio apropiado.
LIMPIEZA Y CUIDADO
Antes de la instalación, limpieza y cuidado, desconecte el aparato y desenchufe el conector de red de la toma de corriente.
Espere unos minutos para que los condensadores del aparato se puedan cargar completamente.
Para la limpieza utilice solamente un paño suave ligeramente humedecido. Debe evitar los disolventes y limpiadores
químicos, ya que podrían dañar las superficies.
Desenchufe inmediatamente el conector de red si entran en la pantalla cuerpos extraños como agua, otros líquidos,
piezas metálicas, etc. No intente nunca introducir en el aparato ningún objeto ni las manos.
Existe peligro de descarga eléctrica o accidente.
ESPAÑOL
PILAS
En caso de ingestión, las pilas pueden implicar peligro de muerte. Por lo tanto, mantenga las pilas fuera del alcance de
los niños. Si se ingiere una pila, debe solicitarse asistencia médica inmediata.
Extraiga siempre inmediatamente las pilas gastadas del mando a distancia, ya que pueden tener fugas y causar daños.
Las pilas suministradas no deben cargarse ni reactivarse por otros medios, abrirse, lanzarse al fuego ni cortocircuitarse.
Las pilas gastadas no deben eliminarse junto con la basura doméstica. Las pilas deben depositarse en los puntos de
recogida previstos para ello.
OTRAS ADVERTENCIAS
Cuando la pantalla está en el modo standby, sigue estando conectada a la red eléctrica. Para cortar totalmente la
alimentación, debe poner el interruptor de alimentación en la posición O" o desenchufar el conector de red de la toma
de corriente.
Para una mayor ergonomía, se recomienda no usar letras rojas y azules o símbolos sobre fondo oscuro. Debido al bajo
contraste, una visualización de este tipo causa una mala legibilidad y los ojos se fatigan pronto. Por este motivo, debe
usar visualizaciones con el mayor contraste posible, por ejemplo, letras negras sobre fondo blanco.
Para evitar dolor en los ojos y mantener una distancia de visión óptima, la distancia al aparato debe ser cinco a seis veces
la diagonal de la pantalla. En la sala donde se encuentre la pantalla debe ser lo bastante clara para que se pueda leer.
Con una claridad excesiva se pierden los contrastes. Una luz insuficiente cansa la vista con los cambios claro / oscuro
en la pantalla.
Los embalajes y envoltorios son reciclables y deben destinarse a la reutilización cuando ya no sean necesarios.
ESPAÑOL
3
Page 66

3. Resumen
La pantalla TFT ofrece múltiples posibilidades de conexión para PC, reproductores de DVD, vídeos, videocámaras, etc.
Tanto si se trata de imágenes de televisión, de vídeo o de PC, se reproducen con una nitidez asombrosa y sin distorsión
sobre la superficie de la pantalla totalmente plana. La reproducción de las imágenes se caracteriza por una excelente
claridad y un brillo extraordinario. Otras características importantes son la gran diagonal de la pantalla de 75 cm con una
relación de 15:9 y la profundidad muy plana.
Para funcionar como televisor es necesaria la conexión a una antena terrestre, instalación de recepción SAT o sistema
de televisión por cable.
El manejo se realiza interactivamente a través del mando a distancia suministrado y el menú en pantalla (OSD). En él
pueden efectuarse todos los ajustes de la calidad de la imagen.
Un nuevo sistema de refrigeración permite el funcionamiento de la pantalla TFT sin el molesto ruido de ventilador. Dado
que es silenciosa como un televisor normal, la pantalla TFT es extraordinariamente indicada para salas de estar y de
conferencias.
Equipamiento
Carcasa de aluminio de alta calidad
Diseño sin ventilador
Diagonal de pantalla de 75 cm
Formato 15:9
Ángulo de visión horizontal/vertical 170 grados
Sistema estéreo de altavoces integrado
Posibilidades de ajuste del aparato
Filtro de característica en peine digital
Compatible con PAL, SECAM y NTSC
Compatible con VGA, SVGA, WXGA, XGA y SXGA
Teletexto
Identificación de programa y clasificación de emisora automáticas
Sleep Timer
Salvapantallas
2 conexiones SCART
1 S-Video
1 FBAS
1 DVI (I) (analógico y digital)
3.1 Volumen de suministro
Compruebe la pantalla TFT después de extraerla del embalaje, para detectar posibles daños de transporte y que no falte
ningún elemento del suministro. El proveedor sólo podrá atender sus reclamaciones por daños de transporte si lo
comunica antes de la primera puesta en servicio. Si falta algún elemento en el volumen de suministro, póngase en
contacto con el teléfono de servicio al cliente. Conserve el embalaje original por si necesita transportar la pantalla.
Volumen de suministro estándar
2 pilas LR03
1 pantalla TFT
1 mando a distancia
1 cable de
alimentación de 2,5 m
1 manual de usuario y
1Ătarjeta de garantía
1 Cable de vídeo
HD-Sub en DVI-I
1 Cable Scart
1 Cable de antena
4
ESPAÑOL
Page 67

3.2 Conexiones
ESPAÑOL
1 2 3 4 5
AUDIO IN
SCART 2
SERIALCVBSS-VIDEO
SCART 1
PC DVI - I
ANTENNA
6
OUT
LINE
CVBSPCS-VIDEO
11 10 9 8 7
[1] SCART 2 - por ejemplo, conexión al vídeo
[2] S-VIDEO (Y/C) - por ejemplo, conexión de videocámara con toma S-Video
[3] SERIAL - Interfaz RS232 para servicio
[4] PC DVI-I - Conexión PC (RGB en señales analógicas, DVI en señales digitales)
[5] AUDIO IN PC - Por ejemplo, conexión de PC con toma Line-Out
[6] OUT LINE - Por ejemplo, conexión de amplificador de audio o receptor DVD
[7] AUDIO IN CVBS - por ejemplo, conexión de videocámara con toma Video-Out
[8] AUDIO IN S-VIDEO - por ejemplo, videocámara con toma S-Video
[9] ANTENNA - Conexión de señal de antena de TV (antena terrestre o conexión de cable)
[10] CVBS - por ejemplo, conexión de videocámara con toma Video-Out
[11] SCART 1 - por ejemplo, conexión de receptor satélite
ESPAÑOL
5
Page 68

3.3 Teclas de funcionamiento y funciones del mando a distancia
Para poder controlar la pantalla TFT con el mando a distancia, el conector de red debe estar enchufado y el interruptor
de alimentación encendido.
El mando a distancia de infrarrojos sólo funciona cuando no hay ningún obstáculo entre el mando y el sensor de infrarrojos
de la parte delantera (inferior) de la pantalla. El alcance del mando a distancia es de 6 m aprox.
Si las pilas se debilitan, se reduce el alcance del mando a distancia. En este caso, cambie las pilas. Sólo deben usarse
2 pilas del tipo LR03 AAA 1,5 V.
Las pilas gastadas no deben eliminarse junto con la basura doméstica. Deben depositarse en
un lugar de recogida de pilas usadas (por ejemplo, un contenedor de recogida de pilas en una
tienda) o eliminarse como residuos especiales
[1] Tecla standby
[2] Teclas de programa 1-9, 0
[3] Tecla M (Memo), roja
[4] Tecla verde
[5] Tecla azul
[6] Tecla amarilla
[7] Tecla selección de programa ascendente
[8] Tecla Menú
[9] Tecla para reducir el volumen / tecla de dirección izquierda
[10] Tecla para aumentar el volumen / tecla de dirección derecha
[11] Tecla selección de programa descendente
[12] Tecla de selección directa del modo TV
[13] Tecla para cambiar entre número de programa de uno o
varios dígitos
[14] Tecla de selección directa del modo PC
[15] Tecla para la función de lista de programas en el modo TV o
funciones en el modo de teletexto
[16] Tecla de selección directa del modo Vídeo
[17] Tecla de selección directa de teletexto
[18] F2 = Tecla FREEZE (modo de teletexto)
F1 - F4 = Teclas con diferentes funciones según la
configuración
[19] Tecla de selección del formato de imagen
[20] Tecla de desconexión del sonido
[21] Tecla HOLD
[22] Tecla M/S
[23] Tecla PIP (imagen sobre imagen)
[24] Tecla para mostrar el reloj / tecla MIX
[25] Tecla AUTO o PAGE
[26] Tecla de información
11
1212
16
19
23
1
2
3
4
7
9
5
6
6
8
10
13
14
15
17
18
21
25
20
22
24
26
El mando a distancia suministrado puede tener un diseño diferente del mostrado.
3.4 Teclas del funcionamiento del aparato
Las funciones de las teclas del aparato se corresponden con las del mando a distancia.
Tecla Vol -
Tecla P
Tecla P
6
Tecla Vol +Ă
Tecla standby
ESPAÑOL
Page 69

4. Primera puesta en servicio
Apague todos los aparatos utilizados, incluida la pantalla TFT antes de realizar cualquier
conexión.
4.1 Desembalaje e instalación
SELECCIONAR EL LUGAR DE INSTALACIÓN
Dirección de visión
A pesar del ángulo de visión amplio, la pantalla TFT ofrece el mejor rendimiento cuando la dirección de visión es
directa y perpendicular. Alinee la pantalla en la dirección de visión usada más frecuentemente.
Lugar de instalación
Reflejos
No instale la pantalla frente a ventanas u otras fuentes de luz.
Acceso a la entrada de red
La entrada de red y el interruptor de alimentación deben estar siempre accesibles.
Circulación de aire
Deje una distancia mínima de 10 cm en los lados y la parte trasera hasta los muebles. Por la parte superior la disĆ
tancia mínima a los muebles o el techo debe ser de 30 cm.
Temperatura ambiente
Para que el funcionamiento sea seguro y fiable, la Temperatura ambiente debe estar entre 5 °C y 35 °C.
ESPAÑOL
DESEMBALAJE
10 cm
Espacio
libre
30 cm
Espacio libre
ESPAÑOL
Esquina de
apertura
Coloque la caja, con la parte inferior sobre una base
firme. Identificará la parte superior por la dirección de las
puntas de las flechas impresas en la cara longitudinal de
la caja.
Separe la cinta de la caja de la esquina de apertura y
extraiga hacia arriba la parte superior de la caja.
7
Page 70

Para extraerla, sujete la pantalla TFT del centro por las dos piezas insertadas en el embalaje.
Se recomienda extraer la pantalla TFT entre dos personas.
Parte superior de la caja
Pieza insertada en
el embalaje
Pantalla TFT
Pieza insertada en el
embalaje
Parte inferior de la caja
4.2 Conexión y encendido
Conexión (visión general de las conexiones en la fig. de la página 5)
Enchufe el cable de alimentación en la toma de entrada de red de la pantalla y el conector de red en una toma de
corriente.
Conexión del cable / Antena terrestre
Si desea conectar un cable o una antena terrestre, use para ello la toma
ANTENNA.
Receptor satélite
Si recibe su programa de televisión por satélite, conecte su receptor con un
cable SCART a la toma SCART 1 o SCART 2. SCART 1 dispone
adicionalmente de una conexión para fuentes RGB, como p.ej. un
reproductor de DVD.
8
ESPAÑOL
Page 71

PC
Para conectar su PC a la pantalla TFT, use la toma PC DVI-I. Si su PC disĆ
pone de una salida VGA analógica, para conectar use un cable DVI-I a
15Ăpin HD-Sub.
Con las tarjetas gráficas más viejas de PC puede ocurrir que el
pin 9 esté cerrado. Si es así, póngase en contacto con el teléfono
de servicio al cliente.
Preparación
Mando a distancia
Abra la tapa del compartimiento de las pilas que hay en la parte posterior del mando a distancia e introduzca
las dos pilas suministradas (tipo LR03 Micro AAA). Tenga en cuenta los datos de polaridad del fondo del comĆ
partimiento de las pilas. Cierre de nuevo el compartimiento.
Encendido
Ponga el interruptor de alimentación de la parte posterior de la pantalla en la posición I". La pantalla se encuentra
ahora en el modo standby y puede encenderse con el mando a distancia.
Conexión del cable / Antena terrestre
Encienda la pantalla con la tecla TV de su mando a distancia.
ESPAÑOL
Receptor satélite
PC
Encienda su receptor satélite y después la pantalla con la tecla VIDEO
de su mando a distancia. Tenga en cuenta que según el tipo de toma
SCART al que esté conectado su receptor, puede que tenga que pulĆ
sar varias veces la tecla VIDEO.
Encienda la pantalla con la tecla PC de su mando a distancia y selecĆ
cione la entrada de señal correspondiente ( PC(RGB) o PC(DVI) ).
Para ello, con la tecla MENU del mando a distancia, llame el menú
OSD de su pantalla y en el submenú ENTRADAS seleccione su señal
de entrada.
ESPAÑOL
9
Page 72

4.3 Manejo del menú OSD
Su pantalla TFT puede ajustarse y manejarse fácilmente con el menú OSD. Para ello dispone de 6 teclas en su mando
a distancia:
1
2
4
3
5
6
[1] Tecla M
Memoriza los cambios realizados.
[2] Tecla P Ă
Subir en el menú OSD. El menú o la función seleccionado se resalta por el color del fondo.
Si se muestran funciones en forma de valor o diagrama de barras, puede aumentar el valor con esta tecla.
[3] Tecla Ă
Volver al menú anterior. Sale del submenú o la función seleccionado.
[4] Tecla MENU
Mostrar el menú principal OSD. El menú principal aparece en el borde superior izquierdo de la pantalla.
Ocultar el menú OSD.
[5] Tecla Ă
Activa el submenú o la función seleccionado. La opción de menú seleccionada se resalta con fondo
verde y puede modificarse.
[6] Tecla PĂ Ă
Descender en el menú OSD. El menú o la función seleccionado se resalta por el color del fondo.
Si se muestran funciones en forma de valor o diagrama de barras, puede reducir el valor con esta tecla.
MEMORIZAR CAMBIOS
Los cambios que realice se memorizan pulsando la tecla M de su mando a distancia (véase la fig. anterior) o bien al salir
del menú OSD.
10
ESPAÑOL
Page 73
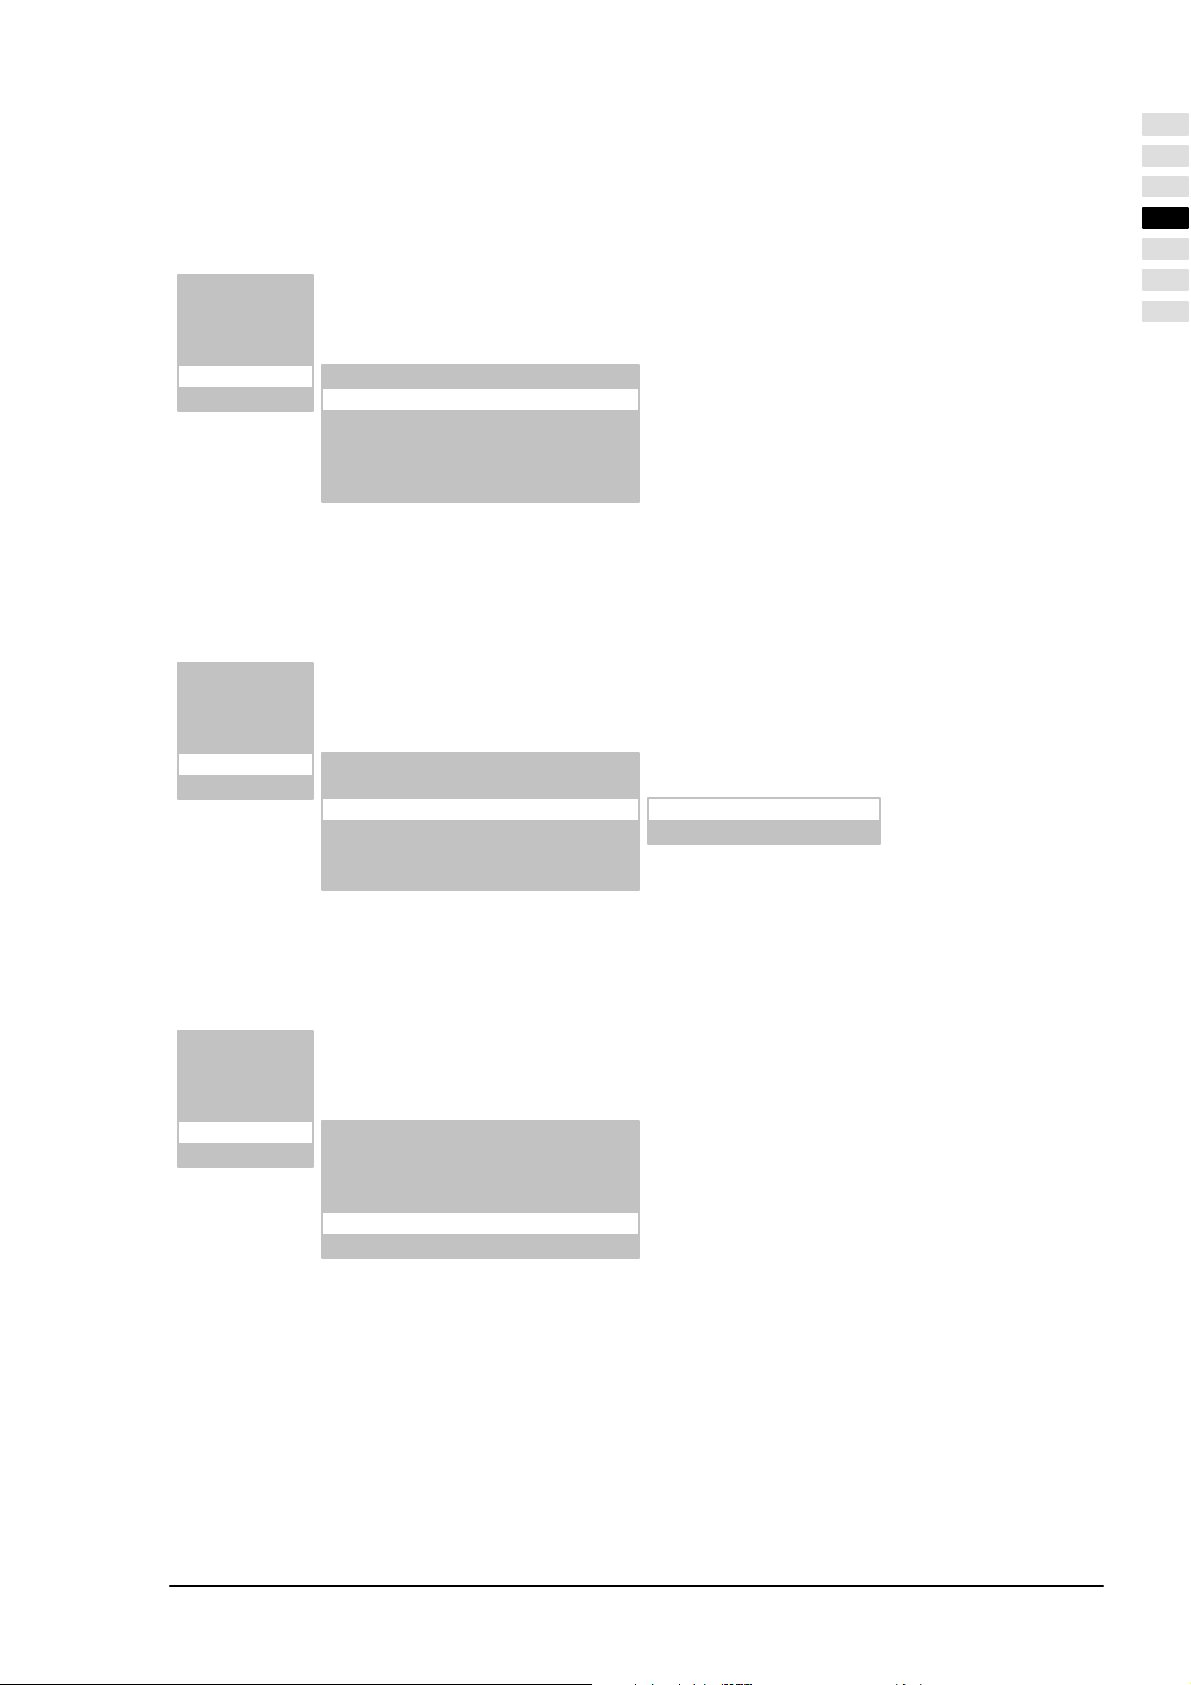
4.4 Ajustes básicos del menú OSD
CAMBIAR IDIOMA OSD
Su pantalla dispone de un menú OSD en 6 idiomas (alemán, inglés, francés, italiano, holandés y español). Para cambiar
el idioma preajustado, en el menú principal llame la opción AJUSTES. En el submenú, ajuste la opción de menú IDIOMA
y seleccione el idioma deseado:
Entradas >
Imagen >
Pantalla >
Sonido >
Ajustes >
Información >
MODIFICACIÓN DE LAS PROPIEDADES DEL MENÚ OSD
Para modificar la Pantalla o el tiempo de la misma (tiempo después de la última pulsación hasta la desaparición) del menú
OSD, en el menú principal seleccione la opción de menú AJUSTE. En el submenú AJUSTES DEL OSD dispone de otro
submenú con las opciones TIEMPO DE APAGADO (Posibilidades de selección: 5, 10 y 15 segundos) y
TRANSPARENCIA (Posibilidades de selección: act. y des.):
Entradas >
Imagen >
Pantalla >
Sonido >
Ajustes >
Información >
Fuente información: On
Idioma: Español
Ajustes del OSD: >
Apagado/Stand–by: >
Reinicio volores de fábrica: >
Apagado automático: Off
Fuente información: On
Idioma: Español
Ajustes del OSD: >
Apagado/Stand–by: >
Reinicio volores de fábrica: >
Apagado automático: Off
Tiempo de apagado: 5 s
Transparencia: Off
ESPAÑOL
RESTABLECIMIENTO DE LOS AJUSTES DE FÁBRICA
Existe la posibilidad de anular todos los cambios realizados en el menú OSD y restablecer la configuración original de
fábrica. Para ello, seleccione en el menú principal la opción de menú AJUSTES y active en el submenú la opción de menú
REINICIO VOLORES DE FÁBRICA:
Entradas >
Imagen >
Pantalla >
Sonido >
Ajustes >
Información >
Fuente información: On
Idioma: Español
Ajustes del OSD: >
Apagado/Stand–by: >
Reinicio volores de fábrica: >
Apagado automático: Off
4.5 Ajustes durante la primera puesta en servicio
MODO TV
Búsqueda automática de emisoras
Si recibe sus programas exclusivamente por satélite, no debe realizar la búsqueda automática de emisoras.
Para iniciar la búsqueda automática de emisoras, proceda del modo siguiente:
Encienda la pantalla con la tecla TV de su mando a distancia.
Llame el menú OSD con la tecla MENU de su mando a distancia y seleccione la opción de menú ENTRADAS.
Se abre un submenú.
Seleccione en el submenú la opción de menú AJUSTES. Se abre otro submenú.
ESPAÑOL
11
Page 74
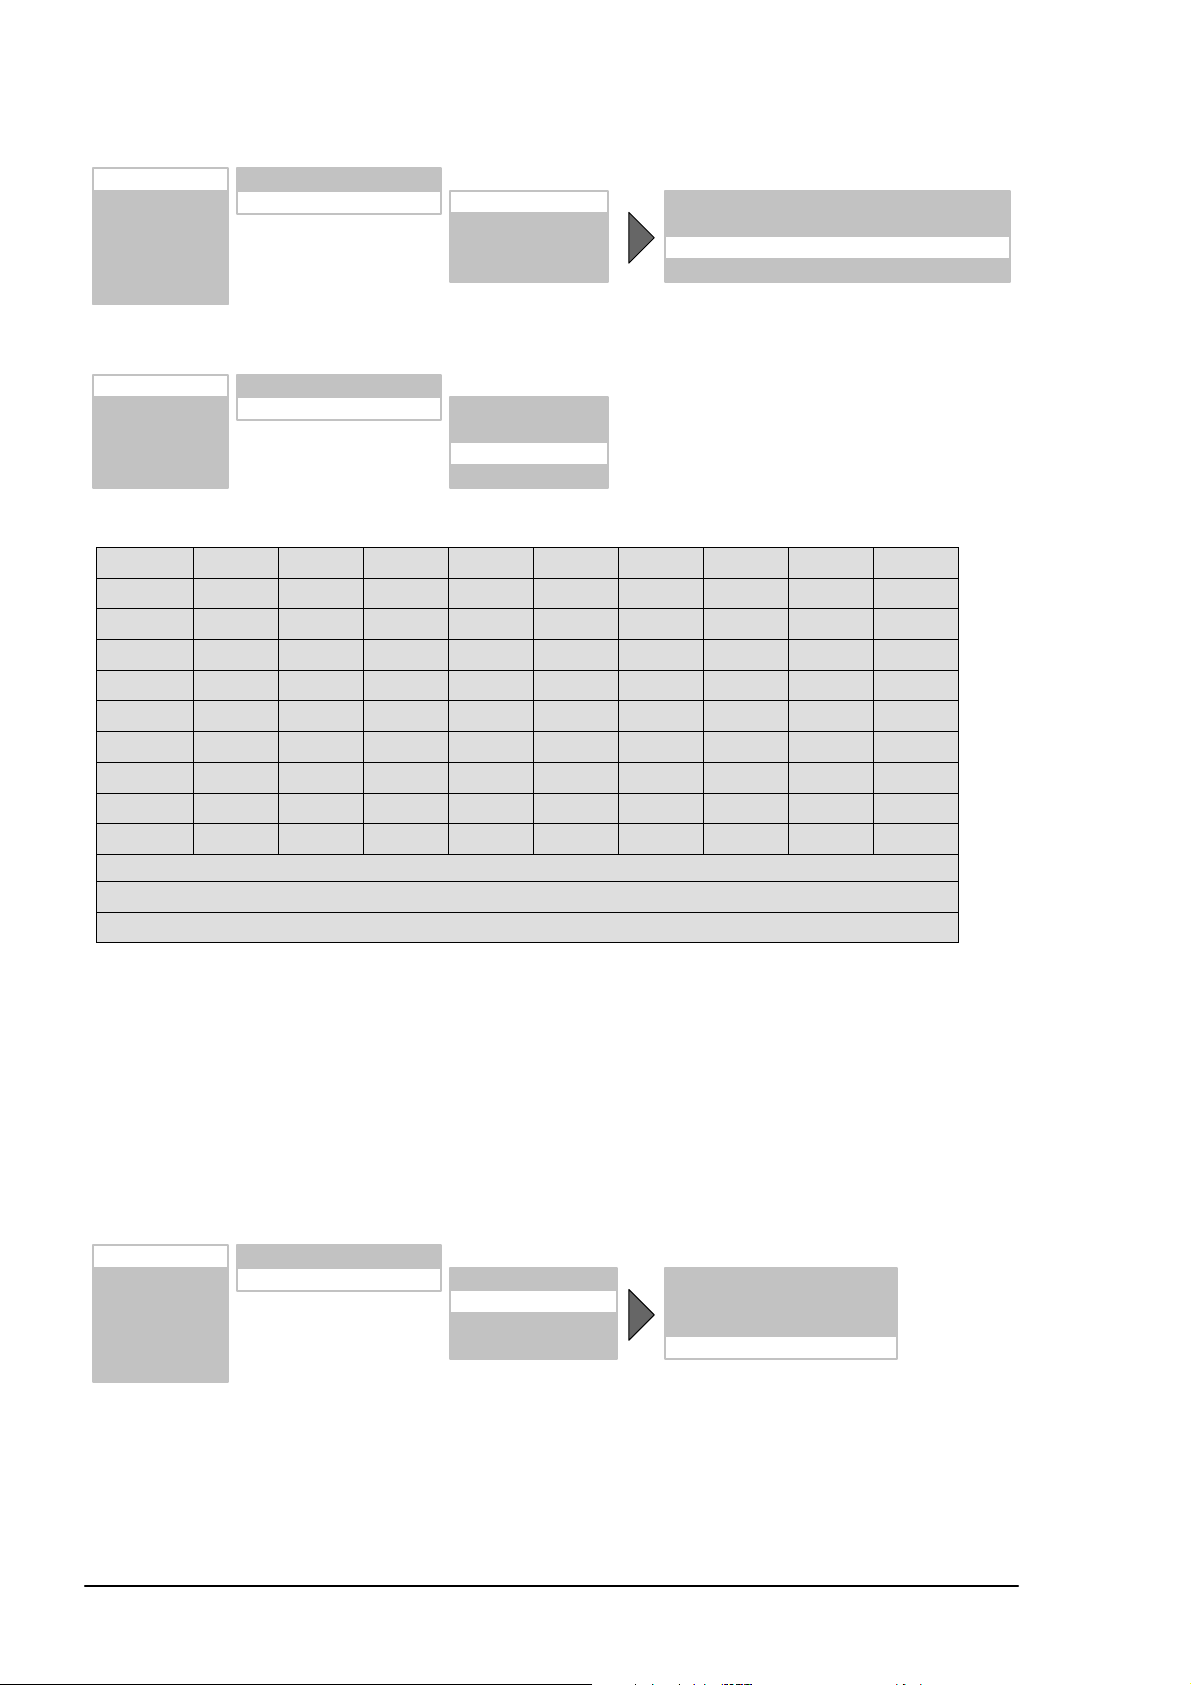
Seleccione ahora la opción de menú BÚSQUEDA AUTOM. y active la opción del submenú COMIENZO DE
LA BÚSQUEDA. Se inicia la búsqueda de emisoras automática.
Entradas >
Imagen >
Pantalla >
Sonido >
Ajustes >
Información >
Seleccionar: TV
Preferencias > Búsqueda autom. >
Búsqueda man. >
Clasificación >
Borra >
TV estandár : PAL BG
Modo búsqueda: Todos los programas
Comienzo de la búsqueda:
Punto de comienzo: 01
CLASIFICAR EMISORAS DE TV
Entradas >
Imagen >
Pantalla >
Sonido >
Ajustes >
1 ARD 2 3 4 5 6 7 8 9 10
11 ZDF
21 WDR
31 _ _ _
41
51
61
71
81
91 99
Seleccionar: TV
Preferencias > Búsqueda autom. >
Búsqueda man. >
Clasificación >
Borra >
(Verde)_: Selección de un programa. Actual: 31 MENU: Cerrar
(Azul)_: Insertar una posición de programa vacía
(Amarillo)_: Memorizar el programa seleccionado en la posición actual
Modificar el nombre del programa
Si la pantalla TFT puede identificar el nombre de la emisora a partir de la señal de televisión, el nombre identificado se
memoriza en el número de programa ajustado. Si no se ha identificado el nombre del programa, en el nombre aparece
el número de programa (por ejemplo, PR02).
Para modificar el nombre del programa proceda del modo siguiente:
Mueva la marca con la tecla Ăo sobre el nombre de la opción de menú.
Seguidamente, pulse la tecla Ăpara seleccionar la posición del primer carácter.
Con las teclas ĂyĂĂpuede desplazarse por el juego de caracteres hasta que aparezca el que desee en la posiĆ
ción seleccionada.
Utilice la tecla āĂĂpara seleccionar la posición del carácter siguiente.
Repita los 3 pasos anteriores hasta que haya introducido el NOMBRE. Son posibles un máximo de 5 caracteres.
Entradas >
Imagen >
Pantalla >
Sonido >
Ajustes >
Información >
Seleccionar: TV.
Preferencias > Búsqueda autom. >
Búsqueda manual >
Clasificación >
Borra >
Programa: 01
TV estándar: PAL BG
Frecuencia: 055.25 MHz
Nombre: SW3
MODO PC
Seleccionar la entrada de señal
Encienda la pantalla con la tecla PC de su mando a distancia.
Llame el menú OSD con la tecla MENU de su mando a distancia. La opción de menú ENTRADAS está resalĆ
tada de color.
Seleccione en el submenú SELECCIONAR la entrada de señal correspondiente (PC (RGB) o PC (DVI)).
12
ESPAÑOL
Page 75

Entradas >
Imagen >
Pantalla >
Sonido >
Ajustes >
Información >
Seleccionar: PC (RGB)
Preferencias >
FUNCIÓN ADJUSTE AUTO
La pantalla TFT ejecuta automáticamente siempre que se usa por primera vez un formato de vídeo PC analógico (RGB)
la función Ajuste Auto . Durante este tiempo, la visualización se mueve ligeramente a un lado y a otro para adquirir la
posición y reproducción óptimas.
La posición H/V (horizontal/vertical) y el tamaño de imagen tienen que ajustarse manualmente
en algunos formatos de PC poco prácticos. La función Ajuste auto. depende mucho de la
Pantalla de imagen. La visualización de una imagen blanca que llene la pantalla representa una
buena solución.
ESPAÑOL
Entradas >
Imagen >
Pantalla >
Sonido >
Ajustes >
Información >
Puede memorizar los formatos usados frecuentemente como formatos de usuario. La pantalla identifica los formatos meĆ
morizados y los visualiza correctamente de forma inmediata sin ejecutar la función Ajuste auto.
En el menú principal, seleccione la opción de menú ENTRADAS y llame el submenú AJUSTES. Se abre otro subĆ
menú.
Active la opción de menú AJUSTES DEL USUARIO.
Con la opción de menú RELLAMADA puede determinar el formato de usuario ajustado actualmente. Por ejemplo,
con la opción de menú GUARDA puede asignar el formato de usuario, por ejemplo, en la posición 1 (existen 8
posiciones).
Entradas >
Imagen >
Pantalla >
Sonido >
Ajustes >
Información >
Seleccionar: PC (RGB)
Preferencias >
Seleccionar: PC (RGB)
Preferencias >
Frec. H: 60.0 kHz
Frec. V: 75.0 Hz
Pixel Clk: 78.75 MHz
Pol. H / V: + / –
Ajustes del usuario >
Ajuste auto.
Pos. V:
Tamaño V:
Tamaño H:
Pos. H:
Fase
Frec. H: 60.0 kHz
Frec. V: 75.0 Hz
Pixel Clk: 78.75 MHz
Pol. H / V: + / –
Ajustes del usuario >
Ajuste auto.
Pos. V:
Tamaño V:
Tamaño H:
Pos. H:
Fase
Posición: 1
Rellamada
Guarda
Borra todo
5. Manejo cotidiano
5.1 Encender / apagar
ENCENDER
Para encender la pantalla TFT ponga el interruptor de alimentación en la posición I".
El LED STANDBY se ilumina de color naranja en el sensor de infrarrojos.
A continuación, pulse una tecla numérica del mando a distancia para poner en marcha la pantalla TFT.
El LED de FUNCIONAMIENTO del sensor de infrarrojos se ilumina de color verde.
APAGAR
Pulse la tecla standby en el mando a distancia, la pantalla TFT cambia de nuevo al modo standby.
El LED STANDBY se ilumina de color naranja en el sensor de infrarrojos.
ESPAÑOL
13
Page 76
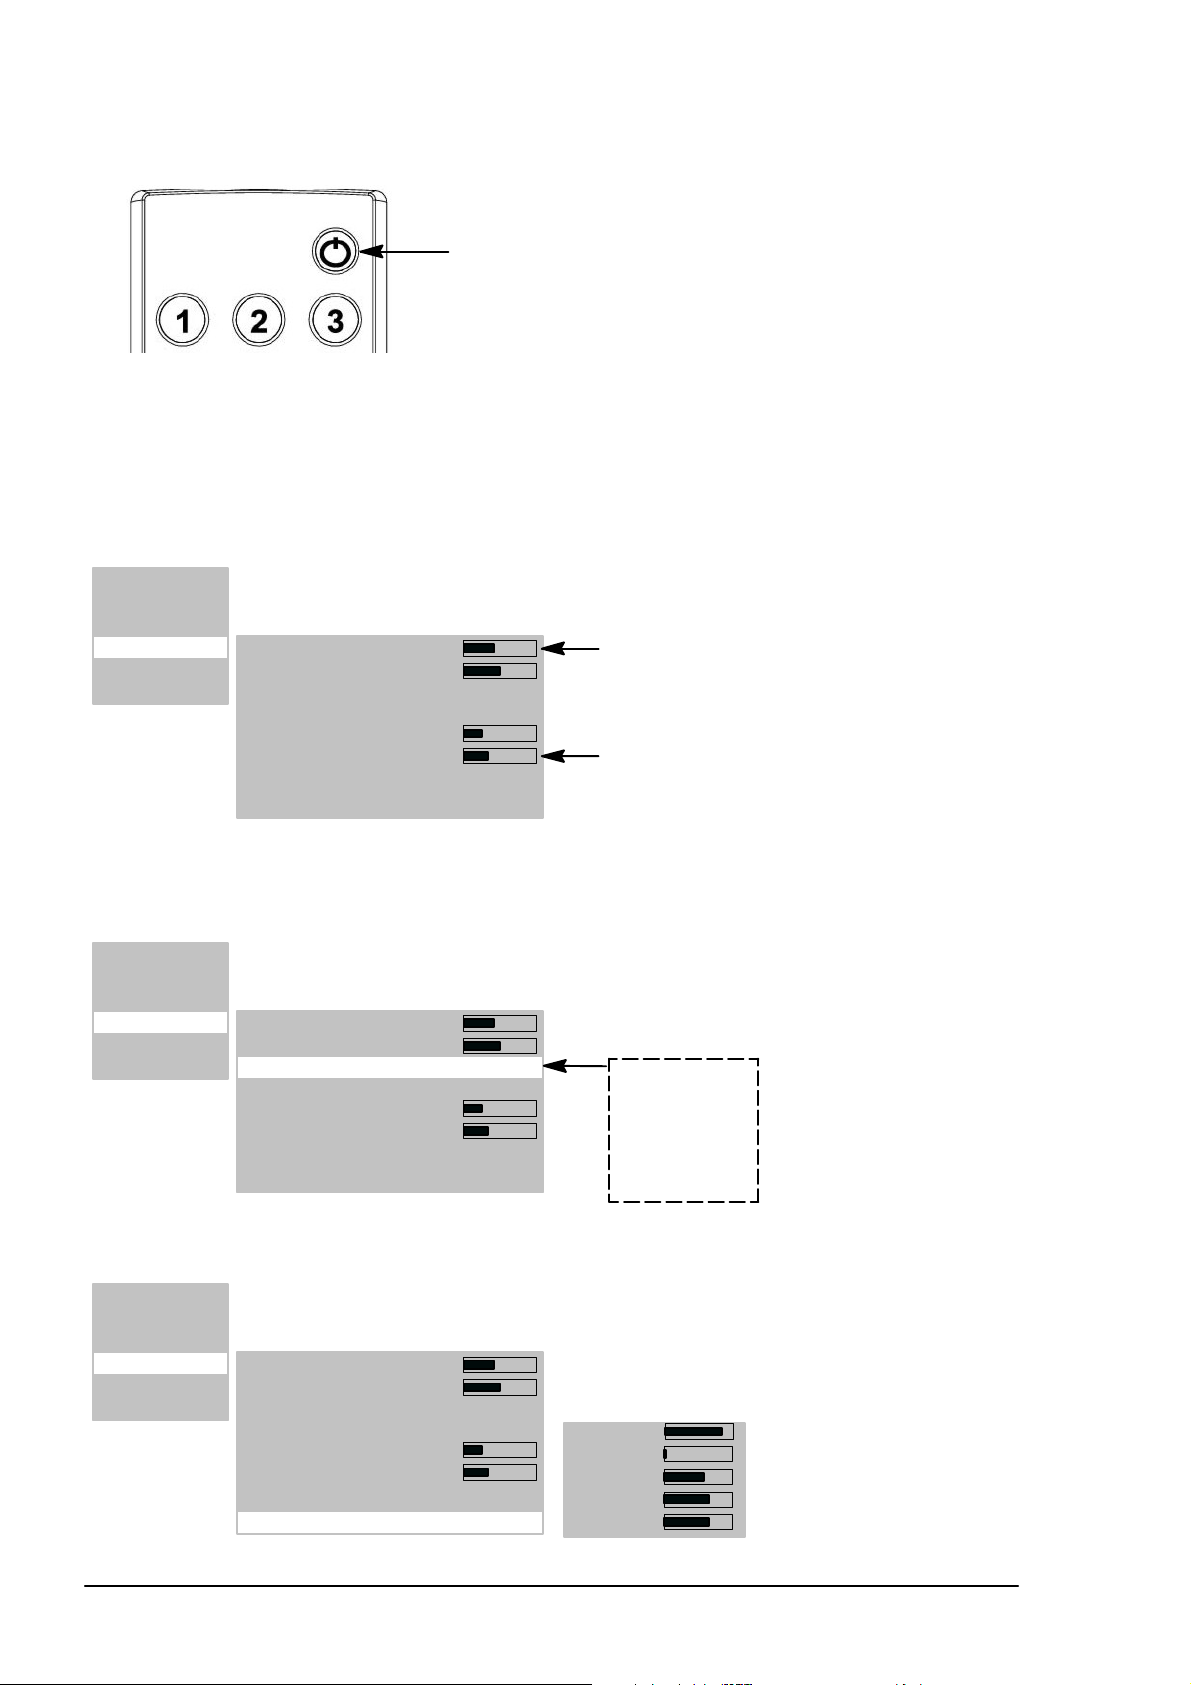
Para apagar completamente de nuevo la pantalla TFT ponga de nuevo el interruptor de alimentación en la
posición 0".
Tecla standby
5.2 Ajustar el sonido
AJUSTE DEL VOLUMEN
Pulse la tecla Ă(Vol -) oĂ (Vol +) en el mando a distancia para ajustar el volumen deseado.
Entradas >
Imagen >
Pantalla >
Sonido >
Ajustes >
Información >
Volúmen:
Balance:
Ecualizador: Rock
Opción: Estéreo
Volúmen linea de salida :
Volúmen inicial máx.:
Control automático del volúmen: On
Ecualizador del usuario >
Indicación del volumen ajustado actualmente
Volumen al encender la pantalla TFT
AJUSTE DE SONIDO
En la opción de menú ECUALIZADOR puede ajustar la muestra de sonido predefinida.
Entradas >
Imagen >
Pantalla >
Sonido >
Ajustes >
Información >
Seleccione la opción de menú ECUALIZADOR DEL USUARIO para realizar su muestra de sonido individual.
Entradas >
Imagen >
Pantalla >
Sonido >
Ajustes >
Información >
Volúmen:
Balance:
Ecualizador: Rock
Opción: Pseudo estéreo
Volúmen linea de salida :
Volúmen inicial máx.:
Control automático del volúmen: On
Ecualizador del usuario >
Volúmen:
Balance:
Ecualizador: Rock
Opción: Pseudo estéreo
Volúmen linea de salida :
Volúmen inicial máx.:
Control automático del volúmen: On
Ecualizador del usuario >
Plano
Usuario
Jazz
Rock
Vocal
Clásico
Pop
< 120 Hz:
500 Hz:
1.5 kHz:
5 kHz:
> 10 kHz
14
ESPAÑOL
Page 77

DESCONEXIÓN DEL SONIDO
Pulse la tecla en el mando a distancia. El sonido se desconecta y en la pantalla aparece durante 3Ăsegundos
aprox. la ventana informativa siguiente:
Tuner : 2 ZDF
Mute
El sonido se conecta de nuevo cuando se pulsa la tecla Ă(Vol -) oĂ (Vol +) en el mando a distancia. En la
pantalla aparece durante 3 segundos aprox. la ventana informativa siguiente:
Tuner : 2 ZDF
Estéreo Analog
5.3 Ajustar la imagen
Puede ajustar el valor deseado de contraste, claridad, nitidez de imagen y color.
CONTRASTE / CLARIDAD / NITIDEZ DE IMAGEN / COLOR
Pulse la teclaĂĂpara aumentar oĂĂpara reducir los valores.
Con el ajuste NITIDEZ puede mejorarse la Pantalla de la imagen.
La opción de menú COLOR permite modificar el balance de color:
Si pulsa la teclaĂ, la imagen es más verdosa.
Si pulsa la teclaĂ, la imagen es más rojiza.
Entradas >
Imagen >
Pantalla >
Sonido >
Ajustes >
Información >
Contraste: 64
Brillo: 64
Nitidez:
Color: 15
DNC: 0
Foto CD: Apagado
Interlace: Automático
¡Estas opciones de menú no
en los ajustes ENTRADAS SELECCIONAR
PC(RGB)" y PC(DVI"!
están disponibles
ESPAÑOL
FORMATO DE IMAGEN
En la opción de menú Pantalla FORMATO DE LA IMAGEN ZOOM puede seleccionar formatos preajustados.
La opción de menú ZOOM DEL USUARIO le ofrece la posibilidad de crear un formato de usuario propio. Para activar su
formato de usuario, en la opción de menú ZOOM seleccione ZOOM DEL USUARIO.
Pantalla completa
En este ajuste de formato, la imagen se ajusta horizontal y verticalmente a la pantalla, de forma que siempre la llena
completamente.
Vídeo 4:3
Este ajuste de formato visualiza una imagen PAL 4:3 en la relación lateral correcta. En el borde izquierdo y derecho
de la imagen pueden verse franjas oscuras.
Auto
Este ajuste de formato escala la señal de entrada automáticamente en dirección horizontal y vertical a una Pantalla
con la imagen ajustada a la pantalla. Identifica formatos de película 16:9 y los escala con los factores prefijados.
No linear
Este ajuste de formato escala la señal de entrada automáticamente en dirección horizontal y vertical ajustando la imaĆ
gen a la pantalla, pero no linealmente. Esto significa que los contenidos de la imagen se visualizan originalmente en
el centro de la pantalla y se realiza un escalado más intenso hacia el borde.
Zoom del usuario
En este ajuste de formato puede visualizar un formato de imagen individual en el margen del 40% al 140 % del tamaño
de imagen original.
Zoom
La conmutación manual del ajuste del formato Vídeo 4:3 en el Zoom agranda la imagen en dirección vertical y horizonĆ
tal un 20% aprox. más grande que la Pantalla con la imagen ajustada a la pantalla. De este modo, cuando se ven
películas en formato 4:3, se reducen las franjas oscuras en el borde inferior y superior de la imagen.
Vídeo 16:9
Este ajuste de formato visualiza una imagen PAL 4:3 de forma que no se ven franjas oscuras en el borde derecho
e izquierdo de la imagen.
Para cambiar entre los formatos pulse repetidamente la tecla F
ESPAÑOL
en el mando a distancia.
15
Page 78

Entradas >
Imagen >
Pantalla >
Sonido >
Ajustes >
Información >
Formato del la imagen >
Temperatura del color: 9300 k
Contraste del la imagen: normal
Imagen dentro de imagen >
Congelar imagen
Temp. del color del usuario >
Zoom: Pantalla completa
Zoom del usuario:
¡Esta opción de menú solaĆ
mente está disponible en el
ajuste ENTRADAS
PC(DVI) / PC(RGB)!
Pantalla completa
Vídeo 4:3
Auto
No linear
Zoom del usuario
Zoom
Vídeo 16:9
¡Esta opción de menú solaĆ
mente está disponible en el
ajuste ENTRADAS
PC(DVI) / PC(RGB)!
PC 1:1
5.4 Modo de televisión
La pantalla TFT está en el modo standby.
Para encender, pulse una de las teclas con cifras 0...9 o la tecla TV del mando a distancia.
Durante la inicialización se muestra el logotipo de la empresa.
Después aparece la última emisora de televisión seleccionada (número de programa) en la pantalla. Al mismo
tiempo se muestra durante 3 segundos aprox. la ventana informativa siguiente:
Tuner : 2 ZDF
Estéreo Analog
Pulse la tecla P āo bien PĂ āāpara subir o bajar el número de programa de uno en uno.
Con las teclas numéricas del mando a distancia puede seleccionar directamente cualquier número de programa.
TELETEXTO
Su pantalla TFT puede recibir y presentar información de teletexto TOP/FLOF.
Seleccione una emisora de televisión con teletexto.
Pulse la tecla TEXT en el mando a distancia para visualizar el teletexto.
Para seleccionar directamente páginas de teletexto, use las teclas numéricas.
Las teclas roja, verde, amarilla y azul del mando a distancia tienen diferentes funciones según el tipo de teletexto,
que se indican en la parte inferior del mismo.
5.5 Modo PC
Apague la pantalla TFT y el PC.
Conecte su PC y la pantalla TFT con un cable de vídeo habitual (conector DVI en la pantalla y conector HD-Sub
en el PC).
Encienda de nuevo la pantalla TFT y el PC.
En la opción de menú ENTRADAS SELECCIONAR debe estar ajustado el PC (RGB). Cuando se enciende, la
pantalla TFT identifica automáticamente el formato de imagen ajustado en el PC. Esta información se visualiza en
una ventana informativa.
RGB–1024x 768
Imagen completa
5.6 Funcionamiento con aparatos adicionales
VÍDEO
APAGUE la pantalla TFT y el vídeo.
Existen 3 posibilidades de conexión para su vídeo a la pantalla TFT:
por medio del cable de antena, lea para ello el manual de usuario del vídeo
con un cable Scart a SCART1 o SCART2
si su vídeo tiene una salida de S-Video, conéctela a la entrada Y/C.
ENCIENDA de nuevo la pantalla TFT y el vídeo.
16
ESPAÑOL
Page 79

Para conmutar a la entrada conectada (por ejemplo, SCART1), pulse repetidamente la tecla VIDEO del mando a
distancia.
SCART 1
Pantalla completa
DVD PLAYER
Apague la pantalla TFT y el reproductor DVD.
Conecte su reproductor DVD a SCART1 o a la entrada Y/C, si tiene una salida S-Video.
Encienda de nuevo la pantalla TFT y el reproductor DVD.
Para conmutar a la entrada conectada, pulse repetidamente la tecla VIDEO del mando a distancia.
YC
Pantalla completa
5.7 Funciones especiales
BÚSQUEDA DE PROGRAMA MANUAL
En la opción de menú PROGRAMA, introduzca un número de programa que no se haya usado todavía.
En la opción de menú FRECUENCIA debe introducir directamente la frecuencia de la emisora de televisión que
busca.
Si la imagen no es óptima, aumente o reduzca la frecuencia introducida en pasos pequeños.
Si la emisora de televisión no emite ningún nombre, puede introducirlo en la opción de menú NOMBRE.
ESPAÑOL
Entradas >
Imagen >
Pantalla >
Sonido >
Ajustes >
Información >
Seleccionar: TV
Preferencias > Búsqueda autom. >
Búsqueda manual >
Clasificación >
Borra >
Programa: 11
TV estándar: PAL BG
Frecuencia: 168.25 MHz
Nombre: HR
TEMPERATURA DE COLOR
Puede seleccionar la temperatura de color en 3 valores predefinidos o especificar un valor con la opción de menú
TEMPERATURA DE COLOR.
Un valor bajo de la temperatura de color aumenta la parte roja de la imagen y hace que aparezca más cálida". Al aumentar
la temperatura de color aumenta la parte de luz azul y la imagen aparece más fría".
Entradas >
Imagen >
Pantalla >
Sonido >
Ajustes >
Información >
Entradas >
Imagen >
Pantalla >
Sonido >
Ajustes >
Información >
Formato del la imagen >
Temperatura del color: 9300 k
Contraste del la imagen: normal
Imagen dentro de imagen >
Congelar imagen
Temp. del color del usuario >
Formato del la imagen >
Temperatura del color: 9300 k
Contraste del la imagen: normal
Imagen dentro de imagen >
Congelar imagen
Temp. del color del usuario >
7500K
9300K
11000K
Usuario
Rojo: 128
Verde 128
Azul: 110
ESPAÑOL
17
Page 80
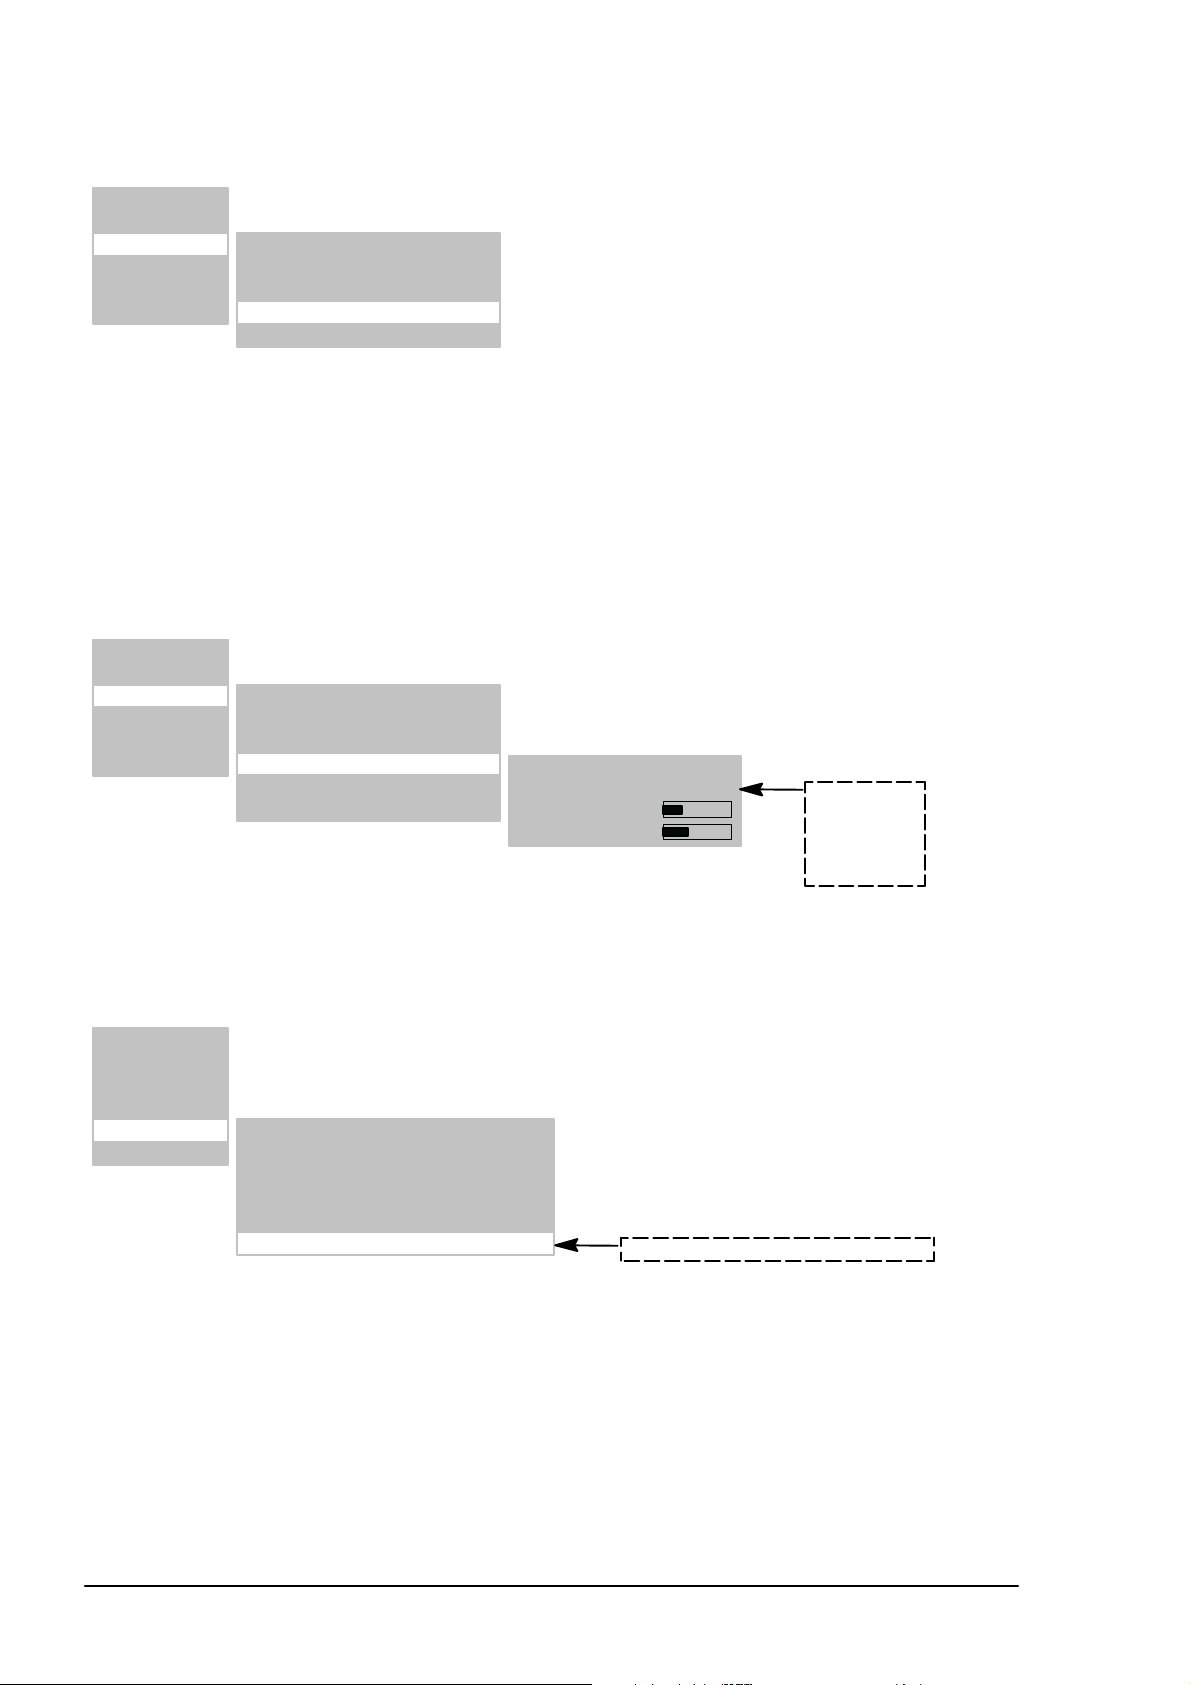
IMAGEN FIJA
Puede obtener una imagen fija con la tecla FREEZE o con la opción de menú CONGELAR IMAGEN.
Entradas >
Imagen >
Pantalla >
Sonido >
Ajustes >
Información >
Formato del la imagen >
Temperatura del color: 9300 k
Contraste del la imagen: normal
Congelar imagen
Temp. del color del usuario >
IMAGEN SOBRE IMAGEN
La función IMAGEN SOBRE IMAGEN ofrece la posibilidad de visualizar imágenes de vídeo durante la Pantalla de señaĆ
les de PC.
La opción de menú IMAGEN SOBRE IMAGEN solamente se visualiza con los ajustes ENTRADASĂĂSELECCIONAR
ĂPC(DVI) / PC(RGB) o la tecla PIP está activa.
Si pulsa la tecla PIP, se mezcla en la imagen actual la imagen de la entrada ajustada en la opción de menú
PANTALLAĂĂIMAGEN DENTRO DE IMAGENĂĂFUENTEĂ (por ejemplo, TV).
Si no hay aplicada ninguna señal en esta entrada, la ventana visualizada aparece oscura.
La posición y el tamaño de la ventana pueden ajustarse. Para activar sus ajustes individuales, debe configurar
ON. en la opción de menú FORMATO.
Entradas >
Imagen >
Pantalla >
Sonido >
Ajustes >
Información >
Formato del la imagen >
Temperatura del color: 9300 k
Contraste del la imagen: normal
Imagen dentro de imagen >
Congelar imagen
Temp. del color del usuario >
Formato (+On/Off): Apagado
Fuente: TV
Pos. horizontal :
Pos. Vertical :
TV
SCART1
SCART2
CVBS
YC
DESCONEXIÓNĂAUTOMÁTICA
Puede ajustar la pantalla TFT de forma que después de un tiempo determinado se desconecte automáticamente.
Seleccione en la opción APAGADO AUTOMÁTICA un tiempo prefijado.
Cuando transcurre ese tiempo se apaga automáticamente la pantalla TFT.
Entradas >
Imagen >
Pantalla >
Sonido >
Ajustes >
Información >
Fuente información: On
Idioma: Español
Ajustes del OSD: >
Apagado/Stand–by: >
Reinicio valores de fábrica: >
Apagado automático: Off
Off / 0:30 / 1:00 / 1:30 / 2:00 / 2:30
CONMUTACIÓN DE CANAL DOBLE DE SONIDO
Canal doble de sonido es la denominación para las películas en las que el espectador puede cambiar entre el doblaje
y el idioma original.
Si se realizan emisiones con canal doble de sonido, primero está activo el canal A.
Pulse la tecla M/S del mando a distancia para conmutar al canal B.
18
ESPAÑOL
Page 81

6. Solución de problemas
Si se produce un fallo durante el uso de su pantalla TFT, lea los errores que se describen a continuación o su solución
antes de enviar el aparato para su reparación. Posiblemente pueda solucionar el fallo por sí mismo muy fácilmente. Por
ejemplo, si el conector de red no está enchufado en la toma de corriente o existen problemas con la instalación receptora
(antena), podría creer equivocadamente que la pantalla es defectuosa.
Si las indicaciones facilitadas para la solución de los problemas no tuviesen éxito, apague el
aparato en el interruptor de alimentación y desenchufe el conector de red de la toma de coĆ
rriente.
No intente nunca reparar por sí mismo el aparato ni abra nunca la cubierta trasera del aparato.
FALLO CAUSA POSIBLE SOLUCIÓN POSIBLE
No hay imagen ni sonido
a pesar de que el conecĆ
tor de red está enchufado
y el aparato encendido.
Interruptor de alimentación en la posiĆ
ción 0" (Apagado).
El conector de red del aparato no está
enchufado en la toma de corriente.
Cable de alimentación defectuoso.
Poner el interruptor de alimentación en
la posición I".
Enchufe el conector del cable de aliĆ
mentación en la toma de corriente.
Llame al teléfono de servicio al cliente.
ESPAÑOL
La pantalla permanece
oscura.
Colores débiles o demaĆ
siado intensos.
La imagen aparece corĆ
tada o no está centrada.
La imagen es demasiado
grande o pequeña.
El mando a distancia no
funciona.
La imagen visualizada es
demasiado oscura.
Se visualiza imagen pero
no se oye sonido.
No se visualizan letras inĆ
dividuales (modo PC).
Franjas horizontales en
las señales de TV o víĆ
deo.
Para restablecer de nuevo los valores de suministro use la opción de menú
Contraste ajustado demasiado bajo.
No hay señal de entrada, seleccioĆ
nada una entrada incorrecta.
Color mal ajustado.
Cable de conexión mal conectado.
Posición de imagen mal ajustada. Corrija la posición de la imagen.
Formato de imagen mal ajustado. Pulse repetidamente la tecla F
Las pilas están gastadas.
Existe un obstáculo entre el mando a
distancia y el sensor.
El mando a distancia está fuera de
su alcance.
La calidad de la imagen está mal ajusĆ
tada.
La desconexión del sonido está actiĆ
vada.
Volumen ajustado al mínimo.
Fuente de señal instalada delante de
la pantalla.
La pantalla del cable de vídeo es insuĆ
ficiente.
AJUSTES ' RESTABLECER LOS AJUSTES DE FÁBRICA
Ajustar correctamente la claridad y/o el
contraste.
Verificar el cable de conexión; asignar
la entrada correcta de la fuente.
Ajuste el color (en la opción de menú
IMAGEN).
Conectar el cable correctamente.
hasta que la imagen aparezca
ajustada a la pantalla.
Cambie las pilas por otras nuevas.
Retire el obstáculo entre el mando a
distancia y el sensor.
Use el mando a distancia dentro del
alcance indicado.
Corrija la claridad y el contraste de la
imagen.
Pulse la tecla en el mando a distanĆ
cia.
Aumente el sonido.
Ajuste correctamente la posición de
las fases.
Compruebe el ajuste del ancho de
imagen.
Ejecute Ajuste Auto .
Coloque las fuentes de señal
generalmente a los lados o detrás de
la pantalla.
Use solamente un cable de señal de
alta calidad con una alta atenuación
del apantallamiento.
Aviso de temperatura
ESPAÑOL
Si la pantalla TFT se calienta demasiado, se muestra una ventana roja de
advertencia en el ángulo superior izquierdo de la pantalla (véase la fig. izĆ
quierda). Si no
pantalla puede conmutarse automáticamente al modo standby.
proporciona la ventilación correspondiente, posiblemente la
19
Page 82

7. Datos técnicos
PANTALLA
Tamaño / diagonal: 75 cm (30"), formato 15:9
Tamaño de imagen reproducible: 643 mm (horizontal) x 386 mm (vertical)
Resolución: 1280 x 768 píxels
Visualización de color: 16,7 millones de colores, simultáneamente
Ángulo de visión: 170° típico
Relación de contraste: 500:1 típico
2
Densidad lumínica: 450 cd/m
Tiempo de reacción: 25 ms
Errores de píxels:
NORMAS DE VÍDEO
TV / Vídeo: PAL (BG, I, DK/K', M, L/L') / SECAM / NTSC
Sintonizador TV: PAL / SECAM, 47 - 861 MHz (VHF, UHF, Hyperband)
PALplus, Cinescope: Identificación automática del formato (ajuste de la imagen a la pantalla)
Formatos:
GAMA DE FRECUENCIAS PC
Frecuencia horizontal: 30 - 80 kHz
Frecuencia vertical: 50 - 90 Hz
Frecuencia de reloj: máx. 140 MHz
Resoluciones:
Resolución recomendada :
Formatos: 1:1, Patalla completa, Formato completo, Zoom, Zoom de usuario
ENTRADAS / CONEXIONES / SINCRONIZACIÓN
Entrada de PC / Video: Identificación síncrona analógica y automática RBG
Conexiones de vídeo Sintonizador de TV: IEC, Resistencia de entrada 75 ohmios
Conexión de PC analógica/digital: DVI-I
Conexiones de audio Altavoces integrados: 2 x 2 banda ancha con 2 senos de 7 W
Sincronización: Sinc. en verde, Composite Sync con identificación automática,
Elementos de mando: Interruptor de alimentación, mando a distancia IR (menú OSD 6 idiomas)
CONDICIONES DE FUNCIONAMIENTO
Temperatura: 5 °C Ć +35 °C (funcionamiento), -20 °C Ć +60 °C (almacenamiento)
Humedad ambiental: 20% Ć 85% (sin condensación)
Altura: máx. 2.000 m (7.000 pies)
DATOS CONEXIÓN DE RED
Alimentación eléctrica: 220 V Ć 240 V CA
Frecuencia de red: 50 Hz ± 10%
Consumo de potencia: 140 W típico, 5 W en el modo standby
DIMENSIONES Y PESO
A x a x P de la pantalla: 535 mm x 870 mm x 140 mm
Peso: 17 kg
puntos oscuros y claros sueltos en total 7
distancia mínima entre dos puntos oscuros
4:3, 16:9, Video NLS, Patalla completa, Zoom, Zoom de usuario
(40%āĆā140%)
DOS: 640 x 480 @ 60 Hz, 720 x 400 @ 70 Hz,
VGA: 640 x 480, SVGA: 800 x 600; XGA: 1024 x 768 50 Hz - 90 Hz
WXGA: 1280 x 768 @ 60 Hz,
SXGA: 1280 x 1024 50 - 75 Hz
1280 x 768 @ 60 Hz
SCART1: RGB, entrada FBAS, salida FBAS,
SCART2: entrada FBAS, salida FBAS,
SCART1/SCART2: entrada/salida de audio
FBAS: RCA-Cinch
Y/C: MiniDIN (HOSIDEN)
Entrada estéreo: 3 Cinch 1 Vrms (FBAS, Y/C, PC),
Salida estéreo: 1 Cinch, regulable
sincronización independiente H y V
típica
5 mm
2 SCART 1 Vrms
20
ESPAÑOL
Page 83

Indice
1. Norme 2. . . . . . . . . . . . . . . . . . . . . . . . . . . . . . . . . . . . . . . . . . . . . . . . . . . . . . . . . . . . . . . . . . . . . . . . . . . .
2. Avvertenze importanti 2. . . . . . . . . . . . . . . . . . . . . . . . . . . . . . . . . . . . . . . . . . . . . . . . . . . . . . . . . . . . .
3. Panoramica 4. . . . . . . . . . . . . . . . . . . . . . . . . . . . . . . . . . . . . . . . . . . . . . . . . . . . . . . . . . . . . . . . . . . . . . .
3.1 Dotazione 4. . . . . . . . . . . . . . . . . . . . . . . . . . . . . . . . . . . . . . . . . . . . . . . . . . . . . . . . . . . . . . . . . . . .
3.2 Collegamenti 5. . . . . . . . . . . . . . . . . . . . . . . . . . . . . . . . . . . . . . . . . . . . . . . . . . . . . . . . . . . . . . . . .
3.3 Tasti e funzioni del telecomando 6. . . . . . . . . . . . . . . . . . . . . . . . . . . . . . . . . . . . . . . . . . . . . . . .
3.4 Tasti presenti sull'apparecchio 6. . . . . . . . . . . . . . . . . . . . . . . . . . . . . . . . . . . . . . . . . . . . . . . . . .
4. Prima messa in funzione 7. . . . . . . . . . . . . . . . . . . . . . . . . . . . . . . . . . . . . . . . . . . . . . . . . . . . . . . . . . .
4.1 Disimballo ed installazione 7. . . . . . . . . . . . . . . . . . . . . . . . . . . . . . . . . . . . . . . . . . . . . . . . . . . . .
4.2 Allacciamento ed attivazione 8. . . . . . . . . . . . . . . . . . . . . . . . . . . . . . . . . . . . . . . . . . . . . . . . . . .
ITALIANO
4.3 Uso del menu OSD 10. . . . . . . . . . . . . . . . . . . . . . . . . . . . . . . . . . . . . . . . . . . . . . . . . . . . . . . . . . .
4.4 Impostazioni di base del menu OSD 11. . . . . . . . . . . . . . . . . . . . . . . . . . . . . . . . . . . . . . . . . . . . .
4.5 Impostazioni in occasione della prima messa in funzione 11. . . . . . . . . . . . . . . . . . . . . . . . . . .
5. Utilizzo giornaliero 13. . . . . . . . . . . . . . . . . . . . . . . . . . . . . . . . . . . . . . . . . . . . . . . . . . . . . . . . . . . . . . . .
5.1 Attivazione / Disattivazione 13. . . . . . . . . . . . . . . . . . . . . . . . . . . . . . . . . . . . . . . . . . . . . . . . . . . . .
5.2 Regolazione del sonoro 14. . . . . . . . . . . . . . . . . . . . . . . . . . . . . . . . . . . . . . . . . . . . . . . . . . . . . . . .
5.3 Regolazione dell'immagine 15. . . . . . . . . . . . . . . . . . . . . . . . . . . . . . . . . . . . . . . . . . . . . . . . . . . . .
5.4 Modalità televisione 16. . . . . . . . . . . . . . . . . . . . . . . . . . . . . . . . . . . . . . . . . . . . . . . . . . . . . . . . . . .
5.5 Modalità PC 16. . . . . . . . . . . . . . . . . . . . . . . . . . . . . . . . . . . . . . . . . . . . . . . . . . . . . . . . . . . . . . . . . .
5.6 Funzionamento con apparecchi aggiuntivi 16. . . . . . . . . . . . . . . . . . . . . . . . . . . . . . . . . . . . . . . .
5.7 Funzioni speciali 17. . . . . . . . . . . . . . . . . . . . . . . . . . . . . . . . . . . . . . . . . . . . . . . . . . . . . . . . . . . . . .
6. Eliminazione degli errori 19. . . . . . . . . . . . . . . . . . . . . . . . . . . . . . . . . . . . . . . . . . . . . . . . . . . . . . . . . . .
7. Dati tecnici 20. . . . . . . . . . . . . . . . . . . . . . . . . . . . . . . . . . . . . . . . . . . . . . . . . . . . . . . . . . . . . . . . . . . . . . .
ITALIANO
Page 84

1. Norme
Il presente schermo è un dispositivo tecnologico per la trasmissione delle informazioni ed è conforme alle seguenti norme
e direttive dell'Unione Europea:
89/336/CEE del 3 Maggio 1989 e successive modifiche (direttiva 92/31/CEE diaprile 1992 e direttiva 93/68/CEE
del 22 Luglio 1993)
73/23/CEE del 19 Febbraio 1973 e successive modifiche (direttiva 93/68/CEE del 22 Luglio 1993)
EN55013, EN55020, EN61000-3-2/-3 (compatibilità elettromagnetica)
EN60065 (requisiti di sicurezza).
La corrispondenza con i requisiti viene certificata per mezzo del contrassegno applicato
Il produttore non può essere ritenuto responsabile per il funzionamento dell'apparecchio in condizioni diverse da quelle
descritte nelle presenti istruzioni per l'uso. Inoltre, in tal caso vengono meno gli eventuali diritti inerenti la responsabilità
del produttore e la garanzia sul prodotto.
sul prodotto.
2. Avvertenze importanti
Leggere ed osservare le avvertenze, affinché l'utilizzo conforme dell'apparecchio non provochi alcun pericolo per la salute
dell'operatore. Errori durante l'installazione ed il collegamento possono causare danni all'apparecchio stesso ed agli apĆ
parecchi ad esso collegati. Osservare gli avvertimenti riportati sull'apparecchio e nelle istruzioni per l'uso. Non permettere
mai che i bambini utilizzino apparecchi elettronici senza alcuna sorveglianza.
DATI DI CARATTERE GENERALE
Lo schermo da Voi acquistato soddisfa i massimi requisiti qualitativi in questo settore ed è stato sottoposto ad un controllo
per individuare eventuali errori di pixel. Nonostante la massima accuratezza durante la produzione degli apparecchi, per
motivi tecnologici non è possibile escludere al 100% la possibilità che alcuni pixel presentino dei difetti.
Determinate condizioni possono causare un ronzio dello schermo. Il ronzio proviene generalmente dalla tensione di rete
e può essere provocato dal collegamento di conduttori di terra diversi. È possibile porre rimedio a questo inconveniente
utilizzando un cosiddetto filtro per l'alimentazione con rivestimento tra il cavo dell'antenna e l'ingresso dell'antenna nello
schermo. I filtri per l'alimentazione con rivestimento sono reperibili nei negozi specializzati sotto forma di piccoli adattatori.
a causa di limiti tecnici, è possibile che anche l'apparecchio stesso generi delle rumorosità, che tuttavia non devono esĆ
sere superiori ai valori riportati nelle specifiche dell'apparecchio.
Se lo schermo è collegato con un'antenna esterna, quest'ultima dev'essere dotata di messa a terra in qualità di protezione
contro eventuali scosse elettriche e cariche elettrostatiche. La messa a terra dev'essere conforme alle normative vigenti.
CONDIZIONI AMBIENTALI
Non utilizzare mai lo schermo in condizioni ambientali che differiscano dai dati tecnici riportati nel presente manuale.
Un utilizzo in condizioni diverse da quelle previste potrebbe causare pericoli elettrici, incendi o guasti all'apparecchio.
Proteggere lo schermo dall'umidità. In questo concetto sono comprese un'elevata e perdurante umidità dell'aria, la viciĆ
nanza dell'apparecchio ad acqua, spruzzi, gocciolamenti e pioggia. Non collocare sopra all'apparecchio alcun recipiente
contenente acqua, come ad esempio vasi, ecc. Durante il collegamento dell'apparecchio con un'antenna esterna, accerĆ
tarsi che non possano aver luogo infiltrazioni d'acqua nella zona di introduzione dei cavi.
Pericolo di scosse elettriche nonché di danni irreparabili all'apparecchio.
Proteggere l'apparecchio dal calore e dall'esposizione diretta ai raggi solari. Evitare di collocare l'apparecchio vicino a
fuoco, termosifoni, forni. Proteggere l'apparecchio dal surriscaldamento. Non coprire le feritoie di ventilazione. Mantenere
una sufficiente distanza sopra e sotto le feritoie di ventilazione, nonché lateralmente rispetto ai mobili ed al soffitto. Non
coprire l'apparecchio con tendine.
Pericolo d'incendio a causa del surriscaldamento.
COLLEGAMENTO ALLA RETE ED UTILIZZO
Per una sicura separazione dello schermo dalla tensione di rete è necessario disinserire l'interruttore di rete e rimuovere
il cavo di rete dal modulo di collegamento. Collegare lo schermo esclusivamente ad una presa installata in conformità alle
norme e dotata di contatto di terra, con una tensione di rete corrispondente ai dati tecnici dell'apparecchio. accertarsi che
la spina e la presa siano raggiungibili in qualunque momento.
Un utilizzo in condizioni diverse da quelle previste potrebbe causare pericoli elettrici, incendi o guasti all'apparecchio.
Posare il cavo di rete in modo tale che nessuno possa rimanervi impigliato.
Una caduta dello schermo potrebbe causare il ferimento di persone e danni irreparabili all'apparecchio.
2
ITALIANO
Page 85

Utilizzare solamente il cavo di rete fornito in dotazione. Tale cavo dev'essere protetto da eventuali danneggiamenti e non
dev'essere modificato in alcun modo. Non utilizzare mai un cavo di rete danneggiato. Nel caso in cui il cavo di rete o la
spina risultino danneggiati il display non deve più essere acceso.
Pericolo di scosse elettriche, incendio o guasto dell'apparecchio.
Non toccare mai l'interruttore di rete ed il cavo di rete con le mani bagnate.
Pericolo di scosse elettriche.
Non rimuovere mai la spina dalla presa tirandola per il cavo di rete. Evitare di posare il cavo di rete in prossimità di oggetti
caldi.
Pericolo d'incendio e di scosse elettriche.
Per ragioni di sicurezza, in caso di periodi di assenza prolungati o di temporali scollegare la spina elettrica dalla presa di
corrente ed il connettore dell'antenna di casa dalla relativa presa.
Si tratta di una misura precauzionale volta ad evitare un possibile incendio ed eventuali danni all'apparecchio, nonché
il rischio di scosse elettriche.
Spegnere sempre lo schermo e l'origine del segnale prima di instaurare una connessione tra i due apparecchi.
Pericolo di scosse elettriche.
DISTURBI
In caso di danneggiamento dello schermo o del cavo di rete rimuovere immediatamente il cavo di rete dalla presa di corĆ
rente.
Nel caso in cui fumo, odori o rumorosità inusuali provenissero dall'apparecchio, scollegare immediatamente la spina di
rete. Procedere nello stesso modo anche nel caso in cui lo schermo, dopo essere stato attivato, non dovesse visualizzare
più alcuna immagine. Non cercare mai di continuare ad utilizzare lo schermo in queste condizioni.
Non tentare in nessun caso di aprire e/o riparare l'apparecchio personalmente. all'interno dello schermo non si trova alcun
componente la cui manutenzione o sostituzione possa essere eseguita dall'operatore. Rivolgersi alla nostra Hotline per
il servizio di assistenza oppure ad un altro centro specializzato adeguato.
ITALIANO
PULIZIA E CURA DELL'APPARECCHIO
Prima dell'installazione, della pulizia e della cura dell'apparecchio quest'ultimo dev'essere disattivato e la spina di rete
scollegata dalla presa. attendere alcuni minuti affinché i condensatori installati nell'apparecchio siano completamente
scarichi.
Per la pulizia utilizzare solamente un panno morbido, leggermente inumidito. Evitare l'uso di solventi e detergenti chimici,
poiché potrebbero danneggiare le superfici dell'apparecchio.
Scollegare immediatamente la spina di rete dalla presa nel caso in cui corpi estranei come acqua, altri liquidi, particolari
di metallo ecc. penetrino all'interno dello schermo. Non cercare mai di introdurre qualsiasi oggetto o le mani all'interno
dell'apparecchio.
Pericolo di scosse elettriche o di incidenti.
BATTERIE
L'ingerimento delle batterie può costituire un pericolo mortale. Pertanto, conservare le batterie fuori dalla portata dei bamĆ
bini. Nel caso in cui una batteria venisse ingoiata, richiedere subito l'intervento di personale medico.
Rimuovere sempre immediatamente le batterie usate dal telecomando, poiché un eventuale fuoriuscita di liquido da queĆ
ste batterie potrebbe causare danni al telecomando stesso.
Le batterie in dotazione non devono essere ricaricate o riattivate con altri mezzi, non devono essere smontate, gettate
nel fuoco o cortocircuitate.
Le batterie esauste non devono essere gettate nei rifiuti domestici, Le batterie devono essere smaltite nei punti di raccolta
previsti all'uopo.
ULTERIORI AVVERTENZE
Quando lo schermo è commutato in modalità di stand-by, è sempre collegato alla rete. Per scollegare completamente l'apĆ
parecchio l'interruttore di rete dev'essere commutato in posizione O" oppure la spina di rete dev'essere rimossa dalla
presa.
Per ragioni ergonomiche si suggerisce di evitare l'uso di scritte rosse e blu oppure di simboli su sfondo scuro. Una visualizĆ
zazione di questo tipo genera una cattiva leggibilità a causa del ridotto contrasto e provoca un prematuro affaticamento
della vista. Utilizzare pertanto visualizzazioni che siano il più possibile a forte contrasto, ad esempio scritte nere su sfondo
bianco.
Per evitare dolore agli occhi ed avere un punto ottimale di osservazione, la distanza dall'apparecchio dovrebbe essere
pari a cinque-sei volte la diagonale dello schermo. Nella stanza in cui si trova lo schermo ci dovrebbe essere luce suffiĆ
ciente anche per poter leggere. In caso di eccessiva luminosità si perdono i contrasti della visualizzazione. Una luce insufĆ
ficiente affatica gli occhi a causa della variazione di chiaro-scuro dello schermo.
Imballi non più utilizzati e materiali d'imballaggio sono riciclabili e devono essere sostanzialmente riutilizzati nel caso in
cui non risultino più necessari.
ITALIANO
3
Page 86

3. Panoramica
Lo schermo TFT offre molteplici possibilità di connessione a Personal Computer, lettori DVD, videoregistratori, videoĆ
camere, ecc.
Tutte le immagini, indipendentemente dal fatto che siano televisive, video o PC, vengono riprodotte nitidissime e senza
alcuna distorsione sulla superficie completamente piatta dello schermo. Per questo motivo le immagini si contraddistinĆ
guono grazie all'eccezionale luminosità ed alla straordinaria nitidezza. Ulteriori caratteristiche di notevole importanza
sono costituite dall'ampia diagonale dello schermo, pari a 75 cm con un rapporto proporzionale di 15:9, nonché dal ridottisĆ
simo spessore dell'apparecchio.
Per la modalità TV è necessaria la connessione ad un'antenna terrestre, un impianto di ricezione satellitare oppure ad
un impianto TV via cavo.
Il controllo avviene in modo interattivo per mezzo del telecomando fornito in dotazione e del menu a video On-ScreenDisplay" (OSD). Con questi strumenti possono essere eseguite le più svariate regolazioni della qualità dell'immagine.
Un innovativo sistema di raffreddamento consente di utilizzare lo schermo TFT senza sentire i fastidiosi rumori prodotti
dalle ventole. Silenzioso come un apparecchio televisivo tradizionale, lo schermo TFT risulta straordinariamente adatto
per gli ambienti domestici e le sale conferenza.
Dotazione
Case in alluminio di ottima qualità
Design privo di ventole
Diagonale schermo 75 cm
Formato 15:9
Angolo di visibilità orizzontale/verticale 170 gradi
Sistema di altoparlanti stereo integrato
Possibilità di regolazione sull'apparecchio
Filtro a pettine digitale
Compatibile con i sistemi PaL, SECAM e NTSC
Compatibile con i sistemi VGA, SVGA, WXGA, XGA e SXGA
Televideo
Identificazione automatica dei programmi e ordinamento delle stazioni
Sleep Timer
Screen saver
2x prese SCART
1 x S-Video
1 x FBAS
1x DVI (I) (analogico e digitale)
3.1 Dotazione
Una volta tolto dal suo imballo, controllare che lo schermo TFT non presenti eventuali danni causati dal trasporto e che
la fornitura sia completa. Il fornitore può accogliere eventuali richieste di interventi in garanzia relative a danni di trasporto
solamente nel caso in cui tali rivendicazioni vengano presentate prima della messa in funzione iniziale dell'apparecchio.
Nel caso in cui la fornitura risultasse incompleta, rivolgersi alla Hotline del servizio d'assistenza. Conservare l'imballo origiĆ
nale per un eventuale trasporto del monitor.
Dotazione standard
2 x batterie LR03
1 x Cavo Scart
1 x Cavo per antenna
1x schermo TFT
1x telecomando
1x cavo di rete 2,5 m
1x manuale d'istruzioni ed
1x certificato di garanzia
1 x Cavo video
HD-Sub su DVI-I
4
ITALIANO
Page 87
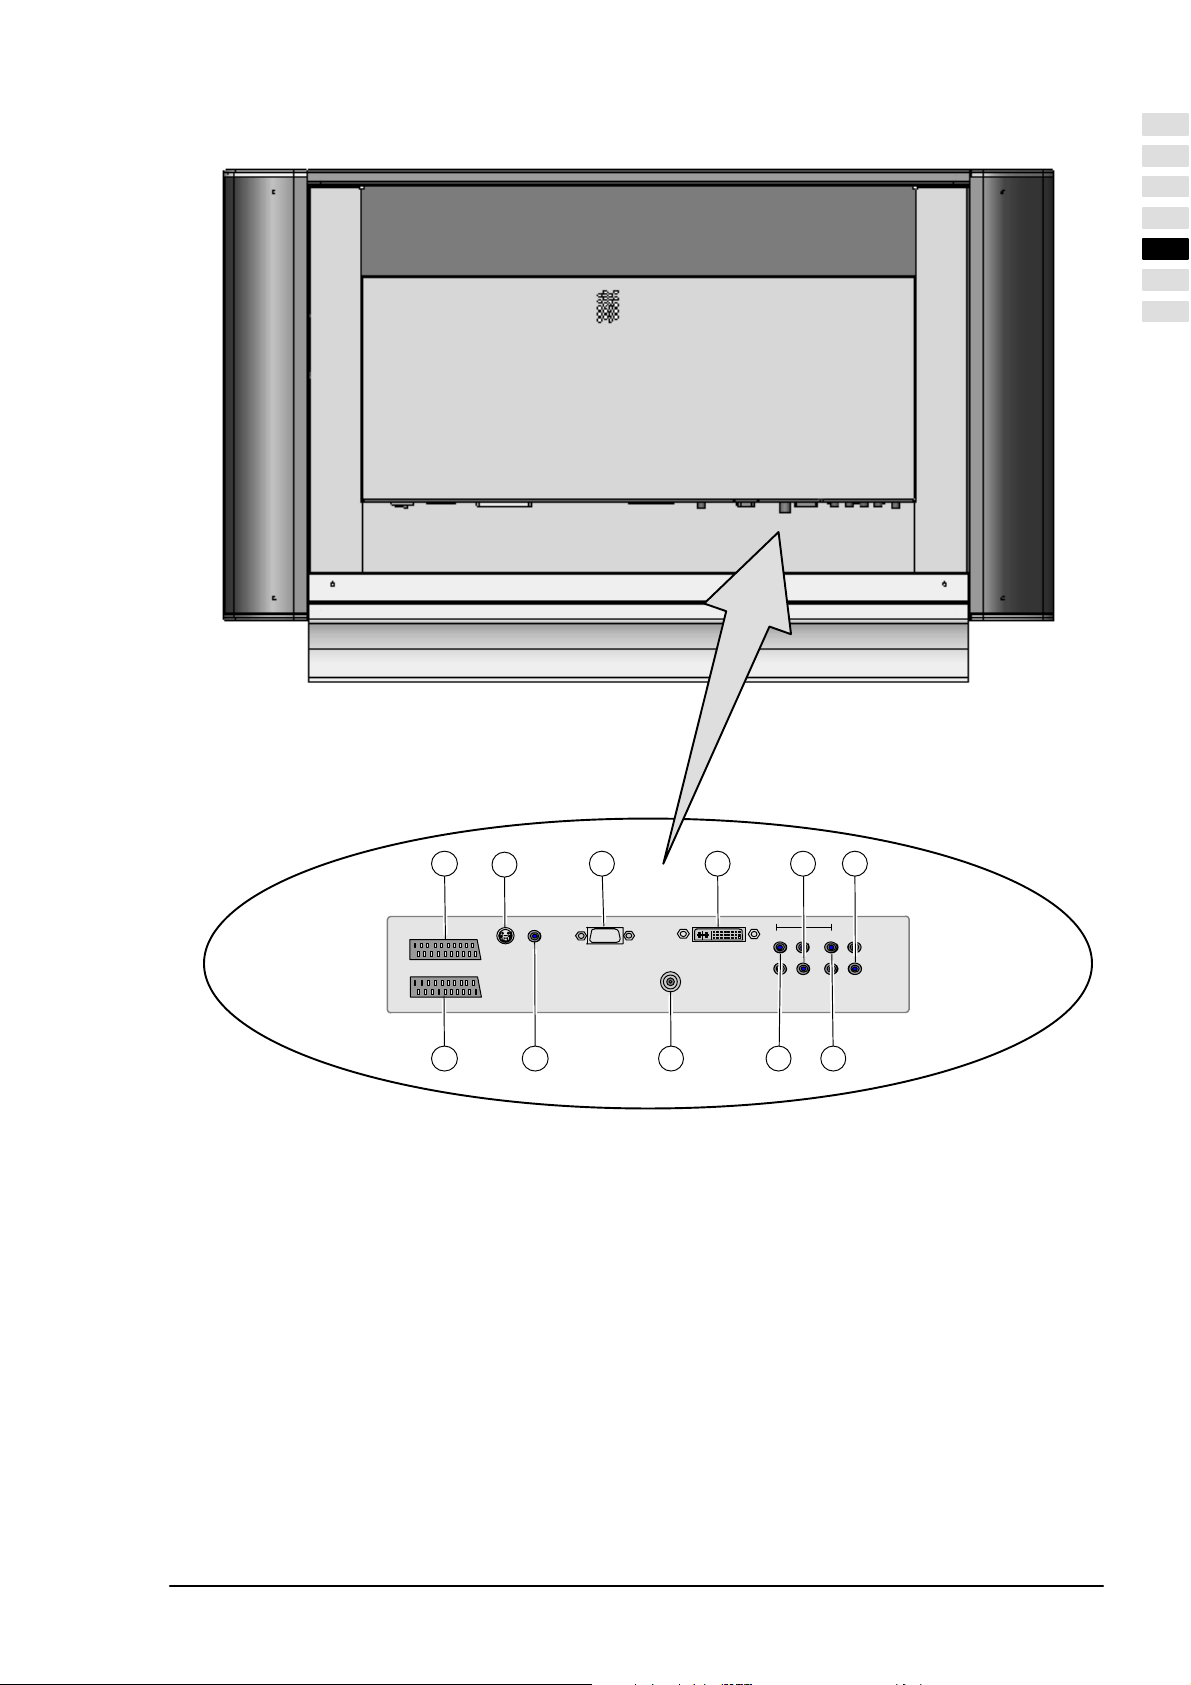
3.2 Collegamenti
ITALIANO
1 2 3 4 5
AUDIO IN
SCART 2
SERIALCVBSS-VIDEO
SCART 1
PC DVI - I
ANTENNA
6
OUT
LINE
CVBSPCS-VIDEO
11 10 9 8 7
[1] SCART 2 - ad esempio collegamento videoregistratore
[2] S-VIDEO (Y/C) - ad esempio collegamento camcorder con presa S-video
[3] SERIAL - interfaccia RS232 per interventi di assistenza
[4] PC DVI-I - collegamento PC (RGB per segnali analogici, DVI per segnali digitali)
[5] AUDIO IN PC - ad esempio collegamento PC con presa line-out
[6] OUT LINE - ad esempio collegamento amplificatore audio o ricevitore DVD
[7] AUDIO IN CVBS - ad esempio collegamento camcorder con presa video-out
[8] AUDIO IN S-VIDEO - ad esempio collegamento camcorder con presa S-video
[9] ANTENNA - collegamento segnale antenna TV (antenna terrestre o collegamento TV via cavo)
[10] CVBS - ad esempio collegamento camcorder con presa video-out
[11] SCART 1 - ad esempio collegamento ricevitore satellitare
ITALIANO
5
Page 88
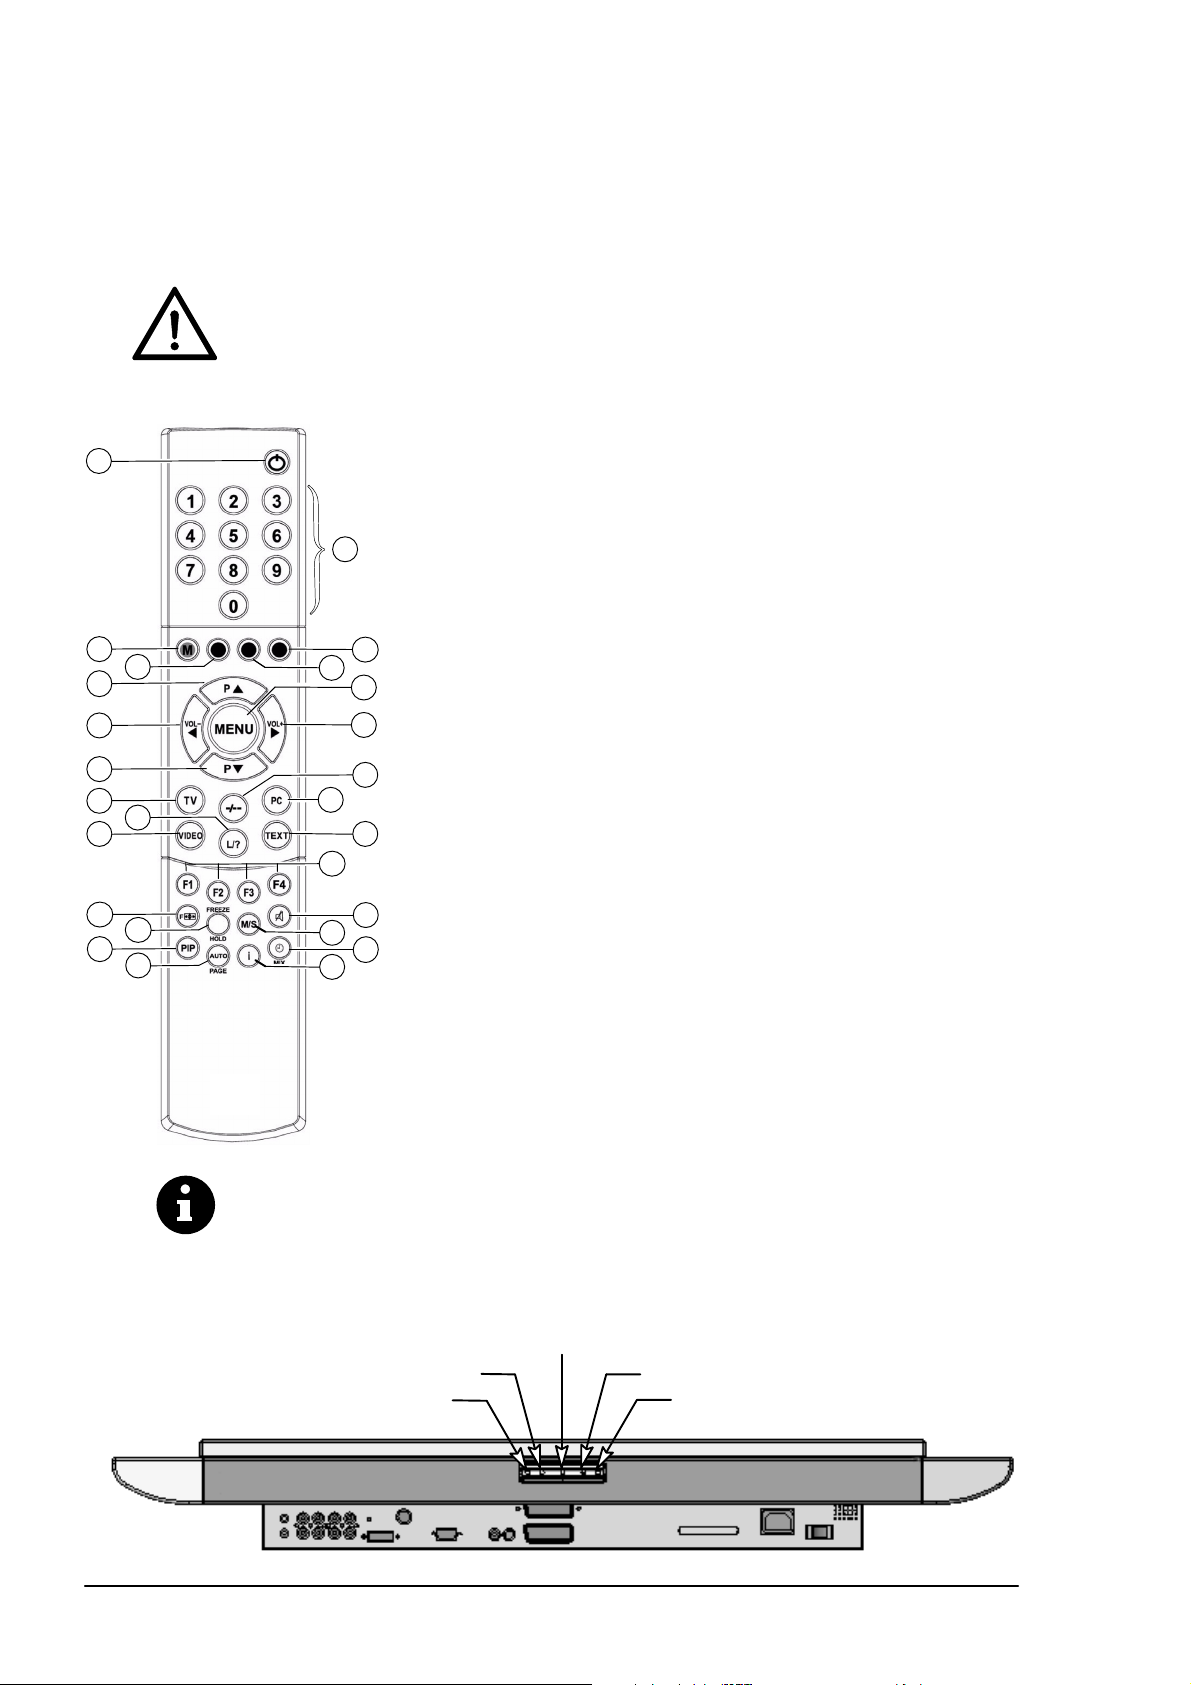
3.3 Tasti e funzioni del telecomando
Per potere utilizzare lo schermo TFT con il telecomando, la spina di rete dev'essere inserita e l'interruttore di rete dev'esĆ
sere attivato.
Il telecomando ad infrarossi funziona solamente se non è presente alcun ostacolo tra il telecomando stesso ed il sensore
ad infrarossi situato sulla parte anteriore (in basso) dello schermo. La portata del telecomando è di ca. 6 m.
Quando le batterie iniziano a scaricarsi, si riduce di conseguenza la portata del telecomando. In questo caso procedere
alla sostituzione delle batterie. Devono essere utilizzate solamente 2 batterie di tipo LR03 AAA 1,5 V.
Le batterie esauste non devono essere gettate nei rifiuti domestici, bensì devono essere smaltite
presso un punto di raccolta per batterie esauste (ad esempio contenitori di raccolta batterie
presso i rivenditori) oppure trattate come rifiuti speciali.
[1] Tasto di stand-by
[2] Tasti programma 1-9, 0
[3] Tasto M (Memo), rosso
[4] Tasto verde
[5] Tasto blu
[6] Tasto giallo
[7] Tasto di selezione programmi, selezione crescente
[8] Tasto menu
[9] Tasto per la riduzione del volume audio / Tasto direzione
sinistro
[10] Tasto per l'incremento del volume audio /
Tasto direzione destro
[11] Tasto di selezione programmi, selezione decrescente
[12] Tasto per la selezione diretta modalità TV
[13] Tasto di commutazione tra numero programma ad una cifra
o più cifre
[14] Tasto per la selezione diretta modalità PC
[15] Tasto per la funzione elenco dei programmi in modalità TV
oppure funzioni modalità televideo
[16] Tasto per la selezione diretta modalità video
[17] Tasto per la selezione diretta televideo
[18] F2 = Tasto FREEZE (modalità televideo)
F1 - F4 = Tasti funzione per occupazione di configurazione
[19] Tasto di selezione formato immagine
[20] Tasto per disabilitazione del suono
[21] Tasto HOLD
[22] Tasto M/S
[23] Tasto PIP (Picture-in-Picture", immagine nell'immagine)
[24] Tasto per visualizzazione orologio / Tasto MIX
[25] Tasto AUTO o PAGE
[26] Tasto informazione
11
1212
16
19
23
1
2
3
4
7
9
5
6
6
8
10
13
14
15
17
18
21
25
20
22
24
26
Il design del telecomando in dotazione può differenziarsi rispetto al telecomando qui raffigurato.
3.4 Tasti presenti sull'apparecchio
Le funzioni dei tasti presenti sull'apparecchio corrispondono a quelle del telecomando!
Tasto Vol -
Tasto P
Tasto P
6
Tasto Vol +Ă
Tasto stand-by
ITALIANO
Page 89
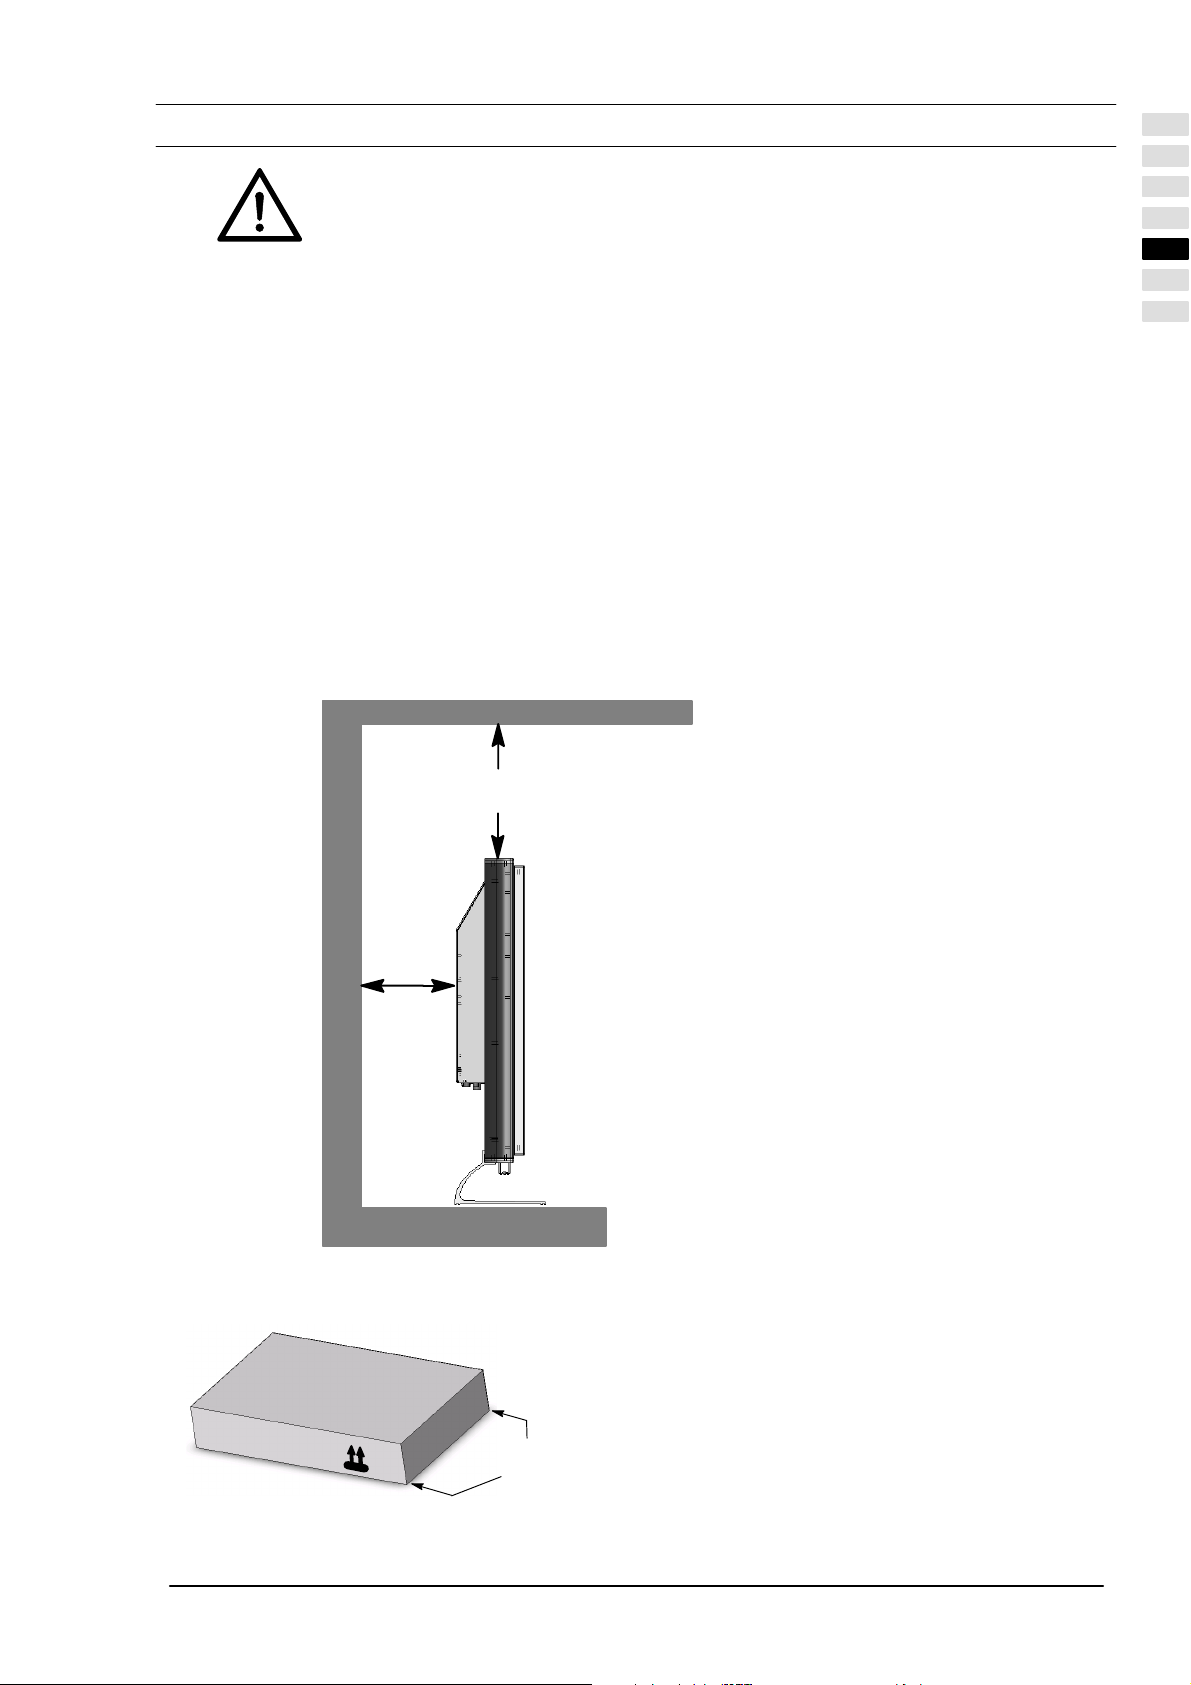
4. Prima messa in funzione
Prima di instaurare una qualsiasi connessione, disattivare tutti gli apparecchi coinvolti, compreso
lo schermo TFT.
4.1 Disimballo ed installazione
SCELTA DEL LUOGO D'INSTALLAZIONE
Direzione di osservazione
Nonostante l'ampia angolazione, lo schermo TFT offre la migliore performance per quanto concerne la direzione
di osservazione verticale diretta. Orientare lo schermo in funzione della direzione di osservazione utilizzata più
frequentemente.
Luogo di installazione
Riflessione della luce
Evitare l'installazione di fronte a finestre o altre sorgenti luminose.
Accesso all'ingresso di rete
L'ingresso alla rete e l'interruttore di rete devono essere sempre facilmente raggiungibili.
Afflusso d'aria
Lasciare, lateralmente e verso il basso, almeno 10 cm di distanza rispetto ai mobili. Verso l'alto la distanza minima
dai mobili o dal soffitto dovrebbe essere di almeno 30 cm.
Temperatura ambiente
Per un funzionamento sicuro ed affidabile dell'apparecchio la temperatura dev'essere tra 5 °C e 35 °C.
ITALIANO
Disimballo
10 cm
Spazio
libero
30 cm
Spazio libero
Lato
d'apertura
Posizionare la scatola in modo che la parte inferiore sia
posata su un piano d'appoggio stabile. La parte supeĆ
riore è riconoscibile grazie alla direzione indicata dalle
frecce riportate lateralmente sulla scatola.
Tagliare il nastro per imballaggio sul lato per l'apertura e
rimuovere la parte superiore della scatola tirando verso
l'alto.
ITALIANO
7
Page 90
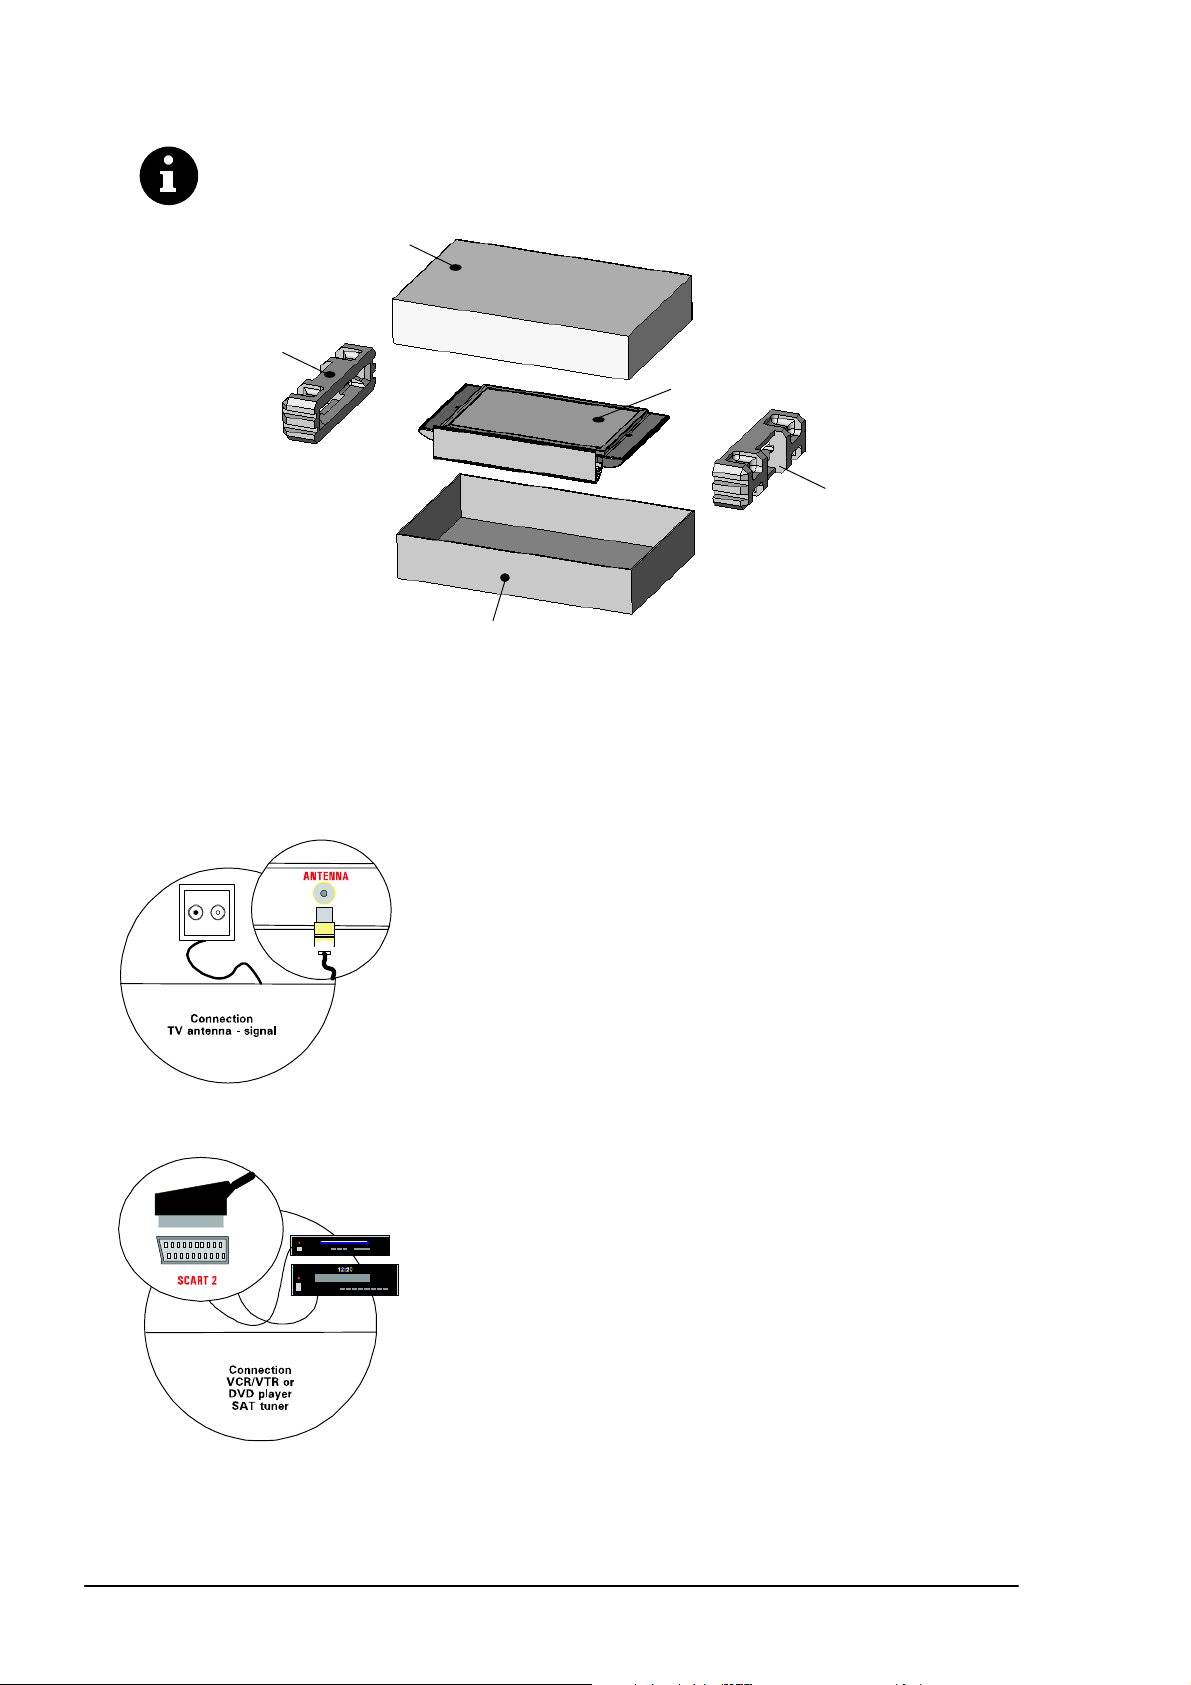
Per estrarlo, afferrare lo schermo TFT al centro di entrambi gli inserti d'imballaggio.
Si suggerisce che lo schermo TFT venga estratto/sollevato da due persone.
Parte superiore scatola
Inserto d'imballaggio
Schermo TFT
Parte inferiore scatola
Inserto d'imballaggio
4.2 Allacciamento ed attivazione
Allacciamento (prospetto collegamenti vedere figura 5)
Inserire il cavo di rete nell'ingresso di rete dello schermo e la spina elettrica in una presa di corrente.
Collegamento cavi / antenna terrestre
Per un collegamento TV via cavo o per collegare un'antenna terrestre, utilizĆ
zare la presa ANTENNA.
Ricevitore satellitare
Se si ricevono i programmi televisivi via satellite, collegare il ricevitore meĆ
diante un cavo SCART alla presa SCART 1 o SCART 2.
SCART 1 dispone inoltre di una connessione per sorgenti RGB come ad
esempio Lettori DVD.
8
ITALIANO
Page 91

PC
Per il collegamento del PC allo schermo TFT utilizzare la presa PC DVI-I. Se
il PC dispone di un uscita VGA analogica, utilizzare per il collegamento un
cavo di connessione DVI-I a 15 pin HD-Sub.
Nelle schede grafiche dei PC più vecchi, può accadere che il pin 9
sia chiuso. In un caso del genere, rivolgersi alla hotline per il serviĆ
zio assistenza.
Preparazione
Telecomando
Aprire il coperchio del vano portabatterie sulla parte posteriore del telecomando ed inserire le due batterie in
dotazione (tipo LR03 Micro aAa). Rispettare le indicazioni di polarità riportate sul fondo del vano portabatterie.
Richiudere nuovamente il vano portabatterie.
Attivazione
Commutare l'interruttore di rete sulla parte posteriore dello schermo in posizione I". a questo punto lo schermo si
trova in modalità di stand-by e può essere azionato con il telecomando.
Collegamento cavi / antenna terrestre
Attivare lo schermo mediante il tasto TV sul telecomando.
ITALIANO
Ricevitore satellitare
PC
Attivare il ricevitore satellitare ed attivare lo schermo mediante il tasto
VIDEO sul telecomando. Tenere presente che, in funzione della presa
SCaRT utilizzata per il collegamento del ricevitore, il tasto VIDEO dovrà
essere all'occorrenza premuto più volte.
Mediante il tasto PC sul telecomando, azionare lo schermo e selezioĆ
nare il corrispondente ingresso del segnale (PC(RGB) o PC(DVI)). a tal
scopo, utilizzando il tasto MENU del telecomando, richiamare il menu
OSD dello schermo e selezionare nel sottomenu INGRESSI il segnale
d'ingresso appropriato.
ITALIANO
9
Page 92
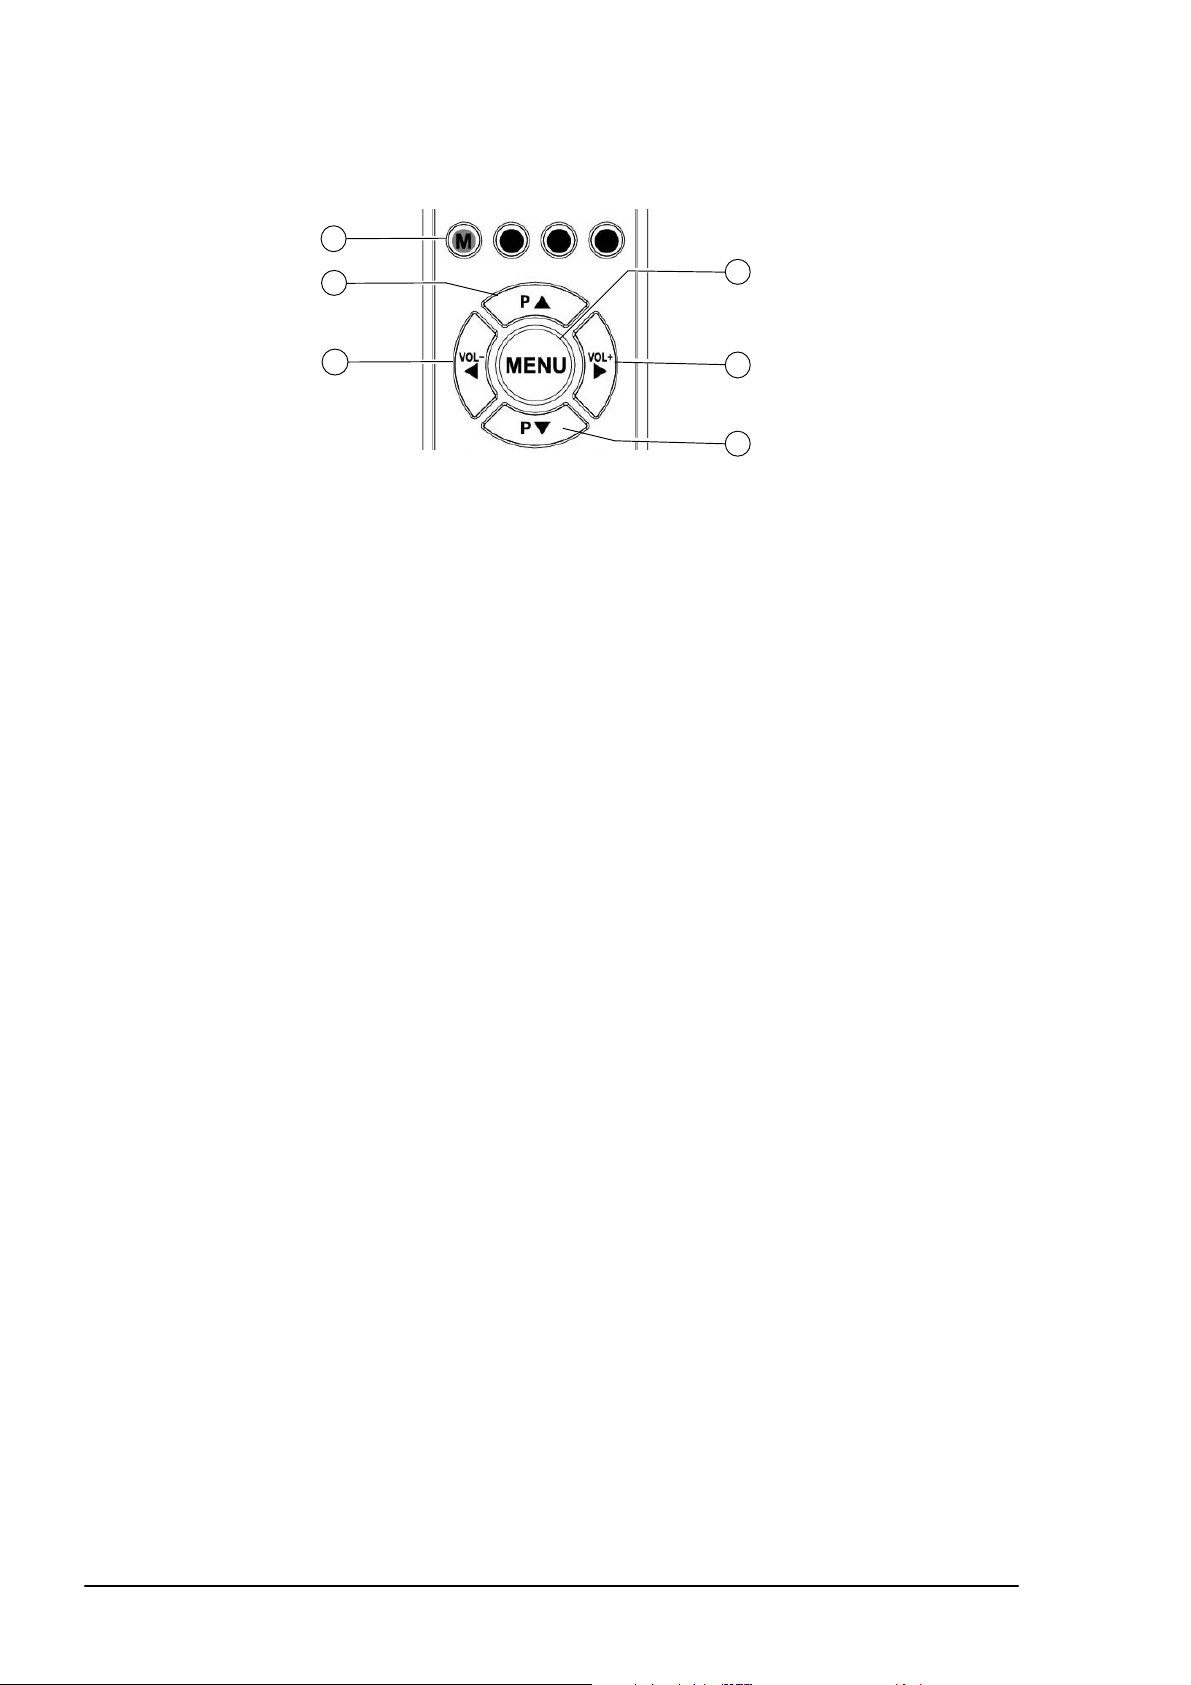
4.3 Uso del menu OSD
Lo schermo TFT può essere impostato ed utilizzato per mezzo del semplice comando a menu OSD. a questo scopo sono
disponibili sul telecomando 6 tasti:
1
2
4
3
5
6
[1] Tasto M
Memorizza le modifiche apportate
[2] Tasto P Ă
Spostamento in avanti nel menu OSD. Il menu selezionato o la funzione selezionata vengono evidenziati con
uno sfondo colorato.
Nel caso in cui vengano rappresentate funzioni sotto forma di valori o diagrammi a barre, è possibile
incrementarne il valore utilizzando questo tasto.
[3] Tasto Ă
Indietro al menu precedente. Viene abbandonato il sottomenu selezionato oppure la funzione selezionata.
[4] Tasto MENU
Apre in dissolvenza il menu principale OSD. Il menu principale compare in alto a sinistra nello schermo.
Chiude in dissolvenza il menu OSD.
[5] Tasto Ă
Attiva il sottomenu selezionato oppure la funzione selezionata. La voce di menu selezionata viene evidenziata
con uno sfondo verde e può essere modificata.
[6] Tasto PĂ Ă
Spostamento indietro nel menu OSD. Il menu selezionato o la funzione selezionata vengono evidenziati con
uno sfondo colorato.
Nel caso in cui vengano rappresentate funzioni sotto forma di valori o diagrammi a barre, è possibile ridurne il
valore utilizzando questo tasto.
MEMORIZZAZIONE DELLE MODIFICHE
Le modifiche apportate vengono memorizzate mediante la pressione del tasto M sul telecomando (vedere figura sopra)
oppure uscendo dal menu OSD.
10
ITALIANO
Page 93

4.4 Impostazioni di base del menu OSD
MODIFICA LINGUA OSD
Lo schermo dispone di un menu OSD a 6 lingue (tedesco, inglese, francese, italiano, olandese e spagnolo). Per modifiĆ
care la lingua preimpostata, richiamare nel menu principale la voce di menu IMPOSTAZIONE. attivare nel sottomenu la
voce di menu LINGUA e selezionare la lingua desiderata:
Ingressi >
Immagine >
Display >
Suono >
Impostazione >
Info >
MODIFICA DELLE CARATTERISTICHE DEL MENU OSD
Per modificare la rappresentazione oppure il tempo di dissolvenza (tempo dall'ultima attivazione fino alla chiusura in
dissolvenza) del menu OSD, selezionare nel menu principale la voce di menu IMPOSTAZIONE. Nel sottomenu
SETUP SU SCHERMO è disponibile un ulteriore sottomenu con le voci di menu TEMPO D'ATTESA (possibilità di
scelta: 5, 10 e 15Ăsecondi) e TRASPARENZA (possibilità di scelta: ACCESO e SPENTO):
Ingressi >
Immagine >
Display >
Suono >
Impostazione >
Info >
Visualizza info fonte: Acceso
Lingua: Italiano
Setup su schermo: >
Stand–by: >
Impostazioni di fabbrica: >
Autospegnimento: Spento
Visualizza info fonte: Acceso
Lingua: Italiano
Setup su schermo: >
Stand–by: >
Impostazioni di fabbrica: >
Autospegnimento: Spento
Tempo d’attesa: 5 s
Trasparenza: Spento
ITALIANO
RIPRISTINO DELLE IMPOSTAZIONI ORIGINALI
Esiste la possibilità di annullare tutte le modifiche apportate nel menu OSD e ripristinare nuovamente le impostazioni origiĆ
nali. Per fare ciò selezionare nel menu principale la voce di menu IMPOSTAZIONE ed attivare nel sottomenu la voce di
menu IMPOSTAZIONI DI FABBRICA:
Ingressi >
Immagine >
Display >
Impostazione >
Suono >
Info >
Visualizza info fonte: Acceso
Lingua: Italiano
Setup su schermo: >
Stand–by: >
Impostazioni di fabbrica: >
Autospegnimento: Spento
4.5 Impostazioni in occasione della prima messa in funzione
MODALITÀ TV
Ricerca automatica
Se i programmi vengono ricevuti esclusivamente via satellite, non dev'essere eseguita la ricerca automatica.
Per avviare la ricerca automatica procedere come di seguito specificato:
Attivare lo schermo mediante il tasto TV sul telecomando.
Richiamare il menu OSD mediante il tasto MENU del telecomando e selezionare la voce di menu INGRESSI.
Verrà aperto un sottomenu.
Selezionare nel sottomenu la voce di menu IMPOSTAZIONI FONTE. Verrà aperto un ulteriore sottomenu.
ITALIANO
11
Page 94

Selezionare ora la voce di menu RICERCA AUTOM. ed attivare la voce di sottomenu AVVIO RICERCA. Viene
così avviata la ricerca automatica.
Ingressi >
Immagine >
Display >
Suono >
Impostazione >
Info >
Seleziona: Tuner
Impostazioni fonte > Ricerca autom. >
Ricerca manuale >
Sorteggia >
Cancella >
TV standard: PAL BG
Modo di ricerca: Tutti programmi
Avvio ricerca:
Punto di avvio del programma: 01
ORDINAMENTO EMITTENTI TV
Ingressi >
Immagine >
Display >
Suono >
Impostazione >
Info >
1 ARD 2 3 4 5 6 7 8 9 10
11 ZDF
21 WDR
31 _ _ _
41
51
61
71
81
91 99
Seleziona: Tuner
Impostazioni fonte > Ricerca autom. >
Ricerca manuale >
Sorteggia >
Cancella >
(Verde)_: Selezione di un programma. attuale: 31 MENU: Termina
(Blu)_: Inserimento di una posizione di programma vuota
(Giallo)_: Spostamento del programma selezionato alla posizione attuale
Modifica dei nomi di programma
Quando lo schermo TFT è in grado di riconoscere il nome delle emittenti dal segnale televisivo, il nome riconosciuto viene
memorizzato nel numero di programma impostato. Nel caso in cui il nome del programma non venga riconosciuto, compaĆ
rirà nel campo nome il numero del programma (ad esempio PR02).
Procedere come indicato di seguito per modificare il nome dei programmi:
Spostare la zona evidenziata con il tasto oppure alla voce di menu Nome.
Premere a questo punto il tasto Ăper selezionare il primo carattere.
Con i tasti Ăe è possibile scorrere" i set di caratteri, finché il carattere desiderato non compare nella posizione
selezionata.
Utilizzare il tasto ā per la selezione della posizione successiva.
Ripetere i tre passi precedenti finché il nome non è stato completamente inserito. È possibile inserire max. 5 caratĆ
teri.
Ingressi >
Immagine >
Display >
Suono >
Impostazione >
Info >
Seleziona: Tuner
Impostazioni fonte > Ricerca autom. >
Ricerca manuale >
Sorteggia >
Cancella >
Programmi: 01
TV standard: PAL BG
Frequenza: 055.25 MHz
Nome: SW3
MODALITÀ PC
Selezionare l'ingresso del segnale
Attivare lo schermo mediante il tasto PC sul telecomando.
Richiamare il menu OSD mediante il tasto MENU del telecomando. La voce di menu INGRESSI è evidenziata
con uno sfondo colorato.
Selezionare nel sottomenu SELEZIONA l'ingresso di segnale corrispondente (PC (RGB) o PC (DVI)).
12
ITALIANO
Page 95
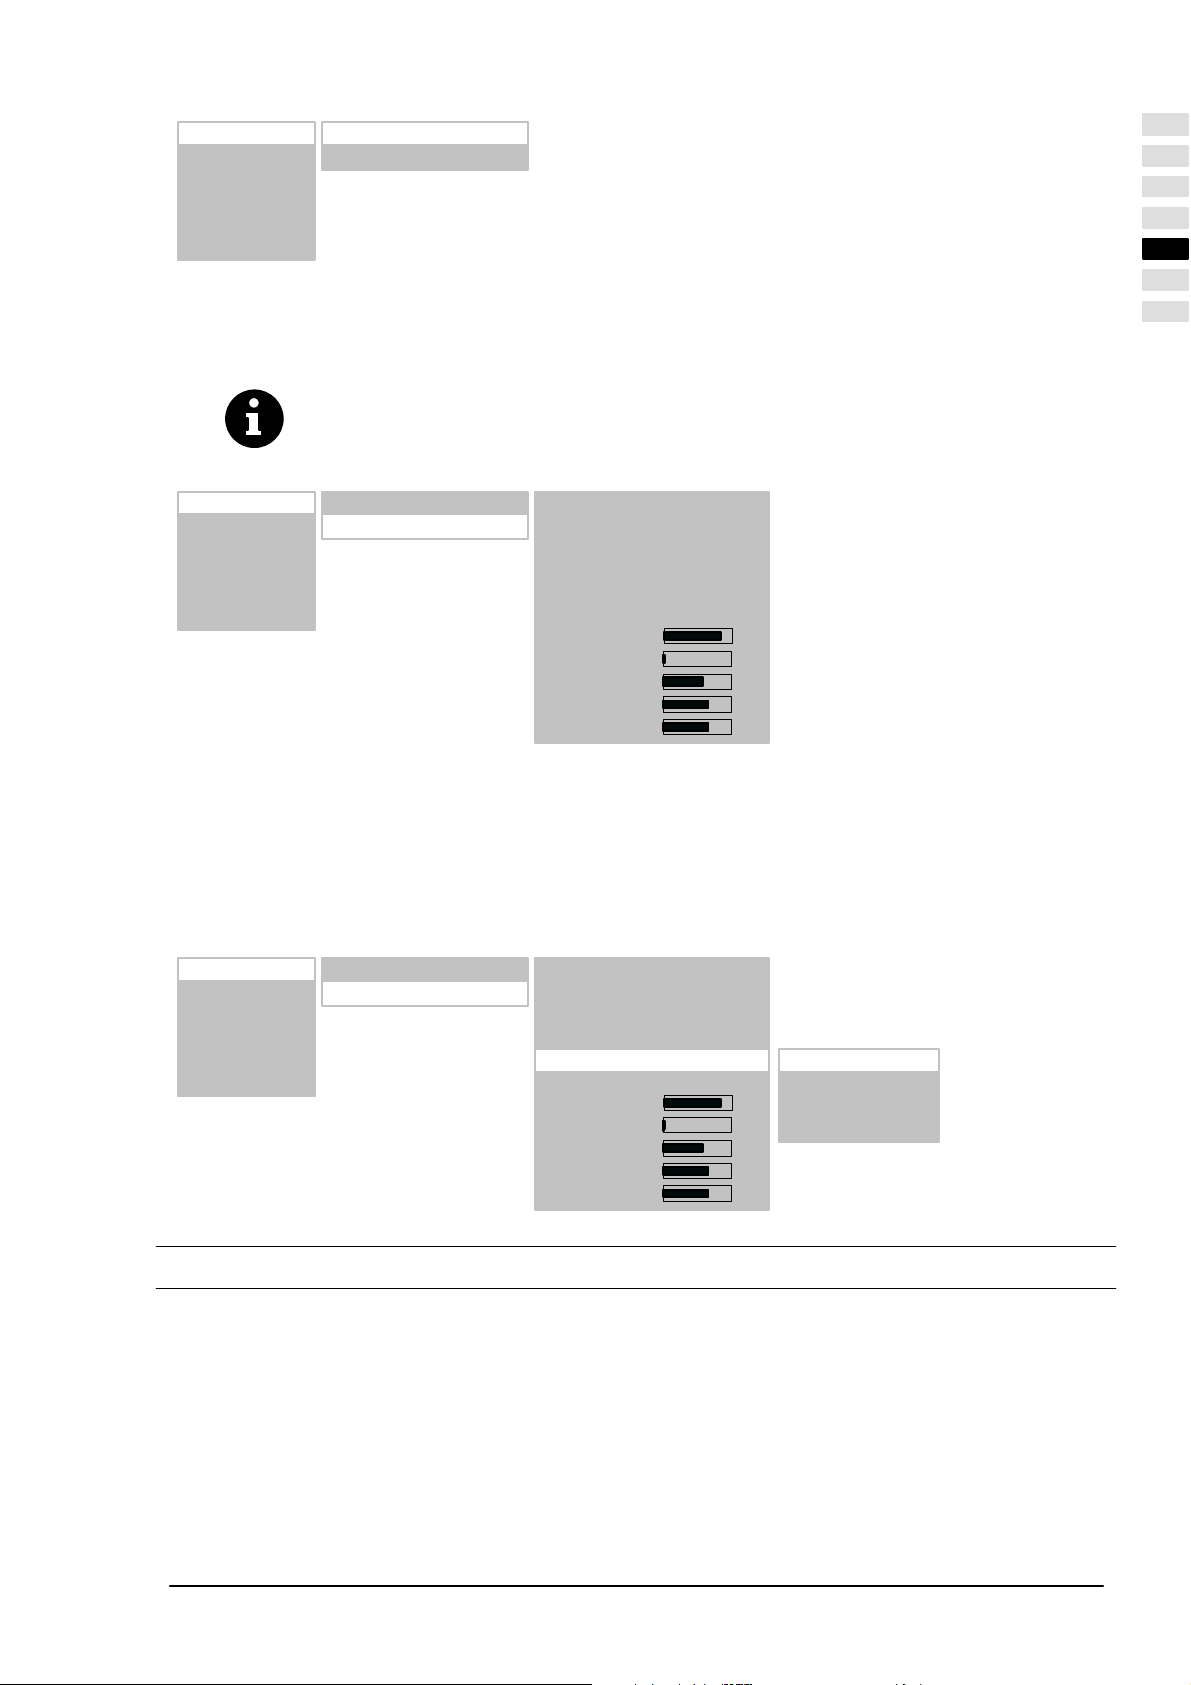
Ingressi >
Immagine >
Display >
Suono >
Impostazione >
Info >
Seleziona: PC (RGB)
Impostazioni fonte >
FUNZIONE AUTO-ADJUST
In occasione del primo utilizzo di un PC analogico formato video (RGB), lo schermo TFT esegue sempre automaticamente
la funzione di auto-adjust. Durante questo periodo di tempo la visualizzazione si sposta leggermente avanti ed indietro,
allo scopo di raggiungere la posizione e riproduzione ottimali.
In caso di formati PC sfavorevoli, la posizione H/V (orizzontale/verticale) e la dimensione dell'imĆ
magine devono essere impostate manualmente. La funzione di auto-adjust dipende in gran
parte dalla visualizzazione dell'immagine. Risulta particolarmente adatta la visualizzazione di
un'immagine bianca a tutto schermo.
ITALIANO
Ingressi >
Immagine >
Display >
Suono >
Impostazione >
Info >
Esiste la possibilità di memorizzare i formati usati frequentemente come formati utente. Lo schermo riconosce i formati
memorizzati e li visualizza subito in modo corretto senza dover eseguire la funzione di auto-adjust.
Selezionare nel menu principale la voce di menu INGRESSI e richiamare il sottomenu IMPOSTAZIONI FONTE.
Verrà aperto un ulteriore sottomenu.
Attivare la voce di menu formati utente.
Con la voce di menu CHIAMATA si rileva il formato utente attualmente impostato. a questo punto, mediante la
voce di menu SALVA, è possibile memorizzare il formato utente ad esempio nella posizione 1 (sono disponibili
8 posizioni).
Ingressi >
Immagine >
Display >
Suono >
Impostazione >
Info >
Seleziona: PC (RGB)
Impostazioni fonte >
Seleziona: PC (RGB)
Impostazioni fonte >
H Freq.: 60.0 kHz
V Freq.: 75.0 Hz
Orol. pixel 78.75 MHz
H / V Pol: + / –
Formati utente >
Setup automatico
V Pos :
V formato :
O formato:
O Pos :
Fase
H Freq.: 60.0 kHz
V Freq.: 75.0 Hz
Orol. pixel 78.75 MHz
H / V Pol: + / –
Formati utente >
Setup automatico
V Pos :
V formato :
O formato:
O Pos :
Fase
Posizione: 1
Richiama
Salva
Cancella tutto
5. Utilizzo giornaliero
5.1 Attivazione / Disattivazione
ATTIVAZIONE
Per attivare lo schermo TFT commutare l'interruttore di rete in posizione I".
Il led di STAND-BY nel sensore ad infrarossi s'illumina di arancione.
Premere a questo punto uno dei tasti numerici sul telecomando, in modo da mettere in funzione lo schermo TFT.
Il led ATTIVITÀ nel sensore ad infrarossi s'illumina di verde.
DISATTIVAZIONE
Premendo il tasto di stand-by sul telecomando, lo schermo TFT tornerà nuovamente alla modalità stand-by.
Il led di STAND-BY nel sensore ad infrarossi s'illumina di arancione.
ITALIANO
13
Page 96

Per disattivare di nuovo completamente lo schermo TFT, spostare l'interruttore di rete in posizione 0".
Tasto di stand-by
5.2 Regolazione del sonoro
REGOLAZIONE DEGLI ALTOPARLANTI
Azionare il tasto Ă(Vol -) o Ă (Vol +) sul telecomando, in modo da impostare il volume audio desiderato.
Ingressi >
Immagine >
Display >
Suono >
Impostazione >
Info >
Volume:
Balance:
Equalizer: Rock
Opzione: Stereo
Volume uscita:
Volume mass. all’avvio:
Controllo volume automatico: Acceso
Equalizer utente >
Visualizzazione del volume audio attualĆ
mente impostato
Volume audio al momento dell'attivazione
dello schermo TFT
IMPOSTAZIONE SOUND
Alla voce di menu EQUALIZER è possibile impostare campioni di suono predefiniti.
Ingressi >
Immagine >
Display >
Suono >
Impostazione >
Info >
Selezionare la voce di menu EQUALIZER UTENTE per creare un campione di suono personalizzato.
Ingressi >
Immagine >
Display >
Suono >
Impostazione >
Info >
Volume:
Balance:
Equalizer: Rock
Opzione: Stereo
Volume uscita:
Volume mass. all’avvio:
Controllo volume automatico: Acceso
Equalizer utente >
Volume:
Balance:
Equalizer: Rock
Opzione: Stereo
Volume uscita:
Volume mass. all’avvio:
Controllo volume automatico: Acceso
Equalizer utente >
Flat
Utente
Jazz
Rock
Vocale
Classico
Pop
< 120 Hz:
500 Hz:
1.5 kHz:
5 kHz:
> 10 kHz
14
ITALIANO
Page 97
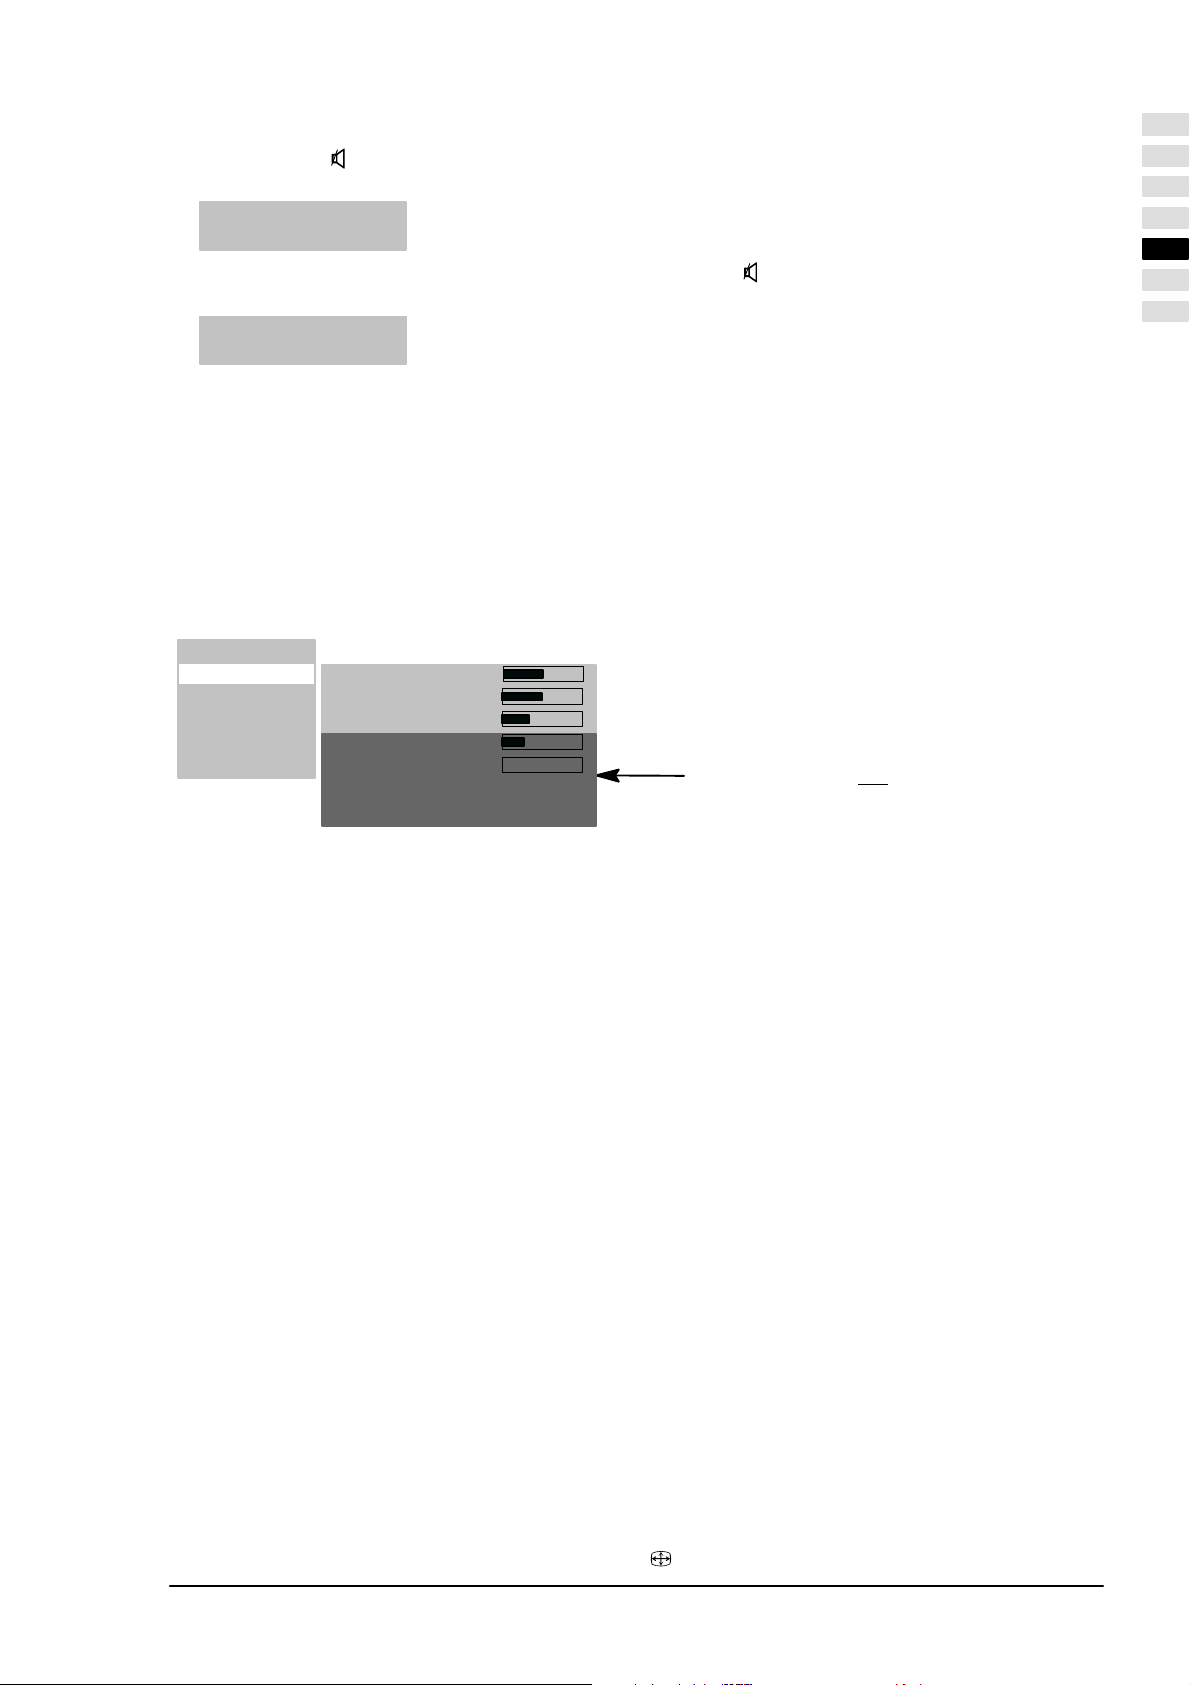
DISABILITAZIONE DEL SUONO
Premere il tasto sul telecomando. Il suono verrà disattivato e sullo schermo comparirà per circa 3Ă secondi la
seguente finestra informazioni:
Tuner : 2 ZDF
Muto
Il suono verrà ripristinato quando verrà nuovamente premuto il tasto , Ă(Vol -) o (Vol +) sul telecomando.
Sullo schermo comparirà per circa 3Ă secondi la seguente finestra informazioni:
Tuner : 2 ZDF
Stereo Analogo
5.3 Regolazione dell'immagine
È possibile impostare il contrasto, la luminosità, la definizione dell'immagine ed il colore ai valori desiderati.
CONTRASTO / LUMINOSITÀ / DEFINIZIONE IMMAGINE / COLORE
Premere il tasto per incrementare oppure il tasto ĂĂ per ridurre i valori.
Con l'impostazione DEFINIZIONE IMMAGINE è possibile migliorare la visualizzazione dell'immagine.
La voce di menu COLORE consente di modificare il bilanciamento del colore:
Premendo il tasto , l'immagine assumerà un colore più verdastro.
Premendo il tasto , l'immagine assumerà un colore più rossastro.
Ingressi >
Immagine >
Display >
Suono >
Impostazione >
Info >
Contrasto: 64
Luminosità: 64
Nitidezza
Colore: 15
DNC: 0
Foto CD: Spento
Interlace: Automatico
Queste voci di menu non
nelle impostazioni INGRESSI SELEZIONA
PC(RGB)" e PC(DVI)"!
sono disponibili
ITALIANO
FORMATO IMMAGINE
Alla voce di menu DISPLAY FORMATO IMMAGINE ZOOM è possibile selezionare i formati preimpostati.
La voce di menu ZOOM UTENTE offre la possibilità di creare un formato utente personalizzato. Per attivare il formato
utente personalizzato, alla voce di menu ZOOM selezionare ZOOM UTENTE.
Intero schermo
In questa impostazione di formato l'immagine viene adattata, sia in orizzontale sia in verticale, in modo da ottenere
sempre una visualizzazione a tutto schermo.
Video 4:3
Questa impostazione di formato rappresenta un'immagine PaL 4:3 nel corretto rapporto tra altezza e larghezza. ai
margini sinistro e destro sono visibili due strisce scure.
Auto
Questa impostazione di formato ridimensiona automaticamente il segnale in ingresso in senso orizzontale e verticale,
in modo da offrire sempre una visione a tutto schermo. Riconosce formati di film 16:9 e li ridimensiona in base ai fattori
prestabiliti.
Non lineare
Questa impostazione di formato ridimensiona automaticamente il segnale in ingresso in senso orizzontale e verticale,
per una visione a tutto schermo, ma non lineare. Ciò significa che i contenuti dell'immagine al centro dello schermo
verranno visualizzati come nell'originale, mentre ai lati dello schermo avrà luogo un ridimensionamento più marcato.
Zoom utente
In questa impostazione di formato è possibile visualizzare un formato immagine individuale in un range compreso tra
il 40% ed il 140% della dimensione originale dell'immagine.
Zoom
La commutazione manuale dall'impostazione di formato Video 4:3 all'impostazione Zoom allunga l'immagine in senso
orizzontale e verticale del 20% circa oltre la visualizzazione a tutto schermo. In tal modo, nella visione dei film in formato
4:3 vengono ridotte le strisce scure ai margini superiore ed inferiore dell'immagine.
Video 16:9
Questa impostazione di formato visualizza un'immagine PaL 4:3 in modo che non sia visibile alcuna striscia scura ai
margini sinistro e destro dell'immagine.
Per commutare i formati premere ripetutamente il tasto F
ITALIANO
sul telecomando.
15
Page 98

Ingressi >
Immagine >
Display >
Suono >
Impostazione >
Info >
Formato immagine >
Temperatura del colore: 9300 k
Contrasto immagine: Ideale
Immagine in immagine >
Fissa immagine
Temp. colore utente >
Zoom: Intero schermo
Zoom utente:
Questa voce di menu è dispoĆ
nibile solamente nell'impostaĆ
zione INGRESSI PC(DVI) /
PC(RGB)!
Intero schermo
Video 4:3
Auto
Non lineare
Zoom utente
Zoom
Video 16:9
Questa voce di menu è dispoĆ
nibile solamente nell'impostaĆ
zione INGRESSI PC(DVI) /
PC(RGB)!
PC 1:1
5.4 Modalità televisione
Lo schermo TFT si trova in modalità stand-by.
Per l'attivazione premere uno dei tasti numerici 0...9 oppure il tasto TV sul telecomando.
Durante l'inizializzazione verrà visualizzato in dissolvenza il logo dell'azienda.
Successivamente, comparirà sullo schermo l'ultima emittente televisiva selezionata (numero programma). al conĆ
tempo, verrà visualizzata in dissolvenza, per circa 3 secondi, la seguente finestra informazioni:
TUNER : 2 ZDF
Stereo Analogo
Premere il tasto Pāā oppure PĂāā per aumentare o ridurre di un'unità il numero di programma.
Utilizzando i tasti numerici sul telecomando è possibile selezionare direttamente qualsiasi numero di programma.
TELEVIDEO
Lo schermo TFT è in condizione di ricevere e visualizzare le informazioni televideo TOP/FLOF.
Selezionare un'emittente televisiva con televideo.
Premere il tasto TEXT sul telecomando per visualizzare il televideo.
Per la selezione diretta delle pagine del televideo utilizzare i tasti numerici.
In base al tipo di televideo, i tasti rosso, verde, giallo e blu del telecomando svolgono funzioni diverse che venĆ
gono rappresentate nella parte inferiore del televideo.
5.5 Modalità PC
Disattivare lo schermo TFT ed il PC.
Collegare il PC e lo schermo TFT con il cavo video comunemente reperibile in commercio (connettore DVI sullo
schermo e connettore HD-Sub sul PC).
Attivare nuovamente lo schermo TFT ed il PC.
Alla voce di menu INGRESSI SELEZIONA dev'essere impostata l'opzione PC (RGB). al momento dell'attivaĆ
zione lo schermo TFT riconoscerà automaticamente il formato immagine impostato nel PC. Questa Info viene viĆ
sualizzata in una finestra di Info.
RGB–1024 x 768
Tutto schermo
5.6 Funzionamento con apparecchi aggiuntivi
VIDEOREGISTRATORE
Disattivare lo schermo TFT ed il videoregistratore.
Esistono 3 possibilità di collegamento per il videoregistratore allo schermo TFT:
Mediante il cavo dell'antenna; leggere a questo proposito le istruzioni per l'uso del videoregistratore
Mediante un cavo scart oppure con la SCART1 o SCART2
Se il videoregistratore dispone di un'uscita S-Video, collegarla con l'ingresso Y/C.
Attivare nuovamente lo schermo TFT ed il videoregistratore.
16
ITALIANO
Page 99
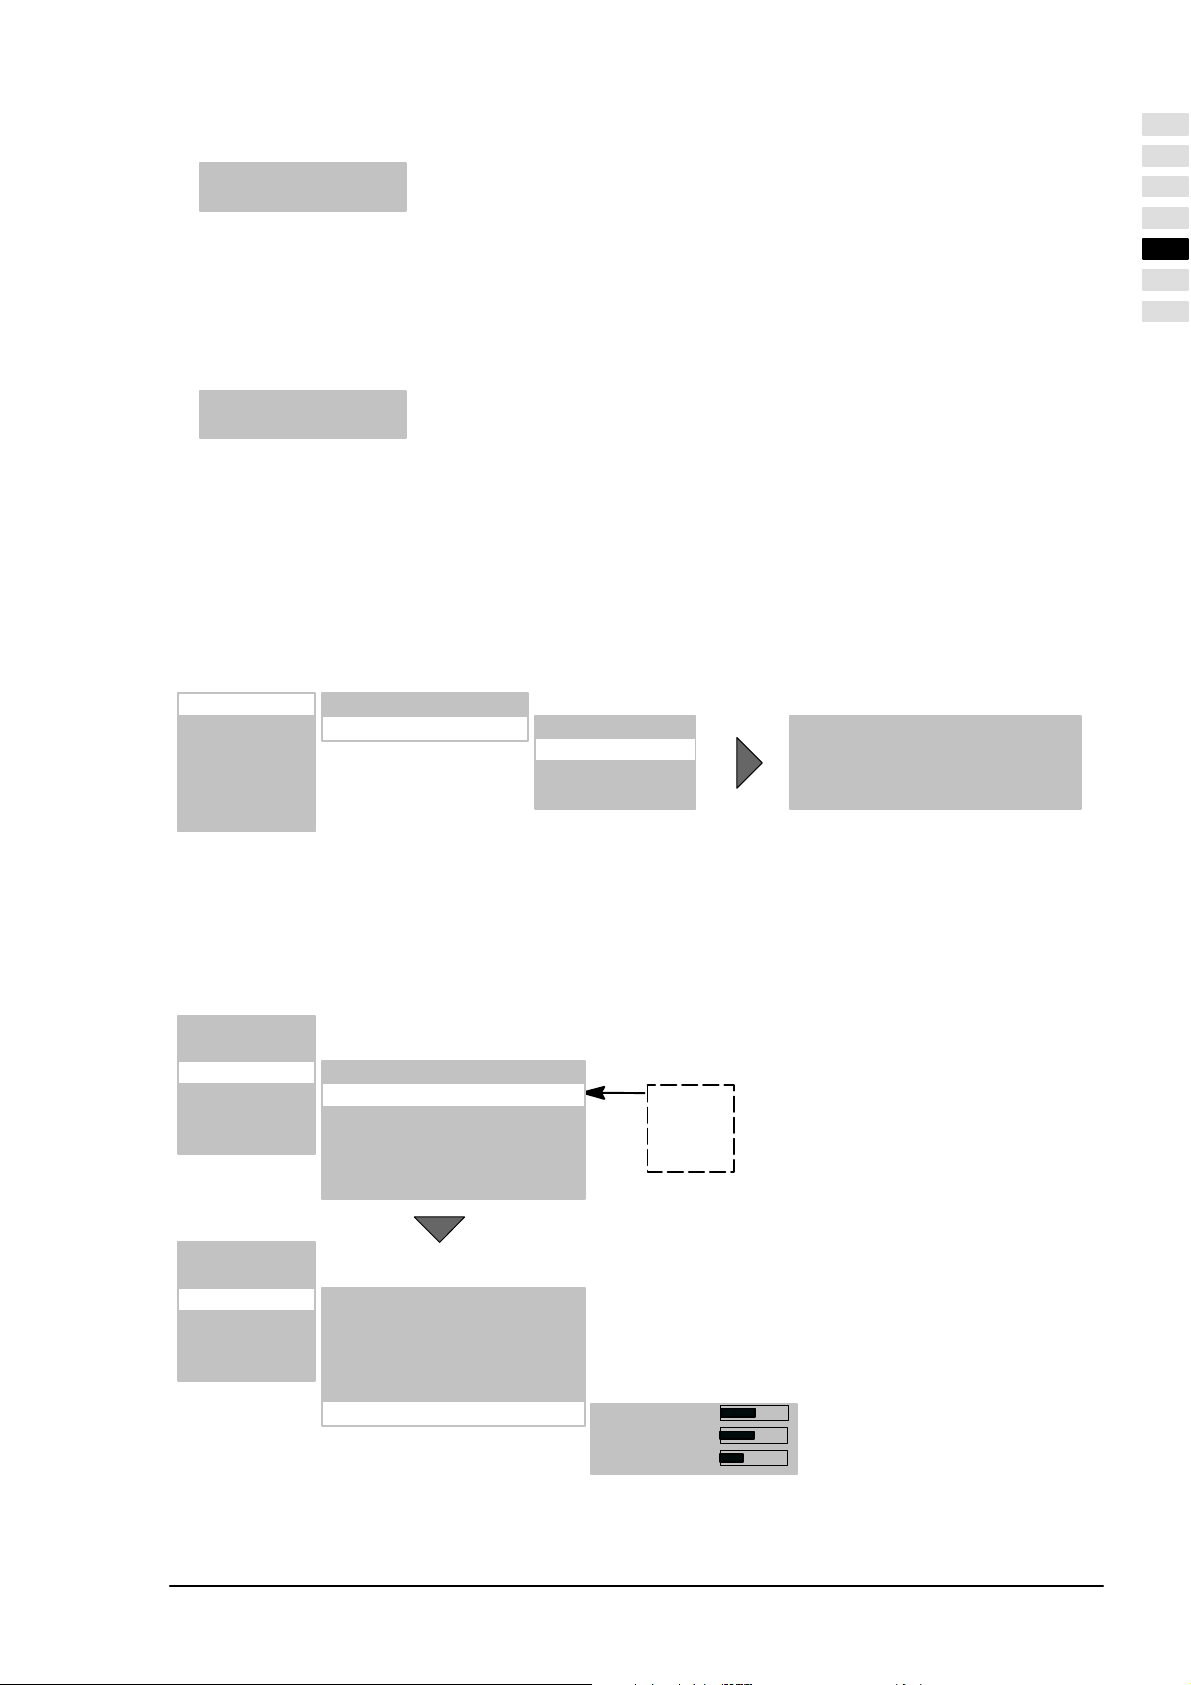
Per commutare sull'ingresso utilizzato per il collegamento (ad esempio SCART1), premere ripetutamente il tasto
VIDEO del telecomando.
SCART 1
a tutto schermo
LETTORE DVD
Disattivare lo schermo TFT ed il lettore DVD.
Collegare il lettore DVD con la presa SCART1 oppure mediante l'ingresso Y/C, nel caso in cui l'apparecchio dispoĆ
nesse di un'uscita S-Video.
Attivare nuovamente lo schermo TFT ed il lettore DVD.
Per commutare sull'ingresso utilizzato per il collegamento, premere ripetutamente il tasto VIDEO del telecomando.
YC
a tutto schermo
5.7 Funzioni speciali
RICERCA DEI PROGRAMMI MANUALE
Alla voce di menu PROGRAMMI inserire un numero del programma non ancora utilizzato.
Alla voce di menu FREQUENZA si dovrà inserire direttamente la frequenza dell'emittente televisiva che si sta cerĆ
cando.
Se l'immagine non risulta ottimale, aumentare o ridurre - procedendo per piccoli passi - la frequenza introdotta.
Se l'emittente non trasmette alcun nominativo, sarà possibile inserire il nome alla voce di menu NOME.
ITALIANO
Ingressi >
Immagine >
Display >
Suono >
Impostazione >
Info >
Seleziona: TUNER
Impostazioni fonte > Ricerca autom. >
Ricerca manuale >
Sorteggia >
Cancella >
Programmi: 11
TV standard: PaL BG
Frequenza: 168.25 MHz
Nome: HR
TEMPERATURA DEL COLORE
La temperatura del colore può essere selezionata tra 3 valori predefiniti oppure può essere impostato un valore personaĆ
lizzato mediante la voce di menu TEMP. COLORE UTENTE.
Un valore basso della temperatura del colore aumenta la percentuale di rosso nell'immagine e le conferisce un aspetto
più caldo". Con una temperatura del colore in aumento, aumenterà la percentuale di blu, e l'immagine risulterà più
fredda".
Ingressi >
Immagine >
Display >
Suono >
Impostazione >
Info >
Ingressi >
Immagine >
Display >
Suono >
Impostazione >
Info >
Formato immagine >
Temperatura del colore: 9300 k
Contrasto immagine: Ideale
Immagine in immagine >
Fissa immagine
Temp. colore utente >
Formato immagine >
Temperatura del colore: 9300 k
Contrasto immagine: Ideale
Immagine in immagine >
Fissa immagine
Temp. colore utente >
7500K
9300K
11000K
Utente
Rosso: 128
Verde 128
Blu: 110
ITALIANO
17
Page 100

FERMO IMMAGINE
Un fermo immagine può essere prodotto mediante il tasto FREEZE oppure alla voce di menu FISSA IMMAGINE.
Ingressi >
Immagine >
Display >
Suono >
Impostazione >
Info >
Formato immagine >
Temperatura del colore: 9300 k
Contrasto immagine: Ideale
Fissa immagine
Temp. colore utente >
IMMAGINE NELL'IMMAGINE (Picture-in-Picture")
La funzione IMMAGINE IN IMMAGINE offre la possibilità di inserire videoimmagini in dissolvenza durante la visualizzaĆ
zione dei segnali PC.
La voce di menu IMMAGINE IN IMMAGINE è inserita solamente con le impostazioni INGRESSIĂ
SELEZIONAĂĂPC(DVI) / PC(RGB) e se il tasto PIP è attivo.
Premendo il tasto PIP, l'immagine verrà inserita in dissolvenza nell'immagine attuale dall'ingresso impostato nella
voce di menu DISPLAYĂĂIMMAGINE IN IMMAGINEĂĂFONTEĂ (ad esempio Tuner).
Nel caso in cui non venisse rilevato alcun segnale a questo ingresso, la finestra inserita in dissolvenza resterebbe
scura.
È possibile impostare posizione e dimensione della finestra. Per attivare le impostazioni personalizzate, è necesĆ
sario impostare la voce di menu FORMATO su grande, medio o piccolo.
Ingressi >
Immagine >
Display >
Suono >
Impostazione >
Info >
Formato immagine >
Temperatura del colore: 9300 k
Contrasto immagine: Ideale
Immagine in immagine >
Fissa immagine
Temp. colore utente >
Formato (+spento): Spento
Fonte: TUNER
Pos. Orrizontale:
Pos. verticale:
TUNER
SCART1
SCART2
YC
CVBS
DISATTIVAZIONE AUTOMATICAĂ
È possibile impostare lo schermo TFT in modo tale che si spenga automaticamente dopo un determinato periodo di
tempo.
Selezionare alla voce menu AUTOSPEGNIMENTO uno dei periodi di tempo preimpostati.
Una volta trascorso questo periodo di tempo lo schermo TFT verrà automaticamente disattivato.
Ingressi >
Immagine >
Display >
Suono >
Impostazione >
Info >
Visualizza info fonte: Acceso
Lingua: Italiano
Setup su schermo: >
Stand–by: >
Impostazioni di fabbrica: >
Autospegnimento: Spento
Spento / 0:30 / 1:00 / 1:30 / 2:00 / 2:30
COMMUTAZIONE SU AUDIO A DOPPIO CANALE
L'audio a doppio canale è la definizione per i film in cui lo spettatore ha la possibilità di passare dalla versione sincronizzata
alla versione in lingua originale.
Qualora vengano mandate in onda trasmissioni con audio a doppio canale, il primo canale attivo è il canale a.
Premere il tasto M/S del telecomando per commutare sul canale B.
18
ITALIANO
 Loading...