


M{ZD{ MX-5 MIATA
SMART START GUIDE
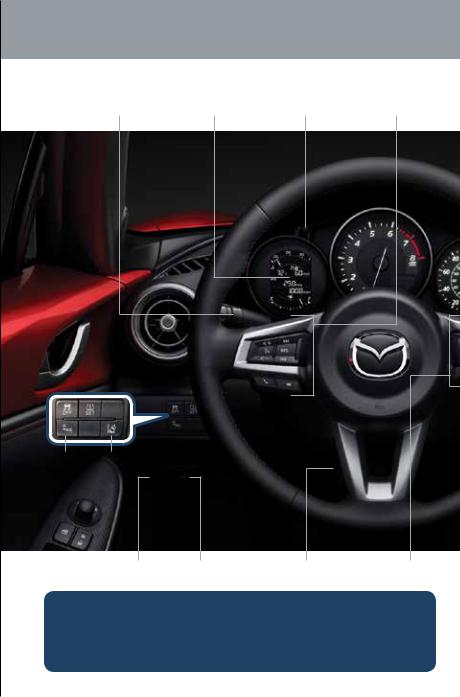
Driver’s View
|
|
ILLUMINATION |
BLUETOOTH® |
LIGHTING/ |
INFORMATION |
DIMMER/ |
HANDS-FREE/ |
TURN SIGNALS |
DISPLAY |
TRIP METER |
AUDIO |
(P. 23) |
(P. 7) |
(PP. 31-32) |
(PP. 13-14) |
|
|
|
TPMS |
|
DSC |
|
SET |
||
OFF |
|
(P. 6) |
||
|
|
|
|
|
|
|
|
|
|
|
|
|
|
|
BSM |
LDWS |
(P. 23) |
(P. 21) |
|
HOOD |
TRUNK |
TILT/TELESCOPING |
CRUISE |
|
RELEASE |
RELEASE |
STEERING WHEEL LEVER |
CONTROL |
|
This easy-to-use SMART START GUIDE provides information on some |
|||
|
unique features and functions of your new vehicle. Additional features are |
|||
|
available at www.mymazda.com and the MyMazda app -> VEHICLE |
|||
1 |
HOW TO. Complete information on features and functions are available in |
|||
your Owner’s Manual. |
|
|
|
|
|
|
|
|
|
|
www.MazdaUSA.com |
||
|
|
|
|
|
|
|
|
|
|
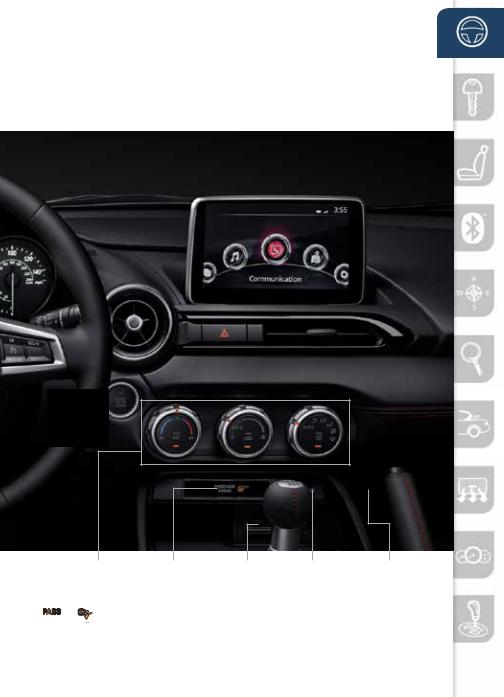
WIPER/ |
HAZARD |
NAVIGATION/AUDIO |
|||||
|
WASHER |
WARNING |
(WITH MAZDA CONNECT) CLOCK |
|||||
|
(P. 24) |
|
|
(PP. 15-16, 27-28) |
|
|||
|
|
|
||||||
|
|
|
|
|
|
|
|
|
|
|
|
|
|
|
|
|
|
|
|
|
|
|
|
|
|
|
|
|
|
|
|
|
|
|
|
|
|
|
|
|
|
|
|
|
PUSH
BUTTON START
(P. 4)
|
CLIMATE |
PASSENGER |
AUX/USB |
SEAT |
12V ACCESSORY |
|
CONTROL |
AIRBAG OFF |
PORTS |
WARMERS |
SOCKET |
|
(P. 30) |
INDICATOR1 |
|
|
(Under dash in back |
1 |
|
|
|
|
of footwell) |
This indicator light turns on to remind you that the front passenger’s front/side |
|||||


 airbags and seat belt pretensioner will not deploy during a collision. The reason for this is that the sensor has determined that an adult is not sitting in the front passenger seat.
NOTE: If a smaller adult sits on the front passenger seat, the sensors might detect the adult as being
a child depending on the person’s physique and may deactivate the front passenger’s front/side 2 airbags and seat belt pretensioner. Always wear your seat belt and secure children in the rear seats in appropriate child restraints. See the Owner’s Manual for important information on this safety feature.
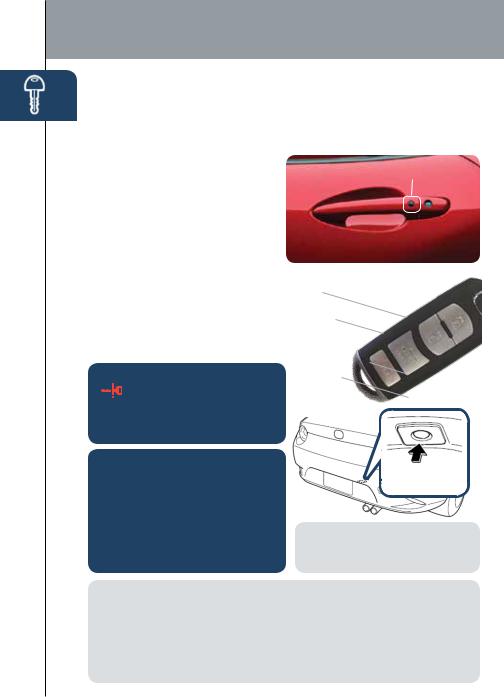
Key
ADVANCED KEYLESS ENTRY SYSTEM (if equipped)
This system allows you to lock and unlock the doors without taking the key out.
While Carrying the Advanced Key…
• Unlock the driver’s door by |
Door Request Switch |
||
|
pushing the driver’s door request |
||
|
switch once. |
|
|
• Unlock all doors by pushing |
|
||
|
the driver’s door request switch |
|
|
|
once or twice (depending on |
|
|
|
personalization setting (p. 10)) |
|
|
|
OR by pushing the passenger’s |
|
|
|
door request switch once. |
Advanced Key |
|
• |
Lock all doors by pushing any |
||
Lock |
|||
|
request switch once. |
||
|
|
||
• |
Open the trunk by pushing |
Unlock |
|
|
the trunk switch once (switch |
||
|
|
||
|
is located to the right of |
|
|
|
the rear license plate). |
|
|
CAUTION: RED KEY indicator light |
Trunk |
|
|
||
may illuminate if advanced key |
Panic Alarm |
|
is placed in the cup holder. The key |
||
|
||
can sometimes not be detected in |
|
|
the cup holder. |
|
CAUTION:
•Make sure vehicle is OFF and take the keyless entry system key with you when leaving the vehicle.
•When locking doors using inside door switches or inside door lock knobs, be careful not to leave the key inside the vehicle.
Electric Trunk
Lid Opener
NOTE: Refer to your Owner’s Manual for additional details about “Personalization Features”.
NOTE: Vehicles equipped with the Advanced Keyless Entry System and the Keyless Entry System both use the same type of keyless entry transmitter. However, only vehicles equipped with the Advanced Keyless Entry System allow you to lock and unlock the doors with the door request switches (without taking the key out of your purse or pocket).
Vehicles equipped with the Keyless Entry System do not have request switches on
3the doors/trunk. To lock and unlock the doors, the corresponding transmitter button must be pushed.
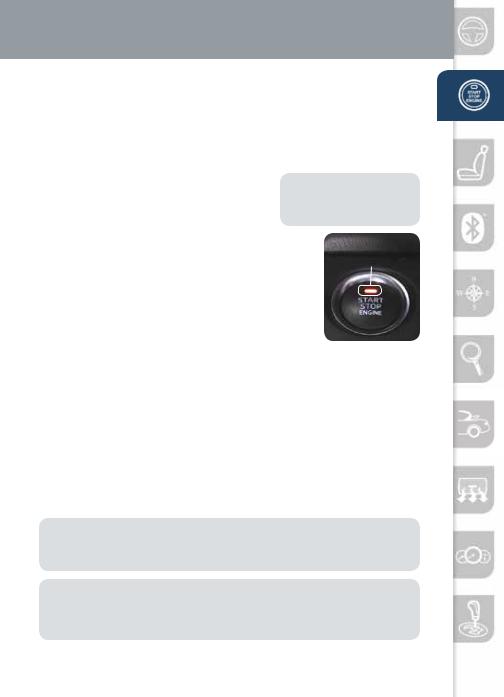
Starting The Enginewww.MazdaUSA.com
STARTING THE ENGINE WITH ACCELERATED WARM-UP SYSTEM (AWS)
The MX-5 is equipped with SKYACTIV combustion technology. This technology includes AWS (Accelerated Warm-up System) for optimal emission performance during cold starting conditions.
While Carrying the Key…
•Start the engine by pushing the START/ STOP ENGINE button while pushing the clutch pedal (M/T) or the brake pedal (A/T).
NOTE: You can drive the vehicle during AWS
activation, no need to wait.
•What you will notice? On start-up, the
engine speed and sound are higher (1500 RPM) for less than 1 minute to quickly bring the catalyst to efficient operating temperature. The RPM will reduce to idle once the temperature is achieved. This is normal engine operation under cold start conditions.
START/STOP
Indicator Light
•What this does? This heats up the catalytic converter faster to reduce emissions and allows Mazda to use an exhaust header on the engine (to improve efficiency and horsepower).
•Shut the engine OFF by making sure the vehicle is in park (A/T) and setting the parking brake, then push the START/STOP ENGINE button.
•Activate Accessories (ACC) by pushing the START/STOP ENGINE button once without pushing the clutch or brake pedal.
•Turn the ignition to the ON position by pushing the START/STOP ENGINE button twice without pushing the clutch or brake pedal.
Emergency Engine Stop
Pushing and holding the START/STOP button or repeatedly pushing
the button while the engine is running will turn the engine OFF. Use only in case of an emergency.
NOTE: The engine may not start if the key cannot be detected. The Key Indicator Light may flash RED or “Key not detected” may be displayed if the key is placed in the cup holder.
If the START/STOP ENGINE button indicator light flashes AMBER, this could indicate a problem with the engine starting system. You may not be able to start the engine or switch the ignition to ACC or ON. Have your vehicle inspected at an Authorized Mazda Dealer as soon as possible.
4
Tires
TIRE PRESSURE MONITORING SYSTEM (TPMS)
For your safety, the MX-5 is equipped with TPMS that detects low tire pressure in one or more tires. If the tire pressure starts getting low in one or more tires, the system alerts the driver by turning on a light in the instrument cluster (pp. 31-32) and sounding an alarm.
What to do? Don’t ignore the TPMS warning light. Stop and check your tire pressure (when tires are cold) and inflate them to the proper pressure. Properly inflated tires are safer, last longer, and increase fuel economy.
In the following cases, the TPMS must be “initialized” so the system can operate normally.
•The tire pressure is adjusted (up or down) in one or more tires.
•A tire rotation is performed.
•Any tire or wheel is replaced.
•The vehicle’s battery is disconnected, replaced or completely dead.
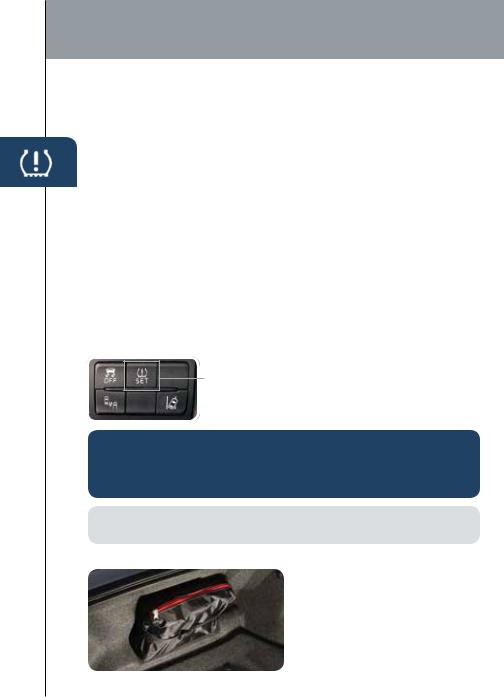
Initialization Process (TPMS Warning Light  is Illuminated)
1Park the vehicle in a safe place and firmly apply the parking brake.
2Let the tires cool, then adjust the tire pressure to the specified pressure (See tire label located on the driver’s side door opening) on all four (4) tires.
3Switch the ignition ON, but leave the vehicle parked.
4Push and hold the TPMS “Set Switch” (left side
of dash) until the TPMS warning light  in the instrument cluster flashes twice and a beep sound is heard once.
CAUTION: If the TPMS “Set Switch” is pushed without adjusting the tire pressure, the system cannot detect the normal tire pressure. The TPMS warning light may not turn on, even if the tire pressure is low, or it may turn on if the tire pressure is normal.
NOTE: Drastic changes in temperature or altitude may cause the TPMS warning light to turn on.
INSTANT MOBILITY SYSTEM (IMS)
|
The IMS emergency flat tire repair |
|
kit (located in the trunk) is for a |
|
temporary repair of a slightly damaged |
|
flat tire, resulting from running over |
|
nails, or similar sharp objects on the |
5 |
road surface. Refer to your Owner’s |
Manual for complete details. |

Fuel/Cupholders/Storagewww.M zdaUSA.com
FUEL FILLER LID
Unlock the doors and push the fuel-filler lid to open it. To close, push the fuel-filler lid until it locks securely.
NOTE: The fuel door will not open if the doors are locked.
CUPHOLDERS
FUEL ECONOMY:
To achieve the best fuel economy, visit fueleconomy.gov for more information.
Use both hands when removing the cup holder. When installing a cup holder, insert it all the way into the installation hole and make sure that it is secured in place.
 Rear cup holder
 Front cup
STORAGE
Unlock
Lock
6
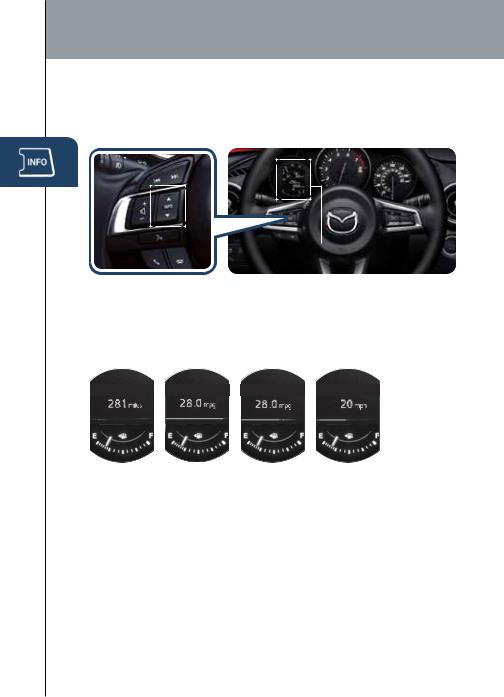
Information Display
INFO
Toggle the INFO button up or down on steering wheel to cycle through different types of information.
Information
display
Push the center of the INFO button to make selections.
Display Screens
Push and hold the center of the INFO button to reset the currently displayed feature such as Average MPH or Average MPG.
Actual displayed information will vary on your vehicle model.
Range |
AVG |
Current |
AVG |
Distance |
Average |
Current |
Average |
to Empty |
MPG |
MPG |
Speed |
7
Seats and Mirrors www.MazdaUSA.com
FRONT SEATS
Headrests
For your safety, the front seats are equipped with active headrests that are not adjustable forward or backward, only up and down. An active headrest is designed to move forward in the event of a collision to close the gap between your head and the headrest (to reduce the possibility of whiplash).
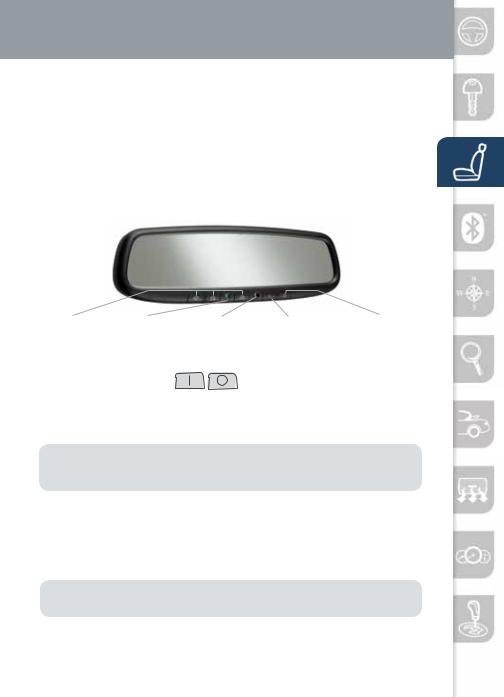
AUTO-DIMMING MIRROR AND HOMELINK®
HomeLink Auto-Dimming |
Rear Auto-Dimming Auto-Dimming |
||
Indicator Light |
Light |
On |
Off |
|
Sensor |
|
|
On |
Off |
|
|
Auto-Dimming Mirror
•Auto-dimming will automatically darken your rearview mirror and outside driver’s mirror to reduce headlight glare from vehicles behind you.
•Auto-dimming is activated every time the engine is started.
NOTE: In addition to the auto-dimming mirror’s rear light sensor, there is also a front light sensor (not shown). Do not place or hang any objects over the front or rear mirror light sensors; otherwise, the auto-dimming mirror will not operate properly.
HomeLink® 


•This feature provides a convenient way to replace up to three transmitters such as garage door openers, home lighting remotes and other radio frequency devices.
•Refer to your Owner’s Manual for complete programming details.
NOTE: Genuine Mazda Accessory Auto-Dimming Mirror with Compass and Homelink is available at your Authorized Mazda Dealer.
8

Mazda Connect Infotainment System
MAZDA CONNECT INFOTAINMENT SYSTEM (if equipped)
MAZDA CONNECT is designed to be operated by using one of the following three interfaces:
1 |
The commander switch (p. 11). |
Talk |
2 |
The touchscreen (if the vehicle is not moving). |
|
3 |
Voice control (p. 12). |
|
NOTE:
•In the interest of safety and to avoid distracted driving, the touchscreen is disabled at speeds over 5 mph. Use the commander switch
or voice control to operate the infotainment system.
•You can touch and tap, slide or swipe the touchscreen, but cannot pinch.
|
|
|
|
|
|
|
|
|
|
|
|
Push TALK button |
|
|
Push TALK button |
||
|
|||||
and say “Entertainment.” |
and say “Navigation.” |
||||
|
|
|
|
|
|
Push TALK button |
Push TALK button and |
Push TALK button |
and say “Applications.” |
say “Communication.” |
and say “Settings.” |
NOTE: These types of Warning screens appear if there is a problem with the vehicle.
|
|
For issues with MAZDA CONNECT, visit |
|
|
|
9 |
|
http://infotainment.mazdahandsfree.com |
|
or call 800-430-0153. |
|
|
|
Mazda Connect Settingswww.MazdaUSA.com
MAZDA CONNECT SETTINGS (if equipped)
To view the different setting screens:
1Move the commander switch to the left or right to change tabs.
2When the desired tab is highlighted, push the knob of the commander switch down.
3Turn the dial of the commander switch to scroll down the list.
NOTE: If there is a scroll bar on the right side, there are more items further down.
Display Settings |
Sound Settings |
Device Settings |
Use this to turn off the display. Touch the screen or use the commander switch to turn back on.
 Use System to change the
brightness of the Display between Day (bright), Night (dim), and AUTO (switches from Day to Night when headlights are turned ON).
See illumination dimmer pp. 31-32.
Vehicle Settings |
System Settings |
Safety Settings |
Clock Settings |
|
|
|
|
The CLOCK tab can be used to adjust the time, sync the clock with GPS, and change between 12 and 24 hr clock.
10
Commander/Voice Control
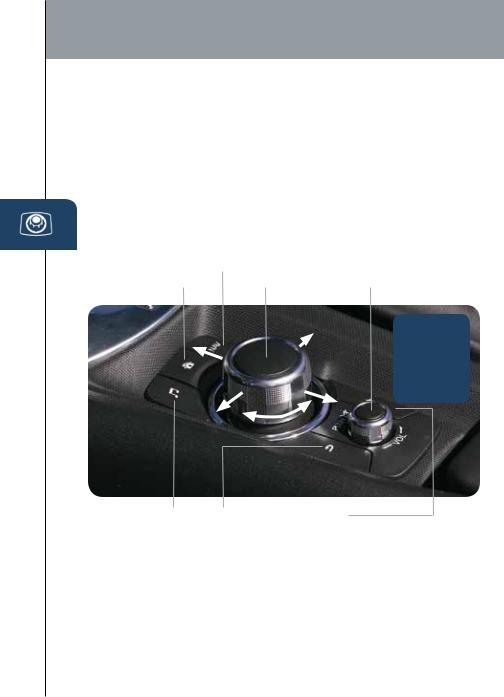
COMMANDER SWITCH (if equipped)
The commander is the primary means for operating Mazda Connect. It allows you to keep your head up and eyes on the road.
The control places five buttons naturally beneath the five fingers and shows five matching icons on the home screen for touch-only operation. Select a button around the commander knob to operate the desired system.
Select an item on the screen by:
1Moving the knob up or down, left or right, and/or turn the dial to move the cursor to the desired on-screen location (and get a description of the icon).
2Pushing the knob down (ENTER) to select your choice on the screen.
NAVIGATION |
MUTE (push down) |
|
HOME |
ENTER |
VOLUME (turn dial) |
Push and hold the Favorites (Star) button to store your favorites.
AUDIO BACK
(to previous screen)
FAVORITES
The following can be stored in Favorites:
•50 stations total for AM, FM, and XM.
•50 contacts in the system phonebook.
•50 points of interest in navigation. (To edit or delete HOME, select HOME and push and hold the commander knob until the Edit/ Delete HOME screen appears.)
11
 Loading...