

Page 1

Model PMD800 User Guide
TUNER
R
Page 2
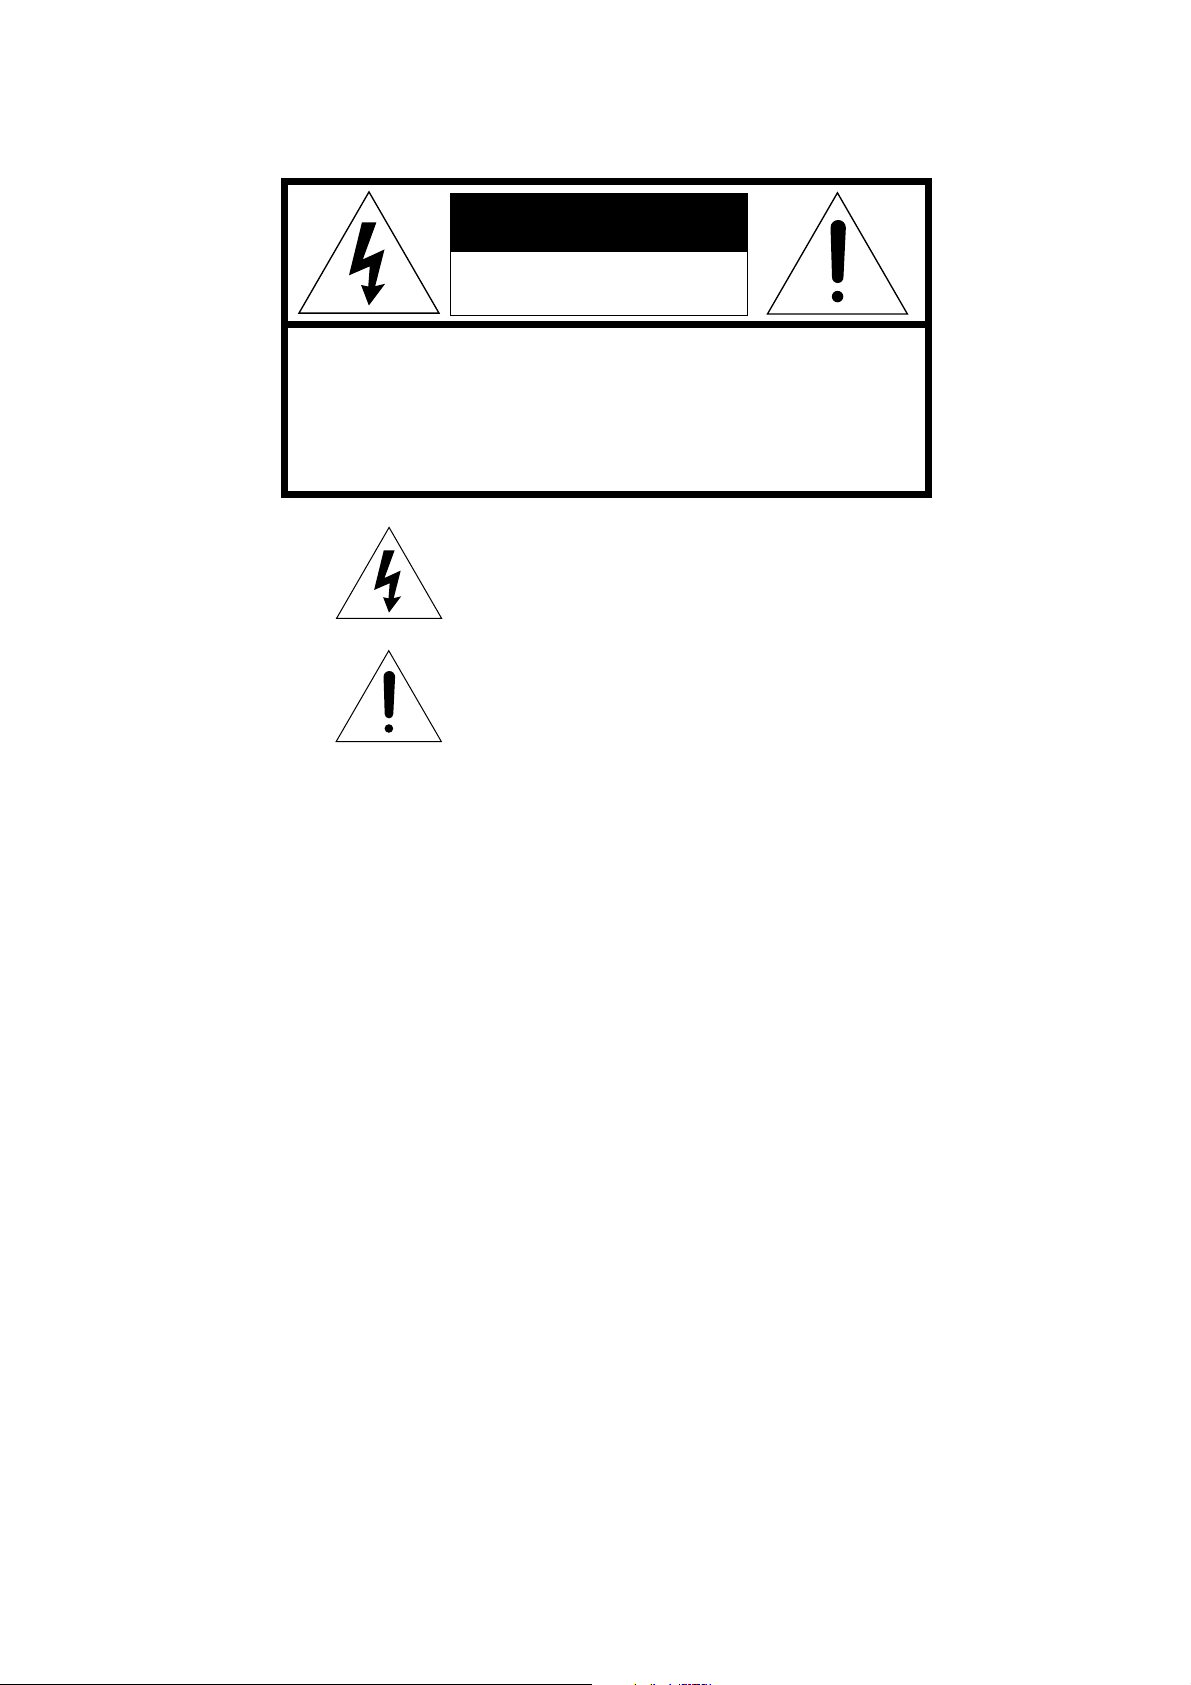
CAUTION
RISK OF ELECTRIC SHOCK
DO NOT OPEN
CAUTION: TO REDUCE THE RISK OF ELECTRIC SHOCK,
DO NOT REMOVE COVER (OR BACK)
NO USER-SERVICEABLE PARTS INSIDE
REFER SERVICING TO QUALIFIED SERVICE PERSONNEL
The lightning flash with arrowhead symbol
within an equilateral triangle is intended to
alert the user to the presence of uninsulated
“dangerous voltage” within the product’s
enclosure that may be of sufficient magnitude
to constitute a risk of electric shock to persons.
The exclamation point within an equilateral
triangle is intended to alert the user to the
presence of important operating and
maintenance (servicing) instructions in the
literature accompanying the product.
WARNING
TO REDUCE THE RISK OF FIRE OR ELECTRIC SHOCK,
DO NOT EXPOSE THIS PRODUCT TO RAIN OR MOISTURE.
CAUTION:
TO PREVENT ELECTRIC SHOCK, MATCH WIDE
BLADE OF PLUG TO WIDE SLOT, FULLY INSERT.
ATTENTION:
POUR ÉVITER LES CHOC ÉLECTRIQUES,
INTRODUIRE LA LAME LA PLUS LARGE DE LA FICHE DANS LA
BORNE CORRESPONDANTE DE LA PRISE ET POUSSER
JUSQU’AU FOND.
NOTE TO CATV SYSTEM INSTALLER:
This reminder is provided to call the CATV (Cable-TV) system installer’s attention to Section 820-40 of the NEC which provides
guidelines for proper grounding and, in particular, specifies that the cable ground shall be connected to the grounding system of the
building, as close to the point of cable entry as practical.
NOTE:
This equipment has been tested and found to comply with
the limits for a Class B digital device, pursuant to Part 15
of the FCC Rules. These limits are designed to provide
reasonable protection against harmful interference in a
residential installation. This equipment generates, uses
and can radiate radio frequency energy and, if not
installed and used in accordance with the instructions,
may cause harmful interference to radio communications. However, there is no guarantee that interference
will not occur in a particular installation. If this equipment
does cause harmful interference to radio or television
reception, which can be determined by tuning the
equipment off and on, the user is encouraged to try to
correct the interference by one or more of the following
measures:
- Reorient or relocate the receiving antenna.
- Increase the separation between the equipment and receiver.
- Connect the equipment into an outlet on a circuit different
from that to which the receiver is connected.
- Consult the dealer or an experienced radio/TV technician for
help.
NOTE:
Changes or modifications not expressly approved by the
party responsible for compliance could void the user’s
authority to operate the equipment.
2
Page 3
IMPORTANT SAFETY
INSTRUCTIONS
READ BEFORE OPERATING EQUIPMENT
This product was designed and manufactured to meet strict quality and
safety standards. There are, however, some installation and operation
precautions which you should be particularly aware of.
1. Read Instructions – All the safety and operating instructions
should be read before the product is operated.
2. Retain Instructions – The safety and operating instructions should
be retained for future reference.
3. Heed Warnings – All warnings on the product and in the operating
instructions should be adhered to.
4. Follow Instructions – All operating and use instructions should be
followed.
5. Cleaning – Unplug this product from the wall outlet before
cleaning. Do not use liquid cleaners or aerosol cleaners. Use a
damp cloth for cleaning.
6. Attachments – Do not use attachments not recommended by the
product manufacturer as they may cause hazards.
7. Water and Moisture – Do not use this product near water-for
example, near a bath tub, wash bowl, kitchen sink, or laundry tub,
in a wet basement, or near a swimming pool, and the like.
8. Accessories – Do not place this product on an unstable cart,
stand, tripod, bracket, or table. The product may fall, causing
serious injury to a child or adult, and serious damage to the
product. Use only with a cart, stand, tripod, bracket, or table
recommended by the manufacturer, or sold with the product. Any
mounting of the product should follow the manufacturer’s
instructions, and should use a mounting accessory recommended
by the manufacturer.
9. A product and cart combination should be moved with care. Quick
stops, excessive force, and uneven surfaces may cause the
product and cart combination to overturn.
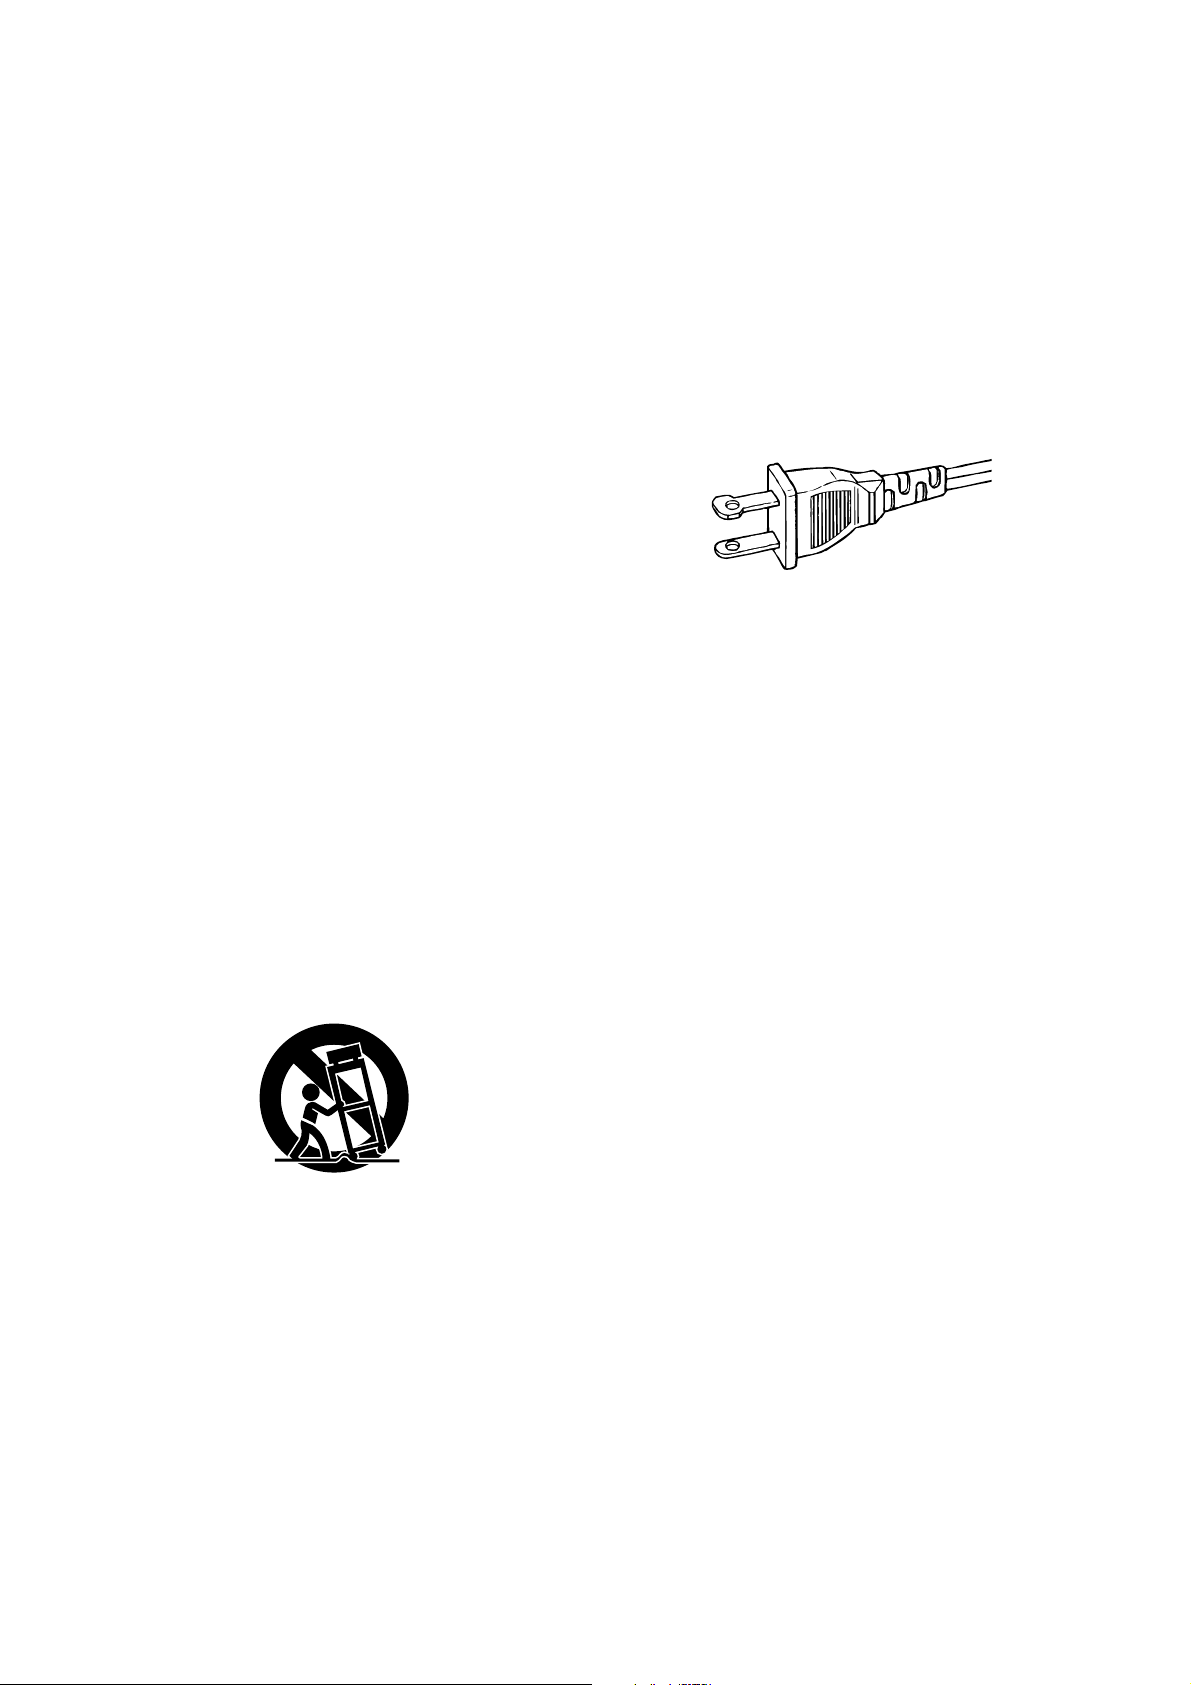
12. Grounding or Polarization – This product may be equipped with a
polarized alternating-current line plug (a plug having one blade
wider than the other). This plug will fit into the power outlet only
one way. This is a safety feature. If you are unable to insert the
plug fully into the outlet, try reversing the plug. If the plug should
still fail to fit, contact your electrician to replace your obsolete
outlet. Do not defeat the safety purpose of the polarized plug.
AC POLARIZED PLUG
13. Power-Cord Protection – Power-supply cords should be routed so
that they are not likely to be walked on or pinched by items placed
upon or against them, paying particular attention to cords at plugs,
convenience receptacles, and the point where they exit from the
product.
14. Protective Attachment Plug – The product is equipped with an
attachment plug having overload protection. This is a safety
feature. See Instruction Manual for replacement or resetting of
protective device. If replacement of the plug is required, be sure
the service technician has used a replacement plug specified by
the manufacturer that has the same overload protection as the
original plug.
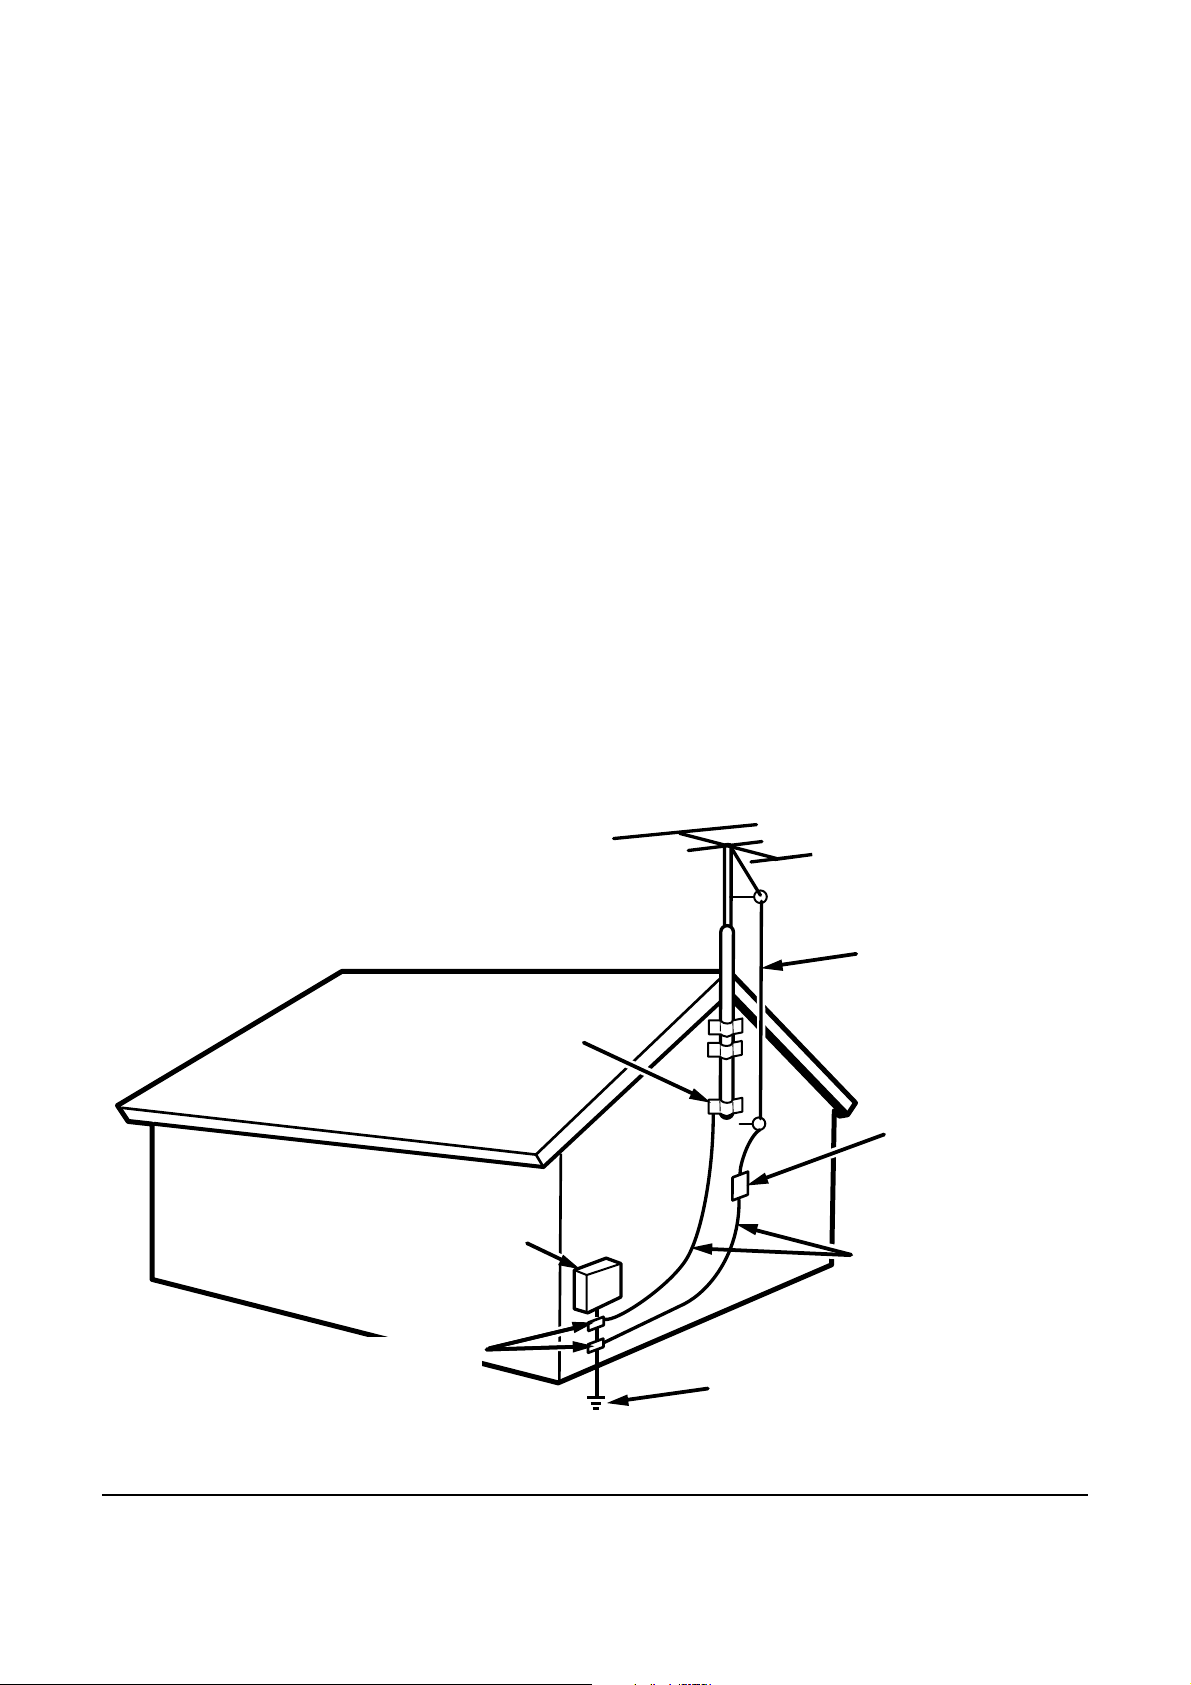
15. Outdoor Antenna Grounding – If an outside antenna or cable
system is connected to the product, be sure the antenna or cable
system is grounded so as to provide some protection against
voltage surges and built-up static charges. Article 810 of the
National Electrical Code, ANSI/NFPA 70, provides information
with regard to proper grounding of the mast and supporting
structure, grounding of the lead-in wire to an antenna discharge
unit, size of grounding conductors, location of antenna-discharge
unit, connection to grounding electrodes, and requirements for the
grounding electrode. See Figure 1.
10. Ventilation – Slots and openings in the cabinet are provided for
ventilation and to ensure reliable operation of the product and to
protect it from overheating, and these openings must not be
blocked or covered. The openings should never be blocked by
placing the product on a bed, sofa, rug, or other similar surface.
This product should not be placed in a built-in installation such as
a bookcase or rack unless proper ventilation is provided or the
manufacturer’s instructions have been adhered to.
11. Power Sources – This product should be operated only from the
type of power source indicated on the marking label. If you are not
sure of the type of power supply to your home, consult your
product dealer or local power company. For products intended to
operate from battery power, or other sources, refer to the
operating instructions.
16. Lightning – For added protection for this product during a lightning
storm, or when it is left unattended and unused for long periods of
time, unplug it from the wall outlet and disconnect the antenna or
cable system. This will prevent damage to the product due to
lightning and power-line surges.
17. Power Lines – An outside antenna system should not be located
in the vicinity of overhead power lines or other electric light or
power circuits, or where it can fall into such power lines or circuits.
When installing an outside antenna system, extreme care should
be taken to keep from touching such power lines or circuits as
contact with them might be fatal.
18. Overloading – Do not overload wall outlets, extension cords, or
integral convenience receptacles as this can result in a risk of fire
or electric shock.
19. Object and Liquid Entry – Never push objects of any kind into this
product through openings as they may touch dangerous voltage
points or short-out parts that could result in a fire or electric shock.
Never spill liquid of any kind on the product.
3
Page 4
20. Servicing – Do not attempt to service this product yourself as
opening or removing covers may expose you to dangerous
voltage or other hazards. Refer all servicing to qualified service
personnel.
21. Damage Requiring Service – Unplug this product from the wall
outlet and refer servicing to qualified service personnel under the
following conditions:
a. When the power-supply cord or plug is damaged.
b. If liquid has been spilled, or objects have fallen into the product.
c. If the product has been exposed to rain or water.
d. If the product does not operate normally by following the operating
instructions. Adjust only those controls that are covered by the
operating instructions as an improper adjustment of other controls
may result in damage and will often require extensive work by a
qualified technician to restore the product to its normal operation.
e. If the product has been dropped or damaged in any way, and
f. When the product exhibits a distinct change in performance – this
indicates a need for service.
FIGURE 1
EXAMPLE OF ANTENNA GROUNDING AS PER
NATIONAL ELECTRICAL CODE, ANSI/NFPA 70
22. Replacement Parts – When replacement parts are required, be
sure the service technician has used replacement parts specified
by the manufacturer or have the same characteristics as the
original part. Unauthorized substitutions may result in fire, electric
shock, or other hazards.
23. Safety Check – Upon completion of any service or repairs to this
product, ask the service technician to perform safety checks to
determine that the product is in proper operating condition.
24. Wall or Ceiling Mounting – The product should be mounted to a
wall or ceiling only as recommended by the manufacturer.
25. Heat – The product should be situated away from heat sources
such as radiators, heat registers, stoves, or other products
(including amplifiers) that produce heat.
ANTENNA
LEAD IN
WIRE
GROUND
CLAMP
ANTENNA
DISCHARGE UNIT
(NEC SECTION 810-20)
ELECTRIC
SERVICE
EQUIPMENT
GROUND CLAMPS
POWER SERVICE GROUNDING
ELECTRODE SYSTEM
(NEC ART 250, PART H)
NEC - NATIONAL ELECTRICAL CODE
This Class B digital apparatus complies with Canadian ICES-003. Cet appareil numérique de la Classe B est conforme à la norme
NMB-003 du Canada.
GROUNDING CONDUCTORS
(NEC SECTION 810-21)
4
Page 5

INTRODUCTION
Thank you for selecting the Marantz PMD800 FM/AM Stereo Tuner for
your system.
Please read these operating instructions carefully. We recommend that
you read the entire user guide before you attempt to connect or operate
the Tuner.
After you have reviewed the contents of this manual, we suggest that
you make all system connections before you attempt to operate the
unit.
Refer to the figures on the pages at the back of this user’s guide. The
callout numbers on the figures correspond to those found in the text. All
references to the connections and controls that are printed in BOLD
type are as they appear on the unit.
INSTALLATION
Remember the following important points when installing the Tuner.
• Do not expose the component to rain or moisture, as this may cause
damage to the Tuner.
• Prevent extra heat from reaching the unit. Never put the Tuner in the
full glare of the sun or near a heat source.
PRECAUTIONS
The following precautions should be taken when operating the equipment.
LOCATION AND FUNCTION OF PARTS AND
CONTROLS
FRONT PANEL FEATURES
(SEE APPEARANCE DRAWING)
q
q
POWER ON /STANDBY button
This button is used to power on or power standby.
w
w
ANTENNA A/B button
This button is used selection of the FM antenna A or B.
e
e
IF BAND button
This button is used for selecting the bandwidth of the FM broadcast.
rr
r
TIME ADJ (adjust) button
r
This button is used for adjusting the current time.
t
t
ST.NAME/DISPLAY button
tt
This button is used for manual tuning or selecting the display mode.
Press this button slightly longer (for more than 1.5 second) to file in
manually stations name in the preset memory.
y
y
TUNING MODE button
This button is used for selecting the manual tuning or the fine tuning
mode. Fine tuning mode is available only in the FM band.
u
u
TUNING 5 (UP/DOWN) button
This button used for tuning in the desired broadcasting stations or
adjusting the time, or manual tuning, etc.
ENGLISH
GENERAL PRECAUTIONS
When installing the equipment ensure that:
— air is allowed to circulate freely around the equipment.
— it is placed on a vibration-free surface.
— it will not be exposed to excessive heat, cold, moisture or dust.
— it will not be exposed to direct sunlight.
— it will not be exposed to electrostatic discharges.
In addition, never place heavy objects on the equipment.
If a foreign objector water does enter the equipment, contact your nearest dealer or service center.
Do not pull out the plug by pulling on the mains lead; grasp the plug
itself.
It is advisable when leaving the house, or during a thunderstorm, to
disconnect the equipment from the AC outlet.
PMD800 FEATURES
• Max.30-station preset memory (each FM,AM) with auto preset
memory function
• Remote control operation
• Select the FM Antenna A/B
• Select the IF band (wide/narrow)
• Fine Tuning
ii
i
CANCEL button
i
This button is used for canceling the program during manual file or
adjusting the on/off time of the timer.
o
o
NEXT button
This button is used for advancing to the next step during time adjustment or manual filing, etc.
!
!0
MEMO button
This button is used for presetting the broadcasting stations.
!
!1
(Timer) ON/OFF button
This button used for engaging the daily timer function.
!!2
TIMER SET button
!2
!
This button is used for presetting the time when the system is turned
on and off every day at a specified time.
!
!3
PRESET 5 (UP/DOWN) button
This button used for preset in the desired broadcasting stations.
!!4
!4
FM MODE button
!
This unit automatically switches into the STEREO mode when a FM
stereo broadcast is received press this button to change the monaural mode, then the “STEREO” indicator will go out on the display.
!
!5
BAND button
This button is used for selecting the FM or AM broadcast.
!
!6
DISPLAY/INDICATOR
a
TIMER
a
aa
This indicator light up when the daily timer is engaged by pressing the timer button.
bb
DAILY timer indicator
b
b
c
c
TUNED indicator
cc
d
d
STEREO indicator
e
e
MEMORY indicator
ff
PRESET Number indicator
f
f
g
g
FM IF band indicator
h
h
Antenna A or B indicator
5
Page 6

OPERATIONS
1. MEMORY PRESETTING
a. Manual operation
For example: presetting FM 90.1 M Hz, to Preset number. 10
1. Select the FM by using the BAND button.
2. Tune to 90.1 MHz by using the TUNING 5 button.
3. Press the MEMO button briefly (for less than 0.5 second) Then,
“MEMO” will bricking in the florescent tube display.
4. Select the preset number by using the TUNING 5 button.
5. MEMO button pushed again, 90.1 MHz (broadcast station) was able
to be memorized in number 10 by this.
Note:
Be sure to select the antenna A or B memorization when you preset
ENGLISH
manual memory in FM broadcast.
b. Automatic operation
Select the desired broadcasting (FM or AM) by using the BAND but-
1.
ton.
2. Press the MEMO button slightly longer than 1.5 second does.
Then, broadcasting will be automatically received, and as many
broadcasting station are received well will be memorized preset number-01 after another
3. Check the broadcasting station by using the TUNING 5 button.
Note:
1. In the case of FM automatic presetting, the antenna A, B selector
is set to “A” automatically,
And the broadcasting station is scanned twice. The stations that
have stronger broadcasting signal are preset in the first time.;
weaker ones are preset in the second time.
2. If a new broadcasting station is preset into a channel the broad-
casting station which has been preset into that position aria will be
automatically erased.
3. In mountainous or remote area broadcasting stations which have
weak broadcasting signals cannot be automatically preset into the
memory.
4. Max. 30 broadcasting stations each for FM, AM bands can be
preset.
3. FINE, MANUAL TUNING
This function used for selection the manual tuning of the fine tuning
mode.
Fine tuning mode is available only in the FM mode.
1. Press the TUNING MODE button.
2. Every time you press this button, the following will be displayed
FINE ⇔ MANUAL.
a. In FINE (Tuning) mode
When you try press the TUNING 5 button, the frequency will be selected by 10 kHz step to ±50 kHz. Then, it will automatically be set to
the MANUAL mode in 4 second.
b. In MANUAL (Tuning) mode
1.
Press the TUNING 5 button in the FM band, then the frequency
will be selected by 50 kHz step.
2. In the MW band, the frequency will be selected by 10 kHz step.
4. DIRECT TUNING
1. Press the F. DIRECT (frequency direct) button
2. Next press the numeric (0 to9) button.
For example: FM 98.10 MHz
a. FM is chosen with BAND (or TUNER) button on remote controller.
b. Press the F. DIRECT (Frequency Direct) button.
c. Press the numeric button of “9”.
d. Press the numeric button of “8”.
e. Press the numeric button of “1”.
f. Press the numeric button of “0”.
g. The display fixed 98.10 MHz and broadcast station received.
MW, LW band is same as above operations.
5. ADJUSTING CURRENT TIME
You can adjust the current time regardless of power on/standby.
1. Press the TIME ADJ button. Then “Hour display” indicator will blink.
2. LISTENING TO RADIO
1. Select FM or AM by using the BAND button.
2. Tune to the desired broadcast by using the TUNING or PRESET
5
button.
3. FM broadcasting is set up to “STEREO” mode
If the broadcasting signal is weak, or if there is a large amount of
interference in FM stereo broadcast, change the monaural mode by
presetting the FM MODE button.
4. Select the IF BAND (FM bandwidth)
Select the NARROW bandwidth by pressing this button if the broad-
cast signal is interfered with adjacent broadcast in the FM .
blink
2. The hour is set with the TUNING 5 button.
3. Press the NEXT button. Then “minute display” indicator will blink.
blink
4. The minute is set with the TUNING 5 button.
blink
5. Press the NEXT button.
6
Page 7
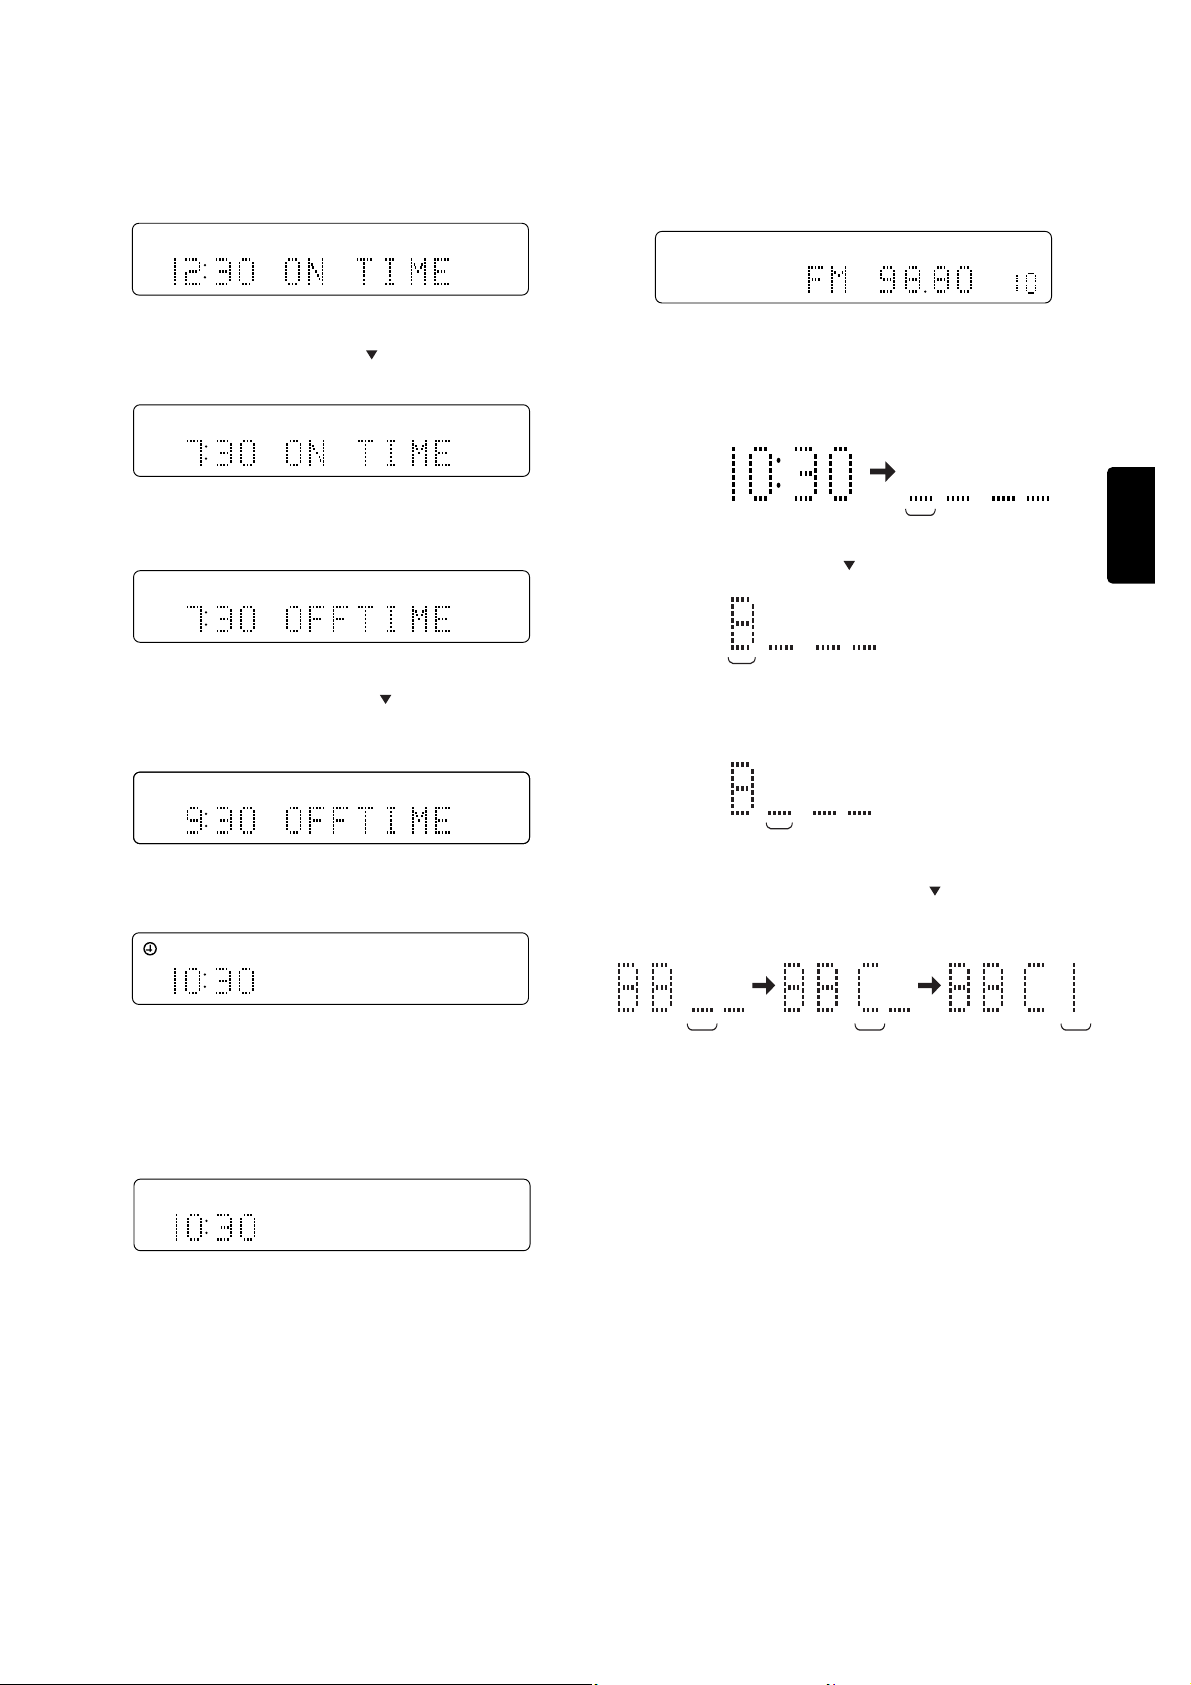
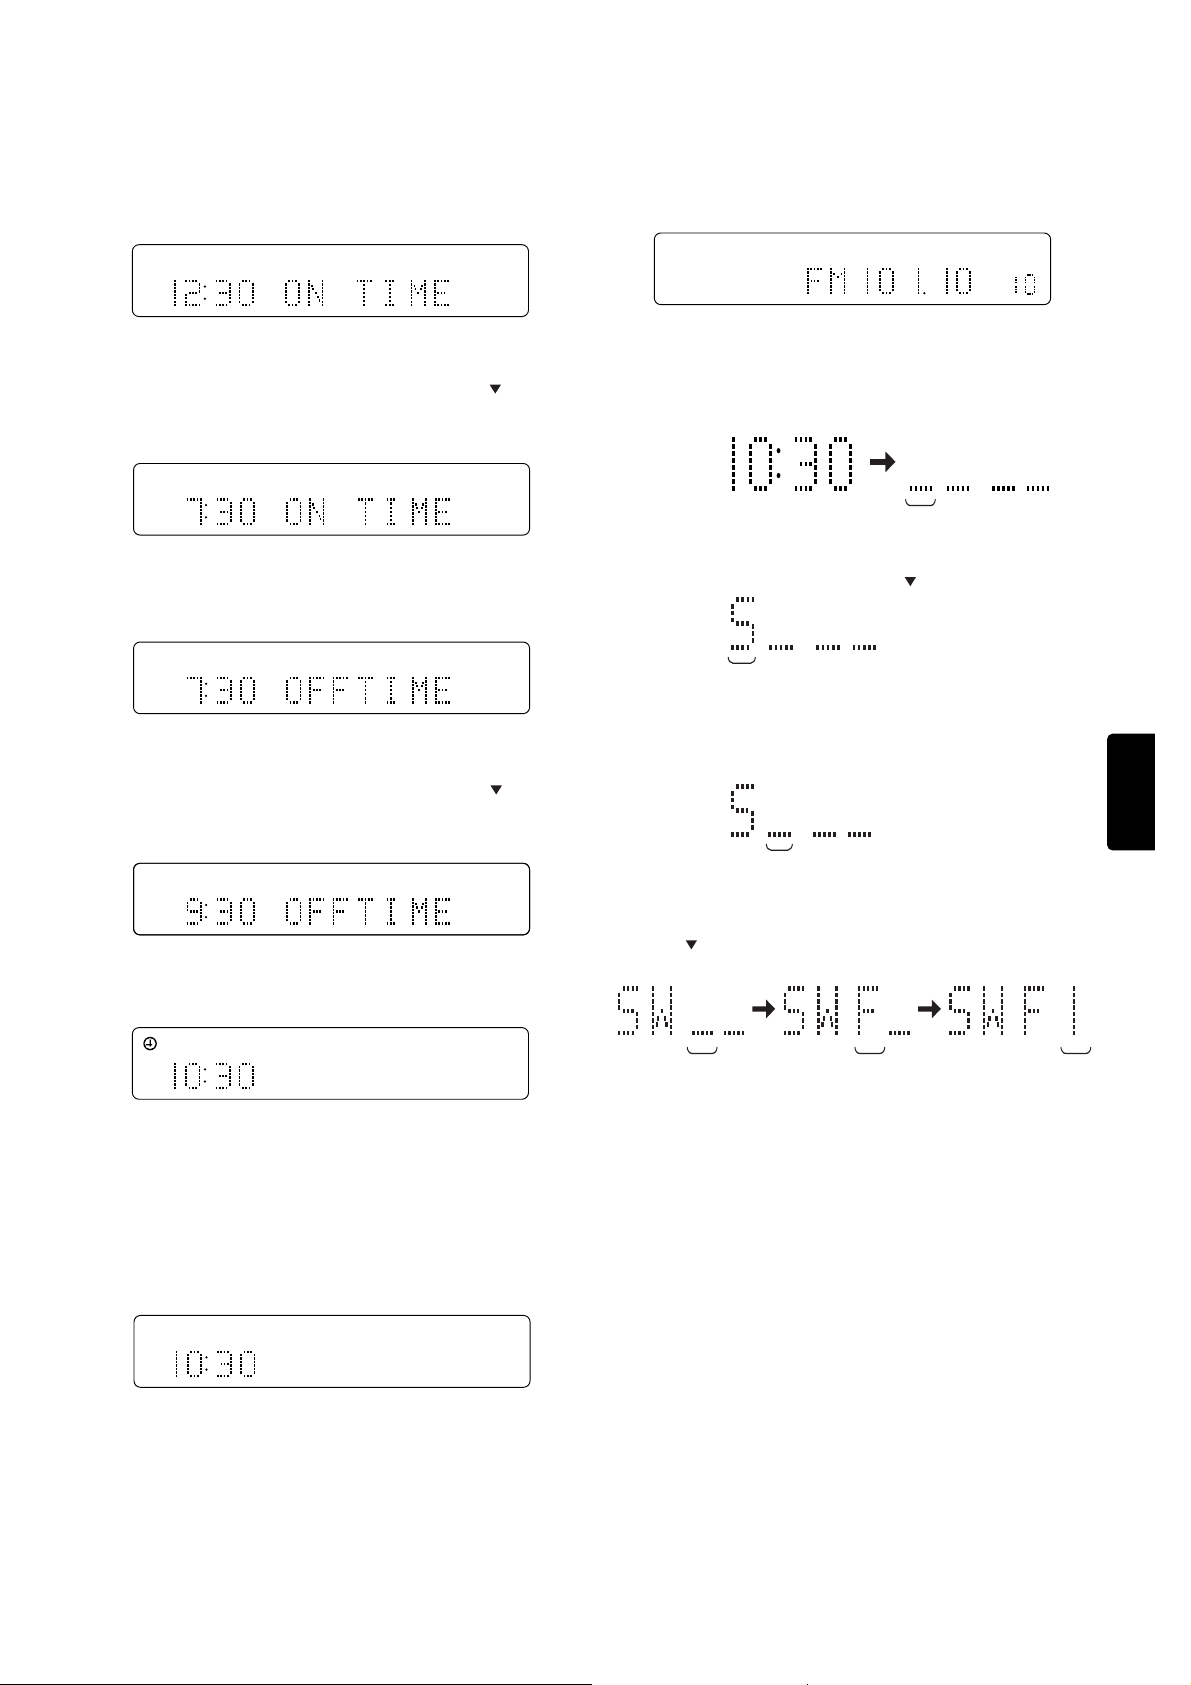
Daily timer
Example: presetting ON time: 7:15 OFF time: 9:30
1. Press the TIMER SET button.
DA LY
6. FILING (STATION NAME, ETC. )
For example: FM 98.8 MHz Preset CH-10 Station name BBC1
1. Select the preset number 10 in the preset mode.
PRESET
MHz
CH
2. Preset the ON time by the TUNING 5 button and the NEXT button.
(Same as operation of time adjust)
DAILY
3. If ON time setting OK, Press the NEXT button.
DAILY
4. Preset the OFF time by the TUNING 5 button and the NEXT but-
ton.
(Same as operation of time adjust)
DAILY
5. Press the NEXT button. The timer setting is completed.
DA LY
TIMER
2. Press the ST.NAME/DISPLAY button long pushed (for more than 1.5
second)
Then, “_ _ _ _” will be displayed in the clock indicator.
blink
3. Select “B” with the TUNING 5 button.
blink
4. Press the NEXT button. and then, the cursor will move one space.
blink
5. After selecting “BBC 1” with the TUNING 5 and the NEXT button,
press the MEMO button. and then, the broadcasting station name
will be changed to “BBC 1”.
ENGLISH
* Daily timer makes the system turn on and off at preset times every
day.
* If you want to record at ON time, select the desired source with the
input selector deck to the REC position.
* If the timer indicator “TIMER” is off, the daily timer doesn’t work.
DAILY
* If you want to check the daily timer, press the TIMER SET button at
first. The ON time setting will be displayed in the clock indicator. And,
press the TIMER SET button again. The OFF time setting will be displayed. Finally press TIMER SET button once again. It returns to the
normal time display.
* While setting the daily timer, if the cancel button is held depressed,
the timer function will be canceled.
blink
blink
blink
7
Page 8
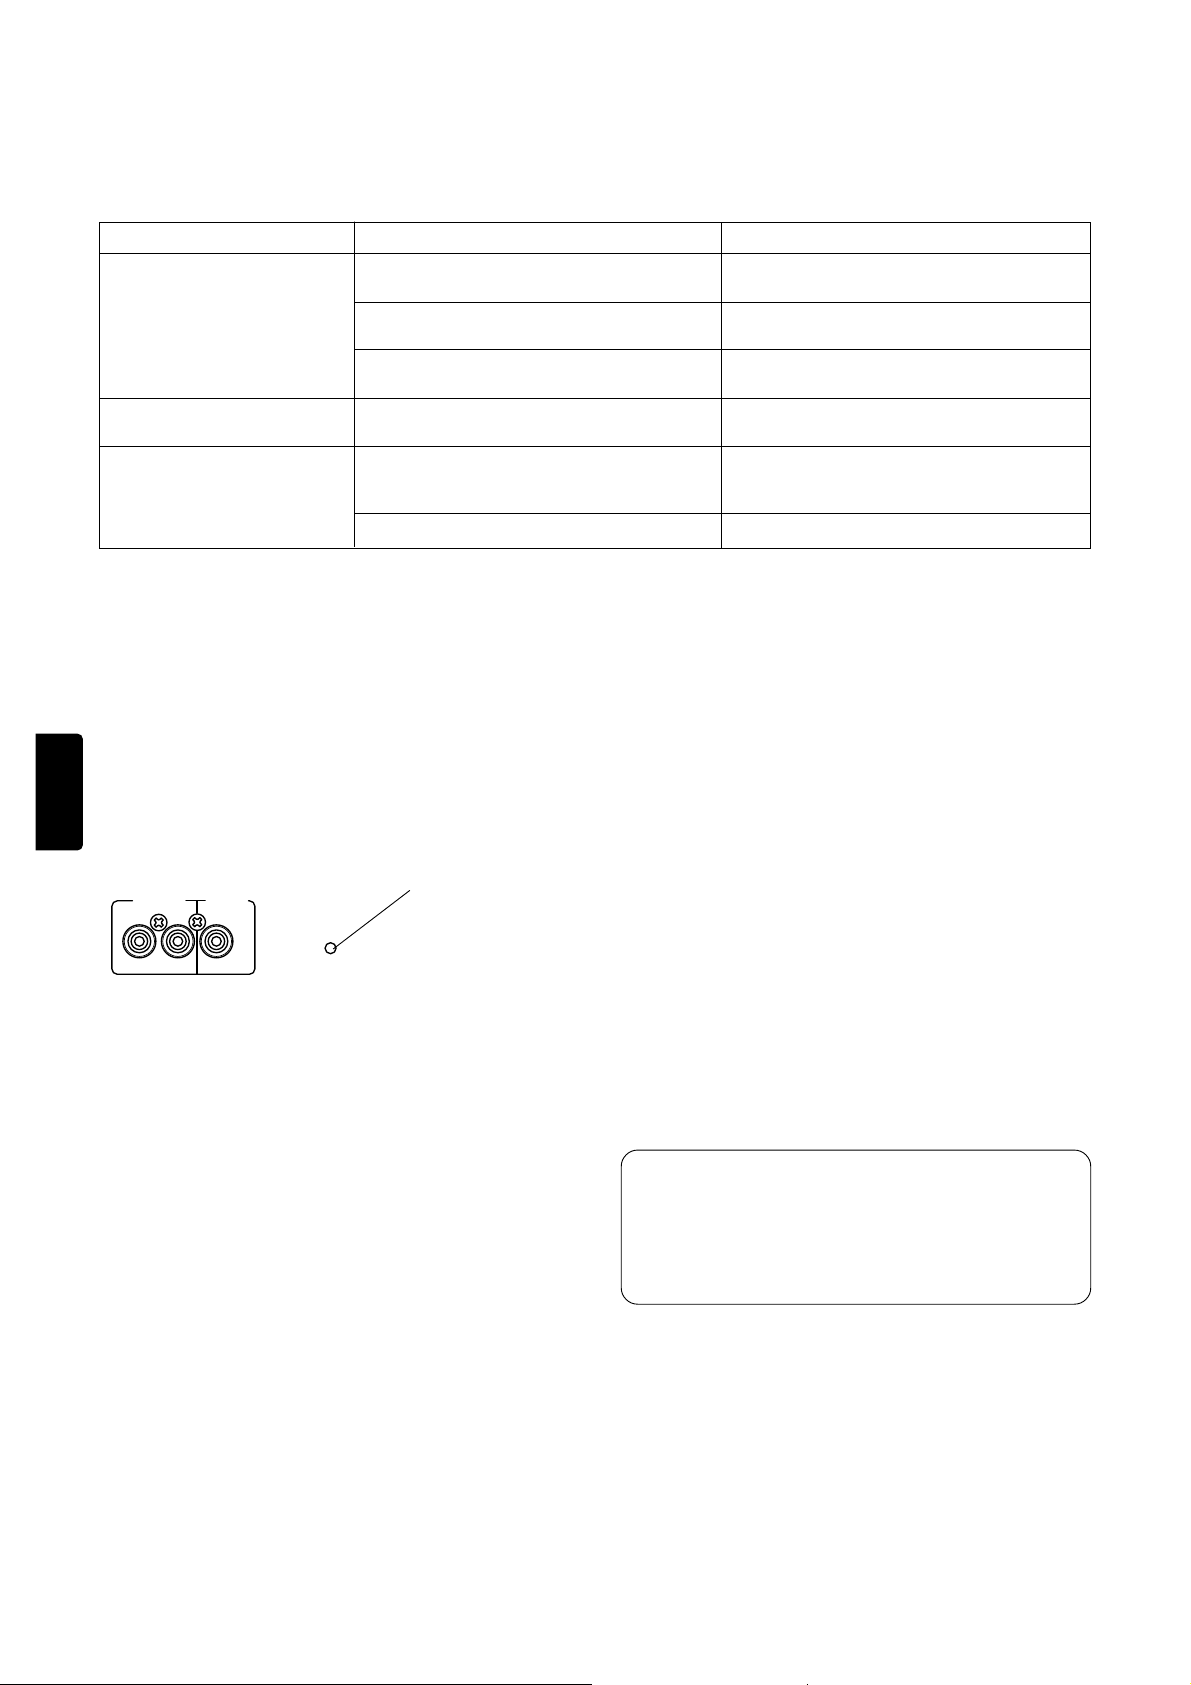
TROUBLESHOOTING GUIDE
If your Tuner should not perform as expected, consult the table below to see if the problem can be corrected before seeking help from your dealer or
our service organization.
Symptom
No sound
Only noise is heard
Broadcasting is received but with
noise
ENGLISH
INPUT SELECTOR of amplifier is not Select
“TUNER” in INPUT SELECTOR
Volume of amplifier positioned in “MIN.”
The terminal for system connection is pullet out.
The antenna is pulled out
The frequency is not detected exactly
The position of antenna is not suitable.
The power of CD player is turned on
WHEN TO USE RESET SWITCH
• When this system is subjected to an electrical shock.
• When the power is irregular.
In the above cases, function buttons may not often operate or the
display may operate wrongly. In these cases, try the following:
— Rear panel —
LINE OUT
R
REMOTE
CONTROL
L
RESET SWITCH
RESET
Probable cause (s)
Suggested remedy
set to “TUNER”
Adjust Volume accordingly
Connect the terminal for system
Connection correctly
Connect the antenna on the rear panel.
Set the frequency correctly
Install the antenna again after locating the best
reception position.
Turn off CD player.
REPAIRS
Only the most competent and qualified service technicians shoud be
allowed to service your unit. Marantz and its factory trained warranty
station personnel have the knowledge and special equipment needed
for the repair and calibration of this precision instrument.
In the event of difficulty, call the proper telephone number listed on the
face of the warranty to obtain the name and address of the Marants
Authorized Service Center nearest you. In many cases, the dealer where
you purchased your Marants unit may be equipped to provide service.
Please include the model, serial number of your unit together with a
copy of your purchase receipt and a full description of what you feel is
abnormal in its behaviour.
Press the RESET switch lightly once or twice with a pencil or a ballpoint
pen.
CARE AND MAIN TENANCE
This section describes the care and maintenance tasks that must be
performed to optimize the operation of your Marantz equipment.
CLEANING OF EQUIPMENT EXTERNAL
SURFACES
The exterior finish of your PMD800 will last indefinitely with proper care
and cleaning. Never use scouring pads, steel wool, scouring powders
or harsh chemical agents (e.g., lye solution), alxohol, thinners, benzine,
insecticide or other volatile substances as these will mar the finish of the
equipment. Likewise, never use cloths containing chemical substances.
If the equipment gets dirty, wipe the external surfaces with a soft, lintfree cloth.
If the equipment becomes heavily soiled:
– dilute some washing up liquid in water, in a ratio of one part deter-
gent to six parts water;
– dip a soft, lint free cloth in the solution and wring the cloth out until it
is damp;
– wipe the equipment with the damp cloth;
– dry the equipment by wiping it with a dry cloth.
Memory backup
• In case a power outage occurs or the power cord is accidentally unplugged, the PMD800 is equipped with a backup function to prevent memory data such as the preset memory from
being erased.
The memory funcitons are backed up for up to about one
week.
8
Page 9
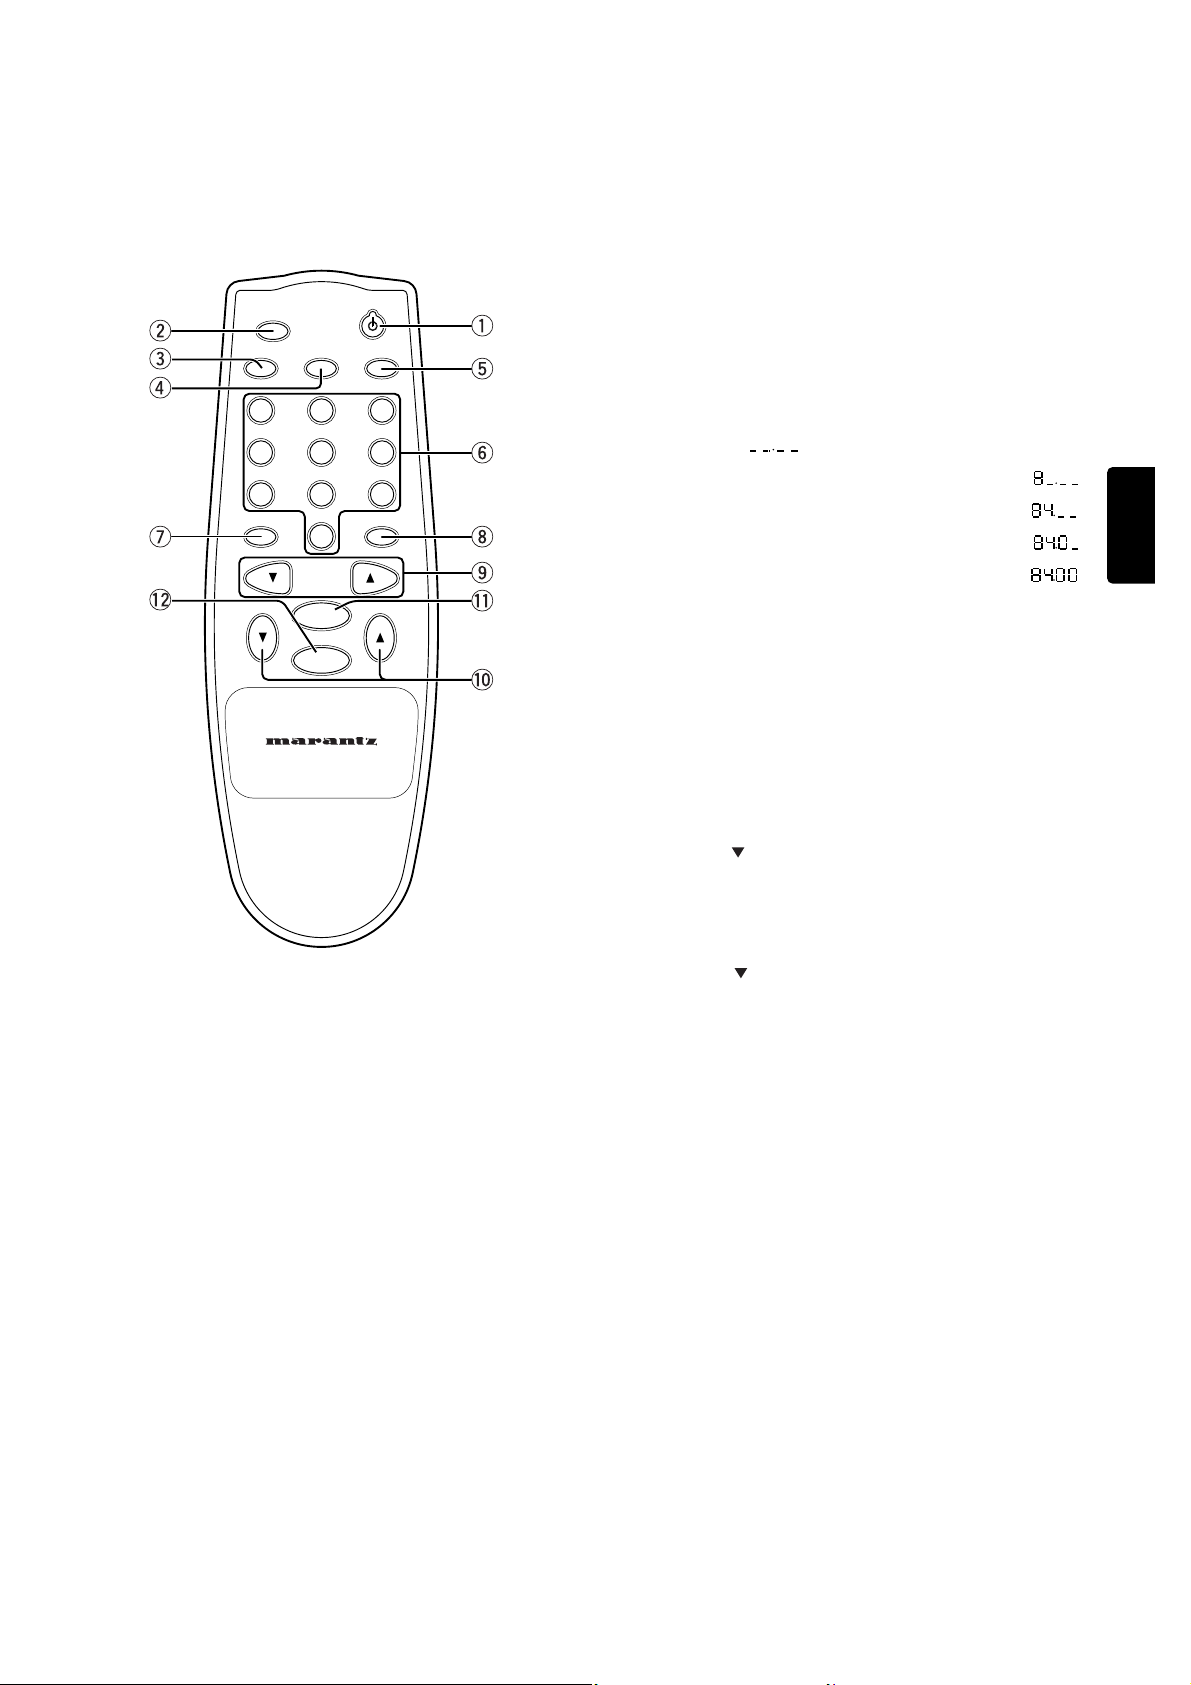
NAME AND USE OF EACH BUTTON ON THE
REMOTE CONTROL
w
e
SLEEP
DISPLAYBAND F.DIRECT
q
t
r
321
u
!2
654
987
IF BANDFM MODE
0
TUNING
PRESET PRESET
MEMO
P.SCAN
y
i
o
!1
!0
REMOTE CONTROL UNIT
RC6000ST
t
t
F.DIRECT button, y Numeric buttons
Use these buttons together to tune in a station by inputting the
station’s broadcast frequency directly through the remote control.
1. Press the F.DIRECT button on the remote control.
2. Next, use the numeric buttons (0 to 9) to input the broadcast fre-
quency of the desired station.
(You can find the broadcast frequencies of local stations in the newspaper, etc.)
Example: Tuning in FM 84.0MHz through the remote control
a. Make sure that the set is set to the FM band. If the set is set to
the AM band, press the BAND button in order to switch to FM.
b. Press the F.DIRECT button on the remote control.
The frequency that was being displayed disappears, and is replaced by “
c. Next, press numeric button “8”. The display now reads “
d. Next, press numeric button “4”. The display now reads “
e. Next, press numeric button “0”. The display now reads “
f. Next, press numeric button “0”. The display now reads “
the TUNED and STEREO indicators light, and you can now hear
the broadcast from that station.
To tune in an AM station, follow the same procedure, except set
the band to AM.
u
u
FM MODE button
Use this button to listen to a stereo broadcast in monaural sound.
This button works for both FM and AM stereo broadcasts.
i
i
IF BAND button
Use this button to switch the FM intermediate frequency band.
” on the display.
”.
”.
”.
”,
ENGLISH
qq
POWER ON/OFF button
q
q
Use this button to turn the power on or to put the unit into standby
mode.
w
w
SLEEP button
Press this button to set the sleep timer. The sleep timer can be set
to 10, 20, 30, 40, 60, or 90 minutes, or OFF. To cancel the sleep
timer, either use this button to select “OFF,” or use the POWER button to turn the set off (i.e., put the set in standby mode).
e
e
BAND button
ee
Use this button to select either the AM band or the FM band. The
band switches each time this button is pressed.
r
r
ST.NAME/DISPLAY button
Press this button to switch the display between the programmed
name, the frequency, and the antenna input level.
o
o
TUNING 55 buttons
oo
Use these buttons to increase or decrease the frequency to which
the tuner is currently tuned. Holding one of these buttons down
initiates the auto tuning operation. (The operation of these buttons
is the same as on the main unit.)
!
!0
PRESET 5 buttons
Use these buttons to move up or down through the preset stations.
!
!1
MEMO button
Use this button to store a station in preset memory. The operation of
this button is the same as on the main unit.
!
!2
P.SCAN (Preset Scan) button
!!2
Use this button to automatically tune in each of the stations stored
in preset memory, for five seconds each. If you hear a broadcast
that you want to listen to, press this button again to stop scanning
on that station.
9
Page 10
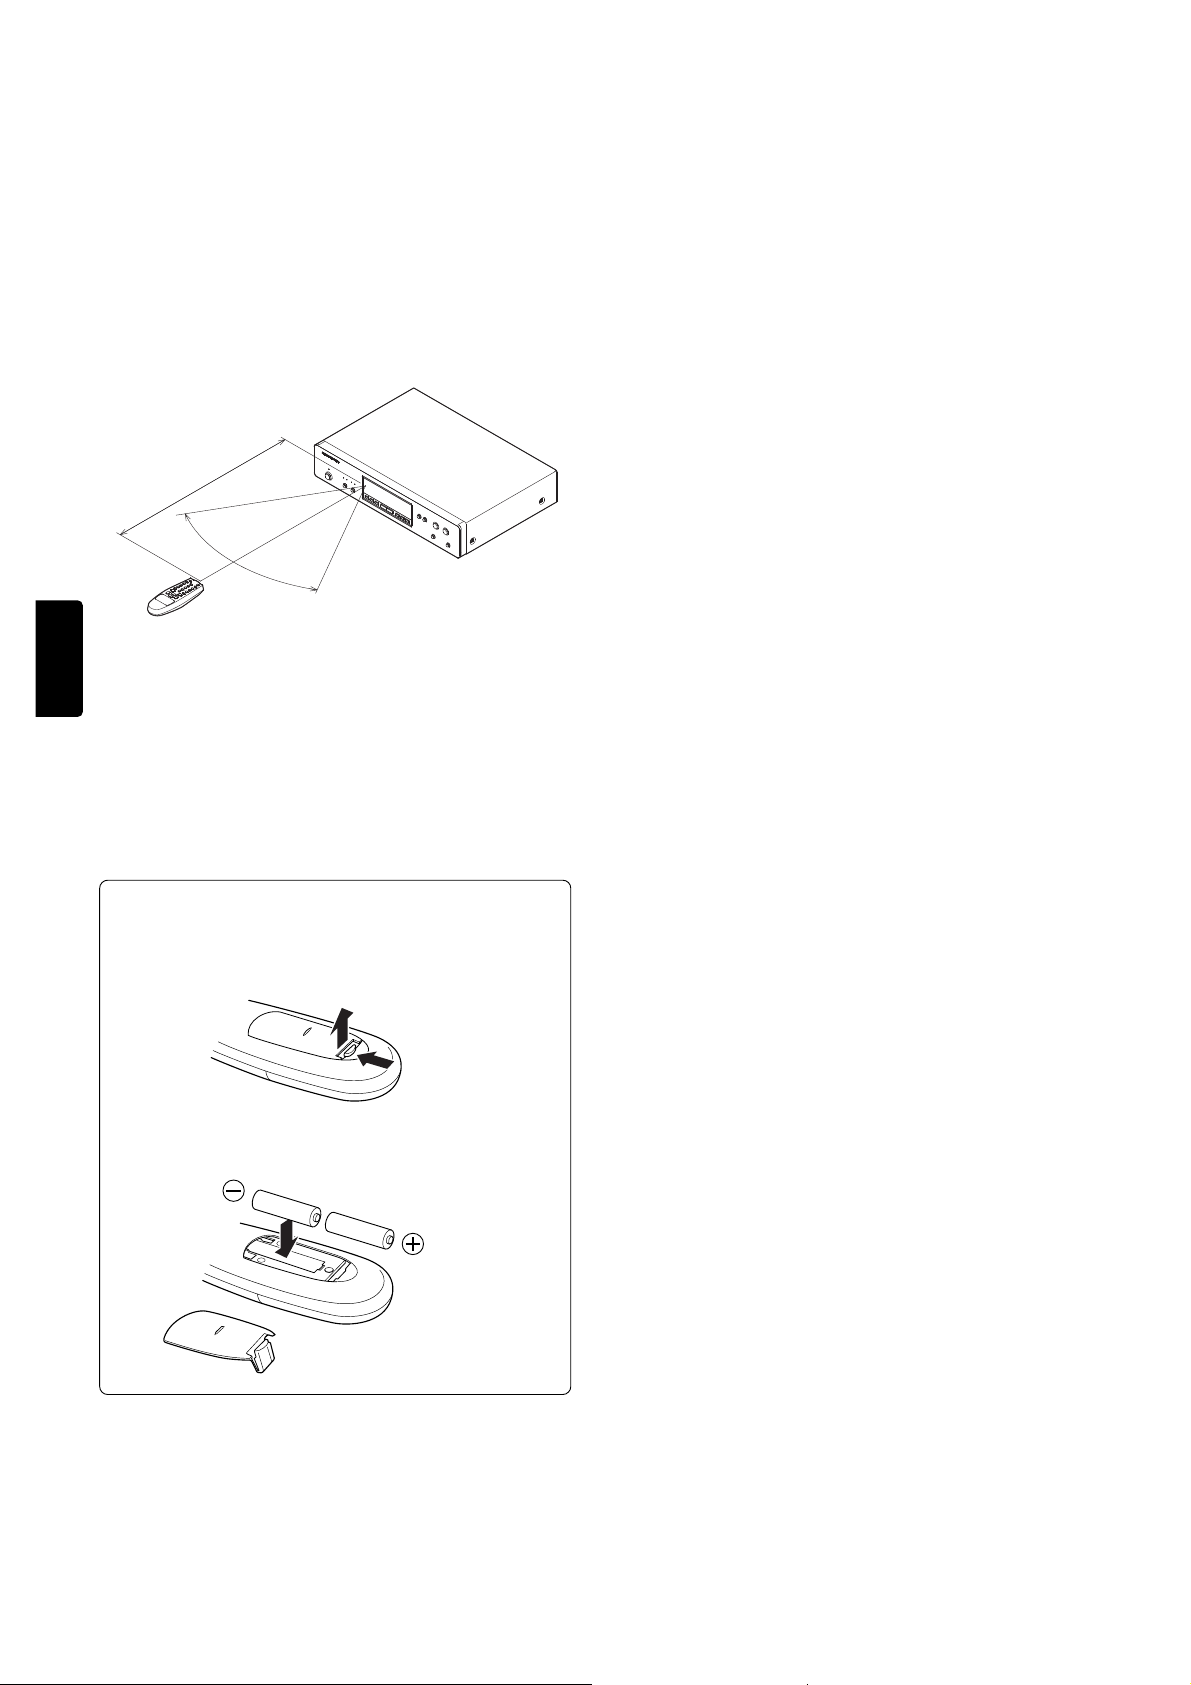
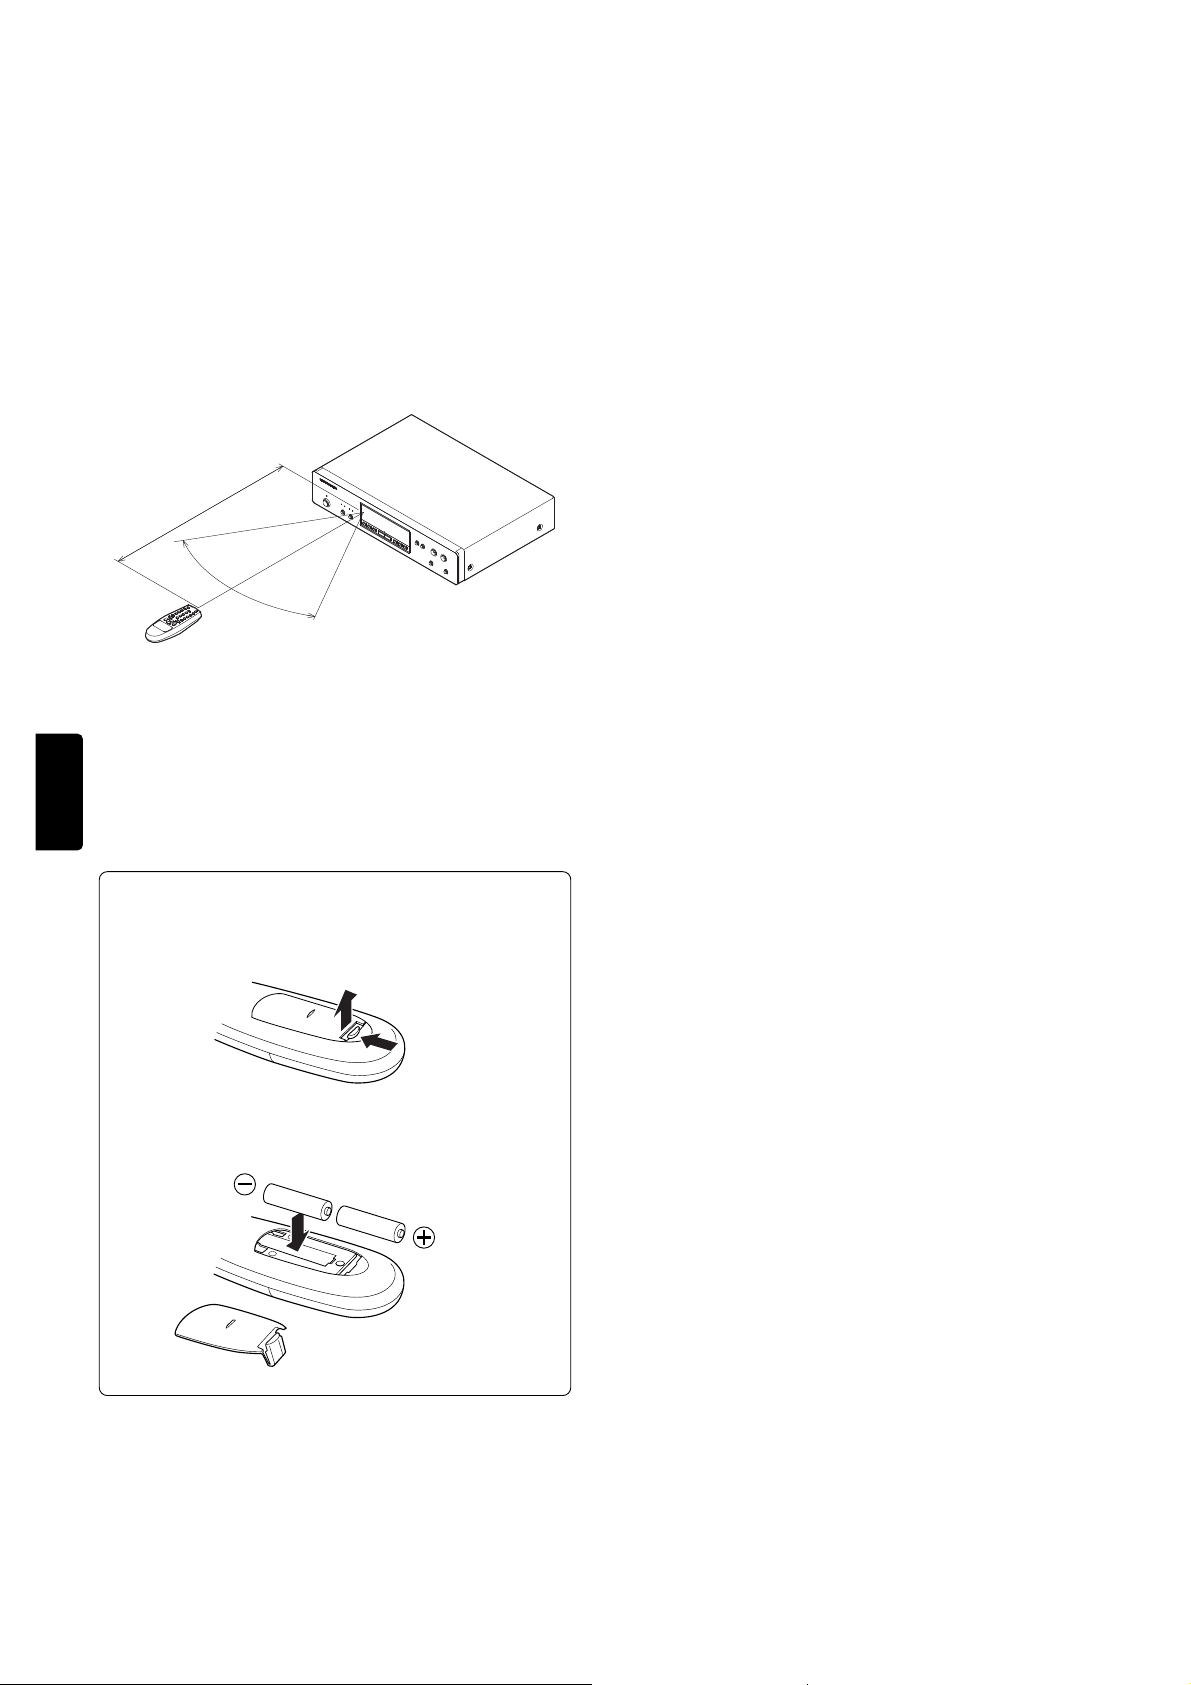
USING THE REMOTE CONTROL UNIT
1. Remote control
Operate the remote control unit (RC6000ST) within a distance of approx.
5 m from the infrared signal reception window (remote sensor) on the
front of the Tuner.
Remote control operation may not be possible if the remote control unit’s
transmitter is not pointing in the direction of the remote sensor or if there
is an obstruction between the transmitter and the remote sensor.
Remote control operating range
Tuner (PMD800)
ENGLISH
Approx. 5m
60°
Remote control unit (RC6000ST)
2. Loading batteries
Batteries in this remote control unit have a life of approximately 1 year
under normal operating conditions. If the remote control unit is not going
to be used for an extended period of time, remove the batteries. Also, if
you notice that the batteries are starting to run down, replace them as
soon as possible.
1. Open the battery cover by lifting it in direction B while
pushing section A in the direction of the arrow.
B
A
2. Insert the provided batteries with correct polarity.
10
Page 11

INTRODUCTION
Nous vous remercions d’avoir choisi le syntoniseur stéréo FM/AM
PMD800 de Marantz pour votre chaîne audio.
Veuillez lire attentivement ces instructions. Nous vous recommandoris
de lire ce manuel en entier avant d’essayer de connecter ou de faire
fonctionner l’appareil.
Après avoir pris connaissance du contenu de ce mauel, nous vous
suggérons d’effectuer toutes les connexions de la chaîne avant de faire
fonctionner l’appareil.
Se référer aux schémas qui se trouvent à la fin de ce manuel. Les
numéros des schémas renvoient aux numéros se trouvant dans le texte.
Toutes les références aux connexions et commandes imprimés en
caractères GRAS sont telles qu’elles apparaissent sur l’appareil.
INSTALLATION
Ne pas oublier les points suivants lors de l’installation du syntoniseur.
• Ne pas exposer l’appareil à la pluie ni à l humidité car cela pourrait
l'endommager.
• Eviter que l’appareil ne soit soumis à de trop hautes températures.
Ne jamais le placer directement sous les rayons du soleil ou à
proximité d’une source de chaleur.
PRECAUTIONS
Il convient de prendre les précautions suivantes pendant le
fonctionnement de l’appareil.
PRECAUTIONS GENERALES
Lors de l’installation de l’appareil, vérifier:
— que l’air peut circuler librement autour de l’appareil
— que l’appareil est placé sur une surface non sujette aux vibrations.
— qu’il n’est pas exposé à des sources de chaleur excessive, au froid,
à l’humidité et à la poussière.
— qu’il n’est pas exposé aux rayons directs du soleil.
— qu’il n’est pas exposé aux décharges électrostatiques.
En outre, ne jamais placer d’objets lourds sur l’appareil
Si un objet ou de l’eau pénètre à l’intérieur de l’appareil, prendre contact avec le distributeur ou le centre de service après-vente le plus
proche.
Toujours débrancher l’appareil en tirant sur la fiche et non pas sur le
cordon secteur.
Il est recommandé de débrancher l’appareil de la prise secteur lorsque
son fonctionnement est interrompu pendant une longue période de
temps ou en cas d’orage.
CARACTERISTIQUES DU PMD800
• Mémoire préréglée de 30 stations maximum (pour chaque bande
FM et AM) avec fonction de préréglage automatique en mémoire
• Fonctionnement télécommandé par RC-BUS
• Sélection de l'antenne FM A/B
• Sélection de la bande IF (large/étroite)
• Syntonisation fine
EMPLACEMENT ET FONCTIONS DES
PIECES ET COMMANDES
PANNEAU AVANT
(VOIR LE SCHEMA DE L'APPAREIL)
qq
q
Touche POWER ON/STANDBY (mise sous tension/veille)
q
Utiliser cette touche pour mettre l'appareil sous tension ou en veille.
w
w
Touche ANTENNA A/B (antenne A/B)
Utiliser cette touche pour sélectionner l'antenne FM A ou B.
ee
e
Touche IF BAND (BAND IF)
e
Utiliser cette touche pour sélectionner la largeur de bande d'une
émission FM.
r
r
Touche TIME ADJ (réglage de l'heure)
Utiliser cette touche pour régler l'heure actuelle.
t
Touche ST.NAME/DISPLAY (nom de station/affichage)
t
tt
Utiliser cette touche pour une syntonisation manuelle ou pour sélectionner le mode d'affichage. Appuyer sur cette touche légèrement
plus longtemps (pendant plus de 1,5 seconde) pour enregistrer
manuellement des noms de stations dans la mémoire de préréglage.
y
y
Touche TUNING MODE (mode de syntonisation)
Utiliser cette touche pour sélectionner le mode de syntonisation
manuelle ou de syntonisation fine. Ce dernier mode n'est disponible
que pour la bande FM.
u
u
Touche TUNING 55 (UP/DOWN) (syntonisation vers le
haut/le bas) (augmentation/diminution)
Utiliser cette touche pour syntoniser les stations d'émission désirées,
régler l'heure ou la syntonisation manuelle, etc.
i
i
Touche CANCEL (annulation)
Utiliser cette touche pour annuler un programme pendant une mise
en mémoire manuelle ou le réglage de l'heure de mise sous/hors
tension de la minuterie.
o
o
Touche NEXT (étape suivante)
Utiliser cette touche pour passer à l'étape suivante pendant le
réglage de l'heure, la mise en mémoire manuelle, etc.
!
!0
Touche MEMO (mémorisation)
Utiliser cette touche pour prérégler des stations émettrices.
!
!1
Touche (Timer) ON/OFF (mise sous/hors tension minuterie)
Utiliser cette touche pour activer/désactiver la fonction de minuterie
quotidienne.
!
!2
Touche TIMER SET (réglage minuterie)
Utiliser cette touche pour prérégler l'heure où le système se met
sous tension et hors tension tous les jours à l'heure spécifiée.
!
!3
Touche PRESET 5 (UP/DOWN)
(syntonisation vers le haut/le bas)
Utiliser cette touche pour prérégler les stations d'émission désirées.
!
!4
Touche FM MODE (mode FM)
!!4
Cet appareil se commute automatiquement au mode STEREO
lorsqu'une émission FM stéréo est reçue. Appuyer sur cette touche
pour passer au mode monaural et l'indicateur "STEREO" disparaît
de l'affichage.
!
!5
Touche BAND (bande)
Utiliser cette touche pour sélectionner la bande FM ou AM.
!
!6
AFFICHAGE/INDICATEURS
a
a
TIMER (minuterie)
Cet indicateur s'allume lorsque la minuterie quotidienne est activée
en appuyant sur la touche de minuterie.
b
b
Indicateur de minuterie DAILY (quotidienne)
c
c
Indicateur TUNED (syntonisé)
d
d
Indicateur STEREO
dd
e
e
Indicateur MEMORY (mémoire)
f
f
Indicateur de numéro PRESET (préréglage)
g
g
Indicateur de bande FM IF
h
h
Indicateur d'antenne A ou B
hh
11
FRANÇAIS
Page 12

UTILISATION
1. PREREGLAGE DE LA MEMOIRE
a. Préréglage manuel
Par exemple : Préréglage de FM 90,1 MHz sur le numéro préréglé 10
1. Sélectionner la bande FM au moyen de la touche BAND.
2. Syntoniser 90,1 MHz au moyen de la touche TUNING 5 .
3. Appuyer brièvement sur la touche MEMO (pendant moins de 0,5
seconde). "MEMO" clignotera sur l'affichage fluorescent.
4. Sélectionner le numéro préréglé 10 au moyen de la touche TUNING
.
5
5. Appuyer de nouveau sur la touche MEMO et 90,1 MHz (station
émettrice) est alors mémorisé sur le numéro préréglé 10.
Remarque :
Sélectionner toujours l'antenne A ou B lors du préréglage manuel en
mémoire d'une émission FM.
SYNTONISATION FINE, MANUELLE
Cette fonction est utilisée pour sélectionner le mode de syntonisation
manuelle ou de syntonisation fine.
La fonction de syntonisation fine n'est disponible qu'en mode FM.
1. Appuyer sur la touche TUNING MODE.
2. Des pressions successives sur cette touche font s'afficher FINE ⇔
MANUAL.
a. Mode FINE (syntonisation)
Appuyer sur la touche TUNING 5 et la fréquence est sélectionnée
par pas de 10 kHz jusqu'à ±50 kHz. Puis le mode passe, en 4 secondes,
à MANUAL.
b. Mode MANUAL (syntonisation)
Appuyer sur la touche TUNING 5 , dans la bande FM, et la
1.
fréquence est sélectionnée par pas de 50 kHz.
2. Dans la bande MW, la fréquence est sélectionnée par pas de 10 kHz.
b. Préréglage automatique
Sélectionner la bande désirée (FM ou AM) au moyen de la touche
1.
BAND.
2. Appuyer sur la touche MEMO légèrement plus de 1,5 seconde.
FRANÇAIS
Les stations sont alors reçues automatiquement et toutes celles dont
la réception est bonne sont mémorisées l'une après l'autre dans les
numéros préréglés, à partir du numéro 01.
3. Vérifier les stations mémorisées en appuyant sur la touche TUNING
5
.
Remarque :
1. Lors d'un préréglage FM automatique, le sélecteur d'antenne A, B
est réglé automatiquement sur "A".
Les stations émettrices sont balayées deux fois. Celles dont le
signal est fort sont préréglées lors du premier balayage ; les stations plus faibles lors du deuxième.
2. Si une nouvelle station est mémorisée dans un numéro préréglé,
la station qui était déjà mémorisé dans ce numéro est effacée.
3. Dans les régions montagneuses ou éloignées des stations
émettrices, où les signaux sont faibles, un préréglage automatique
en mémoire est impossible.
4. 30 stations maximum peuvent être préréglées pour chaque bande
FM, AM.
2. ECOUTE DE LA RADIO
1. Sélectionner FM ou AM au moyen de la touche BAND.
2. Syntoniser l'émission désirée au moyen de la touche TUNING ou
PRESET 5
3. La réception des émissions FM se fait en mode "STEREO".
Si le signal est faible ou s'il y a beaucoup de parasites pendant une
émission FM stéréo, passer au mode monaural en appuyant sur la
touche FM MODE.
4. Sélectionner la largeur de bande FM (touche IF BAND)
Sélectionner le réglage bande étroite en appuyant sur cette touche
si le signal reçu est parasité par des émissions adjacentes de la
bande FM.
.
4. SYNTONISATION DIRECTE
1. Appuyer sur la touche F. DIRECT (fréquence directe).
2. Appuyer ensuite sur les touches numériques (0 à 9).
Par exemple : FM 98,10 MHz
a. FM est choisi au moyen de la touche BAND (ou TUNER) de la
télécommande.
b. Appuyer sur la touche F. DIRECT (fréquence directe).
c. Appuyer sur la touche numérique "9".
d. Appuyer sur la touche numérique "8".
e. Appuyer sur la touche numérique "1".
f. Appuyer sur la touche numérique "0".
g. L'affichage indique 98.10 MHz et la station est reçue.
Les opérations sont les mêmes pour les bandes MW et LW.
5. REGLAGE DE L'HEURE ACTUELLE
Il est possible de régler l'heure actuelle que l'appareil soit sous tension
ou en veille.
1. Appuyer sur la touche TIME ADJ. L'indicateur "affichage des heures"
clignote.
Clignote
2. Les heures sont réglées au moyen de la touche TUNING 5 .
3. Appuyer sur la touche NEXT. L'indicateur "affichage des minutes"
clignote.
Clignote
4. Les minutes sont réglées au moyen de la touche TUNING 5 .
Clignote
5. Appuyer sur la touche NEXT.
12
Page 13

Minuterie quotidienne
Exemple : Préréglage de l'heure ON (mise sous tension) : 7:15, heure
OFF (mise hors tension) : 9:30
1. Appuyer sur la touche TIMER SET.
DAILY
6. MémORISATION (NOM DE STATION, ETC.)
Exemple : Mémorisation du nom de station RTL1, préréglage CH-10,
FM 104,3 MHz
1. Sélectionner le numéro préréglé 10 en mode préréglage.
PRESET
CH
MHz
2. Prérégler l'heure ON au moyen de la touche TUNING 5 et de la
touche NEXT.
(Opérations identiques au réglage de l'heure)
DA LY
3. Si le réglage de l'heure ON est correct, appuyer sur la touche NEXT.
DA LY
4. Prérégler l'heure OFF au moyen de la touche TUNING 5 et de la
touche NEXT.
(Opérations identiques au réglage de l'heure)
DA LY
5. Appuyez sur la touche NEXT. Le réglage de la minuterie est terminé.
2. Maintenir enfoncée la touche ST. NAME/DISPLAY (pendant plus de
1,5 seconde).
“_ _ _ _” s’affiche sur l’indicateur d’horloge.
Clignote
3. Sélectionner “R” au moyen de la touche TUNING 5 .
Clignote
4. Appuyer sur la touche NEXT et le curseur se déplace d’un espace.
Clignote
5. Après avoir sélectionné “RTL1” au moyen de la touche TUNING 5
et de la touche NEXT, appuyer sur la touche MEMO et le nom de la
station émettrice change en “RTL1”.
FRANÇAIS
DAILY
TIMER
* La minuterie quotidienne fait se mettre le système sous et hors tension
aux heures préréglées, tous les jours.
* Pour enregistrer à l'heure de mise sous tension, sélectionner la source
désirée en réglant le sélecteur d'entrée sur la position REC.
* Si l'indicateur "TIMER" est éteint, la minuterie quotidienne ne fonctionne
pas.
DAILY
* Si vous voulez vérifier la minuterie quotidienne, appuyez tout d’abord
sur la touche TIMER SET. Le réglage de l’heure de mise sous tension
s’affichera sur l’indicateur d’horloge. Puis appuyez de nouveau sur la
touche TIMER SET. Le réglage de l’heure de mise hors tension
s’affichera. Finalement, appuyez encore une fois sur la touche TIMER
SET. L’affichage revient à celui de l’heure normal.
* Pendant le réglage de la minuterie quotidienne, la fonction de minuterie
est annulée en maintenant enfoncée la touche CANCEL.
Clignote
Clignote
Clignote
13
Page 14

GUIDE DE DEPISTAGE DES PANNES
Si le syntoniseur ne fonctionne pas normalement, consulter le tableau ci-dessous pour essayer de remédier au problème avant de prendre contact
avec le distributeur ou notre service après-vente.
Symptôme
Pas de son
L'antenne est débranchée.
Les émissions sont reçues, mais
elles sont parasitées
Le sélecteur INPUT de l'amplificateur n'est pas réglé
sur "TUNER".
Le volume de l'amplificateur est réglé sur "MIN".
La prise de raccordement du système est débranchée.
L’antenne est débranchée.
La fréquence n’est pas détectée avec exactitude.
La position de l’antenne est incorrecte.
Le lecteur de CD est sous tension
FRANÇAIS
UTILISATION DU COMMUTATEUR DE
REMISE A ZERO
¡ En cas de court-circuit sur l’appareil.
¡ En cas de variation de l’alimentation
Dans les cas mentionnés ci-dessus, les touches de fonctions et
l’affichage risquent de ne pas fonctionner correctement. Dans ces
cas là, procédez de la façon suivante:
— Panneau arrière —
LINE OUT
R
REMOTE
CONTROL
L
COMMUTATEUR DE REMISE A ZERO
RESET
Cause(s) probable(s)
Mesure suggérée
Le régler sur "TUNER".
Régler correctement le volume.
Brancher correctement la prise de raccordement du
système.
Seulement des parasites sont entendus
Brancher l’antenne sur le panneau arrière.
Régler correctement la fréquence.
Installer de nouveau l'antenne après avoir localisé
la meilleure position de réception.
Mettre le lecteur de CD hors tension.
REPARATIONS
Seuls des techniciens qualifiés et compétents sont autorisés à réparer
votre appareil. Marantz et son personnel formé en usine présent dans
les centres de garantie, disposent des connaissances et des
équipements spéciaux requis pour la réparation et l’étalonnage de ces
appareils de précision.
En cas de problème, appelez le numéro de téléphone figurant sur la
garantie afin de connaître le nom et l’adresse du Centre autorisé de
service aprèsvente Marantz le plus proche de chez vous. Très souvent,
le revendeur auprès duquel vous avez acquis votre appareil Marantz
sera équipé pour effectuer la réparation. Veuillez préciser le modèle et
le numéro de série de votre appareil et joindre une copie de votre preuve
d’achat ainsi qu’une description complète de l’anomalie apparente de
l’appareil.
Appuyez légèrement une ou deux fois, sur la touche RESET à l’aide
d’un crayon ou d’un stylo.
ENTRETIEN ET MAINTENANCE
Ce chapitre traite des opérations d’entretien et de maintenance à
effectuer afin que l’utilisation de votre appareil Marantz soit optimale.
NETTOYAGE DES SURFACES
EXTERIEURES
La finition extérieure de votre PMD800 durera indéfiniment tant que vous
l’entretiendrez correctement. Ne jamais utiliser des tampons à récurer,
de la paille de fer, des poudres à récurer ou de puissants agents
chimiques (comme des produits de lessive), de l’alcool, des diluants,
de la benzine, des insecticides ou autres substances volatiles étant
donné qu’elles altèrent la finition de l’appareil. De la même manière, ne
jamais utiliser de chiffons imbibés de substances chimiques. Si l’appareil
est sale, nettoyer les surfaces extérieures avec un chiffon doux, non
pelucheux.
Si l’appareil est fortement sali:
– diluer un peu de liquide pour vaisselle dans de l’eau, à savoir une
part de produit détergent pour six parts d’eau;
– tremper un chiffon doux, non pelucheux dans la solution et tordre le
chiffon jusqu’à ce qu’il soit humide;
– nettoyer l’appareil à l’aide du chiffon humide;
– essuyer l’appareil en le frottant avec un chiffon sec.
Sauvegarde de la mémoire
• Le PMD800 est doté d’une fonction de sauvegarde qui permet
aux données stockées en mémoire, pour les préréglages par
exemple, de ne pas être effacées, au cas où une panne de
courant se produit ou si la fiche du cordon secteur est retirée
par accident.
Les fonctions de la mémoire sont gardées pendantune semaine environ.
14
Page 15

NOM ET UTILISATION DES TOUCHES DE
LA TÉLÉCOMMANDE
w
e
SLEEP
DISPLAYBAND F.DIRECT
q
t
r
321
u
!2
654
987
IF BANDFM MODE
0
TUNING
PRESET PRESET
MEMO
P.SCAN
y
i
o
!1
!0
REMOTE CONTROL UNIT
RC6000ST
t
Touche F.DIRECT (fréquence directe),
t
Utilisez ces touches ensemble pour syntoniser une station en
introduisant directement la fréquence d’émission de la station au
moyen de la télécommande.
1. Appuyez sur la touche F.DIRECT de la télécommande.
2. Utilisez ensuite les touches numériques (0 à 9) pour introduire la
fréquence d’émission de la station désirée.
(Vous pouvez trouver les fréquences d’émission des stations locales
dans le journal, etc.)
Exemple: Syntonisation de FM 84.0 MHz au moyen de la télécom-
a. Vérifiez que l’appareil est réglé sur la bande FM. S’il est réglé
b. Appuyez sur la touche F.DIRECT de la télécommande.
c. Appuyez ensuite sur la touche numérique “8”. L’affichage indique
d. Appuyez ensuite sur la touche numérique “4”. L’affichage indique
e. Appuyez ensuite sur la touche numérique “0”. L’affichage indique
f. Appuyez ensuite sur la touche numérique “0”. L’affichage indique
uu
u
Touche FM MODE (mode FM)
u
Utilisez cette touche pour écouter une émission stéréo en son monaural. Cette touche fonctionne pour les émissions stéréo FM et AM.
mande
sur la bande AM, appuyez sur la touche BAND pour passer en
FM.
La fréquence qui était affichée disparaît et elle est remplacée
par “
alors “
alors “
alors “
alors “
vous entendez l’émission de cette station.
Pour syntoniser une station AM, effectuez les mêmes opérations
en réglant la bande sur AM.
” sur l’affichage.
”.
”.
”.
”, les indicateurs TUNED et STEREO s’allument et
y
Touches numériques
y
FRANÇAIS
q
q
Touche POWER ON/OFF (mise sous/hors tension)
Utilisez cette touche pour mettre l’appareil sous tension ou en mode
de veille.
w
w
Touche SLEEP (minuterie d’arrêt automatique)
Appuyez sur cette touche pour régler la minuterie d’arrêt
automatique. Vous pouvez la régler sur 10, 20, 30, 40, 60 ou 90
minutes, ou sur OFF (désactivée). Pour annuler la fonction de
minuterie, utilisez soit cette touche pour sélectionner “OFF” soit la
touche POWER pour mettre l’appareil hors tension (c’est-à-dire le
mettre en mode de veille).
e
Touche BAND (bande)
e
ee
Utilisez cette touche pour sélectionner la bande soit AM soit FM. La
bande change chaque fois que vous appuyez sur cette touche.
r
r
Touche ST.NAME/DISPLAY (nom de station/affichage)
Appuyez sur cette touche pour commuter l’affichage entre le nom
programmé, la fréquence et le niveau d’entrée d’antenne.
i
i
Touche IF BAND (bande de fréquence intermédiaire)
Utilisez cette touche pour passer à la bande de fréquence
intermédiaire.
oo
o
Touches TUNING 55 (syntonisation)
o
Utilisez ces touches pour augmenter ou diminuer la fréquence qui
est actuellement syntonisée. Maintenez une de ces touches
enfoncée pour démarrer la syntonisation automatique. (L’utilisation
de ces touches est identique à celle des touches de l’appareil principal).
!
!0
Touches PRESET 5 (stations préréglées)
Utilisez ces touches pour passer par les stations préréglées dans
l’ordre ascendant ou descendant.
!
!1
Touche MEMO (mémorisation)
Utilisez cette touche pour enregistrer une station dans la mémoire
préréglée. L’utilisation de cette touche est identique à celle de la
touche de l’appareil principal.
!
!2
Touche P.SCAN (balayage des stations préréglées)
Utilisez cette touche pour syntoniser automatiquement, pendant cinq
secondes, chacune des stations enregistrées dans la mémoire
préréglée. Lorsque vous entendez une émission que vous voulez
écouter, appuyez de nouveau sur cette touche pour arrêter le
balayage sur cette station.
15
Page 16
UTILISATION DE LA TELECOMMANDE
1. Télécommande
Utiliser la télécommande (RC6000ST) dans une portée d’environ 5 m du
capteur de signaux infrarouges (capteur de la télécommande), situé en
façade du Tuner.
Il se peut que la télécommande ne fonctionne pas son émetteur n’est pas
dirigé vers le capteur ou si un obstacle se trouve entre l’émetteur ou le
capteur.
Rayon d’action de la télécommande
Tuner (PMD800)
Environ 5m
60°
FRANÇAIS
Télécommande (RC6000ST)
2. Mise en place des piles
Les piles de cette télécommande ont une durée de vie d’environ 1 an
dans des conditions normales d’utilisation. Si la télécommande ne doit
pas être utilisée pendant un long moment, il convient de retirer les piles.
Veiller également à remplacer les piles aussi rapidement que possible
lorsque l’on remarque qu’elles arrivent à épuisement.
1. Ouvrir le couvercle du logement des piles en le soulevant
dans le sens B tout en poussant la partie A dans le sens
de la flèche.
2. Insérer les piles fournies en respectant les marques de
polarité.
B
A
16
Page 17

EINFÜHRUNG
Wir beglückwünschen Sie zu Ihre Entscheidung für den Marantz PMD800
Stereo Tuner für Ihre Audio/Video-Anlage. Bitte lesen Sie diese
Bedilenungsanleitung sorgfältig durch. Wir empfehlen, das gesamte
Handbuch zu lesen, bevor Sie der Tuner anschließen und in Betrieb
nehmen.
Nachdem Sie sich den Inhalt des Handbuches angeschaut haben,
sollten Sie zuerst alle Systemverbindungen voehmen und erst dann das
Gerät in Betrieb nehmen.
Zum besseren Verständnis des Textes sind die Abbildungen am Ende
dieses Handbuches zu benutzen. Die Numerierung auf den Abbildungen
entspricht den im Text verwendeten Nummern. Alle Bezeichnungen von
Anschlüssen und Bedienelementen, die EFTT gedrucktsind, sind auch
auf dem Gerät angegeben.
AUFSTELLUNG
Beachten Sie bei der Aufstellung des Tuner folgende Punkte.
• Das Gerät nicht Regen oder Feuchtigkeit aussetzen, da der Tuner
hierdurch beschädigt werden kann.
• Sorgen Sie dafür, daß keine zusätzliche Wärme das Gerät erreichen
kann. Stellen Sie den Tuner niemals in direktem Sonnelicht oder in
der Nähe einer Wärmequelle auf.
VORSICHTSMASSNAHMEN
Beim Betrieb des Gerätes sind folgende Vorsichtsmaßnahmen zu treffen.
ALLGEMEINE VORSICHTSMASSNAHMEN
Bei der aufstellung des Gerätes ist darauf zu achten daß:
— das Gerät auf einer erschütterungssicheren Unterlage steht,
— das Gerät nicht übermäßiger Hitze, Kälte, Feuchtigkeit oder Staub
ausgesetzt ist,
— das Gerät nicht direkter Sonneneinstrahlung ausgesetzt ist,
— das Gerät nicht elektrostatischen Entladungen ausgesetzt ist.
Außerdem niemals schwere Gegenstände auf das Gerät stellen!
Ist ein Fremdkörper oder Wasser in das Gerät eingedrungen, wenden
Sie sich an Ihren nächsten Marantz-Händler oder das nächste ServiceCenter.
Den Stecker nicht am Kabel aus der Steckdose ziehen, sondern immer
am Stecker anfassen!
Es ist ratsam, während eines Gewitters den Netzstecker herauszuziehen.
PMD800 MERKMALE
• Speicher für insgesamt 30 beliebige Vorwahlsender (für UKW, MW)
mit automatischer Speicherfunktion
• Fernbedienungsbetrieb
• Wahl der UKW-Antenne A/B
• Wahl des ZF-Bereichs (breit/schmal)
• Feinabstimmung
e
IF BAND Taste
e
Diese Taste ist zu betätigen, um die Bandbreite einer UKW-Sendung
zu wählen.
r
TIME ADJ Einstelltaste
r
Diese Taste ist zu betätigen, um die aktuelle Uhrzeit einzustellen.
t
t
ST.NAME/DISPLAY Taste
Diese Taste ist zu betätigen, um einen Sender manuell abzustimmen
oder um den Display-Modus zu wählen. Halten Sie diese Taste etwas
länger gedrückt (länger als 1,5 Sekunden), um Sendernamen
manuell in den Speicher einzugeben.
y
y
TUNING MODE Taste
Diese Taste ist zu betätigen, um den Modus für manuelle Abstimmung oder Feinabstimmung zu wählen. Der Feinabstimmungsmodus kann nur für den UKW-Bereich verwendet werden.
u
u
TUNING 5 (UP/DOWN) Taste
Diese Taste ist zu betätigen, um die gewünschten Rundfunksender
abzustimmen, die Zeit einzustellen, eine manuelle Abstimmung
durchzuführen usw.
i
i
CANCEL Taste
Diese Taste ist zu betätigen, um einen Sendernamen während der
manuellen Eingabe zu löschen oder um die Einschalt-/Ausschaltzeit
der Zeitschaltuhr abzuändern.
o
o
NEXT Taste
Diese Taste ist zu betätigen, um bei der Zeiteinstellung oder der
manuellen Vorabspeicherung zum nächsten Schritt weiterzugehen.
!!0
!0
MEMO Taste
!
Diese Taste wird für die Vorabspeicherung von Rundfunksendern
verwendet.
!
!1
(Zeitschaltuhr) ON/OFF Taste
Diese Taste ist zu betätigen, um die Tageszeitschaltuhr-Funktion
einzuschalten.
!
!2
TIMER SET Taste
Diese Taste ist zu betätigen, um die gewünschten täglichen Einund Ausschaltzeiten des Gerätes zu speichern.
!
!3
TUNING 5 (UP/DOWN) Taste
Diese Taste ist zu betätigen, um die gewünschten Rundfunksender
vorabzuspeichern.
!!4
FM MODE Taste
!4
!
Dieses Gerät schaltet automatisch auf STEREO-Modus um, wenn
eine UKW-Stereosendung empfangen wird. Drücken Sie diese Taste,
um auf Mono-Modus umzuschalten; dabei erlischt gleichzeitig auch
die „STEREO"-Anzeige auf dem Display.
!
!5
BAND Taste
Diese Taste ist zu betätigen, um UKW-, MW- oder LW-Empfang zu wählen.
DEUTSCH
LAGE UND FUNKTION DER TEILE UND
BEDIENELEMENTE
FRONTTAFELELEMENTE (SIEHE DIE ABBILDUNG
DER ÄUSSEREN ERSCHEINUNG)
q
q
POWER ON/STANDBY Taste
Diese Taste ist zu betätigen um das Gerät einzuschalten bzw. in die
Betriebsbereitschaft auszuschalten.
w
w
ANTENNA A/B Taste
Diese Taste ist zu betätigen, um die UKW-Antenne A oder B zu wählen.
17
!
!6
DISPLAY/ANZEIGEN
a
TIMER
a
Diese Anzeige leuchtet auf, wenn die Tageszeitschaltuhr durch
Drücken der Zeitschaltuhrtaste aktiviert wird.
b
b
DAILY Zeitschaltuhranzeige (Täglich)
cc
TUNED Anzeige (Abgestimmt)
c
c
d
d
STEREO Anzeige (Stereo)
e
e
MEMORY Anzeige (Speicher)
f
PRESET Nummer-Anzeige (Speicherplatznummer)
f
g
FM IF-Wellenbereichsanzeige
g
hh
Anzeige für Antenne A oder B
h
h
Page 18

BEDIENUNG
1. SENDERSPEICHERUNG
a. Manueller Betrieb
Zum Beispiel: Speicherung eines UKW-Senders mit einer Frequenz von
90,1 MHz in die Speichernummer 10
1. Wählen Sie den UKW-Bereich mit Hilfe der BAND Taste.
2. Stimmen Sie mit Hilfe der TUNING 5 Taste auf die Frequenz von
90,1 MHz ab.
3. Drücken Sie die MEMO Taste kurz (weniger als 0,5 Sekunden lang).
Dann blinkt die Anzeige „MEMO" im Leuchtstoffröhren-Display.
4. Wählen Sie die Speichernummer mit Hilfe der TUNING 5 Taste.
5. Drücken Sie die MEMO Taste erneut. Dadurch wird der Rundfunk-
sender mit einer Frequenz von 90,1 MHz unter der Speichernummer
10 gespeichert.
Hinweis:
Achten Sie darauf, auch die Einstellung für die Antenne A oder B zu
speichern, wenn Sie einen UKW-Sender manuell vorabspeichern.
b. Automatischer Betrieb
Wählen Sie den gewünschten Wellenbereich (MW oder UKW) mit
1.
Hilfe der BAND Taste.
2. Drücken Sie die MEMO Taste länger als 1,5 Sekunden.
Dann wird der Wellenbereich eingestellt, und die Sender werden
nacheinander unter den Speichernummern gespeichert, beginnend
mit der Speichernummer 01.
3. Überprüfen Sie alle gespeicherten Sender durch Drücken der TUN-
DEUTSCH
Hinweise:
2. RADIO HÖREN
1. Wählen Sie den gewünschten Wellenbereich (MW oder UKW) mit
2. Stimmen Sie den gewünschten Sender mit Hilfe der Taste TUNING
3. Der UKW-Empfang ist auf „STEREO"-Modus eingestellt.
4. Drücken Sie die IF BAND Taste, um die UKW-Bandbreite zu wählen.
Taste.
ING 5
1. Im Falle der automatischen Speicherung eines UKW-Senders wird
für die Einstellung der Antenne A oder B automatisch „A" gewählt.
Außerdem wird der Wellenbereich zweimal abgesucht. Beim ersten
Absuchen werden nur die Sender mit stärkeren Empfangssignalen
gespeichert. Sender mit schwächeren Signalen werden dann beim
zweiten Absuchen gespeichert.
2. Wenn ein Sender in einen Programmplatz gespeichert wird, wird
der Sender, der bereits in diesem Programmplatz gespeichert war,
automatisch gelöscht.
3. Die automatische Programmplatz-Speicherung ist in Gebirgen oder
anderen Gebieten mit schlechtem Empfang nicht möglich.
4. Maximal können 30 Sender für jeden der Wellenbereiche FM
(UKW) und AM (MW und LW) gespeichert werden.
Hilfe der BAND Taste.
oder PRESET 5
Wenn das Empfangssignal schwach ist oder beim UKW-Empfang
starke Störungen auftreten, schalten Sie auf Mono-Empfang um,
indem Sie die FM MODE Taste drücken.
Durch Drücken dieser Taste wird die Einstellung NARROW
(Schmalband) gewählt, wenn das Empfangssignal eines Senders
durch den benachbarten Sender im UKW-Bereich gestört wird.
ab.
3. FEINABSTIMMUNG, MANUELLE ABSTIMMUNG
Diese Funktion wird für die Wahl des manuellen oder des Feinabstimmumgsmodus verwendet.
Der Feinabstimmungsmodus steht nur im UKW-Bereich zur Verfügung.
1. Drücken Sie die TUNING MODE Taste.
2. Mit jedem Drücken dieser Taste schaltet der Modus zwischen
manueller Abstimmung und Feinabstimmung um, und die Anzeige
im Display wechselt wie folgt:
FINE ⇔ MANUAL
a. Feinabstimmungsmodus
Wenn Sie die TUNING 5 Taste drücken, wird die Frequenz in 10-kHzSchritten zwischen ± 50 kHz gewählt. Nach 4 Sekunden wird dann
automatisch auf den manuellen Abstimmungsmodus umgeschaltet.
b. Manueller Abstimmungsmodus
1.
Drücken Sie die TUNING 5 Taste, nachdem Sie den UKW-Bereich
gewählt haben, dann wird die Frequenz in 50-kHz-Schritten gewählt.
2. Im MW-Bereich wird die Frequenz in 10-kHz-Schritten gewählt.
4. DIREKTABSTIMMUNG
1.
Drücken Sie die F.DIRECT Taste (Direktfrequenz).
2. Drücken Sie dann die entsprechende Zifferntaste (0 bis 9).
Zum Beispiel: UKW 98,10 MHz
a. Wählen Sie den UKW-Bereich mit Hilfe der Taste BAND (oder
TUNER) auf der Fernbedienung.
b. Drücken Sie die Taste F.DIREKT (Direktfrequenz).
c. Drücken Sie die Zifferntaste „9".
d. Drücken Sie die Zifferntaste „8".
e. Drücken Sie die Zifferntaste „1".
f. Drücken Sie die Zifferntaste „0".
g. Das Display zeigt 98,10 MHz und den empfangenen Sender an.
Die Direktabstimmung eines Senders im MW- oder LW-Bereich
erfolgt auf dieselbe Weise wie im UKW-Bereich.
5. EINSTELLEN DER UHRZEIT
Sie können die aktuelle Uhrzeit einstellen, wenn das Gerät eingeschaltet
oder in die Betriebsbereitschaft ausgeschaltet ist.
1. Drücken Sie die TIME ADJ Taste. Dann blinkt die Stunden-Anzeige
im Display.
Blinkt
2. Stellen Sie den Wert für die Stunden-Anzeige mit Hilfe der TUNING
Taste ein.
5
3. Drücken Sie die NEXT Taste. Dann blinkt die Minuten-Anzeige im
Display.
Blinkt
4. Stellen Sie den Wert für die Minuten-Anzeige mit Hilfe der TUNING
Taste ein.
5
5. Drücken Sie die NEXT Taste.
18
Blinkt
Page 19
Tageszeitschaltuhr
6. EINGABE (SENDERNAME USW.)
Beispiel: Speichern der Einschaltzeit: 7.15 Uhr und der Ausschaltzeit:
9.30 Uhr
1. Drücken Sie die TIMER SET Taste.
DA LY
2. Speichern Sie die Einschaltzeit mit Hilfe der TUNING 5 Taste und
der NEXT Taste.
(Der Bedienungsvorgang erfolgt auf dieselbe Weise wie für die
Einstellung der aktuellen Uhrzeit.)
DAILY
3. Wenn Sie die Einschaltzeit richtig eingestellt haben, drücken Sie die
NEXT Taste.
DAILY
4. Speichern Sie die Ausschaltzeit mit Hilfe der TUNING 5 Taste und
der NEXT Taste.
(Der Bedienungsvorgang erfolgt auf dieselbe Weise wie für die
Einstellung der aktuellen Uhrzeit.)
DAILY
Zum Beispiel: UKW 101,1 MHz, Speicherplatz-Nr. 10, Sendername SWF1
1. Wählen Sie im Speicherungsmodus die Speichernummer 10.
PRESET
CH
MHz
2. Halten Sie die Taste ST.NAME/DISPLAY etwas länger gedrückt
(länger als 1,5 Sekunden).
Dann wird „_ _ _ _” in der Uhrzeit-Anzeige angezeigt.
Blinkt
3. Wählen Sie „S” mit Hilfe der TUNING 5 Taste.
Blinkt
4. Drücken Sie die NEXT Taste, dann wird der Cursor um eine Stelle
verschoben.
Blinkt
DEUTSCH
5. Drücken Sie die Taste NEXT. Die Timer-Einstellung ist abgeschlossen.
DA LY
TIMER
* Mit Hilfe der Tageszeitschaltuhr schaltet sich das Gerät jeden Tag zur
gewünschten gespeicherten Zeit ein und aus.
* Falls Sie zur Einschaltzeit eine Aufnahme vornehmen möchten, wählen
Sie die gewünschte Aufnahmequelle mit dem Eingangswahlschalter
in der REC (Aufnahme) Position.
* Falls die Zeitschaltuhranzeige „TIMER" erloschen ist, ist die
Tageszeitschaltuhr funktionsunfähig.
DAILY
* Um der Tagestimer zu überprüfen, drücken Sie zuerst die Taste TIMER
SET. Die Einschaltzeiteinstellung wird auf der Uhranzeige angezeigt.
Drücken Sie dann die Taste T MER SET erneut. Die Ausschaltzeiteinstellung
wird angezeigt. Drücken Sie die Taste TIMER SET dann nochmals.
Daraufhin wird wieder die normale Uhrzeit angezeigt.
* Wenn während der Einstellung der Tageszeitschaltuhr die CANCEL
Taste gedrückt wird, wird die Zeitschaltuhrfunktion ausgeschaltet.
5. Wählen Sie die anderen Schriftzeichen in „SWF1" mit Hilfe der TUN-
Taste und der NEXT Taste. Drücken Sie dann die MEMO
ING 5
Taste. Der Name des Rundfunksenders wechselt auf „SWF1".
Blinkt
Blinkt
19
Blinkt
Page 20
STÖRUNGSSUCHE
Falls Ihr Tuner nicht wie erwartet funktioniert, ziehen Sie die untenstehende Tabelle zu Rate, um zu sehen, ob die Störung auf diese Weise behoben
werden kann, bevor Sie sich an Ihren Fachhändler oder eine Kundendienststelle wenden.
Symptom
Kein Ton
Nur Rauschen
Eine Sendung wird empfangen,
enthält aber viel Rauschen.
Der Eingangswahlschalter des Verstärkers ist nicht
auf „TUNER" eingestellt.
Der Lautstärkeregler des Verstärkers ist auf „MIN"
gestellt.
Das Gerät ist nicht angeschlossen.
Die Antenne ist nicht eingesteckt.
Die Frequenz wird nicht genau erfaßt.
Die Antenne ist nicht richtig ausgerichtet.
Der CD-Spieler ist eingeschaltet.
Mögliche Ursache(n)
VERWENDUNG DES RÜCKSTELLSCHALTERS
• Wenn das Gerät einer Überlastung ausgesetzt war oder ein
DEUTSCH
Kurzschluß auftrat.
• Wenn Netz-Schwankungen auftreten.
In den genannten Fällen kann es zu Fehlfunktionen der Tasten und/
oder der Anzeigen kommen. Sollte das der Fall sein, versuchen Sie
bitte folgendes:
— Geräte-Rückseite —
LINE OUT
R
REMOTE
CONTROL
L
RESET-Rückstellschalter
RESET
Abhilfe
Stellen Sie den Eingangswahlschalter auf „TUNER".
Stellen Sie den Lautstärkeregler auf den
gewünschten Lautstärkepegel.
Schließen Sie das Gerät sachgemäß an.
Die Antenne ist nicht eingesteckt.
Die Frequenz wird nicht genau erfaßt.
Installieren Sie die Antenne erneut, nachdem Sie
die Richtung für den besten Empfang ausfindig
gemacht haben.
Schalten Sie den CD-Spieler aus.
REPARATUREN
Die Wartung des Gerätes darf nur von gut geschultem und qualifiziertem
Service-Personal durchgeführt werden. Die Firma Marantz und ihr
werkgeschultes Personal besitzen die Erfahrung und speziellen
Einrichtungen, die für die Reparatur und Kalibrierung dieses
Präzisionsgerätes erforderlich sind.
Bei Problemen rufen Sie die Telefonnummer oben auf der Garantiekarte
an, um Namen und Anschrift der nächstgelegenen autorisierten MarantzKundendienststelle zu erfahren. In vielen Fällen kann Ihnen Ihr
Fachändler weiterhelfen, bei dem Sie das marantz-Gerät erworben
haben. Bei korrespondenz geben Sie bitte die Modellbezeichnung und
die Seriennummer des Gerätes an, und fügen Sie eine Kopie der
Kaufquittung und eine Beschreibung des Fehlers bei.
Betätigen Sie den RESET Schalter ein- bis zweimal mittels eines Bleistifts
oder Kugelschreibers. Hierbei genügt leichter Druck.
PFLEGE UND WARTUNG
Dieser Abschnitt beschreibt die Pflege-und Wartungsaufgaben, die zun
Optimierung der Leistung dieses Marantz-Gerätes auszuführen sind.
REINIGEN DER AUSSENFLÄCHEN DES
GERÄTES
Bei richtiger Pflege und Reinigung behält dieses Gerät sein Aussehen
praktisch unbegrenzt bei. Niemals Scheueschwämme, Stahlwolle,
Scheuermittel oder scharfe chemische Mittel (wie z.B. Laugen), Alkohol,
Verdünner, Benzin, Insektizide oder andere flüchtige Substanzen
verwenden, weil diese das Gehäuse des Gerätes angreifen können,
Esdürfen auch niemals Tücher verwendet werden, die chemische
Substanzen enthalten, Wenn das Gerät schmutzig ist, die Außenflächen
mit einem weichen, flusenfreien Tuch abwischen.
Ist das Gerät stark verschmutzt, wie folgt vorgehen:
– Etwas Geschirrspülmittel in Wasser verdünnen, und zwar in einem
Verhältnis von einem Teil Geschirrspülmittel zu sechs Teilen Wasser.
– Ein weiches, flusenfreies Tuch in die Lösung tauchen und auswringen,
so daß es feucht ist.
– Das Gerät mit dem feuchten Tuch abwischen.
– Das Gerät mit einem trockenen Tuch trockenwischen.
Speichersjcherung
• Bei einem Stromausfall oder versehentlichem Herausziehen
des Netzsteckers werden die Speicherdaten, zum Beispiel
der Speicher für die Vorwahlsender, nicht gelöscht, da der
PMD800 über eine Sicherungsfunktion verfügt.
Die Speicherfunktionen bleiben etwa eine Woche erhalten.
20
Page 21
BEZEICHNUNG UND VERWENDUNG JEDER
TASTE AUF DER FERNBEDIENUNG
w
e
SLEEP
DISPLAYBAND F.DIRECT
q
t
r
321
u
!2
654
987
IF BANDFM MODE
0
TUNING
PRESET PRESET
MEMO
P.SCAN
y
i
o
!1
!0
REMOTE CONTROL UNIT
RC6000ST
t
t Taste F.DIRECT,
Verwenden Sie diese Tasten zusammen, um einen Sender
abzustimmen, indem Sie die Senderfrequenz direkt auf der
Fernbedienung eingeben.
1. Drücken Sie die Taste F.DIRECT auf der Fernbedienung.
2. Verwenden Sie dann die Zifferntasten (0 bis 9), um die Frequenz
des gewünschten Sendern einzugeben.
(Die Senderfrequenzen der örtlichen Sender sind in Zeitungen usw.
angeführt.)
Beispiel: Abstimmen eines UKW-Senders mit einer Frequenz von
a. Vergewissern Sie sich, dass der FM-Wellenbereich (UKW)
b. Drücken Sie die Taste F.DIRECT auf der Fernbedienung.
c. Drücken Sie dann die Zifferntaste „8“. Das Display zeigt „
d. Drücken Sie dann die Zifferntaste „4“. Das Display zeigt „
e. Drücken Sie dann die Zifferntaste „0“. Das Display zeigt „
f. Drücken Sie dann die Zifferntaste „0“. Das Display zeigt „
84,0 MHz über die Fernbedienung
eingestellt ist. Falls der AM-Wellenbereich (MW) eingestellt ist,
drücken Sie die Taste BAND, um auf den FM-Wellenbereich
(UKW) umzuschalten.
Die bisher angezeigte Frequenz erlischt, und auf dem Display
wird „
an.
an.
an, die Anzeigen TUNED und STEREO leuchten, und Sie
empfangen das ausgestrahlte Programm.
Um einen MW-Sender abzustimmen, führen Sie das gleiche
Verfahren durch, nur muss in diesem Fall der AM-Wellenbereich
(MW) gewählt werden.
y
Zifferntasten
“ angezeigt.
“ an.
“
“
“
DEUTSCH
q
Ein-/Ausschalttaste
Verwenden Sie diese Taste, um das Gerät einzuschalten bzw. in
den Bereitschaftsmodus auszuschalten.
w
w
Taste SLEEP
Drücken Sie diese Taste, um die Einschlaf-Zeitschaltuhr einzustellen.
Die Einschlaf-Zeitschaltuhr kann auf 10, 20, 30, 40, 60 oder 90
Minuten bzw. auf OFF (aus) eingestellt werden. Um die EinschlafZeitschaltuhr zu deaktivieren, verwenden Sie entweder diese Taste,
um „OFF“ zu wählen, oder die Ein-/Ausschalttaste, um das Gerät
auszuschalten (d. h. auf den Bereitschaftsmodus umzuschalten).
e
Taste BAND
Verwenden Sie diese Taste, um entweder der AM-Wellenbereich
(MW) oder den FM-Wellenbereich (UKW) zu wählen. Mit jedem
Drücken dieser Taste wird zwischen den Wellenbereichen
umgeschaltet.
u
u
Taste FM MODE
Verwenden Sie diese Taste, um ein Stereo-Programm in Mono
wiederzugeben. Diese Taste kann sowohl für UKW- als auch für MWSendungen verwendet werden.
i
i
Taste IF BAND
Verwenden Sie diese Taste, um das UKW-Zwischenfrequenzband
umzuschalten.
o
o
Tasten TUNING 5
Verwenden Sie diese Tasten, um die derzeitig abgestimmte Frequenz
zu erhöhen bzw. abzusenken. Falls eine dieser Tasten gedrückt
gehalten wird, beginnt der automatische Abstimmungsvorgang. (Der
Betrieb dieser Tasten erfolgt auf dieselbe Weise wie bei den
entsprechenden Tasten am Hauptgerät.)
!!0
!0
Tasten PRESET 5
!
Verwenden Sie diese Tasten um in Aufwärts- oder Abwärtsrichtung
durch die gespeicherten Sender zu suchen.
!
!1
Taste MEMO
Verwenden Sie diese Taste, um einen Sender im Senderspeicher
zu speichern. Der Betrieb dieser Taste erfolgt auf dieselbe Weise
wie bei der entsprechende Taste am Hauptgerät.
r
Taste ST.NAME/DISPLAY
Drücken Sie diese Taste, um das Display zwischen der Anzeige
des Programmnamens, der Frequenz und des Antenneneingangspegels
umzuschalten.
21
!
!2
Taste P.SCAN (Speichersuche)
Verwenden Sie diese Taste, um jeden der gespeicherten Sender
automatisch fünf Sekunden lang abzustimmen. Falls Ihnen ein
Programm gefällt, drücken Sie diese Taste erneut, damit der Suchlauf
bei diesem Sender aufhört.
Page 22
VERWENDUNG DER FERNBEDIENUNG
1. Fernbedienung
Verwenden Sie die Fernbedienung (RC6000ST) innerhalb eines
Abstands von ca. 5 m vom Infrarotsignal-Empfangsfenster
(Fernbedienungssensor) an der Vorderseite des Tuners.
Unter Umständen ist der Fernbedienungsbetrieb nicht möglich, falls der
Übertragungsgeber der Fernbedienung nicht auf den
Fernbedienungssensor zeigt oder falls sich ein Hindernis zwischen dem
Übertragungsgeber und dem Fernbedienungssensor befindet.
Betriebsbereich der Fernbedienung
Tuner (PMD800)
Ca. 5 m
60°
Fernbedienung (RC6000ST)
2. Einlegen der Batterien
Die Batterien in dieser Fernbedienung haben eine Lebensdauer von
DEUTSCH
ungefähr einem Jahr bei normalen Betriebsbedingungen. Falls die
Fernbedienung über längere Zeit nicht verwendet werden soll,
entnehmen Sie die Batterien. Außerdem sollten Sie die Batterien
umgehend austauschen, falls Sie feststellen, dass ihre Leistung
nachlässt.
1. Öffnen Sie den Batteriedeckel, indem Sie ihn in Richtung
B anheben, während Sie Teil A in Pfeilrichtung schieben.
B
A
2. Legen Sie die mitgelieferten Batterien ein, wobei Sie auf
die richtige Polarität achten.
22
Page 23

INTRODUCCIÓN
Gracias por elegir el Receptor Estéreo Marantz PMD800 FM/AM para
su equipo de audio.
Le rogamos que lea atentamente este manual de instrucciones. Antes
de conectar o poner en funcionamiento la unidad, le recomendamos
una lectura completa del manual de usuario.
Una vez repasado el contenido del manual, le sugerimos que realice
todas las conexiones del sistema antes de intentar poner en
funcionamiento la unidad.
Remítase a las figuras de las últimas páginas del manual. Los números
de las figuras se corresponden con los que aparecen en el texto. Las
referencias a conexiones y controles impresas en NEGRITA son tal y
como se presentan en la unidad.
INSTALACIÓN
Recuerde las siguientes advertencias cuando instale el receptor.
• No exponga el aparato a la lluvia, ya que el receptor podría resultar
dañado.
• Procure que la unidad no reciba exceso de calir. No sitúe nunca el
receptor a la luz directa del sol ni en las proximidades de una fuente
de calor.
PRECAUCIONES
Deberán tomarse las siguientes precauciones durante el manejo del
equipo.
PRECAUCIONES DE CARÁCTER GENERAL
Cuando instale el equipo asegúrese de que:
— el aire puede circular libremente alrededor del equipo;
— está colocado sobre una superficie no expuesta a vibraciones;
— no quedará expuesto a un exceso de calor, frío, polvo o humedad;
— no quedará expuesto a la luz directa del sol;
— no quedará expuesto a descargas electrostáticas.
Además, no coloque nunca objetos pesados sobre el equipo.
Si entra un cuerpo extraño o líquido en el interior del equipo, póngase
en contacto con su distribuidor o servicio de asistencia técnica más
cercano.
Desconecte el cable de red tirando del enchufe, nunca del propio cable.
Es aconsejable desconectar el equipo de la toma de red al ausentarse
de casa y durante las tormentas.
CARACTERÍSTICAS DEL MODELO PMD800
• Memoria de presintonías para un máximo de 30 emisoras (de FM y
AM) con función de memorización automática de presintonías
• Funcionamiento del mando a distancia
• Selección de antena de FM A/B
• Selección de banda IF (ancha/estrecha)
• Sintonización fina
e
e
Botón de banda de frecuencia intermedia (IF BAND)
Este botón se utiliza para seleccionar el ancho de banda de las
emisiones por FM.
r
r
Botón de ajuste de la hora (TIME ADJ)
rr
Este botón se utiliza para ajustar la hora actual.
t
t
Botón de nombre de emisora/visualización (ST.NAME/
DISPLAY)
Este botón de utiliza para sintonizar manualmente o seleccionar el
modo de visualización. Presione este botón ligeramente más tiempo
(durante 1,5 segundos o más) para archivar manualmente nombres
de emisoras en la memoria de presintonías.
y
y
Botón de modo de sintonización (TUNING MODE)
Este botón se utiliza para seleccionar el modo de sintonización
manual o sintonización fina. La sintonización fina sólo se puede
realizar en la banda de FM.
u
u
Botón de sintonización ascendente/descendente
(TUNING 55
Este botón de utiliza para sintonizar la emisora deseada o ajustar la
hora, o sintonizar manualmente, etc.
i
i
Botón de cancelación (CANCEL)
Este botón de utiliza para cancelar el programa durante el archivado
manual o para ajustar la hora de encendido/apagado con el
temporizador.
o
o
Botón de siguiente paso (NEXT)
oo
Este botón de utiliza para avanzar al siguiente paso durante el ajuste
de la hora o el archivado manual, etc.
!
!0
Botón de memorización (MEMO)
Este botón de utiliza para presintonizar las emisoras.
!
Botón de activación/desactivación del temporizador
!1
!!1
(TIMER ON/OFF)
Este botón de utiliza para activar la función del temporizador diario.
!
!2
Botón de ajuste del temporizador (TIMER SET)
Este botón de utiliza para programar la hora para cuando se quiera
que el sistema se apague o encienda todos los días a una hora
especificada.
!
!3
Botón de sintonización ascendente/descendente
(TUNING 55
Este botón de utiliza para presintonizar las emisoras deseadas.
!!4
!4
Botón de modo FM (FM MODE)
!
Este aparato se cambia automáticamente al modo STEREO cuando
se recibe una emisora FM en estéreo. Presione este botón para
cambiar al modo monoaural, luego, el indicador "STEREO"
desaparecerá del visualizador.
!!5
!5
Botón de selección banda (BAND)
!
Este botón de utiliza para seleccionar las bandas de FM, MW o LW.
!
!6
VISUALIZACIÓNES/INDICADORES
!!6
a
a
TIMER
Este indicador se enciende cuando se activa el temporizador
presionando el botón de temporizador.
)
)
ESPAÑOL
UBICACIÓN DE PARTES Y CONTROLES Y
SUS FUNCIONES
FUNCIONES EN EL PANEL DELANTERO
(CONSULTE EL DIBUJO DE APARIENCIA)
q
q
Botón de encendido del aparato/puesta en espera
qq
(POWER ON/STANDBY)
Este botón se utiliza para encender el aparato o ponerlo en espera.
ww
Botón de antena A/B (ANTENNA A/B)
w
w
Este botón se utiliza para seleccionar la antena de FM A o B.
23
b
b
Indicador del temporizador diario (DAILY)
c
c
Indicador de sintonizado (TUNED)
d
Indicador de estéreo (STEREO)
d
dd
e
e
Indicador de memoria (MEMORY)
f
f
Indicador de número de presintonía (PRESET)
g
g
Indicador de banda FM IF
h
h
Indicador de antena A o B
Page 24
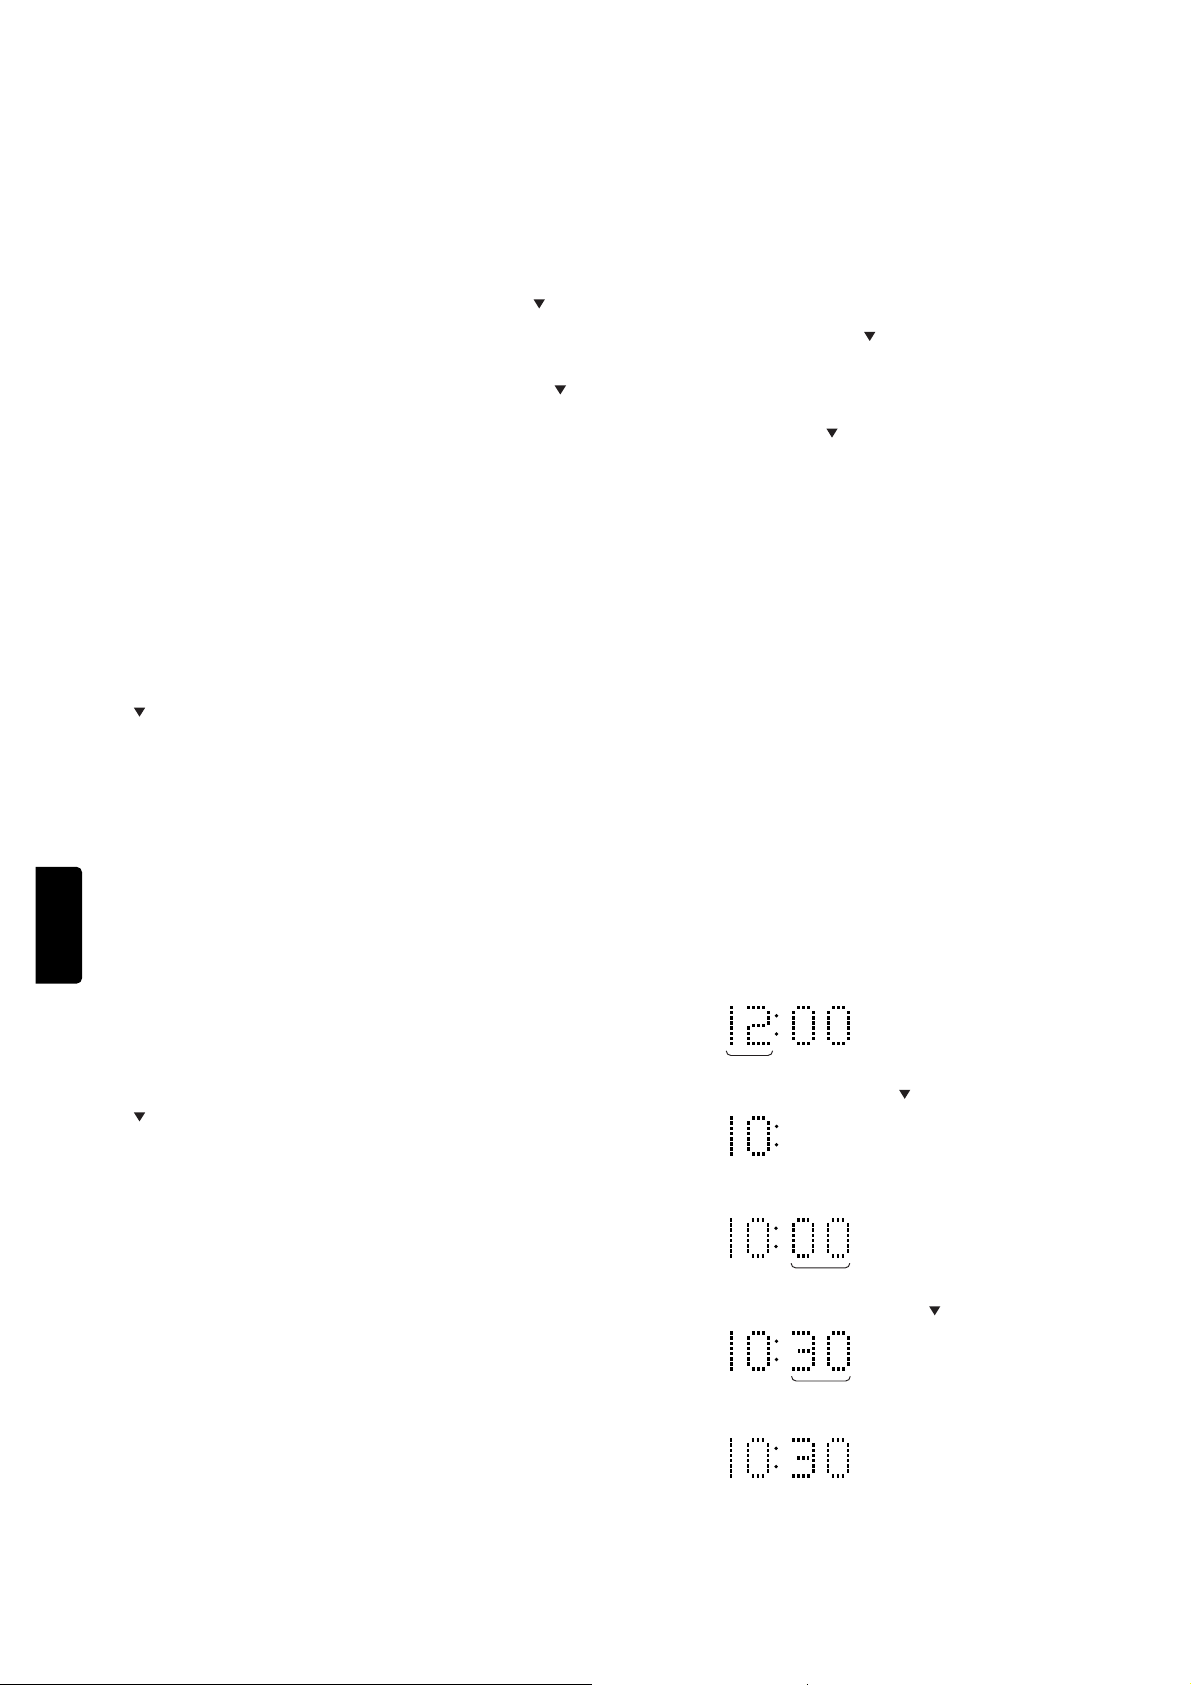
OPERACIONES
1. PRESINTONIZACIÓN EN MEMORIA
a. Operación manual
Por ejemplo: para presintonizar la frecuencia FM 90.1 MHz en el número
de presintonía 10.
1. Seleccione FM usando el botón BAND.
2. Sintonice la frecuencia 90.1 MHz usando el botón TUNING 5 .
3. Presione ligeramente (durante menos de 0,5 segundos) el botón
MEMO. Luego, "MEMO" parpadeará en el visualizador de tubo
fluorescente.
4. Seleccione el número de presintonía utilizando el botón TUNING 5 .
5. Presione otra vez el botón MEMO. De esta forma la frecuencia 90.1
MHz (emisora sintonizada) se habrá memorizado en el número de
presintonía 10.
Nota:
Asegúrese de seleccionar la antena A o B cuando presintonice
manualmente emisoras de FM en la memoria.
b. Operación automática
1.
Seleccione la banda deseada (AM o FM) usando el botón BAND.
2. Presione el botón MEMO durante algo más de 1,5 segundos.
Luego, se recibirán emisoras automáticamente, y se memorizarán a
partir del número de presintonía 0-1 una tras otra tantas emisoras
como se reciban.
3. Compruebe las emisoras memorizadas usando el botón TUNING
.
5
Notas:
1. En el caso de presintonización automática de emisoras de FM, el
selector de antena A, B, se ajusta automáticamente en "A", y la
emisoras serán exploradas dos veces. Las emisoras cuya señal
sea más intensa se presintonizarán durante la primera exploración,
y las de señal más débil se presintonizarán durante la segunda.
ESPAÑOL
2. Si se presintoniza una emisora en un número de presintonía que
ya tenga una emisora presintonizada, la nueva emisora
reemplazará a la que ya estaba presintonizada.
3. En zonas montañosas o remotas, las emisoras cuya señal sea
débil no se podrán presintonizar automáticamente en la memoria.
4. En la memoria se puede presintonizar un máximo de 30 emisoras
para las bandas de FM y AM(MW y LW).
3. SINTONIZACIÓN FINA, MANUAL
Esta función se utiliza para seleccionar el modo de sintonización manual
o sintonización fina.
El modo de sintonización fina sólo se puede realizar en el modo de FM.
1. Presione el botón TUNING MODE.
2. Cada vez que presione el botón, se visualizará lo siguiente:
FINE ⇔ MANUAL
a. En el modo de sintonización fina (FINE)
Cuando presione el botón TUNING 5 , la frecuencia será seleccionada
en pasos de 10 kHz a (50 kHz. Luego, se pondrá automáticamente en
el modo MANUAL en 4 segundos.
b. En el modo de sintonización manual (MANUAL)
Presione el botón TUNING 5 en la banda de FM, luego la frecuencia
1.
se seleccionará en pasos de 50 kHz.
2. En la banda de MW, la frecuencia se seleccionará en pasos de 10
kHz.
4. SINTONIZACIÓN DIRECTA
1. Presione el botón F. DIRECT (Frecuencia directa).
2. A continuación, presione el botón numérico (0 a 9).
Por ejemplo: para sintonizar FM 98.10 MHz.
a. Elija la banda FM con el botón BAND (o TUNER) del mando a
distancia.
b. Presione el botón F. DIRECT (Frecuencia directa).
c. Presione el botón numérico "9".
d. Presione el botón numérico "8".
e. Presione el botón numérico "1".
f. Presione el botón numérico "0".
g. El visualizador mostrará 98.10 MHz y se sintonizará la emisora.
Sintonice la banda de MW o LW realizando las mismas
operaciones de arriba.
5. AJUSTE DE LA HORA ACTUAL
Podrá ajustar la hora actual independientemente de si el aparato está
encendido o enParpadea
1. Presione el botón TIME ADJ. Luego el indicador "Hour" parpadeará
en el visualizador.
2. ESCUCHA DE LA RADIO
1. Seleccione la banda AM o FM usando el botón BAND.
2. Sintonice la emisora deseada usando el botón TUNING o PRESET
5
.
3. El modo de sintonización se pondrá automáticamente en "STEREO".
Si la señal de la emisora es débil, o si hay mucha interferencia en la
emisora de FM, cambie al modo monoaural presionando el botón
FM MODE.
4. Seleccione el ancho de banda de FM (IF BAND)
Si la señal de la emisora tiene interferencias con otra emisora de FM
adyacente, seleccione el ancho de banda "NARROW" presionando
el botón IF BAND.
Parpadea
2. Ajuste la hora con el botón TUNING 5 .
3. Presione el botón NEXT. Luego el indicador "Minute" parpadeará en
el visualizador.
Parpadea
4. Ajuste los minutos con el botón TUNING 5 .
Parpadea
5. Presione el botón NEXT.
24
Page 25
Temporizador diario
Ejemplo: Para que el aparato se encienda a las 7:15 y se apague a las
9:30.
1. Presione el botón TIMER SET.
DA LY
6. ARCHIVADO (NOMBRE DE EMISORA, ETC.)
Por ejemplo: FM 102.40 MHz, en el canal de presintonización CH-10 y
nombre de emisora RNA1
1. Seleccione el número de presintonía 10 en el modo de presintonización.
PRESET
CH
MHz
2. Programe la hora de encendido (ON) usando el botón TUNING 5
y el botón NEXT.
(La misma operación que para el ajuste de la hora)
DAILY
3. Si la hora de encendido (ON) es la correcta, presione el botón NEXT.
DAILY
4. Programe la hora de apagado (OFF) usando el botón TUNING 5 y
el botón NEXT.
(La misma operación que para el ajuste de la hora)
DAILY
5. Pulse el botón NEXT. La configuración del temporizador ha finalizado.
DA LY
TIMER
2. Mantenga presionado (durante más de 1,5 segundos) el botón
ST.NAME/DISPLAY.
Luego, se visualizará “_ _ _ _” en el indicador del reloj.
Parpadea
3. Seleccione “R” con el botón TUNING 5 .
Parpadea
4. Presione el botón NEXT, y luego el cursor se moverá un espacio.
Parpadea
5. Después de seleccionar “RNA1” con TUNING 5 y el botón NEXT
presione el botón MEMO, y luego el nombre de la emisora sintonizada
cambiará a “RNA1”.
ESPAÑOL
* El temporizador diario enciende y apaga el aparato todos los días a
las horas programadas.
* Si quiere grabar a la hora de encendido, seleccione la fuente deseada
con el selector de entrada puesto en la posición REC.
* Si el indicador de temporizador "TIMER" está apagado, el temporizador
diario no funcionará.
DAILY
* Si desea comprobar el temporizador diario, pulse el botón TIMER
SET en primer lugar. Aparecerá la configuración de tiempo/hora “ON”
(encendido) en el indicador del reloj. Pulse otra vez el botón TIMER
SET. Aparecerá la configuración de tiempo/hora “OFF” (apagado).
Por último, pulse otra vez más el botón TIMER SET. Volverá a la pantalla
normal de tiempo/hora.
* Durante la programación del temporizador diario, si mantiene
presionado el botón de cancelación, se cancelará la función del
temporizador.
25
Parpadea
Parpadea
Parpadea
Page 26

SOLUCIÓN DE PROBLEMAS
Si el sintonizador no funcionase como es de esperar, antes de solicitar ayuda a su distribuidor o a un taller de servicio, consulte la tabla de abajo para
ver si puede solucionar el problema.
Síntoma
No hay sonido
Sólo se escucha ruido.
Se recibe la emisora pero con
ruido.
El selector INPUT del amplificador no se ha ajustado
en "TUNER".
El volumen del amplificador está ajustado en "MIN".
El terminal de conexión del sistema se ha desconectado.
La antena se ha desconectado.
La frecuencia no se detecta exactamente.
La posición de la antena no es apropiada.
El reproductor de CD está encendido.
CUANDO USAR EL CONMUTADOR DE
REAJUSTE (RESET)
• Cuando el sistema ha sufrido una descarga eléctrica.
• Cuando el voltaje de red es irregular.
En los casos arriba mencionados es posible que los botones de
función del equipo ó el pantalla visualizadora no opere correctamente.
En estos casos intente los siguiente.
ESPAÑOL
— Panel posterior —
LINE OUT
R
REMOTE
CONTROL
L
Conmutador de reajuste (RESET)
RESET
Causa(s) posible(s)
Remedio sugerido
Ajústelo en "TUNER".
Ajuste el volumen apropiado.
Conecte el terminal del sistema.
Conéctelo correctamente.
Conecte la antena en el panel posterior.
Ajuste correctamente la frecuencia.
Instale la antena otra vez después de localizar la
mejor posición de recepción.
Apague el reproductor de CD.
REPARACIONES
La unidad sólo deberá recibir asistencia técnica de los técnicos más
competentes y cualificados. Marantz y su personal técnico de
preparación interna cuentan con los conocimientos y los equipos
especiales necesarios para reparar y calibrar este instrumento de
precisión.
Si se presenta alguna complicación, llame la teléfono que se indica en
la garantía ya solicite el nombre y la dirección del Servicio Técnico
Marantz autorizado más próximo. En muchos casos, el distribuidor en
el que adquirió la unidad puede disponer del material necesario para
prestarle el servicio. Incluya el número de serie del modelo junto con
una copia de la factura de compra y una descripción detallada de la
anomalía detectada en su funcionamiento.
Presione suavemente el conmutador una o dos veces con un lápiz o
bolígrafo.
CUIDADO Y MANTENIMIENTO
Este capítulo describe las tareas de cuidado y mantenimiento que deben
realizarse para obtener el máximo rendimiento de su equipo Marantz.
LIMPIEZA DE LAS SUPERFICIES
EXTERNAS
El acabado exterior del PMD800 se conservará intacto indefinidamente
con el cuidado y la limpieza adecuados. No utilice nunca estropajos,
detergentes o agentes químicos (p.ej., soluciones de lejía), alcohol,
diluyentes, bencina, insecticidas u otro tipo de sustancias volátiles que
podrían dañar el acabado del equipo. De igual manera, no emplee nunca
paños que contengan sustancias químicas. Si el equipo presenta
suciedad, pase un paño suave -que no suelte pelusa- por las superficies externas.
Si el equipo presenta claros signos de suciedad:
– diluya detergente líquido para vajillas en agua, en una proporción
de una parte de detergente por cada seis de agua;
– sumerja un paño suave, que no suelte pelusa, en la solución y
escúrralo;
– frote las superficies con el paño húmedo;
– seque el equipo con un paño seco.
Memoria de seguridad
• En prevención de que se produzca un corte del suministro
eléctrico o que el cable de alimentación se desconecte accidentalmente de la red, el PMD800 está equipado con una
función de seguridad que evita que se borren datos de
memoria tales como la memoria de presintonías.
Las funciones de memoria están protegidas por un período
de hasta una semana.
26
Page 27

NOMBRE Y USO DE CADA BOTÓN DEL
MANDO A DISTANCIA
w
e
SLEEP
DISPLAYBAND F.DIRECT
q
t
r
321
u
!2
654
987
IF BANDFM MODE
0
TUNING
PRESET PRESET
MEMO
P.SCAN
y
i
o
!1
!0
REMOTE CONTROL UNIT
RC6000ST
t
t Botón F.DIRECT, y
Utilice estos botones juntos para sintonizar una emisora
introduciendo la frecuencia de emisión de la emisora directamente
a través del mando a distancia.
1. Pulse el botón F.DIRECT del mando a distancia.
2. A continuación, utilice los botones numéricos (0 a 9) para introducir
la frecuencia de emisión de la emisora deseada.
(Puede encontrar las frecuencias de emisión de las emisoras locales en el periódico, etcétera).
Ejemplo: Sintonización en FM 84.0 MHz a través del mando a
a. Compruebe que el aparato está configurado en la banda FM. Si
b. Pulse el botón F.DIRECT del mando a distancia.
c. A continuación, pulse el botón numérico “8”. En la pantalla se
d. A continuación, pulse el botón numérico “4”. En la pantalla se
e. A continuación, pulse el botón numérico “0”. En la pantalla se
f. A continuación, pulse el botón numérico “0”. En la pantalla se
distancia
el aparato está configurado en la banda AM, pulse el botón BAND
para pasar a FM.
La frecuencia anteriormente visualizada desaparece y es
sustituida en la pantalla por “
lee entonces “
lee entonces “
lee entonces “
lee entonces “
STEREO y entonces puede oír las emisiones de esa emisora.
Para sintonizar una emisora AM, aplique el mismo procedimiento,
configurando la banda en AM.
Botones numéricos
”.
”.
”.
”.
”, se encienden los indicadores TUNED y
q
q
Botón POWER ON/OFF
Utilice este botón para encender el aparato o ponerlo en modo de
espera.
w
w
Botón SLEEP
Pulse este botón para configurar el temporizador de reposo. El
temporizador de reposo puede configurarse en 10, 20, 30, 40, 60,
o 90 minutos, o en “OFF”. Para cancelar el temporizador de reposo,
utilice este botón para seleccionar “OFF,” o el botón “POWER” para
apagar el aparato (es decir, para ponerlo en modo de espera).
e
e
Botón BAND
ee
Utilice este botón para seleccionar la banda AM o FM. La banda
cambia cada vez que se pulsa este botón.
r
r
Botón ST.NAME/DISPLAY
Pulse este botón para cambiar la visualización entre el nombre
programado, la frecuencia y el nivel de entrada de antena.
u
u
Botón FM MODE
Utilice este botón para escuchar una emisión estéreo con sonido
monoaural. Este botón funciona indistintamente en las emisiones
estéreo FM y AM.
i
i
Botón IF BAND
Utilice este botón para cambiar la banda de frecuencia intermedia
FM.
o
o
Botones TUNING 5
Utilice estos botones para aumentar o reducir la frecuencia en la
que el sintonizador está sintonizado actualmente. Al presionarse
uno de estos botones se inicia la sintonización automática. (Estos
botones funcionan igual que en el aparato principal).
!!0
!0
Botones PRESET 5
!
Utilice estos botones para recorrer hacia arriba o hacia abajo las
emisoras presintonizadas.
!
!1
Botón MEMO
Utilice este botón para guardar una emisora en la memoria de
presintonización. Este botón funciona igual que en el aparato principal.
!
!2
Botón P.SCAN (Exploración de emisoras presintonizadas)
Utilice este botón para sintonizar automáticamente cada una de las
emisoras guardadas en la memoria de presintonización, durante
cinco segundos cada una. Si oye una emisión que desea escuchar,
pulse de nuevo este botón para interrumpir la exploración en dicha
emisora.
ESPAÑOL
27
Page 28

UTILIZACIÓN DEL MANDO A DISTANCIA
1. Mando a distancia
Utilice el mando a distancia (RC6000ST) en una distancia de unos 5
metros desde la ventana de recepción de señal de infrarrojos (sensor
remoto), situada en la parte delantera del sintonizador.
Es posible que el mando a distancia no funcione si el transmisor del
mando a distancia no apunta hacia el sensor remoto o si hay un obstáculo
entre el transmisor y el sensor remoto.
Radio de acción del mando a distancia
Sintonizador (PMD800)
Aprox. 5 m
60°
Mando a distancia (RC6000ST)
2. Para cargar las pilas
Las pilas de este mando a distancia tienen una duración aproximada
de un año en condiciones normales de funcionamiento. Si no va a utilizar
el mando a distancia durante un periodo de tiempo prolongado, saque
las pilas. Asimismo, si observa que las pilas se están agotando,
cámbielas lo antes posible.
ESPAÑOL
1. Abra la tapa de las pilas levantándola en la dirección B a
2. Inserte las pilas suministradas con la polaridad correcta.
la vez que presiona la sección A en la dirección de la
flecha.
B
A
28
Page 29

29
Page 30

SPECIFICATIONS
FM section
Frequency range......................................................................................................................... 87.5 MHz to 108.0 MHz
50 kHz steps: Manual mode
(10 kHz steps: Fine mode)
Sensitivity (S/N: 30 dB) .......................................................................................................................................... 1.2 μV
Total harmonic distortion (1 kHz)
Mono ............................................................................................................................................................... 0.08 %
Stereo.............................................................................................................................................................. 0.15 %
Signal to Noise ratio
Mono: ................................................................................................................................................................ 80 dB
Stereo:............................................................................................................................................................... 75 dB
Selectivity (±400 kHz)
Wide mode ........................................................................................................................................................ 65 dB
Narrow mode..................................................................................................................................................... 80 dB
Frequency Response...................................................................................................... 20 Hz to 15 kHz (+1.0, -3.0 dB)
Image Rejection ...................................................................................................................................................... 70 dB
AM Suppression ..................................................................................................................................................... 55 dB
Stereo Separation (1 kHz) ...................................................................................................................................... 50 dB
AM Section
Frequency range....................................................................................................... 520 kHz to 1710 kHz (10 kHz step)
Sensitivity (S/N: 20 dB) ..................................................................................................................................50 dBμV /m
Signal to Noise ratio................................................................................................................................................ 50 dB
Total harmonic distortion ......................................................................................................................................... 1.0 %
Image Rejection ...................................................................................................................................................... 35 dB
General
Power supply .......................................................................................................................................... AC 120 V 60 Hz
Power consumption ................................................................................................................................................ 7.5 W
Dimension (WxHxD) ......................................................................................................................... 440 x 96 x 311 m/m
Weight (Net)............................................................................................................................................................ 3.8 kg
Accessories
Remote control connection cord ...................................................................................................................................x1
Audio signal connection cord ........................................................................................................................................x1
FM indoor antenna........................................................................................................................................................ x1
AM loop antenna........................................................................................................................................................... x1
Remote control unit (RC6000ST) ................................................................................................................................. x1
AAA (R03) Batteries...................................................................................................................................................... x2
Market Survey Card ......................................................................................................................................................x1
Note:
Improvements may result in specification or feature changes without notice.
Photos and illustrations may differ slightly from production models.
30
Page 31

FIGURES
BEFORE USE
Matching
Transformer
(optional)
Roof-top FM Antenna(75 ohms)
Lead-type FM Antenna(75Ω)
(provided)
CAUTION:Do not plug the power cord of any
component into AC outlets and do not turn their POWER
switches on until connections have been performed.
AM Indoor Loop Antenna
(provided)
AM Outdoor Antenna
5 to 12m
Tuner
FM ANTENNA B
FM ANTENNA A
75Ω 75Ω
AM ANTENNA
GND
AM
RCA Pin Plug Cord
(Provided)
CD
PHONO T PE 2AUXTUNER TAPE 1
IN
IN
OUT
REMOTE
LINE OUT
CONTROL
L
R
RESET
RCA Pin Plug Cord
(Provided)
To AC Outlet
Stereo Amplifier
SYSTEM 1 MINIMUM 8 OHMS
SYSTEM 2 MINIMUM 8 OHMS
SYSTEM 1 AND 2 MINIMUM 16 OHMS
SPEAKER SYSTEMS 1
R
OUT
RR
R
SPEAKER SYSTEMS 2
REMOTE
CONT
IN
OUT
31
Page 32
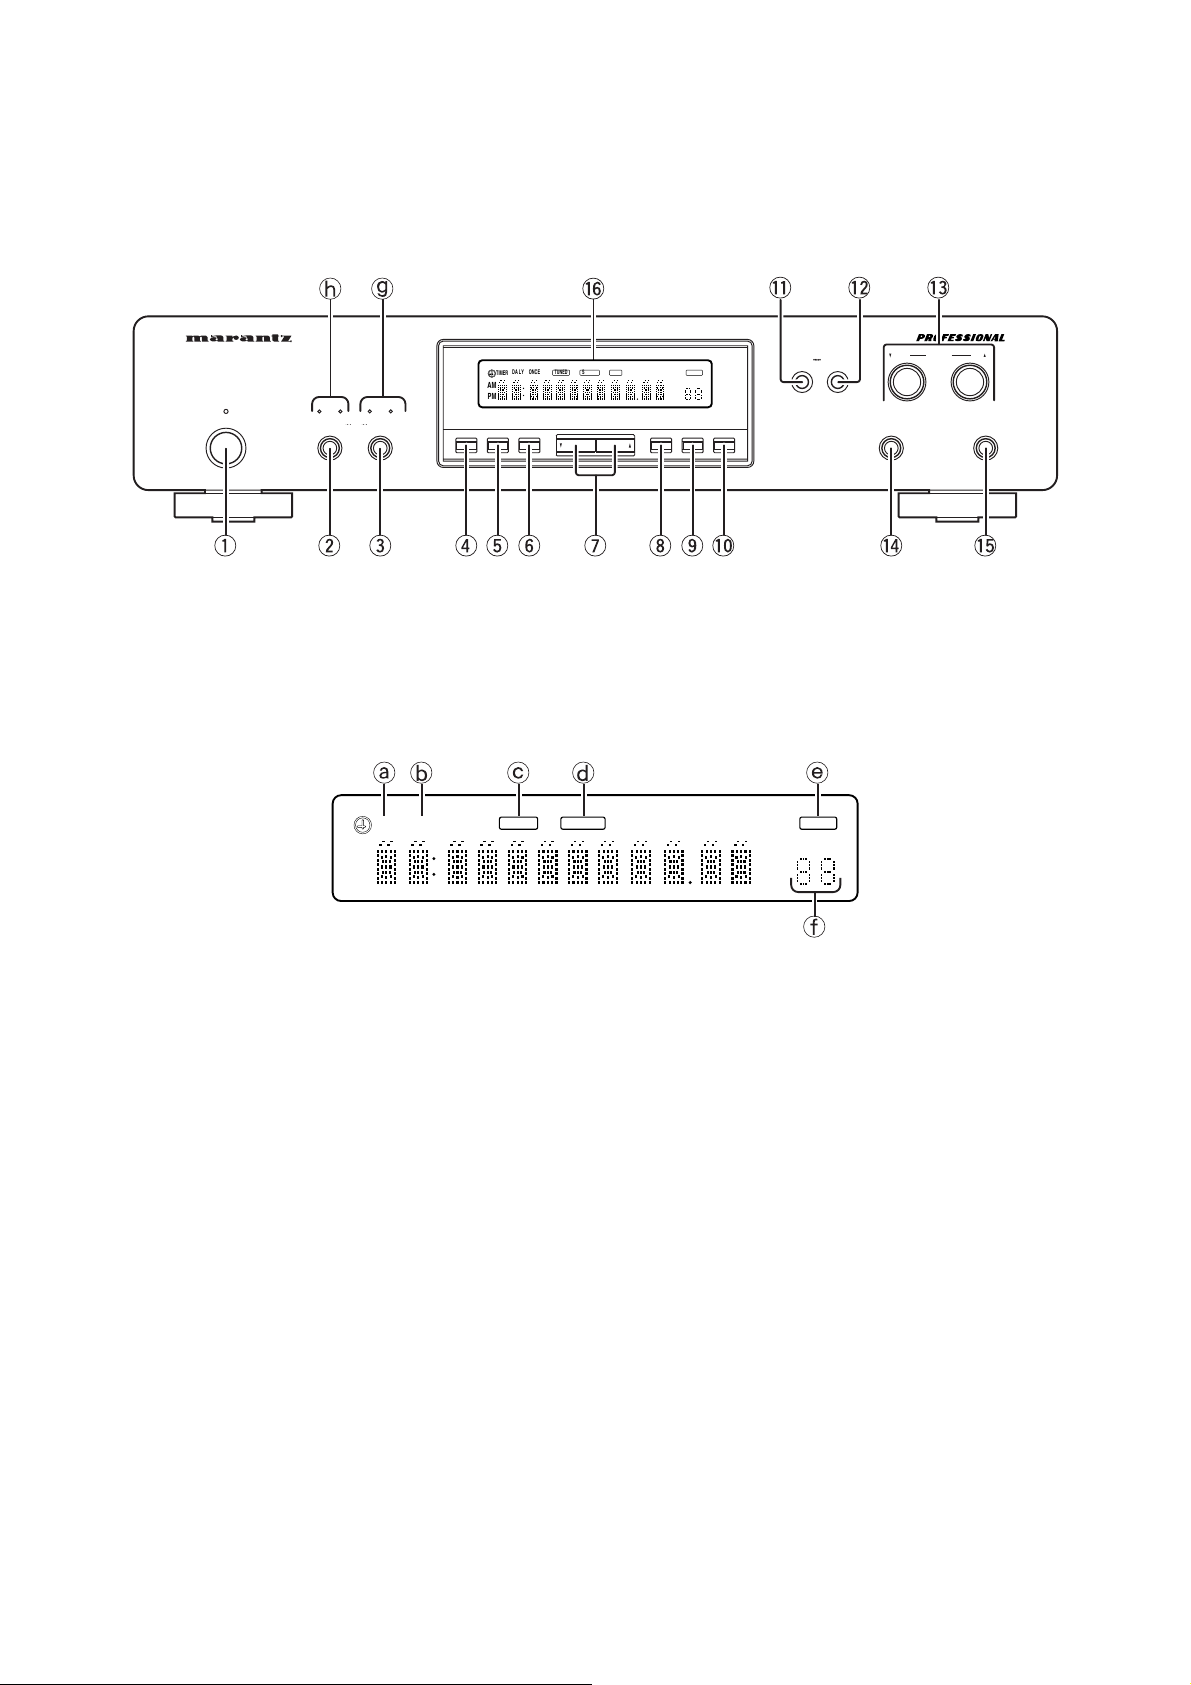
CONTROLS AND FUNCTIONS
POWER
FL-DISPLAY
TUNNG
MODE
!6
TUNEDPMSTEREO RDS
DOWN
TUNNG
PTY PT TP TA AUTO
kHz
MHz
UP
CANCEL
MEMO
PRESET
CH
MEMONEXT
CD
TUNER MD800
DA LY ONCE
TIMER
STANDBY
ONSTAMDBY
AB
ANTETTA
WIDE
NARROW
F BAND
FM
AM
STNAME
DSPLAY
TME ADJ
q w e rty iuo!0
AM
TIMER
DAILY
?= >
TUNEDPMSTEREO
@A
!1 !2 !3
ONOFF
TIMER SET
DOWN
FM MODE
!4 !5
AUTO
MEMO
PRESET
CH
kHz
MHz
UP
PRESET
BAND
B
32
Page 33

Limited Warranty
Your Marantz Professional product is warranted against manufacturer
defect for period of one year parts and labor.
Except as specified below this warranty covers defects in material and
workmanship. The following are not covered under warranty.
1. a) Damage, deterioration, malfunction or failure to meet performance
specification resulting from:
b) Accidents, acts of nature, misuse, abuse, neglect or unauthorized
product modification.
c) Improper installation, removal or maintenance, or failure to follow
supplied instruction.
d) Repair or attempted repair by a non Marantz authorized agent.
e) Any shipment of the product (claims must be presented to the
carrier).
f) Any cause other than a defect in manufacturing.
2. Cleaning, check-ups with no fault found, or changes incurred for
installation, removal or reinstallation of the product.
3. Any serialized product on which the serial number has been defaced,
modified or removed.
4. Batteries and battery chargers.
5. Accessories, including but not limited to, cables, mounting hardware
and brackets, cleaning accessories, power cords and adaptors, and
carry cases.
6. Product purchased outside the United States, its possessions or
territories.
Non-Transferable Warranty
This warranty may be enforced only by the original purchaser.
Limitation of Implied Warranties
All implied warranties, including warranties or merchantability and fitness
for a particular purpose, are limited in duration to the length or this
warranty.
Exclusion of Damages
Liability for any defective product is limited to repair or replacement of
the product at manufacturer’s option. Manufacturer shall not be liable for
damage to other products caused by any defects in Marantz products,
damages based upon inconvenience or loss of use of the product, or
any other damages, whether incidental, consequential, or otherwise.
Some states do not allow limitations on how long an implied warranty
lasts and/or do not allow the exclusion or limitation of incidental or
consequential damages, so the above limitations and exclusions may
not apply to you.
How State Law Relates to the Warranty
This warranty gives you specific legal rights, and you may have other
rights which may vary from state to state.
Marantz Professional Service Number:
Marantz Professional Factory Service (630) 820-4800
This warranty is enforceable only in the United States and its possessions
and territories.
What We Will Pay For
We will pay for all labor and material expense for items covered by the
warranty.
How You Can Get Service
1. If your unit needs service, contact our service referral at the appropriate
telephone number indicated below. We will advise you of the name
and location of one or more warranty authorized service centers from
which service may be obtained. Please do not return your unit directly
to us.
2. You must pay any shipping charges if it is necessary to ship the product
for service. If the necessary repairs are covered by the warranty, we
will pay the return shipping charges to your location anywhere in the
United States or its territories.
3. Whenever warranty service is required, you must present the original
dated sales receipt or other proof of date purchased.
33
Page 34

R
is a registered trademark.
Printed in China
07/2002 MITs 282W851280
 Loading...