

Marantz DH-9500 Owners Manual

Model DH9500 User Guide
MUSIC SERVER
CLASS 1 LASER PRODUCT
LUOKAN 1 LASERLAITE
KLASS 1 LASERAPPARAT
COPYRIGHT NOTICE
The DH9500 Music Server software and this documentation
are copyright materials. No part of the Music Server software
or this documentation may be reproduced, transmitted,
transcribed, stored in a retrieval system, or translated into any
language, or computer language, in any form or by any means
without prior written permission of Marantz.
XiVA™ is a trademark of Imerge Ltd. All other product
names are trademarks or registered trademarks of their
respective owners.
Music recognition technology and related data are provided
by Gracenote and the Gracenote CDDB® Music Recognition
SM
Service
recognition technology and related content delivery. For
more information go to www.gracenote.com
CD and music-related data from Gracenote, Inc., copyright
© 2000-2003 Gracenote. Gracenote CDDB® Client
Software, copyright 2000-2003 Gracenote. This product and
service may practice one or more of the following U.S.
Patents: #5,987,525; #6,061,680; #6,154,773, #6,161,132,
#6,230,192, #6,230,207, #6,240,459, #6,330,593, and other
patents issued or pending.
Gracenote and CDDB are registered trademarks of
Gracenote. The Gracenote logo and logotype, the
Gracenote CDDB logo, and the “Powered by Gracenote”
logo are trademarks of Gracenote.
MPEG Layer-3 audio coding technology licensed from
Fraunhofer IIS and THOMSON multimedia.
The information in this guide is believed to be correct as of
the date of publication. However our policy is one of
continuous development and so the information in this guide
is subject to change without notice, and does not represent
a commitment on the part of Marantz.
. Gracenote is the industry standard in music
XIVA™ NEW MEDIA BROUGHT TO LIFE
XiVA™ is a highly portable software framework that powers
next-generation media appliances. XiVA™ blends hard disk
technology, advanced software design, and embedded
Internet technology to provide amazing features; audio,
video, text, graphics, and all forms of streaming new media
are all brought to life through a wealth of interactive user
interface options. The next generation media appliance is
powered by XiVA™.
ENGLISH
WARRANTY
For warranty information contact your local Marantz
distributor.
RETAIN YOUR PURCHASE RECEIPT
Your purchase receipt is your permanent record of a
valuable purchase. It should be kept in a safe place to be
referred to as necessary for insurance purposes or when
corresponding with Marantz.
IMPORTANT
When seeking warranty service, it is the responsibility of the
consumer to establish proof and date of purchase. Your
purchase receipt or invoice is adequate for such proof.
FOR U.K. ONLY
This undertaking is in addition to a consumer’s statutory
rights and does not affect those rights in any way.
FRANÇAIS
GARANTIE
Pour des informations sur la garantie, contacter le
distributeur local Marantz.
CONSERVER L’ATTESTATION D’ACHAT
L’attestation d’achat est la preuve permanente d’un achat de
valeur. La conserver en lieur sûr pour s’y reporter aux fins
d’obtention d’une couverture d’assurance ou dans le cadre
de correspondances avec Marantz.
IMPORTANT
Pour l’obtention d’un service couvert par la garantie, il
incombe au client d’établir la preuve de lachat et d’en
corroborer la date. Le reçu ou la facture constituent des
preuves suffisantes.
DEUTSCH
GARANTIE
Bei Garantiefragen wenden Sie sich bitte an Ihren MarantzHändler.
HEBEN SIE IHRE QUITTUNG GUT AUF
Die Quittung dient Ihnen als bleibende Unterlage für Ihre
wertvolle Anschaffung Das Aufbewahren der Quittung ist
wichtig, da die darin enthaltenen angaben für
Versicherungszwecke oder bei korrespondenz mit Marantz
angeführt werden müssen.
WICHTIG!
Bei Garantiefrangen muß der Kunde eine Kaufunterlage mit
kaufdatum vorlegen. Ihre Quittung oder Rechnung ist als
Unterlage ausreichend.
ESPAÑOL
GARANTÍA
Para Información sobre las Condiciones de Garantía,
sírvase consultar el Certificado que encontará en le interior
del embalaje del equipo.
CONSERVE EL COMPROBANTE DE LA
COMPRA
La factura es el comprobante de la adquisición de un
producto valioso. Consérvela en lugar seguro para poder
consultarla en caso necesario.
IMPORTANTE
Para disponer de servicios cubiertos por la garantía, el
usuario deberá acreditar la fecha y el lugar de adquisición
del equipo. La factura o recibo de la compra constituyen un
comprobante válido a tal efecto.
CONGRATULATIONS ON YOUR PURCHASE OF THIS
FINE MARANTZ PRODUCT.
MARANTZ is on the leading edge of Hard Disk Music
products for the consumer market and this unit incorporates
the latest technological developments.
We are sure you will be fully satisfied with the Music Server.
Thank you for your support.
WARNING:
TO REDUCE THE RISK OF FIRE OR ELECTRIC SHOCK,
DO NOT EXPOSE THIS APPLIANCE TO RAIN OR
MOISTURE.
Do not remove the cover from the equipment. There are no
user serviceable parts inside, and opening the case will
invalidate your warranty.
Do not insert anything into the equipment through the
ventilation holes.
Do not handle the mains lead with wet hands.
To avoid overheating do not position the Music Server near
heat sources, and ensure that the ventilation holes are not
blocked.
CAUTION: This product contains a lithium battery. Danger
of explosion if battery is incorrectly replaced. Replace only
with the same or equivalent type recommended by Marantz.
Dispose of batteries according to the manufacturer’s
instructions.
IMPORTANT NOTICE
[For U.S. model]
The serial number for this equipment is located on the rear
panel. Please write this serial number on your enclosed
warranty card and keep it in a secure area. This is for your
security.
CAUTION: This product satisfies FCC regulations when
shielded cables and connectors are used to connect the
unit to other equipment. To prevent electromagnetic
interference with electric appliances such as radios and
televisions, use shielded cables and connectors for
connections.
CAUTION
z Use of controls or adjustments or performance of
procedures other than those specified herein may
result in hazardous radiation exposure.
z The use of optical instruments with this product will
increase eye hazard.
Information to User
Alteration or modifications carried out without appropriate
authorization may invalidate the user’s right to operate
the equipment.
[For Canadian model]
NOTE: This Class B digital apparatus complies with
Canadian ICES-003.
Cet appareil numérique de la Classe B est conforme à la
norme NMB-003 du Canada.
CAUTION: TO PREVENT ELECTRIC SHOCK, MATCH
WIDE BLADE OF PLUG TO WIDE SLOT, FULLY INSERT.
ATTENTION: POUR ÉVITER LES CHOCS ÉLECTRIQUES,
INTRODUIRE LA LAME LA PLUS LARGE DE LA FICHE
DANS LA BORNE CORRESPON-DANTE DE LA PRISE ET
POUSSER JUSQU’AU FOND.
[For European model]
NOTE: This product has been designed and type-tested
to comply with the limits set out in EN55013, EN55020,
EN60950, EN55022: 1998 CLASS B4, EN55024: 1998,
FCC RULES PART 15 SUBPART B CLASS B. NS/N29
3548:1995 CLASS B
ENGLISH
NOTE: This equipment has been tested and found to
comply with the limits for a Class B digital device,
pursuant to Subpart J, Part 15 of the FCC rules. These
limits are designed to provide reasonable protection
against harmful interference in a residential installation.
This equipment generates, uses, and can radiate radio
frequency energy and, if not installed and used in
accordance with the instructions, may cause harmful
interference to radio communications. However, there is
no guarantee that interference will not occur in a
particular installation. If this equipment does cause
harmful interference to radio or television reception,
which can be determined by turning the equipment off
and on, the user is encouraged to try to correct the
interference by one or more of the following measures:
– Reorient or relocate the receiving antenna.
– Increase the separation between the equipment and
receiver.
– Connect the equipment into an outlet on a circuit
different from that to which the receiver is connected.
– Consult the dealer or an experienced radio/TV
technician for help.
Changes or modifications may cause this unit to fail to
comply with Part 15 of the FCC Rules and may void the
user’s authority to operate the equipment.
CAUTION:
LASER SAFETY: This unit employs a LASER. Only a
qualified person should remove the cover or attempt to
service the device, due to possible eye injury.
“CAUTION-USE OF CONTROLS OR ADJUSTMENTS OR
PERFORMANCE OF PROCEDURE OTHER THAN THOSE
SPECIFIED HEREIN MAY RESULT IN HAZARDOUS
RADIATION EXPOSURE.”
COPYRIGHT
This equipment must not be used for unauthorised
duplication of CDs or any other works protected by
copyright. No license to infringe copyright is granted by
the sale of this equipment.
Recording and playback of some material may require
permission. For further information refer to the following:
– Copyright Act 1956
– Dramatic and Musical Performers Act 1958
– Performers Protection Acts 1963, and 1972
– Any subsequent statutory enactments and orders.
1
ENGLISH
IMPORTANT SAFETY INSTRUCTIONS
READ INSTRUCTIONS - All the safety and
operating instructions should be read before the
product is operated.
KEEP INSTRUCTIONS - The safety and operating
instructions should be kept for future reference.
HEED WARNINGS - All warnings on the product
and in the operating instructions should be
adhered to.
FOLLOW INSTRUCTIONS - All operating and use
instructions should be followed.
CLEANING - Unplug this product from the wall
outlet before cleaning. The product should be
cleaned only with a soft dry cloth. Never clean
with furniture wax, benzine, insecticides or other
volatile liquids since they may corrode the
cabinet.
ATTACHMENTS - Do not use attachments not
recommended by the product manufacturer as
they may cause hazards.
WATER AND MOISTURE - Do not use this product
near water - for example near a bathtub, wash
bowl, kitchen sink, or laundry tub; in a wet
basement; or near a swimming pool; and the
like.
ACCESSORIES - Do not place this product on an
unstable cart, stand, tripod, bracket, or table.
The product may fall, causing serious injury to a
child or adult, and serious damage to the
product. Use only with a cart, stand, tripod,
bracket or table recommended by the
manufacturer, or sold with the product. Any
mounting of the product should follow the
manufacturer’s instructions and should use a
mounting accessory recommended by the
manufacturer.
CART - A product and cart combination should be
moved with care. Quick stops, excessive force
and uneven surfaces may cause the product and
cart combination to overturn:
VENTILATION - Slots and openings in the cabinet
are provided for ventilation and to ensure
reliable operation of the product and to protect it
from overheating. Do not block any ventilation
openings. The openings should never be
blocked by placing the product on a bed, sofa,
rug or other similar surface. This product should
not be placed in a built-in installation such as a
bookcase or rack unless proper ventilation is
provided. Install in accordance with the
manufacturer’s instructions.
POWER SOURCES - This product should be
operated only from the type of power source
indicated on the marketing label. If you are not
sure of the type of power supply to your home,
consult your product dealer or local power
company.
LOCATION - The appliance should be installed in a
stable location.
NONUSE PERIODS - The power cord of the
appliance should be unplugged from the outlet
when left unused for a long period of time.
GROUNDING OR POLARIZATION - If this product
is equipped with a polarized alternating current
line plug (a plug having one blade wider than the
other), it will fit into the outlet only one way. This
is a safety feature. If you are unable to insert
the plug fully into the outlet, try reversing the
plug. If the plug does not fit into the outlet,
contact your electrician to replace your obsolete
outlet. Do not defeat the safety purpose of the
polarized plug.
If this product is equipped with a three-wire
grounding type plug, a plug having a third
(grounding) pin, it will only work in a grounding
type power outlet. This is a safety feature. If
you are unable to insert the plug into the outlet,
contact your electrician to replace your obsolete
outlet. Do not defeat the safety purpose of the
grounding type plug.
POWER CORD PROTECTION - Power-supply
cords should be protected from being walked on
or pinched particularly at plugs, convenience
receptacles, and the point where they exit from
the product.
OUTDOOR ANTENNA GROUNDING - If an outside
antenna or cable system is connected to the
product be sure the antenna or cable system is
grounded so as to provide some protection
against voltage surges and built-up static
charges. Article 810 of the National Electric
Code. ANSI/NFPA70 provides information with
regard to proper grounding of the mast and
supporting structure, grounding of the lead-in
wire to an antenna discharge unit, connection to
grounding electrodes, and requirements for the
grounding electrode. See Figure A.
LIGHTNING - For added protection for this product
during a lightning storm, or when it is left
unattended and unused for long periods of time,
unplug it from the wall outlet and disconnect the
antenna or cable system. This will prevent
damage to the product due to lightning and
power-line surges.
POWER LINES - An outside antenna system
should not be located in the vicinity of overhead
power lines or other electric light or power
circuits, or where it can fall into such power lines
or circuits. When installing an outside antenna
system, extreme care should be taken to keep
from touching such power lines or circuits as
contact with them might be fatal.
OVERLOADING - Do not overload wall outlets,
extension cords or integral convenience
receptacles as this can result in a risk of fire
or electric shock.
OBJECT AND LIQUID ENTRY - Never push
objects of any kind into this product through
openings as they may touch dangerous
voltage points or short-out parts that could
result in a fire or electric shock. Never spill
liquid of any kind on the product.
SERVICING - Do not attempt to service this
product yourself as opening or removing
covers may expose you to dangerous voltage
or other hazards. Refer all servicing to
qualified service personnel.
DAMAGE REQUIRING SERVICE - Refer all
servicing to qualified service personnel.
Servicing is required when the apparatus has
been damaged in any way, such as powersupply cord or plug is damaged, liquid has
been spilled or objects have fallen into the
apparatus, the apparatus has been exposed
to rain or moisture, does not operate normally,
or has been dropped.
REPLACEMENT PARTS - When replacement
parts are required, be sure the service
technician has used replacement parts
specified by the manufacturer or have the
same characteristics as the original part.
Unauthorized substitutions may result in fire,
electric shock, or other hazards.
SAFETY CHECK - Upon completion of any
service or repairs to this product, ask the
service technician to perform safety checks to
determine that the product is in proper
operating condition.
WALL OR CEILING MOUNTING - The product
should not be mounted to a wall or ceiling.
HEAT - Do not install near any heat source such
as radiators, heat registers, stores, or other
apparatus (including amplifiers) that produce
heat.
The lightning flash with arrowhead symbol, within an
equilateral triangle, is intended to alert the user to the
presence of uninsulated “dangerous voltage” within the
product’s enclosure that may be of sufficient magnitude to
constitute a risk of electric shock to persons.
The exclamation point within an equilateral triangle is
intended to alert the user to the presence of important
operating and maintenance (servicing) instructions in the
literature accompanying the appliance.
2
FOREWORD
This section must be read carefully before any connection is
made to the mains supply.
WARNINGS
• Do not expose the equipment to rain or moisture.
• Do not remove the cover from the equipment.
• Do not insert anything into the equipment through
the ventilation holes.
• Do not cover the ventilation holes with any items
such as tablecloths, newspapers, curtains, etc.
• Do not place naked flame sources, such as lighted
candles, on the equipment.
• Do not handle the mains lead with wet hands.
• Allow adequate ventilation. Leave a gap of 0.1m
on all sides of the unit.
• Do not splash or spill water on the unit. Do not
place objects filled with liquid (such as vases) on the
unit.
EQUIPMENT MAINS WORKING SETTING
Your Marantz product complies with the household power
and safety requirements in your area.
IMPORTANT: (FOR UK VERSION ONLY)
This apparatus is fitted with an approved moulded 13 Amp
plug. To change a fuse in this type of plug proceed as follows:
1 Remove fuse cover and fuse.
2 Fix new fuse which should be a BS1362 5A, A.S.T.A
or BSI approved type.
3 Refit the fuse cover.
If the fitted plug is not suitable for your socket outlets, it
should be cut off and an appropriate plug fitted in its place.
If the mains plug contains a fuse, this should have a value of
5A. If a plug without a fuse is used, the fuse at the
distribution board should not be greater than 5A.
NOTE: The severed plug must be destroyed to avoid a
possible shock hazard should it be inserted into a 13A
socket elsewhere.
HOW TO CONNECT A PLUG
The wires in the mains lead are coloured in accordance with
the following code:
BLUE - “NEUTRAL” (“N”)
BROWN - “LIVE” (“L”)
1 The BLUE wire must be connected to the terminal
which is marked with the letter “N” or coloured BLACK.
2 The BROWN wire must be connected to the terminal
which is marked with the letter “L” or coloured RED.
3 The GREEN/YELLOW-GREEN wire must be
connected to the terminal which is marked by the
letter “E” or by the safety earth symbol or
coloured green or green-and-yellow.
Before replacing the plug cover, make certain that the cord
grip is clamped over the sheath of the lead - not simply over
the two wires.
PRECAUTIONS
The following precautions should be taken when operating
the equipment.
GENERAL PRECAUTIONS
When installing the equipment ensure that:
– the ventilation holes are not covered.
– air is allowed to circulate freely around the equipment.
– it is placed on a vibration free surface.
– it will not be exposed to excessive heat, cold,
moisture or dust.
– it will not be exposed to direct sunlight.
– it will not be exposed to electrostatic discharges.
In addition, never place heavy objects on the equipment.
If a foreign object or water does enter the equipment,
contact your nearest dealer or service center.
Do not pull out the plug by pulling on the mains lead; grasp
the plug.
It is advisable when leaving the house, or during a
thunderstorm, to disconnect the equipment from the mains
supply.
COMPACT DISCS
The glossy side shining like a rainbow is the front side of the
disc, and the side on which the label is printed is the back.
Unlike conventional turntables for playing analogue discs, the
DH9500 Music Server reads the information recorded on the
disc from underneath without contacting it using a beam of
laser light. Therefore, the performance of a compact disc will
not degrade like conventional analogue records.
Handle discs carefully so as not to damage or scratch
the front side.
To protect the disc avoid placing it in the following
locations:
– In direct sunlight or near a source of heat like a heater.
– In a place which is damp or dirty.
– In a place which could be exposed to rain, such as
near a window.
Always keep the surface of the disc clean.
Up to six billion data units are recorded on the front side of
the disc. When cleaning the disc surface always be sure to
use a special compact disc cleaner. Do not use a
conventional record cleaner for analogue records, as this
will adversely affect the disc surface.
Store discs properly by placing them in their disc cases.
Do not attach a piece of paper or sticker on the label
side of the disc.
When a disc has a piece of plastic tape or rental CD label
with paste protruded from the edge or when a disc has a
trace of such a sticky object, do not attempt to play the disc.
If such a disc is inserted into the Music Server it may cause
extensive damage to the system. It may also be impossible
to remove the disc.
Do not use a disc with a special shape.
Do not attempt to use a disc with a special shape such as a
heart-shaped disc or octagonal disc. This may cause the
system to malfunction.
DTS encoded discs
Caution - when playing DTS encoded CDs excessive noise
will be heard on the analogue outputs jacks of the Music
Server. To avoid possible damage to the audio system you
should ensure that the correct connections are made to your
amplification system for replaying this type of disc.
CAUTION
When disposing of used batteries, please comply with
governmental regulations or environmental regulations or
environmental public instruction’s rules that apply in your
country or area.
POWER BUTTON
When this button is pressed once, the power turns On
and information will appear on the display. When
pressed again, press the Off action key or the 3 key on
the remote control to switch to Off mode.
When the unit is in Off mode the “Standby” indicator is lit;
the apparatus is not disconnected from the AC mains
supply in this mode.
3
ENGLISH
ENGLISH
1
3
2
abc
0
-/().@*
5
jkl
6
mno
9
wxyz
4
ghi
7
pqrs
8
tuv
def
DELETECAPS.
+
_
+
_
Mute
Output
Select
Album
Artist
Genre
Playlist
Default o/p
AV
-/--
TV
HDD
Audio
Amp
Disc
Standby
Ch.
E
Menu Home
3
4
1
5
6
QUICK START GUIDE
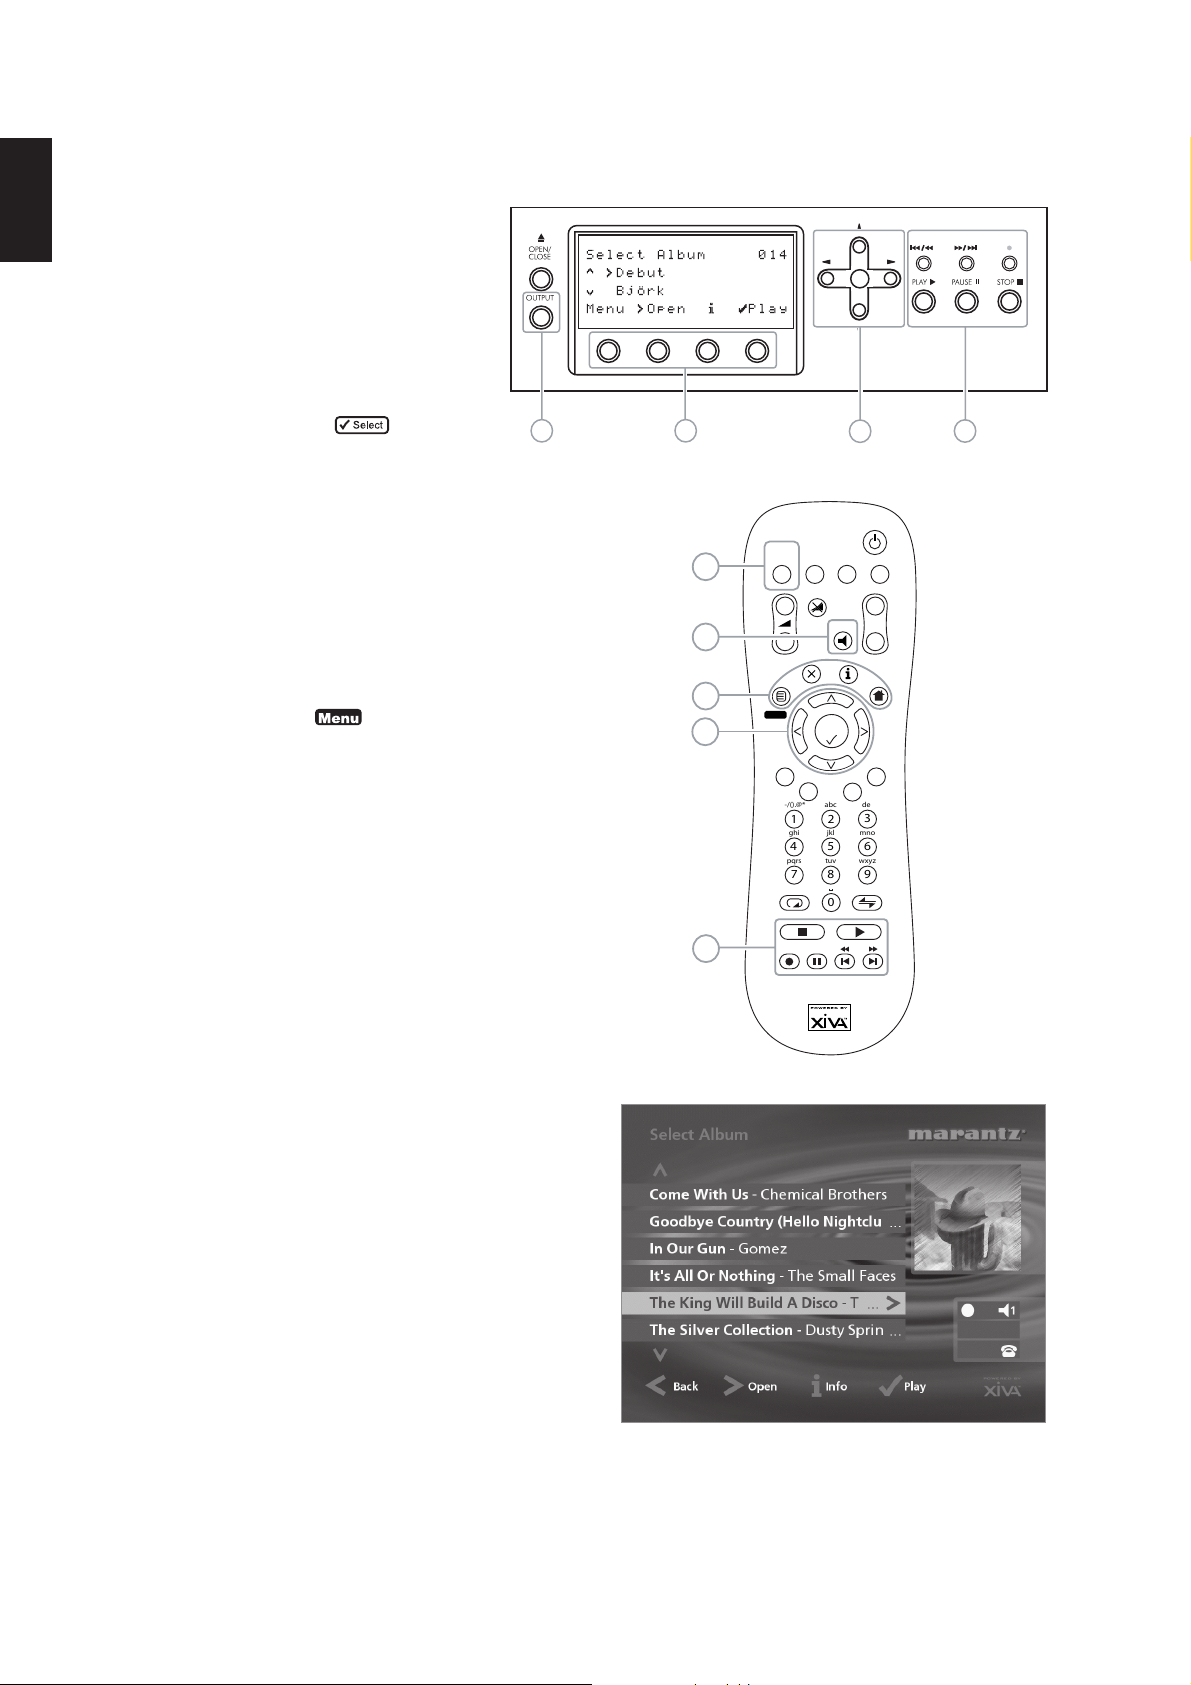
CONTROLS
1. Output button: Press this button to display
information on the music currently playing.
Press this button again to switch to the next
output on the Music Server.
2. Front panel action keys: These four keys
correspond to the different actions clearly
visible by reading the front panel display. For
example, in the display opposite, the 5Play
action key will commence playback of the
selected album. The 5 symbol indicates that
you can also press the key on the
remote control to commence playback.
3. Navigation keys: Move up, down, left, and right
through the menu system. The button in the centre
selects the currently highlighted option.
4. Transport keys: Controls the playback of music on
the currently selected output. The KRecord key is
an action key used on some menu screens to begin
a recording or to modify a playlist.
5. HDD Audio button: Press this button to control the
Music Server.
6. Remote control action keys:
1
Fig. A - Front panel display
2
3
4
• Press the 1 key to display the main
menu at any time.
• Press the 2 key whenever this symbol is
displayed on the TV screen or on the front
panel to cancel, exit or delete the current
operation according to the information on
screen.
• Press the 3 key whenever this symbol is
displayed on the TV screen or on the front
panel to edit text information, or confirm a
new text entry according to the information
on screen.
• Press the 4 key to return to the ‘home’
page of the current function. For instance
when browsing the library press this key to
return to the Library menu.
RECORDING FROM A CD
Fig. B - Remote Control
• Press the OPEN/CLOSE key on the front panel to
open the CD tray.
• Place a CD in the tray.
• Push the OPEN/CLOSE key on the front panel.
The CD detected prompt is displayed.
• Press the K Record action key to proceed.
The Please select Auto or Custom record display then
allows you to chose whether to do a quick (one touch)
record or specify individual record options.
• Press the 5Auto action key to do a one touch
recording.
The display confirms when the recording is finished.
Note: You can play music from your music library while you
are recording a CD.
Fig. C - TV User Interface
4
PLAYING MUSIC
• Display the Main Menu by pressing the 1
key on your Music Server remote control, or the
Menu action key on the front panel.
The Main Menu will be displayed.
• Press the 9 and 8 keys to highlight Library.
• Press the 5Select action key.
The Library menu lets you choose how you want to browse
your music collection. You can browse items by album,
artist, genre, or playlist.
• Press the 9 and 8 keys to step between categories.
For example, if you select Albums you will see an
alphabetical list of your album titles.
To play music
• Use the 9 and 8 keys to highlight the item you
would like to play.
• Press the 7 key to view the contents of the selected
item.
• Press the 5Play action key.
To stop play
• Press the B key on
the front panel or the
Music Server remote
control.
To pause play
• Press the C key on
the front panel or your
Music Server remote
control.
To skip to the next or
previous track
• Press the Gor F key on the front panel or your
Music Server remote control.
To seek within a track
• Hold down the E or D key on the front panel or your
Music Server remote control.
Play resumes from the new position when you release the
key.
Stop key
Pause key Skip/Seek keys
Play key
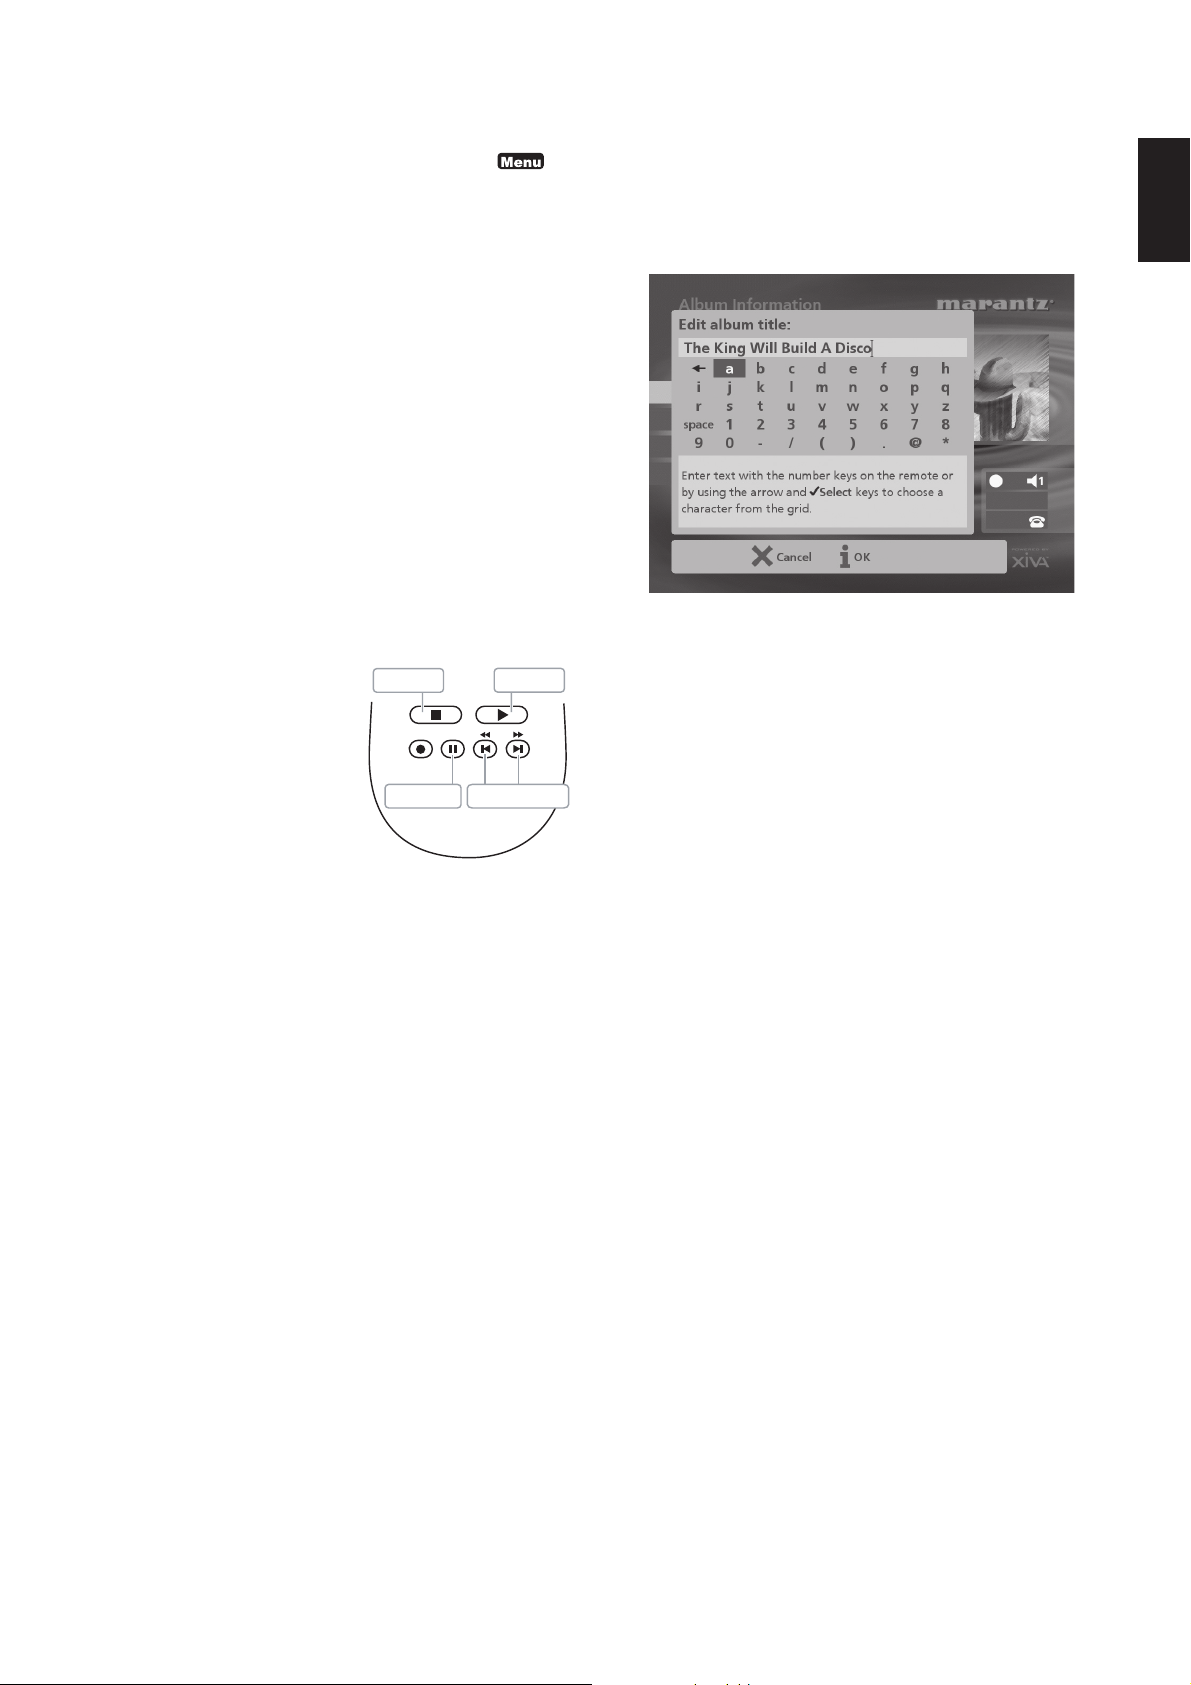
ENTERING TEXT
To enter text using the alphanumeric keypad
• Press the 7 or 6 keys to move the cursor to the
required position.
• Use the keys on the alphanumeric keypad to enter a
letter.
For example to enter S press the 7 key four times, because
S is the fourth letter on the 7 key.
• Press the DELETE key on your Music Server
remote control to delete letters.
• Press the CAPS key on either the front panel or
your Music Server remote control to switch between
upper-case and lower-case letters.
To select letters from a grid
Alternatively, the Grid provides a convenient way of
selecting letters:
• Press the 8 key to move the cursor into the grid
area.
The currently selected letter is highlighted:
• Use the 7,6,9 or 8 keys to move the cursor and
press the 5Select action key to enter each letter.
• Use the CAPS key on either the front panel or the
Music Server remote to switch between upper and
lower case letters.
If at any time you need to enter text in a different part of the
text field, or you want to return to entering text using the
alphanumeric keypad:
• Press the 9 key repeatedly until the cursor returns
to the text field.
Finally, when you have finished entering the name:
• Press the 3OK action key.
SWITCHING ON AND OFF
To switch to standby mode
Standby mode should be used when the Music Server is not
being used for a short period of time. Do not remove the
power from the Music Server in this mode.
• Press the POWER/Standby key on the front panel
or the L Standby key on the remote control.
• Press the 5Standby action key to enter standby.
To switch to off mode
Off mode should be used when the Music Server is not
being used overnight (or for several days). When the unit is
in off mode it consumes very little power. You can safely
remove the power from the Music Server in this mode.
• Press the POWER/Standby key on the front panel
or the L Standby key on the remote control.
• Press the 3 Off action key to enter off mode.
To switch on from standby or off mode
• Press the POWER/Standby key on the front panel
or the L Standby key on the remote control.
ENGLISH
5

ENGLISH
INTRODUCTION
Welcome to the DH9500 Music Server from Marantz. The
DH9500 is a revolutionary way of filling your home with music.
Your Music Server stores and catalogues your music collection,
allowing you to select any album or track at the press of a key.
You can browse through your albums and tracks using
convenient on-screen menus displayed on your television,
showing full album, track, and artist names downloaded from the
Gracenote CDDB Music Reconition Service. Your Music Server
also lets you organise your music collection and create
selections for different occasions to suit your mood.
Incredible capacity
Your Music Server is a hard disk based audio system which
can store hundreds of hours of music, all with the
convenience of instant access, at the touch of a key.
Convenient TV screen
Play music, record CDs, or organise your library using
convenient on-screen menus which show the full album,
artist, and track names, allowing you to select the one you
want with a few simple selections.
Internet access for track listings
Your Music Server records the CDs from your music
collection at faster than real time. It then automatically
connects to the Gracenote CDDB Music Recognition
Service via the built-in modem or Ethernet connection. This
database provides album and track details for a wide range
of CDs. This information can be downloaded and stored
with each CD you record, allowing you to select any item in
your music collection by album name, artist name, track
name, or genre, giving you total flexibility in the way you
access and control your music collection.
Create your own playlists
Your Music Server allows you to compile personal playlists
and then automatically play tracks from the playlist you have
selected. Playlists let you customise your Music Server for
each member of the family, or for matching the music to the
occasion or mood.
Instant access, irrespective of your music collection
Whether you select a track by title, album, artist, or genre,
your Music Server locates it instantly and plays it at the
press of a key. All this is achieved with an extremely simple
and intuitive user interface, operated using a few keys on
the front panel or remote control.
SPECIFICATIONS
– General
System........................ Hard Disk Based Audio Server
Power requirements ...... AC 100V-240V ~ 50Hz/60Hz
Power Consumption .....................................44W Max
Weight ............................................................... 8.5Kg
Dimensions ........ 98mm(H) x 440mm(W) x 375mm(D)
Operating temperature .................................. 10-40°C
Operating humidity ...... 10-90% RH (non-condensing)
– Video Outputs
• S-Video Output
Output level ................................................. 1V
Connector ............................................. S-VIDEO jack
• Composite outputs (4 individual outputs)
Output level ................................................. 1V
Connector ..................................................... RCA jack
p-p
p-p
/75Ω
/75Ω
• VGA output
Output level ............................................ 0.75V
p-p
/75Ω
Connector ........................................... 15 pin D-type F
Output resolution ........................................... 800x600
– Audio outputs
• Analogue outputs (4 pairs of outputs)
Output level ........................................................ 2V
Output impedance .............................................. 600Ω
Connector.................................................. ... RCA jack
• Digital outputs
Optical digital output ........ Optical digital jack (Toslink)
Coaxial digital output level ................... 500mV
p-p
/75Ω
Coaxial digital output connector ................... RCA jack
– Audio inputs
• Analogue inputs
Maximum input level .......................................... 2V
Input impedance ................................................. 10kΩ
Connector .................................................... RCA Jack
• Coaxial Digital input
SRC supported freqency ....... 32kHz, 44.1kHz, 48kHz
Maximum input level ............................ 500mV
p-p
/75Ω
Coaxial Input Connector .............................. RCA Jack
Optical Input Connector .. Optical digital jack (Toslink)
– Analogue audio characteristics (typical)
Frequency response ...............20Hz to 20kHz ± 0.5dB
S/N ratio (@1KHz)........................... 100dB (A weight)
Dynamic range ................................. better than 96dB
Total harmonic distortion (@1kHz) ................. 0.003%
Channel separation (@1KHz) ......... more than 110dB
– Communications
• Modem
Connector ............................................RJ11 (56kbit/s)
• Ethernet
Connector .................... RJ45 (10 Base T/100 Base T)
• Controller
Connector ............................................ 9 pin D-type M
• USB (2 connectors)
Connector ..................................... Type A USB socket
– Accessories
Stereo RCA cable ...................................................... 1
Video cable ................................................................ 1
Modem cable ............................................................. 1
Power cord ................................................................ 1
Remote control unit ................................................... 1
AAA (R03P) dry cell batteries .................................... 2
Operating instructions ............................................... 1
Warranty card (U1B model only) ............................... 1
Note
The specifications and design of this product is subject to
change without notice.
RMS
RMS
6
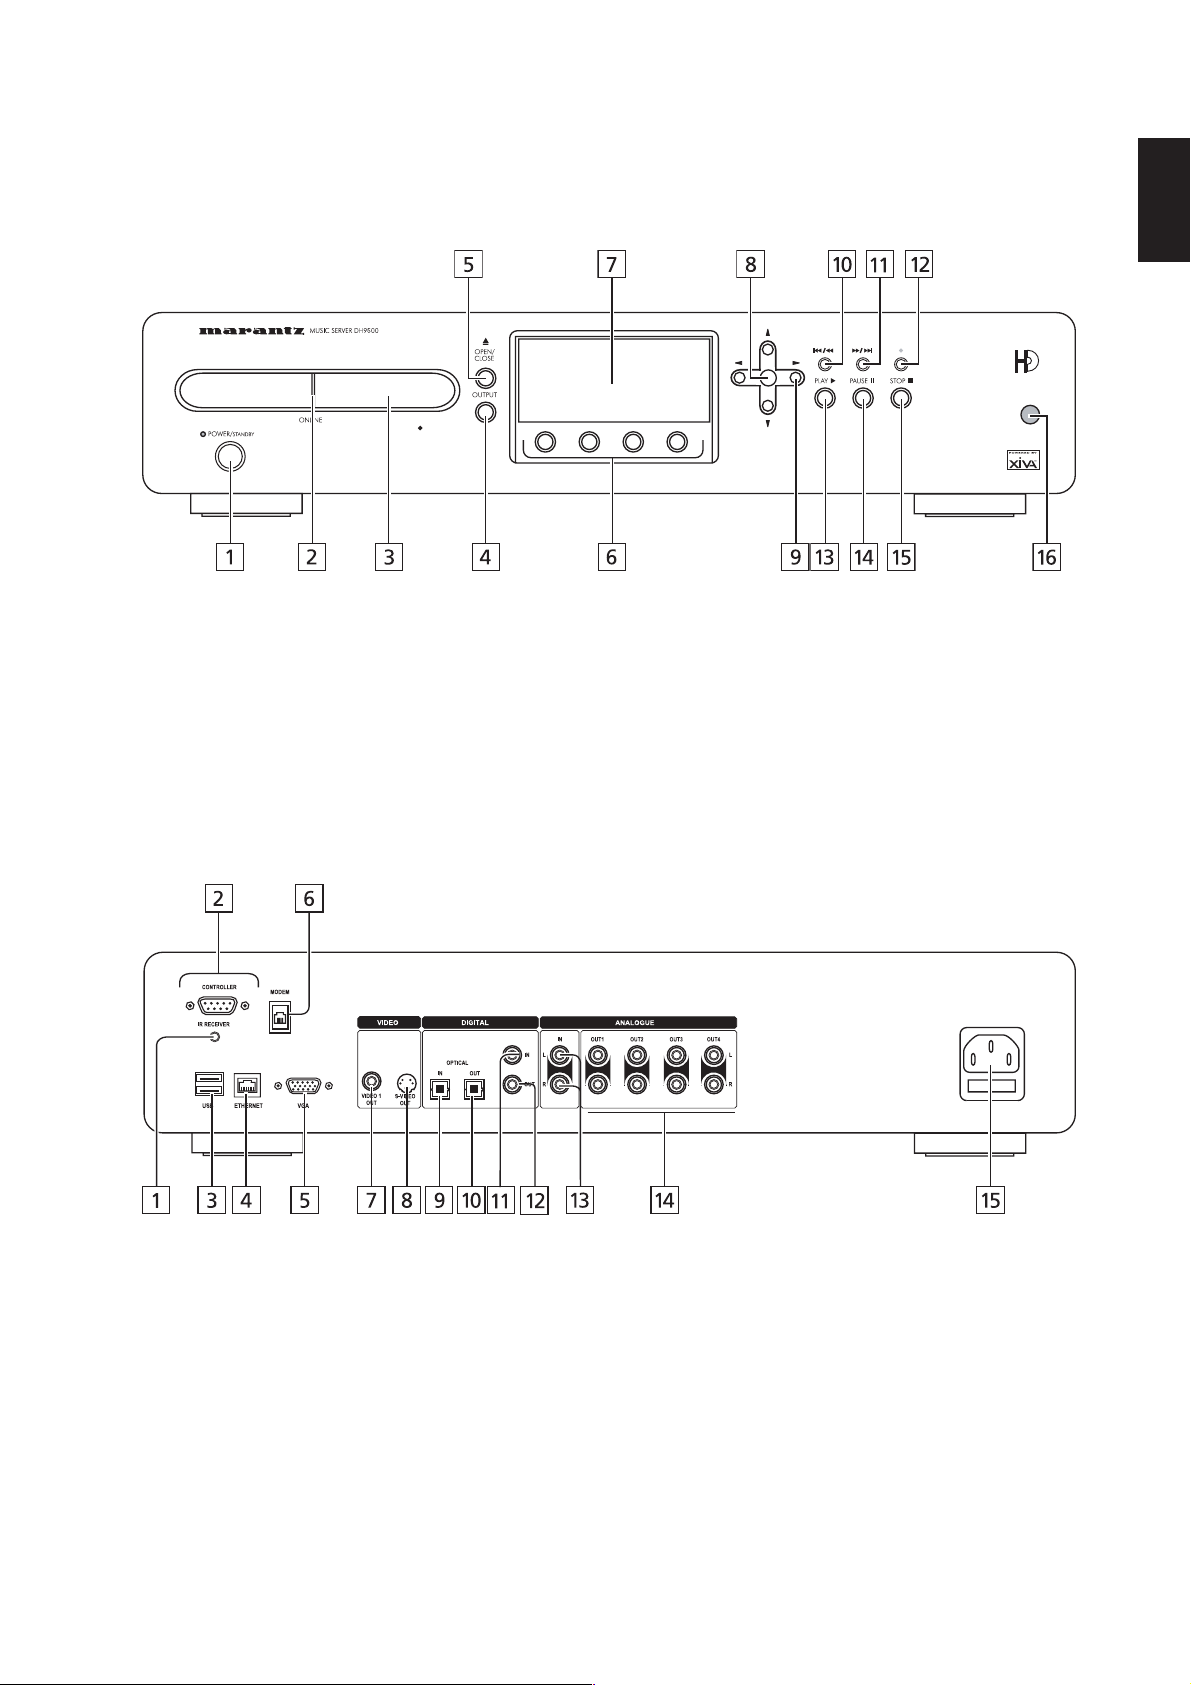
FRONT VIEW
ENGLISH
REAR VIEW
7

ENGLISH
CONTROLS AND
CONNECTIONS
This section provides information on the controls and
connections available on your DH9500 Music Server.
FRONT
POWER/STANDBY
Press to put your Music Server into either standby or off
mode, press again to switch your Music Server back on.
ONLINE
The online indicator is illuminated when the modem is active.
DISC TRAY
Insert a disc with the label side up.
OUTPUT button
Press the output button to display what music is playing on
the currently selected output. Pressing the output button
for a second time will select the next output in sequence.
OPEN/CLOSE button
Pressing the open/close button opens the disc tray. Place
a compact disc on the tray with the label side facing up.
Press the button again to close the tray.
ACTION buttons
Action buttons allow you to perform specific operations
dependent on the current menu screen. For more
information on using the action buttons see the chapter
called Using the Music Server action keys p.13.
DISPLAY
The display shows information about the music available on
the unit, the status of the Music Server (for instance if the
unit is currently playing), and the current configuration of the
unit.
SELECT button
Selects the option currently visible on the display.
NAVIGATION buttons
The navigation buttons allow you to move up, down, left or
right through the menus shown on the display.
R / E button
When the button is pressed briefly during playback, play
restarts at the beginning of the current track. A second brief
press moves to the beginning of the previous track. When
the button is held for a longer period of time the music will
rewind at high speed.
D/ Q button
When the button is pressed briefly during playback, play
restarts at the beginning of the next track. When the button
is held for a longer period of time the music will fast forward
at high speed.
J RECORD button
The record button is an action key - on some menu screens
you can use this button to begin a recording, either from the
CD inside the unit, or from the input connectors. When
managing playlists this button is also used to create new
playlists or add tracks to an existing playlist.
A PLAY button
Press the play button to recommence playback if the music
has been stopped or paused.
C PAUSE button
Press the pause button to interrupt playback temporarily.
B STOP button
Press the stop button to halt playback on the current output.
REMOTE SENSOR
This window receives signals transmitted from the remote
control unit.
REAR
IR RECEIVER
The IR Receiver connection allows remote control
information to be carried from other devices directly to your
Music Server. See the chapter called Using your Music
Server in a Multiroom System p.31.
CONTROLLER
The Controller port provides serial communication with
supported devices. For instance a multiroom control system
may communicate with the Music Server using the XiVA-
Link protocol.
USB
Allows the Music Server to communicate with supported
USB devices.
ETHERNET
The Ethernet port can be used to connect the Music Server
to a high speed internet connection. It may also be used by
supported software applications to communicate with the
system. A shielded Ethernet cable should be used in
conjunction with this connection.
VGA
The VGA connector may be used to connect a VGA monitor
or a suitable Plasma screen for displaying the TV user
interface.
MODEM
The Modem port can be used to connect the Music Server
to a standard analogue telephone line for internet access
(using the supplied cable).
VIDEO OUT
Connect the Video Out composite output of the Music
Server to the composite input of a suitable PAL/NTSC TV
(depending on the supplied configuration) to display the TV
user interface. You may also need to switch the TV to the
relevant AUX input to display the picture.
S-VIDEO OUT
Connect the S-VIDEO output of the Music Server to the SVIDEO input of a suitable PAL/NTSC TV (depending on the
supplied configuration) to display the TV user interface. You
may also need to switch the TV to the relevant AUX input to
display the picture.
8
DIGITAL OPTICAL IN
DIGITAL AUDIO OUT - COAXIAL
High Quality recordings can be made onto the Hard Disk of
the Music Server using an optical connection from a suitable
device (such as Minidisc or DAT).
DIGITAL OPTICAL OUT
The audio output can be transmitted in the form of light
through an optical fibre cable and photocoupler. The optical
signal transmission features low signal loss due to cables and
complete isolation of the ground loop so that a very high
quality output can be produced without any digital noise. The
audio output of the Digital Out connector is the same as the
audio output of the Analogue Audio Out 1 connector.
Connection method
Connect this jack to a D/A convertor, digital sound processor
or an amplifier equipped with a Digital Optical input jack.
Remove the caps from the Digital Optical Out jack and the
optical input jack of the connected component and connect
the two jacks through an optical fibre cable. This output
may not be used for making a digital copy of your media.
DIGITAL AUDIO IN - COAXIAL
High Quality recordings can be made onto the Hard Disk of
the Music Server using a coaxial connection from a suitable
device (such as Minidisc or DAT).
By connecting this jack to a digital audio component (D/A
convertor, digital sound processor etc.), digital signals from
the Music Server can be transmitted directly from the
system without first being converted to analogue. The audio
output of the Digital Out connector is the same as the audio
output of the Analogue Audio Out 1 connector.This output
may not be used for making a digital copy of your media.
ANALOGUE AUDIO IN
Analogue sources (such as cassette or vinyl LP) may be
recorded onto the Hard Disk of the Music Server using this
connection.
ANALOGUE AUDIO OUT 1,2,3,4
The DH9500 Music Server is a multiroom device allowing
you to listen to different music in up to 4 different rooms all
at the same time. Each analogue output should be
connected to the input jacks of a pre-amplifier. For more
information see the chapter called Using your Music
Server in a multiroom system p.31.
MAINS
Connect the supplied mains lead to this connector to
provide power to the unit.
ENGLISH
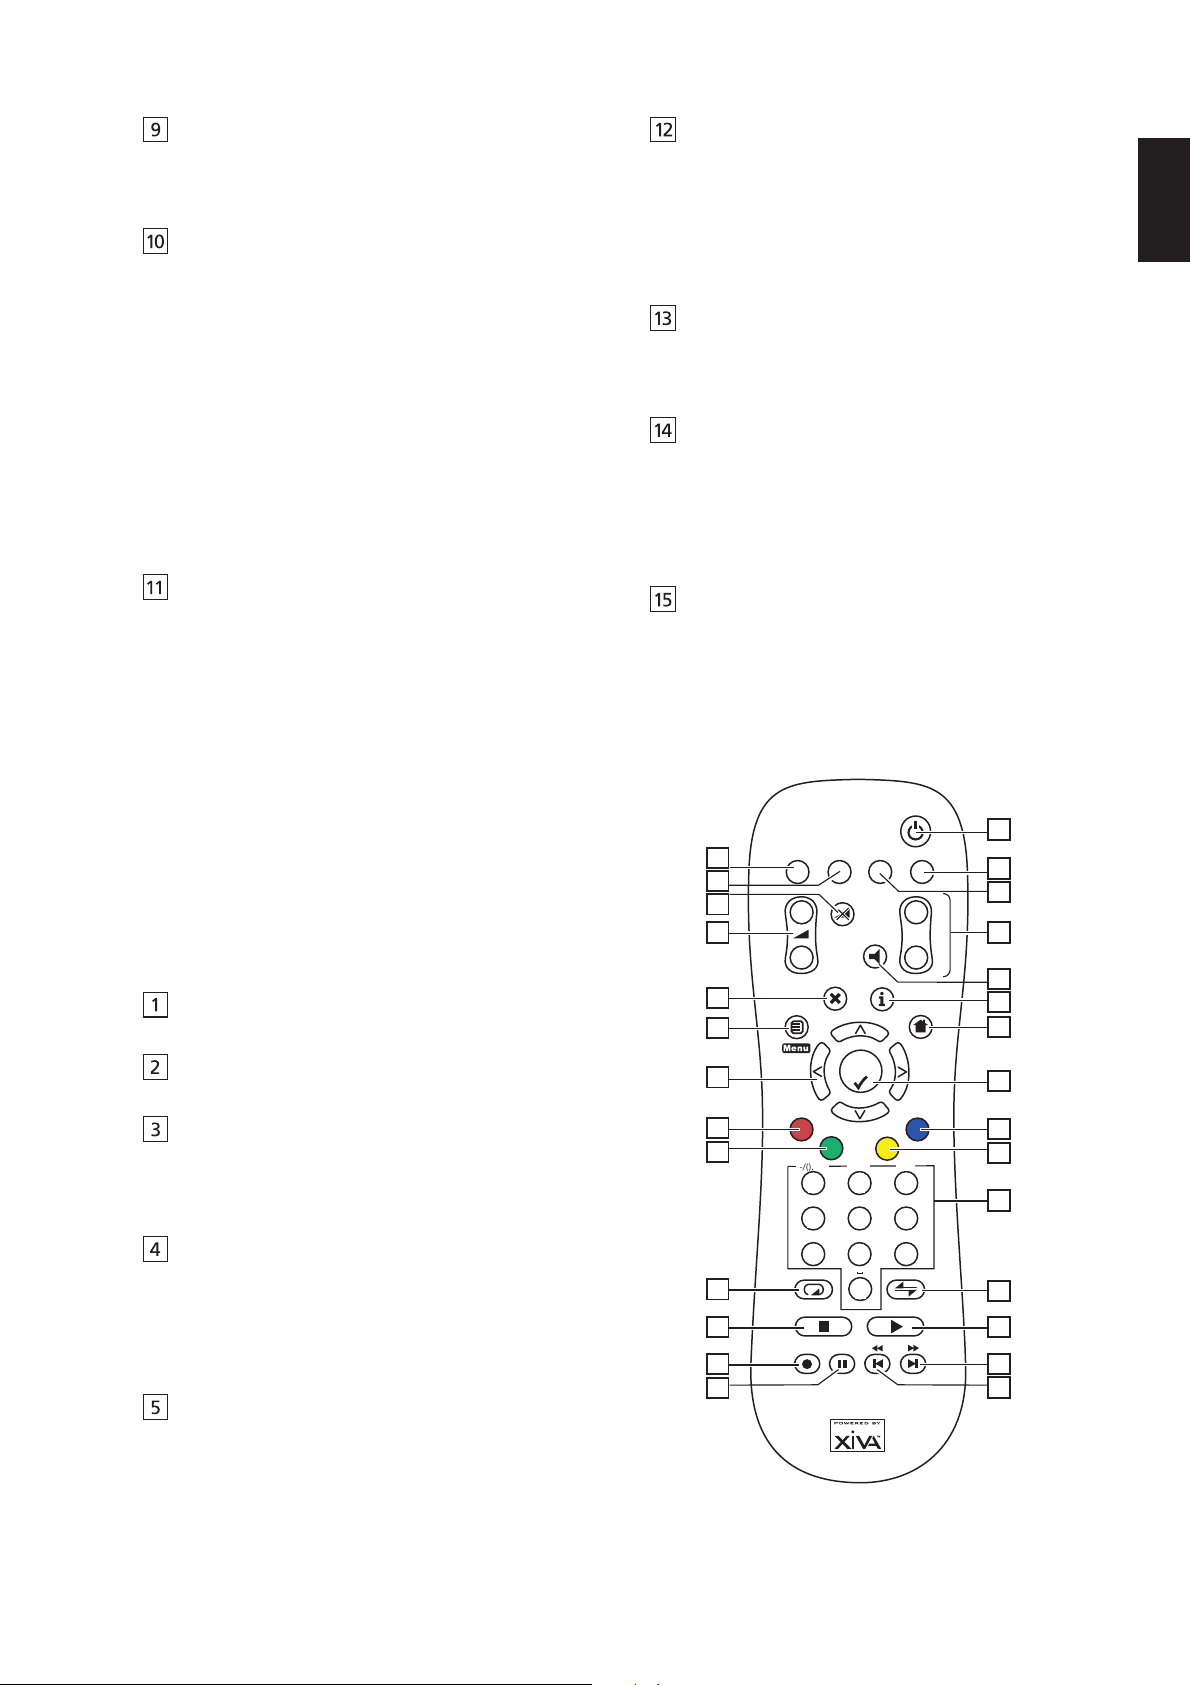
USING THE REMOTE CONTROL
The remote control supplied with the Music Server is a
“Universal” remote control. This means that other devices,
such as a television or amplifier, may be controlled using
this remote control. When you have selected to control the
television the TV device button will light up each time you
press a button - similarly when the Music Server is selected
the HDD Audio button will light and when the Amp is
selected the Amp button will light.
The diagram opposite explains the function of the keys on
your Music Server remote control:
LSTANDBY button
Places the Music Server in/out of standby or off mode.
HDD Audio button
Selects the Music Server as the device to be controlled.
TV button
Selects the TV as the device to be controlled. For more
information on configuring this remote to control your
television see the chapter called Configuring your remote
to control other devices p.11.
DEFAULT O/P button
Resets the TV user interface to controlling the default output
for the room where you are located. For more information
on multiroom use of the Music Server see the chapter called
Using your Music Server in a multiroom system p.31. If
the TV device is selected this button will show/hide the onscreen clock.
AMP button
Selects the Amp as the device to be controlled. For more
information on configuring this remote to control your
amplifier see the chapter called Configuring your remote
to control other devices p.11.
10
13
14
16
18
22
23
25
28
Standby
HDD
TV
2
3
7
8
Audio
+
Mute
_
Amp
Output
Default o/p
+
Disc
_
Ch.
E
Menu
Album
-/().@*
Artist
1 3 2
ghi
4
pqrs
7
-/--
Select
abc
tuv
Home
Playlist
Genre
def
jkl
mno
6
5
wxyz
9
8
DELETE CAPS.
0
AV
1
4
5
6
9
11
12
15
17
19
20
21
24
26
27
9
ENGLISH
DISC/CH. buttons
Selects the next/previous album (or playlist) on your Music
Server. If you have the TV device selected these buttons
will select the next and previous channels.
O MUTE button
Provided that the Music Server output volume setting is set
to variable this button will mute the output of the Music
Server. For more information see the chapter Advanced
Settings p.29. If the TV or Amp device is selected the TV/
Amp volume is muted.
NVOLUME buttons
Provided that the Music Server output volume setting is set
to variable these buttons will increase/decrease the volume
of the Music Server output. For more information see the
chapter Advanced Settings p.29. If the TV or Amp device
is selected these buttons control the volume of the TV/Amp.
- OUTPUT button
Press the output button to display what music is playing on
the currently selected output. In certain situations pressing
the output button for a second time will select the next output
in sequence - for more information see the chapter called
Using your Music Server in a multiroom system p.31.
2CANCEL button
The cancel button is an action key - on some menu screens
this is used to cancel an operation which you no longer wish
to continue. If the TV device is selected this button will hide
text services.
3INFO button
The info button is an action key - on some menu screens
this is used to display additional information which may not
be currently displayed; on other menu screens it may also
be used to edit text on the screen. If the TV device is
selected this button displays text services.
4HOME button
The home key is an action key - it can be used to return to
the top page of a particular function. For instance if you are
browsing the music library and you wish to look for a
different album you may use the Home key to return to the
main Library menu
1 button
The menu key is an action key - pressing this key will
always return the TV screen and front panel to the Main
Menu. Use this button if you wish to start a new operation.
NAVIGATION 9,8,6,7buttons
The navigation buttons are used to move up, down, left or
right through the menu pages.
button
Select is used to activate the currently highlighted option.
When browsing the library this key will start playback of the
selected item.
ALBUM button
The album button can be used to jump to the album list in
the music library. In TV mode this button selects the red
text service option.
PLAYLIST button
The playlist button can be used to jump to the playlist list in
the music library. In TV mode this button selects the blue
text service option.
ARTIST button
The artist button can be used to jump to the artist list in the
music library. If the TV device is selected this button selects
the green text services option.
GENRE button
The genre button can be used to jump to the genre list in
the music library. If the TV device is selected this button
selects the yellow text services option.
NUMERIC (0 to 9) buttons
The numeric keys can be used as follows:
• When browsing the track list these buttons allow you
specify the track you wish to play.
• When browsing the list of presets these buttons
allow you to jump to a preset number.
• In the music library you may jump to an item in the
list that begins with one of the letters specified at the
top of each key.
• In text entry mode these keys can be used as an
alphanumeric key pad (similar to a mobile phone).
If the TV device is selected the numeric buttons select which
channel you wish to view.
I RANDOM (DELETE) button
The random button has the following functions:
• During playback this button toggles the random play
setting on the Music Server.
• In text entry mode this button can be used to delete
characters.
If the TV device is selected this button switches the TV
channel to the AV input.
H REPEAT (CAPS) button
The repeat button has the following functions:
• During playback this button toggles the repeat play
setting on the Music Server.
• In text entry mode this button can be used to toggle
between upper-case and lower-case letters.
If the TV device is selected this button switches the TV
between single digit and double digit channel selection.
B STOP button
During playback the stop button halts playback on the
currently selected output of the Music Server.
A PLAY button
The play button can be used to recommence playback on
the currently selected output of the Music Server.
K RECORD button
The record button is an action key - on some menu screens
you can use this button to begin a recording, either from the
CD inside the unit, or from the input connectors. When
managing playlists this button is also used to create new
playlists or add tracks to an existing playlist.
DF button
When the button is pressed briefly during playback, play restarts
at the beginning of the next track. When the button is held for a
longer period of time the music will fast forward at high speed.
GE button
When the button is pressed briefly during playback, play restarts at
the beginning of the current track. A second brief press moves to
the beginning of the previous track. When the button is held for a
longer period of time the music will rewind at high speed.
C PAUSE button
Press the pause button to interrupt playback temporarily.
10
CONFIGURING YOUR REMOTE TO
CONTROL OTHER DEVICES
The TV and Amp devices on the Music Server remote
control may be individually configured to control a range of
televisions and amplifiers from well known manufacturers.
To configure the remote to control your
television
• Press the TV and buttons simultaneously;
hold them down for 1 second.
The TV button will remain lit for 20 seconds; the
configuration process must be completed during this time.
• Enter the 3 digit numeric code matching the
manufacturer of your television from the list in
Appendix A.
• Press the TV button again.
The TV button will blink twice to indicate that the
configuration has been accepted. If the TV button does not
blink begin the process again, taking care to enter the
number exactly as printed in the list. If the television is
switched on during the configuration process, entering the
correct code will cause the television to go into standby.
To configure the remote to control your
amplifier.
• Press the Amp and buttons simultaneously;
hold them down for 1 second.
The Amp button will remain lit for 20 seconds; the
configuration process must be completed during this time.
• Enter the 3 digit numeric code matching the
manufacturer of your amplifier from the list in
Appendix A.
• Press the Amp button again.
The Amp button will blink twice to indicate that the
configuration has been accepted. If the Amp button does
not blink begin the process again, taking care to enter the
number exactly as printed in the list. If the amplifier is
switched on during the configuration process, entering the
correct code will cause the amplifier to go into standby.
Reassigning volume control when using the
Music Server.
If the volume setting of the Music Server is set to fixed the
Nand OMute keys will have no effect (for more
information on volume output settings see the chapter called
Advanced Settings p.29.). These buttons may therefore be
configured to control the volume on your amplifier whilst the
HDD Audio device is selected. To re-configure these keys:
• Ensure that the Amp device is correctly configured
to control your amplifier (as shown above).
• Press the HDD Audio and buttons
simultaneously; hold them down for 1 second.
The HDD Audio button will remain lit for 20 seconds; the
configuration process must be completed during this time.
• Press the O Mute
• Press the N+ key
• Press the Amp device key
The HDD Audio device key will blink twice to indicate that
the configuration has been accepted. If the HDD Audio
button does not blink begin the process again, taking care to
press the buttons in the correct sequence. The Nand O
Mute keys should now control the amplifier when the HDD
Audio device is selected.
To return the N and O
configuration repeat the above process, pressing the HDD
Audio button instead of the Amp button.
Mute keys to their original
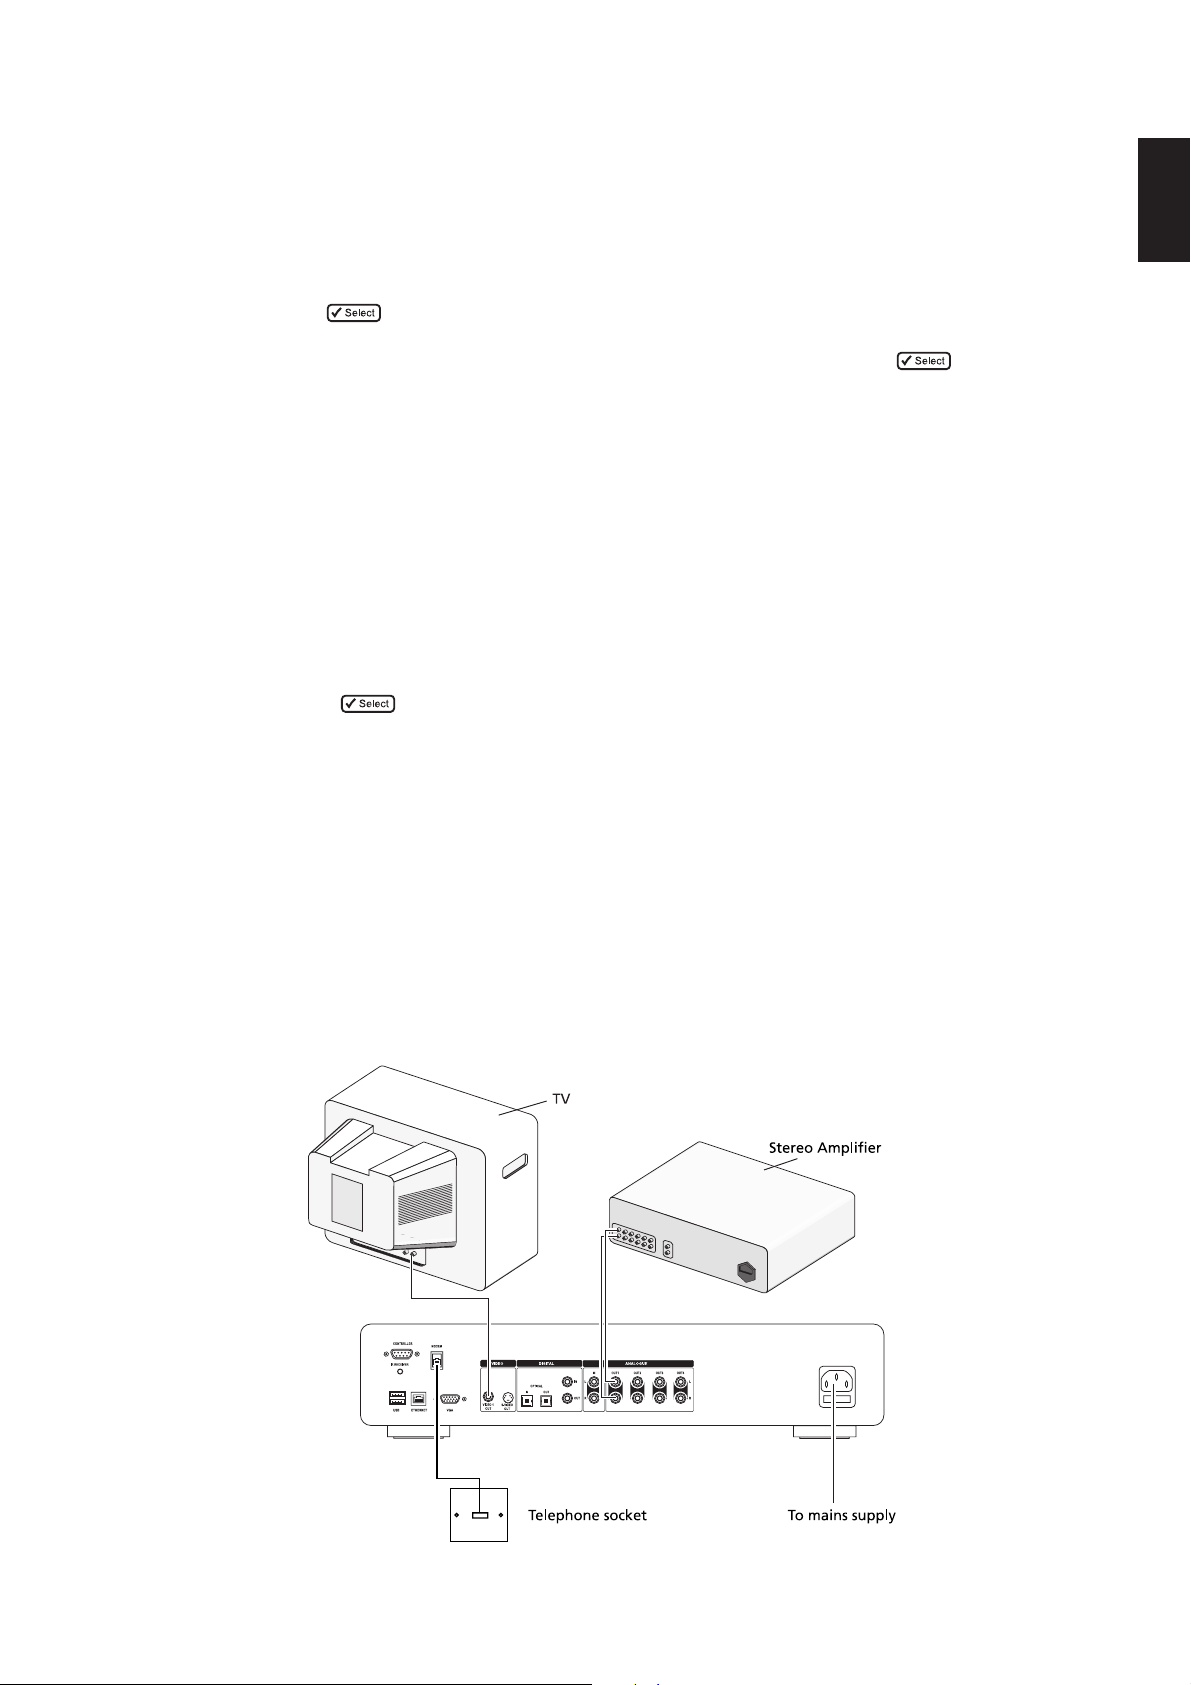
CONNECTING YOUR MUSIC SERVER
The diagram below illustrates the basic connections
required to use your Music Server.
Note: Do not make any connections to the Music Server
while the power supply is connected and switched on.
• Connect the supplied telephone lead to a standard
analogue telephone socket. Connect the other end
of this cable to the socket marked Modem on the
back panel of the Music Server.
ENGLISH
11
ENGLISH
• Connect the red plug of the supplied audio lead to
the red Analogue Audio Out 1 socket on the back
of the Music Server. Connect the adjacent white
plug to the white Analogue Audio Out 1 socket on
the Music Server. Connect the other end of this
cable to the AUX or CD inputs on your amplifier.
• Connect the yellow plug of the supplied TV lead to
the yellow Video Out socket of the Music Server.
For the European TV lead* connect the Scart plug to
the ext. 1 or 2 socket on the rear of your TV. For the
non-European TV lead connect the yellow plug to
the video input on the rear of your TV.
• Connect the supplied power cord to your mains
power supply.
• Switch on your television. Select the appropriate
video channel to view the Music Server TV user
interface display.
* For Scart connection, the red and black plugs are not
required.
SWITCHING ON AND OFF
There are two power saving modes available from the
POWER/Standby button on the Music Server front panel
and the Lbutton on the remote control.
If you are not using your Music Server it is strongly
recommended that you place the unit into one of the two
power saving modes.
Standby mode
Standby mode should be used when the Music Server is not
being used for a short period of time. Putting the unit into
standby takes just a few seconds; switching the unit on from
standby also takes just a few seconds. Do not remove the
power from the Music Server in this mode.
Off mode
Off mode should be used when the Music Server is not
being used overnight (or for several days). There is a short
wait whilst the unit is switched to off mode; switching the unit
on from off mode may take a few minutes. When the unit is
in off mode it consumes very little power. You can safely
remove the power from the Music Server in this mode.
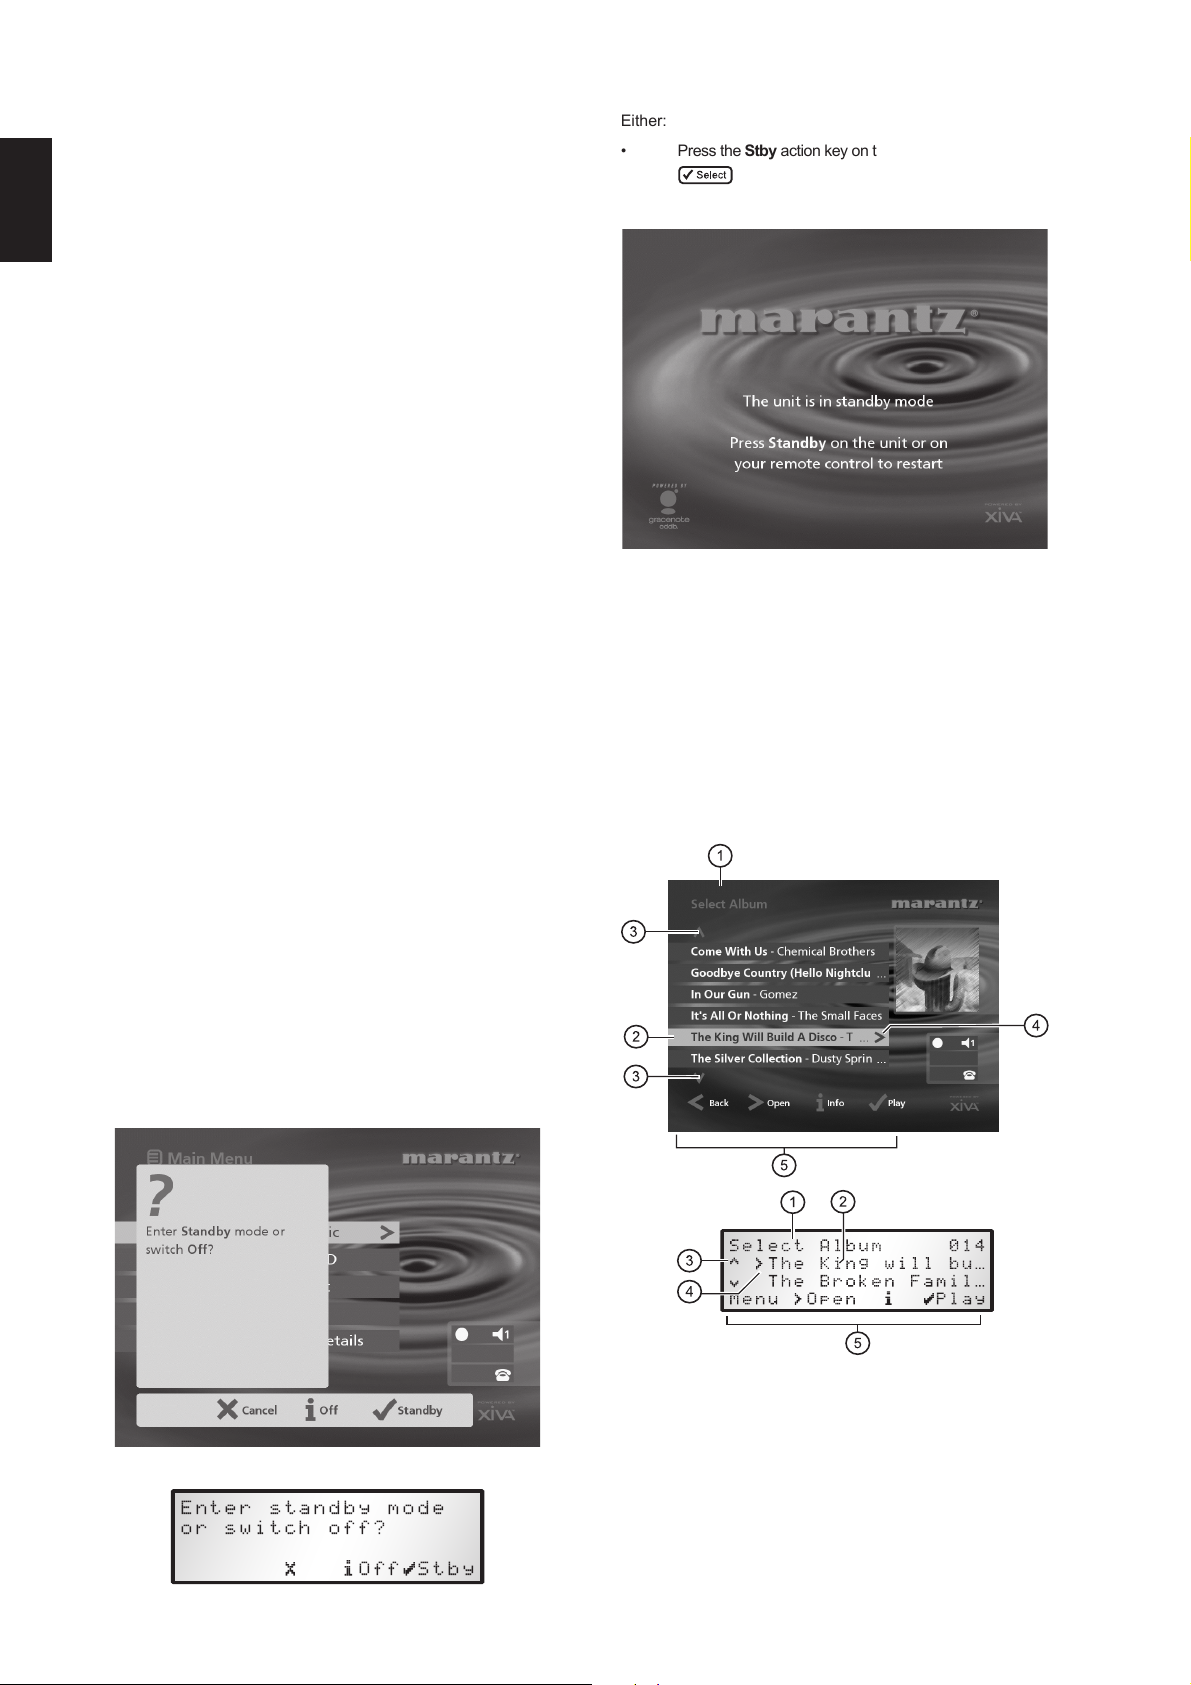
To enter standby or off mode
• Press the POWER/Standby key on the front panel
or the LStandby key on the remote control.
The following prompt is displayed:
Either:
• Press the Stby action key on the front panel or the
key on the remote control to switch to standby.
After a short delay the TV screen shows:
Or:
• Press the Off action key on the front panel or the 3
key on the remote control to switch to off mode.
After a short period of time the TV display and front panel
display will switch off.
To switch on from standby or off mode
• Press the POWER/Standby key on the front panel
or the L Standby key on the remote control.
TV SCREEN AND FRONT PANEL DISPLAY
The following diagram shows the key features of a typical
Music Server TV screen and front panel display:
The front panel display shows:
1. Indicates the title of the current screen.
2. Title of the current selection, shown highlighted on
the TV screen.
3. Indicates that you can use the 9 or 8 keys to
browse up and down the current menu list.
4. Indicates that you can press the 7 key to look inside
the currently selected item, such as to show the tracks
in an album, or the albums by an artist or in a genre.
5. Action keys available from the current menu for
12
selection or navigation.
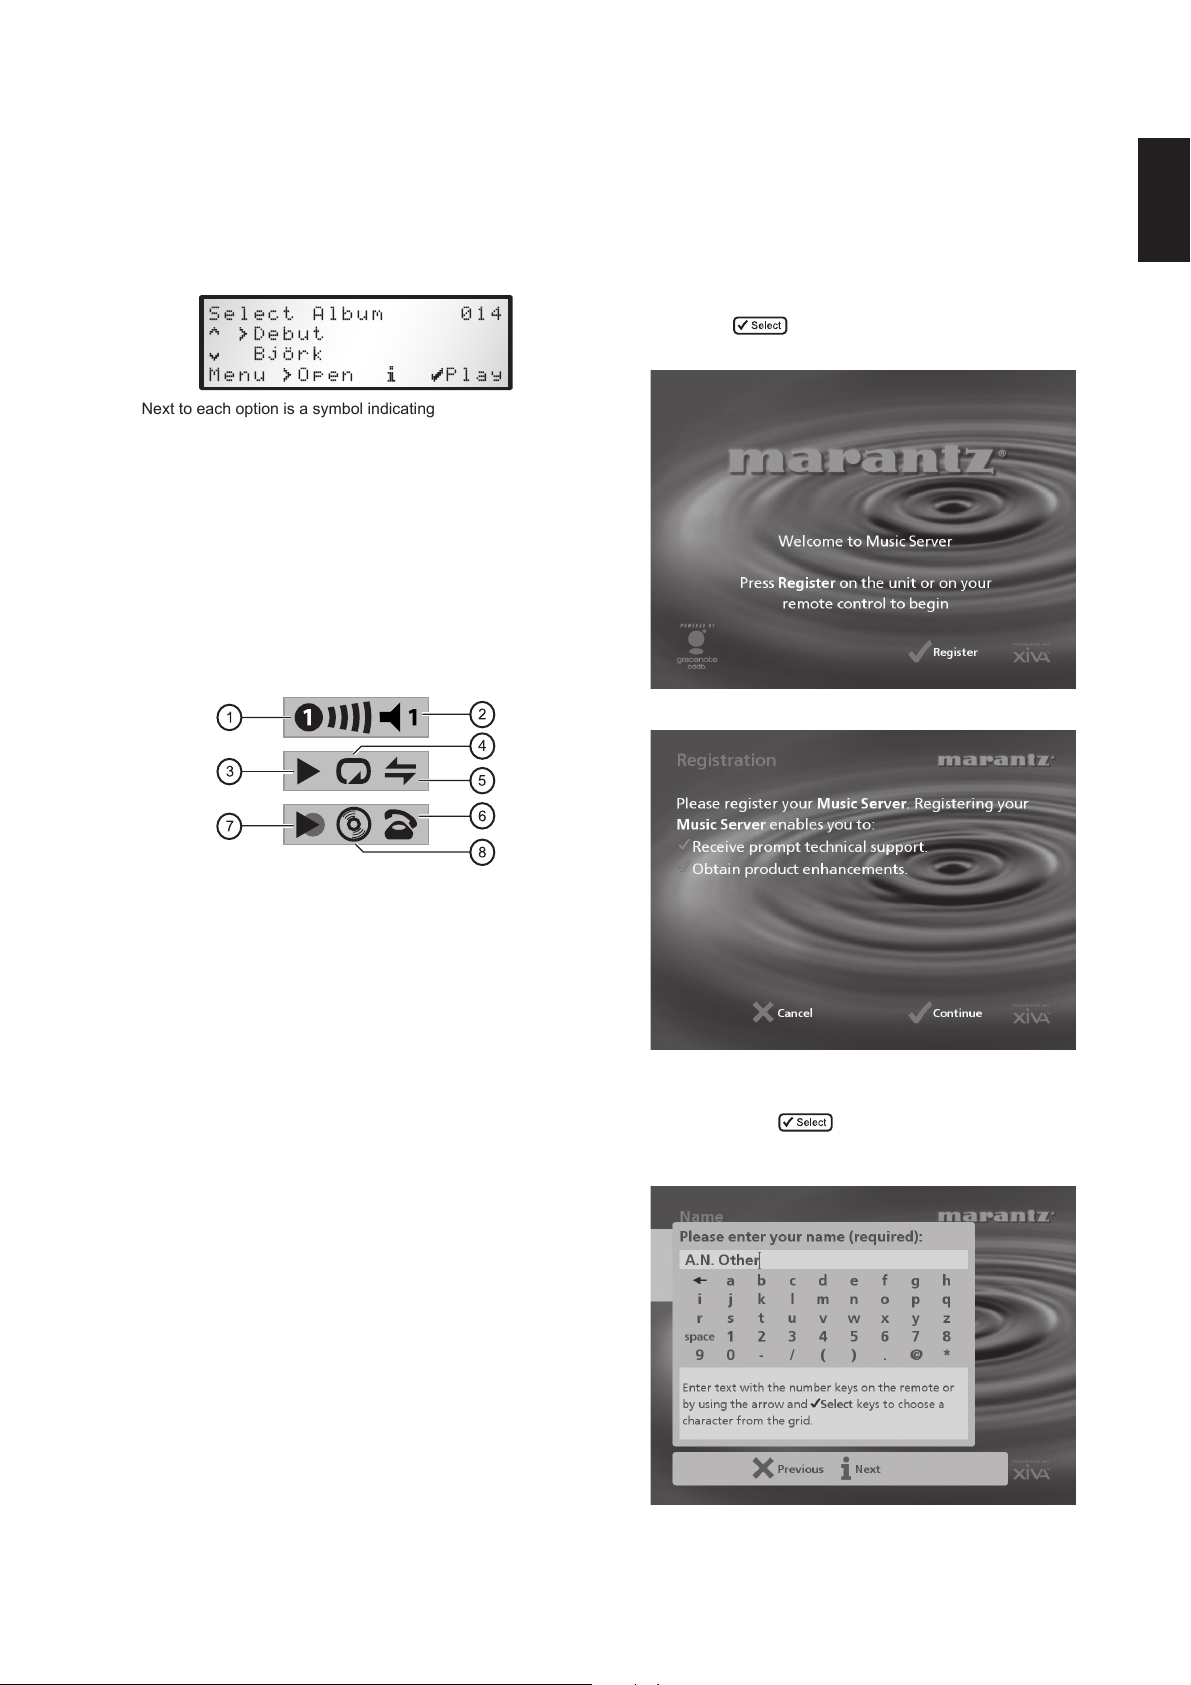
USING THE MUSIC SERVER ACTION KEYS
The front panel of your Music Server has four “action” keys
located underneath the main display. The function of these
keys changes depending on which menu you are currently
viewing. The available actions are shown on the bottom line
of the front panel display. For example, in the following
menu the functions Menu, Open, Info, and Play are
available on the corresponding keys:
Next to each option is a symbol indicating where a key on
the Music Server remote control may be used instead of
pressing the action key. By default:
• 3 corresponds to an information action
• 2 corresponds to a cancel action
• 5 corresponds to a select action
The TV screen also displays these actions as well as other
actions available on the Music Server remote control.
MUSIC SERVER STATUS ICONS
The TV display shows the current status of the Music Server
using a series of icons as shown below:
REGISTERING YOUR
MUSIC SERVER
Before using your Music Server you should spend some
time registering your purchase. This enables you to receive
technical support as well as software upgrades.
To register your Music Server
• When the welcome screen is first displayed, press
the
action key on the front panel.
key on the remote control or the Regstr
ENGLISH
1. Indicates which remote location currently has control
of the TV user interface. The bar to the right shows
how long the user has before the TV interface is
available for other users to access. A green circle
indicates that infrared is being received from the
controlling location. A red circle indicates that
infrared is being received from another location and
will be rejected until the interface is available again.
A yellow circle indicates that infrared is being
received and no update is required on the TV user
interface. For information on using your Music
Server in a multiroom environment see the chapter
called Using your Music Server in a multiroom
system, p.31.
2. Shows which output the user interface is currently
controlling.
3. Indicates the playback status of the currently
selected output (e.g. play, stop, pause etc.)
4. Indicates whether repeat is enabled on the current
output.
5. Indicates whether random is enabled on the current
output.
6. When the handset is lifted the unit is connected to
the internet using the built-in modem; when the
handset is on top of the telephone the unit is offline.
If your Music Server is set to connect to the internet
via a broadband ethernet connection this symbol is
not used.
7. Indicates that a line-in recording is currently in
progress.
8. Indicates that an audio CD is inside the CD tray.
The following registration screen will be displayed:
The same information is also shown on the front panel
display.
• Press the key on your remote control or the
Cont. action key on the front panel to display the
first registration screen:
13
ENGLISH
To use the alphanumeric keypad
As part of the registration process you will need to enter
your name and address into the Music Server. You can do
this using the following keys on the remote control:
Action How
Enter Text
Switch between
entering upper-case or
lower-case letters
Enter a space. Press the 0 key.
Use the alphanumeric keys on the remote
control. For example, to type an S press
the 7 key four times.
Press the action key labelled Caps or
the HCAPS key on the remote control.
To connect your Music Server to an Internet
Account
The next sequence of screens helps you connect your
Music Server to the Internet.
• Press the Cont. action key on the front panel or the
key on the remote to begin.
The following screen then allows you to select the options
for your Internet connection:
Delete a mistake
Move the cursor within
the text
Press the IDELETE key on the remote
control.
Press the 6 or 7 keys.
Alternatively you can use the built-in alphanumeric grid to
enter details:
• Press the 8 key to move the cursor onto the grid,
then use the 6, 7, 8, and 9 keys to highlight
characters, and the key to select them.
• Use the 9 key repeatedly to move the cursor back
into the text entry box to return to normal text entry
mode.
When you have completed each entry:
• Press the Next action key on the front panel or the 3
button on the remote.
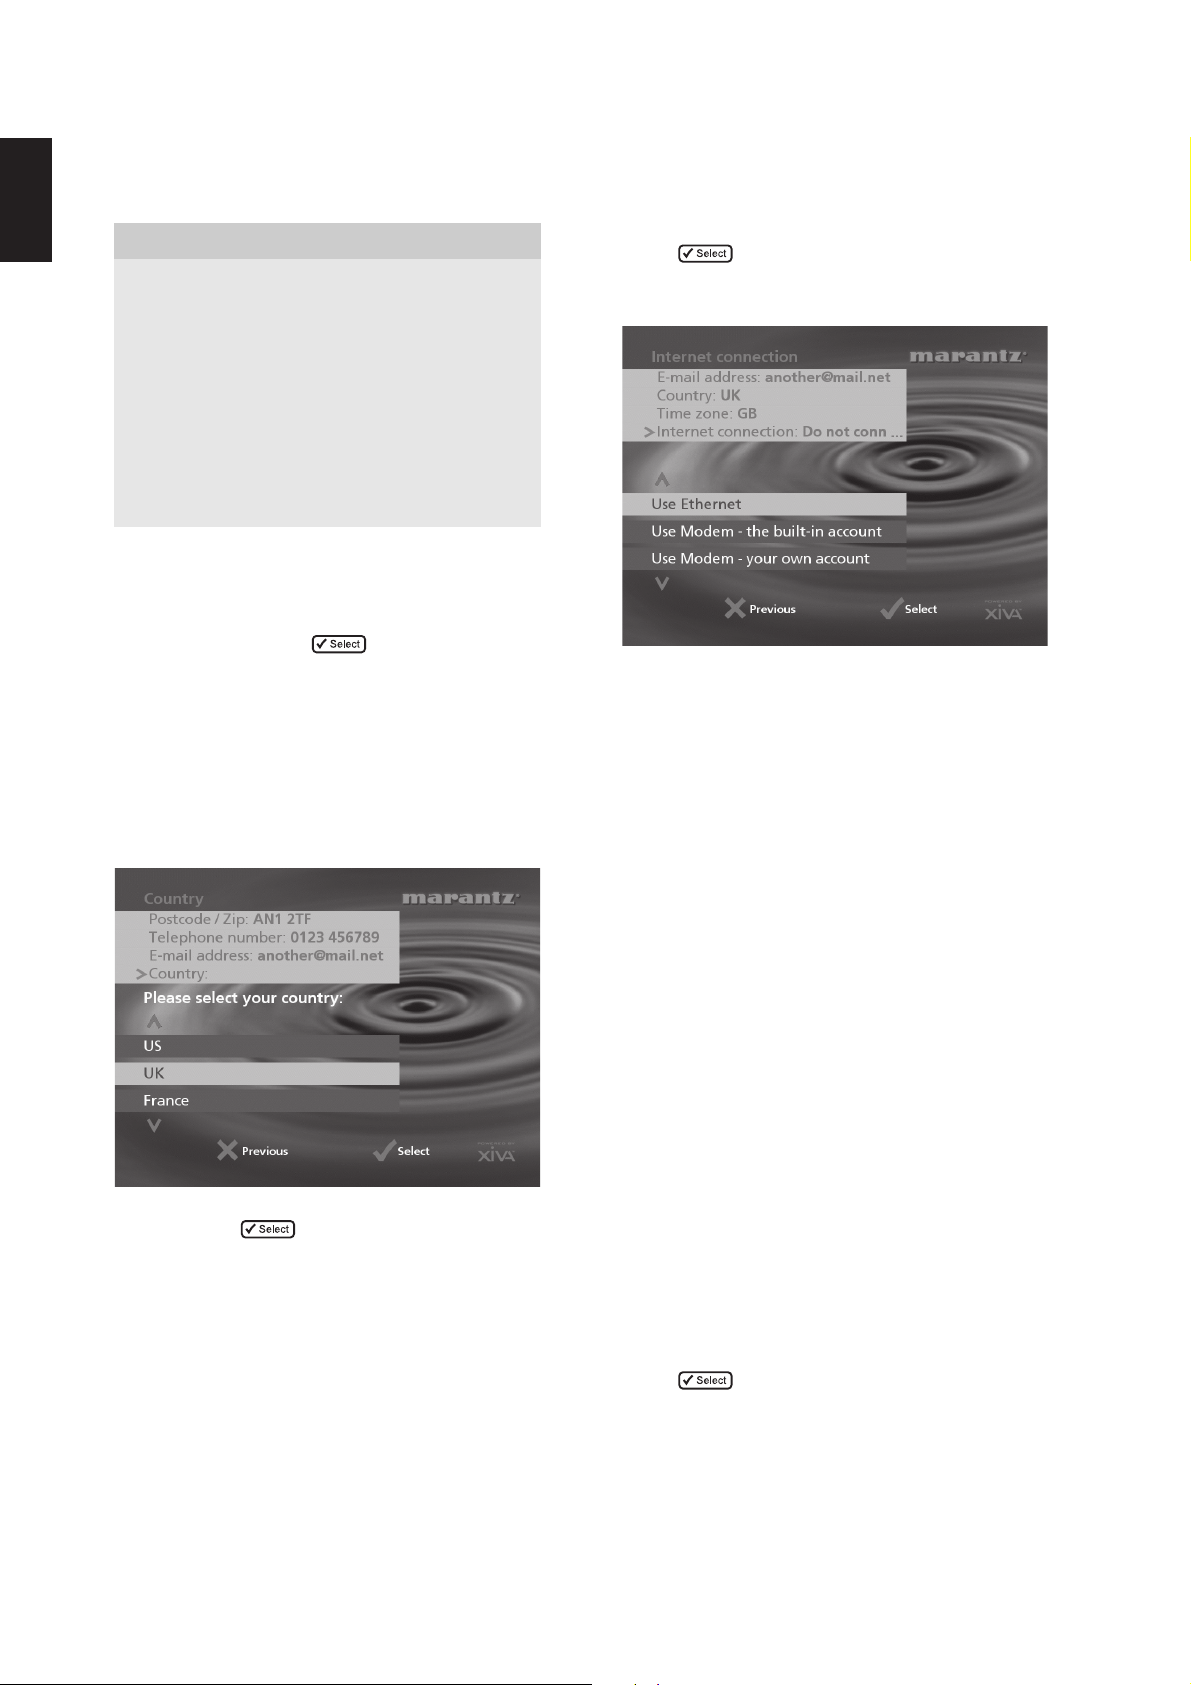
When you have entered your name and address details you
will be prompted to select your country:
• Press the 9 or 8 keys to highlight your country and
press the key on the remote control or the
5 on the front panel.
• Press the 8 or 9 keys to select between the
following options:
1. Use Ethernet.
Use this option to connect to a high speed,
broadband internet service via the Ethernet port.
Note: you will require additional networking
hardware for this type of connection. Contact your
dealer for further information.
2. Use Modem - the built-in account.
Your Music Server will connect using a pre-installed
internet account for your country.
Note: The built-in Internet account may not be
available for your country.
3. Use Modem - your own account.
If you are already using a computer to connect to
the Internet via a telephone line, and you have an
existing Internet account, you may prefer to use
these account details for your Music Server. If you
do not know your username, password, and Internet
account telephone number you may be able to read
these from your computer’s settings; otherwise
contact your Internet Service Provider for
assistance.
Note: AOL and Compuserve accounts are not
currently supported.
4. Do not connect.
You should use this option if you do not presently
have access to a telephone line (you may set up a
connection later).
• Press the 5 action key on the front panel or the
key on the remote to select the option you
have chosen.
14
If you have selected Use Ethernet follow the onscreen instructions to specify how your Music
Server obtains an Ethernet IP address. If you select
the Manual option a series of screens will allow you
to enter an IP address, IP Mask, Gateway, IP DNS1
and IP DNS2.
If you have selected Use Modem - the built-in
Internet Account, read the terms and conditions
and press the Accept action key on the front panel
or the key on the remote control to
continue.
If you have selected Use your existing Internet
Account, follow the on-screen instructions to enter
your account username, password, and the
telephone number of your service provider.
The Music Server will then attempt to connect to the Internet
to send your registration details to Marantz.
If you are using an Ethernet connection ensure that you
have connected your Music Server to the appropriate
network device using a shielded Ethernet cable. If you are
not using an Ethernet connection check that you have
connected your Music Server to a telephone line using the
cable supplied.
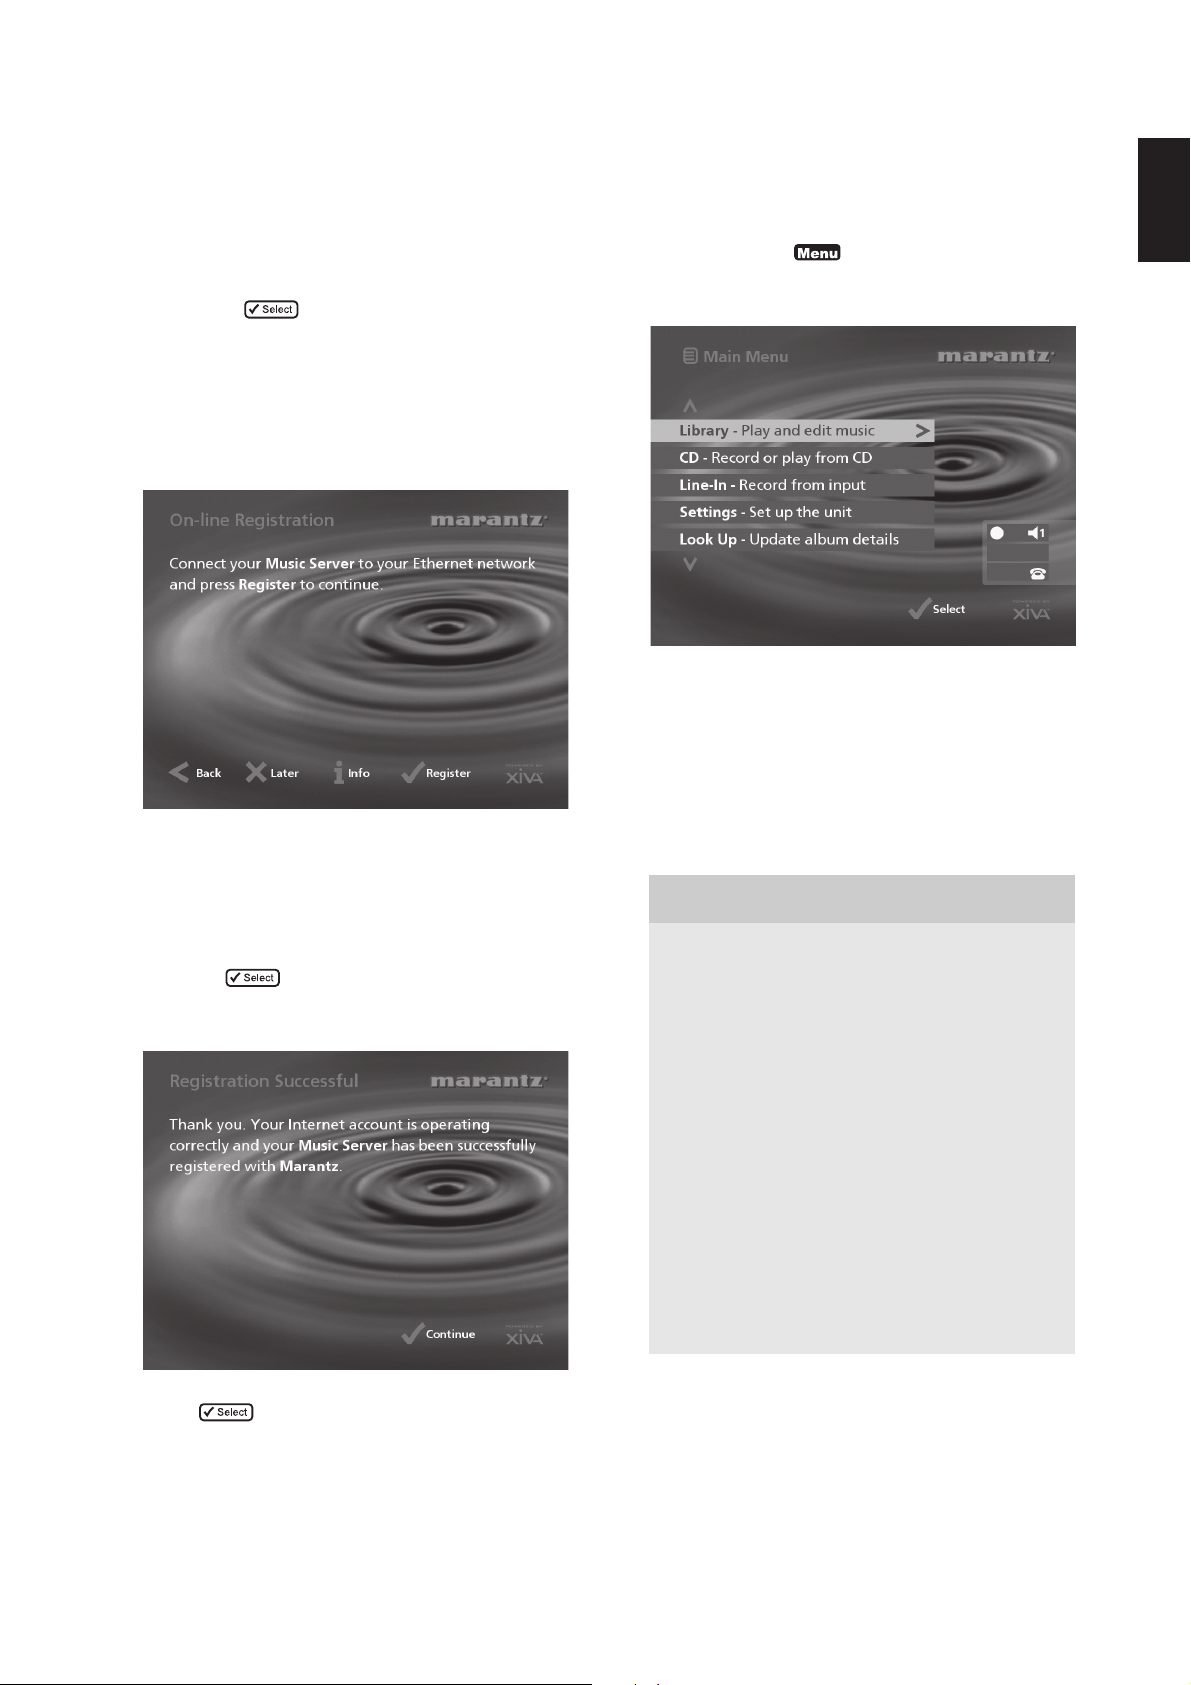
• Press the Regstr action key on the front panel or
the button on the remote control.
The following screen confirms that registration was successful
and your Internet account is operating successfully:
THE MUSIC SERVER MAIN
MENU
To display the Main Menu at any time during normal
operation:
• Press the 1
The Main Menu will be displayed on the TV screen and on
the front panel display.
To select an option from the main menu
• Press the 9 or 8 key on the front panel or Music
Server remote control to step between the main
menu options.
The current option is shown highlighted.
• Press the 5Select button to select the current
option.
The options are as follows:
Option Description
Connects to the Internet and registers your
Regi ster
Library
CD
Line-in
Settings
Look Up
Disconnect
Music Server with Marantz. This option will
only be available if your Music Server has not
been registered.
Allows you to select the music you want to play
by album, artist, genre, preset or playlist. You
may also edit the names of the music stored on
the hard disk.
Allows you to play a CD or record new music to
the hard disk.
Allows you to record music onto the hard disk
fro m the line-in c onnectors.
Allows you to c onfigure your Musi c Server
settings.
This option allows you to retrieve any missing
CD information from the Internet.
Interrupts any on-line processes using the
modem connection and releases the telephone
line .
action key.
ENGLISH
• Press the Cont action key on the front panel or the
button on the remote control to continue.
Registration is now complete and the Main Menu will be
displayed.
If the Music Server is unable to successfully connect to the
Internet you will be given further details on how to connect
to the Internet later.
More information about each of these functions is given in
the following chapters.
15
ENGLISH
RECORDING MUSIC
Your Music Server can make new recordings onto the hard
disk either by recording music directly from an audio CD
placed in the CD tray or by recording from another piece of
equipment (such as a vinyl record player) using the line-in
connectors on the back of the unit.
If you are recording directly from the CD tray your Music
Server can access the internet, using either a broadband
connection (via the Ethernet port) or using the built-in
modem, to automatically retrieve information about the CD
including the album name, artist name, track names and
music genre from the Gracenote CDDB Music Recognition
Service.
If you do not provide an Internet connection you can label the
CDs you record manually.
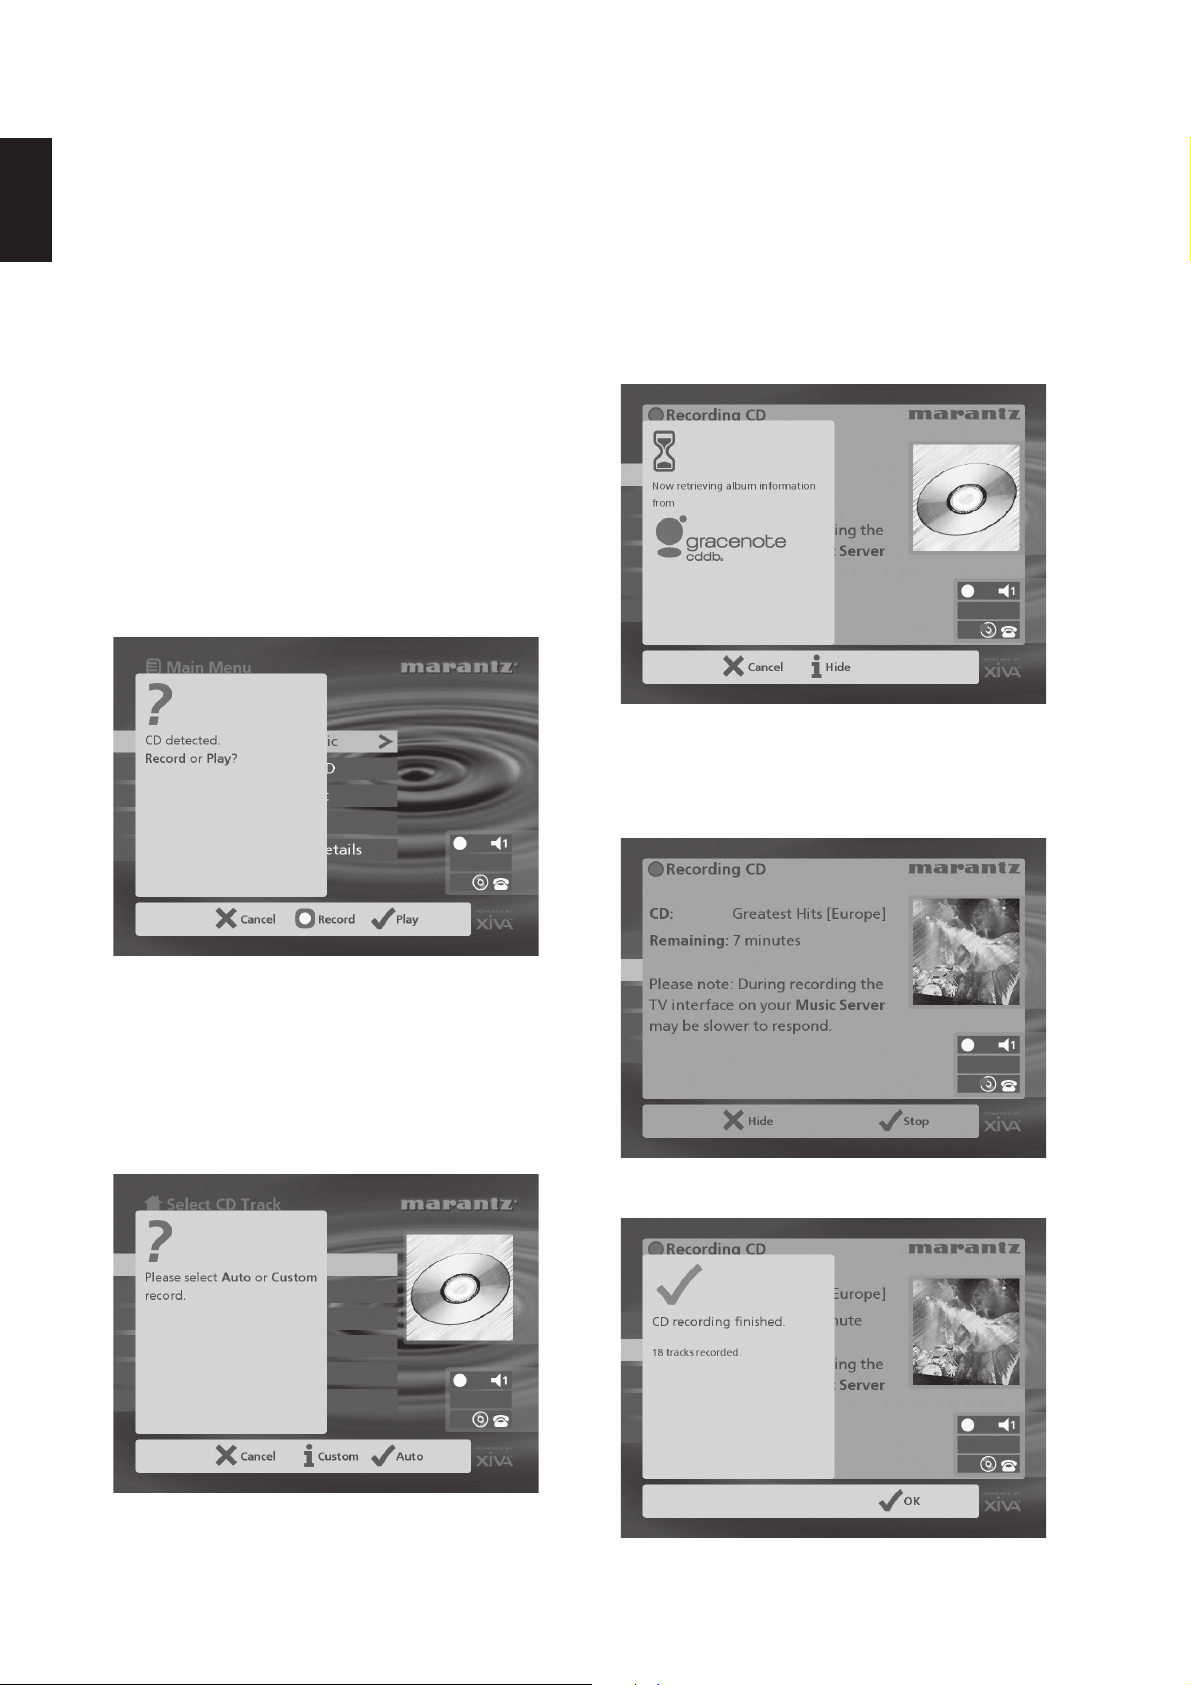
RECORDING FROM A CD
• Press the OPEN/CLOSE key on the front panel to
open the CD tray.
• Place a CD in the tray.
• Push the OPEN/CLOSE key on the front panel.
The following prompt is automatically displayed:
To make an auto (one-touch) recording
• Press the 5Auto key.
An Auto recording will automatically look up the track and artist
information from the Gracenote CDDB Music Recognition
Service, and then record all the tracks on the album.
The quality of the recording is specified in the Settings
menu (under Default Recording Quality). For more
information on the settings menu see the chapter called
Advanced Settings p.29.
Once recording has begun your Music Server will connect to
the Internet to retrieve the CD information:
• Press the KRecord action key to record the album
onto the Hard Disk.
Note: If you already have a CD in the tray, select the CD
option from the Main Menu to display the contents of the
disc; press the KRec. CD to begin recording.
The following display then allows you to choose whether to
do an auto (one-touch) recording of the entire CD, or a
custom recording which allows you to select the tracks you
want to record and the recording quality:
Once the search has been completed you will receive a
confirmation to tell you if the CD has been found.
• Press the 5OK key to continue.
The following display shows the approximate progress of the
recording:
Once recording is complete the following screen confirms
how many tracks have been successfully recorded.
• Press the Open/Close button to remove the disc.
16
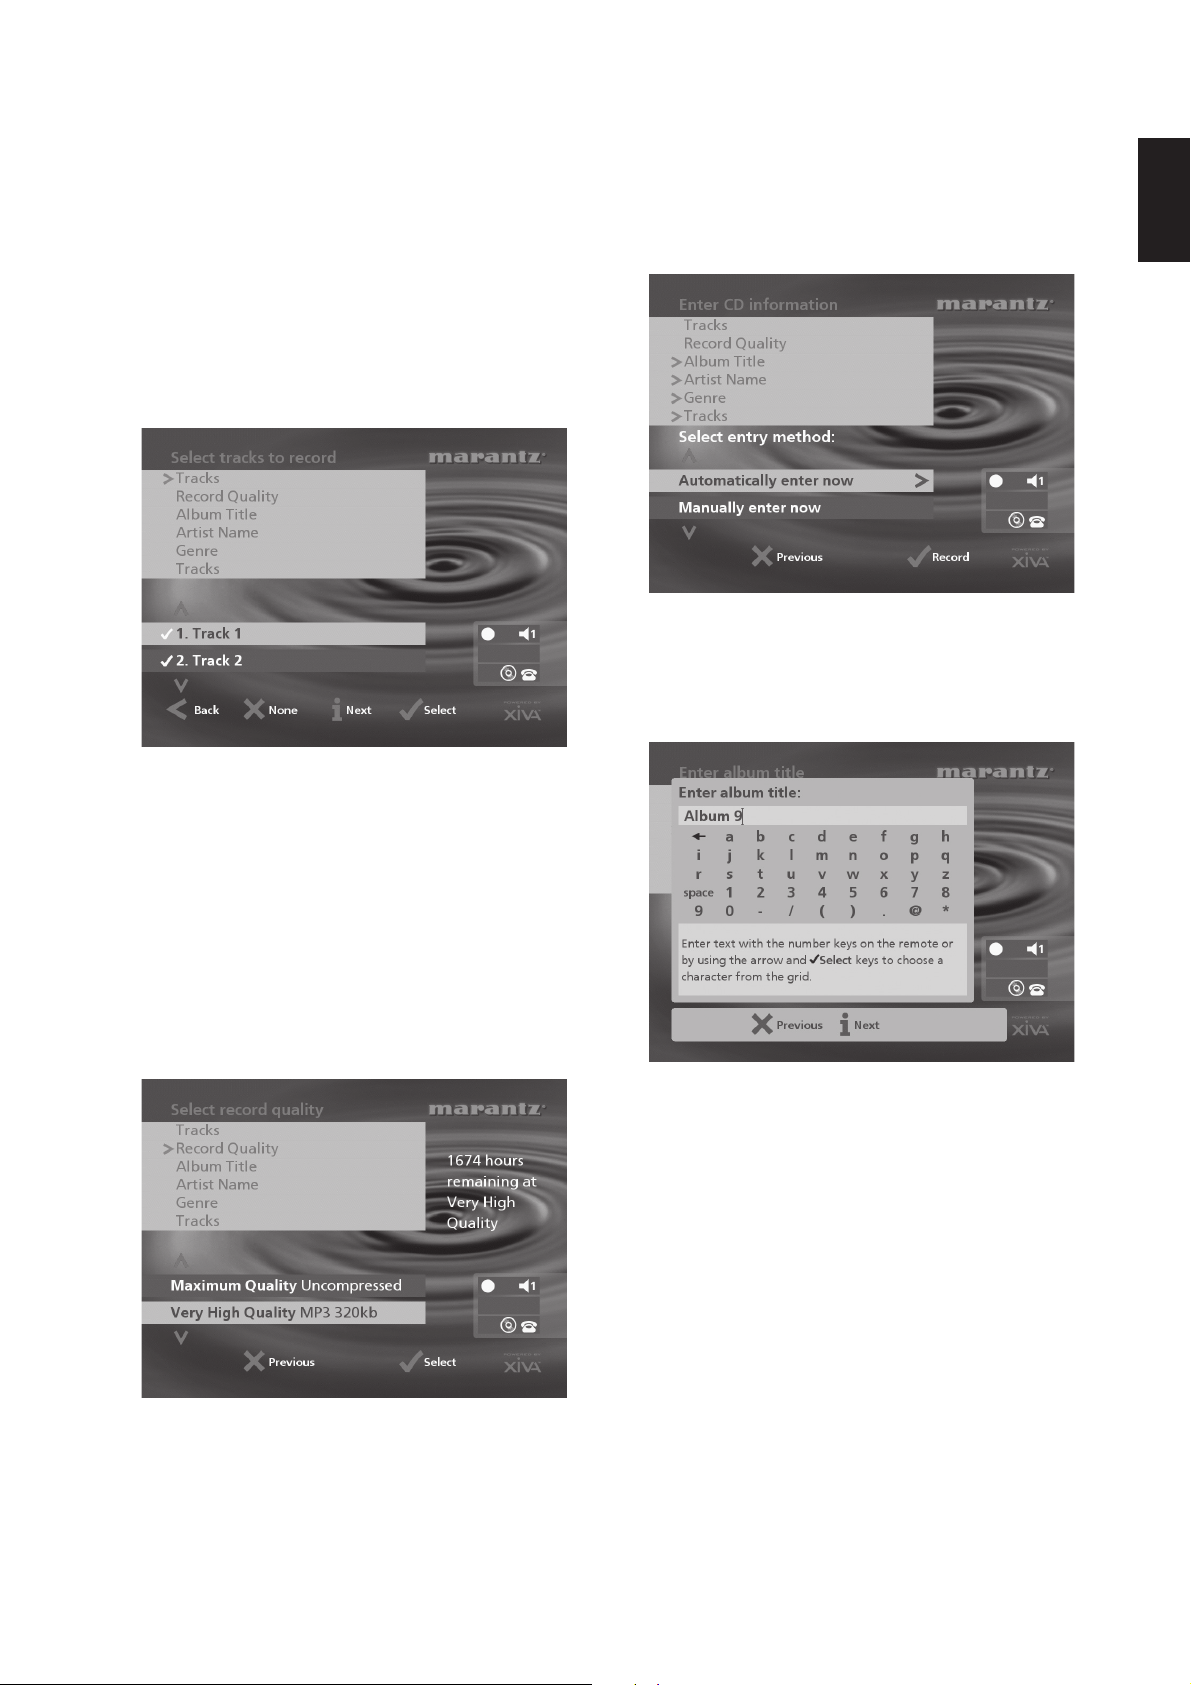
Making a custom recording
The custom recording option lets you choose which tracks to
record, the sound quality of the recording, and allows you to
enter album information.
To make a custom recording:
• Choose 3Custom from the “Please select Auto or
Custom record” screen.
A series of screens allow you to specify each of the
recording options.
Tracks
The tracks menu lets you specify which tracks you want to
record:
In each case the display shows the total remaining recording
time available at the specified recording quality.
• Press the 5Select key to confirm your selection.
CD information
The CD information screen allows you to choose how to
enter the album name, artist name, genre and tracks:
If you select Enter Information Later you can download the
CD Information for all the CDs you have recorded by choosing
Look Up from the Main Menu menu at a later time.
If you select Manually enter now a series of menus
prompts you to enter the album name, artist name, and track
titles:
ENGLISH
Initially all tracks are selected, as indicated by a 5 in front of
the track number.
• Press the 5Select key to unselect or select the
highlighted track.
• Press the 9 or 8 keys to step between tracks.
• Press the 2None/All action key to unselect or
select all of the tracks respectively.
When you have specified which tracks you want to record:
• Press the 3Next key.
Record Quality
The Record Quality menu allows you to specify the
recording quality:
• Use the 9 or 8 keys to choose between Maximum
(no compression used) or one of the MP3
compression options.
Note: The higher quality options use more space on your
Music Server Hard Disk, so you will not be able to record as
many CDs.
• Edit the album and artist name using the
alphanumeric keys on your Music Server remote
control or by using the text grid on the front panel.
For more information about entering and editing names see
the chapter called Entering and editing names, p.28.
After entering the album name and artist name, you will be
prompted to select a genre:
• Select a genre using the 9 and 8 keys.
• Press the 5Select action key to confirm your
choice.
You will finally be prompted to enter the track titles.
• Edit each track title in the usual way, and press the
3Next key once each title is complete.
• Once all the entries are complete recording will
commence automatically.
If you select Automatically enter now your Music Server will
attempt to connect to the Gracenote CDDB Service to retrieve
the correct CD information. You will receive confirmation if
this search has been successful once the connection is
complete. For information about setting up the Internet
connection see Registering your Music Server p.13.
17
ENGLISH
If you do not have an Internet connection, or the CD is not
listed in the database it will be given names such as Album
35, Artist 21, and Track 1, Track 2 etc. and it will be
classified in genre Unclassifiable.
CD-Text Support
If the CD you have inserted contains CD-Text information
your Music Server will use this information to label the
recording appropriately.
Listening to music while recording a CD
You can play music from your music library while you are
recording a CD.
• If you are already playing music from the library
press the -Output action key to return to displaying
information about the track you are playing.
• If you are not already playing music from the library
or wish to change the music you are listening to,
press the 1 key on the Music Server remote
control and select Music as normal.
For more information on selecting music for playback see
the chapter called Playing Music p.21.
At any time you can return to see the progress of your
recording by selecting CD from the Main Menu.
Note: During the recording process the update of the TV
display may be slightly slower.
RECORDING FROM AN ANALOGUE OR
DIGITAL INPUT
Using the line-in connectors on the back of your Music
Server you can make recordings from sources such as
Minidisc, vinyl record and cassette. Before beginning a new
recording make sure that the device you wish to record from
is connected to one of the following inputs:
• Digital Optical input
• Digital Coaxial input
• Analogue input
For more information on these connectors see the rear
panel diagram on p.7.
To create a new line-in recording session
• Display the Main Menu by pressing the 1
action key on your Music Server remote control.
• If necessary use the 9 or 8 keys to highlight Line-In.
• Press the 5Select key.
A series of screens allows you to set up the new recording.
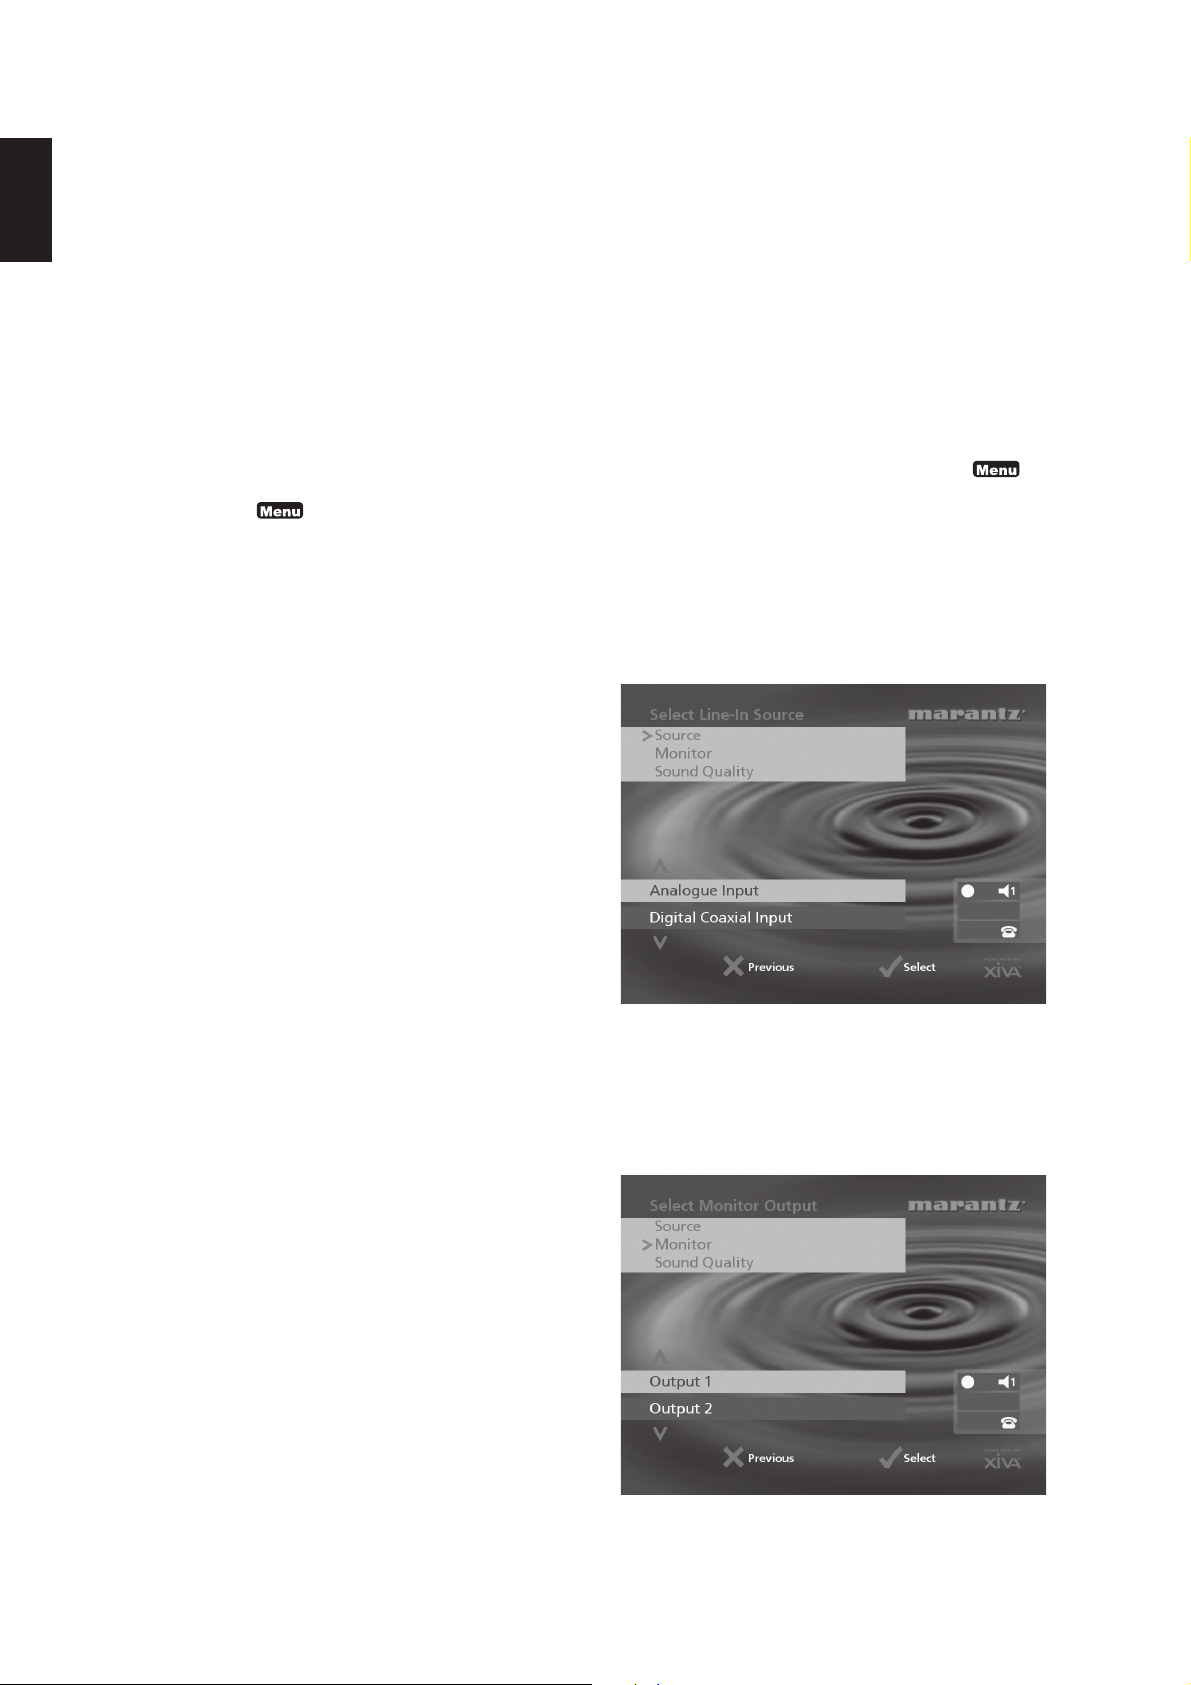
Line-in Source
The Line-in Source menu lets you specify which input
connector to use for the new recording:
• Use the 9 or 8 keys to choose the input your
device is connected to.
• Press the 5Select key to confirm your selection.
Monitor Output
The Monitor Output menu allows you to select which output
you would like to use to listen to the line-in recording:
18
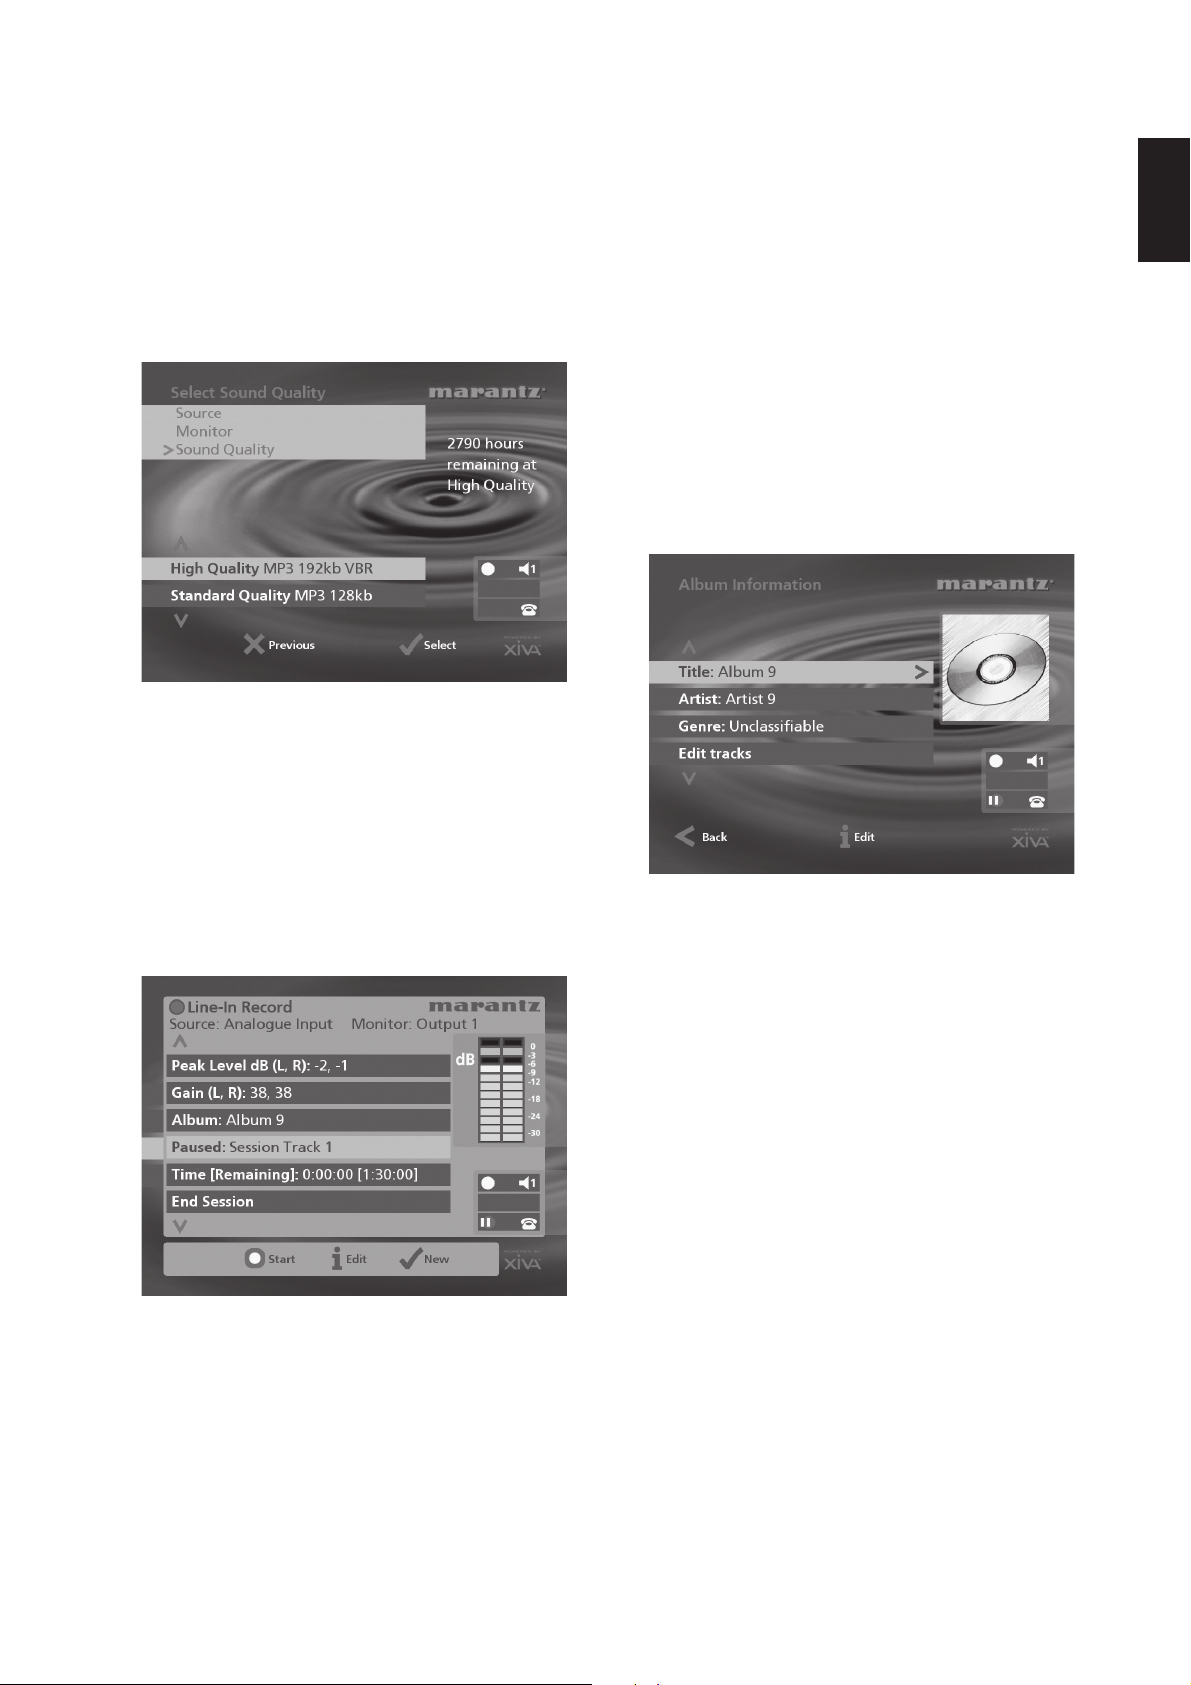
• Select an output using the 9 or 8 keys.
• Press the 5Select key to confirm your selection.
Note: Any music currently playing on this output will
continue to play but will no longer be audible while while the
Line-In Record screen is visible. The None option allows
you to make a line-in recording without interrupting playback
on any output.
Sound Quality
The Sound Quality menu allows you to specify the
recording quality:
• Use the 9 or 8 keys to choose between Maximum
(no compression used) or one of the MP3
compression options.
Note: The higher quality options use more space on your
Music Server hard disk.
In each case the display shows the total remaining recording
time available at the specified recording quality.
• Press the 5Select key to confirm your selection.
To record from the line-in connectors
Once you have created a new session the Line-In Record
screen allows you to begin the recording process:
If your Line-in Source is the analogue input connector, you
will need to set the recording Gain to an appropriate level.
To achieve the best quality recording try to play the loudest
passage from the music you are going to record and set the
gain such that the loudest peaks are in the yellow region of
the signal level meters. The Peak Level dB indicator shows
the maximum level reached so far.
To adjust the recording gain setting
• Use the 9 or 8 keys to highlight the Gain (dB)
option and press the 3Edit action key.
• Use the 9 or 8 keys to highlight the appropriate gain
option.
• Use the 6 or 7 keys to adjust the gain setting to
ensure that the loudest peaks in volume are in the
yellow region of the signal level meters. Press the
3Clear action key at any time to reset the peak level
marker.
• Press the 5Select action key to confirm your
settings and return to the Line-In Record screen.
Note: If you have selected either the coaxial or optical digital
input as your line-in source the gain setting may not be
altered. The signal indicator in this case will show whether a
valid digital connection has been made. If the signal indicator
shows protected the current digital source has been copy
protected and may not be recorded onto your Music Server
using the digital inputs.
To edit the album details
All the recordings made in this line-in recording session will
be placed in a new album. This album is automatically
assigned a name such as Album 4, Artist 7; it will also be
placed in the Unclassifiable genre. You can edit these
details at any stage in the recording session as follows:
• Use the 9 or 8 keys to highlight the Album option
and press the 3Edit action key.
To edit the album name and artist name:
• Use the 9 or 8 keys to highlight the item you want
to edit and press the 3Edit action key.
• Edit the album name and artist name using the
alphanumeric keys on your Music Server remote
control or by using the text grid on the front panel.
• Press the 3OK action key to confirm the new name.
To edit the genre:
• Use the 9 or 8 keys to highlight the Genre option
and press the 3Edit action key.
• Select a genre using the 9 or 8 keys.
• Press the 5Select key to confirm your choice.
To edit the names of any tracks you have already recorded:
• Use the 9 or 8 keys to highlight the Edit tracks
option and press the 5Select action key.
• Use the 9 or 8 keys to highlight the track name you
wish to edit and press the 3Edit action key.
• Edit the track name using the alphanumeric keys on
your Music Server remote control or by using the
text grid on the front panel.
• Press the 3OK action key to confirm the new name.
For more information on entering and editing names see the
chapter called Entering and editing names, p.28.
19
ENGLISH
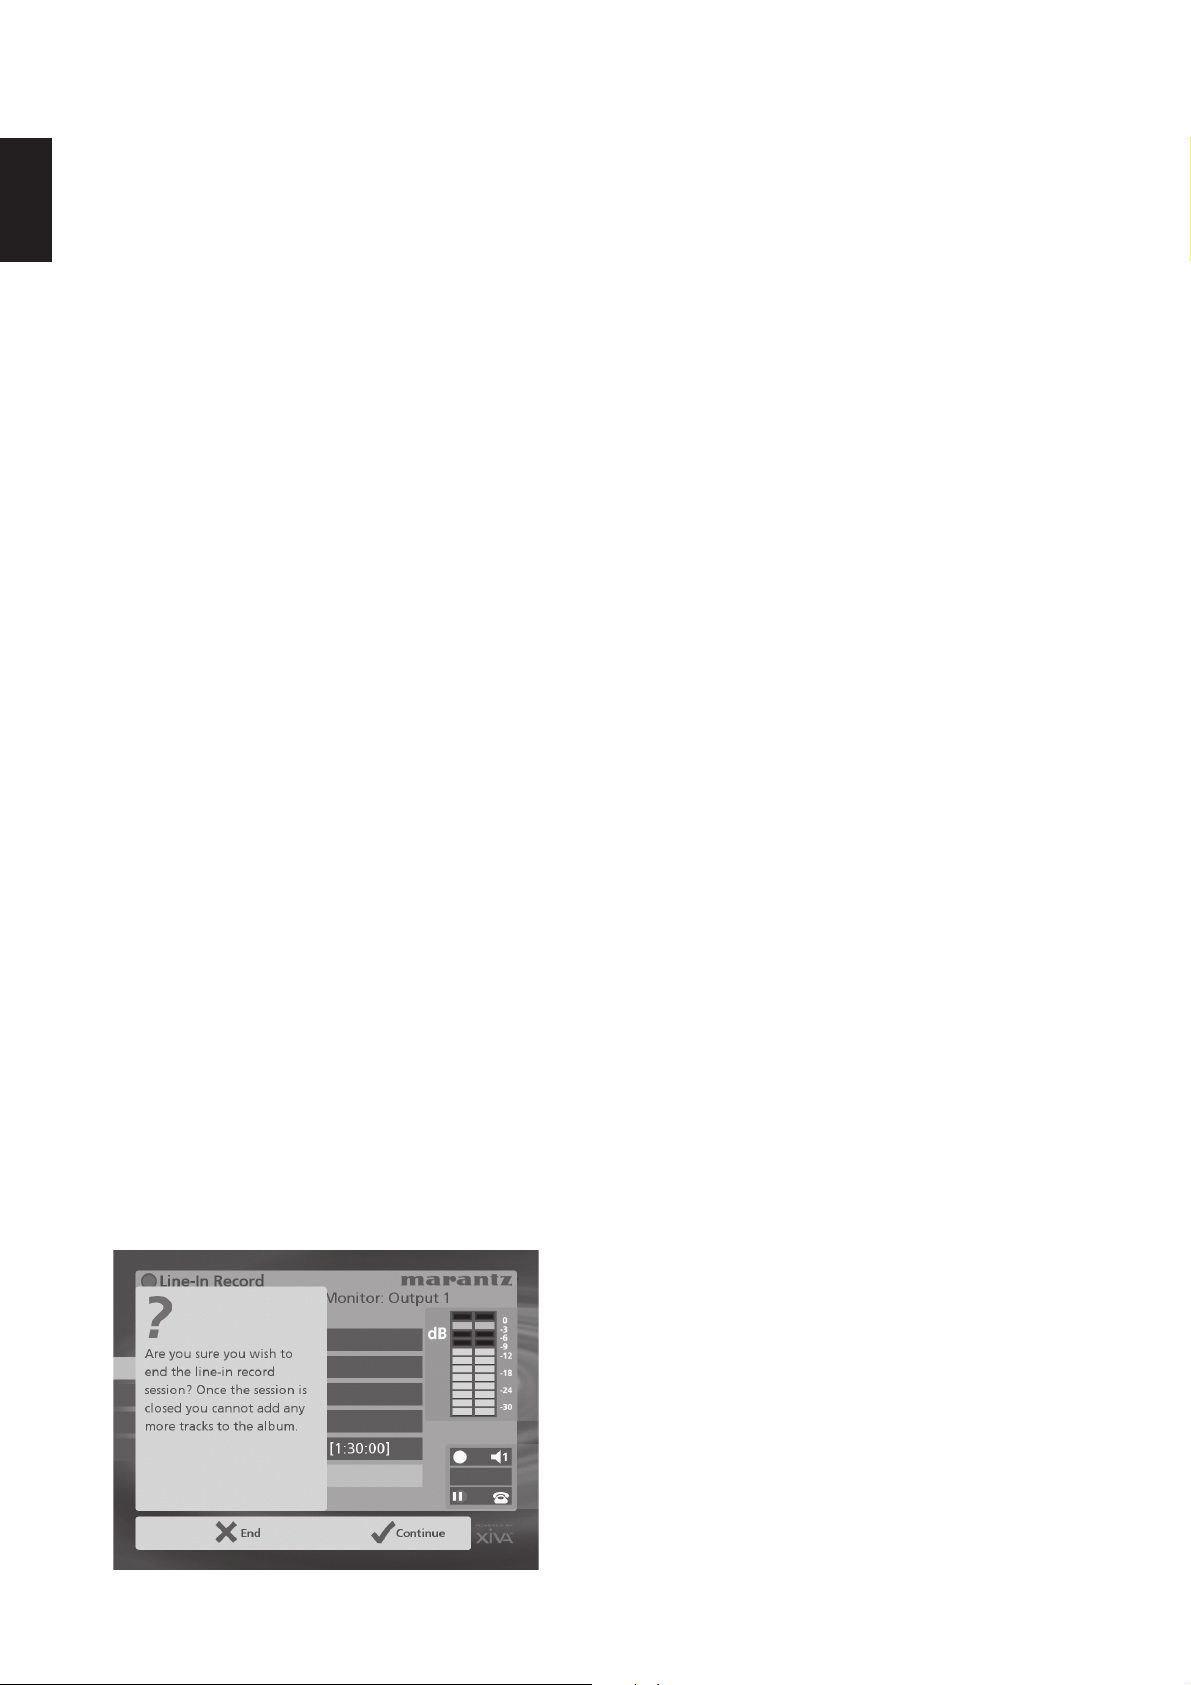
ENGLISH
To begin recording a new track
• Press the KStart action key.
At any time whilst the Line-In Record screen is visible
press the CPause action key to pause the recording. You
can resume the recording again by pressing the KStart
action key.
Recording will begin immediately; the track will automatically
be named “Session Track 1”.
Each recording session is limited to a maximum duration;
the [Remaining] indicator shows how much time remains
for this session. To change the maximum recording
duration:
• Use the 9 or 8 keys to highlight the Time
[Remaining] option and press the 3Edit action key.
• Use the 6 or 7 keys to increase or decrease the
duration. The amount of recording time available at the
current quality setting is displayed above.
• Press the 5OK action key to confirm the new
setting.
Note: the maximum recording length for a single track is
approximately 3 hours. If this duration is exceded a new
track will be created automatically and recording will
continue.
To change the name of the new track
Whilst the recording is in progress change the name of the
new track as follows:
• Use the 9 or 8 keys if necessary to highlight the
Recording option and press the 3Edit action key.
• Edit the track name using the alphanumeric keys on
your Music Server remote or by using the text grid
on the front panel.
• Press the 3OK action key.
To record additional tracks
• Use the 9 or 8 keys if necessary to highlight the track
name option and press the 5New action key.
A new track named “Session Track 2” will begin recording. The
5New option will be unavailable for approximately 5
seconds after creating a new track.
Note: If your line-in recording is currently paused you will
need to press the KStart action key to commence
recording.
To end a line-in recording session
Once you have finished adding tracks to the recording:
• Use the 9 or 8 keys to highlight the End Session
option and press the 5Select action key.
The following prompt is displayed:
• Press the 2End action key to confirm your
selection.
Note: once a recording session has ended no further tracks
may be added to this album.
Listening to music while recording from a
line input
You can play music from your library while a line-in
recording session is in progress:
• Press the 2Hide action key to display the Main
Menu.
Any music currently playing on your line-in monitor output
will be audible once again. If nothing is currently playing
music can be selected from the library as normal.
For more information on selecting music for playback see
the following chapter called Playing Music.
At any time you can return to see the progress of your line-in
recording session by selecting Line-in from the Main Menu.
The monitor output selected at the start of the recording
session will return to monitoring the line-in connection.
Note: During the recording process the update of the TV
display may be slightly slower.
20
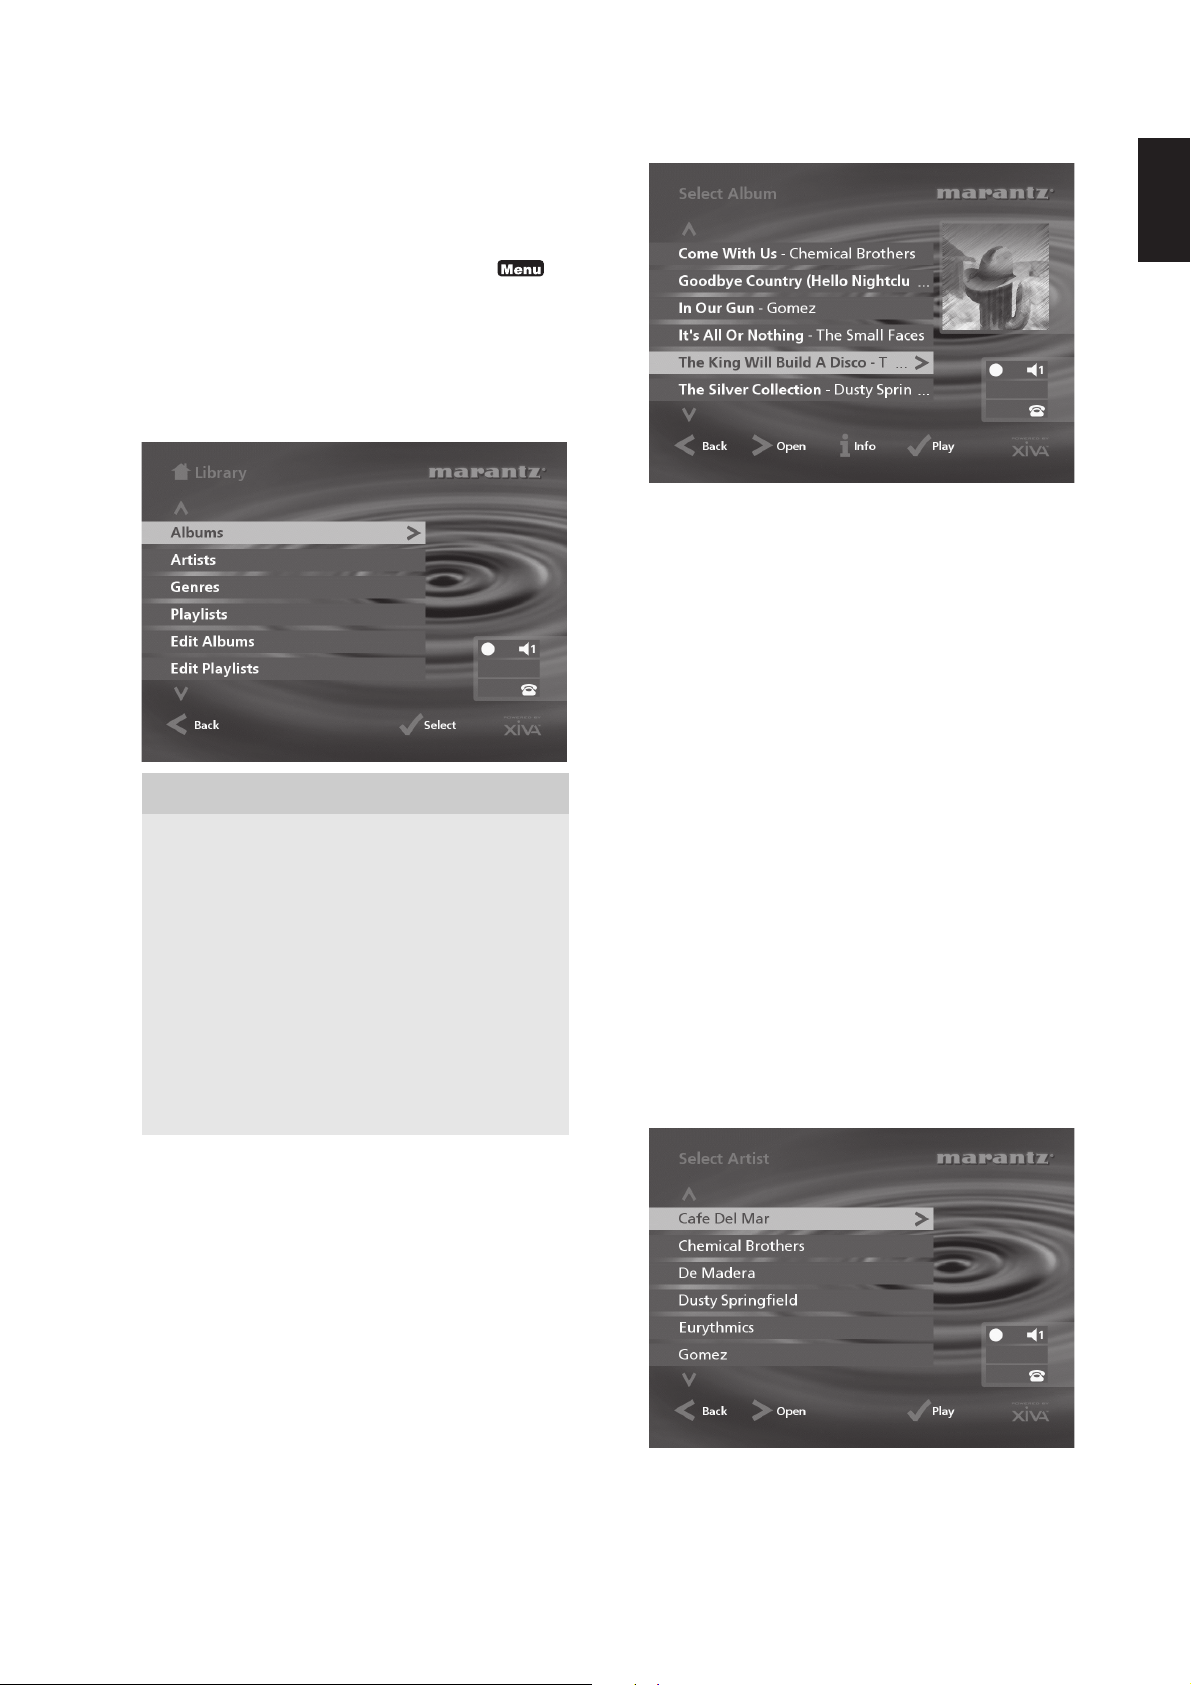
PLAYING MUSIC
This chapter explains how to play music on your Music
Server. It also explains how to search for a track in a
number of alternative ways.
PLAYING MUSIC FROM THE LIBRARY
• Display the Main Menu by pressing the 1
action key on your Music Server remote control.
• If necessary use the 9 or 8 keys to highlight
Library.
• Press the 5Select key.
The Library menu will be displayed. This lets you choose
how you want to browse your music collection:
Option Description
Albums
Artists
Genres Display your music library grouped by genre.
Playlist Display a complete list of custom playlists.
Edit Albums
Edit Playlists
Presets Display a complete list of preset 'stations'.
Display a list of albums in the library sorted
alphabetically by album title.
Display your music library grouped by artist
name.
Edit the album title, artist name, genre or track
name of exis ting music in your library.
Use this option to create and edit custom
playlists.
The front panel display and TV screen both display the
albums available in your library:
ENGLISH
• Press the 9 or 8 keys to step between albums, or
press the appropriate letter on your Music Server
remote control to jump directly to that position in the list.
To play the entire album:
• Press the 5Play action key to begin playback.
To select a particular track from this album:
• Press the 7Open key to open the album and
display the tracks it contains.
• Use the 9 or 8 keys to step between tracks, or
press a key on the alphanumeric keypad to jump to
that track number.
• Press the 5Play action key to play the currently
selected track.
• Press the 6 key to return to browsing by album.
To browse the library by artist
Either:
• Use the 9 or 8 keys if necessary to highlight the
Artists option in the Library menu.
• Press the 5Select action key to confirm your selection.
or:
• Press the ARTIST key on your Music Server remote
control.
The front panel display and TV screen both display the
artists available in your library:
Alternatively you can display the contents of a category
directly by pressing the ALBUM, ARTIST, GENRE,
PLAYLIST keys on your Music Server remote control.
To browse the library by album
Either:
• Use the 9 or 8 keys if necessary to highlight the
Albums option in the Library Menu.
• Press the 5Select action key to confirm your
selection.
or:
• Press the ALBUM key on your Music Server remote
control.
Artists are displayed in alphabetical order.
• Press the 9 or 8 keys to step between artists, or
press the appropriate letter on your remote control
to jump directly to the item in the list beginning with
that letter.
21
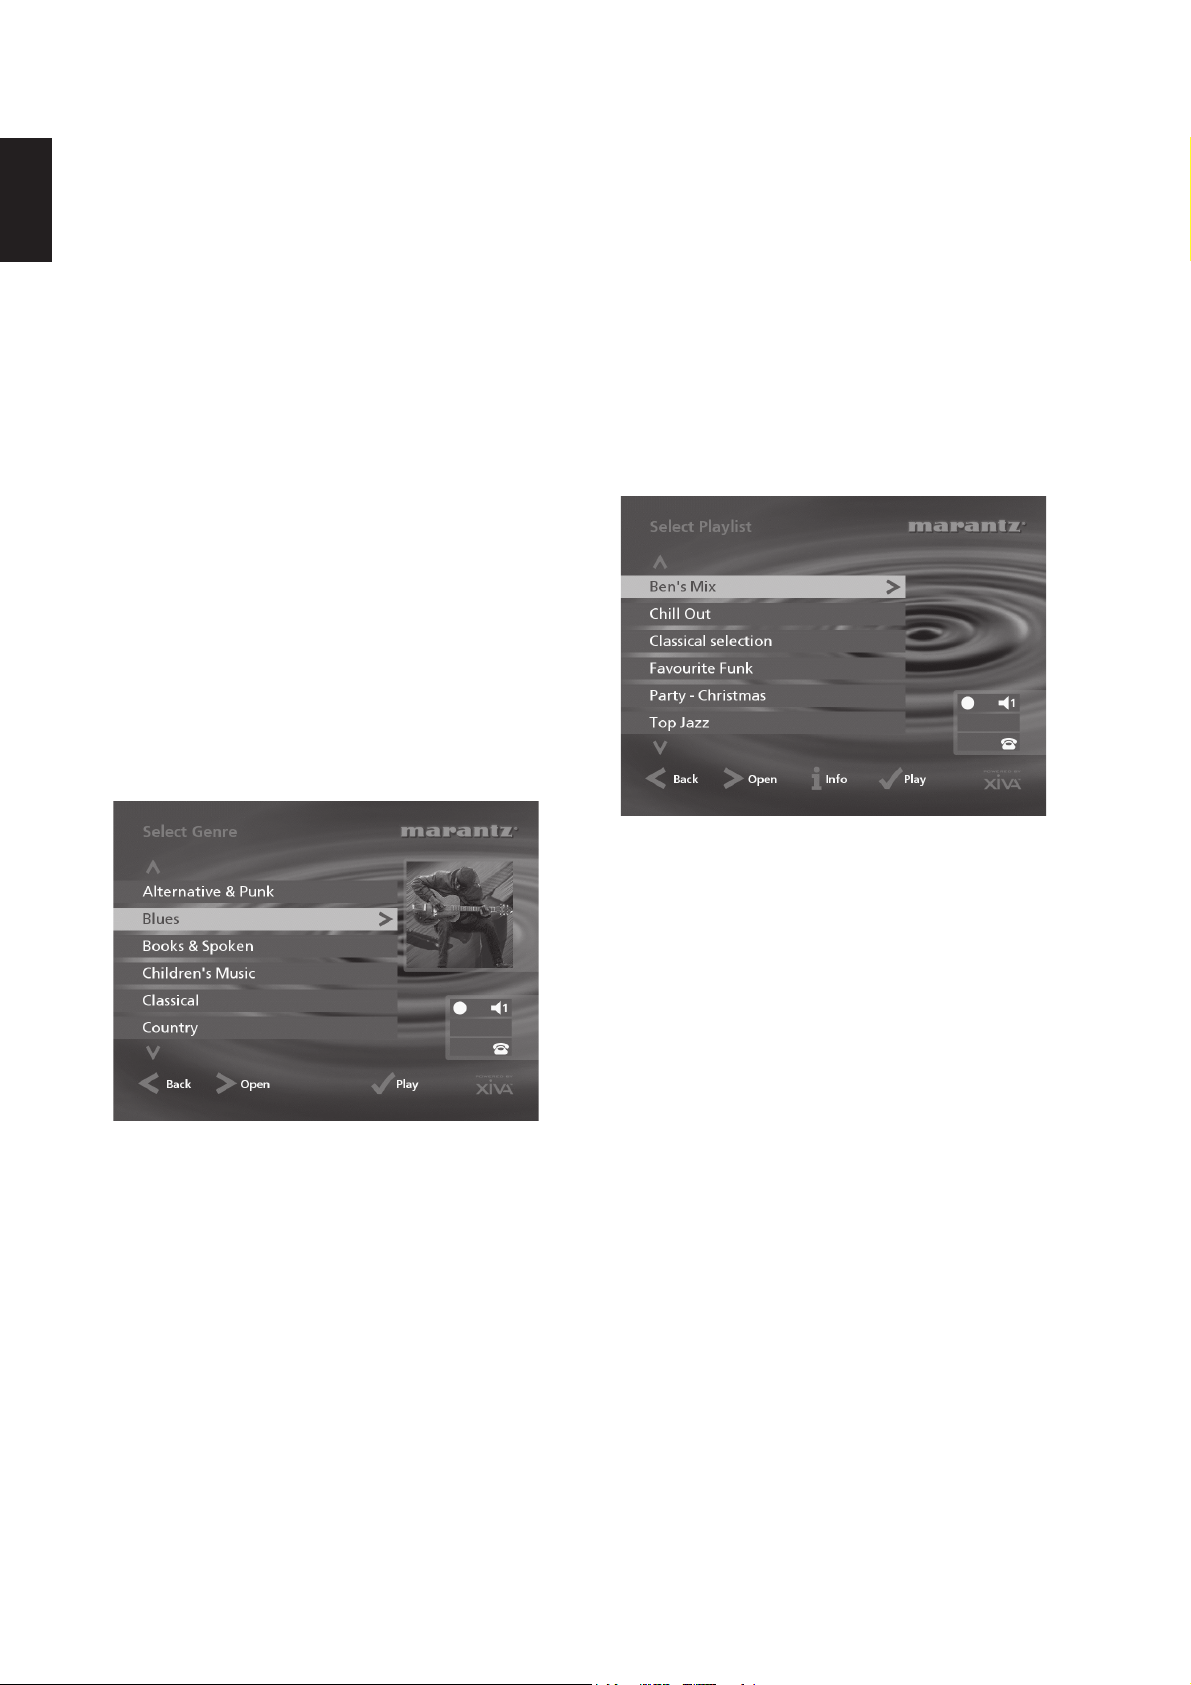
ENGLISH
To play all albums by the selected artist
• Press the 5Play key to begin playback.
To play a particular album by the selected artist
• Press the 7Open key to display all the available
albums by the selected artist.
• Use the 9 or 8 keys to step between albums.
Either:
• Press the 5Play action key to play the currently
selected album.
Or:
• Press the 7Open key again to select a track from
within this album.
Or:
• Press the 6 key to return to browsing by artist.
To browse the library by genre
Either:
• Use the 9 or 8 keys if necessary to highlight the
Genres option in the Library menu.
• Press the 5Select action key to confirm your
selection.
or:
• Press the GENRE key on your Music Server remote
control.
The front panel and TV screen both display the genres
available in your library:
To Browse the library by playlist
Playlists allow you to create your own selections of tracks
and save them with a name of your choice such as Party
Music. For more information about creating a playlist see To
create a new Playlist p.25.
Either:
• Use the 9 or 8 keys if necessary to highlight the
Playlists option in the Library menu.
• Press the 5Select action key to confirm your
selection.
or:
• Press the PLAYLIST key on your Music Server
remote control.
The front panel and TV screen both display the Playlists
available in your library:
• Press the 9 or 8 keys to step between genres.
To play all albums in a selected genre
• Press the 5Play key to begin playback.
To play a particular album from the selected genre
• Press the 7Open key to display all the available
albums in the selected genre.
• Use the 9 or 8 keys to step between albums.
Either:
• Press the 5Play action key to play the currently
selected album.
Or:
• Press the 7Open key again to select a track from
within this album.
Or:
• Press the 6 key to return to browsing by genre.
Note: If you have not yet created any playlists the list will be
empty.
• Press the 9 or 8 keys to step between playlists, or
press the appropriate letter on your Music Server
remote control to jump directly to the item in the list
beginning with that letter.
• Press the 5Play key to begin playback.
To browse the library by preset
Presets are simple playlists that can be used in the same
way as a preset station on your radio tuner; for example, you
may have a preset which plays a random selection from your
entire music library. Presets can be programmed into a
simple multiroom controller system where browsing of the
music library is not possible. For more information on
programming presets see the chapter called Storing a
preset p.26.
• Use the 9 or 8 keys if necessary to highlight the
Presets option in the Library menu.
• Press the 5Select action key to confirm your
selection.
22
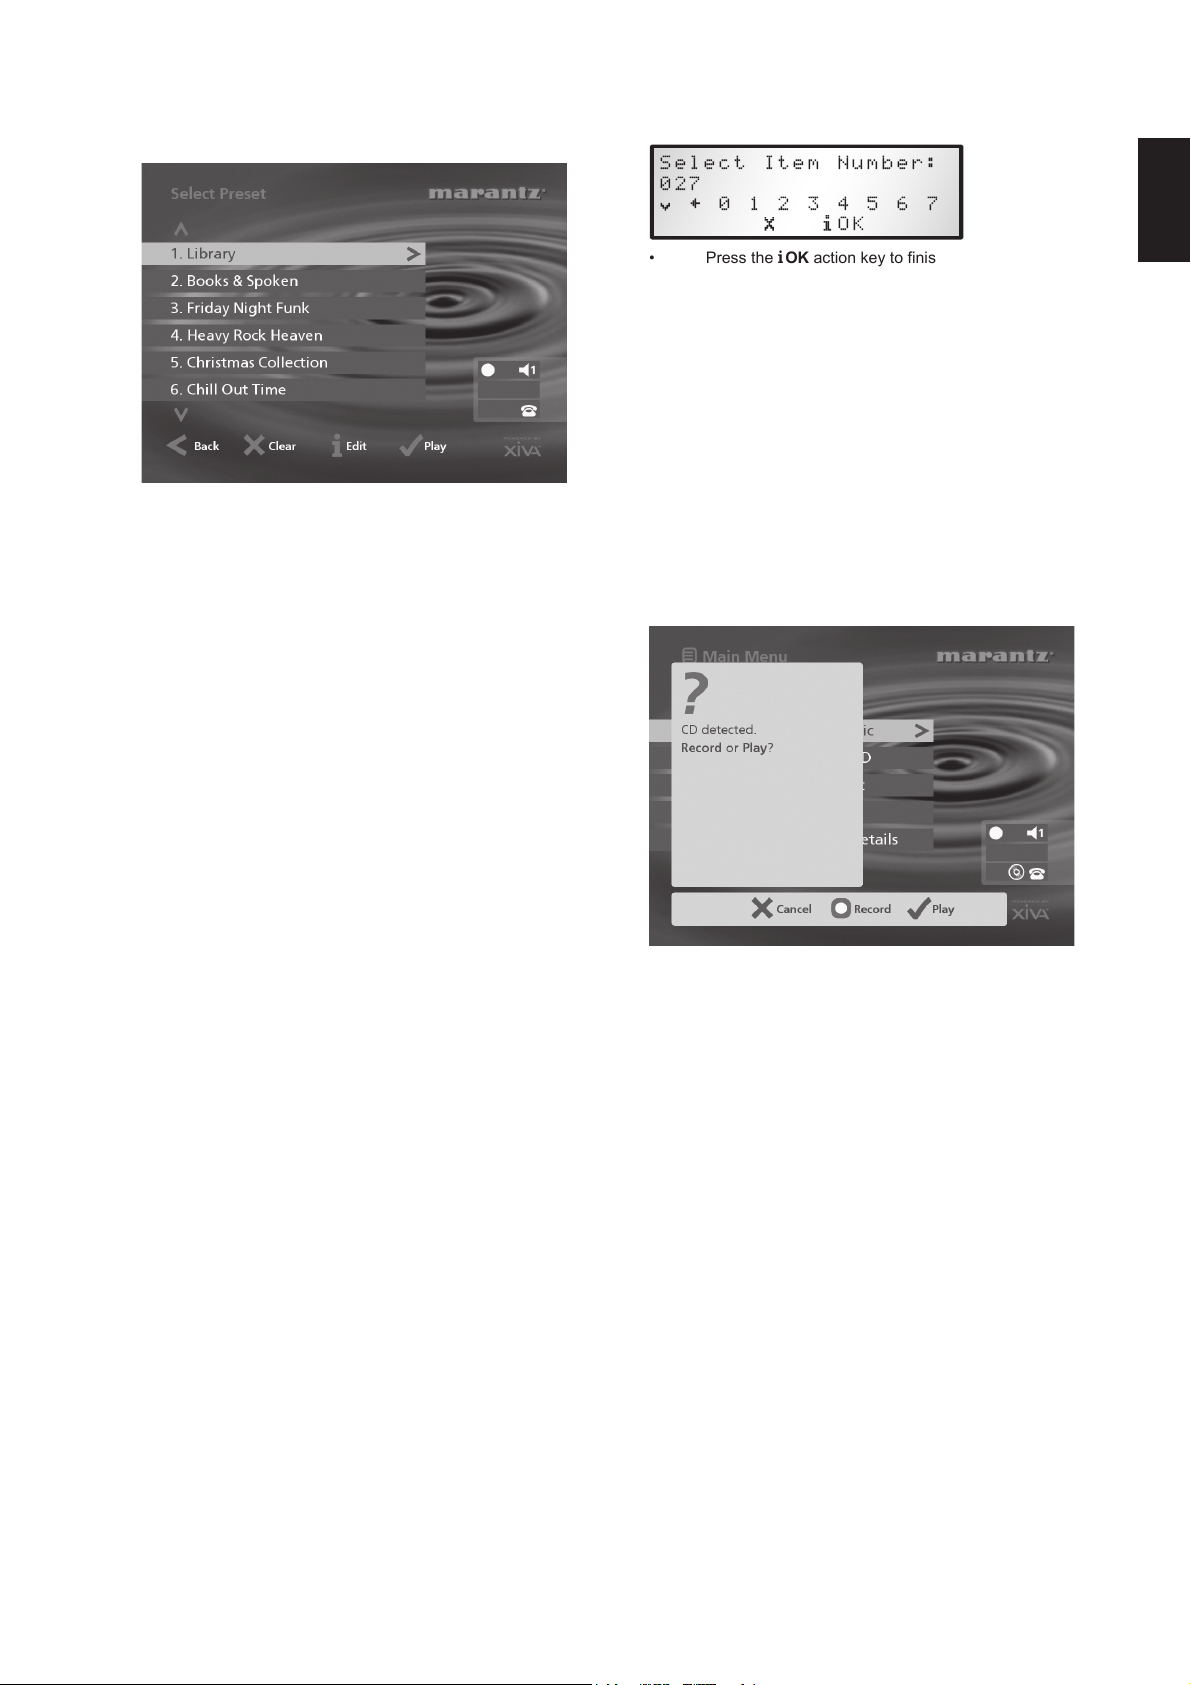
The front panel and TV screen both display the presets
available in your library:
Note: any preset which currently has no program will be
labelled [Empty].
• Press the 9 or 8 keys to step between presets, or
press the appropriate number on your Music Server
remote control to jump directly to that preset number
in the list.
• Press the 5Play key to begin playback. Random
and repeat playback will automatically be enabled
for this selection.
Selecting items directly using your Music
Server remote control.
You can select an album, artist, genre or playlist directly by
the first letter of its title using the alphanumeric keypad on
your Music Server remote control.
To select an album, artist, genre or playlist by name
• Display the appropriate library menu for the item you
want to find (e.g. Select Artist menu).
• Press the alphanumeric keypad key corresponding
to the first letter of the item you want to select.
For example to find the artist Santessa press the ARTIST
key to display the Select Artist menu, then press the 7 key
four times because S is the fourth letter on the 7 key. The
front panel and TV screen show the first artist beginning with
the letter S.
If there are several artists beginning with the letter S press
the 8 key to step through until you find the artist you are
looking for.
To select a track or preset by number
• Display the list of tracks in the album or playlist, or
display the list of presets.
• Press the key on the alphanumeric keypad
corresponding to the track number you want to
select.
Selecting an album by number
Each album you have recorded onto the Hard Disk of your
Music Server is allocated a sequence number, from zero
upwards. If you know the number of the album you want to
listen to you can select it directly by number using the
alphanumeric keys on your Music Server remote control.
• Press the ALBUM button to display the albums in
your library.
• Press the 0 key followed by the number of the
album.
For example, to select album 27 press ALBUM,0,2,7.
The front panel displays:
• Press the 3OK action key to finish entering the
album number.
• Press the 5Play action key once again to begin
playing the album.
PLAYING MUSIC FROM A CD
Your Music Server allows you to play a CD directly without
recording it to the hard disk first.
To play a disc:
• Press the OPEN/CLOSE key on the front panel to
open the CD tray.
• Place a CD in the tray with the label side facing
upwards.
• Push the OPEN/CLOSE key on the front panel.
The following prompt is automatically displayed:
Alternatively if you already have a CD in the tray select the
CD option from the Main Menu.
• Press the 5Play action key to begin playing the CD.
ENGLISH
23
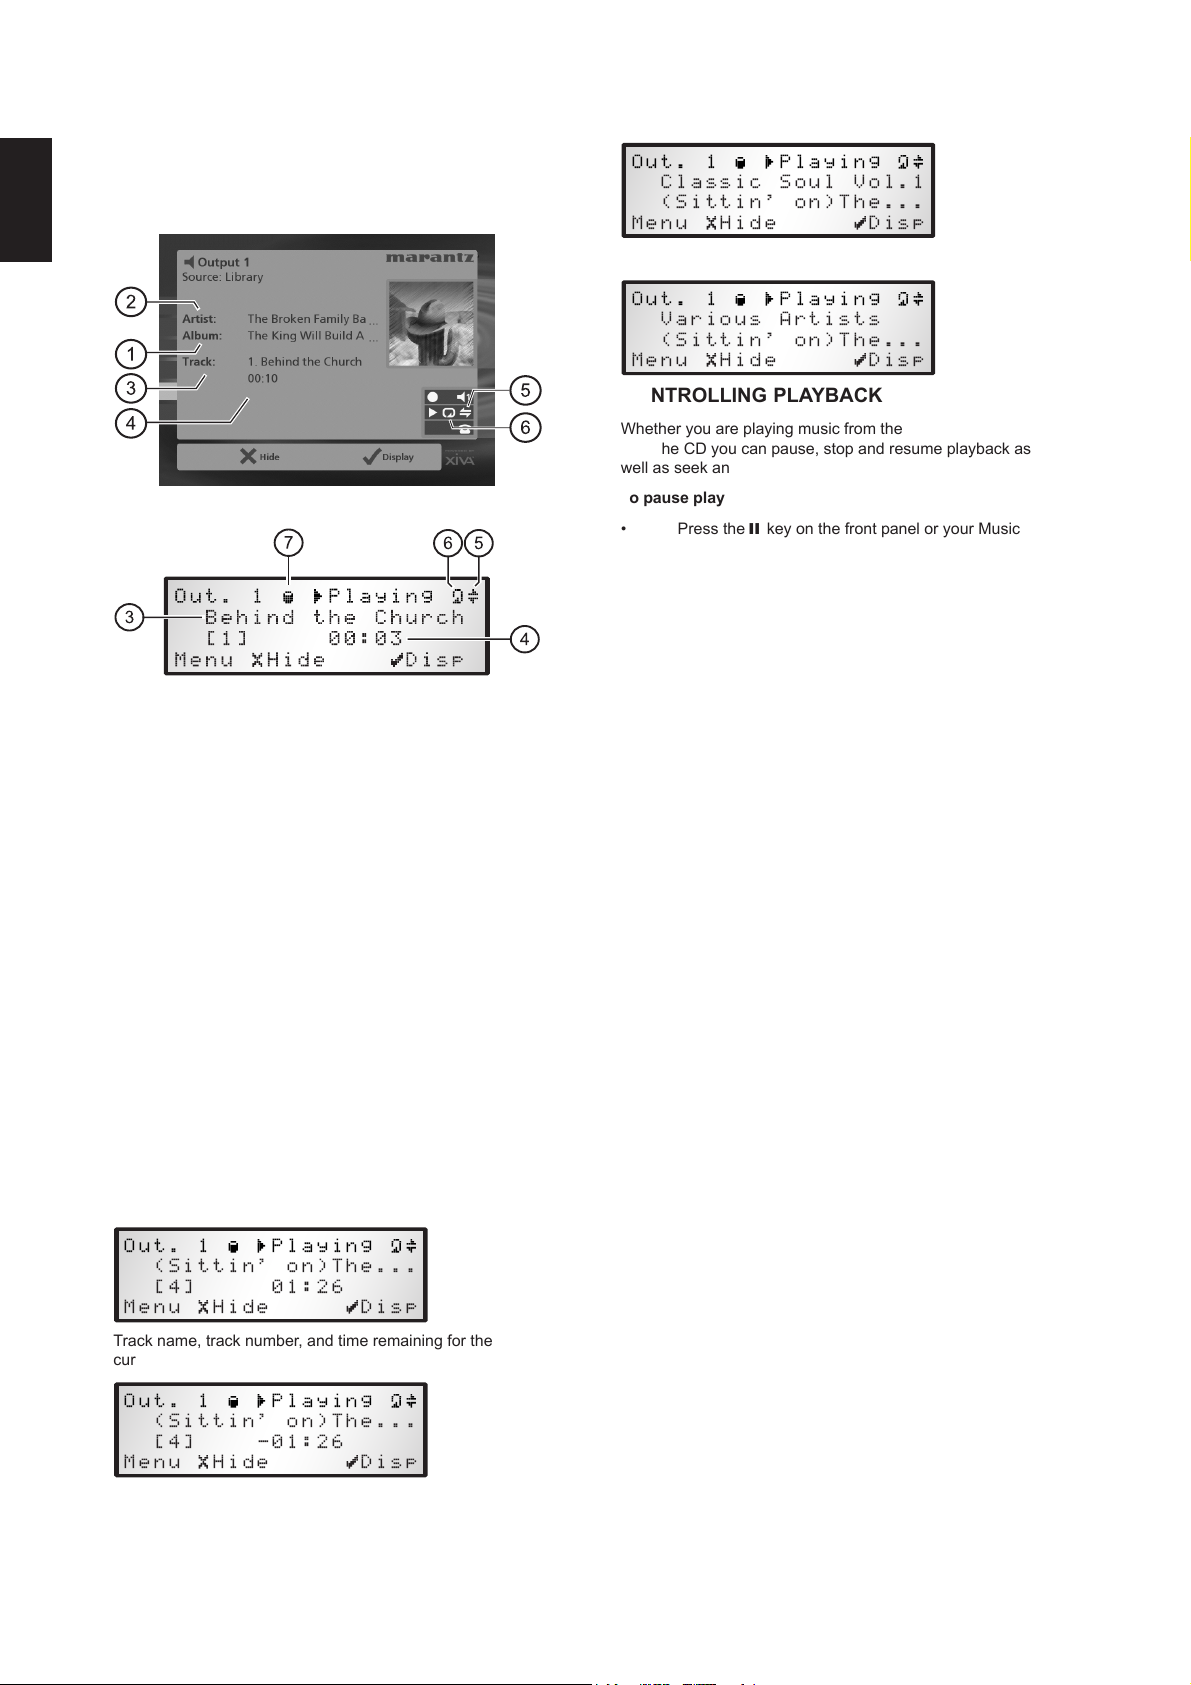
ENGLISH
PLAYBACK INFORMATION
The output screen
Whenever you select an item for playback the following
screen is displayed:
The front panel displays:
1. Indicates the title of the album.
2. Indicates the title of the artist.
3. Indicates the name of the track currently playing.
4. Displays either track time or time remaining for the
current track.
5. Indicates that random playback is enabled.
6. Indicates that repeat playback is enabled.
7. Indicates that the unit is playing from an item in the
Hard Disk library.
You can display the output screen at any time by pressing
the - Output key. The output key may also be used to
select a different output on the Music Server; for more
information see the chapter called Using your Music
Server in a multiroom system p.31.
To change the displayed information
You can choose what information is displayed on the TV
screen and front panel display whilst playing;
• Press the 5Display action key to step between the
following four options:
Track name, track number, and elapsed time for the current
track:
! "#$ %&'(
Track name, track number, and time remaining for the
current track:
!
" #$% &'()
Album name and track name:
! "#$
Artist name and track name:
! "#$
CONTROLLING PLAYBACK
Whether you are playing music from the library or directly
from the CD you can pause, stop and resume playback as
well as seek and skip tracks at any time.
To pause play
• Press the C key on the front panel or your Music
Server remote control.
To stop play
• Press the B key on the front panel or your Music
Server remote control.
To resume play
• Press the A key on the front panel or your Music
Server remote control.
To skip to the next or previous track
• Press the Gor F key on the front panel or your
Music Server remote control.
The front panel display shows the number of each track as
you skip between them.
To seek within a track
• Hold down the E or D key on the front panel or your
Music Server remote control.
Play resumes from the new position when you release the
key.
Random and repeat playback
Your Music Server lets you play albums, artists, genres or
playlists in a random order to add variety to your music. You
can also play a selection repeatedly.
To randomise the current selection
• Press the I key on your Music Server remote
control.
Press the I key again to disable random playback.
To repeat the current selection
• Press the H key on your Music Server remote
control.
Press the H key again to disable repeat playback.
The front panel and TV screen indicate that both random
and repeat are enabled.
Note: random and repeat mode will both be enabled by
default when a preset is selected for playback.
24

ORGANISING YOUR MUSIC
COLLECTION
This chapter describes the features built into your Music
Server to help you organise the music in your music library,
including information about creating playlists of your
favourite tracks, deleting albums or tracks you no longer
want to store, and naming albums, tracks, and artists.
PLAYLISTS
Your Music Server allows you to create your own selections
of tracks, called playlists, and identify them with a name of
your choice. For example, you could select your favourite
party tracks from a number of different albums and include
them in a playlist called Party Music. You can then play your
selection simply by choosing the appropriate playlist from
the Select Playlist menu.
To create a new playlist
• Display the Main Menu by pressing the 1
key on your Music Server remote control.
• Press the 9 or 8 key to highlight the Library option
and press the 5Select action key.
• Press the 9 or 8 key to highlight the Edit Playlists
option and press the 5Select action key.
The existing playlists will be displayed:
called Entering and editing names, p.28.
• Press the 3OK action key to confirm the name you
have entered.
To select items for a playlist
• Press the 9 or 8 key to highlight the Edit Tracks
option and press the 5Select action key.
You will then be prompted to select the items that you want
to include in the playlist:
• Press the KAdd action key.
The Add Music Menu then lets you browse through the
music library to select the first item you want to add to the
playlist.
You can add whole albums, complete genres, all the albums
by a selected artist, another playlist, or individual tracks. For
more information on browsing the music library refer to
Playing Music from the Library p.21.
When you have located the album, genre, artist, playlist or
track you want to add:
• Press the 5Add action key to add it to the playlist.
ENGLISH
If you have not previously created a playlist this list will be
empty.
• Press the K New key to create a new playlist.
• The following menu then allows you to enter a name
for the playlist:
• Enter a name for the playlist using the alphanumeric
keys on your Music Server remote control or using
the grid.
For more information about entering names see the chapter
• Press the 5OK action key to continue.
When you have finished compiling the playlist:
• Press the KDone action key to finish adding tracks.
• Press 5OK to confirm your action.
25
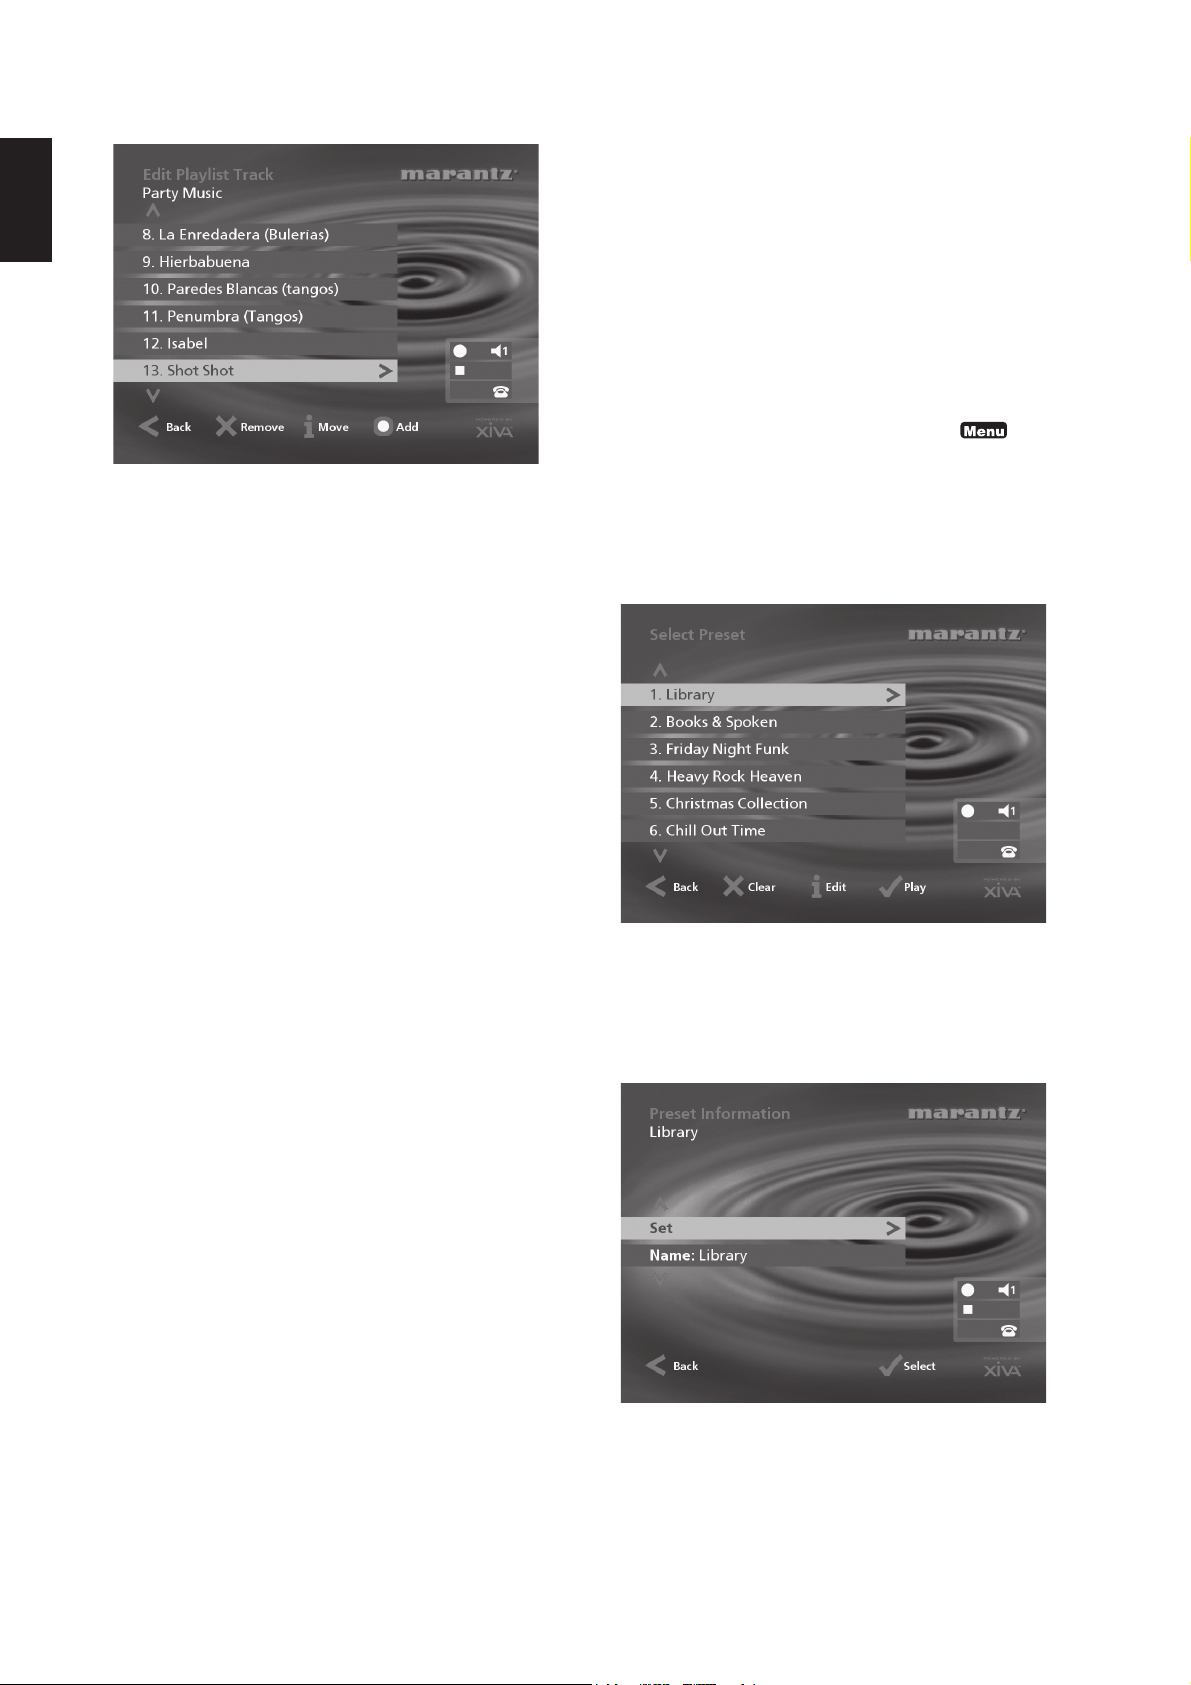
ENGLISH
The tracks you have added will be shown in the playlist:
Editing a Playlist
You can change a playlist at any stage by adding items,
deleting tracks, or changing position of tracks in the playlist.
To add items to a playlist
Either:
• Select the playlist you want to change from the
Select Playlist menu in the library.
• Press the 3Info action key to display the Playlist
Information menu.
• Use the 9 or 8 keys to highlight the Edit tracks
option and press the 5Select action key.
Or:
• Select Edit Playlists from the Library menu and
highlight the playlist you want to change.
• Press the 5Select action key to open the playlist for
editing.
• Use the 9 or 8 keys to highlight the Edit tracks
option and press the 5Select action key.
Once you have selected the appropriate playlist:
• Press the KAdd action key to add new tracks, and
locate the item you want to add by browsing through
the music library.
To remove a track from a playlist.
• Open the playlist as previously described.
• Press the 9 or 8 keys to highlight the track you
want to remove.
• Press the 2Remove action key to remove the track.
• Press the 5Remove action key to confirm your
choice.
To change the position of a track within a playlist.
• Open the playlist as previously described.
• Press the 9 or 8 keys to highlight the track you
want to change.
• Press the 3Move action key to move the track.
• Press the 9 or 8 keys to move the track up or
down as required.
• Press the 5Store key to confirm the new track
position.
PRESETS
Presets are simple playlists that can be used in the same
way as a preset station on your radio tuner; for example, you
may have a preset which plays a random selection from
your entire music library. Although you can select a preset
for playback using the TV user interface presets are more
commonly used by simple multi-room control systems and
remote controls to trigger playback without referring to the
TV screen. For more information see the chapter called
Using your Music Server in a Multiroom System p.31.
Before a preset can be used a selection of music must be
assigned to that ‘station’:
Storing a preset
• Display the Main Menu by pressing the 1 key
on your Music Server remote control.
• Press the 9 or 8 key to highlight the Library option
and press the 5Select action key.
• Press the 9 or 8 key to highlight the Presets
option and press the 5Select action key.
The existing presets will be displayed:
If you have not previously stored a preset all the names will
be labelled [Empty].
• Use the 9 or 8 keys to highlight the preset you wish
to program and press the 3 Info action key.
• The following menu allows you to choose whether
you wish to rename the preset or re-program it:
To select the music for a preset:
• Press the 9 or 8 key to highlight the Set option
and press the 5Select action key.
You will be prompted to select an item from the library to
store as your preset. This may be a single track, an album,
all the tracks by an artist, all the tracks in a genre, a playlist
26
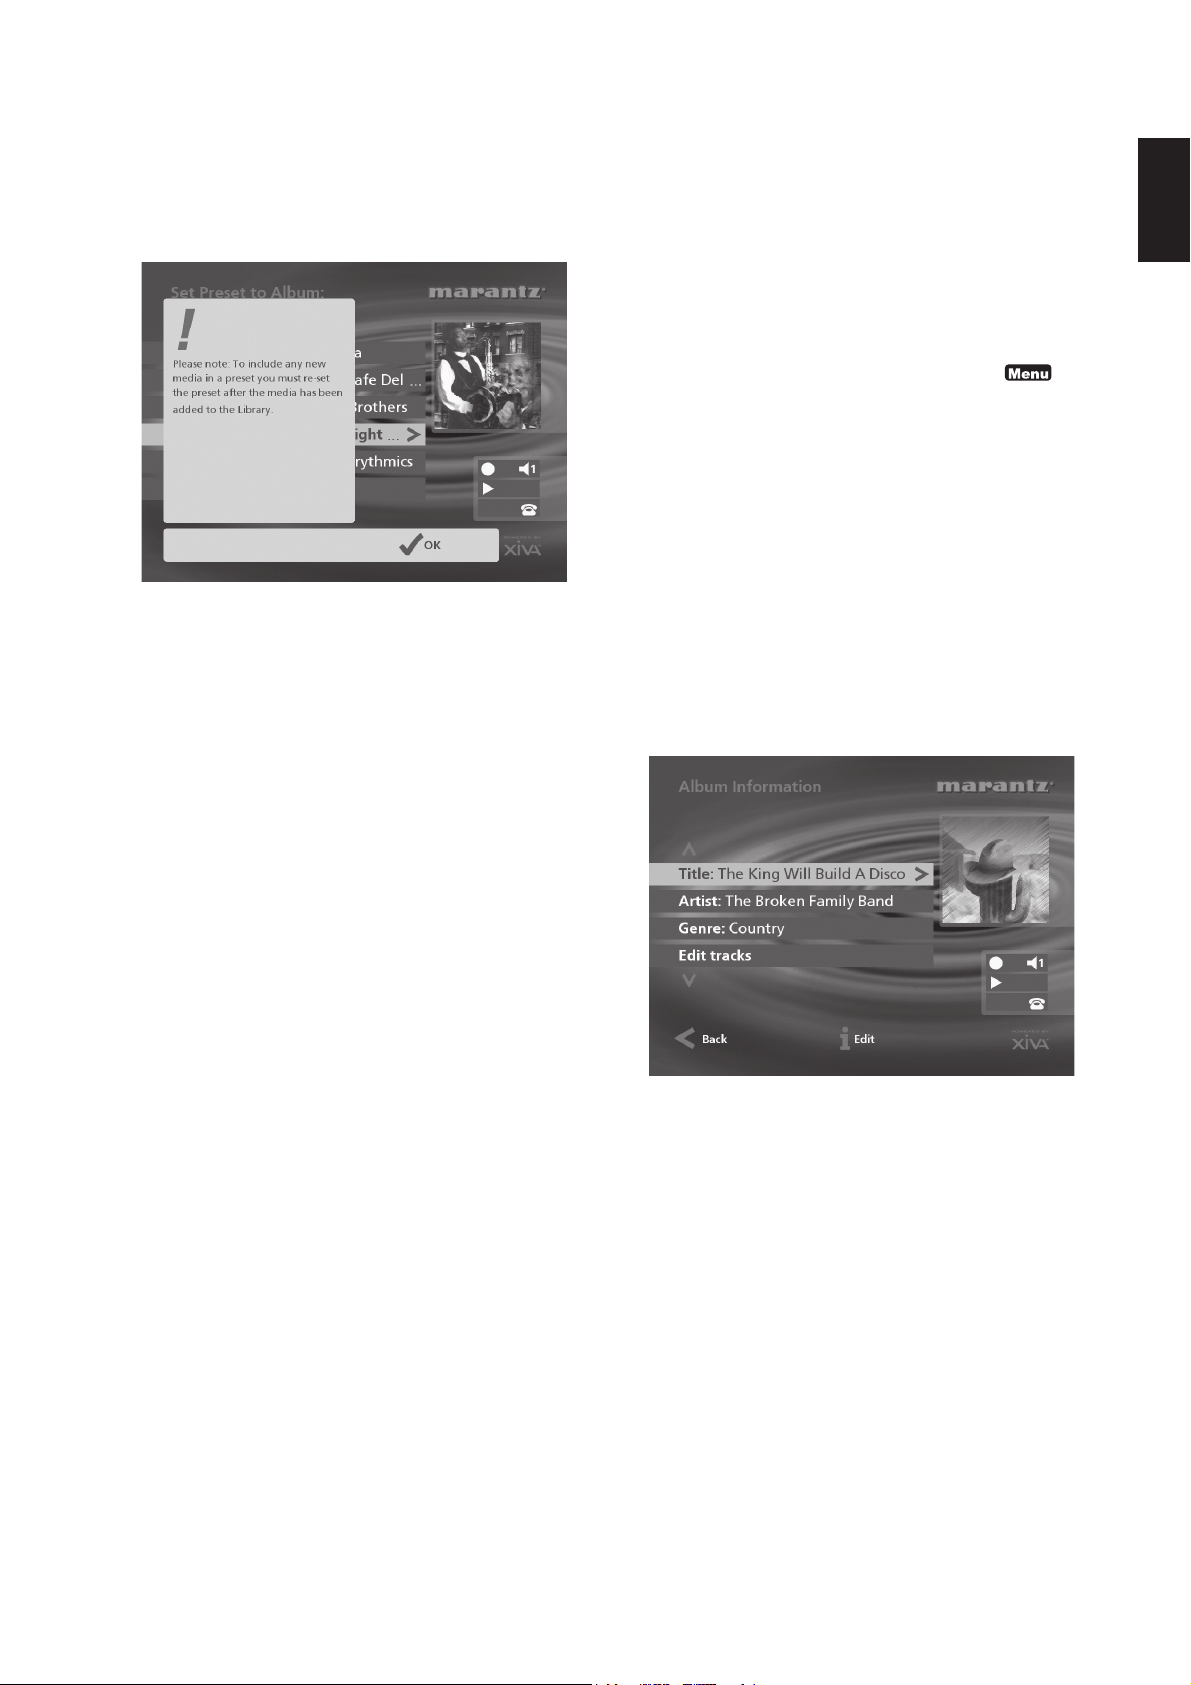
or all the tracks stored on your Music Server. For more
information on browsing the music library refer to Playing
Music from the Library p.21.
When you have located the album, genre, artist, playlist or
track you want to select:
• Press the 5Set action key to store it as a preset.
• Press the 5OK action key to continue.
Note: presets are not automatically updated when new
music is recorded onto your Music Server. For example if
you have a preset which plays the Blues genre, when a new
Blues album is added the preset will not contain those new
tracks.
A name for your preset will be chosen automatically
according to the music selection you have made. To change
the name of your preset:
• Display the Preset Information screen using the
method described previously.
• Press the 9 or 8 key if necessary to highlight the
preset name and press the 3 Edit action key to enter
a new name.
• Enter a name for the preset using the alphanumeric
keys on your Music Server remote control or using
the grid.
For more information about entering names see the chapter
called Entering and editing names, p.28.
• Press the 3OK action key to confirm the name you
have entered.
ALBUMS
Your Music Server labels the albums, artists and tracks in
your music library with names which identify the track you
are listening to, and these help you locate items when you
are browsing through the library.
If you have an Internet connection, your Music Server reads
the CD information automatically from the Gracenote CDDB
Music Recognition Service. You can edit these names at
any stage to suit your own preferences.
To edit album information
• Display the Main Menu by pressing the 1
key on your Music Server remote control.
• Press the 9 or 8 key to highlight the Library option
and press the 5Select action key.
Either:
• Press the 9 or 8 key to highlight the Edit albums
option and press the 5Select action key.
• Select the album you want to edit and press the
5Select action key.
Or:
• Press the 9 or 8 key to highlight the Albums
option and press the 5Select action key.
• Select the album you want to edit and press the
3Info action key.
The following menu allows you to choose information to edit:
• Select the item you want to edit and press the 3Edit
action key.
• See the following section called Entering and
Editing Names to enter a new name.
ENGLISH
27
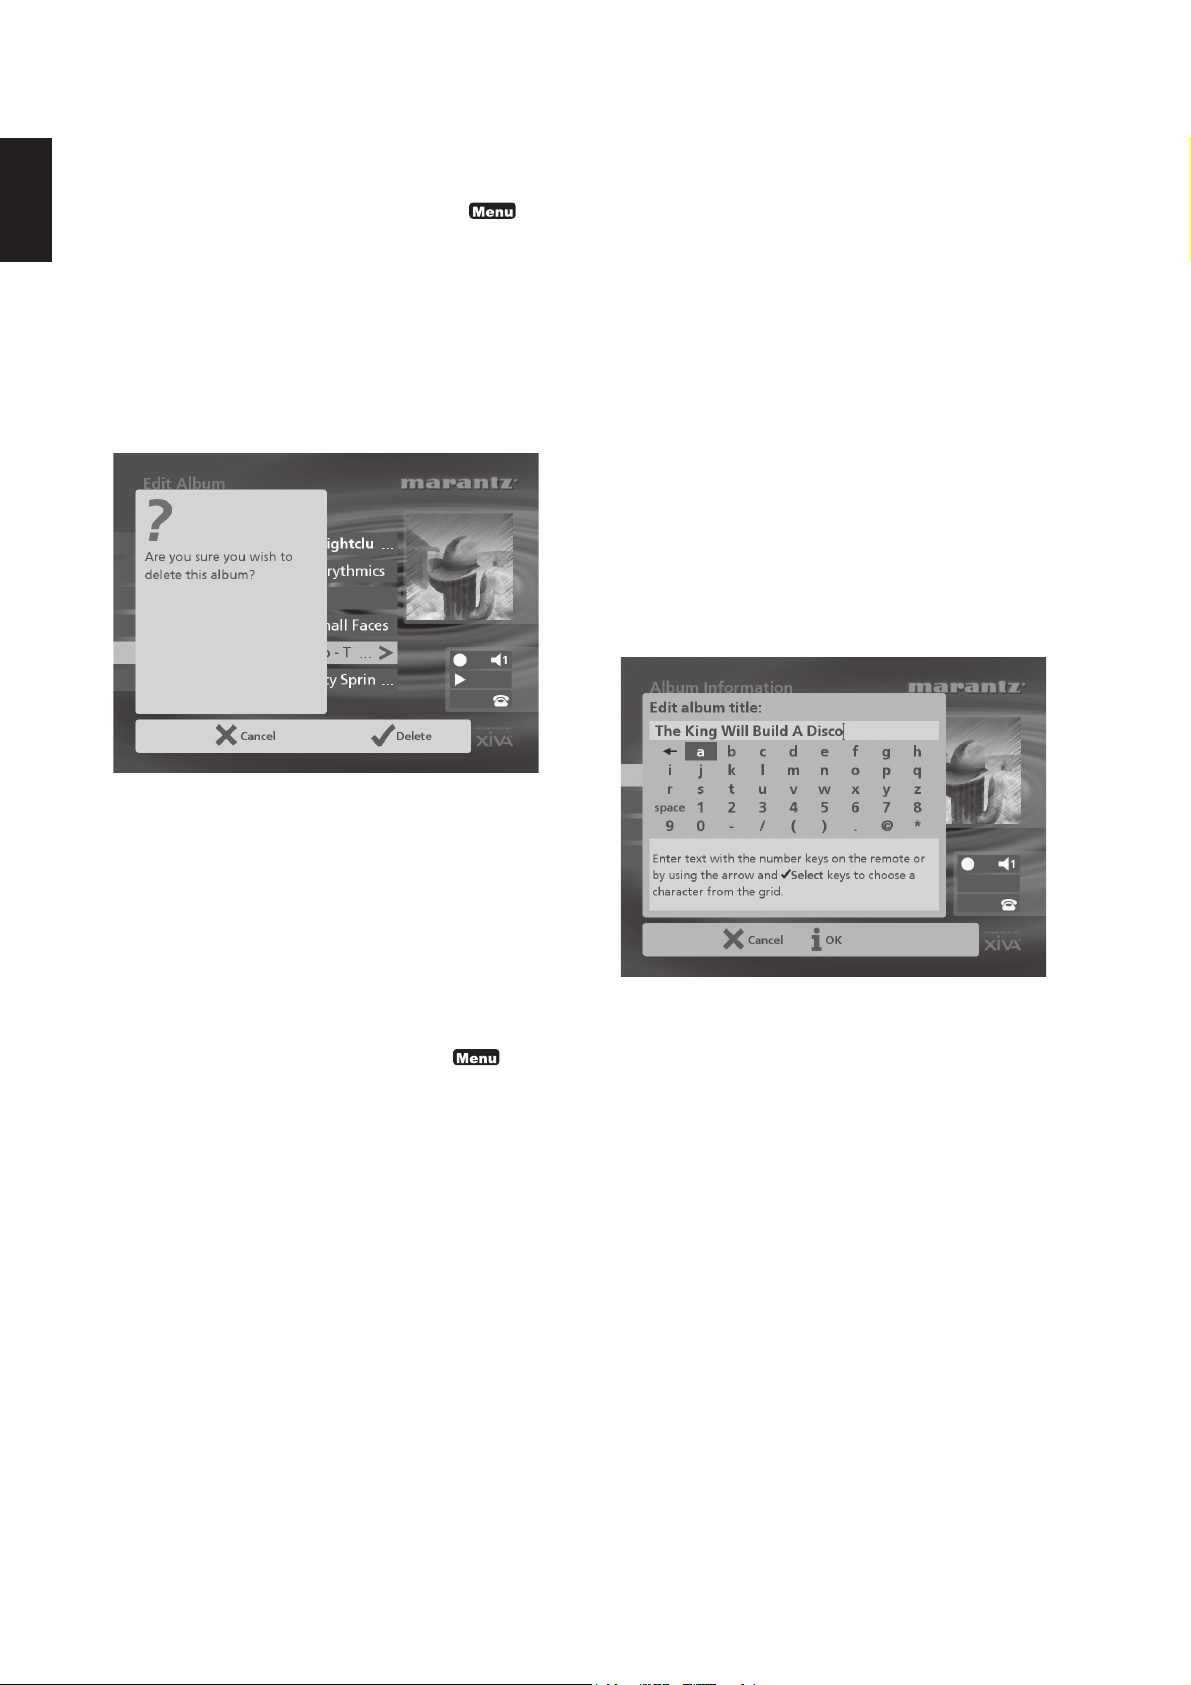
ENGLISH
Deleting albums, tracks or playlists
You can delete albums, tracks or playlists you no longer
want from your Music Server library.
• Display the Main Menu by pressing the 1
key on your Music Server remote control.
• Press the 9 or 8 key to highlight the Library option
and press the 5Select action key.
• Press the 9 or 8 key to highlight either the Edit
Playlists or Edit Albums option and press the
5Select action key.
• Locate the album, playlist or track you want to
delete.
• Press the 2Delete action key to delete it.
ENTERING AND EDITING NAMES
You can enter a new name or edit an existing name on your
Music Server using either of the following methods:
To enter text using the alphanumeric keypad
• Press the 7 or 6 keys to move the cursor to the
required position.
• Use the keys on the alphanumeric keypad to enter a
letter.
For example to enter S press the 7 key four times, because
S is the fourth letter on the 7 key.
• Press the DELETE key on your Music Server
remote control to delete letters.
• Press the CAPS key on either the front panel or
your Music Server remote control to switch between
upper-case and lower-case letters.
To select letters from a grid
Alternatively, the Grid option provides a convenient way of
selecting letters from a grid:
• Press the 8 key to move the cursor into the grid
area.
The currently selected letter is highlighted:
• If you are sure you want to delete the item, press the
5Delete action key again to complete the
operation.
Note: This operation will permanently remove information
from your Hard Disk; you will need to re-record the album if
you delete tracks or albums accidentally. However, deleting
a playlist does not remove any music from the Hard Disk the original albums are unaffected.
CLEARING A PRESET
You can clear the contents of a preset at any time in order to
re-program it as follows:
• Display the Main Menu by pressing the 1 key
on your Music Server remote control.
• Press the 9 or 8 key to highlight the Library option
and press the 5Select action key.
• Press the 9 or 8 key to highlight the Presets
option and press the 5Select action key.
• Highlight the preset you wish to clear and press the
2Clear action key.
• Press the 5Clear action key to confirm your choice.
• You will receive confirmation once the operation is
complete. Press the 5OK action key to continue.
• Use the 7,6,9 or 8 keys to move the cursor and
press the 5Select action key to enter each letter.
• Use the CAPS key on either the front panel or the
Music Server remote to switch between upper and
lower case letters.
If at any time you need to enter text in a different part of the
text field, or you want to return to entering text using the
alphanumeric keypad:
• Press the 9 key repeatedly until the cursor returns
to the text field.
Finally, when you have finished entering the name:
• Press the 3OK action key.
28
 Loading...