


Model DV4300 User Guide
DVD Player
R
CLASS 1 LASER PRODUCT
LUOKAN 1 LASERLAITE
KLASS 1 LASERAPPARAT
CAUTION
RISK OF ELECTRIC SHOCK
DO NOT OPEN
CAUTION: TO REDUCE THE RISK OF ELECTRIC SHOCK,
DO NOT REMOVE COVER (OR BACK)
NO USER-SERVICEABLE PARTS INSIDE
REFER SERVICING TO QUALIFIED SERVICE PERSONNEL
The lightning flash with arrowhead symbol
within an equilateral triangle is intended to
alert the user to the presence of uninsulated
“dangerous voltage” within the product’s
enclosure that may be of sufficient magnitude
to constitute a risk of electric shock to persons.
The exclamation point within an equilateral
triangle is intended to alert the user to the
presence of important operating and
maintenance (servicing) instructions in the
literature accompanying the product.
ENGLISH
WARNING
TO REDUCE THE RISK OF FIRE OR ELECTRIC SHOCK,
DO NOT EXPOSE THIS PRODUCT TO RAIN OR MOISTURE.
CAUTION:
BLADE OF PLUG TO WIDE SLOT, FULLY INSERT.
ATTENTION:
INTRODUIRE LA LAME LA PLUS LARGE DE LA FICHE DANS LA
BORNE CORRESPONDANTE DE LA PRISE ET POUSSER
JUSQU’AU FOND.
NOTE TO CATV SYSTEM INSTALLER:
This reminder is provided to call the CATV (Cable-TV) system installer’s attention to Section 820-40 of the NEC which provides
guidelines for proper grounding and, in particular, specifies that the cable ground shall be connected to the grounding system of the
building, as close to the point of cable entry as practical.
NOTE:
This equipment has been tested and found to comply with
the limits for a Class B digital device, pursuant to Part 15
of the FCC Rules. These limits are designed to provide
reasonable protection against harmful interference in a
residential installation. This equipment generates, uses
and can radiate radio frequency energy and, if not
installed and used in accordance with the instructions,
may cause harmful interference to radio communications. However, there is no guarantee that interference
will not occur in a particular installation. If this equipment
does cause harmful interference to radio or television
reception, which can be determined by tuning the
equipment off and on, the user is encouraged to try to
correct the interference by one or more of the following
measures:
TO PREVENT ELECTRIC SHOCK, MATCH WIDE
POUR ÉVITER LES CHOC ÉLECTRIQUES,
- Reorient or relocate the receiving antenna.
- Increase the separation between the equipment and receiver.
- Connect the equipment into an outlet on a circuit different
from that to which the receiver is connected.
- Consult the dealer or an experienced radio/TV technician for
help.
NOTE:
Changes or modifications not expressly approved by the
party responsible for compliance could void the user’s
authority to operate the equipment.
i

ENGLISH
IMPORTANT SAFETY
INSTRUCTIONS
READ BEFORE OPERATING EQUIPMENT
This product was designed and manufactured to meet strict quality and
safety standards. There are, however, some installation and operation
precautions which you should be particularly aware of.
1. Read Instructions – All the safety and operating instructions
should be read before the product is operated.
2. Retain Instructions – The safety and operating instructions should
be retained for future reference.
3. Heed Warnings – All warnings on the product and in the operating
instructions should be adhered to.
4. Follow Instructions – All operating and use instructions should be
followed.
5. Cleaning – Unplug this product from the wall outlet before
cleaning. Do not use liquid cleaners or aerosol cleaners. Use a
damp cloth for cleaning.
6. Attachments – Do not use attachments not recommended by the
product manufacturer as they may cause hazards.
7. Water and Moisture – Do not u se this product near water-for
example, near a bath tub, wash bowl, kitchen sink, or laundry tub,
in a wet basement, or near a swimming pool, and the like.
8. Accessories – Do not place this product on an unstable cart,
stand, tripod, bracket, or table. The product may fall, causing
serious injury to a child or adult, and serious damage to the
product. Use only with a cart, stand, tripod, bracket, or table
recommended by the manufacturer, or sold with the product. Any
mounting of the product should follow the manufacturer’s
instructions, and should use a mounting accessory recommended
by the manufacturer.
9. CART – A product and cart combination should be moved with
care. Quick stops, excessive force, and uneven surfaces may
cause the product and cart combination to overturn.
12. Grounding or Polarization – This product may be equipped with a
polarized alternating-current line plug (a plug having one blade
wider than the other). This plug will fit into the power outlet only
one way. This is a safety feature. If you are unable to insert the
plug fully into the outlet, try reversing the plug. If the plug should
still fail to fit, contact your electrician to replace your obsolete
outlet. Do not defeat the safety purpose of the polarized plug.
AC POLARIZED PLUG
13. Power-Cord Protection – Power-supply cords should be routed so
that they are not likely to be walked on or pinched by items placed
upon or against them, paying particular attention to cords at plugs,
convenience receptacles, and the point where they exit from the
product.
14. Protective Attachment Plug – The product is equipped with an
attachment plug having overload protection. This is a safety
feature. See Instruction Manual for replacement or resetting of
protective device. If replacement of the plug is required, be sure
the service technician has used a replacement plug specified by
the manufacturer that has the same overload protection as the
original plug.
15. Outdoor Antenna Grounding – If an outside antenna or cable
system is connected to the product, be sure the antenna or cable
system is grounded so as to provide some protection against
voltage surges and built-up static charges. Article 810 of the
National Electrical Code, ANSI/NFPA 70, provides information
with regard to proper grounding of the mast and supporting
structure, grounding of the lead-in wire to an antenna discharge
unit, size of grounding conductors, location of antenna-discharge
unit, connection to grounding electrodes, and requirements for the
grounding electrode. See Figure 1.
10. Ventilation – Slots and openings in the cabinet are provided for
ventilation and to ensure reliable operation of the product and to
protect it from overheating, and these openings must not be
blocked or covered. The openings should never be blocked by
placing the product on a bed, sofa, rug, or other similar surface.
This product should not be placed in a built-in installation such as
a bookcase or rack unless proper ventilation is provided or the
manufacturer’s instructions have been adhered to.
11. Power Sources – This product should be operated only from the
type of power source indicated on the marking label. If you are not
sure of the type of power supply to your home, consult your
product dealer or local power company. For products intended to
operate from battery power, or other sources, refer to the
operating instructions.
16. Lightning – For added protection for this product during a lightning
storm, or when it is left unattended and unused for long periods of
time, unplug it from the wall outlet and disconnect the antenna or
cable system. This will prevent damage to the product due to
lightning and power-line surges.
17. Power Lines – An outside antenna system should not be located
in the vicinity of overhead power lines or other electric light or
power circuits, or where it can fall into such power lines or circuits.
When installing an outside antenna system, extreme care should
be taken to keep from touching such power lines or circuits as
contact with them might be fatal.
18. Overloading – Do not overload wall outlets, extension cords, or
integral convenience receptacles as this can result in a risk of fire
or electric shock.
19. Object and Liquid Entry – Never push objects of any kind into this
product through openings as they may touch dangerous voltage
points or short-out parts that could result in a fire or electric shock.
Never spill liquid of any kind on the product.
ii
20. Servicing – Do not attempt to service this product yourself as
opening or removing covers may expose you to dangerous
voltage or other hazards. Refer all servicing to qualified service
personnel.
21. Damage Requiring Service – Unplug this product from the wall
outlet and refer servicing to qualified service personnel under the
following conditions:
a. When the power-supply cord or plug is damaged.
b. If liquid has been spilled, or objects have fallen into the product.
c. If the product has been exposed to rain or water.
d. If the product does not operate normally by following the operating
instructions. Adjust only those controls that are covered by the
operating instructions as an improper adjustment of other controls
may result in damage and will often require extensive work by a
qualified technician to restore the product to its normal operation.
e. If the product has been dropped or damaged in any way, and
f. When the product exhibits a distinct change in performance – this
indicates a need for service.
22. Replacement Parts – When replacement parts are required, be
sure the service technician has used replacement parts specified
by the manufacturer or have the same characteristics as the
original part. Unauthorized substitutions may result in fire, electric
shock, or other hazards.
23. Safety Check – Upon completion of any service or repairs to this
product, ask the service technician to perform safety checks to
determine that the product is in proper operating condition.
24. Wall or Ceiling Mounting – The product should be mounted to a
wall or ceiling only as recommended by the manufacturer.
25. Heat – The product should be situated away from heat sources
such as radiators, heat registers, stoves, or other products
(including amplifiers) that produce heat.
ENGLISH
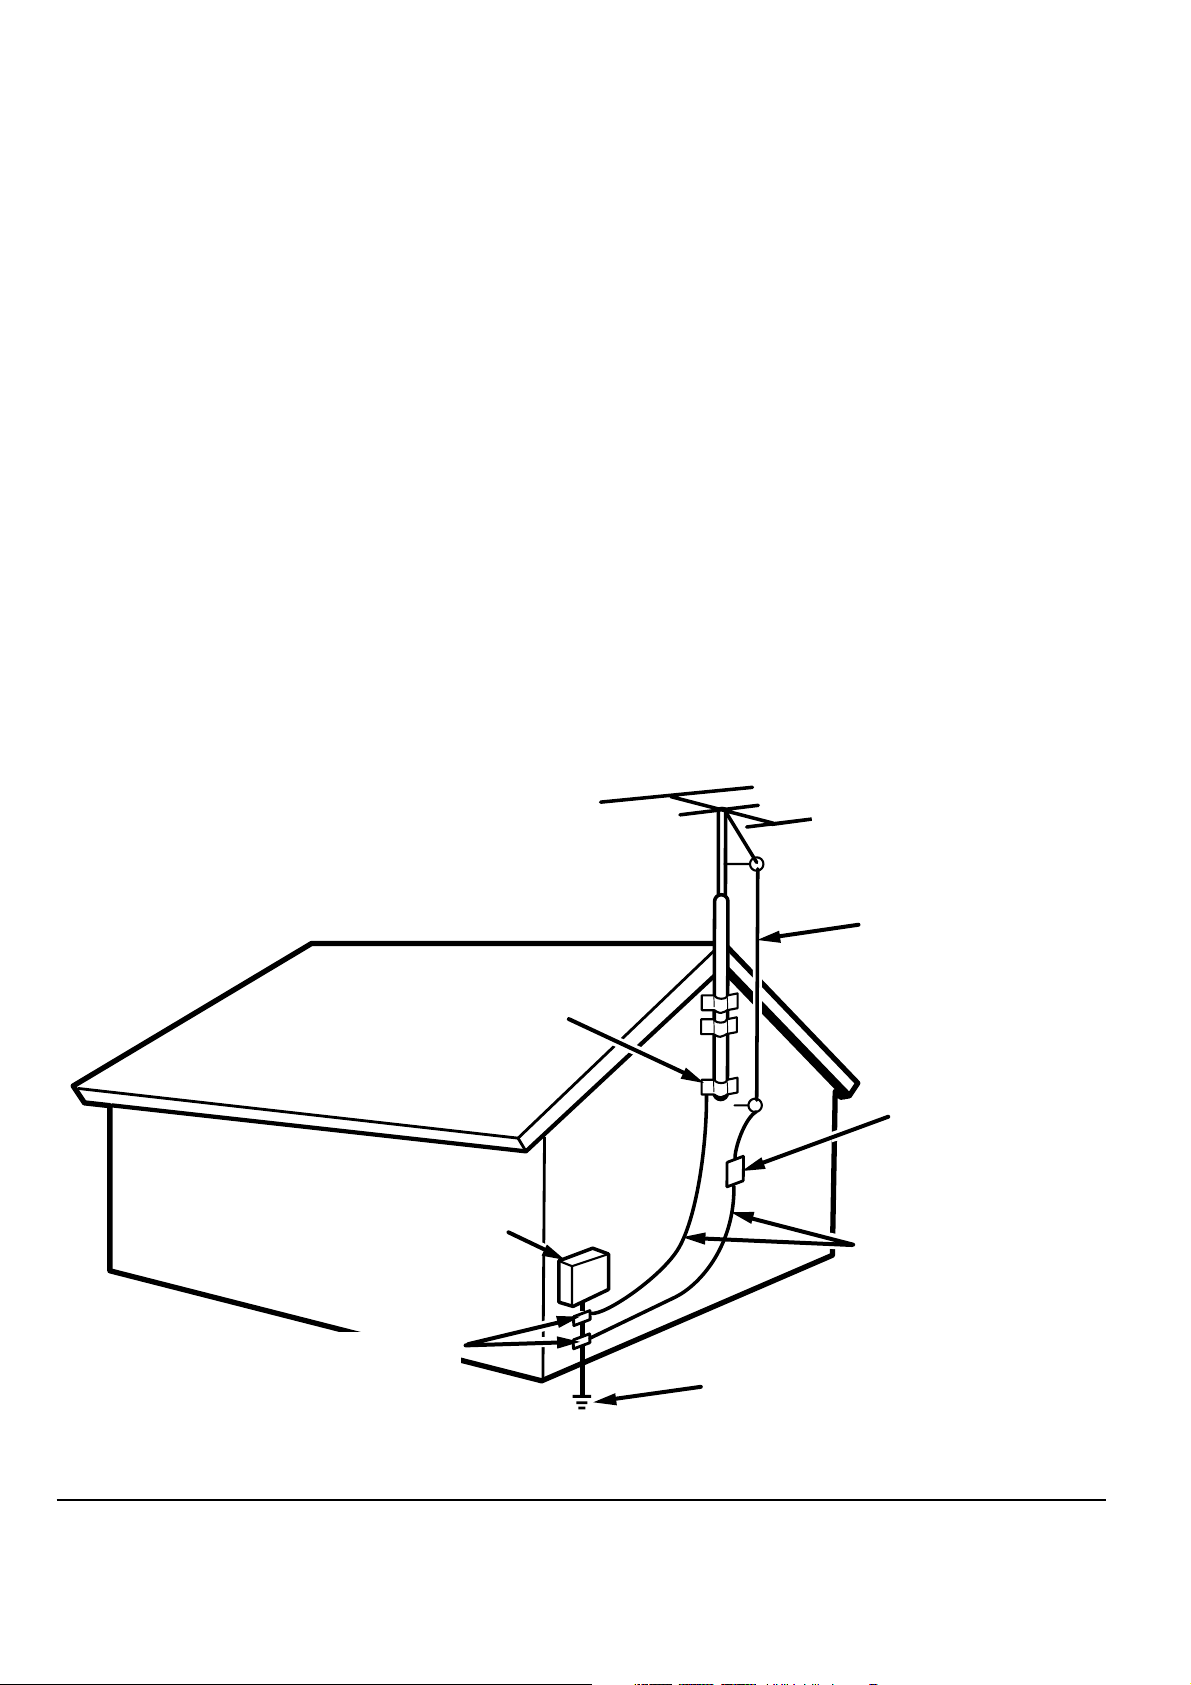
FIGURE 1
EXAMPLE OF ANTENNA GROUNDING AS PER
NATIONAL ELECTRICAL CODE, ANSI/NFPA 70
GROUND
CLAMP
ELECTRIC
SERVICE
EQUIPMENT
ANTENNA
LEAD IN
WIRE
ANTENNA
DISCHARGE UNIT
(NEC SECTION 810-20)
GROUNDING CONDUCTORS
(NEC SECTION 810-21)
GROUND CLAMPS
POWER SERVICE GROUNDING
ELECTRODE SYSTEM
(NEC ART 250, PART H)
NEC - NATIONAL ELECTRICAL CODE
This Class B digital apparatus complies with Canadian ICES-003. Cet appareil numérique de la Classe B est conforme à la norme
NMB-003 du Canada.
iii

Operating Environment
Operating environment temperature and humidity:
+5°C to +35°C (+41°F to +95°F); less than 85%RH (cooling vents not
blocked)
Do not install in the following locations
• Location exposed to direct sunlight or strong artificial light
• Location exposed to high humidity, or poorly ventilated location
This product is for general household purposes. Any failure due to
use for other than household purposes (such as long - term use for
business purposes in a restaurant or use in a car or ship) and which
requires repair will be changed for even during the warranty period.
LASER SAFETY
This unit employs a laser. Only a qualified service
person should remove the cover or attempt to service
this device, due to possible eye injury.
ENGLISH
USE OF CONTROLS OR ADJUSTMENTS OR PERFORMANCE OF
PROCEDURES OTHER THAN THOSE SPECIFIED HEREIN MAY
RESULT IN HAZARDOUS RADIATION EXPOSURE.
CAUTION VISIBLE AND INVISIBLE LASER RADIATION WHEN
OPEN AVOID EXPOSURE TO BEAM (WARNING
LOCATION: INSIDE ON LASER COVERSHIELD)
This product incorporates copyright protection technology that is
protected by method claims of certain U. S. patents and other intellectual
property rights owned by Macrovision Corporation and other rights
owners. Use of this copyright protection technology must be Authorized
by Macrovision Corporation, and is intended for home and other limited
viewing uses only unless otherwise authorized by Macrovision
corporation. Reverse engineering or disassembly is prohibited.
Manufactured under license from Dolby Laboratories. "Dolby" and
the double-D symbol are trademarks of Dolby Laboratories.
Confidential unpublished works. © 1992-1997 Dolby Laboratories,
Inc. All rights reserved.
DTS" and "DTS Digital" are trademarks of Digital Theater Systems,Inc.
1

ENGLISH
CONGRATULATIONS ON YOUR PURCHASE OF THIS FINE MARANTZ PRODUCT.
MARANTZ is on the leading edge of DVD research for consumer products and this unit incorporates the latest technological developments.
We are sure you will be fully satisfied with the DVD player.
Thank you for your support.
Please read through these operating instructions so you will know how to operate your model properly. After you have finished reading the
instructions, put them away in a safe place for future reference.
• This player is not suitable for commercial use.
TABLE OF CONTENTS
BEFORE YOU START.................................. 3
What’s in the box ....................................................................................... 3
Putting the batteries in the remote control ................................................. 3
Using the remote control ............................................................................ 3
Discs compatible with this player ............................................................... 4
DVD Video regions .................................................................................... 4
MP3 compatibility information .................................................................... 4
Caution! ...................................................................................................... 4
BASIC CONNECTION ..................................5
S -Video Out Connection ........................................................................... 5
Composite video out Connection ............................................................... 6
Component video out connection (480i/480p) ........................................... 6
Analog Audio Connection ........................................................................... 7
Digital Audio Connection ............................................................................ 8
System Control Connection ....................................................................... 9
CONTROLS & DISPLAY ............................10
Front Panel .............................................................................................. 10
Display ...................................................................................................... 11
Rear Panel ............................................................................................... 12
Remote Controller Unit ............................................................................ 13
BASIC FUNCTION ..................................... 16
Open / Close Disc Tray ............................................................................ 16
Basic play of DVD, VIDEO-CD or CDDA ................................................. 17
Basic play of MP3 .................................................................................... 18
Selecting VIDEO MODE .......................................................................... 18
Selecting MENU ITEMS (DVD or Video CD with PBC only) .................... 19
STOP and POWER OFF.......................................................................... 19
SEARCH .................................................................................................. 20
SKIP ......................................................................................................... 21
SLOW ...................................................................................................... 21
Selecting Audio Languages (DVD only) ................................................... 22
Selecting Subtitles (DVD only) ................................................................. 23
Selecting Angles (DVD only) .................................................................... 23
Kodak picture CD play ............................................................................. 24
JPEG file play .......................................................................................... 24
ADVANCED FUNCTION ............................25
3D sound effect (MP3, CDDA , Dolby Digital 2CH Stereo) ...................... 25
Utilizing Repeat Function ......................................................................... 26
SHUFFLE (VCD with PBC off, MP3, CDDA only) .................................... 27
PROGRAM (VCD, MP3, CDDA only) ...................................................... 27
Digest (VCD,JPEG,Kodak picture CD, CDDA only) ................................. 28
MARKER (DVD, VCD WITH PBC OFF, CDDA)....................................... 29
Display ..................................................................................................... 29
Zoom screen ............................................................................................ 31
CUSTOMIZING DVD PERFORMANCE ..... 32
Audio ........................................................................................................ 32
Video ........................................................................................................ 33
Other ........................................................................................................ 35
Languages (DVD only) ............................................................................. 35
Parental Lock (DVD only) ........................................................................ 36
ADDITIONAL INFORMATION .................... 37
Handling discs .......................................................................................... 37
Cleaning the pickup lens .......................................................................... 37
Problems with condensation .................................................................... 37
Hints on installation .................................................................................. 38
Moving the player ..................................................................................... 38
Power cord caution .................................................................................. 38
Resetting the player ................................................................................. 38
Malfunctioning of this unit ........................................................................ 38
Glossary ................................................................................................... 39
TROUBLESHOOTING................................40
SPECIFICATIONS ...................................... 42
2
BEFORE YOU START
What’s in the box
Thank you for buying this MARANTZ product. Please confirm
that the following accessories are in the box when you open it.
• Remote control
• AAA/R03 dry cell batteries x2
• Audio/Video cable
• System control cable
• Operating instruction (this manual)
• Warranty card
Putting the batteries in the remote control
1 Open the battery compartment cover on the back of the remote
control.
2 Insert two AAA/R03 batteries into the battery compartment
following the indications (+, -) inside the compartment.
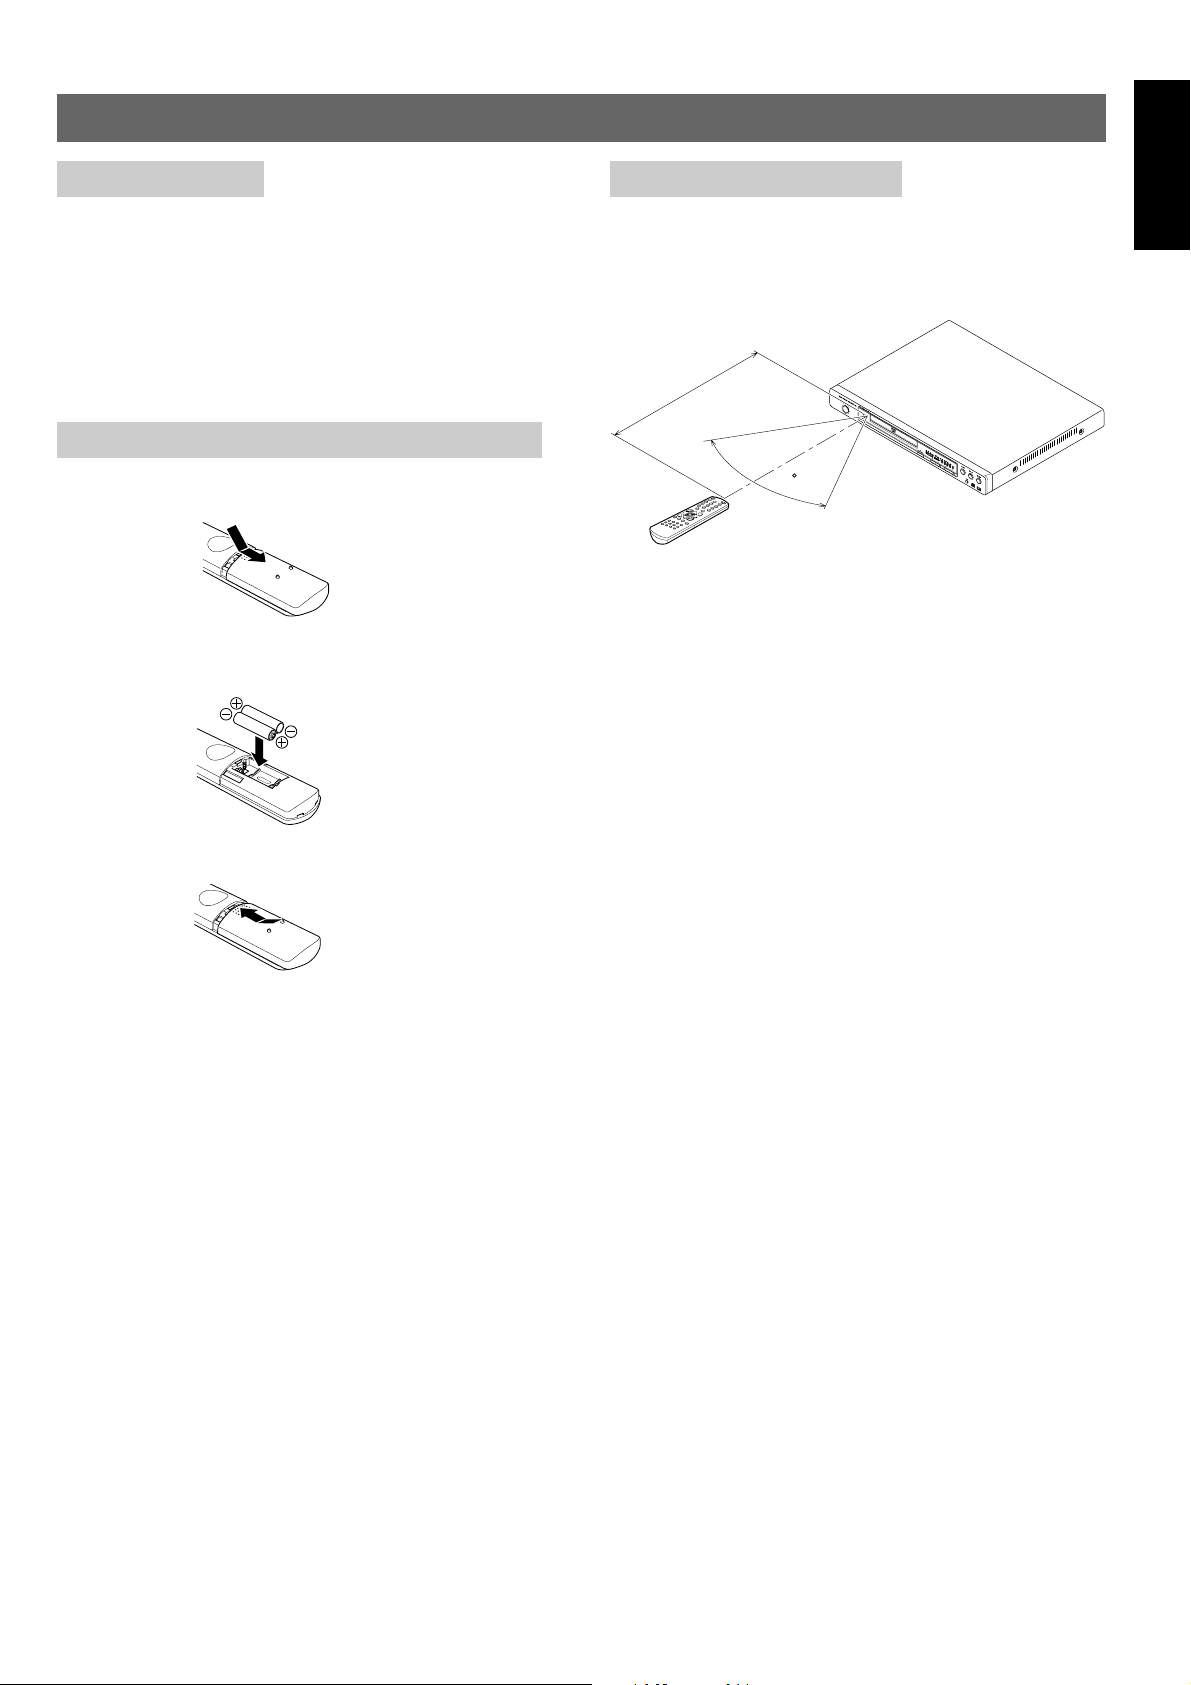
Using the remote control
Keep in mind the following when using the remote control:
• Make sure that there are no obstacles between the remote and
the remote sensor on the unit.
• Use within the operating range and angle, as shown.
5m(17 feet)
60
• Remote operation may become unreliable if strong sunlight or
fluorescent light is shining on the unit’s remote sensor.
• Remote controllers for different devices can interfere with each
other. Avoid using remotes for other equipment located close to
this unit.
• Replace the batteries when you notice a fall off in the operating
range of the remote.
Note
When using this player independently, set a REMOTE CONTROL
switch on the rear panel to INTERNAL. (page 9)
ENGLISH
3 Close the cover.
Note
Incorrect use of batteries can result in hazards such as leakage and
bursting. Please observe the following:
• Don’t mix new and old batteries together.
• Don’t use different kinds of battery together—although they may
look similar, different batteries may have different voltages.
• Make sure that the plus and minus ends of each battery match
the indications in the battery compartment.
• Remove batteries from equipment that isn’t going to be used for
a month or more.
When disposing of used batteries, please comply with governmental
regulations or environmental public instruction’s rules that apply in
your country or area.
3
ENGLISH
Discs compatible with this player
Any disc that displays one of the following logos should play in
this player. Other formats, including DVD-RAM, DVD-ROM,
CD-ROM (except those that contain MP3 files), and Photo CD
will not play.
DVD Video compatibility:
• Logos:
• Single-sided or double-sided discs
• Single layer or dual layer discs
• Dolby Digital, DTS (Digital out only), MPEG or Linear PCM
digital audio
• MPEG-2 digital video
Discs are generally divided into one or more titles. Titles may be
further subdivided into chapters.
DVD-R compatibility:
This unit can play DVD-R discs. Please note the following points when
using these discs:
• Logo:
• This unit can play DVD-R discs recorded as DVD video format.
Audio CD compatibility:
• Logos:
• 12cm or 8cm discs
• Linear PCM digital audio
• CD-Audio, CD-R* and CD-RW* formats
CDs are divided into tracks.
*This unit can play CD-R and CD-RW discs recorded in CD Audio or
Video CD format, or with MP3 audio files, or Kodak picture CD files.
Video CD compatibility:
• Logo:
• 12cm or 8cm discs
• MPEG-1 digital audio
• MPEG-1 digital video
Video CDs are divided into tracks.
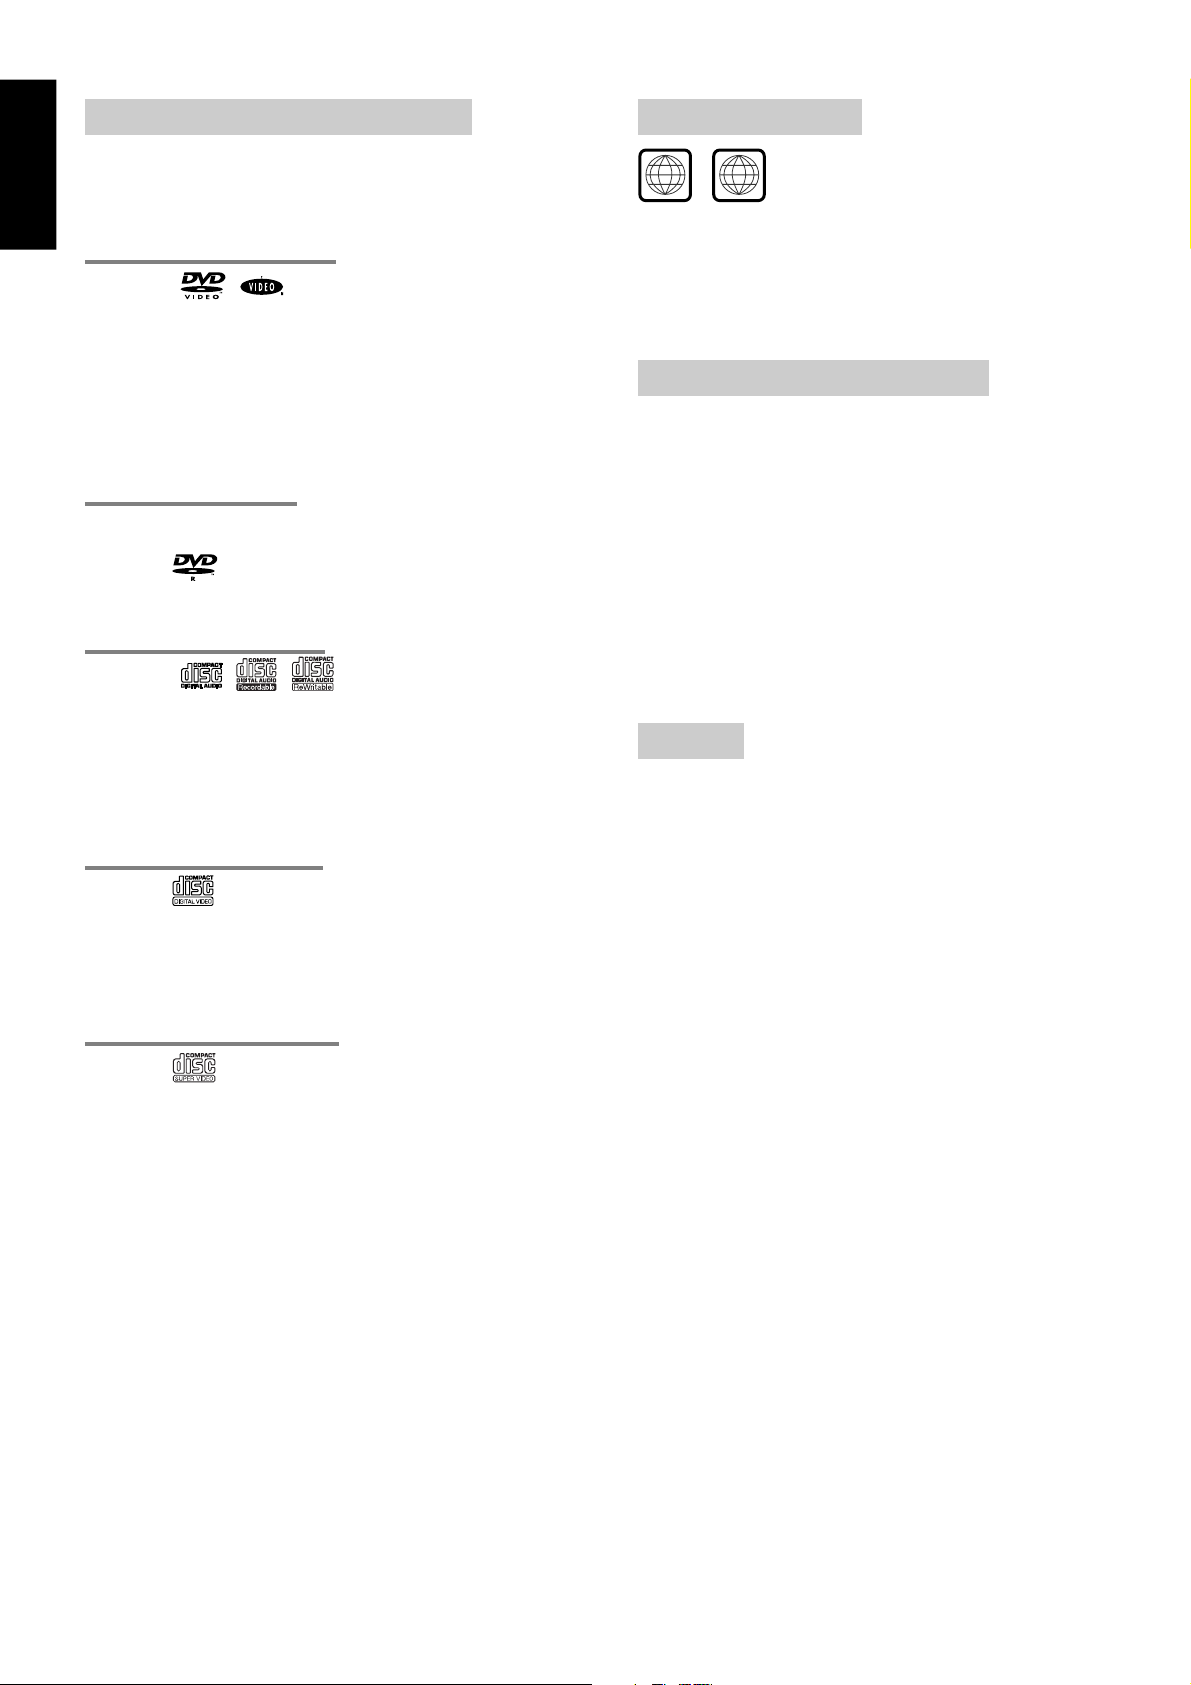
DVD Video regions
1
All DVD Video discs carry a region mark on the case
somewhere that indicates which region(s) of the world the disc
is compatible with. Your DVD player also has a region mark,
which you can find on the rear panel. Discs from incompatible
regions will not play in this player. Discs marked ALL will play
in any player.
ALL
MP3 compatibility information
• The CD-ROM must be ISO 9660 compatible.
• Mono or stereo MPEG-1 Audio Layer 3 format, 32 or 44.1 or
48kHz, fixed bit-rate. Incompatible files will not play.
• Not compatible with variable bit-rate (VBR) files.
• This player only plays tracks that are named with the file
extension “.mp3” or “.MP3”.
• This player is compatible with multi-session discs.
• Use CD-R or CD-RW media for recording your MP3 files. The
disc must be finalized in order to play.
• Audio encoded at 128Kbps should sound close to regular audio
CD quality. Although this player will play 56 to 256k bit-rate MP3
tracks, the sound quality becomes noticeably worse at lower bitrates.
• This player can recognize a maximum of 126 folders and 255
tracks.
Caution!
• DVD-R and CD-R/RW discs recorded using a personal computer
or a DVD or CD recorder may not play if the disc is damaged or
dirty, or if there is dirt or condensation on the player’s lens.
• If you record a disc using a personal computer, even if it is
recorded in a compatible format, there are cases in which it may
not play because of the settings of the application software used
to create the disc. (Check with the software publisher for more
detailed information.)
• Unfinalized DVD-R discs cannot be played.
• Unfinalized CD-R/RW discs can be played, but not all time
information (playing time, etc.) will be displayed.
• For more information on using DVD-R and CD-R/RW discs, see
Handling discs starting on page 37.
Super VCD compatibility:
• Logo:
• 12cm (5in.) or 8cm (3in.) discs
• MPEG-1 digital audio
• MPEG-2 digital video
Super VCDs are divided into tracks.
4
BASIC CONNECTION
VIDEO
S-VIDEO
COMPONENT
COAXIAL
OPTICAL
INTERNAL
EXTERNAL
S-VIDEO
• First of all, read through the instructions before connecting other equipment. Make sure that this unit and other equipment to be
connected are set to the standby mode or off, and disconnect the AC mains before starting connection. In order for air to
circulate freely, please do not block ventilation holes of any of the equipment. Select the appropriate screen size at the initial
setting according to your TV set, conventional 4:3 or wide screen 16:9.
• TV MODE SETTING
Setup Menu / Video Video Output
Progressive Output mode Video Jack S-Video Jack Component Jack
OFF YCbCr Composite
ON YCbCr
--
-
OFF S-Video Composite S-Video
Note
• Do not connect your DVD-player via your VCR, because the video quality could be distorted by the copy protected system.
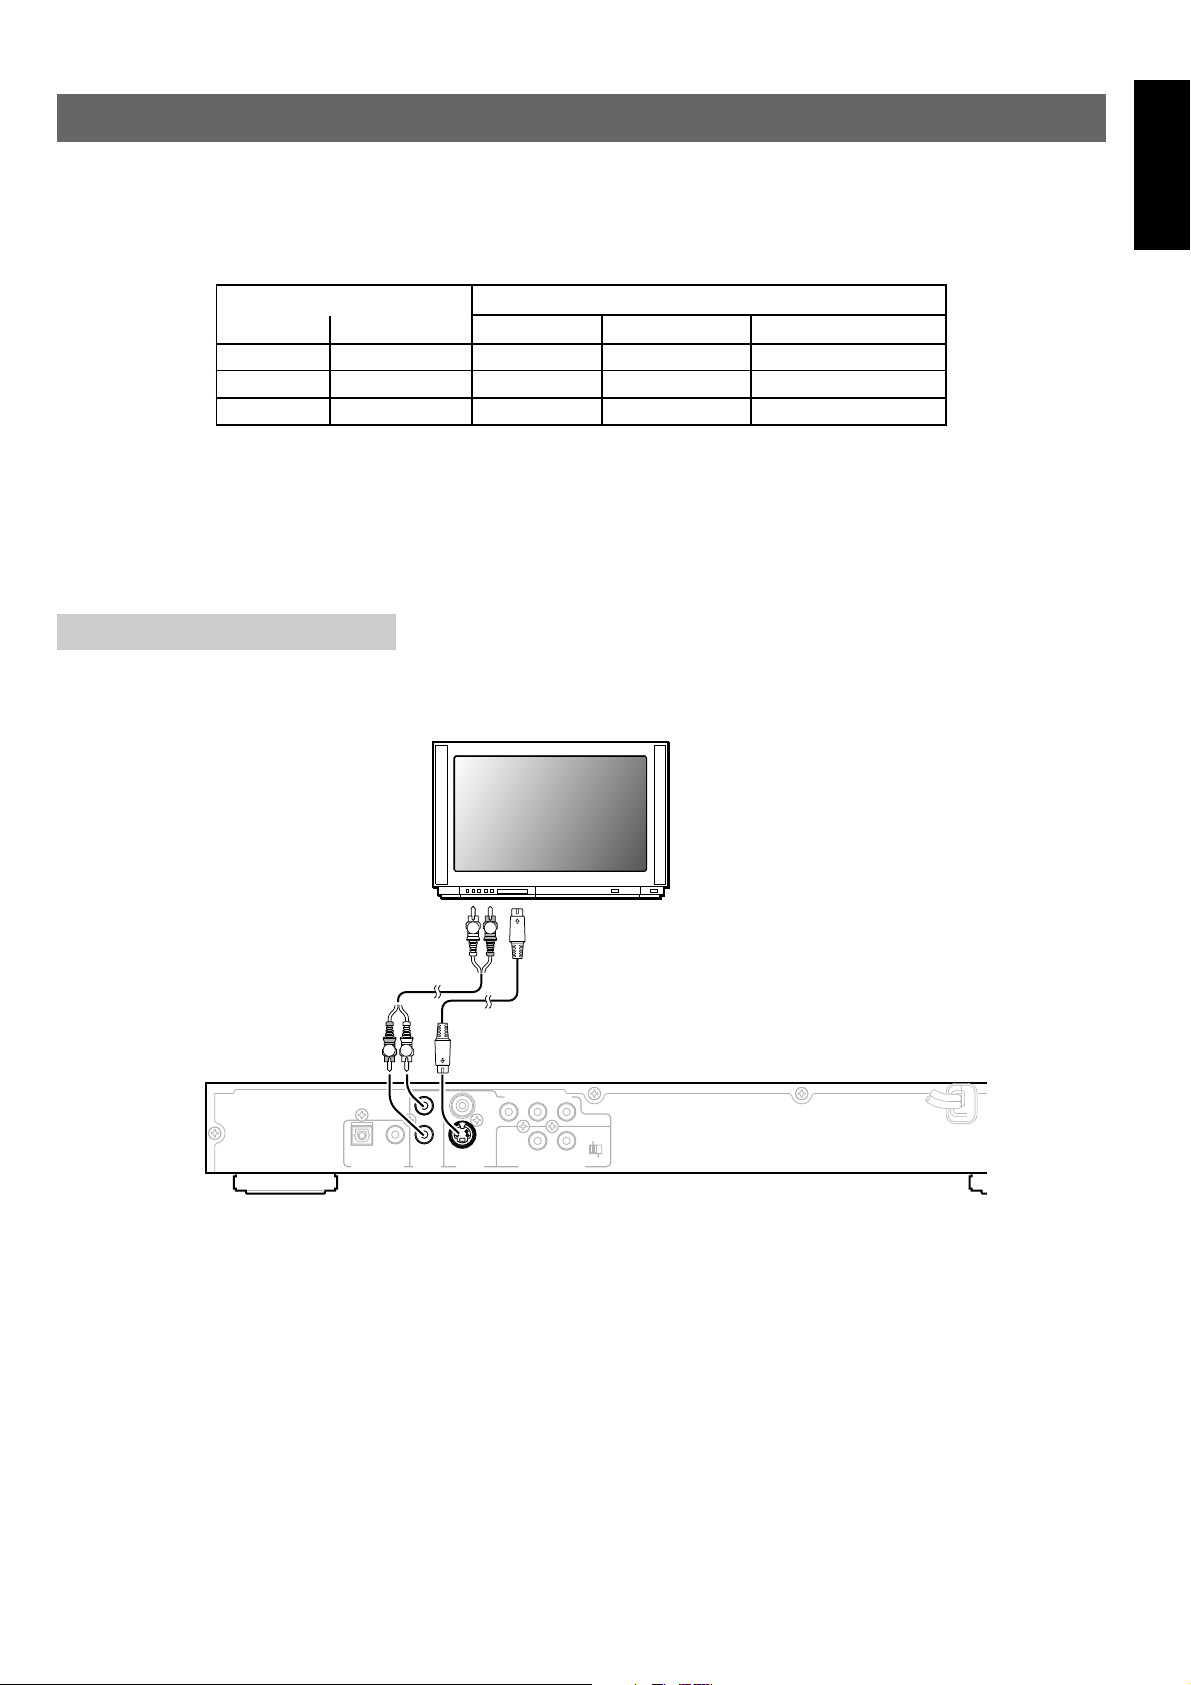
S -VIDEO OUT CONNECTION
Note
From the SETUP menu display, set the OUTPUT MODE to S-VIDEO.
Interlace mode (480i)
Progressive mode (480p)
-
ENGLISH
L R
a
b
LR
VIDEO
Y
CB /
PBCR /
P
OPTICAL
DIGITAL OUTPUT
COAXIAL
AUDIO
AUDIO
OUTPUT
OUTPUT
L
L
R
R
S-VIDEO
S-VIDEO
VIDEO
VIDEO
OUTPUT
OUTPUT
REMOTE CONTROL
R
COMPONENT
EXTERNAL
OUTIN
INTERNAL
a. audio cable (optional)
To audio input connectors on TV. (red, white)
b. S-Video cable (optional)
To S-Video input connector on TV.
5
ENGLISH
REMOTE CONTROL
EXTERNAL
VIDEO
S-VIDEO
COMPONENT
COAXIAL
OPTICAL
INTERNAL
EXTERNAL
COMPONENT
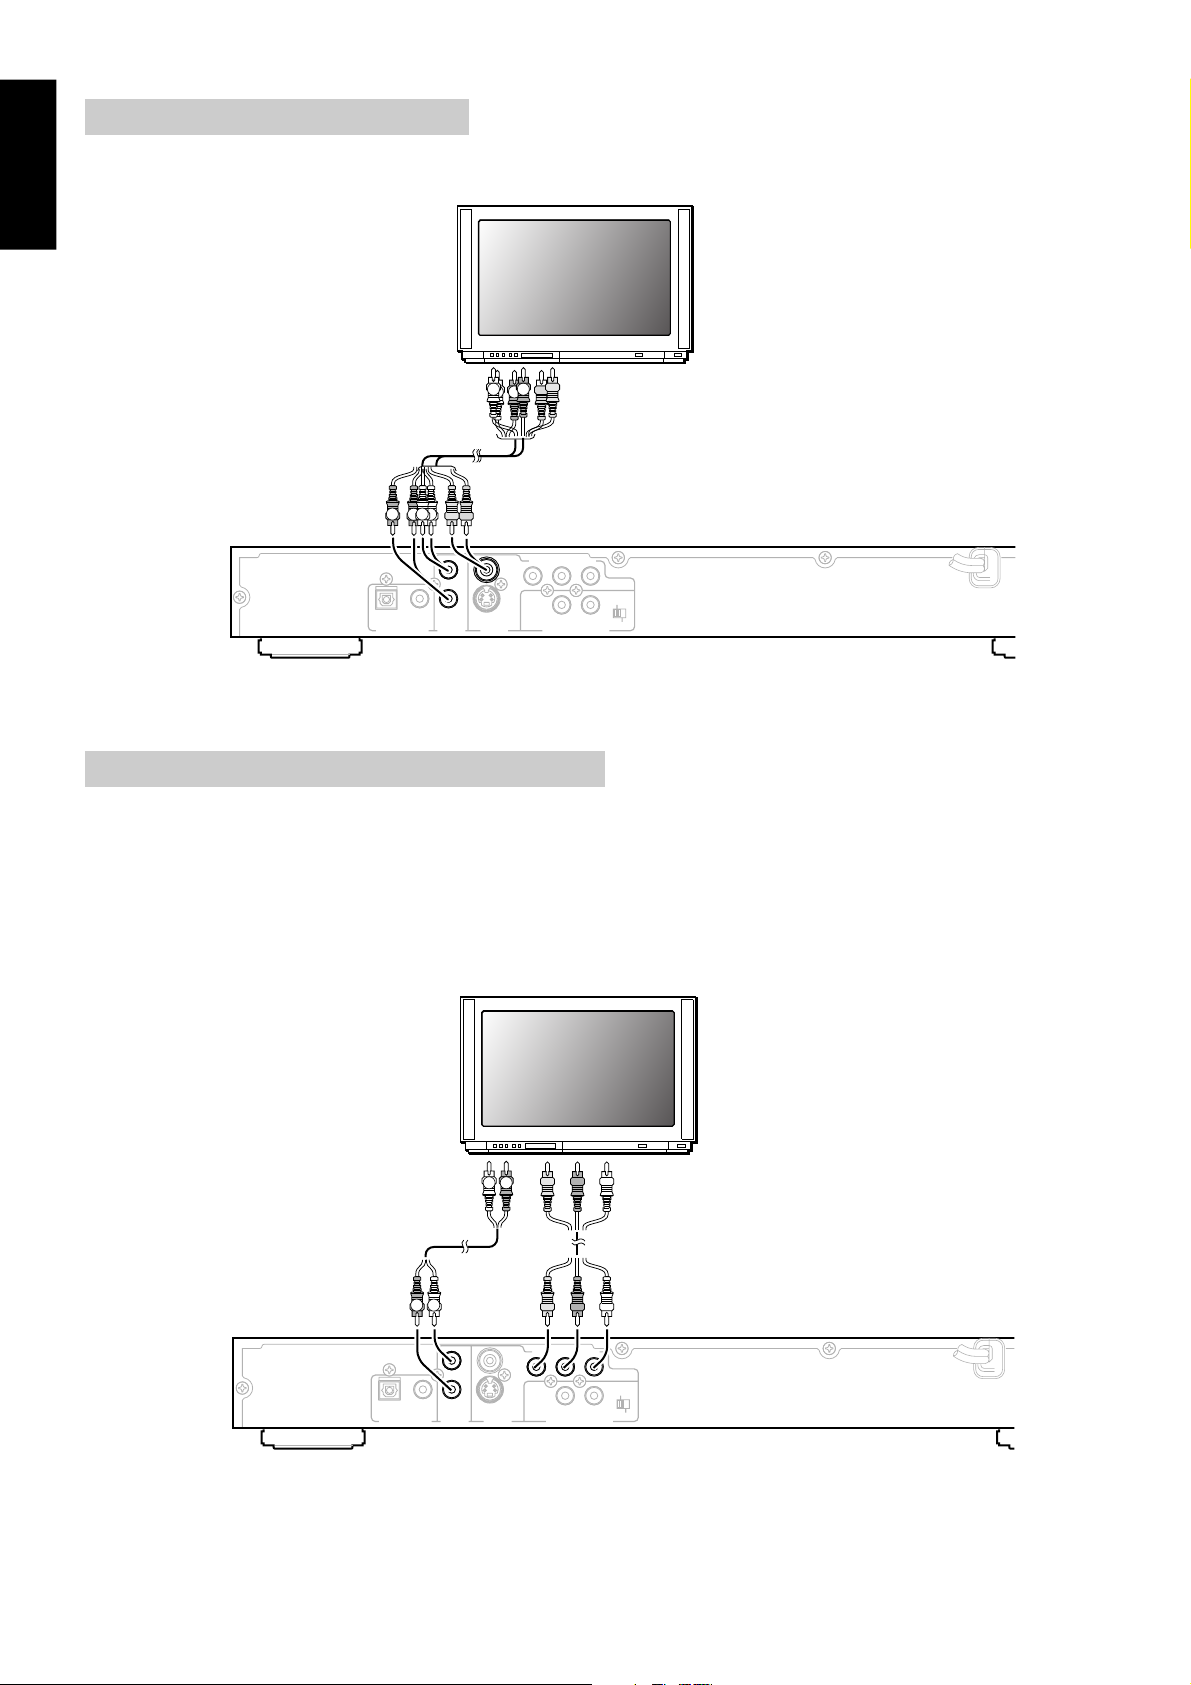
Composite video out Connection
Note
From the SETUP menu display, set the Progressive to OFF.
LR
LR
COAXIALOPTICAL
OUTPUT
DIGITAL OUTPUT
OUTPUT
RL
L R
c
VIDEO
VIDEO
Y
CB /
PBCR /
P
REMOTE CONTROL
R
COMPONENT
EXTERNAL
OUTIN
INTERNAL
L
L
R
R
S-VIDEO
AUDIO
AUDIO
VIDEO
VIDEO
OUTPUT
OUTPUT
c. Video/audio cable (accessory)
To audio input connectors on TV. (red, white)
To video input connector on TV. (yellow)
Component video out connection (480i/480p)
Note
• If your TV has progressive (480p) video input, from the SETUP menu display, set the progressive mode to ON and also set the
output mode to YCbCr.
• If your TV has interlace (480i) video input, from the SETUP menu display, set the progressive mode to OFF and also set the output
mode to YCbCr.
• All HD TV are compatible with this player but some TV may cause artifacts in the picture.
• If you set progressive mode to ON [progressive scan mode], you can’t see the picture with your Analog TV or some digital TV. In this
case, press stop button for 5 seconds of your remote controller then you can see the picture on the interlace mode with your TV.
L R
d
e
6
LR
VIDEO
Y
CB /
PBCR /
Y
CB /
PBCR /
REMOTE CONTROL
OUTIN
OPTICAL
DIGITAL OUTPUT
COAXIAL
AUDIO
AUDIO
OUTPUT
OUTPUT
L
L
R
R
S-VIDEO
VIDEO
OUTPUT
d. Audio cable (optional)
To audio input connectors on TV. (red, white)
e. Component-Video cable (optional)
To Component video input connectors on TV.
P
R
P
R
COMPONENT
COMPONENT
EXTERNAL
INTERNAL
VIDEO
S-VIDEO
COMPONENT
COAXIAL
OPTICAL
INTERNAL
EXTERNAL
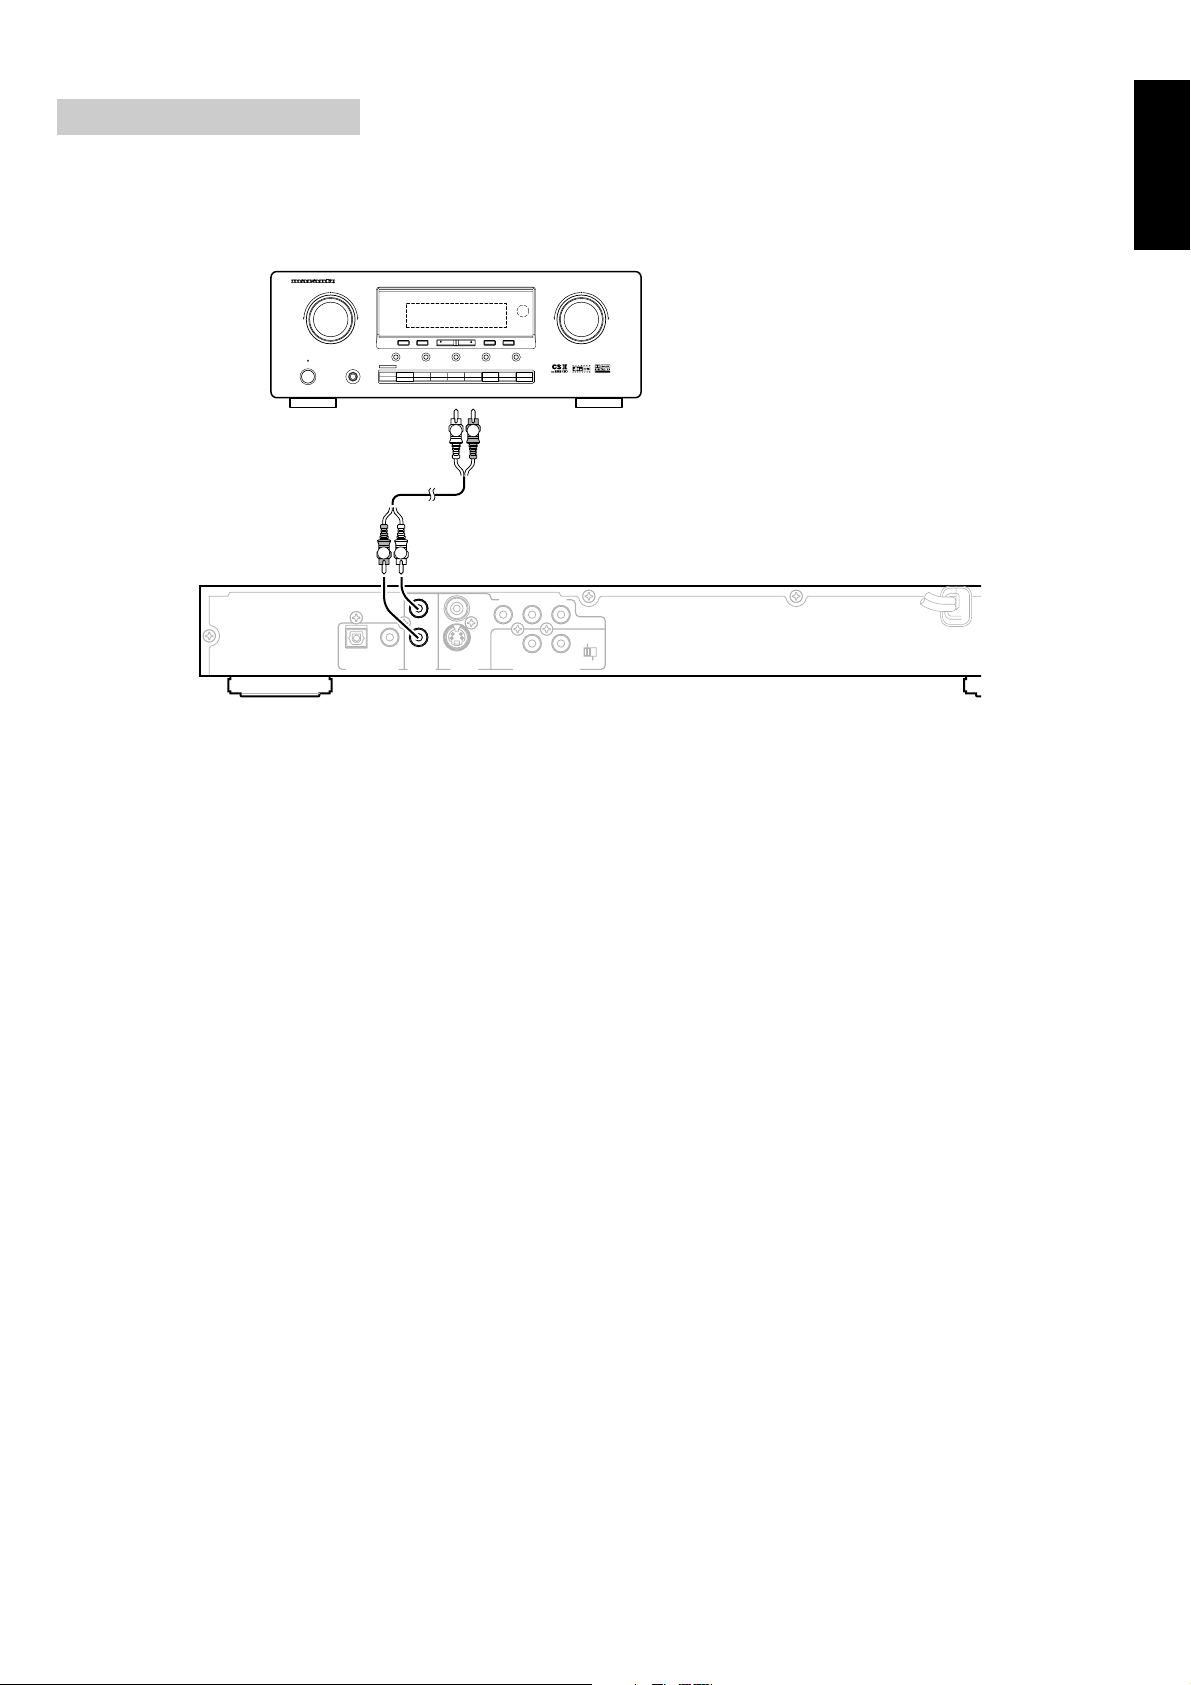
Analog Audio Connection
Note
• Make analog audio connections to a stereo amplifier or receiver.
• Analog audio connections can also be made to a TV or monitor with stereo input jacks.
• When playing DTS-encoded discs, excessive noise may be output from the Analog Audio out jack. This is not a malfunction.
ENGLISH
POWER ON/STANDBY
AV SURROUND RECEIVER SR4300
SURROUND
CLEAR
MEMORY
HT-EQ
STANDBY
A/D
PHONES
DVD
TV
6.1CH-IN
F/P
MODE
TUNING/PRESET
S-DIRECT
DSS/VCR2
VCR1
CDR/MD
DIMMER
TAPECDTUNER
MUTE
VOLUME
DOWN
UP
L R
g
LR
VIDEO
Y
CB /
PBCR /
P
OPTICAL
DIGITAL OUTPUT
COAXIAL
AUDIO
AUDIO
OUTPUT
OUTPUT
L
L
R
R
S-VIDEO
VIDEO
OUTPUT
REMOTE CONTROL
R
COMPONENT
EXTERNAL
OUTIN
INTERNAL
g. Audio cable (optional)
To audio input connectors on AV amplifier or receiver.
7
ENGLISH
DIGITAL OUTPUT
REMOTE CONTROL
OUTPUT
VIDEO
OUTPUT
OUT
DIGITAL OUTPUT
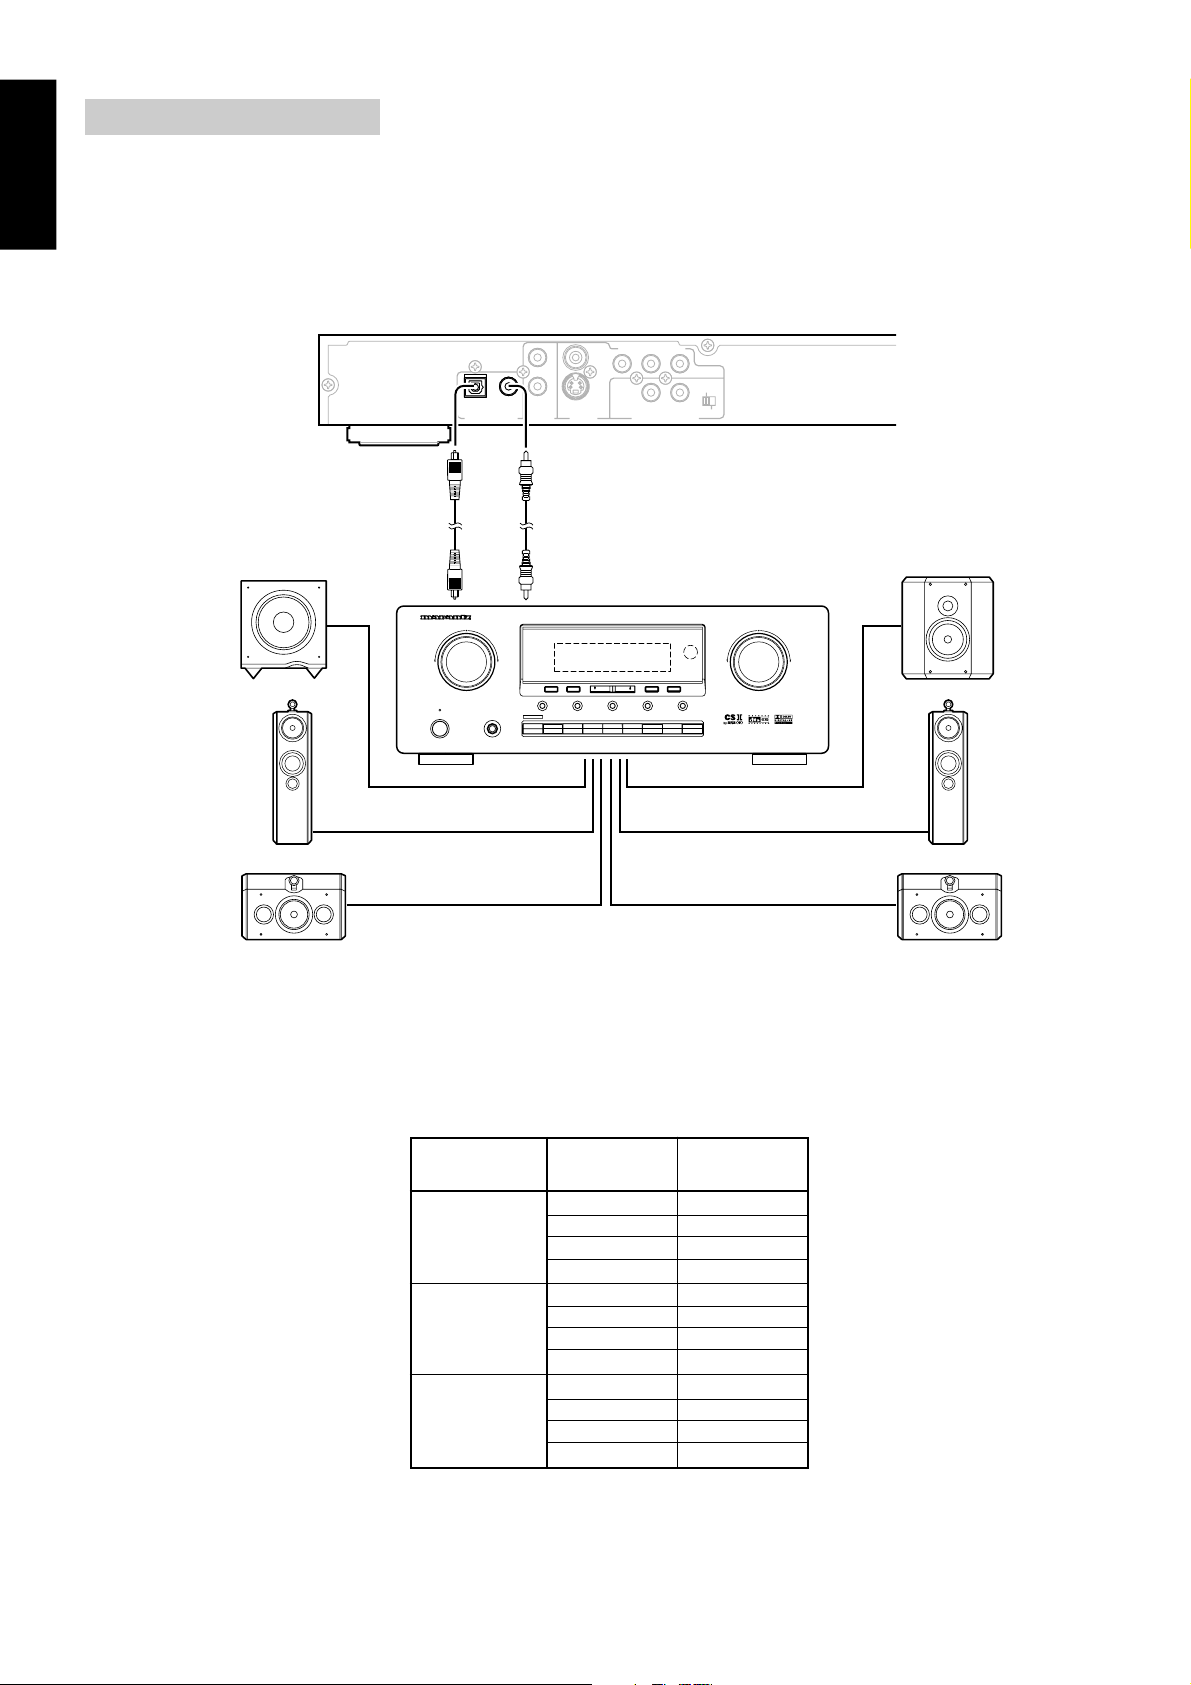
Digital Audio Connection
Note
• When a recorded in a Dolby Digital or DTS is loaded, noise will be output if you have made connections via the digital audio jacks
to a receiver or amplifier that cannot decode a Dolby Digital or DTS digital bitstream.
In this case, be sure to set up the SETUP, Audio setting; Digital out to PCM or OFF.
VIDEO
Y
CB /
PBCR /
P
IN
REMOTE CONTROL
R
COMPONENT
EXTERNAL
OUT
INTERNAL
Center speaker
VOLUME
Subwoofer
DIGITAL OUTPUT
DIGITAL OUTPUT
SURROUND
COAXIALOPTICAL
COAXIALOPTICAL
AV SURROUND RECEIVER SR4300
L
R
S-VIDEO
AUDIO
VIDEO
OUTPUT
OUTPUT
ih
AV amplifier or receiver with built-in
Dolby Digital and DTS decorder.
Front speaker
(left)
Surround speaker (left)
UP
POWER ON/STANDBY
CLEAR
MEMORY
HT-EQ
STANDBY
A/D
PHONES
DVD
TV
6.1CH-IN
VCR1
F/P
TUNING/PRESET
S-DIRECT
DIMMER
DSS/VCR2
CDR/MD
TAPECDTUNER
DOWN
MODE
MUTE
Surround speaker (right)
h, i. Optical (h) or coaxial (i) audio cable (optional)
To optiacl or coaxial digital input connectors on AV amplifier or receiver.
• DIGITAL OUT SETTING
SETUP menu
Digital Out
OFF
BTSTREAM
PCM
DISC DIGITAL OUT
Dolby Digital
DTS
PCM
MPEG 2
-
-
-
-
Dolby Digital Dolby Digital
DTS DTS
PCM PCM
MPEG 2 MPEG 2
Dolby Digital PCM
DTS DTS
PCM PCM
MPEG 2 PCM
Front speaker
(right)
8

VIDEO
S-VIDEO
COMPONENT
COAXIAL
OPTICAL
INTERNAL
EXTERNAL
INTERNAL
EXTERNAL
System Control Connection
By connecting this DVD player to another Marantz audio component using a supplied System Control cable, you can remotely
operate the components as a single system.
• When connecting to component with a remote sensor, be sure to connect the REMOTE CONTROL IN jack of this DVD player to
the REMOTE CONTROL OUT jack of the component with the remote sensor.
• When connecting to component which is not equipped with a remote sensor, be sure to connect the component to the REMOTE
CONTROL OUT jack of this DVD player.
Remote switch
• When using this DVD player independently, set this switch to INTERNAL. When using this DVD player in a system with a
Marantz receiver equipped with a remote sensor, set the switch to EXTERNAL.
VIDEO
Y
CB /
PBCR /
P
OPTICAL
DIGITAL OUTPUT
COAXIAL
AUDIO
OUTPUT
L
R
S-VIDEO
VIDEO
OUTPUT
REMOTE CONTROL
REMOTE CONTROL
R
COMPONENT
EXTERNAL
EXTERNAL
OUTIN
OUTIN
INTERNAL
INTERNAL
EXTERNAL
ENGLISH
j
INTERNAL
OUT IN
REMOTE CONTROL
POWER ON/STANDBY
AV SURROUND RECEIVER SR4300
SURROUND
CLEAR
MEMORY
HT-EQ
STANDBY
A/D
PHONES
DVD
TV
6.1CH-IN
F/P
CDR/MD
DIMMER
TAPECDTUNER
MODE
MUTE
TUNING/PRESET
S-DIRECT
DSS/VCR2
VCR1
VOLUME
DOWN
UP
j. System conrol cable (optional)
To remote control output connector on AV amplifier or receiver.
9

ENGLISH
CONTROLS & DISPLAY
Front Panel
qw retyui
o!0!1 !2!3 !4
q POWER (STANDBY/ON) button
To switch the unit On or into STAND BY when connected to AC
power outlet.
w STAND BY indicator
Lights when Power is STAND BY mode.
e REMOTE SENSOR
Receives a light signal from the remote controller.
r DISC TRAY
To load or unload a disc. Put a disc to be played on here.
t FL DISPLAY
Displays operation status (Refer to Page11 FL Display).
y PLAY button
To play the loaded disc. Press this button to go to the preferred
item when the menu is displayed on the TV screen.
u STOP button
To stop playing. If using a Video CD 2.0, SVCD or CVD with
PBC, this button works as a RETURN function to move to the
previous menu.
oo
o OPEN/CLOSE button
oo
To open or close the disc tray.
00
!
0 FR (Fast Reverse) button
00
To play the disc fast reverse. It can also be used as a Slow
Reverse button when in pause or step mode, and also a left
arrow(
) button when in menu mode.
!1 FF (Fast Forward) button
To play the disc fast forward. It can also be used as a Slow
Forward button when in pause or step mode, and also a right
arrow(
!
To skip back from the current chapter (for DVD) or track (for
VCD or CD). When in menu mode, this button also works as a
down arrow(
button works as the PREV button to move to the previous play
list.
!
To skip forward to the next chapter (for DVD) or track (for VCD
or CD). When in menu mode, this button also works as an up
arrow(
works as the NEXT button to move to the next play list.
) button when in menu mode.
22
2 PREV button
22
) button. If playing a Video CD with PBC, this
33
3 NEXT button
33
) button. If playing a Video CD with PBC, this button
i PAUSE/STEP button
Used to view one frame at a time during play. When you continue pressing this button, it will function continuously. Press
PLAY button for normal play.
10
44
!
4 MENU button
44
To view the general information for the current loaded disc such
as language selection, audio output selection and subtitle language selection and so on.

Display
as dfghj k
ENGLISH
l¡0 ¡1 ¡2
a CDDA/SVCD/DVD/MP3
Illuminates the type of a disc loaded on disc tray.
s TITLE/CHAPTER
Illuminates the information of the TITLE or CHAPTER of the
DVD disc under play.
d PLAY/PAUSE/STEP
Illuminates the current operation mode.
f ROTATION
Rotates when the disc is spinning.
g ANGLE
Indicates the current disc being played is viewed as multi angle.
This function only works for discs having scenes recorded at
different angles.
h SUB-T
Indicates the current disc under play has multi subtitle. This function only works for discs having recordings with multiple subtitle
languages.
j AUDIO
Indicates the current disc under play has multi audio soundtrack
languages. This function only works for discs having recordings
in multiple audio soundtrack languages.
k DTS, LPCM, MPEG, 2
Indicates the audio type of the disc under play is DTS, LPCM,
MPEG or 2.
l SHUFFLE/PROGRAM
Illuminates under shuffle/program mode.
(Video CD with PBC off or CDDA only)
¡0 REPEAT T, C, 1, A-B, ALL
Illuminates when the current play mode is under repeat title,
chapter, track (single), A-B, disc (all) respectively.
¡1 TIME
Indicates time information and sometimes system information
like STOP, MENU and so on.
¡2 L, C, R, LFE, LS, S, RS
Indicates the audio channel information of the disc under play.
For DVD discs having the Dolby Digital audio.
11

ENGLISH
VIDEO
S-VIDEO
COMPONENT
DIGITAL OUTPUT
COAXIAL
OPTICAL
OUTPUT
OUTPUT
INTERNAL
Rear Panel
zxc v b n
VIDEO
Y
CB /
PBCR /
P
OPTICAL
DIGITAL OUTPUT
COAXIAL
AUDIO
OUTPUT
L
R
S-VIDEO
VIDEO
OUTPUT
REMOTE CONTROL
R
COMPONENT
EXTERNAL
OUTIN
INTERNAL
m,.
SERIAL NO.
z DIGITAL OUT (OPTICAL)
Connects digital audio under play mode into an AV amplifier or
a receiver equipped with digital audio decoder for you to enjoy
the theatre-quality sound in your home.
Note
Remove the dust protection cap from the optical digital audio output
•
connector and connect the cable firmly so that the configurations of
both the cable and connector match.
• Do not connect to the digital audio input of an amplifier that does
not have Dolby Digital and dts decoder when you set the digital out
option of setup information to BITSTREAM.
x DIGITAL OUT (COAXIAL)
Connects digital audio under play mode into an AV amplifier or
a receiver equipped with digital audio decoder for you to enjoy
the theatre-quality sound in your home.
c AUDIO OUT
Analogue 2 channel (L/R) audio output in order to connect to a
TV or stereo amplifier.
v VIDEO OUT
Connects composite video signal to Composite Video input connector of TV or monitor to achieve high fidelity colour reproduction.
b COMPONENT VIDEO OUT (480i or 480p)
Connects component video signal to component video input
connector on TV, if your TV supports interlace video input (480i)
or Progressive video input (480p).
m S-VIDEO OUT
Connects to TV or monitor equipped with S-VIDEO input. In
order to achieve a sharper and cleaner picture than that when
connected via VIDEO OUT (composite video).
, System Control in / out jack
Connect this DVD player to another Marantz Component, to
operate the components as a single system (page 9).
. System Control external / internal switch
When using this DVD player independently, set this switch to
“INTERNAL” (page 9).
n AC in power cord connection terminal
Creates POWER between wall outlet and the unit.
12

Remote Controller Unit
Numbers for each button on the remote control unit will be indicated in parenthesis mark starting from the next page.
ENGLISH
q
w
e
r
t
y
u
i
o
!0
!1
!2
!3
!4
!5
!6
!7
!8
!9
@0
@1
@2
@3
@4
@5
@6
@7
@8
@9
q POWER
w NUMERIC BUTTONS (1-9, 0)
e CLEAR
r MENU/RETURN
t PREV
y ENT (ENTER)
u FR/SR
i SETUP
o PAUSE/STEP
!0 ZOOM
!1 (ANGLE) / DIGEST
!2 SHUFFLE
!3 MARKER
!4 VOCAL
!5 PAL/NTSC
!6 OPEN/CLOSE
!7 DISPLAY
!8 TOP MENU/PBC
!9 NEXT
@0 ARROW (Left, Right, Up, Down)
@1 FF/SF
@2 STOP
@3 PLAY
@4 SUBTITLE
@5 AUDIO
@6 A-B
@7 REPEAT
@8 3D SOUND
@9 PROG (PROGRAM)
13

ENGLISH
1. General Function for Remote Control Unit
3. Advanced Functions
1. POWER q
Activates the unit POWER ON or into STANDBY.
2. OPEN/CLOSE !6
After pressing power button, press OPEN/CLOSE button to open
or close the disc tray. If pressed under STAND BY, power is
automatically turned on and the tray is opened.
3. NUMERIC w
Used from the menu to select, title/chapter search, time search
and direct track number.
4. CLEAR e
Used when discarding wrong number input, returning to normal
play during slow or search. This button can also be used when
clearing zoom state.
5. PAL/NTSC !5
Set up TV type according to type supported by user’s TV.
2. Basic Function
1. PLAY button @3,
Use this button to play.
2. STOP button @2,
To stop the current playing mode, press STOP button.
Press the stop key for 5 seconds to convert progressive scan
mode into interlace mode.
3. PAUSE / STEP button o,
Use this button to play one frame at a time. To do step backward, press this button during reverse operation i.e. fast reverse
or slow reverse.
4. FF/SF @1,
To play a disc fast forward or slow forward. During pause or
step state, this button works as Slow Forward. (Page 21)
5. FR/SR u,
To play a disc fast reverse or slow reverse. During pause or
step state, this button works as Slow Reverse. (Page 21)
6. NEXT !9,
Used to move to the next chapter (DVD) or track (VCD or CDDA)
from the current chapter or track.
Pressing this button shows next play list when playing VCD with
PBC. (Page 21)
7. PREV t,
Used to move to the previous chapter (DVD) or track (VCD or
CDDA) from the current chapter or track.
Pressing this button shows previous play list when playing VCD
with PBC. (Page 21)
1. REPEAT @7 (Except VCD with PBC on)
To set up the repeat viewing during play. Two repeat modes are
possible. When using a DVD, “CHAPTER REPEAT ON” repeats
the current chapter and “TITLE REPEAT ON” repeats all chapters in the current title.
When using a VCD with PBC off or CDDA, “REPEAT ONE” repeats the current track and
the disc. To clear the repeat function, press this button until you
see REPEAT OFF on the TV screen. Turn off PBC to use this
function on VCD with PBC included.
2. A-B @6 (Except MP3)
To repeat the selected segment. The moment you press this
button during play, the starting point for the desired segment is
selected. When you press this button again, the ending point is
selected and starts repeated play of the selected segment automatically. Press this button again to cancel the repeating of the
selected segment.
3. PROG (PROGRAM
Use this button to play the tracks, which you want to watch. You
can program desired tracks up to the total programmed time of
99 minutes. Turn off PBC to use this function on VCD with PBC
included
4. SHUFFLE !2 (VCD with PBC off and CDDA only)
Use this button to play the loaded disc in a random order. Turn
off PBC to use this function on VCD with PBC included
(Page 27)
5. DIGEST !1 (VCD with PBC off and CDDA only)
Use this button to do quick search or preview the disc contents.
This function shows thumbnail contents of the loaded disc. Turn
off PBC to use this function on VCD with PBC included. (Page 28)
6. ZOOM !0 (Except CDDA and MP3)
Enlarges DVD or VCD screen images up to eight times. You
may also move the image using left, right, up and down arrow
button @0.
7. MARKER !3 (Except MP3)
Stores playing point up to five locations for the easy search,
when you want to move to the stored playing point.
8. DISPLAY !7 (Except MP3)
This button has multiple functions. Supports search of a chapter/title for DVD or a track for VCD and CDDA. Also shows information for elapsed or remaining time. On DVD, you may see bit
rate meter. (Page 29)
9. 3D SOUND @8 (CDDA and MP3 only)
Adds 3D surround effect to analogue audio output. There are 4
surround modes. (Page 25)
10. PBC !8 (VCD with PBC only)
You may turn on or off the PBC function by pressing this button.
When the VCD with PBC is loaded, PBC function is enabled automatically. Video CD 2.0, SVCD and CVD are PBC controllable.
.
(Page 27)
(Page 31)
(Page 25)
“
REPEAT ALL” repeats all tracks on
(Page 26)
@9
(VCD with PBC off and CDDA only))
.
(Page 29)
14
11. VOCAL !4
If the disc is a Dolby Digital Karaoke disc, the following modes
are available:
No vocal / Left vocal / Right vocal / Both vocal / Mixed vocal
“Mixed vocal” means sending (Left vocal + Right vocal) / 2 to
both left and right speaker.

4. DVD Function
5. SETUP Function
1. TOP MENU !8
Used to display the title menu of the loaded DVD disc. This
function is disc dependent. A DVD disc may not contain the title
menu. (Page 19)
2. MENU r
Used to display the contents menu of the loaded DVD disc. This
function is disc dependent. A DVD disc may not contain a contents menu. (Page 19)
(ANGLE !1)
3.
Used to select a different angle when the loaded DVD disc supports multiple angles. This function is a disc dependent. Many
DVD discs don’t support multiple angles. (Page 23)
4. SUBTITLE @4
Used to change the subtitle language to a different language or
off from the one selected at the initial settings, when the loaded
disc supports multiple languages.
(Page 23)
5. AUDIO @5
Used to change the audio language to a different language from
the one selected at the initial settings, when the loaded disc supports multiple audio languages.
(Page 22)
1. ARROW @0,
Used to move to the desired menu and moves the image center
of an enlarged screen in zoom mode. Also can be used in marker
or display function.
2. ENT(ENTER y)
Used to select the menu item. When pressed during STOP,
PAUSE, STEP, SEARCH or SLOW state, it also cancels the
current state and converts to PLAY mode.
3. SETUP i
Sets up the various operation information of this unit to customize DVD performance. (Page 32)
ENGLISH
• This remote control supports two remote control codes: DVD1 and DVD2.
• When the unit is shipped from the factory, the remote control is set to DVD1.
• To set the remote control to DVD2, hold down both the “ (Stop)” button and the “2” number button on the remote control for at least five
seconds. (If the batteries in the remote control are replaced while the remote control is set to DVD2, the setting will revert to DVD1.)
• To set the remote control back to DVD1, hold down both the “ (Stop)” button and the “1” number button on the remote control for at least five
seconds.
• To check which remote control code is set at STOP mode, hold down both the Stop and PAUSE buttons; the current setting (either “DVD1” or
“DVD2”) will be displayed in the display window on the main unit.
• Also set the REMOT CODE on the main unit to the same setting as the remote control.
Press SETUP buttom for longer than five seconds in stop mode.
Use the Up/Down buttom ( / ) to select the type of REMOTE CODE (DVD1/DVD2), and press ENTER you want to set.
To exit the REMOTE CODE setting, press SETUP.
(This setting is set to DVD1 when the unit is shipped from the factory.)
15

ENGLISH
BASIC FUNCTION
Open / Close Disc Tray
1. Connect to AC power
When AC power is connected, the STAND-BY INDICATOR on the front panel is turned on.
2. Press POWER button
When the POWER button is pressed, the STAND-BY INDICATOR turns off. TV or monitor screen shows the initial pictures as
shown below.
OA D I NG
L
3. Press OPEN/CLOSE button
When the disc tray opens, OPEN message is displayed on TV screen and Fluorescent display on front panel simultaneously.
PEN
O
4. Load your selected disc using disc tray guide with logo-printed side up
5. Press OPEN/CLOSE button again to close the disc tray
16

Basic play of DVD, VIDEO-CD or CDDA
1. Press PLAY button
When you press the PLAY button, the disc tray will be closed if opened and play will start automatically. In case of many DVD
movies, an interactive DVD or Video CD with PBC, a menu screen appears on the TV. In this case you should follow next
instruction.
ENGLISH
play mode sceneindex special subtitle audiofeature
VIDEO
1.Audio and Video Synchronization
2.
Still Pictures
3.
Play Item Connectivity
4.
Selection List and Play List
5.
CD-DA
6.
End
CD Ver.2.0 Test Disc
Main
Menu
DVD menu screen Video CD menu screen
2. When a menu screen appears on the TV screen
When a DVD disc is loaded, select desired menu item using arrow button or numeric button (remote only) and then press ENT
(ER) button to start play. When a VCD is loaded, select desired menu item using numeric button (remote only) and then press
ENT (ER) button to start play.
play mode sceneindex special subtitle audiofeature
VIDEO
1.Audio and Video Synchronization
2.
Still Pictures
3.
Play Item Connectivity
4.
Selection List and Play List
5.
CD-DA
6.
End
CD Ver.2.0 Test Disc
Main
Menu
02
Selecting DVD Menu Selecting Video CD Menu
17

ENGLISH
Basic play of MP3
1. Load MP3 disc
When an MP3 disc is loaded, MP3 menu screen is displayed automatically depending on MP3 disc’s folder (directory) structure
as shown below.
2. Select desired folder
Use the arrow button to select the folder you want to play, by pressing the ENT (ER) button. This button allows, you to see the file
lists under the folder.
3. Select MP3 title when stopped
Use arrow button and select an MP3 title using the ENT (ER) button then play will start automatically. When you know the title
number, enter the MP3 title number using the numeric buttons on the remote controller and then press the ENT (ER) button.
ROOT
01.UK
Selecting MP3 file
4. Select MP3 title when playing
Press NEXT button on remote controller to choose next title. Press PREV button for previous title.
When you know the title number, enter MP3 title number using the numeric buttons on the remote controller and then press the
ENT (ER) button.
Note This player can recognize a maxinum of 126 folders and 255 tracks.
Selecting VIDEO MODE
1. Using PAL/NTSC button
If TV or MONITOR does not display output image properly, keep pressing NTSC/PAL button on the remote contoroller untill the
output displays normal images. Each pressing of NTSC/PAL button changes VIDEO MODE in turn of, MULTI and NTSC.
2. Using SETUP
Press the SETUP button and select VIDEO submenu on SETUP screen. After that, select TV type by pressing DOWN button until
your TV mode is selected. (Page34)
3. The information will remain effective when the POWER is turned ON next time.
Disc Format Position of TV Type
MULTI NTSC
NTSC NTSC NTSC
PAL PAL NTSC
18

Selecting MENU ITEMS (DVD or Video CD with PBC only)
MENU screen is displayed on DVD disc with MENU data or VIDEO CD with PBC Junction.
1. Selecting 3rd menu item when DVD menu screen appears as shown below
Ex1) Press the numeric 3 button on remote controller and then press ENT (ER) button
Ex2) Press DOWN button twice to highlight the 3rd menu item then press ENT (ER) button
:
ELES
TC
03
3
3
Navigation Test (2)
Navigation Test (2)
Select using numeric button Select using arrow button
2. Selecting the 3rd menu item when Video CD menu screen appears as shown below
Ex) Press the numeric 3 button on remote controller and then press SELECT button
VIDEO
1.Audio and Video Synchronization
2.
Still Pictures
3.
Play Item Connectivity
4.
Selection List and Play List
5.
CD-DA
6.
End
CD Ver.2.0 Test Disc
Main
Menu
03
ENGLISH
STOP and POWER OFF
1. Stop playing
Press the STOP button during play mode. If a DVD disc is playing, PRESTOP OSD is displayed when you press the STOP button
once showing time information and the play mark (
This state is called PRESTOP. If you press PLAY in a PRESTOP state, the picture is played from the point you previously
stopped.
RESTOP
P
DVD PRESTOP VCD STOP
2. Removing DISC from the disc tray
Press OPEN/CLOSE button to open disc tray. When the disc tray is opened, take out the disc from the tray.
3. Press POWER button
When POWER is pressed, disc tray is closed and POWER is into STAND BY mode and STAND BY indicator turns on.
) will be blinking on the Fluorescent Display instead of the STOP message.
STOP
If power is stand by, after pressing POWER button during PLAY or PRESTOP state, play is resumed from the point where it was
stopped. It is called RESUME function. If you switch OFF by disconnecting AC cord, the machine will start playing from the first track
or chapter.
19

ENGLISH
SEARCH
Use this function to play the DISC contents in fast forward or fast reverse. During searching, audio will be muted (except CDDA).
1. FAST FORWARD
1. Press FF/SF button during play mode
FAST 2X is displayed on TV screen and the speed of forward direction becomes faster.
2. Press FF/SF button again
FAST 4X is displayed on TV screen and the speed of forward direction becomes faster. When a DVD disc is loaded, it
changes faster and faster from FAST 16X, FAST 32X and FAST 64X. If you press the FF/SF button again during FAST 64X if
playing a DVD (FAST 16X when VCD, FAST 8X when CDDA), it goes back to FAST 2X.
FAST2 FAST4 FAST8
FAST 2X FAST 4X FAST 8X
FAST61 FAST23 FAST46
FAST 16X FAST 32X FAST 64X
2. FAST REVERSE
1. Press FR/SR button during play mode
FAST 2X is displayed on TV screen and the speed of reverse direction becomes faster.
2. Press FR/SR button again
FAST 4X is displayed on TV screen and the speed of reverse direction becomes faster. When a DVD disc is loaded, it
changes faster and faster from FAST 16X, FAST 32X and FAST 64X. If you press the FR/SR button again during FAST 64X if
playing a DVD (FAST 16X when VCD, FAST 8X when CDDA), it goes back to FAST 2X.
FAST2 FAST4 FAST8
FAST 2X FAST 4X FAST 8X
FAST61 FAST23 FAST46
20
FAST 16X FAST 32X FAST 64X

SKIP
SLO
W
81
Use this function to move to the next or previous chapter for DVD, track for VCD and CDDA.
1. SKIP FORWARD
1. Press NEXT button during play mode
If NEXT button is pressed, the current chapter or track stops and starts playing the next chapter or track. By pressing this button
continuously, you may locate the desired chapter or track even faster. When the last chapter or track is encountered, if playing a
VCD or CDDA, it stops playing and goes to the stop status. If playing a DVD, it depends on the disc’s content. It may display the
menu contents of the disc.
01 0
7
02 2
1
SKIP FORWARD
2. SKIP REVERSE
1. Press PREV button during playing
If PREV button is pressed, the current chapter or tracks stop and start playing the previous chapter or track. By pressing this
button continuously, you may locate the desired chapter or track even faster. When the first chapter or track is encountered, if
playing a VCD or CDDA, it stops playing and goes to the stop status. If playing a DVD, it starts playing from the first chapter.
01 0
7
03 2
1
ENGLISH
SKIP REVERSE
SLOW
Use this function when you want to view the movie slowly. This function works only for DVD or VCD.
1. SLOW FORWARD
1. Press PAUSE / STEP button during play mode
By pressing PAUSE / STEP button, it pauses the playing temporarily.
2. Press FF/SF button
If FF/SF button is pressed under PAUSE or STEP,
3. Press FF/SF button again
If FF/SF button is pressed again,
If pressed again
SLOW 1/8 is displayed and it changes slower in conformity to the ratio. To return to normal play, press PLAY
SLOW 1/4 is displayed and the speed changes even slower.
button (DVD and VCD). The CLEAR button clears slow state at any speed of slow.
W
SLO
21 SLO
SLOW 1/2 SLOW 1/4 SLOW 1/8
Note
• There is no sound when viewing pause/STEP or slow playback.
• Pause/STEP or slow play may not be possible with certain titles.
SLOW 1/2 is displayed and the speed of forward direction becomes slower.
W
41
21

ENGLISH
2. SLOW REVERSE (DVD ONLY)
1. Press PAUSE/STEP button during play mode
By pressing PAUSE/STEP button, the play mode is temporarily paused.
2. Press FR/SR button
If FR/SR button is pressed under PAUSE/STEP, SLOW 1/2 is displayed and the speed of the reverse direction becomes slower.
3. Press FR/SR button again
If FR/SR button is pressed again,
If pressed again
SLOW 1/8 is displayed and it changes slower in conformity to the ratio. To return to normal play, Press PLAY
SLOW 1/4 is displayed and the speed changes even slower.
button. The CLEAR button clears slow state at any speed of slow.
SLO
W
21 SLO
W
41 SLO
W
81
SLOW 1/2 SLOW 1/4 SLOW 1/8
Selecting Audio Languages (DVD only)
It is possible to change the audio soundtrack language to a different language from the one selected at the initial settings. This
operation works only with discs on which multiple audio soundtrack languages are recorded. If the loaded disc supports multiple
languages, you can see AUD indicator on FL display.
1. Press AUDIO button during play
If a disc does have multiple languages, the audio information is displayed as the figure shown below and the audio language is
changed. If the loaded disc does not support multiple audio, the forbidden mark (
) is displayed.
Dolby Digit
2
AUD
IO
:83
HC
Audio Change
2. Choosing desired audio language
Pressing the AUDIO button continuously until the desired audio language is displayed.
This function is a disc dependent. There are some DVD discs that prevent selecting languages even though the disc supports
multiple languages. If this is the case, languages should be selected via the disc menu.
22

Selecting Subtitles (DVD only)
It is possible to change the subtitle language to a different language from the one selected at the initial settings. This operation
works only with discs on which multiple subtitle languages are recorded. If the loaded disc supports multiple subtitles, you can see
SUB-T indicator on FL display.
1. Press SUBTITLE button during playing
If playing a disc with multiple subtitles, the subtitle information is displayed as the figure shown below and the subtitle language is
changed. If the loaded disc does not support multiple subtitle, the forbidden mark (
I T L
SUBT
E
:0110
ENGL I SH
SUBTITLE Change
2. Choosing desired subtitle language
Press the SUBTITLE button continuously until the desired subtitle language is displayed.
This function is a disc dependent. There are some DVD discs that prevent selecting subtitle even though the disc supports multiple
subtitles. In this case, the subtitle should be selected via the disc menu.
) is displayed.
ENGLISH
Selecting Angles (DVD only)
Some DVD discs may contain scenes, which have been shot simultaneously from a number of different angles. For these discs,
the same scene can be viewed from each of these different angles using the ANGLE button. If the loaded disc supports multiple
angles, you can see
1. Press ANGLE button during play mode
When playing a disc with multiple angles recorded, the camera angle is changed as shown in the figure.
2. Choosing desired angle
Press the ANGLE button continuously until the desired angle is displayed.
This function is a disc dependent. There are some DVD discs that prevent selecting angle using ANGLE button even though the disc
supports multiple angles. In this case, angle changes should be selected via the disc menu.
indicator on the FL display and TV screen.
92
Angle Change
23

ENGLISH
Kodak picture CD play
When a Kodak Picture CD is inserted, an automated slide show is launched.
You can see nine thumbnail pictures by using the digest key .
Twelve slideshow transition modes are provided. Use Menu key to switch the slideshow effect Mode.
1. Slideshow modes
o : no effect(default)
1 : wipe from top to bottom
2 : wipe from bottom to top.
3 : wipe from top/ bottom to center.
4 : wipe from center to top/ bottom
5 : vertical blind
6 : wipe from left to right
7 : wipe from right to left.
8 : wipe from left /right to center
9 : wipe from center to left/right.
10 : wipe from edge to center
11 : horizontal blind
12 : random
2. Image rotation.
There are four modes to rotate a picture: Left,Right,Invert,Mirror
key : invert key :mirror : Turn left : Turn right
JPEG file play
When a JPEG file is loaded, an automated slide show is launched.
You can enjoy Twelve slideshow effects(same as Kodak picture CD slideshow mode) by using Menu key of the remote controller.
And You can see nine thumbnail pictures by using the Digest key .
You also rotate image same as Kodak picture CD playing.
1. Zoom effect
You can see a picture at 25% ~ 200% size.
Press zoom button in the slideshow mode, use FF and FR key to control the amount of zoom in and out, and press the zoom
button again, zoom function is off and return to slideshow mode.
24

ADVANCED FUNCTIONS
3D sound effect (MP3, CDDA, Dolby Digital 2CH Stereo only)
This function outputs 3D effects on the stereo audio analog output. 3D effects are broken down into 4 surround modes.
1. Press 3D SOUND button
3D SOUND MODE 1 is displayed on TV screen. And analog stereo output is changed to surround mode 1.
SOUND MODE 13D
3D SOUND MODE1
2. Press 3D SOUND button again
Press the 3D SOUND button continuously until the desired 3D sound mode is selected.
3D SOUND MODE2
3D SOUND MODE3 3D SOUND MODE4 NORMAL
Note This function is only for CDDA, MP3 and Dolby Digital 2CH Stereo.
ENGLISH
Repeat selected segment
Use this function to repeat the play of a selected segment. This is very useful for studying foreign languages because it repeats
the selected segment until canceled.
1. Press A-B button
Press A-B button at the point of where repeat play is to start. A TO B, SET A and A
-*are displayed, followed by A- indicator on
FL display turning on, and the starting point of your selected segment is set up.
2. Press A-B button again
-
Press A-B button at the point of where repeat play is to end. While A TO B, SET B and A
B are displayed again and A-B indicator
on FL display is turned on, the ending point is set up and PLAY starts from the A point right away.
3. Press A-B button once more
Press A-B button one more time to cancel the repeat play. A TO B, CANCELLED and
are displayed on TV screen
*-*
We recommend you set up the desired segment within a minimum 3 seconds for smooth repeat play.
CANCE LL ED
TO
A
SET
TO
A
A
-
*
A
B
A
-
AB
TO
SET
B
B
A TO B SET A A TO B SET B A TO B CANCELLED
B
-
**
25

ENGLISH
Utilizing Repeat Function
Use this button to repeat the chapter/title for DVD or track/disc for VCD and CDDA.
1. Press REPEAT button
When playing a DVD, CHAPTER REPEAT ON is displayed on the TV screen and REPEAT C indicator on the FL display is turned
on. In this status, the selected chapter is played repeatedly forever. Whilst if playing a VCD or CDDA, REPEAT ONE is displayed
on the TV screen and REPEAT 1 indicator on the FL display is turned on. In this case, the selected track is played repeatedly
forever.
CHA P TE R R E PE A T ON
In case of DVD In case of VCD
In order to use the repeat function on a VCD with PBC, you should turn off PBC by pressing PBC button on the remote controller.
2. Press REPEAT button again
If playing a DVD, TITLE REPEAT ON is displayed on the TV screen and REPEAT T indicator on the FL display is turned on. In this
state, the selected title is played repeatedly forever. Whilst if playing a VCD or CDDA, REPEAT ALL is displayed on the TV screen
and REPEAT ALL indicator on the FL display is turned on. In this case, all tracks on disc are played repeatedly forever.
TITLE REPEAT ON
REP EAT ONE
REPEAT ALL
In case of DVD In case of VCD
3. Press REPEAT button again
If you press the REPEAT button in REPEAT TITLE or REPEAT ALL state, REPEAT OFF is displayed on the TV screen and
REPEAT T or ALL on the FL display is cleared. The repeat function becomes cleared and the playing state changes to normal.
Note With some DVD discs, there may be times when repeat playback is not possible.
26

SHUFFLE (VCD with PBC off, MP3, CDDA only)
This function selects random tracks and plays all the tracks on the disc just once in random order.
1. Press SHUFFLE button on remote controller
When the SHUFFLE button is pressed, SHUFFLE is displayed on the TV screen and the SHUFFLE indicator on the FL display is
turned on.
2. Press PLAY button
When the PLAY button is pressed, the shuffled track starts playing.
3. Press SHUFFLE button to cancel SHUFFLE operation
To cancel SHUFFLE operation, press SHUFFLE button. When the SHUFFLE button is pressed, SHUFFLE OFF is displayed on
TV and the SHUFFLE indicator on the FL display is turned off.
HU F F L E
S
HU F F OF FLE
S
Shuffle On Shuffle Off
• In order to use the shuffle function on a VCD with PBC, you should turn off the PBC by pressing the PBC button on remote controller.
• In case of MP3 Playing, if shuffle button is pressed, random play is engaged and RANDOM is displayed on the TV screen and the SHUFFLE
indicator on the FL display is turned on.
If shuffle button is pressed again, shuffle play is engaged and SHUFFLE is displayed on the TV screen and the SHUFFLE indicator on the FL
display is turned on. (RAMDOM is that all the trucks is played in random order till shuffle is cancelled)
ENGLISH
PROGRAM (VCD, MP3, CDDA only)
This function is used to play the tracks on the disc in an order you program.
1. Press STOP button
Press the STOP button to stop playing because this function is valid only for the STOP state.
2. Press PROGRAM button on remote controller
When the PROGRAM button is pressed, PROGRAM P00:00 is displayed on the TV screen, the PROGRAM indicator on the FL
display is turned on, the title number on the FL display is 0 and time information is 00:00.
3. Enter track number to program
Enter the number of the desired TRACK and press the ENTER button. When the number of the desired TRACK is entered,
PROGRAM PXX:YY is displayed on the TV screen and FL displays entered TRACK number (XX is the number of programmed
tracks and YY is the last entered track number). In the following figure, a total of 4 tracks are programmed and the last track
number is 5.
ROGRA M
PP00:00
ROGRA M
PP03:05
Program Initial Screen Programmed – Total 4 tracks
27

ENGLISH
4. Press a PLAY
When all the desired TRACK numbers are entered, press PLAY to play according to the programmed order
5. PROGRAM
Press PROGRAM after STOP button, when the PROGRAM button is pressed repeatedly, status of PROGRAM appeared on the
TV screen and FL display.
6. Press CLEAR after STOP button
To cancel the PROGRAM operation, press the STOP button to stop programmed playing and then press the CLEAR button for
longer than 3sec. If press the CLEAR button rapidly, the last entered track is cancelled. And if you want to add a program, enter
the number of the desired TRACK and press the ENTER.
Digest (VCD,JPEG,Kodak picture CD, CDDA only)
This function helps speedy search to the desired track by displaying 9 different small screens per page showing information
regarding the tracks recorded on the disc. When an CDDA is loaded, only the 1. INTRO function will work so be careful.
1. Press STOP button
Press the STOP button to stop playing because this function is valid only for the STOP state.
2. Press DIGEST button
If the DIGEST button is pressed, 4 submenus are displayed on the TV screen as shown below.
Select the submenu, which you want, by pressing the appropriate number button and the ENTER button. If you don’t want this
function, press number 4 for exit.
1.I
2.D
NTRO
ISC
3.T
4.E
RACK
X
IT
1.I
.
2
NTRO
----
-
.
3
----
-
X
IT
.
E
4
Digest submenu for VCD Digest submenu for CDDA
1. INTRO plays each track for 10 seconds (VCD and CDDA)
2. DISC shows digest screen based on the disc. It plays each track on the thumbnail screen for about 5 seconds (VCD only).
3. TRACK shows digest screen based on the track. It plays partitioned track on thumbnail screen for about 5 seconds (VCD only).
4. EXIT just exits digest function
3. When you choose INTRO
All the tracks on the disc are played for 10 seconds if no key is pressed. After all the tracks are played, it stops and displays STOP
on the TV.
4. When you choose DISC or TRACK
Digest function will play and display in the small screen in the center. Each screen plays approximately five seconds while
displaying a total of nine screens as shown in the figure. Press NEXT button to see the next page and press PREV button to see
the previous page.
123
123
894
765
765
Digest – DISC Digest - TRACK
5. Press the desired screen number
If you press the desired number of small screen, it starts playing from the position where the small screen begins. You don’t need
to press the ENTER button.
• In case of JPEG, Kodak Picture CD, See page 24.
28
894
765

MARKER (DVD, VCD WITH PBC OFF, CDDA)
This function is to move to the desired location fast and easily during play by storing up to 5 markers in advance.
1. Press MARKER button during play mode
When MARKER button is pressed during play, the screen is displayed as shown the figure below.
2. Storing marker
Go to the desired marker point using arrow buttons and press the ENTER button to store the data to be viewed.
will be marked
at the selected point.
3. Repeat storing marker as you want
By repeating the above 2 steps, you may store a maximum of 5 markers.
4. Choose stored marker
To play the marker point, press the MARKER button to shows maker information and select the desired marker using arrow
buttons, and press the ENTER.
5. Deleting stored marker
To cancel the marker function, press up, down or CLEAR button at the marker you want to delete
K
MAR R
E
-
K
MAR R
ENT
----
ENT
----E
ENGLISH
Marker Initial Screen 1 Marker Stored
Display
The unit features On-Screen Menu icons showing disc information such as TITLE and CHAPTER for DVD, TRACK for VCD, and TIME
or Bit Rate (DVD only) during play. There are 10 sub functions for DVD, 8 sub functions for VCD or CDDA. DVD sub functions are TITLE/
CHAPTER search, TIME SEARCH, TITLE ELAPSED, TITLE REMAIN, CHAPTER ELAPSED, CHAPTER REMAIN, BIT RATE METER,
SHUFFLE, PROGRAM and REPEAT. VCD sub functions are TRACK/TIME search, SINGLE ELAPSED, SINGLE REMAIN, TOTAL
ELAPSED, TOTAL REMAIN, SHUFFLE, PROGRAM and REPEAT.
Note Depending on the format and type of disc being used, not all screens may be displayed.
1. Display function for DVD
1. Perform TITLE and CHAPTER search
When the DISPLAY button is pressed during play. TITLE and CHAPTER information are displayed as shown in the figure below.
For TITLE search, Enter the number of your desired title number using numeric buttons and then press the ENTER button or
adjust title number using up and down buttons and press the ENTER button at the TITLE column. For Chapter search, Adjust
chapter number in the same manner as for title search.
2. Perform TIME SEARCH
When the DISPLAY button is pressed twice during play, TIME SEARCH sub function is activated.
After entering the time you want to jump, press the ENTER button. If you want to go to 0:31:23 (0 hour, 31 min, 23 sec) press the
numeric buttons in this order (0, 3, 1, 2, 3) then press the ENTER button. The time you want to enter should be in the title
boundary. After you press the ENTER button, it starts playing from the time entered, if valid.
3. Viewing time information
When the DISPLAY button is pressed three times during play, title elapsed time information is displayed on top of TV screen at
the left corner. When the DISPLAY button is pressed again title remain time information is displayed. If pressed again, CHAPTER
elapsed time information is displayed. Pressing the DISPLAY button once more activates CHAPTER remain time information.
Press of DISPLAY button displays the Bit Rate Meter.
Finally, press of the DISPLAY button displays the SHUFFLE / PROGRAM / REPEAT information.
29

ENGLISH
4. Displaying Off
Press DISPLAY button when SHUFFLE / PROGRAM / REPEAT are activated.
0
01 2
Chapter/Title Time Search Title Elapsed Title Remain
C
HAPTER
ELA
0:00:10
Chapter Elapsed Chapter Remain Bit Rate Meter SHUFFLE/PROGRAM/REPEAT
2. Display function for VCD (PBC off only)
020051
PSED
C
HAPTER
0:11:38
01 2
0
REM
AIN
3123::0
T
ITLE
0:46:08
B
ITT
RRAE TME E
PSED T
ELA
8. 4 4MBPS
ITLE
2:03:11
F/OFSHU
AIN
REM
F
F
RE
G/O
F
PRO
PO
F
F
/
1. Perform TRACK search
When the DISPLAY button is pressed during play, TRACK information and TIME search is displayed as shown in the figure
below. For TRACK search, enter the number of your desired track using numeric buttons and then press the ENTER button or
adjust track number using up and down buttons and press the ENTER button at the TITLE column.
2. Perform TIME search
Press the Right arrow button go to the TIME search, during TRACK information and TIME search is displayed.
After entering the time you want to jump, press the ENTER button. If you want to go to 01:23 (1 min, 23 sec), press the numeric
buttons in this order (0, 1, 2, 3) and press the ENTER button. The time you want to enter should be in this current track boundary.
After you press the ENTER button, it starts playing from the time entered if valid.
3. Viewing time information
When the DISPLAY button is pressed twice during play, track (single) elapsed time information is displayed on the top of the TV
screen at the left corner. When the DISPLAY button is pressed again, a track (single) remain time information is displayed on the
screen. If pressed again, disc (total) elapsed time information is displayed on the screen. And next DISPLAY button activates disc
(total) remain time information. Press of the DISPLAY button displays the SHUFFLE / PROGRAM / REPEAT information.
4. Display Off
Press DISPLAY button when SHUFFLE / PROGRAM / REPEAT are activated.
09 1
0
00:00
09 1
0
23:10 S
INGLE
0:00:05
ELA
PSED
Track Search Time Search Single Elapsed
30
S
INGLL REM
0:04:22
AIN
0:34:44
ELA
PSED
T
OTAL
0:07:49
REM
T
OTAL
Single Remain Total Elapsed Total Remain
AIN F/OFSHU
SHUFFLE/PROGRAM/REPEAT
F
F
RE
G/O
F
PRO
PO
/
F
F

Zoom screen
1. Zoom screen by X2
If the ZOOM button is pressed during play, ZOOM X2 is displayed and the screen is magnified to twice the size.
2. Zoom screen by X4
If the ZOOM button is pressed again, ZOOM X4 is displayed and the screen size is quadrupled.
3. Zoom screen by X8
If the ZOOM button is pressed again, ZOOM X8 is displayed and the screen is magnified by eight times.
4. Zoom off
If the ZOOM button is pressed again when in ZOOM X8 state, ZOOM function is turned off and a normal screen is displayed.
Pressing the CLEAR button at any time of ZOOM state clears ZOOM function.
ENGLISH
ZOOM
2
4
ZOOM
8
ZOO OF FMZOOM
Zoom 2X Zoom 4X Zoom 8X Zoom Off
31

ENGLISH
CUSTOMIZING DVD PERFORMANCE
Once the initial settings have been completed, the player can always be operated under the same conditions whenever the power is
switched on. These settings are called SETUP data that are easily modified and stored using the SETUP menu. The SETUP menu
includes the information for AUDIO, VIDEO, OTHER system controls, LANGuages and parental LOCK. AUDIO and VIDEO
submenus deal with items related to AUDIO and VIDEO. The OTHER submenu deals with items related to other system controls.
LOCK submenu deals with items related to parental locks, they are parental levels and passwords. The submenu of SETUP is
differentiated by two categories. One is submenu changeable during play mode. The other is not. The ability to change during play
is on the AUDIO and VIDEO submenu. The other is OTHER, LANGuage and parental LOCK.
Audio
There are six sub items in the AUDIO submenu. They are DIGITAL OUT, LCPM OUTPUT, DOWNMIX, DUAL MONO,
OPERATIONAL and DYNAMIC RANGE. When you press the SETUP button and select AUDIO among the six submenus, the sub
items for AUDIO are displayed as shown in the figure below.
DIGITAL OUT
LPCM OUTPUT
DOWNMIX
DUAL MONO
OPERATIONAL
DYNAMIC RNG
EXIT SETUP
BITSTREAM
LPCM 48K
LO/RO
STEREO
LINEMODE
0
1. DIGITAL OUT
DIGITAL OUT item controls the output condition of digital out (coaxial or optical) connector. There are 3 values possible for
DIGITAL OUT. They are OFF, BITSTREAM and PCM. In case of OFF value, No digital signal can be output. Only analog audio
can be output. In case of BITSTREAM value, the original audio stream recorded on the disc is output through the digital out
connector. In case of PCM value, the decoded audio stream will be output through the digital out connector. The relation of
amplifier and DIGITAL OUT option is shown below.
DISC DVD VCD & CD & MP3
DTS
DTS Disc
PCM
DTS
OFF
-
Bitstream
PCM
(Except
MP 3)
PCM
PCM
(Except
MP 3)
OFF
-
Digital OUT Setting
Digital Audio output
Dolby Digital Disc
Bitstream
Dolby
Digital
PCM
PCM
OFF
-
Bitstream
PCM
LPCM Disc
PCM
PCM
OFF
-
Bitstream
Note
• When a recorded in a Dolby Digital or DTS is loaded, noise will be output if you have made connections via the digital audio jacks
to a receiver or amplifier that cannot decode a Dolby Digital or DTS digital bitstream.
In this case, be sure to set up the SETUP, Audio setting; Digital out to PCM or OFF as above mentioned.
2. LPCM OUTPUT
If your AV amplifier is compatible with high sampling rate (96kHz), set this to LPCM 96k.
LPCM out setting ANALOG OUT DIGITAL OUT
48k Disc 96k Disc 48k Disc 96k Disc
LPCM 48k 48k sampling 48k sampling 48k sampling 48k sampling
LPCM 96k 48k sampling 96k sampling 48k sampling 96k sampling
Note
• Even when set to
LPCM 96k, some discs will only output down sampled audio.
3. DOWNMIX (Dolby Digital DVD disc only)
DOWNMIX is used to reproduce the proper analog audio when the audio channel recorded on the disc differs from the output
audio channel configuration. Assume that 5.1 channels audio are recorded on the disc but you can receive only stereo audio
channels. In this case downmix is unavoidable and you will hear all the channels recorded on disc. There are two ways of
downmixing. One is LT/RT and the other is LO/RO. If you are using Dolby Surround Pro Logic decoder, please set the downmix
mode to LT/RT otherwise LO/RO.
32

4. DUAL MONO (Valid for Dolby Digital DVD disc)
DUAL MONO are two independent mono channels defined in Dolby Digital. DUAL MONO programs are mainly used for different
language versions in one program. This functions in a similar fashion to TV or VCR supporting secondary audio program. From
two MONO channels, STEREO, LEFT MONO, RIGHT MONO and MIXED MONO may be output in 4 different combinations.
STEREO L channel on L speaker, R channel on R speaker
LEFT MONO L channel on L and R speaker
RIGHT MONO R channel on L and R speaker
MIXED MONO Mix two mono and output mixed mono on both (L, R) speaker
5. OPERATIONAL
To simplify the implementation of dialogue normalization, dynamic range control, and downmixing, Dolby Digital decoder
implementations offer standard operational modes called Line Mode and RF Mode. There are 2 values for OPERATIONAL. They
are Line Mode and RF Mode. Choose Line Mode when connecting to an amplifier, RF Mode for TV via ANTENNA.
6. DYNAMIC RNG (Valid for Dolby Digital DVD disc)
A consistent problem in the delivery of audio programming is that different members of the audience desire or even need different
amounts of dynamic range depending on the listening situation. Original high quality programs, such as feature films, are typically
mixed with a wide dynamic range. Using dialogue as a reference, loud sounds like explosions are often 20 dB louder, and faint
sounds like leaves rustling may be 50 dB quieter. In many listening situations, it is objectionable to allow the sound to become
very loud, and the loudest sounds must be compressed downwards in level. Likewise the very quiet sounds would be inaudible
and must be brought upwards in level to be heard. If you want to hear the original dynamic range recorded on disc set the
DYNAMIC RNG to 0. Otherwise set to 8 then the dynamic range is reduced by bringing down the level of the loud sounds and
bringing up the level of the quiet sounds.
Video
There are 6 submenus for VIDEO. They are OSD, TV ASPECT, TV TYPE, PROGRESSIVE, OUTPUT MODE, CAPTIONS. If you
select VIDEO, VIDEO sub items are displayed as shown in the figure.
ENGLISH
OSD
T
V ASPECT
T
V TYPE
PROGRESSIVE
OUTPUT MODE
CAPTIONS
EXIT SETUP
ENGLISH
4:3 PS
NTSC
OFF
YCbCr
OFF
1. OSD LANG
This item is to select the language for On-Screen Display messages that will be displayed on the TV screen. When your desired
language is selected, all OSD messages are displayed in the selected language.
2. TV ASPECT
Set up TV aspect according to your TV set. If WIDE screen is supported on your TV, select 16:9 WIDE. If your TV supports only
4:3, you may select both 4:3 PS (Pan & Scan) and 4:3 LB (Letter Box).
When using a wide screen TV (16:9 aspect ratio)
Select 16:9 WIDE in the TV ASPECT value. Discs may be recorded in more than one screen format. Following the chart below,
make screen aspect adjustments in your wide screen TV according to the aspect ratio on the disc you are viewing.
Wide Screen Disc (16:9) Standard Screen Disc (4:3)
Screen
TV Setting Wide Standard
33

ENGLISH
When using a standard TV (4:3 aspect ratio)
Select 4:3 LB (Letter Box) or 4:3 PS (Pan & Scan) in the TV ASPECT value. Following the chart below, make screen aspect
adjustments according to the aspect ratio on the disc you are viewing.
Wide Screen Disc (16:9) Standard Screen Disc (4:3)
Letter Box (4:3 LB)
Screen
Pan & Scan (4:3 PS)
Note : Some disc will not allow you to change the aspect ratio.
3. TV TYPE
Set up TV type according to type supported by your TV or monitor. When you select MULTI, the output video type is dependent
on the disc loaded. If the recorded video type is NTSC then it outputs NTSC.
Disc Format Position of TV Type
MULTI NTSC
NTSC NTSC NTSC
No setting required
(Always Standard 4:3 screen )
PAL PAL NTSC
4. PROGRESSIVE
Set up PROGRESSIVE ON/OFF according to type supported by your TV or monitor.
A progressive scan TV is capable of stable, flicker-free images.
Note
• If you connect aTV or monitor, that is not compatible with progressive scan signal and choose “ON” of the progressive scan
setting, you will not be able to see any picture at all.
• Push stop button for loner than 5 second to set progressive scan setting into OFF.
5. OUTPUT MODE
If you want to see the picture in S-VIDEO, choose S-VIDEO and connect to the TV set using S-VIDEO cable. Set to YCbCr to view
in component video via Y, Cb/Pb, Cr/Pr connect.
Setup Menu / Video Video Output
Progressive Output mode Video Jack S-Video Jack Component Jack
OFF YCbCr Composite
ON YCbCr
OFF S-Video Composite S-Video
6. CAPTIONS (NTSC only)
CLOSED CAPTION was invented for hearing impaired person. But it is very useful when learning foreign languages. If your TV
supports closed caption, select ON. If not, closed caption won’t be displayed.
--
-
Interlace mode (480i)
Progressive mode (480p)
-
34

Other
If you select OTHER, OTHER’s sub item is displayed as
shown in the figure below. The sub item of OTHER is related
to system control on various subjects.
1. ANGLE MARK (Valid for DVD only)
It is possible to have 9 different angles on a DVD disc. This
selects whether to display
OSD (On Screen Display)
showing multi-angle on the TV screen or not, when playing
DVD disc supporting multiple angles. If you select ON, you
can see the
OSD when multi-angle is detected while
playing.
2. SCREEN SAVER
If a bright picture does not move for a long time, the TV
may be damaged. If on longer than 5 minutes, the screen
saver works when ON is selected. The screen saver
protects the CRT (Cathode Ray Tube) from damage by
displaying a moving DVD logo continuously on the screen.
3. FLT DISPLAY
There are three levels of brightness to control FL display on the front panel. They are BRIGHT, MEDIUM and DIM. In the bright
daylight, you may select BRIGHT and DIM for dark nights.
4. FLT AUDIO CH (Dolby Digital DVD only)
If playing a Dolby Digital DVD disc, the audio channel configuration is varied according to the disc loaded. When you select ON,
this feature displays the audio channel configuration on the FL display on the front panel.
ANGLE MARK
SCREEN SAVER
FLT DISPLAY
FLT AUDIO CH.
FRONT KEY
AUDIO POWER OFF
DEFAULTS RESET
EXIT SETUP
ON
ON
BRIGHT
ON
UNLOCK
ON
ENGLISH
5. FRONT KEY
To prevent children from pressing buttons on the front panel, you can select lock. This feature is only effective when the power is
on. Whenever you turn on the power, you should select LOCK again to protect the front panel buttons.
6. AUTO POWER OFF
If there is no key input for 5 minutes in status of stop, prestop, pause, setup, top menu, menu, open, no disc, step, screen saver
will be executed.Auto power off will be executed after 30 minutes in above condition.
7. DEFAULTS
If you are not confident about what you have selected in setup submenu items, you can initialize them to the factory adjusted values.
Be aware that, the password you already have set, remains the same even after the values are changed to the factory defaults.
Languages (DVD only)
If you select LANG., LANG’s sub item is displayed as shown in the figure below. The sub item of LANG is related to preferable
language for audio, subtitle or disc menu.
AUDIO
SUBTITLE
DISC MENU
EXIT SETUP
ENGLISH
OFF
ENGLISH
1. AUDIO
Set this value to the preferred audio language. If an audio language is selected, whenever you start playing a new disc, the
selected audio language is played, if the selected language is contained in the disc. For example, if you select ENGLISH as the
preferred audio language and ENGLISH audio language is contained in the disc, when the disc plays it will be in English.
2. SUBTITLE
Set this value to the preferred subtitle language. If a subtitle language is selected, whenever you start playing a new disc, the
selected subtitle language is played, if the selected language is contained in the disc. For example, if you select ENGLISH as the
preferred subtitle language and ENGLISH subtitle language is contained in the disc. When you start playing the disc, you can see
English subtitles.
35

ENGLISH
3. DISCMENU
Set this value to the preferred disc menu language. If a disc menu language is selected, whenever you start playing a new disc,
the selected disc menu language is played if the selected language is contained in the disc. For example, if you select ENGLISH
as the preferred disc menu language and ENGLISH disc menu language is contained in the disc. When you start playing the disc,
you can see the disc menu in English.
Parental Lock (DVD only)
This function is to disable the playing of specified DVD discs that are unsuitable for children. As each disc has slightly different
codes, please refer to the disc instruction. There are a total of 8 levels. If the level is 8, the contents of the disc are suitable for
adult. If the level is 1, the contents of the disc are suitable for children. If you didn’t set a new password, there is no restriction in
changing parental level. When you turn on this unit for the first time, a new password set is recommended.
PARENTAL
PASSWORD
EXIT SETUP
8 ADULT
CHANGE
1. PARENTAL
Used to adjust the level of parental lock. Once selected, whenever you play a disc, the selected parental level is compared to the
level on the disc. If the level you selected is greater than the level of the disc, you may play the loaded disc. If not, you may not
play the disc. To set appropriate parental level do the following instructions. If you move to the PARENTAL sub item, you can see
the values for the PARENTAL sub item. You can move to the value position by pressing the RIGHT arrow button. Select proper
value using UP and DOWN arrow button and then press the SELECT button. If you press the ENTER button then it asks for the
current password. If there is no current password then it doesn’t ask. A parental level change will be done by entering the current
stored password.
PARENTAL
PASSWORD
EXIT SETUP
1
KID
2
3
4
5
6
7
8 ADULT
CURRENT PASSWORD
PRESS ENTER TO CONTINUE
XXXX
PARENTAL Values Current PASSWORD
2. PASSWORD
Used to change the saved password to a new one. To change the current password, move to PASSWORD sub item using UP
and DOWN arrow buttons. If you move to the PARENTAL sub item, you can see the value for the PASSWORD. Just one sub item
CHANGE can be shown. You can move to the value position by pressing RIGHT arrow button. Press ENTER button to change
password. If you press ENTER button, password change window appears as shown below. If it is the first time change then there
is no old password. If not, you should enter old password. Enter new password in 4 digits. Re-enter new password for confirm
then press ENTER button. To store the password press ENTER button, password change is finished.
OLD PASSWORD
NEW PASSWORD
CONFIRM PASSWORD
XXXX
Change Sub item Password Change Finish
Note
• If you forget the password, press “8095” as old password in password change.
36
OLD PASSWORD
NEW PASSWORD
CONFIRM PASSWORD
PRESS ENTER TO CONTINUE
XXXX
XXXX
XXXX

ADDITIONAL INFORMATION
Handling discs
When holding discs of any type, take care not to leave
fingerprints, dirt or scratches on the disc surface. Hold the disc
by its edge or by the center hole and edge.
Damaged or dirty discs can affect playback performance.
Take care also not to scratch the label side of the disc.
Although not as fragile as the recorded side, scratches can still
result in a disc becoming unusable.
Should a disc become marked with fingerprints, dust, etc.,
clean using a soft, dry cloth, wiping the disc lightly from the
center tothe outside edge as shown in the diagram below.
Wipe lightly from the
center of the disc using
straight strokes.
If necessary, use a cloth soaked in alcohol, or a commercially
available CD/DVD cleaning kit to clean a disc more
thoroughly. Never use benzine, thinner or other cleaning
agents, including products designed for cleaning vinyl
records.
Don’t wipe the disc
surface using circular
strokes.
Discs to avoid
Discs spin at high speed inside the player. If you can see that
a disc is cracked, chipped, warped, or otherwise damaged,
don’t risk using it in your player
the unit.
This unit is designed for use with conventional, fully circular
discs only. Use of shaped discs is not recommended for this
product.
-
you could end up damaging
Cleaning the pickup lens
The DVD player’s lens should not become dirty in normal
use, but if for some reason it should malfunction due to
dust or dirt, consult your nearest MARANTZ-authorized
service center. Although lens cleaners for CD players are
commercially available, we do not recommend using them
since some may damage the lens.
Problems with condensation
ENGLISH
Storing discs
Although CDs and DVD discs are more durable than vinyl
records, you should still take care to handle and store discs
correctly. When you’re not using a disc, return it to its case and
storeupright. Avoid leaving discs in excessively cold, humid,
or hot environments (including under direct sunlight).
Don’t glue paper or put stickers onto the disc, or use a pencil,
ball-point pen or other sharp-tipped writing instrument. These
could all damage the disc.
For more detailed care information see the instructions that
comewith discs.
Do not load more than one disc into the player.
Condensation may form inside the player if it is brought
into a warm room from outside, or if the temperature of the
room rises quickly. Although the condensation won’t
damage the player, it may temporarily impair its performance.
For this reason you should leave it to adjust to the
warmer temperature for about an hour before switching on
and using.
37

ENGLISH
Hints on installation
Moving the player
We want you to enjoy using this unit for years to come, so
please bear in mind the following points when choosing a
suitable location for it:
Do...
Use in a well-ventilated room.
Place on a solid, flat, level surface, such as a table, shelf
or stereo rack.
Don’t...
Use in a place exposed to high temperatures or humidity,
including near radiators and other heat-generating
appliances.
Place on a window sill or other place where the player will
be exposed to direct sunlight.
Use in an excessively dusty or damp environment.
Place directly on top of an amplifier, or other component in
your stereo system that becomes hot in use.
Use near a television or monitor as you may experience
interference
antenna.
Use in a kitchen or other room where the player may be
exposed to smoke or steam.
Use on a thick rug or carpet, or cover with cloth-this may
prevent proper cooling of the unit.
Place on an unstable surface, or one that is not large
enough to support all four of the unit’s feet.
-
especially if the television uses an indoor
If you need to move the player, first press POWER button on
the front panel to turn the player off, then the unplug the power
-
cord. Never lift or move the unit during playback
at a high speed and may be damaged.
discs rotate
Power cord caution
Handle the power cord by the plug part. Do not pull out the
plug by tugging the cord, and never touch the power cord
when your hands are wet, as this could cause a short circuit or
electric shock. Do not place the unit, a piece of furniture, or
other object on the power cord or pinch the cord in any other
way. Never make a knot in the cord or tie it with other cords.
The power cords should be routed so that they are not likely to
be stepped on. A damaged power cord can cause a fire or give
you an electric shock. Check the power cord once in a while. If
you find it damaged, ask your nearest MARANTZ authorized
service center or your dealer for a replacement.
Resetting the player
Resetting the player returns setup menu to their factory
defaults. To reset the player, press and hold
(NEXT) on the front panel simultaneously.
(FR) and
Malfunctioning of this unit
Static electricity or other external influences may cause
malfunctioning of this unit. In this case,
1. Press the power button on the front panel till power is
turned off .
2. unplug the power cord and then plug back in.
This will usually reset the unit for proper operation. If this does
not correct the problem, please consult your nearest
MARANTZ service center.
38

Glossary
Analog audio
An electrical signal that directly represents sound. Compare
this to digital audio which can be an electrical signal, but is an
indirect representation of sound. See also Digital audio.
Aspect ratio
The width of a TV screen relative to its height. Conventional
TVs are 4:3 (in other words, the screen is almost square);
widescreen models are 16:9 (the screen is almost twice as
wide as it is high).
Chapter (DVD-Video)
Just as a book is split up into several chapters, a title on a DVD
disc is usually divided into chapters. See also Title.
Digital audio
An indirect representation of sound by numbers. During
recording, the sound is measured at discrete intervals (44,100
times a second for CD audio) by an analog-todigital converter,
generating a stream of numbers. On playback, a digital-toanalog converter generates an analog signal based on these
numbers. See also Sampling frequency and Analog audio.
Dolby Digital
The maximum 5.1 channels of audio used in the surround
system (Surround Digital) for movie theaters is digital data
compressed by the third generation algorithm encoder.
1
In order to enjoy Dolby Digital discs, this unit’s digital output
jack (either coaxial or optical) must be connected to the digital
input jack of an AV amplifier or Dolby Digital decoder to enjoy
the sound of Dolby Digital soundtracks.
DTS
DTS stands for Digital Theater System. DTS is a surround
system different from Dolby Digital that has become a popular
surround sound format for movies. In order to enjoy the
benefits of DTS encoded discs, the digital output jack (either
coaxial or optical) of this player needs to be connected to an
AV amplifier or receiver or to a DTS decoder to be able to
enjoy the surround sound of DTS audio. DTS audio is not
output from the analog audio outputs.
Dynamic range
The difference between the quietest and loudest sounds
possible in an audio signal (without distorting or getting lost in
noise). Dolby Digital and DTS soundtracks are capable of a
very wide dynamic range, delivering dramatic cinema-like
effects.
File extension
A tag added to the end of a filename to indicate the type of file.
For example, “.mp3 ” indicates an MP3 file.
MP3
MP3 (MPEG1 audio layer 3) is a compressed audio file format.
Files are recognized by their file extension “.mp3” or “.MP3”.
MPEG video
The video format used for Video CDs and DVDs. Video CD
uses the older MPEG-1 standard, while DVD uses the newer
and much better quality MPEG-2 standard.
Multi-session
A CD-R/RW that contains two or more ‘sessions’. Each
session is a complete recording process, so each session is
read as a complete disc. This player can only read the first
session on a disc.
Optical digital output
A jack that outputs digital audio in the form of light pulses.
Connect components with optical digital jacks using a special
optical cord, available from good audio dealers.
PCM (Pulse Code Modulation)
The most common system of encoding digital audio, found on
CDs and DAT. Excellent quality, but requires a lot of data
compared to formats such as Dolby Digital. For compatibility
with digital audio recorders (CD, MD and DAT) and AV
amplifiers with digital inputs. See also Digital audio.
PBC (PlayBack Control) (Super VCD / Video CD only)
A system of navigating a Super VCD / Video CD through onscreen menus recorded onto the disc. Especially good for
discs that you would normally not watch from beginning to end
all at once
Progressive scan video
Also called non-interlaced video, this method of displaying a
picture updates all the lines in one pass, resulting in one pass,
resuiling in a more stable, flicker-free image than interlaced
video (for a given scanning rate). See also interlaced video.
Regions (DVD only)
These associate discs and players with particular areas of the
world. This unit will only play discs that have compatible region
codes. You can find the region code of your unit by looking on
the rear panel. Some discs are compatible with more than one
region (or all regions).
Sampling frequency
The rate at which sound is measured to be turned into digital
audio data. The higher the rate, the better the sound quality,
but the more digital information is generated. Standard CD
audio has a sampling frequency of 44.1kHz, which means
44,100 samples (measurements) per second. See also Digital
audio.
Title (DVD-Video only)
A collection of chapters on a DVD-Video disc.
Track
Audio CDs and Super Video CDs / Video CDs discs all use
tracks to divide up the content of a disc. The DVD-Video
equivalent is called a chapter. See also Chapter.
-
karaoke discs, for example.
ENGLISH
Interraced video
A methord of displaying a picture in which odd-numbered lines
are updated in one pass, then even-numbered lines updated
in the next. See also Progressive scan video.
39

ENGLISH
TROUBLESHOOTING
Incorrect operation is often mistaken for trouble or malfunction.If you think that there is something wrong with this component,check
the points below.Sometimes the trouble may lie in another component.Inspect the other components and electrical appliances being
used.If the trouble cannot be rectified after checking the items below,ask your nearest MARANTZ authorized service center or your
dealer to carry out repair work.
The disc is ejected automatically after loading.
• Dirty or damaged disc.
See pages 37 for disc care information.
• Disc not seated properly in the disc guide.
Align the disc properly.
• Incompatible region number.
If the region number on a DVD-Video disc does not match
the number on the player,the disc cannot be used (page 4 ).
• Condensation inside the player.
Allow time for condensation to evaporate.Avoid using the
player near an air-conditioning unit.
Playback is not possible.
• Disc is loaded upside down.
Reload the disc with the label side face up.
• A Super VDC is does not comform with the IEC.
standard might not play normally.
mark appears on screen.
• The operation is prohibited by the player and / or disc.
Picture playback stops and the operation buttons cannot be used.
• Press ,then start playback again ( ).
• Switch the power off once using the front panel POWER
button and then switch on again using the front panel
POWER button.
New settings made in the Setup screen menus while a
disc is playing are ineffective.
• Some settings can be changed while a disc is playing, but
are not effective until the disc is stopped then restarted.
This is not a malfunction.
Make the same setting when the player is stopped.
Settings are canceled.
• When the power is cut due to power failure or by
unplugging the power cord,settings will be canceled.
Before unplugging the power cord,press POWER button
and checking that STANDBY indicator light on the front
panel.
No picture / No color
• Incorrect video connections.
Check that connections are correct and that plugs are
inserted fully.
• TV/monitor or AV amplifier settings are incorrect.
Check the instruction manual of the connected equipment.
• The VIDEO-Progressive menu is set to ON but your TV/
monitor is not compatible with progressive scan.
Reconnect the player to your TV using a composite or SVideo cord and set the TV to appropriate input. Now
choose the OFF setting in the VIDEO-progressive menu,
then swith the TV input back to the component input.
Or Push stop button for longer than 5 sec to set progressive
scan setting into OFF.
Screen is stretched or aspect does not change.
• The TV ASPECT setting in the Setup menu is incorrect.
Set the TV ASPECT option to match the TV/monitor you’re
using (pages 33 ).
Picture disturbance during playback or dark.
• This player is compatible with Macro-Vision System copy
guard. Some discs include a copy prevention signal,and
when this type of disc is played back,stripes etc.,may appear
on some sections of the picture depending on the TV.
This is not a malfunction.
Discs respond differently to particular player functions.This
•
may result in the screen becoming black for a brief instant or
shaking slightly when the function is executed.
These problems are largely due to differences between discs
and disc content and are not malfunctions of this player.
• The TV type may be set in appropriately. See setting the
TV type on page 34.
• When using progressive scan. If your TV is connected
using COMPONENT VIDEO OUT Jack, set the
PROGRESSIVE menu to OFF (page 34).
When recorded on a VCR or passed through an AV
selector, there is disturbance in the playback picture.
• Due to the player ’s copy protection circuits,connection of
this device through a VCR or an AV selector may prevent
recording or cause picture problems.
This is not a malfunction.
The remote control doesn’t seem to work.
• The Control In jack on the rear panel is connected.
Check that REMOTE CONTROL SW is set to the external
position (page 9 ).
• The remote control is too far from the player,or the angle
with the remote sensor is too wide.
Use the remote within its operating range (page 3 ).
• The batteries are exhausted.
Put in new batteries (page 3 ).
• Check that REMOTE CODE setting is set to the correct
position (page 15 ).
40

No audio,or audio is distorted.
• Some DVD discs do not output digital audio.
Switch your amplifier to the player’s analog outputs.
• Dirt,dust,etc.on the disc.
Clean the disc (page 37 ).
• Interconnects are not fully inserted into the terminals
(or are not connected).
Check that all interconnects are firmly inserted.
• Dirty or oxidized plugs/terminals.
Clean the plugs/terminals.
• Incorrect audio cable connection.
Check the audio connections (page 7 ).
• Player’s output is connected to the amplifier’s phono
(turntable) inputs.
Connect to any set of inputs except phono.
• The disc is paused.
Press
• Incorrect amplifier settings.
Check that the volume is turned up,that the speakers are
on, the input function set correctly,etc.
The analog audio is OK,but there appears to be no digital
audio signal.
• Incorrect Audio menu settings.
Make sure that the Digital Out setting is set to
BITSTREAM or PCM (page 32).
Check that the BITSTREAM and PCM settings are
suitable for your amplifier —check the amp’s instruction
manual.
(play) to exit the pause mode.
The disc containing the MP3 tracks won ’t play.
• If the disc is a recordable CD,make sure that the disc is
finalized.
Check that the track(s)are in the MPEG1 Audio Layer 3
format.
Check that the sampling rate of the track(s)are 32 or 44.1
or 48kHz.
Some MP3 tracks appear to be missing from a disc.
• If a track name does not end in “.mp3 ”or “.MP3 ”,this
player will not recognize it as an MP3 track.
• This player only recognizes the first 126 folders and 255
tracks on a disc.If there are more folders/tracks than this,
you will not be able to play them.
Note
Static electricity or other external influences may cause
malfunctioning of this unit. In this case, unplug the power cord
and then plug back in. This will usually reset the unit for proper
operation. If this does not correct the problem, please consult
your nearest MARANTZ service center.
ENGLISH
Noticeable difference in DVD and CD volume.
• DVDs and CDs use different recording methods.
This is not a malfunction.
No DTS audio output.
• If this unit is connected to a non-DTS compaible amplifier
or decoder using a digital audio cable, please connect to a
DTS compatible amplifire or decorder. If you do not do
this,noise will be output if you try and play a DTS disc.
• If this unit is connected to a DTS-compatible amplifier or
decoder using a digital audio cable,check the amplifier
settings,and that the cable is properly connected.
41

ENGLISH
SPECIFICATIONS
General
System ..................................................... DVD-Video, DVD-R
Super VCD, Video-CD
CD and MP3 files
Power requirements .................... AC 100 V- 240 V, 50/60 Hz
Power consumption ......................................................... 14 W
Weight ............................................................................6.6 lbs
3 kg
Dimensions ................ 17 5/16 (W) x 2 2/16 (H) x 11 (D) inch
440 (W) x 54 (H) x 280 (D) mm
Operating temperature ..................................... +5°C to +35°C
Operating humidity .................. 5% to 85% (no condensation)
S-Video output
Y (luminance) - Output level .............................. 1 Vp-p (75 Ω)
C (color) - Output level ............................... 286 mVp-p (75 Ω)
Jacks .................................................................. S-VIDEO jack
Video output
Output level........................................................ 1 Vp-p (75 Ω)
Jacks ......................................................................... RCA jack
Component video output (Y, Cb/Pb, Cr/Pr)
Output level................................................. Y: 1.0 Vp-p (75 Ω)
................................................. Cb/Pb, Cr/Pr: 0.7 Vp-p (75 Ω)
Jacks ....................................................................... RCA jacks
Audio output
Output level
During audio output .................... 200 mVrms (1 kHz, –20 dB)
Number of channels .............................................................. 2
Jacks ......................................................................... RCA jack
Audio characteristics
Frequency response ............ 4 Hz to 44 kHz (DVD fs: 96 kHz)
S/N ratio ........................................................................ 101 dB
Dynamic range.............................................................. 100 dB
Total harmonic distortion ............................................ 0.003 %
Wow and flutter
.............. Limit of measurement (±0.001% W. PEAK) or lower
Digital output
Optical digital output ................................... Optical digital jack
Coaxial digital output ................................................ RCA jack
Accessories
Audio/Video cable.................................................................. 1
System control cable ............................................................. 1
Remote control unit ............................................................... 1
“AAA” size (R03) batteries..................................................... 2
Operating Instructions ........................................................... 1
Warranty card ........................................................................ 1
Dimensions
Note: The specifications and design of this product are subject
to change without notice, due to improvement.
11
(280)
Unit :inch (mm)
42
17 5/16
(440)
(42)
1 10/16
(12)
8/16
(54)
2 2/16

COUNTRY COMPANY ADDRESS
ALGERIE Azur 2000 8, Lotissement Ben Hatadi, Alger, Algerie
ARMENIA NGYIG Ltd. 47 A/75 St. Lalaiants, 375000 Yerevan, Armenia
AUSTRALIA QualiFi Pty. Ltd., P.O. Box 350, Mt. Waverley, VIC 3149, Australia
AUSTRIA Huber & Prohaska GmbH Taborstraße 95 / Ladestraße 1, Gebäude Hangartner, A-1200 Wien, Austria
BAHREIN Ambassador Stores P.O. Box 237,141, Government Avenue, Manama,Bahrein
BANGLADESH Target 1078, Ramjoy Mohanja Lane Asadgonj, Chittagong 4000, Bangladesh
BELGIUM Van der Heyden Audio N.V. Brusselbaan 278, 9320 Erembodegem, Belgium
BULGARIA Ariescommerce GmbH Makedonia Blvd. 16, 1606 Sofia, Bulgaria
CANADA Lenbrook Industries Limited 633 Granite Court, Pickering, Ontario
CHINA
CYPRUS Empire Hifi systems Ltd. P.O. Box 5604, Nicosia, Cyprus
CZECH REPUBLIC Audio International Sokolska 41, 67902 Rajecko, OKR,Blansko, Czech Republic
DENMARK Audio Nord Dali Allé 1, 9610 Noerager, Denmark
DUBAI V.V.& SONS P.O. Box 105, Dubai, U.A.E.
EGYPT Solimco 9, El Attibaa St. Doki, Cairo, Egypt
ESTONIA HiFi Club Estonia Ehte 4, 90503 Haapsalu, Estonia
F.Y.R.O.M. T.P. KODI ul.Cedomir Kantargiev 21a, Skopje, Former Yugoslavian Republic of Macedonija
FINLAND Audio Nord Uudenmaankatu 4-6, Helsinki SF-00120, Finland
FRANCE Marantz France A division of Marantz Europe B.V., P.O. Box 301, 92 156 Suresnes Cedex, France
GERMANY Marantz Deutschland Hakenbusch 3, 49078 Osnabrück, Germany
GREECE Adamco S.A. 188, Hippocratous Street, 11471 Athens, Greece
HEADQUARTERS EUROPE: Marantz Europe B.V. P.O. Box 8744, 5605 LS Eindhoven, The Netherlands
HONG KONG Marantz Hong Kong Ltd. Unit 1706, Metroplaza II, 223 Hing Fong Road, Kwai Fong, N.T., Kowloon, Hong Kong
HUNGARY Infovox Ltd. Terez Krt.31, 1067 Budapest, Hungary
ICELAND ID Electronics Ltd. Armula 38, 108 Reykjavik, Iceland
INDIA NOVA Audio Private 6¥êunam Co-op.Society 29/30 Road#5, Union Park MUMBAI 400052, India
IRAN Home Co. 5th floor no 878 Philips Building Enghelab ave, P.O. 11365/7844 Tehran, Iran
IRELAND Marantz Ireland Clonskeagh, Dublin 14, Ireland
ISRAEL Elmor Ltd. 52 Heh Beiyar Street, Kikar Hamedina, Tel Aviv, Israel
ITALY Marantz Italy Via Casati 23, 20052 Monza (Milano), Italy, Servizio Consumatori 1678-20026, Numero Verde
IVORY COAST Hifivoir B.P. 2428, Abidjan 01, Ivory Coast
JAPAN Marantz Japan Inc. 35-1 Sagami Ohno 7-Chome, Sagamihara-shi, Kanagawa 228-8505, Japan
KOREA MK Enterprises Ltd. Rm604, Electro-officetel, 16-58. Hangang-ro 3Ga, Yongsan-Ku, Seoul, Korea
KUWAIT alAlamiah Electronics Intl. P.O. Box 8196, Salmiah 22052, Kuwait
LATVIA Ace Ltd. 61, LacPlesa Str., Riga LV 1011, Latvia
LEBANON AZ Electronics S.A., 1, P.O. Box 11 2833, Beirut, Lebanon
LITHUANIA Accapella Ltd. Ausros, Vartu G/5, Pasazo SKG., 2001 Vilnius, Lithuania
MALAYSIA Wo Kee Hong Electronics Sdn. Bhd. 2nd Floor Bangnan Infinite Centre, Lot1, Jalan 13/6, 46200 Petaling Jaya, Selangor Datul Ehsan, Malaysia
MALTA Doneo Co Ltd. 78 The Strand, Sliema SLM07, Malta
MAURITIUS SKR Electronics Ltd. P.O. Box 685, Bell Village, Port Louis, Mauritius
MILITARY MARKET EUROPE PASCO GmbH PO BOX 1280, Sandhausen 69200, Germany
NEW ZEALAND Wildash Audio Systems 14 Malvern Road, Mt. Albert, Auckland, New Zealand
NORWAY Audio Nord Sandkerveien 64, Oslo 0483, Norway
OMAN Mustafa & Jawad Trading CO. P.O. Box 1918, Ruwi, Oman
POLAND Philips Polska Sp. z.o.o. Al.Jerozolimskie 195b, 02 222 Warszawa, Poland
PORTUGAL Corel2 Comércio de Electrónica Lda., Av. Luís Bívar, No 85 A, 1050 Lisboa, Portugal
PROFESSIONAL EUROPE Marantz Professional Products Kingsbridge House, Padbury Oaks, 575-583 Bath Road, Longford, Middlesex UB7 0EH, U.K.
PROFESSIONAL U.S.A. Marantz Professional Products Distributed by: Superscope Technologies Inc., 1000 Corporate Blvd. Ste.D, Aurora, Illinois
QATAR Almana & Partners W.W.L. P.O. Box 49, Doha, Qatar
REUNION Vision + 180 Rue du Marechal Leclerc, 97400 Saint Denis, Ile de la Reunion
ROMANIA Nova Music Entertainment 5, Zagazului Str. Bl.1G,apt.18, sector 1,Bucharest, Romania
RUSSIA Absolute Audio 7/2, Montazhnaya Street, 107497 Moscow, Russia
SAUDI ARABIA Adawlia Univ. Electr. Apl P.O. Box 2154, Alkhobar 31952, Saudi Arabia
SINGAPORE Wo Kee Hong Distribution PTE Ltd. 130 Joo Seng Road, #03-02 Olivine Building, Singapore 368357
SLOVAKIA Bis Audio s.r.o. Nam. SNP 10, 96001 Zvolem, Slovakia
SLOVENIA Bofex Smartinska 152, HALA V/3, 61000 Ljubljana, Slovenia
SOUTH AFRICA Coherent Imports (PTY) Ltd. P.O. Box 1614, Alberton, 1450, South Africa
SPAIN Marantz Spain Martinez Villergas 2, Apartado 2065, Madrid 28027, Spain
SRI LANKA The listening Room Mezzanine Floor, The Landmark 385, Galle Road, Colombo - 3, Sri Lanka
SWEDEN Audio Nord Almedalsvagen 4, Gotenborg 402-23, Sweden
SWITZERLAND Sound Company AG Postfach, 8010 Zürich, Switzerland
SYRIA Hamzeh & Partners Hafez Ibrahim Str. No 117, Damascus Shalan, Syria
TAHITI Covecolor Av. Prince Hinoi, Cours de l'union sacré, P.O. Box 2334, Papeete, Tahiti
TAIWAN Pai-Yuing Co. Ltd. 6th No 148 Sung Kiang Road, Taipei 10429, Taiwan R.O.C.
THAILAND MRZ Standard Co. Ltd. 746-750 Mahachai Road, Wangburapa, Bangkok 10200, Thailand
TUNESIA Societe EDEVIG 40, Avenue du Golfe Arabe, El Menzah, 1004, Tunesia
TURKEY Türk Philips Ticaret A.S. Yukari Dudullu Organize sanayi Bolgesi, 2.Cadde no.28, 81260 Umraniye-Istanbul, Turkey
U.K. Marantz Hifi UK Ltd. Kingsbridge House, Padbury Oaks, 575-583 Bath Road, Longford, Middlesex UB7 0EH, U.K.
U.S.A. Marantz America Inc. 1100 Maplewood Drive Itasca, IL 60143, U.S.A.
YUGOSLAVIA ITM Company Omladinskih Brigada 86, 11070 Belgrade, Yugoslavia
www.marantz.com
Guang Chang Audio International Co., Ltd.
No.38 Yushan Road, ShiQiao, Pan Yu, Guang Dong, China
R
is a registered trademark.
2002/09 MITh 21AW851250Printed in Korea
 Loading...