


 Manitowoc

LuminIce™
Installation, Use & Care Manual
This manual is updated as new information and models are released. Visit our website for the latest manual. www.manitowocice.com
This manual contains English and French text
America’s #1 Selling Ice Machine
Part Number 000008463 10/11

Table of Contents
Section 1
General Information
Before You Begin . . . . . . . . . . . . . . . . . . . . . . . . . . . . . . . . . . . . . . . . . . . . . . . . . . . 3
LuminIce™ . . . . . . . . . . . . . . . . . . . . . . . . . . . . . . . . . . . . . . . . . . . . . . . . . . . . . . . . 4
Section 2
Installation Instructions
LuminIce™ Installation 30" Wide Single Evaporator Models . . . . . . . . . . . . . . . . 5 LuminIce™ Installation 48" Wide Single Evaporator Models . . . . . . . . . . . . . . . . 7 LuminIce™ Installation Two Evaporator Ice Machines . . . . . . . . . . . . . . . . . . . . . 10
LuminIce™ Reminder Setup . . . . . . . . . . . . . . . . . . . . . . . . . . . . . . . . . . . . . . . 12
Section 3 Customer Support
Cleanup Procedure for Accidental Bulb Breakage . . . . . . . . . . . . . . . . . . . . . . . . 13
Before Cleanup . . . . . . . . . . . . . . . . . . . . . . . . . . . . . . . . . . . . . . . . . . . . . . . . . 13
During Cleanup . . . . . . . . . . . . . . . . . . . . . . . . . . . . . . . . . . . . . . . . . . . . . . . . . 13
After Cleanup . . . . . . . . . . . . . . . . . . . . . . . . . . . . . . . . . . . . . . . . . . . . . . . . . . . 13 Cleanup Steps for Hard Surfaces . . . . . . . . . . . . . . . . . . . . . . . . . . . . . . . . . . . . . . 14 Cleanup Steps for Carpeting or Rugs . . . . . . . . . . . . . . . . . . . . . . . . . . . . . . . . . . . 14 Future Cleaning of Carpeting or Rugs . . . . . . . . . . . . . . . . . . . . . . . . . . . . . . . . 15
2 |
Part Number 000008463 10/11 |
Section 1
General Information
This manual covers installation of the LuminIce™ on the following ice machine models:
Self-Contained |
Self-Contained |
Remote |
QuietQube |
Remote |
|||
Air-Cooled |
Water-Cooled |
Condenser |
Condensing |
|
|
|
Unit |
ID0302A |
ID0303W |
---- |
---- |
IY0304A |
IY0305W |
---- |
---- |
ID0322A |
ID0323W |
---- |
---- |
IY0324A |
IY0325W |
---- |
---- |
ID0452A |
ID0453W |
---- |
---- |
IY0454A |
IY0455W |
---- |
---- |
IR0500A |
IR0501W |
IR0590N |
---- |
ID0502A |
ID0503W |
ID0592N |
---- |
IY0504A |
IY0505W |
IY0594N |
---- |
IR0520A |
IR0521W |
---- |
---- |
ID0522A |
ID0523W |
---- |
---- |
IY0524A |
IY0525W |
---- |
---- |
ID0602A |
ID0603W |
ID0692N |
ID0682C |
IY0604A |
IY0605W |
IY0694N |
IY0684C |
|
|
|
IB0694YC |
IR0850A |
IR0851W |
IR0890N |
ID0872C |
ID0852A |
ID0853W |
ID0892N |
IY0874C |
IY0854A |
IY0855W |
IY0894N |
IB0894YC |
ID1002A |
ID1003W |
ID1092N |
ID1072C |
IY1004A |
IY1005W |
IY1094N |
IY1074C |
|
ID1003WM |
|
IB1094YC |
ID1202A |
ID1203W |
--- |
--- |
IY1204A |
IY1205W |
--- |
--- |
ID1402A |
ID1403W |
ID1492N |
ID1472C |
IY1404A |
IY1405W |
IY1494N |
IY1474C |
|
ID1403WM |
|
|
IR1800A |
IR1801W |
IR1890N |
ID1872C |
ID1802A |
ID1803W |
ID1892N |
IY1874C |
IY1804A |
IY1805W |
IY1894N |
|
---- |
---- |
---- |
ID2172C |
|
|
|
IY2174C |
Kit K00424 is used with 22" & 30" wide single evaporator models (i0300 through i1000)
Kit K00434 is used with all 48" wide or dual evaporator models
Before You Begin
Remove all packing material and inspect the equipment for concealed shipping damage. If damage is found, notify the shipper immediately.
LuminIce™ is for use on Indigo™ ice machines and is not compatible with previous series ice machines.
! Warning
PERSONAL INJURY POTENTIAL
Do not operate equipment that has been misused, abused, neglected, damaged, or altered/modified from that of original manufactured specifications. This appliance is not intended for use by persons (including children) with reduced physical, sensory or mental capabilities, or lack of experience and knowledge, unless they have been given supervision concerning use of the appliance by a person responsible for their safety.
Part Number 000008463 10/11 |
3 |

General Information |
Section 1 |
|
|
LuminIce™
The LuminIce™ growth inhibitor recirculates the air in the ice machine foodzone over a UV bulb. This process will inhibit the growth of common micro-organisms on all exposed foodzone surfaces.
•LuminIce™ bulbs require replacement on a yearly basis. Although the bulb will still illuminate after 12 months, the effectiveness of the bulb diminishes as operational hours increase. To retain maximum effectiveness, replace the bulb on a 12 month schedule.
•The control board can be set to automatically display a reminder after 12 months. Refer to Section 2 LuminIce™ setup procedure for full details.
4 |
Part Number 000008463 10/11 |
Section 2
Installation Instructions
LuminIce™ Installation 30" Wide Single
Evaporator Models
! Warning
Disconnect power to ice machine at the electrical disconnect. Pressing the power button does not disconnect line voltage.
1.Disconnect all power to the ice machine at the electrical disconnect.
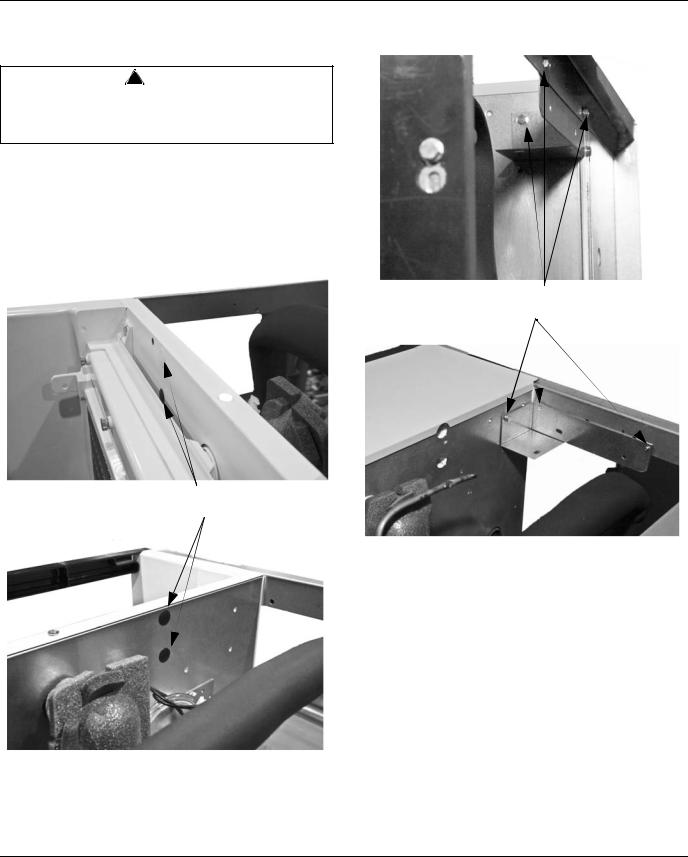
2.To allow access for LuminIce™ tubing, the evaporator dust cover and plastic caps in the evaporator and compressor compartment bulkhead wall must be removed and discarded.
Remove Plastic Caps From Bulkhead In The
Evaporator And Compressor Compartment
3.Assemble bracket to left-hand top rail with three provided screws.
Mount Bracket With
Three Screws
Part Number 000008463 10/11 |
5 |

Installation Instructions |
Section 2 |
|
|
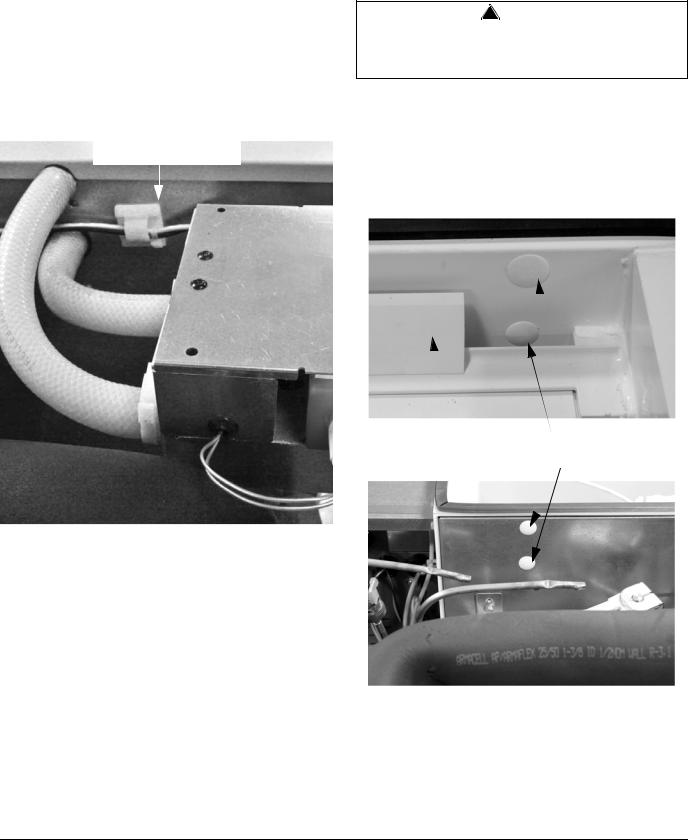
4.Assemble LuminIce™ to bracket with three screws provided. The bulb and bulb wiring must face toward the rear of the ice machine to allow bulb replacement with LuminIce™ in place.
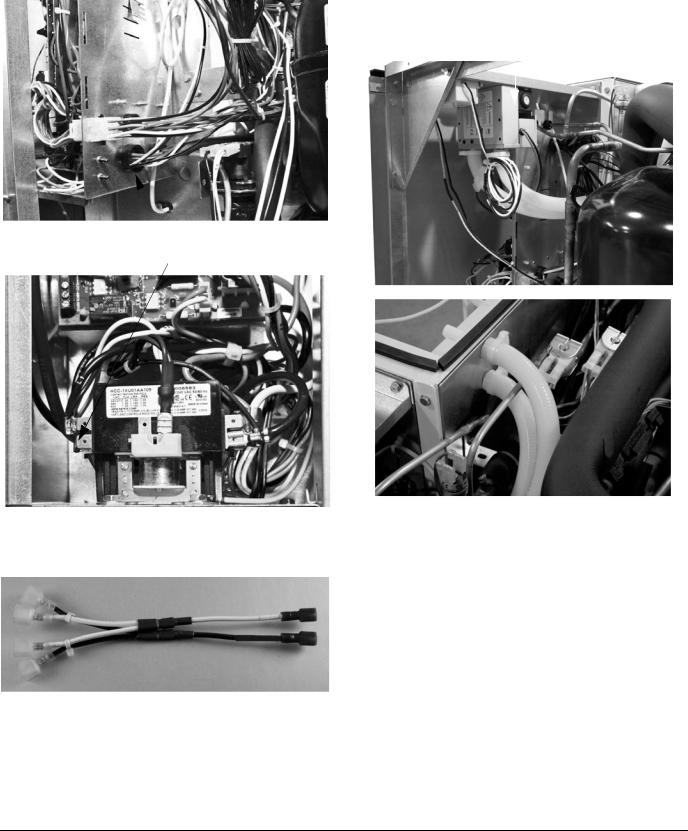
6.Route line voltage wires (Black & White) through line voltage Heyco fitting and attach to L1 and L2 contactor terminals.
Attach With Three Screws 
Route Through Line Voltage Heyco and
Attach to Contactor Terminals
5.Mount transformer on evaporator bulkhead above control box. Attach supplied wire clip and route line voltage wires through clip.
Install Transformer |
Attach Wire Clip |
Route Line Voltage Wires Through Clip
NOTE: QuietQube models do not have open terminals on contactor. Remove two wires from contactor, install supplied electrical connector and connect wires.
Wires Removed From Contactor |
Contactor |
L2
L1
LuminIce Power
6 |
Part Number 000008463 10/11 |
Section 2 |
Installation Instructions |
|
|
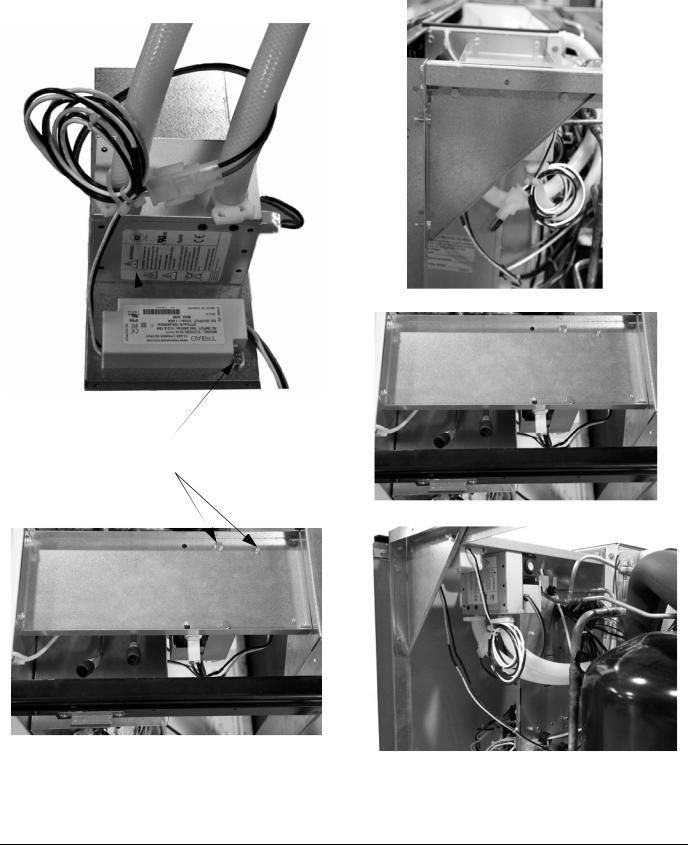
7.Route low voltage wiring (black and yellow wires) to the LuminIce™. Install wire clip and route wires close to evaporator bulkhead to assure harness is away from any moving parts, then snap wire harness connectors together.
8.Install LuminIce™ hoses.
•Insert hose closest to the front of the ice machine in the bottom evaporator bulkhead hole.
•Insert hose farthest from the front of the ice machine
in the upper evaporator bulkhead hole.
Install wire clip and route wires along evaporator bulkhead.
LuminIce™ Installation 48" Wide Single
Evaporator Models
! Warning
Disconnect power to ice machine at the electrical disconnect. Pressing the power button does not disconnect line voltage.
1.Disconnect all power to the ice machine at the electrical disconnect.
2.To allow access for LuminIce™ tubing, the evaporator dust cover and plastic caps in the evaporator and compressor compartment bulkhead wall must be removed and discarded. Remove the evaporator dust cover to access lower cap.
Remove Dust Cover
Remove Plastic Caps From Bulkhead In The
Evaporator And Compressor Compartment
9.Install the notched evaporator dust cover from kit and test run the ice machine and LuminIce™. The Luminice™ is energized whenever power is applied to the ice machine.
Part Number 000008463 10/11 |
7 |
Installation Instructions |
Section 2 |
|
|
3.Remove bracket from ice machine and assemble LuminIce™ and transformer to bracket. Attach tubing and secure with hose clamps.
4. Assemble bracket to ice machine.
Mount LuminIce™ and
Transformer To Bracket
8 |
Part Number 000008463 10/11 |
Section 2 |
Installation Instructions |
|
|
5.Route line voltage wires (Black & White) through line voltage Heyco fitting and attach to L1 and L2 contactor terminals.
6.Route LuminIce™ hoses to evaporator and attach.
•Insert hose closest to the front of the ice machine in the bottom evaporator bulkhead hole.
•Insert hose farthest from the front of the ice machine in the upper evaporator bulkhead hole.
Route Through Line Voltage Heyco and
Attach to Contactor Terminals
NOTE: Three phase models do not have open terminals on contactor. Remove two wires from contactor, install supplied electrical connector and connect wires.
Ice Machine Power |
Incoming Power Supply |
N
L1
LuminIce Power
7.Install the evaporator dust cover and test run the ice machine and LuminIce™. The Luminice™ is energized whenever power is applied to the ice machine.
Part Number 000008463 10/11 |
9 |
 Loading...