


 Manitowoc

F Model
Ice Storage Bins
Installation, Use & Care Manual
This manual is updated as new information and models are released.
Visit our website for the latest manual. www.manitowocice.com
This manual contains English and French text
America’s #1 Selling Ice Machine
Part Number 000006528 10/09

Table of Contents
Section 1
General Information
Model Numbers . . . . . . . . . . . . . . . . . . . . . . . . . . . . . . . . . . . . . . . . . . . . . . . . . . . . . 3
Before You Begin . . . . . . . . . . . . . . . . . . . . . . . . . . . . . . . . . . . . . . . . . . . . . . . . . . . 3
Section 2
Installation Instructions
Installation Procedure . . . . . . . . . . . . . . . . . . . . . . . . . . . . . . . . . . . . . . . . . . . . . . . 4
Drain Requirements . . . . . . . . . . . . . . . . . . . . . . . . . . . . . . . . . . . . . . . . . . . . . . . . . 4
Door Removal . . . . . . . . . . . . . . . . . . . . . . . . . . . . . . . . . . . . . . . . . . . . . . . . . . . . . . 5
Removing Lower Door Assembly . . . . . . . . . . . . . . . . . . . . . . . . . . . . . . . . . . . 5
Reinstalling Lower Door Assembly . . . . . . . . . . . . . . . . . . . . . . . . . . . . . . . . . . 5
Section 3
Operation
Baffle Operation . . . . . . . . . . . . . . . . . . . . . . . . . . . . . . . . . . . . . . . . . . . . . . . . . . . . 6
For More Ice . . . . . . . . . . . . . . . . . . . . . . . . . . . . . . . . . . . . . . . . . . . . . . . . . . . 6
For More Access . . . . . . . . . . . . . . . . . . . . . . . . . . . . . . . . . . . . . . . . . . . . . . . . 6
Using Ice Probe Tool Accessory . . . . . . . . . . . . . . . . . . . . . . . . . . . . . . . . . . . . . . . 6
Section 4
Maintenance
Cleaning and Sanitizing Interior Bin . . . . . . . . . . . . . . . . . . . . . . . . . . . . . . . . . . . . |
7 |
Cleaning Exterior Bin . . . . . . . . . . . . . . . . . . . . . . . . . . . . . . . . . . . . . . . . . . . . . . . . |
7 |
Section 5
Customer Support
Before Calling For Service Checklist . . . . . . . . . . . . . . . . . . . . . . . . . . . . . . . . . . . |
8 |
Limited Warranty For Ice Storage Bin & Dispensers . . . . . . . . . . . . . . . . . . . . . . |
9 |
2 |
Part Number 000006528 10/09 |
Section 1
General Information
Model Numbers
This manual covers the following models:
Single Door Upright
Ice Storage Bins
F700 |
F1325 |
F1300 |
F1650 |
Before You Begin
After uncrating and removing all packing material, inspect the equipment for concealed shipping damage. If damage is found, notify the shipper immediately.
! Warning
Top is NOT fastened to bin. Be aware of this to avoid personal injury.
! Warning
PERSONAL INJURY POTENTIAL
Do not operate equipment that has been misused, abused, neglected, damaged, or altered/modified from that of original manufactured specifications. This appliance is not intended for use by persons (including children) with reduced physical, sensory or mental capabilities, or lack of experience and knowledge, unless they have been given supervision concerning use of the appliance by a person responsible for their safety.
! Caution
Avoid excessive tightening force when connecting to the bin drain fitting. Overtightening may cause damage.
! Caution
Do not apply excessive heat if any sweating of fittings is necessary. Heat conduction through metal may melt threads in plastic drain fitting.
! Caution
30" large capacity ice storage bins must be attached to the wall.
Part Number 000006528 10/09 |
3 |

Section 2
Installation Instructions
Installation Procedure
1.Remove all packing material from bin.
2.Remove all tape and temporary fastenings from door assemblies and outside of bin.
3.Remove top from bin.
4.Remove set of four legs and any other accessories packed inside bin.
5.Lay bin on back, being careful to protect finish, and remove bolts holding skid to bin.
6.Screw legs into tapped holes in bin bottom and tighten to seat legs well against bottom.
7.Set bin upright.
8.Reinstall top onto bin.
9.Remove protective paper from stainless steel exterior.
10.Move bin to permanent location.
11.Adjust “foot” at bottom of each leg to level bin in both directions.
12.Mount ice machine(s) on bin in accordance with ice machine instructions.
13.Connect drain line to 1" FPT female fitting located in bottom of bin.
14.Make final connections to ice machine.
Drain Requirements
•Bin drain termination must have an air gap.
•Drain lines must have a 1.5 inch drop per 5 feet of run (2.5 cm per meter), and must not create traps.
•The floor drain must be large enough to accommodate drainage from all drains.
•Run separate bin and ice machine drain lines and insulate to prevent condensation.
4 |
Part Number 000006528 10/09 |
Section 2 |
Installation Instructions |
|
|
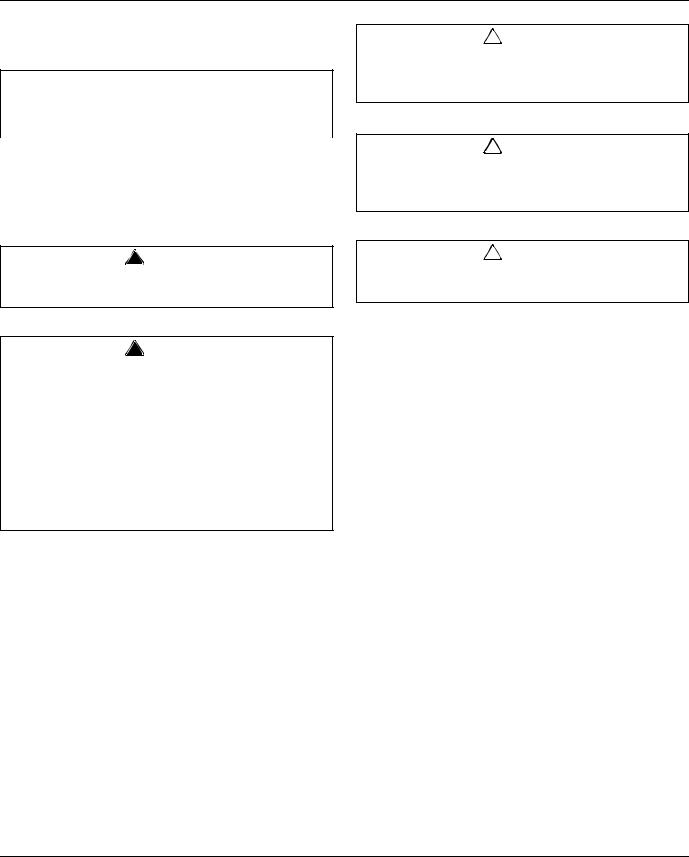
Door Removal
REMOVING LOWER DOOR ASSEMBLY
(Only if required for access through narrow doors)
1.With door in closed position, remove Phillips head screw and washer from hinge area on each side of lower access door.
2.Insert screwdriver between door and hinge bracket on one side of door and gently push against bracket to provide room for door stud to clear bracket.
3.Remove access door.
4.Pull up on baffle to remove.
5.Remove screws along top of door assembly.
6.Pull forward on top of assembly and lift to remove.
ACCESS
DOOR
BAFFLE
LOWER
DOOR
ASSEMBLY
REINSTALLING LOWER DOOR ASSEMBLY
1.Reinstall lower door assembly in bin opening.
2.Reinstall screws in hood at top of door assembly.
3.Reinstall baffle in side panel tracks and push down to seat.
4.With door in closed position, insert one door stud through hinge bracket, install washer, screw and tighten.
NOTE: For proper operation the access door must be reinstalled in the closed position.
5.On other side, insert screwdriver between door and hinge bracket and gently push against bracket to provide room for door stud to clear bracket.
6.Reinstall washer and screw in lift door and tighten.
7.Check door to ensure proper operation.
Part Number 000006528 10/09 |
5 |
Section 3
Operation
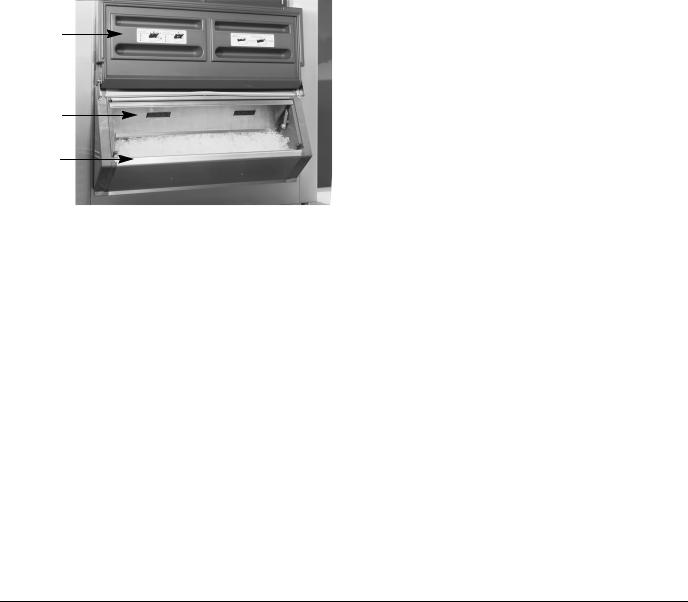
Baffle Operation
The baffle controls the flow of ice into lower door assembly area for removal with either a scoop or shovel. The baffle can also be adjusted and locked at one of several levels to accommodate flow characteristics of different types of ice.
Bin is shipped with the baffle in full down position. The baffle can be raised and locked in higher position for better flow or when more access is needed.
FOR MORE ICE
If more ice is needed in lower door area:
1.Use full-length handle at top of the baffle to gently lift and jiggle the baffle to encourage ice to flow into access area of the bin. (Loose ice will cascade into lower door area.)
2.When adequate ice has flowed, push the baffle back down.
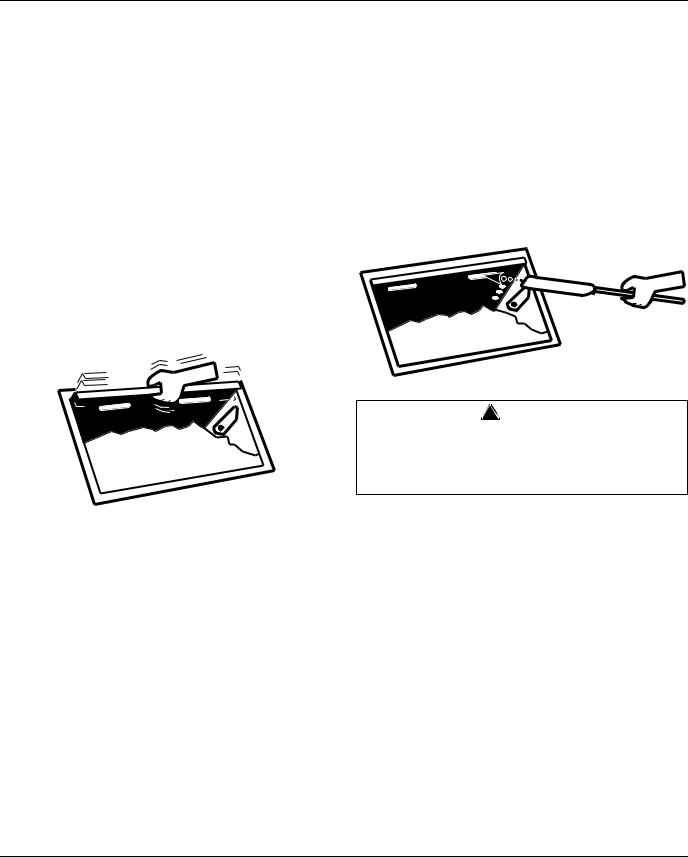
Using Ice Probe Tool Accessory
Ice probe tool is an optional accessory. If your bin has been ordered with ice probe tool accessory, mount probe for easy access on either side of bin in bracket provided.
If there is adequate ice in bin but lower door area is not filled with ice, it may be that ice has congealed in bin and cannot flow. This can often be remedied by quickly jiggling the baffle several times (see preceding, Baffle Operation). If problem continues, probe tool can be inserted through rectangular openings in the baffle and agitated back and forth to break up congealed ice mass.
FOR MORE ACCESS
When more access is needed or to encourage flow of less “slippery” ice:
1.Lock gate at higher level by pulling up and holding the baffle at correct level, and pushing tapered end of catch into nearest hole in gate (catch will automatically release when you pull up).
2.To release catch, pull up on the baffle.
! Warning
Use probe tool only as described above. To avoid possible injury, keep head and face clear of lower door area and tool at all times. Do not use probe tool for other purposes.
6 |
Part Number 000006528 10/09 |
 Loading...