


MAKITA UC4551AX1 Manual
1
v
GB
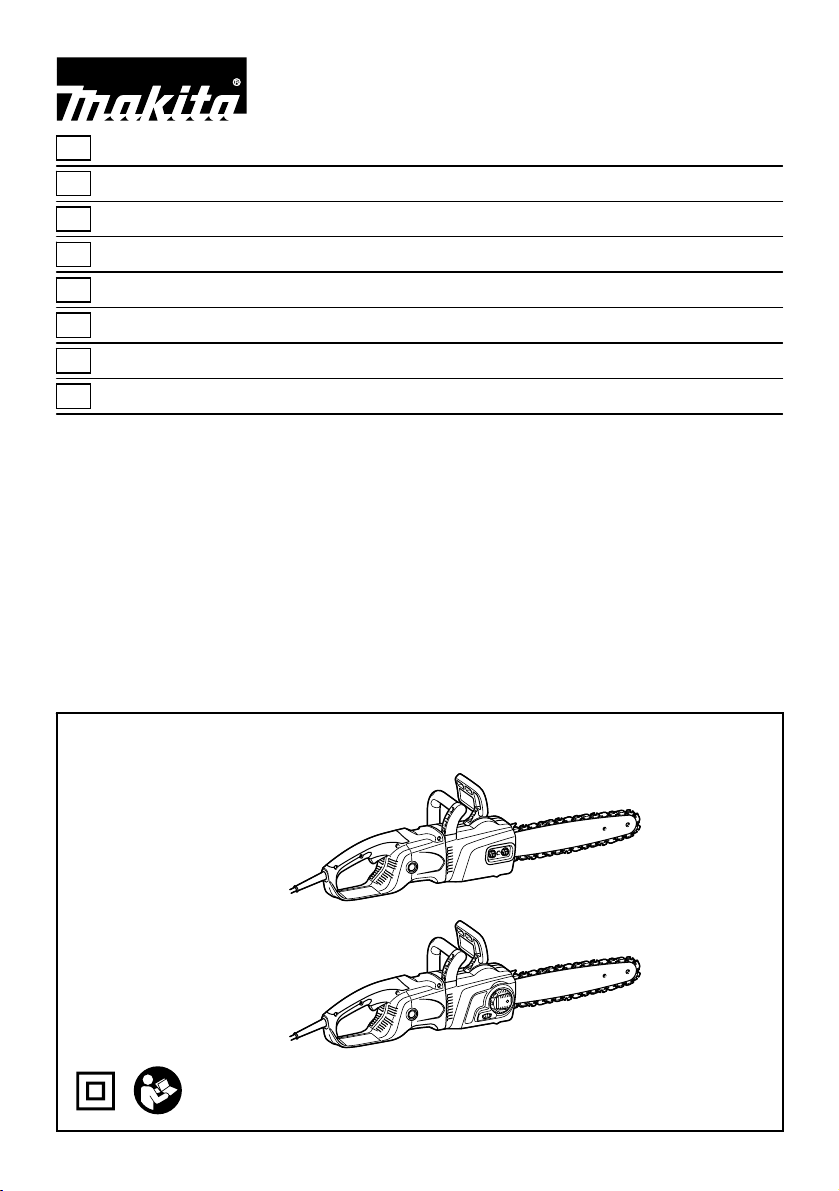
Electric Chain Saw INSTRUCTION MANUAL
S
Elektrisk kedjesåg BRUKSANVISNING
N
Elektrisk kjedesag BRUKSANVISNING
FIN
Sähkömoottorisaha KÄYTTÖOHJE
LV
Elektriskais motorzāģis LIETOŠANAS INSTRUKCIJA
LT
Elektrinis grandininis pjūklas NAUDOJIMO INSTRUKCIJA
EE
Elektriline kettsaag KASUTUSJUHEND
RUS
Электрическая Цепная Пила
РУКОВОДСТВО ПО ЭКСПЛУАТАЦИИ
UC3050A
UC3550A
UC3550AP
UC4050A
UC4550A
UC3051A
UC3551A
UC4051A
UC4551A
2
1 014453
1
2
2 014393
1
3 014515
1
4 014516
1
5 014457
2
1
6 014448
3
1
2
7 014380 8 014454
1
2
9 014394
1
2
3
5
4
10 014680
1
2
3
5
4
11 014682
4
3
1
2
12 014359
1
2
13 014376
Reclaimend
oil
14 006921
1
2
15 014386
3
1
2
3
18 014387
1
32
19 014439
1
20 014517 21 014392
1
22 014389
23 006914
A
B
A
B
24 006915
25 014390
45
o
2
1
/
2
45
o
1
26 006917 27 006918
28 006923
1
2
2
3
3
29 009202
30 006924
1
2
3
5
4
16 014680
1
2
3
5
4
17 014682
4
22
1
1
3
1
31 014456
30
30
11
32 014455
33 006927
30
34 006928
35 014344
36 006930
1
2
37 014391
1
38 014513
1
39 001145
1
2
40 014395
5
ENGLISH (Original instructions)
Explanation of general view
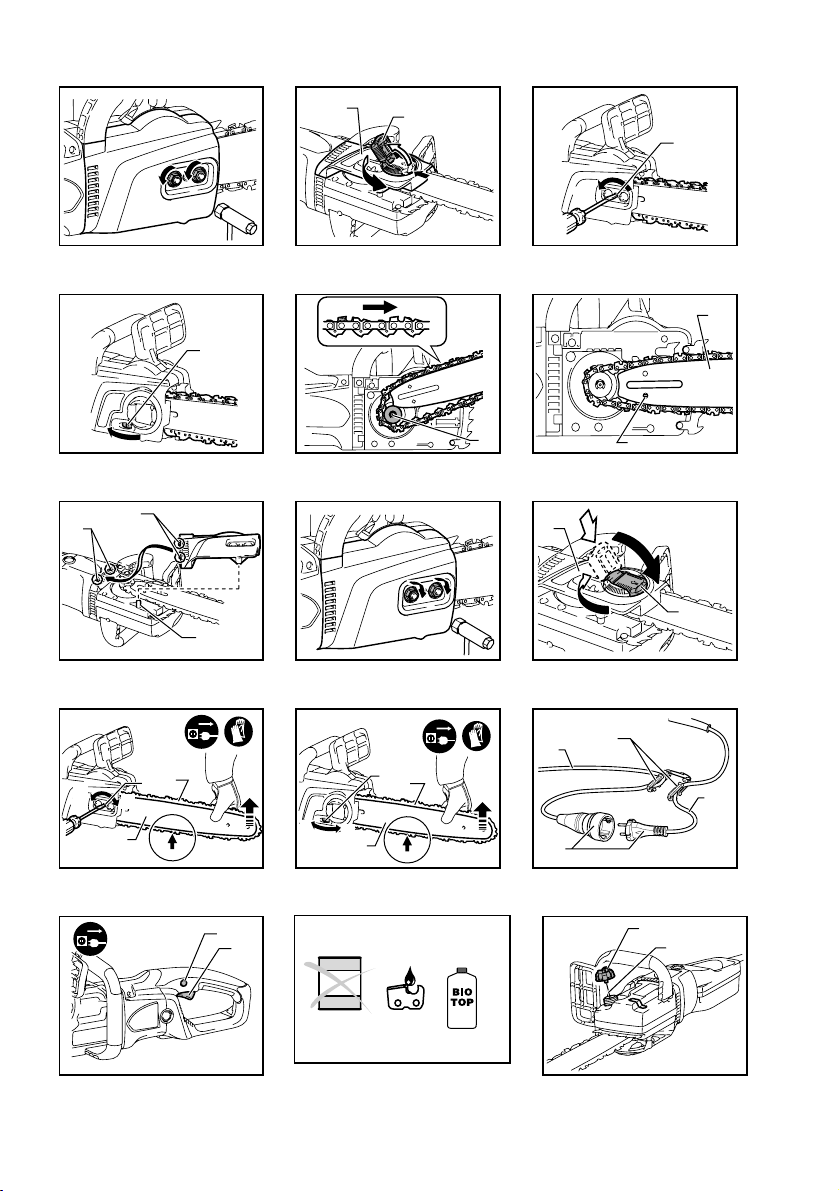
2-1. Lever
2-2. Sprocket cover
3-1. Adjusting screw
4-1. Adjusting dial
5-1. Sprocket
6-1. Guide bar
6-2. Hole
7-1. Hook
7-2. Hole
7-3. Pin
9-1. Lever
9-2. Sprocket cover
10-1. Loosen
10-2. Tighten
10-3. Chain adjusting screw
10-4. Guide bar
10-5. Saw chain
11-1. Loosen
11-2. Tighten
11-3. Adjusting dial
11-4. Guide bar
11-5. Saw chain
12-1. Cord hook
12-2. Tool's cord
12-3. Extension cord
12-4. Plug and socket (the shape may
differ from country to country)
13-1. Lock-off button
13-2. Switch trigger
15-1. Oil filler cap
15-2. Strap
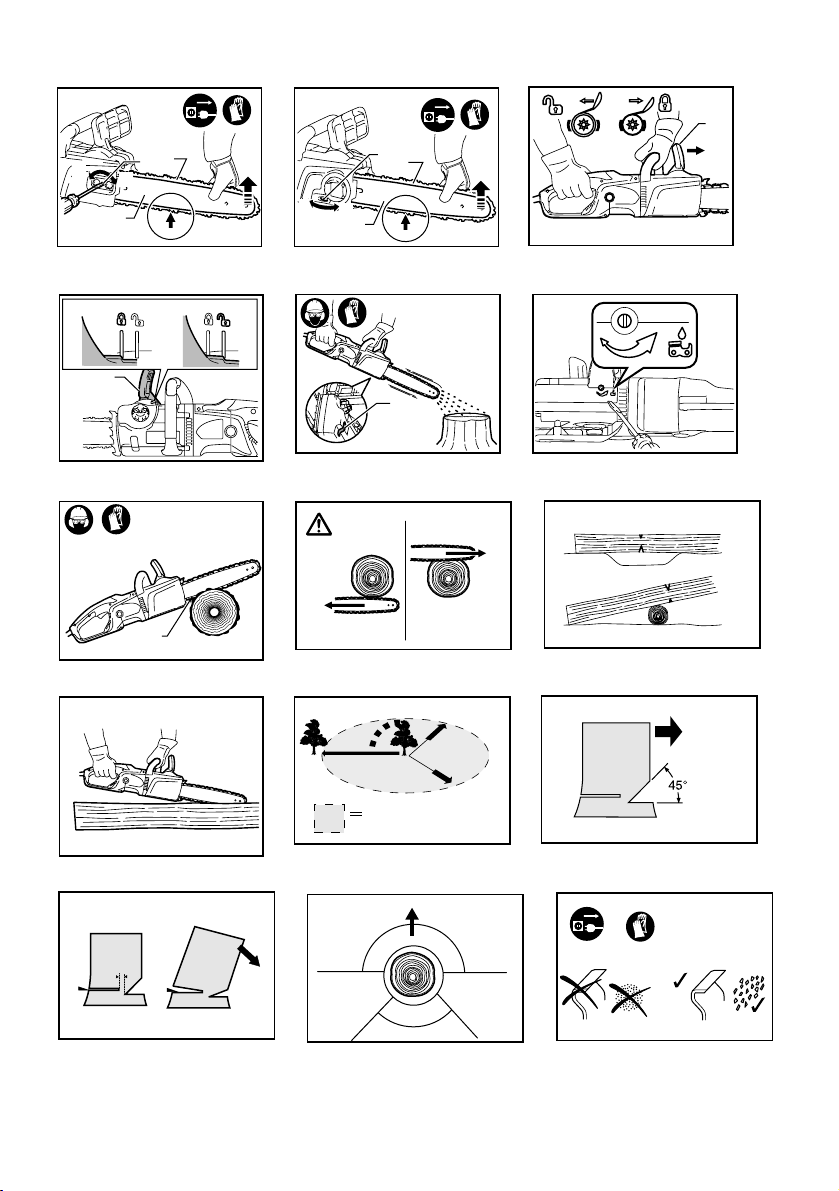
16-1. Loosen
16-2. Tighten
16-3. Chain adjusting screw
16-4. Guide bar
16-5. Saw chain
17-1. Loosen
17-2. Tighten
17-3. Adjusting dial
17-4. Guide bar
17-5. Saw chain
18-1. Front hand guard
18-2. Lock
18-3. Unlock
19-1. Front hand guard
19-2. Unlock
19-3. Lock
20-1. Oil level sight
22-1. Spike bumper
26-1. Felling area
29-1. Felling direction
29-2. Danger zone
29-3. Escape route
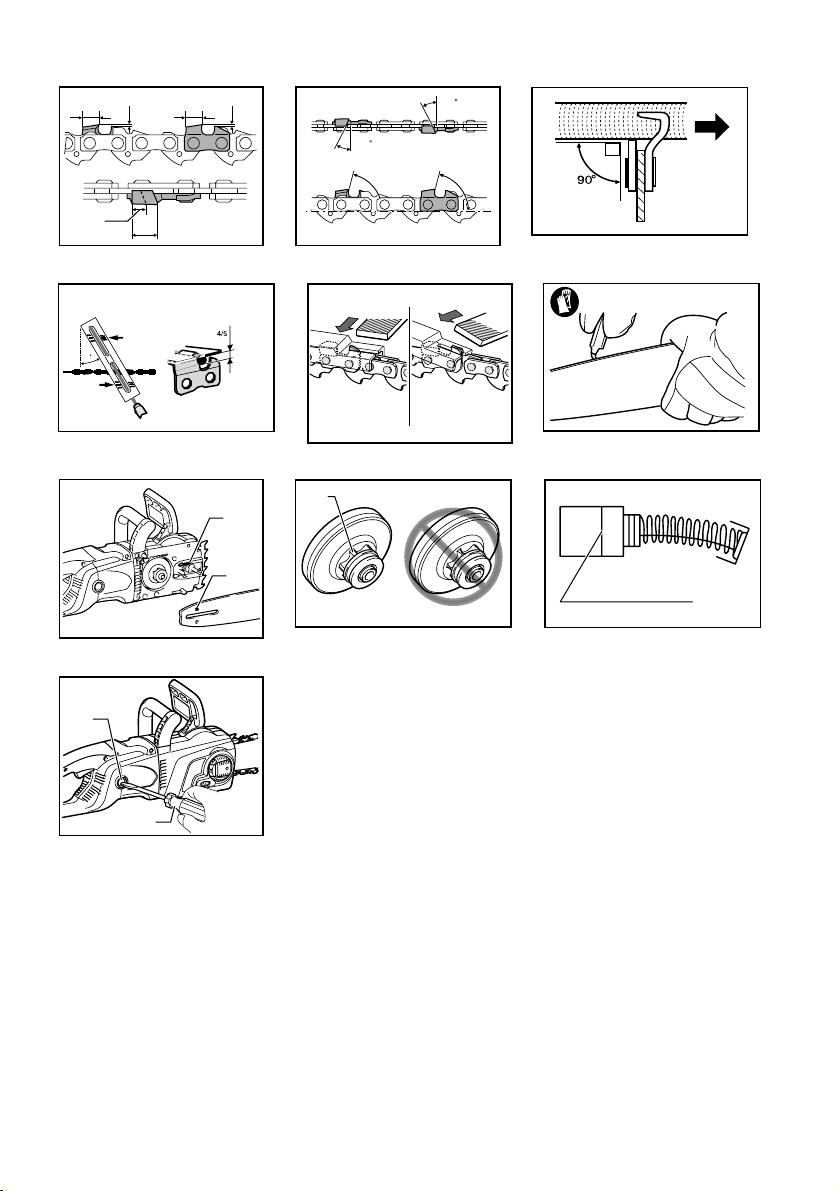
31-1. Cutting length
31-2. Distance between cutting edge
and depth gauge
31-3. Minimum 3 mm
32-1. Side plate angle
37-1. Oil guide groove
37-2. Oil feed hole
38-1. Sprocket
39-1. Limit mark
40-1. Brush holder cap
40-2. Screwdriver
SPECIFICATIONS
Model
UC3050A UC3051A UC3550A
UC3550AP
UC3551A UC4050A UC4051A UC4550A
UC4551A
Max. chain speed 14.5 m/s (870 m/min)
Bar length 300 mm 350 mm 400 mm 450 mm
Cutting length 260 mm 320 mm 355 mm 415 mm
Standard guide
bar
Guide bar type Sprocket nose bar
Type 91PX
Pitch 3/8"
Standard saw
chain
No. of drive links 46 52 56 62
Recommended guide bar length 300 - 450 mm
Overall length (without guide bar) 505 mm
Net weight 5.4 kg 5.5 kg 5.5 kg 5.6 kg 5.5 kg 5.6 kg 5.7 kg
Extension cable (optional) DIN 57282/HO 7RN -F L=30 m max.,3x1.5 mm
2
• Due to our continuing program of research and development, the specifications herein are subject to change without notice.
• Specifications may differ from country to country.
• Weight according to EPTA-Procedure 01/2003
END218-7
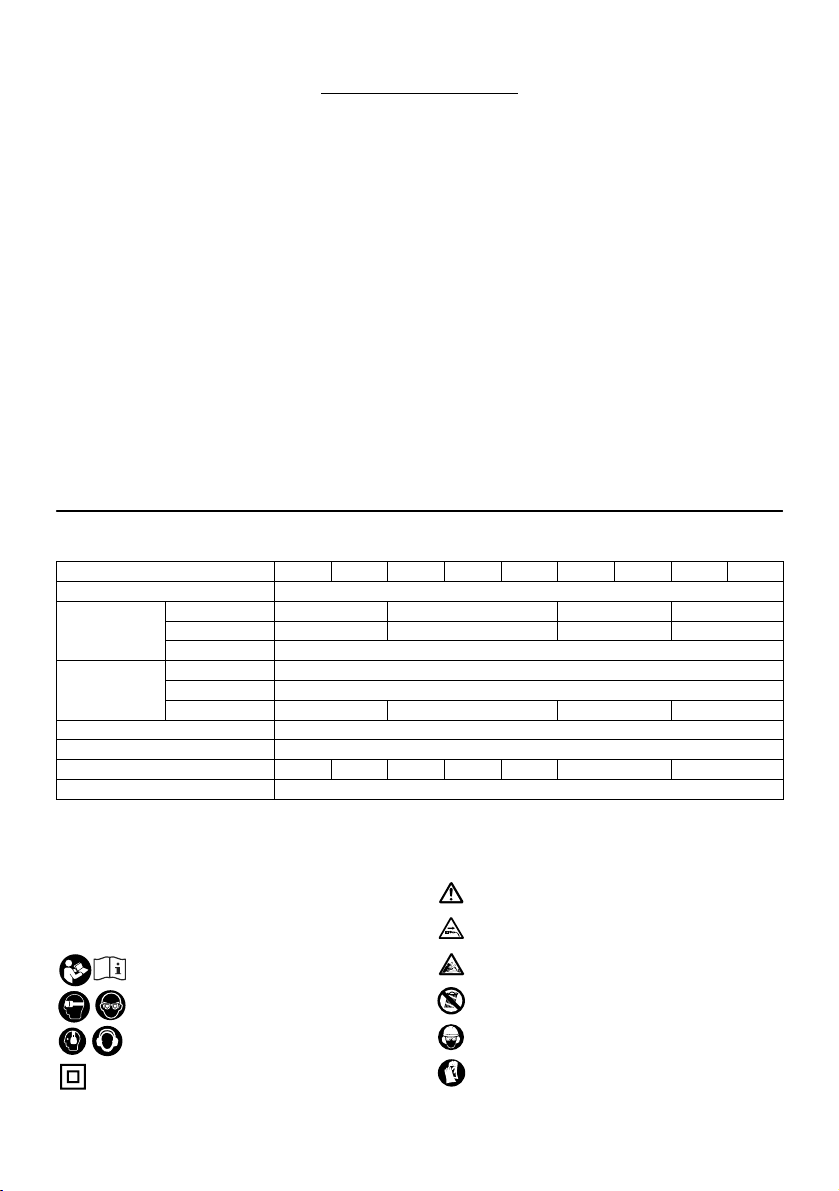
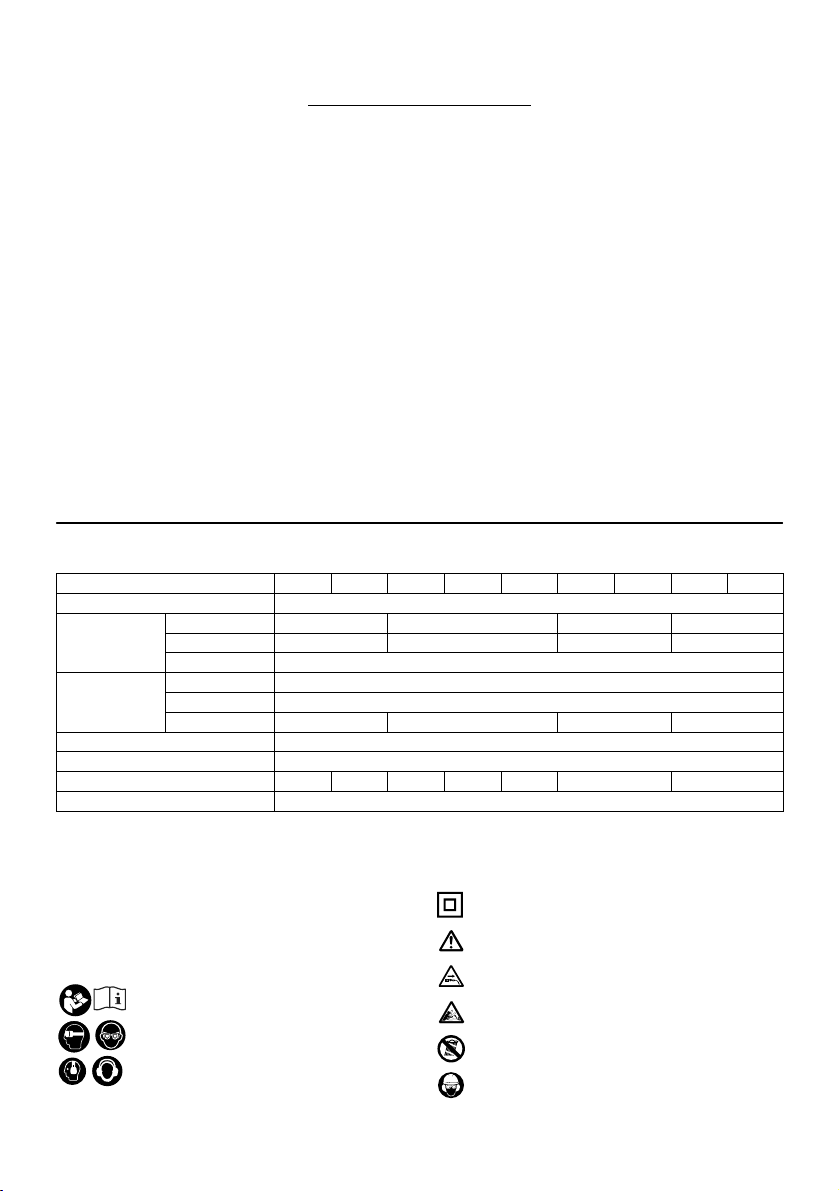
Symbol
The following show the symbols used for the equipment.
Be sure that you understand their meaning before use.
・ Read instruction manual and follow the
warnings and safety instructions.
・ Wear eye protection.
・ Wear ear protection.
・ DOUBLE INSULATION
・ Caution: particular care and attention
required!
・ Caution: withdraw the mains plug
immediately if the cable is damaged!
・ Caution: kickback!
・ Protect against rain and damp!
・ Wear a helmet, goggles and ear
protection!
・ Wear safety gloves!

6
・ Withdraw the mains plug!
・ First aid
・ Maximum permissible length of cut
・ Direction of chain travel
・ Chain oil
・ Chain brake released
・ Chain brake applied
・ Prohibited!
・ Only for EU countries
Do not dispose of electric equipment
together with household waste
material!
In observance of the European
Directive, on Waste Electric and
Electronic Equipment and its
implementation in accordance with
national law, electric equipment that
have reached the end of their life must
be collected separately and returned to
an environmentally compatible
recycling facility.
ENE085-1
Intended use
The tool is intended for cutting lumbers and logs.
ENF002-2
Power supply
The tool should be connected only to a power supply of
the same voltage as indicated on the nameplate, and
can only be operated on single-phase AC supply. They
are double-insulated and can, therefore, also be used
from sockets without earth wire.
ENG905-1
Noise
The typical A-weighted noise level determined
according to EN60745:
Sound pressure level (L
pA
) : 90.8 dB (A)
Sound power level (L
WA
) : 101.8 dB (A)
Uncertainty (K) : 2.5 dB (A)
Wear ear protection
ENG900-1
Vibration
The vibration total value (tri-axial vector sum)
determined according to EN60745:
Work mode : cutting wood
Vibration emission (a
h
) : 5.2 m/s
2
Uncertainty (K) : 1.5 m/s
2
ENG901-1
•
The declared vibration emission value has been
measured in accordance with the standard test
method and may be used for comparing one tool
with another.
• The declared vibration emission value may also be
used in a preliminary assessment of exposure.
WARNING:
• The vibration emission during actual use of the
power tool can differ from the declared emission
value depending on the ways in which the tool is
used.
• Be sure to identify safety measures to protect the
operator that are based on an estimation of
exposure in the actual conditions of use (taking
account of all parts of the operating cycle such as
the times when the tool is switched off and when it
is running idle in addition to the trigger time).
ENH021-8
For European countries only
EC Declaration of Conformity
Makita declares that the following Machine(s):
Designation of Machine:
Chain Saw
Model No./ Type: Type: UC3050A, UC3550A,
UC4050A, UC4550A, UC3051A, UC3551A,
UC3550AP, UC4051A, UC4551A
Specifications: see "SPECIFICATIONS" table.
Conforms to the following European Directives:
2000/14/EC, 2006/42/EC
They are manufactured in accordance with the following
standard or standardized documents:
EN60745
The technical file in accordance with 2006/42/EC is
available from:
Makita, Jan-Baptist Vinkstraat 2, 3070, Belgium
The conformity assessment procedure required by
Directive 2000/14/EC was in Accordance with annex V
Measured Sound Power Level: 101.9 dB (A)
Guaranteed Sound Power Level: 103 dB (A)
8.5.2014
000331
Yasushi Fukaya
Director
Makita, Jan-Baptist Vinkstraat 2, 3070, Belgium
7
GEA010-1
General Power Tool Safety
Warnings
WARNING Read all safety warnings and all
instructions. Failure to follow the warnings and
instructions may result in electric shock, fire and/or
serious injury.
Save all warnings and instructions for
future reference.
GEB037-8
Chain saw safety warnings
1. Keep all parts of the body away from the saw
chain when the chain saw is operating. Before
you start the chain saw, make sure the saw
chain is not contacting anything. A moment of
inattention while operating chain saws may cause
entanglement of your clothing or body with the
saw chain.
2. Always hold the chain saw with your right
hand on the rear handle and your left hand on
the front handle. Holding the chain saw with a
reversed hand configuration increases the risk of
personal injury and should never be done.
3. Hold the power tool by insulated gripping
surfaces only, because the saw chain may
contact hidden wiring or its own cord. Saw
chains contacting a "live" wire may make
exposed metal parts of the power tool "live" and
could give the operator an electric shock.
4. Wear safety glasses and hearing protection.
Further protective equipment for head, hands,
legs and feet is recommended. Adequate
protective clothing will reduce personal injury by
flying debris or accidental contact with the saw
chain.
5. Do not operate a chain saw in a tree. Operation
of a chain saw while up in a tree may result in
personal injury.
6. Always keep proper footing and operate the
chain saw only when standing on fixed,
secure and level surface. Slippery or unstable
surfaces such as ladders may cause a loss of
balance or control of the chain saw.
7. When cutting a limb that is under tension be
alert for spring back. When the tension in the
wood fibres is released the spring loaded limb
may strike the operator and/or throw the chain
saw out of control.
8. Use extreme caution when cutting brush and
saplings. The slender material may catch the
saw chain and be whipped toward you or pull you
off balance.
9. Carry the chain saw by the front handle with
the chain saw switched off and away from
your body. When transporting or storing the
chain saw always fit the guide bar cover.
Proper handling of the chain saw will reduce the
likelihood of accidental contact with the moving
saw chain.
10. Follow instructions for lubricating, chain
tensioning and changing accessories.
Improperly tensioned or lubricated chain may
either break or increase the chance for kickback.
11. Keep handles dry, clean, and free from oil and
grease. Greasy, oily handles are slippery causing
loss of control.
12. Cut wood only. Do not use chain saw for
purposes not intended. For example: do not
use chain saw for cutting plastic, masonry or
non-wood building materials. Use of the chain
saw for operations different than intended could
result in a hazardous situation.
13. Causes and Operator Prevention of Kickback:
Kickback may occur when the nose or tip of the
guide bar touches an object, or when the wood
closes in and pinches the saw chain in the cut.
Tip contact in some cases may cause a sudden
reverse reaction, kicking the guide bar up and
back towards the operator.
Pinching the saw chain along the top of the guide
bar may push the guide bar rapidly back towards
the operator.
Either of these reactions may cause you to lose
control of the saw which could result in serious
personal injury. Do not rely exclusively upon the
safety devices built into your saw. As a chain saw
user, you should take several steps to keep your
cutting jobs free from accident or injury.
Kickback is the result of tool misuse and/or
incorrect operating procedures or conditions and
can be avoided by taking proper precautions as
given below:
− Maintain a firm grip, with thumbs and
fingers encircling the chain saw handles,
with both hands on the saw and position
your body and arm to allow you to resist
kickback forces. Kickback forces can be
controlled by the operator, if proper
precautions are taken. Do not let go of the
chain saw.
014316

8
− Do not overreach and do not cut above
shoulder height. This helps prevent
unintended tip contact and enables better
control of the chain saw in unexpected
situations.
− Only use replacement bars and chains
specified by the manufacturer. Incorrect
replacement bars and chains may cause
chain breakage and/or kickback.
− Follow the manufacturer’s sharpening
and maintenance instructions for the saw
chain. Decreasing the depth gauge height
can lead to increased kickback.
ADDITIONAL SAFETY RULES
1. Read the instruction manual in order to familiarize
yourself with operation of the chain saw.
2. Before using the chain saw for the first time,
arrange to have instruction in its operation. If this
is not possible, at least practice cutting round
timber on a trestle before beginning work.
3. The chain saw must not be used by children or
young persons under 18 years of age. Young
persons over 16 years of age may be exempted
from this restriction if they are undergoing training
under the supervision of an expert.
4. Working with the chain saw requires a high level
of concentration. Do not work with the saw if you
are not feeling fit and well. Carry out all work
calmly and carefully.
5. Never work under the influence of alcohol, drugs
or medication.
Proper use
1. The chain saw is intended solely for cutting wood.
Do not use it for example to cut plastic or porous
concrete.
2. Only use the chain saw for operations described
in this instruction manual. Do not, for example,
use it to trim hedges or for similar purposes.
3. The chain saw must not be used for forestry work,
i.e. for felling and limbing standing timber. The
chain saw cable does not provide the operator
with the mobility and safety required for such
work.
4. The chain saw is not intended for commercial use.
5. Do not overload the chain saw.
Personal protective equipment
1. Clothing must be close-fitting, but must not
obstruct mobility.
2.
Wear the following protective clothing during work:
• A tested safety helmet, if a hazard is
presented by falling branches or similar;
• A face mask or goggles;
• Suitable ear protection (ear muffs, custom or
mouldable ear plugs). Octave brand analysis
upon request.
• Firm leather safety gloves;
• Long trousers manufactured from strong
fabric;
• Protective dungarees of cut-resistant fabric;
• Safety shoes or boots with non-slip soles,
steel toes, and cut-resistant fabric lining;
• A breathing mask, when carrying out work
which produces dust (e.g. sawing dry wood).
Protection against electric shock
・ The chain saw must not be used in wet
weather or damp environments, as the
electric motor is not waterproof.
1. Only plug the saw into sockets in tested electrical
circuits. Check that the system voltage matches
that on the rating plate. Ensure that a 16 A line
fuse is fitted. Saws used in the open air must be
connected to a residual current-operated circuit-
breaker with an operating current no higher than
30 mA.
・ Should the connecting cable be
damaged, withdraw the mains plug
immediately.
Safe working practices
1. Before starting work, check that the chain saw is
in proper working order and that its condition
complies with the safety regulations. Check in
particular that:
• The chain brake is working properly;
• The run-down brake is working properly;
• The bar and the sprocket cover are fitted
correctly;
• The chain has been sharpened and tensioned
in accordance with the regulations;
• The mains cable and mains plug are
undamaged;
Refer to the "CHECKS " section.
2. Always ensure in particular that the extension
cable used is of adequate cross-section (see
"SPECIFICATIONS"). When using a cable reel,
wind the cable completely off the reel. When
using the saw in the open air, ensure that the
cable employed is intended for open-air use and
is rated accordingly.
3. Keep the cord away from the cutting area and to
position cord so that it will not be caught on
branches, and the like, during cutting.
4. Do not operate the chain saw in the vicinity of
flammable dust or gases, as the motor generates
sparks and presents a risk of explosion.
5. Work only on firm ground and with a good footing.
Pay particular attention to obstacles (e.g. the
cable) in the working area. Take particular care
where moisture, ice, snow, freshly cut wood or
bark may make surfaces slippery. Do not stand
on ladders or trees when using the saw.
6. Take particular care when working on sloping
ground; rolling trunks and branches pose a
potential hazard.
9
7. Never cut above shoulder height.
8. Hold the chain saw with both hands when
switching it on and using it. Hold the rear
handle with your right hand and the front handle
with your left. Hold the handles firmly with your
thumbs. The bar and the chain must not be in
contact with any objects when the saw is
switched on.
014316
9. Clean the area to be cut of foreign objects such
as sand, stones, nails, wire, etc. Foreign objects
damage the bar and chain, and can lead to
dangerous kickback.
10. Take particular care when cutting in the vicinity of
wire fences. Do nut cut into the fence, as the saw
may kick back.
11. Do not cut into the ground.
12. Cut pieces of wood singly, not in bunches or
stacks.
13. Avoid using the saw to cut thin branches and
roots, as these can become entangled in the
chain saw. Loss of balance presents a hazard.
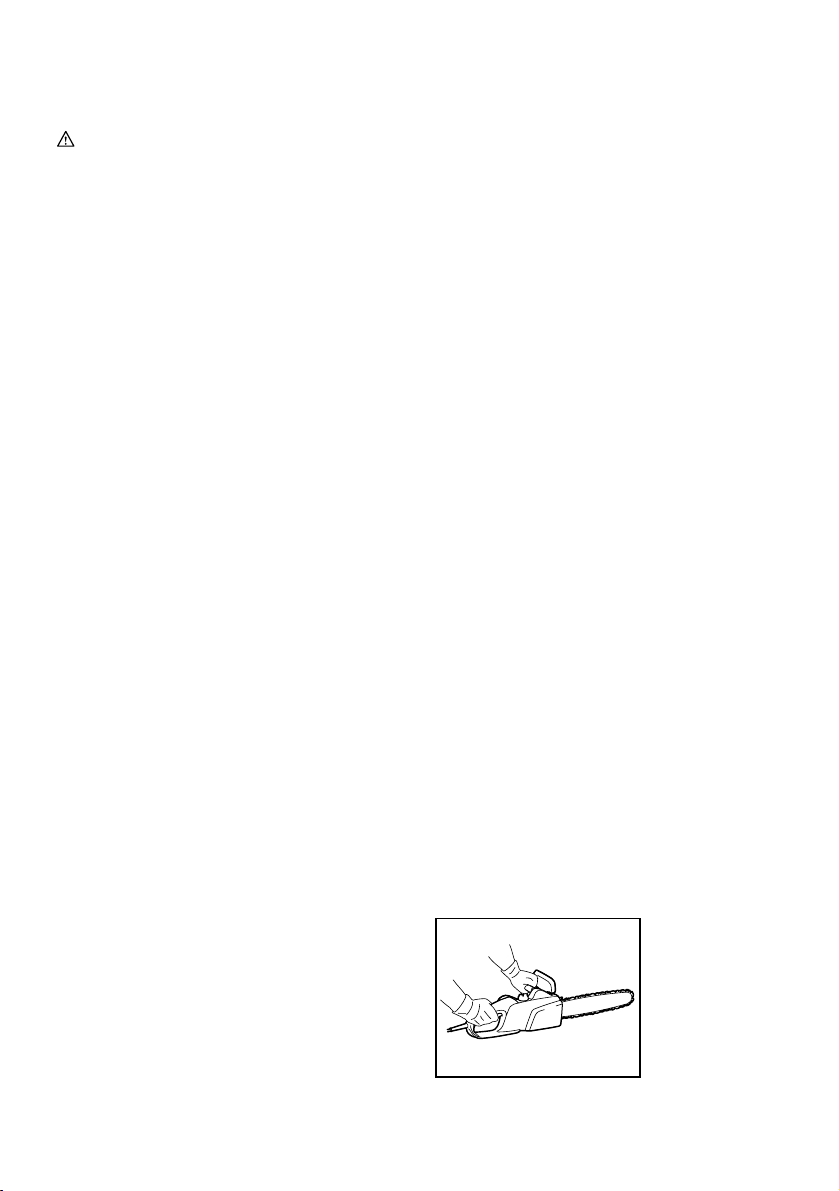
14. Use a secure support (trestle) when cutting sawn
timber.
15. Do not use the chain saw to prise off or brush
away pieces of wood and other objects.
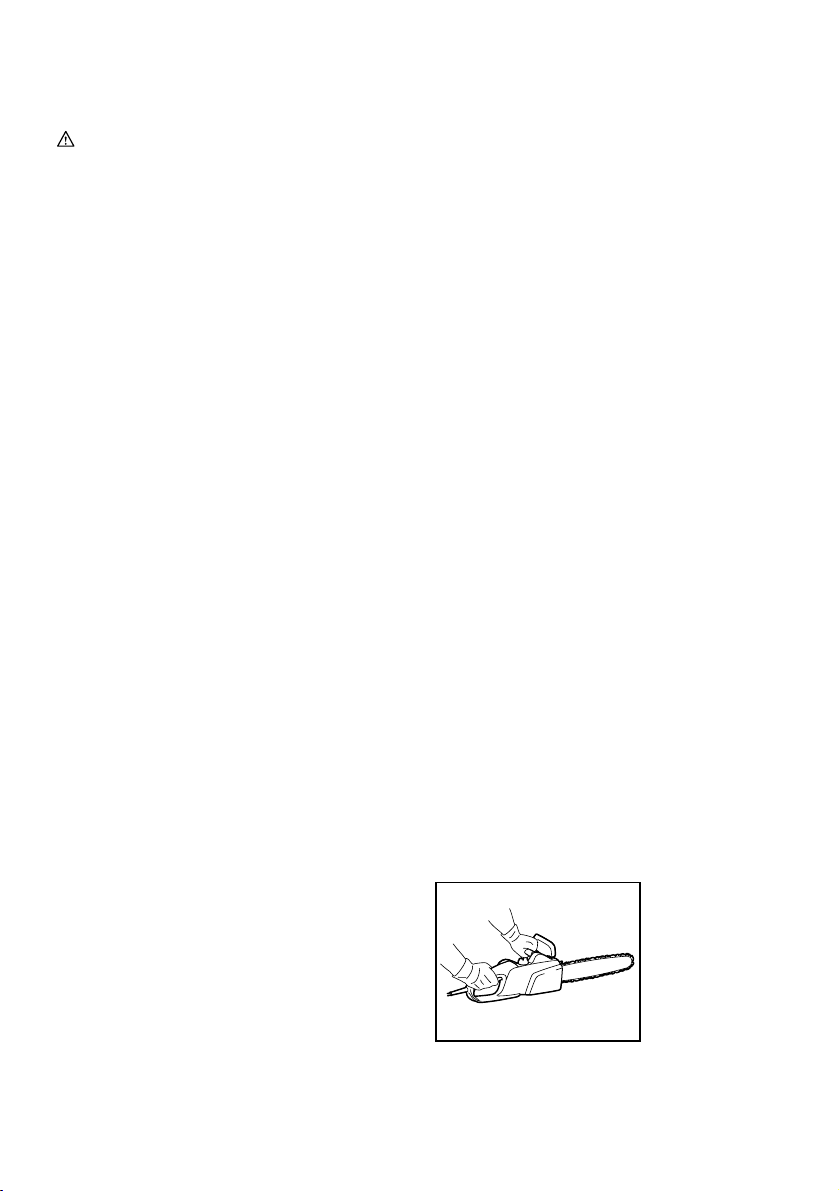
16. Guide the chain saw such that no part of your
body is within the extended path of the saw chain
(see figure).
006909
17. When moving around between sawing operations,
apply the chain brake in order to prevent the
chain from being operated unintentionally. Hold
the chain saw by the front handle when carrying it,
and do not keep your finger on the switch.
18. Withdraw the mains plug when taking breaks or
leaving the chain saw unattended. Leave the
chain saw where it cannot present a hazard.
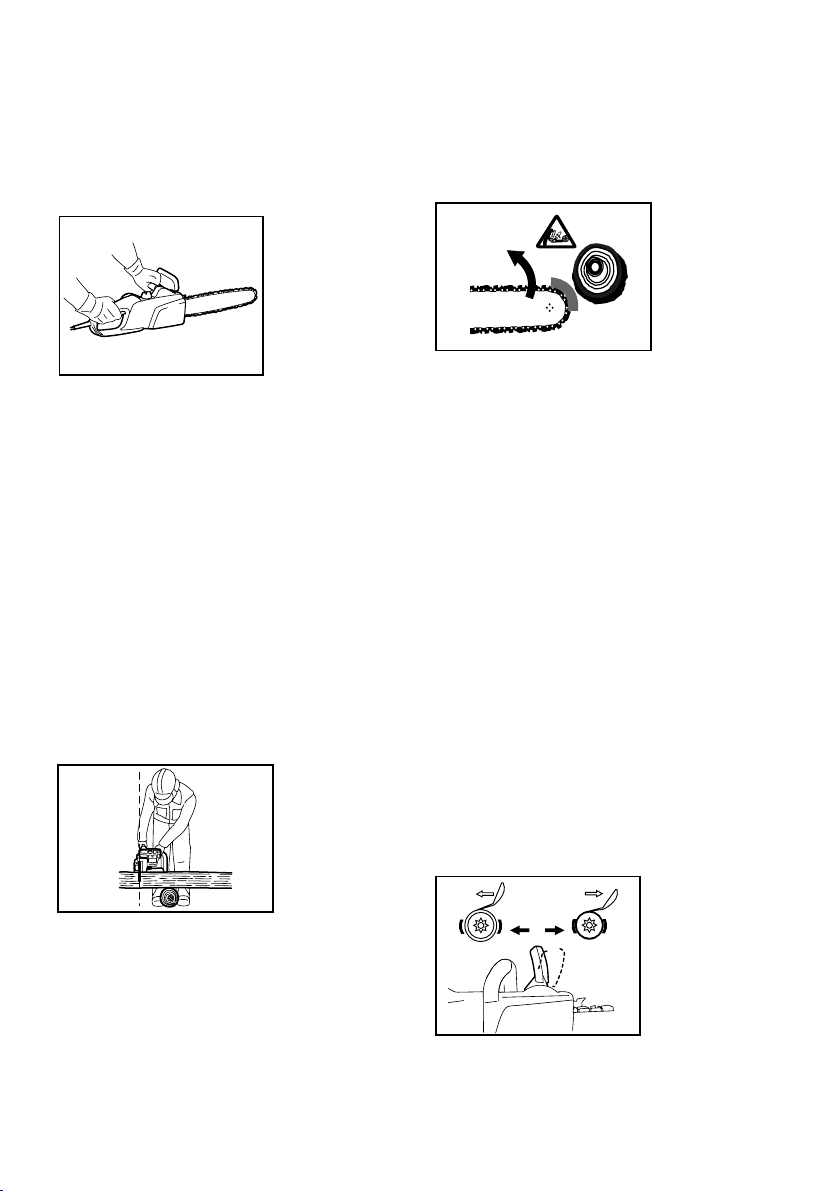
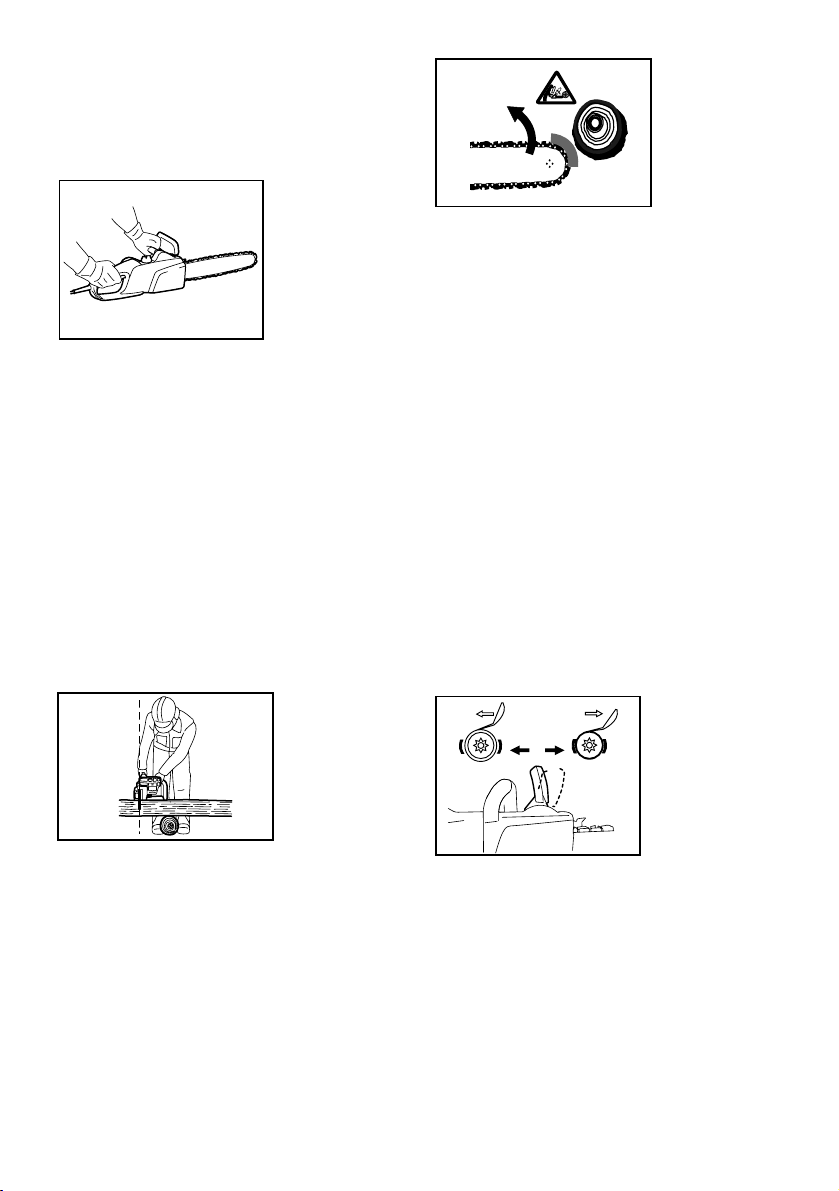
Kickback
1. Hazardous kickback may arise during work with
the chain saw. Kickback arises when the tip of the
bar (in particular the upper quarter) comes into
contact with wood or another solid object. This
causes the chainsaw to be deflected in the
direction of the operator.
006919
2. In order to avoid kickback, observe the following:
• Never begin the cut with the tip of the bar.
• Never use the tip of the bar for cutting. Take
particular care when resuming cuts which
have already been started.
• Start the cut with the chain running.
• Always sharpen the chain correctly. In
particular, set the depth gauge to the correct
height.
• Never saw through several branches at a time.
• When limbing, take care to prevent the bar
from coming into contact with other branches.
• When bucking, keep clear of adjacent trunks.
Always observe the bar tip.
• Use a trestle.
Safety features
1. Always check that the safety features are in
working order before starting work. Do not use
the chain saw if the safety features are not
working properly.
− Chain brake:
The chain saw is fitted with a chain brake which
brings the saw chain to a standstill within a fraction
of a second. It is activated when the hand guard is
pushed forwards. The saw chain then stops within
0.15 s, and the power supply to the motor is
interrupted.
12
014317
− Run-down brake:
The chain saw is equipped with an run down brake
which brings the saw chain to an immediate stop
1. Chain brake
applied
2. Chain brake
released

10
when the ON/OFF switch is released. This
prevents the saw chain from running on when
switched off, and thus presenting a hazard.
− The front and rear hand guards protect the user
against injury from pieces of wood which may be
thrown backwards, or a broken saw chain.
− The trigger lockout prevents the chain saw from
being switched on accidentally.
− The chain catcher protects the user against injury
should the chain jump or break.
Transport and storage
・ When the chain saw is not in use or is
being transported, withdraw the mains
plug and fit the guide bar cover
supplied with the saw. Never carry or
transport the saw with the saw chain
running.
1. Carry the chain saw by the front handle only, with
the bar pointing backwards.
2. Keep the chain saw in a secure, dry and locked
room out of the reach of children. Do not store the
chain saw outdoors.
MAINTENANCE
1. Withdraw the plug from the socket before carrying
out any adjustments or maintenance.
2. Check the power cable regularly for damage to
the insulation.
3. Clean the chain saw regularly.
4. Have any damage to the plastic housing repaired
properly and immediately.
5. Do not use the saw if the switch trigger is not
working properly. Have it properly repaired.
6. Under no circumstances should any modifications
be made to the chain saw. Your safety is at risk.
7. Do not carry out maintenance or repair work other
than that described in this instruction manual. Any
other work must be carried out by authorized
service centers.
8. Only use genuine replacement parts and
accessories intended for your model of saw. The
use of other parts increases the risk of accident.
9.
We accept no responsibility for accidents or
damage should non-approved bars, saw chains or
other replacement parts or accessories be used.
First aid
・ Do not work alone. Always work within
shouting distance of a second person.
1. Always keep a first-aid box to hand. Replace any
items taken from it immediately.
2. Should you request assistance in the event of an
accident, state the following:
• Where did the accident happen?
• What happened?
• How many persons are injured?
• What injuries do they have?
• Who is reporting the accident?
NOTE:
Individuals with poor circulation who are exposed to
excessive vibration may experience injury to blood
vessels or the nervous system.
Vibration may cause the following symptoms to occur in
the fingers, hands or wrists: "Falling asleep
"(numbness), tingling, pain, stabbing sensation,
alteration of skin colour or of the skin.
If any of these symptoms occur, see a physician!
SAVE THESE INSTRUCTIONS.
WARNING:
DO NOT let comfort or familiarity with product
(gained from repeated use) replace strict adherence
to safety rules for the subject product. MISUSE or
failure to follow the safety rules stated in this
instruction manual may cause serious personal
injury.

11
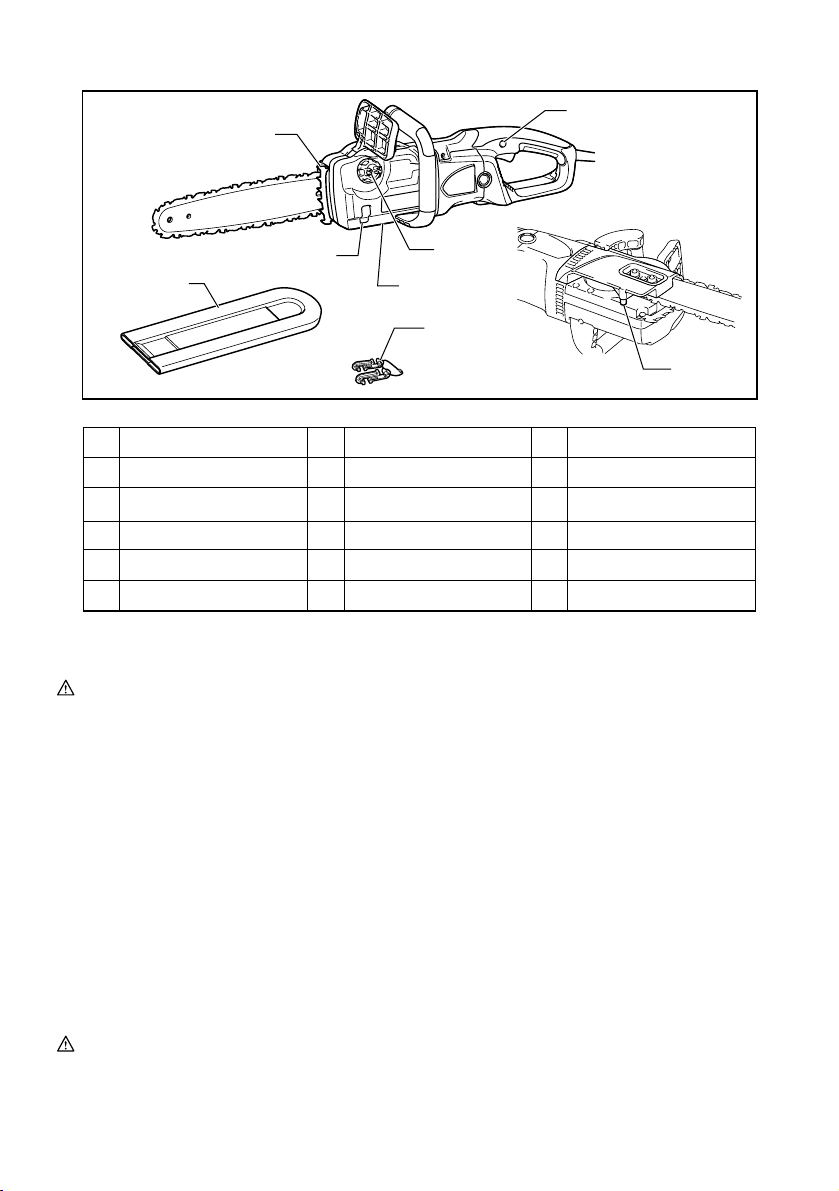
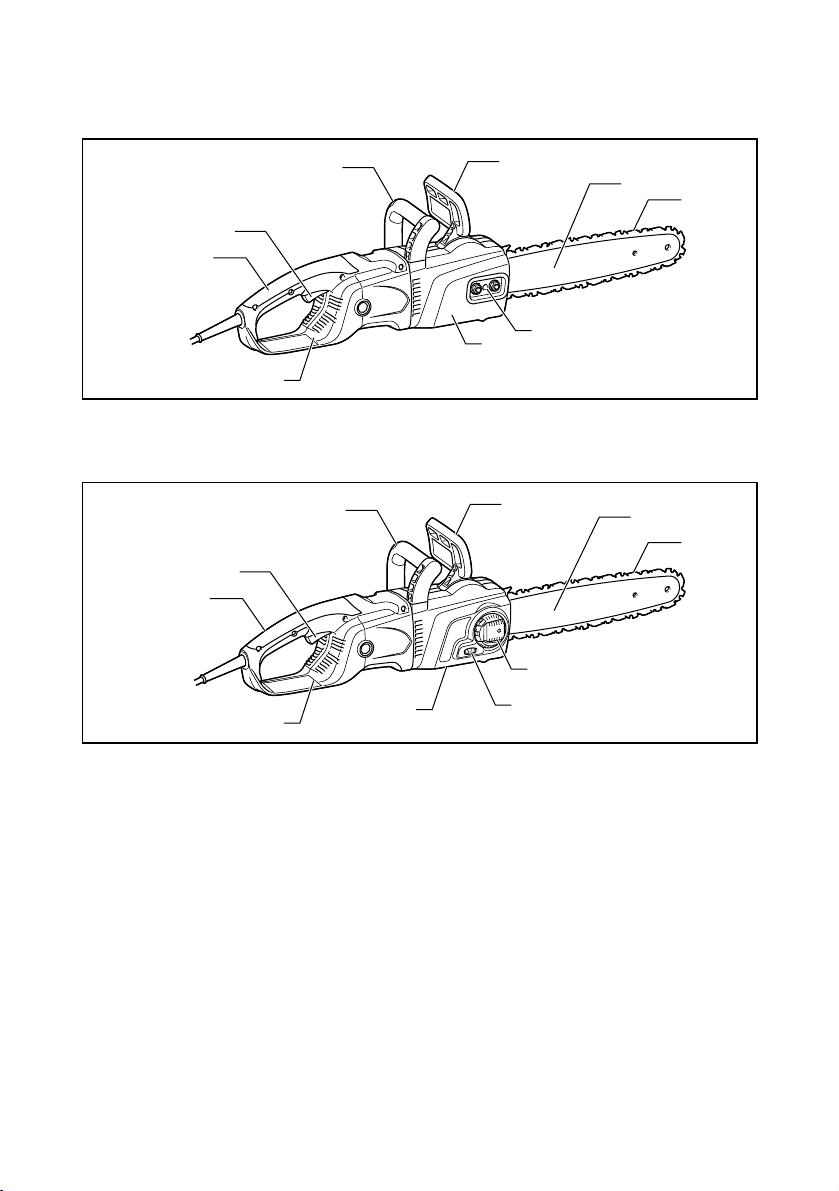
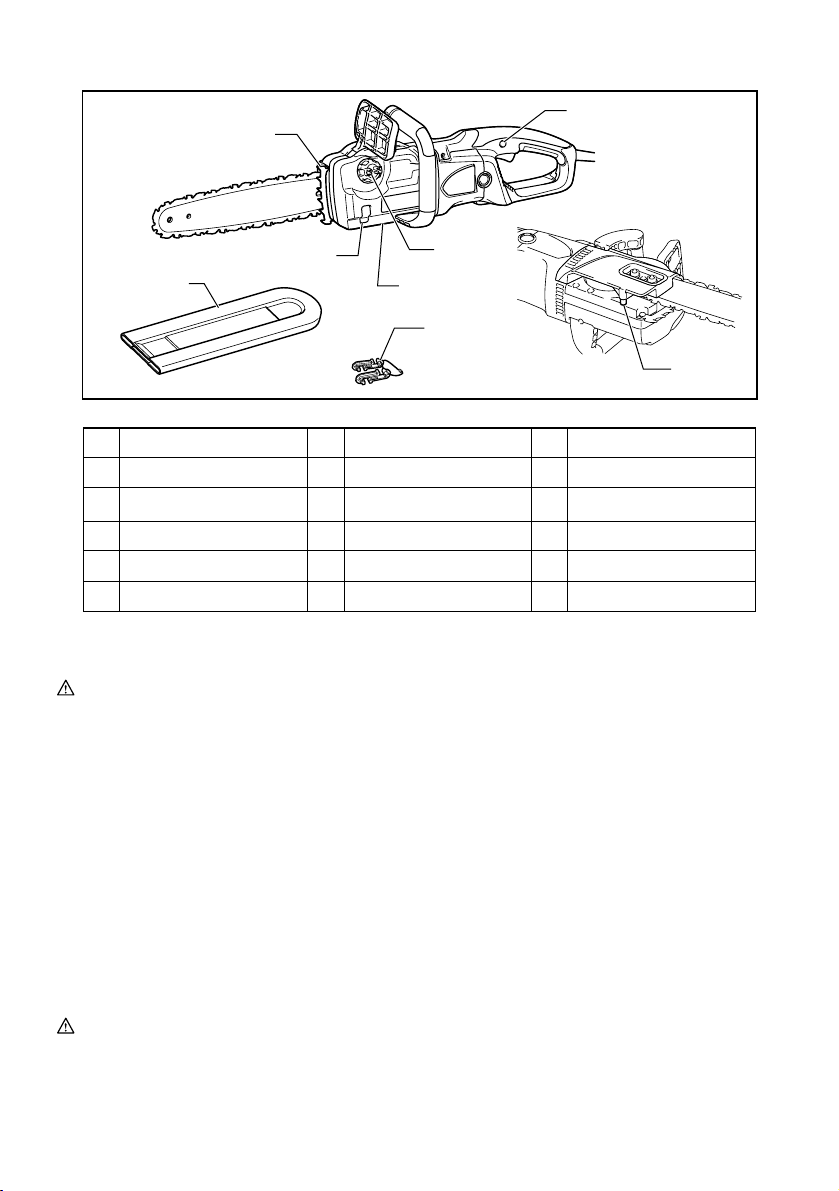
DESIGNATION OF PARTS
(Nut model: the sprocket cover is tightened by nuts.)
For Model UC3050A, UC3550A, UC3550AP, UC4050A,
UC4550A
1
2
3
4
5
6
9
10
8
014372
(Lever model: the sprocket cover is tightened by lever.)
For Model UC3051A, UC3551A, UC4051A, UC4551A
1
2
3
4
5
6
9
10
8
7
014373
12
(For all models)
14
12
11
15
13
17
16
18
014514
Cord hook
1
2
3
4
5
6
7
9
8
10
11
12
13
Spike bumper
18
14
15
16
17
Rear handle
Switch trigger
Oil filler cap
Front handle
Front hand guard
Guide bar
Saw chain
Lever
Adjusting screw/dial
Oil level sight
Rear hand guard
Lock-off button
Chain catcher
Guide bar cover
Adjusting screw for oil pump
(at the bottom)
Sprocket cover
014375
ASSEMBLY
CAUTION:
•
Always be sure that the tool is switched off and
unplugged before carrying out any work on the tool.
Removing or installing sprocket cover
To remove the sprocket cover, perform the following
steps:
(For nut models)
Fig.1
Loosen the nut.
(For lever models)
Fig.2
Press and fully open the lever until it stops.
Turn the lever counterclockwise.
To install the sprocket cover, perform the above steps in
reverse.
Removing or installing saw chain
CAUTION:
• Always wear gloves when installing or removing
the saw chain.
To remove the saw chain, perform the following steps:
1. Loosen the sprocket cover.
2. (For nut models) Turn the chain adjusting screw
counterclockwise to release the saw chain
tension.
(For lever models) Turn the adjusting dial to "-"
direction to loosen the saw chain tension.
Fig.3
Fig.4
3. Remove the sprocket cover.
4. Remove the saw chain and guide bar from the
chain saw.
To install the saw chain, perform the following steps:
5. Make sure the direction of the chain. The arrow
mark on the chain shows the direction of the
chain.
Fig.5
6. Fit in one end of the saw chain on the top of the
guide bar and the other end of it around the
sprocket.
7. Place the guide bar on the chain saw.
8. Align the tension slide with the hole of the guide
bar.

13
Fig.6
9. Holding the guide bar, and turn the chain
adjusting screw / dial to adjust the saw chain
tension.
10. Place the sprocket cover so that the hooks fit
alongside the holes and the pin fits its counterpart
on the sprocket cover.
Fig.7
11. Tighten the sprocket cover.
Fig.8
Fig.9
Adjusting saw chain tension
The saw chain may become loose after many hours of
use. From time to time check the saw chain tension
before use.
1. Loosen the sprocket cover lightly.
2. Lift up the guide bar tip slightly.
3. Turn the adjusting screw / dial to adjust saw chain
tension.
Fig.10
Fig.11
4. Tighten the saw chain until the lower side of the
saw chain fits in the guide bar rail (see circle).
5. Keep holding the guide bar lightly, tighten the
sprocket cover after adjusting the chain tension.
Make sure that the saw chain does not loose at
lower side.
Make sure the saw chain fits snugly against the lower
side of the bar.
CAUTION:
• Do not tighten the saw chain too much.
Excessively high tension of saw chain may cause
breakage of saw chain, wear of the guide bar and
breakage of the adjusting dial.
• A chain which is too loose can jump off the bar,
and therefore presents an accident risk.
• Carry out the procedure of installing or removing
saw chain in a clean place free from sawdust and
the like.
Engaging extension cord
CAUTION:
• Make sure that the extension cord is unplugged to
the mains outlet.
Fig.12
When engaging the extension cord, secure it to the
chain saw's cord with the cord hook.
Attach the cord hook about 100 - 200 mm from the
extension cord connector. This helps prevent
unintentional disconnection.
OPERATION
CAUTION:
• Hold the tool firmly with right hand on the rear
handle and left hand on the front handle when
performing the tool.
Switch action
Fig.13
CAUTION:
• Always be sure that the tool is switched off and
unplugged before checking function on the switch
trigger.
• Before plugging in the tool, always check to see
that the switch trigger actuates properly and
returns to the "OFF" position when released.
To prevent the switch trigger from being accidentally
pulled, a lock-off button is provided.
To start the tool, depress the lock-off button and pull the
switch trigger. Release the switch trigger to stop.
Lubrication
CAUTION:
• Always be sure that the tool is switched off and
unplugged before lubricating the saw chain.
Fig.14
Lubricate the saw chain and bar using biologically
degradable saw chain oil with an adhesion agent. The
adhesion agent in the saw chain oil prevents the oil from
being thrown off the saw excessively quickly. Mineral
oils must not be used, as they are harmful to the
environment.
CAUTION:
• Prevent the oil from coming into contact with the
skin and eyes. Contact with the eyes causes
irritation. In the event of eye contact, flush the
affected eye immediately with clear water, then
consult a doctor at once.
•
Never use waste oil. Waste oil contains carcinogenic
substances. The contaminants in waste oil cause
accelerated wear of the oil pump, the bar and the
chain. Waste oil is harmful to the environment.
• When filling the chain saw with chain oil for the
first time, or refilling the tank after it has been
completely emptied, add oil up to the bottom edge
of the filler neck. The oil delivery may otherwise be
impaired.
Fig.15
To fill the oil, perform the following steps:
1. Clean the area around the oil filler cap thoroughly
to prevent any dirt from entering the oil tank.
2. Unscrew the oil filler cap and add oil up to the
lower edge of the filler neck.
3. Screw the oil filler cap firmly back in place.
4. Wipe away any spilt chain oil carefully.

14
NOTE:
•
When the chain saw is used for the first time, it may
take up to two minutes for the saw chain oil to begin
its lubricating effect upon the saw mechanism. Run
the saw without load until it does so (see "CHECKS ").
CHECKS
Before starting work, carry out the following checks:
Checking the chain tension
WARNING:
• Always withdraw the mains plug before checking
the chain tension, and wear safety gloves.
(For nut models)
Fig.16
(For lever models)
Fig.17
Make sure the saw chain fits snugly against the lower
side of the bar (see circle).
Check the chain tension frequently, as new chains are
subject to elongation.
Excessively high tension of saw chain may cause
breakage of saw chain, wear of the guide bar and
breakage of the adjusting dial.
A chain which is too loose can jump off the bar, and
therefore presents an accident risk.
If the chain is too loose: Refer to the section titled
"Adjusting saw chain tension" and adjust the saw chain
tension again.
Checking the switch action
CAUTION:
Before plugging in the tool, always check to see that the
switch trigger actuates properly and returns to the
"OFF" position when released.
To prevent the switch trigger from being accidentally
pulled, a lock-off button is provided.
To start the tool, depress the lock-off button and pull the
switch trigger. Release the switch trigger to stop.
Do not pull the switch trigger hard without depressing
the lock-off button. This may cause switch breakage.
Checking the chain brake
NOTE:
• If the chain saw fails to start, check whether the
chain brake is released. To release the chain
brake, pull the hand guard backwards firmly until
you feel it engage.
Fig.18
Fig.19
Check the chain brake as follows:
1. Hold the chain saw with both hands when
switching it on. Hold the rear handle with your
right hand, the front handle with your left. Make
sure that the bar and the chain do not contact
with any object.
2. First press the lock-off button, then the switch
trigger. The saw chain starts immediately.
3. Press the front hand guard forwards using the
back of your hand. Make sure that the saw chain
comes to an immediate standstill.
CAUTION:
• If the saw chain does not stop immediately, do not
use the saw under any circumstances. Consult
Makita authorized service centers.
Checking the run-down brake
Switch on the chain saw.
Release the switch trigger completely. Make sure the
saw chain comes to a standstill within a second.
CAUTION:
• If the saw chain does not stop immediately, do not
use the saw under any circumstances. Consult
Makita authorized service centers.
Checking the chain oiler
Before starting work, check the oil level in the tank, and
the oil delivery.
The oil level can be seen in the oil level sight shown in
the figure.
Fig.20
Check the oil delivery as follows:
Start the chain saw.
With the saw running, hold the saw chain approximately
15 cm above a tree trunk or the ground. If lubrication is
adequate, the oil spray will produce a light oil trace.
Observe the wind direction, and do not expose yourself
to the oil spray unnecessarily.
CAUTION:
• If an oil trace is not formed, do not use the saw.
The lifespan of the chain will otherwise be reduced.
Check the oil level. Clean the oil feed groove and
the oil feed hole in the bar (refer to
"MAINTENANCE ").
Adjusting the chain lubrication
Fig.21
You can adjust the oil pump feed rate with the adjusting
screw.
WORKING WITH THE CHAIN SAW
CAUTION:
• Always use a front handle and rear handle and
firmly hold the tool by both front handle and rear
handle during operations.
• Always secure the timber to be cut, otherwise the
cut fragments may cause personal injury.
Bucking
Fig.22
For bucking cuts, rest the spike bumper shown in the
figure on the wood to be cut.

15
With the saw chain running, saw into the wood, using
the rear handle to raise the saw and the front one to
guide it. Use the spike bumper as a pivot.
Continue the cut by applying slight pressure to the front
handle, easing the saw back slightly. Move the spike
bumper further down the timber and raise the front
handle again.
When making several cuts, switch the chain saw off
between cuts.
CAUTION:
• If the upper edge of the bar is used for cutting, the
chain saw may be deflected in your direction if the
chain becomes trapped. For this reason, cut with
the lower edge, so that the saw will be deflected
away from your body.
Fig.23
Cut wood under tension on the pressure side (A) first.
Then make the final cut on the tension side (B). This
prevents the bar from becoming trapped.
Fig.24
Limbing
CAUTION:
•
Limbing may only be performed by trained persons.
A hazard is presented by the risk of kick-back.
When limbing, support the chain saw on the trunk if
possible. Do not cut with the tip of the bar, as this
presents a risk of kickback.
Pay particular attention to branches under tension. Do
not cut unsupported branches from below.
Do not stand on the felled trunk when limbing.
Burrowing and parallel-to-grain cuts
CAUTION:
• Burrowing and parallel-to-grain cuts may only be
carried out by persons with special training. The
possibility of kickback presents a risk of injury.
Fig.25
Perform parallel-to-grain cuts at as shallow an angle as
possible. Carry out the cut as carefully as possible, as
the spike bumper cannot be used.
Felling
CAUTION:
• Felling work may only be performed by trained
persons. The work is hazardous.
Observe local regulations if you wish to fell a tree.
Fig.26
− Before starting felling work, ensure that:
(1) Only persons involved in the felling operation
are in the vicinity;
(2)
Any person involved has an unhindered path of
retreat through a range of approximately 45 °
either side of the felling axis. Consider the
additional risk of tripping over electrical cables;
(3) The base of the trunk is free of foreign
objects, roots and ranches;
(4) No persons or objects are present over a
distance of 2 1/2 tree lengths in the direction
in which the tree will fall.
− Consider the following with respect to each tree:
• Direction of lean;
• Loose or dry branches;
• Height of the tree;
• Natural overhang;
• Whether or not the tree is rotten.
− Consider the wind speed and direction. Do not
carry out felling work if the wind is gusting strongly.
− Trimming of root swellings: Begin with the largest
swellings. Make the vertical cut first, then the
horizontal cut.
Fig.27
− Cut a scarf: The scarf determines the direction in
which the tree will fall, and guides it. It is made on
the side towards which the tree is to fall. Cut the
scarf as close to the ground as possible. First
make the horizontal cut to a depth of 1/5 -1/3 of
the trunk diameter. Do not make the scarf too
large. Then make the diagonal cut.
− Cut any corrections to the scarf across its entire
width.
Fig.28
− Make the back cut a little higher than the base cut
of the scarf. The back cut must be exactly
horizontal. Leave approximately 1/10 of the trunk
diameter between the back cut and the scarf.
The wood fibers in the uncut trunk portion act as a
hinge. Do not cut right through the fibers under
any circumstances, as the tree will otherwise fall
unchecked. Insert wedges into the back cut in time.
− Only plastic or aluminum wedges may be used to
keep the back cut open. The use of iron wedges is
prohibited.
− Stand to the side of the falling tree. Keep an area
clear to the rear of the falling tree up to an angle of
45 ° either side of the tree axis (refer to the " felling
area " figure). Pay attention to falling branches.
− An escape path should be planned and cleared as
necessary before cuts are started. The escape
path should extend back and diagonally to the rear
of the expected line of fall as illustrated in figure.
Fig.29
MAINTENANCE
CAUTION:
• Always be sure that the tool is switched off and
unplugged before attempting to perform inspection
or maintenance.
• Always wear gloves when performing any
inspection or maintenance.

16
• Never use gasoline, benzine, thinner, alcohol or
the like. Discoloration, deformation or cracks may
result.
Carry out the maintenance work described below at
regular intervals. Warranty claims will be accepted only
if these operations have been performed regularly and
properly.
Only maintenance work described in this instruction
manual may be performed by the user. Any other work
must be carried out by MAKITA authorized service
centers.
Cleaning the chain saw
Clean the saw regularly with a clean rag. The handles,
in particular, must be kept free of oil.
Checking the plastic housing
Carry out regular visual inspections of all parts of the
housing. If any parts are damaged, have them repaired
immediately and properly in MAKITA authorized service
centers.
Sharpening the saw chain
CAUTION:
• Always withdraw the mains plug and wear safety
gloves when performing work on the saw chain.
Fig.30
Sharpen the saw chain when:
− Mealy sawdust is produced when damp wood is
cut;
− The chain penetrates the wood with difficulty, even
when heavy pressure is applied;
− The cutting edge is obviously damaged;
− The saw pulls to the left or right in the wood. The
reason for this behavior is uneven sharpening of
the saw chain, or damage to one side only.
Sharpen the saw chain frequently, but remove only
a little material each time.
Two or three strokes with a file are usually sufficient for
routine resharpening. When the saw chain has been
resharpened several times, have it sharpened in
MAKITA authorized service center.
Sharpening criteria:
− All cutter length must be equal. Cutters of differing
length prevent the chain from running smoothly,
and may cause the chain to break.
− Do not sharpen the chain once a minimum cutter
length of 3 mm has been reached. A new chain
must then be fitted.
− The chip thickness is determined by the distance
between the depth gauge (round nose) and the
cutting edge.
− The best cutting results are obtained with following
distance between cutting edge and depth gauge.
Chain blade 91PX: 0.65 mm
Fig.31
WARNING:
•
An excessive distance increases the risk of kick-back.
− The sharpening angle of 30 ° must be the same on
all cutters. Differences in angle cause the chain to
run roughly and unevenly, accelerate wear, and
lead to chain breaks.
− The side plate angle of the cutter is determined by
the depth of penetration of the round file. If the
specified file is used properly, the correct side
plate angle is produced automatically.
− Side plate angle for each saw chain are as follows:
Chain blade 91PX: 80 °
Fig.32
File and file guiding
− Use a special round file (optional accessory) for
saw chains to sharpen the chain. Normal round
files are not suitable.
− Diameter of the round file for each saw chain is as
follows:
Chain blade 91PX: 4.0 mm
− The file should only engage the cutter on the
forward stroke. Lift the file off the cutter on the
return stroke.
− Sharpen the shortest cutter first. Then the length
of this shortest cutter becomes the standard for all
other cutters on the saw chain.
Fig.33
− Guide the file as shown in the figure.
− The file can be guided more easily if a file holder
(optional accessory) is employed. The file holder
has markings for the correct sharpening angle of
30 ° (align the markings parallel to the saw chain)
and limits the depth of penetration (to 4/5 of the
file diameter).
Fig.34
− After sharpening the chain, check the height of the
depth gauge using the chain gauge tool (optional
accessory).
Fig.35
− Remove any projecting material, however small,
with a special flat file (optional accessory).
− Round off the front of the depth gauge again.
Cleaning the guide bar and lubricating the
return sprocket
CAUTION:
• Always wear safety gloves for this task. Burrs
present a risk of injury.
Fig.36
Check the running surfaces of the bar regularly for
damage. Clean using a suitable tool, and remove burrs
if necessary.

17
If the chain saw receives frequent use, lubricate the
return sprocket bearing at least once a week. Before
adding new fresh grease, carefully clean the 2 mm hole
on the tip of the guide bar, then force a small quantity of
multi-purpose grease (optional accessory) into the hole.
Cleaning the oil guide
Fig.37
− Clean the oil guide groove and the oil feed hole in
the bar at regular intervals.
New saw chains
Use two or three saw chains alternately, so that the saw
chain, sprocket and running surfaces of the bar wear
evenly.
Turn the bar over when changing the chain so that the
bar groove wears evenly.
CAUTION:
• Only use chains and bars which are approved for
this model of saw (refer to "SPECIFICATIONS").
Fig.38
Before fitting a new saw chain, check the condition of
the sprocket.
CAUTION:
• A worn sprocket damages a new saw chain. Have
the sprocket replaced in this case.
Always fit a new locking ring when replacing the sprocket.
Maintaining the chain and run-down brakes
The braking systems are very important safety features.
Like any other component of the chain saw, they are
subject to a certain degree of wear. They must be
inspected regularly by MAKITA authorized service
centers. This measure is for your own safety.
Replacing carbon brushes
Fig.39
Remove and check the carbon brushes regularly.
Replace when they wear down to the limit mark. Keep
the carbon brushes clean and free to slip in the holders.
Both carbon brushes should be replaced at the same
time. Use only identical carbon brushes.
Fig.40
Use a screwdriver to remove the brush holder caps.
Take out the worn carbon brushes, insert the new ones
and secure the brush holder caps.
After replacing brushes, plug in the tool and break in
brushes by running tool with no load for about 10
minutes.
Storing tool
Biologically degradable saw chain oil can only be kept
for a limited period. Beyond two years after manufacture,
biological oils begin to acquire an adhesive quality, and
cause damage to the oil pump and components in the
lubricating system.
− Before taking the chain saw out of service for a
longer period, empty the oil tank and fill it with a
small quantity of engine oil (SAE 30).
− Run the chain saw briefly to flush all residue of the
biological oil out of the tank, lubricating system
and saw mechanism.
NOTE:
• When the chain saw is taken out of service, small
quantities of chain oil leaks from it for some time
afterwards. This is normal, and is not a sign of a
fault.
Store the chain saw on a suitable surface.
Before returning the chain saw to service, fill up with
fresh BIOTOP saw chain oil.
To maintain product SAFETY and RELIABILITY, repairs,
any other maintenance or adjustment should be
performed by Makita Authorized Service Centers,
always using Makita replacement parts.

18
TROUBLE SHOOTING
Before asking for repairs, conduct your own inspection
first. If you find a problem that is not explained in the
manual, do not attempt to dismantle the tool. Instead,
ask Makita Authorized Service Centers.
No oil on the chain.
Chain does not stop
even the chain brake is
engaged.
The tool vibrates
abnormally.
Malfunction status
Possible cause Remedy
The chain saw does not
start.
Chain does not run.
Insufficient performance.
Cable defective.
Chain brake is engaged.
Carbon brush worn down.
Oil tank is empty.
Oil guide groove is dirty.
Oil pump adjusting screw
incorrectly adjusted.
Brake
band worn down.
Loose guide bar or saw
chain.
No power supply.
Release chain brake.
Ask your local authorized service center for repair.
Fill the oil tank.
Clean the groove.
Adjust the oil pump feed rate.
Adjust the guide bar and
saw chain tension.
Tool malfunction.
Tool malfunction.
Connect to the power supply.
Check the power supply.
Stop using the tool immediately, and ask your local
authorized service center.
Stop using the tool immediately, and ask your local
author
ized service center.
Stop using the tool immediately, and ask your local
authorized service center.
Stop using the tool immediately, and ask your local
authorized service center.
014314
OPTIONAL ACCESSORIES
CAUTION:
• These accessories or attachments are
recommended for use with your Makita tool
specified in this manual. The use of any other
accessories or attachments might present a risk of
injury to persons. Only use accessory or
attachment for its stated purpose.
If you need any assistance for more details regarding
these accessories, ask your local Makita Service Center.
• Saw chain
• Guide bar cover
• Guide bar
• Saw chain oil
NOTE:
• Some items in the list may be included in the tool
package as standard accessories. They may differ
from country to country.
19
SVENSKA (Originalbruksanvisning)
Förklaring till översiktsbilderna
2-1. Spak
2-2. Kopplingskåpa
3-1. Inställningsskruv
4-1. Justeringsratt
5-1. Kedjehjul
6-1. Svärd
6-2. Hål
7-1. Krok
7-2. Hål
7-3. Stift
9-1. Spak
9-2. Kopplingskåpa
10-1. Lossa
10-2. Dra fast
10-3. Kedjejusteringsskruv
10-4. Svärd
10-5. Sågkedja
11-1. Lossa
11-2. Dra fast
11-3. Justeringsratt
11-4. Svärd
11-5. Sågkedja
12-1. Kabelhake
12-2. Maskinens kabel
12-3. Förlängningssladd
12-4. Stickpropp och uttag (formen kan
variera mellan länder)
13-1. Säkerhetsknapp
13-2. Avtryckare
15-1. Oljetankens lock
15-2. Rem
16-1. Lossa
16-2. Dra fast
16-3. Kedjejusteringsskruv
16-4. Svärd
16-5. Sågkedja
17-1. Lossa
17-2. Dra fast
17-3. Justeringsratt
17-4. Svärd
17-5. Sågkedja
18-1. Främre handskydd
18-2. Lås
18-3. Lås upp
19-1. Främre handskydd
19-2. Lås upp
19-3. Lås
20-1. Oljenivåfönster
22-1. Barkstöd
26-1. Fällområdet
29-1. Fällriktning
29-2. Riskzon
29-3. Flyktväg
31-1. Skärlängd
31-2. Avstånd mellan skärtand och
underställningsklack
31-3. Minst 3 mm
32-1. Stötvinkel
37-1. Oljekanal
37-2. Oljematningshål
38-1. Kedjehjul
39-1. Slitmarkering
40-1. Kolhållarlock
40-2. Skruvmejsel
SPECIFIKATIONER
Modell
UC3050A UC3051A UC3550A
UC3550AP
UC3551A UC4050A UC4051A UC4550A
UC4551A
Max. kedjehastighet 14,5 m/s (870 m/min)
Svärdlängd 300 mm 350 mm 400 mm 450 mm
Skärlängd 260 mm 320 mm 355 mm 415 mm
Standardsvärd
Svärdtyp Svärd med noshjul
Typ 91PX
Delning 3/8"
Standard
sågkedja
Antal drivlänkar 46 52 56 62
Rekommenderad svärdlängd 300 - 450 mm
Längd (utan svärd) 505 mm
Vikt 5,4 kg 5,5 kg 5,5 kg 5,6 kg 5,5 kg 5,6 kg 5,7 kg
Förlängningssladd (tillbehör) DIN 57282/HO 7RN -F L=30 m max.,3x1,5 mm
2
• På grund av vårt pågående program för forskning och utveckling kan dessa specifikationer ändras utan föregående meddelande.
• Specifikationerna kan variera mellan olika länder.
• Vikt i enlighet med EPTA-procedur 01/2003
END218-7
Symbol
Följande visar symbolerna som används för
utrustningen. Se till att du förstår innebörden innan du
använder borrmaskinen.
・ Läs igenom bruksanvisningen och följ
varningar och säkerhetsanvisningar.
・ Använd skyddsglasögon.
・ Använd hörselskydd.
・ DUBBEL ISOLERING
・ Försiktigt: extra försiktighet och
uppmärksamhet krävs!
・ Försiktigt: dra ur nätsladden
omedelbart om den skadas!
・ Försiktigt: bakåtkast!
・ Skydda mot regn och fukt!
・ Använd hjälm, skyddsglasögon och
hörselskydd!

20
・ Använd skyddshandskar!
・ Dra ut nätsladden!
・ Första hjälpen
・ Tillåten maximal skärlängd
・ Kedjans rörelseriktning
・ Kedjeolja
・ Kedjebroms släppt
・ Kedjebroms tillslagen
・ Förbjudet!
・ Gäller endast EU-länder
Elektrisk utrustning får inte kastas i
hushållssoporna!
Enligt EU-direktivet som avser äldre
elektrisk och elektronisk utrustning och
dess tillämpning enligt nationell
lagstiftning ska uttjänt elektriskt
utrustning sorteras separat och lämnas
till miljövänlig återvinning.
ENE085-1
Användningsområde
Verktyget är avsett för kapning av virke och stockar.
ENF002-2
Strömförsörjning
Maskinen får endast anslutas till elnät med samma
spänning som anges på typplåten och med enfasig
växelström. De är dubbelisolerade och får därför också
anslutas i ojordade vägguttag.
ENG905-1
Buller
Typiska A-vägda bullernivån är mätt enligt EN60745:
Ljudtrycksnivå (L
pA
): 90,8 dB (A)
Ljudeffektnivå (L
WA
): 101,8 dB (A)
Mättolerans (K): 2,5 dB (A)
Använd hörselskydd
ENG900-1
Vibration
Vibrationens totalvärde (tre-axlars vektorsumma) mätt
enligtEN60745 :
Arbetsläge: sågning i trä
Vibrationsemission (a
h
): 5,2 m/s
2
Mättolerans (K): 1,5 m/s
2
ENG901-1
•
Det deklarerade vibrationsemissionsvärdet har
uppmätts i enlighet med standardtestmetoden och
kan användas för jämförandet av en maskin med
en annan.
• Det deklarerade vibrationsemissionsvärdet kan
också användas i preliminär bedömning av
exponering för vibration.
VAR NING!
• Viberationsemissionen under faktisk användning
av maskinen kan skilja sig från det deklarerade
emissionsvärdet, beroende på hur maskinen
används.
• Se till att hitta säkerhetsåtgärder som kan skydda
användaren och som grundar sig på en
uppskattning av exponering i verkligheten (ta med
i beräkningen alla delar av användandet såsom
antal gånger maskinen är avstängd och när den
körs på tomgång samt då startomkopplaren
används).
ENH021-8
Gäller endast Europa
EU-konformitetsdeklaration
Makita försäkrar att följande maskiner:
Maskinbeteckning:
Kedjesåg
Modellnr./-typ: UC3050A, UC3550A, UC4050A,
UC4550A, UC3051A, UC3551A, UC3550AP,
UC4051A, UC4551A
Specifikationer: se tabellen “SPECIFIKATIONER“.
Följer följande EU-direktiv:
2000/14/EU, 2006/42/EU
De är tillverkade i enlighet med följande standard eller
standardiseringsdokument:
EN60745
Den tekniska dokumentationen i enlighet med
2006/42/EG finns tillgänglig från:
Makita, Jan-Baptist Vinkstraat 2, 3070, Belgium
Den bedömning av överensstämmelse som krävs av
direktiv 2000/14/EU var i enlighet med bilaga V
Uppmätt ljudeffektnivå: 101,9 dB (A)
Garanterad ljudeffektnivå: 103 dB (A)
8.5.2014
000331
Yasushi Fukaya
Direktör
Makita, Jan-Baptist Vinkstraat 2, 3070, Belgium
21
GEA010-1
Allmänna säkerhetsvarningar för
maskin
VARNING Läs igenom alla säkerhetsvarningar
och instruktioner. Underlåtenhet att följa varningar och
instruktioner kan leda till elektrisk stöt, brand och/eller
allvarliga personskador.
Spara alla varningar och instruktioner
för framtida referens.
GEB037-8
Säkerhetsvarningar för kedjesåg
1. Håll alla kroppsdelar borta från kedjesågen
när den är igång. Se till att sågkedjan inte
vidrör någonting innan du startar kedjesågen.
Ett ögonblick av ouppmärksamhet medan du
arbetar med kedjesågen kan leda till att
kedjesågen kommer i kontakt med dina kläder
eller med kroppen.
2. Håll alltid kedjesågen med din högerhand på
det bakre handtaget och din vänsterhand på
det främre handtaget. Att hålla kedjesågen med
handen vriden ökar risken för personskador, vilket
absolut inte får ske.
3. Håll endast maskinen i de isolerade
handtagen eftersom sågkedjan kan komma i
kontakt med en dold elkabel eller sin egen
kabel. Om sågkedjan kommer i kontakt med en
strömförande ledning blir maskinens metalldelar
strömförande och kan ge operatören en elektrisk
stöt.
4. Använd skyddsglasögon och
hörselskydd.Ytterligare skyddsutrustning
rekommenderas för huvud, händer, ben och
fötter. Passande skyddskläder minskar risken för
personskador från flygande materialrester eller
oavsiktlig kontakt med sågkedjan.
5. Arbeta inte med kedjesågen i ett träd. Att
arbeta med kedjesågen uppe i ett träd kan orsaka
personskador.
6. Stå alltid stadigt och arbeta endast med
kedjesågen när du står på ett fast, säkert och
plant underlag. Halt eller ostadigt underlag
såsom stegar kan leda till att du tappar balansen
eller tappar kontrollen över kedjesågen.
7. Var uppmärksam vid sågning av en gren som
är spänd eftersom den kan fjädra tillbaka. När
spänningen i träfibrerna släpper kan den spända
grenen slå tillbaka mot användaren och/eller slå
kedjesågen ur händerna.
8. Var mycket försiktig vid sågning av buskar
och unga träd. Det fina materialet kan fånga
sågkedjan och piskas emot dig eller få dig ur
balans.
9. Bär kedjesågen i det främre handtaget och
bort från kroppen med maskinen avstängd.
Vid transport eller förvaring av kedjesågen
ska alltid svärdskyddet sitta på. Korrekt
hantering av kedjesågen minskar risken för
oavsiktlig kontakt när sågkedjan är i rörelse.
10.
Följ instruktionerna för smörjning,
kedjesträckning och utbyte av tillbehör.
Felaktig
sträckning eller kedjesmörjning kan antingen få
kedjan att gå av eller öka risken för bakåtkast.
11. Håll handtagen torra, rena och fria från olja
och fett. Hala handtag orsakar okontrollerad
sågning.
12. Såga endast i trä. Använd kedjesågen endast
för det ändamål den är avsedda för. Till
exempel: använd den inte för sågning i plast,
murverk eller annat byggmaterial som inte är
av trä. Användning av kedjesågen för annat
ändamål än vad den är avsedd för kan leda till att
en farlig situation uppstår.
13. Orsaker till och förebyggande av bakåtkast:
Bakåtkast kan uppstå när nosen eller spetsen på
svärdet kommer i kontakt med ett objekt, eller när
träet kniper tag i och låser fast kedjesågen i skäret.
Kontakt med spetsen kan i vissa fall orsaka en
plötslig motsatt reaktion där svärdet slås uppåt
och bakåt mot användaren.
Fastlåsning av sågkedjan längs spetsen på
svärdet kan snabbt trycka svärdet bakåt mot
användaren.
Endera av dessa reaktioner kan orsaka att du
tappar kontrollen över sågen vilket kan resultera i
allvarliga personskador. Lita inte uteslutande på
de inbyggda säkerhetsenheterna i din såg. Som
en kedjesågsanvändare ska du vidta
försiktighetsåtgärder så att inte olyckor eller
skador uppstår i ditt arbete med sågen.
Bakåtkast beror på ovarsamhet och/eller felaktiga
arbetsrutiner eller –förhållanden och kan undvikas
genom att vidta nedanstående förebyggande
åtgärder.
− Håll sågen stadigt med båda händerna så
att de omsluter kedjesågens handtag.
Med båda händerna på sågen, placera
kroppen och armen stadigt så att du kan
ta emot kraften från ett bakåtkast. Kraften i
bakåtkastet kan kontrolleras av användaren
genom att vidta tillbörliga
försiktighetsåtgärder. Släpp inte kedjesågen.
014316

22
− Sträck dig inte för långt när du använder
maskinen och såga inte över axelhöjd.
Detta förhindrar oavsiktlig kontakt med
spetsen och ger bättre kontroll över
kedjesågen i oväntade situationer.
− Använd endast reservdelar som svärd
och kedjor specificerade av tillverkaren. I
annat fall kan det orsaka att kedjan går av
och/eller bakåtkast.
− Följ tillverkarens instruktioner för
slipning och underhåll av sågkedjan.
Minskning av höjden på
underställningsklacken kan leda till ökad risk
för bakåtkast.
YTTERLIGARE
SÄKERHETSANVISNINGAR
1. Läs bruksanvisningen för att lära dig hur
kedjesågen fungerar.
2. Låt gärna någon demonstrera hur sågen används
innan du själv använder den för första gången.
Om det inte är möjligt att ordna med en
demonstration är det lämpligt att övningssåga i en
stock på en sågbock.
3. Kedjesågen får inte användas av barn eller
ungdomar under 18 år. Undantag kan göras för
ungdomar över 16 år som har fått utbildning och
träning på sågens funktioner.
4. Arbete med en kedjesåg kräver full koncentration.
Arbeta inte med sågen när du känner dig fysiskt
eller psykiskt nedsatt. Utför allt arbete noggrant
och i lugnt tempo.
5. Arbeta aldrig om du är påverkad av alkohol eller
mediciner.
Användningsområde
1. Kedjesågen är endast avsedd för sågning i trä.
Använd den inte till att t ex såga i plast eller
lättbetong.
2. Använd sågen endast till de funktioner som
beskrivs i denna bruksanvisning. Använd den inte
till att beskära häckar eller för liknande ändamål.
3. Kedjesågen får inte användas för skogsarbete,
dvs. trädfällning och kvistning av stående träd.
Kedjesågens sladd begränsar användarens
rörlighet på ett sådant sätt att denna typ av
användning är olämplig.
4. Kedjesågen är inte avsedd för yrkesmässig
användning.
5. Överbelasta inte kedjesågen.
Personlig skyddsutrustning
1. Använd åtsittande kläder som inte begränsar
rörligheten.
2. Följande skyddskläder är lämpliga under arbete:
• Godkänd skyddshjälm som skydd mot
nedfallande grenar o dyl.
• Visir eller skyddsglasögon.
• Hörselskydd (hörselkåpor eller öronproppar).
Frekvensanalys kan erhållas på begäran.
• Kraftiga skyddshandskar.
• Långbyxor i kraftigt tyg.
• Överdragskläder med.
• Säkerhetsskor eller stövlar med halkfria sulor,
stålhätta och.
• Ansiktsmask när arbetet genererar damm
(t ex sågning i torrt trä).
Elsäkerhet
・ Kedjesågen får inte användas i regn
eller i fuktig miljö eftersom den
elektriska motorn inte är vattenskyddad.
1. Sågen får endast kopplas in i ett godkänt el-uttag.
Kontrollera att nätspänningen är densamma som
på märkplåten. Kontrollera att uttaget är skyddat
med en säkring på 16 A. Om sågen används
utomhus måste den anslutas till en jordfelsbrytare
med en utlösningsström på högst 30 mA.
・ Om nätsladden skadas måste sladden
omedelbart dras ut ur nättuttaget.
Säkerhetsrutiner
1. Kontrollera att kedjan är i gott skick och uppfyller
säkerhetsanvisningarna innan arbetet påbörjas.
Kontrollera i synnerhet att:
• Kedjebromsen fungerar.
• Tröghetsbromsen fungerar.
•
Svärdet och kopplingskåpan är rätt monterade.
• Kedjan är filad och spänd i enlighet med
anvisningarna.
• Inga skador finns på nätsladd inklusive
kontakt.
Mer information finns i avsnittet "KONTROLLER".
2. Kontrollera alltid att de förlängningskablar som
används har tillräckligt tvärsnitt (se
"SPECIFIKATIONER"). Om en kabelvinda
används ska hela kabeln dras ut. Om du
använder sågen utomhus måste kabeln vara
godkänd för användning utomhus och ha rätt
specifikationer.
3. Håll kabeln borta från sågområdet och placera
den så att den inte fastnar i grenarna under
sågningen.
4. Använd inte kedjesågen i närheten av brännbart
damm eller gaser eftersom motorn genererar
gnistor som kan orsaka en explosion.
5. Arbeta endast på stadigt underlag och med
säkert fotfäste. Var särskilt uppmärksam på
hinder inom arbetsområdet, t ex nätsladd och
förlängningskabel. Var särskilt uppmärksam på
omständigheter som kan medföra halka, t ex fukt,
is, snö, sågspån eller bark. Använd inte
kedjesågen när du står på en stege eller i ett träd.
6. Iaktta särskild uppmärksamhet när du arbetar på
sluttningar eller med stockar eller liknande som
kan komma i rullning.
7. Såga aldrig över axelhöjd.
23
8. Håll sågen med båda händerna både när du
startar och använder den. Håll bakre handtaget
med höger hand och främre handtaget med
vänster hand. Greppa handtagen med hela
handen. Svärdet och kedjan får inte vara i kontakt
med något när sågen startas.
014316
9. Ta bort hindrande föremål som t ex sand, stenar,
spikar, ståltråd osv från arbetsområdet innan
arbetet påbörjas. Hindrande föremål kan skada
svärdet och kedjan och orsaka bakåtkast.
10. Var extra uppmärksam vid arbete nära
nätstängsel. Vid eventuell sågning i nätet riskeras
bakåtkast.
11. Såga inte i marken.
12. Såga stockar en och en, aldrig buntvis eller
högvis.
13. Använd inte sågen till tunna grenar och rötter
eftersom de kan trasslas in i kedjesågen. Det är
riskfyllt att förlora balansen.
14. Använd ett lämpligt stöd (sågbock) vid sågning.
15. Använd inte sågen för att putsa bort träflisor eller
annat.
16. Håll alltid sågen så att du inte kommer i sågens
förlängda skärriktning (se bilden).
006909
17. Använd kedjebromsen när du flyttar sågen mellan
olika arbetsuppgifter för att undvika att kedjan rör
sig oavsiktligt. Bär kedjesågen i det främre
handtaget. Håll aldrig fingret på avtryckaren.
18. Dra alltid ur nätsladden vid paus i arbetet eller när
kedjesågen lämnas oövervakad. Ställ ifrån dig
sågen där den inte kan utgöra någon risk.
Bakåtkast
1.
Farliga bakåtkast kan inträffa under arbete med en
kedjesåg. Bakåtkast inträffar när svärdet (i
synnerhet den övre fjärdedelen) kommer i kontakt
med trästycket eller andra fasta föremål. Bakåtkast
innebär att sågen kastas i riktning mot användaren.
006919
2. Tänk på följande för att undvika bakåtkast:
• Börja aldrig såga med spetsen på svärdet.
• Använd aldrig spetsen på svärdet för kapning.
Var särskilt uppmärksam om du fortsätter
såga i ett tidigare påbörjat skär.
• Börja aldrig såga utan att kedjan löper.
• Fila alltid kedjan på rätt sätt. Se särskilt till att
ställa in underställningsklacken till rätt höjd.
• Såga aldrig i flera grenar samtidigt.
• Vid kvistning är det viktigt att svärdet inte
kommer i kontakt med andra grenar.
• Vid kapning är det viktigt att intilliggande
stockar inte stör arbetet. Var alltid
uppmärksam på svärdspetsen.
• Använd sågbock.
Säkerhetsfunktioner
1.
Kontrollera alltid att säkerhetsfunktionerna fungerar
innan arbetet påbörjas. Använd inte kedjesågen om
inte säkerhetsfunktionerna fungerar på rätt sätt.
− Kedjebroms:
Kedjesågen är utrustad med en kedjebroms som
stoppar kedjan på bråkdelen av en sekund. Den
aktiveras när du skjuter handskyddet framåt.
Kedjas stoppas inom 0,15 sek och strömmen till
motorn bryts.
12
014317
− Tröghetsbroms:
Kedjesågen är utrustad med en tröghetsbroms
som stoppar kedjan omedelbart när avtryckaren
släpps. På så vis förhindras att kedjan löper och
utgör en risk när motorn är avstängd.
− Det främre och bakre handskyddet skyddar
användaren från skador som kan orsakas av
spånor eller splitter som kastas bakåt, eller av att
kedjan slits av.
− Startspärren förhindrar att kedjesågen startas
oavsiktligt.
−
Kedjefångaren
skyddar användaren mot skador som
kan uppstå om kedjan hoppar ur spåret eller slits av.
1. Kedjebroms på
2. Kedjebroms
släppt

24
Transport och förvaring
・ Dra alltid ur nätsladden och sätt på
sågens svärdskydd när kedjesågen inte
används eller när den flyttas. Bär eller
transportera aldrig sågen medan
kedjan löper.
1. Bär kedjesågen endast i det främre handtaget
med svärdet riktat bakåt.
2. Förvara alltid kedjesågen i ett säkert, torrt och
låst utrymme utom räckhåll för barn. Förvara inte
kedjesågen utomhus.
UNDERHÅLL
1. Dra alltid ur nätsladden innan justeringar eller
underhåll utförs.
2. Kontrollera nätsladden regelbundet så att
isoleringen är intakt.
3. Rengör kedjesågen regelbundet.
4.
Eventuella skador på plastkåporna måste
repareras omedelbart och med vederbörlig omsorg.
5. Använd inte kedjesågen vid fel på avtryckaren.
Se till att få den korrekt reparerad.
6. Inte under några omständigheter får ändringar
göras på kedjesågen. I annat fall kan inte
säkerheten garanteras.
7. Utför inga andra underhålls- eller
reparationsarbeten än de som beskrivs i
bruksanvisningen. Allt annat arbete måste utföras
ett auktoriserat servicecenter.
8. Använd endast originalreservdelar och
originaltillbehör som är avsedda för den aktuella
modellen. Om andra delar används medför det
ökad olycksrisk.
9. Vi tar inget ansvar för olyckor eller skador om
icke-godkända svärd, sågkedjor eller andra
reservdelar eller tillbehör används.
Första hjälpen
・ Arbeta aldrig ensam. Arbeta alltid inom
hörhåll för en annan person.
1.
Se alltid till att ha första förband tillgängligt under
arbete. Förbandslådan måste alltid hållas komplett.
2. Om hjälp behöver tillkallas i händelse av olycka
ska följande information uppges:
• Var inträffade olyckan?
• Vad inträffade?
• Hur många personer är skadade?
• Vilka skador har de skadade personer?
• Vem rapporterar olyckan?
OBS!
Personer med cirkulationsbesvär som utsätts för
kraftiga vibrationer kan drabbas av blodsutgjutningar
och skador på nervsystemet.
Vibrationer kan orsaka följande symptom i fingrar,
händer och handleder: Domningar (stumhet), darrningar,
smärtor, stickningar, färgförändringar i huden och
hudförändringar.
Uppsök läkare om du drabbas av något av dessa
symptom!
SPARA DESSA ANVISNINGAR.
VARNING!
GLÖM INTE att noggrant följa
säkerhetsanvisningarna för maskinen även efter det
att du har blivit van att använda den. OVARSAM
hantering eller underlåtenhet att följa
säkerhetsanvisningarna i denna bruksanvisning kan
leda till allvarliga personskador.
25
DELAR
(Muttermodell: kopplingskåpan spänns åt av muttrarna.)
För modell UC3050A, UC3550A, UC3550AP,
UC4050A, UC4550A
1
2
3
4
5
6
9
10
8
014372
(Spakmodell: kopplingskåpan spänns åt av spaken.)
För modell UC3051A, UC3551A, UC4051A, UC4551A
1
2
3
4
5
6
9
10
8
7
014373
26
(För alla modeller)
14
12
11
15
13
17
16
18
014514
Kabelhake
1
2
3
4
5
6
7
9
8
10
11
12
13
Barkstöd
18
14
15
16
17
Bakre handtag
Avtryckare
Oljetankens lock
Främre handtag
Främre handskydd
Svärd
Sågkedja
Spak
Justeringsskruv/kedjesträckare
Oljenivåfönster
Bakre handskydd
Säkerhetsknapp
Kedjefångare
Svärdskydd
Justeringsskruv för oljepump
(på undersidan)
Kopplingskåpa
014375
MONTERING
FÖRSIKTIGT!
• Se alltid till att maskinen är avstängd och
nätsladden urdragen innan maskinen repareras.
Ta bort eller installera kopplingskåpan
Ta bort kopplingskåpan genom att utföra följande:
(För muttermodeller)
Fig.1
Lossa muttern.
(För spakmodeller)
Fig.2
Tryck på och öppna spaken helt tills den stoppar.
Vrid spaken motsols.
Installera kopplingskåpan genom att utföra stegen ovan
i omvänd ordning.
Ta bort eller montera sågkedjan
FÖRSIKTIGT!
• Använd alltid handskar när du hanterar kedjan.
Utför följande steg för att ta bort sågkedjan:
1. Lossa kopplingskåpan.
2. (För muttermodeller) Vrid kedjejusteringsskruven
motsols för att lätta på sågkedjans sträckning.
(För spakmodeller) Vrid kedjesträckaren i riktning
mot "-" för att lätta på sågkedjans sträckning.
Fig.3
Fig.4
3. Ta bort kopplingskåpan.
4. Ta bort kedjan och svärdet från kedjesågen.
Utför följande steg för att installera sågkedjan:
5. Säkerställ kedjans riktning. Pilmärket på kedjan
visar dess riktning.
Fig.5
6. Passa in ena änden av sågkedjan på översidan
av svärdet och den andra änden runt kedjehjulet.
7. Placera svärdet på kedjesågen.
8. Rikta in sträckningssliden med hålet på svärdet.
Fig.6
9. Håll i svärdet och vrid
kedjejusteringsskruven/kedjesträckaren för att
justera sågkedjans sträckning.
10. Placera kopplingskåpan så att hakarna passar in i
hålen och att styrstiftet passar i motstycket på
kopplingskåpan.

27
Fig.7
11. Spänn åt kopplingskåpan.
Fig.8
Fig.9
Justering av kedjesträckning
Kedjan kan förlora sin sträckning efter ett antal timmars
användning. Kontrollera därför emellanåt
kedjesträckningen innan du använder kedjesågen.
1. Lossa lätt på kopplingskåpan.
2. Lyft upp svärdsändan något.
3. Vrid justeringsskruven/kedjesträckaren för att
justera sågkedjans sträckning.
Fig.10
Fig.11
4. Spänn åt sågkedjan tills den nedre delen av
sågkedjan passar in i svärdets skena (se cirkeln).
5. Fortsätt att hålla lätt i svärdet, dra åt
kopplingskåpan efter att du justerat
kedjespänningen. Se till att sågkedjan inte är lös
på den undre sidan.
Se till att sågkedjan ligger tätt mot den undre sidan av
svärdet.
FÖRSIKTIGT!
• Sträck inte sågkedjan för mycket. En alltför sträckt
kedja kan medföra kedjebrott, ökat slitage på
svärdet eller trasig kedjesträckare.
• En kedja som inte är tillräckligt spänd kan hoppa
ur sitt spår på svärdet och utgör därför en
olycksrisk.
• Montera eller ta bort kedjan på en ren plats fri från
sågdamm och liknande.
Ansluta en förlängningskabel
FÖRSIKTIGT!
• Kontrollera att förlängningskabeln inte är ansluten
till el-uttaget.
Fig.12
När förlängningskabeln kopplas in, anslut den till
kedjesågens kabel med säkerhetskroken.
Fäst kabelkroken cirka 100–200 mm från anslutningen
med förlängningskabeln. Detta hjälper att förebygga
oavsiktlig frånkoppling.
ANVÄNDNING
FÖRSIKTIGT!
• Håll verktyget stadigt med höger hand på bakre
handtaget och vänster hand på främre handtaget
när du använder verktyget.
Avtryckarens funktion
Fig.13
FÖRSIKTIGT!
• Se alltid att maskinen är avstängd och bortkopplad
innan du kontrollerar avtryckarens funktion.
• Innan du ansluter maskinen till elnätet ska du
kontrollera att avtryckaren fungerar och återgår till
läget "OFF" när du släpper den.
En startspärr förhindrar oavsiktlig aktivering av
avtryckaren.
Tryck in startspärren och tryck sedan på avtryckaren för
att starta maskinen. Släpp avtryckaren för att stanna
maskinen.
Smörjning
FÖRSIKTIGT!
• Se alltid till att maskinen är avstängd och att
nätsladden är urdragen innan du smörjer
sågkedjan.
Fig.14
Smörj kedjan och svärdet med en biologiskt nedbrytbar
kedjeolja av typen klisterolja. Klisterkomponenten i
kedjeoljan förhindrar att oljan slungas bort från
sågkedjan onödigt snabbt. Mineraloljor ska inte
användas eftersom de är skadliga för miljön.
FÖRSIKTIGT!
• Låt inte oljan komma i kontakt med hud och ögon.
Kontakt med ögonen orsakar irritation. Skölj
omedelbart med rent vatten och kontakta läkare
om du får olja i ögonen.
• Använd aldrig gammal motorolja. Redan använda
oljor innehåller cancerframkallande ämnen.
Föroreningarna i använda oljor medför ökad
förslitning i oljepump, svärd och kedja. Gammal
motorolja är skadlig för miljön.
• När du fyller på kedjeolja för första gången i sågen,
eller om du fyller på olja när tanken blivit helt tom,
ska du fylla på olja upp till kragen på
påfyllningshålet. Oljefördelningen kan annars
försämras.
Fig.15
Utför följande steg för att fylla på olja:
1. Rengör noggrant området runt oljelocket för att
förhindra att smuts kommer in i oljetanken.
2. Skruva loss locket och fyll på olja upp till kragen
på påfyllningshålet.
3. Skruva på locket ordentligt.
4. Torka omsorgsfullt bort eventuell utspilld olja.
OBS!
• När kedjesågen används för första gången kan det
ta upp till två minuter innan oljan börjar smörja
sågmekanismen. Kör sågen utan belastning tills
den automatiska oljesmörjningen har kommit
igång (se "KONTROLLER").

28
KONTROLLER
Kontrollera följande innan arbetet påbörjas:
Kontrollering av kedjesträckningen
VAR NING!
• Dra alltid ur nätsladden innan du kontrollerar
kedjesträckningen och använd skyddshandskar.
(För muttermodeller)
Fig.16
(För spakmodeller)
Fig.17
Se till att sågkedjan ligger tätt mot den undre sidan av
svärdet (se cirkel).
Kontrollera kedjesträckningen ofta eftersom nya kedjor
har en tendens att förlängas.
En alltför sträckt kedja kan medföra kedjebrott, ökat
slitage på svärdet eller trasig kedjesträckare.
En kedja som inte är tillräckligt spänd kan hoppa ur sitt
spår på svärdet och utgör därför en olycksrisk.
Om kedjan är för lös: Se avsnittet "Justering av
kedjesträckning" och justera sågkedjans sträckning igen.
Kontrollering av avtryckarens funktion
FÖRSIKTIGT!
Innan du ansluter maskinen till elnätet ska du
kontrollera att avtryckaren fungerar och återgår till läget
"OFF" när du släpper den.
En startspärr förhindrar oavsiktlig aktivering av
avtryckaren.
Tryck in startspärren och tryck sedan på avtryckaren för
att starta maskinen. Släpp avtryckaren för att stanna
maskinen.
Tryck inte in avtryckaren hårt utan att ha tryckt in
startspärren. Det kan skada avtryckaren.
Kontrollering av kedjebroms
OBS!
• Om kedjesågen inte startar ska du kontrollera om
kedjebromsen har släppts. Dra handskyddet bakåt
till du känner att den kopplar in för att släppa
kedjebromsen.
Fig.18
Fig.19
Kontrollera kedjebromsen på följande sätt:
1. Håll kedjesågen med båda händerna när du
startar den. Håll bakre handtaget med höger hand
och främre handtaget med vänster hand. Se till
att svärdet och kedjan inte har kontakt med något
föremål.
2. Tryck in startspärren och tryck sedan på
avtryckaren. Sågen startar omedelbart.
3. Tryck det främre handskyddet framåt med
baksidan av handen. Se till att kedjan stoppar helt.
FÖRSIKTIGT!
• Om kedjan inte stoppar omedelbart ska du inte
under några omständigheter använda sågen.
Kontakta ett Makita-auktoriserat servicecenter.
Kontrollering av tröghetsbroms
Starta kedjesågen.
Släpp avtryckaren helt. Se till att kedjan stoppar helt
inom en sekund.
FÖRSIKTIGT!
• Om kedjan inte stoppar omedelbart ska du inte
under några omständigheter använda sågen.
Kontakta ett Makita-auktoriserat servicecenter.
Kontrollering av kedjeolja
Kontrollera oljenivån i tanken och fördelningen av olja
innan arbetet påbörjas.
Oljenivån kan kontrolleras genom siktfönstret enligt figuren.
Fig.20
Kontrollera oljefördelningen på följande sätt:
Starta kedjesågen.
Håll sågkedjan cirka 15 cm ovanför en stock eller
marken medan den går. Om smörjningen är tillräcklig
kommer oljan att skapa ett oljespår.
Kontrollera vindriktningen och utsätt inte dig själv för
oljestänk i onödan.
FÖRSIKTIGT!
• Om inget oljespår bildas ska sågen inte användas.
I annat fall förkortas kedjans livslängd. Kontrollera
oljenivån. Rengör oljekanalen och hålet i svärdet
(se "UNDERHÅLL").
Justering av kedjesmörjningen
Fig.21
Du kan justera matningshastigheten för oljepumpen
med justeringsskruven.
STARTA KEDJESÅGEN
FÖRSIKTIGT!
• Använd alltid ett främre och ett bakre handtag och
håll maskinen stadigt med både det främre och det
bakre handtaget under användningen.
• Se alltid till att stockar som ska kapas är ordentligt
förankrade. I annat fall kan kapade delar orsaka
personskador.
Kapning
Fig.22
Vid kapning ska du stöda barkstödet så som visas i
figuren, mot stocken.
Medan sågkedjan löper sågar du in i stocken genom att
lyfta sågen med det bakre handtaget och styra svärdet
med det främre. Använd barkskyddet som vridpunkt.
Fortsätt att såga genom att trycka lätt på det främre
handtaget och lyfta sågens bakända något. Flytta
barkskyddet i sågriktningen och lyft det främre
handtaget igen.

29
Stäng av sågen mellan skären om du ska göra fler
kapningar.
FÖRSIKTIGT!
• Du kan få bakåtkast i riktning mot dig om du sågar
med svärdets ovansida och kedjan kläms fast.
Såga därför med undersidan så att sågen strävar i
riktning bort från dig.
Fig.23
Om en sida av stocken är utsatt för tryck ska alltid den
tryckutsatta sidan (A) sågas först. Såga därefter
slutskäret från den andra sidan (B). På så vis undviker
du att svärdet kläms fast.
Fig.24
Kvistning
FÖRSIKTIGT!
• Kvistning får endast utföras av personer med stor
erfarenhet av sågning. Kastrisken är stor.
Om möjligt bör sågen stödas mot stammen. Använd inte
spetsen på svärdet på grund av kastrisken.
Var särskilt uppmärksam på grenar som är i spänn.
Såga inte i fritt hängande grenar från undersidan.
Stå inte på det avverkade trädet vid kvistning.
Spårsågning och sågning parallellt med träfibrerna
FÖRSIKTIGT!
• Spårsågning och sågning parallellt med träfibrerna
får endast utföras av personer med särskild
utbildning. Kastrisken och olycksrisken är stor.
Fig.25
Sågning parallellt med träfibrerna ska göras i så liten
vinkel som möjligt. Dessa typ av skär kräver extra
omsorgsfullhet eftersom barkskyddet inte kan användas.
Trädfällning
FÖRSIKTIGT!
• Fällning av träd får endast utföras av särskilt
utbildade personer. Arbetet är riskfyllt.
Iaktta gällande föreskrifter vid fällning av träd.
Fig.26
− Innan du påbörjar arbetet ska du kontrollera
följande:
(1) Inga obehöriga får finnas inom området.
(2) Alla inblandade personer måste ha en säker
reträttväg inom ett område av ca 45° på
vardera sidan av fällriktningen. Eventuella
elkablar som kan befinna sig i fällområdet
måste lokaliseras.
(3) Det får inte finnas hindrande föremål t ex
rötter och grenar på trädets rotdel.
(4) Personer eller föremål får inte finnas inom ett
avstånd av 2 1/2 trädlängder i trädets
fällriktning.
− Beakta följande för respektive träd:
• Lutningsriktning.
• Lösa eller torra grenar.
• Trädets höjd.
• Naturliga överhäng.
• Eventuell röta i trädet.
− Beakta vindhastighet och vindriktning. Fäll inte
träd när starka vindbyar förekommer.
− Trimning av rötter: Börja med de största
rotutskotten. Såga det vertikala skäret först och
därefter det horisontella.
Fig.27
− Såga ett riktskär: Riktskäret bestämmer
fällriktningen och styr trädet. Riktskäret görs på
den sida som trädet ska falla åt. Anlägg riktskäret
så nära marken som möjligt. Såga först det
horisontella skäret till ett djup på 1/5 - 1/3 av
stamdiametern. Gör inte skäret för långt. Såga
därefter det diagonala skäret.
− Eventuella korrigeringar av riktskäret ska göras
över hela dess bredd.
Fig.28
− Såga fällskäret litet högre upp än riktskärets
horisontella skär. Fällskäret måste vara exakt
horisontellt. Lämna ungefär 1/10 av
stamdiametern mellan fällskär och riktskär.
Träfibrerna i den osågade delen fungerar som ett
gångjärn. Stammen får inte under några
omständigheter sågas helt igenom eftersom trädet
då faller okontrollerat. Sätt i fällkilar i fällskäret så
snart skärdjupet är tillräckligt.
− Endast kilar av plast eller aluminium får användas
för att hålla fällskäret öppet. Järnkilar får inte
användas.
− Stå vid sidan av det fallande trädet. Se till att
området bakom trädet är tomt i en vinkel av 45° på
båda sidor av trädets axel (se figuren med
"fällområdet"). Var uppmärksam på fallande grenar.
− En flyktväg ska planeras och eventuella hinder
undanröjas innan sågningen påbörjas. Flyktvägen
ska gå bakåt och diagonalt till den gräns som
trädet förväntas att falla, såsom visas i figuren.
Fig.29
UNDERHÅLL
FÖRSIKTIGT!
• Se alltid till att maskinen är avstängd och
nätkabeln urdragen innan inspektion eller
underhåll utförs.
• Använd alltid handskar vid kontroller och underhåll.
• Använd inte bensin, thinner, alkohol eller liknande.
Missfärgning, deformation eller sprickor kan
uppstå.

30
Utför nedanstående underhållsåtgärder regelbundet.
Garantianspråk beaktas endast om
underhållsåtgärderna har utförts regelbundet och på rätt
sätt.
Endast de underhållsåtgärder som beskrivs i denna
bruksanvisning får utföras av användaren. Allt annat
arbete måste utföras av ett MAKITA-auktoriserat
servicecenter.
Rengöring av kedjesåg
Rengör kedjesågen regelbundet med en ren trasa. Det
är särskilt viktigt att hålla handtagen fria från olja.
Kontrollering av plastkåpa
Inspektera regelbundet alla delarna av kåpan. Om
några delar skada ska de omedelbart och på rätt sätt
repareras i ett MAKITA-auktoriserat servicecenter.
Filning av sågkedja
FÖRSIKTIGT!
• Dra alltid ur nätsladden och använd
skyddshandskar när du utför arbete på
kedjesågen.
Fig.30
Fila kedjan när:
− Du får spåndamm när du sågar i fuktigt trä.
− Kedjan har svårt att såga trots att du trycker hårt
med sågen.
− Skärtänderna är synbart skadade.
− Sågen drar åt vänster eller höger i träet. Orsaken
till detta är att filningen av sågkedjan har blivit
ojämn eller skadad på någon av sidorna.
Fila sågkedjan litet men ofta.
Två eller tre drag med filen är oftast tillräckligt vid
rutinmässig filning. Lämna sågkedjan för filning hos ett
MAKITA-auktoriserat servicecenter när du har filat om
den många gånger.
Filningskriterier:
− Alla skärtänder måste vara lika långa. Om
skärtänderna har olika längd löper inte kedjan
jämnt och det kan leda till kedjebrott.
− Fila inte kedjan om skärtänderna är endast 3 mm.
Kedjan måste då bytas ut.
− Spåntjockleken bestäms av avståndet mellan
underställningsklacken (rund nos) och skärtanden.
− Det bästa sågresultatet uppnås med följande
höjdskillnad mellan skärtand och
underställningsklack.
Kedjeblad 91PX: 0,65 mm
Fig.31
VAR NING!
• Ett för stort mått ökar risken för bakåtkast.
− Filningsvinkeln ska vara 30° och måste vara
densamma för alla skärtänder. Skillnader i vinkel
får kedjan att löpa ryckigt och ojämnt, slitaget ökar
och det leder till kedjebrott på kedjan.
− Stötvinkeln bestäms genom rundfilens filningsdjup.
När den angivna filen används på rätt sätt erhålls
rätt stötvinkel automatiskt.
− Stötvinkel för varje sågkedja är följande:
Kedjeblad 91PX: 80°
Fig.32
Fil och filningsanvisningar
− Fila kedjan med en specialrundfil (valfritt tillbehör)
för sågkedjor. Använd inte standardrundfilar.
− Diametern för rundfilen för varje sågkedja är som
följande:
Kedjeblad 91PX: 4,0 mm
− Fila endast med skjutande tag. Lyft filen från
skärtanden när du för filen bakåt.
− Fila den kortaste skärtanden först. Längden för
den kortaste skärtanden blir standard för alla
andra skärtänder på sågkedjan.
Fig.33
− För filen på det sätt som framgår av figuren.
− Det går lättare att fila om en filmall (tillbehör)
används. Filmallen har markeringar för rätt
filningsvinkel, 30° (rikta in markeringarna parallellt
med sågkedjan), och begränsar filningsdjupet (till
4/5 av fildiametern).
Fig.34
− Kontrollera höjden på underställningsklacken med
hjälp av specialverktyget (tillbehör) när kedjan är
färdigfilad.
Fig.35
− Ta bort eventuellt utskjutande material, avsett hur
litet, med en speciell plattfil (tillbehör).
− Runda av främre delen av underställningsklacken
igen.
Rengöring av svärd och smörjning av noshjul
FÖRSIKTIGT!
• Använd alltid skyddshandskar under detta arbete.
Filningsgrader utgör alltid en olycksrisk.
Fig.36
Kontrollera regelbundet att svärdets löpspår inte är
skadade. Rengör med ett lämpligt verktyg och ta bort
grader vid behov.
Smörj noshjulet minst en gång i veckan om sågen
används ofta. Innan du applicerar nytt smörjmedel ska
du noggrant rengöra det 2 mm stora hålet i framkanten
på svärdet. Pressa sedan in en liten mängd vanligt
smörjfett (tillbehör) i hålet.
Rengöring av oljekanal
Fig.37
− Rengör regelbundet oljekanalen och hålet i
svärdet.
 Loading...