

Page 1

Magellan 10’x10’ Straight Camo Canopy
FSMGPT0300
Assembly Instructions
& User’s Manual
Customer Service: (888) 922-2336
7:00 am to 12:00 am CST (daily)
Live Chat at: www.academy.com
Email: customerservice@academy.com
(Made in China)
Please keep this instruction manual for future reference
Page 2

Table of Contents
Warnings…………………………………………………………………..2
Parts List……………...…………………………………………………...3
Assembly Instructions……………………………………..................4-6
Care and Maintenance……………………………………….................7
Warranty Information…………………………………………………..…7
Page 1 of 7
Note: Before beginning assembly of product, make sure
all parts are present. Compare parts with package content
list and hardware contents. If any part is missing or
damaged do not attempt to assemble the unit. Contact
customer service for replacement parts.
Page 3
Warnings
IMPORTANT SAFETY AND TIP INFORMATION
TO MAXIMIZE THE ENJOYMENT OF YOUR PRODUCT PLEASE ASSEMBLE AND USE YOUR PRODUCT
AS SAFELY AS POSSIBLE. THE PURPOSE OF THE SAFETY ALERT SYMBOL IS TO CALL YOUR
ATTENTION TO POSSIBLE HAZARDS RELATING TO THE USE AND ASSEMBLY OF YOUR PRODUCT.
THE PURPOSE OF THE TIP SYMBOL IS TO CALL YOUR ATTENTION TO SUGGESTIONS THAT
WILL ASSIST YOU IN THE ASSEMBLY/DISASSEMBLY PROCESS AND ENHANCE YOUR CAMPING
EXPERIENCE. WHEN YOU SEE THESE SYMBOLS, PLEASE CLOSELY FOLLOW THE INFORMATION
PROVIDED.
IMPORTANT NOTES BEFORE YOU BEGIN:
• Assemble your canopy before the event to become familiar with the assembly.
• Two people are recommended for set up.
• Select a clean, level area for the shelter free of debris and sharp objects, away from a natural
watercourse.
• KEEP ALL FLAME AND HEAT SOURCES AWAY FROM THIS CANOPY FABRIC. This tent
meets the flammability requirements of CPAI-84. The fabric may burn if left in continuous
contact with any flame source. The application of any foreign substance to the tent fabric may
render the flame resistant properties ineffective
• Do not erect this product near an open flame.
• Never use any fuel burning, oxygen consuming devices, or any device that produces fumes
(including, but not limited to cooking stoves, lanterns, candles, hibachis, or heaters) in or
around your product. Inhalation of fumes may result in carbon monoxide poisoning, injury
and/or death.
• FAILURE TO USE CANOPY PROPERLY CAN VOID WARRANTY. The canopy is designed
for daily use. They should never be left unattended in rainy or windy conditions. Canopy must
be taken down during heavy rain or high winds. It is not designed for long term or seasonal
use. It is designed for daily outings or activities where ease of set-up and take down is
required.
• This recreational product is made from synthetic fabric that has been treated and is highly
resistant to the sun’s Ultraviolet (UV) light. No fabric can withstand prolonged exposure to
sunlight. UV damage is not covered by the limited warranty.
• Do not spray or apply insecticide or pesticide on your product. It may damage UV resistant
and/or water repellent properties of this product. Any damage caused by applying insecticide
or pesticide on this product is not covered by the limited warranty.
• This recreational product is constructed to rigid specifications. It is not made, however, for
extreme weather, climates, or environments. Modification, abuse and extreme weather are
some conditions that may adversely affect the structural integrity.
WARNING
Page 2 of 7
Page 4

Parts List
A Canopy polyester fabric body 1
B Speed Up Steel Frame ( Frame
size 10’ x 10’ x 9’4’’)
1
C Carry Bag 1
D Steel Stakes 8
E Guy Ropes 4
Page 3 of 7
Page 5

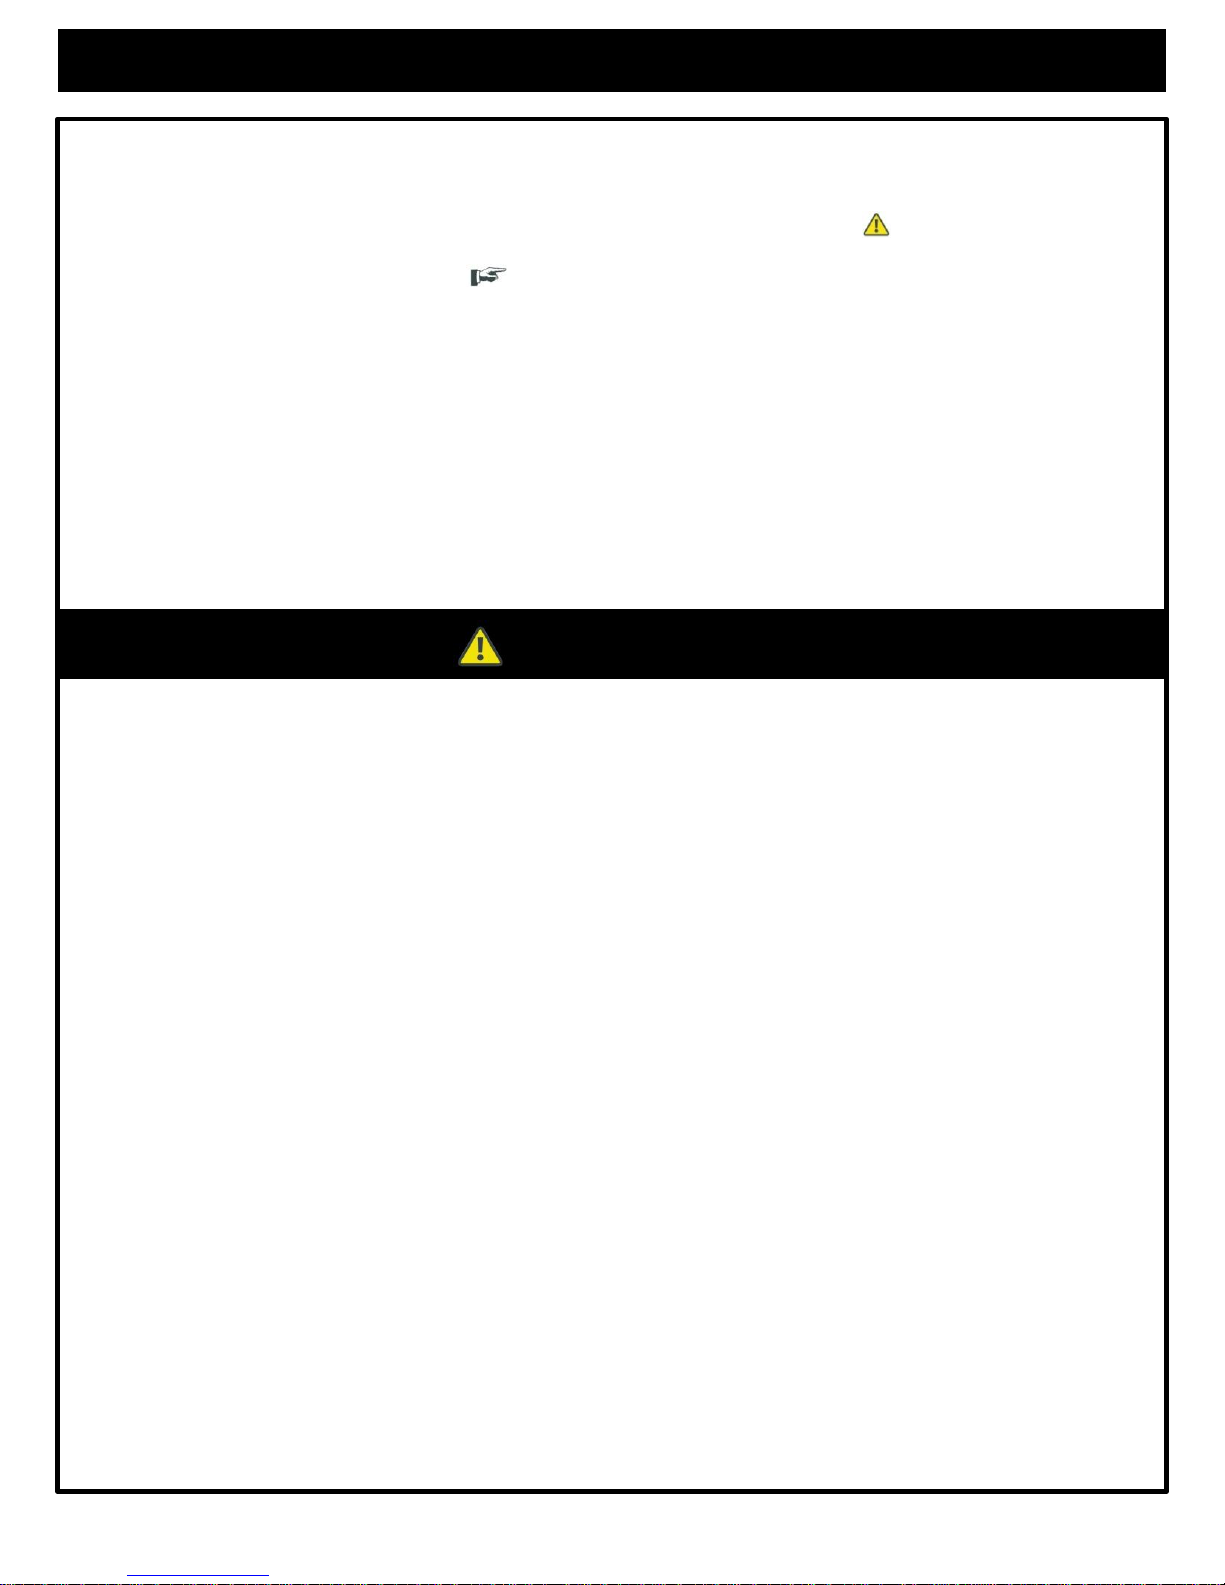
Assembly Instructions
Step 1:
Verify package contents by
emptying contents of bag(s)
and confirming all parts are
undamaged.
Tip: Do this at home
prior to your first use of
the product.
Step 2:
Pull and extend the frame:
a) Select a smooth level site to
let your shelter stand in.
b) With two people on diagonal
corners of the structure, each
grab a leg and have one person
stand in place while the other
walks the frame out. Slide the
roof lock mechanisms located
on each leg, up toward roof
corners, two legs at a time; at
each leg, listen for lock to “click”
into place. Stop adjusting frame
legs at mid-level (half-way mark)
for the next step.
Tip: Two people stand on
diagonal corners.
Page 4 of 7
Page 6
Assembly Instructions
Step 3:
Cover the frame with Fabric
Shell
a) Lay the fabric over the roof.
b) Line up all corners, adjusting
from opposite sides. Fabric will
fit snugly.
c) Attach the hook and loop
fastener on the underside of the
roof fabric to the roof frame.
Tip: Pay careful attention
of the two hook and loop
fastener points shown on
right.
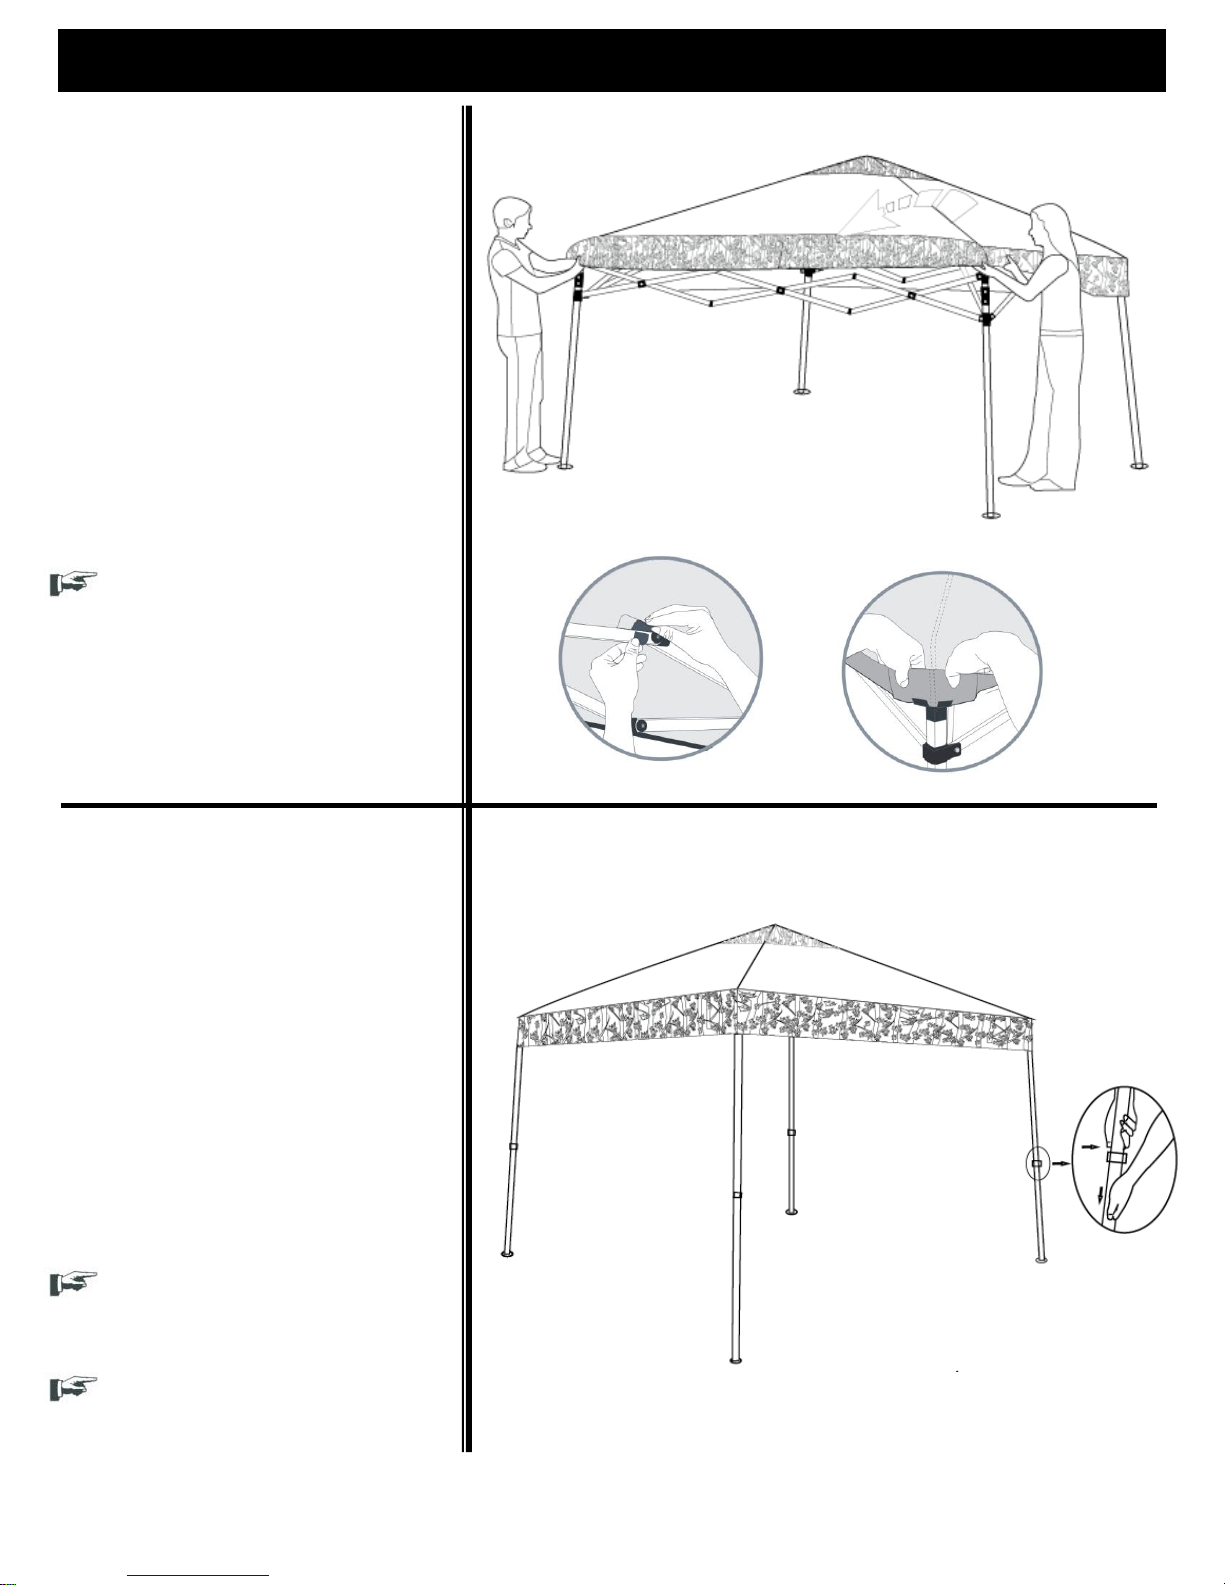
Step 4:
Extend the Legs:
Step on frame leg base.
Working from opposite sides,
slide the roof lock mechanisms
(located on upper leg portion)
upwards until they lock into
place. The amount of force
necessary will be much less if
you ensure the leg segment
remains in its slanted position.
Tip 1: Do not try and
straighten the legs as this
could damage the frame.
Tip 2: You will hear and
feel a click when the roof
lock is correctly secured at
each position.
Page 5 of 7
Page 7
Assembly Instructions
Step 5:
Stake canopy by driving stakes
through the holes at the foot of
each leg.
Tip: Use Additional weights
(sand bags, other heavy
objects) on each foot or place
legs twelve inches down into
sand to help secure set up for
beach use. Stake alone will not
secure Canopy in sand or soft
soil.
Page 6 of 7
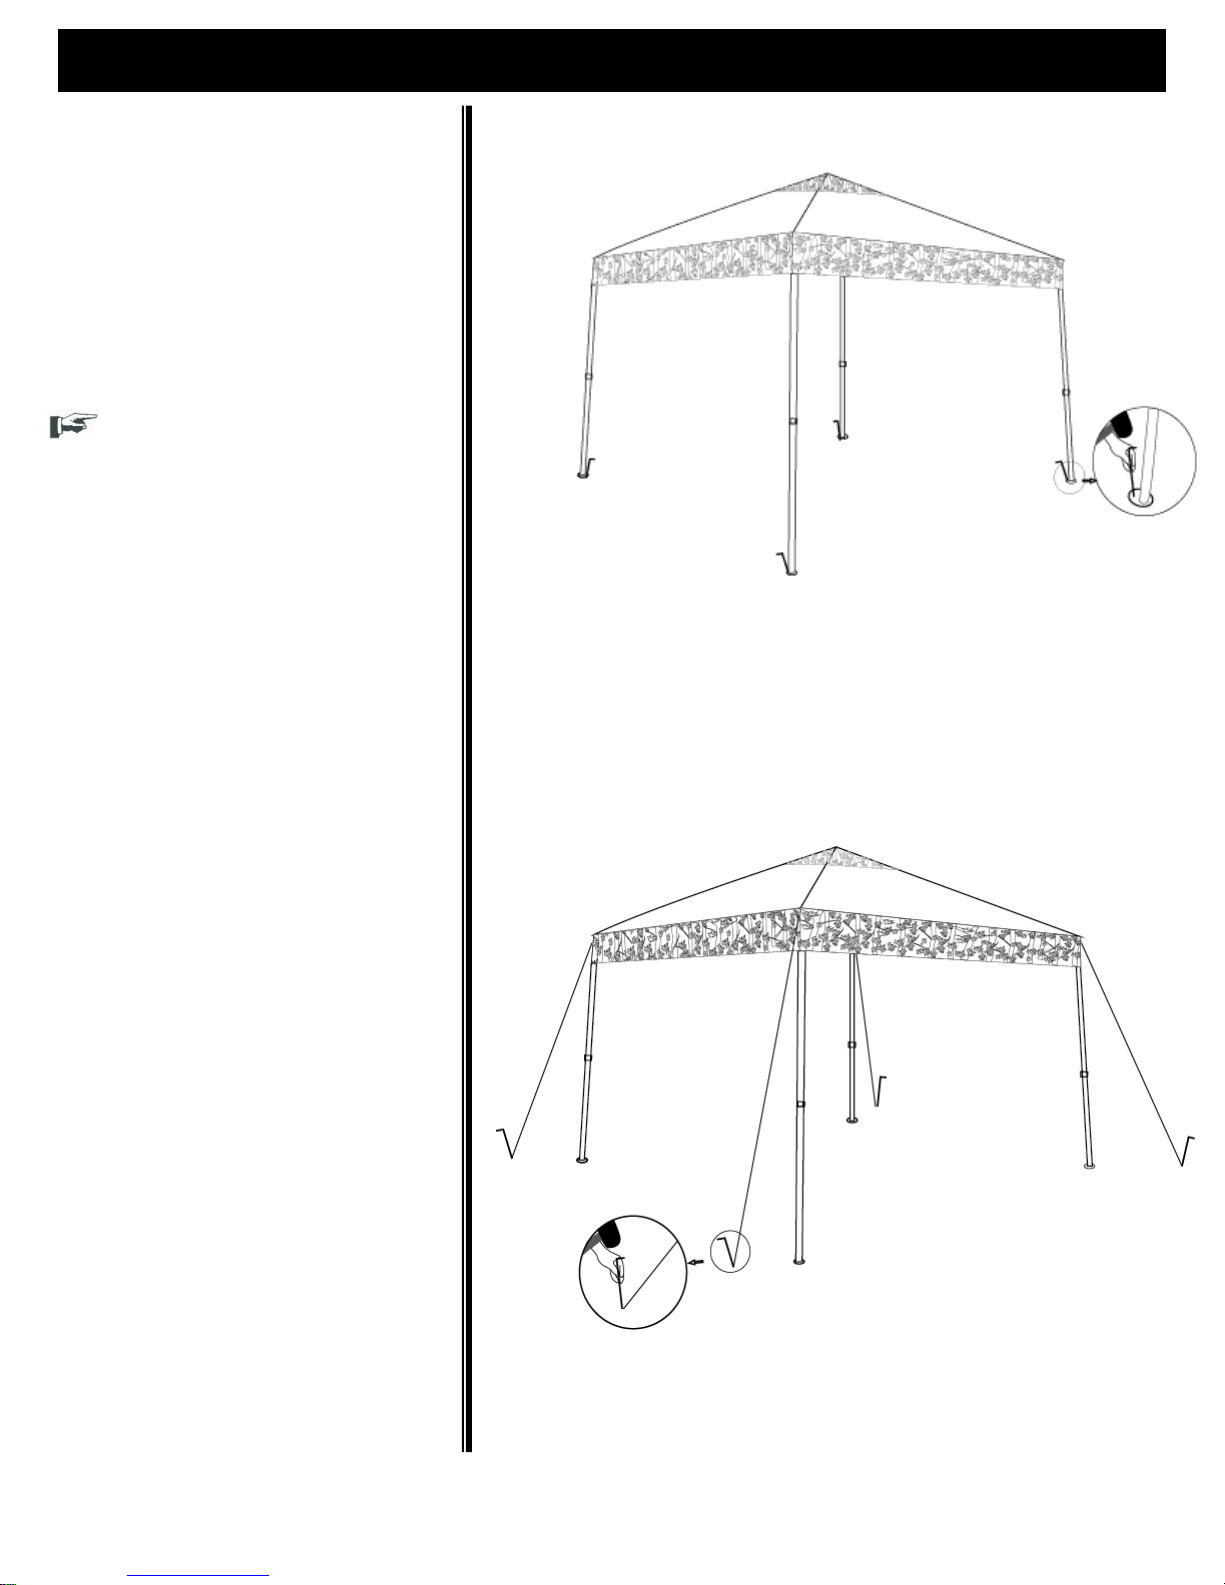
Step 6:
If necessary, put the guy ropes
through the “U” shaped plastic
ring and make a knot on the end.
On the other end pull the guy
ropes to the direction wanted and
fix it into the ground with a stake .
Page 8

• Your product must be stored dry. One of the easiest ways to damage your product is
storing it while it is wet. Storing a wet canopy as short a 24 hours in warm weather is
likely to cause mildew on the fabric coatings and are not covered by the limited warranty.
• If you must close camp in the rain, open your product and set it up to allow it to dry as
soon as possible. Allow dirt to dry on the fabric after a rainfall before lightly sweeping it
off with a brush. For tougher stains, spray the area with water and lightly wipe it off with
a few strokes. Do not use washer or dryer. DO NOT SCRUB THE FABRIC. ALWAYS MAKE
SURE CANOPY IS COMPLETELY DRY BEFORE REPACKING.
• Do not leave your canopy set up for weeks at a time. Exposure to ultraviolet rays from
the sun can damage and /or discolor the material.
• Clean the poles with a cloth and lubricate them with a silicone spray to help prevent
corrosion and keep from becoming gritty. This is especially important after using the
canopy around salt water.
• Store the stakes in a separate storage bag. Do not pack the stakes inside the canopy.
Care and Maintenance
Care and Maintenance
Page 7 of 7
Warranty Information
This product has been manufactured under the highest standards of quality
and workmanship. We warrant to the original consumer purchaser that all
aspects of this product will be free of defects in material and workmanship for
one year from the date of purchase. A replacement for any defective part will
be supplied free of charge for installation by the consumer. Defects or damage
caused by the use of other than genuine parts are not covered by this warranty.
This warranty shall be effective from the date of purchase as shown in the
purchaser receipt.
This warranty is valid for the original consumer purchaser only and excludes
industrial, commercial or business use of the product, product damage due to
shipment or failure which results from alteration, product abuse, or product
misuse, whether performed by a contractor, service company, or consumer. We
will not be responsible for labor charges and/or damage incurred in installation,
repair or replacement nor for incidental or consequential damage. This
warranty does not apply to damages caused by wind, rain, or other forces of
nature, not to accidental or deliberate damage of the product, nor to use of the
product that does not conform with the product instructions.
 Loading...