


Logitech HARMONY 665 User Manual
HARMONY®
665
Advanced
Remote
Control
Setup Guide
Languages
English. . . . . . . . . . . . . . . . . . . . 4
Deutsch . . . . . . . . . . . . . . . . . . 12
Français . . . . . . . . . . . . . . . . . . 20
Italiano . . . . . . . . . . . . . . . . . . .28
Español . . . . . . . . . . . . . . . . . . 36
Nederlands . . . . . . . . . . . . . . . . 44
Svenska . . . . . . . . . . . . . . . . . . 52
Dansk . . . . . . . . . . . . . . . . . . . 60
Norsk . . . . . . . . . . . . . . . . . . . 68
Suomi . . . . . . . . . . . . . . . . . . . 76
3
Thank you!
The Harmony 665 Advanced Remote Control is your answer to effortless home entertainment. The Activities buttons enable control of all your devices in one convenient remote. You can go from watching TV to watching a DVD to listening to music with the touch of an Activity button. You no longer need to type in codes to get your remote working with your entertainment system. The guided online setup walks you through the step-by-step configuration of your Harmony 665 with your entertainment system and then you’ll be ready to sit back and enjoy!
Package contents
•Harmony 665 Advanced Remote Control
•USB cable
•2 AA batteries
•User documentation
4 English
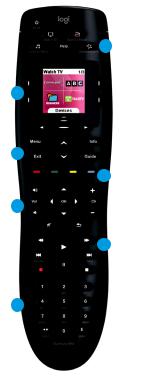
Getting to know your Harmony 665
AThe Activity buttons allow you to start your Activities. If an Activity does not start
as expected, press the Help button and answer simple questions to get your Activity working the way you expect.
BThe buttons around the screen control
the functions that appear on the screen such as favorite channels. It also gives you access to other commands and remote functions.
CThe menu area controls your TV-screen guides and menu.
DThe color-coded buttons perform cable and satellite functions or you can customize them with your favorite commands.
EThe channel area puts the most popular buttons at your fingertips. You can control the volume or change channels from one location.
FThe play area puts your play, pause, skip,
and other buttons in one area for quick access.
GThe number pad.
A
B
C
D
E
F
G
English 5
What to expect
Set aside at least 45 minutes to set up your Harmony remote.
1.Collect your manufacturer and model numbers of all the devices in your entertainment system.
2.Visit setup.myharmony.com on your computer and download the MyHarmony desktop software, create your account, and set up your devices an Activities.
3.Test your remote.
6 English

1 Get details about your system
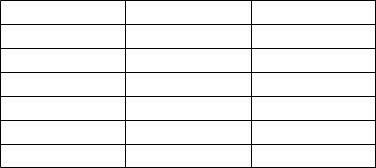
You will need to collect your devices’ manufacturer and model numbers before you start.
1.Find the model numbers on the front, back or bottom of each device in your entertainment system.
2.Write down the information in the table provided on page 8 (Device type, Manufacturer, Model number).
3.Take note of how your devices are connected together. For example, your DVD player is plugged into Video 1 on your TV etc. For more help, see What are Inputs... on the page 8.
English 7

Device |
Manufacturer |
Model number |
TV
Cable/Satellite
DVD
What are inputs... and why do I need to know about them?
Inputs are how your devices are connected. For example, if your DVD player is connected to your TV using Video 1 input, you would need to select Video 1 when setting up your Watch a DVD Activity in the MyHarmony software.
Once you set up Activities on your remote, one touch of an Activity button will power on and set the inputs on all the devices needed for that Activity.
8 English

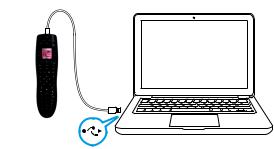
2 Setup
Create an account in the MyHarmony desktop software so that you can set up your Harmony 665 to control your home entertainment system.
1.Visit setup.myharmony.com to download the MyHarmony desktop software.
2.After installing the software, connect your remote to your computer using the supplied USB cable.
3.Follow the on-screen instructions to create a new account or sign in to a current Harmony account, and then set up your devices and Activities.
4.Update or sync your remote before you disconnect it from your computer.
setup.myharmony.com
English 9
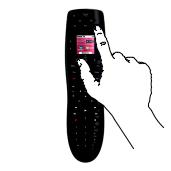
3 Test your remote
Test your remote to make sure everything is working.
1.Disconnect your remote from your computer and go to your entertainment system.
2.Go through the tutorial provided on the remote to get to know your remote better.
3.Try your remote to see that it works. If you want to make changes, launch the MyHarmony desktop software from your computer and login to your Harmony account.
Note: Once setup is complete, use Harmony 665 as your only remote;
using other remotes could cause the devices in your Activities to go out of sync. If this happens, use the “Help” button and follow the on-screen instructions.
10 English
We’re here to help
Visit support.myharmony.com/665 to find additional support including:
•Set up tutorials
•Support articles
•Troubleshooting guides
•User forums
English 11
Vielen Dank!
Mit der Harmony 665 Advanced-Fernbedienung steuern Sie Ihr HomeEntertainment spielend leicht. Über die Aktionstasten können Sie sämtliche Geräte auf einer praktischen Fernbedienung steuern. So können Sie mit nur einem einzigen Tastendruck vom Fernsehempfang zur DVDoder Musik-Wiedergabe wechseln. Sie müssen keine Codes mehr eingeben, damit Ihre Fernbedienung mit Ihrem Entertainment-System funktioniert. Bei der geführten Online-Einrichtung erhalten Sie eine schrittweise Anleitung zur Konfiguration der Harmony 665 für
Ihr Entertainment-System – und schon können Sie sich zurücklehnen und genießen!
Inhalt
•Harmony 665 Advanced-Fernbedienung
•USB-Kabel
•2 AA-Batterien
•Bedienungsanleitung
12 Deutsch

Beschreibung der Harmony 665
AMithilfe der Aktionstasten können Sie Ihre Aktionen starten. Wenn eine Aktion nicht erwartungsgemäß gestartet wird, drücken Sie die Taste für die interaktive Hilfe und beantworten Sie einige einfache Fragen, um das Problem zu beheben.
BDie Tasten neben und unter dem Display dienen der Steuerung der angezeigten Funktionen (z.B. Lieblingssender). Außerdem erhalten
Sie Zugriff auf weitere Befehle und Fernbedienungsfunktionen.
CÜber die Menütasten steuern Sie
die Bildschirmmenüs und -verzeichnisse.
DDie farbigen Tasten sind mit Funktionen zum Kabelund Satellitenfernsehen belegt.
Sie können ihnen aber jederzeit beliebige andere Funktionen zuweisen.
EIm Kanalbereich sind die am häufigsten benutzten Tasten für Sie immer griffbereit. Hier können Sie zentral die Lautstärke regeln oder die Programme wechseln.
FIm Wiedergabebereich sind die Tasten für Wiedergabe, Pause, Überspringen und
andere Tasten für den schnellen Zugriff kompakt untergebracht.
GDer Nummernblock.
A
B
C
D
E
F
G
Deutsch 13
Was erwartet Sie?
Planen Sie für das Einrichten Ihrer Fernbedienung mindestens 45 Minuten ein.
1.Tragen Sie die Hersteller und Modellnummern aller Geräte in Ihrem Entertainment-System zusammen.
2.Besuchen Sie auf Ihrem Computer setup.myharmony.com,
um die MyHarmony-Desktop-Software herunterzuladen, Ihr Konto zu erstellen sowie Ihre Geräte und Aktionen einzurichten.
3.Testen Sie Ihre Fernbedienung.
14 Deutsch

1 Erfassen der Details zu Ihrem System
Sie müssen Hersteller und Modellnummern Ihrer Geräte zusammentragen, bevor Sie anfangen.
1.Die Modellnummern finden Sie auf der Vorder-/Rückseite oder unten auf den einzelnen Geräten in Ihrem Entertainment-System.
2.Tragen Sie die Informationen in die Tabelle auf Seite 16 ein (Gerätetyp, Hersteller, Modellnummer).
3.Achten Sie darauf, wie Ihre Geräte miteinander verbunden sind. Beispiel:
Ihr DVD-Player ist mit dem Eingang „Video 1“ Ihres Fernsehers verbunden usw. Weitere Hilfe finden Sie unter „Was versteht man unter Eingängen ...“
auf Seite 16.
Deutsch 15

Gerät |
Hersteller |
Modellnummer |
TV
Kabel/Satellit
DVD-Player
Was versteht man unter Eingängen ... und wofür benötigt man sie?
Eingänge sind die Anschlüsse, über die verschiedene Geräte miteinander verbunden sind. Wenn beispielsweise Ihr DVD-Player über den Eingang „Video 1“ mit Ihrem Fernseher verbunden ist, müssen Sie „Video 1“ auswählen, um die Aktion „DVD wiedergeben“ in der MyHarmony-Software einzurichten. Nachdem Sie Aktionen auf Ihrer Fernbedienung eingerichtet haben, müssen Sie nur noch
eine Aktionstaste drücken, um alle für die jeweilige Aktion benötigten Geräte einzuschalten und die entsprechenden Eingänge einzustellen.
16 Deutsch
2 Einrichtung
Erstellen Sie in der MyHarmony-Desktop-Software ein Konto, um Ihre Harmony 665Fernbedienung für die Steuerung Ihres Home-Entertainment-Systems einrichten
zu können.
1.Besuchen Sie setup.myharmony.com, um die MyHarmony-Desktop-Software herunterzuladen.
2.Nachdem Sie die Software installiert haben, verbinden Sie die Fernbedienung über das mitgelieferte USB-Kabel mit dem Computer.
3.Befolgen Sie die Anweisungen auf dem Bildschirm, um ein neues HarmonyKonto zu erstellen bzw. sich bei einem bestehenden Konto anzumelden und anschließend Ihre Geräte und Aktionen einzurichten.
4.Aktualisieren oder synchronisieren Sie Ihre Fernbedienung, bevor Sie diese von Ihrem Computer trennen.
setup.myharmony.com
Deutsch 17

3 Testen Ihrer Fernbedienung
Testen Sie Ihre Fernbedienung, um sich zu vergewissern, dass alles wie vorgesehen funktioniert.
1.Trennen Sie Ihre Fernbedienung von Ihrem Computer und gehen Sie zu Ihrem Entertainment-System.
2.Gehen Sie das Tutorial auf der Fernbedienung durch, um sich mit ihr vertraut zu machen.
3.Probieren Sie aus, ob Ihre Fernbedienung funktioniert. Wenn Sie Änderungen vornehmen möchten, starten Sie auf Ihrem Computer die MyHarmony- Desktop-Software und melden Sie sich bei Ihrem Harmony-Konto an.
Hinweis: Verwenden Sie nach dem Abschließen der Einrichtung die Harmony 665 als einzige Fernbedienung. Die Verwendung anderer Fernbedienungen könnte dazu führen, dass die Synchronisierung der in Ihren Aktionen verwendeten Geräte verloren geht. Falls dies passiert, verwenden Sie die Schaltfläche „Hilfe“
und befolgen Sie die auf dem Bildschirm angezeigten Anweisungen.
18 Deutsch
Wir helfen gerne
Weitere Unterstützung finden Sie auf support.myharmony.com/665, darunter:
•Tutorials zur Einrichtung
•Support-Artikel
•Anleitungen zur Fehlerbehebung
•Benutzerforen
Deutsch 19
Merci.
Vous souhaitez utiliser votre système multimédia sans efforts? La télécommande de pointe Harmony 665 est la solution qu'il vous faut. Les boutons d'activité de
la télécommande tout-en-un permettent de contrôler l'ensemble de vos dispositifs. Passez du téléviseur au lecteur DVD ou audio en appuyant sur un simple bouton. Plus aucun code n'est nécessaire à l'allumage de chaque composant du système multimédia. Le programme de configuration en ligne vous permettra de configurer la télécommande Harmony 665 sur votre système multimédia. Et une fois
la télécommande configurée, place au divertissement!
Contenu
•Télécommande de pointe Harmony 665
•Câble USB
•2 piles AA
•Documentation utilisateur
20 Français
Familiarisation avec la télécommande Harmony 665
ALes boutons d'activité vous permettent de démarrer vos activités. Si une activité ne démarre pas comme voulu, appuyez sur le bouton d'aide et répondez aux questions qui s'affichent pour résoudre le problème.
BLes boutons situés autour de l'écran contrôlent les fonctions qui s'affichent sur ce dernier,
vos chaînes préférées, par exemple. Ils donnent également accès à d'autres fonctions de
la télécommande.
CLa zone de menu permet d'accéder au menu de l'écran de votre téléviseur.
DLes boutons de couleur donnent accès
aux fonctions du câble et du satellite. Vous pouvez également ajouter des fonctions personnalisées à ces boutons.
EL'emplacement dédié aux chaînes fournit un accès rapide aux commandes courantes.
Réglez le volume ou changez de chaîne à partir du même emplacement.
FLa zone de lecture regroupe tous les boutons
de lecture, de mise en pause et d'autres fonctions dans un même emplacement facile d'accès.
GLe pavé numérique.
A
B
C
D
E
F
G
Français 21
Déroulement de la configuration
Prévoyez au moins 45 minutes pour configurer votre télécommande Harmony.
1.Rassemblez les numéros de modèle et les noms de fabricant de tous les dispositifs de votre système multimédia.
2.Rendez-vous sur le site setup.myharmony.com à partir de votre ordinateur et téléchargez le logiciel de bureau MyHarmony; créez votre compte,
puis configurez vos dispositifs et activités.
3.Testez votre télécommande.
22 Français

1 Recueil d'informations sur votre système
Avant de commencer, vous devez rassembler les numéros de modèle et les noms de fabricant de vos dispositifs.
1.Vous trouverez le numéro de modèle à l'avant, à l'arrière ou sous chaque composant du système multimédia.
2.Indiquez ces informations dans le tableau disponible à la page 24 (dispositif, fabricant, numéro de modèle).
3.Notez le mode de connexion entre vos dispositifs. Par exemple, le lecteur DVD est branché sur l'entrée Vidéo 1 du téléviseur, etc. Pour plus d'informations, reportez-vous à la section Que sont les entrées... à la page 24.
Français 23
Dispositif |
Fabricant |
Numéro de modèle |
Téléviseur
Câble/Satellite
DVD
Que sont les entrées... et à quoi servent-elles?
Les entrées servent à connecter vos dispositifs. Si par exemple votre lecteur DVD est connecté à votre téléviseur sur l'entrée Vidéo 1, vous devez sélectionner cette entrée lorsque vous configurez l'activité Regarder un DVD dans le logiciel
MyHarmony. Une fois les activités configurées sur votre télécommande, une simple pression sur un bouton permettra de lancer l'activité. Les entrées seront alors automatiquement définies sur les dispositifs requis pour l'activité en question.
24 Français

2 Installation
Pour configurer la télécommande Harmony 665 en vue de contrôler votre système multimédia, créez un compte via le logiciel MyHarmony.
1.Rendez-vous sur setup.myharmony.com pour télécharger le logiciel de bureau MyHarmony.
2.Après l'installation du logiciel, reliez votre télécommande Harmony à l'ordinateur
àl'aide du câble USB fourni.
3.Suivez les instructions à l'écran pour créer un compte ou vous connecter
àun compte Harmony existant, puis configurez vos dispositifs et activités.
4.Mettez à jour ou synchronisez la télécommande avant de la débrancher de l'ordinateur.
setup.myharmony.com
Français 25

3 Test de la télécommande
Testez votre télécommande pour vérifier que toutes les commandes sont opérationnelles.
1.Débranchez-la de l'ordinateur et approchez-vous du système multimédia.
2.Lisez le didacticiel qui s'affiche sur la télécommande pour mieux connaître son fonctionnement.
3.Essayez la télécommande pour voir si elle réagit correctement. Si vous souhaitez modifier sa configuration, lancez le logiciel MyHarmony à partir de votre ordinateur et connectez-vous à votre compte Harmony.
Remarque: Une fois la configuration terminée, n'utilisez plus que
la télécommande Harmony 665, sans quoi les dispositifs associés à vos activités risquent de ne plus être synchronisés. Dans ce cas, utilisez le bouton "Aide"
et suivez les instructions à l'écran.
26 Français
 Loading...