

Page 1
ConferenceCam Connect
QuickStart Guide
Page 2

English. . . . . . . . . . . . . . . . . . . . . . . . . 3
Deutsch . . . . . . . . . . . . . . . . . . . . . . . . 13
Français . . . . . . . . . . . . . . . . . . . . . . . .23
Italiano. . . . . . . . . . . . . . . . . . . . . . . . .33
Español . . . . . . . . . . . . . . . . . . . . . . . 43
Português . . . . . . . . . . . . . . . . . . . . . . .53
Nederlands . . . . . . . . . . . . . . . . . . . . . .63
Svenska . . . . . . . . . . . . . . . . . . . . . . . .73
Dansk . . . . . . . . . . . . . . . . . . . . . . . . .83
Norsk . . . . . . . . . . . . . . . . . . . . . . . . .93
Suomi . . . . . . . . . . . . . . . . . . . . . . . . 103
Ελληνικά. . . . . . . . . . . . . . . . . . . . . . . . 113
По-русски . . . . . . . . . . . . . . . . . . . . . . . 123
Magyar . . . . . . . . . . . . . . . . . . . . . . . 133
Česká verze . . . . . . . . . . . . . . . . . . . . . 143
Po polsku . . . . . . . . . . . . . . . . . . . . . . 153
Page 3

Logitech ConferenceCam Connect
What’s in the box
1 2
3
4
5
ConferenceCam Connect
QuickStart Guide | Guide de démarrage rapide
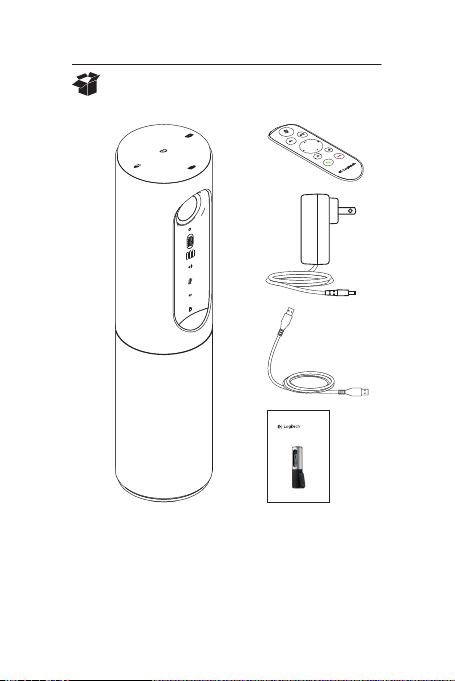
1. Main unit with camera
and speakerphone
2. Remote control
3. Power cable
and regional plugs
4. USB Cable
5. User documentation
English 3
Page 4

Logitech ConferenceCam Connect
2
3
1
5
6
4
7
9
11
5
12
14
7
6
8
13
15
10
Z
E
I
S
S
H
D
1
0
8
0
p
,
4
x
Z
o
o
m
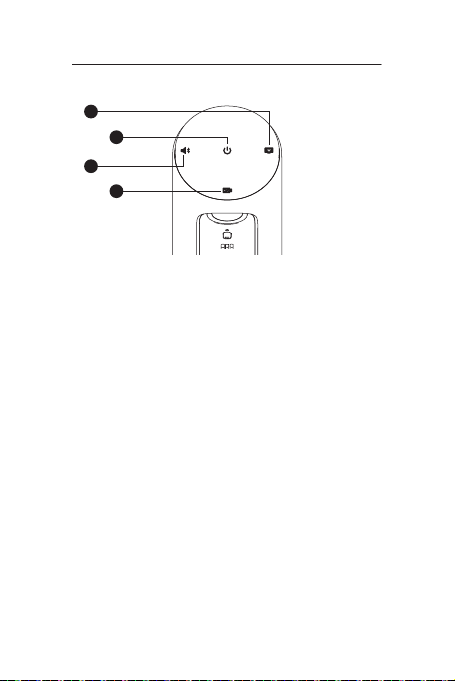
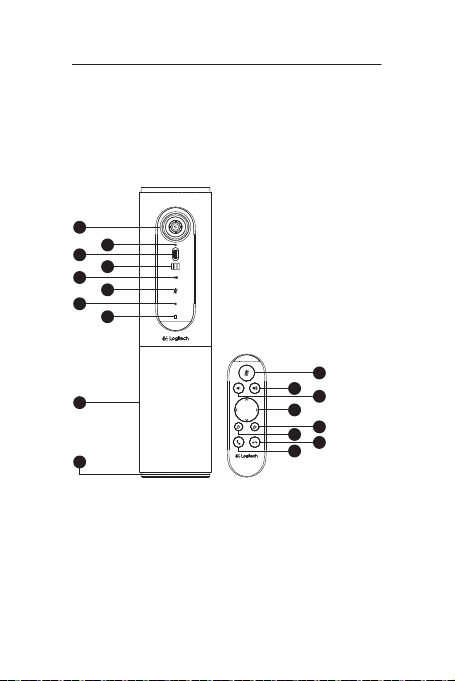
Know your product
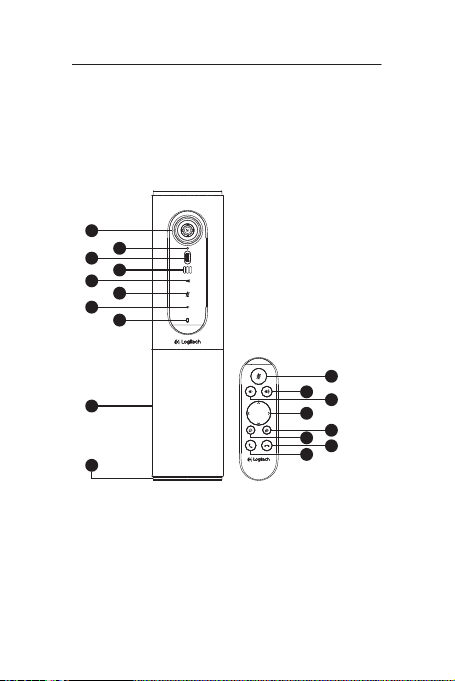
1. Camera, 1080p and
90-degree FOV
2. Camera LED
3. Tilt wheel for tilting
camera lens
4. Microphones
5. Volume Up
6. Mute
7. Volume down
8. Battery indicator
9. Speakerphone
10. Speakerphone/
Battery LED
4 English
11. Pan and Tilt
12. Zoom In
13. Zoom Out
14. End Call
15. Make/Answer Call
Page 5
Logitech ConferenceCam Connect
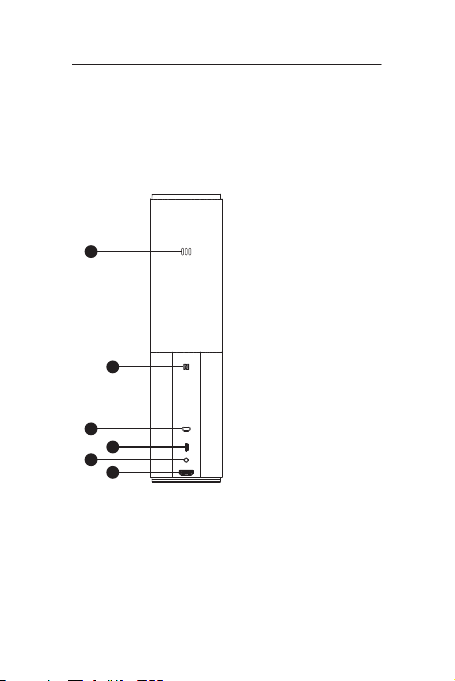
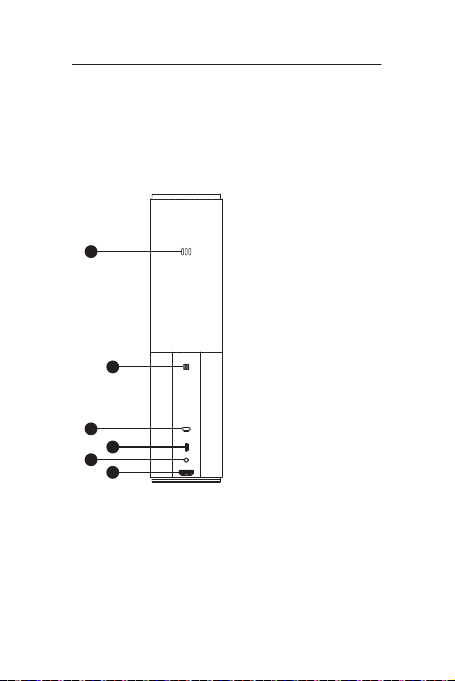
1. Microphone
1
2
3
4
5
6
2. NFC
3. Kensington Lock
4. USB connector
5. Power
6. HDMI connector
(wireless screen
mirror mode)
English 5
Page 6

Logitech ConferenceCam Connect
1
2
3
4
1. Wireless screen mirror mode
2. Power On/O button
3. Bluetooth® mode
4. Video conferencing mode
6 English
Page 7

Logitech ConferenceCam Connect
1
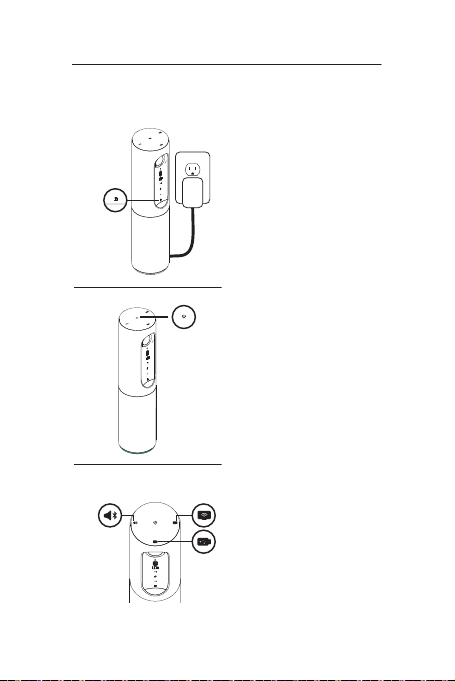
Setup your product
1. Connect ConferenceCam
Connect to external power.
Although ConferenceCam Connect
comes with rechargeable battery,
it must first be plugged into external
2
On / O
power and charged till the green
battery light displays.
Note: The device can also be charged
through USB on your PC or Mac
(charging times may vary.)
2. Press and hold power On/O
button to turn on the device.
A sound will play and the device
LEDs will light for 2-3 seconds,
with the last used mode LED
staying lit when on.
3
Bluetooth mode
3. Select the following modes
Wireless Screen
and follow the instructions
Mirror Mode
to get started.
Video
Conferencing
Mode
English 7
Page 8

Logitech ConferenceCam Connect
1. Video Conferencing Mode:
1. Connect the USB cable to the device and to your USB port.
2. To start a call from your PC or Mac application,
select Video Conferencing Mode on ConferenceCam
Connect. The camera and speakerphone LEDs will flash
to show that connection is taking place, and when
completed, the camera LED will light steady for a few
seconds and the speakerphone will play a sound.
If these activities do not take place, try again and then
consult Troubleshooting or call technical support.
3. Ensure that ConferenceCam Connect is selected as
the default video and audio device in your OS settings
and in your conferencing application. Start your video
or audio call from your application. The LEDs on the
camera and speakerphone will alight when streaming.
2. Bluetooth Mode
To connect ConferenceCam Connect speakerphone
to your mobile device:
1. Select Bluetooth mode on the ConferenceCam Connect.
2. If your device is NFC enabled, touch the mobile device
to the NFC icon on the speakerphone, which should
enable Bluetooth acceptance on the mobile device,
or hold down the Bluetooth button until the LED on
the speakerphone starts blinking blue rapidly.
3. On your mobile device, go to settings and turn on
Bluetooth to connect. The ConferenceCam Connect
will also play a sound to acknowledge connection.
8 English
Page 9

Logitech ConferenceCam Connect
3. Wireless Screen Mirror Mode (Screen share content
from your mobile device):
1. Connect the HDMI cable from your display to the back
of the ConferenceCam Connect device.
2. Select Wireless Screen Mirror Mode on
the ConferenceCam Connect.
3. On your mobile device, go to Settings, and then select
your mobile device’s option for screen mirroring.
The listed option name will dier from device
to device. For help with your mobile device setting,
please consult www.logitech.com/support/connect
for list of tested devices.
Note: Only Bluetooth mode and Wireless Screen
Mirror Mode may operate at the same time.
Wireless performance may vary.
English 9
Page 10

Logitech ConferenceCam Connect
Use your product
• Video
• Starting the video: The video is controlled by
the application and will start once the camera
is selected and the video is started in the application.
Camera LED will light when the video is streaming.
• Pan, tilt and zoom the camera using the controls on
the remote control. Press once for incremental or press
and hold for continuous pan or tilt. You can also pan
and tilt the camera image – first zoom in, and then pan
the image or tilt the image. You may also tilt the actual
camera with the tilt wheel on the unit. Do not manually
try to tilt camera itself. Doing so may damage unit.
• Saving pan, tilt and zoom settings: An optional
application is available which includes a software
interface to control camera settings. These can be
saved so your camera settings remain next time
you turn on the unit. You may download the software
from www.logitech.com/support/connect
• Far end control: You may control the pan, tilt and zoom
of a remote ConferenceCam CC3000e, ConferenceCam
Connect or a ConferenceCam BCC950, in supported
applications. Please visit the download page listed for
more information.
• Audio
• Volume: Volume Up and Down adjusts volume.
• Mute: Mute audio with Mute button.
• Calling: Run video conferencing software. Answer picks
up call. Hang up ends call. For call waiting, select hang
up to reject second call or answer button to toggle
between calls
Note: Answer and Hang up buttons may not work
in some applications. Use video conferencing
software to answer and end call. To enable answer
and hangup buttons for Skype or Cisco Jabber,
please download the plugin available from
www.logitech.com/support/connect
• SpeakerPhone Activity light indications
10 English
Page 11

Logitech ConferenceCam Connect
Blue: ConferenceCam is in active call. Blinking Blue:
Call is being received or Bluetooth is in pairing mode.
Bluetooth to connect ConferenceCam Connect
speakerphone to your mobile device for speakerphone
broadcast of call:
• If your device is NFC enabled, touch the mobile device
to the NFC icon on the speakerphone, which should
enable Bluetooth acceptance on the mobile device
OR
• Press the Bluetooth button on the speakerphone until
connection is made to the mobile device
• Battery Light Indicator
• When the battery is fully charged, the battery light turns
green. The green turns o when the power dips below 75%.
• When the battery has 25% power left, a red battery
light will alight continuously steady, indicating that
the device needs to be plugged into external power
very soon.
• When the battery has 10% power left, the red battery
light will blink, indicating that the device will no
longer operate unless plugged into external power
immediately, and a sound will also play once.
• The ConferenceCam Connect battery indicator will
blink green when the unit is being charged.
• When the device is completely charged, the LED will
turn o until the device is unplugged from external
power and running on battery.
• When the remote is docked the speakerphone indicator
will represent the same sequence.
English 11
Page 12

Logitech ConferenceCam Connect
Visit Product Central
Discover your product’s full potential. Get valuable information
and usage tips by browsing easy-to-use FAQs. Find answers
to product questions and get help setting up your product.
See if there’s software available for download that can
enhance your product experience. To enjoy all the benefits
of your Logitech product, visit www.logitech.com/support/
connect and take advantage of Logitech’s wide range of useful
support services:
• Product information
• Tutorials
• Troubleshooting
• Diagnostics
• Firmware upgrades
• Support community
• Software downloads
• In-box documentation
• Warranty information
• Spare parts
Troubleshooting tips
• Please visit www.logitech.com/support/connect
for troubleshooting tips, information on software tools
and for a diagnostic tool to help troubleshoot any issues
you may have with your ConferenceCam Connect.
12 English
Page 13
Logitech ConferenceCam Connect
Inhalt
1 2
3
4
5
ConferenceCam Connect
QuickStart Guide
1. Haupteinheit mit Kamera
und Freisprecheinrichtung
2. Fernbedienung
3. Netzkabel und regionale
Stecker
4. USB-Kabel
5. Bedienungsanleitung
Deutsch 13
Page 14
Logitech ConferenceCam Connect
2
3
1
5
6
4
7
9
11
5
12
14
7
6
8
13
15
10
Z
E
I
S
S
H
D
1
0
8
0
p
,
4
x
Z
o
o
m
Produkt auf einen Blick
1. Kamera, 1080p und
90-Grad-Sichtfeld
2. Kamera-LED
3. Scrollrad zum Kippen
des Kameraobjektivs
4. Mikrofone
5. Lauter
6. Stumm
7. Leiser
8. Akkustandsanzeige
9. Freisprecheinrichtung
10. Freisprecheinrichtung/
Akku-LED
14 Deutsch
11. Schwenken und Kippen
12. Vergrößern
13. Verkleinern
14. Anruf beenden
15. Anruf tätigen/annehmen
Page 15

Logitech ConferenceCam Connect
1. Mikrofon
1
2
3
4
5
6
2. NFC
3. Kensington-Schloss
4. USB-Stecker
5. Akku
6. HDMI-Anschluss
(kabelloser Bildschirmspiegelungs-Modus)
Deutsch 15
Page 16
Logitech ConferenceCam Connect
1
2
3
4
1. Kabelloser Bildschirmspiegelungs-Modus
2. Ein-/Aus-Taste
3. Bluetooth-Modus
4. Videokonferenz-Modus
16 Deutsch
Page 17
Logitech ConferenceCam Connect
1
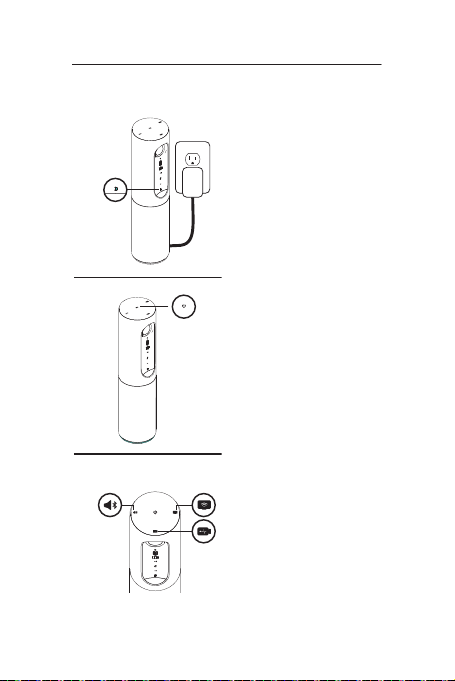
Einrichtung des Produkts
1. Schließen Sie ConferenceCam Connect
an eine externe Stromquelle an.
ConferenceCam Connect ist zwar
mit einem wiederaufladbaren Akku
ausgestattet, muss jedoch zunächst an
2
On / O
eine externe Stromquelle angeschlossen
und aufgeladen werden, bis die Akkustandsanzeige grün leuchtet.
Hinweis: Das Gerät kann auch per USB
auf Ihrem PC oder Mac aufgeladen
werden (die Ladezeiten können
dabei variieren).
2. Drücken und halten Sie
zum Einschalten des Geräts die Ein-/
Aus-Taste. Es ertönt ein Audiosignal,
und die LEDs des Geräts leuchten
2–3 Sekunden lang auf, wobei die
LED für den zuletzt verwendeten
Modus in eingeschaltetem Zustand
dauerhaft leuchtet.
3
Bluetooth mode
3. Wählen Sie die folgenden Modi aus
Wireless Screen
und folgen Sie den Anweisungen,
Mirror Mode
um zu beginnen.
Video
Conferencing
Mode
Deutsch 17
Page 18

Logitech ConferenceCam Connect
1. Videokonferenz-Modus:
1. Schließen Sie das USB-Kabel an das Gerät und
an Ihren USB-Anschluss an.
2. Wählen Sie an der ConferenceCam Connect den
Videokonferenz-Modus aus, um einen Anruf über
die Anwendung auf dem PC bzw. Mac zu tätigen.
Die LEDs von Kamera und Freisprecheinrichtung
blinken, während die Verbindung aufgebaut wird.
Ist der Vorgang abgeschlossen, leuchtet die KameraLED mehrere Sekunden lang durchgehend und
die Freisprecheinrichtung gibt ein Audiosignal aus.
Wenn diese Signale ausbleiben, starten Sie einen
neuen Versuch und suchen Sie ggf. anschließend
unter „Fehlerbehebung“ nach weiteren Informationen
oder wenden Sie sich an den technischen Support.
3. Stellen Sie sicher, dass ConferenceCam Connect
im Betriebssystem und in der Konferenzanwendung
als Standardvideo- und -audiogerät eingestellt ist.
Starten Sie den Video- oder Audioanruf aus
der Anwendung heraus. Die LEDs an Kamera und
Freisprecheinrichtung leuchten während des StreamingVorgangs auf.
2. Bluetooth-Modus
So verbinden Sie die Freisprecheinrichtung von
ConferenceCam Connect mit Ihrem Mobilgerät:
1. Wählen Sie auf der ConferenceCam Connect
den Bluetooth-Modus aus.
2. Bei NFC-fähigen Geräten berühren Sie mit dem Gerät
das NFC-Symbol auf der Freisprecheinrichtung.
Daraufhin sollte der Aufbau einer Bluetooth-Verbindung
auf Ihrem Mobilgerät akzeptiert werden. Alternativ
halten Sie die Bluetooth-Taste so lange gedrückt, bis die
blaue LED an der Freisprecheinrichtung schnell blinkt.
3. Önen Sie auf Ihrem Mobilgerät die Einstellungen
und schalten Sie Bluetooth ein, um eine Verbindung
herzustellen. Die ConferenceCam Connect gibt
außerdem ein Audiosignal aus, um die Verbindung
zu bestätigen.
18 Deutsch
Page 19

Logitech ConferenceCam Connect
3. Kabelloser Bildschirmspiegelungs-Modus
(Teilen von Bildschirminhalten von Ihrem Mobilgerät):
1. Schließen Sie das HDMI-Kabel von Ihrem Display an
die Rückseite des ConferenceCam Connect-Geräts an.
2. Wählen Sie auf der ConferenceCam Connect den
kabellosen Bildschirmspiegelungs-Modus aus.
3. Önen Sie auf Ihrem Mobilgerät die Einstellungen und
wählen Sie dort die Option für die Bildschirmspiegelung
aus. Der für die Option aufgeführte Name unterscheidet
sich von Gerät zu Gerät. Wenn Sie Hilfe mit den
Einstellungen Ihres Mobilgeräts benötigen, finden Sie
unter www.logitech.com/support/connect eine Liste
mit bereits getesteten Geräten.
Hinweis: Nur der Bluetooth-Modus und der kabellose
Bildschirmspiegelungs-Modus können gleichzeitig
betrieben werden. Bei der kabellosen Leistung sind
individuelle Abweichungen möglich.
Deutsch 19
Page 20

Logitech ConferenceCam Connect
Verwendung des Produkts
• Video
• Video starten: Das Video wird durch die Anwendung
gesteuert. Es startet, sobald in der Anwendung
die Kamera ausgewählt und das Video gestartet wird.
Während der laufenden Übertragung des Videos
leuchtet die Kamera-LED.
• Schwenken und kippen Sie die Kamera und zoomen Sie
mit der Fernbedienung. Zur schrittweisen Anpassung
drücken Sie die entsprechende Taste einmal, zur
stufenlosen Anpassung halten Sie die Taste gedrückt.
Sie können auch das Kamerabild schwenken und
kippen: Zoomen Sie dazu zunächst heran, um das
Bild anschließend zu schwenken oder zu kippen.
Außerdem besteht die Möglichkeit, die Kamera
selbst mit dem Scrollrad an der Einheit zu kippen.
Versuchen Sie nicht, die Kamera selbst von Hand zu
kippen. Dadurch könnte das Gerät beschädigt werden.
• So speichern Sie Schwenk-, Kipp- und
Zoomeinstellungen: Eine optionale Anwendung
ist verfügbar, die eine Software-Schnittstelle
zur Steuerung der Kameraeinstellungen enthält.
Sie können die Kameraeinstellungen speichern,
damit sie beim nächsten Einschalten der Einheit
erhalten bleiben. Die Software können Sie unter
www.logitech.com/support/connect herunterladen.
• Steuerung der Kamera der Gegenseite:
Aus unterstützten Anwendungen heraus können
Sie die Schwenk-, Kipp- und Zoomfunktion
einer beim Gesprächspartner befindlichen
ConferenceCam CC3000e, ConferenceCam Connect
oder ConferenceCam BCC950 steuern. Auf der
Downloadseite finden Sie weitere Informationen.
• Audio
• Lautstärke: Die Lautstärkeregelung erfolgt über
die Lauter-/Leiser-Tasten
• Ton aus: Mit der Stummschalttaste wird der Ton
ausgeschaltet.
20 Deutsch
Page 21

Logitech ConferenceCam Connect
• Anruf: Starten Sie die Videokonferenzsoftware.
Mit „Annehmen“ werden Gespräche angenommen.
Mit „Auflegen“ werden Anrufe beendet. Ertönt ein
Anklopfton, wählen Sie entweder „Auflegen“,
um den zweiten Anruf abzulehnen, oder betätigen Sie die
Antworttaste, um zwischen den Anrufen umzuschalten.
Hinweis: Die Tasten „Annehmen“ und „Auflegen“
funktionieren nicht in allen Anwendungen. Verwenden
Sie die Videokonferenzsoftware zum Annehmen und
Beenden von Gesprächen. Zum Aktivieren der Tasten
„Annehmen“ und „Auflegen“ für Skype oder Cisco
Jabber laden Sie bitte das entsprechende Plugin unter
www.logitech.com/support/connect herunter.
• Aktivitätsanzeige der Freisprecheinrichtung
Blau: ConferenceCam wird in einem Gespräch aktiv
verwendet. Blinkt blau: Ein Anruf geht ein oder Bluetooth
befindet sich im Pairing-Modus.
So verbinden Sie ConferenceCam Connect zur Wiedergabe
von Anrufen über die Freisprecheinrichtung per Bluetooth
mit Ihrem Mobilgerät:
• Bei NFC-fähigen Geräten berühren Sie mit dem Gerät
das NFC-Symbol auf der Freisprecheinrichtung.
Daraufhin sollte der Aufbau einer BluetoothVerbindung auf Ihrem Mobilgerät akzeptiert werden.
• Drücken Sie die Bluetooth-Taste auf der Freisprech-
einrichtung, bis eine Verbindung mit dem Mobilgerät
aufgebaut wurde.
• Akkustandsanzeige
• Wenn der Akku vollständig geladen ist,
leuchtet die Statusanzeige grün. Das grüne Licht erlischt,
wenn der Akkustand unter 75 % fällt.
• Wenn der Akkustand nur noch 25 % beträgt,
leuchtet eine rote Akku-LED durchgehend,
um anzuzeigen, dass das Gerät sehr bald an
eine externe Stromquelle angeschlossen werden muss.
• Wenn der Akkustand nur noch 10 % beträgt,
blinkt die rote Akku-LED, um anzuzeigen, dass das
Gerät nicht mehr funktionieren wird, sofern es nicht
umgehend an eine externe Stromquelle angeschlossen
wird. Außerdem ertönt ein Audiosignal.
Deutsch 21
Page 22

Logitech ConferenceCam Connect
• Die ConferenceCam Connect-Akkustandsanzeige
blinkt grün, während die Einheit aufgeladen wird.
• Wenn das Gerät vollständig aufgeladen ist,
erlischt die LED, bis das Gerät von der externen Stromversorgung getrennt wird und im Akkubetrieb läuft.
• Wenn die Fernbedienung angedockt ist, zeigt die LED
für die Freisprecheinrichtung dieselbe Sequenz an.
Produktzentrale
Entdecken Sie das volle Potential Ihres Geräts. Holen Sie sich
wertvolle Informationen und Anwendungstipps in den leicht
verständlichen FAQs. Finden Sie Antworten auf Fragen zum
Gerät und Hilfe beim Einrichten des Geräts. Suchen Sie nach
herunterladbarer Software, mit der sich der Funktionsumfang
des Geräts erweitern lässt. Um alle Vorteile Ihres Logitech
Produkts nutzen zu können, greifen Sie unter www.logitech.com/
support/connect auf das umfassende Serviceangebot von
Logitech zu:
• Produktinformationen
• Tutorials
• Fehlerbehebung
• Diagnose
• Firmware-Aktualisierungen
• Support-Community
• Software-Downloads
• Mitgelieferte Dokumentation
• Garantieinformationen
• Ersatzteile
Tipps zur Fehlerbehebung
• Tipps zur Fehlerbehebung, Informationen zu SoftwareTools sowie ein Diagnose-Tool zur Fehlerbehebung bei
Problemen mit der ConferenceCam Connect finden Sie
unter www.logitech.com/support/connect.
22 Deutsch
Page 23

Logitech ConferenceCam Connect
Contenu du coret
1 2
3
4
5
ConferenceCam Connect
QuickStart Guide | Guide de démarrage rapide
1. Unité principale
dotée d'une caméra et
d'un module mains libres
2. Télécommande
3. Câble d'alimentation
et prises régionales
4. Câble USB
5. Documentation utilisateur
Français 23
Page 24

Logitech ConferenceCam Connect
2
3
1
5
6
4
7
9
11
5
12
14
7
6
8
13
15
10
Z
E
I
S
S
H
D
1
0
8
0
p
,
4
x
Z
o
o
m
Présentation du produit
1. Caméra 1080p et champ
de vision de 90 degrés
2. Témoin lumineux
de la caméra
3. Roulette
multidirectionnelle
pour régler l'inclinaison
de l'objectif de la caméra
4. Microphones
5. Volume +
6. Sourdine
7. Volume -
8. Témoin de niveau
de charge de la batterie
9. Module mains libres
24 Français
10. Module mains libres/
témoin de la batterie
11. Panoramique et inclinaison
12. Zoom avant
13. Zoom arrière
14. Fin d'appel
15. Appel/prise d'appel
Page 25

Logitech ConferenceCam Connect
1. Microphone
1
2
3
4
5
6
2. NFC
3. Kensington Lock
4. Connecteur USB
5. Marche/Arrêt
6. Port HDMI (mode de
recopie vidéo sans fil)
Français 25
Page 26

Logitech ConferenceCam Connect
1
2
3
4
1. Mode de recopie vidéo sans fil
2. Bouton Marche/Arrêt
3. Mode Bluetooth
4. Mode de visioconférence
26 Français
Page 27
Logitech ConferenceCam Connect
1
Installation du produit
1. Branchez ConferenceCam Connect
à une source d'alimentation
externe. Bien que le système
ConferenceCam Connect soit fourni
avec une batterie rechargeable, il doit
d'abord être branché à une source
2
On / O
d'alimentation externe et chargé
jusqu'à ce que le témoin lumineux vert
de batterie s'allume.
Remarque: le dispositif peut également
être chargé par connexion USB sur
votre PC ou Mac (les temps de charge
peuvent varier).
2. Appuyez longuement sur le bouton
Marche/Arrêt pour mettre le
dispositif sous tension. Le dispositif
émet un signal sonore et les témoins
lumineux s'allument pendant 2
à 3 secondes. Le témoin lumineux
du dernier mode utilisé reste allumé.
3
Bluetooth mode
3. Sélectionnez les modes suivants
Wireless Screen
et suivez les instructions
Mirror Mode
pour démarrer.
Video
Conferencing
Mode
Français 27
Page 28

Logitech ConferenceCam Connect
1. Mode Visioconférence:
1. Branchez le câble USB entre le dispositif et votre port USB.
2. Pour eectuer un appel à partir d’une application
PC ou Mac, sélectionnez le mode Visioconférence
sur ConferenceCam Connect. Les témoins lumineux
de la caméra et du module mains libres clignotent,
indiquant que la connexion est en cours; une fois
celle-ci établie, le témoin lumineux de la caméra
reste allumé pendant quelques secondes et le module
mains libres émet un son. Dans le cas contraire,
vérifiez l'installation et consultez les rubriques
de dépannage ou contactez le support technique.
3. Assurez-vous que ConferenceCam Connect est sélectionné
en tant que dispositif vidéo et audio par défaut dans
les paramètres de votre système d'exploitation et de
votre application de visioconférence. Eectuez votre appel
vidéo ou audio à partir de votre application. Les témoins
lumineux de la caméra et du module mains libres restent
allumés en cours de communication.
2. Mode Bluetooth
Pour connecter le module mains libres
ConferenceCam Connect à votre dispositif mobile:
1. Sélectionnez le mode Bluetooth sur le dispositif
ConferenceCam Connect.
2. Si votre dispositif mobile est compatible NFC,
apposez-le sur le logo NFC du module mains libres
afin d'activer la connexion Bluetooth de l'appareil,
ou maintenez enfoncé le bouton Bluetooth jusqu'à ce
que le témoin lumineux du module mains libres se mette
à clignoter rapidement en bleu.
3. Accédez aux paramètres sur votre dispositif mobile
et activez le mode Bluetooth pour établir la connexion.
Le dispositif ConferenceCam Connect émet également
un son pour confirmer la connexion.
28 Français
Page 29

Logitech ConferenceCam Connect
3. Mode Recopie vidéo sans fil (partage du contenu
de l'écran de votre dispositif mobile):
1. Branchez le câble HDMI entre votre écran et l'arrière
du dispositif ConferenceCam Connect.
2. Sélectionnez le mode Recopie vidéo sans fil sur
le dispositif ConferenceCam Connect.
3. Accédez aux paramètres sur votre dispositif mobile
et sélectionnez la fonction de recopie vidéo de
votre dispositif mobile. Le nom de la fonction dière
selon les dispositifs mobiles. Pour obtenir de l'aide
concernant les réglages de votre dispositif mobile,
consultez la liste des dispositifs testés sur la page
www.logitech.com/support/connect.
Remarque: seuls les modes Bluetooth et Recopie
vidéo peuvent fonctionner en même temps.
Les performances sans fil peuvent varier.
Français 29
Page 30

Logitech ConferenceCam Connect
Utilisation du produit
• Vidéo
• Démarrer la vidéo: La vidéo est contrôlée par
l'application et démarre dans l'application une fois
la caméra sélectionnée. Le témoin lumineux de
la caméra s'allume pendant la diusion de la vidéo.
• Utilisez les fonctions de panoramique, inclinaison
et zoom de la caméra à l'aide de la télécommande.
Pour un réglage progressif, procédez par pressions
courtes; pour un contrôle Panoramique ou
Inclinaison continu, maintenez une pression longue.
Vous pouvez également utiliser les fonctions de
panoramique et d'inclinaison sur l'image de la caméra:
eectuez d'abord un zoom avant puis faites
un panoramique ou inclinez l'image. Il est aussi possible
d'incliner la caméra elle-même en utilisant la roulette
multidirectionnelle de l'unité. Ne tentez pas d'incliner
la caméra manuellement. Cela risque d'endommager
le dispositif.
• Enregistrement des paramètres de panoramique,
de zoom et d'inclinaison: il existe une application
facultative orant une interface logicielle permettant
de régler les paramètres de la caméra. Vous pouvez
enregistrer ces paramètres pour qu'ils soient
disponibles à la prochaine utilisation de votre dispositif.
Vous pouvez télécharger le logiciel à l'adresse suivante:
www.logitech.com/support/connect
• Contrôle à distance: vous pouvez contrôler la fonction
de zoom numérique panoramique d'un dispositif
ConferenceCam CC3000e, ConferenceCam Connect ou
ConferenceCam BCC950 distant (pour les applications
prises en charge). Pour plus d'informations, accédez à
la page de téléchargement dédiée.
• Audio
• Volume: les boutons de volume + et - permettent de
régler le volume.
• Sourdine: coupure du son grâce au bouton de sourdine.
30 Français
Page 31

Logitech ConferenceCam Connect
• Appel: lancement du logiciel de visioconférence. Le bouton
de prise d'appel permet de décrocher. Le bouton de fin
d'appel permet de raccrocher. Pour utiliser la fonction
de double appel, utilisez le bouton de fin d'appel pour
rejeter le deuxième appel ou le bouton de prise d'appel
pour passer d'un appel à l'autre
Remarque: il est possible que les boutons de prise
et de fin d'appel ne fonctionnent pas avec certaines
applications. Utilisez le logiciel de visioconférence
pour prendre des appels ou y mettre fin. Pour utiliser
les boutons de prise et de fin d'appel avec Skype
ou Cisco Jabber, téléchargez le plug-in disponible
sur www.logitech.com/support/connect
• Témoins lumineux d'activité du module mains libre
Bleu: la webcam ConferenceCam est en cours d'utilisation
pour un appel. Bleu clignotant: un appel est en cours de
réception ou le mode de couplage Bluetooth est activé.
Connexion Bluetooth du module mains libres
ConferenceCam Connect à votre dispositif mobile
pour la diusion de l'appel:
• Si votre dispositif mobile est compatible NFC,
apposez-le sur le logo NFC du module mains libres
afin d'activer la connexion Bluetooth du dispositif, ou:
• Appuyez sur le bouton Bluetooth du module mains
libres jusqu'à ce que la connexion avec le dispositif
mobile soit établie.
• Témoin de charge de la batterie
• Lorsque la batterie est complètement chargée, le témoin
lumineux devient vert. Le témoin lumineux vert s'éteint
lorsque la charge de la batterie est inférieure à 75%.
• Lorsque la batterie est chargée à 25%, le témoin
lumineux de la batterie s'allume en rouge,
indiquant que le dispositif doit être rapidement
branché sur une source d'alimentation externe.
• Lorsque la batterie est chargée à 10%, le témoin
lumineux de la batterie rouge se met à clignoter,
indiquant que le dispositif doit être immédiatement
branché sur une source d'alimentation externe
ou qu'il cessera de fonctionner. Cela sera également
indiqué par un signal sonore.
Français 31
Page 32

Logitech ConferenceCam Connect
• Le témoin de charge de la batterie du dispositif
ConferenceCam Connect clignote en vert lors
du chargement de l’unité.
• Lorsque le dispositif est entièrement chargé, le témoin
lumineux s’éteint jusqu’à ce que le dispositif soit
débranché de l’alimentation externe et qu’il fonctionne
sur batterie.
• Lorsque la télécommande est connectée à la base,
le témoin lumineux du module mains libres réagit
de la même façon.
Pages Produits
Profitez de tout le potentiel oert par votre produit.
Bénéficiez d'informations précieuses et de conseils d'utilisation
en consultant les questions fréquentes. Trouvez les réponses
à vos questions et obtenez de l'aide pour la configuration
de votre produit. Vérifiez s'il est possible de télécharger
un logiciel vous permettant d'améliorer les fonctionnalités
de votre produit. Pour profiter de tous les avantages de
votre produit Logitech, rendez-vous sur www.logitech.com/
support/connect et profitez des nombreux services du support
technique de Logitech:
• Informations relatives au produit
• Didacticiels
• Dépannage
• Diagnostics
• Mises à niveau du micrologiciel
• Communauté d'entraide
• Logiciels à télécharger
• Documentation fournie
• Informations sur la garantie
• Pièces de rechange
Conseils de dépannage
• Pour obtenir des conseils de dépannage, des informations
sur les outils logiciels ainsi qu'un outil de diagnostic
facilitant le dépannage de votre dispositif
ConferenceCam Connect, rendez-vous sur le site
www.logitech.com/support/connect.
32 Français
Page 33

Logitech ConferenceCam Connect
Contenuto della confezione
1 2
3
4
5
ConferenceCam Connect
QuickStart Guide
1. Unità principale con webcam
e vivavoce
2. Telecomando
3. Cavi di alimentazione
e connettori del paese di utilizzo
4. Cavo USB
5. Documentazione
per l'utente
Italiano 33
Page 34

Logitech ConferenceCam Connect
2
3
1
5
6
4
7
9
11
5
12
14
7
6
8
13
15
10
Z
E
I
S
S
H
D
1
0
8
0
p
,
4
x
Z
o
o
m
Panoramica del prodotto
1. Webcam, 1080p
e campo visivo di 90°
2. LED della webcam
3. Rotella per inclinare
l’obiettivo della webcam
4. Microfoni
5. Aumento del volume
6. Disattivazione
del volume
7. Riduzione del volume
8. Indicatore del livello
di carica della batteria
9. Vivavoce
34 Italiano
10. Vivavoce/
LED carica batteria
11. Panoramica e inclinazione
12. Zoom avanti
13. Zoom indietro
14. Chiusura chiamata
15. Chiamata/Risposta
Page 35

Logitech ConferenceCam Connect
1. Microfono
1
2
3
4
5
6
2. NFC
3. Predisposizione per
lucchetto Kensington
4. Connettore USB
5. Accensione
6. Connettore HDMI
(modalità di condivisione
wireless dello schermo)
Italiano 35
Page 36

Logitech ConferenceCam Connect
1
2
3
4
1. Modalità di condivisione wireless dello schermo
2. Pulsante di accensione/spegnimento
3. Modalità Bluetooth
4. Modalità videoconferenza
36 Italiano
Page 37

Logitech ConferenceCam Connect
1
Installazione del prodotto
1. Collegare ConferenceCam Connect
all'alimentazione esterna. Anche se
ConferenceCam Connect è dotato
di batteria ricaricabile, è necessario
collegarlo all’alimentazione esterna
2
On / O
per caricarla fino a quando si accende
l’indicatore verde.
Nota: la batteria può essere ricaricata
collegando il cavo USB al PC o al Mac
(i tempi di ricarica possono variare).
2. Tenere premuto il pulsante
di accensione per accendere
il dispositivo. Viene emesso
un suono e i LED del dispositivo
si accendono per 2 o 3 secondi.
Quello della modalità utilizzata
per ultima rimane acceso.
3
Bluetooth mode
3. Selezionare le seguenti modalità
Wireless Screen
e seguire le istruzioni per iniziare
Mirror Mode
a utilizzare il dispositivo.
Video
Conferencing
Mode
Italiano 37
Page 38

Logitech ConferenceCam Connect
1. Modalità videoconferenza:
1. Collegare il cavo USB al dispositivo e alla porta USB.
2. Per avviare una chiamata dall’applicazione per PC
o Mac, selezionare la modalità videoconferenza
in ConferenceCam Connect. I LED della webcam
e del vivavoce iniziano a lampeggiare mentre viene
stabilita della connessione; una volta stabilita,
il LED della webcam rimane acceso per alcuni secondi
e il vivavoce emette un suono. Se ciò non si verifica,
riprovare e quindi consultare la sezione per la risoluzione
dei problemi o contattare il supporto tecnico.
3. Assicurarsi che ConferenceCam Connect sia selezionato
come dispositivo video e audio predefinito nelle
impostazioni del sistema operativo e nell’applicazione
utilizzata per le videoconferenze. Avviare la chiamata
audio o video dall'applicazione. I LED della webcam
e del vivavoce si illuminano durante lo streaming.
2. Modalità Bluetooth
Per collegare il vivavoce ConferenceCam Connect
al dispositivo mobile:
1. Selezionare la modalità Bluetooth in ConferenceCam
Connect.
2. Se il dispositivo è dotato della tecnologia NFC,
posizionarlo sull'icona NFC del vivavoce per abilitare
l'accettazione tramite Bluetooth nel dispositivo mobile,
oppure tenere premuto il pulsante Bluetooth fino
a quando il LED del vivavoce inizia a lampeggiare
rapidamente di colore blu.
3. Sul dispositivo mobile, accedere alle impostazioni
e attivare Bluetooth per eettuare la connessione.
ConferenceCam Connect emette un suono per
confermare la connessione.
38 Italiano
Page 39

Logitech ConferenceCam Connect
3. Modalità di condivisione wireless dello schermo
(condivisione del contenuto dello schermo
del dispositivo mobile):
1. Collegare il cavo HDMI allo schermo e alla parte
posteriore di ConferenceCam Connect.
2. Selezionare la modalità di condivisione wireless
dello schermo in ConferenceCam Connect.
3. Sul dispositivo mobile, accedere alle impostazioni
e selezionare l’opzione per la condivisione
dello schermo. Il nome dell’opzione varia a seconda
del dispositivo. Per assistenza su come impostare
il dispositivo mobile, vedere l’elenco dei dispositivi
testati su www.logitech.com/support/connect.
Nota: solo le modalità Bluetooth e condivisione
wireless dello schermo possono funzionare
contemporaneamente. Le prestazioni wireless
possono variare.
Italiano 39
Page 40

Logitech ConferenceCam Connect
Utilizzo del prodotto
• Video
• Avvio del video: Il video viene controllato
dall'applicazione e avviato dopo la selezione della
webcam e della riproduzione nell'applicazione stessa.
Il LED della webcam si illumina durante lo streaming
del video.
• Ruotare, inclinare e utilizzare lo zoom della webcam
servendosi dei controlli del telecomando. Premere una
volta per una rotazione o inclinazione incrementale
o tenere premuto per un movimento continuo. È anche
possibile ruotare e inclinare l’immagine della webcam:
ingrandire l’immagine e quindi ruotarla o inclinarla.
È possibile inclinare anche la webcam tramite l’apposita
rotella posta sull’unità. Non inclinare manualmente
la webcam per evitare di causare danni all'unità.
• Salvataggio delle impostazioni relative a panoramica,
inclinazione e zoom: è disponibile un’applicazione
opzionale che include un’interfaccia software per
gestire le impostazioni della webcam e salvarle per la
prossima volta che si utilizza l’unità. Scaricare il software
da www.logitech.com/support/connect
• Controllo a distanza: nelle applicazioni supportate
è possibile controllare rotazione, inclinazione e zoom
di ConferenceCam CC3000e, ConferenceCam Connect
e ConferenceCam BCC950. Per ulteriori informazioni,
visitare la pagina di download.
• Audio
• Volume: utilizzare Volume su e Volume giù per regolare
il volume.
• Disattivazione dell'audio: disattivare l'audio con
il pulsante Disattivazione audio.
• Chiamate: eseguire un'applicazione per videoconferenze.
Rispondere a una chiamata con il pulsante Risposta.
Terminare una chiamata con il pulsante Interruzione della
chiamata. Per le chiamate in attesa, premere il pulsante
Interruzione della chiamata per rifiutare la seconda chiamata
o il pulsante Risposta per passare da una chiamata all’altra.
40 Italiano
Page 41

Logitech ConferenceCam Connect
Nota: è possibile che i pulsanti Risposta e Interruzione
della chiamata non funzionino in alcune applicazioni.
Utilizzare il software per videoconferenze per rispondere
e terminare una chiamata. Per abilitare tali pulsanti
per Skype o Cisco Jabber, scaricare il plug-in disponibile
alla pagina www.logitech.com/support/connect
• Indicatori luminosi del vivavoce
Blu: è in corso una chiamata con ConferenceCam.
Blu lampeggiante: è in arrivo una chiamata o Bluetooth
è in modalità di associazione.
Utilizzo di Bluetooth per collegare il vivavoce
di ConferenceCam Connect al dispositivo mobile
per ascoltare una chiamata:
• Se il dispositivo è dotato della tecnologia NFC,
posizionarlo sull'icona NFC del vivavoce per abilitare
l'accettazione tramite Bluetooth nel dispositivo,
OPPURE
• Tenere premuto il pulsante Bluetooth sul vivavoce fino
ad avvenuta connessione con il dispositivo mobile.
• Indicatore luminoso del livello di carica della batteria
• Quando la batteria e completamente carica,
l’indicatore diventa verde. La luce verde si spegne
quando il livello di carica scende al di sotto del 75%.
• Quando il livello di carica è al 25%, l’indicatore
si accende di colore rosso per avvertire che presto
sarà necessario collegare il dispositivo all’alimentazione
esterna.
• Quando il livello di carica è al 10%, viene emesso
un suono e la luce rossa inizia a lampeggiare per
indicare che il dispositivo funzionerà solo se verrà
collegato immediatamente all’alimentazione esterna.
• L’indicatore del livello di carica della batteria
di ConferenceCam Connect lampeggia di colore verde
durante la ricarica.
Italiano 41
Page 42

Logitech ConferenceCam Connect
• Quando il dispositivo è completamente carico, Il LED
si spegne fino a quando il dispositivo viene scollegato
dalla fonte di alimentazione esterna e viene alimentato
a batteria.
• Quando il telecomando si trova sulla base,
l’indicatore del vivavoce segue la stessa sequenza.
Sezione Prodotti di punta
Scopri tutto il potenziale del prodotto. Ottieni informazioni
utili e consigli per l'uso esplorando la sezione di facile
consultazione relativa alle domande frequenti. Trova risposte
alle domande inerenti al prodotto e ottieni assistenza per
la relativa configurazione. Controlla la presenza di software
disponibile per il download in grado di migliorare l'esperienza
d'uso del prodotto. Per scoprire tutti i vantaggi del prodotto
Logitech, visita la pagina www.logitech.com/support/connect
e approfitta dell'ampia gamma di utili servizi di supporto
di Logitech:
• Informazioni sul prodotto
• Esercitazioni
• Risoluzione dei problemi
• Diagnostica
• Aggiornamenti firmware
• Community di supporto
• Download del software
• Documentazione contenuta nella confezione
• Informazioni sulla garanzia
• Parti di ricambio
Consigli per la risoluzione dei problemi
• Visitare la pagina www.logitech.com/support/connect per
consigli sulla risoluzione dei problemi, per informazioni
sugli strumenti software e per uno strumento di
diagnostica per la risoluzione di eventuali problemi
relativi a ConferenceCam Connect.
42 Italiano
Page 43

Logitech ConferenceCam Connect
Contenido de la caja
1 2
3
4
5
ConferenceCam Connect
QuickStart Guide
1. Unidad principal
con cámara y teléfono
manos libres
2. Mando a distancia
3. Cable de alimentación
y conectores regionales
4. Cable USB
5. Documentación
del usuario
Español 43
Page 44

Logitech ConferenceCam Connect
2
3
1
5
6
4
7
9
11
5
12
14
7
6
8
13
15
10
Z
E
I
S
S
H
D
1
0
8
0
p
,
4
x
Z
o
o
m
Componentes del producto
1. Cámara, 1080p y campo
visual de 90 grados
2. LED de cámara
3. Botón rueda inclinable
para inclinar la lente
de la cámara
4. Micrófonos
5. Subir volumen
6. Silencio
7. Bajar volumen
8. Indicador de estado
de la batería
9. Teléfono manos libres
44 Español
10. LED de manos libres/
batería
11. Panorámico e inclinación
12. Ampliar
13. Reducir
14. Colgar
15. Realizar/responder
llamadas
Page 45
Logitech ConferenceCam Connect
1. Micrófono
1
2
3
4
5
6
2. NFC
3. Bloqueo Kensington
4. Conector USB
5. Alimentación
6. Conector HDMI
(modo espejo
en pantalla inalámbrico)
Español 45
Page 46

Logitech ConferenceCam Connect
1
2
3
4
1. Modo espejo en pantalla inalámbrico
2. Botón de encendido/apagado
3. Modo Bluetooth
4. Modo de videoconferencia
46 Español
Page 47

Logitech ConferenceCam Connect
1
Instalación del producto
1. Conecta ConferenceCam Connect
a una toma de alimentación externa.
Aunque ConferenceCam Connect se
entrega con una batería recargable,
primero se debe conectar a una toma
2
On / O
de alimentación externa y cargarse
hasta que se ilumine en verde el diodo
de estado de la batería.
Nota: El dispositivo también se puede
cargar mediante el puerto USB
del PC o Mac (los tiempos de recarga
pueden variar).
2. Mantén pulsado el botón de
encendido/apagado para encender
el dispositivo. Se reproducirá un
sonido y los LED del dispositivo se
iluminarán durante 2 o 3 segundos,
y el LED de modo usado por última
vez estará iluminado mientras
esté encendido.
3
Bluetooth mode
3. Selecciona los modos siguientes
Wireless Screen
y sigue las instrucciones
Mirror Mode
para empezar.
Video
Conferencing
Mode
Español 47
Page 48

Logitech ConferenceCam Connect
1. Modo videoconferencia:
1. Conecta el cable USB al dispositivo y a un puerto USB.
2. Para iniciar una llamada desde tu aplicación de PC
o Mac, selecciona el modo de videoconferencia
en ConferenceCam Connect. Los LED de la cámara
y del teléfono manos libres emitirán destellos mientras
se establece la conexión y, una vez establecida,
el LED de la cámara permanecerá iluminado durante
unos segundos y el teléfono manos libres reproducirá
un sonido. De no ser así, inténtalo de nuevo y si
es necesario consulta la información de solución
de problemas o solicita asistencia técnica.
3. Asegúrate de que ConferenceCam Connect esté
seleccionado como dispositivo de audio y vídeo
predeterminado en la configuración del sistema
operativo y en la aplicación de videoconferencias.
Inicia una videoconferencia o una llamada desde
la aplicación. Los LED de la cámara y el teléfono manos
libres se iluminarán cuando se produzca streaming.
2. Modo Bluetooth
para conectar el teléfono manos libres ConferenceCam
Connect a tu dispositivo móvil:
1. Selecciona el modo Bluetooth en ConferenceCam
Connect.
2. Si el dispositivo es compatible con NFC, toca con
él el icono NFC del teléfono manos libres para activar
la recepción Bluetooth en el dispositivo móvil,
o mantén pulsado el botón de Bluetooth hasta que
el LED del teléfono manos libres empiece a emitir
rápidos destellos azules.
3. En el dispositivo móvil, accede a la configuración
y activa Bluetooth para conectarte.
ConferenceCam Connect reproducirá un sonido
para reconocer la conexión.
48 Español
Page 49

Logitech ConferenceCam Connect
3. Modo espejo en pantalla inalámbrico
(compartir contenido en pantalla desde el dispositivo móvil):
1. Conecta el cable HDMI de la pantalla a la parte trasera
del dispositivo ConferenceCam Connect.
2. Selecciona el modo espejo en pantalla inalámbrico
en ConferenceCam Connect.
3. En el dispositivo móvil, accede a la configuración y,
a continuación, selecciona la opción de tu dispositivo
móvil para reflejar la pantalla. El nombre de la opción
de la lista varía según el dispositivo. Para obtener ayuda
con la configuración del dispositivo, consulta una lista de
dispositivos que pasaron las pruebas en www.logitech.
com/support/connect.
Nota: Sólo pueden funcionar al mismo tiempo el modo
Bluetooth y el modo espejo en pantalla inalámbrico.
El rendimiento inalámbrico puede variar.
Español 49
Page 50

Logitech ConferenceCam Connect
Utilización del producto
• Vídeo
• Inicio del vídeo: El vídeo se controla mediante
la aplicación y empezará en cuanto se seleccione
la cámara y se inicie el vídeo en la aplicación. El LED de la
cámara se ilumina al iniciarse el streaming del vídeo.
• Aplica panorámico, inclina la cámara y amplía o reduce
la imagen mediante el mando a distancia. Pulsa una
vez para incrementar gradualmente el panorámico
y la inclinación, o mantén la pulsación para un incremento
continuado. También puedes aplicar panorámico e
inclinar la cámara. Para ello primero amplía la imagen
y luego aplica panorámico o inclina la imagen. Otra
opción sería inclinar la cámara con la rueda inclinable en
la unidad. No intentes inclinar la cámara manualmente.
Podrías dañar la unidad.
• Configuración de Guardar panorámico, inclinación
y zoom: Hay disponible una aplicación opcional
que incluye una interfaz de software para controlar
la configuración de la cámara. Puedes guardar
la configuración de la cámara para la próxima vez
que enciendas la unidad. Puedes descargar el software
de www.logitech.com/support/connect
• Control remoto: Puedes controlar las funciones de
panorámico, inclinación y zoom de una ConferenceCam
CC3000e, ConferenceCam Connect o ConferenceCam
BCC950 remotas en aplicaciones compatibles. Para
obtener más información, visita la página de descargas.
• Audio
• Volumen: se ajusta con los botones de subir y bajar
volumen.
• Silencio: el sonido se silencia con el botón de silencio.
• Llamadas: ejecuta software para videoconferencias. El botón
Contestar responde a una llamada. El botón Colgar finaliza
la llamada. Para la llamada en espera, selecciona el botón
de finalización de llamada para rechazar la segunda llamada
o el botón de respuesta para alternar entre llamadas
50 Español
Page 51

Logitech ConferenceCam Connect
Nota: Es posible que los botones para contestar y colgar
no funcionen en algunas aplicaciones. Utiliza software de
videoconferencias para contestar y colgar. Para activar
los botones Contestar y Colgar para Skype o Cisco
Jabber, descarga el módulo adicional disponible en
www.logitech.com/support/connect
• Indicadores de actividad del teléfono manos libres
Azul: ConferenceCam tiene una llamada en curso.
Destellos azules: Se está recibiendo una llamada o Bluetooth
se encuentra en modo de emparejamiento.
Uso de Bluetooth para conectar el teléfono manos libres
ConferenceCam Connect al dispositivo móvil y difundir
una llamada:
• Si el dispositivo es compatible con NFC, toca con
él el icono NFC del teléfono manos libres para activar
la recepción Bluetooth en el dispositivo móvil
O
• Presiona el botón Bluetooth del teléfono manos libres
hasta que se establezca conexión con el dispositivo móvil
• Indicador de estado de baterías
• Cuando la batería se ha cargado completamente, el indicador
de estado de baterías se ilumina de color verde. La luz verde
se apaga cuando la batería desciende al 75%.
• Cuando quede un 25% de batería,
permanecerá encendida una luz roja para indicar
que el dispositivo necesita conectarse pronto
a una toma de alimentación externa.
• Cuando quede un 10% de batería, la luz roja parpadeará
y se reproducirá un sonido para indicar que el dispositivo
va a dejar de funcionar a no ser que se conecte
a una fuente de alimentación externa de inmediato.
• El indicador de estado de las baterías de ConferenceCam
Connect emitirá destellos verdes mientras la unidad
se esté cargando.
Español 51
Page 52

Logitech ConferenceCam Connect
• Cuando el dispositivo esté completamente cargado,
el LED se apagará hasta que el dispositivo se
desconecte de la fuente de alimentación externa
y funcione con baterías.
• Cuando el mando a distancia se encuentre en la base,
el indicador del teléfono manos libres representará
la misma secuencia.
Visita a Central de productos
Descubre todo el potencial de tu producto. En nuestra sección
de preguntas frecuentes encontrarás valiosa información
y consejos de uso. Obtén las respuestas a preguntas sobre
productos y ayuda para configurar tu producto. Comprueba si
hay software disponible para mejorar la experiencia de uso
de tu producto. Para disfrutar de todas las ventajas de tu
producto Logitech, visita www.logitech.com/support/connect
y usa la amplia gama de servicios de asistencia de Logitech:
• Información sobre el producto
• Ejercicios de aprendizaje
• Resolución de problemas
• Diagnósticos
• Actualizaciones de firmware
• Comunidad de asistencia
• Descargas de software
• Documentación incluida en paquete
• Información de garantía
• Piezas de repuesto
Consejos para resolver problemas
• En www.logitech.com/support/connect encontrarás
consejos para resolver problemas, información sobre
herramientas de software y una herramienta
de diagnósticos útil para posibles problemas
de ConferenceCam Connect.
52 Español
Page 53

Logitech ConferenceCam Connect
Incluído na embalagem
1 2
3
4
5
ConferenceCam Connect
QuickStart Guide
1. Unidade principal com câmara
e altifalante
2. Controlo remoto
3. Cabo de alimentação e tomadas
adaptadas à região
4. Cabo USB
5. Documentação
do utilizador
Português 53
Page 54

Logitech ConferenceCam Connect
2
3
1
5
6
4
7
9
11
5
12
14
7
6
8
13
15
10
Z
E
I
S
S
H
D
1
0
8
0
p
,
4
x
Z
o
o
m
Conheça o seu produto
1. Câmara, 1080p e FOV
(campo de visão)
de 90 graus
2. Câmara LED
3. Roda de inclinação
para a lente da câmara
4. Microfones
5. Aumentar volume
6. Sem som
7. Diminuir volume
8. Indicador de bateria
9. Altifalante
54 Português
10. LED de Altifalante/
Bateria
11. Rotação e inclinação
12. Ampliar
13. Reduzir
14. Terminar chamada
15. Efectuar/atender
chamada
Page 55

Logitech ConferenceCam Connect
1. Microfone
1
2
3
4
5
6
2. NFC
3. Bloqueio Kensington
4. Conector USB
5. Alimentação
6. Conector HDMI
(modo duplicação
do ecrã sem fios)
Português 55
Page 56

Logitech ConferenceCam Connect
1
2
3
4
1. Modo duplicação do ecrã sem fios
2. Botão | / O
3. Modo Bluetooth
4. Modo de conferência de vídeo
56 Português
Page 57

Logitech ConferenceCam Connect
1
Instalar o produto
1. Ligue a ConferenceCam Connect
à alimentação externa.
Apesar de a ConferenceCam Connect
ser fornecida com uma bateria
recarregável, é necessário primeiro
2
On / O
ligá-la à alimentação externa
e carregá-la até ser apresentada
a luz verde da bateria.
Nota: O dispositivo também pode ser
carregado por USB no computador
ou Mac (os tempos de carregamento
podem variar).
2. Mantenha premido o botão | / O
para ligar o dispositivo. É emitido
um som, o LED do dispositivo
acende durante 2 ou 3 segundos
e o último LED de modo utilizado
permanece aceso.
3
Bluetooth mode
3. Seleccione os seguintes modos
Wireless Screen
e siga as instruções para começar.
Mirror Mode
Video
Conferencing
Mode
Português 57
Page 58

Logitech ConferenceCam Connect
1. Modo de conferência de vídeo:
1. Ligue o cabo USB ao dispositivo e à porta USB.
2. Para iniciar uma chamada a partir de uma aplicação do
computador ou Mac, seleccione o Modo de conferência
de vídeo em ConferenceCam Connect. Os LEds
da câmara e do altifalante piscam para indicar que
a ligação está em curso e, quando concluída, o LED
da câmara acende por alguns segundos e o altifalante
emite um som. Caso estas actividades não ocorram,
tente novamente e, em seguida, consulte a Resolução
de problemas ou contacte o suporte técnico.
3. Certifique-se de que a ConferenceCam Connect está
seleccionada como o dispositivo de vídeo e áudio
predefinido nas definições do SO e na aplicação
de conferência. Inicie a chamada de vídeo ou
de voz a partir da aplicação. Os LEDs da câmara
e do altifalante são alinhados durante a transmissão.
2. Modo Bluetooth
Para ligar o altifalante ConferenceCam Connect
ao dispositivo móvel:
1. Seleccione o modo Bluetooth na ConferenceCam
Connect.
2. Se tem um dispositivo com tecnologia NFC, toque com
o dispositivo móvel no ícone NFC no altifalante,
o que deve activar a aceitação Bluetooth no dispositivo
móvel, ou prima o botão de Bluetooth até o LED
do altifalante começar a piscar rapidamente a azul.
3. No seu dispositivo móvel, aceda às definições e active
o Bluetooth para ligar. A ConferenceCam Connect
também emite um som de confirmação da ligação.
58 Português
Page 59

Logitech ConferenceCam Connect
3. Modo duplicação de ecrã sem fios
(Conteúdos de partilha de ecrã do dispositivo móvel):
1. Ligue o cabo HDMI do visor à parte posterior
do dispositivo ConferenceCam Connect.
2. Seleccione o Modo duplicação do ecrã sem fios
na ConferenceCam Connect.
3. No dispositivo móvel, aceda a Definições e seleccione
a opção do dispositivo móvel para duplicação do ecrã.
O nome da opção listada é diferente de dispositivo
para dispositivo. Para obter ajuda na configuração do
dispositivo móvel, consulte www.logitech.com/support/
connect para ver a lista de dispositivos testados.
Nota: Apenas o modo Bluetooth e o Modo Duplicação
do ecrã sem fios podem funcionar em simultâneo.
O desempenho sem fios pode variar.
Português 59
Page 60

Logitech ConferenceCam Connect
Utilize o seu produto
• Vídeo
• Iniciar o vídeo: O vídeo é controlado pela aplicação
e inicia quando a câmara é seleccionada e o vídeo
iniciado na aplicação. O LED da câmara acende quando
o vídeo está em transmissão contínua.
• Rode, incline e aplique o zoom na câmara com
os controlos do controlo remoto. Prima uma vez para
acção gradual e mantenha premido para rotação
ou inclinação contínuas. É também possível rodar
e inclinar a imagem da câmara: primeiro aproxime
com zoom e, em seguida, rode ou incline a imagem.
Pode igualmente inclinar a própria câmara com
a roda de inclinação da unidade. Não tente inclinar
manualmente a própria câmara. Fazê-lo pode danificar
a unidade.
• Guardar as definições de rotação, inclinação e zoom:
Encontra-se disponível uma aplicação opcional
que inclui uma interface de software para controlar
as definições da câmara. As definições podem
ser guardadas de modo a estarem disponíveis
em futuras utilizações. Pode transferir o software
em www.logitech.com/support/connect
• Controlo remoto: Pode controlar a rotação,
inclinação e o zoom de ConferenceCam CC3000e,
ConferenceCam Connect ou ConferenceCam BCC950
remotas em aplicações suportadas. Visite a página
de transferência listada para obter mais informações.
• Áudio
• Volume: Aumentar e Diminuir volume ajusta o volume.
• Sem som: Silencie o áudio com o botão Sem som.
• Efectuar chamadas: Execute o software
de videoconferência. Atender para atender a chamada.
Desligar para terminar a chamada. Para chamadas
em espera, seleccione desligar para rejeitar
a segunda chamada, ou o botão de atender para alternar
entre chamadas
60 Português
Page 61

Logitech ConferenceCam Connect
Nota: Os botões de Atender e Desligar podem não
funcionar em algumas aplicações. Utilize o software de
videoconferência para atender e terminar a chamada.
Para activar os botões de atender e desligar a chamada
para o Skype ou o Cisco Jabber, transfira o plugin
disponível em www.logitech.com/support/connect
• Indicações luminosas da actividade do altifalante
Azul: A ConferenceCam tem uma chamada activa.
Azul intermitente: A receber chamada ou o Bluetooth
encontra-se no modo de emparelhamento.
Bluetooth para ligar o altifalante da ConferenceCam
Connect ao dispositivo móvel para transmissão
da chamada via altifalante:
• Se o seu dispositivo possui tecnologia NFC activada,
toque com o dispositivo móvel no ícone NFC
no altifalante, o que deverá activar a aceitação
Bluetooth no dispositivo móvel
OU
• Prima o botão Bluetooth no altifalante até que
a ligação ao dispositivo móvel seja estabelecida
• Indicador luminoso da bateria
• A luz da câmara passa a verde quando a bateria está
completamente carregada. O verde apaga quando a carga
da bateria é inferior a 75%.
• Quando a bateria indica 25% de carga restante,
acende uma luz vermelha contínua que indica
a necessidade de em breve ligar o dispositivo
à alimentação.
• Quando a bateria indica 10% de carga restante,
a luz vermelha passa a intermitente e é emitido
um sinal sonoro, indicando que o dispositivo deixará
de funcionar a menos que seja imediatamente ligado
à corrente.
• O indicador da bateria da ConferenceCam Connect
pisca a verde quando a unidade está a carregar.
Português 61
Page 62

Logitech ConferenceCam Connect
• Quando o dispositivo está totalmente carregado,
o LED desliga-se até que o dispositivo seja desligado da
fonte de alimentação externa e esteja a funcionar com a
alimentação da bateria.
• Quando o controlo remoto está na base, o indicador
do altifalante representa a mesma sequência.
Visite a Central de produtos
Descubra em pleno o potencial do seu produto.
Obtenha informação valiosa e sugestões de utilização
navegando pelas perguntas frequentes fáceis de utilizar.
Encontre respostas a perguntas sobre o produto e consiga
ajuda para configurar o seu produto. Verifique se existe
software disponível para transferência que possa melhorar
a experiência do seu produto. Para desfrutar de todos os
benefícios do seu produto Logitech, visite www.logitech.com/
support/connect e tire partido da vasta gama de serviços
de suporte úteis da Logitech:
• Informações sobre o produto
• Manuais de iniciação
• Resolução de problemas
• Diagnósticos
• Actualizações de firmware
• Comunidade de apoio
• Transferências de software
• Documentação incluída na embalagem
• Informação da garantia
• Peças sobressalentes
Sugestões para a resolução de problemas
• Visite www.logitech.com/support/connect para obter
sugestões de resolução de problemas, informação sobre
ferramentas de software e uma ferramenta de diagnóstico
para ajudar na resolução de problemas que possam
ocorrer com a ConferenceCam Connect.
62 Português
Page 63

Logitech ConferenceCam Connect
Inhoud van de doos
1 2
3
4
5
ConferenceCam Connect
QuickStart Guide
1. Hoofdeenheid met camera
en speakerphone
2. Afstandsbediening
3. Stroomdraad
en regionale stekkers
4. USB-kabel
5. Handleiding
Nederlands 63
Page 64
Logitech ConferenceCam Connect
2
3
1
5
6
4
7
9
11
5
12
14
7
6
8
13
15
10
Z
E
I
S
S
H
D
1
0
8
0
p
,
4
x
Z
o
o
m
Ken uw product
1. Camera: 1080p
en gezichtsveld
van 90 graden
2. Camera-led
3. Tilt-wiel voor kantelen
cameralens
4. Microfoons
5. Volume omhoog
6. Dempen
7. Volume omlaag
8. Batterij-indicator
9. Speakerphone
64 Nederlands
10. Speakerphone/Accu-led
11. Pannen en kantelen
12. Inzoomen
13. Uitzoomen
14. Gesprek beëindigen
15. Gesprek maken/
beantwoorden
Page 65

Logitech ConferenceCam Connect
1. Microfoon
1
2
3
4
5
6
2. NFC
3. Kensington-slot
4. USB-connector
5. Vermogen
6. HDMI-connector
(modus Draadloos
schermweergave delen)
Nederlands 65
Page 66

Logitech ConferenceCam Connect
1
2
3
4
1. Modus Draadloos schermweergave delen
2. Aan/uit-knop
3. Bluetooth-modus
4. Videovergadermodus
66 Nederlands
Page 67

Logitech ConferenceCam Connect
1
Uw product instellen
1. Sluit de ConferenceCam Connect
aan op een externe voedingsbron.
De ConferenceCam Connect wordt
geleverd met een oplaadbare batterij,
maar moet eerst op een externe stroom-
2
On / O
toevoer worden aangesloten en
opgeladen tot het groene batterijlampje
oplicht.
N.B. Het apparaat kan via een USBaansluiting op uw pc of Mac worden
opgeladen (oplaadtijden kunnen variëren).
2. Houd de aan/uit-knop ingedrukt
om het apparaat in te schakelen.
U hoort een geluidssignaal en
de led's van het apparaat lichten
2-3 seconden op. De led van de
laatst gebruikte modus blijft branden
wanneer ingeschakeld.
3
Bluetooth mode
3. Selecteer de volgende modi en volg
Wireless Screen
de instructies om van start te gaan.
Mirror Mode
Video
Conferencing
Mode
Nederlands 67
Page 68

Logitech ConferenceCam Connect
1. Videovergadermodus:
1. Sluit de USB-kabel op het apparaat en uw USB-poort aan.
2. Als u een gesprek wilt starten vanuitf uw pc- of
Mac-toepassing, selecteert u Videovergadermodus
op ConferenceCam Connect. De led's van de camera
en speakerphone knipperen om aan te geven dat er
verbinding wordt gemaakt. Wanneer de verbinding tot
stand is gebracht, brandt de led van de camera enkele
seconden en geeft de speakerphone een geluidssignaal.
Als dit niet gebeurt, probeert u het opnieuw. Lukt het
nog steeds niet, raadpleeg dan probleemoplossing of
bel naar de technische ondersteuning.
3. Zorg dat de ConferenceCam Connect geselecteerd
is als het standaardapparaat voor video en audio in
uw besturingssysteeminstellingen en in uw toepassing
voor videovergaderen. Start uw video- of audiogesprek
vanuit uw toepassing. De led's van de camera en
speakerphone gaan branden wanneer streaming
plaatsvindt.
2. Bluetooth-modus
Zo sluit u de ConferenceCam Connect-speakerphone
aan op uw mobiele apparaat:
1. Selecteer Bluetooth-modus op de ConferenceCam
Connect.
2. Als uw apparaat NFC heeft, houdt u uw mobiele
apparaat tegen het NFC-pictogram op de
speakerphone. Normaal gesproken wordt Bluetooth
nu ingeschakeld op het mobiele apparaat. U kunt ook
de Bluetooth-knop ingedrukt houden tot de led op
de speakerphone snel blauw begint te knipperen.
3. Ga op uw mobiele apparaat naar Instellingen en schakel
Bluetooth in om te verbinden. De ConferenceCam
Connect speelt een geluid af om aan te geven dat er
verbinding is gemaakt.
68 Nederlands
Page 69

Logitech ConferenceCam Connect
3. Modus Draadloos schermweergave delen
(deel inhoud op het scherm van uw mobiele apparaat):
1. Sluit de HDMI-kabel van uw display aan op de
achterkant van het ConferenceCam Connect-apparaat.
2. Selecteer de modus Draadloos schermweergave delen
op de ConferenceCam Connect.
3. Ga op uw mobiele apparaat naar Instellingen
en selecteer de optie voor schermweergave van uw
mobiele apparaat. De weergegeven optienaam verschilt
voor elk apparaat. Voor hulp bij het instellen van
uw mobiele apparaat gaat u naar www.logitech.com/
support/connect voor een lijst van geteste apparaten.
N.B. Alleen Bluetooth-modus en de modus Draadloos
schermweergave delen mogen op hetzelfde moment
actief zijn. Draadloze prestaties kunnen verschillen.
Nederlands 69
Page 70

Logitech ConferenceCam Connect
Uw product gebruiken
• Video
• De video starten: De video wordt bestuurd door de
toepassing en start zodra de camera is geselecteerd en
de video in de toepassing wordt gestart. De camera-led
gaat branden wanneer de video wordt gestreamd.
• Pan, kantel en zoom de camera met de knoppen op
de afstandsbediening. Druk eenmaal voor stapsgewijs
pannen en kantelen of houd ingedrukt voor doorlopend
pannen en kantelen. U kunt de camera-afbeelding ook
pannen en kantelen: zoom eerst in en pan of kantel
vervolgens de afbeelding. U kunt de camera zelf ook
kantelen met het tilt-wiel op de eenheid. Kantel de
camera nooit handmatig. Hierdoor kan de eenheid
beschadigd raken.
• Instellingen voor pannen, kantelen en zoomen opslaan:
Er is een optionele toepassing beschikbaar die een
software-interface bevat om camera-instellingen
te bedienen. U kunt uw camera-instellingen opslaan
zodat ze behouden blijven wanneer u de eenheid
opnieuw inschakelt. U kunt de software downloaden
via: www.logitech.com/support/connect
• Bediening voor externe camera: U kunt u een externe
ConferenceCam CC3000e, ConferenceCam Connect of
ConferenceCam BCC950 pannen, kantelen en zoomen
in ondersteunde toepassingen. Ga naar de opgegeven
downloadpagina voor meer informatie.
• Audio
• Volume: Pas het volume aan met de knoppen Volume
omhoog en Volume omlaag.
• Mute: Demp het geluid met de knop Dempen.
• Bellen: Start uw software voor videovergaderen.
Met Opnemen beantwoordt u de oproep. Met Ophangen
beëindigt u het gesprek. Voor binnenkomende oproepen,
drukt u op de knop Ophangen om een tweede oproep af
te wijzen of op de knop Opnemen om tussen de oproepen
te schakelen
70 Nederlands
Page 71

Logitech ConferenceCam Connect
N.B. In sommige toepassingen werken de knoppen
Opnemen en Ophangen mogelijk niet. Gebruik de software
voor videovergaderen om het gesprek te beantwoorden en
beëindigen. Als u de knoppen Opnemen en Ophangen wilt
inschakelen voor Skype of Cisco Jabber, downloadt u de
relevante plugin van www.logitech.com/support/connect
• Betekenis van het speakerphone-lampje
Blauw: ConferenceCam wordt gebruikt voor een lopend
gesprek. Knippert blauw: U wordt gebeld of Bluetooth
bevindt zich in koppelingsmodus.
Bluetooth verbindt de ConferenceCam Connectspeakerphone met uw mobiele apparaat om uw gesprek
via speakerphone uit te zenden:
• Als uw apparaat NFC heeft, houdt u uw mobiele
apparaat tegen het NFC-pictogram op de speakerphone.
Normaal gesproken wordt Bluetooth nu ingeschakeld op
het mobiele apparaat.
• U kunt ook de Bluetooth-knop op de speakerphone
ingedrukt houden totdat verbinding met het mobiele
apparaat tot stand is gebracht.
• Indicatielampje voor de batterij
• Het lampje brandt groen wanneer de batterij volledig
opgeladen is. Het groene lichtje gaat uit wanneer
het batterijvermogen lager is dan 75%.
• Als er nog maar 25% batterijvermogen is, gaat een rood
batterijlampje branden. Dit geeft aan dat het apparaat
binnen afzienbare tijd op een externe voedingsbron
moet worden aangesloten.
• Als er nog maar 10% batterijvermogen is, gaat een rood
batterijlampje knipperen. Dit geeft aan dat het apparaat
niet meer zal werken tenzij het onmiddellijk op een
externe voedingsbron wordt aangesloten. Het apparaat
geeft ook een eenmalig geluidssignaal.
• De batterij-indicator van de ConferenceCam Connect
knippert groen wanneer de eenheid wordt opgeladen.
Nederlands 71
Page 72

Logitech ConferenceCam Connect
• Wanneer het apparaat volledig is opgeladen, gaat de
led uit tot het apparaat van de externe stroomtoevoer
wordt ontkoppeld en op batterijvermogen gaat werken.
• Als de afstandsbediening in de houder staat,
wordt dezelfde informatie via het speakerphone-lampje
weergegeven.
Ga naar Product centraal
Ontdek wat uw product allemaal kan. Vind nuttige informatie
en tips voor gebruik door naar onze gebruiksvriendelijke
veelgestelde vragen te gaan. Vind antwoorden op vragen over
producten en ontvang hulp bij het instellen van uw product.
Kijk of u software kunt downloaden die uw ervaring met het
product kan verbeteren. Als u wilt profiteren van alle voordelen
die uw Logitech-product te bieden heeft, gaat u naar
www.logitech.com/support/connect voor een ruime keuze aan
nuttige Logitech-ondersteuningsservices:
• Productinformatie
• Studielessen
• Problemen oplossen
• Diagnostische gegevens
• Firmware-upgrades
• Ondersteuningscommunity
• Softwaredownloads
• Documentatie in de doos
• Garantie-informatie
• Reserveonderdelen
Tips voor probleemoplossing
• Ga naar www.logitech.com/support/connect voor tips
om problemen op te lossen, informatie over softwaretools
en voor een diagnostische tool waarmee u problemen
met uw ConferenceCam Connect kunt verhelpen.
72 Nederlands
Page 73

Logitech ConferenceCam Connect
Innehåll
1 2
3
4
5
ConferenceCam Connect
QuickStart Guide
1. Huvudenhet med kamera
och högtalartelefon
2. Fjärrkontroll
3. Nätkabel och regionala kontakter
4. USB-sladd
5. Bruksanvisning
Svenska 73
Page 74

Logitech ConferenceCam Connect
2
3
1
5
6
4
7
9
11
5
12
14
7
6
8
13
15
10
Z
E
I
S
S
H
D
1
0
8
0
p
,
4
x
Z
o
o
m
Produktöversikt
1. Kamera, 1080p och
90-graders bildvinkel
2. Indikator för kamera
3. Vinklingshjul för
kameralins
4. Mikrofoner
5. Volym +
6. Ljud av
7. Volym -
8. Batteriindikator
9. Högtalartelefon
10. Högtalartelefon/
batteriindikator
74 Svenska
11. Panorera och vinkla
12. Zooma in
13. Zooma ut
14. Avsluta samtal
15. Ringa/Svara på samtal
Page 75

Logitech ConferenceCam Connect
1. Mikrofon
1
2
3
4
5
6
2. NFC
3. Kensington-lås
4. USB-anslutning
5. På/av
6. HDMI-kontakt
(trådlöst skärmspeglingsläge)
Svenska 75
Page 76

Logitech ConferenceCam Connect
1
2
3
4
1. Trådlöst skärmspeglingsläge
2. Av/på-knapp
3. Bluetooth-läge
4. Videokonferensläge
76 Svenska
Page 77

Logitech ConferenceCam Connect
1
Konfigurera produkten
1. Anslut ConferenceCam Connect
till extern strömkälla. Även om ett
uppladdningsbart batteri medföljer
ConferenceCam Connect måste
enheten först anslutas till en extern
2
On / O
strömkälla och laddas tills den gröna
batterilampan visas.
Obs! Enheten kan också laddas via
en USB-port på din PC eller Mac
(laddningstiden kan variera).
2. Tryck på och håll ned Av/Påknappen för att starta enheten.
Ett ljud spelas upp och enhetens
indikatorlampa lyser under
2–3 sekunder medan det senaste
indikatorläget fortsätter lysa när
enheten är aktiverad.
3
Bluetooth mode
3. Markera följande lägen
Wireless Screen
och följ instruktionerna
Mirror Mode
för att komma igång.
Video
Conferencing
Mode
Svenska 77
Page 78

Logitech ConferenceCam Connect
1. Videokonferensläge:
1. Anslut USB-sladden till enheten och till USB-porten.
2. Starta ett samtal från ditt PC- eller Mac-program
genom att välja videokonferensläge på ConferenceCam
Connect. Kamerans och högtalartelefonens indikatorer
blinkar för att visa att anslutningen pågår. När den
är klar lyser kamerans indikatorlampa med ett fast
sken i några sekunder och ett ljud spelas upp från
högtalartelefonen. Försök igen om aktiviteterna inte
startas. Se sedan felsökning eller ring teknisk support.
2. Kontrollera att ConferenceCam Connect har
markerats som standardenhet för video och
ljud i operativsystemets inställningar och i ditt
konferensprogram. Starta ditt video- eller ljudsamtal
från programmet. Indikatorlampan på kameran
och högtalartelefonen lyser vid strömning.
2. Bluetooth-läge
Anslut ConferenceCam Connects högtalartelefon till
din mobila enhet:
1. Välj Bluetooth-läge i ConferenceCam Connect.
2. Om enheten är NFC-aktiverad låter du den mobila
enheten snudda vid NFC-ikonen på högtalartelefonen
så att Bluetooth-godkännande aktiveras på den mobila
enheten. Alternativt kan du hålla ned Bluetoothknappen tills indikatorn på högtalartelefonen hastigt
blinkar blått.
3. Gå till inställningar på den mobila enheten och aktivera
Bluetooth för att ansluta. ConferenceCam Connect
kommer även att spela upp ett ljud som visar att
anslutningen är slutförd.
78 Svenska
Page 79

Logitech ConferenceCam Connect
3. Trådlöst skärmspeglingsläge (dela skärminnehåll från
din mobila enhet):
1. Anslut HDMI-kabeln från skärmen till baksidan
av ConferenceCam Connect-enheten.
2. Välj läget för trådlös skärmspegling i ConferenceCam
Connect.
3. Gå till Inställningar på den mobila enheten och aktivera
alternativet för skärmspegling. Namnet på det alternativ
som finns på listankommer att variera mellan olika
enheter. Om du behöver hjälp med inställningarna i din
mobila enhet går du till www.logitech.com/support/
connect där det finns en lista över testade enheter.
Obs! Det är endast Bluetooth-läge och trådlöst
skärmspeglingsläge som kan användas samtidigt.
Trådlös prestanda kan variera.
Svenska 79
Page 80

Logitech ConferenceCam Connect
Använda produkten
• Video
• Starta videon: Videon styrs av -programmet och
den startar när kameran är vald och videon startar
i programmet. En indikator på kameran lyser när
videon strömmas.
• Panorera, vinkla och zooma med kameran med hjälp
av knapparna på fjärrkontrollen. Tryck ned en gång för
stegvis justering eller tryck ned och håll för kontinuerlig
panorering eller vinkling. Du kan även panorera och vinkla
kamerabilden – först zoomar du in och sedan kan du
panorera eller vinkla bilden. Du kan även vinkla kameran
med vinklingshjulet på enheten. Försök inte vinkla själva
kameran manuellt. Det kan skada enheten.
• Spara inställningar för panorering, vinkling och zoomning:
Ett valfritt program finns tillgängligt med ett gränssnitt till
programvaran som styr kamerans inställningar. Kamerans
inställningar kan sparas så att de finns kvar nästa gång
du aktiverar enheten. Ladda ner programvaran från:
www.logitech.com/support/connect
• Fjärrstyrd kamera: Du kan styra panorering, vinkling och
zoomning för en fjärrstyrd ConferenceCam CC3000e
eller en ConferenceCam Connect eller en
ConferenceCam BCC950 i de program som stöds.
Besök nedladdningssidan för ytterligare information.
• Ljud
• Volym: Volymknapparna +/- justerar volymen.
• Ljud av: Stäng av ljudet med Ljud av-knappen.
• Samtal: Kör videokonferensprogrammet. Svara – tar samtal.
Lägg på – avslutar samtal. Vid väntande samtal kan du välja
Lägg på och avvisa ytterligare ett samtal eller Svara-knappen
för att växla mellan samtal
80 Svenska
Page 81

Logitech ConferenceCam Connect
Obs! Det är inte säkert att knapparna Svara och Lägg på
fungerar i alla program. Använd videokonferensprogram
för att besvara och avsluta samtal. Du kan aktivera
knapparna Svara och Lägg på för Skype eller Cisco Jabber
genom att ladda ner respektive plugin-program
på www.logitech.com/support/connect
• Ljusindikatorer för högtalaraktivitet
Blå: ConferenceCam används i ett aktivt samtal.
Blinkar blått: Ett samtal tas emot eller Bluetooth är
i kopplingsläge.
Anslut ConferenceCam Connect -högtalartelefonen
till din mobila enhet om du vill sända ut samtalet
via högtalartelefonen:
• Om enheten är NFC-aktiverad rör du vid den mobila
enheten på NFC-ikonen på högtalartelefonen
så att Bluetooth-godkännande aktiveras på
den mobila enheten.
• Alternativt trycker du på Bluetooth-knappen på
högtalartelefonen tills den mobila enheten är ansluten
• Lampa för batteriindikator
• Batteriet är fulladdat är när indikatorn lyser med ett
grönt sken. Det gröna ljuset stängs av när laddningen
är under 75%.
• När batteriets laddning är 25% lyser en röd lampa
med fast sken, vilket visar att enheten måste anslutas
till en extern strömkälla så fort som möjligt.
• När batteriets laddning är 10% blinkar en röd lampa,
vilket visar att enheten endast kan användas om
den ansluts till en extern strömkälla omedelbart.
Även ett ljud spelas upp.
• Batteriets indikator i ConferenceCam Connect blinkar
grönt när enheten laddas.
Svenska 81
Page 82

Logitech ConferenceCam Connect
• När enheten är fulladdad slocknar LED-indikatorn och
lyser inte förrän enheten kopplas bort från den externa
strömkällan och körs på batteri.
• När fjärrkontrollen är dockad kommer
högtalartelefonens indikator att återge samma sekvens.
Besök produktcentralen
Upptäck din produkts fulla potential. Få värdefull
information och användningstips genom att bläddra
i användarvänliga frågor och svar. Hitta svar på produkfrågor
och få hjälp att konfigurera din produkt. Se om det finns
programvara tillgänglig för nedladdning som kan förbättra
produktanvändningen. Besök www.logitech.com/support/
connect och dra nytta av alla fördelar med din Logitechprodukt. Ta del av det stora utbudet av användbara
supporttjänster från Logitech:
• Produktinformation
• Självstudier
• Felsökning
• Diagnostik
• Uppgraderingar av inbyggd programvara
• Supportgemenskap
• Nedladdningsbar programvara
• Dokumentation
• Garantiinformation
• Reservdelar
Felsökningstips
• Besök www.logitech.com/support/connect för
felsökningstips, information om programverktyg och få
hjälp med ett verktyg för att felsöka eventuella problem
som kan uppstå med din ConferenceCam Connect.
82 Svenska
Page 83

Logitech ConferenceCam Connect
Kassens indhold
1 2
3
4
5
ConferenceCam Connect
QuickStart Guide
1. Hovedenhed med kamera
og højtalertelefon
2. Fjernbetjening
3. Strømledning
og regionale stik
4. USB-kabel
5. Brugervejledning
Dansk 83
Page 84

Logitech ConferenceCam Connect
2
3
1
5
6
4
7
9
11
5
12
14
7
6
8
13
15
10
Z
E
I
S
S
H
D
1
0
8
0
p
,
4
x
Z
o
o
m
Oversigt over produktet
1. Kamera, 1080p og
90-graders synsfelt
2. Kameraindikator
3. Vippehjul til vipning
af kameralinsen
4. Mikrofoner
5. Skru op
6. Slå lyden fra/til
7. Knap til at skrue ned
for lydstyrken
8. Batteriindikator
9. Højtalertelefon
84 Dansk
10. Højtalertelefon/
batteriindikator
11. Panorering og vipning
12. Zoom ind
13. Zoom ud
14. Afslut samtalen
15. Foretag/besvar opkald
Page 85

Logitech ConferenceCam Connect
1. Mikrofon
1
2
3
4
5
6
2. NFC
3. Kensington-lås
4. USB-tilslutning
5. Tænd/sluk
6. HDMI-stik
(trådløs skærmspejlingstilstand)
Dansk 85
Page 86

Logitech ConferenceCam Connect
1
2
3
4
1. Trådløs skærmspejlings-tilstand
2. Tænd/sluk-knap
3. Bluetooth-tilstand
4. Videokonference-tilstand
86 Dansk
Page 87

Logitech ConferenceCam Connect
1
Tag dit produkt i brug
1. Slut ConferenceCam Connect til
ekstern strømforsyning. Selv om der
følger et genopladeligt batteri med
ConferenceCam Connect, skal det først
sættes i en ekstern strømforsyning
2
On / O
og oplades indtil batteriindikatoren
lyser grønt.
Bemærk: Enheden kan også oplades
via USB-stikket på din pc eller Maccomputer (opladningstiden kan variere.)
2. Du kan tænde enheden ved at trykke
på Tænd/sluk-knappen og holde den
nede. Du vil høre en lyd, og enhedens
indikatorer lyser i 2-3 sekunder,
hvorefter indikatoren for sidst
anvendte tilstand bliver ved med
at lyse, indtil enheden slukkes igen.
3
Bluetooth mode
3. Kom i gang ved at vælge følgende
Wireless Screen
tilstande og følge anvisningerne.
Mirror Mode
Video
Conferencing
Mode
Dansk 87
Page 88

Logitech ConferenceCam Connect
1. Videokonference-tilstand:
1. Forbind USB-porten og enheden ved hjælp af USB-kablet.
2. Vælg Videokonference-tilstand i ConferenceCam
Connect, hvis du vil foretage et opkald via pc- eller
Mac-programmet. Kameraets og højtalertelefonens
indikatorer blinker mens der oprettes forbindelse
og når der er forbindelse, vil kameraindikatoren
blive ved med at lyse, og højtalertelefonen afspiller
en lyd. Hvis disse aktiviteter ikke sker, skal du prøve
igen, læse afsnittet om problemløsning eller ringe
til teknisk support.
3. Sørg for at ConferenceCam Connect er valgt
som standardvideo- og -lydenhed i styresystemet
og i konferenceprogrammet. Start video- eller
lydopkaldet i programmet. Indikatorerne på kameraet
og højtalertelefonen lyser når der streames.
2. Bluetooth-tilstand
Sådan sluttes ConferenceCam Connect-højtalertelefonen
til mobilenheden:
1. Vælg Bluetooth-tilstand på ConferenceCam Connect.
2. Hvis din enhed er NFC-kompatibel, kan du klikke på
mobilenhedens NFC-ikon på højtalertelefonen hvilket
bør få mobilenheden til at acceptere Bluetoothforbindelser. Du kan også holde Bluetooth-knappen
nede indtil indikatoren på højtalertelefonen blinker blåt
med korte mellemrum.
3. Gå ind i Indstillinger, og aktivér Bluetooth-forbindelsen.
ConferenceCam Connect vil afspille en lyd,
når forbindelsen bliver accepteret.
88 Dansk
Page 89

Logitech ConferenceCam Connect
3. Trådløs skærmspejlings-tilstand
(del indhold på din mobilenhed via skærmen):
1. Sæt HDMI-kablet i din skærmenhed og i bagsiden
af ConferenceCam Connect-enheden.
2. Vælg Trådløs skærmspejlings-tilstand
på ConferenceCam Connect.
3. Gå ind i Indstillinger på mobilenheden, og vælg
mobilenhedens indstilling til skærmspejling.
Indstillingens angivne navn vil variere fra enhed til
enhed. Du kan få hjælp til din mobilenheds indstillinger
ved at gå ind på www.logitech.com/support/connect;
her vil du finde en liste over testede enheder.
Bemærk: Kun Bluetooth-tilstand og Trådløs
skærmspejlings-tilstand kan anvendes samtidigt.
Kvaliteten af den trådløse forbindelse kan variere.
Dansk 89
Page 90

Logitech ConferenceCam Connect
Brug af produktet
• Video
• Start af video: Videoen styres af programmet
og startes når kameraet er blevet valgt, og videoen
er startet i programmet. Kameraindikatoren lyser når
der streames video.
• Panorer, vip og zoom med kameraet ved hjælp af
knapperne på fjernbetjeningen. Tryk en enkelt gang for
at panorere eller vippe gradvist, og hold knappen nede
for at gøre det kontinuerligt. Du kan også panorere
og vippe kamerabilledet – zoom først ind, og panorer
derefter billedet, eller vip det. Ligeledes kan selve
kameraet vippes ved hjælp af enhedens vippehjul.
Du må ikke prøve at vippe selve kameraet manuelt.
Du kan risikere at ødelægge det.
• Sådan gemmes indstillingerne for panorering,
vipning og zoomning: Der findes et alternativt
program med en softwarebrugerflade hvor
kameraindstillingerne kan justeres. Disse kan gemmes
så dine kameraindstillinger forbliver de samme næste
gang du tænder enheden. Du kan hente softwaren
på www.logitech.com/support/connect
• Fjernstyring: Du kan styre panorering, vipning og
zoom på et eksternt ConferenceCam CC3000e,
ConferenceCam Connect eller ConferenceCam BCC950
i understøttede programmer. Besøg den angivne side
til overførsler for at få flere oplysninger.
• Lydudstyr
• Lydstyrke: Knapperne til at skrue op og ned bruges
til at justere lydstyrken.
• Lyd fra: Knappen Lyd fra bruges til at slå lyden fra.
• Opkald: Kør softwaren til videokonferencer. Knappen Svar
bruges til at besvare et opkald. Knappen Læg på bruges
til at afslutte et opkald. For ventende opkald vælg læg på
for at afvise andet opkald eller besvar-knappen for at skifte
mellem opkald
90 Dansk
Page 91

Logitech ConferenceCam Connect
Bemærk: Knapperne Svar og Læg på virker muligvis ikke
i alle programmer. Brug software til videokonferencer
til at besvare og afslutte opkald. For at aktivere besvarog afvis-knapperne for Skype eller Cisco Jabber
skal du hente udvidelsesmodulet på www.logitech.com/
support/connect
• Beskrivelse af aktivitetsindikatorer på højtalertelefon
Blå: ConferenceCam er midt i et opkald. Blinker blåt:
Der modtages et opkald, eller Bluetooth er
i bindingsetablerings-tilstand.
Bluetooth forbinder ConferenceCam Connecthøjtalertelefonen til mobilenheden så højtalertelefonen
kan sende opkald:
• Hvis din enhed er NFC-kompatibel, skal du holde
mobilenheden mod NFC-ikonet på højtalertelefonen,
hvilket skulle aktivere registrering af Bluetoothforbindelser på mobilenheden ELLER
• Tryk på Bluetooth-knappen på højtalertelefonen indtil
forbindelsen til mobilenheden er oprettet
• Batteriindikator
• Når batteriet er fuldt opladet, vil batteriindikatoren lyse
grønt. Det grønne lys slukkes når der er mindre end 75%
strøm tilbage.
• Når der kun er 25% strøm tilbage på batteriet,
lyser batteriindikatoren rødt hele tiden,
hvilket betyder at enheden skal sluttes til en ekstern
strømforsyning snarest.
• Når der kun er 10% strøm tilbage på batteriet,
blinker batteriindikatoren rødt hvilket betyder at
enheden ikke længere kan benyttes før den sættes
i en ekstern strømforsyning ligesom der afspilles
en enkel lyd.
• Batteriindikatoren på ConferenceCam Connect
vil blinke grønt mens enheden oplades.
Dansk 91
Page 92

Logitech ConferenceCam Connect
• Når enheden er fuldt opladet, slukker indikatoren og
forbliver slukket indtil enheden kobles fra det eksterne
strømnet og kører på batteri.
• Mens fjernbetjeningen står i holderen, vil højtaler-
telefonens indikator gennemgå samme sekvens.
Besøg produktcentralen
Her kan du finde ud af hvordan du udnytter produktet
fuldt ud. Du kan få nyttige oplysninger og tip om brug ved
at gennemse de brugervenlige ofte stillede spørgsmål.
Du kan også finde svar på spørgsmål om produktet og få
hjælp til at konfigurere det. Her kan du også se om der kan
hentes software der kan forbedre din brug af produktet.
Hvis du vil udnytte alle fordelene ved dit Logitech-produkt,
kan du besøge www.logitech.com/support/connect hvor
du kan bruge Logitechs omfattende supporttjenester:
• Produktoplysninger
• Selvstudier
• Problemløsning
• Diagnosticering
• Firmwareopgraderinger
• Supportbrugergruppe
• Download af software
• Dokumentation
• Garantioplysninger
• Reservedele
Tip til problemløsning
• På www.logitech.com/support/connect er der tip
til problemløsning, oplysninger om softwareværktøjer og
et diagnosticeringsværktøj som kan bruges til at løse evt.
problemer med ConferenceCam Connect.
92 Dansk
Page 93

Logitech ConferenceCam Connect
Eskens innhold
1 2
3
4
5
ConferenceCam Connect
QuickStart Guide
1. Hovedenhet med kamera
og høyttaler
2. Fjernkontroll
3. Strømledning og regionale
støpsel
4. Usb-kabel
5. Brukerdokumentasjon
Norsk 93
Page 94

Logitech ConferenceCam Connect
2
3
1
5
6
4
7
9
11
5
12
14
7
6
8
13
15
10
Z
E
I
S
S
H
D
1
0
8
0
p
,
4
x
Z
o
o
m
Bli kjent med produktet
1. Kamera, 1080p og
90 graders synsfelt
2. Kamera-lampe
3. Vippehjul for å vippe
på kameralinsen
4. Mikrofoner
5. Volum opp
6. Demp
7. Volum ned
8. Batterilampe
9. Høyttalertelefon
10. Høyttalertelefon/
batteri LED
94 Norsk
11. Panorering og vipping
12. Zoom inn
13. Zoom ut
14. Avslutt samtale
15. Ring/Svar
Page 95

Logitech ConferenceCam Connect
1. Mikrofon
1
2
3
4
5
6
2. NFC
3. Kensington-lås
4. Usb-kontakt
5. Av/på-knapp
6. HDMI-kontakt (trådløs
skjermspeilingsmodus)
Norsk 95
Page 96

Logitech ConferenceCam Connect
1
2
3
4
1. Trådløs skjermspeilingsmodus
2. Av/på-knapp
3. Bluetooth-modus
4. Videokonferansemodus
96 Norsk
Page 97

Logitech ConferenceCam Connect
1
Konfigurere produktet
1. Kople ConferenceCam Connect til
ekstern strøm. Selv om ConferenceCam
Connect har et oppladbart batteri,
må det først kobles til ekstern strøm
og lades til batterilampen lyser grønt.
2
On / O
NB: Enheten kan også lades gjennom
usb på PC eller Mac-maskiner
(ladetider kan variere.)
2. Du slår på enheten ved å holde inne
av/på-knappen. En lyd vil spilles
av og indikatorlampene på enheten
vil lyse i 2-3 sekunder. Lampen
for sist brukte modus vil lyse når
enheten er på.
3
Bluetooth mode
3. Velg følgende moduser og følg
Wireless Screen
instruksjonene for å komme i gang.
Mirror Mode
Video
Conferencing
Mode
Norsk 97
Page 98

Logitech ConferenceCam Connect
1. Videokonferanse-modus:
1. Kople usb-ledningen mellom enheten og en usb-port
på datamaskinen.
2. Hvis du vil starte et anrop fra pc- eller Macprogrammet, velger du Videokonferanse-modus
på ConferenceCam Connect. Indikatorlampene
på kameraet og høyttalertelefonen vil blinke for
å vise at tilkoplingen pågår. Når den er tilkoplet,
vil kameralampen lyse jevnt i noen sekunder,
og høyttalertelefonen vil spille en lyd. Hvis dette ikke
skjer, kan du prøve på nytt, og så konsultere feilsøking,
eller ringe teknisk brukerstøtte.
3. Sørg for at ConferenceCam Connect er valgt
som standard video- og lydenhet i innstillingene
i operativsystemet, og i konferanseprogrammet.
Start video- eller taleanrop fra programmet.
Indikatorlampene på kameraet og høyttalertelefonen
vil lyse opp under strømmingen.
2. Bluetooth-modus
Slik kopler du ConferenceCam Connect høyttalertelefon
til mobilenheten:
1. Velg Bluetooth-modus på ConferenceCam Connect.
2. Dersom enheten er nfc-aktivert, holder du
mobilenheten inntil nfc-ikonet på høyttalertelefonen.
Dette bør aktivere Bluetooth-godkjenning
på mobilenheten. Eller du kan holde inne Bluetoothknappen til lampen på høyttalertelefonen blinker blått.
3. Gå til innstillinger på mobilenheten og slå på Bluetooth
for å koble til. ConferenceCam Connect vil også spille
av en lyd for å bekrefte tilkoblingen.
98 Norsk
Page 99

Logitech ConferenceCam Connect
3. Trådløs skjermspeilingsmodus
(Skjermdelingsinnhold fra mobilenheten):
1. Koble HDMI-kabelen fra skjermen til baksiden
av ConferenceCam Connect-enheten.
2. Velg trådløs skjermspeilingsmodus på ConferenceCam
Connect.
3. Gå til innstillinger på mobilenheten og velg
mobilenhetens alternativ for skjermspeiling.
Navnet på listen vil variere fra enhet til enhet. Du kan få
hjelp med innstillingene på mobilenheten ved å se
www.logitech.com/support/connect for en liste over
testede enheter.
NB: Kun Bluetooth-modus og Trådløs
skjermspeilingsmodus kan operere på samme tid.
Trådløs ytelse kan variere.
Norsk 99
Page 100

Logitech ConferenceCam Connect
Bruke produktet
• Video
• Starte videoen: Videoen kontrolleres av programmet
og vil starte når kameraet velges og videoen startes
i programmet. Indikatorlampen for kameraet vil lyse når
videoen strømmes.
• Du kan panorere, vippe og zoome på kameraet
ved hjelp av kontrollene på fjernkontrollen.
Trykk én gang for trinnvis justering, eller hold inne for
sammenhengende justering av panorering og vipping.
Du kan også panorere og vippe kamerabildet – først må
du zoome inn, så kan du panorere eller vippe bildet. Du
kan også vippe kameraet med vippehjulet på enheten.
Ikke prøv å vippe selve kameraet manuelt. Det kan
skade enheten.
• Lagre innstillingene for panorering, vipping og
zooming: Et valgfritt program som inkluderer
et programvaregrensesnitt som kan kontrollere
kamerainnstillingene er tilgjengelig. Disse kan
lagres slik at de samme kamerainnstillingene brukes
neste gang du slår på enheten. Du kan laste ned
programvaren fra www.logitech.com/support/connect
• Fjernkontroll: Du kan styre panorering, vipping og
zooming for et eksternt ConferenceCam CC3000e,
ConferenceCam Connect eller ConferenceCam BCC950
i støttede programmer. Du finner mer informasjon på
den angitte nedlastingssiden.
• Lyd
• Volum: Volum opp/ned justerer volumet.
• Lyd av: Slå lyden av med Lyd av-knappen.
• Ringe: Start videokonferanseprogrammet. Svar besvarer
anrop. Legg på avslutter anrop. For samtale venter,
velg legg på for å avvise den andre samtalen eller
svarknappen for å bytte mellom samtaler
100 Norsk
 Loading...