

Page 1

QuickCam
®
Setup
ClickSmart™ 420
Page 2

© 2002 Logitech. All Rights Reserved. Logitech, the Logitech logo, and other Logitech marks are owned by Logitech and may be registered. All other trademarks
are the property of their respective owners. Logitech assumes no responsibility for any errors that may appear in this manual. Information contained herein is subject
to change without notice.
Part Number:
FCC Compliance and Advisory Statement.
1) this device may not cause harmful interference, and 2) this device must accept any interference received, including interference that may cause undesired operation.
This equipment has been tested and found to comply with the limits for a Class B digital device, pursuant to Part 15 of the FCC Rules. These limits are designed to provide
reasonable protection against harmful interference in a residential installation. This equipment generates, uses, and can radiate radio frequency energy and, if not
installed or used in accordance with the instructions, may cause harmful interference to radio communications. However, there is no guarantee that interference will
not occur in a par ticular installation. If this equipment does cause harmful interference to radio or television reception, which can be determined by turning the
equipment off and on, the user is encouraged to try to correct the interference by one or more of the following measures: 1) reorient or relocate the receiving antenna;
2) increase the separation between the equipment and the receiver; 3) connect the equipment to an outlet on a circuit different from that to which the receiver is
connected; 4) consult the dealer or an experienced radio/TV technician for help. Any changes or modifications not expressly approved by the party responsible for
compliance could void the user's authority to operate the equipment. Where shielded interface cables have been provided with the product or specified additional
components or accessories elsewhere defined to be used with the installation of the product, they must be used in order to ensure compliance with FCC regulations.
Canadian DOC Statement.
equipment standard entitled “Digital Apparatus,” ICES-003 of the Department of Communications.
This device complies with RSS-210 of Industry and Science Canada. Operation is subject to the following two conditions: 1) this device may not cause interference,
and 2) this device must accept any interference, including interference that may cause undesired operation of the device.
© 2002 Logitech. Tous droits réservés. Logitech, le logo Logitech et les autres marques Logitech sont la propriété exclusive de Logitech et sont susceptibles d’être
des marques déposées. Toutes les autres marques sont la propriété exclusive de leurs détenteurs respectifs. Logitech décline toute responsabilité en cas d'erreurs dans
ce manuel. Les informations énoncées dans le présent document peuvent faire l’objet de modifications sans avis préalable.
Déclaration FCC.
1) l'équipement concerné ne doit pas causer d'interférences dangereuses, et 2) il doit accepter toute interférence reçue, y compris les interférences risquant d'engendrer
un fonctionnement indésirable. Cet équipement a été testé et déclaré conforme aux limitations prévues dans le cadre de la catégorie B des appareils numériques défini
par la section 15 du règlement de la FCC. Ces limitations sont stipulées aux fins de garantir une protection raisonnable contre les interférences gênantes en installation
résidentielle. Cet équipement génère, utilise et diffuse des ondes radio, et s'il n'est pas installé ni utilisé en conformité avec les instructions dont il fait l'objet, peut causer
des interférences gênantes avec les communications radio. Cependant, nous ne pouvons vous garantir qu'une interférence ne se produira pas dans une installation
particulière. Si cet équipement produit des interférences graves lors de réceptions radio ou télévisées qui peuvent être détectées en allumant et en éteignant
l'équipement, vous êtes invités à les supprimer de plusieurs manières: 1) Réorienter ou déplacer l'antenne de réception; 2) Augmenter la distance séparant l'équipement
et le récepteur; 3) Connecter l'équipement à un circuit différent de celui auquel le récepteur est connecté; 4) Contacter votre revendeur ou un technicien radio/TV
qualifié. Toutes modifications ou tous changements effectués sans l'accord exprès de la partie responsable de la conformité aux normes pourraient contraindre
l'utilisateur à ne plus utiliser son équipement. Afin d'assurer la conformité avec les règlements FCC, les câbles d'interface blindés fournis avec le produit doivent être
utilisés, ainsi que tout autres composants ou accessoires également spécifiés, lors de l'installation du produit.
Déclaration du Ministère des Communications Canadien.
des appareils numériques de catégorie B, telles que stipulées dans le cadre de la norme Appareils numériques ICES-003 édictée par le Ministère canadien de l’Industrie.
Cet équipement a été déclaré conforme à la norme RSS-210 édictée par le Ministère canadien des Sciences et de l'Industrie. Son fonctionnement est soumis
aux conditions suivantes: 1) l'équipement concerné ne doit pas causer d'interférences, et 2) il doit accepter toute interférence reçue, y compris les interférences risquant
d'engendrer un fonctionnement indésirable.
623092-0403
This hardware device complies with Part 15 of the FCC Rules. Operation is subject to the following two conditions:
This digital device does not exceed the Class B limits for radio noise emissions from digital apparatus specified in the interference-causing
Cet équipement a été testé et déclaré conforme à la section 15 du règlement de la FCC. Son fonctionnement est soumis aux conditions suivantes:
Cet appareil numérique est conforme aux limitations concernant l'émission d'interférences radio par
ii
Page 3

Contents
English . . . . . . . . . . . . . . . . . . . . . . . . . . . . . . . . . . . . . . . . . . . . . . . . . . . . . . . . . . . . . . . . . . . . . . . . 1
Español . . . . . . . . . . . . . . . . . . . . . . . . . . . . . . . . . . . . . . . . . . . . . . . . . . . . . . . . . . . . . . . . . . . . . . . 7
Français . . . . . . . . . . . . . . . . . . . . . . . . . . . . . . . . . . . . . . . . . . . . . . . . . . . . . . . . . . . . . . . . . . . . . . 13
Português . . . . . . . . . . . . . . . . . . . . . . . . . . . . . . . . . . . . . . . . . . . . . . . . . . . . . . . . . . . . . . . . . . . . 19
iii
Page 4

Page 5
1
Welcome!
It’s easy with your Logitech®
ClickSmart™ 420 digital camera
plus webcam!
Take spontaneous digital pictures,
or make fun videos with sound.
Share your creations quickly with family
and friends over e-mail, or the Web.
For digital pictures and videos, turn on
the camera, and then point and shoot.
Your pictures and videos are stored
in camera memory. Later, download
your images to the computer.
For video instant messaging or online
video chat, connect the camera
to your computer. Then launch
the Logitech® camera software
that’s included with your camera.
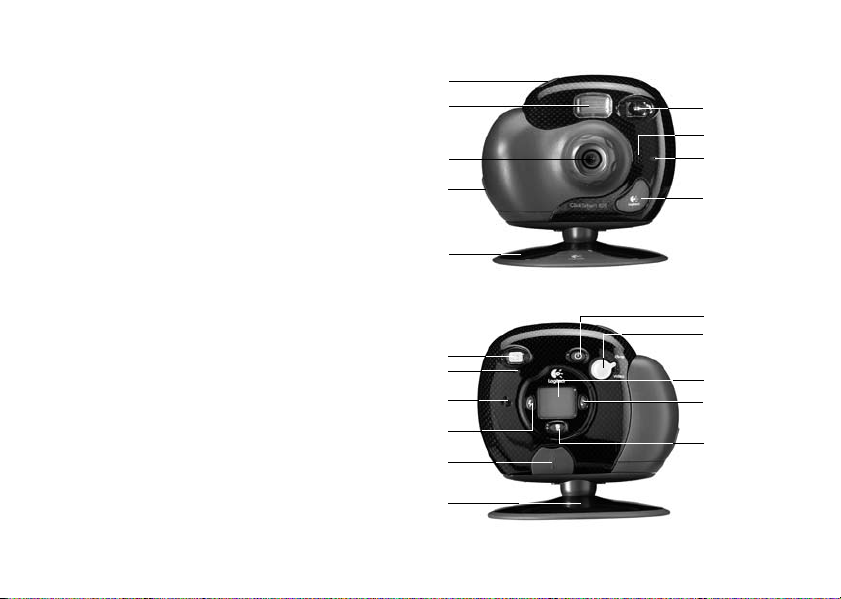
Shutter button
Flash
Lens
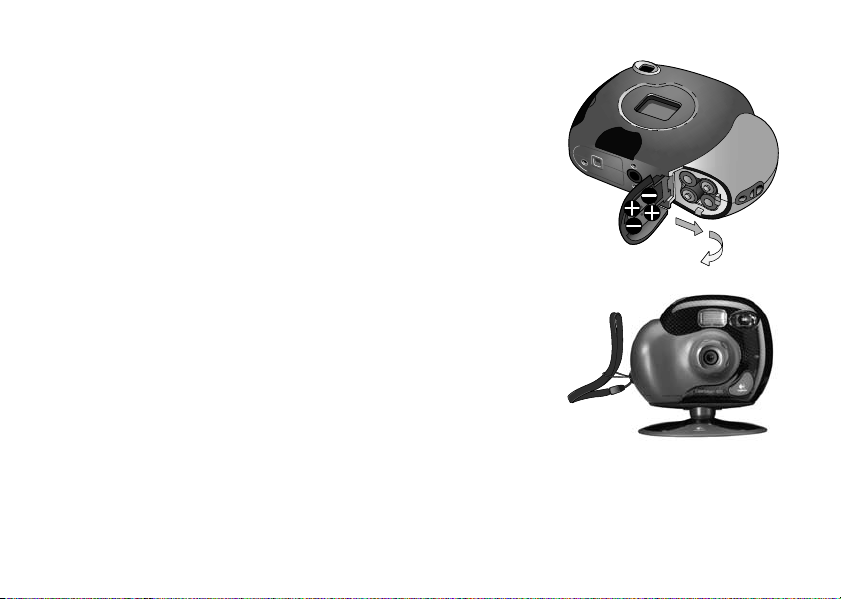
Wrist strap
and lens cap
attachment
Base
Viewfinder
Video-on LED
Speaker
Flash button
USB connector
(under flap)
USB cable attachment
Viewfinder
Microphone
Self-timer-on LED
™
QuickSync
badge
Power button
Photo/video
switch
Status display
Self-timer button
Delete button
English
1
Page 6
2
1.
2.
3.
Getting Ready
Insert the four AAA alkaline camera batteries.
Insert the wrist strap and lens cap.
Install the Logitech® camera software using your computer’s CD-ROM drive.
Follow the on-screen instructions.
3
1.
2.
3.
2
Taking Pictures and Videos
Press and hold the Power button for one second to turn on the camera.
To take a picture, set the Picture/Video switch to “Picture.”
Then press the Shutter button to take a picture. If the lens cap is left on,
the Lens Cap display icon will blink.
For videos, set the Picture/Video switch to “Video.” Then press and hold
the Shutter button to take a video. The Video LED blinks to indicate
the camera is recording.
(This LED will blink more rapidly when the camera begins to run out of
memory.) Release the Shutter button to stop recording. When not in use,
the camera turns itself off after two minutes to conserve battery power.
To switch the camera off, press the Power button.
English
Page 7
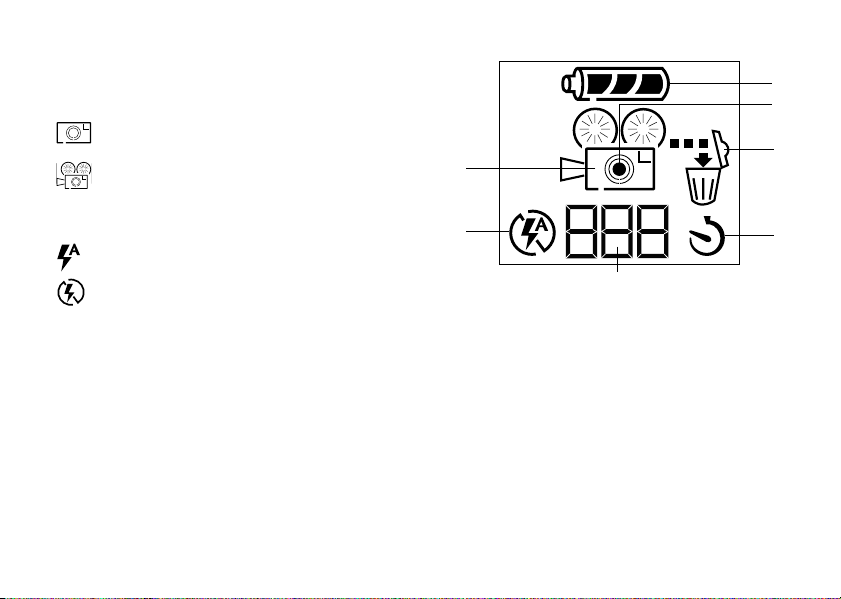
4
1. Camera Mode
2. Flash
3. Counter.
4. Timer.
5. Delete.
6. Lens-cap-on Indicator
7. Battery Status
The Status Display
Photo.
Resolution is 640 x 480 pixels.
Video.
Press and hold the Shutter button
to record video; release button to stop.
Resolution is 320 x 240 pixels.
Press Flash button to select automatic flash with
each shot.
Press Flash button to select no flash.
Shows number of pictures or frames of video taken.
Press the Timer button to turn on the timer; the picture is taken after 10 seconds.
Press the Delete button for two seconds to delete the last picture. Before the two seconds are up,
you have the option of not deleting your pictures by releasing the Delete button.
1
2
7
6
5
4
3
English
3
Page 8
5
1.
2.
3.
4.
5.
6.
4
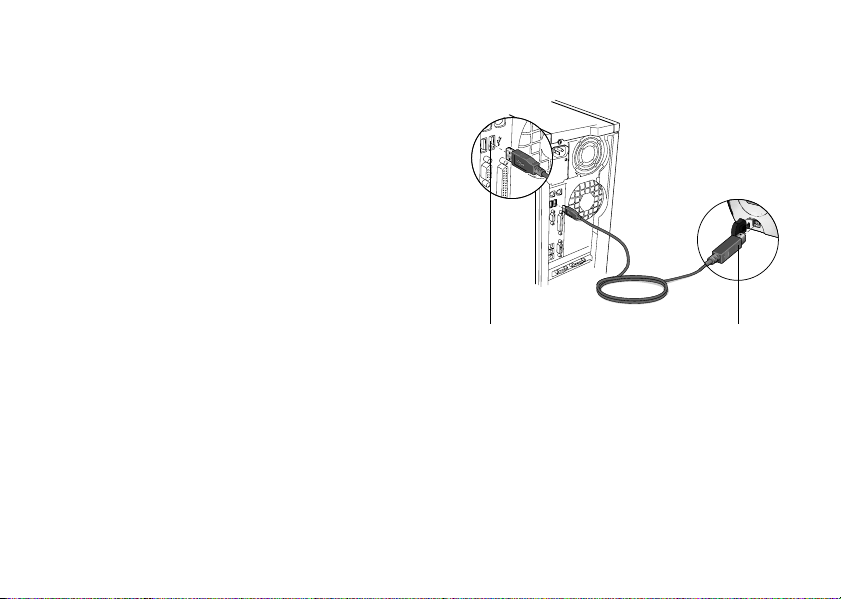
Getting Your Pictures and Videos into the Computer
Turn on the computer.
Open the cover protecting the USB connector on the camera.
Place the camera on its stand.
Plug the USB cable into the camera. Plug the other cable end
into a USB port on the computer.
If there are images in your camera, the QuickSync
downloading program launches. Note that the QuickSync™
badge lights up after new images have been taken.
It blinks when images are downloaded to the computer.
Choose one of the following options:
•
Download the images to my computer.
transfers your images to the Gallery section of the software.
You can view new images while downloading to the QuickView window. After the transfer, the images in the
camera are deleted automatically. (See the online help system for more information about using QuickView.)
• Delete the images without copying them.
•
Cancel.
Retains the images in the camera. The images are not deleted nor are they downloaded to
the computer.
English
This option
USB port USB conncetor
Page 9

6
•
•
•
•
•
•
•
•
•
Tips for Taking and Sharing Great Pictures and Videos
Fill the viewfinder with your subject and hold the camera steady for extra time to prevent blurry images.
Make sure your subject fits within the crop marks in the viewfinder.
Avoid subjects of extreme contrast that have both deep shadows and harsh highlights (e.g., when the sun
is directly behind your subject).
Avoid taking videos in very dim light; your video will be too dark.
The flash range for your camera is between 3 and 7 feet (0.9 to 2.1 meters). Make sure your subject is within
the flash range to obtain the best results.
Obtain free software updates. Your Logitech® camera software automatically checks the Logitech® web site
and downloads the newest version of the software.
Share your pictures and videos! Download your pictures to the computer (see “Getting Your Pictures and Videos
into the Computer”). To e-mail a photo or video, use the “Attach to an E-mail” button in the Gallery section of
the software. For more information, refer to the online how-to guide or help system.
Use your camera as a webcam. With your camera and software, do video instant messaging, video chat,
or live video broadcasting on the Internet right from your PC. Simply connect the camera to your PC, and place
the camera on your computer monitor or your desktop. Launch the Logitech® camera software. For additional
information, refer to the online
Get more Information. Access the how-to guide and online help system. From within the Logitech® camera
software, click the Help button. A drop-down list box displays. Select “View the How-to Guide” or choose
“Contents and Index” to launch the help system. For additional information about Logitech® QuickCam® Web
cameras, as well as other Logitech® products, please visit
help system
.
www.logitech.com
.
English
5
Page 10

7
•
•
•
•
•
•
•
•
Camera and Battery Warnings!
Don’t expose the camera to extremes of cold or heat. Operating temperature is between 32° to 104° F
(0° to 40° C).
Don’t immerse the camera in water.
Avoid touching the LCM window.
Remember that when the camera is set to auto-flash, the camera batteries are drained more quickly.
If the camera detects that its internal memory is defective for any reason, it will automatically re-format
the internal memory. All stored images and videos in the camera will be lost.
When the batteries are low, it’s best to change them. If your batteries leak, use normal precaution and follow
the battery manufacturer's recommendations.
When replacing batteries, use alkalines. You may also use other battery types, such as rechargeable nickel metal
hydride (NiMH) batteries.
manufacturer's instructions.
Exercise care when handling batteries. When batteries are misused, they may explode or leak, causing burns
and personal injury. When you are not using your camera for long periods of time, remove the batteries and store
them in a dry place at normal room temperature.
But do not mix battery types.
Discard all used batteries according to the battery
Warranty
This product comes with a limited two-year warranty. For more information, please read the Product Warranty
section found in the
Logitech camera products are intended to be used in a lawful manner. Certain uses of digital PC camera products
may be prohibited by local laws in some countries or states, such as the surreptitious recording of audio and/or video
communications for certain purposes. If you have any question about whether a proposed use of your product is
lawful, you should consult a local legal authority before proceeding.
English
6
how-to guide
located on the Logitech® software CD.
Page 11

1
Bienvenido
¡La cámara digital Logitech® ClickSmart™
420 hace las cosas realmente fáciles!
Tome fotografías digitales espontáneas
o grabe divertidos vídeos con sonido.
Comparta rápidamente sus creaciones
con familiares y amistades a través
de correo electrónico o de Internet.
Para capturar vídeos y fotografías
digitales, encienda la cámara,
encuadre y dispare. Las fotografías
y vídeos se guardan en la memoria
de la cámara. Y más tarde se descargan
al ordenador.
Para mensajería instantánea
con vídeo o videoconferencias en línea,
conecte la cámara al ordenador.
A continuación, inicie el software
de la cámara de Logitech® incluido
con la cámara.
Botón del obturador
Flash
Objetivo
Correa de muñeca
y tapa de objetivo
Base
Indicador LED de vídeo
(debajo de la tapa)
Accesorio de cable
Visor
Altavoz
Botón de flash
Conector USB
USB
Visor
Micrófono
Indicador LED
de disparador
automático
Botón QuickSync
Botón de encendido
Conmutador
de fotografías/vídeo
Pantalla de estado
Botón de disparador
automático
Botón de borrado
™
Español
7
Page 12

2
1.
2.
3.
Operaciones preliminares
Coloque las cuatro pilas alcalinas AAA.
Coloque la correa de muñeca y la tapa del objetivo.
Instale el software de la cámara de Logitech® desde la unidad de CD-ROM
del ordenador. Siga las instrucciones que se muestran en pantalla.
3
1.
2.
3.
8
Toma de fotografías y grabación de vídeos
Mantenga pulsado el botón de encendido durante un segundo para
encender la cámara.
Para tomar una fotografía, configure el conmutador de fotografías/vídeo
en “Photo”. Pulse el obturador para tomar una fotografía. Si está puesta
la tapa del objetivo, parpadea el icono correspondiente en la pantalla
de estado.
Para grabar vídeos, configure el conmutador de fotografías/vídeo en “Video”.
A continuación, mantenga pulsado el obturador para grabar una secuencia
de vídeo. El indicador LED de vídeo parpadea para indicar que la cámara
está grabando.
Este indicador parpadeará con más rapidez cuando la cámara no dispone de suficiente memoria. Suelte el botón
del obturador para detener la grabación. Si no se utiliza, la cámara se apaga automáticamente tras dos minutos
de inactividad para conservar la energía de las pilas. Para apagar la cámara, pulse el botón de encendido.
Español
Page 13

4
1. Modo de cámara
2. Flash
3. Contador.
4. Temporizador.
5. Borrar.
6. Indicador de tapa de objetivo colocada
7. Estado de las pilas
Pantalla de estado
Fotografía.
Vídeo.
para grabar vídeo; suéltelo para detener
la grabación. La resolución es 320 x 240 píxeles.
Pulse el botón del flash para seleccionar flash
automático con cada disparo.
Pulse el botón de flash para no seleccionar flash.
Pulse el botón de borrado durante dos segundos para borrar la última fotografía. Antes de que
transcurran los dos segundos, puede soltar el botón de borrado para no borrar las fotografías.
La resolución es 640 x 480 píxeles.
Mantenga pulsado el botón del obturador
Muestra el número de fotografías o cuadros de vídeo tomados.
Pulse el temporizador para encenderlo; la fotografía se tomará transcurridos 10 segundos.
1
2
3
7
6
5
4
Español
9
Page 14

5
1.
2.
3.
4.
5.
6.
10
Transferir fotografías y vídeos al ordenador
Encienda el ordenador.
Abra la tapa que protege el conector USB de la cámara.
Coloque la cámara en la base.
Conecte el cable USB a la cámara. Conecte el otro extremo
del cable a un puerto USB del ordenador.
Si hay imágenes en la cámara, se iniciará el programa
de descarga QuickSync. Observe que el botón QuickSync™
se enciende después de tomar imágenes nuevas.
Parpadea cuando se descargan las imágenes al ordenador.
Elija una de las opciones siguientes:
•
Descargar las imágenes al ordenador.
transfiere las imágenes a la Galería del software. Puede ver las imágenes nuevas al descargarlas
a la ventana QuickView. Después de la transferencia, las imágenes se borran automáticamente de la cámara.
Para más información, consulte la ayuda en pantalla sobre cómo usar QuickView.
• Eliminar las imágenes sin copiarlas.
•
Cancelar.
Español
Retiene las imágenes en la cámara. Las imágenes no se borran ni se descargan al ordenador.
Esta opción
Puerto USB Conector USB
Page 15

6
•
•
•
•
•
•
•
•
•
Consejos para obtener y compartir fotografías y vídeos de gran calidad
Procure que el sujeto aparezca entero en el visor y mantenga firme la cámara durante más tiempo, para evitar
obtener imágenes desenfocadas.
Asegúrese de que el sujeto queda encuadrado dentro de las marcas de corte del visor.
Evite sujetos con contrastes excesivos que contengan a la vez sombras muy oscuras y claros demasiado intensos
(como ocurre cuando el sol está situado directamente detrás del sujeto).
Procure no grabar vídeos con poca luz; las imágenes serán demasiado oscuras.
El área iluminada por el flash de la cámara se encuentra entre 0,9 y 2,1 metros. Para obtener los mejores
resultados, el sujeto debe estar dentro del área iluminada por el flash.
Obtenga las actualizaciones de software gratuitas. El software de la cámara de Logitech® busca automáticamente
en la página Web de Logitech® y descarga la versión más reciente del software.
Comparta sus fotografías y vídeos. Descargue las fotografías al ordenador (véase Transferir fotografías
y vídeos al ordenador). Para mandar por correo electrónico una fotografía o una secuencia de vídeo,
utilice el botón Adjuntar a mensaje de correo electrónico de la sección Galería del software. Para más información,
consulte el manual del usuario o el sistema de ayuda en pantalla.
Utilice la cámara como cámara Web. Con la cámara y el software de la cámara, puede realizar mensajería
instantánea con vídeo, videoconferencias o difundir vídeo en directo a través de Internet desde el PC.
Basta con que conecte la cámara al PC y la coloque sobre el monitor del ordenador o la superficie de trabajo.
Inicie el software de la cámara de Logitech®. Para más información, consulte el
Más información. A través de la guía del usuario y el sistema de ayuda en pantalla. Desde el software de la cámara
de Logitech®, haga clic en el botón Ayuda. Aparece una lista desplegable. Seleccione Ver el manual del usuario
o Contenido e índice para iniciar el sistema de ayuda. Para más información sobre cámaras Web Logitech®
QuickCam® y otros productos Logitech®, visite la página
www.logitech.com
sistema de ayuda
.
en pantalla.
Español
11
Page 16

7
•
•
•
•
•
•
•
•
Advertencias sobre la cámara y las pilas
No exponga la cámara a condiciones extremas de frío o calor. La temperatura de funcionamiento debería estar
entre 0° y 40° C.
No sumerja la cámara en agua.
No toque la ventana LCM.
Recuerde que al activar el flash automático las pilas de la cámara se agotan más rápidamente.
Si la cámara detecta algún defecto en su memoria interna por cualquier motivo, la reformateará
automáticamente. Se perderán todas las imágenes y secuencias de vídeo guardados en la cámara.
Cuando las pilas estén a punto de agotarse, se recomienda cambiarlas. Si se produce alguna fuga,
tome las precauciones habituales y siga las instrucciones del fabricante de las pilas.
Utilice siempre pilas alcalinas. También es posible utilizar otros tipos de pilas, como las pilas recargables NiMH
(Nickel Metal Hydride).
las instrucciones del fabricante de las pilas.
Maneje las pilas con cuidado. Un uso inadecuado de las mismas puede hacerlas explotar u originar escapes,
con el consiguiente riesgo de quemaduras y lesiones físicas. Si no va a utilizar la cámara por un largo periodo
de tiempo, quite las pilas y guárdelas en un lugar seco a temperatura ambiente.
No mezcle nunca distintos tipos de pilas.
Deseche las pilas usadas de acuerdo con
Garantía
Este producto tiene dos años de garantía limitada. Para más información, consulte la sección de garantía
de producto que aparece en el
Las cámaras Logitech deberían utilizarse dentro de lo permitido por la ley. Es posible que las leyes de algunos países
o estados prohíban usos de cámaras digitales para PC tales como la grabación subrepticia de audio o vídeo
para ciertos propósitos. En caso de dudas sobre la legalidad del uso que piensa hacer de su cámara, consulte con
las autoridades competentes antes de utilizarla.
Español
12
manual del usuario
ubicado en el CD de software Logitech®.
Page 17

1
Bienvenue!
Facilitez-vous la vie avec l’appareil
photo numérique ClickSmart™ 420
de Logitech® qui fait en plus office
de caméra Web!
Prenez des photos numériques
spontanées, ou réalisez des vidéos
amusantes agrémentées de son.
Partagez rapidement vos créations avec
votre famille et vos amis par courrier
électronique ou sur le Web.
Pour prendre des photos numériques
et réaliser des vidéos, allumez l’appareil,
puis visez et capturez. Les photos et
vidéos sont stockées dans sa mémoire.
Vous pouvez ensuite télécharger
vos images sur l'ordinateur.
Pour créer des messages vidéo
instantanés ou établir des conversations
vidéo en ligne, branchez l'appareil sur
l'ordinateur. Lancez ensuite le logiciel
Logitech® fourni avec votre appareil.
Bouton du déclencheur
Flash
Objectif
Bracelet
et attache du
cache de l'objectif
Socle
Témoin d'activation
Fixation du câble USB
Viseur
de la vidéo
Haut-parleur
Bouton du flash
Connecteur USB
(sous le rabat)
Viseur
Microphone
Témoin d'activation
du déclencheur
à retardement
Badge QuickSync
Bouton
d’alimentation
Commutateur
photo/vidéo
Ecran d'affichage
Bouton
du déclencheur
à retardement
Bouton
de suppression
™
Français
13
Page 18

2
1.
2.
3.
Préparation
Insérez quatre piles alcalines de type AAA.
Insérez le bracelet et le cache de la lentille.
Installez le logiciel de l’appareil photo numérique Logitech® en utilisant
le lecteur de CD-ROM de votre ordinateur. Suivez les instructions
qui s'affichent à l'écran.
3
1.
2.
3.
14
Prise de photos et enregistrement de vidéos
Appuyez sur le bouton d’alimentation et maintenez-le enfoncé pendant
une seconde pour allumer l’appareil photo numérique.
Pour prendre une photo, placez le commutateur photo/vidéo en mode
photo, puis appuyez sur le bouton du déclencheur. Si le cache est resté
sur l'objectif, l'icône correspondante clignote.
Pour réaliser des vidéos, placez le commutateur photo/vidéo en mode
vidéo, puis appuyez sur le bouton du déclencheur et maintenez-le enfoncé.
Le témoin de la vidéo clignote pour indiquer que l'appareil enregistre
(il clignote plus rapidement lorsque la mémoire de l'appareil arrive
à saturation). Relâchez le bouton du déclencheur pour arrêter l'enregistrement. Lorsque l’appareil
photo numérique n’est pas utilisé, il s’éteint après deux minutes pour économiser le niveau des piles.
Pour éteindre l'appareil, appuyez sur le bouton d’alimentation.
Français
Page 19

4
1. Modes disponibles
2. Flash
3. Compteur. Indique le nombre de photos ou d'images vidéo prises.
4. Retardateur. Appuyez sur le bouton du retardateur pour l'activer; la photo est prise après 10 secondes.
5. Suppression. Appuyez sur le bouton de suppression pendant deux secondes pour supprimer la dernière photo.
6. Indicateur du cache de l'objectif
7. Niveau des piles
Ecran d'affichage
Photo. La résolution est de 640 x 480 pixels.
Vidéo. Appuyez sur le bouton du déclencheur
et maintenez-le enfoncé pour enregistrer
des vidéos, relâchez-le pour arrêter l'enregistrement.
La résolution est de 320 x 240 pixels.
Appuyez sur le bouton du flash pour sélectionner
le flash automatique à chaque prise.
Appuyez à nouveau sur ce bouton pour désactiver le flash.
Si vous changez d’avis et ne voulez plus la supprimer, relâchez le bouton avant la fin des deux secondes.
1
2
3
7
6
5
4
Français
15
Page 20

5 Transfert des photos et vidéos vers l’ordinateur
1. Mettez l’ordinateur sous tension.
2. Ouvrez le couvercle qui protège le connecteur USB
de l’appareil photo.
3. Placez l'appareil sur son socle.
4. Branchez une extrémité du câble USB sur l’appareil photo.
Branchez l’autre extrémité du câble sur le port USB
de l’ordinateur.
5. Si votre appareil contient des images, le programme de
téléchargement QuickSync est lancé. Notez que le badge
QuickSync™ s'allume lorsque de nouvelles images ont été
prises. Il clignote lorsque les images sont téléchargées
sur l'ordinateur.
6. Choisissez l'une des options suivantes:
• Télécharger les images sur mon ordinateur. Cette option permet de transférer les images dans
la section Galerie du logiciel. Vous pouvez afficher les nouvelles images pendant le téléchargement
dans la fenêtre QuickView. Après le transfert, les images de l’appareil sont supprimées automatiquement
(pour plus d'informations sur l'utilisation de QuickView, consultez l'aide en ligne).
• Supprimer les images sans les copier.
• Annuler. Conserve les images dans l'appareil. Les images ne sont pas supprimées, ni téléchargées
vers l'ordinateur.
16 Français
Port USB Connecteur USB
Page 21

6 Conseils pour réaliser et partager des photos et vidéos de qualité
• Cadrez votre sujet dans le viseur et veillez à ce que l’appareil soit stable pendant une durée plus longue que
celle requise, afin d’éviter les images floues.
• Assurez-vous que votre sujet reste dans la zone du viseur délimitée par les marques de cadrage.
• Evitez les sujets à fort contraste, qui présentent en même temps des ombres profondes et des lumières vives
(par exemple, lorsque le soleil est directement derrière votre sujet).
• Evitez de réaliser des vidéos lorsque la lumière est très faible, car celles-ci seront trop sombres.
• La portée du flash est comprise entre 0,9 et 2,1 mètres. Vérifiez que votre sujet se trouve dans le champ du flash
pour obtenir des résultats optimaux.
• Procurez-vous des mises à jour logicielles gratuites. Le logiciel de votre appareil Logitech® consulte
automatiquement le site Web de Logitech® et télécharge la version la plus récente du logiciel.
• Partagez vos photos et vidéos! Téléchargez vos photos sur l’ordinateur (reportez-vous à la section
Transfert des photos et vidéos sur l’ordinateur). Pour envoyer une photo ou une vidéo par courrier électronique,
utilisez le bouton Joindre à un courrier électronique dans la section Galerie du logiciel. Pour plus d'informations,
consultez le Guide d'installation ou l'aide en ligne.
• Utilisez votre appareil comme une caméra Web. Grâce à votre appareil photo et à votre logiciel, vous pouvez
envoyer des messages vidéo instantanés, avoir des conversations vidéo ou diffuser de la vidéo en direct
sur Internet depuis votre PC. Il suffit de brancher l’appareil photo sur votre ordinateur et de le placer
sur votre moniteur ou sur votre bureau. Lancez le logiciel de l’appareil photo Logitech®. Pour en savoir plus,
consultez l’aide en ligne.
• Informations complémentaires. Vous pouvez accéder au Guide d'installation et à l'aide en ligne. Quelle que soit
l’application où vous vous trouvez dans le logiciel Logitech®, cliquez sur le bouton d’aide. Une liste déroulante
s’affiche. Sélectionnez Visualiser le Guide d'installation ou choisissez Sommaire et index pour lancer l'aide.
Pour plus d’informations sur les caméras Web QuickCam® de Logitech®, ainsi que sur les autres produits Logitech®,
consultez le site www.logitech.com.
Français 17
Page 22

7 Avertissements relatifs à l'appareil photo et aux piles!
• N’exposez pas l’appareil photo à des températures extrêmes (froides ou chaudes). La température
de fonctionnement est comprise entre 0° et 40° C.
• N’immergez pas l’appareil dans l’eau.
• Evitez de toucher l’écran à cristaux liquides.
• N’oubliez pas que, lorsque l’appareil photo est réglé sur flash automatique, ses piles s’usent plus rapidement.
• Si l'appareil photo détecte la défaillance de sa mémoire interne, il la reformate automatiquement.
Toutes les images et vidéos stockées dans l'appareil photo seront alors perdues.
• Lorsque le niveau des piles est faible, il est conseillé de les changer. Si les piles coulent, prenez les précautions
d’usage et suivez les conseils du fabricant.
• Lorsque vous remplacez les piles, veillez à utiliser des piles alcalines. Vous pouvez utiliser d'autres types de piles,
telles que des piles à hydrure métallique de nickel (NiMH). Ne mélangez pas différents types de piles.
Avant de vous débarrasser des piles usagées, référez-vous aux instructions du fabricant.
• Manipulez les piles avec précaution. En cas de mauvaise utilisation, les piles risquent d'exploser ou de couler,
entraînant des dommages matériels et corporels. Lorsque vous n'utilisez pas votre appareil photo pendant
des périodes prolongées, retirez les piles et conservez-les dans un endroit sec à température ambiante.
Garantie
Ce produit est fourni avec une garantie limitée de deux ans. Pour plus d’informations, veuillez lire la section intitulée
Garantie du produit dans le Guide d'installation sur le CD du logiciel Logitech®.
Les appareils photo caméras de Logitech doivent faire l’objet d’une utilisation légale. Certaines utilisations
de caméras et appareils photo numériques pour PC peuvent être interdites par les lois locales dans certains pays
ou états, telles que l’enregistrement clandestin de communications audio ou vidéo pour des usages particuliers.
Pour toute question concernant la légalité de l’utilisation proposée de votre produit, veuillez consulter une autorité
légale locale au préalable.
18 Français
Page 23

1 Bem-vindo!
É fácil com a câmara digital Logitech®
ClickSmart™ 420 com Câmara Web!
Tire fotografias digitais espontâneas
ou faça vídeos divertidos com som.
Partilhe num instante suas criações com
familiares e amigos através de e-mail
ou da Web.
Para vídeos e fotografias digitais,
ligue a câmara, aponte e dispare.
Os vídeos e as fotografias são
armazenados na memória da câmara.
Depois é só fazer um download
das imagens no computador.
Para mensagem instantânea com videochat on-line, conecte a câmara
ao computador. Em seguida inicie
o software da câmara Logitech®
incluído na câmara.
Botão Obturador
Flash
Lente
Correia de pulso
e anexação
da tampa da lente
Base
LED de vídeo ligado
Conexão do cabo USB
Visor
Alto-falante
Botão do flash
Conector USB
(sob a capa)
Visor
Microfone
LED do disparador
automático ligado
Símbolo do
™
QuickSync
Botão de força
Interruptor foto/
vídeo
Exibição de status
Botão do disparador
automático
Botão de exclusão
Português 19
Page 24

2 Preparando-se
1. Coloque as quatro pilhas alcalinas AAA da câmara.
2. Introduza a correia de pulso e a tampa da lente.
3. Instale o software da câmara da Logitech® utilizando a unidade de CD-ROM
do computador. Siga as instruções na tela.
3 Fazendo Fotografias e Vídeos
1. Pressione por um segundo o botão de força para ligar a câmara.
2. Para tirar uma fotografia, defina o interruptor Foto/Vídeo para “Picture”.
Em seguida pressione o botão Obturador para tirar uma fotografia.
Se a tampa da lente estiver colocada, o ícone da tampa da lente irá piscar.
3. Para vídeos, defina o interruptor Foto/Vídeo para “Video”. Em seguida
pressione e mantenha pressionado o botão Obturador para gravar um vídeo.
O LED de vídeo irá piscar, indicando que a câmara está gravando.
(O LED piscará com mais rapidez quando a câmara começar a ficar
sem memória.) Solte o botão Obturador para parar a gravação. Quando não
em uso, a câmara desliga-se depois de dois minutos, para conservar a energia das pilhas. Para desligar a câmara,
pressione o botão de força.
20 Português
Page 25

4 Exibição do Status
1. Modo da Câmara
Foto. Resolução de 640 x 480 pixels.
Vídeo. Pressione e mantenha pressionado o botão
Obturador para gravar; solte-o para parar.
Resolução de 320 x 240 pixels.
2. Flash
Pressione o botão do flash para selecionar o flash
automático para cada gravação.
Pressione o botão do flash para não selecionar
o flash.
3. Contador. Mostra o número de fotografias ou quadros de vídeo feitos.
4. Disparador automático. Pressione o botão do disparador automático para ativar o disparador; a fotografia
será tirada após 10 segundos.
5. Excluir. Pressione o botão "Delete" por dois segundos para excluir a última fotografia. Antes de se completarem
dois segundos, você terá a opção de não excluir as fotografias ao soltar o botão “Delete”.
6. Indicador de lente tampada
7. Status das Pilhas
1
2
3
Português 21
7
6
4
5
Page 26

5 Transferindo Fotos e Vídeos para o Computador
1. Ligue o computador.
2. Abra a tampa que protege o conector USB na câmara.
3. Coloque a câmara na base.
4. Plugue o cabo USB na câmara. Plugue a outra extremidade
do cabo em uma porta USB no computador.
5. Se houver imagens na câmara, o programa de download
QuickSync será iniciado. Observe que o símbolo do
QuickSync™ irá acender-se depois que novas imagens forem
tiradas. Piscará quando for feito o download das imagens
no computador.
6. Selecione uma destas opções:
• Carregar as imagens para meu computador.
Essa opção transfere as imagens para a seção Galeria do software. Você poderá visualizar novas imagens
enquanto fizer o download para a janela Visualização Rápida. Depois de transferi-las, as imagens na câmara
serão excluídas automaticamente. (Consulte o sistema de ajuda on-line para mais informações sobre o uso
da Visualização Rápida.)
• Excluir as imagens sem copiá-las.
• Cancelar. Retém as imagens na câmara. As imagens não serão excluídas nem será feito o download
no computador.
22 Português
Porta USB Conector USB
Page 27

6 Dicas para fazer e compartilhar fotos e vídeos excelentes
• Preencha o visor com o objeto a ser gravado e segure a câmara com firmeza, para impedir que as imagens
fiquem desfocadas.
• Certifique-se de que o objeto se enquadre no interior das marcas de corte no visor.
• Evite objetos com grande contraste que apresentem sombras profundas e áreas de luz intensas (por exemplo,
quando o sol incide diretamente por trás do objeto focalizado).
• Evite fazer vídeo com pouca luz; o vídeo ficará muito escuro.
• O alcance do flash na câmara vai de 0,9 a 2,1 metros). Assegure-se que o objeto esteja dentro do campo
de alcance do flash, para obter os melhores resultados.
• Obtenha atualizações gratuitas do software. O software da câmara da Logitech® verifica automaticamente
o site Web da Logitech® e carrega a versão mais recente do software.
• Compartilhe fotografias e vídeos! Carregue as fotografias no computador (consulte “Transferindo Fotos e Vídeos
para o Computador”). Para enviar foto ou vídeo por e-mail, use o botão “Anexar a um E-mail”, na seção Galeria
do software. Para obter mais informações, consulte o guia do usuário on-line ou o sistema da ajuda.
• Use a câmara como uma Câmara Web. Com a câmara e o software, faça mensagens instantâneas com vídeo,
vídeo-chat ou transmissão de vídeo ao vivo na Internet a partir de seu PC. Basta conectar a câmara ao PC
e posicionar a câmara no monitor do computador ou na área de trabalho. Inicie o software da câmara
da Logitech®. Para obter mais informações, consulte o sistema da ajuda on-line.
• Obtendo mais informações. Acesse o guia do usuário e o sistema da ajuda on-line. A partir do software da câmara
da Logitech® , clique no botão Ajuda. É exibida uma caixa de listagem suspensa. Selecione “Exibir o Guia
do Usuário” ou escolha “Conteúdo e Índice” para iniciar o sistema da ajuda. Para obter mais informações sobre
câmaras Web Logitech® QuickCam®, assim como outros produtos da Logitech®, visite www.logitech.com.
Português 23
Page 28

7 Avisos sobre a câmara e as pilhas!
• Não exponha a câmara a extremos de frio ou calor. A temperatura operacional é entre 0° e 40° C).
• Não mergulhe a câmara na água.
• Evite tocar a janela da LCM.
• Lembre-se de que, quando a câmara estiver definida para flash automático, as pilhas da câmara serão consumidas
com mais rapidez.
• Se a câmara detectar que há falha na memória interna por algum motivo, ela reformatará automaticamente
a memória interna. Todas as imagens e todos os vídeos armazenados na câmara serão perdidos.
• Quando a energia das pilhas estiver fraca, será melhor trocá-las. Se as pilhas vazarem, use de precaução normal
e siga as recomendações do fabricante das pilhas.
• Ao trocá-las, use pilhas alcalinas. Pode usar também outros tipos de pilha, como as de hidreto de níquel e metal
(NiMH) recarregáveis. Mas não misture os tipos de pilha. Jogue fora todas as pilhas usadas conforme as
instruções do fabricante.
• Tome cuidado ao manusear as pilhas. Quando usada incorretamente, uma bateria pode explodir ou vazar,
causando queimaduras e ferimento. Se não usar a câmara por um longo período, remova as pilhas e guarde-as
em lugar seco e em temperatura ambiente normal.
Garantia
Este produto tem uma garantia limitada de dois anos. Para obter mais informações, consulte a seção Garantia
do Produto, no guia do usuário localizado no CD do software da Logitech®.
Os produtos de câmara da Logitech destinam-se a usos que se conformem à lei. Determinados usos da câmara
digital de PC podem ser proibidos por leis locais em alguns países ou estados, tais como gravação clandestina de
áudio e/ou comunicações de vídeo para determinados propósitos. Se tiver alguma dúvida se um uso intencionado
do produto é lícito, consulte uma autoridade legal antes de prosseguir.
24 Português
Page 29

Logitech® Addresses and Telephone Numbers
Country
EUROPEAN, MIDDLE EASTERN
& AFRICAN HEADQUARTERS
LOGITECH Trading S.A.
CORPORATE HEADQUARTERS
LOGITECH Inc.
ASIAN PACIFIC HEADQUARTERS
LOGITECH Far East Ltd.
AUSTRALIA
LOGITECH Australia Computer
Peripherals Pty Ltd.
CANADA
Sales & Marketing Office
JAPAN
LOGICOOL Co. Ltd.
In LATIN AMERIC A AND
THE CARIBBEAN
Address
Moulin-du-Choc
CH 1122 Romanel-sur-Morges
6505 Kaiser Drive
USA Fremont, CA 94555
#2 Creation Road IV
Science-Based – Industrial Park
ROC Hsinchu, Taiwan
Level 2, 633 Pittwater Road
AUS Dee Why NSW 2099, Australia
5025 Orbitor Dr., Bldg. 6, Suite 200
CDN Mississauga, ON L4W 4Y5
Ryoshin Ginza East Mirror Bldg.,
7F 3-15-10 Ginza
Chuo-ku, Tokyo, Japan 104-0061
Contact your local authorized distributor, or call our Customer Support
Hotline in the USA
Infoline
Product Information
+41 (0) 21 863 54 00 English
FAX +41 (0) 21 863 54 02
(800) 231-7717
(800) 231-7717
Hotline
Technical Help
+41 (0) 21 863 54 01 English
FAX +41 (0) 21 863 54 02
+1 702 269 3457
+886 (2) 27466601 x2206
+61 (02) 9804 6968
+61 (02) 9972 3561
+1 702 269 3457
+81 (3) 3543 2122
FAX +81 (3) 3543 2911
+1 702 269 3457
Page 30

Logitech® on the world wide web: www.logitech.com
©2002 Logitech. All rights reserved. Logitech, the Logitech logo, and other Logitech marks
are owned by Logitech and may be registered. All other trademarks are the property of
their respective owners. Logitech assumes no responsibility for any errors that may appear
in this manual. Information contained herein is subject to change without notice.
Part number: 623092-0403
 Loading...