

Page 1

®
Spider Jam
with version 2 firmware features
Pilot’s Handbook
Manuel de pilotage
Pilotenhandbuch
Pilotenhandboek
Manual del Piloto
Please visit www.line6.com/manuals to
download information on SD Card features.
40-00-0134 Electrophonic Limited Edition available @ www.line6.com/manuals Rev D
Page 2

WARNING: To reduce the risk of fire or
electric shock, do not expose this appliance to
rain or moisture.
NOTICE: This equipment has been tested and found to comply with the limits for a Class B digital device pursuant
to Part 15 of FCC Rules. Operation is subject to the following two conditions: (1) This device may not cause harmful
interference, and (2) this device must accept any interference received, including interference that may cause undesired
operation.
CAUTION: To reduce the risk of fire or electric shock,
do not remove screws. No user-serviceable parts inside. Refer
servicing to qualified service personnel.
The lightning symbol within a triangle means
“electrical caution!” It indicates the presence
of information about operating voltage and
potential risks of electrical shock.
The serial number can be found on the back panel of your Spider Jam. It’s the number that begins
with “(21)”. Please note it here for future reference:
SERIAL NO:
The exclamation point within a triangle
means “caution!” Please read the
information next to all caution signs.
Please Note:
All product names referred to in this manual are
trademarks of their respective owners, which are in
no way associated or affiliated with Line 6. These
trademarks of other manufacturers are used solely to
identify the products of those manufacturers whose
tones and sounds were studied during Line 6’s sound
model development.
Page 3

You should read these Important Safety Instructions
Keep these instructions in a safe place
Before using your Spider Jam, carefully read the applicable items of these operating instructions and the safety suggestions.
1. Obey all warnings on the amp and in the Spider Jam Manual.
2. Connect only to AC power outlets rated 100-120V or 200-240V 47-63Hz (depending on voltage range of the power supply;
refer to label on the unit).
3. Do not perform service operations beyond those described in the Spider Jam Manual. Service is required when the
apparatus has been damaged in any way, such as:
• power-supplycordorplugisdamaged
• liquidhasbeenspilledorobjectshavefallenintotheapparatus
• theunithasbeenexposedtorainormoisture
• theunitdoesnotoperatenormallyorchangesinperformanceinasignicantway
• theunitisdroppedortheenclosureisdamaged.
4. Transformers can get hot during operation. Do not touch during operation or shortly after.
5. Do not place near heat sources, such as radiators, heat registers, or appliances which produce heat. Keep the rear of the unit
at least three inches from walls or other items that might block heat radiation.
6. Do not block any of the ventilation openings or use in an enclosed space.
7. Guard against objects or liquids entering the enclosure. Do not use or place unit near water.
8. Do not step on power cords. Do not place items on top of power cords so that they are pinched or leaned on. Pay particular
attention to the cord at the plug end and the point where it connects to the amp.
9. Unplug the amp when not in use for extended periods of time. Unplug the amp during lightning storms.
10. Clean only with a damp cloth.
11. Do not defeat the safety purpose of the grounding type plug. A grounding type plug has two blades and a third grounding
prong. The third prong is provided for your safety. When the provided plug does not fit into your outlet, consult an
electrician for replacement of the obsolete outlet.
12. Only use attachments/accessories specified by the manufacturer.
13. Prolonged listening at high volume levels may cause irreparable hearing loss and/or damage. Always be sure to practice “safe
listening.”
Spider Jam Pilot’s Handbook © 2009 Line 6, Inc.
Page 4

Table of Contents
Tutorials ..................................................................................1•1
Tutorial 1 – Jam with a Song ......................................................................... 1•1
Tutorial 2 – Record & Overdub with Drums ................................................. 1•2
Tutorial 3 – Record & Play with FBV Foot Controller ................................. 1•4
Tutorial 4 – Connect a Mic to the XLR Input .............................................. 1•6
Tutorial 5 – Using the Aux Input .................................................................. 1•7
Controls & Connections ........................................................ 2•1
Spider Jam the Amp .............................................................. 3•1
Recalling Amp Presets .................................................................................. 3•1
Saving Guitar Tone Presets ........................................................................... 3•2
Mic/Aux FX Presets ...................................................................................... 3•3
Aux Input Assign .......................................................................................... 3•3
Guitar Noise Gate ......................................................................................... 3•3
Guitar Tuner ................................................................................................... 3•4
FX Auto Select .............................................................................................. 3•5
Microphone Trim Knob ................................................................................. 3•5
Microphone, Aux, and CD/MP3 Input Levels ............................................ 3•5
Mic/Aux EQ .................................................................................................. 3•6
Mic/Aux Delay And Reverb ......................................................................... 3•6
Mic/Aux Compressor .................................................................................... 3•7
Factory Reset ................................................................................................. 3•7
Jamming with Spider Jam ..................................................... 4•1
Loading Drum Grooves ................................................................................. 4•1
Loading Songs ............................................................................................... 4•1
Play Preview .................................................................................................. 4•2
Page 5

Endless Play ................................................................................................... 4•2
Setting the Band/Drum Playback Level ....................................................... 4•3
Time Stretch/Transpose a Song or Drum Groove ......................................... 4•3
Changing the Speed/Pitch of a Song or Drum Groove ................................ 4•4
Setting Guitar Tones with Songs .................................................................. 4•4
Output Routing for RCA Jacks ..................................................................... 4•5
Setting the FBV Mode .................................................................................. 4•5
Loop Recording with Spider Jam ......................................... 5•1
Loop Recording 101 ....................................................................................... 5•1
Recording without a Song or Drum Groove .................................................. 5•2
Recording with a Song or Drum Groove ....................................................... 5•2
Quick Capture ................................................................................................ 5•3
Undoing the Last Recording .......................................................................... 5•3
Clearing (Erasing) the Current Track ............................................................ 5•3
Saving Recordings ......................................................................................... 5•4
Loading Recordings ....................................................................................... 5•4
Setting the Recorder Playback Level ............................................................ 5•5
Setting the Recorder Overdub Level ............................................................ 5•5
Erasing Recordings ........................................................................................ 5•6
Appendix A: Modeled Amps ................................................. A•1
Which Amps Are Modeled? ......................................................................... A•1
Appendix B: Using Your Feet ................................................B•1
FBV Cable ...................................................................................................... B•1
FBV Express ...................................................................................................B•2
FBV Shortboard ............................................................................................. B•4
Page 6

Page 7
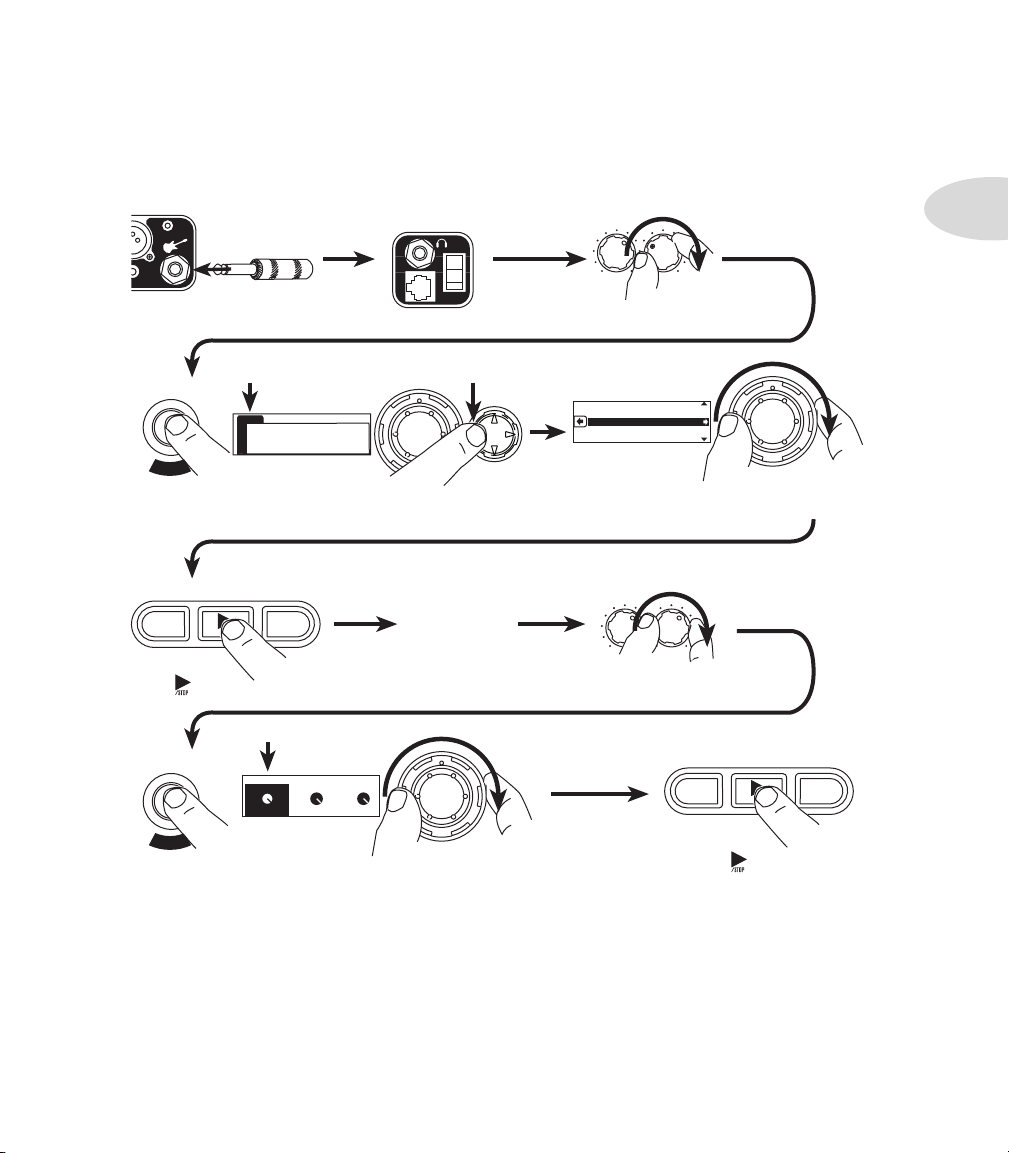
Tu T o r i a l s
Press the
SONG/DRUMS
button.
Turn on power.
If the SONGS tab isn t already selected as shown,
press left on the 4-way button to select it.
Turn the wheel and you ll see the list of songs, and
hear a preview of each as it s selected.
Press . Song loads and plays.
Play along with the
song. A matched
guitar preset is
loaded by default.
Press the INPUTS/LEVEL button. With the SONG/DRUMS tab selected,
turn the wheel to adjust the song volume.
Press to stop song.
Set MASTER about as shown.
SONGS DRUMS REC
063 COOL 2 BEAT SWING
063 COOL 2 BEAT SWING 2
064 RATS
080 TRAPPED
081 MOODY BALLAD
OVERDUB
REC
/STOP HOLD TO CLEAR
UNDO
OVERDUB
REC
/STOP HOLD TO CLEAR
UNDO
PEDAL
POWER
REVERB MASTER
S
O
N
G
D
R
U
M
S
Use CHAN VOL to
adjust guitar volume.
TREBLE CHAN VOL
L
E
V
E
L
I
N
P
U
T
S
Plug in your guitar.
CLIP
/
MP3
CLIP
A Cool 2 Beat Swing
PLAYBACK LEVELS
MIC/AUX
GUITAR
100%
100%
100%
SONG/DRUMS
100%
Tutorial 1 – Jam with a Song
Tutorials
1•1
You can also jam with Drums. Give it a try!
Page 8

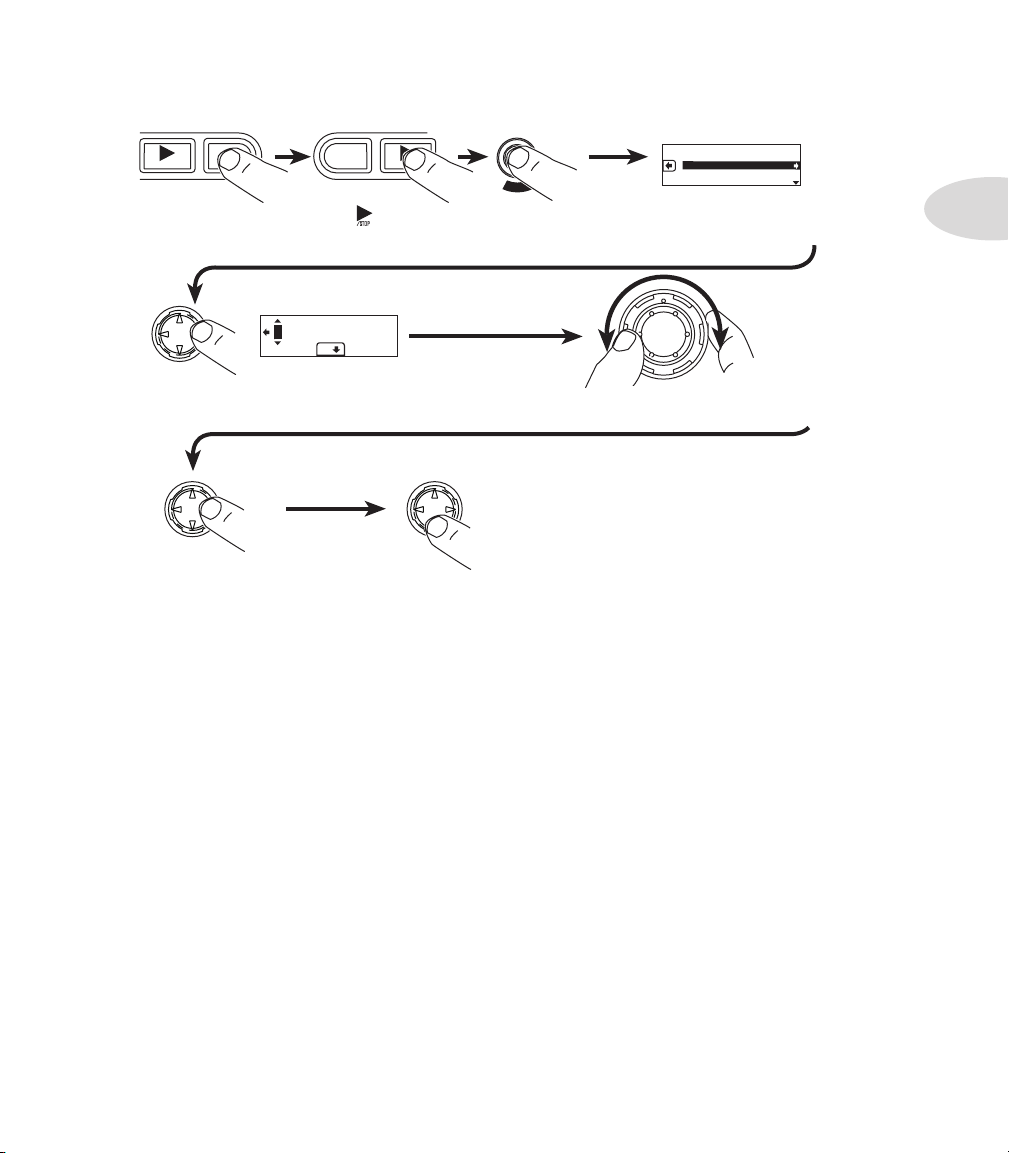
Tutorials
Turn the wheel and you ll see the list of drums, and
hear a preview of each as it s selected.
Press the
SONG/DRUMS button.
If GUITAR is not already
lit, press RECORD
SELECT to light it.
Count in plays.
Play your guitar for 4 bars then... press
REC/OVERDUB at downbeat of bar 5 to loop back
beginning and immediately enter play mode.
To load DRUMS press
right on the 4-way button.
Press REC.
Plug in your guitar.
Recording...
Continues top
of next page.
STRAIGHT GROOVE
SONGS DRUMS RECORDINGS
063 2 BEAT SWING
069 JAX
071 MY SUN
077 UN-DEAD
082 HOLIDAY
OVERDUB
REC
/STOP
S
O
N
G
D
R
U
M
S
If DRUMS tab isn t selected as shown, press
left/right on the 4-way button to select it.
RECORD SELECT
HOLD FOR REC MODE
OVERDUB
REC
/STOP
Press REC/OVERDUB
again to enter
overdub mode.
OVERDUB
REC
/STOP
CLIP
/
MP3
CLIP
Bar 1 Bar 2 Bar 3 Bar 4
Bar 1 Bar 2 Bar 3 Bar 4
This is your already recorded guitar
Your first overdub.
Your second overdub.
Play your guitar: you’re recording your first overdub...
and additional overdubs for each repeat of the loop
and so on.
Tutorial 2 – Record & Overdub with Drums
1•2
Page 9
Tutorials
Press UNDO to discard
most recent overdub.
Press SAVE.
Press RIGHT on the 4-way button.
Your display should now look something like this.
Press down on the 4-way
button to finish.
Make sure SAVE RECORDING
is selected as shown.
SAVE RECORDING
SAVE GUITAR TONE
ERASE SAVED RECORDING
Rec #00
OK
/STOP HOLD TO CLEAR
UNDO
Press once. Loop
play/recording stops.
OVERDUB
REC
/STOP
S
A
V
E
Press right on the 4-way
button to select other
characters you wish to change.
Turn the wheel to change
the first character.
1•3
Page 10

Tutorials
1•4
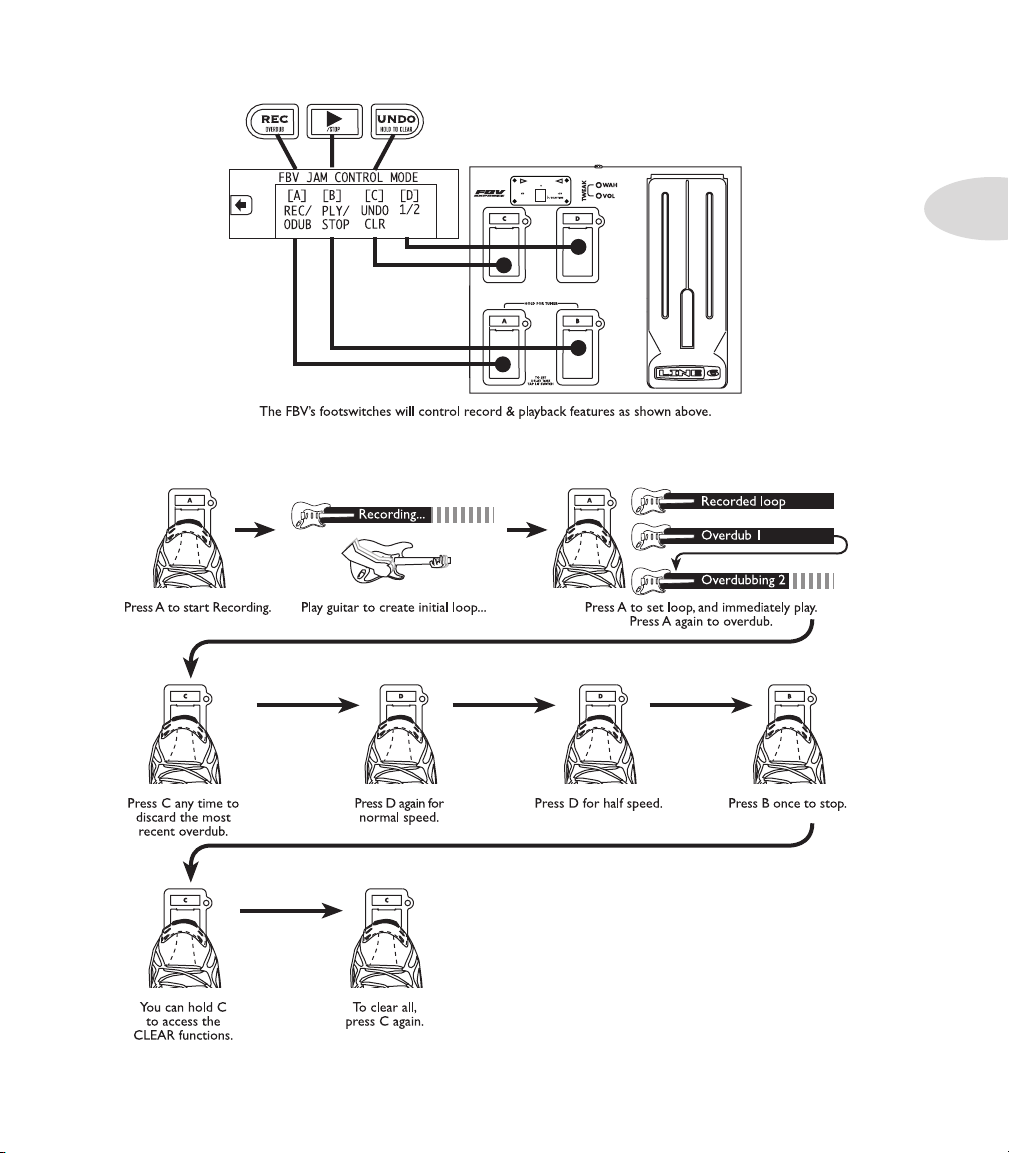
Tutorial 3 – Record & Play with FBV Foot Controller
Page 11
Tutorials
1•5
Page 12

Tutorials
Connect your mic to the XLR input.
Increase mic TRIM. Decrease if clipping.
Press TONE/SETTINGS button twice
to show MIC/AUX PRESETS.
Press LEVEL/INPUTS button twice. Press left/right on the 4-way
button to select MIC tab. Turn the wheel to balance Mic Level.
Mic/Aux Presets
Vocals Female 1
Press left/right on 4-way button to select values,
and turn wheel to adjust them.
If you want to record your
mic, press RECORD SELECT
until MIC/AUX is lit.
Turn the wheel to select a vocal preset.
MIC/AUX EQ
MIC/AUX REVERB & DELAY
MIC/AUX COMPRESSOR
FBV MODE- NORMAL
MIC/AUX REVERB AND DELAY
50%
REVERB DELAY
50%
DLY TIME
50%
CLIP
CD/MP3AUX
CLIP
LEVEL
L
E
V
E
L
I
N
P
U
T
S
T
O
N
E
S
E
T
T
I
N
G
S
RECORD SELECT
HOLD FOR REC MODE
T
O
N
E
S
E
T
T
I
N
G
S
Turn wheel to select
MIC/AUX REVERB & DELAY
Press TONE/SETTINGS
again to show more
functions.
Press right on 4-way
button to see the reverb
and delay settings.
MIC AUX CD
-80..-60..-40..-20..0
+0dB
Tutorial 4 – Connect a Mic to the XLR Input
1•6
Pop quiz: Follow the steps for recording as described earlier and create your first ever vocal
harmony loop.
Page 13

Tutorial 5 – Using the Aux Input
CD
/
AUX
LEVEL
Tutorials
1•7
Page 14

Page 15
Controls & Connections
Co n T r o l s & Co n n e C T i o n s
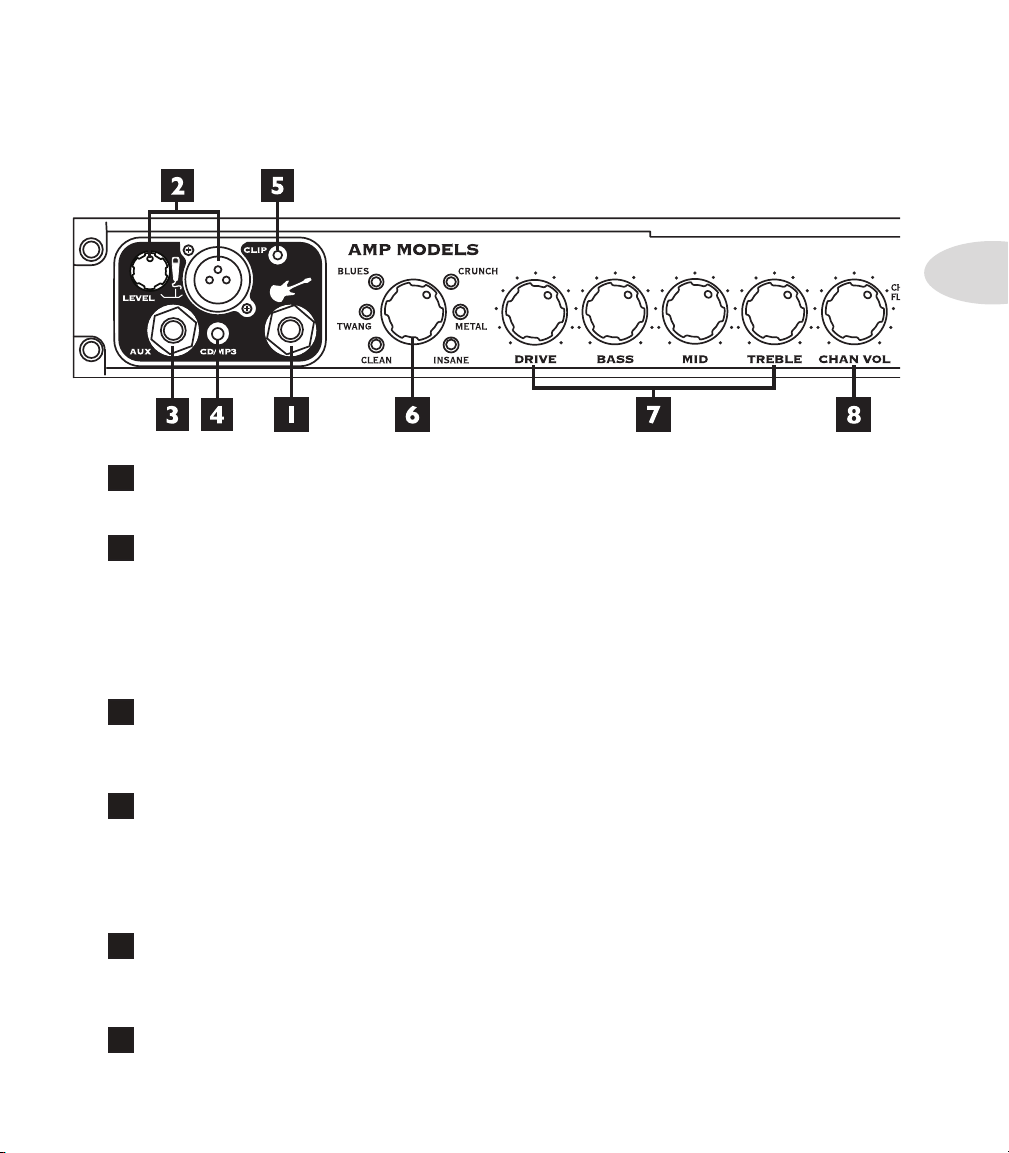
Guitar In – Plug your guitar in here. The Guitar input has dedicated Amp and
1
FX processing.
Mic In and Trim – Connect a microphone to this XLR input and use the Trim
2
knob to adjust its gain. The Mic input has its own independent EQ, Reverb, Delay and
Compressor FX processing.
2•1
Note: When not using a mic, always turns this all the way left (clockwise) to
minimum to avoid any noise from the unconnected mic preamp.
Aux In – This 1/4-inch input can be used for a second guitar, mic or just about any
3
other audio source. You can choose whether this input gets processed and recorded with
the Guitar input or Mic input.
CD/MP3 – Plug in any audio source to jam with your favorite music or drum
4
machine. Use the device’s output control to adjust its volume. Note: Start with the
volume on your device at it’s lowest setting and bring it up to the volume you desire.
This input gets mixed with the Mic input for recording, but without any processing.
Clip Light – This lights to say, “Whoa, Nelly! That’s too much input!” If the
5
Guitar and Aux inputs cause clipping, turn down the device that’s feeding your Spider
Jam. If the Mic input causes clipping, turn down the Mic Trim.
Amp Models – Spin this knob to select one of (12) Amp Models. All the guitar
6
Page 16

Controls & Connections
tone and FX controls will automatically be set to sound great with that Amp Model, so you
can just play! When you turn this knob, the Display will briefly show the currently-loaded
Amp Model name, along with the current settings of the Drive, Bass, Mid, Treble, and
Chan Vol knobs.
Tone Controls – Drive is like the volume or gain knob on other amps; controls
7
how much “dirt” you get in your sound. Bass, Mid, and Treble controls are customized
2•2
for each Amp Model to give you optimal tonal control. When you turn any of these knobs,
the Display will briefly show the currently-loaded Amp Model name, along with the
current settings of the Drive, Bass, Mid, Treble, and Chan Vol knobs.
Channel Volume – This control helps you balance the volumes of different
8
amp-and-effect setups that you store in your Spider Jam’s (36) User preset channels. When
you turn this knob, the Display will briefly show the currently-loaded Amp Model name,
along with the current settings of the Drive, Bass, Mid, Treble, and Chan Vol knobs.
Smart Control FX – Spin one of these knobs to get great FX, fast and easy:
9
Knob A selects Chorus/Flange, Phaser or Tremolo, with a range of settings – from subtle
to extreme – for each effect. The LED shows the active effect. Turning the knob all the
way down turns this effect off.
Knob B selects Delay, Tape Echo or Sweep echo, with a range of mix settings from low
to high. The LED indicates the active effect and the Ta p LED flashes the delay time. To
change the delay time, tap the Ta p button. Turning this knob all the way down turns the
effect off.
Page 17

Controls & Connections
When you turn either knob, the Display will briefly show you the current settings.
10
Reverb – Dial up more or less virtual room. While turning the knob, the Display
will show you the current setting.
11
Master Volume – You can choose the overall volume of the amplifier, without
affecting your tone. The current setting is briefly shown in the Display when you turn this
knob.
12
Tap / Hold for Tuner – Tap on the Ta p button a few times to set the
delay time. The Display will briefly show the delay time you tapped in BPM (beats per
minute).
Hold the Ta p button for 3 seconds to activate the built-in chromatic tuner.
13
FBV Pedal – Plug in an optional Line 6 FBV foot controller and control Spider
Jam with your feet. See page 4•5 for more info.
14
Phones – To listen with headphones, plug in here. The speakers are muted when
this jack is in use.
15
Power Switch – Flip the switch to bring Spider Jam to life.
2•3
16
Display – The LCD (liquid crystal display) is your window into the power of Spider
Jam. Here, you’ll see various “pages” as you work the controls.
17
Select Knob – Turn this knob to change the selected item on the Display.
18
4-way Navigation Button – Press Up, Down, Left, or Right on this
Page 18

Controls & Connections
button to get to a setting that you’d like to change.
19
Transport Controls – These buttons control the built-in jam and recording
functions:
Rec/Overdub –• Press to start and stop recording or overdubbing.
2•4
Play/Stop –• Press to start and stop the loaded Song, Drum Loop or Recording.
Undo/Hold to Clear –• After recording, press to undo (delete) your last recorded
section, or hold for 3 seconds to clear (erase) either the entire recording, the Guitar
track, the Mic/Aux track, or the Song/Drum selection by using the Clear menu.
20
Record Select Button and LEDs – Press this button to select an input
for recording, either Guitar or Mic/Aux. The Display and corresponding text will light
up to show what’s been selected.
Press and hold for 2 seconds to choose whether the Aux should feed the guitar tone and
get recorded with Guitar, or feed the Mic FX and get recorded with the Mic.
21
Song / Drums Button – A first press of this button gives you:
Song Select•
Drums Select•
Recording Select•
A second press of this button displays the following menu items:
Tempo/Pitch Modes•
Looping On/Off•
Endless Play On/Off•
Recorder Overdub Level•
Play Preview On/Off•
22
Level / Inputs Button – A first press of this button gives you:
Song/Drums Volume•
Page 19

Guitar Track Volume•
Mic/Aux Track Volume•
A second press of this button gives you:
Mic Input Level•
Controls & Connections
Aux Input Level•
CD Input Level•
23
Tone / Settings Button – A first press of this button gives you:
Guitar Tone Presets•
A second press of this button gives you:
Mic/Aux Presets•
A third press of this button displays the following menu items:
Gate/Boost On/Off•
FX Auto Select On/Off•
Songs Set Tone On/Off•
Recordings Set Tone On/Off•
Mic/Aux EQ•
Mic/Aux Delay And Reverb•
Mic/Aux Compressor•
Output Routing Mode•
2•5
Pitch/Tempo Preview Mode•
FBV Mode•
24
Save Button – Pressing this button displays the following menu items:
Save Guitar Tone•
Save Recording To Internal•
Page 20

Controls & Connections
Save Recording To SD Card•
Erase Saved Recording•
Erase SD Card Recording•
Erase All Internal Recordings•
2•6
Transfer Recording To Card•
Transfer Recording From Card•
Transfer All To Card•
Transfer All From Card•
Save Recording Mix As WAV To Card•
Import WAV File From Card•
Format Card•
Firmware Version•
Firmware Upgrade•
25
Direct/Recording Out – This pair of RCA jacks is perfect for connecting
Spider Jam to an external recorder or computer to capture your jams. Or, connect them to
your sound system to hear Spider Jam through it.
26
SD Card Slot – You can use standard SD Cards, up to 2GB capacity, to
store Spider Jam recordings and transfer them to/from your computer. Please visit
www.line6.com/manuals to download more information on SD Card features. This slot
is also used at our factory to install the firmware that controls your Spider Jam.
27
Power Connector & Fuse – The included power cable connects here.
See the rear panel markings for fuse information.
Page 21

Spider Jam the Amp
sp i d e r Ja m T h e am p
Recalling Amp Presets
Your new Spider Jam amplifier is loaded with over 300 amp-and-effect presets to cover
a wide range of tones and styles. Many presets have been dialed-in by some of today’s
influential artists!
When selecting presets, the display looks like this:
Press • Up on the 4-way button to select the top left area (it will be shown in the
display as a black box with inverted text). While this area is selected:
Turn the • Select knob to choose the Artist Bank, Style Bank, or User Bank.
Now press • Right on the 4-way button to select the top right area (it will be shown
in the display as a black box with inverted text). While this area is selected:
For the • Artist and Style presets, turn the Select knob to choose from the
available Artist and Style folders.
For the • User presets, turn the Select knob to choose a User preset.
Press • Down on the 4-way button to select the preset name (it will be shown in the
display as a black box with inverted text). While this area is highlighted:
Turn the • Select knob to select the next/previous presets from the currently
selected preset group.
Want to know more about these presets? We’re glad you asked:
Artist –• These presets were dialed-in by a team of insane guitar slinging rock stars
that cover a great range of styles. We sent an amp to each of them to create a bank of
inspiring tones. Some chose to capture the tone of their records, while some explored
the insane range of tonal possibility that Spider Jam offers. Whatever the outcome,
their work is at your disposal. It’s as if they came to your home and helped you dial in
your amp! There are separate folders for each artist. These presets cannot be erased,
but they can be modified and saved to one of the 36 User preset locations.
3•1
Page 22

Spider Jam the Amp
3•2
Saving Guitar Tone Presets
You can store your current settings to one of the 36 User preset locations as follows:
Style –• Presets organized by style or song, including based on the top 200 guitar
rock songs of all time. There are separate folders for each style and year that the song
came out. These, too, are read-only and cannot be erased, but can be modified and
saved to any of the 36 User presets.
User –• 36 great-sounding presets that you can overwrite with your own custom
tones. The User presets are numbered 1A - 9D and can also be recalled using an
optional FBV foot controller. Check out Appendix B for more info. A factory reset
(see page 3•2) will restore these presets to their factory defaults.
Press the • Save button.
Turn the • Select knob to highlight Save Guitar Tone.
Press • Right on the 4-way button. If you’ve modified a User preset, you’ll be taken
to that User preset location. If you’ve modified any other preset, you’ll go to User
preset location 1A.
Turn the • Select knob to select the User preset location you want to store to.
Press • Right on the 4-way button.
If you want to rename the new preset, use • Left/Right on the 4-way button to pick
a character and the Select knob to change that character.
Press • Down on the 4-way button to save, or press the Song, Level, or Tone buttons
to cancel.
The settings of all these controls are stored:•
Page 23

Spider Jam the Amp
Mic/Aux FX Presets
The Microphone input has its own FX. If you’ve chosen to mix the Aux input with the
Microphone input (see page 3•3), the Aux input will share this processing, too. To
select a preset for these FX:
Press the • Tone / Settings button twice to show this display:
Turn the • Select knob to select from the presets.
Aux Input Assign
The Aux input can be used for a second guitar or any other audio source. This input can
either share the Amp and FX processing with the Guitar input, or share the Microphone
input’s EQ, Reverb, Delay and Compressor FX. You get to decide. If you’re connecting a
second guitar, you’ll want to share the Guitar processing. For just about everything else,
you’ll want to share the Microphone processing. Here’s how you make that choice:
Hold the • Record Select button for two seconds.
Turn the • Select knob to select Mixed with Microphone or Mixed with Guitar.
Press the • Song / Drums, Level / Inputs or Tone/Settings button to exit.
3•3
Guitar Noise Gate
Spider Jam includes a built-in Noise Gate, which helps to cut down on hiss and noise.
Here’s how you turn it on and off:
Press the • Tone / Settings button three times to show additional functions.
Page 24

Spider Jam the Amp
This setting is stored and recalled with presets.
Guitar Distortion Boost
3•4
There’s also a Distortion Boost available. This gives the kind of extra ‘dirt’ that you’d
expect from a Distortion pedal with the distortion control set low and the output control
set high. It boosts your guitar signal before it reaches the Amp Model, so that you hit
the model harder and get a more distorted sound. Enabling this is the same as kicking on
Stomp on the FBV Shortboard.
Turn the • Select knob to highlight Guitar Gate/Boost.
Press • Right on the 4-way button.
Turn the • Select knob to turn the Noise Gate on or off.
Press the • Tone / Settings button three times to show additional functions.
Turn the • Select knob to highlight Guitar Gate/Boost.
Press • Right on the 4-way button.
On the page showing the gate and boost settings, press • Right on the 4-way button
to select Boost.
Turn the • Select knob to turn the Distortion Boost on or off.
This setting is stored and recalled with presets.
Guitar Tuner
Press and hold the Ta p button (or Ta p footswitch on an optional FBV footswitch) for 2
seconds or more and you get an instant digital Tuner. The volume is muted during tuning
so you won’t hear anything coming out of the amp. Press any button to exit Tuner Mode.
The display on the top panel of the Spider Jam will work as the tuner display.
FX Auto Select
When you select an Amp Model from the front panel, Spider Jam will also automatically
dial-in the effects to make that effect shine. If you’d like to disable this feature, you can:
Page 25

Press the • Tone / Settings button three times to show additional functions.
Turn the • Select knob to highlight FX Auto Select.
Press • Right on the 4-way button.
Turn the • Select knob to turn the FX Auto Select on or off.
Microphone Trim Knob
Spider Jam the Amp
The first step after connecting a microphone is to set this knob:
Sing into your microphone at maximum volume and turn this knob until the • Clip
light starts to light slightly.
Turn the knob back down slightly so clipping won’t occur.•
When not using a mic, always turns this all the way left (clockwise) to minimum to •
avoid any noise from the unconnected mic preamp.
Microphone, Aux, and CD/MP3 Input Levels
Before using the Mic, Aux and CD/MP3 inputs, set their levels as follows:
Press the • Level / Inputs button twice to show this display:
Press • Left/Right on the 4-way button to select Mic, Aux, or CD.
Sing or play into the selected input and observe the readings on the meter.•
Adjust the • Select knob so that the meter shows a peak reading between -20 and 0.
3•5
Tip: Start by turning the Select knob until you see +0 dB on the screen (as shown in
the previous graphic). Then, turn whatever is connected to Spider Jam up or down
to get a peak meter reading between -20 and 0. If you can’t get there from the other
unit, use the Select knob as described above.
Page 26

Spider Jam the Amp
BASS TREBLEMID
Mic/Aux EQ
If you’d like to customize the Mic/Aux EQ yourself:
Press the • Tone / Settings button three times to show additional functions.
Turn the • Select knob to highlight Mic/Aux EQ.
3•6
Press • Right on the 4-way button.
Press • Left/Right on the 4-way button to select Bass, Mid, or Treble.
Turn the • Select knob to adjust the Bass, Mid, or Treble levels.
Mic/Aux Delay And Reverb
If you’d like to customize the Mic/Aux Delay and Reverb:
Press the • Tone / Settings button three times to show additional functions.
Turn the • Select knob to highlight Mic/Aux Delay And Reverb.
Press • Right on the 4-way button.
Press • Left/Right on the 4-way button to select Reverb, Delay, or Delay Time.
Turn the • Select knob to adjust the Reverb level, Delay level, or Delay Time.
Page 27

Spider Jam the Amp
Mic/Aux Compressor
The Compressor will help even out your performance by reducing the volume of the
loudest sounds to better match the volume of the quieter sounds.
Press the • Tone / Settings button three times to show additional functions.
Turn the • Select knob to highlight Mic/Aux Compressor.
Press • Right on the 4-way button.
Press • Left/Right on the 4-way button to select between Threshold (at what level
should the compressor start working?), Ratio (how aggressive should the compressor
be when it starts working?) and Level (turn it up if the compressor ends up lowering
your volume too much).
Turn the • Select knob to adjust the selected parameter.
3•7
Factory Reset
If you’d like to reset your Spider Jam to its factory-fresh state, discarding all your own
adjustments to the User presets and restoring the factory-standard settings, do the
following:
Power up while holding the • Tone / Settings button.
Warning: a Factory Reset will replace all your customized User presets •
with the factory-standard settings. So before doing a reset, be sure to
back up any custom presets you’d like to save.
Page 28

Page 29

Jamming with Spider Jam
Ja m m i n g w i T h sp i d e r Ja m
Spider Jam is always ready to back you with over 100 built-in Songs and Drum Grooves
laid down by top L.A. session aces. No MIDI here! From country to funk, and blues to
punk, these authentic backing tracks are the perfect accompaniment and inspiration for
practicing, composing or simply having fun playing guitar.
Loading Drum Grooves
To load a drum groove:
Press the • Song / Drums button to show the Song/Drums Page.
Press • Left/Right on the 4-way button to select Drums.
Turn the • Select knob to see the available drum grooves. The grooves are arranged
by tempo and the BPM (beats per minute) shows up as the first 3 characters of the
name. If Play Preview is on, you’ll hear a short clip of each drum groove as you
browse.
When you get to the one you want, press the • Play button to play the groove and
remain in the list. Or, press Right on the 4-way button to play the groove and exit
the list.
4•1
Press the • Play / Stop button to stop and start the groove. If Endless Play is set to
on, the groove will play in a continuous loop. If Endless Play is set to off, the groove
will play from beginning to end, then stop. (see page 4•2 for info on Play Preview
and Endless Play settings).
Loading Songs
To load a Song:
Press the • Song / Drums button to show the Song/Drums Page.
Press • Left/Right on the 4-way button to select Songs.
Turn the • Select knob to see the available Songs. The Songs are arranged by tempo
and the BPM (beats per minute) shows up as the first 3 characters of the Song name.
If Play Preview is on, you’ll hear a short clip of each Song as you browse.
Page 30

Jamming with Spider Jam
When you get to the one you want, press the • Play button to play the Song and
remain in the list. Or, press Right on the 4-way button to play the Song and exit
the list.
Press the • Play / Stop button to stop and start the Song. If Endless Play is set to on,
the Song will play in a continuous loop. If Endless Play is set to off, the Song will
play from beginning to end, then stop.
Play Preview
You can choose whether you want to automatically hear short clips while you browse
4•2
through the Songs and Drum Grooves, as follows:
Press the • Song / Drums button twice to show the additional functions.
Turn the • Select knob to highlight Play Preview.
Press • Right on the 4-way button.
Turn the • Select knob to turn Play Preview On or Off.
Endless Play
To choose whether the Songs and Drum Grooves “loop” endlessly or just play once and
stop, do the following:
Press the • Song / Drums button twice to show the additional functions.
Turn the • Select knob to highlight Endless Play.
Press • Right on the 4-way button.
Turn the • Select knob to turn Endless Play On or Off.
You can also choose whether a free time Recording “loops” endlessly or just plays once
then stops, as follows:
Press the • Song / Drums button twice to show the additional functions.
Turn the • Select knob to highlight Looping, then press Right on the 4-way button.
Turn the • Select knob to turn Looping for Recording or Playback On or Off.
Page 31

Jamming with Spider Jam
MIC/AUX/WAVGUITAR
PITCH SHIFT
SEMI KEY
0B
ORIG
95 BPM
TEMPO
100 BPM
TIME STRETCH
Setting the Song/Drums Playback Level
Press the • Level / Inputs button to show the Playback Levels page.
Press • Left/Right on the 4-way button to select Song/Drums.
Turn the • Select knob up or down to set the playback level.
Time Stretch/Transpose a Song or Drum Groove
You can time stretch or transpose the currently-loaded Song or Drum Groove as follows:
Press the • Song / Drums button twice to show the additional functions.
Turn the • Select knob to highlight Tempo/Pitch Modes, then press Right on the
4-way button.
4•3
Turn the • Select knob to display the Time Stretching And Pitch Shifting screen then
press Right on the 4-way button.
To time stretch, press • Left on the 4-way button, if necessary, to highlight Time
Stretch.
Then turn the • Select knob to change tempo.
If a Song or Drum is active, the original tempo is also shown for reference, •
and will not change.
If no Song or Drum is active, time stretch will be shown as a percentage, rather than a
Page 32

Jamming with Spider Jam
BPM (beats per minute) value.
To transpose, press • Right on the 4-way button, if necessary, to highlight the Pitch
Shift heading.
If no Song or Drum is active, transpose will be shown as a percentage, rather than semitones.
4•4
Changing the Speed/Pitch of a Song or Drum Groove
You can change the tempo of the currently-loaded Song or Drum Groove as follows:
Press the • Song / Drums button twice to show the additional functions.
Turn the • Select knob to to highlight Tempo/Pitch Modes, then press Right on the
4-way button.
Turn the Select knob to highlight • Varispeed and press Right on the 4-way button.
Then turn the • Select knob to transpose up/down.
If a Song is active, the resulting key will also be shown.•
If a Drum is active, no key will be shown.•
For Drum Grooves, the default tempo in BPM (beats per minute) will be displayed. •
Turn the Select knob to select a new tempo.
For Songs, a transposition amount will be displayed, along with the current tempo •
in BPM. Turn the Select knob to pick a new pitch in 1/2 steps; the resulting tempo
will be displayed.
Note that once you’ve made a recording, you can’t change the speed/pitch.
*For more details on Tempo/Pitch Modes, please download the Spider Jam Advanced
Guide at www.line6.com/manuals.
Setting Guitar Tones with Songs
By default, loading a Song will automatically load a custom-crafted guitar tone, too. You
can choose whether you want a Song to automatically set the guitar tone, as follows:
Page 33

Jamming with Spider Jam
Press the • Tone / Settings button three times to show the additional functions.
Turn the • Select knob to highlight Songs Set Tone.
Press • Right on the 4-way button.
Turn the • Select knob to select On or Off.
Output Routing for RCA Jacks
You can choose what signals are sent to the RCA jacks on the back of the unit:
Press the • Tone / Settings button three times to show the additional functions.
Turn the • Select knob to highlight Output Routing.
Press • Right on the 4-way button.
To have everything come out of both Spider Jam’s on-board speakers and the RCA •
jacks, turn the Select knob to select Normal.
To have the Guitar come out of Spider Jam’s 12-inch speaker and everything else •
come out of the RCA jacks, turn the Select knob to select Performance.
4•5
Setting the FBV Mode
Plugging in an optional Line 6 FBV foot controller lets you control Spider Jam with your
feet. There are two FBV Modes of operation. Normal Mode allows you to use your FBV for
User bank and channel switching, while Jam Control Mode gives you access to Transport
Controls and Song selection.
Depending on which FBV you choose to use, both modes give you access to effects on/off,
distortion boost on/off, wah/volume pedals, and tap tempo for setting delay times.
On the following page is a table of FBV functionality when using one with a Spider Jam.
*(not all functions are available from all FBVs).
Page 34

Jamming with Spider Jam
FBV Footswitch Normal Mode Jam Control Mode
STOMP (STOMP 1) Dist Boost
4•6
PITCH/TREMOLO unassigned
FAVORITE CHANNEL unassigned
A Tone A Rec/Overdub
B Tone B Play/Stop
C Tone C Undo/Clear
D Tone D 1/2 Speed
UP Tone Bank Up
DN Tone Bank Down
LOOP N/A
TAP Delay Time
MOD Mod FX On/Off
DELAY Delay On/Off
REVERB Reverb On/Off
STOMP 2 unassigned
STOMP 3 unassigned
AMP 1 unassigned
AMP 2 unassigned
To change the FBV mode, do the following:
Press the • Tone / Settings button three times to show the additional functions.
Turn the • Select knob to highlight FBV Mode.
Press • Right on the 4-way button.
Turn the • Select knob to choose Normal Mode or Jam Control Mode.
When Jam Control Mode is selected, the display shows you what the ABCD •
footswitches will do.
If you try this without an FBV connected, the display will show “No Pedal Connected”.
*For details on Alternate Footswitch Modes, which were implemented in the v2.09 firmware,
please download the Spider Jam Advanced Guide at www.line6.com/manuals.
Page 35

Loop Recording with Spider Jam
First recording also
determines loop length
First recording
First Overdub
Second Overdub
Third Overdub
First recording
First recording also
determines loop length
First Overdub
Second Overdub
Third Overdub
Time in Minutes
3 Minute Song or Drum
Groove
This portion will loop
with the recording
lo o p re C o r d i n g w i T h sp i d e r Ja m
Loop Recording 101
Spider Jam’s on-board loop recorder allows you to record your guitar (or any other input),
automatically loop that recording, and overdub into that recorded loop. You can also think
of it graphically:
With Spider Jam, you can also loop record with or without a Song or Drum Loop. If you
record with a Song or Drum Groove:
As the recording loops, the portion of the Song or Drum Groove that matches the recording
will loop, too, as if it had been recorded with the loop.
5•1
Page 36

Loop Recording with Spider Jam
Recording without a Song or Drum Groove
To record without a Song or Drum Groove:
Press the • Song / Drums button to show the Song/Drums page.
Press • Right on the 4-way button to select Rec.
Make sure your sources are connected and your levels are set as described in Chapters •
3 and 4.
Press the • Record Select button to choose Guitar or Mic/Aux as your recording
source. Remember that the Aux input can be assigned to either Guitar or Mic (see
page3•3)andtheCD/MP3inputgetsmixedandrecordedwiththeMicinput.
Press the • Rec / Overdub button to set the loop start point and start recording.
5•2
Play or sing.•
Press the • Rec / Overdub button to set the loop end point. Loop immediately begins
to play back from the beginning, and will continuously loop.
Or, press the • Play / Stop button to set the loop end point and stop playback.
Once you have a loop recorded and playing back, press the • Rec / Overdub button
twice to overdub additional audio on top of the loop.
Recording with a Song or Drum Groove
To record with a Song or Drum Groove:
Press the • Song / Drums button to show the Song/Drums page.
Press • Right on the 4-way button to select Song or Drums.
Make sure your sources are connected and your levels are set as described in Chapters •
3 and 4.
Press the • Record Select button to choose Guitar or Mic/Aux as your recording
source. Remember that the Aux input can be assigned to either Guitar or Mic (see
page3•3)andtheCD/MP3inputgetsmixedandrecordedwiththeMicinput.
Load and play a Song or Drum Loop as described in Chapter 4.•
About 1 bar before you want to begin recording, press the • Rec button. Recording
Page 37

Loop Recording with Spider Jam
begins at beat 1 of the next bar. This will also set the loop start point.
Play or sing.•
Press the • Rec / Overdub button to set the loop end point. Loop immediately begins
to play back from the beginning, and will continuously loop.
Or, press the • Play / Stop button to set the loop end point and stop playback.
Once you have a loop recorded and playing back, press the • Rec / Overdub button
twice to overdub additional audio on top of the loop.
Quick Capture
If you’ve got a guitar riff that you want to capture quickly without having to set up the
recorder, press and hold the Undo button then press the Rec button. This forces Rec
Select to Guitar, turns off the Song/Drums, and immediately starts the recorder. Press Play
/ Stop to stop recording.
Undoing the Last Recording
Press the Undo button to erase your last overdub.
5•3
Clearing (Erasing) the Current Track
To access the Clear functions:
Hold the • Undo button for 2 seconds.
Clear All• is initially selected:
Press • Undo to completely clear recorded audio, and also clear the Drum/
Song selection.
Or turn the • Select knob to choose Clear Guitar Track:
Press • Undo to clear just the guitar track, without affecting the Mic/Aux
track or the Drum/Song selection.
Or turn the • Select knob to choose Clear Mic/Aux Track:
Page 38

Loop Recording with Spider Jam
Press • Undo to clear just the guitar track, without affecting the Mic/Aux
track or the Drum/Song selection.
Or turn the • Select knob to choose Clear Song/Drum Track:
Press • Undo to clear the current Drum/Song selection, but leave any current
recorded audio undisturbed.
Saving Recordings
When you save a recording, your complete setup is saved, including any recorded audio,
which Song is selected, your levels, Aux setup, Mic FX and guitar tone preset. To save a
recording to internal memory:
5•4
Press the • Save button.
Turn the • Select knob to highlight Save Recording To Internal.
Press • Right on the 4-way button.
Turn the • Select knob to select the location you want to save to.
Press • Right on the 4-way button.
If you want to rename the new recording, press • Left/Right on the 4-way button to
pick a character and the Select knob to change that character.
Press • Down on the 4-way button to save, or press the Song, Level, or Tone buttons
to cancel.
Loading Recordings
To load a recording:
Press the • Song / Drums button to show the Song/Drums Page.
Press • Right on the 4-way button to select Rec.
Turn the • Select knob to see the available recordings.
When you get to the one you want, press the • Play button to play the Recording and
remain in the list. Or, press Right on the 4-way button to play the Recording and
exit the list.
Page 39

Loop Recording with Spider Jam
MIC/AUX/WAVGUITAR
Press the • Play / Stop footswitch to stop and start the recording.
*With the latest Spider Jam firmware update, you can now save and load Recordings
directly to and from an SD card. For more details, please download the Spider Jam
Advanced Guide at www.line6.com/manuals.
Setting the Recorder Playback Level
You can adjust the playback levels of the Song/Drums, recorded Guitar track and recorded
Mic track:
Press the • Level / Inputs button.
Press • Left/Right on the 4-way button to select Song/Drums, Guitar, or Mic.
Turn the • Select knob to set the level.
Setting the Recorder Overdub Level
You can choose how loud you want previously recorded material to be when you’re
overdubbing:
Press the • Song / Drums button twice to show the additional functions.
Turn the • Select knob to highlight Recorder Overdub, then press Right on the 4-way
button.
Turn the • Select knob to set the level.
5•5
Page 40

Loop Recording with Spider Jam
Erasing Recordings
To erase a recording, do the following:
Press the • Save button.
Turn the • Select knob to highlight Erase Saved Recording.
Press • Right on the 4-way button.
Turn the • Select knob to select the Recording you want to erase.
Press • Right on the 4-way button.
Press the • Down button to erase, or press the Song, Level, or Tone buttons to
5•6
cancel.
You can also select and erase the Demo, just like any recording, to free up some additional
recording time.
*Additionally, there are new Erase commands included with the latest Spider Jam
firmware update, such as Erase All Internal Recordings and Erase SD-Card Recording.
For details, please see the Spider Jam Advanced Guide at www.line6.com/manuals.
Page 41

Appendix A: Modeled Amps
ap p e n d i x a: mo d e l e d am p s
Which Amps Are Modeled?
There are 12 Amp Models living within your Spider Jam.
Clean
Red LED: “Clean”. Select this Amp Model and adjust the tone controls to get crisp, amazing
clean tones, great warm jazz tones, and all the high-end shimmer you’ll need with a generous
amount of bottom end to boot. Then dial up a little chorus and delay to get the ultimate
clean sound!
Green LED: “Glassy”. We developed this Amp Model to emulate those late 60’s and early
70’s clean tones. It started off as an Amp Model based on a 1973 Hiwatt® custom 100. We
extended the tone control range and tightened up the low end. Hit an open A chord and
let that big sweet tone ring!
Twang
Red LED: “Twang”. This Amp Model draws on our analysis of mid 60’s Fender® amps,
including the blackface ’65 Twin Reverb® and blackface ’64 Deluxe Reverb®. We wanted
an Amp Model that has that classic glassy high end tone, with some snap and bite for some
serious chick’n pick’n. Things don’t get too crunchy until reaching the top range of the
Drive knob.
Green LED: “Twin Twang”. This Amp Model is based on a number of vintage tweed amps.
We evaluated a ’53 Fender® tweed Deluxe, ’58 Fender® tweed Bassman® and a ’60 Gibson
Explorer to create a swingin’ Rockabilly tone. Add some reverb and a slap echo and Be-bopalu-la!
Blues
Red LED: “Blues”. What would happen if we based a model on three helpings of ’65
Marshall® JTM-45, one scoop of ’58 Fender® Bassman®, a schmeer of ’63 Fender® Vibroverb
and a dash of Supro for good measure? The biggest, fattest down home Blues amp ever heard.
This Amp Model slides between gritty swamp-infected cleans to syrupy smooth, walloping
drive tones. It’s time to get down and dirty!
* All product names are trademarks of their respective owners, which are in no way associated or affiliated with Line 6. These product
names, descriptions and images are provided for the sole purpose of identifying the specific products that were studied during Line 6’s sound
model development. Hiwatt® is a registered trademark of Fernandes Company, Inc. FENDER®, Twin Reverb, Deluxe Reverb and
Bassman are registered trademarks of Fender Musical Instruments Corporation.
A•1
Page 42

Appendix A: Modeled Amps
Green LED: “Class A”. Ready, steady....GO! This Amp Model is based on a fawn Vox®
AC-30 amplifier with an updated and expanded tone control circuit. We wanted to capture
that early British pop rock tone that the Beatles and the Stones are so well known for.
Crunch
Red LED: “Crunch”. This sound was crafted during our studies of the ‘68 Marshall® Plexi
50 Watt. This type of Marshall® amp was used by a number of early metal bands. Check
out albums like British Steel, Number of the Beast and Black Out. Crunch provides a wider
range of tone control settings than the original Marshall® amp had. This Amp Model will
allow you to bump up the mids even at the highest Drive settings.
Green LED: “On Fire”. Plexi On Fire! This Amp Model is based on a ‘68 Marshall® Plexi
100 watt with a few added extras; The combination of a Variac and the jumpered input
channels creates that infamous brown sound that will feel like flames are shooting out the
input jack! “Come on Dave… Give me a break!”
Metal
A•2
Red LED: “Metal”. This Amp Model is based on the Mesa/Boogie® Dual Rectifier®. For
JM4 Looper, we made careful enhancements to this classic tone. The resulting Amp Model
has a definite modern flavor. This monster truck of tone delivers a tight bottom end that’s
big, powerful, tight and fast. Use this Amp Model to get a tight and punchy, high gain Metal
sound.
Green LED: “Spinal Puppet”. This sound was created to be an aggressive high gain Amp
Model with a unique Mid control that will sweep though an entire spectrum of tone on one
knob. The Mid knob for this Amp Model changes the character of the distortion. When set
to minimum, the distortion exhibits Fuzz pedal characteristics. When the Mid is set to noon,
it mimics the creamy modern high gain amp tones. And when the Mid knob is turned up
to max, it’s very much reminiscent of that Class A sound. Of course, then there are all the
places in-between...
Insane
Red LED: “Insane”. This model is our “dialed in for shredding” version of the Mesa/Boogie®
Dual Rectifier® red channel. It combines the intensity and impact of Metal Red, but delivers
more midrange and teeth for that bone-crushing, brain piercing insane grind.
* All product names are trademarks of their respective owners, which are in no way associated or affiliated with Line 6. These product
names, descriptions and images are provided for the sole purpose of identifying the specific products that were studied during Line 6’s sound
model development. VOX® is a registered trademark of Vox R&D Limited. MARSHALL® is a registered trademark of Marshall Amplification Plc. MESA/BOOGIE® and RECTIFIER® are registered trademarks of Mesa/Boogie, Ltd.
Page 43

Appendix A: Modeled Amps
Green LED: “80s Solo”. Our goal with Insane was to provide you with as much input gain
distortion as possible short of complete meltdown. You get an obscene helping of distortion,
while still retaining tonal definition and character. As a result, you get way more bottom
end and cabinet character than other small amps. Crank up the Drive control and prepare
to dominate!
A•3
Page 44

Page 45

Appendix B: Using Your Feet
ap p e n d i x B: us i n g Yo u r Fe e T
The FBV series of foot controllers includes the original FBV, the more-compact FBV
Shortboard, and the FBV Express. The following pages detail operations with the two
most appropriate FBVs for Spider Jam, the FBV Express and FBV Shortboard (note that
the “Line 6 Floor Board” and “FB4” foot controllers will not work with Spider Jam).
FBV Cable
FBV foot controllers come with an included RJ-45 cable. Connect this cable between the
rear panel of the Spider Jam and the side of the FBV. If you ever need a replacement cable,
look for a Category 5, 10 Base-T or RJ-45 cable with male connectors on both ends. These
can be found at almost any computer supply retailer.
Note: Do not use a “cross-over” CAT-5 cable, as it may send voltage to unintended
locations of your FBV controller and damage the unit.
B•1
Page 46

Appendix B: Using Your Feet
FBV Express
B•2
1. Channel A, B, C & D: See page 4•5. In Normal FBV Mode, these select presets and
you can tap on the lit switch to set Delay Time. In Jam Control Mode, these control
recorder/song/drum playback and recording.
2. FBV Pedal: Press the pedal forward to click the toe-switch, turning the pedal from
Volume to Wah.
3. Wah and Volume Lights: These light to show that a pedal is ready to control Wah
or Volume.
To switch the pedal to control Wah or Volume, press the pedal fully forward and •
shift your weight onto your toe enough to click the toe-switch.
The Tweak function does not apply to Spider Jam.•
Page 47

Using your FBV Express Tuner
Appendix B: Using Your Feet
B•3
Page 48

Appendix B: Using Your Feet
FBV Shortboard
1. Channel A, B, C & D: See page 4•5. In Normal FBV Mode, these select presets and
B•4
you can tap on the lit switch to set Delay Time. In Jam Control Mode, these control
recorder/song/drum playback and recording.
*For details on new Alternate Footswitch Modes, which were implemented in the v2.09
firmware, please see the Spider Jam Advanced Guide at www.line6.com/manuals.
2. Bank Up - Bank Down: Select any of the 9 Banks of User presets.
3. Stomp/Mod/Delay/Reverb: You guessed it! These switch the Spider Jam effects Mod,
Delay and Reverb on and off kinda like they were stomp boxes on a pedal board. Stomp
engages the Distortion Boost.
4. Tap/Tuner: Tap a couple beats to set the tempo. Or press and hold this switch until you
see the tuner on the pedal’s display. Press it again to exit tuner mode.
5. Wah and Volume Lights: These light to show that a pedal is ready to control Wah
or Volume.
To switch the pedal to control Wah or Volume, press the pedal fully forward and •
shift your weight onto your toe enough to click the toe-switch.
Page 49

Appendix B: Using Your Feet
The Tweak function does not apply to Spider Jam.•
If a separate expression pedal is connected to the Shortboard’s rear panel 1/4-inch •
jack, the Shortboard pedal controls Wah only, with the toe switch toggling the Wah
on/off.
6. External Pedal Jack: You can connect an expression pedal (such as the Line 6 EX-1)
to the Shortboard’s rear panel 1/4-inch jack, and the connected pedal will control Volume,
while the Shortboard pedal controls Wah only.
7. FBV Pedal: Press the pedal forward to click the toe-switch, turning the pedal from
Volume to Wah.
8. FX Loop: Displays the current Recording name if a recording is loaded.
B•5
Page 50

 Loading...